

Page 1

CE901, CE901M
Ceramic cooktop
User guide
US
Anafe Vitrocerámico
Guía del Usuario ES
Plaque de cuisson céramique
Manuel d’utilisation
FR
Page 2

Page 3

Contents
Introducing your cooktop 2
Cooktop safety 3
Temperature control 5
Cookware 7
Cleaning 8
Frequently asked questions 10
Trouble shooting 11
Limited warranty 12
US
Contenido
Familiarizandose con su anafe 16
Seguridad del anafe 17
Control de la temperatura 19
Ollas y sartenes 21
Cuidado y limpieza 22
Preguntas frecuentes 24
Reparación de averías 25
Garantia limitada 26
Table des matieres
Vous familiariser avec votre plaque de cuisson 30
Utilisation en toute securite 31
Boutons de contrôle 33
Ustensiles 35
Entretien et nettoyage 36
Questions fréquemment posées 38
En cas de problèmes 39
Garantie limitee 40
ES
FR
1
Page 4

User guide
Thank you for buying a Fisher & Paykel appliance!
Congratulations on the purchase of your new Ceramic Glass Smoothtop. We strongly
recommend that you read this User Guide carefully to take full advantage of the features offered
by this product.
Location of features
3
1
2
1
2
1. 1200W element
2. 1800W element
3. 1100/2500W dual element
4. 1200W element (low simmer 25W)
5. Cooktop controls
2
1
5
CE901
3
2
4
5
CE901M
Important!
It is important that the User Guide should be retained with the appliance for future reference.
Should the appliance be sold or transferred to another owner, always ensure that the User
Guide is left with the appliance in order that the new owner can familiarize themselves with
the appliance and the relevant warnings.
2 3
Page 5

Cooktop safety
Your safety is important to us
This guide contains safety statements under warning symbols. Please pay special attention to
these symbols and follow instructions.
WARNING!
This symbol alerts you to hazards such as fire, electrical shock, or other injuries.
Important safety instructions
CAUTION!
Do not touch heating elements or areas near elements. Elements may be hot even
though they are dark in color. Areas near surface may become hot enough to cause
burns. During and after use, do not touch, or let clothing or other flammable materials
contact elements or areas near elements until they have had sufficient time to cool.
CAUTION!
Do not store items of interest to children in cabinets above a cooktop. Children climbing
on the cooktop could be seriously injured.
US
WARNING!
To reduce the risk of fire, electrical shock, injury to persons, or damage when using the
cooktop, follow basic precautions including the following:
General safety tips
This appliance must be properly installed and grounded by a qualified technician.
Never use your appliance for warming or heating the room.
Children should not be left alone or unattended in an area where the appliance is in use.
They should never be allowed to sit or stand on any part of the appliance.
Wear proper apparel. Loose-fitting or hanging garments should never be worn while
using the appliance.
Do not repair or replace any part of the appliance unless specifically recommended in
the manual. All other servicing should be referred to a qualified technician.
Do not store flammable materials near the appliance.
Page 6

Do not use water on grease fires. Smother fire or flame or use dry chemical or foam type
extinguisher.
Use only dry potholders. Moist or damp potholders on hot surfaces may result in burns
from steam. Do not let potholder touch hot heating elements. Do not use a towel or
other bulky cloth.
Use an appropriate pan size. This appliance is equipped with one or more surface
units of different size. Select utensils having flat bottoms large enough to cover the
surface unit heating element. The use of undersized utensils will expose a portion of
the heating element to direct contact and may result in ignition of clothing. Proper
relationship of utensil to element will also improve efficiency.
Never leave an element unattended at HI heat settings - boilover causes smoking and
greasy spills that may ignite.
Glazed cooking utensils. Only certain types of glass/ceramic, ceramic, earthenware
or other glazed utensils are suitable for cooktop service without breaking due to the
sudden change in temperature.
To reduce the risk of burns, ignition of flammable materials, and spillage due to
unintentional contact with the utensil, the handle of a utensil should be turned inward,
so that it does not extend over adjacent elements.
Do not cook on broken cooktop. If cooktop should break, cleaning solutions and
spillovers may penetrate the broken cooktop and create a risk of electric shock. Turn off
at the wall switch. Contact a qualified technician immediately.
Clean cooktop with caution. If a wet sponge or cloth is used to wipe spills on a hot
cooking area, be careful to avoid steam burns. Some cleaners can produce noxious
fumes if applied to a hot surface.
4 5
Page 7

Temperature control
Your cooktop offers a wide range of temperature
settings from delicate slow cooking to the intense
hot temperatures needed for boiling and searing.
As the control knob is turned clockwise, the heat
output is increased. Turn the control knob to
the HI setting to begin cooking and adjust as
necessary.
US
The control knob must be pushed down to turn
it from the OFF position. When the control knobs
are in any position other than OFF, they may be
turned without pushing down.
The elements are controlled by variable energy regulators giving infinite control. There is no
‘stop’ at the low marking, this is to allow you to experiment at finding the minimum heat for
those delicate cooking tasks. (The power level drops off rapidly to zero below the LO marking).
The HI setting is ideal for boiling, searing or frying. For general cooking purposes turn the
control knob to the HI setting to begin cooking and adjust as necessary. Once your pan is hot,
reduce the temperature to maintain a steady heat to cook your food through.
Cooking efficiency will vary due to the different types of cooking utensils used. Cooking results
are influenced by pot quality and size. It is essential that pot size matches the diameter of
the cooking zone. Use flat bottom utensils of good quality. Poor performance is often due to
incorrect pot size. You will need to experiment with the temperature settings to match your
desired cooking result.
Be sure you turn the control knob off when you finish cooking. You will feel a click at the off
position (marked
), and see the indicator light change colour.
Temperature control knob
Dual circuit controls
Select the full element by turning the knob counter-clockwise to high. To heat the inner
element only, turn clockwise to high.
Hot surface indicators
The indicator light glows red (CE901) or white
(CE901M) whenever an element is on. After
the element has been turned off, the indicator
will glow amber (CE901) or red (CE901M) until
the element surface has cooled down to a
temperature that is safe to touch.
Hot surface
indicators
Page 8

Supersimmer (CE901M only)
The front right element of your cooktop is fitted with
a unique simmer control. This allows the element to
be turned down to a very low and even power setting
(25 watts compared with 60 watts on other elements).
These lower settings are ideal for melting chocolate and
butter, cooking rice and delicate sauces and simmering
soups and stews. It can also be used as a ‘warm zone’
for keeping cooked food hot.
The Supersimmer element is just as powerful (1200W)
in the top heat range as the same size standard element
(lefthand rear element) allowing food to be browned,
seared, sautéed or boiled before simmering all on the
same element.
Supersimmer control
(CE901M only)
Temperature limiters
Temperature limiters are fitted to the elements to prevent the glass from overheating. You may
notice the limiters turn the elements on and off during cooking.
Heating tips
Choose cookware of a suitible size, material and construction.
Place your pan on the element prior to turning on the heat.
Minimize the amount of liquid or fat to reduce cooking times.
Select the most appropriate temperature setting for the cooking task.
When you need to boil, simmer or pan fry food, first set the temperature to HI. Once boiling
or your pan is hot, reduce the temperature setting to maintain a steady heat to cook your food
through.
Using a lid will help retain the heat.
Using the heat retained in the ceramic glass after the element has been turned off helps to finish
the cooking process or to keep foods warm.
Radiant elements
The element will cycle on and off to maintain your selected heat setting.
It is safe to place hot cookware from the oven or another element on the glass surface when the
surface is cool.
Even after the elements are turned off, the glass surface retains enough heat to continue
cooking. To avoid over-cooking, remove pans from hot elements when the food is cooked.
Avoid placing anything on a hot element until it has cooled completely (the hot surface indicator
light has gone out).
6 7
Page 9
Cookware
To get the best results out of your cooktop follow these simple suggestions :
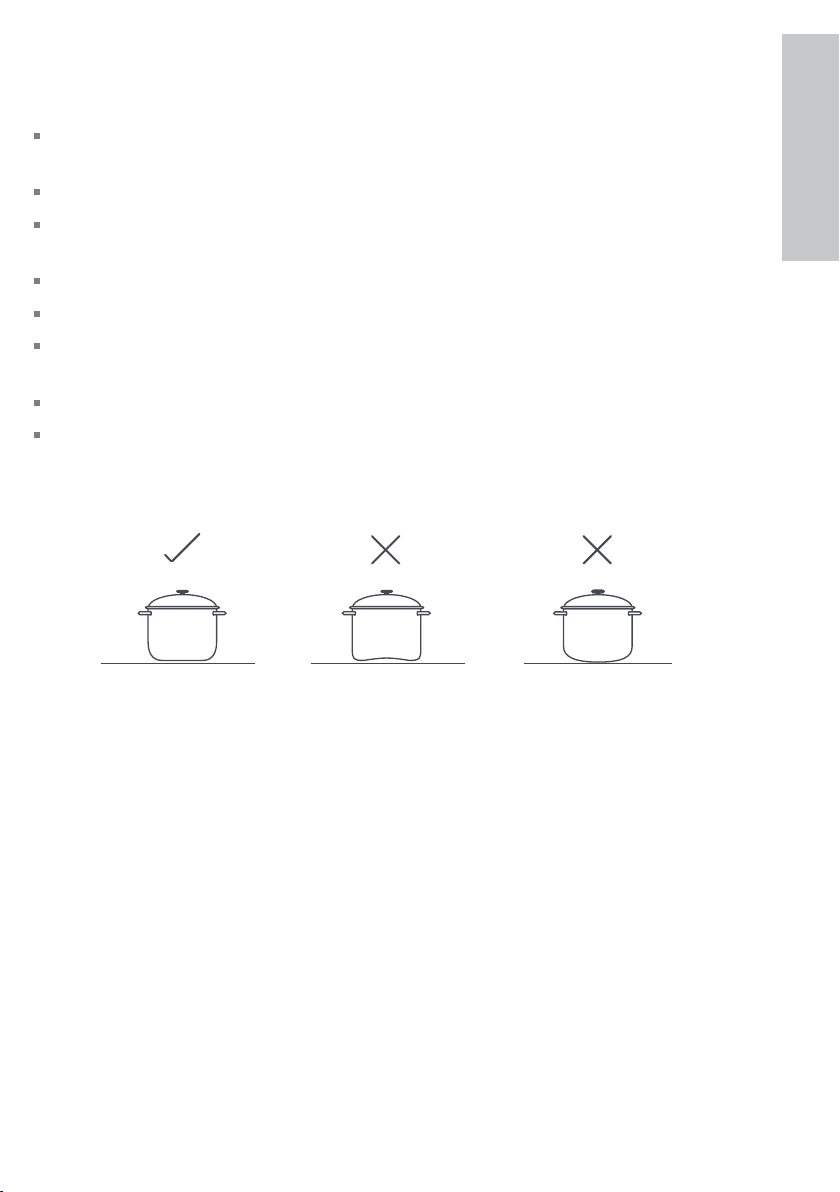
Use heavy gauge, flat, smooth bottom pans that conform to the diameter of the cooking area.
This will provide good contact with the glass and help reduce cooking times.
Preheat the cookware on the cooktop/hob before adding food.
Cookware with a stainless steel sandwich base or enamelled cast iron will give you the best
results.
When food comes to the boil reduce the temperature setting.
Never use plastic or aluminium foil dishes on the cooktop.
Aluminium and copper-bottomed cookware can cause a metallic residue to remain on the
cooktop. If left, this becomes difficult to remove. Clean the cooktop after every use.
Jagged edges on saucepans or heavy frypans will scratch the cooktop.
Using a lid will reduce cooking times.
US
Page 10

Cleaning
Caring for your cooktop
Clean the cook top thoroughly before using for the first time. Apply about 1/4 teaspoon of non-
abrasive cleaner e.g. Weiman Cook Top Cleaning Creme to the ceramic glass with a clean cloth.
Wipe over the entire surface with a damp cloth to remove any cleaner residue and dry with a
clean lint-free cloth. The cook top may stain if cleaning residue or moisture remains.
To keep your cook top looking attractive and easy to clean, wipe over with an approved cleaner
after every cooking session. Apply the cleaning creme sparingly onto the cool ceramic surface
with a clean cloth. Rub well to remove dirt and grease. Wipe with a damp cloth and dry with a
clean lint-free cloth. Normal wear and tear will occur but this will not affect the performance of
the cook top.
Avoid the use of abrasive or corrosive cleaning products. Nylon scouring pads, steel wool,
pumice scourers, oven sprays or strong caustic cleaners may scratch or cause pitting of the
ceramic glass surface.
Remove any heavy or burned on spills or grease using the scraper provided. Apply 1/4 teaspoon
of cleaning creme to the cool soiled area and holding the scraper at a 30° angle to the cook top
surface and gently scrape off any residue. Take care not to scratch or gouge the surface. Creme
cleaners work well when the surface is still warm but to avoid personal injury do not wipe or
clean any hot areas.
WARNING!
Cut Hazard
When the safety cover is retracted the blade in the scraper is razor
sharp. Use with extreme care and always store safely and out of reach of
children.
Food spillovers with a high sugar content such as jellies, fudge and candy syrups must be
removed immediately, before cooling, as they can cause permanent damage to the cooktop.
Plastics and aluminium foil can also cause pitting and must never be allowed to melt on. Special
care should be taken when removing hot substances. Turn off all surface units affected by
the spillover and remove the hot pans. Wearing an oven mitt to hold the scraper, scrape the spill
to a cool area of the cook top and use a paper towel to remove any excess. Clean the surface
unit when cool. Do not continue to use the soiled area until all the spillover has been removed.
Remember some foods e.g. peas and turnip, have a naturally high sugar content.
8 9
Page 11

Metallic stains
Copper based or aluminium saucepans may cause metallic staining. These stains show as a
metallic sheen on the cooktop. If the cooktop is not cleaned regularly and the stains are allowed
to burn onto the surface, they may react with the glass and will no longer be removable. The
use of a conditioner will help prevent damage if applied after every use.
Cleaning the stainless steel frame
Use warm soapy water for cleaning when the cooktop is cold. Apply soapy water with a soft
sponge or cloth. Do not use steel soap pads as this may dull the appearance of the appliance
over time.
After cleaning, wipe dry with a clean cloth to ensure the surface is thoroughly dry. For extra
shine, use a stainless steel polish such as 3M Stainless Steel Cleaner and Polish.
Do not use abrasive cleaners on any part of the cooktop as this may damage the cooktop.
Do not drag pots over the edge of the cooktop as this may mark the stainless steel.
Recommended cleaners for your ceramic cooktop
Weiman Cooktop Cleaning Creme (Sample provided with the cooktop)
Cera Care
Hopes Cooktop Cleaning Creme
Cerama Bryte
US
Page 12

Frequently asked questions
Q
Is it possible for my cooktop to shatter?
A
This is highly unlikely. The glass is very robust
and strong and goes through a vigorous
testing process before it is accepted.
Q
Does the glass scratch easily?
A
No, the glass is very tough. However check
that your pots do not have jagged edges on
the bottom.
Q
What do the lights mean?
A
These depict the status of the elements:
Red (CE901), White (CE901M) - the element is
turned on.
Amber (CE901), Red (CE901M) - the element
is turned off but the surface is still hot.
Q
Will the graphics come off?
A
No, the graphics on the glass are fused onto
the surface. However they may be obscured
by baked on food. This is easily removed with
the scraper supplied with the product. The
graphics on the stainless steel are etched by
laser. Refer to the Cleaning instructions.
Q
A
Q
A
Q
A
CE901M: The Supersimmer control on the
Q
A
Why do the elements appear to turn off while
cooking/heating?
In order to maintain the selected temperature
the element may pulse on and off.
Do I need special pans?
No, however flat bottom pans are
recommended as they are more energy
efficient and stable.
How can I achieve a low setting for delicate
cooking and simmering?
CE901: The lowest power element is the inner
part of the dual element and you may want
to experiment by turning the control below
the marked low setting.
front right element allows it to be turned
down to a very low and even power setting.
Can I fit my Fisher & Paykel oven below my
cooktop?
Yes, with a standard bench height.
Q
Will the surface overheat?
A
Each element is fitted with temperature
limiters that prevent overheating.
Q
What is the best way to clean my cooktop?
A
See Cleaning instructions.
10 11
Page 13

Trouble shooting
Problem Possible solutions
The graphics appear to
have worn off the glass.
This is unlikely to happen. It is probable that baked on food
has obscured the graphics. We recommend using a razor
scraper for removing such spills.
US
There is a metal sheen
on the glass.
The glass is being
scratched.
The element keeps
turning itself on and
off.
The element status
indicator lights are no
longer working or are
showing the wrong
colour.
This could be caused by copper or aluminium bottomed
pots. Ceramic cleaner should remove this. If the cooktop is
not cleaned regularly and the stains are allowed to burn onto
the surface, they may react with the glass and no longer be
removable.
The most common cause of this is rough edged cookware,
check that your pots/pans have flat smooth bases.
This is normal and is caused by :
1. The element cycling to prevent the glass from overheating.
2. The controller sometimes cycling to maintain your selected
heat setting.
Call your Service Center. Refer to the Customer care section
for your nearest Authorised Service Centre .
Page 14

Limited warranty
When you purchase any new Fisher & Paykel whiteware Product for personal or consumer use
you automatically receive a two year Limited Warranty covering parts and labor for servicing
within the 48 mainland United States, Hawaii, Washington D.C and Canada. In Alaska the Limited
Warranty is the same except that you must pay to ship the Product to the service shop or the
service technician’s travel to your home. Products for use in Canada must be purchased through
the Canadian distribution channel to ensure regulatory compliance.
If the Product is installed in a motor vehicle, boat or similar mobile facility, you receive the same
two year Limited Warranty, but you must bring the vehicle, boat or mobile facility containing the
Product to the service shop at your expense or pay the service technician’s travel to the location
of the Product.
Fisher & Paykel undertakes to:
Repair without cost to the owner either for material or labor any part of the Product, the serial
number of which appears on the Product, which is found to be defective. In Alaska, you must
pay to ship the Product to the service shop or for the service technician’s travel to your home.
If the Product is installed in a motor vehicle, boat or similar mobile facility, you must bring it to
the service shop at your expense or pay for the service technician’s travel to the location of the
Product. If we are unable to repair a defective part of the Product after a reasonable number of
attempts, at our option we may replace the part or the Product, or we may provide you a full
refund of the purchase price of the Product (not including installation or other charges).
This warranty extends to the original purchaser and any succeeding owner of the Product for
products purchased for ordinary single-family home use.
All service under this Limited Warranty shall be provided by Fisher & Paykel or its Authorized
Service Agent during normal business hours.
How long does this Limited Warranty last?
Our liability under this Limited Warranty expires TWO YEARS from the date of purchase of the
Product by the first consumer.
Our liability under any implied warranties, including the implied warranty of merchantability
(an unwritten warranty that the Product is fit for ordinary use) also expires ONE YEAR (or such
longer period as required by applicable law) from the date of purchase of the Product by the first
consumer. Some states do not allow limitations on how long an implied warranty lasts, so this
limit on implied warranties may not apply to you.
12 13
Page 15

This warranty does not cover:
A
Service calls that are not related to any defect in the Product. The cost of a service call will be
charged if the problem is not found to be a defect of the Product. For example:
1. Correct faulty installation of the Product.
2. Instruct you how to use the Product.
3. Replace house fuses, reset circuit breakers, correct house wiring or plumbing, or replace
light bulbs.
4. Correct fault(s) caused by the user.
5. Change the set-up of the Product.
6. Unauthorized modifications of the Product.
7. Noise or vibration that is considered normal, for example, drain/fan sounds, regeneration
noises or user warning beeps.
8. Correcting damage caused by pests, for example, rats, cockroaches etc.
B
Defects caused by factors other than:
1. Normal domestic use or
2. Use in accordance with the Product’s User Guide.
C
Defects to the Product caused by accident, neglect, misuse, fire, flood or Act of God.
D
The cost of repairs carried out by non-authorized repairers or the cost of correcting such
unauthorized repairs.
E
Travel Fees and associated charges incurred when the product is installed in a location with
limited or restricted access. (i.e. airplane flights, ferry charges, isolated geographic areas).
F
Normal recommended maintenance as set forth in the Product’s User Guide.
US
If you have an installation problem contact your dealer or installer. You are responsible for
providing adequate electrical, exhausting and other connection facilities.
We are not responsible for consequential or incidental damages (the cost of repairing or
replacing other property damaged if the Product is defective or any of your expenses caused if
the Product is defective). Some states do not allow the exclusion or limitation of incidental or
consequential damages, so the above limitation or exclusion may not apply to you.
How to get service
Please read your User Guide. If you then have any questions about operating the Product,
need the name of your local Fisher & Paykel Authorized Service Agent, or believe the Product is
defective and wish service under this Limited Warranty, please contact your dealer or call us at:
TOLL FREE 1-888-9-FNP-USA (1-888-9-367-872) Canada also
or contact us through our web site: www.usa.fisherpaykel.com
You may be required to provide reasonable proof of the date of purchase of the Product before
the Product will be serviced under this Limited Warranty.
Page 16

Commercial use
If you are using the Product in a commercial setting (any use other than a single family dwelling),
we agree to repair or replace, without cost to you for parts only, any defective parts, the serial
number of which appears on the Product. Our liability for these repairs expires ONE YEAR from
the date of original purchase.
At our option we may replace the part or the Product, or we may provide you a full refund of
the purchase price of the Product (not including installation or other charges). All service under
this Limited Warranty shall be provided by Fisher & Paykel or its Authorized Service Agent during
normal business hours.
No other warranties
This Limited Warranty is the complete and exclusive agreement between you and Fisher & Paykel
regarding any defect in the Product. None of our employees (or our Authorized Service Agents)
are authorized to make any addition or modification to this Limited Warranty.
Warrantor: Fisher & Paykel Appliances, Inc.
If you need further help concerning this Limited Warranty, please call us at the above number, or
write to:
Fisher & Paykel Appliances, Inc.
27 Hubble, Irvine, CA 92618
This Limited Warranty gives you specific legal rights, and you may also have other rights which
vary from state to state.
14
Page 17

Page 18

Guia del usuario
¡Gracias por comprar un artefacto electrico Fisher & Paykel!
Felicitaciones por la adquisición de su nuevo Anafe Vitrocerámico. Le recomendamos que lea
detenidamente esta Guía del Usuario para aprovechar al máximo las características que ofrece
este producto.
Ubicacion de caracteristicas
3
1
2
1
2
1. Calentador de 1200W
2. Calentador de 1800W
3. Calentador doble 1100/2500W
4. Calentador “Supersimmer” de 1200W
5. Controles del anafe
2
1
5
CE901
3
2
4
5
CE901M
16 17
Page 19

Seguridad del anafe
Su seguridad es importante para nosotros
Esta guía contiene declaraciones sobre seguridad bajo símbolos de llamada de atención. Por
favor preste especial atención a estos símbolos y siga las instrucciones.
ATENCION!
Este símbolo le alerta sobre peligros como fuego,electrocución y otras heridas.
Instrucciones de seguridad muy importantes
ATENCION!
No toque los calentadores o sus zonas aledañas. Los calentadores pueden estar
calientes aún cuando su color sea oscuro. Las zonas cercanas a la superficie pueden
calentarse lo suficiente como para ocasionar quemaduras. Durante y luego de su uso
no toque o permita que la ropa u otros materiales inflamables entren en contacto con
los calentadores o las zonas aledañas hasta que hayan tenido suficiente tiempo para
enfriarse.
ATENCION!
No almacene artículos de interés para niños en alacenas ubicadas encima del anafe. Los
niños que trepen al anafe pueden resultar seriamente lastimados.
ATENCION!
Para reducir el riesgo de fuego, electrocución, heridas o daños al utilizar el anafe siga las
siguientes precauciones básicas:
Generales
Para asegurar el funcionamiento correcto y seguro: el artefacto eléctrico debe ser
instalado y conectado a tierra correctamente por un técnico calificado.
Nunca utilice su artefacto eléctrico para calentar o entibiar el ambiente.
ES
No deje niños solos cerca del lugar donde se está utilizando el anafe. Nunca permita que
los niños se sienten o paren sobre cualquier parte del artefacto.
Utilice ropa adecuada. No lleve prendas sueltas o colgantes cuando usa el anafe.
Page 20

Reparaciones del usuario: no repare o reemplace ningún componente de este artefacto
eléctrico a menos que se lo sugiera específicamente en el manual. Todo otro tipo de
reparación debe ser realizada por un técnico calificado.
Almacenamiento: los materiales inflamables no deben almacenarse cerca de este
artefacto eléctrico.
No utilice agua sobre incendios de grasa. Ahogue el fuego o las llamas o utilice
extinguidores de espuma o químicos secos.
Utilice solamente agarraderas secas. Las agarraderas húmedas o mojadas sobre las
superficies calientes pueden ocasionar quemaduras por vapor. No permita que las
agarraderas entren en contacto con los calentadores cuando éstos estén encendidos. No
utilice una toalla u otra tela voluminosa.
Utilice ollas y sartenes de tamaño adecuado. Este artefacto eléctrico posee uno
o más calentadores de diferente tamaño. Elija ollas y sartenes con fondos planos
suficientemente grandes como para cubrir la unidad calefactora. La utilización de
utensilios más pequeños expondrá una porción del calentador al contacto directo,
y puede provocar el encendido de la ropa. Una relación adecuada entre utensilio y
calentador mejorará también la eficiencia.
Nunca deje la superficie desatendida cuando el nivel de calor es alto (los rebosamientos
ocasionan humo y salpicaduras grasosas que pueden prender fuego).
Nutensilios de cocina vidriados. Sólo ciertos tipos de vitrocerámica, cerámica, cacharros
de alfarería u otros utensilios vidriados son adecuados para su uso sobre un anafe sin
que se rompan debido al cambio brusco en la temperatura.
Para reducir el riesgo de quemaduras, el encendido de materiales inflamables y las
salpicaduras debido a contacto no intencional con el utensilio, las manijas de los
utensilios deben posicionarse de forma tal que no se extiendan sobre los calentadores
adyacentes.
No cocine sobre un anafe roto. Si el anafe se rompiera, las soluciones de limpieza y las
salpicaduras podrían penetrarlo y aumentar así el riesgo de electrocución. Apague el
anafe desconectando el enchufe empotrado en la pared. Llame inmediatamente a un
técnico calificado.
Limpie el anafe con cuidado. Si utiliza un trapo o esponja mojada para limpiar
salpicaduras sobre una superficie de cocción caliente tenga cuidado de evitar
quemaduras de vapor. Algunos limpiadores pueden ocasionar vapores nocivos si se
aplican sobre una superficie caliente.
18 19
Page 21

Control de la temperatura
Su anafe ofrece una amplia gama de temperaturas,
desde cocción lenta y delicada hasta las altas
temperaturas necesarias para hervir y sellar los
alimentos. Al girar la perilla de control en el sentido
de las agujas del reloj, la producción de calor
se incrementa. Gire la perilla de control hasta la
posición HI [Alto] para comenzar a cocinar y ajuste
según sea necesario.
La perilla de control debe presionarse hacia abajo para girarla desde la posición OFF [Apagado].
Cuando las perillas de control se encuentran en cualquier otra posición excepto OFF [Apagado],
se pueden girar sin necesidad de hacer presión hacia abajo sobre ellas.
Los calentadores se controlan por medio de reguladores de energía variable, brindándole la
posibilidad de control infinito. La perilla no se detiene en la posición más baja, esto le permite
experimentar con encontrar el calor mínimo para las tareas de cocción delicadas. (El nivel de
energía cae rápidamente a cero por debajo de la posición LO [Bajo]). La posición HI [Alto] es
ideal para hervir, sellar o freír. Para propósitos generales de cocción gire la perilla de control hasta
la posición HI [Alto], para comenzar a cocinar, y luego ajuste según sea necesario. Una vez que
su cacerola esté caliente, reduzca la temperatura para mantener un calor parejo para cocinar
totalmente su comida.
La eficiencia de la cocción variará dependiendo de los diferentes tipos de utensilios de cocina a
utilizar. Los resultados de cocción varían dependiendo de la calidad y tamaño de las cacerolas.
Es imprescindible que el tamaño de las cacerolas haga juego con el diámetro de la zona de
cocción. Utilice utensilios de cocción de fondo plano y buena calidad. El tamaño incorrecto de
las cacerolas ocasiona un rendimiento pobre. Experimente con diferentes temperaturas hasta
que descubra los resultados de cocción que desea.
ES
Asegúrese de girar la perilla de control hasta la posición de apagado al terminar de cocinar. Oirá
un clic al llegar a la posición OFF [Apagado], y verá que la luz indicadora cambiará de color.
Controles de circuito doble
Seleccione el calentador completo girando la perilla en sentido contrario a las agujas del reloj
hasta la posición HI [Alto]. Para calentar solamente el calentador interior gire en sentido de las
agujas del reloj hasta la posición HI [Alto].
Page 22

Indicadores de superficie caliente
Cuando un calentador está encendido la luz
indicadora se torna roja (GC901) o blanca
(GC901M). Luego de apagar el calentador, el
indicador se tornará color ámbar (GC901) o rojo
(GC901M) hasta que la superficie del calentador
se haya enfriado hasta una temperatura que sea
segura al tacto.
Indicadores
de superficie
caliente
Supersimmer (solamente CE901M)
El calentador delantero derecho de su anafe
ha sido equipado con un control de cocción a
fuego lento único. Esto permite que el calentador
descienda hasta una posición de energía muy
baja y pareja (25 watts en comparación con los 60
watts de otros calentadores). Estas temperaturas
tan bajas son ideales para derretir chocolate y
manteca, cocinar arroz y salsas delicadas y cocinar
a fuego lento sopas y guisos. Se puede utilizar
también como ‘zona tibia’, para mantener calientes
los alimentos ya cocidos.
El calentador “Supersimmer” es tan poderoso (1200 watts) en la gama de temperaturas altas
como un calentador estándar de tamaño similar (calentador posterior izquierdo), permitiendo
dorar, sellar, saltear o hervir antes de cocer a fuego lento, todo sobre el mismo calentador.
Limitadores de temperatura
Los calentadores han sido equipados con limitadores de temperatura para evitar que el vidrio
se recaliente. Usted notará que los limitadores encienden y apagan los calentadores durante la
cocción.
Acerca de los calentadores
El calentador se encenderá y apagará cíclicamente para mantener la temperatura seleccionada
por usted.
El colocar utensilios de cocina calientes salidos del horno u otro calentador sobre la superficie de
vidrio cuando ésta se encuentra fría es seguro.
Aún después de apagar los calentadores la superficie de vidrio retiene suficiente calor como para
continuar la cocción. Para evitar la cocción excesiva retire las cacerolas del calentador cuando
haya terminado la cocción de los alimentos. Evite colocar objetos sobre un calentador todavía
caliente hasta que se haya enfriado completamente (y se apague la luz indicadora de superficie
caliente).
20 21
Page 23

Ollas y sartenes
Para alcanzar un rendimiento óptimo utilice cacerolas de gran espesor, y de fondo plano y parejo
que concuerde con el diámetro del área de cocción.
Caliente las cacerolas sobre el anafe antes de agregar comida.
Las cacerolas que poseen una base “sandwich” de acero inoxidable o hierro fundido esmaltado
brindarán los mejores resultados.
Reduzca la temperatura cuando la comida alcance el punto de hervor.
No utilice nunca platos de plástico o plancha de aluminio sobre el anafe.
Las ollas y sartenes con fondo de aluminio y cobre pueden dejar un residuo metálico sobre el
anafe. Si no se lo limpia se vuelve difícil de eliminar.
Haga que el fondo de su cacerola concuerde con la zona de cocción. Esto le brindará la cocción
más eficiente.
Una cacerola con fondo plano hará mejor contacto con el calentador, dando por resultado
tiempos de cocción más breves.
Los bordes serrados en cacerolas o sartenes pesadas rayarán el anafe.
Para reducir el tiempo de cocción utilice una tapa.
ES
Page 24

Cuidado y limpieza
Como cuidar su anafe
Limpie cuidadosamente su anafe antes de utilizarlo por primera vez. Aplique alrededor de
1/4 de cucharadita de limpiador no abrasivo, por ej. Weiman Cook Top Cleaning Creme, al
vidrio cerámico con un paño limpio. Limpie la totalidad de la superficie con un trapo húmedo
para eliminar cualquier residuo de limpiador, y seque con un trapo sin hilas. Si deja rastros de
limpiador o humedad el vidrio puede resultar manchado.
Para mantener la apariencia atractiva de su anafe y su facilidad de limpieza, límpielo con
un limpiador autorizado luego de cada sesión de cocina. Aplique la crema limpiadora con
moderación con un paño limpio sobre la superficie cerámica fría. Frote bien para eliminar polvo y
grasa. Limpie con un paño húmedo y seque con una toalla de papel limpia. Ocurrirá el deterioro
normal, pero esto no afectará el desempeño del anafe.
Evite utilizar productos de limpieza abrasivos o corrosivos. Las almohadillas abrasivas de nylon,
la viruta de acero, los limpiadores abrasivos de piedra pómez, los limpiadores para horno en
aerosol, o los limpiadores cáusticos fuertes pueden rayar o agujerear la superficie vitrocerámica.
Quite cualquier salpicadura importante o grasa utilizando la rasqueta suministrada. Aplique 1/4
de cucharadita de crema limpiadora al área sucia fría, y sosteniendo la rasqueta en un ángulo
de 30° con la superficie del anafe remueva suavemente cualquier residuo. Asegúrese de no
rayar o acanalar la superficie. Los limpiadores cremosos funcionan bien cuando la superficie se
encuentra todavía tibia, pero para evitar heridas no limpie las zonas calientes.
ATENCION!
Cuando la cubierta de seguridad está retractada el filo de la rasqueta es
muy filoso. Utilice con sumo cuidado, vuelva a colocar siempre la cubierta
de seguridad luego de utilizarla y guárdela en lugar seguro y fuera del
alcance de los niños.
Las salpicaduras de comida con alto contenido de azúcar como gelatinas, chocolates y almíbares
de caramelo deben limpiarse inmediatamente, antes de que se enfríen, porque pueden causar
daño permanente al anafe. Los plásticos y las planchas de aluminio pueden también agujerear el
anafe y nunca se debe permitir que se derritan sobre el anafe. Al retirar substancias calientes
hay que tener especial cuidado. Apague todas los calentadores afectados por la salpicadura
y retire las cacerolas calientes. Utilizando un guante para el horno para sostener la rasqueta,
arrastre la salpicadura hacia una zona fría de la superficie del anafe, y utilice una toalla de papel
para quitar cualquier exceso. Limpie el calentador cuando se enfríe. No continúe utilizando la
zona sucia hasta que haya eliminado todos los restos de la salpicadura.
Recuerde que algunos alimentos como las arvejas y el nabo poseen un alto contenido de azúcar.
22 23
Page 25

Manchas metalicas
Las ollas con fondo de cobre o aluminio pueden ocasionar manchas metálicas. Estas manchas
adquieren la forma de un brillo metálico sobre el anafe. Si el anafe no se limpia regularmente,
y se deja que las manchas se quemen sobre la superficie, pueden reaccionar con el vidrio
cerámico y no se podrán ya eliminar. El uso de una crema limpiadora ayudará a prevenir daños si
se la aplica luego de cada uso.
Como limpiar el marco de acero inoxidable
Utilice agua caliente jabonosa para la limpieza cuando el anafe está frío. Aplique agua jabonosa
con una esponja o paño suave. No utilice almohadillas jabonosas de acero porque pueden
opacar la apariencia del artefacto con el paso del tiempo.
Luego de limpiarlo, séquelo con un paño limpio para asegurarse de que la superficie esté
absolutamente seca. Para lograr un brillo extra, utilice un lustrador de acero inoxidable como por
ejemplo 3M Stainless Steel Cleaner and Polish.
No utilice limpiadores abrasivos en ninguna parte del anafe, porque pueden dañarlo.
No arrastre cacerolas por encima del borde del anafe, porque esto puede marcar el acero
inoxidable.
Limpiadores recomendados para anafes vitroceramicos
Weiman Cooktop Clearing Creme (se suministra una muestra gratis con el anafe).
Cera Care
Hopes Cooktop Clearing Creme
Cerama Bryte
ES
Page 26

Preguntas frecuentes
P
¿Es posible que mi anafe se astille?
R
Esto es sumamente improbable. El vidrio
es muy robusto y fuerte y debe pasar un
proceso riguroso de prueba antes de ser
aceptado.
P
¿El vidrio se raya con facilidad?
R
No, es muy resistente. Sin embargo, tenga
cuidado de que sus cacerolas no tengan
bordes serrados en la base.
P
¿Qué significan las luces?
R
Las luces muestran el estado de los
calentadores:
Rojo (CE901), Blanco (CE901M) - el calentador
está encendido.
Ambar (CE901), Rojo (CE901M) - el calentador
está apagado pero la superficie se encuentra
todavía caliente.
P
¿Los gráficos se desprenderán?
R
No, los gráficos del vidrio han sido fusionados
sobre la superficie de vidrio. Sin embargo,
pueden quedar ocultos bajo restos de
comida cocida. Estos se pueden retirar
fácilmente utilizando la rasqueta que se
entrega con el producto. Los gráficos sobre el
acero inoxidable han sido grabados con láser.
Vea las instrucciones de limpieza.
P
¿Por qué los calentadores parecen apagarse
durante la cocción/calentamiento?
R
Para mantener la temperatura deseada el
calentador puede apagarse y encenderse de
manera intermitente.
P
¿Necesito cacerolas especiales?
R
No, sin embargo se recomienda el uso de
recipientes con fondo plano porque son
más eficientes en materia de energía y más
estables. Para mayor información.
P
¿Cómo puedo lograr un valor bajo para la
cocina delicada o a fuego lento?
R
CE901: El calentador de menor potencia es
la parte interior del calentador doble; puede
experimentar girando el control por debajo
del valor marcado como bajo.
CE901M: El control de “Supersimmer” en el
calentador delantero derecho le permite
bajarlo hasta una temperatura muy baja y
pareja.
P
¿Puedo instalar mi horno Fisher & Paykel
debajo de mi anafe?
R
Sí, con una altura de mesón estándar.
P
¿La superficie se recalentará?
R
Cada calentador posee limitadores de
temperatura que evitan el recalentamiento.
P
¿Cuál es la mejor forma de limpiar mi anafe?
R
Vea las instrucciones de limpieza.
24 25
Page 27

Reparacion de averias
Problema Possible solucion
Los gráficos parecen
haberse borrado del
vidrio.
Esto es improbable que suceda. Es probable que los gráficos
hayan sido oscurecidos por restos cocidos de comida. Le
recomendamos que utilice una rasqueta filosa para eliminar
estas salpicaduras.
Hay un brillo metálico
sobre el vidrio
El vidrio está siendo
rayado
El calentador se apaga
y enciende
Las luces indicadoras
de estado del elemento
no funcionan más
o muestran el color
incorrecto
Esto podría haber sido ocasionado por cacerolas con fondos
de aluminio o cobre. Un limpiador para cerámica debería
eliminarlo. Si el anafe no se limpia regularmente, y las manchas
se calcinan sobre la superficie, pueden reaccionar con el vidrio
cerámico y volverse imposibles de eliminar.
La causa más común de esto son los utensilios de cocina con
bordes rugosos. Controle que sus cacerolas y ollas tengan
bases planas lisas.
Esto es normal y se debe a:
1. El calentador se enciende y apaga cíclicamente
para evitar el recalentamiento del vidrio.
2. El controlador a veces repite este proceso cíclico
para mantener la temperatura seleccionada.
Llame al Servicio Técnico.
ES
Page 28

Garantia limitada
Cuando usted adquiere cualquier producto electrodoméstico nuevo Fisher & Paykel para uso
personal o doméstico, usted recibe automáticamente una Garantía Limitada por dos años que
cubre partes y mano de obra para reparaciones dentro de los 48 Estados Unidos continentales,
Hawai, Washington D.C. y Canadá. En Alaska la Garantía Limitada es la misma excepto que
usted debe pagar para enviar el Producto al servicio técnico, o pagar el viaje del técnico de
reparaciones a su casa. Los Productos para ser utilizados en Canadá deben ser adquiridos a través
del canal de distribución canadiense para asegurar el cumplimiento de las regulaciones.
Si el Producto se instala en un vehículo motorizado, bote o instalación móvil similar, usted recibe
la misma Garantía Limitada por dos años, pero debe hacerse cargo de llevar el vehículo, bote
o instalación móvil que contiene el Producto al servicio técnico, o pagar el viaje del técnico de
reparaciones hasta la ubicación donde está el Producto.
Fisher & Paykel se compromete a:
Reparar sin costo para el dueño tanto en cuanto a materiales como mano de obra cualquier
parte del Producto, cuyo número de serie aparece en el Producto, que sea defectuosa. En Alaska,
usted debe pagar por el envío del Producto al servicio técnico, o pagar el viaje del técnico de
reparaciones a su casa. Si el producto se instala en un vehículo motorizado, bote o instalación
móvil similar, usted debe hacerse cargo de llevarlo al servicio técnico, o pagar el viaje del
técnico de reparaciones hasta la ubicación donde está el Producto. Si no podemos reparar una
parte defectuosa del Producto luego de una cantidad razonable de intentos, a nuestra elección
podemos reemplazar la parte del Producto, o podemos devolverle la totalidad del precio de
compra del Producto (sin incluir costos de instalación u otros costos).
Esta garantía se extiende al comprador original y cualquier dueño sucesivo del Producto para
Productos adquiridos para uso doméstico normal de una sola familia.
Todo servicio bajo esta Garantía Limitada deberá ser suministrado por Fisher & Paykel o su
Agente de Servicio Técnico Autorizado durante el horario comercial normal.
¿Cuánto tiempo dura esta Garantía Limitada?
Nuestra responsabilidad bajo esta Garantía Limitada caduca DOS AÑOS luego de la fecha de
compra del Producto por el primer consumidor.
Nuestra responsabilidad bajo cualquier garantía implícita, incluyendo la garantía implícita de
comerciabilidad (una garantía no escrita de que el Producto es adecuado para el uso normal)
también caduca UN AÑO (o período de duración más largo tal como sea requerido por la ley
aplicable) desde la fecha de compra del Producto por el primer consumidor. Algunos estados no
permiten limitaciones acerca de cuánto tiempo dura una garantía implícita, así que este límite
sobre las garantías implícitas puede no aplicarse a usted.
26 27
Page 29

Esta garantia no cubre
A
Visitas del servicio técnico que no están relacionadas con cualquier defecto en el Producto.
El costo del servicio técnico será cobrado a usted si no se encuentra que el problema sea un
defecto del Producto. Por ejemplo:
1. Corregir una instalación defectuosa del Producto.
2. Enseñarle a utilizar el Producto.
3. Reemplazar fusibles de la casa, resetear disyuntores de circuitos, corregir el cableado o
plomería de la casa, o reemplazar bombillas eléctricas.
4. Corregir defecto/s ocasionados por el usuario.
5. Cambiar la configuración del Producto.
6. Modificaciones no autorizadas del Producto.
7. Ruido y vibración considerados normales, por ejemplo sonidos de desagüe, sonidos de
regeneración o pitidos de aviso del usuario.
8. Corrección de daños ocasionados por pestes, por ejemplo ratas, cucarachas, etc.
B
Defectos ocasionados por factores que no sean:
1. Uso doméstico normal o
2. Uso de acuerdo con la Guía del Usuario del Producto.
C
Defectos al producto ocasionados por accidente, negligencia, mal uso, fuego, inundaciones o
acto de la naturaleza.
D
El costo de las reparaciones llevadas a cabo por reparadores no autorizados, o el costo de
corregir tales reparaciones no autorizadas.
E
Gastos de viaje y gastos asociados incurridos cuando el producto es instalado en una ubicación
con acceso limitado o restringido (es decir, vuelos de aviones, tarifas de ferry, áreas geográficas
aisladas).
F
Mantenimiento normal recomendado según se establece en la Guía del Usuario del Producto.
ES
Si tiene un problema de instalación contáctese por favor con su proveedor o instalador. Usted es
responsable de proporcionar conexiones eléctricas, de escape y otras instalaciones de conexión
adecuadas. No somos responsables por daños consecuentes o fortuitos (el costo de reparar
o reemplazar otra propiedad dañada si el producto es defectuoso o cualquiera de sus gastos
ocasionados si el Producto es defectuoso). Algunos estados no permiten la exclusión o limitación
de daños fortuitos o consecuentes, por lo que la limitación o exclusión de más arriba puede no
ser aplicable en su caso.
Page 30

Cómo conseguir el servicio técnico
Por favor lea su Guía del Usuario. Si luego tiene alguna pregunta acerca de cómo operar el
Producto, precisa el nombre de su Agente local de Servicio Técnico Autorizado por Fisher &
Paykel, o cree que el Producto es defectuoso y desea repararlo bajo esta Garantía Limitada, por
favor contáctese con su proveedor o llámenos gratis al:
1-888-9-FNP-USA (1-888-9-367-872) – también Canadá – o contáctenos a través de nuestro
sitio en Internet: www.usa.fisherpaykel.com
Se le puede solicitar que suministre prueba razonable de la fecha de compra del Producto antes
de reparar el Producto bajo esta Garantía Limitada.
Uso comercial
Si usted utiliza el Producto en un entorno comercial (cualquier uso que no sea una vivienda para
una sola familia), nos comprometemos a reparar o reemplazar, sin costo para usted en cuanto
a partes solamente, cualquier parte defectuosa, cuyo número de serie aparece en el Producto.
Nuestra responsabilidad sobre estas reparaciones caduca UN AÑO luego de la fecha de compra
original.
A nuestra discreción podemos reemplazar la parte o el Producto, o podemos devolverle la
totalidad del precio de compra del Producto (sin incluir costos de instalación u otros costos).
Todo servicio bajo esta Garantía Limitada debe ser suministrado por Fisher & Paykel o su Agente
de Servicio Técnico Autorizado durante el horario comercial normal.
Ninguna otra garantía
Esta Garantía Limitada es el acuerdo completo y exclusivo entre usted y Fisher & Paykel en
relación a cualquier defecto en el Producto. Ninguno de nuestros empleados (o nuestros
Agentes de Servicio Técnico Autorizados) están autorizados para realizar ningún agregado o
modificación a esta Garantía Limitada.
Garante: Fisher & Paykel Appliances, Inc.
Si usted precisa más ayuda en relación a esta Garantía Limitada, por favor llámenos al número de
más arriba, o escriba a:
Fisher & Paykel Appliances, Inc.
27 Hubble, Irvine, CA 92618
Esta Garantía Limitada le otorga derechos legales específicos, y usted puede contar también con
otros derechos que varían de estado a estado.
28
Page 31

Page 32

Manuel d’utilisation
Nous vous remercions de votre achat d’un appareil Fisher & Paykel
Merci d’avoir pris la décision d’acheter une nouvelle plaque de cuisson à surface en verre
céramique. Nous vous recommandons vivement de lire soigneusement ce Manuel d’utilisation
pour bénéficier pleinement des fonctions offertes par ce produit.
Emplacement des fonctions
3
1
2
Titan CE901
3
1
2
Titan Iridium CE901M
1. 1200W
2. 1800W
3. Double plaque de cuisson - Plaque intérieure 1100
watts, 2500 watts au complet
4. Supersimmer pour cuisson à feu doux de 1200 watts
5. Boutons de la plaque de cuisson
2
1
5
2
4
5
30 31
Page 33

Utilisation en toute securite
Votre securite est importante
Ce manuel contient des avis de sécurité répertoriés sous des symboles d’avertissement. Veuillez
prêter attention à ces symboles et respecter les instructions énoncées.
AVERTISSEMENT!
Ce symbole vous avertit de dangers tels que les incendies, Les risques d’electrocution ou
autres blessures.
Instructions importantes sur l’utilisation en toute securite
ATTENTION!
Ne pas ranger des objets pouvant susciter l’intérêt des enfants dans des placards audessus de la plaque de cuisson. Les enfants pourraient se blesser gravement en grimpant
sur la plaque de cuisson pour essayer de les atteindre.
ATTENTION!
Ne pas toucher les résistances chauffantes ni les zones à proximité des résistances
chauffantes. Les résistances peuvent être chaudes même si elles sont de couleur foncée.
Les zones à proximité des surfaces chaudes peuvent devenir suffisamment chaudes
pour provoquer des brûlures. Pendant et après l’utilisation, ne pas toucher ou laisser
des vêtements ou autres matériaux inflammables entrer en contact avec les résistances
chauffantes ou les zones à proximité des résistances chauffantes avant qu’elles aient eu
suffisamment de temps pour refroidir.
FR
AVERTISSEMENT!
Pour réduire les risques d’incendie, d’électrocution, de blessures sur les personnes et les
risques d’endommagement lors de l’utilisation de la plaque decuisson, veuillez respecter
les précautions élémentaires, y compris les généralités suivantes :
Generalites
Pour assurer un fonctionnement en toute sécurité et correcte de la plaque de cuisson,
l’appareil doit être correctement installé et relié à la terre par un technicien qualifié.
Ne pas utiliser l’appareil pour réchauffer ou chauffer la pièce.
Ne pas laisser des enfants seuls ou sans surveillance dans une pièce dans laquelle
l’appareil est en marche. Ne pas les laisser s’asseoir ou se tenir debout sur une
quelconque pièce de l’appareil.
Page 34

Porter des vêtements appropriés. Eviter de porter des vêtements amples ou larges
lorsque vous utilisez le four.
Maintenance par l’utilisateur. Ne pas réparer ou remplacer une quelconque pièce de
l’appareil sauf si spécifiquement recommandé dans ce manuel d’utilisation. Toute la
maintenance devra être confiée à un technicien qualifié.
Rangement. Les produits inflammables ne devront pas être rangés à proximité de
l’appareil.
Ne pas utiliser d’eau pour éteindre les incendies déclenchés par les graisses. Etouffer
les flammes ou l’incendie ou utiliser un extincteur d’incendie à mousse ou à poudre
chimique.
Utiliser uniquement des gants de cuisine secs. Vous risquez d’entraîner des brûlures
par la vapeur si vous utilisez des gants de cuisine humides ou mouillés sur des surfaces
chaudes. Ne pas laisser les gants entrer en contact avec les résistances chauffantes
chaudes. Ne pas utiliser de serviettes ou autres torchons volumineux comme gants de
cuisine.
Utiliser des plats de taille appropriée. Cet appareil est équipée d’une ou plusieurs unités
de taille différente sur la surface de la plaque. Choisir des ustensiles ayant un fond plat
et suffisamment large pour recouvrir la résistance chauffante. L’utilisation d’ustensiles
trop petits exposera une partie de la résistance chauffante au contact direct et pourrait
enflammer vos vêtements. L’utilisation d’ustensiles adaptés à la taille de la résistance
chauffante optimisera l’efficacité.
Ne jamais laisser la surface sans surveillance lorsque la plaque de cuisson est sur HI. Les
débordements entraînent de la fumée et les débordements gras peuvent s’enflammer.
Ustensiles de cuisson vernis. Seuls certains types d’ustensiles en verre/céramique, en
céramique, en terre ou autres types d’ustensiles vernis peuvent s’utiliser sur la plaque de
cuisson sans casser à cause du changement soudant de température.
Pour réduire les risques de brûlures, éviter d’enflammer des matériaux inflammables
et de répandre involontairement le contenu d’un plat par contact involontaire avec
l’ustensile, la poignée de l’ustensile devra être tournée vers l’intérieur de manière à ne
pas dépasser sur les résistances chauffantes adjacentes.
Ne pas cuisiner sur une plaque de cuisson fissurée. Dans le cas où la plaque de cuisson
serait fissurée, les solutions de nettoyage et les produits répandus risquent de pénétrer
dans la plaque fissurée et présentent un risque d’électrocution. Couper le courant au
niveau de la prise murale. Prendre immédiatement contact avec un technicien qualifié.
Faire attention lorsque vous nettoyez la plaque de cuisson. Si vous utilisez une éponge
ou un chiffon mouillé pour essuyer les produits répandus sur une zone de cuisson
chaude, faire très attention pour éviter les brûlures par la vapeur. Certains produits
nettoyants peuvent dégager des fumées nocives lorsqu’ils sont apposés sur une surface
chaude.
32 33
Page 35

Boutons de controle de la temperature
Votre plaque de cuisson se caractérise par plusieurs
réglages de la température allant de la cuisson
délicate aux températures extrêmement chaudes
requises pour l’ébullition et la saisie des aliments.
En tournant le bouton de contrôle dans le sens des
aiguilles d’une montre, vous augmentez l’intensité
de la chaleur. Tournez le bouton de contrôle sur
la position HI pour commencer la cuisson puis
ajustez l’intensité comme nécessaire.
Le bouton de contrôle de la température doit être enfoncé pour pouvoir le tourner depuis la
position OFF. Lorsque les boutons de contrôle sont sur une quelconque autre position que la
position OFF, ils peuvent être tournés sans qu’il soit nécessaire de les enfoncer.
Les résistances sont contrôlées par des régulateurs d’énergie variables permettant un contrôle
infini. Il n’y a pas de position ‘stop’ au niveau de la position faible ; cela est volontaire et doit
vous permettre de sélectionner la chaleur minimum nécessaire à la cuisson de plats délicats.
(Le niveau de courant chute rapidement sur zéro en-dessous de la position LO). La position HI
est idéale pour porter à ébullition, saisir ou faire sauter des aliments. Pour la cuisson normale,
tournez le bouton de contrôle sur la position HI pour commencer la cuisson et ajustez-le comme
requis. Une fois le plat chaud, réduisez la température pour maintenir une chaleur constante
pour cuire vos aliments.
L’efficacité de la cuisson variera en fonction des différents types d’ustensiles de cuisson utilisés.
Les performances de cuisson dépendent de la qualité et de la taille des plats. Il est indispensable
que la taille du plat corresponde au diamètre de la zone de cuisson. Utilisez des ustensiles à
fond plat de bonne qualité. Les performances médiocres sont généralement dues à l’utilisation
de plats de mauvaises tailles. Il vous faudra faire des essaies avec les réglages de la température
pour obtenir les résultats de cuisson voulus.
Vérifiez que vous avez bien tourné le bouton de contrôle sur la position Off une fois la cuisson
terminée. Vous sentirez un déclic lorsque vous tournerez le bouton sur la position OFF et le
témoin indicateur changera de couleur.
Controles de circuit double
Sélectionnez la résistance entière en tournant le bouton dans le sens inverse des aiguilles d’une
montre jusqu’à la position HI. Pour chauffer uniquement la résistance intérieure, tournez le
bouton dans le sens des aiguilles d’une montre jusqu’à la position HI.
FR
Page 36

Temoins indicateurs de surface chaude
Le témoin indicateur est allumé en rouge (GC901)
ou en blanc (GC901M) dès qu’une résistance est
allumée. Une fois la résistance éteinte, le témoin
indicateur passera à l’orange (GC901) ou au rouge
(GC901M) jusqu’à ce que la surface du rond ait
refroidi à une température pouvant être touchée
en toute sécurité.
Temoins
indicateurs de
surface chaude
Fonction supersimmer de cuisson a
feu doux (CE901M uniquement)
La résistance avant à droite de votre plaque de
cuisson se caractérise par une fonction de cuisson
à feu doux unique en son genre. Cela permet
de tourner l’intensité de la résistance sur une
position à chaleur constante très faible (25 watts
en comparaison avec les 60 watts sur les autres
ronds de cuisson). Ces positions plus faibles sont
idéales pour faire fondre le chocolat et le beurre,
cuire le riz et les sauces délicates et faire mijoter les
soupes et ragoûts. Ce rond peut également être
utilisé comme ‘zone de maintien au chaud’ pour
maintenir chauds les plats cuits.
La résistance du rond Supersimmer est aussi puissant (1200 watts) en termes de plage de chaleur
maximum que toute autre résistance standard de même taille (résistance du rond arrière à
gauche) et permet de faire dorer, saisir, sauter ou de porter à ébullition vos aliments avant de les
laisser mijoter sur le même rond.
Limiteurs de temperature
Des limiteurs de température sont intégrés aux résistances pour empêcher le verre de chauffer
excessivement. Vous verrez sans doute les limiteurs éteindre et allumer les résistances pendant la
cuisson.
A propos des resistances chauffantes
La résistance s’allumera et s’éteindra pour maintenir la température sélectionnée avec le bouton
de contrôle.
Vous pouvez placer sans danger des ustensiles chauds sortant du four, ou d’un autre rond, sur la
surface en verre lorsque la surface est froide.
Même une fois les résistances éteintes, la surface en verre conserve suffisamment de chaleur
pour continuer la cuisson. Pour éviter de cuire excessivement les aliments, retirez les casseroles/
poêles des résistances chaudes une fois les aliments cuits. Evitez de poser quoi que ce soit sur
une résistance chaude avant qu’elle soit complètement refroidie (le témoin indicateur de surface
chaude doit être éteint).
34 35
Page 37

Ustensiles
Pour bénéficier de performances de cuisson optimum, utilisez des casseroles/poêles lourdes à
fond lisse et plat correspondant au diamètre du rond de cuisson.
Pour obtenir d’excellents résultats, veuillez respecter ces simples
recommandations :
Préchauffez l’ustensile sur la plaque de cuisson avant de mettre les aliments.
Les ustensiles ayant un fond en acier inoxydable ou en fonte émaillée vous donneront
d’excellents résultats.
Lorsque les aliments arrivent à ébullition, réduisez la température.
N’utilisez pas de plats en aluminium ou plastique sur la plaque de cuisson.
Les ustensiles à fond en cuivre et aluminium peuvent laisser des résidus métalliques sur la
surface de la plaque de cuisson. S’ils sont laissés sur la plaque, ils seront difficiles à retirer.
Utilisez des casseroles/poêles ayant un fond correspondant au diamètre du rond de cuisson.
Vous bénéficierez ainsi d’une cuisson hautement efficace.
Une casserole à fond plat aura un meilleur contact avec la résistance d’où une réduction des
temps de cuisson.
Les bords ébréchés des casseroles ou poêles lourdes raieront la surface de la plaque de cuisson.
Utilisez un couvercle pour réduire les temps de cuisson.
FR
Page 38

Entretien et nettoyage
Nettoyage de la plaque de cuisson
Nettoyez toute la surface de la plaque de cuisson avant de l’utiliser pour la première fois.
Appliquez environ 1/4 d’une cuiller à café de nettoyant non abrasif, comme par exemple la
crème de nettoyage pour plaque de cuisson Weiman sur la surface en céramique à l’aide d’un
chiffon propre. Essuyez toute la surface avec un chiffon humide pour retirer tout résidu du
produit nettoyant et séchez la surface avec un chiffon propre non pelucheux. La plaque de
cuisson risque de rester tachée si vous laissez des résidus du produit nettoyant ou si la plaque
n’est pas complètement essuyée à sec.
Pour que la plaque de cuisson reste impeccable et facile à nettoyer, essuyez-la avec un nettoyant
recommandé après chaque utilisation. Appliquez une petite quantité de crème nettoyante sur la
surface céramique froide à l’aide d’un chiffon propre. Frottez pour enlever la saleté et la graisse.
Essuyez avec un chiffon humide et séchez la surface avec un chiffon propre non pelucheux.
Vous constaterez une usure progressive normale de la plaque mais cela n’affectera pas les
performances de la plaque de cuisson.
Evitez d’utiliser des produits nettoyants corrosifs ou abrasifs. Les tampons à gratter en nylon, les
pailles de fer, les pierres ponces, les bombes pour nettoyer le four et les puissants nettoyants
caustiques risquent d’égratigner ou de ronger la surface céramique.
Retirez les traces de matières grasses ou de liquide répandu ayant brûlé ou important en utilisant
le grattoir fourni. Utilisez 1/4 d’une cuiller à café de la crème nettoyante sur la zone sale et tenez
le grattoir à un angle de 30° par rapport à la surface de la plaque et gratter doucement tout
résidu. Faites attention pour ne pas égratigner ou rayer la surface. Les nettoyants sous forme
de crème sont très efficaces lorsque la surface est encore tiède mais nous vous recommandons
vivement de ne pas essuyer ou nettoyer les surfaces chaudes pour éviter toute blessure sur la
personne.
AVERTISSEMENT!
Une fois la protection de sécurité retirée, la lame du grattoir est
tranchante comme un rasoir. Faites extrêmement attention et remettez
la protection de sécurité sur la lame après chaque utilisation et rangez le
grattoir en lieu sûr et hors de la portée des enfants.
Les liquides répandus ayant une teneur en sucre élevée comme la gelée de fruit, les caramels
mous et sirops de confiserie doivent être nettoyés aussitôt, avant de refroidir, au risque
d’endommager de manière permanente la plaque de cuisson. Les feuilles en aluminium et les
plastiques peuvent également ronger la surface et ne doivent pas être laissés fondre sur la
plaque. Faites très attention lorsque vous retirez des substances chaudes. Eteignez tous les ronds
de la plaque sur lesquels les aliments se sont répandus et retirez les casseroles chaudes. Utilisez
un gant de cuisine pour tenir le grattoir et grattez les aliments répandus tout en les poussant
36 37
Page 39

jusque dans un coin refroidi de la plaque pour ensuite les ramasser avec du papier absorbant.
Nettoyez la surface une fois refroidie. N’utilisez pas la surface sale tant qu’elle n’aura pas été
complètement nettoyée.
N’oubliez pas de certains aliments tels que les petits pois et le navet, ont naturellement une
teneur élevée en sucre.
Taches metalliques
Les casseroles/poêles en aluminium ou ayant un fond en cuivre risquent de laisser des taches
métalliques. Ces taches laissent un lustre métallique sur la surface de la plaque. Si la plaque n’est
pas nettoyée régulièrement et que les taches brûlent sur la surface, elles peuvent réagir avec
la surface en vitro-céramique et deviendront impossibles à enlever. L’utilisation d’un nettoyant
crème après chaque utilisation évitera d’endommager la plaque.
Nettoyage du contour en acier inoxydable
Utilisez de l’eau savonneuse tiède pour nettoyer le contour en acier inoxydable lorsque la plaque
est froide. Appliquez l’eau savonneuse avec un chiffon ou une éponge douce. N’utilisez pas de
tampons en acier car ils terniront l’apparence de l’appareil au fil du temps.
Après le nettoyage, essuyez la surface avec un chiffon propre et assurez-vous que la surface
est complètement sèche. Pour la faire briller davantage, utilisez un produit polissant pour acier
inoxydable tel que le produit polissant et nettoyant Stainless Steel Cleaner and Polish.
N’utilisez pas de produits nettoyants abrasifs sur une quelconque partie de la plaque au risque
d’endommager la plaque.
Ne traînez pas les casseroles sur le bord de la plaque au risque de faire des marques sur l’acier
inoxydable.
Nettoyants recommandes pour plaque de cuisson ceramique
Crème de nettoyage pour plaque Weiman [Weiman Cooktop Cleaning Creme] (échantillon fourni
avec la plaque de cuisson)
Cera Care
Crème de nettoyage pour plaque Hopes [Hopes Cooktop Cleaning Creme]
Cerama Bryte
FR
Page 40

Questions frequemment posees
Q
Q
Est-il possible que la plaque de cuisson se
brise ?
R
Cela est très peu probable. Le verre est très
robuste et solide et subit une série de tests
extrêmement rigoureux avant d’être accepté.
Q
Est-ce que le verre s’égratigne facilement ?
R
Non. Le verre est très résistant. Vérifiez
cependant que la base de vos casseroles n’est
pas ébréchée.
Q
Quelle est la signification des différentes
couleurs ?
R
Elles décrivent le statut des résistances.
Rouge (CE901), blanc (CE901M) - la résistance
est allumée
Orange (CE901), rouge (CE901M) - la
résistance est éteinte mais la surface est
encore chaude.
Q
Est-ce que les graphiques s’effaceront ?
R
Non. Les graphiques sur le verre sont fondus
sur la surface. Cependant, ils pourront être
cachés par les aliments répandus et cuits sur
la plaque. Vous pouvez facilement enlever
ces aliments avec le grattoir fourni avec le
produit. Les graphiques sur l’acier inoxydable
sont gravés à l’eau forte par laser. Veuillez
vous référer aux instructions de nettoyage.
Q
Y a-t-il des risques de surchauffe de la surface ?
R
Des limiteurs de température sont mis en
place sur chaque résistance pour empêcher
toute surchauffe.
Pourquoi les résistances semblent s’éteindre
pendant la cuisson ?
R
La résistance alterne entre la position allumée
et éteinte pour maintenir la température
sélectionnée.
Q
Dois-je acheter des casseroles/poêles
spéciales ?
R
Non. Cependant nous vous recommandons
vivement d’utiliser des casseroles/poêles à
fond plat car elles sont plus stables et plus
économiques en termes de consommation
d’énergie. Veuillez vous référer pour de plus
amples informations.
Q
Comment sélectionner une température
minimum pour la cuisson délicate et à feu
doux ?
R
CE901 :La résistance ayant la plus faible est la
résistance intérieure du rond double. Il vous
suffit de tourner le bouton de contrôle de la
température en-dessous de la position low.
CE901M :Le bouton de contrôle Supersimmer
sur le rond avant à droite peut être tourné
jusqu’à une position permettant d’obtenir
une puissance constante minimum.
Q
Puis-je installer mon four Fisher & Paykel sous
la plaque de cuisson ?
R
Oui, avec une hauteur de table de travail
standard.
Q
Quelle est la meilleure manière pour nettoyer
la plaque ?
R
Veuillez vous référer aux instructions de
nettoyage.
38 39
Page 41

En cas de problemes
Probleme Solution
Les graphiques
semblent s’effacer de la
surface en verre.
Cela est très peu probable. Il est possible que les aliments
répandus et cuits sur la surface de la plaque cachent les
graphiques. Nous vous recommandons d’utiliser un grattoir à
lame de rasoir pour retirer ces aliments.
Le verre est égratigné
La résistance s’allume
et s’éteint toute seule
sans arrêt
Les témoins
indicateurs du statut
de la résistance ne
fonctionnent plus ou
indiquent la mauvaise
couleur
Cela provient généralement d’ustensiles à bords abîmés.
Vérifiez que vos casseroles/poêles ont des fonds plats et lisses.
Cela est normal et s’explique par :
1. La résistance s’allume et s’éteint pour empêcher la
surchauffe du verre.
2. Le dispositif de contrôle s’allume et s’éteint pour maintenir
le réglage de température sélectionné.
Prenez contact avec le service après-vente.
FR
Page 42

Garantie limitee
Lorsque vous achetez un nouvel appareil électroménager Fisher & Paykel pour une utilisation
ménagère, vous recevez automatiquement une Garantie limitée de deux ans couvrant les pièces
de rechange et la main d’œuvre pour le service dans les 48 états du continent américain, Hawaï,
Washington D.C. et au Canada. Eu égard à l’Alaska, la Garantie limitée est identique sauf que vous
devez prendre en charge les frais d’expédition du Produit jusqu’au service clientèle ou prendre
en charge les frais de déplacement du technicien de maintenance jusqu’à votre domicile. Les
Produits destinés à être utilisés au Canada doivent être achetés par l’intermédiaire de la chaîne
de distribution canadienne pour garantir la conformité avec la réglementation en vigueur.
Si le Produit est installé dans un véhicule automobile, sur un bateau ou sur une unité mobile
similaire, vous bénéficiez de la même Garantie limitée de deux ans, mais il relève de votre
responsabilité d’amener le véhicule, bateau ou l’unité mobile dans laquelle est installé le
Produit au service après-vente à vos frais ou de prendre en charge les frais de déplacement du
technicien de maintenance jusqu’au lieu où se trouve le Produit.
Fisher & Paykel s’engage à :
Réparer sans frais encourus sur le propriétaire en termes de main d’œuvre ou de matériau
une quelconque partie du Produit, dont le numéro de série se trouve sur le Produit, s’avérant
défectueuse. Eu égard à l’Alaska, vous devez prendre en charge les frais d’expédition du Produit
jusqu’au service clientèle ou prendre en charge les frais de déplacement du technicien de
maintenance jusqu’à votre domicile. Si le Produit est installé dans un véhicule automobile, sur un
bateau ou sur une unité mobile similaire, il relève de votre responsabilité d’amener le véhicule,
bateau ou l’unité mobile dans laquelle est installé le Produit au service après-vente à vos frais ou
de prendre en charge les frais de déplacement du technicien de maintenance jusqu’au lieu où
se trouve le Produit. Si nous ne pouvons pas réparer une pièce défectueuse du Produit après un
nombre raisonnable de tentatives, nous procéderons au remplacement de la pièce ou du Produit
ou nous vous proposerons de vous rembourser intégralement le prix d’achat du Produit (frais
d’installation et autres frais étant exclus), selon notre choix.
Cette garantie s’étend à l’acheteur original et à tout propriétaire successeur du Produit pour les
Produits achetés pour toute utilisation ménagère par une seule famille.
Le service en vertu de cette Garantie limitée devra être assuré par Fisher & Paykel ou par son
agent agréé pendant les heures normales de bureau.
Durée de cette Garantie limitée
Notre responsabilité en vertu de cette Garantie limitée expire DEUX ANS après la date d’achat
du Produit par le premier consommateur. Notre responsabilité en vertu de toutes garanties
implicites, y compris la garantie implicite de qualité marchande (une garantie implicite selon
laquelle le Produit est adapté à toute utilisation ordinaire) expire également UN AN (ou durée
supérieure comme requis par la loi en vigueur) à compter de la date d’achat du Produit par le
premier consommateur. Certains états n’autorisent pas les limitations sur la durée de la garantie
implicite, il est donc possible que les limitations sur les garanties implicites ne vous concernent
pas.
40 41
Page 43

Cette garantie ne couvre pas les points suivants :
A
Les déplacements d’un technicien de maintenance jusqu’à votre domicile pour tout problème
non lié à un défaut dans le Produit. Les frais du déplacement vous seront facturés si le problème
s’avère ne pas être un défaut du Produit. Par exemple :
1. Rectifier une mauvaise installation du Produit.
2. Vous expliquer comment utiliser le Produit.
3. Remplacer les fusibles de la maison ou procéder au réglage des disjoncteurs, refaire le
câblage ou la plomberie de la maison ou remplacer les ampoules.
4. Rectifier les défaillances provoquées par l’utilisateur.
5. Rectifier le réglage du Produit.
6. Modifications non autorisées du Produit.
7. Bruit ou vibrations considérés comme normaux, par exemple, bruits de tuyauterie, bruits de
régénération ou sonneries d’avertissement destinées à l’utilisateur.
8. Réparations des dommages provoqués par des animaux nuisibles comme les rats ou les
cafards, etc.
B
Défauts causés par des facteurs autres que :
1. L’utilisation ménagère normale ou
2. L’utilisation en conformité avec le manuel d’utilisation du Produit.
C
Les défaillances du Produit causées par accident, la négligence, une mauvaise utilisation,
l’incendie, l’inondation ou une catastrophe naturelle.
D
Les frais des réparations effectuées par des réparateurs non agréés ou les frais associés à la
correction de telles réparations non autorisées.
E
Les frais de déplacement et frais associés encourus lorsque le Produit est installé dans un
endroit disposant d’un accès limité ou restreint (par ex frais d’avions, frais de ferry et zones
géographiques isolées).
F
La maintenance recommandée normale comme énoncée dans le manuel d’utilisation du
Produit.
En cas de problème avec l’installation, prenez contact avec votre revendeur ou installateur.
Les raccordements électriques et d’évacuation et autres raccordements relèvent de votre
responsabilité.
FR
Nous ne sommes pas responsable des dommages indirects (les frais des réparations ou les
frais de remplacement d’autres propriétés endommagées si le Produit est défectueux ou vos
dépenses encourues si le Produit est défectueux). Certains états n’autorisent pas l’exclusion ou la
limitation des dommages indirects, il est donc possible que la limitation ou l’exclusion ci-dessus
ne s’applique pas à votre situation.
Page 44

Comment solliciter le service clientèle ?
Veuillez lire le manuel d’utilisation. Si après la lecture du manuel, vous avez toujours des
questions sur le fonctionnement du Produit, ou si vous avez besoin de connaître le nom de votre
représentant Fisher & Paykel agréé local ou si vous pensez que le Produit est défectueux et que
vous souhaitez contacter le service clientèle dans le cadre de cette Garantie limitée, veuillez
prendre contact avec votre revendeur ou nous appeler au numéro suivant :
1-888-9-FNP-USA (1-888-9-367-872) – Canada également – ou nous contacter sur notre site
Internet : www.usa.fisherpaykel.com
Il est possible qu’il vous soit demandé de fournir une preuve valable de la date d’achat du
Produit avant que le Produit puisse être accepté par le service clientèle en vertu de cette
Garantie limitée.
Utilisation commerciale
Si vous utilisez le Produit dans un environnement commercial (toute autre utilisation que
l’utilisation par une unité familiale simple), nous nous engageons à réparer ou remplacer, sans
frais de pièces uniquement, les pièces défectueuses dont le numéro de série figure su le Produit.
Notre responsabilité eu égard à ces réparations expire UN AN à compter de la date d’achat
originale.
Selon notre choix, nous procéderons au remplacement de la pièce ou du Produit ou nous vous
proposerons de vous rembourser intégralement le prix d’achat du Produit (frais d’installation et
autres frais étant exclus). Le service en vertu de cette Garantie limitée devra être assuré par Fisher
& Paykel ou par son agent agréé pendant les heures normales de bureau.
Aucune autre garantie
Cette Garantie limitée constitue l’intégralité de l’accord exclusif passé entre l’acheteur et Fisher
& Paykel eu égard à toute défaillance du Produit. Aucun de nos employés (ou de nos agents
agréés) n’est autorisé à procéder à un quelconque ajout ou à une quelconque modification de
cette Garantie limitée.
Garant : Fisher & Paykel Appliances, Inc.
Si vous avez besoin d’assistance eu égard à cette Garantie limitée, veuillez nous contacter au
numéro ci-dessus ou nous écrire à l’adresse ci-dessous :
Fisher & Paykel Appliances, Inc.
27 Hubble, Irvine, CA 92618
Cette Garantie limitée vous donne des droits juridiques spécifiques et il est également possible
que vous bénéficiez d’autres droits pouvant varier d’un état à un autre.
42
Page 45

Page 46

Page 47

Page 48

Copyright Reserved © Fisher & Paykel 2004.
The product specifications in this booklet apply to the
specific products and models described at the date
of issue. Under our policy of continuous product
improvement, these specifications may change at any
time. You should therefore check with your Dealer to
ensure this booklet correctly describes the product
currently available.
Derechos Reservados © Fisher & Paykel 2004.
Las especificaciones del producto en este folleto
se refieren a los productos y modelos específicos
descritos en el momento de publicación. Bajo
nuestra política de mejora continua de nuestros
productos estas especificaciones pueden cambiar en
cualquier momento. Usted debe por lo tanto confirmar
con su comerciante para asegurarse que este folleto
describa correctamente el producto disponible en
este momento.
Droits réservés © Fisher & Paykel 2004.
Les spécifications du produit contenues dans ce
manuel s’appliquent aux modèles et produits
spécifiques comme décrits à la date de publication.
Dans le cadre de notre politique d’améliorations
en permanence de nos produits, ces spécifications
pourront être modifiées à tout moment. Nous vous
recommandons de vérifier auprès de votre revendeur
que ce manuel décrit le produit actuellement
disponible.
www.usa.fisherpaykel.com
US ES FR
Ceramic cooktop user guide
Published: 02/2004
Part No. 599085 C
 Loading...