

Page 1

User guide
Built-in oven
BI453 and BI603 ‘classic range’ models
NZ AU
Page 2

Page 3

Contents
1
Introduction
Safety and warnings
Overview of oven models
Clocks and timers
Operating the oven
Cooking functions
Automatic cooking
Oven shelves
Accessories
Oven temperature conversion chart
Cooking function options
Cooking charts
Care and cleaning - oven
Ceramic cooktop (CTE)
Care and cleaning - ceramic cooktop (CTE)
Warranty and service
2
3
4
5
9
10
11
13
14
14
15
16
24
26
28
29
Important!
SAVE THESE INSTRUCTIONS
The models shown in this user guide may not be available in all markets and are
subject to change at any time. For current details about model and specification
availability in your country, please go to our website www.fisherpaykel.com or
contact your local Fisher & Paykel dealer.
Page 4

2
Introduction
About your new oven
Thank you for buying a Fisher & Paykel built-in oven. Now that it is installed and ready to use,
you will want to know everything about it to make sure you get excellent results right from the
start. This guide introduces you to all its features, as well as giving you a comprehensive set of
cooking charts. We recommend you read the whole guide before using your new oven, for both
safety and cooking success.
Before using your new oven
Before using your new oven, please:
Read this user guide, taking special note of the ‘Safety and warnings’ section following.
Remove all accessories and packaging (from both ovens in double models).
Set the clock. The oven will not work until the clock has been set. See the ‘Clocks and timers’
section.
Condition the oven/s by turning the function knob to FAN BAKE
0
to 200
C and heat for one hour. You can condition both ovens in double models at the same
time. The upper oven controls are on the right
There will be a distinctive smell while you are conditioning your oven. This is normal, but make
sure your kitchen is well ventilated during the conditioning.
and the lower on the left .
and the temperature knob
Page 5
Safety and warnings
Your built-in oven has been carefully designed to operate safely during normal cooking
procedures. Please keep the following guidelines in mind when you are using your oven.
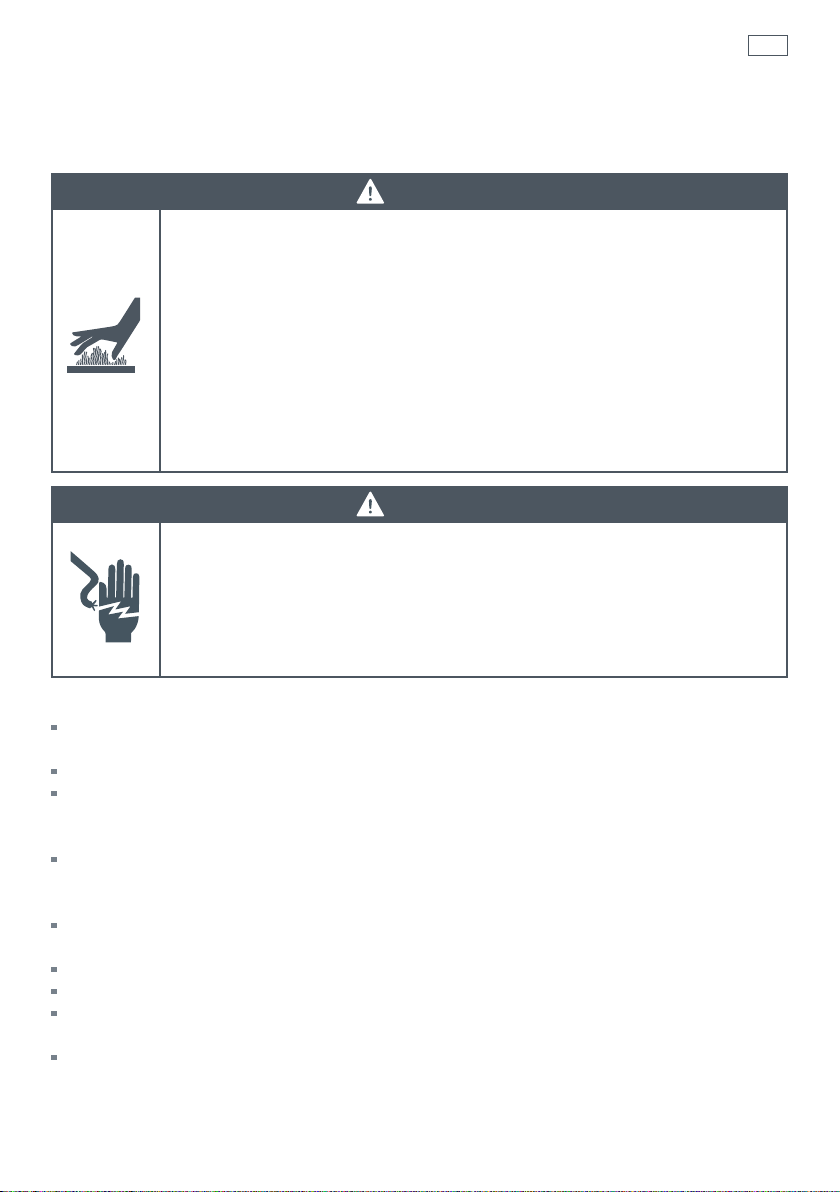
WARNING!
Hot Surface Hazard
Accessible parts will become hot when this oven is in use.
Accessible parts may become hot when the grill is in use with the door open.
To avoid burns and scalds keep children away.
Do not touch hot surfaces inside the oven.
Use oven mitts or other protection when handling hot surfaces such as oven
shelves or dishes.
Take care when opening the oven door.
Let hot air or steam escape before removing or replacing food.
Failure to do so could result in burns and scalds.
Electrical Shock Hazard
Switch the oven off at the wall before replacing fuses or the oven lamp.
Do not use the appliance if the cooktop surface is cracked. Switch the
appliance off at the power supply and contact your service centre.
Failure to do so may result in death or electrical shock.
WARNING!
3
Important safety precautions
Isolating switch: make sure this oven is connected to a circuit which incorporates an isolating
switch providing full disconnection from the power supply.
Household appliances are not intended to be played with by children.
Children, or persons with a disability which limits their ability to use the appliance, should have
a responsible person to instruct them in its use. The instructor should be satisfied that they can
use the appliance without danger to themselves or their surroundings.
Safe food handling: leave food in the oven for as short a time as possible before and after
cooking. This is to avoid contamination by organisms which may cause food poisoning. Take
particular care during warmer weather.
Do not place aluminium foil or dishes with reflective qualities on the oven floor as this will
cause a heat build-up which will irreversibly damage the enamel.
Do not stand on the door, or place heavy objects on it.
Do not use a steam cleaner to clean any part of the oven or the ceramic cooktop.
Do not use harsh abrasive cleaners or sharp metal scrapers to clean the oven door glass since
they scratch the surface, which may result in shattering of the glass.
When the safety cover is retracted the blade in the cooktop scraper is razor-sharp. Use with
extreme care and always store safely.
Page 6
4
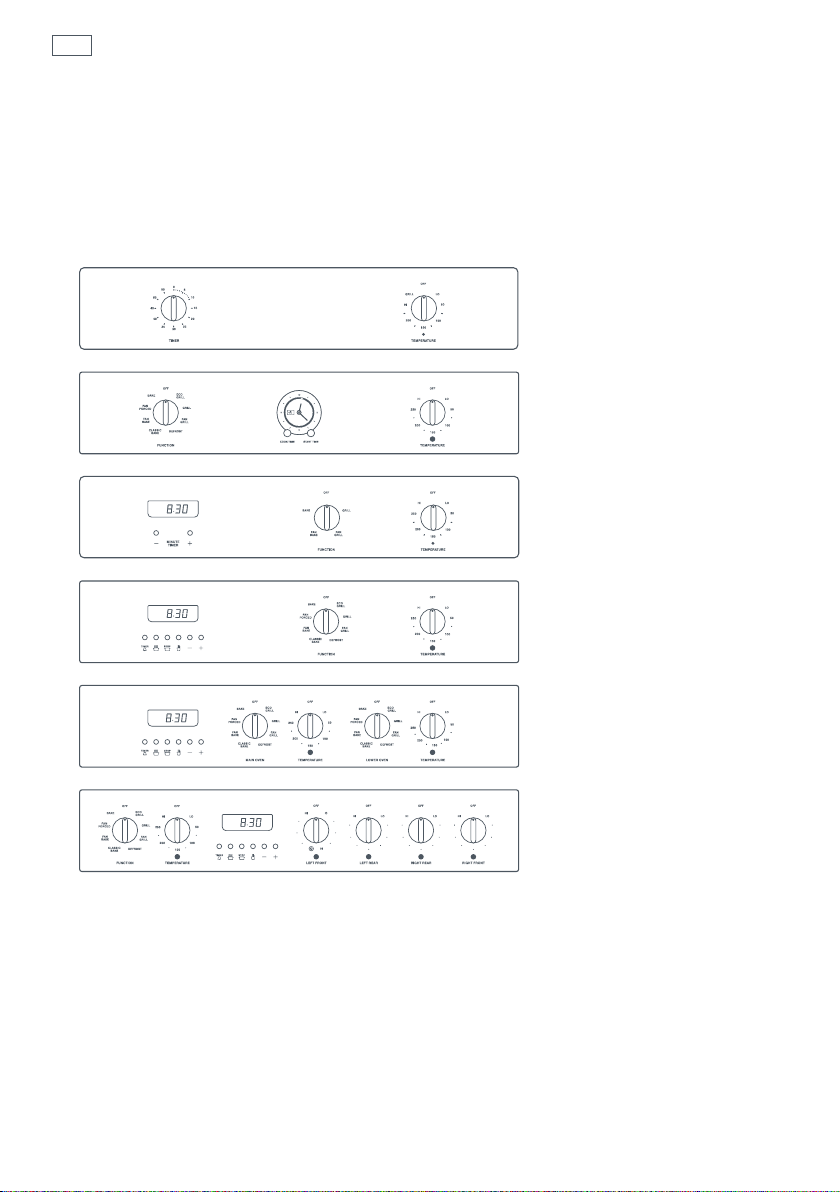
Overview of oven models
Built-in oven models
Depending on which model you have, your built-in oven will have one of the following control
panels.
Ringer timer (R)
Analogue clock (A)
Electronic clock with
minute timer (C)
Electronic clock (E)
Double oven with
electronic clock (ED)
Oven with cooktop and
electronic clock (CTE)
Fig.1 Oven models
Page 7

Clocks and timers
5
Types of clock
You have to set the clock before you can use the oven. Depending on which model you have (see
‘Overview of oven models’) your oven may have a ringer timer, an analogue clock, an electronic
clock with minute timer, or an electronic clock.
Ringer timer model (R)
The timer can be used at any time even if the oven is not in use.
The timer can be set for up to 55 minutes.
If the oven is in use, the timer does not turn the oven off.
Fig.2 Ringer timer
Setting the timer
Turn the timer control knob clockwise to the 55 minute mark, then turn it back to show the
number of minutes you want. The timer will count down and will ring when the set time is
reached.
Page 8

6
Clocks and timers
Analogue clock model (A)
Timer
Timer bell off stops the timer bell
ringing.
Start time sets a time for
automatic cooking to start.
Manual symbol returns the oven to manual
mode when automatic cooking is
finished.
Setting the analogue clock
To set the clock:
1
Turn the COOK TIME knob anticlockwise until the symbol shows.
2
Press and turn the COOK TIME knob anticlockwise until the clock shows the correct time.
3
Press and turn the START TIME knob anticlockwise until the triangle clicks into alignment with
the hour hand.
COOK TIME START TIME
Fig.3 Analogue clock
Setting the timer
You can use the timer at any time, even when the oven is not in use. If the oven is in use, the
timer will turn the oven off when the selected time has elapsed.
To set the timer, turn the COOK TIME knob anticlockwise until the number of minutes you want
shows in the centre of the display, eg 60 minutes. When the time is up, the timer will ring and the
oven will turn off.
To turn the timer bell off, turn the COOK TIME knob anticlockwise to the
To return the oven to manual mode, turn the COOK TIME knob anticlockwise to the
symbol.
symbol.
Page 9
Clocks and timers
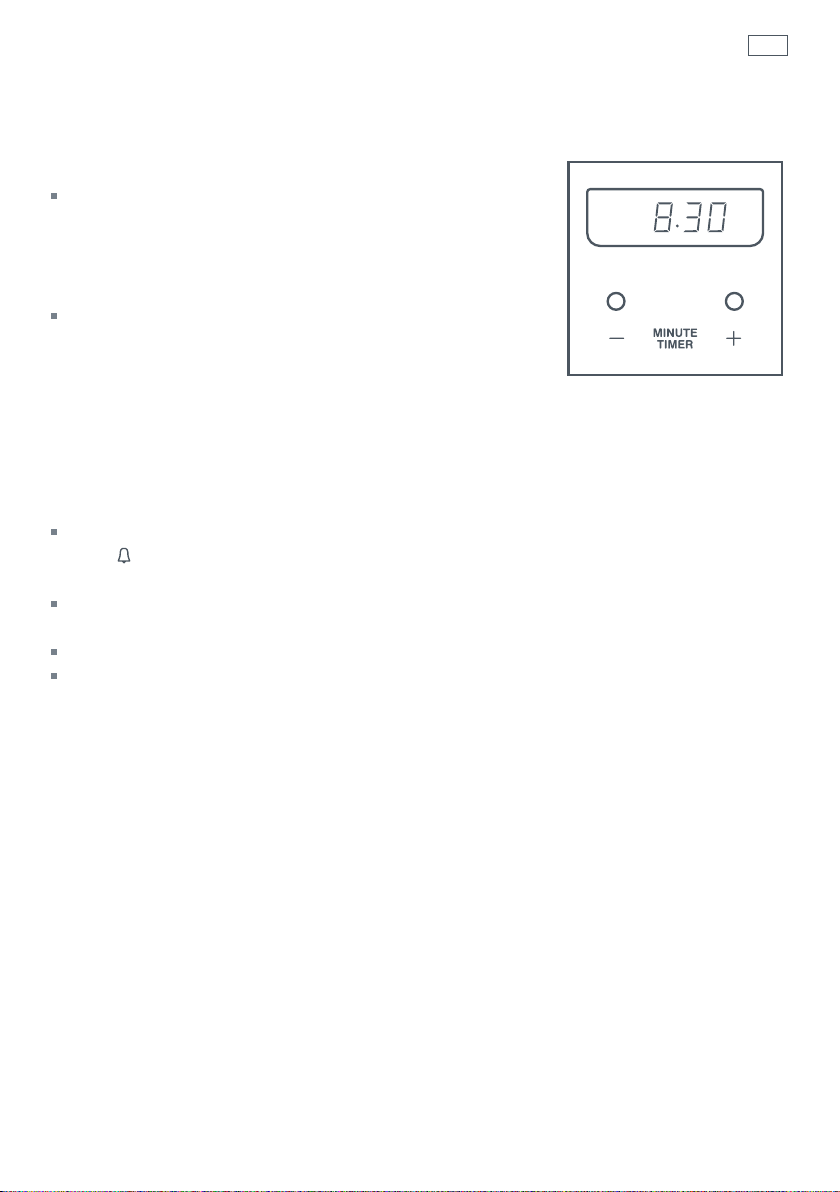
Electronic clock with minute timer model (C)
Setting the electronic clock
To set the clock, press and hold the – + buttons together
briefly (0.00 will stop flashing). You have six seconds to
start setting the clock. Press the – or + button until the
correct time is displayed. If you make a mistake, press the
– + buttons together and correct the time.
To adjust the time for daylight savings you can reset the
hours only. Press and hold the – + buttons together until
the hour digits begin flashing, release the – + buttons and
re-press either the – or + button until the correct time is
displayed.
Setting the minute timer
You can use the timer at any time, even when the oven is not in use. The timer does not turn the
oven off and has a maximum setting of 10 hours.
To set the timer, press the – or + button briefly, then the – or + button to set the time you want.
The
symbol and time set are displayed. The minute timer displays the countdown in minutes
and seconds, or hours and minutes.
To check the time of day during the running of the minute timer, briefly press the – + buttons
together.
To cancel the timer, reset the time to 0.00 by pressing the – button.
When the time is up, the timer will beep. Press the – or + button to turn the timer off.
Fig.4 Electronic clock with
minute timer
7
Adjusting the volume of the timer
You can choose between three levels of volume for the timer beeps.
To adjust the volume:
1
Check the clock is set and the timer is not running.
2
Press and hold the – button. The timer will beep.
3
Release the – button and re-press to hear the next level of volume. The last level selected is
stored.
Note: if the power to the oven is cut, then the ‘beep’ volume will reset to the loudest level.
Page 10
8
Clocks and timers
Electronic clock models (E, ED, CTE)
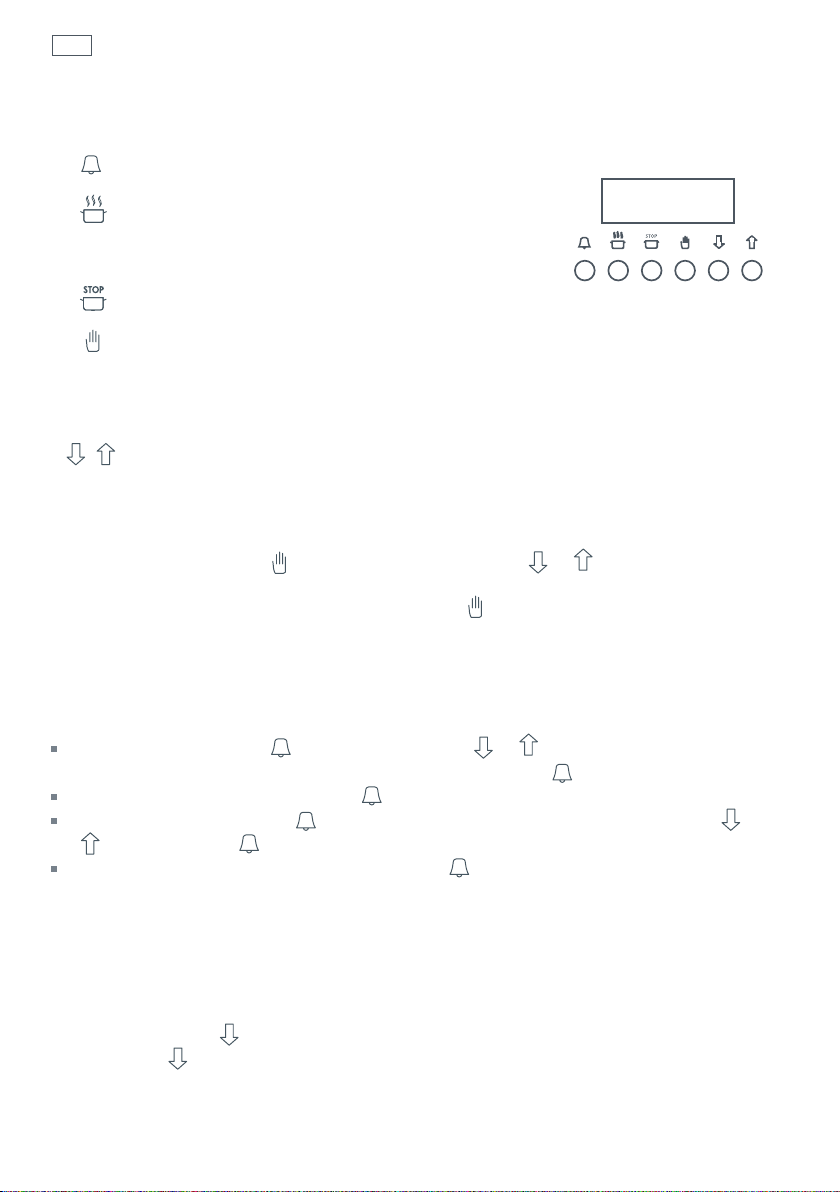
Timer
Cook time is used for automatic cooking.
The oven will automatically turn off at the
end of the set cook time.
Stop time is used for automatic cooking.
Manual returns the oven to manual
control during automatic cooking or when
automatic cooking is completed, and is
used for setting the clock.
Symbols are used for changing times in
the selected mode.
Setting the clock
Fig.5 Electronic clock
To set the clock, press the
shows the correct time.
AUTO will appear in the clock display while the button is being pressed.
Note:
button once and then press the
or button until the clock
Using the timer
You can use the timer at any time, even when the oven is not in use. The timer does not turn the
oven off.
To set the timer, press the
After a few seconds, the clock will show the time of day with the
To check the remaining time press the
To cancel the timer, press the
buttons. Press the button to turn the timer off.
When the time is up, the timer will beep. Press the
button briefly, then the or button to set the time you want.
symbol in the display.
button.
button and then reset the time to 0:00 by pressing the and
button to turn the timer off.
Adjusting the volume of the timer
You can choose between three levels of volume for the timer beeps.
To adjust the volume:
1
Check the clock is set and the timer is not running.
2
Press and hold the button. The timer will beep.
3
Release the button and re-press to hear the next level of volume. The last level selected is
stored.
Note: if the power to the oven is cut, then the ‘beep’ volume will reset to the loudest level.
Page 11
Operating the oven
Your oven has a variety of cooking functions to suit your needs (not all models have the entire
range of cooking functions). Depending on which model you have, your oven will have either a
ringer timer, or function and temperature control knobs.
Note: the oven cooling fan comes on automatically at different stages of the cooking cycle. It
blows out warm air above the door. When the oven is turned off, the cooling fan may stay on
until the oven cools down.
Ringer timer model (R)
The ringer timer model has two cooking functions: Bake (between ‘LO’ and ‘HI’) and Grill.
To turn the oven on to Bake, simply turn the temperature control knob clockwise to the required
temperature. The oven light will come on automatically while the oven is in use. The oven
indicator light will glow until the oven has reached the set temperature.
When you have finished cooking, turn the temperature control knob to Off.
For grilling, turn the temperature control knob to Grill.
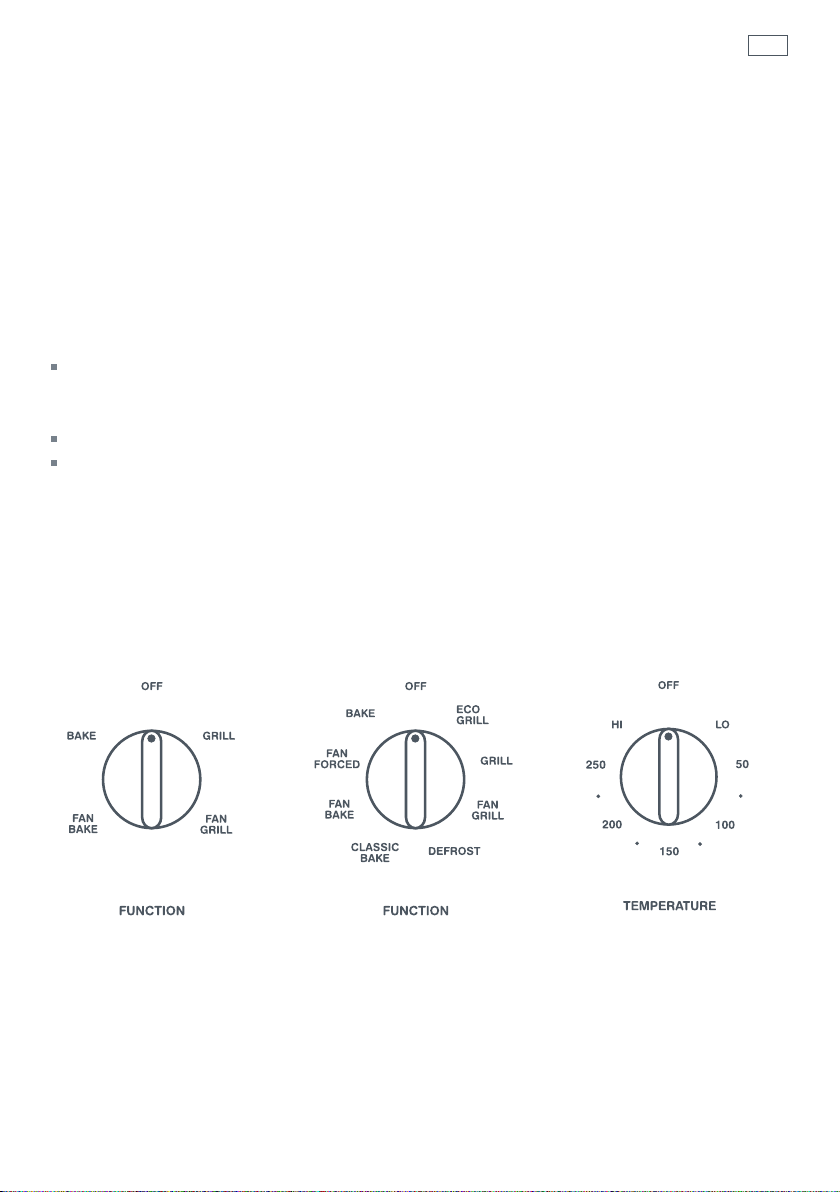
Control knob models (C, A, E, ED, CTE)
1
Select the function using the function control knob. The oven light/s will come on.
2
Select the temperature using the temperature control knob. The oven temperature indicator
light will glow until the oven has reached the set temperature, and then it will go out.
3
When you have finished cooking, turn the function and temperature control knobs to OFF.
9
Fig.6 C model Fig.7 A, E, ED and CTE models Fig.8 C, A, E, ED and CTE models
Note: oven knobs may vary from those illustrated.
Page 12

10
Cooking functions
Note: not all models have the entire range of cooking functions.
ECO GRILL Top inner element
ECO GRILL
grill single servings or small pieces of food. ECO grill with the door open at the first stop
position.
GRILL Inner and outer top elements
GRILL
with the door open at the first stop position. Grilled vegetables are quick to cook and full
of flavour.
FAN GRILL Fan plus top elements
FAN GRILL
would normally be fried. Large cuts of meat can be cooked using this function with
results similar to using a rotisserie. Use FAN GRILL
moussaka. Fan-grilled whole chicken is excellent. Fan grill with the oven door closed.
DEFROST Fan only
The fan circulates air around the oven, speeding up the defrosting process by
approximately 30%.
uses the inner area of the top element and is useful when you need to
uses both of the top elements and is ideal for grilling a large area of food. Grill
circulates hot air from the top elements and is excellent for food that
for dishes such as lasagne and
CLASSIC BAKE Bottom element
CLASSIC BAKE
or FAN BAKE . Use CLASSIC BAKE for quiches, slices or anything you want
browner on the bottom than on the top.
FAN BAKE Fan plus top and bottom elements
FAN BAKE
in BAKE
good for crisping food, eg pastry products.
FAN FORCED Fan plus fan element
In FAN FORCED
FAN FORCED
potatoes.
BAKE Top and bottom elements
BAKE
time in this function. Use BAKE
eg fruit cakes, bread and roasts.
is the traditional method of cooking. It is best to cook on only one shelf at a
uses heat from the bottom element only. Preheat the oven first on BAKE
circulates hot air from the top and bottom elements. Food cooks faster than
, so you may need to lower the oven temperature by 5-10 0C. FAN BAKE is
, heat from the element around the fan is forced throughout the oven.
is perfect for multi-shelf cooking and batch baking, casseroles and baked
for delicate food and foods that require long cooking,
Page 13

Automatic cooking
Use automatic cooking to automatically turn the oven on, cook, and then turn the oven off.
Analogue clock model (A)
To set automatic cooking:
1
Check the clock shows the correct time.
2
Select the function and temperature. The oven indicator
light will glow, and the oven will come on.
3
Decide how long the food will take to cook, allowing time
for preheating if necessary.
4
Turn the COOK TIME knob anticlockwise to show how
long you need the food to cook for, eg 60 minutes
(Fig. 9b).
5
Decide when you would like the oven to come on.
For example, if you would like the oven to turn off at 7
pm, and the cooking time is 60 minutes, you want the
oven to turn on at 6 pm.
6
Press and turn the START TIME knob anticlockwise until
the
the oven to turn on, eg 6 pm (Fig. 9c).
triangle is pointing to the time you would like
11
Fig.9a
Fig.9b
If there is time to wait before cooking starts, the oven
indicator light will go out, and the oven will switch off but
is now set for automatic cooking.
If you are already at home to turn the oven on and only
want the oven to turn off automatically, start cooking as
normal, then follow step 4 to set a cook time. In this case
the
triangle will be pointing to the current time (Fig.
9b).
When the cook time is completed, the oven will turn off and the timer will ring.
To turn the ringer off, turn the
COOK TIME knob anticlockwise to the
To turn the oven off or cancel automatic cooking at any time:
1
Turn the COOK TIME knob anticlockwise to the symbol (Fig. 9a).
2
Press and turn the START TIME knob until the
triangle clicks into
alignment with the hour hand (Fig. 9a).
3
Turn temperature and function to OFF.
symbol.
Fig.9c
Automatic cooking
on analogue clock.
Page 14

12
Automatic cooking
Electronic clock models (E, ED, CTE)
To set automatic cooking:
1
Check the clock shows the correct time.
2
Select the function and temperature. The oven temperature indicator light
will glow and the oven will come on.
3
Decide how long the food will take to cook, allowing time for
preheating if necessary.
4
Press the button. 0.00 will show. Using the
set the cooking time, eg 1 hour 15 minutes.
5
Select the time you would like the oven to turn off by
pressing the
If there is time to wait before cooking starts, the current time of
day and
indicator light will go out and the oven will switch off but is now set
for automatic cooking.
If you are already at home to turn the oven on and only want the
oven to turn off automatically, start cooking as normal, then
follow step 5 to set a time to stop the oven.
AUTO will show in the clock display. The oven temperature
button and then using the
buttons,
buttons eg 18.00.
Fig.11 Sample cook time shown
Fig.10 Electronic clock
and controls
When automatic cooking starts,
To see the remaining cook time, press the
To see the set stop time, press the
To cancel automatic cooking at any time, press the
function knobs to the off
When the stop time is reached, the oven will turn off, the timer will beep and
Press the
Turn the temperature and function knobs to the off
button to stop the beeping and return the oven to manual mode.
AUTO will be displayed and the oven will turn on.
button.
button.
button and turn the temperature and
position.
O
position.
O
AUTO will flash:
Important!
Safe food handling: leave food in the oven for as short a time as possible before and after
cooking. This is to avoid contamination by organisms which may cause food poisoning. Take
particular care during warmer weather.
Page 15

Shelf positions
Oven shelves
13
Shelf positions are numbered from the
top down. The top positions are for
grilling functions and middle shelves
are suitable for baking and roasting.
Do not cook or place anything on the
oven floor.
Shelf supports
The shelf supports hold the wire
shelves and the grill/roast pan.
1
2
3
4
5
6
7
8
Important!
For all shelf positions (unless your oven is supplied
with shelf slides on position 7) make sure you fit
shelves and the grill/roast pan between the metal
runners of the shelf supports, as shown in Fig.12.
The oven shelves and the grill/roast pan have a ‘stop
notch’ so that you do not accidentally pull them right out
of the oven. Make sure you put the stop notch towards the
back of the oven, as shown in Fig.13.
Do not place aluminium foil or dishes with
reflective qualities on the oven floor as this
will cause a heat build-up which will
irreversibly damage the enamel.
Shelf supports
Step-down shelf
Rear edge to back of oven
Stop notch
Shelf slides
Fig. 12 Shelf positions
Shelf slides
Shelf slides in shelf position 7 give
easy access to the most commonly
used shelf position for baking and
roasting. The shelf slides can hold the
wire shelves and the grill/roast pan.
Note: shelf slides are not supplied with every model.
Step-down shelf
The step-down oven shelf increases shelving flexibility and
maximises the useable space in the oven. Using the
step-down shelf in the bottom shelf position is excellent
for quiches and pastry tarts.
Fig. 13 Location of stop notch
Page 16

14
Accessories and oven temperature conversion chart
Baking tray
The baking tray is suitable for biscuits and baked goods.
Three-piece grill/roast system
The three-piece grill/roast system (made up of the pan, grid and rack) is designed to give
superior cooking results and to prevent hot fat and juices in the pan splattering throughout the
oven. All pieces can be used together as one complete unit, or in different combinations.
Note: not all accessories are supplied with every model.
Baking tray
Grid
Rack
Pan
Fig. 14 Accessories
Celsius (°C) Fahrenheit (°F) Gas Mark
110 225 ¼
130 250 ½
140 275 1
150 300 2
170 325 3
180 350 4
190 375 5
200 400 6
220 425 7
230 450 8 Hot
240 475 9 Very hot
Cool
Moderately cool
Moderate
Moderately hot
Page 17

Cooking function options
This chart will help you to match your
cooking requirements to the most
appropriate cooking function.
Key:
Recommended method
Alternative method
15
Baked products
Biscuits - single tray
Biscuits - 2-3 trays
Slices
Butter cake
Fruit cake
Sponge
Meringues
Scones
Muffins
Pastry
Filo parcels / Apple pie
Lemon meringue pie
Quiche
Meats
Beef - roast
Beef - steak
Lamb - roast
Lamb - rack
Pork - roast
BAKE
FAN FORCED
FAN BAKE
CLASSIC BAKE
GRILL
FAN GRILL
Poultry
Chicken - whole
Chicken - pieces
Savoury dishes
Casseroles
Lasagne
Complete oven meals and
reheating precooked food
Compact oven
The compact oven can be used in the same way as a full sized oven because it is fully featured.
As the oven is smaller, use shelves 1 & 2 for grilling, and shelves 3 & 4 for baking.
Food may need to be cooked at a lower temperature (approximately 5-10 oC) or for a shorter time
(approximately 10%).
Page 18

16
Cooking charts
Grilling
For many meats grilling is considered to be a healthier option than frying. Recently, grilling has
also become a popular way to cook vegetables.
Tips for successful grilling
GRILL and ECO GRILL
Preheat the grill for five minutes before using it.
Grill with the oven door open at the first stop-position.
Place food on the three-piece grill/roast system, and slot it into one of the upper shelf positions
(see the ‘Grilling chart’ for the most appropriate shelf).
The higher you place the food, the faster it will cook and brown.
The higher the temperature, the faster the food will cook and brown, and we recommend you
grill at high temperatures. However, you can use lower temperatures.
Grill only on one shelf at a time.
Use ECO GRILL
In ECO GRILL
system (where the metal bars are further apart).
for smaller portions of food.
, place the food on the middle of the grill rack in the three-piece grill/roast
FAN GRILL
You do not need to preheat the grill.
Use FAN GRILL
circulates the hot air. The thermostat maintains the oven temperature.
Use FAN GRILL
cuts of meat. It’s also good for dishes like lasagne and moussaka.
Place food on the three-piece grill/roast system, and slot it into one of the middle or lower shelf
positions (see the ‘Grilling chart’ for the most appropriate shelf).
with the oven door closed. The top elements cycle on and off, and the fan
for foods you might otherwise pan fry, barbeque or rotisserie, and for larger
Page 19

Cooking charts
Grilling chart
GRILL/ECO GRILL FAN GRILL
Food Shelf Temp Time (mins) Shelf Temp oC Time (mins)
Beef
Steak - rare 3 High 8-10
Steak - medium 4 High 10-15
Steak - well done 4 High 15-20
Hamburgers - well done 4 High 12-15 5 180-200 15-20
Meatballs - well done 4 High 12-15 5 180-200 15-25
Lamb
Chops - medium 4 High 15-20 4 180-200 15-20
Chops - well done 4 High 20-25 4 190-200 20-25
Rack - medium 6 190-200 25-35
Pork
Chops - well done 4 High 15-20 5 180-200 20-30
Ham steaks - well done 4 High 10-15 5 180-200 15-20
Bacon - well done 3 High 6-8 4 180-200 10-15
Sausages
Well done 4 High 10-15 5 180-200 15-25
Chicken
Pieces - well done 5 180-200 15-30
Whole - well done 7 175 30-35
Fish
Fillets - thick 4 High 8-12 4 180-200 8-12
Fillets - thin 4 High 6-10 4 180-200 6-10
To as t
3-6 slices - medium 1 High 2-3
1-2 slices - medium 1 High 2-3
per 500 g
17
continued...
Page 20

18
Cooking charts
Grilling chart continued...
GRILL/ECO GRILL FAN GRILL
Food Shelf Temp Time (mins) Shelf Temp oC Time (mins)
Family favourites
Fruit crumble 7 150-160 30-40
Macaroni cheese 7 175-180 20-25
Lasagne 7 150-160 25-30
Moussaka 7 150-160 30-35
Cannelloni 5 150-160 25-30
Vegetables 5 175-200 20-30
Snacks
Cheese on toast 2 High 4-5
Nachos 4 175 10-15
This chart refers to shelf positions in the full-sized oven.
The above temperatures and times are a guide only and you may need to increase or decrease
them depending on your preferences.
Page 21

Cooking charts
Baking
Your built-in oven gives you an outstanding choice of baking options (see ‘Cooking functions’).
Tips for successful baking
Preheat the oven while you prepare your food – many baked items should not be left long
before baking.
Read the recipe and assemble the ingredients on the bench before you start.
Use baking paper to line cake pans and biscuit trays, to eliminate the need for greasing.
See the ‘Baking chart’ for suggested times, temperature and shelf positions.
For best results use the trays supplied with your oven.
Some foods are best cooked on a particular function (see the ‘Cooking function options’ chart).
FAN BAKE
hour to cook.
When using FAN BAKE
the oven temperature slightly (approximately 5-10
(approximately 10%).
FAN FORCED
shelves evenly in the oven so the hot air can circulate freely.
Bread and rich fruitcakes are best cooked on BAKE
this function swap them over towards the end of the cooking time (that is, move the upper tray
to the lower position and the lower tray to the upper position) so both brown evenly.
Always place baking pans centrally on the oven shelf. If cooking more than one pan on a shelf,
space them evenly so the hot air can circulate freely around them. If the pans are large, it may be
necessary to swap them around towards the end of the cooking time.
CLASSIC BAKE
base such as custard tarts, baked cheesecakes and quiches or anything that doesn’t need to be
browned on top. Preheat the oven on FAN FORCED
BAKE
is great for pastry products such as apple pie and anything that takes less than an
for a recipe that only gives instructions for BAKE you need to lower
is the best function for cooking on more than one shelf at a time. Space the
uses heat from the bottom element only and is perfect for foods with a pastry
.
o
C) and/or reduce the cooking time a little
. If two shelves of baking are cooked on
before switching function to CLASSIC
19
Important!
Some recipes recommend putting water or ice in the oven with bread dough during baking. The additional
moisture improves the bread crust. You must place the water or ice in a dish on an oven shelf. Do not put it
directly onto the oven floor. Placing water, ice, or any dish or tray directly on the oven floor can irreversibly
damage the enamel.
Page 22

20
Cooking charts
Baking chart
BAKE
Food Shelf Temp oC Time (mins)
Baked products
Biscuits 6 170-180 10-15
Slices 7 160-175 20-30
Shortbread 6 135-145 25-35
Cake - butter/choc 7 150-170 55-75
Cake - fruit light 7 150-160 70-90
Cake - fruit rich 7 135-150 4-6 hrs
Sponge 7 170-190 25-35
Muffins 6 200-220 12-18
Meringues 7 110-120 55-65
Scones 6 200-220 10-15
Bread/Rolls 7 190-220 15-30
Pizza 7 225-250 12-20
Apple pie 8 175-190 25-35
Pastry
Filo 7 175-190 30-35
Flaky/Puff 7 210-225 10-20
Choux 7 185-210 35-45
Quiche 7 180-200 20-30
Bacon & egg pie 7 180-200 35-45
Custard tart - pastry case 7 180-200 14-18
Custard tart - filling 7 180
Lemon meringue pie - pastry case 7 180-200 14-18
Lemon meringue pie - filling 7 170-180 15-20
120 7 20-25
Family favourites
Lasagne 7 170-180 35-45
Meatloaf 7 175-190 60-70
Chicken pieces 7 175-180 45-50
Chicken casserole 7 175-190 50-65
Fish pie 7 175-190 25-30
Complete oven meal* - - -
Vegetables
Baked 7 160-180 45-70
Roasted 7 175-200 30-45
*
Complete oven meal example: 1.5 kg roast lamb, 800 g potatoes, 400-500 g root vegetables & fruit pie.
Depending on the size of the meat and weight of vegetables, cooking times will vary.
Two-stage baking process - adjust temperature after the first stage.
Page 23

Cooking charts
FAN BAKE FAN FORCED
Shelf Temp oC Time (mins) Shelf Temp oC Time (mins)
6 160-175 8-12 5, 7 170-180 10-15
7 150-170 20-30 7 160-175 20-30
6 125-235 20-30 6 135-145 20-30
7 150-160 45-65 7 150-170 55-75
7 140-150 60-80 7 145-155 80-100
7 125-145 4-6 hrs 7 130-150 4-6 hrs
7 160-175 20-30 7 170-190 25-35
6 190-200 12-16 6 200-220 12-18
7 100-110 50-60 5, 7 110-120 55-65
6 190-210 8-12 6 190-210 10-12
7 180-210 15-25 7 190-210 15-30
7 200-230 12-18 7 225-250 15-20
8 175-190 25-30 7 180-200 25-30
7 160-175 25-30 7 175-190 30-35
7 200-220 10-20 7 210-225 10-20
7 175-200 30-40 7 185-210 35-45
7 170-190 20-30 7 180-200 20-30
7 170-190 30-40 7 180-200 35-45
7 175-195 12-16 7 180-200 14-18
7 170
7 175-195 12-16 7 180-200 14-18
7 165-175 10-15 7 170-180 15-20
110 7 20-25 7 180 120 7 20-25
21
7 150-160 35-45 7 160-170 35-45
7 170-180 50-60 7 175-190 60-70
7 155-170 45-50 7 175-180 45-50
7 150-165 45-60 7 170-180 45-60
7 170-180 20-30 7 175-190 25-30
---4, 816090-100
7 160-175 45-70 7 160-180 45-70
7 175-190 30-45 7 175-200 30-45
Page 24

22
Cooking charts
Roasting
Your built-in oven is equipped to handle a variety of roasts.
Tips for successful roasting
When cooking large cuts of meat, times and temperatures are based on 30 minutes per
500 g/1 lb. Times and temperatures given below are guidelines and small adjustments may be
necessary.
Roasting times will be affected by the shape, size and temperature of the meat being roasted.
Meat with a bone will cook more quickly than a boneless roast.
Do not add water to your roast, as this steams the meat.
For perfect results, use a meat probe or a meat thermometer.
Let all roast meats and poultry stand for 10-15 minutes at the end of cooking before carving.
This allows the meat fibres to relax. Fewer juices will be lost when it is cut and the meat will be
juicier and more tender. To keep the meat warm, cover with foil.
The meat will continue to cook during standing, so allow for this in your calculations (this is
particularly important if you want a rare or medium rare roast).
Roasting can be achieved with a range of cooking functions. FAN BAKE
BAKE
Meats roasted on FAN GRILL
outside surface while the inside remains tender and juicy. You do not need to preheat the oven
on FAN GRILL
BAKE
FAN FORCED
position.
FAN BAKE
and FAN GRILL can all be used for roasting, each giving unique results.
cook and brown in a rotisserie style. Radiant heat sears the
.
is the traditional function for roasting. Cook one tray at a time.
is perfect for roasting when you also need to cook other dishes on another shelf
tends to brown and cook faster than BAKE .
, FAN FORCED ,
Page 25

Cooking charts
Roasting chart
Food Shelf Temp oC Mins/500 g Internal temp oC
Meat
Beef - rare 7 160-170 30-35 50-60
Beef - medium 7 160-170 35-45 65-70
Beef - well done 7 160-170 45-60 75-80
Mutton - well done 7 160-170 45-60 75-80
Hogget - medium 7 160-170 30-40 65-70
Hogget - well done 7 160-170 45-60 75-80
Pork - well done 7 180-185 40-45 75-80
Chicken - well done 7 160-180 25-30 82-85
Venison* - rare 7 220 3.5
*
Brown prior to roasting in an oiled frypan on high heat.
per cm thickness 50-60
23
Page 26

24
Care and cleaning - oven
Cleaning the outside of the oven
Important!
Do not use abrasive cleaners or a steam cleaner on the outside surfaces of the oven.
Before cleaning the outside of your oven, we recommend you turn the oven off at the wall.
Wipe the oven’s outside surfaces often, using warm water and a household detergent and/or a
stainless steel cleaner and polish.
Cleaning the inside of your oven
Important!
Before you start cleaning inside your oven, please:
Read these cleaning instructions and the ‘Safety and warnings’ section at the start of this guide.
Turn the oven off at the wall.
Make sure the oven is a safe temperature to touch.
Do not use a steam cleaner to clean the inside of the oven.
Do not use any oven cleaners, abrasive cleaners, ammonia-based cleaners or detergents on the
self-cleaning oven liners. See ‘Caring for the self-cleaning liners’.
It is easier to clean the oven while it is still warm, using household detergents or an ammoniabased cleaner. You may use ‘off the shelf’ oven cleaners, if you carefully follow the manufacturers’
instructions.
To make cleaning easier, you can remove the wire shelf supports, the oven door, and the fan
cover. The top element also drops down to make cleaning the oven roof easier.
Removing and replacing the oven door
B
1
To remove the oven door, open the door fully, lift
the clips (C) back towards you onto the hooks (A).
2
Raise the door slightly, holding it on either side
near the handle, Make sure the clips stay on the
hooks (A) and lift the door out.
3
To put the door back on, place the upper hinge
arm (B) in the upper slot and the lower hinge arm
(D) in the lower slot. Push the hinge arms in as
far as they will go until the slot in the lower arm
locates in the hinge support.
4
Lower the door gently and release the clips.
5
Raise the door slightly to make sure the clips are
released from the hooks. Close the door.
A. Hook
B. Upper hinge arm
C. Clip
D. Lower hinge arm
Fig.15 Removing the oven door
A
D
C
Page 27

Care and cleaning - oven
Removing and replacing the oven lamp
Always turn the oven off at the wall before touching an oven lamp. To clean the oven more
easily, pull off the glass cover. If you need to replace the light, simply unscrew it.
Removing and replacing the shelf supports
1
Push the shelf slides in position 7 back into the oven.
2
To remove the shelf supports gently push the retaining wire from underneath the stud then
swing the lowest edge of the shelf support up and out towards the centre of the oven. The
prongs at the top will slide out.
3
To replace the shelf support, hold them horizontally and locate the prongs into the small slots at
the top of oven cavity.
4
Lower the shelf support and gently place the retaining wire underneath the stud.
Important!
To avoid chipping the enamel – do not lower the shelf supports until the prongs are fully inserted into the
small slots at the top of the oven.
Cleaning the shelf slides
25
Important!
Do not wash the shelf slides in the dishwasher. Do not immerse them in soapy water, or use oven cleaner on
them. Removing the ‘white’ lubricating grease will reduce the life of the shelf slides and prevent them from
running smoothly.
Wipe the shelf slides with a damp cloth and a mild detergent only. Do not wipe off or wash away
the ‘white’ lubricating grease (you can see this when the slides are extended).
Note: shelf slides are not supplied with every model.
Caring for the self-cleaning liners
Self-cleaning liners are supplied with some models of the built-in oven. They help reduce
manual oven cleaning. The liners are coated with a special enamel which is porous and contains
oxidising catalysts.
Any grease and dirt coming into contact with the liner is absorbed by the enamel and is broken
down with the help of the oxidising catalysts at normal cooking temperatures.
As cleaning is improved by using a high temperature, it may be necessary to occasionally run the
empty oven on FAN GRILL
Note: self-cleaning liners are not supplied with every model.
at 200 °C for 1 to 11/2 hours.
Page 28

26
Ceramic cooktop (CTE)
The ceramic cooktop is made from glass ceramic, a tough material which is not affected by
changes in temperature.
Left rear element
Left front dual element
Elements
Your cooktop has four individual elements, one of which is a dual circuit element. The diameters
of the cooking area are clearly marked.
The elements become red when turned on full. Corresponding hot surface indicator lights glow
on the control area.
Temperature limiters are fitted to the elements to prevent the glass from overheating. The
limiters will turn the elements on and off during cooking to maintain the temperature that has
been set.
Right rear element
Right front element
Surface hot indicators
Fig.16 Ceramic cooktop
Controls
The controls on the underbench oven are ‘push and turn’ as a safety feature to deter children
from turning the cooktop on.
Fig.17 Cooktop controls
Page 29

Ceramic cooktop (CTE)
Surface hot indicator lights
The surface hot indicator lights are marked on the ceramic glass.
The indicator lights will glow when the glass above an element
is hot. They will continue to glow after the element has been
turned off until the glass has cooled to a temperature that is safe
to touch.
Fig.18 Surface hot indicator lights
Dual element control
The left front element can be adjusted from inner element, to
full element.
To heat the entire element, push and turn control anticlockwise to Hi.
To heat inner part only, push and turn control clockwise to Hi.
27
Cookware
To get the best results out of your cooktop follow these simple suggestions:
Use heavy-gauge, flat, smooth bottom pans that conform to the diameter of the cooking area.
This will provide good contact with the glass and help reduce cooking times.
Cookware with a stainless steel sandwich base or enamelled cast iron will give you the best
results.
When food comes to the boil reduce the temperature setting.
Never use plastic or aluminium foil dishes on the cooktop.
Aluminium and copper-bottomed cookware can cause a metallic residue to remain on the
cooktop. If left, this becomes difficult to remove. Clean the cooktop after every use.
Jagged edges on saucepans or heavy frypans will scratch the cooktop.
Using a lid will reduce cooking times.
Fig.20 Efficient and inefficient pan bases
Fig.19 Dual element control
Page 30

28
Care and cleaning - ceramic cooktop (CTE)
Cleaning the ceramic glass cooktop
To clean your cooktop:
1
Remove baked-on spills while they are still warm, using the razor blade scraper supplied.
2
Wipe clean with a damp, soapy cloth.
3
Allow to cool, then apply ceramic glass cooktop cleaner to soiled areas.
4
Rub vigorously with a clean soft cloth or paper towel.
5
Wipe over with a damp cloth to remove any food or cleaner residue. The cooktop may become
stained if any of the cleaner is left on the cooktop.
6
Apply ceramic glass cooktop polish sparingly, and rub well with a clean soft cloth or paper towel
to ensure the whole cooktop surface is covered.
7
Polish with a clean, dry, soft cloth.
Important!
Do not use abrasive sponges, or corrosive cleaners such as oven sprays and stain removers.
When the safety cover is retracted the blade in the scraper is razor-sharp. Use with extreme care and
always store safely and out of reach of children.
Spillovers that require immediate attention
Anything that MELTS on the ceramic surface, or food spillovers with a high sugar content, may
cause pitting on the ceramic cooktop if they are left to cool there.
Clean these listed spillovers immediately
using the provided razor blade scraper.
Do not let them cool on the cooktop.
Clean and polish the cooktop after every spill. The polish protects the ceramic as it helps to
prevent spills bonding to the surface.
Metallic stains
Copper-based or aluminium saucepans may cause metallic staining. These stains show as a
metallic sheen on the cooktop. If the cooktop is not cleaned regularly and the stains are allowed
to burn into the surface, they may react with the ceramic glass and will no longer be removable.
Apply a ceramic glass polish after every use to help protect against stains.
Melted plastics
Plastic wrap
Melted aluminium foil
Sugar
Sugar syrup
Jam
Vegetables with a high sugar
content, eg peas and beetroot
Page 31

Warranty and service
Before you call for service or assistance ...
Check the things you can do yourself. Refer to the installation instructions and your user guide
and check that:
1
Your product is correctly installed.
2
You are familiar with its normal operation.
If after checking these points you still need assistance, please refer to the Service & Warranty
book for warranty details and your nearest Authorised Service Centre, or contact us through our
website:
www.fisherpaykel.com
29
Page 32

30
Page 33

Page 34

32
Page 35

Page 36

Copyright © Fisher & Paykel 2006. All rights reserved.
The product specifications in this booklet apply to
the specific products and models described at the
date of issue. Under our policy of continuous product
improvement, these specifications may change at any
time. You should therefore check with your Dealer to
ensure this booklet correctly describes the product
currently available.
www.fisherpaykel.com
NZ AU
Built-in oven user guide
Published: 05/2006
Part No. 542630 A
 Loading...