

Page 1
s
User Manual
Document: D5134
Part: D301667X012
November 2016
enBSI Version 5.9
ControlWave ScriptTool User’s Guide
Remote Automa ti on Solution
www.EmersonProcess.com/Remote
Page 2

Application Safety Considerations
Protecting Operating Processes
A failure of this application – for whatever reason -- may leave an operating process without
appropriate protection and could result in possible damage to property or injury to persons. To protect
against this, you should review the need for additional backup equipment or provide alternate means
of protection (such as alarm devices, output limiting, fail-safe valves, relief valves, emergency shutoffs,
emergency switches, etc.)
CAUTION
When implementing control using this product, observe best industry practices as suggested by applicable
and appropriate environmental, health, and safety organizations. While this product can be used as a safety
component in a system, it is NOT intended or designed to be the ONLY safety mechanism in that system.
Page 3

ControlWave ScriptTool User’s Guide
Contents
Chapter 1 – Introduction - What is the ScriptTool? 1-1
1.1 Log File ...................................................................................................................................... 1-2
1.2 Zip File ....................................................................................................................................... 1-2
1.3 Commands ................................................................................................................................ 1-2
1.4 Script Variables ......................................................................................................................... 1-3
1.5 Operator Interface page ............................................................................................................ 1-3
Chapter 2 – Starting ScriptTool and Creating Scripts 2-1
2.1 Before You Begin ...................................................................................................................... 2-1
2.2 Starting the ScriptTool ............................................................................................................... 2-1
2.3 Creating a Simple Script ........................................................................................................... 2-1
2.4 Saving the Script / Zip File ........................................................................................................ 2-3
2.5 Creating a New, Empty Zip File ................................................................................................ 2-5
2.6 Opening an Existing Zip File ..................................................................................................... 2-6
2.7 Making a Copy of the Current Zip File with a Different Name .................................................. 2-6
2.8 Selecting a Script From within the Current Zip File ................................................................... 2-6
2.9 Making a Copy of the Current Script with a Different Name ..................................................... 2-7
2.10 Modifying Lines of a Script ........................................................................................................ 2-7
2.11 Deleting a Script ........................................................................................................................ 2-7
2.12 More Information on Creating Scripts ....................................................................................... 2-7
2.12.1 Testing the Script You Just Created ........................................................................... 2-12
Chapter 3 – Running ScriptTool from the Command Line 3-1
3.1 ScriptTool Command Line ......................................................................................................... 3-1
3.2 Sample Command Lines ........................................................................................................... 3-2
Chapter 4 – Debugging Scripts 4-1
4.1 Error Reporting .......................................................................................................................... 4-1
4.2 Working with Breakpoints .......................................................................................................... 4-2
4.2.1 Setting a Breakpoint ...................................................................................................... 4-3
4.2.2 Stepping through the Script using Step Mode .............................................................. 4-3
4.2.3 Skipping Over a Section of the Script ........................................................................... 4-3
4.2.4 Re-Executing a Line of the Script ................................................................................. 4-4
4.2.5 Clearing a Single Breakpoint......................................................................................... 4-4
4.2.6 Clearing All Breakpoints ................................................................................................ 4-4
4.3 Using the Watch Window .......................................................................................................... 4-4
4.4 Stopping the Currently Executing Script ................................................................................... 4-6
Appendix A – ScriptTool Commands A-1
Issued Nov-2016 Contents iii
Page 4

ControlWave ScriptTool User’s Guide
ABORT command ................................................................................................................... A-2
ARCHIVE command ................................................................................................................ A-2
ARRAY command ................................................................................................................... A-3
ARRAY_WRITE command ...................................................................................................... A-4
AUDIT command ..................................................................................................................... A-4
BATCH_EDIT command ......................................................................................................... A-5
BITMAP command .................................................................................................................. A-6
CLEAR_HISTORY command .................................................................................................. A-6
CREATE_FOLDER command ................................................................................................ A-8
DELETE_FOLDER command ................................................................................................. A-8
ECHO command ..................................................................................................................... A-8
EXIT command ........................................................................................................................ A-9
FCP command ......................................................................................................................... A-9
FLASHCNF command ........................................................................................................... A-10
FOLDER_EXISTS command ................................................................................................ A-23
GOTO command ................................................................................................................... A-24
IF command ........................................................................................................................... A-24
IMPORT command ................................................................................................................ A-25
LIST command ...................................................................................................................... A-25
NDARRY command ............................................................................................................... A-26
OUTPUT command ............................................................................................................... A-26
PAUSE command .................................................................................................................. A-27
PROJCTRL command ........................................................................................................... A-27
PROMPT command .............................................................................................................. A-30
RECIPE command ................................................................................................................ A-31
RUN command ...................................................................................................................... A-31
SETVAL command ................................................................................................................ A-32
SIGN_ON command .............................................................................................................. A-32
TEXTFILE command ............................................................................................................. A-33
UPDATE_FRM command ..................................................................................................... A-34
VAR_ADD command ............................................................................................................. A-34
VAR_DECR command .......................................................................................................... A-35
VAR_F_SIG command .......................................................................................................... A-35
VAR_F_VAL command ......................................................................................................... A-35
VAR_INCR command ............................................................................................................ A-36
VERSION command .............................................................................................................. A-36
WAIT_FOR_SIG command ................................................................................................... A-37
INDEX I-1
iv Contents Issued Nov-2016
Page 5

ControlWave ScriptTool User’s Guide
Chapter 1 – Introduction - What is the ScriptTool?
This manual discusses the ControlWave ScriptTool.
Chapter 1 introduces some of the terminology.
Chapter 2 explains how to create scripts and run them.
Chapter 3 discusses command line options.
Chapter 4 talks about debugging scripts.
Appendix A – includes a list of all commands you can use in scripts.
In This Chapter
1.1 Log File ............................................................................................ 1-2
1.2 Zip File ............................................................................................. 1-2
1.3 Commands ....................................................................................... 1-2
1.4 Script Variables ................................................................................ 1-3
1.5 Operator Interface page ................................................................... 1-3
The ControlWave ScriptTool allows you to create pre-defined sets of
instructions – called scripts – which you can use to access a
ControlWave.
You edit scripts directly in the ScriptTool, or with an ASCII text editor.
Scripts have the file extension *.TST and are ASCII text files. The
ScriptTool stores the scripts in a standard *.zip file on the OpenBSI
workstation. The zip file holds multiple scripts as well as other files that
the ScriptTool requires to perform the commands included in the scripts.
Most of the commands used in the scripts are lower-level commands
that OpenBSI utilities normally use. The ScriptTool bypasses the
OpenBSI utilities and executes these commands directly.
Typically, you use scripts to run test sequences to verify your
ControlWave and its application functions correctly.
Issued Nov-2016 Introduction 1-1
Page 6

ControlWave ScriptTool User’s Guide
Scripts also serve as a method for automating certain day-to-day tasks
you might need to perform.
1.1 Log File
Scripts are ASCII files with *.TST extensions. They
reside in a zip file at the PC.
The ScriptTool runs on the PC and issues
commands down to the ControlWave.
Figure 1-1. ScriptTool Overview
As commands in the script execute, by default, all text messages
generated are sent to a *.LOG file included within the zip file. The
ScriptTool provides commands to suspend logging or to redirect the text
logging to a different file.
1.2 Zip File
1.3 Commands
The log file can help you debug problems with your script because it
shows the results of commands.
As mentioned earlier, the ScriptTool stores scripts in a zip file. The zip
file also includes other files important to the scripts including the log
file, other input or output files, etc.
Appendix A includes a full list of the available commands you can use in
your scripts.
When you create your scripts, you can type the command parameters in
directly, or optionally, you can activate a prompt for a given command
by pressing the F2 key. This activates a dialog box which shows the
various parameters and, if applicable, selectable options for the current
command.
1-2 Introduction Issued Nov-2016
Page 7

ControlWave ScriptTool User’s Guide
1.4 Script Variables
Since scripts are essentially programs that the ScriptTool can run,
scripts can include script variables to store values. Based on these
values you can make logical decisions for executing portions of the
script.
Note: Do not confuse script variables with variables ins ide the
ControlWave project. You can assign the value of a variable
from the ControlWave project to a script variable, but the script
variable is only used or modified from within the script, you
can’t reference it from within the ControlWave project.
1.5 Operator Interface page
When you run ScriptTool you can optionally launch an operator
interface screen. The operator selects scripts from the File menu.
For information on launching the operator interface screen, see the “-O”
command line option in Chapter 3.
To change the icon displayed within the operator interface screen, see
the BITMAP command in Appendix A.
Figure 1-2. Operator Interface Page
Issued Nov-2016 Introduction 1-3
Page 8

ControlWave ScriptTool User’s Guide
This page is intentionally left blank
1-4 Introduction Issued Nov-2016
Page 9

ControlWave ScriptTool User’s Guide
Chapter 2 – Starting ScriptTool and Creating Scripts
In this chapter, we discuss how to create scripts, and how to work with
zip files.
In This Chapter
2.1 Before You Begin ............................................................................. 2-1
2.2 Starting the ScriptTool ..................................................................... 2-1
2.3 Creating a Simple Script .................................................................. 2-1
2.4 Saving the Script / Zip File ............................................................... 2-3
2.5 Creating a New, Empty Zip File ....................................................... 2-5
2.6 Opening an Existing Zip File ............................................................ 2-6
2.7 Making a Copy of the Current Zip File with a Different Name ......... 2-6
2.8 Selecting a Script From within the Current Zip File ......................... 2-6
2.9 Making a Copy of the Current Script with a Different Name ............ 2-7
2.10 Modifying Lines of a Script ............................................................... 2-7
2.11 Deleting a Script .............................................................................. 2-7
2.12 More Information on Creating Scripts .............................................. 2-7
2.12.1 Testing the Script You Just Created .................................. 2-12
2.1 Before You Begin
When you install either OpenBSI Network Edition or BSI_Config
(Version 5.8 and newer) you automatically install ScriptTool.
NetView or TechView provide communications between ScriptTool and
the ControlWave so you must run either NetView or TechView to use
the ScriptTool.
2.2 Starting the ScriptTool
To start the ScriptTool, click: Start > Programs > OpenBSI Tools >
ControlWave Tools > ControlWave ScriptTool
Note: You can also start the tool from the command line. Typically,
you would use this technique to automate execution of scripts
you already created. See Chapter 3 for more information.
2.3 Creating a Simple Script
These steps outline how to make a very simple script.
1. Start ScriptTool by clicking: Start > Programs > OpenBSI Tools >
ControlWave Tools > ControlWave ScriptTool. The ScriptTool
opens.
Issued Nov-2016 Creating Scripts 2-1
Page 10

ControlWave ScriptTool User’s Guide
Figure 2-1. ControlWave ScriptTool
2. Click the first line of the Command column, and scroll in the drop-
down menu to the command you want to choose. For this example,
choose the ECHO command.
Figure 2-2. Selecting a Command
3. The ScriptTool shows ECHO on the first line.
Figure 2-3. Command without parameter(s)
2-2 Creating Scripts Issued Nov-2016
Page 11

ControlWave ScriptTool User’s Guide
4. Now type the words “hello everybody” (or whatever words you
choose) after the command and press Enter. This completes the first
line of the script and advances the cursor to the second line, where
you can enter another command if desired.
Figure 2-4. Entering a Command
5. To cancel editing of a line, press Esc.
6. If you want to create another script in this zip file, click the “New
Script” icon, or click on File > New Script.
7. When you finish creating scripts, save the script(s) and zip file. (See
Section 2.4 for information on how to do this.)
2.4 Saving the Script / Zip File
The method for saving the script varies depending upon whether this is
the first script in a zip file, or you are saving a script in a zip file that
already includes other scripts.
Note: When you edit files in the zip file through the ScriptTool,
ScriptTool temporarily saves them in a working folder; once you
complete your edits in the ScriptTool and close the zip file,
ScriptTool overwrites your existing scripts with your newly
edited scripts. This happens even if the files are only written to
the RTU. If, for some reason, you want to preserve the earlier
version, you must copy it to another folder for safekeeping
before you begin editing the zip file. If you want to make
changes to the files manually, you must not have the zip file
open in the ScriptTool until you are finished making your
changes as it overwrites your files with the ones from the
ScriptTool when the ScriptTool either closes the zip file or exits.
Saving the first
script in a
zip file
To save a script in a zip file that hasn’t been saved yet, and so doesn’t
include any other scripts, first you must save the zip file.
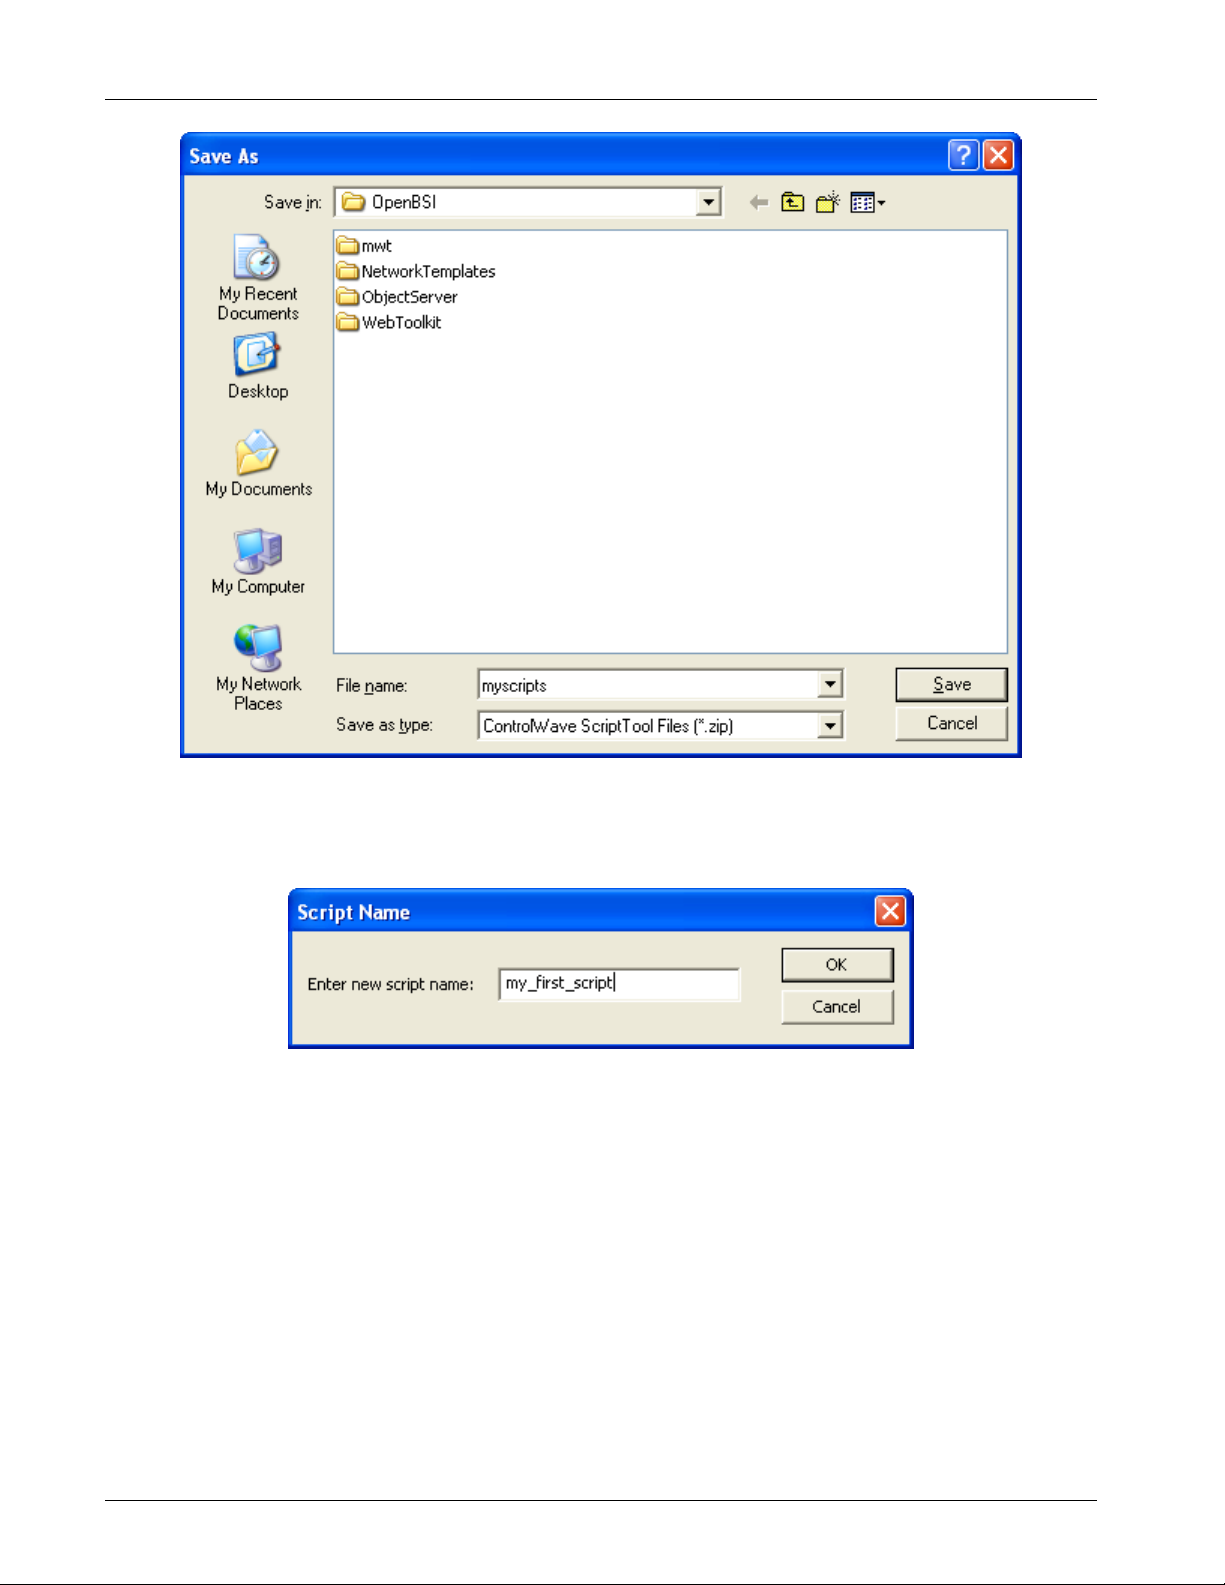
1. Click the “Save File” icon or click File > Save Zip.
2. Enter a name for the zip file in the File name field, then click Save.
Issued Nov-2016 Creating Scripts 2-3
Page 12
ControlWave ScriptTool User’s Guide
Figure 2-5. Saving the Zip File
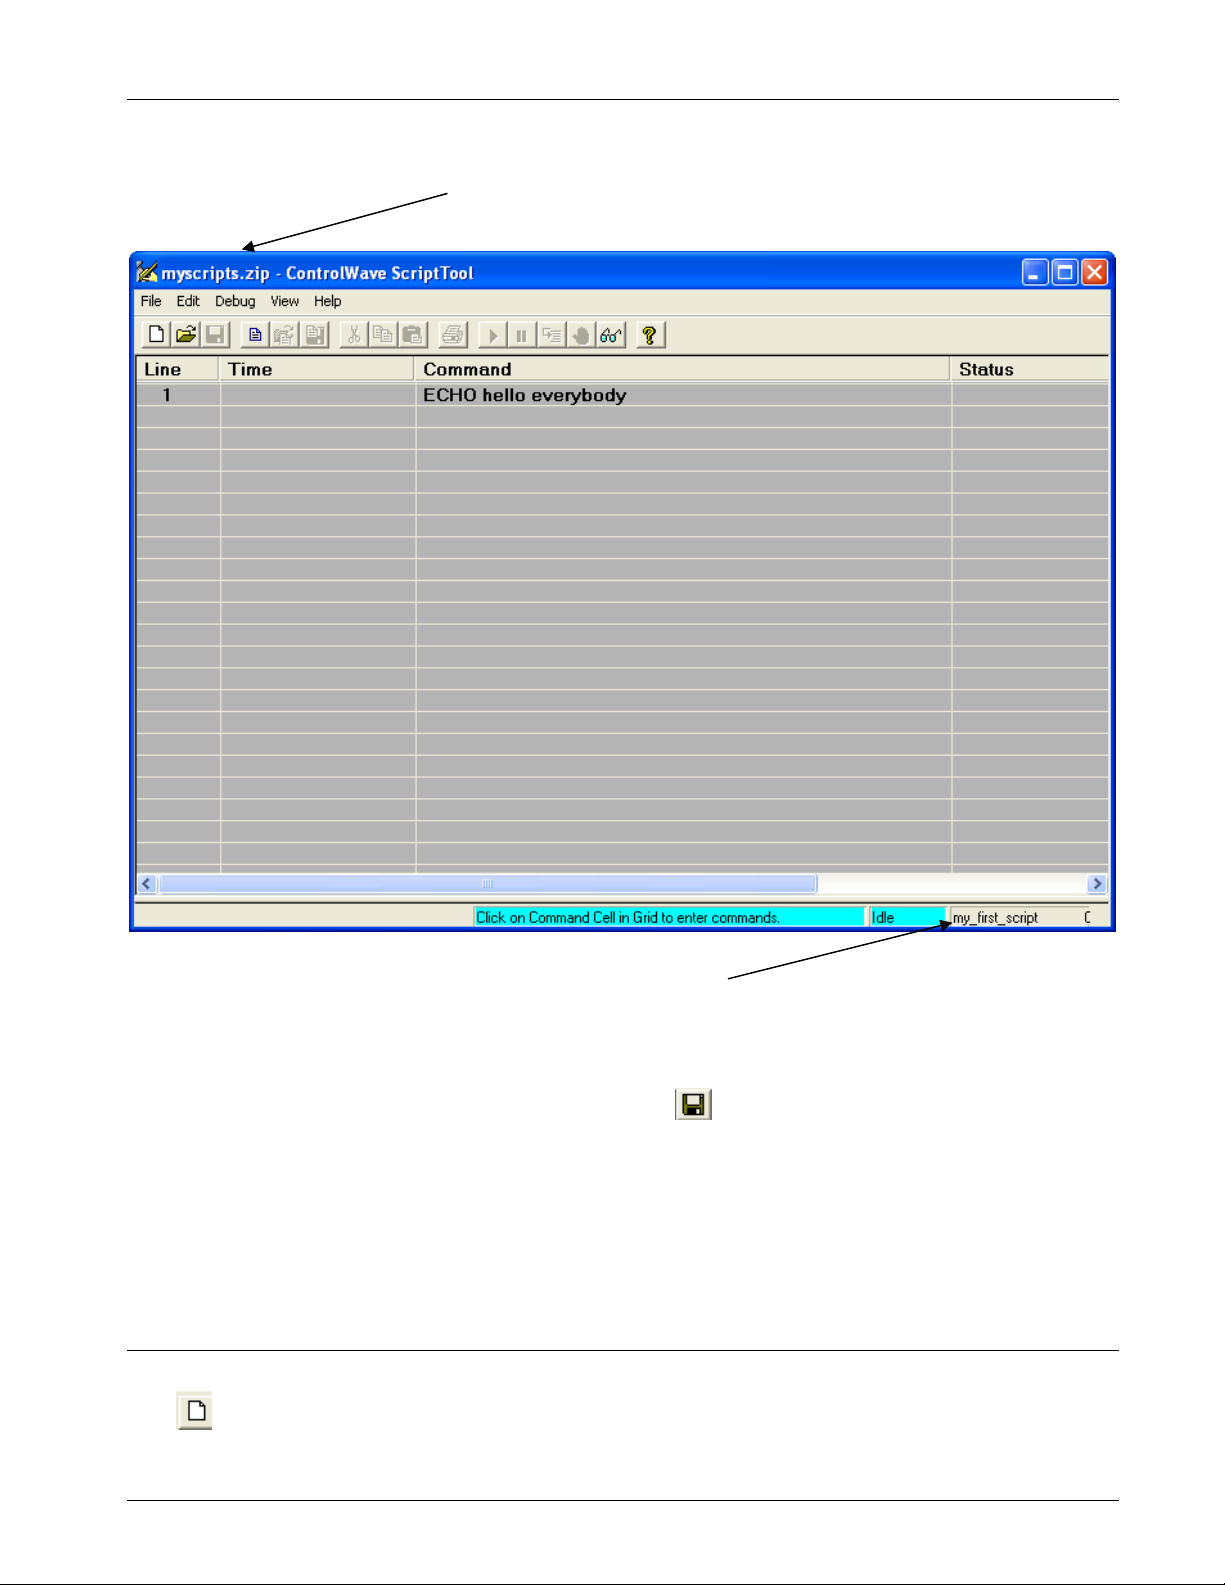
3. The Script Name dialog box opens. Enter a name for your script,
then click OK.
Figure 2-6. Naming the Script
4. The ScriptTool now shows the zip file name in the title bar, and the
name of the script you just created shows in the status bar.
2-4 Creating Scripts Issued Nov-2016
Page 13
ControlWave ScriptTool User’s Guide
Name of the Zip file.
Name of the current script file.
Figure 2-7. Zip and Script File Names Displayed
Saving the script
Click the “Save File” icon
or click File > Save Zip.
in a zip file that
contains other
scripts
2.5 Creating a New, Empty Zip File
If, when you finish with the current zip file, you want to create another zip file, click the “New Zip”
icon or click File > New Zip.
Issued Nov-2016 Creating Scripts 2-5
Page 14

ControlWave ScriptTool User’s Guide
2.6 Opening an Existing Zip File
To open an existing zip file, click the “Open File” icon, or click
File > Open Zip.
In the Open dialog box, select the name of the zip file, and click Open.
Notes:
The File pulldown menu displays recently opened files. If you see
the file you want there, click on it directly.
You can also open a zip file by dragging it from Windows®
Explorer onto a running instance of the ScriptTool.
2.7 Making a Copy of the Current Zip File with a Different Name
Click File >Save Zip As.
2.8 Selecting a Script From within the Current Zip File
To open a script in the current zip file, click the “Open Script” icon,
or click File >Open Script to open the Scripts dialog box.
Figure 2-8. Selecting an Existing Script
This dialog box lists all scripts in the current zip file. Select the script
you want to open and click OK.
2-6 Creating Scripts Issued Nov-2016
Page 15

ControlWave ScriptTool User’s Guide
2.9 Making a Copy of the Current Script with a Different Name
Click File >Save Script As. You can now edit the new script.
2.10 Modifying Lines of a Script
When you edit a script, you can use standard editing techniques to cut,
paste, copy, etc. entire lines in a script. The table, below, shows the
supported editing commands:
Table 2-1. ScriptTool Editing Functions
Editing
Function
Cut
Copy
Paste
Insert Not applicable
Delete Not applicable
Toolbar Icon
2.11 Deleting a Script
Outside of the ScriptTool, open the zip file in an application such as
Winzip, and delete the script. Then save the zip file.
2.12 More Information on Creating Scripts
Menu Bar
Sequence
Edit > Cut Cuts the selected line of the
Edit > Copy Copies the selected line of
Edit > Paste Pastes the contents of the
Edit > Insert Inserts a blank line in the
Edit > Delete Deletes the current line of
Description
script and stores it in the
paste buffer.
the script and puts it in the
paste buffer.
paste buffer to the current
script line.
script
the script.
So far, we’ve talked about creating a really simple script using the
ECHO command. Typically, you’re going to want to do more than just
display text on the screen.
You might, for example, want to collect the flash configuration
parameters from a controller, and collect the audit records from the
controller. We’ll do this using the FCP and AUDIT commands; see
Appendix A for more information on any command.
To create a script that does that, follow these steps:
1. Start the ScriptTool as described in Section 2.2.
2. Click on the first line of the script in the Command column, and
select the FCP command from the pull down menu.
Issued Nov-2016 Creating Scripts 2-7
Page 16

ControlWave ScriptTool User’s Guide
3. With “FCP” visible in the Command column, press F2.
Figure 2-10. Command Column – Command Selected
4. If you go to Appendix A you can look at the parameters associated
with the FCP command, and type them in. It might be easier,
though, to use the F2 key. The F2 key calls up the Command
Parameters dialog box. The appearance of this dialog box varies
depending upon which command you choose.
Figure 2-9. Selecting a Command
Currently
selected
command
Parameters for this
particular command.
Figure 2-11. Command Parameters dialog box
5. Use the Node list box to select the controller from which you want
to retrieve flash parameters.
2-8 Creating Scripts Issued Nov-2016
Page 17

ControlWave ScriptTool User’s Guide
Figure 2-12. Selecting the Controller
Note: If you want to use this same script for operations with multiple
different controllers, you can specify the keyword “RTU” for the
Node and then run the script from the command line using the
–R switch. See Chapter 3 for more information.
6. For the Type field, select the “READ” option.
Figure 2-13. Selecting the Type
7. Specify a filename to hold the collected FCP parameters. Here we
specified a filename called:
“C:\ProgramData\Bristol\OpenBSI\MYFCP.FCP.”
Figure 2-14. Specifying a Filename
8. When you finish specifying the parameters in the Command
Parameters dialog box, click OK. This displays the completed
command.
Figure 2-15. Completed Command
9. Now click on the second line and select the “AUDIT” command.
Issued Nov-2016 Creating Scripts 2-9
Page 18

ControlWave ScriptTool User’s Guide
10. As before, while “AUDIT” is highlighted, press F2.
Figure 2-17. Command Column
Figure 2-16. Selecting a Command
11. The F2 key calls up the Command Parameters dialog box. Notice
that the Command Parameters dialog box looks different; it shows
parameters for a different command.
Figure 2-18. Command Parameters – for AUDIT
12. Choose the controller in the Node field.
13. Use the Clear Data list box to choose whether or not you want to
delete audit records from the controller once you collect them. “O”
preserves the audit records; “1” deletes audit records.
2-10 Creating Scripts Issued Nov-2016
Page 19
ControlWave ScriptTool User’s Guide
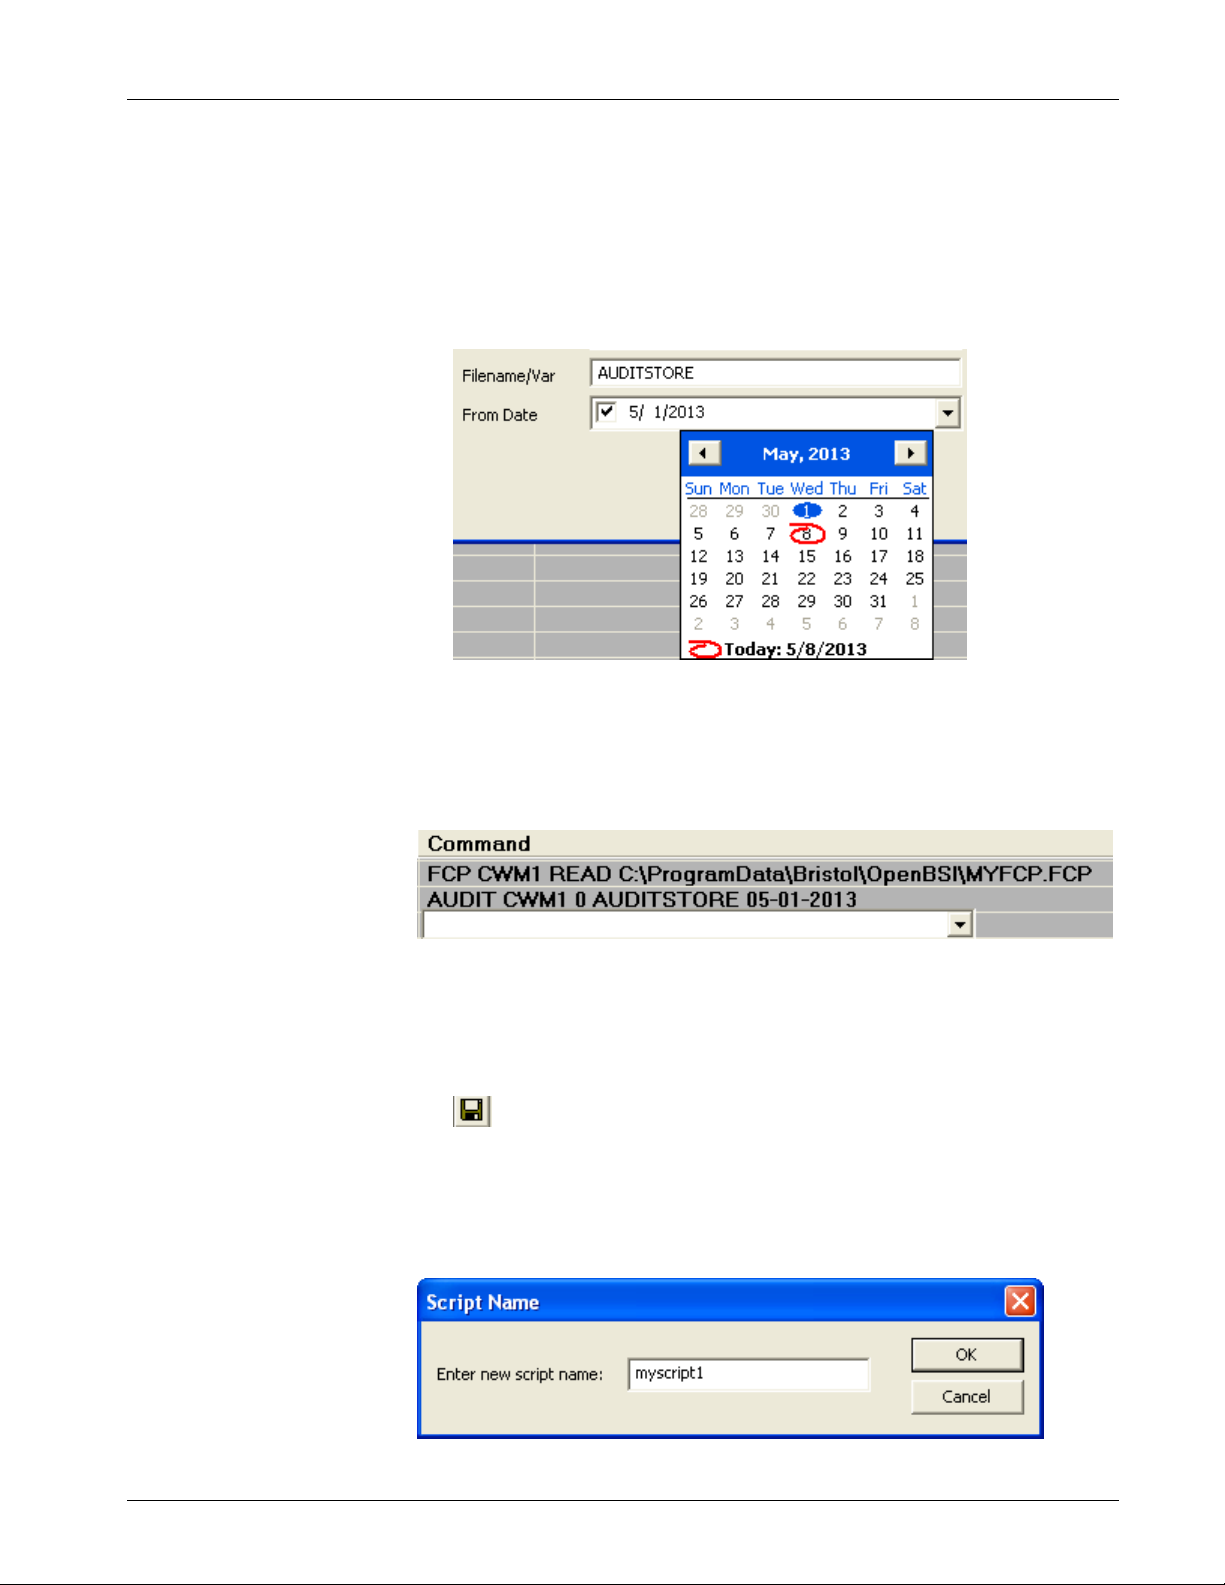
14. Specify a name for the file in the Filename/Var field that stores the
audit records; if you specify a full path, ScriptTool stores the file
according to that path; if you just enter a filename, the file resides in
the zip file. For this example, we’ll just make up a name
“AUDITSTORE.”
15. In the From Date field you can optionally select a date; ScriptTool
only collects audit records from that date forward.
Figure 2-19. Selecting Audit Records From After a Specific Date
16. When you finish completing the fields, click OK. Now you have
two commands in your script, and the cursor moves to the third line.
Figure 2-20. Finishing the Script
17. Since we don’t need to add any other command to finish the script,
press Esc to exit the third line.
18. Now save the zip file by clicking File>Save Zip or just click the
icon.
19. In the Save As dialog box, specify a name for the zip file in the File
name field, then click Save.
20. The Script Name dialog box opens. Specify a name for the script;
for this example we entered “myscript1.”
Figure 2-21. Entering the Script Name
Issued Nov-2016 Creating Scripts 2-11
Page 20
ControlWave ScriptTool User’s Guide
2.12.1 Testing the Script You Just Created
Now that you’ve successfully created the script, you can test it.
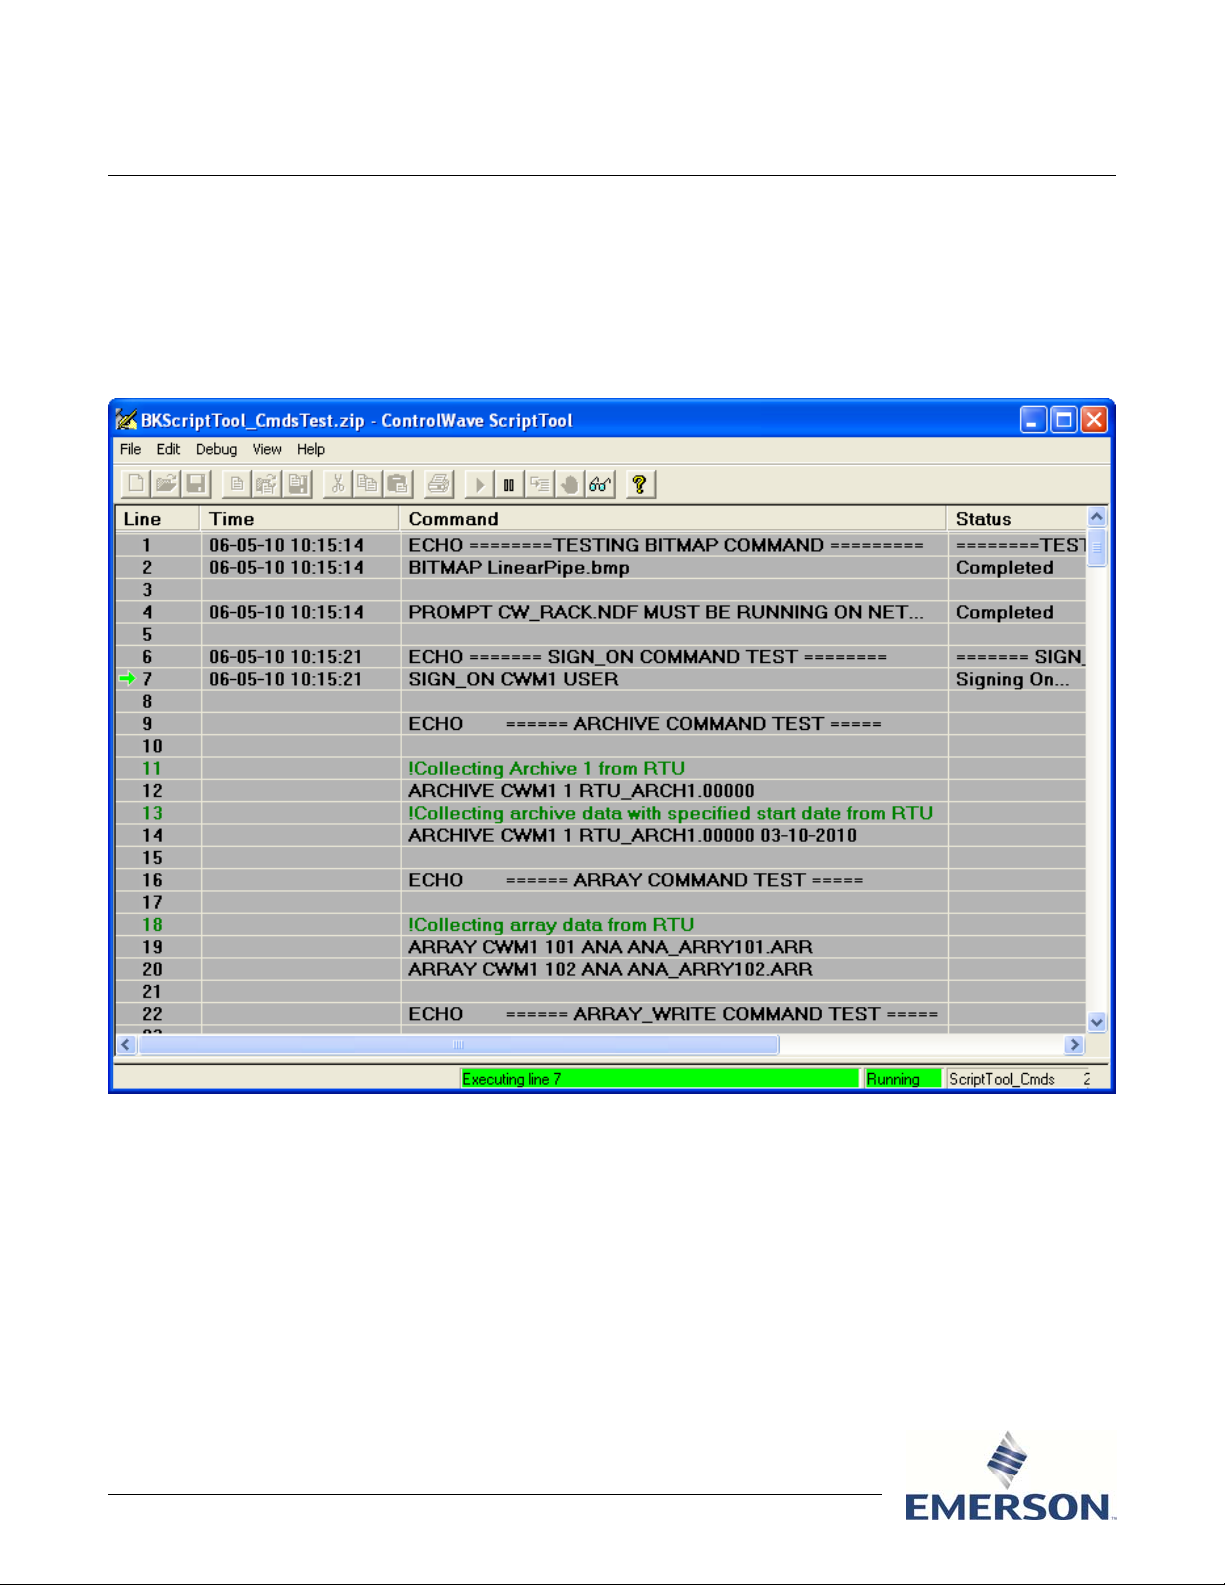
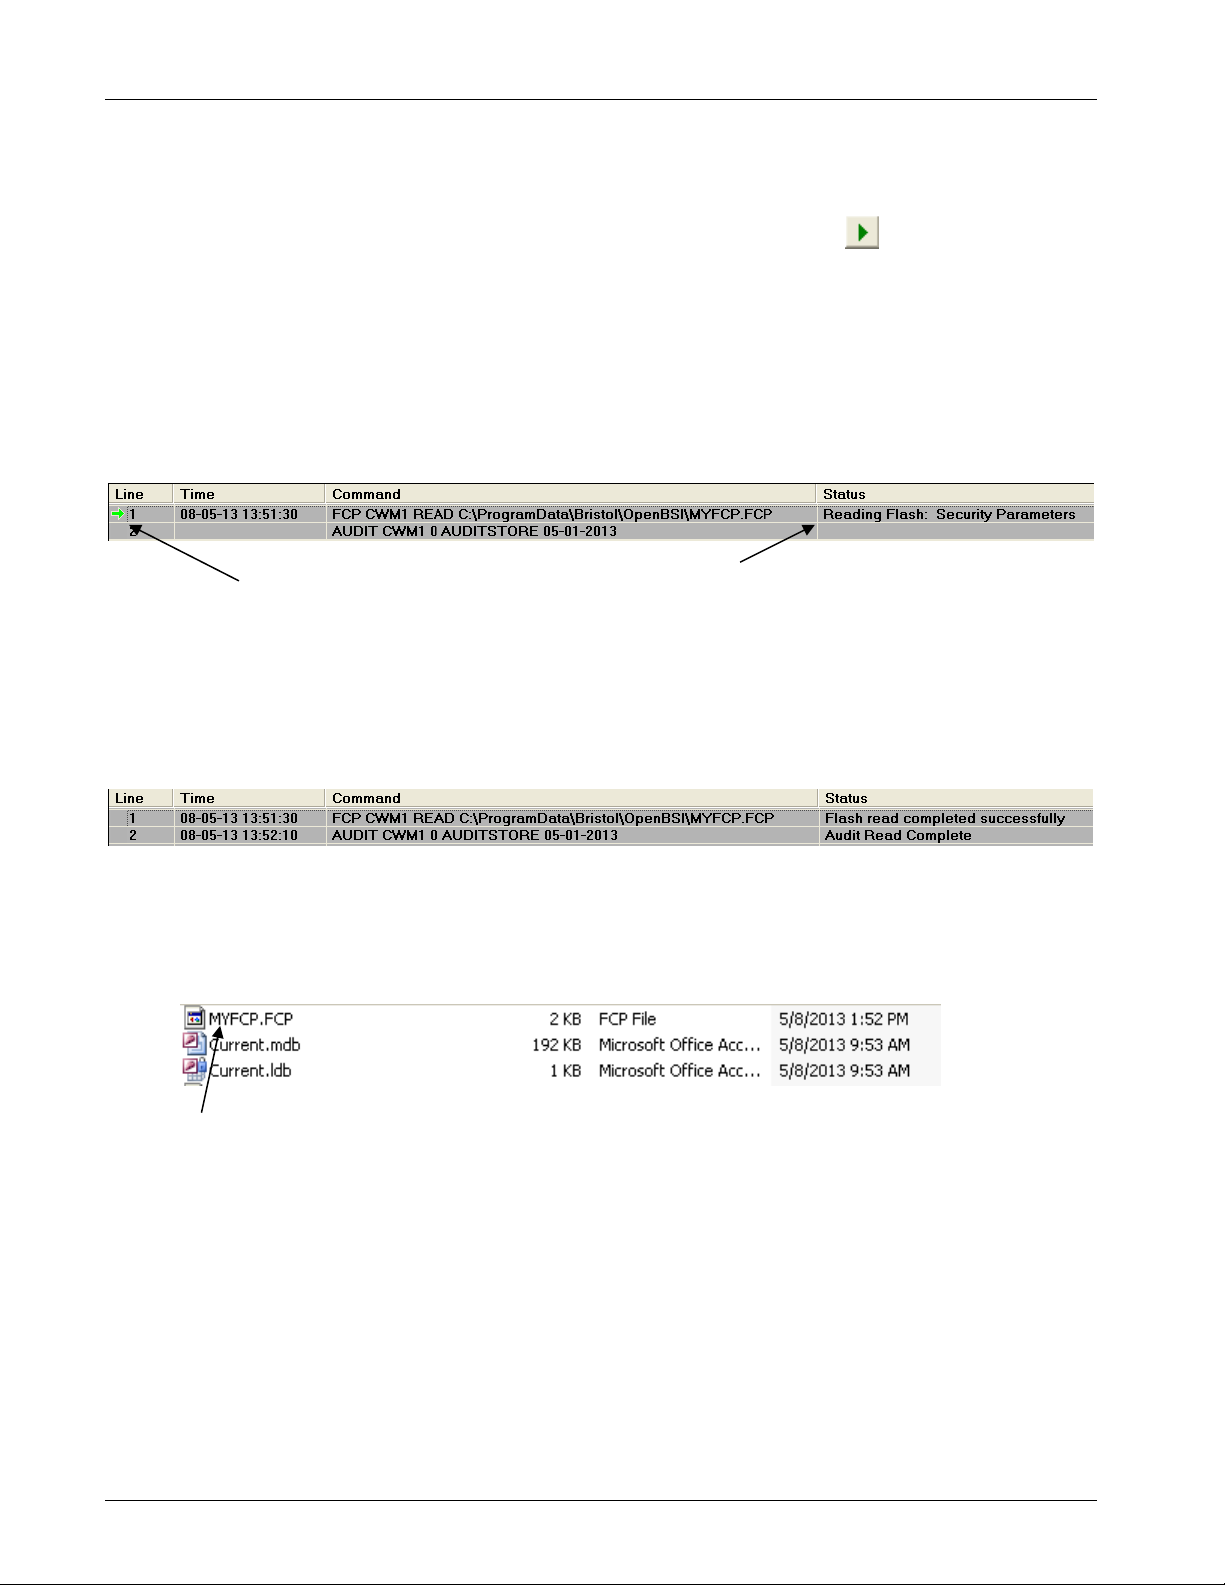
1. Click Debug > Run or click the Run icon .
2. A green arrow on the screen points to the line of the script currently
executing, in this case, line 1. Notice that as ScriptTool executes the
first command it reports the progress in the Status column. When
the ScriptTool finishes executing the first command (which may
take some time) the green arrow advances to the next line and
ScriptTool begins processing the second command.
Green arrow shows the
command line ScriptTool
is currently processing.
MYFCP.FCP file present
3.
“Status” column reports
on progress of command.
Figure 2-22. Testing the Script
4. Check the Status column. It should look like the Status column in
Figure 2-23.
Figure 2-23. Successful Execution
5. As a further check, you should verify that the script actually created
the files you specified. Using Windows® Explorer, look on the C
drive for the MYFCP.FCP file
Figure 2-24. Verify FCP File Creation
6. Now use Notepad (or another text editor) to look at the contents of
the MYFCP.FCP file; you can see flash parameter information
collected from the controller.
2-12 Creating Scripts Issued Nov-2016
Page 21

ControlWave ScriptTool User’s Guide
Figure 2-25. Contents of FCP File
7. Similarly, since we specified a file called “AUDITSTORE” without
any path to hold audit data, you should to see that ScriptTool created
it inside the zip file.
Look for file in the ZIP.
Figure 2-26. Files in the Zip File
8. Since audit data is in ASCII format, you can also view the
AUDITSTORE file in a text editor
Figure 2-27. Audit Records
Congratulations! You’ve created a script!
Issued Nov-2016 Creating Scripts 2-13
Page 22

ControlWave ScriptTool User’s Guide
Note: If you can’t find an AUDIT file in your zip, it could be that there
were no audit records in the controller to retrieve, or you
specified a start date newer than the most recent audit records.
This two line script allowed you to collect flash parameters using the
FCP command, and audit records using the AUDIT command. There
are many other commands. For more information on the available
commands, please see Appendix A.
You can run the script as we did, directly in the ScriptTool using the
Run icon. You may, however, decide that you want to automate the
process by running the script from the command line using some sort of
scheduled-task software or batch files. See Chapter 3 for information on
command line options.
Because there are dozens of different commands you can include in a
script, it is fairly easy for you to create very complex scripts that might
be hundreds of lines long. If you want to create lengthy scripts, you’ll
want to review the debugging techniques in Chapter 4.
2-14 Creating Scripts Issued Nov-2016
Page 23

ControlWave ScriptTool User’s Guide
Chapter 3 – Running ScriptTool from the Command Line
You might choose to run the ScriptTool from the command line if you
want to use a third-party scheduling program or batch files to invoke the
ScriptTool at a particular time, for example to handle certain day-to-day
tasks. This section describes command line options.
In This Chapter
3.1 ScriptTool Command Line ............................................................... 3-1
3.2 Sample Command Lines ................................................................. 3-2
3.1 ScriptTool Command Line
Note: In this section, optional modifiers for the script appear in
brackets ([ ]) which may be nested. You do not type the brackets.
From a DOS command prompt, you can enter the command in one of
two formats:
SCRIPTTOOL –Tscript_name [–Zzip_file] [-Rnode_name] [-A [-Lnnn]]
or
SCRIPTTOOL –O –Zzip_file –Tscript_name [-Rnode_name]
where:
-A Autostart – Starts script immediately and closes
tool on completion of the script.
-O Start script through operator interface page. When
you specify this switch the only other valid
switches are: “-Z”, “-T”, and “-R”. The operator
interface page only works with ZIP files,
therefore if you specify the “-T” switch, you must
specify the “-Z” switch as well.
-Lnnn Start script execution from decimal line nnn of
the script or at textual label nnn within script.
This switch is valid only when the “-A” switch is
specified as well.
-Rnode_name
If the script includes the text “RTU” this replaces
each occurrence of RTU with the specified
node_name. This is particularly useful because it
lets you specify generic commands in your scripts
that you can re-use with different controllers.
Issued Nov-2016 ScriptTool Command Line 3-1
Page 24

ControlWave ScriptTool User’s Guide
-Tscript_file
-Zzip_file
3.2 Sample Command Lines
To run a script called “script1.tst” which resides in the zip file
“c:\Program Files\Bristol\OpenBSI\myscripts.zip” enter:
SCRIPTTOOL –Tscript1.tst –Z”c:\Program
Files\Bristol\OpenBSI\myscripts.zip”
specifies the name of the script file which has a
*.TST extension. If you specify a zip file (-Z
switch) this is the file name of a *.TST file within
the zip file. Otherwise, you must specify an
absolute path for the script file.
specifies the path and name of the zip file. The
zip file contains scripts and other files needed by
the scripts.
To run a script called “script2.tst,” that is located in the path
“C:\Program Files\Bristol\OpenBSI” (not in a zip file) and replace each
occurrence of the text “RTU” with the node name “cwm7,” enter:
SCRIPTTOOL – T”c:\Program Files\bristol\openbsi\script2.tst” –
Rcwm7
To run a script called “bigscript.tst” which resides in the zip file
“c:\Program Files\Bristol\OpenBSI\scriptlibrary.zip” and start it within
the operator interface page, enter:
SCRIPTTOOL –O –Z”c:\Program
Files\Bristol\OpenBSI\scriptlibrary.zip” –Tbigscript.tst
Note: Because the path for the above command lines includes a space
(in the “Program Files” portion of the path) the full path must be
surrounded by “ “ quotation marks. If there were no spaces in the
path, the quotation marks around the path would be unnecessary.
3-2 ScriptTool Command Line Issued Nov-2016
Page 25

ControlWave ScriptTool User’s Guide
erro
do
Chapter 4 – Debugging Scripts
If you create a complex script that includes dozens or even hundreds of
lines of commands, it will likely include some errors. To help you
correct the errors, ScriptTool includes some debugging features.
In This Chapter
4.1 Error Reporting ................................................................................ 4-1
4.2 Working with Breakpoints ................................................................ 4-2
4.3 Using the Watch Window ................................................................. 4-4
4.4 Stopping the Currently Executing Script .......................................... 4-6
4.1 Error Reporting
If ScriptTool encounters a problem when it executes a line of your
script, it highlights that line in red, and displays an error message in the
Status column. This helps you identify common syntactical errors.
Command with errors highlighted in red.
Run Stop Step Breakpoint
Watch
Win
w
“Status” column displays error.
“Status” field displays
r.
State of script execution. Either
“Running,” “Idle,” or “Break.”
Percent completion of script
Figure 4-1. Error Reporting
Issued Nov-2016 Debugging Scripts 4-1
Page 26

ControlWave ScriptTool User’s Guide
You can resume execution after the line containing the error by clicking
on the Run icon.
Although the ScriptTool detects syntactical errors during execution,
sometimes script errors relate more to the logic of the script. To solve
those kinds of problems often requires you to look at more than just the
current script line. You might need to pause execution at a particular
point, and then proceed line by line, while examining the state of
different script variables. To do this, you need to use the breakpoint
feature and step mode.
4.2 Working with Breakpoints
A breakpoint is a flag that you place on a line at which you would like
execution to pause. As the script executes, it pauses on the line
containing the breakpoint, but doesn’t execute the command on the line.
This allows you to look at the watch window to view the state of script
variables immediately before the breakpoint. When the execution
pauses, the script enters step mode. Step mode allows you to execute
one script line at a time, by clicking on the Step icon.
Breakpoints
set
By stopping execution at certain points, and then looking at script
variables, it is possible to better understand how the script works, and
identify errors in the script’s logic. As you advance line by line, you
may be able to identify the source of a problem so you can correct it.
Figure 4-2. Setting Breakpoints
4-2 Debugging Scripts Issued Nov-2016
Page 27

ControlWave ScriptTool User’s Guide
4.2.1 Setting a Breakpoint
There are three different ways to set a breakpoint.
You can click in the Line column on the script line where you want
to place the breakpoint –or–
You can click in one of the other columns of the script line where
you want the breakpoint, and click on the Breakpoint icon, –or–
You can click in one of the other columns of the script line where
you want the breakpoint, and click Debug > Breakpoint
Any of these methods places a stop flag in the Line column. This
means that line has a breakpoint.
The next time you execute the script, execution pauses on the line
containing the flag, prior to executing the command on that line.
Notes:
You can only set or clear a breakpoint when the script is in either the
“Idle” or “Break” state.
You cannot set a breakpoint on a comment line or an empty line.
ScriptTool preserves breakpoints between sessions.
4.2.2 Stepping through the Script using Step Mode
Once execution pauses on a particular line of the script, you can proceed
one line at a time by clicking on the Step icon or click Debug >
Step. You can also press the F10 key to do this.
You can now look in the Watch Window to see how values of script
variables in the script change. See Using the Watch Window.
4.2.3 Skipping Over a Section of the Script
If a section of your script has errors, but there are later sections of the
script you want to run, for testing purposes, you can specify a starting
point for the script, from which you can run the script, or optionally,
step through the script.
1. Click Debug > Run – Start At Line to run the script from a
particular line or Debug > Step – Start At Line to step through the
script beginning at a certain line.
2. In either case, the “Select a starting point” dialog box opens. Choose
Start At Line and specify a particular line from which to start the
script, –or– click Start At Label and select a label from within the
script as the starting point.
3. Click OK to start the script from the specified point.
Issued Nov-2016 Debugging Scripts 4-3
Page 28

ControlWave ScriptTool User’s Guide
4.2.4 Re-Executing a Line of the Script
If execution stops on a particular line of the script, and you want to reexecute that line, you can do so. You have the option of either restarting the script execution on that line, or re-executing the line and
then executing in step mode.
Click Debug > Run – Repeat Current Command to re-start the script
from the current line or Debug > Step – Repeat Current Command to
re-run the line and then keep the execution in step mode.
Figure 4-3. Select a starting point dialog box
4.2.5 Clearing a Single Breakpoint
There are three different ways to clear a breakpoint.
You can click in the Line column on the breakpoint icon to clear the
breakpoint. –or–
You can click in one of the other columns of the script line where
you want to clear the breakpoint, and click on the Breakpoint
icon, –or–
You can click in one of the other columns of the script line where
you have the breakpoint, and click Debug > Breakpoint
Any of these methods removes the stop flag
thereby clearing the breakpoint.
4.2.6 Clearing All Breakpoints
To clear all breakpoints in the script, click Debug > Clear All
Breakpoints.
4.3 Using the Watch Window
in the Line column,
When the script execution pauses on a breakpoint, the Watch Window
displays the current value of script variables executed up until that
point. This helps you know how the logic in the script affects the
variables and can help you identify problems.
4-4 Debugging Scripts Issued Nov-2016
Page 29

ControlWave ScriptTool User’s Guide
Values in the Watch Window are only updated when the script stops at a
Caution
breakpoint. The values shown are only for those variables which have
already executed in the script. The Watch Window displays a white
background in this state.
When the script resumes execution, the Watch Window displays a gray
background; values shown during execution may not reflect the most
recent changes. Therefore, only trust Watch Window values if you see a
white background.
To open the watch window, click on the Watch Window icon, or
click View > Watch Window. You close the watch window the same
way.
Watch Window
Figure 4-4. Watch Window
Issued Nov-2016 Debugging Scripts 4-5
Page 30

ControlWave ScriptTool User’s Guide
4.4 Stopping the Currently Executing Script
To stop the currently executing script, click the Stop icon or click
Debug>Stop.
The system prompts you to confirm you want to stop the script. Click
OK.
You can then proceed to make edits to the script or start a different
script.
4-6 Debugging Scripts Issued Nov-2016
Page 31

ControlWave ScriptTool User’s Guide
Appendix A – ScriptTool Commands
In this appendix we use the following conventions:
You make entries in bold exactly as shown.
You replace entries in italics with a valid parameter.
We show optional parameters in square brackets ([optional item]). You
do not type the brackets.
Notes:
You include a single command on each line of the script.
Include a space or tab between different parameters in the command.
If you specify a path, folder, or filename that includes spaces you
must place quotation marks (“ “) around the entire path and
filename. For example, C:\MY DATA\DATA.TXT must be entered
as: “C:\MY DATA\DATA.TXT”
To include a comment in the script, place an exclamation point (!) at
the beginning of the line; all other characters on that line are treated
as comments.
To include a label in the script include a colon (:) at the beginning of
Commands:
a line. That makes the line a label. (A label is just a name; the script
can use GOTO commands to jump to a subsequent line with a label.)
ABORT command ........................................................................... A-2
ARCHIVE command ....................................................................... A-2
ARRAY command ........................................................................... A-3
ARRAY_WRITE command ............................................................. A-4
AUDIT command ............................................................................ A-4
BATCH_EDIT command ................................................................. A-5
BITMAP command .......................................................................... A-6
CLEAR_HISTORY command ......................................................... A-6
CREATE_FOLDER command ........................................................ A-8
DELETE_FOLDER command ........................................................ A-8
ECHO command ............................................................................. A-8
EXIT command ............................................................................... A-9
FCP command ................................................................................ A-9
FLASHCNF command .................................................................. A-10
FOLDER_EXISTS command ........................................................ A-23
GOTO command .......................................................................... A-24
IF command .................................................................................. A-24
IMPORT command ....................................................................... A-25
LIST command.............................................................................. A-25
NDARRY command ...................................................................... A-26
OUTPUT command ...................................................................... A-26
PAUSE command ......................................................................... A-27
PROJCTRL command .................................................................. A-27
PROMPT command ...................................................................... A-30
Issued Nov-2016 ScriptTool Commands A-1
Page 32

ControlWave ScriptTool User’s Guide
RECIPE command ........................................................................ A-31
RUN command ............................................................................. A-31
SETVAL command ....................................................................... A-32
SIGN_ON command ..................................................................... A-32
TEXTFILE command .................................................................... A-33
UPDATE_FRM command............................................................. A-34
VAR_ADD command .................................................................... A-34
VAR_DECR command ................................................................. A-35
VAR_F_SIG command ................................................................. A-35
VAR_F_VAL command ................................................................. A-35
VAR_INCR command ................................................................... A-36
VERSION command ..................................................................... A-36
WAIT_FOR_SIG command .......................................................... A-37
ABORT command
Terminates the current script. If you include the [string] parameter,
ScriptTool displays the string on the screen for the operator and logs it
in the file.
Syntax: ABORT [string]
Examples:
To terminate the script without a message use:
To terminate the script and show a message “script is finished”
ARCHIVE command
Collects an archive file from the controller.
Syntax: ARCHIVE node archive_file [output_file] [option]
where:
node specifies the name of the controller, as defined in
archive_file specifies either the number of the archive file here, or a
ABORT
on the screen enter:
ABORT script is finished
NetView.
script variable for which the value of the script variable
is the archive file number.
output_file If the output_file is present ScriptTool stores archive data
in UOI format to that file. You can specify a full path for
the file; if you just enter a filename, ScriptTool stores the
output file in the ZIP file. If you omit output_file
entirely, ScriptTool writes the archive data to the log file.
You can optionally use a script variable to specify the
output_file.
A-2 ScriptTool Commands Issued Nov-2016
Page 33

ControlWave ScriptTool User’s Guide
option If the option is “ALL” ScriptTool collects all archive
data. If option contains a date (mm-dd-yyyy) where mm
= month, dd=day, and yyyy-year, ScriptTool collects
data from that date forward. If you omit option,
ScriptTool collects data from where the last collection
left off according to the stored file.
Examples:
To collect all archive data from archive file 10 in node CWM5
and store it in a file called DAILY.ARC in the zip file enter:
ARCHIVE CWM5 10 DAILY.ARC ALL
To collect archive data from March 27, 2010 forward from
archive file 7 in node ELM_STREET, and store it in a file called
MYARC.DAT in the zip file enter:
ARCHIVE ELM_STREET 7 MYARC.DAT 03-27-2010
To collect archive data from where the last collection left off in
archive file 3 in node RPC2, and store it in a file on the PC with
the path
C:\ProgramData\Bristol\OpenBSI\ArchData\ARCH2.ARC,
enter:
ARCHIVE RPC2 3 C:\ProgramData\Bristol\OpenBSI\ArchData\ARCH2.ARC
ARRAY command
Collects an array from the controller.
Syntax: ARRAY node array type [output_file]
where:
node specifies the name of the controller, as defined in
array specifies either the number of the array here, or a script
type specifies the type of array. Enter either ANA for analog
output_file If the output_file is present ScriptTool stores array data
NetView.
variable name for which the value of the script variable is
the array number.
array or LOG for logical array.
in that file. You can specify a full path for the file; if you
just enter a filename, ScriptTool stores the output file in
the ZIP file. If you omit output_file entirely, ScriptTool
writes the array data to the log file. You can optionally
use a script variable to specify the output_file.
Example:
Issued Nov-2016 ScriptTool Commands A-3
Page 34

ControlWave ScriptTool User’s Guide
To collect all array data from analog array 23 in node CWM2
ARRAY_WRITE command
Writes data from a file to an array in the controller.
Syntax: ARRAY_WRITE node array type input_file
where:
node specifies the name of the controller, as defined in
array specifies either the number of the array here, or a script
type specifies the type of array. Enter either ANA for analog
and store it in a file called CWM2.ARY in the zip file enter:
ARRAY CWM2 23 ANA CWM2.ARY
NetView.
variable for which the value of the script variable is the
array number.
array or LOG for logical array.
input_file specifies the file that holds data to be written to the array.
Example:
To write the data from file ARAYINIT.TXT in the zip file into
ARRAY_WRITE MAIN_STREET 17 ANA ARAYINIT.TXT
AUDIT command
Collects audit information from the controller. Audit collection begins
from the oldest data.
Syntax: AUDIT node clear_data [output_file] [option]
where:
node specifies the name of the controller, as defined in
You can specify a full PC path for the file; or if you just
enter a filename, ScriptTool searches for the input file in
the ZIP file. You can optionally use a script variable to
specify the input_file.
analog array 17 in node MAIN_STREET enter:
NetView.
clear_data specifies whether the ScriptTool should erase audit
records from the controller once it collects them. If 0, it
does not erase audit records from the controller; if non-
A-4 ScriptTool Commands Issued Nov-2016
Page 35

ControlWave ScriptTool User’s Guide
zero, it erases records from the controller after it collects
them. You can specify a script variable for clear_data.
output_file If the output_file is present ScriptTool stores audit data in
UOI format in that file. You can specify a full path for
the file; if you just enter a filename, ScriptTool stores the
output file in the ZIP file. If you omit output_file
entirely, ScriptTool writes the audit data to the log file.
You can optionally use a script variable to specify the
output_file.
option If the option is “ALL” ScriptTool collects all audit data.
If option contains a date (mm-dd-yyyy) where mm =
month, dd=day, and yyyy-year, ScriptTool collects data
from that date forward. If you omit option, ScriptTool
collects data from where the last collection left off
according to the stored file.
Examples:
To collect all audit records from node RSM3, without erasing
the records after collection, and store it in a file called
RSM3.AUD in the zip file enter:
To collect audit records from April 3, 2010 forward from node
LINCOLN, delete them from the node after collection, and store
the records in a file called LINCOLN.AUD in the zip file enter:
BATCH_EDIT command
Copies archive and list definitions between a folder in the zip file (or on
the PC) and the ControlWave project in the controller.
Note: The BATCH_EDIT command only copies the structure and
configuration of the archive file, not the data values and
timestamps stored in the archive file. Similarly, it only copies the
names and order of variables in lists, not the values of those
variables.
Syntax: BATCH_EDIT node type folder project
AUDIT RSM3 0 RSM3.AUD ALL
AUDIT LINCOLN 1 LINCOLN.AUD 04-03-2010
where:
node specifies the name of the controller, as defined in
NetView.
type specify READ to read archive and list definitions from
the controller and store it in the folder. Specify WRITE
Issued Nov-2016 ScriptTool Commands A-5
Page 36

ControlWave ScriptTool User’s Guide
folder You can specify a full path for the folder; if you just
project specify the name of the ControlWave project running in
Examples:
To copy archive and list definitions from the folder MYDEFS in the zip
file, and send it to the ControlWave project MYPROJ running in node
CWM4, enter:
BATCH_EDIT CWM4 WRITE MYDEFS MYPROJ
To copy archive and list definitions from the ControlWave project CW3
in node PINE_STREET, and store it in the folder
C:ProgramData\Bristol\OpenBSI\MYDEFS\BACKUP enter:
to take definitions from folder and copy it to the
controller.
enter a folder name, ScriptTool assumes the folder is in
the ZIP file.
the controller.
BATCH_EDIT PINE_STREET READ
C:\ProgramData\Bristol\OpenBSI\MYDEFS\BACKUP CW3
BITMAP command
Changes the bitmap displayed on the operator interface page.
Syntax: BITMAP filename
where:
filename specifies the filename of the bitmap to display. A blank
Example:
To display a bitmap called calib.bmp from the zip file, enter:
BITMAP calib.bmp
filename sets the bitmap back to the default bitmap. You
can specify a full path for the bitmap; if you just enter a
filename, ScriptTool assumes the file is in the ZIP file.
You can optionally use a script variable to specify the
filename.
CLEAR_HISTORY command
Deletes archive and/or audit data from the controller.
If there should be a power failure to the ControlWave during the
Caution
A-6 ScriptTool Commands Issued Nov-2016
CLEAR_HISTORY operation, files will not delete properly.
Page 37

ControlWave ScriptTool User’s Guide
If you want to save any Audit or Archive data, you must do this before
you use the CLEAR_HISTORY command.
We also recommend you save your current historical configuration to
an FCP file prior to deleting audit or archive files, so that you can
restore the structure (though not the data), if a failure occurs.
THERE IS NO CONFIRMATION PROMPT TO PREVENT ACCIDENTAL
DELETION. Once CLEAR_HISTORY executes there is no way to reverse
the deletion operation; the CLEAR_HISTORY command removes the
chosen files from the unit and the unit re-boots twice to accomplish the
deletion operation.
Syntax: CLEAR_HISTORY node type [arch_num]
where:
node specifies the name of the controller, as defined in
NetView.
type specifies the type of data to delete, as follows:
ALL = delete ALL data (audit and archive)
ARCHIVE = delete archive file(s)
AUDIT = delete all audit records
arch_num optionally specifies a specific archive file number to
delete. Use only when type = ARCHIVE. arch_num can
be a constant or a script variable. If you omit arch_num
from the command and type = ARCHIVE, ScriptTool
deletes all archive files.
Example:
To delete all historical files (audit and archive) from controller
OAK_ST, enter:
CLEAR_HISTORY OAK_ST ALL
To delete all audit records from controller SPRING_ST, enter:
CLEAR_HISTORY SPRING_ST AUDIT
To delete all archive files from controller ELM_ST, enter:
CLEAR_HISTORY ELM_ST ARCHIVE
To delete only archive file 5 from controller BIRCH_AVE, enter:
CLEAR_HISTORY BIRCH_AVE ARCHIVE 5
Issued Nov-2016 ScriptTool Commands A-7
Page 38

ControlWave ScriptTool User’s Guide
CREATE_FOLDER command
Creates a folder.
Syntax: CREATE_FOLDER folder
where:
folder specifies the name of the folder. You can specify a full
Examples:
To create a folder named HISTDATA in the zip file, enter:
CREATE_FOLDER HISTDATA
To create a folder on the PC in the
C:\ProgramData\Bristol\OpenBSI\MYDATA folder named HISTDATA
enter:
CREATE_FOLDER C:\ProgramData\Bristol\OpenBSI\MYDATA\HISTDATA
path for the folder; if you just enter a name, ScriptTool
creates the folder in the ZIP file. You can optionally use
a script variable to specify the folder or path and folder.
To use a script variable named MYFOLDER to create a folder on the
PC in the C:\ProgramData\Bristol\OpenBSI\MYDATA folder named
HISTDATA, enter:
VAR_F_VAL MYFOLDER
C:\ProgramData\Bristol\OpenBSI\MYDATA\HISTDATA
CREATE_FOLDER MYFOLDER
DELETE_FOLDER command
Deletes a folder.
Syntax: DELETE_FOLDER folder
where:
folder specifies the name of the folder. You can specify a full
path for the folder; if you just enter a name, ScriptTool
looks for the folder in the ZIP file. You can optionally
use a script variable to specify the folder or path and
folder.
Example:
To delete a folder named YEST_DATA in the zip file, enter:
DELETE_FOLDER YEST_DATA
ECHO command
Displays the string on the screen and logs it to the output file.
A-8 ScriptTool Commands Issued Nov-2016
Page 39

ControlWave ScriptTool User’s Guide
Syntax: ECHO string
where:
string specifies text to display on the screen for the operator.
Example:
To display the string “starting file copy”enter:
ECHO starting file copy
EXIT command
Causes SCRIPTTOOL to exit. Optionally, the tool writes the contents of
string to the log file.
Syntax: EXIT string
where:
string specifies text to display on the screen for the operator.
Example:
FCP command
To display the string “terminating script” enter:
EXIT terminating script
Reads or writes all FCP parameters from/to the controller.
Syntax: FCP node type filename
where:
node specifies the name of the controller, as defined in
NetView.
type specify READ to read FCP parameters from the
controller and store it in the filename. Specify WRITE to
take FCP parameters from filename and copy them to the
controller.
filename specifies the filename of the FCP file. You can specify a
full path for file; if you just enter a filename, ScriptTool
assumes the file is in the ZIP file. You can optionally use
a script variable to specify the filename.
Example:
To write FCP parameters from the file myparams.FCP, in the zip file, to
the controller named RPC4, enter:
Issued Nov-2016 ScriptTool Commands A-9
Page 40

ControlWave ScriptTool User’s Guide
FCP RPC4 WRITE MYPARAMS.FCP
To read FCP parameters from the controller named OAK_ST and store
it in the file
C:\ProgramData\Bristol\OpenBSI\MYFILES\FCPSTUFF.FCP, enter:
FCP OAK_ST READ
C:\ProgramData\Bristol\OpenBSI\MYFILES\FCPSTUFF.FCP
FLASHCNF command
Syntax:
FLASHCNF node list parameter_code param_value1
[param_value2] [param_value3]
where:
node specifies the name of the controller, as defined in
NetView.
list specifies the name of an internal list of flash parameters
you want to define with this command. The list is named
based on the type of parameters you want to define, and
must be one of the following:
Name of list Description
SECURITY Security parameters
SOFTSW Soft switches
IP IP parameters
APPL Application parameters
SPORT1 Serial Port 1 parameters
SPORT2 Serial Port 2 parameters
SPORT3 Serial Port 3 parameters
SPORT4 Serial Port 4 parameters
SPORT5 Serial Port 5 parameters
SPORT6 Serial Port 6 parameters
SPORT7 Serial Port 7 parameters
SPORT8 Serial Port 8 parameters
SPORT9 Serial Port 9 parameters
SPORT10 Serial Port 10 parameters
SPORT11 Serial Port 11 parameters
EPORT1 Ethernet Port 1 parameters
EPORT2 Ethernet Port 2 parameters
EPORT3 Ethernet Port 3 parameters
AUDIT Audit parameters
ARCHIVE Archive parameters
parameter_code specifies which parameter within the list that you
want to define. Depending on the parameters, you
may have to define one, two, or three parameter
values for the parameter. To choose the proper
A-10 ScriptTool Commands Issued Nov-2016
Page 41

ControlWave ScriptTool User’s Guide
p
p
p
p
p
p
parameter_code see the descriptions based on the
list name, later in this sub-section.
Notes:
You can only specify one parameter code in a particular
FLASHCNF command. If a particular list has more than one
parameter, you need to have a separate FLASHCNF command for
each parameter you define.
Depending on the requirements of the parameter, you may need to
specify more than one value for a particular parameter in a single
FLASHCNF command.
aram_value1
aram_value2
aram_value3
list = SECURITY
specifies the value(s) for a particular parameter. Once you define the
arameter_code you define the values required by that parameter.
Depending on the parameter, you may need to define one, two, or
three values for that parameter. To determine the proper value for
aram_value1, param_value2, or param_value3 see the descriptions
based on the list name, later in this sub-section.
When list is SECURITY parameter_code defines the privileges of
the RDB_Max user. (The RDB_Max user is used by OpenBSI RDB
commands that access the RTU.)
Note: To configure security privileges, you must log on as an
administrator.
Choices are: 1 Operator
2 Engineer
3 Administrator
If you’re configuring the RDBMax user, typically, you should choose
“3” for the privileges.
aram_value1 specifies the name of a file defining each user.
Example:
To specify RDB_Max has administrative privileges and that other
users are defined in the file USERS.TXT, enter:
FLASHCNF RTU SECURITY 3 USERS.TXT
The contents of the users file (in this case we named it USERS.TXT)
must define each user in the system. Each line of the file defines a
single format according to the following syntax:
UserName Password Privileges [User_Priv]
where:
UserName is the user’s name (up to 16 characters)
Password is the user’s password (up to 16 characters0
Privileges is one of the following:
Issued Nov-2016 ScriptTool Commands A-11
Page 42

ControlWave ScriptTool User’s Guide
1 = Operator privileges
2 = Engineer privileges
3 = Adminstrator privileges
4 = User-defined privileges as specified by
[User_Priv] when Privileges is 4, this is a number that
The bits which make up [User_Priv] are:
[User_Priv].
specifies which bits representing particular
privileges are set. Although 64 bits (bits 0 to
63) are available, only the first 17 are currently
defined. For each privilege you want to assign
add the decimal equivalents of the bit (2
bit
)
value. The sum of all decimal equivalents is
user_priv.
Bit User Privilege Decimal used to
represent this
privilege (2
bit
)
0 Read data value 1
1 Update data value 2
2 Read Flash Files via FTP 4
3 Change / Del Flash Files
via FTP
4 Read Historical Data
(audit / archive)
5 Change Last Read
Pointers in Audit Info
6 Update Signal Attributes 64
7 Change / Delete
Historical Definitions
8 Add / Change / Del User
Security Info
9 Modify Soft Switches 512
10 Run Diag to read
Memory
11 Run Diag to write
Memory
8
16
32
128
256
1024
2048
12 Read Stat / Diag Info 4096
13 Reset Stat / Crash Blocks 8192
14 Read Application Values 16384
15 Write Application Values 32768
16 Full Application Access in 65536
A-12 ScriptTool Commands Issued Nov-2016
Page 43

ControlWave ScriptTool User’s Guide
p
p
p
ControlWave Designer.
Examples:
In USERS.TXT, to define a user named BOB with a password of
BT738 who has operator privileges, enter:
BOB BT738 1
In USERS.TXT, to define a user named ANN with a password of
H72M who has administrative privileges, enter:
ANN H72M 3
In USERS.TXT, to define a user named FRED with a password
HAPPY who has the following user-defined privileges
(Read data values = bit 0; decimal equivalent 1)
(Update data values = bit 1; decimal equivalent 2)
(Update signal attributes = bit 6; decimal equivalent 64)
then enter:
FRED HAPPY 4 67
We entered “67” because that is the sum of the decimal equivalents
for the three privileges we mentioned: 1 + 2 + 64 = 67.
list = SOFTSW
When list is SOFTSW, there are two possible values for
arameter_code each of which have a single parameter
(param_value1).
arameter_code
values for
aram_value1
0 (define BSAP local address) 1 to 127
2 (define EBSAP group number) 0 to 126
Examples:
To set the BSAP local address of RTU to 6, enter:
FLASHCNF RTU SOFTSW 0 6
To set the EBSAP group number of RTU to 0, enter:
FLASHCNF RTU SOFTSW 2 0
Issued Nov-2016 ScriptTool Commands A-13
Page 44

ControlWave ScriptTool User’s Guide
p
p
N
list = IP
When list is IP, there are several possible values for parameter_code
each of which have a single parameter (param_value1).
arameter_code
values for param_value1
0 (define NHP IP address A) Primary IP address of NHP in
format aaa.bbb.ccc.ddd
1 (define NHP IP address B) Secondary IP address of NHP in
format aaa.bbb.ccc.ddd
2 (define IBP port)t UDP port number (socket
number) the IPdriver uses.
3 (define Time synch port) UDP port number (socket
number) the IP driver uses for
time synchronization of the
RTU's.
4 (define default gateway
address)
IP address of the default gateway
in format aaa.bbb.ccc.ddd
5 (define default username) Username used for PAP/CHAP
rotocol.
6 (define RIP inclusion address) IP address in format
aaa.bbb.ccc.ddd
7 (define RIP inclusion mask) IP mask in format
aaa.bbb.ccc.ddd
8 (define RIP exclusion address)IP address in format
aaa.bbb.ccc.ddd
9 (define RIP exclusion mask) IP mask in format
aaa.bbb.ccc.ddd
10 (define IP ping rate) Dynamic IP routing ping rate in
milliseconds.
11 (define IP ping timeout) Dynamic IP routing ping timeout
in milliseconds.
12 (define IP ping retries)
umber of additional ping tests
the system makes after the first
failure.
13 (define filename to define IP
routes)
Filename to define destination IP
destinations and masks for IP
routes.
Each line of the file takes the
format:
CheckPrim DestAddr DestMask
GateAddr_1 GateAddr_2
GateAddr_3 GateAddr_4
A-14 ScriptTool Commands Issued Nov-2016
Page 45

ControlWave ScriptTool User’s Guide
P
P
D
D
P
P
P
P
ingAddr_1 PingAddr_2
ingAddr_3 PingAddr_4
Where:
CheckPrim - Check Primary
0 = Don't Check
1 = Check
estAddr = Destination IP
Address
estMask = Destination IP Mask
GateAddr_1 = Gateway IP
Address #1
GateAddr_2 = Gateway IP
Address #2
GateAddr_3 = Gateway IP
Address #3
GateAddr_4 = Gateway IP
Address #4
ingAddr_1 = Ping IP Address
#1
ingAddr_2 = Ping IP Address
#2
ingAddr_3 = Ping IP Address
#3
ingAddr_4 = Ping IP Address
#4
46 (disable SNMP processing) If “0” SNMP processing allowed.
If “1” SNMP processing
disabled.
Note: For details on dynamic IP routing, and othere IP
parameters see the Flash Configuration section of Chapter
5 of the OpenBSI Utilities Manual (D5081).
Examples:
To set the primary (A) IP address for the NHP to 10.211.75.124
enter:
FLASHCNF RTU IP 0 10.211.75.124
To set the time synch port number to 1235 enter:
Issued Nov-2016 ScriptTool Commands A-15
Page 46

ControlWave ScriptTool User’s Guide
p
p
j
E
FLASHCNF RTU IP 3 1235
To define the destination IP addresses and masks in a file called
“my_routes.txt” enter:
FLASHCNF RTU IP 13 my_routes.txt
list = APPL
When list is APPL, there are several possible values for
arameter_code each of which have a single parameter
(param_value1).
arameter_code
values for param_value1
0 = goal idle This is a goal expressing the
desired percentage of time the
ControlWave CPU remains idle.
1 = idle min ticks This is the minimum number of 1
millisecond clock ticks allowed
between executions of the
DEFAULT task.
2 = minimum idle If the ControlWave CPU cannot
maintain this percentage of free
CPU time, it reports an overload
exception.
3 = program RAM In kilobytes, this is the amount of
memory the system reserves at
startup to store the code for the
ControlWave project.
4 = data RAM This is the size of storage the
system reserves for variables in
kilobytes.
5 = retain RAM This is the size of storage space
(in kilobytes) the system reserves
at startup for variables marked
“RETAIN”.
6 = unit A address This IP address must correspond
to an Ethernet port on the A
controller in a redundant pair.
7 = unit B address This IP address must correspond
to an Ethernet port on the B
controller in a redundant pair.
8 = power fail time before
ump to safe state (I/O
expansion rack only)
See the ControlWave I/O
xpansion Rack Quick Setup
Guide (D5122) for information
on this.
A-16 ScriptTool Commands Issued Nov-2016
Page 47

ControlWave ScriptTool User’s Guide
E
N
E
p
p
9 = communications loss time
before set safe state (I/O
expansion rack only.)
See the ControlWave I/O
xpansion Rack Quick Setup
Guide (D5122) for information
on this.
list = SPORTx
10 thru 19 – MFA registration
o longer supported.
codes
20 = serial failover enabled
(I/O expansion rack only)
See the ControlWave I/O
xpansion Rack Quick Setup
Guide (D5122) for information
on this.
Examples:
To set the IP address for unit A of a redundant pair to 10.0.0.5 enter:
FLASHCNF RTU APPL 6 10.0.0.5
To set the program RAM parameter to 1250K enter:
FLASHCNF RTU APPL 3 1250
When list is SPORTx (where x is a serial port number) there are
multiple parameters.
Setting the Baud Rate for the Serial Port:
To set the baud rate, you must set parameter_code to 0 and
aram_value1 to the value that corresponds to the desired baud rate.
arameter_code
0 (set baud rate)
Set param_value1 to to get this baud rate
2 300 baud
3 600 baud
4 1200 baud
5 2400 baud
6 4800 baud
7 9600 baud
8 19200 baud
9 38400 baud
10 57600 baud
11 115200 baud
Examples:
To set the baud rate for serial port 4 to 9600 baud enter:
Issued Nov-2016 ScriptTool Commands A-17
Page 48

ControlWave ScriptTool User’s Guide
p
e
p
p
p
FLASHCNF RTU SPORT4 0 7
To set the baud rate for serial port 2 to 115200 baud enter:
FLASHCNF RTU SPORT2 0 11
Setting the Data Format for the Serial Port:
You configure three separate items that for the data format: number
of bits per character, the number of stop bits, and the parity.
arameter_cod
1 (set data
format)
aram_value1 param_value2
Number of bits
per character
5 = 5 bits/char
6 = 6 bits/char
7 = 7 bits/char
8 = 8 bits/char
Number of stop bits
1 = 1 stop bit
2 = 2 stop bits
3 = 1.5 stop bits
Examples:
To set serial port 3 to 8 bits per character, 1 stop bit, no parity, enter:
FLASHCNF RTU SPORT3 1 8 1 0
To set serial port 5 to 7 bits per character, 2 stop bits, odd parity
enter:
FLASHCNF RTU SPORT5 1 7 2 1
Setting the Protocol Mode for the Serial Port:
The protocol mode determines the type of communication messages
that this port can receive and transmit.
aram_value3
Parity
0 = no parity
1 = odd parity
2 = even parity
arameter_code param_value1
2 (set protocol
mode)
0 = Port Unused
1 = BSAP Slave
2 = EBSAP Slave
3 = VSAT Slave
4 = MODBUS Master
7 = Gould MODBUS Slave
8 = Enron MODBUS Slave
14 = Allen Bradley DF1 Slave
29 = Generic Serial Communications
32 = DNP3 Serial Master
33 = DNP3 Serial Slave
200 = Allen Bradley DF1 Master
256 = PPP Port
4096 = BSAP Master
4098 = EBSAP Master
Examples:
To designate serial port 4 as a BSAP master port enter:
A-18 ScriptTool Commands Issued Nov-2016
Page 49

ControlWave ScriptTool User’s Guide
p
p
p
p
FLASHCNF RTU SPORT4 2 4096
To designate serial port 2 as a Gould Modbus slave enter:
FLASHCNF RTU SPORT2 2 7
Setting the P1 Parameter:
P1 is a protocol-specific value, typically used with a custom protocol
or user-defined protocol.
arameter_code param_value1
3 (set P1) Varies depending on protocol.
Example:
To set the P1 value for serial port 3 to 6 enter:
FLASHCNF RTU SPORT3 3 6
Setting the P2 Parameter:
P2 is a protocol-specific value, typically used with a custom protocol
or user-defined protocol.
arameter_code param_value1
4 (set P2) Varies depending on protocol.
Example:
To set the P1 value for serial port 5 to 89 enter:
FLASHCNF RTU SPORT5 4 89
Setting the IP address: (PPP ports only)
If this is a serial IP port (PPP) you must specify the IP address for the
ort.
arameter_code param_value1
5 (set IP address) IP address in dotted decimal format, i.e.
aaa.bbb.ccc.ddd.
Example:
To set the IP address for serial port 2 to 10.21.115.1 enter:
FLASHCNF RTU SPORT2 5 10.21.115.1
Issued Nov-2016 ScriptTool Commands A-19
Page 50

ControlWave ScriptTool User’s Guide
p
p
p
p
p
e
p
Setting the IP mask: (PPP ports only)
If this is a serial IP port (PPP) you must specify the IP mask for the
ort.
arameter_code param_value1
7 (set IP mask) IP mask in dotted decimal format, i.e.
Example:
To set the IP mask for serial port 2 to 255.255.0.0 enter:
FLASHCNF RTU SPORT2 7 255.255.0.0
Setting the maximum number of slaves for an EBSAP master
If this is an EBSAP master port, you must specify the maximum
number of slave nodes under a virtual node on this port.
arameter_code param_value1
aaa.bbb.ccc.ddd.
8 (set max number of
slaves)
maximum number of slaves under a
virtual node.
Example:
To set the maximum number of slaves under a virtual node on an
EBSAP master port on serial port 4 to 5, enter:
FLASHCNF RTU SPORT4 8 5
list = EPORTx
When list is EPORTx (where x is an Ethernet port number) the
different parameters you need to define are the IP address(es) for the
ort and the IP mask.
Setting the IP address(es) and mask for the Ethernet Port
arameter_cod
5 Sets primary IP address (A) in dotted decimal format
6 Sets secondary IP address (B) in dotted decimal
aram_value1
aaa.bbb.ccc.ddd
format aaa.bbb.ccc.ddd
7 Sets IP mask for the Ethernet port in dotted decimal
format aaa.bbb.ccc.ddd
Examples:
A-20 ScriptTool Commands Issued Nov-2016
Page 51

ControlWave ScriptTool User’s Guide
p
e
p
To set the primary IP address for Ethernet port 1 to 10.2.3.100 enter:
FLASHCNF RTU EPORT1 5 10.2.3.100
To set the secondary IP address for Ethernet port 3 to 10.7.2.37 enter:
FLASHCNF RTU EPORT3 6 10.7.2.37
To set the IP mask for Ethernet port 2 to 255.255.0.0 enter:
FLASHCNF RTU EPORT2 7 255.255.0.0
list = AUDIT
When list is AUDIT you configure parameters for audit storage in the
controller.
Setting AUDIT Parameters:
arameter_cod
0 (set storage location) 0 = store records in FLASH memory
1 (set logging type) 0 = Continuous Logging
2 (set number of events) Enter desired number of events you want
3 (set number of alarms) Enter desired number of alarms you
4 (set percentage for number
of record in overflow buffer)
5 (set logging master port) 0 = COM Port #1
aram_value1
1 = store records in SRAM
1 = Stop on Full
to maintain in the audit buffer.
want to maintain in the audit buffer.
Enter percentage for number of records
in overflow buffer.
1 = COM Port #2
2 = COM Port #3
3 = COM Port #4
4 = COM Port #5
15 = Ethernet
Examples:
To specify that the ControlWave should store audit records in Flash
memory, enter:
FLASHCNF RTU AUDIT 0 0
To specify continuous logging enter:
FLASHCNF RTU AUDIT 1 0
To specify that the audit buffer should maintain 100 events enter:
FLASHCNF RTU AUDIT 2 100
Issued Nov-2016 ScriptTool Commands A-21
Page 52

ControlWave ScriptTool User’s Guide
f
f
list = ARCHIVE
When list is ARCHIVE you configure parameters for archive storage
in the controller. You define the archive parameters in a separate text
file.
To identify a text file named archives.txt, enter:
FLASHCNF RTU ARCHIVE archives.txt
Each line starting with “#” in the archive file defines one archive as
follows:
#filenum filename num_recs location interval mode
where:
ilenum specifies the archive file number from 1 to 64.
ilename specifies the archive file name. You can optionally use
a script variable to specify the filename.
num_recs specifies the number of records in the archive file.
location specifies where the controller stores archive data:
0 = store archives in Flash memory
1 = store archives in SRAM
interval specifies the storage interval.
0 = No Interval
1 = 1 min
2 = 5 min
3 = 15 min
4 = 1 hr
5 = 1 day
mode specifies the storage interval.
0 = Start of Period
1 = Storage Time
Each line starting with “&” in the archive file defines one column of
the archive file as follows:
&column_name data_type char size precision
where:
A-22 ScriptTool Commands Issued Nov-2016
Page 53

ControlWave ScriptTool User’s Guide
s
p
column_name specifies the title for the column
data_type specifies the type of data in the column.
Choices include:
1 = BOOL
2 = SINT
3 = INT
4 = DINT
10 = REAL
17 = BYTE
18 = WORD
19 = DWORD
char specifies the logging characteristics. Choices
include:
0 = Average for Time
1 = Arithmetic Mean
2 = Average of Square Root
3 = Square of Average of Square Root
4 = Instantaneous
5 = Minimum
6 = Maximum
7 = Place Value in Log
8 = Integration
ize specifies the width (in number of characters)
recision specifies the data precision. This is the number
FOLDER_EXISTS command
Checks if a folder exists. If it does, execution jumps to a label.
Syntax: FOLDER_EXISTS folder label
where:
folder specifies the name of the folder. You specify a full path
for the folder if it resides on the PC outside of the zip
file; if you just enter a name, or a relative path,
ScriptTool looks for the folder in the ZIP file. You can
optionally use a script variable to specify the folder or
path and folder.
for the data in this column.
of characters to the right of the decimal point
for data in this column.
Issued Nov-2016 ScriptTool Commands A-23
Page 54

ControlWave ScriptTool User’s Guide
label specifies a textual label in the script file that the script
Example:
To check whether the folder HIST_DATA exists, and to jump to label
DONE if it does, enter:
FOLDER_EXISTS HIST_DATA DONE
GOTO command
Jumps from the current line of the script to another line identified by a
label.
Syntax: GOTO label
where:
jumps to.
IF command
label specifies a textual label in the script file that the script
jumps to.
Example:
To jump from the current line of the script to the line labeled ERRORS
enter: GOTO ERRORS
Compares a script variable to another script variable or a number, and if
the expression is true, jumps to a label in the script.
Syntax: IF variable condition var_or_number label
where:
variable is a script variable
condition is a condition to be evaluated for the variables. It must be
one of the following:
EQ equal to
NE not equal to
LE less than or equal to
LT less than
GE greater than or equal to
GT greater than
A-24 ScriptTool Commands Issued Nov-2016
Page 55

ControlWave ScriptTool User’s Guide
var_or_number
is a script variable, a number, or a string literal.
label specifies a textual label in the script file that the script
jumps to.
Example:
To jump from the current line of the script to the line labeled EXIT if
script variable COUNT1 is greater than script variable COUNT2, enter:
IF COUNT1 GT COUNT2 EXIT
IMPORT command
Imports a specified file into the active log file. After the last line of the
source file is included the text "IMPORT END" is included in the log
file to designate the end of included data.
Syntax: IMPORT filename
LIST command
where:
filename is the name of the file you want to include in the log file.
You can optionally use a script variable to specify the
filename.
Example:
To include the file
C:\ProgramData\Bristol\OpenBSI\mydata\description.txt in the current
log file, enter:
IMPORT C:\ProgramData\Bristol\OpenBSI\mydata\description.txt
Collects a list from the controller and stores it in a file.
Syntax: LIST node list [filename]
where:
node is the controller that contains the list.
list is the number of the list, or the name of a variable that
stores the number of the list.
[filename] is the name of the file you want to hold the list.
ScriptTool stores the list data in UOI format. You can
specify a full path for file; if you just enter a filename,
ScriptTool assumes the file is in the ZIP file. If you omit
this entirely, ScriptTool saves the list data in the current
Issued Nov-2016 ScriptTool Commands A-25
Page 56

ControlWave ScriptTool User’s Guide
Example:
To collect list 5 from controller R201 and store it in the file
C:ProgramData\Bristol\OpenBSI\MYDATA\LIST5.LST enter:
LIST R201 5 C:\ProgramData\Bristol\OpenBSI\MYDATA\LIST5.LST
NDARRY command
Turns polling ON or OFF for a given local address.
Syntax: NDARRY local value
where:
local specifies the BSAP local address (1 to 127) of the
log file. You can optionally use a script variable to
specify the filename.
controller for which you want to turn ON/OFF polling.
value is either ON (to turn ON polling) or OFF (to turn OFF
Example:
To turn polling on for the controller at local address 7 enter:
NDARRY 7 ON
OUTPUT command
Specifies whether ScriptTool keeps a log of commands, responses, and
collected data in a log file. The log file resides in the ZIP file.
Syntax: OUTPUT flag
where:
flag is either ON (to turn ON logging) or OFF (to turn OFF
Note: For commands that specify a filename for output e.g. ARRAY,
polling).
logging). ON is the default.
AUDIT, ARCHIVE, LIST collected data goes to that specified
file, not the log file, regardless of the OUTPUT command
setting.
Example:
To turn logging on, enter:
OUTPUT ON
A-26 ScriptTool Commands Issued Nov-2016
Page 57

ControlWave ScriptTool User’s Guide
PAUSE command
Stops processing of the current script for a specified number of seconds.
Syntax: PAUSE seconds
where:
seconds specifies the number of seconds that ScriptTool stops
processing. When this number of seconds expires,
ScriptTool resumes processing the script.
Example:
To pause the script for 15 seconds, enter:
PAUSE 15
PROJCTRL command
Activates project control commands normally invoked through
ControlWave Designer. This includes downloading the boot project to
the controller and activating the project.
Syntax: PROJCTRL node action [source_file [destination]]
where:
node specifies the name of the controller, as defined in
NetView.
action is one of several possible project control actions. These
are:
Action Description
ACTCOLD
ACTIVATE
ACTWARM
BOOTCOLD
BOOTPROJ
BOOTWARM
COLD
Perform an ACTIVATE, then perform a
COLD start. (See ACTIVATE and COLD)
Copies the bootproject into active
memory (SDRAM or SRAM depending
upon platform). This happens
automatically on RESET.
Perform an ACTIVATE, then perform a
WARM start. (See ACTIVATE and
WARM)
Perform a BOOTPROJ then perform an
application COLD start. See BOOTPROJ
and COLD.
Download the bootproject (*.PRO file) to
the controller.
Perform a BOOTPROJ then perform an
application WARM start. See
BOOTPROJ and WARM.
Application cold start. Project in active
memory is started from the beginning
with all variables set to initial values.
Project must be in STOP state to initiate
a cold start. If project is running it must
be stopped prior to initiating the cold
start.
Issued Nov-2016 ScriptTool Commands A-27
Page 58

ControlWave ScriptTool User’s Guide
DELBOOT
HOT
READFILE
RESET
STOP
WARM
WRITEFILE
Delete the bootproject from the
controller.
Hot start the project in the controller. No
variables initialized. Project must be in
STOP state to initiate a hot start. If
project is running it must be stopped
prior to initiating the hot start.
Allows uploading of files from the
controller’s flash to your PC. (Requires
OpenBSI 5.8 Service Pack 2 or newer)
STOP the current project running in the
controller (if not already stopped) then
initiate an application COLD start. See
STOP and COLD.
Stop the current project running in the
controller. Project must be in RUN state
to initiate a STOP.
Application warm start. Project in active
memory is started from the beginning
with retain variables set to saved values;
all other variables set to initial values.
Project must be in STOP state to initiate
a warm start. If project is running it must
be stopped prior to initiating the warm
start.
Copies a file to the controller, e.g. web
pages, text files, etc.
source_file used with BOOTCOLD, BOOTPROJ, BOOTWARM,
WRITEFILE and READFILE only.
for an action of BOOTPROJ, BOOTCOLD, or
BOOTWARM, specifies a project *.PRO file:
If you specify a relative path and filename, e.g.
\myfiles\cwm3.pro
ScriptTool assumes the PRO file resides in the zip file.
If you specify a full path and filename, e.g.
C:\programdata\bristol\OpenBSI\myprojects\boulevard.pro
ScriptTool looks for the file on the PC, not in the zip file.
For an action of WRITEFILE, if the path in source_file
includes a “:” then the path is used as is and the file is
read from the specified location. Otherwise, the file is
expected to be in the zip file. The file name cannot be
longer than 34 characters (including the extension).
For an action of READFILE specifies the name of the
file at the RTU that you want to upload to the PC. The
file name cannot be longer than 34 characters (including
the extension).
A-28 ScriptTool Commands Issued Nov-2016
Page 59

ControlWave ScriptTool User’s Guide
destination For an action of WRITEFILE, destination specifies the
path and filename on the PC to which ScriptTool copies
the source_file.
Examples:
To download the bootproject called LINCOLN.PRO located in the
folder C:\ProgramData\Bristol\OpenBSI\MYLOADS to a controller
named CWM8, and then initiate an application cold start, enter:
PROJCTRL CWM8 BOOTCOLD C:\ProgramData\Bristol\OpenBSI\MYLOADS\LINCOLN.PRO
To perform an application warm start of the current project in a
controller named PINE_ISLAND, enter:
PROJCTRL PINE_ISLAND WARM
To copy the file MAINMENU.HTM from the zip file to a controller
named LINVILLE enter:
PROJCTRL LINVILLE WRITEFILE MAINMENU.HTM
To copy the file MAINMENU.HTM from the zip file to a controller
named LINVILLE, but to give it the name LINVILLE.HTM at the
controller, enter:
PROJCTRL LINVILLE WRITEFILE MAINMENU.HTM
LINVILLE.HTM
To upload the file bootfile.pro from the RTU named DC4 to the path
and filename
C:\ProgramData\Bristol\OpenBSI\MYPROJECTS\FLOWPROJECT.PRO
enter:
PROJCTRL DC4 READFILE BOOTFILE.PRO
C:\ProgramData\Bristol\OpenBSI\MYPROJECTS\F
LOWPROJECT.PRO
Note: In addition to invoking it through scripts, you can optionally start
the PROJCTRL utility alone from a DOS prompt. To do so, enter
parameter “0” between PROJCTRL and the node parameter. For
example, PROJCTRL 0 IP64 STOP.
Issued Nov-2016 ScriptTool Commands A-29
Page 60

ControlWave ScriptTool User’s Guide
PROMPT command
Displays a message for the operator and processes their YES/NO
response.
Syntax: PROMPT string
where:
string is the message the ScriptTool displays on the screen for
If the operator clicks OK (yes) or NO, the test proceeds; if the operator
clicks Cancel, the test stops. The result of the operation is loaded into
the script variable PROMPT. Where:
PROMPT = 1 when the operator selects YES
PROMPT = 0 when the operator selects NO
ScriptTool loads the string data entered into the prompt text box into the
variable P_STRING. ScriptTool loads the numeric equivalent of the
data entered into the prompt text box into the variable P_VAL.
Example:
the operator.
To prompt the operator whether to stop the script, enter:
PROMPT Stop the script?
The operator sees this:
If the operator clicks Yes the ScriptTool loads a “1” into the script
variable PROMPT and into the P_VAL variable.
If the operator clicks NO the ScriptTool loads a “0” into the script
variable PROMPT and into the P_VAL variable.
If the operator enters a value in the text field at the bottom of the dialog
box, ScriptTool stores that in the P_STRING variable.
You must include logic in the script to process the response and perform
the desired action, for example, to stop the script you could use
something like:
IF PVAL EQ 1 ENDSCRIPT
:ENDSCRIPT ABORT Terminating Script
A-30 ScriptTool Commands Issued Nov-2016
Page 61

ControlWave ScriptTool User’s Guide
RECIPE command
Reads or writes a recipe from/to the controller.
Syntax: RECIPE node type recipe_name
where:
node specifies the name of the controller, as defined in
NetView.
type specify READ to read the current values of the variables
named in the recipe recipe_name from the controller and
update them in the recipe_name recipe.
Specify WRITE to copy the values from the recipe in
recipe_name to the corresponding values in the
controller.
recipe_name specifies the filename of the RCP file. You can specify a
full path for the file; if you just enter a filename,
ScriptTool assumes the file is in the ZIP file. You can
optionally use a script variable to specify the
recipe_name.
RUN command
Example:
To write values from the recipe MYRECIPE.RCP, in the zip file, to the
controller named CWM5 enter:
RECIPE CWM5 WRITE MYRECIPE.RCP
Executes the specified batch file or program.
Syntax: RUN file
where:
file is either the name of an executable program (.EXE), the
name of a batch file (.BAT), or a string script variable. If
you specify a BAT file, you must include the .BAT
extension. If you specify a string script variable, the
string must be either the name of an EXE, or a BAT file
name, with the .BAT extension. Note: The string script
variable option requires OpenBSI 5.8 Service Pack 2 or
newer.
Example 1:
To run a batch file called COPYFILES.BAT enter:
Issued Nov-2016 ScriptTool Commands A-31
Page 62

ControlWave ScriptTool User’s Guide
RUN copyfiles.bat
Example 2:
To run an executable program called MYPROG.EXE enter:
RUN MYPROG
Example 3:
To set a string script variable called “MYSTRING” to the value of a
STRING variable called “@GV.MYCOMM” running in the
ControlWave named “RTU1” and then use that value with the RUN
command, enter:
VAR_F_SIG MYSTRING RTU1 @GV.MYCOMM
RUN MYSTRING
SETVAL command
Writes a value to a variable in the controller.
Syntax: SETVAL node variable type value
where:
node specifies the name of the controller, as defined in
variable specifies the name of the variable in the controller.
type specifies the type of varaible. Enter either ANA for
value specifies the value you want to assign to the variable in
Example:
To set the value of analog variable @GV.SPEED_SETPOINT to 50 in
controller CWM2, enter:
SIGN_ON command
NetView.
analog variables, LOG for logical variables or STR for
string variables.
the controller. For logical variables, value must be 0 or 1.
SETVAL CWM2 @GV.SPEED_SETPOINT ANA 50
Signs on to the controller.
Syntax: SIGN_ON node [option]
where:
node specifies the name of the controller, as defined in
NetView.
option if set to USER, ScriptTool loads the credentials of the
user currently signed into NetView or TechView. If you
A-32 ScriptTool Commands Issued Nov-2016
Page 63

ControlWave ScriptTool User’s Guide
don’t specify this option, ScriptTool prompts for a
username and password.
Example:
To sign on to controller WCS3 using credentials of the currently signed
on user, enter: SIGN_ON WCS3 USER
To prompt the user to provide a username and password when signing
on to controller CW7, enter: SIGN_ON
TEXTFILE command
Instead of sending text to the log file, redirects the text from this point in
the script forward to a specified text file.
Syntax: TEXTFILE command filename
where:
command specifies the file operation for the redirected text file.
Valid commands are:
WRITE Opens a new text file (as specified by
filename) for writing.
APPEND Opens an existing text file (as specified by
filename) for writing, and redirects text to
the end of the file.
CLOSE Closes the currently open text file.
filename specifies the name of the text file for redirected text. You
can optionally use a script variable to specify the
filename.
Example:
To redirect text to the file
C:\ProgramData\Bristol\OpenBSI\MYDATA\REPORT.TXT enter:
TEXTFILE WRITE
C:\ProgramData\Bristol\OpenBSI\MYDATA\REPORT.TXT
To append text output to the file LISTING.TXT in the zip file, enter:
TEXTFILE APPEND LISTING.TXT
To close the currently open text file enter:
TEXTFILE CLOSE
Issued Nov-2016 ScriptTool Commands A-33
Page 64

ControlWave ScriptTool User’s Guide
UPDATE_FRM command
Updates the system firmware in the controller.
Syntax: UPDATE_FRM node file [flag]
where:
node specifies the name of the controller, as defined in
filename specifies the filename of the firmware *.BIN file. You
flag if set to Q, download occurs without operator prompting.
Example:
To silently update the system firmware in controller SEASIDE_DRIVE
using file CWP05.30.BIN in the zip file enter:
NetView.
can specify a full path for the file; if you just enter a
filename, ScriptTool assumes the file is in the ZIP file.
Otherwise, the operator receives a prompt to confirm the
system firmware update.
UPDATE_FRM SEASIDE_DRIVE CWP05.30.BIN Q
VAR_ADD command
Adds a specified value to a script variable, or concatenates a value to a
string script variable’s contents. Note: The concatenation option
requires OpenBSI 5.8 Service Pack 2 or newer.
Syntax: VAR_ADD var value
where:
var specifies the name of an existing script variable.
value specifies either a value to add to the script variable
Examples:
To add the value of 5 to a script variable named TOTAL enter:
VAR_ADD TOTAL 5
To add the value of script variable to Y to a script variable named X
enter:
named by var, or the name of another script variable
containing a value to add to var. If var is a STRING type
variable, the command concatenates value to the contents
of the string script variable var.
VAR_ADD X Y
To concatenate the contents of string script variable MYSTRING
(where my string’s value is “RTU”) to the value 5, enter:
VAR_ADD MYSTRING 5
This results in the value of MYSTRING changing to “RTU5”.
A-34 ScriptTool Commands Issued Nov-2016
Page 65

ControlWave ScriptTool User’s Guide
VAR_DECR command
Decrements a script variable by 1.
Syntax: VAR_DECR var
where:
var specifies the name of an existing script variable.
Example:
To subtract 1 from the current value of the script variable COUNT
enter:
VAR_DECR COUNT
VAR_F_SIG command
Sets a script variable to the value of a variable from the ControlWave
project. If the script variable doesn’t exist, this creates it.
Syntax: VAR_F_SIG var node variable
where:
var specifies the name of a script variable. If the script
node specifies the name of the controller, as defined in
variable specifies the name of an analog or logical variable from
Example:
To create a script variable called COUNTER and set it to the value of
the variable @GV.F101_COUNT in the controller MAIN_ST enter:
VAR_F_SIG COUNTER MAIN_ST @GV.F101_COUNT
VAR_F_VAL command
Sets a script variable to a value or to the value of another script variable.
If the destination script variable doesn’t exist, this creates it.
variable doesn’t already exist, ScriptTool creates one
with this name.
NetView.
the project running in node.
Syntax: VAR_F_VAL var var_or_val
where:
var specifies the name of a script variable. If the script
variable doesn’t already exist, ScriptTool creates one
with this name.
Issued Nov-2016 ScriptTool Commands A-35
Page 66

ControlWave ScriptTool User’s Guide
var_or_val specifies the name of another script variable or just a
Examples:
To create a script variable called TEMP and set it to the value of the
script variable named TOTAL enter:
VAR_F_VAL TEMP TOTAL
To create a script variable called TEST and set it to 25.3 enter:
VAR_F_VAL TEST 25.3
VAR_INCR command
Increments a script variable by 1.
Syntax: VAR_INCR var
value. The destination script variable is set to this. You
can specify a numeric value or a string for the value.
where:
var specifies the name of an existing script variable.
Example:
To add 1 to the current value of the script variable COUNT enter:
VAR_INCR COUNT
VERSION command
Retrieves version information from a controller, and stores it in script
variables. The script variables are:
FWVERSION stores the system firmware version level
PMVERSION stores the PROM release version level
BTVERSION stores the Boot PROM version level
CSTVERSION stores the custom PROM version level
Syntax: VERSION node
where:
node specifies the name of the controller, as defined in
NetView.
Example:
To retrieve version information from the controller CWM4 enter:
VERSION CWM4
A-36 ScriptTool Commands Issued Nov-2016
Page 67

ControlWave ScriptTool User’s Guide
WAIT_FOR_SIG command
Pauses execution until a comparison between a script variable (or
constant) and a variable in the controller evaluates to true or a timer
expires. If the comparison becomes TRUE prior to expiration of the
timer, execution proceeds normally; if the timer expires before an
evaluation that the comparison is TRUE, execution jumps to a label, if
present, or if there is no label, execution proceeds normally.
Syntax:
WAIT_FOR_SIG var node variable condition max_time [label]
where:
var is a script variable or constant
node specifies the name of the controller, as defined in
NetView.
variable specifies the name of an analog or logical variable from
the project running in node.
condition is a condition to be evaluated for the variables. It must be
one of the following:
EQ equal to
NE not equal to
LE less than or equal to
LT less than
GE greater than or equal to
GT greater than
max_time is a script variable or a constant that specifies the
maximum waiting time before execution resumes.
label optionally specifies a textual label in the script file that
the script jumps to if the comparison does not become
TRUE prior to expiration of max_time.
Example:
To pause execution of the script for a maximum of 60 seconds or until
the script variable TOTAL is greater than or equal to the variable
@GV.FLOW_001 in controller OAK_ST enter:
WAIT_FOR_SIG TOTAL OAK_ST @GV.FLOW_001 GE 60
Issued Nov-2016 ScriptTool Commands A-37
Page 68

This page is intentionally left blank
Page 69

Index
A
WAIT_FOR_SIG ........................................... A-37
CREATE_FOLDER command ............................ A-8
ABORT command ............................................... A-2
ARCHIVE command ........................................... A-2
ARRAY command ............................................... A-3
ARRAY_WRITE command ................................. A-4
AUDIT command ................................................ A-4
B
BATCH_EDIT command ..................................... A-5
BITMAP command .............................................. A-6
breakpoints ......................................................... 4-2
C
CLEAR_HISTORY command ............................. A-6
Commands
ABORT ........................................................... A-2
ARCHIVE ........................................................ A-2
ARRAY ........................................................... A-3
ARRAY_WRITE.............................................. A-4
AUDIT ............................................................. A-4
BATCH_EDIT ................................................. A-5
BITMAP .......................................................... A-6
CLEAR_HISTORY ......................................... A-6
CREATE_FOLDER ........................................ A-8
DELETE_FOLDER ......................................... A-8
ECHO ............................................................. A-8
EXIT ................................................................ A-9
FCP ................................................................ A-9
FLASHCNF ................................................... A-10
FOLDER_EXISTS ........................................ A-23
GOTO ........................................................... A-24
IF .................................................................. A-24
IMPORT ........................................................ A-25
LIST .............................................................. A-25
NDARRY ...................................................... A-26
OUTPUT ....................................................... A-26
PAUSE ......................................................... A-27
PROJCTRL ................................................... A-27
PROMPT ...................................................... A-30
RECIPE ........................................................ A-31
RUN .............................................................. A-31
SETVAL ........................................................ A-32
SIGN_ON ..................................................... A-32
TEXTFILE ..................................................... A-33
UPDATE_FRM ............................................. A-34
VAR_ADD ..................................................... A-34
VAR_DESCR ................................................ A-35
VAR_F_SIG .................................................. A-35
VAR_F_VAL ................................................. A-35
VAR_INCR ................................................... A-36
VERSION ..................................................... A-36
D
Debugging scripts ............................................... 4-1
DELETE_FOLDER command ............................ A-8
E
ECHO command ................................................. A-8
Errors
viewing ............................................................ 4-1
EXIT command ................................................... A-9
F
FCP command .................................................... A-9
Figures
2-1. ControlWave ScriptTool .......................... 2-2
2-2. Selecting a Command ............................. 2-2
2-3. Commands without parameter(s) ............ 2-2
2-4. Entering a Command .............................. 2-3
2-5. Saving the Zip File ................................... 2-4
2-6. Naming the Script .................................... 2-4
2-7. Zip and Script File Names Displayed ...... 2-5
2-8. Selecting an Existing Script ..................... 2-6
2-9. Selecting a Command ............................. 2-8
2-10. Command Column – Command Selected
...................................................................... 2-8
2-11. Command Parameters dialog box ......... 2-8
2-12. Selecting the Controller ......................... 2-9
2-13. Selecting the Type ................................. 2-9
2-14. Specifying a Filename ........................... 2-9
2-15. Completed Command ........................... 2-9
2-16. Selecting a Command ......................... 2-10
2-17. Command Column .............................. 2-10
2-18. Command Parameters – for AUDIT .... 2-10
2-19. Selecting Audit Records From After a
Specific Date .............................................. 2-11
2-20. Finishing the Script .............................. 2-11
2-21. Entering the Script Name .................... 2-11
2-22. Testing the Script ................................ 2-12
2-23. Successful Exec
2-24. Verify FCP File Creation...................... 2-12
2-25. Contents of FCP File ........................... 2-13
2-26. Files in the Zip File .............................. 2-13
2-27. Audit Records ...................................... 2-13
4-1. Error Reporting ........................................ 4-1
4-2. Setting Breakpoints ................................. 4-2
4-3. Select a starting point dialog box ............ 4-4
4-4. Watch Window ........................................ 4-5
FLASHCNF command ...................................... A-10
FOLDER_EXISTS command ............................ A-23
ution ..........................
2-12
Issued: Nov-2016 Index I-1
Page 70

ControlWave ScriptTool User’s Guide
G
GOTO command .............................................. A-24
I
IF command ...................................................... A-24
IMPORT command ........................................... A-25
L
LIST command ................................................. A-25
N
NDARRY command .......................................... A-26
O
OUTPUT command .......................................... A-26
P
PAUSE command ............................................. A-27
PROJCTRL command ...................................... A-27
PROMPT command .......................................... A-30
R
RECIPE command ............................................ A-31
RUN command ................................................. A-31
S
Scripts
copying to a different name ............................ 2-7
creating ........................................................... 2-1
debugging ....................................................... 4-1
deleting a script .............................................. 2-7
editing ............................................................. 2-7
Running ........................................................ 2-12
saving a script ................................................ 2-3
selecting from the zip file ................................ 2-6
stopping the script .......................................... 4-6
testing ........................................................... 2-12
ScriptTool
starting the ...................................................... 2-1
SETVAL command ............................................... 32
SIGN_ON command ............................................. 32
Step Mode ........................................................... 4-3
stopping the script ............................................... 4-6
T
Tables
2-1. ScriptTool Editing Functions ................... 2-7
TEXTFILE command ........................................ A-33
U
UPDATE_FRM command ................................. A-34
V
VAR_ADD command ........................................ A-34
VAR_DECR command ..................................... A-35
VAR_F_SIG command ..................................... A-35
VAR_F_VAL command ..................................... A-35
VAR_INCR command ....................................... A-36
VERSION command ......................................... A-36
W
WAIT_FOR_SIG command .............................. A-37
Watch Window .................................................... 4-4
Z
Zip file
copying to a different name ............................ 2-6
creating a new ................................................ 2-5
saving a zip file ............................................... 2-3
I-2 Index Issued: Nov-2016
Page 71

This page is intentionally left blank
Page 72

q
p
/
ControlWave ScriptTool User’s Guide
For customer service and technical support,
visit www.EmersonProcess.com/Remote/Support.
e:
uarters,
Africa:
© 2010–2016 Remote Automation Solutions, a business unit of Emerson Automation
Solutions. All rights reserved.
This publication is for informational purposes only. While every effort has been made to ensure
accuracy, this publication shall not be read to include any warranty or guarantee, express or
implied, including as regards the products or services described or their use or applicability.
Remote Automation Solutions (RAS) reserves the right to modify or improve the designs or
specifications of its products at any time without notice. All sales are governed by RAS terms
and conditions which are available upon request. RAS accepts no responsibility for proper
selection, use or maintenance of any product, which remains solely with the purchaser and/or
end-user.
Global Head
North America, and Latin America:
Emerson Automation Solutions
Remote Automation Solutions
6005 Rogerdale Road
Houston, TX 77072 U.S.A.
T +1 281 879 2699 | F +1 281 988 4445
www.EmersonProcess.com/Remote
Euro
Emerson Automation Solutions
Remote Automation Solutions
Unit 8, Waterfront Business Park
Dudley Road, Brierley Hill
Dudley UK DY5 1LX
T +44 1384 487200 | F +44 1384 487258
Middle East
Emerson Automation Solutions
Remote Automation Solutions
Emerson FZE
P.O. Box 17033
Jebel Ali Free Zone – South 2
Dubai U.A.E.
T +971 4 8118100 | F +971 4 8865465
Asia-Pacific:
Emerson Automation Solutions
Remote Automation Solutions
1 Pandan Crescent
Singapore 128461
T +65 6777 8211| F +65 6777 0947
Remote Automation Solutions
 Loading...