


Also available
with 11”DD coil
(Item# F70-11DD)
Metal Detector
Users Manual

OPERATING MANUAL &GUIDE TO METAL DETECTING
The F70 is a multipurpose metal detector.
It’s most popular uses are coinshooting and relic hunting.
Product Features
• Light weight and well-balanced
• Menu-driven user interface
• Large LCD screen
• Visual indicators of important values such as:
Target Identification
Target Confidence
Target Depth in Pinpoint Mode
Ground Mineralization (Dirt indicator)
• Two Search Modes:
Discrimination
Autotune
• GroundGrab™ touch pad ground balancing
• Waterproof 9 3/4” open-frame concentric elliptical search coil
• Touch pad actuated target pinpointing with variable audio pitch
• Adjustable Arm Rest
• Notch and discrimination controls
• Two retrievable user-programmed memory settings
If you have any questions, or need assistance with your metal detector,
915-225-0333 or 1-800-685-505, and ask for Fisher Hobby Technical
Call
Service.
Copyright Fisher Research Labs, Inc., 2011
2

Table Of Contents
Specifications . . . . . . . . . . . . . . . . . . . . . . . . . . . . . . . . . . . . . . . . . . . . . . . . . . . . .4
Quick-Start . . . . . . . . . . . . . . . . . . . . . . . . . . . . . . . . . . . . . . . . . . . . . . . . . . . . . . . .5
Mechanicals
Assembly Instructions . . . . . . . . . . . . . . . . . . . . . . . . . . . . . . . . . . . . . . . . . . .6-7
Mechanicals . . . . . . . . . . . . . . . . . . . . . . . . . . . . . . . . . . . . . . . . . . . . . . . . . . . .8
Arm Rest Adjustment . . . . . . . . . . . . . . . . . . . . . . . . . . . . . . . . . . . . . . . . . . . . .8
Using Headphones (not included) . . . . . . . . . . . . . . . . . . . . . . . . . . . . . . . . . . .8
Introduction to the F70
General Information . . . . . . . . . . . . . . . . . . . . . . . . . . . . . . . . . . . . . . . . . . . . . .9
Controls . . . . . . . . . . . . . . . . . . . . . . . . . . . . . . . . . . . . . . . . . . . . . . . . . . . .10-11
Menu System . . . . . . . . . . . . . . . . . . . . . . . . . . . . . . . . . . . . . . . . . . . . . . . . . .12
Ground Balancing . . . . . . . . . . . . . . . . . . . . . . . . . . . . . . . . . . . . . . . . . . . .13-15
Autotune Mode . . . . . . . . . . . . . . . . . . . . . . . . . . . . . . . . . . . . . . . . . . . . . . . . .16
Discrimination Mode . . . . . . . . . . . . . . . . . . . . . . . . . . . . . . . . . . . . . . . . . .17-19
Pinpoint Feature . . . . . . . . . . . . . . . . . . . . . . . . . . . . . . . . . . . . . . . . . . . . . . . .20
LCD Visual Display . . . . . . . . . . . . . . . . . . . . . . . . . . . . . . . . . . . . . . . . . . .21-23
Frequency Shifting . . . . . . . . . . . . . . . . . . . . . . . . . . . . . . . . . . . . . . . . . . . . . .24
Capabilities & Limitations . . . . . . . . . . . . . . . . . . . . . . . . . . . . . . . . . . . . . .25-26
Tips & Techniques
Search Techniques
How to Sweep the Search Coil . . . . . . . . . . . . . . . . . . . . . . . . . . . . . . . .27
Pinpointing Targets . . . . . . . . . . . . . . . . . . . . . . . . . . . . . . . . . . . . . . . . .27
Estimating Target Size, Depth, & Shape . . . . . . . . . . . . . . . . . . . . . . . . .28
False Signals & Chatter . . . . . . . . . . . . . . . . . . . . . . . . . . . . . . . . . . . . . .29
Adjusting Sensitivity . . . . . . . . . . . . . . . . . . . . . . . . . . . . . . . . . . . . . . . . .31
Tips on Ground Balancing . . . . . . . . . . . . . . . . . . . . . . . . . . . . . . . . . . . .32
Detecting Activities
Coinshooting . . . . . . . . . . . . . . . . . . . . . . . . . . . . . . . . . . . . . . . . . . . . . . .33
Relic Hunting . . . . . . . . . . . . . . . . . . . . . . . . . . . . . . . . . . . . . . . . . . . .33-34
Gold Prospecting . . . . . . . . . . . . . . . . . . . . . . . . . . . . . . . . . . . . . . . . .35-36
Cache Hunting . . . . . . . . . . . . . . . . . . . . . . . . . . . . . . . . . . . . . . . . . . . . .36
Shallow Water Hunting . . . . . . . . . . . . . . . . . . . . . . . . . . . . . . . . . . . . . . .37
Salt-Water Hunting . . . . . . . . . . . . . . . . . . . . . . . . . . . . . . . . . . . . . . . . . .37
How Metal Detectors Work . . . . . . . . . . . . . . . . . . . . . . . . . . . . . . . . . . . . . . . .38
Treasure Hunter’s Code of Ethics . . . . . . . . . . . . . . . . . . . . . . . . . . . . . . . . . .38
Warranty . . . . . . . . . . . . . . . . . . . . . . . . . . . . . . . . . . . . . . . . . . . . . . . . . . . . . . . . .39
Accessories . . . . . . . . . . . . . . . . . . . . . . . . . . . . . . . . . . . . . . . . . . . . . . . .Back Cover
3

OPERATING MANUAL &GUIDE TO METAL DETECTING
Specifications
Mechanical: 3-piece breakdown aluminum pole system, batteries under elbow,
Armrest adjustment - forward/backward.
Search coil: 9 3/4” open-frame waterproof concentric elliptical search coil.
Batteries: 4 AA, alkaline (not included).
Weight: 2 pounds 15 ounces (1.3kg), with alkaline batteries installed.
Operating Principle: VLF induction balance
Operating Frequency: nominal 13 kHz, quartz crystal timing reference
Basic Sensitivity: 6 x 10
Lag Coefficient: 78 milliseconds
Overload: standard 10” elliptical concentric
Resistive Overload: approximately 1,200 micro-cgs units (volume susceptibility)
Ground Balancing
Range: From ferrite to salt, inclusive
Discrimination
Ground Suppression: combination of second and third order methods
ID Ground
Suppression: third order
Battery Life: Typically 40 hours with high quality alkaline batteries
9
root Hertz (detectivity)
Reactive approximately 10,000 micro-cgs
Resistive approximately 1,200 micro-cgs
accessory 1
Reactive approximately 30,000 micro-cgs
Resistive approximately 3,700 micro-cgs
4,800 micro-cgs units with sensitivity < 30.
Estimated 80 hours with nickel oxyhydroxide batteries
Estimated 65 hours with lithium iron disulfide batteries
1” bi-axial
Operating
T
emp Range: 4 to +122 degrees F (-20 to +50 degrees C)
Operating
Humidity Range: 0-90% non-condensing
4

Quick Start
Use your F70 right out of the box
1. Assemble the detector (see instructions beginning page 4).
2. Install four AA
3. Turn the knob, located under the armrest, fully clockwise.
This turns the machine on and sets audio volume to maximum.
4. When first turned on, the
Discrimination Level = 15 (iron eliminated) in both program-1 and -2.
Speed = dE
Sensitivity = 60
Threshold = 0
Number of Tones = 3
Sweep the search coil from side to side, parallel to the ground. Keep the search coil
moving over the ground. If you stop moving the search coil, the sound will also stop.
Probable target type will be indicated at the top of the LCD screen.
5. If the search coil is not in motion and not close to metal, the detector should be silent.
6. If you experience false signals from electrical interference, from the soil itself, or from lots
of trash metal, press MENU button until:
Sensitivity is highlighted.
Press “-” as needed
Reduce the sensitivity setting until the false signals go away.
After 7 seconds, the machine will exit the menu, unless you exit
by pressing MENU first.
7. Toss a coin on the ground and sweep back and forth over it a few times to get a feel for
how the machine responds.
alkaline batteries. All positive (button-end) terminals point up.
F70 starts out in the Discrimination mode, with presets at:
8. You are now ready to search.
9. Press-and-Hold the PINPOINT button to pinpoint the exact location of targets, making
them easier to unearth.
When Pinpoint is held ....
The search coil need not be in motion to detect an object.
The 2-digit numeric display indicates approximate target depth, in inches.
5
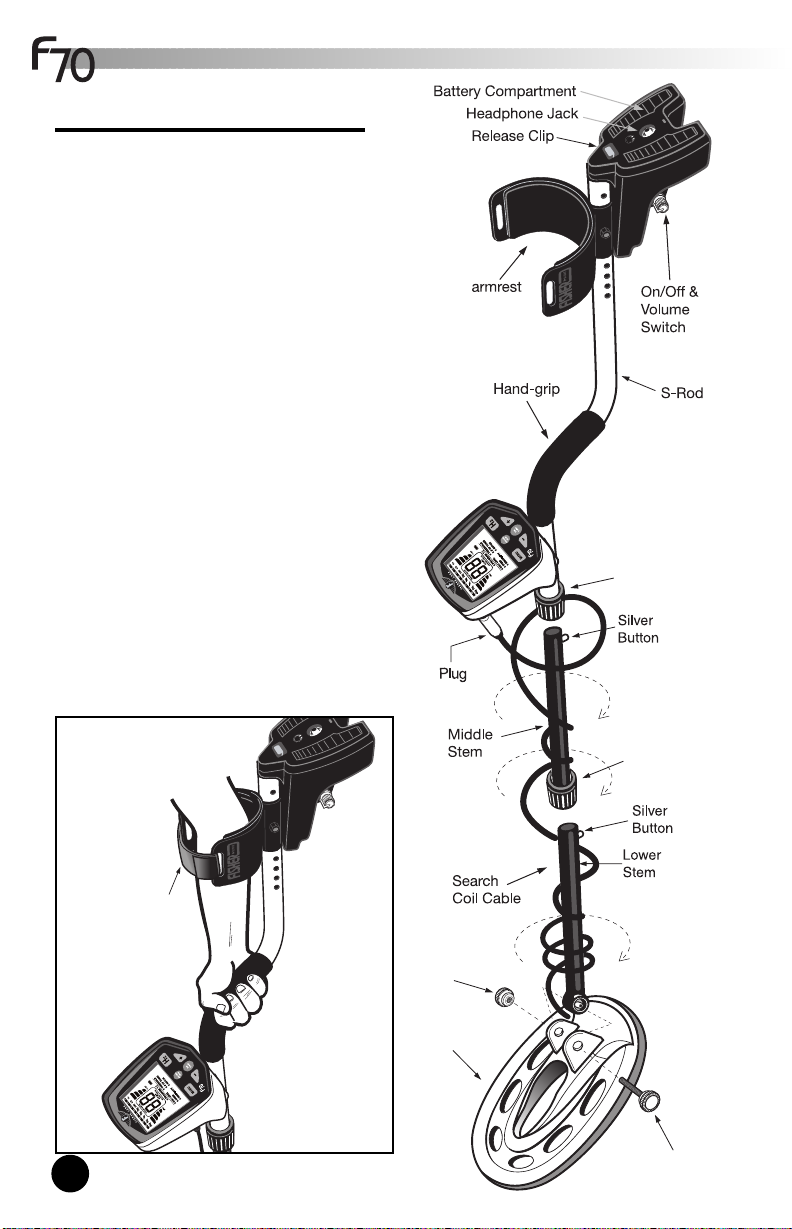
OPERATING MANUAL &GUIDE TO METAL DETECTING
Coil
Knob
Coil Bolt
Top
Locking
Collar
Lower
Locking
Collar
Biaxial
Search Coil
Optional
Arm Strap
Assembly
Adjusting the Arm Rest
The Arm Rest may be moved forward or
backward by removing the single screw and nut,
and then repositioning the 2-piece Arm Rest.
Users with shorter arms may find the Arm Rest
more comfortable in the forward position. In order to
move the Arm Rest backward, the plastic plug must
be removed from the aluminum tube.
Arm Rest Strap
(optional accessory)
The Arm Rest Strap accessory can be purchased
separately. Some users prefer to use the strap
when swinging the detector vigorously, in order
to hold the detector securely against the arm.
The detector can always be used without the
strap, with no compromise to detector balance
and stability under most conditions.
6
Assembly (continued)
Loc
kin
g
Col
lar
Loc
kin
g
Col
lar
S-R
od
Vel
cro
Str
ap
Vel
cro
Str
ap
Knurle
d
Kno
b
Bolt
Hand
-
grip
Low
er
Stem
Middle
Stem
Cab
le
Plu
g
Sea
rch
coil
S-ROD
LOCKING
COLLAR
INTERNAL
CAM LOCK
SILVER BUTTON
MIDDLE
STEM
S-ROD
MIDDLE STEM
Assembly is easy and
requires no tools.
1
Position detector upright.
●
2
Rotate the LOCKING COLLAR fully in
●
a counter clockwise direction.
3
Insert your finger inside the tube and
●
make sure the INTERNAL CAM LOCK
is flush with the inside of the tube.
4
Insert the MIDDLE STEM into the S-
●
ROD.
5
Rotate the MIDDLE STEM until the SILVER BUTTON locates
●
in the hole.
6
Twist the LOCKING COLLAR fully in the clockwise direction
●
until it locks.
7
If your detector has 3 tubes and 2 Locking Collars, repeat this
●
process on the Lower Stem.
8
Position the Lower Stem with the Silver Button toward the back.
●
Using the Bolt, Single Rubber Washer, and Knurled Knob, attach
the Searchcoil to the Lower Stem.
9
Adjust the Lower Stem to a length that lets you maintain a
●
comfortable upright posture, with your arm relaxed at your side,
and the Searchcoil parallel to the ground in front of you.
10
Wind the Cable securely around the Stems.
●
A loose or moving Cable can cause false signals.
11
Connect Cable Plug to housing.
●
Do not twist the Cable or Plug. Turn Locking Ring only. Use
minimal finger pressure to start the threads. Do not cross-thread.
When the Locking Ring is fully engaged over the threaded
connector, give it a firm turn to make sure that it is very tight.
When the Locking Ring is fully engaged over the threaded
connector, it may not cover all of the threads.
12
Tighten both Locking Collars.
●
13
Secure the Cable with the 2 Velcro Straps provided, one on the
●
Lower Stem close to the Searchcoil, and one on the Upper Stem,
close to the housing. Leave just enough slack in the Cable, at the
Searchcoil end, to be able to rotate the Searchcoil a small amount
about the Bolt. After full assembly and upon first use in the field,
check this adjustment. It is very important to keep the Cable secure
against the Stem, especially at high Gain, as movement in the
Cable may cause false signals.
7

OPERATING MANUAL &GUIDE TO METAL DETECTING
Mechanicals
BATTERIES (not included)
The F70 requires four AAbatteries.
These
non-rechargeable chemistries may be used: Alkaline, Nickel Oxy-Hydroxide
(Panasonic Oxyride or Duracel PowerPix), and lithium iron disulfide (Energizer L91).
Nickel metal hydride and nickel-cadmium
rechargeable chemistries may also be used.
Zinc-carbon and so-called “heavy duty” batteries may not work, especially in cold weather
Do not use these batteries.
Expect 40 hours of service in the field with one set of alkaline batteries.
Rechargeable batteries will usually deliver over 25 hours of service without recharging, but
when they start running low
Always install batteries which are of the same type and the same state of charge. Otherwise
battery life will be determined by the weakest battery, because the good batteries cannot
deliver their power with a dead battery blocking the current.
All 4 batteries are installed with the
The LCD screen shows battery condition on the right.
, they die suddenly with little warning.
positive terminals facing upward.
.
ARM REST
The arm rest is adjustable up and down the pole.
If you notice unwanted movement while swinging the detector, check the tightness of the
locking collars.
The locking collars must be rotated a full 270° to reach the locking position.
HEADPHONES (not included)
The F70 is equipped with a standard 1/4-inch stereo headphone jack at the rear of the unit,
located under the elbow as you hold the detector for use.
plug should work; headphones with a mono plug will not work.
may not be compatible.
shorter than three meters.
This device is to be used with interconnecting cables/headphones
Any headphone with a 1/4” stereo
A few electronic head phones
Using headphones (not supplied) improves battery life, and prevents the sounds from
annoying bystanders. It also allows you to hear subtle changes in the sound more clearly
particularly if searching in a noisy location. For safety reasons, do not use headphones near
traf
fic or where other dangers, like rattlesnakes, are present.
This device is to be used with interconnecting cables/headphone cables shorter than three meters.
,
8

Introduction to the Fisher F70
HIGH PERFORMANCE The F70 is a multi-purpose high-performance computerized metal
detector. It has the high sensitivity and ground balancing control needed for even the
most challenging soil conditions, the discrimination responsiveness needed for serious
relic hunting under difficult conditions, and visual target ID considered essential in
searching for coins. The
jewelry as well as to coins. The
concentric elliptical search coil for broad sweep yet narrow target pinpointing.
USER COMFORT The F70 is among the lightest and best balanced of all high-performance
metal detectors, so you can hold and swing it almost effortlessly. The grip is durable highfriction foam elastomer, comfortable in any kind of weather. The controls are
conveniently located and easy to learn how to use. Locking collars on the tubes
eliminate rattling.
EASY-TO-USE & INFORMATIVE INTERFACE The entire menu is always visible on the
LCD display. The LCD display indicates the electrical signature (target I.D.) of the
detected metal object. The display provides continuous information on battery condition
and on ground mineralization, which affects detection depth.
LOW OPERATING COST The F70 is powered by four AAalkaline batteries, which will
typically last for more than 40 hours of use before needing replacement.
DESIGNED BY SOME OF THE INDUSTRY’S MOST TALENTED ENGINEERS The lead
engineer on the
credits include the F75, F4, and F2. Assisting John Gardiner were John Griffin, Dave
Johnson, Mark Krieger, and Gerhard Staiger.
F70 design team was John Gardiner. John’s previous Fisher design
F70 operates at 13 kHz for good sensitivity to gold nuggets and
F70 comes with a 9 3/4”-inch open-frame waterproof
MECHANICAL ENGINEERING
While the F70 is robustly engineered for outdoor use, it is not indestructible and it is not
waterproof.
RESET function
The F70’s microprocessor will save all settings which you input, even after the power is
turned off.
If you wish to reset the settings to the factory preset, follow this process:
1. Turn detector off.
2. Press-and-hold both the GROUNDGRAB and MENU buttons.
3. Turn the detector on, while you are still pressing the buttons.
4. Detector displays “88”.
5. Release the buttons.
6. The detector is reset, and operating in program-1.
9
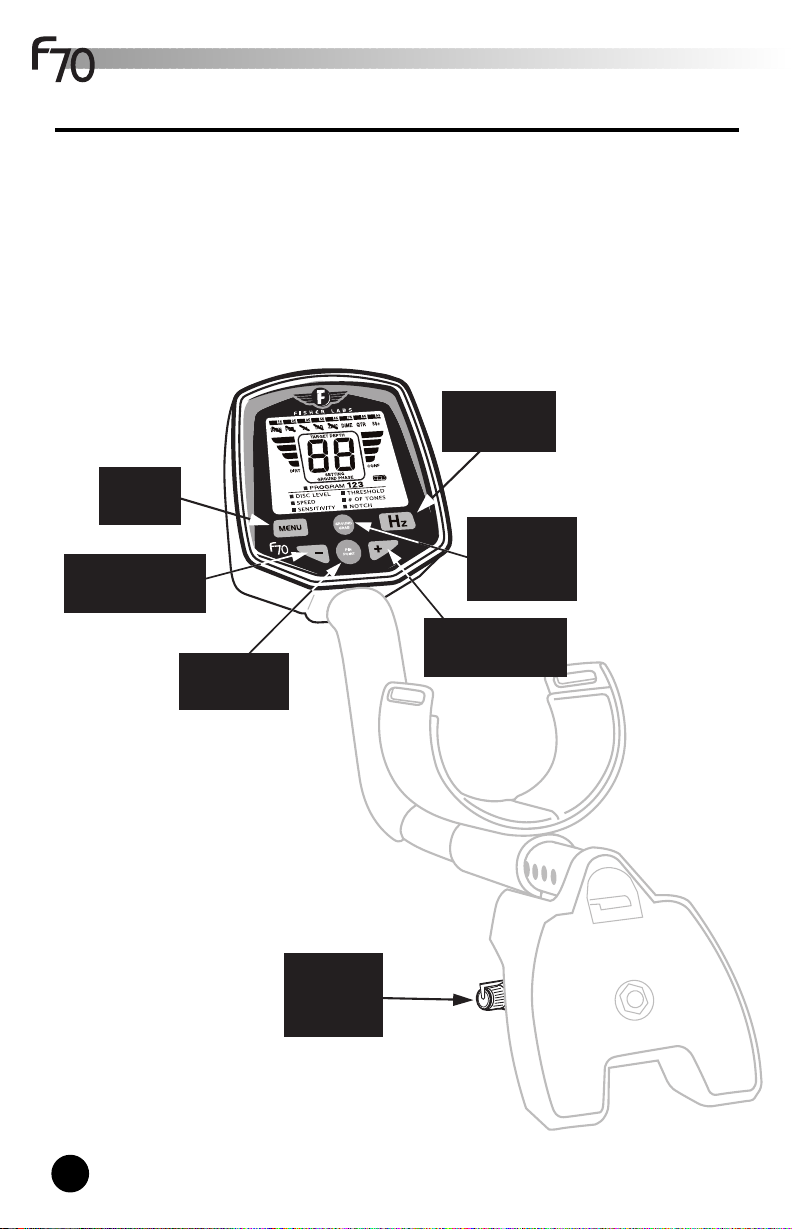
OPERATING MANUAL &GUIDE TO METAL DETECTING
Frequency
Shift
On/Off &
Volume
Pin-Point
Menu
Control
Minus
Programming
Plus
Programming
Ground
Balance
Activation
Controls
ON-OFF & VOLUME Knob
This knob turns the machine on or off, and controls speaker volume and headphone volume.
Knob position has no effect on detector’s sensitivity or susceptibility to noise from electrical
interference
The F70 has six controls on the front panel.
(Under the elbow)
10

Controls (continued)Search Techniques (continued)
MENU button
Push the MENU button to:
1. Step through the menu selections on the display.
With each push of the button, the next menu selection will be
highlighted.
The - or + buttons then allows you to change values for the highlighted
selection.
2. Recall the last setting which you adjusted.
After you have adjusted a setting, the
highlighted next to this menu selection. One push of the MENU button
will recall that selection and display the stored value.
This recall function is useful for a value you want to adjust frequently.
■
indicator will remain
+ and - buttons
Press + or - buttons to change the settings (or value) of the highlighted menu selection
you have chosen.
PINPOINT button
While the button is depressed, metal objects are temporarily detected without the need for
search coil motion. This aids in pinpointing the exact location of objects which were found
while searching in the Discrimination or Autotone modes.
GROUND GRAB
Press-and-hold the button to activate automatic ground balancing. The internal computer
measures the magnetic properties of the soil in order to cancel interference from naturallyoccurring minerals in the ground. After the detector measures the soil in this manner, the
detector then uses this information to control operation in both the Discrimination and Autotune
search modes. GROUND GRAB can be used at any time during operation. The coil must be
pumped up and down over the ground while holding the button. See section on ground
balancing.
Hz
Pressing this button changes the detector’s operating frequency. Use this feature if you
suspect that the detector is behaving erratically due to the presence of electrical interference
from some other electronic device. Press and release one time to change to another
frequency. Default value is 4. There are a total of 7 frequencies.
frequencies, you need to ground balance the detector again, as changing operating
frequencies will move the ground balance point.
Note that after changing
11
OPERATING MANUAL &GUIDE TO METAL DETECTING
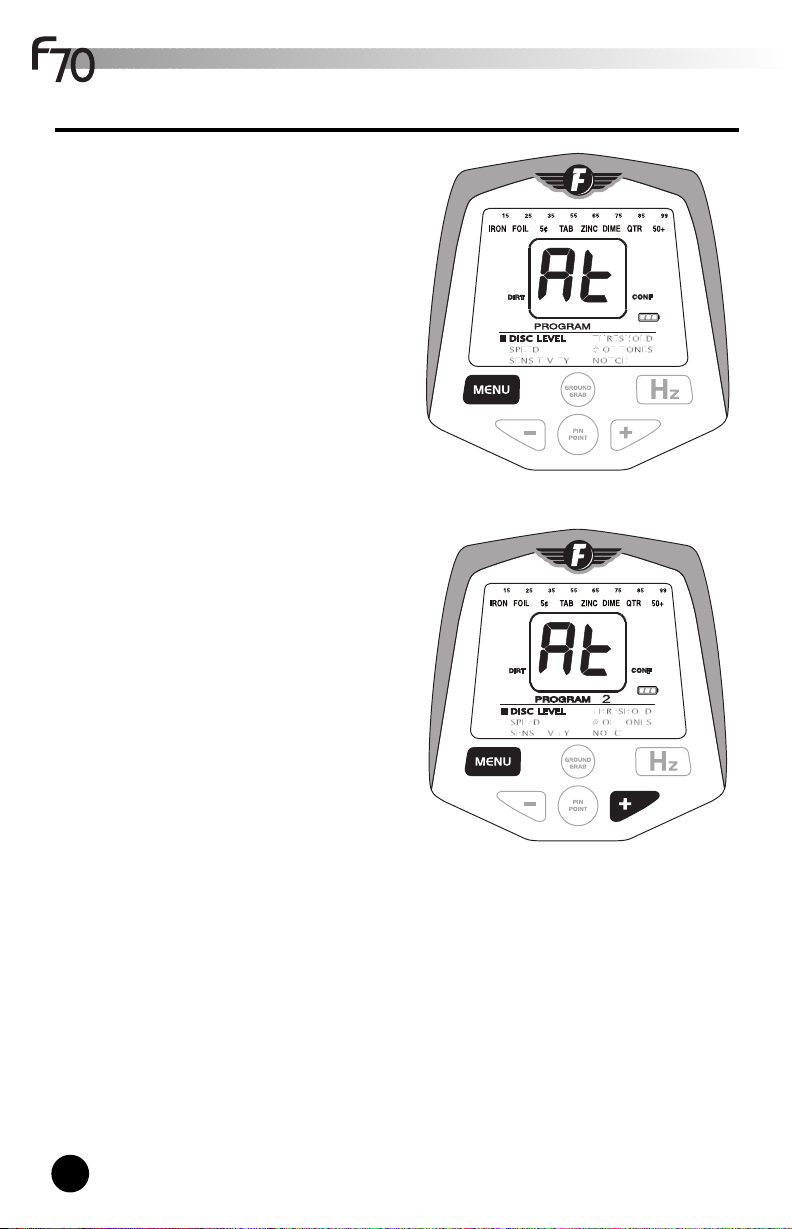
The Menu System
The entire menu is printed on the LCD display.
There are two search modes, Discrimination and
Autotune.
To select the
To return to
Each search mode has several adjustable function
settings:
AUTOTUNE: Speed, Sensitivity, Threshold.
DISCRIMINATION: Discrimination Level, Speed, Sensitivity, Threshold, # of Tones, and Notch.
You can establish two different sets of program settings
Autotune mode:
1. Press MENU until the DISC LEVEL line of
the menu system is highlighted.
2. Press “-“ until the display reads
Discrimination mode:
1. Press MENU until the DISC LEVEL line of
the menu system is highlighted.
2. Press “+” until a value other than
displayed.
for recall, using the PROGRAM selection.
- The number next to “PROGRAM” indicates
which program is active.
- To change from one program to another, press
“+” or “-“ while “PROGRAM” is highlighted.
- Press “+” to choose program-2.
- Press “-“ to choose program-1.
“At”.
“At” is
One convenient application for PROGRAM is to
change easily between the Autotone and
Discrimination modes.
To do this, program the two modes as follows:
1. Go to DISC LEVEL. Select
2. Then press MENU until “PROGRAM” is highlighted.
Press “+” or “-“ to change the program number.
Then press MENU to move down to DISC LEVEL and press “+” or “-“ to choose a DISC
LEVEL setting other than
Then toggle between the two modes, or programs, as follows:
1. Press MENU until PROGRAM is highlighted.
2. While “PROGRAM” is highlighted, press “+” or “-“ to change between modes.
If you are programming the detector after pressing MENU and do not press a button after 7
seconds, the detector will exit the menu system automatically, and resume normal operation.
Any value currently displayed will be saved into memory.
If you press the MENU button while the machine is in normal operation, the user interface will
return to the last menu selection you had adjusted. The last menu selection is indicated while
the menu system is inactive with a highlighted
“At”.
“At” with “-“ button.
■
symbol.
12

Ground Balancing
WHAT IS GROUND BALANCING?
All soils contain minerals. Signals from ground minerals are often tens or hundreds of times
as strong as the signal from a buried metal object. The magnetism of iron minerals, found in
nearly all soils, causes one type of interfering signal. Dissolved mineral salts, found in some
soils, are electrically conductive, causing another type of interfering signal.
Ground Balancing is the process by which the metal detector cancels the unwanted ground
signals while leaving signals from buried metal objects intact. This is accomplished by
establishing the detector’s internal Ground Balance setting; this setting is calibrated to the soil
and eliminates the signal produced by ground minerals.
Calibration to the actual soil condition will result in deeper target
detection, quieter operation, and more accurate target identification.
This calibration, or Ground Balancing, can be accomplished
automatically with the detector’s internal computer, by pushing the
GROUND GRAB button and bobbing the coil over the ground.
The ground balance setting carries through into both operating
modes. In Discrimination mode, the ground signal is generally
inaudible unless the discrimination setting is 0.
GROUND BALANCING PROCEDURE
(GROUNDGRABTM)
1. Find a spot of ground where there is no metal present.
2. Hold the detector with the search coil about one
foot above the ground.
3. Push-and-hold the GROUND GRAB
button.
4. Physically
detector up and down over the ground.
Lift it about 6 inches above the ground and
lower it to within 1 inch of the ground, about
once or twice a second.
5. A2-digit value will appear on the display. This
is the Ground Phase setting.
If the detector’s internal computer is unable
to ground balance, you will continue to hear
sound and no 2-digit number will appear on
the screen.
If you are in DISC mode and
do not ground
balance
successfully, try
changing to
Autotune, and reattempt the
groundgrab
procedure.
pump the search coil and
Note: GROUND
GRAB will not
automatically balance
over highly conductive
soils, such as a wet
salt water beach.
13

OPERATING MANUAL &GUIDE TO METAL DETECTING
Ground Balancing (continued)
The range of ground balance settings indicated on the display range from 0 to 99.
DIRT
The DIRT bar graph on the LCD display indicates the amount of magnetic mineralization. The
search coil must be in motion to measure mineralization. The most accurate measurement is
obtained by
pumping the search coil, as in the Ground Balancing procedure.
The two-digit GROUND PHASE number displayed on the LCD indicates the
mineralization.
Some typical ground mineralization types are:
0 – 10 Wet salt and alkali.
5 – 25 Metallic iron. Very few soils in this range. You are probably over metal.
26–39 Very few soils in this range -- occasionally some saltwater beaches.
40–75 Red, yellow, and brown iron-bearing clay minerals.
75–95 Magnetite and other black iron minerals.
type of ground
14

Ground Balancing (continued)
When ground balancing, try to “feel out” a spot on the
ground to make sure there is no metal present.
In order to avoid locking onto metal, the detector will not
balance in DISCRIMINATION mode where the GROUND
PHASE is less than 40.
enter AUTOTUNE mode (DISC LEVEL= At) and then perform
the ground balancing procedure.
If the ground balance adjustment is incorrect, there will be a
difference in the sound as the search coil is either moving
toward or away from the ground. It sounds like you are
pulling the sound out of the ground, or pushing the
either
sound into the ground.
• If the sound gets louder as you raise the search coil,
ground balance setting is too low.
• If the sound gets louder as you lower the search coil,
the ground balance setting is too high.
Positive and Negative Response
The purpose of ground balancing is to adjust the metal
detector to ignore ground minerals. If the setting is
incorrect, ground minerals will give either a
negative response, depending on which direction the
adjustment is off. If the ground balance setting is not
accurate, repeat the GROUNDGRAB procedure.
Where the ground reads less than 40,
The detector will not balance in
DISCRIMINATION mode where the
GROUND PHASE is less than 40
positive or a
POSITIVE RESPONSE
If the Phase setting is too high a number, the response of
minerals will be
coil is lowered to the ground in Pinpoint or Autotune, the sound
will get louder as the search coil approaches the ground. The
sound will grow quieter as the search coil is raised. What, if
anything, you will hear in discrimination mode depends on the discrimination setting.
When searching in an AUTOTUNE mode, if ground balance is properly set to cancel the
ground, and you sweep over a
of a metal object.
NEGATIVE RESPONSE
If the PHASE setting is too low a number, the response of minerals will be negative. When
the search coil is lowered to the ground in Pinpoint and Autotune mode, the machine will be
silent. The machine will sound off as the search coil is lifted away from the ground. What, if
anything, you hear in discrimination model depends on the discrimination setting.
When searching in AUTOTUNE mode, a
passing over it, making it difficult to know where it is located. It will not have the sound and
“feel” of a metal object.
positive. This means that when the search
positive hot rock, the rock will give a “zip” sound similar to that
negative hot rock will produce a “boing” sound after
If the ground reads less than 40,
enter AUTOTUNE mode (see
Menu System pg. 12)
15

OPERATING MANUAL &GUIDE TO METAL DETECTING
WRONG
RIGHT
Autotune Mode
The Autotune mode is more sensitive and offers better feel than the Discrimination mode, and
is used to find all metal objects present in the ground. The search coil must be in motion for
objects to be detected. This is a single filter search mode similar to the “fast autotune”,
“SAT”, or “P4” mode found in other detectors you might already be familiar with.
SPEED
There are two speed
selections, DEFAULT and
SLOW:
dE = default.
dE provides the best target
separation.
SL = slow.
SL provides more sensitivity to
deep targets. SL is more
likely to result in noisy
detector operation at high
sensitivity levels.
SENSITIVITY This controls the signal gain, and is
adjustable from 1 to 99. In the presence of electrical
interference, high ground mineralization, or variable ground
mineralization, operation will usually be too noisy (wobbly
and erratic sound) if the sensitivity is set too high. At
settings above 90, the internal circuit noise of the machine
will probably be audible. The sensitivity level setting is
largely a matter of personal preference. However, if you
cannot hear at least some noise, the smallest or deepest
objects will not be detected
16
THRESHOLD
Adjustable from -9 to 9.
At 9, you will hear the loudest background sound.
At -9, you will have the lowest possible level of background
sound.
This is also referred to as audio threshold. For maximum
ability to hear the weakest signals, adjust this audio
threshold high enough so that it is barely audible while the
detector is in use in the field. To eliminate the weakest
signals, adjust the audio threshold level into the negative
region, which will allow the machine to run silently if the
Sensitivity is not set too high.

Discrimination Mode
The Discrimination Mode is used to eliminate trash metal objects from detection, e.g. nails, aluminum
foil, or pull-tabs. The search coil must be in motion for metal objects to be detected. In comparison
to the Autotune mode, discrimination incurs some loss of sensitivity to small or deep objects.
DISCRIMINATION LEVEL
This is adjustable from 0 to 65, and controls the range of objects to
be eliminated from detection (discriminated out or rejected).
Objects with numeric values below the selected discrimination level
will not be detected. NOTE: the numerical range that pertains to
each class of object is printed at the top of the visual display. To
eliminate iron, a setting of 15 is usually about right. Asetting of 65
will eliminate aluminum trash and zinc pennies, but nickels will also
be lost, unless you notch-in nickels with the NOTCH feature.
To use DISC LEVEL
1. Highlight DISC LEVEL using the MENU button.
2. Press “+” or “-“ to choose a number between 0 and 65.
3. Aslash will appear over the word describing the target category being eliminated.
When you select a value within any range, the slash will appear,
within that range might not be eliminated from detection.
To recall the discrimination setting, press the MENU button until you enter the DISC
LEVEL feature.
SPEED
There are two speed selections, DEFAULT and SLOW:
dE = default.
SL = slow.
Slow speed provides more depth detection on more highly conductive
metal objects. SL is more likely to result in noisy detector operation.
even though all values
SENSITIVITY
This controls the signal gain, and is adjustable from 1 to 99. In the presence of electrical
interference, high ground mineralization, or variable ground mineralization, operation will
usually be too noisy (wobbly and erratic sound) if the sensitivity is set too high. At settings
above 90, the internal circuit noise of the machine will probably be audible. The sensitivity level
setting is largely a matter of personal preference. However, if you cannot hear at least some
noise, the smallest or deepest objects will not be detected.
THRESHOLD
This control is useful in managing electrical interference and for eliminating shallow trash
objects from detection.
In Discrimination Mode, this control also acts as a target size filter.
Adjustable from -9 to 9.
9 = accepts the smallest size targets. The detector may be noisy at this setting.
-9 = The maximum amount of elimination of small targets.
The detector will operate quietest at the -9 setting.
If you wish not to detect a target of a given size, or if you are detecting a specific small
target, and wish not to detect it, then lower the threshold number.
17

OPERATING MANUAL &GUIDE TO METAL DETECTING
Discrimination Mode (continued)
NUMBER OF TONES
This menu selection allows you to select the number of audio tones emitted by the detector.
Different search conditions, search objectives, or personal preference will determine how
many tones you want to hear. With the below settings, you can decide to hear the same tone,
regardless of the target category, or have different categories of targets induce different tones.
The “# OF TONES” selections are:
1: SINGLE MEDIUM PITCH TONE.
All types of metal induce the same tone.
1F: MEDIUM-TO-HIGH PITCH TONE varying in proportion to target signal strength.
Large shallow objects will produce a squeal. The variable audio pitch provides you more
information about the detected object, but some people find the sound on strong signals too
annoying.
2F: TWO TONES.
Similar to
Useful if you want to hear all targets and want to identify iron. Most relic hunters prefer this
selection. If target is not iron, the pitch varies according to signal strength.
3H: Same as 3, except that nickels produce a high tone.
3: THREE DIFFERENT AUDIO TONES. Iron produces a low pitch tone. Aluminum trash, zinc
pennies, and nickels produce a medium tone. High conductivity coins produce a high tone.
The 3-tone selection is often preferred for coinshooting. Most users will set the
discrimination level below nickels, at about 25, and dig only objects that produce a
consistent and repeatable high tone.
consistent high tones, similar to coins.
1F, except that iron produces a low-pitched tone regardless of signal strength.
(# OF TONES)
NOTE: with this setting, steel bottle caps may produce
4H: Same as 4, except that nickels produce a high tone.
Useful when coinshooting in a trashy area.
4: FOUR DIFFERENT AUDIO TONES This selection is similar to 3, but with a fourth medium-
high tone for targets in the numeric range of 53 to 65. This four-tone system is useful for
searching in areas where there may be very old coins which register in this range.
dP: DELTA PITCH This setting produces a tone whose pitch
varies in relation to the visual ID number -- the higher the
ID, the higher the pitch. Good for relic hunting. This setting
is also useful in areas with a high concentration of steel
bottle caps. Coins will produce a fairly constant pitch as
you sweep back and forth. Bottle caps produce
inconsistent tones, often with a
the sound.
squawk at the beginning of
18

Discrimination Mode (continued)
NOTCH
Unlike Discrimination Level, which eliminates all targets from the left of the scale to the right,
NOTCH can eliminate and re-include targets within the scale displayed at the top of the display.
Inclusion or exclusion of target ranges is indicated with a crossed icon.
To demonstrate how to set a notch, follow this instruction at first use.
RESET DETECTOR
1. Turn detector off.
2. Press-and-hold both the GROUNDGRAB and
MENU buttons.
3. Turn the detector on, while you are still pressing
the buttons.
4. Detector displays “88”.
5. Release the buttons.
6. The detector is reset, and operating in program-1.
Then press MENU button to move down to the
NOTCH selection.
1. Press “+” until the number
Then press MENU again to accept this notch
value. You must press menu to accept the
notch setting. If MENU is not pressed, the
display will time out with a notch programmed.
3. Notice that a slash appears across the word
“TAB” printed on the top of the display.
5. All targets in the of the TAB range (TAB range
is from 36 to 55) will be
eliminated from detection.
40 appears.
The following are characteristics of NOTCH programming:
• As you press + or - to enter a notch range, the
target indicator block at the top edge of the screen illuminates to show you the range
you are in.
• After you have selected a notch, by pressing MENU again, a slash is illuminated (or
not) over that range, indicating that all targets within that range are eliminated (or
not) from detection.
• When you enter the program to make a change to the notch settings, you are
changing the status of the notch. If no slash is illuminated and then you press
MENU to set a notch range, you will be
previously illuminated and you press MENU to set this notch range, you will be
notching-in this range.
•
Programming a notch range always reverses the status of the notch.
notching-out this range. If a slash was
19

OPERATING MANUAL &GUIDE TO METAL DETECTING
Pinpoint Feature
After a buried target has been located using the Autotune
or Discrimination modes, you want to pinpoint the exact
location of the target in order to facilitate its recovery.
Accurate target pinpointing will minimize digging.
Activate the Pinpoint feature by pressing-and-holding the
PINPOINT button. Unlike the Autotune and
Discrimination modes, Pinpoint does not require motion to
detect metal. Pinpoint will detect objects while the coil is
in motion and will continue to detect metal if search coil
motion stops over the target.
GROUND PICK-UP
If you have not performed the ground balancing procedure, the Pinpoint feature usually causes
the ground to sound off. This means that while pressing-and-holding the Pinpoint button, the
audio tone will get louder as you lower the search coil to the ground; this is called
Since you want to hear the target, rather than the ground, we recommend first ground
up.
balancing in order to eliminate ground pick-up. Alternatively, if you experience ground pick-up,
you may place the coil very close to the ground, off to the side of the target; then press-andhold PINPOINT, and raise the search coil slightly while passing it over the target.
HOW TO PINPOINT
Position the search coil an inch or two (2.5-5cm) above the ground, and to the side of the
target. Then press-and-hold PINPOINT. Now move the search coil slowly across the target,
and the sound will communicate the target’s location. As you sweep from side to side, and
hear no sound at the ends of the sweep, the target is located in the middle of that zone, where
the sound is loudest and the audio pitch is highest. If the sound is loud over a wide area, the
buried object is large. Use the Pinpoint feature to trace an outline of such large objects.
ground pick-
NARROW IT DOWN
To further narrow the field of detection, position the search coil near the center of the
response pattern (but not at the exact center), release the PINPOINT button and then
press-and-hold it again. Now you will only hear a response when the search coil is right
over the top of the target. Repeat this procedure to narrow the zone even further. Each
time you repeat the procedure, the field of detection will narrow further.
CONTROLLING SENSITIVITY IN PINPOINT MODE
If you wish to change the Pinpoint sensitivity setting, you must change the SENSITIVITY
setting.
BUY A PINPOINTER
When you kneel down to unearth the desired object, you may find it frustrating as the object
may appear exactly like the surrounding soil. You may hold the object in your hand, and find it
necessary to pass a handful of dirt over the search coil to see if it contains metal. An easier
way is to use a handheld pinpointer. It is a probe-like device which is poked into the ground,
making close up pinpointing a snap, reducing digging time, and minimizing the size of the
holes you will dig. Fisher Research Labs offers the
inexpensive device designed for this purpose.
FPoint™ pinpointer, a robust and
20

LCD Visual Display
In normal operation, when the search coil passes over a metal object, the electrical signature
(2-digit I.D.) of the metal object is displayed on the numeric display for 4 seconds, unless
superceded by another detected object. On a given buried object, the number will bounce
around if the signal is weak or if the amount of ground mineralization is high.
At the top of the display, a block illuminates to indicate the classification of the object.
NUMERIC TARGET I.D. (2-digits)
The following table shows the numbers typically associated with certain commonly
encountered nonferrous metal objects. Older silver U.S. coins usually read about the same as
their modern clad equivalents. Modern quarter-sized dollar coins like the Susan B. Anthony
and the Sacagawea read about the same as a quarter. Many Canadian coins are minted from
a magnetic nickel alloy which gives very inconsistent readings and may register as iron. Most
one-ounce silver bullion coins will fall into the same range as the modern U.S. $1 Eagle.
OBJECT TARGET I.D.
foil from gum wrapper 16-25
U.S. nickel (5¢ coin) typically 30
aluminum pull-tab 33-55
aluminum screwcap 60 - 70
zinc penny (dated after 1982) typically 60
aluminum soda pop can most often 63-69, but can vary widely
copper penny, clad dime typically 70
U.S. quarter (25¢ coin), clad typically 80
50¢ coin, modern clad typically 86
old silver dollar coin typically 90
US silver Eagle $1 coin typically 91
PROBABLE TARGET I.D.
The probable target ID zones at the top of the LCD display represent the signal ranges
produced by various coins and types of metal objects. When a metal target is detected, the
microcomputer analyzes the signal and categorizes it based on what kinds of metal objects
usually produce that kind of signal. The
microprocessor then displays a block
along the top of the LCD screen above
corresponding category.
For instance, if the detected signal fits
within the parameters usually exhibited
by zinc pennies, the microcomputer will
categorize the signal as "zinc penny".
The LCD screen will then illuminate the
block above the “ZINC”.
Copper pennies (pre-1982) will usually register in the DIME zone.
Most gold jewelry is small, and will tend to read in the 16-55 range. Silver jewelry usually has
more metal in it and therefore tends to produce higher readings.
21

OPERATING MANUAL &GUIDE TO METAL DETECTING
LCD Visual Display (continued)
Since different metal objects can produce similar signals, and since minerals in the soil can
distort the signals, the probable target ID's are just that -- probable. There is no way of
knowing for sure what's buried other than to dig it up. Experienced metal detector users have
a rule of thumb -- "when in doubt, dig".
TARGET
The target indicators are at the top edge of the
display. When a target is detected, a rectangle-like
indicator will illuminate over the target category
corresponding to the target’s electrical characteristics.
DEPTH
When the PINPOINT is pressed-and-held to facilitate
pinpointing an object, the numerical display indicates
the approximate depth of the object, in inches,
based on the assumption that the object is a typical
U.S. coin. Small objects will read deeper than they
actually are, and large objects will usually read
shallower than they actually are.
CONF (Target Confidence Indicator)
This 4-segment graphic indicates how confident the detector is of the 2-digit target identification
it has assigned. If all 4 segments are displayed, the detector is confident that the target ID is
accurate. If 2 or fewer segments are displayed, the confidence is low. If no segments appear
when the 2-digital ID is displayed, the detector has no confidence that the value is accurate; it
has assigned its best guess. Junk targets tend to produce lower confidence indications than
coin targets of similar electrical conductivity. Sloppy sweep technique also reduces the
confidence indication. You can use this indicator to train yourself to sweep more skillfully.
DIRT (Ground Mineralization Indicator)
This bar graph displays the relative amount of magnetic mineralization (i.e. magnetic
susceptibility) of the soil. The primary magnetic minerals in most soils are magnetite (black
sand), and maghemite (a red clay mineral). The depth to which objects can be accurately
identified is strongly influenced by the magnetic susceptibility of the soil. High values (4 bars)
have a greater effect on detection depth in the Discrimination mode than in the Autotune mode.
For the most accurate DIRT reading, pump the search coil as though you were ground
balancing.
DIRT
BARS Description
4 Uncommonly heavy mineralization
(not uncommon in goldfields)
3 medium mineralization
2 light mineralization
1 very light mineralization
blank White beach sands
22

LCD Visual Display (continued)
BATTERY CONDITION INDICATOR
Fresh alkaline batteries will illuminate all three bars.
When no bars are displayed and the batteries are
about to go dead, the left-most segment will start
flashing. Replace the batteries when the indicator
flashes. When no battery segments are illuminated,
the detector will lose power in a minute or so. The
detector should operate for about 30 minutes from
the time the indicator starts flashing. If using NiMH
rechargeable batteries, the display will remain stuck
on the second or third bar for most of the battery
life; when it drops to the first bar, the batteries will
go dead within several minutes.
GROUND PHASE
This is the ground balance setting, 0-99. It is
displayed when ground balancing with the
GROUND GRAB button.
SETTING
This is illuminated when you are in the menu,
adjusting a MENU selection value. When the
word “SETTING” is indicated, the number being
displayed is a setting, and not, for instance, a
Target ID indication.
23

OPERATING MANUAL &GUIDE TO METAL DETECTING
Hz: Frequency Shifting
One characteristic of a highly sensitive metal detector, operated at high sensitivity levels, is its
susceptibility to electrical interference from other electronic devices. If the detector chatters
while the search coil is not in motion, the cause is either electrical interference or internal
circuit noise due to a high sensitivity setting. If the detector chatters or emits intermittent false
signals in the field, you are also probably experiencing electrical interference. If you suspect
electrical interference, you may change the
method to try to find a frequency different from the suspected source.
To shift frequencies:
1. Press Hz.
2. Each frequency change requires a push of the MENU button.
Each actuation will shift the frequency by one value.
The LCD will display the frequency, from F1 to F7. F1 is the lowest frequency. F4 is default.
The
F70 will NOT retain a change in frequency setting when powered off.
See the Search Techniques section of this manual for more information on electrical
interference.
The ground balance point will change when you change frequency, so after changing
frequency, remember to re-balance using the GroundGrab procedure.
F70’s operating frequency. This is a trial and error
24

Capabilities and Limitations
WRONG
RIGHT
DEPTH
The F70 can detect U.S. coins to a depth of up to 13-14 inches (35cm) under good
conditions. Large objects (55 gallon drums, manhole covers, etc.) can be detected to a depth
of up to several feet (1-2 meters).
Electrical interference from power lines and from electrical appliances and electronic
equipment can reduce detection depth, or cause audible interference, making it necessary for
the user to reduce the sensitivity setting. Soils with large amounts of iron or salt minerals
may also reduce detection depth or necessitate a reduction in the sensitivity setting.
TARGET IDENTIFICATION
The F70 identifies the probable type of metal object by measuring its effective electrical
conductivity, which is displayed as a number from 0 to 99 on the LCD screen. The
electrical conductivity
orientation relative to the search coil. Since coins are minted to tightly controlled
specifications, they can be accurately identified. Identification of pull-tabs and foil is less
consistent because these kinds of targets come in wide variety. In general, smaller objects,
and objects made from lower conductivity alloys such as iron, bronze, brass, lead, pewter, and
zinc will read lower on the effective conductivity scale. Larger objects and objects made from
higher conductivity alloys such as silver, copper, and aluminum, will tend to read higher. The
notable exceptions are gold, which usually reads low because it is rarely found in large pieces,
and zinc pennies, which read moderately high because of their size and shape. Although nails
and other iron and steel objects will usually give low readings, ring-shaped pieces of iron (for
instance steel washers and harness rings) will usually produce medium to high readings. Flat
pieces of iron or steel, such as can lids, and steel bottle caps will occasionally do the same.
of an object depends on its metallic composition, size, shape, and
effective
Most targets can be identified accurately in air to a distance of about 10 inches (25cm) . The
minerals in many soils will cause identification to be less accurate. In most soils, effective
target identification can be achieved to a depth of at least 6 inches (15cm).
REQUIREMENT FOR MOTION: PINPOINT
FEATURE
As with other modern metal detectors, the
F70’s search coil must be kept in motion in
order to both detect and identify targets.
The Autotune mode is more forgiving of
sweep speed variation than is the
Discrimination mode.
The Pinpoint feature continues to detect
metal if search coil motion stops over the
target. The Pinpoint feature is used primarily
to Pinpoint the exact location of a target so
that it can be retrieved with a minimum of
digging, and does not provide target
identification.
25

OPERATING MANUAL &GUIDE TO METAL DETECTING
Capabilities and Limitations (continued)
GROUND BALANCING
To achieve maximum depth in any detection mode, as well as when using the Pinpoint feature, the
F70 offers the ability to cancel out ground minerals automatically using the GROUNDGRAB feature.
If you do not perform the ground balancing operation, the Discrimination mode will usually still
work fairly well, but the Autotune mode will not. The Pinpoint feature can be used for
pinpointing objects at moderate depth in most soils without prior ground-balancing.
The internal computer can cancel salt water only while in the Autotune mode.
DISCRIMINATION
Discrimination refers to a metal detector's ability to ignore metal objects in selected categories,
especially iron and aluminum. This makes searching much more pleasant in an area with a lot
of metal trash. The F70 offers a wide variety of discrimination features which you can select
according to the search conditions and your personal preference.
DEPTH READING
The estimated Depth Reading displayed when in Pinpoint mode is based on the strength of
the signal. It is calibrated for typical coin-sized objects. Smaller objects will read deeper than
they actually are, and large objects will read shallower than they actually are.
AIR TESTING
There may be times when you want to test or demonstrate the metal detector without
sweeping it over the ground, for instance, if not fully assembled, or if you are indoors.
To air test, place the search coil in a spot where the detector is stable and more
than two feet away from any large masses of metal, including the reinforcing steel
usually present in concrete. If you are wearing a wristwatch or jewelry on
your hand or arm, remove it. Then, test or
demonstrate by waving metal objects over the
search coil; wave objects briskly, several inches over the top
of, and parallel to, the search coil.
Ground balancing cannot be tested or demonstrated in air
unless you happen to have appropriate specimens of iron
minerals available.
SWEEP SPEED
The F70 is noted for its quick response. It permits the user to sweep the search coil quickly in
order to cover more ground with very little risk of losing targets. In general, if you are
searching an area where the desirable targets are more than 8 to 10 inches deep, a faster
sweep speed will detect to a greater depth and yield more accurate target IDs. Another way to
achieve greater depth detection is with the SL Speed Control.
CHECKING A TARGET
In order to most accurately verify a detected target with most other metal detectors, users will narrow
their sweep and loiter over the top of the target. The
advanced signal sampling system produces the most accurate target IDs with deliberate (shoulder
width) sweeps all the way across the target, even if there are other targets nearby. If you check
targets using sweep techniques learned on some other detectors, you run the risk of getting less
accurate target IDs. You can use the confidence level indicator to improve your technique.
F70 is different. The F70's quick response and
26

Search Techniques
SWEEPING SEARCH COIL (this does not apply to Pinpointing)
Keep the search coil in motion to detect targets. Sweep the search coil parallel to the ground;
do not lift the search coil at the end of the sweep.
When you have located a target and continue sweeping back and forth for verification, use
broad, deliberate sweeps across the target for the most accurate target ID. Do not use short
sweeps as you might with other metal detectors.
SHALLOW TARGETS
Shallow targets tend to give multiple responses, with the last response being the one that
remains illuminated on the visual display. This last response is usually sampled at the edge of
the search coil and will tend to be inaccurate. If you suspect a shallow target (within 2 to 3
inches of the search coil), lift the search coil slightly, and slow down your sweep speed until
you notice a single response consistently in the same place.
Large shallow targets can cause signal overload, indicated by the siren sound. In these
instances, raise the search coil until the overload warning disappears, and sweep at this
increased height.
LARGE TARGETS
If an overload warning is not confined to a small spot, you are probably overloading on a large
object, for example, a large iron pipe, reinforcing steel in concrete, or buried sheet metal. It is
usually not possible to locate objects, such as coins, in close proximity to large masses of metal.
PINPOINTING
When you turn the F70 on, the ground balance setting is preset to give a positive response on
nearly all soils. This means that if you holding the PINPOINT button, the audio tone will get
louder as you lower the search coil to the ground. But you do not want to hear the ground;
you just want to hear the target. So always Ground Balance first.
After you have discovered a buried metal target using the AUTOTUNE or DISCRIMINATION
Modes, use PINPOINT to find its exact location.
Position the search coil an inch or two (2.5-5cm) above the ground, and to the side of the
target. Then push PINPOINT. Now move the search coil slowly across the target, and the
sound will communicate the target’s location. As you sweep from side to side, and hear no
sound at the end of the sweep, the target is located in the middle of that zone, where the
sound is loudest and the audio pitch is highest. If the sound is loud over a wide area, the
buried object is large. Use the Pinpoint feature to trace an outline of such large objects.
27

OPERATING MANUAL &GUIDE TO METAL DETECTING
Search Techniques (continued)
ESTIMATING TARGET SIZE, DEPTH, AND SHAPE
When Pinpoint is activated, the LCD displays estimated depth. The estimate is based on the
presumption that it is a coin-sized target.
But what if it is not a coin-sized target? The most common example is that of an aluminum can.
Flattened aluminum cans are usually identified as zinc, pennies or as dimes. Their large size
will produce a strong signal, tricking the microcomputer into thinking that it is a shallow coin.
The following explains techniques for differentiating buried aluminum cans from coins. Sweep
back and forth to get a feel for the target, keeping the search coil close to the ground. Now,
continue to sweep back and forth as you slowly raise the search coil higher and higher. If the
response diminishes quickly and never gets very broad, the target is probably a coin. If the
response diminishes slowly as you lift the search coil, and you get a broad response, the
target is probably an aluminum can. If you practice this by laying a coin and a flattened
aluminum can on the ground, you will quickly understand how to differentiate the two and you
will probably never have to dig another aluminum can again. And, you will know whether it
was deep or shallow. This technique works well in the Autotune mode, and to a lesser extent
in Discrimination mode.
Objects which are ring-shaped, or flat and round like coins, tend to give a narrower, crisper
response than objects of similar size with irregular shapes. The easiest way to demonstrate
this is with an aluminum screwcap from a soda bottle. In its normal shape, it occupies a
volume, and gives a somewhat broader response than that of a coin. But if you flatten it, the
response will be crisper and more like that of a coin. Again, these differences are most readily
noticed in the Autotune mode.
Long skinny iron or steel objects such as nails usually produce a double response when
scanned lengthwise, and a weaker single response when scanned crossways. This is most
noticeable in the Autotune mode. However, a coin lying on its edge can produce a similar
response, so rely on both the target ID as well as
kinds of objects. Objects within 2 inches (5cm) of the search coil will often produce multiple
responses as you sweep across them, because the response field close to the search coil is
irregular.
target feel to distinguish between different
28

Search Techniques (continued)
ESTIMATING TARGET I.D.
With a single sweep over a target, you will usually see a 2-digit target ID displayed on the
LCD. Repeated sweeps back and forth over the target may cause the 2-digit target ID values
to change with each sweep of the coil; this may seem inconsistent with your discrimination
setting. These variations and inconsistencies provide important clues regarding the identity of
the buried object.
The visual ID and the discriminator are independent systems which analyze different sets of
signals. Therefore what you hear, or do not hear, provides additional information regarding
target ID. For instance, if discrimination is set at 12, and most sweeps result in no visual
target ID, the target is most likely iron even though the majority of the ID numbers will be
greater than 12.
The
F70 has a tendency to up-average nonferrous targets in the proximity of iron, indicating ID
numbers higher than would be obtained in an air test. This tendency is connected with the
F70’s enhanced see-through ability – that is, the ability to find valuable targets in an area
where there is a lot of iron trash.
FALSE SIGNALS AND CHATTER
At times the detector may beep when there is nothing there, or it may seem like there is
nothing there. There are five major causes for this: electrical interference, nuisance buried
objects, ground minerals, hot rocks, and sensitivity set so high that internal circuit noise is
audible. The problem can usually be corrected by reducing the sensitivity setting, but
sometimes other measures can also be taken.
ELECTRICAL INTERFERENCE
Electrical Interference can be caused by power lines, appliances, computer equipment, cell
phones, fluorescent and vapor type lamps, household light dimmers, other nearby metal
detectors, electric fences, radio transmitters, and electrical storms. If you get abnormal noise
while holding the search coil motionless in the air, the cause is electrical interference or
internal circuit noise. By walking around with the metal detector, you can often
signal
and track it back to the offending device; simply turn the device off, or come back at
another time when it may be off. If the interference is from power lines, you might try another
time of day. Interference on power lines is usually caused by something connected to them
which may be idle in the evenings or on weekends. If the interference is from a
communications or broadcast transmitting antenna, reducing the sensitivity is usually your only
recourse.
The
F70 allows you to shift operating frequencies to avoid electrical interference. See the
Frequency Shifting section for information about this technique.
follow the
29

OPERATING MANUAL &GUIDE TO METAL DETECTING
NUISANCE BURIED OBJECTS
In some areas there is a lot of metallic trash which produces weak signals. These could
include deeply buried objects, little bits and pieces of rusty iron and corroded foil. These items
can be detected, but are difficult to pinpoint due to their depth and small size. When you dig
and find nothing, it may seem like the machine is beeping at nothing even though there is
actually something there. The best solution is usually to reduce sensitivity.
If searching a very trashy area and unwanted signals are a problem, search with the search
coil 2 inches (5cm) away from the ground. Trash objects very close to the search coil will
sometimes not be completely eliminated, even when the discrimination setting should have
eliminated the target.
Metal detectors are designed to see one metal object at a time. Where there are two iron
objects near each other, the detector can be fooled into thinking that the gap between them is
nonferrous metal. This is a common condition where a wooden building has burned or been
torn down, and the site is littered with nails. Asignal from a nonferrous metal object such as a
coin will usually be repeatable, whereas a false
positive signal resulting from multiple or oddly
shaped iron objects will seem to wander around and even to vanish. Experienced detectorists
call these
non-repeating signals and usually do not bother digging them since nonrepeating
signals are almost always trash.
GROUND MINERALS
Conductive mineral salts usually produce broad signals which will not be mistaken for a
metallic object. Common causes are concentrations of mineral fertilizer, spots where
evaporation has concentrated naturally occurring mineral salts, residue from de-icing salts,
and urine from livestock. Unless dry, “cow pies” can sound off like they are metal. Ocean
beaches have salt water—this subject is discussed elsewhere in the manual.
In spots where there has been intense fire, such as a campfire site or where a stump was
burned during land clearing, the soil minerals may be altered by oxidation so that their ground
balance setting is lower than that of the surrounding soil. In such cases, search slowly.
In some areas, electrically conductive industrial minerals such as fuel coke, slag, clinkers (left
over from burning mineral fuels), or charcoal have been dumped or used as landfill. Individual
lumps of these materials can usually be quieted by reducing sensitivity and searching with a
discrimination level of at least 25. However, where the ground consists primarily of such
materials, you may not be able to search quietly. In that case, do not dig unless a signal is
crisp and repeatable.
Electrically conductive natural minerals such as graphite, graphitic slate, or sulfide ore
minerals are rarely encountered except when gold prospecting. When gold prospecting, you
need to be able to hear everything, and you can expect to dig conductive minerals that turn
out not to be gold. In a given locality you may learn to recognize what type of rocks these
minerals are found in, and to ignore them if people in the area say that gold is not found in
rocks of that type.
30

Search Techniques (continued)
HOT ROCKS
A hot rock is a rock which causes the metal detector to sound off because the rock contains
iron minerals. They come in two basic types.
NEGATIVE hot rocks (also called cold rocks) are usually magnetite or contain
magnetite, and give a negative response because their ground balance value is a
higher number than the soil they are found in. They tend to be dark in color, usually
black, and usually heavy. In some cases they will have rust stains. They are usually
attracted to a magnet, and for this reason gold prospectors always carry a magnet—
the ultimate ferrous/nonferrous discriminator. In Autotune mode, negative hot rocks
produce a
difference and you will learn to ignore them.
POSITIVE hot rocks are iron-bearing rocks which have been oxidized by natural
weathering processes so that their Ground Balance number is a number lower than
the soil they are found in. They are often small, right on the surface, sound just like
a gold nugget, and are common in many gold prospecting areas. They are usually,
but not always, drawn to a magnet. They are most often reddish in color but are
often black, brown, or yellow. On relic hunting sites, red clay bricks and rocks which
have lined a fireplace or a campfire will often be
usually eliminate them without difficulty if widely scattered, but if there is a large
concentration of them, the discriminator may not quiet them all. In that case, you can
revert to the rule of thumb -- “don’t dig non-repeatable signals”.
USING THE SENSITIVITY CONTROL
boing sound rather than the zip sound of a metallic target; recognize the
hot rocks. The discriminator will
When the F70 is first turned on, the Sensitivity is
at a medium setting appropriate for most
coinshooting. For relic hunting or gold
prospecting, higher Sensitivity settings are usually
preferred.
In the event of detection of electrical interference
from electrical power lines, electrical or electronic
appliances, or another metal detector, it is usually
necessary to reduce the Sensitivity setting to
achieve quiet operation. Alternatively, use the
Frequency Shift feature described earlier in this
manual.
If, while searching, you are constantly getting
signals from which you cannot recover metal targets, you may be detecting small or deep
targets which are not recoverable using the methods at hand. So, you may do better if you
reduce the Sensitivity setting.
31

OPERATING MANUAL &GUIDE TO METAL DETECTING
Search Techniques (continued)
TIPS ON GROUND BALANCING
When the F70 first turns on, the ground balance setting is preset to 90. This
will give a
in the Discrimination mode, you will probably not have to
balance to the ground. If you switch to Autotune mode,
ground balancing will probably be necessary.
You must find a spot of ground which is free of metal to
accurately balance to the ground. Before
you attempt to Ground Balance, sweep
back and forth to see if any metal target is
present. Locate what seems to be a clear
area and then Ground Balance using the
GroundGrab procedure. After you have ground balanced,
sweep back and forth to see if there is little or no audible response
to the soil. This is best done either in Autotune mode, or in
Discrimination mode with Disc Level set to zero. Alternatively, use
Pinpoint to check the spot. If there is little or no response, ground
balancing was successful. If there is still substantial response, there may have been metal
present where you attempted to ground balance, so find another promising spot and try again.
If you cannot find a spot to successfully ground balance, it is time to give up.
positive response on nearly all soils. If you search
In most areas, once you have ground balanced, the ground balance setting will remain
satisfactory for a long time. However, if the soil has been disturbed by digging or the addition
of fill dirt, or if you are in a geologically complex setting such as is commonly encountered in
gold prospecting areas, you may have to frequently perform the ground balancing procedure
to accommodate changing soil conditions.
When you ground balance, the numerical Ground Phase will momentarily appear on the LCD
screen. In general, sandy or gravelly soils will tend to read in the 75-95 range, light colored
loams and clays will tend to read in the 50-80 range, and red clays will tend to read in the 3555 range. To express it in other terms, the more highly weathered, oxidized, or finely grained
the soil is, the lower the numeric reading will tend to be.
The DIRT bar graph indicates how much iron mineralization is present. For it to work, the
search coil must remain in motion. The most accurate readings will be achieved by
the coil as you do when ground balancing. The higher the mineralization, the greater the
necessity to ground balance the detector for the best depth performance.
If you are searching for relics, you can make a map of the soil of the site. Make a grid of the
site. Then collect data. Ground Balance to document mineral
the DIRT bar graph. Then plot the data on the site map and draw isolines. In this way you
may be able to locate areas which have been dug, backfilled, or subjected to fire. This
information in turn helps to reveal the history of the site.
type; view mineral amount on
pumping
32

Detecting Activities
Coinshooting
Coinshooting is searching for coins, usually in places like parks,
schoolyards, church lawns, and people's yards. In most places where
coins are likely to be found, there is also a lot of aluminum trash like
pull-tabs and bottle caps, as well as steel bottle caps and often nails.
Sometimes there is jewelry present. You will usually search using
discrimination to get rid of the iron and the aluminum trash, even
though this mode will cause you to miss some of the jewelry.
Much coinshooting is done in lawn areas, where digging holes would
cause damage to the grass. We recommend use of an accessory
hand-held pinpointer in such cases. Recovering targets is usually
done by first accurately pinpointing the target, then carefully cutting a
slit in the turf with a knife, and tamping it firmly when you are
finished. In these situations, you cannot recover deep targets for
fear of damaging the turf, so you can cut down on nuisance signals
by reducing the sensitivity.
When searching on private property, first get the permission of the
property owner. Most of the public places where one is likely to do
coinshooting are city, county, or school district property. There is
usually no ordinance prohibiting use of a metal detector as long as you
are not causing damage. Sometimes such ordinances do exist.
Administrators and security personnel often have the legal authority to prohibit any activity
they do not like even if there is no ordinance against it. If there is a metal detecting club in
your area, someone will usually know what areas can and cannot be searched.
Be prepared to always put your best foot forward when using a metal detector in a public
place. Pick up any trash you recover; put it in a pouch or pocketed apron. This way you can
explain that you are performing a public service by helping keep the place free of trash,
especially pieces of metal or glass that could endanger a child at play. Be proficient at
recovering targets without causing damage to the lawn. Explain that whenever you find
jewelry which has personal identification marks, such as a class ring, you make an attempt to
determine the owner and to return it. When someone who questions what you are doing
understands that you are causing no damage and are actually performing a public service, you
will usually be welcome.
Relic Hunting
Relic hunting is searching for historical artifacts. The most common desired objects are
battlefield debris, coins, jewelry, harness hardware, metal buttons, trade tokens, metal toys,
household items, and tools used by workmen and trades people. The most common
unwanted metal is iron (nails, fence wire, rusted cans, etc.), but some iron and steel objects
such as weapons may be valuable. If you are at a site where you may encounter unexploded
ordinance, use caution.
33

OPERATING MANUAL &GUIDE TO METAL DETECTING
Loc
kin
g
Col
lar
Loc
kin
g
Col
lar
S-R
od
Vel
cro
Str
ap
Vel
cro
Str
ap
Knurle
d
Kno
b
Bolt
Hand
-
grip
Low
er
Stem
Middle
Stem
Cab
le
Plu
g
Sea
rch
coil
S-ROD
LOCKING
COLLAR
INTERNAL
CAM LOCK
SILVER BUTTON
MIDDLE
STEM
S-ROD
MIDDLE STEM
Detecting Activities (continued)
Relic Hunting (continued)
Most relic hunting locations are in fields, forested areas and vacant
lots where digging holes will not damage turf grass, so having a
detector with good depth sensitivity is important. Some places are so
littered with iron that it is necessary to discriminate out iron in order to be
able to search, even though you may miss some potentially valuable
artifacts.
Before you go relic hunting, obtain permission from the property owner.
If you intend to hunt on public land, check first with the administrator to
make sure it's not illegal. Certain kinds of sites, on both public and
private land, are protected by law from relic hunting. If there is a metal
detecting club in your area, some of the members will probably know what
the laws are in that area and which sites are off limits.
Relic hunting is most rewarding if you have an avid interest in history.
In many cases, the value of a relic is not the object itself, but the
story it's a part of -- what historians call
provenance. A few pieces of rusty metal can tell the story of life in a
specific place, or that of a specific family or person from hundreds of years
ago. They can capture our imagination and help to give context to our lives today.
The value and context of a find can be readily lost without proper documentation and storage.
Add finds to your collection with care. Take the trouble to understand the site you are
searching and keep track of where you find things. Describe exactly how and where items
were found. Consider including a sketch of the site with your finds. Organization techniques
might include storing together all finds from the same site. Alternatively, if you have an interest
in specific items, like buttons, make a button collection, and within that collection, document
the circumstances surrounding each button found. If your finds are mixed together, without
categorization or documentation, their context will be lost.
context and archeologists call
The ground balancing and DIRT bar graph features of the
a site. In this way you might determine which areas have been dug, backfilled, or subjected to
fire. This information in turn helps to reveal the history of the site.
To find promising sites to hunt, conduct research at your local library, look for clues in old
newspapers, and seek information on the Internet. Where did buildings used to be? Which
have since been torn down? Where did people gather for public events like dances and county
fairs? Where did train and stage lines run? Where were the swimming holes? In almost
every town there is a historical society and museum of local history. Most museums are
grateful for anything they can put on display, and when you dig something you cannot identify,
the curator can often identify it for you. If you work closely with the local historical society or
museum, landowners will be more willing to grant you permission to search their property.
Some of the most promising sites for relic hunting are places being cleared for development.
After the site is built on, whatever is in the ground will become inaccessible. The property owner
can often be persuaded that the site should be searched immediately while it is still searchable.
34
F70 can be used to map the soils of

Detecting Activities (continued)
Gold Prospecting
In the United States, gold is found in many places in
the western states, Alaska, and in a few localities in
the Appalachians. The old saying "Gold is where
you find it", means that to find gold, you should
look in areas where the yellow metal is
known to be present.
Hillsides are the best areas for gold
prospecting using a metal detector,
because hillsides cannot be cleaned
out by panning and dredging the way
streams can. Also, gold on hillsides,
not far from its source vein, tends to be
larger, and hence more readily detected, than alluvial (placer) gold which tends to get pounded
to pieces and worn away as it rolls along the streambed with gravel during floods. Gold is
valuable because it is a scarce commodity. Even in a good gold producing area, you will often
spend an entire day without finding any gold. Meanwhile you will dig bits and pieces of other
metal-- birdshot, shells and bullets from hunting and target practice, bits of rusted barbed wire,
chips off shovels and other mining tools, rusted tin cans, etc. Hot rocks -- rocks containing
concentrations of iron oxides that sound like metal when you pass over them -- are also a
nuisance in many gold areas. Discrimination is usually ineffective because the loss of
sensitivity resulting from discrimination is enough to cause those little nuggets to vanish. If
you have gone many hours without finding gold and are wondering if there is something wrong
with your metal detector or how you are using it, the most important clue is this: if you are
digging
tiny pieces of trash metal, then if you had swept over gold nuggets, you would have
dug them too!
Because most gold nuggets are tiny, and are usually found in soil which is high in iron oxide
minerals, serious gold prospecting requires a detector with high sensitivity and true ground
balanced autotune operation. Run the machine with the sensitivity high enough to hear some
noise from ground minerals, and
recommended unless consideration for safety (for instance rattlesnakes) rules them out. Move
the search coil slowly and deliberately, carefully controlling its height above the ground to
minimize noise from iron minerals in the soil. If you hear ground noise, your Ground Phase
could be a bit off, so perform the ground balancing procedure again. As you walk even a very
short distance, ground conditions can change. The ground geology typically associated with
gold will tend to change over very short distances.
The DIRT bar graph indicates the amount of iron mineralization in the soil. In most gold fields,
especially alluvial (placer) deposits, gold tends to be associated with iron minerals, especially
magnetite
maximize your gold recovery by concentrating your effort on areas where the bar graph
indicates higher amounts of iron mineralization.
black sand. If you know this to be the case in the area you're working, you can
learn the language of the sounds you hear. Headphones are
35

OPERATING MANUAL &GUIDE TO METAL DETECTING
Detecting Activities (continued)
Gold Prospecting (continued)
Gold prospectors are mostly a friendly bunch, and willing to spend some time showing a
beginner how to increase his odds of finding the yellow stuff. Many will invite you to search on
their claims (if they have any) once they get to know you. In some gold areas, a lot of the
terrain is under claim, so you need to learn how to recognize posted claims and stay off of them
unless you have the claim owner's permission. Prospecting clubs such as the GPAAoften own
claims which are open to their members, and sponsor group outings to good gold areas.
To dig into the ground and pull out a precious piece of yellow metal that you are the first
person on earth to see, can be a thrilling experience. If you love being outdoors, have
patience, and can stay motivated by the prospect of finding that next nugget, then
gold
may be the hobby for you. Not many get rich prospecting, so think of it as outdoor
recreation where your finds might defray the expense while having fun doing it!
beeping for
Cache Hunting
A cache (pronounced "cash") is an accumulation
of money, jewelry, gold, or other valuables, which
someone has hidden. When people bury a cache,
they usually put it in a strongbox or in a jar. To
search for a cache, you first need a reason to
believe the cache may exist. This means doing
research. Some caches have been the subject of
many stories you can read about in print, but you
need to be able to sort fact from fiction. If you can
get copies of old newspaper stories about the
circumstances surrounding the hiding of the
cache, you may find discrepancies which help you
to judge the reliability of the information available.
Often the best information on an old cache is to be learned from old timers who live in the
area where the cache is thought to be. In the case of newer caches, often the only
information is what can be obtained from family and acquaintances of the person who is
believed to have hidden the cache.
The ownership of a cache is not always clear. Sometimes it belongs to the person or heirs of
the person who hid it, sometimes it belongs to the owner of the property on which it is located,
and sometimes it belongs to the person who finds it -- or some combination of the above. If
the contents of the cache were stolen, this fact can also complicate the question of ownership.
Find out what laws apply to the cache in question, and always make sure that the issue of
ownership is resolved prior to recovering a cache.
Compared to a coin, a cache is usually large and deep. Searching in Autotune mode is
recommended. However, for a really deep cache, it may be advantageous to search in
PINPOINT, by keeping the button depressed, frequently releasing and re-depressing the
button momentarily to maximize sensitivity.
36

Detecting Activities (continued)
Shallow Water Hunting
All Fisher Research Labs search coils are waterproof, allowing you to search in shallow water
to about two feet deep. If searching around water, be careful not to get the electronics
housing wet. Avoid salt spray, as it will work its way into the control housing and damage the
electronics -- such damage is not covered by the warranty.
Both fresh and salt water beaches are popular places for metal detecting. Vacationers lose
money and jewelry playing in the sand and in the water. It is usually easy to dig in a beach
environment, and metal detecting is permitted on most beaches. Occasionally you may be
able to help someone recover a piece of jewelry they have lost minutes before, this is a
gratifying experience.
When searching on a beach, it is best to either search in Autotune mode, or to search with the
discrimination level set just high enough to eliminate iron, because the value of beach finds is
largely in the jewelry rather than in the coins. You will dig a lot of aluminum trash, but the
digging is easy, and you can tell people that you are helping to clean up the beach and make
it safer for people's feet. We recommend the use of special
valuables from the sand quickly -- most metal detector dealers sell these.
The electrical conductivity of the water itself can pose some challenges. You may get false
signals when going into and coming out of the water, making it necessary to pay careful
attention to keep the coil either in or out of the water, but not to touch the surface. This effect
may be observed in either fresh or salt water.
sand scoop for recovering
Salt Water Hunting
Salt water is highly conductive, and produces a strong signal which is like that of metal.
The
F70 is not specifically designed for top performance in salt water, but can be used in this
environment.
If you desire to search in or over salt water, the following measures will usually be sufficient to
silence the salt water response while retaining acceptable sensitivity:
1. Set the detector to Autotune mode (At).
2. Set the
2. Use GroundGrab button to balance.
3. Search in the Discrimination mode with a discrimination setting higher than 20.
sensitivity to less than 30.
37

OPERATING MANUAL &GUIDE TO METAL DETECTING
How Metal Detectors Work
Most hobby metal detectors use VLF Induction Balance technology. Here's how they work.
The search coil (also called search head or loop) contains two electrical induction coils which
are like antennas. One coil transmits a rapidly alternating magnetic field,
region surrounding the search coil. If metal is present, its electrical conductivity distorts the
magnetic field. If iron metal is present, its magnetism also distorts the magnetic field, but in a
different way, allowing the metal detector to distinguish between ferrous and nonferrous
metals.
The other coil is a receiving antenna which detects changes in the magnetic field caused by
the presence of metal. Electronic circuits amplify this weak signal, analyze it to determine the
changes which occur as the search coil sweeps over the target, and then convey the
information to the user in the form of a visual display or audio tones. Most modern metal
detectors perform many of these tasks in software running on an internal microcomputer.
The iron minerals which are present in most soils also distort the magnetic field, obscuring the
weak signals of small or deep objects. This can cause the object to go undetected, or to be
misidentified when it is detected. Much of the technology that goes into modern metal
detectors is devoted to the task of eliminating the unwanted signals from iron minerals in the
soil, while not losing the signals from metal objects.
illuminating the
Treasure Hunter’s Code of Ethics:
• Always check Federal, State, County and local laws before searching.
• Respect private property and do not enter private property without the owner’s permission.
• Take care to refill all holes and leave no damage.
• Remove and dispose of any and all trash and litter found.
• Appreciate and protect our inheritance of natural resources, wildlife and private property.
• Act as an ambassador for the hobby, use thoughtfulness, consideration and courtesy at all
times.
• Never destroy historical or archaeological treasures.
• All treasure hunters may be judged by the example you set; always conduct yourself with
courtesy and consideration of others
Copyright Fisher Research Labs, Inc., 2011
38

5-Year Limited Warranty
The F70 metal detector is warranted against defects in materials and workmanship
under normal use for five years from the date of purchase to the original owner.
Damage due to neglect, accidental damage or misuse of this product is not covered
under this warranty. Decisions regarding abuse or misuse of the detector are made
solely at the discretion of the manufacturer.
Proof of Purchase is required to make a claim under this warranty.
Liability under this Warranty is limited to replacing or repairing, at our option,
the metal detector returned, shipping cost prepaid to Fisher Labs.
Shipping cost to Fisher Labs is the responsibility of the consumer
To return your detector for service, please first contact Fisher Labs for a Return
Authorization (RA) Number. Reference the RAnumber on your package and return
the detector within 15 days of calling to:
Fisher Research Labs, Inc.
1465-H Henry Brennan Dr
El Paso, TX 79936
Phone: 915-225-0333 ext.118
Warranty coverage does not include the cost of transporting the detector back to an
owner who is located outside of the United States of
NOTE TO CUSTOMERS OUTSIDE THE U.S.A
This warranty may vary in other countries, check with your distributor for details.
According to FCC part 15.21 Changes or Modifications made to this device not expressly approved by
the party responsible f
Factory warranty follows the channel of distribution.
arranty does not cover shipping costs.
W
or compliance could void the users authority to operate this equipment.
.
America.
.
Copyright© 2011 by Fisher Research Labs, Inc.
All rights reserved, including the right to reproduce this book, or parts thereof, in any form.
Published by Fisher Research Labs, Inc.
Fisher®is a registered trademark of Fisher Research Labs, Inc.
www.fisherlab.com
1-800-685-5050
39

ACCESSORIES
FOR COMPLETE DETAILS VISIT WWW.FISHERLAB.COM • 1-800-685-5050
Fisher Padded Carry Bag
......
$ 45.00
Rugged double stitched construction. Includes handy
exterior pocket for extra batteries or small accessories.
103693000C
Fisher Stereo Headphones
......
$ 40.00
Use with Fisher metal detectors. Lightweight and adjustable with
true stereo sound, adjustable volume, 1/8 jack with 1/4 adaptor,
4’ cable. 9720950000
Fisher Pin Pointer
......
$ 69.00
Pinpoints the exact location of buried metal objects. Audio signal
indicator and vibrator. Runs on 1 – 9-Volt Battery. FPOINT
Metal Sand Scoop
......
$ 29.99
Large galvanized metal scoop with filtering holes.
Strong Rubberized grip. SAND SCOOP
Lesche Knife
......
$ 49.95
Made from high quality heat-treated tempered steel.
The ultimate digging tool. Comes with a durable sheath.
12" in length with a 7" serrated blade. LESCHE KNIFE
Fisher Apron
......
$ 5.95
Natural canvas with 2 large pockets.
Fisher Baseball Cap
......
$ 14.95
One size fits all. FCAP
Fisher T-Shirt*
......
$ 19.99
100% white cotton with Fisher® Logo. Sizes – LG, XL & XXL
Replacement/Accessory Search Coils
11” Biaxial Accessory Coil - 11COIL-F75
......
$ 199.95
10” Concentric Standard Coil (replacement)– 10COIL-F70
.
$ 179.00
6.5” Concentric Accessory Coil - 6COIL-E
......
$ 169.00
5” Biaxial Accessory Coil - 5COIL-F75
......
$ 159.95
Coil Covers
Specially made to protect your coil from abrasion and damage.
11” Biaxial Accessory Coil Cover – COVER-11DD
......
$ 19.99
10” Concentric Standard Coil Cover – F70COVER
......
$ 19.95
6.5” Concentric Accessory Coil Cover- 6COVER-E
......
$ 7.00
5” Biaxial Accessory Coil Cover - 5COVER-CZ3
......
$ 7.00
Fisher® Face Rain Cover
......
$ 10.95
Specially made to protect your F70 from weather
Gold
Prospecting Kits
$ 29.99 $ 59.99 $ 109.99
*Image not shown.
OPERATING MANUAL &GUIDE TO METAL DETECTING
M70 Rev3 122211
 Loading...