


2
English ................................................................................................................................................................................ |
3–20 |
Čeština............................................................................................................................................................................ |
21–38 |
Slovenčina .................................................................................................................................................................... |
39–56 |
Magyarul ....................................................................................................................................................................... |
57–74 |
Polski ................................................................................................................................................................................ |
75–92 |
Slovenščina ................................................................................................................................................................ |
93–112 |
FZP 2020-E

Table of Contents 3 EN
Electric Chain Saw
USER'S MANUAL
TABLE OF CONTENTS
1. |
GENERAL SAFETY INSTRUCTIONS .......................................................................................................................... |
4 |
2. |
SYMBOLS ........................................................................................................................................................................... |
5 |
3. |
SAFETY INSTRUCTIONS ................................................................................................................................................ |
7 |
4. |
DESCRIPTION OF THE CHAIN SAW ....................................................................................................................... |
9 |
5. |
INSTALLING THE GUIDE BAR AND CHAIN ....................................................................................................... |
10 |
6. |
FILLING THE CHAIN SAW OIL TANK..................................................................................................................... |
11 |
7. |
OPERATING THE CHAIN SAW ................................................................................................................................ |
11 |
8. |
CHAIN BRAKE................................................................................................................................................................ |
12 |
9. |
ADJUSTING THE CHAIN TENSION ........................................................................................................................ |
13 |
10. |
USING THE CHAIN SAW............................................................................................................................................ |
13 |
11. |
CUTTING........................................................................................................................................................................... |
13 |
12. |
CLEANING AND MAINTENANCE......................................................................................................................... |
15 |
13. |
SHARPENING THE SAW CHAIN............................................................................................................................. |
16 |
14. |
REPLACING THE SAW CHAIN ................................................................................................................................ |
17 |
15. |
STORAGE ......................................................................................................................................................................... |
18 |
16. |
TECHNICAL SPECIFICATIONS................................................................................................................................. |
19 |
17. |
DISPOSAL ........................................................................................................................................................................ |
19 |
ELECTRIC CHAIN SAW |
|
|
USER'S MANUAL |

EN 4 General safety instructions
1. GENERAL SAFETY INSTRUCTIONS
Important safety notice
Carefully unpack the product and take care not to throw away any part of the packaging before you find all the parts of the product.
Store the product in a dry place out of reach of children.
Read all warnings and instructions. Not following warnings or instructions may lead to injury by electrical shock, a fire and/or serious injuries.
Packaging
The product is packed in a package that prevents damage during transport. This package is a resource and so can be handed over for recycling.
Operating instructions
Before you start working with the power tool, read the following safety and usage instructions. Understand the operating elements and the correct use of the power tool. Keep the user’s manual in a safe place where it can be easily retrieved for future use. Save the original packaging, including the internal packing material, warranty card and proof of purchase receipt, at least for the duration of the warranty. If you need to ship this power tool, pack it in the original cardboard box to ensure maximum protection during shipping or transport (e.g. when moving or when you need to send this power tool for repair to a service centre).
Note: If you hand over the power tool to somebody else, do so together with this user's manual.
Following the instructions in the included user's manual is a prerequisite for the proper use of the power tool.
The user's manual also contains operating, maintenance and repair instructions.
The manufacturer takes no responsibility for accidents or damages resulting from not following the instructions in this manual.
FZP 2020-E

Symbols 5 EN
2. SYMBOLS
Do not expose the power tool to rain.
Before using the power tool, carefully read the user's manual.
In the event that the power cord is damaged, immediately disconnect it from the power supply.
When working, always use a safety helmet, safety glasses and ear protection.
Careful: danger of kickback.
ELECTRIC CHAIN SAW |
|
|
USER'S MANUAL |

EN 6 Symbols
DANGER! Do not use the power tool if there are children, other persons or animals in your vicinity.
While working use protective gloves.
Use solid insulating work footwear.
Use hearing protection.
Use work gloves.
Be careful of falling branches.
FZP 2020-E

Safety Instructions 7 EN
3. SAFETY INSTRUCTIONS
ATTENTION!
Acquaint yourself with all warnings and safety instructions and with operation instructions for the power tool.
ATTENTION!
Not adhering to warnings or safety instructions may result in injury by electrical shock, a fire and/or serious injury.
ATTENTION!
Store all warnings and safety instructions in a practical location for future reference.
Note: The term "power tool" in all hereafter provided warnings is defined as an electric power tool powered from the power grid (via a flexible power cord).
Safety in the work area
Keep the work area tidy and well illuminated. Untidiness and dark locations in the workplace are sources of accidents.
Do not use the power tool in environments where there is a explosion hazard, where there are flammable liquids, gases or dust. The power tool generates sparks which could ignite dust or vapours.
When using the power tool, prevent children and other persons access to the power tool. If you become distracted, you may lose control over the power tool.
Safety when working with power tools
The plug on the flexible power cord must correspond to the power socket outlet. Never modify the plug in any way. Never use any socket adapters with power tools that have a safety earth grounding connection. Plugs that are not damaged by modifications and that correspond to the power socket will limit the danger of injury by electrical shock.
Prevent your body from coming into contact with grounded objects, such as pipes, central heating radiators, stoves and refrigerators. The risk of injury by electrical shock is greater when your body is connected to the ground.
Do not expose the power tool to rain, dampness or wetness. The entry of water into the power tool increases the danger of injury by electrical shock.
Do not use the flexible power cord for other purposes. Never carry or pull the power tool by its power cord or pull the plug out of the socket by the power cord. Protect the power cord against heat, grease, sharp edges and moving parts. Damaged or tangled power cords increase the danger of injury by electrical shock.
If the power tool is used outdoors, use an extension cord suitable for outdoor use. Using extension cords designed for outdoor use limits the risk of injury by electrical shock.
If you will be using the power tool in a damp environment, use a residual current device (RCD) in the power supply circuit. The use of a residual current device reduces the risk of injury by electrical shock.
Note: The "residual current device" (RCD) may be substituted for by the term "ground fault circuit interrupter" (GFCI) or "earth leakage circuit breaker" (ELCB).
ELECTRIC CHAIN SAW |
|
|
USER'S MANUAL |

EN 8 Safety Instructions
Safety of people
When working with the power tool, always stay alert, watch what you are doing and use common sense. Do not use power tools if you are tired or under the influence of drugs, alcohol or medication. A moment of carelessness when working with power tools may result in serious injury.
Use personal protective aids. Always use eye protection. Use protective aids, e.g. respirator, safety footwear with anti-slip soles, hard head cover or hearing protection appropriately to the work conditions; they reduce the risk of injury to persons.
Avoid accidentally starting up the power tool. Before connecting to a power source, before connecting the battery, before storage or before carrying the power tool, make sure that the start/stop trigger is in the off position. Carrying the power tool with a finger on the trigger or connecting the power tool’s plug with the trigger engaged may cause an accident.
Remove all adjustment tools and spanners before turning on the power tool. An adjustment tool or spanner left attached to a rotating part of the power tool may result in injury to persons.
Only work in locations that you can reach safely. Always maintain a stable stance and balance. In this way you will have better control over the power tool in unexpected situations.
Dress in an appropriate manner. Do not wear loose clothing or jewellery. Make sure that your hair, clothing and gloves are at a sufficient distance from moving parts. Loose clothing, jewellery and long hair may become caught in the moving parts.
If there is equipment available for the extraction and collection of dust, make sure that such equipment is connected and used correctly. The use of such equipment may limit the danger posed by the created dust.
Using power tools and their maintenance
Do not overload the power tool. Only use power tools that are appropriate for the work being performed.
Appropriate power tools for the given task will do the job better and more safely.
Do not use power tools that cannot be turned on and off with a switch. Any electric power tools that cannot be controlled using a switch are dangerous and must be repaired.
Before adjusting the power tool, before replacing accessories or if you will not be using the power tool, pull the power plug out of the power socket. These preventative safety measures limit the danger of accidentally turning on the power tool.
When not used, store the power tool out of children’s reach and do not permit person not acquainted with the power tool or these instructions to use the power tool. A power tool in the hands of inexperienced users is dangerous.
Perform maintenance on the tool. Check the adjustment of moving parts and their movement, focus on cracks, broken parts or any other circumstances that may threaten the proper operation of the power tool. If the power tool is damaged, have it repaired before using it again. Many accidents are caused by insufficiently maintained power tools.
Keep cutting power tools clean and sharp. Correctly maintained and sharpened cutting power tools are less likely to get stuck on material or to jam and they are also easier to control.
Use power tools, accessories, working tools, etc. in accordance with these instructions and in such
a manner as prescribed for the specific power tool with respect to the given work conditions and the type of work being carried out. Using power tools for tasks other than for which they are designed may lead to dangerous situations.
Service
Have your power tool repaired by a qualified person that will use original spare parts. In this manner, the same level of safety will be ensured as before the repair of the power tool.
FZP 2020-E

Safety instructions | Description of the chain saw 9 EN
Storage
only move or store the power tool with the protective cover attached
carefully clean and perform appropriate maintenance before storing the power tool before transporting the power tool, secure it against oil leakage, damage or injury hazard
4. DESCRIPTION OF THE CHAIN SAW
1. |
Power cord safety hook |
9. |
Guide bar |
2. |
Power cord fastening hole |
10. |
Sprocket cover |
3. |
Rear handle |
11. |
Hole for replacement of motor brushes |
4. |
Front handle |
12. |
Start/stop trigger |
5. |
Safety brake |
13. |
Trigger safety lock |
6. |
Chain tensioning wheel |
14. |
Oil tank cap |
7. |
Sprocket cover fastening knob |
15. |
Window for checking the oil level |
8. |
Chain |
|
|
Fig. 1
Included contents:
Electric chain saw, 40 cm Oregon guide bar, Oregon chain, plastic guide bar cover, spare brushes set, mounting wrench.
ELECTRIC CHAIN SAW |
|
|
USER'S MANUAL |

EN 10 Installing the guide bar and chain
5. INSTALLING THE GUIDE BAR AND CHAIN
ATTENTION!
The chain saw must be disconnected from the power grid.
ATTENTION!
Always wear protective gloves when installing and inspecting the chain to prevent injury from the sharp cutting edges on the chain.
The safety brake lever (fig. 1 point 5) must be disengaged (pull it towards the top handle) Loosen the sprocket cover fastening knob (fig. 1, point 7) and remove the sprocket cover (fig. 1, point
10)
The wheel of the quick coupling system (see fig. 2, point 1) is already mounted.
If the guide bar is replaced, it is possible to remove this wheel and mount it on the new guide bar
Seat the chain on to the guide bar; put the guide bar with the chain on the guide bolt (fig. 3, point 1) and thread the chain on to the drive sprocket wheel (fig. 3, point 3)
Turn the wheel of the quick coupling system (fig. 3, point 2) to easily tension the chain.
Put on the sprocket cover and fasten it using the sprocket cover fastening knob (fig. 4)
Do not fully tighten the knob, it would not be possible to tension the chain
Tension the chain using the tensioning wheel (fig. 1, point 6).
For tensioning it is necessary to hold down the sprocket cover fastening knob (see fig. 5)
ATTENTION!
The chain is correctly tensioned if it is possible to lift chain off the guide bar and its height in the
horizontal position in the middle of the guide bar is 3 to 4 mm.
Fig. 2
Fig. 3
Fig. 4
Fig. 5
FZP 2020-E
Filling the chain saw oil tank | Operating the chain saw 11 EN
6. FILLING THE CHAIN SAW OIL TANK
ATTENTION!
A new chain requires a certain running-in period, which is usually 5 minutes. The lubrication of the chain is very important during this phase. After this running-in period, check the chain tension and readjust if necessary.
The oil tank on the supplied chain saw is empty. Fill this oil tank with oil prior to first use of this chain saw. Only use oil specified for total-loss lubrication
Screw off the oil tank cap (fig. 1, point 14).
Pour the oil into the tank (take care to prevent the oil from becoming dirty while filling the tank). Screw on the oil tank cap
ATTENTION!
Do not use oil that has already been used or processed because this could damage the oil pump. Only use oil specified for total-loss lubrication
7. OPERATING THE CHAIN SAW
Securing the extension cord.
ATTENTION!
When working with this chain saw, only use extension cords designed for outdoor use. The wire crosssections on the extension cord must be at least 1.5 mm2.
To ensure safe operation of this chain saw, it is necessary to secure the power cord in place. Bend the power cord approximately 20 cm before the socket. Thread the bend through the hole (fig. 1, point 2) in the rear handle and fit it into the hook. (fig. 1, point 1)
ATTENTION!
If you use an extension cord longer than 30 m, the power of the chain saw will be reduced
Turning on / off
ATTENTION!
The voltage in the power grid must corresponds to the voltage on the rating label of the chain saw.
ATTENTION!
Hold the chain saw firmly with both hands when starting and working with it
Starting
Press the trigger safety lock button located on the left above the start/stop trigger and then press the start/ stop trigger (fig. 1, point 13) . When started, the chain saw will run at maximum speed.
ATTENTION!
If the chain saw does not start, disengage the brake lever (fig. 1, point 5).
ELECTRIC CHAIN SAW |
|
|
USER'S MANUAL |

EN 12 Operating the chain saw | Chain brake
Turning off
Release the start/stop trigger (fig. 1, point 12).
ATTENTION!
The chain saw is equipped with a safety motor brake, which will immediately stop the chain when the start/ stop trigger is released. If the chain does not immediately come to a stop when the trigger is released, please contact an authorised service centre without delay.
Checking chain lubrication
ATTENTION!
Adhere to safety provisions and prevent the guide bar from coming into contact with the surface of the terrain. Use this power tool safely and maintain a minimum distance of 20 cm from the ground.
Before starting work, check the chain lubrication and the amount of oil in the oil tank. Start the chain saw and hold it above the ground. If you see a growing oil stain then chain lubrication is working properly. If there are no oil stains on the ground, clean the oil outlet, the top chain tensioning hole and the oil lines or contact an authorised service centre.
8. CHAIN BRAKE
This chain saw is equipped with an automatic brake that stops the chain in the event of kickback. The brake is automatically engaged as soon as the force of inertia acts on the ballast located inside the brake box. The chain brake may also be engaged manually when the brake lever (fig. 1, point 5) is moved downwards towards the guide bar. The activation of the brake stops the chain movement within 0.12 seconds.
Checking the working order of the brake.
Check that the brake works properly before every use.
Place the running chain saw on to the ground and for 1 to 2 seconds leave it at full speed. Push the brake lever (fig. 1, point 5) forward. The chain should stop immediately.
ATTENTION!
If the chain stops slowly or does not stop at all, do not use the chain saw and contact an authorised service centre.
If you wish to disengage the brake, pull the brake lever towards the top handle (fig. 1, point 4) so that you hear the typical sound for the disengagement of the brake.
ATTENTION!
Check that the chain brake is in order. A correctly functioning chain brake will protect you against potential injury, which could result from kickback. If the brake is not working properly, have it adjusted or repaired at an authorised service centre.
FZP 2020-E

Adjusting the chain tension | Using the chain saw | cutting 13 EN
9. ADJUSTING THE CHAIN TENSION
ATTENTION!
Due to the effect of higher temperatures, during operation the saw chain has a tendency to lengthen.
A longer chain becomes loose and could slide off the guide bar.
ATTENTION!
This chain saw has a chain tensioning system that does not require any tools.
Loosen the sprocket cover fastening knob (fig. 1, point 7).
Make sure that the chain is seated in the guiding groove of the guide bar.
Turn the chain tensioning wheel (fig. 1, point 6) clockwise to tension the chain (fig. 5). It should be possible to lift a correctly tensioned chain in the middle of the guide bar in the horizontal position to a height of approximately 3 to 4 mm).
Tighten the sprocket cover fastening knob (fig. 1, point 7).
ATTENTION!
Do not tension the chain excessively. Excessive tension of a warm chain may result in excessively tension when it cools down.
10. USING THE CHAIN SAW
Before starting any kind of work, thoroughly acquaint yourself with the sections describing the safety instructions for the operation of the chain saw. We recommend that you acquire experience by practising on waste wood. In this way you will learn about the operating parameters of this chain saws.
Always adhere to safety instructions.
Only use this chain saw for cutting wood. Cutting any other materials is forbidden.
The vibration intensity and type of kickback on this chain saws depends on the type of wood being cut. Do not use this chain saw as a lever for lifting, moving or splitting material.
If the chain jams in the material that is being cut, stop the chain saw and knock a wooden or plastic wedge into the cut to release the chain. Restart the chain saw and carefully commence cutting.
11. CUTTING
ATTENTION!
Before proceeding, please read the chapter “Safety instructions”. We recommend that you gain experience by cutting smaller logs. In this way you will also get to know the chain saw.
Always adhere to safety instructions. The chain saw may only be used for cutting wood.
It is forbidden to cut any other materials. Vibrations and kickback differ for various materials. Do not use the chain saw as a lever for lifting, moving or splitting material. It is forbidden to attach any parts or jigs other than those specified in the technical documentation.
ELECTRIC CHAIN SAW |
|
|
USER'S MANUAL |
EN 14 Cutting
It is not necessary to push the chain saw into the cut. When the motor is running at full speed, push the chain saw down lightly.
If the chain jams in the cut, do not attempt to free it by pulling, rather stretch open the cut using a wedge or crowbar.
Safety brake (protection against kickback)
This chain saw is equipped with an automatic chain brake that, if it works correctly, immediately stops the chain in the event of kickback. It is necessary to check the working order of the chain brake before every use of the chain saw. Run the chainsaw at full speed for 1 - 2 seconds and then tilt the front protective cover. The chain must stop immediately even when the motor is running at high speed. If the chain stops slowly or does not stop at all, please contact an authorised service centre.
It is extremely important to check the working order of the chain brake and the sharpness of the chain before every use to ensure that the necessary level of safety in the event of a kickback is maintained. Removing safety accessories, incorrect maintenance or when using unsuitable guide bars or chains may, in the event of kickback, result in serious injuries.
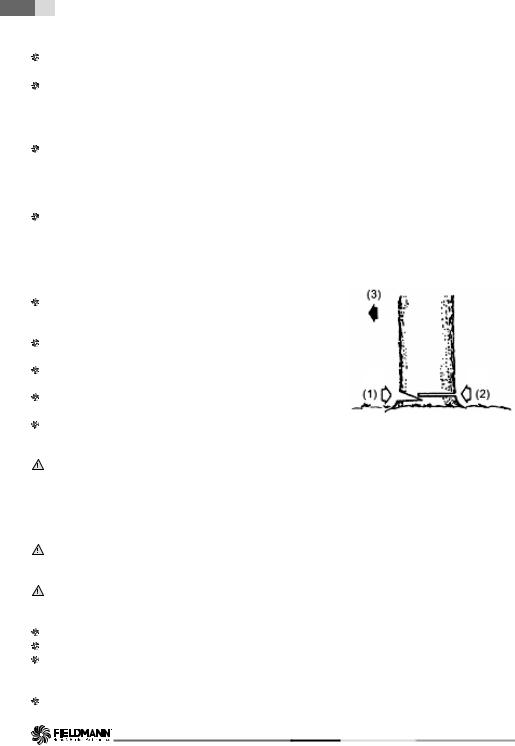
Cutting trees |
|
Decide about the direction in which the tree will fall, respecting |
|
the wind direction, incline angle of the tree and location of the |
|
branches, and consider all other factors before cutting. |
|
The area around the tree must be clear, without obstacles, and |
|
must enable a stable stance. The escape route must be passable. |
|
Cut a wedge into one third of the tree’s diameter on the side to |
|
which the tree should fall. (see fig. Cutting trees, point 1) |
|
From the opposite direction perform a separation cut at a level |
|
above the wedge cut. (see fig. Cutting trees, point 2) |
Cutting trees |
The tree will fall in the direction towards the wedge cut. |
|
(see fig. Cutting trees, point 3) |
|
ATTENTION!
When cutting trees, inform other people in the area about the potential danger. Cutting trees requires experience and we do not recommend performing this task without the necessary experience.
Cutting logs
ATTENTION!
Always maintain a stable stance. Do not step on logs.
ATTENTION!
Before starting work, check that all components are in their place and that all nuts and bolts are tightened.
The log being cut may roll away. Especially when cutting on a slope, always stand above the log being cut. Prevent kickback of the saw by following the instructions in chapter “Safety instructions”.
Before starting work, assess the direction of the force causing the cut trunk to bend. The final cut needs to always be done from the opposite side of where the bending force is acting to prevent the guide bar from being clamped inside the cut.
Only carry the chain saw with the motor turned off and the guide bar protected by the protective cover.
FZP 2020-E
Cutting | Cleaning and maintenance 15 EN
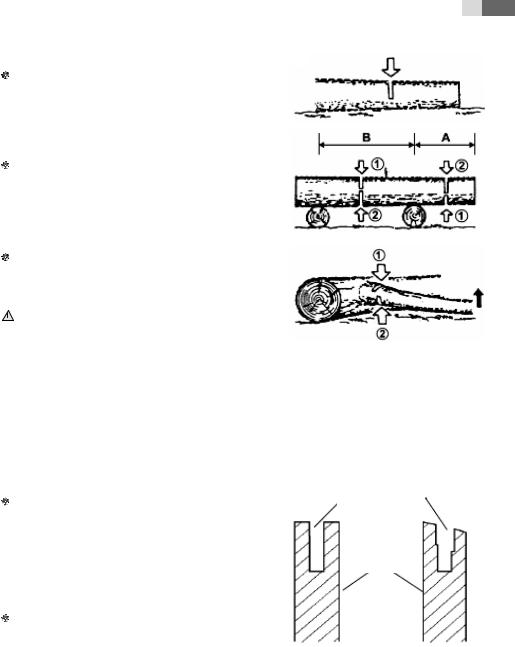
Log lying on the ground
Cut it halfway through, then roll it over and complete the cut from the other side.
Log above the ground
In part “A” make a cut from below to a third of the log and then complete the cut from above. In part “B” make a cut from above to a third of the log and then complete the cut from below.
Removing a fallen tree
First find out to which side the branch is bent. Then make the initial cut from the side of the bend and then complete the cut from the opposite side.
ATTENTION!
A bent branch may spring up.
12. CLEANING AND MAINTENANCE
Cleaning the body of the chain saw
Keep the body of the chain saw clean. When cleaning, use a soft cloth dipped in a soap solution. Use this cloth to meticulously clean the body of the chain saw.
Maintaining the guide bar
Most problems with the guide bar arise due to uneven wear. Uneven wear occurs mainly as a result of an incorrectly sharpened chain or an incorrectly set depth gauge. When the guide bar is worn out unevenly, the guiding groove is widened (see Picture). The result is a rattling chain and rivets falling off.
The chain saw cannot be used for straight cuts. In such a case, replace the guide bar for a new one.
Always check the condition of the guide bar before sharpening the chain. Using a worn out or damaged guide bar is very dangerous. Using a worn out or damaged guide bar will result in damage to the chain. Cutting with such
a power tool will also be much more difficult and demanding.
Guide bar groove
Guide bar
Standard |
Guide bar with |
guide bar |
uneven wear |
ELECTRIC CHAIN SAW |
|
|
USER'S MANUAL |

EN 16 Cleaning and maintenance | Sharpening the saw chain
Normal maintenance of the guide bar
Remove the guide bar from the body of the chain saw.
Regularly remove sawdust from the guide bar groove. For cleaning use a spatula or a wire. Clean oily grooves at the end of every work day.
Replace the guide bar if:
•it is bent or cracked
•its groove is very damaged or worn out
Note: To replace the guide bar, follow the instruction contained in this user's manual. You will find the correct guide bar type in the technical specifications.
13. SHARPENING THE SAW CHAIN
Keep the saw chain sharp. Cutting will be significantly faster and most importantly safer. A blunt saw chain increases wear on the sprocket, guide bar, chain and motor. If you need to push on the saw and only sawdust with a few splinters are produced then this means that the chain is blunt.
For this task, we recommend that you contact an authorised service centre
Equipment necessary for sharpening a saw chain
Round file as per technical specifications
Depth gauge
File guide
Vice
Medium-size flat file
Sharpening the teeth on the chain
Use the file guide set at an angle of 30° (mark A, see figure).
Set the saw chain tension to the correct level.
Fasten the guide bar in a vice so that you have the chain in a stable position.
Note: Do not fasten the chain itself.
Push the round file, inserted in the file guide, into the groove between the top plate and the depth gauge on the chain. The chain should be touching both the top plate as well as the depth gauge
(see figure)
Note: File in the middle of the guide bar.
Note: In the figure you can see the position of the file guide and the direction for filing the teeth on the left side of the chain.
Place the file guide at the required angle (mark A, see figure).
Check that the mark is at 30° on the file guide aligned with the centre of the guide bar. This will ensure that you will file at an angle of 30°.
FZP 2020-E

Sharpening the saw chain | Replacing the saw chain 17 EN
File the tooth in the direction from inside out (in direction B, see figure) until it is sharp. File only in this direction.
Note: Two to three passes of the file should be sufficient to sharpen the tooth.
Filing the depth gauge
As a result of sharpening the teeth on the chain, the depth gauge tolerance is reduced. After every second or third sharpening, it is necessary to adjust the depth gauge setting.
Place the depth gauge adjustment jig (see fig., point 1) firmly on the top edge of two teeth. Make sure that the groove of the jig is in the groove of the depth gauge (see fig., point 2.)
Use a medium-sized flat file (see fig., point 3).
File the depth gauge (see fig., point 4) to the level of the depth gauge adjustment jig.
Remove the depth gauge adjustment jig. Using a flat file, round the front edge of the depth gauge (see figure). When
filing, adhere to the prescribed values (see fig., point 5).
Note: After the chain has been sharpened by hand several times, have the saw chain sharpened at an authorised service centre or sharpen it on a special sharpening machine. This will renew the even sharpness of all teeth.
4
3
1
|
2 |
|
||
|
|
|
|
|
|
|
|
|
|
5 |
|
0,6 mm |
||
|
|
|||
|
|
|
|
|
14. REPLACING THE SAW CHAIN
ATTENTION!
When replacing the saw chain, do not clamp the chain saw or the guide bar in a vice.
Always replace the chain if the teeth are excessively worn out and they cannot be sharpened or if the chain snaps. Use only an original spare chain according to the specifications in this user’s manual. When replacing the saw chain, always also replace the cogged wheel of the sprocket. This will ensure the correct position of the chain during movement. (Note: You will find the specifications of the correct chain type and the cogged wheel in the technical specifications.)
ELECTRIC CHAIN SAW |
|
|
USER'S MANUAL |

EN 18 Replacing the saw chain | Storage
Loosen and remove the bar guide bolt. Remove the sprocket cover.
Remove the saw chain.
Wind the new chain around the cogged wheel, then along the top groove of the guide bar and around the guide bar nose.
Note: Check that the saw teeth are facing in the correct direction.
Put on the chain so that the teeth on the top side of the guide bar are facing towards the guide bar nose (see figure).
Before placing the sprocket cover into position, check that the chain tensioning pin is inserted into the adjustment hole on the guide bar. Put the sprocket cover back on to the body of the chain saw.
Fasten the sprocket cover using the guide bar bolt.
ATTENTION!
Only tighten the bolt by hand.
Adjust the tension of the saw chain.
Tighten the guide bar bolt.
ATTENTION!
Check that you have not placed the saw chain on the guide bar in the opposite direction.
Otherwise, the chain saw will exhibit excessive vibrations and will not cut.
15. STORAGE
If you will not use the chain saw for longer than 30 days, proceed as follows.
Drain the oil tank.
Remove and clean out the guide bar and chain. Submerge the guide bar and chain into a kerosene-based or soap cleaning solution.
Then dry the guide bar and the chain.
Put the chain into a container filled with oil. This will prevent it from corroding. Gently coat the guide bar with oil.
Wipe the body of the chain saw with a cloth. When cleaning, use a soft cloth dipped in a soap solution. Store the chain saw
•In higher shelves or in locked areas out of children’s reach
•in a dry location
FZP 2020-E

|
Technical specifications | Disposal |
19 |
EN |
16. TECHNICAL SPECIFICATIONS |
|||
|
|
|
|
Power input |
2400 W |
|
|
|
|
|
|
Voltage/frequency |
230 V - 240 V / 50 Hz |
|
|
|
|
|
|
Chain pitch |
3/8“ |
|
|
|
|
|
|
Guiding groove width |
1.3 mm |
|
|
|
|
|
|
Number of chain links |
56 links |
|
|
|
|
|
|
Length of the guide bar |
40 cm |
|
|
|
|
|
|
File diameter |
4 mm |
|
|
|
|
|
|
Cutting speed |
14 m/s |
|
|
|
|
|
|
Oil tank capacity |
220 ml |
|
|
|
|
|
|
Weight (with guide bar and chain) |
5.5 kg |
|
|
|
|
|
|
Level of acoustic power LWA |
measured 112 dB(A) |
|
|
|
|
|
|
User's manual in original language.
17. DISPOSAL
INSTRUCTIONS AND INFORMATION REGARDING THE DISPOSAL OF USED PACKAGING MATERIALS
Dispose of used packaging material at a site designated for waste in your municipality.
The machine and its accessories are manufactured from various materials, e.g. metal and plastic.
Take damaged parts to a recycling centre. Inquire at the relevant government department.
Changes in the text, design and technical specifications may be made without prior notice and we reserve the right to make these changes.
ELECTRIC CHAIN SAW |
|
|
USER'S MANUAL |

EN 20 Notes
FZP 2020-E
Obsah 21 CZ
Elektrická pila
NÁVOD K OBSLUZE
OBSAH
1. |
VŠEOBECNÉ BEZPEČNOSTNÍ PŘEDPISY ............................................................................................................ |
22 |
2. |
SYMBOLY ......................................................................................................................................................................... |
23 |
3. |
BEZPEČNOSTNÍ POKYNY.......................................................................................................................................... |
25 |
4. |
POPIS PILY ....................................................................................................................................................................... |
27 |
5. |
INSTALACE VODICÍ LIŠTY A ŘETĚZU .................................................................................................................... |
28 |
6. |
NAPLNĚNÍ NÁDRŽKY PILY OLEJEM ..................................................................................................................... |
29 |
7. |
OVLÁDÁNÍ PILY ............................................................................................................................................................ |
29 |
8. |
BRZDA ŘETĚZU............................................................................................................................................................... |
30 |
9. |
SEŘÍZENÍ NAPNUTÍ ŘETĚZU....................................................................................................................................... |
31 |
10. |
POUŽITÍ ŘETĚZOVÉ PILY ............................................................................................................................................. |
31 |
11. |
ŘEZÁNÍ .............................................................................................................................................................................. |
31 |
12. |
ČIŠTĚNÍ A ÚDRŽBA NÁŘADÍ ................................................................................................................................... |
33 |
13. |
OSTŘENÍ PILOVÉHO ŘETĚZU.................................................................................................................................... |
34 |
14. |
VÝMĚNA PILOVÉHO ŘETĚZU .................................................................................................................................. |
35 |
15. |
SKLADOVÁNÍ ................................................................................................................................................................. |
36 |
16. |
TECHNICKÉ ÚDAJE...................................................................................................................................................... |
37 |
17. |
LIKVIDACE....................................................................................................................................................................... |
37 |
ELEKTRICKÁ PILA |
|
|
NÁVOD K OBSLUZE |

CZ 22 Všeobecné bezpečnostní předpisy
1. VŠEOBECNÉ BEZPEČNOSTNÍ PŘEDPISY
Důležitá bezpečnostní upozornění
Výrobek pečlivě vybalte a dejte pozor, abyste nevyhodili žádnou část obalového materiálu dříve, než najdete všechny součásti výrobku.
Výrobek uchovávejte na suchém místě mimo dosah dětí.
Čtěte všechna upozornění a pokyny. Zanedbání při dodržování varovných upozornění a pokynů mohou mít za následek úraz elektrickým proudem, požár a/nebo těžká poranění.
Obal
Výrobek je umístěn v obalu bránícím poškozením při transportu. Tento obal je surovinou a lze jej proto odevzdat k recyklaci.
Návod k použití
Než začnete se strojem pracovat, přečtěte si následující bezpečnostní předpisy a pokyny k používání. Seznamte se s obslužnými prvky a správným používáním zařízení. Návod pečlivě uschovejte pro případ pozdější potřeby.
Minimálně po dobu záruky doporučujeme uschovat originální obal včetně vnitřního balicího materiálu, pokladní doklad a záruční list. V případě přepravy zabalte stroj zpět do originální krabice od výrobce, zajistíte si tak maximální ochranu výrobku při případném transportu (např. stěhování nebo odeslání do servisního místa).
Poznámka: Předáváte-li stroj dalším osobám, předejte jej společně s návodem.
Dodržování přiloženého návodu k obsluze je předpokladem řádného používání stroje. Návod k obsluze obsahuje rovněž pokyny pro obsluhu, údržbu a opravy.
Výrobce nepřebírá odpovědnost za nehody nebo škody vzniklé následkem nedodržování tohoto návodu.
FZP 2020-E

Symboly 23 CZ
2. SYMBOLY
Nevystavujte nářadí dešti.
Před použitím nářadí si pečlivě přečtěte návod k obsluze.
V případě poškození napájecího kabelu ihned nářadí odpojte od napájení.
Při práci vždy použijte ochrannou helmu, brýle a ochranu sluchu.
Pozor nebezpečí zpětného rázu.
ELEKTRICKÁ PILA |
|
|
NÁVOD K OBSLUZE |

CZ 24 Symboly
NEBEZPEČÍ! Nespouštějte nářadí, pokud se ve vaší blízkosti nacházejí děti, jiné osoby či zvířata.
Při práci používejte ochranné rukavice.
Používejte pevnou izolační pracovní obuv.
Používejte ochranu sluchu.
Používejte pracovní rukavice.
Pozor na padající větve.
FZP 2020-E

Bezpečnostní pokyny 25 CZ
3. BEZPEČNOSTNÍ POKYNY
POZOR!
Seznamte se se všemi výstražnými a bezpečnostními pokyny a s pokyny pro obsluhu nářadí.
POZOR!
Nedodržení výstražných či bezpečnostních pokynů může vyústit v úraz elektrickým proudem, vznik požáru a/nebo vážný úraz.
POZOR!
Všechny výstražné a bezpečnostní pokyny si uložte na praktické místo pro budoucí použití.
Poznámka: Výrazem „elektrické nářadí“ ve všech dále uvedených výstražných pokynech je myšleno elektrické nářadí napájené (pohyblivým přívodem) ze sítě.
Bezpečnost pracovního prostředí
Udržujte místo práce uklizené a dobře osvětlené. Nepořádek a tmavá místa na pracovišti bývají příčinou nehod.
Nepoužívejte elektrické nářadí v prostředí s nebezpečím výbuchu, kde se vyskytují hořlavé kapaliny, plyny nebo prach. V elektrickém nářadí vznikají jiskry, které mohou zapálit prach nebo výpary.
Při používání elektrického nářadí zamezte přístupu dětí a jiných osob k nářadí. Budete-li vyrušováni, můžete ztratit kontrolu nad nářadím.
Bezpečnost při práci s elektrickým nářadím
Vidlice pohyblivého přívodu elektrického nářadí musí odpovídat síťové zásuvce. Nikdy jakýmkoliv způsobem neupravujte vidlici. S nářadím, které má ochranné spojení se zemí, nikdy nepoužívejte žádné zásuvkové adaptéry. Vidlice, které nejsou znehodnoceny úpravami, a odpovídající zásuvky omezí nebezpečí úrazu elektrickým proudem.
Vyvarujte se dotyku těla s uzemněnými předměty, jako jsou např. potrubí, tělesa ústředního topení, sporáky a chladničky. Nebezpečí úrazu elektrickým proudem je větší, je-li vaše tělo spojené se zemí.
Nevystavujte elektrické nářadí dešti, vlhku nebo mokru. Vnikne-li do elektrického nářadí voda, zvyšuje se nebezpečí úrazu elektrickým proudem.
Nepoužívejte pohyblivý přívod k jiným účelům. Nikdy nenoste a netahejte elektrické nářadí za přívod ani nevytrhávejte vidlici ze zásuvky tahem za přívod. Chraňte přívod před horkem, mastnotou, ostrými hranami a pohybujícími se částmi. Poškozené nebo zamotané přívody zvyšují nebezpečí úrazu elektrickým proudem.
Je-li elektrické nářadí používáno venku, používejte prodlužovací přívod vhodný pro venkovní použití.
Používání prodlužovacího přívodu pro venkovní použití omezuje nebezpečí úrazu elektrickým proudem.
Musíte-li použít elektrické nářadí ve vlhkém prostředí, použijte v napájecím okruhu proudový chránič (RCD).
Použití proudového chrániče (RCD) snižuje riziko úrazu elektrickým proudem.
Poznámka: Výraz „proudový chránič“ (RCD) může být nahrazen termínem „přerušovač zemního spojení“
(GFCI) nebo ochranný jistič (ELCB).
ELEKTRICKÁ PILA |
|
|
NÁVOD K OBSLUZE |

CZ 26 Bezpečnostní pokyny
Bezpečnost osob
Při práci s elektrickým nářadím buďte stále pozorní, sledujte, co provádíte, a používejte zdravý rozum. Nepoužívejte elektrické nářadí, jste-li unavení nebo jste-li pod vlivem drog, alkoholu nebo léků. Chvilka nepozornosti při práci s elektrickým nářadím může mít za následek vážné zranění.
Používejte osobní ochranné pracovní pomůcky. Vždy používejte ochranu zraku. Ochranné pomůcky, např. respirátor, bezpečnostní obuv s protiskluzovou úpravou, tvrdá pokrývka hlavy nebo ochrana sluchu, používané v souladu s podmínkami práce, snižují nebezpečí poranění osob.
Vyvarujte se neúmyslného spuštění. Před připojením k napájecímu zdroji, před připojením baterie, před uložením nebo před přenášením nářadí se ujistěte, zda je spouštěcí spínač v poloze vypnuto. Přenášení nářadí s prstem na spínači nebo zapojování vidlice nářadí se zapnutým spínačem může být příčinou nehod.
Před zapnutím nářadí odstraňte všechny seřizovací nástroje nebo klíče. Seřizovací nástroj nebo klíč, který ponecháte připevněn k otáčející se části elektrického nářadí, může být příčinou poranění osob.
Pracujte jen tam, kam bezpečně dosáhnete. Vždy udržujte stabilní postoj a rovnováhu. Budete tak lépe ovládat elektrické nářadí v nepředvídaných situacích.
Oblékejte se vhodným způsobem. Nepoužívejte volné oděvy ani šperky. Dbejte, aby vaše vlasy, oděv
a rukavice byly v dostatečné vzdálenosti od pohyblivých částí. Volné oděvy, šperky a dlouhé vlasy mohou být zachyceny pohybujícími se částmi.
Jsou-li k dispozici prostředky pro připojení zařízení k odsávání a sběru prachu, zajistěte, aby taková zařízení byla připojena a správně používána. Použití těchto zařízení může omezit nebezpečí způsobená vznikajícím prachem.
Použití elektrického nářadí a jeho údržba
Elektrické nářadí nepřetěžujte. Používejte pouze nářadí, které je vhodné pro prováděnou práci.
Správné elektrické nářadí bude lépe a bezpečněji vykonávat práci, pro kterou bylo navrženo.
Nepoužívejte elektrické nářadí, které nelze zapnout a vypnout spínačem. Jakékoliv elektrické nářadí, které nelze ovládat spínačem, je nebezpečné a musí být opraveno.
Před seřizováním nářadí, před výměnou příslušenství, nebo pokud nářadí nepoužíváte, vytáhněte zástrčku napájecího kabelu ze zásuvky. Tato preventivní bezpečnostní opatření omezují nebezpečí nahodilého spuštění elektrického nářadí.
Nepoužívané elektrické nářadí ukládejte mimo dosah dětí a nedovolte osobám, které nebyly seznámeny
s elektrickým nářadím nebo s těmito pokyny, aby nářadí používaly. Elektrické nářadí je v rukou nezkušených uživatelů nebezpečné.
Provádějte údržbu elektrického nářadí. Kontrolujte seřízení pohybujících se částí a jejich pohyblivost, zaměřte se na praskliny, zlomené součásti a jakékoliv další okolnosti, které mohou ohrozit funkci elektrického
nářadí. Je-li nářadí poškozeno, před dalším používáním zajistěte jeho opravu. Mnoho nehod je způsobeno nedostatečně udržovaným elektrickým nářadím.
Řezací nástroje udržujte ostré a čisté. Správně udržované a naostřené řezací nástroje se s menší pravděpodobností zachytí za materiál nebo se zablokují a práce s nimi se snáze kontroluje. Elektrické nářadí, příslušenství, pracovní nástroje atd. používejte v souladu s těmito pokyny a takovým
způsobem, jaký byl předepsán pro konkrétní elektrické nářadí, a to s ohledem na dané podmínky práce
a druh prováděné práce. Používání elektrického nářadí k provádění jiných činností, než pro jaké bylo určeno, může vést k nebezpečným situacím.
Servis
Opravy vašeho elektrického nářadí svěřte kvalifikované osobě, která bude používat originální náhradní díly.
Tímto způsobem bude zajištěna stejná úroveň bezpečnosti elektrického nářadí jako před opravou.
FZP 2020-E

Bezpečnostní pokyny | Popis pily 27 CZ
Skladování
nářadí přepravujte a skladujte pouze s nasazeným ochranným krytem před uložením nářadí pečlivě očistěte a proveďte příslušnou údržbu
před přepravou nářadí zajistěte proti úniku oleje, poškození či způsobení úrazu
4. POPIS PILY
1. |
Bezpečnostní úchyt přívodního kabelu |
9. |
Lišta |
2. |
Otvor pro zajištění kabelu |
10. |
Kryt řetězky |
3. |
Zadní madlo |
11. |
Otvor pro výměnu uhlíků motoru |
4. |
Přední madlo |
12. |
Hlavní spínač |
5. |
Bezpečnostní brzda |
13. |
Pojistka hlavního spínače |
6. |
Šroub dopínání řetězu |
14. |
Zátka olejové nádrže |
7. |
Šroub zajištění krytu řetězky |
15. |
Otvor pro kontrolu stavu hladiny oleje |
8. |
Řetěz |
|
|
Obr. 1
Obsah balení:
Elektrická pila, lišta Oregon 40 cm, řetěz Oregon, plastový kryt lišty, náhradní sada uhlíků, montážní klíč.
ELEKTRICKÁ PILA |
|
|
NÁVOD K OBSLUZE |

CZ 28 Instalace vodicí lišty a řetězu
5. INSTALACE VODICÍ LIŠTY A ŘETĚZU
POZOR!
Řetězová pila musí být odpojena od elektrické sítě.
POZOR!
Při instalaci a při provádění kontrol řetězu používejte vždy ochranné rukavice, abyste zabránili zraněním způsobeným ostrými břity řetězu.
Páka bezpečnostní brzdy (obr. 1, bod 5) musí být odjištěna (přitáhněte směrem k hornímu madlu)
Povolte šroub zajištění krytu řetězky (obr. 1, bod 7) a sejměte kryt řetězky (obr. 1, bod 10)
Na lište v balení je již připevněno kolo rychloupínacího systému (viz obr. 2, bod 1).
Pro případ výměny lišty lze toto kolo sejmout a umístit na novou lištu
Nasaďte řetěz na lištu, lištu s řetězem nasaďte na vodící šroub (obr. 3, bod 1) a řetěz navlečte na hnací řetězové kolo (obr. 3, bod 3)
Otáčením kola rychloupínacího systému (obr. 3, bod 2) lehce dopněte řetěz.
Nasaďte kryt řetězky a zajistěte ho pomocí šroubu zajištění krytu (obr. 4)
Šroub zcela nedotahujte, nebylo by možné dopnout
řetěz
Dopněte řetěz dopínacím šroubem (obr. 1, bod 6).
Pro dopnutí je třeba přidržet šroub krytu řetězovky (viz obr. 5)
POZOR!
Napnutí řetězu je správné, můžete-li řetěz zvednout z vodicí lišty a je-li jeho výška v horizontální poloze uprostřed vodicí lišty 3 až 4 mm.
Obr. 2
Obr. 3
Obr. 4
Obr. 5
FZP 2020-E

Naplnění nádržky pily olejem | Ovládání pily 29 CZ
6. NAPLNĚNÍ NÁDRŽKY PILY OLEJEM
POZOR!
Nový řetěz vyžaduje určitou dobu záběhu, která trvá zhruba 5 minut. V této fázi je velmi důležité mazání
řetězu. Po této době záběhu zkontrolujte napnutí řetězu a je-li to nutné, proveďte jeho další seřízení.
Nádržka na olej u dodané pily je prázdná. Před prvním použitím pily naplňte tuto nádržku olejem. Používejte pouze olej určený pro ztrátové mazání
Odšroubujte víčko plnicího otvoru (obr 1, bod 14).
Nalijte do nádržky olej (dávejte pozor, abyste zabránili znečištění oleje během plnění nádržky).
Zašroubujte víčko plnicího otvoru
POZOR!
Nepoužívejte olej, který byl již použit nebo zpracován, protože by mohlo dojít k poškození olejového
čerpadla. Používejte pouze olej určený pro ztrátové mazání
7. OVLÁDÁNÍ PILY
Zajištění prodlužovacího kabelu.
POZOR!
Při práci s touto řetězovou pilou používejte pouze prodlužovací kabely určené pro venkovní použití. Příčný průřez vodičů prodlužovacího kabelu musí být minimálně 1,5 mm2.
Za účelem bezpečného provozu této řetězové pily je nutné zajistit přívodní kabel. Přívodní kabel ve vzdálenosti cca 20 cm od zástrčky přehněte. Ohyb prostrčte otvorem (obr. 1, bod 2) v zadním madle a zajistěte ho do háčku. (obr. 1, bod 1)
POZOR!
Bude-li použit prodlužovací kabel delší než 30 m, dojde k poklesu výkonu řetězové pily
Zapnutí / Vypnutí
POZOR!
Napětí v elektrické síti se musí shodovat s napájecím napětím na výkonovém štítku pily.
POZOR!
Při spouštění i během práce držte pilu pevně oběma rukama
Zapnutí
Stiskněte zajišťovací tlačítko spínače, které se nachází vlevo nad hlavním spínačem (obr. 1, bod 13) a potom stiskněte hlavní spínač (obr. 1, bod 12). Po zapnutí začne řetězová pila pracovat v maximálních otáčkách.
POZOR!
Nedojde-li k spuštění řetězové pily, uvolněte páku brzdy (obr. 1, bod 5).
ELEKTRICKÁ PILA |
|
|
NÁVOD K OBSLUZE |

CZ 30 Ovládání pily | Brzda řetězu
Vypnutí
Uvolněte hlavní spínač (obr. 1, bod 12).
POZOR!
Pila je vybavena bezpečnostní brzdou motoru, která zastaví řetěz okamžitě po uvolnění hlavního spínače. V případě, že se řetěz po uvolnění spínače ihned nezastaví, kontaktujte neprodleně autorizované servisní středisko.
Kontrola mazání řetězu
POZOR!
Dodržujte bezpečnostní opatření a zabraňte kontaktu vodicí lišty s povrchem terénu. Používejte toto nářadí bezpečně a udržujte minimální vzdálenost od země 20 cm.
Před zahájením práce zkontrolujte namazání řetězu a množství oleje v nádržce pily. Zapněte pilu a držte ji nad zemí. Uvidíte-li zvětšující se stopy po oleji, mazání řetězu probíhá správně. Nebudou-li na zemi žádné stopy oleje, očistěte výstupní otvor pro olej, horní otvor napínání řetězu a rozvod oleje nebo kontaktujte autorizované servisní středisko.
8. BRZDA ŘETĚZU
Tato pila je vybavena automatickou brzdou, která zastavuje řetěz v případě zpětného rázu při provozu pily. Brzda se zapne automaticky, jakmile začne působit setrvačná síla na závaží nacházející se uvnitř skříně brzdy.
Brzda řetězu může být aktivována také ručně, je-li páka brzdy (obr. 1, bod 5) přesunuta směrem dolů k vodicí liště. Aktivace brzdy řetězu zastavuje pohyb řetězu do 0,12 s.
Kontrola funkce brzdy.
Před každým použitím pily zkontrolujte správnou funkci brzdy.
Položte pilu v chodu na zem a na 1 až 2 sekundy ji nechejte v chodu v maximálních otáčkách.
Zatlačte páku brzdy (obr. 1, bod 5) dopředu. Řetěz by se měl ihned zastavit.
POZOR!
Zastavuje-li se řetěz pomalu nebo nezastaví-li se vůbec, pilu nepoužívejte a kontaktujte autorizované servisní středisko.
Chcete-li brzdu uvolnit, přitáhněte páku brzdy směrem k horní rukojeti (obr. 1, bod 4) tak, abyste uslyšeli typický zvuk pro uvolnění zablokování.
POZOR!
Ujistěte se, zda je funkce brzdy řetězu v pořádku. Správně fungující brzda řetězu Vás ochrání proti případnému úrazu, který může způsobit zpětný ráz. V případě, kdy brzda nepracuje správně, svěřte její seřízení nebo opravu autorizovanému servisu.
FZP 2020-E
 Loading...