


Lenovo
User Guide
ideapad D330-10IGM
Read the safety notices and important tips in the
included manuals bef
ore using your computer.

Notes
• Before using the product, be sure to read Lenovo Safety and General Information
Guide first.
• The latest electronic compliance and environmental information are available
fr
om the Lenovo compliance information Web sites.
- To view compliance information go to:
http://www.lenovo.com/compliance.
- To download environmental information go to:
http://www.lenovo.com/ecodeclaration.
• Some instructions in this guide may assume that you are using Windows® 10. If you
are using another Windows operating system, some operations may be slightly
different. If you are using other operating systems, some operations may not apply
to you.
• The features described in this guide are common to most models. Some
features may not be available on your computer or your computer may include
features that are not described in this user guide.
• The illustrations in this manual may di
ffer from the actual product. The
screenshots of operating system are for reference only. Please refer to the actual
product.
Regulatory Notice
• For details, refer to Guides & Manuals at http://support.lenovo.com.
First Edition (March 2018)
© Copyright Lenovo 2018.
LIMITED AND RESTRICTED RIGHTS NOTICE: If data or software is delivered pursuant to a General
Services Administration “GSA” contract, use, reproduction, or disclosure is subject to restrictions set
forth in Contract No. GS-35F-05925.

Contents
Chapter 1. Getting to know your computer ......................................... 1
Top view ..................................................................................................................... 1
Left-side view ............................................................................................................ 6
Right-side view .......................................................................................................... 8
Rear View ................................................................................................................... 9
Bottom view ............................................................................................................. 10
Chapter 2. Starting to use Windows 10 ............................................. 11
Configuring the operating system for the
first time .................................................................................................................... 11
Operating system interfaces .................................................................................. 11
Putting the computer to sleep or shutting
it down ...................................................................................................................... 14
Connecting to a wireless network ........................................................................ 16
Get help from Windows ......................................................................................... 17
Chapter 3. Recovery system ............................................................... 18
Push-button reset .................................................................................................... 18
Chapter 4. Troubleshooting ................................................................20
Frequently asked questions ................................................................................... 20
Troubleshooting ...................................................................................................... 22
Trademarks ..........................................................................................25
i


Chapter 1. Getting to know your computer
Top view - - - - - - - - - - - - - - - - - - - - - - - - - - - - - - - - - - - - - - - - - - - - - - - - - - - - - - - - - - - - - - - - - - - - - - - - -
Note: The dashed areas indicate parts that are not visible externally.
Attention:
• Do not open
careful not to leave pens or any other objects in between the display panel and the
keyboard. Otherwise, the display panel may be damaged.
the display panel beyond 170 degrees. When closing the display panel, be
1

Chapter 1. Getting to know your computer
a Integrated
Use the camera for video communication.
camera
b Wireless LAN
antennas
c Computer display
d Touch pad
Note: You can enable/disable the touch pad by pressing Fn + ( ).
Connect to a wireless LAN adapter to send and receive
wireless radio signals.
The LCD display with LED backlight provides brilliant
visual output.
The touch pad functions as a conventional mouse.
Touch pad: To move the pointer on the screen, slide your
fingertip over the pad in the direction in which you want the
pointer to move.
Touch pad buttons: The functions of the left/right side
correspond to those of the left/right mouse button on a
conventional mouse.
2
Chapter 1. Getting to know your computer
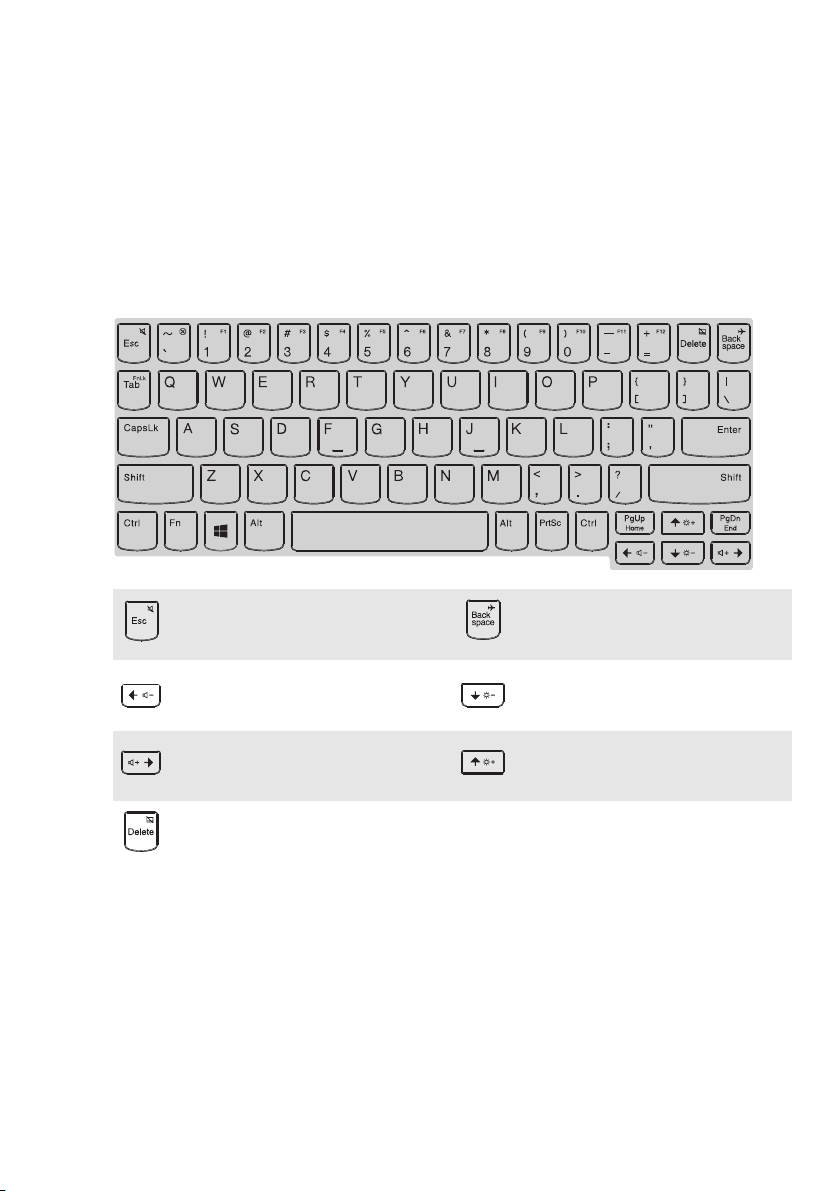
Using the keyboard
Hotkeys
You can access certain system settings quickly by pressing the appropriate
hotkeys.
Mutes/unmutes the sound.
Decreases the volume
level.
Increases the volume level.
Enables/disables the touch
pad.
Enables/disables airplane
mode.
Decreases display
brightness.
Increases display
brightness.
3

Chapter 1. Getting to know your computer
Setting hotkey mode
By default, the hotkey functions are accessible by pressing the appropriate
hotkey. However, you can disable the hotkey mode in the BIOS setup utility.
To disable the hotkey mode:
1 Shu
2 Pre
3 In the BIOS s
t down the computer.
ss the Novo button and then select BIOS Setup.
etup utility, open the Configuration menu, and change the
setting of Hotkey Mode from Enabled to Disabled.
4 Open the Exit m
Note: If you changed the Hotkey Mode from Enabled to Disabled in the BIOS setup utility,
you will need to press the Fn key in combination with the appropriate hotkey.
enu, and select Exit Saving Changes.
4
Chapter 1. Getting to know your computer
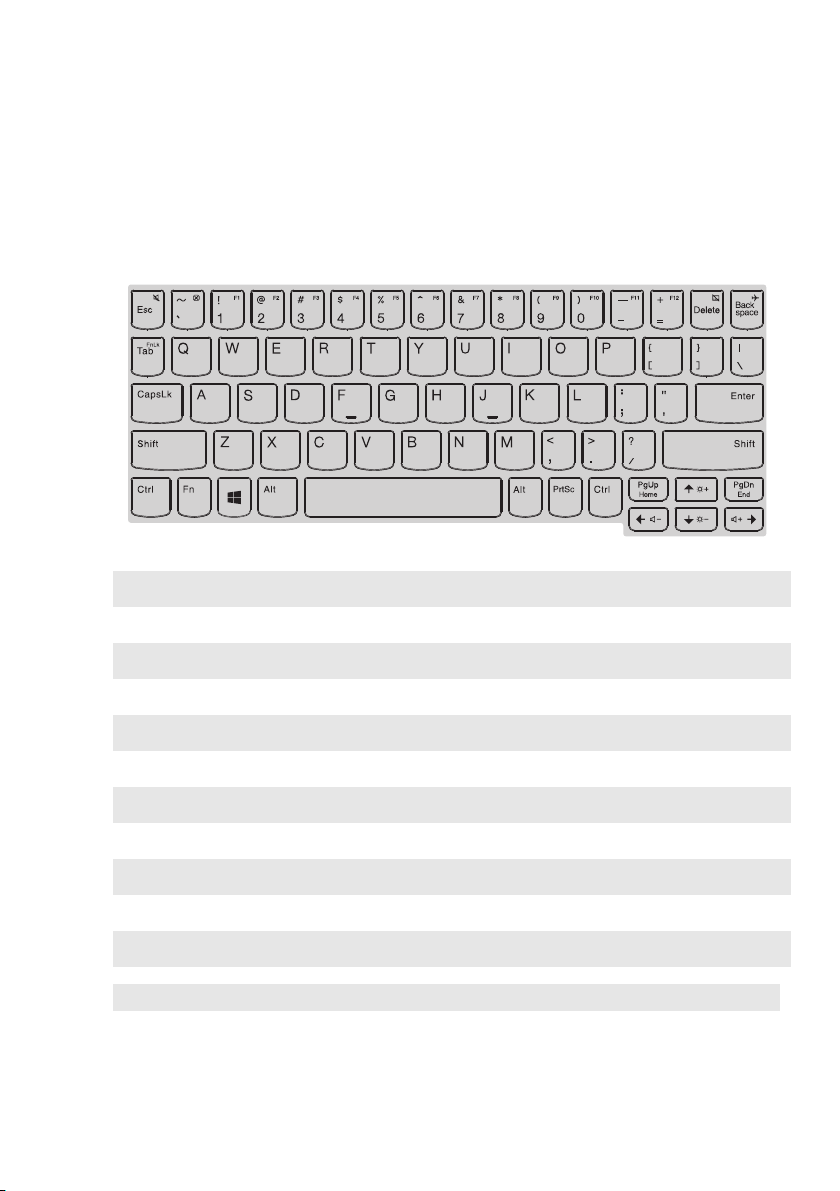
Function key combinations
Through the use of the function keys, you can change operational features
instantly. To use this function, press and hold Fn a; then press one of the
function keys b.
The following describes the features of each function key.
Fn + B: Break
Fn + P:
Pause
Fn + S: SysRq
Fn + K:
ScrLk
Fn + I: Insert
Fn + T:
PrtScn
Fn + 4: Sleep
Fn + Sp:
Keyboard Backlight
Fn + Tab: Magnifier Utility
Fn + D:
Toggle Privacy Filter
Fn + Q: Quiet Mode
Note: Hidden Functions applied only on systems where applicable.
5

Chapter 1. Getting to know your computer
Notes:
Left-side view - - - - - - - - - - - - - - - - - - - - - - - - - - - - - - - - - - - - - - - - - - - - - - - - - - - - - - - - - - - - - - -
a USB 2.0 port
b Combo audio
Connects to USB devices.
Connects to headsets.
jack
• The combo audio jack does not support conventional microphones.
• The recording function may not be supported if third-party headphones or headsets are
connected, due to different industry standards.
6
Chapter 1. Getting to know your computer
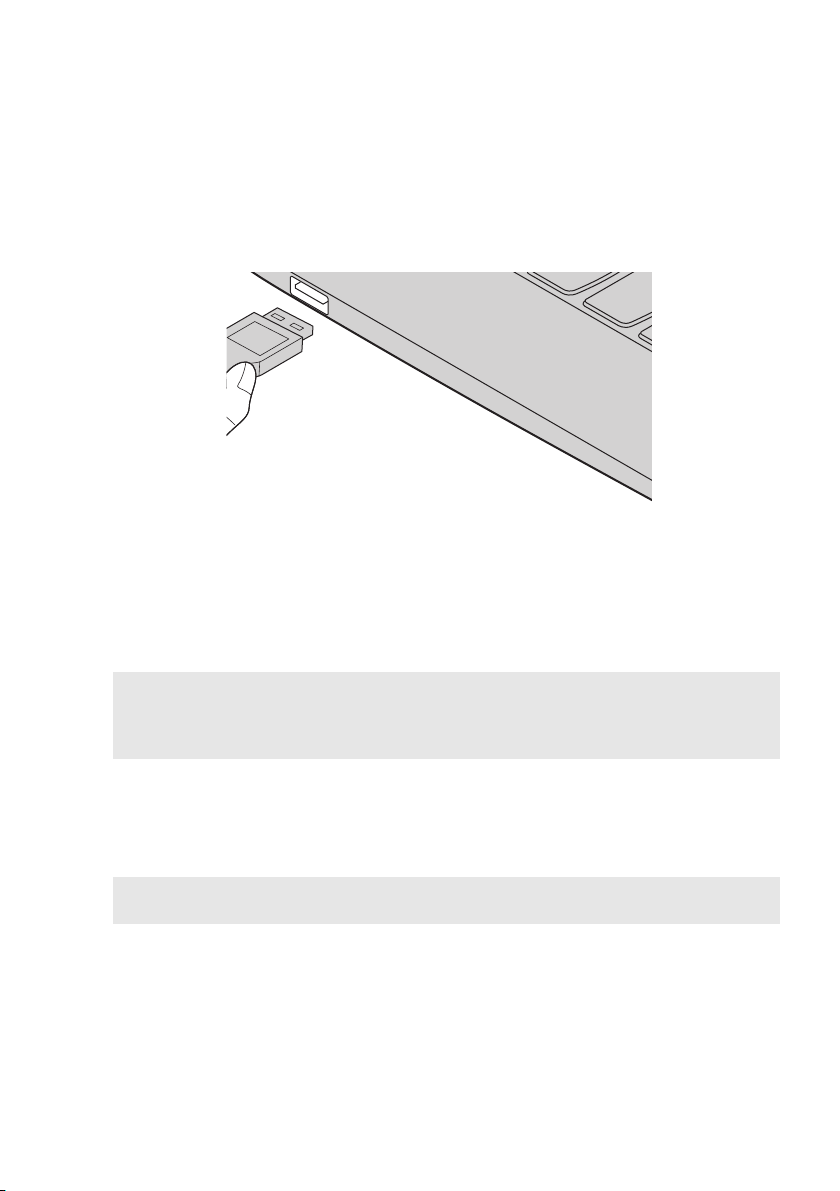
Connecting USB devices
You can connect a USB device to your computer by inserting its USB plug
(Type A) into the USB port on your computer.
The first time you plug a USB device into a particular USB port on your
computer, Windows automatically installs a driver for that device. After the
driver has been installed, you can disconnect and reconnect the device
without performing any additional steps.
Note: Typically, Windows detects a new device after it has been connected, and then installs
the driver automatically. However, some devices may require you to install the driver
before connecting. Check the documentation provided by the device’s manufacturer
before connecting the device.
Before disconnecting a USB storage device, make sure your computer has
finished transferring data to that device. Click the Safely Remove Hardware
and Eject Media icon in the Windows notification area to remove the device
before disconnecting.
Note: If your USB device uses a power cord, connect the device to a power source before
connecting it. Otherwise, the device may not be recognized.
7

Chapter 1. Getting to know your computer
Right-side view - - - - - - - - - - - - - - - - - - - - - - - - - - - - - - - - - - - - - - - - - - - - - - - - - - - - - - - - - - - -
a Power button
b Volume up/down
button
c Type-C port
d AC power
adapter jack
e USB 2.0 port
Press this button to turn on/off the computer.
When the computer is on, press and hold this button for
more than 1 second, the computer will enter sleep mode,
press and hold it for more than 4 seconds, the computer
will be turned off.
Increases/decreases the volume level.
Type-C port supports:
• USB 3.1
Connects to the AC power adapter.
Connects to USB devices.
8

Chapter 1. Getting to know your computer
Rear View - - - - - - - - - - - - - - - - - - - - - - - - - - - - - - - - - - - - - - - - - - - - - - - - - - - - - - - - - - - - - - - - - - - - - - -
a Rear camera (on
select models)
Use the camera for video communication or taking photos.
9

Chapter 1. Getting to know your computer
Bottom view - - - - - - - - - - - - - - - - - - - - - - - - - - - - - - - - - - - - - - - - - - - - - - - - - - - - - - - - - - - - - - - - - -
a Hinge Boss
Bracket
b Pogo pin frame
c Micro SD ca
slot
rd /SIM Card
Accepts a micro SD card and SIM card
(not supplied).
10

Chapter 2. Starting to use Windows 10
Configuring the operating system for the
first time - - - - - - - - - - - - - - - - - - - - - - - - - - - - - - - - - - - - - - - - - - - - - - - - - - - - - - - - - - - - - - - - - - - - - - - - -
You may need to configure the operating system when it is first used. The
configuration process may include the procedures below:
• Accepting the end user license agreement
• Configuring the Internet connection
• Registering the operating system
• Creating a user account
Operating system interfaces - - - - - - - - - - - - - - - - - - - - - - - - - - - - - - - - - - - - -
The return of the Start menu
Windows 10 comes with a powerful and useful start menu. To open the start
menu, do one of the following:
• Select the Start button in the lower-left corner, the Start menu is displayed.
• Press the Windows key on the keyboard.
11

Chapter 2. Starting to use Windows 10
The power button is on the Start menu, click it you can choose to shut down
or restart the computer, or put the computer into sleep mode.
Through the Start menu, you can locate all the installed apps or view the
frequently used apps.
The ACTION CENTER
Select the ACTION CENTER icon on the taskbar and the ACTION
CENTER is displayed.
From the ACTION CENTER, you can examine important notifications from
Windows and your apps. Moreover, you can change common settings
quickly.
12

Chapter 2. Starting to use Windows 10
Task View in taskbar
In Windows 10, you can add a new desktop and switch between different
desktops.
To add a new desktop, do the following:
• Click the Task View icon
• Click New desktop.
in the taskbar area.
To switch between desktops, click the Task View icon , then select your
desired desktop.
13

Chapter 2. Starting to use Windows 10
Putting the computer to sleep or shutting
it down - - - - - - - - - - - - - - - - - - - - - - - - - - - - - - - - - - - - - - - - - - - - - - - - - - - - - - - - - - - - - - - - - - - - - - - - - - - -
When you have finished working with your computer, you can put it to sleep
or shut it down.
Putting your computer to sleep
If you will be away from your computer for only a short time, put the
computer to sleep.
When the computer is in sleep mode, you can quickly wake it to resume use,
b
ypassing the startup process.
To put the computer to sleep, do one
• Close the display lid.
• Press and hold the Power key for about 1 to 5 seconds.
• Move the cursor to the lower-left corner, and then select the Start button.
Se
lect Power Sleep.
Note: Put your computer to sleep before you move it. Moving your computer while the hard
disk drive is spinning can damage the hard disk, causing loss of data.
of the following:
To wake up the computer, perform the following:
• Press any key on the keyboard.
14

Chapter 2. Starting to use Windows 10
Sh
utting down the computer
If you are not going to use your computer for a long time, shut it down.
To shut down your computer, do one of the following:
• Move the cursor to the lower-left corner, and then select the Start button.
Sel
ect Power Shut down.
• Right-click the Start button in the lower-left corner and select Shut down or
sign out Shut down.
15

Chapter 2. Starting to use Windows 10
Connecting to a wireless network - - - - - - - - - - - - - - - - - - - - - - - - - - -
Enabling wireless connection
To enable wireless functions, do one of the following:
• Click the ACTION CENTER icon
deselect Ai
• Press
•Click Set
rplane mode.
to disable airplane mode.
tings Network & Internet Airplane mode to open the
network configuration page. Then toggle the airplane mode switch to Off.
Connecting to a wireless network
After wireless has been enabled, the computer will automatically scan for
available wireless networks and display them in the wireless network list. To
connect to a wireless network, click the network name in the list, and then
click Connect.
Note: Some networks require a network security key or passphrase for connection. To
connect to one of those networks, ask the network administrator or the Internet service
provider (ISP) for the security key or passphrase.
in the notification area, and then
16

Chapter 2. Starting to use Windows 10
Get help from Windows - - - - - - - - - - - - - - - - - - - - - - - - - - - - - - - - - - - - - - - - - - - - - -
If you have a problem with the operating system, see the Windows Get
started app. To open it, do the following:
• Move the cursor to the lower-left corner, and then select the Start button.
Select Get started from All apps.
17

Chapter 3. Recovery system
Push-button reset - - - - - - - - - - - - - - - - - - - - - - - - - - - - - - - - - - - - - - - - - - - - - - - - - - - - - - - -
Push-button reset is a built-in recovery tool that enables users to restore
their operating system to its original state. This preserves their data and
important customizations, without the need to back up their data in advance.
The following Push-button reset features are available to users from
multiple locations within Windows:
Refreshing the computer
Fixes software problems by reinstalling the factory default configuration.
This preserves the user’s data, important settings, and any Windows Store
apps previously purchased from the Windows Store.
Resetting the computer
Prepares the computer for recycling or transfer of ownership. This reinstalls
the factory default configuration and returns all user data and applications to
the state of their original Out-of-Box Experience (OOBE).
Using Push-button reset
Push-button reset can be launched using one of the following methods:
• Novo button:
- Shut down the computer and wait at least five seconds. Press the Novo
button and then select System Recovery.
•Settings:
- Settings Update & security Recovery Advanced startup select
Restart now.
For more instructions, see the Windows Help and Support file on your
computer.
When I purchased my computer, it included a copy of Windows. How can I
determine whether the copy of Windows is preinstalled by Lenovo?
On the outside of the sales package of your computer, you should find a
label containing configuration information for your computer. Check the
printed string next to OS. If it contains Windows or WIN, the copy of
Windows was preinstalled by Lenovo.
18

Chapter 3. Recovery system
I uninstalled a preinstalled software, but there is no significant increase in the
free drive space.
The copy of Windows running on your computer may be Compact
tec
hnology enabled. For computers with Compact technology enabled
Windows, the majority of files needed for preinstalled software are
installed on the Recovery Partition and won’t be deleted through normal
uninstallation.
How can I determine whether
the Windows running on my computer is
Compact technology enabled?
Compact technology is normally enabled
on copies of Windows 10 Update
running on SSD (or eMMC) -only computer models. To check your
computer,
1 Right-
click the Start button in the lower-left corner and select Disk
Management.
2 The
If Wi
Disk Management program starts.
m Boot is labeled on the Windows partition (as illustrated), Compact
technology is enabled on your copy of Windows.
Where can I find drivers for the various hardware devices of my computer?
If your computer is preinstalled with a W
indows operating system, first
check the installation program on the D partition of your hard disk (for
select models, on the C partition). If you cannot find the drivers for all the
hardware devices that you need there, download the drivers from the
Lenovo consumer support website.
Note: The Lenovo support Web site contains the latest drivers.
19

Chapter 4. Troubleshooting
Frequently asked questions - - - - - - - - - - - - - - - - - - - - - - - - - - - - - - - - - - - - - - - - - - - -
This section lists frequently asked questions by category.
Finding information
What safety precautions should I follow when using my computer?
The Lenovo Safety and General Information Guide which came with your
computer contains safety precautions for using your computer. Read and
follow all the precautions when using your computer.
Where can I find the hardware specifications for my computer?
You can find hardware specification for your computer on the printed
flyers which came with your computer.
Where can I find warranty information?
For the warranty applicable to your computer, including the warranty
period and type of warranty service, see the Lenovo limited warranty flyer
that came with your computer.
Drivers and preinstalled software
Where are the installation discs for Lenovo preinstalled software (desktop
software)?
Your computer does not come with installation discs for Lenovo
preinstalled software. If you need to reinstall any preinstalled software,
you can find the installation program on the D partition of your hard disk
(for select models, on the C partition). If you cannot find the installation
program there, you can also download it from the Lenovo consumer
support website.
Where can I find drivers for the various hardware devices of my computer?
If your computer is preinstalled with a Windows operating system, Lenovo
provides drivers for all the hardware devices that you need on the D
partition of your hard disk (for select models, on the C partition). You can
also download the latest device drivers from the Lenovo consumer support
website.
20

Chapter 4. Troubleshooting
BIOS setup utility
What is the BIOS setup utility?
The BIOS setup utility is ROM-based software. It displays basic computer
information and provides options for setting boot devices, security,
hardware mode, and other preferences.
How can I start the BIOS setup utility?
To start the BIOS setup utility:
1 Shut down the computer.
2 Press the Novo button and then select BIOS Setup.
How can I change the boot mode?
There are two boot modes: UEFI and Legacy Support. To change the boot
mode, start the BIOS setup utility and set boot mode to UEFI or Legacy
Support on the boot menu.
When do I need to change the boot mode?
The default boot mode for your computer is UEFI mode. If you need to
install a legacy operating system, such as Windows, Linux or Dos, etc (that
is, any operating system before Windows 8) on your computer, you must
change the boot mode to Legacy Support. The legacy operating system,
such as Windows, Linux or Dos, etc cannot be installed if you don't change
the boot mode.
Getting help
How can I contact the customer support center?
See “Chapter 3. Getting help and service” of
Information Guide
.
Lenovo Safety and General
21

Chapter 4. Troubleshooting
Troubleshooting - - - - - - - - - - - - - - - - - - - - - - - - - - - - - - - - - - - - - - - - - - - - - - - - - - - - - - - - - - - - - - -
Display problems
When I turn on the
computer, nothing appears
on the screen.
When I turn on the
computer, only a white
cursor appears on a blank
screen.
The screen goes blank
while the comput
er is on.
Sleep problems
The critical low-battery
error message appears,
and the computer
immediately turns off.
The computer enters sleep
mode immediately after
-on.
Power
• If the screen is blank, make sure that:
- The AC power adapter is connected to the
computer
working electrical outlet.
- The computer power is on. Press the Power key
again for confirmation.
• If these items are set correctly, and the screen remains
blank, have the computer serviced.
• Restore backed-up files to your Windows
environment or the entire contents of your hard disk
to its original factory contents using Push-button
reset. If you still see only the cursor on the screen,
have the computer serviced.
• Your power management is enabled. Perform the
following to resume from sleep mode:
- Press any key on the keyboard.
• The battery power is getting low. Connect the AC
power adapter to the computer.
• Make sure that:
- The battery is charged.
- The operating temperature is within the acceptable
range. S
the Lenovo Safety and General Information Guide.
, and the power cord is plugged into a
ee “Chapter 2. Use and care Information” in
Note: If the battery is charged and the temperature is within range, have the computer
serviced.
22

Chapter 4. Troubleshooting
The computer does not
return from sleep mode and
the computer does not
work.
• If your computer is in sleep mode, connect the AC
power adapter to the computer, then press the
Windows button or the Power key.
• If the system still does not return from sleep mode,
your system has stopped responding, and you cannot
turn off the computer; reset the computer. Unsaved
data may be lost. To reset the computer, press and
hold the Power key for eight seconds or more. If the
computer still does not reset, remove the AC power
adapter.
Display panel problems
The screen is blank. • Do the following:
- If you are using the AC power adapter or the
ba
ttery, and the battery status indicator is on, press
) to make the screen brighter.
resume from sleep mode.
The screen is unreadable or
distorted.
Incorrect characters appear
on
the screen.
F12 (
- If the power indicator is blinking, press the Power
key to
- If the problem persists, follow
next problem “The screen is unreadable or
distorted.”
• Make sure that:
- The screen resolution and color quality are correctly
set.
- The monitor type is correct.
• Is the operating system or programs installed
correctly? If they are installed and configured
correctly, have the computer serviced.
Sound problems
No sound can be heard
from the speakers even
when the volume is turned
up.
• Make sure that:
- The Mute function is off.
- The combo audio jack is not being used.
- Speakers are selected as the playback device.
the solution in the
23

Chapter 4. Troubleshooting
Battery problems
Your computer shuts down
before the battery status
indicator shows empty.
-or-
Your computer operates
e battery status
after th
indicator shows empty.
Other problems
Your computer does not
respond.
The connected external
device does not wo
rk.
• Recharge the batte
• To turn off your computer, press and hold the Power
key for eight seconds or more. If the computer still
does not respond, remove the AC power adapter.
• Y
our computer might lock when it enters sleep mode
during a communication operation. Disable the sleep
timer when you are working on the network.
• Do not connect or disconnect any external device
cables other than USB while the computer power is
on. Otherwise, you might damage your computer.
• When u
devices, such as an external USB optical drive, use an
external device power adapter. Otherwise, the device
may not be recognized, or the system may shut down
as a result.
sing high power consumption external
ry.
24

Trademarks
The following terms are trademarks or registered trademarks of Lenovo in the
United States, other countries, or both.
Lenovo
Microsoft and Windows are trademarks of Microsoft Corporation in the United
States, other countries, or both.
Other company, products, or service names may be trademarks or service marks
of others.
25

en-US
Rev. AA00
©Lenovo China 2018

Lenovo
ideapad D330-10IGM
Regulatory Notice

Lenovo regulatory notice for wireless adapters - - - - - - - - - - - - - - - - - - - - - - - - - - - - - - - - - - - - - - - -
This manual contains regulatory information for the following Lenovo products:
• Lenovo ideapad D330-10IGM
Read first — regulatory information
Please read this document before you use your Lenovo computer. Your Lenovo computer
complies with the radio frequency and safety standards of any country or region in which it
has been approved for wireless use. You must install and use your computer in strict
accordance with the instructions as described hereafter.
Veuillez lire ce document avant d’utiliser votre ordinateur Lenovo. Votre ordinateur Lenovo
est conforme aux normes de sécurité et de radiofréquence du pays ou de la région où son
utilisation sans fil est approuvée. Vous devez installer et utiliser votre ordinateur en
respectant scrupuleusement les instructions décrites ci-après.
USA — Federal Communications Commission (FCC)
I. Factory preinstalled Wireless LAN + Bluetooth Combo module
• FCC ID: PD93165D2 (Model: 3165D2W)
• FCC ID: PD98265D2 (Model: 8265D2W)
• FCC ID: PPD-QCNFA425 (Model: QCNFA425)
FCC ID: ZMOL850GL (Model: L850)
•
The following wireless LAN modules marketed in the USA and Canada do not support or
function in the extended channels (Ch. 12, Ch. 13):
– Models: QCNFA425
i) The FCC RF Exposure compliance:
The radiated output power of the Wireless LAN + Bluetooth Combo Mini PCI Express Card
authorized to use for the your Lenovo computer is far below the FCC radio frequency
exposure limits. Nevertheless, it shall be used in such a manner that the potential for human
contact during normal operation is minimized as follows:
Caution: The total radiated energy from the antennas connected to the installed wireless LAN module,
conforms to the FCC limit of the SAR (Specific Absorption Rate) requirement, regarding 47
CFR Part 2 section 1093, when the computer was tested in either conventional notebook or
tablet computer orientations.
ii) FCC ID of wireless module:
On the bottom side of your Lenovo computer, you will find an indicator label of the format
“Contains Transmitter Module: FCC ID XXXX”, where XXXX represents the FCC ID that
corresponds to your preinstalled Wireless LAN + Bluetooth Combo module.
iii) Radio Frequency interference requirement:
Each device has been tested and found to comply with the limits for a Class B digital device
pursuant to FCC Part 15 Subpart B. Refer to “Electronic emission notices” on page 4.
When you use a Wireless LAN + Bluetooth Combo module in the 802.11 a/n transmission mode:
• High power radars are allocated as primary users of the 5250 to 5350 MHz and 5650 to
5850 MHz bands. These radar stations can cause interference with and/or damage this
device.
1

II. Simultaneous use of RF transmitters
Make sure of the following conditions on use of wireless features:
1. When you use any other RF option device, all wireless features in your Lenovo computer
are required to be turned off.
2. Users must follow the RF Safety instructions on wireless option devices that are included
in the RF option device’s user’s manual.
Canada — Industry Canada (IC)
IC Certification number
Factory preinstalled Wireless LAN + Bluetooth Combo modules:
I)
•
IC: 1000M-3165D2 (Model: 3165D2W)
IC: 1000M-8265D2 (Model: 8265D2W)
•
•
IC: 4104A-QCNFA425 (Model: QCNFA425)
•
IC: 21374-L850-GL (Model:
The following wireless LAN modules marketed in the USA and Canada do not support or
function in the extended channels (Ch. 12, Ch. 13):
– Models: QCNFA425
There is no certification number of Industry Canada for Mini PCI Express Card shown on the
enclosure of your Lenovo computer. Instead you will find an indicator label pointing to the
location of the IC Certification number on the bottom side of your Lenovo computer. This label
will be of the format “Contains Transmitter Module: Canada IC: XXXX”, where XXXX
represents the IC ID that corresponds to your preinstalled WLAN module.
II) Low power license-exempt radiocommunication devices (RSS-247):
Operation is subject to the following two conditions:
1. This device may not cause interference, and
2. this device must accept any interference, including interference that may cause undesired
operation of the device.
When you use a Wireless LAN and Bluetooth Combo module adapter in the 802.11 a/n
transmission mode:
• The devices for the band 5150-5350 MHz are only for indoor usage to reduce potential for
harmful interference to co-channel Mobile Satellite systems.
• High power radars are allocated as primary users (meaning they have priority) of
5250-5350 MHz and 5650-5850 MHz bands and these radars could cause interference
and/or damage to LE-LAN (Licence-Exempt Local Area Network) devices.
• The maximum antenna gain permitted for devices in the 5250-5350 MHz,
5470-5725 MHz, and 5725-5825 MHz bands complies with the e.i.r.p. limit.
L850-GL)
III) Exposure of humans to RF fields (RSS-102):
Lenovo computers employ low gain integral antennas that do not emit RF field in excess of
Health Canada limits for the general population; consult Safety Code 6, obtainable from
Health Canada’s Web site at www.hc-sc.gc.ca/rpb
The radiated energy from the antennas connected to the wireless adapters conforms to the IC
limit of the RF exposure requirement regarding IC RSS-102, Issue 5 clause 4.
2

Numéro d’homologation IC
I) Modules de réseaux local sans fil pré-installé à l’usine:
IC: 1000M-3165D2 (Model: 3165D2W)
•
IC: 1000M-8265D2 (Model: 8265D2W)
•
IC: 4104A-QCNFA425 (Model: QCNFA425)
•
•
IC: 21374-L850-GL (Model: L850-GL)
Le boîtier de votre ordinateur Lenovo ne comporte pas de numéro d’homologation IC (Industry
Canada) pour la carte mini-PCI Express ; mais sous votre Lenovo, vous trouverez une étiquette
indicatrice pointant vers l’emplacement du numéro d’homologation IC. L’étiquette se présente
sous la forme “Contains Transmitter Module: Canada IC: XXXX” où XXXX représente l’ID IC qui
correspond au module WLAN préinstallé.
II) Remarque relative aux appareils de communication radio de faible puissance sans
licence (CNR-210, CNR-247):
Le fonctionnement de ce type d’appareil est soumis aux deux conditions suivantes:
1. Cet appareil ne doit pas perturber les communications radio, et
2. cet appareil doit supporter toute perturbation, y compris les perturbations qui pourraient
provoquer son dysfonctionnement.
Lorsque vous utilisez un module adaptateur LAN sans fil et Bluetooth Combo dans le
802,11 un mode de transmission / n :
• Les dispositifs pour la bande 5150-5350 MHz ne sont que pour une utilisation en intérieur
pour réduire potentiel d’interférences nuisibles à la co-canal systèmes satellite mobile .
• Les radars à haute puissance sont désignés comme utilisateurs principaux ( ce qui signifie
qu’ils ont la priorité) des bandes 5250- 5350 MHz et 5650-5850 MHz et ces radars
pourraient provoquer interférences et / ou des dommages à LE-LAN ( exempte de
licence Local Area Network) appareils.
• Le gain d'antenne maximal autorisé pour les appareils dans les bandes de fréquence
5250-5350 MHz, 5470-5725 MHz et 5725-5825 MHz est conforme à la limite p.i.r.e
(puissance isotrope rayonnée équivalente).
III) Exposition des êtres humains aux champs radioélectriques (RF) (CNR-102):
L’ordinateur Lenovo utilise des antennes intégrales à faible gain qui n’émettent pas un
champ électromagnétique supérieur aux normes imposées par le Ministére de la santé
canadien pour la population. Consultez le Safety Code 6 sur le site Web du Ministére de la
santé canadien à l’adresse “www.hc-sc.gc.ca/rpb
L’énergie rayonnée par les antennes connectées aux adaptateurs sans fil est conforme à la IC
limite de l’exigence de l’exposition aux RF IC concernant CNR- 102, Issue 5, Section 4.
”.
3

Electronic emission notices
Federal Communications Commission (FCC) Statement
• Models: 3165D2W, 8265D2W, QCNFA425
This equipment has been tested and found to comply with the limits for a Class B digital
device, pursuant to Part 15 of the FCC Rules. These limits are designed to provide
reasonable protection against harmful interference in a residential installation. This
equipment generates, uses, and can radiate radio frequency energy and, if not installed and
used in accordance with the instructions, may cause harmful interference to radio
communications. However, there is no guarantee that interference will not occur in a
particular installation. If this equipment does cause harmful interference to radio or
television reception, which can be determined by turning the equipment off and on, the user
is encouraged to try to correct the interference by one or more of the following measures:
• Reorient or relocate the receiving antenna
Increase the separation between the equipment and receiver.
•
• Connect the equipment into an outlet on a circuit different from that to which the receiver
is connected.
• Consult an authorized dealer or service representative for help.
Lenovo is not responsible for any radio or television interference caused by unauthorized
changes or modifications to this equipment. Unauthorized changes or modifications could
void the user’s authority to operate the equipment.
This device complies with Part 15 of the FCC Rules. Operation is subject to the following two
conditions: (1) this device may not cause harmful interference, and (2) this device must accept
any interference received, including interference that may cause undesired operation.
Responsible Party:
Lenovo (United States) Incorporated
1009 Think Place - Building One
Morrisville, NC 27560
Telephone: 1-919-294-5900
.
4

©Lenovo China 2018
Rev. AA00
 Loading...