

Page 1

Page 2
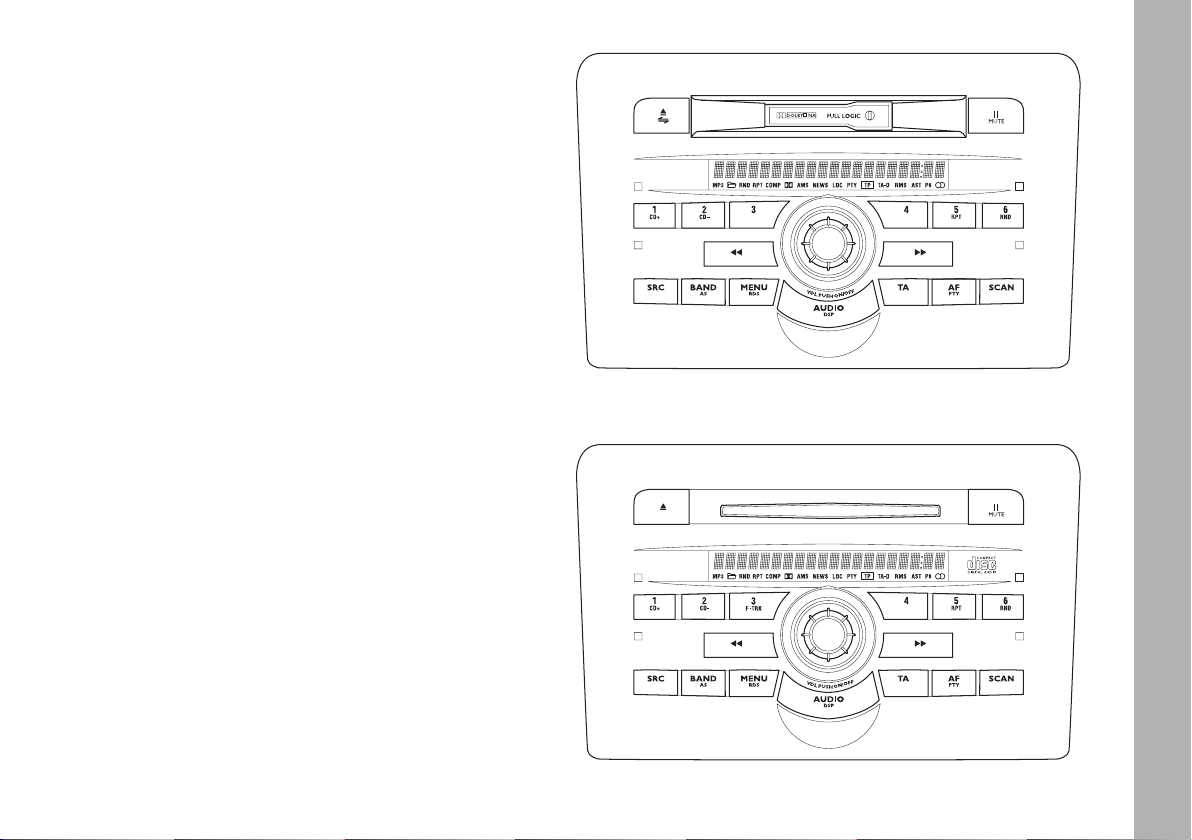
RADIO WITH CASSETTE PLAYER
RADIO WITH COMPACT
DISC PLAYER
F0C0288m
F0C0289m
Page 3
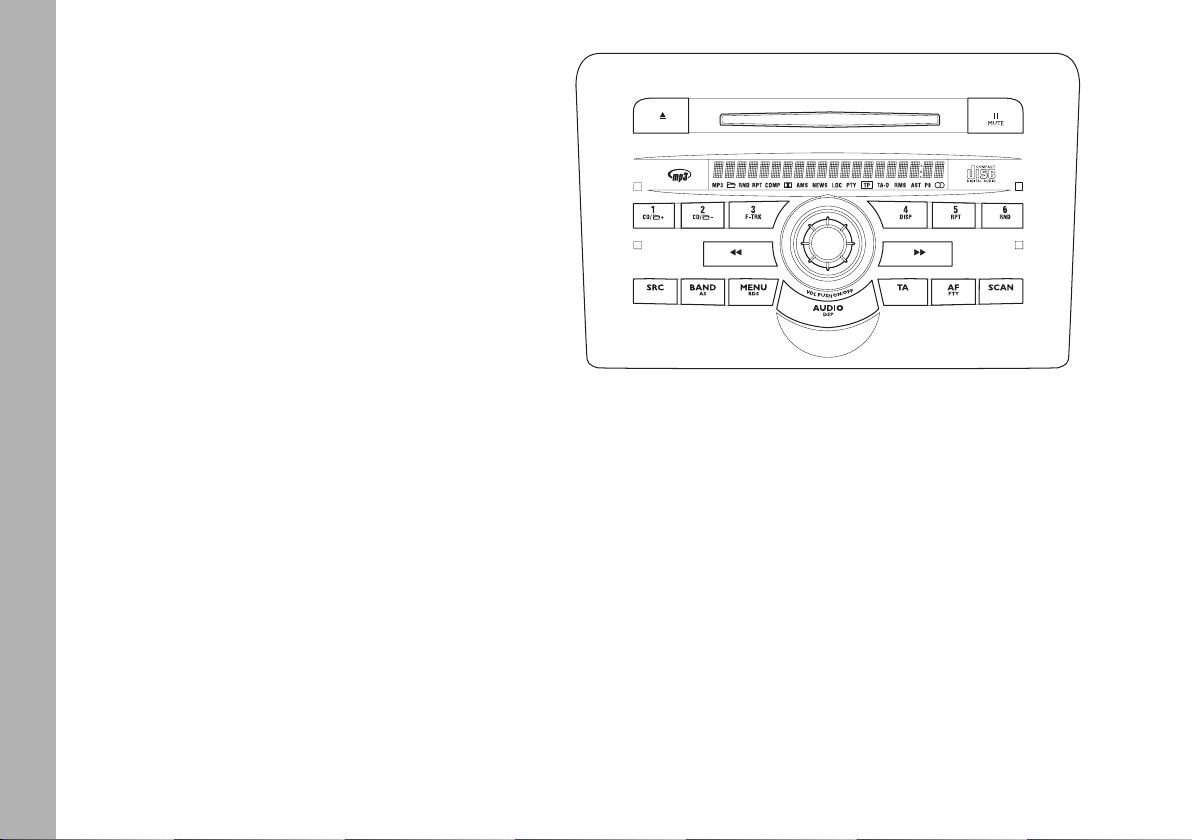
RADIO WITH CD AND MP3
PLAYER
F0C0190m
Page 4

CCCCOOOONNNNTTTTEEEENNNNTTTTSS
SS
INTRODUCTION .................................. 4
ADVICE ............................................................. 4
– Road safety .................................................. 4
– Reception conditions ................................ 4
– Care and maintenance ............................. 4
– Cassettes ..................................................... 4
– Compact Disc ............................................ 5
– Notes on Compact Discs ........................ 6
RADIO WITH CASSETTE
PLAYER
CONTROL DESCRIPTION ............................... 7
GENERAL ................................................................ 12
Radio section ........................................................... 12
Cassette section...................................................... 12
Compact Disc section ........................................... 12
Sound section .......................................................... 13
Antitheft protection ............................................... 13
GLOSSARY ............................................................. 14
OPERATION
Controls on steering wheel ................................ 16
Functions and adjustments .................................. 17
Telephone provision ............................................. 19
Radio (Tuner) ......................................................... 20
Menu ......................................................................... 25
Adjustments ............................................................ 26
Cassette player (Tape) ......................................... 29
CD Changer ............................................................ 31
Secret coding .......................................................... 34
Technical information ........................................... 36
RADIO WITH COMPACT
DISC PLAYER
CONTROL DESCRIPTION ............................... 39
GENERAL ................................................................ 44
Radio section ........................................................... 44
Compact Disc section ........................................... 44
Sound section .......................................................... 45
Antitheft protection ............................................... 45
CAUTIONS ............................................................ 45
GLOSSARY ............................................................. 46
OPERATION
Controls on steering wheel ................................ 48
Functions and adjustments .................................. 49
Telephone provision ............................................. 51
Radio (Tuner) ......................................................... 52
Menu ......................................................................... 57
Adjustments ............................................................ 58
Compact Disc player ............................................ 62
CD Changer ............................................................ 64
Secret coding .......................................................... 68
Technical information ........................................... 69
RADIO WITH CD AND MP3
PLAYER
CONTROL DESCRIPTION ............................... 73
INTRODUCTION.................................................. 78
MP3 Player .............................................................. 78
RADIO WITH CASSETTE PLAYER
3
Page 5

INTRODUCTION ADVICE
The sound system, of fixed type, is
fitted with audiocassette player
(radio with audiocassettes) or CD
player (radio with Compact Disc
player) or CD MP3 player (radio
with Compact Disc MP3 player) and
sound graphic equaliser. The sound
system has been designed according
to the specific passenger compartment characteristics. The special
design is in line with the style of the
dashboard.
The radio is installed in a userfriendly position for the driver and
passenger and the graphics on the
front panel make location of the controls quick, facilitating use.
The CD Changer for 5 discs, if present, is housed in the upper glove
box of the dashboard, on passenger
side.
Below you will find the instructions
for use, which you are advised to
read through carefully. The instructions also contain the procedure for
controlling the CD Changer through
the radio. For the instructions for
use of the CD Changer refer to the
specific manual.
4
Road safety
You are advised to learn how to
use the various radio functions (e.g.:
storing stations) before starting to
drive.
WARNING
Too high a volume when
driving can put the driver’s
life at risk and that of other people.
Therefore the volume should always be adjusted in such a way that
it is always possible to hear the
noises of the surrounding environment (e.g.: horns, ambulance, police sirens, etc.).
Reception conditions
Reception conditions change constantly when driving. Reception may
be disturbed by the presence of
mountains, buildings or bridges particularly when far away from the station being listened to.
IMPORTANT When receiving
traffic information, the volume may
be higher than normal.
Care and maintenance
The radio structure ensures long
operation with no need for particular maintenance. In the event of a
fault, contact a Fiat Dealership.
Do not expose cassettes to the sun
or high temperatures and put them
back in their boxes after use. To
obtain optimum playing conditions
do not use poor quality cassettes
and in any case no longer than C-90.
To clean the front panel only use a
soft, antistatic cloth. Cleaning and
polishing products might spoil the
surface.
Cassettes
To obtain optimum playing conditions we give the following advice:
– do not use poor quality cassettes,
with distortions or labels detached;
Page 6
– never leave the cassette in the
radio when not in use;
– never insert other objects in the
cassette slot;
– do not expose cassettes to the
sun or high temperatures;
– put cassettes back in their boxes
after use;
– over time, dirt on the playing
head caused by tapes may reduce the
high notes when playing. You are
therefore advised to clean the head
routinely using a special cleaner
taper of the non abrasive type;
– preferably use C-60 cassettes and
in any case no longer than C-90 to
ensure the best playing conditions;
– avoid inserting cassettes with
damage tapes in the radio, especially
if using C-90 cassettes, as the tape
might come out and get stuck;
– do not lubricate the cassette
mechanism;
– do not touch the player head
with magnetic or hard objects.
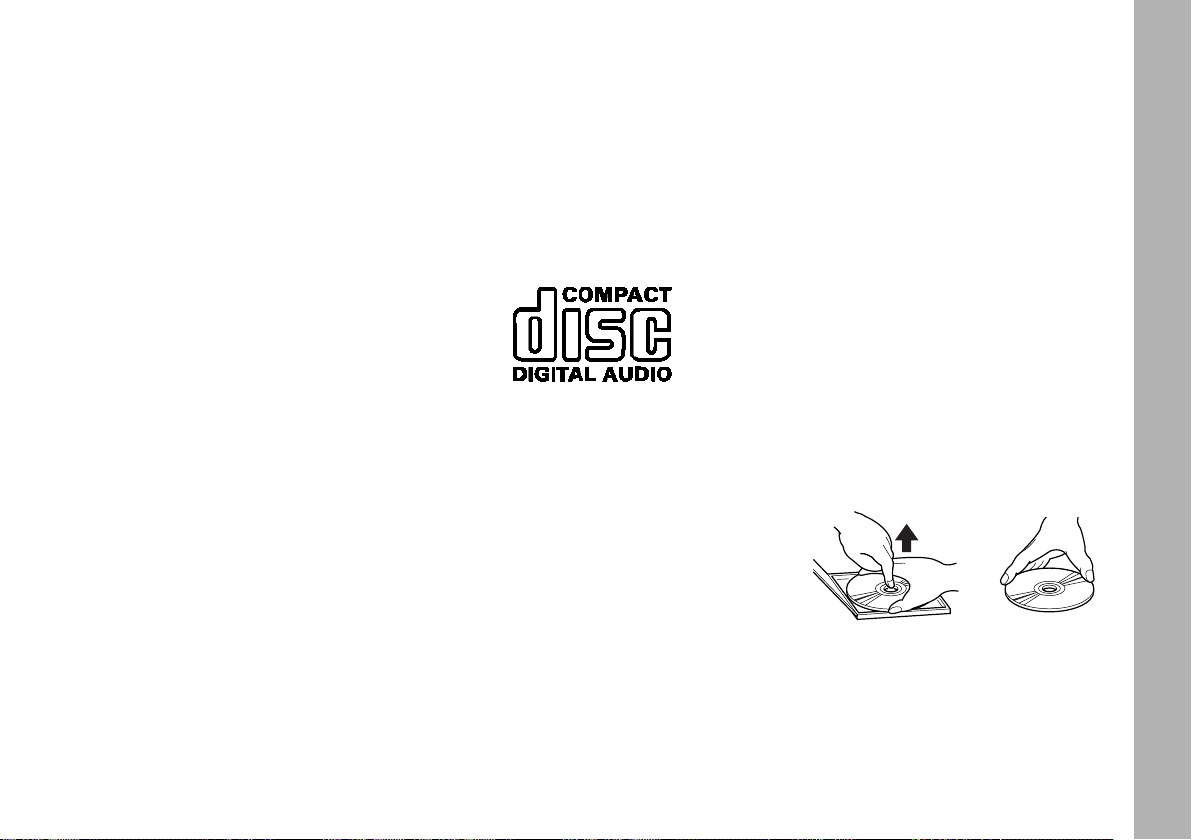
Compact Disc
Remember that dirt, marks or distortion on Compact Disc can cause
skipping. For top performance conditions, we give the following advice:
– Only use Compact Discs which
have the following brand:
– Carefully clean all Compact Discs
of fingerprints and dust using a soft
cloth. Support Compact Discs from
the outer circumference and clean
from the centre outwards.
– Never use chemical products for
cleaning (e.g. spray cans, antistatic or
thinners) as they might damage the
surface of Compact Discs.
– After use, put Compact Discs
back in their container, to avoid
marks or scratches that may cause
skipping when playing.
– Do not expose Compact Discs to
direct sunlight, high temperatures or
damp for prolonged lengths of time
to prevent them from bending.
– Do not stick labels or write on
the recorded surface of Compact
Discs with pens or pencils.
To remove a Compact Disc from
its container, press the centre and
raise the disc carefully, holding it by
the outer circumference.
Removing the disc
Estrazione del disco
Proper way to hold the
Modo corretto di tenere
compact disc
il compact disc
Always hold Compact Discs by the
outer circumference. Never touch
the surface.
5
Page 7
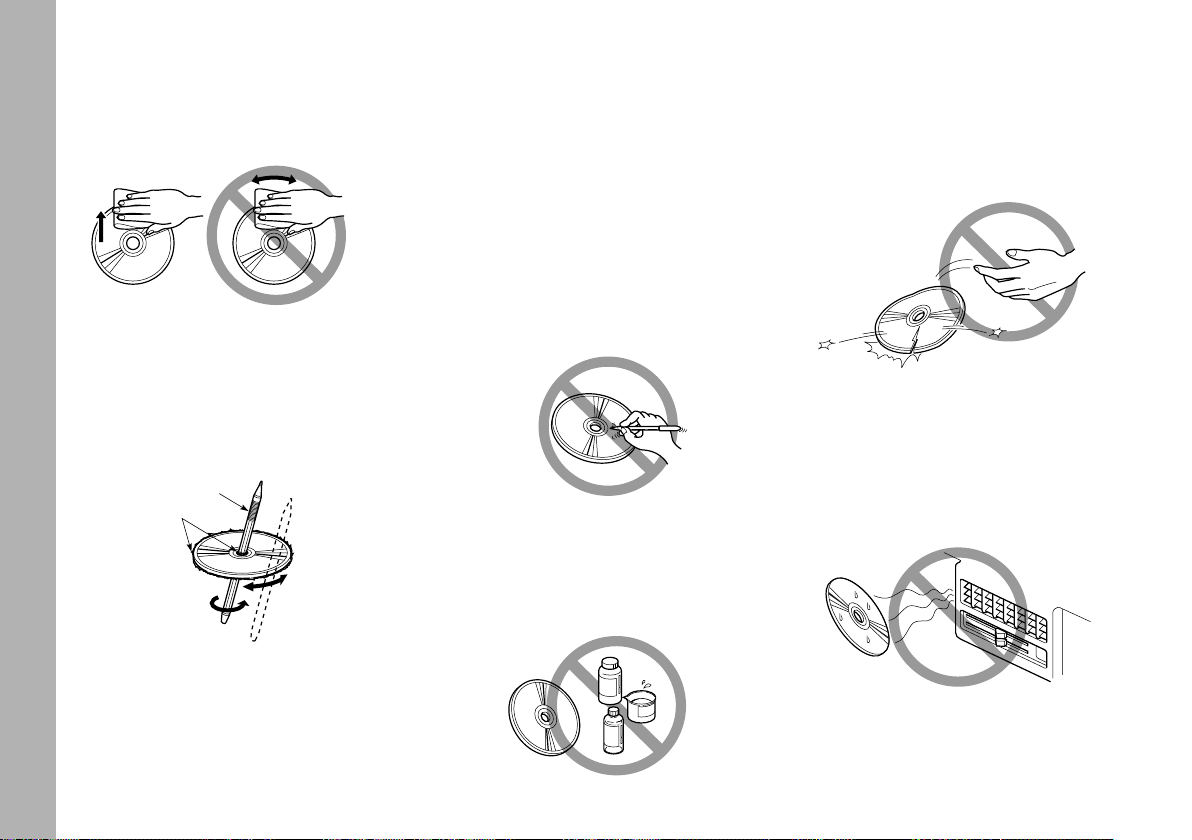
To remove fingerprints and dust,
Errato
Penna a sfera
Ruvidità
Errato
Errato
Errato
Errato
use a soft cloth starting from the
centre of the Compact Disc outwards.
New discs may be rough around
the edges. When these discs are
used, the player might not work or
the sound might skip. To remove the
roughness from the edge of the disc
use a ball-point pent, etc.
Ball-point pen
Roughness
To obtain the best sound quality, use
original CD supports. Correct operation is not ensured if not correctly
written CD-R/RW supports and/or
with capacity higher than 650 MB are
used.
6
No
IMPORTANT Do not use the protective sheets for CD in commerce or
discs with stabilisers, etc. as they might
get stuck in the internal mechanism
and damage the disc.
IMPORTANT if the CD is copyprotected, the system may need few
seconds before starting to play it.
Notes on Compact Discs
Do not stick labels on the surface
of the Compact Disc or write on the
surface with pens or pencils.
No
Do not use solvents like stain
removers, antistatic sprays or thinners in commerce for cleaning
Compact Discs.
No
Do not use highly scratched,
cracked, or distorted discs, etc. The
use of these discs will involve malfunctioning or damage to the player.
No
Do not expose Compact Discs to
direct sunlight or any source of heat.
No
Page 8
RRRRAAAADDDDIIIIOOOO WW
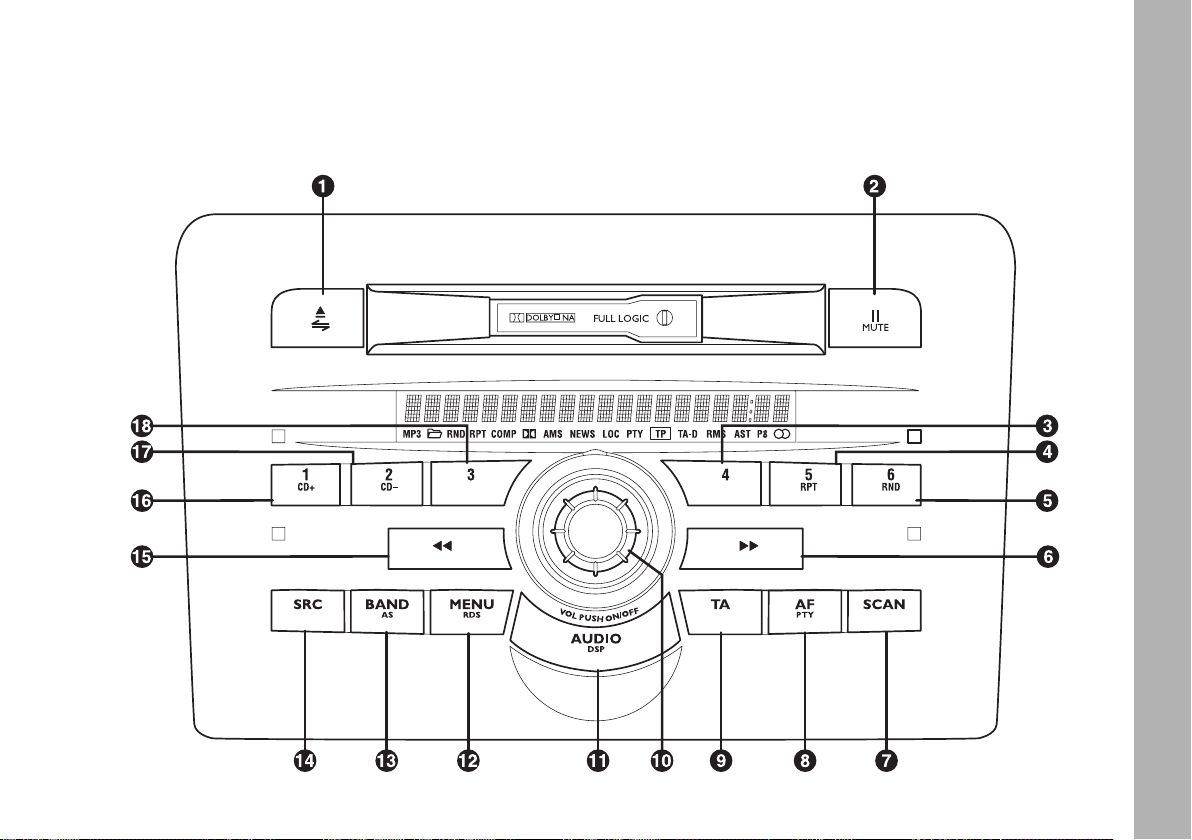
CONTROL DESCRIPTION
WWIIIITTTTHHHH CCCCAAAASSSSSSSSEEEETTTTTTTTEEEE PPPPLLLLAAAAYYYYEEEERRRR
F0C0026m
RADIO WITH CASSETTE PLAYER
fig. 1
7
Page 9

Button RADIO mode
Letters or symbol Function
Buttons and front panel
Brief pressing Pressing over 2 sec.
RADIO WITH CASSETTE PLAYER
1
2
3
4
5
6
7
8
9
10
11
12
Ä
II MUTE
4
5 RPT
6 RND
>>
SCAN
AF PTY
TA
VOL PUSH ON/OFF
AUDIO DSP
MENU RDS
Eject/Reverse
Mute
Preset station 4
Preset station 5/track repetition
Preset station 6
RaNDom functions of tracks on CD
Forward/Next
Automatic scanning
Alternative frequency/Programme Type
Traffic information
Radio ON/OFF
Volume adjustment
Sound setting
Menu function
Eject Tape (cassette)
Audio Mute
FM/AM:call preset station 4
FM/AM:call preset station 5
FM/AM:call preset station 6
FM: Seek + / MAN +
AM: Seek + / MAN +
PTY: Select programme type
Automatic scanning of stations on the
band in use
AF ON/OFF
TA ON/OFF
ON/OFF: press
volume adjustment:
turn leftwards: to decrease
turn rightwards: to increase
Bass (B)
Treble (T)
Fader (F)
Balance (B)
Manual tuning ON/OFF
NEWS ON/OFF
Function confirmation BEEP ON/OFF
(BEEP)
SENS DX/LO
SVC (SPEED VOLUME)
Loudness ON/OFF
EON TA ON
FM/AM: store preset station 4
FM/AM: store preset station 5
FM/AM: store preset station 6
Automatic scanning of stations tunable
on the band in use
Select programme type
PTY: displays selected programme type
Adjusting TA volume
Access to Equalizer function
RDS Clock display
Audio Clip Detect ON/OFF
Setting Radio mode ON
Telephone volume adjustment
ON/OFF
Max. radio volume at switching on
8
Page 10

CASSETTE mode
Brief pressing Pressing over 2 sec.
CD
CHANGER
mode
Brief pressing Pressing over 2 sec.
Eject Tape (cassette)/
Reverse/normal
Playing Pause / Audio Mute
Fast forward (to tape end)
Automatic scanning of cassette tracks
TA ON/OFF
ON/OFF: press
volume adjustment:
turn leftwards: to decrease
turn rightwards: to increase
Bass (B)
Treble (T)
Fader (F)
Balance (B)
Dolby B
NEWS ON/OFF
Function confirmation BEEP ON/OFF (BEEP)
SVC (SPEED VOLUME)
Loudness ON/OFF
EON TA ON
AMS function enabled, forward
to next track
Adjusting TA volume
Access to Equalizer function
RDS Clock display
Audio Clip Detect ON/OFF
Setting radio mode ON
Telephone volume adjustment ON/OFF
Max. radio volume at switching on
Eject Tape (cassette)
Playing Pause / Audio Mute
CD track repetition ON/OFF
Random CD track repetition ON/OFF
Select next track
Automatic scanning of CD tracks
TA ON/OFF
ON/OFF: press
volume adjustment:
turn leftwards: to decrease
turn rightwards: to increase
Bass (B)
Treble (T)
Fader (F)
Balance (B)
NEWS ON/OFF
Function confirmation BEEP ON/OFF (BEEP)
SVC (SPEED VOLUME)
Loudness ON/OFF
EON TA ON
CD compression
Fast forward (continuous)
RADIO WITH CASSETTE PLAYER
Adjusting TA volume
Access to Equalizer function
RDS Clock display
Audio Clip Detect ON/OFF
Setting radio mode ON
Telephone volume adjustment ON/OFF
Max. radio volume at switching on
9
Page 11

Button RADIO mode
Letters or symbol Function
Buttons and front panel
Brief pressing Pressing over 2 sec.
RADIO WITH CASSETTE PLAYER
13
14
15
16
17
18
BAND AS
SRC
<<
1 CD+
2 CD–
3
Choosing frequency band
Select source
Backward/Previous
Preset station 1
Preset station 2
Preset station 3
FM1,FM2,FM3,FMAST
LW,MW,AMAST
TAPE (Cassette), RADIO, CD Changer
(if connected)
FM: Seek – / MAN –
AM: Seek – / MAN –
PTY: Select programme type
FM/AM:call preset station 1
FM/AM:call preset station 2
FM/AM:call preset station 3
Store automatically in preset
station group.
Exit on FMAST.P1 or AMAST.P1
FM/AM:call preset station 1
FM/AM: store preset station 2
FM/AM: store preset station 3
10
Page 12

CASSETTE mode
Brief pressing Pressing over 2 sec.
CD
CHANGER
mode
Brief pressing Pressing over 2 sec.
Exit cassette mode
Insert tuner in last band
TAPE (Cassette), RADIO, CD Changer
(if connected)
Fast rewind (continuous)
AMS function enabled, return to
previous track
Exit CD mode
Insert tuner in last band
TAPE (Cassette), RADIO, CD Changer
(if connected)
Select previous track
CD +
CD –
Fast rewind (continuous)
RADIO WITH CASSETTE PLAYER
11
Page 13

GENERAL
The set possesses the following
functions:
RADIO SECTION
– PLL tuning with FM/FMAST/AM/
AMAST/MW/LW frequency bands
– RDS (Radio Data System) with
TA (traffic information) - PTY
(Program Type) - EON (Enhanced
Other Network) - REG (Regional
RADIO WITH CASSETTE PLAYER
programmes) functions
– Alternative frequency search
selection in RDS mode (AF function)
– Automatic/manual station tuning
– Manual storage of 42 stations: 24
in the FM band (6 in FM1, 6 in FM2,
6 in FMT and 6 in FMAST), 6 in the
MW band, 6 in the LW band and 6 in
the AM (MW+LW) band, with automatic storage (AutoSTore function)
in the AMAST band
– Automatic storage (AutoSTore
function) of 6 stations in FM band
and 6 stations in the AM band
– SENS DX/LO function (sensitivity
adjusting in searching radio stations)
– Scan function (scanning stored
stations or scanning on frequency
band in use), lasting approx. 10 sec.
for each station.
– Automatic Stereo/Mono switching.
CASSETTE SECTION
– Autoreverse
– Tape fast forward/rewind
– CrO
tape equalizing
2
– AMS function (Automatic Music
Search)
– Scan function (scan tape tracks),
lasting approx. 10 sec. for each track.
– DOLBY B (noise reduction cir-
cuit) (*)
– Powered cassette loading and
eject.
(*) The DOLBY reduction circuit is made
under the licence of Dolby Laboratories
Licensing Corporation. DOLBY and the
(M) symbol with double D are patented
brands of Dolby Laboratories Licensing
Corporation.
COMPACT DISC SECTION
(when the CD-Changer is fitted)
– Disc select (disc no.)
– Track select (forward/backward)
– Fast forward/backward
– Track Repeat function (repetition
of last track)
– Track Scan function (scanning the
tracks on the Compact Disc, lasting
approx. 10 sec. for each track).
12
Page 14

– RaNDom function (random play-
ing of tracks).
– Powered CD loading and eject.
For installation and
connection of the CDChanger apply only to
Fiat Dealership.
WARNING
On multimedia CDs in addition to sound tracks also
data tracks are recorded. Playing
one of these CDs may cause
rustling and such a volume as to
compromise road safety, as well as
causing damage to the final stages
and speakers.
SOUND SECTION
– Mute/Pause function
– Loudness function
– 5-band graphic equalizer
– Separate bass/treble adjustment
– Right/left and front/rear channel
balancing.
– Audio Clip Detect function
– Soft Mute function
ANTITHEFT PROTECTION
The radio is fitted with an antitheft
protection system based on a fourdigit secret code that makes the
radio unusable.
CODE Card
This the document that certifies
possession of the radio. The Code
Card contains the radio model, serial number and secret code.
Keep the Code Card in a safe place,
not in the car.
Secret coding
When the secret coding is activated and radio is removed from the
car battery (or 30 positive terminal),
the radio is protected electronically.
The radio can only be switched on
entering your personal secret code.
RADIO WITH CASSETTE PLAYER
13
Page 15

GLOSSARY
AF (Alternative Frequency)
Function that allows the radio to
stay tuned on the FM station selected also passing through areas served
by transmitters with different frequencies.
The RDS system actually keeps the
intensity and quality of the signal
received under control, automatically switching tuning on the frequency
RADIO WITH CASSETTE PLAYER
of the transmitter that is sending the
strongest signal.
AMS (Automatic Music Search)
This function enables to play automatically the next/previous track
provided that between the two
tracks there is a pause/muting of
about 4 seconds.
Autoreverse
Function that makes it possible to
listen to both sides of the tape without having to turn the cassette over.
Autostore
Function with which it is possible to
store automatically radio stations.
Balance (Channel balancing)
Function with which it is possible to
suitably adjust the sound from the
right or left speakers.
Bass (Bass tones)
This function adjusts the bass
tones.
CD-Changer
Multiple Compact Disc player.
Distant/Local (Sens Dx/Loc)
These are two levels of reception
sensitivity.
1) Distant (maximum sensitivity),
which makes it possible to tune all
the stations that can be received.
2) Local (minimum sensitivity),
which makes it possible to tune only
those stations with sufficiently strong
signals, such as for example local stations.
Dolby B
Tape noise limiting device produced
under licence of “Dolby Laboratories
Licensing Corporation”.
EON (Enhanced Other
Network)
Function that allows the radio to
tune automatically on a different station that the one being listened to
which broadcasts traffic information.
Fader
Function with which it is possible to
suitably adjust the sound from the
front or rear speakers.
Loudness
Function that emphasises the bass
and treble tones when listening at
low level. It is cut off when the volume is set to maximum (level 34).
14
Page 16

Mute
This function enables to mute the
active source. This function is activated automatically, if a cell phone is
connected to the radio, when a
phone call is being received.
Presettings
Number of radio stations that can
be stored manually or automatically.
PTY (Program Type)
This function allows the presetting
of a category of programmes such as
for instance, news bulletins, music,
sport, etc.
RDS (Radio Data System)
This is an additional radio information system which uses the 57 kHz
subcarrier of normal FM broadcasts.
With this function it is possible to
receive different types of information such as station names, alternative frequencies, automatic tuning to
traffic bulletins or special programmes selected through the PTY
function.
REG (Regional transmission
reception function)
Function with which it is possible to
tune only to local (regional) stations.
Repeat (Repetition of the
track)
Function with which it is possible to
listen continuously to the last track
played on the Compact Disc.
Scan
Function with which it is possible to
listen, for approx. 10 seconds, to all
the radio stations stored, or the
beginning of all the tracks contained
on a cassette or Compact Disc.
Soft Mute
Function that gradually highers and
lowers the volume when Mute is
turned on or off.
SVC
Function that automatically adjusts
the level of the volume to the speed
of the car to maintain the radio with
the noise level in the passenger compartment.
TA (Traffic information)
Function with which it is possible to
receive the traffic information
broadcast by the stations enabled,
also when tuned to another station
or listening to a cassette/CD.
RADIO WITH CASSETTE PLAYER
Treble (Treble tones)
This adjusts the treble tones.
15
Page 17
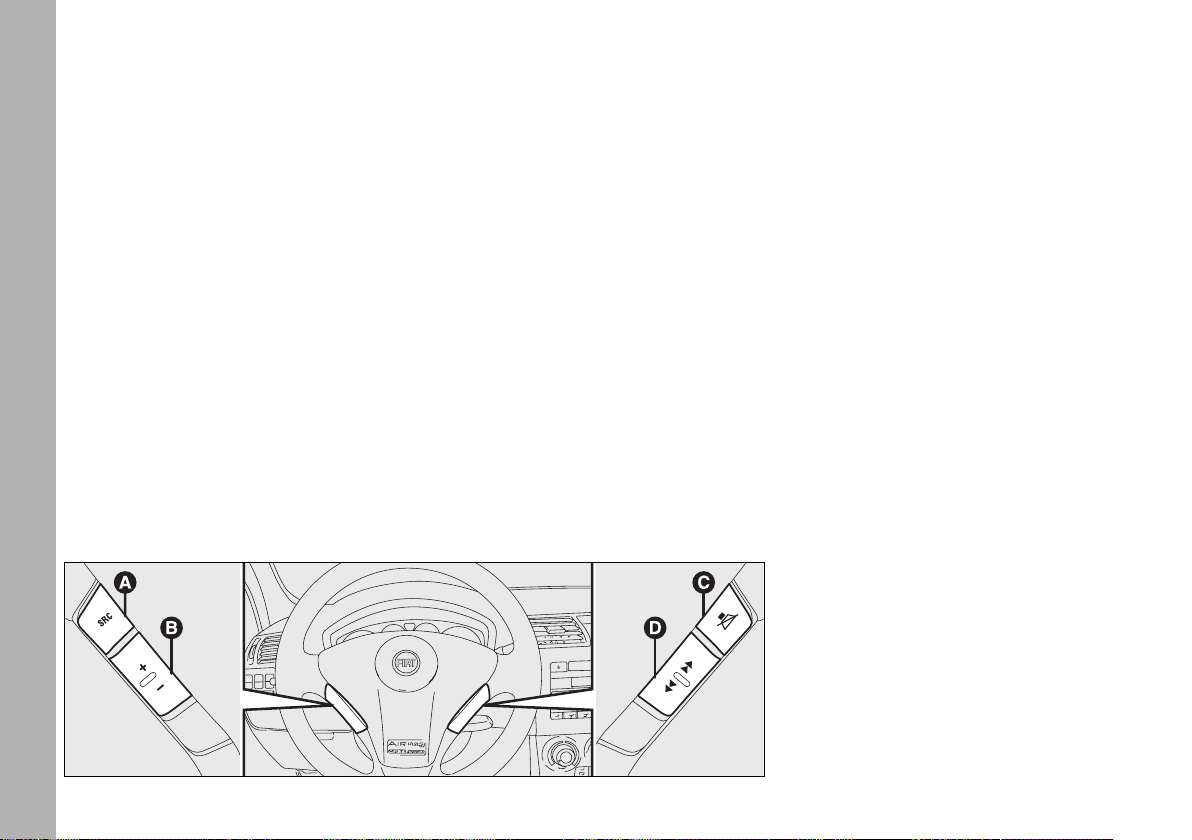
CONTROLS ON STEERING
WHEEL (where provided) fig. 2
The main radio function controls
are repeated on the steering wheel,
to allow easier control.
Volume adjustment
(“+” and “–”) Mute function
(“Mute”)
Press button B (“+”) to increase
volume and (“–”) to decrease volume as specified in paragraph
RADIO WITH CASSETTE PLAYER
ADJUSTMENT
. Function identical to
that of the button/knob 10 (VOL
PUSH ON/OFF) set on the radio.
VOLUME
Press button C (MUTE) to turn
on/off this function that brings the
volume to zero. When this function
is on the display shows “MUTE”
preceded by the current source (e.g.
“TUNER MUTE” when in radio
mode). If in CDC mode (CD
Changer), the display shows: “CD
PAUSE”.
Select Radio,
CD Changer
Cassette,
(“SRC”)
(SRC= Source = source)
Press repeatedly button A (SRC)
to cyclically select Radio, Cassette,
CD Changer (if the Compact Disc
player is fitted). This button function
is identical to that of the button 14
(SRC) set on the radio.
F0C0096m
Setting Radio, Cassette,
CD Changer (“+” and “–”)
Button D (<</>>) implements
three different functions according to
the selected operating mode (Radio,
cassette or CD Changer).
Button functions are identical to
the functions of buttons 6 (>>) and
15 (<<) set on the radio, as concerns the following functions.
1) Radio function: adjust tuning
Press button D (<</>>) to select
stations in the required band.
2) Cassette function
Press button D (<</>>) to forward/rewind the tape.
3) CD Changer function
select CD Changer next/
previous track
Press button D (<</>>) to play
next/previous track on the Compact
Disc you are listening to according
to modes
SELECT OR REPEAT A TRACK
.
16
fig. 2
Page 18

FUNCTIONS AND
ADJUSTMENTS
Switching on
The set is switched on pressing the
button/knob 10 (VOL PUSH ON/
OFF). Switching on may be connected to engine starting: turning the ignition key to MAR, the radio turns on;
turning the ignition key to STOP the
radio turns off. If the radio was on
before the engine was turned off, it
will turn on again automatically the
next time the engine is started.
If the radio is turned on with the
ignition key at STOP, it will turn off
automatically after about 20 minutes.
Turning the radio off
To turn the radio off press button/
knob 10 (VOL PUSH ON/ OFF).
Selecting Radio/Cassette/
CD Changer
Pressing briefly and repeatedly the
14 (SRC) button it is possible to
select the following functions in
sequence:
– TUNER (Radio)
– TAPE (Cassette) (only if the cassette is inserted)
– CDC (CD Changer) (only if the
CD Changer is connected).
After each change of the listening
source, the display shows the function selected: TUNER (Radio),
TAPE (Cassette), CDC (CD
Changer).
The functions that cannot be
selected (e.g. “TAPE” when the cassette is not inserted) are automatically disabled.
Pause function
If while listening to a cassette or
Compact Disc another function is
selected (e.g. the radio), playing is
stopped and when the cassette or
Compact Disc mode is resumed, it
starts again from the point in which
it was stopped.
If while listening to the radio another function is selected, when the
Radio mode is resumed, it is tuned
to the last station selected.
RADIO WITH CASSETTE PLAYER
Volume adjustment
Adjust volume through button/knob
10 (VOL PUSH ON/OFF).
Turn the knob rightwards to
increase volume and leftwards to
decrease it.
The display shows “VOLUME 00”
… “VOLUME 12”
17
Page 19

Mute function (turning off
the volume completely)
To switch on the MUTE function,
briefly press (less than 1 second) the
button 2 (II MUTE). Volume will
gradually lower ( SOFT MUTE
function) and the display will show
the function selected and the word
MUTE (e.g. “TUNER MUTE”
when Radio function is selected).
To switch off the MUTE function,
press button 2 (II MUTE) briefly
again. Volume will gradually become
RADIO WITH CASSETTE PLAYER
louder (SOFT MUTE function)
returning to the value set before
switching on the MUTE function.
Turning the button/knob 10 (VOL
PUSH ON/OFF), the sound level
changes but the MUTE function
stays on. Press again button 2 (II
MUTE) to switch it off.
With the MUTE function on, all the
other functions can be used and if a
traffic bulletin arrives with the TA
function on, the message ignores the
MUTE function.
Soft Mute function
When the MUTE function is
turned on or off, the volume lowers
or increases gradually (SOFT
MUTE function).
Tone adjustment
Proceed as follows:
– briefly (less than 1 second) and
repeatedly press the 11 (AUDIO
DSP
) button until the display shows
“BASS” , “TREBLE” (select Bass,
Treble function)
– turn button/knob 10 (VOL
PUSH ON/OFF) to the right to
increase basses or trebles or to the
left to decrease.
For few seconds the display shows
the levels of the basses/trebles (from
–10 to +10).
After few seconds from the last
adjustment, the display returns to
the main radio screen.
Balance adjustment
Proceed as follows:
– briefly (less than 1 second) and
repeatedly press the 11 (AUDIO
DSP
) button until the display shows
“BALANCE” (select Balancing
function)
– turn button/knob 10 (VOL
PUSH ON/OFF) to the right to
increase the sound from the right
speakers and to the left to increase
the sound from the left speakers.
For few seconds the display shows
the levels of balancing from˙ +10
to ¯ +10 (˙ = right, ¯ = left). After
few seconds from the last adjustment, the display returns to the main
radio screen.
18
Page 20

Equalizer settings
(only if the equalizer is on)
To turn on the equalizer, press but-
ton 11 (AUDIO
DSP
) and turn button/knob 10 (VOL PUSH
ON/OFF) to select one of the following adjustments:
– “PRESET” (preset equalizer
adjustment)
– “CLASSIC” (preset equalizer
adjustment)
– “JAZZ” (preset equalizer adjust-
ment)
– “ROCK” (preset equalizer
adjustment)
– “CUSTOMER” (adjustment of
the 5 equalizer bands that can be
changed by the user)
Press repeatedly the 15 (<<) or 6
(>>) to select the band and use button/knob 10 (VOL PUSH
ON/OFF) to increase/reduce level
in the frequency band selected.
Fader adjustment
Proceed as follows:
– briefly (less than 1 second) and
repeatedly press the 11 (AUDIO
DSP
) button until the display shows
“FADE” (select Fader function)
– turn button/knob 10 (VOL
PUSH ON/OFF) to the right to
increase the sound from the front
speakers and to the left to increase
the sound from the rear speakers.
After few seconds from the last
adjustment, the display returns to
the main radio screen.
Loudness function
The Loudness function improves
the sound volume when listening at
low level, increasing the basses and
trebles. It is cut off when the volume
is set to maximum.
To switch the function on/off, press
briefly (less than 1 second) the 12
(MENU
RDS
) button to enter the
MENU and then press the button
for scrolling the menu. The function
condition (on or off) is shown on the
display by “LOUDNESS: ON” or
“LOUDNESS: OFF”, selectable
through buttons 15 (<<) or 6 (>>).
TELEPHONE PROVISION
If the handsfree kit is installed on
the car, when a phone call is
received, the volume selected for
the PHONE function is set in the
menu, and can be cut off if required
(OFF).
RADIO WITH CASSETTE PLAYER
19
Page 21

RADIO (Tuner) fig. 1
When the set is turned on the last
function selected before turning off
is played (Radio, Cassette or CD
Changer).
To select the Radio source while
listening to a cassette or Compact
Disc, press briefly (less than 1 second) and repeatedly the 14 (SRC)
button until this function is selected.
If in the radio source, press briefly
(less than 1 second) and repeatedly
RADIO WITH CASSETTE PLAYER
the 13 (BAND
AS
) button to select
the required reception band.
Every time the button 13 (BAND
AS
) is pressed, the following bands
are selected in sequence: “FM1”,
FM2”, “FM3”, “FM4AST”, “LW”,
“MW” and “AMAST”.
The FM band is divided into sections: FM1, FM2, FM3 and
FMAST. The FMAST section is
reserved to the stations stored automatically with the AutoSTore function.
The “FMAST” reception band is
reserved to the stations stored automatically with the AutoSTore function.
The AM band is divided into sections: MW, LW and AMAST. The
AMAST section is reserved to the
stations stored automatically with
the AutoSTore function.
The radio is always ready to
receive stations in the RDS mode
(Radio Data System).
Presetting buttons
The buttons with symbols from 1
to 6 (“3”, “4”, “5”, “16”, “17, “18”)
make it possible to set the following
presettings:
– 24 in the FM band (6 in FM 1, 6 in
FM 2, 6 in FM 3, 6 in FMAST)
– 6 in the LW band
– 6 in the MW band
– 6 in the AMAST band
To call a preset station, choose the
required frequency band and then
press briefly (less than 1 second) the
corresponding preset button (from 1
to 6). The display will show the name
and the presetting number.
Storing the last station heard
The radio automatically keeps in
storage the last station heard for
each reception band, which is then
tuned when the radio is turned on or
the reception band is changed.
20
Page 22

Automatic tuning
Briefly press (less than 1 second)
button 15 (<<) or 6 (>>) to start
automatically searching the tuning
for the next station that it is possible
to receive in the direction chosen.
If the station on which the tuner
stops is one of the stations stored
with the preset buttons (from 1 to
6), the display will show the presetting number.
Manual tuning
This allows manual station searching in the chosen band. This function
has to be through the MENU.
For manual tuning proceed as follows:
1. Select the band (or the storing
section) with button13 (BAND
AS
FM1, FM2, FM3, MW or LW.
2. Press briefly (less than 1 second)
and repeatedly button 15 (<<) or 6
(>>).
Pressing one of the buttons 15
(<<) or 6 (>>) longer (over 1 second) obtains fast forward searching,
which is stopped when the button is
released.
If the station on which the tuner
stops is one of the stations stored
with the preset buttons (from 1 to
6), the display will show the presetting number on the bottom line.
Station scanning
(Scan function)
Press button 7 (SCAN) to start
scanning the stations in the frequency band selected (FM, AM, MW,
LW). The frequency of each station
found is shown on the display.
While scanning the display will
show “TUNER SCAN”, or “CDC
):
SCAN” (if the CD Changer is fitted), with the word “SCAN” flashing.
When the SCAN function is on, all
the other functions are cancelled.
The SCAN function is interrupted
in the following cases:
– pressing again 7 (SCAN)
– turning the set off
– changing the listening source
(Cassette, CD Changer)
– changing the frequency band (or
storing section) selected
– pressing a preset button
– turning AutoSTore on (automatic
storage)
– inserting a cassette.
RADIO WITH CASSETTE PLAYER
21
Page 23

Scanning preset stations
Press the 7 (SCAN) button for at
least 2 seconds to start scanning the
preset stations in the present frequency band;
– FM: FM 1, FM 2, …., FM II 1, FM
II 2,… FM III 1, FM III 2,… FMAST 1,
FMAST 2, ….
– AM: MW 1, MW 2, …. MW 6,
LW 1, LW 2, …. LW 6, AMAST 1,
AMAST 2, …
Each preset station will be heard
RADIO WITH CASSETTE PLAYER
for few seconds and its frequency
shown on the display.
The preset station SCAN function
is interrupted in the following cases:
– pressing again 7 (SCAN)
– turning the set off
– pressing a preset button
– turning AutoSTore on (automatic
storage)
– changing the listening source
(Cassette, CD Changer)
– changing the FM level or frequen-
cy band selected
– inserting a cassette
Manual station storage
The station being heard can be
stored in the range selected with
buttons numbered from 1 to 6.
Keep one of these buttons (from 1
to 6) pressed. After storage, the display shows the number of the button
with which the station has been
stored and a confirmation beep
sounds.
AutoSTore function
(automatic station storage)
To switch on the AutoSTore func-
AS
tion, keep the 13 (BAND
) button pressed. With this function the
radio automatically stores the stations with the strongest signal in
decreasing order of intensity of the
FMAST frequency band.
IMPORTANT Activating the
AutoSTore function cancels the stations stored previously in the
FMAST band.
During automatic storage the display shows “TUNER FMAST” or
“TUNER AMAST” if in the
TUNER mode (Radio) with FM or
AM frequency bands. To interrupt
the storage process, press the 13
AS
(BAND
) button again: the radio
will automatically tune to the station
heard before activation of the
AutoSTore function.
Listening to stored stations
Proceed as follows:
– select the required frequency
band and the storing section (FM1,
FM2, FM3, FMAST, MW, LW,
AMAST);
– briefly press (less than 1 second)
one of the six station storage buttons.
22
Page 24

The display will show the station
name (if any) and frequency, and on
the bottom line of the display will be
shown “Pn” where n corresponds
to the active presetting number.
In bands FM1, FM2, FM3 and
FMAST, if reception is poor and the
AF alternative frequency search
function is active, the station with
the strongest signal that is broadcasting the same programme will be
sought automatically.
AF function (alternative frequency search)
To turn on/off the alternative frequency search function (AF function), press briefly (less than 1 sec-
PTY
ond) the 8 (AF
) button. The
name RDS (if available) stays on the
display and if the AF function has
been turned on the messageAF
SWITCHING: ON is displayed.
– “AF SWITCHING: ON” =
alternative frequency search on
– “AF SWITCHING: OFF” =
alternative frequency search off.
When the signal of the RDS station
tuned weakens, the following two
cases may occur:
– With “AF SWITCHING: ON”
the RDS system activates automatic
tuning of the optimum frequency of
the station chosen, with the stations
enabled, therefore the radio is automatically tuned to the station with
the strongest signal that is broadcasting the same programme. During
the journey it will thus be possible to
continue listening to the station chosen without having to change the frequency when changing area. Of
course, the station being listened to
must be receivable in the area the
car is crossing.
– With “AF SWITCHING:
OFF” the radio will not tune the
strongest station automatically and it
will have to be found manually using
the tuner buttons.
TA function (traffic information)
Certain stations in the FM band (in
FM1, FM2, FM3 and FMAST storing
sections) are enabled to also broadcast information about traffic conditions. When listening to traffic information the display shows "TRAF-
FIC INFO" and the current station
(e.g. station name) alternately.
To turn the TA (traffic information)
function on/off, briefly press (less
than 1 second) the 9 (TA) button. If
the function is on the display shows
“TA-ON”.
With the TA function on, at the
start of the traffic bulletin the radio
stops temporarily the current station or the cassette/CD in order to
broadcast traffic information. This is
possible only if the current station
selected and the station broadcasting
traffic information are connected for
the EON function.
RADIO WITH CASSETTE PLAYER
23
Page 25

Program Type function (PTY)
(selecting a type of programme)
Many radio stations offer, in the FM
range (FM1, FM2, FM3), the ‘type of
programme’ (PTY) service. For
example, stations broadcasting information/news will display “NEWS”
as PTY code.
With the PTY function, a search filter is activated that enables tuning
only on the stations broadcasting
programmes with preset PTY code
(e.g. “POP”).
RADIO WITH CASSETTE PLAYER
To turn on the PTY function, keep
PTY
button 8 (AF
) pressed.
The types of programmes offered
by a radio station can change according to broadcasting:
NEWS News and magazine
AFFAIRS Politics and news
INFO Special information
programmes
SPORT Sport
programmes
EDUCATE Education
DRAMA Radio dramas and
literature
CULTURE Culture and reli-
gion
SCIENCE Science
VARIED Variety
POP M Pop music (hits)
ROCK M Rock music
EASY M Easy music
LIGHT M Light classic music
CLASSICS Classic music
OTHER M Other music
(e.g. folk)
WEATHER Weather report
FINANCE Finance news
CHILDREN Child’s pro-
grammes
SOCIAL Social information
RELIGION Religion and philos-
ophy
PHONE IN Listener’s calls
(other than “
IN
” function active
PHONE
only with handsfree
kit connection for
cell phone)
TRAVEL Tourist’s informa-
tion
LEISURE Free time and
hobbies
JAZZ Jazz
COUNTRY Country music
NATION M National
broadcasting
OLDIES Golden Oldies
FOLK M Folk music
DOCUMENT Special reports
Automatic PTY select
To select a type of programme
through this function select a programme type in the stored list and
then start the automatic search as
described in the following paragraphs.
24
Page 26

PTY function reactivation
PTY
Press button 8 (AF
) for over 2
seconds…. Then, the last programme type selected is displayed
(e.g. “POP”).
Setting the programme type
PTY
Press button 8 (AF
) for over 2
seconds and the PTY code of the
current station will be displayed.
Select the required code turning the
button/knob 10 (VOL PUSH ON/
OFF). Then press one of the 15
(<<) or 6 (>>) buttons to start the
automatic search of stations broadcasting with the selected PTY code.
Automatic PTY search stops automatically on next station offering the
preset programme type and shows
the type of programme (e.g.
“POP”), word “PTY” flashes.
IMPORTANT If no station is
available with this type of programme, the station selected previously is heard and the PTY function
is abandoned.
PTY function deactivation
When selecting the PTY mode, if
no operation is performed within 10
seconds, the radio returns to the
mode selected before pressing button 8 (AF
PTY
) and stores the last
PTY code selected.
MENU
Functions of the
RDS
12 (MENU
) button
To activate the menu function,
briefly press (less than 1 second) the
RDS
12 (MENU
) button, in this way
you enter the first level menu. To
enter the second level keep the 12
(MENU
RDS
) button pressed for
over 2 seconds.
To scroll the menu functions press
RDS
repeatedly the 12 (MENU
) but-
ton.
The functions controlled by the
first level menu are:
1 Manual tuning seek on/off (MAN-
UAL TUNING SEEK)
2 Function confirmation beep
(BEEP)
3 Tuning sensitivity adjustment
(SENS DX/LO)
4 News programmes on/off
(NEWS)
5 Volume control according to
speed (SVC)
6 Tuning adjustment on traffic
information (EON TA)
7 Loudness on/off (LOUDNESS)
8 Tape noise reduction system,
“Dolby B”
9 CD Compression (with CD
Changer only)
To turn selected function on/off
press buttons 15 (<<) or 6 (>>)
The functions controlled by the
second level menu are:
1 Current RDS station time display
(if any)
2 Audio distortion clipper on/off
(AUDIO CLIP DETECT)
RADIO WITH CASSETTE PLAYER
25
Page 27

3 Max. volume setting at switching
on (MAX VOLUME)
4 Phone volume adjustment func-
tion (PHONE)
5 AUTO setting selection through
which radio on/off depends on
engine starting/stopping.
To turn the selected function on/off
press button/knob 10 (VOL PUSH
ON/OFF).
NOTE When passing to next set-
ting item, the previous set one is
RADIO WITH CASSETTE PLAYER
stored.
ADJUSTMENTS
First level menu functions
1 - manual tuning seek on/off
(TUNING SEEK)
This function enables to search
manually (MANUAL) or automatically (AUTO) the stored stations.
To switch from manual to automat-
ic press buttons 15 (<<) or 6 (>>).
The display will show the current
status of the function:
– “TUNING SEEK: AUTO” =
automatic seek
– “TUNING SEEK: MANUAL”
= manual seek.
2 - function confirmation beep
(BEEP)
System is fitted with the BEEP
function (the display shows
“ROGER BEEP-ON”).
This function confirms button
pressing by a sound indication
(BEEP).
To turn this function on/off, press
buttons 15 (<<) or 6 (>>).
The display will show the current
status of the function:
– “ROGER BEEP: ON” = func-
tion on
– “ROGER BEEP: OFF” = function off.
3 - tuner sensitivity adjustment
(SENS DX/LO)
With this function it is possible to
change the sensitivity of automatic
station searching. When low sensitivity is set “SENSITIVITY:
LOCAL” only stations with excellent reception are sought; when high
sensitivity is set “SENSITIVITY:
DISTANT” all stations are sought.
Therefore, if the car is in an area
with a considerable number of stations and you want to choose only
those with a strong signal, set to low
sensitivity “SENSITIVITY:
LOCAL”.
To turn this function on/off press
buttons 15 (<<) or 6 (>>).
The display will show the current
status of the function:
– “SENSITIVITY: LOCAL” =
low sensitivity
– “SENSITIVITY: DISTANT” =
high sensitivity.
26
Page 28

4 - News programmes on/off
(NEWS)
This function is similar to the TA
function: with FM station and NEWS
mode active, if a news programme is
broadcast, the radio operates as follows:
– it sets the same volume as the TA
function, if the TUNER source is
active;
– it switches from active source
(cassette or CDC) to TUNER
mode, in case of other source, setting the same volume as the TA function.
To make use of this function, the
radio, in TUNER mode, must be
tuned on a FM station broadcasting
the NEWS code.
To turn this function on/off, press
buttons 15 (<<) or 6 (>>).
The display will show the current
status of the function:
– “NEWS: ON” = function on
– “NEWS: OFF” = function off
5 - SVC, volume changing with
car speed
The SVC function makes it possible
to automatically adapt the volume
level to the speed of the car, increasing it as the speed increases to maintain the ratio with the noise level
inside the passenger compartment.
Press 15 (<<) or 6 (>>) to change
SVC setting, thus passing from OFF
to the selected gain level (from 1 to
7). High gain level values correspond
to proportionally higher volume
increases according to speed.
The display will show the current
status of the function:
“SPEED VOLUME OFF” =
function off
“SPEED VOLUME: +3” = function on and gain level indication
6 - tuning adjustment on traffic
information (EON TA DX/LO)
This function enables to adjust
reception sensitivity of radio stations
broadcasting traffic information.
To turn this function on/off press
buttons 15 (<<) or 6 (>>)
The display will show the current
status of the function:
– “TRAFFIC: LOCAL” = low
sensitivity
– “TRAFFIC: DISTANT” = high
sensitivity
7 - loudness on/off (LOUDNESS)
The LOUDNESS function improves
the sound volume when listening at
low level, increasing the basses and
trebles.
To turn this function on/off press
buttons 15 (<<) or 6 (>>)
RADIO WITH CASSETTE PLAYER
27
Page 29

The display will show the current
status of the function:
“LOUDNESS: ON” = loudness
on
“LOUDNESS: OFF” = loudness
off
8 - DOLBY
Turn volume button/knob 10
(VOL PUSH ON/OFF) clockwise
= “DOLBY NR ON”
Turn volume button/knob 10
RADIO WITH CASSETTE PLAYER
(VOL PUSH ON/OFF) counterclockwise = “DOLBY NR OFF”
9 - CD Compression
This function optimises sound level
according to the type of music
played by the CD.
To turn this function on/off, press
buttons 15 (<<) or 6 (>>).
The display will show the current
status of the function:
– “COMPRESSION: ON” =
function on
– “COMPRESSION: OFF” =
function off
Second level menu functions
1 - RDS station time display
This function makes it possible to
display current RDS station time (if
this information is present).
2 - audio distortion clipper
on/off (AUDIO CLIP DETECT)
This function reduces automatically
the radio output level when excessive distortion is detected that could
damage the speakers.
To turn this function on/off, press
buttons 15 (<<) or 6 (>>).
The display will show the current
status of the function:
“CLIP DETECT: ON” = func-
tion on
“CLIP DETECT: OFF” = func-
tion off
3 - max. volume setting at
switching on (MAX VOLUME)
This function makes it possible to
set the radio volume (from 10 to 33)
at switching on.
To adjust volume use button/knob
10 (VOL PUSH ON/OFF).
The display will show the set volume (e.g. “MAX VOLUME: 25”)
4 - phone volume adjustment
function (PHONE)
With this function it is possible to
adjust the phone volume (volume
level setting 1 to 3).
The display shows the default message “PHONE LEVEL: OFF” (vol-
ume set by Manufacturer and corresponding to the max. level).
Using the button/knob 10 (VOL
PUSH ON/OFF) the volume can
be adjusted at 3 different levels
(PHONE LEVEL 1, PHONE
LEVEL 2 and PHONE LEVEL 3):
the higher the figure is, the lower is
the volume.
28
Page 30

5 - AUTO function setting
With this function it is possible to
set radio turning on/off depending on
car ignition/stopping or independent
radio turning on/off.
With this function on (radio is set
to switch off when the car is
switched off), it is however possible
to switch on the radio.
With this function off, when
switching off the car the radio stays
on.
To turn this function on/off, press
buttons 15 (<<) or 6 (>>).
The display will show the current
status of the function:
– “AUTO: ON” = function on
– “AUTO: OFF” = function off
CASSETTE PLAYER
(TAPE) fig. 1
Your radio is fitted with a cassette
player for magnetic tapes.
It has an AUTOREVERSE function which makes it possible to listen
to both sides of the tape without
having to turn over the cassette.
Cassette insertion and ejection are
facilitated by a powered mechanism.
Selecting the cassette player
To turn the cassette player on,
even when the set if off, insert the
cassette in the slot with the tape facing rightwards.
The display shows “TAPE PLAY
A” or “TAPE PLAY B” depending
on which side is playing.
If the cassette is already in, turn the
set on then press briefly (less than 1
second) and repeatedly the 14
(SRC) button until the display shows
“TAPE”.
Changing the tape playing side
After playing the tape, the cassette
side is changed automatically
(AUTOREVERSE function). To
change side before the end of the
tape, press button 1 (Ä) for over 2
seconds.
Tape fast forward/rewind
To move the tape fast forward,
press 6 (>>) or 15 (<<) depending
on the direction of the tape.
To interrupt fast forward/rewind,
press again 6 (>>) or 15 (<<).
The fast forward/rewind function is
interrupted in the following cases:
– When the sound source is
changed
– When the cassette is ejected
– When the direction of the tape is
reversed
– When the set is turned off
RADIO WITH CASSETTE PLAYER
29
Page 31

Pause function
To pause the cassette player, briefly
press (less than 1 second) the 2 (II
MUTE) button. The display will
show “TAPE PAUSED”.
To listen to the track again, press
again 2 (II MUTE).
AMS function
AMS = Automatic Music Search
This function enables to play automatically the next/previous track
RADIO WITH CASSETTE PLAYER
provided that between the two
tracks there is a pause/muting of
about 4 seconds.
During fast forward/rewind the display shows “TAPE <<AMS>>”.
The AMS function is interrupted in
the following cases:
– When the sound source is
changed
– When the cassette is ejected
– When the direction of the tape is
reversed
– When the set is turned off
Scanning tracks (Scan function)
With this function it is possible to
listen to all the cassette tracks for
about 10 seconds, provided that
between one track and the other
there is a pause/muting of about 4
seconds.
Keep the 7 (SCAN) button
pressed; while playing the track and
searching the start of the next track,
the display will show “TAPE
SCAN”.
Press the 7 (SCAN) button again
to interrupt scanning while listening
to a track: the cassette will be played
starting from that track.
The scanning sequence is the following:
– from the track played up to the
end of the tracks on the same side of
the tape
– playing side change and scanning of
all the tracks on that side
– changing again the playing side and
scanning all the tracks on that side.
After playing the tracks the function
goes off.
The SCAN function is interrupted
in the following cases:
– turning the set off
– press 7 (SCAN) again to contin-
ue listening to the track being played
– turning the Pause function on
Ejecting the cassette
To eject the cassette, press 1 (Ä)
with the set on. The display shows
“TAPE EJECT”.
After ejecting the cassette, the
source heard before playing the cassette will be resumed.
The cassette cannot be ejected if
the radio is off.
30
Page 32

CD CHANGER (Multiple
Compact Disc Player)
(if connected)
The radio is preset for compatible
compact disc player Fig. 3 (available
at Lineaccessori Fiat).
For installation and
connection of the CD
changer apply only to
Fiat Dealership.
F0C0261m
Lineaccessori Fiat CD Changer is
fitted with a proper loader for 5
compact discs.
WARNING
On multimedia CDs in ad-
dition to sound tracks also
data tracks are recorded. Playing
one of these CDs may cause
rustling and such a volume as to
compromise road safety, as well as
causing damage to the final stages
and speakers.
Selecting the CD Changer
To turn on the CD Changer, turn
on the set, then press briefly (less
than 1 second) and repeatedly the
14 (SRC) button to select the
“CDC” (CD Changer) source.
Possible error messages
If the loader does not contain any
Compact Discs, the display will show
“NO CD”. If at least one CD is
found, it will be played.
If the CD played is illegible, the
next CD will be selected; if there are
no other CDs or if they are also
illegible, the display will show “NO
CD” until the listening source is
changed.
RADIO WITH CASSETTE PLAYER
fig. 3
31
Page 33

Operation
To play the Compact Discs in the
CD Changer, select “CDC” pressing
briefly and repeatedly button14
(SRC).
When listening to a Compact Disc
for the first time after putting it in
the CD loader, playing starts from
the first track on the first disc available in the loader.
While playing the display shows the
number of the track being heard (e.g.
RADIO WITH CASSETTE PLAYER
“TRACK 12” = twelfth track), the
playing time elapsed from the start of
the track (e.g. “11:10” = 11 minutes
and 10 seconds) and the number of
the Compact Disc selected (e.g.
“CDC3” = third CD) depending on
the function selected in the menu.
Choosing the CD
CD
Press 16 (1
+) to select the next
CD and 17 (2 CD–) to select the
previous CD.
If the loader does not contain a disc
in the position selected, the display
shows “NO CD”, and the next disc
is played automatically.
Select track (forward/backward)
Briefly press 6 (>>) to play the
next track on the Compact Disc
being listened to.
Briefly press (less than 1 second)
button 15 (<<) within 3 seconds
from the start of the track to play
the previous track on the Compact
Disc being listened to. If the button
is pressed after 3 seconds from the
start of the track, the current track
is played again from the beginning.
Fast forward/backward
Keep the 6 (>>) button pressed to
move the track selected fast forward
and keep the 15 (<<) button
pressed to move it fast backward.
Fast forward/backward is stopped
when the button is released.
Scanning tracks on the CD
(Scan Function)
With this function it is possible to
listen to all the tracks contained in
the CD selected.
Keep the 7 (SCAN) button
pressed to play the first 10 seconds
of every track on the CD. While
playing the display will alternately
show the CD function chosen (CD
name, time and number) and the
word “SCAN” (e.g. “CDC3
SCAN TK12 0.04”)
If the SCAN function is on, the
REPEAT and MIX functions are
turned off.
32
Page 34

The scanning sequence is the fol-
lowing:
– from the track played up to the
last one on the CD
– from the first track up to the one
played until the start of scanning.
The SCAN function is interrupted
in the following cases:
– turning the set off
– pressing 7 (SCAN) again to continue listening to the track being
played
– pressing 6 (>>) or 15 (<<)
thereby moving to the next or previous track
– pressing a preset button
– changing the sound source
– pressing the 12 (MENU
RDS
button.
If the SCAN function is not interrupted, at the end it will continue
playing the track played before scanning was started.
Pause function
To pause the CD player, press
briefly (less than 1 second) the 2 (II
MUTE). The display will show
“CDC PAUSE”.
To listen to the track again, press
button 2 (II MUTE) again.
The pause function is automatically
cancelled changing the listening
source.
)
Track Repeat function
Briefly press (less than 1 second)
RPT
the preset button 4 (5
) to listen
repeatedly to the last track played:
the display shows “CDC REPEAT
TRACK”.
RPT
Press the preset button 4 (5
) a
second time to listen again to the
CD being played: the display shows
“CDC REPEAT DISK”.
RPT
Press the preset button 4 (5
) a
third time to listen to all the CDs
contained in the CD Changer: the
display shows “CDC REPEAT
PACK”.
RPT
Press the preset button 4 (5
) a
fourth time to turn the function off:
the display shows “CDC REPEAT
OFF”.
Changing the sound source, the
function is turned off.
IMPORTANT When the repeat
function is turned on, the SCAN
and MIX functions are turned off.
RADIO WITH CASSETTE PLAYER
33
Page 35

Random track playing
(RaNDom function)
To start random playing of tracks
on the Compact Disc selected, press
the preset button 5 (6
RND
track will be played and the display
will show “CDC RANDOM
DISK”. To start random playing of
all the CDs contained in the CD
Changer, press a second time 5 (6
RND
); the display will show “CDC
RANDOM PACK”. Press 5 (6
RND
RADIO WITH CASSETTE PLAYER
) a third time to urn the function
off: the display will show “CDC
RANDOM OFF”.
Changing the sound source, the
function is turned off.
). A new
Stopping and ejecting the CD
Press 1 (Ä) or 14 (SRC) button to
return to the radio mode.
SECRET CODING
Entering radio’s secret code
Entry of the secret code is required
to allow the radio to work after the
first connection to the car electric
system different from the original
one.
Connecting the radio to the car
supply, the display shows “RADIO
M - CODE ----”.
The secret code comprises four figures, each corresponding to one of
the dashes.
To enter the first digit of the code,
press the corresponding button of
the preset stations (from 1 to 4).
Press repeatedly the preset buttons
1-4 (16, 17, 18 and 3) to enter the
secret code digits (from 0 to 9).
To confirm the required digit press
RPT
4 (5
).
34
Page 36

Waiting times
If a wrong code is entered, the next
attempts to enter the code are
spaced by the following waiting
times.
During the waiting time the radio
shall not be on.
It shall however be connected with
+12V permanent voltage. The waiting time is over when the display
shows the figure and the dashes of
the next attempt (e.g. 2 - - - ).
The following table shows the
times between one attempt and the
other.
Vain attempts Waiting
(on display) time (approx.)
1 1 minute
2 2 minutes
3 4 minutes
4 8 minutes
5 16 minutes
6 30 minutes
7 1 hour
8 2 hours
9 4 hours
10 8 hours
11 16 hours
12 24 hours
Waiting time passes keeping the
radio on. When turning the radio
on/off, counting restarts from the
start of the current attempt.
The waiting time is over when the
display shows the figure and the
dashes of the next attempt (e.g. 2 -
- - )
Entering the secret code
of the CD Changer
Should the control code between
the radio and the CD Changer be
not recognised, to reset CD
Changer proper operation the fourdigit secret code must be entered
manually.
When entering the secret code,
the display shows: “CDC M --
CODE ----”.
The secret code comprises four figures, each corresponding to one of
the dashes and is different for each
CD Changer.
To enter the first digit of the code,
press the corresponding button of
the preset stations (from 1 to 4).
Press repeatedly the preset buttons
1-4 (16, 17, 18 and 19) to enter the
secret code digits (from 0 to 9).
RADIO WITH CASSETTE PLAYER
35
Page 37

To confirm the required digit press
4 (5
RPT
).
If the code has been entered properly, the radio and the CD Changer
start to work regularly.
Otherwise try to enter the secret
code a second and even a third time
if required. After the third negative
attempt, the radio sets in “stand-by”
for approx. 1 hour before enabling
other three attempts.
RADIO WITH CASSETTE PLAYER
TECHNICAL INFORMATION
Aerial fig. 4
The car is fitted with an aerial
located on the roof. You are recommended to slacken and remove the
aerial from the roof to avoid damaging it when washing the car in automatic systems.
– 4 x 35W (with standard sound
system comprising 2 tweeters + 2
front woofers and 2 rear full-range
speakers)
Standard system speakers fig. 5
The standard sound system
includes:
– 2 front tweeters A-fig. 5, 4 Ohm
impedance and 40W power.
F0C0077m
36
fig. 4
F0C0298m
fig. 5
fig. 6
F0C0078m
Page 38

– 2 front midwoofers B-fig. 6, 165
mm diameter, 4 Ohm impedance and
40W power.
– 2 rear full-range A-fig. 7, 165
mm diameter, 4 Ohm impedance and
40W power.
The radio with cassette player
doesn’t support the HI-FI sound system.
F0C0143m
Protection fuse
The radio has a 10A protection
fuse D-fig. 8.
Power
CONNECTIONS
A-fig. 8
A1 CAN B line signal
A2 Not Connected
A3 CAN A line signal
A4 Connection to +12V switch-
ing on voltage (at car starting)
A5 Radio aerial connection
A6 Not connected
A7 Connection to +12V (perma-
nent) supply voltage
A8 Earth connection.
Speakers
CONNECTIONS
B-fig. 8
B1 Rear speaker
(right +)
B2 Rear speaker
(right –)
B3 Front speaker
(right +)
B4 Front speaker
(right –)
B5 Front speaker
(left +)
B6 Front speaker
(left –)
B7 Rear speaker
(left +)
B8 Rear speaker
(left –)
RADIO WITH CASSETTE PLAYER
fig. 7
37
Page 39

Additional connections
CONNECTIONS
C-fig. 8
Line output connection preset-
ting for power amplifier (Booster) or
active speaker.
C1 Positive sound input for
external TMC module
C2 Negative sound input for
external TMC module
C3 MUTE signal input from
RADIO WITH CASSETTE PLAYER
external TMC module
C4 Not connected
C5 Not connected
C6 Not connected
PHONE INPUT
Connection presetting for hands-
free phone kit (through radio).
C7 Positive sound input for
external phone presetting
C8 Negative sound input for
external phone presetting
C9 MUTE signal from external
phone presetting
C10 Not connected
C11 Not connected
C12 Phone earth
F0C0028m
CD CHANGER CONNECTION
C13 CDC bus line
C14 CD Changer data bus
C15 CD Changer +12V supply
voltage
C16 CD Changer switch voltage
C17 CDC bus earth
C18 Sound signal earth from CD
Changer
C19 LH CDC sound channel
C20 RH CDC sound channel
38
fig. 8
Page 40

RRRRAAAADDDDIIIIOOOO WW
CONTROL DESCRIPTION
WWIIIITTTTHHHH CCCCOOOOMMMMPPPPAAAACCCCTTTT DDDDIIIISSSSCCCC PPPPLLLLAAAAYYYYEEEERRRR
F0C0027m
RADIO WITH COMPACT DISC PLAYER
fig. 9
39
Page 41

Button RADIO mode
Letters or symbol Function
Buttons and front panel
Brief pressing Pressing over 2 sec.
RADIO WITH COMPACT DISC PLAYER
1
2
3
4
5
6
7
8
9
10
11
˚
11 MUTE
4
5 RPT
6 RND
>>
SCAN
AF PTY
TA
VOL PUSH ON/OFF
AUDIO DSP
Eject
Mute
Preset station 4
Preset station 5/
track repetition
Preset station 6
Next forward
Automatic scanning
Alternative frequency/Programme Type
Traffic information
Radio ON/OFF
Volume adjustment
Sound settings
Eject (CD)
Audio Mute
FM/AM/PTY:call preset station 4
FM/AM/PTY:call preset station 5
FM/AM/PTY:call preset station 6
FM: Seek + / MAN +
AM: Seek + / MAN +
PTY: Select next programme/ automatic
search (inside the programme)
Automatic scanning of stations
on the band in use
AF ON/OFF
TA ON/OFF
ON/OFF: press
volume adjustment:
turn leftwards: to decrease
turn rightwards: to increase
Bass (B)
Treble (T)
Fader (F)
Balance (B)
FM/AM: store preset station 4
PTY: store programme
FM/AM: store preset station 5
PTY:store programme
FM/AM: store preset station 6
PTY: store programme
Automatic scanning of stations tunable
on the band in use
Select programme type
PTY: displays selected programme type
Adjusting TA volume
Access to Equalizer function
40
Page 42

CD mode
Brief pressing Pressing over 2 sec.
CD
CHANGER
mode
Brief pressing Pressing over 2 sec.
Eject (CD)
Playing Pause / Audio Mute
CD track repetition ON/OFF
Random CD track repetition ON/OFF
Select next track
Automatic scanning of tracks on the CD
TA ON/OFF
ON/OFF: press
Volume adjustment:
turn leftwards: to decrease
turn rightwards: to increase
Bass (B)
Treble (T)
Fader (F)
Balance (B)
Fast forward (continuous)
Adjusting TA volume
Access to Equalizer function
Eject (CD)
Playing Pause / Audio Mute
CD track repetition ON/OFF
Random CD track repetition ON/OFF
Select next track
Automatic scanning of tracks on the CD
TA ON/OFF
ON/OFF: press
Volume adjustment:
turn leftwards: to decrease
turn rightwards: to increase
Bass (B)
Treble (T)
Fader (F)
Balance (B)
Fast forward (continuous)
RADIO WITH COMPACT DISC PLAYER
Adjusting TA volume
Access to Equalizer function
41
Page 43

Button RADIO mode
Letters or symbol Function
Buttons and front panel
Brief pressing Pressing over 2 sec.
RADIO WITH COMPACT DISC PLAYER
12
13
14
15
16
17
18
RDS MENU
BAND AS
SRC
<<
1 CD+
2 CD–
3 F-TRK
Menu function
Select frequency band
Select source
Previous backward
Preset station 1
Preset station 2
Preset station 3
Manual station tuning ON/OFF
NEWS ON/OFF
Function confirmation beep ON/OFF
(BEEP)
SENS DX/LO
SVC (Speed Volume)
Loudness ON/OFF
EON TA ON
CD Compression
TPM (Track Program Memory)
CD Naming
FM1,FM2,FM3,FMAST, LW,MW,AMAST
TAPE (Cassette), RADIO, CD Changer
(if connected)
FM: Seek – / MAN –
AM: Seek – / MAN –
PTY: Select next programme / automatic
search (inside the programme)
FM/AM/PTY:call preset station 1
FM/AM/PTY: call preset station 2
FM/AM/PTY: call preset station 3
RDS Clock display
Audio Clip Detect ON/OFF
Automatic search ON/OFF
Phone volume adjustment ON/OFF
Max. radio volume at switching on
Store automatically in preset station
group.
Exit on FMAST.P1 or AMAST.P1
FM/AM: store preset station 1
PTY: store programme
FM/AM: store preset station 2
PTY: store programme
FM/AM: store preset station 3
PTY: store programme
42
Page 44

CD mode
Brief pressing Pressing over 2 sec.
CD
CHANGER
mode
Brief pressing Pressing over 2 sec.
NEWS ON/OFF
Function confirmation beep ON/OFF (BEEP)
SVC (SPEED VOLUME)
Loudness ON/OFF
EON TA ON
CD Compression
CD Naming
TPM (Track Program Memory)
Exit CD mode
Insert tuner in last band
CD, RADIO, CD Changer (if connected)
Select previous track
Quick CD track selection (function controlled
through the button/knob 10 VOL PUSH
ON/OFF)
RDS Clock display
Audio Clip Detect ON/OFF
Set radio switching on mode
Phone volume adjustment ON/OFF
Max. radio volume at witching on
Audio Clip Detect ON/OFF
NEWS ON/OFF
Function confirmation beep ON/OFF (BEEP)
SVC (SPEED VOLUME)
Loudness ON/OFF
EON TA DX/LO ON
CD Compression
TPM (Track Program Memory)
Exit CD mode
Insert tuner in last band
CD, RADIO, CD Changer (if connected)
Select previous track
CD +
CD –
RDS Clock display
Audio Clip Detect ON/OFF
Set radio switching on mode
Phone volume adjustment ON/OFF
Max. radio volume at witching on
Fast backward (continuous)
RADIO WITH COMPACT DISC PLAYER
43
Page 45

GENERAL
The set possesses the following
functions:
RADIO SECTION
– PLL tuning with FM/AM/MW/LW
frequency bands
– RDS (Radio Data System) with
TA (traffic information) - PTY
(Program Type) - EON (Enhanced
Other Network) - REG (Regional
programmes) functions
– Alternative frequency search
RADIO WITH COMPACT DISC PLAYER
selection in RDS mode (AF function)
– Automatic/manual station tuning
– Manual storage of 42 stations: 24
in the FM band (6 in FM1, 6 in FM2,
6 in FMT and 6 in FMAST), 6 in the
MW band, 6 in the LW band and 6 in
the AM (MW+LW) band, with automatic storage (AutoSTore function)
in the AMAST band
– Automatic storage (AutoSTore
function) of 6 stations in FM band
and 6 stations in the AM band
– SENS DX/LO function (sensitivity
adjusting in searching radio stations)
– Scan function (scanning stored
stations), lasting approx. 10 seconds
for each station
– Automatic Stereo/Mono switching.
COMPACT DISC SECTION
– Disc select (disc no.)
– Track select (forward/backward)
– Fast forward/backward
– Track Repeat function (repetition
of last track)
– Track Scan function (scanning the
tracks on the Compact Disc, about
10 seconds for each track)
– RaNDom function (random playing).
– TPM function (storing CD track
playing sequence)
– CD Naming Function (allocating a
name to a CD)
– CD Compression function (volume reduction according to signal
input level from CD)
– Stored CD loading and ejecting
For installation and
connection of the CDChanger apply only to
Fiat Dealership.
WARNING
On multimedia CDs in addition to sound tracks also
data tracks are recorded. Playing
one of these CDs may cause
rustling and such a volume as to
compromise road safety, as well as
causing damage to the final stages
and speakers.
44
Page 46

SOUND SECTION
– Mute/Pause function
– Loudness function
– 5-band graphic equalizer
– Separate bass/treble adjustment
– Right/left and front/rear channel
balancing
– Audio Clip Detect function
– Soft Mute function.
ANTITHEFT PROTECTION
The radio is fitted with an antitheft
protection system based on a fourdigit secret code that makes the
radio unusable.
CODE Card
This the document that certifies
possession of the radio. The Code
Card contains the radio model, serial number and secret code.
Keep the Code Card in a safe place,
not in the car.
Secret coding
When the secret coding is activated and radio is removed from the
car battery (or 30 positive terminal),
the radio is protected electronically.
The radio can only be switched on
entering your personal secret code.
CAUTIONS
If it is very cold inside the car and
the CD player is used a little after
turning the heater on, a film of damp
may form on the Compact Disc or
on the player optics and the sound
may not be perfect. In this case do
not use the CD player for at least an
hour, so that the condensation dissolves naturally and normal operation is resumed.
Driving on rough roads with heavy
vibrations may cause skipping when
the CD player is working.
IMPORTANT The CD player can
read most of the compression systems
currently on sale (e.g.: LAME, BLADE,
XING, FRAUNHOFER); however,
due to the evolution of these systems,
reading of all compression formats is
not guaranteed.
IMPORTANT If using copy-protected CDs, a few seconds may be required before the system starts playback.
RADIO WITH COMPACT DISC PLAYER
45
Page 47

GLOSSARY
AF (Alternative Frequency)
Function that allows the radio to
stay tuned on the FM station selected also passing through areas served
by transmitters with different frequencies.
The RDS system actually keeps the
intensity and quality of the signal
received under control, automatically switching tuning on the frequency
of the transmitter that is sending the
strongest signal.
RADIO WITH COMPACT DISC PLAYER
Autostore
Function with which it is possible to
store automatically radio stations.
Balance (Channel balancing)
Function with which it is possible to
suitably adjust the sound from the
right or left speakers.
Bass (Bass tones)
This function adjusts the bass
tones.
CD-Changer
Multiple Compact Disc player.
Distant/Local (Sens Dx/Loc)
These are two levels of reception
sensitivity.
1) Distant (maximum sensitivity),
which makes it possible to tune all
the stations that can be received.
2) Local (minimum sensitivity),
which makes it possible to tune only
those stations with sufficiently strong
signals, such as for example local stations.
EON (Enhanced Other
Network)
Function that allows the radio to
tune automatically on a different station that the one being listened to
which broadcasts traffic information.
Fader
Function with which it is possible to
suitably adjust the sound from the
front or rear speakers.
F-TRK
Function enabling to select a particular track on the CD. This function is
activated by pressing button 18 (3 F-
TRK), then use the button/knob 10
(VOL PUSH ON/OFF) to perform
the required selection.
Loudness
Function that emphasises the bass
and treble tones when listening at
low level. It is cut off when the volume is set to maximum (level 34).
Mute
This function enables to mute the
active source. This function is activated automatically, if a cell phone is
connected to the radio, when a
phone call is being received.
Presettings
Number of radio stations that can
be stored manually or automatically.
46
Page 48

PTY (Program Type)
This function allows the presetting
of a category of programmes such as
for instance, news bulletins, music,
sport, etc. The set automatically
gives priority to the type of programme selected when transmission
starts, interrupting the one in
progress.
RaNDom
This function is used to randomly
select a Compact Disc among those
present in the loader and all the
tracks on this Compact Disc are
played in random sequence.
RDS (Radio Data System)
This is an additional radio information system which uses the 57 kHz
subcarrier of normal FM broadcasts.
With this function it is possible to
receive different types of information such as station names, alternative frequencies, automatic tuning to
traffic bulletins or special programmes selected through the PTY
function.
REG (Regional transmission
reception function)
Function with which it is possible to
tune only to local (regional) stations.
Soft Mute
Function that gradually highers and
lowers the volume when Mute is
turned on or off.
SVC
Function that automatically adjusts
the level of the volume to the speed
of the car to maintain the radio with
the noise level in the passenger compartment.
Track Repeat
Function with which it is possible to
listen continuously to the last track
played on the Compact Disc.
Track Scan
Function with which it is possible to
listen, for few seconds, to all the
radio stations stored, or the beginning of all the tracks contained on
Compact Disc.
TA (Traffic information)
Function with which it is possible to
receive the traffic information
broadcast by the stations enabled,
also when tuned to another station
or listening to a CD.
TPM (Track Program Memory)
Function with which it is possible to
store the sequence for playing the
tracks of a CD, to be able to play
them later in the sequence set.
Treble (Treble tones)
This adjusts the treble tones.
RADIO WITH COMPACT DISC PLAYER
47
Page 49

CONTROLS ON STEERING
WHEEL (where provided)
fig. 10
The main radio function controls
are repeated on the steering wheel,
to allow easier control.
Volume adjustment
(“+” and “–”) Mute function
(“Mute”)
Press button B (“+”) to increase
volume and (“–”) to decrease volume as specified in paragraph
ADJUSTMENT
that of the button/knob 10 (VOL
RADIO WITH COMPACT DISC PLAYER
PUSH ON/OFF) set on the radio.
. Function identical to
VOLUME
Press C (MUTE) to turn on/off
this function that brings the volume
to zero. When this function is on the
display shows “MUTE” preceded by
the current source (e.g. “TUNER
MUTE” when in radio mode). If in
CDC mode (CD Changer), the display shows: “CDC PAUSE”.
Select Radio, Compact Disc,
CD Changer (“SRC”)
(SRC = Source = source)
Press repeatedly button A (SRC)
to cyclically select Radio, Compact
Disc, CD Changer (if the Compact
Disc player is fitted). This button
function is identical to that of the
button 14 (SRC) set on the radio.
F0C0149m
Setting Radio, Compact Disc,
CD Changer (“+” and “–”)
Button D (<</>>) implements
three different functions according to
the selected operating mode (Radio,
Compact Disc or CD Changer).
Button functions are identical to
the functions of buttons 6 (>>) and
15 (<<) set on the radio, as concerns the following functions.
1) Radio function: adjust tuning
Press button D (<</>>) to select
stations in the required band.
2) Compact Disc function
Press button D (<</>>) to select
next/previous track.
3) Compact Disc function:
select CD next/previous track
Press button D (<</>>) to play
next/previous track on the Compact
Disc you are listening to according
to modes
SELECT OR REPEAT A TRACK
.
48
fig. 10
Page 50

FUNCTIONS AND
ADJUSTMENTS
Switching on
The set is switched on pressing the
button/knob 10 (VOL PUSH ON/
OFF). Switching on may be connected to engine starting: turning the ignition key to MAR, the radio turns on;
turning the ignition key to STOP
the radio turns off. If the radio was
on before the engine was turned off,
it will turn on again automatically the
next time the engine is started.
If the radio is turned on with the
ignition key at STOP, it will turn off
automatically after about 20 minutes.
Turning the radio off
To turn the radio off press button/
knob 10 (VOL PUSH ON/ OFF).
Selecting Radio/Compact Disc/
CD Changer
Pressing briefly and repeatedly the
14 (SRC) button it is possible to
select the following functions in
sequence:
– TUNER (Radio)
– CD (Compact Disc)
– CDC (CD Changer) (only if the
CD Changer is connected).
After each change of the listening
source, the display shows the function selected: TUNER (Radio), CD
(Compact Disc), CDC (CD
Changer).
The functions that cannot be
selected (e.g. “CD” when the CD is
not inserted) are automatically disabled.
Pause function
If while listening to a Compact Disc
another function is selected (e.g. the
radio), playing is stopped and when
the Compact Disc mode is resumed,
it starts again from the point in
which it was stopped.
If while listening to the radio another function is selected, when the
Radio mode is resumed, it is tuned
to the last station selected.
Volume adjustment
Adjust volume through
button/knob 10 (VOL PUSH
ON/OFF).
Turn the knob rightwards to
increase volume and leftwards to
decrease it.
The display shows: “VOLUME
00” … “VOLUME 12”
RADIO WITH COMPACT DISC PLAYER
49
Page 51

Mute function (turning off the
volume completely)
To switch on the MUTE function,
briefly press (less than 1 second) the
button 2 (II MUTE). Volume will
gradually lower (SOFT MUTE
function) and the display will show
the function selected and the word
MUTE (e.g. “TUNER MUTE”
when Radio function is selected).
To switch off the MUTE function,
press button 2 (II MUTE) briefly
again. Volume will gradually become
louder (SOFT MUTE function)
returning to the value set before
RADIO WITH COMPACT DISC PLAYER
switching on the MUTE function.
Turning the button/knob 10 (VOL
PUSH ON/OFF) the sound level
changes but the MUTE function
stays on. Press again button 2 (II
MUTE) to switch it off.
With the MUTE function on, all
the other functions can be used and
if a traffic bulletin arrives with the
TA function on, the message ignores
the MUTE function.
Soft Mute function
When the MUTE function is
turned on or off, the volume lowers
or increases gradually (SOFT
MUTE function).
Tone adjustment
Proceed as follows:
– briefly (less than 1 second) and
repeatedly press the 11 (AUDIO
DSP
) button until the display shows
“BASS” , “TREBLE” (select Bass,
Treble function).
– turn button/knob 10 (VOL
PUSH ON/OFF) to the right to
increase basses or trebles or to the
left to decrease.
For few seconds the display shows
the levels of the basses/trebles (from
–10 to +10).
After few seconds from the last
adjustment, the display returns to
the main radio screen.
Balance adjustment
Proceed as follows:
– briefly (less than 1 second) and
repeatedly press the 11 (AUDIO
DSP
) button until the display shows
“BALANCE” (select Balancing
function)
– turn button/knob 10 (VOL
PUSH ON/OFF) to the right to
increase the sound from the right
speakers and to the left to increase
the sound from the left speakers.
For few seconds the display shows
the levels of balancing from ˙ +10 a
¯ +10 (˙ = right, ¯ = left). After
few seconds from the last adjustment, the display returns to the main
radio screen.
50
Page 52

Equalizer settings
(only if the equalizer is on)
To turn on the equalizer, press but-
ton 11 (AUDIO
DSP
) and turn button/knob 10 (VOL PUSH
ON/OFF) to select one of the following adjustments:
– “PRESET” (preset equalizer
adjustment)
– “CLASSIC” (preset equalizer
adjustment)
– “JAZZ” (preset equalizer adjust-
ment)
– “ROCK” (preset equalizer
adjustment)
– “CUSTOMER” (adjustment of
the 5 equalizer bands that can be
changed by the user)
Press repeatedly the 15 (<<) or 6
(>>) to select the band and use button/knob 10 (VOL PUSH ON/
OFF) to increase/reduce level in the
frequency band selected.
Fader adjustment
Proceed as follows:
– briefly (less than 1 second) and
repeatedly press the 11 (AUDIO
DSP
) button until the display shows
“FADE” (select Fader function)
– turn button/knob 10 (VOL
PUSH ON/OFF) to the right to
increase the sound from the front
speakers and to the left to increase
the sound from the rear speakers.
After few seconds from the last
adjustment, the display returns to
the main radio screen.
Loudness function
The Loudness function improves
the sound volume when listening at
low level, increasing the basses and
trebles. It is cut off when the volume
is set to maximum.
To switch the function on/off, press
briefly (less than 1 second) the
MENU button to enter the 12
(MENU
RDS
) and then press the
button for scrolling the menu. The
function condition (on or off) is
shown on the display by “LOUD-
NESS: ON” or “LOUDNESS:
OFF”, selectable through buttons 6
(>>) or 15 (<<).
TELEPHONE PROVISION
If the handsfree kit is installed on
the car, when a phone call is
received, the volume selected for
the PHONE function is set in the
menu, and can be cut off if required
(OFF).
RADIO WITH COMPACT DISC PLAYER
51
Page 53

RADIO (Tuner) fig. 9
When the set is turned on the last
function selected before turning off
is played (Radio, Compact Disc or
CD Changer).
To select the Radio source while
listening to a Compact Disc, press
briefly (less than 1 second) and
repeatedly the 14 (SRC) button
until this function is selected.
If in the radio source, press briefly
(less than 1 second) and repeatedly
AS
the 13 (BAND
) button to select
the required reception band.
RADIO WITH COMPACT DISC PLAYER
Every time the button 13 (BAND
AS
) is pressed, the following bands
are selected in sequence: “FM1”,
FM2”, “FM3”, “FM4AST”, “LW”,
“MW” and “AMAST”
The FM band is divided into sections: FM1, FM2, FM3 and
FMAST. The FMAST section is
reserved to the stations stored automatically with the AutoSTore function.
The “FMAST” section is reserved
to the stations stored automatically
with the AutoSTore function.
The AM band is divided into sections: MW, LW and AMAST. The
AMAST section is reserved to the
stations stored automatically with
the AutoSTore function.
The radio is always ready to
receive stations in the RDS mode
(Radio Data System).
Presetting buttons
The buttons with symbols from 1
to 6 (“3”, “4”, “5”, “16”, “17, “18”)
make it possible to set the following
presettings:
– 24 in the FM band( 6 in FM 1, 6 in
FM 2, 6 in FM 3, 6 in FMAST)
– 6 in the LW band
– 6 in the MW band
– 6 in the AMAST band
To call a preset station, choose the
required frequency band and then
press briefly (less than 1 second) the
corresponding preset button (from 1
to 6). The display will show the
name, the frequency and the presetting number.
Storing the last station heard
The radio automatically keeps in
storage the last station heard for
each reception band, which is then
tuned when the radio is turned on or
the reception band is changed.
52
Page 54

Automatic tuning
Briefly press (less than 1 second)
button 15 (<<) or 6 (>>) to start
automatically searching the tuning
for the next station that it is possible
to receive in the direction chosen.
If the station on which the tuner
stops is one of the stations stored
with the preset buttons (from 1 to
6), the display will show the presetting number.
Manual tuning
This allows manual station searching in the chosen band. This function
has to be through the MENU.
For manual tuning proceed as follows:
1. Select the band by button 13
AS
(BAND
): FM1, FM2, FM3, MW
or LW.
2. Press briefly (less than 1 second)
and repeatedly button 15 (<<) or 6
(>>).
Pressing one of the buttons 15
(<<) or 6 (>>) longer (over 1 second) obtains fast forward searching,
which is stopped when the button is
released.
If the station on which the tuner
stops is one of the stations stored
with the preset buttons (from 1 to
6), the display will show the presetting number on the bottom line.
Station scanning
(Scan function)
Press button 7 (SCAN): to start
scanning the stations in the frequency band selected (FM, AM, MW,
LW). The frequency of each station
found is shown on the display.
While scanning the display will
show “TUNER SCAN”, or “CDC
SCAN” (if the CD Changer is fitted), with the word “SCAN” flashing.
When the SCAN function is on, all
the other functions are cancelled.
The SCAN function is interrupted
in the following cases:
– pressing again 7 (SCAN)
– turning the set off
– changing the listening source
(Radio, CD Changer)
– changing the frequency band (or
storing section) selected
– pressing a preset button
– turning AutoSTore on (automatic
storage)
RADIO WITH COMPACT DISC PLAYER
53
Page 55

Scanning preset stations
Press the 7 (SCAN) button for at
least 2 seconds to start scanning the
preset stations in the present frequency band;
– FM: FM 1, FM 2, …., FM II 1, FM
II 2,… FM III 1, FM III 2,… FMAST 1,
FMAST 2,….
– AM: MW 1, MW 2, …. MW 6,
LW 1, LW 2, …. LW 6, AMAST 1,
AMAST 2,…
Each preset station will be heard
for few seconds and its frequency
shown on the display.
RADIO WITH COMPACT DISC PLAYER
The preset station SCAN function
is interrupted in the following cases:
– pressing again 7 (SCAN)
– turning the set off
– pressing a preset button
– turning AutoSTore on (automatic
storage)
– changing the listening source
(Radio, CD Changer)
– changing the FM level or frequency band selected
Manual station storage
The station being heard can be
stored in the range selected with
buttons numbered from 1 to 6.
Keep one of these buttons (from 1
to 6) pressed. After storage, the display shows the number of the button
with which the station has been
stored and a confirmation beep
sounds.
AutoSTore function
(automatic station storage)
To switch on the AutoSTore func-
AS
tion, keep the 13 (BAND
) button pressed. With this function the
radio automatically stores the stations with the strongest signal in
decreasing order of intensity of the
FMAST frequency band.
IMPORTANT Activating the
AutoSTore function cancels the stations stored previously in the
FMAST band.
During automatic storage the display shows “TUNER FMAST” or
“TUNER AMAST” if in the
TUNER mode (Radio) with FM or
AM frequency bands. To interrupt
the storage process, press the 13
(BAND
AS
) button again: the radio
will automatically tune to the station
heard before activation of the
AutoSTore function.
Listening to stored stations
Proceed as follows:
– select the required frequency
band and the storing section (FM1,
FM2, FM3, FMAST, MW, LW,
AMAST);
– briefly press (less than 1 second)
one of the six station storage buttons.
54
Page 56

The display will show the station
name (if any) and frequency, and on
the bottom line of the display will be
shown “Pn” where n corresponds
to the active presetting number.
In bands FM1, FM2 and FM3 if
reception is poor and the AF alternative frequency search function is
active, the station with the strongest
signal that is broadcasting the same
programme will be sought automatically.
AF function
(alternative frequency search)
To turn on/off the alternative frequency search function (AF function), press briefly (less than 1 second) the 8 (AF PTY) button. The
name RDS (if available) stays on the
display and if the AF function has
been turned on the message AF
SWITCHING: ON is displayed.
– “AF SWITCHING: ON”=
alternative frequency search on
– “AF SWITCHING: OFF” =
alternative frequency search off.
When the signal of the RDS station
tuned weakens, the following two
cases may occur:
– With “AF SWITCHING: ON”
the RDS system activates automatic
tuning of the optimum frequency of
the station chosen, with the stations
enabled, therefore the radio is automatically tuned to the station with
the strongest signal that is broadcasting the same programme. During the
journey it will thus be possible to
continue listening to the station chosen without having to change the frequency when changing area. Of
course, the station being listened to
must be receivable in the area the car
is crossing.
– With “AF SWITCHING: OFF”
the radio will not tune the strongest
station automatically and it will have
to be found manually using the tuner
buttons.
TA function
(traffic information)
Certain stations in the FM band (in
FM1, FM2, FM3 and FMAST storing
sections) are enabled to also broadcast information about traffic conditions. When listening to traffic information the display shows “TRAF-
FIC INFO” and the current station
(e.g. station name) alternately.
To turn the TA (traffic information)
function on/off, briefly press (less
than 1 second) the 9 (TA) button. If
the function is on the display shows
“TA-ON”.
With the TA function on, at the
start of the traffic bulletin the radio
stops temporarily the current station or the CD in order to broadcast
traffic information. This is possible
only if the current station selected
and the station broadcasting traffic
information are connected for the
EON function.
RADIO WITH COMPACT DISC PLAYER
55
Page 57

Program Type function (PTY)
(selecting a type of programme)
Many radio stations offer, in the FM
range (FM1, FM2, FM3), the type of
programme (PTY) service. For
example, stations broadcasting information/news will display “NEWS”
as PTY code.
With the PTY function, a search filter is activated that enables tuning
only on the stations broadcasting
programmes with preset PTY code
(e.g. “POP”).
To turn on the PTY function, keep
PTY
button 8 (AF
RADIO WITH COMPACT DISC PLAYER
) pressed.
The types of programmes offered
by a radio station can change according to broadcasting:
NEWS News and magazine
AFFAIRS Politics and news
INFO Special information
programmes
SPORT Sport programmes
EDUCATE Education
DRAMA Radio dramas and
literature
CULTURE Culture and
religion
SCIENCE Science
VARIED Variety
POP M Pop music (hits)
ROCK M Rock music
EASY M Easy music
LIGHT M Light classic music
CLASSICS Classic music
OTHER M Other music
(e.g. folk)
WEATHER Weather report
FINANCE Finance news
CHILDREN Child’s programmes
SOCIAL Social information
RELIGION Religion and philos-
ophy
PHONE IN Listener’s calls (other
than “
PHONE IN
” function active only with
handsfree kit connection for cell phone)
TRAVEL Tourist’s
information
LEISURE Free time and
hobbies
JAZZ Jazz
COUNTRY Country music
NATION M National
broadcasting
OLDIES Golden Oldies
FOLK M Folk music
DOCUMENT Special reports
Automatic PTY select
To select a type of programme
through this function select a programme type in the stored list and
then start the automatic search as
described in the following paragraphs.
56
Page 58

PTY function reactivation
PTY
Press button 8 (AF
) for over 2
seconds…. Then, the last programme type selected is displayed
(e.g. “POP”).
Setting the programme type
PTY
Press button 8 (AF
), for over
2 seconds and the PTY code of the
current station will be displayed.
Select the required code turning the
button/knob 10 (VOL PUSH
ON/OFF). Then press one of the
15 (<<) or 6 (>>) buttons to start
the automatic search of stations
broadcasting with the selected PTY
code. Automatic PTY search stops
automatically on next station offering the preset programme type and
shows the type of programme (e.g.
“POP”) and the word “PTY” flashes.
IMPORTANT If no station is
available with this type of programme, the station selected previously is heard and the PTY function
is abandoned.
PTY function deactivation
When selecting the PTY mode, if
no operation is performed within 10
seconds, the radio returns to the
mode selected before pressing button 8 (AF
PTY
) and stores the last
PTY code selected.
MENU
Functions of the
RDS
12 (MENU
) button
To activate the menu function,
briefly press (less than 1 second) the
RDS
12 (MENU
) button.
in this way you enter the first level
menu. To enter the second level
RDS
keep the 12 (MENU
) button
pressed for over 2 seconds.
To scroll the menu functions press
RDS
repeatedly the 12 (MENU
) but-
ton.
The functions controlled by the
first level menu are:
1 Manual tuning seek on/off (MAN-
UAL TUNING SEEK)
2 Function confirmation beep
(BEEP)
3 Tuning sensitivity adjustment
(SENS DX/LO)
4 News programmes on/off
(NEWS)
5 Volume control according to
speed (SVC)
6 Tuning adjustment on traffic
information (EON TA)
7 Loudness on/off (LOUDNESS)
8 CD Compression
To turn selected function on/off
press buttons 15 (<<) or 6 (>>).
9 Allocate a name to a CD/select
CD tracks (TPM = Track Program
Memory)
RADIO WITH COMPACT DISC PLAYER
57
Page 59

58
The functions controlled by the
second level menu are:
1 Current RDS station time display
(if any)
2 audio distortion clipper on/off
(AUDIO CLIP DETECT)
3 Max. volume setting at switching
on (MAX VOLUME)
4 Phone volume adjustment func-
tion (PHONE)
5 AUTO setting selection through
which radio on/off depends on
engine starting/stopping.
RADIO WITH COMPACT DISC PLAYER
To turn the selected function on/off
press button/knob 10 (VOL PUSH
ON/OFF).
NOTE When passing to next set-
ting item, the previous set one is
stored.
ADJUSTMENTS
First level menu functions
1 - manual tuning seek on/off
(TUNING SEEK)
This function enables to search
manually (MANUAL) or automatically (AUTO) the stored stations.
To switch from manual to automat-
ic press buttons 15 (<<) or 6 (>>).
The display will show the current
status of the function:
– “TUNING SEEK: AUTO”:
automatic seek on
– “TUNING SEEK: MANUAL”:
manual seek on.
2 - function confirmation beep
(BEEP)
System is fitted with the BEEP
function (the display shows
“ROGER BEEP-ON”).
This function confirms button
pressing by a sound indication
(BEEP).
To turn this function on/off, press
buttons 15 (<<) or 6 (>>).
The display will show the current
status of the function:
– “ROGER BEEP: ON” = func-
tion on
– “ROGER BEEP: OFF” = function off.
3 - tuner sensitivity adjustment
(SENS DX/LO)
With this function it is possible to
change the sensitivity of automatic
station searching. When low sensitivity is set “SENSITIVITY:
LOCAL” only stations with excellent reception are sought; when high
sensitivity is set “SENSITIVITY:
DISTANT” all stations are sought.
Therefore, if the car is in an area
with a considerable number of stations and you want to choose only
those with a strong signal, set to low
sensitivity “SENSITIVITY:
LOCAL”.
To turn this function on/off, press
buttons 15 (<<) or 6 (>>).
The display will show the current
status of the function:
– “SENSITIVITY: LOCAL” =
low sensitivity
– “SENSITIVITY: DISTANT” =
high sensitivity.
Page 60

4 - News programmes on/off
(NEWS)
This function is similar to the TA
function: with FM station and NEWS
mode active, if a news programme is
broadcast, the radio operates as follows:
– it sets the same volume as the TA
function, if the TUNER source is
active;
– it switches from active source
(CD or CDC) to TUNER mode, in
case of other source, setting the
same volume as the TA function.
To make use of this function, the
radio, in TUNER, mode, must be
tuned on a FM station broadcasting
the NEWS code.
To turn this function on/off press
buttons 15 (<<) or 6 (>>).
The display will show the current
status of the function:
– “NEWS: ON” = function on
– “NEWS: OFF” = function off
5 - SVC, volume changing
with car speed
The SVC function makes it possible
to automatically adapt the volume
level to the speed of the car, increasing it as the speed increases to maintain the ratio with the noise level
inside the passenger compartment.
Press 15 (<<) or 6 (>>) to change
SVC setting, thus passing from OFF
to the selected gain level (from 1 to
7). High gain level values correspond
to proportionally higher volume
increases according to speed.
The display will show the current
status of the function:
“SPEED VOLUME OFF” =
function off
“SPEED VOLUME: +3” = function on and gain level indication
6 - tuning adjustment on traffic
information (EON TA DX/LO)
This function enables to adjust
reception sensitivity of radio stations
broadcasting traffic information.
To turn this function on/off press
buttons 15 (<<) or 6 (>>).
The display will show the current
status of the function:
– “TRAFFIC: LOCAL” = low
sensitivity
– “TRAFFIC: DISTANT” = high
sensitivity
RADIO WITH COMPACT DISC PLAYER
7 - loudness on/off (LOUDNESS)
The LOUDNESS function improves
the sound volume when listening at
low level, increasing the basses and
trebles.
To turn this function on/off press
buttons 15 (<<) or 6 (>>).
59
Page 61

The display will show the current
status of the function:
“LOUDNESS: ON” = loudness
on
“LOUDNESS: OFF” = loudness
off
8 - CD Compression
This function optimises sound level
according to the type of music
played by the CD.
To turn this function on/off, press
buttons 15 (<<) or 6 (>>).
The display will show the current
RADIO WITH COMPACT DISC PLAYER
status of the function:
– “COMPRESSION: ON” =
function on
– “COMPRESSION: OFF” =
function off
9 - allocate a name to a
CD/select CD tracks (TPM)
This function can be chosen only if
a Compact Disc is inserted.
If the CD already has a name, this
will be shown on the display.
The TPM function enables the fol-
lowing:
– to name up to 10 CDs with max.
12 characters
– to select played tracks (in the
original sequence and up to 99 max.)
Every CD is identified by total play-
ing time and total number of tracks.
To name a CD (CD Naming) pro-
ceed as follows:
– the display shows “Name 1:”
– use button/knob 10 (VOL
PUSH ON/OFF) to select the CD
(1 to 10) to be named (active only if
the 10 memories for the CD names
are all used);
– press button 6 (>>) to confirm
the CD
– the first character relevant to the
CD name flashes to indicate the cursor position
– use button/knob 10 (VOL
PUSH ON/OFF) to select letters
(from “A” to “Z”) for allocating the
name to the CD
– use button 6 (>>) or 15 (<<) to
move the cursor along characters
RDS
– press button 12 (MENU
) to
confirm the CD name and to move
to TPM function TPM (Track
Program Memory)
– the display shows the default
message “PLAY TRACK: ALL”;
selecting ALL on TPM, the display
will show “PLAY TRACK: ALL”;
otherwise “PLAY TRACK: 10 – Y
or N” (YES or NO) wil be displayed
– use button/knob 10 (VOL
PUSH ON/OFF) to select
between ALL, 1, 2, 3… max
track no.
60
Page 62

– use button 6 (>>) or 15 (<<) to
enter or exclude the current track
no. from the TPM list
RDS
– press button 12 (MENU
) to
confirm the CD playing sequence
thereby moving to the next menu
function
IMPORTANT When entering
name or TPM, the radio returns to
the current source without storing
modifications if no button is pressed
for at least 20 seconds.
Second level menu functions
1 - RDS station time display
This function makes it possible to
display current RDS station time (if
this information is present).
2 - audio distortion clipper
on/off (AUDIO CLIP DETECT)
This function reduces automatically
the radio output level when excessive distortion is detected that could
damage the speakers.
To turn this function on/off, press
buttons 15 (<<) or 6 (>>).
The display will show the current
status of the function:
“CLIP DETECT: ON” = func-
tion on
“CLIP DETECT: OFF” = func-
tion off
3 - max. volume setting at
switching on (MAX VOLUME)
This function makes it possible to
set the radio volume (from 10 to 33)
at switching on.
To adjust volume use button/knob
10 (VOL PUSH ON/OFF).
The display will show the set volume (e.g. “MAX VOLUME: 25”)
4 - phone volume adjustment
function (PHONE)
With this function it is possible to
adjust the phone volume (volume
level setting 1 to 3).
The display shows the default message “PHONE LEVEL: OFF” (vol-
ume set by Manufacturer and corresponding to the max. level).
Using the button/knob 10 (VOL
PUSH ON/OFF) the volume can
be adjusted at 3 different levels
(PHONE LEVEL 1, PHONE
LEVEL 2 and PHONE LEVEL 3):
the higher the figure is, the lower is
the volume.
RADIO WITH COMPACT DISC PLAYER
61
Page 63

5 - AUTO function setting
With this function it is possible to
set radio turning on/off depending on
car ignition/stopping or independent
radio turning on/off.
With this function on (radio is set
to switch off when the car is
switched off), it is however possible
to switch on the radio.
With this function off, when
switching off the car the radio stays
on.
To turn this function on/off, press
buttons 15 (<<) or 6 (>>).
RADIO WITH COMPACT DISC PLAYER
The display will show the current
status of the function:
– “AUTO: ON” = function on
– “AUTO: OFF” = function off
COMPACT DISC PLAYER
fig. 9
You radio is fitted with a Compact
Disc player for sound CDs.
Compact Disc insertion and ejection are facilitated by a powered
mechanism.
Selecting the Compact
Disc player
To turn on the Compact Disc player integrated in the set, when a CD
is already inserted, turn the set on
pressing button/knob 10 (VOL
PUSH ON/OFF), then briefly (less
than 1 second) and repeatedly press
button 14 (SRC) to select the “CD”
mode.
Inserting a CD, also with the device
off, the CD player is turned on.
Inserting/ejecting a CD
To insert the CD set it gently in
place to activate the powered loading system, which will position it correctly.
Press 1 (˚) with the device on to
operate the powered CD eject system.
Display information
When the CD player is working,
the display shows information which
has the following meaning:
“CD”: shows the CD mode
“TRACK 12”: shows the number
of the track on the CD
“11.04”: shows the time elapsed
since the start of the track
62
Page 64

Select track (forward/
backward)
Press briefly (less than 1 second)
the 6 (>>) button to play the next
track on the CD and 15 (<<) to play
the previous one.
To select tracks continuously, keep
the button pressed.
If playing the track started more
than 3 seconds ago, pressing 15
(<<) the track is played again from
the start. In this case of wanting to
play the previous trac, press button
15 (<<) twice consecutively.
Fast forward/backward
Keep the 6 (>>) button pressed to
move the track selected fast forward
and keep the 15 (<<) button
pressed to move it fast backward.
Fast forward/backward is stopped
when the button is released.
FAST TRACK SELECTION
(forward/backward)
Briefly press (less than 1 second)
the button/knob 18 (3 F-TRK) to
enter the fast selection mode. The
sound system display will show the
message “TRx FASTTRACK” (x
indicates the track number).
To select the required track, turn
the button/knob 10 (VOL PUSH
ON/OFF) and then press it briefly
(less than 1 second) to confirm:
required track playback will start.
Pause function
To pause the CD player, briefly
press the 2 (II MUTE) button. The
display will show “CD PAUSE”.
To listen to the track again, press
button 2 (II MUTE) again.
Scanning tracks on the CD
(Scan Function)
With this function it is possible to
listen to all the tracks contained in
the CD selected.
Keep the 7 (SCAN) button
pressed to play the first 10 seconds
of every track on the CD.
The scanning sequence is the following:
– from the track played up to the
last one on the CD
– from the first track up to the one
played until the start of scanning.
The SCAN function is interrupted
in the following cases:
– turning the set off
– pressing again 7 (SCAN)
– changing the sound source
RADIO WITH COMPACT DISC PLAYER
63
Page 65

Track Repeat function
Briefly press (less than 1 second) the
RPT
preset button 4 (5
): the display
shows “CD REPEAT TRACK”.
Press the preset button 4 (5
again to turn off the repeat function:
the display shows “CD REPEAT
OFF”.
Changing the sound source, the
function is turned off.
To guarantee optimum playing, use
original CDs. If using R/RW CDs,
use top quality CDs duplicated at as
low as possible speed.
RADIO WITH COMPACT DISC PLAYER
Random track playing
(RaNDom function)
To start the random playing of
tracks on the Compact Disc, press
briefly (less than 1 second) button 5
RND
(6
). A new track will be played
and the display will show “CD
RANDOM TRACK”.
RPT
Press the preset button 5 (6
again to turn off the repeat function:
the display shows “CD RANDOM
OFF”.
)
When the random function is on,
all the tracks on the CD are played
in random sequence.
Changing the sound source, the
function is turned off.
TPM function (CD playing
sequence storage)
With the TPM function (Track
Program Memory) it is possible to
store the sequence for playing tracks
of a CD, to be able to play them
later in the sequence set.
To store CD track playing
sequence, refer to
TO A CD
/
SELECT CD TRACKS(TPM
ALLOCATE A NAME
previous pages.
RND
)on
CD CHANGER (Multiple
)
Compact Disc Player) USE
(if connected)
The radio is preset for compatible
compact disc player fig. 11 (available
at Lineaccessori Fiat).
For installation and
connection of the CD
changer apply only to
Fiat Dealership.
F0C0261m
64
fig. 11
Page 66

Lineaccessori Fiat CD Changer is
fitted with a proper loader for 5
compact discs.
WARNING
On multimedia CDs in ad-
dition to sound tracks also
data tracks are recorded. Playing
one of these CDs may cause
rustling and such a volume as to
compromise road safety, as well as
causing damage to the final stages
and speakers.
CD CHANGER (Multiple
Compact Disc Player)
(if connected)
Selecting the CD Changer
To turn on the CD Changer, turn
on the set, then press briefly (less
than 1 second) and repeatedly the
14 (SRC) button to select the
“CDC” source (CD Changer).
Possible error messages
If the loader does not contain any
Compact Discs, the display will show
“NO CD”. If at least one CD is
found, it will be played.
If the CD played is illegible, the
next CD will be selected; if there are
no other CDs or if they are also
illegible, the display will show “NO
CD” until the listening source is
changed.
Operation
To play the Compact Discs in the
CD Changer, select “CDC” pressing
briefly and repeatedly button 14
(SRC).
When listening to a Compact Disc
for the first time after putting it in
the CD loader, playing starts from
the first track on the first disc available in the loader.
While playing the display shows the
number of the track being heard (e.g.
“TRACK 12” = twelfth track), the
playing time elapsed from the start of
the track (e.g. “11:10” = 11 minutes
and 10 seconds) and the number of
the Compact Disc selected (e.g.
“CDC3” = third CD) depending on
the function selected in the menu.
RADIO WITH COMPACT DISC PLAYER
65
Page 67

Choosing the CD
Press 16 (1
CD+) to select the next
CD and17 (2 CD–) to select the previous one.
If the loader does not contain a disc
in the position selected, the display
shows“NO CD”, and the next disc
is played automatically.
RADIO WITH COMPACT DISC PLAYER
Select track (forward/backward)
Briefly press 6 (>>) to play the
next track on the Compact Disc
being listened to.
Briefly press (less than 1 second)
button 15 (<<) to play the previous
track on the Compact Disc being listened to.
Fast forward/backward
Keep the 6 (>>) button pressed to
move the track selected fast forward
and keep the 15 (<<) button
pressed to move it fast backward.
Fast forward/backward is stopped
when the button is released.
Scanning tracks on the CD
(Scan function)
With this function it is possible to
listen to all the tracks contained in
the CD selected.
Keep the 7 (SCAN) button
pressed to play the first 10 seconds
of every track on the CD. While
playing the display will alternately
show the CD function chosen (CD
name, time and number) and the
word “SCAN” (e.g. “CDC3
SCAN TK12 0.04”)
If the SCAN function is on, the
REPEAT and MIX functions are
turned off.
The scanning sequence is the following:
– from the track played up to the
last one on the CD
– from the first track up to the one
played until the start of scanning.
66
Page 68

The SCAN function is interrupted
in the following cases:
– turning the set off
– pressing 7 (SCAN) again to continue listening to the track being
played
– pressing 6 (>>) or 15 (<<)
thereby moving to the next or previous track
– pressing a preset button
– changing the sound source
RDS
– pressing 12 (MENU
).
If the SCAN function is not interrupted, at the end it will continue
playing the track played before scanning was started.
Pause function
To pause the CD player, press
briefly (less than 1 second) the 2 (II)
button. The display shows “CDC
MUTE”.
To listen to the track again, press
button 2 (II) again.
The pause function is automatically
cancelled changing the listening
source.
Track Repeat function
Briefly press (less than 1 second)
RPT
the preset button 4 (5
) to listen
repeatedly to the last track played:
the display shows “CDC REPEAT
TRACK”.
Press the preset button 4 (5
RPT
again to turn off the repeat function:
the display shows “CD REPEAT
OFF”.
Changing the sound source, the
function is turned off.
IMPORTANT When the repeat
function is turned on, the SCAN
and MIX functions are turned off.
Random track playing
(RaNDom function)
To start random playing of tracks
on the Compact Disc selected, press
the preset button 5 (6
track will be played and the display
will show “CDC RANDOM
)
DISK”. To start random playing of
all the CDs contained in the CD
Changer, press a second time 5 (6
RND
); the display will show “CDC
RANDOM PACK”. Press 5 (6
RND
) a third time to urn the function
off: the display will show “CDC
RANDOM OFF”.
Stopping and ejecting the CD
Press 1 (˚) or 14 (SRC) to return
to the radio mode.
RND
). A new
RADIO WITH COMPACT DISC PLAYER
67
Page 69

SECRET CODING
Entering radio’s secret code
Entry of the secret code is required
to allow the radio to work after the
first connection to the car electric
system different from the original
one.
Connecting the radio to the car
supply, the display shows “RADIO
M - CODE ----”.
The secret code comprises four figures, each corresponding to one of
the dashes.
RADIO WITH COMPACT DISC PLAYER
To enter the first digit of the code,
press the corresponding button of
the preset stations (from 1 to 4).
Press repeatedly the preset buttons
1-4 (16, 17, 18 and 3) to enter the
secret code digits (from 0 to 9).
To confirm the required digit press
RPT
4 (5
).
Waiting times
If a wrong code is entered, the next
attempts to enter the code are
spaced by the following waiting
times. During these intervals the
radio can be connected or disconnected but not switched on.
During the waiting time the radio
shall not be on.
It shall however be connected with
+12V permanent voltage. The waiting time is over when the display
shows the figure and the dashes of
the next attempt (e.g. 2 - - -).
The following table shows the
times between one attempt and the
other.
Vain attempts Waiting
(on display) time (approx.)
1 1 minute
2 2 minutes
3 4 minutes
4 8 minutes
5 16 minutes
6 30 minutes
7 1 hour
8 2 hours
9 4 hours
10 8 hours
11 16 hours
12 24 hours
Waiting time passes keeping the
radio on. When turning the radio
on/off, counting restarts from the
start of the current attempt.
The waiting time is over when the
display shows the figure and the
dashes of the next attempt (e.g. 2 - -
- ).
68
Page 70

Entering the secret code
of the CD Changer
Should the control code between
the radio and the CD Changer be
not recognised, to reset CD
Changer proper operation the fourdigit secret code must be entered
manually.
When entering the secret code,
the display shows: “CDC M --
CODE ----”.
The secret code comprises four figures, each corresponding to one of
the dashes and is different for each
CD Changer.
To enter the first digit of the code,
press the corresponding button of
the preset stations (from 1 to 4).
Press repeatedly the preset buttons
1-4 (16, 17, 18 and 3) to enter the
secret code digits (from 0 to 9).
To confirm the required digit press
4 (5
RPT
).
If the code has been entered properly, the radio and the CD Changer
start to work regularly.
Otherwise try to enter the secret
code a second and even a third time
if required. After the third negative
attempt, the radio sets in “stand-by”
for approx. 1 hour before enabling
other three attempts.
TECHNICAL INFORMATION
Aerial fig. 12
The car is fitted with an aerial
located on the roof. You are recommended to slacken and remove the
aerial from the roof to avoid damaging it when washing the car in automatic systems.
Radio power
– 4 x 35W (with standard sound
system comprising 2 tweeters + 2
front woofers and 2 rear full-range
speakers)
F0C0298m
RADIO WITH COMPACT DISC PLAYER
fig. 12
69
Page 71

Standard system speakers
The standard sound system
includes:
– 2 front tweeters A-fig. 13 4
Ohm impedance and 40W power.
RADIO WITH COMPACT DISC PLAYER
– 2 front midwoofers B-fig. 14,
165 mm diameter, 4 Ohm impedance and 40W power.
– 2 rear full-range speakers A-fig.
15, 165 mm diameter, 4 Ohm
impedance and 40W power.
F0C0078m
HI-FI system speakers
(where fitted)
The HI-FI system consists of the
following:
– 2 front tweeters A-fig. 13,
4 Ohm impedance and 40W power.
– 2 front mid-woofers B-fig. 13,
165 mm diameter, 4 Ohm impedance and 40W power.
– 2 rear mid-woofers B-fig. 16,
165 mm diameter, 4 Ohm impedance and 40W power (5-door and
Multi Wagon versions)
70
fig. 13
F0C0077m
fig. 14
fig. 15
F0C0143m
F0C0299m
fig. 13
Page 72

– 2 rear tweeters A-fig. 16, 4 Ohm
impedance and 40W power (5-door
and Multi Wagon versions)
– 2 rear full-range speakers A-fig.
15, 165 mm diameter, 4 Ohm
impedance and 40W power (3-door
versions)
– 1 box subwoofer C-fig. 17 set in
the boot, with 100W built-in amplifier
Protection fuse
The radio has a 10A protection
fuse D-fig. 18.
F0C0135m
Power
CONNECTIONS
A-fig. 18
A1 CAN B line signal
A2 Amplified subwoofer pres-
ence signal
A3 CAN A line signal
A4 Connection to +12V switch-
ing on voltage (at car starting)
A5 Radio aerial connection
A6 Not connected
A7 Connection to +12V (perma-
nent) supply voltage
A8 Earth connection.
F0C0028m
Speakers
CONNECTIONS
B-fig. 18
B1 Rear speaker
(right +)
B2 Rear speaker
(right –)
B3 Front speaker
(right +)
B4 Front speaker
(right –)
B5 Front speaker
(left +)
B6 Front speaker
(left –)
B7 Rear speaker
(left +)
B8 Rear speaker
(left –)
RADIO WITH COMPACT DISC PLAYER
fig. 17
fig. 18
71
Page 73

Additional connections
PHONE INPUT
CD CHANGER CONNECTION
CONNECTIONS
C-fig. 18
Line output connection preset-
ting for power amplifier (Booster) or
active speaker.
C1 Positive sound input for
external TMC module
C2 Negative sound input for
external TMC module
C3 MUTE signal input from
external TMC module
C4 Not connected
RADIO WITH COMPACT DISC PLAYER
C5 Not connected
C6 Power amplifier switching
voltage: on/off (max. 0.3A).
Connection presetting for hands-
free phone kit (through radio).
C7 Positive sound input for
external phone presetting
C8 Negative sound input for
external phone presetting
C9 MUTE signal from external
phone presetting
C10 Not Connected
C11 Not Connected
C12 Phone earth
C13 CDC bus line
C14 CD Changer data bus
C15 CD Changer +12V supply
voltage
C16 CD Changer switch voltage
C17 CDC bus earth
C18 Sound signal earth from CD
Changer
C19 LH CDC sound channel
C20 RH CDC sound channel
72
Page 74

RRRRAAAADDDDIIIIOOOO WW
WWIIIITTTTHHHH CCCCDDDD AAAANNNNDDDD MMMMPPPP3333 PPPPLLLLAAAAYYYYEEEERRRR
CONTROL DESCRIPTION
F0C0237m
RADIO WITH CD AND MP3 PLAYER
fig. 19
73
Page 75

Button RADIO Mode
Buttons and front panel Function
Buttons and front panel
Brief pressing Pressing over 2 sec.
RADIO WITH CD AND MP3 PLAYER
1
2
3
4
5
6
7
8
9
10
11
˚
11 MUTE
4 DISP
5 RPT
6 RND
>>
SCAN
AF PTY
TA
VOL PUSH ON/OFF
AUDIO DSP
Eject
Mute
Preset station 4
Preset station 5/
track repetition
Preset station 6
Next forward
Automatic scanning
Alternative frequency/Programme Type
Traffic information
Radio ON/OFF
Volume adjustment
Sound settings
Eject (CD)
Audio Mute
FM/AM/PTY:call preset station 4
FM/AM/PTY:call preset station 5
FM/AM/PTY:call preset station 6
FM: Seek + / MAN +
AM: Seek + / MAN +
PTY: Select next programme/ automatic
search (inside the programme)
Automatic scanning of stations
on the band in use
AF ON/OFF
TA ON/OFF
ON/OFF: press
volume adjustment:
turn leftwards: to decrease
turn rightwards: to increase
Bass (B)
Treble (T)
Fader (F)
Balance (B)
FM/AM: store preset station 4
PTY: store programme
FM/AM: store preset station 5
PTY:store programme
FM/AM: store preset station 6
PTY: store programme
Automatic scanning of stations tunable
on the band in use
Select programme type
PTY: displays selected programme type
Adjusting TA volume
Access to Equalizer function
74
Page 76

CD/MP3 Mode
Brief pressing Pressing over 2 sec.
CD
CHANGER
Mode
Brief pressing Pressing over 2 sec.
Eject (CD)
Playing Pause/Audio Mute
Displaying of file name, folder number and
name, singer, album, track
MP3 track repeating ON/OFF, repeating of
MP3 tracks contained in the folder or
repeating of the whole CD/MP3
MP3 random track repeating or random
repeating of MP3 tracks contained in the
folder
Select next track
Automatic scanning of tracks on the CD
TA ON/OFF
ON/OFF: press
Volume adjustment:
turn leftwards: to decrease
turn rightwards: to increase
Bass (B)
Treble (T)
Fader (F)
Balance (B)
Message setting on display
Fast forward (continuous) with
display of folder number and track
number and title
Adjusting TA volume
Access to Equalizer function
Eject (CD)
Playing Pause / Audio Mute
CD track repetition ON/OFF
Random CD track repetition ON/OFF
Select next track
Automatic scanning of tracks on the CD
TA ON/OFF
ON/OFF: press
Volume adjustment:
turn leftwards: to decrease
turn rightwards: to increase
Bass (B)
Treble (T)
Fader (F)
Balance (B)
Fast forward (continuous)
RADIO WITH CD AND MP3 PLAYER
Adjusting TA volume
Access to Equalizer function
75
Page 77

Button Buttons and front panel
Letters or symbol Function
RADIO Mode
Brief pressing Pressing over 2 sec.
RADIO WITH CD AND MP3 PLAYER
12
13
14
15
16
17
18
MENU RD
BAND AS
SRC
<<
1 CD / *+
2 CD / * –
3 F-TRK
Menu function
Select frequency band
Select source
Previous backward
Preset station 1
Preset station 2
Preset station 3
Manual station tuning ON/OFF
NEWS ON/OFF
Function confirmation beep ON/OFF
(BEEP)
SENS DX/LO
SVC (Speed Volume)
Loudness ON/OFF
EON TA ON
CD Compression
TPM (Track Program Memory)
CD Naming
FM1,FM2,FM3,FMAST, LW,MW,AMAST
TAPE (Cassette), RADIO, CD Changer
(if connected)
FM: Seek – / MAN –
AM: Seek – / MAN –
PTY: Select next programme / automatic
search (inside the programme)
FM/AM/PTY:call preset station 1
FM/AM/PTY: call preset station 2
FM/AM/PTY: call preset station 3
RDS Clock display
Audio Clip Detect ON/OFF
Automatic search ON/OFF
Phone volume adjustment ON/OFF
Max. radio volume at switching on
Store automatically in preset station
group.
Exit on FMAST.P1 or AMAST.P1
FM/AM: store preset station 1
PTY: store programme
FM/AM: store preset station 2
PTY: store programme
FM/AM: store preset station 3
PTY: store programme
76
Page 78

CD/MP3 Mode
Brief pressing Pressing over 2 sec.
CD
CHANGER
Mode
Brief pressing Pressing over 2 sec.
NEWS ON/OFF
Function confirmation beep ON/OFF (BEEP)
SVC (SPEED VOLUME)
LOUDNESS ON/OFF
EDN/TA ON
CD Compression
ON/OFF track/folder name scroll (NAME
SCROLL) or single scroll of the folder name
(ONCE)
Exit CD mode
Insert tuner in last band
CD, RADIO CD Changer (if connected)
Select previous track
Next folder selection
Previous folder selection
Quick CD track and/or folder selection
(function controlled through the button/knob
10 (VOL PUSH ON/OFF)
RDS Clock display
Audio Clip Detect ON/OFF
Select previous track
Phone volume adjustment ON/OFF
Max. radio volume at witching on
Fast backward (continuous)
NEWS ON/OFF
Function confirmation beep ON/OFF (BEEP)
SVC (SPEED VOLUME)
Loudness ON/OFF
EDN/TA ON DX/LO
Cd Compression
TPM (Track Program Memory)
Exit CD mode
Insert tuner in last band
CD, RADIO, CD Changer (if connected)
Select previous track
CD +
CD –
RDS clock display
Audio Clip Detect ON/OFF
Set radio switching on mode
Phone volume adjustment ON/OFF
Max. radio volume at witching on.
Fast backward (continuous)
RADIO WITH CD AND MP3 PLAYER
77
Page 79

INTRODUCTION
As far as Radio, Compact Disc and
Cd Changer are concerned, please refer to the chapter
PACT DISC PLAYER
As for the MP3 player, read the following indications.
MPEG Layer-3 audio decoding
technology licensed from Fraunhofer
IIS and Thomson multimedia.
MP3 PLAYER
Besides a normal CD reproduction,
RADIO WITH CD AND MP3 PLAYER
the sound system can reproduce also
CD ROM in which compressed files
have been recorded in MP3 format. It
operates as a normal system with
Compact Disc player when a CD is inserted, except for the
ING/SELECTION
(see previous chapter
COMPACT DISC PLAYER
deactivated.
RADIO WITH COM
.
(TPM) and CD
) modes, that are
TRACK NAM
NAMING
RADIO WITH
CD/MP3 reading
When a CD-ROM is inserted in the
magazine, two operations will be carried out:
-
1) Scanning of the tracks inside the
CD for the file audio detection. The
audio tracks are the first to be detected and this means that the sound
system plays only these ones. The
song name with a flashing indication
“SCAN” is shown on the display (ex.
“MIDNIGHT MOTION SCAN”).
2) Reading of the MP3 tracks to determine the song and folder structure.
The indication “READING DISC” is
shown on the display at this stage. It
takes about 2 minutes to read a complex MP3 structure (made of several
sessions with many folders and songs)
-
on a CD-ROM.
To guarantee optimum playing, use
top quality CDs duplicated at as low
as possible speed.
The CD-ROM reading will be termi-
nated in the following cases:
– In case of a correct CD-ROM reading and MP3 track identification. In this
case “MP3” appears on the display
and the playing starts from the first
track and the first folder (see next
paragraph
PLAY MODE
).
– In case the CD-ROM reading is not
ended after 2 minutes. “CHECK
DISC” appears on the display for
about 5 seconds. In this case the sound
system changes its audio source and
goes back to TUNER mode.
– If MP3 is not found. In this case
“NO MP3 FILES” appears on the
display for about 5 seconds. The system changes its audio source and goes
back to TUNER mode.
78
Page 80

Play mode
During a CD-ROM playing where
MP3 tracks have been recorded, the
sound system display will indicate the
song title and its playing time (ex.
“MIDNIGHT MOTION 4:37”).
The following operations can be carried out while playing:
– single or continuous scroll on the
song title
– ascending or descending scroll
through the tracks in single, continuous or multiple mode.
– ascending or descending scroll
through the folders (see next para-
FOLDER STRUCTURE
graph
).
DISP
Function enabling to change displayed
settings of the various info present on
CD (e.g.: tracks, folder, singer's name,
album title, etc.). This function is activated by pressing button 3 (4 DISP)
for over 2 seconds, then use the button/knob 10 (VOL PUSH ON/OFF)
to select the required display setting.
In MP3 the sound system:
– plays only the MP3 tracks
– plays the tracks in an alphabetic/numerical order for any folder (ordered
according to the same way) (it is better to place a number, for ex. “01”,
“02” or “001” “002” before each file
name)
– comes back to the beginning of the
last track each time the radio is
switched on.
During the track selection (see the
paragraph
WARD/BACKWARD
TRACK SELECTION(FOR
) the folder number,
-
the song number and title will be displayed (ex. “3/13 MIDNIGHT MO-
TION“).
The sound system accumulates the
number of pressures on the preselection buttons (from 1 to 6) to make
easier the selection, and it skips only
once, as it was a single request.
IMPORTANT MP3 tracks recorded with the variable bit speed method
may cause differences in the playing
time indicated on the display.
IMPORTANT The CD player can
read most of the compression systems
currently on sale (e.g.: LAME, BLADE,
XING, FRAUNHOFER); however,
due to the evolution of these systems,
reading of all compression formats is
not guaranteed.
Folder structure
The sound system with MP3 player:
– recognizes only the folders containing MP3 files
– if the CD-ROM MP3 files contain
several “sub-folders”, their structure
become a single-level one, that is the
“sub-folders” become main folders
(see the following example).
RADIO WITH CD AND MP3 PLAYER
79
Page 81

Example: With a CD with the fol-
lowing structure:
+ - MP3 collection – Volume n.1
* - Celine Dion
* - Falling into you
| - It’s all coming back to
me now.mp3
| - Because you loved
me.mp3
* - Incognito
| - Incognito.mp3
RADIO WITH CD AND MP3 PLAYER
| - Lolita.mp3
| - Delivre-Moi.mp3
* - Prodigy
* - Experience
| - Jericho.mp3
| - Wind it now.mp3
| - Out of space.mp3
* - The fat of the land
* - Favourite songs
| - Breathe.mp3
| - Firestarter.mp3
The sound system recognizes all the
folders and will move from one of the
following folders to the others:
* – Falling into you
* – Incognito
* – Experience
* – Favourite songs
The *symbol indicates that the system is displaying the folder name. At
each request of ascending or descending scroll through the folders,
the folder name and number are displayed (with a max. length of 15-18
types, according to the folder number).
When “ON” or “ONCE” are cho-
RDS
sen with 12 (MENU
graph
TRACK FOLDER NAME SCROLL
) (see para-
), the
complete folder name is scrolled in the
folder display mode, before returning
to the cut folder.
Next/previous folder selection
Press 16 (1 CD / * +) for a short
time (less than 1 second) to select the
songs contained in the next folder.
Press 17 (2 CD / * –) for a short
time (less than 1 second) to select the
songs contained in the previous folder.
The name and number of the
next/previous folder are shown on the
display (ex. “9 MISC COLLEC-
TION”).
80
Page 82

Track repeat
(Folder Repeat mode)
When 4 (5
RPT
) is pressed for a
short time (less than 1 second), the
song repeating mode changes through
following pressures on the key, on the
display appears: “CD REPEAT
TRACK”- > “CD REPEAT FOLD-
ER” - > “CD REPEAT DISC” - >
“CD REPEAT OFF”.
The following functions are associat-
ed to these notices:
“CD REPEAT TRACK”: repeats
the current track
“CD REPEAT FOLDER”: repeats
the tracks in the selected folder
“CD REPEAT DISC”: repeats the
whole MP3 CD
“CD REPEAT OFF”: deactivates
the track repeating mode.
The mode is deactivated each time
the audio source is changed.
RaNDom repeating mode
(Folder Repeating)
RND
Press 5 (6
) for a short time (less
than 1 second) to play a random selection of the tracks contained in the
Compact Disc: the following notices
appear on the display by pressing it
further on: “CD RANDOM FOLD-
ER”- > “CD RANDOM DISC” - >
“CD RANDOM OFF”.
The following functions are associat-
ed to these notices:
“CD RANDOM FOLDER”: plays
a random selection of the tracks contained in the chosen folder.
“CD RANDOM DISC”: plays a
random selection of the tracks contained in the MP3 CD.
“CD RANDOM OFF”: deactivates
the random repeating mode.
The mode is deactivated each time
the audio source is changed.
Folder name and number
display
To activate this function, press. 3 (4
DISP
) for a short time (less than 1 sec-
ond).
DISP
When 3 (4
) is pressed again (or
after 5 seconds), the previous display
will be shown.
RADIO WITH CD AND MP3 PLAYER
81
Page 83

Track selection
(Forward/backward)
Press 6 (>>) for a short time (less
than 1 second) to play the next track
and 15 (<<) to play the previous one.
It is possible to seek manually the
next track by pressing 6 (>>) again.
The folder number, the song number
and title followed by “TK SEEK” will
be shown on the display (ex. “3/13
TK SEEK +6”).
In the same way, it is possible to seek
again the previous track by pressing 15
(<<). In this case the folder number,
RADIO WITH CD AND MP3 PLAYER
the track number and title will be
shown on the display, followed by
“TK SEEK” (ex. “3/13 TK SEEK
–4).
Keep the button pressed to select
the songs in a continuous way. The
folder number and the track title and
number will be shown on the display
(ex. “3/13 MIDNIGHT MO-
TION”).
If the track playing started more than
3 seconds before, it can be played
again from the beginning by pressing
15 (<<). In this case, if you want to reproduce the last song, press 15 (<<)
two times consecutively.
FAST TRACK SELECTION
(Forward/backward)
Briefly press (less than 1 second) the
button/knob 18 (3 F-TRK) to enter
the fast selection mode. The sound
system display will show the message
“Fy TRx FASTTRACK” (y indicates the folder number, x indicates
the track number).
To select the required track, turn the
button/knob 10 (VOL PUSH
ON/OFF) and then press it briefly
(less than 1 second) to confirm: required track playback will start.
Track/folder name scroll
(NAME/SCROLL function)
It is possible to activate for only one
time/deactivate the complete folder
name scroll by pressing for a short
time (less than 1 second) 12 (MENU
RDS
).
According to the different cases the
following will be displayed:
“NAME SCROLL: ON” = contin-
uous scroll of the song/folder complete names
“NAME SCROLL: ONCE” = sin-
gle scroll of the complete folder name
and 15/16 types display afterwards
“NAME SCROLL: OFF” = fixed
visualization of the first 15/16 types of
the track/folder name.
82
Page 84

NNNNOOOOTTTTEEEESS
SS
Page 85

Fiat Auto S.p.A.
After Sales - Assistenza Tecnica - Ingegneria Assistenziale
Largo Senatore G. Agnelli, 5 - 10040 Volvera - Torino (Italia)
Print no. 603.46.306 - III/2005 - 3
rd
edition
Page 86

 Loading...