

Page 1
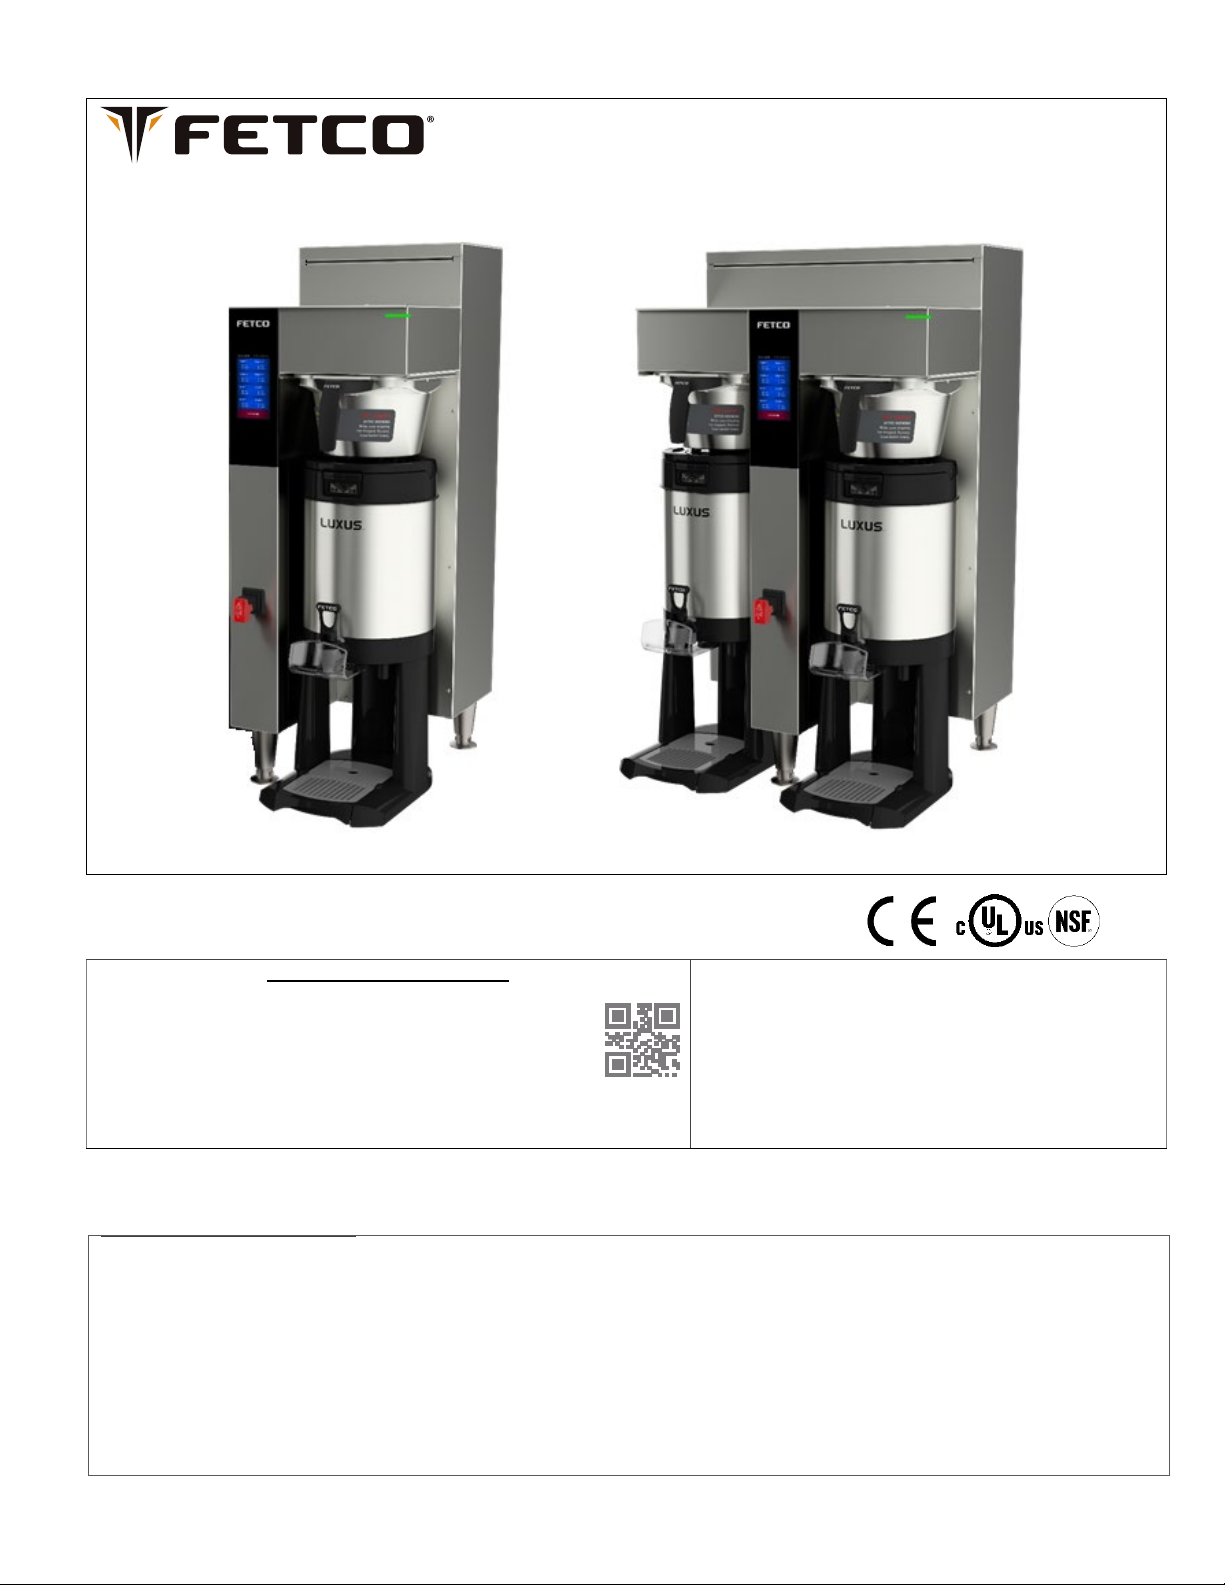
CBS-2251, CBS-2252 & CBS-2253 Next Generation Brewing System
FETCO Next Generation-NG® Commercial Beverage Equipment
(Dispensers not included) (Plastic brew baskets are standard, brewers avalible with optional stainless steel brew baskets)
CONTACT INFORMATION
fetco.com
User’s Guide and Operator Instructions
CBS-2251 CBS-2252
FETCO® FOOD EQUIPMENT TECHNOLOGIES COMPANY
600 ROSE ROAD
LAKE ZURICH • IL • 60047-0429 • USA
Product made in USA
INTERNET: www.fetco.com
PATENTS:https://www.fetco.com/pl,pages,patents,74.html
©2020-2023 FOOD EQUIPMENT TECHNOLOGIES COMPANY
COFFEE BREWER CBS-2250NG Series
PHONE: (800) 338-2699 (US & CANADA)
(847) 719-3000 (All Countries and International)
FAX:(847) 719-3001
EMAIL:[email protected]
[email protected] (to order parts and equipment)
[email protected] (all service queries)
P195 February 2023
TABLE OF CONTENTS
Weights and Capacities ............................................... 2
Rough-In Drawings ...................................................... 2
Fast Start Brewing ....................................................... 5
Brew Recipes ............................................................... 6
Settings ........................................................................ 7
Inputs ........................................................................... 8
Service ......................................................................... 8
Error Codes .................................................................. 9
Hot Water Portions ..................................................... 10
Calibration .................................................................. 11
How to calibrate the flow rate ..................................... 11
Outputs ....................................................................... 12
Counters ..................................................................... 13
Brewer Setup .............................................................. 14
Installation Guide........................................................ 15
Operator Training ....................................................... 16
Parts diagrams ........................................................... 18
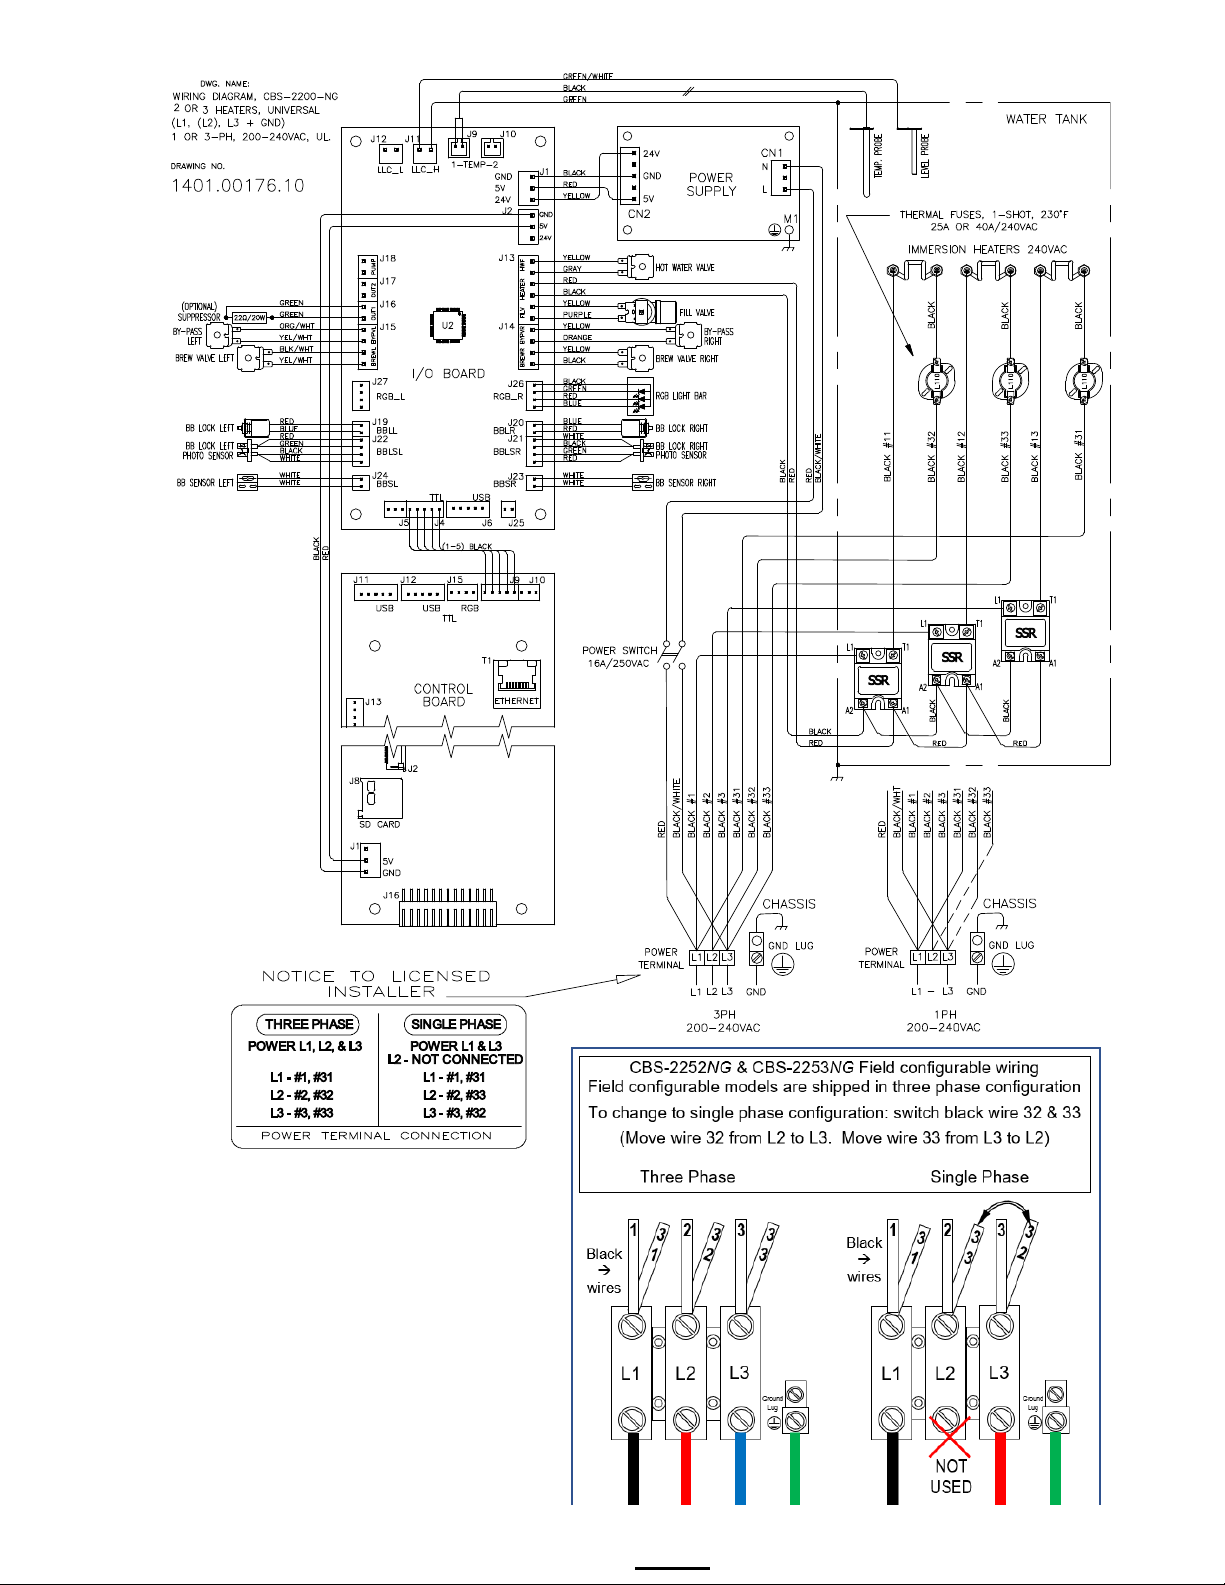
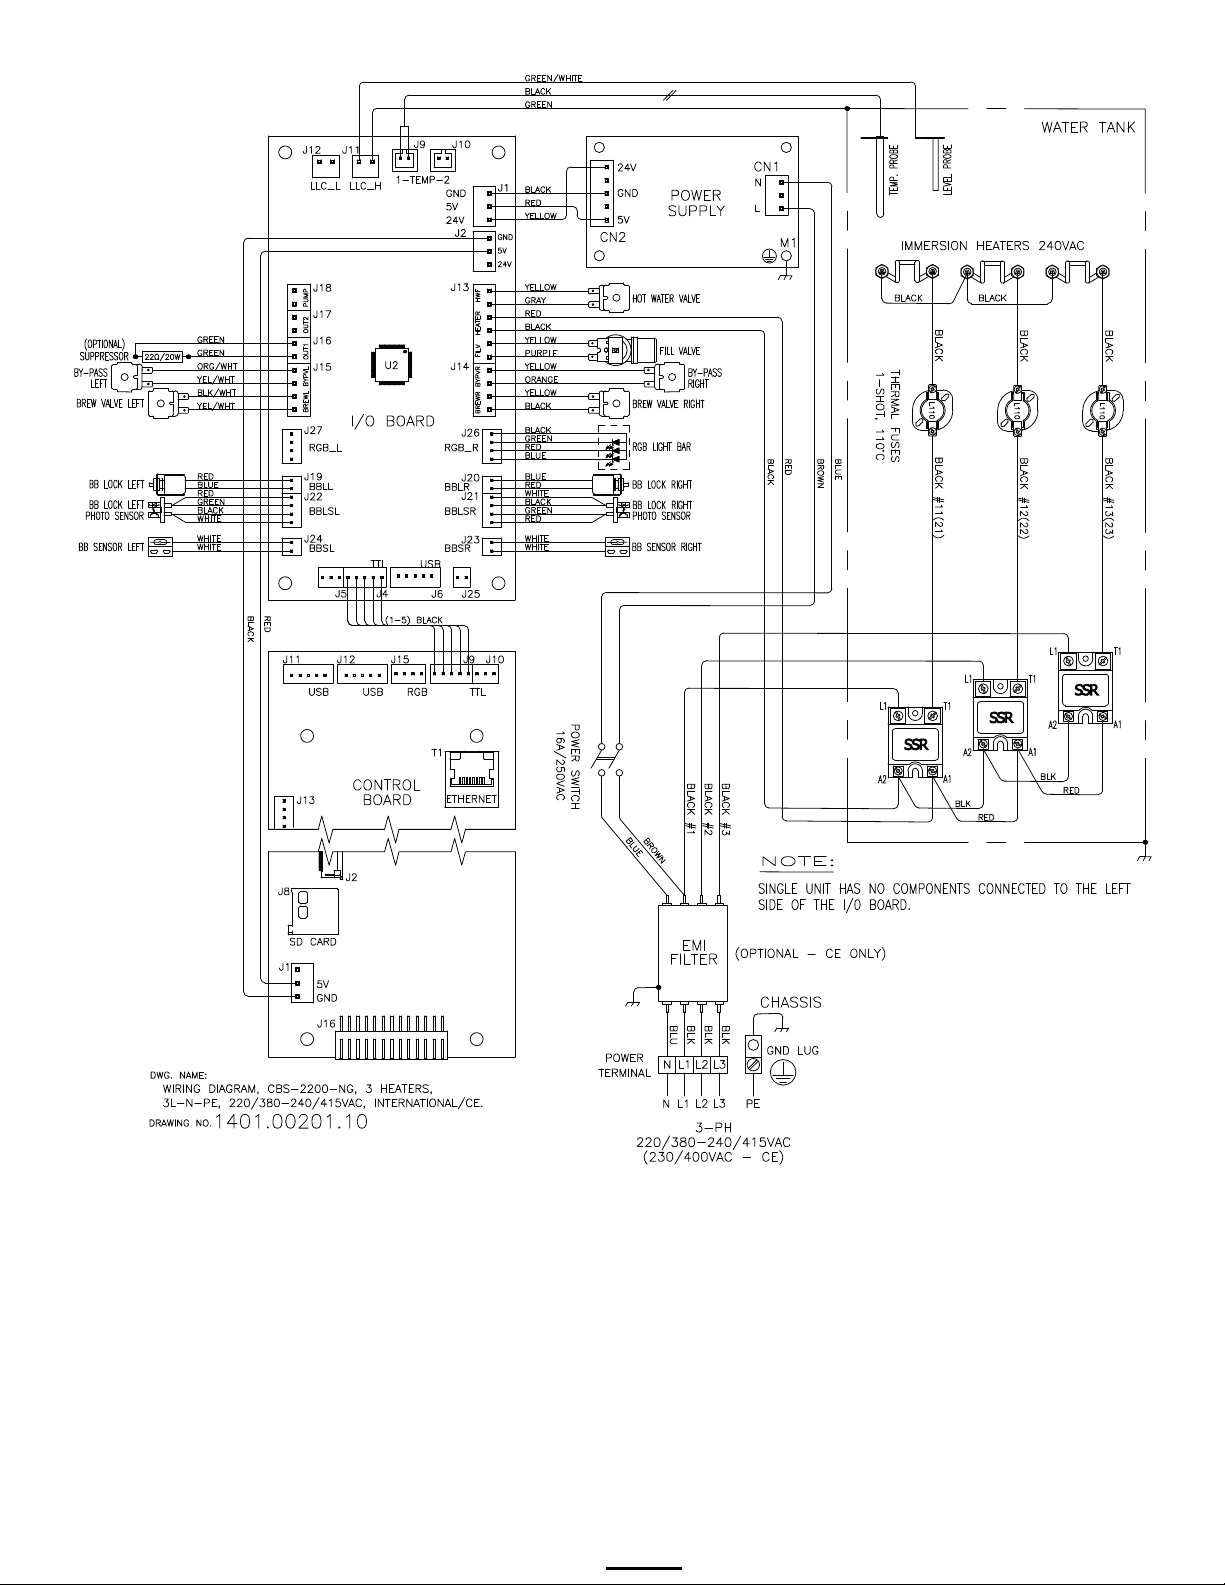
Wiring Diagrams ......................................................... 25
Page 2
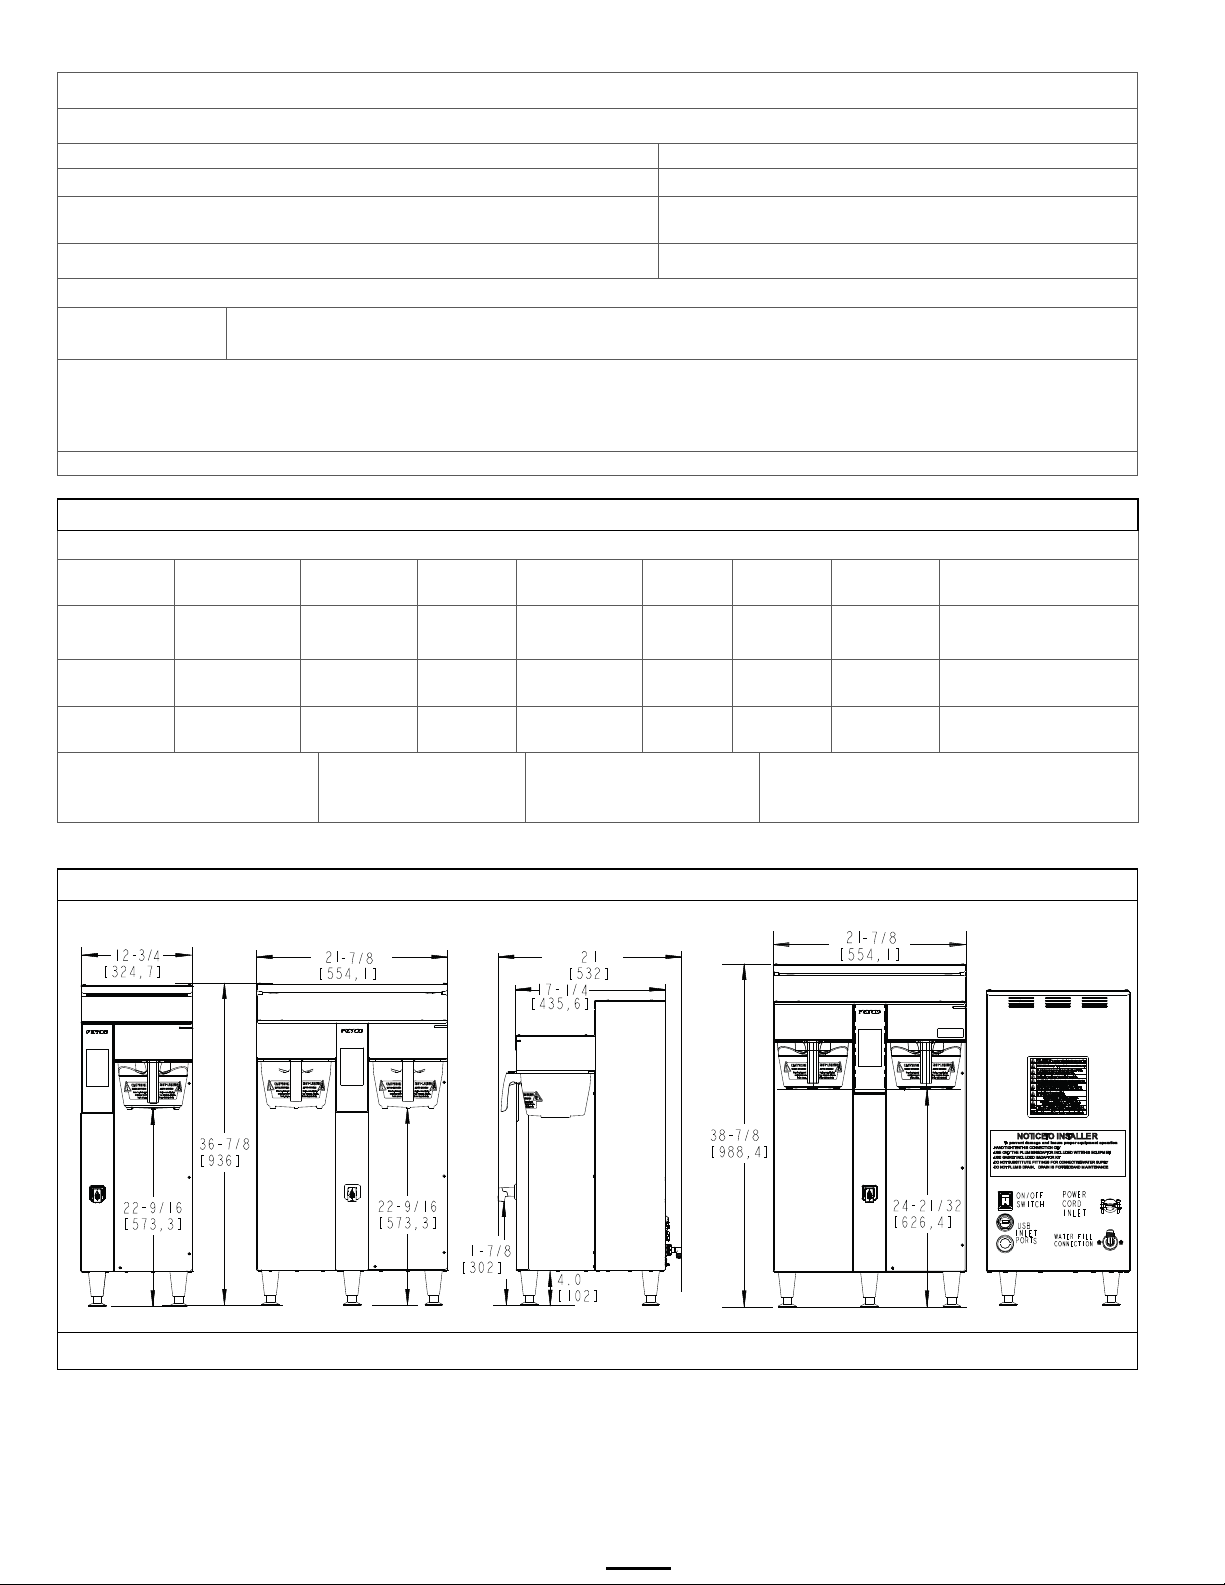
Weights and Capacities
Water tank
capacity
Empty
Weight
Filled
Weight
Shipping
Weight
Shipping
Dimensions
CBS-2252
1½ gal
36 7/8 in
940 mm
21 7/8 in
550 mm
22 1/2 in
570 mm
11.1 gallon
42.1 L
77 lbs
35.0 kg
174 lbs
78.9 kg
97 lbs
44 kg
38” x 24” x 27”
96.5 x 61 x 68.6 cm
CBS-2253
2 gal
39 in
99.1 mm
21 7/8 in
550 mm
22 1/2 in
570 mm
11.1 gallon
42.1 L
82 lbs
37.2 kg
180 lbs
81.6 kg
97 lbs
44 kg
40” x 24” x 27”
102 x 61 x 68.6 cm
CBS-2251 & CBS-2252
1½ gallons/ 6 liters
CBS-2253
2 gallons/ 8 liters
Filter Paper all models
Or use FETCO # F001
Rough-In Drawings
Specifications and Requirements
FETCO CBS-2250 Brewers have unique construction only available for these models.
Water Requirements:
Coffee Filter Size:
CBS-2250 20-75 psig, (138-517kPa) 1½ gpm/(5.7 lpm)
15” X 5 ½ ”– standard FETCO # F001
Optimal water hardness between 125-250 TDS (6-13 grain)
Important! Please use a water filter for all beverage equipment
Temperature, as set by factory:
200°F (93°C) inside water tank (at sea level)
Brew Volume: Full Batch CBS-2250: 1 ½ gallon/ 5.6 liters CBS-2252-2: 2 gallons 7.5 liters
(approximate)
CBS-2252 7-22 brews per hour
Total Brew Cycle: Factory setting: 6 minutes consisting of 4 min. brew time and 2.0 min. drip delay
Advanced user controls for pulse count, prewet percent and prewet delay, drip delay, programmable energy saving
See pages 4-5 for how to adjust controls for temperature, brew volume, units - and all other settings
Water inlet fitting: 3/8 inch male flare. Electrical: See electrical configuration chart Pg 3.
Brew Capacity
Individual menu brew-process parameters are user controllable for:
Basic user controls for brew volume, brew time, units of measure, recipe name
Model Height Width Depth
CBS-2251
1½ gal
Calibrated for
CBS-2251 7-10 brews per hour
36 7/8 in
940 mm
12 3/4 in
320 mm
Calibrated for
22 1/2 in
570 mm
Output is controlled by heater power and water temperature
6.5 gallon
24.4 L
15” X 5 ½ ”– standard
53 lbs
24 kg
107 lbs
63 lbs
48.3kg
Brewers ship with plastic brew baskets.
See page 25 for optional brew baskets
28.6 kg
38” x 18” x 24”
96.5 x 45.7 x 61 cm
CBS-2251 Front CBS-2252 Front CBS-2251, CBS-2252, CBS-2153 Side CBS-2252 Front Back (ALL)
Go to fetco.com for the latest versions of all information Page 2 P195 January 2023
Page 3
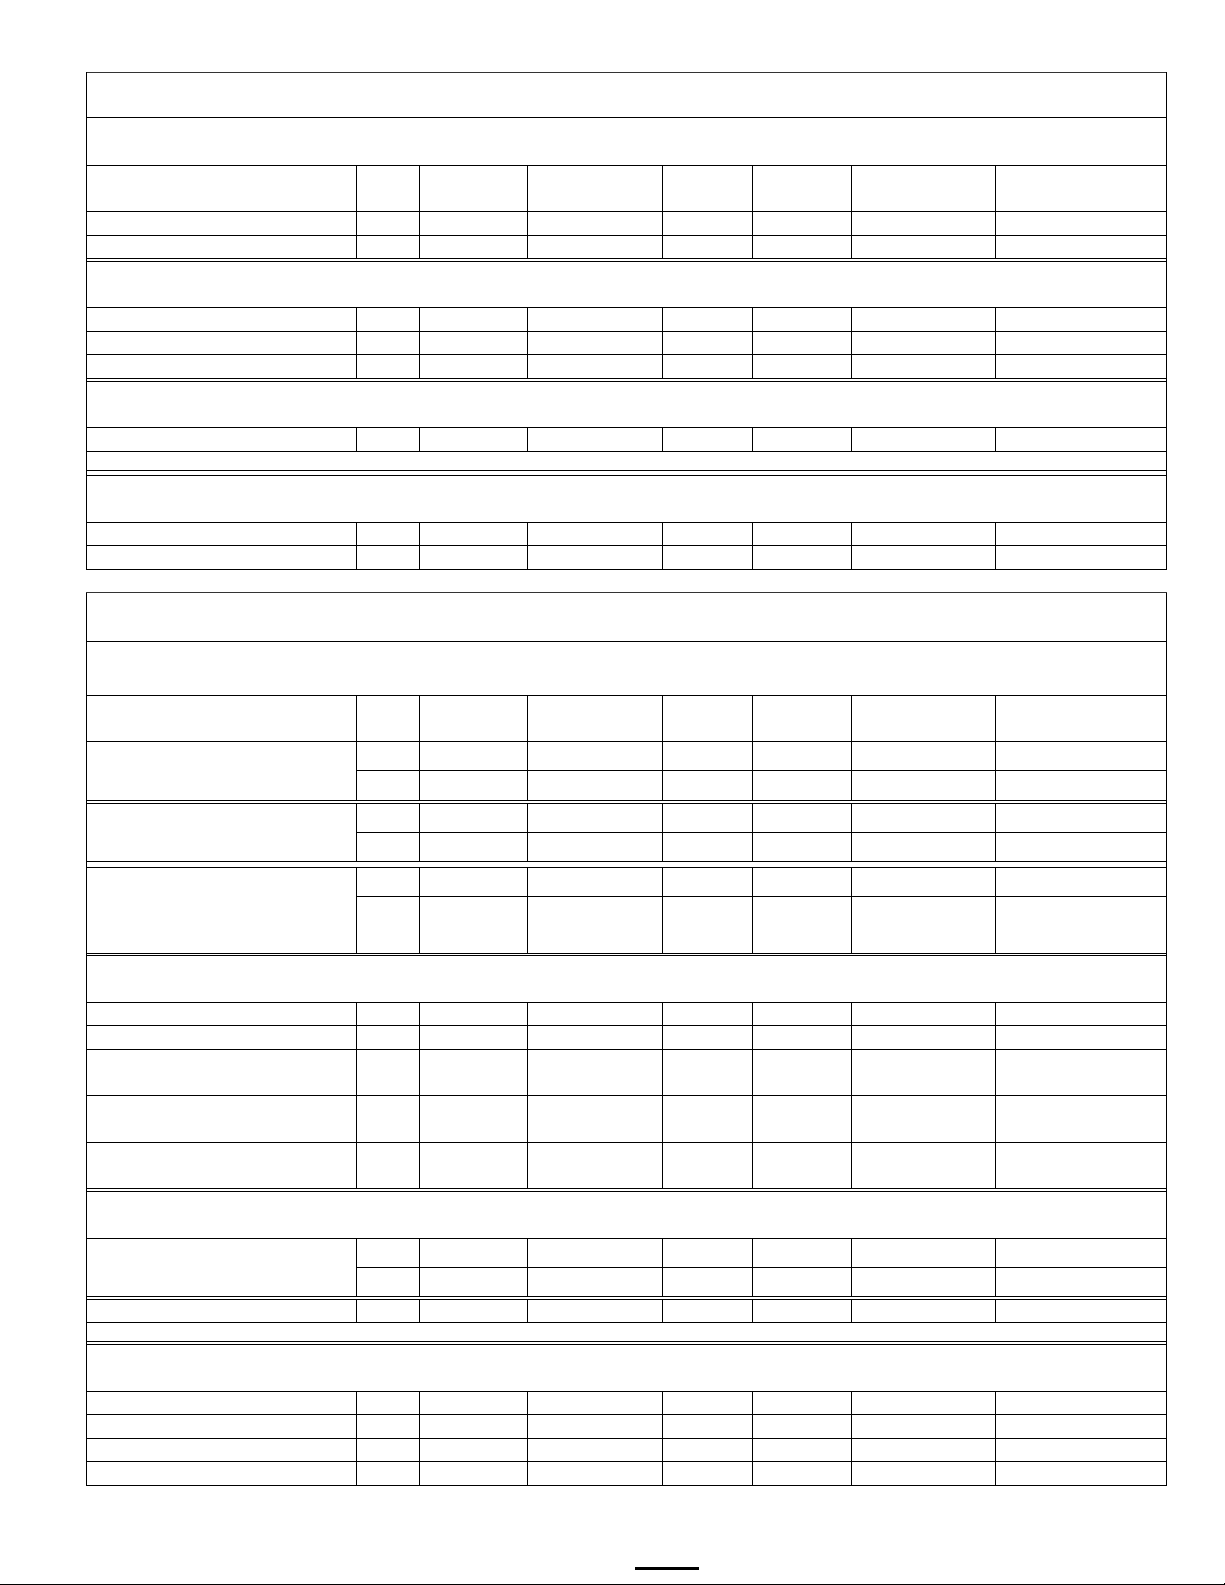
Electrical and Output Specifications for CBS-2251Next Generation Single 1½ Gallon-6 Liter Coffee Brewers
CBS-2251 Domestic USA and Canada models Single-Voltage. With cUL/UL & NSF-4 Certification
Electrical and Output Specifications All brewers use terminal block electrical connection for 50Hz or 60Hz Professional installation is required
Phase
Heater
Configuration
Maximum Amp
Draw
Brew-Volume
Per Hour
E2251US-1B230-PA110
1
200-240
2 X 3.0 kW
2+G
4.6-6.1
22.4-25.8
15.3 gal/58 liters
E2251US-1B230-MA110
1
200-240
2 X 3.0 kW
2+G
4.6-6.1
22.4-25.8
15.3 gal/58 liters
CBS-2251 Domestic and International models Single-Voltage. With cUL/UL & NSF-4 Certification
Electrical and Output Specifications All brewers use terminal block electrical connection for 50Hz or 60Hz Professional installation is required
E2251IN-1B140-PA110
1
200-240
1 X 4.0 kW
2+G
4.1
14.2-17.1
9.3 gal/35 liters
E2251IN-1B150-PA110
1
200-240
1 X 5.0 kW
2+G
5.1
17.7-21.3
12.7 gal/48 liters
E2251IN-1B230-PA110
1
200-240
2 X 3.0 kW
2+G
6.1
21.3-25.5
15.3 gal/58 liters
CBS-2251 NOM (Mexico In Spanish) Single-Voltage. With cUL/UL & NSF-4 Certification
Electrical and Output Specifications All brewers use terminal block electrical connection for 50Hz or 60Hz Professional installation is required
E2251NM-1B230-PA110
1
200
2 X 3.0 kW
2+G
4.2
21.2
14.5 gal/54 liters
NM in SKU suffix (above) denotes equipment with NOM certification, Spanish labeling for Mexico and Spanish language user guide
CBS-2251 Export CE CE listed models with NSF-4 Certification. Internal EMI Filter Not cUL or UL Listed
Electrical and Output Specifications All brewers use terminal block electrical connection for 50Hz or 60Hz Professional installation is required
E2251CE-2B230- PA110
2
2 X 2.3 kW
230/400
2L,N,PE
4.9
11.8
14.0 gal/53 liters
E2251CE-1B230-PA110
2
2 X 3.0 kW
230/400
2L,N,PE
5.6
12.4
15.3 gal/58 liters
Electrical and Output Specifications
Heater
Configuration
Maximum Amp
Draw
Brew-Volume
Per Hour
E2252US-UB230-MA110
Field
Sold as 3 phase
3
200-240
3 X 3.0 kW
3+G
6.9-9.1
19.5-22.5
22.5 gal/85 liters
E2252US-UB230-PA110
Field
Sold as 3 phase
1
200-240
2 X 3.0 kW
2+G
4.6-6.1
22.4-25.8
15.3 gal/58 liters
3
200-240
3 X 3.0 kW
3+G
6.9-9.1
19.5-22.5
22.5 gal/85 liters
1
200-240
2 X 5.0 kW
2+G
7.6-10.1
36.9-42.5
25.3 gal/97 liters
CBS-2252 Domestic and International models Single-Voltage. With cUL/UL & NSF-4 Certification
Electrical and Output Specifications All brewers use terminal block electrical connection for 50Hz or 60Hz Professional installation is required.
E2252IN-1B230-PA110
1
200-240
2 X 3.0 kW
2+G
4.6-6.1
22.4-25.8
15.3 gal/58 liters
E2252IN-1B250-PA110
1
200-240
2 X 5.0 kW
2+G
7.6-10.1
36.9-42.5
25.3 gal/97 liters
220/380 or
240/415
220/380 or
240/415
220/380 or
240/415
CBS-2252 NOM (Mexico In Spanish) Field Selectable-Voltage. With cUL/UL & NSF-4 Certification
Electrical and Output Specifications All brewers use terminal block electrical connection for 50Hz or 60Hz Professional installation is required
E2252NM-UB250-PA110
Sold as 3 phase
1
200-240
2 X 5.0 kW
2+G
7.6-10.1
36.9-42.5
25.3 gal/97 liters
E2252NM-1B250-PA110
1
200-240
2 X 5.0 kW
2+G
7.6-10.1
36.9-42.5
25.3 gal/97 liters
NM in SKU suffix (above) denotes equipment with NOM certification, Spanish labeling for Mexico and Spanish language user guide
CBS-2252 Export CE CE listed models with NSF-4 Certification. Internal EMI Filter Not cUL or UL Listed
Electrical and Output Specifications All brewers use terminal block electrical connection for 50Hz or 60Hz Professional installation is required
E2252CE-3B350-PM110
3
230/400
3 X 5.0 kW
3L,N,PE
14.1
20.4
38.3 gal/145 liters
E2252CE-3B350-PA110
3
230/400
3 X 5.0 kW
3L,N,PE
14.1
20.4
38.3 gal/145 liters
E2252CE-3B330-PA110
3
230/400
3 X 3.0 kW
3L,N,PE
8.6
12.4
22.5 gal/85 liters
SKU Number
Voltage
Wires KW
Electrical and Output Specifications for CBS-2252Next Generation Dual 1½ Gallon-6 Liter Coffee Brewers
CBS-2252 Domestic USA and Canada Field Selectable-Voltage. With cUL/UL & NSF-4 Certification
All brewers use terminal block electrical connection for 50Hz or 60Hz Professional installation is required.
SKU Number
Selectable 1 or 3 phase
Phase
Voltage
Wires KW
1 200-240 2 X 3.0 kW 2+G 4.6-6.1 22.4-25.8 15.3 gal/58 liters
Selectable 1 or 3 phase
E2252US-UB250-PA110
Field Selectable 1 or 3 phase
Sold as 3 phase
3 200-240 3 X 5.0 kW 3+G 11.4-15.1 32.0-36.9 38.3 gal/145 liters
E2252IN-3B340-PA110 3
E2252IN-3B330-PA110 3
E2252IN-3B350-PA110 3
Field Selectable 1 or 3 phase
3 200-240 3 X 5.0 kW 3+G 11.4-15.1 32.0-36.9 38.3 gal/145 liters
3 X 4.0 kW 4+G 12.2 15.7-17.1 29.5 gal/112 liters
3 X 3.0 kW 4+G 9.1 11.8-12.9 22.5 gal/85 liters
3 X 5.0 kW 4+G 15.1 19.5-21.4 38.3 gal/145 liters
Go to fetco.com for the latest versions of all information Page 3 P195 January 2023
Page 4
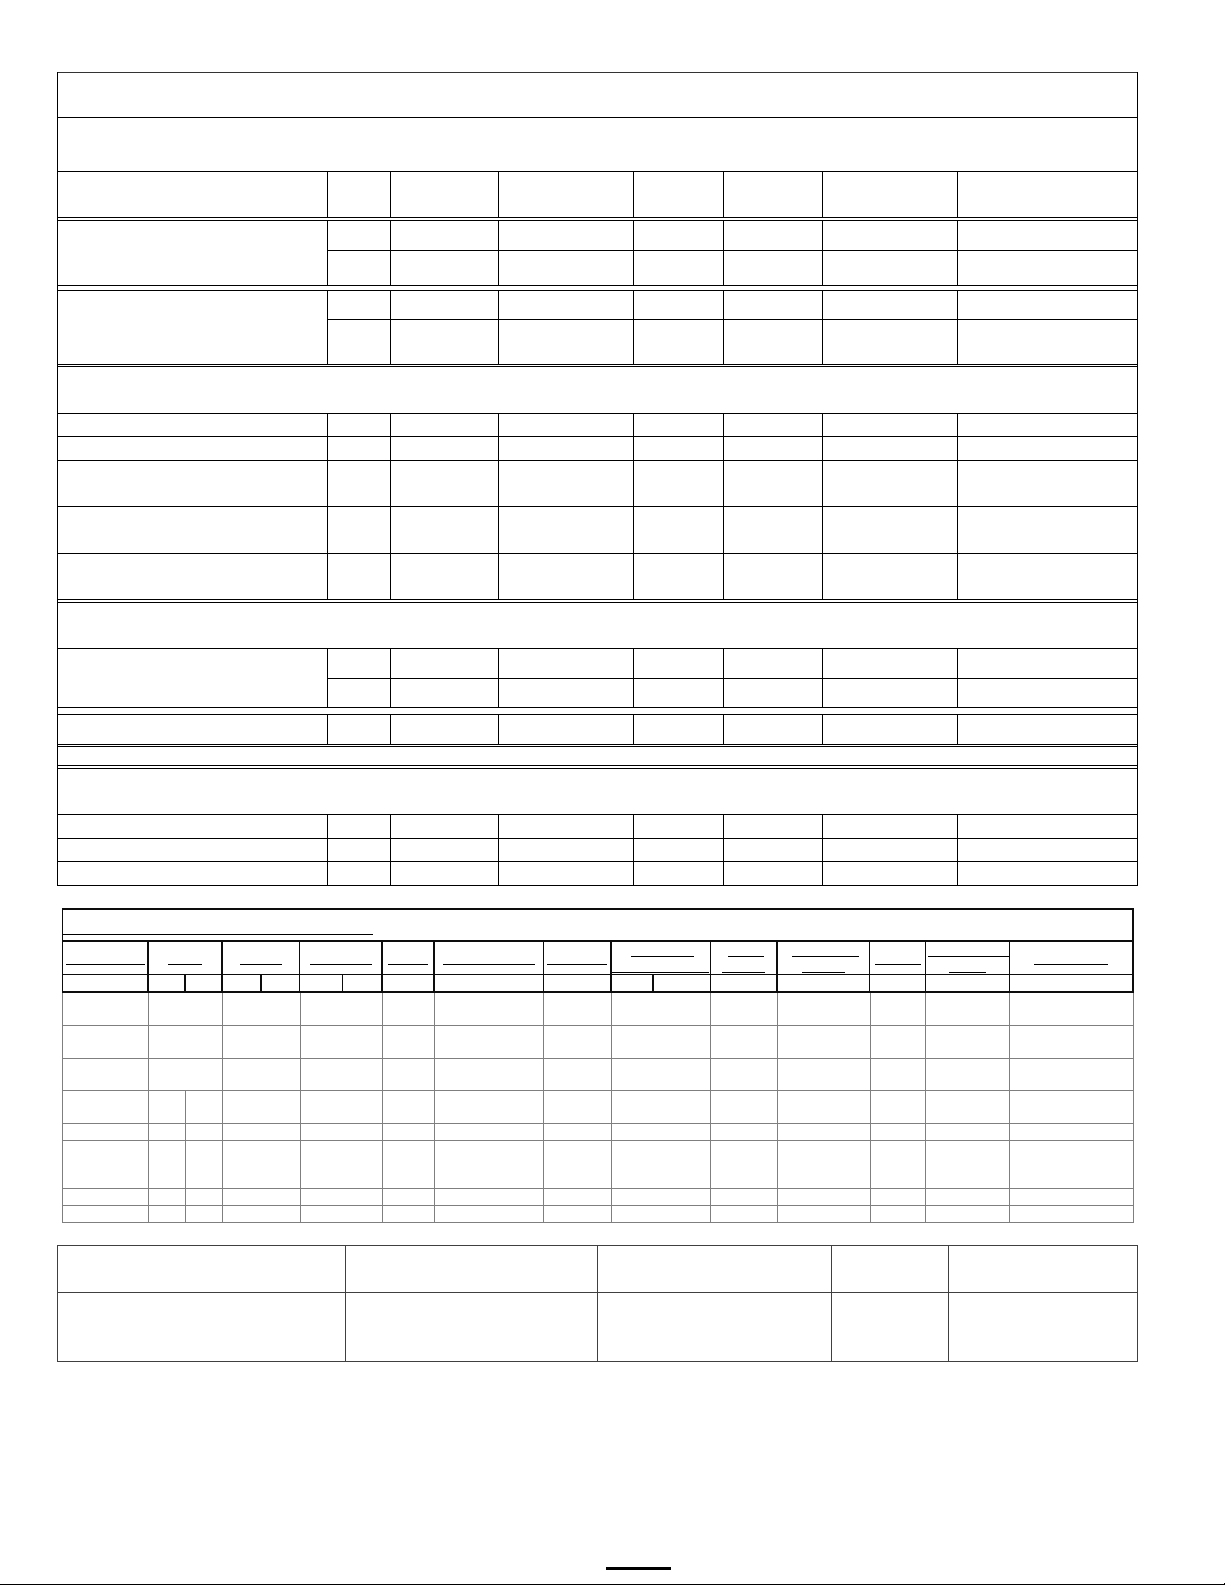
Electrical and Output Specifications for CBS-2253Next Generation Dual 2 Gallon-8 Liter Coffee Brewers
Heater
Configuration
Maximum
Amp Draw
Brew-Volume
Per Hour
E2253US-UB230-PA110
1
200-240
2 X 3.0 kW
2+G
4.6-6.1
22.4-25.8
15.3 gal/58 liters
1
200-240
2 X 5.0 kW
2+G
7.6-10.1
36.9-42.5
25.3 gal/97 liters
CBS-2252 Domestic and International models Single-Voltage. With cUL/UL & NSF-4 Certification
Electrical and Output Specifications All brewers use terminal block electrical connection for 50Hz or 60Hz Professional installation is required.
E2253IN-1B230-PA110
1
200-240
2 X 3.0 kW
2+G
4.6-6.1
22.4-25.8
15.3 gal/58 liters
E2253IN-1B250-PA110
1
200-240
2 X 5.0 kW
2+G
7.6-10.1
36.9-42.5
25.3 gal/97 liters
220/380 or
240/415
220/380 or
240/415
220/380 or
240/415
CBS-2253 NOM (Mexico In Spanish) Field Selectable-Voltage. With cUL/UL & NSF-4 Certification
Electrical and Output Specifications All brewers use terminal block electrical connection for 50Hz or 60Hz Professional installation is required
E2253NM-UB250-PA110
Sold as 3 phase
1
200-240
2 X 5.0 kW
2+G
7.6-10.1
36.9-42.5
25.3 gal/97 liters
3
200-240
3 X 5.0 kW
3+G
11.4-15.1
32.0-36.9
38.3 gal/145 liters
E2253NM-1B250-PA110
1
200-240
2 X 5.0 kW
2+G
7.0-10.0
35.2-42.2
26.6gal/100.7liters
NM in SKU suffix (above) denotes equipment with NOM certification, Spanish labeling for Mexico and Spanish language user guide
CBS-2253 Export CE CE listed models with NSF-4 Certification. Internal EMI Filter Not cUL or UL Listed
Electrical and Output Specifications All brewers use terminal block electrical connection for 50Hz or 60Hz Professional installation is required
E2253CE-3B350-PM110
3
230/400
3 X 5.0 kW
3L,N,PE
14.1
20.4
38.3 gal/145 liters
E2253CE-3B350-PA110
3
230/400
3 X 5.0 kW
3L,N,PE
14.1
20.4
38.3 gal/145 liters
E2253CE-3B330-PA110
3
230/400
3 X 3.0 kW
3L,N,PE
8.6
12.4
22.5 gal/85 liters
Individual
Heater Wattage
Brew
Basket
Hot Water
Faucet
Brew Basket
Locks
E 2 2 5 3 U S U B
2 5 0 P M
01 1 0
US =United
States
51=
single side
IN =
International
22=Next
Gen Series
52=
dual side
U = 1 or
3
4.0
4=NEMA 6-30P
53=
2 gallon
6=UK1-13P
7= AUSTRALIAN
BREW BASKET TYPE
(P, M OR C)
HOT WATER FAUCET
(M, A OR N)
BYPASS
(1 OR 0)
Brew Basket Lock
(1 OR 0)
* is factory standard feature
after all SKU numbers
*P=Plastic
C= Gourmet Metal + clips
*M=Standard manual
N=No hot water faucet
*1=With
*1=With
CBS-2253 Domestic USA and Canada Field Selectable-Voltage. With cUL/UL & NSF-4 Certification
Electrical and Output Specifications All brewers use terminal block electrical connection for 50Hz or 60Hz Professional installation is required.
SKU Number
Phase
Field Selectable 1 or 3 phase
Sold as 3 phase
E2253US-UB250-PA110
Field Selectable 1 or 3 phase
Sold as 3 phase
E2253IN-3B340-PA110 3
E2253IN-3B330-PA110 3
E2253IN-3B350-PA110 3
Field Selectable 1 or 3 phase
Voltage
Wires KW
3 200-240 3 X 3.0 kW 3+G 6.9-9.1 19.5-22.5 22.5 gal/85 liters
3 200-240 3 X 5.0 kW 3+G 11.4-15.1 32.0-36.9 38.3 gal/145 liters
3 X 4.0 kW 4+G 12.2 15.7-17.1 29.5 gal/112 liters
3 X 3.0 kW 4+G 9.1 11.8-12.9 22.5 gal/85 liters
3 X 5.0 kW 4+G 15.1 19.5-21.4 38.3 gal/145 liters
EXAMPLE: SKU E2253US-UB230-PM110 SKU NUMBER IDENTIFICATION KEY
Product Line Level Family Region ID Phase Voltage Range # Heaters
E=extractor
dual side
1 A = 100-120 1 1.5 P=plastic M=manual 1=Yes 1=Yes 0=Terminal Block
2 B = 200-240 2 1.7 M=metal A=automatic 0=no 0=no 1= NEMA 5-15P
CE = CE 3 C = 380-415 3 2.3
NM = NOM
D = 440-480
X=120 or 240
Dual Voltage
3.0
5.0
Customer options
Add all the following numbers
M=Gourmet Metal
A=Automatic electronic
N=None
Bypass
0=None
Power Cord
2=NEMA 5-20P
3=NEMA 6-15P
5= CEE 7/7
Schuko
0=None
Go to fetco.com for the latest versions of all information Page 4 P195 January 2023
Page 5
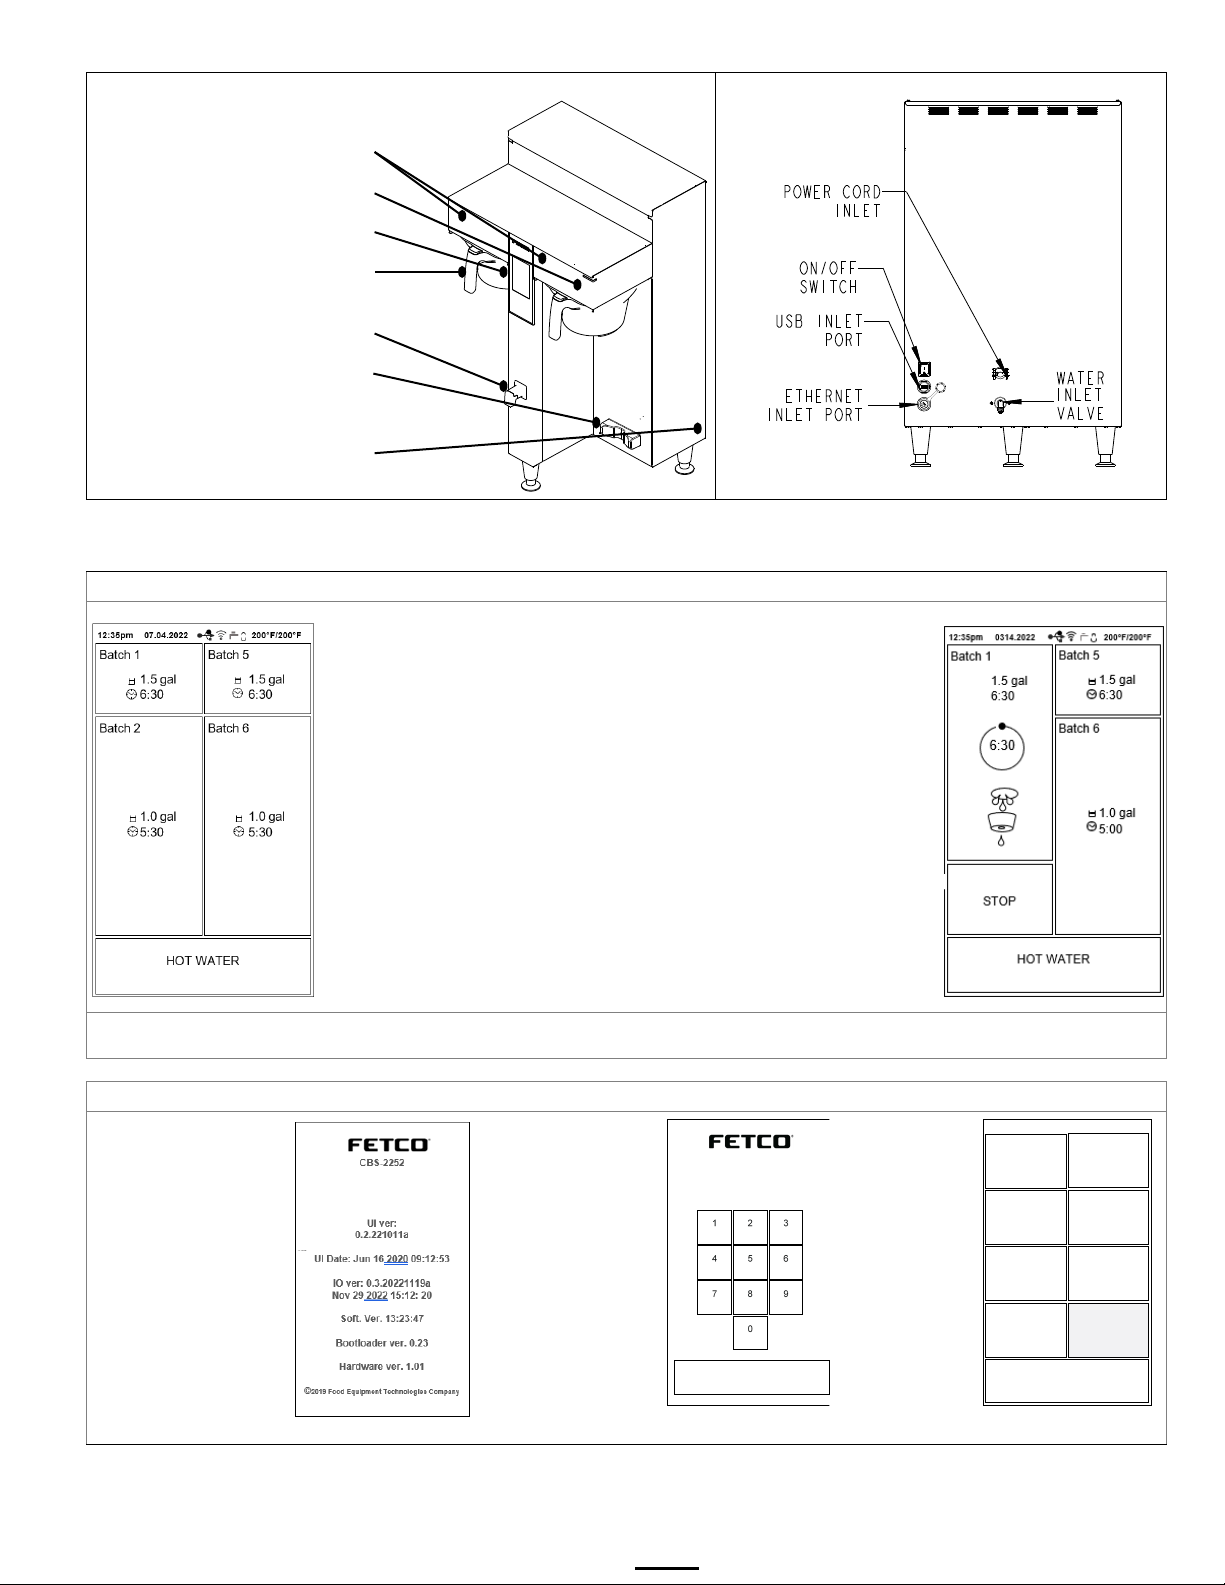
Layout of the brewer
Operation and service
Operation
.
Service
Brew basket sensor (internal)
LED Status indicator bar
Touch-screen
(for brewer operation)
Brew basket
Hot Water Service Faucet
(not on all models)
Starting The Brew
1. Turn the power switch “ON”. (Twin Shown)
Twin Brewer ready to brew.
Batch one-top left brew position selected
Brewing in process
Batch one selected
Programming
To enter programming
Turn the power switch
.
as soon as
)
Touch the “FETCO”
)
Bootup screen
Password Screen
Programming access
Ente
r Pass word
_ _ _ _
CANCEL
MAIN
Brew
Recipes
Hot Water
Portions
Settings
Calibration
Outputs
Inputs
Counters
Service
EXIT
Air pot or Dispenser Locator
(1 gallon/3 liter models)
Main power switch
Fast Start Brewing
Layout for installing brewer (back side)
2. Prepare a brew basket with the correct size filter and appropriate
amount of coffee. (6-12 ounces or 170-340 grams for 1½ gal/6 liters)
3. Slide the brew basket completely into the rails.
4. Place a clean, empty, preheated dispenser under the brew basket.
5. Select a batch & touch the corresponding BREW icon
(Batch #1 selected in illustration), then press “START”
6. -STOP icon will illuminate,
-Countdown time will display, with proportional graphic circle icon
-LED indicator will pulse.
-All other BREW icons for that brew head will be hidden.
….-Opposite side BREW icons on dual brewer remain active
7. When the brew cycle is finished,
-Spray icon will extinguish and the BREW circular icon will remain.
This indicates that coffee may still be dripping from the brew basket
For safety- do not remove brew basket until drip-out is complete.
1.
2.
“OFF”, then “ON”:
Bootup will begin
Touch the center of
the screen
the bootup screen
disappears
(shown on right
logo when the
“Enter Password”
screen appears
(shown right
3.
Make changes
and adjustments
from the
Programming
Menu screen
(Shown right)
See progamming
menu layout next
page
Go to fetco.com for the latest versions of all information Page 5 P195 January 2023
Page 6
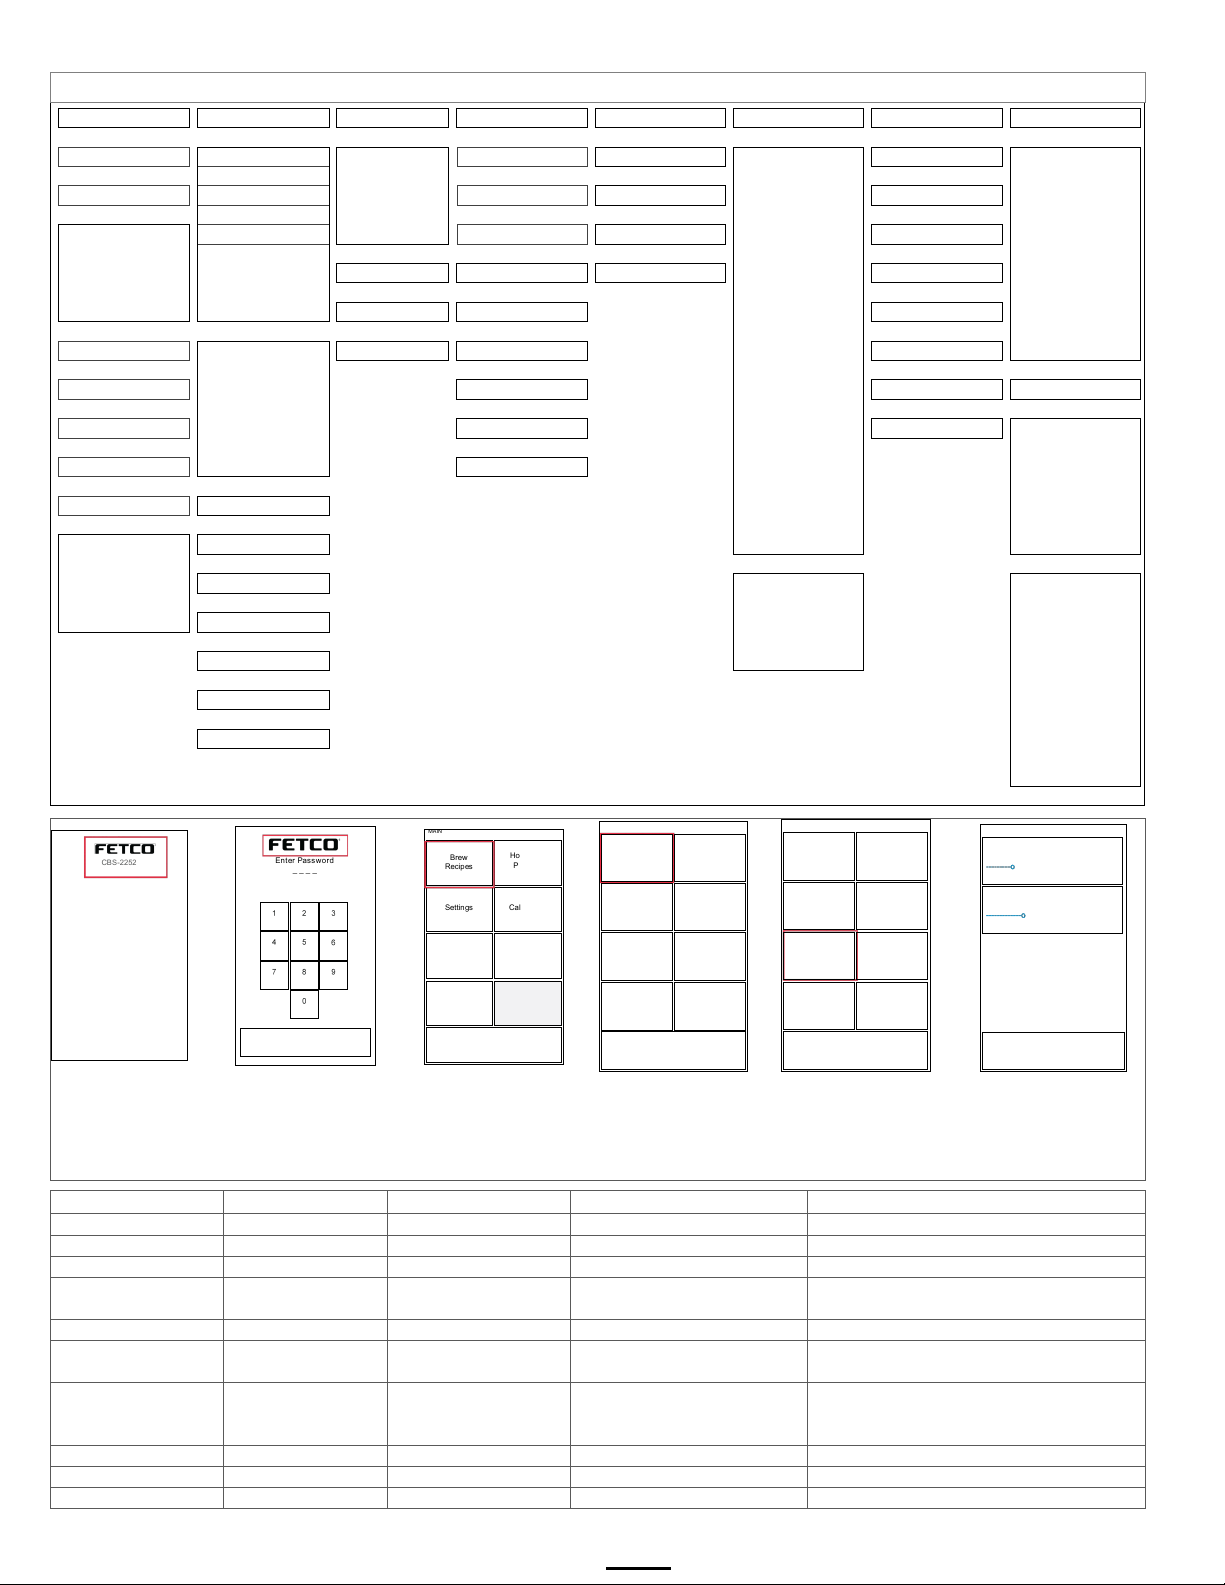
CBS-2200NG Next Generation Programming Menu Layout
`
Brew Recipes
Settings
Inputs Service
Hot Water Portions
Calibrations
Outputs
Counters
| | | | | | | |
Batch On/Off & Name
Temperature
Brew Basket
Select Model
Continuous
Flow Rates
Brew Valve(s)
Counters
|
|||
||| | | ||| | |||
BREW TIME
(Tank Temperature)
(Sensor)
Enable Options
Volume 1.
(Water Valves)
Fill Valve
Lifetime Counters
|
|||
||| | | ||| |
|||
Prewet
(Brew at Temp.)
(Lock Sensor)
Overrides
Volume 2
((Brew left))
Heater SSR
Service Counters
|||
|||
| | | ||| | |||
(Prewet Percent)
(Show tank temp?)
Liquid Level
Backup or Restore
Volume 3
((Brew right))
Light Bar
Hot Water Counters
|||
|||
| | ||| | |||
(Prewet Delay)
(Show setpoint temp?)
Temp Sensor
HW/SW/BL Version
((Bypass left))
Bypass Valve(s)
Brew Counters
| | | | ||| |
|||
Bypass Percent
Units Of Measure
Peripherals
Restore Defaults
((Bypass right))
Faucet Valve
Data Counters
| ||| | ||| | |
Drip Delay
(Temperature)
Error Codes
(Faucet Valve)
Brew Basket Lock
Water Filter
| ||| | ||| | |
Volume
(Volume)
Reset Passcodes
(Fill Compensation)
Extra Outputs
Statistics
| ||| | |||
|||
Number of Pulses
(Faucet)
Languages ((Off))
Brew Statistics
| | ||| |||
Bypass
ECO Mode
((1.5x))
Energy Statistics
| | ||| |||
Copy Batch
Water Filter (life)
((2.0x))
Hot Water Statistics
|| | |
|
Copy Batch: From
Demo Mode
LLC Sensitivity
Counters (resettable)
|| | | |||
Copy Batch: To
Hot Water (faucet)
((Normal))
Lifetime Counters
| | |||
Status Light
((High))
Service Counters
|
For electronic faucet
Activates for service
|||
Screen Saver
Hot Water Counters
| |||
Date and Time
Brew Counters
|||
Data Counters
TO ACCESS PROGRAMMI NG
Touch the FETCO logo when
Touch Brew Recipes for
Touch Batch 1 to set the brew
Touch Prewet icon to adjust
Touch and slide to desired
Brew Recipes
Program Items
Factory set Default
Programming Range
Notes
Batch Name
Batch On/Off
All “ON”
On/Off
Only top batch(s) are always enabled
Batch Name
Customize Name
Batch (1-4 L) (5-8 R)
Complete keypad
Scroll and tap three virtual keypads
Brew Time
Time of brew
4:00 minutes
2:00-12:00 mins/secs
Add to prewetting and drip delay times
Initial wetting to stabilize very fresh
coffee
Prewet
Prewet delay time
1:00 sec.
0:10 sec to 5:00 min
Pause after coffee bed is prewetted
Time that brew basket remains locked
during drip-out. This is a safety feature.
1.5 gallons/5.6 liters
2.0 gallons/8liters
Number of Pulses
Start/stop in brew
8
4-20
Algorithm evenly divides brew time cycle
Bypass Percentage
Diverts brew water
0
0-40% of brew volume
Affects flavor, strength and mouth-feel
Copy & Paste Menu
Current recipe
Paste into all other recipes
Will paste selected into the other
CBS-2252
UI ver: 0.0.02t2020-0616a
UI Date: J un 16 20
20 09:12:53
IO ver: 0.0.0.2t 2020-0610
IO Date: Jun e 10
2020 10:26:2
7
Soft. Ver. 09: 12:53
Bootl oader ver . 0.23
Hardwar e ver. 1.01
©
2019 Food Equi pment Tec hnolo gies Comp any
Enter Pas sword
_ _ _ _
CANCEL
MAIN
Brew
Recipes
Hot Water
Portions
Settings
Calib
ration
Outputs
Inputs
Counters
Service
EXIT
Main>Recip ies
Batch L1
BATCH 1
1.5 gal/6:00
Batch R1
BATCH 5
1.5 gal/6
:00
Batch L2
BATCH 2
1.5 gal/6:00
Batch R2
BATCH
5
1.5 gal/6
:00
Batch R3
BATCH 6
1.5 gal/6:00
Batch L3
BATCH 3
1.5 gal/6:00
Batch R4
BATCH
8
1.5 gal/6:00
Batch L4
BATCH 4
1.5 gal/6:00
BACK
Main>Recip es>L1
Batch Name
Batch 1
ON
Volu
me
1.50 gal
Brew Time
4:00 min
Number of Pulses
4
Bypass0%Prewet
0%
1:00 min
Copy Batch
And
Paste To
Drip Delay
1:30 min
BACK
Main>Recip es>L1>Prewet
P
rewet Percentag e 0
0 % 25
--------- ------------ ---------- ---
Prewet Delay 1:00
0:10 mm;ss 5:00
--------- ------------ ---------
BACK
(permanent)
Turn brewer OFF then ON
When the bootup screen
appears touch the FETCO
logo
the password screen appears
setting the brewer parameters
for each menu item
Batch 1 will be selected
parameters.
Prewet will be selected
Prewet Prewet percentage 0 0-25% brew volume
Drip Delay Pause after brew 2:00 min:sec. 00.30 to 6:00
Brew Volume Total volume
Go to fetco.com for the latest versions of all information Page 6 P195 January 2023
1.0 gallon/3.8 liter
0.5-2.0 gal./0.95-8.0 liters
prewet
The chart below describes the
icons shown on this screen
setting. Touch BACK when
complete and make further
adjustments or press BACK
and SAVE & EXIT.
Factory set for 1½ gallon dispenser
and for 1 gallon second batch
Page 7
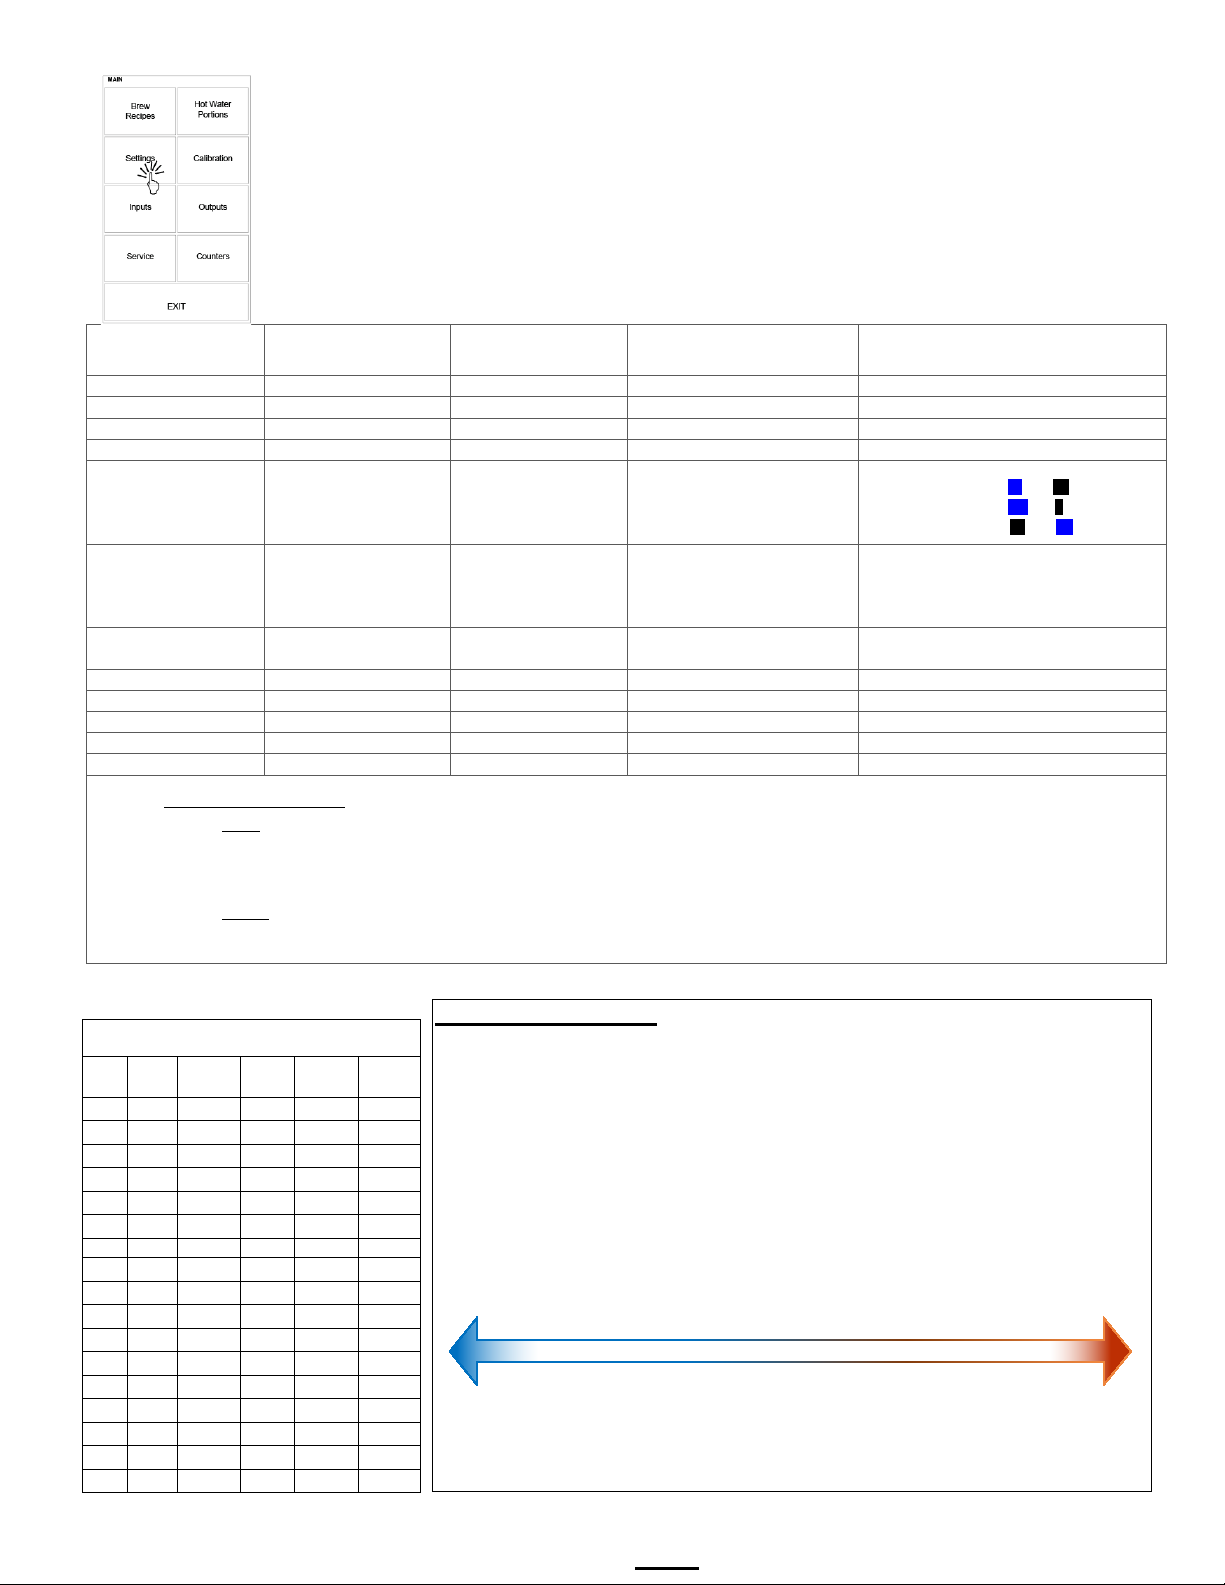
Settings
Factory set
Default
Temperature
Tank Temperature
200°F/92°C
170-208°F/70-96°C
Hot water tank, brewing water temp.
Temperature
Brew at Temperature*
ON
OFF/ON
See note below
Temperature
Show Tank Temp.
ON
OFF/ON
Shows 1st at top right screen
Temperature
Show Setpoint Temp.
ON
OFF/ON
Shows 2nd at top right screen
F° or C° degree
Ounce or Milliliters
ON/OFF
temperature
Water filer installed
Rated filtering volume
NO
2625 gallons
NO or YES
250 gallons to 3950 gallons
Demo Mode
Disables controls
OFF
OFF/ON
For training and user familiarization
Hot Water
Digital H. Wtr Faucet
ON
ON/OFF/Automatic
Automatic activates portion control
Status Light
READY LED color
Green
White/Blue/Green
Color when brewer is ready to brew
Screen Saver
Covers recipe screen
OFF
ON/OFF & Timeout setting
“OFF” leaves recipe screen
Date and Time
Set unit date and time
12 hour format
12/24 hour format & date
Store in real time clock
Altitude Correction Chart
Chart to correct for altitude for boiling point
in tank water temperature.
0 0 205
212.0
96
100.0
500
152
205
211.0
96
99.5
1000
305
200
210.1
93
98.9
2000
610
200
208.1
93
97.8
2500
762
200
207.2
93
97.3
3000
914
200
206.2
93
96.8
3500
1067
197
205.3
92
96.3
4000
1219
195
204.3
91
95.7
4500
1372
194
203.4
90
95.2
5000
1524
194
202.4
90
94.7
5500
1676
193
201.5
89
94.2
6000
1829
192
200.6
89
93.6
6500
1981
191
199.6
88
93.1
7000
2134
190
198.7
87
92.6
7500
2286
188
197.8
86
92.1
8000
2438
187
196.9
86
91.6
8500
2591
185
196.0
85
91.1
Brew At Temperature
Faster Brew Cycle/reduced extraction lower temperature Correct flavor/proper extraction temperature
Faster brew cycle with reduced temperature Correct brew water temperature
Compromised Extraction Proper Extraction
170°F/77°C 180°F/82°C 190°F/88°C 200°F/93°C
Program Items
Programming Range Notes
Units of Measure
ECO Mode
Temperature
Volume
Hot water Faucet
Eco idle time (to start)
Eco Tank
units
Gallon or Liters units
OFF
1 hour
169°F
NO or YES
Turn on or off
1-6 hours
158°F to 176°F
Water Filter
NOTES: Brew at Temperature*
Brew At Temp: “ON”
(Default: factory programmed into brewer)
“BREW START” will not be accessible until tank temperature is at set point.
“BREW START” becomes accessible when hot water tank is at the selected temperature.
Menu screen will be dimmed if tank temperature is low
Brew At Temp: “OFF” USER SELECTABLE (Not recommended)
Allows brewing at any temperature above 170°F/77°C.
May not apply for two sided brewer if one side is in brew cycle
Ideal brew water temperature is 200°F/93°C. After brewing, brewers can take time to
[ft] [m]
Suggested
Setting[°F]
Boiling
point[°F]
Suggested
Setting[°C]
Boiling
point [°C]
recover the hot water tank temperature and signal READY to brew. This is called
“recovery time”. The lag in recovery time is caused by rapid brewing cycles in a rush, low
power heating elements, low incoming electrical voltage, water supply temperature, even
the barometric pressure.
Operators will adjust the “Brew At” temperature to allow the brewing at lower
temperatures. This will allow a slightly faster recovery time and give a small increase in
brew cycles per hour.
Reduced brew temperature will always compromise the quality of the finished brew and
lower the temperature of the customers coffee.
Main>Settings>UNITS
Temperature °F °C °
Volume gal L
Faucet oz ml
Screen will display Eco Mode when
activated-will take time to reheat to
set brew water temperature
Go to fetco.com for the latest versions of all information Page 7 P195 January 2023
Page 8
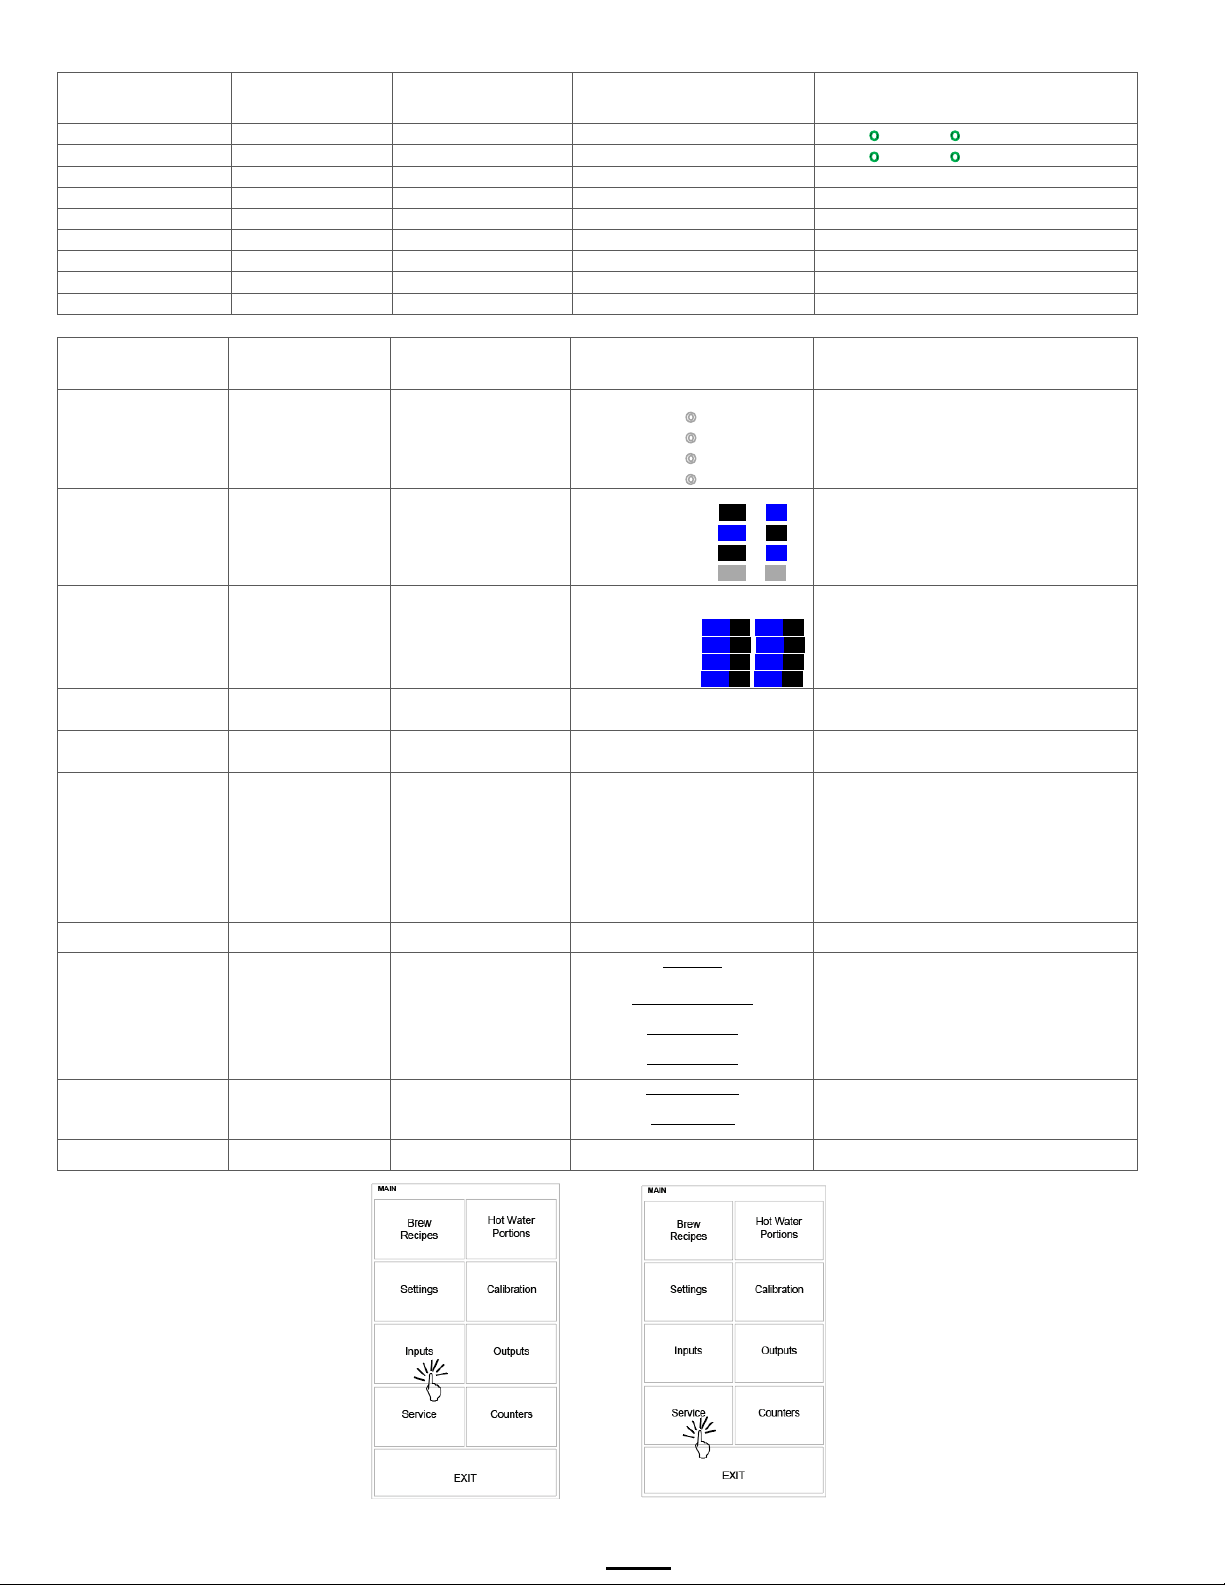
Inputs
Factory set
Default
Brew Basket
Sensor
Displays activity
Brew basket in place?
LEFT RIGHT (green=on;red=off)
Brew Basket
Lock Sensor
Displays activity
Brew basket locked?
LEFT RIGHT (green=on;red=off)
Liquid Level
LOW
Not used
Not used
Not used
Liquid Level
HIGH
Hot water tank fill
Filled/Not Filled & signal
Green=Filled/Red=Not Filled
Temp. Sensors
Sensor 1
Hot water tank temp.
Actual temperature & signal
Temp. Sensors
Sensor 2
Not used
Not used
Not used
Peripherals
USB1
Digital input/output
Displays activity
(green=active;red=off)
Peripherals
USB2
Not used
Not used
Not used
Peripherals
RS-232
Digital input/output
Displays activity
(green=active;red=off)
Factory set
Default
MODEL
1
) 2
226x
Options
Override Safety Features
HW Press and hold OFFON OFFON
Backup current
configuration
Will save all
programmed settings
Insert USB thumb drive and touch
“BACKUP” & follow instructions
Installs saved
settings
USB thumb drive
with one file-
One file, must be titled:
backup.txt
Insert USB thumb drive and touch
“RESTORE” & follow instructions
Software
IO Board rev
Error Log
Follow prompts to delete
Operator Code
Follow prompts to change
Program Items
Programming Range Notes
Service
Select Model Set brewer model CBS-2242
Enable Options
Overrides
Backup or Restore
Program Items
Brew Basket Sensor
Brew Basket Lock
Brew Basket Lock Sensor
HW Press and hold
Programming Range Notes
(single side)
223x
224x
225x
Electric HW faucet OFF ON
Bypass Valve(s) OFF ON
Brew Basket Lock(s) OFF ON
Expansion Board OFF ON
Left Right
Brew Basket Sensor OFFON OFFON
Brew Basket Lock OFFON OFFON
Br. Basket Lock SensorOFFON OFFON
Requires USB thumb drive
(dual side
To select: touch icon for brewer, touch
“BACK” and got to EXIT & SAVE
Overriding deactivates onboard safety
systems. This is not recommended for
normal operation. A warning/reminder
will display in the start screen
Backup or Restore
UI 0.2.221011a
IO 0.3.20221119a
Bootloader UI
HW/SW/BL Version
Bootloader IO
Compilation Time
UI Oct 11 2022 13:28:09
IO Nov 29 2022 15:12: 20
Hardware
Main Board rev
Restore Defaults Return factory sets Will overwrite all settings Touch and hold icon 5 seconds
Error Codes
Reset Passcodes Overrides default
Languages
Go to fetco.com for the latest versions of all information Page 8 P195 January 2023
Reserved for future use
Error Code
Code & definition Date/time stamp
Export Log To USB
Follow prompts to export
Error code frequency
Follow prompts to change
Error Statistics
Error Statistics
Service Code
Page 9
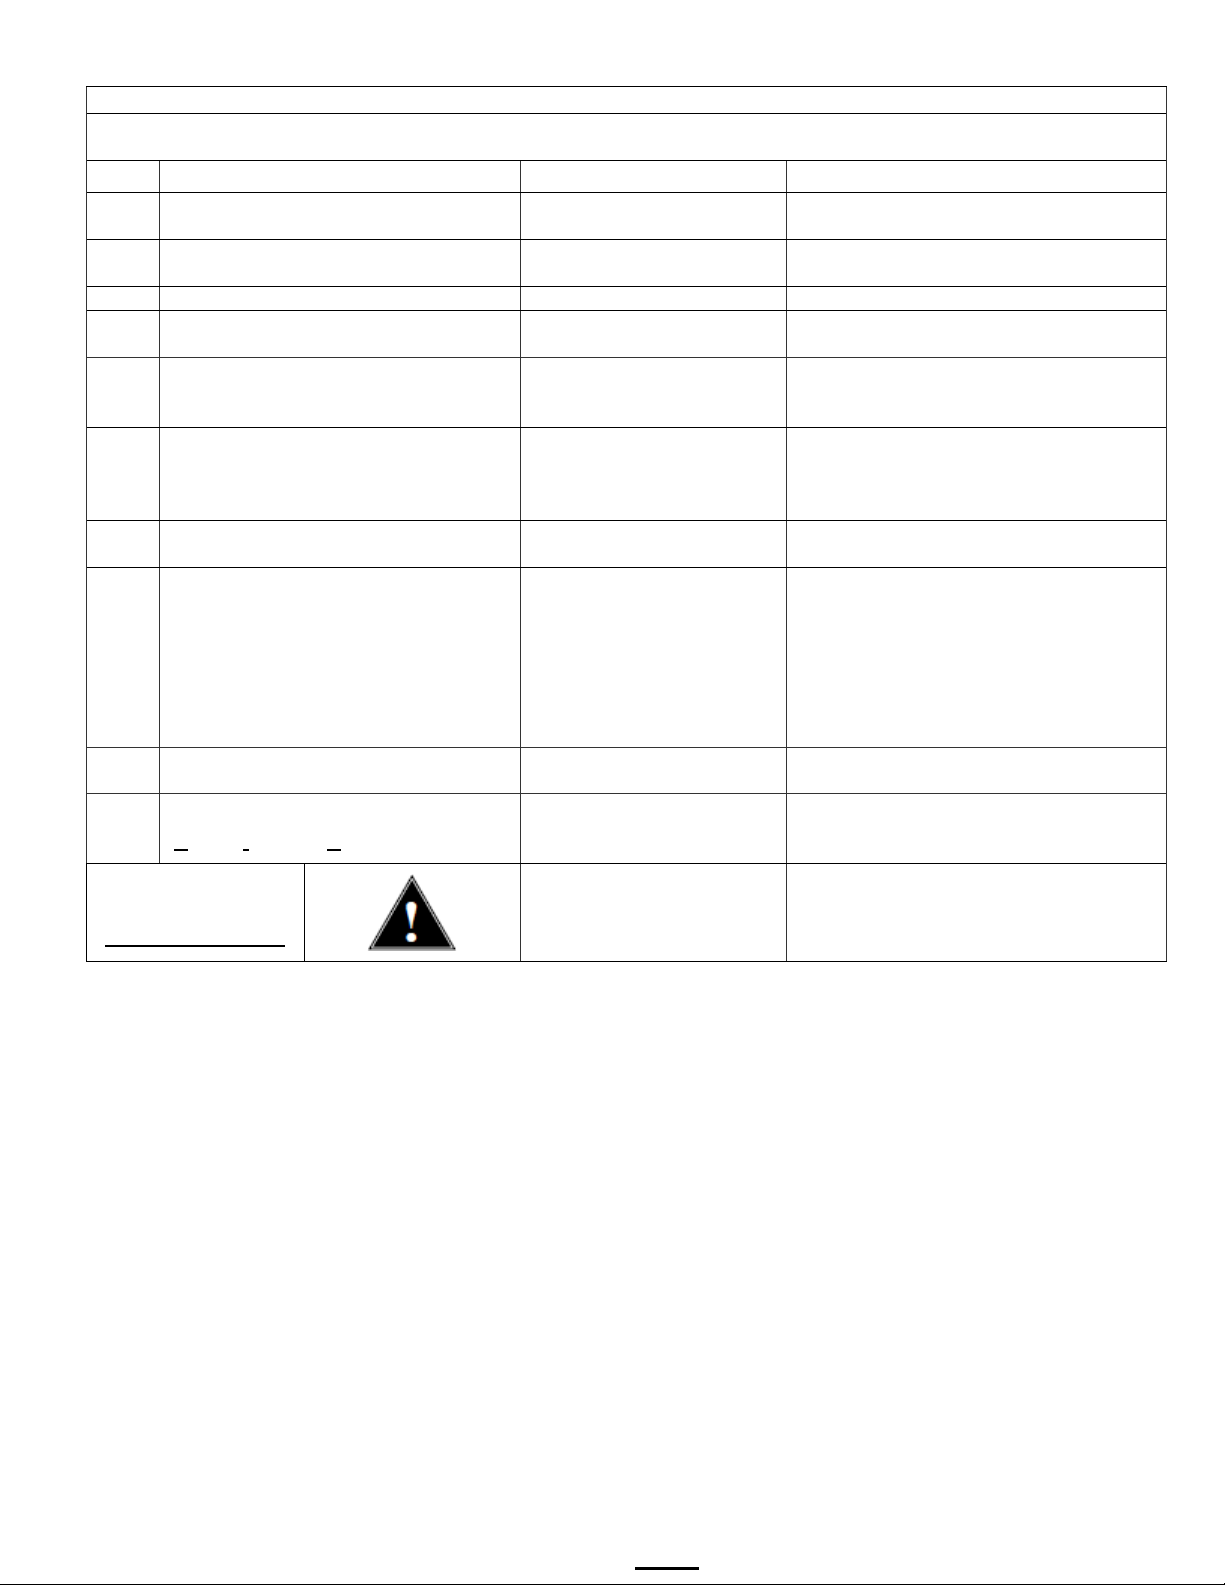
Error Codes
(From SERVICE – Page7)
DO NOT CLEAR ERROR CODES UNTIL ERROR IS IDENTIFIED AND CORRECTED
Contact factory or specialized personnel for error codes
Code Description Possible Cause Corrective Action
Software error-error on start up or
corrupted software
Improper start-up or
shutdown
Internal flash corrupted
internal data memory malfunction
Error found in cyclic
redundancy check CRC
Restart, if still fault: reload software
If not corrected: replace board
050
Short-circuit in temperature probe
Probe failure.
Replace probe.
Bad probe connection, or
probe failure.
Check all connections. Replace probe if
necessary.
Initial Fill Error.
expected after powering up.
Water supply flow rate is
water line kinked or closed.
Reboot machine. If persists-investigate
filter, kinked line, stuck fill valve)
Water supply flow rate to
(SEE PAGE 13)
Check water supply line. Flow should be
flow rate is in range-replace fill valve
Heater is on, temperature is
not rising/dropping
High elevation correction. Bad heaters
or temperature probe or position
1) Failure of SSR, high limit,
“heating”)
especially during “heating”.
Heater is off and heating
SSR is stuck “ON”
Check ohms on heater (15-60Ω). SSR
may be stuck in ON mode-replace SSR.
Usually from longer than 10
reassembly after service
Brew basket must be in
SAFETY FEATURE
001
002
051 Open temperature probe.
100
101
Initial fill time took longer than
Error on refill-.
Tank did not refill within expected time.
200 Heating flatline-Tank is boiling
If the hot water tank heaters are turned
on during a heating cycle and tank
201
temperature is not increasing
according to software logic and the
tank temperature is below setpoint
202 Heater Shorted or Stuck SSR
too low, fill valve is stuck,
hot water tank is too low, or
fill valve stuck or damaged
temperature probe, or
heating element.
2) Water being removed by
hot water faucet during
heating (control displays
Restart, if still fault: reload software
cause of low flow rate. (Clogged water
20-75 psig, (138-517kPa) >1gal/3.8L/min
Investigate cause of low flow rate. If the
1)Test and check SSRs, high limit
devices temperature probe. Check
heating elements with current clamp,
replace if necessary.
2)Advise staff to refrain from taking large
amounts of water from hot water tank,
255
Insert Brew Basket
Keyboard [HID] error
(Human Interface Device)
NO
BSKT
seconds’ contact. Or faulty
place
This is a
Go to fetco.com for the latest versions of all information Page 9 P195 January 2023
Restart, if still fault: reload software. If
mechanical: replace module
Insert brew basket into brewer rails to
enable brewer
Page 10
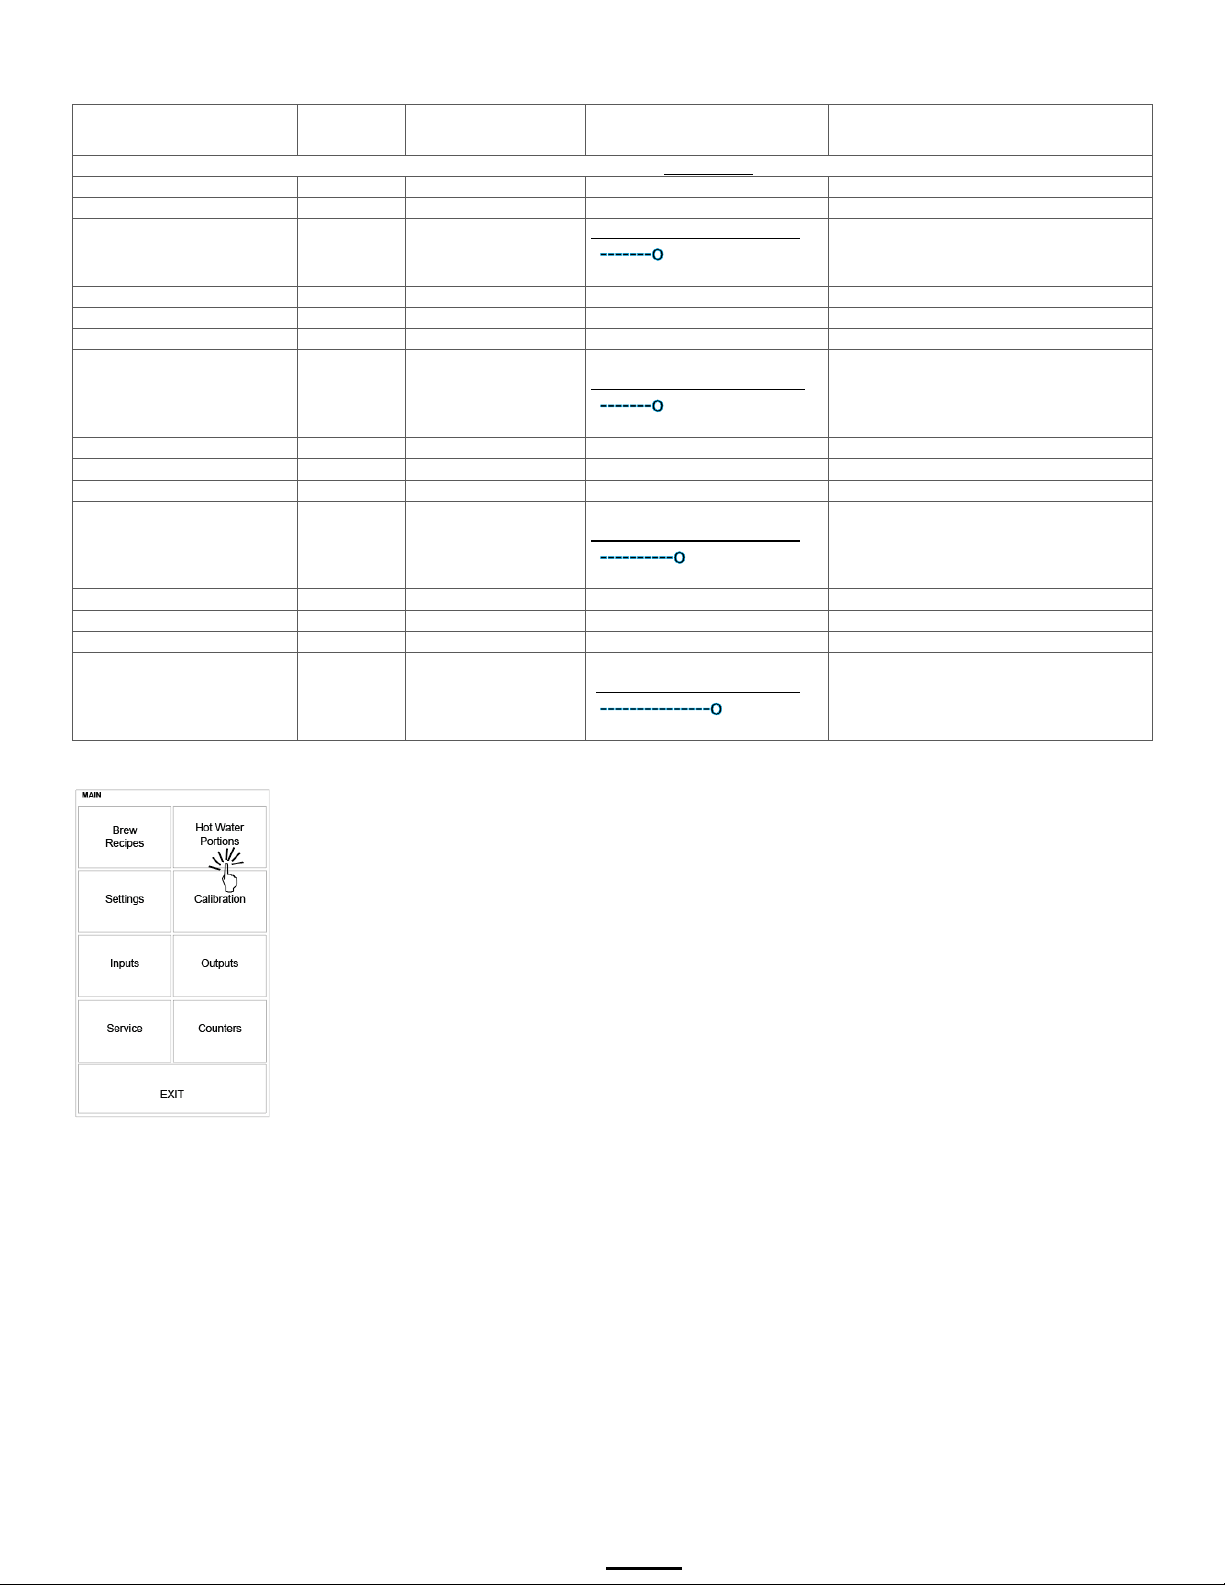
Program
Items
Factory set
Default
This setting is only for brewers with an electronic hot water faucet. In the SETTINGS menu, the “Automatic” feature must be enabled
Hot Water Portions
Enabled
“ON”
OFF/ON
Hot Water Portions
Name
Continuous
Rename on keypad
Scroll and tap three virtual keypads
0:10 min 0:60
Scroll and go to EXIT&SAVE
Hot Water Portions
Volume 1
6 oz.
Enabled
ON
Turns “ON” or “OFF”
OFF/ON
Name
Volume 1
Rename on keypad
Scroll and tap three virtual keypads
Volume 6
Scroll and go to EXIT&SAVE
Hot Water Portions
Volume 2
8 oz Enabled
ON
Turns “ON” or “OFF”
OFF/ON
Name
Volume 2
Rename on keypad
Scroll and tap three virtual keypads
Volume 8
Scroll and go to EXIT&SAVE
Hot Water Portions
Volume 3
8 oz
Enabled
ON
Turns “ON” or “OFF”
OFF/ON
Name
Volume 3
Rename on keypad
Scroll and tap three virtual keypads
Volume 12
Scroll and go to EXIT&SAVE
Hot Water Portions
Safety
Timeout
Volume
dispensed
Volume
dispensed
Volume
dispensed
0:25
6 oz
8 oz
12 oz
Programming Range Notes
------------------
2 oz 30
------------------
2 oz 30
----------------
2 oz 30
-----------
Sets limit for touch and dispense
Sets limit for #1 touch and dispense
Sets limit for #2 touch and dispense
Sets limit for #3 touch and dispense
Go to fetco.com for the latest versions of all information Page 10 P195 January 2023
Page 11
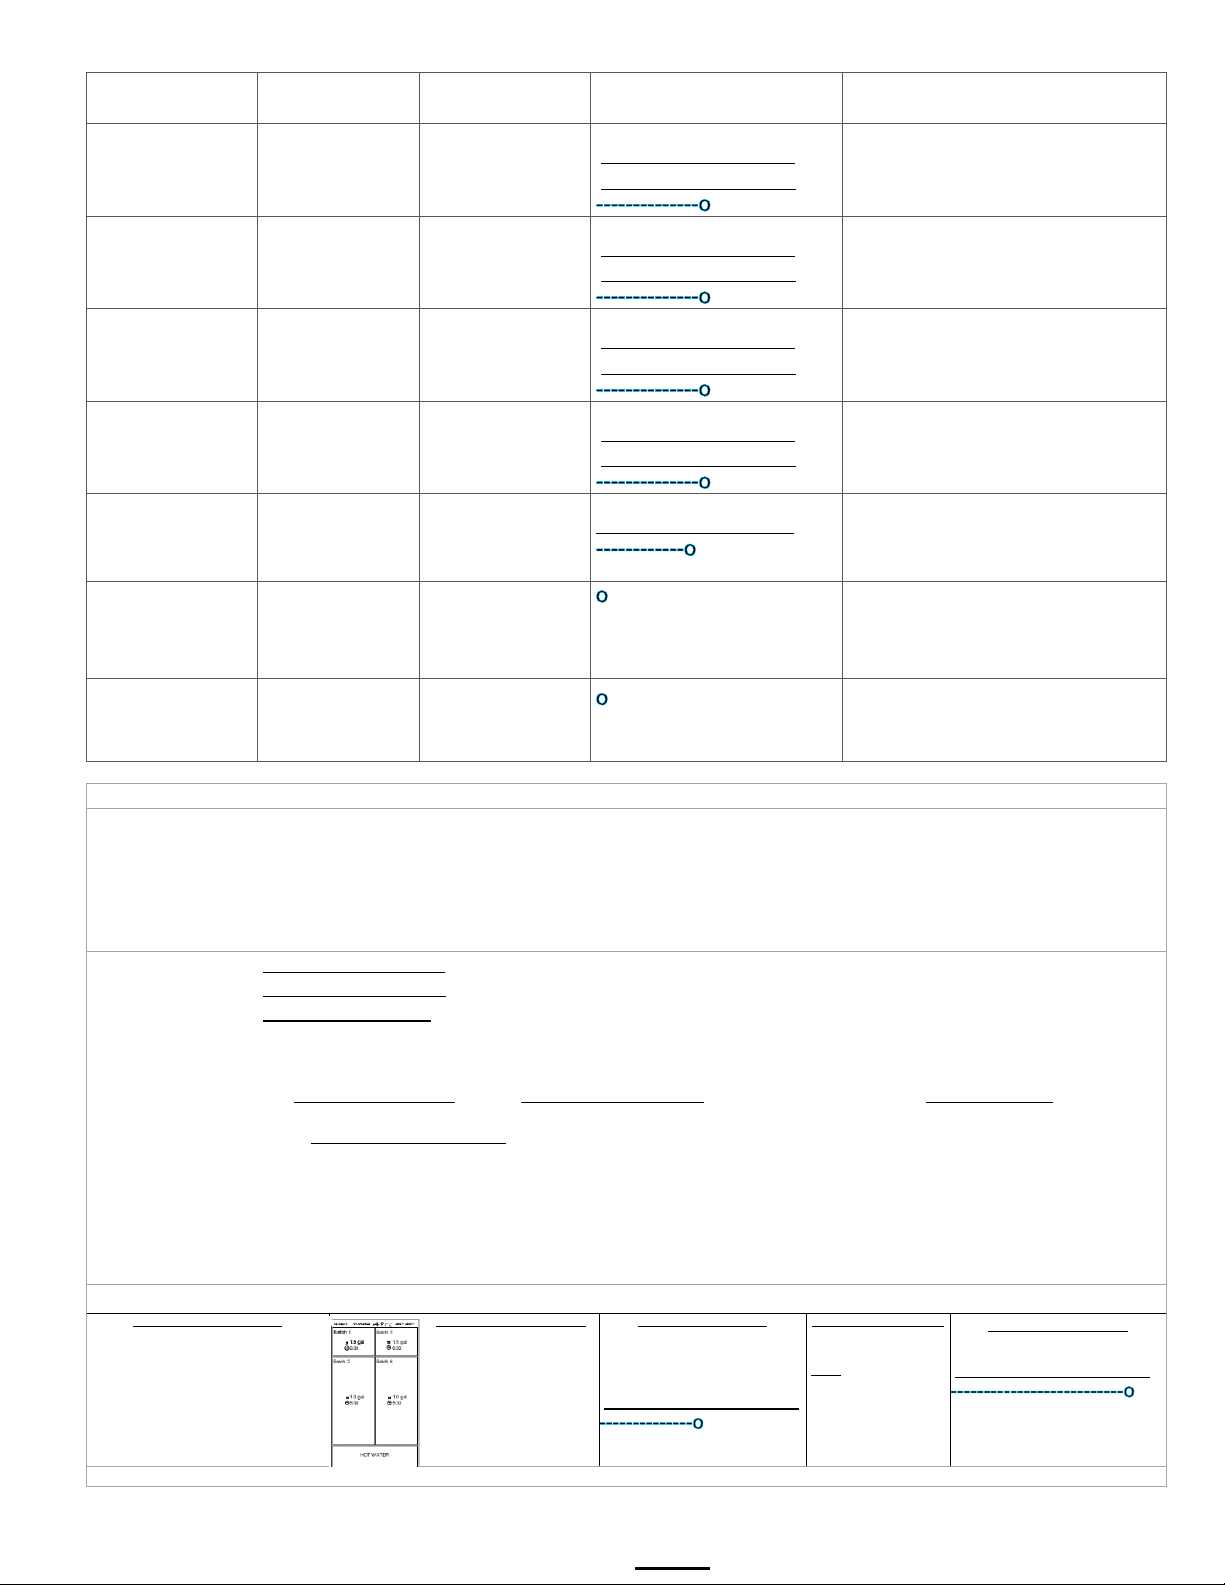
Calibration
Factory set
Default
Brew Left
-----------------
Brew Right 0.93
/3550
-----------------
Bypass Left
-----------------
Bypass Right
-----------------
Faucet 4
Scroll and go to EXIT&SAVE
Off
Scroll and go to EXIT&SAVE
Liquid level control sensitivity.
very pure water.
How to calibrate the flow rate
Set the flow rates of the brewer valves to adjust for over or under potting.
-Obtain the VOLUME DISPENSED of water only, by brewing a batch without coffee or filter paper.
T
to obtain decimal format 1 ½ gallon=128oz+64oz=192 oz (in 1 ½ gal.) 192÷128=1.5 gal.
Example below shows overpotting of 16oz over 11/2 gal. batch corrected by recalibration using the formula above
Obtain Volume Dispensed
Example:
A CBS
over the 1½ gallon (192oz) setting
for Batch 1
192oz+16oz=208oz
208oz
Obtain Programmed Value
Obtain Current Setting
The valves flow rate is in the
top right corner
Brew Left
Use the formula above
The new flow rate is
Brew Left
Enter new setting on the slider
.
By entering the new flow rate number into the brewer, the software automatically corrects the volume discrepancy
Program Items
Programming Range Notes
Flow Rates
Water Valves
Flow Rates
Water Valves
Flow Rates
Water Valves
Flow Rates
Water Valves
Flow Rates
Faucet Valve
Fill Compensation
Brew left 3000 ml/min
Brew right 3000 ml/min
Bypass left 1900 ml/min
Bypass right 1900 ml/min
For automatic hot
water faucet
Slow Flow
Compensation
4 ml/min
OFF
LLC NORMAL
3000 ml/min 4150
0.93(Gal.)/3550
(ml)
0.79 gal/min 1.09
3000 ml/min 4150
(Gal.)
(ml)
0.79 gal/min 1.09
1150 ml/min 1700
0.36(Gal.)/1350
(ml)
0.30 gal/min 0.44
1150 ml/min 1700
0.36(Gal.)/1350
0.30 gal/min 0.44
1 ml/min 10
----------------
o .. 1.5x
o 2.5x
Normal
o .. High
Scroll and go to EXIT&SAVE
Use to attenuate and compensate for
variations in brew valve output
Use to attenuate and compensate for
variations in brew valve output
Use to attenuate and compensate for
variations in bypass valve output
(ml)
Use to attenuate and compensate for
variations in bypass valve output
To compensate variations in timed
dispense from automatic hot water
faucet
Use for FloJet bottled water supply or
for reduced water supply from mains.
Normal for most water.
High is for reverse osmosis water or
Built-in algorithms in brewer controller software corrects brew parameter to customer preferences or to trim variations in flow control components
The control software uses the new flow rate entered in the CALIBRATION screen to adjust and correct the amount of water delivered by the valve
Increasing the flow rate value DECREASES the volume of water dispensed
Decreasing the flow rate value INCREASES the volume of water dispensed
Flow rate adjustment will control all batches made by the valve. All batches on the side of the valve will be adjusted, (left or right)
-Obtain the PROGAMMED VALUE of the same brew. This is displayed on the home screen in the batch box
-Obtain the CURRENT SETTING for the flow rate from the brewer. Do this by entering PROGRAMMING and
ap to “CALIBRATION” then, tap “Flow Rates” and then “Water Valves”. The valves flow rate is in the top right corner.
Using the values obtained above to obtain the new flow rate setting to correct the volume dispensed:
Divide the volume dispensed by the programmed volume and then multiply by the current setting
VOLUME DISPENSED
PROGRAMMED VALUE
×CURRENT SETTING=NEW FLOW RATE SETTING
-Enter programming mode, tap to “CALIBRATION”
-Tap back to “Flow Rates” and then to “Water Valves”
-Enter the new flow rate into the calibration slider for the valve tested
Note: values for brewers set in gallons are in decimal format. Place all quantities in ounces and divide by 128 (One gallon =128 ounces)
-2252 delivered 16 ounces
-Left Side
÷128oz/gallon=1.63gallon
Go to fetco.com for the latest versions of all information Page 11 P195 January 2023
The Programmed value
for batch 1 -left side of
the CBS-2252 is on the
home screen in the
batch box.
The value is 1.5 gallon
0.93(Gal.)
0.79 gal/min 1.09
---------------
The value is 0.93
1.65
× 0.93 = .
1.5
1.02
0.79 gal/min 1.09
Enter the New Flow Rate
1.02(Gal.)
-
as shown and EXIT to save
Retesting recommended
Page 12
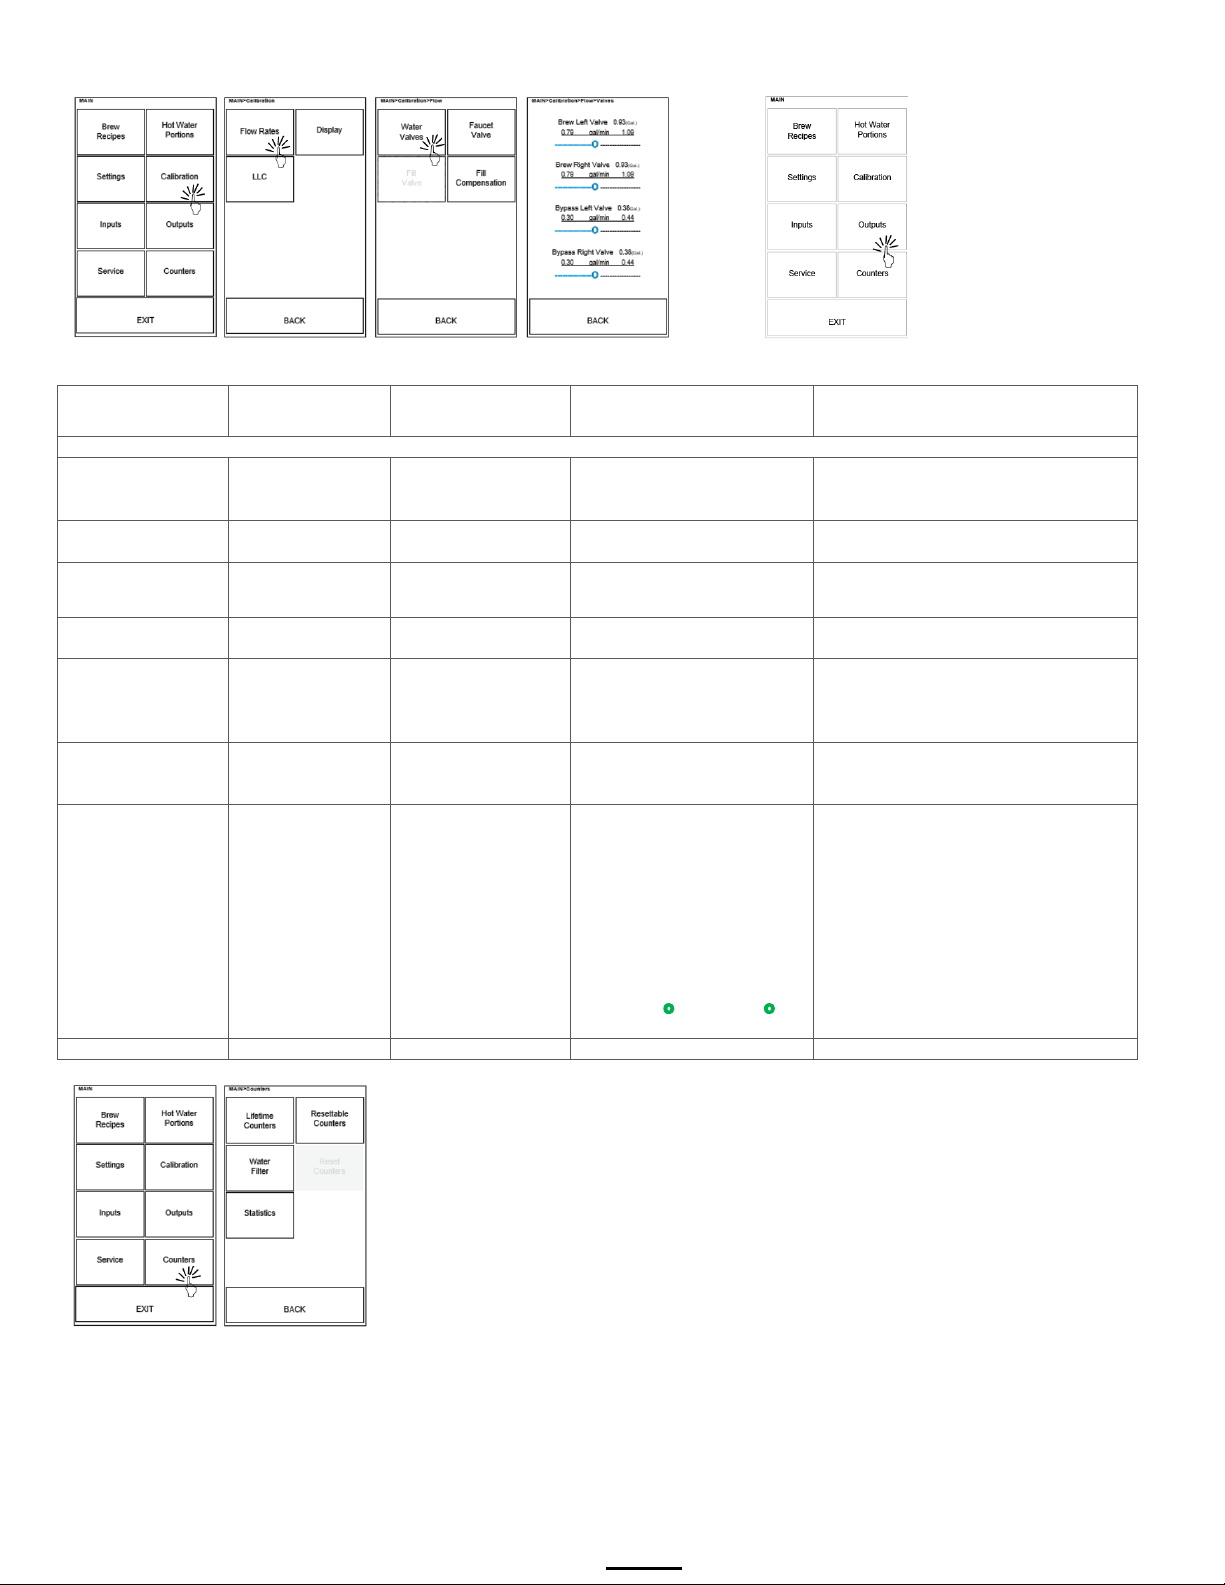
PROGRAMMING sequence for calibrating left brew valve from page 10 Enter into OUTPUTS-below
Factory set
Default
These settings are used to activate individual controls for testing verifications and servicing operations
Momentarily
Right Brew valves
Momentarily
operate fill valve
Have dispenser under spray heads!
Touch to activate flow
3 sec max
Momentarily
operate light bar(s)
Momentarily
valves
Momentarily
valve
For brewers with
faucet
Extra Outputs
For future use
Not used
Not used
Not used
Outputs
Brew Valve(s)
Fill Valve
Heater SSR
Light Bar
Bypass Valve(s)
Faucet Valve
Brew Basket Lock
Program Items
operate Left or
Turns on all
heaters
operates Left or
Right Bypass
operate faucet
Operates brew
basket locks,
toggling them on
and off
automatic hot water
Programming Range Notes
Left Right
Brew
Fill
Heater
Status Light
Left Right
Bypass
Faucet
Left Right
BBL lock
Have dispenser under spray head!
Touch to activate flow
Activates SSRs to turn on heaters
Have dispenser under bypass port!
Touch to activate flow
Have dispenser under faucet!
Touch to activate flow
Left Right
BBL Unlock
Will toggle brew basket locks to be
engaged then OFF.
Left Right
BBL Sensor
Go to fetco.com for the latest versions of all information Page 12 P195 January 2023
Page 13
Program
Items
Factory set
Default
This setting shows usage of the brewers functions
permanent record for
Main>Counters>Lifetime>Fauc et
3 0 0
Main>Counters>Lifetime>Brew
8 0 0
Data Counters
Reserved for future
Main>Counters>Reset Filt er
Statistics
Reserved for future
Reserved for future
Reserved for future
Main>Counters>Reset>Clear
Hot Water
Counters
See screen above
See screen above
See screen above
Counters
Lifetime Counters
These counters are
permanent and
cannot be deleted.
The quantities
shown are a
the machine,
Service Counters
Hot Water
Counters
Brew Counters
Programming Range Notes
Main>Counters>Lifetime>Serv ice
Unit Uptime 0
Fill Valve
Heater
Hot Water
Hot Water Valve
Brewer
Brew Valve
Bypass Valve
Locks
Recipe Number Volume
Act ivation
Lifetime Counters
(units in hours and liters)
Volume 0
Activation 0
Time On 0
Activation 0
Dispense Count 0
Volume 0
Activation 0
Volume 0
Left Right
Brew Count 0 0
Volume 0 0
Activation 0 0
Volume 0 0
Activation 0 0
Activation 0 0
Lifetime Counters
Volume Activation
Continues 0 0
1 0 0
2 0 0
1 0 0
2 0 0
3 0 0
4 0 0
5 0 0
6 0 0
7 0 0
(units in liters)
Lifetime Counters
(units in liters)
Water Filter
Resettable Counters
These are the same
screens as above in
“lifetime counters”.
These can be reset
Water Filter Life Time
Filter
Life Time 0% of 10,000
Water Filer Life Time
Press and hold button for 5 seconds
To Reset Filter
!
Brew Statistics
Energy Statistics
Hot Water Statistics
Service Counters
Brew Counters
See screen above
Clear Resettable Counters
Press and hold button for 5 seconds
Service Counters
To Clear Error Log
!
Go to fetco.com for the latest versions of all information Page 13 P195 January 2023
Page 14
Brewer Setup
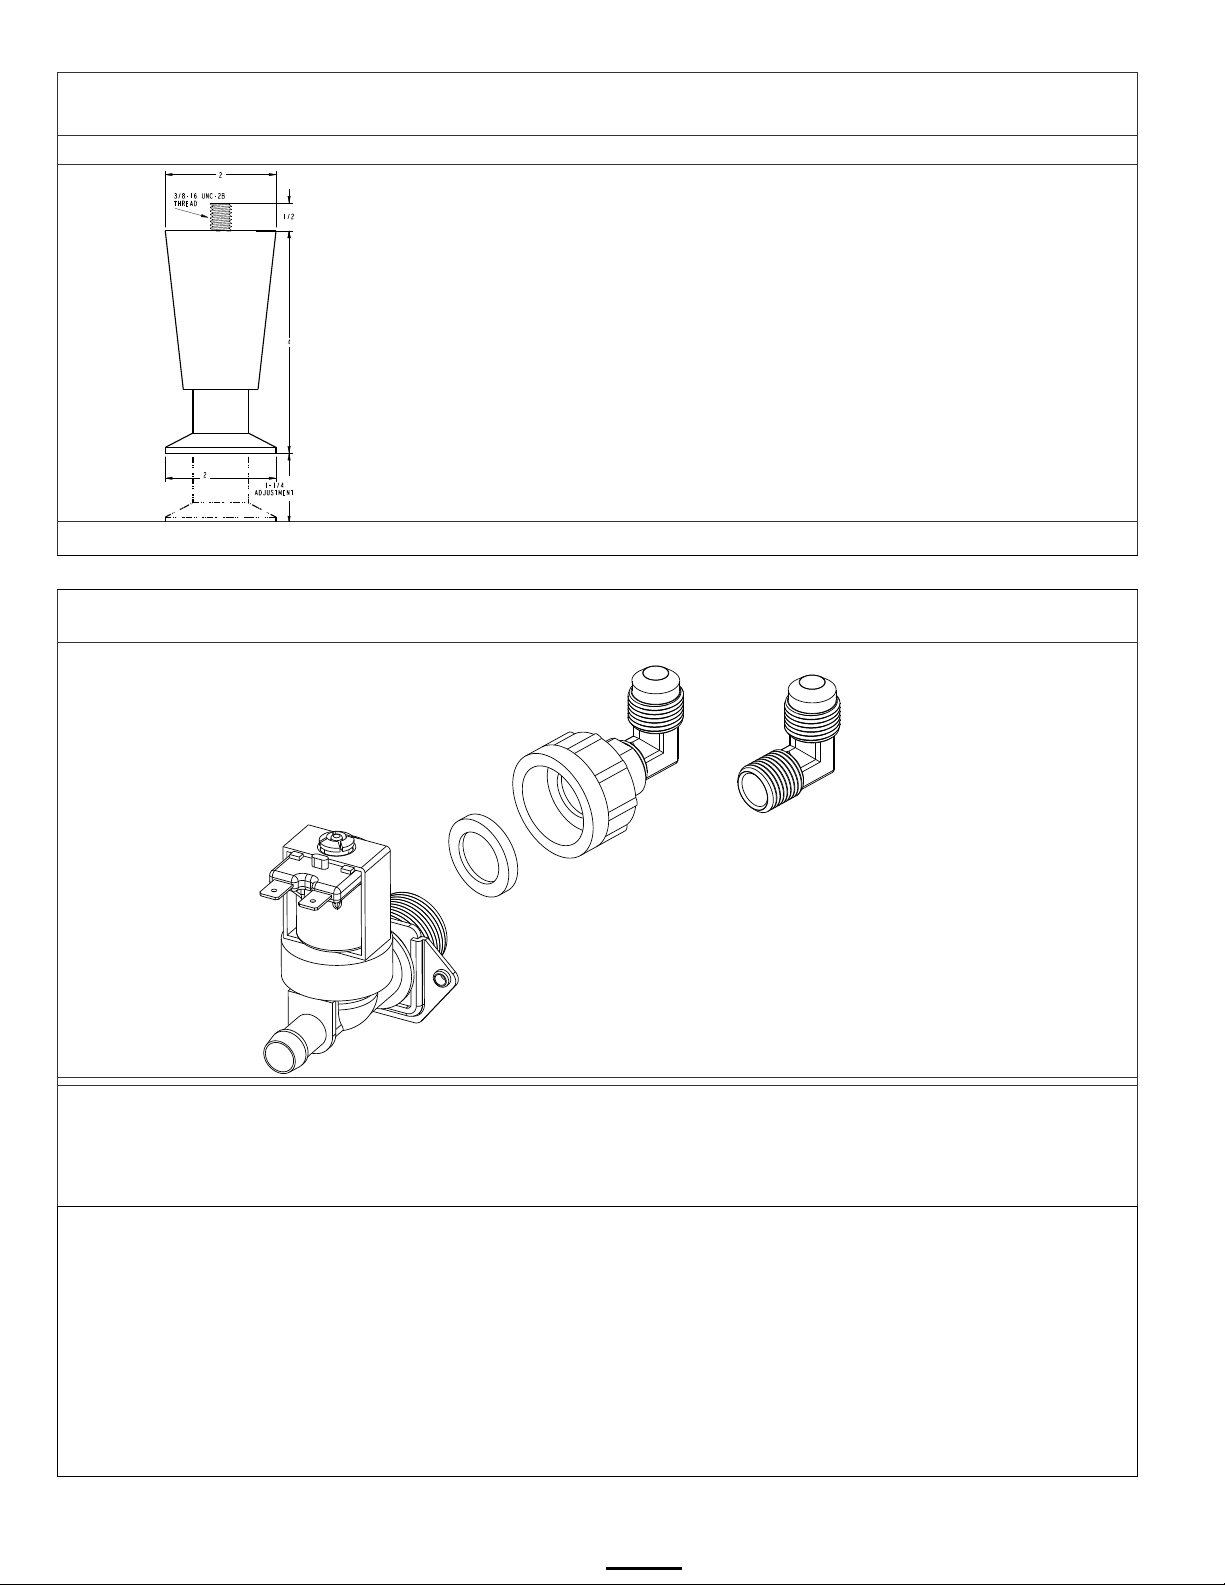
NOTE-Assemble legs immediately after unpacking the brewer and before connection to utilities
1) Attach legs
NOTE-Legs are located in brew basket
Legs are sent from factory inside brew basket. Attach legs before installing
2) Attach water inlet adapter
Place rubber washer with screen in adapter. Hand tighten only-and 1/4 turn with wrench
Install the adapter on inlet valve first before attaching water line. Adapter is shipped in the brew basket
The threads on the USA adapters are unusable for the valve
Inlet valve
90 degree 3/8” flare fitting
4” legs -
Part number 1073.00007.00
3 required for CBS-2252
4 required for CBS-2251
This may be removed
and replaced with a 3/8”
compression fitting or
other connection.
Fitting to base is ¼” NPT
Use thread sealing
plumber tape or sealant
paste on threads
FETCO
Inlet valve
Rubber washer
with screen
(Included with
adapter)
adapter
3/8”
flare fitting
¼” fnpt base
The valve threads are 3/4" BSP MALE THREAD and are not 3/4 garden hose fittings.
Use of any other connector to valve will damage the valve
DO NOT use US dishwasher water adapter or US washing machine adapter for this connection.
The inlet valve thread is 3/4 INCH BSP (British Standard Pipe).
This valve is not a standard USA washing machine or dishwasher thread (¾” GHT)
TO PREVENT DAMAGE AND INSURE PROPER EQUIPMENT OPERATION
-Use only the plumbing adaptor kit included with this equipment. Use the gasket included in adaptor kit
-Plumber’s tape is not recommended for the adapter to valve connection
-Hand tighten adapter on valve with gasket, then very lightly wrench 1/4 turn to set
-DO NOT SUBSTITUTE FITTINGS FOR CONNECTING TO WATER SUPPLY
Damage to inlet valve from improper installation will void the warranty
NOTE: DO NOT TANK PLUMB DRAIN. DRAIN IS FOR SERVICE AND MAINTENANCE.
Go to fetco.com for the latest versions of all information Page 14 P195 January 2023
Page 15
!
Installation Guide
(For Qualified Service Technicians Only)
General:
1. If not installed correctly by qualified personnel, the brewer will not operate properly and damage may result.
2. Utilize only qualified beverage equipment service technicians for service and installation.
3. Always have an empty dispenser under spray head of all coffee brewing equipment-including when at idle
4. Damages resulting from improper installation are not covered by the warranty, and will void the warranty.
Electrical:
1. All FETCO brewers require an electrical ground wire. Installation without grounding is dangerous.
2. Note Equipotentiality Terminal, if present,
of equipment or of a system to the same potential, not necessarily being the earth (ground) potential, e.g. for local bonding.)
(To identify the terminals which, when connected together, bring the various parts
3. Verify voltages, polarity, circuits, and circuit breaker access before attaching equipment.
4. Brewers in this series wire differently in regards to a neutral wire. Review the wire diagrams.
5. The electrical diagram is located in the User’s Guide and online at www.fetco.com.
6. Make sure of the tight grounding of the equipment and use the external ground bolt.
7. The installation must comply with applicable federal, state, and local codes having jurisdiction at your location.
Check with your local inspectors to determine what codes will apply.
See wiring diagrams for connections
Plumbing:
1. North America: All installations must comply with applicable federal, state, or local plumbing codes.
2. All Others: The water and waste piping and connections shall comply with the International Plumbing Code 2003,
International Code Council (ICC), or to the Uniform Plumbing Code 2003 (IAPMO).
3. Use an inline water filter for all beverage equipment.
4. Install the filter unit after a water shutoff valve and in a position to facilitate filter replacement.
5. The water line and newly installed filter cartage must be flushed thoroughly prior to connecting it to the brewer to
prevent debris from contaminating the machine.
6. Verify that the water line will provide a flow rate of at least 1½gpm/(5.7lpm) per minute and the water pressure is
between 20-75 psig (138-517kPa) before making any connections.
7. Use a wrench on the factory fitting when connecting the incoming water line. This will reduce stress on the internal
connections and reduce the possibility of leaks developing after the install has been completed
8. Install a backflow prevention device. Most municipalities require a recognized backflow preventer.
Usable on all hot beverage and cold beverage equipment is a WATTS® SD-2 or SD-3.
WATTS spring loaded double check valve models are accepted by most zoning authorities.
The check valve should be as close to the water supply inlet of the beverage equipment as possible.
Tank Drain
The water tank must be drained before maintenance procedures, and when the unit is to be relocated or shipped
1. Disconnect power and water to unit. DANGER: Insure that all utility connections to the brewer are broken.
2. Move the unit near a sink or obtain a container large enough to hold four gallons of water.
Note: the hot water tank may hold more than four gallons.
3. Remove the front panel and tank cover and allow the tank to cool to a safe temperature
4. The tank drain line and clamp are located inside-under the hot water tank. Pinch the drain line clamp to close
5. Locate the fill valve against the back wall, using pliers, loosen the hose clamp and move it back over the tube.
Note Do not loosen the hose clamp to the bottom of the hot water tank
6. Crimp the tube an inch or two away from the drain plug to prevent water from flowing and pull it off the valve.
7. Pull the tube end out of the brewer and position over sink or bucket.
8. Release the crimped tube and hose clamp and allow the water to flow into the sink or container.
9. Multiple buckets may be needed during the draining, see tank volumes below.
Brewer Hot Water Tank Capacity
CBS-2251 Single 6.3 gal 24 liter
CBS-2252 Twin 11.5 gal 44 liter
To drain tank & service brewer
OPEN
Leave open for use
PINCH SHUT
AI
Go to fetco.com for the latest versions of all information Page 15 P195 January 2023
Page 16
Operator Training
Review the operating procedures with whoever will be using the brewer.
Pay particular attention to the following areas:
1. Always pre-heat the dispensers before the first use of each day by filling them half way with hot water, and letting
them stand for at least 5 minutes.
2. Do not remove the brew basket from a coffee brewer until it has stopped dripping.
3. Make sure the dispenser is empty before brewing into it.
4. Show how to attach covers, close, and or secure the dispensers for transporting.
5. Show the location and operation of the water shut off valve as well as the circuit breaker for the brewer.
6. Steam from the tank will form condensation in the vent tubes. This condensation will drip into and then out of the
brew baskets. Up to 1/4 cup/60 cc discharging overnight is possible. Place an appropriate container under each
brew basket when not in use.
7. We recommend leaving the power to the brewer on overnight. The water tank is well insulated and very little
electricity is used to keep the tank hot. Leaving the brewer in the “ON” position will also avoid delays at the
beginning of shifts for the brewer to reach operating temperature.
Cleaning & Maintenance
After Each Brew:
1. Dispose of grounds and rinse brew basket.
2. Never strike a brew basket or hit it against a hard surface.
This will damage the brew cone, and may damage the brew basket support rails
3. Rinse dispensers before reuse.
Every Day:
1. Wash brew basket with hot sudsy water.
2. Pull CSD from the spray head, it is magnetically attached. Use gloves or a heavy towel.
Wash off any film and reattach. Use vinegar if limescale filming is present.
3. Clean dispensers with hot suds water and a brush, rinse and air dry.
4. Use only a soft cloth and hot suds on the outside to avoid scratches. Never use abrasives that
will scratch surface.
Weekly
1. Use a commercial coffee dispenser cleaner such as URNEX™, TABZ™, DIP-IT™ or Squeak 'n Clean™.
2. Carefully Follow the instructions supplied with the cleaning product
3. Never use spray cleaners, solvent, solvent based cleaner or petroleum based polish anywhere on dispensers
Warning
1. Turn off power before any cleaning procedure, including wiping the exterior for appearance reasons.
2. Dry the exterior, especially the face panel, before turning on power.
3. Do not apply any type of spray cleaner on the face panel of this equipment.
4. Never use solvent or solvent-based cleaner or petroleum based polish anywhere on this equipment.
5. Dry the face of the touch pad before turning on power
6. Do not electrically energize this equipment or attempt operation without all covers in place and all screws fastened.
7. Unplug machine before disassembly or servicing.
Go to fetco.com for the latest versions of all information Page 16 P195 January 2023
Page 17
Installation safety and hygiene directions-For International and CE equipment
1. Access to the service area is restricted to persons having safety/hygiene knowledge and practical experience of the coffee
brewer. This appliance must be installed in locations where it can be overseen by trained personnel.
2. For proper operation, this appliance must be installed indoors where the temperature is between 10°C/50°F to 35°C/95°F.
Drain and remove all liquid from equipment and lines if exposed to freezing temperatures.
3. All commercial cooking equipment, including this unit, is not intended for use by children or persons with reduced physical,
sensory, or mental capabilities. Ensure proper supervision of children and keep them away from the unit.
4. Children should be supervised to ensure that they do not play hot beverage equipment.
5. This unit must be installed and serviced by qualified personnel only.
6. Installation must conform to all local electrical and plumbing codes. Installation by unqualified personnel will void the unit
warranty and may lead to electric shock or burn, as well as damage to unit and/or its surroundings.
7. If the power cord requires repair or replacement-it must be performed by the manufacturer or authorized service personnel
with the specified cord only from the manufacturer in order to avoid a hazard.
8. Review the dimensions for the unit and verify that it will fit properly in the space intended for it. Verify that the counter or
table will support the total weight of the brewer and dispensers when filled (See: Technical Data).
9. Place the brewer on the counter or stand. When the brewer is in position, level it front to back as well as side-to-side by
adjusting the legs.
10. Brewers will need a sturdy supported surface for operation. Do not move brewers when filled.
11. Do not tilt appliance more than 10° to insure safe operation.
12. Unit is for protected indoor use only. Do not steam clean or use excessive water on unit.
13. This unit is not “jet-proof” construction. Do not pressure wash or use jet spray to clean this unit.
14. The unit is not waterproof-do not submerge or saturate with water.
Equipment exposed to flood and contaminated must not be used due to electrical and food safety.
Do not operate if unit has been submerged or saturated with water.
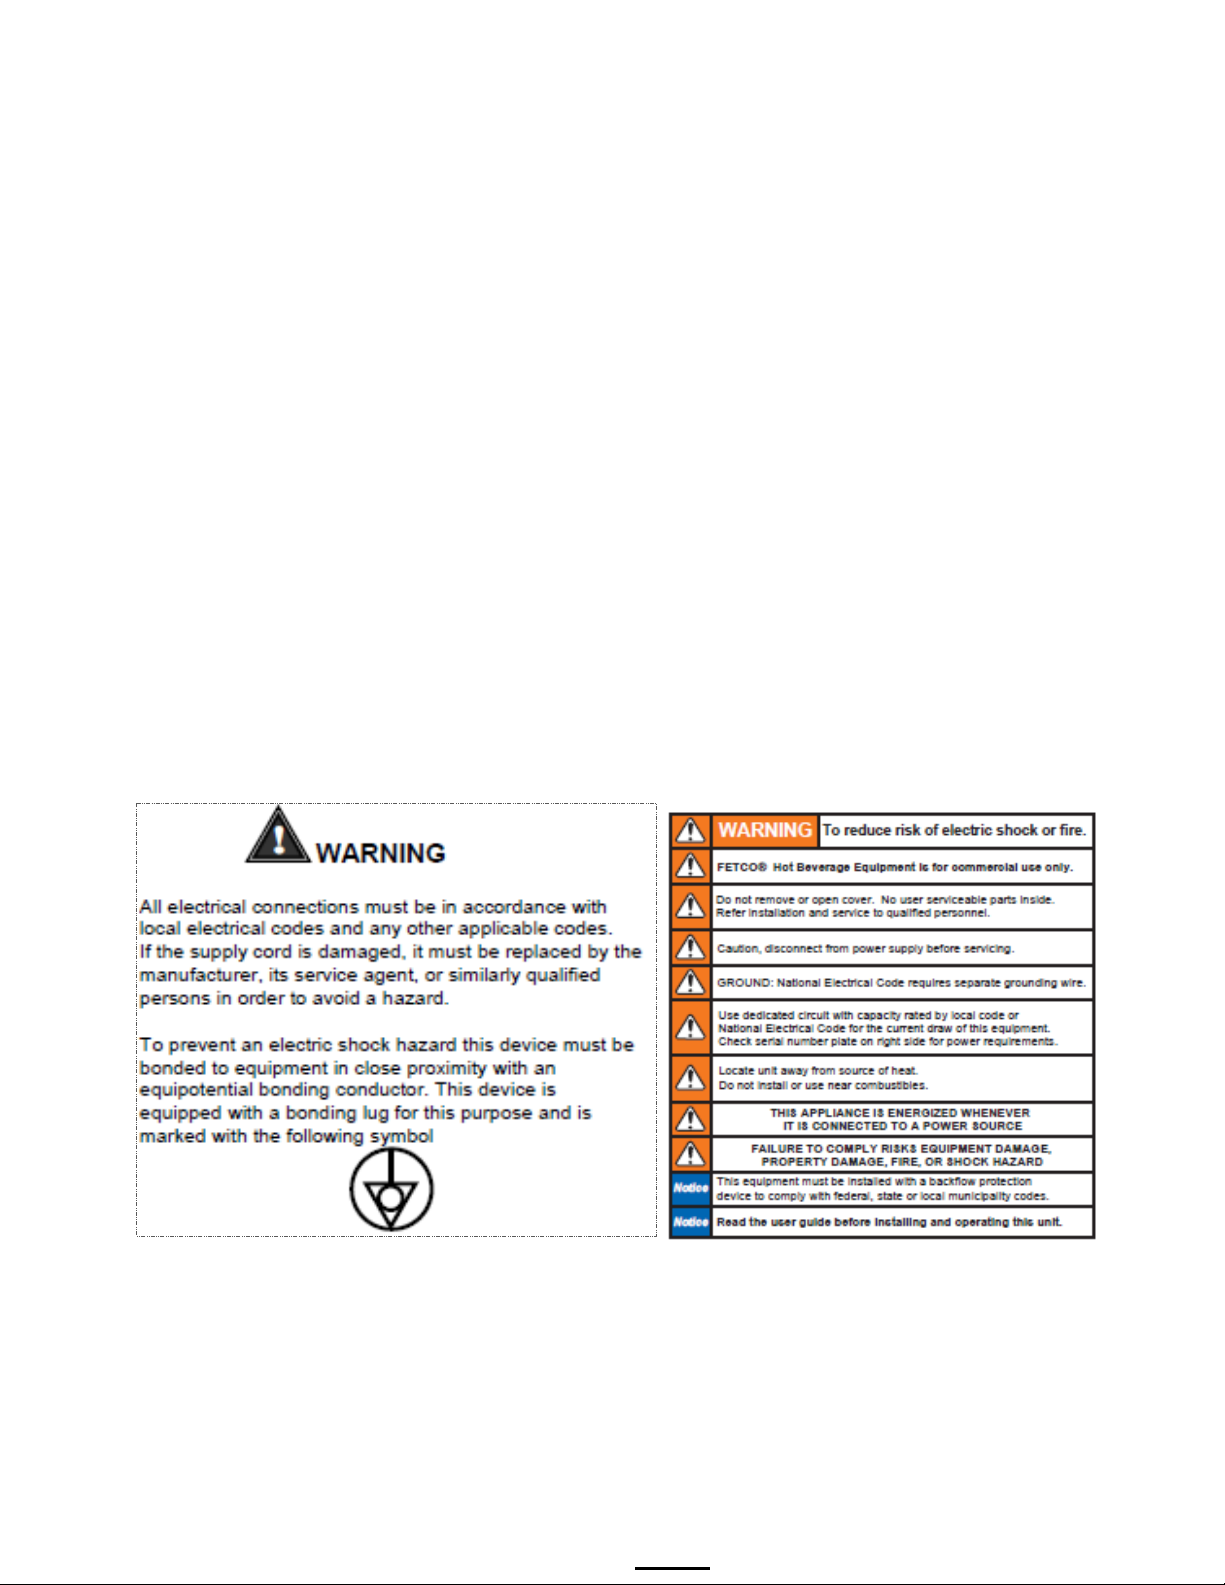
Labels and warnings for hot beverage equipment Label for BACK PANEL of equipment (1046.00035.00)
Go to fetco.com for the latest versions of all information Page 17 P195 January 2023
Page 18
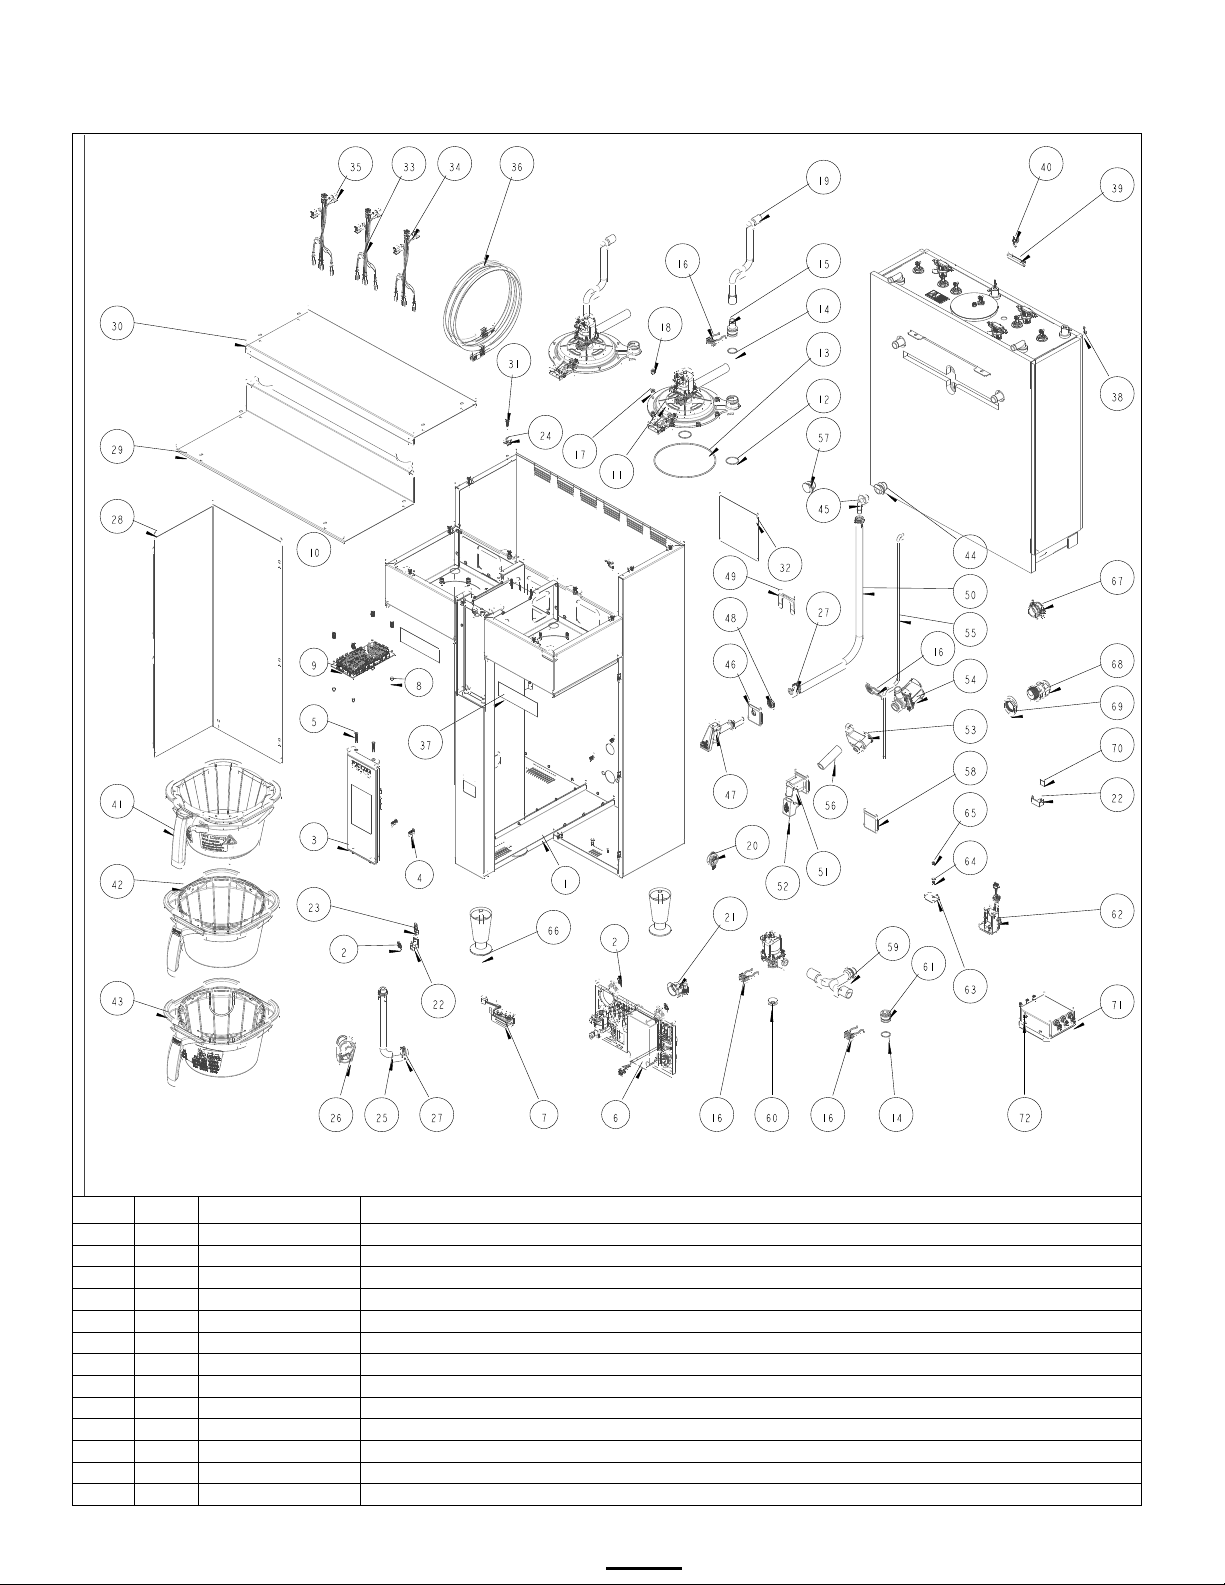
Parts diagrams
Ref
Qty
Part Number
Description Drawing 1101.00557.00 CBS-2252
1 1 1111.00099.00
WELDMENT BODY, CBS-2252
2 6 1084.00051.00
NUT, HEX LOCKWASHER, #8-32, 18-8 ST. STL.
3 1 1102.00448.00
FRONT PANEL ASSEMBLY, CBS-2200 SERIES
4 2 1082.00020.00
SCREW, #6 X 5/8, TRUSS HD PHIL, SHEET MTL
5 2 1082.00058.00
SCREW, # 8-32 X 5/8, FLAT HD, PH, 18-8 SS
6 1 1102.00449.00
ELECTRICAL COMPONENT LATTICE, CBS-2200
7 1 1102.00444.00
VISUAL COMMUNICATION RGB LED BAR, ASSY
8 4 1081.00006.00
SPACER, 6MM OD x 3.2MM ID x 5MM LG, Z/P
9 1 1051.00046.00
CBS-2200 SERIES, I/O BOARD, 24V
10 4 1029.00006.00
NUT, FINGER KNURLED, #4-40
11 2 1102.00450.00
QUICK CONNECT SPRAYHEAD ASSEMBLY, BASIC
12 4 1024.00107.00
O-RING, 1 3/16" OD X 1 1/16" ID X 1/16" TH, BYPASS SEAL
Parts list continues next page
Drawing 1101.00557.00
CBS-2252
Go to fetco.com for the latest versions of all information Page 18 P195 January 2023
Page 19

Ref
Qty
Part Number
Description Drawing 1101.00557.00 CBS-2252 …Continued from page 13
13 2 1024.00108.00
O-RING, 5 11/16"OD X 5 1/2" ID X 3/32" TH, BREW SEAL
14 3 1024.00106.00
O-RING, 13/16"OD X 11/16"ID X 1/16" TH, FOR QUICK CONNECT
15 2 1023.00343.00
VENT INSERT, QUICK CONNECT
16 5 1023.00342.00
QUICK CONNECT CLIP
17
16
1083.00010.00
WASHER, #10 SCREW W/NEOPRENE-BONDED SEAL
18
16
1084.00006.00
NUT, 8-32 18-8 HEX MACHINE SCREW
19 2 1024.00098.00
VENT TUBE, CBS-XTS/XV+ EXTRACTOR SERIES
20 2 1086.00004.00
BUSHING, SNAP, 1" MOUNTING HOLE
21 1 1102.00243.00
ADAPTER ASSY, 3/4" BSP x 1/4" NPT x 3/8" TUBE
22
12
1065.00009.00
GROUND LUG CONNECTOR, 14-2 AWG, ALUMINUM
23 1 1044.00012.00
LABEL GROUND, CE
24
12
1084.00011.00
NUT, CLIP ON (J-NUT), #6-32, 22-20 GA., BLK-PH FINISH
25 1 1025.00058.00
TUBE, 9/16"OD X 5/16"ID X 25.00"LG
26 1 1086.00009.00
CLAMP, 3/4" MAX TUBE OD FLOW CONTROL
27 4 1086.00003.00
UNICLAMP, 15.9 HOSE OD CLAMP
28 1 1112.00529.00
WELDMENT FRONT COVER, CBS-2250
29 1 1001.00352.00
COVER, UPPER BASE, CBS-1152 EXTRACTOR V+
30 1 1001.00399.00
COVER TOP, CBS-2252
31
12
1082.00017.00
SCREW, TRUSS HD. PHIL. MACHINE, # 6-32 X 1/2 LG.
32 1 1046.00035.00
LABEL, WARNING "TO REDUCE RISK OF ELECTRIC SHOCK OR FIRE"
33 1 1402.00106.00
HARNESS, CBS-2240/50-NG, LOW AMP, UNIVERSAL
34 1 1402.00107.00
HARNESS ADDITION, CBS-2242/52-NG, LOW AMP, UNIVERSAL
35 1 1402.00053.01
HARNESS HIGH AMP, CBS-1152-XV+
36 1 1063.00042.00
ETHERNET CABLE, CAT-7, 5FT LENGTH
37 2 1046.00003.00
LABEL, CSD WARNING, 1.5" X 5.0"
38 1 1104.00160.00
COMPLETE TANK ASSEMBLY, CBS-2252, 3 X 3KW/240VAC
38 1 1104.00161.00
COMPLETE TANK ASSEMBLY, CBS-2252, 2 X 3KW/240VAC
38 1 1104.00162.00
COMPLETE TANK ASSEMBLY, CBS-2252, 3 X 4KW/240VAC
38 1 1104.00163.00
COMPLETE TANK ASSEMBLY, CBS-2252, 3 X 5KW/240VAC
38 1 1104.00164.00
COMPLETE TANK ASSEMBLY, CBS-2252, 2 X 5KW/240VAC
39 1 1022.00032.00
SLEEVE, Ø.50 x 2.0" LG. x 1.50" SLOT
40 2 1066.00003.00
CABLE TIE, 3-7/8" LG., BLACK
41 1 B015280BN2
BB ASSEMBLY, 16" x 6", Ø.280" HOLE
42 1 B001280B1BB
ASSY, 16" X 6", 0.280 DIA HOLE, BLACK
43 1 B002280B1BB
ASSY, 16" X 6", 0.280" DIA HOLE, BLACK
44 1 1024.00050.00
GROMMET, SILICONE, 11.4mm ID
45 1 1023.00183.00
FITTING, ELBOW, GROMMET, .375"
46 1 1023.00348.00
HOT WATER INSERT, MANUAL FAUCET
47 1 1071.00055.00
FAUCET, HOT WATER, PSC-BR-8, WITH FLAT AND STEM
48 1 1084.00048.00
JAM NUT, 1/2-20 UNF, NICKEL PLATED BRASS
49 1 1003.00370.00
HOT WATER INSERT LOCK
50 1 1025.00082.00
TUBE, 5/8"OD X 3/8"ID X 19.00"LG.
51 1 1023.00346.00
HOT WATER INSERT, AUTO FAUCET
52 1 1029.00041.00
COVER, AUTO HOT WATER FAUCET, SILICONE
53 1 1023.00347.00
VALVE MOUNT, HOT WATER DISPENSER
54 2 1057.00076.00
VALVE ASSEMBLY, COMPLETE, NG, DELTROL
55 1 1025.00026.00
TUBE, 1/4"OD X 1/8"ID X 25"LG, VENT, HOT WATER VAPOR
56 1 1025.00138.00
TUBE, SILICONE, 3/4" OD X 1/2" ID X 2.5" LG, HOT WATER
57 1 1024.00051.00
GROMMET, SILICONE, BLANK
58 1 1023.00349.00
HOT WATER INSERT, NO FAUCET
59 1 1029.00040.00
BYPASS T-TUBE, SILICONE, 2200 DUAL SERIES
60 1 1023.00345.00
ORIFICE INSERT, QUICK CONNECT
61 1 1023.00344.00
PLUG INSERT, QUICK CONNECT
62 1 1102.00445.00
ASSY, BREW BASKET LOCKER W/FEEDBACK
63 1 1003.00259.00
BRACKET, BREW BASKET LOCK COVER
64 2 1083.00009.00
WASHER, #6 SCREW , INTL TOOTH LOCKWASHER
65 1 1084.00010.00
NUT, HEX, #6-32, UNDERSIZED, ZINC PLATED
66 3 1073.00007.00
LEG, FLANGE FOOT, 4" HIGH
67 1 1086.00008.00
CONNECTOR, CLAMP, NON-METALLIC CABLE, 3/4"
68 1 1086.00031.00
SKINTOP, 3/4" NPT, 0.354" - 0.630" DIA CABLE, BLK
69 1 1086.00032.00
LOCKNUT, SKINTOP, 3/4" NPT, BLACK HEX
70 1 1044.00013.00
LABEL EQUIPOTENTIALITY, CE
71 1 1052.00027.00
EMI FILTER, THREE LINE 30A, 250/440VAC
72 1 1084.00012.00
NUT, HEX, #6-32 MACHINE SCREW
Go to fetco.com for the latest versions of all information Page 19 P195 January 2023
Page 20
Ref
Qty
Part Number
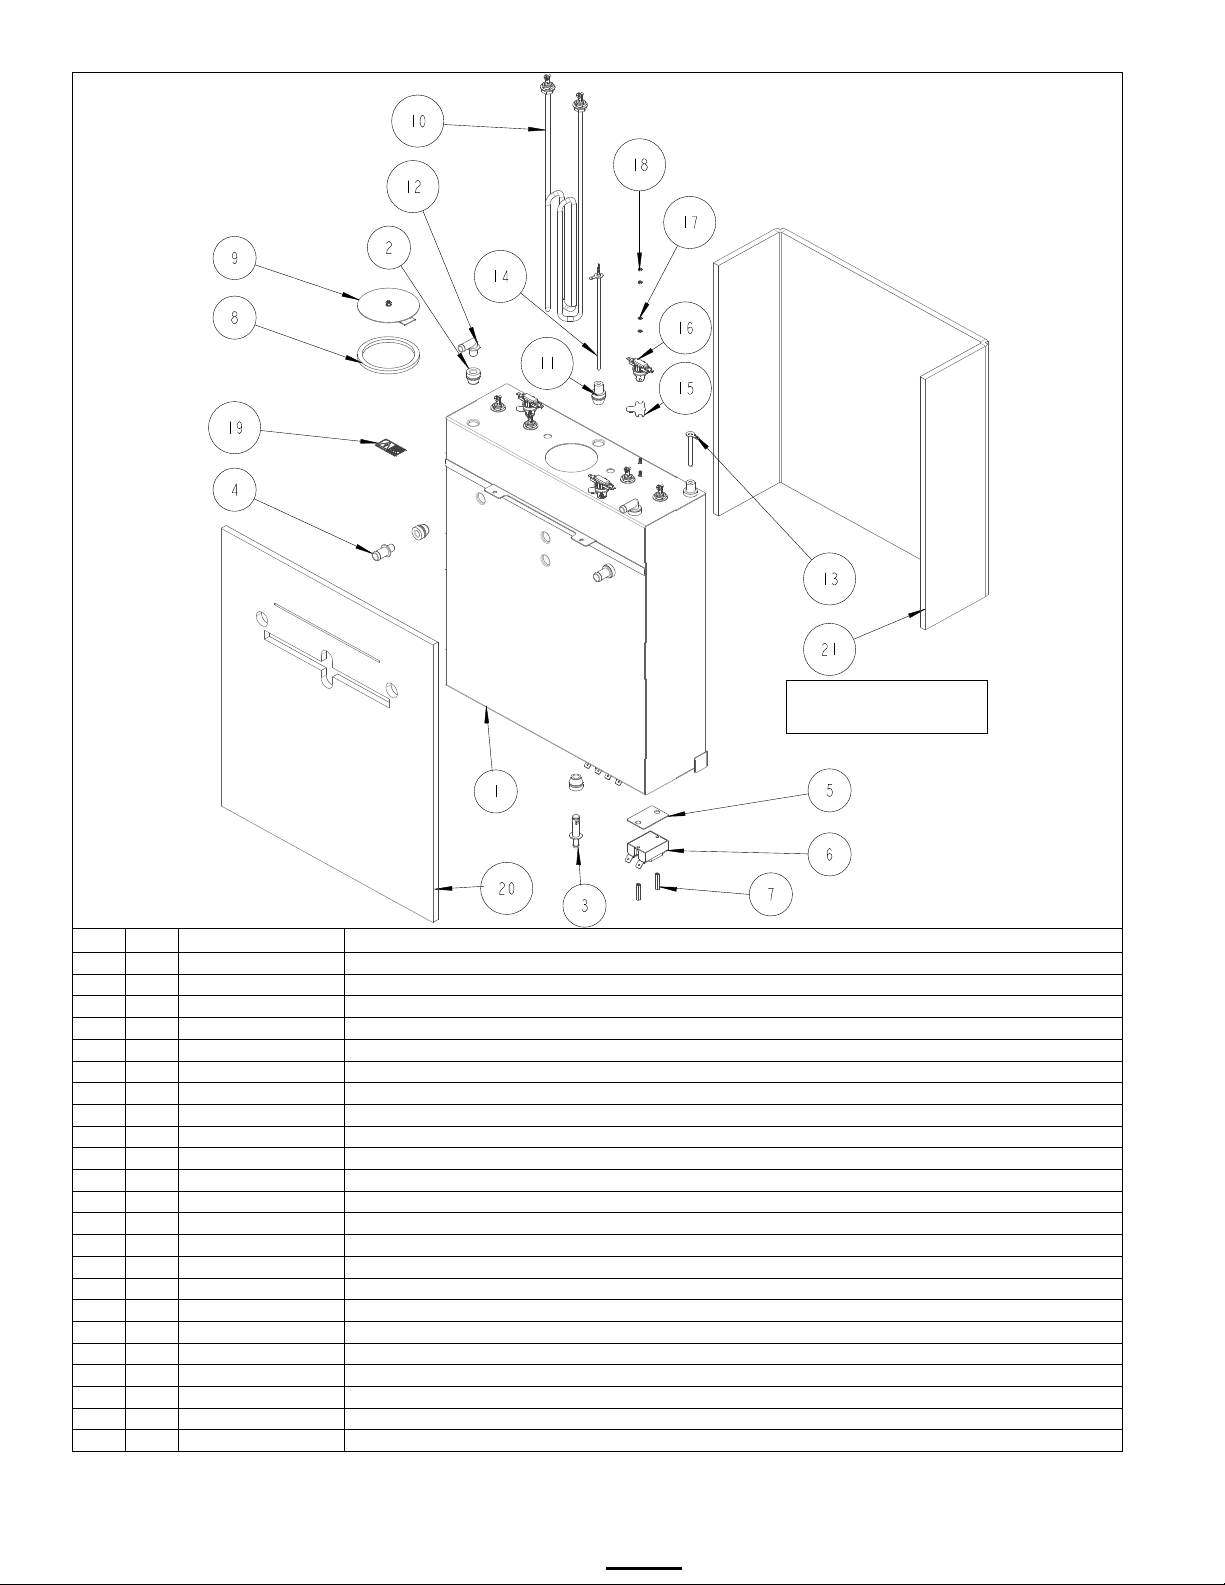
Description Drawing 1104.00160.00 TANK ASSEMBLY, CBS-2252
1 1 1114.00164.00
WELDMENT TANK, CBS-2252. LASER
2 5 1024.00050.00
GROMMET, SILICONE, 11.4mm ID
3 1 1023.00166.00
FITTING, COLD WATER INLET, GROMMET DESIGN
4 2 1023.00203.00
FITTING, STRAIGHT, GROMMET, .625"
5 3 1003.00140.00
ALUMINUM BRACKET FOR SSR
6 3 1052.00033.00
RELAY, SOLID STATE, 50A/480VAC, W/BUILD IN VARISTOR
7 6 1081.00042.00
STANDOFF, 1/4" HEX
8 1 1024.00110.02
TANK GASKET, CBS-2131
9 1 1102.00007.00
TANK COVER ASSEMBLY
10 3 1107.00005.00
ASSEMBLY,IMMERSION HEATER, 3000W, 240VAC
10 3 1107.00010.00
ASSEMBLY,IMMERSION HEATER, 4000W, 240VAC
10 3 1107.00032.00
ASSEMBLY,IMMERSION HEATER, 5000W, 240VAC
11 2 1024.00053.00
LEVEL AND TEMP PROBE GROMMET
12 2 1023.00212.00
FITTING, ELBOW, GROMMET, .500"
13 1 1112.00019.00
PROBE WELDMENT, WATER LEVEL 2.600" LG
14 1 1102.00161.00
PROBE ASSEMBLY, TEMP. AND LLC, 8" LONG
15 3 1003.00005.00
BRACKET, ONE SHOT THERMOSTAT
16 3 1053.00051.00
THERMOSTAT, SINGLE SHOT, 240V/45A
17 6 1083.00009.00
WASHER, #6 SCREW , INTL TOOTH LOCKWASHER
18 6 1084.00010.00
NUT, HEX, #6-32, UNDERSIZED, ZINC PLATED
19 1 1044.00004.00
LABEL, DANGER, HIGH VOLTAGE
20 1 1022.00070.00
INSULATION, TANK FRONT, CBS-2152
21 1 1022.00071.00
INSULATION, TANK BACK, CBS-2152
CBS-2252
Hot water tank
Drawing 1104.00160.00
Go to fetco.com for the latest versions of all information Page 20 P195 January 2023
Page 21
Ref
Qty
Part Number
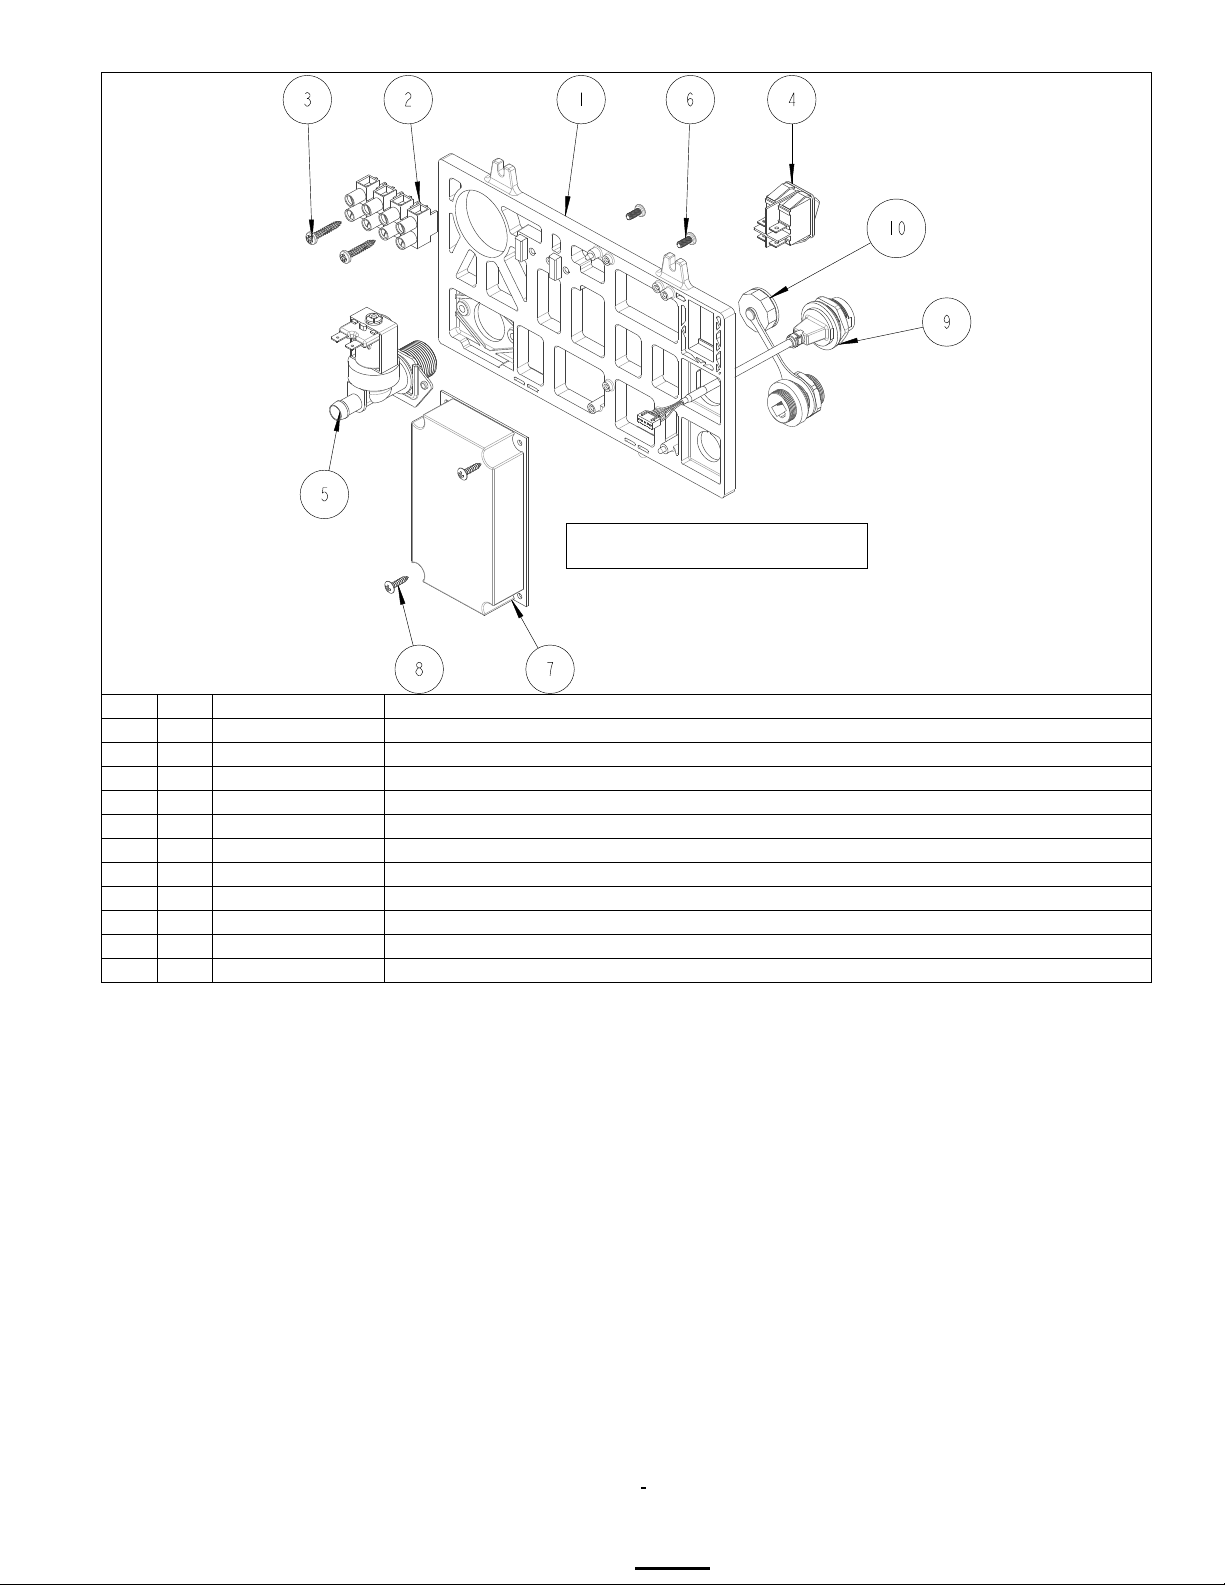
Description Electrical component lattice, CBS-2200 Part#1102.00449.00
1102.00449.00
COMPLETE ELECTRICAL COMPONENT LATTICE, CBS-2200
1 1 1023.00350.00
ELECTRICAL MOUNTING LATTICE, COMMON
2 1 1052.00023.00
EUROSTRIP HE16 TERM. BLOCK, 4 POLE, 63 AMP, 18-8 AWG
3 2 1082.00056.00
SCREW, #8-11 X 1" PAN HD PHIL, THREAD FORMING
4 1 1058.00024.00
SWITCH, POWER, DOUBLE POLE, 16A, 125/250 VAC
5 1 1057.00043.00
SOLENOID VALVE, 5.5L/min, 180 DEG, 24VDC
6 2 1082.00010.00
SCREW, PAN HD. PHIL. MACH., M4x10 ZINC-PLATED
7 1 1052.00059.00
POWER SUPPLY, 90-264VAC/24VDC, 2.25A
8 2 1082.00020.00
SCREW, #6 X 5/8, TRUSS HD PHIL, SHEET MTL
9 1 1058.00055.00
USB CONNECTOR
10 1 1058.00162.00
ETHERNET PLUG IN CONNECTOR, W/COVER
CBS-2250 Electical component lattice
Pa rt# 1102.00449.00
Go to fetco.com for the latest versions of all information Page 21 P195 January 2023
Page 22
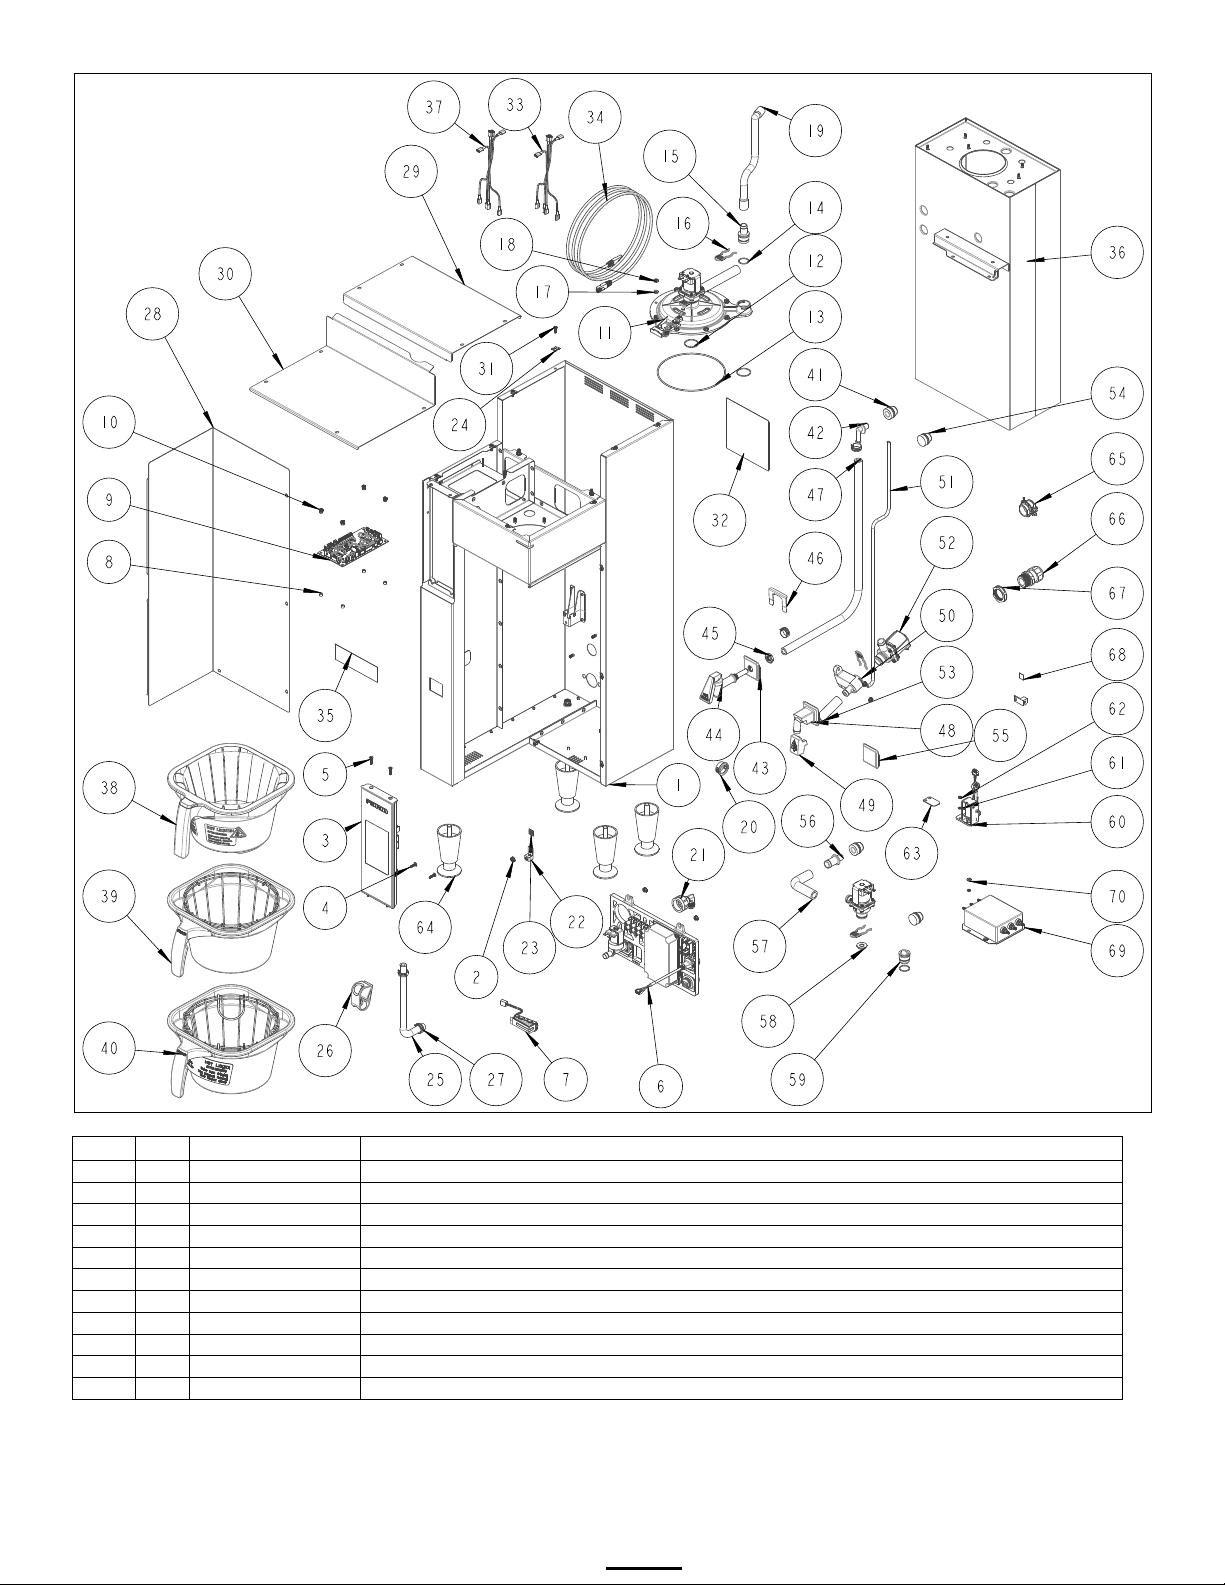
Ref
Qty
Part Number
Description Drawing 1101.00562.00 CBS-2251
1 1 1111.00100.00
WELDMENT BODY, CBS-2251
2 8 1084.00051.00
NUT, HEX LOCKWASHER, #8-32, 18-8 ST. STL.
3 1 1102.00448.00
FRONT PANEL ASSEMBLY, CBS-2200 SERIES
4 2 1082.00020.00
SCREW, #6 X 5/8, TRUSS HD PHIL, SHEET MTL
5 2 1082.00058.00
SCREW, # 8-32 X 5/8, FLAT HD, PH, 18-8 SS
6 1 1102.00449.00
ELECTRICAL COMPONENT LATTICE, CBS-2200
7 1 1102.00444.00
VISUAL COMMUNICATION RGB LED BAR, ASSY
8 4 1081.00006.00
SPACER, 6MM OD x 3.2MM ID x 5MM LG, Z/P
9 1 1051.00046.00
CBS-2200 SERIES, I/O BOARD, 24V
10 4 1029.00006.00
NUT, FINGER KNURLED, #4-40
Parts list continues next page
Drawing 1101.00562.00
CBS-2251
Go to fetco.com for the latest versions of all information Page 22 P195 January 2023
Page 23

Ref
Qty
Part Number
Description Drawing 1101.00562.00 CBS-2251 …Continued from page 21
11 1 1102.00450.00
QUICK CONNECT SPRAYHEAD ASSEMBLY, BASIC
12 2 1024.00107.00
O-RING, 1 3/16" OD X 1 1/16" ID X 1/16" TH, BYPASS SEAL
13 1 1024.00108.00
O-RING, 5 11/16"OD X 5 1/2" ID X 3/32" TH, BREW SEAL
14 2 1024.00106.00
O-RING, 13/16"OD X 11/16"ID X 1/16" TH, FOR QUICK CONNECT
15 1 1023.00343.00
VENT INSERT, QUICK CONNECT
16 3 1023.00342.00
QUICK CONNECT CLIP
17 8 1083.00010.00
WASHER, #10 SCREW W/NEOPRENE-BONDED SEAL
18 8 1084.00006.00
NUT, 8-32 18-8 HEX MACHINE SCREW
19 1 1024.00098.00
VENT TUBE, CBS-XTS/XV+ EXTRACTOR SERIES
20 1 1086.00004.00
BUSHING, SNAP, 1" MOUNTING HOLE
21 1 1102.00243.00
ADAPTER ASSY, 3/4" BSP x 1/4" NPT x 3/8" TUBE
22 2 1065.00009.00
GROUND LUG CONNECTOR, 14-2 AWG, ALUMINUM
23 1 1044.00012.00
LABEL GROUND, CE
24
12
1084.00011.00
NUT, CLIP ON (J-NUT), #6-32, 22-20 GA., BLK-PH FINISH
25 1 1025.00058.00
TUBE, 9/16"OD X 5/16"ID X 25.00"LG
26 1 1086.00009.00
CLAMP, 3/4" MAX TUBE OD FLOW CONTROL
27 4 1086.00003.00
UNICLAMP, 15.9 HOSE OD CLAMP
28 1 1112.00529.00
WELDMENT FRONT COVER, CBS-2250
29 1 1001.00402.00
COVER TOP, CBS-2251
30 1 1001.00403.00
COVER, UPPER BASE, CBS-2251
31
12
1082.00017.00
SCREW, TRUSS HD. PHIL. MACHINE, # 6-32 X 1/2 LG.
32 1 1046.00035.00
LABEL, WARNING "TO REDUCE RISK OF ELECTRIC SHOCK OR FIRE"
33 1 1402.00106.00
HARNESS, CBS-2240/50-NG, LOW AMP, UNIVERSAL
34 1 1063.00042.00
ETHERNET CABLE, CAT-7, 5FT LENGTH
35 1 1046.00003.00
LABEL, CSD WARNING, 1.5" X 5.0"
36 1 1104.00167.00
COMPLETE TANK ASSEMBLY, CBS-2251, 2 X 2.3KW/240VAC
36 1 1104.00168.00
COMPLETE TANK ASSEMBLY, CBS-2251, 2 X 3KW/240VAC
36 1 1104.00165.00
COMPLETE TANK ASSEMBLY, CBS-2251, 2 X 4KW/240VAC
36 1 1104.00166.00
COMPLETE TANK ASSEMBLY, CBS-2251, 2 X 5KW/240VAC
37 1 1402.00061.01
HARNESS HIGH AMP, CBS-1151-XV+
38 1 B015280BN2
BB ASSEMBLY, 16" x 6", Ø.280" HOLE
39 1 B001280B1
BB ASSY, 16" X 6", 0.280 DIA HOLE, BLACK
40 1 B002280B1
BB ASSY, 16" X 6", 0.280" DIA HOLE, BLACK
41 2 1024.00050.00
GROMMET, SILICONE, 11.4mm ID
42 1 1023.00183.00
FITTING, ELBOW, GROMMET, .375"
43 1 1023.00348.00
HOT WATER INSERT, MANUAL FAUCET
44 1 1071.00055.00
FAUCET, HOT WATER, PSC-BR-8, WITH FLAT AND STEM
45 1 1084.00048.00
JAM NUT, 1/2-20 UNF, NICKEL PLATED BRASS
46 1 1003.00370.00
HOT WATER INSERT LOCK
47 1 1025.00082.00
TUBE, 5/8"OD X 3/8"ID X 19.00"LG.
48 1 1023.00346.00
HOT WATER INSERT, AUTO FAUCET
49 1 1029.00041.00
COVER, AUTO HOT WATER FAUCET, SILICONE
50 1 1023.00347.00
VALVE MOUNT, HOT WATER DISPENSER
51 1 1025.00026.00
TUBE, 1/4"OD X 1/8"ID X 25"LG, VENT, HOT WATER VAPOR
52 2 1057.00076.00
VALVE ASSEMBLY, COMPLETE, NG, DELTROL
53 1 1025.00138.00
TUBE, SILICONE, 3/4" OD X 1/2" ID X 2.5" LG, HOT WATER
54 2 1024.00051.00
GROMMET, SILICONE, BLANK
55 1 1023.00349.00
HOT WATER INSERT, NO FAUCET
56 1 1023.00203.00
FITTING, STRAIGHT, GROMMET, .625"
57 1 1025.00136.00
TUBE, SILICONE, 3/4" OD X 1/2" ID X 4.25" LG, BREW
58 1 1023.00345.00
ORIFICE INSERT, QUICK CONNECT, 5/16" HOLE
59 1 1023.00344.00
PLUG INSERT, QUICK CONNECT
60 1 1102.00445.00
ASSY, BREW BASKET LOCKER W/FEEDBACK
61 6 1083.00009.00
WASHER, #6 SCREW , INTL TOOTH LOCKWASHER
62 2 1084.00010.00
NUT, HEX, #6-32, UNDERSIZED, ZINC PLATED
63 1 1003.00259.00
BRACKET, BREW BASKET LOCK COVER
64 4 1073.00007.00
LEG, FLANGE FOOT, 4" HIGH
65 1 1086.00008.00
CONNECTOR, CLAMP, NON-METALLIC CABLE, 3/4"
66 1 1086.00031.00
SKINTOP, 3/4" NPT, 0.354" - 0.630" DIA CABLE, BLK
67 1 1086.00032.00
LOCKNUT, SKINTOP, 3/4" NPT, BLACK HEX
68 1 1044.00013.00
LABEL EQUIPOTENTIALITY, CE
69 1 1052.00027.00
EMI FILTER, THREE LINE 30A, 250/440VAC
70 4 1084.00012.00
NUT, HEX, #6-32 MACHINE SCREW
Go to fetco.com for the latest versions of all information Page 23 P195 January 2023
Page 24
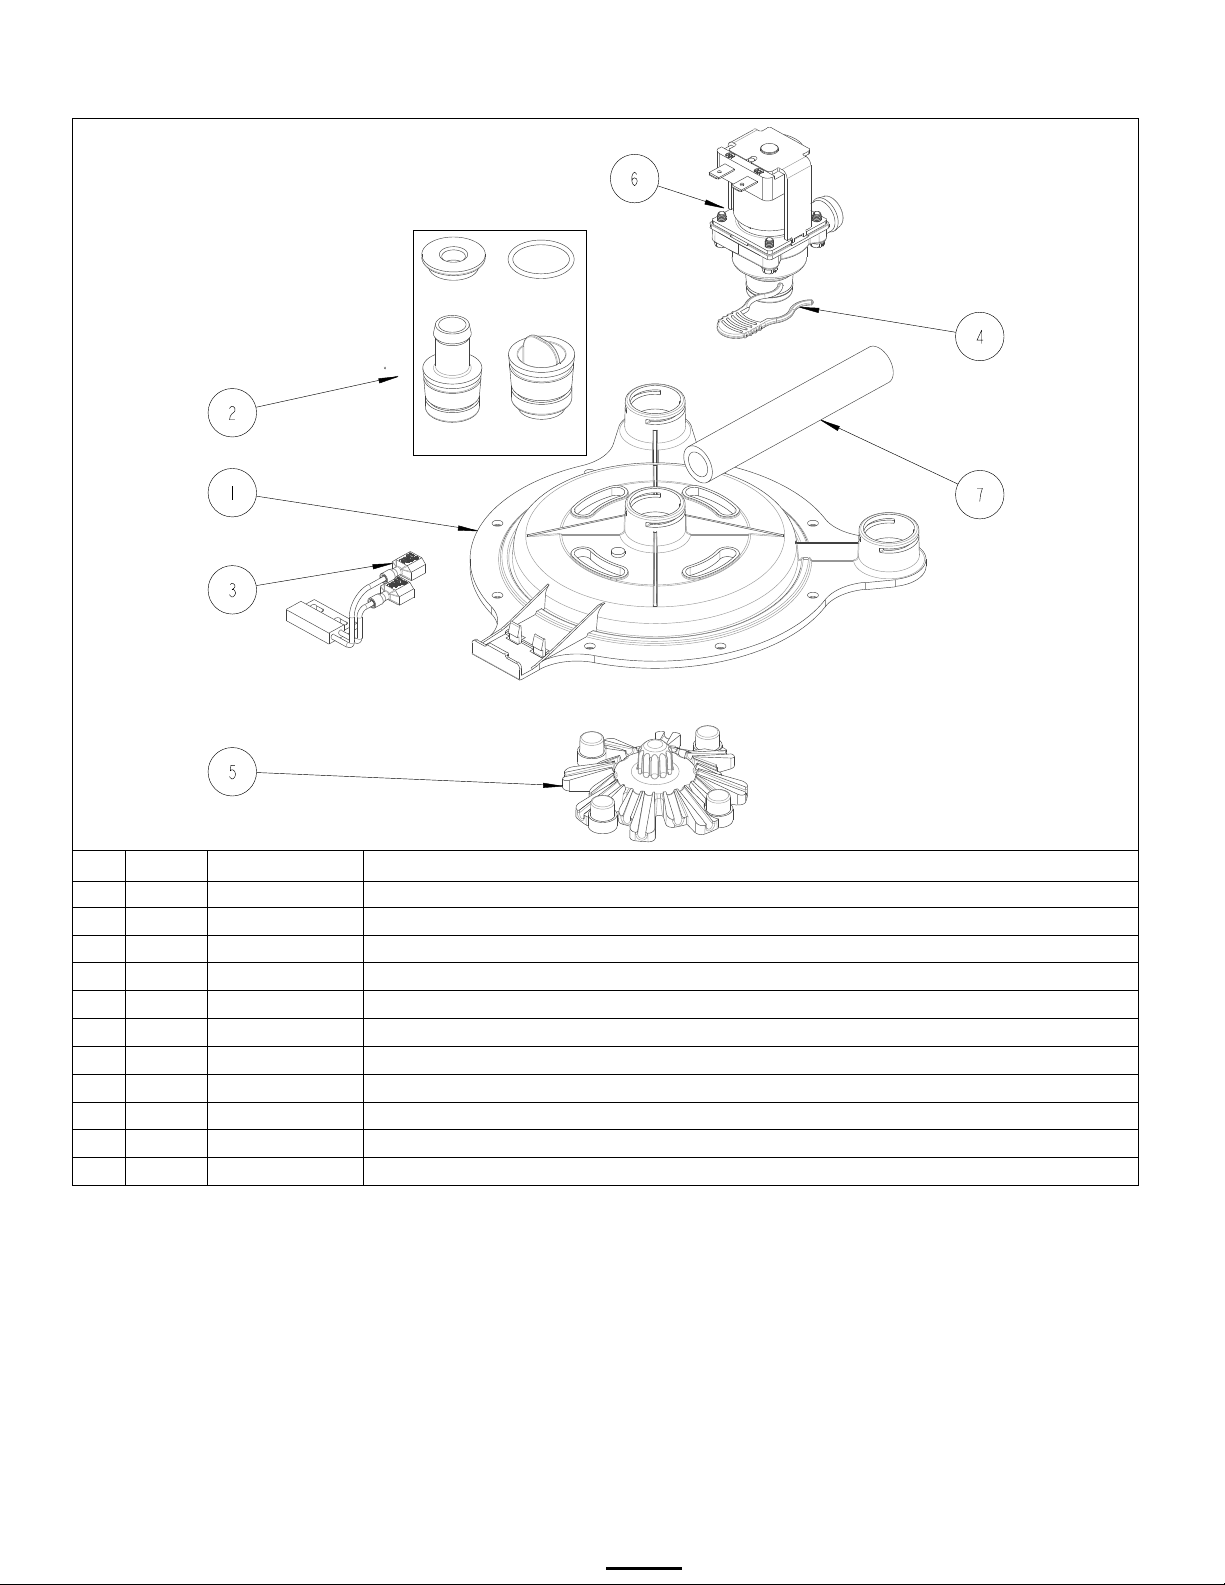
1102.00450.00
COMPLETE QUICK CONNECT SPRAYHEAD ASSEMBLY, BASIC
1
1
1023.00341.00
BASE, QUICK CONNECT SPRAYHEAD
2A
1
1023.00345.00
(Bypass Valve) ORIFICE INSERT, QUICK CONNECT, 5/16" HOLE
2B
3
1024.00106.00
O-RING, 13/16"OD X 11/16"ID X 1/16" TH, FOR QUICK CONNECT
2C
1
1023.00343.00
VENT INSERT, QUICK CONNECT
2D
~
1023.00344.00
PLUG INSERT, QUICK CONNECT
3
1
1102.00113.00
SWITCH, REED, ASSEMBLY
4
3
1023.00342.00
QUICK CONNECT CLIP
5
1
1102.00043.00
CASCADE SPRAY DOME, CBS-2050/60'S
6
1 or 2
1057.00076.00
VALVE ASSEMBLY, COMPLETE, NG, DELTROL
7
1
1025.00136.00
TUBE, SILICONE, 3/4" OD X 1/2" ID X 4.25" LG, BREW
2A 2B
2C
2D
Ref Qty
Part Number Description Drawing 1102.00450.00 QUICK CONNECT SPRAYHEAD
Go to fetco.com for the latest versions of all information Page 24 P195 January 2023
Page 25
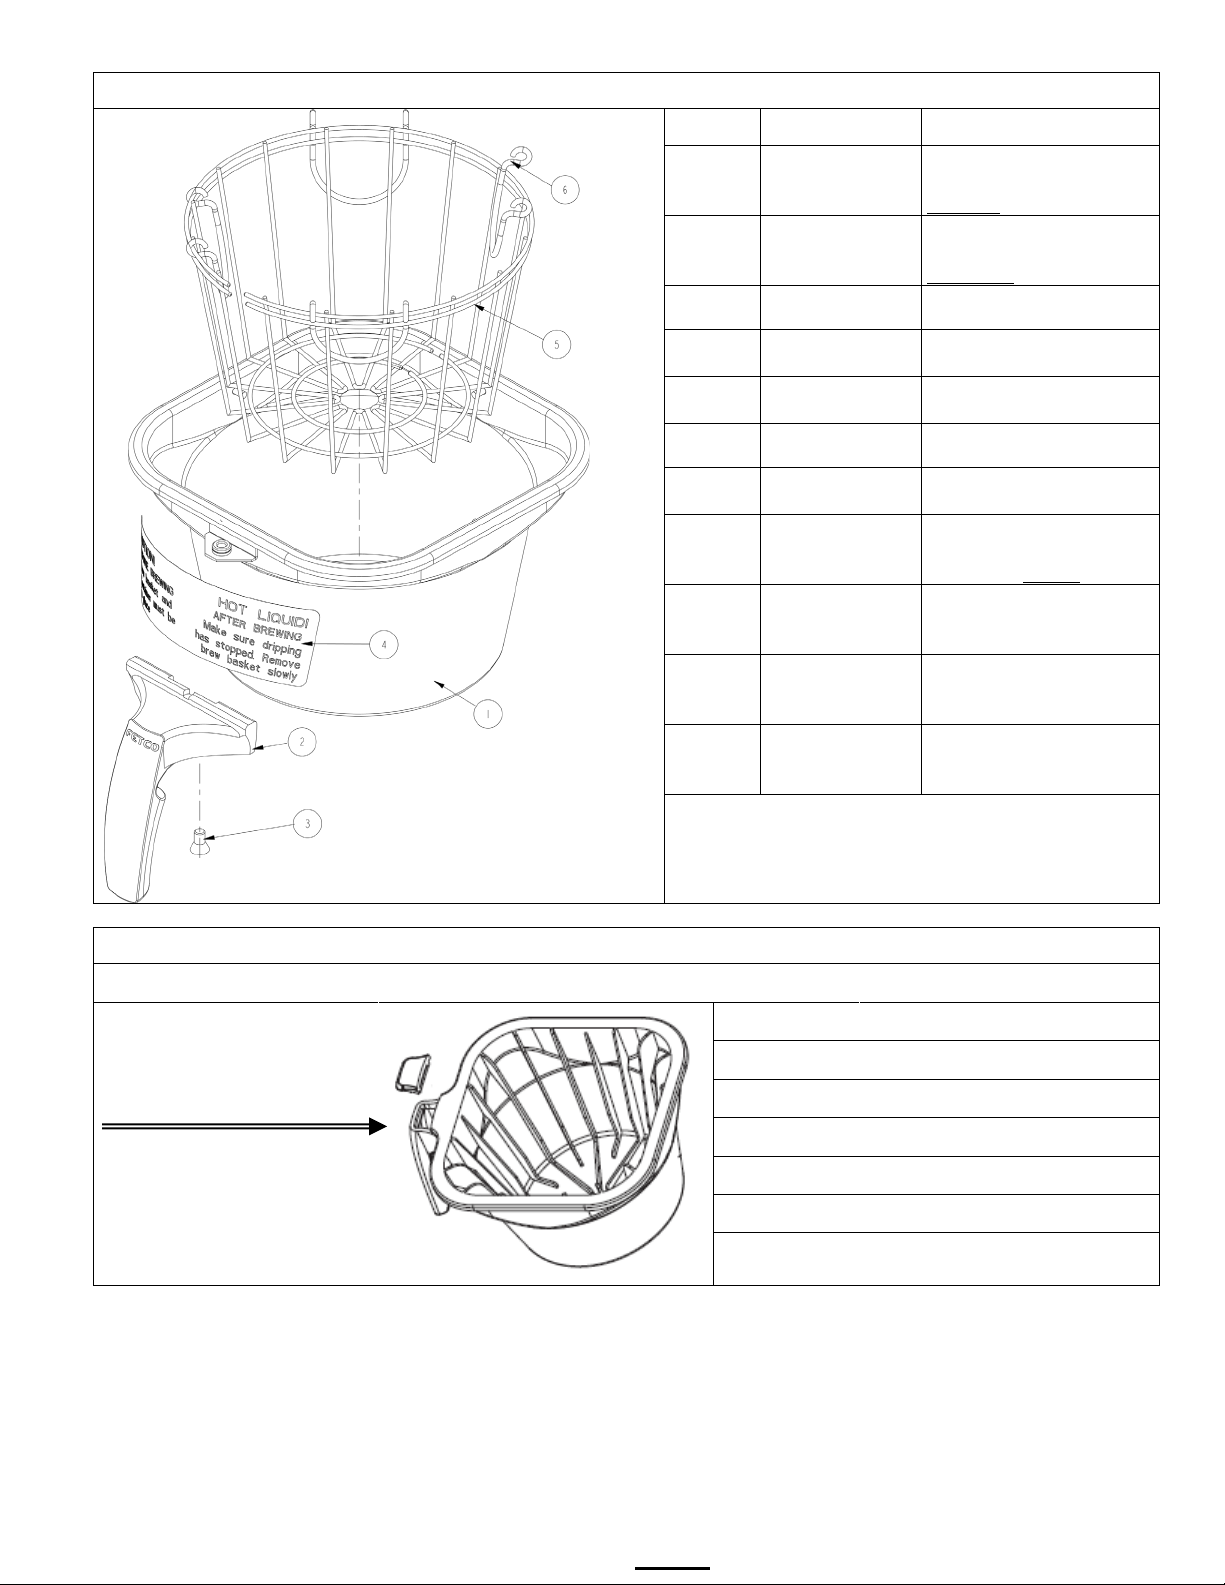
Stainless Steel Brew Baskets
Complete Stainless Steel
no clips
Complete Stainless Steel
with clips
BREW BASKET
WARNING LABEL
SCREW, 1/4-20 X .5,
FL HD, PH., W/NYLN
HANDLE W/MAGNET
ASY, BLACK
CLIP, WIRE BASKET,
Requires 4 clips
Optional
handle
Optional
handle
Optional
handle
Complete Plastic Brew Basket
Brown colored insert
Brew basket handle plug
polymeric brew baskets is
available in optional colors.
1023.00195.00
BROWN PLUG, BB HANDLE
1023.00194.00
BLACK PLUG, BB HANDLE
1023.00190.00
RED PLUG, BB HANDLE
1023.00191.00
GREEN PLUG, BB HANDLE
1023.00192.00
1023.00180.00
Ref# Part Number Description
B001280B1
B002280B1
Brew basket
Brew basket
1 1112.00058.00 BB brew cone WLDMNT
2 1046.00025.00
3 1082.00040.00
4 1009.00005.00 WIRE BASKET
5 1102.00064.00
6 1009.00003.00
colored
colored
colored
1102.00065.00
1102.00066.00
1102.00067.00
HANDLE W/MAGNET
RED
HANDLE W/MAGNET
GREEN
HANDLE W/MAGNET
ORANGE
NOTE!:
is standard
Go to fetco.com for the latest versions of all information Page 25 P195 January 2023
Plastic Brew Basket Parts
Part Number B015280BN2 –
Part Number Plug Insert color
for
ORANGE PLUG, BB HANDLE
BLUE PLUG, BB HANDLE
Wiring Diagrams
Page 26
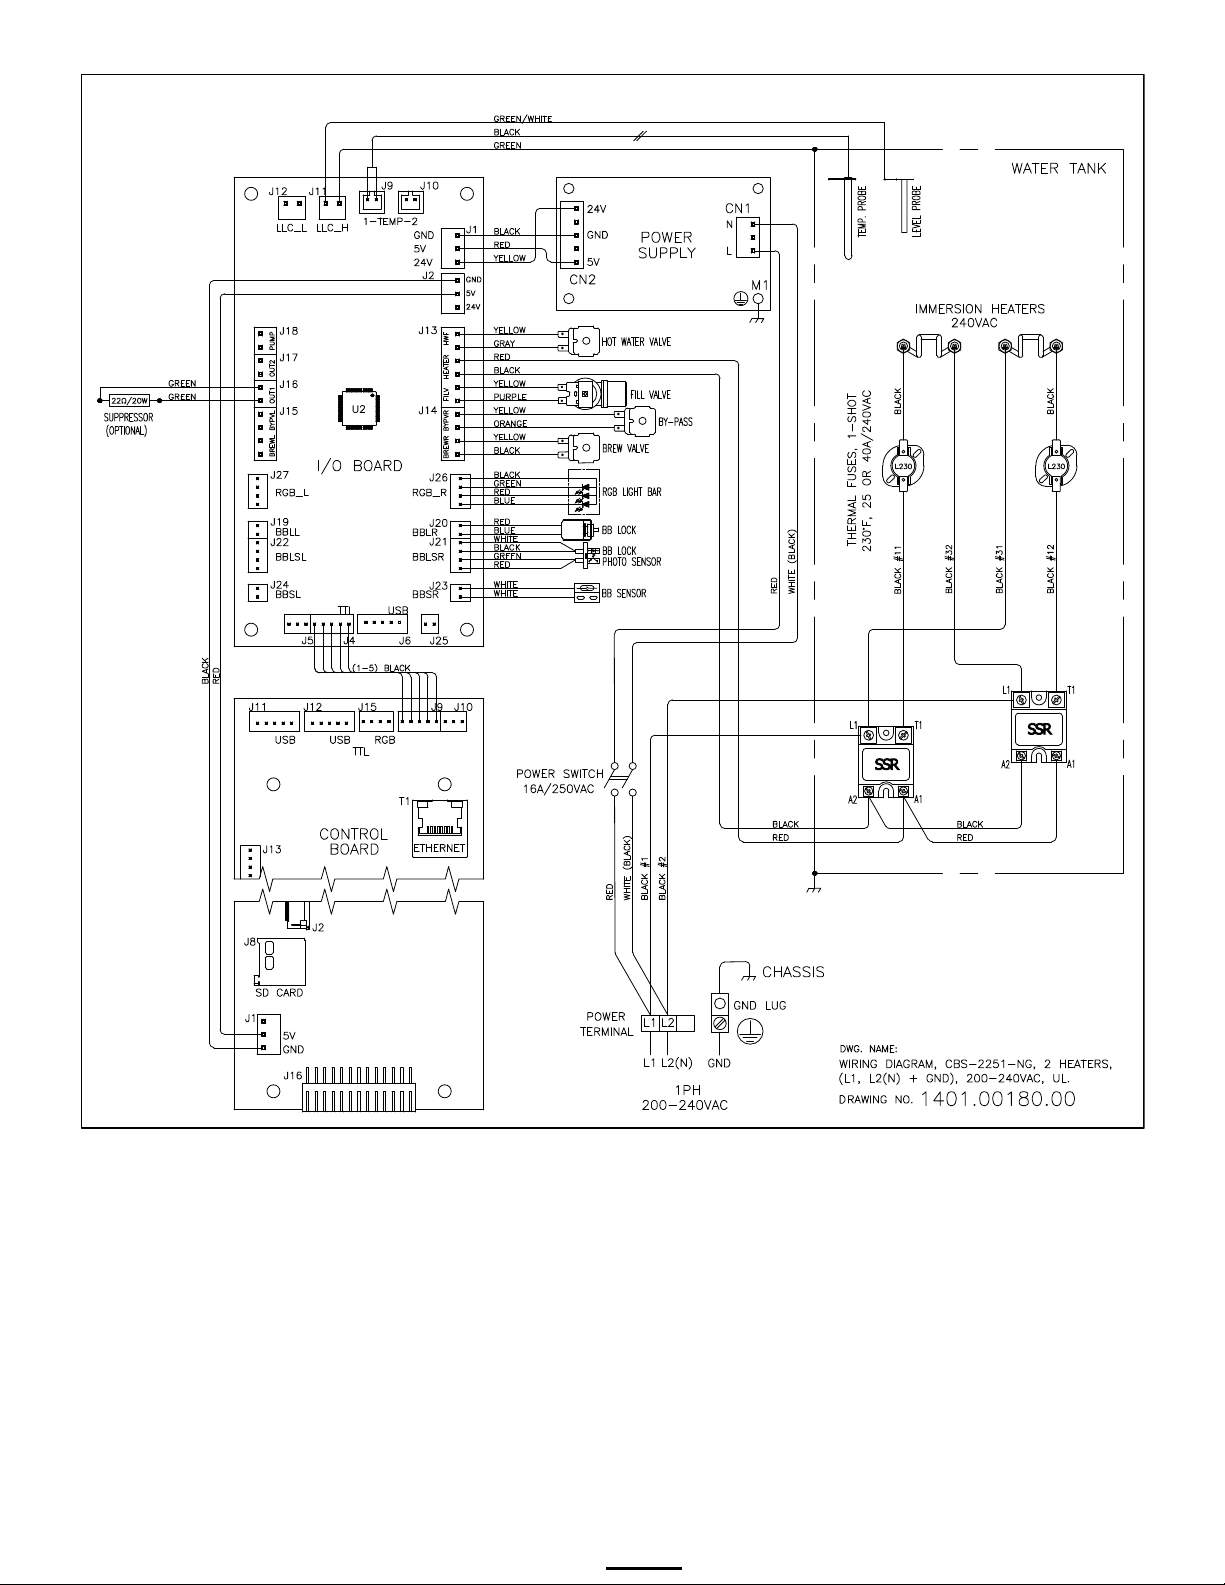
Go to fetco.com for the latest versions of all information Page 26 P195 January 2023
Page 27
Go to fetco.com for the latest versions of all information Page 27 P195 January 2023
Page 28
Go to fetco.com for the latest versions of all information Page 28 P195 January 2023
Page 29

End of section notes
N
 Loading...