

Festool ROTEX SERIES, RO 90 DX FEQ Plus, RO 125 FEQ Plus, RO 150 FEQ Plus Supplemental User's Manual
Page 1

Rotex Series
Dual Mode Sanders
RO 90 DX FEQ Plus, RO 125 FEQ Plus, RO 150 FEQ Plus
Supplemental User’s Manual
WARNING To reduce the risk of serious injury, read and understand all safety
precautions and instructions in this manual before using this tool.
Page 2

Limited Warranty
1
30 Day Money Back Guarantee
Buy with condence. If you are not completely satised, return
your tool2 to the selling dealer within 30 days and you will
receive a refund of either your purchase price or the lowest
retail price at which the same item has been offered since your
date of purchase. Freight charges are not refundable.
Service All-Inclusive® Warranty
Festool USA warrants that all new Festool power tools� purchased from authorized dealers in the U.S. and Canada will be
free from defects in materials and workmanship for a term of
three years from the date of original retail purchase.
Conditions of Service All-Inclusive Warranty
This warranty applies for three years from the date of original
retail purchase. Proof of purchase is required. This warranty is
void if the tool is not used, operated, repaired and maintained
in accordance with the tool’s instruction manual.
Excluded from this warranty’s coverage are:
► Accessories and/or attachments, including, but not limited to,
saw blades, drill bits, router bits, sanding discs and apparel
► Tools purchased from outside of the U.S. or Canada
► Repairs or replacements not performed by an authorized
Festool Service Center, outside of routine maintenance as set
forth in the instruction manual
► Parts or components not supplied by Festool or that have
been modied
► Damage caused by misuse, abuse, accident, impact, abnor-
mal wear and tear, improper storage and/or exposure to the
elements, or neglect
► Damage caused by anything other than defects in materials
and workmanship
► Normal adjustments and recommended maintenance as set
forth in the tool’s instruction manual
► Damage from the operation of the tool at a voltage or fre-
quency different from the tool’s rating, including the use of
transformers
1 The following is an exemplar Festool limited warranty. The actual warranty that comes
with your power tool is controlling.
2 Tool must be returned in complete and whole condition as supplied to include Systainer,
cutter, blade, power cord, etc.
3 For purposes of this warranty, power tools are dened as any Festool branded product
that bears a serial number (S.Nr. or M.Nr.).
4 To determine if your application is excluded from the warranty under this condition,
please contact the Festool Service Center at 800.554.8741
Repairs
If your Festool power tool requires repair, whether it be
warranty or non-warranty, you must contact our Service
► Damage resulting from the use of any non-Festool accessories
or attachments
► Tools used in high volume industrial applications⁴
Should any failure covered by this Limited Warranty occur, the
purchaser must contact Festool through our website, www.
festoolusa.com/SAI, or call 888.337.8600 for authorization and
shipping information. For purchases made in Canada, contact
our website, www.festoolcanada.com/SAI or call 613.363.0169.
Festool, in its sole discretion, may elect to repair, replace or
refund the purchase price of any tool covered by this Limited
Warranty that is found to be defective, at no cost to the purchaser. Warranty returns will be processed by Festool according
to normal work ow and availability of replacement parts and
components. Festool will issue a prepaid shipping label for
return of the tool to the Festool Service Center and will also
return the repaired tool freight prepaid, if the repair or replacement is covered under this Limited Warranty.
FESTOOL SHALL NOT BE LIABLE FOR ANY CONSEQUENTIAL,
INCIDENTAL OR SPECIAL DAMAGES REGARDLESS OF THE
THEORY OF LAW ON WHICH THE CLAIM IS BASED. ALL
WARRANTIES IMPLIED BY STATE LAW, INCLUDING THE
IMPLIED WARRANTIES OF MERCHANTABILITY AND FITNESS
FOR A PARTICULAR PURPOSE ARE HEREBY LIMITED TO THE
DURATION OF THREE YEARS.
SOME STATES IN THE U.S. AND SOME CANADIAN PROVINCES
DO NOT ALLOW EXCLUSIONS/LIMITATIONS OF INCIDENTAL
OR CONSEQUENTIAL DAMAGES AND/OR LIMITATIONS ON
HOW LONG AN IMPLIED WARRANTY LASTS, SO THE ABOVE
LIMITATION MAY NOT APPLY TO YOU. THIS WARRANTY GIVES
YOU SPECIFIC LEGAL RIGHTS, AND YOU MAY ALSO HAVE
OTHER RIGHTS THAT VARY FROM STATE TO STATE IN THE U.S.
AND FROM PROVINCE TO PROVINCE IN CANADA.
With the exception of any warranties implied by state or
province law as limited above, the foregoing limited warranty is
exclusive and in lieu of all other warranties, guarantees, agreements, and similar obligations of Festool. No agent, representative, distributor, dealer, or employee of Festool has the authority
to increase or otherwise modify the obligations or limitations of
this warranty.
Warrantor:
Festool USA Phone: USA—888.337.8600
Festool Canada Canada—613.363.0169
400 N Enterprise Dr. festoolusa.com/SAI
Lebanon, IN 46052 festoolcanada.com/SAI
Department at 888-337-8600 (613-363-0169 Canada) for
authorization and address details.
Liability Statement
This product has been built to the high standards of Festool.
Please do not attempt to operate or repair this equipment without adequate training. Any use, operation, or repair in contravention of this document is at your own risk. By acceptance of
this system you hereby assume all liability consequent to your
use or misuse of this equipment. Festool assumes no liability
for incidental, special, or consequential damage of any kind.
Equipment specications, applications, and options are subject
to change at the sole discretion of Festool without notice.
Proprietary Notice
All drawings and information herein are the property of Festool,
TTS Tooltechnic Systems AG & Co. KG. All unauthorized use and
reproduction is prohibited.
Written and Illustrated by Rick Christopherson.
© 2014 TTS Tooltechnic Systems AG & Co. KG
Festool USA is a division of Tooltechnic Systems, LLC.
2 Rotex Series Dual Mode Sanders
Festool is a trademark and service mark of TTS Tooltechnic
Systems AG & Co. KG
Plug-It and Systainer are registered trademarks of TTS
Tooltechnic Systems AG & Co. KG
www.festoolusa.com
Page 3

Contents
About This Manual ........................................... 3
Tool Symbols ................................................... 3
General Power Tool Safety Warnings .............. 4
Work Area Safety ..........................................4
Electrical Safety ............................................ 4
Personal Safety ............................................. 4
Power Tool Use and Care ................................ 4
Service ........................................................ 5
Specic Safety Rules for Sanders ....................... 5
Respiratory Exposure Safety Warnings ................ 5
Sander Overview ............................................. 5
Intended Use ................................................... 5
Technical Specications ..................................... 5
Functional Description ...................................... 6
Sanding Action/Mode ........................................ 7
Dual-Action ................................................... 7
Gear Driven (Rotex) Mode .............................. 7
Random Orbit ............................................... 7
Optimizing Random Orbit ................................ 7
Anatomy of Sandpaper ..................................... 8
Choosing the Appropriate Grit ......................... 9
Best Sandpaper for the Task ........................... 9
Setup ............................................................. 10
Changing Sanding Pads ................................... 10
Choosing the Correct Sanding Pad ................. 10
Changing Delta (RO90) Sanding Pads ............... 11
Changing Sandpaper ...................................... 12
Connecting a Dust Extractor ............................ 12
Connecting the Plug-It Power Cord ................... 12
Setting the Variable Speed .............................. 12
Installing the Sanding Bumper ......................... 13
Setting the Sanding Mode ............................... 13
Turning on the Sander .................................... 13
Operation ...................................................... 14
Using Dust Extraction ..................................... 14
Choosing Hand Positions ................................. 15
Working With Sanding Grits ............................. 15
Sanding Techniques ........................................ 16
Establishing Optimal Sanding Pressure ........... 16
Sanding Pattern and Movement ..................... 16
Maintenance and Adjustment ........................ 18
Routine Maintenance ...................................... 18
Motor Brush Replacement ............................... 18
RO 90 Motor Brushes ................................... 18
RO 125 Motor Brushes ................................. 19
RO 150 Motor Brushes ................................. 20
Troubleshooting ............................................. 21
About This Manual
Save These Instructions
It is important for you to read and understand this manual. The information it contains relates to protecting YOUR SAFETY
and PREVENTING PROBLEMS. The symbols below are used to help you recognize this information.
WARNING! Indicates a potentially hazardous situation which, if
not avoided, could result in death or serious injury.
CAUTION! Indicates a potentially hazardous situation which, if
not avoided, could result in minor or moderate injury.
NOTICE: Indicates a potential situation which, if not avoided,
can result in property damage or damage to the tool.
Note: Indicates information, notes, or tips for improving your
success using the tool.
Tool Symbols
V Volts
W Watts
Hz Hertz
~ Alternating Current (AC)
n
No-load Speed
o
Class II Double Insulated
Supplemental Owner’s Manual 3
Page 4

General Power Tool Safety Warnings
WARNING! Read all safety warnings and
instructions. Failure to follow the warnings and
instructions may result in electric shock, re, and/or
serious injury.
Work Area Safety
► Keep your work area clean and well lit. Cluttered or dark work
areas invite accidents.
► Do not operate power tools in explosive atmospheres, such
as in the presence of ammable liquids, gases, or dust. Power
Electrical Safety
► Power tool plugs must match the outlet. Never modify the
plug in any way. Do not use any adapter plugs with earthed
(grounded) power tools. Unmodied plugs and matching
outlets will reduce risk of electric shock.
► Avoid body contact with earthed or grounded surfaces such
as pipes, radiators, ranges and refrigerators. There is an
increased risk of electric shock if your body is earthed or
grounded.
► Do not expose power tools to rain or wet conditions. Water
entering a power tool will increase the risk of electric shock.
► Do not abuse the cord. Never use the cord for carrying, pull-
ing, or unplugging the power tool. Keep cord away from heat,
oil, sharp edges or moving parts. Damaged or entangled
cords increase the risk of electric shock.
► When operating a power tool outdoors, use an extension
cord suitable for outdoor use. Use of a cord for outdoor use
reduces the risk of electric shock.
Save all warnings and instructions
for future reference.
tools create sparks which may ignite the dust or fumes.
► Keep children and bystanders away while operating a power
tool. Distractions can cause you to lose control.
► If operating a power tool in a damp location is unavoidable,
use a ground fault circuit interrupter (GFCI) protected supply.
Use of a GFCI reduces the risk of electric shock.
► Never use an extension cord that is damaged, including cuts,
exposed wires, or bent/missing prongs. Damaged extension
cords increase the risk of re or electric shock.
► Use only extension cords rated for the purpose.
► Use only extension cords rated for the amperage of this tool
and the length of the cord. Using too small of an extension
cord can cause the cord to overheat.
Extension Cord Ratings
Cord Length Size (AWG)
<50 Ft. 14
50-100 Ft. 12
>100 Ft. Not recommended
Personal Safety
► Stay alert, watch what you are doing, and use common sense
when operating a power tool. Do not use a power tool while
tired or under the inuence of drugs, alcohol, or medication.
A moment of inattention while operating power tools may
result in serious personal injury.
► Use personal protective equipment. Always wear eye pro-
tection. Protective equipment such as dust mask, non-skid
safety shoes, hard hat, or hearing protection used for appropriate conditions will reduce personal injuries.
► Prevent unintentional starting. Ensure the switch is in the
off-position before connecting to power source, picking up,
or carrying the tool. Carrying power tools with your nger on
the switch or energizing power tools that have the switch on
invites accidents.
► Remove adjusting key or wrench before turning the power
tool on. A wrench or a key that is left attached to a rotating
part of the tool may result in personal injury.
► Do not overreach. Keep proper footing and balance at all
times. This enables better control of the tool in unexpected
situations.
► Dress properly. Do not wear loose clothing or jewelry. Keep
your hair, clothing, and gloves away from moving parts. Loose
clothes, jewelry, or long hair can be caught in moving parts.
► If devices are provided for the connection of dust extrac-
tion and collection facilities, ensure these are connected and
properly used. Use of dust collection can reduce dust-related
hazards.
► Always wear safety glasses complying with ANSI Z87.1.
Ordinary glasses are not proper protection.
Power Tool Use and Care
► Do not force the power tool. Use the correct power tool for
your application. The correct power tool will do the job better
and safer at the rate for which it is designed.
► Do not use the power tool if the switch does not turn it on
and off. Any power tool that cannot be controlled with the
switch is dangerous and must be repaired.
► Disconnect the plug from the power source before making
any adjustments, changing accessories, or storing the tool.
Such preventive safety measures reduce the risk of starting
the tool accidentally.
► Store idle tools out of reach of children and do not allow
persons unfamiliar with the power tool or these instructions
4 Rotex Series Dual Mode Sanders
to operate the power tool. Power tools are dangerous in the
hands of untrained users.
► Maintain power tools. Check for misalignment or binding of
moving parts, breakage of parts and any other condition that
may affect the power tool’s operation. If damaged, have the
power tool repaired before use. Many accidents are caused by
poorly maintained power tools.
► Keep cutting tools sharp and clean. Properly maintained tools
with sharp cutting edges are less likely to bind and are easier
to control.
► Use the power tool, accessories, and tool bits etc. in accor-
dance with these instructions, taking into account the working
Page 5

conditions and the work to be performed. Use of the power
tool for operations different from those intended could result
in a hazardous situation.
Service
► Have your power tool serviced by a qualied repair person
using only identical replacement parts. This will ensure that
Specic Safety Rules for Sanders
► Know the material you are sanding and take precautions
accordingly. Some materials contain chemicals, elements,
or bers which may be toxic or harmful when abraded. Take
caution to prevent dust or vapor inhalation and skin contact.
► Always perform sanding in a well ventilated area and use
personal respiratory protection.
► Do not use in wet environments. Ingestion of water into the
motor may result in electrocution hazard.
Respiratory Exposure Safety Warnings
Substantial or repeated inhalation of dust and other airborne
contaminants, in particular those with a smaller particle size,
may cause respiratory or other illnesses. Various dusts created
by power sanding, sawing, grinding, drilling and other construction activities contain chemicals or substances known (to the
State of California and others) to cause cancer, birth defects or
other reproductive harm. Some examples of these chemicals/
substances are: lead from lead-based paints; crystalline silica
from bricks, cement, and other masonry products; arsenic and
chromium from chemically-treated lumber; and some wood
► To reduce the risk of serious injury, never alter or misuse the
power tool.
the safety of the power tool is maintained.
► Do not use the sander if the sanding pad fails to retain the
sanding disk. Replace the sanding pad. A loose sanding disk
can come free and cause personal injury.
► Take care when disposing of ne sanding dust. Fine particle
dust may become explosive. Do not throw sanding dust on an
open ame.
► Never sand materials containing asbestos.
dusts, especially from hardwoods, but also from some softwoods such as Western Red Cedar.
The risk from these exposures varies, depending on how often
you do this type of work. To reduce your exposure to these
chemicals: work in a well ventilated area and use a properly
functioning dust extraction system. When the inhalation of
dust cannot be substantially controlled, i.e., kept at or near the
ambient (background) level, the operator and any bystanders
should wear a respirator approved by NIOSH for the type of
dust encountered.
Sander Overview
Intended Use
The Rotex sanders are designed for dry sanding and polishing of wood, plastic, metal, composite materials, paint/
varnish, ller, and similar materials.
The sander must not be used when wet or damp, or operated in a damp environment for electrical safety reasons.
Use this sander only for dry sanding. The tool should not
Technical Specications
RO 90 DX FEQ RO 125 FEQ RO 150 FEQ
Power Consumption 400 W 500 W 720 W
Orbital Speed 3000-7000 rpm 3000-6000 rpm 3300-6800 rpm
Rotational Speed (Rotex Mode) 260-520 spm 300-600 spm 320-660 spm
Orbital Stroke 3 mm 3.6 mm 5 mm
Sanding Pad Diameter 90 mm 125 mm 150 mm
Dust Extraction Port Size 27 mm 27 mm 27 mm
Weight 1.5 kg / 3.3 lbs 1.9 kg / 4.2 lbs 2.3 kg / 5.1 lbs
be altered or used for any other purpose, other than as
specied in these operating instructions. Using the tool in
contravention to this manual will void your warranty and
may lead to injury. The user shall be responsible and liable
for damages and accidents resulting from misuse or abuse
of this sander.
These specications are subject to change without notice.
Supplemental Owner’s Manual 5
Page 6
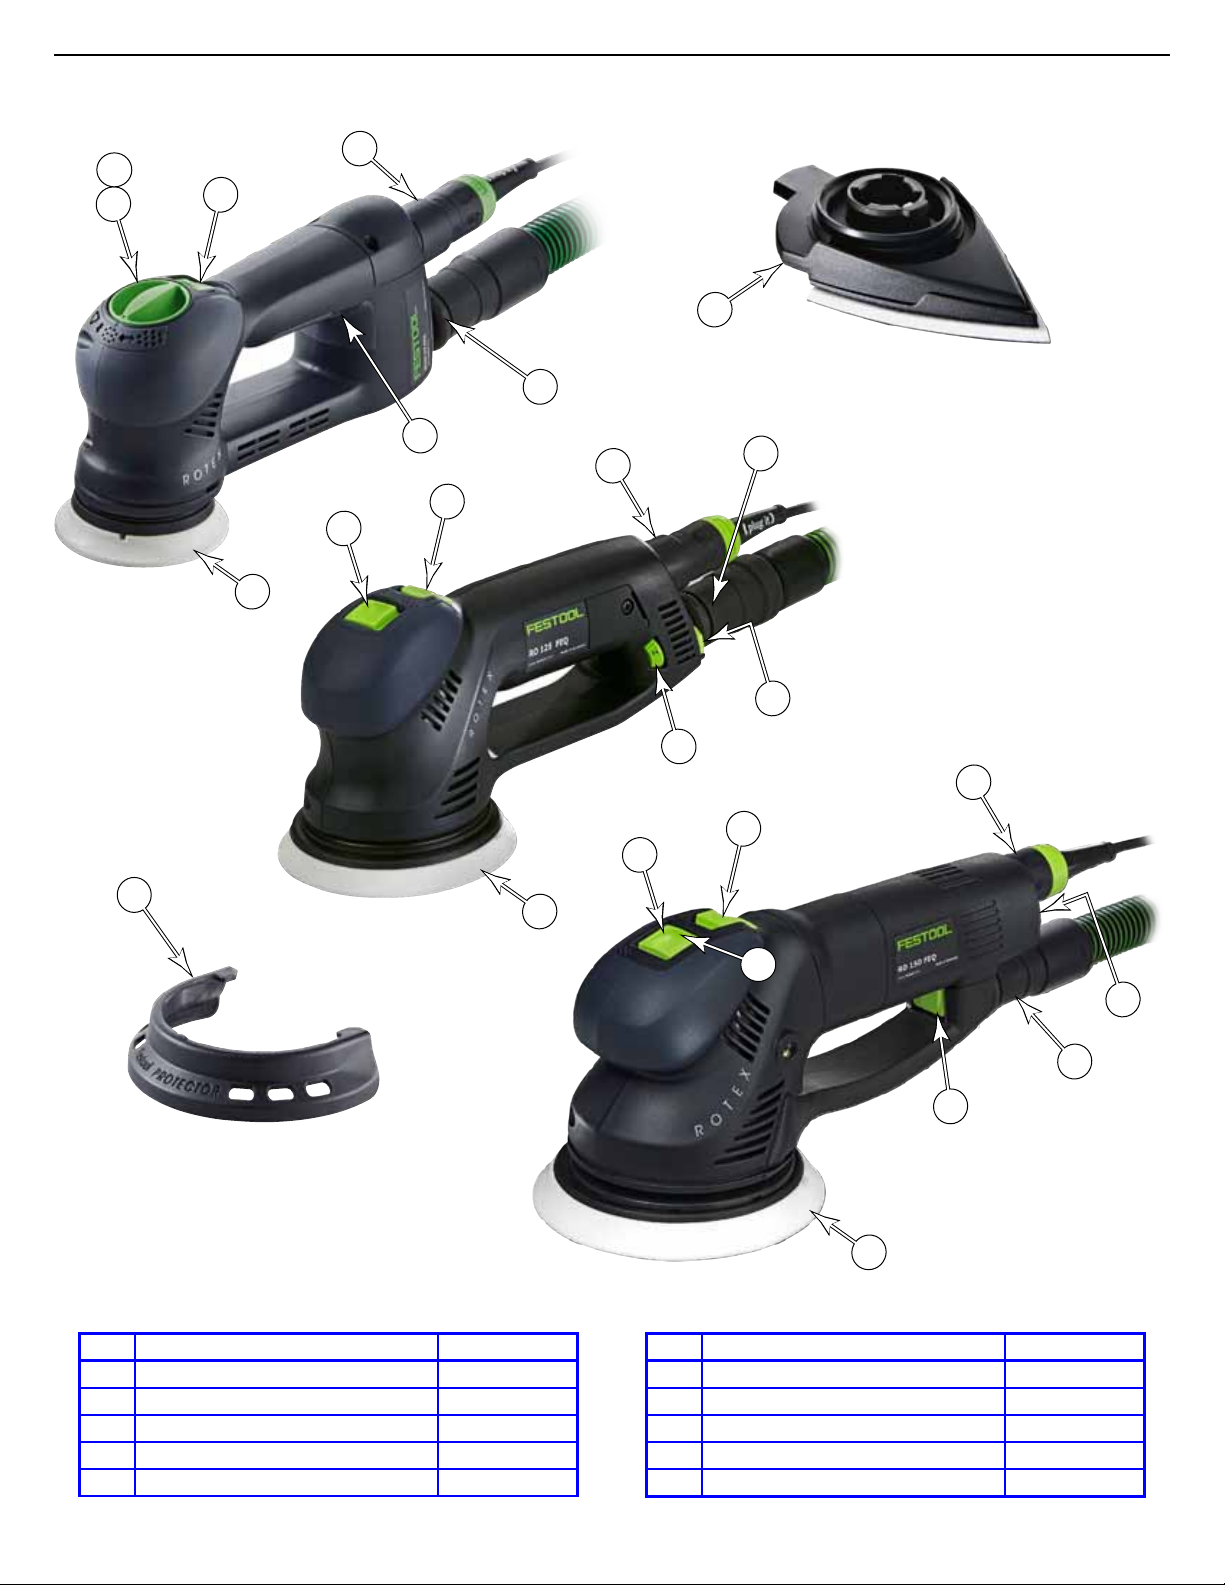
Functional Description
F
J
B
A
H
RO 90 DX FEQ
I
D
C
F
D
A
B
G
J
C
A
B
RO 125 FEQ
G
Detail Pad
F
RO 90 DX
M
C
D
E
G
RO 150 FEQ
Item Name or Description Ref. Page(s)
A Power Switch 13
B Mode Selector 7, 13
C Speed Control Dial 12
D Dust Collection Port 12
E Dust Channel Release (RO150) 12
6 Rotex Series Dual Mode Sanders
Item Name or Description Ref. Page(s)
F Plug-It Power Port 12
G Sanding Pad 10
H DX Sanding Pad (RO90) 11
I Sanding Bumper/Protector 13
J Fast-Fix Spindle Lock 10
Page 7
Sanding Action/Mode
Sanding is dened as scratching or abrading a surface. So
when we discuss scratches and scratch patterns, the goal is
to minimize them or make them less visible to the eye, but
they will always be present.
The Festool Rotex sander is not only a dual-action sander,
but is also a dual-mode sander. Even though those two
terms sound similar, they do not mean the same thing.
Because both of the dual modes are variations of dual-
action, it is best to describe dual-action rst.
Dual-Action
Dual-action means that the sanding pad moves in two
distinct motions simultaneously. The primary motion is an
eccentric orbit—similar to the motion of a bicycle pedal. The
center of the sanding disk moves in a small eccentric circle
about the center of the
sander. The diameter of this
orbital path ranges from
3mm to 5mm, depending
on the model sander (Refer
to “Technical Specications”
on page 5).
The second motion is the
rotation of the disk about
the disk’s center. Because
the sanding disk is eccentric
to the machine center, so is
this path of rotation.
The effect of this dual
motion is that each point
on the sanding pad traces out a geometric shape called
a roulette. You may be familiar with this shape from the
children’s drawing toy, “Spirograph”. The exact shape of this
roulette depends on the ratio between the orbital radius and
the radius of the pad rotation. This means that each part of
the sanding pad traces out a slightly different shape. This
minimizes the visibility of the scratch patterns on the wood
because each part of the sanding disk leaves slightly different scratch shapes. Dual action sanders don’t leave fewer
scratches, but the scratches are less visible because each
one is different.
Rotation
Eccentric
Orbit
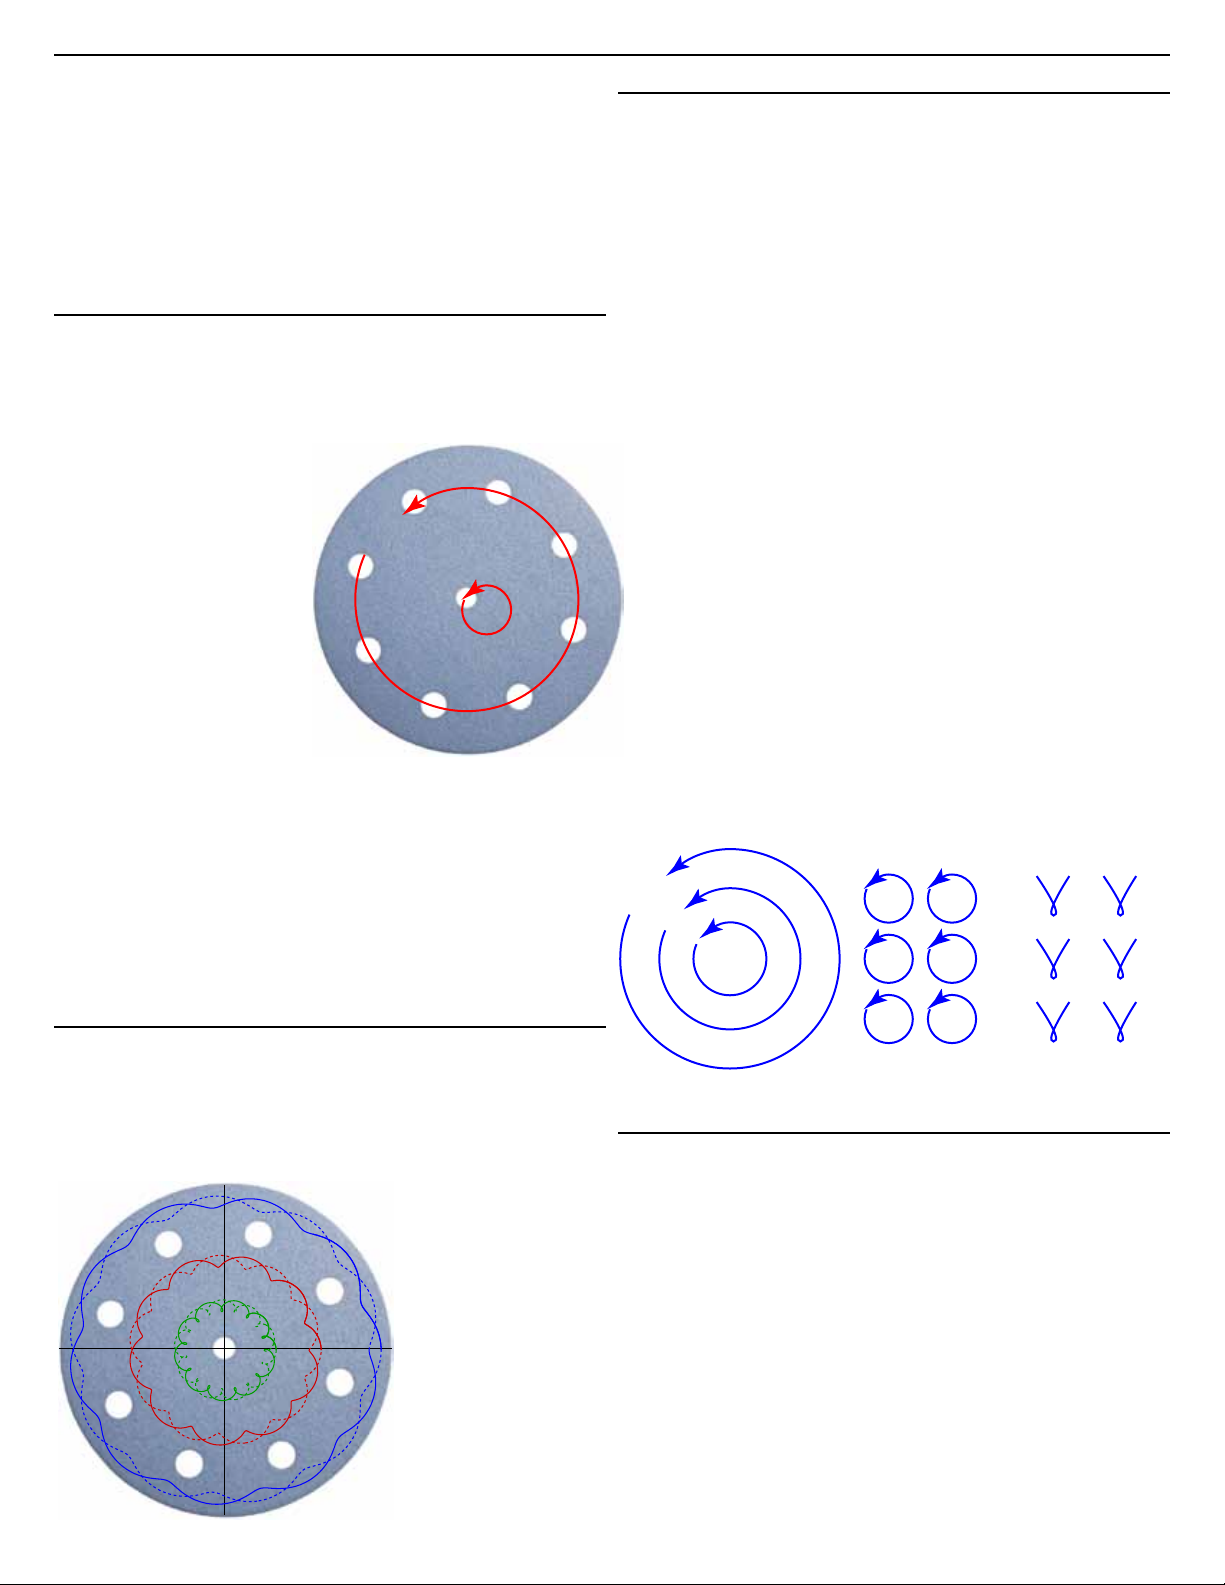
Random Orbit
This name random orbit is a slight misnomer because it
isn’t the eccentric orbit that is random, but the disk rotation that is random. The motion of the sanding pad is still
considered dual-action, but the rotational component of the
motion is not constrained to follow a strict ratio of the orbits
like a gear-driven sander. The disk rotation is permitted to
freewheel about the orbit, and this includes even rotating
backward at times.
It is this freewheel motion that permits the sander to be
both fairly aggressive but to also leave very few visible
scratches. Again, it isn’t because there are fewer scratches,
but that the scratches are even less visible.
What makes the rotation of the disk somewhat random is
friction with the sanding surface. Inertia causes the disk to
want to rotate in unison with the orbital motion, but friction
with the workpiece tempers this motion, and causes the
disk to speed up, slow down, or even turn backward.
You may have noticed that when hand-sanding wood, there
is more resistance to sanding across the grain than there is
with the grain. The same is true for a random orbit sander.
As a result, when the orbital motion is moving across-thegrain, the freewheel rotational motion will resist moving
across the grain. The net result will be more scratches
being parallel to the wood grain than across the grain.
Unlike a singular orbital motion (orbital sander) or a singular rotational motion (grinder), whose scratch patterns will
be circular, a random orbital scratch pattern will be more
“V” shaped and in the direction of the wood grain. Because
these are less geometric in shape, they are less visible to
the eye. The tighter this “V” shape, the less noticeable the
scratches will be.
Gear Driven (Rotex) Mode
In the gear driven mode, the dual-action rotation of the
sanding pad is directly coupled to the orbital motion. For
each of the Rotex sander models, the pad rotates once for
approximately 10 orbits of the eccentric center. (In the
image below-left, this ratio is 9.5 to 1.)
This gear driven mode
provides some of the
aggressiveness of a
rotary grinder, but the
high ratio (10:1) of
the rotation-to-orbit
minimizes the visible scratches that a
grinder would impart
on the wood.
Supplemental Owner’s Manual 7
Grinder Scratch
Patterns
Optimizing Random Orbit
Optimizing the sanding doesn’t remove the number of
scratches, it just makes them less visible to the eye. The
least visible scratches are those that are not geometric and
are in-line with the wood grain. Both of these conditions are
optimized by letting the friction between the sanding pad
and sanded surface control the rotation of the sanding disk.
Many operators will apply excessive downward pressure to
the sander to slow down the freewheel motion of the pad,
but this will increase the amount of friction and make the
scratches more geometric and more visible. Instead, using
a light pressure allows the cross-grain friction to be larger
than the in-line friction, and the ideal scratch pattern shown
above will be the result.
The best random orbit motion is when the sanding pad has
very little pressure, and is permitted to freewheel on its own.
Orbital Scratch
Patterns
Random Orbit
Scratch Patterns
Page 8

Anatomy of Sandpaper
The various parts of sandpaper affect its performance.
These are shown below and explained in the subsequent
sections.
Abrasive
Dispersion
Grit
Top
Bond
Base
Bond
Backing
StickFix
StickFix is a short-nap hook and loop system for retaining
the sandpaper to the Festool sanding pad. The stiff, shortnap hooks resist heating effects, and therefore last longer.
Backing is the primary substrate for the sandpaper. The
backing type determines the performance and longevity of
the sandpaper. Stiffer backings resist the pressure of the
individual grit particles, and is therefore more aggressive in
sanding. Softer backings conform to the grit particles more,
so the result is shallower scratches from the grit particles.
Paper backing is the most common and economical type,
and comes in different thicknesses designated by a letterweight of b, c, d, or e with the higher the letter, the heavier/
stiffer the paper.
Cloth backed disks are the stiffest and intended for extreme
usage conditions where long-life is important. The extra
durability makes them ideal for a metal working environment, but they may also be used for aggressive sanding in
woodworking.
Foam backed disks provide the softest backing for the shallowest scratches. This permits the disk to better contour to
the surface being sanded and is ideal for polishing.
Abrasive is the material that performs the actual sanding
or abrasion. The two most common types of abrasive material are aluminum oxide and silicon carbide, with aluminum
oxide being the more common of the two.
Silicon carbide is a very hard material with very sharp
edges. Because silicone carbide is so hard, it fractures
easily, and this exposes new cutting edges to the sanding
operation. This keeps the sandpaper very sharp for cutting
hard materials, but the grit gets smaller with usage. A side
benet of this is that a coarse grit sandpaper will become
a ner grit with use, which is typically desired in the sanding process. Silicon carbide is best suited for nish sanding
where reduced sanding pressure reduces how frequently the
grit cleaves.
Aluminum oxide is almost as hard as silicon carbide, but the
crystals are pyramid shaped and do not cleave the edges
during use. The edges aren’t as sharp, but that is what
permits them to last longer. This long life is the reason aluminum oxide is one of the most common abrasive materials.
Grit is the size of the abrasive particles. The smaller the grit
number, the larger the grit particle size. Larger grit particles
will cut deeper into the sanded surface, and therefore, more
aggressively. However, the deeper the cut, the deeper the
scratches. This is the reason why sanding is performed with
8 Rotex Series Dual Mode Sanders
progressively ner grits; to remove the scratches left behind
from the coarser grits.
Dispersion (Coat) is the spacing between grit particles
that coat the substrate. The term “open coat” for example,
means that at least 70% of the substrate is open or
uncoated. A closed coating means that the substrate is
nearly fully coated, and a semi-open coat falls somewhere
in between the two. The dispersion is most noticeable in the
coarser grits where an open coat results in visible exposure
of the substrate (see image below).
A more open dispersion leaves more room for sanding dust
(called swarf) to clear the sanding grit to avoid buildup and
clogging, but also permits the grit to penetrate deeper into
the sanded workpiece, leaving deeper scratches.
Open Coat
Sandpaper
Base Bond and Top Bond is the material and/or method
for adhering the abrasive to the backing material. The grit
material is impregnated into the bonding agent to slightly
encapsulate the grit material for better adhesion and less
fracturing of the grit.
The thickness of the top
bond is called the level-
ing, as it tends to ll in
the valleys and level the
bond coating. An open
leveled top bond is lighter
and leaves deeper valleys
to permit greater swarf
removal.
A closed leveled top bond
is thicker and lls in the
valleys, but provides
a stronger bond of the
abrasive grit particles.
The prevents the grit from
breaking loose from the
substrate for longer lasting, durable abrasive properties, but may clog faster
when sanding materials
that generate more swarf.
Open
Leveled
Closed
Leveled
Page 9

Non-Woven Fiber, Vlies (pronounced eece) is a special
RUBIN
GRANAT
BRILLIANT
SAPHIR
CRISTAL
TITAN
PLATIN
VLIES
abrasive pad of a non-woven ber impregnated with abrasive into the ber. The exible ber mesh and 3-dimensional
abrasive make these ideal for polishing nishes and metal
surfaces.
to level the surface. With this comes the trade off between
speed versus deeper scratches. The key is to choose the
nest of the coarse grits that will provide the leveling in a
reasonable amount of time and effort. Choosing too coarse
of a grit may actually increase the amount of sanding later
to remove excess scratching. The Rotex line of sanders
provide the added benet of gear-driven mode, which can
remove material quickly with a less-coarse grit. Therefore,
before switching to a ner grit, rst switch the sander back
to random orbital mode to help reduce the scratches with
the same grit that created them. Then you can progress
through the grits normally or switching between modes.
The purpose of ne sanding is the removal of previous
scratches. The key here is to sand only up to the nest
grit necessary for the desired nish type. The nal grit size
should be commensurate with the grain or structure size of
the material being sanded. Metals, plastics, and nishes; for
Choosing the Appropriate Grit
Selecting the best sanding grit for a task is fairly subjective
and depends on the task and even the sanding mode of the
sander. The adage of working progressively up through the
grits is based on the principle of each ner grit removing the
scratches that the coarser grit leaves behind.
For initial stages of sanding with a coarse grit, the goal is
example, have a very ne structure and may be sanded to
a ner grit. Wood, on the other hand, has a relatively large
grain structure and should not be sanded beyond a medium
grit unless a burnished nished is desired. (Burnishing tends
to close the wood pores and reduces the absorption of stains
and nishes.)
In summary, you should avoid starting too coarse or nishing too ne for the particular material or surface type.
Best Sandpaper for the Task
Name Type Range Description
► Aluminum Oxide
► e-Wt Paper
► Synthetic Resin
► Closed-coat
P40-P220 The heavy weight paper backing and strong top bond make this
sandpaper very good for long lasting use on bare wood, metal, and
auto body llers.
► Aluminum Oxide
► Synthetic Resin
► Closed-coat
► Aluminum Oxide
► Synthetic Resin
► Closed-coat
► Aluminum Oxide
► Cloth-backing
► Semi-close Coat
► Closed-leveled
► Aluminum Oxide
► Phenolic Resin
► Open-coat
► Aluminum Oxide
► Synthetic Resin
► Latex Base Bond
► Semi-close Coat
► Silicon Carbide
► Synthetic Resin
► Open Coated
► Foam
P40-P1500 The non-wax stearated coating and lighter paper weight make this
a very good universal sandpaper for nished and unnished wood,
metal, plastic, solid surface, and composite materials. The high
density closed coat grit is more uniform for reduced scratches.
P40-P400 The lighter weight paper and thinner top bond results in shallower
scratches for good sanding results in harder woods, nishes, and
paints. The open-leveled top bond and anti-static coating loads less
when sanding nishes.
P24-P100 The cloth-backing, semi-closed coating, and closed-leveled bond
make these disks very durable workhorses for sanding and leveling
on hard wood, metal, berglass, and reinforced plastics.
P40-P120 The broad open-coat dispersion of this disk makes it ideal for
aggressive sanding without loading on clog-prone materials, such
as paint stripping or high-resin woods.
P40-P3000 The latex base bond provides greater exibility of the grit coating,
which makes Titan idea for polishing tasks on solid surface, plas-
tics, and nishes. The semi-closed coat and open-leveled top bond
result in ner sanding with fewer scratches. However, with the
stearate coating, it is not recommended for water borne nishes.
S400-S4000 The tight woven grit base and foam backing makes Platin ideal
for a high gloss surface in plastic, solid surface, and nishes. The
permeable foam and ber results in consistent dust extraction
across the whole disk and cooler surface temperatures.
► Al-Ox or Si-Carb
► Synthetic Resin
► Stearate Si-C
A120-A800 The elastic ber mat with impregnated grit makes Vlies ideal for
deep pore cleaning of woods and scouring or de-rusting of metals.
Supplemental Owner’s Manual 9
Page 10

Setup
Changing Sanding Pads
Each model sander may be used with a variety of sanding
pad options. It may also be necessary to change sanding
pads for different sanding purposes or when they become
worn.
CAUTION! Do not use a sanding pad if it no longer
holds the sanding disk in place. Using a worn pad
can result in the sanding disk to y off the pad and
cause injury. Sanding pads are considered a wear
item and should be replaced when the StickFix
hook-&-loop bers cannot rmly hold the sanding
disk.
NOTE: Excessive heat from sanding will cause the
sanding pads to wear faster. To maximize your pad
life, avoid operations that generate excessive friction
and heat, such as sanding stationary on a sharp edge
or applying too much pressure while sanding.
Choosing the Correct Sanding Pad
Sanding pads come in different grades of hardness/softness for improved performance for different sanding tasks.
The hardness or softness of the sanding pad determines
how much the sanding pad conforms to the surface being
sanded.
A harder sanding pad is best for course sanding on at surfaces. The rmer pad resists creating a wavy surface where
there are softer and harder portions of the wood ber. This
is especially important with woods that have a wide spacing
in their annular growth rings or signicant differences in the
density of the wood ber between rings.
A slightly softer sanding pad is best used for progressively
ner sanding of the workpiece. This permits the pad to
slightly conform to the surface to ensure previous grit sanding marks are removed, but is less prone to creating a wavy
surface because the grit is less aggressive.
Similarly, a very soft sanding pad is best used for ne
sanding or sanding of nishes. Having greater conformance
to the very small waves in the surface is desired, and with
the high grit abrasive, risk of creating deeper waves is less
likely.
Removing/Installing the Pad
1. Unplug the sander for safety.
2. Lock the sander spindle from rotating:
► For the RO90, turn the mode selector to the DX (orbital)
mode.
► For the RO125 and RO150, slide the mode selector to
the Rotex mode, and press in on the spindle lock button.
3. Rotate the pad 1/4-turn to remove or install it.
DX Mode
RO-90 DX Mode
Spindle
Lock
RO-125
Blue / Hard
Black / Soft Gray / Super Soft
Spindle
Lock
Tighten
Loosen
RO-150
10 Rotex Series Dual Mode Sanders
Page 11

Changing Delta (RO90) Sanding Pads
The RO90 sander can also use an optional detail sanding
pad. The Delta (DX) sanding pad is triangular shaped for
reaching into tight corners and along edges. The pad operates only in orbital mode, and does not rotate.
NOTICE: The RO90’s mode selection dial has an
interlock to prevent the sander from being operated in either of the rotary modes when the DX pad
is installed. Forcing the dial to turn with a DX pad
installed will damage the sander.
The standard DX sanding pad is actually a sanding pad
holder with removable sanding pads. The sanding pads
can be either a hard sanding pad or a soft sanding pad. An
extended sanding pad is also available, but does not use
the separate sanding pads. The extended sanding pad has
a longer tip for reaching into narrow spaces. Both types of
Delta pads use the same sandpaper.
Delta Pad
Holder
Installing the Pad (Holder) on the Sander
1. Unplug the sander for safety.
2. Turn the mode selector dial to the DX mode.
► This lowers the interlock pin and locks the spindle in the
only position the DX pad can be installed.
► If the interlock pin is extended, the dial is not in DX
mode and the pad cannot be installed.
► If the spindle is not locked, rotate it until it does lock.
3. Place the DX pad on the spindle at 45° counterclockwise
from its normal position so it engages the retaining tabs.
(The pad and sander bodies have alignment arrows for
this position, as shown in the image below.)
4. Rotate the DX pad clockwise until it clicks into place and
is aligned with the main body of the sander.
5. To remove the DX pad, press forward on the release button (shown in the lower left image), and rotate the pad
45° counterclockwise.
Sanding
Pad
Extended
Sanding Pad
Installing the Pad on the Holder
The sanding pad is secured to the holder with hook & loop
around the perimeter and with a snap in the center. To
install the pad, center it over the snap, align the dust ports
with the holes in the pad, and then rmly press it into place.
Retaining
Snap
Release
Button
Spindle
Release
Button
Retaining
Tabs
Interlock
Pin
Lock
Align
Arrows
Dust
Ports
Supplemental Owner’s Manual 11
Page 12

Changing Sandpaper
The sandpaper is held in place with a hook & loop system,
and can be changed by simply pulling off the old disk and
pressing on a new one. However, for the integral dust collection, make sure to align the holes in the sandpaper with the
dust extraction inlets in the sanding pad.
Connecting the Plug-It Power Cord
The sander comes equipped with a removable Plug-It power
cord. The cord can be removed for easier storage of the
tool. To install the power cord, insert the cord into the inlet
(port) on the tool with the key and keyway aligned, and
twist the locking ring ¼-turn until it clicks. Reverse the
procedure to remove the cord.
NOTICE: Make sure to fully tighten the plug-it cord
a full quarter-turn until it clicks. If the plug is not
fully locked, the socket and cord can overheat and be
damaged.
NOTE: The 18 gauge plug-it cord is interchangeable
with other tools that use the same size cord, but it
cannot be used with larger tools, such as routers and
saws. The plug has an extra key to prevent it from
being used on a larger tool that would otherwise
damage the cord. Larger cords may be used with
smaller tools, but not the reverse.
Connecting a Dust Extractor
The dust port on the back of the sander connects to a
Festool 27mm vacuum hose. To connect the hose, rock it
back and forth over the ribs while pressing inward.
27mm
Hose
The dust port on the RO150 can be removed for polishing
or other operations that do not require dust extraction by
pressing in on the release lever and sliding the port off the
sander.
Key &
Lock
Unlock
Keyway
Locking
Ring
Setting the Variable Speed
The speed of the sander is adjustable with the speed control
dial. Most operations are best performed at full speed, but
a lower speed can sometimes improve control or reduce
aggressiveness for ner operations, such as polishing or
bufng. The speed may be adjusted with the motor either
on or off. The slowest speed is 1 and the highest speed is 6.
RO 90
RO 150
RO 125
Speed
Control
Release
Lever
12 Rotex Series Dual Mode Sanders
Page 13

Installing the Sanding Bumper
The sanding bumper is used to help keep the sander from
gouging perpendicular borders around the sanding area. It
can be removed from the sander for better visibility of the
sanding disk for most operations.
To install the bumper, slide it over the front of the sander’s
housing until the tabs lock into place.
To remove the bumper, pry out on the end of the bumper
to release the tabs and slide the bumper off the sander
housing.
Setting the Sanding Mode
The Rotex sanders can be switched between gear-driven
(Rotex) mode and random orbit mode. The RO-90 has the
third option of orbital mode (Delta). The chosen mode is
dependant on the type of sanding required.
Rotex mode is the most aggressive for rapid material
removal. Random orbit mode produces the nest nish with
minimal visible scratches. Orbital mode is typically used in
conjunction with the delta sanding pad for detail sanding,
but may also be used with circular sanding pads if desired.
Changing modes should be done with the sander turned
off. For the RO-125 and RO-150 sanders, slide the selector
switch side to side to the respective mode setting. For the
RO-90, rotate the selector dial to the desired setting.
NOTICE: The RO90’s mode selection dial has an
interlock to prevent the sander from being operated in either of the rotary modes when the DX pad
is installed. Forcing the dial to turn with a DX pad
installed will damage the sander.
RO-125 and RO-150
Rotex
Turning on the Sander
For best control and sanding results, the sander should be
placed on the sanding surface with no downward pressure
before turning it on, and lifted from the surface before
turning it off. The Rotex sanders have soft-start circuitry, so
there will be a slight delay before the sander reaches the set
motor speed.
To turn the sander on, slide the power switch forward until
it clicks into the on position. To turn the sander off, slide the
power switch back.
RO-90
Random
Orbit
Random
Orbit
Rotex
Delta
On
Off
On
Off
Supplemental Owner’s Manual 13
Page 14

Operation
Aside from installing sandpaper, your Rotex sander is
ready to use right out of the box. There is no special setup,
adjustment, or break-in procedure required before using
your sander. However, new users may want to practice with
the sander to become familiar with its operation, function,
and even the best way to hold the sander.
Sanding is frequently considered one of the most important
Using Dust Extraction
Using dust extraction on a Rotex sander isn’t just a matter
of keeping the work area clean or protecting your health;
which of course is very important. The sander itself is
specically designed to perform best when used with dust
extraction.
Sanding wouldn’t be very effective if a layer of sanding
dust was permitted to accumulate between the sanding
pad and the sanded surface. Festool sanders incorporate
Airstream technology to help get the sanding dust away
from the sanding surface as efciently as possible. With
traditional sanding pads, dust accumulates at the center
of the disk because it can’t get drawn out by the vacuum.
Airstream technology creates airow from the center of the
pad radially outward to the dust extraction holes (as well as
the normal airow from the perimeter). This keeps the dust
clear and allows the sanding grit to work on the sanding
surface.
Dust
Extraction
Makeup Air
Passage
stages of any type of project because it is often the rst
stage of the nishing phase. Even given its great impor-
tance, the nuances of sanding are often overlooked, and it
is viewed as more of a chore than a productive aspect of
the overall project. Discovering the optimal nuances of your
sander will help you get the most out of your sander, but
may take some practice and learning.
performance of the sander. Too high of a vacuum pressure
can suck the sander tight to the workpiece, which reduces
sanding quality and diminishes controllability of the sander.
For best results, the power of the vacuum should be reduced
below maximum. A sign that the vacuum is too strong is a
lack of controllability, with excessive jumping and jitter in
the movement of the sander across the workpiece. Having
the vacuum set too high will also increase the depth of
sanding scratches, and make them more difcult to remove
through the higher sanding grits. The optimal vacuum power
will vary depending on the size of the sander and even the
coarseness of the sandpaper, with ner grits needing less
power.
1. To use the dust extraction system, slide the vacuum hose
over the dust collection port as described on page 14.
2. Plug the sander into the electrical receptacle on the
front of the dust extractor, and turn the power switch to
“Auto”.
► When the power switch is in the manual or off position,
the electrical outlet will not have any power.
3. Turn the speed control dial counterclockwise to reduce
the power of the vacuum.
Tool’s
Power Cord
With HEPA ltration, auto-start, and variable speed, Festool
dust extractors are ideally suited for use with Rotex sanders. The variable speed is of particular importance because
it permits adjusting the power of the vacuum for the optimal
14 Rotex Series Dual Mode Sanders
Slow
Power Switch
Set to Auto
Fast
Page 15

Choosing Hand Positions
While it may sound trivial on the face of it, how you hold
the sander plays a pivotal role in the optimal performance
of the sander. Balance, control, and comfort are the keys in
deciding what hand positions work best for you. It is recommended to spend some time practicing and rening your
handhold positions to suit your needs. They will vary from
user to user, but the information below presents the most
common starting point for many users.
The basic handhold positions are one hand forward and one
hand aft, with the forward hand providing the majority of
the control over the sander. The rear hand provides slight
guidance and balance to the sander. A grip near the power
cord works best for this.
The forward hand provides the majority of the control and
a majority of the balance. This may be over the top of the
motor or in front of the motor, with the front of the motor
being slightly more preferred by most users.
These hand positions provide the greatest separation of your
hands from the front to rear of the sander. This separation
is what results in greater control of the sander and makes it
easier to avoid tilting the sanding pad against the sanding
surface.
When experimenting with different hand grips, use varying
sandpaper grits and both modes of the sander. The goal is
to hold the sander in such a way that balance and control
are achieved, which results in the smoothest motion of the
sander as you move it about the workpiece. Here are some
signs that your grip on the sander is not balanced:
► Uneven resistance to movement: If the sander resists
more in one direction than the opposite direction, it is a
sign that you are slightly tilting the sander.
► If you experience excessive jumping and jitter, it means
your grip is not balanced, you’re moving too fast, and you
are applying too much down force to the sander.
Working With Sanding Grits
Generally speaking, the sanding process begins with the
coarser grits and progresses up to the ner grits. However,
not all sanding tasks are the same. So choosing which grits
to use will vary depending on the task. The adage of progressing through the grits holds true for nearly all sanding,
but where to begin and where to end isn’t always clear.
While the coarsest grits provide rapid material removal and
leveling, it isn’t always desired to begin sanding with the
coarsest grit available. Avoid starting with too coarse of a
grit. For example, when working with pre-planed lumber,
there should be little need to use a coarser grit that 120
unless there is the need for joint-leveling. Even with jointleveling, only a slightly coarser grit may be called for, with
coarser grits reserved for joint leveling of wider panels.
Similarly, the highest grit chosen should be commensurate
with the type of material and surface nish desired. The grit
size should be consistent with the grain size of the material.
Very high grits should be used for achieving a high gloss
surface on paints, nishes, and plastics. However, because
the grain size of wood is much larger than man-made mate-
rials, the highest (unnished) sanding grit should be much
more limited.
When sanding bare wood in preparation for applying most
surface-build nishes, a sanding grit of approximately 220
grit should be considered the maximum, or even slightly
lower for very high-build nishes. On the other hand, for
non-build nishes or when the bare wood is the nal nish,
then higher grits may be called for. Using too high of a grit
will tend to burnish the wood. With some non-build nishes
or for bare wood, this is desired. However, for most surface-
build nishes, burnishing can hinder nish penetration of the
surface.
For colorants, and especially pigmented stains, the higher
the bare wood sanding grit, the less the colorant will pen-
etrate the wood. In some cases this can even lead to a loss
of grain denition in the nal nish. However, this can also
be used to an advantage for controlling the intensity of a
colorant, by using a coarser grit for a darker intensity and a
higher grit for a lighter intensity.
The purpose of progressing through the grits from coarse
to ne is so that each successive grit is aggressive enough
to remove enough material to remove the scratches of the
previous grit, while only leaving smaller scratches itself.
This is most apparent in the coarser grits where the grit
scratches are deeper.
Supplemental Owner’s Manual 15
Page 16

Sanding Techniques
Establishing Optimal Sanding Pressure
The amount of downward force applied to the sander will
have a varying impact on how aggressive the sander will
perform, but also on the controllability and nish level too.
More downward force will make the sander operate more
aggressively, but it will also tend to make the sander more
difcult to control and reduce the quality of the nish. The
general rule for any rotational type sander is to keep minimal downward force on the sander and let the sander to the
work on its own.
The primary sign that you are applying too much down
pressure is that the sander will lurch and jitter as it moves
across the sanding surface. When this happens, reduce the
sanding pressure, which even includes lifting the sander a
little bit when necessary.
In random orbit mode, anything that diminishes the “randomness” of the pad rotation increases the occurrence of
Sanding Pattern and Movement
One key to achieving a quality sanded nish is to establish
an effective and smooth sanding pattern for moving the
sander across the workpiece. Different patterns and speeds
of motion will be optimal for different material types and
even different grits of sand paper.
Because the sanding pad is moving in a clockwise dual
motion (both in Rotex and random orbit modes), a general
clockwise sanding pattern produces the least resistance to
movement, and therefore, the smoothest pattern. As much
as possible, make your motions and direction changes in a
general clockwise direction.
For homogenous materials that do not have a discernible
grain direction, such as metals, plastics, solid surface, and
nishes; a circular pattern may be best. These types of patterns do not have a stopping or sharp transition point where
the direction of the sander is abruptly changed.
For materials with an inherent grain structure such as wood
and even some plastics, the sander motion should be kept
generally in-line with the grain as much as reasonably possible. This leads to a linear back and forth motion, but the
transitions for changing direction should be as smooth as
possible without an abrupt stop/start.
Example, Solid Surface Joint Leveling:
Solid surface material has a non-oriented grain structure. It
is therefore best to sand in a generally circular pattern. For
initial leveling, sanding emphasis should be applied to the
higher of the two surfaces, but not to the complete exclusion of both surfaces. This calls for an oval pattern overlapping onto the lower surface, yet focused on the upper
surface.
visible scratches. Initial intuition may suggest that slowing
down the pad rotation is good, but the opposite is true.
If the pad is not freely spinning, then the motion is not
random, and too much down force is being applied to the
sander.
In Rotex mode, by their nature, the sanders will be more
difcult to control because different parts of the sanding pad
will be operating in a cross-grain direction at different times.
This is what give the sander its rapid material removal rate.
So in Rotex mode, the sander will expectably have more
jitter, especially with coarser grits.
NOTE: The effect of the vacuum created below the
sanding pad from the dust extractor will add some
downward force to the sander. It is important to
reduce the power of the dust extractor so it is not
applying too much down-force on the sander.
As the joint becomes more level, the pattern should switch
to perpendicular to the joint in tight overlapping loops.
Example, Wood Panel Joint Leveling:
In a similar fashion, initial leveling should focus on the
higher surface, but not to the exclusion of the lower surface.
Some overlap across the joint is required to avoid the likelihood of creating a slight depression on the high surface just
inside the joint. As leveling progresses, the sanding pattern
should become more balanced across the two pieces.
16 Rotex Series Dual Mode Sanders
Page 17

Example, Faceframe Leveling:
While the temptation may be to focus sanding directly over
a frame’s joint, this should be avoided. To reduce the chance
of a depression at the corner, a general L-shaped pattern
should be used extending well beyond the joint. For more
emphasis at the joint, a mixture of both short and long
strokes should be used, but never just stationary over the
joint.
Once the joints are leveled, the entire frame should be
sanded, but this too should have a pattern. While not as
critical, the general approach is to sand those frame mem-
bers which are captive between other frame members rst.
In other words, sand the horizontal rails rst, followed by
the vertical stiles.
Example, Frame to Carcase Leveling:
Leveling the joint between a solid wood frame and a plywood veneer carcase is one of the most precarious sanding
operations due to the likelihood of sanding through the thin
veneer. The key is to evenly remove enough of the solid
wood frame without sanding into the veneer.
While the temptation may be to sand the frame with only
the edge of the sanding pad, this will invariably result in a
slight bevel to the frame. Instead, keep the center of the
pad centered over the frame, but held as perfectly parallel
to the surface as possible. Sand the frame ush, and then
begin working out into the veneer surface. Here are some
tips to safely achieving ush joints:
► Using a soft, wide-lead pencil, scribble across the veneer
near the joint. As long as the pencil lines remain, you will
not be sanding through the veneer.
► Use the rmest sanding pad available to avoid rounding
the edge of the frame.
► Avoid using too coarse of a disk, as the veneer can be
damaged too quickly if you tilt the sander.
► Operate the sander with authority and rm pressure to
maintain maximum control, but reduce the pressure as
the joint gets closer to ush.
► Avoid the tendency to tilt the sander away from the
veneer, as this will create a bevel on the frame.
► As the joint gets close to ush, expand your strokes to
include more of the veneer surface, and continue sanding
until the pencil marks are gone.
Pencil
Supplemental Owner’s Manual 17
Page 18

Maintenance and Adjustment
WARNING! Any maintenance or repair work
that requires opening of the motor or gear housing should be carried out only by an authorized
Customer Service Center (see your dealer for
information on locating a service center).
WARNING! To reduce the risk of electrocution or
other personal injury, always unplug the tool from
the power supply outlet before performing any
maintenance or repair work on the tool.
Routine Maintenance
Dust and debris from some materials can be extremely
abrasive and cause components within the sander to wear
prematurely. It is important to keep moving parts cleared of
abrasive dusts.
► As a general rule, keep the sander clean of all dust and
Motor Brush Replacement
Motor brushes provide electricity to the spinning motor
armature, and will wear over time. The brushes are
designed to disconnect power to the motor when they have
RO 90 Motor Brushes
WARNING! To avoid the risk of electrical shock,
make sure the sander is unplugged from power.
1. Unplug the sander from power.
2. Remove the 4 T10 Torx screws that secure the brush
cover, and remove the cover.
NOTICE: Do not use compressed air to clean the
motor housing of the tool, as you could inject foreign objects into the motor through the ventilation
openings.
NOTICE: Certain cleaning agents and solvents are
harmful to plastic parts. Some of these include, but
are not limited to: Gasoline, Acetone, Methyl Ethyl
Ketone (MEK), Carbonyl Chloride, cleaning solutions
containing Chlorine, Ammonia, and household cleaners containing Ammonia.
debris. Even soft-wood dust can be abrasive over time.
► Examine all moving parts for dust and debris.
► Sanding pads are considered a wear item and will need
to be replaced periodically. Replace the pad when it no
longer holds sanding disks in place.
warn beyond their usable life. If your sander stops working,
it is likely that the brushes have warn and need replacement. Contact Festool for replacement brushes.
Spring
on Post
Mounting
Screws (4)
Brush
Cover
3. Using a small tweezer, carefully lift the pressure spring
off the brush and rest it on the adjacent post.
4. Using tweezers or needle nose pliers, carefully remove
the wire terminal from the spade lug.
5. Slide the brush out of the brush holder, and repeat for
the second brush on the other side of the motor.
Pressure
Spring
Brush
Wire
Terminal
Post
Brush
6. Install the new brushes by reversing the procedure. Don’t
forget to move the pressure spring back over the brush.
Brush
Wire
Terminal
18 Rotex Series Dual Mode Sanders
Page 19

RO 125 Motor Brushes
WARNING! To avoid the risk of electrical shock,
make sure the sander is unplugged from power.
1. Unplug the sander from power.
2. Remove the T15 Torx screw that secures each brush
cover (one on either side of the motor), and remove the
covers.
Mounting
Screw
Brush
Cover
Spring
on Post
Brush
Post
Pressure
Spring
3. Using a small tweezer, carefully lift the pressure spring
off the brush and rest it on the adjacent post.
4. Using tweezers or needle nose pliers, carefully remove
the wire terminal from the spade lug.
5. Slide the brush out of the brush holder, and repeat for
the second brush on the other side of the motor.
Wire
Brush
6. Install the new brushes by reversing the procedure. Don’t
forget to move the pressure spring back over the brush.
Terminal
Brush
Wire
Terminal
Supplemental Owner’s Manual 19
Page 20

RO 150 Motor Brushes
WARNING! To avoid the risk of electrical shock,
make sure the sander is unplugged from power.
1. Unplug the sander from power.
2. Remove the dust port as described on page 12.
3. Remove the T15 Torx screw that secures the brush cover,
and slide the cover off the back of the sander handle.
Brush
Cover
Sander
Handle
Brush
Holder
Mounting
Screw
Wire
Terminal
Mounting
Screw
4. Remove the switch linkage that connects the green
power switch to the electrical switch inside the sander.
a. Lift the linkage yoke off the pin on the electrical
switch.
b. Tilt the linkage as shown, and slide it off the green pin
on the power switch.
A
Upper
Brush
B
Yoke
& Pin
Switch
Linkage
5. Using tweezers or needle nose pliers, carefully remove
the wire terminal from the spade lug.
6. Using a T15 Torx driver, remove the mounting screw that
secures the brush holder to the motor housing.
7. Lift the brush and brush holder out of the sander.
8. Repeat for the second brush and brush holder on the
underside of the motor.
9. If the replacement brushes do not come pre-mounted in
brush holders, install the brushes in the existing brush
holders as shown.
► Make sure the wire passes through the body of the
brush holder.
► Make sure the pressure spring is pressing against the
top of the brush.
Pressure
Spring
Brush
Holder
Brush
20 Rotex Series Dual Mode Sanders
Page 21

Troubleshooting
Symptom Possible Causes
Motor does not start ► Check that the cord is properly plugged into an outlet.
► Make sure the Plug-it connector is properly inserted and fully tightened.
► Make sure the outlet has power. Check the circuit breaker or try another outlet.
► If used with a Festool dust extractor, make sure the selector switch is pointing to “Auto”. The
auxiliary outlet on the dust extractor has power only when the selector is at Auto.
► Inspect the power cord (including extension cords) for damage or missing prongs.
► The motor brushes may have worn and need replacement.
► Please note that the power switch is a sealed pneumatically actuated switch that is not
prone to dust ingestion. Do not attempt to open the switch.
Sander runs
sporadically or looses
power
Sanding disk doesn’t
stick or ies off during
sanding
Deep scratches in
nish sanding
Excessive swirl marks ► Make sure the dust collection vacuum is set for reduced power. Too much vacuum will apply
Sander jumps or is
hard to control
► Make sure the Plug-it cord is properly tightened. Inspect the plug and tool power inlet for
signs of overheating. If signs of overheating are present, discontinue use and have the tool
serviced. If the Plug-it cord shows signs of overheating, do not use the cord for other tools,
as it can damage the inlet of the other tool.
► Make sure the disk is rmly pressed onto the pad.
► To make sure it isn’t a defective disk, try using a different disk.
► Make sure the bottom of the pad is clean and free of debris.
► The sanding pad is a wear item and may need replacement. Sanding generates heat, and
heat will degrade the Stickx hooks on the sanding pad. Avoid operations that generate
excessive heat, such as holding the sander motionless on sharp edges.
► The most likely cause is that scratches from a coarse grit paper are too deep for the cur-
rent/nal grit paper. Make sure you don’t skip a grit in progression.
► If switching from Rotex to random orbit mode, stay with the same grit.
► Rework the nish with a grit appropriate to remove the scratches and progress to nish grit.
► Avoid beginning with too coarse of a grit for the need. Begin sanding with a grit only coarse
enough to meet the smoothing and leveling needs of the project.
too much pressure to the sanding surface.
► Reduce your sanding pressure. Too much sanding force reduces the freewheel motion of the
sanding pad, which results in sanding swirls.
► With the sander turned off, inspect the freewheel motion of the sanding pad. If the free-
wheel seems too stiff, apply a thin lubricant such as paste wax between the pad brake and
sanding pad.
► Make sure you are holding the sander level on the work surface. Tilting the sander or even
applying uneven down-force can cause it to jump.
► Reduce sanding pressure and make sure the dust collection vacuum is running at reduced
power.
► Inspect the sanding pad for proper installation. A loose or misaligned sanding pad can result
in runout in the orbital motion.
Supplemental Owner’s Manual 21
Page 22

Festool USA
400 N. Enterprise Blvd
Lebanon, IN 46052
www.festoolusa.com
Service Questions:
800-554-8741
Application Questions:
888-337-8600
 Loading...