

Page 1
de Originalbetriebsanleitung - Akku-Winkelschleifer 7
en Original Instructions – Cordless angle grinder 17
fr Notice d'utilisation d'origine - meuleuse d'angle sans fil 26
es Manual de instrucciones original - Amoladora angular a batería 37
it Istruzioni per l’uso originali - Smerigliatrice angolare a batteria 48
nl Originele gebruiksaanwijzing - haakse accuslijper 58
sv Originalbruksanvisning - Batterivinkelslip 68
fi Alkuperäiset käyttöohjeet - akkukulmahiomakone 77
da Original brugsanvisning – akku-vinkelsliber 86
nb Original bruksanvisning for batteridrevet vinkelsliper 95
pt Manual de instruções original - Rebarbadora angular de bateria 104
ru
cs Originální návod k obsluze – akumulátorová úhlová bruska 125
pl Oryginalna instrukcja obsługi - akumulatorowa szlifierka kątowa 134
Оригинальное руководство по эксплуатации – Аккумуляторная угловая
шлифмашина
114
AGC 18
Festool GmbH
Wertstraße 20
D-73240 Wendlingen
+49 (0)7024/804-0
www.festool.com
718293_C / 2019-06-06
Page 2

2a 2b
1-1
1-6
1-11
1-3
1-4
1-6
1-2
1-7
1-5
1-3
1-8
1-8
1-9
1-10
1
Page 3
2
1
1
3a 3b
BP 18
2
1
3
4
4-2
4-4
4-1
4-5
4-3
4
Page 4

5b
5a
2
1
3
4
5-1
2
1
3
6-2
6-1
6-3
6-4
6
Page 5
Click
2
3
1
7
2
2
3
1
8
2
2
1
9
Page 6

Akku-Winkelschleifer
Cordless angle grinder
Meuleuse d‘angle sans fil
Seriennummer
1)
Serial number
1)
N° de série
1)
(T-Nr.)
AGC 18 204079
de
EG-Konformitätserklärung. Wir erklären
in alleiniger Verantwortung, dass dieses Produkt
allen einschlägigen Bestimmungen der folgenden
Richtlinien einschließlich ihrer Änderungen entspricht und mit den folgenden Normen übereinstimmt:
en
EC-Declaration of Conformity. We declare
under our sole responsibility that this product is in
conformity with all relevant provisions of the following directives including their amendments and
complies with the following standards:
fr
CE-Déclaration de conformité communautaire. Nous déclarons sous notre propre respons-
abilité que ce produit est conforme aux normes ou
documents de normalisation suivants:
es
CE-Declaración de conformidad. Declaramos
bajo nuestra exclusiva responsabilidad que este
producto corresponde a las siguientes normas o
documentos normalizados:
it
CE-Dichiarazione di conformità. Dichiariamo
sotto la nostra esclusiva responsabilità che il presente prodotto e conforme alle norme e ai documenti normativi seguenti:
nl
EG-conformiteitsverklaring. Wij verklaren op
eigen verantwoordelijkheid dat dit produkt voldoet
aan de volgende normen of normatieve documenten:
sv
EG-konformitetsförklaring. Vi förklarar i eget
ansvar, att denna produkt stämmer överens med
följande normer och normativa dokument:
fi
EY-standardinmukaisuusvakuutus. Va-
kuutamme yksinvastuullisina, etta tuote on seuraavien standardien ja normatiivisten ohjeiden
mukainen:
da
EF-konformitetserklæring. Vi erklærer at
have alene ansvaret for, at dette produkt er i overensstemmelse med de følgende normer eller
normative dokumenter:
nb
CE-Konformitetserklæring. Vi erklærer på
eget ansvar at dette produktet er i overensstemmelse med følgende normer eller normative dokumenter:
pt
CE-Declaração de conformidade. Declara-
mos, sob a nossa exclusiva responsabilidade, que
este produto corresponde às normas ou aos docu-
mentos normativos citados a seguir:
ru
Декларация соответствия ЕС. Мы заявляем
с исключительной ответственностью, что данный
продукт соответствует следующим нормам или
нормативным документам:
cs
ES prohlašeni o shodě. Prohlašujeme s vešk-
erou odpovědnosti, že tento vyrobek je ve shodě s
nasledujicimi normami nebo normativnimi dokumenty:
pl
Deklaracja o zgodności z normami UE. Ninie-
jszym oświadczamy na własną odpowiedzialność,
że produkt ten spełnia następujące normy lub
dokumenty normatywne:
2006/42/EG, 2014/30/EU
2)
, 2014/53/EU3),
2011/65/EU
EN 60745-1:2009 + A11:2010
EN 60745-2-3:2011 + A2:2013 + A11:2014 +
A12:2014 + A13:2015
EN 55014-1:2017
2)
EN 55014-2:2015 2)
EN 300 328:2016 V2.1.1
3)
EN 301 489-1:2017 V2.1.1
3)
EN 301 489-17:2017 V3.1.1 3)
EN 50581:2012
Festool GmbH
Wertstr. 20, D-73240 Wendlingen
GERMANY
Wendlingen, 2019-04-12
Markus Stark
Head of Product Development
Ralf Brandt
Head of Product Conformity
1)
im definierten Seriennummer-Bereich (S-Nr.) von 40000000 - 49999999/
in the specified serial number range (S-Nr.) from 40000000 - 49999999/
dans la plage de numéro de série (S-Nr.) de 40000000 - 49999999
2)
gilt in Kombination mit Akku/
valid in combination with battery pack/
valable en combinaison avec batterie
BP 18 Li 5,2 AS, BP 18 Li 6,2 AS, BP 18 Li 3,1 C
3)
gilt in Kombination mit Bluetooth® Akku/
valid in combination with Bluetooth® battery pack/
valable en combinaison avec Bluetooth
®
batterie
BP 18 Li 5,2 ASI, BP 18 Li 6,2 ASI, BP 18 Li 3,1 CI
721183_A
Page 7
Deutsch
Inhaltsverzeichnis
1 Symbole.......................................................7
2 Sicherheitshinweise....................................7
3 Bestimmungsgemäße Verwendung......... 11
4 Technische Daten......................................12
5 Geräteelemente........................................ 12
6 Inbetriebnahme.........................................12
7 Akkupack...................................................13
8 Einstellungen............................................ 13
9 Arbeiten mit dem Elektrowerkzeug..........15
10 Akustische Warnsignale........................... 15
11 Zubehör..................................................... 16
12 Wartung und Pflege.................................. 16
13 Umwelt...................................................... 16
14 Allgemeine Hinweise................................ 16
1 Symbole
Warnung vor allgemeiner Gefahr
2 Sicherheitshinweise
2.1 Allgemeine Sicherheitshinweise WARNUNG! Lesen Sie alle Sicherheits
hinweise und Anweisungen. Versäumnis
se bei der Einhaltung der Sicherheitshinweise
und Anweisungen können elektrischen Schlag,
Brand und/oder schwere Verletzungen verursa
chen.
Bewahren Sie alle Sicherheitshinweise und
Anweisungen für die Zukunft auf.
Der in den Sicherheitshinweisen verwendete
Begriff „Elektrowerkzeug“ bezieht sich auf
netzbetriebene Elektrowerkzeuge (mit Netzlei
tung) oder auf akkubetriebene Elektrowerkzeu
ge (ohne Netzleitung).
Beachten Sie die Betriebsanleitung des Lade
geräts und des Akkupacks.
2.2 Maschinenspezifische
Sicherheitshinweise
Warnung vor Stromschlag
Betriebsanleitung, Sicherheitshinweise
lesen!
Gehörschutz tragen!
Schutzhandschuhe tragen!
Atemschutz tragen!
Schutzbrille tragen!
Festes Schuhwerk tragen!
Nicht in den Hausmüll geben.
Tipp, Hinweis
Handlungsanweisung
Akkupack einsetzen
Akkupack lösen
CE-Kennzeichnung: Bestätigt die Kon
formität des Elektrowerkzeugs mit den
Richtlinien der Europäischen Gemein
schaft.
Gemeinsame Sicherheitshinweise zum Schlei
fen, Arbeiten mit Drahtbürsten und Trenn
schleifen
– Dieses Elektrowerkzeug ist zu verwenden
als Schleifer, Drahtbürste und Trenn
schleifmaschine. Beachten Sie alle Sicher
heitshinweise, Anweisungen, Darstellun
gen und Daten, die Sie mit dem Gerät er
halten. Wenn Sie folgende Anweisungen
nicht beachten, kann es zu elektrischem
Schlag, Feuer und/oder schweren Verlet
zungen kommen.
– Dieses Elektrowerkzeug ist nicht geeignet
zum Sandpapierschleifen und Polieren.
Verwendungen, für die das Elektrowerk
zeug nicht vorgesehen ist, können Gefähr
dungen und Verletzungen verursachen.
– Verwenden Sie kein Zubehör, das vom
Hersteller nicht speziell für dieses Elekt
rowerkzeug vorgesehen und empfohlen
wurde. Nur weil Sie das Zubehör an Ihrem
Elektrowerkzeug befestigen können, ga
rantiert das keine sichere Verwendung.
– Die zulässige Drehzahl des Einsatzwerk
zeugs muss mindestens so hoch sein wie
die auf dem Elektrowerkzeug angegebene
Höchstdrehzahl. Zubehör, das sich schnel
ler als zulässig dreht, kann zerbrechen und
umherfliegen.
– Außendurchmesser und Dicke des Ein
satzwerkzeugs müssen den Maßangaben
Ihres Elektrowerkzeugs entsprechen.
Falsch bemessene Einsatzwerkzeuge kön
7
Page 8

Deutsch
nen nicht ausreichend abgeschirmt oder
kontrolliert werden.
– Einsatzwerkzeuge mit Gewindeeinsatz
müssen genau auf das Gewinde der
Schleifspindel passen. Bei Einsatzwerk
zeugen, die mittels Flansch montiert wer
den, muss der Lochdurchmesser des Ein
satzwerkzeuges zum Aufnahmedurch
messer des Flansches passen. Einsatz
werkzeuge, die nicht genau am Elektro
werkzeug befestigt werden, drehen sich
ungleichmäßig, vibrieren sehr stark und
können zum Verlust der Kontrolle führen.
– Verwenden Sie keine beschädigten Ein
satzwerkzeuge. Kontrollieren Sie vor je
der Verwendung Einsatzwerkzeuge wie
Schleifscheiben auf Absplitterung und
Risse, Schleifteller auf Risse, Verschleiß
oder starke Abnutzung, Drahtbürsten auf
lose oder gebrochene Drähte. Wenn das
Elektrowerkzeug oder das Einsatzwerk
zeug herunterfällt, überprüfen Sie, ob es
beschädigt ist, oder verwenden Sie ein un
beschädigtes Einsatzwerkzeug. Wenn Sie
das Einsatzwerkzeug kontrolliert und ein
gesetzt haben, halten Sie und in der Nähe
befindliche Personen sich außerhalb der
Ebene des rotierenden Einsatzwerkzeugs
auf und lassen Sie das Gerät 1 min lang
mit Höchstdrehzahl laufen. Beschädigte
Einsatzwerkzeuge brechen meist in dieser
Testzeit.
– Tragen Sie persönliche Schutzausrüstung.
Verwenden Sie je nach Anwendung Vollge
sichtsschutz, Augenschutz oder Schutz
brille. Soweit angemessen, tragen Sie
Staubmaske, Gehörschutz, Schutzhand
schuhe oder Spezialschürze, die kleine
Schleif- und Materialpartikel von Ihnen
fernhalten. Die Augen sollen vor herum
fliegenden Fremdkörpern geschützt wer
den, die bei verschiedenen Anwendungen
entstehen. Staub- oder Atemschutzmaske
müssen den bei der Anwendung entstehen
den Staub filtern. Wenn Sie lange lautem
Lärm ausgesetzt sind, können Sie einen
Hörverlust erleiden.
– Achten Sie bei anderen Personen auf si
cheren Abstand zu Ihrem Arbeitsbereich.
Jeder, der den Arbeitsbereich betritt,
muss persönliche Schutzausrüstung tra
gen. Bruchstücke des Werkstücks oder ge
brochene Einsatzwerkzeuge können weg
fliegen und Verletzungen auch außerhalb
des direkten Arbeitsbereichs verursachen.
– Halten Sie das Elektrowerkzeug nur an
den isolierten Griffflächen, wenn Sie Ar
beiten ausführen, bei denen das Einsatz
werkzeug verborgene Stromleitungen
treffen kann. Der Kontakt mit einer span
nungsführenden Leitung kann auch metall
ene Geräteteile unter Spannung setzen und
zu einem elektrischen Schlag führen.
– Legen Sie das Elektrowerkzeug niemals
ab, bevor das Einsatzwerkzeug völlig zum
Stillstand gekommen ist. Das sich drehen
de Einsatzwerkzeug kann in Kontakt mit
der Ablagefläche geraten, wodurch Sie die
Kontrolle über das Elektrowerkzeug verlie
ren können.
– Lassen Sie das Elektrowerkzeug nicht
laufen, während Sie es tragen. Ihre Klei
dung kann durch zufälligen Kontakt mit
dem sich drehenden Einsatzwerkzeug er
fasst werden und das Einsatzwerkzeug sich
in Ihren Körper bohren.
– Reinigen Sie regelmäßig die Lüftungs
schlitze Ihres Elektrowerkzeugs. Das Mo
torgebläse zieht Staub in das Gehäuse, und
eine starke Ansammlung von Metallstaub
kann elektrische Gefahren verursachen.
– Verwenden Sie das Elektrowerkzeug nicht
in der Nähe von brennbaren Materialien.
Funken können diese Materialien entzün
den.
– Verwenden Sie keine Einsatzwerkzeuge,
die flüssige Kühlmittel erfordern. Die Ver
wendung von Wasser oder anderen flüssi
gen Kühlmitteln kann zu einem elektri
schen Schlag führen.
Rückschlag und entsprechende Sicherheits
hinweise
Rückschlag ist eine plötzliche Reaktion infolge
eines hakenden oder blockierten drehenden
Einsatzwerkzeugs wie Schleifscheibe, Schleif
teller, Drahtbürste usw. Verhaken oder Blo
ckieren führt zu einem abrupten Stopp des ro
tierenden Einsatzwerkzeugs. Dadurch wird ein
unkontrolliertes Elektrowerkzeug gegen die
Drehrichtung des Einsatzwerkzeugs an der
Blockierstelle beschleunigt.
Wenn z. B. eine Schleifscheibe im Werkstück
hakt oder blockiert, kann sich die Kante der
Schleifscheibe, die in das Werkstück eintaucht,
verfangen und dadurch die Schleifscheibe aus
brechen oder einen Rückschlag verursachen.
Die Schleifscheibe bewegt sich dann auf die Be
dienperson zu oder von ihr weg, je nach Dreh
8
Page 9

Deutsch
richtung der Scheibe an der Blockierstelle.
Hierbei können Schleifscheiben auch brechen.
Ein Rückschlag ist die Folge eines falschen
oder fehlerhaften Gebrauchs des Elektrowerk
zeugs. Er kann durch geeignete Vorsichtsmaß
nahmen, wie nachfolgend beschrieben, verhin
dert werden.
– Halten Sie das Elektrowerkzeug gut fest
und bringen Sie Ihren Körper und Ihre Ar
me in eine Position, in der Sie die Rück
schlagkräfte abfangen können. Verwen
den Sie immer den Zusatzhandgriff, falls
vorhanden, um die größtmögliche Kon
trolle über Rückschlagkräfte oder Reakti
onsmomente beim Hochlauf zu haben. Die
Bedienperson kann durch geeignete Vor
sichtsmaßnahmen die Rückschlag- und
Reaktionskräfte beherrschen.
– Bringen Sie Ihre Hand nie in die Nähe sich
drehender Einsatzwerkzeuge. Das Ein
satzwerkzeug kann sich beim Rückschlag
über Ihre Hand bewegen.
– Meiden Sie mit Ihrem Körper den Bereich,
in den das Elektrowerkzeug bei einem
Rückschlag bewegt wird. Der Rückschlag
treibt das Elektrowerkzeug in die Richtung
entgegengesetzt zur Bewegung der
Schleifscheibe an der Blockierstelle.
– Arbeiten Sie besonders vorsichtig im Be
reich von Ecken, scharfen Kanten usw.
Verhindern Sie, dass Einsatzwerkzeuge
vom Werkstück zurückprallen und ver
klemmen. Das rotierende Einsatzwerkzeug
neigt bei Ecken, scharfen Kanten oder
wenn es abprallt dazu, sich zu verklem
men. Dies verursacht einen Kontrollverlust
oder Rückschlag.
– Verwenden Sie kein Ketten- oder gezähn
tes Sägeblatt. Solche Einsatzwerkzeuge
verursachen häufig einen Rückschlag oder
den Verlust der Kontrolle über das Elektro
werkzeug.
Besondere Sicherheitshinweise zum Schleifen und Trennschleifen
– Verwenden Sie ausschließlich die für Ihr
Elektrowerkzeug zugelassenen Schleif
körper und die für diese Schleifkörper
vorgesehene Schutzhaube. Schleifkörper,
die nicht für das Elektrowerkzeug vorgese
hen sind, können nicht ausreichend abge
schirmt werden und sind unsicher.
– Gekröpfte Schleifscheiben müssen so
montiert werden, dass ihre Schleiffläche
nicht über der Ebene des Schutzhauben
randes hervorsteht. Eine unsachgemäß
montierte Schleifscheibe, die über die Ebe
ne des Schutzhaubenrandes hinausragt,
kann nicht ausreichend abgeschirmt wer
den.
– Die Schutzhaube muss sicher am Elektro
werkzeug angebracht und für ein Höchst
maß an Sicherheit so eingestellt sein, dass
der kleinstmögliche Teil des Schleifkör
pers offen zum Bediener zeigt. Die Schutz
haube hilft, die Bedienperson vor Bruch
stücken, zufälligem Kontakt mit dem
Schleifkörper sowie Funken, die Kleidung
entzünden könnte, zu schützen.
– Schleifkörper dürfen nur für die empfoh
lenen Einsatzmöglichkeiten verwendet
werden. Zum Beispiel: Schleifen Sie nie
mit der Seitenfläche einer Trennscheibe.
Trennscheiben sind zum Materialabtrag
mit der Kante der Scheibe bestimmt. Seitli
che Krafteinwirkung auf diese Schleifkör
per kann sie zerbrechen.
– Verwenden Sie immer unbeschädigte
Spannflansche in der richtigen Größe und
Form für die von Ihnen gewählte Schleif
scheibe. Geeignete Flansche stützen die
Schleifscheibe und verringern so die Ge
fahr eines Schleifscheibenbruchs. Flansche
für Trennscheiben können sich von den
Flanschen für andere Schleifscheiben un
terscheiden.
– Verwenden Sie keine abgenutzten Schleif
scheiben von größeren Elektrowerkzeu
gen. Schleifscheiben für größere Elektro
werkzeuge sind nicht für die höheren Dreh
zahlen von kleineren Elektrowerkzeugen
ausgelegt und können brechen.
Weitere besondere Sicherheitshinweise zum Trennschleifen
– Vermeiden Sie ein Blockieren der Trenn
scheibe oder zu hohen Anpressdruck.
Führen Sie keine übermäßig tiefen Schnit
te aus. Eine Überlastung der Trennscheibe
erhöht deren Beanspruchung und die An
fälligkeit zum Verkanten oder Blockieren
und damit die Möglichkeit eines Rück
schlags oder Schleifkörperbruchs.
– Meiden Sie den Bereich vor und hinter der
rotierenden Trennscheibe. Wenn Sie die
Trennscheibe im Werkstück von sich weg
bewegen, kann im Falle eines Rückschlags
das Elektrowerkzeug mit der sich drehen
den Scheibe direkt auf Sie zugeschleudert
werden.
9
Page 10

Deutsch
– Falls die Trennscheibe verklemmt oder
Sie die Arbeit unterbrechen, schalten Sie
das Gerät aus und halten Sie es ruhig, bis
die Scheibe zum Stillstand gekommen ist.
Versuchen Sie nie, die noch laufende
Trennscheibe aus dem Schnitt zu ziehen,
sonst kann ein Rückschlag erfolgen. Er
mitteln und beheben Sie die Ursache für
das Verklemmen.
– Schalten Sie das Elektrowerkzeug nicht
wieder ein, solange es sich im Werkstück
befindet. Lassen Sie die Trennscheibe erst
ihre volle Drehzahl erreichen, bevor Sie
den Schnitt vorsichtig fortsetzen. Ande
renfalls kann die Scheibe verhaken, aus
dem Werkstück springen oder einen Rück
schlag verursachen.
– Stützen Sie Platten oder große Werkstü
cke ab, um das Risiko eines Rückschlags
durch eine eingeklemmte Trennscheibe zu
vermindern. Große Werkstücke können
sich unter ihrem eigenen Gewicht durch
biegen. Das Werkstück muss auf beiden
Seiten der Scheibe abgestützt werden, und
zwar sowohl in der Nähe des Trennschnitts
als auch an der Kante.
– Seien Sie besonders vorsichtig bei „Ta
schenschnitten“ in bestehende Wände
oder andere nicht einsehbare Bereiche.
Die eintauchende Trennscheibe kann beim
Schneiden in Gas- oder Wasserleitungen,
elektrische Leitungen oder andere Objekte
einen Rückschlag verursachen.
– Führen Sie das Elektrowerkzeug nur im
eingeschalteten (laufenden) Zustand ins
Material.
– Aus Sicherheitsgründen muss das Werk
stück in einem Schraubstock oder einer
sonstigen Spannvorrichtung eingespannt
werden. Ein eingespanntes Werkstück
macht beide Hände zur Bedienung des
Elektrowerkzeugs frei.
– Arbeiten Sie nicht auf Leitern.
– Trennen Sie nicht über Metallgegenstän
den, Nägeln oder Schrauben.
– Verwenden Sie geeignete Suchgeräte, um
verborgene Versorgungsleitungen aufzu
spüren, oder ziehen Sie die örtliche Ver
sorgungsgesellschaft hinzu. Der Kontakt
des Einsatzwerkzeuges mit einer span
nungsführenden Leitung kann zu Feuer
und einem elektrischem Schlag führen.
Beschädigung einer Gasleitung kann zur
Explosion führen. Eindringen in eine Was
serleitung verursacht Sachbeschädigung.
– Beim Arbeiten können schädliche/giftige
Stäube entstehen (z.B. bleihaltiger An
strich, einige Holzarten und Metall). As
besthaltige Materialien dürfen nur von
sachkundigen Personen bearbeitet wer
den. Das Berühren oder Einatmen dieser
Stäube kann für die Bedienperson oder in
der Nähe befindliche Personen eine Ge
fährdung darstellen. Beachten Sie die in Ih
rem Land gültigen Sicherheitsvorschriften.
Besondere Sicherheitshinweise zum Arbeiten mit Drahtbürsten
– Beachten Sie, dass die Drahtbürste auch
während des üblichen Gebrauchs Draht
stücke verliert. Überlasten Sie die Drähte
nicht durch zu hohen Anpressdruck. Weg
fliegende Drahtstücke können sehr leicht
durch dünne Kleidung und/oder die Haut
dringen.
– Wird eine Schutzhaube empfohlen, ver
hindern Sie, dass sich Schutzhaube und
Drahtbürste berühren können. Teller- und
Topfbürsten können durch Anpressdruck
und Zentrifugalkräfte ihren Durchmesser
vergrößern.
2.3 Weitere Sicherheitshinweise – Verwenden Sie das Elektrowerkzeug nicht
im Regen oder in feuchter Umgebung.
Feuchtigkeit im Elektrowerkzeug kann zu
Kurzschluss und Brand führen.
Tragen Sie zum Schutz Ihrer Gesund
heit eine P2-Atemschutzmaske.
– Nach Bearbeitung von mineralischen Ma
terialien (z. B. Gips, …): Blasen Sie den In
nenraum des Elektrowerkzeugs durch die
Lüftungsöffnungen und das Schaltelement
mit trockener und ölfreier Druckluft aus.
Andernfalls kann sich Staub im Gehäuse
des Elektrowerkzeugs und am Ein-/
Ausschalter absetzen und in Verbindung
mit Luftfeuchtigkeit aushärten. Dies kann
zu Beeinträchtigungen am Schaltmecha
nismus führen und das Elektrowerkzeug
kann überhitzen.
– Nach Bearbeitung von Metall: Blasen Sie
den Innenraum des Elektrowerkzeugs
durch die Lüftungsschlitze mit trockener
und ölfreier Druckluft aus. Andernfalls
kann sich leitfähiger Staub im Innern des
Elektrowerkzeugs absetzen. Dies kann zu
einem Kurzschluss führen.
10
Page 11

Deutsch
– Keine Netzteile oder Fremd-Akkupacks
zum Betreiben des Akku-Elektrowerk
zeugs verwenden. Keine Fremd-Ladege
räte zum Laden der Akkupacks verwen
den. Die Verwendung von nicht vom Her
steller vorgesehenem Zubehör kann zu ei
nem elektrischen Schlag und/oder schwe
ren Unfällen führen.
2.4 Sicherheitshinweise Schleifwerkzeuge
– Schleifwerkzeuge sind bruchempfindlich,
daher ist äußerste Sorgfalt beim Umgang
mit Schleifwerkzeugen erforderlich! Die
Verwendung von beschädigten, falsch auf
gespannten oder eingesetzten Schleifwerk
zeugen ist gefährlich und kann zu schwer
wiegenden Verletzungen führen.
– Die Schleifwerkzeuge während der Lage
rung keinen mechanischen Beschädigun
gen und schädigenden Umwelteinflüssen
aussetzen.
– Schleifwerkzeuge mit Sorgfalt behandeln
und transportieren.
– Angaben auf dem Etikett oder dem Schleif
werkzeug sowie Verwendungseinschrän
kungen, Sicherheitshinweise oder weitere
Hinweise beachten. Bei Unklarheiten über
die Auswahl von Schleifwerkzeugen muss
der Anwender vor Gebrauch beim Herstel
ler Auskunft einholen.
– Das Montieren von Schleifwerkzeugen
muss in Übereinstimmung mit Kapitel 8.2
erfolgen.
– Das Montieren von Schleifwerkzeugen darf
nur durch sachkundige Personen erfolgen.
Schleifen
ah = 5 m/s
K = 2 m/s
2
2
Trennschleifen
ah ≤ 2,5 m/s
K = 2 m/s
2
2
Die angegebenen Emissionswerte (Vibration,
Geräusch)
– dienen dem Maschinenvergleich,
– eignen sich auch für eine vorläufige Ein
schätzung der Vibrations- und Geräuschbe
lastung beim Einsatz,
– repräsentieren die hauptsächlichen An
wendungen des Elektrowerkzeugs.
Andere Anwendungen wie z. B. Drahtbürsten
können zu anderen Schwingungsemissionswer
ten führen.
VORSICHT
Emissionswerte können von den angegebe
nen Werten abweichen. Dies hängt ab von
der Verwendung des Werkzeugs und der Art
des bearbeiteten Werkstücks.
► Die tatsächliche Belastung während des
gesamten Betriebszyklus muss beurteilt
werden.
► Abhängig von der tatsächlichen Belastung
müssen geeignete Sicherheitsmaßnahmen
zum Schutz des Bedieners festgelegt wer
den.
2.5 Emissionswerte
Die nach EN 60745 ermittelten Werte betragen
typischerweise:
Schalldruckpegel LPA = 86 dB(A)
Schallleistungspegel LWA = 97 dB(A)
Unsicherheit K = 3 dB
VORSICHT
Beim Arbeiten eintretender Schall
Schädigung des Gehörs
► Gehörschutz benutzen.
Schwingungsemissionswert ah (Vektorsumme
dreier Richtungen) und Unsicherheit K ermittelt
entsprechend EN 60745:
3 Bestimmungsgemäße
Verwendung
Das Elektrowerkzeug ist bestimmt zum Trenn
schleifen, leichten Schleifen, Arbeiten mit
Drahtbürsten und Entgraten von Metall- und
Steinwerkstoffen ohne Verwendung von flüssi
gen Kühl- und Schmiermitteln.
Je nach Anwendung die jeweils dafür vorgese
hene Schutzhaube verwenden.
Es dürfen nur gebundene Trenn- und Schleif
scheiben nach EN 12413, Diamanttrennschei
ben nach EN 13236 sowie Drahtbürsten nach
EN 1083 verwendet werden.
Dieses Elektrowerkzeug nicht verwenden zum
Polieren, zum Schleifen von Oberflächen mit
Diamantscheiben sowie Anwendungen mit Di
amant- und Hartkeramikscheiben.
Fräsräder, Hartmetall- und spanende Schleif
werkzeuge (mit geometrisch bestimmter
11
Page 12

Deutsch
Schneide) sind von der Verwendung ausge
schlossen.
Das Elektrowerkzeug ist für die Verwendung
mit den Festool Akkupacks der Baureihe BP
gleicher Spannungsklasse bestimmt.
Bei nicht bestimmungsgemäßem Ge
brauch haftet der Benutzer.
4 Technische Daten
Akku-Winkelschleifer AGC 18
Motorspannung 18 V DC
Drehzahl (Leerlauf)
Drehzahlstufen 1
Umfangsgeschwindigkeit
4500 - 8500 min
4500 min
2
3
4
5
6
5300 min
6100 min
6900 min
7700 min
8500 min
80 m/s
Schleifwerkzeug
Schleifspindelgewinde M 14
Schleifwerkzeug-Ø 125 mm
Schleifwerkzeugdicke max. 6,0 mm
min. 1,0 mm
Gewicht entsprechend EP
2,7 kg
TA-Procedure 01:2014
5 Geräteelemente
[1-1]
[1-2]
[1-3]
[1-4]
[1-5]
[1-6]
[1-7]
[1-8]
[1-9]
Schutzhaube
Spindelarretierung
Gewinde für Zusatzhandgriff
Drehzahlregelung
Ein-/Ausschalter
Zusatzhandgriff
Isolierte Griffflächen (grau schattier
ter Bereich)
Tasten zum Lösen des Akkupacks
Taste Kapazität am Akkupack
Abgebildetes oder beschriebenes Zubehör ge
hört teilweise nicht in den Lieferumfang.
Die angegebenen Abbildungen befinden sich
am Anfang der Betriebsanleitung.
5.1 Elektronik Sanftanlauf
Der elektronisch geregelte Sanftanlauf sorgt
für ruckfreien Anlauf des Elektrowerkzeugs.
Drehzahlregler [1-4]
Die Drehzahl lässt sich mit dem Stellrad stu
fenlos im Drehzahlbereich einstellen. Dadurch
können Sie die Geschwindigkeit dem jeweiligen
-1
-1
-1
Material optimal anpassen. Beachten Sie hierzu
auch die Angaben auf den Schleifwerkzeugen.
Konstante Drehzahl
Die vorgewählte Motordrehzahl wird elektro
-1
-1
nisch konstant gehalten. Dadurch wird auch bei
Belastung eine gleichbleibende Geschwindig
keit erreicht.
-1
-1
Rückstoßschutz
Bei plötzlicher Drehzahlabsenkung, z. B. durch
Blockierung im Trennschnitt, wird der Motor
sofort abgeschaltet. Zur Wiederinbetriebnahme
muss das Elektrowerkzeug zuerst ausgeschal
tet und dann wieder eingeschaltet werden.
Wiederanlaufschutz
Der eingebaute Wiederanlaufschutz verhindert,
dass das Elektrowerkzeug im Dauerbetriebszu
stand nach einer Spannungsunterbrechung
wieder selbständig anläuft. Zur Wiederinbet
riebnahme muss das Elektrowerkzeug zuerst
ausgeschaltet und dann wieder eingeschaltet
werden.
Überhitzungsschutz
Bei Überhitzung schaltet die Sicherheitselekt
ronik in die Betriebsart Kühlung um. Der Motor
läuft weiter und die konstante Drehzahl wird
deaktiviert. Nach einer Abkühlphase von ca.
10-20 Sek. ist die Maschine wieder betriebsbe
reit und voll belastbar.
6 Inbetriebnahme
6.1 Elektrowerkzeug richtig halten
Das Elektrowerkzeug mit zwei Händen an den
isolierten Griffflächen [1-7] halten: eine Hand
am Motorgehäuse hinter dem Schalter und eine
Hand am Zusatzhandgriff [1-6].
[1-10]
[1-11]
12
Kapazitätsanzeige
Ablagepunkte
Page 13
Deutsch
6.2 Ein-/Ausschalten Einschalten [2a]
► Ein-/Ausschalter [1-5] nach vorne schie
ben. Bei gleichzeitigem Druck auf das vor
dere Schalterteil wird der Ein-/ Ausschalter
arretiert.
Ein-/ Ausschalter [1-5] ist arretiert und Elekt
rowerkzeug ist eingeschaltet.
Das Gerät erst am Material ansetzen,
wenn die Betriebsdrehzahl erreicht ist.
Drehzahl einstellen
Die Drehzahl kann in 6 Stufen an die Anforde
rungen des Werkstücks angepasst werden.
► Drehzahlregler [1-4] auf gewünschte Stufe
stellen.
Ausschalten [2b]
► Elektrowerkzeug vom zu bearbeitenden Ma
terial abheben.
► Auf den hinteren Teil des Ein-/Ausschal
ters [1-5] drücken.
Arretierung ist gelöst und Elektrowerkzeug ist
ausgeschaltet.
Weitere Infos zu Akkupack und Ladegerät
finden Sie in den Betriebsanleitungen von
Akkupack und Ladegerät.
8 Einstellungen
WARNUNG
Verletzungsgefahr
► Vor allen Arbeiten am Elektrowerkzeug
den Akkupack vom Elektrowerkzeug ab
nehmen.
8.1 Zusatzhandgriff [1-6] montieren
Immer Zusatzhandgriff verwenden, um ei
ne sichere und ermüdungsarme Arbeits
haltung zu gewährleisten.
Mit Hilfe der speziellen Konstruktion
„VIBRASTOP“ werden die Schwingungen durch
den Zusatzhandgriff reduziert.
► Zusatzhandgriff [1-6] abhängig von der Ar
beitsweise seitlich am Gewinde [1-3] ein
drehen.
8.2 Schleifwerkzeug montieren [4]
WARNUNG
Verletzungsgefahr durch Rückschlag, weg
fliegende Teile
► Vor dem Ablegen des Elektrowerkzeugs
warten, bis das rotierende Schleifwerkzeug
vollständig zum Stillstand kommt.
► Das Elektrowerkzeug auf den Ablagepunk
ten [1-11] ablegen.
7 Akkupack
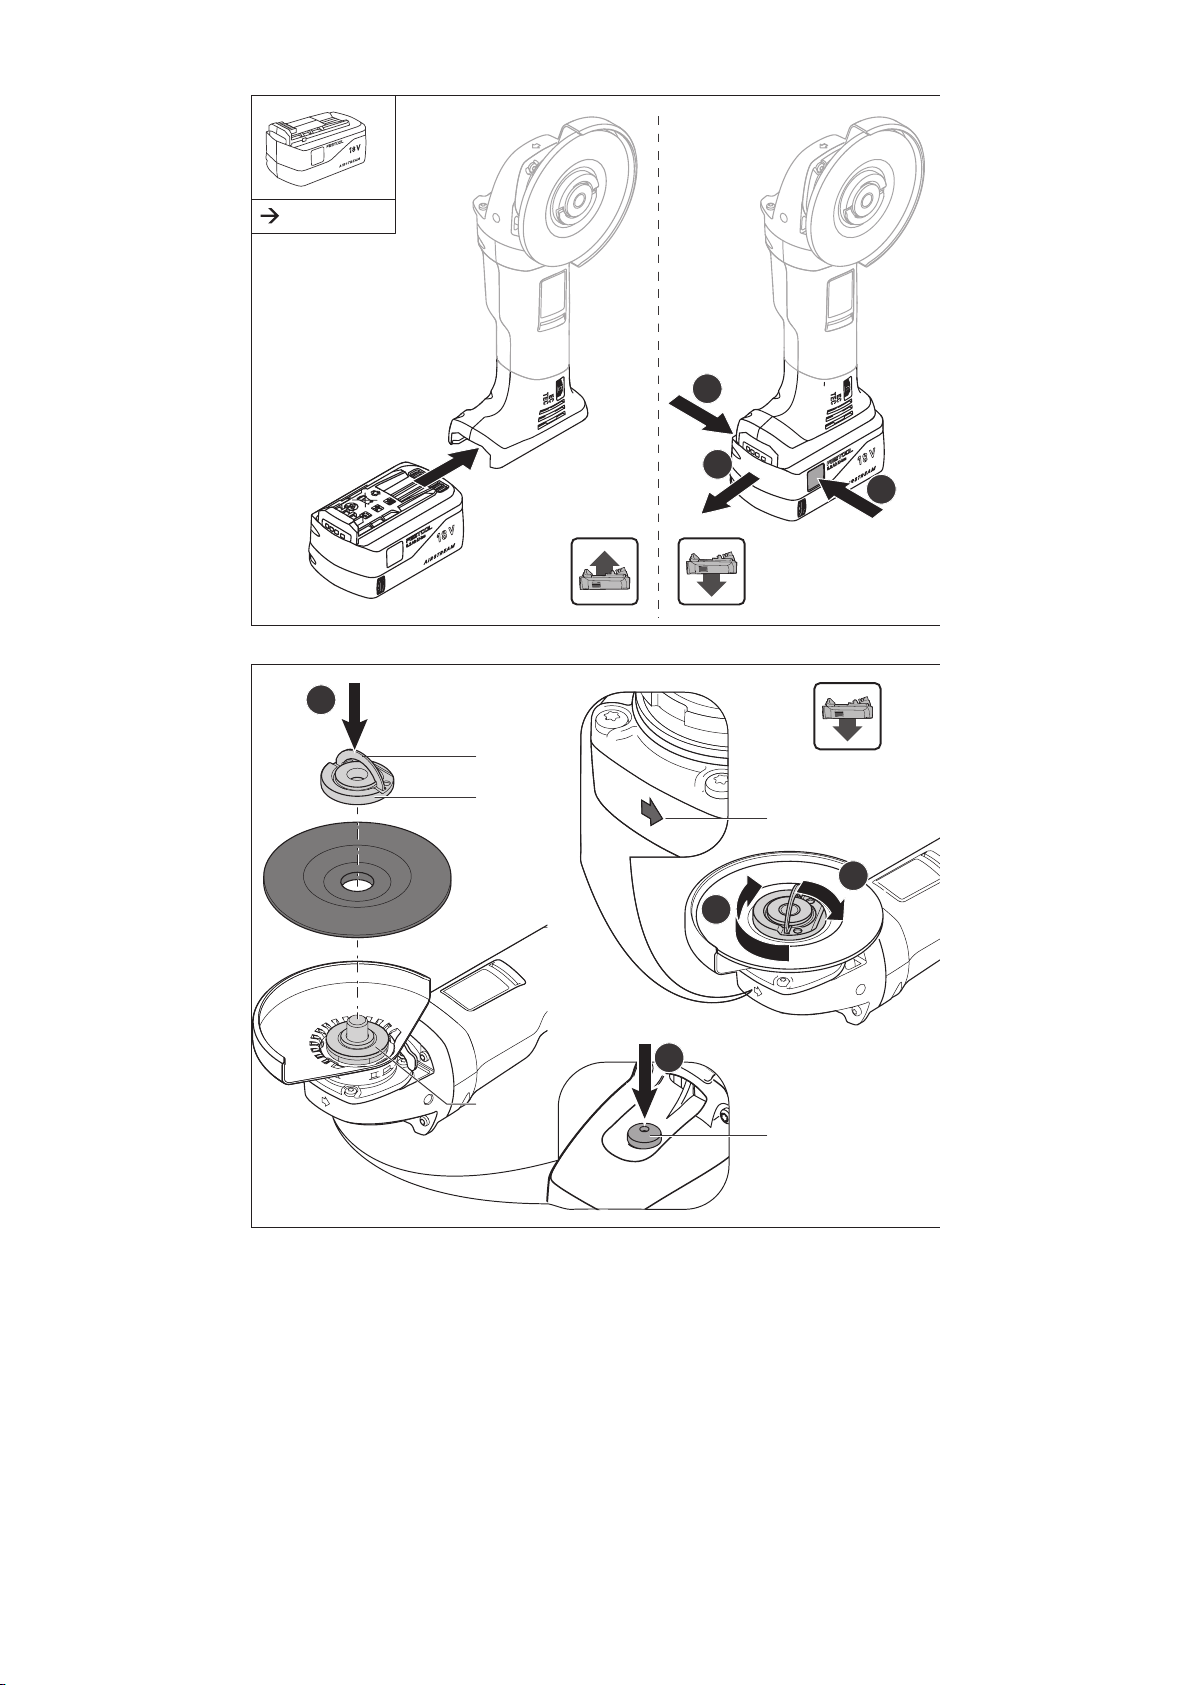
► Akkupack einsetzen [3a]
► Akkupack abnehmen [3b]
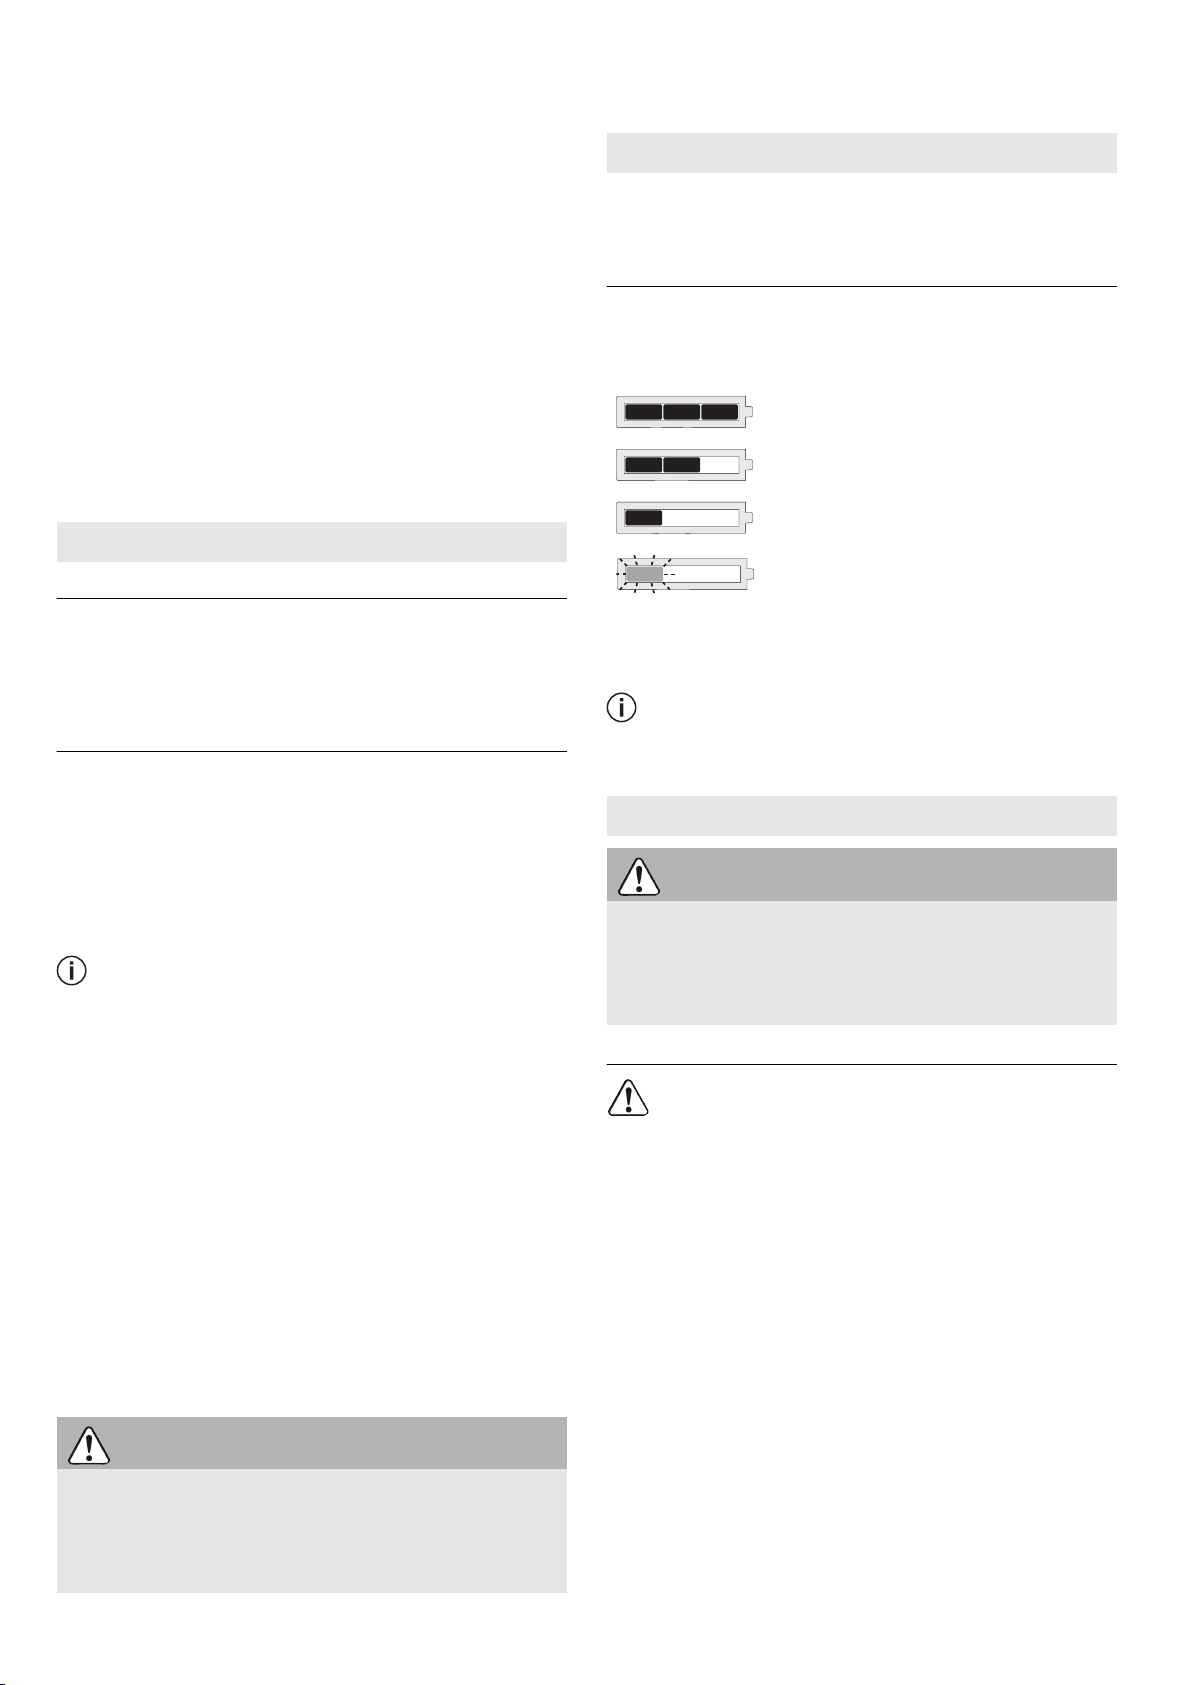
7.1 Kapazitätsanzeige
Die Kapazitätsanzeige [1-10] zeigt bei Betäti
gung der Taste [1-9] den Ladezustand des Ak
kupacks für ca. 2s an:
70‑100%
VORSICHT
Verletzungsgefahr durch heißes und schar
fes Werkzeug
► Keine vibrierenden, stumpfen und defekten
Schleifwerkzeuge verwenden.
► Keine Schleifwerkzeuge verwenden, die vor
der Montage starker Feuchtigkeit, Nässe
oder hohen Temperaturen ausgesetzt wa
ren.
► Schutzhandschuhe tragen.
WARNUNG
Verletzungsgefahr durch fehlerhaft mon
tiertes Schleifwerkzeug
► Den Griffbügel [4-3] der Schnellspannmut
ter nur bei Austausch des Schleifwerk
zeugs ausklappen.
► Darauf achten, dass vor Montage des
Schleifwerkzeugs der Flansch [4-4] auf der
Spindel aufgesteckt ist.
40‑70%
15‑40%
< 15%
*
Empfehlung: Akkupack vor weiterer Ver
wendung laden.
*
13
Page 14
Deutsch
Die Spannmutter nur von Hand anziehen
oder lösen. Der Griffbügel darf keinesfalls
mittels Werkzeugen zum Festziehen oder
Lösen benutzt werden.
Falls sich die Mutter von Hand nicht mehr
lösen lässt, darf diese nur mittels eines
Stirnlochschlüssels [5-1] gelöst werden.
Ist der Griffbügel lose oder beschädigt,
darf die Spannmutter keinesfalls weiter
benutzt werden.
Je nach Anwendung die jeweils dafür vor
gesehene Schutzhaube verwenden.
► Den Akkupack vom Elektrowerkzeug ab
nehmen.
► Griffbügel [4-3] der Schnellspannmutter
öffnen.
► Schnellspannmutter [4-2] von Hand ab
schrauben.
►
Schleifwerkzeug auf Spindel und
Flansch [4-4] aufsetzen.
Darauf achten, dass der Zentrierabsatz des
Flansches genau in die Scheibenöffnung
passt und der Formschluss zwischen Elekt
rowerkzeug/Spindel und Flansch überein
stimmt.
Darauf achten, dass die Spindel des Elekt
rowerkzeugs im Durchmesser mit der Boh
rung des Schleifwerkzeugs übereinstimmt.
8.3 Drahtbürsten montieren [6]
► Handgriff [6-1] abnehmen.
►
Handgriff mit Handschutz [6-2] montie
ren.
►
Drahtbürste [6-3] sicher an Aufnahme
gewinde [6-4] montieren.
Der Drahtbürste beiliegende Hinweise be
achten.
8.4 Schutzhaube/Trennschutzhaube positionieren [7]
Die Schutzhaube ist vormontiert. Durch einfa
che Drehung kann die Lage der Schutzhaube an
die Anforderungen des Arbeitsgangs angepasst
werden.
►
Arretierungshebel der Schutzhaube ge
drückt halten.
►
Die Schutzhaube des Elektrowerkzeugs
so einstellen, dass Funken und Schleifparti
kel vom Körper weggeleitet werden.
►
Arretierungshebel loslassen und
Schutzhaube weiterdrehen, bis diese ein
rastet.
Die als Zubehör erhältliche Trennschutz
haube lässt sich gleichermaßen positio
nieren.
8.5 Schutzhaube/Trennschutzhaube abnehmen [8]
Gekröpfte Schleifwerkzeuge müssen
so montiert werden, dass ihre Schleif
fläche nicht über der Ebene des
Schutzhaubenrandes hervorsteht.
Auf die vorgeschriebene Drehrichtung des
Schleifwerkzeugs (Pfeil auf Schleifwerk
zeug = Pfeil am Gerätegehäuse [4-1]) ach
ten.
► Schnellspannmutter auf Schleifwerkzeug
und Spindel aufsetzen.
►
Spindelarretierung [4-5] auf Rückseite
des Geräts drücken.
►
Schnellspannmutter per Hand festzie
hen.
►
Griffbügel der Schnellspannmuter
schließen.
► Befestigung und Sitz des Schleifwerkzeugs
am Elektrowerkzeug prüfen.
► Neue Schleifwerkzeuge etwa eine Minute
ohne Belastung zur Probe laufen lassen.
Die Demontage erfolgt in umgekehrter Reihen
folge [5a].
VORSICHT
Verletzungsgefahr durch Funkenflug und
brechende Trennscheiben.
► Zum Trennschleifen die als Zubehör er
hältliche Trennschutzhaube verwenden:
siehe Kapitel 9.2
► Bereits montiertes Schleifwerkzeug vom
Elektrowerkzeug demontieren: siehe Kapi
tel 8.2 .
►
►
►
Arretierungshebel der Schutzhaube ge
drückt halten.
Schutzhaube nach Überwindung des
Druckpunktes nach vorne drehen.
Die Schutzhaube vom Elektrowerkzeug
abnehmen.
14
Page 15
8.6 Schutzhaube/Trennschutzhaube montieren [9]
HINWEIS
Verschleißerscheinungen an der Trenn
schutzhaube.
► Vor dem Einschalten prüfen, ob sich das
Schleifwerkzeug frei bewegen kann. Das
Schleifwerkzeug darf nicht an der Trenn
schutzhaube schleifen.
Je nach Anwendung die jeweils dafür vor
gesehene Schutzhaube verwenden.
►
►
Zur Montage des Schleifwerkzeugs siehe Kapi
tel 8.2 .
Schutzhaube in vorderer Position einset
zen. Dabei darauf achten, dass die Zapfenund Nutenlage übereinstimmen.
Schutzhaube in gewünschte Position
drehen, bis der Arretierungshebel von
selbst einrastet.
9 Arbeiten mit dem
Elektrowerkzeug
Deutsch
WARNUNG
Verletzungsgefahr durch Arbeiten über Kopf
► Bei Arbeiten über Kopf immer Schutzbrille
tragen.
► P2-Atemschutzmaske tragen.
Das Elektrowerkzeug lässt sich bei Nicht
benutzung auf den Ablagepunkten [1-11]
ablegen.
► Das Schleifwerkzeug für den Transport aus
dem Elektrowerkzeug entfernen.
9.1 Schleifen
Zum Schleifen immer die im Lieferumfang ent
haltene Schutzhaube verwenden.
Die Schutzhaube ist vormontiert. Zur Demonta
ge der Schutzhaube siehe Kapitel 8.5 .
9.2 Trennschleifen
Zum Trennschleifen immer die als Zubehör er
hältliche Trennschutzhaube TSH-AGC 18-125
verwenden.
Die Trennschutzhaube wird wie die Schutzhau
be montiert, positioniert und abgenommen, sie
he Kapitel 8.5 und 8.6 .
WARNUNG
Verletzungsgefahr
► Das Elektrowerkzeug nur im eingeschalte
ten (laufenden) Zustand ins Material füh
ren.
► Werkstück so befestigen, dass es sich beim
Bearbeiten nicht bewegen kann.
► Die Hände vom drehenden Schleifwerk
zeug fernhalten.
WARNUNG
Verletzungsgefahr durch brüchiges Schleif
werkzeug
► Darauf achten, dass das Verfallsdatum des
Schleifwerkzeugs nicht überschritten ist.
WARNUNG
Verletzungsgefahr durch sich bewegendes
Werkstück
► Werkstück sicher befestigen.
► Das Schleifwerkzeug stets gerade durch
das Werkstück führen.
Darauf achten, dass sich das Schleifwerk
zeug nicht verkantet und schräg oder seit
lich belastet wird.
► Bei dickwandigen Werkstücken einen
Trennschnitt durch oszillierende Bewegun
gen und unter leichtem Druck des Elektro
werkzeugs durchführen.
9.3 Arbeiten mit Drahtbürsten
WARNUNG
Verletzungsgefahr am Auge durch wegflie
gende Teile/Drähte
► Schutzbrille tragen.
Zum Arbeiten mit Drahtbürsten immer den als
Zubehör erhältlichen Handschutz HS-AGC18
verwenden, siehe Kapitel
8.3 .
10 Akustische Warnsignale
Schaltet das Elektrowerkzeug aufgrund nach
folgender Betriebszustände ab, ertönt beim
Einschalten ein Warnsignal.
Akkupack nicht akzeptiert
– Richtiges Akkupack-Model einlegen.
Akkupack leer
– Den Akkupack wechseln.
15
Page 16
EKAT
1
2
3
5
4
Deutsch
– Den Akkupack laden.
Akkupack defekt
– Den Akkupack wechseln.
– Die Funktionsfähigkeit bei abgekühltem
Akkupack mit dem Ladegerät prüfen.
Akkupack überhitzt
– Den Akkupack abkühlen lassen.
Elektrowerkzeug ist überhitzt
– Nach Abkühlung kann das Elektrowerk
zeug wieder in Betrieb genommen werden.
Elektrowerkzeug defekt
– Festool Kundendienstwerkstatt oder Fach
händler kontaktieren.
Elektrowerkzeug blockiert
– Blockade beseitigen.
Schaltet das Elektrowerkzeug bei einer
Blockade ab, ertönt kein Warnsignal.
11 Zubehör
Verwenden Sie nur Original Zubehöre von
Festool, wie in der bestimmungsgemäßen Ver
wendung beschrieben. Durch die Verwendung
von minderwertigen Einsatzwerkzeugen und
Fremd-Zubehör kann es zu erhöhter Verlet
zungsgefahr und erheblichen Unwuchten kom
men, die die Qualität der Arbeitsergebnisse
verschlechtern und den Verschleiß der Maschi
ne erhöhen.
Die Bestellnummern für Zubehör und Werkzeu
ge finden Sie in Ihrem Festool Katalog oder im
Internet unter „www.festool.de“.
12 Wartung und Pflege
WARNUNG
Verletzungsgefahr, Stromschlag
► Vor allen Wartungs- und Pflegearbeiten
stets den Akkupack von dem Elektrowerk
zeug abnehmen.
► Alle Wartungs- und Reparaturarbeiten, die
ein Öffnen des Elektrowerkzeugs erfor
dern, dürfen nur von einer autorisierten
Kundendienstwerkstatt durchgeführt wer
den.
Kundendienst und Reparatur
nur durch Hersteller oder durch
Servicewerkstätten. Nächstge
legene Adresse unter:
www.festool.de/service
Nur original Festool Ersatzteile
verwenden! Bestell-Nr. unter:
www.festool.de/service
Zur Sicherung der Luftzirkulation müssen die
Kühlluftöffnungen im Motorgehäuse stets frei
und sauber gehalten werden.
Bei Bearbeitung von mineralischen Materialien
(z. B. Gips, …) kann sich Staub im Gehäuse des
Elektrowerkzeugs und am Ein-/Ausschalter ab
setzen und in Verbindung mit Luftfeuchtigkeit
aushärten. Dies kann zu Beeinträchtigungen
am Schaltmechanismus führen und das Elekt
rowerkzeug kann überhitzen.
Bei Bearbeitung von Metall kann sich leitfähi
ger Staub im Innern des Elektrowerkzeugs ab
setzen. Dies kann zu einem Kurzschluss füh
ren.
► Nach jeder Bearbeitung den Innenraum des
Elektrowerkzeugs durch die Lüftungsöff
nungen und den Ein-/Ausschalter mit tro
ckener und ölfreier Druckluft ausblasen.
Die Schleifwerkzeuge nach der Verwendung
reinigen.
Die Anschlusskontakte am Elektrowerkzeug,
Ladegerät und Akkupack sauber halten.
13 Umwelt
Gerät nicht in den Hausmüll werfen!
Geräte, Zubehör und Verpackungen ei
ner umweltgerechten Wiederverwertung
zuführen. Geltende nationale Vorschriften be
achten.
Nur EU: Gemäß Europäischer Richtlinie über
Elektro- und Elektronik-Altgeräte und Umset
zung in nationales Recht, müssen verbrauchte
Elektrowerkzeuge getrennt gesammelt und ei
ner umweltgerechten Wiederverwertung zuge
führt werden.
Informationen zur REACh: www.festool.com/
reach
14 Allgemeine Hinweise
14.1
Bluetooth
Die Wortmarke Bluetooth® und die Logos sind
eingetragene Marken von Bluetooth SIG, Inc.
und werden von der TTS Tooltechnic Sys
tems AG & Co. KG und somit von Festool unter
Lizenz verwendet.
®
16
Page 17

English
Contents
1 Symbols.....................................................17
2 Safety warnings.........................................17
3 Intended use..............................................21
4 Technical data........................................... 21
5 Parts of the machine.................................21
6 Commissioning..........................................22
7 Battery pack.............................................. 22
8 Settings......................................................22
9 Working with the electric power tool........24
10 Acoustic warning signal............................24
11 Accessories............................................... 25
12 Service and maintenance..........................25
13 Environment..............................................25
14 General information..................................25
1 Symbols
Warning of general danger
Warning of electric shock
Read the operating manual and safety
instructions.
Wear ear protection.
Wear protective gloves.
Wear a dust mask.
Wear protective goggles.
Wear sturdy shoes.
Do not dispose of it with domestic
waste.
Tip or advice
Handling instruction
Inserting the battery pack
Removing the battery pack
CE marking: Confirms the conformity
of the power tool with the European
Community directives.
2 Safety warnings
2.1 General safety instructions WARNING! Read all safety warnings and
all instructions. Failure to follow the
warnings and instructions may result in electric
shock, fire and/or serious injury.
Save all warnings and instructions for future
reference.
The term "power tool" in the warnings refers to
your mains-operated (corded) power tool or
battery-operated (cordless) power tool.
Follow the operating manual for the charger
and the battery pack.
2.2 Machine-specific safety notices
General safety warnings for sanding, wire brushing and abrasive cutting
– This power tool is designed to be used as a
sander, wire brush and abrasive cutting
machine. Read all safety warnings, infor
mation, illustrations and technical data
enclosed with the tool. If the following in
structions are not observed, this may lead
to electric shock, fire and/or serious inju
ries.
– This power tool is not suitable for sanding
using sandpaper or polishing. Applications
for which the power tool is not intended can
pose a serious risk and cause injuries.
– Do not use accessories which are not spe
cifically designed and recommended by
the tool manufacturer. Just because the
accessory can be attached to your power
tool, it does not assure safe operation.
– The rated speed of the accessory must be
at least equal to the maximum speed
marked on the power tool. Accessories
running faster than their rated speed can
break and fly apart.
– The outside diameter and the thickness of
your accessory must be within the capaci
ty rating of your power tool. Incorrectly
sized accessories cannot be adequately
guarded or controlled.
– Threaded mounting of accessories must
match the grinder spindle thread. For ac
cessories mounted by flanges, the arbour
hole of the accessory must fit the locating
diameter of the flange. Accessories that do
not match the mounting hardware of the
power tool will run out of balance, vibrate
excessively and may cause loss of control.
– Do not use a damaged accessory. Before
each use inspect the accessory such as
17
Page 18

English
abrasive wheels for chips and cracks,
backing pad for cracks, tear or excess
wear, wire brush for loose or cracked
wires. If power tool or accessory is drop
ped, inspect for damage or install an un
damaged accessory. After inspecting and
installing an accessory, position yourself
and bystanders away from the plane of the
rotating accessory and run the power tool
at maximum no-load speed for one mi
nute. Damaged accessories will normally
break apart during this test time.
– Wear personal protective equipment. De
pending on application, use face shield,
safety goggles or safety glasses. As ap
propriate, wear dust mask, hearing pro
tectors, gloves and workshop apron capa
ble of stopping small abrasive or work
piece fragments. The eye protection must
be capable of stopping flying debris gener
ated by various operations . The dust mask
or respirator must be capable of filtrating
particles generated by your operation. Pro
longed exposure to high intensity noise may
cause hearing loss.
– Make sure that any other persons in the
vicinity are at a safe distance from your
work area. Anyone entering the work area
must wear personal protective equipment.
Fragments of the workpiece or broken
tools may fly off and even cause injuries
outside the immediate work area.
– Hold the power tool by insulated gripping
surfaces only, when performing an opera
tion where the cutting accessory may con
tact hidden wiring. Cutting accessory con
tacting a "live" wire may make exposed
metal parts of the power tool "live" and
could give the operator an electric shock.
– Never lay the power tool down until the
accessory has come to a complete stop.
The spinning accessory may grab the sur
face and pull the power tool out of your
control.
– Do not run the power tool while carrying it
at your side. Accidental contact with the
spinning accessory could snag your cloth
ing, pulling the accessory into your body.
– Regularly clean the power tool’s air vents.
The motor’s fan will draw the dust inside
the housing and excessive accumulation of
powdered metal may cause electrical haz
ards.
– Do not operate the power tool near flam
mable materials. Sparks could ignite these
materials.
– Do not use accessories that require liquid
coolants. Using water or other liquid cool
ants may result in electrocution or shock.
Kickbacks and corresponding safety warnings
Kickback is a sudden reaction caused by an in
sertion tool becoming caught or jammed while
rotating, such as an abrasive wheel, sanding
pad, wire brush, etc. Catching or jamming cau
ses the rotating insertion tool to stop suddenly.
This accelerates an uncontrolled power tool
against the rotational direction of the accessory
at the site where the accessory is jammed.
If, for example, an abrasive wheel becomes
caught or jammed in the workpiece, the edge of
the abrasive wheel which is plunged into the
workpiece may become stuck, causing the
abrasive wheel to break or resulting in kick
back. The abrasive wheel then moves towards
or away from the operator, depending on the
wheel's rotational direction. This can also
cause abrasive wheels to break.
A kickback occurs as a result of using the pow
er tool incorrectly or misguidedly. It can be pre
vented by taking appropriate precautions, as
described below.
– Maintain a firm grip on the power tool and
position your body and arm to allow you to
resist kickback forces. Always use auxili
ary handle, if provided, for maximum con
trol over kickback or torque reaction dur
ing start-up. The operator can control tor
que reactions or kickback forces, if proper
precautions are taken.
– Never place your hand near the rotating
accessory. Accessory may kickback over
your hand.
– Do not position your body in the area
where power tool will move if kickback oc
curs. Kickback will propel the tool in direc
tion opposite to the wheel’s movement at
the point of snagging.
– Use special care when working corners,
sharp edges etc. Avoid bouncing and snag
ging the accessory. Aorners, sharp edges
or bouncing have a tendency to snag the ro
tating accessory and cause loss of control
or kickback.
– Do not attach a saw chain woodcarving
blade or toothed saw blade. Such blades
create frequent kickback and loss of con
trol.
18
Page 19

English
Specific safety warnings on sanding and abra
sive cutting
– Use only wheel types that are recommen
ded for your power tool and the specific
guard designed for the selected wheel.
Wheels for which the power tool was not
designed cannot be adequately guarded
and are unsafe.
– The grinding surface of centre depressed
wheels must be mounted below the plane
of the guard lip. An improperly mounted
wheel that projects through the plane of
the guard lip cannot be adequately protec
ted.
– The guard must be securely attached to
the power tool and positioned for maxi
mum safety, so the least amount of wheel
is exposed towards the operator. The
guard helps to protect the operator from
broken wheel fragments, accidental con
tact with wheel and sparks that could ignite
clothing.
– Wheels must be used only for recommen
ded applications. For example: do not
grind with the side of cut-off wheel. Abra
sive cut-off wheels are intended for periph
eral grinding, side forces applied to these
wheels may cause them to shatter.
– Always use undamaged wheel flanges that
are of correct size and shape for your se
lected wheel. Proper wheel flanges sup
port the wheel thus reducing the possibility
of wheel breakage. Flanges for cut-off
wheels may be different from grinding
wheel flanges.
– Do not use worn down wheels from larger
power tools. Wheel intended for larger
power tool is not suitable for the higher
speed of a smaller tool and may burst.
Other specific safety warnings on abrasive cutting
– Do not “jam” the cut-off wheel or apply
excessive pressure. Do not attempt to
make an excessive depth of cut. Over
stressing the wheel increases the loading
and susceptibility to twisting or binding of
the wheel in the cut and the possibility of
kickback or wheel breakage.
– Do not position your body in line with and
behind the rotating wheel. When the
wheel, at the point of operation, is moving
away from your body, the possible kickback
may propel the spinning wheel and the
power tool directly at you.
– When wheel is binding or when interrupt
ing a cut for any reason, switch off the
power tool and hold the power tool mo
tionless until the wheel comes to a com
plete stop. Never attempt to remove the
cut-off wheel from the cut while the wheel
is in motion otherwise kickback may oc
cur. Investigate and take corrective action
to eliminate the cause of wheel binding.
– Do not restart the cutting operation in the
workpiece. Let the wheel reach full speed
and carefully re-enter the cut. The wheel
may bind, walk up or kickback if the power
tool is restarted in the workpiece.
– Support panels or any oversized work
piece to minimize the risk of wheel pinch
ing and kickback. Large workpieces tend to
sag under their own weight. Supports must
be placed under the workpiece near the
line of cut and near the edge of the work
piece on both sides of the wheel.
– Use extra caution when making a “pocket
cut” into existing walls or other blind
areas. The protruding wheel may cut gas or
water pipes, electrical wiring or objects
that can cause kickback.
Safety Warnings Specific for Wire Brushing Operations
– Note that the wire brushes lose wire bris
tles during normal use. Do not overload
the wire by applying too much pressure.
Flying wire pieces can easily penetrate thin
clothing and/or skin.
– If the use of a guard is recommended for
wire brushing, do not allow any interfer
ence of the wire wheel or brush with the
guard. Wire wheel or brush may expand in
diameter due to work load and centrifugal
forces.
2.3 Further safety warnings
– Do not use the power tool in the rain or in
damp surroundings. Moisture in the power
tool may cause a short circuit and burning.
– Only guide the power tool into the material
when it is switched on (running).
– For safety reasons, the workpiece must be
clamped in a vice or another type of clamp
ing device. Clamping a workpiece frees up
both your hands for operating the power
tool.
– Never perform work while standing on lad
ders.
– Do not carry out cutting work above metal
lic objects, nails, screws or bolts.
19
Page 20
English
– Use appropriate detection devices to look
for any hidden supply lines or consult your
local utility company. If the insertion tool
makes contact with live cables, it can result
in fire and electric shock. Damage to a gas
pipe can lead to an explosion. Penetration
of a water pipe can result in damage to
property.
– Harmful/toxic dust may be produced dur
ing your work (e.g. paint containing lead,
certain types of wood and metal). Only
qualified persons are permitted to handle
materials containing asbestos. Aontact
with or inhalation of this dust may pose a
risk for the operating personnel or persons
in the vicinity. Comply with the safety regu
lations that apply in your country.
Wear a P2 respiratory mask to protect
your health.
– After machining mineral materials (e.g.
gypsum): Blow out the inside of the power
tool through the vents and the control ele
ment using dry, oil-free compressed air.
Otherwise, dust deposits may build up in
side the power tool's housing and on the
on/off switch and harden when exposed to
humidity. This may impair the switching
mechanism and cause the power tool to
overheat.
– After machining metal: Blow out the inside
of the power tool through the vents using
dry, oil-free compressed air. Otherwise,
conductive dust deposits may build up in
side the power tool. This can cause a shortcircuit.
– Do not use power supply units or third-
party battery packs to operate cordless
power tools. Do not use third-party charg
ers to charge the battery packs. The use of
accessories not expressly authorised by the
manufacturer can result in electric shocks
and/or serious accidents.
2.4 Safety warnings for sanding tools
– Sanding tools are fragile, which is why you
must be extremely careful when handling
them. The use of damaged, incorrectly
clamped or inserted sanding tools is dan
gerous and can cause serious injuries.
– Ensure that the sanding tools are not ex
posed to any mechanical damage or harm
ful environmental conditions during stor
age.
– Handle and transport sanding tools with
care.
– Pay attention to the information on the la
bel or the sanding tool itself, as well as us
age restrictions, safety warnings or other
instructions. If any points are unclear when
choosing sanding tools, the user must con
tact the manufacturer for information be
fore using the tool.
– Sanding tools must be fitted in accordance
with Section 8.2 .
– Only experienced staff are permitted to fit
sanding tools.
2.5 Emission levels
The levels determined in accordance with EN
60745 are typically:
Sound pressure level LPA = 86 dB(A)
Sound power level LWA = 97 dB(A)
Uncertainty K = 3 dB
CAUTION
Noise generated when working
Risk of damage to hearing
► Use ear protection.
Vibration emission level ah (vector sum for
three directions) and uncertainty K measured in
accordance with EN 60745:
Sanding
ah = 5 m/s
K = 2 m/s
Abrasive cutting
ah ≤ 2,5 m/s
K = 2 m/s
The specified emission levels (vibration, noise)
– are used to compare machines.
– They are also used for making preliminary
estimates regarding vibration and noise
load during operation.
– They represent the primary applications of
the power tool.
Other applications, e.g. wire brushes, may
cause different vibration emission values.
2
2
2
2
20
Page 21
English
CAUTION
The emission values may deviate from the
specified values. This is dependent on how
the tool is used and the type of workpiece
being machined.
► The actual load during the entire operating
cycle must be evaluated.
► Depending on the actual load, suitable pro
tective measures must be defined in order
to protect the operator.
3 Intended use
The power tool is designed for abrasive cutting,
light sanding, working with wire brushes and
deburring metal and stone materials without
the use of liquid coolant or lubricant.
Use the guard provided for the application in
each case.
Only bonded cutting discs and abrasive wheels
as per EN 12413, diamond cutting discs as per
EN 13236 and wire brushes as per EN 1083 may
be used.
Do not use this power tool for polishing, sand
ing surfaces using diamond discs or for appli
cations involving diamond or hard ceramic
discs.
Cutter wheels, carbide and machining sanding
tools (with geometrically defined cutting edge)
are not suitable for use.
This power tool is intended for use with
BP Festool battery packs of the same voltage
class.
The user is liable for improper or non-in
tended use.
4 Technical data
Cordless angle grinder AGC 18
Motor voltage 18 V DC
Speed (no-load)
Speed settings 1
Circumferential speed of
sanding tool
4500–8500 rpm
4500 rpm
2
3
4
5
6
5300 rpm
6100 rpm
6900 rpm
7700 rpm
8500 rpm
80 m/s
Cordless angle grinder AGC 18
Grinding spindle thread M 14
Sanding tool diameter 125 mm
Sanding tool thickness max. 6.0 mm
min. 1.0 mm
Weight as per EPTA proce
dure 01:2014
2.7 kg
5 Parts of the machine
[1-1]
[1-2]
[1-3]
[1-4]
[1-5]
[1-6]
[1-7]
[1-8]
[1-9]
[1-10]
[1-11]
Accessories shown or described are not always
included in the scope of delivery.
The specified illustrations appear at the begin
ning of the operating manual.
5.1 Electronics Smooth start-up
The electronically controlled smooth start-up
function ensures that the power tool starts up
smoothly.
Speed regulator [1-4]
You can continuously adjust the speed within
the speed range using the adjusting wheel .
This enables you to optimise the speed to suit
the respective material. Please also note the
specifications on the sanding tools.
Constant speed
The preselected motor speed is kept constant
through electronic control. This ensures a uni
form speed even when under load.
Recoil protection
In the event of a sudden speed reduction, e.g. if
the power tool becomes jammed in a separat
ing cut, the motor is switched off immediately.
Guard
Spindle lock
Thread for auxiliary handle
Speed control
On/off switch
Auxiliary handle
Insulated gripping surfaces (grey
shaded area)
Buttons for releasing the battery pack
Capacity button on battery pack
Capacity indicator
Support points
21
Page 22
English
To put the power tool back into operation, it
must first be switched off and then on again.
Restart protection
The built-in restart protection prevents the
power tool from starting up again automatically
if the power is disconnected during continuous
use. To put the power tool back into operation,
it must first be switched off and then on again.
Overheating protection
In the event of overheating, the safety electron
ics system switches to cooling mode. The motor
continues to run and the constant speed is de
activated. Let the machine cool down for ap
proximately 10–20 seconds before using it
and/or fully loading it again.
6 Commissioning
6.1 Holding the power tool correctly
Hold the power tool with both hands using the
insulated gripping surfaces [1-7]: One hand on
the motor housing behind the switch and the
other on the auxiliary handle [1-6].
6.2 Switch on/off Switching on [2a]
► Set the power tool down on the support
points [1-11].
7 Battery pack
► Inserting the battery pack [3a]
► Removing the battery pack [3b]
7.1 Capacity display
The capacity display [1-10] indicates the charge
of the battery pack for approx. 2 seconds after
the button [1-9] is pressed:
70‑100%
40‑70%
15‑40%
< 15%
*
Recommendation: Charge the battery pack
before any further use.
Further information about the battery pack
and charger can be found in the corre
sponding operating manual.
*
► Push the on/off switch [1-5] forwards.
Pressing the front part of the switch at the
same time locks the on/off switch.
On/off switch [1-5] is locked and the power tool
is switched on.
Only position the tool on the material once
it has reached operating speed.
Setting the speed
The speed can be adapted in six settings de
pending on the workpiece requirements.
► Set the speed regulator [1-4] to the re
quired setting.
Switching off [2b]
► Lift the power tool from the processed ma
terial.
► Press the rear part of the on/off
switch [1-5].
Lock is released and the power tool is switched
off.
8 Settings
WARNING
Risk of injury
► Remove the battery pack from the power
tool before performing any work on the
power tool.
8.1 Fitting the auxiliary handle [1-6]
Always use the auxiliary handle to ensure
a safe working posture that prevents you
from tiring.
The special "VIBRASTOP" design of the auxiliary
handle helps to reduce vibrations.
► Screw in the auxiliary handle [1-6] on the
side of the thread [1-3] according to the
working method.
WARNING
Risk of injury from kickback, ejected parts
► Before setting down the power tool, wait
until the rotating sanding tool has come to
a complete stop.
22
Page 23
English
8.2 Fitting the sanding tool [4]
CAUTION
Risk of injury from hot and sharp tool
► Do not use any vibrating, blunt or defective
sanding tools.
► Do not use sanding tools that have been
exposed to extreme humidity, moisture or
high temperatures prior to installation.
► Wear protective gloves.
WARNING
Risk of injury from incorrectly fitted sanding
tool
► Only fold up the lift-up handle [4-3] for the
quick-action clamping nut when you are
replacing the sanding tool.
► Ensure that the flange [4-4] is fitted on the
spindle before installing the sanding tool.
Only tighten or loosen the clamping nut by
hand. Never use tools to loosen or tighten
the lift-up handle.
If the nut can no longer be loosened by
hand, it should only be loosened with a
face wrench [5-1].
If the lift-up handle is loose or damaged,
the clamping nut must no longer be used
under any circumstances.
Use the guard provided for the application
in each case.
► Remove the battery pack from the power
tool.
► Open the lift-up handle [4-3] for the quick-
action clamping nut.
► Unscrew the quick-action clamping nut
[4-2] by hand.
►
Place the sanding tool on the spindle
and flange [4-4].
Ensure that the centring ridge of the flange
fits exactly into the opening in the disc and
that the form-fit connection between the
power tool/spindle and flange matches.
Ensure that the diameter of the power tool
spindle matches the hole in the sanding
tool.
Offset sanding tools must be fitted so
that their sanding area does not pro
trude beyond the edge of the guard.
Adhere to the stipulated rotational direction
of the sanding tool (arrow on the sanding
tool = arrow on the tool housing [4-1]).
► Place the quick-action clamping nut on the
sanding tool and spindle.
►
►
►
► Check that the sanding tool is securely at
► Let new sanding tools run for around one
Removal is performed in reverse sequence to
assembly [5a].
8.3 Fitting the wire brushes [6]
► Remove the handle [6-1].
►
►
8.4 Positioning the guard/cutting guard [7]
The guard is preassembled. You can simply
turn the guard to adapt its position to the re
quirements of the task.
►
►
►
8.5 Removing the guard/cutting guard [8]
Press the spindle lock [4-5] on the re
verse of the tool.
Tighten the quick-action clamping nut by
hand.
Close the lift-up handle for the quick-ac
tion clamping nut.
tached and fitted to the power tool.
minute with no load as a test.
Fit the handle with hand protection
[6-2].
Fit the wire brushes [6-3] securely in the
holding thread [6-4].
Observe the information provided for the
wire brushes.
Press and hold the locking lever on the
guard.
Adjust the guard on the power tool so
that sparks and particles are deflected away
from the body.
Release the locking lever and continue
to turn the guard until it locks in place.
The cutting guard, available as an acces
sory, can be positioned in the same way.
CAUTION
Risk of injury due to flying sparks and bro
ken cutting discs.
► For abrasive cutting, use the cutting guard
that is available as an accessory: See sec
tion 9.2
► Remove the sanding tool that has already
been fitted to the power tool: See section
8.2 .
23
Page 24
English
► Press and hold the locking lever on the
guard.
►
►
8.6 Fitting the guard/cutting guard [9]
After passing the pressure point, turn
the guard forwards.
Remove the guard from the power tool.
NOTICE
Signs of wear on the cutting guard.
► Before switching on the sanding tool, check
that it can move freely. The sanding tool
must not sand against the cutting guard.
Use the guard provided for the application
in each case.
►
►
To fit the sanding tool, see section 8.2 .
Insert the guard in the front position.
Make sure that the position of the pin and
groove match.
Turn the guard to the required position
until the locking lever engages automatical
ly.
9 Working with the electric
power tool
When not in use, the power tool can be set
down on the support points [1-11].
► Remove the sanding tool from the power
tool for transport.
9.1 Sanding
For sanding, always use the guard supplied
with the tool.
The guard is preassembled. For how to remove
the guard, see section 8.5 .
9.2 Abrasive cutting
For abrasive cutting, always use the TSHAGC 18-125 cutting guard that is available as an
accessory.
The cutting guard is fitted, positioned and re
moved in the same way as the guard, see sec
tions 8.5 and 8.6 .
► Always guide the sanding tool through the
workpiece in a straight line.
Ensure that the sanding tool does not tilt
and that it is not loaded at an angle or from
the side.
► For thick-walled workpieces, make a sepa
rating cut using oscillating movements
while applying slight pressure to the power
tool.
WARNING
Risk of injury
► Only guide the power tool into the material
when it is switched on (running).
► Always secure the workpiece in such a
manner that it cannot move.
► Keep your hands away from the rotating
sanding tools.
WARNING
Risk of injury from the fragile sanding tool
► Ensure that the sanding tool's expiry date
has not been exceeded.
WARNING
Risk of injury due to moving workpiece
► Ensure that the workpiece is secure.
WARNING
Risk of injury from overhead work
► Always wear safety glasses for overhead
work.
► Wear a P2 respiratory mask.
9.3 Working with wire brushes
WARNING
Risk of eye injuries caused by flying parts/
wires
► Wear protective goggles.
For working with wire brushes, always use the
HS-AGC18 hand protection that is available as
an accessory, see section
8.3 .
10 Acoustic warning signal
If the power tool switches off because of subse
quent operating statuses, no warning signal
sounds when it switches on.
Battery pack not accepted
– Insert the correct battery pack model.
Battery pack empty
– Change the battery pack.
– Charge the battery pack.
Battery pack fault
– Change the battery pack.
– Use the charger to check that the battery
pack is fully functional once it has cooled
down.
Battery pack overheated
24
Page 25
EKAT
1
2
3
5
4
English
– Let the battery pack cool down.
Power tool overheated
– The power tool must cool down before it
can be started again.
Power tool fault
– Contact a Festool service workshop or spe
cialist dealer.
Power tool jammed
– Eliminate the cause of the jam.
If the power tool switches off when it be
comes jammed, no warning signal sounds.
11 Accessories
Always use original Festool accessories, as
described in the section on intended use. Us
ing low-quality tools or accessories from other
manufacturers may increase the risk of injury
and seriously unbalance the machine, decreas
ing the quality of the working results and accel
erating machine wear.
The PO numbers of the accessories and tools
can be found in the Festool catalogue or online
at "www.festool.co.uk".
12 Service and maintenance
WARNING
power tool housing and on the on/off switch and
harden when exposed to humidity. This may im
pair the switching mechanism and cause the
power tool to overheat.
When machining metal, conductive dust depos
its may build up inside the power tool. This can
cause a short-circuit.
► After each machining process, blow out the
inside of the power tool through the vents
and the on/off switch using dry, oil-free
compressed air.
Clean the sanding tools after use.
Keep the contacts on the power tool, charger
and battery pack clean.
13 Environment
Do not dispose of the device in the
household waste! Recycle devices, ac
cessories and packaging. Observe appli
cable national regulations.
EU only: In accordance with the European Di
rective on waste electrical and electronic
equipment and implementation in national law,
used power tools must be collected separately
and handed in for environmentally friendly re
cycling.
Information on REACH: www.festool.com/reach
Risk of injury, electric shock
► Always remove the battery pack from the
power tool before performing any mainte
nance or service work.
► All maintenance and repair work that re
quires the power tool to be opened up
should always be carried out by an author
ised service workshop.
Customer service and repairs
must only be carried out by the
manufacturer or service work
shops. Find the nearest address
at: www.festool.co.uk/service
Always use original Festool
spare parts. Order no. at:
www.festool.co.uk/service
14 General information
14.1
Bluetooth
The Bluetooth® word mark and the logos are
registered trademarks of Bluetooth SIG, Inc.;
they are used by TTS Tooltechnic Systems AG &
Co. KG, and therefore by Festool, under licence.
®
To ensure constant air circulation, always keep
the cooling air openings in the motor housing
clean and free of blockages.
When machining mineral materials (e.g. gyp
sum, etc.), dust deposits may build up in the
25
Page 26
Français
Sommaire
1 Symboles...................................................26
2 Consignes de sécurité...............................26
3 Utilisation conforme..................................30
4 Caractéristiques techniques.....................31
5 Éléments de l'appareil..............................31
6 Mise en service..........................................32
7 Batterie......................................................32
8 Réglages....................................................32
9 Utilisation de l'outil électroportatif...........34
10 Signaux d'avertissement sonores.............35
11 Accessoires............................................... 35
12 Entretien et maintenance......................... 35
13 Environnement..........................................36
14 Remarques générales...............................36
1 Symboles
Avertit d'un danger général
Avertit d'un risque de décharge électri
que
Lire le mode d'emploi et les consignes
de sécurité !
Porter une protection auditive !
Porter des gants de protection !
Porter une protection respiratoire !
Porter des lunettes de protection !
Porter des chaussures robustes !
Ne pas jeter avec les ordures ménagè
res.
Conseil, information
Instruction
Insérer la batterie
Dégager la batterie
Marquage CE : confirme la conformité
de l'outil électroportatif aux directives
de la Communauté européenne.
2 Consignes de sécurité
2.1 Consignes générales de sécurité AVERTISSEMENT ! Veuillez lire toutes
les consignes de sécurité et instructions.
Le non-respect des consignes de sécurité et
des instructions peut provoquer une décharge
électrique, un incendie et/ou des blessures
graves.
Conserver toutes les consignes de sécurité et
instructions afin de pouvoir les consulter ulté
rieurement.
Le terme « outil électroportatif » utilisé dans
les consignes de sécurité se rapporte aux outils
électroportatifs fonctionnant sur secteur (avec
câble) et aux outils électroportatifs fonction
nant sur batterie (sans câble).
Respecter la notice d'utilisation du chargeur
et de la batterie.
2.2 Consignes de sécurité spécifiques à
l'appareil
Consignes de sécurité communes pour le pon
çage, l'utilisation de brosses métalliques et le
tronçonnage
– Cet outil électroportatif doit être utilisé
comme ponceuse, brosse métallique et
tronçonneuse. Tenez compte de l'ensem
ble des consignes de sécurité, instruc
tions, représentations et données fournies
avec la machine. Le non-respect des ins
tructions suivantes peut provoquer une dé
charge électrique, un incendie et/ou des
blessures graves.
– Cet outil électroportatif ne convient pas au
ponçage avec du papier de verre ni au po
lissage. Toute utilisation pour laquelle
l'outil n'est pas conçu peut provoquer des
situations dangereuses et des blessures.
– Utilisez uniquement les accessoires spé
cialement prévus pour cet outil électro
portatif et recommandés par le fabricant.
Le simple fait de pouvoir fixer l'accessoire
sur votre outil électroportatif ne garantit
pas une utilisation sûre.
– La vitesse admissible de l'outil d'usinage
doit être au moins égale à la vitesse maxi
male indiquée sur l'outil électroportatif.
Les accessoires dont la vitesse de rotation
est supérieure à la valeur admissible ris
quent de se briser ou d'être projetés.
– Le diamètre extérieur et l'épaisseur de
l'outil d'usinage doivent correspondre aux
dimensions indiquées pour votre outil
électroportatif. Si les accessoires ne pré
26
Page 27

Français
sentent pas les dimensions appropriées, il
est impossible de garantir une protection
et un contrôle suffisants.
– Les outils d'usinage à douille filetée doi
vent être parfaitement adaptés au filetage
de la broche porte-meule. Dans le cas des
outils d'usinage à installer au moyen
d'une bride, le diamètre de l'orifice de
l'outil doit être adapté au diamètre de
montage de la bride. Les outils d'usinage
mal fixés sur l'outil électroportatif ont une
vitesse de rotation irrégulière, génèrent de
fortes vibrations et peuvent entraîner une
perte de contrôle.
– N'utilisez pas d'outils d'usinage endom
magés. Avant chaque utilisation, contrôlez
l'état des outils d'usinage. Par ex. : les
disques abrasifs ne doivent pas être ébré
chés ou fissurés, les plateaux de ponçage
ne doivent pas être fissurés, usés ou for
tement dégradés et les brosses métalli
ques ne doivent pas présenter de fils arra
chés ou rompus. En cas de chute de l'outil
électroportatif ou de l'outil d'usinage, vé
rifiez qu'il n'est pas endommagé ou utili
sez un outil d'usinage en parfait état.
Après avoir contrôlé et mis en place l'outil
d'usinage, tenez-vous, ainsi que toute au
tre personne présente, à distance de la
zone de l'outil en rotation et laissez tour
ner l'appareil au régime maximum pen
dant 1 minute. Dans la plupart des cas, les
outils d'usinage endommagés se cassent
avant la fin de cet essai.
– Portez un équipement de protection indi
viduelle. Selon l'utilisation, munissezvous d'un masque intégral, d'une protec
tion oculaire ou de lunettes de protection.
Si nécessaire, portez un masque contre la
poussière, une protection auditive, des
gants de protection ou un tablier spécial
qui vous protègent des particules abrasi
ves et particules de matériau de petite
taille. Protégez vos yeux des projections de
corps étrangers survenant lors de différen
tes opérations d'usinage. Le masque respi
ratoire ou de protection contre la poussière
doit filtrer la poussière générée pendant
l'utilisation. Si vous êtes exposé longtemps
à un niveau sonore élevé, vous pouvez subir
une perte auditive.
– Si d'autres personnes sont présentes,
veillez à ce qu'elles se tiennent suffisam
ment loin de votre zone de travail. Toute
personne qui pénètre dans la zone de tra
vail doit porter un équipement de protec
tion individuelle. Des éclats de pièce ou
des fragments d'outil d'usinage peuvent
être projetés et provoquer des blessures, y
compris en dehors de la zone de travail di
recte.
– Si l'outil monté pourrait entrer en contact
avec des câbles électriques invisibles, te
nez l'outil électroportatif uniquement à
l'aide des poignées isolées. Le contact
avec un câble sous tension peut également
mettre des pièces métalliques de l'appareil
sous tension et provoquer une décharge
électrique.
– Ne posez jamais l'outil électroportatif
avant que l'outil d'usinage ne soit complè
tement immobilisé. L'outil d'usinage en ro
tation peut entrer en contact avec la surfa
ce de dépose, ce qui risque de vous faire
perdre le contrôle de l'outil électroportatif.
– Ne faites pas fonctionner l'outil électro
portatif pendant que vous le transportez.
En cas de contact accidentel, vos vête
ments pourraient être happés par l'outil
d'usinage en rotation, lequel pourrait s'en
foncer dans votre corps.
– Nettoyez régulièrement les fentes d'aéra
tion de votre outil électroportatif. Le venti
lateur du moteur attire la poussière dans le
carter, et une forte accumulation de pous
sière métallique peut engendrer des ris
ques électriques.
– N'utilisez pas l'outil électroportatif à
proximité de matières inflammables. Des
étincelles peuvent mettre le feu à ces ma
tières.
– N'utilisez pas d'outils d'usinage qui néces
sitent un liquide pour leur refroidisse
ment. L'utilisation d'eau ou d'autres liqui
des de refroidissement peut provoquer une
décharge électrique.
Recul et consignes de sécurité correspondan
tes
Le recul est une réaction soudaine provoquée
par un outil d'usinage qui se coince ou se blo
que en tournant, par ex. un disque abrasif, un
plateau de ponçage, une brosse métallique etc.
Le coincement ou le blocage provoque un arrêt
brusque de l'outil d'usinage en rotation. Ainsi,
un outil électroportatif incontrôlé sera projeté
dans le sens inverse de rotation de l'outil d'usi
nage au point de blocage.
Si un disque abrasif, par exemple, se coince ou
se bloque dans la pièce, il est possible que le
27
Page 28

Français
bord du disque déjà inséré reste accroché.
Dans ce cas, le disque abrasif risque de se
rompre ou de provoquer un recul. Le disque
abrasif se dirige alors vers l'utilisateur ou s'en
éloigne, en fonction de son sens de rotation au
point de blocage. Dans ce genre de situation,
les disques abrasifs peuvent également se
rompre.
Un recul est la conséquence d'un mauvais usa
ge ou d'une utilisation incorrecte de l'outil élec
troportatif. Il peut être évité en prenant des me
sures de précaution adéquates, comme décrit
ci-après.
– Tenez fermement l'outil électroportatif et
placez votre corps et vos bras dans une
position qui vous permettra de résister à
la force de recul. Si l'outil électroportatif
en dispose, utilisez toujours la poignée
supplémentaire pour maîtriser au mieux
la force de recul ou les couples de réac
tion pendant l'accélération. Des mesures
de précaution adéquates permettent à l'uti
lisateur de maîtriser la force de recul et les
couples de réaction.
– N'approchez jamais vos mains d'outils
d'usinage en rotation. En cas de recul,
l'outil d'usinage peut se déplacer sur votre
main.
– Protégez-vous en restant à l'écart de la
zone dans laquelle l'outil électroportatif
se déplacera en cas de recul. Le recul en
traîne l'outil électroportatif dans le sens
opposé au déplacement du disque abrasif
au point de blocage.
– Procédez avec une grande prudence dans
les coins, au niveau des arêtes vives, etc.
Empêchez l'outil d'usinage de rebondir
sur la pièce et de se coincer. L'outil d'usi
nage en rotation a tendance à se coincer
dans les coins, sur les arêtes vives ou
quand il rebondit, ce qui provoque une per
te du contrôle ou un recul.
– N'utilisez pas de lame de scie dentée ou
de lame de scie à chaîne. Ces outils d'usi
nage provoquent souvent un recul ou une
perte de contrôle de l'outil électroportatif.
Consignes de sécurité spéciales pour le pon
çage et le tronçonnage
– Utilisez exclusivement les outils abrasifs
autorisés pour votre outil électroportatif
ainsi que le capot de protection conçu
pour ces outils abrasifs. Il n'est pas pos
sible d'assurer une protection suffisante si
les outils abrasifs n'ont pas été conçus
pour l'outil électroportatif. Ces derniers
provoquent donc des dangers.
– Les disques abrasifs courbes doivent être
montés de manière à ce que leur surface
abrasive ne dépasse pas du bord du capot
de protection. Il n'est pas possible d'assu
rer une protection suffisante si le disque
abrasif est monté de manière incorrecte et
dépasse du bord du capot de protection.
– Le capot de protection doit être fixé cor
rectement sur l'outil électroportatif. Pour
un niveau maximal de sécurité, il doit être
réglé de manière à réduire le plus pos
sible la partie de l'outil abrasif directe
ment accessible dirigée vers l'utilisateur.
Le capot de protection contribue à protéger
l'utilisateur contre la projection de frag
ments, un contact accidentel avec l'outil
abrasif ainsi que les étincelles, suscepti
bles d'enflammer les vêtements.
– Avec les outils abrasifs, limitez-vous tou
jours aux possibilités d'utilisation recom
mandées. Exemple : ne poncez jamais
avec la face latérale d'un disque de tron
çonnage. Les disques de tronçonnage sont
conçus pour l'enlèvement de matière avec
leur bord. Ces outils abrasifs peuvent se
rompre sous l'effet de forces latérales.
– Utilisez toujours des brides de serrage en
bon état et présentant une taille et une
forme adaptées au disque abrasif de votre
choix. Les brides bien adaptées soutien
nent le disque abrasif, dont le risque de
rupture est alors moindre. Les brides pour
disques de tronçonnage peuvent être diffé
rentes de celles des autres disques abra
sifs.
– N'utilisez pas de disques abrasifs usagés
provenant d'outils électroportatifs de plus
grande taille. Les disques abrasifs pour les
outils électroportatifs de plus grande taille
ne sont pas conçus pour les vitesses de ro
tation plus élevées des petits appareils et
risquent de se rompre.
Autres consignes de sécurité spéciales pour le tronçonnage
– Évitez tout blocage du disque de tronçon
nage ou une pression d'appui trop élevée.
N'effectuez pas de coupe d'une profon
deur excessive. Lorsqu'un disque de tron
çonnage est en surcharge, il subit des con
traintes plus élevées et les risques d'incli
naison latérale ou de blocage augmentent.
Par conséquent, les risques de recul ou de
28
Page 29

Français
rupture de l'outil abrasif augmentent eux
aussi.
– Évitez les zones situées devant et derrière
le disque de tronçonnage en rotation. Si
vous déplacez le disque de tronçonnage de
vant vous dans la pièce, l'outil électropor
tatif et le disque en rotation peuvent être
projetés directement vers vous en cas de
recul.
– Si le disque de tronçonnage se coince ou
que vous souhaitez interrompre votre tra
vail, éteignez l'appareil et tenez-le de ma
nière stable jusqu'à ce que le disque soit
immobilisé. N'essayez jamais de sortir le
disque de tronçonnage de l'entaille tant
qu'il est en rotation. Sinon, un recul peut
survenir. Déterminez la cause du blocage
et prenez les mesures nécessaires pour y
remédier.
– Ne remettez pas l'outil électroportatif en
marche tant qu'il se trouve dans la pièce à
travailler. Laissez le disque de tronçonna
ge atteindre sa pleine vitesse de rotation
avant de reprendre avec précaution la
coupe entamée. Sinon, le disque peut se
coincer, être projeté hors de la pièce à tra
vailler ou provoquer un recul.
– Placez des appuis sous les panneaux ou
les pièces de grande taille afin de réduire
le risque de recul en cas de blocage du
disque de tronçonnage. Les pièces de
grande taille peuvent fléchir sous leur pro
pre poids. La pièce à travailler doit être
soutenue des deux côtés du disque, et ce
près de l'entaille de coupe ainsi qu'au ni
veau du bord.
– Soyez particulièrement prudent lors des
« coupes en profondeur » dans des parois
ou autres zones sans visibilité. Lors de la
coupe, le disque de tronçonnage peut en
trer en contact avec des conduites de gaz
ou d'eau, des câbles électriques ou d'au
tres objets, et risque de provoquer un re
cul.
Consignes de sécurité spéciales pour l'utilisa
tion de brosses métalliques
– Notez que même dans le cadre de l'utilisa
tion normale, la brosse métallique perd
des fragments de fils. Ne soumettez pas
les fils à une charge excessive en exerçant
une pression d'appui trop élevée. Les
fragments de fils métalliques projetés peu
vent pénétrer très facilement dans les vê
tements fins et/ou la peau.
– Si l'utilisation d'un capot de protection est
recommandée, veillez à ce qu'il ne puisse
pas entrer en collision avec la brosse mé
tallique. Le diamètre des brosses disque et
des brosses boisseau peut augmenter sous
l'effet de la pression d'appui et des forces
centrifuges.
2.3 Autres consignes de sécurité – Ne pas utiliser l'outil électroportatif sous
la pluie ou dans un environnement humi
de. L'humidité dans l'outil électroportatif
peut causer un court-circuit et provoquer
un incendie.
– N'introduisez l'outil électroportatif dans le
matériau qu'après l'avoir mis en marche.
– Pour des raisons de sécurité, la pièce à tra
vailler doit être serrée dans un étau ou un
autre dispositif de serrage. Le serrage de
la pièce permet de garder les mains libres
pour l'utilisation de l'outil électroportatif.
– Ne travaillez pas sur une échelle.
– Lors du tronçonnage, ne traversez pas
d'objets métalliques, clous ou vis.
– Utilisez des appareils de détection appro
priés pour repérer les câbles d'alimenta
tion invisibles ou consultez l'entreprise de
distribution locale. Le contact de l'outil
monté avec un câble sous tension peut pro
voquer un feu ou une décharge électrique.
Une conduite de gaz endommagée peut
provoquer une explosion. Le perçage dans
une conduite d'eau provoque des dégâts
matériels.
– Au cours du travail, des poussières noci
ves/toxiques peuvent être générées (com
me les poussières de peintures au plomb
ou certaines poussières de bois ou de mé
tal). Seuls les spécialistes doivent traiter
les matériaux en amiante. Le contact ou
l'inhalation de ces poussières peut présen
ter un danger pour l'utilisateur ou les per
sonnes se trouvant à proximité. Veuillez
respecter les prescriptions de sécurité en
vigueur dans votre pays.
Pour votre santé, portez un masque
de protection respiratoire de classe P2.
– Après l'usinage de matériaux minéraux
(par ex. plâtre, …) : nettoyez l'intérieur de
l'outil électroportatif par les ouvertures
de ventilation ainsi que le commutateur
avec de l'air comprimé sec et sans huile.
Sinon, de la poussière peut se déposer
dans le boîtier de l'outil électroportatif de
29
Page 30

Français
même que sur l'interrupteur marche/arrêt,
puis durcir sous l'effet de l'humidité de
l'air. Ceci peut compromettre le bon fonc
tionnement du mécanisme de commutation
et provoquer une surchauffe de l'outil élec
troportatif.
– Après l'usinage de métal : nettoyez l'inté
rieur de l'outil électroportatif par les fen
tes d'aération avec de l'air comprimé sec
et sans huile. Sinon, de la poussière con
ductrice peut se déposer à l'intérieur de
l'outil électroportatif. Ceci peut provoquer
un court-circuit.
– Ne pas faire fonctionner l'outil électropor
tatif sans fil avec des blocs d'alimentation
secteur ou avec des batteries d'autres fa
bricants. Ne pas utiliser de chargeurs
d'autres fabricants pour recharger la bat
terie. L'utilisation d'accessoires autres que
ceux prévus par le fabricant peut provoquer
une décharge électrique et/ou des acci
dents graves.
2.4 Consignes de sécurité pour les outils abrasifs
– Les outils abrasifs sont fragiles et doivent
donc être manipulés avec le plus grand
soin ! L'utilisation d'outils abrasifs endom
magés ou serrés/installés de manière in
correcte est dangereuse et peut provoquer
des blessures graves.
– Stocker les outils abrasifs à l'abri des dom
mages mécaniques et des agressions exté
rieures.
– Manipuler et transporter avec soin les ou
tils abrasifs.
– Tenir compte des informations figurant sur
l'étiquette ou l'outil abrasif, ainsi que des
restrictions d'utilisation, des consignes de
sécurité ou autres indications. En cas de
doute lors du choix d'outils abrasifs, l'utili
sateur doit se renseigner auprès du fabri
cant avant l'utilisation.
– Les outils abrasifs doivent être montés
conformément aux instructions du chapitre
8.2 .
– Le montage d'outils abrasifs doit unique
ment être effectué par des personnes qua
lifiées.
2.5 Valeurs d'émission
Les valeurs typiques déterminées selon EN
60745 sont les suivantes :
Niveau de pression acousti
LPA = 86 dB(A)
quel
Niveau de puissance acousti
LWA = 97 dB(A)
que
Incertitude K = 3 dB
ATTENTION
Émission de bruit lors de l'utilisation
Lésions auditives
► Utiliser une protection auditive.
Valeur d'émission vibratoire ah (somme vecto
rielle tridirectionnelle) et incertitude K détermi
nées conformément à EN 60745 :
Ponçage
ah = 5 m/s
K = 2 m/s
2
2
Tronçonnage
ah ≤ 2,5 m/s
K = 2 m/s
2
2
Les valeurs d'émission indiquées (vibrations,
bruit)
– sont fournies à des fins de comparaison
avec d'autres appareils,
– permettent également une estimation pro
visoire des nuisances sonores et vibratoi
res lors de l'utilisation,
– sont représentatives des principales appli
cations de l'outil électroportatif.
Une autre application, par ex. brosses métalli
ques, peut s'accompagner de valeurs d'émis
sions vibratoires différentes.
ATTENTION
Les valeurs d'émissions peuvent diverger
des valeurs indiquées. Ceci dépend de l'utili
sation de l'outil et du type de pièce à travail
ler.
► Il est nécessaire d'évaluer les nuisances
sonores réelles sur toute la durée du cycle
d'utilisation.
► Déterminer ensuite des mesures de sécu
rité adaptées aux nuisances sonores réel
les afin de protéger l'utilisateur.
3 Utilisation conforme
30
L'outil électroportatif est conçu pour le tron
çonnage, le ponçage léger, les travaux avec des
brosses métalliques et l'ébavurage de maté
Page 31

Français
riaux métalliques et minéraux sans utilisation
de liquides pour le refroidissement ou la lubrifi
cation.
Utiliser le capot de protection prévu pour l'ap
plication concernée.
L'appareil doit uniquement être utilisé avec des
disques de tronçonnage et des disques abrasifs
agglomérés conformes à EN 12413, des dis
ques de tronçonnage diamant conformes à EN
13236 et des brosses métalliques conformes à
EN 1083.
Ne pas utiliser cet outil électroportatif pour le
polissage, le ponçage de surfaces avec des
disques diamant ou pour des opérations avec
des disques diamant ou des disques en céra
mique dure.
L'utilisation de roulettes de fraisage, d'outils de
ponçage carbure ou d'outils de ponçage par en
lèvement de matière (lame de coupe détermi
née géométriquement) est interdite.
L'outil électroportatif est conçu pour l'utilisa
tion avec les batteries Festool de la série BP de
la même catégorie de tension.
L'utilisateur est responsable des dom
mages provoqués par une utilisation non
conforme.
4 Caractéristiques techniques
Meuleuse d'angle sans fil AGC 18
Tension du moteur 18 V CC
Vitesse de rotation (à vi
de)
Niveaux de vitesse 1
Vitesse circonférentielle
de l'outil abrasif
Filetage de la broche por
te-meule
Ø de l'outil abrasif 125 mm
4500 - 8500 tr/min
4500 tr/min
2
3
4
5
6
5300 tr/min
6100 tr/min
6900 tr/min
7700 tr/min
8500 tr/min
80 m/s
M 14
Meuleuse d'angle sans fil AGC 18
Épaisseur de l'outil abra
sif
Poids selon la procédure
EPTA 01:2014
max. 6,0 mm
min. 1,0 mm
2,7 kg
5 Éléments de l'appareil
[1-1]
[1-2]
[1-3]
[1-4]
[1-5]
[1-6]
[1-7]
[1-8]
[1-9]
[1-10]
[1-11]
Les accessoires illustrés ou décrits ne font pas
tous partie des éléments livrés.
Les figures indiquées se trouvent au début de la
notice d'utilisation.
5.1 Système électronique Démarrage progressif
Le démarrage progressif à régulation électro
nique assure un démarrage sans à-coups de
l'outil électroportatif.
Régulateur de vitesse [1-4]
La molette permet de régler en continu la vi
tesse de rotation dans la plage de régimes.
Vous pouvez ainsi adapter de façon optimale la
vitesse à chaque matériau. Tenez compte éga
lement des indications fournies sur les outils
abrasifs.
Vitesse constante
Le système électronique maintient à un niveau
constant le régime moteur présélectionné. Ain
si, la vitesse est toujours stable, y compris sous
charge.
Capot de protection
Blocage de la broche
Trou fileté pour poignée supplémen
taire
Régulation de la vitesse
Interrupteur marche/arrêt
Poignée supplémentaire
Parties isolées (zone en gris) servant
de poignée
Touches d'extraction de la batterie
Touche de niveau de charge sur la
batterie
Témoin de charge
Points de dépose
Protection contre le recul
En cas de baisse soudaine du régime, due par
ex. à un blocage dans l'entaille de coupe, le
31
Page 32

Français
moteur est immédiatement mis à l'arrêt. Pour
la remise en marche, l'outil électroportatif doit
être éteint puis rallumé.
Protection anti-redémarrage
La protection anti-redémarrage intégrée empê
che le redémarrage automatique de l'outil élec
troportatif en fonctionnement continu après
une coupure d'alimentation. Pour la remise en
marche, l'outil électroportatif doit être éteint
puis rallumé.
AVERTISSEMENT
Risques de blessures par recul et projection
de fragments
► Avant de déposer l'outil électroportatif, at
tendre jusqu'à ce que l'outil abrasif rotatif
soit complètement immobilisé.
► Placer l'outil électroportatif sur les points
de dépose [1-11].
Protection contre la surchauffe
En cas de surchauffe, le système électronique
de sécurité commute l'appareil en mode refroi
dissement. Le moteur continue à tourner et la
vitesse de rotation constante est désactivée.
Après une pause refroidissement d'env. 10 à
20 secondes, la machine est de nouveau prête
au fonctionnement sans aucune restriction.
6 Mise en service
6.1 Maintien correct de l'outil électroportatif
Tenir l'outil électroportatif des deux mains avec
les poignées isolées [1-7] : une main sur le
carter moteur, derrière l'interrupteur, et l'autre
sur la poignée supplémentaire [1-6].
6.2 Marche/Arrêt
Mise en marche [2a]
► Pousser l'interrupteur marche/arrêt [1-5]
en avant. En appuyant simultanément sur la
partie avant de l'interrupteur marche/arrêt,
ce dernier est fixé à sa position.
L'interrupteur MARCHE/ARRÊT [1-5] est blo
qué et l'outil électroportatif est connecté.
7 Batterie
► Insérer la batterie [3a]
► Retirer la batterie [3b]
7.1 Affichage de capacité
L'affichage de capacité [1-10] indique à l'ac
tionnement de la touche [1-9] le niveau de
charge de la batterie pendant env. 2 s :
70‑100 %
40‑70 %
15‑40 %
< 15 %
*
Recommandation : recharger la batterie
avant de continuer à utiliser l'appareil.
Vous trouverez des informations supplé
mentaires sur la batterie et le chargeur
dans les notices d'utilisation de ces deux
éléments.
*
8 Réglages
N'appliquer l'appareil sur le matériau
qu'une fois la vitesse de travail atteinte.
Réglage de la vitesse de rotation
La vitesse de rotation est réglable sur 6 niveaux
à choisir en fonction de la pièce à travailler.
► Régler le régulateur de vitesse [1-4] sur le
niveau souhaité.
Mise à l'arrêt [2b]
► Retirer l'outil électroportatif du matériau à
travailler.
► Appuyer sur la partie arrière de l'interrup
teur MARCHE/ARRÊT [1-5].
Le système de verrouillage est déverrouillé et
l'outil électroportatif est désactivé.
32
AVERTISSEMENT
Risque de blessures
► Retirer la batterie de l'outil électroportatif
avant toute intervention sur ce dernier.
8.1 Montage de la poignée [1-6] supplémentaire
Toujours utiliser la poignée supplémen
taire, afin de garantir une position de tra
vail sûre et sans fatigue.
Une structure spéciale appelée « VIBRASTOP »
réduit les vibrations dans la poignée supplé
mentaire.
► Selon la méthode de travail utilisée, visser
la poignée supplémentaire [1-6] sur le côté
dans le trou fileté [1-3].
Page 33

Français
8.2 Montage de l'outil abrasif [4]
ATTENTION
Risques de blessures dus à l'outil chaud et
tranchant
► Ne pas monter d'outils abrasifs vibrants,
émoussés ou défectueux.
► Ne pas utiliser d'outils abrasifs exposés
auparavant à une forte humidité, des liqui
des ou des températures élevées.
► Porter des gants de protection.
AVERTISSEMENT
Risques de blessures en cas de montage in
correct de l'outil abrasif
► N'ouvrir la poignée étrier [4-3] de l'écrou
de serrage rapide que pour le remplace
ment de l'outil abrasif.
► Avant le montage de l'outil abrasif, s'assu
rer que la bride [4-4] est bien en place sur
la broche.
Serrer ou desserrer l'écrou de serrage
uniquement à la main. Ne jamais utiliser
la poignée étrier au moyen d'outils de ser
rage ou de desserrage.
S'il n'est plus possible de desserrer
l'écrou à la main, seule l'utilisation d'une
clé à ergots [5-1] est autorisée.
Si la poignée étrier s'est détachée ou est
endommagée, il est strictement interdit de
continuer à utiliser l'écrou de serrage.
Utiliser le capot de protection prévu pour
l'application concernée.
► Retirer la batterie de l'outil électroportatif.
► Ouvrir la poignée étrier [4-3] de l'écrou de
serrage rapide.
► Dévisser l'écrou de serrage rapide [4-2] à
la main.
►
Placer l'outil abrasif sur la broche et la
bride [4-4].
Veiller à ce que l'épaulement de centrage
de la bride s'insère parfaitement dans l'ou
verture du disque et à ce que les formes de
l'outil électroportatif/la broche et la bride
soient bien adaptées les unes aux autres et
permettent d'assurer une bonne fixation.
S'assurer que le diamètre de la broche de
l'outil électroportatif et celui de l'orifice de
l'outil abrasif correspondent.
Les outils abrasifs courbes doivent
être montés de manière à ce que leur
surface abrasive ne dépasse pas du
bord du capot de protection.
Tenir compte du sens de rotation prescrit
pour l'outil abrasif (flèche sur l'outil abrasif
= flèche sur le boîtier de l'appareil [4-1]).
► Placer l'écrou de serrage rapide sur l'outil
abrasif et la broche.
►
►
►
► Contrôler la fixation et la position de l'outil
► Tester les outils abrasifs neufs en les fai
Le démontage s'effectue dans l'ordre inverse
[5a].
8.3 Montage des brosses métalliques [6]
► Retirer la poignée [6-1].
►
►
8.4 Positionnement du capot de protection/
Le capot de protection est déjà monté. Il suffit
de tourner le capot de protection pour en adap
ter la position à l'opération prévue.
►
►
►
Enclencher le dispositif de blocage de la
broche [4-5] à l'arrière de l'appareil.
Serrer l'écrou de serrage rapide à la
main.
Fermer la poignée étrier de l'écrou de
serrage rapide.
abrasif sur l'outil électroportatif.
sant tourner à vide (hors matériau) pendant
une minute environ.
Monter la poignée avec la protection des
mains [6-2].
Visser solidement la brosse métallique
[6-3] sur le support fileté [6-4].
Respecter les consignes fournies avec la
brosse métallique.
capot de protection pour tronçonnage
[7]
Maintenir enfoncé le levier d'arrêt du ca
pot de protection.
Régler le capot de protection de l'outil
électroportatif de manière à dévier les étin
celles et les particules abrasives dans le
sens opposé à l'utilisateur.
Relâcher le levier d'arrêt et continuer à
tourner le capot de protection jusqu'à ce
qu'il se verrouille.
Le positionnement du capot de protection
pour tronçonnage disponible comme ac
cessoire s'effectue de la même manière.
33
Page 34

Français
8.5 Retrait du capot de protection/capot de protection pour tronçonnage [8]
ATTENTION
Risques de blessures par projection d'étin
celles et rupture du disque de tronçonnage.
► Pour le tronçonnage, utiliser le capot de
protection pour tronçonnage disponible
comme accessoire : voir chapitre 9.2
► Démonter l'outil abrasif installé sur l'outil
électroportatif : voir chapitre 8.2 .
►
►
►
8.6 Montage du capot de protection/capot
Maintenir enfoncé le levier d'arrêt du ca
pot de protection.
Après avoir franchi le point de résistance,
tourner le capot de protection vers l'avant.
Retirer le capot de protection de l'outil
électroportatif.
de protection pour tronçonnage[9]
AVERTISSEMENT
Risques de blessures en cas d'utilisation
d'un outil abrasif fragilisé
► Veiller à ne pas dépasser la date limite
d'utilisation de l'outil abrasif.
AVERTISSEMENT
Risques de blessures en cas de mouvement
de la pièce à travailler
► Fixer soigneusement la pièce à travailler.
AVERTISSEMENT
Risques de blessures lors des travaux en
hauteur
► Lors des travaux en hauteur, toujours por
ter des lunettes de protection.
► Porter un masque respiratoire de catégorie
P2.
AVIS
Traces d'usure sur le capot de protection
pour tronçonnage.
► Avant la mise en marche, s'assurer que
l'outil abrasif peut bouger correctement.
L'outil abrasif ne doit pas frotter contre le
capot de protection pour tronçonnage.
Utiliser le capot de protection prévu pour
l'application concernée.
►
►
Pour le montage de l'outil abrasif, voir chapitre
8.2 .
Installer le capot de protection à la posi
tion avant. Veiller à ce que la position du te
non et celle de la rainure correspondent.
Tourner le capot de protection à la posi
tion souhaitée jusqu'à ce que le levier d'ar
rêt se verrouille de lui-même.
9 Utilisation de l'outil
électroportatif
AVERTISSEMENT
Risques de blessures
► N'introduire l'outil électroportatif dans le
matériau qu'après l'avoir mis en marche.
► Fixer la pièce à travailler de manière à ce
qu'elle ne puisse pas bouger pendant l'usi
nage.
► Tenir les mains à l'écart de l'outil abrasif
en rotation.
Lorsqu'il n'est pas utilisé, l'outil électro
portatif peut être placé sur les points de
dépose [1-11].
► Pour le transport, retirer l'outil abrasif de
l'outil électroportatif.
9.1 Ponçage
Pour le ponçage, toujours utiliser le capot de
protection fourni.
Le capot de protection est déjà monté. Pour le
démontage du capot de protection, voir chapitre
8.5 .
9.2 Tronçonnage
Pour le tronçonnage, toujours utiliser le capot
de protection pour tronçonnage TSHAGC 18-125 disponible comme accessoire.
Pour le montage, le positionnement et le retrait
du capot de protection pour tronçonnage, pro
céder comme avec le capot de protection, voir
chapitres 8.5 et 8.6 .
► Toujours déplacer l'outil abrasif en ligne
droite dans la pièce.
Veiller à ce que l'outil abrasif ne s'incline
pas sur le côté et ne subissent pas de con
traintes obliques ou latérales.
► Dans le cas des pièces à parois épaisses,
procéder au tronçonnage en effectuant un
mouvement oscillant et en exerçant une lé
gère pression sur l'outil électroportatif.
34
Page 35

EKAT
1
2
3
5
4
Français
9.3 Utilisation de brosses métalliques
AVERTISSEMENT
Risques de blessures aux yeux par projec
tion de fragments/fils métalliques
► Porter des lunettes de protection.
Pour les opérations à effectuer avec des bros
ses métalliques, toujours utiliser la protection
des mains HS-AGC18 disponible comme acces
soire, voir chapitre
8.3 .
10 Signaux d'avertissement
sonores
Si l'outil électroportatif se coupe en raison de
l'un des états de fonctionnement suivants, un
signal d'avertissement retentit à la mise en
marche.
Batterie non acceptée
– Insérer le modèle de batterie approprié.
Batterie vide
– Remplacer la batterie.
– Charger la batterie.
Batterie défectueuse
– Remplacer la batterie.
– Après l'avoir laissée refroidir, vérifier avec
le chargeur que la batterie fonctionne.
Batterie en surchauffe
– Laisser la batterie refroidir.
L'outil électroportatif est en surchauffe
– Après refroidissement, l'outil électroporta
tif peut être réutilisé.
Outil électroportatif défectueux
– Prendre contact avec l'atelier du service
après-vente Festool ou un revendeur.
Outil électroportatif bloqué
– Éliminer le blocage.
Si l'outil électroportatif se coupe en raison
d'un blocage, aucun signal d'avertisse
ment n'est émis.
11 Accessoires
Utilisez uniquement des accessoires Festool
d'origine, et ce comme décrit au chapitre por
tant sur l'utilisation conforme. L'utilisation
d'outils d'usinage de moindre qualité et d'ac
cessoires autres que ceux de Festool peut aug
menter le risque de blessures et provoquer un
balourd considérable, entraînant une dégrada
tion de la qualité des résultats et une usure
prématurée de la machine.
Les références des accessoires et des outils fi
gurent dans le catalogue Festool ou sur Inter
net, à l'adresse « www.festool.fr ».
12 Entretien et maintenance
AVERTISSEMENT
Risques de blessures, décharge électrique
► Avant toutes les opérations de maintenan
ce et d'entretien, toujours retirer la batte
rie de l'outil électroportatif.
► Toutes les opérations de maintenance et
de réparation nécessitant l'ouverture de
l'outil électroportatif doivent uniquement
être effectuées par un atelier de service
après-vente agréé.
Service après-vente et répara
tion uniquement par le fabri
cant ou des ateliers homolo
gués. Pour trouver l'adresse la
plus proche : www.festool.fr/
services
Utiliser uniquement des pièces
détachées Festool d'origine !
Réf. sur : www.festool.fr/servi
ces
Pour assurer la circulation de l'air, il est impé
ratif que les ouïes de ventilation du carter mo
teur soient maintenues dégagées et propres.
Lors de l'usinage de matériaux minéraux (par
ex. plâtre, …), de la poussière peut se déposer
dans le boîtier de l'outil électroportatif et sur
l'interrupteur marche/arrêt, puis durcir sous
l'effet de l'humidité de l'air. Ceci peut compro
mettre le bon fonctionnement du mécanisme
de commutation et provoquer une surchauffe
de l'outil électroportatif.
Lors de l'usinage de métal, de la poussière
conductrice peut se déposer à l'intérieur de
l'outil électroportatif. Ceci peut provoquer un
court-circuit.
► Après chaque usinage, nettoyer l'intérieur
de l'outil électroportatif par les ouvertures
de ventilation ainsi que l'interrupteur mar
che/arrêt avec de l'air comprimé sec et
sans huile.
Nettoyer les outils abrasifs après l'utilisation.
Veiller à ce que les contacts de branchement
sur l'outil électroportatif, le chargeur et la bat
terie restent propres.
35
Page 36

Français
13 Environnement
Ne pas jeter l'appareil avec les ordures
ménagères ! Veiller à un recyclage éco
logique des appareils, accessoires et
emballages. Respecter les règlements natio
naux en vigueur.
Uniquement UE : selon la directive européenne
relative aux appareils électriques et électroni
ques usagés et sa transposition en droit natio
nal, les outils électroportatifs usagés doivent
être collectés à part et recyclés de manière
écologique.
Informations à propos de REACh : www.fes
tool.com/reach
14 Remarques générales
14.1
Bluetooth
La marque verbale Bluetooth® et les logos sont
des marques déposées de Bluetooth SIG, Inc. et
sont utilisés sous licence par TTS Tooltechnic
Systems AG & Co. KG et donc par Festool
GmbH.
®
36
Page 37

Español
Índice de contenidos
1 Símbolos....................................................37
2 Indicaciones de seguridad........................ 37
3 Uso conforme a lo previsto.......................41
4 Datos técnicos...........................................42
5 Componentes de la herramienta..............42
6 Puesta en servicio..................................... 43
7 Batería.......................................................43
8 Ajustes.......................................................43
9 Trabajo con la herramienta eléctrica....... 45
10 Señales acústicas de advertencia.............46
11 Accesorios.................................................46
12 Mantenimiento y cuidado..........................46
13 Medio ambiente.........................................47
14 Observaciones generales..........................47
1 Símbolos
Aviso de peligro general
2 Indicaciones de seguridad
2.1 Indicaciones de seguridad generales ADVERTENCIA. Leer y observar todas las
indicaciones de seguridad. Si no se cum
plen debidamente las indicaciones de seguridad
y las instrucciones, puede producirse una des
carga eléctrica, quemaduras o lesiones graves.
Guardar todas las indicaciones de seguridad e
instrucciones para que sirvan de futura refe
rencia.
El término «herramienta eléctrica» empleado
en las indicaciones de seguridad hace referen
cia a herramientas eléctricas conectadas a la
red eléctrica (con un cable de red) o a herra
mientas eléctricas alimentadas con batería (sin
cable de red).
Tenga en cuenta el manual de instrucciones
del cargador y de la batería.
2.2 Indicaciones de seguridad específicas
Peligro de electrocución
¡Leer el manual de instrucciones y las
indicaciones de seguridad!
Usar protección para los oídos
Utilizar guantes de protección
Utilizar protección respiratoria.
Utilizar gafas de protección
Llevar calzado resistente.
No depositar en la basura doméstica.
Consejo, indicación
Guía de procedimiento
Insertar la batería
Soltar la batería
Marcado CE: Certifica la conformidad
de la herramienta eléctrica con las di
rectivas de la Comunidad Europea.
Indicaciones de seguridad comunes para el li
jado, el trabajo con cepillos de alambre y el
tronzado con muela
– Esta herramienta eléctrica está prevista
para su uso como lijadora, cepillo de
alambre y amoladora tronzadora. Obser
var todas las indicaciones de seguridad,
instrucciones, representaciones y datos
recibidos junto con la herramienta. De no
respetar las siguientes instrucciones, po
dría producirse una descarga eléctrica, un
incendio o lesiones graves.
– Esta herramienta eléctrica no es apta para
el pulido y el lijado de papel. El uso de esta
herramienta eléctrica para aplicaciones no
previstas supone riesgo de lesiones.
– No utilizar ningún accesorio que no haya
sido previsto y recomendado por el fabri
cante especialmente para esta herramien
ta eléctrica. Solo por el hecho de que pue
da fijar el accesorio a su herramienta eléc
trica, no quiere decir que esté garantizado
un empleo seguro.
– El número de revoluciones admisible de la
herramienta insertable debe ser como mí
nimo igual al número de revoluciones má
ximo indicado en la herramienta eléctrica.
Cualquier accesorio que gire más rápida
mente de lo admisible puede romperse y
salir volando de forma descontrolada.
– El diámetro exterior y el grosor de la he
rramienta insertable deben correspon
derse con los datos de dimensiones de su
herramienta eléctrica. Las herramientas
37
Page 38

Español
insertables medidas incorrectamente no se
pueden proteger o controlar suficiente
mente.
– Las herramientas con accesorio de rosca
deben ajustarse exactamente a la rosca
del husillo de lijado. En el caso de las he
rramientas que se montan mediante bri
das, el diámetro del agujero de la herra
mienta debe ajustarse al diámetro del alo
jamiento de la brida. Las herramientas in
sertables que no se fijan con precisión en
la herramienta eléctrica giran irregular
mente, vibran mucho y pueden provocar la
pérdida del control.
– No utilizar herramientas insertables da
ñadas. Antes de cada uso, compruebe que
las herramientas insertables, como los
discos de lijar, no estén fragmentadas ni
presenten grietas, que los platos lijadores
no estén agrietados, desgastados o muy
consumidos y que los cepillos de alambre
no presenten alambres sueltos o rotos. Si
la herramienta eléctrica o la herramienta
se cae, compruebe si está dañada o utilice
una herramienta no dañada. Una vez que
haya comprobado y colocado la herra
mienta insertable, manténgase usted mis
mo y las personas que se encuentran cer
ca fuera del área de la herramienta rota
toria y deje que la herramienta funcione
durante un minuto a la máxima velocidad.
Generalmente, las herramientas dañadas
se rompen durante esta fase de prueba.
– Utilice un equipo de protección individual.
En función de la aplicación utilice protec
ción completa para la cara, protección
ocular o gafas de protección. En la medida
en que sea razonable, lleve mascarilla,
protección de oídos, guantes de protección
o delantal especial que mantengan aleja
das las partículas pequeñas del lijado y
del material. Hay que proteger los ojos de
aquellos elementos extraños que salen vo
lando y que se producen en las diferentes
aplicaciones. La mascarilla antipolvo o de
protección respiratoria tiene que filtrar el
polvo originado durante la aplicación. Si
usted se expone a un fuerte ruido de mane
ra prolongada, podrá padecer una pérdida
auditiva.
– Procurar que las demás personas se si
túen a una distancia segura respecto a su
área de trabajo. Toda persona que entre
en el área de trabajo debe utilizar un equi
po de protección individual. Los fragmen
tos de la pieza de trabajo o las herramien
tas insertables rotas pueden salir despedi
dos y causar lesiones también fuera del
área de trabajo inmediata.
– La herramienta eléctrica debe sujetarse
exclusivamente por las superficies de
agarre aisladas cuando se lleven a cabo
trabajos en los que la herramienta de cor
te pudiera entrar en contacto con cables
eléctricos ocultos. El contacto con un cable
eléctrico puede poner bajo tensión las pie
zas metálicas de la máquina y provocar una
descarga eléctrica.
– No depositar nunca la herramienta eléc
trica antes de que la herramienta inserta
ble se haya parado por completo. La he
rramienta insertable que está girando pue
de entrar en contacto con la superficie para
depositar objetos, de manera que podría
perder el control sobre la herramienta
eléctrica.
– No dejar en marcha la herramienta eléc
trica mientras la lleva. Su ropa podría ver
se arrastrada por el contacto casual con la
herramienta insertable que está girando y
la herramienta insertable podría perforarle
el cuerpo.
– Limpiar periódicamente las ranuras de
ventilación de su herramienta eléctrica. El
ventilador del motor atrae polvo a la carca
sa, y una fuerte acumulación de polvo de
metal puede causar peligros eléctricos.
– No utilice la herramienta eléctrica cerca
de materiales inflamables. Las chispas
pueden prender estos materiales.
– No emplee herramientas insertables que
requieran refrigerantes líquidos. El em
pleo de agua u otros refrigerantes líquidos
puede provocar una descarga eléctrica.
Contragolpes e indicaciones de seguridad co
rrespondientes
Un contragolpe es una reacción repentina debi
da al enganche o el bloqueo de una herramien
ta giratoria, como un disco de lijar, un plato lija
dor, un cepillo de alambre etc. Este enganche o
bloqueo provoca una parada abrupta de la he
rramienta rotatoria. De esta forma, en el punto
de bloqueo se acelera la herramienta eléctrica
sin control en sentido opuesto al de giro de la
herramienta.
Si, por ejemplo, un disco de lijar se engancha o
bloquea en la pieza de trabajo, el borde del dis
co introducido en la pieza puede enredarse, lo
que podría provocar la rotura del disco de lijar
38
Page 39

Español
o un contragolpe. En este caso, el disco de lijar
se mueve hacia el usuario o en sentido contra
rio, en función de la dirección de giro del disco
en el punto de bloqueo. De esta forma también
pueden romperse los discos de lijar.
El contragolpe es la consecuencia de un uso in
correcto o inapropiado de la herramienta eléc
trica. Puede evitarse si se siguen unas medidas
de precaución adecuadas como las que se des
criben a continuación.
– Sujetar la herramienta eléctrica con fir
meza y colocar el cuerpo y los brazos de
tal modo que permitan hacer frente a la
fuerza de un posible contragolpe. Utilizar
siempre el asa adicional, en el caso de te
nerla, para ejercer el máximo control po
sible sobre la fuerza de los contragolpes o
los momentos de reacción durante la ace
leración. El usuario puede controlar las
fuerzas de contragolpe y de reacción me
diante medidas de precaución adecuadas.
– No colocar nunca la mano cerca de las he
rramientas que están girando. Si se pro
duce un contragolpe, la herramienta puede
desplazarse sobre su mano.
– Evite situar su cuerpo en la zona en la que
la herramienta eléctrica se movería en el
caso de un contragolpe. Un contragolpe
desplaza la herramienta eléctrica en la di
rección contraria al movimiento del disco
de lijar en la posición de bloqueo.
– Trabajar con especial cuidado en zonas
con esquinas, bordes afilados, etc. Evitar
que las herramientas insertables reboten
en la pieza de trabajo y se bloqueen. Las
herramientas insertables giratorias tien
den a bloquearse en esquinas, bordes afi
lados o cuando rebotan. Esto provoca una
pérdida de control o un contragolpe.
– No utilice sierras de cadena ni hojas de
serrar dentadas. Este tipo de herramientas
suelen provocar contragolpes o la pérdida
del control de la herramienta eléctrica.
Indicaciones de seguridad especiales para el lijado y el tronzado con muela
– Utilice exclusivamente los discos abrasi
vos autorizados para su herramienta eléc
trica y la caperuza de protección prevista
para dichos discos abrasivos. Los discos
abrasivos que no estén previstos para la
herramienta eléctrica no se pueden prote
ger lo suficiente y son inseguros.
– Los discos de lijar con centro rebajado se
deben montar de modo que su superficie
de lijado no sobresalga del plano del bor
de de la caperuza de protección. Un disco
de lijar montado indebidamente que sobre
salga por encima el plano del borde de la
caperuza de protección no puede proteger
se suficientemente.
– La caperuza de protección debe colocarse
de forma segura en la herramienta eléc
trica y ajustarse para un grado máximo de
seguridad de modo que la parte más pe
queña posible del disco abrasivo destapa
do señale hacia el usuario. La caperuza de
protección ayuda a proteger al usuario de
los fragmentos, del contacto casual con el
disco abrasivo y de las chispas que podrían
incendiar la ropa.
– Los discos abrasivos únicamente se deben
emplear para las posibilidades de uso re
comendadas. Por ejemplo: No lije nunca
con la superficie lateral de un disco de
tronzar. Los discos de tronzar están dise
ñados para la eliminación de material con
el borde del disco. Una aplicación de fuerza
lateral sobre dichos discos abrasivos puede
romperlos.
– Utilice siempre una brida de sujeción no
deteriorada, con el tamaño y la forma co
rrectos para el disco de lijar elegido por
usted. Las bridas apropiadas sirven de
apoyo al disco de lijar y reducen así el peli
gro de una rotura del disco de lijar. Las bri
das para los discos de tronzar pueden dife
renciarse de las bridas para otros discos de
lijar.
– No utilice discos de lijar desgastados de
herramientas eléctricas de mayor tamaño.
Los discos de lijar para herramientas eléc
tricas de mayor tamaño no están diseñados
para los elevados números de revoluciones
de las herramientas eléctricas más peque
ñas y se pueden romper.
Otras indicaciones de seguridad especiales para el tronzamiento con muela
– Evite bloquear el disco de tronzar o apli
car una presión demasiado alta. No reali
zar cortes demasiado profundos. Si se so
brecarga el disco de tronzar, aumentará la
demanda de rendimiento y la tendencia a
ladearse o bloquearse, con lo que se incre
mentarán las probabilidades de que se pro
duzcan contragolpes o la rotura del disco.
– Evite las áreas delantera y trasera del dis
co de tronzar cuando esté girando. Al ale
jar de usted el disco de tronzar en la pieza
de trabajo, la herramienta eléctrica podría
39
Page 40

Español
salir disparada en su dirección con el disco
en marcha por un efecto de contragolpe.
– Si se atasca el disco de tronzar o si inte
rrumpe el trabajo, apague la herramienta
y sosténgala hasta que el disco se deten
ga. Intente no extraer el disco de tronzar
en marcha del corte realizado; de lo con
trario, se puede producir un contragolpe.
Averigüe y subsane el motivo del atasco.
– No vuelva a encender la herramienta eléc
trica mientras se encuentre en la pieza de
trabajo. Primero, deje que el disco de
tronzar alcance el número de revolucio
nes máximo; después, hacer el corte con
cuidado.De no seguir estos pasos, el disco
puede engancharse, saltar de la pieza de
trabajo o causar un contragolpe.
– Apoye los paneles o piezas de trabajo
grandes con el fin de reducir el riesgo de
un contragolpe a causa de un disco de
tronzar atascado. Las piezas de trabajo
grandes pueden combarse por su propio
peso. La pieza de trabajo debe apoyarse so
bre ambos lados del disco y tanto cerca del
corte de tronzado como en el borde.
– Tenga especial precaución al realizar
"cortes tipo bolsillo" en muros existentes
o en otros ámbitos que no pueda exami
nar. El disco de tronzar podría causar un
contragolpe al cortar conductos de gas o
agua, cables u otros objetos.
Indicaciones de seguridad especiales para tra
bajar con cepillos de alambre
– Tenga en cuenta que el cepillo de alambre
también pierde pedazos de alambre du
rante el uso habitual. No sobrecargue los
alambres con una presión de aplicación
excesiva. Los pedazos de alambre que sa
len volando pueden penetrar muy fácil
mente a través de la ropa fina y/o de la piel.
– Si se recomienda una caperuza de protec
ción, impida que se puedan tocar la cape
ruza de protección y el cepillo de alambre.
Los cepillos circulares y de vaso pueden
aumentar su diámetro a causa de la pre
sión de aplicación y de las fuerzas centrífu
gas.
2.3 Otras indicaciones de seguridad – No utilice la herramienta eléctrica bajo la
lluvia o en entornos húmedos. La hume
dad puede provocar un cortocircuito en ella
y hacer que se incendie.
– Guíe la herramienta eléctrica hacia el ma
terial únicamente en estado conectado (en
marcha).
– Por motivos de seguridad, la pieza de tra
bajo se tiene que sujetar en un tornillo de
banco o en otro tipo de dispositivo de fija
ción. Una pieza de trabajo sujeta permite
tener ambas manos libres para el manejo
de la herramienta eléctrica.
– No trabaje sobre escaleras.
– Nunca realice un tronzado sobre objetos
metálicos, clavos ni tornillos.
– Utilice aparatos de exploración adecuados
para detectar tuberías de abastecimiento
ocultas o consulte a la compañía local de
abastecimiento de energía. El contacto de
la herramienta con cables eléctricos puede
provocar fuego y descargas eléctricas. Si
se daña una tubería de gas, puede provocar
una explosión. La penetración en una tube
ría de agua ocasiona daños materiales.
– Al trabajar puede generarse polvo perju
dicial o tóxico (p. ej., de pintura con plomo,
de algunos tipos de madera y metal). Los
materiales que contienen amianto solo
pueden ser procesados por personal ex
perto. El contacto o la inhalación de este
polvo puede suponer una amenaza para la
persona que realiza el trabajo o para aque
llas que se encuentren cerca. Observar las
normativas de seguridad vigentes en el
país de uso.
Por el bien de su salud utilice una
mascarilla de protección respiratoria con
filtro P2.
– Después de trabajar con minerales (p. ej.,
yeso), limpie el interior de la herramienta
eléctrica soplando a través de los orificios
de ventilación y del elemento de mando
con aire comprimido seco y sin aceite. De
lo contrario podría sedimentarse polvo en
la carcasa de la herramienta eléctrica y en
el interruptor de conexión y desconexión , y
endurecerse tras entrar en contacto con la
humedad ambiental. Esto podría conllevar
problemas en el mecanismo de conmuta
ción y que la herramienta eléctrica se so
brecaliente.
– Después de haber trabajado con metal:
Limpie el espacio interior de la herra
mienta eléctrica soplando con aire com
primido seco y sin aceite a través de las
ranuras de ventilación. En caso contrario,
se puede acumular polvo en el interior de
40
Page 41

Español
la herramienta eléctrica. Esto podría pro
vocar un cortocircuito.
– No utilizar fuentes de alimentación o bate
rías de otro fabricante con la herramienta
eléctrica de batería. No utilizar cargado
res de otro fabricante para cargar la bate
ría. El uso de accesorios no previstos por el
fabricante puede provocar una descarga
eléctrica o accidentes graves.
2.4 Indicaciones de seguridad de la herramienta de lijado
– Las herramientas de lijado se pueden rom
per, por lo que hay que tener muchísimo
cuidado al manejarlas. El uso de herra
mientas de lijado dañadas, mal tensadas o
mal empleadas es peligroso y puede provo
car lesiones graves.
– Mientras esté almacenada, no exponer la
herramienta de lijado a daños mecánicos ni
a influencias ambientales dañinas.
– Manejar y transportar la herramienta de li
jado con cuidado.
– Tener en cuenta los datos que figuran so
bre la etiqueta o la herramienta de lijado,
así como las limitaciones de uso, las indi
caciones de seguridad y de otro tipo. En ca
so de ambigüedades sobre la herramienta
de lijado, el usuario debe confirmar la in
formación con el fabricante antes de usar
el producto.
– El montaje de la herramienta de lijado debe
efectuarse de forma acorde con el apartado
8.2 .
– La herramienta de lijado solo la pueden
montar personas profesionales.
2.5 Emisiones
Los valores típicos obtenidos de acuerdo con la
norma EN 60745 son:
Nivel de intensidad sonora LPA = 86 dB(A)
Nivel de potencia sonora LWA = 97 dB(A)
Incertidumbre K = 3 dB
ATENCIÓN
Ruido producido durante el trabajo
Daños en los oídos
► Utilizar protección de oídos.
Valor de emisión de vibraciones en ah (suma
vectorial de tres direcciones) e incertidumbre K
determinada según EN 60745:
Lijar
ah = 5 m/s
K = 2 m/s
2
2
Tronzado con muela
ah ≤ 2,5 m/s
K = 2 m/s
2
2
Las emisiones especificadas (vibración, ruido)
– sirven para comparar máquinas,
– son adecuadas para una evaluación provi
sional de los valores de vibración y ruido en
funcionamiento
– y representan las aplicaciones principales
de la herramienta eléctrica.
Otras aplicaciones, como el cepillo de alambre,
pueden provocar otros valores de emisión de vi
braciones.
ATENCIÓN
Los valores de emisión pueden diferir de los
valores indicados. Esto depende del uso que
se le dé a la herramienta y del tipo de pieza
de trabajo procesado.
► Debe valorarse el nivel de carga real a lo
largo de todo el ciclo de funcionamiento.
► Dependiendo de la carga real, deberán de
terminarse medidas de seguridad adecua
das para proteger al usuario.
3 Uso conforme a lo previsto
La herramienta eléctrica está destinada al
tronzado con muela, el lijado ligero, trabajos
con cepillo de alambre y el desbardado de me
tales y piedra sin utilizar refrigerantes ni lubri
cantes.
En función de la aplicación, utilizar la caperuza
de protección adecuada.
Solo se pueden utilizar discos de tronzar y lijar
que cumplan con la normativa EN 12413, discos
de tronzar de diamante que cumplan la EN
13236 y cepillos de alambre que cumplan la EN
1083.
No utilizar esta herramienta eléctrica para pu
lir, lijar superficies con discos de diamante ni
para aplicaciones con discos de diamante o de
cerámica dura.
Quedan excluidas del uso las ruedas de fresar y
las herramientas de lijado por arranque de vi
rutas y de metal duro (con filo definido geomé
tricamente).
41
Page 42

Español
El uso previsto de la herramienta eléctrica es
con acumuladores de Festool de la serie BP
con la misma clase de tensión.
El usuario será responsable de cualquier
utilización indebida.
4 Datos técnicos
Amoladora angular a batería AGC 18
Tensión del motor 18 V CC
Número de revoluciones
(marcha en vacío)
Velocidad 1
4.500-8.500 rpm
4.500 rpm
2
3
4
5
6
5.300 rpm
6.100 rpm
6.900 rpm
7.700 rpm
8.500 rpm
[1-10]
[1-11]
Los accesorios representados o descritos no
forman parte íntegra de la dotación de suminis
tro.
Las figuras indicadas se encuentran al principio
del manual de instrucciones.
5.1 Sistema electrónico Arranque suave
El arranque suave regulado electrónicamente
garantiza un arranque sin sacudidas de la he
rramienta eléctrica.
Regulador [1-4]
El número de revoluciones puede ajustarse de
modo continuo con la rueda de ajuste dentro
del rango de revoluciones. De este modo, puede
adaptarse perfectamente la velocidad a cada
material. Para ello, tenga en cuenta también la
información que contiene la herramienta de li
jado.
Indicación de capacidad
Puntos de apoyo
Velocidad circunferencial
de la herramienta de lijado
Rosca del husillo de lijado m14
Diámetro de la herramien
ta de lijado
Grosor de las herramientas
de lijado
Peso según procedimiento
EPTA 01:2014
máx. 6,0 mm
mín. 1,0 mm
80 m/s
125 mm
2,7 kg
5 Componentes de la
herramienta
[1-1]
[1-2]
[1-3]
[1-4]
Caperuza de protección
Bloqueo del husillo
Rosca para mango adicional
Regulación del número de revolucio
nes
Número de revoluciones constante
El número preseleccionado de revoluciones del
motor se mantiene constante gracias a un sis
tema electrónico. De este modo se consigue
una velocidad estable también con carga.
Protección frente a los contragolpes
En caso de una reducción repentina de la velo
cidad, por ejemplo, por un bloqueo en el corte
de tronzado, el motor se desconecta. Para po
nerlo en marcha de nuevo, se deberá desco
nectar primero la herramienta eléctrica y, a
continuación, volver a conectarla.
Protección contra rearranque
La protección contra rearranque integrada im
pide que la herramienta eléctrica se vuelva a
poner en funcionamiento de forma automática
tras una caída de la tensión cuando se encuen
tra en estado de funcionamiento continuo. Para
ponerlo en marcha de nuevo, se deberá desco
nectar primero la herramienta eléctrica y, a
continuación, volver a conectarla.
[1-5]
[1-6]
[1-7]
[1-8]
[1-9]
42
Interruptor de conexión y descone
xión
Mango adicional
Superficies de agarre con aislamiento
(zona sombreada en gris)
Teclas para aflojar la batería
Tecla de la capacidad en la batería
Protección contra sobrecalentamiento
Para la protección de sobrecalentamiento, el
sistema electrónico de seguridad conmuta al
modo de funcionamiento de refrigeración. El
motor sigue funcionando y el número de revo
luciones constante se desactiva. Una vez trans
currida una fase de enfriamiento de aprox.
10-20 segundos, la máquina está de nuevo ope
rativa y con plena capacidad de carga.
Page 43

Español
6 Puesta en servicio
6.1 Mantener la herramienta eléctrica correctamente
Sujetar la herramienta eléctrica por las super
ficies de agarre aisladas [1-7] con las dos ma
nos: una mano en la carcasa del motor detrás
del interruptor y otra mano en el mango adicio
nal [1-6].
6.2 Conexión y desconexión
Conexión [2a]
► Mover hacia adelante el interruptor de co
nexión y desconexión [1-5]. Al pulsar simul
táneamente la parte delantera del interrup
tor, el interruptor de conexión y descone
xión se bloquea.
El interruptor de conexión y desconexión [1-5]
está bloqueado y la herramienta eléctrica co
nectada.
No conecte la herramienta con el material
hasta que se alcance la velocidad de fun
cionamiento.
Regulación del número de revoluciones
El número de revoluciones puede ajustarsen 6
pasos, según las necesidades de la pieza de
trabajo.
► Ajustar el regulador [1-4] en el nivel desea
do.
Desconexión [2b]
► Levantar la herramienta eléctrica del mate
rial con el que se esté trabajando.
► Presionar la parte trasera del interruptor
de conexión y desconexión [1-5].
El bloqueo está suelto y la herramienta eléctri
ca desconectada.
7.1 Indicación de capacidad
La indicación de la capacidad [1-10] muestra,
al accionar la tecla [1-9], el estado de carga de
la batería durante aprox. 2 s:
70‑100%
40‑70%
15‑40%
< 15%
*
Recomendación: cargar la batería antes de
cada utilización.
Encontrará más información sobre la ba
tería y el cargador en el manual de ins
trucciones de la batería y el cargador.
*
8 Ajustes
ADVERTENCIA
Peligro de lesiones
► Antes de llevar a cabo cualquier trabajo en
la herramienta eléctrica, retirar de esta la
batería.
8.1 Montaje del mango adicional[1-6]
Utilice siempre el mango adicional para
garantizar una postura de trabajo segura
y sin fatiga.
Con ayuda de la estructura especial "VIBRAS
TOP" se reducen las oscilaciones gracias al
mango adicional .
► Atornillar el asa adicional [1-6], según có
mo se esté trabajando, en el lateral de la
rosca [1-3].
ADVERTENCIA
Peligro de lesiones por contragolpe, partícu
las despedidas
► Antes de depositar la herramienta eléctri
ca, esperar a que la herramienta de lijado
rotatoria se detenga por completo.
► Colocar la herramienta eléctrica sobre los
puntos de apoyo [1-11].
7 Batería
► Insertar la batería [3a]
► Extraer la batería [3b]
8.2 Montaje de la herramienta de lijado [4]
ATENCIÓN
Peligro de lesiones por herramienta caliente
y afilada
► No utilizar herramientas de lijado que vi
bren ni que estén desafiladas o defectuo
sas.
► No utilizar herramientas de lijado que an
tes del montaje hayan estado expuestas a
humedad intensa o temperaturas elevadas.
► Utilice guantes de protección.
43
Page 44

Español
ADVERTENCIA
Peligro de lesiones si la herramienta de lija
do está mal montada
► Girar hacia afuera el mango [4-3] del man
dril de sujeción rápida solo cuando se vaya
a cambiar la herramienta de lijado.
► Prestar atención a que antes del montaje
de la herramienta de lijado, la brida [4-4]
esté colocada sobre el husillo.
La tuerca de fijación solo debe apretarse o
aflojarse con la mano. El mango no se
puede usar en ningún caso como herra
mienta para apretar o aflojar.
Si no fuera posible aflojar la tuerca con la
mano, solo se puede utilizar una llave de
espigas [5-1] para hacerlo.
Si el mango está suelto o dañado, en nin
gún caso se puede seguir utilizando la
tuerca de fijación.
►
►
► Comprobar que la herramienta de lijado es
► Deje rodar las nuevas herramientas de lija
El desmontaje se realiza en el orden inverso
[5a].
8.3 Montar los cepillos de alambre [6]
► Quitar [6-1] la empuñadura.
►
►
Apretar el mandril de sujeción rápida a
mano.
Cerrar el mango de la tuerca de sujeción
rápida.
tá fija y asentada sobre la herramienta eléc
trica.
do durante aproximadamente un minuto sin
carga a modo de prueba.
Montar la empuñadura con protección
para las manos [6-2].
Montar el cepillo de alambre [6-3] con
seguridad en la rosca de alojamiento [6-4].
Seguir las instrucciones que se adjuntan
con el cepillo de alambre.
En función de la aplicación, utilizar la ca
peruza de protección adecuada.
► Retirar la batería de la herramienta eléctri
ca.
► Abrir el mango [4-3] del mandril de suje
ción rápida.
► Destornillar el mandril de sujeción rápida
[4-2] con la mano.
►
► Colocar el mandril de sujeción rápida sobre
►
Colocar la herramienta de lijado sobre el
husillo y la brida [4-4].
Comprobar que el inciso de centrado de la
brida encaja perfectamente con la apertura
del disco y que el mecanismo de bloqueo
entre la herramienta eléctrica/husillo y la
brida coinciden.
Comprobar que el husillo de la herramienta
eléctrica encaja en diámetro con el orificio
de la herramienta de lijado.
Las herramienta de lijado con centro
rebajado se deben montar de modo
que su superficie de lijado no sobre
salga del plano del borde de la caperu
za de protección.
Prestar atención al sentido de giro prescrito
de la herramienta de lijado (flecha sobre la
herramienta de lijado = flecha en la carcasa
de la herramienta [4-1]).
la herramienta de lijado y el husillo.
Presionar el bloqueo del husillo [4-5] en
la parte posterior de la herramienta.
8.4 Colocación de la caperuza de protección/la caperuza protectora de separación [7]
La caperuza de protección está premontada.
Para ajustar la posición de la caperuza de pro
tección a los requisitos de la operación, basta
con girarla un poco.
►
►
►
8.5 Retirar la caperuza de protección/
Mantener presionada la palanca de blo
queo de la caperuza de protección.
Colocar la caperuza de protección de la
herramienta eléctrica de forma que las
chispas y las partículas resultantes del lija
do estén alejadas del cuerpo.
Aflojar la palanca de bloqueo y apretar la
caperuza de protección hasta que quede
enclavada.
La caperuza de protección disponible co
mo accesorio se coloca de la misma ma
nera.
caperuza protectora de separación [8]
ATENCIÓN
Peligro de lesiones por chispas y discos de
tronzar rotos.
► Para tronzar, utilizar la caperuza protecto
ra de separación disponible como acceso
rio adicional: ver apartado
9.2
44
Page 45

► Desmontar la herramienta de lijado ya
montada de la herramienta eléctrica: ver
apartado 8.2 .
►
►
►
8.6 Montar la caperuza de protección/la
Mantener presionada la palanca de blo
queo de la caperuza de protección.
Tras superar el punto de presión, girar
hacia delante la caperuza de protección.
Retirar la caperuza de protección de la
herramienta eléctrica.
caperuza de protección de separación
[9]
Español
ADVERTENCIA
Peligro de lesiones si la herramienta de lija
do puede romperse
► Comprobar que no se ha superado la fecha
de caducidad de la herramienta de lijado.
ADVERTENCIA
Peligro de lesiones a causa de que la pieza
de trabajo puede deslizarse
► Fijar la pieza de trabajo.
AVISO
Signos de desgaste en la caperuza de pro
tección de separación.
► Antes de encender, comprobar si la herra
mienta de lijado puede moverse libremen
te. La herramienta de lijado no puede lijar
sobre la caperuza de protección de separa
ción.
En función de la aplicación, utilizar la ca
peruza de protección adecuada.
►
►
Para el montaje de la herramienta de lijado, ver
apartado 8.2 .
La caperuza de protección puede encla
varse en la posición delantera. Para ello,
comprobar que la posición del taco y la
tuerca coinciden.
Girar la caperuza de protección hasta la
posición deseada, hasta que la palanca de
bloqueo quede encajada.
9 Trabajo con la herramienta
eléctrica
ADVERTENCIA
Peligro de lesiones
► Guiar la herramienta eléctrica hacia el ma
terial únicamente en estado conectado (en
marcha).
► Fijar la pieza de trabajo siempre de forma
que no se pueda mover cuando se trabaje
con ella.
► Mantener las manos lejos de la herramien
ta de lijado cuando esté en movimiento.
ADVERTENCIA
Peligro de lesiones por trabajar por encima
de la cabeza
► Para realizar trabajos por encima de la ca
beza utilizar siempre gafas de protección.
► Llevar una mascarilla de protección respi
ratoria con filtro P2.
La herramienta eléctrica puede colocarse
en posición horizontal sobre los puntos de
apoyo [1-11] cuando no se esté utilizando.
► Para el transporte, retirar la herramienta
de lijado de la herramienta eléctrica.
9.1 Lijar
Para lijar, usar siempre la caperuza de protec
ción incluida en el dotación de suministro.
La caperuza de protección está premontada.
Para desmontar la caperuza de protección, vea
el apartado 8.5 .
9.2 Tronzado con muela
Para tronzar, utilizar siempre la caperuza pro
tectora de separación TSH-AGC 18-125 disponi
ble como accesorio adicional.
La caperuza de protección de separación se
monta, coloca y desmonta como la caperuza de
protección, ver apartados 8.5 y 8.6 .
► Guíe siempre la herramienta de lijado di
rectamente a través de la pieza de trabajo.
Comprobar que la herramienta de lijado no
se ladea ni se carga oblicua ni lateralmente.
► En piezas de trabajo con paredes gruesas,
realizar el corte de tronzado con movimien
tos oscilatorios y ejerciendo una ligera pre
sión con la herramienta eléctrica.
45
Page 46

EKAT
1
2
3
5
4
Español
9.3 Trabajo con cepillos de alambre
ADVERTENCIA
Peligro de lesiones en los ojos por partículas
despedidas o alambres
► Utilizar gafas de protección.
Para trabajar con cepillos de alambre, usar
siempre los guantes de protección HS-AGC18,
disponibles como accesorios, ver capítulo
10 Señales acústicas de
advertencia
Si la herramienta eléctrica se desconecta a
causa los siguientes estados de funcionamien
to, al encenderla emite una señal acústica de
advertencia.
Batería incompatible
– Colocar el modelo a batería correcto.
Batería vacía
– Cambiar la batería.
– Cargar la batería.
Batería defectuosa
– Cambiar la batería.
– Comprobar el funcionamiento de la batería
ya enfriada con el cargador.
Batería sobrecalentada
– Dejar que la batería se enfríe.
La herramienta eléctrica está sobrecalentada
– Una vez fría, la herramienta eléctrica se
puede volver a utilizar.
Herramienta eléctrica defectuosa
– Ponerse en contacto con un taller autoriza
do de Festool o un distribuidor especializa
do.
Herramienta eléctrica bloqueada
– Eliminar el bloqueo.
Si la herramienta se desconecta a causa
de un bloqueo, no emite ninguna señal de
aviso acústica.
11 Accesorios
Utilice únicamente accesorios originales de
Festool, como se describe en el uso conforme
a lo previsto. El uso de herramientas de poca
calidad y de accesorios de otros fabricantes
puede aumentar el riesgo de sufrir lesiones y
causar desequilibrios considerables que redu
cen la calidad de los resultados del trabajo y
aumentan el desgaste de la máquina.
46
8.3 .
Los números de pedido de los accesorios y las
herramientas figuran en el catálogo Festool o
en la dirección de internet www.festool.es.
12 Mantenimiento y cuidado
ADVERTENCIA
Peligro de lesiones y electrocución
► Antes de llevar a cabo cualquier trabajo de
cuidado o mantenimiento, retirar siempre
la batería de la herramienta eléctrica.
► Cualquier tarea de mantenimiento y repa
ración que suponga la apertura de la he
rramienta eléctrica deberá ser realizada
únicamente por un taller de servicios auto
rizado.
El servicio de atención al clien
te y de reparaciones solo está
disponible a través del fabrican
te o de los talleres de repara
ción. Dirección más cercana en:
www.festool.es/servicio
Utilice únicamente piezas de
recambio Festool originales.
Referencia en: www.festool.es/
servicio
A fin de garantizar una correcta circulación del
aire, las aberturas para el aire de refrigeración
dispuestas en la carcasa del motor deben man
tenerse libres y limpias.
Al trabajar con materiales minerales (p. ej., ye
so) puede sedimentarse polvo en la carcasa de
la herramienta eléctrica y en el interruptor de
conexión y desconexión , y endurecerse tras en
trar en contacto con la humedad ambiental. Es
to podría conllevar problemas en el mecanismo
de conmutación y que la herramienta eléctrica
se sobrecaliente.
Al trabajar con metal, se puede acumular polvo
en el interior de la herramienta eléctrica. Esto
podría provocar un cortocircuito.
► Después de cada mecanizado, limpiar el in
terior de la herramienta eléctrica y del inte
rruptor de conexión y desconexión introdu
ciendo aire comprimido seco y sin aceite
por los orificios de ventilación.
Limpiar la herramienta de lijado después de ca
da uso.
Mantenga siempre limpios los puntos de cone
xión de la herramienta eléctrica, el cargador y
la batería.
Page 47

13 Medio ambiente
No desechar con la basura doméstica.
Reciclar las herramientas, los acceso
rios y los embalajes de forma respetuo
sa con el medio ambiente. Respetar las disposi
ciones nacionales vigentes.
Solo UE: De acuerdo con la Directiva europea
sobre residuos de aparatos eléctricos y electró
nicos y su transposición a la legislación nacio
nal, las herramientas eléctricas usadas deben
recogerse por separado y reciclarse de forma
respetuosa con el medio ambiente.
Información sobre REACh: www.festool.com/
reach
14 Observaciones generales
14.1
Bluetooth
La marca denominativa Bluetooth® y los logoti
pos son marcas registradas de Bluetooth SIG,
Inc. Por lo tanto, todo uso que TTS Tooltechnic
Systems AG & Co. KG y, por consiguiente, tam
bién Festool, hagan de dicha marca está sujeto
a un contrato de licencia.
®
Español
47
Page 48

Italiano
Sommario
1 Simboli.......................................................48
2 Avvertenze per la sicurezza...................... 48
3 Utilizzo conforme...................................... 52
4 Dati tecnici.................................................52
5 Elementi dell’utensile...............................53
6 Messa in funzione......................................53
7 Batteria......................................................54
8 Impostazioni.............................................. 54
9 Utilizzo dell’elettroutensile.......................56
10 Segnali di avviso acustici.......................... 56
11 Accessori...................................................56
12 Cura e manutenzione................................57
13 Ambiente................................................... 57
14 Indicazioni generali................................... 57
1 Simboli
Avvertenza di pericolo generico
Avvertenza sulle scariche elettriche
Leggere le istruzioni d'uso e le avver
tenze di sicurezza.
Indossare dispositivi di protezione del
l'udito.
Indossare guanti protettivi.
Indossare un dispositivo di protezione
delle vie respiratorie.
Indossare gli occhiali protettivi.
Indossare calzature solide.
Non smaltire tra i rifiuti domestici.
Consiglio, avvertenza
Indicazione operativa
Innestare la batteria
Sbloccare la batteria
Contrassegno CE: attesta la conformità
dell’elettroutensile alle Direttive della
Comunità Europea.
2 Avvertenze per la sicurezza
2.1 Avvertenze di sicurezza generali AVVERTENZALeggere tutte le avvertenze
per la sicurezza e le indicazioni. Eventua
li errori nell'osservanza delle avvertenze di si
curezza e delle istruzioni d'uso possono provo
care scosse elettriche, incendi e/o gravi lesioni.
Conservare tutte le avvertenze di sicurezza e
le istruzioni d'uso per riferimenti futuri.
Il termine "elettroutensile" utilizzato nelle av
vertenze di sicurezza indica elettroutensili sia a
filo (con cavo di rete), sia a batteria (senza cavo
di rete).
Osservare il manuale di istruzioni del carica
batterie e della batteria.
2.2 Avvertenze di sicurezza specifiche della
macchina
Avvertenze di sicurezza generali per la leviga
tura, il lavoro con spazzole metalliche e la
troncatura
– Il presente elettroutensile andrà utilizzato
come smerigliatrice, spazzola metallica
ed utensile da taglio alla mola. Attenersi a
tutte le avvertenze di sicurezza, alle istru
zioni, agli schemi e ai dati accluse/-i all’u
tensile. La mancata osservanza delle se
guenti istruzioni comporta il rischio di fol
gorazione, incendio e/o gravi lesioni.
– Il presente elettroutensile non è idoneo
alla levigatura con carta abrasiva, né alla
lucidatura. L’impiego dell’utensile per sco
pi diversi da quelli previsti può causare pe
ricoli e lesioni.
– Non utilizzare accessori che non sono stati
espressamente previsti e consigliati dal
costruttore per questo elettroutensile. Il
semplice fatto che sia possibile fissare
l'accessorio all'elettroutensile non significa
che lo si possa utilizzare in sicurezza.
– Il numero di giri ammesso per l'inserto
deve essere almeno pari al numero di giri
massimo indicato sull'elettroutensile. Un
accessorio che gira più velocemente di
quanto consentito può rompersi in vari pez
zi che vengono lanciati intorno.
– Diametro esterno e spessore dell’utensile
accessorio dovranno corrispondere alle
misure indicate per l’elettroutensile del
caso. Utensili accessori dimensionati in
modo errato non possono essere adeguata
mente schermati o controllati.
– Gli utensili accessori con inserto filettato
dovranno corrispondere esattamente alla
48
Page 49

Italiano
filettatura dell’alberino. In caso di utensili
accessori flangiati, il diametro del foro
dell’utensile accessorio dovrà corrispon
dere al diametro di attacco della flangia.
Gli utensili accessori fissati in modo impre
ciso sull’elettroutensile ruotano in modo ir
regolare, vibrano molto fortemente e pos
sono causare la perdita del controllo.
– Non utilizzare utensili accessori danneg
giati. Prima di ogni utilizzo, verificare che
gli utensili accessori, ad es. i dischi abra
sivi, non presentino scheggiature e scre
polature, che i platorelli non siano screpo
lati, usurati o fortemente logori e che le
spazzole metalliche non presentino fili di
staccati o spezzati. Se l’elettroutensile o
l’utensile accessorio cade, verificare che
non abbia subito danni, oppure utilizzare
un utensile accessorio non danneggiato.
Controllato ed introdotto l’utensile acces
sorio, mantenersi – e mantenere chi si
trovi nelle vicinanze – fuori dal piano di
rotazione dell’utensile accessorio e la
sciar funzionare l’utensile per 1 minuto al
massimo numero di giri. Con questo test,
gli utensili accessori danneggiati solita
mente si rompono.
– Indossare equipaggiamenti di protezione
individuale. In base al tipo di applicazione,
utilizzare una maschera protettiva, una
protezione per gli occhi o occhiali protetti
vi. Se necessario, indossare maschera an
tipolvere, protezione per l’udito, guanti
protettivi o grembiule speciale, in grado di
proteggere da particelle di levigatura e di
materiale. Gli occhi andranno protetti da
eventuali proiezioni di corpi estranei, possi
bili durante le varie lavorazioni. La ma
schera antipolvere o la maschera di prote
zione delle vie respiratorie dovranno poter
filtrare la polvere sprigionata dalla specifi
ca applicazione. L’esposizione prolungata a
forte rumorosità comporta il rischio di per
dita dell’udito.
– In presenza di terzi, accertarsi che gli
stessi si trovino a distanza di sicurezza
dall’area di lavoro. Chiunque acceda all’a
rea di lavoro dovrà indossare adeguati
equipaggiamenti di protezione individuale.
Eventuali frammenti del pezzo in lavorazio
ne, o utensili accessori spezzati, potrebbe
ro venire proiettati, causando lesioni anche
al di fuori dell’immediata area di lavoro.
– Trattenere l’elettroutensile esclusiva
mente sulle superfici di presa isolate,
qualora si eseguano lavori in cui l’utensile
accessorio possa entrare in contatto con
linee elettriche nascoste. Il contatto con
una linea sotto tensione può mettere sotto
tensione anche parti metalliche dell’utensi
le, con conseguente rischio di folgorazione.
– Non deporre in alcun caso l’elettroutensi
le prima che l’utensile accessorio sia com
pletamente fermo. L’utensile accessorio in
rotazione può entrare a contatto con il pia
no d’appoggio, facendo perdere il controllo
dell’elettroutensile.
– Non lasciare l’elettroutensile in funzione
quando lo si trasporta. Gli indumenti del
l’utilizzatore potrebbero venire afferrati in
caso di contatto accidentale con l’utensile
accessorio in rotazione, con conseguente
rischio di lesioni.
– Pulire regolarmente le feritoie d’aerazio
ne dell’elettroutensile. La ventola del mo
tore attira polvere nella scatola ed un forte
accumulo di polvere metallica può causare
pericoli di natura elettrica.
– Non utilizzare l’elettroutensile nelle vici
nanze di materiali infiammabili. Eventuali
scintille potrebbero innescare detti mate
riali.
– Non utilizzare utensili accessori che ri
chiedano refrigeranti liquidi. L’utilizzo di
acqua o di altri refrigeranti liquidi può cau
sare folgorazioni.
Contraccolpi e relative avvertenze di sicurezza
Il contraccolpo è una reazione improvvisa, cau
sata dall’inceppamento o dal blocco di un uten
sile accessorio, ad es. disco abrasivo, platorel
lo, spazzola metallica ecc. L’inceppamento o il
blocco provocano un arresto improvviso dell’u
tensile accessorio in rotazione, che provoca uno
scatto improvviso ed incontrollato dell’utensile
accessorio in direzione opposta al senso di ro
tazione.
Se, ad esempio, un disco abrasivo si inceppa nel
pezzo in lavorazione, oppure si blocca, il bordo
del disco stesso che penetra nel materiale po
trebbe restare incastrato, rompendo il disco,
oppure provocando un contraccolpo. Il disco
abrasivo, quindi, si sposterebbe verso l’opera
tore, oppure in direzione opposta, in base al
senso di rotazione del disco nel punto di bloc
caggio. Ciò può anche comportare la rottura dei
dischi abrasivi.
Un contraccolpo deriva da un utilizzo errato o
non corretto dell’utensile accessorio. Il proble
49
Page 50

Italiano
ma si può evitare mediane apposite misure pre
cauzionali, come indicato di seguito.
– Tenere l'elettroutensile saldamente con
entrambe le mani, portando braccia e cor
po in una posizione tale da poter contra
stare la forza del contraccolpo. Utilizzare
sempre l'impugnatura supplementare, se
presente, per avere il massimo controllo
possibile sulle eventuali forze del con
traccolpo o momenti di reazione ad eleva
to numero di giri. L'utente, adottando ade
guate precauzioni, può contrastare le forze
di contraccolpo e di reazione.
– Non avvicinare in alcun caso le mani agli
utensili accessori in movimento. L’utensile
accessorio potrebbe spostarsi sulla mano
in caso di contraccolpi.
– Mantenersi a distanza dall’area di sposta
mento per contraccolpo dell’elettrouten
sile. Il contraccolpo spinge l’elettroutensile
in direzione opposta a quella di movimento
del disco abrasivo nel punto di bloccaggio.
– Lavorare con particolare prudenza in
prossimità degli angoli, spigoli vivi, ecc.
Evitare che gli inserti scattino via dal pez
zo in lavorazione o vi si blocchino. L'inser
to rotante in prossimità di angoli, spigoli vi
vi o se rimbalza tende a bloccarsi. Ciò pro
voca una perdita del controllo o un contrac
colpo.
– Non utilizzare lame per seghe a catena o
lame dentate. Tali utensili accessori provo
cano spesso contraccolpi o perdita del con
trollo sull’elettroutensile.
Avvertenze di sicurezza specifiche per leviga
tura e taglio alla mola
– Utilizzare esclusivamente mole di tipo
omologato per l’elettroutensile del caso e
la calotta protettiva prevista per dette mo
le. Mole di tipi non previsti per l’elettrou
tensile non possono essere adeguatamente
schermate e, pertanto, non sono sicure.
– I dischi abrasivi a centro depresso andran
no montati in modo che la superficie di le
vigatura non sporga oltre il bordo della
calotta protettiva. Un disco abrasivo mon
tato non correttamente, che sporga oltre il
bordo della calotta protettiva, non può es
sere adeguatamente schermato.
– La calotta protettiva andrà applicata in
modo sicuro sull’elettroutensile e, per of
frire la massima sicurezza, andrà regolata
in modo da lasciare scoperta verso l’ope
ratore la minima parte possibile della mo
la. La calotta protettiva contribuisce a pro
teggere l’operatore da frammenti, contatti
accidentali con le mole e da scintille, che
potrebbero incendiare gli indumenti.
– Le mole andranno utilizzate esclusiva
mente per gli impieghi consigliati. Ad
esempio: non levigare in alcun caso con la
superficie laterale di un disco da taglio. I
dischi da taglio sono concepiti per asporta
re il materiale con il bordo del disco. Eser
citando una forza laterale su dette mole,
esse potrebbero spezzarsi.
– Utilizzare sempre flange di serraggio inte
gre e di forma e dimensioni corrette per il
disco abrasivo scelto. Le flange di tipo ido
neo supportano il disco abrasivo, riducendo
il rischio di una sua rottura. Le flange per
dischi da taglio possono differire da quelle
per altri tipi di dischi abrasivi.
– Non utilizzare dischi abrasivi usurati di
elettroutensili di maggiori dimensioni. I
dischi abrasivi per elettroutensili di mag
giori dimensioni, non essendo concepiti per
i maggiori numeri di giri degli elettrouten
sili più piccoli, potrebbero spezzarsi.
Ulteriori avvertenze di sicurezza specifiche per taglio alla mola
– Evitare di far bloccare il disco da taglio e
non esercitare un’eccessiva pressione di
spinta. Non tagliare eccessivamente in
profondità. Un sovraccarico sul disco da
taglio lo sollecita maggiormente e lo rende
più soggetto ad piegature o blocchi e, quin
di, alla possibilità di contraccolpi o di rottu
ra della mola.
– Mantenersi a distanza dalla zona davanti e
dietro al disco da taglio in rotazione. Se
l’operatore allontana da sé il disco da taglio
nel pezzo in lavorazione, in caso di contrac
colpi l’elettroutensile potrebbe venire
proiettato direttamente sull’operatore
stesso, assieme al disco in rotazione.
– Se il disco da taglio si inceppa, oppure se il
lavoro viene interrotto, l’utensile andrà
spento e mantenuto stabile fino all’arre
sto del disco. Non tentare in alcun caso di
estrarre dal taglio il disco ancora in movi
mento: ciò potrebbe causare un contrac
colpo. Determinare ed eliminare la causa
dell’inceppamento.
– Non riaccendere l’elettroutensile fino a
quando si trovi nel pezzo in lavorazione.
Attendere che il disco da taglio raggiunga
il pieno numero di giri, prima di prosegui
re, con cautela, il taglio. In caso contrario,
50
Page 51

Italiano
il disco potrebbe incepparsi e fuoriuscire
improvvisamente dal pezzo, oppure causa
re un contraccolpo.
– Pannelli o pezzi di grandi dimensioni an
dranno sostenuti, per ridurre il rischio di
contraccolpi qualora il disco da taglio si
inceppi. I pezzi di grandi dimensioni posso
no flettersi sotto il loro peso. Il pezzo in la
vorazione andrà sostenuto su entrambi i la
ti del disco: sia in prossimità del taglio, sia
sul bordo.
– Prestare particolare attenzione durante i
“tagli a tasca” in pareti già esistenti o in
altre zone cieche. Penetrando nella super
ficie, il disco da taglio potrebbe causare un
contraccolpo nell’incontrare condotti del
gas o dell’acqua, linee elettriche o altri og
getti.
Avvertenze di sicurezza specifiche per l’utiliz
zo di spazzole metalliche
– Nota bene: la spazzola metallica perde
pezzi di filo anche nel normale utilizzo.
Non sovraccaricare i fili con un’eccessiva
pressione di spinta. I pezzi di filo eventual
mente proiettati possono penetrare molto
facilmente in indumenti molto sottili e/o
nella pelle.
– Qualora sia consigliata una calotta protet
tiva, evitare che la stessa entri in contatto
con la spazzola metallica. Le spazzole a di
sco e a tazza possono aumentare di diame
tro a causa della pressione di spinta e delle
forze centrifughe.
2.3 Ulteriori avvertenze di sicurezza – Non utilizzare l’elettroutensile sotto la
pioggia o in ambienti umidi. La presenza di
umidità nell’elettroutensile può provocare
cortocircuiti ed incendi.
– Condurre l’elettroutensile nel materiale
esclusivamente quando è acceso (in funzio
ne).
– Per ragioni di sicurezza, il pezzo in lavora
zione andrà fissato in una morsa a vite o in
un altro dispositivo di serraggio. Fissando il
pezzo in lavorazione, si disporrà di entram
be le mani per comandare l’elettroutensile.
– Non lavorare su scale.
– Non tagliare su oggetti metallici, chiodi o
viti.
– Utilizzare strumenti opportuni per localiz
zare tubi o cavi nascosti o consultare la
società di approvvigionamento della zona.
Il contatto dell'attrezzo con un cavo condut
tore di tensione può causare scariche elet
triche e incendi. Il danneggiamento di un
tubo del gas può causare esplosioni. La pe
netrazione in un tubo dell'acqua è causa di
danni materiali.
– In fase di lavorazione possono generarsi
polveri dannose/tossiche (ad es. pitture
contenenti piombo, alcuni tipi di legno e
metallo). I materiali contenenti amianto
devono essere sottoposti a lavorazione
esclusivamente da personale qualificato.
Il contatto o l'inalazione di tali polveri pos
sono costituire un pericolo per l'operatore
o per le persone nelle vicinanze. Osservare
le disposizioni di sicurezza in vigore nel
proprio paese.
Indossare una maschera di protezio
ne delle vie respiratorie di livello P2.
– Dopo una lavorazione su materiali mine
rali (ad es. gesso ecc.): soffiare aria com
pressa asciutta e priva di olio all’interno
dell’elettroutensile attraverso le aperture
d’aerazione e sull’elemento di commuta
zione. In caso contrario, nella scatola del
l’elettroutensile e sull’interruttore ON/OFF
potrà depositarsi polvere, che indurisce a
contatto con l’umidità atmosferica: ciò può
compromettere il funzionamento del mec
canismo di commutazione e far surriscal
dare l’elettroutensile.
– Dopo una lavorazione su metallo: soffiare
aria compressa asciutta e priva di olio al
l’interno dell’elettroutensile attraverso le
aperture d’aerazione. In caso contrario, al
l’interno dell’elettroutensile potrà deposi
tarsi polvere conduttiva, con rischio di cor
tocircuito.
– Non utilizzare alimentatori o batterie di
fornitori terzi per azionare gli utensili a
batteria. Non utilizzare caricatori di forni
tori terzi per caricare la batteria. L'uso di
accessori non raccomandati dal produttore
può provocare scosse elettriche e/o gravi
incidenti.
2.4 Avvertenze di sicurezza per utensili abrasivi
– Poiché gli utensili abrasivi sono sensibili
alla rottura, essi andranno impiegato con
estrema cautela. L’utilizzo di utensili abra
sivi danneggiati, oppure serrati o introdotti
in modo errato, è pericoloso e può causare
gravi lesioni.
51
Page 52

Italiano
– Durante il periodo di magazzinaggio, non
esporre gli utensili abrasivi a danni mecca
nici o ad influssi ambientali dannosi.
– Manipolare e trasportare con cautela gli
utensili abrasivi.
– Attenersi alle indicazioni riportate sull’eti
chetta o sull’utensile abrasivo, nonché a li
mitazioni di utilizzo, avvertenze di sicurezza
o altre avvertenze. In caso di dubbi sulla
scelta degli utensili abrasivi, richiedere in
formazioni al costruttore prima dell’utiliz
zo.
– Gli utensili abrasivi andranno montati con
formemente al capitolo 8.2 .
– Gli utensili abrasivi andranno montati
esclusivamente da personale esperto.
2.5 Valori di emissione
I valori determinati in base a EN 60745 sono ti
picamente:
Livello di pressione acustica LPA = 86 dB(A)
Livello di potenza acustica LWA = 97 dB(A)
Tolleranza K = 3 dB
PRUDENZA
Suono risultante dal lavoro
Danneggiamento dell'udito
► Utilizzare la protezione per l'udito.
Valore dell'emissione di vibrazioni ah (somma
vettoriale di tre direzioni) e tolleranza K rilevati
secondo la norma EN 60745:
Levigatura
ah = 5 m/s
K = 2 m/s
PRUDENZA
I valori di emissione possono differire dai va
lori specificati. Questo dipende dall'uso del
l'utensile e dal tipo di pezzo da lavorare.
► Deve essere valutato il carico effettivo du
rante l'intero ciclo operativo.
► A seconda del carico effettivo, devono es
sere definite misure di sicurezza adeguate
per proteggere l'operatore.
3 Utilizzo conforme
L’elettroutensile è concepito per taglio alla mo
la, levigatura leggera, utilizzo di spazzole me
talliche e sbavatura su materiali metallici e pie
trosi, senza impiego di refrigeranti o lubrificanti
liquidi.
Utilizzare il tipo di calotta protettiva previsto
per l’applicazione del caso.
Andranno utilizzate esclusivamente dischi da
taglio e dischi abrasivi legati secondo EN 12413,
dischi diamantati secondo EN 13236 e spazzole
metalliche secondo EN 1083.
Non usare questo elettroutensile per la luci
datura o la levigatura di superfici con dischi
diamantati né per l'utilizzo di dischi diamantati
e in ceramica dura.
È escluso l'utilizzo di utensili per la fresatura,
utensili per la levigatura in metallo duro e ad
asportazione di truciolo (con tagliente geome
tricamente definito).
L’elettroutensile è concepito per l’utilizzo con
le batterie Festool serie BP della stessa classe
di tensione.
2
2
Il proprietario risponde dei danni in caso
di uso non appropriato dell'attrezzo.
Taglio alla mola
ah ≤ 2,5 m/s
K = 2 m/s
2
2
I valori di emissione indicati (vibrazioni, rumo
rosità)
– hanno valore di confronto tra le macchine,
– permettono una valutazione provvisoria del
carico di rumore e di vibrazioni durante l'u
so,
– rappresentano l'attrezzo elettrico nelle sue
applicazioni principali.
Applicazioni diverse, ad es. con spazzole metal
liche, potrebbero comportare diversi valori di
emissione oscillazioni.
52
4 Dati tecnici
Smerigliatrice angolare a
batteria
Tensione motore 18 V DC
Numero di giri (a vuoto) 4500 - 8500 giri/min
Livelli del numero di
giri
1 4500 giri/min
2 5300 giri/min
3 6100 giri/min
4 6900 giri/min
5 7700 giri/min
6 8500 giri/min
AGC 18
Page 53

Italiano
Smerigliatrice angolare a
batteria
Velocità periferica
utensile abrasivo
Filettatura dell’alberi
no
Ø utensile abrasivo 125 mm
Spessore utensile
abrasivo
Peso secondo procedu
ra EPTA 01:2014
max. 6,0 mm
min. 1,0 mm
AGC 18
80 m/s
M 14
2,7 kg
5 Elementi dell’utensile
[1-1]
[1-2]
[1-3]
[1-4]
[1-5]
Calotta protettiva
Blocco dell’alberino
Filettatura per impugnatura supple
mentare
Regolazione del numero di giri
Interruttore ON/OFF
motore, consentendo di ottenere una velocità
uniforme anche sotto carico.
Protezione anticontraccolpi
Se il numero di giri cala improvvisamente, ad
es. a causa di un bloccaggio all’interno del ta
glio, il motore verrà immediatamente disinseri
to. Per rimetterlo in funzione, l’utensile andrà
dapprima spento, quindi riacceso.
Protezione contro il riavvio
La protezione contro il riavvio integrata impedi
sce che l’elettroutensile, in funzionamento con
tinuo, si riavvii autonomamente dopo un’inter
ruzione di tensione. Per rimetterlo in funzione,
l’utensile andrà dapprima spento, quindi riac
ceso.
Protezione dal surriscaldamento
In caso di surriscaldamento, il sistema elettro
nico di sicurezza commuterà in modalità Raf
freddamento: il motore resterà in funzione, ma
verrà disattivato il numero di giri costante. Do
po una fase di raffreddamento di circa 10-20
secondi, l’utensile sarà nuovamente pronto e
pienamente utilizzabile.
[1-6]
[1-7]
[1-8]
[1-9]
[1-10]
[1-11]
L'accessorio raffigurato o descritto può non
comparire nella fornitura standard.
Le illustrazioni indicate si trovano all’inizio del
le istruzioni per l’uso.
5.1 Elettronica Avviamento graduale
L’avviamento graduale, regolato elettronica
mente, fa sì che l’elettroutensile si avvii senza
strappi.
Regolatore del numero di giri [1-4]
Il numero di giri è regolabile in modo continuo,
nel relativo campo, mediante l’apposita rotella.
Ciò consente di adattare al meglio il numero di
giri in base al materiale. Attenersi anche alle
indicazioni riportate sugli utensili abrasivi.
Numero di giri costante
Un apposito sistema elettronico mantiene co
stante il numero di giri preselezionato per il
Impugnatura supplementare
Superfici d’impugnatura isolate (zona
in grigio)
Tasti di sblocco della batteria
Tasto capacità della batteria
Indicatore di capacità
Punti di appoggio
6 Messa in funzione
6.1 Trattenere l’elettroutensile correttamente
Trattenere l’elettroutensile con entrambe le
mani, sulle superfici di presa isolate [1-7]: una
mano sulla scatola motore, dietro all’interrut
tore, ed una sull’impugnatura supplementa
re [1-6].
6.2 Accensione/spegnimento
Accensione [2a]
► Spingere in avanti l’interruttore ON/
OFF [1-5]. Premendo simultaneamente sul
la parte anteriore dell’interruttore, l’inter
ruttore ON/OFF verrà bloccato.
L’interruttore ON/OFF [1-5] è bloccato e l’elet
troutensile è acceso.
Accostare l’utensile al materiale soltanto
quando si sia raggiunto il numero di giri di
funzionamento.
Regolazione del numero di giri
Il numero di giri è adattabile su 6 livelli ai requi
siti del pezzo in lavorazione.
► Posizionare il regolatore del numero di giri
[1-4] sul livello desiderato.
53
Page 54

Italiano
Spegnimento [2b]
► Sollevare l’elettroutensile dal materiale da
lavorare.
► Premere sul retro dell’interruttore ON/
OFF [1-5].
Il bloccaggio è allentato e l’elettroutensile è
spento.
AVVERTENZA
Pericolo di lesioni in caso di contraccolpi o
proiezione di parti
► Prima di deporre l’elettroutensile, attende
re che l’utensile abrasivo in rotazione si sia
completamente arrestato.
► Deporre l’elettroutensile sugli appositi pun
ti di appoggio [1-11].
7 Batteria
► Innesto della batteria [3a]
► Estrazione della batteria [3b]
7.1 Indicatore della capacità
Azionando il tasto [1-9], l'indicatore della capa
cità [1-10] mostra per ca. 2 secondi lo stato di
carica della batteria:
70‑100%
Grazie alla speciale concezione “VIBRASTOP”,
l’impugnatura supplementare riduce le oscilla
zioni.
► Avvitare l’impugnatura supplementare [1-6]
in base alla procedura di lavoro, lateral
mente sulla filettatura [1-3].
8.2 Montaggio dell’utensile abrasivo [4]
PRUDENZA
Pericolo di lesioni a causa dell’utensile affi
lato e ad alta temperatura
► Non utilizzare utensili accessori che vibri
no, oppure non più affilati o difettosi.
► Non utilizzare utensili abrasivi che, prima
del montaggio, siano stati esposti a forte
umidità o a temperature elevate.
► Indossare guanti protettivi.
AVVERTENZA
pericolo di lesioni in caso di montaggio erra
to dell’utensile abrasivo
► Aprire la staffa di presa [4-3] del dado au
toserrante soltanto in caso di sostituzione
dell’utensile abrasivo.
► Prima di montare l’utensile abrasivo, ac
certarsi che la flangia [4-4] sia innestata
sull’alberino.
40‑70%
15‑40%
< 15%
*
Raccomandazione: caricare la batteria pri
ma di continuare a utilizzarla.
Per maggiori informazioni sulla batteria e
sul caricabatterie, consultare i manuali di
istruzioni di entrambi.
*
8 Impostazioni
AVVERTENZA
Pericolo di lesioni
► Prima di lavorare con l'utensile elettrico
staccare la batteria.
8.1 Montaggio dell’impugnatura supplementare [1-6]
Utilizzare sempre l’impugnatura supple
mentare, per garantire una postura di la
voro sicura e riposante.
Fissare o allentare il dado di serraggio
esclusivamente a mano. La staffa di presa
non andrà in alcun caso utilizzata con at
trezzi per fissare o allentare.
Se non è più possibile svitare il dado ma
nualmente, lo si potrà svitare soltanto con
una chiave a foro frontale [5-1].
Se la staffa dell’impugnatura è allentata o
danneggiata, il dado di serraggio non potrà
più essere utilizzato in alcun caso.
Utilizzare il tipo di calotta protettiva previ
sto per l’applicazione del caso.
► Prelevare la batteria dall’elettroutensile.
► Aprire la staffa di presa [4-3] del dado auto
serrante.
► Svitare manualmente il dado autoserrante
[4-2].
►
Applicare l’utensile abrasivo sull’alberi
no e sulla flangia [4-4].
Accertarsi che il rialzo di centraggio della
flangia si inserisca esattamente nell’aper
tura del disco e che l’accoppiamento geo
metrico fra elettroutensile/alberino e flan
gia corrisponda.
54
Page 55

Italiano
Accertarsi che il diametro dell’alberino
elettroutensile corrisponda con il foro del
l’utensile abrasivo.
Gli utensili abrasivi a centro depresso
andranno montati in modo che la su
perficie di levigatura non sporga oltre
il bordo della calotta protettiva.
Prestare attenzione al senso di rotazione
prescritto per l’utensile abrasivo (freccia
sull’utensile abrasivo = freccia sulla scatola
utensile [4-1]).
► Applicare il dado autoserrante sull’utensile
abrasivo e sull’alberino.
►
►
►
► Verificare che l’utensile abrasivo sia fissato
► A scopo di prova, lasciar funzionare a vuoto
Lo smontaggio si svolgerà in sequenza inversa
[5a].
8.3 Montaggio delle spazzole metalliche [6]
► Prelevare l’impugnatura [6-1].
►
►
8.4 Posizionamento della calotta
La calotta protettiva è premontata. Semplice
mente ruotando, la posizione della calotta pro
tettiva si potrà adattare ai requisiti della fase di
lavorazione.
Spingere il blocco dell’alberino [4-5] sul
retro dell’utensile.
Fissare manualmente il dado autoser
rante.
Chiudere la staffa di presa del dado au
toserrante.
e correttamente inserito sull’elettroutensi
le.
i nuovi utensili abrasivi per circa un minuto.
Montare l’impugnatura con protezione
mani [6-2].
Montare in modo sicuro la spazzola me
tallica [6-3] sulla filettatura di attacco
[6-4].
Attenersi alle avvertenze accluse alla spaz
zola metallica.
protettiva/della calotta protettiva per
taglio [7]
La calotta protettiva per taglio, disponibile
come accessorio, è posizionabile nello
stesso modo.
8.5 Prelievo della calotta protettiva/della calotta protettiva per taglio [8]
PRUDENZA
Pericolo di lesioni in caso di scintille sprigio
nate in aria e di rottura dei dischi da taglio.
► Per eseguire il taglio alla mola, utilizzare
la calotta protettiva per taglio, disponibile
come accessorio: vedi capitolo 9.2
► Per smontare dall’elettroutensile un utensi
le abrasivo già montato: vedi capitolo 8.2 .
►
►
►
8.6 Montaggio della calotta protettiva/
Mantenere premuta la levetta di blocco
della calotta protettiva.
Superato il punto di pressione, ruotare la
calotta protettiva in avanti.
Prelevare la calotta protettiva dall’elet
troutensile.
calotta protettiva per taglio [9]
NOTA
Segni di usura sulla calotta protettiva per ta
glio.
► Prima dell’accensione, verificare che l’u
tensile abrasivo possa muoversi libera
mente. L’utensile abrasivo non dovrà fare
attrito sulla calotta protettiva per taglio.
Utilizzare il tipo di calotta protettiva previ
sto per l’applicazione del caso.
►
►
Per il montaggio dell’utensile abrasivo, vedi ca
pitolo 8.2 .
Introdurre la calotta protettiva in posi
zione anteriore. Durante tale fase, accertar
si che perni e scanalature corrispondano.
Ruotare calotta protettiva nella posizio
ne desiderata, sino a far scattare automati
camente in posizione la levetta di arresto.
►
►
►
Mantenere premuta la levetta di blocco
della calotta protettiva.
Regolare la calotta protettiva dell’elet
troutensile in modo da deviare lontano da
sé scintille e particelle di rettifica.
Rilasciare la levetta di blocco e ruotare
ulteriormente la calotta protettiva sino a
farla scattare in posizione.
55
Page 56

Italiano
9 Utilizzo dell’elettroutensile
AVVERTENZA
Pericolo di lesioni
► Condurre l’elettroutensile nel materiale
esclusivamente quando è acceso (in funzio
ne).
► Fissare il pezzo in modo che non possa
spostarsi durante la lavorazione.
► Mantenere le mani a distanza dall’utensile
abrasivo in rotazione.
AVVERTENZA
Pericolo di lesioni in caso di utensile abrasi
vo fragile
► Accertarsi che la data di scadenza dell’u
tensile abrasivo non sia stata superata.
AVVERTENZA
Pericolo di lesioni in caso di pezzo in lavora
zione non fermo
► Fissare in modo sicuro il pezzo in lavora
zione.
AVVERTENZA
Pericolo di lesioni in caso di lavori sopra te
sta
► In caso di lavori sopra testa, indossare
sempre occhiali protettivi.
► Indossare una maschera di protezione del
le vie respiratorie di livello P2.
Quando non lo si utilizza, deporre l’elet
troutensile sugli appositi punti di appoggio
[1-11].
► Per eseguire il trasporto, rimuovere l’uten
sile abrasivo dall’elettroutensile.
9.1 Levigatura
Per eseguire la levigatura, utilizzare sempre la
calotta protettiva in dotazione.
La calotta protettiva è premontata. Per lo
smontaggio della calotta protettiva, vedi capito
lo 8.5 .
9.2 Taglio alla mola
Per eseguire il taglio alla mola, utilizzare sem
pre la calotta protettiva per taglio TSHAGC 18-125, disponibile come accessorio.
La calotta protettiva per taglio andrà montata,
posizionata e prelevata come la calotta protetti
va: vedi capitoli
8.5 e 8.6 .
► Condurre sempre in rettilineo l’utensile
abrasivo nel pezzo in lavorazione.
Accertarsi che l’utensile abrasivo non si
pieghi e non subisca sollecitazioni oblique o
laterali.
► In caso di pezzi dalle pareti spesse, esegui
re un taglio con movimenti oscillatori, eser
citando una leggera pressione con l’elet
troutensile.
9.3 Utilizzo di spazzole metalliche
AVVERTENZA
Pericolo di lesioni oculari causate da proie
zione di parti/di fili
► Indossare occhiali protettivi.
Per le lavorazioni con spazzole metalliche, uti
lizzare sempre la protezione mani HS-AGC18
disponibile come accessorio, vedi capitolo
8.3 .
10 Segnali di avviso acustici
Se l’utensile si spegne a causa dei seguenti sta
ti di funzionamento, all’accensione verrà emes
so un segnale di avviso.
Batteria non accettata
– Introdurre il corretto modello di batteria.
Batteria scarica
– Sostituire la batteria.
– Ricaricare la batteria.
Batteria difettosa
– Sostituire la batteria.
– Verificare la funzionalità con il caricabatte
ria, a batteria raffreddata.
Batteria surriscaldata
– Lasciar raffreddare la batteria.
Elettroutensile surriscaldato
– Una volta raffreddato, l’elettroutensile si
potrà rimettere in funzione.
Elettroutensile difettoso
– Contattare un’officina autorizzata dell’Assi
stenza Clienti Festool, oppure un rivendito
re specializzato.
Elettroutensile bloccato
– Eliminare il bloccaggio.
Se l’elettroutensile si spegne a causa di un
bloccaggio, non verrà emesso alcun se
gnale di avviso.
11 Accessori
Utilizzare esclusivamente accessori originali
Festool, come descritto nella parte sull’utiliz
zo conforme. L’impiego di utensili accessori di
56
Page 57

EKAT
1
2
3
5
4
Italiano
inferiore qualità e di accessori di produttori ter
zi può aumentare il pericolo di lesioni e com
portare forti sbilanciamenti, che pregiudicano
la qualità del lavoro ed accelerano l’usura del
l’utensile.
I numeri d'ordine per accessori e utensili si tro
vano nel catalogo Festool o su Internet alla pa
gina "www.festool.it".
12 Cura e manutenzione
AVVERTENZA
Pericolo di lesioni e di folgorazione
► Prima di qualsiasi intervento di cura e ma
nutenzione, prelevare la batteria dall’elet
troutensile.
► Qualsiasi intervento di manutenzione e ri
parazione che richieda l’apertura dell’elet
troutensile andrà eseguito esclusivamente
da un’officina autorizzata dell’Assistenza
Clienti Festool.
Assistenza Clienti e riparazio
ne esclusivamente a cura del
costruttore o di officine di assi
stenza autorizzate. Per l’indiriz
zo più vicino alla vostra zona:
www.festool.it/service
Tenere puliti i contatti di collegamento sull'e
lettroutensile, sul caricabatteria e sulle batte
rie.
13 Ambiente
Non gettare l’utensile fra i rifiuti dome
stici! Avviare utensili, accessori ed im
ballaggi ad un riciclo rispettoso dell’am
biente. Attenersi alle disposizioni di legge na
zionali in vigore.
Solo UE: nel rispetto della direttiva europea in
materia di apparecchiature elettriche ed elet
troniche usate e delle rispettive leggi nazionali
derivatene, gli elettroutensili devono essere
raccolti separatamente e introdotti nell'apposi
to ciclo di smaltimento e recupero a tutela del
l'ambiente.
Informazioni su REACh: www.festool.com/
reach
14 Indicazioni generali
14.1
Bluetooth
Il marchio denominativo Bluetooth® e i loghi
sono marchi registrati di Bluetooth SIG, Inc. e
vengono utilizzati da TTS Tooltechnic Systems
AG & Co. KG e quindi da Festool su licenza.
®
Utilizzare esclusivamente ri
cambi originali Festool. Per il
codice prodotto: www.festool.it/
service
Per garantire la circolazione d'aria è necessario
tenere sempre sgombre e pulite le aperture per
l'aria di raffreddamento praticate nell'alloggia
mento del motore.
Qualora si lavorino materiali minerali (ad es.
gesso ecc.), nella scatola dell’elettroutensile e
sull’interruttore ON/OFF potrà depositarsi pol
vere, che indurisce a contatto con l’umidità at
mosferica: ciò può compromettere il funziona
mento del meccanismo di commutazione e far
surriscaldare l’elettroutensile.
Qualora si lavori metallo, all’interno dell’elet
troutensile potrà depositarsi polvere condutti
va, con rischio di cortocircuito.
► Dopo ogni lavorazione, soffiare aria com
pressa asciutta e priva di olio all’interno
dell’elettroutensile attraverso le aperture
d’aerazione e sull’interruttore ON/OFF.
Pulire gli utensili abrasivi dopo l’utilizzo.
57
Page 58

Nederlands
Inhoudsopgave
1 Symbolen...................................................58
2 Veiligheidsvoorschriften........................... 58
3 Gebruik volgens de voorschriften.............62
4 Technische gegevens................................63
5 Apparaatelementen.................................. 63
6 Ingebruikneming.......................................63
7 Accupack................................................... 64
8 Instellingen................................................64
9 Werken met het elektrische gereed
schap......................................................... 66
10 Akoestische waarschuwingssignalen.......66
11 Accessoires............................................... 67
12 Onderhoud en verzorging..........................67
13 Milieu.........................................................67
14 Algemene aanwijzingen............................ 67
1 Symbolen
Waarschuwing voor algemeen gevaar
Waarschuwing voor elektrische schok
CE-markering: Bevestigt de conformi
teit van het elektrische gereedschap
met de richtlijnen van de Europese
Unie.
2 Veiligheidsvoorschriften
2.1 Algemene veiligheidsvoorschriften WAARSCHUWING! Lees alle veiligheids
voorschriften en aanwijzingen. Worden
de veiligheidsinstructies en aanwijzingen niet in
acht genomen, dan kan dit een elektrische
schok, brand en/of ernstig letsel tot gevolg
hebben.
Bewaar alle veiligheidsinstructies en aanwij
zingen om ze later te kunnen raadplegen.
Het begrip “elektrisch gereedschap” dat in de
veiligheidsinstructies gebruikt wordt, heeft be
trekking op elektrisch gereedschap met net
voeding (met netsnoer) of elektrisch gereed
schap met accuvoeding (zonder netsnoer).
Neem de bedieningshandleiding van het op
laadapparaat en het accupack in acht.
Lees de gebruiksaanwijzing en veilig
heidsvoorschriften!
Draag gehoorbescherming!
Draag veiligheidshandschoenen!
Draag een zuurstofmasker!
Draag een veiligheidsbril!
Stevige schoenen dragen!
Niet met het huisvuil meegeven.
Tip, aanwijzing
Handelingsinstructie
Accupack inbrengen
Accupack uitnemen
2.2 Machinespecifieke
veiligheidsvoorschriften
Gemeenschappelijke veiligheidsinstructies voor het schuren, werken met draadborstels en doorslijpen
– Dit elektrische gereedschap dient te wor
den gebruikt als slijpmachine, draadbor
stelmachine of doorslijpmachine. Neem
alle veiligheidsinstructies, aanwijzingen,
afbeeldingen en gegevens die u bij uw ap
paraat ontvangt, in acht. Als u de volgende
aanwijzingen niet in acht neemt, dan kan
dit leiden tot een elektrische schok, brand
en/of ernstig letsel.
– Dit elektrische gereedschap is niet ge
schikt om met schuurpapier te schuren en
te polijsten. Gebruik waarvoor het elektri
sche gereedschap niet bestemd is, kan ge
vaar en letsel veroorzaken.
– Gebruik geen accessoires die niet door de
fabrikant speciaal voor dit elektrische ge
reedschap zijn geadviseerd en niet hier
voor bedoeld zijn. Dat u de accessoires aan
uw elektrische gereedschap kunt bevesti
gen, is nog geen garantie voor een veilig
gebruik.
– Het toelaatbare toerental van het inzetge
reedschap dient minstens zo hoog te zijn
als het maximale toerental dat op het
elektrische gereedschap is aangegeven.
Accessoires die sneller dan toegestaan
58
Page 59

Nederlands
draaien, kunnen breken en in het rond vlie
gen.
– Buitendiameter en dikte van het inzetge
reedschap moeten overeenkomen met de
maatvoering van uw elektrisch gereed
schap. Inzet gereedschappen met verkeer
de afmetingen kunnen niet voldoende afge
schermd of gecontroleerd worden.
– Inzetgereedschap met schroefdraad moet
precies op het schroefdraad van de
schuurspil passen. Bij inzetgereedschap
dat via een flens wordt gemonteerd, moet
de gatdiameter van het inzetgereedschap
op de opnamediameter van de flens pas
sen. Inzetgereedschap dat niet precies op
het elektrische gereedschap kan worden
bevestigd, draait ongelijkmatig, trilt zeer
sterk en kan tot verlies van controle leiden.
– Gebruik geen beschadigd inzetgereed
schap. Controleer inzetgereedschap, zoals
schuurschijven, voor het gebruik altijd op
afsplinteringen en scheuren, steunschij
ven op scheuren, (sterke) slijtage en
draadborstels op losse of gebroken dra
den. Wanneer het elektrische gereed
schap of het inzetgereedschap valt, con
troleer dan of het beschadigd is of ga over
op onbeschadigd inzetgereedschap. Wan
neer u het inzetgereedschap heeft gecon
troleerd en ingebracht, zorg er dan voor
dat u en eventuele andere personen in de
buurt buiten het bereik van het roterende
inzetgereedschap blijven en laat het appa
raat 1 minuut lang draaien op het hoogste
toerental. In deze testperiode breekt be
schadigd inzetgereedschap meestal.
– Draag een persoonlijke veiligheidsuitrus
ting. Gebruik afhankelijk van de toepas
sing gezichtsbescherming, oogbescher
ming of veiligheidsbril. Voor zover pas
send, draag een stofmasker, gehoorbe
scherming, veiligheidshandschoenen of
een speciaal schort dat kleine schuur- of
materiaaldeeltjes tegenhoudt.De ogen
moeten tegen rondvliegende deeltjes be
schermd worden die bij diverse toepassin
gen ontstaan. Mond- of stofmasker moeten
stof filteren dat bij de toepassing ontstaat.
Als u lang aan luid lawaai wordt blootge
steld, kan dit tot gehoorverlies leiden.
– Let bij andere personen op een veilige af
stand tot uw werkgebied. Iedereen die
zich in het werkgebied bevindt, moet een
persoonlijke veiligheidsuitrusting dragen.
Fragmenten van het werkstuk of gebroken
inzetgereedschappen kunnen wegvliegen
en letsel ook buiten het directe werkgebied
veroorzaken.
– Houd het elektrische gereedschap alleen
aan de geïsoleerde greepvlakken vast als
u werkzaamheden uitvoert waarbij het in
zetgereedschap verborgen stroomleidin
gen kan raken. Het contact met een span
ningvoerende leiding kan ook metalen ap
paraatonderdelen onder spanning zetten
en tot een elektrische schok leiden.
– Leg het elektrische gereedschap nooit
weg voordat het volledig tot stilstand ge
komen is. Het draaiende inzetgereedschap
kan in contact komen met het weglegvlak,
waardoor u de controle over het elektri
sche gereedschap kunt verliezen.
– Laat het elektrische gereedschap niet lo
pen terwijl u het draagt. Uw kleding kan
door toevallig contract met het draaiende
gereedschap gegrepen worden, en het in
zetgereedschap kan zich in uw lichaam bo
ren.
– Reinig regelmatig de ventilatiesleuven
van uw elektrisch gereedschap. De motor
ventilator trekt stof in de behuizing, en een
grote verzameling van metaalstof kan elek
trische gevaren veroorzaken.
– Gebruik het elektrische gereedschap niet
in de buurt van brandbare materialen.
Door vonken kunnen deze materialen in
brand raken.
– Gebruik geen inzetgereedschappen waar
voor vloeibare koelmiddelen nodig zijn.
Het gebruik van water of andere vloeibare
koelmiddelen kan tot een elektrische schok
leiden.
Terugslag en bijbehorende veiligheidsinstruc
ties
Terugslag is een abrupte reactie als gevolg van
een klemmende of geblokkeerd draaiend inzet
gereedschap zoals schuurschijf, steunschijf,
draadborstel, etc. Vastklemmen of blokkeren
leidt tot een abrupte stop van het draaiende in
zetgereedschap. Daardoor wordt een ongecon
troleerd elektrisch gereedschap tegen de
draairichting van het inzetgereedschap op de
blokkeerplaats versneld.
As bijv. een schuurschijf in het werkstuk klemt
of blokkeert, kan de rand van de schuurschijf
die in het werkstuk induikt, zich vasthaken
waardoor de schuurschijf uitbreekt of een te
rugslag veroorzaakt. De schuurschijf beweegt
zich dan op de bedienende persoon toe of van
hem weg, afhankelijk van de draairichting van
59
Page 60

Nederlands
de schijf op de blokkeerpositie. Hierbij kunnen
schuurschijven ook breken.
Een terugslag is het gevolg van een onjuist of
verkeerd gebruik van het elektrische gereed
schap. Door passende voorzorgsmaatregelen
die hierna worden beschreven, kan dit echter
worden voorkomen.
– Houd het elektrische gereedschap goed
vast en breng uw lichaam en armen in zo'n
positie dat u de terugslagkrachten kunt
opvangen. Gebruik altijd de extra hand
greep, indien aanwezig, om een zo groot
mogelijke controle over de terugslag
krachten of reactiemomenten op hoge
toeren te hebben. De bedienende persoon
kan door passende veiligheidsmaatregelen
de terugslag- en reactiekrachten beheer
sen.
– Kom met uw hand nooit in de nabijheid van
draaiend inzetgereedschap. Het inzetge
reedschap kan bij een terugslag over uw
hand bewegen.
– Mijd met uw lichaam het bereik waarin het
elektrische gereedschap bij een terugslag
wordt bewogen. De terugslag drijft het
elektrische gereedschap in de richting te
gengesteld aan de beweging van de
schuurschijf op de blokkeerpositie.
– Werk bijzonder voorzichtig nabij hoeken,
scherpe randen, etc. Voorkom dat inzetge
reedschappen van het werkstuk terug
kaatsen en zich vastklemmen. Het rote
rende inzetgereedschap heeft de neiging
om bij hoeken, scherpe randen of als het
afkaatst, zich vast te klemmen. Dit veroor
zaakt controleverlies of terugslag.
– Gebruik geen ketting- of getand zaagblad.
Dergelijk inzetgereedschappen veroorza
ken vaak een terugslag of het verlies van
de controle over het elektrische gereed
schap.
Bijzondere veiligheidsinstructies voor het schuren en doorslijpen
– Gebruik uitsluitend de voor uw elektrische
gereedschap toegestane slijpschijven en
de voor deze schijven bedoelde bescherm
kap. Slijpschijven die niet voor het elektri
sche gereedschap bedoeld zijn, kunnen niet
voldoende afgeschermd worden en zijn on
veilig.
– Haaks gebogen schuurschijven moeten zo
gemonteerd zijn dat hun slijpvlak niet over
het vlak van de beschermkaprand uit
steekt. Een niet-correct gemonteerde
schuurschijf die over het vlak van de be
schermkaprand uitsteekt, kan niet voldoen
de afgeschermd worden.
– De beschermkap moet stevig op het elek
trische gereedschap aangebracht zijn en
voor optimale veiligheid zo ingesteld zijn
dat het kleinst mogelijke deel van de slijp
schijf open naar de bedienende persoon
wijst. De beschermkap helpt om de bedie
nende persoon te beschermen tegen frag
menten, toevallig contact met de slijpschijf
en vonken die brandplekken op kleding
kunnen veroorzaken.
– Slijpschijven mogen alleen voor de aanbe
volen toepassingsmogelijkheden worden
gebruikt. Bijvoorbeeld: Slijp nooit met het
zijvlak van een doorslijpschijf. Doorslijp
schijven zijn voor de materiaalafname met
de rand van de schijf bedoeld. Door zijde
lingse krachtontwikkeling op deze slijp
schijven kunnen ze breken.
– Gebruik altijd onbeschadigde spanflenzen
in de juiste grootte en vorm voor de geko
zen schuurschijf. Geschikte flenzen steu
nen de schuurschijf en verminderen zo het
gevaar van een schuurschijfbreuk. Flenzen
voor doorslijpschijven zijn anders dan die
voor schuurschijven.
– Gebruik geen versleten schuurschijven
van grotere elektrische gereedschappen.
Schuurschijven voor grotere elektrische
gereedschappen zijn niet ontworpen voor
de hogere toerentallen van kleinere elek
trische gereedschappen kunnen breken.
Verdere bijzondere veiligheidsinstructies voor het doorslijpen
– Voorkom het blokkeren van de doorslijp
schijf of een te hoge aandrukkracht. Voer
geen overmatig diepe sneden uit. Een
overbelasting van de doorslijpschijf ver
groot de slijtage en de gevoeligheid voor
schuin wegdraaien of blokkeren en daar
door de mogelijkheid van een terugslag of
breuk van de slijpschijf.
– Blijf weg van het gebied voor en achter de
ronddraaiende doorslijpschijf. Wanneer u
de doorslijpschijf in het werkstuk van u af
beweegt, kan bij een terugslag het elektri
sche gereedschap met draaiende schijf di
rect naar u toe worden geslingerd.
– Als de doorslijpschijf zich vastklemt of u
onderbreekt het werk, schakel de machi
ne dan uit en houd deze rustig tot de schijf
tot stilstand is gekomen. Probeer nooit
een nog lopende doorslijpschijf uit de
60
Page 61

Nederlands
slijpsnede te trekken, anders kan er een
terugslag plaatsvinden. Bepaal de oorzaak
voor het vastklemmen en verhelp het pro
bleem.
– Schakel het elektrische gereedschap niet
opnieuw in zolang het zich in het werkstuk
bevindt. Laat de doorslijpschijf eerst zijn
volledige toerental bereiken voordat u
voorzichtig verder gaat met het doorslij
pen. Anders kan de schijf beklemd raken,
uit het werkstuk springen of een terugslag
veroorzaken.
– Ondersteun platen of grote werkstukken
om het risico van een terugslag door een
ingeklemde doorslijpschijf te verminde
ren. Grote werkstukken kunnen onder hun
eigen gewicht doorbuigen. Het werkstuk
dient aan beide kanten van de schijf onder
steund te worden, zowel bij de doorslijp
snede als aan de rand.
– U dient bijzonder voorzichtig te zijn bij
„gleufsneden“ in bestaande wanden of an
dere plaatsen waar geen waarneming mo
gelijk is. De invallende doorslijpschijf kan
bij het snijden in gas- of waterleidingen,
elektrische leidingen of andere objecten
een terugslag veroorzaken.
vrij voor de bediening van het elektrische
gereedschap.
– Werk niet op ladders.
– Slijp niet door over metalen voorwerpen,
spijkers of schroeven.
– Gebruik geschikte zoekapparaten om ver
borgen toevoerleidingen op te sporen of
raadpleeg het plaatselijke nutsbedrijf.
Aontact van inzetgereedschap met een
spanningvoerende leiding kan brand ver
oorzaken of tot een elektrische schok lei
den. Beschadiging van een gasleiding kan
een explosie veroorzaken. Het penetreren
van een waterleiding veroorzaakt materiële
schade.
– Tijdens het werken kunnen schadelijke/
giftige stoffen ontstaan (bijv. bij loodhou
dende verf, enkele houtsoorten en me
taal). Asbesthoudend materiaal mag al
leen door geschoolde personen worden
bewerkt. Voor de gebruiker van de machi
ne of voor personen die zich in de buurt van
de machine bevinden kan het aanraken of
inademen van deze stoffen gevaarlijk zijn.
Neem de veiligheidsvoorschriften in acht
die in uw land van toepassing zijn.
Bijzondere veiligheidsinstructies bij werk
zaamheden met draadborstels
– Houd er rekening mee dat de draadborstel
ook tijdens normaal gebruik draadstukken
verliest. Overbelast de draden niet door te
hoge aandrukkracht. Wegvliegende draad
stukken kunnen heel gemakkelijk door
dunne kleding en/of de huid binnendringen.
– Als een beschermkap aanbevolen wordt,
verhindert u dat de afschermkap en de
draadborstel elkaar kunnen raken. Bord-
en komborstels kunnen door aandruk
kracht en centrifugale krachten hun diame
ter vergroten.
2.3 Overige veiligheidsvoorschriften – Gebruik het elektrische gereedschap niet
in de regen of in een vochtige omgeving.
Vocht in het elektrische gereedschap kan
tot kortsluiting en brand leiden.
– Geleid het elektrische gereedschap alleen
in ingeschakelde (lopende) toestand in het
materiaal.
– Om veiligheidsredenen moet het werkstuk
in een bankschroef of andere inspanvoor
ziening ingespannen worden. Door een in
gespannen werkstuk heeft u beide handen
Draag ter bescherming van uw ge
zondheid een P2-stofmasker.
– Na bewerking van minerale materialen
(bijv. gips, …): blaas de binnenruimte van
het elektrische gereedschap door de ven
tilatieopeningen en het schakelelement
met droge en olievrije perslucht uit. An
ders kan zich stof in de behuizing van het
elektrische gereedschap en op de aan-/uit-
schakelaar afzetten en in verbinding met
luchtvochtigheid uitharden. Dat kan tot na
delige beïnvloeding van het schakelmecha
nisme leiden, en het elektrische gereed
schap kan oververhit raken.
– Na bewerking van metaal: Blaas de bin
nenruimte van het elektrische gereed
schap door de ventilatiesleuven met droge
en olievrije perslucht uit. Anders kan zich
geleidend stof in het inwendige van het
elektrische gereedschap afzetten. Dit kan
tot kortsluiting leiden.
– Geen netvoeding of accupacks van andere
leveranciers voor het gebruik van het ac
cugereedschap toepassen. Geen oplaad
apparaten van andere leveranciers voor
het laden van de accupacks gebruiken. Het
gebruik van accessoires die niet door de fa
brikant worden voorgeschreven, kan tot
61
Page 62

Nederlands
een elektrische schok en/of ernstig letsel
leiden.
2.4 Veiligheidsinstructies slijpgereedschappen
– Slijpgereedschappen zijn gevoelig voor
breuk, daarom is een uiterst voorzichtige
omgang met slijpgereedschappen noodza
kelijk! Het gebruik van beschadigde, ver
keerd opgespannen of ingezette slijpge
reedschappen is gevaarlijk en kan tot ern
stige verwondingen leiden.
– De schuurmachines tijdens de opslag niet
blootgesteld worden aan mechanische be
schadigingen en schadelijke milieufacto
ren.
– Slijpgereedschappen zorgvuldig behande
len en transporteren.
– Gegevens op het etiket of de schuurmachi
ne en gebruiksbeperkingen, veiligheidsin
structies of andere instructies in acht ne
men. Bij onduidelijkheden over de keuze
van de slijpgereedschappen moet de ge
bruiker vóór het gebruik bij de fabrikant in
formatie opvragen.
– De montage van slijpgereedschappen moet
conform hoofdstuk 8.2 plaatsvinden.
– De montage van slijpgereedschappen mag
alleen door deskundige personen gebeu
ren.
Doorslijpen
ah ≤ 2,5 m/s
K = 2 m/s
De aangegeven emissiewaarden (trilling, ge
luid)
– zijn geschikt om machines te vergelijken,
– om tijdens het gebruik een voorlopige in
schatting van de trillings- en geluidsbelas
ting te maken
– en gelden voor de belangrijkste toepassin
gen van het elektrische gereedschap.
Andere toepassingen zoals draadborstels kun
nen tot andere trillingsemissiewaarden leiden.
VOORZICHTIG
Emissiewaarden kunnen van de aangegeven
waarden afwijken. Dit hangt af van het ge
bruik van het gereedschap en de soort van
het bewerkte werkstuk.
► De werkelijke belasting tijdens de gehele
bedrijfscyclus moet beoordeeld worden.
► Afhankelijk van de werkelijke belasting
moeten passende veiligheidsmaatregelen
ter bescherming van de bediener worden
vastgelegd.
3 Gebruik volgens de
2
2
2.5 Emissiewaarden
De volgens EN 60745 bepaalde waarden bedra
gen gewoonlijk:
Geluidsdrukniveau LPA = 86 dB(A)
Geluidsvermogensniveau LWA = 97 dB(A)
Onzekerheid K = 3 dB
VOORZICHTIG
Geluid dat bij het werk optreedt
Beschadiging van het gehoor
► Gehoorbescherming gebruiken.
Trillingsemissiewaarde ah (vectorsom van drie
richtingen) en onzekerheid K bepaald volgens
EN 60745:
Slijpen
ah = 5 m/s
K = 2 m/s
voorschriften
Het elektrische gereedschap is bedoeld voor
het doorslijpen, licht slijpen, werkzaamheden
met draadborstels en ontbramen van metalen
en steenmateriaal zonder gebruik van vloeibare
koel- en smeermiddelen.
Afhankelijk van de toepassing de daarvoor be
doelde beschermkap gebruiken.
Er mogen alleen gebonden doorslijp- en
schuurschijven volgens EN 12413, diamantslijpschijven volgens EN 13236 en draadbor
stels volgens EN 1083 worden gebruikt.
Dit elektrische gereedschap niet gebruiken
voor polijsten, het schuren van oppervlakken
met diamantschijven en voor toepassingen
met diamant- en harde keramische schijven.
Freeswieltjes, hardmetaal- en verspanende
slijpgereedschappen (met geometrisch bepaal
2
de snijkant) zijn van gebruik uitgesloten.
Het elektrische gereedschap is bedoeld voor
2
gebruik met Festool-accupacks van de serie BP
uit dezelfde spanningsklasse.
62
Page 63

Nederlands
De gebruiker is aansprakelijk bij gebruik
dat niet volgens de voorschriften plaats
vindt.
4 Technische gegevens
Haakse accuslijper AGC 18
Motorspanning 18 V DC
Toerental (onbelast)
Toerentalstanden 1
Omtreksnelheid slijpge
4500 - 8500 min
4500 min
2
3
4
5
6
5300 min
6100 min
6900 min
7700 min
8500 min
-1
-1
-1
-1
-1
-1
-1
80 m/s
reedschap
Slijpspilschroefdraad M 14
Slijpgereedschap-Ø 125 mm
Slijpgereedschapdikte max. 6,0 mm
min. 1,0 mm
Gewicht conform EPTA-
2,7 kg
procedure 01:2014
5 Apparaatelementen
[1-1]
[1-2]
[1-3]
[1-4]
[1-5]
[1-6]
[1-7]
[1-8]
[1-9]
[1-10]
[1-11]
Afgebeelde of beschreven accessoires behoren
voor een deel niet tot de leveringsomvang.
Beschermkap
Spindelvergrendeling
Schroefdraad voor extra handgreep
Toerentalregeling
Aan-/uit-schakelaar
Extra handgreep
Geïsoleerde greepvlakken (grijs gear
ceerd gebied)
Toetsen voor het losmaken van het
accupack
Toets capaciteitsindicatie op het ac
cupack
Vermogensindicatie
Steunpunten
De vermelde afbeeldingen staan in het begin
van de gebruiksaanwijzing.
5.1 Elektronica Zachte aanloop
De elektronisch geregelde zachte aanloop zorgt
ervoor dat het elektrische gereedschap stootvrij
aanloopt.
Toerentalregelaar [1-4]
Het toerental kan met de stelknop traploos in
het toerentalbereik worden ingesteld. Hierdoor
kunt u de snelheid optimaal aan het betreffende
materiaal aanpassen. Neem hiervoor ook de
gegevens op het slijpgereedschap in acht.
Constant toerental
Het vooraf ingestelde motortoerental wordt
elektronisch constant gehouden. Hierdoor
wordt ook bij belasting een gelijkblijvende snel
heid bereikt.
Terugstootbeveiliging
Bij abrupte toerentalvermindering, bijv. door
blokkering in de doorslijpsnede, wordt de motor
direct uitgeschakeld. Voor de heringebruikne
ming moet het elektrische gereedschap eerst
uitgeschakeld en vervolgens ingeschakeld wor
den.
Herstartbeveiliging
De ingebouwde herstartbeveiliging voorkomt
dat het elektrische gereedschap bij continuwer
king na een spanningsonderbreking weer auto
matisch start. Voor de heringebruikneming
moet het elektrische gereedschap eerst uitge
schakeld en vervolgens ingeschakeld worden.
Oververhittingsbeveiliging
Bij oververhitting schakelt de beveiligingselek
tronica over op de koelmodus. De motor loopt
verder, en het constante toerental wordt ge
deactiveerd. Na een afkoeltijd van ca. 10 -20 se
conden is de machine weer bedrijfsklaar en vol
ledig belastbaar.
6 Ingebruikneming
6.1 Elektrisch gereedschap correct vasthouden
Het elektrische gereedschap met twee handen
aan de geïsoleerde greepvlakken [1-7] vast
houden: één hand aan de motorbehuizing ach
ter de schakelaar en één hand aan de extra
handgreep [1-6].
63
Page 64

Nederlands
6.2 In-/Uitschakelen Inschakelen [2a]
► Aan-/uit-schakelaar [1-5] naar voren schui
ven. Door tegelijk op het voorste schakel
aardeel te drukken, wordt de aan-/ uitschakelaar vergrendeld.
Aan-/uit-schakelaar [1-5] is vergrendeld en het
elektrische gereedschap is ingeschakeld.
Het apparaat pas op het materiaal aan
brengen, wanneer het bedrijfstoerental is
bereikt.
Toerental instellen
Het toerental kan in 6 standen aan de eisen van
het werkstuk worden aangepast.
► Toerentalregelaar [1-4] op gewenste stand
zetten.
Uitschakelen [2b]
► Elektrisch gereedschap van het te bewer
ken materiaal afnemen.
► Op het achterste deel van de aan-/uit-scha
kelaar [1-5] drukken.
Vergrendeling is los en het elektrische gereed
schap is uitgeschakeld.
WAARSCHUWING
< 15%
*
Advies: Laad het accupack op alvorens de
machine verder te gebruiken.
Meer informatie over accupack en oplaad
apparaat vindt u in de bedieningshandlei
dingen van accupack en oplaadapparaat.
*
8 Instellingen
WAARSCHUWING
Gevaar voor letsel
► Vóór alle werkzaamheden aan het elektri
sche gereedschap het accupack van het
elektrische gereedschap verwijderen.
8.1 Extra handgreep[1-6] monteren
Altijd de extra handgreep gebruiken om
een veilige en ontspannen werkhouding te
garanderen.
Met behulp van de speciale constructie „VI
BRASTOP“ worden de trillingen door de extra
handgreep verminderd.
► Extra handgreep [1-6] afhankelijk van de
werkwijze zijdelings op de schroefdraad
[1-3] indraaien.
Gevaar voor letsel door terugslag, wegvlie
gende delen
► Wachten tot het draaiende elektrische ge
reedschap geheel tot stilstand is gekomen
alvorens het weg te leggen.
► Het elektrische gereedschap op de steun
punten [1-11] wegleggen.
7 Accupack
► Accupack inbrengen [3a]
► Accupack verwijderen [3b]
7.1 Vermogensindicatie De capaciteitsindicatie [1-10] geeft als de toets
[1-9] wordt ingedrukt de laadtoestand van het
accupack ca. 2 sec. lang aan:
70‑100%
40‑70%
15‑40%
8.2 Slijpgereedschap monteren [4]
VOORZICHTIG
Letselgevaar door heet en scherp gereed
schap
► Geen trillende, botte en defecte slijp ge
reedschappen gebruiken.
► Geen slijpgereedschappen gebruiken die
vóór de montage aan vochtigheid, natheid
of te hoge temperaturen blootgesteld wa
ren.
► Veiligheidshandschoenen dragen.
WAARSCHUWING
Letselgevaar door foutief gemonteerd slijp
gereedschap
► De greepbeugel [4-3] van de snelspanmoer
alleen bij vervanging van het slijpgereed
schap uitklappen.
► Erop letten dat vóór de montage van het
slijpgereedschap de flens[4-4] op de spil is
gestoken.
64
Page 65

Nederlands
Draai spanmoer alleen met de hand vastof losmaken. De greepbeugel mag in geen
geval door middel van gereedschappen
voor het vast- of losdraaien worden ge
bruikt.
Als de moer niet meer met de hand kan
worden losgedraaid, mag deze alleen met
een nokkensleutel [5-1] worden losge
draaid.
Als de greepbeugel loszit of is beschadigd,
mag de spanmoer in geen geval meer wor
den gebruikt.
Afhankelijk van de toepassing de daarvoor
bedoelde beschermkap gebruiken.
► Het accupack van het elektrische gereed
schap afnemen.
► Greepbeugel [4-3] van de snelspanmoer
openen.
► Snelspanmoer [4-2] met de hand afschroe
ven.
►
Slijpgereedschap op spil en flens [4-4]
plaatsen.
Erop letten dat de centreerinspringing van
de flens precies in de schijfopening past en
de koppeling tussen elektrisch gereed
schap/spil en flens overeenstemt.
Erop letten dat de spil van het elektrische
gereedschap in de diameter met het boor
gat van het slijpgereedschap overeenstemt.
8.3 Draadborstels monteren [6]
► Handgreep [6-1] afnemen.
►
Handgreep met handbescherming [6-2]
monteren.
►
Draadborstel [6-3] stevig op de opname
schroefdraad [6-4] monteren.
De met de draadborstel meegeleverde in
structies in acht nemen.
8.4 Beschermkap/doorslijpbeschermkap positioneren [7]
De beschermkap is voorgemonteerd. Door een
voudige draaiing kan de positie van de be
schermkap aan de eisen van het werkproces
aangepast worden.
►
Vergrendelingshendel van de bescherm
kap ingedrukt houden.
►
De beschermkap van het elektrische ge
reedschap zo instellen dat vonken en slijp
deeltjes van het lichaam afgewend worden.
►
Vergrendelingshendel loslaten en be
schermkap verder draaien tot deze vast
klikt.
De als accessoire verkrijgbare doorslijp
beschermkap kan op dezelfde manier ge
positioneerd worden.
8.5 Beschermkap/doorslijpbeschermkap afnemen [8]
Haaks gebogen slijpgereedschappen
moeten zo gemonteerd zijn dat hun
slijpvlak niet over het vlak van de be
schermkaprand uitsteekt.
Op de voorgeschreven draairichting van het
slijpgereedschap (pijl op het slijpgereed
schap = pijl op de behuizing [4-1]) letten.
► Snelspanmoer op slijpgereedschap en spil
plaatsen.
►
Spilvergrendeling [4-5] op de achterzij
de van het apparaat drukken.
►
►
Snelspanmoer met de hand vastdraaien.
Greepbeugel van de snelspanmoer slui
ten.
► Bevestiging en zitting van het slijpgereed
schap op het elektrische gereedschap con
troleren.
► Nieuwe slijpgereedschappen ongeveer 1
minuut zonder belasting laten proefdraaien.
De demontage vindt plaats in omgekeerde volg
orde [5a].
VOORZICHTIG
Letselgevaar door vonkenregen en brekende
doorslijpschijven.
► Voor het doorslijpen de als accessoire ver
krijgbare doorslijpbeschermkap gebruiken:
zie hoofdstuk 9.2
► Reeds gemonteerd slijpgereedschap van
het elektrische gereedschap demonteren:
zie hoofdstuk 8.2 .
►
►
►
Vergrendelingshendel van de bescherm
kap ingedrukt houden.
Beschermkap na overbrugging van het
drukpunt naar voren draaien.
De beschermkap van het elektrische ge
reedschap afnemen.
65
Page 66

Nederlands
8.6 Beschermkap/doorslijpbeschermkap monteren [9]
LET OP
Slijtagesporen op de doorslijpbeschermkap.
► Vóór het inschakelen controleren of het
slijpgereedschap zich vrij kan bewegen.
Het slijpgereedschap mag niet tegen de
doorslijpbeschermkap schuren.
Afhankelijk van de toepassing de daarvoor
bedoelde beschermkap gebruiken.
►
►
Voor de montage van het slijpgereedschap, zie
hoofdstuk 8.2 .
De beschermkap in de bovenste positie
zetten. Erop letten dat de pen- en groefpo
sitie overeenstemmen.
Beschermkap in gewenste positie draai
en tot de vergrendelingshendel vanzelf
vastklikt.
9 Werken met het elektrische
gereedschap
WAARSCHUWING
Gevaar voor letsel
► Het elektrische gereedschap alleen in in
geschakelde (lopende) toestand in het ma
teriaal geleiden.
► Werkstuk zo bevestigen, dat het tijdens de
bewerking niet kan bewegen.
► De handen weghouden van draaiend slijp
gereedschap.
Het elektrische gereedschap kan als het
niet wordt gebruikt op de steunpunten
[1-11] weggelegd worden.
► De slijpschijf vóór het transport uit het elek
trische gereedschap verwijderen.
9.1 Slijpen
Voor het slijpen altijd de meegeleverde be
schermkap gebruiken.
De beschermkap is voorgemonteerd. Voor de
demontage van de beschermkap, zie hoofdstuk
8.5 .
9.2 Doorslijpen
Voor het doorslijpen altijd de als accessoire
verkrijgbare doorslijpbeschermkap TSHAGC 18-125 gebruiken.
De doorslijpbeschermkap wordt zoals de be
schermkap gemonteerd, geplaatst en afgeno
men, zie hoofdstuk 8.5 en 8.6 .
► Het slijpgereedschap steeds recht door het
werkstuk leiden.
Erop letten dat het slijpgereedschap niet
schuin wegdraait en schuin of zijdelings be
last wordt.
► Bij dikke werkstukken een doorslijpsnede
door oscillerende bewegingen en onder
lichte druk van het elektrische gereedschap
uitvoeren.
9.3 Werken met draadborstels
WAARSCHUWING
Letselgevaar aan ogen door wegvliegende
delen/draden
► Veiligheidsbril dragen.
WAARSCHUWING
Letselgevaar door broos slijpgereedschap
► Erop letten dat de vervaldatum van het
slijpgereedschap niet overschreden is.
WAARSCHUWING
Letselgevaar door verschuivend werkstuk
► Werkstuk zo bevestigen, dat het tijdens de
bewerking niet kan bewegen.
WAARSCHUWING
Letselgevaar door bovenhands werken
► Bij bovenhands werken altijd een veilig
heidsbril dragen.
► P2-stofmasker dragen.
66
Voor het werken met draadborstels altijd de als
accessoire verkrijgbare handbescherming HSAGC18 gebruiken, zie hoofdstuk
8.3 .
10 Akoestische
waarschuwingssignalen
Als het elektrische gereedschap als gevolg van
volgende bedrijfstoestanden uitschakelt, klinkt
bij het inschakelen een waarschuwingssignaal.
Accupack niet geaccepteerd
– Juiste accupackmodel plaatsen.
Accupack leeg
– Het accupack vervangen.
– Het accupack laden.
Accupack defect
– Het accupack vervangen.
Page 67

EKAT
1
2
3
5
4
Nederlands
– Controleer de werking bij een afgekoeld
accupack met het oplaadapparaat.
Accupack oververhit
– Laat het accupack afkoelen.
Elektrisch gereedschap is oververhit
– Na afkoeling kan het elektrische gereed
schap weer in bedrijf worden genomen.
Elektrisch gereedschap defect
– Contact opnemen met de Festool onder
houdswerkplaats of uw vakhandel.
Elektrisch gereedschap blokkeert
– Blokkering verhelpen.
Als het elektrische gereedschap bij een
blokkering uitschakelt, klinkt er geen
waarschuwingssignaal.
11 Accessoires
Gebruik alleen originele accessoires van Fes
tool zoals beschreven voor het beoogde ge
bruik. Het gebruik van inferieur inzetgereed
schap en onbekende accessoires kan tot een
verhoogd letselrisico en aanzienlijke onbalans
leiden, waardoor de kwaliteit van de werkresul
taten af- en de slijtage van de machine toene
emt.
De bestelnummers voor accessoires en ge
reedschappen vindt u in uw Festool-catalogus
of op het internet op www.festool.com.
12 Onderhoud en verzorging
Alleen originele Festool-reser
veonderdelen gebruiken! Be
stelnr. op: www.festool.nl/
service
Om de luchtcirculatie te garanderen, moeten de
koelluchtopeningen in de motorbehuizing altijd
vrij en schoon gehouden worden.
Bij verwerking van minerale materialen (bijv.
gips, ...) kan zich stof in het inwendige van het
elektrische gereedschap en op de aan-/uitschakelaar afzetten en in verbinding met lucht
vochtigheid uitharden. Dat kan tot nadelige be
invloeding van het schakelmechanisme leiden,
en het elektrische gereedschap kan oververhit
raken.
Bij bewerking van metaal kan zich geleidend
stof in het inwendige van het elektrische ge
reedschap afzetten. Dit kan tot kortsluiting lei
den.
► Blaas na elke bewerking de binnenruimte
van het elektrische gereedschap door de
ventilatieopeningen en de aan-/uit-schake
laar met droge en olievrije perslucht uit.
De slijpgereedschappen na het gebruik reini
gen.
De aansluitcontacten van het elektrisch ge
reedschap, oplaadapparaat en accupack schoon
houden.
WAARSCHUWING
Gevaar voor letsel, elektrische schokken
► Vóór alle onderhouds- en reparatiewerk
zaamheden altijd het accupack van het
elektrische gereedschap verwijderen.
► Alle onderhouds- en reparatiewerkzaam
heden waarvoor het vereist is om de behui
zing van het elektrische gereedschap te
openen, mogen alleen in een geautoriseer
de onderhoudswerkplaats worden uitge
voerd.
Klantenservice en reparatie al
leen door fabrikant of door ser
vicewerkplaatsen. Adres bij u in
de buurt op: www.festool.nl/
service
13 Milieu
Geef het apparaat niet met het huisvuil
mee! Voer de apparaten, accessoires en
verpakkingen op milieuvriendelijke wijze
af. Neem de geldende nationale voorschriften in
acht.
Alleen EU: Volgens de Europese richtlijn inzake
gebruikte elektrische en elektronische appara
ten en de omzetting hiervan in de nationale
wetgeving dienen oude elektrische apparaten
gescheiden te worden ingezameld en op milieu
vriendelijke wijze te worden afgevoerd.
Informatie voor REACH: www.festool.com/
reach
14 Algemene aanwijzingen
14.1
Bluetooth
Het woordmerk Bluetooth® en de logo's zijn ge
registreerde merken van Bluetooth SIG, Inc. en
worden door TTS Tooltechnic Systems AG & Co.
KG en dus door Festool onder licentie gebruikt.
®
67
Page 68

Svenska
Innehållsförteckning
1 Symboler................................................... 68
2 Säkerhetsanvisningar............................... 68
3 Avsedd användning................................... 72
4 Tekniska data............................................ 72
5 Delar..........................................................72
6 Driftstart....................................................73
7 Batteri........................................................73
8 Inställningar..............................................73
9 Arbeta med elverktyg................................75
10 Akustiska varningssignaler...................... 75
11 Tillbehör.................................................... 75
12 Underhåll och skötsel...............................76
13 Miljö...........................................................76
14 Allmänna anvisningar............................... 76
1 Symboler
Varning för allmän risk
Varning för elstötar
Läs bruksanvisningen och säkerhets
anvisningarna!
Använd hörselskydd!
Använd skyddshandskar!
Använd andningsskydd!
Använd skyddsglasögon!
Använd rejäla skor!
Kasta den inte i hushållssoporna.
Tips, information
Bruksanvisning
Isättning av batteri
Lossa batteriet
CE-märkning: Bekräftar att elverktyget
uppfyller kraven i Europeiska gemens
kapens direktiv.
2 Säkerhetsanvisningar
2.1 Allmänna säkerhetsanvisningar VARNING!Läs och följ alla säkerhetsan
visningar. Följs inte säkerhetsanvisning
arna och andra anvisningar kan det leda till els
tötar, brand och/eller allvarliga personskador.
Spara alla säkerhetsanvisningar och andra an
visningar för framtida bruk.
Med begreppet ”Elverktyg” som används i sä
kerhetsanvisningarna menas nätdrivna elverk
tyg (med nätkabel) och batteridrivna elverktyg
(utan nätkabel).
Observera bruksanvisningen för batteriet och
laddaren.
2.2 Maskinspecifika säkerhetsanvisningar
Allmänna säkerhetsanvisningar för slipning, arbete med stålborstar och kapslipning
– Detta elverktyg används som slipmaskin,
stålborste och kapslipmaskin. Följ alla sä
kerhetsanvisningar, andra anvisningar,
bilder och information som medföljer ma
skinen. Om du inte följer dessa anvisningar
kan det leda till elstötar, brand och/eller
allvarliga personskador.
– Detta elverktyg är inte lämpligt för slip
ning med sandpapper eller polering. Om
det används till annat än avsedda ändamål
kan risker och skador uppstå.
– Använd inga tillbehör som inte är speciellt
avsedda och rekommenderade för detta
elverktyg. Att de kan monteras på ditt el
verktyg garanterar inte att det är säkert att
använda dem.
– Det tillåtna varvtalet för insatsverktyget
måste vara minst lika högt som maxvarv
talet som anges på elverktyget. Tillbehör
som roterar snabbare än tillåtet kan gå
sönder och slungas iväg.
– Insatsverktygets ytterdiameter och tjock
lek måste motsvara måttuppgifterna för
ditt elverktyg. Insatsverktyg med fel mått
kan inte avskärmas eller kontrolleras or
dentligt.
– Insatsverktyg med gänginsats måste pas
sa exakt i slipspindelns gänga. När det
gäller insatsverktyg som monteras med
hjälp av en fläns måste insatsverktygets
håldiameter passa till flänsens håldiame
ter. Insatsverktyg som inte sätts fast exakt
i elverktyget roterar ojämnt, vibrerar kraf
tigt och kan göra att man förlorar kontrol
len över verktyget.
68
Page 69

Svenska
– Använd aldrig skadade insatsverktyg.
Kontrollera insatsverktygen före varje an
vändning beträffande splitter eller sprick
or, spruckna slipplattor, slitage eller kraf
tig förslitning, löst sittande stålborstar el
ler trasig borst. Om elverktyget eller in
satsverktyget faller ner, kontrollera om
det har skadats eller använd ett oskadat
verktyg. När du har kontrollerat och satt i
insatsverktyget ska du och andra perso
ner i närheten hålla er utanför det rote
rande insatsverktygets arbetsområde och
låta verktyget gå i 1 minut på högsta varv
tal. Skadade insatsverktyg går då oftast
sönder under denna tid.
– Använd personlig skyddsutrustning. An
vänd heltäckande ansiktsskydd, ögon
skydd eller skyddsglasögon beroende på
arbetets art. I den mån som behövs, an
vänd andningsskydd, hörselskydd, arbets
handskar eller specialförkläde som skyd
dar mot små slip- och materialpartik
lar.Skydda ögonen mot partiklar som kan
slungas ut under arbetet. Andningsskydd
eller -masker måste filtrera dammet som
bildas. Att utsätta sig för långvarigt buller
kan leda till nedsatt hörsel.
– Se till att andra personer befinner sig på
säkert avstånd från arbetsområdet. Alla
som uppehåller sig i arbetsområdet måste
använda personlig skyddsutrustning.
Brottstycken av arbetsobjektet eller trasiga
insatsverktyg kan slungas iväg och förorsa
ka personskador även utanför det direkta
arbetsområdet.
– Håll alltid elverktyget i de isolerade hand
tagsytorna när du arbetar i situationer där
insatsverktyget kan stöta på dolda elled
ningar. Om insatsverktyget kommer i kon
takt med en strömförande ledning kan även
metalldelarna på verktyget bli strömföran
de och riskera att ge användaren en stöt.
– Lägg aldrig ifrån dig elverktyget innan in
satsverktyget har stannat helt. Det rote
rande insatsverktyget kan komma i kontakt
med ytan, så att du tappar kontrollen över
elverktyget.
– Låt inte elverktyget vara igång när du bär
det. Dina kläder kan fastna i det roterande
insatsverktyget och verktyget kan tränga in
i kroppen.
– Rengör elverktygets ventilationsöppning
ar regelbundet. Motorfläkten suger in
damm i höljet, vilket gör att en kraftig an
samling av metalldamm kan förorsaka
elektriska faror.
– Använd inte elverktyget i närheten av
brännbara material. Gnistor kan antända
dessa material.
– Använd inga insatsverktyg som kräver fly
tande kylmedel. Om man använder vatten
eller andra flytande kylmedel kan det leda
till elstötar.
Rekyl och tillhörande säkerhetsanvisningar
Rekyl är en plötslig reaktion till följd av att ett
insatsverktyg, t.ex. slipskiva, slipplatta, stål
borste osv., har fastnat eller blockerats och
detta har medfört att det roterande insatsverk
tyget plötsligt stannat.Då accelererar elverkty
get okontrollerat i motsatt riktning mot insats
verktygets rotationsriktning på det ställe där
det blockerats.
Om t.ex. en slipskiva har fastnat eller blocke
rats i arbetsobjektet kan slipskivans kant, som
sänkts ner i arbetsobjektet, fastna och därige
nom lossna eller orsaka en rekyl. Slipskivan rör
sig därefter mot eller bort från användaren, be
roende på skivans rotationsriktning på stället
för blockeringen.Det kan också hända att slips
kivan går sönder.
En rekyl kan uppstå om elverktyget hanteras
felaktigt eller olämpligt. Rekyler kan förhindras
genom lämpliga försiktighetsåtgärder enligt
beskrivningen nedan.
– Håll fast elverktyget ordentligt och håll
kroppen och armarna i en position som
gör att du kan parera rekyler. Använd all
tid extrahandtaget, om sådant finns, för
att ha så mycket kontroll som möjligt över
rekylkrafterna och reaktionsmomenten
vid höga varvtal. Genom lämpliga försiktig
hetsåtgärder kan användaren behärska re
kyl- och reaktionskrafterna.
– Håll aldrig handen nära roterande insats
verktyg. Insatsverktyget kan skada handen
vid en rekyl.
– Håll dig undan från området inom vilket
elverktyget rör sig vid en rekyl. Rekylen
driver elverktyget i motsatt riktning mot
slipskivans rörelse på det ställe där den
blockeras.
– Var extra försiktig när du arbetar i hörn,
på vassa kanter osv., så att insatsverkty
get inte studsar tillbaka och kilas fast. I
hörn och på kanter kan det roterande in
satsverktyget lätt kilas fast om det studsar
tillbaka. Det kan orsaka en rekyl och du
kan tappa kontrollen.
69
Page 70

Svenska
– Använd inga kedjesågblad eller tandade
sågblad. Sådana insatsverktyg orsakar ofta
rekyler eller gör att man förlorar kontrol
len över elverktyget.
Speciella säkerhetsanvisningar för slipning och kapslipning
– Använd uteslutande de för elverktyget till
åtna slipkropparna och den därtill avsed
da skyddskåpan. Slipkroppar som inte är
avsedda för elverktyget kan inte avskärmas
tillräckligt och är därför inte tillförlitliga.
– Slipskivor med försänkt centrum måste
monteras så, att deras slipyta inte sticker
ut över skyddskåpans kant. En icke fack
mässigt monterad slipskiva som sticker ut
över skyddskåpans kant kan inte avskär
mas tillräckligt.
– Skyddskåpan måste monteras säkert på
elverktyget och för högsta möjliga säker
het vara inställd så att så liten del av slip
kroppen som möjligt är frilagd mot använ
daren. Skyddskåpan hjälper till att skydda
användaren mot brottstycken, tillfällig kon
takt med slipkroppen samt gnistor som kan
antända kläderna.
– Endast slipkroppar för de rekommendera
de användningsområdena får användas.
Exempel: Slipa aldrig med kapskivans si
doyta. Kapskivor är avsedda för materia
lavverkning med skivans kant. Den kan gå
sönder om slipkropparna utsätts för kraft
från sidan.
– Använd alltid en oskadad spännfläns av
rätt storlek och form för den slipskiva du
valt. En lämplig fläns stöttar slipskivan och
minskar på så sätt risken för skivbrott.
Flänsen för kapskivor kan skilja sig från
flänsarna för andra slipskivor.
– Använd aldrig slitna slipskivor från större
elverktyg. Slipskivor för större elverktyg är
inte konstruerade för de mindre elverkty
gens högre varvtal och kan därför gå sön
der.
Ytterligare särskilda säkerhetsanvisningar för kapslipning
– Undvik blockering av kapskivan och för
högt påpressningstryck.Gör inga alltför
djupa snitt. Om kapskivan överbelastas
ökar påfrestningen på den, så att den lätta
re hamnar snett eller blockeras och där
med orsakar en rekyl eller brott på skivan.
– Undvik området framför och bakom den
roterande kapskivan. Om du för kapskivan
bort från dig i arbetsobjektet så kan elverk
tyget med den roterande skivan slungas
mot dig vid en rekyl.
– Om kapskivan har fastnat eller om du av
bryter arbetet ska du koppla från verkty
get och hålla det stilla tills kapskivan har
stannat. Försök aldrig dra ut kapskivan ur
kapstället så länge den roterar, eftersom
det kan förorsaka en rekyl. Ta reda på var
för kapskivan har fastnat och åtgärda pro
blemet.
– Koppla inte på elverktyget igen så länge
det befinner sig i arbetsobjektet.Låt först
kapskivan uppnå fullt varvtal innan du för
siktigt fortsätter att kapa. Annars kan ski
van fastna, hoppa ur arbetsobjektet eller
förorsaka en rekyl.
– Stötta skivorna eller stora arbetsobjekt
för att minska risken för rekyl på grund av
en kapskiva som fastnat.Stora arbets
objekt kan böjas på grund av sin egen
vikt.Arbetsobjektet måste stöttas på båda
sidor, såväl i närheten av kapsnittet som
utmed kanten.
– Var extra försiktig vid ”ficksnitt” i befintli
ga väggar eller andra områden utan insyn.
Om kapskivan träffar en gas- eller vatten
ledning, elledning eller annat objekt kan
det orsaka en rekyl.
Speciella säkerhetsanvisningar för arbeten med stålborstar
– Tänk på att stålborsten förlorar trådbitar
även när den används som vanligt. Över
belasta inte ståltrådarna genom att trycka
för hårt. Flygande trådbitar kan lätt tränga
igenom tunna klädesplagg och/eller huden.
– Om en skyddskåpa rekommenderas, mås
te man förhindra att skyddskåpan och
stålborsten kan komma i kontakt med var
andra. Diametern på axialstålborstar och
toppborstar kan förstoras genom påpress
ningstryck och centrifugalkrafter.
2.3 Övriga säkerhetsanvisningar
– Använd inte elverktyget i regn eller fuktig
miljö. Fukt i elverktyget kan leda till kort
slutning och brand.
– Sätt i elverktyget i materialet först efter att
det kopplats på (är igång).
– Av säkerhetsskäl måste arbetsobjektet
spännas fast i ett skruvstycke eller en an
nan fastspänningsanordning. Om ett ar
betsobjekt är fastspänt har man båda hän
derna fria för att hantera elverktyget.
– Arbeta inte uppe på stegar.
70
Page 71

Svenska
– Kapa aldrig över metallföremål, spikar el
ler skruvar.
– Använd lämpliga sökapparater för att lo
kalisera dolda försörjningsledningar, el
ler kontakta den lokala distributören. Om
verktyget kommer i kontakt med en ström
förande ledning kan det leda till brand och
livsfarliga strömstötar. En skadad gasled
ning kan leda till explosion. En trasig vat
tenledning kan leda till omfattande materi
ella skador.
– Under arbetet kan skadligt/giftigt damm
uppstå (t.ex. av blyhaltig färg, vissa trä
material och metall). Asbesthaltiga mate
rial får endast bearbetas av sakkunniga
personer. Att vidröra eller andas in detta
damm kan vara farligt för användaren eller
personer i närheten. Följ säkerhetsföre
skrifterna för resp. land.
Använd en P2-andningsmask som
skydd för hälsan.
– Efter bearbetning av mineraliska material
(t.ex. gips, …): blås ur elverktyget invän
digt genom ventilationshålen samt
strömbrytaren med torr och oljefri tryck
luft. Annars kan ledande damm avsättas i
elverktygets hölje och på strömbrytaren
och härdas där i kombination med fuktig
luft. Det kan leda till störningar i kopp
lingsmekanismen och elverktyget kan
överhettas.
– Efter bearbetning av metall: blås ur el
verktyget invändigt genom ventilations
öppningarna med torr och oljefri tryckluft.
Annars kan ledande damm avsättas inuti
elverktyget. Det kan leda till kortslutning.
– Inga nätadaptrar eller batterier av annat
fabrikat får användas till det batteridrivna
elverktyget. Inga batteriladdare av annat
fabrikat får användas för att ladda batteri
et. Om man använder tillbehör av annat
fabrikat finns risk för elstötar och/eller risk
för svåra olyckor.
2.4 Säkerhetsanvisningar för slipverktyg
– Slipverktyg är brottkänsliga, och därför
måste man vara mycket försiktig när man
hanterar dem! Användning av skadade, fel
aktigt fastspända eller isatta slipverktyg är
farligt och kan orsaka allvarliga persons
kador.
– Förvara slipverktygen skyddat mot meka
niska skador och skadlig påverkan från
omgivningen.
– Hantera och transportera slipverktygen
omsorgsfullt.
– Beakta uppgifterna på etiketten eller på
slipverktyget samt användningsbegräns
ningarna, säkerhetsanvisningarna och övri
ga anvisningar. Om du är osäker på valet av
slipverktyg ska du rådfråga tillverkaren
före användningen.
– Slipverktygen måste monteras i enlighet
med kapitel 8.2 .
– Endast sakkunniga personer får montera
slipverktyg.
2.5 Emissionsvärden
De enligt EN 60745 fastställda värdena uppgår
vanligtvis till:
Ljudtrycksnivå LPA = 86 dB(A)
Ljudeffektnivå LWA = 97 dB(A)
Osäkerhet K = 3 dB
OBS!
Buller vid arbetet
Hörselskador
► Använd hörselskydd.
Vibrationsemissionsvärde ah (vektorsumma för
tre riktningar) och osäkerhet K fastställs enligt
EN 60745:
Slipa
ah = 5 m/s
K = 2 m/s
Kapslipning
ah ≤ 2,5 m/s
K = 2 m/s
De angivna emissionsvärdena (vibration, oljud)
– används för maskinjämförelse,
– kan även användas för preliminär upp
skattning av vibrations- och bullernivån un
der arbetet,
– representerar elverktygets huvudsakliga
användningsområden.
Andra användningsområden, som t.ex. stål
borstar, kan medföra andra vibrationsemis
sionsvärden.
2
2
2
2
71
Page 72

Svenska
OBS!
Emissionsvärdena kan avvika från de angiv
na värdena. Det beror på hur verktyget an
vänds och typen av arbetsobjekt.
► Man måste bedöma den faktiska belas
tningen under hela driftcykeln.
► Beroende på den faktiska belastningen
måste lämpliga säkerhetsåtgärder vidtas
för att skydda användarna.
3 Avsedd användning
Elverktyget är avsett för kapslipning, lätt slip
ning, arbete med stålborstar samt avgradning
av metall- och stenmaterial utan användning av
flytande kyl- och smörjmedel.
Beroende på arbetets art ska man använda den
avsedda skyddskåpan.
Endast bundna kap- och slipskivor enligt EN
12413, diamantkapskivor enligt EN 13236 samt
stålborstar enligt EN 1083 får användas.
Detta elverktyg får inte användas för polering,
slipning av ytor med diamantskiva samt an
vändningsområden med diamant- och kera
mikskivor.
Fräshjul, hårdmetall- och spånavskiljande slip
verktyg (med geometriska skär) får inte använ
das.
Elverktyget är avsett för användning med Fe
stool-batterier i serien BP av samma spän
ningsklass.
Vid felaktig användning ligger ansvaret
på användaren.
4 Tekniska data
Batteridriven vinkelslip AGC 18
Slipverktygs-Ø 125 mm
Slipskivstjocklek max. 6,0 mm
min. 1,0 mm
Vikt enligt EPTA-proce
dur 01:2014
2,7 kg
5 Delar
[1-1]
[1-2]
[1-3]
[1-4]
[1-5]
[1-6]
[1-7]
[1-8]
[1-9]
[1-10]
[1-11]
Det avbildade eller beskrivna tillbehöret ingår
ibland inte i leveransen.
De angivna bilderna finns i början av bruksan
visningen.
5.1 Elektronik Mjukstart
Elektroniskt styrd mjukstart för ryckfri start av
elverktyget.
Skyddskåpa
Spindellåsning
Gänga för extra handtag
Varvtalsreglering
Strömbrytare
Extra handtag
Isolerade handtagsytor (grått områ
de)
Knappar för lossning av batteri
Knapp för kapacitet på batteriet
Batteriindikator
Stödpunkter
Batteridriven vinkelslip AGC 18
Motorspänning 18 V DC
Varvtal (tomgång) 4500-8500 varv/min
Varvtalssteg 1 4500 varv/min
2 5300 varv/min
3 6100 varv/min
4 6900 varv/min
5 7700 varv/min
6 8500 varv/min
Slipverktygets periferi
hastighet
Slipspindelgänga m14
72
80 m/s
Varvtalsreglage [1-4]
Varvtalet kan ställas in steglöst inom varvtals
området med ratten. På så sätt kan man anpas
sa hastigheten optimalt till materialet. Följ då
också uppgifterna på slipverktygen.
Konstant varvtal
Det förvalda motorvarvtalet hålls elektroniskt
konstant. Det gör att hastigheten bibehålls även
under belastning.
Rekylskydd
Vid plötslig varvtalsreducering, t.ex. genom
blockering under kapsnitt, kopplas motorn från
omedelbart.För att kunna starta elverktyget
igen måste man först koppla från det och sedan
koppla på det igen.
Page 73

Svenska
Omstartspärr
Den inbyggda omstartspärren förhindrar att el
verktyget under konstant drift startar automa
tiskt efter ett spänningsavbrott. För att kunna
starta elverktyget igen måste man först koppla
från det och sedan koppla på det igen.
Överhettningsskydd
Vid överhettning kopplas säkerhetselektroniken
om till driftsättet kylning. Motorn fortsätter att
gå och det konstanta varvtalet avaktiveras. Ef
ter en avkylningsfas på ca 10–20 sek är maskin
en klar för användning igen och kan därmed be
lastas fullt ut.
6 Driftstart
6.1 Håll elverktyget på rätt sätt
Håll elverktyget med båda händerna på de iso
lerade greppytorna [1-7]: med ena handen på
motorhuset bakom strömbrytaren och andra
handen på det extra handtaget [1-6].
6.2 Start/avstängning
7 Batteri
► Isättning av batteri [3a]
► Borttagning av batteri [3b]
7.1 Batteriindikator
Batteriindikatorn [1-10] visar batteriets ladd
ningsstatus i ca 2 sekunder när man trycker på
knappen [1-9]:
70‑100%
40‑70%
15‑40%
< 15%
*
Rekommendation: ladda batteriet innan det
används igen.
Mer information om batteriet och laddaren
finns i deras respektive bruksanvisningar.
*
Tillkoppling [2a]
► Skjut fram strömbrytaren [1-5]. Man spär
rar strömbrytaren genom att samtidigt
trycka på den främre brytardelen.
Strömbrytaren [1-5] är spärrad och elverktyget
är tillkopplat.
Placera verktyget på materialet först när
driftvarvtalet uppnåtts.
Ställa in varvtalet
Varvtalet kan anpassas i 6 steg till arbetsobjek
tets krav.
► Ställ in varvtalsreglaget [1-4] på önskat
steg.
Frånkoppling [2b]
► Lyft av elverktyget från materialet som ska
bearbetas.
► Tryck på bakre delen av strömbryta
ren [1-5].
Spärren lossas och elverktyget kopplas från.
VARNING!
Risk för personskador på grund av rekyl och
kringslungade delar
► Innan man lägger ifrån sig elverktyget ska
man vänta tills det roterande slipverktyget
har stannat helt och hållet.
8 Inställningar
VARNING!
Risk för personskador
► Före alla arbeten på elverktyget ska man
ta ut batteriet.
8.1 Montera [1-6] extra handtag
Använd alltid det extra handtaget för en
säkrare och bekvämare arbetsställning.
Med hjälp av den speciella konstruktionen ”VIB
RASTOP” reduceras vibrationerna från det ex
tra handtaget.
► Skruva i det extra handtaget [1-6] i gängan
på sidan [1-3] beroende på arbetssättet.
8.2 Montera slipverktyg [4]
OBS!
Risk för skador på grund av heta och vassa
verktyg
► Använd inga vibrerande, slöa eller defekta
slipverktyg.
► Använd inga slipverktyg som före monter
ingen utsatts för kraftig fukt, väta eller hög
temperatur.
► Använd skyddshandskar.
► Lägg ner elverktyget på stödpunkterna
[1-11].
73
Page 74

Svenska
VARNING!
Risk för personskador på grund av felaktigt
monterat slipverktyg
► Fäll endast ut greppbygeln [4-3] på
snabbspännmuttern vid byte av slipverktyg.
► Kontrollera noga att flänsen [4-4] är på
stucken på spindeln innan slipverktyget
monteras.
Dra endast åt eller lossa spännmuttern för
hand. Greppbygeln får under inga omstän
digheter användas för att dra åt eller lossa
med verktyg.
Om muttern inte kan lossas för hand får
den endast lossas med en tappnyckel
[5-1].
Om greppbygeln sitter löst eller är skadad
får spännmuttern under inga omständig
heter användas mer.
Beroende på arbetets art ska man använ
da den avsedda skyddskåpan.
► Ta av batteriet från elverktyget.
► Öppna greppbygeln [4-3] på snabbspänn
muttern.
► Skruva av snabbspännmuttern [4-2] för
hand.
►
► Sätt snabbspännmuttern på slipverktyget
►
►
►
► Kontrollera att slipverktyget sitter fast kor
► Låt nya slipverktyg gå i en minut utan be
Sätt slipverktyget på spindeln och flän
sen [4-4].
Kontrollera noga att flänsens centrering
sklack passar exakt i skivans öppning så att
formpassningen mellan elverktyget/spin
deln och flänsen stämmer överens.
Kontrollera att elverktygets spindeldiame
ter stämmer överens med slipverktygets
hål.
Slipverktyg med försänkt centrum
måste monteras så, att deras slipyta
inte sticker ut över skyddskåpans kant.
Kontrollera den föreskrivna rotationsrikt
ningen för slipverktyget (pilen på slipverkty
get = pilen på maskinhöljet [4-1]).
och spindeln.
Tryck på spindellåsningen [4-5] på verk
tygets baksida.
Dra åt snabbspännmuttern för hand.
Stäng snabbspännmutterns greppbygel.
rekt på elverktyget.
lastning för att kontrollera dem.
Demonteringen sker i omvänd ordning [5a].
8.3 Montera stålborstar [6]
► Ta av handtaget [6-1].
►
►
8.4 Positionera skyddskåpan/
Skyddskåpan är förmonterad. Man kan enkelt
anpassa skyddskåpan till arbetets krav genom
att vrida den.
►
►
►
8.5 Ta av skyddskåpan/kapskyddskåpan [8]
Montera handtaget med handskydd
[6-2].
Montera stålborsten [6-3] säkert på hål
largängan [6-4].
Följ anvisningarna som medföljer stålbors
ten.
kapskyddskåpan [7]
Håll skyddskåpans spärrarm intryckt.
Ställ in elverktygets skyddskåpa så, att
gnistor och slippartiklar leds bort från
kroppen.
Släpp spärrarmen och fortsätt att vrida
skyddskåpan tills den hakar fast.
Kapskyddskåpan, som finns som tillbehör,
kan positioneras på samma sätt.
OBS!
Risk för personskador på grund av gnistbild
ning och kapskivor som gått sönder.
► Vid kapslipning ska man använda kap
skyddskåpan som finns som tillbehör: Se
kapitel 9.2
► Demontera redan monterade slipverktyg
från elverktyget: se kapitel 8.2 .
►
►
►
8.6 Montera skyddskåpan/kapskyddskåpan
Håll skyddskåpans spärrarm intryckt.
Vrid skyddskåpan framåt efter att tryck
punkten övervunnits.
Ta av skyddskåpan från elverktyget.
[9]
ANMÄRKNING
Slitage på kapskyddskåpan.
► Kontrollera att slipverktyget är fritt rörligt
innan du kopplar på det. Slipverktyget får
inte slipa mot kapskyddskåpan.
Beroende på arbetets art ska man använ
da den avsedda skyddskåpan.
74
Page 75

Svenska
► Sätt i skyddskåpan i det främre läget.
Kontrollera noga att tapp- och notläget
stämmer överens.
►
För montering av slipverktyg, se kapitel 8.2 .
Vrid skyddskåpan till önskat läge tills
spärrarmen hakar i av sig själv.
9 Arbeta med elverktyg
VARNING!
Risk för personskador
► Sätt i elverktyget i materialet först efter att
det kopplats på.
► Fäst alltid arbetsobjektet ordentligt, så att
det inte kan förflytta sig under arbetet.
► Håll händerna borta från slipverktyg som
roterar.
VARNING!
Risk för personskador på grund av dåliga
slipverktyg
► Kontrollera att slipverktygets slutdatum
inte har överskridits.
VARNING!
Risk för personskador på grund av arbets
objekt som rör sig
► Sätt fast arbetsobjektet ordentligt.
VARNING!
Risk för personskador på grund av arbeten
ovanför huvudet
► Vid arbeten ovanför huvudet ska man alltid
använda skyddsglasögon.
► Använd P2-andningsmask.
Lägg ner elverktyget på stödpunkterna
[1-11] när det inte används.
► Ta ut slipverktyget ur elverktyget före
transport.
9.1 Slipa
Använd alltid skyddskåpan som ingår i leveran
sen.
Skyddskåpan är förmonterad. Beträffande de
montering av skyddskåpan, se kapitel 8.5 .
9.2 Kapslipning
Använd för kapslipning alltid skyddskåpan TSHAGC 18-125, vilken finns som tillbehör.
Kapskyddskåpan monteras, placeras och tas av
på samma sätt som skyddskåpan, se kapitel 8.5
och 8.6 .
► Styr alltid slipverktyget rakt genom arbets
objektet.
Se noga till att slipverktyget inte vinklas och
belastas snett eller på sidan.
► När det gäller arbetsobjekt med tjock vägg
kapar man med hjälp av oscillerande rörel
ser och under lätt tryck mot elverktyget.
9.3 Arbeten med stålborstar
VARNING!
Risk för ögonskador på grund av kringslung
ade delar/ståltrådar
► Använd skyddsglasögon.
Vid arbete med stålborstar ska handskyddet
HS-AGC18, se kapitel
8.3 .
10 Akustiska varningssignaler
Kopplas elverktyget från på grund av driftför
hållandena nedan, så avges en varningssignal
när verktyget kopplas på.
Batteriet accepteras inte
– Lägg i rätt batterimodell.
Batteriet tomt
– Byt batteriet.
– Ladda batteriet.
Batteriet defekt
– Byt batteriet.
– Kontrollera funktionen med en laddare när
batteriet svalnat.
Batteriet överhettat
– Låt batteriet svalna.
Elverktyget är överhettat
– När elverktyget har svalnat kan det använ
das igen.
Elverktyget defekt
– Kontakta Festools serviceverkstad eller
återförsäljare.
Elverktyget blockerat
– Ta bort blockeringen.
Om elverktyget kopplas från på grund av
en blockering hörs en varningssignal.
11 Tillbehör
Använd endast originaltillbehör från Festool
enligt beskrivningen för den avsedda använd
ningen. Användning av undermåliga insatsverk
tyg och tillbehör från andra tillverkare kan leda
till ökad risk för personskador och kraftig oba
lans som försämrar kvaliteten på arbetsresul
taten och ökar slitaget på maskinen.
75
Page 76

EKAT
1
2
3
5
4
Svenska
Artikelnummer för tillbehör och verktyg hittar
du i Festool-katalogen eller på ”www.festo
ol.se”.
12 Underhåll och skötsel
VARNING!
Risk för personskador, elstötar
► Ta alltid bort batteriet från elverktyget före
underhålls- och servicearbete.
► Alla underhålls- och reparationsarbeten
som kräver att man öppnar elverktyget får
endast genomföras av en auktoriserad ser
viceverkstad.
Service och reparation får en
dast utföras av tillverkaren eller
serviceverkstäder. Hitta när
maste adress på: www.festo
ol.se/service
nationell lagstiftning måste förbrukade elverk
tyg källsorteras och återvinnas på ett miljövän
ligt sätt.
Information om REACh: www.festool.com/
reach
14 Allmänna anvisningar
14.1
Bluetooth
Varumärkesnamnet Bluetooth® och logotyper
na är registrerade märken som tillhör Blue
tooth SIG, Inc. och används under licens av
Tooltechnic Systems AG & Co. KG och därmed
av Festool.
®
Använd bara Festools original
reservdelar! Art.nr på: www.fe
stool.se/service
För att luftcirkulationen ska kunna garanteras,
måste kylluftöppningarna i motorns hölje alltid
hållas öppna och rena.
När man arbetar med mineraliska material
(t.ex. gips) kan damm ansamlas i elverktygets
hölje, avsätta sig på strömbrytaren och härdas
där i kombination med fuktig luft. Det kan leda
till störningar i kopplingsmekanismen och el
verktyget kan överhettas.
När man arbetar med metall kan ledande
damm avsättas inuti elverktyget. Det kan leda
till kortslutning.
► Blås ur elverktyget invändigt genom ventila
tionshålen och strömbrytaren med torr och
oljefri tryckluft efter varje användning.
Rengör slipverktygen efter användningen.
Håll anslutningskontakterna på elverktyget,
laddaren och batterierna rena.
13 Miljö
Släng inte maskinen i hushållssoporna!
Se till att verktyg, tillbehör och förpack
ningar lämnas till miljövänlig återvin
ning. Följ den nationella föreskrifterna.
Endast EU: Enligt EU-direktivet om uttjänt el-
och elektronikutrustning och omsättning till
76
Page 77

Suomi
Sisällys
1 Tunnukset..................................................77
2 Turvallisuusohjeet.....................................77
3 Määräystenmukainen käyttö.....................81
4 Tekniset tiedot...........................................81
5 Laitteen osat..............................................81
6 Käyttöönotto.............................................. 82
7 Akku...........................................................82
8 Asetukset...................................................83
9 Työskentely sähkötyökalulla.....................84
10 Varoitusäänimerkit....................................84
11 Lisävarusteet ja tarvikkeet........................85
12 Huolto ja hoito........................................... 85
13 Ympäristö.................................................. 85
14 Yleisiä ohjeita............................................ 85
1 Tunnukset
Varoitus yleisestä vaarasta
Sähköiskuvaara
Lue käyttöopas, turvallisuusohjeet!
Käytä kuulosuojaimia!
Käytä työkäsineitä!
Käytä hengityssuojainta!
Käytä suojalaseja!
Käytä tukevia jalkineita!
Älä hävitä kotitalousjätteiden mukana.
Ohje, vihje
Käsittelyohje
Akun asennus
Akun irrotus
CE-tunnus: vahvistaa, että sähkötyöka
lu täyttää Euroopan yhteisön direktii
vien määräykset.
2 Turvallisuusohjeet
2.1 Yleiset turvallisuusohjeet VAROITUS!Lue kaikki turvallisuus- ja
käyttöohjeet. Turvallisuusohjeiden ja
käyttöohjeiden noudattamisen laiminlyönti voi
aiheuttaa sähköiskun, tulipalon ja/tai vakavia
vammoja.
Säilytä kaikki turvallisuusohjeet ja käyttöoh
jeet myöhempää tarvetta varten.
Turvallisuusohjeissa käytetty termi "sähkötyö
kalu" tarkoittaa verkkokäyttöisiä sähkötyökalu
ja (verkkojohdon kanssa) tai akkukäyttöisiä säh
kötyökaluja (ilman verkkojohtoa).
Noudata laturin ja akun käyttöohjetta.
2.2 Konekohtaiset turvallisuusohjeet
Yhteiset turvallisuusohjeet hiontaan, teräs
harjaukseen ja katkaisuhiontaan
– Tämä sähkötyökalu on tarkoitettu hion
taan, teräsharjaukseen ja katkaisuhion
taan. Huomioi laitteen mukana saamasi
turvallisuusohjeet, käyttöohjeet, kuvat ja
tiedot. Seuraavia ohjeiden noudattamisen
laiminlyönti voi aiheuttaa sähköiskun, tuli
palon ja/tai vakavia vammoja.
– Tämä sähkötyökalu ei sovellu hiekkapape
rihiontaan eikä kiillottamiseen. Sähkötyö
kalun käyttäminen määräysten vastaisiin
tarkoituksiin voi aiheuttaa vaaroja ja tapa
turmia.
– Älä käytä sellaisia tarvikkeita, joita val
mistaja ei ole tarkoittanut tai suositellut
käytettäväksi tämän sähkötyökalun kans
sa. Vain se, että tarvikkeen pystyy kiinnittä
mään sähkötyökaluun, ei ole tae sen käytön
turvallisuudesta.
– Käyttötarvikkeen suurimman sallitun
kierrosluvun on oltava vähintään yhtä
suuri kuin sähkötyökalulle ilmoitettu
enimmäiskierrosluku. Sallittua nopeam
min pyörivä käyttötarvike voi murtua ja sin
koutua ympäriinsä.
– Käyttötarvikkeen ulkohalkaisijan ja pak
suuden täytyy vastata sähkötyökalun mit
tatietoja. Väärän mittaisia käyttötarvikkeita
ei pystytä suojaamaan eikä hallitsemaan
riittävän hyvin.
– Kierreliitännällä varustettujen käyttötar
vikkeiden täytyy sopia tarkalleen hioma
karan kierteelle. Laippa-asenteisissa
käyttötarvikkeissa käyttötarvikkeen reiän
halkaisijan täytyy sopia laipan kiinnitys
kohdan halkaisijalle. Käyttötarvikkeet, jot
ka eivät kiinnity kunnolla sähkötyökaluun,
77
Page 78

Suomi
pyörivät epätasaisesti, tärisevät erittäin voi
makkaasti ja voivat aiheuttaa hallinnan me
nettämisen.
– Älä käytä vaurioituneita käyttötarvikkeita.
Tarkasta käyttötarvikkeet ennen jokaista
käyttökertaa mahdollisten vaurioiden va
ralta (esim. hiomalaikkojen säröt tai hal
keamat, hiomalautasten halkeamat tai
voimakas kuluneisuus, teräsharjojen ir
ronneet tai katkenneet langat). Jos sähkö
työkalu tai käyttötarvike pääsee putoam
aan lattialle, tarkasta vaurioiden varalta
tai vaihda ehjä käyttötarvike tilalle. Kun
olet tarkastanut ja kiinnittänyt käyttötar
vikkeen, poistu yhdessä muiden lähellä
olevien henkilöiden kanssa pyörivän käyt
tötarvikkeen käyttöalueen ulkopuolelle ja
anna laitteen käydä maksimikierrosluvul
la 1 minuutin ajan. Vialliset käyttötarvik
keet rikkoutuvat yleensä tämän testausajan
sisällä.
– Käytä henkilökohtaisia suojavarusteita.
Käytä käyttökohteen mukaan kasvojen
suojainta, silmiensuojainta tai suojalaseja.
Käytä tarpeen mukaan pölysuojainta, kuu
lonsuojainta, työkäsineitä tai erikoisessua,
joka suojaa sinua pieniltä siruilta ja pöly
hiukkasilta. Silmät tulee suojata ympäriin
sä sinkoutuvilta siruilta, joita syntyy eri
käyttösovelluksissa. Pöly- tai hengityssuo
jaimien täytyy suodattaa työssä syntyvä pö
ly. Jos altistut pitkäaikaisesti melulle, tämä
voi aiheuttaa kuuroutta.
– Varmista, että sivulliset pysyvät turvalli
sella etäisyydellä työpisteestä. Kaikkien
työalueelle tulevien täytyy käyttää henki
lönsuojaimia. Työkappaleesta murtuneet
sirpaleet tai rikkoutuneet käyttötarvikkeet
voivat sinkoutua ympäriinsä ja aiheuttaa
vammoja myös varsinaisen työpisteen ulko
puolella.
– Pidä sähkötyökalusta kiinni vain sen eris
tetyistä kahvapinnoista, kun teet sellaisia
töitä, joissa käyttötarvike saattaa osua pii
lossa oleviin sähköjohtoihin. Kosketus jän
nitteiseen sähköjohtoon saattaa johtaa säh
köä myös laitteen metalliosiin ja aiheuttaa
sähköiskun.
– Älä missään tapauksessa laita sähkötyö
kalua syrjään, ennen kuin käyttötarvike on
pysähtynyt paikalleen. Pyörivä käyttötarvi
ke voi koskettaa allaan olevaa pintaa ja ai
heuttaa tämän myötä sähkötyökalun hallin
nan menettämisen.
– Älä kuljeta sähkötyökalua, kun se on
käynnissä. Vaatteesi saattavat takertua
pyörivään käyttötarvikkeeseen, jolloin käyt
tötarvike voi porautua kehoosi.
– Puhdista sähkötyökalun tuuletusreiät
säännöllisin väliajoin. Moottorin tuuletin
imee pölyä rungon sisään ja laitteen sisään
päässyt suuri metallipölymäärä voi aiheut
taa sähkövaaran.
– Älä käytä sähkötyökalua palonarkojen
materiaalien lähellä. Kipinät saattavat sy
tyttää palonarat materiaalit.
– Älä käytä käyttötarvikkeita, jotka vaativat
lastuamisnestettä. Veden tai lastuamis
nesteiden käyttö voi aiheuttaa sähköiskun.
Takaisku ja sitä koskevat turvallisuusohjeet
Takaisku on äkillinen reaktio, joka syntyy pyöri
vän käyttötarvikkeen (esim. hiomalaikka, hio
malautanen, teräsharja, yms.)jumittuessa. Ju
mittuminen pysäyttää pyörivän käyttötarvikkeen
yhtäkkiä. Tällöin sähkötyökalu tempautuu juut
tumiskohdassa hallitsemattomasti käyttötarvik
keen pyörintäsuuntaan vastaan.
Jos esim. hiomalaikka jumittuu tai lukittuu työ
kappaleeseen, hiomalaikan reuna saattaa upota
ja juuttua työkappaleeseen. Tällöin hiomalakka
voi murtua tai aiheuttaa takaiskun. Hiomalaikka
tempautuu tällöin käyttäjän suuntaan tai käyt
täjästä poispäin, riippuen laikan pyörintäsuun
nasta jumittumiskohdassa. Tässä yhteydessä
hiomalaikat voivat myös murtua.
Takaisku on seuraus sähkötyökalun väärästä
tai epäasianmukaisesta käytöstä. Sen voi estää
sopivilla varotoimenpiteillä, kuten seuraavana
on kuvattu.
– Pidä sähkötyökalusta tukevasti kiinni mo
lemmin käsin ja pidä keho ja käsivarret
sellaisessa asennossa, jossa voit hallita
takaiskusta syntyviä voimia. Käytä aina li
säkahvaa (mikäli kuuluu varustukseen),
jotta pystyt hallitsemaan mahdollisimman
hyvin takaiskuvoimia ja käynnistyksen yh
teydessä syntyviä reaktiomomentteja.
Työkalun käyttäjä pystyy hallitsemaan ta
kaisku- ja reaktiovoimia soveltuvia varotoi
menpiteitä noudattamalla.
– Älä missään tapauksessa pidä kättä pyöri
vien käyttötarvikkeiden lähellä. Käyttötar
vike voi sinkoutua takaiskun seurauksena
kätesi päälle.
– Vältä pitämästä kehoasi sillä alueella, jo
hon sähkötyökalu tempautuu takaiskun
yhteydessä. Takaisku tempaa sähkötyöka
78
Page 79

Suomi
lun vastakkaiseen suuntaan hiomalaikan
liikkeeseen nähden juuttumiskohdassa.
– Työskentele erityistä varovaisuutta nou
dattaen nurkkien, terävien reunojen yms.
alueilla. Estä käyttötarvikkeiden ponnah
taminen irti työkappaleesta ja kiinnijuut
tuminen. Pyörivä käyttötarvike juuttuu her
kästi kiinni nurkissa, terävissä kulmissa tai
ponnahtaessaan irti työkappaleesta. Tämä
aiheuttaa hallinnan menettämisen tai taka
iskun.
– Älä käytä ketju- tai hammastettua sahan
terää. Sellaiset käyttötarvikkeet aiheuttavat
usein takaiskun tai sähkötyökalun hallin
nan menettämisen.
Hiontaa ja katkaisuhiontaa koskevat erityiset turvallisuusohjeet
– Käytä vain sähkötyökaluusi hyväksyttyjä
hiomatarvikkeita ja näille hiomatarvik
keille tarkoitettua suojusta. Sähkötyöka
lulle sopimattomia hiomatarvikkeita ei voi
da suojata tarpeeksi tehokkaasti ja ne eivät
ole turvallisia.
– Taivutetut hiomalaikat täytyy asentaa niin,
ettei niiden hiomapinta ulotu suojuksen
reunan tasoa pidemmälle. Epäasianmukai
sesti asennettu hiomalaikka, joka ulottuu
suojuksen reunan tasoa pidemmälle, ei ole
suojattu riittävän tehokkaasti.
– Suojus täytyy kiinnittää kunnolla sähkö
työkaluun ja säätää parhaan turvallisuu
den takaamiseksi niin, että mahdollisim
man pieni osuus hiomatarvikkeesta on
esillä käyttäjään nähden. Suojus suojaa
käyttäjää siruilta, hiomatarvikkeen tahatto
malta koskettamiselta ja kipinöiltä, jotka
saattaisivat sytyttää vaatteet.
– Hiomatarvikkeita saa käyttää vain suosi
teltuihin käyttökohteisiin. Esimerkki: Älä
missään tapauksessa hio katkaisulaikan
kylkipinnalla. Katkaisulaikat on tarkoitettu
laikan päätyreunalla tehtävään materiaalin
työstöön. Näiden hiomatarvikkeiden sivu
suuntainen kuormitus saattaa aiheuttaa
laikan rikkoutumisen.
– Käytä aina vauriotonta kiinnityslaippaa,
joka on oikean kokoinen ja muotoinen ja
sopii valitsemaasi hiomalaikkaan. Soveltu
va laippa tukee hiomalaikkaa ja vähentää
laikan murtumisvaaraa. Katkaisulaikkojen
laipat saattavat erota muiden hiomalaikko
jen laipoista.
– Älä asenna loppuun kuluneita hiomalaik
koja, joita on käytetty suuremmissa säh
kötyökaluissa. Suurempien sähkötyökalu
jen hiomalaikat eivät kestä pienempien
sähkötyökalujen suurta kierroslukua ja ne
saattavat murtua.
Muita katkaisuhiontaa koskevia erityisiä tur
vallisuusohjeita
– Vältä katkaisulaikan jumittumista tai liian
suurta painamisvoimaa. Älä leikkaa liian
syviä uria. Katkaisulaikan ylikuormitus li
sää rasitusta ja aiheuttaa herkästi laikan
kanttaamisen tai jumittumisen, jolloin syn
tyy takaiskun tai hiomatarvikkeen murtu
misvaara.
– Vältä pyörivän katkaisulaikan edessä ja
takana olevaa aluetta. Jos liikutat katkai
sulaikkaa työkappaleessa itsestäsi pois
päin, takaiskutapauksessa sähkötyökalu
saattaa sinkoutua pyörivän laikan kanssa
suoraan sinua kohti.
– Jos katkaisulaikka jumittuu tai keskeytät
työskentelyn, sammuta moottori ja pidä
työkalua liikuttamatta paikallaan, kunnes
laikka on pysähtynyt paikalleen. Älä yritä
vetää edelleen pyörivää katkaisulaikkaa
leikkausurasta, koska muuten voi tapah
tua takaisku. Selvitä ja poista jumittumisen
syy.
– Älä käynnistä sähkötyökalua uudelleen,
kun se on kiinni työkappaleessa. Anna kat
kaisulaikan kiihtyä maksiminopeuteen,
ennen kuin jatkat leikkaamista varovai
suutta noudattaen. Muuten syntyy vaara,
että laikka jumittuu, ponnahtaa pois työ
kappaleesta tai aiheuttaa takaiskun.
– Tue levyt ja suuret työkappaleet, jotta saat
vähennettyä katkaisulaikan jumittumises
ta johtuvaa takaiskuvaaraa. Suuret työkap
paleet voivat taipua omasta painostaan.
Työkappale täytyy tukea laikan kummalla
kin puolella, sekä katkaisu-uran läheltä et
tä myös reunojen kohdalta.
– Noudata erityistä varovaisuutta, kun teet
upotusleikkauksia seiniin tai muihin pii
lossa olevien kohteisiin. Materiaaliin up
poava katkaisulaikka voi aiheuttaa takais
kun, jos se osuu kaasu- tai vesiputkiin, säh
köjohtoihin tai muihin esteisiin.
Teräharjoilla työskentelyä koskevat erityisen turvallisuusohjeet
– Muista, että teräsharjoista irtoaa langan
paloja myös tavanomaisen käytön yhtey
dessä. Älä ylikuormita teräslankoja liialli
sella painamisvoimalla. Ympäriinsä sin
koutuvat langanpalat saattavat lävistää
herkästi ohuen vaatekankaan ja/tai ihon.
79
Page 80

Suomi
– Jos työhön suositellaan suojusta, varmis
ta, ettei suojus voi koskettaa teräsharjaa.
Lautas- ja kuppiharjojen halkaisija saattaa
suurentua painamisvoiman ja keskipako
voiman vaikutuksesta.
2.3 Lisäturvallisuusohjeet – Älä käytä sähkötyökalua sateessa tai kos
teassa ympäristössä. Kosteus voi aiheuttaa
sähkötyökalussa oikosulun tai tulipalon.
– Ohjaa sähkötyökalu vain moottori käynnis
sä materiaaliin.
– Turvallisuussyistä työkappale täytyy kiinnit
tää ruuvipenkkiin tai muuhun kiinnityslait
teeseen. Kiinnitetty työkappale vapauttaa
molemmat käden sähkötyökalun käyttöön.
– Älä työskentele tikkailla seisten.
– Älä katkaise metalliesineiden, naulojen tai
ruuvien kohdalta.
– Käytä soveltuvia rakenneilmaisimia piilos
sa olevien johtojen etsimiseen, tai kysy
neuvoa paikalliselta energia-/vesijohtolai
tokselta. Sähkötyökalun kosketus jännitet
tä johtavaan johtoon voi aiheuttaa tulipalon
ja sähköiskun. Kaasujohdon vaurioituminen
voi aiheuttaa räjähdyksen. Vesijohdon rik
koutuminen aiheuttaa esinevahinkoja.
– Työstön yhteydessä saattaa syntyä tervey
delle haitallista / myrkyllistä pölyä (esim.
lyijypitoisten maalien, tiettyjen puulaatu
jen ja metallien yhteydessä). Asbestipitoi
sia materiaalilajeja saavat työstää vain
asiantuntevat henkilöt. Näiden pölylaatu
jen koskettaminen tai hengittäminen voi ai
heuttaa vaaraa laitteen käyttäjälle tai lähel
lä oleville ihmisille. Noudata oman maasi
voimassaolevia turvallisuusmääräyksiä.
Käytä terveytesi suojelemiseksi P2-
hengityssuojainta.
– Mineraalisten materiaalien (esim. kipsi,
jne.) työstön jälkeen: puhdista sähkötyö
kalun sisäosa tuuletusaukkojen kautta ja
kytkinosa kuivalla ja öljyttömällä paineil
malla. Muuten sähkötyökalun rungon si
sään ja käynnistys-/sammutuskytkimeen
voi kertyä pölyä, joka kovettuu ilmankos
teuden vaikutuksesta. Tämä saattaa häiritä
kytkentämekanismin toimintaa ja sähkö
työkalu voi ylikuumentua.
– Metallin työstön jälkeen: Puhdista sähkö
työkalun sisäosa tuuletusaukkojen kautta
kuivalla ja öljyttömällä paineilmalla. Muu
ten sähkötyökalun sisäosaan saattaa kertyä
sähköä johtavaa pölyä. Tämä voi aiheuttaa
oikosulun.
– Älä käytä akkusähkötyökalua verkkolait
teilla tai vierailla akuilla. Älä käytä vierai
ta latureita akkujen lataukseen. Jos käytät
muita kuin valmistajan suosittelemia lisä
tarvikkeita, tämä voi johtaa sähköiskuun
ja/tai vakaviin tapaturmiin.
2.4 Hiomatarvikkeiden turvallisuusohjeet
– Hiomatarvikkeet murtuvat herkästi. Siksi
niitä on käsiteltävä erittäin varovasti! Vauri
oituneet sekä väärin kiristetyt tai asennetut
hiomatarvikkeet ovat vaarallisia ja saatta
vat aiheuttaa vakavia vammoja.
– Älä altista varastossa olevia hiomatarvik
keita mekaaniselle rasitukselle tai haitalli
sille ympäristövaikutuksille.
– Käsittele ja kuljeta hiomatarvikkeita varo
vasti.
– Huomioi etiketin tai hiomatarvikkeen tiedot
sekä käyttörajoitukset, turvallisuusohjeet ja
muut mahdolliset ohjeet. Jos hiomatarvik
keiden valinnassa on epäselvyyksiä, käyttä
jän tulee kysyä neuvoa valmistajalta ennen
käytön aloittamista.
– Hiomatarvikkeiden asennus täytyy tehdä
luvun 8.2 mukaan.
– Hiomatarvikkeita saavat asentaa vain
asiantuntevat henkilöt.
2.5 Päästöarvot
EN 60745 mukaan määritetyt arvot ovat tyypilli
sesti:
Äänenpainetaso LPA = 86 dB(A)
Äänentehotaso LWA = 97 dB(A)
Epävarmuus K = 3 dB
HUOMIO
Työskenneltäessä syntyy melua
Kuulovaurioiden vaara
► Käytä kuulosuojaimia.
Tärinäarvo ah (kolmen suunnan vektorisumma)
ja epävarmuus K standardin mukaan määritet
tynäEN 60745:
Hionta
ah = 5 m/s
K = 2 m/s
2
2
80
Page 81

Suomi
Katkaisuhiominen
ah ≤ 2,5 m/s
K = 2 m/s
Ilmoitetut päästöarvot (tärinä, melu)
– ovat koneiden keskinäiseen vertailuun,
– soveltuvat myös käytön yhteydessä synty
vän tärinä- ja melukuormituksen alusta
vaan arviointiin,
– edustavat sähkötyökalun pääasiallisia käyt
tösovelluksia.
Muilla käyttötavoilla (esim. teräsharjaus) voivat
muodostua erilaisia tärinäarvoja.
HUOMIO
Päästöarvot saattavat poiketa ilmoitetuista
arvoista. Ne riippuvat työkalun käyttötavasta
ja työkappaleen laadusta.
► Todellinen kuormitus täytyy arvioida koko
käyttöjakson puitteissa.
► Todellisesta kuormituksesta riippuen täy
tyy määrittää asiaankuuluvat varotoimenpi
teet käyttöturvallisuuden takaamiseksi.
4 Tekniset tiedot
2
Akkukulmahiomakone AGC 18
2
Moottorin jännite 18 V DC
Kierrosluku (kuormitta
matta)
Kierroslukuportaat 1
Hiomatarvikkeen kehäno
peus
Hiomakaran kierre M 14
Hiomatarvikkeen Ø 125 mm
Hiomatarvikkeen pak
suus
4500 - 8500 min
-1
4500 min
2
3
4
5
6
5300 min
6100 min
6900 min
7700 min
8500 min
80 m/s
maks. 6,0 mm
min. 1,0 mm
-1
-1
-1
-1
-1
-1
3 Määräystenmukainen käyttö
Tämä sähkötyökalu on tarkoitettu metalli- ja ki
vimateriaalien katkaisuhiontaan, kevyeen hion
taan, teräsharjaukseen ja jäysteen poistoon il
man lastuamisnesteiden ja voiteluaineiden
käyttöä.
Käytä käyttötavan mukaan kyseiseen tehtävään
sopivaa suojusta.
Työkalussa saa käyttää vain standardin EN
12413 mukaisia keinohartsisidosteisia katkai
su- ja hiomalaikkoja, standardin EN 13236 mu
kaisia timanttikatkaisulaikkoja sekä standardin
EN 1083 mukaisia teräsharjoja.
Älä käytä tätä sähkötyökalua kiillottamiseen,
pintojen hiontaan timanttilaikoilla eikä timant
ti- ja kovakeramiikkalaikoilla tehtäviin töihin.
Työkalussa ei saa käyttää kiekkojyrsimiä eikä
kovametallisia tai lastuavia hiomatarvikkeita
(joissa on geometrisesti muodostettu teräsär
mä).
Tämä sähkötyökalu on tarkoitettu käytettäväksi
saman jänniteluokan BP-mallisarjan Festoolakkujen kanssa.
Laitteen käyttäjä vastaa määräystenvas
taisesta käytöstä aiheutuneista vahin
goista.
Paino EPTA-Procedure
2,7 kg
01:2014 -ohjeen mukaan
5 Laitteen osat
[1-1]
[1-2]
[1-3]
[1-4]
[1-5]
[1-6]
[1-7]
[1-8]
[1-9]
[1-10]
[1-11]
Kuvassa esitetyt tai tekstissä kuvaillut lisäva
rusteet eivät osittain sisälly toimitukseen.
Mainitut kuvat ovat käyttöohjekirjan alussa.
Suojus
Karan lukitsin
Lisäkahvan kierre
Kierrosluvun säätö
Käynnistys-/sammutuskytkin
Lisäkahva
Eristetyt kahvapinnat (harmaan värin
en alue)
Akun vapautuspainikkeet
Akun kapasiteetin painike
Kapasiteettinäyttö
Tukipisteet
81
Page 82

Suomi
5.1 Elektroniikka Pehmeä käynnistyminen
Elektronisesti säädetty pehmeä käynnistys var
mistaa sähkötyökalun nykäisemättömän käyn
nistyksen.
Kierroslukusäädin [1-4]
Kierrosluku voidaan säätää säätöpyörän avulla
portaattomasti kierroslukualueen rajoissa. Si
ten voit säätää nopeuden optimaalisesti kulle
kin materiaalille sopivaksi. Huomioi tässä yh
teydessä myös hiomatarvikkeissa annetut tie
dot.
Tasainen kierrosluku
Elektroniikka pitää moottorin esivalitun kier
rosluvun samana. Tämän ansiosta nopeus py
syy jatkuvasti tasaisena myös kuormituksessa.
Takaiskusuoja
Moottori sammuu välittömästi, jos kierrosno
peus laskee äkillisesti, esimerkiksi laikan ju
mittuessa katkaisuleikkauksen yhteydessä. Jot
ta moottorin voi käynnistää uudelleen, sähkö
työkalu täytyy ensin kytkeä pois päältä ja sen
jälkeen uudelleen päälle.
Uudelleenkäynnistyssuoja
Sisäänrakennettu uudelleenkäynnistyssuoja es
tää jatkuvalle käytölle kytketyn sähkötyökalun
automaattisen käynnistymisen jännitekatkok
sen jälkeen. Jotta moottorin voi käynnistää uu
delleen, sähkötyökalu täytyy ensin kytkeä pois
päältä ja sen jälkeen uudelleen päälle.
Ylikuumenemissuoja
Ylikuumenemisen yhteydessä turvaelektroniik
ka kytkee jäähdytyskäytön päälle. Moottori käy
edelleen ja vakiokierrosnopeus deaktivoidaan.
Noin 10-20 sekunnin pituisen jäähdytyskäytön
jälkeen työkalu on jälleen käyttövalmis ja kes
tää maksimikuormitusta.
6 Käyttöönotto
6.1 Sähkötyökalun pitäminen kunnollisessa otteessa
Pidä molemmin käsin kiinni sähkötyökalun
eristetyistä kahvapinnoista [1-7]: pidä kiinni
kytkimen takaa moottorin rungosta ja ota toi
sella kädellä kiinni lisäkahvasta [1-6].
6.2 Päälle-/poiskytkentä
Päällekytkentä [2a]
Käynnistys-/sammutuskytkin [1-5] on lukittu
paikalleen ja sähkötyökalu on kytketty päälle.
Ohjaa laite materiaaliin vasta sen jälkeen
kun työkalu on kiihtynyt käyttönopeuteen.
Kierrosluvun säätäminen
6-portaisella säätimellä kierrosluvun voi säätää
sopivaksi työkappaleen vaatimusten mukaan.
► Säädä haluamasi nopeusporras kierroslu
vun säätimellä [1-4].
Kytkeminen pois päältä [2b]
► Nosta sähkötyökalu työstettävästä materi
aalista ylös.
► Paina käynnistys-/sammutuskytkimen [1-5]
takaosaa.
Lukitus avautuu ja sähkötyökalu sammuu.
VAROITUS
Loukkaantumisvaara takaiskun ja ympäriin
sä sinkoutuvien sirujen takia
► Odota ennen sähkötyökalun asettamista
syrjään, että pyörivä hiomatarvike on py
sähtynyt paikalleen.
► Aseta sähkötyökalu syrjään tukipisteiden
[1-11] varaan.
7 Akku
► Akun asennus [3a]
► Akun irrotus [3b]
7.1 Kapasiteettinäyttö
Kapasiteettinäyttö [1-10] näyttää painiket
ta [1-9] painettaessa akun lataustilan n. 2 s
ajan:
70‑100 %
40‑70 %
15‑40 %
< 15 %
*
Suositus: lataa akku ennen käytön jatkamis
ta.
Akkuun ja laturiin liittyviä lisätietoja löytyy
akun ja laturin käyttöohjeista.
*
► Työnnä käynnistys-/sammutuskytkin
tä [1-5] eteenpäin. Käynnistys-/sammutus
kytkin lukittuu päälle, kun painat samalla
kytkimen etuosaa.
82
Page 83

Suomi
8 Asetukset
VAROITUS
Loukkaantumisvaara
► Irrota akku sähkötyökalusta ennen kaikkia
sähkötyökaluun kohdistuvia töitä.
8.1 Lisäkahvan [1-6] kiinnittäminen
Käytä aina lisäkahvaa turvallisen ja vai
vattoman työskentelyasennon takaami
seksi.
"VIBRASTOP"-erikoisrakenteen ansiosta lisä
kahva vähentää tärinää.
► Ruuvaa lisäkahva [1-6] työtehtävän mukaan
sivukautta kierteeseen [1-3].
8.2 Hiomatarvikkeen asentaminen [4]
HUOMIO
Kuumasta ja terävästä työkalusta aiheutuva
loukkaantumisvaara
► Älä käytä täriseviä, tylsiä tai viallisia hio
matarvikkeita.
► Älä käytä hiomatarvikkeita, jos ne ovat al
tistuneet ennen asennusta kosteudelle, ve
delle tai korkeille lämpötiloille.
► Käytä työkäsineitä.
►
► Aseta pikakiinnitysmutteri hiomatarvikkee
►
►
►
► Tarkasta hiomatarvikkeen kiinnitys ja asen
► Koekäytä uusia hiomatarvikkeita noin mi
Irrotus tapahtuu päinvastaisessa järjestyksessä
[5a].
Aseta hiomatarvike karaan ja laippaan
[4-4].
Varmista, että laipan keskittävä korko sopii
tarkasti laikan aukkoon ja muodostaa säh
kötyökalun/karan ja laipan välisen pitävän
liitoksen.
Varmista, että sähkötyökalun karan halkai
sija vastaa hiomatarvikkeen reiän kokoa.
Taivutetut hiomatarvikkeet täytyy
asentaa niin, ettei niiden hiomapinta
ulotu suojuksen reunan tasoa pidem
mälle.
Huomioi hiomatarvikkeen ohjeenmukainen
pyörintäsuunta (hiomatarvikkeessa oleva
nuoli = laitteen rungossa oleva nuoli [4-1]).
seen ja karaan.
Paina laitteen taustapuolella olevaa ka
ran lukitsinta [4-5].
Kiristä pikakiinnitysmutteri kädellä.
Sulje pikakiinnitysmutterin sanka.
to sähkötyökalussa.
nuutin ajan kuormittamatta.
VAROITUS
Loukkaantumisvaara, jos hiomatarvike
asennetaan väärin
► Käännä pikakiinnitysmutterin sanka [4-3]
ylös vain, kun vaihdat hiomatarvikkeen.
► Varmista, että laippa [4-4] on kytketty ka
raan ennen hiomatarvikkeen asennusta.
Kiristä tai löysää kiinnitysmutteri vain kä
dellä. Sankaa ei saa missään tapauksessa
käyttää työkaluilla tehtävään kiristämiseen
tai löysäämisen.
Jos mutteria ei saa enää avattua kädellä,
mutterin saa löysätä vain laikka-avaimella
[5-1].
Jos sanka on irronnut tai vaurioitunut,
kiinnitysmutteria ei saa missään tapauk
sessa enää käyttää.
Käytä käyttötavan mukaan kyseiseen teh
tävään sopivaa suojusta.
► Ota akku pois sähkötyökalusta.
► Avaa pikakiinnitysmutterin sanka [4-3].
► Ruuvaa pikakiinnitysmutteri [4-2] irti kädel
lä.
8.3 Teräsharjojen asentaminen [6]
► Ota kahva [6-1] pois.
►
►
8.4 Suojuksen/katkaisusuojuksen
Suojus on asennettu valmiiksi paikalleen. Voit
säätää yksinkertaisella kääntöliikkeellä suojuk
sen asennon kyseiseen työtehtävään sopivaksi.
►
►
►
Asenna kahva käsisuojuksen [6-2] kans
sa.
Asenna teräsharjat [6-3] kunnolla kiin
nityskierteeseen [6-4].
Noudata teräsharjojen mukana toimitettuja
ohjeita.
sijoittaminen [7]
Pidä suojuksen lukitusvipua painettuna.
Säädä sähkötyökalun suojus niin, että ki
pinät ja sirut ohjautuvat kehosta poispäin.
Vapauta lukitusvipu ja käännä suojusta
edelleen, kunnes se lukittuu.
Lisätarvikkeena saatava katkaisusuojus si
joitetaan paikalleen samalla tavalla.
83
Page 84

Suomi
8.5 Suojuksen/katkaisusuojuksen irrottaminen [8]
HUOMIO
Loukkaantumisvaara kipinöiden ja katkaisu
laikasta murtuvien sirujen takia.
► Käytä katkaisuhionnassa lisätarvikkeena
saatavaa katkaisusuojusta: katso luku 9.2
► Irrota sähkötyökaluun asennettu hiomatar
vike: katso luku 8.2 .
►
►
►
Pidä suojuksen lukitusvipua painettuna.
Kun puristuspiste on ylitetty, käännä
suojusta eteenpäin.
Ota suojus pois sähkötyökalusta.
VAROITUS
Loukkaantumisvaara liikkuvan työkappaleen
takia
► Kiinnitä työkappale kunnolla paikalleen.
VAROITUS
Loukkaantumisvaara pään yläpuolella ole
vissa työkohteissa
► Käytä aina suojalaseja pään yläpuolella
olevissa työkohteissa.
► Käytä P2-hengityssuojainta.
Sähkötyökalun voi asettaa käyttötauon
ajaksi syrjään tukipisteiden [1-11] varaan.
8.6 Suojuksen/katkaisusuojuksen
asentaminen [9]
HUOMAUTUS
Kulumisjälkiä katkaisusuojuksessa.
► Tarkasta ennen moottorin käynnistämistä,
että hiomatarvike pääsee liikkumaan es
teettömästi. Hiomatarvike ei saa hangata
katkaisusuojukseen.
Käytä käyttötavan mukaan kyseiseen teh
tävään sopivaa suojusta.
►
►
Hiomatarvikkeen asentamiseksi, katso luku
8.2 .
Asenna suojus etuasentoon. Varmista,
että uros- ja naaraspontti ovat kohdakkain.
Käännä suojusta haluttuun asentoon,
kunnes lukitusvipu lukittuu automaattisesti.
9 Työskentely sähkötyökalulla
VAROITUS
Loukkaantumisvaara
► Ohjaa sähkötyökalu vain moottori käynnis
sä materiaaliin.
► Kiinnitä työkappale aina niin, ettei se pääse
liikkumaan työstön aikana.
► Älä pidä käsiä pyörivän hiomatarvikkeen
lähellä.
► Irrota kuljetusta varten hiomatarvike säh
kötyökalusta.
9.1 Hionta
Käytä hionnassa aina vakiovarustukseen kuulu
vaa suojusta.
Suojus on asennettu valmiiksi paikalleen. Suo
juksen irrotusohjeet ovat luvussa 8.5 .
9.2 Katkaisuhiominen
Käytä katkaisuhionnassa aina lisätarvikkeena
saatavaa katkaisusuojusta TSH-AGC 18-125.
Katkaisusuojus asennetaan, kohdistetaan ja ir
rotetaan samalla tavalla kuin tavanomainen
suojus, katso luku 8.5 ja 8.6 .
► Hio hiomatarvikkeella aina suoralinjaisesti
työkappaleen läpi.
Varmista, ettei hiomatarvike kanttaa ja ettei
siihen kohdistu viistoa tai sivusuuntaista
kuormitusta.
► Jos kyse on paksuseinämäisistä työkappa
leista, tee katkaisuhionta edestakaisin liik
kein ja paina samalla sähkötyökalua ke
vyesti.
9.3 Teräsharjoilla työskentely
VAROITUS
Silmien loukkaantumisvaara ympäriinsä sin
koutuvien sirujen/teräslankojen takia
► Käytä suojalaseja.
VAROITUS
Loukkaantumisvaara hiomatarvikkeesta
murtuvien sirujen takia
► Varmista, ettei hiomatarvikkeen viimeistä
sallittua käyttöpäivää ylitetä.
84
Käytä teräsharjauksessa aina lisätarvikkeena
saatavaa käsisuojusta HS-AGC18, katso luku
8.3 .
10 Varoitusäänimerkit
Jos sähkötyökalu kytkeytyy pois päältä seuraa
vien käyttötilojen takia, kuulet käynnistettäessä
varoitusäänen.
Page 85

EKAT
1
2
3
5
4
Suomi
Akkua ei hyväksytä
– Asenna oikea akkumalli.
Akku tyhjä
– Vaihda akku.
– Lataa akku.
Akku on viallinen
– Vaihda akku.
– Tarkasta akun jäähdyttyä sen toimintakyky
latauslaitteella.
Akku on ylikuumentunut
– Anna akun jäähtyä.
Sähkötyökalu on ylikuumentunut
– Sähkötyökalun jäähdyttyä sen voi ottaa uu
delleen käyttöön.
Sähkötyökalu on viallinen
– Ota yhteys Festool-huoltoon tai jälleenmyy
jään.
Sähkötyökalu on jumittunut
– Poista jumittuma.
Jos sähkötyökalu sammuu jumittuman ta
kia, siitä ei ilmoiteta varoitusäänellä.
11 Lisävarusteet ja tarvikkeet
Käytä vain alkuperäisiä Festool-tarvikkeita,
kuten määräystenmukaisen käytön ohjeissa
on kuvattu. Heikkolaatuisten käyttötarvikkeiden
ja muiden valmistamien tarvikkeiden käyttö
saattaa lisätä loukkaantumisvaaraa ja aiheuttaa
voimakasta epätasapainoa, mikä huonontaa
työtuloksen laatua ja lisää koneen kulumista.
Tarvikkeiden ja terien/työkalujen tuotenumerot
voit katsoa Festoolin tuoteoppaasta tai nettio
soitteesta "www.festool.fi".
12 Huolto ja hoito
VAROITUS
Loukkaantumisvaara, sähköiskuvaara
► Irrota aina akku sähkötyökalusta, ennen
kuin alat tehdä koneeseen liittyviä huoltoja kunnossapitotöitä.
► Kaikki sähkötyökalun rungon avaamista
edellyttävät huolto- ja korjaustyöt saa an
taa vain valtuutetun huoltokorjaamon teh
täväksi.
Anna vain valmistajan tai val
tuutetun huoltokorjaamon teh
dä huolto- ja korjaustyöt. Lä
himmän huoltopisteen voit kat
soa nettiosoitteesta: www.fes
tool.fi/huolto
Käytä vain alkuperäisiä Festoolvaraosia! Tuotenumerot voit
katsoa nettiosoitteesta:
www.festool.fi/huolto
Ilmankierron varmistamiseksi moottorin kote
lon jäähdytysilmarakojen täytyy olla aina vapai
ta ja puhtaita.
Mineraalisia materiaaleja (esim. kipsi, jne.)
työstettäessä sähkötyökalun rungon sisään ja
käynnistys-/sammutuskytkimeen voi kertyä pö
lyä, joka kovettuu ilmankosteuden vaikutukses
ta. Tämä saattaa häiritä kytkentämekanismin
toimintaa ja sähkötyökalu voi ylikuumentua.
Metallin työstössä sähkötyökalun sisään saat
taa kertyä sähköä johtavaa pölyä. Tämä voi ai
heuttaa oikosulun.
► Puhdista jokaisen työtehtävän jälkeen säh
kötyökalun sisäosa tuuletusaukkojen kautta
ja käynnistys-/sammutuskytkin kuivalla ja
öljyttömällä paineilmalla.
Puhdista hiomatarvikkeet käytön jälkeen.
Pidä sähkötyökalun, latauslaitteen ja akun lii
täntäkoskettimet puhtaina.
13 Ympäristö
Älä heitä käytöstä poistettua konetta ta
lousjätteiden joukkoon! Toimita käytös
tä poistetut laitteet, tarvikkeet ja pak
kaukset ympäristöystävälliseen kierrätykseen.
Noudata voimassaolevia kansallisia määräyk
siä.
Vain EU: käytöstä poistettuja sähkö- ja elektro
niikkalaitteita koskevan eurooppalaisen direk
tiivin ja sitä vastaavan kansallisen lainsäädän
nön mukaan loppuun käytetyt sähkötyökalut
täytyy kerätä erikseen talteen ja toimittaa ym
päristöä säästävään kierrätykseen.
REACh:iin liittyvät tiedot: www.festool.com/
reach
14 Yleisiä ohjeita
14.1
Bluetooth
Tavaramerkki Bluetooth® ja logot ovat rekiste
röityjä tavaramerkkejä, jotka omistaa Bluetooth
SIG, Inc. ja joita TTS Tooltechnic Systems AG &
Co. KG ja Festool käyttävät lisenssillä.
®
85
Page 86

Dansk
Indholdsfortegnelse
1 Symboler................................................... 86
2 Sikkerhedsanvisninger............................. 86
3 Bestemmelsesmæssig brug.....................90
4 Tekniske data............................................ 90
5 Produktets elementer...............................90
6 Ibrugtagning..............................................91
7 Batteri........................................................91
8 Indstillinger............................................... 91
9 Arbejde med el-værktøjet.........................93
10 Akustiske advarselssignaler.....................93
11 Tilbehør..................................................... 94
12 Vedligeholdelse og pleje........................... 94
13 Miljø...........................................................94
14 Generelle henvisninger.............................94
1 Symboler
Advarsel om generel fare
Advarsel om elektrisk stød
Brugsanvisning, læs sikkerhedsanvis
ningerne!
Brug høreværn!
Brug beskyttelseshandsker!
Brug åndedrætsværn!
Brug beskyttelsesbriller!
Bær solidt fodtøj!
Må ikke bortskaffes sammen med al
mindeligt husholdningsaffald.
Tip, Bemærk
Handlingsanvisning
Indsætning af batteri
Frigørelse af batteri
CE-mærkning: Bekræfter, at el-værk
tøjet er i overensstemmelse med EUdirektiverne.
2 Sikkerhedsanvisninger
2.1 Generelle sikkerhedsanvisninger ADVARSEL!Læs alle sikkerhedsanvisnin
ger og vejledninger. Overholdes sikker
hedsanvisningerne og vejledningerne ikke, er
der risiko for elektrisk stød, brand og/eller al
vorlige kvæstelser.
Opbevar alle sikkerhedsanvisninger og vejled
ninger til senere brug.
Med begrebet "el-værktøj", som anvendes i sik
kerhedsanvisningerne, menes ledningsdrevet
el-værktøj (med netkabel) og batteridrevet elværktøj (uden netkabel).
Læs brugsanvisningen til batteriladeren og
batteriet.
2.2 Maskinspecifikke
sikkerhedsanvisninger
Fælles sikkerhedsanvisninger om slibning, ar
bejde med trådbørster og vinkelslibning
– Dette el-værktøj skal benyttes som slibe
maskine, trådbørste og skære-/slibema
skine. Overhold alle sikkerhedsanvisnin
ger, vejledninger, illustrationer og data,
som du modtager sammen med maskinen.
Hvis følgende anvisninger ikke overholdes,
kan der opstå elektrisk stød, brand og/eller
alvorlige skader.
– Dette el-værktøj er ikke egnet til sandpa
pirsslibning og polering. Formål, som elværktøjet ikke er beregnet til, kan medføre
farlige situationer og personskader.
– Brug ikke tilbehør, som ikke er godkendt
og anbefalet af producenten til dette elværktøj. At du kan fastgøre tilbehøret til
el-værktøjet, betyder ikke, at anvendelsen
er sikker.
– Værktøjets tilladte omdrejningstal skal
være mindst lige så højt som det maksi
male omdrejningstal, der er angivet på elværktøjet. Tilbehør, der drejer hurtigere
end tilladt, kan gå i stykker og flyve om
kring.
– Værktøjets udvendige diameter og tykkel
se skal svare til el-værktøjets målspecifi
kationer. Forkert dimensionerede værktø
jer kan ikke afskærmes eller kontrolleres
tilstrækkeligt.
– Indsatsværktøjer med gevindindsats skal
passe nøjagtigt på slibespindlens gevind.
Indsatsværktøjer, der monteres midt på
flangen, skal have en huldiameter, der
passer til flangens holderdiameter. Ind
satsværktøj, som ikke fastgøres nøjagtigt
86
Page 87

Dansk
på el-værktøjet, roterer uensartet, vibrerer
kraftigt og kan føre til, at du mister kon
trollen.
– Brug aldrig beskadiget indsatsværktøj.
Kontrollér altid indsatsværktøjet før brug,
herunder slibeskiver for splintring og rev
ner, bagskiver for revner, slid eller kraftig
slitage samt trådbørster for løse eller
knækkede tråde. Hvis el-værktøjet eller
indsatsværktøjet falder ned, skal du kon
trollere, om det er beskadiget eller bruge
et nyt indsatsværktøj. Når du har kontrol
leret og isat indsatsværktøjet, skal du hol
de dig og andre personer på sikker af
stand af det roterende indsatsværktøjs
område og lade maskinen køre med mak
simalt omdrejningstal i 1 minut. Hvis ind
satsværktøjet er beskadiget, vil det normalt
gå i stykker inden for dette tidsrum.
– Brug personlige værnemidler. Brug alt ef
ter anvendelse ansigtsskærm, øjenværn
eller beskyttelsesbriller. Brug om nød
vendigt støvmaske, høreværn, beskyttel
seshandsker eller specialforklæde, som
holder små slibe- og materialepartikler
væk fra dig.Øjnene skal beskyttes mod om
kringflyvende fremmedlegemer, som kan
opstå ved forskellige anvendelser. Støv- el
ler åndedrætsmasken skal filtrere det støv,
der opstår under anvendelsen. Hvis du er
udsat for høj støj i længere tid, kan du få
høretab.
– Sørg for, at andre personer opholder sig i
sikker afstand af arbejdsområdet. Alle,
der betræder arbejdsområdet, skal bruge
personlige værnemidler. Brudstykker fra
arbejdsemnet eller knækkede indsats
værktøjer kan blive slynget ud og medføre
personskader, også uden for det direkte
arbejdsområde.
– Hold kun om el-værktøjet på de isolerede
grebsflader under udførelse af arbejde,
hvor der er risiko for, at indsatsværktøjet
kan ramme skjulte strømledninger. Berø
ring af spændingsførende ledninger kan
også sætte metaldele under spænding og
medføre elektrisk stød.
– Læg aldrig el-værktøjet til side, før værk
tøjet står helt stille. Det roterende værktøj
kan komme i kontakt med arbejdspladen,
så du mister kontrollen over el-værktøjet.
– Lad ikke el-værktøjet køre, mens det bæ
res. Dit tøj kan blive fanget ved tilfældig
kontakt med det roterende værktøj, og ind
satsværktøjet kan bore sig ind i kroppen.
– Rengør regelmæssigt el-værktøjets venti
lationsåbninger. Motorblæseren trækker
støv ind i huset, og stor ophobning af me
talstøv kan medføre elektriske risici.
– Anvend ikke el-værktøjet i nærheden af
brændbare materialer. Gnister kan antæn
de disse materialer.
– Anvend ikke indsatsværktøjer, der kræver
flydende kølemidler. Brug af vand eller
andre flydende kølemidler kan medføre
elektrisk stød.
Tilbageslag og tilsvarende sikkerhedsanvis
ninger
Tilbageslag er en pludselig reaktion som følge
af et fanget eller blokeret roterende indsats
værktøj som slibeskive, bagskive, trådbørste
osv. Når et roterende indsatsværktøj bliver fan
get eller blokeret, vil det stoppe pludseligt.
Derved vil et ukontrolleret el-værktøj blive ac
celereret mod indsatsværktøjets omdrejnings
retning på blokeringsstedet.
Hvis f.eks. en slibeskive sætter sig fast eller
blokeres i emnet, kan kanten af slibeskiven,
som dykker ned i emnet, blive fanget, hvorved
slibeskiven brækker af eller forårsager et tilba
geslag. Slibeskiven bevæger sig så imod eller
væk fra brugeren, afhængigt af skivens omdrej
ningsretning på blokeringsstedet. Derved kan
slibeskiver også brække.
Et tilbageslag er følge af en forkert brug af elværktøjet. Det kan forhindres ved hjælp af pas
sende forsigtighedsforanstaltninger som be
skrevet i det følgende.
– Hold godt fast i el-værktøjet, og sørg for,
at både krop og arme befinder sig i en po
sition, der kan klare tilbageslagskræfter
ne. Brug altid det ekstra håndgreb, hvis et
sådant findes, for at have så meget kon
trol som muligt over tilbageslagskræfter
ne eller reaktionsmomenterne, når ma
skinen starter. Brugeren kan beherske til
bageslags- og reaktionskræfterne, hvis der
træffes egnede sikkerhedsforanstaltninger.
– Placer aldrig hånden i nærheden af rote
rende værktøj. Værktøjet kan bevæge sig
hen over hånden ved tilbageslag.
– Undgå med din krop det område, som el-
værktøjet bevæges ind i ved et tilbage
slag. Tilbageslaget driver el-værktøjet i
den modsatte retning af slibeskivens bevæ
gelse på blokeringsstedet.
– Arbejd særligt forsigtigt ved hjørner,
skarpe kanter osv. Undgå, at værktøjet
springer tilbage fra arbejdsemnet og sæt
87
Page 88

Dansk
ter sig fast. Det roterende værktøj har en
tendens til at sætte sig fast ved hjørner og
skarpe kanter, eller hvis det springer tilba
ge. Dette medfører tilbageslag, eller at du
mister kontrollen over el-værktøjet.
– Brug ikke savklinger med kæde eller tæn
der. Sådant indsatsværktøj fører hyppigt til
tilbageslag, eller at man mister kontrollen
over el‑værktøjet.
Særlige sikkerhedsanvisninger om slibning og vinkelslibning
– Brug udelukkende de slibeværktøjer, der
er godkendt til dit el-værktøj og kun den
beskyttelsesskærm, der er beregnet til
disse slibeværktøjer. Slibeværktøjer, der
ikke er beregnet til el-værktøjet, kan ikke
afskærmes tilstrækkeligt og er usikre.
– Forkrøppede slibeskiver skal monteres,
så deres slibeflade ikke rager længere ud
end det plan, hvori beskyttelsesskærmens
kant befinder sig. En ukorrekt monteret
slibeskive, der rager længere ud end be
skyttelsesskærmens kant, kan ikke af
skærmes tilstrækkeligt.
– Beskyttelsesskærmen skal være anbragt
sikkert på el-værktøjet og indstillet til
størst mulig sikkerhed, så den mindst mu
lige del af slibeskiven/slibestiften vender
åbent mod brugeren. Beskyttelsesskær
men hjælper til at beskytte brugeren mod
brudstykker, tilfældigt kontakt med slibe
skiven/slibestiften samt gnister, der ville
kunne antænde tøjet.
– Slibeskiver/slibestifter må kun anvendes
til de angivne formål. Et eksempel: Slib
aldrig med sidefladen af en skæreskive.
Skæreskiver er bestemt til materialeafslib
ning med kanten på skiven. Udsættes disse
slibeskiver/slibestifter for sidevendt kraft
påvirkning, kan de ødelægges.
– Anvend altid intakte spændeflanger i kor
rekt størrelse og form til den valgte slibe
skive. Egnede flanger støtter slibeskiven
og reducerer således faren for, at slibeski
ven knækker. Flanger til skæreskiver kan
adskille sig fra flangerne til andre slibeski
ver.
– Brug ikke nedslidte slibeskiver fra større
el-værktøjer. Slibeskiver til større maski
ner er ikke beregnet til de mindre maskin
ers højere omdrejningstal og kan brække.
Flere særlige sikkerhedsanvisninger om vin
kelslibning
– Undgå at udøve for stort tryk, og at skære
skiven blokeres. Forsøg ikke at lave me
get dybe snit. En overbelastning af skære
skiven øger belastningen på den samt ten
densen til at klemme eller blokere og der
med muligheden for et tilbageslag eller et
brud på indsatsværktøjet.
– Undgå området foran og bagved den rote
rende skæreskive. Bevæger du skæreski
ven i emnet væk fra dig selv, kan el‑værk
tøjets roterende skive slynges direkte ind
mod dig i tilfælde af et tilbageslag.
– Sidder skæreskiven i klemme, eller afbry
der du arbejdet, skal du slukke maskinen
og holde den roligt, indtil skiven er stop
pet. Forsøg aldrig at trække skæreskiven
ud af snittet, mens den roterer, da dette
kan føre til, at maskinen slår tilbage. Find
årsagen til, at skiven sidder i klemme, og
afhjælp fejlen.
– Tænd ikke el-værktøjet igen, så længe det
befinder sig i arbejdsemnet. Lad først
skæreskiven opnå det fulde omdrejnings
tal, før du forsigtigt fortsætter skæringen.
I modsat kan skiven sætte sig fast, springe
ud af emnet eller forårsage et tilbageslag.
– Understøt plader eller store emner for at
mindske risikoen for tilbageslag på grund
af en skæreskive, der sidder fast.Store ar
bejdsemner kan bøje ned på grund af deres
egenvægt. Emnet skal støttes på begge si
der af skiven, både i nærheden af skære
snittet og ved kanten.
– Vær særligt forsigtig med "lommesnit" i
eksisterende vægge eller andre områder,
som ikke kan overskues.Den inddykkende
skæreskive kan forårsage et tilbageslag
ved skæring i gas- eller vandledninger,
elektriske ledninger eller andre objekter.
Særlige sikkerhedsanvisninger om arbejde med trådbørster
– Bemærk, at trådbørsten også mister tråd
stykker under normal brug. Overbelast ik
ke trådene ved at trykke for hårdt. Om
kringflyvende trådstykker kan meget let
trænge igennem tyndt tøj og/eller huden.
– Når beskyttelsesskærm anbefales, skal
det forhindres, at trådbørsten kan berøre
beskyttelsesskærmen. Tallerken- og kop
stålbørsters diameter kan øges som følge
af tryk og centrifugalkræfter.
88
Page 89

Dansk
2.3 Yderligere sikkerhedsanvisninger – Brug ikke el-værktøjet i regnvejr eller i
fugtige omgivelser. Fugt i el-værktøjet kan
føre til kortslutning og brand.
– Før kun el-værktøjet ind i materialet i
tændt (kørende) tilstand.
– Af hensyn til sikkerheden skal arbejdsem
net spændes op i en skruestik eller en an
den spændeanordning. Når emnet er
spændt fast, har man begge hænder fri til
at betjene el-værktøjet.
– Arbejd ikke på en stige.
– Skær ikke over metalgenstande, søm eller
skruer.
– Anvend egnede detektorer for at identifi
cere skjulte forsyningsledninger, eller
spørg det lokale forsyningsselskab. Hvis
indsatsværktøjet får kontakt med en spæn
dingsførende ledning, kan det medføre
brand og elektrisk stød. Beskadigelse af en
gasledning kan medføre en eksplosion.
Gennemtrængning af et vandrør medfører
materielle skader.
– Under arbejdet kan der dannes skadeligt/
giftigt støv (f.eks. blyholdig maling, visse
træsorter og metal). Asbestholdige mate
rialer må kun bearbejdes af sagkyndige
personer. Berøring eller indånding af dette
støv kan være til fare for brugeren eller
personer, som opholder sig i nærheden.
Overhold de til enhver tid gældende natio
nale sikkerhedsforskrifter.
Brug af tilbehør, der ikke er godkendt af
producenten, kan medføre elektrisk stød
og/eller alvorlige ulykker.
2.4 Sikkerhedsanvisninger om slibeværktøjer
– Slibeværktøjer er følsomme over for brud,
og derfor kræver slibeværktøjer en over
ordentlig forsigtig behandling! Brug af be
skadigede, forkert opspændte eller isatte
slibeværktøjer er farlig og kan resultere i
alvorlige kvæstelser.
– Under opbevaring må slibeværktøj ikke ud
sættes for mekaniske beskadigelser og
skadelige miljøpåvirkninger.
– Slibeværktøjer skal behandles og transpor
teres med omhu.
– Overhold oplysningerne på etiketten eller
på slibeværktøjet samt anvendelsesbe
grænsninger, sikkerhedsanvisninger eller
øvrige henvisninger. Ved uklarhed om valg
et af slibeværktøjer skal brugeren indhente
information hos producenten inden brugen.
– Slibeværktøjer skal monteres i overens
stemmelse med kapitel 8.2 .
– Kun sagkyndige personer må montere sli
beværktøjer.
2.5 Emissionsværdier
Værdierne, som er fundet i henhold til EN
60745 er typisk:
Lydtrykniveau LPA = 86 dB(A)
Lydeffekt LWA = 97 dB(A)
Brug en P2-åndedrætsmaske for at
undgå skade på helbredet.
– Efter bearbejdning af mineralske materia
ler (f.eks. gips, …): Blæs el-værktøjet
igennem indvendigt igennem ventilations
åbningerne inklusive kontaktelementet
med tør og oliefri trykluft. Ellers kan støv
sætte sig inde i el-værktøjet og omkring
start-stop-kontakten og hærde i forbindel
se med luftfugtighed. Dette kan hæmme
kontaktmekanismens funktion, og el-værk
tøjet kan blive overophedet.
– Efter bearbejdning af metal: Blæs el-
værktøjet igennem indvendigt gennem
ventilationsåbningerne med tør og oliefri
trykluft. I modsat fald kan ledende støv af
lejres inde i el-værktøjet. Dette kan resul
tere i en kortslutning.
– Brug ikke strømforsyninger eller batteri
er fra andre leverandører til at drive ak
ku-el-værktøjet. Brug ikke ladere fra an
dre leverandører til at oplade batterierne.
Usikkerhed K = 3 dB
FORSIGTIG
Støj, der opstår ved arbejdet
Beskadigelse af hørelsen
► Brug høreværn.
Vibrationsemissionsværdi ah (vektorsum fra tre
retninger) og usikkerhed K målt iht. EN 60745:
Slibning
ah = 5 m/s
K = 2 m/s
Vinkelslibning
ah ≤ 2,5 m/s
K = 2 m/s
De angivne emissionsværdier (vibration, støj)
– bruges til sammenligning af maskiner,
2
2
2
2
89
Page 90

Dansk
– men kan også bruges til en foreløbig be
dømmelse af vibrations- og støjbelastnin
gen ved brug
– og repræsenterer de vigtigste anvendel
sesformål for el-værktøjet.
Andre anvendelser, som f.eks. trådbørster, kan
føre til andre svingningsemissionsværdier.
FORSIGTIG
Emissionsværdierne kan afvige fra de angiv
ne værdier. Dette afhænger af, hvordan
værktøjet anvendes og hvilken type emne,
der bearbejdes.
► Der skal tages højde for den faktiske be
lastning i hele driftscyklussen.
► Alt efter den faktiske belastning skal der
træffes egnede sikkerhedsforanstaltninger
for at beskytte brugeren.
3 Bestemmelsesmæssig brug
El-værktøjet er beregnet til vinkelslibning, let
slibning, arbejde med trådbørster og afgratning
af metal- og stenmaterialer uden brug af fly
dende køle- og smøremidler.
Anvend den beskyttelsesskærm, der er bereg
net til den aktuelle anvendelse.
Der må kun anvendes bundne skære- og slibe
skiver iht. EN 12413, diamantskæreskiver iht.
EN 13236 samt trådbørster iht. EN 1083.
Anvend ikke dette el-værktøj til polering, til
slibning af overflader med diamantskiver og
anvendelser med diamant- og hårdkeramik
skiver.
Fræsehjul, hårdmetal- og spåntagende slibe
værktøjer (med geometrisk bestemt skær) er
udelukket fra anvendelse.
El-værktøjet er beregnet til brug sammen med
Festool-batterierne i serien BP af samme
spændingsklasse.
Ved ikke-bestemmelsesmæssig anven
delse hæfter brugeren.
4 Tekniske data
Akku-vinkelsliber AGC 18
Omdrejningstaltrin 1 4500 o/min
2 5300 o/min
3 6100 o/min
4 6900 o/min
5 7700 o/min
6 8500 o/min
Periferihastighed sli
beværktøj
Slibespindelgevind M 14
Slibeværktøjs-Ø 125 mm
Slibeværktøjstykkelsemaks. 6,0 mm
min. 1,0 mm
Vægt iht. EPTA-pro
cedure 01:2014
80 m/s
2,7 kg
5 Produktets elementer
[1-1]
[1-2]
[1-3]
[1-4]
[1-5]
[1-6]
[1-7]
[1-8]
[1-9]
[1-10]
[1-11]
Det viste eller beskrevne tilbehør er til dels ik
ke en del af leveringen.
De angivne illustrationer findes i starten af
brugsanvisningen.
5.1 Elektronik
Beskyttelsesskærm
Spindellås
Gevind til ekstra håndgreb
Hastighedsregulering
Start-stop-kontakt
Ekstra håndgreb
Isolerede grebsflader (gråt område)
Knapper til frigørelse af batteriet
Tast, kapacitet på batteriet
Kapacitetsindikator
Støttepunkter
Akku-vinkelsliber AGC 18
Motorspænding 18 V DC
Omdrejningstal (ube
lastet)
90
4500-8500 o/min
Blød opstart
Den elektronisk regulerede bløde opstart sør
ger for rykfri start af el-værktøjet.
Hastighedsregulator [1-4]
Omdrejningstallet kan indstilles trinløst med
indstillingshjulet i omdrejningstalområdet. På
den måde kan hastigheden indstilles optimalt i
forhold til det pågældende materiale. Se i den
forbindelse oplysningerne på slibeværktøjerne.
Page 91

Dansk
Konstant omdrejningstal
Det indstillede omdrejningstal holdes konstant
ved hjælp af elektronikken. Derved holdes en
jævn hastighed også under belastning.
Tilbageslagsbeskyttelse
Ved pludselig reducering af omdrejningstal,
f.eks. som følge af blokering i et skæresnit, fra
kobles motoren omgående. For at genstarte
skal el-værktøjet først afbrydes og derefter
tændes igen.
Beskyttelse mod genstart
Den indbyggede beskyttelse mod genstart for
hindrer, at el-værktøjet ved kontinuerlig drift
starter af sig selv igen efter en strømafbrydel
se. For at genstarte skal el-værktøjet først af
brydes og derefter tændes igen.
Overophedningsbeskyttelse
Ved overophedning skifter sikkerhedselektro
nikken om til driftstypen køling. Motoren kører
videre, og det konstante omdrejningstal deakti
veres. Efter en afkølingsfase på ca. 10-20 sek.
er maskinen igen driftsklar og tåler fuld belast
ning.
Kontakten er frigjort, og el-værktøjet er sluk
ket.
ADVARSEL
Fare for personskade som følge af tilbage
slag eller udslyngede dele
► Inden du lægger el-værktøjet fra dig, skal
du vente, indtil det roterende slibeværktøj
er standset helt.
► Læg el-værktøjet på støttepunkterne
[1-11].
7 Batteri
► Isætning af batteri [3a]
► Udtagning af batteri [3b]
7.1 Kapacitetsindikator
Kapacitetsindikatoren [1-10] viser batteriets la
detilstand i ca. 2 s, når der trykkes på knap
pen [1-9]:
70‑100%
40‑70%
6 Ibrugtagning
6.1 Hold el-værktøjet rigtigt
Hold el-værktøjet med to hænder på de isolere
de grebsflader [1-7]: Den ene hånd på motor
huset bag kontakten og den anden hånd på det
ekstra håndgreb [1-6].
6.2 Til-/frakobling Tænd [2a]
► Skub start-stop-kontakten [1-5] fremad.
Når der samtidigt trykkes på den forreste
kontaktdel, låses startstop- kontakten.
Start-stop-kontakten [1-5] er låst, og el-værk
tøjet er tændt.
Sæt først maskinen an mod materialet,
når den har nået driftsomdrejningstallet.
Indstilling af omdrejningstal
Omdrejningstallet kan indstilles i 6 trin svaren
de til de krav, arbejdsemnet stiller.
► Indstil hastighedsregulatoren [1-4] på det
ønskede trin.
Sluk [2b]
► Tag el-værktøjet ud af materialet, der bear
bejdes.
► Tryk på den bageste del af start-stop-kon
takten [1-5].
15‑40%
< 15%
*
Anbefaling: Oplad batteriet, før det bruges
igen.
Yderligere information om batteri og bat
terilader findes i brugsanvisningerne til
batteriet og batteriladeren.
*
8 Indstillinger
ADVARSEL
Risiko for personskader
► Tag batteriet af før alt arbejde på el-værk
tøjet.
8.1 Montering af ekstra håndgreb [1-6]
Anvend altid det ekstra håndgreb for at
garantere en sikker og mindre trættende
arbejdsstilling.
Ved hjælp af den specielle konstruktion "VI
BRASTOP" reduceres vibrationerne gennem det
ekstra håndgreb.
► Skru det ekstra håndgreb [1-6] ind i gevin
det [1-3] i siden afhængigt af arbejdsmå
den.
91
Page 92

Dansk
8.2 Montering af slibeværktøj [4]
FORSIGTIG
Risiko for kvæstelser på grund af varmt og
skarpt værktøj
► Brug ikke vibrerende, sløve eller defekte
slibeværktøjer.
► Brug ikke slibeværktøjer, som inden mon
teringen har været udsat for stærk fugtig
hed, væde eller høje temperaturer.
► Brug beskyttelseshandsker.
ADVARSEL
Fare for personskade som følge af forkert
monteret slibeværktøj
► Klap kun bøjlegrebet [4-3] på lynspænde
møtrikken ud ved udskiftning af slibeværk
tøjet.
► Sørg for, at flangen [4-4] er sat på spind
len, inden slibeværktøjet monteres.
Møtrikken for bagskive må kun spændes
eller løsnes med hånden. Der må under
ingen omstændigheder benyttes værktøj til
at spænde eller løsne bøjlegrebet.
Hvis møtrikken ikke kan løsnes med hånd
en mere, må den kun løsnes med en tap
nøgle [5-1].
Hvis bøjlegrebet er løst eller beskadiget,
må møtrikken for bagskiven ikke bruges
længere.
Vær opmærksom på slibeværktøjets fore
skrevne omdrejningsretning (pil på slibe
værktøjet = pil på maskinens hus [4-1]).
► Sæt lynspændemøtrikken på slibeværktøj
og spindel.
►
►
►
► Kontrollér, at slibeværktøjet sidder ordent
► Test nye slibeværktøjer ved at lade dem kø
Afmonteringen foregår i omvendt rækkefølge
[5a].
8.3 Montering af trådbørster [6]
► Tag grebet [6-1] af.
►
►
8.4 Positionering af beskyttelsesskærm/
Beskyttelsesskærmen er formonteret. Beskyt
telsesskærmens position kan tilpasses til ar
bejdsprocessens krav blot ved at dreje den.
Tryk på spindellåsen [4-5] på maskinens
bagside.
Spænd lynspændemøtrikken med hånd
en.
Luk bøjlegrebet på lynspændemøtrik
ken.
ligt fastgjort på el-værktøjet.
re ca. 1 minut uden belastning.
Monter grebet med håndbeskyttelse
[6-2].
Monter trådbørsten [6-3] sikkert på hol
dergevindet [6-4].
Følg anvisningerne, der følger med trådbør
sten.
skærebeskyttelsesskærm [7]
Anvend den beskyttelsesskærm, der er
beregnet til den aktuelle anvendelse.
► Tag batteriet af el-værktøjet.
► Åbn bøjlegrebet [4-3] på lynspændemøtrik
ken.
► Skru lynspændemøtrikken [4-2] af med
hånden.
►
Sæt slibeværktøjet på spindel og flange
[4-4].
Sørg for, at flangens centreringsafsats pas
ser nøjagtigt ind i skiveåbningen, og at elværktøj/spindel og flange stemmer form
sluttende overens.
Sørg for, at el-værktøjets spindel i diameter
stemmer overens med slibeværktøjets bo
ring.
Forkrøppede slibeværktøjer skal mon
teres, så deres slibeflade ikke rager
længere ud end det plan, hvori beskyt
telsesskærmens kant befinder sig.
►
►
►
8.5 Afmontering af beskyttelsesskærm/
Hold beskyttelsesskærmens låsearm
trykket ind.
Indstil el-værktøjets beskyttelses
skærm, så gnister og slibepartikler ledes
væk fra kroppen.
Slip låsegrebet, og drej beskyttelses
skærmen videre, indtil den går i indgreb.
Skærebeskyttelsesskærmen, der fås som
tilbehør, kan positioneres på samme må
de.
skærebeskyttelsesskærm [8]
FORSIGTIG
Risiko for personskader som følge af flyven
de gnister og brækkede skæreskiver.
► Til vinkelslibning anvendes skærebeskyt
telsesskærmen, der fås som tilbehør: Se
kapitel 9.2
92
Page 93

► Afmonter allerede monteret slibeværktøj
fra el-værktøjet: Se kapitel 8.2 .
►
►
►
8.6 Montering af beskyttelsesskærm/
Hold beskyttelsesskærmens låsearm
trykket ind.
Drej beskyttelsesskærmen fremad, når
trykpunktet er overvundet.
Tag beskyttelsesskærmen af el-værktø
jet.
skærebeskyttelsesskærm [9]
BEMÆRK
Dansk
ADVARSEL
Fare for personskade ved arbejde over hove
det
► Brug altid beskyttelsesbriller ved arbejde
over hovedet.
► Bær P2-åndedrætsværn.
Når el-værktøjet ikke er i brug, kan det
lægges på støttepunkterne [1-11].
► Fjern slibeværktøjet fra el-værktøjet inden
transport.
Tegn på slid på skærebeskyttelsesskærmen.
► Kontrollér inden tilkobling, om slibeværk
tøjet kan bevæge sig frit. Slibeværktøjet må
ikke slæbe imod skærebeskyttelsesskær
men.
Anvend den beskyttelsesskærm, der er
beregnet til den aktuelle anvendelse.
►
►
Vedr. montering af slibeværktøjet, se kapitel
8.2 .
Sæt beskyttelsesskærmen ind i forreste
position. Vær da opmærksom på, at tap- og
notpositionen stemmer overens.
Drej beskyttelsesskærmen til den øn
skede position, indtil låsearmen går i ind
greb af sig selv.
9 Arbejde med el-værktøjet
ADVARSEL
Risiko for personskader
► Før kun el-værktøjet ind i materialet i
tændt (kørende) tilstand.
► Fastgør emnet, så det ikke kan bevæge sig
under bearbejdningen.
► Hold hænderne væk fra det drejende slibe
værktøj.
ADVARSEL
Fare for personskade som følge af skørt sli
beværktøj
► Vær opmærksom på, at slibeværktøjets ud
løbsdato ikke er udløbet.
9.1 Slibning
Anvend altid den medfølgende beskyttelses
skærm ved slibning.
Beskyttelsesskærmen er formonteret. Vedr. af
montering af beskyttelsesskærmen, se kapitel
8.5 .
9.2 Vinkelslibning
Til vinkelslibning anvendes altid skærebeskyt
telsesskærmen TSH-AGC 18-125, der fås som
tilbehør.
Skærebeskyttelsesskærmen monteres, positio
neres og tages af på samme måde som beskyt
telsesskærmen, se kapitel 8.5 og 8.6 .
► Før altid slibeværktøjet lige gennem ar
bejdsemnet.
Sørg for, at slibeværktøjet ikke sætter sig
fast eller bliver belastet skråt eller side
værts.
► Ved tykvæggede arbejdsemner skal der la
ves et skæresnit ved at føre el-værktøjet
med oscillerende bevægelser og under let
tryk.
9.3 Arbejde med trådbørster
ADVARSEL
Fare for øjenskader som følge af vækflyven
de dele/tråde
► Brug beskyttelsesbriller.
Ved arbejde med trådbørster skal man altid be
nytte håndbeskyttelsen HS-AGC18, der fås som
tilbehør, se kapitel
8.3 .
10 Akustiske advarselssignaler
ADVARSEL
Fare for personskade som følge af arbejds
emne i bevægelse
► Fastgør emnet sikkert.
Hvis el-værktøjet afbrydes på grund af følgende
driftstilstande, lyder et advarselssignal, når
man tænder det.
Batteri ikke accepteret
– Læg den rigtige batterimodel i.
Batteri tomt
93
Page 94

EKAT
1
2
3
5
4
Dansk
– Skift batteriet.
– Oplad batteriet.
Batteri defekt
– Skift batteriet.
– Lad batteriet køle af, og kontrollér dets
funktionsevne med batteriladeren.
Batteri overophedet
– Lad batteriet køle af.
El-værktøjet er overophedet
– Efter afkøling kan el-værktøjet tages i drift
igen.
El-værktøj defekt
– Kontakt Festool serviceværksted eller for
handler.
El-værktøj blokeret
– Afhjælp blokaden.
Der lyder ikke noget advarselssignal, når
el-værktøjet slukker på grund af en bloka
de.
11 Tilbehør
Brug udelukkende originalt tilbehør fra Fe
stool som beskrevet i afsnittet om bestemmel
sesmæssig brug. Anvendelsen af ringere ind
satsværktøjer og tilbehørsdele fra andre produ
center kan medføre større fare for personska
der og betydelig ubalance, så arbejdets kvalitet
forringes, og maskinen slides mere.
Artikelnumrene for tilbehør og værktøj kan du
finde i dit Festool-katalog eller på internettet
under "www.festool.dk".
12 Vedligeholdelse og pleje
ADVARSEL
Risiko for kvæstelser, elektrisk stød
► Tag altid batteriet ud af el-værktøjet før
vedligeholdelses- og servicearbejde.
► Vedligeholdelses- og reparationsarbejde,
der kræver, at el-værktøjet åbnes, må kun
foretages af et autoriseret serviceværk
sted.
Kundeservice og reparation må
kun udføres af producenten el
ler serviceværksteder. Nærme
ste adresse findes på: www.fe
stool.dk/service
Brug kun originale Festool-re
servedele! Artikelnr. findes på:
www.festool.dk/service
For at sikre luftcirkulationen skal køleluftåb
ningerne i motorhuset altid holdes frie og rene.
Ved bearbejdning af mineralske materialer
(f.eks. gips, ...) kan støv sætte sig inde i elværktøjet og omkring start-stop-kontakten og
hærde i forbindelse med luftfugtighed. Dette
kan hæmme kontaktmekanismens funktion, og
el-værktøjet kan blive overophedet.
Ved bearbejdning af metal kan ledende støv af
lejres inde i el-værktøjet. Dette kan resultere i
en kortslutning.
► Blæs tør og oliefri trykluft igennem el-
værktøjets ventilationsåbninger og startstop-kontakten efter hver bearbejdning.
Rengør slibeværktøjerne efter brug.
Hold kontakterne på el-værktøjet, batterilade
ren og batteriet rene.
13 Miljø
Maskinen må ikke bortskaffes med al
mindeligt husholdningsaffald! Udstyr,
tilbehør og emballage skal bortskaffes
miljømæssigt korrekt på en kommunal gen
brugsstation. Gældende nationale forskrifter
skal overholdes.
Kun EU: Ifølge Rådets direktiv om affald af
elektrisk og elektronisk udstyr og gennemfø
relse i national ret skal gammelt el-værktøj
indsamles separat og afleveres til miljøvenlig
genvinding.
Informationer om REACh: www.festool.com/
reach
14 Generelle henvisninger
14.1
Bluetooth
Ordmærket Bluetooth® og logoerne er registre
rede varemærker tilhørende Bluetooth SIG, Inc.
og anvendes af TTS Tooltechnic Systems AG &
Co. KG og Festool under licens.
®
94
Page 95

Norsk
Innholdsfortegnelse
1 Symboler................................................... 95
2 Sikkerhetsinformasjon..............................95
3 Riktig bruk.................................................99
4 Tekniske data............................................ 99
5 Apparatets deler....................................... 99
6 Igangsetting.............................................100
7 Batteripakke............................................100
8 Innstillinger............................................. 100
9 Arbeide med elektroverktøyet................ 102
10 Varsellyder.............................................. 102
11 Tilbehør................................................... 103
12 Vedlikehold og pleie................................ 103
13 Miljø......................................................... 103
14 Generell informasjon.............................. 103
1 Symboler
Advarsel om generell fare
Advarsel om elektrisk støt
Brukerhåndbok, les sikkerhetsinfor
masjonen!
Bruk hørselvern!
Bruk vernehansker.
Bruk åndedrettsvern!
Bruk vernebriller!
Bruk solide sko!
Må ikke kastes i husholdningsavfallet.
Tips, merknad
Veiledning
Sette inn batteri
Løsne batteri
CE-merking: Bekrefter at elektroverk
tøyet er i samsvar med EU-direktivene.
2 Sikkerhetsinformasjon
2.1 Generell sikkerhetsinformasjon ADVARSEL!Les alle sikkerhetsregler og
anvisninger. Hvis sikkerhetsinformasjo
nen og anvisningene ikke tas til følge, kan det
føre til elektrisk støt, brann og/eller alvorlige
personskader.
Oppbevar all sikkerhetsinformasjon og alle
anvisninger for fremtidig bruk.
I sikkerhetsinformasjonen brukes uttrykket
"elektroverktøy". Det viser til nettdrevet elek
troverktøy (med ledning) eller batteridrevet
elektroverktøy (uten ledning).
Følg bruksanvisningen for lader og batteri.
2.2 Maskinspesifikk sikkerhetsinformasjon
Sikkerhetsanvisninger for sliping, arbeid med stålbørster og kappesliping
– Dette elektroverktøyet skal brukes som
slipemaskin, stålbørste og kappeslipema
skin. Ta hensyn til alle sikkerhetsanvis
ninger, instruksjoner, fremstillinger og
opplysninger som følger med maskinen.
Hvis du ikke følger anvisningene nedenfor,
kan det oppstå elektrisk støt, brann og/
eller alvorlige personskader.
– Dette elektroverktøyet er ikke egnet for
sandpapirsliping og polering. Ikke-for
skriftsmessig bruk av elektroverktøyet kan
forårsake farlige situasjoner og personska
der.
– Ikke bruk tilbehør som ikke har blitt utvik
let eller anbefalt spesielt for dette elek
troverktøyet av produsenten. Selv om til
behøret kan festes på elektroverktøyet, ga
ranterer ikke dette sikker bruk.
– Det tillatte turtallet for innsatsverktøyet
må være minst så høyt som det maksimale
turtallet angitt på elektroverktøyet. Tilbe
hør som oppnår høyere hastighet enn den
som er tillatt, kan bli ødelagt og slynges
rundt.
– Den ytre diameteren og tykkelsen til inn
satsverktøyet må stemme overens med
målene til elektroverktøyet. Innsatsverk
tøy med feil mål kan ikke avskjermes eller
kontrolleres tilstrekkelig.
– Innsatsverktøy med gjengeinnsats må
passe nøyaktig på gjengene til slipespin
delen. I forbindelse med innsatsverktøy
som monteres med flens må hulldiamete
ren til innsatsverktøyet passe til flensens
festediameter. Innsatsverktøy som ikke
kan festes nøyaktig på elektroverktøyet, ro
95
Page 96

Norsk
terer ujevnt, vibrerer sterkt og kan føre til
at man mister kontrollen.
– Bruk ikke defekte innsatsverktøy. Kon
troller innsatsverktøy som slipeskiver for
hakk og sprekker eller sterk slitasje, og
kontroller stålbørstene for løse eller
brukkede tråder hver gang verktøyet skal
brukes. Hvis elektroverktøyet eller inn
satsverktøyet faller ned, må du undersøke
om det er skadet, eller bruke et uskadet
innsatsverktøy. Når du har kontrollert og
satt inn innsatsverktøyet, må du og andre
personer i nærheten holde avstand til det
roterende innsatsverktøyet mens du lar
verktøyet gå med maksimalt turtall i ett
minutt. Skadede innsatsverktøy brekker
vanligvis i løpet av dette tidsrommet.
– Bruk personlig verneutstyr. Avhengig av
bruksområde skal du bruke helmaske,
øyebeskyttelse eller vernebriller. Hvis ar
beidet tilsier det, skal du bruke støvma
ske, hørselvern, vernehansker eller ver
neforkle som beskytter mot slipe- og ma
terialpartikler. Øynene bør beskyttes mot
fremmedlegemer som kan oppstå ved ulike
typer bruk. Støv- eller åndedrettsmasken
må filtrere støvet som oppstår under arbei
det. Hvis du er utsatt for sterk støy over
lengre tid, kan hørselen bli skadet.
– Hold andre personer på sikker avstand fra
arbeidsområdet. Alle som går inn i arbeid
sområdet, skal bruke personlig verneut
styr. Bruddstykker fra arbeidsemnet eller
ødelagte innsatsverktøy kan slynges rundt
og forårsake personskader også utenfor
det umiddelbare arbeidsområdet.
– Elektroverktøyet må bare holdes i de iso
lerte gripeflatene under arbeid der elek
troverktøyet kan komme i berøring med
skjulte strømledninger. Kontakt med
strømførende ledninger kan føre til at me
talldeler på maskinen settes under spen
ning. Det kan medføre elektrisk støt.
– Legg aldri fra deg elektroverktøyet før
innsatsverktøyet står helt stille. Roteren
de innsatsverktøy kan komme i kontakt
med overflaten der maskinen legges ned,
slik at du mister kontrollen over elektro
verktøyet.
– La aldri elektroverktøyet gå mens du bæ
rer det. Klærne dine kan hekte seg fast i
det roterende innsatsverktøyet hvis de util
siktet kommer i kontakt med det, slik at
innsatsverktøyet borer seg inn i kroppen.
– Rengjør ventilasjonsåpningene til elektro
verktøyet med jevne mellomrom. Motor
viften trekker støv inn i maskinhuset, og en
kraftig opphoping av metallstøv kan føre til
elektriske støt.
– Bruk ikke elektroverktøyet i nærheten av
brennbare materialer. Gnister kan anten
ne disse materialene.
– Bruk ikke innsatsverktøy som krever fly
tende kjølemiddel. Bruk av vann eller an
dre flytende kjølemidler kan føre til elek
trisk støt.
Tilbakeslag og sikkerhetsanvisninger i tilknyt
ning til dette
Tilbakeslag er en plutselig reaksjon på at
dreiende innsatsverktøy, for eksempel en slipe
skive, slipetallerken eller stålbørste, setter seg
fast eller blir blokkert. Fastklemming eller
blokkering fører til at det roterende verktøyet
stanser brått. En ukontrollert maskin kan akse
lerere mot rotasjonsretningen til innsatsverk
tøyet på blokkeringsstedet.
Hvis f.eks. en slipeskive setter seg fast eller blir
blokkert, kan slipeskivens kant, som går ned i
arbeidsemnet, henge seg fast og dermed føre
til at slipeskiven brekkes av eller at det oppstår
rekyl. Slipeskiven beveger seg da enten mot el
ler bort fra operatøren, avhengig av rotasjons
retningen til skiven på blokkeringsstedet. Slipe
skiver kan også brekke.
Rekyl oppstår som følge av feil eller ukyndig
bruk av elektroverktøyet. Det kan unngås ved at
man følger egnede sikkerhetstiltak som de ne
denfor.
– Hold godt fast i elektroverktøyet og plas
ser kroppen og armene slik at du kan stå
imot rekylkreftene. Bruk alltid ekstra
håndtaket, dersom det finnes, for å få best
mulig kontroll over kreftene i rekylen el
ler reaksjonsmomentene ved oppstart.
Ved hjelp av egnede sikkerhetstiltak kan
operatøren få kontroll over rekyl- og reak
sjonskreftene.
– Unngå at hånden kommer i nærheten av
roterende innsatsverktøy. Ved rekyl kan
innsatsverktøyet bevege seg med hånden
din.
– Unngå å oppholde deg i det området som
elektroverktøyet vil bevege seg mot hvis
det oppstår rekyl. Rekylen driver elektro
verktøyet i motsatt retning av hvordan sli
peskiven beveger seg på blokkeringsstedet.
– Vær ekstra forsiktig når du arbeider i
nærheten av hjørner, skarpe kanter osv.
96
Page 97

Norsk
Unngå at innsatsverktøyet slår tilbake fra
emnet og blir fastklemt. Det roterende
innsatsverktøyet har en tendens til å sette
seg fast ved hjørner, skarpe kanter eller
når det slås tilbake. Det kan føre til rekyl
eller at du mister kontroll over maskinen.
– Ikke bruk kjedesagblad eller tannet sag
blad. Slike innsatsverktøy forårsaker ofte
rekyl eller tap av kontroll over elektroverk
tøyet.
Spesielle sikkerhetsanvisninger for sliping og kappesliping
– Bruk bare slipeverktøy som er tillatt for
ditt elektroverktøy og vernedekselet som
der beregnet for disse slipeverktøyene.
Slipeverktøy som ikke er beregnet for elek
troverktøyet kan ikke avskjermes tilstrek
kelig og er ikke sikre.
– Buede slipeskiver må monteres slik at sli
peflaten ikke stikker ut over kanten på
vernedekselet. En feilmontert slipeskive
som stikker ut over kanten på vernedekse
let kan ikke avskjermes tilstrekkelig.
– Vernedekselet må være sikkert plassert
på elektroverktøyet, og for maksimal sik
kerhet må det være stilt inn slik at så lite
som mulig av slipeverktøyet er åpent mot
brukeren. Vernedekselet bidrar til å be
skytte brukeren mot bruddstykker, utilsik
tet berøring av slipeverktøyet og gnister
som kan antenne klær.
– Slipeverktøy må bare brukes til de anbe
falte bruksområdene. Eksempel: Slip aldri
med sideflaten til en kappeskive. Kappe
skiver er beregnet for materialfjerning med
kanten av skiven. Kraftpåvirkning på siden
på disse slipeverktøyene kan føre til at de
blir ødelagt.
– Bruk alltid uskadde spennflenser som har
riktig størrelse og form for slipeskiven du
har valgt. Egnede flenser støtter slipeski
ven og reduserer dermed faren for at den
brekker. Flenser for kappeskiver kan være
forskjellige fra flenser for andre slipeski
ver.
– Bruk ikke slitte slipeskiver som har vært
brukt på større elektroverktøy. Slipeskiver
for større elektroverktøy er ikke beregnet
for det høyere turtallet til mindre elektro
verktøy og kan brekke.
Ekstra sikkerhetsanvisninger for kappesliping
– Unngå blokkering av kappeskiven eller for
høyt presstrykk. Ikke utfør for dype kutt.
Overbelastning av kappeskiven fører til økt
trykk og større sannsynlighet for skråstil
ling eller blokkering og dermed økt fare for
tilbakeslag eller at slipeverktøyet blir øde
lagt.
– Unngå området foran og bak den roteren
de kappeskiven. Hvis du beveger kappeski
ven bort fra deg i emnet, kan elektroverk
tøyet med den roterende skiven slynges
rett mot deg ved et tilbakeslag.
– Hvis kappeskiven setter seg fast eller du
avbryter arbeidet, slår du av maskinen og
holder den rolig til skiven er stoppet. Du
må aldri forsøke å trekke kappeskiven ut
av snittet mens den roterer, ettersom det
kan føre til tilbakeslag. Finn og utbedre
årsaken til at sagbladet kom i klem.
– Slå ikke på elektroverktøyet igjen mens
det befinner seg i emnet. La kappeskiven
få fullt turtall før du forsiktig fortsetter
med snittet. Ellers kan skiven settes seg
fast, hoppe ut av emnet eller forårsake et
tilbakeslag.
– Støtt opp plater eller store emner for å
unngå fare for tilbakeslag på grunn av en
kappeskive som kommer i klem. Store
emner kan bøye seg på grunn av sin egen
vekt. Emnet må støttes opp på begge sider
av skiven, både i nærheten av kappesnittet
og på kanten.
– Vær spesielt forsiktig ved "lommesaging"
i eksisterende vegger eller andre områ
der du ikke kan se. Kappeskiven kan forår
sake tilbakeslag ved skjæring i gass- eller
vannrør, strømledninger eller andre objek
ter.
Spesielle sikkerhetsanvisninger for arbeid med stålbørster
– Vær oppmerksom på at stålbørsten mister
trådbiter også under vanlig bruk. Ikke
overbelast ståltråden ved å utøve for
sterkt presstrykk. Flyvende ståltrådbiter
kan svært lett trenge gjennom tynne klær
og/eller hud.
– Hvis et vernedeksel anbefales, hindrer du
at vernedekselet og stålbørsten kan berø
re hverandre. Skive- og koppbørstenes
diameter kan forstørres av presstrykket og
sentrifugalkreftene.
2.3 Øvrige sikkerhetsanvisninger
– Ikke bruk elektroverktøyet i regn eller
fuktige omgivelser. Fuktighet i elektro
verktøyet kan medføre kortslutning og
brann.
97
Page 98

Norsk
– Før elektroverktøyet inn i materialet bare i
innkoblet tilstand (når verktøyet går).
– Av sikkerhetsgrunner må emnet spennes
fast i en skrustikke eller en annen fast
spenningsanordning. Når emnet er spent
fast, kan begge hendene brukes til å betje
ne elektroverktøyet.
– Ikke arbeid på stiger.
– Kapp ikke over metallgjenstander, spikre
eller skruer.
– Bruk søkeutstyr for å lokalisere skjulte
ledninger/rør eller henvend deg til din
strøm-, vann- eller gassleverandør. Der
som verktøyet kommer i kontakt med en
strømførende ledning, kan dette føre til
brann og elektrisk støt. Skader på gassled
ninger kan føre til eksplosjoner. Boring i
vannrør kan føre til materielle skader.
– Når du arbeider, kan det avgis skadelig/
giftig støv (for eksempel fra blyholdig ma
ling, enkelte treslag og metall). Asbest
holdige materialer må kun behandles av
fagpersonell. Berøring eller innånding av
dette støvet kan utgjøre en fare for opera
tøren eller andre personer som befinner
seg i nærheten. Følg sikkerhetsforskriftene
som gjelder for ditt land.
2.4 Sikkerhetsanvisninger for slipeverktøy
– Slipeverktøy er skjøre, og det er derfor vik
tig å være svært forsiktig ved håndtering av
slipeverktøy! Bruk av slipeverktøy som er
skadet, feil fastspent eller satt inn på feil
måte er farlig og kan føre til alvorlige per
sonskader.
– Slipeverktøyet må ikke utsettes for meka
niske skader og skadelig miljøpåvirkning
under lagring.
– Slipeverktøy må behandles og transporte
res forsiktig.
– Se informasjonen på etiketten eller slipe
verktøyet, og overhold anvisninger om be
grensninger for bruk, sikkerhetsanvisnin
ger og andre anvisninger. Ved uklarhet
med hensyn til valg av slipeverktøy må bru
keren rådføre seg med produsenten før
bruk.
– Slipeverktøy må monteres som beskrevet i
kapittel 8.2 .
– Slipeverktøy må bare monteres av perso
ner med nødvendig fagkunnskap.
2.5 Støyemisjonsverdier
De registrerte verdiene iht. EN 60745 er vanlig
vis på:
Bruk P2-åndedrettsvern som beskyt
telse.
– Etter bearbeiding av mineralske materia
ler (for eksempel gips): Rengjør elektro
verktøyet innvendig gjennom ventilasjons
åpningene, og rengjør bryteren, med tørr
trykkluft uten olje. Ellers kan det legge
seg støv i huset til elektroverktøyet og på
av/på-bryteren, og i kombinasjon med luft
fuktighet kan dette støvlaget bli hardt. Det
te kan føre til begrenset funksjon i kob
lingsmekanismen, og elektroverktøyet kan
overopphetes.
– Etter bearbeiding av metall: Blås innsiden
av elektroverktøyet ren med tørr trykkluft
uten olje gjennom ventilasjonsslissen. El
lers kan støv med ledeevne feste seg inne i
elektroverktøyet. Det kan føre til kortslut
ning.
– Ikke bruk det batteridrevne elektroverk
tøyet med strømadaptere eller batterier
fra andre produsenter. Ikke lad batteriet
med ladere fra andre produsenter. Bruker
du tilbehør som ikke er godkjent av produ
senten, kan dette føre til elektrisk støt og/
eller alvorlige ulykker.
Lydtrykknivå LPA = 86 dB(A)
Lydeffektnivå LWA = 97 dB(A)
Usikkerhet K = 3 dB
FORSIKTIG
Støy under arbeidet
Hørselsskadelig
► Bruk hørselvern.
Svingningsemisjonsverdi ah (vektorsum fra tre
retninger) og usikkerhet K beregnet iht. EN
60745:
Sliping
ah = 5 m/s
K = 2 m/s
Kappesliping
ah ≤ 2,5 m/s
K = 2 m/s
De angitte emisjonsverdiene (vibrasjon, støy)
– brukes til å sammenligne maskiner,
– men kan også brukes til en foreløpig vur
dering av vibrasjons- og støybelastning ved
bruk,
2
2
2
2
98
Page 99

Norsk
– og representerer de viktigste bruksområ
dene for elektroverktøyet.
Annen bruk, for eksempel stålbørster, kan føre
til andre verdier for vibrasjonsemisjon.
FORSIKTIG
Utslippsverdiene kan avvike fra de verdiene
som er oppgitt. Dette avhenger av hvordan
verktøyet brukes og hvilken type arbeidsem
ne som bearbeides.
► Den faktiske belastningen under den totale
arbeidssyklusen må evalueres.
► Avhengig av den faktiske belastningen må
det gjennomføres egnede sikkerhetstiltak
for å beskytte brukeren.
3 Riktig bruk
Elektroverktøyet er beregnet for kappesliping,
lett sliping, arbeid med stålbørster og fjerning
av skarpe kanter på metall- og steinmaterialer
uten bruk av flytende kjøle- og smøremidler.
Bruk vernedekselet som er beregnet for oppga
ven.
Det må bare brukes bundne kappe- og slipeski
ver i henhold til EN 12413, diamantkappeskiver
i henhold til EN 13236 og stålbørster i henhold
til EN 1083.
Dette elektroverktøyet skal ikke brukes til po
lering, sliping av overflater ved bruk av dia
mantskiver eller arbeid med diamant- og
hardkeramikkskiver.
Bruk av freseskiver, hardmetallslipeverktøy og
metallfjernende slipeverktøy (med geometrisk
bestemt kant) er utelukket.
Elektroverktøyet er beregnet for bruk med Fe
stool-batterier i serien BP i samme spennings
klasse.
Ved ikke-forskriftsmessig bruk bærer
brukeren ansvaret.
4 Tekniske data
Batteridrevet vinkelsliper AGC 18
Motorspenning 18 V DC
Batteridrevet vinkelsliper AGC 18
Turtallstrinn 1 4500 o/min
2 5300 o/min
3 6100 o/min
4 6900 o/min
5 7700 o/min
6 8500 o/min
Slipeverktøyets om
kretshastighet
Slipespindelgjenger M 14
Diameter på slipe
verktøy
Tykkelse på slipe
verktøy
Vekt iht. EPTA-Pro
cedure 01:2014
maks. 6,0 mm
min. 1,0 mm
80 m/s
125 mm
2,7 kg
5 Apparatets deler
[1-1]
[1-2]
[1-3]
[1-4]
[1-5]
[1-6]
[1-7]
[1-8]
[1-9]
[1-10]
[1-11]
Det tilbehøret som er avbildet eller beskrevet,
følger ikke nødvendigvis med.
Bildene det henvises til, finner du foran i bruks
anvisningen.
5.1 Elektronikk
Vernedeksel
Spindellåsing
Gjenger for ekstrahåndtak
Turtallsregulering
På/av-knapp
Ekstrahåndtak
Isolerte gripeflater (område i grått)
Knapp for å løsne batteripakken
Knapp for kapasitet på batteripakken
Kapasitetsindikator
Støttepunkter
Turtall (tomgang) 4500 – 8500 o/min
Mykstart
Den elektronisk styrte mykstarten sørger for
rykkfri start av elektroverktøyet.
Turtallsregulator [1-4]
Turtallet kan stilles inn trinnløst med dreiebry
teren i turtallsområdet. Dermed kan du tilpasse
hastigheten optimalt til ethvert materiale. Se
også opplysningene på slipeverktøyene.
99
Page 100

Norsk
Konstant turtall
Forhåndsinnstilt motorturtall holdes konstant
ved hjelp av elektronikken. Dermed holdes ha
stigheten konstant også under belastning.
Beskyttelse mot tilbakeslag
Hvis turtallet plutselig synker, for eksempel på
grunn av blokkering ved kappesnitt, slås moto
ren av umiddelbart. Elektroverktøyet startes
igjen ved at det slås av og deretter slås på igjen.
Selvstartvern
Den innebygde gjenstartbeskyttelsen hindrer at
elektroverktøyet automatisk starter igjen etter
strømbrudd i modus for kontinuerlig drift. Elek
troverktøyet startes igjen ved at det slås av og
deretter slås på igjen.
Overopphetingsvern
Ved overoppheting skifter sikkerhetselektronik
ken til driftsmåten kjøling. Motoren fortsetter å
gå, og konstant turtall deaktiveres. Etter en av
kjølingsfase på 10 til 20 sekunder er maskinen
igjen klar for drift og for full belastning.
ADVARSEL
Fare for personskader på grunn av tilbake
slag og deler som slynges ut
► Vent med å legge fra deg elektroverktøyet
til det roterende slipeverktøyet er stoppet
helt.
► Legg ned elektroverktøyet på de beregnede
støttepunktene [1-11].
7 Batteripakke
► Sette inn batteri [3a]
► Ta ut batteriet [3b]
7.1 Kapasitetsindikator
Kapasitetsindikatoren [1-10] viser batteriets la
denivå i ca. 2 sekunder når du trykker på ta
sten [1-9]:
70‑100%
40‑70%
6 Igangsetting
6.1 Hold elektroverktøyet riktig
Hold elektroverktøyet med begge hendene på
de isolerte gripeflatene [1-7]: den ene hånden
på motorhuset bak bryteren og den andre på
ekstrahåndtaket [1-6].
6.2 Slå på og av Slå på [2a]
► Skyv av/på-bryteren [1-5] forover. Ved sam
tidig trykk på den fremre delen av bryteren
låses av/påbryteren.
På/av-bryteren [1-5] er låst, og elektroverktøy
et er slått på.
Ikke sett maskinen inntil materialet før
driftsturtallet er nådd.
Stille inn turtallet
Turtallet kan stilles inn i 6 trinn og dermed til
passes til emnet.
► Sett turtallsregulatoren [1-4] på ønsket
trinn.
Slå av [2b]
15‑40%
< 15%
*
Anbefaling: Lad batteripakken før videre
bruk.
Nærmere informasjon om batteri og lader
finner du i deres respektive bruksanvisnin
ger.
*
8 Innstillinger
ADVARSEL
Fare for personskade
► Batteriet må tas av før alle typer arbeid
med elektroverktøyet.
8.1 Montere ekstrahåndtaket [1-6]
Bruk alltid ekstrahåndtaket. Det gir sik
kerhet og liten belastning på kroppen un
der arbeidet.
Ekstrahåndtaket har den spesielle konstruksjo
nen "VIBRASTOP" som reduserer vibrasjonene.
► Løft elektroverktøyet fra materialet som
skal bearbeides.
► Trykk på bakre del av på/av-bryteren [1-5].
Låsen er åpnet, og elektroverktøyet er slått av.
100
► Skru inn ekstrahåndtaket [1-6] på siden på
gjengene [1-3] avhengig av arbeidsopera
sjonen.
 Loading...