

F5000DAB
DAB MICRO SYSTEM with docking for iPod
SAFETY INFORMATION
A
Mains supply
This equipment is designed to operate from a 230-240 Volt, 50Hz AC mains supply. Other
power sources may damage it. Check that the rating label on the back of the equipment
states AC 230V before you plug it in for the first time.
The manufacturer accepts NO responsibility for damage or injury caused by using the
product with the wrong mains voltage.
Mains plug
We have fitted this equipment with a standard mains plug.
If you cut off the mains plug, for example to fit a different type, please destroy the old
plug, as it would be dangerous if inserted into a live power outlet.
Carefully follow the wiring instructions supplied with the new plug.
If a fuse is fitted to the plug, remove the fuse before throwing the plug away.
If the mains lead becomes damaged, it must be replaced by the manufacturer, its service
agent or similarly qualified person with a lead of the same type and rating to avoid a
hazard.
Mains plug wiring for a re-wirable plug
In a re-wirable plug, follow the instructions supplied with the new plug.
Never use a fused mains plug without the fuse cover.
Mains fuse
UK standard (BS1363) plugs must have a 3 amp (BS1362 type) fuse fitted. Replace the
plug or have the power lead assembly replaced if the fuse cover is lost.
Symbols
This equipment is double insulated and
an earth connection is not required.
This mark is applied to show the
equipment conforms to European
safety standards.
VERTISSEMENT: pour protéger votre ouïe
Il est important que n'importe quel casque ou écouteurs utilisés en conjonction avec ce produit soient conformes à la norme
européenne Decree of 08 Nov 2005. Ceci garantit que le niveau sonore ne dépasse pas 100 dB SPL.
L'écoute prolongée à volume élevé pendant plus de cinq heures par semaine peut endommager votre audition.
HEADPHONE VOLUME WARNING
Connect headphones with the volume set low and increase it if required. Prolonged
listening through some headphones at high volume settings can result in hearing
damage. !
Earphones or Headphones must comply with EN 50332-1 / EN50332-2!up!fotvsf!
continued protection from excessive sound pressure levels.
UK-1
Dangerous voltage constituting a risk
of electric shock is present inside
this equipment.
There are important operating and
maintenance instructions in the
literature accompanying this
equipment.

SAFE USE AND CARE OF YOUR EQUIPMENT
We have designed and made this product to meet European safety standards, but as with
any electrical equipment you must take care to get the longest working life from it and stay
safe. Here are a few tips to help you do this.
Read these instructions carefully before you try to use the equipment.
Protect the mains lead. Ensure the mains lead cannot be walked on, crushed, chafed or
cut.
Avoid harsh conditions such as wet or damp places, high humidity, heavy vibration,
extremely high or low temperatures, strong sunlight and places that are very dusty.
Never push objects into holes and ventilation slots.
To save power, switch off mains power or pull out the mains power plug when you are not
using the equipment, unless the function of the equipment requires a continuous power
supply.
Don't continue to use this equipment if you have spilt liquids in it, if it is damaged in any way
or if it does not work normally. Immediately unplug the equipment and get expert adv
Pull the mains plug out of the wall socket during thunderstorms.
Uif!nbjot!qmvh!tibmm!cf!uif!nbjo!ejtdpoofdu!efwjdf!boe!tibmm!sfnbjo!pqfsbcmf!bu!bmm!ujnft/
This product is designed for domestic use only. Any other use may invalidate the guarantee
and might be dangerous.
Ventilation
Place the equipment on a hard flat surface away from direct sunlight and heat sources. If it is
in a cabinet, allow at least a 10cm gap all around. Don't obstruct the ventilation slots,
including those underneath, with soft furnishings. Overheating will shorten the life of the
equipment and increase the risk of fire.
ice.
Cleaning
Disconnect the mains supply and use only a lightly dampened soft cloth. Do not use
aggressive cleaners or strong detergents as these may damage the cosmetic finish.
Batteries
Remove batteries when the equipment is not to be used for a long time. Batteries left in
equipment may cause damage through deterioration and corrosive leakage, invalidating the
guarantee. To protect the environment, please use local recycling facilities for battery
disposal.
Important Safety warnings
To prevent electric shock, do not remove any cover.
If anything goes wrong, don't try and fix it yourself, get a qualified service agent to look at
the product.
Do not expose this equipment to dripping or splashing or place any objects filled with
liquids, such as vases, on the equipment.
Never put a naked flame source on or near this equipment.
Small parts. Do not let young children play with the equipment.
Do not dispose of batteries in a fire, danger of explosion.
UK-2
LASER SAFETY
This unit contains a class 1 laser. Only a qualified service person
should remove the cover or attempt to service this device, due to
possible eye injury.
Danger: Invisible laser radiation when open, avoid direct exposure to the beam.
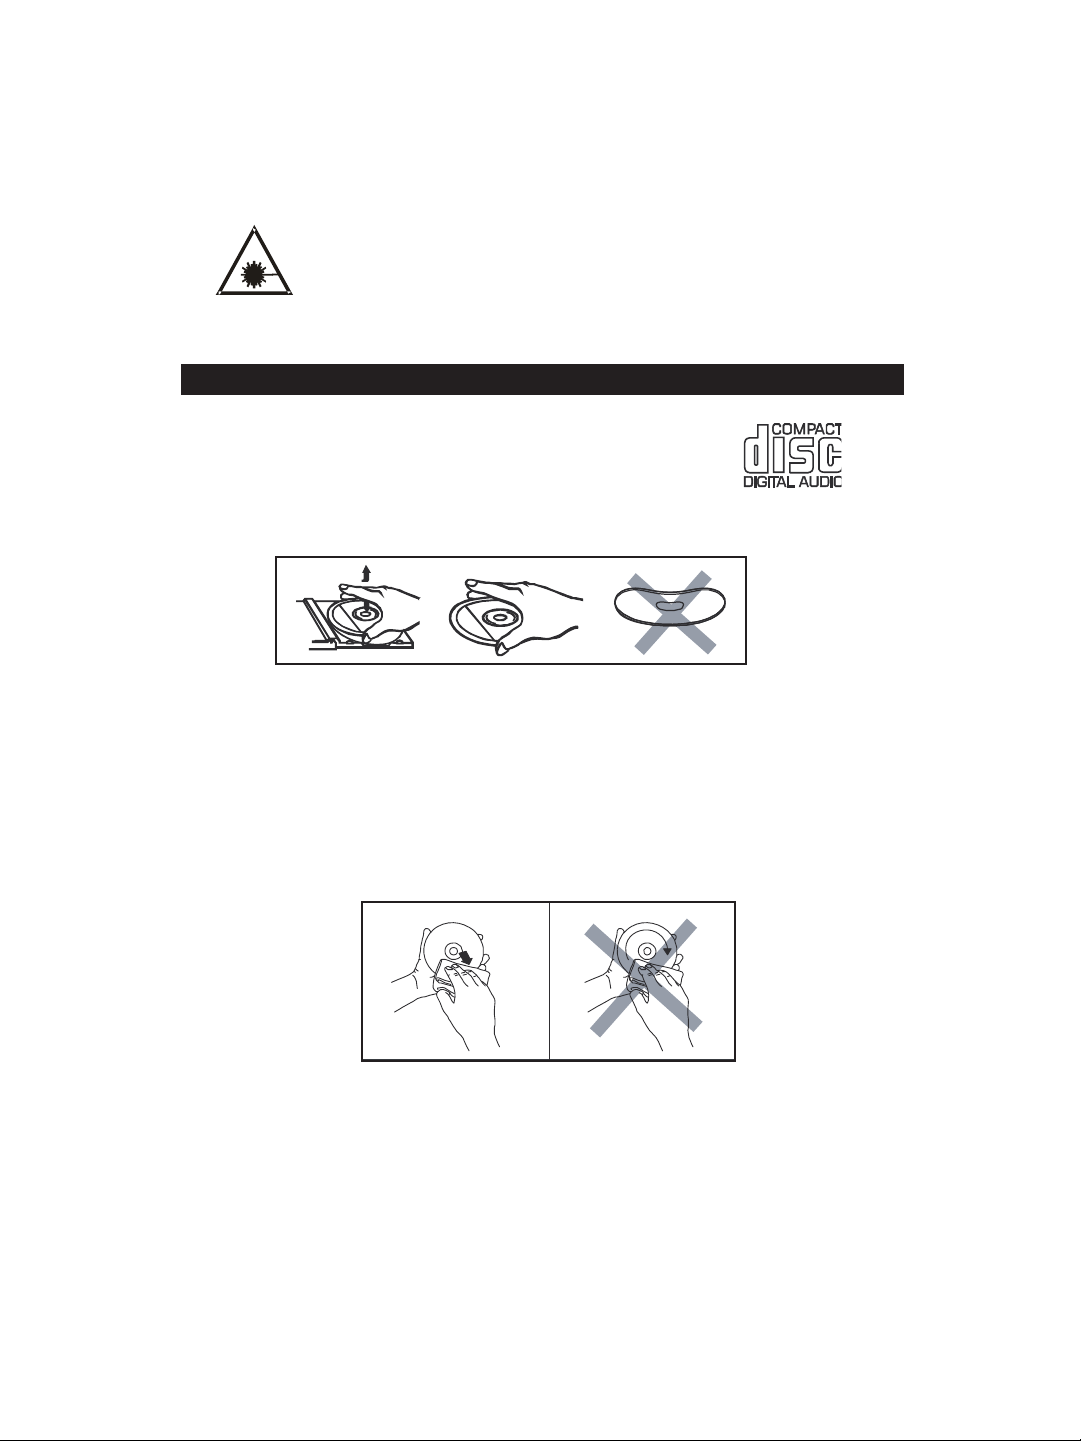
HANDLING COMPACT DISCS
1. Always use compact discs bearing the mark as shown.
2. Notes on handling discs:
Removing the disc from its storage case and loading it.
* Do not touch the reflective recorded surface.
* Do not stick paper or write anything on the surface.
* Do not bend the disc.
3. Storage
* Store the disc in its case.
* Do not expose discs to direct sunlight or high temperatures, high humidity or
dusty places.
4. Cleaning a disc
* Should the disc become soiled, wipe off
dust, dirt and fingerprints with a soft cloth.
* The disc should be cleaned from the centre
to the edge.
FROM THE CENTRE TO THE EDGE
CORRECT
INCO RRECT
* Never use benzene, thinners, record cleaner fluid or antistatic spray.
* Be sure to close the CD tray, so the lens is not contaminated by dust.
UK-3

1. Preparation for wall mounting the speakers.
56 mm
289.5mm
103.5mm
Remove the 4 screws fixing the table stand to each
speaker, then mount the speaker to the wall using
2X 3.5*25BA screws.
They should be
56mm apart.
2. Speakers connection
Max connection distance is 2 metres.
FEATURES AND CONTROLS
1
2
3
5
6
7
8
9
4
1011121314 1516
1. SPEAKER
2. AUX JACK “R”
27
28
29
30
21.CD DOOR
22.CD DOOR OPEN/CLOSE
BUTTON
23.TO WOOFER JACK
REMOTE CONTROL
1. STANDBY BUTTON
2. RANDOM BUTTON
3. REPEAT BUTTON
4. SELECT/MONO/ST. BUTTON
5. SKIP/TUNE SEARCH DOWN BUTTON
6. STOP/MENU/INFO BUTTON
7. FOLDER/ARROW DOWN BUTTON
8. ID3/MEM/C-ADJ. BUTTON
9. EQ BUTTON
10. MUTE BUTTON
11. VOLUME “-” BUTTON
3. AUX JACK “L”
4. FM ANTENNA
5. STANDBY/ON INDICATOR
6. STANDBY/ON BUTTON
7. IR SENSOR
8. CD/iPod/USB/CARD BUTTON
9. DAB/FM/AUX BUTTON
10.VOLUME “-” BUTTON
24.VIDEO OUT JACK
25.HITCHING HOLE
26.SUBWOOFER STANDBY INDICATOR
56mm
The CD / iPod unit is mounted in the same way as the
speakers, the screws should be 112mm apart.
112mm
3. Universal Dock adapter connection
(iPod adaptors are not included)
22
21
25
23
20
19
24
17 18
11.VOLUME “+” BUTTON
12.SD/MMC CARD IN SLOT
13.LCD DISPLAY WINDOW
14.USB DEVICE IN PORT
15.SKIP/TUNE SEARCH DOWN BUTTON
16.SKIP/TUNE SEARCH UP BUTTON
17.HEADPHONES JACK
18.iPod DOCK
19.STOP/MENU/INFO BUTTON
20.PLAY/PAUSE/SCAN BUTTON
27.SUBWOOFER AC POWER SWITCH
28.FROM MAIN
29.OUT SPEAKERS JACK
30.AC POWER CORD
12. INTRO BUTTON
13. VOLUME “+” BUTTON
14. SLEEP BUTTON
15. TIMER BUTTON
16. FOLDER/ARROW UP BUTTON
17. SKIP/TUNE SEARCH UP BUTTON
18. DAB/FM/AUX BUTTON
19. OPEN/CLOSE BUTTON
20. CD/iPod/USB/CARD BUTTON
21. PLAY/PAUSE/SCAN BUTTON
22. CLOCK BUTTON
JACK
26
192021
1
2
3
4
5
6
7
8
9
10
11
18
17
22
16
15
14
13
12
UK-4

PUTTING THE BATTERIES INTO THE REMOTE
CONTROL UNIT
Press down on the battery clip (1), and slide the cover out. (2)
to open the compartment.
Place the one CR2032 battery in the remote control observing
the polarity marking "+" inside the compartment and on the
battery.
Place the cover into the compartment, push it inside until it
snaps on.
Note :If the remote control is not in use for long periods, the
battery will become weak and the remote control will
not function.
Battery Included
** **
The battery used in this
product is 1X CR2032
lithium cell located in the
remote control.
Remove the battery as
described in these
instructions and dispose
of it at your local
recycling point.
OPERATING THE SUBWOOFER AND MAIN UNIT
When you first plug into the AC outlet, to "ON" position on the rear of the
1. The subwoofer and the main unit will be in standby mode, both of the STANDBY indicators will change to red color.
2. Press the STANDBY/ON button on the main unit (or on the remote control) to power the main unit "ON".
3. The standby indicator of the subwoofer will change
turn off.
Note:
The ON / OFF switch does not disconnect the unit from the
the wall socket.
POWER/STANDBY
1. Press the STANDBY/ON button on the unit or on the remote control to switch the unit on.
2. Select the sound source (CD, iPod, USB, CARD) and (DAB, TUNER, AUX) by pressing the (CD, iPod, USB, CARD)
and(DAB, FM, AUX) button on the unit (or remote control). The corresponding display will light up.
3. Adjust the volume with the VOLUME (UP or DOWN)
4. Press the STANDBY/ON button on the unit (or remote control) again to turn off the unit.
Note:
1. If there is no media inserted CD/USB DEVICES/ SD & MMC CARD/ mode, the main unit will switch
within 15 minutes automatically.
2. During in the iPod mode, if there is no iPod Player on the iPod interface
15 minutes automatically.
3. During standby mode, press any button to make the display light for 10 seconds.
4. Please turn the main switch off to save energy, when you are not using the unit.
CLOCK SETTING
The clock will be automatically synchronised
can only receive FM, then you have to set the clock manually. The manual clock setting must be done in standby mode.
Manual clock setting
1. When the unit is first connected to the AC mains outlet, it will be in standby mode, and the display will show “--:--”
and flash.
2. During standby, press and hold the ID3/MEM/C-ADJ. button on the remote control, the hour digits flash in the
display, press the SKIP/TUNE SEARCH (UP or DOWN) button on the unit main or the remote control to set to the
correct hour, then press the ID3/MEM/C-ADJ. button on the remote control again to confirm.
3. After the hour is set, the minute digits will then flash, press the SKIP/TUNE SEARCH (UP or DOWN) button
(or remote
4. When the display shows the correct time, press the ID3/MEM/C-ADJ. button on the remote control again to
confirm, the manual clock setting is now completed.
Note: Turn on the unit and press the CLOCK button (on the remote) in any
disappear about 5 seconds, then return to the original condition.
Synchronise the clock to DAB local time
1. Press the STANDBY/ON button on the unit(or remote control) once to switch the unit on.
2. Press
3. Tune to a DAB station and the clock will be automatically synchronized to the DAB local time.
TIMER SETTING(on the remote control)
This function allows you to switch on and off at your desired time and mode:
1. Press the
show “Timer on” or “Timer Off”. The display will show “ ” to indicate timer function on.
2. To set the on timer clock, press and hold the
and the “hour” digit of the timer clock will flash.
3. Press the SKIP/TUNE SEARCH (UP or DOWN) button on the remote control to set to the desired hour, then
press the TIMER button
clock is set.
4. T hen you will enter into the off timer clock setting, the display will show “Off Timer” and the “hour” digit will flash.
Press the SKIP/TUNE SEARCH (UP or DOWN) button on the remote control to set to the desired hour, then
press the TIMER button on the remote control to confirm, first set the hour and finally the minute, the off timer
clock is set.
5. Finally
iPod, USB, CARD or DAB then press the TIMER button to confirm. The timer setting is now completed.
6. Press the TIMER button again, the timer "VOLUME” indicator appears on the display and flashes, adjust the timer
volume high or low by pressing the SKIP/TUNE SEARCH (UP or DOWN) button.
7. To check the timer setting, repeatedly press the ID3/MEM/C-ADJ.
shows the on timer and the off timer setting.
control) to set to the correct minute.
the FM/DAB/AUX button on the unit(or remote control) to select DAB mode.
TIMER button on the remote control to toggle the timer function between on and off, the display will
on the remote control to confirm, first set the hour and finally the minute, the on timer
press the SKIP/TUNE SEARCH (UP or DOWN) on the remote control to select the timer on mode - FM, CD,
move the power switch
to green and the standby indicator of the main unit will
mains completely, to do this you must remove the plug from
button on the unit (or remote control).
iPod
the main unit will also turn off within
to the DAB clock if you can receive DAB signals in your location. If you
mode, the display will show the time and
TIMER button on the remote control until the display shows “On Timer”
button on the remote control until the display
subwoofer.
off
UK-5

TO SET SLEEP FUNCTION (on the remote control)
This function allows you to program the system to switch off itself after a set period of time. You can set your sleep time
in power on mode:
1. T o activate the sleep function, press the SLEEP button on the remote, the display will show “SLEEP-90,80,70,60,50,
40,30,20,10,OFF”
2. When the display shows your desired sleep time, release the button, the sleep timer is now activated.
The display will show “S#” in which “S1” is to indicate “10 minutes” sleep time and so on. When the sleep time counts
to zero,
3. To cancel sleep, press the SLEEP button once again, the display will show “SLEEP-OFF” and the“S#” will disappear.
LISTENING TO YOUR RADIO
Hints for better reception
This unit carries a single lead wire DAB/FM antenna, to obtain the best performance, you should fully extend the wire
antenna and adjust the position as well as the direction until you find the best reception.
For ideal DAB reception, always maintain the lead wire antenna
behind the unit) is highly recommended.
DAB mode
When the unit is powered up for the first time, it will be in standby mode. Press the STANDBY/ON button on the unit (or
remote control) to turn the radio on, the display
the DAB mode and perform full scan function.
During scan, the display will show “Searching …” together with a slide bar that indicates the progress of the scan and
the amount of stations that have been found so far.
Once
first press the SELECT/MONO/ST. button on the remote control and then select the SELECT/MONO/ST. mode
for selection, when your desired station appears on the display, press the SELECT/MONO/ST. button on the unit
(or
DAB Full scan modes
Full scan will search for all DAB Band III channels. After the scan has finished, the first alphanumerically found
station will be automatically selected.
1. To activate full scan, press the PLAY/PAUSE/SCAN button on the unit (or remote control) once to enter into the
“Full scan” mode, press the
will show “Searching...” and a slower progressing slide bar.
2. All the stations that have been found will be stored automatically, to explore the stations that have been found,
first press the STOP/MENU/INFO button on the unit (or remote control) once, then press the SKIP/TUNE
SEARCH ( UP or DOWN) for selection,
DAB manual tune
1. To select manual tune, press the SELECT/MONO/ST. button on the remote control to enter into the “Manual tune”
mode.
2.
“5A to 13F” and their associated frequencies.
3. W hen your desired frequency appears in the display, press the SELECT/MONO/ST. button to confirm. The name
of the station
4. To see what stations are present on the found ensemble/multiplex, first press the SELECT/MONO/ST. button on
the remote control once, when your desired station appears in the display, press the SELECT/MONO/ST. button
on the remote control again to
Secondary Services
On some occasions you will see a “>” symbol appeared after the name of the station, this indicates that there are
secondary services available to that station. These secondary services contain extra services that relate to the
primary station. E.g. a sports station may want to add extra
directly after the primary station. To select the secondary station, press the SELECT/MONO/ST. button on the
remote control when the “>” appears in the display.
FM mode
1. To select FM, press the DAB/FM/AUX button on the unit (or remote control), the display will
frequency.
2. To activate frequency auto search, press and hold the SKIP/TUNE SEARCH (UP or DOWN) or PLAY/PAUSE/SCAN
button on the unit (or remote control) until it starts to scan down or up the frequency band; it will stop automatically
once a station has been found.
3. Yo u can also press the SKIP/TUNE SEARCH(UP or DOWN) button on the unit (or remote control) to select your
desired frequency.
4. Press the SELECT/MONO/ST. button on the unit (or remote control) to toggle select between the FM “STEREO”
and “MONO” reception.
STORING AND RECALLING STORED PRESET STATION S
In either DAB or FM mode, you can store up to 30 stations to the favourite presets; this will enable you to get direct
access to your favourite stations.
1. To store a preset,
control until the display will show “ Preset Empty # ” and the “#” fiash.
2. Press the SKIP/TUNE SEARCH ( UP or DOWN) button on the remote control to select your
number, then press the ID3/MEM/C-ADJ. button on the remote control to confirm your selection; the display will
show “Preset # stored” in DAB/FM mode.
3. To recall a preset station, press the ID3/MEM/C-ADJ. button once and then press the SKIP/TUNE SEARCH
(UP or DOWN) button to select the stations that you have stored, then press the ID3/MEM/C-ADJ. button on
the remote control to confirm your selection.
the unit will go off.
the scan has finished, the radio will select the first alphanumerically found station. To explore the found stations,
remote control) again to confirm your selection.
Press the SKIP/TUNE SEARCH (UP or DOWN) button to scroll through the DAB channels, the display will show
and flash.
in a vertical position (holding it upward or downward
will show “Welcome Digital Radio”, then it will automatically enter into
SELECT/MONO/ST. button on the remote control to confirm, the display
group (ensemble/multiplex) will be displayed.
confirm.
commentaries. The secondary services are inserted
show FM and the
first tune to your desired station, then press and hold the ID3/MEM/C-ADJ. button on the remote
desired station preset
UK-6

4. If you press a preset that hasn’t been allocated a station; In DAB mode, the display will show “Preset # free”.
Note: 1. The stored stations will be saved into its memory and power off will not erase it. Storing a new
station into a preset location will erase the previously stored station in that location.
2. During the unit in STANDBY mode, press and hold the STOP/MENU/INFO button to erase all preset
memory.
DISPLAY MODES
Every time you press the STOP/MENU/INFO button, the display will cycle through the following display modes:
In FM mode:
Signal strength
Frequency
Auto(Mono/Stereo)
In DAB mode:
Ensemble/Multiplex (Group name)
Frequency
Auto(Mono) Frequency
Stereo and Mono.
FM FM
Signal strength
The display will show a slide bar to indicate the signal
strength, the stronger the signal, the longer the bar will
be from left to right.
Time and date
The time and date will be automatically updated by the
broadcasted information; there is no need to set the
clock
manually. In the unlikely event that no clock information
is received, the display will show “<Time/Date>”.
Audio bit rate
The display will show the digital audio bit rate being
received.
CD/MP3/WMA OPERATION
Listening To Compact Disc (CD/MP3/WMA)
ress the OPEN/CLOSE button on the main unit only, and then the CD door will open automatically.
1. P (F1)
2. Insert the CD/MP3 disc into the CD compartment, press the to close the CD door.
3. Press the CD/iPod button on the unit (or remote control) is select
/WMA disc automatically.
Note: 1. This unit can play CD, CD-R, CD-RW, MP3 and WMA discs. It also play the "8 cm" and "Multi Section" of MP3
DISC.
2. The "Playback Transfer Bit Rate in MP3 is 32 - 320 kbps and WAM is 64 - 320 kbps.
3. The "Max Readable 99 folders and 999 tracks. If no disc or can not read the TCO, "NO DISC" will be
displayed.
Playing The Entire CD/MP3/WMA
- CD
1. Insert the CD disc into the CD compartment, the main unit will automatically read the total number of the folders
and tracks at the same time.
2. Press the PLAY/PAUSE/SCAN button on the unit (or remote
automatically.(F2)
3. Press the PLAY/PAUSE/SCAN button once again, the time elapsed indicator will flash.(F3)
4. Press the SKIP/TUNE SEARCH(UP or DOWN) button once to change Track NO., press and hold the SKIP/TUNE
SEARCH
4. Press the SKIP/TUNE SEARCH(UP or DOWN) button once to change Track NO., press and hold the SKIP/TUNE
SEARCH (UP or DOWN) button to skip fast forward or backward of each song.
5. Press the
STOP/MENU/MONO/ST. Button.
- MP3/WMA
1. Insert the MP3/WMA disc into the CD compartment, the main unit will automatically read the total number of the
folders and tracks at the same time.
2.
Press the PLAY/PAUSE/SCAN button on the unit (or remote control), the unit will play the first track of the CD disc
automatically.
3. Press the PLAY/PAUSE/SCAN button once again, the time elapsed indicator will flash.
4. To change Track NO., press the PLAY/PAUSE/SCAN button once. And press and
(UP or DOWN) button on the unit once (or remote control) to skip fast forward or backward of each song.
5. To resume playback, press the PLAY/PAUSE/SCAN button once more again.
6. To change the ALBUM NO., press the FOLDER/ARROW (UP or DOWN)
7. To stop playback, press the STOP/MENU/ button once on the unit (or remote control).
Note: If the main unit is not working properly, disconnect the power
F1 F2
(UP or DOWN) button to skip fast forward or backward of each song.
PLAY/PAUSE/SCAN button once more to resume the playback. To stop by pressing the
Audio bit rate
INFO
Signal strength
Programme Typ e
The frequency of the present station will be displayed.
Ensemble/Multiplex (Group name)
The Ensemble/Multiplex is a collection of radio stations
that are bundled and transmitted together in a single
frequency. There are national and local multiplexes,
local ones contain stations that are specific to that
Programme type
This describes the style of the programme that
broadcast. If the information is not available, the display
will show “<Programme Type>”.
DLS
DLS stands for Dynamic Label Segment which is a
scrolling message that the broadcaster may include in
their transmissions. The message usually includes
information such as programme details …etc.
OPEN/CLOSE button
to CD/MP3 mode. The unit will read the CD/MP3
control), the unit will play the first track of the CD disc
hold the SKIP/TUNE SEARCH
button on the remote control once.
source and then reconnect it again.
F3
Tim e/Da t e
DLS (Scrolling text)
area.
is being
UK-7

ID3 OPERATION
During in the MP3/WMA mode
1. Press the ID3/MEM/C-ADJ. button once to open the ID3 function.
2. If the MP3/WMA file is written “ID3”, it will automatically search the information of “TITLE NAME”, “ARTIST NAME”
and “ALBUM NAME” indicated on the display .
3. Press the ID3/MEM/C-ADJ. button on the
USB/SD CARD OPERATION
During in the STANDBY mode
1. Insert the USB DEVICE or SD/MMC CARD, and then press the STANDBY/ON button on the unit (or remote
control) to power"ON" the unit.
2. Press the CD/iPod/USB/CARD button on the unit (or remote control) to select the USB or SD CARD mode.
main unit will automatically read the total number of the folders and tracks at the same time. (F4,F5)
3. If the USB memory device more than one folder.
a. Press the FOLDER/ARROW (UP or DOWN) button on the remote control to select each folder.
b. Press the SKIP/TUNE SEARCH (UP or DOWN) button on the unit (or remote control) to select current track in
desired folder.
Note: 1. The main unit can play MP3 and WMA only in this mode.
2. This unit
can not access (or access a longer time) the memory capacity over 32GB. Otherwise, make an others to
access
3. The main unit does not support the WMA file which is protected by "DRM FILE". It just support USB version
1.1 and 2.0.
4. Not support all kinds of “ dual voltage-MMC” card nor “MMC-Plus” card.
Playing The Entire flash disc
1. Playback will start by pressing the PLAY/PAUSE/SCAN button on the unit (or remote control) once. Playback
starts with the first track. The display shows the current track
2. To interrupt playback, press the PLAY/PAUSE/SCAN button again. The time elapsed indicator will flash.
3. Press the PLAY/PAUSE/SCAN button once more to resume the playback. To stop by pressing the STOP/MENU/
INFO button.
In any time, the USB DEVICE or SD CARD
Note :
unit and USB DEVICE or SD CARD were damaged.
REPEAT PLAY FUNCTION
- CD
1. Press the REPEAT button once, REP-1 is displayed. CD will play the current track repeatedly.
2. Press the REPEAT button twice, REP- ALL is displayed. CD will play all tracks repeatedly.
3. Press the REPEAT button once more again, REPEAT function will be off.
- MP3/WMA/USB/SD CARD
1.
Press the REPEAT button once, then REP-1 is displayed. It will play the current track repeatedly.
2. Press the REPEAT button twice, REP- ALL is displayed. It will play all tracks in the current folder repeatedly.
3. Press the REPEAT button thrice, REP-ALBUM is displayed. It will play all tracks
4. Press the REPEAT button once more again, then REPEAT function will be off.
PROGRAM FUNCTION
User can make the program up to 32 tracks (CD) or 64 tracks (MP3/WMA compilation) in any desired order,
Program mode is activated while in stop mode.
1. How to play the program
- CD
1. Press the ID3/MEM/C-ADJ. button on the remote control, shift to MEMORY mode.(F6)
2. Press the SKIP/TUNE SEARCH(UP or DOWN) button on the unit (or remote control), the track number will be
changed.
3. Press the ID3/MEM/C-ADJ. button on the
- MP3/WMA
1. Press the ID3/MEM/C-ADJ. button on the remote control, shift to MEMORY mode. The album number is
flashing. (F7)
2. Press the FOLDER/ARROW(UP or DOWN) button on the remote control, the album number will be changed.
3. Press the
4. Press the SKIP/TUNE SEARCH(UP or DOWN) button on the unit (or remote control), the track number will be
changed.
5. Press the ID3/MEM/C-ADJ. button on the remote control to confirm the favorite track number.
can support most of USB devices, SD/MMC and SDHC cards. The memory capacity up-to 32GB. It
it.
F4
(on the remote control)
ID3/MEM/C-ADJ. button on the remote control, the first track number will be displayed.(F8)
remote again. Then the unit will resume to play normally.
F5
number and its elapsed time.
must be fixed well under in the STANDBY mode to avoid the main
repeatedly.
remote control to confirm the track number.
UK-8
The

F6 F7 F8
2. PROGRAM PLAY
Press the PLAY/PAUSE/SCAN button on the unit (or remote control). The unit will play the first track of the program.
When all tracks have been played, the unit display will show the number of tracks and the playing time of the
CD/MP3/WMA songs.
3. CANCEL PROGRAM
Press the STOP/MENU/ button on the unit (or remote control) once, or open the CD tray door and close it
again that the memory will be erased. Set a new program, the existing one will be cleared
Note : During in the program mode.
1. Press the
Then the unit will repeat the current track.
2. Press the button twice, the will light on the display. Then the unit will repeat all the total
number of tracks.
3.
Press the button once more again. The unit will return to play the program in normally.
RANDOM PLAY(on the remote control)
You can press the RANDOM button on the remote control to select the random play function:
1. During CD stop, press the RANDOM button once to select random play, the display will show “RANDOM”, one
track will be randomly selected and started playing.
2. During playback, first press the RANDOM button once, the display will show “RANDOM”, then press the
SKIP/TUNE SEARCH(UP or DOWN) button on the unit (or remote control), one track will be randomly selected
and started to play.
3. To resume normal playback, press the RANDOM button again until “NORMAL” is displayed.
4.
To cancel random play, press the STOP/MENU/INFO button on the unit (or remote control), playback will be
stopped and the display will show “STOP”.
INTRO PLAY(on the remote control)
1. Press the INTRO button once, and then INTRO is displayed. The main unit will play the first 10 seconds of each
track.(F9)
2. Press the INTRO button twice, and then resume to normal play.
REPEAT
button on the remote control once, the indicator will light on the display.
REPEAT
REPEAT
INFO
REP-1
REP- ALL
F9
During the unit in STANDBY mode:
1. Insert the iPod players in the iPod docking bracket on the right side of the main unit fixedly.
ress the STANDBY/ON button on the unit (or remote control) to switch the unit on.
2. P
ress the
3. P to the iPod mode, the iPod indicator will appear
on the main unit display. (F10)
4. P PLAY/PAUSE/SCAN once to play
5. Adjust the volume control by
6. P PLAY/PAUSE/SCAN once to pause the current track.
7. To skip forwards or backwards, press the (UP or DOWN) button
to select the desired track.
During the unit in iPod MENU mode:
1. During the unit in iPod mode, ress the STOP/MENU/INFO button once, the unit
will enter to the iPod MENU mode. To select the current menu as belows :
Music > Extras > Photo Import (without this
Now Playing will shows on the iPod Player display.
2. Press the FOLDER/ARROW (UP or DOWN) button on the remote control to search the current menu.
3. Press the SELECT/MONO/ST. button enter to
4. Press the (UP or DOWN) button on the unit (or remote control) to search the current content in
the each desired menu folder.
5. If you want return to the iPod menu, press the STOP/MENU/INFO button again.
Charging the iPod Player
1. iPod Player has a internal nonremovable battery, the battery may need to be charged that is not used for a while.
2. You can charge the iPod Player through the main unit automatically under the STANDBY or POWER ON mode.
Notes: 1. The
charge it while playing music, it may take longer.
2. It is not better to charge
CD/iPod/USB/CARD button on the unit (or remote control)
ress the button on the unit (or remote control)
ress the button on the unit (or remote control)
SKIP/TUNE SEARCH
iPod Player battery is 80-percent charged in about an hour, and fully charged in about a few hours. If you
pressing the VOLUME (+ or -) button on the unit (or remote control).
SKIP/TUNE SEARCH on the unit (or remote control)
F10
pon the unit (or remote control)
function display on the iPod Mini) > Settings > Shuffle Songs > Backlight >
on the unit (or remote control)
battery through the main unit:
under the TUNER mode. It may interfere the reception.
the current track.
the desired menu folder.
on the unit (or remote control)
UK-9

3. In any time, you can control the iPod player on the main unit, remote control or iPod player itself while the unit
in the "iPod" mode.
4. In any time, the iPod
were damaged.
5. During the unit in iPod mode. The video function of the iPod with ahnormal working normally.
version of the iPod video function from the apple web-site.
VIDEO OUT SETTING (for i-Pod Video only and Video cable "RCA-type cable" not included)
1. During the unit in the STANDBY mode : Connect the TV set with a videos cable (RCA-type cables) to the VIDEO out
jack on the left side of the unit.
2. During the unit in the iPod mode : Press the "MENU" button on the
3. To set iPod to display videos on a TV :
(a) Choose Videos > Video Settings, and then set TV Out to Ask or On.
(b) If you set TV Out to Ask, iPod gives you
a video.
Notes :1. The Video mode only support that the iPod players have a Video function.
2. iPod classic 80/160GB, iPod
under in the STANDBY mode before operation of the Video function.
AUX IN PLAY
1. Press the DAB/FM/AUX button on the unit (or remote control), until the "AUX” indicator light on the display. This
unit can input analog audio through the AUX(LINE) IN jack on the left of the unit.
2. Use a cable with RCA jack to connect
Note: Aux in cable not included.
EQ CONTROL
When you touch the EQ touch plate or press the EQ button on the remote control, the sound tone changes as below:
MUTE SETTING (on the remote control)
Press the MUTE button on the remote control to stop the sound from the speakers temporarily, the sound stops and
the display will show “MUTE”. To cancel mute, press the MUTE button again or press the VOLUME +/-, “MUTE”
disappears in the display and the sound is restored.
LISTEN TO THE MUSIC BY USING HEADPHONE
Plug your headphones (3.5mm mini-stereo plug) into the headphones jack on the of the unit. The sound
will be heard through the headphones, not the speaker.
SPECIFICATION
POWER SUPPLY : AC 230~50Hz
OUTPUT POWER :
UNIT DIMENSION : 207 (W) x 85 (D) x 206.5 (H) mm
SUB WOOFER
SPEAKER BOX DIMENSION :
N. W. : 7.02kg
RADIO SECTION
FREQUENCY RANGE :
COMPACT DISC SECTION
OPTICAL PICKUP : 3 - BEAM LASER
FREQUENCY RESPONSE :
SPECIFICATION SUBJECT TO CHANGE WITHOUT FURTHER NOTICE.
Ventilation warning : " The normal ventilation of the product shall not be impeded for intended use."
(on the remote control)
DIMENSION :
player must be fixed well under in the STANDBY mode to avoid the unit and iPod player
Update the latest
iPod Click Wheel to set the video function.
the option of showing videos on TV or on iPod while every time you play
nano 3rd generation(Video) 4/8GB and iPod touch 8/16GB should be fixed well
external audio source.
front penal
4.5 Watts x 2
131 (W) x 242 (D) x 173 (H) mm
139 (W) x 72.5 (D) x 200 (H) mm
FM 87.5 - 108 MHz
DAB 174 - 240 MHz
100Hz - 16kHz
The product and packaging should be taken to your local collection point for recycling.
Some collection points
We apologise for any inconvenience caused by minor inconsistencies in these instructions, which may occur as a result
of product improvement and development.
accept products free of charge.
KESA ELECTRICALS U.K HU1 3AU 05 / 08 / 2009
UK-10

 Loading...