

DVD
D-660

1
CONTENT
[TABLE OF CONTENT]
Thank you very much for your purchase of our products. Please read through this manual
in detail before using and keep it for reference.
PRECAUTIONS -----------------------------------------------------------------------------------------
DISC CARE -----------------------------------------------------------------------------------------------
OPERATION GUIDE ---------------------------------------------------------------------------------
INTRODUCTION --------------------------------------------------------------------------------------
NAMES AND FUNCTIONS ------------------------------------------------------------------------
FRONT PANEL --------------------------------------------------------------------------------------
REAR PANEL -------- -------------------------------------------------------------------------------
CONNECTIONS -------------------------------------------------------------------------------------
CONNECTING TO A TV --------------------------------------------------------------------------
CONNECTING TO A 2CH AMPLIFIER -------------------------------------------------------
CONNECTING TO AN AMPLIFIER WITH 5.1CH AUDIO INPUT----------------------
CONNECTING TO AN AMPLIFIER WITH DOLBY PRO LOGIC DECODER -----
CONNECTING TO AN AMPLIFIER WITH DOLBY DIGITAL DECODER ----------
REMOTE CONTROL --------------------------------------------------------------------------------
BASIC OPERATION -------------------------------------------------------------------------------
DVD TITLE & MENU PLAYBACK, VCD MENU PLAYBACK ---------------------------
STEP PLAYBACK, SEQUENTIAL PLAYBACK, PLAY/PAUSE -------------------------
CHAPTER SKIP, ---------------------------------------- -------------------------------------------
FAST FORWARD, FAST REVERSE ---------------------------------------------------------
CHANNEL SELECTING, MUTE, ZOOM ----------------------------------------------------
BROWSE, DISC INFORMATION, 3D, SOUND, SEARCH ----------------------------
SELECTING AN AUDIO LANGUAGE -------------------------------------------------------
2
3
3-4
5
6-7
6
7
8-10
8
8
9
10
10
11
12-15
12
12
12
13
13
14
15
SELECTING AN VIEWING ANGLE ---------------------------------------------------------
SELECTING A SUBTITLE LANGUAGE, REPEAT---------------------------------------
BASIC SETTING ---------------------------------------------------------------------------------
[SETUP MENU] -----------------------------------------------------------------------------------
[GENERAL SETUP] -----------------------------------------------------------------------------
[AUDIO SETUP] -------------------------------------------------------------------------------
ANALOG OUTPUT PAGE -----------------------------------------------------------------
DIGITAL AUDIO SETUP PAGE -------------------------------------------------------
SOUND MODE SETUP PAGE--------------------------------------------------------------
SPEAKER SETUP PAGE----------------------------------------------------------------
NIGHT MODE PAGE -------------------------------------------------------------------------
[VIDEO SETUP] ------------------------------------------------------------------------------
VIDEO SETUP PAGE -------------------------------------------------------------------
PICTURE SETTING SETUP PAGE ------------------------------------------------------
[PREFERENCE SETUP] --------------------------------------------------------------------
CHANGE PASSWORD -------------------------------------------------------------------------
MP3/PICTURE CD PLAYBACK -----------------------------------------------------------------
JPEG PICTURE PLAYBACK ----------------------------------------------------------------
PLAYABLE DISC TYPES/SPECIFICATIOINS -----------------------------------------------
TROUBLESHOOTING ------------------------------------------------------------------------------
ACCESSORIES --------------------------------------------------------------------------------------
15
15
16-23
16
17
18-20
18
18-19
19
19-20
20
21-22
21-22
22
22-23
23
24
24-25
26
27
27
2
PRECAUTIONS
SAFETY PRECAUSTIONS
To prevent fire or shock hazard, do not expose
this appliance to rain or moisture.
This appliance is a Class I laser product. Direct
exposure to beam may cause eyes injury.
Do not open the cabinet by yourself and leave
all servicing to qualified service personnel.
Power requirement for this appliance is AC
110~240V, 50/60 Hz, please ensure the power
supply is in the range before turning on.
OPERATION PRECAUSTIONS
Please use the original packing case and
materials when transporting this DVD player,
and pack the appliance in the original factory
packing style for better protection.
The temperature of the upper cover board
and the rear panel of the player may be high
after a long period of time of playing. This is
not a problem but a normal phenomenon.
When the player is not to be used, please
remove the disc and turn the power off.
Malfunction may be caused when the player
is not used for too long, so please turn it on
occasionally for better maintenance.
Some kinds of discs may cause the
appliance to hang, please restart the
appliance when this occurs.
Interval of restarting should be longer than 10
seconds, which can help to extend the life
expectancy of the appliance.
The moving pictures and played sound may
be affected when the DVD player is placed
close to TV set, radio or VCR, so please keep
them further away.
This DVD player is a device of high
technology and high precision. The image
quality may be impaired when the laser
head or the disc driving parts are dirty or
damaged.
Condensation may cause certain kinds of
damage to the player. It may form because
The player is moved from cold to warm
surroundings;
The player is placed inside a room where
the heater is just on or exposed to the
ventilation hole of an air-conditioner;
The player is moved out from an airconditioned room to a place of high
temperature and humidity in summer time.
The player is being used in a surrounding
of high humidity.
Use a soft and dry cloth for cleaning.
For the stains that cannot be removed easily,
apply some diluted neutral detergent to a
cloth, wring the cloth dry and wipe the stains
away, then use a dry cloth to clean. Do not
use any solvents such as thinner or benzine;
otherwise the surface of the player may be
damaged.
When use duster cloth with chemical substance for leaning, please refer to the using
procedures the product requires.
Manufactured under license from Dolby
Laboratories.
Dolby Pro Logic and double-D
symbols are trademarks of Dolby Laboratories.
Confidential unpublished works. All rights
reserved.
This appliance had better be unplugged
after using each time for better protection.
LOCATION
ACQUIRING CLEAR PICTURES
CONDENSATION PRECAUTIONS
Do not use the player where condensation
may be form easily, otherwise damage may
be caused to the disc and inner parts of the
player. Please take the disc out, plug the
power cord into a wall outlet and turn the
player on. The moisture will disappear when
the temperature rises two or three hours later.
CLEANING PRECAUTIONS
3
This section provides information of using,
cleaning and storing discs.
Do not expose discs to direct sunlight
and heat sources.
Fingerprints or other dirt on the disc
may affect sound and picture quality.
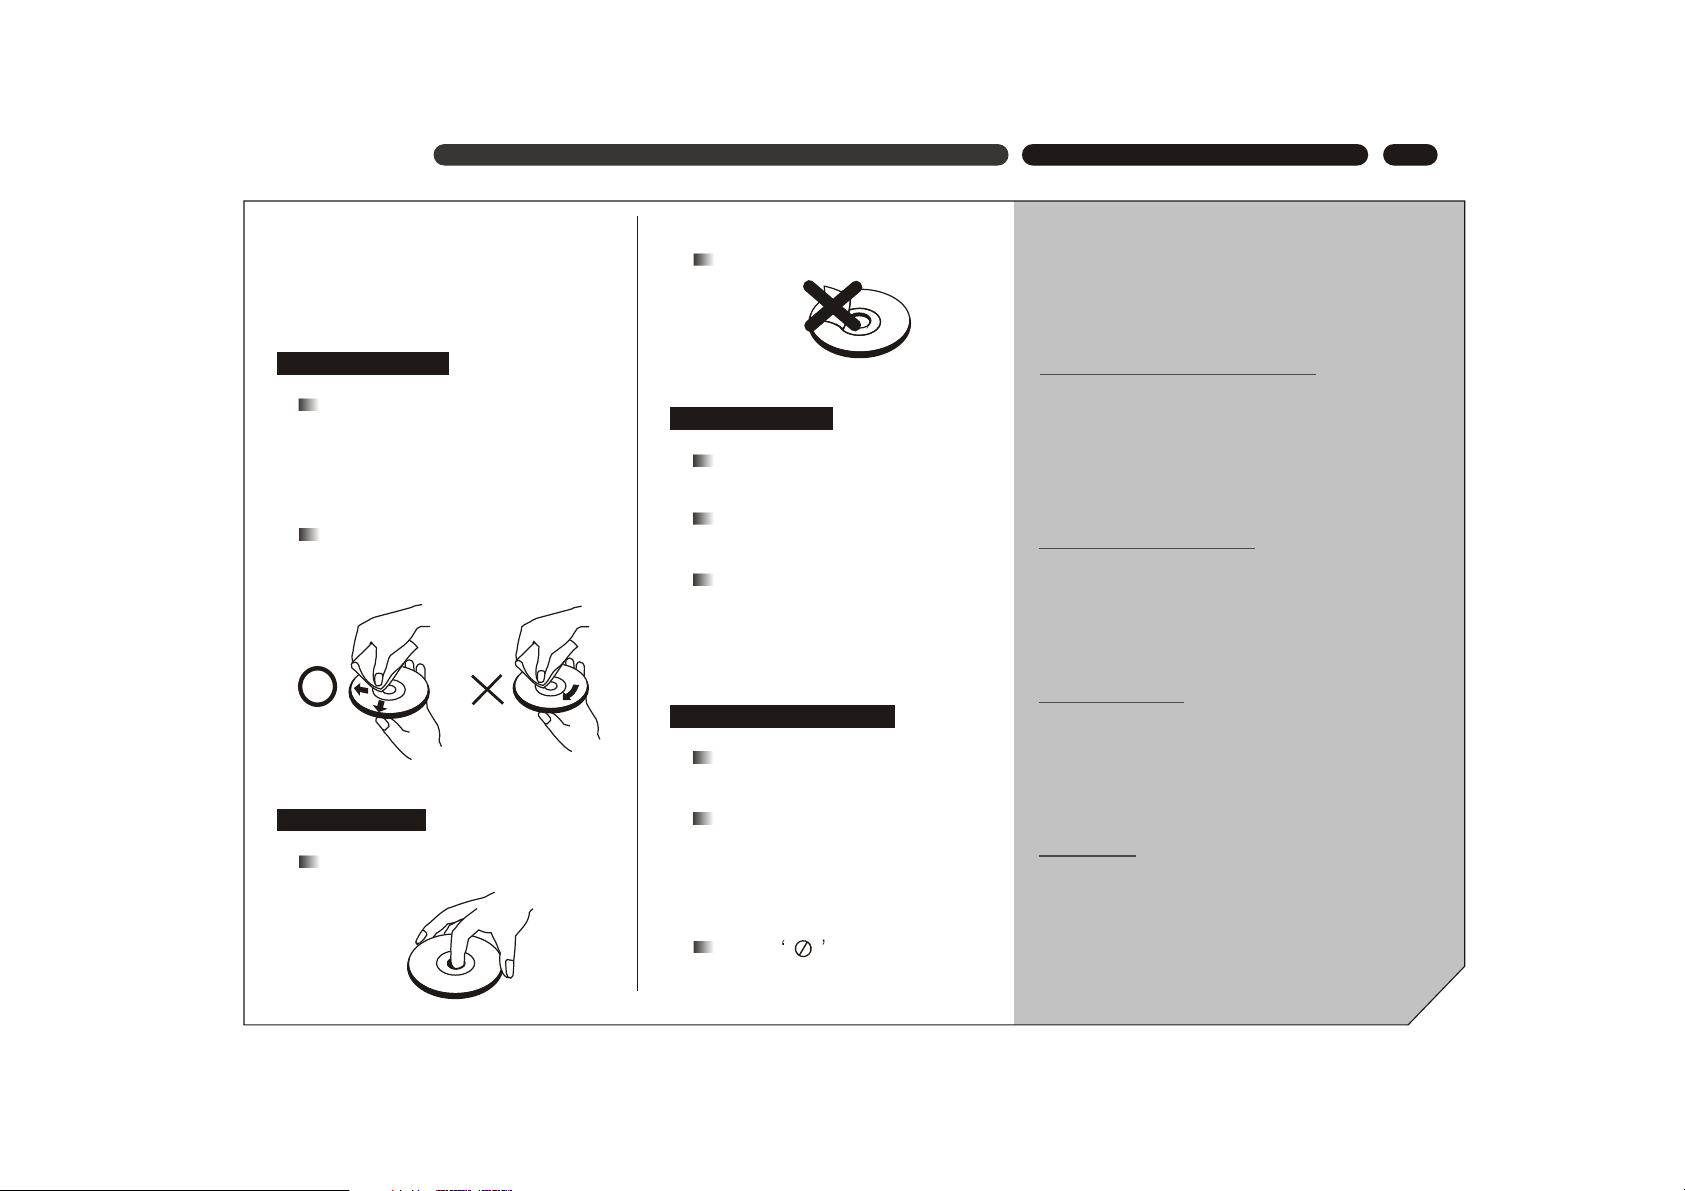
To keep discs clean, use a soft cloth
and wipe from the inside toward the
outer edge.
If soft cloth cannot wipe the dirt
away, use a wet cloth to wipe and
then a dry cloth to clean.
Do not touch the playing surfaces
of discs.
Do not fix labels or stickers to discs.
Keep discs away from moist or dirty
surroundings.
Store discs standing upright in their
jackets. Stacking discs or placing
them outside jackets may cause
them to warp.
This manual only provides basic
explanation for the product.
Some kinds of discs may not be
mentioned or totally the same as
stated in this manual. Please refer
to the TV screen display and disc
specification.
When is displayed on the
screen, the function being used is
not available to this disc.
DISC CARE \ OPERATION GUIDE
[DISC CARE]
CLEANING DISCS
USING DISCS
STORING DISCS
ABOUT THIS MANUAL
DVD is an incredible format that presents the highest
quality digital audio and video available today. It can
contain enormous data, thus provides functions and
features other media cannot reach.
Getting familiar with the DVD player
If you are new to DVD, please first read through
the INTRODUCTION chapter and the NAMES AND
FUNCTIONS chapter, to get familiar with the functions, parts, buttons on the main unit and buttons
on the remote control, which will be referred to
throughout the operation.
Making necessary connection
No entertainment system seems to be set up
exactly the same way. The chapter MAKING CONNECTIONS shows how video and audio connections may be made to suit your home entertainment
system.
Using SETUP menu
If you wish to know about detailed setting of this
appliance, please refer to the BASIC SETTING
chapter, which introduces the various settings and
meanings of the player and helps you to use the
player better.
When all the connection and setups have been
made, you are ready to play a DVD, SVCD, VCD,
DVCD, CD, MP3 disk with this appliance. You can
also enjoy browsing images in a JPEG format
stored in a disc.
Playing discs
[OPERATION GUIDE]
4
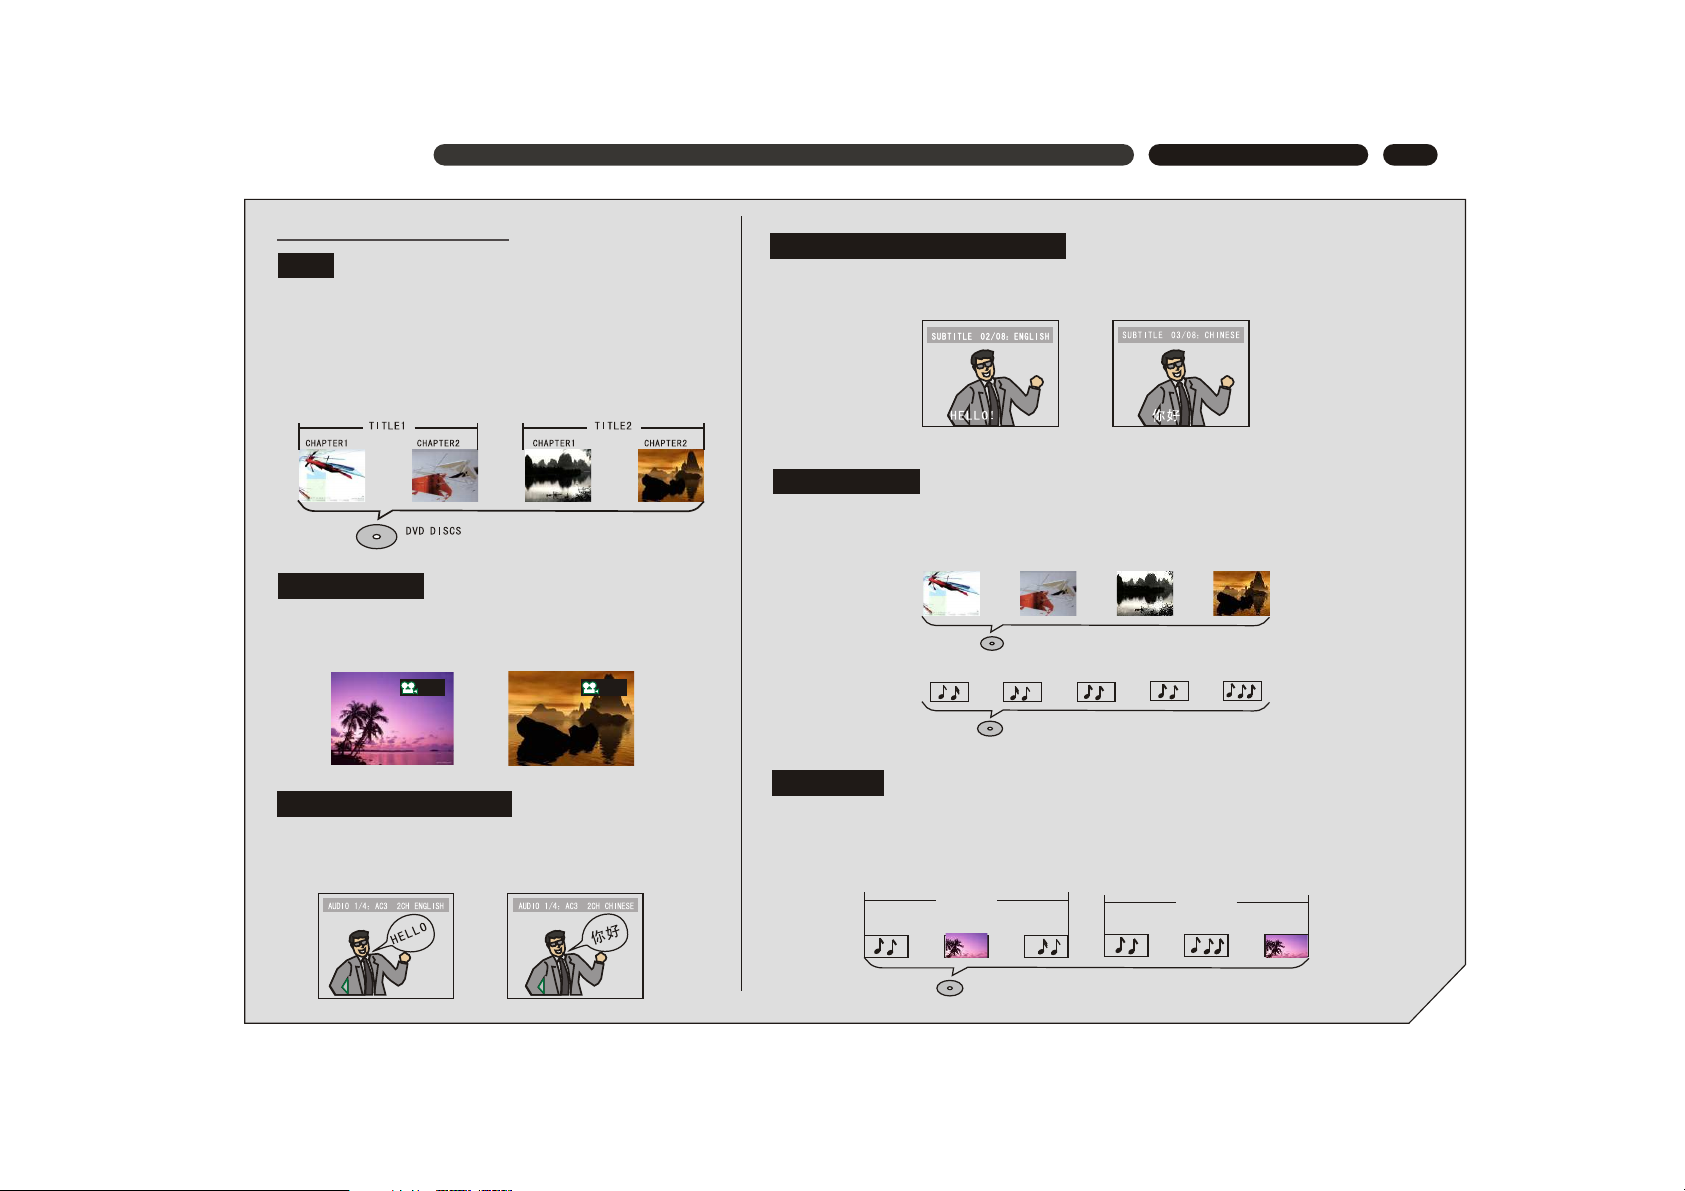
Differences in disc composition
All discs are divided up into smaller, more manageable
sections so that you can find specific content more easily.
DVD discs are divided into one or more titles. Each title
may be further divided into several chapters. Occasionally,
a chapter may contain index points, effectively dividing the
chapter up into several parts, too.
OPERATION GUIDE
You can select the expected subtitle language or turn subtitles off when watching movies
or discs that have multi-language subtitles recorded on them.
SVCD/VCD/CD are divided into a number of tracks. A track may contain a number of
index points occasionally, which effectively divides the track up into several parts.
1/
4
2/
4
You can view scenes from different camera angles when
watching movies or other media with multiple angle
playback available.
You can select the expected language on when watching
movies or discs that have multiple languages and/or
audio soundtracks recorded on them.
MP3 (MPEG1 audio layer 3) is a compressed audio file format. Files are recognized by
their file extension ".mp3" or ".MP3". JPEG is a compressed image file format. Files are
recognized by their file extension ".jpg" or ".JPG".
MP3
FOLDE R1 FOLDE R2
TRACK 1 TRACK 2PICTU RE1 TRACK 1 TRACK 2 PICTU RE1
CD DISCS
SVCD/VCD DISCS
TRACK 1 TRACK 2 TRACK 3 TR ACK4
TRACK 1 TRACK2 TRACK3 TRACK 4 TRACK 5
DVD
MULTI-ANGLE
MULTIPLE LANGUAGES
MULTI-LANGUAGE SUBTITLES
SVCD/VCD/CD
MP3 /JPEG
5
This appliance adopts Taiwan MediaTeK s latest DVD decoder chip that integrates functions
of decoder and servo. It supports full functional DVD playback modes including 8 languages,
32 subtitles and 9 angels. The appliance can play DVD, Super VCD, VCD, DVCD, CD and
CD-R discs. In addition, MP3 and Picture CD are also playable.
The player has the following features:
INTRODUCTION
INTRODUCTION OF PRODUCT FUNCTIONS
MPEG-4, an extension of MPEG-2 technology ,is
a format with high image quality and low data transmission
rate. With the support of MPEG-4 technology, the image
quality of video files on a CD-ROM, whose capacity is
only 700 MB, can reach or approach the image quality
of DVD. The player identifies this type of file by judging
whether the file extension is ".AVI" or ".avi".
MPEG-4
MPEG-4 decorder
The latest ultra-thin DVD (the thickness of the player is only 38mm).
Build-in DOLBY DIGITAL with 6-channel audio output.
Sanyo s
12-bit/108MHz video D/A converter with up to 500-line horizontal resolution.
24-bit/192KHz audio D/A converter with high-quality DVD audio output.
3D virtual surround sound effect and 8 reverb modes.
Coaxial digital audio out jacks.
Standard video out (AV), S-video out, component video out (Y, Cb/Pb, Pr/Cr)
and SCARTvideo out jacks.
16:9 and 4:3 TV screen aspect ratio support.
Playback functions including Program, Repeat, Slow Forward/Reverse, Fast
Forward/Reverse, Zoom In/Out, Memory, JPEG, etc.
Parental Lock Level control system.
High-reliability power supply switch and wide power requirement range
(AC 100-253V, 50/60Hz).
Screen saver program for screen protection.
Auto STANDBY function for automatic electricity saving.
Super search function, supporting various search modes.
latest laser-head with super error-correction capability.
6
NAMES AND FUNCTIONS
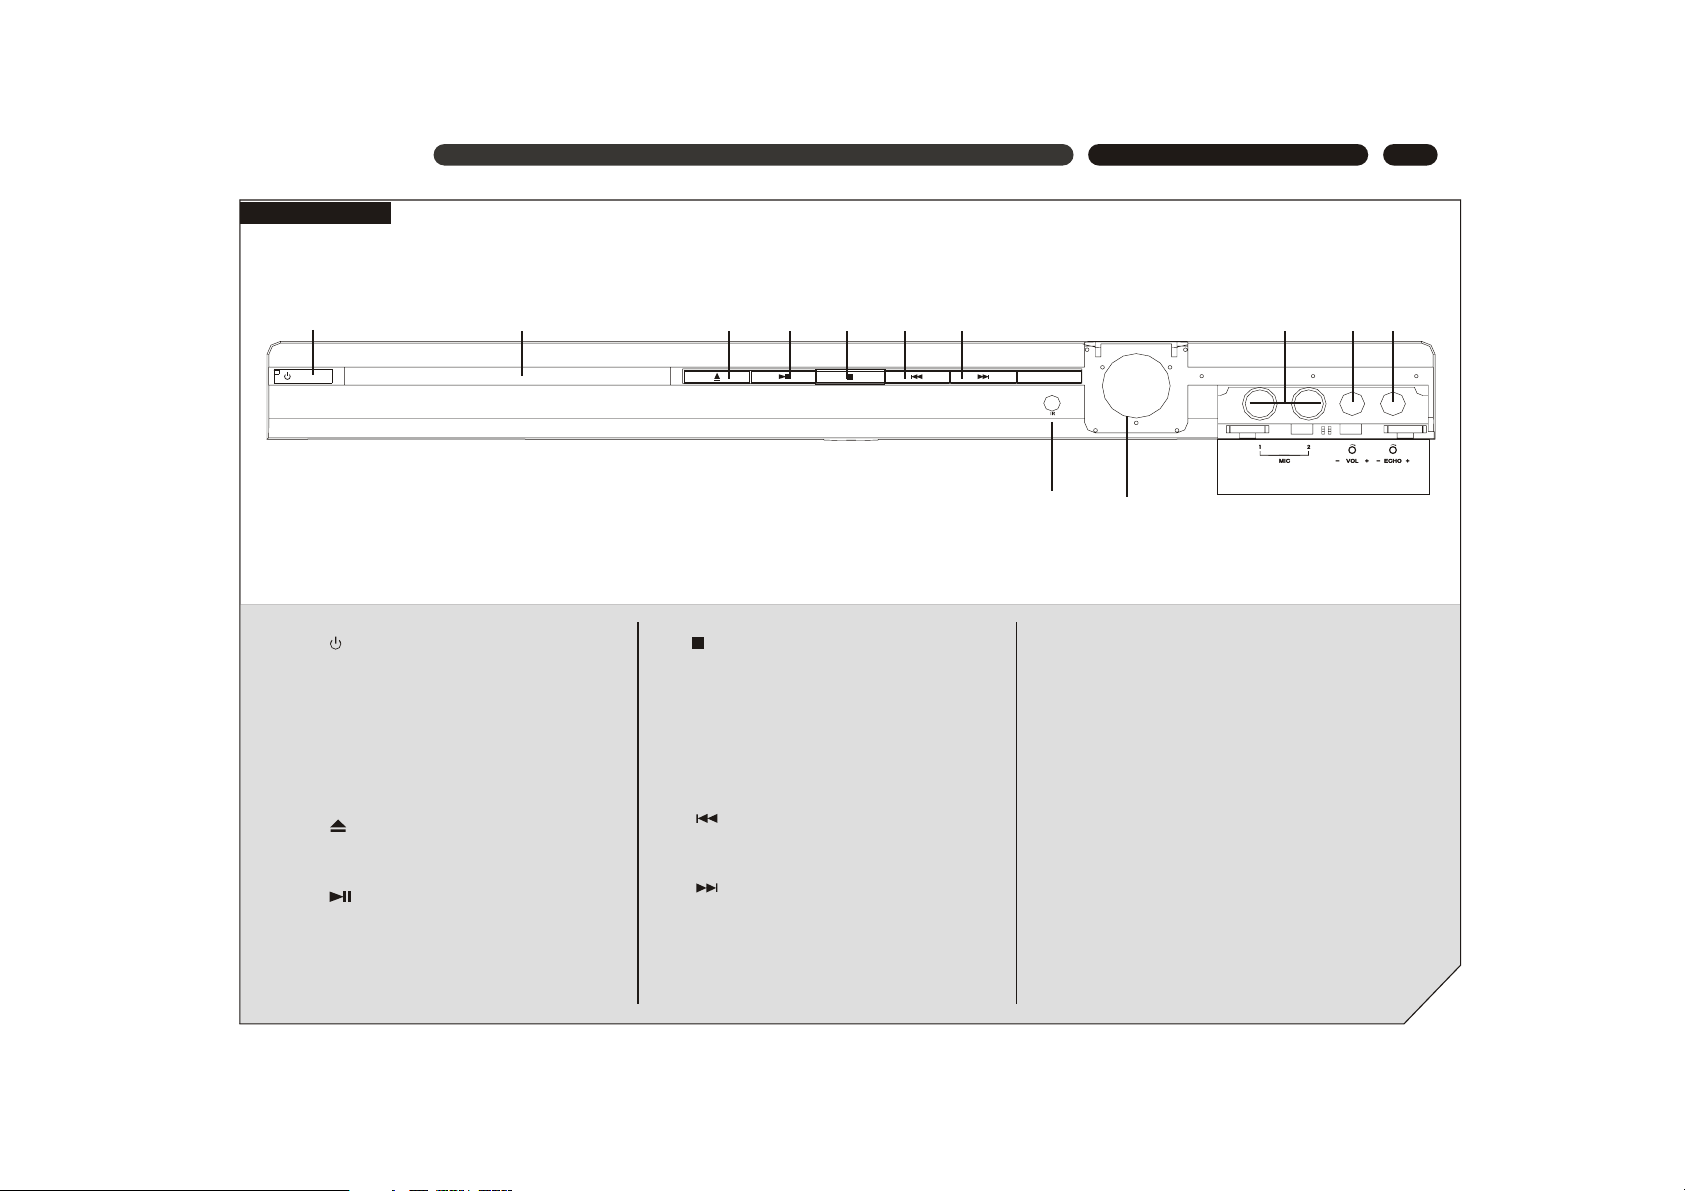
FRONT PANEL
1. POWER button
Press to alternate the player to ON and
OFF repeatedly
2. Disc tray
When loading a disc, place discs in the
disc tray with the label side facing up.
3. (EJECT) button
Press to open and close the disc tray.
4. (PLAY/PAUSE) button
Press for the first time to stop playback,
press for the second time to resume the
playback from the pause point.
12. ECHO control knob
Turn to adjust the echo effect of microphone
input.
11. VOL control knob
Turn to adjust the volume of microphone
input.
10. MIC input jack
Use to connect to a microphone to the
player to use the Karaoke function.
9. Display window
Displays current disc information.
8. Remote sensor
Point the remote control toward the remote
sensor to operate the player.
5. (STOP) button
During DVD playback, press once to stop
and then press PLAY button to resume
playback from the stop point; press this
button twice causes the disc to return to
the beginning of the disc if playback
starts again.
6. (PREV) button
Press to go back to previous chapter/track.
7. (NEXT) button
Press to skip to next chapter/track.
9
1 2 3 4 5 6 7
8
11 1210
7
NAMES AND FUNCTIONS
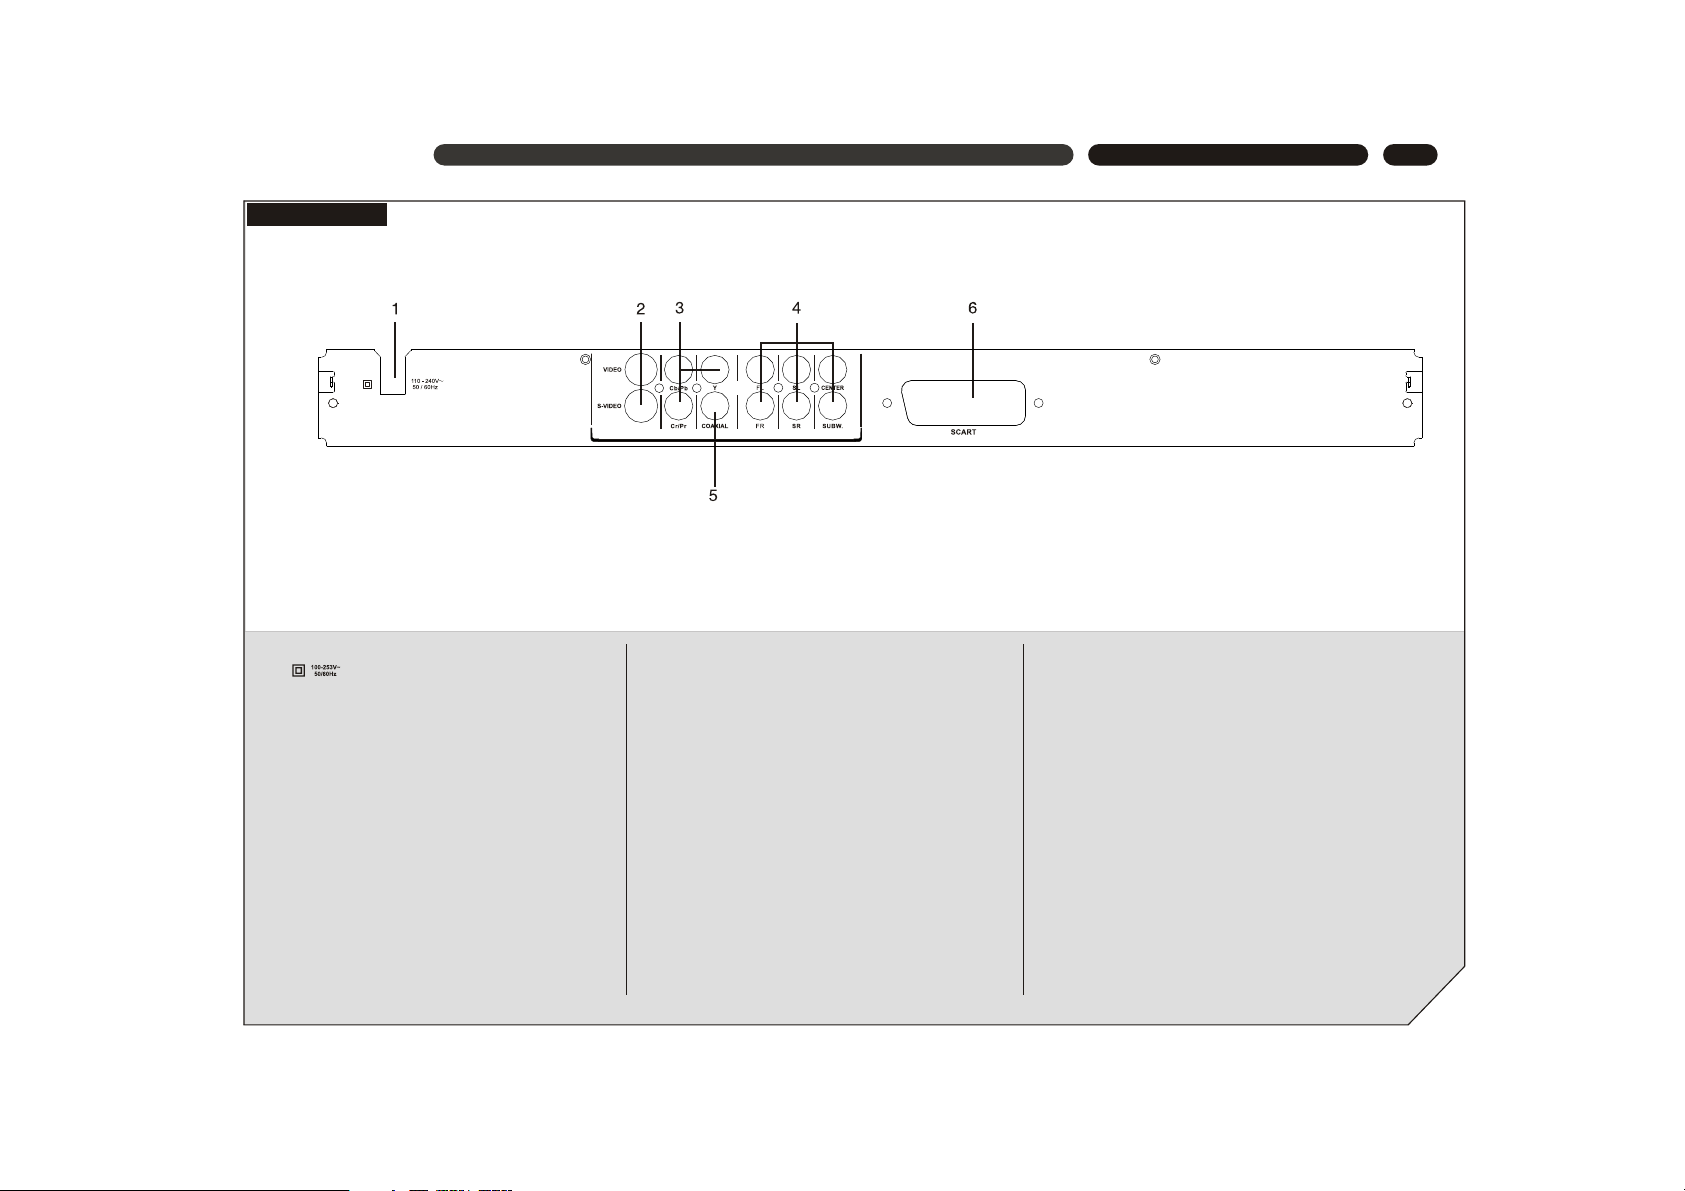
REAR PANEL
4. 5.1CH AUDIO OUT jacks
Use to output decoded 5.1-channel audio to
multi-channel receiver or amplifier.
6. SCART OUT jack
Connect to the SCART input on a TV or other
devices with progrssive scan SCART input
capability.
2. CVBS / S-VIDEO OUT jack
Connect to the video input on a TV, monitor,
AV amplifier or receiver with video input
capability.
3. COMPONENT VIDEO OUT jacks
If your projective monitor or projector or other
similar devices has component video inputs,
you can produce a higher quality picture on
it by connecting its component video cable
to the Y Pb Pr jacks on this unit.
1. AC IN power cord connection terminal
Use to connect the power cord to the wall
outlet.
5. COAXIAL DIGITAL AUDIO OUT jack
Use to output digital audio recorded on discs
by connecting to the coaxial digital audio
input on an AV amplifier or receiver with digital
audio input capability, but you first need to change
the setting to digital audio output on the SETUP
MENU.
8
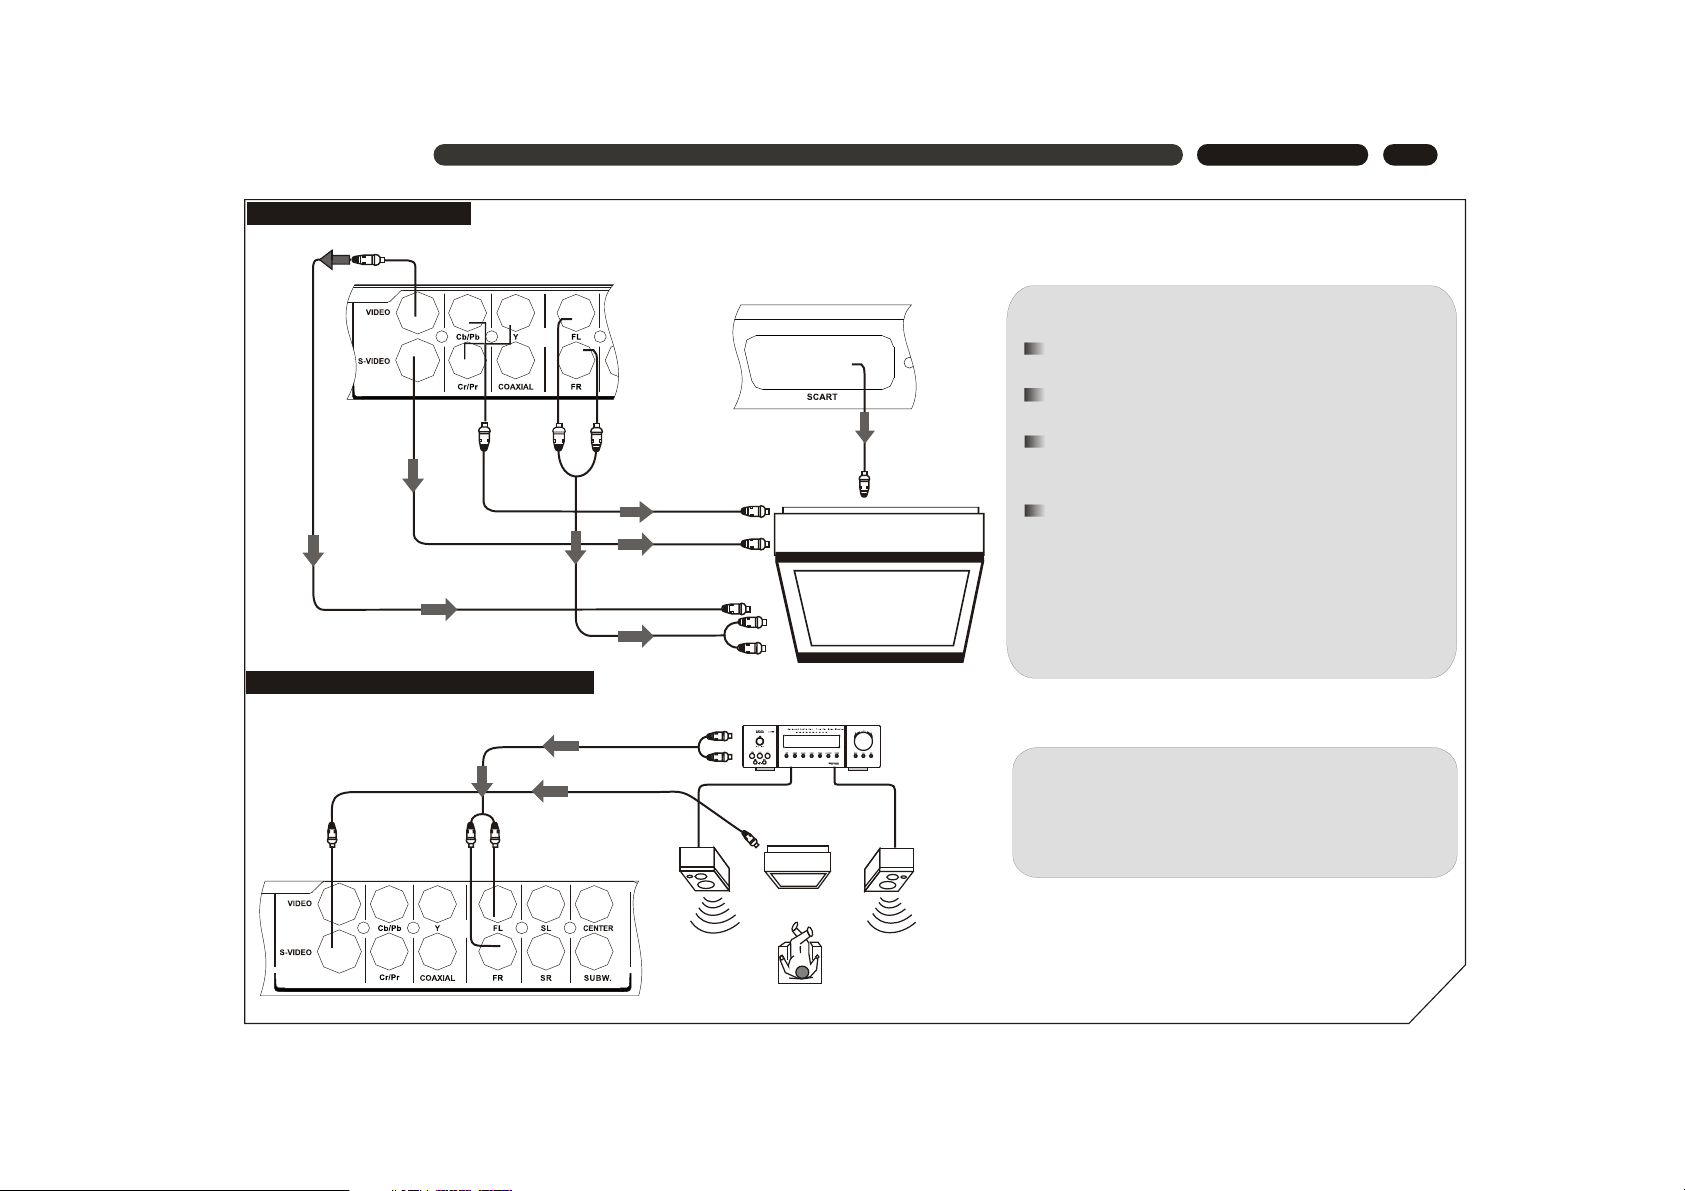
CONNECTIONS
Connection Example
To Y
Cb/Pb
Cr/Pr
OUT
jack
To S-VIDEO
OUT jack
To AUD IO
OUT(L EFT
/RIGH T)
jacks
To AUDIO IN (LEFT/RIGHT) jac ks
To VIDE O IN jack
To S-VIDEO IN jack
CONNECTING TO A TV
To VIDEO OUT jack
To Y Cb/ Pb Cr/Pr IN jack
TV
CONNECTING TO A 2CH AMPLIFIER
To VIDEO/
S-VIDEO IN jack
To VIDEO/
S-VIDEO
OUT j ack
To AUDIO IN jacks
To AUDIO OUT
(LEFT/RIGHT)
jacks
TV
FRONT
RIGHT
FRONT
LEFT
2-CH AMPLIFIER
Notes:
If the TV has a S-VIDEO IN jack, connects it to the
S-VIDEO OUT jack on the player.
If the TV has a SCART IN jack, connects it to the
SCART OUT jack on the player.
If the TV has COMPONENT VIDEO IN jacks (Y, Pb,
Pr), connects them to the corresponding Y, Pb,
Pr OUT jacks.
If you'd like to output the audio to the TV, please
connect the Left/Right channel output jack on the
player to the corresponding channel input jack on the
TV by matching the color of the plugs with the color of
the jacks (red for right channel and white for left).
You can enjoy the stereo audio effect by connecting the
player to a two-channel amplifier-and-speakers system.
Please ensure the audio output of the player is set to
STEREO.
note: To enjoy the movie,please do not have the SCART
and Y/Pb/Pc jacks connected at the same time.
To SCART OUT jack

9
CONNECTIONS
CONNECTING TO AN AMPLIFIER WITH 5.1CH AUDIO INPUT
5.1CH AMPLIFIER
To 5.1CH AUDIO IN jacks
To VIDEO/
S-VIDEO
IN jack
CENTE R
TV
SUBWO OFER
FRONT
RIGHT
FRONT
LEFT
SURROU ND RIGHTSURROU ND LEFT
To VIDEO/
S-VIDEO
OUT j ack
To 5.1CH
AUDIO OUT
jacks
Connection Example
You can enjoy the real 5.1-channel Dolby Digital Audio
effect by connecting the player to an amplifier-andspeakers system with 5.1ch capability.
To DIGITAL
AUDIO
OUT j ack
To DIGITAL AUDIO IN jack

10
CONNECTIONS
CONNECTING TO AN AMPLIFIER WITH DOLBY PRO LOGIC DECODER
CENTE R
TV
FRONT
RIGHT
FRONT
LEFT
SURRO UND R IGHTSURRO UND L EFT
To VIDEO/
S-VIDEO IN jack
To VIDEO/
S-VIDEO
OUT j ack
AMPLIFIER with
DOLBY PRO LOGIC decoder
To AUDIO IN jacks
To AUDIO OUT
(LEFT/RIGHT)
jacks
Connection Example
CONNECTING TO AN AMPLIFIER WITH DOLBY DIGITAL DECODER
Connection Example
To DIGITAL AUDIO IN jacks
To VIDEO/
S-VIDEO IN jack
To VIDEO/
S-VIDEO
OUT j ack
To DIGITAL AUDIO
IN (COAXIAL) jacks
CENTE R
TV
SUBWO OFER
FRONT
RIGHT
FRONT
LEFT
SURROU ND RIGHT
SURROU ND LEFT
AMPLIFIER with DOLBY
DIGITAL decoder
You can enjoy the Dolby Surround audio effect by
connecting the player to an amplifier-and-speakers
system with Dolby Pro Logic decoder.
You can enjoy the completely-reproduced 5.1-channel
Digital Theatre Systems audio effect by connecting the
player to an amplifier-and-speakers system with Dolby
Digital decoder via a coaxial cable. Please ensure the
audio output of the player is set to SPDIF/ ALL or
SPDIF/PCM.

11
NAMES AND FUNCTIONS
REMOTE CONTROL
1. REMOTE SIGNAL
EMITTER
2. STANDBY
3. ZOOM
4. BROWSE
5. NUMBER
6. PREVIOUS
7. NEXT
8. MUTE
9. STEP
10. SETUP
11. PLAY/ PAUSE
12. OK
13. UP/DOWN
14. LEFT/ FAST
REVERSE
15. MENU
16. TITLE
17. ANGLE
18. AUDIO
19. CHANNEL
20. SOUND
21. EJECT
22. REPEAT
23. SEARCH
24. VOLUME
25.STOP
26. RIGHT/ FAST
FORWARD
27. OSD
28. SUBTITLE
29. 3D
1
2 3
4
5
6
7
8
9
+10
0
REP EAT
MEN U
TIT LE
OSD
BRO WSE
ZOO M
ANG LE
CHA NNEL
SET UP
AUD IO
SOU ND
3D
SUB TITLE
OK
VOLU ME
STOP
F.R. F.F.
10
11
12
13
14
15
16
17
3
1
4
6
8
9
2
7
5
18
19
20
21
22
23
24
25
26
27
28
29
+
-
SEA RCH
PLAY/ PAUSE
PREV NEXT
STEP

12
BASIC OPERATION
BASIC OPERATION
DVD TITLE & MENU PLAYBACK
1. Press TITLE button to access the title menu of
the disc.
2. Select the item with the CURSOR buttons then
press OK to start playback.
3. Or press the NUMBER buttons to play the cor responding chapter directly.
4. Press MENU button and the main menu of the
disc will be displayed on the TV screen. Menu
screen varies with the disc.
Notes:
This operation is only available for DVD discs. Some
discs may directly begin playback after data reading.
1. Press MENU button to switch the PBC mode to
ON. For VCD2.0 and SVCD discs, PBC menu
will be accessed automatically.
2. Press the NUMBER buttons to play the corres ponding chapter directly.
3. During playback, press STOP button to stop
playback.
VCD MENU PLAYBACK
1. For VCD2.0 and VCD discs, switch PBC to OFF
and access the sequential playback mode.
2. Under sequential playback mode, you can press
the NUMBER buttons to play the corresponding
chapter directly.
SEQUENTIAL PLAYBACK
Note:
NUMBER buttons are available during playback.
For VCD 1.0 and 1.1 discs, sequential playback
mode will be accessed directly after disc reading.
(only available for sequential playback mode)
PLAY/PAUSE
1. During playback, press the PLAY/PAUSE button on the
remote control or the button on the front panel to
pause playback.
2. When playback paused, press the PLAY/PAUSE button
or button again to resume playback from the pause
point.
1. Press NEXT button on remote control or button on
front panel to skip forward to the next chapter.
2. Press PREVIOUS button on remote control or button
on front panel to skip back to the previous chapter.
CHAPTER SKIP
NUMBER
PREVIOUS
NEXT
OK
PLAY/
PAUSE
MENU
TITLE
STOP
OK
PLAY/ PAUSESETU P STOP
VOLU ME
ZOOM
BROW SE
REPE AT
SEAR CH
PREV NEXT
STEP.
MENU TI TLE O SD
ANGL E AU DIO SUBT ITLE
CHAN NEL 3D
F.R. F.F.
SOUN D
STEP PLAYBACK
Each pressing the button advance the disc a frame
ahead. Press the PLAY button to resume normal
playback.
STEP

13
BASIC OPERATION
2X 4X 8 X 1 6X
32X
2X 4X 8X 16X
32X
VCD discs:
VOICE CANCEL
BASIC OPERATION
FAST FORWARD
Press button on remote control to fast search
the disc at 5 speeds.
FAST REVERSE
Press button on remote control to fast
reverse the disc at 5 speeds.
Notes:
Press PLAY button to resume normal playback at
any speed of forwarding or reversing.
CHANNEL SELECTING
MUTE
Press CHANNEL button to switch the channel
mode. Each pressing of the button will switch
the mode in below sequence:
Notes:
Press PLAY button to resume normal playback at
any speed of forwarding or reversing.
Notes:
For certain Karaoke discs, vocal and music are stored in
left and right channel separately. Switch to the relevant
channel to play only the music channel when using the
Karaoke function.
Mute of f
1. During playback, press MUTE button to turn the sound
off, and the following will appear in the bottom left corner
of the screen.
2. Press MUTE button again to resume the sound, and the
following will appear in the bottom left corner of the TV
screen.
Note: If you find AUDIO OUT doesn't work, please check
if MUTE is on.
Mut e
ZOOM
1. Press ZOOM button to zoom in or zoom out the current
picture in below sequence:
Zoom in Zoom out
Normal
Normal picture
Enlarged picture
MUTE
ZOOM
OK
PLAY/ PAUSESETU P STOP
VOLU ME
ZOOM
BROW SE
REPE AT
SEAR CH
PREV NEXT
STEP
MENU TI TLE O SD
ANGL E AU DIO SUBT ITLE
CHAN NEL 3D
F.R. F.F.
CHANNEL
SOUN D
LEFT VOCAL RIGHT VOCAL
F.R. F.F.

14
BASIC OPERATION
BASIC OPERATION
2. When the picture is large than the TV screen can
display, you can use CURSOR buttons ( )
to move the picture.
3. Press ZOOM repeatedly until the original picture
size is resumed.
BROWSE
1. Press BROWSE button to access the Select
Digest Type window. For VCD, there are three
options: Track Digest, Disc Interval and Track
Interval. For DVD, there are 4 options: Title
Digest, Chapter Digest, Title Interval and
Chapter Interval.
Example: Track for VCDDigest
Type: Track
Select (01-06): - Exit Men u
2. Use NUMBER buttons to enter the number of
the desired static picture, then press ENTER to
start playback from that static picture.
3. Or use CURSOR buttons to move cursor to
highlight EXIT and press ENTER to resume
normal playback.
Press OSD button repeatedly and the disc
information will be displayed in below sequence:
DVD discs
Note: The above displayed information is related to the
setting and content of the disc.
TITLE E LAPSE D
TITLE R EMAIN
CHAPT ER ELAP SED
CHAPT ER REMA IN
DISC INFORMATION
VCD discs (MENU playb ack mode )
SINGL E ELAP SEDSINGLE ELAPSED SINGLE REMAIN
DISPLAY OFF
VCD discs (sequentia l playba ck mode)
SINGL E ELAP SEDSINGLE ELAPSED SINGLE REMAIN
DISPLAY OFF
SINGL E ELAP SEDTOTAL REMAIN TOTAL ELAPSED
3D
SOUND
SEARCH
Press 3D button repeatedly to toggle between 8 audio
surround modes. You can choose your favourite audio
surround mode according to the disc content and the
surrounding of your audio-visual system.
Press SOUND button repeatedly to toggle between 8
sound modes.
DVD discs
1. Press SEARCH
button to display
the search menu on screen, the video picture is
display above the menu, as illustrated.
2. Use button to select the option item you want to
change the setting, and press OK or button to
access the sub-menu. Then use CURSOR or
NUMBER buttons to enter the value and press
OK to confirm.
CURSOR
NUMBER
OK
OSD
SEARCH
BROWSE
3D
OK
PLAY/ PAUSESETU P STOP
VOLU ME
ZOOM
BROW SE
REPE AT
SEAR CH
PREV NEXT
STEP
MENU TI TLE O SD
ANGL E AU DIO SUBT ITLE
CHAN NEL 3D
F.R. F.F.
SOUND
SOUN D
DISPL AY OFF

15
BASIC OPERATION
BASIC OPERATION
SELECTING AN AUDIO LANGUAGE
3. Sub-menus include:
Title
Chapter
Audio
01/02 05/10
5.1CH Subtitle
EnglishEnglish
Angle
1/1
TT time
00:54:51
CH time
00:14:25
Repeat
Chapter
Title
All
Off
Time Disp.
Title Elapsed
Title Remain
Chapter Elapsed
Chapter Remain
01 is the desired title number and 02 is the total title
number. 05 is the desired chapter number and 10 is the
total chapter number.
(The exact total number of title or
chapter differs depending on the disc.)
Time format: HOUR:MINUTE:SECOND
Use SEARCH button, similar to the operation of
DVD discs.
VCD discs
4. Press SEARCH to go back to normal playback.
Press AUDIO repeatedly to toggle between up to
8 audio languages or sound when the disc is
recorded with multi-languages.
For DVD karaoke discs, press AUDIO to alternate
between music and artist vocal. Tthis function is only
available for DVD and Super VCD discs.
Example: AUDIO 1/4:AC-3 5.1C H ENGLI SH
the first language is English
Totally 4 languages/sound re corded
The first language
SELECTING AN VIEWING ANGLE
Press ANGLE repeatedly to toggle between up to
9 viewing angles when scenes recorded in the
disc was shot with multiple cameras from different
angles.
Note: this function is only available for some DVD discs.
SELECTING A SUBTITLE LANGUAGE
Press SUBTITLE repeatedly to toggle between up to
32 subtitle languages when the disc is recorded with
multi-subtitles.
Note: This function is only available for DVD and Super VCD
discs. Total number of subtitle differs depending on the disc.
Example: S UBTI TLE 0 3/08 : ENG LISH
The thi rd sub titl e lang uage i s Engl ish
The th ird su btitl e
Totally 8 s ubti tles reco rded
REPEAT
DVD d is c
SVCD VCD di scs
Press REPEAT button to switch the repeat mode in below
sequence:
Notes:
Repeat playback is only available in PBC OFF mode for
VCD2.0 and Super VCD discs.
Chapter
Title
All
Repeat Of f
Track
All Shu ffle
REPEAT
ANGLE
AUDIO
SUBTITLE
OK
PLAY/ PAUSESETU P STOP
VOLU ME
ZOOM
BROW SE
REPE AT
SEAR CH
PREV NEXT
STEP
MENU TI TLE O SD
ANGL E AU DIO SUBT ITLE
CHAN NEL 3D
F.R. F.F.
SOUN D
Shuffle
Repeat Off

16
BASIC SETTING
[SETUP MENU]
SETUP
CURSOR
OK
To achieve to the best effect of the DVD player, you may need to perform initial setting
according to the content of the disc and peripheral equipment. Details of all the adjustable
functions will be described later in this chapter,
and this section introduce the SETUP MENU.
Press SETUP button to access the initial setup
menu.
Example: SETUP MENU MAIN PAGE
Use CURSOR( \ )buttons to select the
desired setup option.
When selected, the option item is highlighted
and relevant description appears in bottomleft corner.
Press OK button to access the selected submenu.
-- General Setup Page --
Program
Osd Language
Screen Saver
Go To Ge ner al Setu p Page
-- General Setup Page --
Screen Saver
Example: General Setup Page
Firstlevel
submenu
Secondlevel
submenu
Press OK button to save the new setting.
Changed setting will be kept the next time
you turn on the appliance.
Press OK button again to remove the SETUP
MENU.
Use button ( ) and ( ) to select the desired
setup item on the submenu; and use ( ) and
( ) to toggle between first-level submenu
and second-level submenu.
OK
PLAY/ PAUSESETU P STOP
VOLU ME
ZOOM
BROW SE
REPE AT
SEAR CH
PREV NEXT
STEP
MENU TI TLE O SD
ANGL E AU DIO SUBT ITLE
CHAN NEL 3D
F.R. F.F.
SOUN D
Program
OSD Language
Screen Saver
On
Off

17
BASIC SETTING
[GENERAL SETUP]
Use CURSOR( )buttons and OK button to make your
selection for each option.
Program
OSD Language
Screen Saver
Program
-- General Setup Page --
Screen Saver
Program
OSD Language
Screen Saver On
Off
Select the "Program" item, the program playback screen displays.
PROGRAM:TT(0 5)/CH(- -)
11
12
13
14
15
16
17
18
19
20
EXIT STAR TPREV
PROGRAM:TT(0 5)/CH(- -)
__
__
__
__
__
__
__
__
__
__
__
__
__
__
__
__
__
__
__
__
1
2
3
4
5
6
7
8
9
10
EXIT START NEXT
Use n umbe r but ton s on t he rem ote c ont rol t o en ter t he tit le or cha pter
numb er yo u wan t to ad d int o th e prog ram p lay bac k pla yli st. ( TT is th e
titl e num ber , and CH is the chap ter numb er.)
The p layl ist has t wo pag es. You can ad d as m any a s 20 uni ts t o the l ist,
whic h ena ble s you to arr ang e you r fav ori te ch apt ers o r tr acks in the
play lis t as y ou wis h. Us e cur sor butt ons t o mov e th e curs or on to th e
"NEX T" or "PRE V" b utto n, an d pr ess O K butt on to navi gat e bet wee n
page s.
Afte r you have fin ishe d edi tin g the pla ylis t, u se cu rsor but tons to mov e
the c urso r ont o th e "START" butt on, and p ress OK but ton t o start program
play bac k.
To exit t he pr ogra m pla yba ck sc ree n, us e cur sor butt ons t o mov e th e
curs or on to th e "E XIT" butt on a nd pr ess O K butt on to exit
OSD LANGUAGE
On-Screen Display Languages is POLAND and ENGLISH.
SCREEN SAVER
ON: When disc playback is stopped or paused or you have not used the
player or its remote, and this idle status lasts for 5 minutes, the TV
screen will be in automatic protection mode, in which a moving DVD
logo appears on a dark screen.
OFF: Turn off the automatic protection function.

18
BASIC SETTING
[AUDIO SETUP]
-- Audio Setup Pa ge --
Go To Au dio Set up Page
Analog Output
Digital Audio Setup
Sound Mode
Analog Audio Setup
Night Mode
-- Audio Setup Pa ge --
Set Stereo Downmix
Analog Output St ere o
Digital Audio Se tup LT/ RT
Sound Mode 3D Sur rou nd
Analog Audio Setup Mul ti Cha nne l
Night Mode
Analog Output Page
Analog Output
Stereo: This is a Dolby Stereo audio effect. Signals of multi-channel
audio are mixed into the left and right channel, so sound from
channels other than left and right can be heard.
LT/RT: Output mixed two-channel audio encoded with Dolby DOWNMIX
method, which can be reverted back to multi-channel audio via an
amplifier with Dolby Pro Logic decoder.
3D Surround: Using two speakers to simulate the surround sound effect
of multi-channel audio.
Multi Channel: The player will output multi-channel audio. Select this when
your playeris connected to a multi-channel amplifier.
Analog O utput
Digital Audio Setup
Sound Mo de
Analog A udio Setup
Night Mo de
Analog O utput
Digital Audio Setup
Sound Mo de
Analog A udio Setup
Night Mo de
DIGITAL AUDIO SETUP PAGE
-- Digital Audio Se tup Pa ge --
Digital Output
Digital Output Off
LPCM OUTPUT All
PCM O NLY
digital Output
LPCM OUTPUT

19
BASIC SETTING
Digital Output
SPDIF Off: output analog audio to TV or amplifier.
SPDIF/All: output the original digital audio.
SPDIF/PCM: convert the digital audio into PCM format to output
LPCM OUTPUT
Set the digital audio sampling rate. There are two option items:
48K and 96K.
Note:
.
The configuration of LPCM OUTPUT item can not be changed unless the player
is in "PCM ONLY" status.
-- Sound Mode Set up Page --
3D
EQ
SOUND MODE SETUP PAGE
3D
There areeight options: Off , Concert, Living Room , Hall , Bathroom, Cave,
Arena , Church. Make your preferred selection according to the disc content.
3D
EQ
-- Speaker S etu p P age --
Setup Front Spe ake r
Front Speaker Large
Centre Speaker Small
Rear Speaker
Subwoofer
Speakers Delay
Speaker Setup Page
Front Speaker
Centre Speake r
Rear Speaker
Subwoofer
Speakers Dela y
FRONT SPEAKER
Select LARGE or SMALL according to your speaker configuration.
CENTER SPEAKER and REAR SPEAKER
Select LARGE or SMALL or OFF according to your speaker configuration.
SUBWOOFER
Select ON or OFF according to your speaker configuration.
Speakers Delay
Off
Concert
Living Room
Hall
Bathroom
Cave
Arena
Church
EQ
There are eight options: Off , Rock, POP, Live, Dance, Techno, Classic and
Soft. Make your preferred selection according to the disc content.

20
BASIC SETTING
Speakers Delay Page
-- Speaker S etu p P age --
Centre Delay
Centre Delay
Subwoofer
Rear Left
Rear Right
Centre
Subwoofer
Rear Left
Rear Right
1.0M
1.0M
1.0M
1.0M
Night Mode Page
Night Mode
In this mode, the high volume outputs are softened and low volume outputs
are brought upward to an audible level. It is useful watching your favourite
action movie without disturbing others at night.
-- Audio Setup Pa ge --
Analog Output
Digital Audio Setup
Sound Mode
Analog Audio Setup
Night Mode On
Off
Analog O utput
Digital Audio Setup
Sound Mo de
Analog A udior setup
Night Mo de

21
BASIC SETTING
VIDEO SETUP PAGE
[VIDEO SETUP]
-- Video Setup Pa ge --
Set TV Standard
TV TYPE
TV DISPLAY
TV Mode
Picture Setting
Video Output
PAL
Multi
NTSC
TV TYPE
There are three options: PAL, Multi and NTSC.
TV DISPLAY
The width-to-height ratio of conventional TV is 4:3, while the one of wide
screen TV is 16:9. This width-to-height ratio is called the aspect ratio. When
viewing discs recorded in different aspect ratio, the image's width-to-height
ratio can be switched to match the TV or monitor being used.
There are three sub-items for item TV DISPLAY: NORMAL/PS, NORMAL/LB
and WIDE. Select NORMAL/PS or NORMAL/LB according to your preference
when using a conventional TV; select WIDE when using a wide screen TV.
TV TYPE
TV DISPLAY
TV Mode
Picture Setting
Video Output
Viewing discs recorded in 16:9 aspect ratio on a standard 4:3 TV
DVD/Super VCD screen size format
The Letter Box presentation places black
bars at the top and bottom portions of
the screen to provide the full wide screen
presentation of a movie on a standard
TV (4:3 aspect ratio)
The Pan & Scan presentation crops both
sides of the wide screen presentation to
use the full standard TV screen.
When viewing a wide screen format DVD
or Super VCD on a standard TV and TV
DISPLAY is set to WIDE, the picture may
appear 'squeezed' on the screen. To remedy this condition, select either NORMAL/LB or NORMAL/PS.
Setting and Appearance
Set to NORMAL/LB
Set to NORMAL/PS
Set to WIDE
Note:
Whether the aspect can be switched or not depends on the disc.
Some discs may not include the screen format selected in the TV DISPLAY setting.
In this case, the standard TV screen format available on the disc is automatically
selected.
TV Mode
In the progressive scan mode ,you can enjoy the high quality picture with
less flickers. It only works when you have connected the DVD player's
Y Pb Pr jacks to your TV that supports the progressive video input.
Otherwise, a distorted screen will appear on the
Off: To disable Progressive Scan function.
On: To enable Progressive Scan function.

22
BASIC SETTING
Picture Setting Setup Page
-- Personal Pi ctu re Setup --
Brightness
Brightness
Contrast
Tint
COLOUR
0
0
0
0
BRIGHTNESS
Adjust your preferred brightness according to disc content.
CONTRAST
Adjust your preferred contrast according to disc content.
TINT
Adjust your preferred tint according to disc content.
COLOUR
Adjust your preferred colour according to disc content.
Brightness
Contrast
Tint
COLOUR
[PREFERENCE SETUP]
-- Preference P age --
Preferred Audio La ngu age
Audio
Subtitle
Disc Menu
Parental
PBC
Password
Divx Subtitle
Default
English
Chinese
French
Spanish
Portuguess
Polish
Italian
Turkish
AUDIO, SUBTITLE and DISC MENU
DVD discs may be recorded with multi-language audio, subtitle and menu.
Setting your preferred audio, subtitle and menu language, the DVD disc
will be played back in that language if it contains those information.
AUDIO:
English, Chinese, French, Spanish, Portuguese, Polish, Italian,Turkish,
Greek, Norwegian, Finnish, German, Swedish, Danish, Dutch,
Hungarian, Czech, and Others.
SUBTITLE:
Off, English, Chinese, French, Spanish, Portuguese, Polish, Italian,Turkish,
Greek, Norwegian, Finnish, German, Swedish, Danish, Dutch,
Hungarian, Czech, and Others.
DISC MENU:
English, Chinese, French, Spanish, Portuguese, Polish, Italian,Turkish,
Greek, Norwegian, Finnish, German, Swedish, Danish, Dutch,
Hungarian, Czech, and Others.
Audio
Subtit le
Disc Me nu
Parent al
PBC
Passwo rd
Defaul t
Video Output
Select the corresponding video output mode according to what cables are
used to connect the appliance to the TV set.
S-VIDEO: Use a S-VIDEO cable to connect the appliance to the TV set
and the TV set is set to S-VIDEO.
YUV: Use component video cables(YPbPr) to connect the appliance to the
TV set and the TV set is set to component video.
SCART: Use a SCART cable to connect the appliance to the TV set or a
computer monitor and the TV set is set to SCART.

Note: this item is only available when PASSWORD MODE on PASSWORD SETUP
PAGE is set to OFF.
23
BASIC SETTING
OK
Old Password
New Password
Confirm PWD
CHANGE PASSWORD
The default factory password is 136900. If you wish to to change the
password, select the PASSWORD option in the Password Setup Page,
then select CHANGE and press OK, the below menu will be displayed
on screen:
PASSWORD
DIVX SUBTITLE
You can set Divx Subtitle to standard or cyrillic.
PARENTAL
There are eight options: 1 to 8. The smaller the number is, the stricter
the parental lock level will be.
PBC
You can set the PBC to ON or OFF. This feature is available only on
Video CD 2.0 with playback control(PBC) feature.
DEFAULT:
Resume the factory default setting.

24
MP3 /PICTURE C D
00:00 0 0:00
003/00 6
\Cd02\
Cd01
Cd02
Cd03
Cd04
Cd05
Cd06
00:00 0 0:00
003/00 6
\
[MP 3/PICTURE CD PLAYBACK]
Load a MP3 or Picture CD, the below MENU will appear on TV screen when
data reading finishes (Figure 1). Use CURSOR button to move the
highlight to select a folder, and press OK to open the folder (Figure 2).
-Trac k0 1
Trac k0 2
Trac k0 3
Trac k0 4
Trac k0 5
Figure 1 Figure 2
Folder MP3 file unknown and unplayable file format JPEG picture
MP 3 PLAYBACK
MP3 CD PLAY MODE
SINGLE
Play the selected track once.
REPEAT ONE
Repeat only the selected track inside the selected folder.
REPEAT FOLDER
Repeat all the tracks inside the selected folder.
FOLDER
Play tracks inside the selected folder sequentially.
SHUFFLE
Play tracks inside the selected folder randomly.
Note: During Mp3 playback , you can use PREV, NEXT and NUMBER buttons to
select your desired track. You can also use F.F and F.R to search and buttons on
the front panel to control the playback.
[JPEG PICTURE PLAYBACK]
Same as MP3 CD, JPEG picture play modes also include SINGLE, REPEAT
ONE, REPEAT ALL, OFF and SHUFFLE.
Some MP3 CD and other discs also contain JPEG picture files, which can be
viewed with the DVD player.
Basic operations for Picture CD playback include ZOOM, ROTATING and
BROWSE.
ZOOM
While a picture being displayed, press ZOOM and "ZOOM 100%" will appear
on screen, press ZOOM repeatedly to zoom in or zoom out the picture to
100%, 125%, 150%, 200%, 50% and 75% of the original size.
Notes: When a picture is enlarged, use CURSOR ( )buttons to move the
picture. While moving, in top-left corner of the screen will respectively appear
PAN LEFT, PAN RIGHT, PAN UP, PAN DOWN, which will remain for about 3
seconds.
ROTATING
While a picture being displayed, press CURSOR( )buttons to rotate
the picture.
LEFT and RIGHT buttons: each pressing rotate picture by 90, press four
times to resume the original position.
UP button: each pressing flip the picture horizontally, press twice to resume
the original position.
DOWN button: each pressing flip the picture vertically, press twice to resume
the original position.
BROWSE
While a picture being played, press BROWSE button to access the browse
screen. Use CURSOR buttons to select the preferred picture and press
OK to play.

25
JPEG PLAYBACK
Kodak Picture CD playback:
Kodak Picture CD looks exactly the same as a common Compact Disk. It
can be ordered in a Kodak color photograph shop with "Kodak Picture CD"
logo when developing and printing 135mm color film or APS (Advanced
Photograph System) film. The shop will develop and print your film and
store all your photos in a compact disk. This Kodak Picture CD can be slide
shown with the DVD player. Each picture will be adjusted pro rata to fit the
TV screen. All pictures can be zoomed, rotated and changed slide-showing
style as stated above.
Kodak Picture CD mark

26
PLAYABLE DISC TYPES/SPECIFICATIOINS
[PLAYABLE DISC TYPES]
Playable discs
types and marks
DVD video
Super VCD
VCD
CD
MP3
Diameter /
Playable sides
Disc features and
playback time
DVD video
12cm single-sided 1 layer
2 layer
12cm double-sided 1 layer
2 layer
DVD video
8cm single-sided 1 layer
2 layer
8cm double-sided 1 layer
2 layer
Super VCD
12cm single-sided
8cm single-sided
VCD
12cm single-sided
8cm single-sided
CD
12cm single-sided
8cm single-sided
MP3 discs
12cm single-sided
Digital audio, digital video
MPEG2, moving pictures + sound
135 min.
270 min.
270 min.
540 min.
Digital audio, digital video
MPEG2, moving pictures + sound
45 min.
70 min.
83 min.
152 min.
Digital audio, digital video, MPEG2
1/2,2/3, moving pictures + sound
40 min.
10 min.
Digital audio, digital video,
MPEG1, moving pictures + sound
74 min.
20 min.
Compressed digital audio
74 min.
20 min.
Compressed digital audio
Up to 170 songs, 12 hr.
Above disc type mark can be found on disc labels or disc jackets.
CD-R and CD-RW discs recorded in CD Audio or Video CD format, or with MP3
audio files, are also playable.
Caution!
CD-R/RW discs recorded using a personal computer may not play if the disc
is damaged or dirty, or if there is dirt or condensation on the player's lens.
If you record a disc using a personal computer, there are cases in which it
may not play because of the settings of the application software used to
create the disc. (Check with the software publisher for more detailed
information.)
[SPECIFICATIONS]
430mmx257mmx38mm
Environment:
working temperatu re : 0 ~ 40C
worki ng humidity : 10% ~ 80%
Video:
Color system : PAL/MUL TI/NT SC
DVD horizontal res olut ion : 500 l ine
SVCD horizo ntal resol utio n : 350 lin e
VCD horizontal res olut ion : 250 li ne
Audio:
Signal to noise : 90 dB
Frequency respons e : 20 Hz ~ 20 KHz 1 d B
Distortion and noi se : -70dB
Dynamic range : > 80dB
Crosstalk : 80dB
Output:
Video output level :1.0 0.2 Vp-p
Audio basic output leve l :1. 8V
Remote-control
effective distanc e:
-1.0V
+0.2V
not less than 6m; an gle : (h oriz onta l/ve rtical) 30
Power requirement :
AC 100V-253V 50Hz/ 60Hz
Power consumption :
15W
Dimensions:
Weight:
approximately 2.5 kg
+

27
TROUBLESHOOTING/ACCESSORIES
[TROUBLESHOOTING]
Problem
No power
Playback is not
possible
No picture
Distorted picture or
black-and-white picture
No sound
Volume cannot be
turned up
Buttons on front panel
or remote control do
not work
Remote control does
not work
Picture quality is poor
Possible cause
The disc is above the Parental Lock Level.
The video cable is not connected properly.
The audio cable is not connected properly.
Output color system (NTSC/PAL) does
not match the TV color system.
AC Power socket is not plugged properly.
The disc is not compatible or seriously
damaged.
The disc is loaded upside down.
Condensation inside the player.
The player is in STANDBY mode.
The TV is not set up properly.
The disc is not clean or scratched.
MUTE is on.
The initial volume of the TV or amplifier
is set to too low.
Such operation is not supported by the
current disc or the current setting of the
player.
Batteries in the remote control are flat or
inserted the wrong way round.
Too far from the player, or the angle with
the remote sensor is too wide.
Obstacles between the remote sensor
and the remote control
Solution
Press SETUP button to change the TV
TYPE setting in Preference Page.
Connect the plug to the socket firmly and
make sure the power outlet has power.
Only use playable discs.
Make sure the label side is facing up.
Turn off the Parental Control.
Turn on the player to warm up for about
30 min.
Connect the video cable properly.
Press STANDBY button again.
Set the TV input to AV, S-video, Component Video and SCART video.
Clean the disc or replace the disc.
Connect the audio cable properly.
Press the MUTE button again.
Set the initial volume of the TV or
amplifier higher.
Change the setting or perform a proper
operation according to this manual.
Replace the batteries or insert them
correctly.
Be sure to operate the remote control
from a location within its operating range.
Remove the obstacles.
Remote control --------------------------------------------------1
Audio / Video cable---------------------------------------------3
AAA batteries----------------------------------------------------2
,
User s manual ---------------------------------------------------1
[ACCESSORIES]
 Loading...