

Page 1

USER MANUAL
T75
ENGLISH
Page 2
WARNING !!!
Ferguson receivers support recording on external hard disk drives (HDDs) and flash
memories (pendrives). In all instances, the correct operation of the recording function
depends on the type of connected memory! You must read the following limitations.
REMEMBER:
1. In order to use an external USB memory, the memory must support the USB
2.0 standard. To ensure stable recording and playback, you must use a
memory with a recording speed of 9.0 MB/s or greater. Slower hard disk
drives and flash memories may not function properly, have problems with
recording (image jitter), or not function at all!!!
2. Only disks with one basic NTFS or FAT32 partition (we recommend using the
NTFS format) will function properly. If you do not have such a format, prepare
the disk on your computer before connecting it to the receiver.
3. Highly fragmented or used memories may also not operate smoothly or
correctly.
4. External hard disk drives should be autonomously powered, since the built-in
USB port is unable to provide sufficient power.
CAUTION
1. Under no circumstances should you disconnect the USB device from the
receiver during recording or playback. Disconnecting during operation may
cause damage to the receiver and/or flash memory, and to the recorded data.
2. Do not touch the working device (and in particular the USB connector) with
wet hands. Risk of electric shock and permanent damage to the receiver!
2
Page 3
SAFETY MEASURES
We request that you read the instruction manual and recommendations set forward therein.
Also remember to correctly position the antenna!
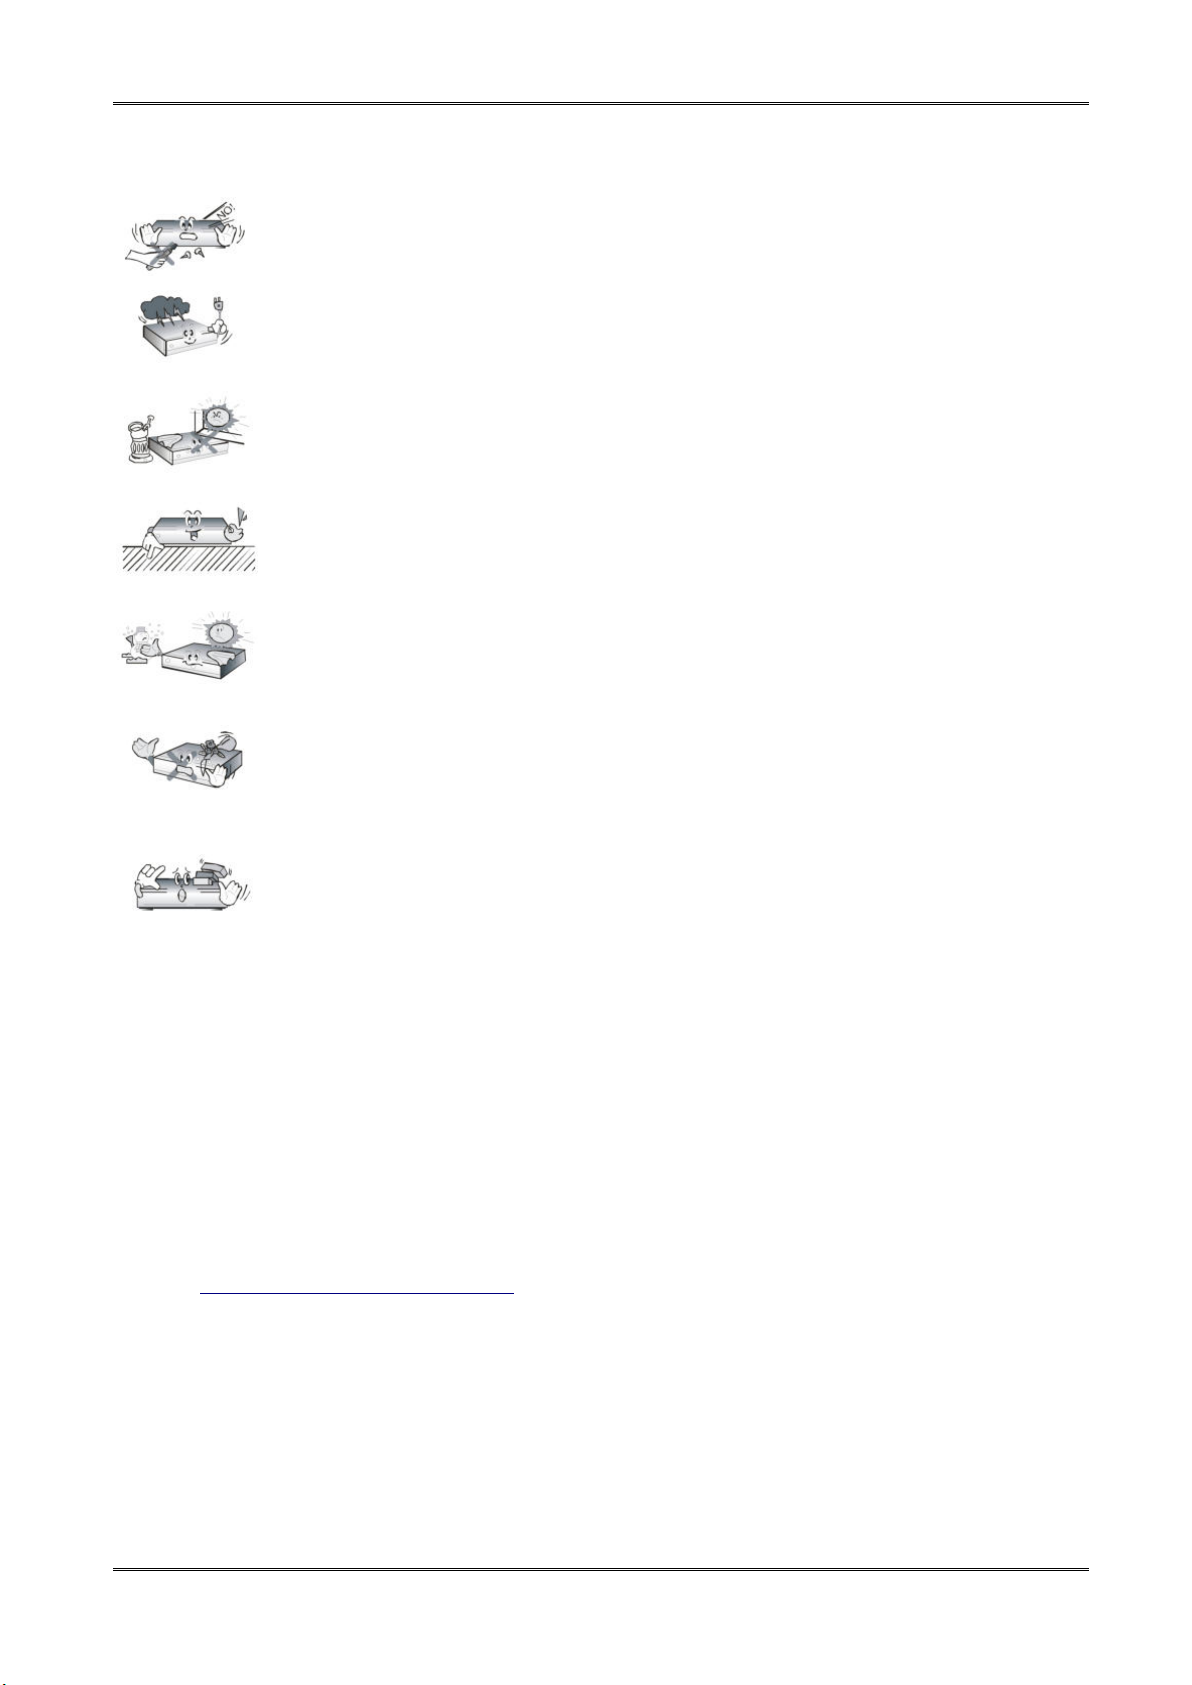
In order to avoid an electric shock, never open the housing. Damage to the
warranty seal shall void the warranty.
Disconnect the device from the mains during thunderstorms or when it is not to
be used for an extended period of time. Please remember that the warranty does
not cover damage to the equipment caused by a lightning strike.
Do not expose the device to direct sunlight. Place it away from sources of heat
and humidity. Do not cover ventilation ducts, in order to ensure the correct
circulation of air.
Place the device horizontally on a flat, even and stable surface.
If you move the device from a room that is warm to one that is cold (or vice
versa), wait at min. 1 hour before connecting it to the mains. Otherwise,
problems may arise.
The device should be placed away from vases, bottles, aquariums and other
water containers in order to avoid damage. Do not touch the mains plug with
your bare hands.
Do not place any objects on the housing of the device. This may cause
overheating and reception problems.
Before commencing maintenance or installation work, disconnect the receiver from the mains.
Do not clean the receiver with alcohol or liquids containing ammonia. If necessary, clean it with
a soft, lint-free cloth wetted with a gentle solution of water and soap.
• Do not connect any cables when the mains plug is in the socket.
• Check the condition of your cables. Damaged cables may cause a fire.
• Please disconnect the receiver from the mains before connecting any cables.
DOWNLOADABLE SOFTWARE
Ferguson has taken every effort to provide for users software with updates in order to ensure
that the parameters of the terrestrial television receiver are up to date. Ferguson reserves the
right to amend, change or modify the software used in the terrestrial television receiver on any
basis and without prior notification. The latest version of the software is available on the
website
http://www.ferguson-digital.eu
3
Page 4
ABOUT THE INSTRUCTION MANUAL
Ferguson Sp. z o.o. has made every effort to provide the most current information about its
products. Ferguson Sp. z o.o. does not grant any guarantee as to the contents of the present
instruction manual and disclaims any implied guarantees concerning market value or suitability
for specific purposes. The information contained herein is an instruction intended to enable the
correct usage and maintenance of the receiver.
Ferguson Sp. z o.o. reserves itself the right to introduce amendments, changes or translations
of the instruction manual without prior notification thereof. For this reason, we recommend you
regularly visit our website in order to obtain the latest information.
MARKINGS AND SIGNS APPLIED TO THE RECEIVER
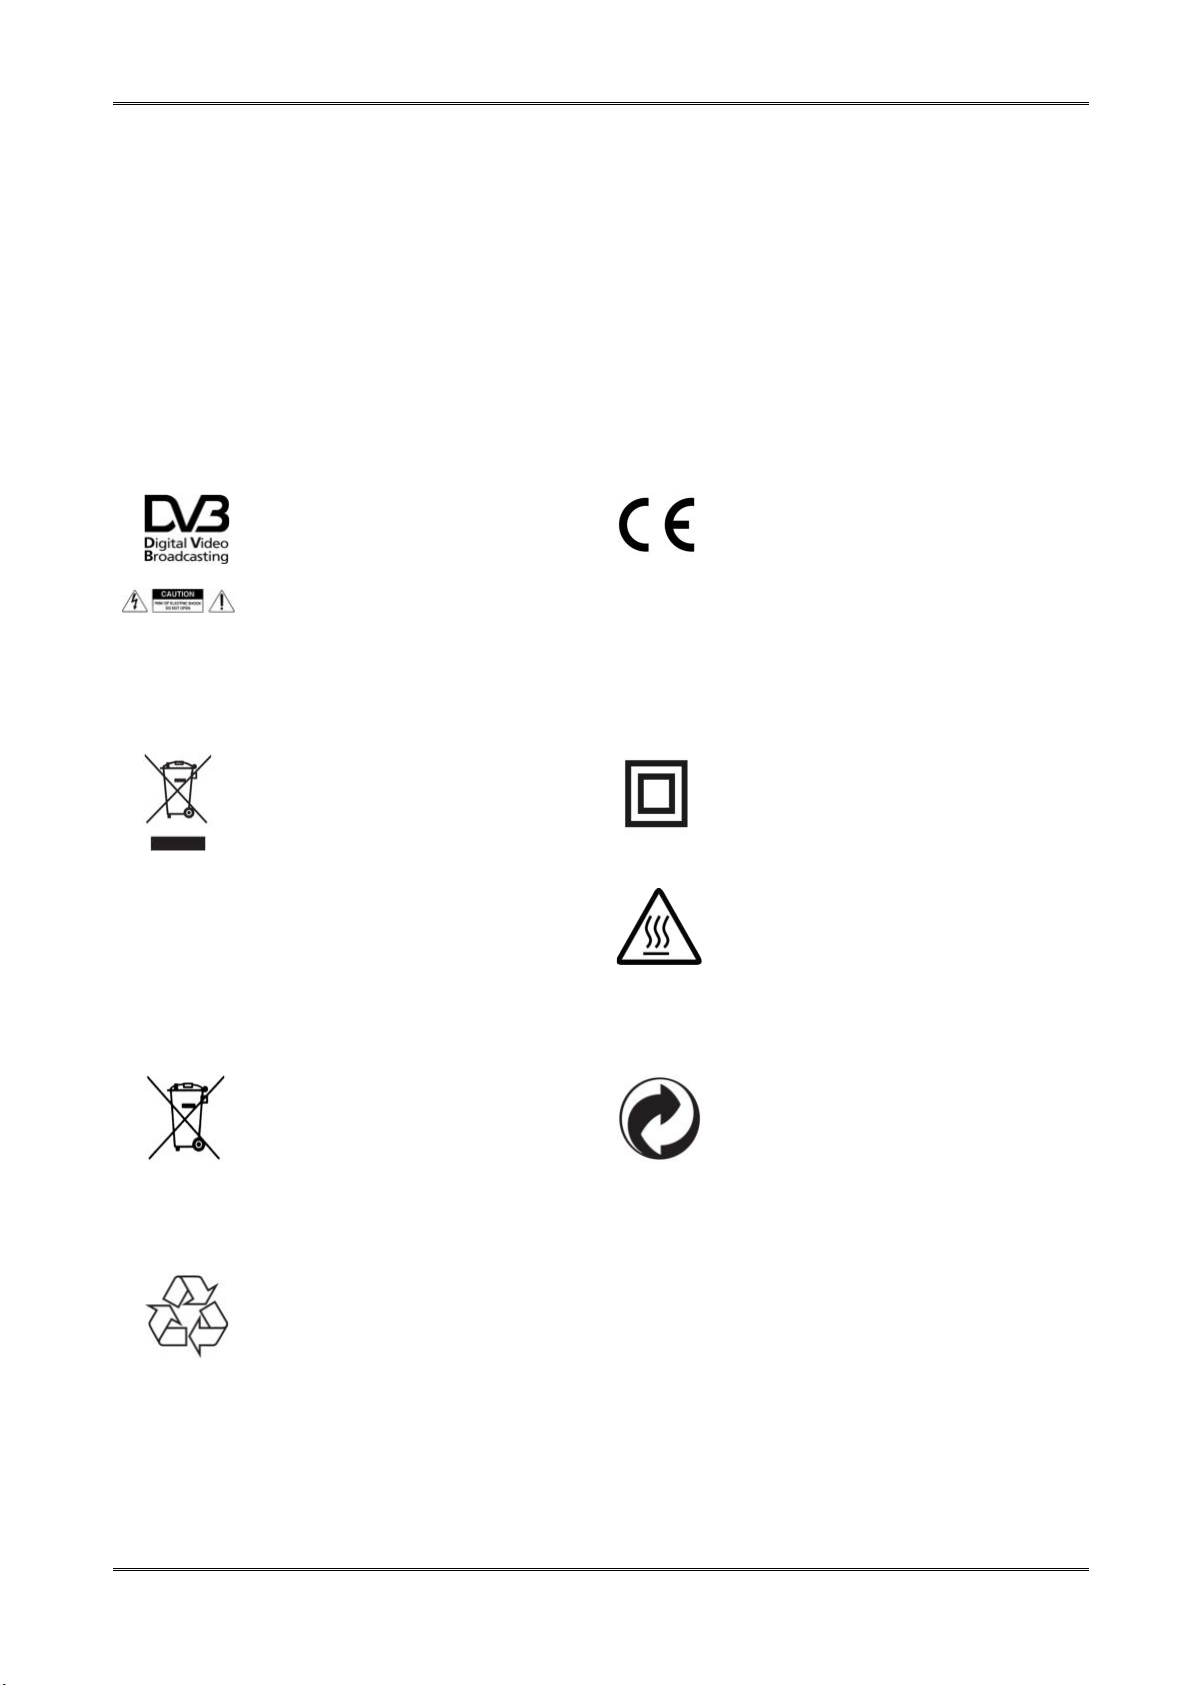
Digital signal transmission logo.
This logo informs that the receiver
conforms to the Digital Video
Broadcasting standards.
Risk of electric shock - do not open.
This notice warns the user not to open
the receiver housing. The housing may
be opened solely by authorized service
technicians.
When this crossed-out wheeled bin
symbol is attached to a product it
means that the product is covered by
the European Directive 2002/96/EC.
Please inform yourself about the local
separate collection system for electrical
and electronic products.
Please act according to your local rules
and do not dispose of your old products
with your normal household waste.
Correct disposal of your old product
helps to prevent potential negative
consequences for the environment and
human health.
Your product contains batteries covered
by the European Directive 2006/66/EC,
which cannot be disposed with normal
household waste. Please inform yourself
about the local rules on separate
collection of batteries because correct
disposal helps to prevent negative
consequences for the environmental
and human health.
Your product is designed and
manufactured with high quality
materials and components, which can
be recycled and reused.
CE logo.
The logo informs that the receiver
conforms to the terms and conditions of
Directive 2004/108/EC concerning
observance by Member States of provisions
regulating electromagnetic compatibility,
and to the terms and conditions of
Directives 2006/95/EC concerning
observance by Member States of provisions
regulating low voltage electricity and safety
with relation to the handling and operation
of electrical equipment.
Double insulation logo.
This logo informs that the receiver is an
electrically safe device, provided that it is
used in accordance with the
recommendations set forward in the
chapter concerning safety.
Hot surface mark
CAUTION: HOT SURFACE. DO NOT TOUCH.
The top surface over the internal heat sink
may become hot when operating this
product continuously. Do not touch hot
areas, especially around the “Hot surface
mark” and the top panel.
When this logo is attached to a product, it
means a financial contribution has been
paid to the associated national recovery
and recycling system.
4
Page 5

Table of Contents
SAFETY MEASURES.........................................................................................................3
DOWNLOADABLE SOFTWARE............................................................................................3
ABOUT THE INSTRUCTION MANUAL...................................................................................4
MARKINGS AND SIGNS APPLIED TO THE RECEIVER............................................................4
BASIC INFORMATION ABOUT THE RECEIVER......................................................................6
1. Main features..........................................................................................................6
2. Contents of box.......................................................................................................6
3. Important instructions concerning handling of the receiver...........................................6
4. Device description...................................................................................................7
5.1 RCU.....................................................................................................................8
5.2 Installation of batteries..........................................................................................9
5.3 Connecting...........................................................................................................9
6. First installation......................................................................................................9
7. Settings................................................................................................................10
8. Troubleshooting.....................................................................................................11
ATTACHMENT A - SPECIFICATION....................................................................................12
5
Page 6
BASIC INFORMATION ABOUT THE RECEIVER
1. Main features
✔ MPEG-2, MPEG-4, MPEG-4 AVC/H.264, HEVC/H.265
standards (Compatible with DVB-T/T2 system)
✔ Reception of high definition channels
✔ Scaling of PAL signals to a resolution of 720p or
1080p
✔ Availability of programmable timers
✔ Separate lists of favourite, TV and Radio channels
✔ Quick channel search function (QuickFind)
✔ Teletext and on-screen captions
2. Contents of box
Unpack the receiver and check whether all of the following elements are present
✔ 1 x remote control unit
✔ 1 x instruction manual
✔ 1 x receiver
✔ 1 x AC adapter
✔ 1 x HDMI cable
3. Important instructions concerning handling of the receiver
The screen menu (OSD) simplifies operation of the receiver and has made it possible to reduce
the number of keys on the remote control. All of the functions are displayed on the screen and
may be controlled by means of a small number of keys. Common functions have been
connected in one "MENU". The selected function is coloured. Depending on the selected option,
various "function keys" are displayed: red, green, yellow and blue in the form of graphics and
descriptions. The colours represent various functions in individual "Menus". The selected
function is activated by pressing a key on the remote control unit. The so-called function keys
are active only when in the appropriate field there is information about it. The user interface
makes it possible to navigate within a menu and between functions in a number of different
ways. Certain buttons on the remote control allow direct access to functions. The buttons are
multi-functional, i.e. their functions depend on previously activated elements.
NOTE:
Please keep in mind that new software may change the functionality of the receiver.
Photographs and descriptions included in the instruction manual are for informational
purposes only. If you should notice an error, please report it - we shall make every
effort to have it rectified.
6
Page 7
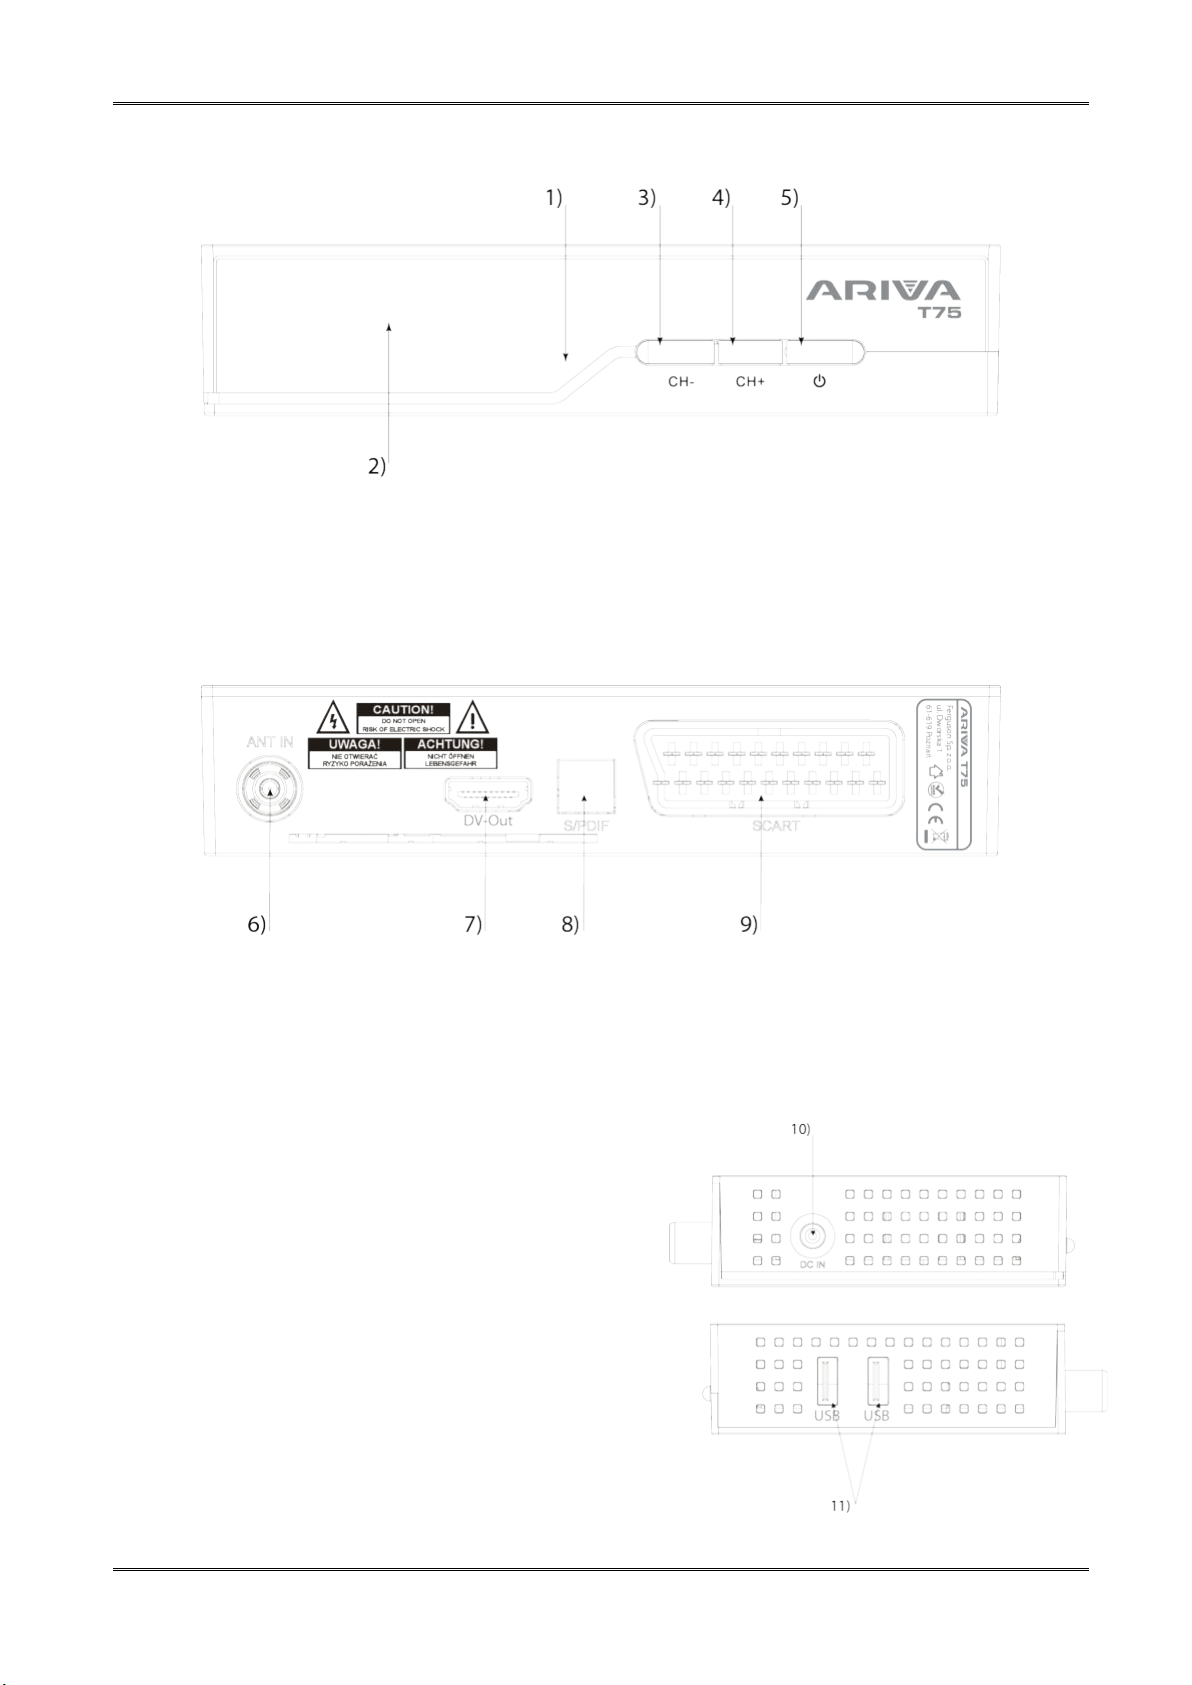
4. Device description
a) Front panel
1) The IR sensor – to the RCU signal receiving.
2) The LED display – displays the channel or time.
3) CH+ - changes the channel to the previous one.
4) CH- - changes the channel to the next one.
5) Standby - Turns off or on the STB.
b) Rear panel
6) RF IN – antenna input
7) DV-OUT - digital signal output.
8) S/PDIF – optical audio output.
9) SCART – analog video and audio output.
c) Sides panel
10)
source.
11) USB – for external device plugin.
7
Power in connector - for the 12V power
Page 8
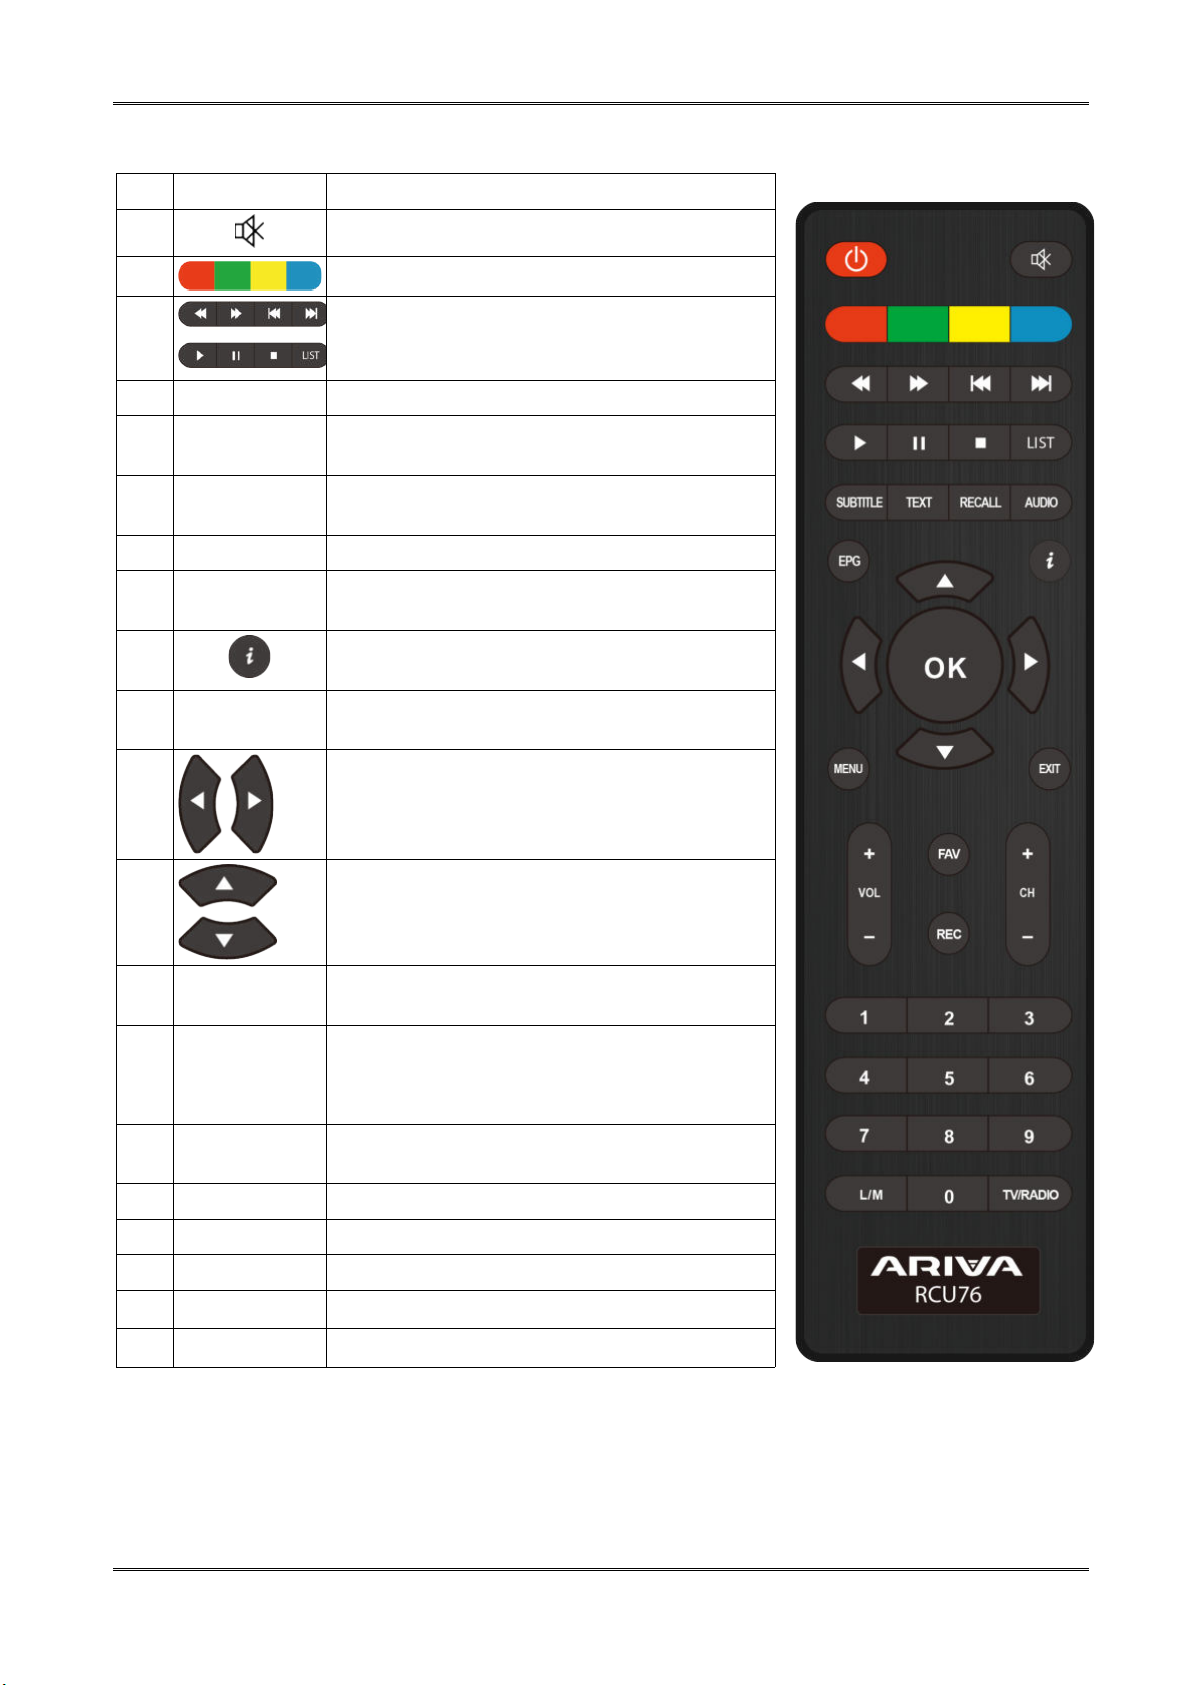
5.1 RCU
5.1 Buttons description
No.: Button
1.
Sound muting.
Description
2. Function buttons
3.
Buttons are for controlling record,
playback, multimedia, and time-shift
functions.
4. LIST Switch between groups T2/C
5. SUBTITLE Turn off/on the subtitle if subs are
available.
5. TEXT Enables the Teletext to be displayed on the
screen, if available.
6. RECALL Switch to the previously viewed channel.
7. AUDIO Switch the version of the audio track, if
available.
8. Displays information about the current
program
9. OK Confirm changes.
Activation of the channel list.
10.
Navigating the receiver's menu
Adjust the volume level (quieter, louder).
11. Navigate the receiver's menu. Switch to
the next or previous channel.
12. EXIT Return to the previous submenu, exit from
the menu.
13. 0-9
Selecting a channel by number in the channel
list.
Entering numerical values. Return to the
previous submenu, exit from the menu.
14. TV/RADIO Change the channel list between TV and
Radio
15. CH+/CH- Change channels
16. VOL+/- Change the volume
17. MENU Display the main menu on the screen.
18. FAV Displays a selection of favorite channel list.
19. REC Starts recording.
Attention! RCU requires to be paired with the STB.
Pairing:
1. Unplug your set top box from a power source.
2. Plug in your set top box to a power source, then press and hold down the red function button for at least 10
seconds.
3. The setup is complete. Check RCU's performance.
Attention! To pair the new RCU76, please follow the instruction above.
8
Page 9
5.2 Installation of batteries
Remove the cover of the battery compartment on the rear panel of the remote control unit;
slide it downwards and put it aside. Insert two AAA (R03) batteries into the compartment,
observing the indicated polarity. Do not mix old and new batteries, or batteries of
different types. Replace the battery compartment cover. Slide it upwards until it locks in
place.
5.3 Connecting
ATTENTION: Make sure the voltage specification of the domestic electrical system matches
the receiver's power supply.
PAY ATTENTION! When connecting the receiver to other equipment (such as the TV, the
receiver), make sure you follow the appropriate instructions for use. Check that you have
disconnected all equipment from the main power supply.
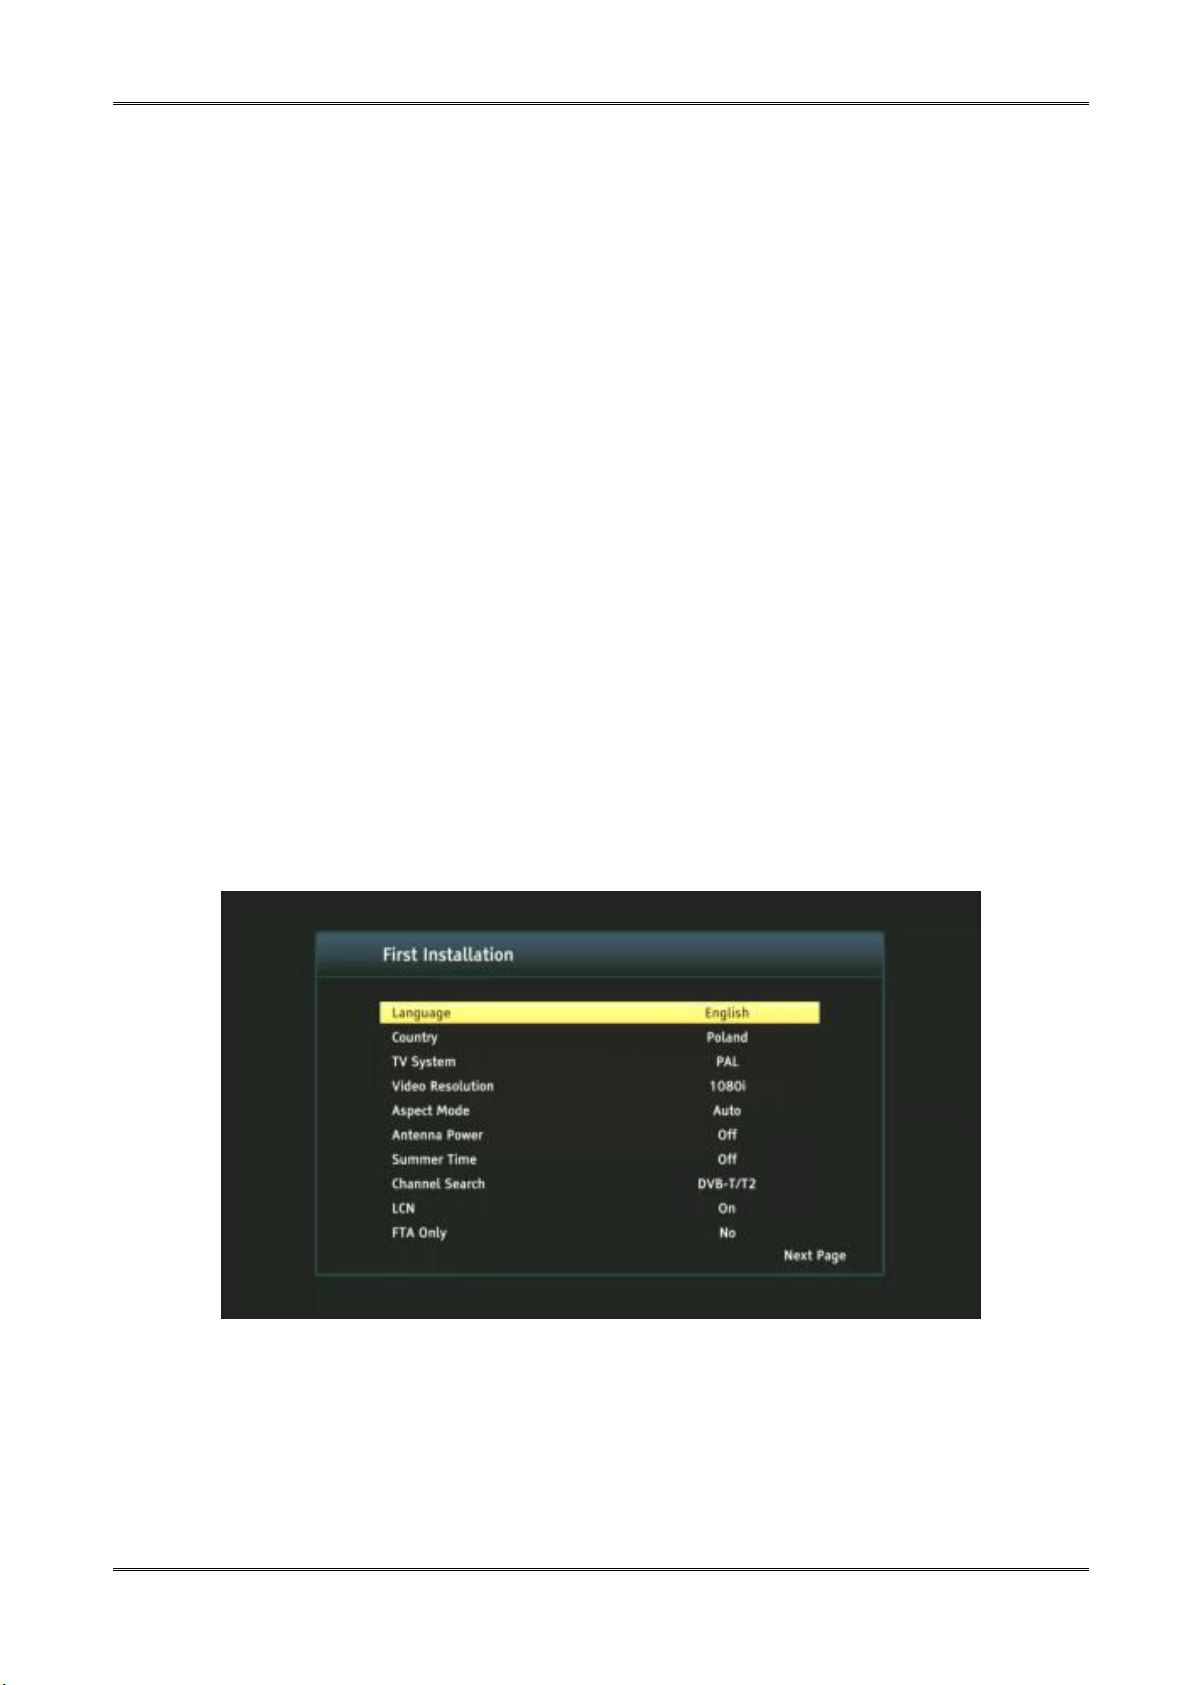
6. First installation
After the decoder is connected correctly to the rest of the equipment, turn on the decoder and
remaining equipment. When the first start-up or restoration of factory settings, the first
installation menu screen will appear. Use the navigation keys on the remote to choose the
appropriate settings for you.
• Language - a setting of the OSD language.
• Country - setting to specify scanning parameters appropriate for the country of installation
of the device.
• TV system - a choice between PAL, NTSC broadcasting systems
• Video Resolution - select a screen resolution
• Aspect Mode - selection of the picture format (4: 3 Letterbox, 4: 3 Pan scan; 16: 9)
• Antenna Power - This allows you to choose between a powered or passive antenna.
• Summer Time – toggle summertime on/off
• Channel Search - a choice between terrestrial TV and cable
• LCN - sort by terrestrial provider numbering
• FTA Only - This allows you to filter pay channels. FTA - "free to air" (free channels)
After selecting the settings we are interested in, go to the "next page" item and confirm with
the "OK" button. Scanning of the signal from the antenna will proceed.
ATTENTION! After selecting the settings we are interested in, go to the "next" item and confirm with the "OK" button.
Scanning of the signal from the antenna will proceed.
ATTENTION! Select a country other than the one the device installation. May result in the lack of reception of the full
range of channels due to differences in signal parameters!
9
Page 10

7. Settings
To go to the settings, press the "MENU" button. For navigating, use the arrows of remote
controls. Switch between pages using right/left buttons. To enter the setting page, press the
"OK" or Up/Down buttons. To change the selected setting, use the up/down buttons. For
select, the setting, use the "OK" or left/right buttons. To back to a previous setting page or
close the main menu press the "EXIT" button.
• Channel list
- TV channel list - channel list editor, allows you to delete channels, change their order,
create favorite channel lists, rename channels.
- Radio channel list - editor of radio channel lists
- Parental Lock - allows you to set a lock code (default "0000") and customize the
services lock
- Play mode - the setting of stable or AV sync
- Delete All - removes all channel lists
• Channel search
- Terrestrial - allows you to search terrestrial TV channels. In the terrestrial scan menu,
there is the scan auto/manual, the antenna power settings, and the country of
installation.
- Cable menu - allows you to search cable TV.
- LCN - sort by terrestrial provider numbering
• Language - language settings
- Language - OSD language setting
- First/Second audio language - sets the default soundtrack
- Subtitle Language - Sets the default subtitle language.
- Teletext - sets the teletext language
• AV settings - audio-video settings
- TV System - allows you to select the broadcasting system
- Video Resolution - Select the resolution on HDMI output
- Aspect Mode - Aspect Ratio configuration
- SCART Out - selecting the signal generated on the SCART output
- Audio Out - allows you to select the output and the type of sound
- Audio Description - enable or only audio description
- Audio Description volume - setting the volume difference
between the audio description and normal audio track
• Time - This tab allows you to set the system time, including turning on summertime.
10
Page 11
• SYSTEM
- Information - shows information about the current firmware version and decoder data
- Factory Settings - restores original settings, deletes data set by the user
- Timer Settings - allows you to set events using Timers
- OSD Settings - allows you to adjust the OSD
- Update - This allows you to update the software or back up the channel lists.
- Standby Settings - Automatic stand-by, stand-by mode, and clock display in standby.
- HDMI CEC Switch - enable disables HDMI CEC support
• Media Center - Selecting the media type allows you to view the supported file formats
on external media.
- Recording Manager - viewing recorded TV programs.
- DVR Configuration - allows you to enable TimeShift and select an external medium
- HDD Information - shows information about the external medium
- Storage format - allows you to format the external media
- Jump - allows you to adjust the shift using the left / right buttons in multimedia and
websites.
• Network
- WiFi – allows you to configure the network connection after connecting the WiFi card to
a USB
- Network applications - access to network applications
Attention! Some websites/network applications available after changing parental lock settings.
Attention! Ferguson reserves that the operation of network services depends on third parties.
Malfunctioning of network services is not a condition for initiating the complaint procedure.
• REC - recording
- This function only works with properly connected external USB memory!
1. Select a channel and press the REC button. Recording of the current channel starts.
2. Pressing the REC button again will display an option where you can define the
duration of the recording (the default is 2 hours).
3. The information bar indicates which program you are recording and viewing.
4. To stop recording, press the STOP button and confirm your decision.
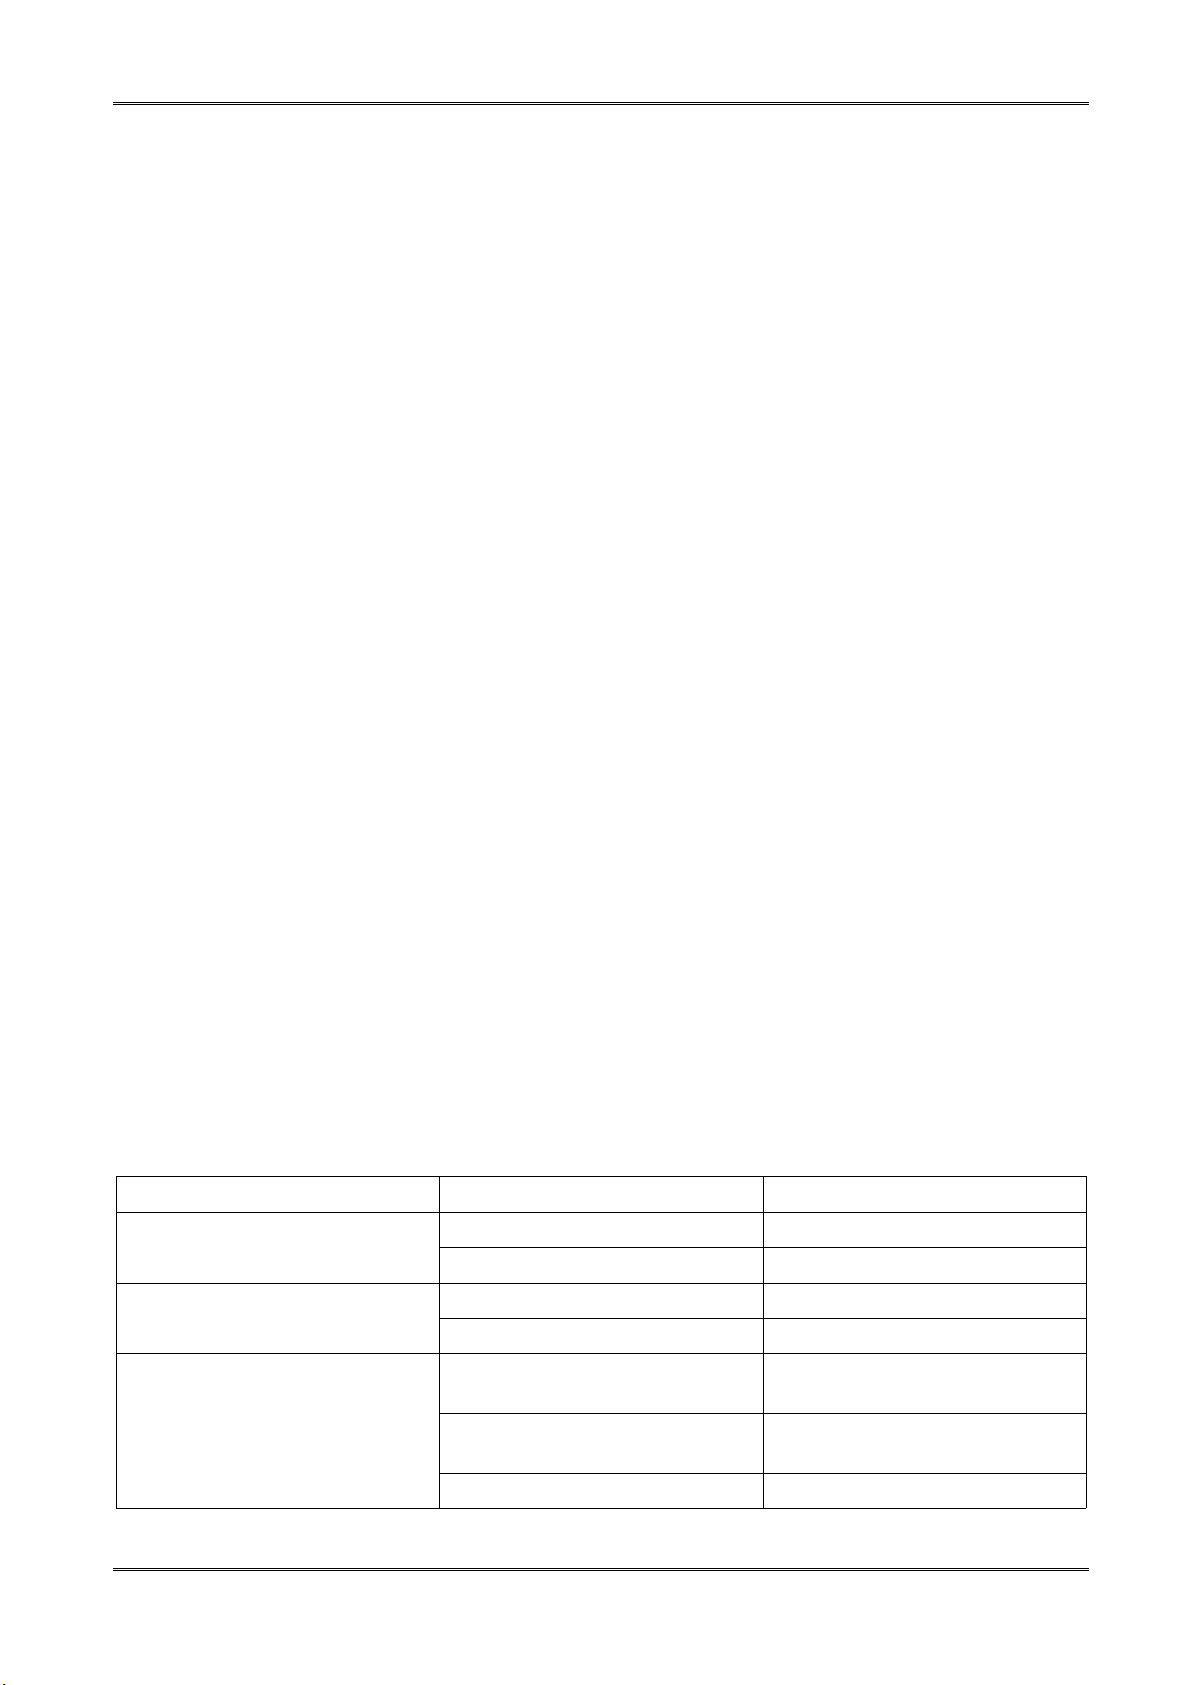
8. Troubleshooting Problem Potential Cause What to do?
No picture No power Connect the power
Power strip turned off Turn on the power strip
The screen shows no signal No antenna cable connected Connect the antenna cable
Incorrect settings Set the correct settings
No sound from the speakers Missing or bad connection with
audio cable
Connect the audio cable
correctly
Muted sound Set the volume to an
appropriate value
Incorrect soundtrack Try a different soundtrack
11
Page 12
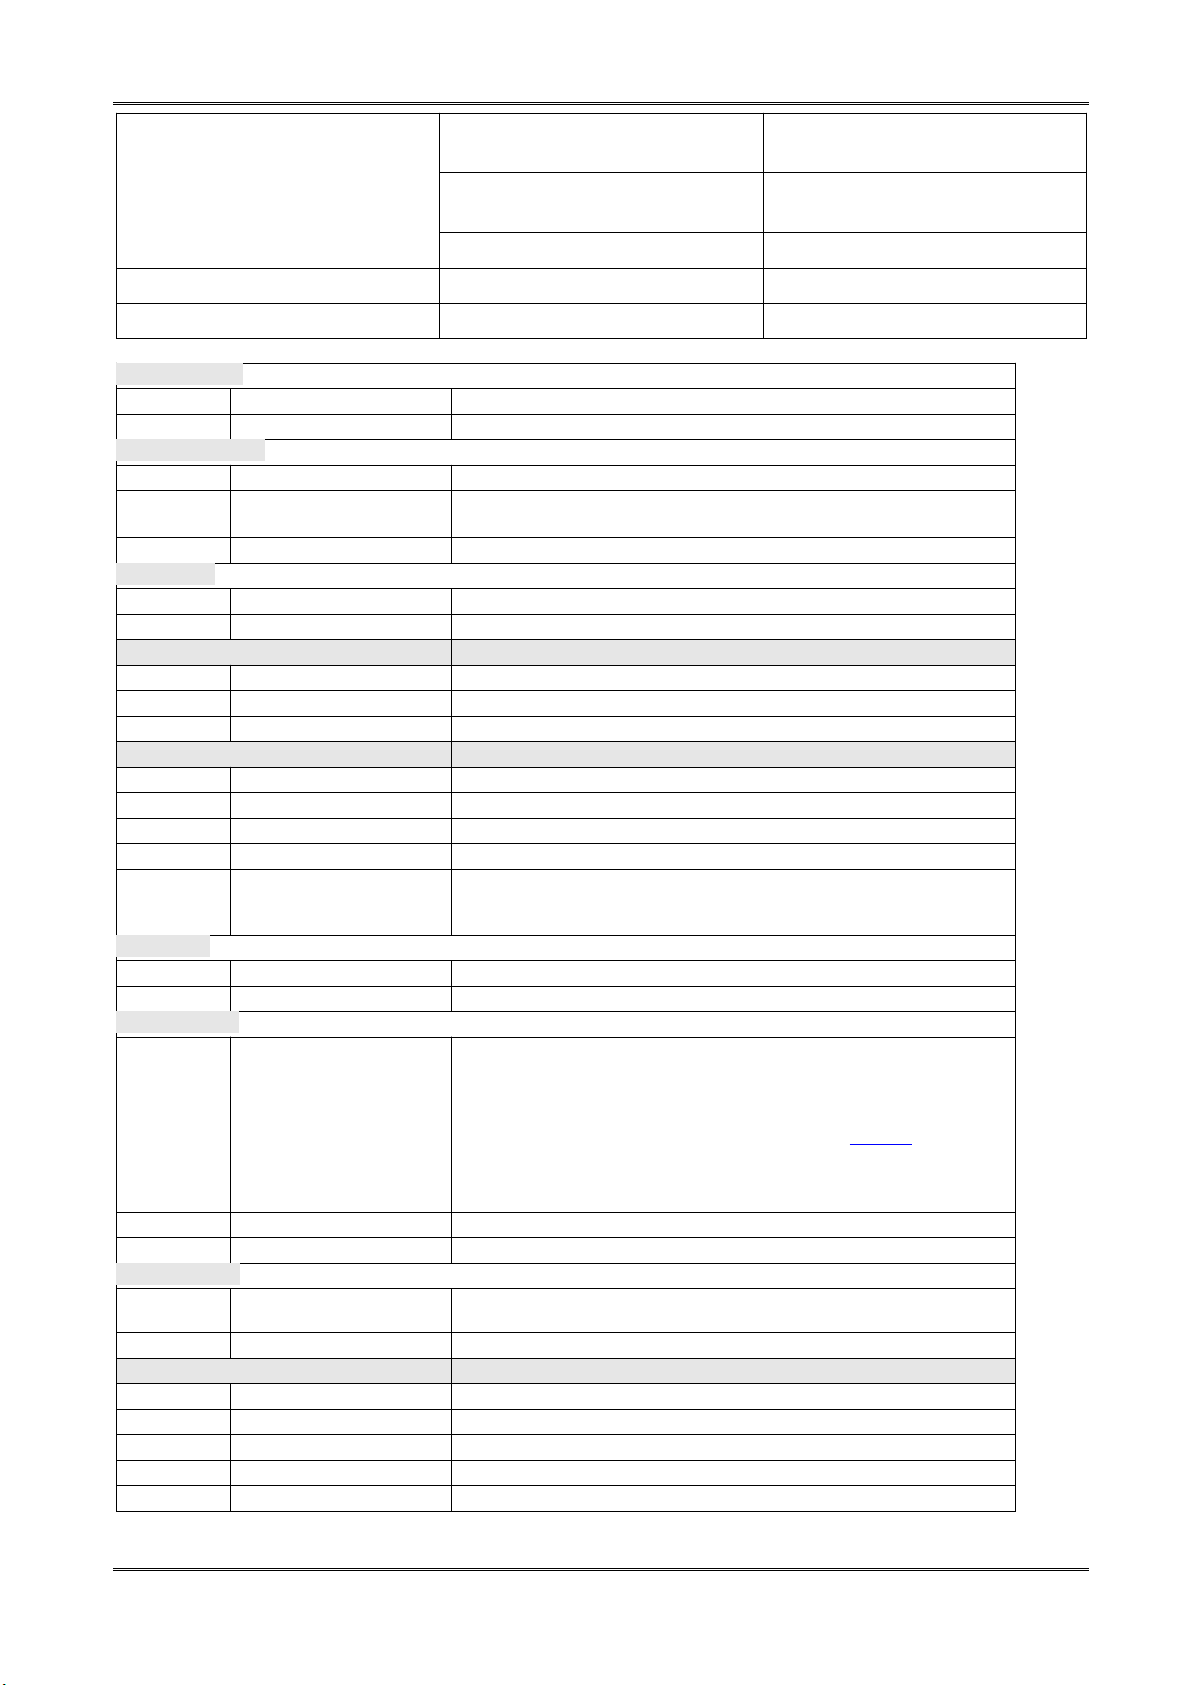
Audio only (no picture) The video cable is missing or
not connected properly
Connect the video cable
correctly
The program is a radio
channel
Press the TV / RADIO button
to change to TV mode
4k channel selected Change the channel
The remote does not work The battery is dead Replace the batteries
Image freezes or has artifacts The signal is too weak Strengthen the signal
ATTACHMENT A - SPECIFICATION
Main Features
STB Type DVB-T/T2 Receiver
Main Chipset MT2203-M2000D
Special Features
Encrypt ASIC Type
TUNER Type Silicon Tuner
SMPS Type Separate SMPS
Mechanical
Dimension 141*95*30mm
Net Weight
Main Chip Sets
CPU frequency 576M
Flash Memory 4 MB
SDRAM Memory 1PC 64MB DDR2
DVB-T tuner
Tuner Type
Frequency Range 47-862 MHz
Input Impedance 75Ω
Active Ant Power 5VDC @ 1500mA MAX, Overload Protection
Input Level Range 256QAM: 78.5dBm~-8.75dBm; 64QAM:-78.5dBm~-
TS Demux
Demultiplexer MPEG2 ISO/IEC 13818-1
Input Bit Rate Max 100Mbit/s
Video Decode
Video Decode MPEG-2 MP@ML/HL, H.264 BP (with no ASO/FMO), MP&HP@
Aspect Ratio 4:3, 16:9, auto
Video Resolution 576i, 576p, 720p, 1080i, 1080p, auto
Audio Decode
Audio Decode MPEG-1/2 Layer I/II/III, MPEG-2/4 LC-AAC, MPEG-4 HE-
Sampling Frequency 32 kHz, 44.1 kHz, 48 kHz
SCART Output
Video Bandwidth SD:5.0 MHz (-3dB), HD:30 MHz (-3dB)
Video Impedance 75Ω
Video Voltage Level 1.0 Vp-p
Audio Freq. Range 20 ~ 20 kHz
Audio Impedance 600Ω
T/T2+C
8.75dBm; 128QAM:-80.1dBm~-8.75dBm;16QAM:-
82.1dBm~-8.75dBm;
L3/L4.1/L4.2, AVS Jizhun profile @ L6.0/ L4.0, AVS Broadcast
profile@ L6.0/ L4.0, MPEG-4 SP Profile, Advanced Simple
Profile@ Level 5 without GMC/Data Partitioning/
Reversible VLC, VC1 SP@ML, MP@HL, AP@L0~3, H.263
baseline profile, JPEG decoder engine
HEVC Main Profile@level 4.1 and Main10 [email protected],High
tier
AAC@Level 4, E-AC-3
12
Page 13
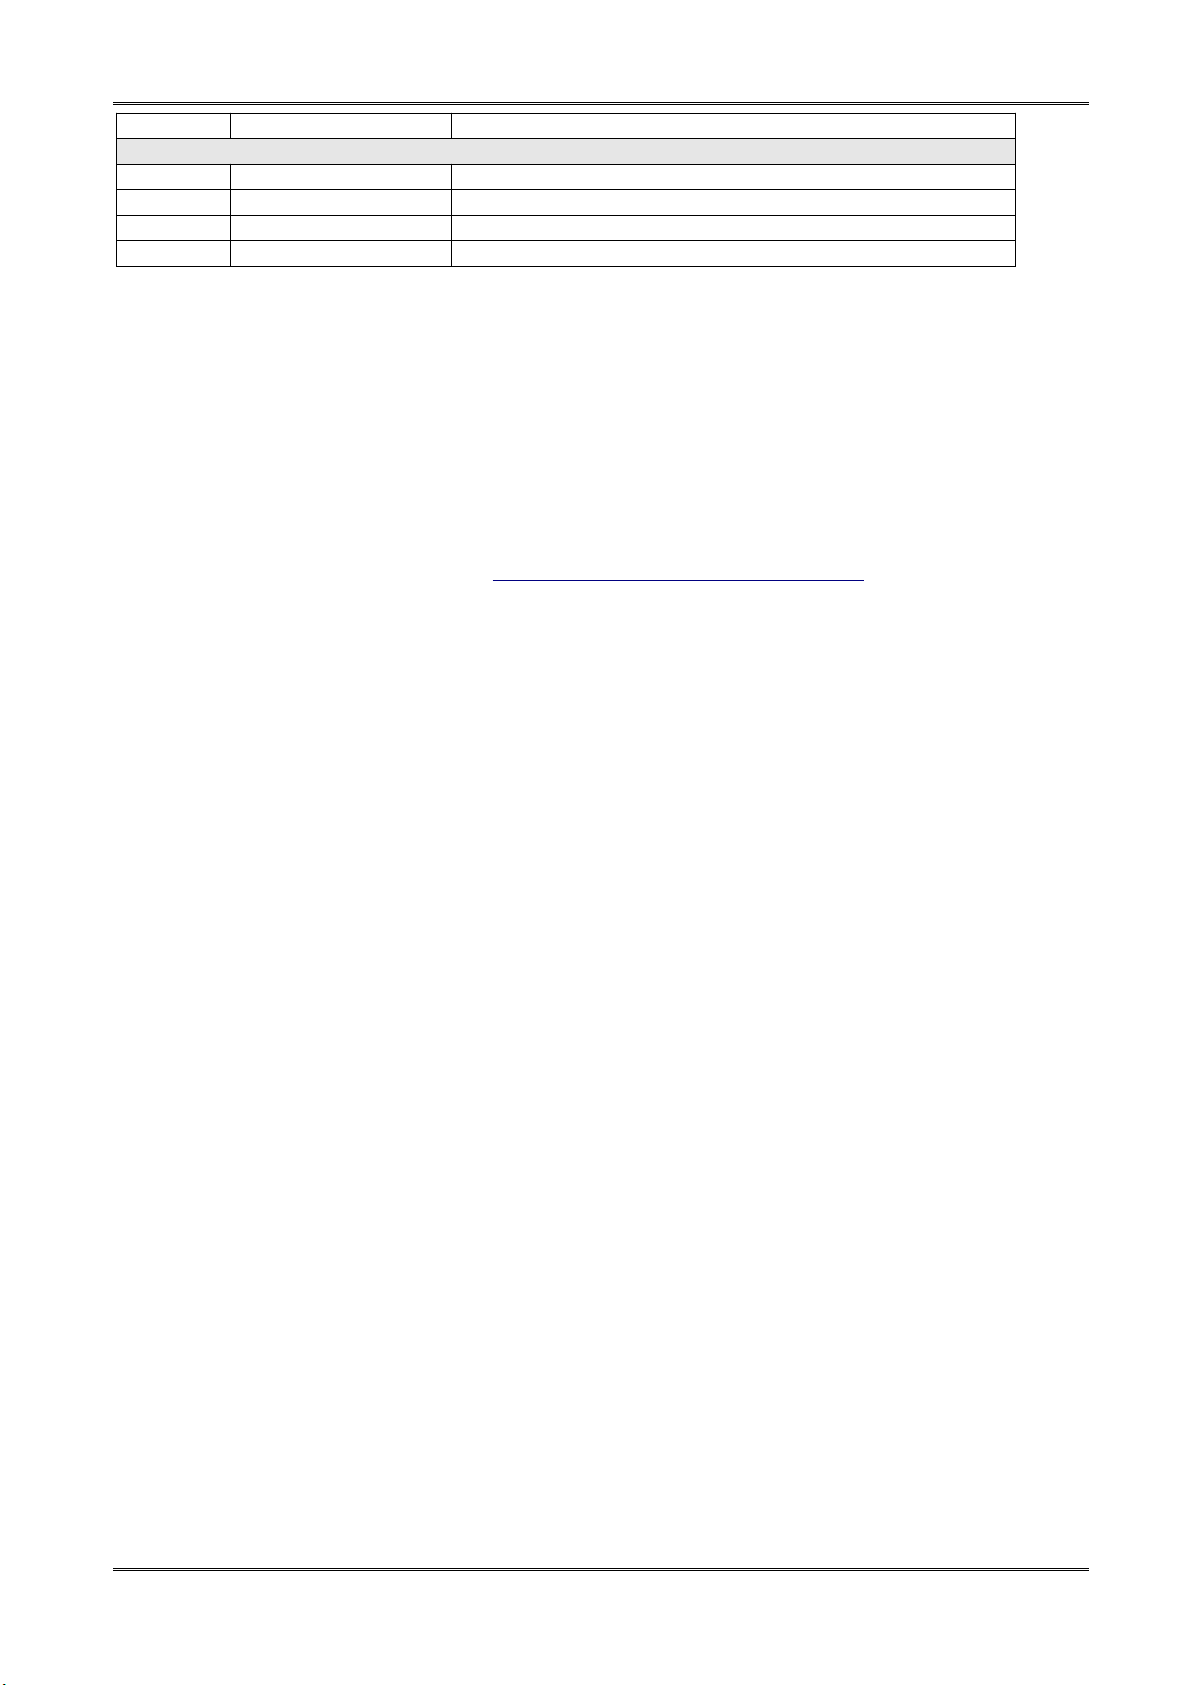
Audio Voltage Level 2V rms(5.6Vp-p)
Environment
Input Voltage 5C/1.5A DC
Consumption Max 7.5W
Temperature 0~40℃
Humidity <95%
SIMPLIFIED DECLARATION OF CONFORMITY
Producer: Ferguson Sp. z o.o., ul. Dworska 1, 61-619 Poznań
Name: Ariva T75
Device type: Digital terrestrial TV receiver
The above-mentioned product complies with Directive 2014/53/EU of the European Parliament and of the Council of 16 April 2014
on the harmonization of the laws of the Member States relating to the making available on the market of radio equipment and
repealing Directive 1999/5/EC.
Full Declaration of Conformity for download at:
https://ferguson-digital.eu/deklaracje-zgodnosci/
13
 Loading...