

Page 1
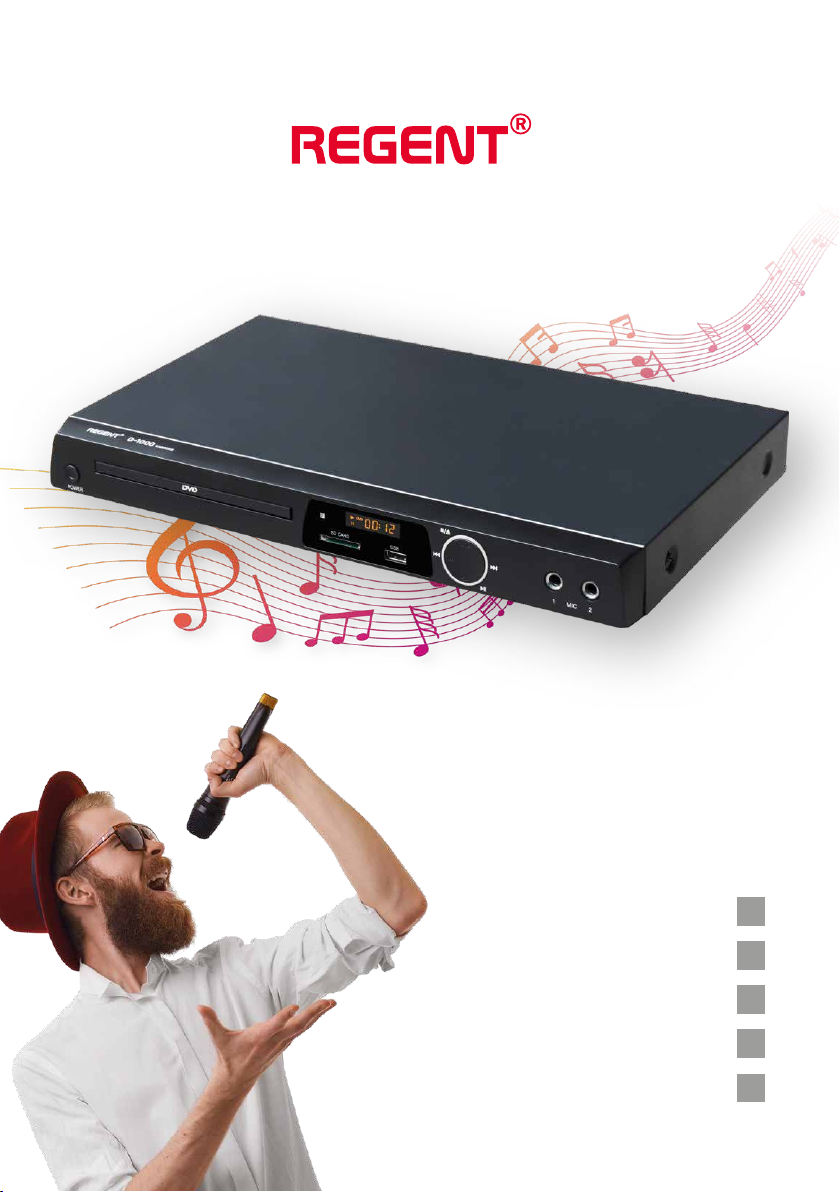
DVD D-1000 karaoke
instrukcja obsługi
users manual
Bedienungsanleitung
manuale d’uso
manuel de l’utilisateur
PL
EN
DE
IT
FR
Page 2
PL
Spis treści
Środki bezpieczeństwa 3
Oprogramowanie do pobrania 3
O instrukcji obsługi 4
Oznaczenia wykorzystane w odtwarzaczu 4
1. Podstawowe informacje 5
1.1. Główne cechy 5
1.2. Zawartość pudełka 5
1.3. Ważne wskazówki do obsługi odtwarzacza 5
2. Pilot zdalnego sterowania 6
3. Wygląd panelu przedniego i tylnego 7
4. Obsługa i podłączenie 8
5. Funkcja karaoke 10
6. Specykacja techniczna 10
7. Rozwiązywanie problemów 11
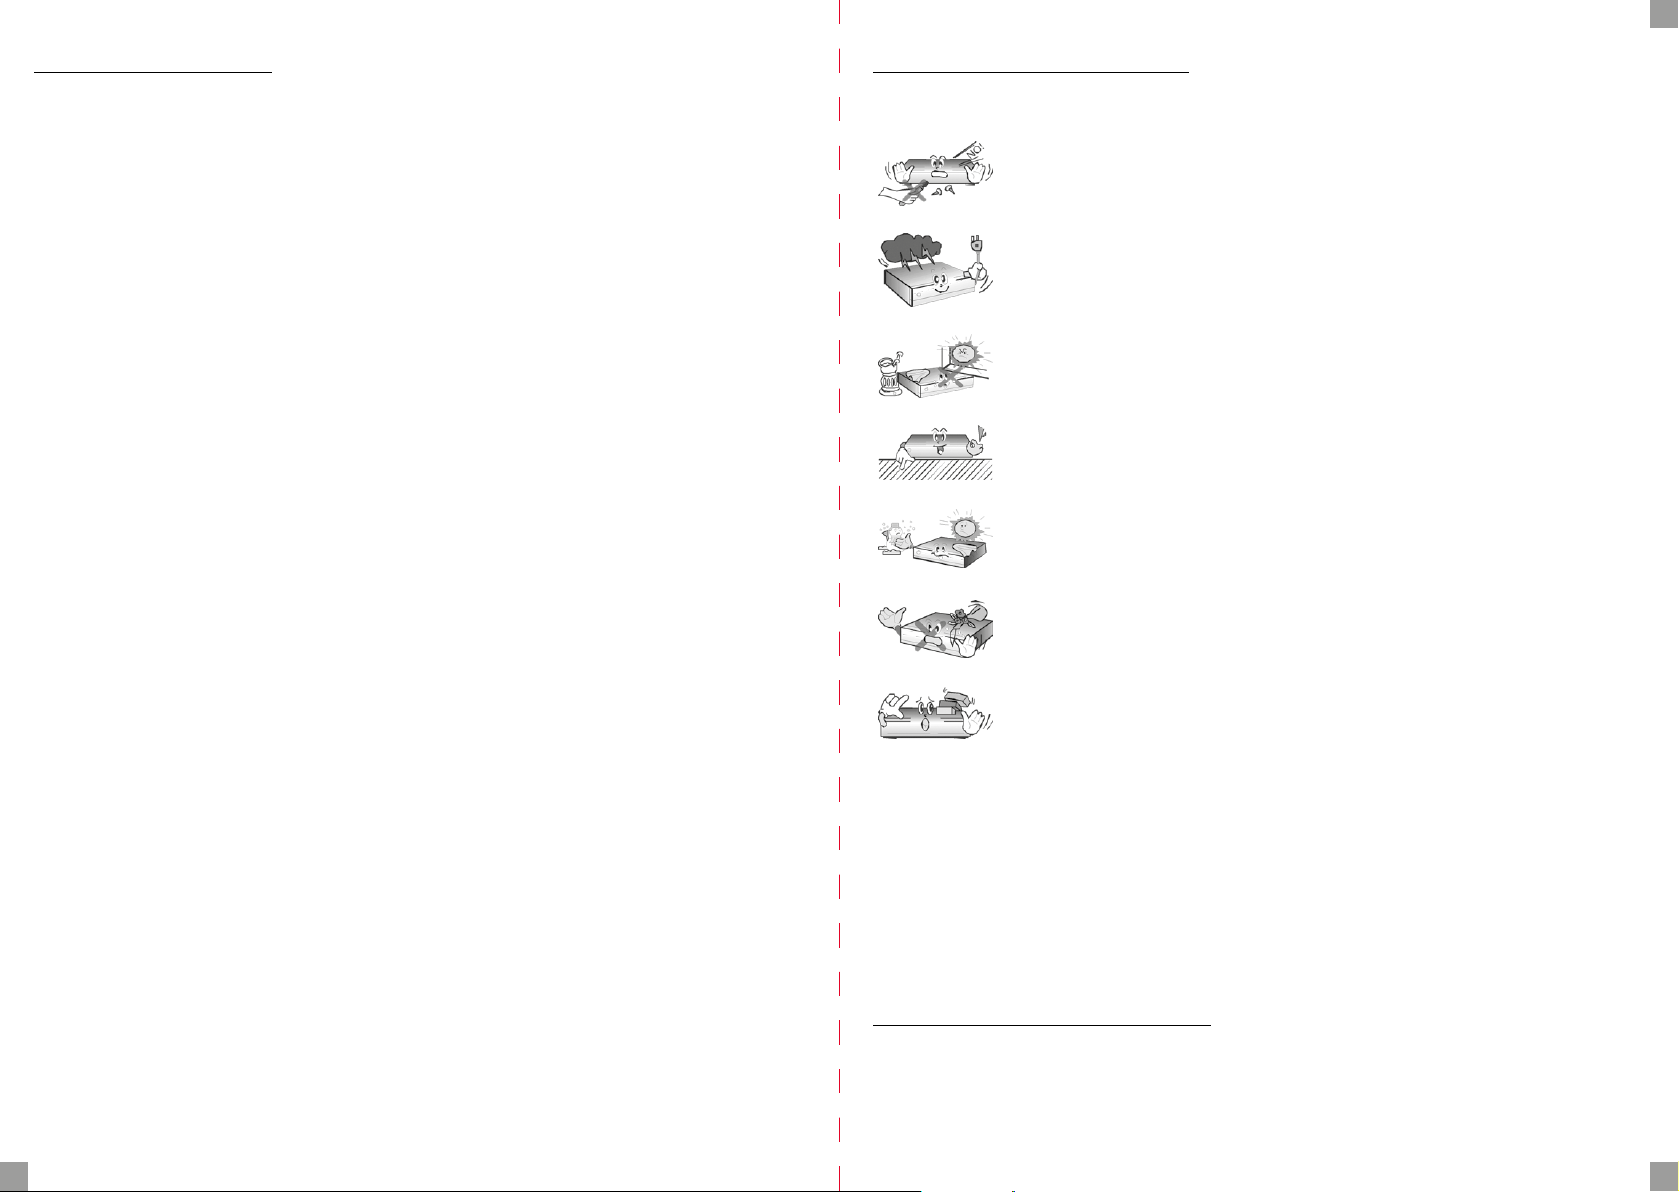
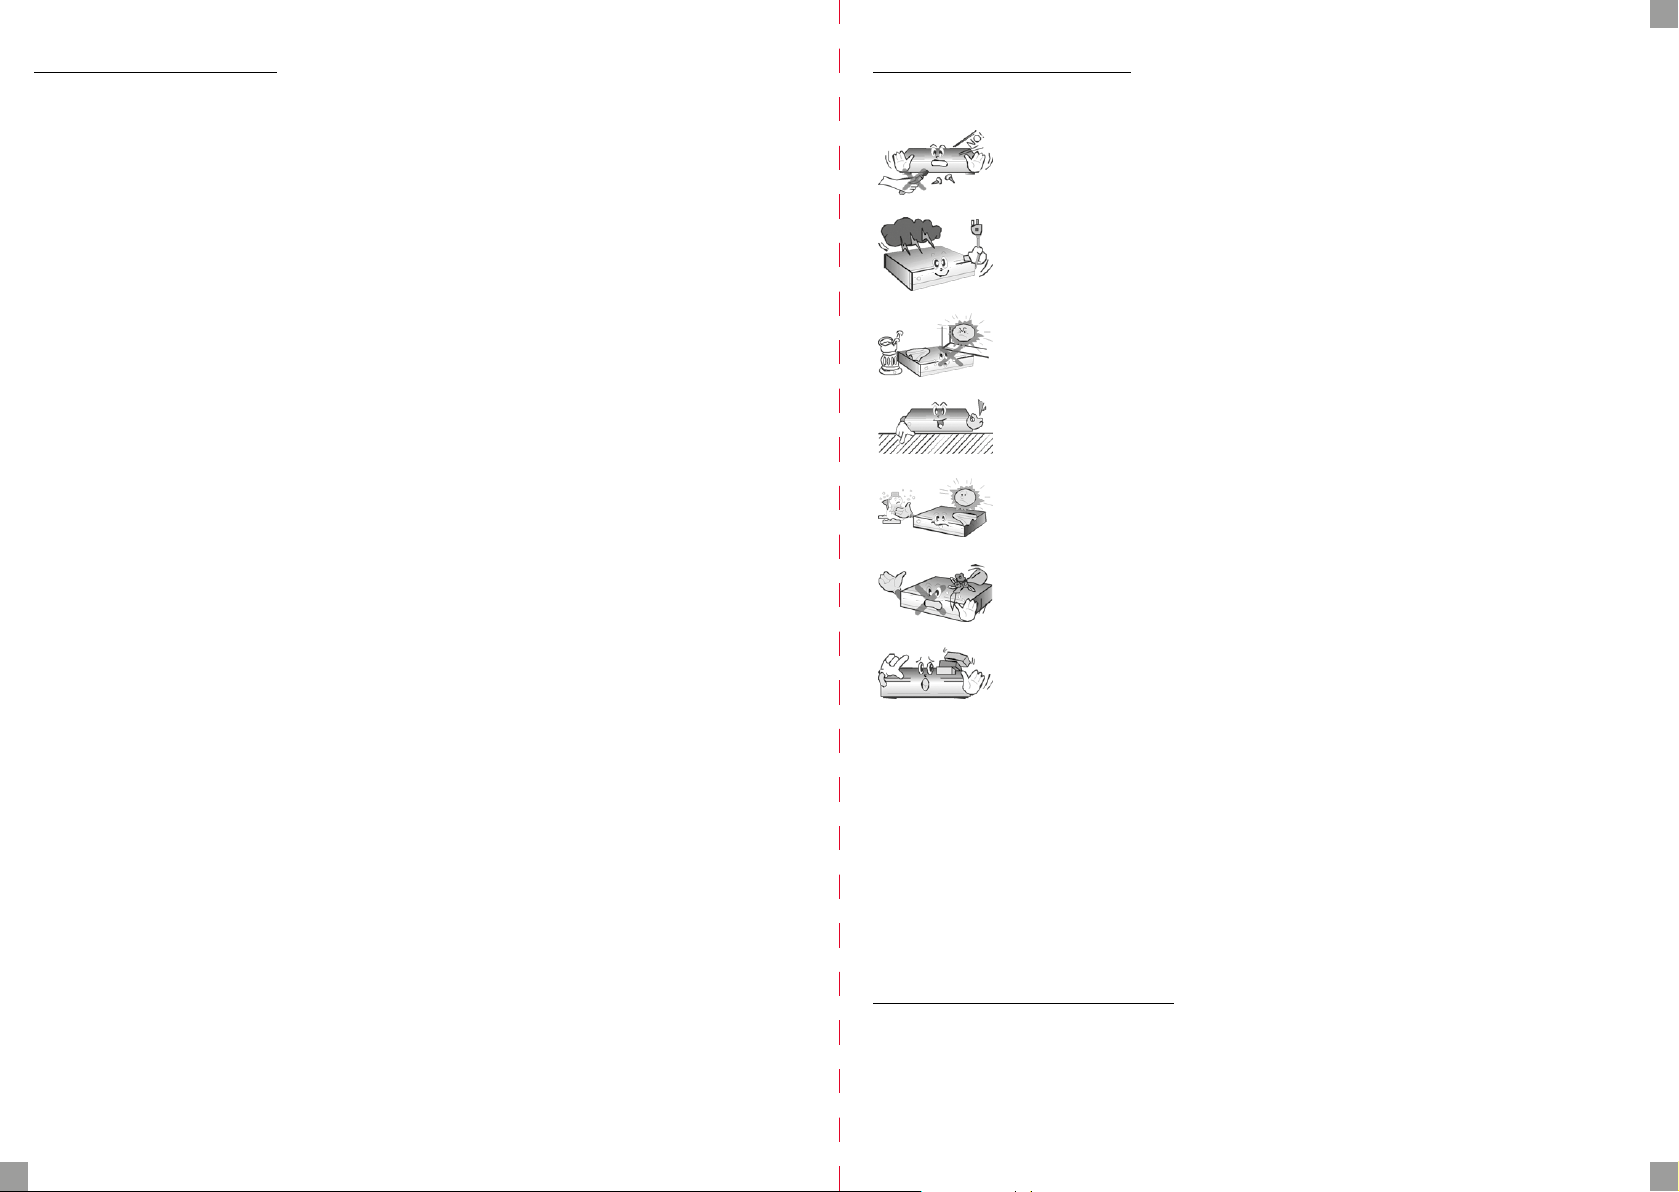
Środki bezpieczeństwa
Prosimy o dokładne zapoznanie się z instrukcją obsługi i zawartymi w niej zaleceniami.
Aby uniknąć porażenia prądem nie otwieraj nigdy obudowy. Uszkodzenie
plomby gwarancyjnej powoduje utratę gwarancji.
Odłącz urządzenie od sieci podczas burzy lub gdy nie będzie używane
przez dłuższy czas. Pamiętaj, że gwarancja nie obejmuje uszkodzeń urządzenia, które są spowodowane uderzeniem pioruna.
Nie wystawiaj urządzenia na bezpośrednie działanie promieni słonecznych.
Trzymać z daleka od źródeł ciepła i od wilgotnego otoczenia. Nie zasłaniać
otworów wentylacyjnych, tak aby zapewnić prawidłową cyrkulację powietrza.
Ustaw urządzenie w pozycji poziomej, na płaskiej, równej i stabilnej powierzchni.
Jeśli przenosisz urządzenie z ciepłego pomieszczenia do zimnego i na odwrót odczekaj min. 1 godzinę przed włączeniem do prądu. W przeciwnym
wypadku mogą wystąpić problemy.
Urządzenie należy trzymać z daleka od wazonów, butelek, akwariów I innych źródeł wody w celu uniknięcia uszkodzenia. Nie należy dotykać wtyczki zasilania gołymi rękoma.
Nie stawiaj żadnych przedmiotów na obudowie urządzenia. Może to spowodować przegrzewanie i problemy z odbiorem.
Przed rozpoczęciem czynności konserwacyjnych lub instalacyjnych należy odłączyć odbiornik od sieci elektrycznej. Do czyszczenia odbiornika nie należy stosować alkoholu ani płynów zawierających amoniak. W razie potrzeby czyścić za pomocą miękkiej, niestrzępiącej się
szmatki zwilżonej łagodnym roztworem wody z mydłem.
• Nie podłączaj żadnych kabli kiedy wtyczka zasilania jest w gniazdku.
• Sprawdź czy masz sprawne kable. Kable uszkodzone mogą spowodować pożar.
• Wyłącz odbiornik z zasilania przy podłączaniu okablowania.
Oprogramowanie do pobrania
Firma Ferguson wykorzystała wszystkie dostępne jej możliwości, aby dostarczyć użytkownikom aktualizacje oprogramowania, pozwalające na poprawę parametrów pracy urządzenia. Firma Ferguson zastrzega sobie prawo do wnoszenia poprawek, zmian lub modykacji
oprogramowania stosowanego w urządzaniu na dowolnej podstawie i bez wcześniejszego
powiadomienia o takich zmianach. Aktualna wersja oprogramowania dostępna jest na stronie internetowej http://www.ferguson-digital.eu
2 3
Page 3
PL
O instrukcji obsługi
Firma Ferguson wykorzystała wszystkie dostępne jej możliwości, aby zapewnić najbardziej
aktualne informacje o swoich produktach. Firma Ferguson nie udziela gwarancji związanych
z zawartością niniejszej instrukcji obsługi oraz zrzeka się wszelkich domniemanych gwarancji dotyczących wartości rynkowej lub przydatności jej do określonych celów. Zawarte tutaj
informacje służą jako wskazówki pozwalające na użytkowanie i konserwację odtwarzacza.
Firma Ferguson zastrzega sobie prawo do wnoszenia poprawek, zmian lub tłumaczenia Instrukcji obsługi bez wcześniejszego powiadomienia o takich zmianach. Z tego względu zaleca się regularne odwiedzanie naszej witryny internetowej w celu uzyskania najnowszych
informacji.
Oznaczenia wykorzystane w odtwarzaczu
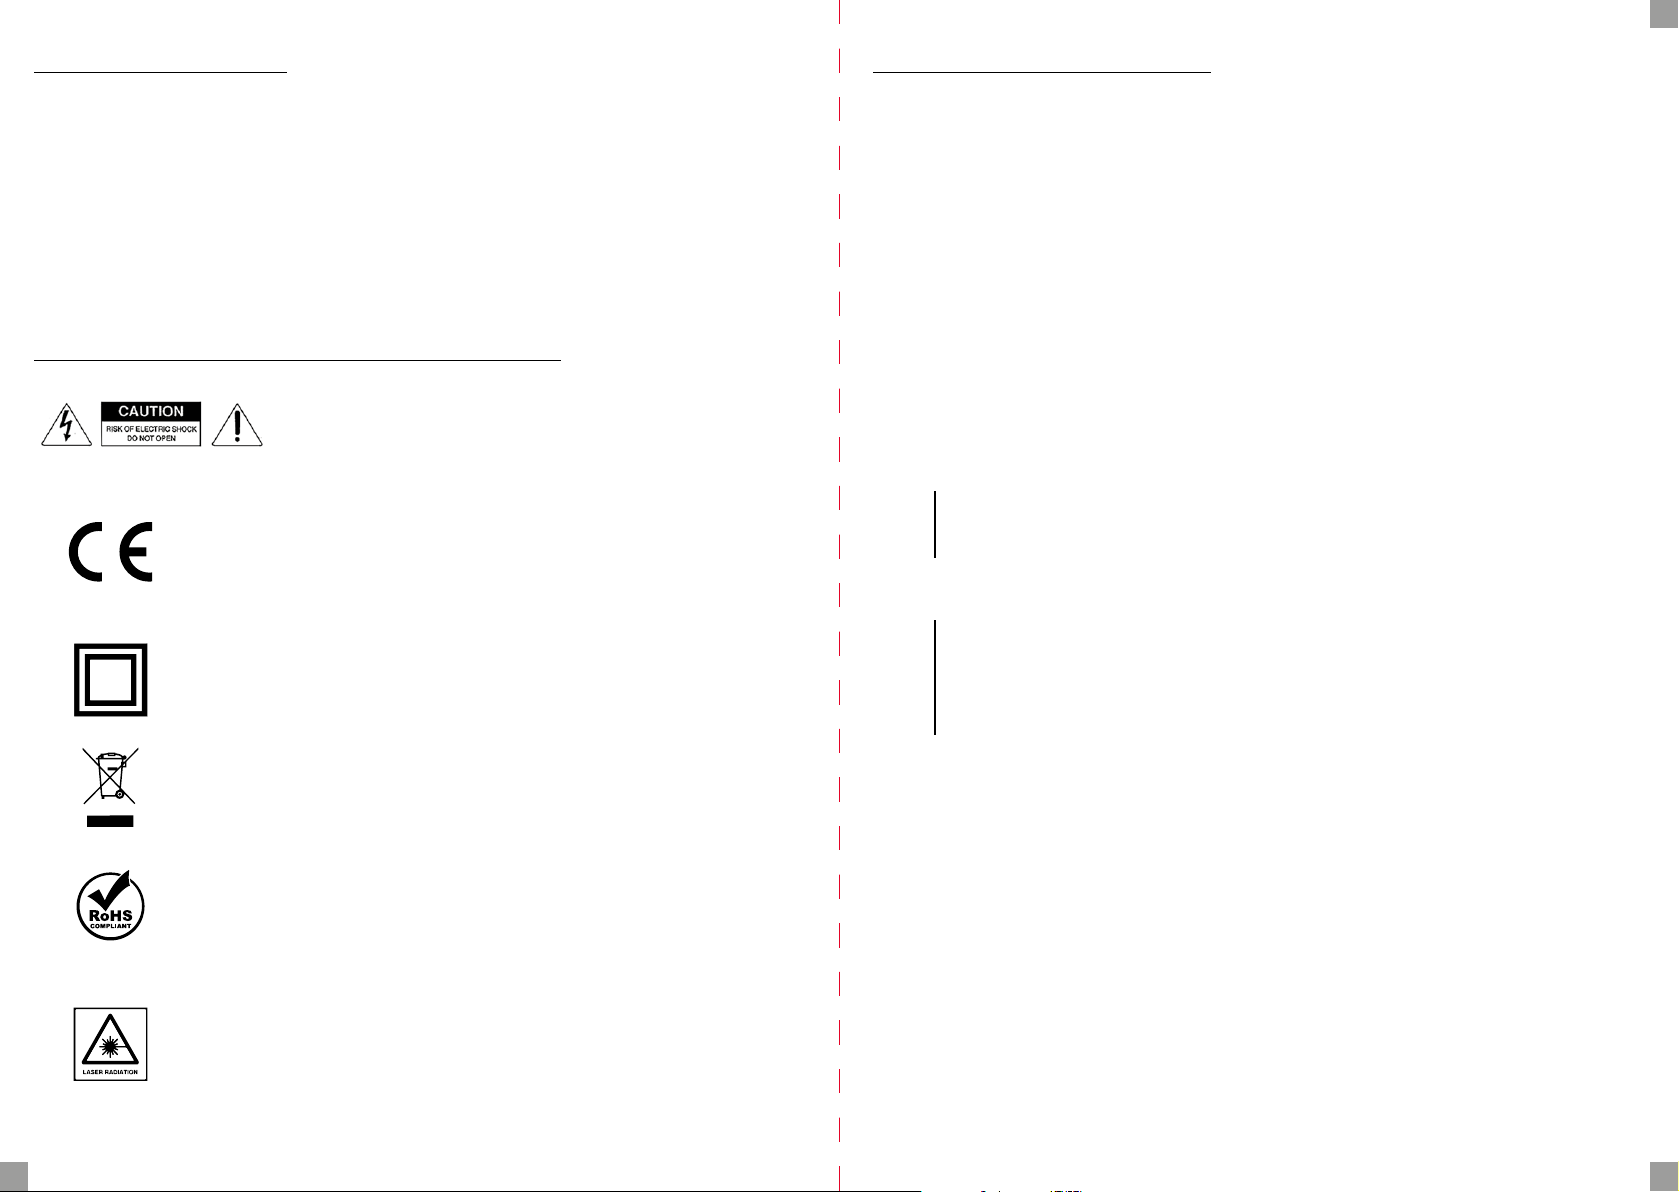
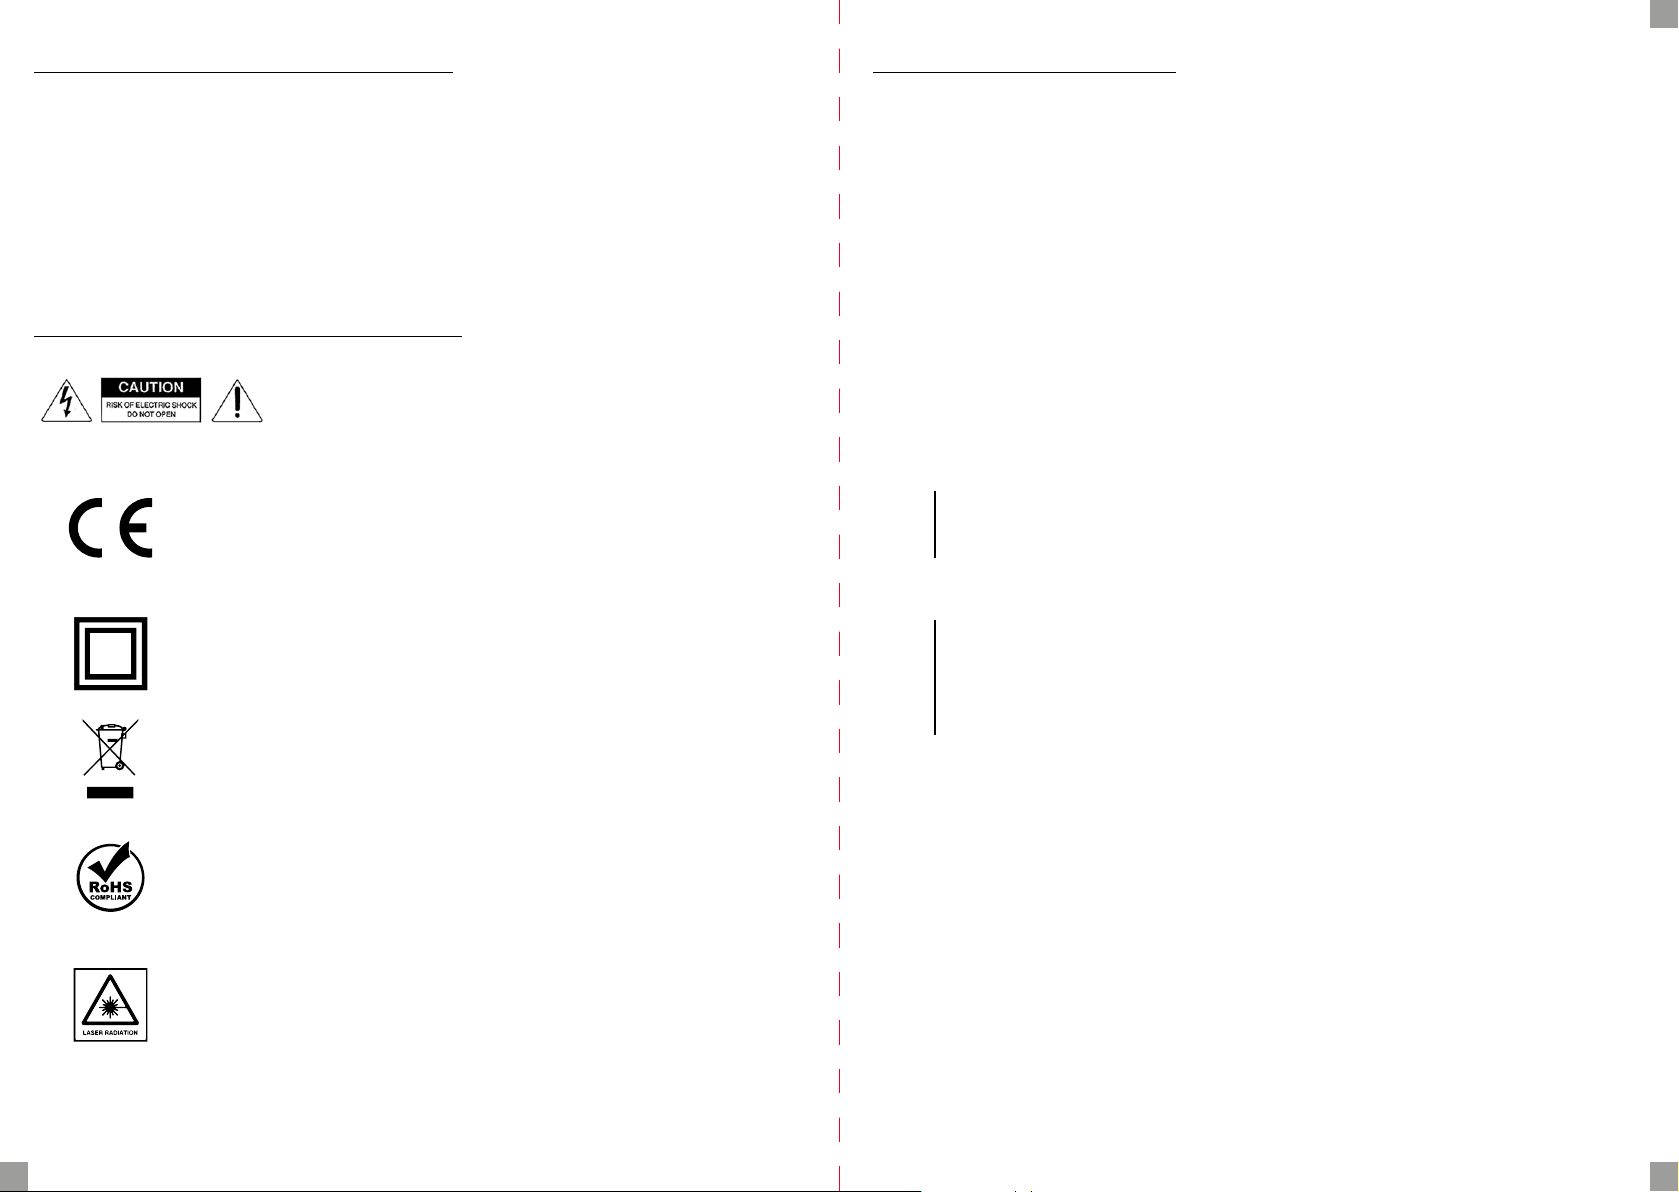
Ostrzeżenie: ryzyko porażenia elektrycznego - nie otwierać
Napis ten ostrzega przed otwieraniem obudowy odtwarzacza. Do
otwierania obudowy upoważnieni są wyłącznie autoryzowani pracownicy serwisowi.
Oznaczenie CE
Oznaczenie to informuje, że urządzenie zgodne jest z warunkami dyrektywy
2014/30/EU dotyczącej przestrzegania przez kraje członkowskie przepisów zgodności elektromagnetycznej oraz warunkami dyrektyw 2014/35/EU dotyczącej przestrzegania przez kraje członkowskie przepisów niskiego napięcia i bezpieczeństwa
związanego z obsługą urządzeń elektrycznych.
Logo podwójna izolacja
Logo to informuje, że urządzenie jest urządzeniem bezpiecznym pod względem
elektrycznym, o ile wykorzystywany jest zgodnie z zaleceniami określonymi w rozdziale dotyczącym bezpieczeństwa.
1. Podstawowe informacje
1.1. Główne cechy:
• Odtwarzanie płyt DVD-video
• Odtwarzanie plików multimedialnych
• Funkcja karaoke
1.2. Zawartość pudełka:
• Pilot zdalnego sterowania
• Instrukcja użytkownika
• Odtwarzacz DVD
1.3. Ważne wskazówki do obsługi odtwarzacza
Odtwarzacz DVD posiada uproszczony interfejs ekranowy (klawisz menu), pozwalający na
przeglądanie zawartości nośnika (w zakresie obsługiwanych formatów) za pomocą krzyża
nawigacyjnego z poziomu pilota.
UWAGA: Formaty nie obsługiwane przez urządzenie mogą
nie pojawić się w przeglądarce multimediów.
Pod klawiszem SETUP znajdują się ustawienia urządzenia.
UWAGA: Proszę pamiętać, że nowe oprogramowanie może zmienić funkcjonalność odbiornika. Zdjęcia i opisy zamieszczone w instrukcji mają charakter poglądowy. Jeśli zauważą Państwo błąd prosimy
o jego zgłoszenie, dołożymy wszelkich starań aby go poprawić.
Bierzmy czynny udział w ochronie środowiska!
Twoje urządzenie jest zbudowane z materiałów, które mogą być poddane ponownemu przetwarzaniu lub recyklingowi. W tym celu należy je dostarczyć do wyznaczonego punktu zbiórki.
Logo RoHS
Logo to informuje, że urządzenie zgodne jest z warunkami dyrektywy 2011/65/EU
(potocznie znanej jako Restriction of Hazardous Substances Directive lub RoHS).
Dyrektywa RoHS obejmuje swoim działaniem ograniczenia na etapie produkcji
w wprowadzaniu substancji niebezpiecznych w elektronice.
Piktogram ostrzegający o emisji światła laserowego
Ten odtwarzacz jest produktem z laserem 1 klasy. Użytkowanie urządzenia niezgodnie z jego przeznaczeniem może spowodować narażenie na działanie niebezpiecznego promieniowania laserowego. Wiązka lasera jest niebezpieczna dla oczu, nie
próbuj zdemontować obudowy. Naprawę sprzętu pozostaw wykwalikowanemu
personelowi.
4 5
Page 4
PL
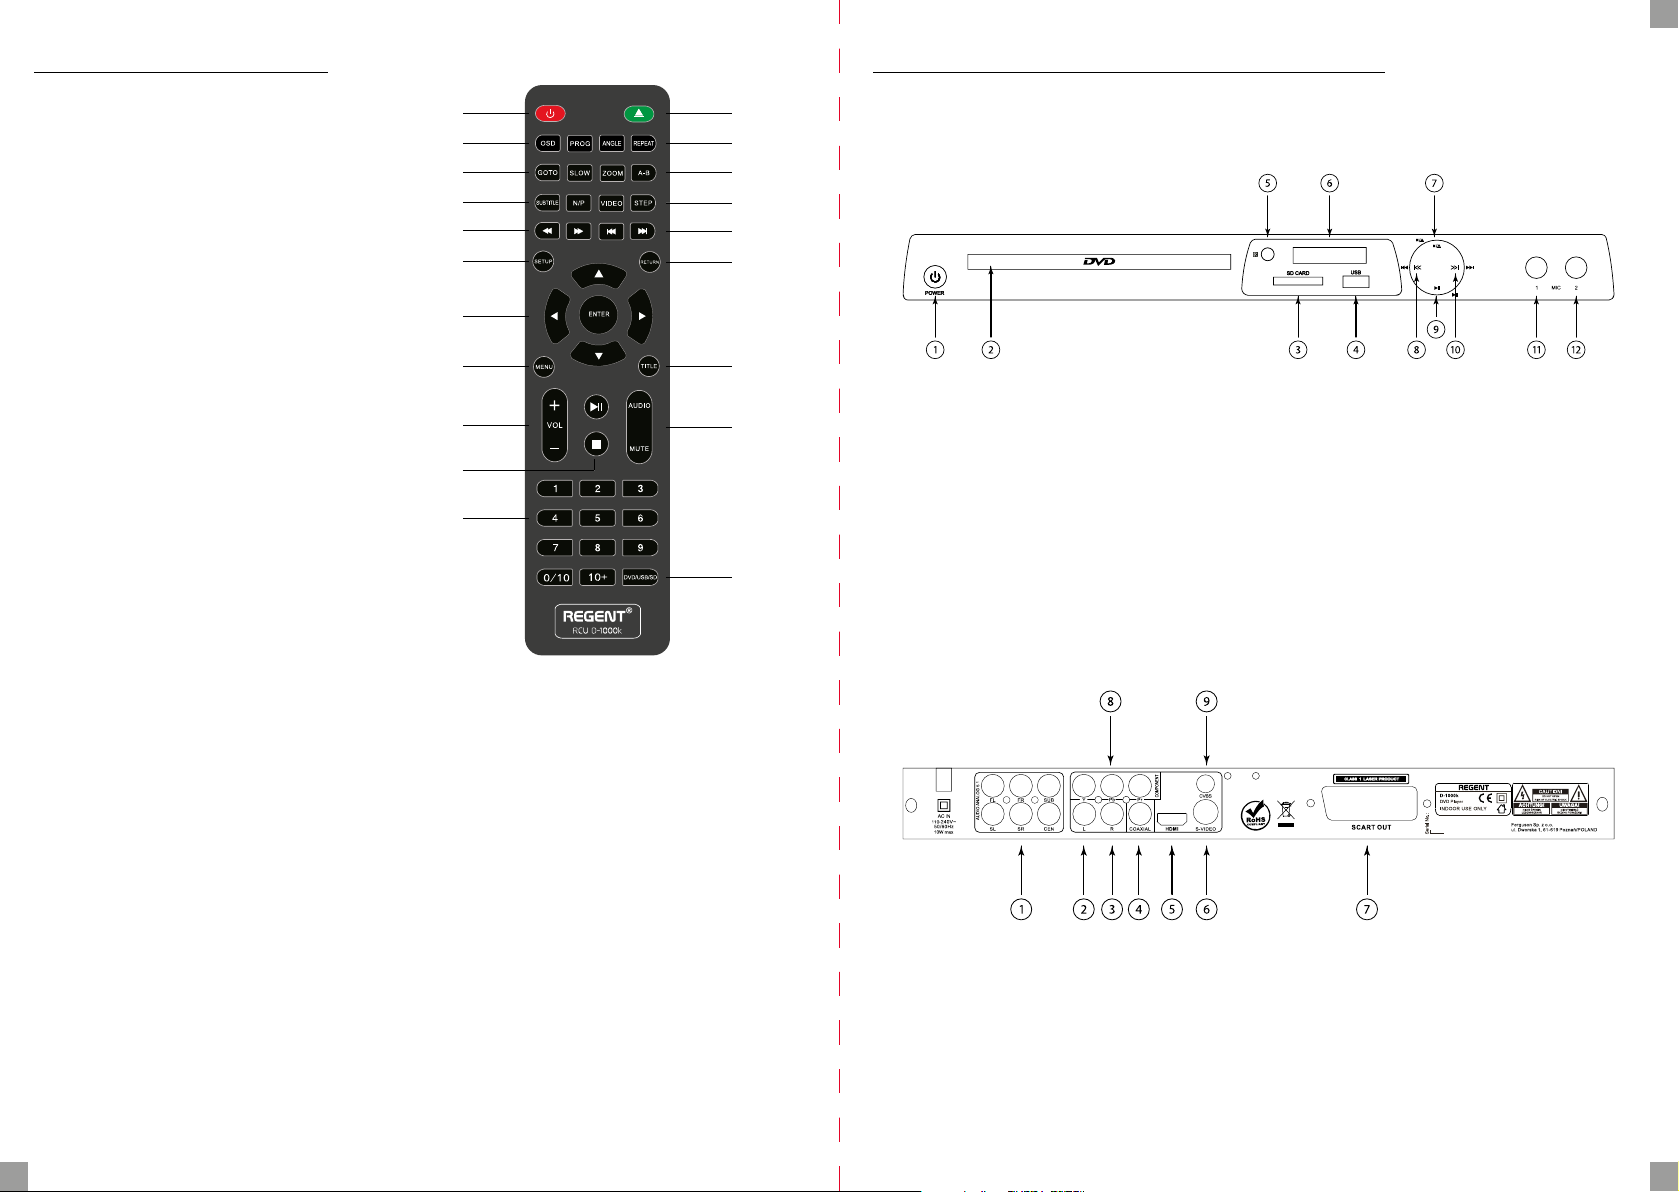
2. Pilot zdalnego sterowania
Programowanie
Przewijanie
Krzyż nawigacyjny
Odtwarzanie/Pauza
Klawisze numeryczne
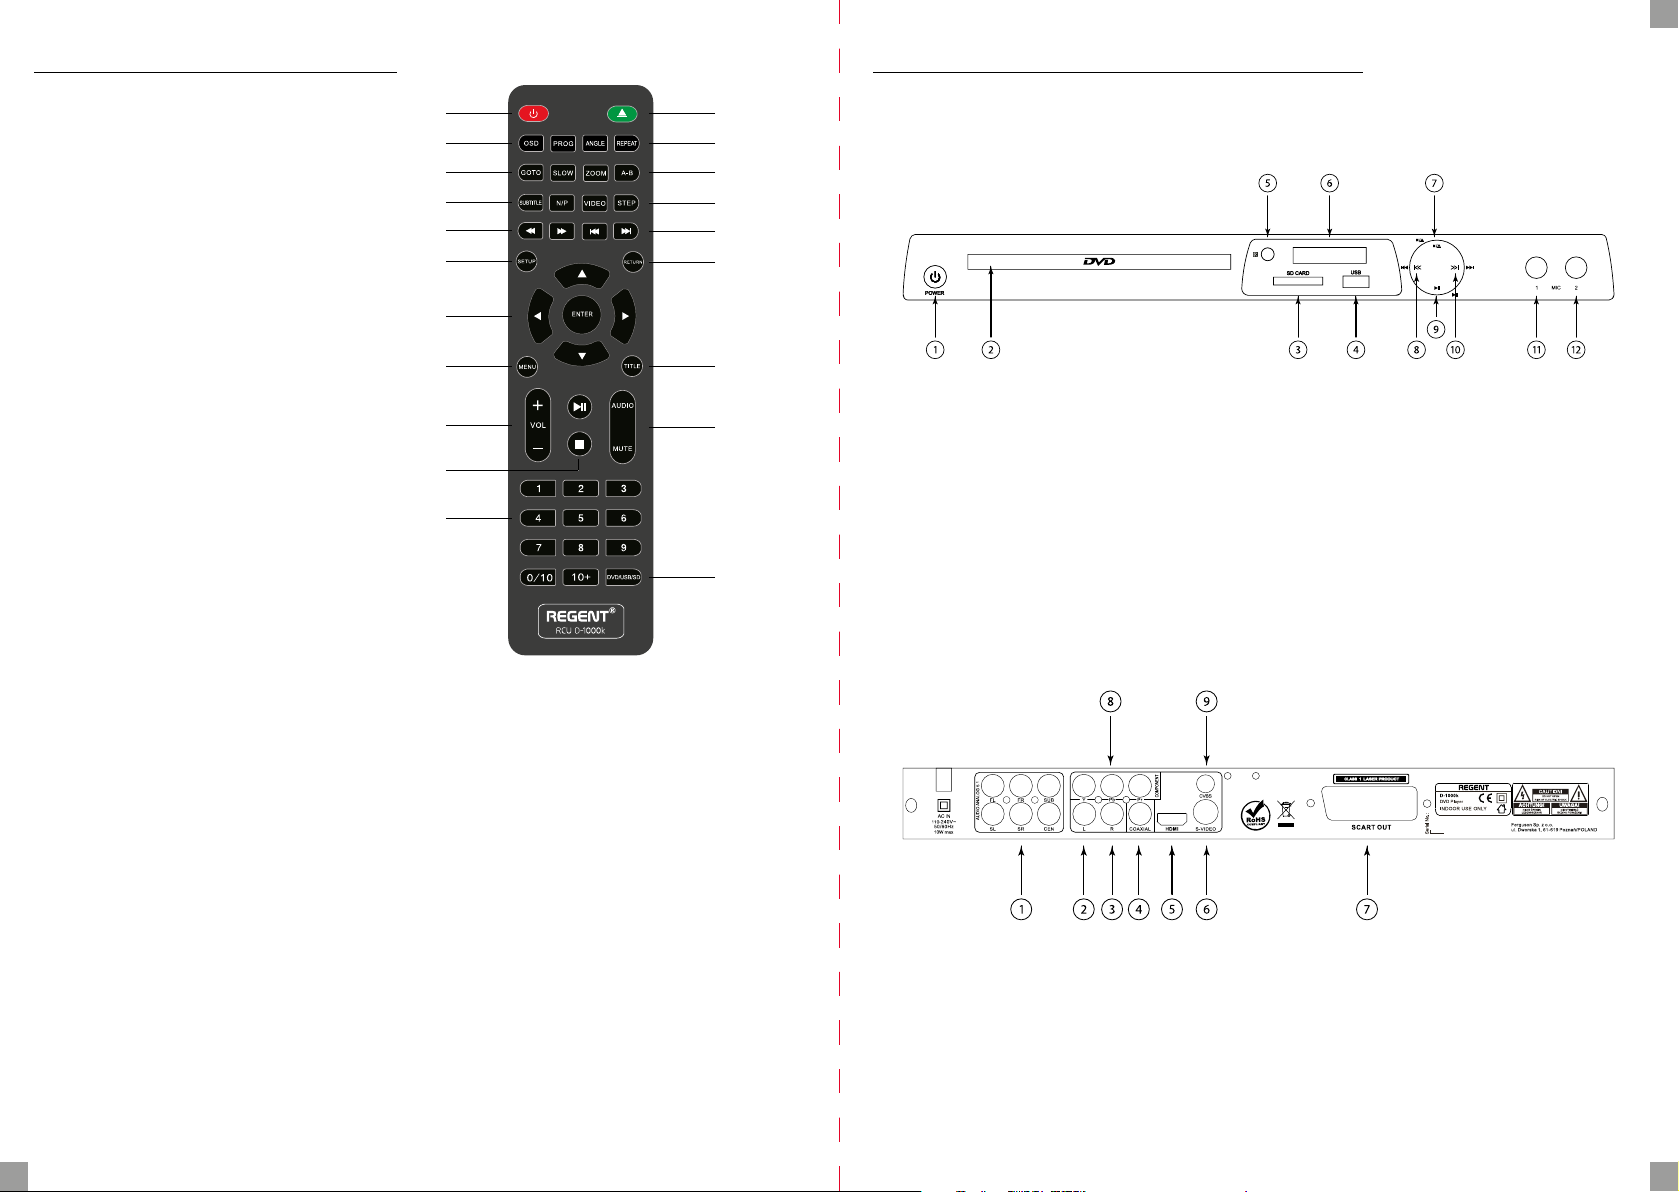
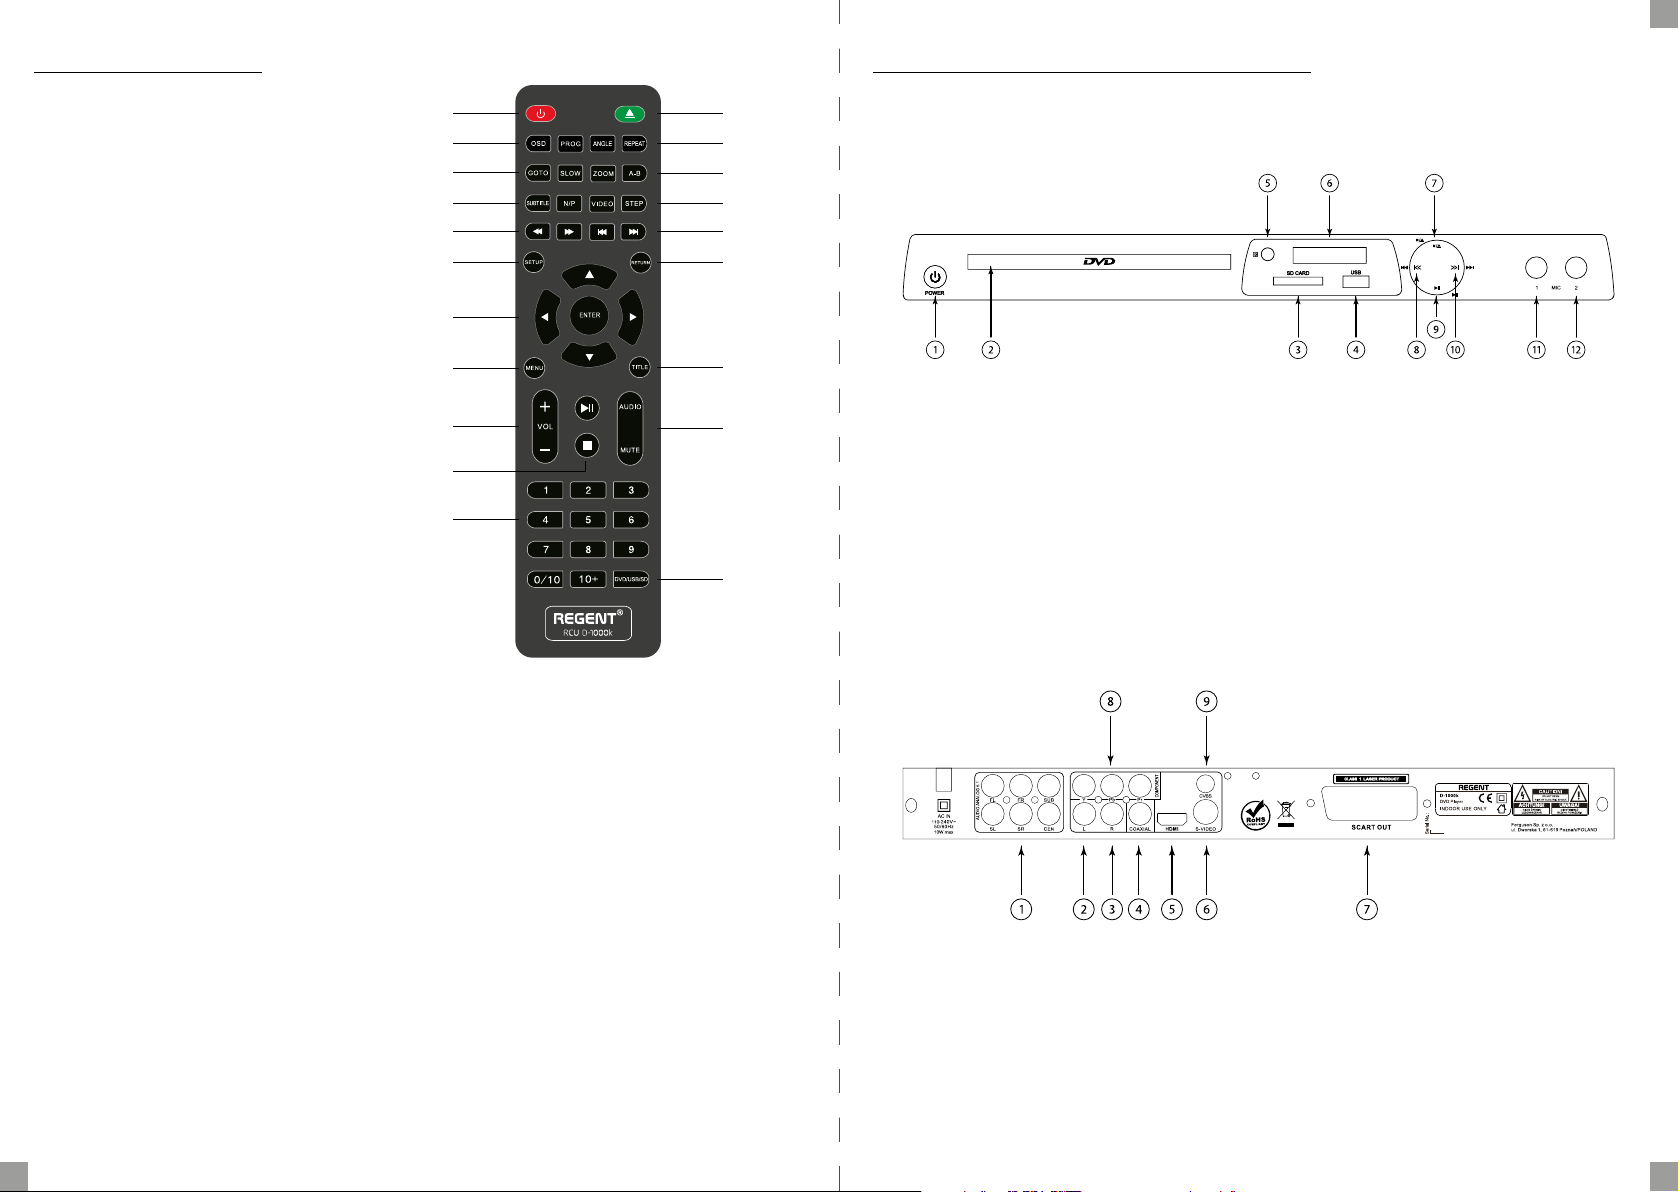
Opis przycisków:
Zasilanie – włącza i wyłącza urządzenie
OSD – menu ekranowe
Programowanie – ustawia-
nie kolejności odtwarzania
Idź do – wybieranie tytu-
łu, rozdziału lub czasu
Powoli – zwolnione przeglądanie video
Napisy – zmiana lub wyłączenie napisów
N/P – przełączenie między sys-
temem PAL a NTC
Przewijanie – przewijanie w przód i tył
Ustawienia – wejście lub wyjście z ustawień
Krzyż nawigacyjny/Enter – nawi-
gacja w menu i przeglądarce multimediów, Enter dla wyboru
Menu – przejście do menu płyty/przeglądarki multimediów
Głośność – dostosowanie głośności
Odtwarzanie/Pauza – od-
twarzaj lub zatrzymaj
Stop – zatrzymanie odtwarzania
Klawisze numeryczne – wprowadzanie cyfr
DVD/USB/SD – wybór nośnika
Zasilanie
OSD
Idź do
Powoli
Napisy
N/P
Ustawienia
Enter
Menu
Głośność
Stop
Wycisz – wyciszanie playera DVD
Dźwięk – wybór ścieżki dźwię-
kowej, jeśli jest dostępna
Tytuł – pokazuje tytuł płyty DVD
Cofnij – powrót do poprzedniej strony
Przejdź/Cofnij – przejście do następ-
nego/poprzedniego rozdziału/tytułu
Krok – przeglądanie klatka po klatce
Wideo – przełączenie między S-Vi-
deo, SCART i Composite
A-B – tworzenie pętli z pkt A do
pkt B w odtwarzanym DVD
Przybliżenie – powiększenie obrazu
Powtórz – zmiana trybu powtarzania
Ujęcie – zmiana między róż-
nymi ujęciami kamery
Zamknij/Otwórz – otwiera-
nie i zamykanie tacki płyt
Zamknij/Otwórz
Ujęcie
Powtórz
Przybliżenie
A-B
Wideo
Krok
Cofnij/Przejdź
Cofnij
Tytuł
Dźwięk
Wycisz
DVD/USB/SD
3. Wygląd panelu przedniego i tylnego
panel przedni odtwarzacza DVD
1. włącz/wyłącz
2. tacka
3. czytnik kart sd
4. usb
5. sensor podczerwieni
6. wyświetlacz
panel tylny odtwarzacza DVD
1. wyjście RCA 5.1
2. wyjście audio RCA lewe
3. wyjście audio RCA prawe
4. koncentryczne cyfrowe wyjście audio
7. stop/wysuń/wsuń tackę
8. poprzedni
9. odtwarzaj/pauza
10. następny
11. gniazdo jack
12. gniazdo jack
5. wyjście HDMI
6. wyjście S-Video
7. SCART
8. Component RCA
9. Video RCA
6 7
Page 5
4. Obsługa i podłączenie
Zasilanie
Podłącz odtwarzacz DVD za pomocą dołączonego przewodu zasilającego do standardowego gniazda zasilającego.
PL
Złącze HDMI (optymalne):
Wymaga kabla HDMI(nie zawarty)
1. Użyj kabla HDMI by podłączyć wyjście HDMI z DVD z wejściem HDMI w telewizorze.
2. Dostosuj połączenia w ustawieniach wejść w telewizorze do użytych w poprzednim kroku.
3. Ustaw rozdzielczość w ustawieniach obrazu.
Podłączenie wideo i audio
Zauważ: Przed podłączeniem lub zmianą podłączenia, upewnij się że wszystkie urządzenia
są odłączone od zasilania.
Zauważ: Oba złącza (wideo i audio) należy podłączyć od DVD do odbiornika Telewizyjnego
Wyjście stereo audio RCA:
1. Używaj złącza stereo audio RCA by przesłać dźwięk z DVD do telewizora
2. Wymagany przewód audio RCA (zawarte)
3. Użyj przewodu audio RCA by podłączyć wyjście RCA stereo audio z wejściem RCA stereo
audio w telewizorze.
4. Dostosuj połączenia w ustawieniach wejść w telewizorze do użytych w poprzednim kroku.
Wyjście 5.1 audio RCA:
1. Używaj złącza 5.1 audio RCA by przesłać dźwięk z DVD do telewizora.
2. Wymagany przewód audio RCA (nie zawarte).
3. Użyj przewodu audio RCA by podłączyć wyjście RCA 5.1 audio z wejściem RCA 5.1 audio
w sprzęcie HiFi.
4. Dostosuj połączenia w ustawieniach wejść w telewizorze do użytych w poprzednim kroku.
Koncentryczne SPDiF:
1. Użyj kabla audio koncentrycznego by przesłać wysokiej jakości dźwięk z DVD do systemu audio.
2. Wymagany przewód audio RCA (zawarty)
3. Użyj przewodu audio RCA by podłączyć cyfrowe koncentryczne złącze RCA z wejściem
cyfrowym RCA audio w systemie dźwiękowym.
4. Dostosuj połączenia w ustawieniach wejść w telewizorze do użytych w poprzednim kroku.
5. W opcjach ustawień SPDiF ustaw RAW/PCM/wył
Złącze composite video:
1. Używaj złącza composite video by przesłać obraz z DVD do telewizora
2. Wymagany przewód video RCA (zawarte)
3. Użyj przewodu video RCA by podłączyć wyjście RCA video z wejściem RCA video w telewizorze.
4. Dostosuj połączenia w ustawieniach wejść w telewizorze do użytych w poprzednim kroku.
Wyjście SCART:
1. Używaj złącza SCART by przesłać obraz z DVD do telewizora.
2. Wymagany przewód SCART (nie zawarte).
3. Użyj przewodu SCART by podłączyć wyjście SCART z wejściem SCART w telewizorze.
4. Dostosuj połączenia w ustawieniach wejść w telewizorze do użytych w poprzednim kroku.
5. Wciśnij przycisk Video na pilocie by przełączyć się na tryb wyjścia SCART.
Wyjście S-Video:
1. Używaj złącza S-Video by przesłać obraz z DVD do telewizora.
2. Wymagany przewód S-Video (nie zawarte).
3. Użyj przewodu S-Video by podłączyć wyjście S-Video z wejściem S-Video w telewizorze.
4. Dostosuj połączenia w ustawieniach wejść w telewizorze do użytych w poprzednim kroku.
5. Wciśnij przycisk Video na pilocie by przełączyć się na tryb wyjścia S-Video.
Wyjście Component Video:
1. Używaj złącza Component Video by przesłać obraz z DVD do telewizora.
2. Wymagany przewodu Component Video (nie zawarte).
3. Użyj przewodu Component Video by podłączyć wyjście Component Video z wejściem
Component Video w telewizorze.
4. Dostosuj połączenia w ustawieniach wejść w telewizorze do użytych w poprzednim kroku.
5. Wciśnij przycisk Video na pilocie by przełączyć się na tryb wyjścia Component Video.
DVD/CD
Wczytywanie dysku
1. Naciśnij otwórz/zamknij by wysunąć tackę napędu.
2. Połóż płytę na tackę napędu etykietą do góry.
3. Naciśnij otwórz/zamknij by wsunąć tackę napędu.
4. W zależności od zawartości dysku odtwarzanie rozpocznie się automatycznie lub będzie wymagane wybranie pliku z eksploratora.
Port USB/Czytnik kart SD
1. Podłącz pamięć USB do portu lub kartę SD do czytnika.
2. Wspierane formaty powinny pojawić się w przeglądarce plików.
8 9
Page 6
3. Wciśnij DVD/USB/SD by przełączyć tryb.
4. Użyj krzyża nawigacyjnego by poruszać
się w przeglądarce plików.
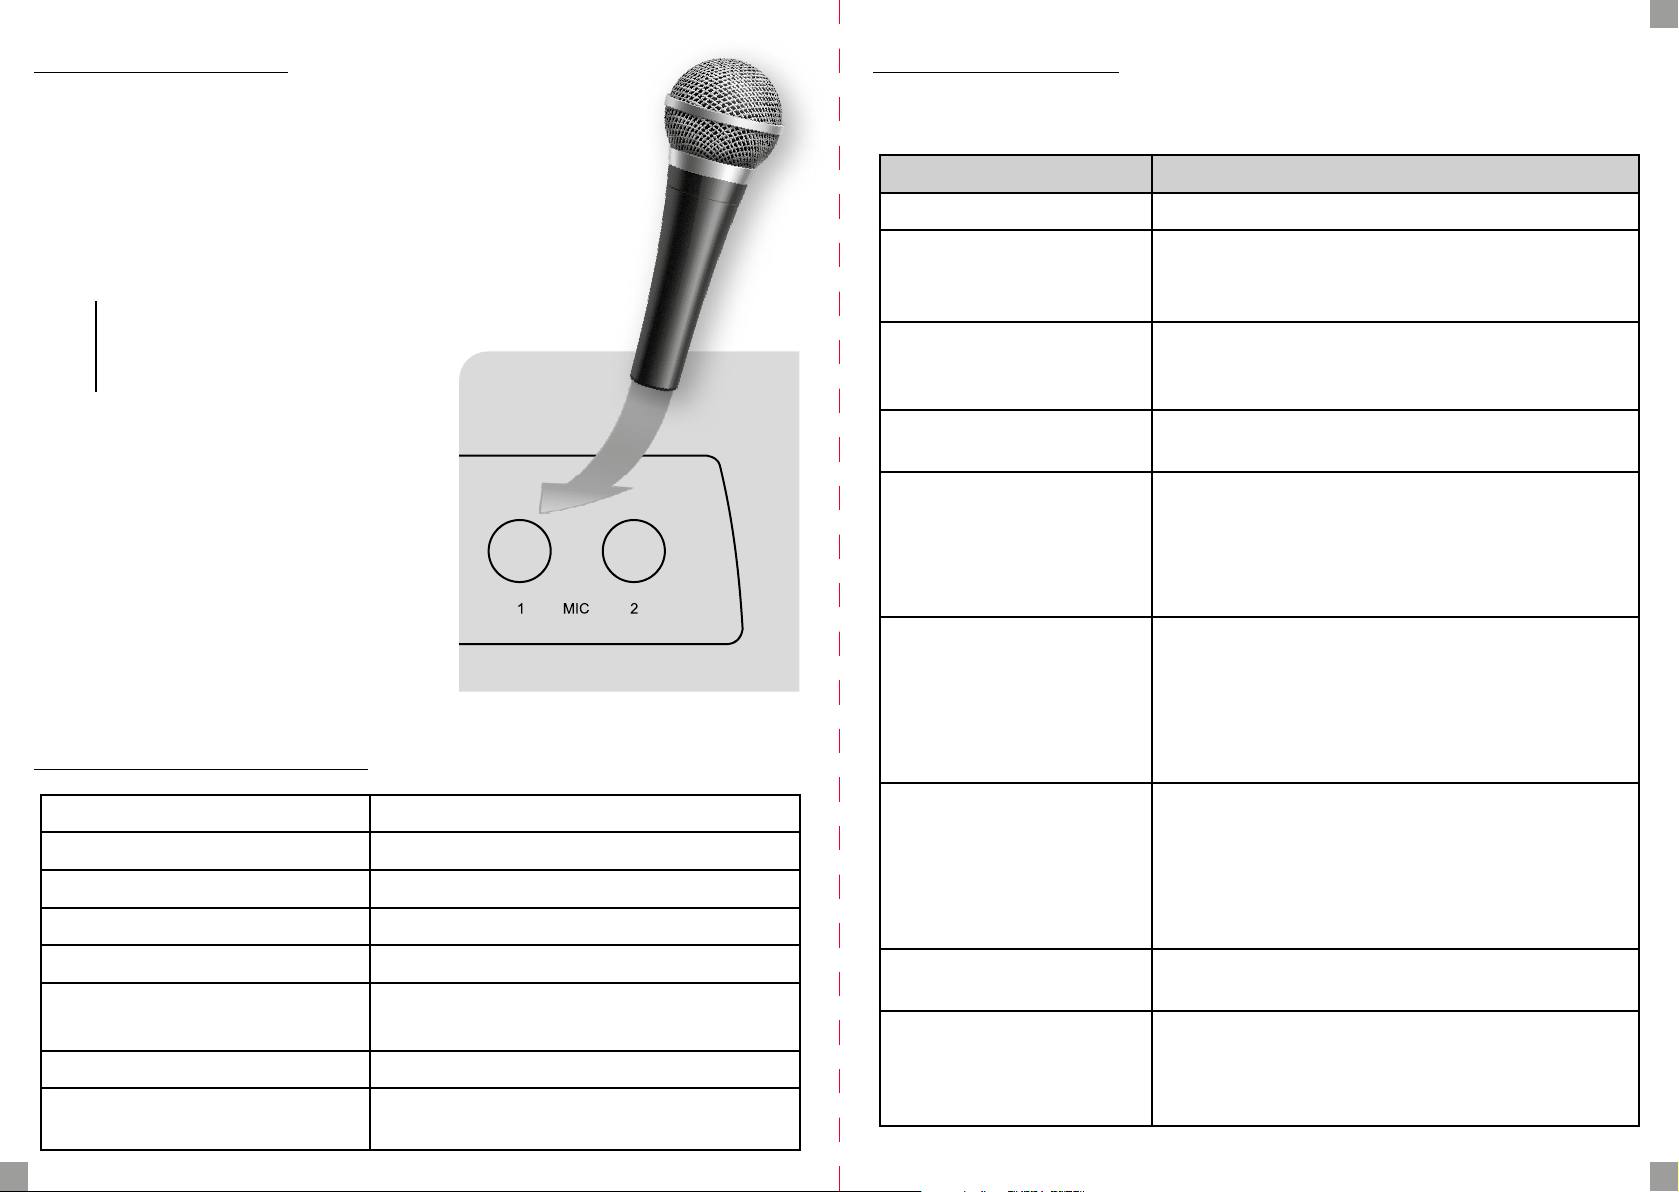
5. Funkcja karaoke
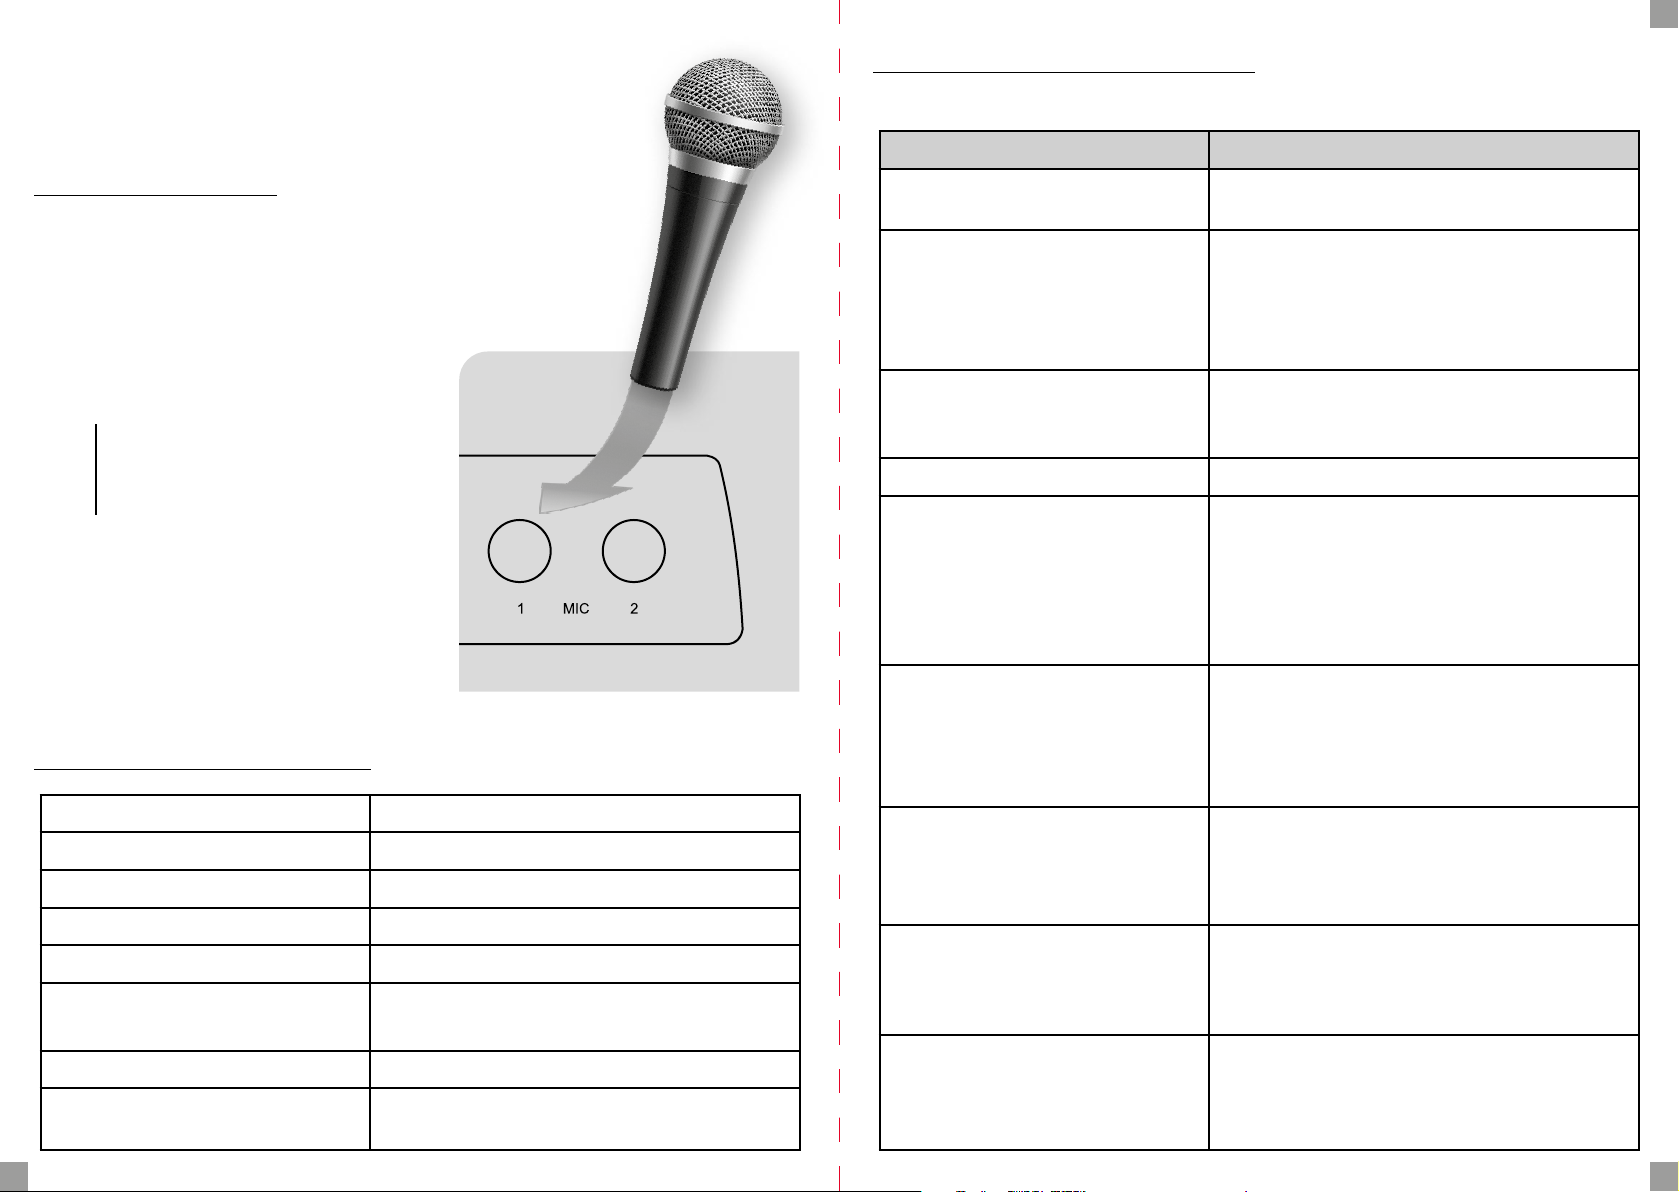
1. Podłącz obsługiwany mikrofon do portu MIC 1 lub MIC 2 na panelu przednim
w sposób pokazany na ilustracji obok.
2. Dostosuj głośność i efekty echa mikrofonu
w ustaniach karaoke.
3. Włącz podkład muzyczny (USB lub Płyta)
4. Dostosuj poziom głośności ścieżki dźwiękowej pilotem DVD
UWAGA: Zauważ, że niektóre
mikrofony mają przełącznik. Ustaw
go w odpowiedniej pozycji.
Funkcja karaoke działa z każdym podkładem
dźwiękowym (USB, DVD, CD).
Ustawienia efektów karaoke zmieniamy w Ustawienia dźwięku > Ustawienia karaoke.
7. Rozwiązywanie problemów
Przed odesłaniem na serwis sprawdź poniższy instrukcję rozwiązywania problemów.
Objaw Rozwiązanie
Brak zasilania
Brak obrazu
Brak dźwięku
Odtwarzany obraz jest słabej jakości • Wyczyść dysk.
Odtwarzacz DVD nie
rozpoczyna odtwarzania
• Poprawnie podłącz kabel zasilający do
ściennego gniazda zasilającego.
• Wybierz odpowiednie wejście
obrazu na telewizorze.
• Podłącz poprawnie złącze
obrazu do telewizora.
• Włącz telewizor.
• Sprawdź połączenia audio.
• Jeśli używasz amplitunera sprawdź
inne złącze lub ustawienia wejść.
• Włóż płytę jeśli nie ma płyty w napędzie.
• Włóż odpowiednią płytę we
wspieranym formacie.
• Wyczyść płytę.
• Włóż płytę w odpowiednią stronę.
• Wyłącz blokadę wieku lub zmień jej poziom.
PL
• Wyczyść urządzenie ściereczką
zwilżoną alkoholem.
6. Specykacja techniczna
System PAL/AUTO/NTSC
Częstotliwość odbioru: 20HZ-20KHZ (at 1KHz 0dB)
Współczynnik sygnału do zakłóceń ≥90dB (at 1KHz 0dB)
Zniekształcenia dźwięku i zakłócenia ≥-60dB (at 1KHz0dB)
Wyjście audio 2.0+0-1.0 Vrms
Wyjście wideo
Zasilacz 110-240V~50/60Hz
Wspierane dyski
10 11
Composite: 1.0±0.2Vp-p
Impedancja obciążenia: 75Ω
DVD/VCD/CD/MP3/Photo CD/
SVCD/JPEG/MPEG-4
Słychać buczenie lub hałas
Pilot nie działa poprawnie
Zniekształcony obraz lub bez koloru
Symbol ø pojawia się
na wyświetlaczu
• Wyczyść płytę.
• Podłącz poprawnie głośniki i ich elementy.
• Odsuń telewizor od sprzętu audio.
• Wskaż pilotem na sensor podczerwieni DVD.
• Używaj pilota w odległości ok 5m.
• Usuń przeszkody.
• Wymień baterie w pilocie na działające.
• Jeśli obraz jest zniekształcony lub
smuży sprawdź czy ustawiony jest
system kolorów odpowiada systemowi
odbiornika telewizyjnego.
• Oprogramowanie DVD blokuje
daną funkcje w danej chwili.
• Oprogramowanie nie wspiera danej funkcji.
• Funkcja jest nie dostępna w danej chwili.
Page 7
EN
Table of Contents
Safety measures 13
Downloadable software 13
About the instruction manual 14
Markings and signs applied to the receiver 14
1. General information 15
1.1. Main features 15
1.2. Box content 15
1.3. Important instructions concerning
handling of the device 15
2. Remote Control Unit 16
3. Front panel and rear panel illustration 17
4. Handling and connection 18
5. Karaoke function 20
Safety measures
We request that you read the instruction manual and recommendations set forward therein.
In order to avoid an electric shock, never open the housing. Damage to the
warranty seal shall void the warranty.
Disconnect the device from the mains during thunderstorms or when it is
not to be used for an extended period of time. Please remember that the
warranty does not cover damage to the equipment caused by a lightning
strike.
Do not expose the device to direct sunlight. Place it away from sources of
heat and humidity. Do not cover ventilation ducts, in order to ensure the
correct circulation of air.
Place the device horizontally on a at, even and stable surface.
If you move the device from a room that is warm to one that is cold (or vice
versa), wait at min. 1 hour before connecting it to the mains. Otherwise,
problems may arise.
The device should be placed away from vases, bottles, aquariums and other
water containers in order to avoid damage. Do not touch the mains plug
with your bare hands.
6. Technical Specications 20
7. Troubleshooting 21
Before starting any maintenance or installation work, disconnect the player from the mains.
Do not use alcohol or liquids containing ammonia to clean the player. If necessary, clean it
with a soft, lint-free cloth moistened with a mild soap and water solution.
• Do not connect any cables when the power plug is in the socket.
• Check if you have working cables. Damaged cables can cause a re.
• Disconnect the player from the power supply while making all connections.
Do not place any objects on the housing of the device. This may cause overheating and reception problems.
Downloadable software
Ferguson has taken every eort to provide users with software updates in order to ensure that
the parameters of the device are up to date. Ferguson reserves itself the right to amend, change
or modify the software used in the device as it shall choose and without prior notication.
The latest version of the software is available on the website http://www.ferguson-digital.eu
12 13
Page 8
EN
About the instruction manual
Ferguson has made every eort to provide the most current information about its products.
Ferguson does not grant any guarantee as to the contents of the present instruction manual and disclaims any implied guarantees concerning market value or suitability for specic
purposes. The information contained herein is an instruction intended to enable the correct
usage and maintenance of the player.
Ferguson reserves itself the right to introduce amendments, changes or translations of the
instruction manual without prior notication thereof. For this reason, we recommend you
regularly visit our website in order to obtain the latest information.
Markings and signs applied to the receiver
Risk of electric shock - do not open
This notice warns the user not to open the device housing. The housing may be opened solely by authorised service technicians.
CE logo
This mark tells you that the device is following the provisions of Council Directive
2014/30/EU on the approximation of the laws of the Member States relating to the
electromagnetic compatibility and the provisions of Council Directive 2014/35/EU
on the approximation of the laws of the Member States relating to low voltage and
electrical safety.
Double insulation logo
This logo informs that the device is an electrically safe device, provided that it is
used in accordance with the recommendations set forward in the chapter concerning safety.
Take an active part in protecting the natural environment!
Your device is made from materials that can be processed or recycled. To this end,
you should deliver it to a designated collection point.
1. General information
1.1. Main features:
• The DVD-video disc playing
• The multimedia les playing
• Karaoke function
1.2. Box content:
• RCU - remote controle unit
• user manual
• DVD player
1.3. Important instructions concerning handling of the device
The DVD player have the simplied OSD interface, it is allow to brows the media carrier content, you can browse with arrows on the RCU.
NOTE: File formats that DVD-player do not support can not display in media browser.
Device settings shows after pressing SETUP button.
NOTE: Please keep in mind that new software may change the functionality of the receiver. Photographs and descriptions included in the instruction manual are for informational purposes only. If you should notice an
error, please report it - we shall make every eort to have it rectied.
The RoHS mark
This mark tells you that the device is following The Directive on the Restriction of
the Use of Certain Hazardous Substances in Electrical and Electronic Equipment
2011/65/EU (commonly referred to as the Restriction of Hazardous Substances
Directive or RoHS).
Laser hazard logo
This player is a class 1 laser product, use of controls or adjustments or performace
of procedures other than those specied herein may result in hazardous radiation
exposure. As the laser beam used in this dvd video player is harmful ro the eyes, do
not attempt to disasemble the cabinet. Refer servicing to qualied personnel only.
14 15
Page 9
2. Remote Control Unit 3. Front panel and rear panel illustration
EN
Description of buttons:
Power - Power the unit on and o
OSD – On Screen Display
Programming - To play contents of
disc in the order you want by programming the track to be played
Goto - To go to a particular title, chapter or time point
Slow – To view slowly
Subtitles – To switch subtitles
N/P – To Select between NTC and PAL
Search – To search forward and backward
Setup - To access or exit the SETUP menu
Arrows/Enter – Arrows are used
for moving around the Menus. Enter is used for Selecting.
Menu – To bring up the DVD Player Menu
Volume – To adjust the DVD Player Volume
Play/Pause – To play or Pause
Stop – To Stop the DVD
Number Keypad – For Input-
ting Number Digits
DVD/USB/SD – To select be-
tween DVD, USB and SD Input
Power
OSD
Programming
Go to
Slow
Subtitles
N/P
Search
Setup
Arrows
Enter
Menu
Volume
Play/Pause
Stop
Number Keypad
Mute – To mute the DVD Player
Audio - To change the audio setting
Title – To Show the DVD Title
Return – Back to the previous page
Skip – To skip forward to back
Step - Plays video frame by frame
Video – switch between Com-
posite, S-Video or SCART
A-B – creating a loop from point A to
point B in the DVD being played
Zoom – To enlarge the Picture
Repeat – To toggle between dif-
ferent repeat modes
Angle – To switch between Mul-
tiple Camera Angles
Open/Close – To open and clo-
se the DVD drawer
Open/Close
Angle
Repeat
Zoom
A-B
Video
Step
Skip
Return
Title
Audio
Mute
DVD/USB/SD
front of DVD player
1. on/o
2. tray
3. SD card reader
4. USB
5. infrared sensor
6. display
back of DVD player
1. RCA 5.1 output
2. RCA left audio output
3. RCA right audio output
4. COAXIAL digital audio output
7. stop/eject/insert the tray
8. previous
9. play/pause
10. next
11. jack socket
12. jack socket
5. HDMI output
6. S-Video output
7. SCART
8. Component RCA
9. Video RCA
16 17
Page 10

4. Handling and connection
Power
Plug the attached AC cord into a standard AC power outlet to power the DVD player.
Connecting Video and Audio
Note: Before making or changing any connections, make sure that all the devices are discon-
nected from the power outlet.
Note: Both video and audio connections must be made from the DVD Player to your televi-
sion.
RCA Stereo Audio Output:
1. Use the RCA Stereo Audio Output to send audio from the DVD player to a television.
2. Required an RCA audio cable (included).
3. Use the RCA audio cable to connect the RCA Stereo Audio Output to an RCA stereo
audio input on a television.
4. Adjust the connected televisions input setting to match the input used in the previous
step.
5.1 RCA audio output:
1. Use the 5.1 RCA audio connector to send the sound from the DVD to the TV.
2. RCA audio cable required (not included).
3. Use the RCA audio cable to connect the RCA 5.1 audio output to the RCA 5.1 audio input
on your HiFi equipment.
4. Adjust the connections in the input settings on the TV to those used in the previous
step.
EN
HDMI Output (Best):
Requires a HDMI cable (not Included)
1. Use a HDMI cable to connect the HDMI Output to a HDMI input on a television.
2. Adjust the connected televisions input setting to match the input used in the previous
step.
3. Set quality in the video settings.
SCART Output:
1. Requires a SCART cable (not included).
2. Use the SCART Output to send audio/video from the DVD player to a television.
3. Use the SCART cable to connect the SCART output in the DVD to a SCART input on a
television.
4. Press the Video button on the remote to switch to Scart mode.
S-Video Output:
1. Requires a S-Video cable (not included).
2. Use a S-Video cable to connect the S-Video Output to a S-Video input on a television.
3. Adjust the connected televisions input setting to match the input used in the previous
step.
4. Press the Video button on the remote to switch to S-Video mode.
Component Video Output:
1. Requires component video cable (not included).
2. Use a component video cable (not included) to connect the Component Video Output
on the DVD player to the Component Video Input on the television.
3. Adjust the television’s source input setting to Component Video (YPbPr).
4. Press the Video button on the remote to switch to YUV mode.
Coaxial Digital Audio Output:
1. Use the Coaxial Digital Audio Output to send high quality audio from the DVD player to
an audio system.
2. Requires an RCA audio cable (included).
3. Use the RCA audio cable to connect the Coaxial Digital Audio Output to a coaxial digital
input on an audio system.
4. Adjust the connected audio system’s input setting to match the input used in the previous step.
5. In the Digital Out portion of the setup menu, adjust to PCM, RAW or o.
Composite Video Output:
1. Use the Composite Video Output to send video from the DVD player to a television.
2. Requires an RCA video cable (included).
3. Use the RCA video cable to connect the Composite Video Output to a composite video
input on a television.
4. Adjust the connected televisions input setting to match the input used in the previous
step.
18 19
DVD/CD
Loading a Disc
1. Press the Open/Close button to open the Disc Drawer.
2. Load a disc into the DVD player, label side facing up.
3. Press the Open/Close button to close the Disc Drawer.
4. After a disc is loaded, it will begin playing automatically.
SD Card / USB Disk/Stick
1. Plug the SD Card/USB drive into the port.
2. The supported formats should appear in the le browser.
3. Press DVD/USB/SD to switch the mode.
4. Use the navigation cross to navigate in the le browser.
Page 11
EN
5. Karaoke function
1. Connect a supported microphone to the
MIC 1 or MIC 2 port on the front panel as
shown in the adjacent illustration.
2. Adjust the microphone volume and echo
eects in karaoke stops.
3. Turn on background music (USB or Disc)
4. Adjust the sound level with the DVD remote control.
NOTE: Note that some microphones have a switch. Put
it in the correct position.
The karaoke function works with any background sound (USB, DVD, CD).
You can change the karaoke eects settings in
Sound settings > Karaoke settings.
7. Troubleshooting
Before Requesting Service check the following guide for possible cause of a problem before
contacting service.
Symptom Solution
No power • Correctly connect the power cord to a wall outlet.
• Select the correct picture input on the TV.
No picture
No sound
The playback picture
is of poor quality
DVD player does not
start playback
• Connect the picture connector to the TV correctly.
• Turn on the TV.
• Check the audio connections.
• If you are using an AV receiver check a
dierent connector or input settings.
• Clean up the disk.
• Insert a disc if there is no disc in the drive.
• Insert a suitable disc in a supported format.
• Clean the disc.
• Insert the disc in the correct direction.
• Disable the age lock or change its level.
• Clean the device with a cloth
moistened with alcohol.
There is a humming or noise
6. Technical Specications
System PAL/AUTO/NTSC
Reception frequency 20HZ-20KHZ (at 1KHz 0dB)
Signal to noise ratio ≥90dB (at 1KHz 0dB)
Sound distortion and noise ≥-60dB (at 1KHz0dB)
Audio output 2.0+0-1.0 Vrms
Video output
Power Supply 110-240V~50/60Hz
Supported drives
20 21
Composite: 1.0±0.2Vp-p
Load impedance: 75Ω
DVD/VCD/CD/MP3/Photo CD/
SVCD/JPEG/MPEG-4
The remote control is
not working properly
Color is distorted or
not displayed
The ø symbol appears
in the display
• Clean the disc.
• Correctly connect the speakers
and their components.
• Move the TV away from the audio equipment.
• Point the remote control at the
infrared sensor of the DVD.
• Use the remote control within 5m.
• Remove the obstacles.
• Replace the batteries in the
remote with working ones.
• If the picture is distorted or smudged, check that
the color system is set to match that of the TV set.
• The DVD software is blocking the
function at the moment.
• The software does not support this function.
• The function is not available at the moment.
Page 12
DE
Inhaltsverzeichnis
Sicherheitsmassnahmen 23
Herunterladbare Software 23
Über die Bedienungsanleitung 24
Markierungen und Zeichen auf dem Player 24
1. Grundlegende Informationen über den Receiver 25
1.1. Haupteigenschaften 25
1.2. Inhalt der Box 25
1.3. Wichtige Hinweise zur Handhabung des Player 25
2. Fernbedienung 26
3. Vorder-und Rückseite 27
4. Gerätebedienung und Anschluss 28
5. Karaoke-Funktion 30
6. Technische Daten 30
7. Problembehebung 31
Sicherheitsmassnahmen
Wir bitten Sie, die Bedienungsanleitung und die darin enthaltenen Empfehlungen zu lesen.
Um einen elektrischen Schlag zu vermeiden, darf das Gehäuse nicht geönet werden. Eine Beschädigung des Garantiesiegels führt zum Erlöschen
der Garantie.
Trennen Sie das Gerät bei Gewittern oder wenn es längere Zeit nicht benutzt werden soll. Bitte beachten Sie, dass die Garantie nicht für Schäden
am Gerät gilt, die durch einen Blitzschlag verursacht wurden.
Setzen Sie das Gerät keiner direkten Sonneneinstrahlung aus. Stellen Sie
es weg von Wärme- und Feuchtigkeitsquellen. Lüftungskanäle nicht abdecken, um eine korrekte Luftzirkulation zu gewährleisten.
Stellen Sie das Gerät waagerecht auf eine glatte, ebene und stabile Fläche.
Wenn Sie das Gerät von einem warmen in einen kalten Raum (oder umgekehrt) bringen, warten Sie mindestens 1 Stunde, bevor Sie es an das Stromnetz anschließen. Andernfalls kann es zu Problemen kommen.
Das Gerät sollte entfernt von Vasen, Flaschen, Aquarien und anderen Wasserbehältern aufgestellt werden, um Beschädigungen zu vermeiden. Berühren Sie den Netzstecker nicht mit bloßen Händen.
Stellen Sie keine Gegenstände auf das Gehäuse des Gerätes. Dies kann zu
Überhitzung und Empfangsstörungen führen.
Vor Beginn der Wartungs- oder Installationsarbeiten den Receiver vom Netz trennen. Reinigen Sie den Receiver nicht mit Alkohol oder ammoniakhaltigen Flüssigkeiten. Reinigen Sie
ihn gegebenenfalls mit einem weichen, fusselfreien Tuch, das mit einer sanften Lösung aus
Wasser und Seife befeuchtet ist.
• Schließen Sie keine Kabel an, wenn sich der Netzstecker in der Steckdose bendet.
• Überprüfen Sie den Zustand Ihrer Kabel. Beschädigte Kabel können einen Brand verursachen.
• Bitte trennen Sie den Receiver vom Netz, bevor Sie Kabel anschließen.
Herunterladbare Software
Ferguson hat alle Anstrengungen unternommen, den Anwendern Software-Updates zur
Verfügung zu stellen, um sicherzustellen, dass die Parameter des Fernsehempfängers auf
dem neuesten Stand sind. Ferguson behält sich das Recht vor, die im Fernsehempfänger verwendete Software nach eigenem Ermessen und ohne vorherige Ankündigung zu ändern.
Die neueste Version der Software ist auf der Website verfügbar. http://www.fergusondigital.eu
22 23
Page 13
DE
Über die Bedienungsanleitung
Ferguson hat alle Anstrengungen unternommen, um die aktuellsten Informationen über
seine Produkte bereitzustellen. Ferguson übernimmt keine Garantie für den Inhalt dieser Bedienungsanleitung und lehnt jegliche angedeutete Gewährleistung hinsichtlich Marktwert
oder Eignung für bestimmte Zwecke ab. Die hierin enthaltenen Informationen sind eine
Anleitung zur korrekten Verwendung und Wartung des Receivers. Ferguson behält sich das
Recht vor, ohne vorherige Ankündigung Änderungen, Ergänzungen oder Übersetzungen
der Bedienungsanleitung vorzunehmen. Aus diesem Grund empfehlen wir Ihnen, unsere
Website regelmäßig zu besuchen, um aktuelle Informationen zu erhalten.
Markierungen und Zeichen auf dem Player
Stromschlaggefahr
Nicht önen Dieser Hinweis warnt den Benutzer davor, das Receivergehäuse zu önen. Das Gehäuse darf nur von autorisierten Servicetechnikern geönet werden.
CE-Logo
Dieses Zeichen weist darauf hin, dass das Gerät den Bestimmungen der Richtlinie
2014/30/EU des Rates zur Angleichung der Rechtsvorschriften der Mitgliedstaaten
über die elektromagnetische Verträglichkeit und den Bestimmungen der Richtlinien 2014/35/EU des Rates zur Angleichung der Rechtsvorschriften der Mitgliedstaaten über Niederspannung und elektrische Sicherheit entspricht.
Doppelte Isolierung-Logo
Dieses Logo weist darauf hin, dass der Receiver ein elektrisch sicheres Gerät ist, vorausgesetzt, dass er gemäß den Empfehlungen im Kapitel „Sicherheit“ verwendet
wird.
Nehmen Sie aktiv am Umweltschutz teil!
Ihr Gerät besteht aus Materialien, die verarbeitet oder recycelt werden können. Zu
diesem Zweck sollten Sie es an einer dafür vorgesehenen Sammelstelle abgeben.
1. Grundlegende Informationen über den Receiver
1.1. Haupteigenschaften:
• Wiedergabe von DVD-Video-Discs
• Wiedergabe von Multimedia-Dateien
• Karaoke-Funktion
1.2. Inhalt der Box:
• Fernbedienung
• Handbuch
• DVD Spieler
1.3. Wichtige Hinweise zur Handhabung des Player
Der DVD-Player verfügt über eine vereinfachte Bildschirmoberäche (Menütaste), die es Ihnen ermöglicht, den Inhalt der Medien (in Bezug auf die unterstützten Formate) mithilfe der
Kreuznavigation der Fernbedienung zu durchsuchen.
HINWEIS: Formate, die vom Gerät nicht unterstützt werden, erscheinen möglicherweise nicht im Medienbrowser.
Unter der Taste SETUP nden Sie die Geräteeinstellungen.
HINWEIS: Bitte beachten Sie, dass neue Software die Funktionalität des
Empfängers verändern kann. Die Bilder und Beschreibungen in diesem
Handbuch dienen nur der Veranschaulichung. Wenn Sie einen Fehler bemerken, melden Sie ihn bitte, wir werden uns bemühen, ihn zu korrigieren.
Das RoHS-Zeichen
Dieses Zeichen weist darauf hin, dass das Gerät der Richtlinie zur Beschränkung
der Verwendung bestimmter gefährlicher Stoe in Elektro- und Elektronikgeräten
2011/65/EG (allgemein als Richtlinie zur Beschränkung der Verwendung bestimmter gefährlicher Stoe oder RoHS bezeichnet) entspricht.
Warnpiktogramm für Laserstrahlung
Dieser Player ist ein Laserprodukt der Klasse 1. Fehlgebrauch kann zu einer Exposition gegenüber gefährlicher Laserstrahlung führen. Der Laserstrahl ist gefährlich für
die Augen, versuchen Sie nicht. Versuchen Sie nicht, den Schrank zu zerlegen. Überlassen Sie die Reparatur des Geräts dem Fachpersonal.
24 25
Page 14
DE
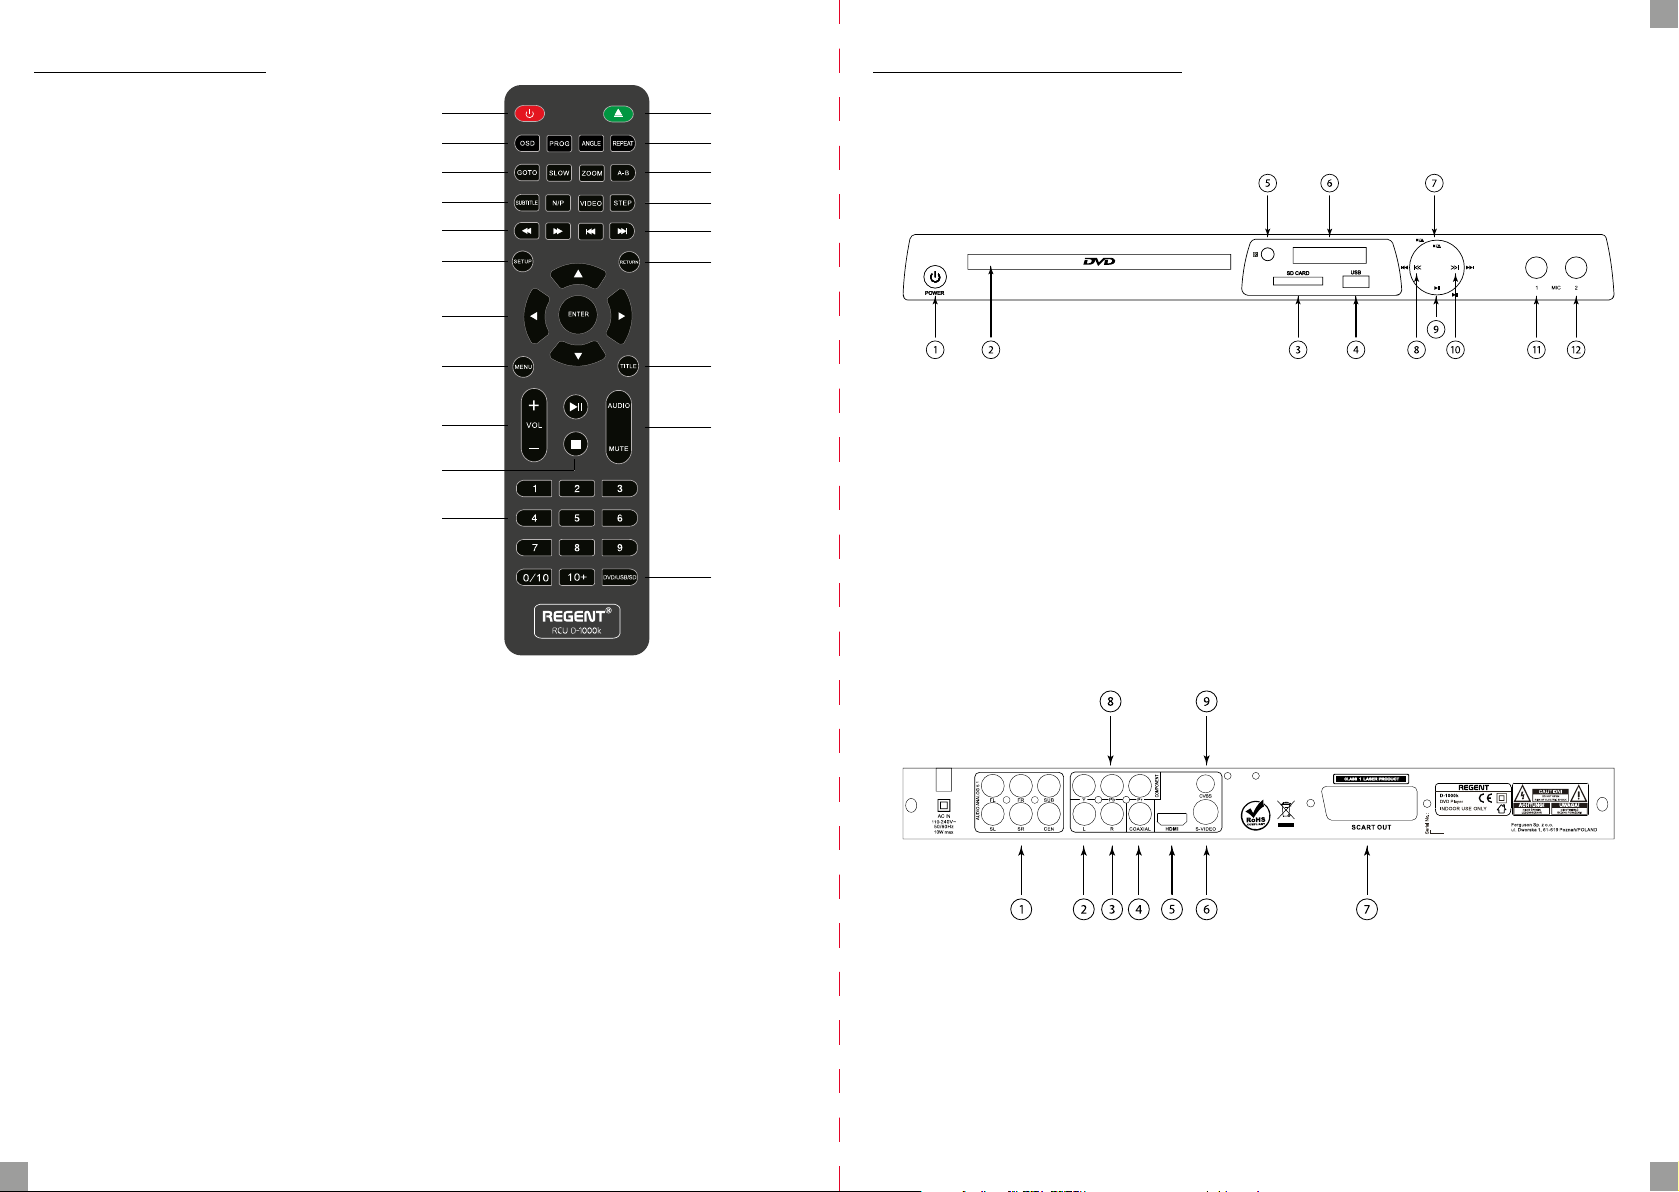
2. Fernbedienung
Programmierung
Wiedergabe/Pause
Tastenbeschreibung:
Power - Schaltet das Gerät ein und aus
OSD - Bildschirmmenü
Programmierung - Einrichten
der Wiedergabereihenfolge
Gehe zu - Titel, Kapitel oder Zeit wählen
Langsam - Langsames Video-Browsing
Untertitel - Untertitel än-
dern oder deaktivieren
N/P - Umschalten zwischen PAL und NTC
Scropllen - Rücklauf und schneller Vorlauf
Einstellungen - Einstellungen
eingeben oder verlassen
Enter - Zum Navigieren im
Menü und Medienbrowser.
Menü - Zum Navigieren zum Di-
sc-Menü/Medienbrowser
Lautstärke - Lautstärke einstellen
Wiedergabe/Pause - Wie-
dergabe oder Stopp
Stop - Wiedergabe stoppen
Zierntasten - zur Eingabe von Zahlen
DVD/USB/SD - Medien auswählen
Mute - Stummschalten des DVD-Players
Power
OSD
Gehe zu
Langsam
Untertitel
N/P
Scropllen
Einstellungen
Enter
Menü
Lautstärke
Stop
Zierntasten
Ton - Audiospur auswählen, falls vorhanden
Titel - DVD-Titel anzeigen
Rückgängig - zurück zur vorherigen Seite
Gehe zu/Zurück - Gehe zum näch-
sten/vorherigen Kapitel/Titel
Schritt - Frame für Frame durchsuchen
Video - wechseln Sie zwischen Com-
posite, S-Video und SCART
A-B - erzeugt eine Schleife von Punkt A
zu Punkt B beim Abspielen der DVD
Zoom - Bild vergrößern
Wiederholen - Wiederho-
lungsmodus ändern
Shot - Wechsel zwischen verschie-
denen Kameraeinstellungen
Schließen/Önen - zum Önen
und Schließen des Disc-Fachs
Schließen/Önen
Shot
Wiederholen
Zoom
A-B
Video
Schritt
Gehe zu/Zurück
Rückgängig
Titel
Ton
Mute
DVD/USB/SD
3. Vorder-und Rückseite
DVD Player Frontplatte
1. an/aus
2. Tablett
3. SD-Kartenleser
4. USB
5. Infrarotsensor
6. Anzeige
Rückplatte
1. Cinch 5.1 Ausgang
2. Cinch-Audioausgang links
3. Cinch-Audioausgang rechts
4. COAXIAL digitaler Audioausgang
7. Stoppen/Auswerfen/Einsetzen des Fachs
8. Bisherige
9. Spielpause
10. Nächster
11. Klinkenbuchse
12. Klinkenbuchse
5. HDMI-Ausgang
6. S-Video-Ausgang
7. SCART
8. Komponente RCA
9. Video RCA
26 27
Page 15
4. Gerätebedienung und Anschluss
Versorgung
Schließen Sie den DVD-Player mit dem mitgelieferten Netzkabel an eine normale Steckdose an.
Video- und Audioanschlüsse
Hinweis: Stellen Sie vor dem Anschließen oder Ändern des Anschlusses sicher, dass alle Geräte von der
Spannungsversorgung getrennt sind.
Hinweis: Beide Anschlüsse (Video und Audio) müssen von der DVD an das Fernsehgerät angeschlos-
sen werden.
Stereo-Audio RCA-Ausgang:
1. Verwenden Sie den Stereo-Audio-Cinch-Anschluss, um den Ton von der DVD zum Fernseher zu
senden.
2. RCA-Audiokabel erforderlich (im Lieferumfang enthalten).
3. Verwenden Sie das Cinch-Audiokabel, um den Stereo-Audio-Cinch-Ausgang mit dem Stereo-Audio-Cinch-Eingang am Fernsehgerät zu verbinden.
4. Passen Sie die Anschlüsse in den Eingangseinstellungen des Fernsehers an die im vorherigen
Schritt verwendeten an.
5.1 RCA-Audioausgang:
1. Verwenden Sie den 5.1-Audio-Cinch-Anschluss, um den Ton von der DVD zum Fernseher zu senden.
2. RCA-Audiokabel erforderlich (nicht im Lieferumfang enthalten).
3. Verwenden Sie ein Cinch-Audiokabel, um den Cinch-5.1-Audioausgang mit dem Cinch-5.1-Audioeingang Ihrer HiFi-Anlage zu verbinden.
4. Passen Sie die Anschlüsse in den Eingangseinstellungen des Fernsehers an die im vorherigen
Schritt verwendeten an.
Koaxial SPDiF:
1. Verwenden Sie ein Koaxial-Audiokabel, um qualitativ hochwertigen Ton von einer DVD an Ihr
Audiosystem zu senden.
2. RCA-Audiokabel erforderlich (im Lieferumfang enthalten).
3. Verwenden Sie ein Cinch-Audiokabel, um den digitalen koaxialen Cinch-Stecker mit dem digitalen Cinch-Audioeingang an Ihrem Soundsystem zu verbinden.
4. Passen Sie die Anschlüsse in den Eingangseinstellungen des Fernsehers an die im vorherigen
Schritt verwendeten an.
5. Stellen Sie in den SPDiF-Einstellungsoptionen RAW/PCM/o ein.
Composite-Video-Anschluss:
1. Verwenden Sie den Composite-Video-Anschluss, um das Bild von der DVD an Ihr Fernsehgerät
zu senden.
2. Sie benötigen ein RCA-Videokabel (im Lieferumfang enthalten).
3. Verwenden Sie ein RCA-Videokabel, um den RCA-Videoausgang mit dem RCA-Videoeingang zu
verbinden Eingang an Ihrem Fernsehgerät.
4. Passen Sie die Anschlüsse in den Eingangseinstellungen Ihres Fernsehers an die im vorherigen
Schritt verwendeten Anschlüsse an.
HDMI-Anschluss (Optimum):
Erfordert HDMI-Kabel (nicht im Lieferumfang enthalten).
DE
1. Verwenden Sie ein HDMI-Kabel, um den HDMI-Ausgang des DVD-Geräts mit dem HDMI-Eingang
des Fernsehers zu verbinden.
2. Passen Sie die Anschlüsse in den Eingangseinstellungen am Fernsehgerät an die im vorherigen
Schritt verwendeten an.
3. Stellen Sie die Auösung in den Bildeinstellungen ein.
SCART-Ausgang:
1. Verwenden Sie den SCART-Anschluss, um das Bild von der DVD an Ihr Fernsehgerät zu senden.
2. SCART-Kabel erforderlich (nicht mitgeliefert).
3. Verwenden Sie das SCART-Kabel, um den SCART-Ausgang mit dem SCART-Eingang Ihres Fernsehers zu verbinden.
4. Passen Sie die Eingangseinstellungen des Fernsehers an die im vorherigen Schritt verwendeten
an.
5. Drücken Sie die Taste Video auf der Fernbedienung, um in den SCART-Ausgangsmodus zu wechseln.
S-Video-Ausgang:
1. Verwenden Sie den S-Video-Anschluss, um das Bild von der DVD auf Ihr Fernsehgerät zu übertragen.
2. Ein S-Video-Kabel ist erforderlich (nicht mitgeliefert).
3. Verwenden Sie ein S-Video-Kabel, um den S-Video-Ausgang mit dem S-Video-Eingang des Fernsehers zu verbinden.
4. Passen Sie die Anschlüsse in den Eingangseinstellungen des Fernsehers an die im vorherigen
Schritt verwendeten an.
5. Drücken Sie die Taste Video auf der Fernbedienung, um in den S-Video-Ausgangsmodus zu wechseln.
Component-Video-Ausgang:
1. Verwenden Sie den Component-Video-Anschluss, um das Bild von der DVD an Ihr Fernsehgerät
zu senden.
2. Erforderlich Komponenten-Videokabel (nicht mitgeliefert).
3. Verwenden Sie das Component-Video-Kabel, um den Component-Video-Ausgang mit dem Component-Video-Eingang Ihres Fernsehers zu verbinden.
4. Passen Sie die Anschlüsse in den Eingangseinstellungen des Fernsehers an die im vorherigen
Schritt verwendeten an.
5. Drücken Sie die Taste Video auf der Fernbedienung, um in den Component-Video-Ausgangsmodus zu wechseln.
DVD/CD
Laden einer Disc
1. Drücken Sie auf open/close, um das Laufwerksfach auszuwerfen.
2. Legen Sie die Disc mit der beschrifteten Seite nach oben in das Laufwerkfach.
3. Drücken Sie auf open/close, um das Laufwerksfach einzuwerfen.
4. Je nach Inhalt der Disc startet die Wiedergabe automatisch oder Sie müssen eine Datei aus dem
Explorer auswählen.
USB-Anschluss/SD-Kartenleser
1. Stecken Sie Ihren USB-Stick in den Anschluss oder stecken Sie Ihre SD-Karte in den Kartenleser.
2. Die unterstützten Formate sollten im Dateibrowser erscheinen.
28 29
Page 16
3. Drücken Sie DVD/USB/SD, um den Modus zu
wechseln.
4. Verwenden Sie die Navigationstaste, um im
Dateibrowser zu navigieren.
DE
7. Problembehebung
Bevor Sie das Gerät zur Reparatur einschicken, lesen Sie bitte die unten stehende Anleitung
zur Fehlerbehebung.
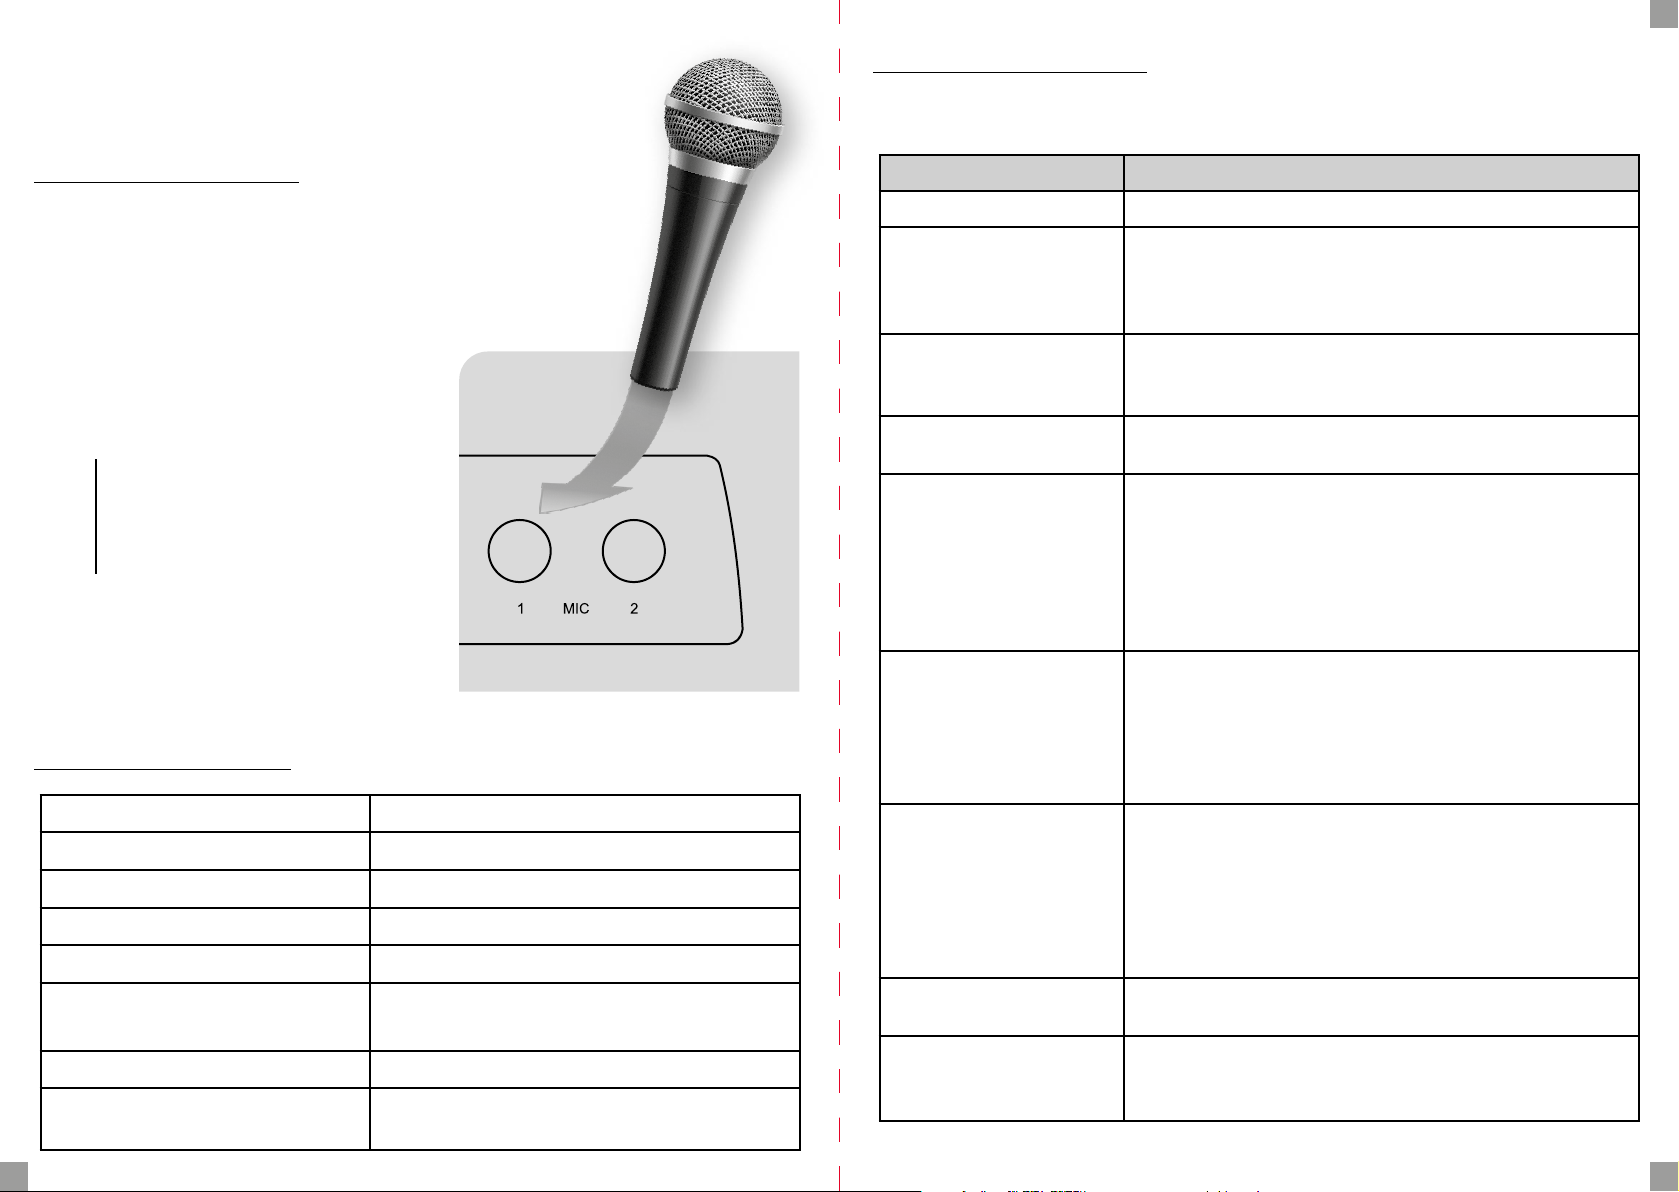
5. Karaoke-Funktion
1. Schließen Sie ein unterstütztes Mikrofon
an den Anschluss MIC 1 oder MIC 2 an der
Frontplatte als wie in der obigen Abbildung gezeigt.
2. Stellen Sie die Lautstärke und die Echoeffekte des Mikrofons im Karaokemund ein.
3. Schalten Sie die Hintergrundmusik ein
(USB oder Disc).
4. Stellen Sie die Lautstärke der Tonspur mit
der DVD-Fernbedienung ein.
HINWEIS: Beachten Sie, dass einige
Mikrofone über einen Schalter
verfügen. Stellen Sie ihn auf die
entsprechende Position ein.
Die Karaoke-Funktion funktioniert mit beliebiger Hintergrundmusik (USB, DVD, CD).
Ändern Sie die Einstellungen für den Karaoke-
-Eekt unter Toneinstellungen > Karaoke-Einstellungen.
6. Technische Daten
System PAL/AUTO/NTSC
Frequenz des Empfangs 20HZ-20KHZ (at 1KHz 0dB)
Signal-Störungs-Verhältnis ≥90dB (at 1KHz 0dB)
Tonverzerrungen und Störungen ≥-60dB (at 1KHz0dB)
Audioausgang 2.0+0-1.0 Vrms
Video-Ausgang
Spannungsversorgung 110-240V~50/60Hz
Unterstützte Laufwerke
Composite: 1.0±0.2Vp-p
Lastimpedanz: 75Ω
DVD/VCD/CD/MP3/Photo CD/
SVCD/JPEG/MPEG-4
Symptom Lösung
Kein Strom • Korrektes Anschließen des Netzkabels an die Wandsteckdose.
• Wählen Sie den richtigen Bildeingang am Fernsehgerät.
Kein Bild
Kein Ton
Das Bild ist von
schlechter Qualität
DVD-Player startet nicht
die Wiedergabe
Summende oder
brummende
Die Fernbedienung
funktioniert nicht richtig
Verzerrtes Bild oder
keine Farbe
ø Symbol erscheint
im Display
• Wählen Sie den richtigen Bildeingang am Fernsehgerät.
• Schließen Sie den Bildstecker richtig an das
Fernsehgerät an/Schalten Sie den Fernseher ein.
• Überprüfen Sie die Audioverbindungen.
• Wenn Sie einen Empfänger verwenden, prüfen Sie die
anderen Anschluss- oder Eingangseinstellungen.
• Reinigen Sie die Disc.
• Legen Sie eine Disc ein, wenn sich keine
Disc im Laufwerk bendet.
• Legen Sie eine geeignete Disc in einem
unterstützten Format ein.
• Reinigen Sie die Disc.
• Legen Sie die Disc in der richtigen Richtung ein.
• Deaktivieren Sie die Alterssperre oder ändern Sie ihre Stufe.
• Geräusche Reinigen Sie das Gerät mit einem
mit Alkohol befeuchteten Tuch.
• Reinigen Sie die Disc.
• Schließen Sie Lautsprecher und Komponenten korrekt an.
• Stellen Sie das Fernsehgerät weiter
weg von den Audiogeräten.
• Richten Sie die Fernbedienung auf den
Infrarotsensor des DVD-Geräts.
• Verwenden Sie die Fernbedienung in
einem Abstand von ca. 5 m.
• Entfernen Sie alle Hindernisse.
• Ersetzen Sie die Batterien in der Fernbedienung
durch funktionierende Batterien.
• Wenn das Bild verzerrt oder streig ist, prüfen Sie,
ob das Farbsystem auf das des Fernsehgeräts.
• Die DVD-Software blockiert gerade eine Funktion.
• Die Software unterstützt die Funktion nicht.
• Die Funktion ist derzeit nicht verfügbar.
30 31
Page 17
IT
Sommario
Misure di sicurezza 33
Software scaricabile 33
Informazioni sul manuale d’uso 34
Marcature utilizzate nel lettore 34
1. Informazioni di base 35
1.1. Caratteristiche principali 35
1.2. Contenuto della confezione 35
1.3. Suggerimenti importanti per
il funzionamento del lettore 35
2. Telecomando 36
3. Vista del pannello anteriore e posteriore 37
4. Funzionamento e collegamento 38
5. Funzione karaoke 40
6. Speciche tecniche 40
Misure di sicurezza
Si prega di leggere attentamente questo manuale e le sue raccomandazioni.
Per evitare scosse elettriche, non aprire mai l’alloggiamento. Il danneggiamento del sigillo di garanzia invaliderà la garanzia.
Scollegare il dispositivo dalla rete durante i temporali o quando non verrà
utilizzato per un lungo periodo. Ricorda che la garanzia non copre i danni al
dispositivo causati da un fulmine.
Non esporre il dispositivo alla luce solare diretta. Tenere lontano da fonti di
calore e ambienti umidi. Non bloccare le aperture di ventilazione per garantire una corretta circolazione dell’aria.
Posizionare il dispositivo in posizione orizzontale su una supercie piana,
uniforme e stabile.
Se sposti il dispositivo da una stanza calda a una fredda e viceversa, attendi
almeno 1 ora prima dell’accensione. In caso contrario, potrebbero sorgere
problemi.
Tenere il dispositivo lontano da vasi di ori, bottiglie, acquari e altre fonti
d’acqua per evitare danni. Non toccare la spina di alimentazione a mani
nude.
Non collocare alcun oggetto sull’alloggiamento del dispositivo. Ciò può
causare surriscaldamento e problemi con la ricezione.
7. Risoluzione dei problemi 41
Prima di iniziare qualsiasi lavoro di manutenzione o installazione, scollegare il ricevitore dalla
rete. Non utilizzare alcol o liquidi contenenti ammoniaca per pulire il ricevitore. Se necessario, pulirlo con un panno morbido e privo di lanugine inumidito con una soluzione di acqua
e sapone delicato.
• Non collegare alcun cavo quando la spina di alimentazione è nella presa.
• Controlla se hai cavi funzionanti. I cavi danneggiati possono provocare un incendio.
• Scollegare il ricevitore dall’alimentazione mentre si eettuano tutti i collegamenti.
Software scaricabile
Ferguson ha utilizzato tutte le opzioni disponibili per fornire agli utenti aggiornamenti
software, consentendo il miglioramento dei parametri operativi del dispositivo. Ferguson si
riserva il diritto di emendare, cambiare o modicare il software utilizzato nel dispositivo su
qualsiasi base e senza preavviso di tali modiche. La versione attuale del software è disponibile sul sito web http://www.ferguson-digital.eu
32 33
Page 18
IT
Informazioni sul manuale d’uso
Ferguson ha sfruttato tutte le possibilità disponibili per fornire le informazioni più aggiornate sui suoi prodotti. Ferguson non concede alcuna garanzia in merito al contenuto di questo
manuale e declina qualsiasi garanzia implicita in merito al valore di mercato o all’idoneità
per scopi specici. Le informazioni qui contenute sono fornite come linee guida per l’uso e la
manutenzione del lettore.
Ferguson si riserva il diritto di modicare, cambiare o tradurre il Manuale dell’operatore senza previa notica di tali modiche. Si consiglia pertanto di visitare regolarmente il nostro sito
Web per le informazioni più recenti.
Marcature utilizzate nel lettore
Avviso di pericolo di scossa elettrica - non aprire
Questa iscrizione avverte di non aprire la custodia del giocatore. Solo
il personale di assistenza autorizzato può aprire l’alloggiamento.
Marcatura CE
Questa marcatura indica che il dispositivo è conforme alle disposizioni della Direttiva 2014/30/UE relativa alla conformità degli Stati membri alle norme di compatibilità elettromagnetica e alle condizioni della Direttiva 2014/35/UE relativa al rispetto
da parte degli Stati membri della bassa tensione e norme di sicurezza relative al
funzionamento dei dispositivi elettrici.
Logo a doppio isolamento
Questo logo indica che il dispositivo è elettricamente sicuro, a condizione che venga utilizzato secondo le istruzioni nel capitolo sulla sicurezza.
Partecipiamo attivamente alla tutela dell’ambiente!
Il dispositivo è realizzato con materiali che possono essere rielaborati o riciclati. A tal
ne, devono essere consegnati a un punto di raccolta designato.
1. Informazioni di base
1.1. Caratteristiche principali:
• Riproduzione di DVD-video
• ORiproduzione di le multimediali
• Funzione karaoke
1.2. Contenuto della confezione:
• Telecomando
• Manuale d’uso
• Lettore DVD
1.3. Suggerimenti importanti per il funzionamento del lettore
Il lettore DVD dispone di un’interfaccia a schermo semplicata (tasto menu) che consente
di visualizzare il contenuto del supporto (nella gamma di formati supportati) utilizzando la
croce di navigazione dal telecomando.
NOTA: i formati non supportati dal dispositivo potrebbero non essere visualizzati nel browser multimediale.
Le impostazioni del dispositivo si trovano sotto il pulsante SETUP.
ATTENZIONE: Si noti che il nuovo software potrebbe cambiare funzionalità del lettore. Le foto e le descrizioni nel manuale sono solo di riferimento.
Se noti un errore, segnalalo, faremo del nostro meglio per correggerlo.
Logo RoHS
Questo logo informa che il dispositivo è conforme alle disposizioni della Direttiva
2011/65/UE (comunemente nota come Direttiva sulla restrizione delle sostanze
pericolose o RoHS). La direttiva RoHS copre le restrizioni nella fase di produzione
nell’introduzione di sostanze pericolose nell’elettronica.
Pittogramma di avvertenza sull’emissione di luce laser
Questo lettore è un prodotto laser di classe 1. L’utilizzo del dispositivo contrario
all’uso previsto può causare l’esposizione a radiazioni laser pericolose. Il raggio laser
è pericoloso per gli occhi, non cercare di smontare l’alloggiamento. Adare la riparazione dell’attrezzatura a personale qualicato.
34 35
Page 19
IT
2. Telecomando
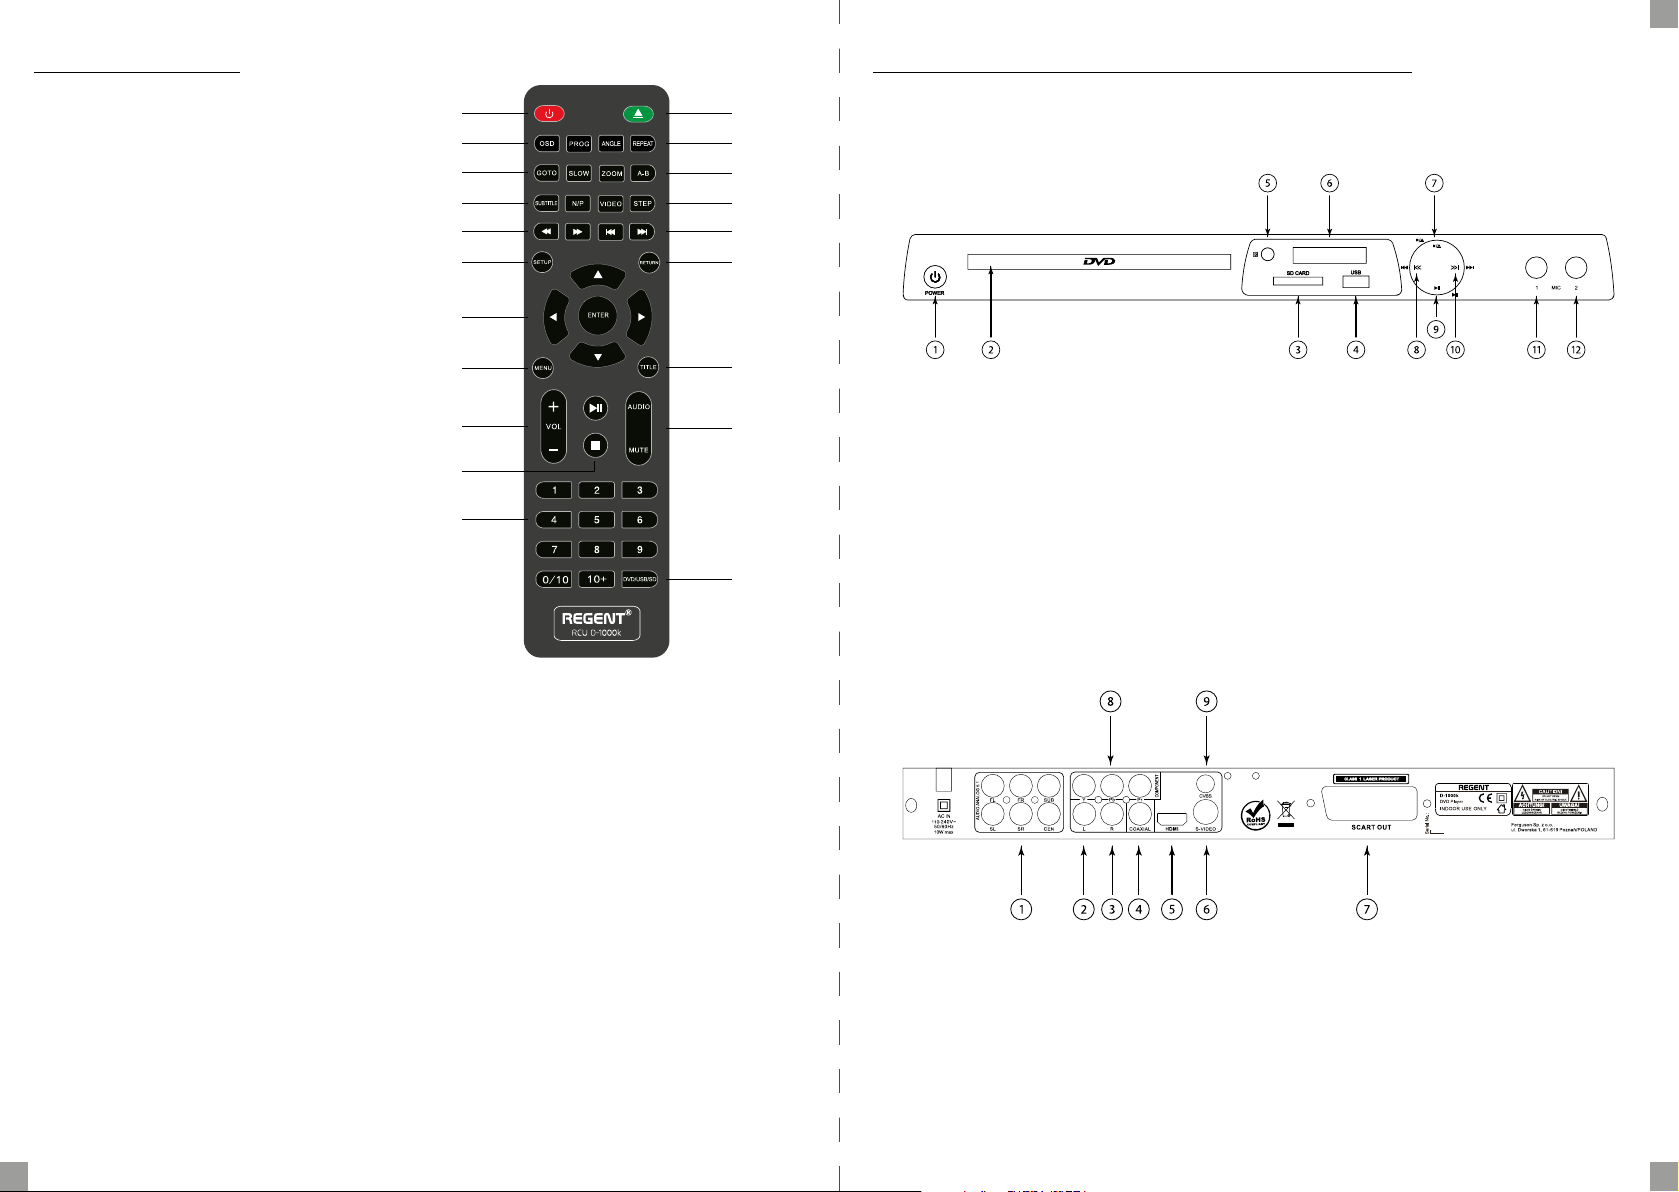
Descrizione dei pulsanti:
Alimentazione - accen-
de e spegne il dispositivo
Alimentazione
OSD
Programmazione
Vai a
Lenta
Sottotitoli
N/P
Riavvolgi
Impostazioni
Pulsante di navigazione/Enter
Menu
Volume
Riproduci/Pausa
Stop
Tasti numerici
Chiudi/Apri
Shot
Ripeti
Zoom
A-B
Video
Step
Vai/Indietro
Annulla
Titolo
Suono
Muto
DVD/USB/SD
3. Vista del pannello anteriore e posteriore
Pannello frontale del lettore DVD
1. acceso/spento
2. vassoio
3. lettore di schede SD
4. USB
5. sensore a infrarossi
6. schermo
7. arrestare/espellere/inserire il vassoio
8. precedente
9. play/pausa
10. il prossimo
11. presa jack
12. presa jack
OSD - Menu su schermo
Programmazione - impostazio-
ne dell’ordine di riproduzione
Retro del lettore DVD
Vai a - seleziona un titolo, un
capitolo o un tempo
Lenta - visualizzazione video lenta
Sottotitoli - modica o disabilita i sottotitoli
N/P - passa dal sistema PAL a quello NTC
Riavvolgi - Avanti veloce e riavvolgi
Impostazioni - per accedere o
uscire dalle impostazioni
Pulsante di navigazione/Enter - per
la navigazione nei menu e il browser
multimediale. Entra per la selezione.
Menu - consente di accedere al menu
del disco/browser multimediale
Volume - regola il volume
Riproduci/Pausa - riproduci o interrompi
Stop - smetti di ricevere
Tasti numerici - per immettere le cifre
DVD/USB/SD – scelta del vettore
Muto - Disattiva il lettore DVD
36 37
Suono - selezione di una colonna sonora, se disponibile
Titolo - mostra il titolo del DVD
Annulla - torna alla pagina precedente
Vai/Indietro - Va al capitolo/ti-
tolo successivo/precedente
Step - visualizzazione foto-
gramma per fotogramma
Video - passare da Compo-
sito, S-Video e SCART
A-B - creazione di un loop dal punto A
al punto B nel DVD in riproduzione
Zoom - ingrandisce l’immagine
Ripeti - cambia la modalità di ripetizione
Shot - Cambia tra diverse an-
golazioni della telecamera
Chiudi/Apri - per aprire e chiude-
re il vassoio del disco
1. uscita RCA 5.1
2. audio out RCA sinistra
3. audio out RCA destra
4. uscita audio digitale COASSIALE
5. uscita HDMI
6. uscita S-Video
7. SCART
8. componente RCA
9. video RCA
Page 20
4. Funzionamento e collegamento
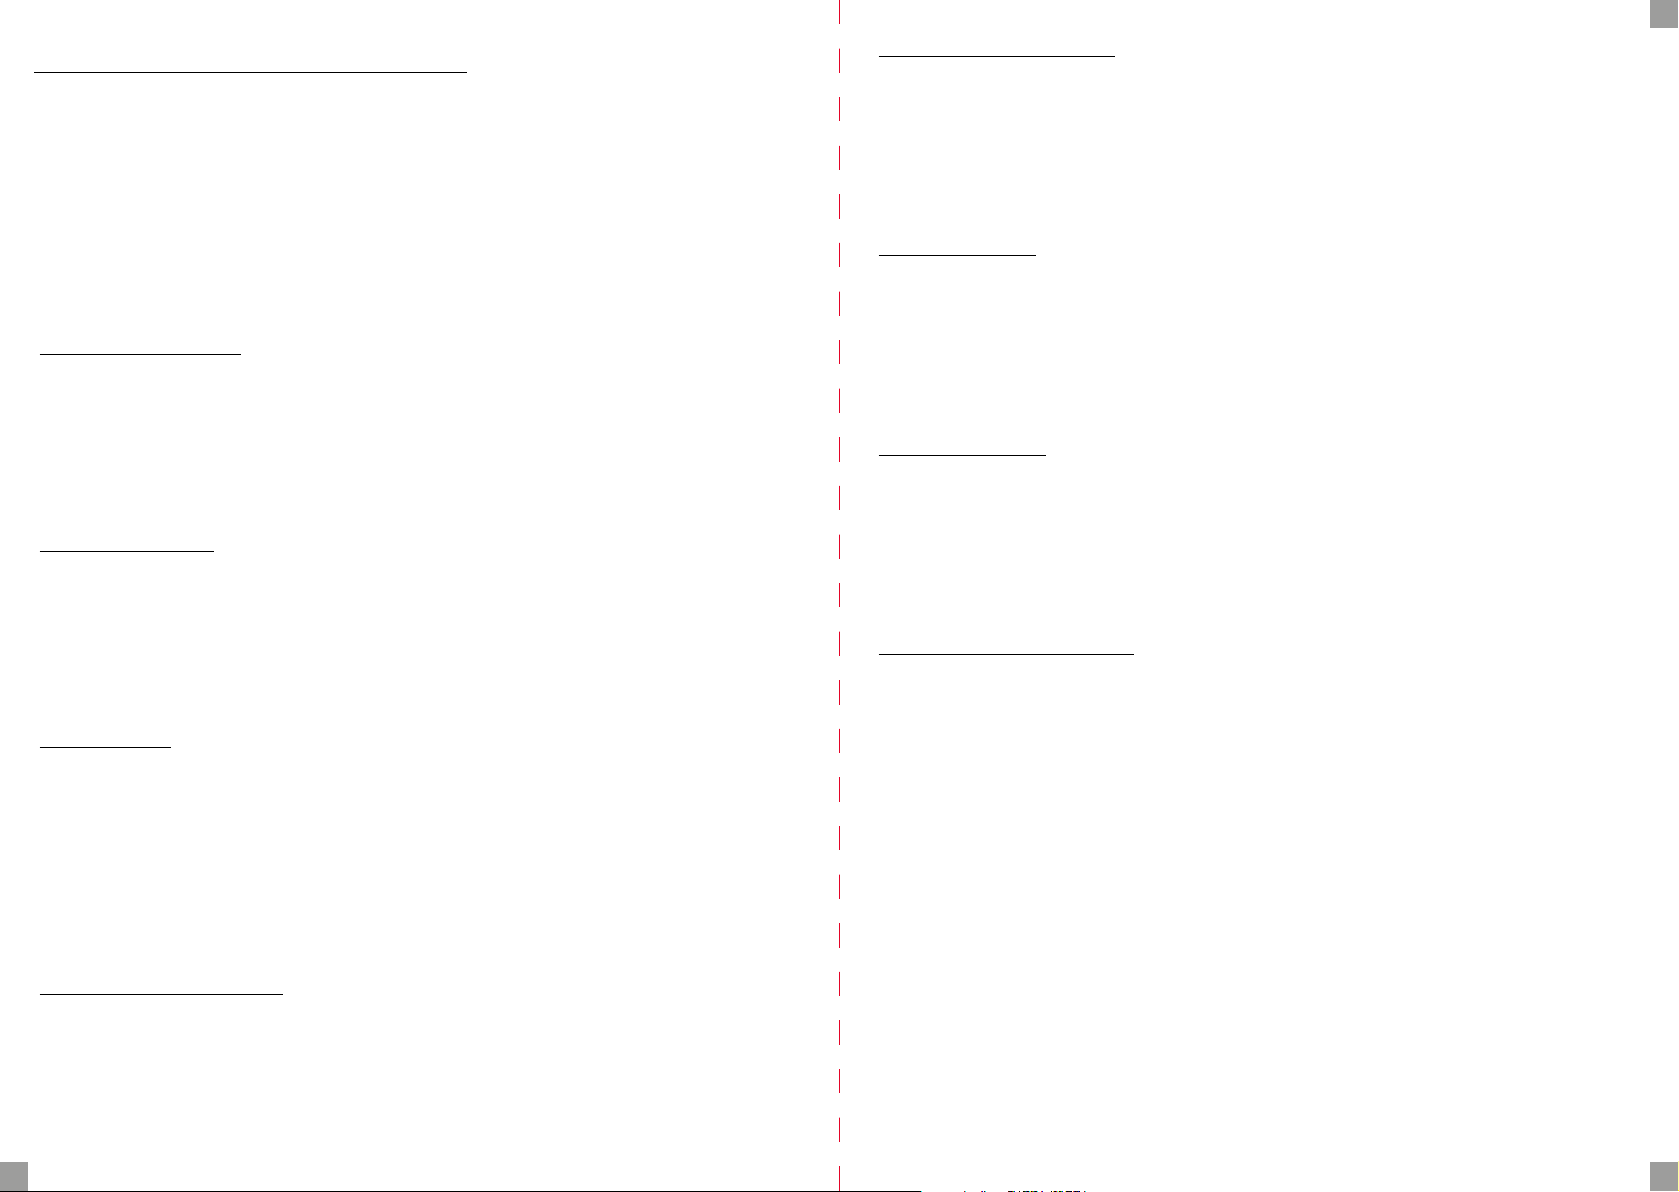
Energia
Collegare il lettore DVD con il cavo di alimentazione in dotazione a una presa di corrente
standard.
Collegamento video e audio
Avviso: prima di collegare o modicare la connessione, assicurarsi che tutti i dispositivi siano
scollegati dall’alimentazione.
Nota: entrambi i connettori (video e audio) devono essere collegati dal DVD al televisore.
Uscita audio stereo RCA:
1. Utilizzare il connettore audio stereo RCA per inviare il suono dal DVD al televisore.
2. Cavo audio RCA richiesto (incluso).
3. Utilizzare il cavo audio RCA per collegare l’uscita audio stereo RCA all’ingresso audio
stereo RCA del televisore.
4. Regolare i collegamenti nelle impostazioni di ingresso sul televisore a quelli utilizzati nel
passaggio precedente.
Uscita audio 5.1 RCA:
1. Utilizzare il connettore audio RCA 5.1 per inviare l’audio dal DVD al televisore.
2. Cavo audio RCA richiesto (non incluso).
3. Utilizzare il cavo audio RCA per collegare l’uscita audio RCA 5.1 all’ingresso audio RCA
5.1 della propria apparecchiatura HiFi.
4. Regolare i collegamenti nelle impostazioni di ingresso sul televisore a quelli utilizzati nel
passaggio precedente.
SPDiF coassiale:
1. Utilizzare un cavo audio coassiale per trasferire un suono di alta qualità dal DVD al sistema audio.
2. Cavo audio RCA richiesto (incluso).
3. Utilizzare un cavo audio RCA per collegare un connettore coassiale RCA digitale a un
ingresso audio RCA digitale sul sistema audio.
4. Regolare i collegamenti nelle impostazioni di ingresso sul televisore a quelli utilizzati nel
passaggio precedente.
5. Nelle opzioni di impostazione SPDiF, impostare RAW/PCM/o
Connettore video composito:
1. Usa video composito per inviare immagini dal DVD alla TV.
2. Cavo video RCA richiesto (incluso).
3. Utilizzare il cavo video RCA per collegare l’uscita video RCA all’ingresso video RCA del
televisore.
4. Regolare i collegamenti nelle impostazioni di ingresso sul televisore a quelli utilizzati nel
passaggio precedente.
IT
Connettore HDMI (ottimale):
Richiede un cavo HDMI (non incluso).
1. Utilizzare un cavo HDMI per collegare l’uscita HDMI del DVD all’ingresso HDMI del televisore.
2. Regolare i collegamenti nelle impostazioni di ingresso sul televisore a quelli utilizzati nel
passaggio precedente.
3. Imposta la risoluzione nelle impostazioni dell’immagine.
Connettore SCART:
1. Usa SCART per inviare immagini dal DVD alla TV.
2. Cavo SCART richiesto (non incluso).
3. Utilizzare il SCART per collegare l’uscita SCART all’ingresso SCART del televisore.
4. Regolare i collegamenti nelle impostazioni di ingresso sul televisore a quelli utilizzati nel
passaggio precedente.
5. Premere il pulsante Video sul telecomando per passare alla modalità Scart.
Connettore S-Video:
1. Usa S-Video per inviare immagini dal DVD alla TV.
2. Cavo S-Video richiesto (non incluso).
3. Utilizzare il S-Video per collegare l’uscita S-Video all’ingresso S-Video del televisore.
4. Regolare i collegamenti nelle impostazioni di ingresso sul televisore a quelli utilizzati nel
passaggio precedente.
5. Premere il pulsante Video sul telecomando per passare alla modalità S-Video.
Connettore Component Video:
1. Usa Component Video per inviare immagini dal DVD alla TV.
2. Cavo Component Video richiesto (non incluso).
3. Utilizzare il Component Video per collegare l’uscita Component Video all’ingresso Component Video del televisore.
4. Regolare i collegamenti nelle impostazioni di ingresso sul televisore a quelli utilizzati
nel.
DVD/CD
Caricamento del disco
1. Premere apri/chiudi per espellere il vassoio dell’unità.
2. Posizionare il disco nel vassoio dell’unità con il lato dell’etichetta rivolto verso l’alto.
3. Premere apri/chiudi per inserire il vassoio dell’unità.
4. A seconda del contenuto del disco, la riproduzione si avvia automaticamente oppure
sarà necessario selezionare un le da Esplora risorse.
Porta USB/lettore di schede SD
1. Collega la chiavetta USB alla porta o la scheda SD al lettore.
2. I formati supportati dovrebbero apparire nel browser dei le.
38 39
Page 21
3. Premere DVD/USB/SD per cambiare la modalità.
4. Utilizzare il pulsante di navigazione per navigare nel browser dei le.
IT
7. Risoluzione dei problemi
Si prega di controllare la guida alla risoluzione dei problemi di seguito prima della spedizione
per l’assistenza.
5. Funzione karaoke
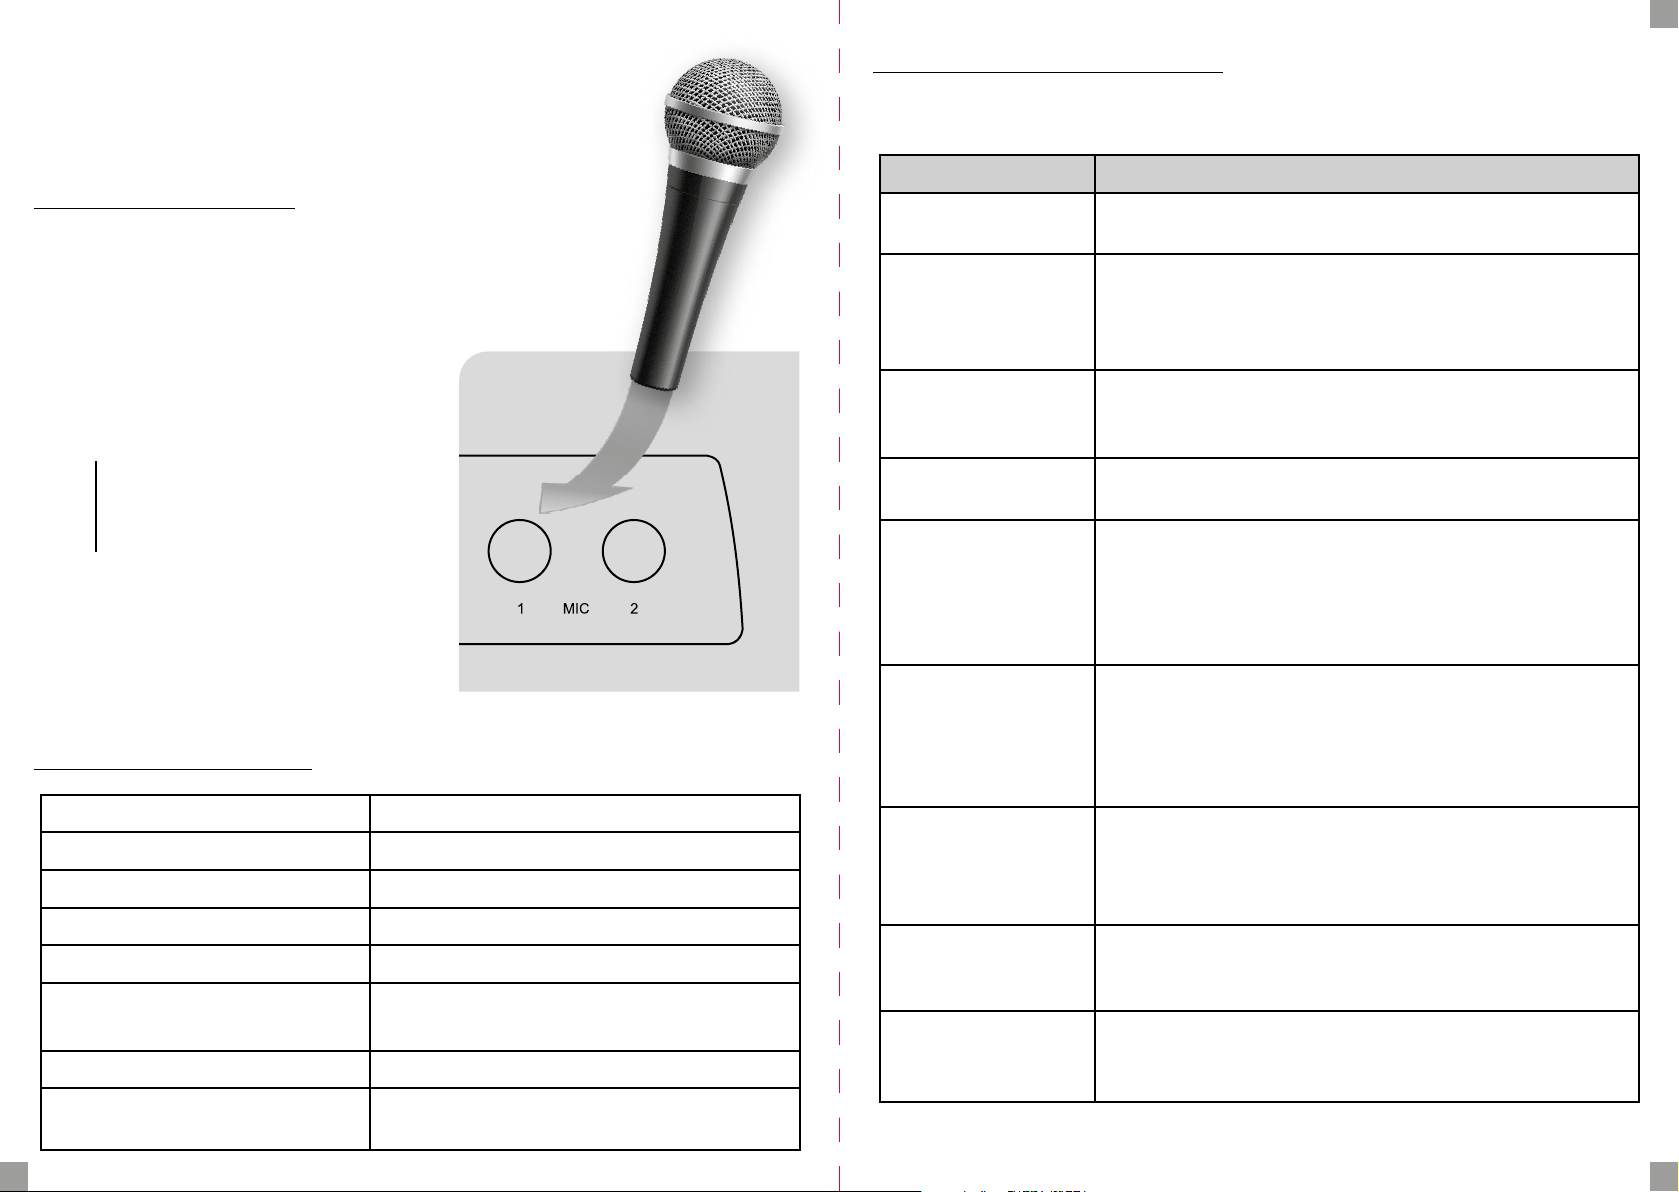
1. Collegare un microfono supportato alla
porta MIC 1 o MIC 2 sul pannello frontale
come mostrato nell’illustrazione sopra.
2. Regola il volume del microfono e gli eetti
di eco nelle fermate del karaoke.
3. Attiva la musica di sottofondo (USB o disco).
4. Regolare il livello del suono con il telecomando del DVD.
NOTA: nota che alcuni microfoni hanno un interruttore. Mettilo nella posizione corretta.
La funzione Karaoke funziona con qualsiasi suono di sottofondo (USB, DVD, CD).
Le impostazioni degli eetti karaoke vengono
modicate in Impostazioni audio > Impostazioni karaoke.
6. Speciche tecniche
Sistema PAL/AUTO/NTSC
Frequenza di ricezione 20HZ-20KHZ (at 1KHz 0dB)
Rapporto segnale-rumore ≥90dB (at 1KHz 0dB)
Distorsione del suono e rumore ≥-60dB (at 1KHz0dB)
Uscita audio 2.0+0-1.0 Vrms
Uscita video
Alimentazione elettrica 110-240V~50/60Hz
Unità supportate
Composite: 1.0±0.2Vp-p
Impedenza di carico: 75Ω
DVD/VCD/CD/MP3/Photo CD/
SVCD/JPEG/MPEG-4
Sintomo Soluzione
No alimentazione
Nessuna immagine
Nessun suono
L'immagine riprodotta
è di scarsa qualità
Il lettore DVD non
avvia la riproduzione
C'è un ronzio o rumore
Il telecomando
non funziona
correttamente
Il colore è distorto
o non viene
visualizzato
Sul display appare
il simbolo ø
• Collegare correttamente il cavo di
alimentazione a una presa a muro.
• Selezionare l’ingresso immagine corretto sul televisore.
• Collegare correttamente il connettore
dell’immagine al televisore.
• Accendi la TV.
• Vericare le connessioni audio.
• Se si utilizza un ricevitore AV, controllare un
connettore o impostazioni di ingresso diversi.
• Pulisci il disco.
• Inserire un disco se non è presente alcun disco nell’unità.
• Inserisci il disco appropriato in un formato supportato.
• Pulisci il disco.
• Inserire il disco nella direzione corretta.
• Disattiva il blocco dell’età o modica il suo livello.
• Pulire il dispositivo con un panno inumidito con alcool.
• Pulisci il disco.
• Collegare correttamente gli altoparlanti
e i loro componenti.
• Allontanare il televisore dall’attrezzatura audio.
• Puntare il telecomando verso il sensore a infrarossi del DVD.
• Utilizzare il telecomando entro 5 m.
• Rimuovere gli ostacoli.
• Sostituire le batterie del telecomando con altre funzionanti.
• Se l’immagine è distorta o macchiata, vericare
che il sistema di colore sia impostato in modo
da corrispondere a quello del televisore.
• Il software del DVD sta bloccando la funzione al momento.
• Il software non supporta questa funzione.
• La funzione non è al momento disponibile.
40 41
Page 22
FR
Table des matières
Mesures de sécurité 43
Logiciel téléchargeable 43
À propos du manuel d’utilisation 44
Marquages utilisés dans le joueur 44
1. Informations de base 45
1.1. Caractéristiques principales 45
1.2. Contenu de la boîte 45
1.3. Conseils importants pour l’utilisation du lecteur 45
2. Télécommande 46
3. Vue du panneau avant et arrière 47
4. Fonctionnement et connexion 48
5. Fonction karaoké 50
Mesures de sécurité
Veuillez lire attentivement le manuel d’utilisation et ses recommandations.
Pour éviter tout choc électrique, n’ouvrez jamais le boîtier. L’endommagement du sceau de garantie annulera la garantie.
Débranchez l’appareil du secteur pendant les orages ou lorsqu’il ne sera
pas utilisé pendant une longue période. N’oubliez pas que la garantie ne
couvre pas les dommages causés à l’appareil par un coup de foudre.
N’exposez pas l’appareil à la lumière directe du soleil. Tenir à l’écart des
sources de chaleur et des environnements humides. Ne bloquez pas les ouvertures de ventilation pour assurer une bonne circulation de l’air.
Placez l’appareil en position horizontale sur une surface plane, plane et
stable.
Si vous déplacez l’appareil d’une pièce chaude vers une pièce froide et vice
versa, attendez au moins 1 heure avant la mise sous tension. Sinon, des
problèmes peuvent survenir.
Éloignez l’appareil des vases à eurs, des bouteilles, des aquariums et
d’autres sources d’eau an d’éviter tout dommage. Ne touchez pas la che
d’alimentation à mains nues.
6. Spécications techniques 50
7. Dépannage 51
Avant de commencer tout travail de maintenance ou d’installation, débranchez le récepteur
du secteur. N’utilisez pas d’alcool ou de liquides contenant de l’ammoniaque pour nettoyer
le récepteur. Si nécessaire, nettoyez-le avec un chion doux non pelucheux imbibé d’une
solution d’eau et de savon doux.
• Ne connectez aucun câble lorsque la che d’alimentation est dans la prise.
• Vériez que vos câbles sont opérationnels. Des câbles endommagés peuvent provoquer
un incendie.
• Débranchez le récepteur de l’alimentation électrique tout en eectuant toutes les
connexions.
Ne placez aucun objet sur le boîtier de l’appareil. Cela peut provoquer une
surchaue et des problèmes de réception.
Logiciel téléchargeable
Ferguson a utilisé toutes les options disponibles pour fournir aux utilisateurs des mises à jour
logicielles, permettant d’améliorer les paramètres de fonctionnement de l’appareil. Ferguson se réserve le droit d’amender, changer ou modier le logiciel utilisé dans l’appareil sur
n’importe quelle base et sans notication préalable de ces changements. La version actuelle
du logiciel est disponible sur le site http://www.ferguson-digital.eu
42 43
Page 23
FR
À propos du manuel d’utilisation
Ferguson a utilisé toutes les possibilités disponibles pour fournir les informations les plus
récentes sur ses produits. Ferguson n’accorde aucune garantie quant au contenu de ce manuel et rejette toute garantie implicite quant à la valeur marchande ou à l’adéquation à des
ns spéciques. Les informations contenues dans ce document sont fournies à titre indicatif
pour l’utilisation et la maintenance du lecteur.
Ferguson se réserve le droit d’amender, de changer ou de traduire le manuel d’utilisation
sans notication préalable de ces changements. Il est donc recommandé de visiter régulièrement notre site Web pour obtenir les dernières informations.
Marquages utilisés dans le joueur
Avertissement de risque d’électrocution - ne pas ouvrir
Cette inscription met en garde contre l’ouverture du boîtier du
joueur. Seul le personnel de service autorisé est autorisé à ouvrir le
boîtier.
Marquage CE
Ce marquage indique que l’appareil est conforme aux dispositions de la directive
2014/30/UE relative à la conformité des États membres aux réglementations de
compatibilité électromagnétique et aux conditions de la directive 2014/35/UE relatives au respect par les États membres de la basse tension et les règles de sécurité
liées au fonctionnement des appareils électriques.
Logo à double isolation
Ce logo indique que l’appareil est électriquement sûr tant qu’il est utilisé conformément aux instructions du chapitre sur la sécurité.
Participons activement à la protection de l’environnement!
Votre appareil est composé de matériaux qui peuvent être retraités ou recyclés.
A cet eet, ils doivent être livrés à un point de collecte désigné.
1. Informations de base
1.1. Caractéristiques principales:
• Lecture de DVD-vidéo
• Lecture de chiers multimédias
• Fonction karaoké
1.2. Contenu de la boîte:
• Télécommande
• Manuel de l’Utilisateur
• Lecteur de DVD
1.3. Conseils importants pour l’utilisation du lecteur
Le lecteur DVD dispose d’une interface à l’écran simpliée (touche de menu) qui vous permet
de visualiser le contenu du support (dans la gamme des formats pris en charge) à l’aide de la
croix de navigation de la télécommande.
REMARQUE: les formats non pris en charge par l’appareil
peuvent ne pas apparaître dans le navigateur multimédia.
Les paramètres de l’appareil se trouvent sous le bouton SETUP.
ATTENTION: Veuillez noter qu’un nouveau logiciel peut modier la
fonctionnalité du récepteur. Les photos et descriptions dans le manuel sont pour référence seulement. Si vous constatez une erreur,
veuillez la signaler, nous ferons de notre mieux pour la corriger.
Logo RoHS
Ce logo informe que l’appareil est conforme aux dispositions de la directive 2011/65/
UE (communément appelée directive sur la restriction des substances dangereuses
ou RoHS). La directive RoHS couvre les restrictions au stade de la production lors de
l’introduction de substances dangereuses dans l’électronique.
Pictogramme d’avertissement concernant l’émission de lumière laser
Ce lecteur est un produit laser de classe 1. L’utilisation de l’appareil contrairement
à son utilisation prévue peut entraîner une exposition à un rayonnement laser dangereux. Le faisceau laser est dangereux pour les yeux, n’essayez pas retirez les couvercles. Conez la réparation de l’équipement à un personnel qualié.
44 45
Page 24
FR
2. Télécommande
Description des boutons:
Power - Allume et éteint l’appareil
OSD - Menu à l’écran
Power
OSD
Programmation
Aller à
Lent
Sous-titres
N/P
Rembobiner
Paramètres
Bouton de navigation/Entrée
Menu
Volume
Lecture/Pause
Arrêter
Touches numériques
Fermer/Ouvrir
Prise de vue
Répéter
Zoom
A-B
Vidéo
Étape
Go/Back
Annuler
Titre
Son
Muet
DVD/USB/SD
3. Vue du panneau avant et arrière
Panneau avant du lecteur DVD
1. allumé éteint
2. plateau
3. lecteur de carte SD
4. USB
5. capteur infrarouge
6. acher
7. arrêter/éjecter/insérer le plateau
8. précédent
9. jouer pause
10. prochain
11. prise jack
12. prise jack
Programmation - réglage
de l’ordre de lecture
Aller à - sélectionnez un titre,
Arrière du lecteur DVD
un chapitre ou une heure
Lent - Visionnage vidéo lent
Sous-titres - modier ou dé-
sactiver les sous-titres
N/P - basculer entre le système PAL et NTC
Rembobiner - Avance et retour rapides
Paramètres - Pour entrer ou
quitter les paramètres
Bouton de navigation/Entrée - pour la
navigation dans les menus et le navigateur multimédia. Entrez pour la sélection
Menu - changements dans le menu
du disque/navigateur multimédia
Volume - régler le volume
Lecture/Pause - lecture ou arrêt
Arrêter - arrêter de jouer
Touches numériques - pour
entrer des chires
DVD/USB/SD - sélection du support
46 47
Muet - Coupe le lecteur DVD
Son - Sélectionnez une bande
son, si disponible
Titre - ache le titre du DVD
Annuler - retourne à la page précédente
Go/Back - Aller au chapitre/
titre suivant/précédent
Étape - Visualisation image par image
Vidéo - basculer entre Com-
posite, S-Video et SCART
A-B - création d’une boucle du point A au
point B sur le DVD en cours de lecture
Zoom - zoom avant sur l’image
Répéter - changer le mode de répétition
Prise de vue - Changement entre
diérents angles de caméra
Fermer/Ouvrir - pour ouvrir et fer-
mer le plateau de disque
1. sortie RCA 5.1
2. sortie audio gauche RCA
3. RCA audio out droite
4. sortie audio numérique COAXIALE
5. sortie HDMI
6. sortie S-Vidéo
7. SCART
8. composant RCA
9. vidéo RCA
Page 25

FR
4. Fonctionnement et connexion
Puissance
Connectez le lecteur DVD avec le cordon d’alimentation fourni à une prise de courant standard.
Connexion vidéo et audio
Remarque: avant de connecter ou de modier la connexion, assurez-vous que tous les appareils
sont déconnectés de l’alimentation électrique.
Remarque: les deux connecteurs (vidéo et audio) doivent être connectés du DVD au téléviseur.
Sortie audio stéréo RCA:
1. Utilisez le connecteur audio stéréo RCA pour envoyer le son du DVD au téléviseur.
2. Câble audio RCA requis (inclus).
3. Utilisez le câble audio RCA pour connecter la sortie audio stéréo RCA à l’entrée audio stéréo
RCA du téléviseur.
4. Ajustez les connexions dans les paramètres d’entrée du téléviseur sur celles utilisées à l’étape
précédente.
2. Ajustez les connexions dans les paramètres d’entrée du téléviseur sur celles utilisées à l’étape
précédente.
3. Réglez la résolution dans les paramètres d’image.
Connecteur SCART:
1. Utilisez le connecteur SCART pour envoyer la video du DVD au televiseur.
2. Necessite un cable SCART (non inclus).
3. Utilisez un cable SCART pour connecter la sortie SCART du DVD a l’entree SCART du
televiseur.
4. Ajustez les connexions dans les parametres d’entree du televiseur sur celles utilisees a
l’etape
5. Appuyez sur le bouton Vidéo de la télécommande pour passer en mode de sortie SCART
precedente.
Connecteur S-Video:
1. Utilisez le connecteur S-Video pour envoyer la video du DVD au televiseur.
2. Necessite un cable S-Video (non inclus).
3. Utilisez un cable S-Video pour connecter la sortie S-Video du DVD a l’entree S-Video du
televiseur.
Sortie audio 5.1 RCA:
1. Utilisez le connecteur audio 5.1 RCA pour envoyer le son du DVD vers le téléviseur.
2. Câble audio RCA requis (non inclus).
3. Utilisez le câble audio RCA pour connecter la sortie audio RCA 5.1 à l’entrée audio RCA 5.1 de
votre équipement HiFi.
4. Ajustez les connexions dans les paramètres d’entrée sur le téléviseur à celles utilisées à l’étape précédente.
SPDiF coaxial:
1. Utilisez un câble audio coaxial pour transférer un son de haute qualité d’un DVD vers votre
système audio.
2. Câble audio RCA requis (inclus).
3. Utilisez le câble audio RCA pour connecter le connecteur coaxial RCA numérique à l’entrée
audio RCA numérique de votre système audio.
4. Ajustez les connexions dans les paramètres d’entrée du téléviseur sur celles utilisées à l’étape
précédente.
5. Dans les options de conguration SPDiF, réglez RAW/PCM/o.
Connecteur vidéo composite:
1. Utilisez le connecteur vidéo composite pour envoyer la vidéo du DVD au téléviseur.
2. Câble vidéo RCA requis (inclus).
3. Utilisez un câble vidéo RCA pour connecter la sortie vidéo RCA à l’entrée vidéo RCA à la
télévision.
4. Ajustez les connexions dans les paramètres d’entrée du téléviseur sur celles utilisées à l’étape
précédente.
4. Ajustez les connexions dans les parametres d’entree du televiseur sur celles utilisees a
l’etape precedente.
5. Appuyez sur le bouton Vidéo de la télécommande pour passer en mode de sortie
S-Vidéo.
Connecteur Component Video:
1. Utilisez le connecteur Component Video pour envoyer la video du DVD au televiseur.
2. Necessite un cable Component Video (non inclus).
3. Utilisez un cable Component Video pour connecter la sortie Component Video du DVD
a l’entree Component Video du televiseur.
4. Ajustez les connexions dans les parametres d’entree du televiseur sur celles utilisees a
l’etape precedente.
5. Appuyez sur le bouton Vidéo de la télécommande pour passer en mode de sortie vidéo
composante.
DVD/CD
Chargement du disque
1. Appuyez sur ouvrir/fermer pour éjecter le plateau du lecteur.
2. Placez le disque dans le plateau du lecteur, face imprimée vers le haut.
3. Appuyez sur ouvrir/fermer pour insérer le plateau du lecteur.
4. En fonction du contenu du disque, la lecture démarre automatiquement ou vous devrez
sélectionner un chier dans l’explorateur.
Port USB/lecteur de carte SD
Connecteur HDMI (optimal):
Nécessite un câble HDMI (non inclus).
1. Utilisez un câble HDMI pour connecter la sortie HDMI du DVD à l’entrée HDMI du téléviseur.
48 49
1. Branchez la clé USB dans le port ou la carte SD dans le lecteur.
2. Les formats pris en charge doivent apparaître dans le navigateur de chiers.
Page 26
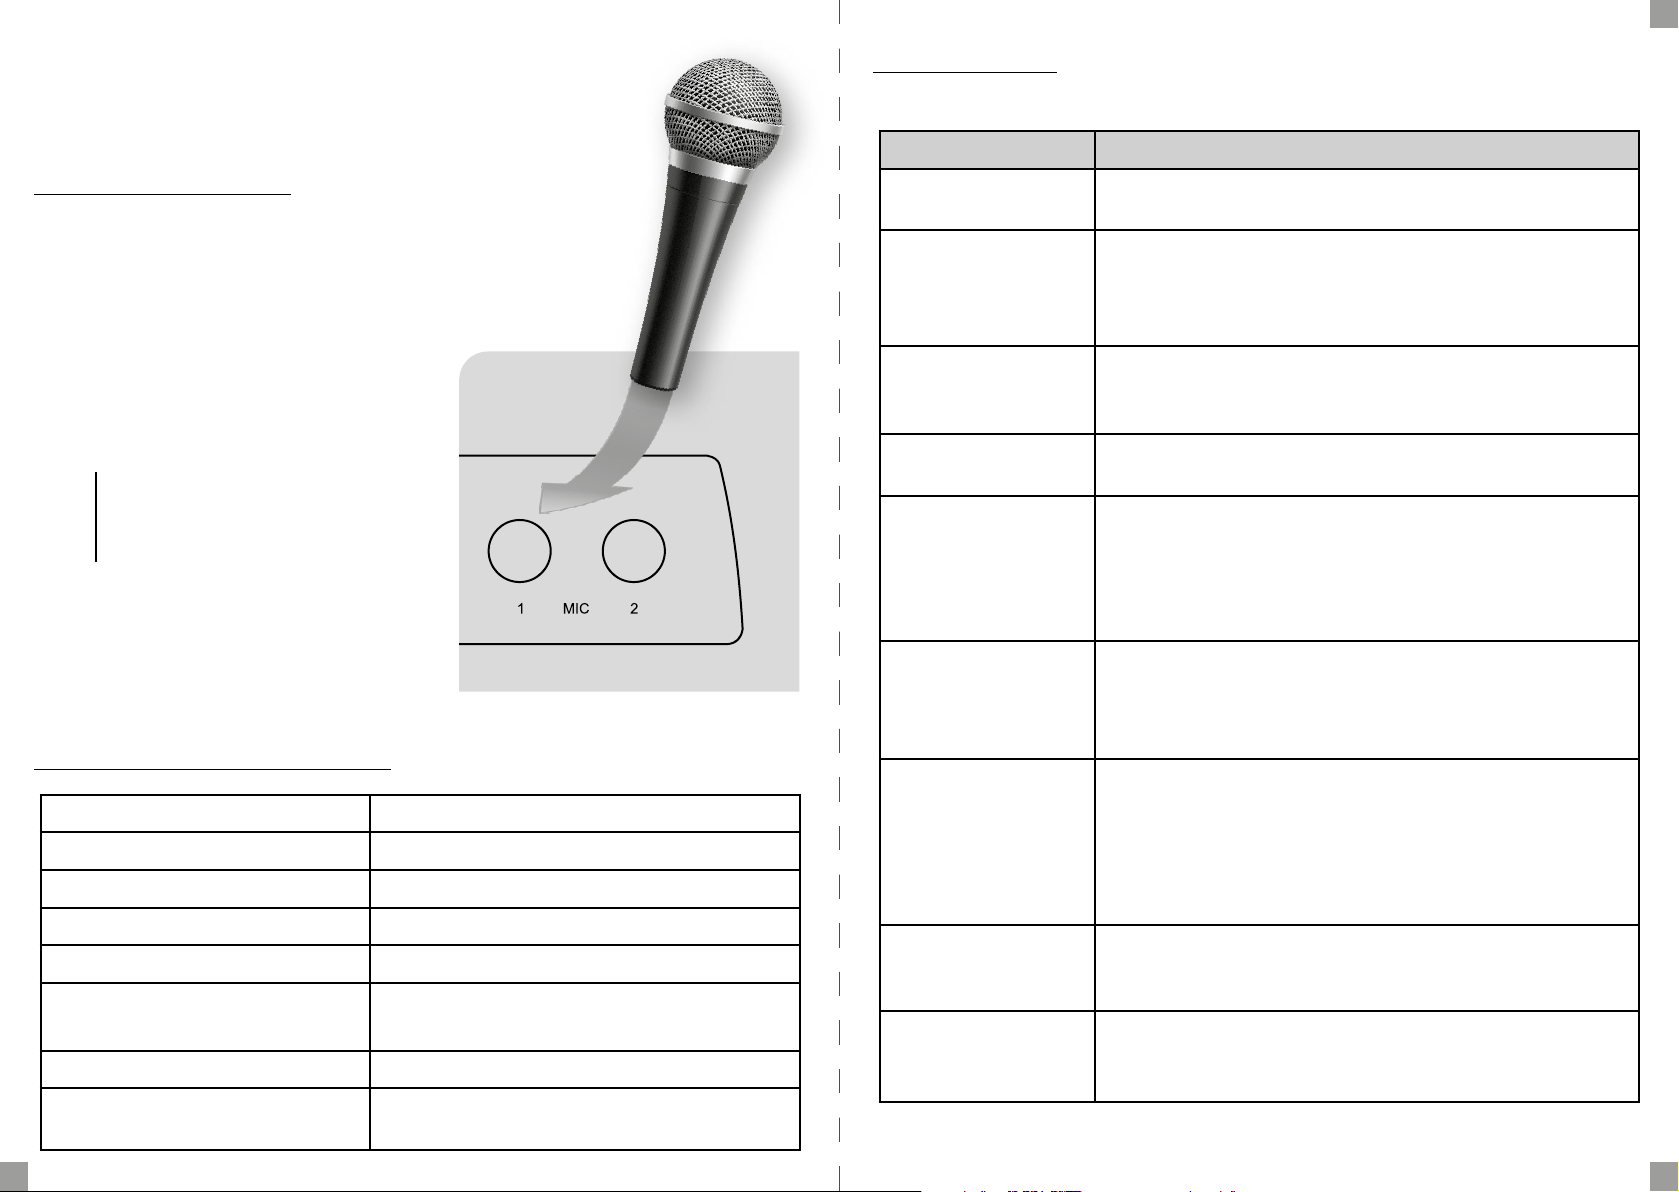
3. Appuyez sur DVD/USB/SD pour changer de
mode.
4. Utilisez le bouton de navigation pour naviguer dans le navigateur de chiers.
5. Fonction karaoké
1. Connectez un microphone pris en charge
au port MIC 1 ou MIC 2 sur le panneau
avant comme indiqué dans l’illustration
ci-dessus.
2. Ajustez le volume du microphone et les effets d’écho dans les jeux de karaoké.
3. Activer la musique de fond (USB ou
disque).
4. Ajustez le niveau sonore avec la télécommande DVD.
REMARQUE: notez que certains
microphones ont un interrupteur.
Mettez-le dans la bonne position.
La fonction karaoké fonctionne avec n’importe
quel son de fond (USB, DVD, CD).
Les paramètres des eets de karaoké sont modiés dans Paramètres de son > Paramètres de
karaoké.
6. Spécications techniques
Système PAL/AUTO/NTSC
Fréquence de réception 20HZ-20KHZ (at 1KHz 0dB)
Rapport signal sur bruit ≥90dB (at 1KHz 0dB)
Distorsion sonore et bruit ≥-60dB (at 1KHz0dB)
Sortie audio 2.0+0-1.0 Vrms
Sortie vidéo
Source de courant 110-240V~50/60Hz
Lecteurs pris en charge
Composite: 1.0±0.2Vp-p
Impédance de charge: 75Ω
DVD/VCD/CD/MP3/Photo CD/
SVCD/JPEG/MPEG-4
6. Dépannage
Veuillez consulter le guide de dépannage ci-dessous avant l’expédition pour réparation.
Symptôme Solution
Aucune puissance
Pas d'image
Pas de son
L'image de lecture est
de mauvaise qualité
Le lecteur DVD ne
démarre pas la lecture
Il y a un
bourdonnement
ou un bruit
La télécommande
ne fonctionne pas
correctement
La couleur est
déformée ou ne
s'ache pas
Le symbole ø
apparaît à l'écran
• Branchez correctement le cordon
d’alimentation sur une prise murale.
• Sélectionnez l’entrée d’image correcte sur le téléviseur.
• Connectez correctement le connecteur
d’image au téléviseur.
• Allumez le téléviseur.
• Vériez les connexions audio.
• Si vous utilisez un récepteur AV, vériez un
connecteur ou des paramètres d’entrée diérents.
• Nettoyez le disque.
• Insérez un disque s’il n’y a pas de disque dans le lecteur.
• Insérez un disque approprié dans un format pris en charge.
• Nettoyez le disque.
• Insérez le disque dans le bon sens.
• Désactivez la limite d’âge ou modiez son niveau.
• Nettoyez l’appareil avec un chion imbibé d’alcool.
• Nettoyez le disque.
• Connectez correctement les enceintes et leurs composants.
• Éloignez le téléviseur de l’équipement audio.
• Dirigez la télécommande vers le
capteur infrarouge du DVD.
• Utilisez la télécommande à moins de 5m.
• Retirez les obstacles.
• Remplacez les piles de la télécommande
par des piles fonctionnelles.
• Si l’image est déformée ou tachée, vériez
que le système couleur est réglé pour
correspondre à celui de votre téléviseur.
• Le logiciel du DVD bloque la fonction pour le moment.
• Le logiciel ne prend pas en charge cette fonction.
• La fonction n’est pas disponible pour le moment.
FR
50 51
Page 27

 Loading...