

Page 1

N637/R00 (23.09.14)
CHG2-TAC Model
ELECTRONIC CONVECTOR
Installation and user manual
EN
ЭЛЕКТРОННЫЕ ОБОГРЕВАТЕЛИ
Инструкция по установке и эксплуатации
RU
ELEKTRONISCHER KONVEKTOR
Montage- und Bedienanleitung
DE
ELEKTRONICKÝ KONVEKTOR
Instalační a uživatelská příručka
CZ
1
Page 2
❶
❷
❸
❺
❹
❻
❼
❽
❾
2
Page 3

Caution (EN)
Caution very hot surface.
CAUTION: Portions of this product may become hot and cause burns. Pay particular attention to the
presence of children and vulnerable people.
Caution: to avoid overheating and for safety reasons, do not cover the panel heater.
Devices with this symbol should not be disposed with household waste but must be collected separately and
recycled. The collection and recycling of end of life must be made according to the provisions and local ordinances
(DEEE 2002/96/CE).
The installation of the device in high altitude causes an increase of the temperature air outlet (about 10 ° C per 1000
m elevation).
1. Installation
- Keep away from this unit child under 3 years unless they are under continuous surveillance.
- This device should not be used by unsupervised children under 14 years old, by people with physical, sensory or mental
capabilities and by persons with lack of experience or knowledge, unless they can benefit through a person responsible for
their safety of prior instructions.
- Children less than 14 years old should not play, adjust, clean or perform maintenance on the unit.
- This device must be plugged or connected according to the rules and standards applicable by an authorized person.
- The instruction book of this product is available by contacting the after-sales service with the number indicate on the
warranty part included in this manual service.
- If the power cable is damaged, it must be replaced by the manufacturer, its after sales service or similarly qualified persons
in order to avoid any danger.
In case of mobile utilisation of the device (see applicable models below):
- Do not use this heater near a bathtub, a shower or a pool.
- Do not use this heater in small areas when they are occupied by people unable to leave the room by themselves unless if a
constant supervision is provided.
1.1 Where to install your heater?
- This equipment was designed to be installed in a residence. Please ask your distributor before using it for any other
purpose.
- The panel heater should be installed according to normal trade practice and incompliance with legislation in the relevant
country (NFC 15-100 for France).
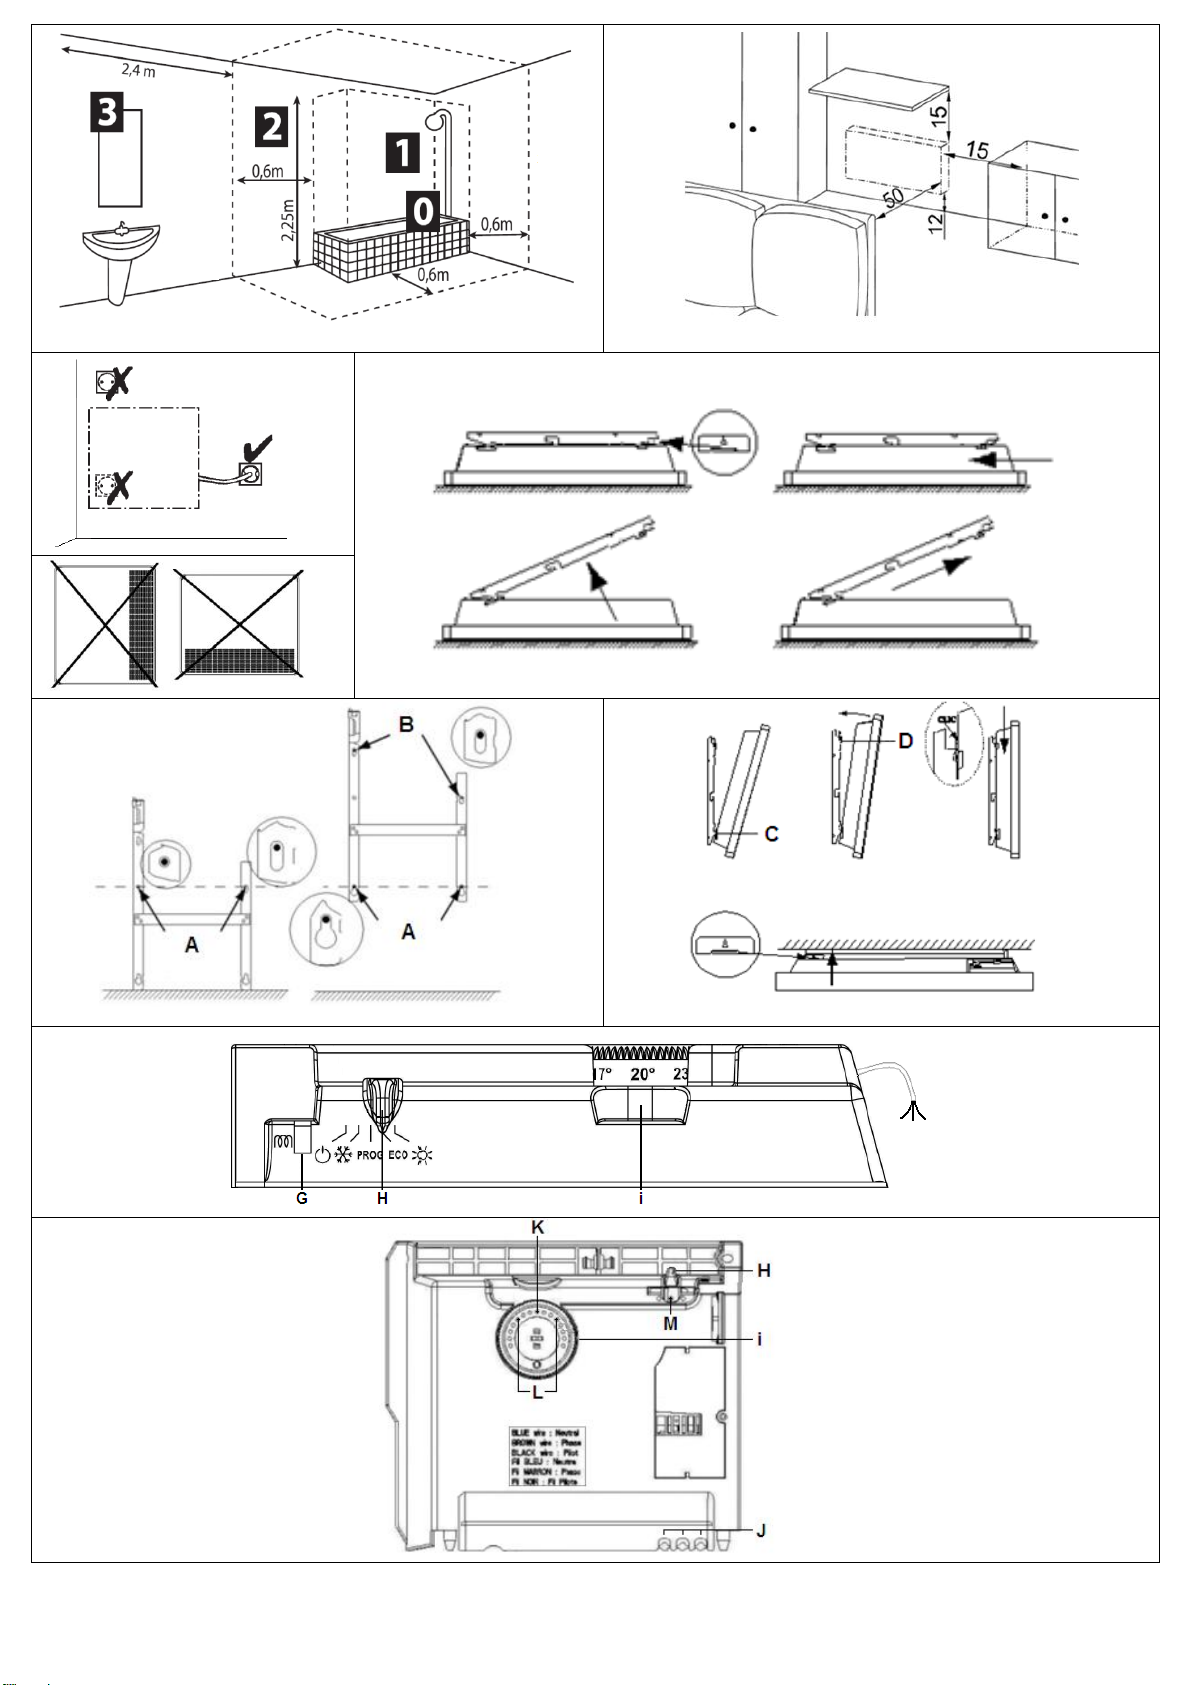
- The equipment is class 2 and is protected against splashed water IP 24. The device can be installed in volume 2 of a
bathroom (Figure ❶). It’s forbidden to install the device in the volume 1. The device is to be installed so that switches and
other controls cannot be touched by a person in the bath or shower.
- Comply with the minimum clearance distances for positioning of the panel (Figure ❷).
- The wall bracket allows keeping a free space behind the device to not disturb its regulation. The distance between the unit
and the wall should not be obstructed.
1.2 Do not install the panel heater
- In a draught that might affect adjustment (for example, under a central mechanical ventilation unit etc...). Under a fixed
power socket (Figure ❸) or near curtains or other combustible materials.
- In a non-conform position.
- The air outlet grid and the control unit is visible in the upper part of the device. It is forbidden to install a vertical unit
horizontally and vice versa (Figure ❹).
1.3 How to install the panel heater?
WARNING: Devices without plug can not be used in mobile version
1.3.1 Preparation
- The wall mounted installation concern all Mechanical devices and Electronic devices.
a. Release the appliance’s hook-on bracket (Figure ❺)
- We recommend that you place the panel heater flat, face down. Have a straight head screwdriver to hand and lift the tab
taking care not deform. While holding the tab rose, push the locking bracket to the bottom of the unit to release the upper
hooks. Rotate the attachment tab around the lower hooks and remove the attachment tab.
b. Fix the hook-on bracket (Figure ❻)
- Place the bracket on the ground and against the wall and mark the drilling points A. These give the position of the bottom
fasteners. Replace the brackets in alignment with the drilling point A to locate drilling points B. These give the position of
the upper fasteners. In case of special support, use proper anchors. Position and screw the wall brackets.
1.3.2 Electrical connexion
- The appliance should have a 230 / 50Hz power supply. The panel heater must be connected to the mains by a 2-wire cable
for Mechanical Device or 3-wire cable for Electronic Device (Brown= Phase, Blue = Neutral, Black = Pilot wire) by means of
a connexion box. In humid areas such as bathrooms and kitchens the power socket must be installed at least 25 cm above
the floor. The installation should be fitted with a double pole break device with a break of at least 3 mm.
- Connection to earth is prohibited / Do not connect the pilot wire (black) to earth. If a driver or driven device is
protected by a 30mA differential (for example for bathroom) it is necessary to protect the power supply of the pilot wire on
that differential.
3
Page 4
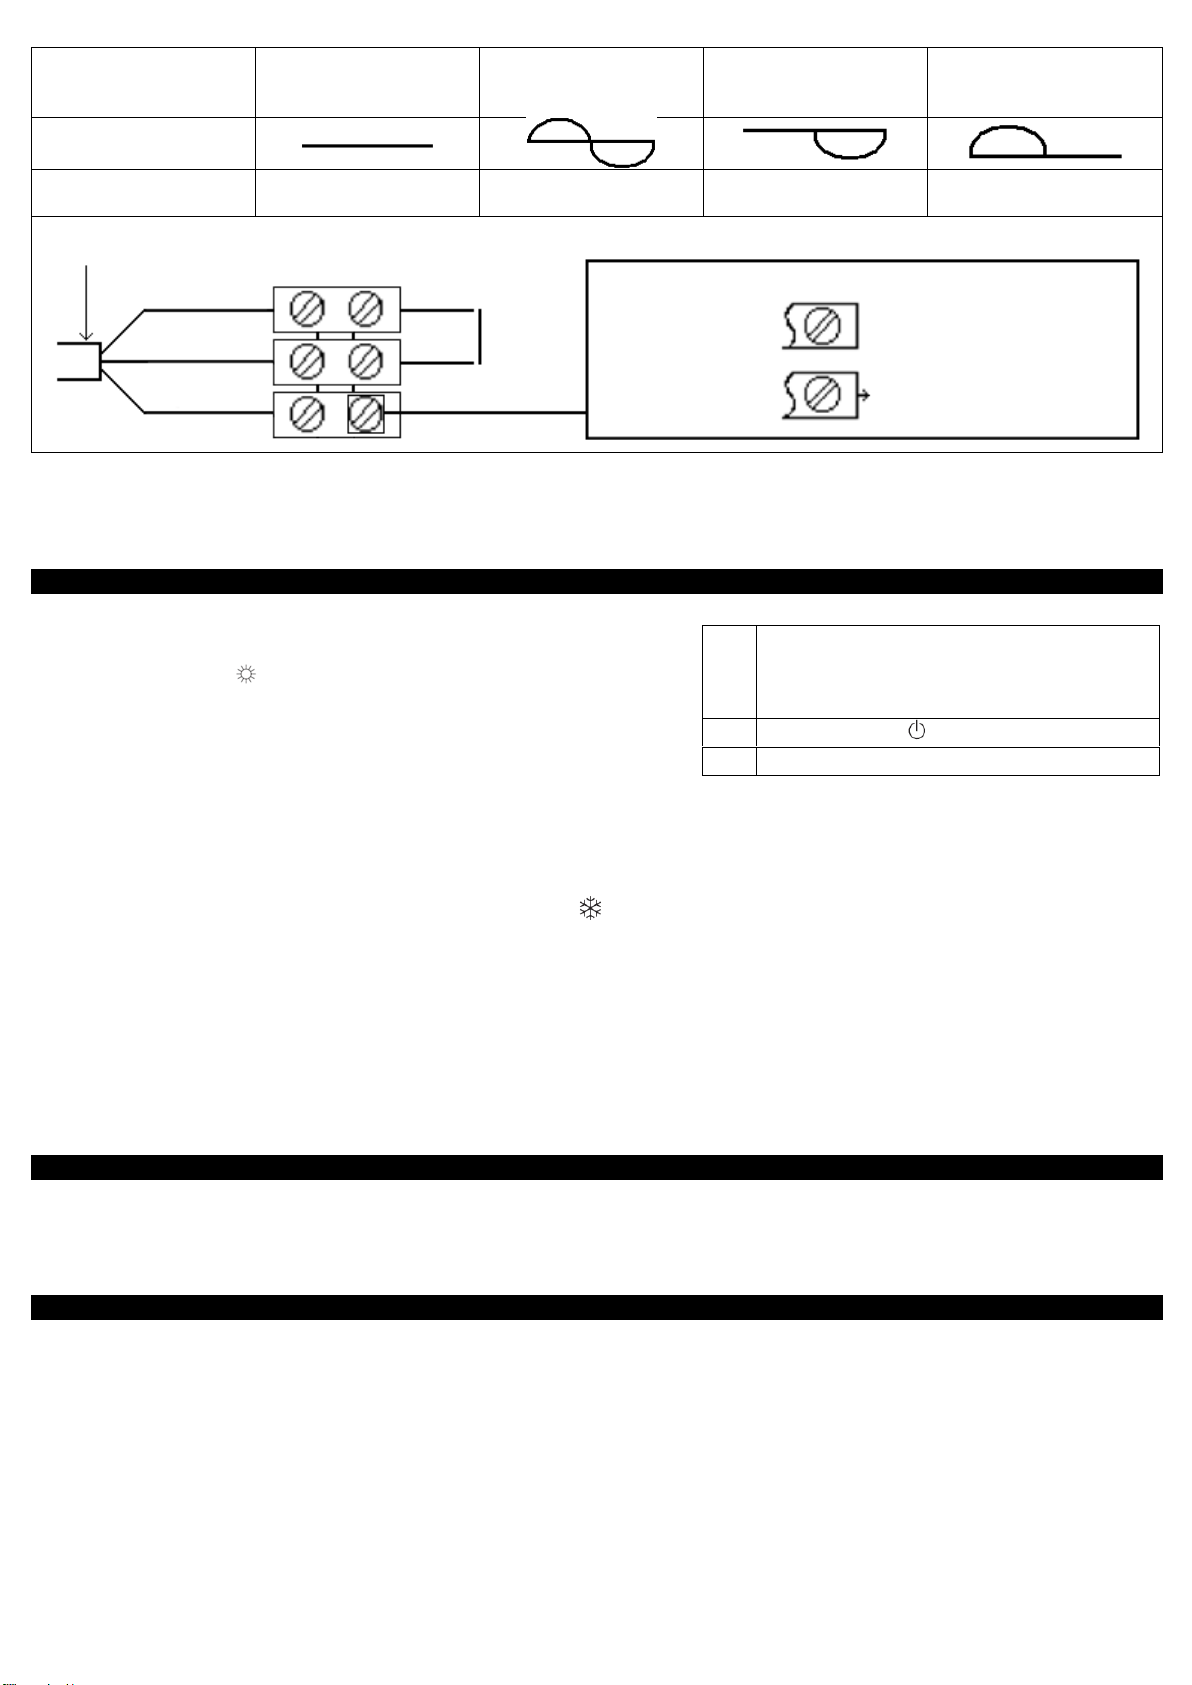
Commands
Received
Absence de signal
Complete
altermation
230 V
Negative
Half/altermation
– 115V
Positive
Half/altermation
+ 115V
Oscilloscope
Ref/Neutral
Mode
obtained
CONFORT
ECO
ANTI - FREEZE
STOP HEATING
LOAD SHEDDING
2. Utilisation
3. Recommendations for use
4. Maintenance
G
Indicator for heating. It indicates the
periods in which the resistance is working.
With a stabilized temperature, it flashes
and if the temperature is too high, it stops.
H
Slider or switch
I
Control knob of the temperature
Neutral = Blue
Phase = Brown
Pilot Wire = Black
Panel heater cable
Phase
Neutral
Electricity
grid
1
st
case: One heater
2nd case: Multiple
heater
Unpiloted device
Pilot wire not connected
To devices with reception box
or central programming
2 possible cases:
1.3.3 Wall mounted installation (Figure ❼)
- Place the device inclined on the brackets C and rotates the device to place it on the brackets D. Lowering the device on the
bracket. A click indicates that the device is attached and locked. To unlock the attachment tab, grab a screwdriver and
push the tab (at the top left of the attachment tab behind the device) towards the wall. Lift the device while holding the tab
with the screwdriver. Tilt it forward and remove it from the supports C.
2.1 How to fix the comfort mode? (Figure ❽)
- The Comfort mode allows setting the desired temperature using the
control knob.
- Put the switch H on , and then set the control knob I on the desired
position, the heating indicator G lights if the ambient temperature is
lower than desired one. Wait until the temperature stabilizes.
2.1.1 How to fix the Eco mode?
- ECO mode allows lowering the temperature of Comfort mode from 3 to
4°C during unoccupied periods of the room. It is recommended that this mode should be used if the room is unoccupied for
more than 2 hours. Put the switch H on ECO and then set the control knob I to the desired position, the heating indicator G
lights if the ambient temperature is lower than desired ECO temperature. Wait until the temperature stabilizes.
2.1.2 How to fix the Frost Free mode?
- It is the position of the switch that keeps the temperature at approximately 7 ° C in the room during prolonged absence from
the house (usually more than 24 hours). Put the switch H on .
2.1.3 How to program your device in Comfort, ECO or Frost Free mode?
- Devices equipped with an electronic thermostat are able to receive orders. There are two solutions:
- By pilot wire (black wire) for devices without plug thanks to the system Chronopass or a wall pilot wire box
- By carrier current with an interface on each device in addition to a Chronopass system or a wall carrier current box.
2.1.4 How to lock the commands (Figure ❾)?
It is possible to lock or limit the use of the control knob I and to lock the switch H to prevent manipulation. Lift the unit from
the wall bracket. On the back of the thermostat, remove the pins J from their support:
- The K position allows locking the control knob.
- The L position allows limiting the utilisation of the control knob.
- The M position allows locking the H switch on the desired mode.
- There is no point in setting maximum heating; the room temperature will not rise any quicker. If you leave for several hours,
remember to reduce the temperature.
- If you have several units in a room, let them operate simultaneously. This will give you a more uniform temperature without
increasing electricity consumption. This also applies for an unoccupied room; it is more interesting to let the device operate
on a lower setting than turn it off completely.
- To maintain performances of your unit, you should clean the upper and lower grids of the unit about twice a year using a
vacuum cleaner or a brush.
- Have a professional check the inside of the unit every five years. Dirt may collect on the grids of the unit if the atmosphere
is polluted. This phenomenon is due to the poor quality of the ambient air. In this case, it is recommended to check that the
room is well ventilated (ventilation, air inlet, etc.), and that the air is clean. The unit will not be replaced under the guarantee
because of this type of dirt. The unit casing should be cleaned with a damp cloth, never use abrasive products.
4
Page 5
5. Trouble-Shooting
- The device does not heat: Make sure that the installation circuit breakers are switched on, or that the load shedder (if you
6. Warranty conditions
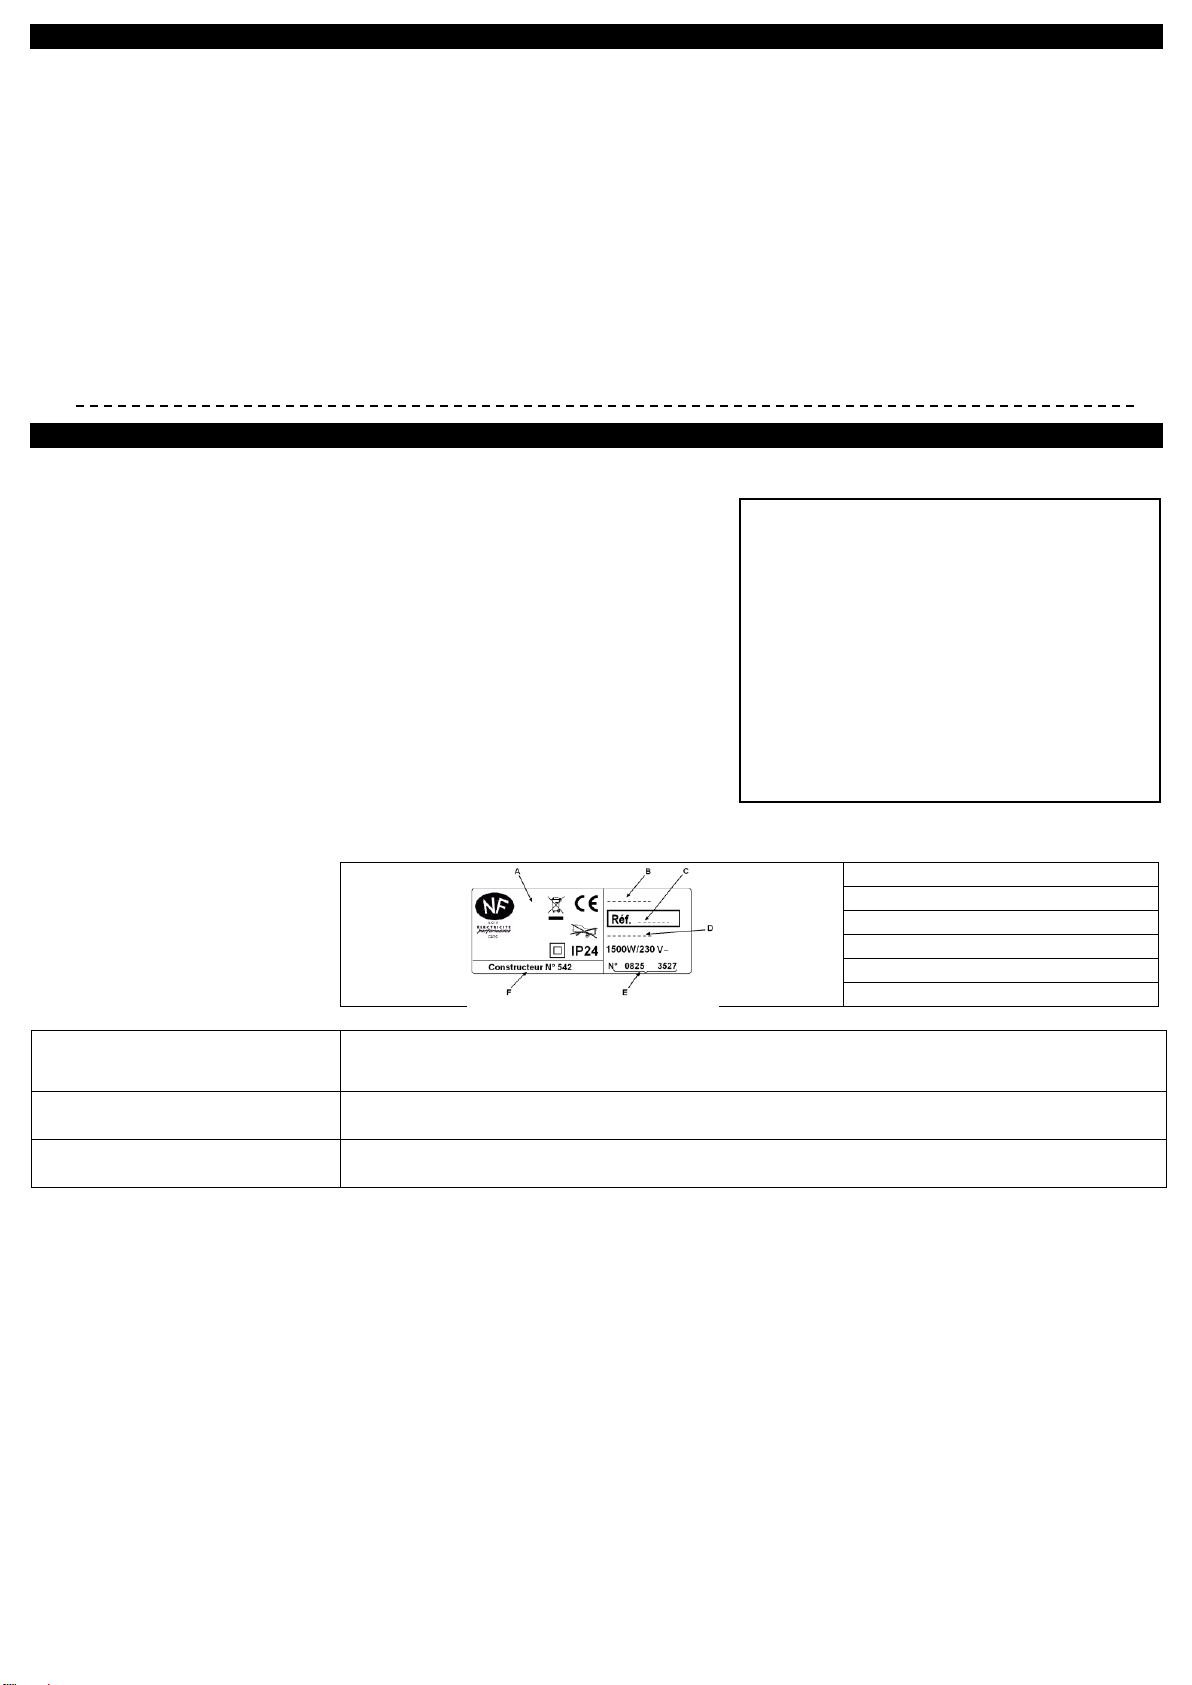
* This information is shown on
the plate which can be seen on
the left-side or behind the front
grille of the unit
A Standards, quality labels
B Commercial name
C Commercial reference
D Manufacturing reference
E Serial Number
F Manufacturer number
Type of Device *
Serial Number *
Name and address of the
customer *
DEALER STAMP
have one) has not switched off the unit power supply. Check the air temperature in the room. For the device equipped,
check that the programmer is in Comfort mode.
- The unit is permanently heating: Make sure that it is not in a draft and that the temperature setting has not been
changed.
- The unit does not carry out programming orders (Device equipped): Make sure that the programming unit is being
correctly used (refer to its user’s manual) or that the Chronocarte is properly inserted in its housing and that it is operating
normally (batteries). The device with electronic control is equipped with a microprocessor that can be distribued by some
severe mains voltage disturbances (outside EC standards defining the disturbance protection level). If there are any
problems (thermostat blocked, etc.) switch off the unit power supply (fuse, circuit breaker, etc.) for about 5 minutes to allow
the unit to start again. If this phenomenon occurs frequently, control the power supply by your energy supplier.
- The device is very hot on the surface: It is normal that the device when working, the maximum surface temperature is
limited in accordance with standards. However, if you believe that your radiator is still too hot, make sure the power is
adapted to the surface of your room (we recommend 100W / m2) and the unit is not placed in a stream of air that would
disrupt its regulation.
KEEP THIS DOCUMENT IN A SAFE PLACE
(This certificate should only be produced if you are making a complaint, attached with the invoice of the purchase)
- This guarantee is applicable for 2 years from the date of original purchase
and shall be valid for no more than 30 months from the date of
manufacture.
- The warranty covers the replacement and supply of accepted defective
parts except damages and interest components.
- Labour costs, travel and transportation are under the responsibility of the
user.
- Damage linked to an improper installation, to a supply network not
complying with standards, to an abnormal using or to the non-compliance
to the instructions of the manual are not covered by the warranty.
- Present this certificate only in case of claim with your distributor or installer
attaching your invoice.
- The provisions of these warranty conditions are not exclusives of benefits
for the purchaser of the legal guarantee for defects and hidden defects that
apply in any case in terms of articles 1641 and following of the Civil Code.
лучай на проблем
5
Page 6

Внимание (RU)
Внимание, горячая поверхность. ВНИМАНИЕ: Некоторые элементы этого изделия могу становиться
очень горячими и вызвать ожоги. Особое внимание необходимо уделять при присутствии детей или
взрослых с повышенной чувствительностью
Предупреждение : В целях безопасности и для избегания перегрева не накрывайте нагревательный прибор.
Прибор, на котором изображен этот символ, не должен выбрасываться с бытовыми отходами, а должен быть
собран отдельно для последующей переработки. В конце срока эксплуатации прибор должен быть
переработан в соответствии с правилами, действующими в стране. (DEEE 2002/96/CE).
В случае, когда прибор установлен на большой высоте над уровнем моря, температура выходящего воздуха
повышается (примерно на 10 ° на каждые 1000 метров).
1. Установка
- Дети до 3 лет не должны приближаться к этому прибору, за исключением тех случаев, когда они находятся под
постоянным присмотром.
- Этот прибор не предназначен для детей младше 14 лет без присмотра взрослых, а также для лиц с
ограниченными физическими или умственными способностями или неопытных, если они не получили
предварительного обучения, по использованию прибора или не находятся под надзором ответственного за их
безопасность.
- Дети до 14 лет не должны играть с прибором, настраивать или чистить его или осуществлять любую работу с ним.
- Этот прибор может быть включен в сеть или подсоединен только квалифицированным специалистом, в
соответствии с действующими требованиями и правилами.
- Инструкция по эксплуатации для этого прибора доступна на страничке послепродажного обслуживания сайта
указанного в талоне гарантийного обслуживания приложенного к этой инструкции.
- Если шнур питания поврежден, он должен быть заменен производителем, его сервисным агентом или
квалифицированным специалистом, чтобы избежать любой опасности.
В случае установки мобильной версии прибора (применимые модели описаны ниже):
- Не использовать этот нагревательный прибор рядом с ванной, душем или бассейном.
- Не использовать этот нагревательный прибор в маленьких помещениях, когда присутствуют люди с ограниченной
подвижностью, которые не могут покинуть помещение без посторонней помощи, если за ними нет постоянного
присмотра.
1.1 Где устанавливать ваш нагревательный прибор?
- Данный прибор предназначен для установки в жилых помещениях. В других случаях обратитесь к своему
дистрибьютору.
- Прибор должен быть установлен в соответствии с профессиональными стандартами и соответствовать нормам,
действующим в стране установки (NFC 15-100 для Франции).
- - Данный прибор класса II, с защитой от воды IP 24. Прибор может быть установлен в зоне 2 душевых комнат
(Рисунок ❶). Запрещено устанавливать прибор в зоне 1. Прибор устанавливается таким образом, чтобы
включатели и другие элементы контроля не были доступны для прикосновения для человека находящегося в
ванной и/или душе.
- Соблюдать минимальные расстояния-отступы при установке прибора (Рисунок ❷).
- Настенный кронштейн позволяет сохранить свободное пространство за устройством, чтобы не мешать его
регулировке. Расстояние между прибором и стеной не должно затруднять доступность.
1.2 Не устанавливать нагревательную панель
- В случаях, которые могут повлиять на регулирование температуры (например, под центральной механической
вентиляцией и т.д.).
- Под или поверх стационарной электрической розеткой (Рисунок ❸) или вблизи штор или других горючих
материалов.
- В положении, когда сетка для выпуска воздуха прибора и управляющая панель видны в верхней его части.
Категорически запрещено устанавливать вертикальный прибор наоборот (Рисунок ❹).
1.3 Как установить нагревательный прибор?
ВНИМАНИЕ: Прибор без вилки не может быть использовано с ножками
1.3.1 Приготовление
- Крепление на стену распространяется на все механические и электронные приборы.
a. Открепите кронштейн крепления от прибора (Рисунки ❺)
- Положите прибор на ровную поверхность решеткой-жалюзи вниз. При помощи плоской отвертки осторожно
подденьте один угол кронштейна, чтобы не деформировать его. Поднимите одну сторону кронштейна под углом 45°
и выньте вторую сторону кронштейна.
b. Установите кронштейн на стене ( Рисунок ❻)
Расположите кронштейн у стены на уровне пола. Наметьте точки сверления А для нижних отверстий кронштейна.
Приподнимите кронштейн, совместив отметки с нижними отверстиями кронштейна, после чего наметьте оставшиеся
два места для верхних отверстий кронштейна В. Просверлите отверстия и зафиксируйте кронштейн на стене при
помощи дюбелей и винтов. Не забудьте вставить прокладки между кронштейном и стеной при необходимости.
Установите и закрепите настенные кронштейны.
1.3.2 Электрическое подключение
- Прибор предназначен для сети 230/50Hz.
6
Page 7

1.3.3 Прибор без вилки:
Принятая команда
Отсутствие сигнала
Полное чередование
230 V
Отрицательное
получередование
– 115V
Положительное
получередование
+ 115V
Oscilloscope
Ref/Neutral
Полученный режим
CONFORT
ECO
ANTI - FREEZE
STOP HEATING
LOAD SHEDDING
2. Использование
3. Рекомендации по эксплуатации
G
Индикатор нагрева. Он показывает периоды,
когда работает сопротивление. Со
стабильной температурой он мигает и, если
температура слишком высока,
останавливается.
H
Лайдер или переключатель
I
Ручка контроля температуры
Нетраль = Синий
Фаза = Коричневый
Сетевой кабель = Черный
Кабель нагревательного прибора
Фаза
Нетраль
Электрич
еская
решетка
1
st
случай: один
нагреватель
2nd случай: несколько
нагревателей
Устройство без управления
Управляющий провод не
подключенt
Для приборов с центральным
програмированием
2 возможных случая:
Нагревательный прибор должен быть подключен к питанию двойным кабелем для механических приборов и
тройным для электронных (коричневый = фаза, синий = нетраль, черный = управляющий провод)
- Во влажных помещениях, таких как ванная комната и кухня электрическая розетка должна быть установлена
минимум в 25 см от пола. Установка должна выполняться с устройством двойной брейк полюса с перерывом не
менее 3 мм.
- Соединение с заземлением запрещено / Не подключать управляющий провод (черный) к заземлению. Если
водущее или ведомое устройство защищено 30 мА дифференциала (например, для ванной комнаты), это
необходимо для защиты питания управляющий провод на этом дифференциале.
1.3.4 Установка прибора на кронштейне (Рисунок ❼)
- Поставьте прибор на нижние выступы кронштейна C. Прижмите прибор к верхним выступам кронштейна D.
Защелкните конвектор на кронштейне по направлению сверху вниз. Чтобы снять прибор с кронштейна, с помощью
плоской отвертки нажмите на язычок (в левом верхнем углу кронштейна) к стене. Поднимите прибор, держа язычок
с помощью отвертки. Подтолкните его вперед, затем снимите с выступов C.
2.1 Как установить режим Комфорт? (Рисунок ❽)
- Режим Комфорт позволяет установить желаемую температуру
используя ручку контроля.
- Установите переключатель Н на , а затем установите ручку
контроля I на желаемую настройку, индикатор нагрева G горит, если
окружающая температура ниже желаемой. Подождите, пока
температура стабилизируется.
2.2 Как установить режим ECO (Эконом)?
- Режим ECO позволяет уменьшать температуру режима Комфорт
на 3-4 °C в течение времени пока комната пустует. Рекомендуется использовать этот режим, если комната пустует
более 2 часов. Установите переключатель H на ECO и затем установите ручку контроля I на желаемую позицию,
индикатор нагрева G горит, если внешняя температура ниже, чем желаемая температура ECO. Подождите, пока
температура стабилизируется.
2.3 Как установить Антиобледенение?
- Это позиция переключателя, которая поддерживает температуру около 7° C в комнате во время длительного
отсутствия дома (обычно более 24 часов). Установите переключатель H on .
2.4 Как запрограммировать прибор в режимах Комфорт, ECO или Антиобледенение?
- Устройства, оборудованные электронным термостатом, могут быть запрограммированы. Через управляющий
провод (черный провод) для устройств без вилки благодаря системе Chronopass или настенному программатору,
2.5 Как заблокировать команды (Рисунок ❾)?
Для предотвращения изменений настроек Вы можете заблокировать или ограничить использование регулятора I и
заблокировать выключатель H. Снимите прибор с кронштейна. На задней части термостата удалить штифты J от их
поддержки:
- Позиция К допускает блокировку регулятора управления.
- L положение позволяет ограничить использование регулятора управления.
- Позиция M позволяет блокировку выключателя H на нужный режим.
- Бесполезно устанавливать настройки прибора на максимум, температура в комнате не станет подниматься от
этого быстрее. Если вы уходите на несколько часов, не забудьте понизить температуру.
- Если в помещении несколько отопительных приборов, пусть они работают одновременно – это обеспечит более
равномерный обогрев с одновременной оптимизацией расходов на электричество. При уходе, вместо полного
отключения прибора, лучше оставьте его включённым на более слабый обогрев.
7
Page 8

4. Обслуживание
- Для поддержания работы вашего прибора, очищайте верхние и нижние решетки прибора как минимум два раза в
5. В случае проблем
6. Условия гарантии
* Эта информация отображена на
пластине, которую можно
увидеть на левой стороне или за
передней решеткой прибора
A Стандарты, знаки качества
B Коммерческое название
C Коммерческий код
D Код производителя
E Серийный номер
F Номер производителя
Тип прибора *
Серийный номер *
Имя и адрес клиента *
ПЕЧАТЬ ДИЛЕРА
год с помощью пылесоса или щетки.
- Когда вы проветриваете помещение, выключайте обогрев, поставив курсор на .
- При использовании прибора в сильно загрязненной атмосфере на поверхности решеток прибора могут появиться
пятна. Такие поверхностные загрязнения не покрываются гарантией прибора и не являются основанием для его
замены. При наличии чрезмерно загрязненного воздуха в помещениях рекомендуется осуществлять более частые
проветривания и более часто проводить чистку прибора. Корпус прибора необходимо очищать влажной тряпкой.
- Внимание : Ни в коем случае не использовать для очистки абразивные и агрессивные материалы, которые могут
повредить поверхность прибора
- Каждые пять лет внутренние компоненты прибора должны быть проверены и протестированы квалифицированным
специалистом.
- Прибор не греет: Убедитесь, что прибор подключен к сети. Проверьте температуру воздуха в комнате. Для
моделей в комплектацию, которых входит программатор, убедитесь в том, что прибор находится в режиме
КОМФОРТ. Прибор постоянно греет: Убедитесь, что он не находится на сквозняке и что установка температуры
не была изменена. Прибор не следует запрограммированным командам: Убедитесь в том, что
программирование было корректно применено (см. инструкцию на это), или что Chronocarte правильно вставлена в
гнездо, и что она функционирует нормально (проверьте батарейки). На работу электронного прибора, содержащего
микропроцессор могут повлиять помехи в электрической сети (за пределами EC стандарты определены уровнем
нарушения защиты). В случае возникновения каких либо проблем (термостат и т.д.) отключите прибор от источника
питания (предохранители, выключатели и т.д.) и перезапустите его через 5 минут. В случае частого возникновения
проблем, проверьте источник питания или обратитесь к Вашему поставщику электроэнергии.
- Поверхность прибора очень горячая: Убедитесь в том, что мощность соответствует площади поверхности
(рекомендуется 100W на m2) и что прибор не находится на сквозняке, который мог бы повлиять на настройки..
Документ пользователя
(Предоставить сертификат только в случае претензии, с приложением документа удостоверяющего покупку)
- Эта гарантия применима в течение 2 лет с даты первоначальной покупки и
действительны в течение не более 30 месяцев с даты изготовления. Гарантия
распространяется на замену и поставку подтвержденных дефектных деталей
за исключением механических повреждений и интересов. Пользователь
оплачивает выезд, стоимость работ и транспортировку.
- Повреждения, связанные с неправильной установкой, с сетью питания, не
соответствующей стандартам, с неправильным использованием или
несоблюдением инструкций руководства не покрывается гарантией.
Представляйте этот сертификат только в случае жалоб к своему
дистрибьютору или установщику с документом подтверждающим покупку.
- Положения настоящих гарантийных условий не исключают осуществление покупателем правовой защиты против
дефектов и скрытых недостатков, которая применяется в соответствии со статьями Гражданского кодекса.
-
8
Page 9

Upozornění
Pozor: Části konvektoru mohou dosahovat vyšších teplot a způsobit popálení. Věnujte zvláštní
pozornost při přítomnosti dětí.
Pozor: V žádném případě konvektor nezakrývejte. Nápis“NEZAKRÝVAT“upozorňuje, že jakýkoliv
materiál, kterým je zakryt konvektor může způsobit přehřátí, požár.
Elektrický odpad se nesmí likvidovat s domácím odpadem.
Recyklujte na vyhrazených místech (podle místně platné legislativy).
Instalace zařízení ve vysoké nadmořské výšce způsobuje zvýšení teploty na výstupu vzduchu (cca 10°C na 1000 m
nadmořské výšky)
1. Instalace
děti do tří let udržujte mimo dosah tohoto spotřebiče, pokud nejsou pod stálým dohledem.
spotřebič by neměl být používán dětmi mladšími 14-ti let bez dozoru, lidmi s omezenými fyzickými, smyslovými nebo
duševními schopnostmi ani osobami s nedostatkem zkušeností.
děti mladší 14-ti let si nesmí hrát, upravovat, čistit ani provádět údržbu spotřebiče.
spotřebič musí být instalován, nebo připojen autorizovanou osobou v souladu s platnými pravidly a normami.
návod k obsluze je součástí balení výrobku, rovněž je k dispozici u prodejce.
pokud je přívodní kabel poškozen, musí být nahrazen výrobcem, servisním pracovníkem nebo podobně kvalifikovanou
osobou aby se předešlo jakémukoli nebezpečí.
Pří případném přenosném využití konvektoru:
Nepoužívejte konvektor v blízkosti vany, sprchy nebo bazénu.
Nepoužívejte konvcektor v malých prostorech, kde se vyskytují osoby, které nejsou schopny vlastní evakuace, nebo pokud
není zajištěn jejich stálý dohled.
1.1 Upozornění pro instalaci
Konvektory jsou určeny k montáži na stěnu v obytných prostorách. Jiný způsob montáže musí být konzultován s výrobcem,
dodavatelem.
Konvektory musí být instalovány v souladu s běžnou praxí a normami dané země.
Konvektor je zařízení třídy II a je chráněn proti stříkající vodě, krytí IP24. V koupelnách musí být konvektor instalován ve
shodě s ČSN 33 200-7-701 a smí být umístěn v souladu s obr. ❶ ) i v zónách 2 a 3.
Ovládání konvektoru nesmí být dosažitelné z vany nebo sprchy.
Dodržujte minimální montážní odstupy pro umístění zařízení (obr. ❷ ).
Nástěnná konzole umožňuje zachovat dostatečný prostor za konvektorem pro volnou konvekci vzduchu. Vzdálenost mezi
konvektorem a stěnou nesmí být ničím omezena. Konvektory je možné instalovat na podklady třídy hořlavosti C, D.
1.2 Konvektory neinstalujte:
v pozici, která by mohla mít vliv na jeho správnou funkci (například v blízkosti vzduchotechniky…. ) elektrické zásuvky ...
(obr. ❸) ani do blízkosti záclon, nebo jiných hořlavých materiálů.
je zakázáno instalovat produkty určené k vertikální instalaci do polohy horizontální a naopak (obr ❹). Při správné instalaci
je mřížka výstupu vzduchu a ovládací panel situován v horní části.
1.3 Instalace
VAROVÁNÍ: Typy bez vidlice (zástrčky) nelze použít jako přenosné.
1.3.1 Nástěnná instalace
Nástěnná instalace je možná u všech typů konvektorů.
c. Uvolněte závěsnou konzoli (obr. ❻)
Doporučujeme položit konvektor čelní stranou dolů, plochým šroubovákem opatrně uvolněte pojistku tak, aby
nedošlo k její deformaci, přidržte šroubovákem pojistku a uvolněte konzoli, poté ji vyklopte i ze spodních závěsů.
d. Upevněte závěsnou konzoli (obr. ❼)
Postavte konzoli na zem ke zdi a označte body pro navrtání otvorů A. Tyto otvory jsou určeny pro spodní závěs.
Zdvihněte konzoli do úrovně otvorů A a označte body pro navrtání otvorů B. které určují pozici horního závěsu.
Použijte vhodné prostředky pro dostatečně pevné ukotvení. Konzoli přišroubujte na zeď do konečné pozice.
9
Page 10

1.3.2 Elektrické připojení
2. Použití
Tabulka příkazů a funkcí
Příkaz
Bez napětí
230V
-115V
+115V
Typ provozu
Komfort
Útlumový
Nezámrzný režim
Vypnuto
Teplota
Dle nastavení
termostatu
Teplota se sníží
o cca 3,5°C
Udržování teploty
na cca 7°C
Vypnuí vytápění
G
Kontrolka vytápění. Signalizuje období kdy je
spotřebič v chodu. Při ustálené teplotě bliká,
v případě příliš vysoké teploty blikat přestane.
H
Přepínač
I
Kolečko pro nastavení teploty
Fáze =
hnědá
Neutrál
= modrá
Pilotní
vodič
= černá
Elektrická
síť
Fáze
Neutrál
2 možné případy
1) pouze
jedno
topidlo
2) více
topidel
Připojovací kabel topidla
Volný konec pilotního vodiče je
izolován a není dále zapojen
Pilotní vodiče všech topidel
v ovládané skupině (max. 20
jednotek), ze kterých je
jedna (kterákoliv) hlavní, jsou
zapojeny pomocí izolovaného
kabelu 1,0mm2 / 220-240V
Konvektory jsou určeny pro připojení na 230V / 50Hz. Konvektor je pro připojení k síti vybaven dvoužilovým kabelem
- mechanický termostat, nebo trojžilovým kabelem - elektronický termostat. Barevné označení vodičů:
Hnědá = Fáze
Modrá = Nula
Černá = Pilotní vodič
Instalace musí být vybavena vypínačem s minimálním odstupem kontaktu 3 mm.
Připojení konvektoru k zemnícímu vodiči je zakázáno. Nezapojujte černý - pilotní vodič k uzemnění.
Pokud je pilotní vodič (nebo topidlo ovládané pilotním vodičem) chráněno proudovým chráničem (např. v koupelně
max. 30mA), musí být zdroj pilotního vodiče chráněn tímto stejným chráničem.
1.3.3 Upevnění spotřebiče na závěsnou konzoli (obr.❼)
Umístěte v nakloněné poloze konvektor ke konzoli C a mírným pohybem jej zasuňte do háčků D. Sklopte konvektor
v konzoli A - cvaknutí znamená, že je konvektor správně nasazen a zajištěn. Chcete-li konvektor sejmout, plochým
šroubovákem zatlačte na pojistku nahoře vlevo. Přidržte pojistku a vysuňte konvektor. Naklopte a vyjměte konvektor
z konzole C.
2.1 Nastavení režimu komfort (obr. ❽)
Komfortní teplota je teplota, kterou si přejete mít v místnosti, když je
obývána
Přepínač H nastavte na pozici , a poté nastavte ovládací kolečko
I na požadovanou teplotu, kontrolka vytápění G svítí, pokud je
teplota v místnosti nižší než požadovaná. Vyčkejte, než se teplota
ustálí.
2.2 Nastavení režimu Eco (útlum)
Režim ECO umožňuje snížit teplotu o 3 až 4°C po dobu kdy není místnost obývána. Tento režim se doporučuje pokud
není místnost užívána déle než 2 hodiny. Nastavte přepínač H do pozice ECO a ovládací kolečko I nastavte do
požadované polohy, kontrolka vytápění G svítí, pokud je okolní teplota nižší než požadovaná ECO. Vyčkejte, než se
teplota ustálí.
2.3 Nastavení nezámrzného režimu
Ovládací kolečko umožňuje udržovat teplotu v místnosti okolo 7°C během Vaší dlouhodobé nepřítomnosti (delší než
24h). Natavte přepínač H do pozice .
2.4 Nastavení režimu KOMFORT, ECO a NEZÁMRZ pomocí příkazů po pilotním vodiči
Konvektory vybavené elektronickým termostatem mohou přijímat příkazy po pilotním vodiči, viz tabulka. Řízení dle
návodu k obsluze programerrů.
2.5 Uzamčení ovládání (obr. ❾)
Je možné zablokovat, nebo omezit použití ovládacího kolečka I a uzamknout přepínač H, aby se zabránilo nechtěné
manipulaci. Vysuňte konvektor z konzole. Na zadní straně termostatu vyjměte svorky J ze základny:
pozice K umožňuje zablokování kolečka pro nastavení teploty
pozice L umožňuje omezit využití ovládacího kolečka
pozice M umožňuje zablokování přepínače H v požadovaném režimu
10
Page 11

3. Doporučené použití
4. Údržba
5. Řešení problémů
6. Záruční podmínky
* Tato informace je uvedena na
štítku umístěném na levé straně
nebo za přední mřížkou
zařízení.
A Normy označení jakosti
B Obchodní název
C Obchodní značka
D Výrobní značka
E Výrobní číslo
F Kód výrobce
Typ zařízení *
Výrobní číslo *
Jméno a adresa zákazníka *
RAZÍTKO PRODEJCE:
Nemá smysl nastavovat maximální vytápění, teplota v místnosti nebude stoupat rychleji.
Pokud odcházíte na několik hodin, nezapomeňte snížit teplotu.
Pokud máte v místnosti více konvektorů, nechejte je v provozu zároveň. Tímto dosáhnete rovnoměrnější teploty bez
zvýšení spotřeby elektřiny.
Pro zajištění výkonu je třeba přibližně jednou za rok vyčistit horní a spodní mřížky vysavačem nebo smetákem.
Každých pět let nechte vnitřní část jednotky profesionálně zkontrolovat.
Na mřížce jednotky se může při znečištěném ovzduší hromadit prach. Tento jev se objevuje při špatné kvalitě okolního
vzduchu. V tomto případě se doporučuje zkontrolovat, jestli je místnost dobře odvětrávaná (ventilace, přívod vzduchu
atd.) a jestli je vzduch čistý. Záruka se nevztahuje na výměnu zařízení v důsledku nerespektování výše uvedených
doporučení. Kryt jednotky by měl být čištěn vlhkým hadříkem, nikdy nepoužívejte abrazivní prostředky.
Konvektor netopí: zkontrolujte, zda jsou zapnuty instalační jističe a proudový chránič (pokud je jím instalace vybavena).
Konvektor trvale topí: ujistěte se, že není konvektor v průvanu a že nebylo změněno nastavení teploty
Konvektor neprovádí programové příkazy (verze s pilotním vodičem ):
Ujistěte se, že programovací jednotka je správně používána (viz. návod k instalaci a použití. Zařízení
s elektronickým ovládáním je vybaveno mikroprocesorem, který může být rušen některými závažnými
poruchami sítového napětí (mimo normy ES určujících úroveň ochrany rušení). Pokud se vyskytnou
nějaké problémy (zablokování termostatu atd.), vypněte napájení (pojistka, jistič, atd.) po dobu asi 5
minut aby se zařízení mohlo restartovat. Pokud se tento jev vyskytuje často, nechte zkontrolovat
napájení Vaším dodavatelem energie.
Povrch konvektoru je velmi horký:
Za normálních okolností je max. povrchová teplota konvektoru v provozu omezena v souladu
s normami. Nicméně pokud si myslíte, že konvektor je příliš horký, ujistěte se, že výkon odpovídá
tepelným ztrátám místnosti a konvektor není umístěn v průvanu, který by narušoval jeho regulaci.
UCHOVEJTE TENTO DOKUMENT NA BEZPEČNÉM MÍSTĚ
(Tento dokument by měl být použit pouze v případě reklamace a včetně dokladu o zakoupení)
Dodavatel poskytuje na výrobky záruku 24 měsíců od data prodeje.
Záruka se nevztahuje na vady způsobené dopravou, nedbalou manipulací,
neodbornou montáží, nedodržením pokynů uvedených v tomto návodu.
Záruka se rovněž nevztahuje na běžné opotřebení výrobku. Jakýkoliv
zásah do výrobku je považován za porušení záručních podmínek.
Kompletní záruční podmínky naleznete na stránkách www.fenixgroup.cz.
Tento dokument včetně dokladu o zakoupení použijte pouze v případě
reklamace u svého prodejce, nebo instalační firmy
Ustanovení v těchto záručních podmínkách nezahrnuje všechny body
uvedené v záručních podmínkách dané zákonem.
11
Page 12

Achtung
ACHTUNG : sehr heisse Oberfläche ! Einige Teile dieses Gerätes können sehr heiss werden und Verbrennungen
verursachen. Besondere Vorsicht walten lassen bei Anwesenheit von Kindern und verwundbaren Personen.
VORSICHT: Das Gerät nicht abdecken wegen Überhitzung und aus Sicherheitsgründen.
Geräte mit diesem Zeichen dürfen nicht in den Hausmüll geworfen werden, sondern müssen separat gesammelt und
recycelt werden. Die Einsammlung und die Verwertung von ausgedienten Produkten muss entsprechend der lokalen
Normen erfolgen (DEEE 2002/96/CE).
Eine Montage in höheren Standorten zieht höhere Luftaustrittstemperaturen nach sich ( ca. 10°C pro 1000 m )
2. Installation
- Kinder unter 3 Jahren immer in ausreichenden Abstand halten außer wenn diese laufend überwacht werden
- Kinder unter 14 Jahren oder Personen, deren körperliche, sensorische oder geistige Fähigkeiten oder Personen ohne
Erfahrung oder Kenntnisse benutzt werden, es sei denn, diese erhielten vorweg von einer Person, die für deren
Sicherheit zuständig ist, Informationen
- Kinder im Alter von unter 14 Jahren dürfen weder mit dem Gerat spielen, noch dieses einstellen, reinigen oder die
Wartung durchführen.
- Das Gerät muss entsprechend der lokalen Vorschriften von einer befähigen Person angeschlossen werden.
- Die Bedienanleitung dieses Gerätes ist beim Kundendienst unter der im Garantiefeld aufgeführten Nummer zu erhalten.
- Das Gerät nicht mit beschädigtem Anschlusskabel benutzen.
Bei Verwendung als tragbares Gerät (siehe entsprechende Modelle unten):
- Das Gerät nicht in der Nähe der Badewanne, der Dusche order eines Pools verwenden.
- Das Gerät nicht in kleinen Räumen verwenden, wo Personen sind, die sich nicht selbst bewegen können, ausser wenn
dauernde Überwachung gewährleistet ist..
2.1 Wo installieren?
- Dieses Gerät ist für die Benutzung im Wohn- und Bürobereich oder ähnliches konzipiert. Bei anderen Anwendungen fragen
Sie Ihren Händler.
- Die Installation muss fachgerecht und unter Beachtung der lokalen Normen erfolgen ( z.B. VDE15100 ).
- Die Geräte haben Schutzklasse II und sind gegen Spritzwasser geschützt ( IP24 ). Sie können somit im Bereich 2 montiert
werden (Bild ❶). Die Bedienelemente dürfen allerdings nicht einer in der Wanne bzw. Dusche befindlichen Person
zugänglich sein. Es ist verboten, das Gerät im Bereich 1 zu montieren.
- Beim Wahl des Montageortes den Mindestabstand zu Gegenständen wahren (Bild ❷).
- The wall bracket allows keeping a free space behind the device to not disturb its regulation. The distance between the unit
and the wall should not be obstructed.
2.2 Wo nicht installieren?
- In einem Durchzug, der die Steuerung beeinträchtigen kann ( z.B. Zwangslüftung, … ). Unter einer Anschlussdose oder in
der Nähe von Gardinen oder anderen brennbaren Materien (Bild ❸).
- In einer nicht erlaubten Position..
- Der Luftauslass und der Thermostat muss im oberen Teil des Gerätes sichtbar sein. Ein horizontales Gerät darf nicht
senkrecht montiert werden und umgekehrt (Bild ❹).
2.3 Wie installieren?
2.3.1 Die Wandhalterung vom Gerät abnehmen (Bild ❺)
- Wir empfehlen, das Gerät flach auf die Vorderseite zu legen. Mit einem Flachschraubenzieher die Haltelippe anheben ohne
Beschädigung. Bei angehobener Lippe die Halterung in Richtung Geräteunterteil drücken und die obere Kralle losen. Die
untere Kralle durch eine senkrechte Drehbewegung aus der Halterung ziehen und die Wandhalterung abnehmen.
2.3.2 Wandhalterung befestigen
- Gerätehöhe 450 mm (Bild ❻) : die Wandhalterung auf den Boden und gegen die Wand stellen, dann die Bohrpunkte A
markieren. Diese sind die unteren Schrauben. Die Halterung auf die Punkte A anlegen und die Bohrpunkte B anzeichnen.
Das sind die oberen Schrauben. Im Fall von speziellem Wandmaterial, die entsprechenden Dübel verwenden.
- Gerätehöhe 250 mm :siehe Bild ❼.
2.3.3 Elektroanschluss
- Das Gerät muss mit Wechselstrom 230 V 50 Hz versorgt werden.
2.3.3.1 Geräte ohne Stecker:
. Der Netzanschluss erfolgt mit 3 adrigem ( braun=Phase, blau=Nulleiter, schwarz=Steuerleitung ) durch eine
Festanschlussdose.
- In Feuchträumen wie Badezimmer und Küche muss die Anschlussdose mindestens 25 cm vom Boden entfernt sein. Das
Gerät wird direkt am Netzkreis angeschlossen, der einen allpoligen Unterbrechungsschalter mit mindestens 3 mm
Kontaktabstand hat
- Die ERDUNG ist untersagt. Den Steuerleitung ( schwarze Ader ) nicht an Erde anschliessen.
- Wenn das Anschlusskabel beschädigt ist, muss es vom Hersteller, seinem Kundendienst oder Personen mit ähnlichen
Kentnissen ausgetauscht werden, um Gefahr zu vermeiden.
12
Page 13

Befehl
Kein Signal
Voller Sinus
230 V
Negativer Halbsinus
– 115V
Positiver
Halbsinus
+ 115V
Oscilloscop
Zu Neutral
Modus
KOMFORT
ECO
FROSTSCHUTZ
STOP BEI ÜBERLAST
2.3.3.1 Gerät mit Stecker:
3. Benutzung
4. Benutzungshinweise
5. Wartung
A
Switch 0/I
B
Control knob of the temperature
C
Mode switch knob.
D
Indicator for heating. It indicates the periods in
which the resistance is working. With a
stabilized temperature, it flashes and if the
temperature is too high, it stops.
Neutral = Blau
Phase = Braun
Steuerleitung = schwarz
Kabel
Phase
Neutral
Netz
Fall 1: ein Gerät
Fall 2: Mehrere
Geräte
Steuerleitung nicht angeschlossen
Verbindung zu Master oder
Steuerung
2 possible cases:
Das Gerät wird mit dem Stecker an das Netz angeschlossen.
2.3.4 Wandinstallation (Bild ❽)
- Das Gerät geneigt auf die Halterung C setzen und dann kippen, um es auf die Halterung D einzurasten. Das Gerät nach
unten schieben. Ein Klick zeigt, dass das Gerät richtig befestigt ist. Um das Gerät wieder abzunehmen, mit einem
Flachschraubenzieher die Haltelippe anheben ohne Beschädigung. Bei angehobener Lippe die Halterung in Richtung
Geräteunterteil drücken und die obere Kralle losen. Die untere Kralle durch eine senkrechte Drehbewegung aus der
Halterung ziehen und von der Wandhalterung abnehmen..
- Siehe Bild ❾.
3.1 Wie den Komfort Modus einstellen?
- Im Komfort Modus wird die gewünschte Temperatur mit dem Stellrad
gewählt.
- Den Schalter A auf I stellen. Den Regler C auf schieben, und dann
das Stellrad B auf die gewünschte Position drehen, Die Heizleuchte D
geht an, wenn die Raumtemperatur unter der gewünschten liegt..
Warten bis sich die Temperatur stabilisiert, erst dann gegebenfalls die
Einstellung ändern.
3.2 Wie den Eco Modus einstellen?
- ECO Modus erlaubt die Temperaturabsenkung von 3 bis 4°C unter den Komfort Modus während Zeiten, in denen der
Raum nicht benutzt wird. Wir empfehlen diesen Modus bei Abwesenheit von mehr als 2 Stunden. Den Schalter A auf I
stellen. Den Regler C auf ECO schieben. Die Heizleuchte D geht an, wenn die Raumtemperatur niedriger als die ECO
Temperatur ist.
3.3 Wie den Frostschutz Modus einstellen?
- In dieser Reglerposition halt das Gerät eine Raumtemperatur von ca. 7 ° C während einer längeren Abwesenheit (im
Allgemeinen mehr als 24 Stunden). Den Schalter A auf I stellen. Dann den Regler C auf schieben.
3.4 Wie das Gerät abschalten?
- Zum Ausschalten, den Regler C auf schieben. Dann den Schalter A auf O stellen.
3.5 Wie die Modi Komfort, ECO oder Frostschutz programmieren?
- Die Geräte sind mit einem elektronischen Thermostat ausgerüstet, das Befehle empfangen kann. Zwei Möglichkeiten :
- Über die Pilotleitung (schwarzes Kabel) bei Geräten ohne Stecker über ChronoPass oder andere externe Schaltuhr
- Durch FM Trägerfrequenz über die Stromleitung mit einem speziellen ChronoPass System.
3.6 Wie die Bedienelemente sperren (Bild ❿)?
Das Stellrad I und/oder der Regler H können verriegelt oder begrenzt werden. Das Gerät von der Wandhalterung nehmen.
Auf der Rückseite des Thermostatkastens die Stifte J von deren Halterung brechen: Die Position K verriegelt das Stellrad /
Die L Position begrenzt den Einstellbereich des Stellrads /Die M Position blockiert den Regler H in der gewünschten
Position.
- Es ist unnötig das Stellrad auf Max zu stellen, da die Raumtemperatur nicht schneller steigt. Wenn Sie mehrere Stunden
abwesend sind, vergessen Sie nicht die Temperatur zu senken.
- Wenn mehrere Geräte in einem Raum sind diese gleichzeitig arbeiten lassen, um eine ausgeglichene
Temperaturverteilung und eine Optimierung des Stromverbrauchs zu erreichen. Das ist auch für ein unbenutztes Zimmer
der Fall : besser das Gerät auf Min arbeiten lassen als komplett abzuschalten.
- Um die Leistung des Gerätes zu gewährleisten sollten Sie 2 mal jährlich die oberen und unteren Öffnungen mit einem
Staubsauger oder einer Bürste entstauben.
- Alle 5 Jahre das Gerät durch einen Fachmann prüfen lassen. Umweltschmutz oder schlechte Raumluft kann
Verschmutzungen am Luftauslass verursachen. Prüfen Sie ob der Raum ausreichend belüftet wird. Diese
Verschmutzungen sind von der Garantie ausgeschlossen. Der Gerätekörper kann mit einem feuchten Tuch gereinigt
werden, aber ohne scheuernde Mittel.
13
Page 14

6. Problembehandlung
- Gerät heizt nicht: Prüfen, dass die Sicherungen eingeschaltet sind und das ein Lastabschalter ( wenn vorhanden ) die
7. Garantiebestimmungen
* Diese Information befinden
sich auf dem Typenschild rechts
am Gerät
A Norm, Qualitätssiegel
B Gerätename
C Artikelnummer
D Werksnummer
E Seriennummer
F Herstellerkode
Gerätemodell *
Seriennummer *
Name und Addresse des
Kunden *
Stempel des Händlers
Heizung nicht abgeschaltet hat. Die Raumtemperatur prüfen. Wenn vorhanden, die Programmierung auf Komfort stellen.
- Gerät heist andauernd: prüfen, ob das Gerät nicht in einem Luftzug hängt oder ob die Temperaturwahl geändert wurde.
- Gerät führt keine Steuerbefehle aus (wenn ausgerüstet): prüfen, dass die Programmkarte richtig benutzt wird, dass die
Karte richtig eingesteckt wurde, dass diese funktioniert. Die Batterien prüfen. Elektronische Geräte mit Mikroprozessoren
können durch bestimmte Netzstromschwankungen beeinflusst werden ( geschützt in den Grenzwerten der EU Normen ).
Bei Problem ( Thermostat blockiert , … ) die Stromversorgung ca. 5 Minuten unterbrechen ( Sicherung, Stecker, .. ) und
Gerät erneut in Betrieb nehmen. Wenn die Störung öfter auftritt, das Netz von einem Spezialisten prüfen lassen.
- Gerät hat sehr heisse Oberfläche: es ist normal, dass das Gerät heiss ist, wenn es arbeitet, wobei die
Oberflächentemperatur entsprechend der aktuellen Normen begrenzt ist. Sollten Sie die Temperatur als zu hoch
empfinden, prüfen Sie ob die Leistung des Gerätes der Raumfläche entspricht ( max 100 W/m² ) und ob das Gerät im
Durchzug montiert ist.
DIESES DOKUMENT SICHER AUFBEWAHREN
(Dokument durch den Benutzer aufzubewahren ( dieses Zertifikat nur im Falle einer Reklamation zeigen )
- Die Garantiedauer ist 2 Jahre ab dem Datum der Installation oder
Kaufdatum und kann ohne Nachweis nicht 30 Monate nach dem
Produktionsdatum überschreiten.
- Die Garantie deckt den Austausch bzw. die Lieferung der als fehlerhaft
anerkannten Teile unter Ausschluss von anderen Ansprüchen.
- Lohn-, Transport- und Reisekosten sind vom Benutzer zu tragen.
- Schäden durch eine nicht konforme Installation, durch ein nicht den
Normen entsprechendes Stromnetz ( EN 50160 ), durch unnormalen
Gebrauch oder die Nichtbeachtung der Vorschriften der Bedienanleitung
fallen nicht unter die Garantie.
- Dieses Zertifikat im Falle einer Reklamation Ihrem Händler zusammen mit
der Rechnung und den Gerätedaten* vorlegen.
- Die Bestimmungen der vorliegenden Garantiebedingungen schliessen nicht das Recht des Käufers auf die
Inanspruchnahme der gesetzlichen Gewährleistung im Falle von versteckten Mängeln aus.
- Bei Garantieansprüchen wenden Sie sich an Ihren Installateur oder Hândler. Wenn notwendig kontaktieren Sie den
Hersteller: ATL International Tel: (+33)146836000, Fax: (+33)146836001, 58 av Gén. Leclerc 92340 Bourg-la-Reine
(France)
14
 Loading...