


CORDLESS RECIPROCATING SAW
(Li-ion Battery)
ORIGINAL INSTRUCTION MANUAL
RS135/18L
WARNING: To reduce the risk
of injury, the user must read and
understand the instruction manual
before using this product.

It is essential that instruction
manual is read before the power
tool is operated for the first time.
Always keeps this instruction manual
together with the power tool.
Ensure that the instruction manual
is with the power tool when it is
given to other persons.
Table of Contents
1. General Power Tool Safety Warnings·······················3
2. Specific Safety Warnings·······································6
3. Check before Use··················································7
4. Noise and Vibration Emissions·································11
5. Specifications and List of Contents ···························12
6. Description of Functions··········································13
7. Operating Instructions ············································14
8. Maintenance························································18
No t e
As our engineers are striving for the c onstant research
and development to develop the quality of products,
shap e o r st r uct u re o f our model can be chan g ed
without previous notice.
2
1
General Power Tool Safety Warnings
WARNING! Read all safety warning and all instructions.
Failure to follow the warning instructions may result in electric shock, fire and/or seroius
injury.
Save all warnings and instructions for future reference.
The term “power tool” in the warnings refers to your mains -operated (corded) power tool or
battery-operated (cordless) power tool.
1) Work area safety
a) Keep work area clean and well lit.
Cluttered and dark areas invite accidents.
b) Do not operate power tools in explosive atmos pheres, such as in the
presence of flammable liquids, gases or dust.
Power tools create sparks which may ignite the dust or fumes.
c) Keep children and bystanders away while operating a power tool.
Distractions can cause you to lose control.
2) Electrical safety
a) Power tool plugs must match the outlet. Never modify the plug in any way.
Do not use any adapter plugs with earthed(gorunded) power tools.
Unmodified plugs and matching outlets will reduce risk of eteclric shock.
b) Avoid body contact with earthed or gr ounded surfaces such as pipes, radiators,
ranges and refrigerators.
There is an increased risk of electric shock if your body is earthed or grounded.
c) Do not expose power tools to rain o r wet codltions.
Water entering a power tool will increase the risk of electric shock.
d) Do not abuse the cord . Never use the cord carrying, pulling or unplugging the
pow tool. Keep cord away from heat, o il, sharp edges or moving parts.
Damaged or entangled cords increase the risk of electric shock.
e) When op erating a power tool o utdoors, use an extensi on cord suitable for
outdoor u se
Use of a cord suitable for outdoor use reduces the risk of electric shock.
f) If operating a power tool in a damp location is unavoidable, use residual
current device (RCD) protected supply.
Use of an RCD reduces the risk of electric shock.
3

3) Personal safety
a) Stay alert, watch what you are doing and use comm on sense when operating
a power tool. Do not use a power tool while you are tired or under the
influence of drugs, alcohol or medication.
A moment of inattention whileoperationg power toolsmayresult in serious personal injury.
b) Use safety equipment. Always wear eye protection.
Safety equipment such as dust mask, non-skid safety shoes, hard hat, or hearing
protection used for appropriate conditions wi
c) Prevent unintentional starting. Ensure the switch is in the off position before
connecting to power source and/or battery pack, pic king up or carrying the
tool.
Carrying power tools with your finger on the switch or energising power tools
that have the switch on invites accidents.
d) Remove any adjusting key o r wrench before turning the power tool on.
A wrench or key left attached to a rotating part of the power tool may result in personal
injur
y.
e) Do not overreach. Keep proper footing and balance at all ti mes.
This enables better control of the power tool in unexpected situations.
f) Dress properly. Do not wear loose clothing or jewellery. Keep your hair,
clothing and gloves away from moving parts.
Loose clothes, jewellery or long hair can be caught in moving parts.
g) If devices are provided for the connection of dust extraction and collection
facilities, ensur e these are connected and properly used.
Use of dust collection can reduce dust-related hazards.
ll reduce personal injuries.
4) Power tool use and care
a) Do not force the po wer tool. Use the correct power tool for your application.
The correct power tool will do the job better and safer at the rate for which it was
designed.
b) Do not use the power tool if the switch does not turn it on and off.
Any power tool that cannot be controlled with the switch is dangerous and must be
repaired.
c) Disconnect the plug from the power source and/or the battery pack
from the po
accessories, o r storing power tools.
Such preventive safety measures reduce the risk of starting the power
tool accidentally.
4
wer tool before making any adjus tments, changing

d) Store idle p ower tools out the reach of children and do not allow persons
unfamiliar with the power tool or these instructions to operate the power tool.
Power tools are dangerous in the hands of untrained users.
e) Maintain power tools. Check for misalig nment or bindin g of moving parts,
breakage of parts and any other condition that may affect the power tool s
operation. If damaged, have the power tool repaired before use.
Many accidents are caused by poorly maintained power tools.
f) Keep cutting tools sharp and clean.
Properly maintained cutting tools with sharp cutting edges are less likely to bind and are
easier to control.
g) Use the power tool, accessories and tool bits etc. in accor dance with these
instructions, taking i nto account the working conditions and the work to be
performed.
Use of the power tool for operations different from those intended could result in a
hazardous situation.
5) Battery tool use and care
a) Recharge on ly with the charger specified by the manufacturer.
A charger that is suitable for one type of battery pack may create a risk of fire when
used with another battery pack.
b) Use pow er tools only with specifically designated battery pack.
Use of any other battery packs may create a risk of injury and fire.
c) When battery pack is not in use, keep it away from other metal objects, like
paper clips, coins, keys, nails, screws, or other small metal objects that can
make a connection fro m one te
Shorting the battery teminals together may cause burns or a fire.
rminal t o another.
d) Under abusive con ditions, liquid may be ejected from the battery; avoid
contact. If contact accidentally occurs, flush with water. If liquid contacts
eyes, additionally seek medical help.
Liquid ejected from the battery may cause irritation or burns.
6) Service
a) Have you r power tool serviced by a qualified repair person using only
identical replacement parts.
This will ensure that the safety of the power tool is maintained.
5

2
Specific Saf ety Warnings
Hold power tool b y insulated gripping surfaces, when performing an
operation where the cutting accessory may contact hidden wiring.
Cutting accessory contacting a "live" wire may make exposed metal parts of the
power tool "live" and could give the operator an electric shock
Do not use the charger under the rain or when it is wet.
Failure to observe this can cause serious injury or death due to electric shock.
Do not insert metal wire or any conductive object through the ventilating
opening of the charger.
Failure to observe this can cause serious injury or death due to electric shock.
Do not attempt to disassemble th e charger and keep the charger out o f the
reach of children.
If the cord of the charger has been damaged, replace or repair it immediately.
Using the charger with damaged cord may cause electric shock.
Electric shock may cause injury.
Do not throw the battery int o the live fire.
In the fire, the battery may explode due to high temperature and cause serious injury.
Do not short the terminals of the battery
If the terminals of the battery is short circuited, excessive current will flow and fire or
explosion may occur causing serious injury. When the battery is not used, store it after
mounting the protective cap firmly in place.
Avoid strong impact on the battery and do not pierce the battery case with a
sharp object.
Fire or explosion may occur causing serious injury.
Store the battery indoors at 0º~40º and avoid dir ect light and closed hot
and humid places.
Fire or explosion may occur causing serious injury.
Do not make your fingers and hands t ouch with the drill bit during operation.
When your fingers and hands are touched with the drill bit or caught in it, you may
be injured seriously.
Do not leave the running tool.
Other operators stayed close to you may be injured.
Set the forward/reverse lever in the neutral position while you are
changing or operating the tool.
Careless operating of the switch may cause a serious injury by the rotating part of
the tool.
Make sure the battery is attached in the body of t he tool tightly before
you start operation.
When the battery is not attached tightly, it may be fallen during the operation and
cause an injury in the top of your foot.
6

Charge only appoved rechargeable batteries. Other types of
batteries may burst causing personal injury and damage
Do not disassemble battery.
Imcorrect reassembly may result in a risk of electric shock, electrocution or fire.
Accessories may be hot after prolonged use.
When removing the bit from the tool avoid contact with skin and use proper
protective gloves when grasping the bit or accessory.
Keep the battery from being overheated.
If overheated battery is inserted, high temperature standby is indicated and charging
can only start after the battery has been cooled down.
Leaving the battery for a prolonged time without using it will shorten the life
of the battery.
If the battery is to be stored for a prolonged time, charge it completely before storing it.
To use the battery for a long period of time, charge it completely every 3 months.
Felisatti
3
Check before Use
1. Power Source
Observe correct main voltage. The voltage of power source must agree with the
voltage specified in the name plate.
Please check if the rated voltage of the product is same as the rated voltage of
the battery.
he battery with higher rated voltage can result in burning and damaging of
Using t
the motor.
2. Attachment of the battery
Make sure the battery is attached correctly before you use the tool
Make sure the battery is attached in the body of the tool tightly before you start
operation. When the battery is not attached tightly, it may be fallen during the operation
and cause an injury in the top of your foot.
3. Polarity of the batt ery
Please check the polarity of the battery is same as the product.
When the polarity of the battery is not correct, it may cause the trouble of the
switch.
7

WRONG
WRONG RIGHT
blade clamp lever
█
REMOVING SAW BLADE
1. Remove battery pack.
2. Turn down the blade clamp lever.
2.
3.
Turn down the blade clamp lever.
3. Remove the blade saw from the blade clamp.
█
INSTALLING SAW BLADE
1. Remove battery pack.
Insert the blade into the blade clamp as far as possible; release blade clamp lever
█
BLADE SELECTION
To obtain the best perfor-mance from the saw, it is important to select the correct
blade for the particular application and type of material you wish to cut. By doing
th
is, you will get a smoother, faster cut and prolong blade life.
Always remove battery pack before installing and removing saw blade.
4. Removing / installing saw blade
8

Tigger Switch
LOCKED
Switch Lock Button
UNLOCKED
5. Switch lock-off
6. To secure and support the work piece
█ SWITCH LOCK
1. To turn the saw ON, push the lock-off button to left side then depress trigger
Switch.
2. To turn it OFF, release the trigger switch and push the trigger switch and push
the lock-off button to right side to lock the trigger switch.
NOTE: The lock-off button can only be activated when the trigger is released.
█ VARIABLE SPEED
The variable speed trigger switch delivers higher speed with increased trigger
pressure and lower spe
ed with decreased trigger pressure.
█ ELECTRIC BRAKE
To stop the reciprocating saw, release the trigger switch and allow the tool to
come to a complete stop. The electric brake quikly stops the saw from stroking.
This feature engages automatically when you release the trigger switch.
█ Use clamps or other equipment to secure and support the work piece.
Holding the work piece in your hand or against your body may laed to loss of
control. It is important to support the work proper
ly to minimize body expo-sure,
blade binding, or loss of control.
7. Trial run
Before starting the work, wear protections (goggles, protective gloves) and run the tool in
the direction avoiding other persons to see if the tool is operated normally.
9
8. An explanation of any symbols or pictograms on the
Santiago Lopes
Jordi Carbonell
tool relevant to safe use.
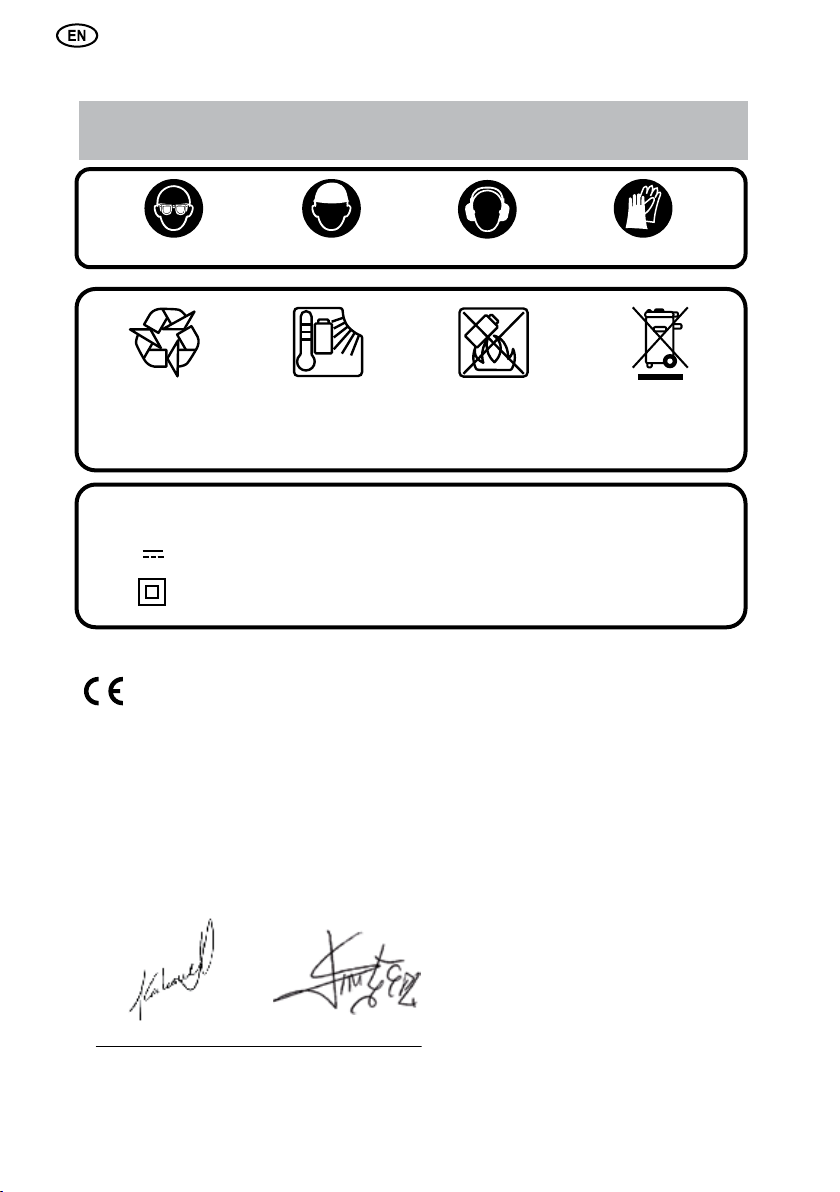
Weargoggles Wearsafetyhelmet Wearear plugs Wearprotective gloves
Max. 50ºC
Return waste material The battery
temperatures over 50ºC
cause damage
V - Volts
V - Direct Current
- Class II construction
Do not incinerate the
battery pack
n
V - No load speed
o
Do not dispose of
batteries with general
refuse.
/min - Revolutions or reciprocations
per minute
~ - Alternating current
EC Declaration of conformity
We declares that these products meet the standards
EN 60745-1, EN 60745-2-11, EN 60335-1, EN 60335-2-29, EN 55014-1, EN 55014-2,
EN 61000-3-2 and EN 61000-3-3 (CategoryII)
in compliance with directives 2006/95/EC, 2006/42/EC, 2004/108/EC.
10

4
Noise and Vibration Emissions
1. Noise emission
1) Noise emission
Measured values are according to EN 60745-2-11
The A-weighted sound power level (LWA)
The A-weighted emission level (L
Uncertainty (K)
)
pA
97 dB(A)
86 dB(A)
3 dB
2. The operator to wear hearing protection
3. Vibration emission
Vibration total values(triaxial vector sum) determined according to EN 60745-2-11
Cutting wood
Vibration emission value(a
Uncertainty (K)
h, cw
)
14.5 m/s²
1.5 m/s²
4. The following information
The declarde vibration total value has been measured in accordance with a standard
test method given in EN60745-2-11 and may be used for comparing one tool with another.
The declard vibration total value may also be used in a preliminary assessment of exposure.
5. A warning
The vibration emission during actual use of the power tool can differ from the
declared total value depending on the ways in which the tool is used.
Identify additional safety measures to protect the operator that are based on an estimation of
exposure in the actual conditions of use (taking account of all parts of the operating cycle such
as thetimes whenthe tool is switched offand when it is running idle in addition to the trigger time).
11

5
Specifications and List of Contents
1. Specifications
Model
Rated voltage [V DC]
No load Speed [/min]
L
ength of Stroke [mm]
Cutting
depth,
max.
[mm]
Orbital Motion
Wood 135
Steel
AL
Weight, according to
EPTA procedure 01/2003
Battery
(Li-ion)
FL18026
Battery
Charger
F180
Ratedvoltage [V DC]
Capacity [Ah]
Weight [kg]
Input voltage [V AC ]
Input frequency [Hz]
Output voltage [V DC ]
Charging current
Charging time [h]
Weight [kg]
Safety class
[kg]
[A]
RS135/18L
18
0-2500
30
6
20
3 Positions
4.0
18
0.6
220-240
50 / 60
18
6.5
0.5
0.6
2. List of Contents
Plastic case
Battery
Battery Charger
Instruction manual
12
1EA
2EA
1EA
1EA

Description of Functions
1. Description of Functions
• •
RS135/18L
6
Footplate
Footplate release button
Power Cord
Charge State LED
Orbital Control Lever
Battery button
Hook
blade clamp lever
Button
-Check charge state of battery
-Work light ON/OFF
F180 (Battery Charger)
•
•
•FL 18026 (Rechargeable Battery)•
Switch Lock Button
Trigger Switch
Battery Slot
Terminal
13

7
Operating Instructions
1. How to charge th e battery
(1) Insert the plug of the charger in the socket, and the charging indicating lamp will be
flickered in green,red and yellow in turn within one second. And then, the battery
charger will be in the standby position.
(2) Insert the battery in the battery charger considering the polarity, and the charging will
be started immediately.
A new battery will work properly after five times of charging and discharging.
Charge and discharge the battery, which is not used for a long time, for two to
three times to function well.
(3) When the battery working time is remarkably short despite full charging, the life of the
battery may be over. Replace the battery immediately
Take care not to short-circuit the terminal of the battery. The short-circuit of the
terminal may cause a fire or explosion doing a serious personal injury.
2. Charging process
Use only the specified battery and battery charger. Otherwise battery and
charger can be damaged by fire, explosion, charging error or overheat.
.
1) Charging indication
Green Blinks : Before charging
Red Lights : While charging
Green Lights : Charging completed
Red Blinks : Overheat standby
(Battery overheated)
Yellow Blinks : Charging impossible
Be sure to unplug the charger after finishing the charging.
2) If charging of the heated battery is attempted immediately after it has been used or
charged, indicator blinks in red (overheat standby). Also, cooling fan in the charger
automatically starts running to cool the hot battery down to normal temperature and,
after the cooling, indication changes to red glowing and charging begins.
3) This charger detects charge status and transfers to fine charging mode when the
battery has been almost fully charged and keeps the battery in full charge state.
14
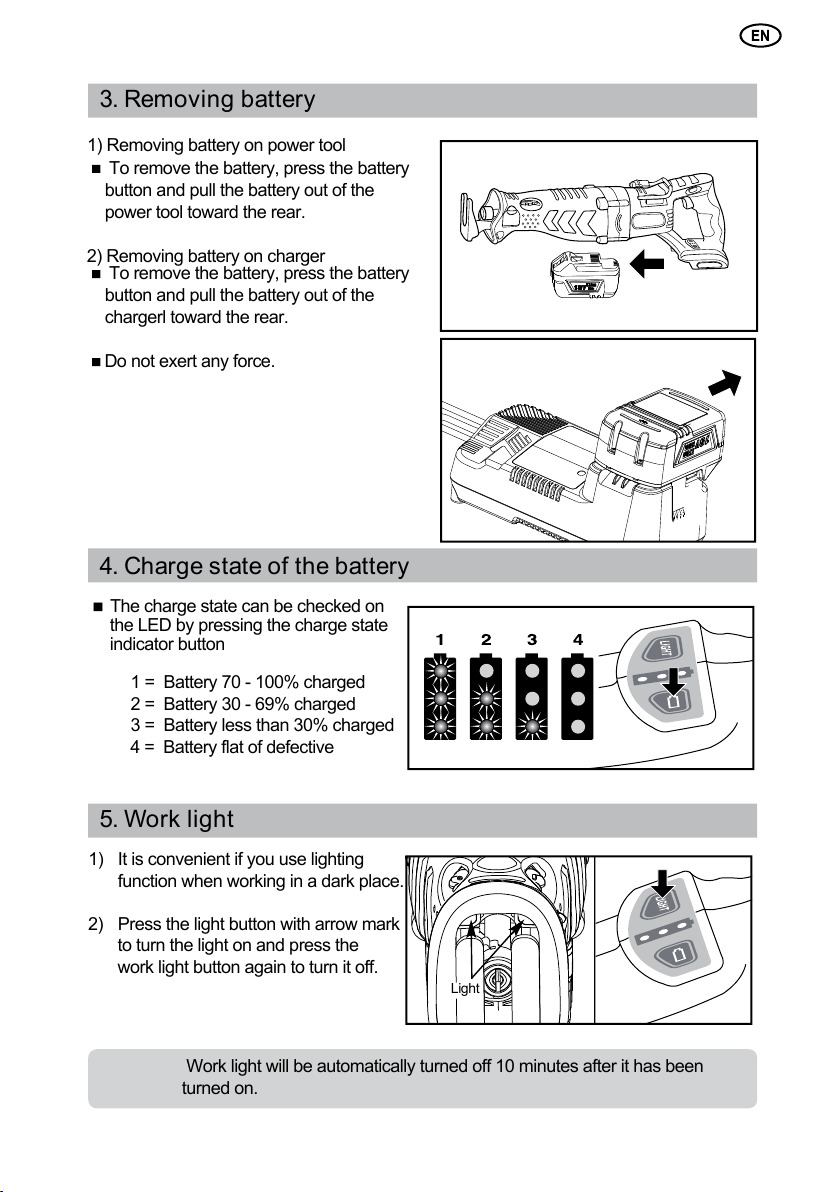
1) Removing battery on power tool
To remove the battery, press the battery
button and pull the battery out of the
power tool toward the rear.
2) Removing battery on charger
To remove the battery, press the battery
button and pull the battery out of the
chargerl toward the rear.
Do not exert any force.
Light
3. Removing battery
4. Charge state of the battery
The charge state can be checked on
the LED by pressing the charge state
indicator button
1 = Battery 70 - 100% charged
2 = Battery 30 - 69% charged
3 = Battery less than 30% charged
4 = Battery flat of defective
5. Work light
1) It is convenient if you use lighting
function when working in a dark place.
2) Press the light button with arrow mark
to turn the light on and press the
work light button again to turn it off.
Work light will be automatically turned off 10 minutes after it has been
turned on.
15
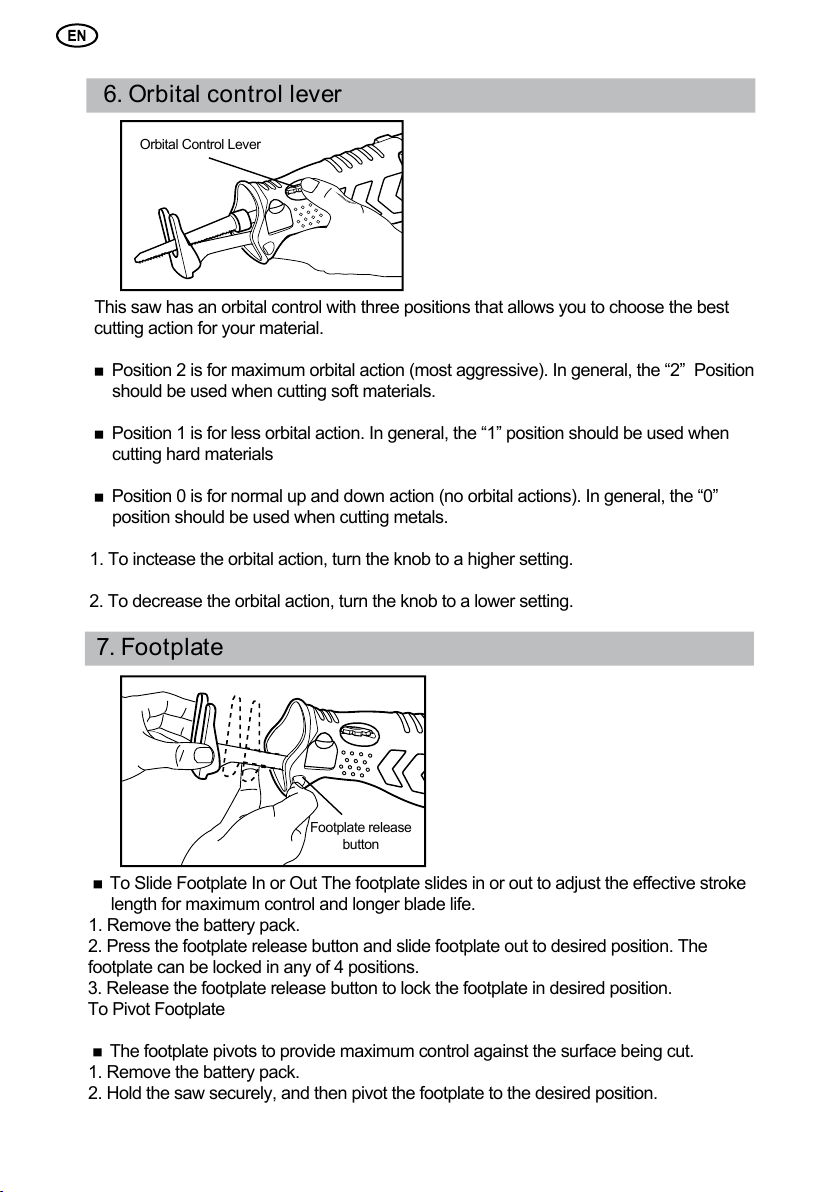
To Slide Footplate In or Out The footplate slides in or out to adjust the effective stroke
length for maximum control and longer blade life.
1. Remove the battery pack.
2. Press the footplate release button and slide footplate out to desired position. The
footplate can be locked in any of 4 positions.
3. Release the footplate release button to lock the footplate in desired position.
To Pivot Footplate
The footplate pivots to provide maximum control against the surface being cut.
1. Remove the battery pack.
2. Hold the saw securely, and then pivot the footplate to the desired position.
Orbital ControlLever
Footplaterelease
button
6. Orbital control lever
7. Footplate
This saw has an orbital control with three positions that allows you to choose the best
cutting action for your material.
Position 2 is for maximum orbital action (most aggressive). In general, the “2” Position
should be used when cutting soft materials.
Position 1 is for less orbital action. In general, the “1” position should be used when
cutting hard materials
Position 0 is for normal up and down action (no orbital actions). In general, the “0”
position should be used when cutting metals.
1. To inctease the orbital action, turn the knob to a higher setting.
2. To decrease the orbital action, turn the knob to a lower setting.
16

8. Hook
Hook for conveniently should be used when hanging up the tool between work steps
9. Cutting
GENERAL CUTTING
1. Firmly hold the saw in front of you and away from you.
2. Make sure the saw blade is clear of any foreign material.
3. Make sure that the material to cut is securely supported. Small work pieces
must be securely clamped in a vise or with clamps to a workbench or table.
4. Clearly mark the line of cut.
5. Push the lock-off button to left side, then depress trigger switch to start the
cutting action.
6. Place the base assembly (shoe) against the work, then move the blade
7. Do not force. Use only enough pressure to keep the saw cutting. Let the blade and
saw do the work. Use of excessive pressure that causes bending or twisting of the
blade may result in broken blades.
PLUNGE CUTTING
1. Clearly mark the line of cut.
2. Choose a convenient starting point inside the area to be cut out,
and place the tip of the blade above that point.
3. Rest the front edge of base assembly (shoe) on the work piece
and hold it firmly in
4. Push the lock-off button to the left side, then depress the trigger
switch to start the
5. With the saw blade at full cutting speed, slowly tilt saw downward
untill tip of blade
. After the blade penetrates the work piece, tilt the saw untill the blade is perpendicular
6
to the work piece.
position.
cutting action.
starts cutting thd work piece.
into the work.
17

10. Trigger switch
To stop the saw, release the trigger switch and allow the tool to come to a complete
stop.
The electric brake quickly stops the saw blade. This feature engages automatically when
you release the trigger switch.
Use of worn cutter blade may cause damage to motor and decrease work
efficiency. Compensate or replace with new cutter blade immediately.
1. Check cutter blade
Maintenance
8
Disconnect the plug from the power supply before making maintenance.
Use of extremely dull cutter blade may cause personal injury due to the
kickback during cutting operation. Replace the cutter blade that its cutting
performance is decreased with new one.
It is very dangerous for customers to troubleshoot or repair the tool for themselves,
Contact the nearest A/S center (sales agency) and request for a service
3. What to do when the tool does not work normally
The tool and its accessories contain much raw materials and plastics that can be
recycled after their life. Therefore, plastic parts are indicated are indicated with their
material types so that they can be classified and recycled for each material type.
2. Environmental Protection
The repair shall be requested to the qualified electric speciailst.
4. Y attachment cord
If the replacement of the supply cord is necessary. this has to be done by the
manufacturer or his agent in order to avoid a safety hazard.
18

Disposal of Old Electrical & Electronic Equipment (Applicable in the European
Union and other European countries with separate collection systems)
This symbol on the product or on its packaging indicates that this product shall not be
treated as household waste. Instead it shall be handed over to the applicable
collection point for the recycling of electrical and electronic equipment. By ensuring
this product is disposed of correctly, you will help prevent potential negative
consequences for the environment and human health, which could otherwise be
caused by inappropriate waste handling of this product. The recycling of materials
will help to conserve natural resources. For more detailed information about recycling
of this product, please contact your local city office, your household waste disposal
service or the shop where you purchased the product.
19

ADVERTENCIA: Para reducir
el riesgo de lesiones, el usuario
debe leer y comprender el manual
de instrucciones antes de utilizar
este producto.
MANUAL DE INSTRUCCIONES
ORIGINAL
RS135/18L
SIERRA RECÍPROCA INALÁMBRICA
)noii-L ed aíretaB(

ADVERTENCIA: Para reducir
el riesgo de lesiones, el usuario
debe leer y comprender el manual
de instrucciones antes de utilizar
este producto.
MANUAL DE INSTRUCCIONES
ORIGINAL
SIERRA RECÍPROCA INALÁMBRICA
)noii-L ed aíretaB(
RS135/18L

¡ADVERTENCIA! Lea todas las advertencias de seguridad e
instrucciones.
El no seguir las instrucciones de advertencia puede generar descargas eléctricas,
incendios y/o lesiones severas.
Guarde todas las instrucciones y advertencias para utilizarlas como referencia a futuro.
El término "herramienta eléctrica" de las advertencias se refiere a su herramienta con
suministro regular (cables) o baterías (inalámbrica).
1) Seguridad en el área de trabajo
a) Mantenga el área de trabajo limpia y bien iluminada.
Las zonas oscuras y con aglomeraciones son una invitación para los accidentes.
b) No opere herramientas eléctricas en atmósferas explosivas, tales como en
presencia de líquidos inflamables, gases o polvo.
Estas herramientas pueden crear chispas que podrían causar una ignición del polvo o gases.
c) Mantenga alejados a niños y personas mientras esté operando una
herramienta eléctrica.
Las distracciones pueden causar que pierda el control.
2) Seguridad Eléctrica
a) Los conectores de la herramienta deben calzar con la toma de corriente.
Nunca modifique el enchufe en cualquier forma posible. No utilice adaptadores
de enchufes con herramientas eléctricas que tengan conector a tierra.
Unmodified plugs and matching outlets will reduce risk of eteclric shock.
b)Evite el contacto corporal con superficies a tierra tales como cañerías,
radiadores, cocinas y refrigeradores.
Existe un riesgo extra de sufrir descargas eléctricas cuando su cuerpo tiene conexión a tierra.
c) No exponga herramientas eléctricas a la lluvia o condiciones húmedas.
Si ingresa agua, el riesgo de descarga eléctrica será mayor.
d)No abuse del cable. Nunca use el cable para cargar, jalar o desconectar la
herramienta. Mantenga el cable lejos del calor, aceite, bordes filosos o partes
móviles.
Los cables dañados o enredados aumentan el riesgo de sufrir una descarga eléctrica.
e) Al operar una herramienta eléctrica en exteriores, utilice un cable extensor
apto para ello.
Utilizar un cable apto para exteriores reduce el riesgo de sufrir descargas eléctricas.
f) Si no puede evitar el uso de una herramienta eléctrica en un lugar húmedo,
utilice la alimentación protegida de un dispositivo de corriente residual (RCD,
por sus siglas en inglés).
El uso de un RCD reduce el riesgo de sufrir descargas eléctricas.
Advertencias de Seguridad
Generales para Herramientas
Es de suma importancia que lea
el manual antes de operar la
herramienta eléctrica por
primera vez.
Siempre guarde el manual junto
con la herramienta eléctrica.
Asegúrese de que el manual se
encuentre junto con la
herramienta cuando se la
entregue a otras personas.
Tabla de Contenidos
1. Advertencias de Seguridad Generales para Herramientas Eléctricas···3
2. Advertencias de Seguridad Específicas··········································6
3. Revisar antes de Usar································································· 7
4. Emisiones de Ruido y Vibración····················································· 11
5. Especificaciones y Lista de Contenidos··········································· 12
6. Descripción de Funciones····························································· 13
7. Instrucciones de Uso····································································· 14
8. Mantenimiento············································································· 18
[Not a ]
Ya que nuestros ingenieros se esfuerzan en constantes
investigaciones y desarrollos para mejorar la calidad de
los productos, la forma o estructura de nuestro
modelo puede sufrir cambios sin previo aviso.
2
Advertencias de Seguridad
Generales para Herramientas
¡ADVERTENCIA! Lea todas las advertencias de seguridad e
instrucciones.
El no seguir las instrucciones de advertencia puede generar descargas eléctricas,
incendios y/o lesiones severas.
Guarde todas las instrucciones y advertencias para utilizarlas como referencia a futuro.
El término "herramienta eléctrica" de las advertencias se refiere a su herramienta con
suministro regular (cables) o baterías (inalámbrica).
1) Seguridad en el área de trabajo
a) Mantenga el área de trabajo limpia y bien iluminada.
Las zonas oscuras y con aglomeraciones son una invitación para los accidentes.
b) No opere herramientas eléctricas en atmósferas explosivas, tales como en
presencia de líquidos inflamables, gases o polvo.
Estas herramientas pueden crear chispas que podrían causar una ignición del polvo o gases.
c) Mantenga alejados a niños y personas mientras esté operando una
herramienta eléctrica.
Las distracciones pueden causar que pierda el control.
2) Seguridad Eléctrica
a) Los conectores de la herramienta deben calzar con la toma de corriente.
Nunca modifique el enchufe en cualquier forma posible. No utilice adaptadores
de enchufes con herramientas eléctricas que tengan conector a tierra.
Unmodified plugs and matching outlets will reduce risk of eteclric shock.
b)Evite el contacto corporal con superficies a tierra tales como cañerías,
radiadores, cocinas y refrigeradores.
Existe un riesgo extra de sufrir descargas eléctricas cuando su cuerpo tiene conexión a tierra.
c) No exponga herramientas eléctricas a la lluvia o condiciones húmedas.
Si ingresa agua, el riesgo de descarga eléctrica será mayor.
d)No abuse del cable. Nunca use el cable para cargar, jalar o desconectar la
herramienta. Mantenga el cable lejos del calor, aceite, bordes filosos o partes
móviles.
Los cables dañados o enredados aumentan el riesgo de sufrir una descarga eléctrica.
e) Al operar una herramienta eléctrica en exteriores, utilice un cable extensor
apto para ello.
Utilizar un cable apto para exteriores reduce el riesgo de sufrir descargas eléctricas.
f) Si no puede evitar el uso de una herramienta eléctrica en un lugar húmedo,
utilice la alimentación protegida de un dispositivo de corriente residual (RCD,
por sus siglas en inglés).
El uso de un RCD reduce el riesgo de sufrir descargas eléctricas.
3
3) Seguridad Personal
a) Al operar una herramienta eléctrica, esté alerta, vigile lo que hace y utilice el
sentido común. No use una herramienta eléctrica cuando esté cansado o
bajo la influencia de drogas, alcohol o medicamentos.
Un momento de descuido al operar herramientas eléctricas podría resultar en severas
lesiones a la persona.
b) Use equipo de seguridad. Use siempre protección ocular.
Los equipos de seguridad tales como mascarillas de polvo, zapatos de seguridad anti-
deslizantes, cascos duros o protección auditiva reducirán las lesiones a la persona.
c) Prevenga el encendido no intencional. Asegúrese de que el interruptor esté
en la posición de apagado antes de conecta
baterías, tomar o transportar la herramienta.
Transportar herramientas eléctricas con su dedo sobre el interruptor o energizar
herramientas que tengan el interruptor en la posición de encendido es una invitación
a que sucedan accidentes.
Saque cualquier elemento de ajuste o llave antes de encender la herramienta.
d)
Dejar una llave unida a una parte rotatoria de la herramienta eléctrica puede causar
lesiones a la persona.
e) No se extralimite. Pise firmemente y con buen balance en todo momento.
Esto permite un mejor control ante situaciones inesperadas.
f) Use la vestimenta adecuada. No use ropa o joyas sueltas. Mantenga su
cabello, ropas y guantes le
Las prendas sueltas, joyas o cabello largo pueden quedar atrapados en las partes móviles.
jos de las partes móviles.
g) Si tiene a su disposición dispositivos para la extracción de polvo e
instalaciones de recolección, asegúrese de que estén conectados y que se
utilicen de manera correcta.
Utilizar recolectores de polvo puede reducir los riesgos relacionados al polvo.
r la fuente de energía y/o
4) Uso y cuidado de la herramienta eléctrica
a) No fuerce la herramienta. Use la herramienta correcta para lo que desea hacer.
La herramienta correcta se encargará del trabajo de mejor manera y con más seguridad
ya que fue diseñada para ello.
b) No utilice la herramienta eléctrica si el interruptor no la enciende y apaga.
Cualquier herramienta que no se pueda controlar con el interruptor se vuelve peligrosa y
ecesita reparación.
n
c) Desconecte el enchufe de la fuente de energía y/o baterías de la
herramienta antes de realizarle ajustes, cambiar sus accesorios o
guardarla.
Estas medidas de seguridad preventiva reducen el riesgo de que la
herramienta se encienda accidentalmente.
4

d) Guarde la sierra lejos del alcance de los niños y no permita que personas no
familiarizadas con la herramienta o con estas instrucciones la operen.
Las herramientas eléctricas son peligrosas en manos de usuarios que no sepan utilizarlas.
e) Cuidado de herramientas eléctricas. Verifique que las piezas estén
alineadas, que las partes móviles no estén atascadas, que no haya piezas
rotas o cualquier otro problema que pueda afectar la operación de la
herramienta. De estar dañada, repare la herramienta antes de usarla.
Las herramientas con mantenimientos deficientes causan muchos accidentes.
f) Mantenga las herramientas de corte afiladas y limpias.
Las herramientas de corte con bordes filosos bien cuidados tienden a atascarse menos y
son más fáciles de controlar.
g) Utilice la herramienta, accesorios y puntas de herramienta, etc. siguiendo
estas instrucciones, considerando las condiciones de trabajo y las
operaciones que realizará.
Usar la herramienta para operaciones que no concuerden con aquellas para las que se
diseñó puede causar una situación peligrosa.
5) Uso y cuidado de la batería
a) Recargar solo con el cargador especificado por el fabricante.
Un cargador apto para un tipo de batería puede generar riesgo de incendio si se utiliza
con otro tipo de batería.
b)Use herramientas eléctricas solo con las baterías diseñadas
específicamen
Usar cualquier otro tipo de batería puede generar riesgo de incendio y lesiones.
te para ellas.
c) Cuando la batería no esté en uso, manténgala lejos de otros objetos
metálicos como sujetapapeles, monedas, llaves, clavos, tornillos u otros
objetos metálicos que puedan establecer una conexión entre una terminal y
otra.
Unir las terminales de la batería puede causar quemaduras o un incendio.
d) Puede que durante condiciones abusivas salga líquido de la batería; evite el
contacto con dicho líquido. Si ocurre un contacto accidental, lave la zona
con agua. Si el líquido entra en contacto con los ojos, busque asistencia
médica.
El líquido de las baterías pueda causar irritación o quemaduras.
6) Mantenimiento
a) Haga que una persona calificada en reparación revise su herramienta
eléctrica, utilizando solo piezas de reemplazo idénticas a las originales.
Esto garantizará que se mantenga la seguridad de la herramienta.
5

Advertencias de Seguridad Específicas
■ Mantenga la herramienta cerca de superficies con agarre y aislación en
lugares donde el accesorio de corte pueda hacer contacto con cables ocultos.
Cuando un accesorio de corte entra en contacto con un cable "vivo" puede cargar las
piezas metálicas de la herramienta, lo cual podría causar una descarga eléctrica.
■ No use el cargador bajo la lluvia o en lugares húmedos.
El no seguir esta indicación puede causar graves lesiones o incluso muerte por descarga eléctrica.
■ No inserte cables de metal u otros objetos conductores a través de la apertura
de ventilación del cargador.
El no seguir esta indicación puede causar graves lesiones o incluso muerte por descarga eléctrica.
■ No intente desarmar el cargador, manténgalo fuera del alcance de los niños.
■ Si el cable del cargador se encuentra dañado, reemplácelo o repárelo
inmediatamente.
Usar un cargador que tenga su cable dañado puede causar una descarga eléctrica.
Una descarga eléctrica puede provocar lesiones.
■ No arroje la batería al fuego
Al entrar en contacto con fuego ardiente, la batería puede explotar debido a las altas
temperaturas y causar lesiones severas.
■ No corte las terminales de la batería
Si las terminales de la batería sufren un cortocircuito, habrá un flujo excesivo de corriente por
lo que podría provocarse un incendio o explosión, lo cual causaría graves lesiones. Cuando la
batería no esté en uso, almacénela después de montar firmemente la tapa protectora.
■ Evite impactos fuertes sobre la batería y no penetre su carcasa con objetos
puntiagudos.
Lo anterior podría provocar incendios o explosiones, lo cual causaría lesiones severas.
■ Almacene la batería en interiores, a una temperatura entre 0°C~40°C; evite
exponerla a la luz directa, calor y lugares húmedos.
Lo anterior podría provocar incendios o explosiones, lo cual causaría lesiones severas.
■ No toque la broca con sus manos mientras la herramienta esté en uso.
Cuando sus manos o dedos tocan la broca, o quedan atrapados con ella, usted puede
sufrir lesiones severas.
■ No deje a la herramienta funcionando sola.
Otros operadores cercanos a su lugar de trabajo podrían sufrir lesiones.
■ Al cambiar o utilizar la herramienta, ponga la palanca de dirección
regular/reversa en posición neutra.
El uso descuidado del interruptor puede provocar una lesión severa causada por la
parte rotatoria de la herramienta.
■ Asegúrese de que la batería esté unida firmemente al cuerpo de la herramienta
antes de comenzar a utilizarla.
Cuando la batería no esté puesta firmemente, ésta podría caerse durante el uso y
causar lesiones en la punta del pie del operador.
6

■ Cargue únicamente baterías aprobadas por Felisatti. Otros tipos de baterías
podrían explotar causando lesiones y daños a personas
■ No desarme la batería.
Armar la batería de forma incorrecta puede provocar descargas eléctricas,
electrocución o incendios.
■ Los accesorios pueden calentarse luego del uso prolongado
Al sacar las cabezas de la herramienta evite el contacto directo con la piel y utilice los
guantes protectores adecuados al tomar las cabezas o accesorios.
■ Evite que la batería se sobrecaliente.
Si se inserta una batería sobrecalentada, se indica que ésta tiene una alta temperatura por
lo que el proceso de carga puede iniciarse únicamente después de que se haya enfriado.
■ No usar la batería por un periodo de tiempo prolongado acortará su vida útil.
Si la batería se almacenará por un periodo de tiempo prolongado, cárguela completamente
antes de almacenarla. Para usar la batería por un periodo de tiempo prolongado, cárguela
cada 3 meses.
3
Revisar antes de Usar
1. Fuente de Energía
?
Observe que el voltaje principal sea el correcto. El voltaje de la fuente de poder debe ser el
mismo que el voltaje especificado en la placa.
? Por favor, verifique el voltaje indicado para el producto sea el mismo que el de la
batería.
Usar una batería con un voltaje mayor puede causar que el motor se queme y
dañe.
2. Fijación de la batería
Asegúrese de que la batería esté fijada correctamente antes de usar la herramienta.
Asegúrese de que la batería esté unida firmemente al cuerpo de la herramienta antes de
comenzar a utilizarla.Cuando la batería no esté puesta firmemente, ésta podría caerse
durante el uso y causar lesiones en la punta del pie del operador.
3. Polaridad de la batería
Por favor, verifique que la polaridad de la batería sea la misma que la del producto.
Cuando la polaridad de la batería no es la correcta, el interruptor podría trabarse.
7

4. Quitar / Instalar la hoja de la sierra
Saque siempre la batería antes de instalar y quitar la hoja de la sierra.
Palanca de la pinza para la hoja
█
CÓMO SACAR LA HOJA DE LA SIERRA
1. Saque la batería.
2. Gire la palanca de cambio de la hoja de corte en el sentido de las manecillas del
reloj.
█ CÓMO INSTALAR LA HOJA
1. Saque la batería.
2. Inserte la hoja en la pinza lo más lejos que pueda.
█ SELECCIÓN DE LA HOJA
Para obtener el mejor desempeño de la hoja, es importante seleccionar el tipo
correcto para cada aplicación y tipo de material que desee cortar. Si sigue la
instrucción anterior conseguirá que la hoja corte más rápido y tenga una vida útil
más larga.
INCORRECTO
8
INCORRECTO CORRECTO
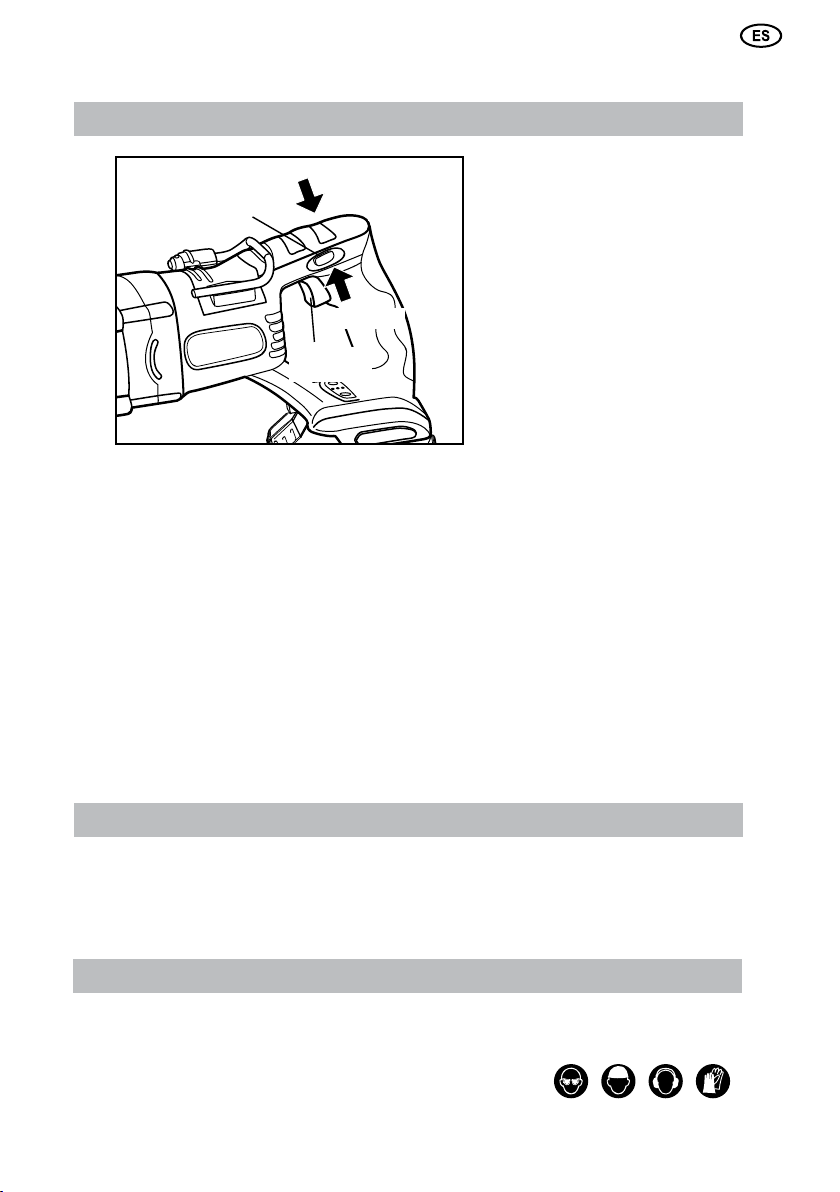
5. Bloqueo del interruptor
Botón de Bloqueo
del Interruptor
DESBLOQUEADO
BLOQUEADO
Interruptor del
gatillo
█ BLOQUEO DEL INTERRUPTOR
1. Para ENCENDER la sierra, presione el botón de bloqueo hacia el lado izquierdo y luego
pulse el gatillo.
2. Para APAGARLA, suelte el interruptor del gatillo, presione el interruptor del gatillo y
presione el botón de bloqueo hacia el lado derecho del interruptor de bloqueo del gatillo.
NOTA: El botón de bloqueo del interruptor se puede activar únicamente al soltar el gatillo.
█ VELOCIDAD VARIABLE
El interruptor del gatillo de velocidad variable entrega una mayor velocidad al ejercer más
presión sobre el gatillo y una menor velocidad al realizar el acto contrario.
█ FRENO ELÉCTRICO
Para detener la sierra reciprocante, suelte el interruptor del gatillo y deje que la
herramienta se detenga por completo. El freno eléctrico detiene la sierra rápidamente.Esta
característica se activa automáticamente al soltar el interruptor del gatillo.
6. Asegurar y darle soporte a la pieza de trabajo
█ Use prensas u otros equipos para asegurar y apoyar la pieza de trabajo.
Sostener la pieza de trabajo en sus manos o contra su cuerpo puede hacerle
perder el control. Es importante apoyar la pieza de trabajo adecuadamente para
minimizar la exposición corporal, atascamientos de la sierra o pérdida de control.
7. Uso de prueba
Antes de comenzar a trabajar, póngase todas las protecciones necesarias (antiparras,
guantes protectores) y encienda la herramienta en una dirección que impida que otras
personas puedan ver si ésta funciona normalmente.
9

8. Explicación símbolos o pictogramas en la herramienta
Santiago Lopes
Jordi Carbonell
que son importantes para un uso seguro
Use antiparras Use casco de seguridad Use tapones para oídos Use guantes protectores
Max. 50
Devuelva el material de
desecho
V - Volts
V - Corriente Directa
Si la temperatura de la
batería está sobre 50°C,
ésta puede causar
daños
No incinere la batería No bote las baterías
n
V - Sin velocidad de carga
o
junto con la basura
común y corriente.
/min - Revoluciones o
reciprocaciones por minuto
- Construcción Tipo II
~ - Corriente alterna
Declaración de conformidad EC
Declaramos que estos productos cumplen con los siguientes estándares:
EN 60745-1, EN 60745-2-11, EN 60335-1, EN 60335-2-29, EN 55014-1, EN 55014-2,
EN 61000-3-2 y EN 61000-3-3 (Categoría II)
en cumplimiento de las directivas 2006/95/EC, 2006/42/EC, 2004/108/EC.
10
 Loading...