

FEC
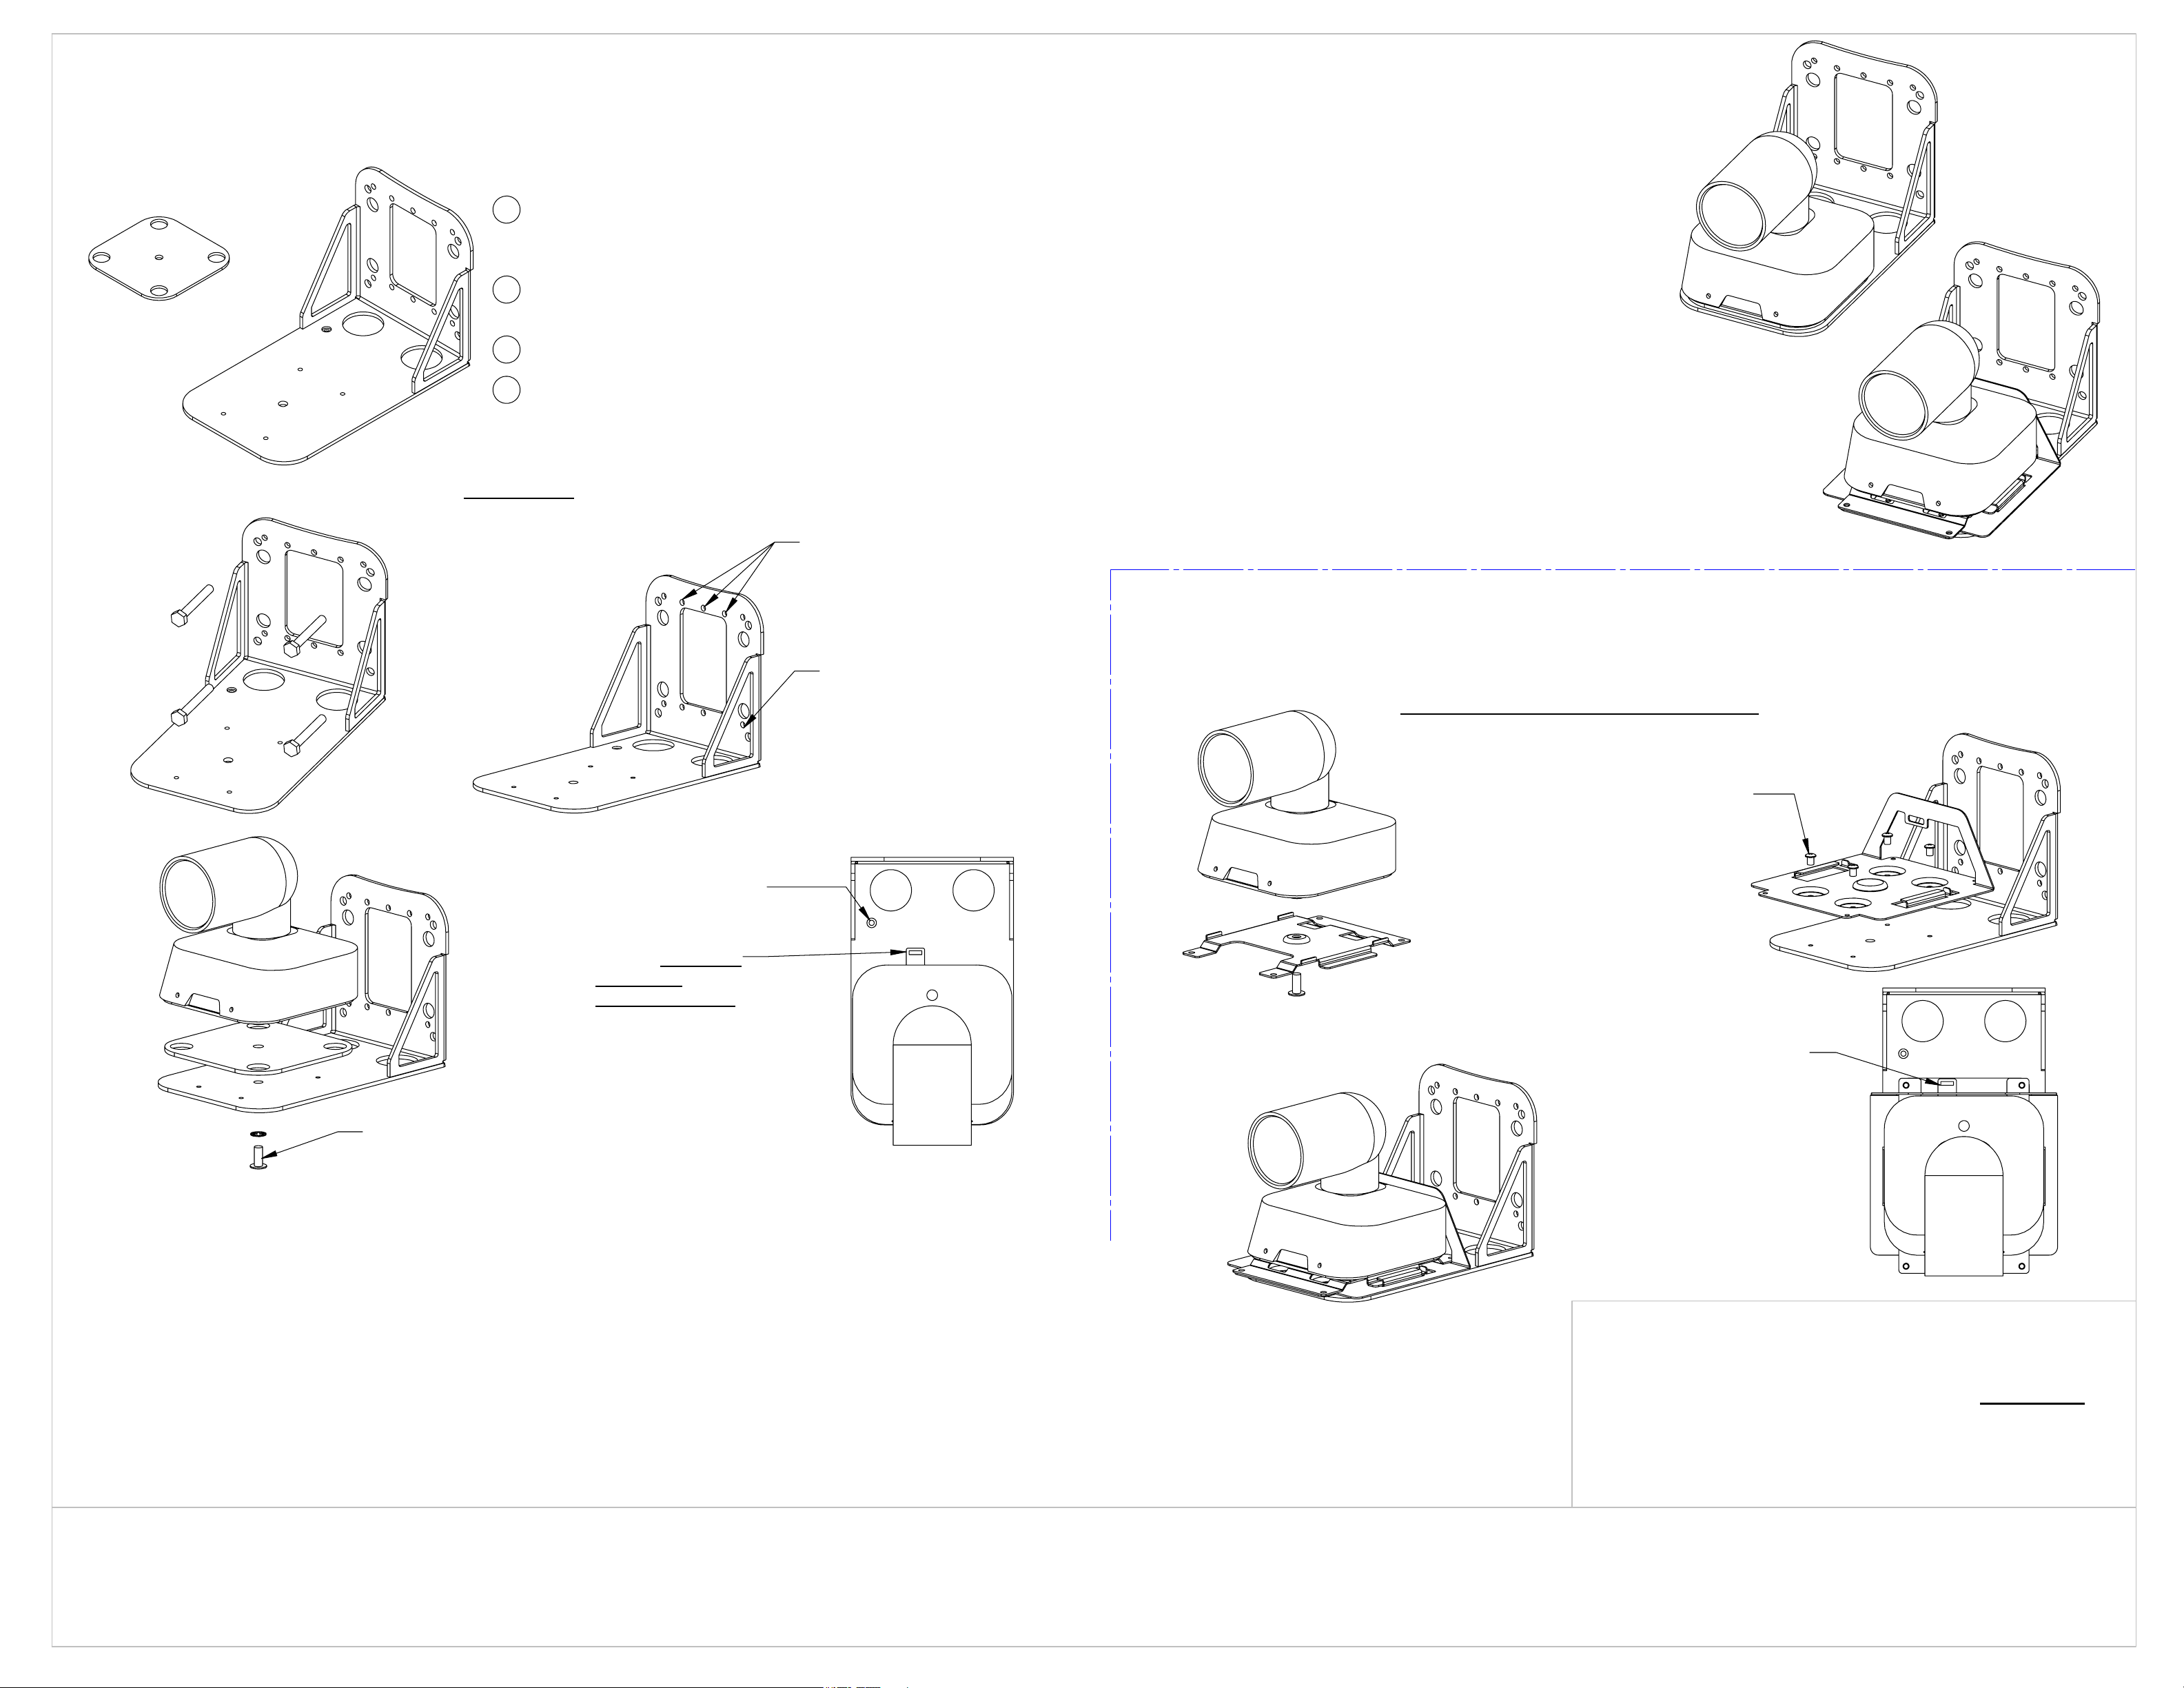
MODEL FEC-4WMK/W FOR PANASONIC AW-UE4 PTZ CAMERA
SPACER
MOUNT
SPACER
8.09" LONG
4.91" WIDE
5.20" TALL
STEP 1
LAG BOLT
"INSTALLATION
WALL MOUNT
MOUNT BRACKET TO WALL USING APPROPRIATE HARDWARE THROUGH THE .25" MOUNTING HOLES.
1
USE 1/4 x 2 1/2" LAG BOLTS FOR WOOD WALL STUDS. ROUTE CABLES THROUGH WIRE MANAGEMENT PORTS.
(MAKE CERTAIN THAT MOUNTING METHOD IS SECURE AND FOLLOWS ACCEPTED NORMS FOR THIS APPLICATION)
AS AN OPTION, THE WALL BRACKET MAY ALSO BE ATTACHED TO A 1 GANG, 2GANG OR 4" SQUARE EO BOX.
2
(DO NOT USE EO BOX AS SOLE SUPPORT. WALL MOUNT BRACKET MUST BE SECURED WITH SUFFICIENT SIZE SCREWS
THROUGH THE .25" DIAMETER. MOUNTING HOLES.)
3
MOUNT SPACER AND CAMERA WITH (1) 1/4-20 SCREW AND LOCKWASHER
4
FINISH SECURING CAMERA TO MOUNT WITH DROP PREVENTION WIRE PER CAMERA INSTRUCTIONS
WITHOUT
STEP 2
INS
TRUCTIONS FOR INSTALLATION WITHOUT PANASONIC QUICK RELEASE PLATE
PANASONIC QUICK RELEASE PLATE"
HOLE SET FOR
ATTACHING TO
1 & 2 GANG
EO BOXES
:
"
CAMERA
CEILING
KIT
MOUNT
INSTALLATION WITH PANASONIC QUICK RELEASE PLATE"
STEP 3
SAFETY NOTE:
NOTE:
MANUAL
INSTRUCTIONS
THIS IS WHERE
DROP PREVENTION
WIRE ATTACHES
(SHIPS WITH CAMERA)
ALIGN SPACER &
CAMERA OVER CENTER
HOLE ON MOUNT. ATTACH
WITH (1) 1/4-20 SCREW &
LOCKWASHER
4MM
THREADED
INSERT
FOLLOW
HOLE SET FOR
ATTACHMENT TO
4" SQUARE EO BOX
STEP 4
THESE VIEWS ARE FOR REFERENCE IF ATTACHING PANASONIC
CEILING KIT TO THE WALL MOUNT WITH PANASONIC HARDWARE.
FOLLOW THE MANUAL INSTRUCTIONS
ONLY CHANGE SHOWN HERE IS TO SECURE "L" BRACKET
WITH (4) 8-32 SCREWS PROVIDED WITH KIT.
ATTACH BRACKET
WITH (4) 8-32 X 1/4"
SCREWS
"L" MOUNT
TO WALLMOUNT
ONLY USE PANASONIC
SUPPLIED 5MM BOLT
TO ATTACH PLATE
REFER TO CAMERA
INSTRUCTIONS
THIS IS WHERE
DROP PREVENTION
WIRE ATTACHES
- Before beginning the installation, it is very important to examine the unit for damage, defects and correct hardware.
- The Installation instructions must be read and entirely understood prior to install.
- It must be determined that the mounting surface is capable of supporting the mount and equipment.
- The Professional Installer must determine the proper way to attach the WALL BRACKET MODEL
- The installation of the mount and equipment is dependent on proper/secure attachment and is the responsibility of the installer.
- Make sure wall will support 4 times the combined weight of Equipment and Wall Mount.-
- This mount should be attached to wood studs only. Under no circumstances should this product be mounted to metal studs, unless an installation professional
deems they have been adequately reinforced and will support 4 times the combined weight of Equipment and the Wall Mount.
- Please use only the bolts supplied with the unit or bolts of the correct size, making sure the hardware used is tightened properly for a secure installation..
- The WALL BRACKET MODEL is only intended to be used with the equipment listed on the install sheet. It is not meant to be used with any other equipment.
- If at anytime, a question arises regarding this installation (or regarding the safety or integrity of the projected use) cease the installation
and either obtain the advice of another qualified installer or contact FEC.
FEC
GLEN COVE, NY 11542
5 BREWSTER ST.
PHONE: (516) 967-9565
fecrack@ix.netcom.com
XXXX
SLIDE CAMERA ASSEMBLY
INTO "L" MOUNT SECURE
WITH (4) M4 SCREWS
HARDWARE:
(4) 1/4" X 2 1/2" HEX HEAD LAG BOLT
(4) 8-32 X 1/4" PHILLIPS PAN HEAD SCREW
HARDWARE BELOW FOR INSTALL
WITHOUT
PANASONIC QUICK RELEASE ASSEMBLY
(1) SPACER
(1) 1/4-20 X 1/4" SCREWS
(1) 1/4" LOCK WASHER
P/N 23531
03-20-20
06-04-20
C10-5191
 Loading...