


SECTION 1.
Introduction:
Why and how do we use MIDI Controllers? What are Zones? Uses and Applications.
Congratulations on your new purchase of the SL-161/SL-61 Studio Logic Master Controller by FATAR. In this manual we will explain the concepts and techniques of using Master MIDI Controllers to greatly expand your flexibility, creativity, control and productivity in your live or studio keyboard setup. Whether you are using one multi-timbral sound module or a rack full of them, this Master Controller Keyboard and all the other Studio Logic Controllers by FATAR will greatly expand your professional and creative abilities.
The |
concept of a controller is |
to centralize your accessibility |
to your MIDI modules. It gives |
you |
a central point of control |
over your slave modules in a |
given setup. |
Have you ever tried to line up patches in your sound modules so that when you selected a patch on your keyboard your other sound modules called up the right patch? Ever tried to locate a patch position to write over a sound that you hopefully won't need later? Tired of bending down to squint and see the display and program a module at the bottom of your rack? All of these scenarios are greatly reduced when using a Master Controller.
The concept of ZONES, SPLITS and LAYERS is as follows:
A ZONE consists of a specified range of keys on your keyboard. That range of notes is assigned parameter messages that are communicated to your slave module(s), this reduces the need to write and store patches on your module. These parameters may consist of the following information: patch number, volume setting, velocity curve, transposition value, pedal enable, wheels enable, etc.... When a patch is selected on your Master Controller all of this information is sent to your modules instantly. The Studio Logic SL-161/SL-61 Master Controller by FATAR has two (2) completely independent zones, meaning each zone can transmit all of its own information on any given MIDI channel. The range of notes in each zone can be setup to be adjacent to another ZONES range of notes ( one ZONE ends, going up the keyboard, as another ZONE starts) or assigned to overlap each other or any part of each other's ranges. Thus we introduce the concept of LAYERS and SPLITS.
A SPLIT is when one ZONE'S range of notes ends and another ZONE'S begins. A simple example would be Bass in the left hand and Piano in the right hand. A ZONE'S range of notes can be any amount of consecutive notes regardless of where another ZONE'S notes begin. When two or more ZONE'S range of notes overlap we call this a LAYER.
LAYERS are the way we can build fat lush patches using the full potential of what your synths and modules have to offer. Let's say we have a big pop ballad that needs your special touch? We want to create a "Pad Piano" sound to cover the song. Assign each ZONE to cover the entire keyboard's range of notes. Using the two ZONES, assign each of them to play a different
patch: (1) dark rich Electric Piano, (2) slow |
attack String |
Pad |
|
with the release rate up slightly. If one or more patches are |
not in the same octave |
as |
the |
others it's easy to fix. Go to that ZONE'S transpose feature and |
move it up or down 12 |
steps |
|
to line it up properly with the others. Something sounds a little mushy when playing Piano parts using the SUSTAIN PEDAL? Try going to the ZONE for the "non Piano" sound and experiment with disabling the SUSTAIN PEDAL for that zone. Within moments you should have a deep, rich, rather large and musically useful sounding patch to use on your ballad.
Are you beginning to see the possibilities here? Please step inside the manual and we'll take
you through the simple yet versatile features of the Studio Logic 610 Master Controller by FATAR.
SECTION 2.
Features:
A guided tour through the Studio Logic 161/61's Controls and Features,
THE KEYBOARD
The Studio Logic 161/61 has a 61 key FATAR semi-weighted piano action. It is a new, improved version of the classic FATAR action. It is an extremely musical feeling piano style action that has a very dynamic yet quick response to it. The velocity sensitive action can be modified with several VELOCITY CURVE response settings that will be discussed later in this manual. The 61 key action of the SL-161/SL-61 will transmit channel AFTERTOUCH on all ZONES.
THE WHEELS
The PITCH and MODULATION WHEELS are the standard style, however, they are made with a new rubberized texture. They have been designed to give the player a more solid tactile sensation during performing and programming for a more musical response.
THE ZONES
The SL-161/SL-61 |
has (2) |
two independent ZONES with each of them capable of being assigned |
to any range |
of keys |
across the SL-161/SL-61's keyboard. As discussed in the introduction to this |
manual, the ZONES are the heart of creating musically useful Layers and Splits. Each of the (2) ZONES consists of:
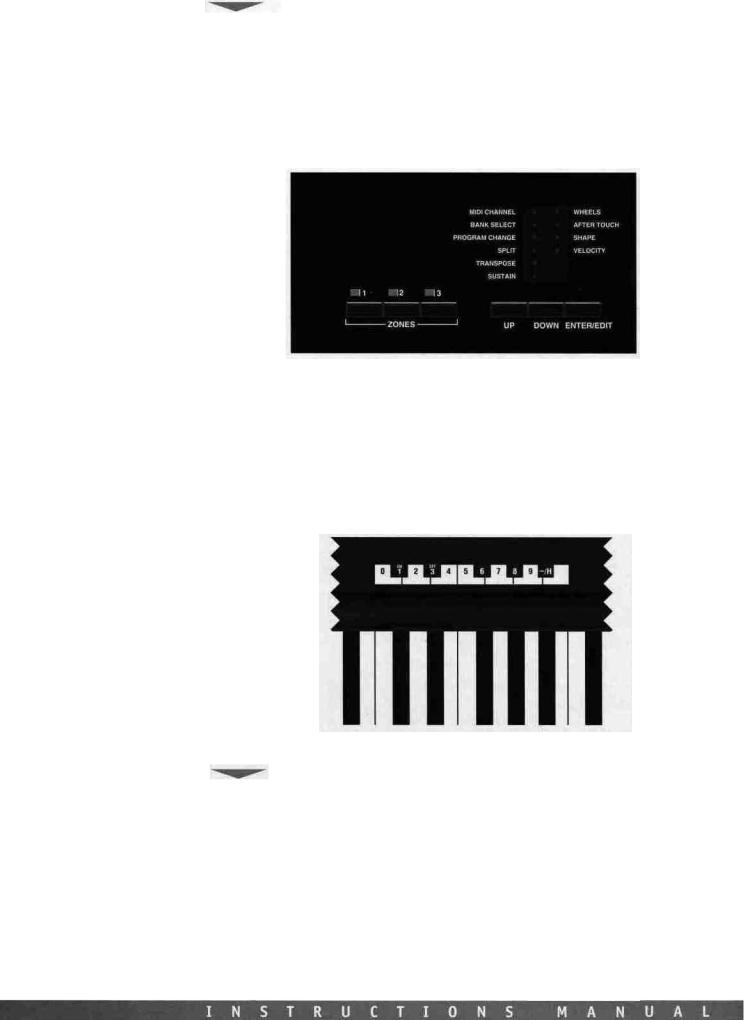
1. ZONE ENABLE/DISABLE BUTTON: Located on the front panel above the keyboard itself.
These are used to turn the ZONES on and off in PERFORMANCE mode. Each switch functions independently of each other. In other words, you can have any combination of ZONES on or off at any point by accessing these ZONE switches.
While in EDIT mode, the ZONE BUTTONS are used to select the desired ZONE to be edited. While editing, only one ZONE at a time can be selected and the buttons now toggle on and off as you select each ZONE SWITCH for editing.
2.MIDI CHANNEL SELECT: While in EDIT mode each ZONE can be set to transmit on any of the 16 MIDI channels available. Only one MIDI channel can be transmitted at a time per ZONE.
3.BANK SELECT: After selecting a MIDI channel to transmit on, and while in EDIT mode, you can initiate or select BANK Changes. The commands are different depending on the external sound module you are accessing. More on BANK SELECT later in this manual.
4.PROGRAM CHANGE: Patch selection can be made for each ZONE while in the EDIT mode.
Each ZONE can be set to select (send) patch changes 1 to 128 (some manufacturers use a numbering scheme 0 to 127, so you may need to add (1) to each patchtt to achieve the desired results).
5. SPLIT or KEY NOTE RANGE: This edit function allows you to select the range of active notes (keys) for each ZONE. The ZONES are completely independent of each other and their split points can overlap thus creating LAYERS.
6 .TRANSPOSE: Each ZONE can be set to transpose its key range up or down 24 semitones. In other words, up or down 2 octaves from the synth module's original setting.
7 .SUSTAIN PEDAL ENABLE / DISABLE SELECT: You can set each ZONE to respond or not respond to sustain pedal information. This is done in the EDIT mode for each ZONE.
8.WHEELS ENABLE / DISABLE SELECT: You can set each ZONE to respond or not respond to PITCH and MODULATION WHEEL information. This is done in the EDIT mode for each ZONE.
9.AFTERTOUCH ENABLE / DISABLE SELECT: You can set each ZONE to respond or not respond CHANNEL AFTERTOUCH information. This is done in the EDIT mode for each ZONE.
10.SHAPE: Velocity curve settings specific to each ZONE. These setting will alter the way velocity information from the keyboard will be transmitted to the receiving MIDI channel. There are 8 preset velocity curves to choose from that vary the dynamic response of the keyboard. Again, these settings are specific to each ZONE and are accessed while in the EDIT mode.
GLOBAL VELOCITY CURVE: This VELOCITY CURVE setting is a global one, meaning it affects the dynamic response of the entire keyboard across all (2) ZONES. There are 8 global settings to choose from. Again, these setting are accessed while in the EDIT mode.
SUSTAIN PEDAL: The Studio Logic SL-161/SL-61 has a connection jack on the rear panel for a SUSTAIN PEDAL input. The VP-26 by Fatar is recommended.
VOLUME PEDAL: The Studio Logic SL-161/SL-61 has a connection jack on the rear panel for a standard VOLUME PEDAL input.
POWER INPUT: The Studio Logic SL-161/SL-61 has a connection jack on the rear panel for the supplied POWER SUPPLY input.
MEMORY STORAGE: The Studio Logic SL-161/SL-61 will remember all of your preset information when powered down. All programmed settings are transmitted when the unit is powered up. There is no need to store edited information, simply exiting the edit mode causes the information to be stored.
SECTIONS.
Rear Panel Connections and Features:
Powering up. Connecting Pedals and hooking up with your other gear.
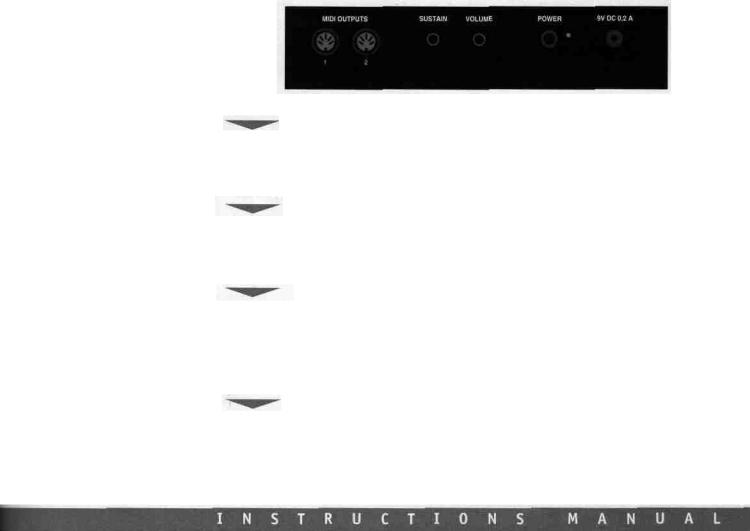
POWER INPUT
The Studio Logic SL-161/SL-61 has a connection jack on the rear panel for the AC POWER SUPPLY INPUT. The AC adapter POWER SUPPLY supplied with this unit is a positive tip 9V DC with a minimum current of 200 mA.
POWER SWITCH
The Studio Logic SL-161/SL-61 has its POWER SWITCH located on the back panel next to the POWER SUPPLY INPUT. There is also a red LED to indicate the unit is on. Upon powering up the keyboard all preset data is transmitted out through the MIDI OUT connections.
SUSTAIN PEDAL
The Studio Logic SL-161/SL-61 has a connection jack on the rear panel for a SUSTAIN PEDAL input. This jack will function properly with either type of "normally closed" or "normally open" SUSTAIN PEDALS. Upon powering up the Studio Logic SL-161/SL-61 will recognize whichever type of pedal is presently connected to the keyboard, regardless of polarity (e.g. PS100 or VFP1). Note:
SUSTAIN PEDAL must be plugged in prior to powering up to properly sense polarity.
VOLUME PEDAL
The Studio Logic SL-161/SL-61 has a connection jack on the rear panel for a standard VOLUME PEDAL input that uses a stereo or balanced jack (e.g. VP-26 by Fatar). This volume control will change the volume equally across all four ZONES simultaneously.
MIDI OUT CONNECTIONS
MIDI OUT Connections: The MIDI OUT jacks are where you connect your Studio Logic SL-161/SL-61 Master Controller to your various MIDI sound sources. Using a standard 5 pin DIN MIDI cable, connect the Studio Logic MIDI OUT to your MIDI input jack on your synthesizer, sound modu-
le or other MIDI equipped |
keyboard. You may use the THRU |
(daisy chain) feature on your MIDI |
|||
gear to connect to |
other MIDI |
modules |
if you like. Avoid |
daisy chaining more than 2 modu- |
|
les, if possible, to |
reduce |
the |
possibility |
of MIDI log jam |
or timing delays. The Studio Logic |
SL-161/SL-61 conveniently is supplied |
with two parallel (identical) MIDI |
OUT jacks on the rear panel |
to help reduce the possibility of timing delays when connecting to |
multiple MIDI sound modu- |
|
les. When connecting multiple |
devices to your SL-161/SL-61 allocate |
them equally across the two |
MIDI OUT connections on this |
keyboard. |
|
SECTION 4.
Description of Front Panel Controls and Features:
What are they, what do they do and how do I use them?
ZONE SELECT
Located on the top panel there are the (2) ZONE buttons for the (1) enabling and disabling of the three keyboard ZONES while in play mode and (2) selecting the ZONES while in EDIT MODE. The LED indicators will be lit up when its corresponding zone is active or selected for editing.
In PLAY mode any combination of ZONES may be on or off at any point in time. However, in EDIT mode the ZONE switches may only be used to select one ZONE at a time. Only one ZONE at a time may be edited and therefore only one ZONE light may be lit at a time while in EDIT mode. You are able to jump from ZONE to ZONE while in edit mode by depressing the corresponding ZONE BUTTONS.
Please note that you may only press a zone button and disable or^nable a zone while no notes are depressed on the keyboard or while the sustain pedal is being depressed.
 Loading...