

Page 1
Leaf Blower
OWNER’S MANUAL
Model PT205HA
120V., 60Hz., 12 Amps
COPYRIGHT© FANTOM 2006
CAUTION
Before using this Leaf
Blower, read this manual
and follow all its Safety
Rules and Operating
Instructions.
FANTOM, 94 Main Mill Street, Door 16, Plattsburgh, N.Y. 12901
• Safety Instructions
• Accessories
• Assembly
• Operation
• Maintenance
Tel.: 1 (800) 275-9251
Page 2

Model
PT205HA
ONE (1) YEAR LIMITED WARRANTY
FANTOM warrants this product to be free from defects in material and workmanship for a period
of one (1) year from the date of the original purchase, when utilized for normal household use,
subject to the following conditions, exclusions and exceptions.
If your appliance fails to operate properly while in use under normal household conditions within
the warranty period, return the complete appliance and accessories, freight prepaid to:
FANTOM, 94 Main Mill Street, Door 16, Plattsburgh NY 12901
If the appliance is found by FANTOM to be defective in material or workmanship, FANTOM will
repair or replace it free of charge. Proof of purchase date must be included. *
Non-durable parts including, without limitation, blades and electrical parts which normally require
replacement are specifically excluded from warranty.
The liability of FANTOM is limited solely to the cost of the repair or replacement of the unit at our
option. This warranty does not cover normal wear of parts and does not apply to any unit that has
been tampered with or used for commercial purposes. This limited warranty does not cover
damage caused by misuse, abuse, negligent handling or damage due to faulty packaging or
mishandling in transit. This warranty does not cover damage or defects caused by or resulting
from damages from shipping or repairs, service or alterations to the product or any of its parts,
which have been performed by a repair person not authorized by FANTOM.
This warranty is extended to the original purchaser of the unit and excludes all other legal and/or
conventional warranties. The responsibility of FANTOM if any, is limited to the specific obligations
expressly assumed by it under the terms of the limited warranty. In no event is FANTOM liable
for incidental or consequential damages of any nature whatsoever. Some states do not permit the
exclusion or limitation of incidental or consequential damages, so the above may not apply to
.
you
This warranty gives you specific legal rights, and you may also have other rights which vary from
state to state.
*Important: Carefully pack item to avoid damage in shipping. Be sure to include proof of
purchase date and to attach tag to item before packing with your name, complete address
and phone number with a note giving purchase information, model number and what you
believe is the problem with item. We recommend you insure the package (as damage in
shipping is not covered by your warranty). Mark the outside of your package “ATTENTION
CUSTOMER SERVICE”. We are constantly striving to impro ve our products, therefore the
specifications contain ed her ein are subject to change without noti c e.
------------------------------------------------------------------------------------------------
OWNERSHIP REGISTRATION CARD
Please fill out and mail the product registration card within ten (10) days of purchase. The
registration will enable us to contact you in the unlikely event of a product safety notification. By
returning this card you acknowledge to have read and understood the instructions for use, and
warnings set forth in the accompanying instructions.
RETURN TO FANTOM: 94 Main Mill Street, Door 16, Plattsburgh, NY 12901
Model PT205HA
_____________________________________________________________________
Appliance model
_____________________________________________________________________________
Date purchased Name of store
_____________________________________________________________________________
Owner’s name
_____________________________________________________________________________
Address City State Zip Code
Printed in China
13
Page 3
TROUBLESHOOTING
SAFETY & WARNING INSTRUCTIONS
TROUBLESHOOTING GUIDE
SYMPTOM CAUSE REMEDY
1. Switch in the OFF
Unit fails to operate
Unit vibrates
abnormally
Impeller will not turn
freely
position.
2. Extension cord
disconnected
3. Circuit breaker
tripped, or fuse blown.
4. Mechanical failure.
1. Mechanical failure.
2. Blockage to parts.
1. Debris in air intake
area.
2. Mechanical failure.
1. Move switch to ON position.
2. Reconnect extension cord.
3. Reset circuit breaker or fuse.
4. Contact Customer Service at
1 (800) 275-9251.
1. Contact Customer Service at
1 (800) 275-9251.
1. Inspect unit for blockage.
1. Unplug and clear unit of debris.
2. Contact Customer Service at
1 (800) 275-9251.
WARNING! THIS MACHINE CAN CAUSE SERIOUS INJURIES. When
using electric gardening appliances basic safety precautions should always be
followed to reduce the risk of fire, electric shock and personal injury. The warnings and
safety instructions in this manual must be followed to provide reasonable safety and
efficiency in using this unit. Carefully read and understand the entire owner’s manual
before using your Leaf Blower. Be thoroughly familiar with the controls and the proper
use of this unit. Restrict the use of this unit to persons who read, understand and follow
unit and manual instructions and warnings. Pay close attention to the Operating
Instructions and Safety Warnings.
READ ALL INSTRUCTIONS BEFORE USING
1. Wear safety glasses or goggles
that are marked as meeting ANSI
Z87.1 standards and ear/hearing
protection when operating this unit.
wear a face or dust mask if the job is
dusty.
2. Do NOT leave the leaf blower plugged
in. Unplug from electrical outlet when
not in use, changing from blower to
vacuum, if the appliance starts to
vibrate abnormally, during
maintenance or before servicing.
3. Only operate this unit in natural
daylight or good artificial light.
4. Avoid dangerous environments. Never
operate your unit in damp or wet
conditions. Moisture is a shock hazard.
Avoid using near pools, hot-tub areas,
etc.
5. Do NOT use the leaf blower in the
rain.
6. Do NOT handle the unit with wet
hands.
7. Use the right tool for the right
job. Use the unit only as described in
this manual. Do NOT use for any job
except that for which it is intended.
This unit is intended for household use
only.
8. Always direct the extension cord to
the rear of the leaf blower. Ensure
that it is firmly attached to the rear
power cord hook.
9. Inspect the area to be cleared before
each use. Remove all objects such as
rocks, sticks, gravel, or other debris
that can ricochet and cause injury.
10. Do NOT unplug by pulling on the
power cord. To unplug, grasp the
plug, not the cord.
11. Keep hair, loose clothing, fingers and
parts of the body away from openings
and moving parts.
12. Do NOT allow to be used as a toy.
Close attention is necessary when
used by or near children.
13. Inspect all extension cords and the
unit power connection periodically.
Look closely for deterioration, cuts or
cracks in the insulation. Also inspect
the connections for damage.
Replace the cords if any defects or
damage appear.
14. Risk of cuts. Keep hands away from
impeller. Keep both hands on handles
when power is on.
12
WARNING: The operation of any leaf blower can result in
foreign objects being thrown in the eyes. This can lead to severe
eye damage. Before commencing power tool operation always
wear safety glasses or goggles that are marked as meeting ANSI
Z87.1 standards and a full face shield when needed.
SAVE THESE INSTRUCTIONS
For Household Use Only
1 Rev. 06/06
Page 4

SAFETY & WARNING INSTRUCTIONS
15. Before each use, thoroughly inspect
your unit for loose or damaged parts.
Do NOT use until adjustments or
repairs have been made.
16. All attachments must be installed
properly before operating the unit,
such as debris collector bag.
17. Keep all bystanders especially pets
and children at least fifty (50) feet
from the unit while using.
18. To avoid unintentionally starting of
the unit, do NOT carry plugged-in
unit with your finger on the switch.
Be sure the unit is unplugged.
19. Always remain alert and use common
sense when using this unit. To
prevent injury to yourself and to
others, NEVER use the leaf blower
when your are tired.
20. Do NOT operate this unit while under
the influence of drugs, alcohol or
medication.
21. Do NOT over reach or use the leaf
blower from unstable surfaces such
as ladders, trees, steep slopes,
rooftops, etc. Keep proper footing and
balance at all times.
22. Wear heavy, long pants, boots, gloves
and a long sleeve shirt. Do NOT wear
loose clothing, jewelry, short pants
sandals or go barefoot. Secure hair
above shoulder level.
23. Always turn switch off when
vacuuming or blowing is delayed or
when changing locations. Always
inspect new locations before
operating.
24. To reduce the risk of electrical shock,
use only with an extension cord
intended for outdoor use such as
SW-A, SOW-A, STW-A, STOW-A,
SJW-A, SJOW-A, SJTW-A or
SJTOW-A.0
25. Ground Fault Circuit Interrupter
(GFCI) protection should always be
provided on electrical circuits or
outlets to be used for this unit.
26. To reduce the risk of electrical shock,
use only with a two conductor
extension cord intended for outdoor
use.
27. Never connect the unit to an AC
voltage that differs from the one on
the unit’s rating plate.
28. To reduce the risk of electrical shock,
this unit has a polarized plug (one
blade is wider than the other) and will
require the use of a polarized
extension cord. This unit plug will fit
into a polarized extension cord only
one way. If the plug does not fit,
obtain a correct polarized extension
cord. A polarized extension cord
requires the use of a polarized wall
outlet. This plug will fit into a polarized
wall outlet only one way. If the plug
does not fit, contact a qualified
electrician to install the proper wall
outlet. Do NOT change the unit plug,
extension cord receptacle or
extension cord plug in any way.
29. When using an extension cord, make
sure that it is a cord that is heavy
enough to carry the current that your
unit will draw. An undersized
extension cord will cause a drop is
line voltage resulting in loss of power
and overheating. The table below
shows the correct size to use
depending on the cord length and
amperage rating.
WARNING
To reduce the risk of electrocution,
keep all connections dry and off the
ground. Do NOT touch the plug with
wet hands.
AMPERAGE
RATING
1-12 AMPS 18 16 14 12
30. Keep impeller clean of vegetation
and other foreign materials.
Cooling air inlets may become
clogged with debris. Overheating
the unit can increase risk of fire or
injury.
31. When using the unit, always hold
the unit with both hands. Keep a
firm grip on the front handle and
on the top handle.
Extension Cord Length
25' 50’ 100’ 150’
WIRE SIZE (AWG)
OPERATING INSTRUCTIONS
Emptying the Vacuum Bag
WARNING: To avoid serious personal
injury, turn the leaf blower to the “Off”
position and unplug from the power
source before removing the vacuum bag.
Note: Empty the vacuum bag after each
use to avoid deterioration and obstructing
the air flow, which will reduce the
performance of the leaf blower.
Warning: Always wear eye protection
and a dust mask when emptying the
vacuum bag.
1. Turn off and unplug the unit from
power source. Wait until all parts
stop moving.
2. Unzip the bag over a receptacle for
debris, such as a garbage bag, or
compost bin. (Fig. 20)
3. Gently shake bag to ensure it is
empty. (Fig. 21)
4. Zipper must be closed to the end to
ensure bag will not leak or throw
objects. (Fig. 22)
MAINTENANCE
Removing Debris from Blocked
Tube/Impeller
1. Turn the unit to the “Off” position and
unplug the leaf blower from the power
source. Wait for all moving parts to stop.
2. Remove the vacuum bag and
blower/vacuum tube.
3. Carefully remove the material blocking
the impeller or blower/vacuum tube.
Rotate the blades by hand to assure
that the blockage has been completely
cleared.
4. Check the impeller for any signs of
damage. If damage to any parts have
occurred contact customer service at
1 (800) 275-9251.
5. Reinstall the blower/vacuum tube and
the vacuum bag.
6. Reconnect to power source and resume
use.
Cleaning Bag and Tubes
Best performance is achieved with proper
cleaning and maintenance.
1. Unplug unit from power source, and
ensure all parts have stopped moving.
2. Empty bag according to instructions on
page 11.
Fig. 20 Fig. 21
Fig. 22
Caution: Do NOT store debris
in bag, this could cause damage
to the fabric, leading to further injury or
damage to the unit.
Note: Check bag frequently for wear.
Small tears in bag will easily enlarge. If
bag shows signs of wear replace only
with bag suggested by manufacturer.
3. To clean bag, turn inside out and
hose down the bag.
4. Air dry for 24hrs.
5. Do NOT install onto unit until bag is
completely dry.
6. To clean tube, remove from unit first,
then use a hose to clear grass or
leaves stuck inside of tube.
Warning: Never douse or squirt
motor with water or any other liquid.
Keep handles and tubes dry, clean and
free from debris.
Storage of Leaf Blower
1. Store unit and extension cord indoors.
2. Keep out of reach of children.
3. Tube can be stored upright after
assembly, however ensure that
there are no sharp objects that can
damage the tube.
4. Do NOT store tube under any other
items. This can cause permanent
dents in the tube.
2
11
Page 5

OPERATING INSTRUCTIONS
Using your Leaf Blower as a
Blower
1. Ensure that proper clothing is worn
and safety. glasses are used.
2. Set the blower/vacuum selection
lever to the blower mode. (Fig. 17)
3. Place the shoulder strap over your
head and onto your shoulder.
Adjust the length as instructed on
page 7.
4. Hold the leaf blower securely with
both hands.
5. Sweep from side to side with the
nozzle several inches above the
ground. Slowly advance, keeping
the accumulated debris pile in front
of you. (Fig. 18, Fig. 19)
Blower Mode
Vacuum Mode
Blower/Vacuum
Selection Lever
Fig. 18 Fig. 19
Fig. 17
Using your Leaf Blower as a
Vacuum
Your leaf blower can be used as a
vacuum to pick up dry material such as
leaves, grass, small twigs, sawdust or
bits of paper.
Do NOT use to vacuum up stones,
gravel, metal, broken glass etc, as this
could cause damage to impeller, or the
operator and bystanders if these objects
propelled through the bag.
1. Ensure that proper clothing is worn
and safety. glasses are used.
2. Set the blower/vacuum selection
lever to the vacuum mode. (Fig. 17)
3. Place the shoulder strap over your
head and onto your shoulder.
Adjust the length as instructed on
page 7.
4. Hold the leaf blower, tilting the
blower/vacuum tube slightly and
using a sweeping motion to collect
light debris. Small leaves and twigs
will flow into the vacuum bag and be
mulched as they pass through the
fan housing, allowing the vacuum
bag to hold more debris. Avoid
forcing the leaf blower into a pile of
debris as this can block the unit or
the blower/vacuum tube.
Note: If the leaf blower starts to vibrate
or make an abnormal sound, turn the unit
“Off”, unplug from power source and
check for the cause.
Warning: Do NOT use the leaf
blower to spread fertilizer or clear
any kind of powdered or dangerous
chemicals. This is highly dangerous and
could cause serious harm to the operator
and environment.
SAFETY & WARNING INSTRUCTION
32. The unit will continue to run for a few
seconds after the power is switched
off.
33. Do NOT rest the unit on any surface
while the unit is running. Debris such
as gravel, sand, dust, grass etc.
could be picked up by the air intake
and thrown out through the
discharge opening, damaging the
unit, property, or causing serious
injury to any person nearby.
34. Never run the unit without the proper
attachments. When used as a
blower, always install a blower tube.
Use only factory approved
attachments provided with the leaf
blower.
35. Do NOT use with any opening
blocked. Keep free of dust, lint, hair
or other objects that may reduce air
flow.
36. To avoid accidental fire, do NOT use
blower near leaf or brush fires,
fireplaces, barbecue pits, ashtrays.
37. Do NOT use for spreading
chemicals, fertilizers, or any other
substances which may contain toxic
materials.
38. Store the unit in a dry place either
locked up or on a high shelf out of
the reach of children to prevent
unauthorized use or damage.
39. Do NOT place objects inside blower
tube or aim blowing debris towards
people, animals, glass, or solid
objects such as cars, trees, walls
etc. The force of the air can throw
objects with enough force to
seriously damage or harm people
or objects.
40. Allow motor to stop and disconnect
power source before opening the
air inlet attachment or to insert or
remove the vacuum tubes. The
motor must be stopped and the
impeller blades should no longer
be turning to avoid serious injury
from the rotating fan-like blades.
41. Inspect debris collector bag
BEFORE each use. Ensure that
bag is firmly zippered shut before
use.
WARNING: Hard objects can be
thrown through the debris collector bag
or the housing and become dangerous
missiles which can seriously injure
operator or bystanders.
42. When using the vacuum
attachment do NOT vacuum up
stones, gravel, glass, metal or
other objects that could damage
debris collector bag. The bag is
intended ONLY for dry materials
such as leaves, grass and very
small twigs.
43. Do NOT vacuum up discarded
matches, cigarettes, ashes, coal,
or fireplace pits. Avoid any
flammable or hot objects. Inspect
area to be vacuumed carefully.
44. Never vacuum up damp or moist
materials or vacuum water or other
liquids. Allow leaves or grass to dry
before collecting in debris collector
bag.
45. Never run vacuum without the
proper installation of parts. When
using the vacuum, always install
vacuum tubes and debris collector
bag according to instructions.
46. Stop and disconnect unit from
power source. Inspect all openings
and tubes frequently, to ensure
safety from overheating and fire.
47. NEVER douse or squirt the unit
with water or any other liquid. Keep
handles dry, clean and free from
debris. Clean after every use. See
cleaning and storage section for
further instructions.
48. Do NOT operate this unit in
explosive atmospheres, such as in
the presence of flammable liquids,
gases or dust.
10
3
Page 6

SAFETY & WARNING INSTRUCTION
49. Make sure that bystanders, pets,
and children are at least 50 feet
from blower or vacuum to avoid
serious injury from objects that
may be propelled by unit.
This unit can violently propel objects.
It is advised that you wear protective
safety clothing, i.e.: long pants, covered
shoes, face mask, and safety glasses.
Disconnect unit from power source
before performing maintenance or
when converting the unit from one
function to another.
All electrical repairs to this unit,
including housing, motor, etc.,
must be diagnosed by a qualified
service personnel. Replacement parts
for a double insulated appliance must be
recommended by the manufacturer.
SERVICING OF A DOUBLE-INSULATED
APPLIANCE.
In a double-insulated product, two
systems of insulation are provided
instead of grounding. No grounding
means are provided for a doubleinsulated product, nor should grounding
means be added to the product. Servicing
a double-insulated product requires
extreme care and knowledge of the
system and should be done only by
qualified service personnel. Replacement
parts for a double-insulated product must
be identical to the original parts. A
double-insulated product is marked with
the words " double Insulation“
or "Double Insulated". Product
may also be marked with
symbol shown.
WARNING
OPERATING INSTRUCTIONS
Using Your Leaf Blower
Warning: If any parts are missing,
damaged or broken, do NOT operate
the leaf blower until they have been
replaced. Failure to do so could result in
possible serious injury.
Warning: To prevent serious
personal injury, always use both the
front hand grip and the top handle to hold
the leaf blower during operation.
Warning: To prevent serious
personal injury, keep hands away
from the impeller. Make sure that the unit
is unplugged when clearing jammed
material from impeller. Do NOT grasp the
impeller when picking up or holding the
unit.
Warning: Always inspect area to be
cleared ensuring there are no large
hard objects that can cause serious injury.
Warning: Do NOT attempt to
vacuum water or other liquids or wet
objects such as wet leaves. This could
cause damage to the unit or cause
electrical shock.
Danger: Never vacuum very hard
objects such as nails, bolts, and rocks
as this will severely damage the unit. Hard
objects can be propelled through the
debris collector bag or the housing and
become dangerous missiles which can
cause serious injury to operator,
bystanders, or nearby solid objects. Avoid
burning debris that can cause the collector
bag to catch on fire. Do NOT operate near
an open flame. Do NOT vacuum up
discarded cigarettes, cigars, or embers
from fireplace, pits or BBQ’s.
Warning: Do NOT assemble or
disassemble the blower/vacuum tube
while the unit is running. Inserting or
removing the blower/vacuum tube while
unit is running can result in serious
injuries. Allow unit to stop and disconnect
from power source.
Warning: Do NOT use leaf
blower as a vacuum without the
vacuum bag in place and firmly attached.
Always make sure the vacuum bag’s
zipper is properly zipped before starting
the unit.
Your leaf blower can be used to sweep
debris or grass clippings from driveways,
sidewalks, or patios. Blowing grass
clippings, straw or leaves into piles for
easy clean-up and/or composting. Before
operating the leaf blower:
1. Ensure that proper clothing is worn
and safety glasses are used. (Fig.15)
2. Direct air flow by directing the blower
tube downwards or from side to side
in a sweeping motion.
3. To clean corners, work from tightest
point outwards.
4. Use caution when working around
vegetation as the air force could
damage plant life.
Fig. 15
Air Vents
Never cover the air vents on the unit.
Always keep them free from obstructions
and debris. (Fig. 16)
Air Vents
SAVE THESE INSTRUCTIONS
For Household Use Only
4
Fig. 16
9
Page 7

OPERATING INSTRUCTIONS
GETTING TO KNOW YOUR LEAF BLOWER
How to Attach the Extension Cord
Note:Do NOTuse an extension cord
over 150 feet long.
1. Use only with a 2 conductor
extension cord intended for outdoor
use with a polarized plug, with one
blade larger than other, UL listed.
2. Form a loop with the extension cord.
(Fig 11)
Fig. 11
3. Slip loop through power cord
guide. (Fig 12)
Fig. 12
4. Latch loop of power cord onto hook.
(Fig. 12)
5. Insert the plug of the leaf blower into
the outlet on the extension cord.
(Fig. 13)
Power Cord
Guide
Power Cord
Hook
How to Use the Power Switch
Warning: If you do NOT fully
seat the extension cord on the inlet
plug, the loose plug could lead to
overheating and cause a fire, or electrical
shock.
Ensure that you fully seat the cord on the
plug and use the cord lock feature to
secure the cord.
Important: Check the power cord
frequently during use for holes in the
insulation or other damage. Do NOT use
a damaged cord.
Do NOT run the cord through standing
water or wet grass.
The leaf blower is equipped with a two way
On/Off switch. (Fig. 14) ‘O’ is OFF. ‘I’ is for
“ON”.
ON
OFF
Fig. 14
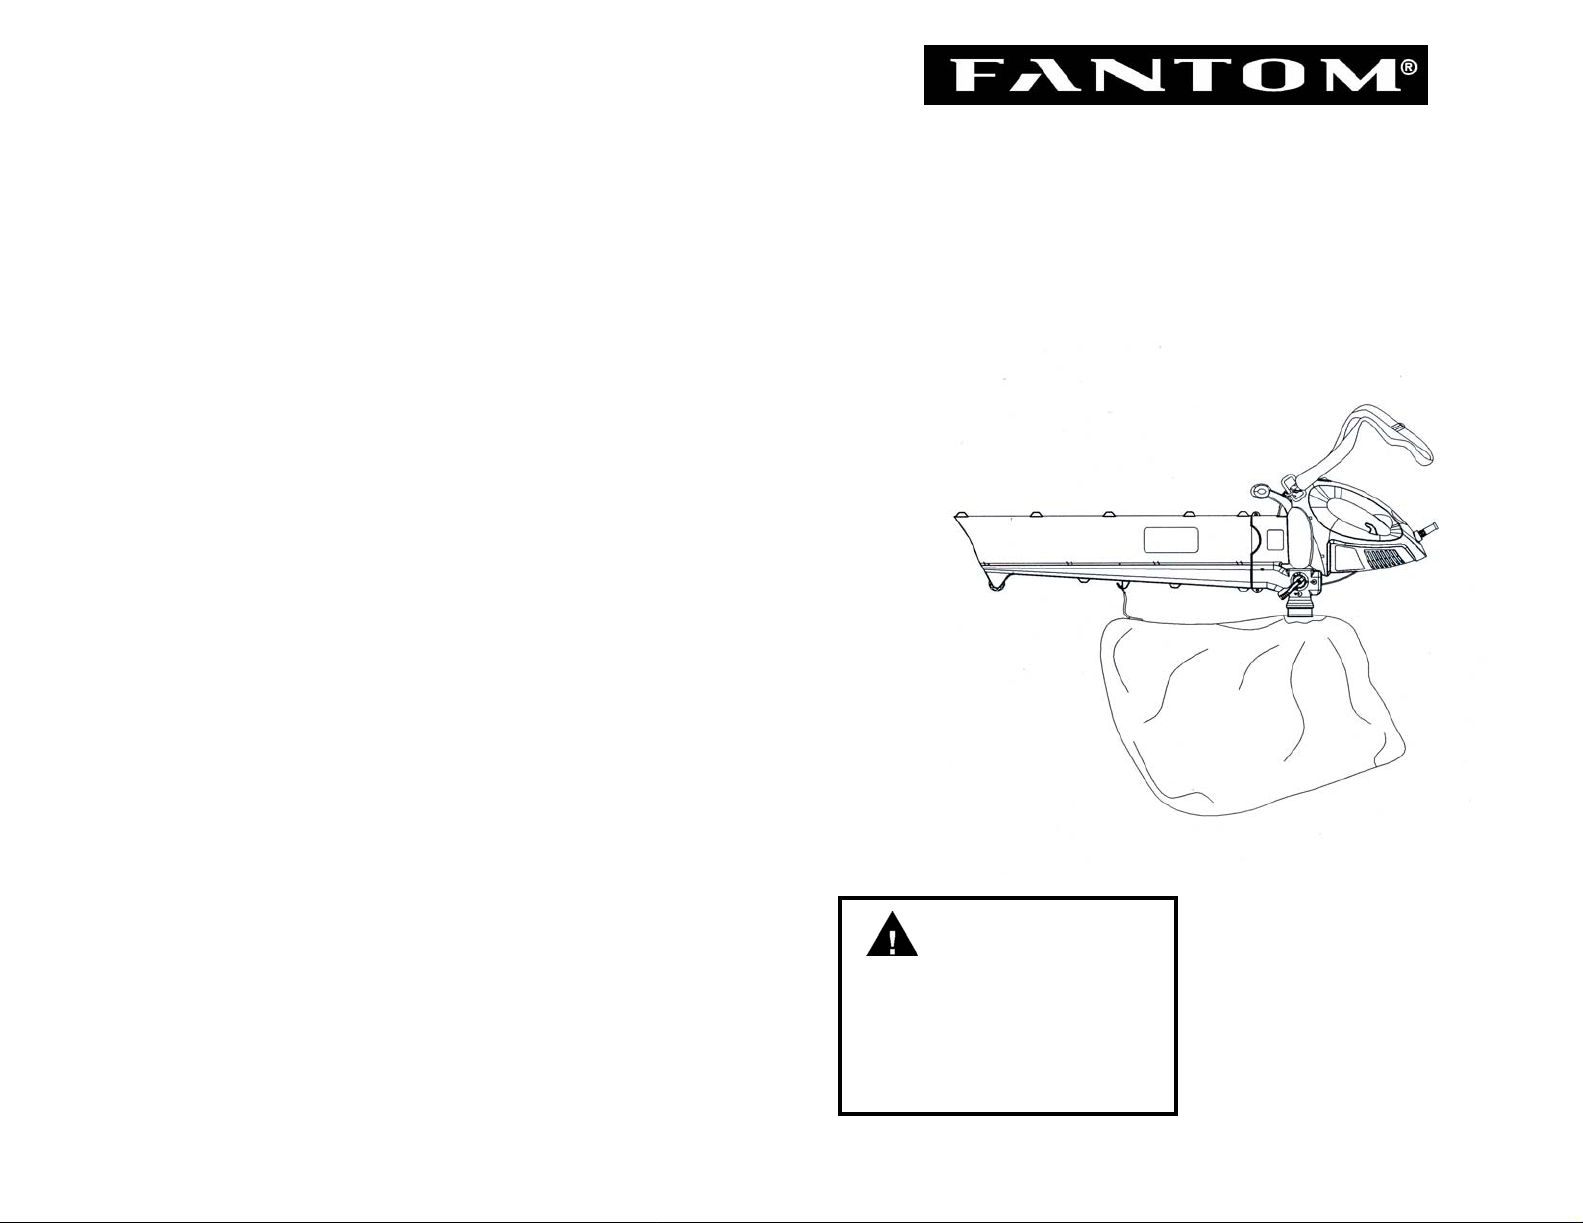
1. On/Off Switch
2. Latch Support
3. Blower/Vacuum Tube
4. Vacuum Inlet
5. Blower Outlet
6. Guide Wheel
7. Vacuum Bag Hook
8. Vacuum Collector Bag (x2)
9. Blower/Vacuum Selection Lever
10. Air Vents
11. Handle
12. Shoulder Strap
Fig. 13
* Illustrations may differ from actual product.
Technical Specifications
Voltage: 120V., 60Hz.
Current: 12 Amps.
Use of ear protection is recommended when using this unit.
8
5
Page 8

OPERATING INSTRUCTIONS
OPERATING INSTRUCTIONS
Assembly Instructions
Warning: Remove the plug
from the power source before
assembly of leaf blower. This will
help prevent accidental starting of
the unit which could result in serious
injury.
Caution: The impeller rotates for
a few seconds after you turn off the
blower and will cause injury. WAIT until all
parts stop moving.
Note: Instructions must be followed in
order.
1. Remove all parts from the packaging.
2. Remove the nuts and screws
provided from the packaging.
3. Insert the blower/vacuum tube all the
way into the opening on the motor
housing until the holes in the tabs on
the blower/vacuum tube align with
the screw holes in the housing. (Fig. 1)
Fig. 1
Motor Housing
Nut
Blower/Vacuum
Nut
Self-Tapping
Screw
Tube
Air Intake
(Vacuum)
Air Output
(Blower)
Debris Exhaust
Tube
Screw
Self-Tapping
Screw
Screw
4. Insert the two (2) screws into the
right side of the motor housing the
two (2) nuts into the left side of the
motor housing. (Fig. 1)
5. Tighten the screws firmly. Do NOT
over-tighten.
6. Insert the two (2) self-tapping screws
into the holes on either side of the
blower outlet housing. (Fig. 2 )
Fig. 2
7. Tighten the screws firmly but do
NOT over-tighten.
Note: If it is necessary to disassemble
the leaf blower, follow these instructions:
8. Turn the unit “Off” and remove the
plug from the extension cord.
9. Remove the two (2) self tapping
screws from either side of the blower
outlet housing.
10. Remove the two (2) screws and nuts
holding the blower/vacuum tube to
the housing.
Note: Place the all the screws and nuts
in a safe place for future use.
11. Remove the blower/vacuum tube
from the motor housing.
Important: Always replace the
blower/vacuum tube before using the leaf
blower.
Important: The leaf blower will not run
unless the vacuum tube is locked in
place.
Attaching the Vacuum Bag
Warning: Remove the plug
from the power source before
assembly of leaf blower. This will
help prevent accidental starting of
the unit which could result in serious
injury.
1. Slide the buckle that is on the
vacuum bag onto the vacuum
bag hook that is on the
underside of the blower/vacuum
tube. (Fig. 3)
Vacuum Bag Hook
Buckle
Fig. 3
2. Slide the vacuum bag over the debris
exhaust tube on the housing. (Fig. 2)
3. Tighten the vacuum bag onto the
debris exhaust tube and fasten the
velcro strap securely on top of the
ridge created for the bag cuff. (Fig. 4)
Fig. 4
Vacuum Bag
Debris Exhaust
Tube
4. To remove the vacuum bag, loosen
the velcro strap and pull the vacuum
bag off of the debris exhaust tube.
(Fig. 5)
Pull vacuum
bag down
Fig. 5
5. Always replace the vacuum bag
before using the leaf blower.
Attaching the Shoulder Strap
If the shoulder strap is not already put
together:
1. Push the end through the center of
the buckle.
2. Pull the strap over the cross bar and
down through the slot in the buckle.
(Fig. 6)
Fig. 6
3. Fully extend the shoulder strap.
(Fig. 7)
Clip
Fig. 7
4. Attach the metal clip of the shoulder
strap to the latch support on top of the
handle. (Fig. 8)
Latch Support
Clip
Fig. 8
5. Place the shoulder
strap over your
head and opposite
shoulder. (Fig. 9)
6. While in the
operating position,
adjust the length
of the shoulder
strap to fit your
height. To lengthen
the shoulder strap,
pull the strap down
and move he buckle
Fig. 9
up. To shorten, pull
the strap back through the buckle
while moving the buckle down.
(Fig. 10)
To Lengthen
Fig. 10
To Shorten
6
7
 Loading...