

Page 1

INSTRUCTION MANUAL
VACUUM CLEANER
FM742H
Contents
IMPORTANT SAFETY INSTRUCTIONS
NAME OF EACH PART
PREPARATION BEFORE USE
USING THE VACUUM CLEANER
USING THE ATTACHMENTS
EMPTYING THE DUST COMPARTMENT
CLEANING THE FILTERS
CLEARING BLOCKAGES IN THE
SUCTION HOSE AND CLEANING THE
AGITATOR ASSEMBLY
REPLACEMENT INSTRUCTIONS
TROUBLESHOOTING
REPLACEMENT PARTS
LIMITED WARRANTY
1
3
4
6
8
9
10
11
12
16
16
17
FOR HOUSEHOLD OR COMMERCIAL USE
Page 2

Page 3

IMPORTANT SAFETY INSTRUCTIONS
When using an electrical appliance, basic precautions should always be
followed, including the following.
READ ALL INSTRUCTIONS
BEFORE USING THIS VACUUM CLEANER
WARNING - To reduce the risk of fire, electric shock or injury:
1. Do not leave the vacuum cleaner when plugged in. Unplug it from the outlet
when not in use and before servicing.
2. Do not use outdoors or on wet surfaces.
3. Do not allow vacuum cleaner to be used as a toy. Close attention is necessary
when used by or near children or infirmed persons.
4. Use only as described in this manual. Use only the manufacturer's
recommended attachments.
5. Do not use with a damaged cord or plug. If the vacuum cleaner is not working
as it should, or if it has been dropped, damaged, left outdoors or dropped into
water, return to FANTOM at 94 Main Mill Street, Door 16, Plattsburgh, NY 12901.
6. Do not pull or carry by the cord, use the cord as a handle, close a door on the
cord, or pull the cord around sharp edges or corners. Do not run the vacuum
cleaner over the cord. Keep the cord away from heated surfaces.
7. Do not unplug by pulling on the cord. To unplug, grasp the plug, not the cord.
8. Do not handle the plug or the vacuum cleaner with wet hands.
9. Do not put any objects into the openings. Do not use with any opening
blocked: keep free of dust, lint, hair and anything that may reduce air flow.
10. Keep hair, loose clothing, fingers and all the parts of your body away from
openings and moving parts.
11. Do not pick up anything that is burning or smoking, such as cigarettes,
matches or hot ashes.
12. Do not use without dust compartment and filters in place.
13. Turn off all controls before unplugging.
14. Use extra care when cleaning on stairs.
15. Do not use to pick up flammable or combustible liquids such as gasoline, or
use in areas where they may be present.
111
Rev.07/04A
Page 4

16. Do not touch the agitator while it is spinning.
17. Do not place any heavy items on top of the vacuum cleaner.
18. Do not step on the hose or pull it too strongly.
19. Do not pick up items such as pieces of waste paper or cloth which looks as though
they may cause the hose to become blocked.
20. Do not clean or store the vacuum cleaner in places where there are high
temperatures.
21. Store the vacuum cleaner away from excessive humidity.
22. When carrying the vacuum cleaner, hold it by the carrying handle.
23. Before servicing the vacuum cleaner, allow all internal metal parts to cool first.
24
. Always place foot on handle release when adjusting the handle position of the
vacuum cleaner.
25. If the supply cord of this appliance is damaged, it must only be replaced by
FANTOM, because special purpose tools are required.
26
. Connect to a properly grounded outlet only. See Grounding Instructions.
SAVE THESE INSTRUCTIONS
This vacuum is intended for household or commercial use.
to user concerning attachment plug:
Note
Grounding Instructions
This appliance must be grounded. If it should malfunction or breakdown, grounding
provides a path of least resistance for electric current to reduce the risk of electric shock.
This appliance is equipped with a cord having an equipment-grounding confuctor and
grounding plug. The plug must be isnerted into an appropriate outlet that is properly
installed and grounded in accordance with all local codes and ordinances.
WARNING - Improper connection of the equipment-grounding conductor can result in a risk
of electric shock. Check with a qualified electrician or service person if you are in doubt as
to whether the outlet is properly grounded. Do not modify the plug provided with the
applince - if it will not fit the outlet, have a proper outlet installed by a qualified electrician.
This appliance is for use on a nominal 120-volt circuit and has a grounding attachment plug
that looks like the plug illustrated below. Make sure that the appliance is connected to an
outlet having the same configuration as the plug.
2
Page 5

NAMES OF EACH PART
Handle
Release
Button C
Carrying Handle
Duster Knob
FRONT
Suction
Hose A
Release
Button A
Release
Button B
Plug shown in figure
may differ from actual
plug attached to unit
for your area.
ON/OFF Switch
Dust
Compartment
REAR
Power Cord
Plug
Power Cord
Cord Storage
Hooks
Crevice Tool
Hose
Holder
Filter
Cover
Headlight
Set the ON/OFF switch
to " ON " to light the
headlight.
Suction
Hose B
Upholstery Tool &
Dusting Brush
Handle Release
Lever
Holder
Mount
Cleaning Utensil
Rug/Floor (Tools)
SELECTOR
WARNING:
Operate vacuum cleaner only at the voltage specified on name plate.
Wand
3
Page 6

PREPARATIONS BEFORE USE
Caution: Do not connect the power cord plug to the wall outlet until assembly
is completed.
Attaching the handle
Set the vacuum cleaner
1
to the upright position.
lnsert the handle
2
as shown in the illustration.
Handle
Attaching the suction hose A & attachments
Suction Hose A
4
Hose Cuff
Suction Inlet
Upholstery Tool
& Dusting Brush
Wand
Crevice Tool
Page 7

PREPARATIONS BEFORE USE
WINDING THE POWER CORD
Hook the pow er cord ove r the clip
1
which
cord stora ge hook as shown.
is located o n the upper
Plug Side
p
Cli
Wind the pow er cord aro und
2
cord storag e hooks.
the
Secure the p ower
cord plug
power
on the
cord.
Cord Storage
Hook
s
THERMAL SAF ETY DEVICE IN MAIN BODY
To protect your vacuum cleaner mo tor from ov erheati ng, a therm al safety d evice has b een
built
in. If your vacuum clea ner hose or air intake clogs up with dust or dirt, or if your dust
bag
becomes full and you continue to run the machine, the vacuum will shut off
automati cally
and
disconne ct your vac uum from po wer outlet , remove th e material cloggin g the machi ne
and
let your vacuum cool down for approximate ly 20 minut es. You can then restart your
vacuum
to prevent the motor from overhea ting. If th is happe ns, turn of f slide s witch
cleaner and use it again.
INSERTING THE POWER CORD PLUG
WARNING: This appliance is equipped with a
grounded-type 3-wire cord (3-prong plug). This plug
will only fit into an electrical outlet made for a 3-prong
plug. This is a safety feature. If the plug should fail to
fit the outlet, contact an electrician to replace the outlet.
Do not attempt to defeat the safety purpose of the
grounding pin, part of the 3-prong plug.
5
Page 8

USING THE VACUUM CLEANER
ON/OFF SWITCH
Start or stop vacuum cleaner by pushing
on the switch.
OFF ON
ADJUSTING THE HANDLE
The handle of this vacuum cleaner can be set to one of
three positions -Upright, Normal, Parallel. Place your foot
on handle release lever as shown and pull back on the handle
until it releases from its upright position.
ON/OFF Switch
Upright position
The handle is normally locked in this
position for storage or when using the
attachments.
Push the handle forward
until it locks.
Handle Release Lever
Normal position
This position is used for normal cleaning.
Handle Release Lever
Parallel position
This position is used for cleaning under
furniture.
6
Page 9
USING THE VACUUM CLEANER
RUG/FLOOR (TOOLS)SELECTOR
The RUG/FLOOR(TOOLS)selector should only be
adjusted while the vacuum cleaner is turned on
and in the upright position.
1
2
Caution: Do not change the setting of the RUG/FLOOR(TOOLS)selector while the vacuum
cleaner is turned off.
RUG
FLOOR
When cleaning a rug or carpet,first
turn the ON/OFF switch to the ON
position,and then set the RUG/
FLOOR(TOOLS)selector to the
RUG position.
When cleaning a bare floor or when using
one of the attachments,set the RUG/FLOOR
(TOOLS)selector to the FLOOR position.
Rug/Floor (Tools)
SELECTOR
EDGE CLEANING
This vacuum cleaner is equipped with an "edge cleaning" function for cleaning carpet edges
near baseboards and stationary furniture.
7
Page 10

USING THE ATTACHMENTS
Caution: When using one of the attachments during cleaning,set the vacuum
cleaner to the upright position.
Remove the attachments from the
1
vacuum cleaner.
Press the release button C to
2
disconnect the handle from the
vacuum cleaner.
Caution:
When removing the attachments, pull
them in the directions shown in the
illustration.Pulling them in the wrong
direction or pulling them forcefully may
cause damage to the attachment clamp.
Wand
Crevice Tool
Release
Button C
Attach the attachments on the handle or
the suction hose B.
3
Attach the attachments as shown below.
Handle
Suction Hose A
Caution:
Suction Hose B
Hook the hose holder onto the holder mount.
Caution:
Before using the attachments, please make sure
the hose is hooked on the holder mount.
Attachment Clamp
Wand
Before using the suction hose B,
please make sure the handle is
reattached on the body.
Upholstery tool & Dusting brush
To detach the dusting brush from the upholstery tool: Press the
tabs on the brush downward to remove it.
Crevice Tool
Groove
Upholstery
Tool
Hose
Holder
Holder
Mount
Dusting
Brush
To reattach the dusting brush to the upholstery tool: Insert
the front of the upholstery tool under the hook on the front of the
dusting brush. Press down on the back of the upholstery tool to
snap it into place under the dusting brush tabs.
When you have finished using the attachments,replace them
in their original positions as shown on page 4.
8
Tabs
Page 11

EMPTYING THE DUST COMPARTMENT
Caution: Be sure to turn the ON/OFF switch to the "OFF" position and disconnect the
power cord from the wall outlet before cleaning.
Empty the dust compartment when
1
1
contents reach the MAX mark.
MAX mark
Press the release lever to open the
3
3
trapdoor.
Trapdoor
Release Lever
Press the release button A meanwhile
2
2
press the release button B to remove
the dust compartment.
Release Button A
Release Button B
3
Turn the duster handle several times in the
4
4
direction shown to empty the dust
compartment.
Duster Handle
Reattaching the Dust Compartment
Close the trapdoor and insert the projection on the
1
1
dust compartment into the groove on the main body.
Projection
Groove
Push the dust compartment into
2
2
the main body as shown to
reattach.
9
Page 12

CLEANING THE FILTERS
Remove the dust compartment.(refer to page 9)
1
Set the dust compartment to the parallel
2
position.Open the trapdoor,then push the
release button E and pull out the main
filter.
The main filter and prefilter will be
removed at the same time.
Caution: Do not push the release
button E at the upright position.
As this may drop or damage the
main filter and prefilter.
Clean the main filter and prefilter with a soft-bristled brush (not included) and
3
rinse with cold water. Allow both items to dry completely for 24 hours.
Caution:
Do not use a hard-bristled brush to clean filters.
This may result in damage to the filters.
Do not attempt to dry with a hair dryer or by
placing in a clothes dryer.Hot air may cause the
filters to warp.
Release Button E
3
Cleaning Utensil
To maintain optimum suction power, the dust filter fins should be kept clean of dirt.
Clean the filter fins free of dirt with the forked end of cleaning utensil as shown.
Cleaning Utensil
Reattaching the filters
Insert the main filter into the
1
prefilter as shown.
Main Filter
Prefilter
Hold onto the main filter and insert into
2
the dust compartment.
Align the ribs of the main filter to match
the shape of the opening in the dust
compartment and press firmly to insert.
Dust Compartment
Ribs
Hole
Close the trapdoor.
3
NOTE: We recommend replacing the main filter every three (3) to six (6) months, depending
on the amount of use
10
Page 13

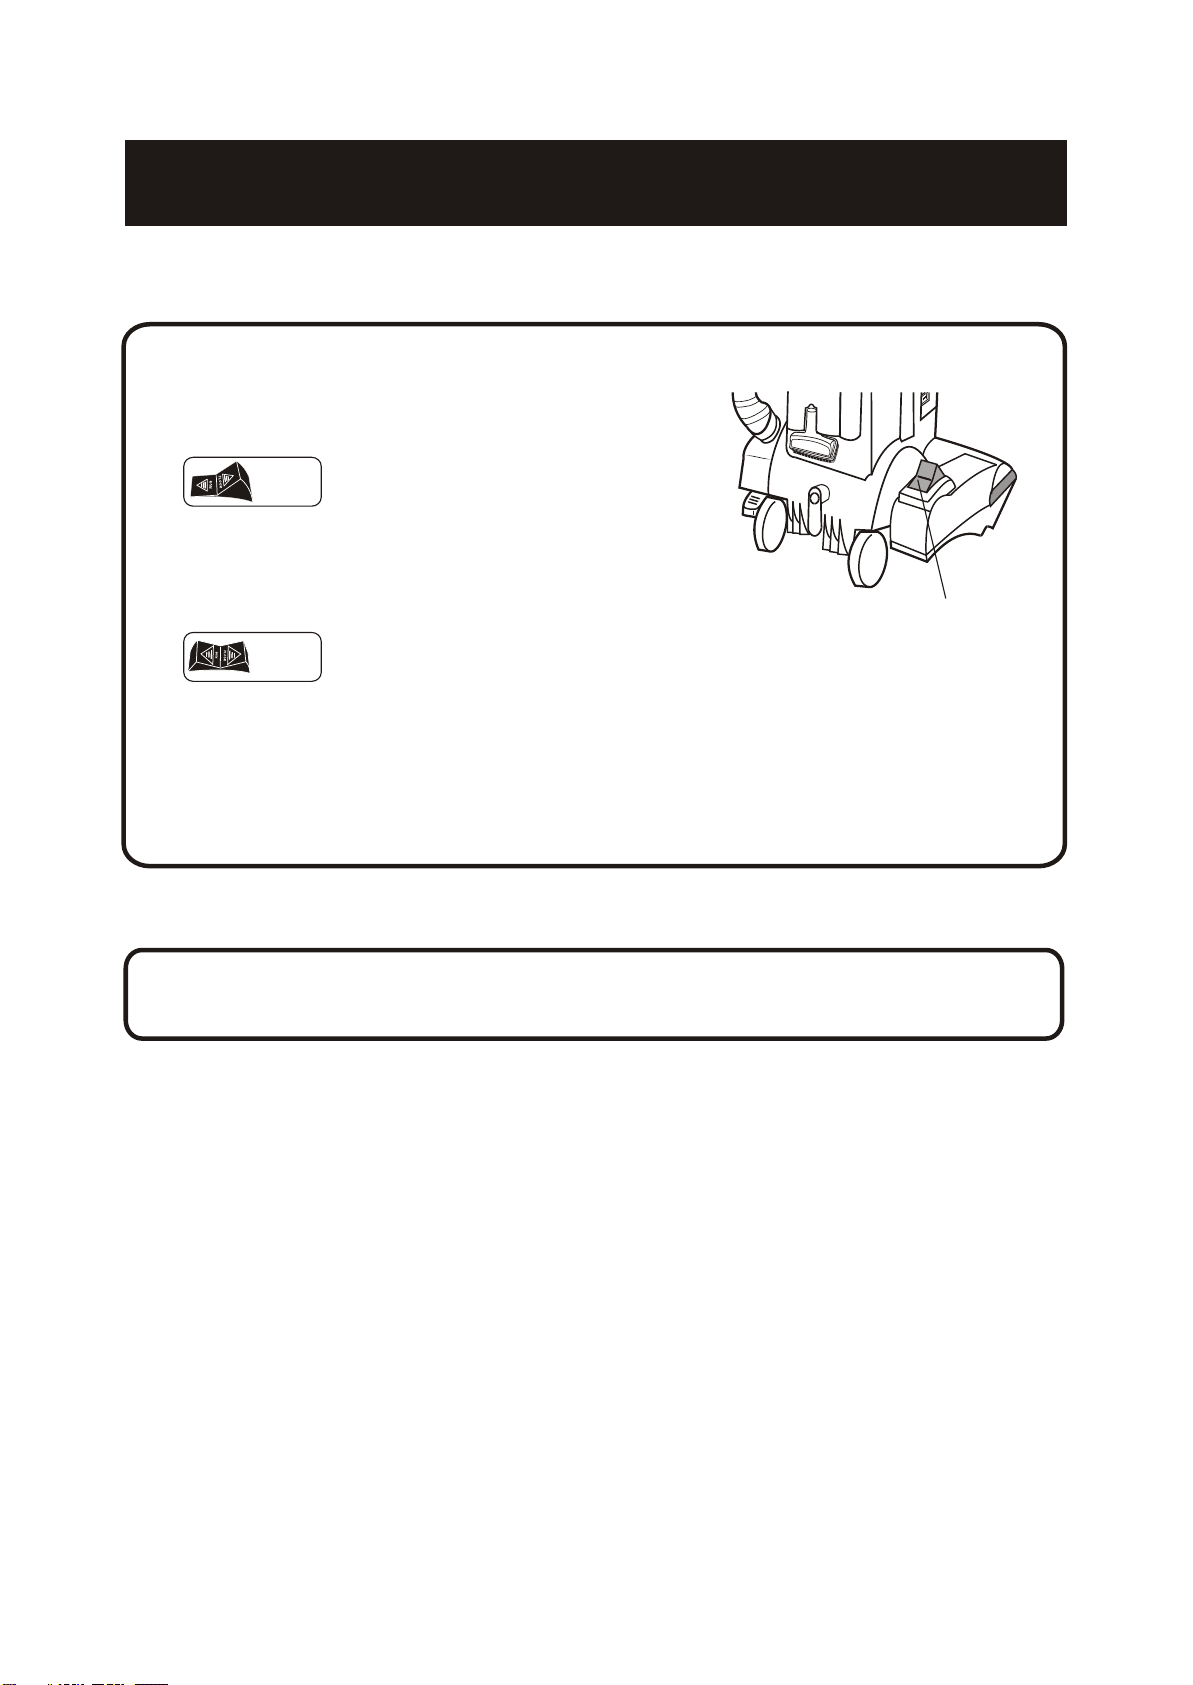
CLEARING BLOCKAGES AND CLEANING
THE AGITATOR ASSEMBLY
Caution: Be sure to turn the ON/OFF switch to the "OFF" position and disconnect
the power cord from the wall outlet before clearing any blockages in the
suction hose and cleaning the agitator assembly.
Cleaning blockages
Cleaning blockages in the suction hose A, B
Set the vacuum cleaner to the upright position.
1
Suction Hose A
Remove the hose cuff from the suction inlet and
2
then remove any blockages from the hose.
Reattach the hose cuff to the suction inlet,and
3
then operate the vacuum cleaner to check that
the blockage has been properly cleared.If the hose
is still blocked,the suction force will be weak.
Hose Cuff
Suction Inlet
Cleaning blockages in the nozzle head
Remove the bottom plate(refer to page 14)
1
Remove any blockages from the nozzle head.
2
Reattach the bottom plate to the nozzle head, and then operate the vacuum cleaner
3
to check that the blockage has been properly cleared. If the nozzle head is still blocked,
the suction force will be weak.
Caution:
When the suction hose A, B or Nozzle head is
blocked, the bypass valve will be opened
automatically to protect the motor, resulting
in the suction force being reduced. The bypass
valve will be at its original position automatically
after the blockage is removed.
Nozzle Head
Bypass Valve
(Inside)
Cleaning the agitator assembly
When threads get caught in the agitator assembly, clean the assembly.
Remove the bottom plate(refter to page 14)
Remove threads caught in the assembly by cutting them
with scissors.
Scissors
Threads
11
Page 14

REPLACEMENT INSTRUCTIONS
Caution: Be sure to turn the ON/OFF switch to the"OFF" position and disconnect the
power cord from the wall outlet before replacing any of the parts below.
REPLACING THE HEADLIGHT LAMP
Set the vacuum cleaner to the parallel position.
1
Loosen the screws to remove the lens.
2
When removing the headlight lamp, be careful
3
not to pull on the headlight lamp wiring.
Screw
Lens
Remove the lamp by pushing it gently in
4
the direction of the arrow and then turning
it counterclockwise.
Push a new lamp gently into the socket and
5
turn it clockwise to tighten it .
Use a standard bayonet base appliance lamp
rated at 120V and 15W (LAMP MAX.15W).
Caution: Be careful not to clamp the
headlight lamp wiring.
Reattach the lensand fasten the screws.
6
2
1
Headlight Lamp
2
1
Socket
Socket
12
Page 15

REPLACEMENT INSTRUCTIONS
Caution: Be sure to turn the ON/OFF switch to the"OFF" position and disconnect the
power cord from the wall outlet before replacing any of the parts below.
REPLACING THE FLAT BELT
Remove the bottom plate.
1
(refer to page 14)
Lift out the agitator assembly,and then remove the flat belt from the motor shaft and
2
3
the agitator pulley.
Place a new flat belt onto the motor shaft and pulley.
Motor Shaft
Flat Belt
Agitator Assembly
Motor Shaft
Flat Belt
Flat Belt
Pulley
Place the agitator assembly into the grooves in the nozzle head, making sure that the new
4
flat belt slides securely into the guide.
Bearing Holder
Groove
Nozzle Head
Reattach the bottom plate
5
(refer to page 14)
Caution:
Install the flat belt so that it has no
twists in it,and so that all components
turn smoothly.
13
Page 16

REPLACEMENT INSTRUCTIONS
REMOVING THE BOTTOM PLATE
Set the vacuum cleaner to the
1
parallel position and turn it over.
Slide the latch in the direction
2
of the arrow.
Remove the bottom plate by pulling
3
the tabs as illustrated.
Latch
PressPress
REATTACHING THE BOTTOM PLATE
Insert the projection on the bottom plate
1
into the groove on the nozzle housing
and set the bottom plate in place.
Bottom Plate
Push the bottom plate as shown.
2
Press
Pull here
Bottom Plate
Press
Projection
Groove
Slide the latch in the direction shown.
3
Latch
14
Turn the vacuum over and place in the
4
upright position.
Page 17

REPLACEMENT INSTRUCTIONS
REPLACING THE FILTER
Under normal usage, the HEPA Filter will require replacement once every
three (3) months, however, vacuuming large amounts of extremely fine dust,
powder or similar material over a long period of time may decrease airflow
performance through the filter. If this occurs, it may become necessary to
replace the HEPA Filter more often. Only use genuine FANTOM
replacement filters.
Press in the locking tabs at points
and pull the filter cover away from the
1
vacuum cleaner.
Remove the HEPAfilter.
2
Caution:
Do not attempt to wash the HEPA filter.
Always replace the old filter with a new one.
1
HEPA Filter
Filter Cover
11
11
22
Insert a new HEPAfilter with the seal
3
to the inside of the vacuum cleaner.
Reattach the filter cover.
Caution:
Be sure that seal on the HEPAfilter is inserted
towards the inside of the vacuum cleaner.
The filter cover should be correctly oriented
when it is reattached. Do not reattach it upside down.
Seal
CLEANING THE SUB-FILTER
Clean the sub-filter when it becomes dirty.
Remove the dust compartment
(refer to page 8).
1
Remove the air inlet cover.
Remove the sub-filter from the vacuum cleaner.
2
Gently clean the sub-filter with water.
3
Make sure that it is completely dry and
then re-install it into the vacuum cleaner.
4
Replace the air inlet cover and the dust compartment.
Caution: Do not wash the sub-filter in a washing machine, and do not use any other equipment
such as a hair dryer to dry it. Always allow 24 hours for drying. Do not operate
the vacuum without the sub-filter. Be sure the sub-filter is dry and properly installed.
Failure to do so could result in electrical shock, personal injury, or motor failure.
Note: We recommend replacing the sub-filter every three (3) to six (6) months, depending on usage.
22
Air Inlet
Cover
11
Sub-Filter
15
Page 18

TROUBLESHOOTING
If there is a problem with the vacuum cleaner, carry out the following checks
to find the cause. If the problem still persists after the checks have been made,
do not use the vacuum cleaner to prevent the possibility of an accident occurring.
Turn the ON/OFF switch to the "OFF" position, disconnect the power cord from the
wall outlet, and contact FANTOM Customer Service at 1-800-275-9251.
Or visit our website at www.fantom.com
Problem Cause R emedy
The motor does not operate
when the ON/OFF switch is
set to the "ON" position.
The power cord plug is not
securely inserted into the
wall outlet.
Insert the power cord plug
securely into the wall
outlet.(refer to page 5 )
Suction force is weak.
The agitator does not
operate.
TO ORDER REPLACEMENT FILTERS CALL 1-800-275-9251
The dust compartment is full.
The suction hose is blocked.
The nozzle head is blocked.
The filters are dirty.
The nozzle air inlet pipe is
blocked.
The bypass vavle is opened.
The flat belt is worn or
broken.
Empty the dust compartment.
(refer to page 9)
Remove the blockage.
(refer to page 11)
Remove the blockage.
(refer to page 11)
Clean the filters.
(refer to page 10)
(refer to page 15)
Remove the blockage.
(refer to page 11)
Remove the blockage.
(refer to page 11)
Replace the flat belt.
(refer to page 13)
9BF-D-P111-00721 0304-
E
16
Page 19

FIVE (5) YEAR LIMITED WARRANTY
FANTOM
date of the original purchase, when utilized for normal commercial or household use, subject to the following conditions,
exclusions and exceptions.
If your appliance fails to operate properly while in use under norma l household conditions within the warranty period, return
the complete appliance and accessories, freight prepaid to
In US:
If the appliance is found by
charge. Proof of purchase date and $19.95 to cover the cost of return shipping and handling must be included. *
Non-durable parts including, without limitation, dust cup filters, filters, belts, brushes and electrical parts which normally
require replacement are specifically excluded from warranty.
The liability of
warranty does not cover normal wear of parts and does not apply to any unit that has been tampered with or used for
commercial purposes. This limited warranty does not cover damage caused by misuse, abuse, negligent handling or damage
due to faulty packaging or mishandling in transit. This warranty does not cover damage or defects caused by or resulting
from damages from shipping or repairs, service or alterations to the product or any of its parts, which have been performed by
a repair person not authorized by
This warranty is extended to the original purchaser of the unit and excludes all other legal and/or conventional warranties. The
responsibility of
the limited
whatsoever. Some states do not permit the exclusion or limitation of incidental or consequential damages, so the above may
not apply to you.
This warranty gives you specific legal rights, and you may also have other rights which vary from state to state.
warrants this product to be free from defects in material and workmanship for a period of five (5) years from the
FANTOM
FANTOM
FANTOM
warranty.
In no event is
, 94 Main Mill Street, Door 16, Plattsburgh, N.Y. 12901
FANTOM
is limited solely to the cost of the repair or replacement of the unit at our option. This
if any, is limited to the specific obligations expressly assumed by it under the terms of
to be defective in material or workmanship,
FANTOM.
FANTOM
liable for incidental or consequential damages of any nature
FANTOM
will repair or replace it free of
*Important: Carefully pack item to avoid damage in shipping. Be sure to include proof of purchase date and to attach
tag to item before packing with your name, c omplete address and phone number with a note giving purchase
information, model number and what you believe is the problem with item. We recommend you insure the package
(as damage in shipping is not covered by your warranty). Mark the outside of your package ATTENTION
CUSTOMER SERVICE .
,,
,,
OWNERSHIP REGISTRATION CARD
Please fill out and mail the product registration card within ten (10) days of purchase. The registration will enable
us to contact you in the unlikely event of a product safety notification. By returning this card you acknowledge to have
read and understood the instructions for use, and warnings set forth in the accompanying instructions.
RETURN TO
FANTOM
, 94 Main Mill Street, Door 16 , Plattsburgh , N.Y . 12901
Model FM742H
Appliance model
Date purchased
,
Owner s name
Address
Name of store
City State
Zip Code
Printed in China
 Loading...