

Page 1
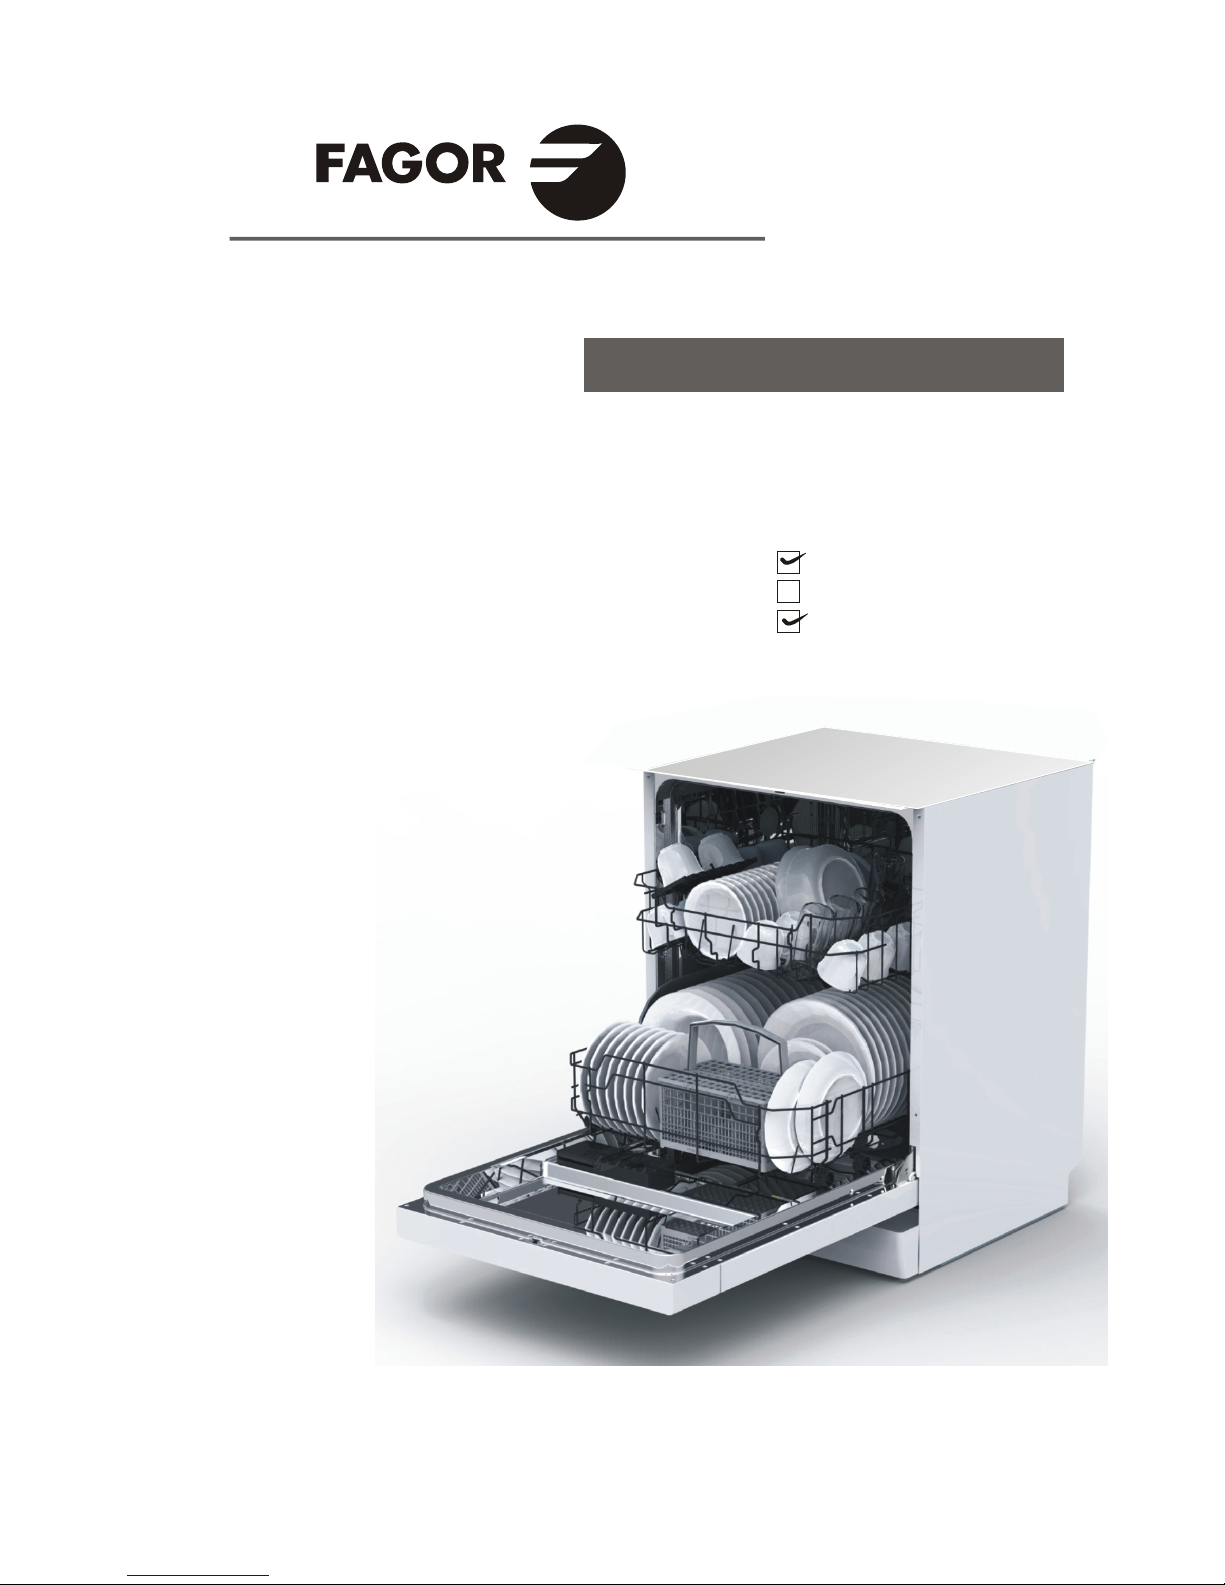
Instruction ManualInstruction Manual
DishwasherDishwasher
12 place settings
Auto program
half-load function
LVF63ITB
Page 2

To review the section on troubleshooting Tips
will help you to solve some common problems
by yourself .
NOTE:
Dear Customer,
Please carefully read this manual before using the
dishwasher, it will help you to use and maintain the
dishwasher properly.
Pass it on to any subsequent owner of the appliance.
This manual contains sections on safety Instructions,
Operating Instructions, Installation Instructions and
Troubleshooting Tips, etc.
The manufacturer, following a policy of constant
development and updating of the product, may
make modifications without giving prior notice.
Read this Manual
Before Calling for Service
Keep it as a refer in the later days.
If you can not solve the problems by yourself ,
please ask for the help of professional technicians.
Dishwasher Features.................................... ...5
4) Prior using for the first time...............................64) Prior using for the first time...............................6
A Water Softener...........................................6
5) Loading the Dishwasher Basket.......................115) Loading the Dishwasher Basket.......................11
Attention before or after loading the Dishwasher
Baskets........................................................ 11
7) Maintenance and cleaning..............................157) Maintenance and cleaning..............................15
Filtering System.............................................15
Caring for the Dishwasher...............................16
B Loading the Salt into the Softener.................7
C Fill the Rinse Aid Dispenser.........................7
D Function of Detergent .................................8
Loading the upper Basket...............................12
Loading the Lower Basket...............................12
6) Starting a washing programme........................136) Starting a washing programme........................13
Wash Cycle Table...........................................13
Turning on the Appliance................................13
Change the Programme..................................14
At the end of the Wash Cycle...........................14
8) Installation instruction....................................178) Installation instruction...................... ............17..
9) Troubleshooting Tips......................................249) Troubleshooting Tips................................ ....24..
Before calling for service.................................24
Error codes...................................................25
Technical information.....................................26
1) Safety Information..........................................11) Safety Information..........................................1
3) Operation Instructions.....................................53) Operation Instructions.....................................5
Control Panel...................................................5
.................................. 17Installation preparation
Aesthetic panel's dimensions and installation...18
..............20Tension adjustment of the door spring
.............................. 20Connection of drain hoses
......................... 21Dishwasher installation steps
About Electricity Connecting...........................22
Cold Water Connection.................................. 23
Loading the baskets according to En50242Loading the baskets according to En50242
2) Quick operation guide..................................... 42) Quick operation guide..................................... 4
Page 3

This appliance is intended to be used in household
and similar applications such as:
-staff kitchen areas in shops, offices and other
working environments;
-farm houses;
-by clients in hotels, motels and other residential type
environments;
-bed and breakfast type environments.
This appliance can be used by children aged from 8
years and above and persons with reduced physical,
sensory or mental capabilities or lack of experience
and knowledge if they have been given supervision
or instruction concerning use of the appliance in a
safe way and understand the hazards involved.
Children shall not play with the appliance. Cleaning
and user maintenance shall not be made by children
without supervision. For EN60335-1
This appliance is not intended for use by persons
(including children )with reduced physical, sensory
or mental capabilities, or lack of experience and
knowledge ,unless they have been given supervision
or instruction concerning use of the appliance by a
person responsible for their safety. For IEC60335-1
This appliance is for indoor use only, for household
use only.
To protect against the risk of electrical shock, do not
immerse the unit, cord or plug in water or other liquid.
Please unplug before cleaning and maintenance the
appliance .
Use a soft cloth moisten with mild soap, and then use
a dry cloth to wipe it again.
1.IMPORTANT SAFETY INFORMATION1.IMPORTANT SAFETY INFORMATION
When using your dishwasher,
follow the precautions listed below:
WARNING! WARNING!
1-1
Page 4

This appliance must be earthed. In the event of a
malfunction or breakdown, earthing will reduce the risk
of an electric shock by providing a path of least
resistance of electric current. This appliance is equipped
with a cord having an equipment-earthing conductor
and a grounding plug.
The plug must be plugged into an appropriate outlet that
i s i nstalled a nd earthed in a ccordance with all local
codes and ordinances.
Improper connection of the equipment-earthing
conductor can result in the risk of an electric shock.
Check with a qualified electrician or service
representative if you are in doubt whether the appliance
is properly grounded.
Do not modify the plug provided with the appliance;
If it does not fit the outlet.
Have a proper outlet installed by a qualified electrician.
Do not abuse, sit on, or stand on the door or dish rack of
the dishwasher.
Do not operate your dishwasher unless all enclosure
panels are properly in place.
Open the door very carefully if the dishwasher is
operating, there is a risk of water squirting out.
Do not place any heavy objects on or stand on the door
when it is open. The appliance could tip forward.
When loading items to be washed:
1) Locate sharp items so that they are not likely to
damage the door seal;
EARTHING INSTRUCTIONS
1-2
Page 5

2) Warning: Knives and other utensils with sharp points
must be loaded in the basket with their points down or
placed in a horizontal position.
Check that the detergent powder is empty after
completion of the wash cycle.
Do not wash plastic items unless they are marked
dishwasher safe or the equivalent.
For plastic it ems n check th e m anufacturer's
ot so marked,
recommendations.
Use only det ergent and rins e add itives des igned for
an aut omatic dish washer.
Never use soap, laundry detergent, or hand washing
detergent in your dishwasher.
Children should be supervised to ensure that they do not
play with the appliance.
The door should not be left open, since this could increase
the risk of tripping.
If the supply cord is damaged, it must be replaced by the
manufacturer or its service agent or a similarly qualified
person in order to avoid a hazard.
During installation, the power supply must not be
excessively or dangerously bent or flattened.
Do not tamper with controls.
The appliance is to be connected to the water mains using
new hose sets and that old hose-sets should not be reused.
The maximum number of place settings to be washed
is .
The maximum permissible inlet water pressure is 1MPa.
The minimum permissible inlet water pressure is 0.04MPa.
2
12
Page 6

Dispose of the dishwasher packaging material
correctly.
All packaging materials can be recycled.
Plastic parts are marked with the standard
international abbreviations:
PE for polyethylene, e.g. sheet wrapping material
PS for polystyrene, e.g. padding material
POM polyoxymethylene, e.g. plastic clips
PP polypropylene, e.g. Salt filler
ABS Acrylonitrile Butadiene Styrene, e.g. Control
Panel .
Packaging material could be dangerous for children!
For disposing of package and the appliance please
go to a recycling centre. Therefore cut off the power
supply cable and make the door closing device
unusable.
Cardboard packaging is manufactured from recycled
paper and should be disposed in the waste paper
collection for recycling.
By ensuring this product is disposed of correctly, you
will help prevent potential negative consequences
for the environment and human health, which could
otherwise be caused by inappropriate waste handling
of this product.
For more detailed information about recycling of this
product, please contact your local city office and your
household waste disposal service.
DISPOSAL: Do not dispose this product as unsorted
municipal waste. Collection of such waste separately
for special treatment is necessary.
WARNING! WARNING!
Disposal Disposal
3
Page 7
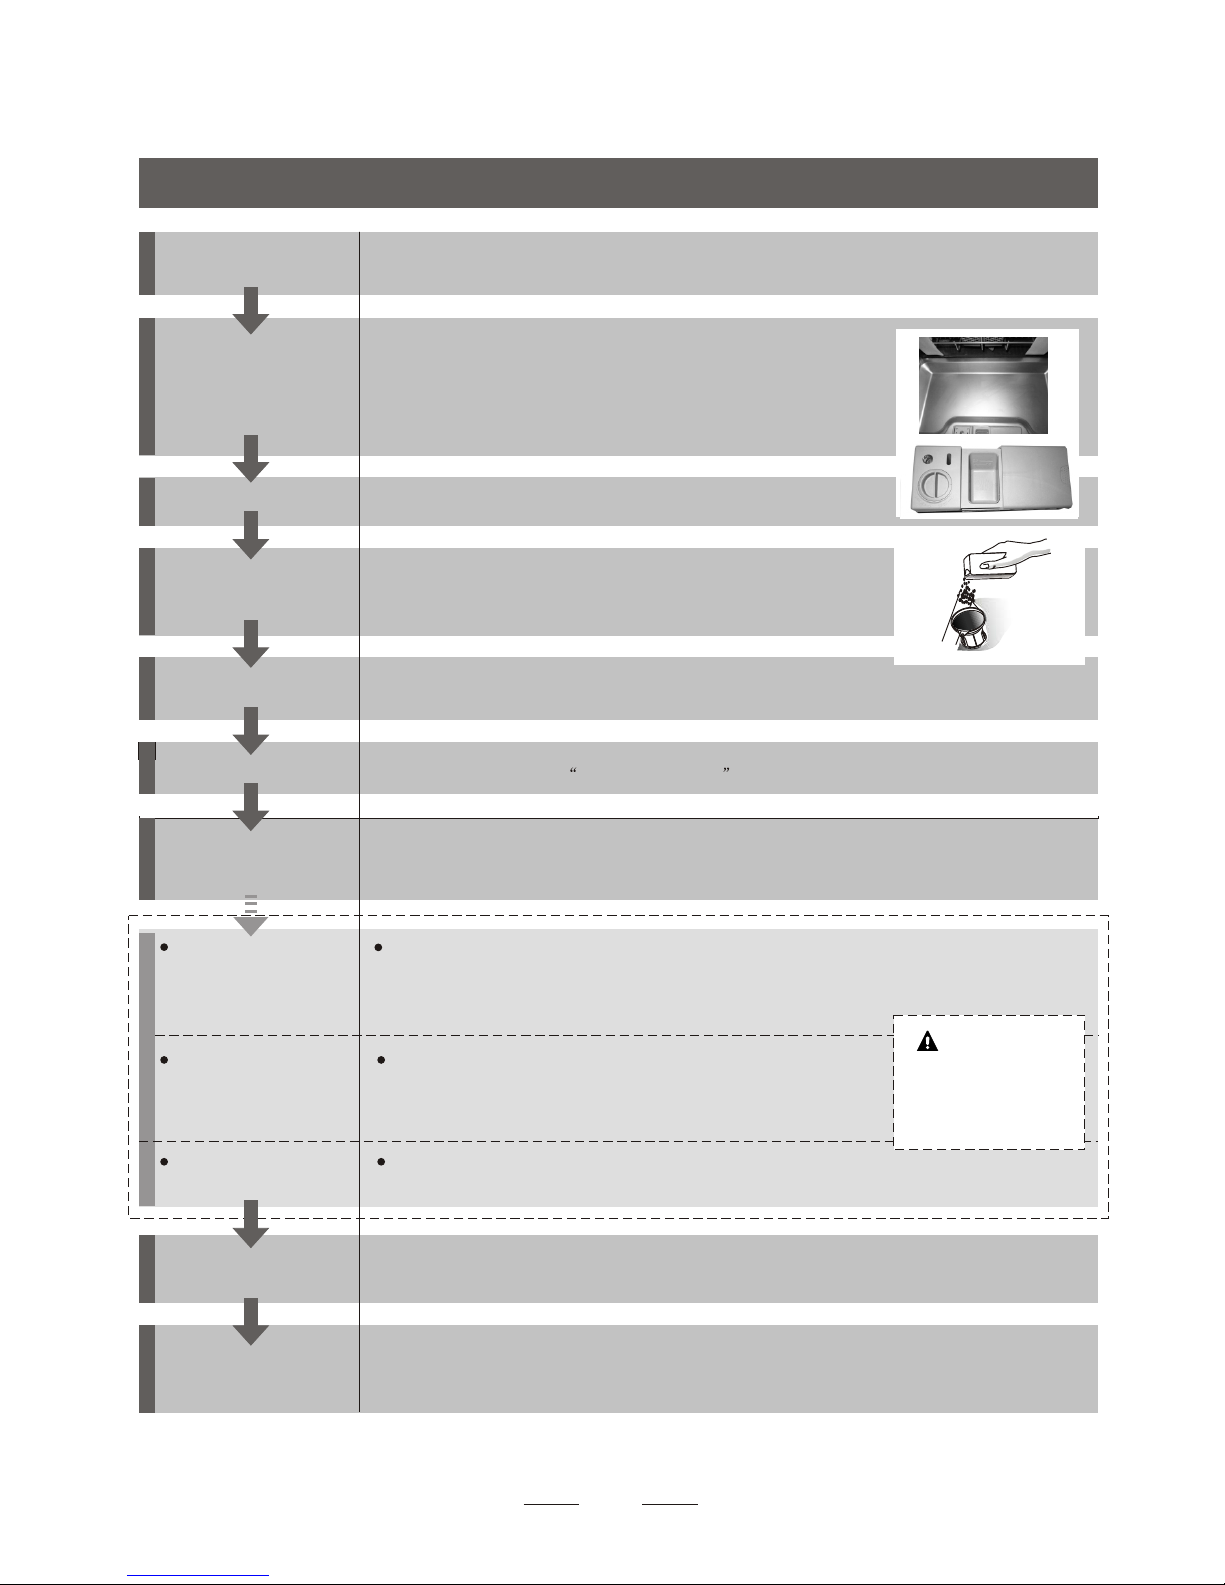
Compartment A:Compartment A:
With each wash cycle.
Compartment B:B:
For programmes with pre-wash only.
(Follow the user instructions!)
Mechanical indicator C. Mechanical indicator C.
Electric indicator on control panel (if provided).
Check the rinse aid level
(On models with water softener system only.)
Electric indicator on control panel (if provided).
If there is no salt warning light in the control panel
(for some models), you can estimate when to fill the salt into
the softener by the number of cycles the dishwasher has run.
Check the regeneration
salt level
Load the baskets
Select a programme
T urn on the water tap ,close the door . The machine will start working at once.
Running the dishwasher
Switch off the appliance
Turn off the water tap,
unload the baskets
Fill the detergent dispenser
Warning: wait a few minutes (about 15 minutes) before unloading the dishwasher to avoid handling
the dishes and utensils while they are still hot and more susceptible to break.
They will also dry better.Unload the appliance, starting from the lower basket.
Changing the programme
Add forgotten dishes in the
dishwasher.
Scrape off any large amount of leftover food. Soften remnants of burnt food in pans,
then load the baskets. Refer to the dishwasher loading instructions.
Press the Programme Button until the selected programme lights up.
( See the section entitled Operation instruction )
When the working cycle has finished, the buzzer of the dishwasher will sound 8 times, then stop.
Turn off the appliance using the On/Off Button.
Since the appliance is standing by, it will power off automaticly after 30 minutes without any operation.
If the appliance is switched
off during a wash cycle.
Open the door carefully.
Hot steam may escape
when the door is opened!
WARNING!
If the appliance is switched off during a wash cycle, when switched
on again, please re-select the washing cycle and operate the dishwasher
according to the original Power-on state ).
Switch on the appliance
Open the door,press the On/Off button to switch on the appliance .
1.Open the door a little to stop the dishwasher.
2.After the spray arms stop working, you can open the door completely.
3.Add the forgotten dishes.
4.Close the door, the dishwasher will start running again.
guide
For detailed operating method read the corresponding content on the instruction manual.
1. A running cycle can only be modified if it has been running for a short time. Otherwise the detergent
may have already been released and the water already drained. If this is the case, the detergent
dispenser must be refilled.
2. Press the Programme Button for more than 3 seconds to cancel the running programme.
3. Select a new programme.
4. Restart the dishwasher.
4
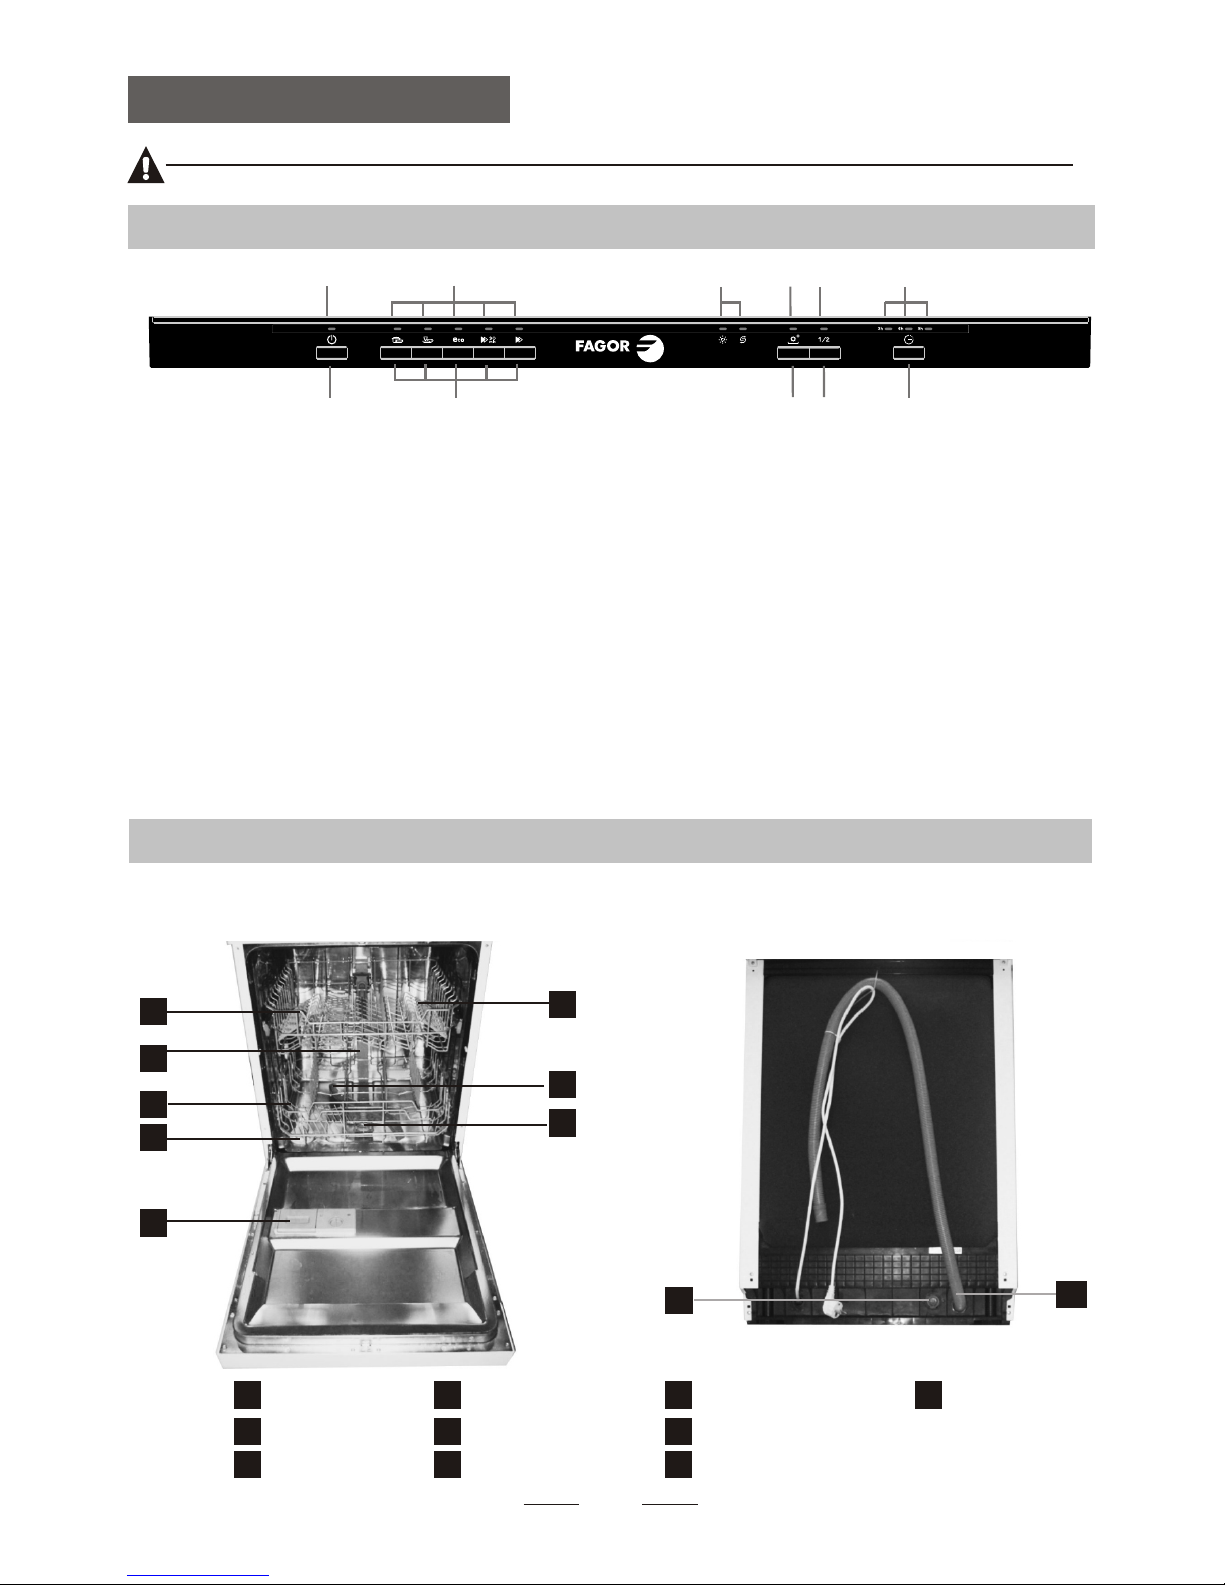
2.Quick operation
AA
CC
BB
Page 8
55
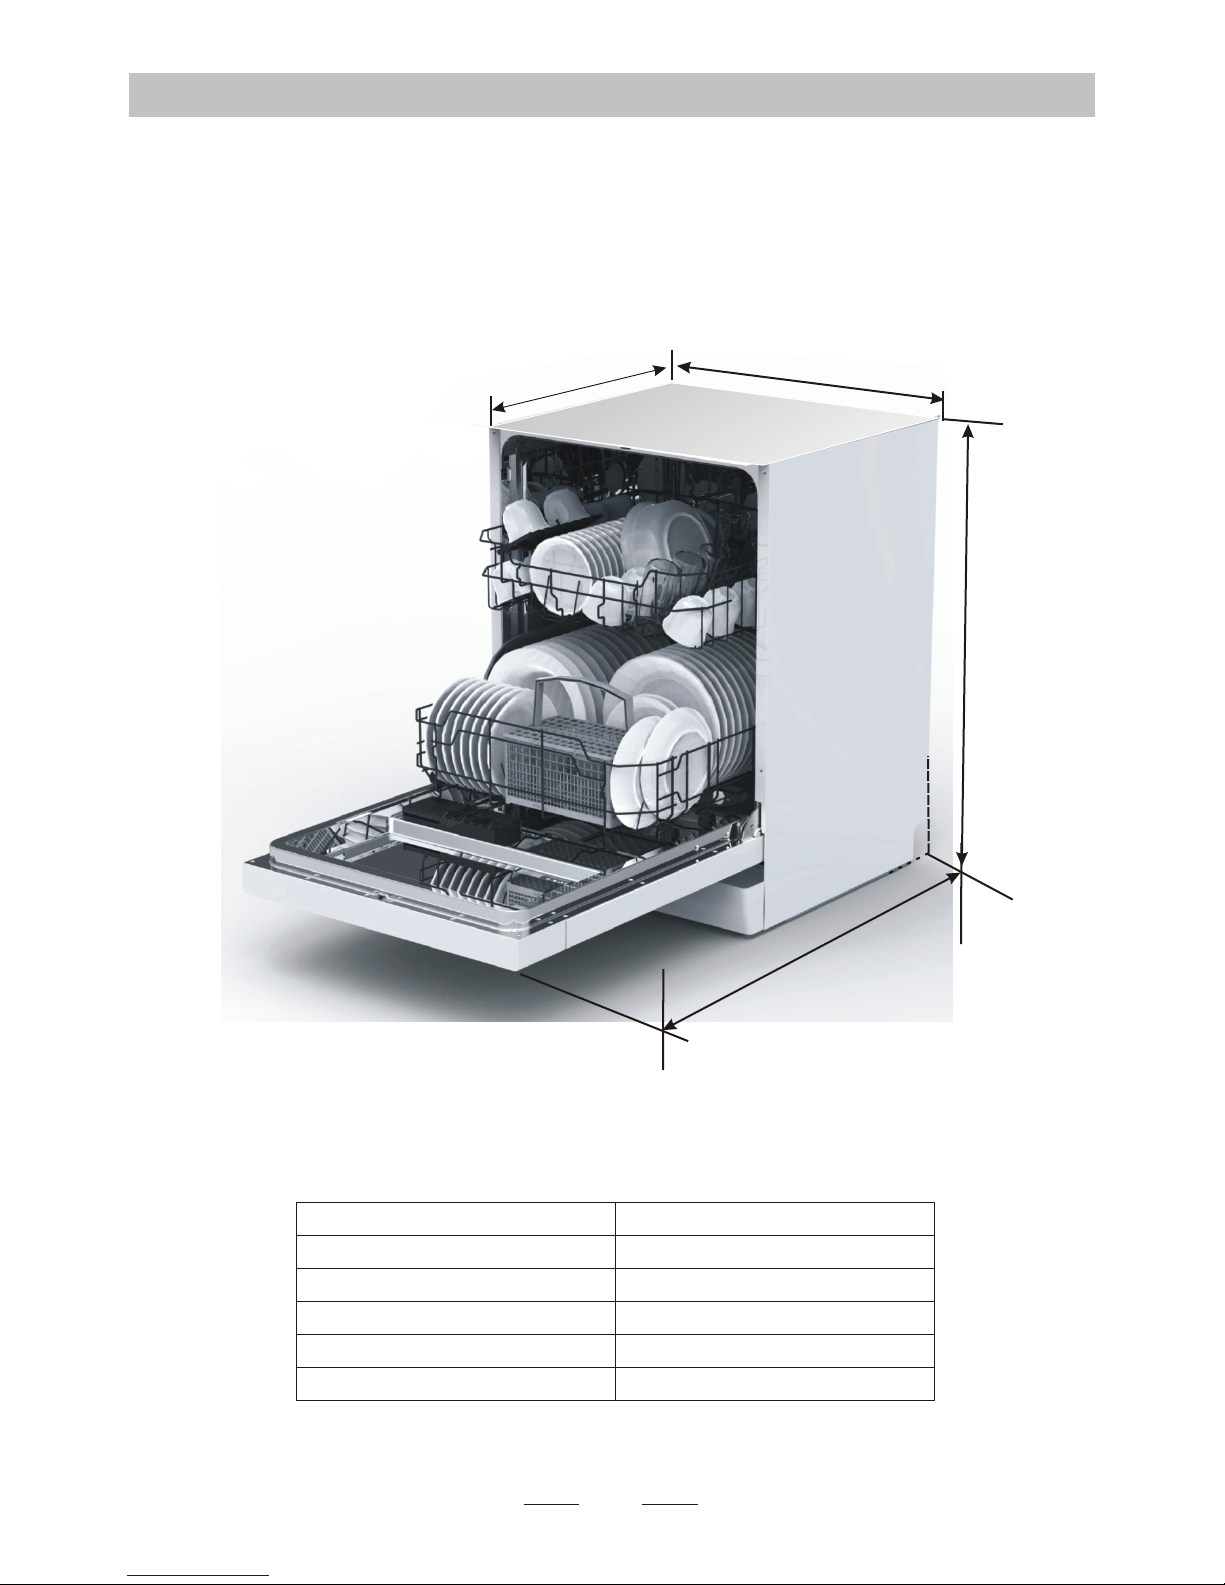
Back View
Front view
Dispenser
Cup Shelf
Spray arms
Filter assembly
Inlet pipe connector
Drain pipe
Lower Basket
Inner pipe
Upper Basket
1
Salt Container
Dishwasher FeaturesDishwasher Features
5
6
7
8
9
10
3
2
4
3.Operation Instruction3.Operation Instruction
Control PanelControl Panel
before using it for the first time.
To get the best performance from your dishwasher, read all operating instructions
IMPORTANTIMPORTANT
Control PanelControl Panel
9
10
1
2
3
4
5
6
7
8
11
22
33
44 55
66
11
44
66
22
55
1. Power button and indicator: to switch On/Off the appliance and to show when the power is on.
2. Program buttons and indicators: press the button to select a wash program. The indicator will
show which wash program you have selected.
3. Salt and rinse aid warning lights: the indicators show when the salt container or dispenser need to
be refilled.
4. Extra drying functions button and indicator: press the button to activate the extra drying function.
It can only be used with the intensive, normal, eco, 90min programs.
5. Half load functions button: to activate the half load function. We recommend to use the half load
function only when loading 6 or less settings in the dishwasher. By using it is possible to reduce
water and energy consumption. The half load function can be used during intensive, normal, eco
and 90min programs.
6. Delay button and indicators: to show the delay time 3 hours 6 hours and 9 hours.
Page 9
The water softener must be set manually, using the water hardness dial.
The water softener is designed to remove minerals and salts from the water, which would have
a detrimental or adverse effect on the operation of the appliance.
The higher the content of these minerals and salts, the harder your water is.
The softener should be adjusted according to the hardness of the water in your area. Your local Water Authority
can advise you on the hardness of the water in your area.
Adjusting Salt Consumption
The dishwasher is designed to allow for adjustment in the amount of salt consumed based on the hardness of
the water used. This is intended to optimise and customise the level o f salt consumption.
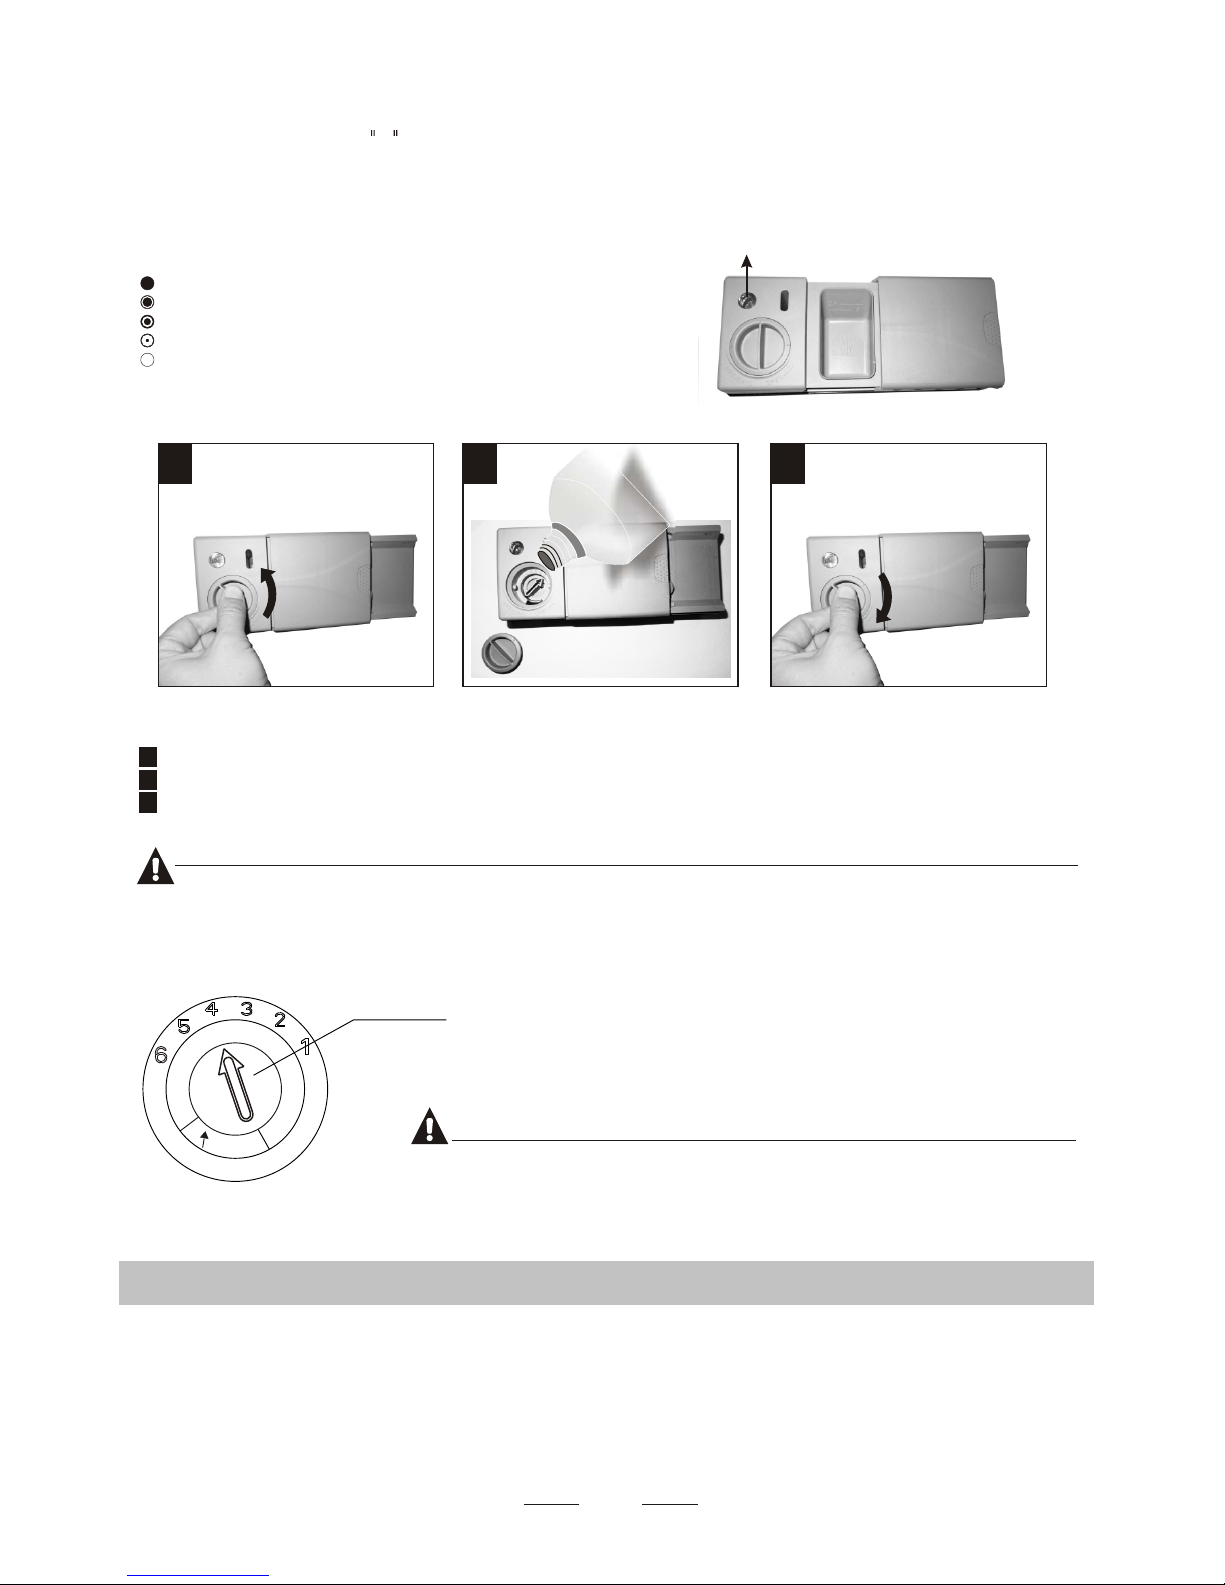
1. Open the door ,Switch on the appliance;
2. Press the Program button for more than 5 seconds to start the water softener
set model within 60seconds after the appliance was switched on( The Salt and
Rinse aid warninglights will be on periodically when it get in the set model );
3. Press the Program button to select the proper set according to your local environment,
the sets will change in the following sequence: H3->H4->H5->H6->H1->H2->;
4. Press the Power button to end the set up model.
WATER SOFTENER
The hardness of the water varies from place to place. If hard water is used in the dishwasher, deposits will
form on the dishes and utensils.
The appliance is equipped with a special softener that uses a salt container specifically designed to eliminate
lime and minerals from the water.
4.Prior using for the first time4.Prior using for the first time
Contact your local water board for information on the hardness of your water supply.
Please follow the steps below for adjustment in salt consumption.
6
A. Water SoftenerA. Water Softener
NOTE:NOTE:
If your model does not have any water softener, you may skip this section.
Note:2Note:2
The manufactory setting: H3 (EN 50242)
Before using your dishwasher for the first time:
A. Set the water softener
B. Add 1.5Kg dishwasher salt and then full fill the salt container with water
C. Fill the rinse aid dispenser
D. Fill in detergent
¡ã
Clark: British degree
¡ã
fH: French degree
¡ã
dH: German degree
Note:1Note:1
dH=1.25 Clarke=1.78 fH=0.178mmol/l
¡ã
¡ã
¡ã
1
dH
mmol/l
0~90~5 0~0.94
H1
0
10-20
6-11
1.0-2.0
H2
9
21-30
12-17 2.1-3.0
H3
12
H4
20
fH
0~6
7-14
15-21
Clarke
WATER HARDNESS
Selector Position
Salt c o nsumption
(gram/cycle)
18-22 31-40 22-28 3.1-4.0
41-60
23-34 4.1-6.0
H5
30
H6
60
29-42
35-55 61-98 43-69 6.1-9.8
Page 10

1. The salt container must only be refilled when the salt warning light in the control panel comes on.
Depending on how well the salt dissolves, the salt warning light may still be on even though the
salt container is filled.
If there is no salt warning light in the control panel (for some Models),you can estimate when to fill
the salt into the softener by the cycles that the dishwasher has run.
2. If there are spills of the salt, a soak or a rapid program should be run to remove the excessive salt.
Always use the salt intended for use with dishwasher.
The salt container is located beneath the lower basket and should be filled as explained
in the following:
Attention!
Only use salt specifically designed for the use in dishwashers! Every other type of
salt not specifically designed for the use in a dishwasher, especially table salt, will
damage the water softener. In case of damages caused by the use of unsuitable
salt the manufacturer does not give any warranty nor is liable for any damages caused.
Only fill with salt just before starting one of the complete washing programs.
This will prevent any grains of salt or salty water, which may have been spilled,
remaining on the bottom of the machine for any period of time, which may cause
corrosion.
7
B. Loading the Salt Into the SoftenerB. Loading the Salt Into the Softener
C. Fill the Rinse Aid DispenserC. Fill the Rinse Aid Dispenser
The rinse aid is released during the final rinse to prevent water from forming droplets on your dishes, which can
leave spots and streaks. It also improves drying by allowing water to roll off the dishes. Your dishwasher is
designed to use liquid rinse aids. The rinse aid dispenser is located inside the door next to the detergent dispenser.
To fill the dispenser, open the cap and pour the rinse aid into the dispenser until the level indicator turns completely
black. The volume of the rinse aid container is about 110ml.
Rinse Aid Dispenser
Function of Rinse Aid
Rinse aid is automatically added during the last rinse, ensuring thorough rinsing, and spot and streak free drying.
Attention!
Only use branded rinse aid for dishwasher. Never fill the rinse aid dispenser with any other substances
(e.g. Dishwasher cleaning agent, liquid detergent). This would damage the appliance.
NOTE:NOTE:
Full fill the salt container with water,It is normal for a small amount of water to come out of the
salt container.
11
22
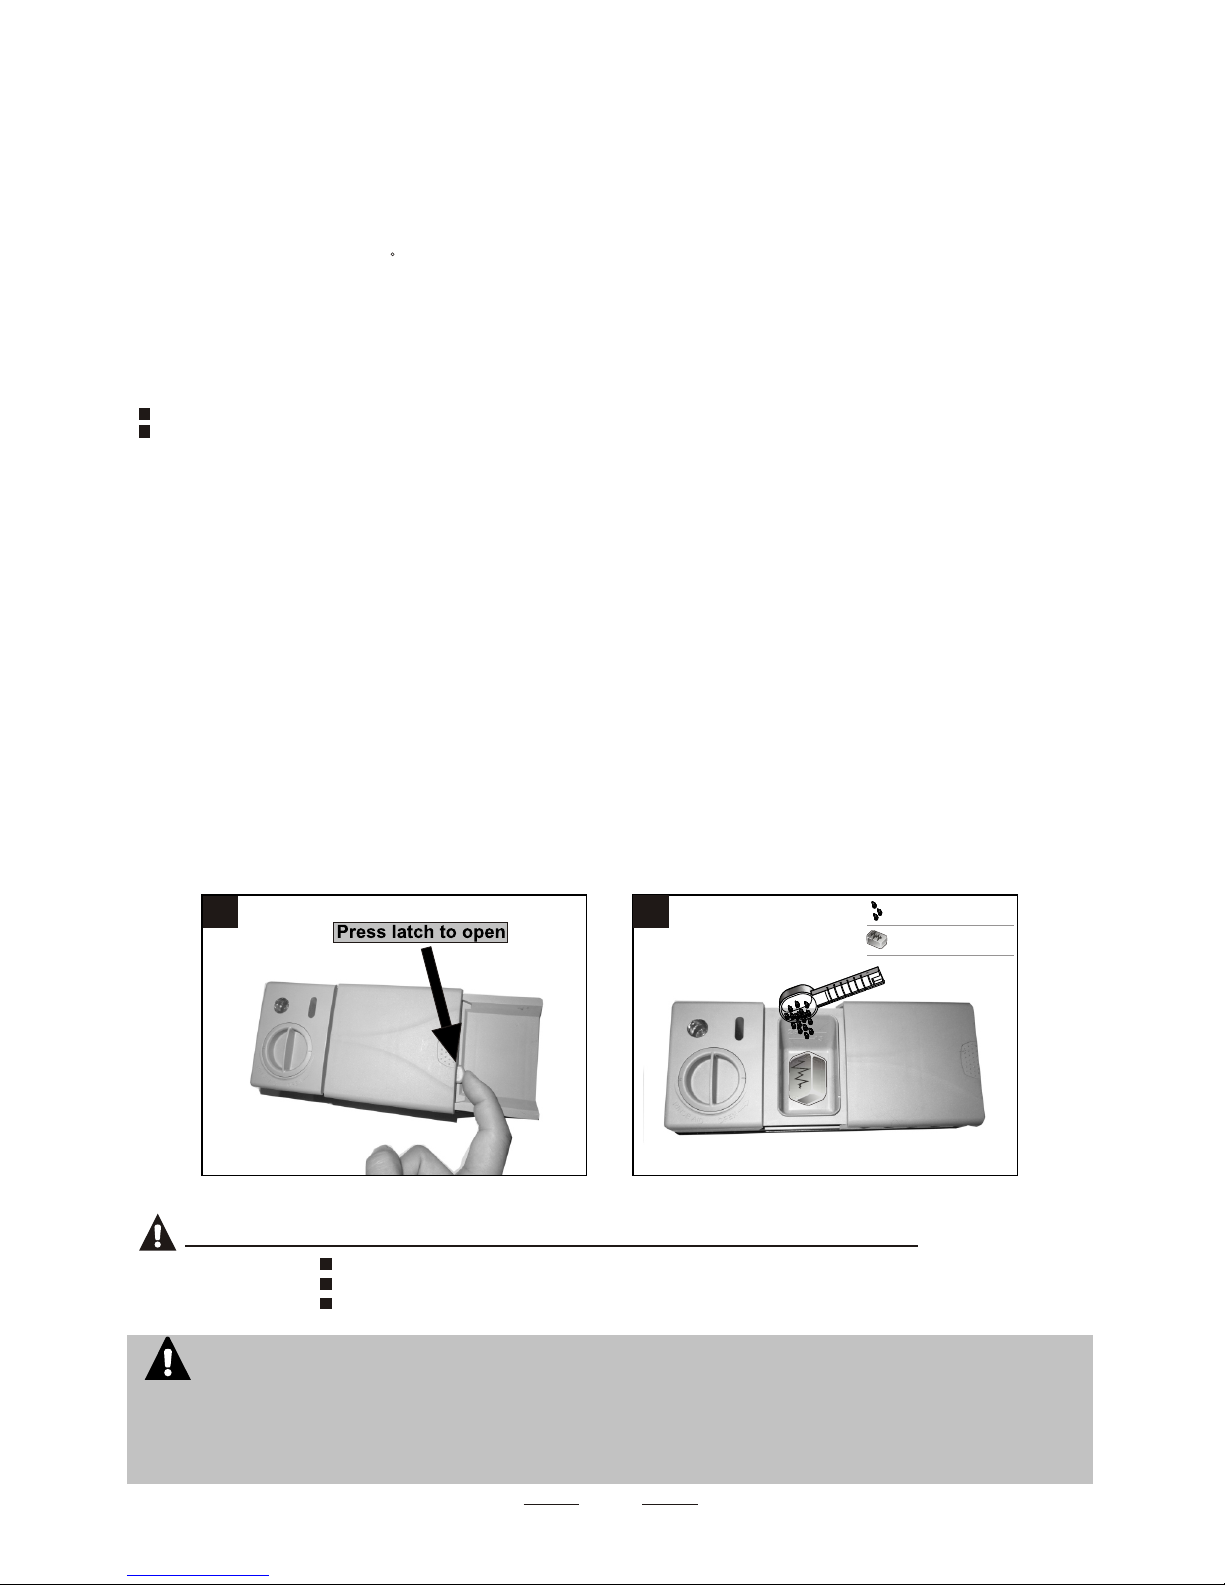
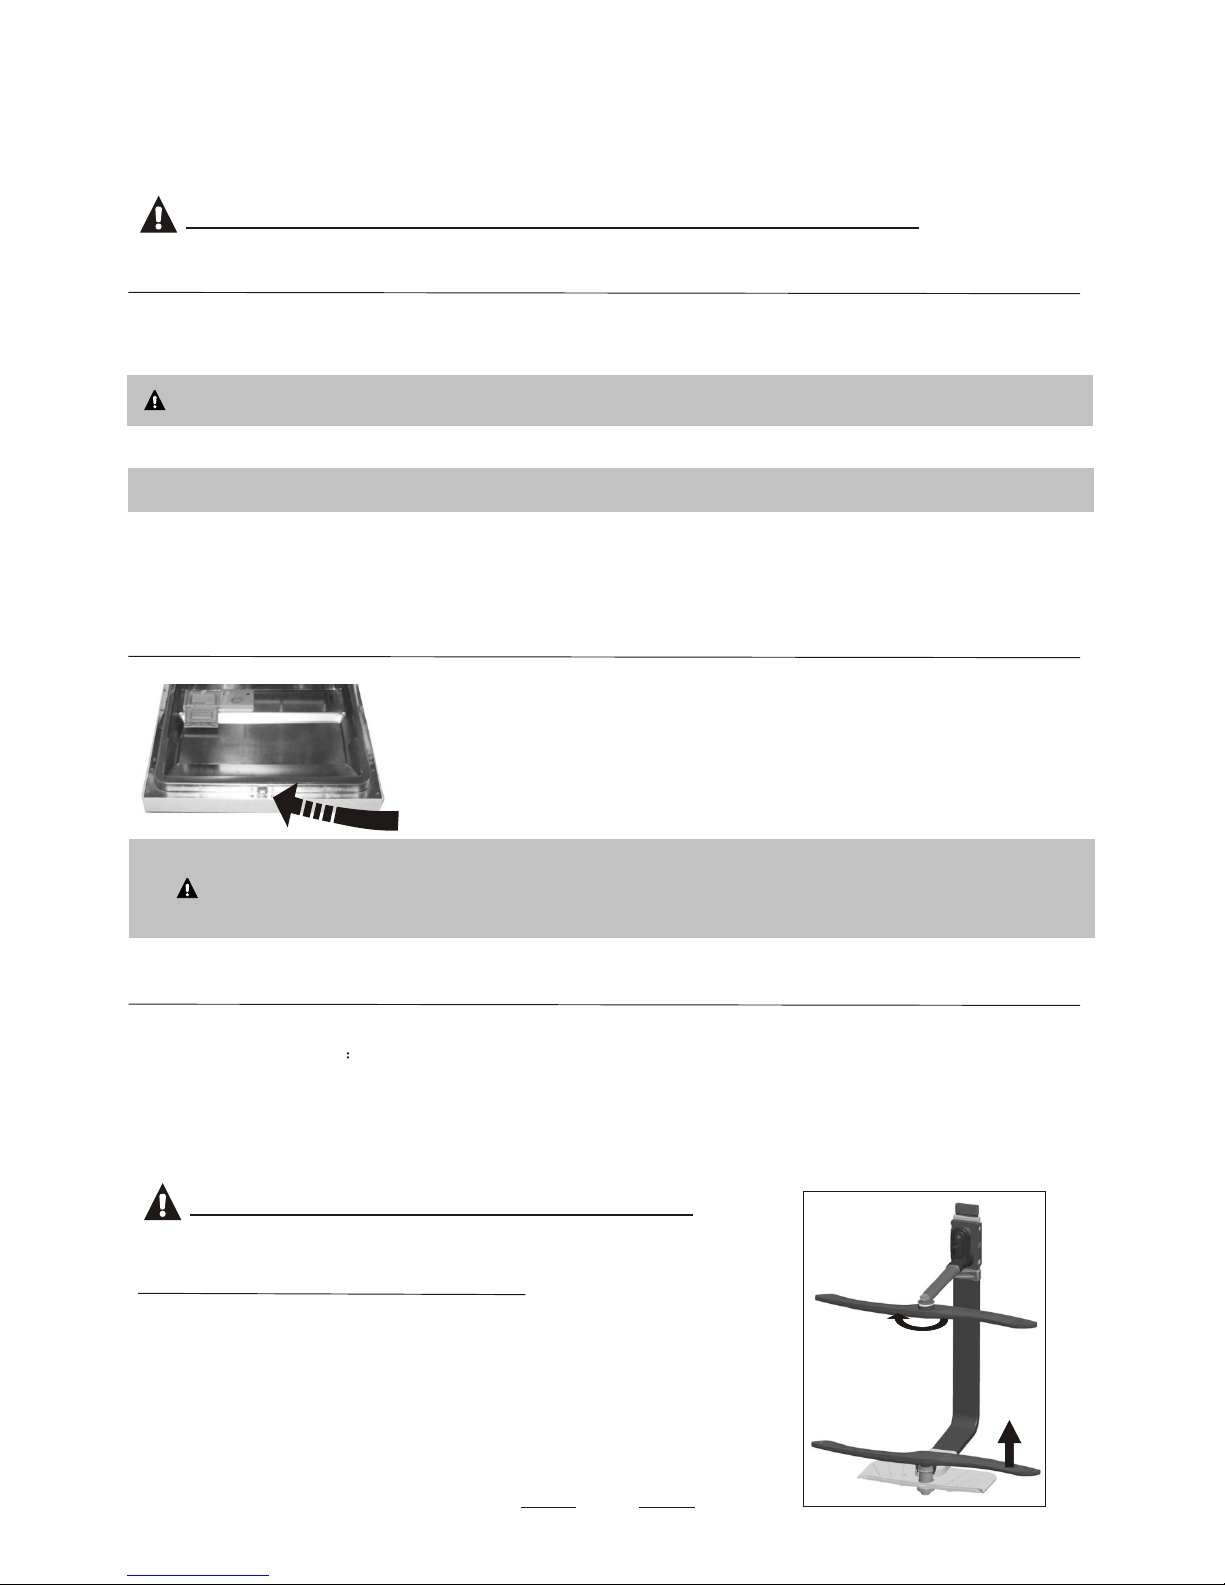
A After the lower basket has been removed, unscrew and remove the cap from the salt container.
B Place the end of the funnel (supplied) into the hole and introduce about 1.5kg of dishwasher salt.
C
D After filling the container , screw the cap tightly back clockwise.
E The salt warning light will stop being after the salt container has been filled with salt.
F Immediately after filling the salt into the salt container, a washing program should be started (We suggest to use a short
program). Otherwise the filter system, pump or other important parts of the machine may be damaged
by salty water. This is out of warranty.
11 22
OpenOpen
Page 11
8
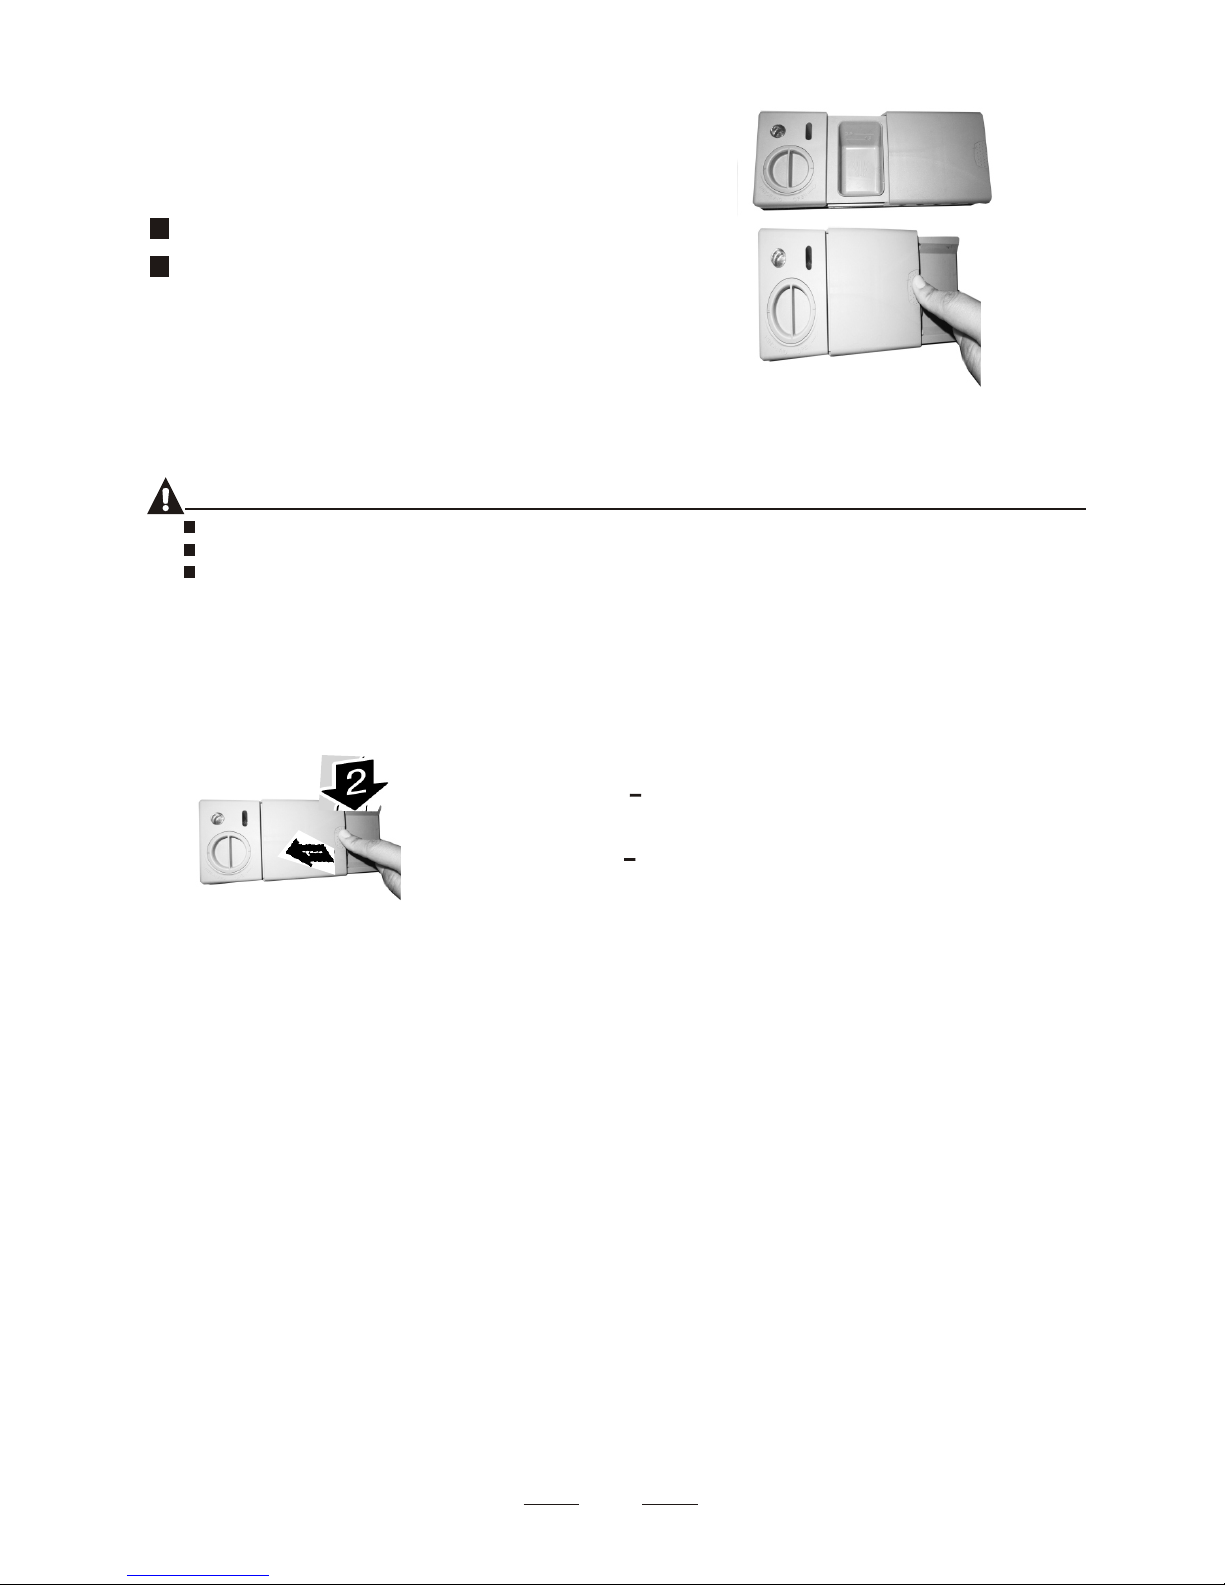
To open the dispenser, turn the cap to the "open" (left) arrow and lift it out.
Pour the rinse aid into the dispenser, being careful not to overfill.
Replace the cap by inserting it aligned with "open" arrow and turning it to the closed (right) arrow.
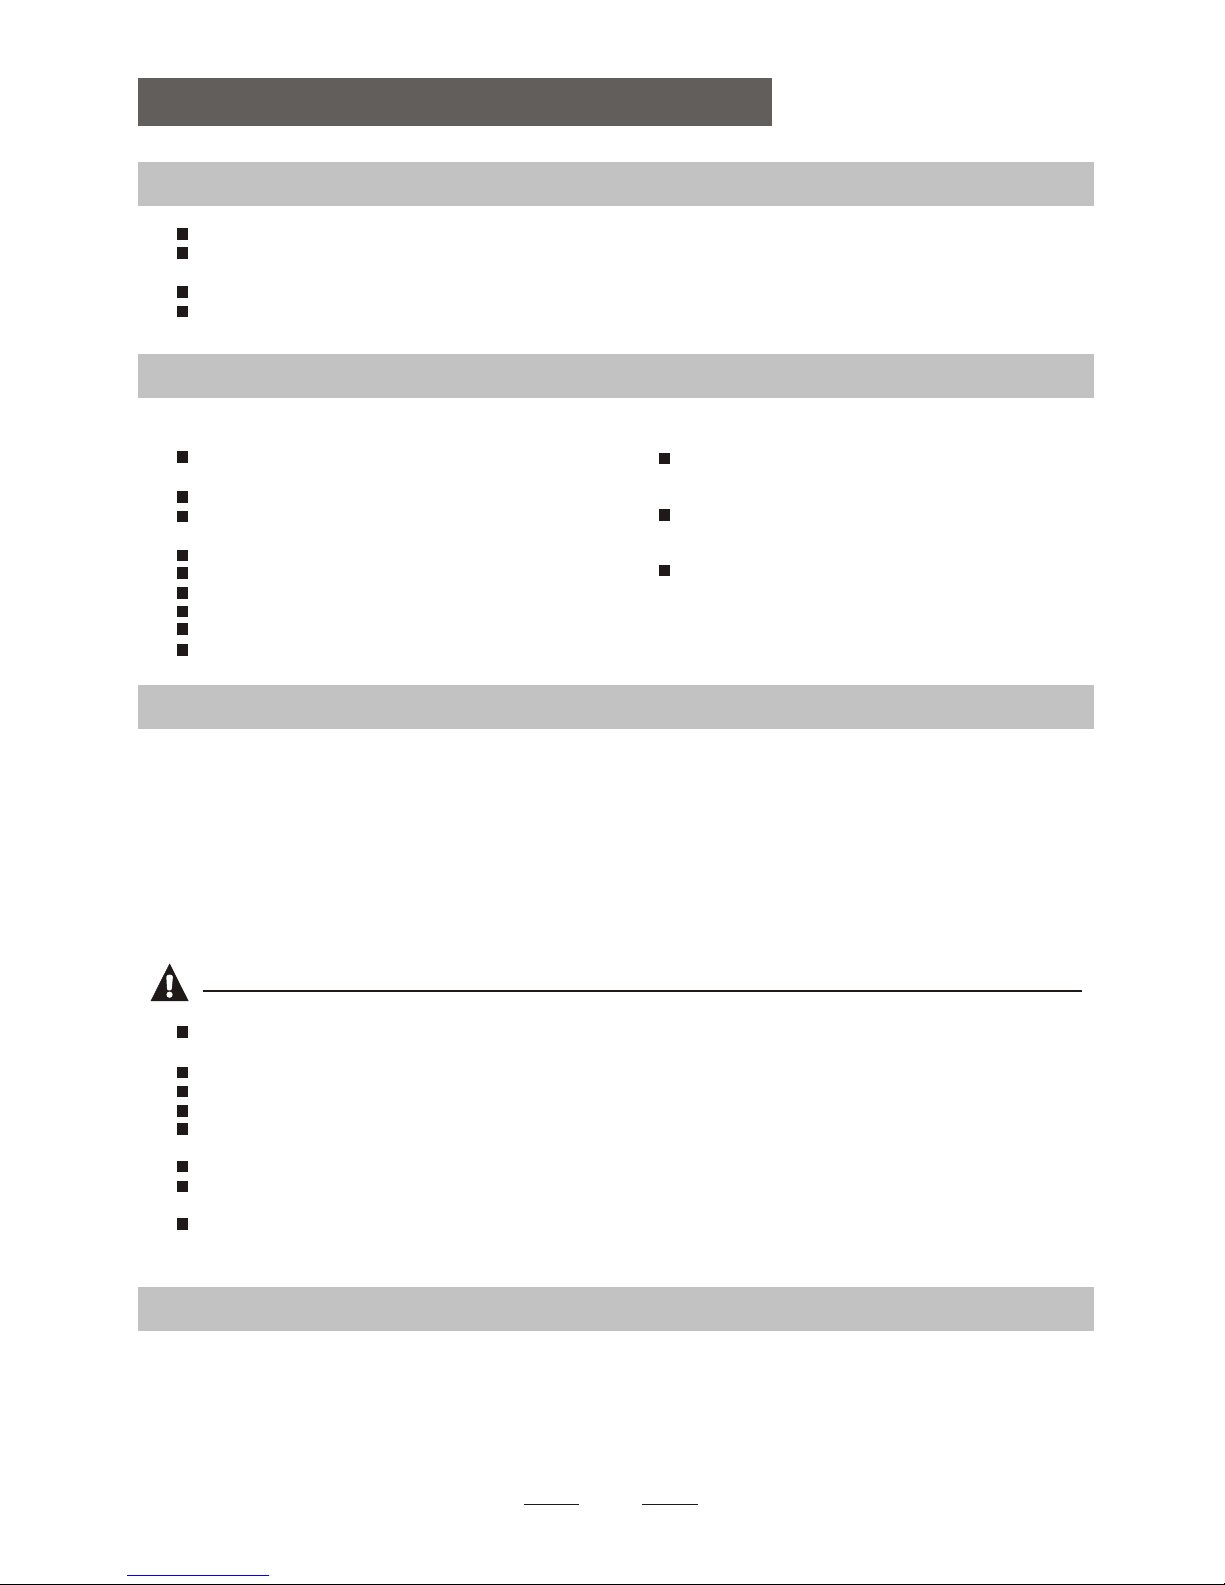
Adjusting Rinse Aid Dispenser
The rinse aid dispenser has six or four settings. Always start with the dispenser
set on "4". If spots and poor drying are a problem, increase the amount of rinse
aid dispensed by removing the dispenser lid and rotating the dial to "5". If the
dishes still are not drying properly or are show spots, adjust the dial to the next
higher lever until your dishes are spot-free. The recommended setting is "4".
(Factory value is "4".)
Increase the dose if there are drops of water or lime spots on the dishes after washing.
Reduce it if there are sticky whitish stains on your dishes or a bluish film on glassware or
knife blades.
1
2
3
As the rinse aid diminishes, the size of the black dot
on the rinse aid level indicator changes, as illustrated below.
Full
3 / 4 ful l
1 / 2 ful l
1 / 4 full - Should refill to eliminate spotting
Empty
Adjust lever
(Rinse)
Adjust lever
(Rinse)
When to Refill the Rinse Aid Dispenser
If there is no rinse-aid warning light in the control panel, you can estimate the amount from the colour
of the optical level indicator C located next to the cap. When the rinse-aid container is full, the whole
indicator will be dark .As the rinse-aid diminishes, the size of the dark dot decreases. You should never let
the rinse aid level fall 1 / 4 full.
during the next wash. Don't forget to replace the cap before you close dishwasher door.
Clean up any rinse aid spilled while during filling with an absorbent cloth to avoid excessive foaming
NOTE:NOTE:
NOTE:NOTE:
Detergents with its chemical ingredients are necessary to remove dirt, crush dirt and transport it out of the dishwasher.
Most of the commercial quality detergents are suitable for this purpose.
D. Function of DetergentD. Function of Detergent
MAXMAX
Proper Use of Detergent
Use only detergent specifically made for the use in dishwashers. Keep your detergent fresh and dry.
Don't put powdered detergent into the dispenser until you're ready to wash dishes.
Attention!
11 22 33
C (Rinse-Aid indicator) C
Page 12
9
Amount of Detergent to Use
Based on their chemical composition, detergents can be split in two basic types:
Detergent tablets of different brands dissolve at different speeds. For this reason some
detergent tablets cannot dissolve and develop their full cleaning power during short
programs. Therefore please use long programs when using detergent tablets, to
ensure the complete removal of detergent residuals.
The dispenser must be refilled before the start of each wash cycle following the instructions
provided in the wash cycle table . Your dishwasher uses less detergent and rinse aid than
Conventional dishwasher. Generally, only one tablespoon of detergent is needed for
a normal wash load. More heavily soiled items need more detergent. Always add the
detergent just before starting the dishwasher, otherwise it could get damp and will not
dissolve properly.
Concentrated Detergent
Detergent Tablets
Detergent Dispenser
conventional, alkaline detergents with caustic components
low alkaline concentrated detergents with natural enzymes
Normally new pulverised detergent is without phosphate. Thus the water softener function of
phosphate is not given. In this case we recommend to fill salt in the salt container even when
the hardness of water is only 6 dH. If detergents without phosphate are used in the case of hard water
often white spots appear on dishes and glasses. In this case please add more detergent to reach
better results. Detergents without chlorine do only bleach a little. Strong and coloured spots will not
be removed completely. In this case please choose a program with a higher temperature.
Detergents
There are 3 sorts of detergents
1.With phosphate and with chlorine
2.With phosphate and without chlorine
3.Without phosphate and without chlorine
Always add the detergent just before starting each wash cycle.
Only use branded detergent aid for dishwasher.
If the lid is closed: press release button. The lid will spring open.
NOTE:NOTE:
11 22
Detergent tablet
Detergent powder
Dishwasher detergent is corrosive!
Take care to keep it out of reach of children.
WARNING! WARNING!
Page 13
10
Fill the detergent dispenser with detergent.
The marking indicates the dosing levels , as
illustrated on the right:
Please observe the manufacturers dosing and storage
Recommendations as stated on the detergent packaging.
Close the lid and press until it locks in place.
If the dishes are heavily soiled, place an additional
detergent dose in the pre-wash detergent chamber. This detergent will take effect during the pre-wash phase.
Fill in Detergent
You find information about the amount of detergent for the single programme on the last page.
Please aware, that according to the level soiling and the specific hardness of water differences are possible.
Please observe the manufacturer's recommendations on the detergent packaging.
NOTE:NOTE:
AA
BB
Close the Detergent compartment
compartment.
Press down the lid (1) until it clicks
shut (2).
If you are using detergent in tablet form,
read the manufacturer
recommendations on the packaging in
order to
determine where the tablets should be
placed inside the dishwasher (e.g. in
cutlery basket, detergent compartment,
etc.).
Make sure that the lid on the detergent
compartment is closed, even if you are
using tablets.
If your dishes are only moderately dirty,
you may be able to use less detergent
than recommended.
The place of main wash cycle detergent placed.
The place of pre-wash cycle detergent placed.
A
B
Page 14
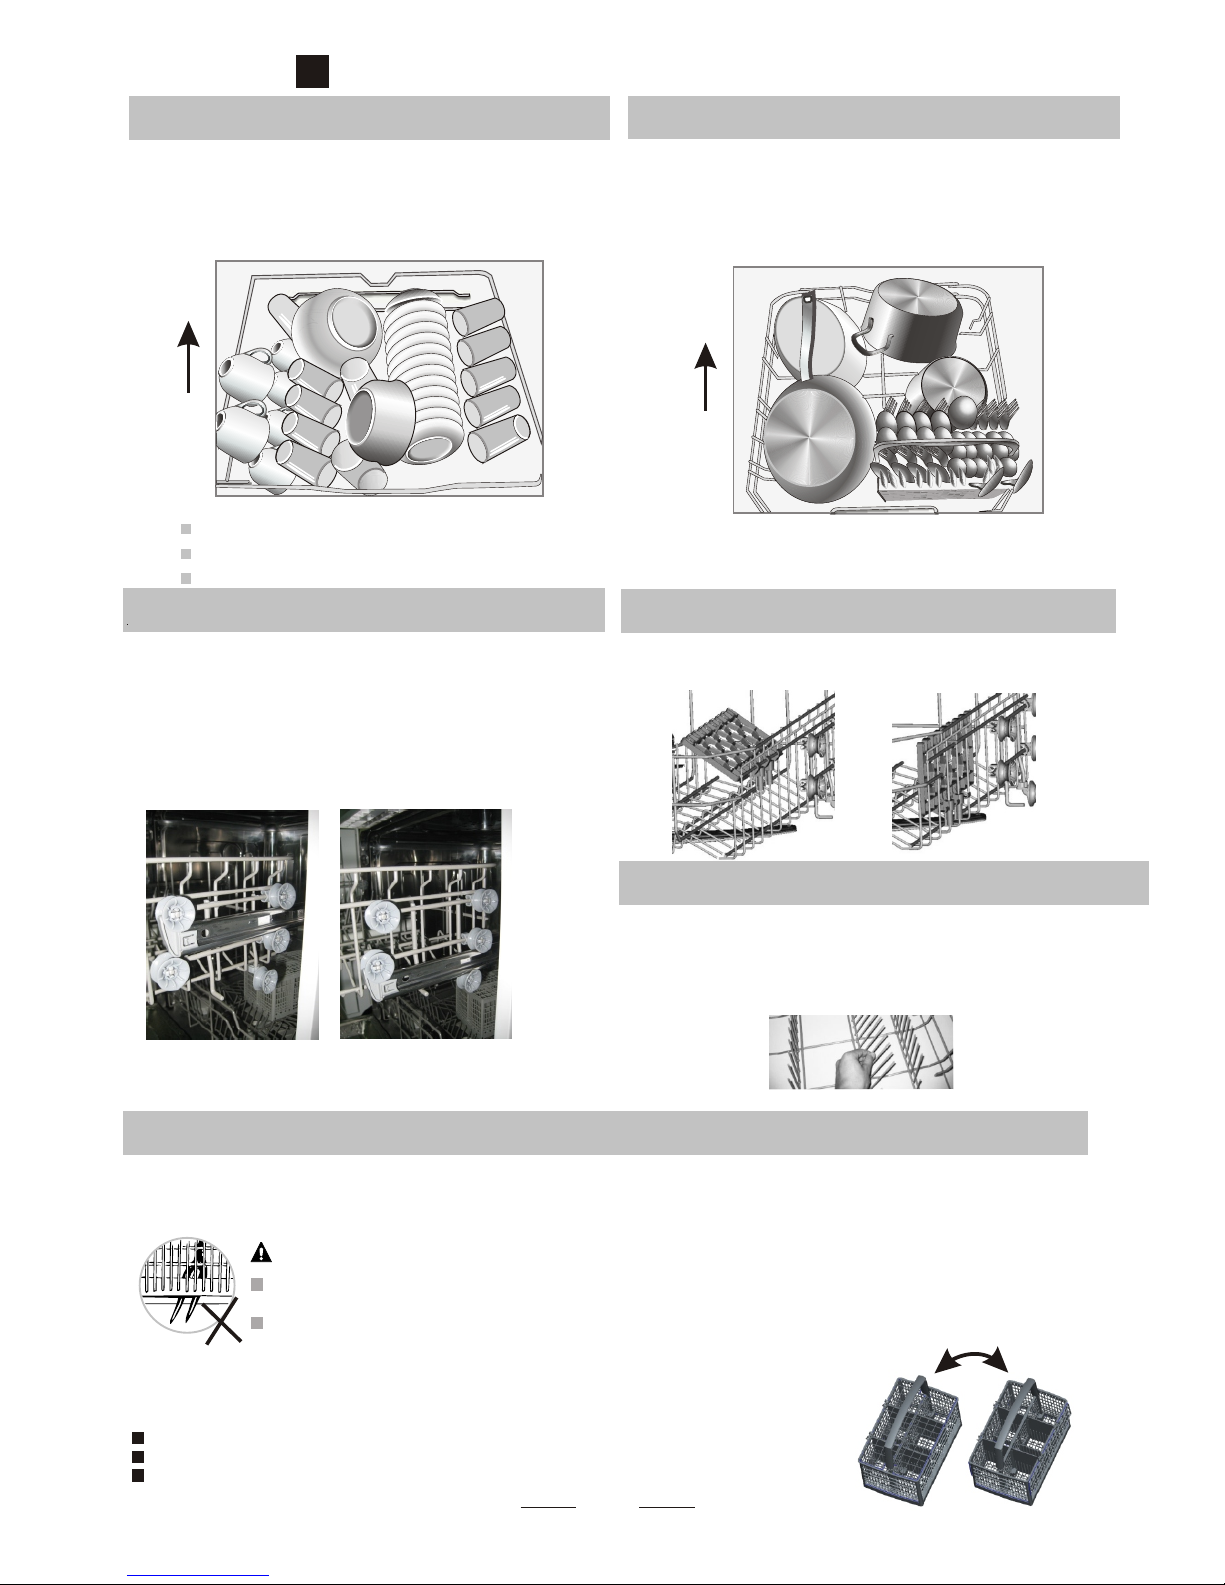
5.Loading the Dishwasher Baskets5.Loading the Dishwasher Baskets
For washing in the dishwasher the following cutlery/dishesFor washing in the dishwasher the following cutlery/dishes
Cutlery with wooden, horn china or
mother-of-pearl handles
Plastic items that are not heat resistant
Older cutlery with glued parts that are not
temperature resistant
Bonded cutlery items or dishes
Pewter or cooper items
Crystal glass
Steel items subject to rusting
Wooden platters
Items made from synthetic fibres
Some types of glasses can become
dull after a large number of washes
Silver and aluminum parts have a
tendency to discolour during washing
Glazed patterns may fade if machine
washed frequently
Are not suitable
Are of limited suitability
Dishes and items of cutlery must not lie inside one another, or cover each other.
To avoid damage to glasses, they must not touch.
Load large items which are most difficult to clean into the lower basket.
The upper basket is designed to hold more delicate and lighter dishware such as glasses, coffee
and tea cups
Long bladed knives stored in an upright position are a potential hazard!
Long and/or sharp items of cutlery such as carving knives must be positioned
horizontally in the upper basket.
Please do not overload your dishwasher. This is important for good results and for
reasonable consumption of energy.
Load hollow items such as cups, glasses, pans etc. With the opening facing downwards so that
water cannot collect in the container or a deep base.
RecommendationRecommendation
Consider buying utensils which are identified as dishwasher-proof.
Use a mild detergent that is described as 'kind to dishes'. If necessary, seek further
information from the detergent manufacturers.
For particular items, select a program with as low a temperature as possible.
To prevent damage, do not take glass and cutlery out of the dishwasher immediately
after the programme has ended.
(For best performance of the dishwasher, follow these loading guidelines.
Features and appearance of baskets and cutlery baskets may vary from your model.)
Scrape off any large amounts of leftover food. Soften remnants of burnt food in pans.
It is not necessary to rinse the dishes under running water.
Place objects in the dishwasher in following way:
1.Items such as cups, glasses, pots/pans, etc. are faced downwards.
2.Curved items, or ones with recesses, should be loaded aslant so that water can run off.
3.All utensils are stacked securely and can not tip over.
4.All utensils are placed in the way that the spray arms can rotate freely during washing.
NOTE:NOTE:
Very small items should not be washed in the dishwasher as they could easily fall out of the basket.
Attention before or after loading the Dishwasher BasketsAttention before or after loading the Dishwasher Baskets
To prevent water dripping from the upper basket into the lower basket, we recommend that you
empty the lower basket first and then the upper basket.
Removing the DishesRemoving the Dishes
11
Page 15
12
The upper basket is designed to hold more delicate
and lighter dishware such as glasses, coffee and
tea cups and saucers, as well as plates, small bowls
and shallow pans (as long as they are not too dirty).
Position the dishes and cookware so that they will
not get moved by the spray of water.
Loading the Upper BasketLoading the Upper Basket
We suggest that you place large items and the most
difficult to clean items are to be placed into the lower
basket: such as pots, pans, lids, serving dishes and
bowls, as shown in the figure below. It is preferable to
place serving dishes and lids on the side of the racks
in order to avoid blocking the rotation of the top spray
arm.
Loading the Lower BasketLoading the Lower Basket
Pots, serving bowls, etc, must always be placed top down.
Deep pots should be slanted to allow water to flow out.
Please be reminded that:
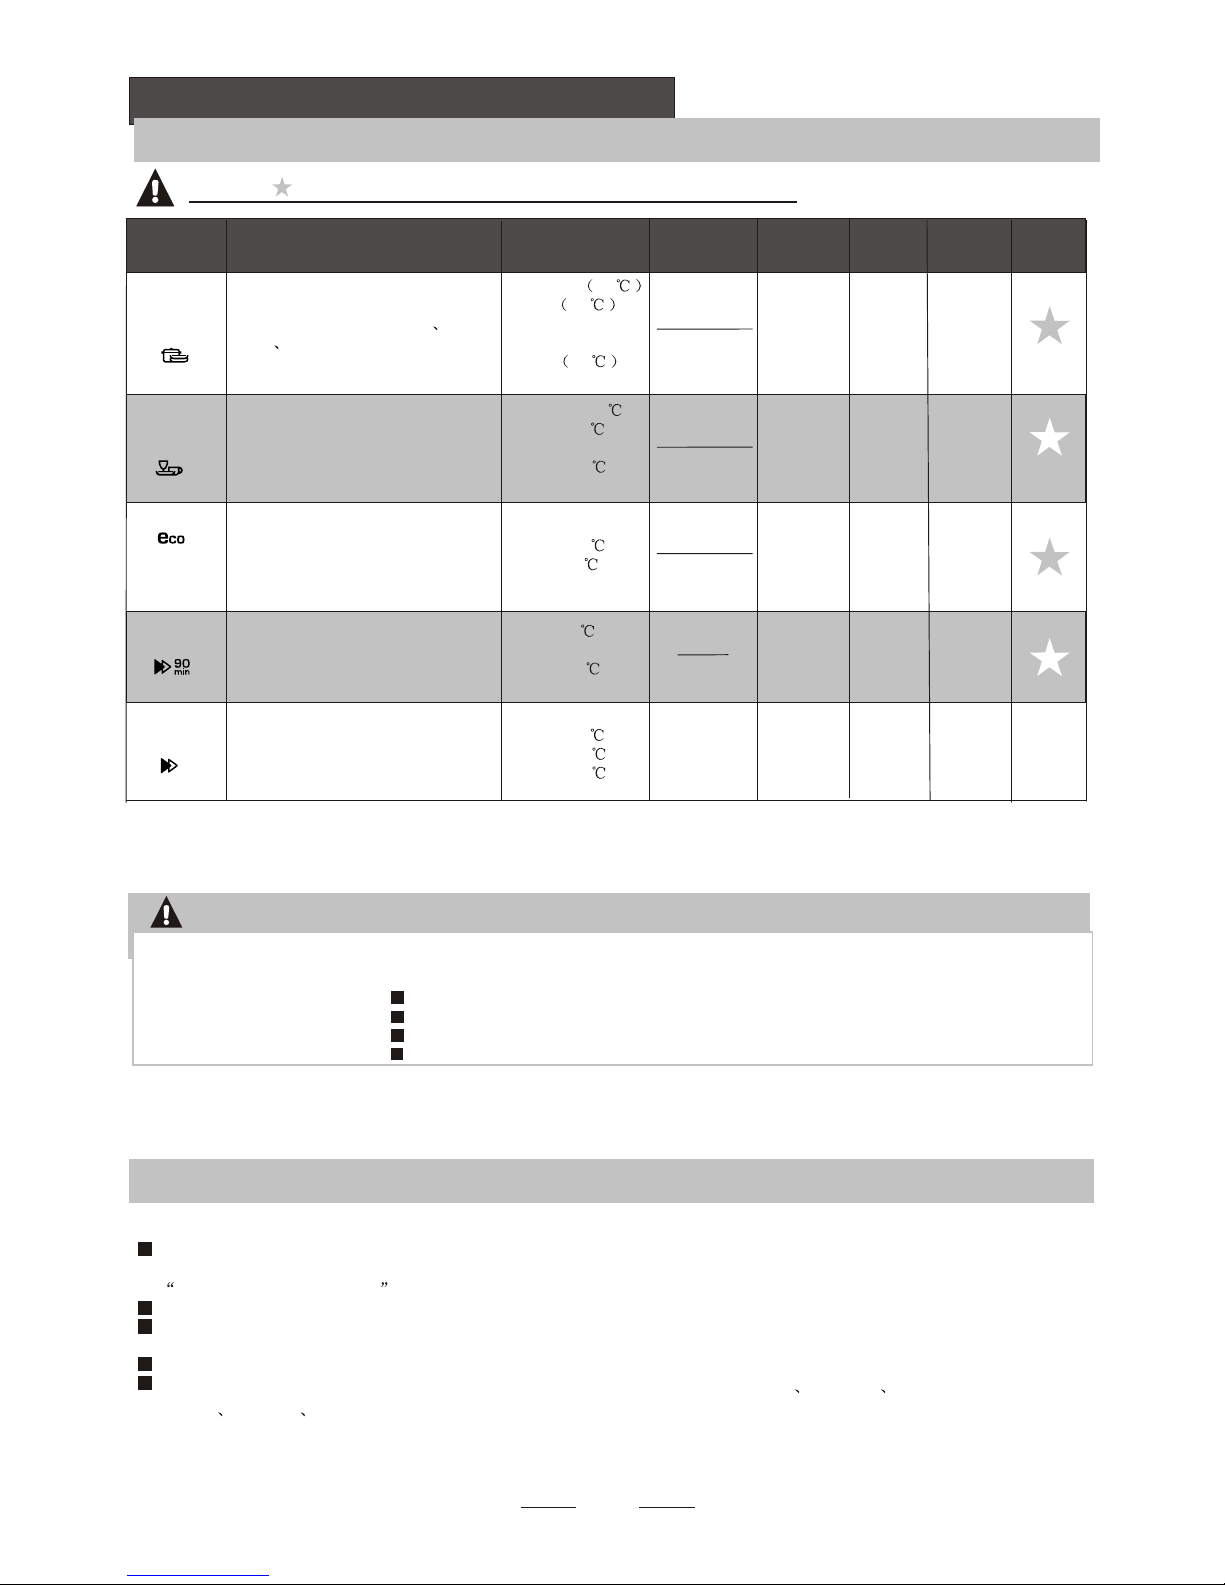
The Bottom Basket features folding spikes so that larger or more pots and pans can be loaded.
The Method Loading Normal DishwareThe Method Loading Normal Dishware
IN
IN
Folding Spikes of Lower Basket
For better stacking of pots and pans,
the spikes can be folded down as
show in the picture right.
Adjusting the Upper Basket
The height of the upper basket can be adjusted in order to
create more space for large utensils both for the upper
/lower basket. The height of the upper basket can be
adjusted by placing the wheels on different height of the
rails. Long items, serving cutlery, salad servers and knives
should be placed on the shelf so that they do not obstruct
the rotation of the spray arms..
Lower positionLower position
Upper positionUpper position
WheelsWheels
Folding back the cup shelives
For better stacking of pots and pans,
the spikes can be folded down as
show in the picture right.
Cutlery should be placed in the cutlery basket with the handles at the bottom. If the rack has side baskets, the
spoons should be loaded separately into the appropriate slots, especially long utensils should be placed in the
horizontal position at the front of the upper basket as shown in the picture.
Cutlery BasketCutlery Basket
Do not let any item extend through the bottom.
Always load sharp utensils with the sharp
point down!
WARNING!
For personal safety and a top quality cleaning, place the silverware in the basket
making sure that:
For personal safety and a top quality cleaning, place the silverware in the basket
making sure that:
They do not nest together.They do not nest together.
Silverware is placed with the handles-down.Silverware is placed with the handles-down.
But place knives and other potentially dangerous utensils are placed handles-up. But place knives and other potentially dangerous utensils are placed handles-up.
Page 16
6.Starting a washing program6.Starting a washing program
NOTE:NOTE:
*EN 5 0242 : This programme is the test cycle. The information for comparability test
in accordance with EN 50242, as follows:
Capacity: 12 settings
Position Upper basket: upper wheels on rails
Rinse aid setting: 6
PI:0.49w;Po:0.45w
Turning On the ApplianceTurning On the Appliance
Starting a cycle wash
Draw out the lower and upper basket, load the dishes and push them back.
It is commended to load the lower basket first, then the upper one (see the section entitled
Loading the Dishwasher ).
Pour in the detergent (see the section entitledSalt, Detergent and Rinse Aid).
Insert the plug into the socket. The power supply is 220-240 VAC /50 HZ, the specification
of the socket is 10A 250VAC. Make sure that the water supply is turned on to full pressure.
Open the door, press the power button, and the On/Off light will turn on.
Press the program Button, you can select the following programs:intensive normal
ECO 90 Min rapid;
If a program is selected, the response light will light. Then close the door, the dishwasher
begins to start.
1
2
3
4
5
13
Wash Cycle TableWash Cycle Table
NOTE:NOTE:
Means: need to fill rinse into the Rinse-Aid Dispenser.
( )
Detergent
pre/main
Detergent
pre/main
Cycle Selection
Information
Cycle Selection
Information
ProgramProgram
Intensive
Normal
Running
time(min)
Running
time(min)
Water
(L)
Water
(L)
Energy
(Kwh)
Energy
(Kwh)
Rinse
Aid
Rinse
Aid
Rapid
Description
of Cycle
Description
of Cycle
90 min
For heaviest soiled crockery,
and normally soiled pots
pans dishes etc with dried
on soiling.
For normally soiled loads,
such as pots, plates,glasses
and lightly soiled pans.
For lightly soiled loads that
do not need excellent drying
efficiency.
A shorter wash for lightly soiled
loads and quick wash.
Prewash(45 )
Wash (55 )
Rinse
Rinse (65 )
Drying
170
1.6
18.5
(1 or 2pieces)
5/25g
Prewash 50
Wash 60
Rinse
Rinse
Rinse 70
Drying
180
1.3
15
Prewash
Wash (45 )
Rinse(65 )
Drying
190
0.96
Wash(65 )
Rinse
Rinse (65 )
Drying
90
12.5
1.35
Wash (45 )
Rinse (50 )
Rinse (55 )
30
0.75
11
(*EN5 0242)
This is standard programme, it is
suitable to clean normally soiled
tableware and it is the most efficient
programme in terms of its combined
energy and water consumption for
that type of tableware.
25g
(1 piece)
30g
(1 or 2pieces)
5/25g
(1 or 2pieces)
5/25g
11.5
Page 17
When the working cycle has finished, the buzzer of the dishwasher will sound for 8 seconds, then stop. Turn off
the appliance using the ON/OFF button, shut off the water supply and open the door of the dishwasher.
Wait for a few minutes before unloading the dishwasher to avoid handling the dishes and utensils while they
are still hot and more susceptible to breakage. They will also dry better.
Switch Off the Dishwasher
The program light is on but is not blinking, only in this case the programme has ended.
1.Switch off the dishwasher by pressing the ON/OFF button.
2.Turn off the water tap!
Open the door carefully.
Hot dishes are sensitive to knocks. The dishes should therefore be allowed to cool down around 15 minutes
before removing from the appliance.
Open the dishwasher's door, leave it ajar and wait a few minutes before removing the dishes. In this way they
will be cooler and the drying will be improved.
Unloading the dishwasher
It is normal that the dishwasher is wet inside.
Empty the lower basket first and then the upper one. This will avoid water dripping from the upper Basket onto
the dishes in the lower one.
Change the Program...Change the Program...
Forgot to Add a Dish?Forgot to Add a Dish?
If you open the door during a wash cycle , the machine will pause. The program light will
stop blinking and the buzzer will mooing every minute unless you close the door . After
you close the door ,the machine will keep on working again .
NOTE:NOTE:
At the End of the Wash CycleAt the End of the Wash Cycle
Premise:
A cycle that is underway can only be modified if it has only been running for a short time. Otherwise, the
detergent may have already been released, and the appliance may have already drained the wash water.
If this is the case, the detergent dispenser must be refilled (see the section entitled " Loading the
Detergent " ).
Open the door ,press the Program button more than 3 seconds , the machine will be in standby state,
then you can change the program to the desired cycle setting (see the section entitled " Starting a
wash cycle. . ." ).
1
2
A forgotten dish can be added any time before the detergent cup opens.
Add forgotten dishes.
Close the door
After the spray arms stop working, you can open the door
completely.
2
3
Open the door a little .
1
4
5
The dishwasher will run again.
14
WARNING! WARNING!
It is dangerous to open the door when washing,
because the hot water may scald you.
Page 18
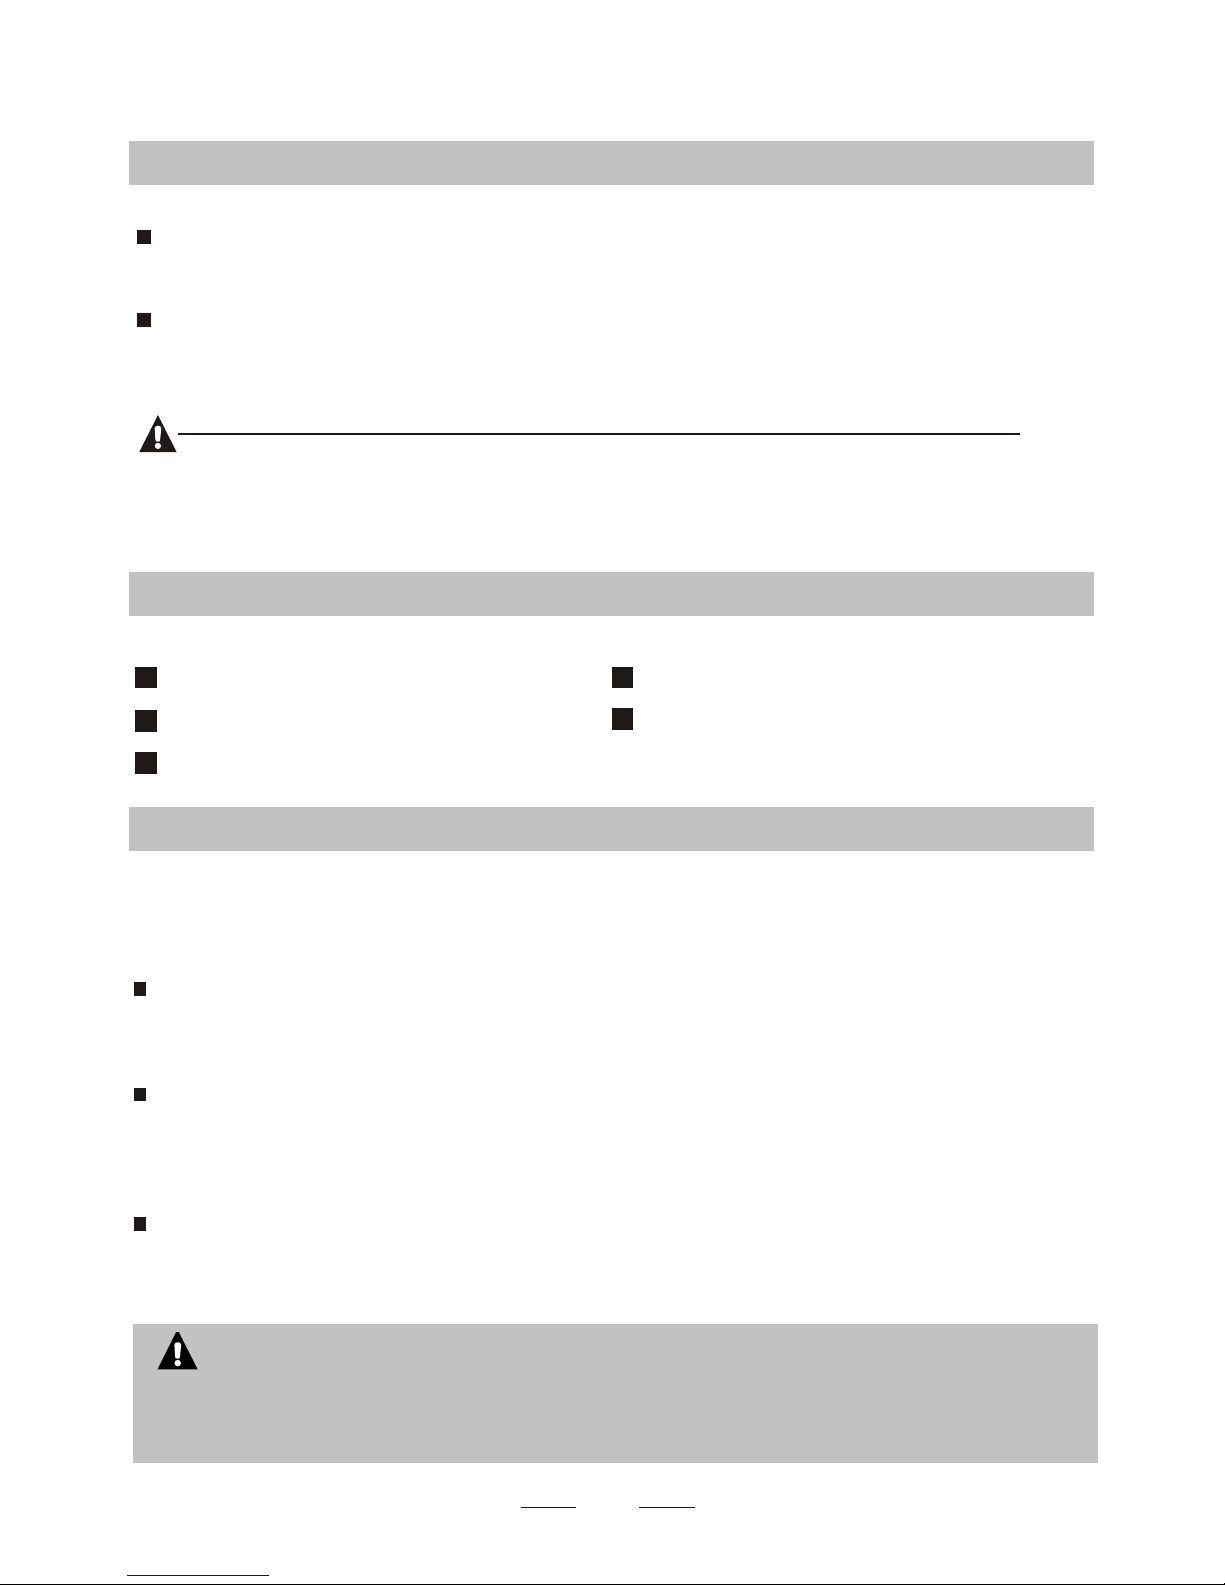
The filter prevents larger remnants of food or other objects from getting inside the pump.
The residues may block the filter, in this case they must be removed.
The filter system consists of a coarse filter,a flat (Main filter)
And a microfilter(Fine filter).
Food and soil particles trapped in this filter are pulverized by a
special jet on the lower spray arm and washed down to drain.
Larger items, such as pieces of bones or glass, that could block
the drain are trapped in the coarse filter. To remove the items
caught by the filter, gently squeeze the tap on the top of this
filter and lift out.
This filter holds soil and food residues in the sump area and
prevents it from being deposited on the dishes during wash cycle.
Main filter
1
Coarse filter
2
Fine filter
3
2
3
1
Filter assembly
The filter efficiently removes food particles from the wash water, allowing it to be recycled during the cycle.
For best performance and results, the filter must be cleaned regularly. For this reason, it is a good idea to
remove the larger food particles trapped in the filter after each wash cycle by rinsing the semicircular filter and
cup under running water. To remove the filter device, pull the cup handle in the upward direction.
WARNING! WARNING!
The dishwasher must never be used without the filters.
Improper replacement of the filter may reduce the performance level of the appliance
and damage dishes and utensils.
nn
nn
Step 1 Turn the filter in anti-clockwise direction,
Step 2 lift the filter assy up
7.Maintenance and Cleaning7.Maintenance and Cleaning
Filtering SystemFiltering System
NOTE:NOTE:
When following this procedure from step1 to step 2, the filter system will be removed;
when following it from Step 2 to Step 1, the filter system will be installed.
15
1
2
OpenOpen
Page 19
The control panel can be cleaned by using a lightly dampened cloth.
After cleaning, make sure to dry it thoroughly.
For the exterior, use a good appliance polish wax.
Never use sharp objects, scouring pads or harsh cleaners on any part of the dishwasher.
Protect Against Freezing
1.Cut off the electrical power to the dishwasher.
2.Turn off the water supply and disconnect the water inlet pipe from the water valve.
3.Drain the water from the inlet pipe and water valve. (Use a pan to gather the water)
4.Reconnect the water inlet pipe to the water valve.
5.Remove the filter at the bottom of the tub and use a sponge to soak up water in the sump.
please take frost protection measures on the dishwasher in winter. Every time after washing cycles,
please operate as follows
Caring for the DishwasherCaring for the Dishwasher
Cleaning the Filter
Cleaning The Door
To clean the coarse filter and the fine filter, use a cleaning brush. Reassemble the filter parts as shown in the figures
on the last page and reinsert the entire assembly in the dishwasher, positioning it in its seat and pressing downwards.
When cleaning the filters, don't knock on them. Otherwise, the filters could be
contorted and the performance of the dishwasher could be decreased.
WARNING! WARNING!
To clean the edge around the door, you should use only a soft warm, damp cloth.
To avoid penetration of water into the door lock and electrical components, do not
use a spray cleaner of any kind.
WARNING! WARNING!
Never use a spray cleaner to clean the door panel as it may damage the door lock
and electrical components.
Abrasive agents or some paper towels should not be used because of the risk of
scratching or leaving spots on the stainless steel surface.
nn
nn
Cleaning the Spray Arms
NOTE:NOTE:
If your dishwasher cannot work because of the ice,
please contact professional service persons.
It is necessary to clean the spray arms regularly for hard
water chemicals will clog the spray arm jets and bearings.
- Inspect the filters for blocking after every time the dishwasher has been used.
- By unscrewing the coarse filter, you can remove the filter system. Remove any food remnants and
clean the filters under running water.
Remarks:
The entire filter assembly should be cleaned once a week.
NOTE:NOTE:
To remove the lower spray arm, pull out the spray arm upward.
To remove the upper spray arm, hold the nut, rotate the arm
clockwise to remove it.
Wash the arms in soapy and warm water and use a soft brush to
clean the jets. Replace them after rinsing them thoroughly.
16
OpenOpen
Page 20
It is recommend that you run a wash cycle with the
dishwasher empty and then remove the plug from the
socket, turn off the water supply and leave the door of
the appliance slightly open. This will help the door
seals to last longer and prevent odours from forming
within the appliance.
If the appliance must be moved, try to keep it in the
vertical position. If absolutely necessary, it can be
positioned on its back.
One of the factors that cause odours to form in the
dishwasher is food that remains trapped in the seals.
Periodic cleaning with a damp sponge will prevent this
from occurring.
Before cleaning or performing maintenance, always
remove the plug from the socket.
To clean the exterior and rubber parts of the dishwasher,
do not use solvents or abrasive cleaning products.
Only use a cloth with warm soapy water.
To remove spots or stains from the surface of the
interior, use a cloth dampened with water an a little
vinegar, or a cleaning product made specifically for
dishwashers.
Remove the Plug
No Solvents or Abrasive Cleaning
Moving the Appliance
Seals
How to Keep Your Dishwasher in Shape
After every wash, turn off the water supply to the
appliance and leave the door slightly open so that
moisture and odours are not trapped inside.
After Every Wash
When not in Use for a LongTime
17
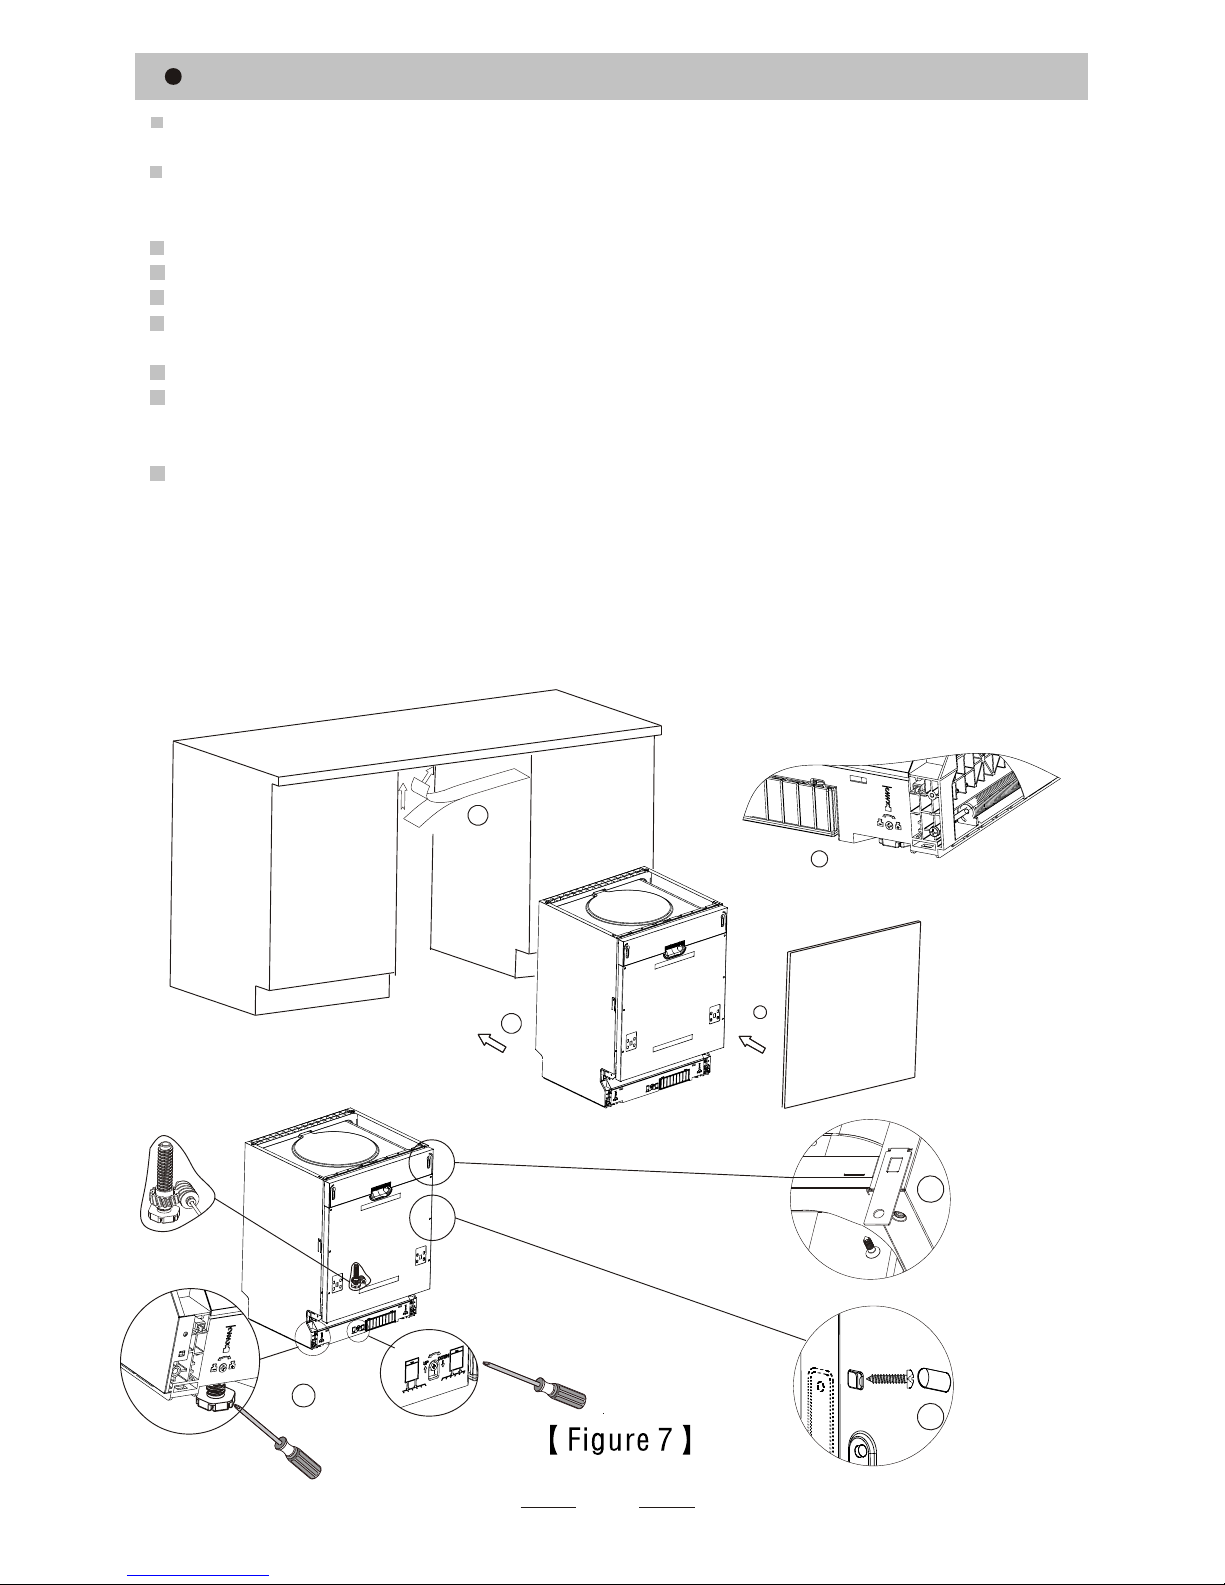
The installation of the pipes
and electrical equipments
should be done by professionals.
Warning
Electrical Shock Hazard
Disconnect electrical power before
installing dishwasher.
Failure to do so can result in death or
electrical shock.
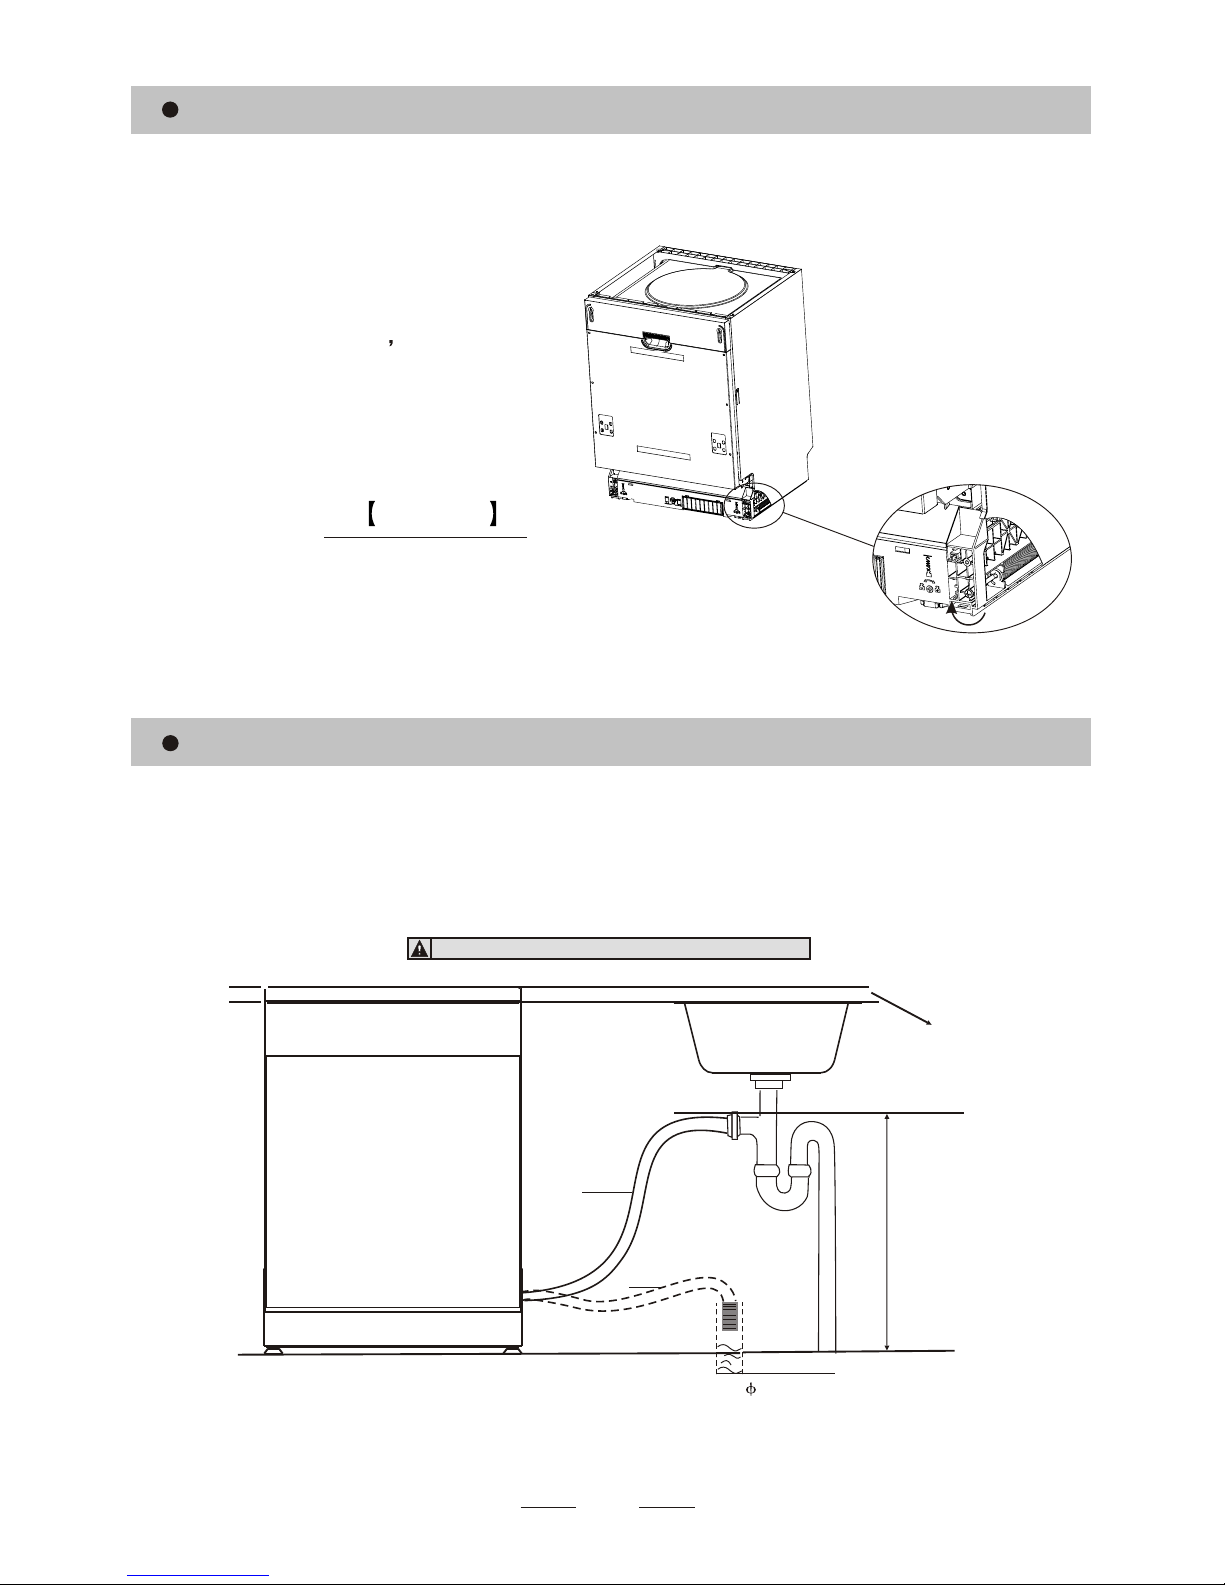
Attention:
The installation position of dishwasher should be near the existing inlet and drain hoses and
power cord.
One side of the cabinet sink should be chosen to facilitate the connection of drain hoses of
the dishwasher.
Installation preparation
Note: please check the accompanying installation accessories(hook for aesthetic panel,screw)
8.Installation instruction8.Installation instruction
Page 21
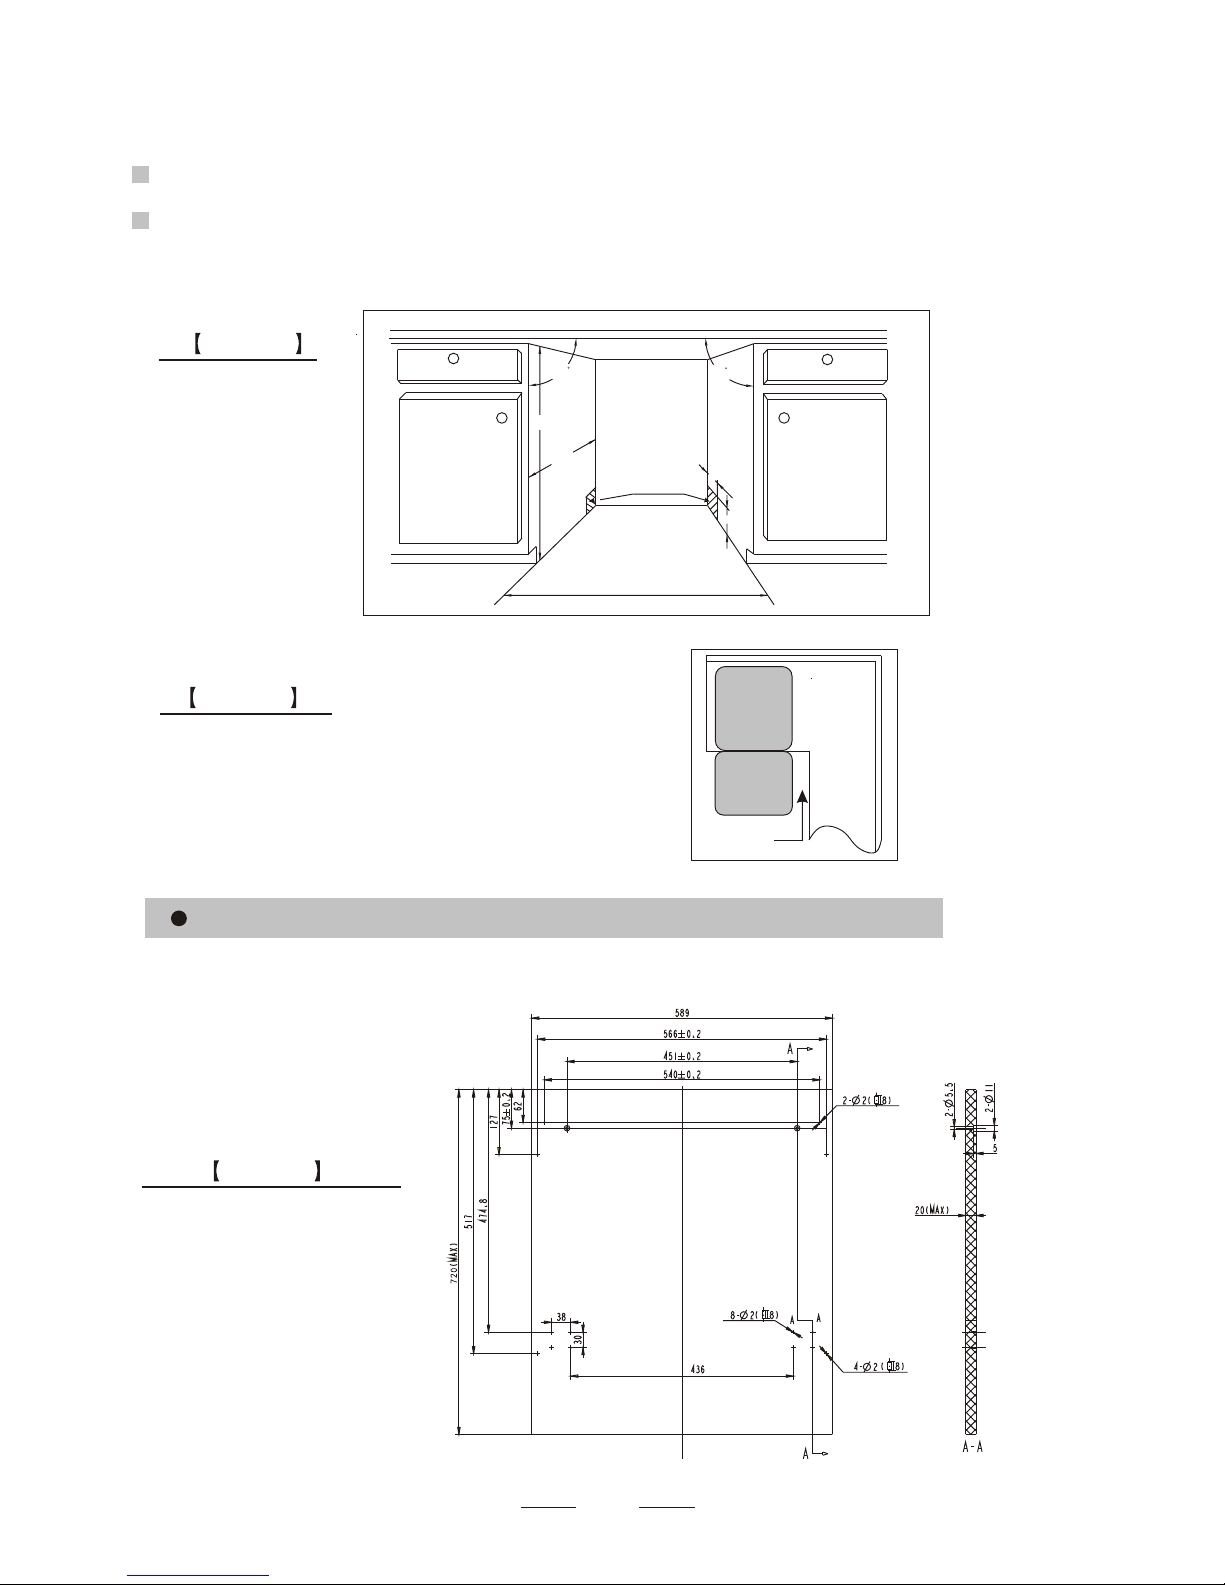
Please carefully read the installation instruction.
Illustrations of cabinet dimensions and installation position of the dishwasher
Preparations should be made before moving the dishwasher to the installation place.
Choose a place near the sink to facilitate the installation of inlet and drain hoses
(see figure 1).
If dishwasher is installed at the corner of the cabinet, there should be some space
(illustrated in figure 2) when the door is opened.
2
1
Minimum space when
t he d oor is o pened
Figure2
Cabinet dimensions
Figure1
Cabinet
Dishwasher
Door of
dishwasher
Minimum space of 50mm
1 The aesthetic wooden panel could be processed according to the Figure 3.
The aesthetic panel should
be processed in accordance
with the illustrated dimensions
Figure3
Aesthetic panel's dimensions and installation
Less than 5mm
between the top
of dishwasher and
cabinet and the
outer door aligned
to cabinet.
90
90
600 mm
820mm
100
580mm
80
Space between cabinet
bottom and floor
Electrical, drain and
water supply line
entrances
(Unit: mm)
18
Page 22
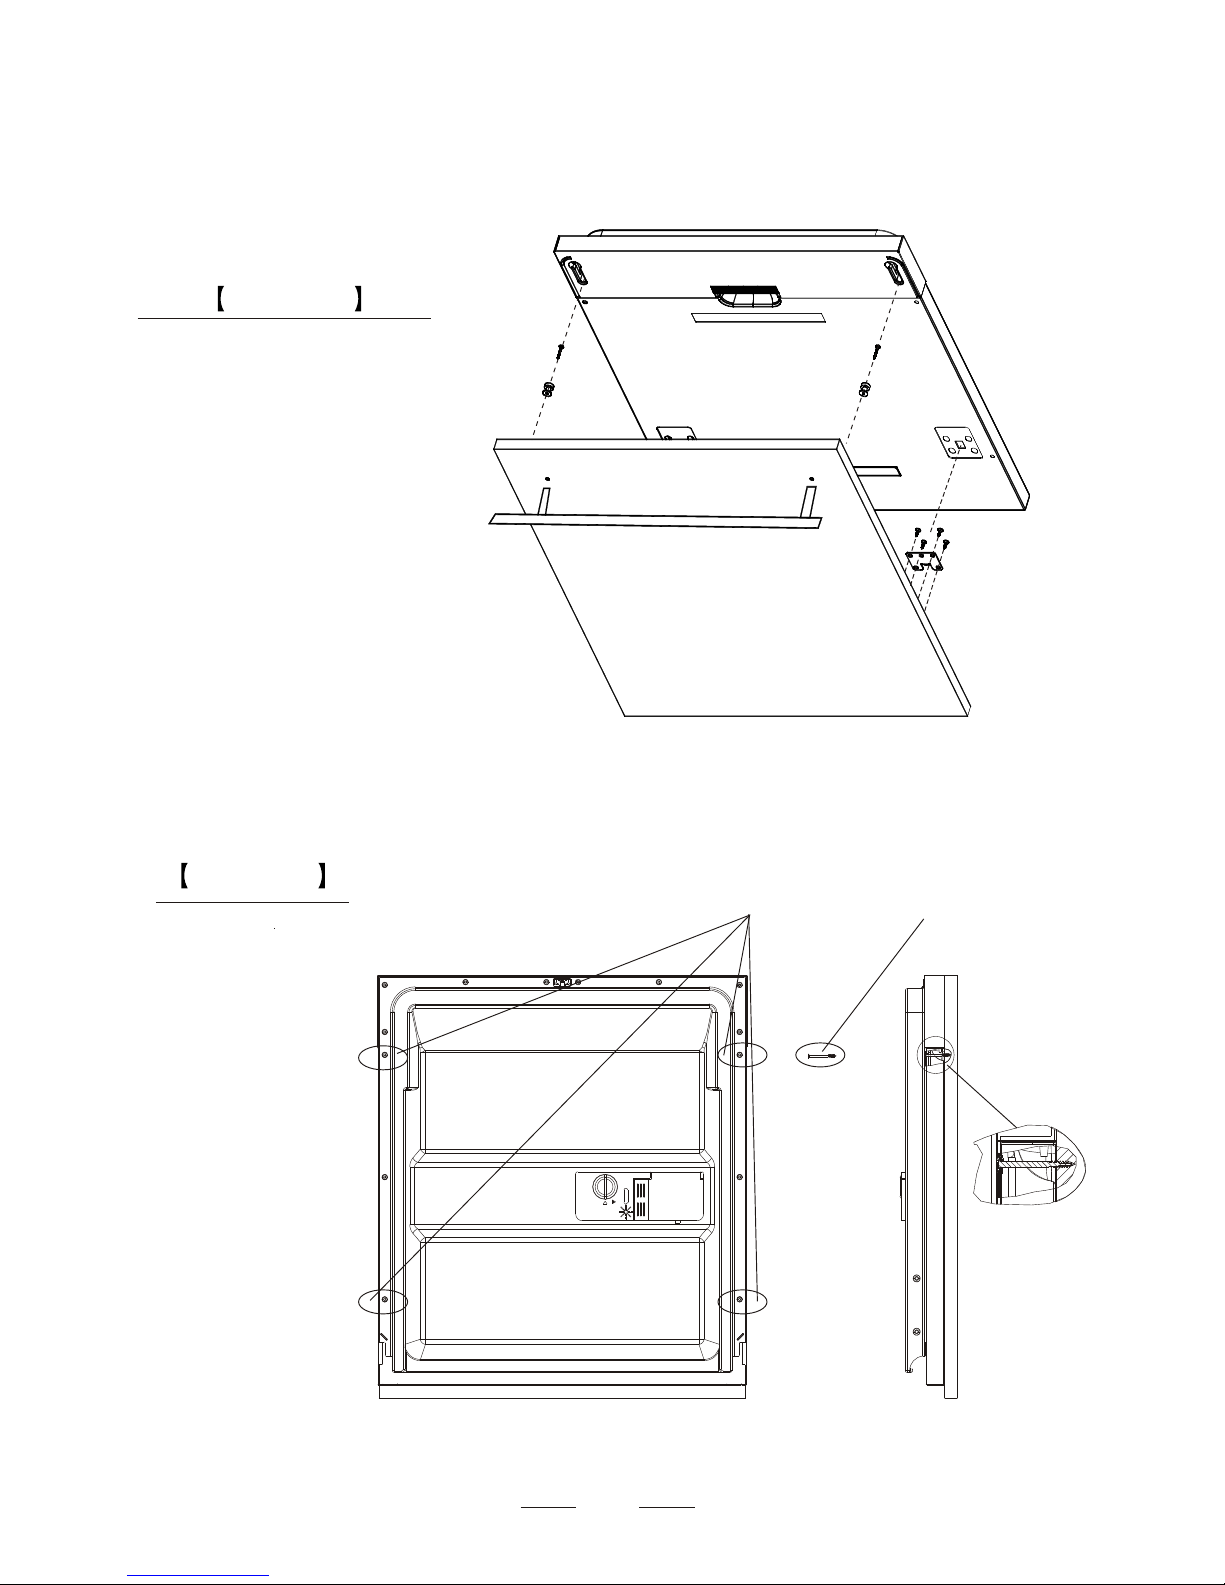
Installation of aesthetic panel
Figure4a
2 Install the hook on the aesthetic wooden panel and put the hook into the slot of the outer door of
dishwasher(see figure 4a). After positioning of the panel , fix the panel onto the outer door by
screws and bolts(See figure 4b) .
Installation of aesthetic
wooden panel
Figure4b
1. take away the four
short screws
2. pin up the four long
screws
Take away the four short screws Take away the four short screws
Pin up the four long screws Pin up the four long screws
19
Page 23
Tension adjustment
of the door spring
Figure5
Tension adjustment of the door spring
Connection of drain hoses
The door springs are set at the factory to the proper tension for the outer door.
If aesthetic wooden panel are installed, you will have to adjust the door spring tension.
Rotate the adjusting screw to drive the adjustor to strain or relax the steel cable
(see figure 5).
Door spring tension is correct when
the door remains horizontal in the
fully opened position yet rises
to a close with the slight lift of a
finger.
20
Insert the drain hose into a drain pipe with a minimum diameter of 40mm, or let it run into the sink, making sure to
avoid bending or crimping it. The top of the hose must be less than 1000mm.
MAX 1000mm
A
Counter
Front
Drain pipe
NOTE
The top of the hose
must be less than
1000mm.
40mm
B
PLEASE FIX THE DRAIN HOSE EITHER WAY OF A, BPLEASE FIX THE DRAIN HOSE EITHER WAY OF A, B
Page 24
21
44
Furniture
d
oorFurniture
d
oor
11
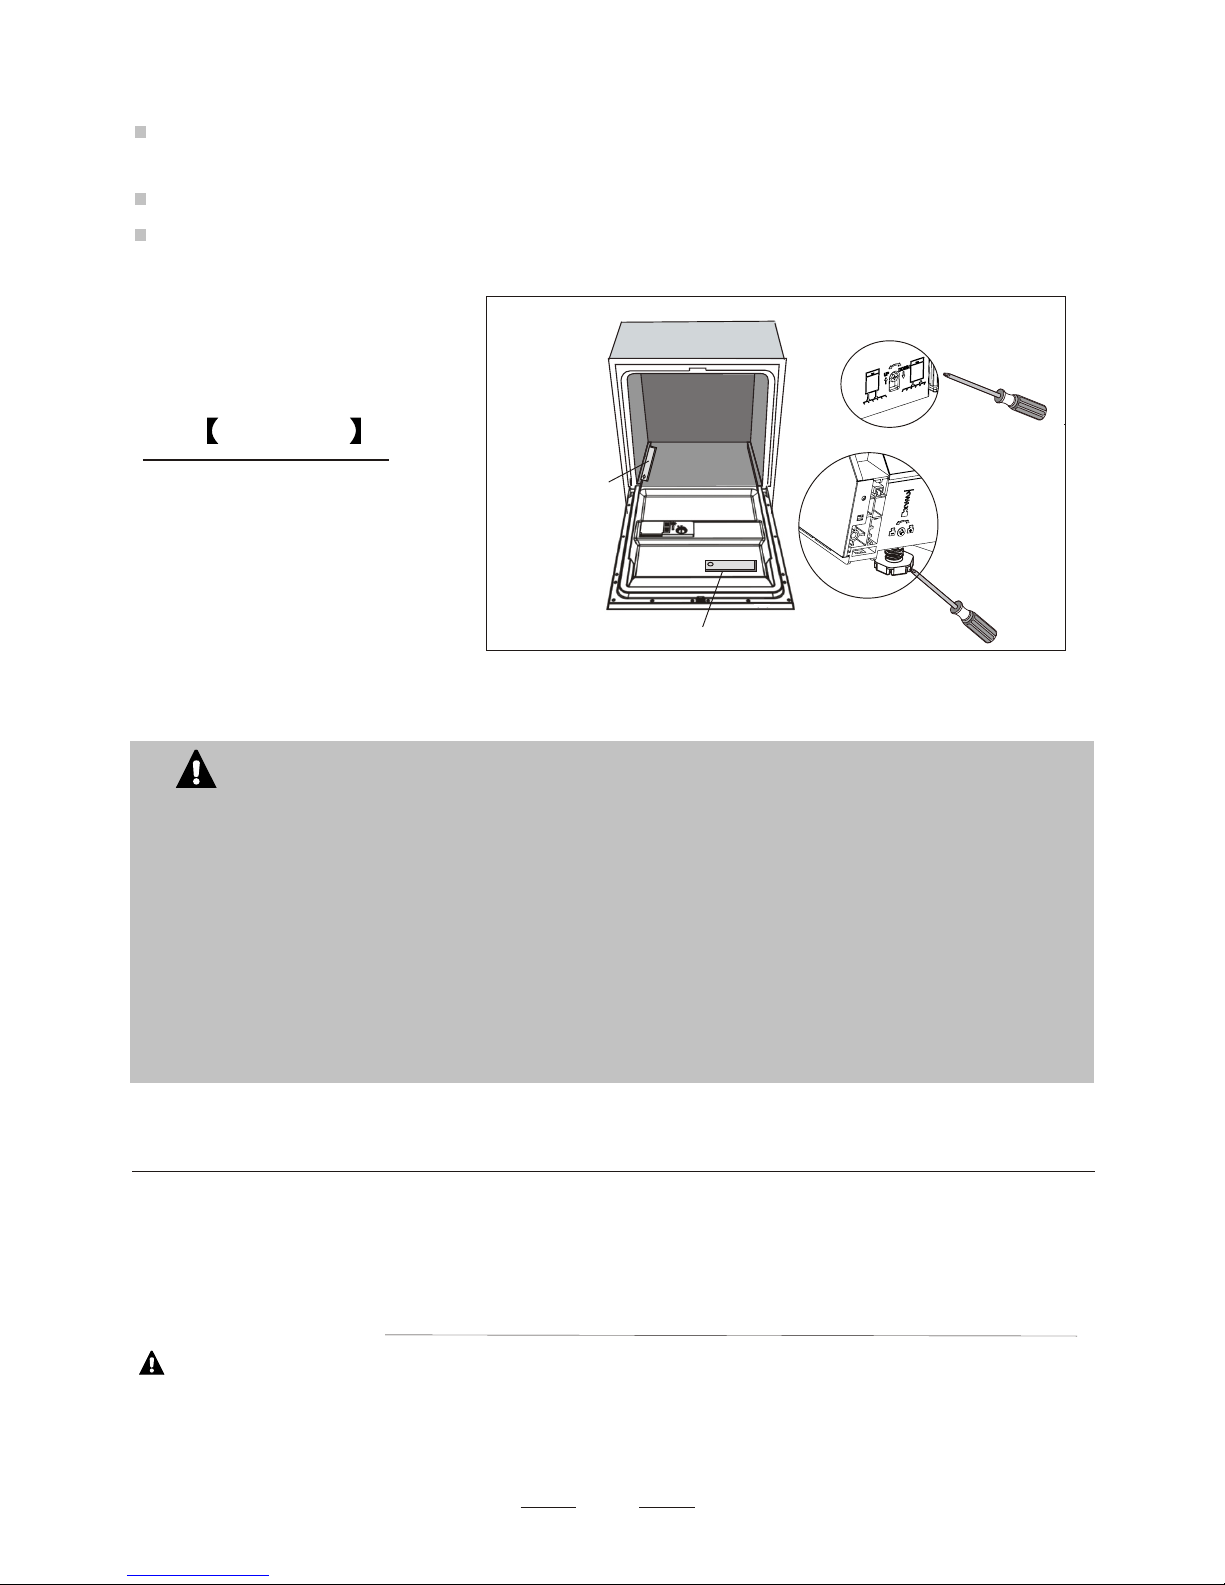
Dishwasher installation steps
1 Install the furniture door to the outer door of the dishwasher using the brackets provided. Refer
to the template for positioning of the brackets.
2 Adjust the tension of the door springs by using an Allen key turning in a clockwise motion to
tighten the left and right door springs. Failure to do this could cause damage to your dishwasher
(Illustration 2).
3 Connect the inlet hose to the cold water supply .
4 Connect the drain hose. Refer to diagram.(Figure 6)
5 Connect the power cord.
6 Affix the condensation strip under the work surface of cabinet. Please ensure the condensation
strip is flush with edge of work surface.
7 Place the dishwasher into position.(Illustration 4)
8 Level the dishwasher. The rear food can be adjusted from the front of the dishwasher by turning
the Allen screw in the middle of the base of dishwasher use an Allen key (Illustration 5A). To adjust
the front feet, use a flat screw driver and turn the front feet until the dishwasher is level (Illustration 5B).
9 The dishwasher must be secured in place. There are two ways to do this:
A. Normal work surface:Put the installation hook into the slot of the side plane and secure it to the
work surface with the wood screws (Illustration 6).
B. Marble or granite work top:Fix the side with Screw. (Illustration 7).
Co
nde
nsa
tion
st
ripCo
nde
nsa
tion
st
rip
2
2
5
5
B
3
3
6
6
7
7
A
A
Page 25
Dishwasher must be level for proper dish rack operation and wash performance.
1 Place a spirit level on door and rack track inside the tub as shown to check that the
dishwasher is level.
2 level the dishwasher by adjusting the three levelling legs individually.
3 When level the dishwasher, please pay attention not to let the dishwasher tip over.
Illustration of feet adjustment
Figure 8
About Electricity Connecting
NOTE:
The maximum adjustment
height of the feet is 50 mm.
Electrical Requirements
Electrical Connection
Ensure the voltage and frequency of the power being corresponds to
those on the rating plate. Only insert the plug into an electrical socket which is earthed
properly. If the electrical socket to which the appliance must be connected is not
appropriate for the plug , replace the socket, rather than using a adaptors or the like as
they could cause overheating and burns.
Insure proper ground
exists before use
Please look at the rating label to know the rating voltage and connect the dishwasher to the appropriate power supply.
Use the required fuse 10 amp, time delay fuse or circuit breaker recommended and provide separate circuit serving
only this appliance.
WARNING! WARNING!
23
Check level side to side
Spirit level
Check level Front to Back
AA
For personal safety:
Do not use an extension cord or an adapter plug
with this appliance.
Do not, under any circumstances, cut or remove the
earthing
Connection from the power cord.
Page 26
23
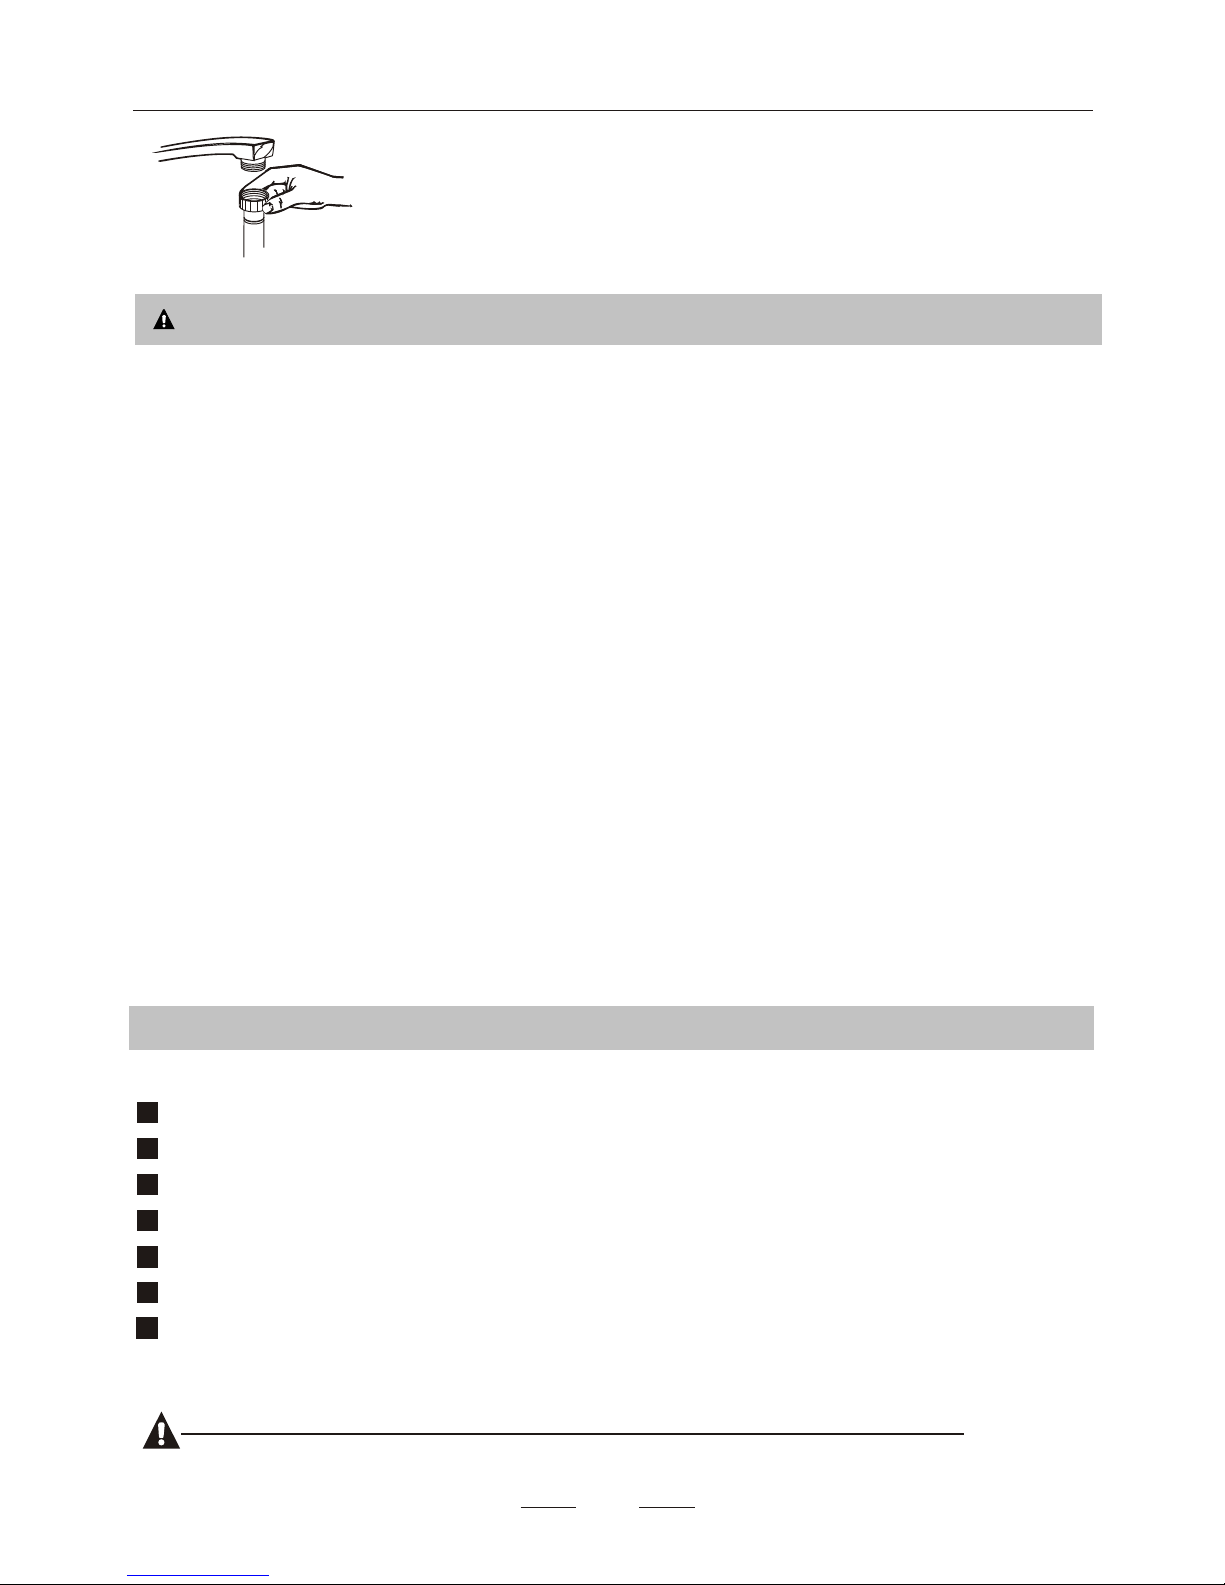
Positioning the Appliance
How to Drain Excess Water From Hoses
If the sink is 1000 higher from the floor, the excess water in hoses cannot be drained directly
into the sink. It will be necessary to drain excess water from hoses into a bowl or suitable
container that is held outside and lower than the sink.
Water Outlet
Connect the water drain hose. The drain hose must be correctly fitted to avoid water leaks.
Ensure that the water inlet hose is not kinked or squashed.
The following things should be checked before starting the dishwasher.
Syphon Connection
Insert the drain hose into a drain pipe with a minimum diameter of 40mm, or let it run into the sink, making sure to
avoid bending or crimping it. The top of the hose must be less than 1000mm.
Start of Dishwasher Start of Dishwasher
The content of this manual is very helpful to the users.
After installation, please make sure to keep this manual.
Attention:Attention:
Extension Hose
If you need a drain hose extension, make sure to use a similar drain hose.
It must be no longer than 4 metres; otherwise the cleaning effect of the dishwasher could be reduced.
1 The dishwasher is level and fixed properly
2 The inlet valve is open
3 There is a leakage at the connections of the conducts
4 The wires are tightly connected
5 The power is switched on
6 The inlet and drain hoses are knotted
7 All packing materials and printings should be taken out from the dishwasher
Position the appliance in the desired location. The back should rest against the wall behind it, and the sides,
along the adjacent cabinets or walls. The dishwasher is equipped with water supply and drain hoses that can
be positioned either to the right or the left sides to facilitate proper installation.
Connect the cold water supply hose to a threaded 3/4(inch) connector and make sure
that it is fastened tightly in place.
If the water pipes are new or have not been used for an extended period of time, let the
water run to make sure that the water is clear. This precaution is needed to avoid the
risk of the water inlet to be blocked and damage the appliance.
Please close the hydrant after using.
WARNING! WARNING!
Cold Water Connection
Page 27

24
9.Troubleshooting Tips9.Troubleshooting Tips
Problem Possible CausesWhat To Do
Fuse blown, or the
circuit breaker acted
Replace fuse or reset circuit breaker. Remove any other
appliances sharing the same circuit with the dishwasher
Suds in the tub
Spilled rinse-aid
Always wipe up rinse-aid spills immediately.
Review the charts on the following pages may save you from calling for service.
White film on
inside surface
There are rust
stains on cutlery
Knocking noise
in the wash cabinet
Rattling noise
in the wash cabinet
Knocking noise
in the water pipes
Hard water minerals
The affected items are
not corrosion resistant.
The lid of the softer
is loose
A spray arm is
knocking against
an item in a basket
Items of crockery
are loose in the
wash cabinet
This may be caused
by on-site installation
or the cross-section of
the piping.
A programme was not
run after dishwasher
salt was added.
Traces of salt have
gotten into the wash cycle.
To clean the interior, use a damp sponge with
dishwasher detergent and wear rubber gloves.
Never use any other cleaner than dishwasher
detergent for the risk of foaming or suds.
Always run the quick wash programme .
without any crockery in the dishwasher and
without selecting the Turbo function (if present),
after adding dishwasher salt.
Check the lip .Ensure the fix is fine.
Interrupt the programme, and rearrange the items
which are obstructing the spray arm.
Interrupt the programme,
and rearrange the items of crockery.
This has no influence on the dishwasher function.
if in doubt, contact a suitably qualified plumber.
Stained tub interior
Detergent with
colourant was used
Make sure that the detergent is the one without
colourant.
Improper detergent
Dishwasher doesn't
start
Make sure the dishwasher is turned on and the door is
closed securely.
Check that the water supply is connected properly and
the water is turned on.
Make sure to close the door properly and latch it.
Make sure the power cord is properly plugged into the
wall socket.
Power supply is not
turned on
Water pressure is low
Door of dishwasher
not properly closed.
water not pumped
form dishwasher
Kink in drain hose
Filter clogged
Kitchen sink clogged
Check drain hose.
Check coarse the filter
(see section titled " Cleaning The Filter ")
Check the kitchen sink to make sure it is draining well.
If the problem is the kitchen sink not draining ,you may
need a plumber rather than a serviceman for dishwashers.
Before Calling for Service Before Calling for Service
Technical
problems
General
problems
Noise
Use only the special dishwasher detergent to avoid suds.
If this occurs, open the dishwasher and let suds evaporate.
Add 1 gallon of cold water to the tub. Close and latch the
dishwasher, then select any cycle. Dishwasher will drain
out the water at the first step.Open the door after draining
is stop and check if the suds is disappeared.
Repeat if necessary.
Page 28
Error CodesError Codes
25
Problem Possible Causes What To Do
The dishes were not
loaded correctly.
See notes in " Loading the Dishwasher Baskets ".
The dishes
are not clean
Cloudiness
on glassware
Black or gray
marks on dishes
Detergent left in
dispenser cups
The dishes
are not drying
Select a more intensive programme.
See" Wash Cycle Table ".
Use more detergent, or change your detergent.
Rearrange the items so that the spray can rotate freely.
Clean and/or fit the filter combination correctly.
Clean the spray arm jets. See "Cleaning the Spray
Arms".
Use less detergent if you have soft water and select
a shortest cycle to wash the glassware and to get
them clean.
Use a mild abrasive cleaner to eliminate those marks.
Re-loading the dishes properly.
Load the dishwasher as suggested in the directions.
Increase the amount of rinse-aid/refill the rinse-aid
dispenser.
Do not empty your dishwasher immediately after
washing. Open the door slightly so that the steam can
escape. Begin unloading the dishwasher only once t
he dishes are barely warm to the touch. Empty the low
basket first. This prevents water form dropping off
dishes in the upper basket.
In short program the washing temperature is lower.
This also lowers cleaning performance. Choose
a program with a long washing time.
Water drainage is more difficult with these items.
Cutlery or dishes of this type are not suitable for
washing in the dishwasher.
The programme was
not powerful enough.
Not enough detergent
was dispensed.
Items are blocking
the path of spray arms.
The filter combination
in the base of wash
cabinet is not clean or
is not correctly fitted.
This may cause
the spray arm jets
to get blocked.
Combination of soft
water and too much
detergent.
Aluminum utensils
have rubbed against
dishes.
Dishes block
detergent cups.
Improper loading
Too little rinse-aid
Dishes are removed
too soon
Wrong program
has been selected
Use of cutlery with
a low-quality coating
Unsatis
-factory
washing
result
Unsatis
-factory
drying
result
WARNING! WARNING!
If overflow occurs, turn off the main water supply before calling a service.
If there is water in the base pan because of an overfill or small leak,
the water should be removed before restarting the dishwasher.
nn
nn
When some malfunctions come on, the appliance will display error codes to warn you:
Overflow.
Codes
Meanings
Possible Causes
Longer inlet time.
Faucets is not opened, or water intake is
restricted,or water pressure is too low.
Some element of dishwasher leaks .
The Rapid light flicker fleetly
The ECO light flicker fleetly
Page 29
26
Technical InformationTechnical Information
Height : 815mm
Width : 598m m
Depth : 550mm(with the door closed)
Water pressure: 0.04-1.0MPa
Power supply: see rating label
Capacity: 12 place settings
59
859
8
815815
11
5
0
11
5
0
(
w
it
h
t
he
d
oo
r
c
lose
d
)
5
5
0
(
)
5
5
0
w
it
h
t
he
d
oo
r
c
lose
d
Page 30
A+
273 kWh
0.96 kWh
0.45 W
0.49 W
A
190 min
81.5 cm
55 cm
1760-2100 W
Sheet of household dishwasher according to EU Directive 1059/2010:
Manufacturer
Type / Description
Standard place settings
Energy efficiency class
Annual energy consumption
Energy consumption of the standard cleaning cycle
Power consumption of off-mode
Power consumption of left-on mode
Annual water consumption
Drying efficiency class
Standard cleaning cycle
Program duration of the standard cleaning cycle
Noise level
Mounting
Height
Width
Depth (with connectors)
Power consumption
Rated voltage / frequency
A + + + (highest efficiency) to D (lowest efficiency)
Energy consumption 273 kWh per year, based on 280 standard cleaning cycles using cold water fill and
the consumption of the low power modes. Actual energy consumption will depend on how the appliance is used.
Water consumption litres per year, based on 280 standard cleaning cycles. Actual water consumption
will depend on how the appliance is used.
A (highest efficiency) to G (lowest efficiency)
This program is suitable for cleaning soiled normally soiled tableware and that it is the
most efficient programme in terms of its combined energy and water consumption for
that type of tableware.
The device meets the European standards and the directives in the current version at delivery:
- LVD 2006/95/EC
- EMC2004/108/EC
- ErP 2009/125/EC
The above values have been measured in accordance with standards under specified operating conditions.
Results may vary greatly according to quantity and pollution of the dishes, water hardness,
amount of detergent, etc.
The manual is based on the European Union's standards and rules.
Technical Data Sheet
NOTE
11
22
33
44
55
1 1
2 2
33
44
55
ECO 45
49 dB(A) re 1 pW
build under
220-240 V~ 50 Hz
Water pressure (flow pressure)
0.4-10 bar = 0.04-1 MPa
Could be built-in
Yes
LVF63ITB
27
12
3220 liter
59.8 cm
3220
FAGOR
Page 31

6
Large serving bowl
Small serving bowl
4
5
Medium serving bowl
3
Glasses
Saucers
2
1
Cups
1
0
Oval platter
8
Dinner plates
9
Soup plates
Dessert dishes
7
Teaspoons
4
Soup spoons
2
Forks
1
Serving forks
8
Serving spoons
6
Knives
5
3
Dessert spoons
7
Gravy ladles
Loading the baskets according to En50242: Loading the baskets according to En50242:
1.Upper basket:1.Upper basket:
2
.
L
ow
er
b
a
s
ke
t:2
.
L
ow
er
b
a
s
ke
t:
3.
Cut
t
er
l
y
b
a
s
k
et
:3.
Cut
t
er
l
y
b
a
s
k
et
:
I
nf
o
r
m
a
ti
on
f
o
r
c
ompa
ra
bi
l
ity
tes
t
s
in
acc
o
rda
nc
e
w
i
t
h
EN 5
0
2
4
2
I
nf
o
r
m
a
ti
on
f
o
r
c
ompa
ra
bi
l
ity
tes
t
s
in
acc
o
rda
nc
e
w
i
t
h
EN 5
0
2
4
2
Ca
p
a
c
it
y
:
1
2
pl
a
ce
set
ti
n
gsCa
p
a
c
it
y
:
1
2
pl
a
ce
set
ti
n
gs
P
osi
t
ion
of
t
he
u
ppe
r
b
a
s
ke
t:
lo
we
r
po
s
i
tio
n
P
osi
t
ion
of
t
he
u
ppe
r
b
a
s
ke
t:
lo
we
r
po
s
i
tio
n
P
r
ogr
a
mme: E
C
OP
r
ogr
a
mme: E
C
O
R
i
ns
e a
i
d
setti
n
g:
6
R
i
ns
e a
i
d
setti
n
g:
6
Soften
e
r
s
e
tt
i
ng
:
H
3
Soften
e
r
s
e
tt
i
ng
:
H
3
88
77
77
77
11
22
11
22 22 22
11
22
1 1
55 55 55
55 55 55
55 55 55
55 55 55
33 33 33 33
11
11
11
22
11
22 22 22
11
22
11
44 44 44 44 44 44
88 77 33 33
33
66
44 44 44 44 44 44
99
1010
77
22
22
11
33 11
33
33
66
33 33
IN
IN
11
33
11
44
55
66
22
22
11
33
11
Page 32

LV (771 )F3F63ITB
FAGOR_20160613
_
Page 33

1 cubiertos2
LVF63ITB
Page 34

........................... ..........3Elementos del lava vajillas
4)
..........................................................4
Instrucci ones p revias ala utili zación i nicia l
del apara to
A ...................................4、Descalcificador de agua
5) ...........9Cómocargarlas cestasdellavavajillas
..... .......................9
Precauciones atener en cuenta antesy despuésde
cargarlascestasdellavavajillas
7) ...............................13Mant e nimiento y l imp ie z a
............................... ...............13Sistemadefiltración
..................... ...................14.Cuid ado dell avavajillas
B ........ ......................5、 Llenadode l depósi to de sal
C.5、 Ll enado d el dos ificador de líquidoabr illant ador
D ..... . ... .. . ........... . . .... .......6
、
Función del detergente
...............................10Cómo cargar la ce sta super ior
............. ....................10Cómocarg ar la ce sta inf erior
6) ...............11Cómo inic iar un pro gram a de lavado
............................... .....11Cuadro de c iclos de lavado
...............................11Puesta e n marc ha del apa rat o
.............. ............12....Cambio de p rogram a de l avado
... ... ... .. . ......... ... .. ....12Fina l iza ciónd el ciclod e lavado
8) ..15Instrucciones para la in stala ción del a parat o
9) ......22Consejos para la resoluciónde problemas
.......................... . ......................................22.
Ateneren cuenta antes desolicitarasistencia
técnica
.................................... ..............2 3.Códigos de error
.............................. ...............24..Inf ormación técnica
1) ......1Información relacionada con la seguridad
2) ................................ 2Guía rápidade referencia
3) .......................................3Ins trucciones de uso
Panelde mandos...... .......................................... ...3
............15Preparativo s pa ra la instalación delaparato
............. ................................ ........... .........16
Dimensiones e instalación delpanel decorativode
puerta
...........18Ajuste de la tensión de los m uelles de puerta
....................18Conexiónde la manguera dedesagüe
....19Pasos a se guir para la instalación del lava vajillas
................................................ ...............20
Informaciónsobrecómoconectar el aparato a la red
eléctrica
........................21Cone xión al sumin istro de agua fría
Carga de las cestas conforme a losrequisitos
del a norma EN 50242
Page 35

Page 36

Page 37

Page 38

Page 39

2
Compartimen to A:
Compartimen to B:
Llenar en cada ciclo de lava do.
Solo paraprogramascon prelavado. (¡Siga las instrucciones
indicadas e n el m anual del u suari o!)
Indicador mec ánico C.
Indicador eléctricosituado en elpanel de mandos (de estar incluido).
Compruebeel nivel de
líquido abrillan ta dor
(Soloen aquellos modelosequipados con descalcificador de agua.)Indicador
eléctri co situado en el panel de mandos (de estar incluido).De no incluirse
testigo indicador de nivel de sal bajo en el panel de mandos (comoes el
caso en algunos modelos),podráestimar cuándo debe rellenarel depósito
de salen funcióndel número de ciclos delavadorealizado por el lavavajillas.
Compruebe elniv el d e sal
Cargue l as cestas
Seleccio ne un progra ma
delavado
Abra el grifo de entrada de agua y cierre la puerta del aparato. El aparato comenzará a funcionar al
cabo de aproximadamente 10 segundos.
Puesta en marchadel
lavavajillas
Apagado del ap arato
Cierre el grifo de
entradadeaguay
descargue las cesta s
Llene el dis pensa dor
de de tergen te
¡Advertencia! Espere unos minutos (aproximadamente 15 minutos) antes de descargar el lavavajillas.
De esta manera, evitarátener que manipular los platos y utensilios mientras aún están calientes y son
más susceptibles de romperse.
Además, dicho intervalo contribuy a a que se sequen mejor. Descargue el aparato empezando por la
cesta inferior.
Cómocambiarde
programa
Cómo añadir en el
lavavajillas platos que
ha olvi dado cargar
anteriormente.
Elimine de vajilla y cubiertos cualquier acumulación importante de restosdecomida.Ablande cualquier
resto de c omida quemada presente en cazuelas y sartenes (poniéndolas previamente en remojo) y, a
continuación, cargue las cestas d el aparato. Consultelas instrucciones sobre cómo cargar el lavavajillas.
Pulsereiteradamente el botón de Selección deprogramas hastaquese ilumineel te stigo
correspondiente al programa deseado.(Consulte la se c ción titulada “Instrucciones de uso")
Una vez finalizado el ciclo de lavado, el avisador acústico del lavavajillassonará 8 veces para después
permanecer en silencio.
Apague el aparato utilizando el botón de encendido / apagado.
Quéocurre si seapaga
el aparat o durante un
ciclodelavado.
Abrala puerta con
cuidado.
¡Podríaliberarsevapor
caliente al a brir la puerta!
Si por cualquier motivo se apaga el aparato durante un ciclo de lavado, al volver a encenderlo, vuelva a
seleccionar el ciclode lavadoy a ejecutar desde el principio la secuencia de puesta en marchadel
lavavajillas.
Encienda el aparato Abra la puerta y pulseel b otón de encendido / apagad o para encender el aparato.
1. Abra ligeramente la puerta del aparato para interrumpir el ciclo delavado.
2. Una vez que los brazos aspersores hayan dejado de girar,podrá abrir
totalmente la puerta.
3. Introduzca los platos que hayaolvidado cargar.
4. Cierre la puerta; el lavavajillas reanudará el ciclo en curso al cabo de
10 segundos.
2.Guía rápidadereferencia
Si desea obtener información detallada acerca del método de utilización delaparato, consulte la sección correspondiente del manual de
instrucciones.
1. Una vez iniciado, solo podrá modificar se un ciclode lavado si lleva ejecutándose un breve intervalo.
De lo contrario, es p osible que ya se haya liberadoel detergente y drenado el agua. En dichocaso,
será necesario volver a llenar el dispensador de detergente.
2. Mantenga pulsado el botón de Selección de programas durante un intervalo superior a 3 segundos
para cancelar el programade lavado en curso.
3. Seleccione un nuevo programa.
4. Vuelva a poner en marcha el lavavajillas.
AA
CC
BB
Page 40

3
Panel de mandos
Paraquesu lavavajillas proporcionelosmejores resultados,lea todas
lasinstruccionesde us o antes de proceder autilizarlopor prim eravez.
Dishwashe r Feat ures
Elementos dell avavajillas
9
Vista posterior
1
2
3
4
5
6
7
8
Vista frontal
10
5
6
7
8
9
10
1
2
3
4
Cesta superior
Cesta inferior
Dosificador
Brazos aspersores
Conector del tubo
de entrada
Tubo interior
Depósito de sal
Soporte para tazas
Conjunto de filtros
Tubo de desagüe
11
22
33
44 55
66
11
44
66
22
55
1. Botón e indicador de encendido: para encender/apagar el aparato y mostrar cuándo está
encendido.
2. Botones e indicadores de programa: pulse el botón para seleccionar un programa de lavado y el
indicador para mostrar qué programa de lavado ha escogido.
3. Luces de advertencia de sal y abrillantador: indican cuándo deberá rellenar el recipiente o
dosificador de sal.
4. Botón e indicador de las funciones de secado adicional: pulse el botón para escoger el secado
adicional y el indicador mostrará la función que ha escogido. Solo podrá usarlo con los programas
intensivo, normal, eco y 90 min).
5. Botón de media carga: para seleccionar las funciones de media carga. (Solo podrá usar esta
función de media carga cuando coloque 6 vajillas o menos en el aparato. Observará que el
consumo energético y de agua es menor. Podrá usar esta función con los programas intensivo,
normal, eco o 90 min).
6. Botón e indicadores de retraso: para mostrar el tiempo de retraso de 3, 6 o 9 horas.
Page 41

Eld escalcifi cador de agua deber á ajustar se manualment e utilizando e l sel ector de la durez a del agua.
Eld escalcifi cador de agua h a sido diseña do para elim inar los miner ales y las sa les presente s en el agua que podrían
tener un efecto perju dicial o negati vo en el funci onami ento del apa rato.
Cuanto mayor sea el con tenido de dichos mi nerales y salesen el a gua, más dura será e l agua a bastecida en su zona .
Eld escalcifi cador deberá a justarse c onforme a la dur eza del a gua aba stecida en su zon a. Su empresa m unicipa l de
abastecimiento de agua pod rá ac onsejarle ac erca de la dureza delagua abas tecida en su z ona.
Ajuste d el consumo de sal
Ella vavajillas ha sidodiseña do para permiti r ajustar la cantidadde sal ut ilizada en funciónde la dur eza del agua
abastecida en su zona. De esta manera,será posi ble optimiza r y personalizar el consumod e sal del aparato .
DESCALCI FICAD OR D EA GUA
La durezadelaguavaríadeun lugar a otro. De utili zarse unaguadura en ellavavajillas, aparecerándepósitos de
cal envajilla y cubiertos .
El a parato cuenta conun descalcificadorespecial queutiliza undepósito desal específicamente diseñado para
eliminar la cal y los minerales del agua.
Sig a los pa sos indica dos a c o ntinua ción para pr ocedera ajus t a r el consumo de sa l.
1.Abra la puerta del aparato y enci énda lo.
2. M antenga pul sado el botó n de Selecci óndep r ogram a s dura nt e un in t e rvalo supe ri or a 5
seg undos enlos 60segundos siguientesa haber encendido elaparato (lostestigos de nivel de sal
yab rillantad or se ilu minarán bre vemente mientra s el apa rato accede alcorrespondient e modo d e
configuración) .
3.Vuelv a a pulsar e l botón de Se lección de programa s a fin de sel eccionar el v alor corr ecto en
función de la dureza del agua abastecida ensuzona;losvalores dispo nibles se mostra rán conforme
a la sigui ente secuen ci a:
4. P ulse el botón de En cend ido par a com p l e tar el proc es o de c on figuración.
A. Descalcificador de agua
sis u modelo de lavavaj illas no c uenta con d escalcificador, podrá saltarse est a sección.
°Clark:Grados conforme a lae scalabri tánica
°fH: Grados conforme a la escala francesa
°dH: Grados conforme a la escalaalemana
°dH=1.25
°Clarke=1.78 °fH=0.178mmol/l
1
Valorpredet erminado por d efecto: H 3(EN 50 242)
Póngase en con tacto con suempresa mu nicipal de abaste cimien to de agua p ara inform arse
acerca de l a dureza del a gua abastecid a en su zona.
dH
mmol/l
0~90~5 0~0.94
H1
0
10-20
6-11
1.0-2.0 H2 20
21-30
12-17 2.1-3.0
H3
30
H4
40
fH
0~6
7-14
15-21
Clarke
DUREZADELAGUA
Posición del
selector
Consumode sal
(gramos/ciclo)
18-22 3 1-40 22-28 3 .1 -4 .0
41-60
23-34 4.1-6.0
H5
50
H6
60
29-42
35-55 6 1-98 43-69 6 .1 -9 .8
Antesde ut ilizar por pri mera vez su la vavajillas, p roceda c omo si gue:
A. Ajuste eldescalcificador paraaguas duras
B.Añada 1,5 kg de sal pa ra lavavaji llas y llene tot almente de a gua el depósito de sal
C.Llene el dosificador del líquido abrillantador
D. L lene el dispe nsador de det ergent e
/
60
50
40
30
20
H3->H4->H5->H6->H1->H2.
Page 42

1.El depósitode sal sol o deberá r ellenarse cuand o se encie nda el testigo de nivelde sal bajoen el
panel de mandos.En fu nción de la proporcióne n que se disuel va la s al, será posible q ue el tes tigo de
nivel de salbajo perman ezca encendi do a pesar d e que el dep ósito de sal est é lleno.De noincluirs e
ningún t estig o de nivel de s al bajo en e l panel de mando s (como sucede enalgunos m odelos), podrá
estimar cuándo debe rel lenar el depós ito d e sal en función del númerode cicl os de lavado real izad o
por el l avavajillas.
2.De habersede rramado sal en el aparato,deberá iniciarseun pr ograma de aclaradoo de lav ado
rápido para eliminar el e xceso de sal .
Utilice únicamente salespecial para la vavajillas.
El d epós ito de sal est á ubicado deb ajo de l a cesta inf erior y de berá llenarse conforme se i ndica
a continuación:
¡Atención!
¡Utilice únicament e sal especia lmente formul ada para su uso en la vavaj illas! La util ización de
cualquier otro tipo desal que no es té especí ficamen te formula da para su u so e n l avavajillas; e n
particular, sal demesa, da ñará sin l ugar a dudas eldescalcifica dor del apara to. Los posib les daños
derivados de l a u ti lización de untipo de sal i nadecuado n o esta rán cubiertos por lagaran tía del
aparato y, por l o tanto , el fabrica nte no ac eptará resp onsabili dad alguna po r ellos.
Des er necesa rio rel lenar el dep ósito d e sa l, há galo úni camente ant es de ejec utar algún pr ograma
del avado complet o.
Dees ta ma nera, se ev itará que lo s granos d e sal o el agua sa lada qu e hayan pod ido derramars e
permanezcan en la c uba infer ior del apar ato durante demasiado ti empo como para provocarcor rosión.
B. Llenado del depósito de sal
C. Llenado del dosificador delíquido abrillantador
El a parato libera c ierta cantidad de abr illantador dur ante el aclar ado final a fin de e vitar la formación de gotas deagua en su
vajilla propensas a dejar m anchas y marcas .Asimismo, a celera el proce so de secado, permi tiendo que el agua seescurra por
síso la de la vaj illa. Su lavava jillas ha sido diseñ ado para utiliza r líquidos abrill antadores. El dosif icador de líquid o abrillan tador
está situadoenla superficie interiordela puerta juntoal dispensadorde detergente. Para llenar eldosificador,abrala tapay
vierta líquido abril lantador en el interior del dosificadorhasta qu e el indicado r de nivel adquiera un co lor totalme nte negro. La
capacidad del dosificador dellíquido abrillan tador es de aproximad amente 110 ml.
Dosificador del líquido abrillantador
Funció n del líquido abrillantador
Ell íquido abrillantador se añade a utom átic amente duran te el úl timo aclaradopar a ga rantiz ar el enjuague óptimod e su v ajill a
y cubi er tos, así co mo un sec ado per fe cto libre de m ancha s y marca s.
¡Atenc ión!
Utilice únicament e líqui do ab rillan tador esp ecífi camente di señado paralavav ajillas. N un ca llen e el dosifica dor d e líqu ido
abrillantad or con otras sustancias (p. ej. líqu ido la vavaji llas o de te rgente líqui do), ya qu e ter minaría dañandoel ap ar ato.
A. Retire la cesta inferior y,a conti nuación, desenrosque y retire l a tapa d el depós ito de sal .
B. Introduzca el extremo del embudo ( suminist rado) enla boca de ll enado deldepósi to y añada aproximadamente 1,5 kg
de sal especia l para lava vaj illas.
C. Llene de ag ua el depó sito de sal.Será nor mal qu e una pe queña ca ntidad d e ag ua rebose del d epósit o.
D.Tras ha ber lle nado el de pósito , vuelva acolocar l a tapa y apriételaf irmement e roscán dola en elsentido delas agu jas del re loj.
E. Generalmente , el te stigo d e nivel de salbajo s e apaga rá tras h aber ll enado el depósito d e sal.
F. Deber á inici arse u n program a de lavad o inme diatam ente despu és de h aber ll enado el d epósit o de sa l.
De loc on trario, e l agua sal ada podríaterm inar da ñando e l sistema defiltraci ón, la bombau otras piezas importantes del
aparato. Dic hos daño s no están cubiertos por la garant ía.
11 22
Abrir
Page 43

1.Para abrir el dosificador, gire e l tap ón hac ia la izquierda hast a su p osi ción " abie rta" (flecha situada ala izq uie rda) y retírelo.
2.Vierta el líqui do a bri llanta do r en el dosificador, teniend o cu idado deque norebose .
3.Vuel va a colo car el tapón en su sitio, a lineando la marca estampadaen el mismo con l a flecha co rrespondiente a s u posición
"abierta" y gírelo hacia l a derecha ha sta que la marca del tap ón coincida co n la fecha indica dora de posición " cerrada"
(flechasituadaaladerecha).
Ajuste del d osific ador de lí quido abrillanta dor
Según el mode lo de la vavajilla s, el dosif icador de líquidoabri llant ador cont ará
con seis o cuatro po siciones deajuste. E n los mod elos con s eis posici ones de
ajuste,empiece siempre con el dosificador a justado a la posición "4". Si tras el
lavado se obse rvan manc has o la cali dad d e secado es deficiente, aumente la
cantidad de líqu ido ab rillan tador dosif icado r etirand o el tapón d el dosif icador y
girando el mando d e ajuste hastala po sición "5". S i la vaji lla sigue s in secarse
correctamente ose siguen obs ervando ma nchas y marc as en esta, gireel mando
dea juste a l siguie nte nivel m ás elevad o hast a que su va jilla qued e impecab le.
Lap osici ón de aju ste reco mendada es l a "4". (La posicióna justada de f ábrica
es la "4".)
Aument e la do sis si se observan go tas o marca s de agua, o bien m otas de cal en su vajilla
tras el l avado.
Reduzca la d osis de líquido abrillantador si se observan manchas blanquec inas y
pegajosas e n suvaji lla, o bien una p elícula az ulada en su cris talerí a oen las hojas de sus
cuch illos.
Amedida que elnivel de líq uido abrillan tador dism inuye, el
tamaño del punto ne gro del indi cador de n ivel irá cambi ando
según se muestra en lailustración infer ior.
Lleno
3/4 de su capacidad máxima
1/2 de su capacidad máxima
1/4 de su capacidad máxima:deb erá relle narse para eliminar
la formación de manchas ymarcas
Vacío
Ma ndo de ajuste
(Abrillanta dor)
Cuándodebe rellenarseel dosificador de líquido abrillanta dor
Siel aparato noincluye un indicadorde avisodenivelbajo de líquido abrilla ntador,podráestim ar la cantidad
remanente en e l dosifica dor en fu nción del colordel indic ador ópt ico de ni vel “C” sit uado ju nto a la t apa.
Cuando el dosi ficador de líqu ido abrill antad or está ll eno, el indicad or adquir irá un col or oscuro . Por el co ntrario,
a medida que e l nivel de líqu ido ab rillantad or dismin uye, e l tamaño del pun to osc uro irá dismin uyen do.
No permita que el nivelde líq uido abrill antador dism inuya por de bajo de 1/4 desu capacidad m áxim a.
li mp ie cualquier ex ceso de líqu ido abr illan tador derr amado durant e el pr oceso de llenado utilizando
unpañoabsorbente.Deestamanera,seevitarálaformaciónexcesivadeespumaduranteel
siguiente lava do. No se olv ide de volve r a colocar e l tapón antes de cerrarla pue rta del la vavajillas.
Gracias a sus ing redientes quí micos, lo s deterg entes son n ecesari os para desi ncrustar la suciedad,di solver la y elim inarla
del lava vajil las.
La m a y oría de lo s deter gent e s de ca l idad d e ven ta en c omerci os son adecuados para dicho propósito.
D.Función deldeterg ente
Usoa decuado del de tergent e
Utilice únicamente d etergente es pecialmente f ormulado p ara su uso en l avavajillas. C onserve su de tergente e n un
lugar f r esco y seco.
Noañ ada deterg ente en polvo en el dispensadorhasta elmomento en quevaya a utilizar el lavavajillas.
¡Atención!
C. (Indica dor denivel delíqu ido
abrillant ado r)
11 22 33
Page 44

Cantidad de detergente a utilizar
Enf unción de su com posición quí mica, los de tergente s puedencla sificarse en dos tiposbá sicos:
Detergentes alcalinos convencionales con ingredientes cáusti cos
Detergentes concent rados de baj a alcalin idad con enzima s natura les
Enf unción de la mar ca ut ilizada, los d etergentes en pa stilla se diso lverán a vel ocidade s distintas. P or este motiv o,
algunos d e t erge ntes en pastilla noconsiguen disol v e rse p or completo ysu poder limpiador no es t otalmente efec ti v o
en p r ogramasc ortos.P orlotanto, u tilice programa s más l ar g os cuando u tilice det ergen t e s en pas till a. De esta man era
podrága rantizarse l a eliminación tot al de los r estos de detergente .
El dispensadordeberállenarse alcomienzo decadaciclodelavado, conforme a lasinstrucciones indicadas enel
cuadro d e ciclos delavado. S ul avava jillas necesita un a menor can tidad de det ergente y ab rillantador qu e los
lavavaji llas c onvenc ionales. Ge neralment e, una cucha rada sopera de det ergente ser á suficientep ara una carga
normal d elavado. Si lavajilla o cubiertos alavar e stán especialmente sucios, será necesarioañadir una mayor
cantidad de detergen te.Añad a siempre el deterg ente justo ant es de in iciar un ciclo de l avado, y a que de lo contr ario,
elde tergente podríahum edecerse y no lle gar a disolv erse de l a m aner a correc ta.
Detergente concentrado
Detergentes en pastilla
Dispensador de detergente
Normalmente, los nuevos ti pos de de tergentes en pol vo no con tienen f osfato. Por lo tan to, no es pos ible benefic iarse
de la acc ión descalci ficad ora que el fo s f ato produc e en el agua. En dic ho caso recom e ndamo s llenarel dep ósito de
sal, incluso si la dure za del ag ua abas tecida e n s u zon a es de tan s olo 6 °dH. D e util izar detergente s sin fos fato con
un tipode agua d ura, aparecerán confrecuenciamarcas blancas en suvajilla y cristalería. De serasí,añadaunama
yor canti d a d de deterge nte pa r a obtener me j ores resul t a d os. Los dete rgen te s sin cloro poseen un pod er lim piador
limitado.No será posible eliminar totalmenteaquellas manchas difícilesy de colores fuertes. EnEstecaso,
seleccio ne un programa con una t em peratura m á s alta.
Detergentes
Hay 3 t ip os d e de tergente nor malmente di sponibles:
1. L osq ue c ontienen f o s fato y cloro
2. L osq ue c ontienen f o s fato p e r o no cl o ro
3.Losque no contienenfosfato perosí cloro
Si la tapaest á cerrada, p resione el b otón de a pertura. La tapase abrirá deforma
automática gracias a su me canismo de reso rte.
Añada s iempr e el detergente justoantes de iniciar u n ciclo d e lavado.
Utilice únicamente d etergente esp ecial para lav avajillas.
Presione el botón para abrir
11 22
De terg ent e en po lvo
De terg ent e en pa sti llas
Page 45

Añada det er gente enel d ispe nsa do r.
Las distintas indic aciones señalan el tipode dosis a ut ilizar
(véase la ilustrac iónde la derecha):
Añada en este hueco eldetergent e para el ci clo de la vado
principal.
Añada en este hueco eldetergente parael ciclo de prelavado.
Observe las recomendaciones del fabricantereferentes a
dosificación y almacenami ento indica das en el env ase o paquete
de deter gent e.
Cierre la tapa y presión ela ligerament e hasta que encaj e
correctamente e n su posicióncerrada.
Sila vajillaa lavarestá muysucia,añadaunadosis adicional de
detergente e n el c ompartimentode prelavado.
El de tergent e añadido en este com part imento se util izará durant e
la fase de prel avado.
A
B
Cómoañadir el detergente
En la última pá gina de este manualencontr ará informac ión acerca d e la canti dad de dete rgente a
utilizarparaun progra ma de lavado simple.
Lerogamos tenerencuenta que,en función delnivel de suciedady de ladureza específicadel agua,
podrán obtenerse resultados diferentes ylascantidades dedetergente y abrillantador a utilizar podrán
variar delasindicadas.
Observe la s r ecomend aciones delfabrican te indicadas en e l envase opaquete de de tergente.
AA
BB
Page 46

Vajilla ycubiertosque puedenlavarse en ellavavajillas:
Cubertería con mango s de mad era, asta, madre p
erla o porcelana
Elementos de plást ico que n o sean resistentes al
calor
Cubertería antigua con pi ezas enc oladas que no
sonre sist entes al calor
Vajillao cubert ería con piezas enc oladas
Utensilios de cobre o est año
Cristalería fina
Utensilios de ac ero propensos a ox idarse
Bandejas de made ra
Utensilios fabricados confibra ssintéticas
Algunos tipos de cristal p ueden llegar a pierdesu
brillo a l cabo de num erosos lavad os
Losutensilios deplatay aluminiotienen tendencia
a pe rder su color nat ural durant e el lavado
Los adornos de cristal o esmaltadospued en pierd e
su brillo ocolorid o si selavan conf recuen cia enun
lavavaji llas
No adecuados
De especialcuidado
Coloque bocabajo a quellos elemen tos huecos ta les como tazas, va sos, copas, ca cerolas, et c. a fin de que no
seacumuleaguaensuinterior.
Losp latos y c ubie rtos no debe rán encajars e entre sí ni solaparseuno s a otros.
Para evitar dañarvasosy copas, a segúresede quenohacencontacto entre sí.
Coloquelos objetosde mayor tamaño y másdifíciles delimpiar en lacestainferi or.
La cesta superior e stá diseñ ada para soport ar objetos m ás livianos ydelicados tales com o vasos, co pas, y
tazas .
¡Noc oloque cu chillos de h oja lar ga con su extre mo cortante orien tado hacia a rriba, ya qu e podrían su poner
un peligro!
Losc ubiertos larg os y/o af ilados tal es como cuchill os de cocina deber án colocarse en po sición hor izontal en
la cesta s uper ior.
Procure n o cargaren excesosu lavavajillas.Estoresulta particularmente importantesi s e deseaobtener los
mejores resultado s y ahorrar e nergía.
Recomendac iones
Considere comprar uten silios de signados como apto s para lavavaj illas.
Utilice un detergen te suave desig nado como "del icado con su va jilla". En caso denecesidad, solic ite informac ión
complementaria a l os fabricant es de deterge ntes.
Para ciertos elementos y ut ensilios, selec cione un progr ama cuya temperatura sea lamás baja posible.
Para evitar daños y r oturas, n o retire la cri stalería y cu biertos del l avavajil las inmediata mente despué s de
finalizar el program a de lavado.
(Para obtener el mej or rendimi ento de s u lavava jillas, observe la s siguientes instrucciones de c arga.)
(Las característica s y el aspecto de la s cestas y canastillaspara cubiertospuede n ser diferen tes de las sumini stradas
con su modelo de lava vajillas.)
Elimine de vaji lla y cubierto s cualquier acum ulación im portante de restosde com ida. Ablande cualquier r esto de
comida quemada p resente en c azuelas ysartenes (poniéndol as prev iamente en remojo).No es n ecesario enj uaga r
los platos debajo d el gr ifo.
Coloque lo s ob jetos en el lavavajillas de la manera siguie nte:
1.Asegúre se de colocar bo cabajo a quellos elementos tal es com o tazas, vasos, c acerolas, sa rtenes, etc.
2. Los elementos c urvos o con huec os debe rán colocars e e n pos ición inclinada parapermitir que elagua puedas
escurrirse fácilmente.
3. Todos lo s elementos deb erán colocar se de manera se gura para que no se cai gan ni se vu elquen.
4. Todos lo s elementos deb erán col ocarse de maner a que no obstaculi cen el mov imiento de los b razos asperso res
durante el lava do.
aquellos elementos dem asiado pequ eños no deberán lavarse ene l lavavaj illas, ya que pod rían
caerse f ácilmen te a través de las ces tas o canasti llas.
Precauciones a tener en cuenta antes y después de cargar las cestas del lavavajillas
Para evitar que gotee aguaen lacestainferior p rocedentedela cesta superior, recomendamosquevacíeprimero
la cesta inferior y, des pués, la s uperior.
Cómodescargarel lavavajillas
Page 47

La cestasuperior estád iseñada para soportar objetos m ás
livianos y delicados tales como vasos, copas, tazas y
platillos, así como platos, tazones pequeños y sartenes de
escasa profundidad (siempre y cuandono estén demasiado
sucios). Coloque los platos y las sartenes o cacerolas de
modo que no haya posibilidad de que puedan desplazarse
con los chorros de agua lanzados por los brazos aspersores.
Cómo ca rgar lacesta superior
Recomendamos colocar los objetos y utensilios demayor
tamaño y m ás difíciles de limpiaren la cesta inferior: p.ej.
ollas, sartenes, cacerolas, tapaderas, platos llanos, platos
hondos y fuentes según se muestra en la figura inferior . Es
preferible colocar los platoshondosy las tapaderas en los
laterales de las cestas paraasíevitar obstaculizar el giro
del brazo aspersor superior.
Cómo car gar la cestainferior
Las cacerolas, fuentes, etc. deberán colocarse siempre bocabajo.
Las sartenes y cacerolas hondas deberán colocarse enposición inclinada para permitir que el agua seescurra.
La cestainferior cuenta con varillas plegables que permiten cargar un mayor número de cacerolas y sartenes o de mayor tamaño.
Porfav or,recuerde lo si guiente:
Métodode carganormal para las cestas del lavavajillas
Plegado del estanteparatazas
Parate ner más espaciodonde colocar c acerolas ysartenes,
será po sibl e p le gar las varil las hacia aba jo según se mue stra
en la ilustración de la derecha.
Varillas pleg ables delas cestas infe rior y
supe rior
Para tener más espacio d onde coloca r c ace ro las ys ar te ne s,
será p o sibl e pl e gar las varil l as h ac ia abajo segú n semue s tra
enla ilustración dela derecha.
Los cu bi ert o s d eb er án c ol oc arse enl a c an ast i ll a p re vi sta a tal
efecto , separados unos de o tr os yen s us huecos cor re spondient es .
Asimismo, asegúresede que los cubiertosno quedanencajados
entre s í , ya que los re su lta do s óp t imo s de limpieza sev erían
compro met idos.
Canastilla para cubiertos
Para garantizarla mayor eficacia de limpieza,coloque loscubiertos
en lacanas t illa previs ta a t a l e fecto, as e gurándose d e lo siguien te:
Loscubiertos noencaj anlosunosen los otros.
Los cubiert os están col ocados con susmangos orie ntados hacia arr iba.
Los utensilios largos e st án colocado s en e l centro.
La altura de la cesta superior podrá ajustarse
insertando en los carriles las ruedas de la cesta
situadas a distintos niveles. Los objetos más
largos, cubiertos de servir, utensilios para servir
ensalada y cuchillos de cocina deberán colocarse
en el estante de modo que no obstaculicen el giro
de los brazos aspersores.
Ajuste de la cesta superior
Page 48

*EN 50242 : este programa es elciclo utilizado comoprueba. La i nfor mación a cerca dela prueba
compa rativa conforme a la norma EN50242es lasiguiente:
Capacidad:1 cubiertos
Posición de la cestasuperior: r uedas superi ores en los c arriles
Ajuste deldosificadorde líquido abrillantador:6
P1:0,49W;Po:0,45W.
Puestaen marcha del aparato
Inicio de unciclo de lavado
Tireha cia fuera de l as cesta s inferior y su perior. S eguidament e, coloqu e la vajilla, u tensilios y c ubiertos en l as
posiciones recomen dadas y vue lva a emp ujar las ces tas hacia el in terior del ap arato. Se rec omienda car gar prim ero
la cesta inferior ydespués la sup erior (consu lte la sección titul ada “Cómo c argar las cestas del l avav ajillas”).
Añada el de tergente (co nsulte las seccio nes refer entes a cómo añadi r Sal, Det ergente y Líquido abrillantador).
Conecte el ench ufe a la toma de corriente.La te nsión de fu ncionamien to del ap arato es de 2 20 - 240 VCA, 50 Hz,la
especif icaci ón para la to ma de corrie nt e debe rá ser d e 250 VCA, 10 A. Asegúr ese de que el grifo de sum inist ro d e
agua al aparato est é abierto al m áximo.
Abra la puerta y pul se el bot ón de enc endido / apa gado pa ra encender el ap arato.
Pulse el botón d e Selección de p rograma ; los program as de lavado irán desfilando en la siguiente se cuencia:
Alseleccionar u ndeterminadoprograma, se encenderá su correspondiente testigo. A continuación, cierrela puerta
del lava v a jillas para que se inici e el ciclo de lavado q ue haya seleccion ad o.
Intens ivo ->Norm al -> Ecológico - >
-> R ápi do;
El as teris co ( ) sign ifica que hay que aña dir líquido abrill a ntado r e n el dos ificador.
Intensivo
Nor mal
(*EN 50242)
Rápido
Prelavad o
Lavado
Aclarado
Aclarado
Aclarado
Secado
(50 )
(60 )
(
)
℃
℃
℃
Prelavad o
Lavado
Aclarado
Aclarado
Secado
(45 )
(55 )
(65 )
℃
℃
℃
(45 )
(6 )
℃
℃
Prelavad o
Lavado
Aclarado
Secado
(4 )
(
5 )
℃
℃
Lavado
Aclarado
Aclarado
(65 )
(65 )
℃
℃
Lavado
Aclarado
Secado
Para cargas deuna suciedad no rm al, tales
como cacer olas, platos, vas os y sart en es
pocosucias.
Para v ajilla e specia lmente suci a y
cacerola s, sa rten es , plato s, et c.
normalmen te suc ios y restos de al iment os
adherido s y secos.
Lavado má s cort o p ar a car gas poc o sucias
que no necesita n se cado.
5/25g
5/25g
5/ g
180
190
170
1.3
1.
18.5
15
11.5
1.35
0.
11
1
2
3
4
5
Programa estándar, este programa es
adecuado para limpiar vajillaen condiciones
normales de suciedad y es el programa más
eficiente en función del consumo combinado
deenergía y agua para este tipo de vajilla.
5
Aclarado
5
5
2 g
25
0.96
90
12.5
75
90 mi n
2
(1 o 2 pie zas)
(1 piezas )
(1 o 2 pie zas)
(1 o 2 pie zas)
30g
5
70
(
)
℃
5
0
6
30
Page 49

Una vez final izado el cic lo de funcionamientodel aparato,el av isador a cústico d el lavavajill as so nará durant e 8
segundos pa ra después perm anecer e n silencio. A pague el apar ato pulsando elbotón d e encendido / ap agado,
cierre el grifo desuministro de aguay abra la p uerta del lav avajillas .
Espere unos minu tos antes de des car gar el lavavajilla s. De est a manera se evit ará mani pular los pla tos y utensili os
mientras aúnestán calientes yson mássusceptibles de romperse.Además, dicho intervalo contribuyaa quese
sequen mejor.
El testigo de progra ma estará apagado.Solo entoncespodrá e star seguro de queel program a ha final izado
1.Apagueel l avavajill as pulsand o el botón de encendido/ apaga do.
2.¡Cierreel g rifo de su ministro de agua!
Cuando la vajilla es tá caliente, e s más sens ible a los gol pes. Por lo tanto,deberá de jar que se enf ríe durante
aproximadamente 15 m inutos antes d e descargar el aparato.
Abra la puerta del la vavajillas, déj ela entre abierta y espere unosminutos antesde procede r a retirar lo s objetos
de su interior. Esto permitirá que seenfríen y f acilitará su sec ado.
Es normal quee l in teri or de l lav ava jil las e sté mojado.
Comience descargando la c esta inferi or y después la sup erior. De esta manera ev itará que gotee aguaprocedente
de la cesta superior y moj e la vajilla exist ente en la cesta inferior.
Apague el lavavaji llas
Abra la puerta co n cuidad o.
Cómo descargar ellavavajill as
Cambiode programade lavado...
Cómoañadirvajilla o cubiertos adicionales unavez iniciado el ciclolavado
Si a bre la puert a mien tras se está ejecutando un ciclo d e l a vado , e ste se inte rrumpi rá. El test i go
del programa seleccionadodejará de parpadeary elavisador acústico emiti rá un tonocadaminuto
a me nos q ue se ci e r r e la pu e rta. Una vez cerr ada la puert a , el ap a rato r eanuda rá el ciclo de lav a do
seleccionado alcabo de 10segundos.
Finalizaci ón del c iclo dela vado
Condición que debecumplirse :
1.Unavez i niciado, solo podrámodifica rse un cic lo de lavado silleva ejecu tándose un breve intervalo. De locontrario,
es posible que yase haya libe rado el det ergente yse haya drenado elagua del ap arato . En dicho cas o, será neces ario
volver a lle nar el dispens ador de dete rgente (co nsulte la se cción titu lada "Cómo añ adir el de terg ente").
2.Mantenga pulsado el bot ón de Se lección de programaduran te un intervalosup erior a 3 seg undos p ara coloca r el
aparato en mod o de espera. Acont inuación, p odrá cam biar el p rograma se leccion ado a otro cic lo de lavado quedesee
(consulte la secci ón titulada "Iniciode un ci clo de lavad o").
Si ha olvidado cargar algún cubierto o vajilla en el aparato yya seha iniciado elciclo de lavado, podrá añadirlos en
cualquier momento antes de qu e el di spensador d e detergente llegue aabrirse .
Añada losplatos o cubiertos que haya olvidadocargar.
Cierrela puerta del aparato.
Una vez q u e los brazos asper sores hayan dejado de
girar,podrá ab rir totalm ente la pue rta.
2
3
Abra liger ame n t e l a puerta d el aparato .
1
4
5
Elaparato reanudará elciclodelavadoal cabo de10
segundos.
Page 50

Elfiltro impide que losresiduos de alimentode mayor tamaño u otros objetos lleguena introducirseen labomba de
ci rculac ión delagua. Dichos resi duos p o drían llega r a o bs trui r el filt r o y, de dar see ste caso, deberán eliminar se.
Elsistemadefiltraciónconsisteenunfiltrodemallagruesa,unfiltroplano
(fi ltro princ ipa l) y unm ic rofiltro ( fil trode malla fi n a).
Las part íc ulas decomid a ysucie da d atrapad a s por es tefiltro son pulve ri zadas
medianteun surtidor especial situado en elbrazoaspersor inferior yseeliminan
a tr a vés de l desa güe.
Laspartículas d emayortamaño, comoporejemplo trozosde huesoo vidrio
que podrían obstruir el d esagüe qued an atrapadas e n el filtro de m alla gruesa .
Pa ra reti ra r las part ícula s y resi duos a t r apadosen e ste f iltro, presione
ligeramente las ale tas situa das en su pa rte super ior para extr aerlo.
Estefiltro atrapa suciedady restosd e comida presentesen el cárterde la
cuba y evita que vuelva n a d eposi tarse sobre la v ajilla y los cubi ertos durante
elc iclo de l avado.
Filtro principal
1
Filtro de malla gruesa
2
Filtro de malla fina
3
2
3
1
Conjunto de filtros
Los filtro s el imina n de manera efic az las p artículas de com ida del a gua de lavad o, haciendo pos ible recic larla durante
el c iclo delavad o. Pa ra un funcionamie nto óptimo dellavavajillas y obte ne r los m e jores resu l t a dos, d eberán limpiars e
los filtros a in terv alos periódicos. Por estemot ivo, resul tará conven iente ret irar las part ículas de ma yor tamañ o que
hayan podido que dar atra padas en el filtrodespué s de cada cic lo de lavado. Pa ra el lo enjuag ue debajo del gri fo el filt ro
semicircular y su al oja miento. Para desmo ntar el conju nto de f iltros de su alojam iento, ti re hacia arriba d e su
correspondienteasa.
Nun cad eberá util i za rse e l l a vava jillas s i n sus fi ltros insta lados.
La colocación inc orrecta de los fil tros podría redu cir la eficaci a d el apa rato y
provocar dañ os en la vajil la y utensilio s cargados en s u interio r.
Paso 1: gireel filtro en sentido contrarioal delas agujas
delr eloj y levántelopar a retirarl o de su ubic ación.
Paso2: extraigael conjunto defiltrostirando de él
haciaarriba.
Sistem a de filtraci ón
Para desmontar l os filtros, ll eve a cabo los paso s 1 y 2. Para volverlosa colocar ensu sitio,
invierta las ecuenci a d e desm on taje.
1
2
Page 51

Podrál impiar el pan el de man dos utili zando un pa ño l i geramente húmedo. Un a vez limp io, asegúres e de sec arlo bien.
Limpie l as su perficies exterio res del aparato c on un pr oducto abrillanta dor adecuad o.
Nunca utilice objetos afilado s, es tropajos abrasivos olimpiado res demasiado f uertes e n n ingun a parte d el lavavajilla s.
Proteccióncontrahel adas
Tom e las medidas pertinentes par a proteger sulavavajillas de heladasdurante el i nvierno. Desp ués de cada ci clo de
lavado, efect úe lo siguient e:
1. Cor te la alimentación eléctrica al la vavaj ill as.
2. Cierre del g rifo de su ministro de agu a y desconect e el tubo de alimentación de la válvulade en trada de agua.
3. Drene el ag ua presente enel tubo de al imentación yen la válvula de entrada.(Util ice un reci piente para r ecoger el
agua).
4.Vuelvaaconectareltubodealimentaciónalaválvuladeentradadeagua.
5. Retire el f iltro de la pa rte inferior d e la cuba y u tilice una espo nja para empa par y recog er el agua acumuladaen el
cárter de la c uba.
Limpieza de los filtros
Limpiezade lapuerta
Utilice un cepillo para limpiar elfil tro de m alla gruesa y de m alla fin a. Vuelva a montar lo s elementos de l sistema de
filtración conforme a l o indica do en las ilustrac iones qu e se incluyen en estemanual y re instálel o correctame nte en
ella vavajilla s, colocándo lo en su aloja miento y pre sionando lo hac ia abajo has ta que quede fir memente enc ajado
en su sit io.
Procurenosometeraimpactoslosfiltrosmientrasloslimpia.Delocontrario,podría
deformar los filtrosy comprometerla eficaciadel lavavajillas.
Paralimpiarlos cantosde la p uerta deberá utilizar u n pañosuave ligeramente
humedecido conagua cali e nte . Par a evitar que penetre a g ua e n l a cerradura d e
lapuerta y en los componenteseléctricos, n o utilice limpiadores en aerosol.
Nuncautilicelimpiadoresen aerosolpara limpiarel panel de lap uerta,ya que
pod ría dañarla cerr adura dela puerta y loscomponenteseléctricos.
Deberá evitarse la utilización deelementosdelimpiezaabrasivos o cierto tipode
toallitasde papel, yaqueexisteriesgo de araña ro dejarmarcas en las superficies
de aceroinoxidable.
Limpieza de los brazos aspersores
si su lavavaj illas no fun ciona debi do a la presenci a
de hielo en el s istema, so licite asi stencia pro fesional
Seránecesariolimpiarlos brazos aspersores a intervalosperiódicos
para eliminar aquellos product os q uí m ico s e x i ste n tes enlas aguas
duras que pod rían obstrui r l os surtidor es ylos cojinet e s de l o s brazo
s aspe rso res.
Para desmontar elbrazo aspersor superior, mantenga sujeta su tuerca
de fijaciónygire el brazoenel sentido de lasagujasdelreloj para
retira r lo d e su eje.
Paradesmontare l brazoaspersorinferior,tire de él h acia arribapara
extraerlodes u sitio.
Lave los brazos aspersores con agua jabonosa caliente y utilice un
cepillo suave para lim piar los surtidore s. Vuel va a colocarlos en s u
siti o u na vezque los h aya enjuaga do a f ondo.
-Ex aminelos filtros después d e cadautilizacióndellavavajillaspara asegurarse de que no estánobstruidos.
-Para desmontarel sistemade filtración, desenrosqu e desu sitioel filtro demalla gruesa.Retirecualquier resto de
comida que haya quedado atr ap ad o y li m pie los filt ros debajo de l gr if o.
Observacio nes:
el sistema de fi ltración com pleto deb erá limpiars e al menos u na vez a la s emana.
Page 52

Sereco mienda e fectuar un cic lo de lavado en v acío y
después retirare lenchufe de latomadecorriente,
cerrar el grifodesuministrode aguay dejar la puerta
del aparato entreabierta. De e sta manera, se
prolongará la vida úti l de los b urletes d e la puerta y
seevi tará la conc entración de ol ores e n e l inte rior del
aparato.
En caso de que sea necesa rio desplazar o tran sportar
el lavavajillas , procure mante nerlo en pos ición vertica l.
Si n o hay más r emedi o, podrá colocar se de maner a que
descanse sobre su parte t rasera.
Uno de losfactores quecontribuyena la concentración
de o lores en e l lavavajillas , es la acumulac ión de restos
de co mida ad heridos en lo s burletes de la p uerta.
Limpiándolos a int ervalos per iódic os c on u na esponja
húm edaevitará este p roblema.
Antes d e l impiar o lleva r a cabo alguna tareade
mantenimiento en el a parato, ase gúrese de reti rar
siempre el enchu fe de la tom a de corrient e.
Procure no uti lizar disolvente s ni productos de
limpiezaabrasivospara limpiarlas superficies
exterioresy los elementos de goma dellavavajillas.
Utilice únicam ente un paño hu medecido c on agua
jabonosacaliente.
Para eli mi nar ma n chas o ma rc as p res entes en la
superficie inte rior del apa rato, utili ce u n p año
humedecido c on un poco de a gua y vinagr e, o bien
un producto de lim pieza e specialment e diseñado
paralavavajillas.
Retire el ench ufe de l a toma de co rriente
No utilice dis olvente s ni li mpiadores abr asivos
Desplazamient o o transporte d el aparato
Burletesde puerta
Una vez finaliz ado cada la vado, cierre delgrifo de
suministro de agu a al apar ato y deje la pue rta
entreabiertapara evitarla concentración de
humedad y olores en su interior.
Después de cada lavado, procedacomosigue
Instrucc iones de mantenimiento en casos de
períodos l argos deno uti lización
Las obras de fo ntanería e in stalación
eléctrica neces arias para la cor recta
instalación del apar ato deb erán
efectuarlas pr ofesional es.
Existe riesgo de elec trocució n
Corte el su mini s tro eléc t rico ant es de
proc eder a inst alar e l lavav ajill a s.
De ignorarse es t as instru cciones, p odr ía
existiru n riesgo de e lectrocución, así como
de sufrir lesione sfísicas graves o incluso
mortales.
El lavavaj illas deberá ubic arse a proximid ad de las tube rías de sum inistro de ag ua, desagüe y to ma de cor riente
exist entes.
Deberá elegirse elladomásconvenientedel mueble delfregadero para facilitarlainstalación yconexión delos
tu bo s de d esagüe del l av avaji llas.
Nota: asegúre se de comproba r los accesor ios de instal ación incl uidos con el apa rato (enganc hes par a e l panel
dec orativo de puerta , torn illos …) .
Preparativospara la instalacióndelaparato
●
Page 53

Lea det enidamente lasinstrucciones de instalación del aparato.
●
Il ustrac iones de las d i m ensiones requeridas para mueble s de co c i na y ubic a c ión correc ta
paralainstalación del lavavajillas
Los preparativ os deberán e fectuarse ant es de desplazar ellavavajilla s hasta su lugar d e
instalación. El ija un lug ar próximo a l fregadero a fin d e faci litar la instal ación de las
ma ngueras de sumini stro d e agua y desa gü e (vé ase la F igura 1).
Deinstalarseel lavavajillas en elextrem odel conjuntode muebles decocina (ilustrado en
la Figur a 2), deberá asegu rarse deque h aya suficiente e s pacio p ara p o d er abr irl a puer ta
delaparato.
2
1
16
Espacio libre míni mo requerido c on la p uerta abiert a
【】Figura2
Dimensiones del mueble:
deberá existi r una distancia
inferior a 5 m m entre la
parte superior de l
lavavajillas y el techo d el
mueble.Asimism o,
la puerta del aparat o de
estar alinead a con el
mueble.
【】Figura1
Mueble
Lavavajillas
Puerta del la va vaji lla s
Distanc i a mínima: 50 mm
1 El panel dec orativo de puert a podrá a daptarse conforme a lomostrado en la Fig ura 3.
Las dimensiones de l panel
decorativo de puerta deberán
coincidir con las ilu stradas.
【】Figura 3
●
Dimensiones e instalaciónd el pa nel decorativo dep uerta
90 °
90 °
600 mm
820mm
100
580mm
80
Distancia entre el suelo
y panel inferiordel mueble
Huecosde entrada
para las tuberías de
suministro de agua,
drenaje y cableado
eléctrico
(Unidad: mm)
Page 54

Instalacióndelpanel
decorativo de puerta
【】Figura 4a
2 Mont e lo s enganche s en elp ane l d e cor at iv o de madera y e nc á jel os enla s c orr e spo nd ie nt es r an u ra s ex ist ent e s en
lasuperficieexteriorde la puertadel lavavajillas (véase laFigura 4a).Trashaber posicionadoel panelen la puerta
dellavavajillas,fíjeloa estautilizandolos correspondi entestornillos(véasela Figura4b).
Instalació n de l panel
decorativo de madera
para lapuerta
【】Figura4b
1.Retire los cuatro
tornillos cortos
2.Instale los cuatro
tornillos largos
17
Retire los cuatro tornillos cortos
Instale los cuatro tornillos largos
Page 55

18
Ajustede la te nsión de los muelles depuerta
【】
Figura5
Ajuste de la tensión de losmuell es de puert a
●
Los muelles de la p uerta e stán ajustad os de fábri ca a la tens ión adecuada parasu funcion amiento cor recto. D e
instalarse un panel decorativode m adera en la pu erta, será n ecesario aju star la tensión delos muelles d e esta.
Gire el tornillo de ajustepara te nsar o deste nsar la e spiral de acero del muelle(véa se la Fig ura 5).
La tensi ón del muelle será la co rrec ta
cuando la puerta per manezca en
posición horizont al estando tot almente
abierta y pueda cer rarse por sí so la con
tan solo elevarla ligeramentecon un
dedo.
·Conexió n dela manguera dedesagüe
●
Insertelamangueradedesagüeenuntubodedesagüedeundiámetromínimode40mm,obiendéjeladesaguaren
elfr egadero , asegurándo se que no quede dobladani es trangulada. La partemás ele vada de la mangue ra deberá
quedar a unaaltu ra inferi or a 1000 mm .
A
Encimera
Partefrontal
Manguera de desagüe
NOTA
La parte más elevada de la
manguera deber á quedar a una
altura inferior a 1000 mm.
φ 40mm
B
TIENDA LA MANGUERA DE DESAGÜECONFORMEA LAS POSICIONESA, B, O CINDICADASENLAILUSTRACIÓN
Page 56

19
Pasosa seguirparala instalación del lavavajillas
●
1. Instale el panel decorativode puert a sobre la supe rfic ie exterior de la puer ta del lavava jillas util izando los
soportessuministrados. Utilice la plantillaparaposicionarcorrectamente los soportes.
2.Ajuste l a tensión de losmuelles de l a puerta uti lizando una llave Al len y girando eltornillo d e ajuste en el sen tido
de las agujas del relo j para tensarlo s o bien en direc ción contrari a p ara deste nsarlos. De no obser varse estas
instrucciones, podrían producirsedaños en ellavavajillas(Ilustración 2).
3. Conecte la man guera de entr ada de agua de l aparato al sum inistro de aguafría de su vivienda.
4. Conecte la man guera de desa güe al apar ato. Utili ce el dia grama como referenc ia. (Figura 6)
5. Conecte el cabl e de alimentació n.
6. Coloque la tira an ti-conde nsación en la car a inferior d e la encime ra o techo del m ueble do nde vaya a em potrarse
el aparato. Ase gúrese de quela tira an ti-condensaci ón qued e a ras con el bo rde de la e ncimera.
7.Posicioneellavavajillas en susitio.(Ilustración 4)
8. Nivele el lavav ajillas. La patatrasera pod rá ajustarse desde laparte front al del lava vajillas, giran do el tornillo
Allen situado e n el centro de l zócalo de labase del aparato. Paraello, uti lice una llave Allen (Ilu stración 5A).
Para ajustar las patasdelanteras, u tilice undestornillado r pl ano y empuje las pat as delan teras para girar las según
convenga hasta que e l lavavajillas est é nivelado (Il ustración 5B) .
9. El lavavajillas d eberá sujet arse firmemen te en su ubicaci ón. Hay dos maneraspara hace rlo:
A.Encimeras normales: Inse rte el eng anche de fij ación en la ranurapresente enla esquina superiorfront al del
lavavajillas y fíjel o con torn illos roscamad era a l a superf icie inferior de la encimera ( Ilustración 6 ).
B.Encimeras de mármol o g ranito: Util ice el ancl aje later al del aparat o para fijarl o con torni llos al costad o del
mueble de cocina. (Ilu stración 7).
【】Figura7
Page 57

El l avavaj illas deberá e star ni velado para que la s band ejas se deslicen correctamentep or sus carriles yel aparato
pueda proporciona r los mejor es resultado s.
1. C oloque un nivelde bu rbuja entre la pu erta y e l carri l interior de lacuba (según s e muestra en lailustración) p ara
comprobar que e l lavavajillas está cor rectamente nivelad o.
2. N ivele el l avav ajillas ajusta ndo individu almente las tres patasde nivelaci ón.
3. M ientr as nivela el l avavajillas, teng a cu idado pa ra evitar que se vuelque .
Ilustración del a juste de las p atas
【】
Figure 8
NOTA:
La altura de ajust e máxima de
las patas es de 5 0 mm.
Asegúrese de qu e la tensión yfrecuencia de lainstalación elé ctrica exist ente
correspondealosvalores indicados enla placa de especificacionestécnicas
del apar a t o . Cone c t e únicament e el a pa rato a una to m a de corrie n te que cuente
con una conexión atierra ade cuada. Si la tom a de corrie nte d onde se va a
conectar el a parato no es ade cuada para el e nchufe del cablede alimenta ción
suministrado, sustituyala toma de corrienteenlugar deutilizar adaptadoreso
componentes similar es que podr ían recalent arse y provocar un in cendio.
Consulte la e tiqueta de espec ificacion es técnicas del a par ato a fin de informars e de la t ensión y am peraj e n ecesarios
para el suministr o eléctrico don de vaya a cone ctarse el lav avajillas y enchu fe el apa rato a una to ma de corriente
adecuada. Utilice unfusible d e 10 am perios, fusib le de acción reta rdada o disy untor elé ctrico re comendado e ins tale
un circuito eléctr ico independ iente pa ra us o exclu sivo de este apar ato.
20
Compruebelanivelaciónlateralcorrecta
Nivel de burbuja
Compruebela
nivelación
correctatanto
del a nte co m o
det rás
Page 58

21
Asegúresede dejar cerrado elgrifotrasla conexión.
Ubicación del apar ato
Cómo drenar el e xceso de agua delas manguer as
Desagüe del aparato
Manguera de prol ongac ión
Conexión al t ubo sinfón ico
Coloque el aparato en ellugar desea do. La parte posteriordel apa rato deber á descansar en l a pared sit uada detrás
de este y sus lat erales en las p aredes o lo s muebles de co cina adya centes. El lavavajillasc uenta con ma ngueras de
entrada de agua y drena je que po drán tenders e tanto por el ladoposterior i zquierdo com o derech o para facilit ar su
correcta instalación.
Sil a altura delfregadero c on respecto al sueloes super ior a 100 cm, e l exceso de agua presenteen l as mangue ras
no podrá desagua r directam ente en el fregad ero. En d icho caso, s erá necesar io drenar l as manguera s en un balde
o recipiente adecuad o situado fu era del fregad ero y a me nor altura que este.
Conecte la mang uera de desagü e de agua al ap arato. La manguerade desagüe de berá estarcorrectam ente
conectada para evita r posibles fug as de agua. As egúrese deque la manguer a de desagüe d e agua no esté d oblada
ni aplastada.
En caso de que necesi te utilizar u na mangue ra de prolong ación de desagü e, asegúrese deutilizar un tipo de
manguera similar al original.
La longitud de d icha manguera n o deberá sup erar los 4 met ros. De lo cont rario, la efica cia limpiadoradel l avavajillas
se verá comprometida.
Inserte la mangue ra de desagüe en u n tubo de de sagüe de undiámetro mínim o de 40 mm, o bie n déjela des aguar en
el fregadero, ase gurándose que noquede doblada ni estrangulada. La parte más ele vada de la mangue ra deberá
quedar a una altur a inferior a 1000mm.
Conectela manguerade entradade agua fría a un conectorroscadode 3/4" y asegúrese de
que está correctamente apretado ensu sitio.
Silos tubos deagua son nuevoso no se hanu tilizado durante períodosprolongados,deje
correrel aguapara asegurarsede quesale limpiay sin impurezas.De no tomarse esta
precaución, la entradade agua podríaobstruirse,con el consiguienteriesgode provocar
dañosen el aparato.
Antes de poner e n servicio el lavavaj illas, deb erán comprobars e los siguien tes puntos:
1.El lavavajillas estácorrectamente nivelado y bien sujeto en su sit io.
2.El grifo de entrada deagua está abierto.
3.La cone xión de la mang uera de entr ada de agua está bienapretada y nohay indicios d e fugas.
4.Los cables están correctamenteconectadosensu sitio.
5.El suministroeléctrico está activado.
6.La s mangueras de en tr ada y de d esagüe no están dobladas ni es trang u l adas.
7.Se han ret irado d el interior d el lavavajill as todos los mate rial es de embala je e informaci ones impre sas.
¡Atención! Tras c omp letar la insta lación, aseg úrese de conserv ar este man ual. El conteni do de este manual
esextremadamente útilparalosusuarios.
Puestaen serviciodel lavavajillas
Tras comple tar la instal ación, asegúrese de conserv ar estemanual.
El con tenido de e ste manuales extremadamenteútil paralos usuarios.
Page 59

Se ha fundido un
fusible o el disyunt or
automático ha saltado
Sustituya el fusibleo reactive el disyuntorautomático.
Desenchufe cualquier otro aparato conectado al mismo
circuitoque su lavavajillas.
Derrame de líquido
abrillanta dor
Asegúrese siempre de limpiar inmediatamente cualquier
derrame de líquido abrillantador.
Minerales presentes
en el agua dura
Los utensilios afectados
no son resistentes a la
corrosión.
El tapón del depósito
de sal no está correcta mente
colocado o apretado
Uno de los brazos aspersores
está golpeando contra algún
objetocolocadoen las cestas
Algunos de los elementos
de la vajilla introducidos no
están correctamente sujetos
en la cestas
Estopuededebersea la
instalacióndeagua
existente o a una sección
transversal del sistema de
tuberías.
No se ha efectua do ningún
ciclodelavadodespuésde
llenar el depósito de sal del
lavavajillas.Cierta cantidad
de sal ha conseguido
penetrar en el ciclo de
lavado.
Paralimpiarel interior del aparato, utiliceuna esponja
húmeda y detergente para lavavajillas.Asegúrese de
utilizar guantes de goma.Nuncautilice ningún otro
limpiador aparte de detergente para lavavajillas. De
esta manera, se evitará el riesgo de emulsión y
formacióndeespuma.
Después de haberllenadoel depósito de sal, ejecute
siempre el programa rápido sin introducir vajilla alguna en
el aparato y sin seleccionar la función Turbo (si la hay).
Compruebe la junta.Asegúrese que asienta correctamen te.
Interrumpa el programa ycoloque correcta mente los
objetos que estén interfiriendo con el desplazamiento del
brazo aspersor.
Interrumpa el programa y coloquecorrectamente los elementos
de la vajilla para queno golpeen unos contra otros.
Estono afectará en modo algunoel funcionamientodel
lavavajillas.
En caso deduda,póngase en contactocon un fontanero
cualificado.
Se hautilizado un
tipode detergente
con colorante
Asegúrese de que el detergente utilizado no contenga
colorantes.
El tipo detergente
utilizado no es el
correcto
Asegúre se de que el lavavajillas está encendido y de que su
puerta está correctamente cerrada.Asimismo, asegúrese de que
el cable de alimentación eléctrica está correctamente enchufado
en la toma de corriente mural.
Compruebe que la entrada de agua está correctamente
conectada y que el grifo de suministro está totalmente abierto.
Asegúrese de cerrarla puerta y comprobarque el pestillo
de estaencajado correctam ente en el cierre.
La alimentación
eléctricano está
activada
Presión de agua
demasiado baja
La puerta del lavavajillas
no está correctamente
cerrada.
Manguera de desagüe
doblada o estrangulada
Filtro o bstruido
Fregadero de cocina
atascado
Compruebe la manguera de desagüe.
Compruebeelfiltrodemallagruesa(consultelasección
titulada"Limpieza de los filtros")
Compruebe elfregadero de su cocinapara asegurarse de
quedesagua como es debido.
Si el problema resideen queel fregadero de cocina no
desagua, es posible que tenga que solicitar la a sistencia
de un f ontanero en lugar de la de un técnico reparador
de lavavajillas.
A tener en cuenta antes de solicitar asistencia técnica
Problemas técnicos
Problemas de
carácter general
Ruido
Para evitar la formación de espuma en el aparato, utilice
únicamente detergente especial para lavavajillas.
Si estoocurre,abrael lavavajillas y deje que la espuma
se evapore.Añada 4,5 litros (1 galón) de agua fría en la
cuba. Cierre el lavavajillas, asegurándose de que el cierre
de la puerta ha encajado correctamente ensu sitio y, a
continuación, inicie cualquier ciclo de lavado. El lavavajillas
drenará toda el agua durante la primera etapa de inicio del
ciclo. Abra la puerta del aparato una vez que el aparato
haya acabado de drenar el agua para comprobar si la
espuma hadesaparecido.Repita el proceso en c asonecesario.
Page 60

Rebose.
De producirse alguna anomalía durante el funcionamiento del aparato, la pantalla mostrarácódigosde error para avisarle y permitirle tomar las
acciones necesariaspara corregirla:
Intervalo de carga de agua demasiado largo.
El grifo no está suficientemente abierto, la entrada de
agua está restringida, o la presión de
Hay fugas en alguno de los elementos del lavavajillas.
El piloto de r parpadea
rápidamente.
ápido
El piloto de ECO
rápidamente.
No se hacargado
correctamentelavajillaen
las cestas.
Consulte las notas proporcionadasen la sección titulada
“Cómo cargar las cestas del lavavajillas".
Seleccione un programa másintensivo.
Consulte la sección titulada "Cuadro de ciclos de lavado".
Utilice una mayor cantidad de detergente, o cambie de
detergente.
Coloque correctamente los objetos de modo que los brazos
aspersorespuedan girar libremente.
Limpie y/o coloque correctamente en su sitio el conjunto de
filtros.
Limpie los surtidores del brazo aspersor. Consulte la sección
titulada "Limpieza de los brazos aspersores".
Utilice menos cantidad de detergente si el agua abastecida
en zona es blanda y seleccione un ciclo de lavado más corto
para lavar su cristalería y hacer que quede más limpia.
Utilice un producto limpiador moderadamente abrasivo para
eliminar dichas marcas.
Re-loading the dishes properly.
Cargueellavavajillasconformeseindicaenlasinstrucciones.
Aumente la cantidad de líquido abrillantador dosificado o
rellene el dosificador de líquido abrillantador.
No vacíe su lavavajillas inmediatamentedespués de finalizar
el ciclo de lavado. Abra ligeramente la puerta de modoque se
libere el vapor. Comience adescargar el lavavajillas una vez
que los objetos en suinterior estén templados al tacto. Vacíe
primero la cesta inferior. De esta manera seevitará que caiga
agua procedente de los objetos que se encuentran en la cesta
superior.
En los programas cortos, la temperatura de lavado es más baja.
Esto reduce también la eficacia limpiadoradel aparato. Elija
un programa con un ciclo de lavado más largo.
El aguano se escurre tan fácilmente en estetipo de cubiertos.
Loscubiertos o la vajillade este tipo no son adecuados para
lavar se en ellavavajillas.
El programa utilizado no es
lo suficientemente intensivo.
Insuficiente dosis de detergente.
Hay objetos que obstaculizan
el movim iento de los brazos
aspersores.
El conjuntode filtrospresente
en la base de la cuba del
aparato no está limpio o no está
correctamente encajado en su
sitio.Esto puede provocar la
obstrucción de los surtidores de
los brazos aspersores.
Combinación de aguablanday
demasiada cantidad de
detergente
Utensilios de aluminiohan
estado rozandocon la vajilla
La vajilla está colocada de
maneraVuelva a posicionar
correctamente la vajilla en l
as cestas.
La vajilla no está correctamente
cargada en las cestas
Cantidad insuficiente de líquido
abrillantador
Ha retirado demasiadopronto
la vajilla del interior del aparato
Se ha seleccionado el
programa incorrecto
El revestimiento de los
cubiertos utilizados es de
baja calidad
Eficacia limpiadora poco satisfactoria
Eficacia de secado poco satisfactoria
·De producirse rebose, cierre el grifo de s uministro deagua antes de ponerse en contacto con el serviciode
asistencia técnica.
·Si hay acumulación de agua en la cuba debido a llenado excesivo o a una pequeña fuga, deberá retirarse el agua
antes de volver a poner en funcionamiento el lavavajillas.
parpadea
Page 61

Altura: 815 mm
Anchur a: 598 mm
Profun did ad:
550mm ( conla puerta cerrada)
Presió n de a gua : 0, 04 a 1,0 MPa
Alime ntaci ón eléctr ica: Véa se la etiqueta de
Capacidad: 1
Información técnica
5
9
8
5
9
8
815815
1
1
5
0
1
1
5
0
(
w
it
h
t
h
e
do
o
r
c
lo
s
e
d
)
5
5
0
(
)
5
5
0
w
it
h
t
h
e
d
o
o
r
c
lo
s
e
d
2
cubiertos
Page 62

FAGOR
LVF63ITB
12
A+
273kWh
0.45 W
0.49 W
A
1 m i n
81,5 cm
59,8 cm
55 cm
1760 -2 100 W
ECO 45 ℃
49 dB(A) re 1pW
Integrable
220-2 4 0 V~ / 50 H z
0,4-1 0 bar= 0,04- 1 MSíPa
3 0
273
0. 96k Wh
32 2 0 litros
90
22
Page 63

11
22
11
22 22 22
11
22
1 1
55 55 55
55 55 55
55 55 55
55 55 55
33 33 33 33
11
11
11
22
11
22 22 22
11
22
11
44 44 44 44 44 44
88 77 33 33
33
66
44 44 44 44 44 44
22
22
11
33 11
33
33
66
33 33
11
33
11
44
55
66
22
22
11
33
11
88
77
77
77
99
1010
77
2.Cesta inferior:
3.Cesta para los cubiertos
1.Cesta superior:
H3
Page 64

Spanish
user manual
LV (771 )F3F63ITB
FAGOR_20160613
Page 65

1
pessoas
2
Manual de Instruções
Máquina de lavar louça
LVF63ITB
Page 66

Caro Cliente,
Por favor, leia atentamente este manual antes de
utilizar a sua máquina de lavar louça. Ele ajudará a
utilizar e manter o seu equipamento corretamente.
Guarde-o para referência futura.
Entregue-o a qualquer eventual proprietário futuro do
aparelho.
Este manual é divido em secções incluindo Instruções de
Segurança, Instruções de Operação, Instruções de
Instalação, Resolução de Problemas, etc.
A secção de Resolução de Problemas ajudará a
resolver problemas comuns por si.
Se não puder resolver os problemas por si,
peça ajuda a técnicos profissionais.
O fabricante, seguindo uma política de constante
desenvolvimento e atualização do produto, poderá
fazer alterações sem aviso prévio.
Painel de controlo.... ...............................3
Características da máquina de lavar louça........3
A、Descalcificador de água...........................4
B、Carregar o sal no descalcificador...............5
C、Encher o dispensador de abrilhantador........5
D、Função do detergente
..................................
6
Precauções antes e depois de carregar a máquina
de lavar louça ......... ........... ...................... ...9
Carregar o cesto superior.......... ......... ........ ....10
Carregar o cesto inferior.........
... ..... ..... .........
..10
Cesto para talheres..................................... .10
Tabela de ciclo de lavagem
... ....... ..... ..... .... .....
11
Ligar o aparelho............................ ....................12
Mudar o programa................................................. 12
Ao fim do ciclo de lavagem.......
..... . ... ..... .........
.1 2
Sistema de filtragem.............................................13
Cuidados com a máquina......................................14
Antes de solicitar
assistência
NOTA:
1) Informações de segurança................................1
2) ..................................2
3) Instruções de operação.....................................3
4) Antes de utilizar pela primeira vez...................4
5) Carregar o cesto para louça..............................9
6) Iniciar um programa de lavagem.......................11
7) Manutenção e limpeza.......................................1 3
Leia este manual
O manual do usuário pode ser obtido pelo fabricante.
Guia rápido de utilização
Instruções de instalação……...................16
Posicionar a máquina……….......................1
Dimensões e instalação da porta do
móvel…………………………………….…....1
Regulação da molas da porta………...........18
Ligação dos tubos de água………...............18
Processo de instalação……………..............19
Ligação elétrica…………………………........2
Ligação da água ………………..…..............21
9) Conselhos de resolução de
problemas…...............................................23
Antes de contactar o Serviço de Assistência
Técnica……………......................................23
Códigos de Erro…………………………......24
Informação Técnica………………………....25
8)
6
7
1
Page 67

1-1
1.INFORMAÇÃO DE SEGURANÇA IMPORTANTE
● Esta máquina está destinada ao uso doméstico e outros
usos semelhantes, tais como:
áreas de cozinha em lojas, escritórios e outros ambientes
de trabalho;
- granjas;
- clientes em hotéis, motéis e outros ambientes de tipo
residencial;
- ambientes de hospedagem.
● Esta máquina pode ser utilizada por crianças de idade
superior a 8 anos e por pessoas com capacidades físicas,
mentais ou sensoriais reduzidas ou sem experiência e
conhecimento, sempre quando tenham recebido
supervisão ou instruções relativas ao uso do aparelho de
um modo seguro e entendam os riscos que implica. As
crianças não devem brincar com a máquina. A limpeza e
manutenção da mesma não deve ser efetivada por
crianças sem supervisão.( Para EN60335-1)
● Esta máquina não está desenhada para o uso de
pessoas (incluindo crianças), com capacidades físicas,
sensoriais ou mentais reduzidas, ou falta de experiência e
conhecimento, exceto que tenham recebido supervisão ou
instrução referente ao seu uso por uma pessoa
responsável pela sua segurança.(Para IEC60335-1)
● Este aparelho é exclusivamente para uso interno e
doméstico. Para proteger contra o risco de choque
elétrico, não submergir a unidade, cabo ou tomada em
água ou outros líquidos.
● Por favor, antes de proceder à limpeza ou manutenção
da máquina ela deve ser desconectada. Utilize um pano
suave molhado em sabão neutro e depois use um pano
seco para limpá-lo novamente.
ADVERTÊNCIA!
Page 68

1-2
INSTRUÇÕES PARA TOMADA COM FIO TERRA
●
mau funcionamento ou ruptura a terra reduz o risco de
choque elétrico provendo uma via de resistência à
corrente elétrica. O aparelho está equipado com um cabo
provido de um condutor de terra e uma tomada de fio
terra.
● A tomada deve estar conectada a uma tomada de
encaixe apropriada e instalada, e com fio terra de acordo
com as normas locais.
● A conexão errada do equipamento condutor pode
ocasionar um risco de choque elétrico. Por favor, consulte
um eletricista ou o representante do serviço técnico em
caso de dúvidas a respeito da tomada com fio terra.
Não modifique a tomada original. No caso de que não
caiba na tomada de encaixe, proceda à uma nova
instalação com a ajuda de um eletricista qualificado.
Não faça mau uso do equipamento; não sentar-se
encima do mesmo, tampouco colocar-se de pé na porta ou
bandeja do lava-louças.
● Não ligue a lava-louças exceto que os painéis de trava
estejam em seu lugar apropriado.
● No caso de abertura da porta durante a operação, por
favor abra cuidadosamente a lava-louças. Existe risco de
saída de água.
● Não ponha objetos pesados encima da máquina,
tampouco apoie-se na porta enquanto esteja aberta
porque o aparelho poderia ser derrubado.
● Para carregar a lava-louças:
1)Coloque as partes afiadas evitando causar dano no selo
da porta;
O aparelho deve estar conectado à terra. No caso de
●
●
Page 69

1-3
devem ser colocados na cesta com suas pontas para baixo
em posição horizontal.
● Comprove se o detergente em pó foi consumido depois
da finalização do ciclo de lavagem.
● Não lavar produtos de plástico, exceto se são fabricados
para limpeza específica em máquina lava-louças. Em caso
de dúvida, consulte o fabricante do produto.
● Utilize unicamente detergente, abrilhantador e demais
aditivos especificamente fabricados para lava-louças.
● Não utilize sabão, sabão de máquina de lavar roupa ou
para lavagem à mão em sua máquina lava-louças.
● As crianças não deveriam utilizar o produto sem
supervisão.
● Não deixe a porta aberta, poderia haver risco de
inversão da máquina.
● Se o cabo está danificado, troque por peças de
reposição original.
● Durante a instalação elétrica a tomada não deve estar
torcida ou achatada de maneira perigosa.
● Não force nem manipule os comandos.
● A máquina deve ser conectada à rede principal
utilizando as mangueiras originais. Não reutilize caldeiras.
● Não utilizar a máquina para serviços não estipulados
pelo fabricante.
● A pressão máxima de entrada é de 1MPa.
● A pressão mínima da água é de 0.04MPa.
2) Atenção: facas e outros utensílios com pontas afiadas
Page 70

1-4
RECICLAGEM
●
● Todos os materiais da embalagem devem ser reciclados.
● Partes em plástico estão marcadas segundo as
abreviaturas dos seguintes padrões internacionais:
PE ----para polietileno.
PS ----para poliestireno.
POM ----polioximetileno.
PP ----polipropileno.
ABS ----Acrilonitrilo Butadieno Estireno.
Recicle o material da embalagem apropriadamente.
ATENÇÃO!
●
● Por favor utilize centros de reciclagem legais.
● Por favor, corte o cabo e inutilize a porta.
● O papelão está fabricado com materiais reciclados e
deveria ser reciclado como papel.
● Ao assegurar-se de que o produto é reciclado
corretamente, você ajuda a prevenir possíveis
consequências negativas contra o meio ambiente e a
saúde, que poderiam ser causados pelo mau uso dos
resíduos do produto.
●Para informação detalhada sobre a reciclagem deste
produto, por favor, contate com sua entidade local de
reciclagem.
● Por favor, não deixe os resíduos do produto em
instalações não classificadas. O produto requer uma
separação e um tratamento específico.
A embalagem pode ser perigosa para as crianças.
Page 71

Para o método de operação pormenorizado, ler o respetivo conteúdo no manual de instruções.
Ligue o aparelho Prima o botão On/Off para ligar o aparelho. Abra a porta.
Encha o dispensador de
detergente
Para cada ciclo de lavagem.
Apenas para programas com pré-lavagem.
(Siga as instruções do manual do utilizador!)
Verifique nível abrilhantador
Indicador elétrico no painel de controlo (se existente).
Verifique o nível de sal
regenerador
(Apenas nos modelos com sistema amaciador de água).
Indicador elétrico no painel de controlo (se existente).
Se não existe luz avisadora de falta de sal no painel de controlo
(para alguns modelos), pode estimar quando encher o amaciador com sal
de acordo com o número de ciclos da máquina.
Carregue os cestos
Selecione um programa
Elimine grandes quantidades de restos de comida. Abrande os resíduos de comida
queimada de frigideiras, e depois, carregue os cestos. Consulte as instruções de
carga da máquina de lavar louça.
Feche a porta, prima o botão Programa até que o programa selecionado se acenda
(ver a secção «Instruções de funcionamento»).
Funcionamento da
máquina de lavar louça
Abra a torneira de água e prima o botão Arranque/Pausa. A máquina arranca depois de
cerca de 10 segundos.
Mudar de programa.
Acrescentar louças
esquecidas na máquina.
Abra a porta com cuidado.
O vapor quente pode
escapar quando a porta é
aberta!
Se o aparelho for desligado
durante um ciclo de
lavagem.
Se o aparelho for desligado durante um ciclo de lavagem, ao ligá-lo
novamente, selecione de novo o ciclo de lavagem e utilize a máquina de
lavar louça de acordo com o estado original ligado).
Desligar o aparelho.
Quando o ciclo de trabalho terminar, o sinal sonoro da
máquina de lavar louça irá tocar 8 vezes e parar.
Desligue o aparelho com o botão On/Off.
Fechar a torneira e
descarregar os cestos.
Atenção: Espere alguns minutos (cerca de 15 minutos) antes de descarregar a máquina de lavar
louça para evitar manusear as louças e os utensílios enquanto estão ainda quentes e mais
suscetíveis a quebras. Isso irá permitir também que a louça seque melhor. Descarregue o aparelho,
começando pelo cesto inferior.
ATENÇÃO!
Compartimento A:
Compartimento B:
Indicador mecânico C
2.Guia rápido de utilização
2
1. Uma alteração de programa só é possível se esse mesmo programa tiver iniciado à pouco tempo.
De outra forma, o detergente da louça já terá sido libertado na água e neste caso é necessário voltar a
repor o detergente.
2. Pressione o botão On/Off para parar a lavagem. Pressione novamente para ligar
3. Seleccione novo programa
4. Reinicie a lavagem
1. Abra um pouco a porta para parar lavagem
2. Após paragem dos braços aspersores abra completamente a
porta
3. Adicione louça
4. Feche a porta.A máquina começa a trabalhar após 10 segundos
AA
CC
BB
Page 72

Para obter o melhor desempenho da sua máquina de lavar louça, leia todas as
instruções de operação antes de a utilizar pela primeira vez.
IMPORTANTE
3. Instruções de operação
3
Painel de controlo
Característicasprincipaisdamáquina
Vista Frontal Vista Traseira
Cesto inferior
Depósito para Sal
Compartimento para
detergente
Suporte para chávenas
Braços aspersores
Conjuno de filtros
Tubo de entrada
Tubo da água
Cesto Superior
1
Tubo de entrada
5
6
7
8
9
10
11
3
2
4
Regulador
11
1
2
3
4
5
6
7
8
9
10
11
22
33
44 55
66
11
44
66
22
55
1. Indicador e botão Liga/Desliga: para Ligar/Desligar o aparelho e indicar quando a alimentação est
á ligada.
2. Indicadores e botões de programa: premir os botões permite selecionar um programa de
lavagem e o indicador mostra qual o programa de lavagem que escolheu.
3. Luz de aviso de sal e abrilhantador: indica quando é necessário encher novamente o
compartimento de sal ou dispensador.
4. Indicador e botão das funções de secagem adicionais: premir o botão permite escolher a
secagem extra e o indicador mostra a função escolhida. Pode ser utilizada com os programas
intensivo, normal, eco e 90 minutos).
5. Botão de função de meia carga: seleciona as funções de meia carga. (Recomendamos a utilizaç
ão da função de meia carga quando carregar 6 ou menos definições na máquina de lavar louça. Ao
utiliza-la é possível reduzir o consumo de água e energia. (A função de meia carga pode ser
utilizada com os programas intensivo, normal, eco e 90 minutos).)
6. Indicadores e botão de atraso: para apresentar o botão de tempo de atraso, de 3, 6 e 9 horas.
Page 73

Antes de utilizar a sua máquina de lavar louça pela primeira vez:
A. Ajuste o descalcificador de água.
B. Acrescente 1,5 k g de sal para máquina de lavar louça e, depois, encha o depósito de sal com água.
C. Encha o dispensador de abrilhantador.
D. Adicione o detergente.
O descalcificador de água deve ser ajustado manualmente, com a ajuda do seletor de dureza da água.
O descalcificador de água destina-se a remover minerais e sais da água, que podem ter um efeito
nocivo ou adverso sobre a operação do aparelho.
Quanto mais alto o teor desses minerais e sais, mais dura é a água.
O descalcificador deve ser ajustado consoante a dureza da água na sua região. A empresa municipal de água
pode informar acerca da dureza da água na sua região.
Ajustar o consumo de sal
A máquina de lavar louça foi concebida para ajustar a quantidade de sal consumida com base na dureza da água
utilizada. Esse ajuste destina-se a otimizar e personalizar o nível de consumo de sal.
DUREZA DA ÁGUA
Posição do
seletor
Consumo de sal
(g/ciclo)
dH
fH
Clarke
mmol
/l
0-5
6-11
12-17
0-9
10-
20
21-
30
0-6
7-1
4
15-21
0 0,94
H1
0
-
1,0-2,0
H
2 9
2 ,1
-3,0
H3
12
1
8-22 31-40
2
2-28
3 ,1
-4,0
H4
20
23-34
41-
60 29-42
4 ,1
-6,0
H5
30
3
5-45 61-80
4
3-56
6 ,1 -8,0
1 dH = 1 ,25 Clar ke = 1,78 f H = 0,178 mm o l/l
dH:
Grau alemão
fH: Grau francês
Clarke: Grau britânico
Configuração de fábrica: H (EN 5 0242).
3
H6
60
Contacte os serviços municipalizados para obter informações acerca da dureza da água que lhe é fornecida.
Se o seu modelo não possui descalcificador, avance para a próxima secção.
DESCALCIFICADOR
A dureza da água varia consoante o local. No caso de utilizar água dura, irão formar-se depósitos na louça e nos
utensílios.
A máquina dispõe de um descalcificador especial que utiliza sal especialmente concebido para eliminar calcário e
minerais da água.
Nota: 1
Nota: 2
NOTA:
4
4. Antes de utilizar pela primeira vez
A. Descalcificador
o
o
o
o
o
o
o
1. Ligue a máquina
2.Pressione,mais de 5 segundos, o botão de Start/Pause para iniciar
descalcificação em 60 segundos
3. Pressione botão Start/Pause para seleccionar posição adequada
para a sua máquina. A posição varia nesta sequência:
4.Pressione botão On/Off
H3->H4->H5->H6->H1->H2.
Page 74

Utilize sempre sal destinado a máquinas de lavar louça.
O depósito de sal está situado por baixo do cesto inferior e deverá ser cheio da seguinte forma:
Atenção!
Utilize sempre sal destinado a máquinas de lavar louça! Qualquer outro tipo de sal que não seja
especificamente destinado à utilização em máquinas de lavar louça, nomeadamente o sal de cozinha,
irá danificar o descalcificador. Em caso de danos consequentes da utilização de sal
inapropriado, o fabricante não dará nenhuma garantia, nem se responsabilizará por qualquer dano causado.
Encha o depósito com sal apenas antes de começar um dos programas de lavagem completos.
Isto evitará que grãos de sal ou projeções de água salgada fiquem acumulados
no fundo da máquina por um período de tempo, o que pode provocar corrosão.
A Retire o cesto inferior e, em seguida, desenrosque e retire a tampa do depósito de sal
B Introduza a extremidade inferior do funil (fornecido) no orifício e introduza cerca de 1,5 kg de sal.
C
Encha completamente o depósito de sal com água. É normal que saia uma pequena
quantidade de água do depósito de sal.
D Depois de encher o depósito, volte a enroscar a tampa firmemente no sentido dos ponteiros do relógio.
E A luz indicadora irá parar de se acender depois do enchimento do depósito de sal .
F Imediatamente depois do enchimento do depósito de sal, um programa de lavagem deve ser realizado (recomendamos o
programa curto). Caso contrário, o sistema de filtro, a bomba e outras peças importantes da máquina poderão ser
danificados pela água salgada. Tais danos não são cobertos pela garantia.
1. O depósito de sal deverá ser novamente cheio sempre que a luz indicadora do nível de sal se acender.
É possível que a luz indicadora de nível de sal não se apague antes de o sal se dissolver
completamente, apesar de o depósito de sal estar cheio.
Se não houver luz indicadora no painel de controlo (alguns modelos), pode estimar quando introduzir sal
no descalcificador consoante o número de ciclos realizados pela máquina.
2. No caso de existir sal derramado, é possível executar um programa de enxaguamento ou de lavagem
rápida para o remover.
3.
Se a máquina tiver de ser esvaziada para ser transportada, reparada, etc., utilize um trapo absorvente ou análogo para
secar a água do depósito de sal e enrosque a tampa firmemente, de seguida, a máquina poderá ser movimentada ou
reparada. Depois da movimentação ou reparação da máquina e de verificar se tudo está em ordem, carregue o sal no
descalcificador como descrito no
capítulo «B. Carregar o sal no descalcificador». Caso contrário, sérios danos poderão ser
provocados à máquina, por
exemplo, ferrugens, apodrecimentos, entre outros. Esses problemas não são cobertos pela garantia.
Dispensador de abrilhantador
O abrilhantador é libertado durante o enxaguamento final para evitar que se formem gotículas de água na sua
louça, que podem deixar manchas ou riscos. Melhora igualmente a secagem, ao permitir à água escorrer da louça.
A sua máquina foi concebida para utilizar abrilhantador. O dispensador de abrilhantador está no interior da porta,
perto do dispensador de detergente. Para o encher, abra a tampa e coloque o abrilhantador no distribuidor até o
indicador de nível ficar completamente preto. A capacidade do depósito de abrilhantador é de cerca de 110 ml.
Função do abrilhantador
O abrilhantador é automaticamente libertado durante o último enxaguamento, proporcionando o enxaguamento
completo e a secagem sem deixar manchas ou riscos.
Atenção!
Utilize apenas abrilhantadores para máquina de lavar louça. Nunca introduza qualquer outra substância no dispensador
de abrilhantador (ex.: produtos de limpeza, detergente líquido). Isso poderia danificar o aparelho.
NOTA:
5
B. Carregar o sal no descalcificador
C. Encher o dispensador de abrilhantador
11 22
Abrir
Page 75

Quando encher novamente o dispensador de abrilhantador
Se o painel de controlo não possuir uma luz indicadora de nível de abrilhantador, pode estimar a quantidade
de abrilhantador pela cor do indicador de nível ótico «C» localizado perto da tampa. Quando o depósito de
abrilhantador está cheio, todo o indicador fica negro. À medida que o abrilhantar diminui, o tamanho do ponto
negro também diminui. Nunca deverá deixar o abrilhantador chegar a 1/4.
À medida que o abrilhantador diminui, o tamanho do ponto negro
no indicador de nível altera-se, conforme abaixo ilustrado:
Cheio
Cheio a 3/4
Cheio a 1/2
Cheio a 1/4 - encher novamente para eliminar manchas
Vazio
1
Para abrir o dispensador, rode a tampa para a seta «open» (aberto) (lado esquerdo) e levante-o.
2 Coloque o abrilhantador no distribuidor, tendo o cuidado de não o encher demasiado.
3 Volte a colocar a tampa, introduzindo-a alinhada com a seta «open» (aberto) e rode-a para a seta «closed» (fechado) (lado
direito).
Limpe e enxague quaisquer gotas derramadas durante o enchimento com um pano absorvente para evitar a formaç ã o de
demasiada espuma na pró xima lavagem. Nã o se esqueç a de colocar novamente a tampa antes de fechar a porta
da má quina.
Ajustar o dispensador de abrilhantador
O dispensador de abrilhantador tem 6 ou 4 posições de regulação. Comece
sempre com o dispensador na posição «4». Se a sua louça tiver manchas ou não
ficar bem seca, aumente a quantidade de abrilhantador, retirando a tampa de
rodando o marcador para «5». Se a louça continuar a não secar
convenientemente ou possuir manchas, ajuste o marcador para o número
superior seguinte até a sua louça deixar de ter manchas. Recomenda-se que o
regule na posição «4». (O valor de fábrica é «4»).
Aumente a dose se ficarem gotas de á gua ou manchas de calcá rio na louç a depois do enxaguamento.
Reduza-a se a louça ficar pegajosa, com manchas brancas ou se notar um filme azulado
em artigos vidro ou nas lâminas das facas.
Os detergentes com os seus ingredientes químicos são necessários para remover sujidades, destruir as sujidades e transportálas para fora da máquina de lavar louça. A maioria dos detergentes de qualidade comercializados é adequada para este fim.
Atenção!
Utilização correta do detergente
Utilize apenas detergentes especificamente concebidos para máquinas de lavar louça. Mantenha o detergente num lugar
Ajustar alavanca
(enxaguamento)
NOTA:
D. Função do detergente
(Indicador de nível de abrilhantador)
C
NOTA:
fresco e seco. Não introduza detergente em pó no dispensador até decidir iniciar a lavagem.
6
11 22 33
Page 76

Detergentes
Existem 3 tipos de detergentes:
1. Com fosfato e cloro
2. Com fosfato e sem cloro
3. Sem fosfato e sem cloro
Normalmente, os novos detergentes em pó não têm fosfatos. Portanto, não amaciam a água. Neste caso,
recomenda-se encher o depósito de sal, mesmo que a dureza da água seja apenas de 6Dh. No caso de águas
duras, se forem utilizados detergentes sem fosfatos, frequentemente surgem manchas brancas na louça e peças
de vidro. Neste caso, adicione mais detergente para obter melhores resultados. Detergentes sem cloro têm
pouco efeito branqueador. As manchas fortes e coloridas não podem ser completamente removidas. Neste caso,
escolha um programa com uma temperatura mais elevada.
Detergentes concentrados
Estes detergentes podem ser divididos em dois tipos básicos, com base na sua composição química:
Detergentes convencionais, alcalinos com componentes cáusticos
Detergentes de baixa concentração alcalina e enzimas naturais.
Detergente em pastilhas
Detergentes em pastilhas de diferentes marcas dissolvem a diferentes velocidades. Por este motivo, alguns detergentes
em pastilha não se dissolvem e não desenvolvem totalmente a sua ação de limpeza durante os programas curtos. Utilize
programas longos ao utilizar detergentes em pastilhas, para garantir a remoção de todos os resíduos de detergentes.
Dispensador de detergente
O dispensador deve ser enchido antes do início de cada ciclo, de acordo com as instruções fornecidas na tabela de
ciclo de lavagem. A sua máquina utiliza menos detergente e abrilhantador do que as máquinas de lavar louça
convencionais. Geralmente, é necessária apenas uma colher de sopa para uma lavagem normal. Os utensílios mais
sujos necessitam de mais detergente. Introduza sempre o detergente apenas antes de ligar a máquina, caso contrário,
este pode ficar húmido e não se dissolver corretamente.
Quantidade de detergente a utilizar
Se a tampa estiver fechada: prima o botão para libertar. A porta abre-se.
Adicione o detergente apenas antes de iniciar cada ciclo de lavagem.
Utilize sempre detergentes de qualidade.
7
NOTA:
ATENÇÃO! O detergente é corrosivo.
Mantenha as crianças longe do detergente.
Empurre para abrir
11 22
Detergent tablet
Detergent powder
Page 77

Encher o depósito de detergente
Encha o dispensador de detergente com
detergente. A marca indica os níveis das doses,
como ilustrado à direita.
A
Local de depósito do detergente para uma lavagem.
B
Local de depósito do detergente para uma pré-lavagem.
Consulte as dosagens do fabricante e as recomendações de
armazenamento indicadas na embalagem.
Baixe e prima a tampa até fechá-la corretamente.
Se a louça estiver muito suja, coloque uma dose adicional
de detergente no compartimento de pré-lavagem. Esse detergente será libertado na etapa de pré-lavagem.
Encontrará informações sobre a quantidade de detergente a utilizar num programa individual.
Tenha em conta que os valores podem variar consoante o nível de sujidade e a dureza da água.
Consulte as recomendações do fabricante na embalagem do detergente.
NOTA:
8
AA
BB
Page 78

Pense em comprar utensílios identificados como aptos a serem lavados em máquinas de lavar louça.
Utilize um detergente suave para a louça. Se necessário, obtenha mais informações junto dos
fabricantes de detergentes.
Para objetos especiais, selecione um programa à temperatura mais baixa possível.
Para evitar ferimentos, não retire objetos de vidro e facas da máquina imediatamente
depois do término do programa.
São adequados São limitadamente adequados
Talheres com pegas em madeira,
chifre ou madrepérola.
Objetos de plástico não resistentes ao calor.
Talheres antigos com peças coladas não
resistentes ao calor.
Talheres ou louças coladas
Objetos em liga de estanho ou cobre
Copos em cristal
Objetos em aço não inoxidável
Travessas em madeira
Objetos realizados com fibras sintéticas.
Alguns tipos de vidros podem ficar
opacos depois de várias lavagens.
As peças em prata e alumínio tendem a
descolorir-se durante a lavagem.
Os desenhos esmaltados podem
desbotar quando lavados
frequentemente à máquina.
(Para obter os melhores resultados da sua máquina de lavar louça, siga estas diretrizes.
As características e a aparência dos cestos para louça e para talheres podem variar consoante o modelo).
Retire os excessos de alimentos da louça. Abrande os resíduos de comida queimada de
frigideiras. Não é necessário passar a louça por água.
Coloque a louça na máquina da seguinte forma;
1. Objetos como chávenas, copos, tachos/frigideiras, etc., virados para baixo.
2. Objetos curvos ou ocos devem ficar inclinados, por forma a permitir que a água circule no seu interior.
3. Todos os utensílios devem ser colocados de forma segura para não cair.
4. Todos os utensílios devem ser colocados por forma que os braços aspersores possam rodar livremente durante a lavagem.
Objetos muito pequenos não devem ser lavados à máquina, pois podem facilmente cair dos cestos.
Coloque os objetos côncavos como chávenas, copos, frigideiras, etc., com a abertura virada para baixo, para que
a água não fique acumulada no fundo da louça.
As louças e os talheres não devem ficar um dentro do outro ou sobrepostos.
Para evitar que os copos se danifiquem, não se devem tocar.
Introduza os objetos maiores, que são mais difíceis de lavar, no cesto inferior.
O cesto superior foi concebido para conter louça mais leve e delicada, tais como copos, chávenas de café
e chávenas de chá.
As facas com lâminas longas em posição vertical são um risco potencial!
Objetos longos e/ou afiados de cutelaria, como facas de trinchar, devem ser colocados em posição horizontal no
cesto superior.
Não sobrecarregue a sua máquina. Isso é importante para obter bons resultados e para
um consumo razoável
de energia.
Para evitar o gotejamento do cesto superior para o cesto inferior, recomendamos que esvazie o cesto inferior antes
do cesto superior.
5. Carregar os cestos da máquina de lavar louça
Recomendação
Para a lavagem à máquina, os seguintes talheres/louça:
Atenção: Antes e depois de carregar os cestos da máquina
NOTA:
Retirar a louça
9
Page 79

O cesto superior foi concebido para conter louça mais
leve e delicada, tais como copos, chávenas de café e
chá e pires, bem como pratos, pequenas tigelas e
tachos pouco profundos (desde que não se encontrem
muito sujos). Posicione a louça e as panelas de modo
a que estas não se movam com o jato de água.
Recomenda-se que introduza objetos maiores, que são
mais difíceis de lavar, no cesto inferior: tachos, panelas,
tampas, pratos e tigelas, conforme apresentado na figura
abaixo. É preferível colocar os pratos e as tampas nas
divisórias adequadas, por forma a evitar o bloqueio da
rotação do braço aspersor superior.
Lembre-se que:
Os tachos, tigelas, etc. deverão ser sempre colocados virados para baixo.
Os tachos fundos deverão estar inclinados, por forma a permitir que a água saia.
O cesto inferior possui filas de dentes que abrem de modo a permitir introduzir mais ou maiores tachos e panelas.
Levantar prateleira para chávenas
Para encaixar melhor os tachos e frigideiras, as filas
de dentes podem ser levantadas, conforme
apresentado na figura à direita.
Baixar fileiras de dentes cesto inferior
Para encaixar melhor os tachos e frigideiras, as filas de dentes
podem ser baixadas, conforme apresentado na figura abaixo.
Os talheres devem ser colocados no cesto com os cabos para baixo. Se a prateleira possuir cestos laterais, as colheres devem
ser colocadas individualmente, nas ranhuras apropriadas, especialmente, os utensílios grandes devem ser colocados
horizontalmente, na parte anterior do cesto superior, conforme apresentado na figura.
O método para carregar louça normal
Carregar o cesto superior
Carregar o cesto inferior
INTRODUZIR
INTRODUZIR
Cesto para talheres
Para a segurança pessoal e uma limpeza de qualidade, coloque os talheres no cesto,
assegurando-se de que:
Um objeto não fique encaixado no outro.
Os talheres fiquem com os cabos para baixo.
Colocou as facas e outros utensílios potencialmente perigosos com os cabos para
cima.
10
ATENÇÃO!
Não deixe que nenhum objeto se deposite no fundo.
Sempre coloque os objetos cortantes com a ponta
afiada para baixo.
A altura do cesto superior pode ser ajustada,
colocando rodas de alturas diferentes nas calhas.
Utensílios longos, talheres para servir, talheres para
salada ou facas, devem ser colocados na prateleira de
forma a que não obstruam a rotação dos aspersores.
A prateleira pode ser dobrada para trás ou removida
quando não for necessário utilizá-la.
Ajustar o cesto superior
Page 80

( )
Indica que
é necessário carregar o dispensador de abrilhantador.
*EN
50242: Este programa é o ciclo de ensaio. Indicações sobre o ensaio de
comparabilidade segundo a norma EN 50242:
Capacidade: 1 pessoas 2
Posição do cesto superior: rodas superiores sobre calhas
Posições de abrilhantador: 6
PI: 0,4 9 W; PO: 0,4 5 W.
NOTA:
Programa
Informações acerca do ciclo
selecionado
Detergente
Pré/princi-
pal
Tempo
funciona
-
mento (min)
Energi
a
(Kwh)
Água
(l)
Abrilhan-
tador
6. Iniciar um programa de lavagem
Tabela de ciclo de lavagem
NOTA:
Ligar o aparelho
11
Descrição do
ciclo
Pré -lavagem (50℃)
Lavagem (60℃)
Intensivo
Normal
Para cargas com sujidade normal,
tais como panelas, pratos, copos e
caç arolas pouco sujas.
Este é o programa padrã o, adequado
para utensílios com sujidade normal e é
o programa mais eficaz em termos de
consumo combinado de energia e á gua
para esse tipo de louç a.
Enxag.
Enxag.
En xag . ( ℃ )
Secagem
Pré -lavagem (45℃)
Lavagem (55℃)
Enxag.
Enxag. (65℃ )
Secagem
170
18 0
190
1, 6
18,5
1,3
1
0, 96
1
Rá pido
Um ciclo mais curto para cargas com
pouca sujidade e lavagem rá pida.
Lavagem (4 ℃)
Enxag.
Enxag. ( 5℃ )
25 g
0,75 11
Para louç as com maior sujidade, e
tachos, frigideiras, travessas, etc.
com sujidade normal, mas que
tenham alimentos secos agarrados.
(*EN50242)
Pré -lavagem
Lavagem ( ℃)
Enxag. (6
℃)
Secagem
5
5
5/25g
5/25g
5/25g
Iniciar ciclo de Lavagem
Tire os cestos, coloque a louça e volte a colocar cestos na máquina. Recomendamos que coloque primeiro a louça
no cesto inferior e só depois o superior (Vêr capítulo “Colocar cestos na Máquina”)
Coloque detergentes (Vêr capítulos “Colocar Sal, Abrilhantador e Detergente)
Insira ficha na tomada electrica. A alimentação eléctrica é de 220-240 VAC/50 HZ, especificação da tomada é 10A
250VAC. Verifique que a torneira da água estão com pressão máxima.
Abra a porta, pressione botão On/Off
Pressione botão de programas para selecionar progrma de lavagem Sequência de programas:
Intensiv ->Normal->E -> ->
;
Ao selecionar programa acende luz indicadora respectiva. Feche a porta e a máquina de lavar louça
arranca.
1.
2.
3.
4.
5.
o CO 90 Min
Rá pido
Lavagem (65℃)
Enxag. (6 5℃)
Secagem
g
90
1,135
2,5
Para loiça com leve sujidade
que não necessi ta de uma
secagem com excelente
eficiência
90 Min
Enxag.
4
5
5
1,5
5
70
( ℃) 50
30
1 ou 2 peças
1 peças
1 ou 2 peças
1 ou 2 peças
30
Page 81

Poderá adicionar louça a qualquer altura antes de a gaveta do detergente abrir.
1
Prima o botão Arranque/Pausa para interromper a lavagem.
2
Abra um pouco a porta.
3
Depois que os braços aspersores pararem de trabalhar,
pode abrir a porta completamente.
4
Coloque a louça esquecida.
5
Feche a porta.
6
Prima o botão Arranque/Pausa, a máquina iniciará o
funcionamento novamente após 10 segundos.
Quando o ciclo de lavagem termina, soa um sinal sonoro durante 8 segundos e a máquina para. Desligue o aparelho
com o botão ON/OFF, desligue o fornecimento de água e abra a porta da máquina.
Aguarde alguns minutos antes de retirar a louça, pois ainda está quente sendo mais suscetível a quebras. Isso permite
também que a louça seque melhor.
Desligar a máquina de lavar louça
O programa estará terminado quando a luz indicadora estiver acesa, mas não estiver a piscar.
1. Desligue a máquina de lavar louça pressionando o botão ON/OFF.
2. Feche a torneira da água!
Abra a porta com cuidado
A louça quente é sensível a quebras. Portanto, deverá deixar que a louça arrefeça durante 15 minutos antes de a
retirar da máquina.
Abra a porta da máquina, deixe-a entreaberta e aguarde alguns minutos antes de retirar a louça. Deste modo,
a louça arrefecerá e os resultados de secagem serão melhores.
Retirar a louça
É normal que a máquina esteja molhada no interior.
Esvazie primeiro o cesto inferior e depois o superior. Isto evitará que as gotas de água do cesto superior molhem
a louça do cesto inferior.
No final do ciclo de lavagem
Mudar um programa...
Esqueceu uma louça?
12
ATENÇÃO! É perigoso abrir a porta no processo
de limpeza, existe o risco de queimar-se.
Atenção:
Se abrir a porta, a máquina interrompe lavagem.O indicador
luminoso do programa começa a piscar e ouvirá um alerta sonoro que apenas pára após fechar a porta.
Lavagem recomeça dentro de 10 segundos
Só é possível alterar um programa de lavagem caso tenha inicidado á pouco tempo, pois o detergente pode já ter
sido libertado e a água da lavagem drenada. Neste caso, deverá repor detergente no compartimento do detergente
( Vêr capítulo “Colocar Detergente”)
Pressione On/Off para efectuar paragem da lavagem, E volte a pressionar para reiniciar e definir novo programa
( Vêr capítulo “Iniciar novo ciclo de lavagem”
1
2
Page 82

O filtro previne que resíduos grandes de alimentos ou outros objetos entrem no interior da
bomba. Os resíduos podem bloquear o filtro, devendo por isso serem removidos.
2
1
3
Conjunto de filtragem
O sistema de filtragem é composto por um filtro largo, um filtro
plano (filtro principal) e um microfiltro (filtro fino).
Filtro principal
1
As partículas de comida e sujidade retidas por este filtro são pulverizadas
por um jato especial no braço aspersor inferior e escoadas pelo tubo.
Filtro largo
2
As partículas maiores, tais como bocados de osso ou vidro, que
poderão obstruir o tubo, são retidas por este filtro largo. Para retirar
as referidas partículas, pressione suavemente as pontas na parte
superior do filtro e retire-o.
Filtro fino
3
Este filtro retém resíduos de comida e sujidade na área de descarga e
evita que voltem a depositar-se na louça, durante a lavagem.
O filtro remove eficazmente os resíduos de comida da água de lavagem, permitindo que esta seja reciclada durante
o ciclo. Para melhores desempenhos e resultados, o filtro deverá ser limpo regularmente. Por este motivo, deve
retirar os resíduos maiores dos alimentos presos no filtro após cada ciclo de lavagem, enxaguando o filtro semicircular
e o copo, passando-os por água corrente. Para remover o dispositivo de filtragem, puxe a pega do copo para cima.
A máquina de lavar louça nunca deverá ser utilizada sem os filtros.
A colocação incorreta do filtro poderá reduzir o nível de desempenho da máquina e danificar
a louça e utensílios.
Passo 1: Rode o filtro no sentido inverso aos ponteiros do relógio.
Passo 2: Levante o conjunto de filtragem.
Siga este procedimento, do passo 1 ao passo 2, para remover o sistema de filtragem;
siga este procedimento, do passo 2 ao passo 1, para colocar o sistema de filtragem.
NOTA:
7. Manutenção e limpeza
Sistema de filtragem
ADVERTÊNCIA!
13
1
2
Page 83

Observações:
- Verifique se os filtros não estão obstruídos após cada utilização da máquina.
- Desaperte o filtro grosso para retirar o sistema do filtro. Retire eventuais restos de comida e
lave os filtros sob água corrente.
O conjunto do filtro deve ser limpo uma vez por semana.
Limpar o filtro
Utilize uma escova para limpar o filtro largo e o filtro fino. Volte a montar as peças do filtro como apresentado nas imagens
da última página e coloque o conjunto todo na máquina, colocando-o no respetivo lugar e empurrando-o para baixo.
Não golpeie os filtros ao limpá-los, caso contrario poderá danificá-los
comprometendo o desempenho da máquina.
Para limpar o painel de controlo, utilize um pano ligeiramente húmido. Em seguida, seque-o completamente.
Para limpar o exterior, utilize uma boa cera de polimento para aparelhos.
Nunca utilize objetos pontiagudos, materiais de polimento ou produtos de limpeza ásperos em qualquer parte da máquina.
Limpar a porta
Utilize apenas um pano macio humedecido em água morna para limpar a bordada porta.
Para evitar que a água entre no bloqueio da porta e nos componentes elétricos, não
utilize sprays de limpeza.
Nunca utilize sprays de limpeza para limpar o painel da porta, uma vez que poderá
danificar o bloqueio da porta e os componentes elétricos.
Não deverá utilizar agentes abrasivos ou alguns tipos de papel de cozinha, uma vez que
poderá riscar
ou deixar manchas na superfície do aço inoxidável.
Proteger contra o frio
Tome medidas de proteção contra o frio durante o inverno. Depois de cada ciclo de lavagem, proceda da
seguinte maneira:
1. Corte a energia elétrica da sua máquina.
2. Feche a rede de água e retire o tubo de admissão de água da válvula de água.
3. Retire a água do tubo de admissão e da válvula de água (utilize uma panela para recolher a água).
4. Ligue novamente o tubo de admissão de água à válvula de água.
5. Retire o filtro na parte inferior da cuba e utilize uma esponja para absorver a água na cobertura de borracha.
Se a máquina de lavar louça não funcionar por
causa do gelo, contacte a assistência técnica.
Limpar os braços aspersores
Os braços aspersores necessitam de ser limpos regularmente, uma vez que
os químicos da água dura irão obstruir os jatos do braço aspersor e os rolamentos.
Para retirar o braço aspersor superior, segure a porca, rode o
braço no sentido dos ponteiros do relógio e remova-o.
Para remover o braço aspersor inferior, puxe-o para cima.
Lave os braços com sabão e água tépida e utilize uma escova macia
para limpar os jatos. Volte a colocá-los depois de os enxaguar
completamente.
NOTA:
NOTA:
ADVERTÊNCIA!
Cuidados com a máquina de lavar louça
ADVERTÊNCIA!
14
Abrir
Page 84

Depois de cada lavagem Quando se ausentar por longos períodos
Depois de cada lavagem, feche a torneira da água
e deixe a porta ligeiramente aberta, por forma que
humidade e odores não fiquem presos no
interior.
Remova a ficha
Antes de limpar ou realizar alguma manutenção na
máquina, retire sempre a ficha da tomada elétrica.
Não utilize solventes ou produtos de
limpeza abrasivos
Para limpar o exterior e partes em borracha da máquina,
não utilize solventes nem produtos de limpeza abrasivos.
Utilize somente um pano e uma solução de água morna
com um pouco de sabão. Para remover manchas da
superfície interior, utilize um pano humedecido com água e
um pouco de vinagre, ou um produto de limpeza feito
especialmente para máquinas de lavar louça.
É recomendável que coloque a máquina a funcionar
vazia, e depois, desligue a ficha da tomada
elétrica, feche a rede de alimentação de água e deixe a
porta ligeiramente aberta. Isto irá ajudar a prolongar a vida
útil dos vedantes e a evitar a formação de odores.
Mover o aparelho
Se tiver de mover o aparelho, procure mantê-lo em
posição vertical. Se for absolutamente necessário, ele
pode ser posicionado apoiado sobre a parte posterior.
Vedantes
Um dos fatores que provoca a formação de nas
máquinas de lavar louça é
a comida que permanece retida nos vedantes.
Para evitar a formação de odores, recomenda-se que os
limpe periodicamente com uma esponja húmida.
Como manter a sua máquina de lavar louça em boas condições
15
Page 85

8. INTRUÇÕES DE INSTALAÇÃO
ATENÇÃO!
A instalação da ligação
elétrica e dos tubos de
água deve ser
realizada por
profissionais
Leia atentamente as instruções de instalação
Desenhos de encastre e posicionamento da máquina de lavar lou ça
1. A preparação deve ser realizada antes de colocar a máquina
Selecione um local perto do lava-louças para facilitar as conexões de água (entrada de água e
descarga) (ver figura 1)
2. Se a máquina ficar instalada num canto, deve deixar espaço livre para a abertura da porta (ver figura
2)
Figura 1
Dimensões do móvel
Figura 2
Espaço mínimo com a porta aberta
PERIGO
Perigo de choque elétrico
Desligue a corrente elétrica
antes de instalar a máquina
de lavar louça.
Se não o fizer pode resultar
em choque elétrico e
consequentemente a morte.
16
Page 86

Dimensões e instalação da porta do móvel
1. A porta do móv el deve ser feita de acordo com as medidas indicadas na figura 3
Figura 3
Medidas da porta do móvel (em mm)
2. Instale os suportes na porta do móvel e encaixe-os nas ranhuras da porta da máquina de lavar louça (ver figura
4). Após colocar a porta do móvel sobre a porta da máquina de lavar louça, fixe com os parafusos fornecidos
(figura 4b).
Figura 4a
Instalação da porta do móvel
17
Page 87

Figura 4b
Instalação da porta do móvel
1. Retireos4parafusos
2. Introduzaosparafusolongos
REGULAÇÃO DAS MOLAS DA PORTA
As molas da porta da máquina de lavar louça estão reguladas de fábrica com a tensão adequada.
Quando instalar a porta do móvel é necessário regular a tensão destas molas. Rode o parafuso de regu lação para
aumentar ou reduzir a tensão do cabo de aço (ver figura 5).
A tensão da mola da porta da máquina
de lavar louça é correta quando a porta
permanece horizontal na posição de completamente
aberta, e se fecha com um leve impulso
de um dedo
.
Figura 5
Regulação da tensão da mola da porta da máquina de lavar louça
18
Page 88

Ligação do tubo de descarga
Insira o tubo de descarga num tubo de esgoto com um diâmetro mínimo de 4 cm ou deixe-o a escoar para um lava-louças
assegurando-se de que o tubo não está dobrado. Utilize o suporte especial fornecido com o aparelho. A parte final do
tubo de descarga deve estar a uma altura de entre 40 cm e 100 cm. A parte final do tubo não deve submergir em ág ua,
caso contrário pode ocorrer que a água regresse novamente à máquina d e lavar louça.
Para instalar a máquina:
1- Instale a porta do móvel sobre a porta da máquina seguindo as instruções indicadas anteriormente.
2- Regule a tensão das molas da porta da máquina utilizando uma chave Allen rodand o no sentido dos ponteiros do
relógio para aumentar a tensão nas molas esquerda e direita. Se não fizer isto corretamente pode danificar a máquina de
lavar louça (figura 2).
3- Ligue o tubo de alimentação da máquina a uma entrada de água.
4-Ligue o tubo de descarga (ver a figura 6).
5- Ligue o cabo de alimentação à tomada.
6- Fixe a fita de condensação por baixo da superfície do tampo. Por favor, assegure-se de que a fita de condensação fica
alinhada com o bordo do tampo.
7- Coloque a máquina de lavar louça em posição (figura 4).
8- Regulação do nível da máquina. Os pés traseiros podem ser regulados a partir da frente da máquina de lavar louça
rodando os parafusos situados à direita e à esquerda (ver figura 5A). Para regular os pés frontais utilize uma chav e de
parafusos plano e rode cada pé frontal até que a máquina fique perfeitamente nivelada (figura 5B).
9- A máquina deve estar numa posição segura. Pode fazê-lo de duas formas:
A Tampo normal: Coloque os suportes nos orifícios laterais e fixe-os com os parafusos próprios para madeira
(Figura 6).
B. Tampo de mármore ou granito: Fixe as laterais com os parafusos (Figura 7).
19
Page 89

A máquina deve estar nivelada para que o manuseio dos cestos e eficiênci a de lavagem sejam ótimos.
1- Coloque um nível sobre a porta e no interior da cuba da má quina de lavar louça para verificar que está
perfeitamente nivelada.
2- Regule a máquina de lavar louça ajustando individualmente os pés.
3- Ao nivelar a máquina de lavar louça tenha em atenção de que esta não fica demasiado inclinada e caia.
Figura 8
Regulação dos pés da máquina de lavar louça
NOTA: A altura máxima é de 50mm
20
Figura 7
Niv elar la do a lado
Aju ste nív el da fre nte
par a trás
Page 90

Ligação elétrica
Requisitos elétricos
Por favor verifique a placa de características do aparelho para saber a tensão e ligue a máquina a uma alimentação
elétrica apropriada. Utilize fusíveis de 10 A, ou diferenciais recomendados, providenciando um circuito separado para a
máquina.
Ligação elétrica
Assegure-se de que a tensão e a frequência da instalação
correspondem à placa de características da máquina de lavar louça.
Ligue apenas a uma tomada com terra. Se a tomada não for
adequada, substitua- a, uma vez que pode sobreaquecer e arder.
Assegure-se de que
a instalação está
corretamente ligada
à terra
21
Para sua segur ança:
Nãoutilizeextensõesou adaptadoresp ara a
ligação elétrica à tomada
Sob nenhuma circunstância, corte our etirea
ligação à terra do c abode ali mentação
ATENÇÃO!
Por fav or,fechea á gua ap ós au tilização.
Ligue a mangueirade abas tecimento deágu a fria atravésde umconector
roscado com 3/4de p olegadas e certifique-se que ficab em apert ada.
Se os tubosde águaf orem novos ounão tiverem sidoutilizados durante
um lon go período de tempo, d eixe aágua passar,para se certificar deque
aáguaestálimpa.Estaprecauçãoénecessáriaparaevitaroriscoda
entrad a e águaficar bloqueada edanific ar o electrodomés tico.
Page 91

Posicionar a máquina de lavar louça
Posicione a máquina de lavar louça no local desejado. A parte traseira da máquina deve encostar à parede traseira, e os
laterais encostar ao longo dos móveis adjacentes. A máquina está equipada com tubos de entrada de água e de
descarga que podem ser colocados quer à direita quer à esquerda para facilitar a instalação.
Como retirar o excesso de água do tubo
Se o lavatório ou o lava-louças tem mais de 1000mm de altura do solo, a água que permanecer no tubo não poderá ser
escoada diretamente para o lavatório ou lava-louças. Será necessário utili z ar um recipiente que esteja colocado fora do
lava-louças e que esteja situado abaixo deste.
Ligação da descarga
Ligue o tubo de descarga, o qual deve estar corretamente ajustado para evitar fugas. Assegure-se de que o tubo de
descarga não está torcido ou apertado.
Extensão do tubo
Caso necessite de uma extensão do tubo de descarga, utilize um similar ao fornecido. Nunca deve ser superior a 4
metros, caso contrário o resultado do processo de limpeza pode ser afetado.
Ligação ao sifão
A saída de água deve de estar a uma altura de entre 40 cm (mínimo) e 100cm (máximo) desde da base da máquina de
lavar louça. O tubo deve estar ajustado e fixo. A extremidade livre do tubo não deve submergir-se em água.
Iniciar a utilização da máquina de lavar louça
Verifique os seguintes pontos antes de utilizar a máquina de lavar louça:
1. A máquina de lavar louça está nivelada e fixa
2. A entrada de água está aberta
3. Não há fugas nas conexões de água
4. O cabo elétrico está corretamente li gado
5. Há energia elétrica
6. Os tubos de entrada de água não estão torcidos nem comprimidos
7. Todos os materiais de embalagem e do material impresso foram retirados da máquina de lavar louça
1
ATENÇÃO!
Após a instalação assegure-se de que guarda este manual
O conteúdo deste manual é de grande utilidade para o
utilizador
22
Page 92

Problemas
técnicos
O fusível está queimado ou
o disjuntor foi acionado
A fonte de alimentaç ã o nã o
foi ligada
Baixa pressã o da á gua
Porta da má quina nã o
fechada corretamente.
Dobra no tubo de descarga
Filtro entupido
Lava-louç as entupido
Detergente inadequado
Substitua o fusível ou reinicie o disjuntor. Desligue qualquer outro
aparelho que partilhe o mesmo circuito que a má quina.
Certifique-se de que ligou a má quina e que a porta se encontra
corretamente fechada.
Certifique-se de que o cabo de alimentaç ã o se encontra
corretamente ligado à tomada elé trica.
Verifique se a rede de alimentaç ã o de á gua se encontra
convenientemente aberta e a á gua está ligada.
Certifique-se de fechar corretamente a porta e o trinco.
Verifique o tubo de descarga.
Verifique o filtro largo.
(consulte o capítulo « Limpar o filtro» ).
Verifique se o lava-louç as está a escoar adequadamente. Se o problema
for o escoamento do lava-louç as, deve chamar um canalizador em vez
da assistê ncia té cnica para má quinas de lavar louç a.
Utilize apenas detergente especial para má quinas de lavar louç a para
evitar espuma. Caso isso ocorra, abra a má quina e deixe que a espuma
evaporar. Adicione cerca de 4 litros de á gua fria na cuba. Feche a
má quina e, em seguida, selecione qualquer ciclo. A má quina irá escoar
a á gua na primeira etapa. Abra a porta apó s o fim do escoamento da
á gua e verifique se a espuma desapareceu.
Repita, se necessá rio.
Abrilhantador derramado Sempre lave e limpe o abrilhantador derramado imediatamente.
Problemas
gerais
Foi utilizado detergente
com corantes
Minerais provenientes de
á gua dura
Os objetos afetados nã o
sã o resistentes à corrosã o.
Nenhum programa foi
iniciado depois da carga
de sal. Vestígios de sal
Certifique-se de que detergente nã o possui corantes.
Para limpar o interior, utilize uma esponja hú mida e
utilize luvas de borracha. Nunca utilize outro produto de
limpeza que nã o o detergente da má quina, correndo o
risco de provocar a formaç ã o de espuma.
Depois de adicionar sal, sempre efetue uma lavagem
rá pida sem nenhum objeto dentro da má quina de lavar
roupa e sem selecionar a funç ã o turbo (se houver).
durante a lavagem.
Ruído
A tampa do descalcificador
está solta
Um braç o aspersor
está a golpear um item
num cesto.
Algum objeto ficou
no compartimento de
lavagem
Isso pode ser provocado
por uma instalaç ã o no
local ou num corte
transversal dos tubos.
Verifique o vedante. Certifique-se de que a correç ã o está correta.
Interrompa o programa e reorganize a louç a que está a
obstruir o braç o aspersor.
Interrompa o programa
e reorganize as louç as.
Isso nã o tem nenhuma influê ncia sobre o funcionamento da
má quina. Em caso de dú vida, chame um canalizador
qualificado.
A leitura das páginas que se seguem pode evitar chamar a assistência técnica
A máquina de lavar
louça não arranca
Água não
bombeada da
máquina
Espuma na cuba
Interior da cuba
manchado
Filme branco na
superfície interna
Manchas de
oxidação nos
talheres
Ruído de batimento
no compartimento
Ruído crepitante no
compartimento
Ruído de batimento
nos tubos de água
9. Conselhos para a resolução de problemas
Antes de solicitar assistência técnica
Problema Causas possíveis Solução
23
Page 93

Resultados
de lavagem
insatisfatórios
Resultados
de secagem
insatisfatórios
A louç a nã o foi carregada
corretamente.
O programa nã o era forte
o suficiente.
Nã o foi dispensado
detergente o suficiente.
Alguns objetos bloqueiam
o movimento dos aspersores.
O conjunto de filtros na
base do compartimento de
lavagem nã o está limpo ou
nã o está corretamente
montado. Isso pode
bloquear os braç os
aspersores.
Combinaç ã o de á gua
macia e demasiado
detergente.
Utensílios de alumínio
em contacto com a louç a.
A louç a está a bloquear os
copos de detergente.
Carga incorreta
Pouco abrilhantador
A louç a foi retirada muito
rapidamente
Um programa errado
foi selecionado.
Talheres com revestimento
de baixa qualidade
Consulte as notas em « Carregar os cestos da má quina» .
Selecione um programa mais intensivo.
Consulte a « Tabela de ciclo de lavagem» .
Utilize mais detergente ou mude de detergente.
Reorganize os objetos para que os aspersores possam
Limpe e/ou monte o conjunto de filtros corretamente. Limpe
os jatos do braç o aspersor. Consulte « Limpar os braç os
aspersores» .
Utilize menos detergente se a á gua é macia e selecione o ciclo
mais curto para lavar objetos em vidro.
Utilize um produto de limpeza pouco abrasivo para limpar essas
marcas.
Reorganize a louç a corretamente.
Carregue a má quina de acordo com as instruç õ es sugeridas.
Aumente a quantidade de abrilhantador/encha o dispensador de
abrilhantador.
Nã o retire a louç a imediatamente depois da lavagem. Abra
ligeiramente a porta, para que o vapor escape.
Comece a retirar a louç a apenas quando já estiver té pida ao
toque. Esvazie o cesto inferior primeiro. Isso evitará o
gotejamento da louç a depositada no cesto superior.
No programa curto, a temperatura de lavagem é també m
inferior. Isso també m diminui o desempenho de limpeza.
Escolha um programa mais longo.
O escoamento da á gua é mais difícil para esses objetos.
Os talheres e louças desse tipo nã o sã o adaptados para a
lavagem à má quina.
Quando forem detetadas anomalias, o aparelho mostrará códigos de erros para o prevenir:
A louça não está
limpa
Detergente nos
A louça não seca
Vidros turvos
Marcas negras ou
cinzentas na louça
copos dispensadores
rodar livremente.
Problema Causas possíveis Solução
Códigos de erros
Se ocorrer um alagamento, feche a rede de alimentação de água principal antes de
solicitar qualquer tipo de assistência.
No caso de existir água na base da cuba devido a um alagamento ou a uma
pequena fuga de água, deverá removaa água antes de ligar novamente a máquina.
ADVERTÊNCIA!
24
Inundação.
Código
Descrição
Causa Possivel
Longa duração.
Baixa pressão de água, pouca entrada de água,
torneira da água fechada.
Fuga em algum elemento na máquina .
Sinal Luminoso Rapid
Sinal Luminoso ECO
Page 94

Altura: 815 mm
Largura: 5 98 mm
Profundidade: 0 mm
(com a porta fechada)
55
Pressão da água:
0,04- 1,0 M Pa
Alimentação elétrica:
consulte a placa sinalética
Capacidade:
1 pessoas
2
Informações técnicas
25
5
9
8
5
9
8
815815
1
1
5
0
1
1
5
0
(
w
it
h
t
h
e
do
o
r
c
lo
s
e
d
)
5
5
0
(
)
5
5
0
w
it
h
t
h
e
d
o
o
r
c
lo
s
e
d
Page 95

Folha de máquina de lavar louça doméstica de acordo com as Diretivas UE 1059/2010:
Fabricante
Tipo / descrição
Serviços individuais padrão
Classe de eficiência de energia
Consumo de energia anual
Consumo de energia do ciclo de limpeza padrão
Consumo de energia em modo OFF
Consumo de energia em modo ON
Consumo de água anual
Classe de eficiência de secagem
Ciclo de limpeza padrão
Duração do programa do ciclo de limpeza padrão
Nível de ruído
Montagem
FAGOR
12
A+
273 k Wh
0,96 kWh
0,45 W
0,49 W
3220 litros
A
ECO 45 ℃
190 m in
49 dB (A) re 1 pW
Pode ser embutido
Sim
Altura
Largura
Profundidade (com conectores)
Consumo de energia
Tensão nominal / frequência
Pressão da água (fluxo)
81 ,5 cm
59 ,8 cm
,0 cm 55
1 0-2 00 W 76 1
220-24 0 V ~ 50 Hz
0,4-1 0 bars = 0 ,04 - 1 MP a
A + + + (mais alta eficiência ) a D (mais baixa eficiência).
Consumo de energia de 273 kWh por ano, com base em 280 ciclos de limpeza padrão com água fria e
baixo consumo. O consumo de energia real irá depender de como esse aparelho for utilizado.
Consumo de água de 0 litros ao ano, com base em 280 ciclos de limpeza padrão. O consumo de água real irá
depender de como esse aparelho for utilizado.
322
A (mais alta eficiência) a G (mais baixa eficiência).
Este programa é adequado para a limpeza de utensílios de mesa com carga normal de
sujidade e é o programa mais eficaz em termos de consumo combinado de energia e água
para esse tipo de utensílio de mesa.
O dispositivo responde às normas europeias e às diretivas em vigor no momento da entrega:
- LVD 2 006 /9 5/EC
- EMC 2 004 /1 08/E C
- E P 200 9/125 /EC r
Os valores acima foram medidos segundo as normas em condições de funcionamento específicas. Os resultados
podem variar muito de acordo com a quantidade e a carga de sujidade da louça, a dureza da água, a
quantidade de detergente, etc.
O manual baseia-se nas normas e regras da União Europeia.
26
Dados Técnicos
NOTA:
LVF63ITB
Encastre
Page 96

11
22
11
22 22 22
11
22
1 1
55 55 55
55 55 55
55 55 55
55 55 55
33 33 33 33
11
11
11
22
11
22 22 22
11
22
11
44 44 44 44 44 44
88 77 33 33
33
66
44 44 44 44 44 44
22
22
11
33 11
33
33
66
33 33
11
33
11
44
55
66
22
22
11
33
11
88
77
77
77
99
1010
77
H3
Page 97

LV (771 )F3F63ITB
FAGOR_20160613
Portuguese user manual
Page 98

Mode d'emploi
12 couverts
LVF63ITB
Page 99

Lisez ce manuel
Cher Client,
Veuillez lire ce manuel avec attention avant d’utiliser
ce lave-vaisselle, il vous aidera à l’utiliser et à
l’entretenir correctement.
Veuillez le conserver pour consultation ultérieure.
Le cas échéan t, fournissez-le au propriétaire suivant
de cet appareil.
Ce manuel contient des paragraphes concernant les
consignes de sécurité, les instructions de fonctionnement,
d’installation, de dépannage rapide, etc.
Avant d’appeler un
réparateur
En consultant la section de dépannage rapide, vous
pourrez trouver des solutions à quelques soucis
courants par vous-même.
Si vous ne trouvez pas de solution par vous-même,
veuillez alors vous adresser à un réparateur
professionnel.
REMARQUE :
Dans un souci constant d’amélioration et de mise
à jour du produit, le fabricant se réserve le droit
d’effectuer des modifications sans avis préalable.
1) Informations concernant la sécurité 1
2) 2
3) Fonctionnement 3
Panneau de Contrôle 3
Description du lave-vaisselle 3
4)
Avant la première utilisation
A. Adoucisseur d’eau 4
B. B. Remplissage du sel dans l’adoucisseur 5
C. Ajout du liquide de rinçage. 5
D. Fonction du détergent
Attention: avant et après
le chargement des paniers
Chargement du panier du haut 10
Chargement du panier du bas 10
Panier à couverts 10
6) Démarrer un programme de lavage
Tableau des cycles de lavage 11
Mettre en marche l’appareil 11
Changer le Programme 1
A la fin du cycle de lavage 12
Système de filtration 13
Entretien du lave-vaisselle 14
A propos des branchements électriques
Alimentation en eau 22
Démarrer le lave-vaisselle 23
9)Guide de dépannage rapide
Avant d’appeler un réparateur
Codes d’erreur
Spécifications techniques 26
Chargement des paniers selon En50242
5)
9
4
Chargement des paniers
9
7)Entretien et nettoyage
7
2
11
13
Guide d’utilisation rapide
Panneaux décoratifs dimensions et installation
Raccordement des tuyaux d’arrivée et évacuation d’eau
Etapes d’installation du lave-vaisselle
16
1
1
1
6
7
9
20
21
24
24
25
Page 100

 Loading...