

Page 1
Using your oven
Instrucciones de uso de su horno
O guia de utilização do seu forno
Le guide d’utilisation de votre four
Bedienungsanleitung Dampfgarer
FR
EN
DE
ES
PT
5HV-440X
99636901_ML_A.qxd 18/04/05 09:50 Page 1
Page 2

Table of Contents
Edito p. 3
Steam cooking
Overview p. 4
What does your oven look like? p. 5
Accessories p. 6
How do you install your oven?
Electrical connection p. 7
Build-in p. 8
How do you program for immediate cooking? p. 9-10
Locking display p. 11
Water management p. 11
Cooking chart p. 12-13
How do you care for your oven? p. 14
Changing the bulbs p. 15
What to do in case of malfunctions? p. 15
2
99636901_ML_A.qxd 18/04/05 09:50 Page 2
Page 3

3
EN
Edito
Dear Customer,
You have just purchased a FAGOR oven and we would like to thank you.
Our research teams have designed a new generation of appliances with you in
mind so that you can fully live out your culinary talents and treat yourself every
day.
With its pure lines and modern appearance, your new FAGOR oven will harmoniously blend into your kitchen as a perfect union between easy use and top
cooking performance.
The FAGOR product range also offers a vast choice of ranges, hobs, ventilation
hoods, dish washers, microwave ovens and integrated fridges, which you can
coordinate with your new FAGOR oven.
As the universal cooking specialist, FAGOR contributes to culinary success, shared pleasures, and warm moments by providing you top-performance products
that are easy to use and respect the environment while being attractive and
reliable.
The FAGOR Brand.
99636901_ML_A.qxd 18/04/05 09:50 Page 3
Page 4

4
Steam cooking
Overview
Steam cooking presents nothing but advantages if you follow the instructions for use.
Healthy and natural, steam cooking preserves the full flavour of foods. A delicate sauce or
aromatic herb seasonings add that something extra that makes the difference.
This kind of cooking releases no odours. There is no need to season the cooking water with
herbs or spices; however, you can flavour fish by placing it on a bed of seaweed or make a
savoury poultry dish by adding a bunch of rosemary or tarragon.
You can simultaneously cook meat, fish and vegetables.
Steam cooking gently reheats pasta, rice and mashed potatoes with no risk of food sticking
or drying out.
It makes it easier to cook puddings, flans, rice pudding, etc. covered with aluminium foil,
the condensation water does not add moisture to the preparations.
There is no need to season before cooking--not even the steam water.
To make meat look more appetising, quickly brown it on all sides with hot butter in a pan.
Compared to boiling, steam offers nothing but advantages:
It is quick: cooking starts immediately, whereas for food in a water-filled dish, the cook time
only begins counting down once the water returns to a full boil.
It is healthy: vitamins (those that are water soluble) and minerals are well preserved
because they scarcely dissolve in the condensation water that touches the food.
Moreover, no fats are used for this type of cooking.
The steam maintains the taste of food. It does not add odours, nor the taste of the grill or
the pan. Furthermore, it takes nothing away because the food is not diluted in the water.
Words of advice: there is no point in using this cooking method to prepare fish that is not
fresh or vegetables left in the refrigerator for a week--the results are catastrophic!
The steam does not transfer flavours or aromas; therefore do not hesitate to save both time
and money by cooking items side by side, but without touching. For example, you can cook
fish next to a dessert.
Steam is also appropriate for blanching, reheating or even holding warm, especially sauces.
First use a very small amount of fat to heat meats like poultry, veal and pork so that they
take on an appetizing browned appearance. Then finish cooking them using the steam
method.
Cut into pieces, food cooks faster and more evenly than if left whole.
99636901_ML_A.qxd 18/04/05 09:50 Page 4
Page 5
5
EN
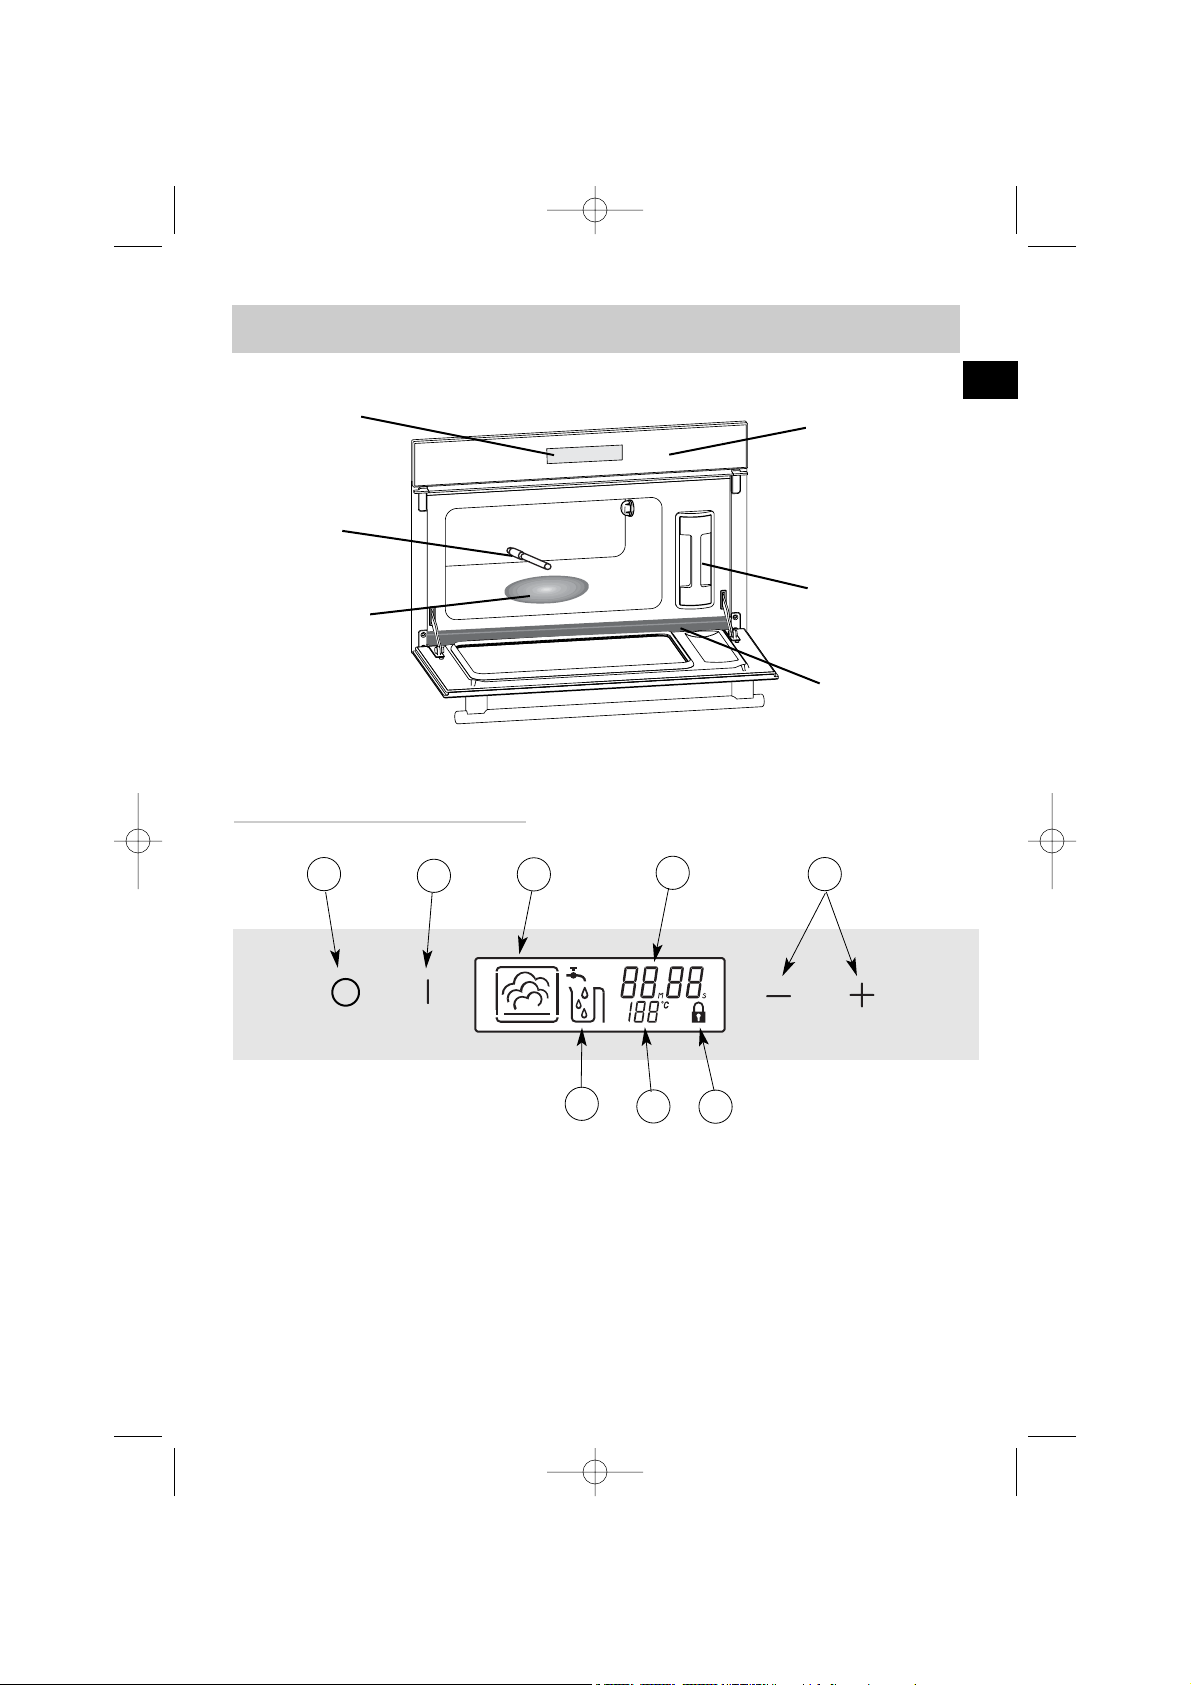
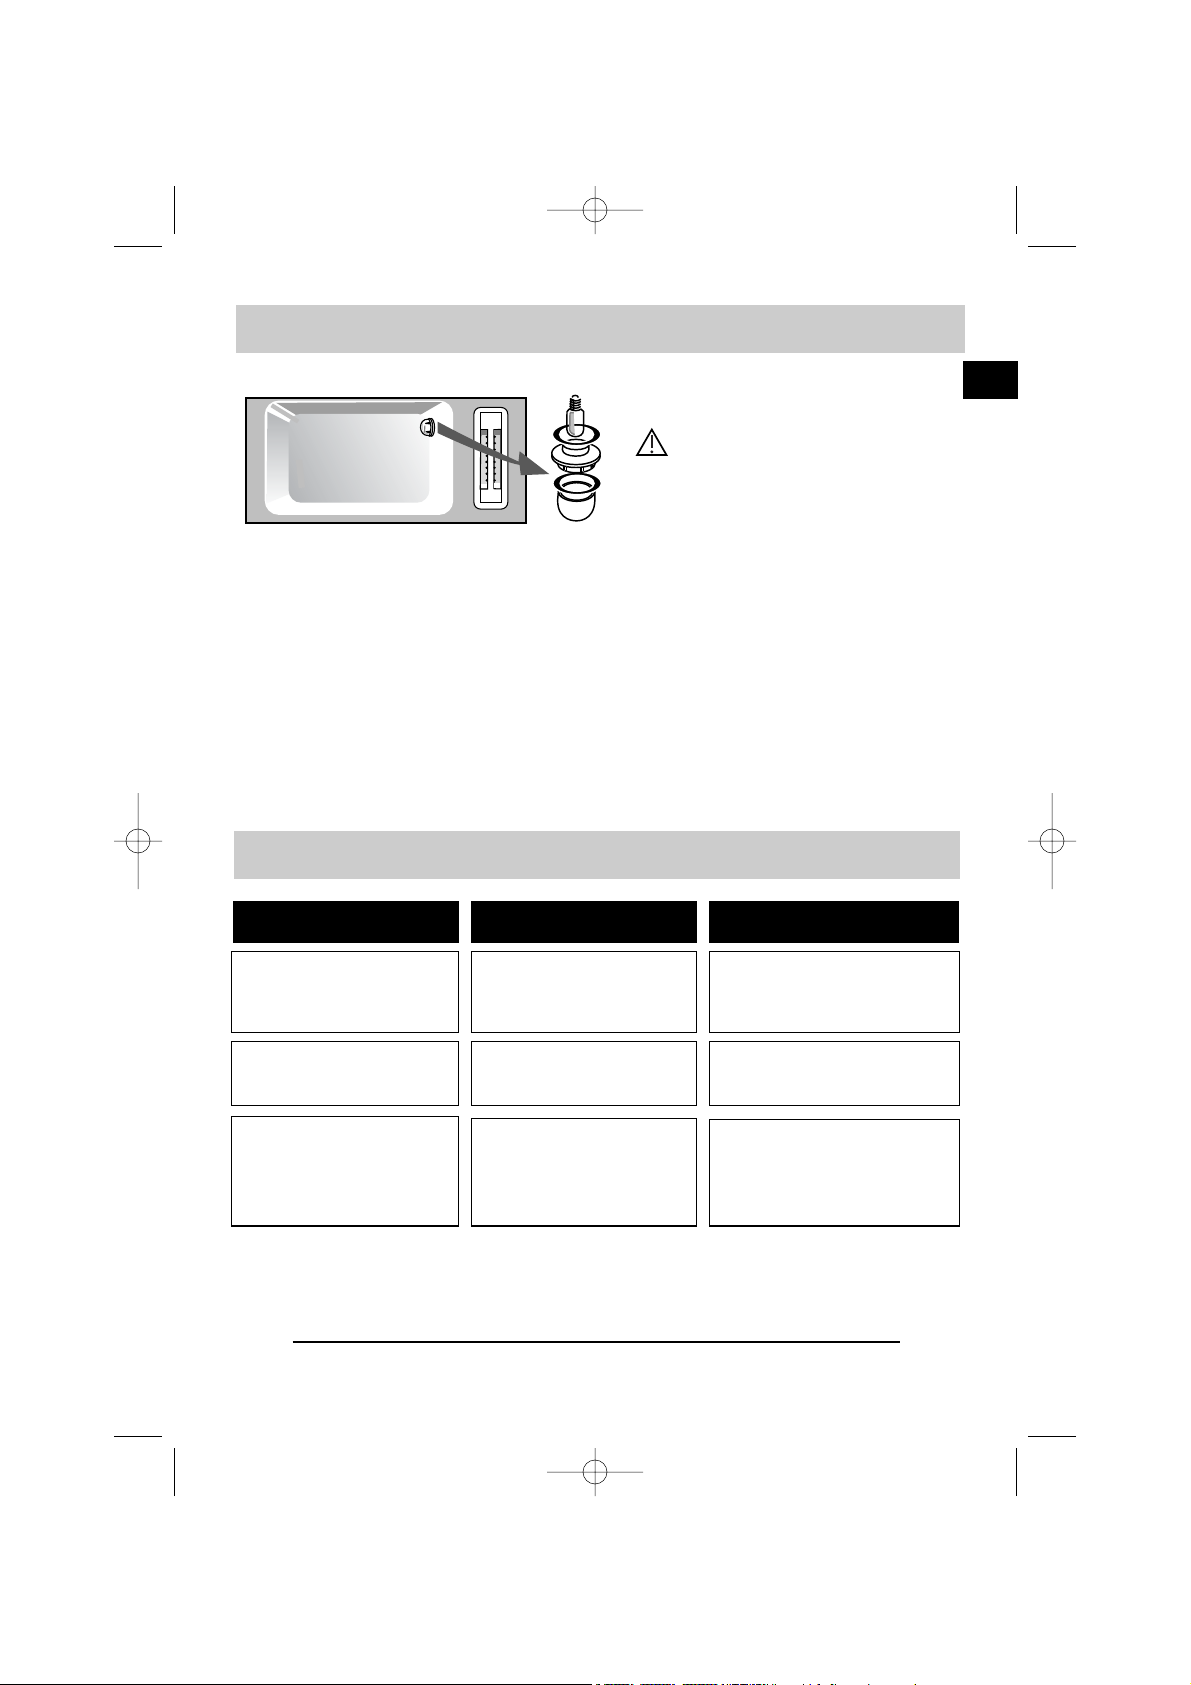
What does your oven look like?
Control
panel
Water
tank
Display
Steam gen-
erator
1. Off button
2. Start button
3. Steam cook symbol
4. Cook time display
5. + and - touch controls for time adjustment
6. Touch pad-locking mechanism
7. Temperature indicator
8. Water circuit problem indicator
1
2
3
5
8
Water
pipe
6
7
Close-up of control panel
Gutter
4
99636901_ML_A.qxd 18/04/05 09:50 Page 5
Page 6
6
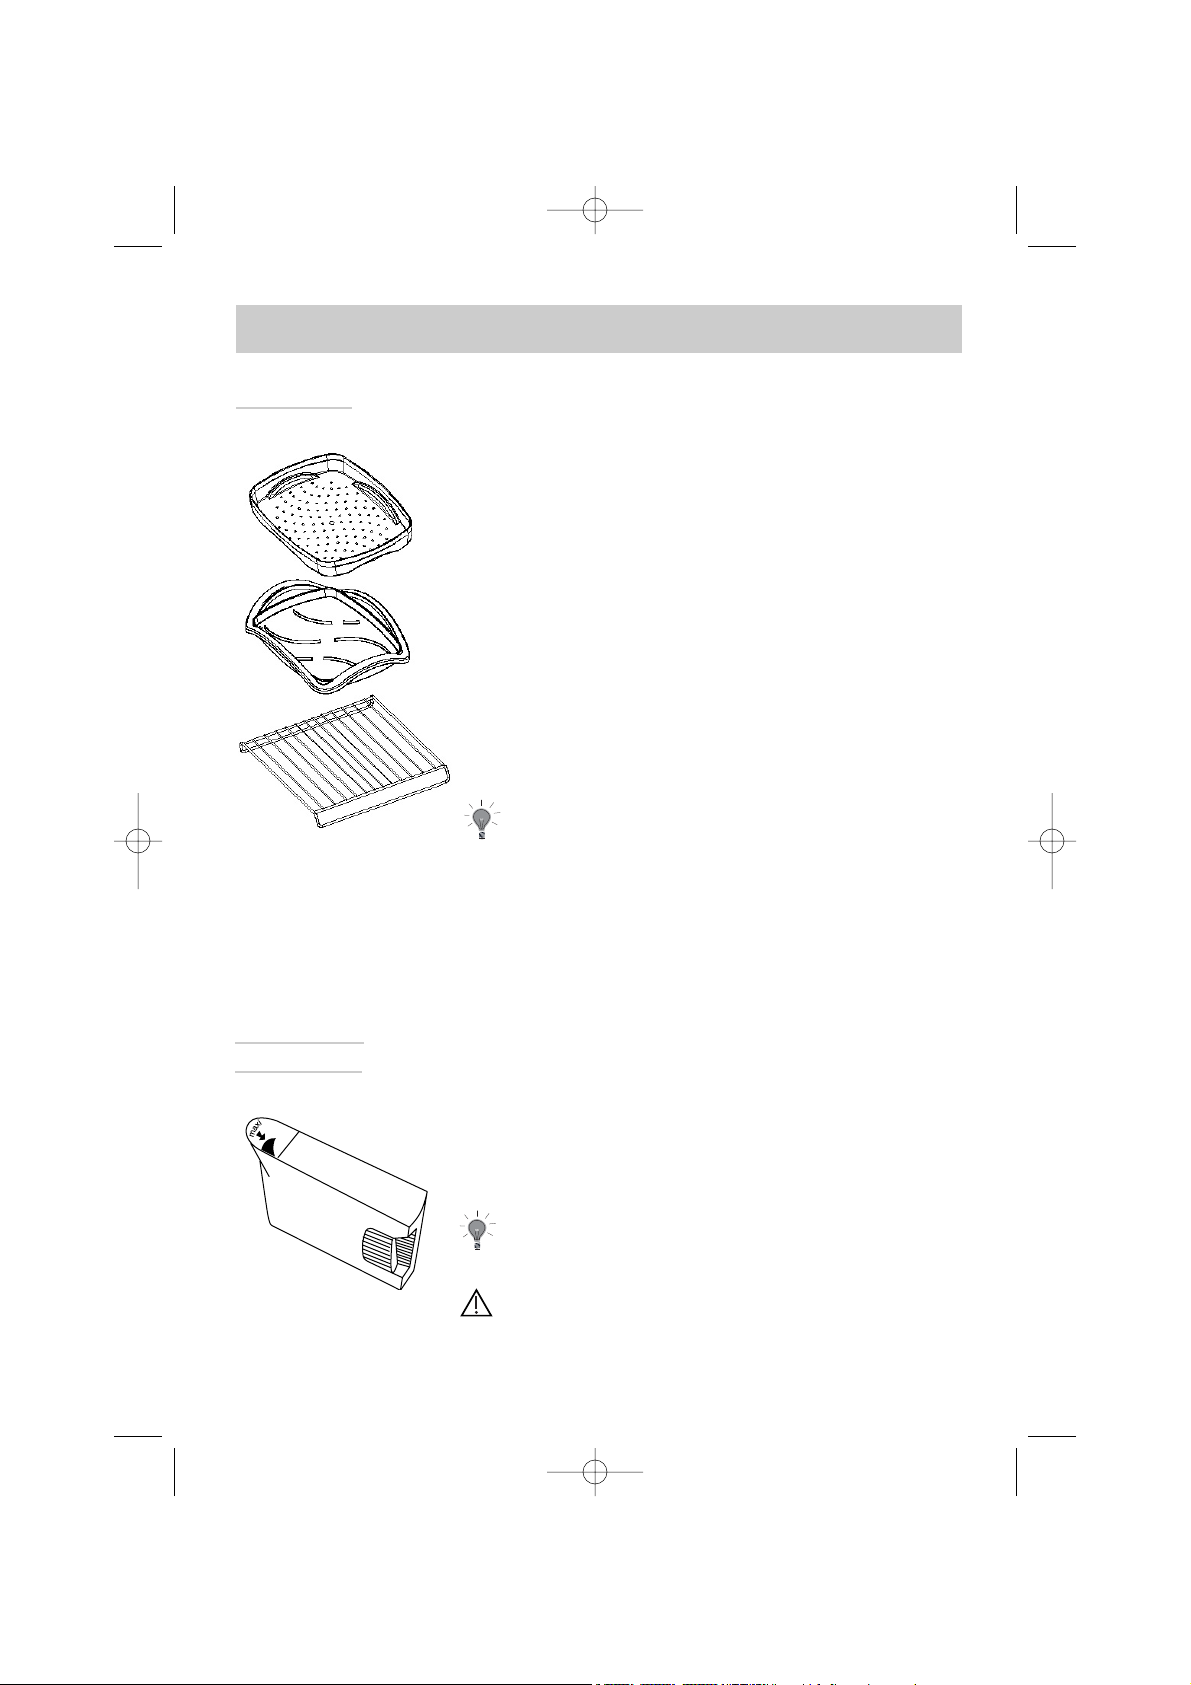
The water tank that allows for independent water supply to the oven.
Its capacity is approximately one litre (maximum level).
Pierced cooking dish to prevent contact between food
and the condensation water.
Drip tray that makes it possible to recover the condensation water.
Stainless steel removable support grid:
it must be placed in the oven.
Accessories
The cookware may be cleaned in the dishwasher.
Removable
water tank
Cookware
Using water with a low level of lime will make it
easier to care for your oven.
Using demineralised water is forbidden (not for
human consumption).
99636901_ML_A.qxd 18/04/05 09:50 Page 6
Page 7

7
EN
Electrical
connection
For permanent installation, be mindful to add a
standardised, compliant cut-off device in the electrical conduit. Otherwise the appliance must be
positioned so that the electrical outlet is accessible
after the unit has been built-in.
You must use an electrical receptacle that contains
a ground wire and is connected in compliance with
applicable safety standards.
Your electrical installation must be equipped with
10-ampere thermal-sensitive protection.
Do not operate the oven if the power cable or its
plug are damaged. In this case, they must be
replaced by the manufacturer, its After Sales
Service department of a person of similar qualifications so as to avoid any danger.
Operating voltage ......................................................... 220-240 V ~ 50 Hz
Total oven power .......................................................................... 1.77 kW
Energy consumption
- heating up to and holding at 100°C for one hour ......................... 0.71 kWh
Internal dimensions of your oven
Width .......................................................................................... 38.5 cm
Height ......................................................................................... 18.2 cm
Depth .......................................................................................... 33.5 cm
Net capacity ............................................................................. 23.5 litres
How do you install your oven?
99636901_ML_A.qxd 18/04/05 09:50 Page 7
Page 8
8
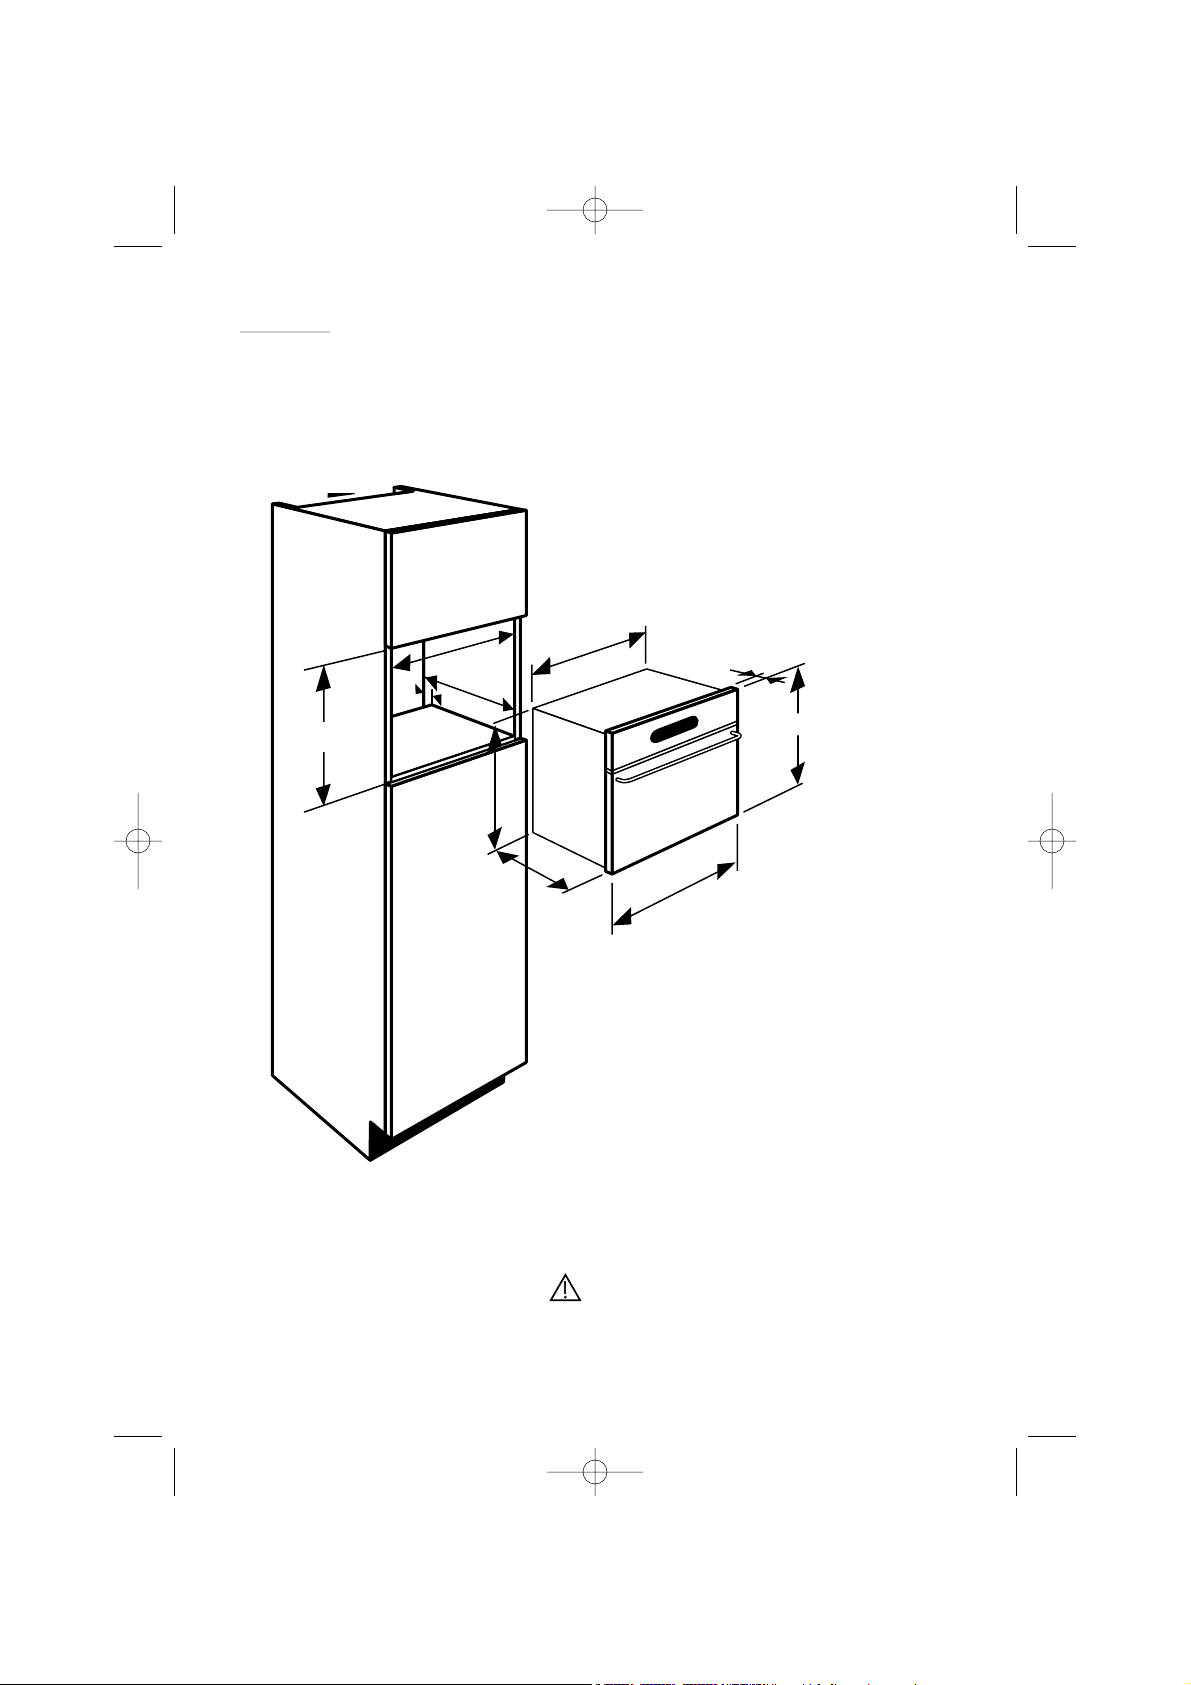
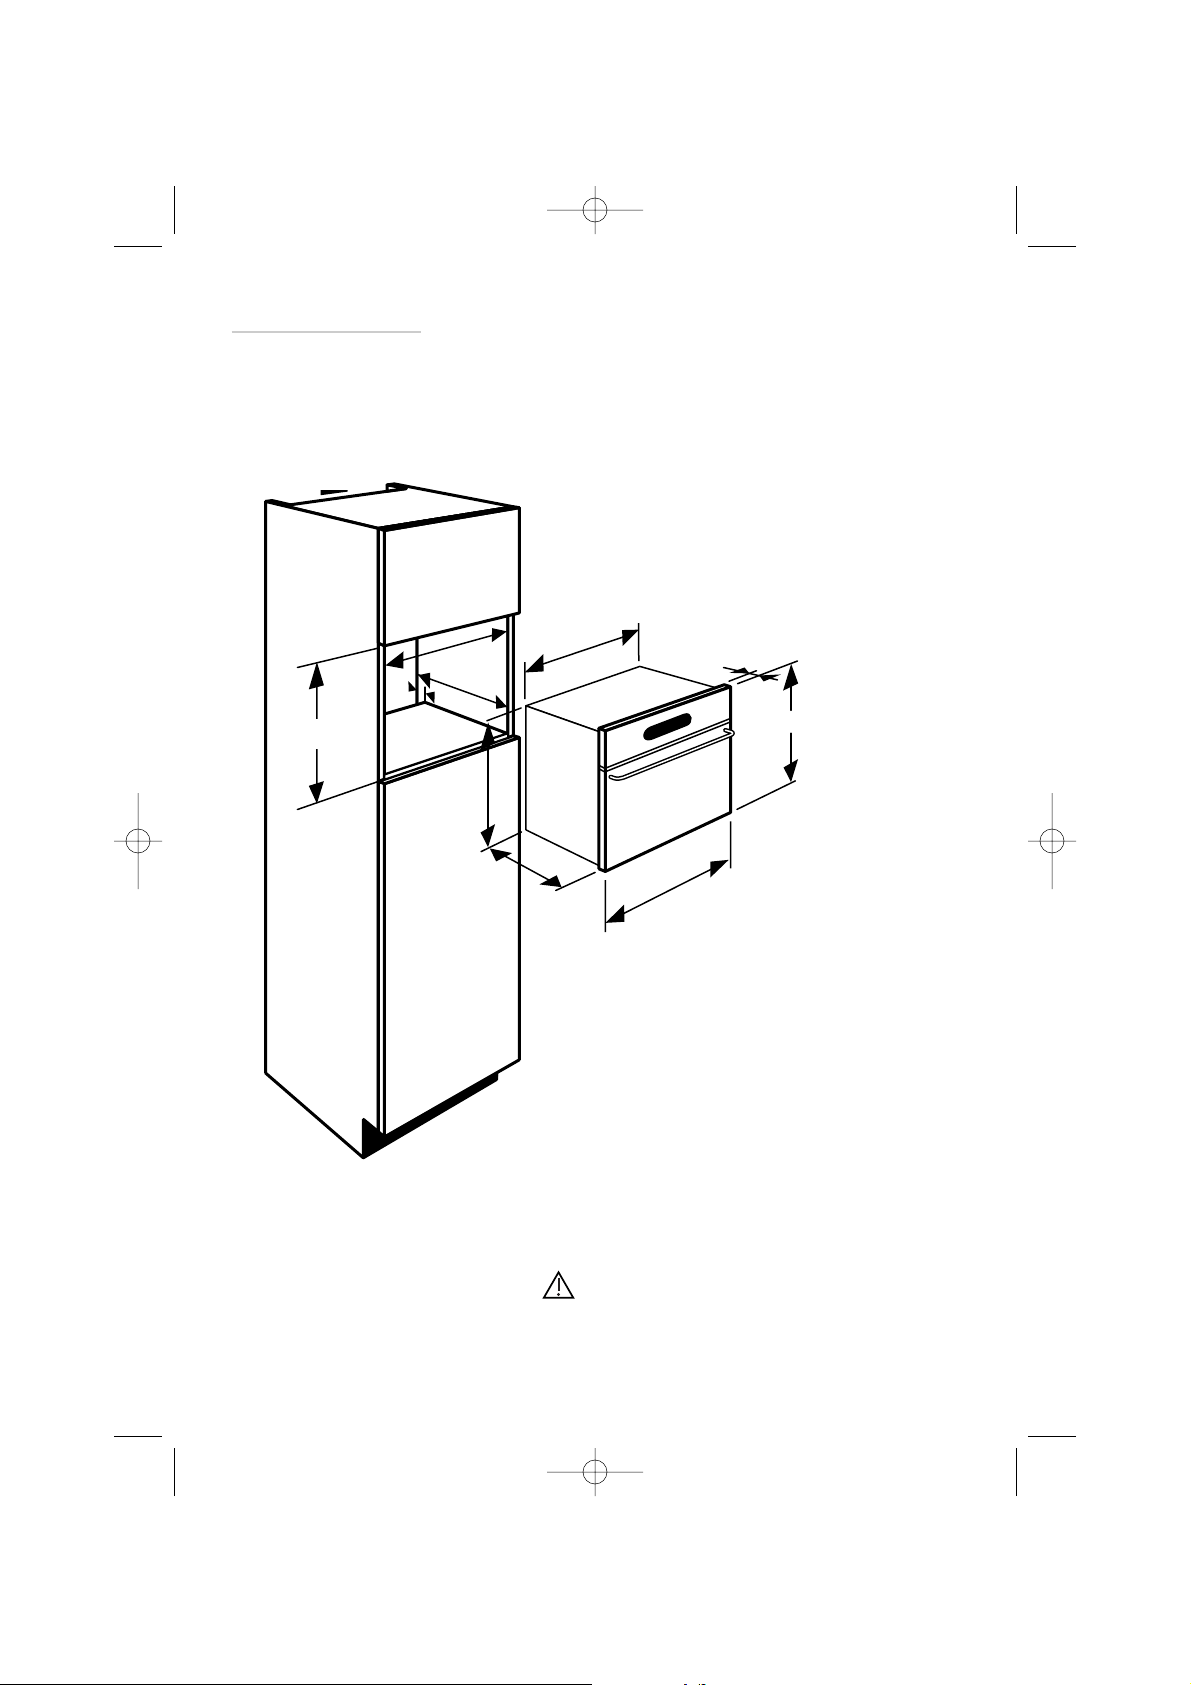
Build-in
1. Place the appliance in the nook.
The appliance must be horizontal. Check
the position.
2. For greater stability, attach the oven in
the cabinet with two screws through the
holes provided for this purpose on either
side of the front inner panels.
3. Make the electrical connection.
Ensure that the plug will be accessible after installation.
99636901_ML_A.qxd 18/04/05 09:50 Page 8
380
50
560
550
378
405
544
20
386,5
595
Page 9
9
EN
Steam
cooking
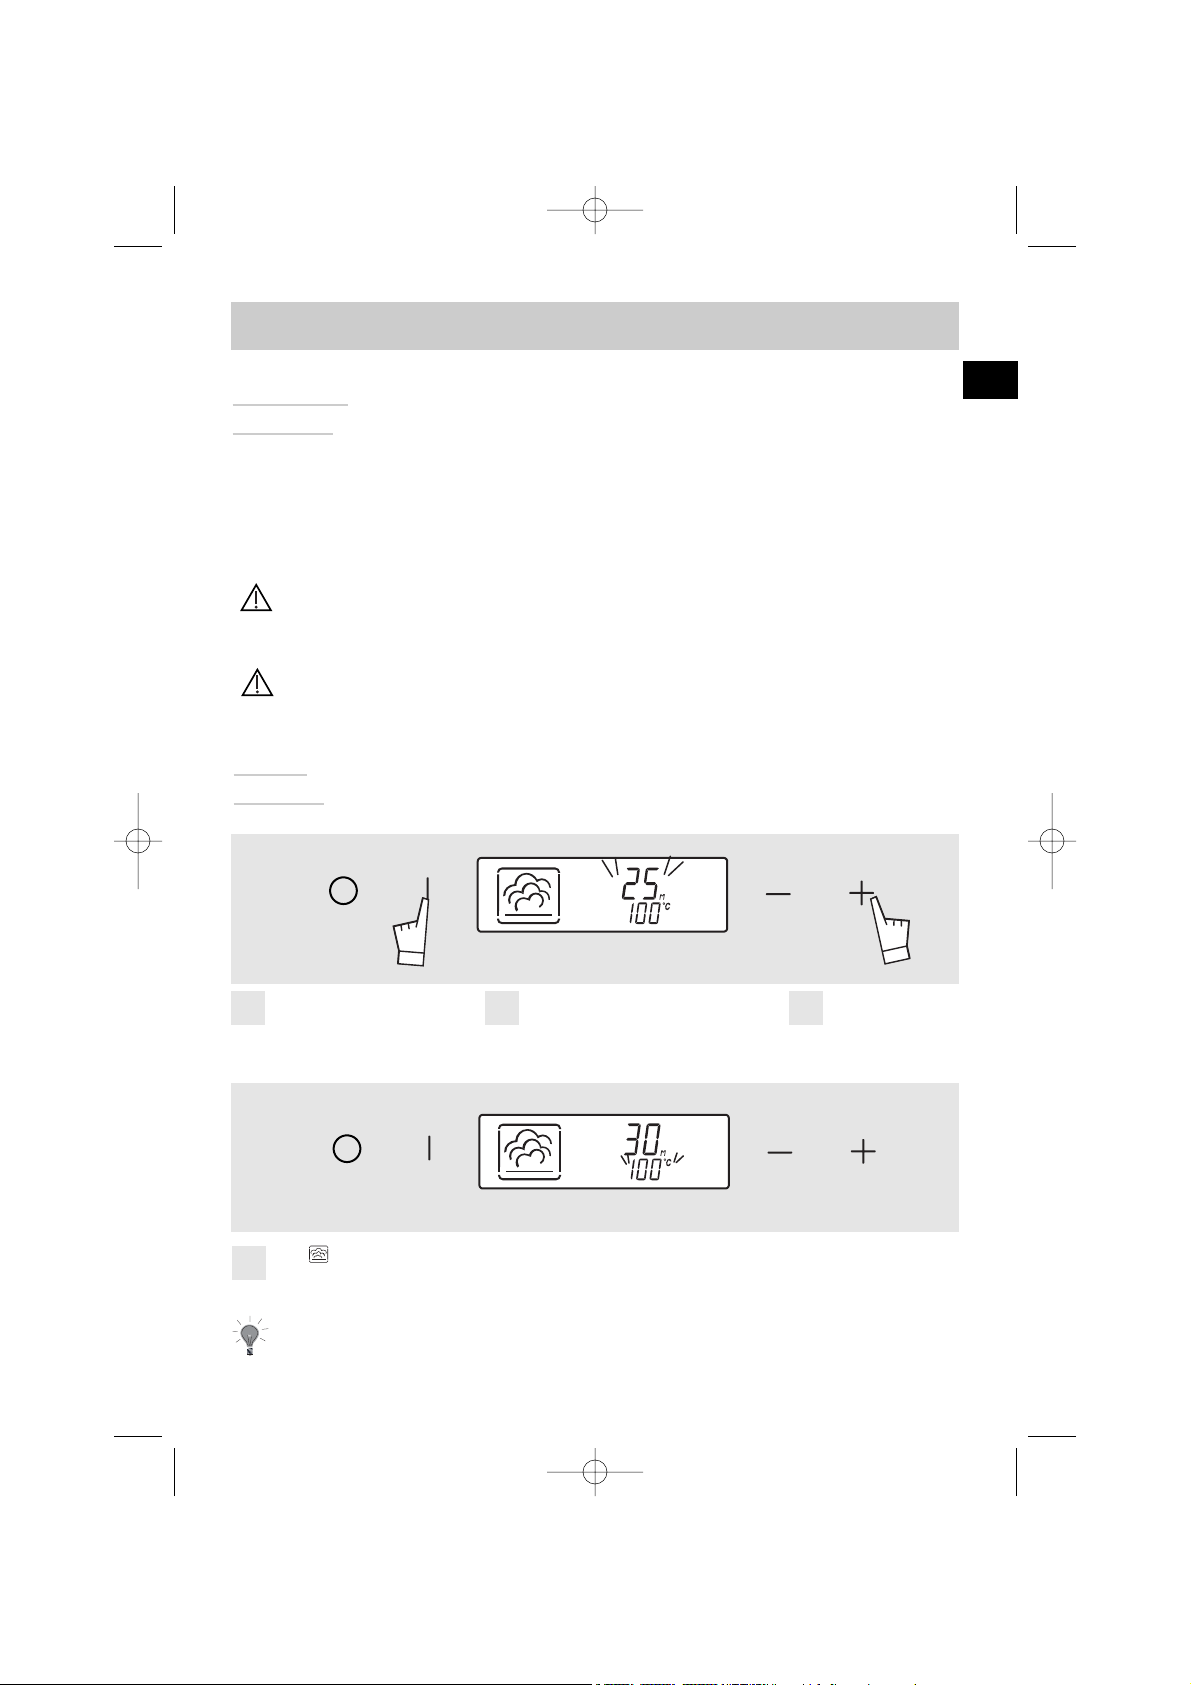
How do you program for immediate cooking?
Steam cooking at 100°C
Press the "Start" touch
control. A cooking time
of 25 minutes is suggested.
Set the desired length of time
(minimum is five minutes and
maximum is 60 minutes) by pressing
the + and - touch controls.
Enter by pressing the "Start"
touch control.
You MUST fill the water tank to the Max. level before cooking. Return the
tank to its housing by firmly pushing ALL THE WAY until you feel the tank
LOCK INTO POSITION.
The symbol is activated. When the temperature has been reached, the 100°C
display stops flashing and a beep is emitted.
Operating
principle
The water contained in the tank arrives in the cavity via
a pipe. This water is transformed into steam when it
comes into contact with a hot surface located in the
lower part of the cavity: this is the steam generator.
There is no need to add water to the cooking dish. To
guarantee REAL STEAM COOKING, your oven is furnished with specially designed cookware that will allow
for perfect cooking.
1 2 3
To avoid compromising the cooking results, do not open the appliance door
during cooking.
When in use, the appliance becomes hot. Hot steam will escape when you
open the door of the appliance. Keep children away.
4
99636901_ML_A.qxd 18/04/05 09:50 Page 9
Page 10

10
At the end
of a cooking
programme
0m00s is displayed. The display animation ceases.
Discontinuous beeps are emitted for three minutes.
To silence the beeps, press the Off touch control or open
the door.
You MUST empty the tank.
In order to guarantee good oven reliability, the fan continues to function
for a short period after cooking is complete.
Changing the
cooking time
Cancelling
cooking
in progress
During cooking, you can adjust the cooking time by
pressing the + or - touch controls.
You can stop the cooking at any time by pressing the Off
touch control (press and hold for approximately one second).
If steam generation has not yet begun (approximately
one minute), the oven stops immediately and the time
disappears.
If steam generation has already begun, the time
converts to three minutes; a countdown begins and the
steam escapes before the door is opened.
99636901_ML_A.qxd 18/04/05 09:50 Page 10
Page 11
11
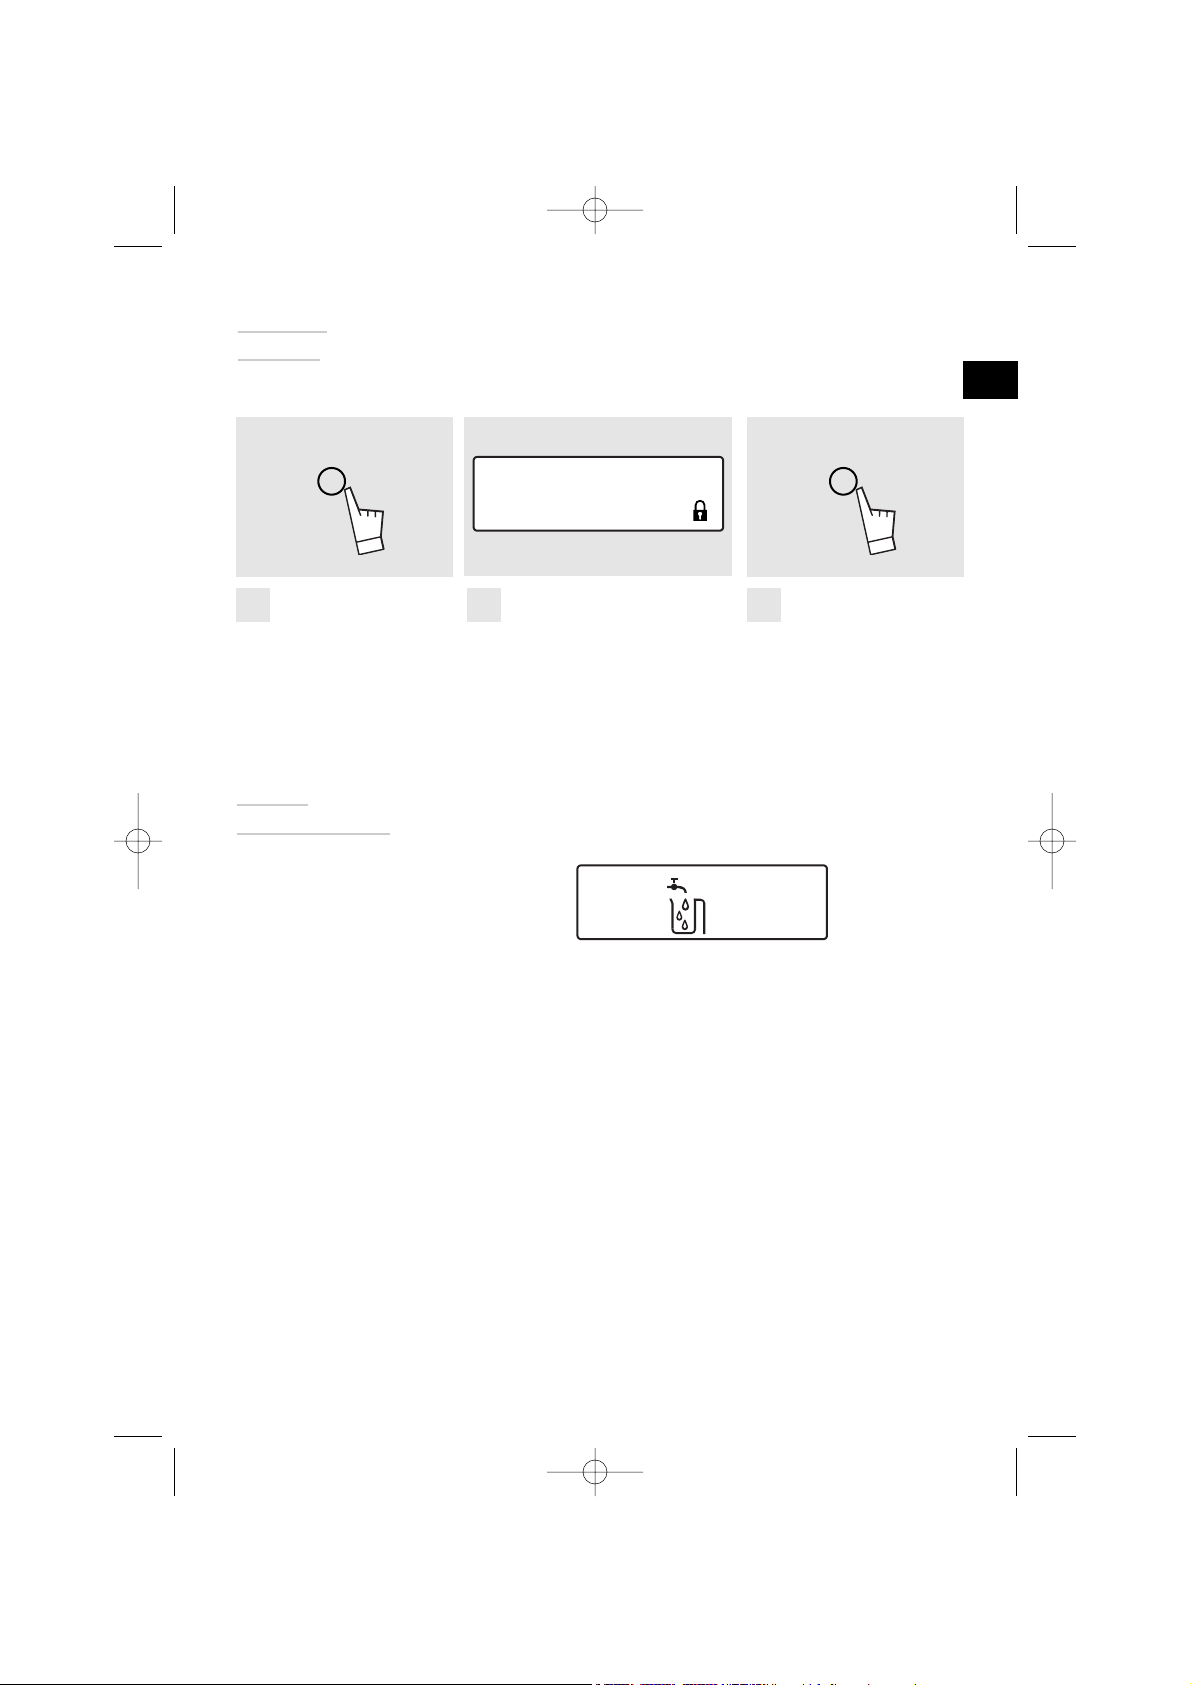
It is possible to lock the display. This feature cannot be
used during timed cooking programmes or delayed
cooking programmes.
Locking
display
Press the "Off" touch
control for a few sec-
onds.
A beep is sounded and a
"padlock" appears on the
screen. From this moment on, no
touch control is active.
To unlock the display,
press the "Off" touch
control for a few seconds:
a beep is sounded and the
padlock disappears.
1 2 3
In the event of a water circuit-related problem during
cooking, the "no water" indicator appears and a beep is
emitted.
This error is specifically associated with:
- An empty tank.
- A poorly seated tank.
After checking these two items, cooking automatically
restarts as soon as the door is closed.
Water
management
EN
99636901_ML_A.qxd 18/04/05 09:50 Page 11
Page 12
12
Artichokes (small)
Asparagus
Broccoli
Carrots
Celery root
Pumpkin
Mushrooms
Puff pastry
Courgettes
Chinese artichokes
Spinach
Endives
Fennel
Green beans
Turnips
Fresh peas
Leeks
Potatoes
Sea scallops
Mussels/periwinkles
Crabs
Lobsters
Crayfish
Apples/pears/
peaches
Compote
Puddings
40 to 45 min.
35 to 40 min.
18 min.
20 to 22 min.
25 to 30 min.
15 to 20 min.
15 min.
30 to 35 min.
22 min.
30 to 35 min.
10 to 15 min.
20 min.
20 min.
35 min
30 min.
22 min.
30 to 35 min.
15 to 20 min.
20 to 25 min.
25 min.
25 min.
40 to 45 min.
10 to 12 min.
20 to 25 min.
25 min.
30 to 35 min.
12 to 15 min.
10 to 15 min.
25 min.
10 min.
placed upside down in the dish
for tips decrease cooking time
in small bunches
in thin, round slices
in thin slices
in cubes
in thin strips
Brussels sprouts
Cauliflower in small bunches
Chopped green cabbage
in round slices
(fresh) stir while cooking
(frozen) " "
core removed, cut in half length-
wise
cut in half
in cubes
/
cut in half
cut in round slices
whole
with seasoning
with seasoning
/
depending on weight
/
whole, peeled
fruit in strips
in ramekins
• These times are a
function of the
type, size and
freshness of the
vegetables. Follow
the indications that
appear in the
"Preparations"
col-
umn.
• The cooking time
remains the same
regardless of the
quantity to be
cooked.
Example:
1 or 4 artichokes
require the same
cooking time.
• To check if food
is cooked pierce
with the tip of a
knife. If there is no
resistance, the food
is cooked.
• Place the scallops
on the grid of the
glass dish, add aromatic herbs.
• Place the crustaceans on a bed
of seaweed.
• Times depend on
ripeness.
Cooking chart
SHELLFISH
TIMES PREPARATIONS NOTES
CRUSTACEANS
FRUITS-
PUDDINGS
TIMES PREPARATIONS NOTES
VEGETABLES
TIMES
PREPARATIONS NOTES
Regardless of quantity
99636901_ML_A.qxd 18/04/05 09:50 Page 12
Page 13

13
• *Steaks: Round
slices of fish of 2 to
3 cm in thickness
(180/200g) per
person.
• Insist on very
fresh products.
• Place whole fish
in the dish as is or
on bay leaves, fennel or other aromatic herbs.
• As soon as cooking is complete,
remove the skin,
which will detach
easily.
• Then brown
under the grill in
another dish.
• Fluff with a fork
when cooking is
complete.
100 g rinsed rice - 20 cl milk -
2 T. sugar
200 g (1/4 litre water)
Rice pudding
Farina
Eggs
start with very
fresh eggs kept at
room temperature
Northern pike
Cod
Sea bream
Haddock
Herring
Pollack/black cod
Monkfish
Mackerel
Atlantic cod
Skate
Red mullet
Red mullet
Spotted dogfish
Salmon
Sole
Tuna
Trout, whole (1 kg)
25 to 30 min.
13 to 15 min.
20 to 25 min.
15 min.
20 min.
15 to 20 min.
15 min.
20 min.
15 min.
25 to 30 min.
15 min.
10 min.
20 min.
15 to 20 min.
10 to 12 min.
20 to 25 min.
20 to 25 min.
whole (1 kg)
steaks (180 g)*
whole (1kg)
filets
whole (200 g)
steaks (180 g)
depending on thickness
whole (250 g)
filets
whole (200 g)
filets
thick steaks (6 to 10 cm in length)
steaks (180/200 g)
filets
steaks (180/200 g)
whole (200 g) 13 to 15 min.
Beef
Pork
(filet mignon)
Poultry (breasts, filets)
(stuffed)
Sausages
Boudins
15 to 30 min.
25 min.
20 to 25 min.
25 min.
20 min.
10 to 15 min.
30 min.
20 min.
7 min.
5 to 6 min.
8 min.
10 to 12 min.
Roast 800 g: 55 to 60 min.
Chicken thighs: 35 to 40 min.
Roast turkey: 50 to 60 min.
400 g piece
MEATS/
TIMES PREPARATIONS NOTES
EGGS
FISH TIMES PREPARATIONS NOTES
Soft-boiled: placed directly on the grid.
Fried:
broken in an individual dish placed on the grid
and covered with cooking wrap.
Medium-boi
led: placed directly on the grid.
Hard-boiled / poached: see detailed recipes.
Place directly in a dish then cover with water or milk. The steam is not enough to saturate
these inflating foods. Place a sheet of aluminium foil on the dish to prevent water droplets
from falling in.
RICE, PASTA
TIMES PREPARATIONS NOTES
FARINA
EN
99636901_ML_A.qxd 18/04/05 09:50 Page 13
Page 14
14
Maintenance
Cavity (after each use)
Wipe the cavity with a dry cloth after the steam generator has cooled or let the cavity air-dry by leaving the
door open.
Water pipe (once a month)
Remove the water pipe by pulling it towards you.
Remove any hard-water deposits that may be inside
(using a thin, pointed object such as a thick skewer or a
knitting needle).
Steam generator (once a month)
Pour 1/2 cup of white vinegar on the generator.
Let sit for a few minutes, then clean and rinse with
water. Do not use sponges or abrasive powders, nor coffee maker cleaning agents.
Cleaning the
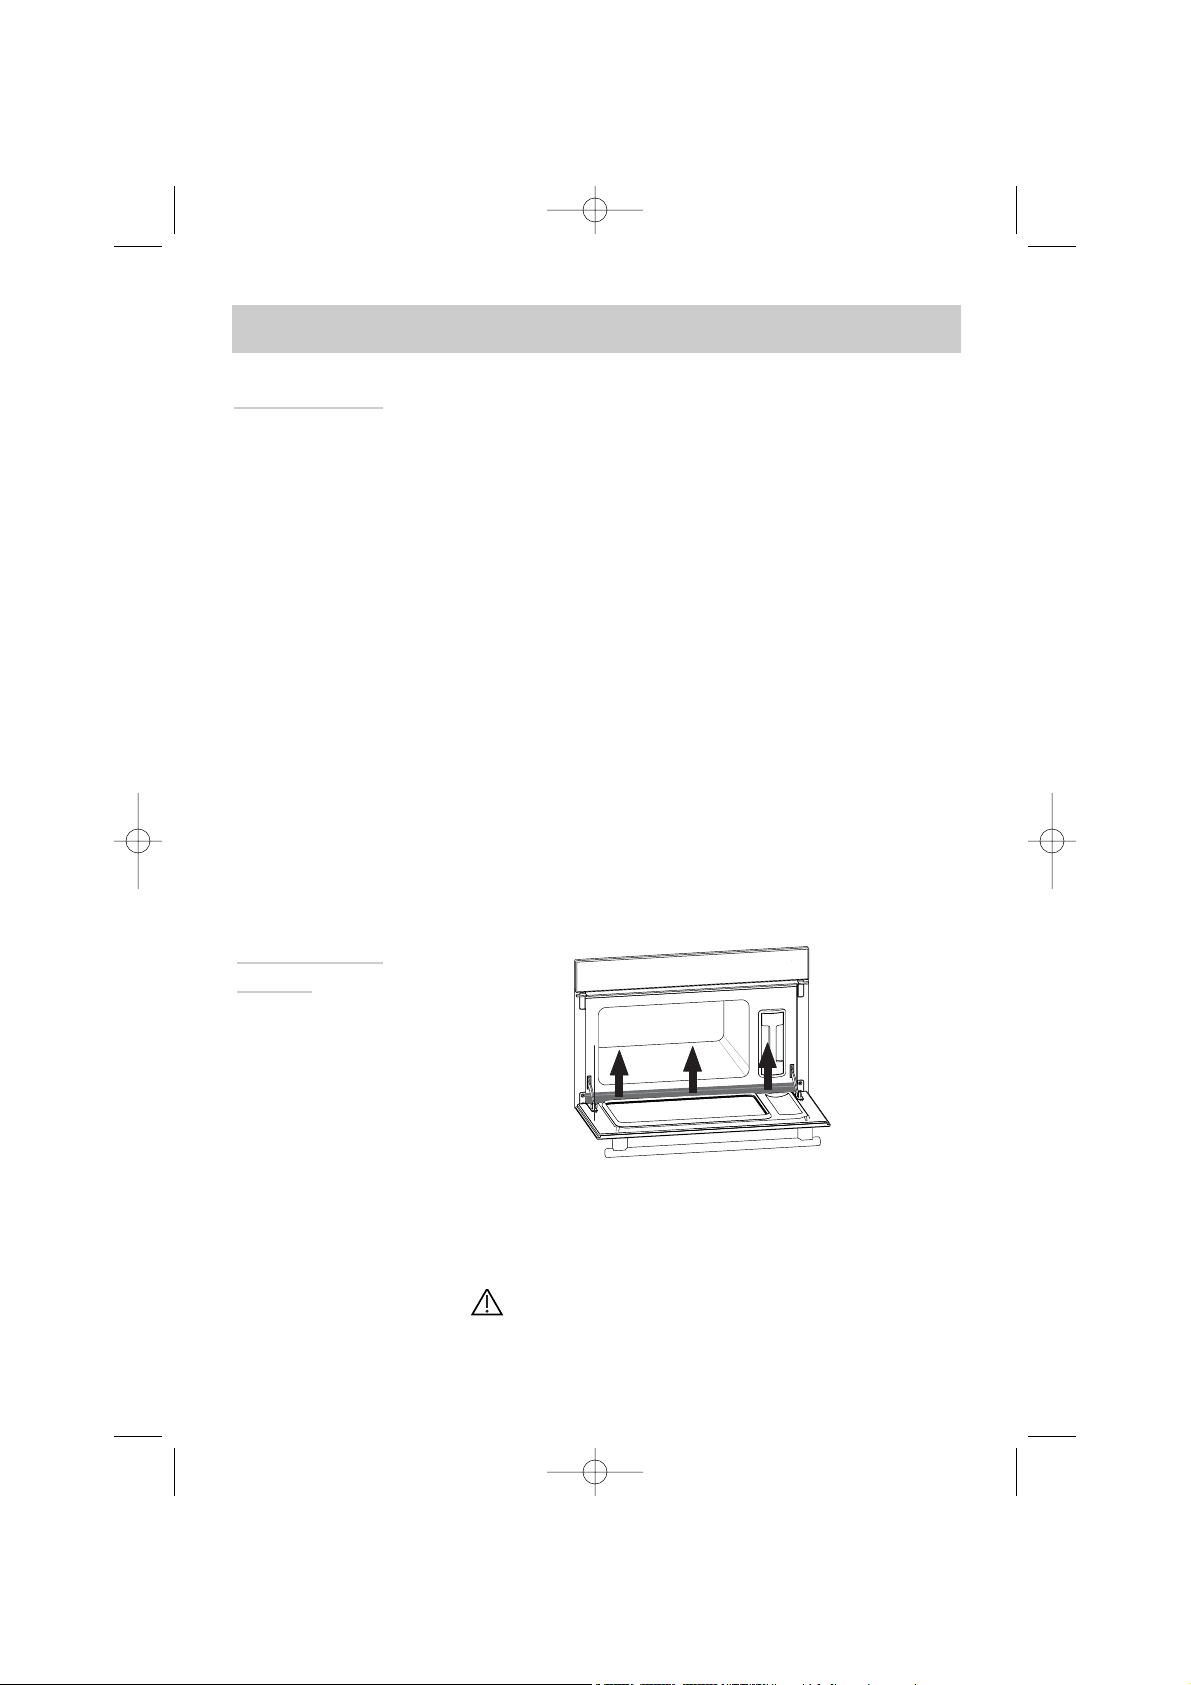
Gutter
Remove this gutter by pulling it upward. Wipe it off and
return it to its position using the three notches provided.
The oven should not be cleaned with a
steam cleaner.
How do you care for your oven?
99636901_ML_A.qxd 18/04/05 09:50 Page 14
Page 15
15
The bulb is located at the back
right of your oven's cavity.
Disconnect your oven
before performing any task
on the bulb to avoid the risk of
electric shock.
Changing the bulbs
- Turn the view port a quarter turn to the left.
- Unscrew the bulb in the same direction.
Bulb characteristics:
- 15 W - 220-240 V
- 300°C - E 14 socket
- Replace the bulb then reposition the view port,
making sure the joints are correctly positioned.
- Reconnect your oven.
What to do in case of malfunctions?
WHAT SHOULD
YOU DO?
POSSIBLE
CAUSES
Your display does not light up
- Oven is not connected to
power source.
- Electronic board is not functioning.
- Check that the appliance is
receiving electricity (good fuse).
- Call the After-Sales Service
Department.
Water or steam comes out of
the appliance.
- The door is not properly
closed.
- The door seal has come away
from its support.
- The door seal is faulty.
- Close the door properly.
- Correctly insert the seal into its
support.
- Call the After Sales Service
Department.
The light on the oven cavity
does not work.
- The light is faulty.
- The oven is not plugged in
- The fuse is out of order
Replace the light.
Plug in the oven
Change the fuse
YOU OBSERVE
THAT…
In all circumstances, if your efforts are not sufficient,
contact the After-Sales Service Department without delay.
EN
99636901_ML_A.qxd 18/04/05 09:50 Page 15
Page 16

16
Sommaire
Editorial p. 17
La cocción al vapor
Generalidades p. 18
¿Cómo se presenta su horno? p. 19
Accesorios p. 20
¿Cómo instalar su horno?
Conexión eléctrica p. 21
Empotramiento p. 22
¿Cómo realizar una cocción inmediata? p. 23-24
Bloqueo del visualizador p. 25
Gestión del agua p. 25
Cuadro de cocción p. 26-27
¿Cómo efectuar el p. 28
mantenimiento de su horno?
¿Cómo cambiar la bombilla? p. 29
¿Qué hacer en caso de anomalías? p. 29
99636901_ML_A.qxd 18/04/05 09:50 Page 16
Page 17

17
Editorial
Estimado/a Cliente/a:
Acaba de adquirir un nuevo horno FAGOR por lo que le quedamos sumamente
agradecidos.
Nuestros equipos de investigación han diseñado para usted una nueva generación de aparatos para que pueda ejercer plenamente sus talentos culinarios y
disfrutar cada día.
Con líneas puras y una estética moderna, su horno FAGOR se integra armoniosamente en su cocina y combina a la perfección facilidad de utilización y prestaciones de cocción.
También encontrará en la gama de productos FAGOR un extenso surtido de
cocinas, encimeras de cocción, campanas extractoras, lavavajillas, hornos microondas y frigoríficos integrables, que podrá coordinar con su nuevo horno
FAGOR.
De este modo, FAGOR, especialista de todo el universo de la cocción, contribuye al éxito culinario, al placer compartido y a la convivencia aportándole productos cada vez con más prestaciones, fáciles de utilizar, respetuosos con el
medio ambiente, estéticos y fiables.
La Marca FAGOR.
ES
99636901_ML_A.qxd 18/04/05 09:50 Page 17
Page 18

18
La cocción al vapor
Generalidades
La cocción al vapor es sumamente beneficiosa si se respeta el modo de empleo. Sana y natural, la cocina al vapor conserva todo el sabor de los alimentos. Una salsa refinada o con
hierbas aromáticas añade el pequeño toque que marca la diferencia.
No transmite ningún olor. No es necesario aromatizar el agua de cocción con hierbas o especias, en cambio, se puede dar sabor a un pescado depositándolo sobre un lecho de algas o
un ave sobre un ramillete de romero o de estragón.
Cuece simultáneamente carne, pescado y verduras.
Calienta suavemente pastas, arroz y puré sin riesgo de que se peguen o se sequen.
Facilita la cocción de cremas, flanes, pasteles de arroz, etc. que, si se recubren con papel de
aluminio, el agua de condensación no los remoja.
No es necesario salar antes, ni siquiera el agua de cocción.
Para dar mejor aspecto a una carne, hay que dorarla rápidamente por todos los lados, con
mantequilla caliente en la sartén.
Comparada con la cocción al agua, el vapor sólo presenta ventajas:
Es rápida: la cocción comienza inmediatamente, mientras que el tiempo de cocción de los
alimentos en un recipiente con agua sólo empieza a contar a partir del momento de la ebullición.
Es dietética: las vitaminas (las denominadas hidrosolubles) y las sales minerales se preservan ya que apenas se disuelven en el agua condensada que cubre los alimentos.
Además, no se utiliza ninguna materia grasa para realizar la cocción.
El vapor respeta el sabor de los alimentos. No añade ningún aroma ni sabor de asado o de
pasado por la sartén, ni tampoco lo elimina ya que no hay dilución en el agua.
Reverso de la moneda: es inútil cocer de esta manera un pescado que no estuviera fresco o
una verdura olvidada en el frigorífico durante una semana: ¡el resultado es catastrófico!
El vapor no comunica los sabores ni los olores; así pues, no dude en ganar a la vez tiempo
y dinero cociendo al lado, pero sin que se toquen, un pescado y un postre, por ejemplo.
El vapor también está recomendado para blanquear, recalentar o incluso mantener caliente,
en particular las salsas.
En primer lugar, rehogue en la sartén, con muy poca materia grasa, las carnes de tipo ave,
ternera o cerdo, para que adquieran un aspecto dorado apetitoso. Después, termine su cocción al vapor.
Cortados en trozos, los alimentos se cuecen más rápido y de forma más homogénea que
cuando están enteros.
99636901_ML_A.qxd 18/04/05 09:50 Page 18
Page 19
19
¿Cómo se presenta su horno?
Panel de
mando
Depósito
Visualizador
Generador
de vapor
1. Tecla Parada
2. Tecla Arranque
3. Símbolo cocción vapor
4. Sigla duración de cocción
5. Teclas + o - ajuste del tiempo
6. Bloqueo teclado
7. Indicador de temperatura
8. Indicador de problema en el circuito de agua
1
2
3
5
8
Tubo de llegada
de agua
4
6
7
Detalle del panel de mando
Conducto
ES
99636901_ML_A.qxd 18/04/05 09:50 Page 19
Page 20

20
Depósito que permite la alimentación de agua de su
horno de forma independiente.
Su capacidad es de 1 litro aproximadamente (nivel
máx.)
Bandeja de cocción perforada que evita el contacto
entre los alimentos y el agua de condensación.
Bandeja que permite recuperar el agua de condensación.
Rejilla soporte extraíble de acero inoxidable:
obligatoria para hornear.
Accesorios
La batería de cocina puede lavarse en el
lavavajillas.
Depósito extraíble
Batería de cocina
La utilización de un agua poco calcárea facilitará el mantenimiento de su horno.
Se prohíbe la utilización de un agua desmineralizada (no alimentaria).
99636901_ML_A.qxd 18/04/05 09:50 Page 20
Page 21
21
Conexión
eléctrica
Para una conexión fija, instalar en el conducto
de alimentación un medio de desconexión
conforme a las normas de instalación. De lo
contrario, el aparato debe instalarse de forma
que la clavija de toma de corriente sea accesible
cuando éste está empotrado.
Es absolutamente necesario utilizar una toma de
corriente que incluya un borne de puesta a la
tierra y que esté conectada de conformidad con
las normas de seguridad en vigor.
Su instalación debe estar equipada con una protección térmica de 10 amperios.
No ponga en funcionamiento el horno si el cable
de alimentación o su clavija están deteriorados.
En este caso, deben ser cambiados por el fabricante, su servicio postventa o personas con una
cualificación similar para evitar todo peligro.
Tensión de funcionamiento ................................................ 220-240 V ~ 50 Hz
Potencia total del horno .................................................................... 1,77 kW
Consumo de energía
-de aumento y mantenimiento a 100ºC durante 1 hora ..................... 0,71 kWh
Dimensiones útiles del horno
Anchura ........................................................................................... 38,5 cm
Altura .............................................................................................. 18,2 cm
Profundidad ..................................................................................... 33,5 cm
Volumen útil ................................................................................ 23,5 litros
¿Cómo instalar su horno?
ES
99636901_ML_A.qxd 18/04/05 09:50 Page 21
Page 22
22
Empotramiento
1. Coloque el aparato en la cavidad. El
horno debe estar horizontal. Controle
esta posición.
2. Para una mayor estabilidad, fije el
horno en el mueble con 2 tornillos en los
orificios previstos con este objeto en los
montantes laterales.
3. Efectúe la conexión eléctrica.
Compruebe que la clavija es accesible después de la instalación.
99636901_ML_A.qxd 18/04/05 09:50 Page 22
380
50
560
550
378
405
544
20
386,5
595
Page 23

23
Cocción al vapor
¿Cómo realizar una cocción inmediata?
Cocción vapor a 100ºC.
Pulse la tecla "arranque".
Se le propone un tiempo de
25 minutos.
Ajuste la duración que desea
(5 min. como mínimo y 60 min.
como máximo) pulsando + o -.
Valide con la
tecla "arranque".
Es ABSOLUTAMENTE NECESARIO llenar el depósito de agua hasta el nivel
máximo antes de la cocción. Ponga el depósito en su alojamiento introduciéndolo A FONDO hasta que note el PASO DE UNA MUESCA.
El símbolo parpadea. Cuando se alcanza la temperatura de 100ºC, se vuelve fijo
y suena un bip.
Principio de
funcionamiento
El agua que contiene el depósito llega a la cavidad por un tubo.
Este agua se transforma en vapor en contacto con una superficie caliente situada en la parte inferior de la cavidad. Se trata
del generador de vapor.
No es necesario añadir agua en la fuente de cocción. Para
garantizar una VERDADERA COCCIÓN AL VAPOR, le proponemos su horno con una batería de cocina especialmente estudiada para ello.
1
2
3
4
Para no alterar los resultados de cocción, no abra la puerta del aparato
durante la cocción.
Durante la cocción, el aparato se calienta y desprende vapor caliente cuando se abre su puerta. Mantenga alejados a los niños.
ES
99636901_ML_A.qxd 18/04/05 09:50 Page 23
Page 24

24
Modificación del
tiempo de cocción
Al final de la cocción
Se visualiza 0m00s. Supresión de la animación. Emisión
de bips discontinuos durante 3 minutos.
Para que dejen de sonar los bips, pulse la tecla Parada
o abra la puerta.
Parada durante la
cocción
Durante la cocción, puede modificar el tiempo con las
teclas + o -.
En cualquier momento puede interrumpir la cocción
pulsando la tecla Parada (pulsación larga de 1 segundo
aproximadamente).
Si la generación de vapor todavía no se ha activado
(aproximadamente 1 minuto), el horno se para inmediatamente y el tiempo desaparece.
Si la generación de vapor ya ha empezado, el tiempo
pasa a 3 minutos, comienza una cuenta atrás y el vapor
se evacua antes de la apertura.
Es IMPRESCINDIBLE vaciar el depósito.
Para garantizar una buena fiabilidad del horno, el ventilador sigue funcionando cierto tiempo después del final de la cocción.
99636901_ML_A.qxd 18/04/05 09:50 Page 24
Page 25

Para desbloquear,
pulse la tecla "Parada"
durante unos segundos,
suena un bip y desaparece
el candado.
Pulse la tecla
"Parada" durante
unos segundos.
25
Es posible bloquear el visualizador. Sólo podrá activarse
fuera de la cocción en modo hora o en modo cocción
diferida.
Bloqueo del
visualizador
Suena un bip y aparece un
candado en la pantalla. A
partir de ese momento, todas
las teclas dejan de ser activas.
1
2
3
En caso de problema relacionado con el circuito de agua
durante la cocción, aparece el indicador "falta de agua" y
suena un bip.
Este se debe en particular a:
- un depósito vacío
- un depósito mal encajado
Una vez verificados estos dos puntos, la cocción se reanuda automáticamente después de cerrar la puerta.
Gestión del agua
ES
99636901_ML_A.qxd 18/04/05 09:50 Page 25
Page 26

26
Alcachofas (pequeñas)
TIEMPOS
sea cual sea la cantidad
Espárragos
Brécol
Zanahorias
Apio-nabo
Calabaza
Champiñones
Calabacines
Estáquides
Espinacas
Endibias
Hinojo
Judías verdes
Nabos
Guisantes frescos
Patatas
de 40 a 45 min .
de 35 a 40 min.
18 min.
de 20 a 22 min.
de 25 a 30 min.
15 a 20 min.
15 min.
10 à 15 min.
20 min.
20 min.
35 min
30 min.
22 min.
de 30 a 35 min.
de 15 a 20 min.
de 20 a 25 min.
25 min.
de 40 a 45 min.
Colocadas invertidas en la fuente
Para las puntas, reducir el tiempo
En pequeños ramilletes
En finas rodajas
En finas rodajas
En cubos
En rodajas
Troncho retirado y cortadas en 2
en el sentido de la longitud
Cortados en 2
en cubos
Puerros
25 min.
cortados en 2
cortadas en rodajas
enteras
• Estos tiempos
dependen de la
naturaleza, del
grosor y de la
frescura de las
verduras. Siga
las indicaciones
que figuran en la
columna
"prepa-
raciones"
.
• El tiempo de
cocción es el
mismo sea cual
sea la cantidad
que se va a
cocer.
Por ejemplo:
1 ó 4 alcachofas
mismo tiempo
de cocción.
• Para controlar
el grado de cocción, pinche en
la parte más
gruesa de la verdura; si está
cocida, no presentará resistencia.
(frescos) remover durante la cocción
(congelados) " " "
/
Coles
de 30 a 35 min.
22 min.
de 30 a 35 min.
Bruselas
Flores en pequeños ramilletes
Repollo finamente picado
En finas láminas
VERDURAS
PREPARACIONES
OBSERVACIONES
Vieiras
TIEMPOS
Mejillones / Bígaros
Cangrejos / Bueyes de mar
Bogavantes
Cigalas
De 10 a 12 min.
De 20 à 25 min.
25 min.
De 30 a 35 min.
De 12 a 15 min.
Con plantas aromáticas
Con plantas aromáticas
/
Según el peso
/
• Coloque los mariscos de concha sobre
la rejilla en la fuente
de cristal y añada
hierbas aromáticas
• Deposite los
crustáceos sobre
un lecho de algas
MARISCOS DE
CONCHA
CRUSTÁCEOS
PREPARACIONES
OBSERVACIONES
Manzanas / peras /
melocotones
TIEMPOS
Compota
Cremas
De 10 a 15 min.
25 min.
10 min.
Enteras, peladas
Frutas en láminas
En pequeños cuencos
• Tiempo según
la madurez
FRUTAS-CREMAS
PREPARACIONES
OBSERVACIONES
Cuadro de cocción
99636901_ML_A.qxd 18/04/05 09:50 Page 26
Page 27

27
Lucio
TIEMPOS
Bacalao / merluza
Dorada
Haddock
Arenque
Merluza
(negra y amarilla)
Rape
Caballa
Pescadilla / Abadejo
Raya
de 25 a 30 min.
de 13 a 15 min.
de 20 a 25 min.
15 min.
20 min.
de 15 a 20 min.
15 min.
20 min.
15 min.
de 25 a 30 min.
Entero (1 kg)
Rodajas (180 g)*
Entero (1 kg)
Filetes
Entero (200 g)
Rodajas (180 g)
Entero (250 g)
• *Rodajas: trozos
de pescado redondos de 2 a 3 cm de
grosor (180/200 g)
por persona.
• Exija productos
muy frescos.
• Coloque los pescados enteros en la
fuente tal cual o
sobre hojas de laurel, hinojo u otra
hierba aromática.
• Una vez terminada la cocción, retire la piel que se
despegará muy
fácilmente.
Según el grosor
Filetes
PESCADOS
PREPARACIONES
OBSERVACIONES
Salmonetes
Salmonetes
Salmoncillo
Salmón
Lenguados
Atún
Trucha entera (1 kg)
15 min.
10 min.
20 min.
de 15 a 20 min.
de 10 a 12 min.
de 20 a 25 min.
de 20 a 25 min.
Entero (200 g)
Filetes
Trozos grandes (de 6 a 10 cm de longitud)
Rodajas (180/200 g)
Rodajas (180/200 g)
Entera (200 g) de
13 a 15 min.
Filetes
Buey
TIEMPOS
Cerdo (filet mignon)
Aves (pechuga, filetes
)
(pulpetas)
Salchichas
de 15 a 30 min.
25 min.
de 20 a 25 min.
25 min.
20 min.
Redondo 800 g:
de
55 a 60 min.
Muslos de pollo:
de
35 a 40 min.
Redondo de pavipollo:
de
50 a 60 min.
Morteau: 400 g
• Después, dore
al grill en otra
fuente.
CARNES/
HUEVOS
PREPARACIONES
OBSERVACIONES
Morcillas
de 10 a 15 min.
Deposite directamente en una fuente, cubra con agua o leche. En efecto, el vapor no
basta para saturar estos alimentos que se inflan. Coloque una hoja de aluminio sobre la
fuente para evitar las salpicaduras de las gotitas de agua.
TIEMPOS
• Esponjar con un
tenedor al final
de la cocción
ARROZ, PASTA,
SÉMOLA
PREPARACIONES
OBSERVACIONES
Arroz con leche
30 min.
100 g de arroz lavado - 20 cl de
leche - 2 cucharadas de azúcar
Sémola
20 min.
200 g (1/4 de litro de agua)
7 min.
de 5 a 6 min.
8 min.
P
asado por agua: colocado directamente sobre la rejilla.
B
lando: colocado directamente sobre la rejilla
Al plato:
cascado en una fuente individual colocada
sobre la rejilla y cubierta con un film transparente.
Huevos
A partir de huevos
muy frescos, conservados a temperatura
ambiente
de 10 a 12 min.
Dur
o / A la cazuela: véanse las recetas detalladas
ES
99636901_ML_A.qxd 18/04/05 09:50 Page 27
Page 28

28
Mantenimiento
Cavidad (después de cada cocción)
Limpiar la cavidad con un trapo seco después de que se haya
enfriado el generador del vapor, o dejar secar la cavidad manteniendo la puerta entreabierta.
Tubo de llegada de agua (1 vez por mes)
Retire el tubo de llegada de agua tirando de él hacia usted.
Retire el depósito de sarro que puede haberse depositado en
el interior (con un objeto fino y puntiagudo de tipo pincho de
brocheta o aguja de hacer punto).
Generador de vapor (1 vez por mes)
Vierta ½ vaso de vinagre de alcohol blanco sobre el generador. Deje actuar unos minutos, limpie y aclare con agua. No
utilice una esponja o polvos abrasivos ni desincrustante de
cafetera.
Limpieza del
conducto
Desmonte este conducto tirando de él hacia arriba,
séquelo y colóquelo de nuevo en su lugar por medio de
las tres ranuras previstas con este objeto.
El horno no debe limpiarse con un limpiador
de vapor.
¿Cómo efectuar el mantenimiento de su horno?
99636901_ML_A.qxd 18/04/05 09:50 Page 28
Page 29

29
¿Qué hacer en caso de anomalías?
¿QUÉ HAY QUE
HACER?
CAUSAS
POSIBLES
El visualizador no se
enciende
La bombilla no
funciona
Fuga de agua o de
vapor a nivel de la
puerta durante la
cocción.
Fallo de alimentación
del horno.
Tarjeta electrónica
fuera de servicio
- Verificar la alimentación (fusible de la instalación)
- Recurrir al servicio
postventa
- Cambiar la bombilla.
- Enchufar el horno.
- Cambiar el fusible de
la instalación
La bombilla está
fuera de servicio.
El horno no está
enchufado.
El fusible de la instalación está fuera de
servicio.
La puerta está mal
cerrada.
La junta de la puerta
es defectuosa.
- Recurrir al Servicio
Postventa
SI OBSERVA QUE
En todos los casos, si su intervención no es suficiente, póngase en
contacto lo antes posible con el Servicio Posventa.
¿Cómo cambiar la bombilla?
- Gire el ventanillo hacia la izquierda un cuarto de vuelta.
- Desenrosque la bombilla en el mismo sentido.
Características de la bombilla:
- 15 W - 220-240 V
- 300°C - casquillo E 14
- Cambie la bombilla y, después, monte el ventanillo
comprobando el correcto posicionamiento de las juntas.
- Vuelva a conectar el horno..
ES
La bombilla está situada en la parte
trasera derecha de la cavidad del horno.
Antes de cualquier intervención en la
bombilla, desconecte el horno de la alimentación eléctrica para evitar cualquier descarga eléctrica.
99636901_ML_A.qxd 18/04/05 09:50 Page 29
Page 30

30
Sumário
Editorial p. 31
A cozedura a vapor
Generalidades p. 32
Como se apresenta o seu forno? p. 33
Acessórios p. 34
Como instalar o seu forno?
Ligação eléctrica p. 35
Encastramento p. 36
Como realizar uma cozedura imediata? p. 37- 38
Bloqueio do visor p. 39
Gestão da água p. 39
Tabela de cozedura p. 40-41
Como limpar o seu forno? p. 42
Como substituir a lâmpada? p. 43
O que fazer em caso de anomalias? p. 43
99636901_ML_A.qxd 18/04/05 09:50 Page 30
Page 31

31
Editorial
Estimado(a) Cliente,
Acabou de adquirir um forno FAGOR e agradecemos-lhe a confiança depositada em nós.
As nossas equipas de pesquisa conceberam para si uma nova geração de aparelhos, de modo a que possa exercer plenamente os seus talentos culinários e
deliciar-se todos os dias.
Com umas linhas puras e uma estética moderna, o seu novo forno FAGOR
integra-se harmoniosamente na sua cozinha, aliando perfeitamente facilidade de
utilização e desempenho de cozedura.
Encontrará também na gama dos produtos FAGOR, uma vasta escolha de
fogões, placas de cozinha, exaustores, máquinas de lavar louça, fornos microondas e frigoríficos integráveis, que poderão combinar perfeitamente com o seu
novo forno FAGOR.
Especialista de todo o universo da cozedura, a FAGOR contribui, desta forma,
para o êxito culinário, o prazer partilhado, o convívio, proporcionando-lhe produtos com um desempenho cada vez maior, simples de utilizar, amigos do ambiente, estéticos e fiáveis.
A Marca FAGOR.
PT
99636901_ML_A.qxd 18/04/05 09:50 Page 31
Page 32

32
A cozedura a vapor
Generalidades
A cozedura a vapor só tem vantagens, na condição de se respeitar o modo de emprego.
Saudável et natural, a cozinha a vapor mantém o bom sabor dos alimentos. Um molho refinado ou com ervas aromáticas é o detalhe que vai marcar a diferença.
Este modo de cozedura não liberta qualquer cheiro. Inútil de aromatizar a água de cozedura com ervas ou especiarias, no entanto, pode-se perfumar um peixe, colocando-o por cima
de uma camada de algas ou no caso das aves, por cima de um ramo de alecrim ou estragão.
A carne, o peixe e os legumes são cozinhados em simultâneo.
A massa, o arroz e o puré são suavemente aquecidos sem pegar nem secar.
A cozedura dos cremes, pudins, e arroz doce é facilitada ... cobertos com papel de alumínio,
não ficam ensopados com a água de condensação.
Inútil de salgar antes, nem mesmo a água de cozedura.
Para que a carne tenha melhor aspecto, faça-a alourar rapidamente de ambos os lados, na
frigideira com manteiga quente.
Comparada com a cozedura em água, a cozedura a vapor só apresenta vantagens:
É rápida: a cozedura inicia imediatamente enquanto a contagem do tempo de cozedura dos
alimentos num recipiente com água começa apenas a partir do início da fervura.
É dietética: as vitaminas (as chamadas hidrossolúveis) e os sais minerais são devidamente
preservados, sendo apenas dissolvidos na água condensada que cobre os alimentos.
Para além disso, não é utilizada qualquer matéria gorda para a cozedura.
O vapor respeita o sabor dos alimentos. Não acrescenta perfumes, nem sabores a grelhado
ou a salteado e também não tira nada ao sabor, pois não há diluição na água.
Reverso da medalha: inútil de cozer deste modo um peixe que não esteja fresco, ou um legu-
me esquecido durante uma semana no frigorífico: pois o resultado seria catastrófico!
O vapor não comunica os sabores nem os odores; não hesite, por conseguinte, em poupar
tempo e dinheiro, colocando um ao pé do outro, mas sem se tocarem, um peixe e uma
sobremesa, por exemplo.
O vapor também é perfeito para escaldar, aquecer ou ainda manter quente, particularmente os molhos.
Primeiro, aloure na frigideira, com um pouco de matéria gorda, as carnes tipo aves,
vitela, porco, de modo a estas ficarem com um aspecto alourado apetitoso. Conclua a coze-
dura a vapor.
Cortados em pedaços, os alimentos cozem mais depressa e de modo mais homogéneo que
se estiverem inteiros.
99636901_ML_A.qxd 18/04/05 09:50 Page 32
Page 33

33
Como se apresenta o seu forno?
Painel de
comandos
Depósito
Visor
Gerador de
vapor
1. Tecla Desligar
2. Tecla Ligar
3. Símbolo de cozedura a vapor
4. Sigla de duração da cozedura
5. Teclas + ou - de regulação do tempo
6. Bloqueio do teclado
7. Indicador de temperatura
8. Indicador de problema no circuito de água
1
2
3
5
8
Tubo de chegada
de água
4
6
7
Painel de comandos em detalhe
Goteira
PT
99636901_ML_A.qxd 18/04/05 09:50 Page 33
Page 34

34
Depósito que permite a alimentação em água do seu
forno de modo independente.
A sua capacidade é aproximadamente de 1 litro (nível
máx.)
Tabuleiro de cozedura perfurado que evita o contacto
entre os alimentos e a água de condensação.
Tabuleiro que permite a recuperação da água de
condensação.
Grelha de suporte amovível em inox: a enfornar
obrigatoriamente.
Acessórios
Os tabuleiros e grelhas do forno podem ser
lavados na máquina de lavar louça.
Depósito amovível
Tabuleiros e Grelhas
A utilização de uma água com baixo teor em
calcário facilitará a manutenção do seu forno.
A utilização de uma água desmineralizada
é proibida (não alimentar).
99636901_ML_A.qxd 18/04/05 09:50 Page 34
Page 35

35
Ligação
eléctrica
Para uma ligação fixa, coloque na conduta de
alimentação um meio de desconexão em conformidade com as regras de instalação. Caso
contrário, o aparelho deverá ser instalado de
modo a que a tomada de corrente fique acessível
após o forno ser encastrado.
Utilize imperativamente uma tomada de corrente com terminal de ligação à terra, ligada em
conformidade com as normas de segurança
vigentes.
A sua instalação deve estar equipada de uma
protecção térmica de 10 Amperes.
Não coloque o forno em funcionamento se o cordão de alimentação ou a ficha estiverem danificados. Nesse caso, deverão ser substituídos pelo
fabricante, o Serviço Pós-Venda ou pessoas
igualmente habilitadas, de modo a evitar qualquer perigo.
Tensão de funcionamento .................................................. 220-240 V ~ 50 Hz
Potência total do forno ...................................................................... 1,77 kW
Consumo de energia
-de subida e estabilização a 100°C durante 1 hora ............................ 0,71 kWh
Dimensões úteis do forno
Largura ........................................................................................... 38,5 cm
Altura .............................................................................................. 18,2 cm
Profundidade .................................................................................... 33,5 cm
Volume útil .................................................................................. 23,5 litros
Como instalar o seu forno?
PT
99636901_ML_A.qxd 18/04/05 09:50 Page 35
Page 36

36
Encastramento
1. Coloque o aparelho no compartimen-
to previsto. O aparelho deve ficar horizontal. Certifique-se dessa posição.
2. Para maior estabilidade, fixe o forno
ao móvel com 2 parafusos introduzidos
nos orifícios previstos para o efeito nos
caixilhos laterais.
3. Proceda à ligação eléctrica.
Certifique-se de que a ficha fica
acessível após a instalação.
99636901_ML_A.qxd 18/04/05 09:50 Page 36
380
50
560
550
378
405
544
20
386,5
595
Page 37

37
Cozedura a vapor
Como efectuar uma cozedura imediata?
Cozedura a vapor a 100°C.
Prima a tecla "ligar". Um
tempo de 25 minutos é-lhe
proposto.
Regule a duração pretendida
(mín. 5 min. e máx. 60 min.),
premindo + ou -
Valide com a
tecla "ligar".
Encha IMPERATIVAMENTE o depósito de água até ao nível máx. antes da
cozedura. Coloque novamente o depósito no seu alojamento, empurrandoo ATÉ AO FUNDO até sentir que ficou ENGATADO.
O símbolo fica animado. Quando a temperatura é alcançada, 100°C fica fixo e um
bip é emitido.
Princípio de
funcionamento
A água contida no depósito chega à cavidade através de um tubo.
Esta água é transformada em vapor ao contacto de uma superfície
quente colocada na parte inferior da cavidade: trata-se do gerador de
vapor.
Não é necessário voltar a acrescentar água no tabuleiro de cozedura.
De modo a garantir UMA VERDADEIRA COZEDURA A VAPOR, o seu
forno proporciona-lhe tabuleiros e grelhas especialmente estudados
para uma cozedura perfeita.
1
2
3
4
De modo a não alterar os resultados da cozedura, não abra a porta do
aparelho durante a cozedura.
Aquando da cozedura, o aparelho fica quente. Um vapor quente é libertado quando a porta do aparelho é aberta. Mantenha as crianças afastadas.
PT
99636901_ML_A.qxd 18/04/05 09:50 Page 37
Page 38

38
Modificação do
tempo de cozedura
No fim da cozedura
0m00s é visualizado. Supressão da animação. Emissão
de bips descontínuos durante 3 minutos.
Para parar os bips, premir a tecla Desligar ou abrir a
porta.
Paragem durante a
cozedura
Durante a cozedura, pode modificar o tempo de cozedura através das teclas + ou -
Em qualquer altura, pode parar a cozedura, premindo a
tecla Desligar (pressão longa de aproximadamente
1 segundo).
Se a geração de vapor não se tiver ainda accionado
(aproximadamente 1 minuto), o forno pára imediatamente e o tempo desaparece.
Se a geração de vapor já tiver começado, o tempo
passa para 3 minutos e é iniciada uma contagem
decrescente, o vapor é evacuado antes da abertura.
Esvazie IMPERATIVAMENTE o depósito.
De modo a garantir uma boa fiabilidade do forno, o ventilador ainda
continua a funcionar durante algum tempo após o fim da cozedura.
99636901_ML_A.qxd 18/04/05 09:50 Page 38
Page 39

Para desbloquear, prima
a tecla "Desligar" durante uns segundos, um bip é
emitido e o cadeado desaparece.
Prima a tecla "Desligar"
durante uns segundos.
39
É possível bloquear o visor. Este pode apenas ser
activado fora das cozeduras em modo de hora ou de
cozedura diferida
Bloqueio do
visor
Um bip é emitido e um
cadeado aparece no ecrã. A
partir deste momento, nenhuma
tecla está activa.
1
2
3
Em caso de problema relacionado com o circuito de água
durante a cozedura, o indicador "falta de água" aparece e
um bip é emitido.
Este defeito está relacionado nomeadamente com:
- um depósito vazio.
- um depósito mal encaixado.
Após ter verificado estes dois pontos, a cozedura é
retomada automaticamente após a porta ser fechada.
Gestão da água
PT
99636901_ML_A.qxd 18/04/05 09:50 Page 39
Page 40

40
Alcachofras (Pequenas)
TEMPO
Independentemente da
quantidade
Espargos
Brócolos
Cenouras
Aipo-rábano
Abóbora
Cogumelos
Courgettes
Alcachofras chinesas
Espinafres
Endívias
Funcho
Feijão verde
Nabos
Ervilhas frescas
Batatas
40 a 45 min .
35 a 40 min.
18 min.
20 a 22 min.
25 a 30 min.
15 a 20 min.
15 min.
10 a 15 min.
20 min.
20 min.
35 min
30 min.
22 min.
30 a 35 min.
15 a 20 min.
20 a 25 min.
25 min.
40 a 45 min.
colocadas ao contrário no tabuleiro
para as pontas, reduzir o tempo
em raminhos
em rodelas finas
em fatias finas
em cubos
Em rodelas
sem o talo e cortadas em 2
partes longitudinalmente
cortado em 2 partes
em cubos
Alho francês
25 min.
cortado em 2 partes
cortadas às rodelas
inteiras
• Estes tempos
dependem da
natureza, espessura e frescura
dos legumes.
Siga as indicações da coluna
"preparações"
.
• O tempo de
cozedura é o
mesmo independentemente da
quantidade a
cozer.
Exemplo:
1 ou 4 alcachofras, tempo de
cozedura idêntico.
• Para verificar o
grau de cozedura,
pique na parte
mais espessa do
legume; se estiver cozida, não
haverá resistência.
(frescos) mexer durante a cozedura
(congelados) " "
/
Couve
30 a 35 min.
22 min.
30 a 35 min.
de Bruxelas
Flor em raminhos
Verde ripada
laminados
LEGUMES
PREPARAÇÕES
OBSERVAÇÕES
Vieiras
TEMPO
Mexilhões/Burriés
Caranguejos/Sapateiras
Lavagantes
Lagostins
10 a 12 min.
20 a 25 min.
25 min.
30 a 35 min.
12 a 15 min.
com ervas
com ervas
/
segundo o peso
/
• Disponha o marisco
na grelha do tabuleiro de vidro, adicione
as ervas aromáticas.
• Coloque os crustáceos por cima de
uma camada de
algas
MARISCOS
CRUSTÁCEOS
PREPARAÇÕES
OBSERVAÇÕES
Maçãs/pêras/
pêssegos
TEMPO
Puré de fruta
Cremes
10 a 15 min.
25 min.
10 min.
inteiros, descascados
fruta laminada
em taças individuais
• Tempo segundo
grau de maturidade.
FRUTOS-CREMES
PREPARAÇÕES
OBSERVAÇÕES
Tabela de cozedura
99636901_ML_A.qxd 18/04/05 09:50 Page 40
Page 41

Vitela
41
Robalo
TEMPO
Peixe bacalhau/Pescada branca
Dourada
Eglefim
Arenque
Garoupa (preta & branca)
Tamboril
Cavala
Pescada Branca/Bacalhau
Raia
25 a 30 min.
13 a 15 min.
20 a 25 min.
15 min.
20 min.
15 a 20 min.
15 min.
20 min.
15 min.
25 a 30 min.
inteiro (1kg)
postas (180 g)*
inteira (1kg)
filetes
inteiro (200g)
postas (180 g)
inteira (250g)
• *Postas: fatias
de peixe redondas
de 2 a 3 cm de
espessura
(180/200g) por
pessoa.
• Exija produtos
bem frescos.
• Coloque os
peixes inteiros no
tabuleiro ou por
cima de folhas de
louro, funcho ou
outras ervas aromáticas.
• No fim da cozedura, retire a pele
que se descolará
com muita facilidade.
conforme espessura
filetes
PREPARAÇÕES
OBSERVAÇÕES
Peixe vermelho
Peixe vermelho
Salmonete
Salmão
Solhas
Atum
Truta inteira (1kg)
15 min.
10 min.
20 min.
15 a 20 min.
10 a 12 min.
20 a 25 min.
20 a 25 min.
inteiro (200g)
filetes
nacos grossos (6 a 10cm de comprimento)
postas (180/200 g)
postas (180/200 g)
inteira (200g)
13 a 15 min.
filetes
TEMPO
Porco (filet mignon)
Ave (peito, filetes)
(Rolinhos)
Salsichas
15 a 30 min.
25 min.
20 a 25 min.
25 min.
20 min.
Rolo de 800 g.:
55 a 60 min.
Coxas de frango: 35 a 40 min.
Rolo de Peru assado:50 a 60 min
.
Chouriço 400 g
• Em seguida
alourar no grelhador dentro de
outro tabuleiro.
CARNES/OVOS
PREPARAÇÕES
OBSERVAÇÕES
Morcelas
10 a 15 min.
Disponha directamente num recipiente, cubra com água ou leite. Com efeito, o vapor não
é suficiente para saturar estes alimentos que aumentam de volume. Coloque em seguida
uma folha de papel de alumínio por cima de modo a evitar os salpicos das gotas de água.
TEMPO
• Desfie com
um garfo no fim
da cozedura.
ARROZ, MASSAS
SÊMOLA
PREPARAÇÕES
OBSERVAÇÕES
Arroz doce
30 min.
100g de arroz lavado -20cl de leite-2
c. de sopa de açúcar 20 min.
Pudim de Sêmola
20 min.
200g (1/4 litro de água)
7 min.
5 a 6 min.
8 min.
Quentes:
colocados directamente em cima da grelha.
Quentes bem passados: colocados directamente em cima da grelha.
Estr
elados: partidos num recipiente individual colocado
em cima da grelha e coberto com película aderente.
Ovos
com ovos extremamente frescos conservados à temperatura
ambiente.
10 a 12 min.
Cozidos/Escal
fados: ver receitas detalhadas..
PT
PEIXES
99636901_ML_A.qxd 18/04/05 09:50 Page 41
Page 42

42
Manutenção
Cavidade (após cada cozedura)
Limpe a cavidade com um pano seco após arrefecimento do gerador de vapor ou deixe secar correctamente a cavidade, mantendo a porta entreaberta.
Tubo de chegada de água (1 vez por mês)
Retire o tubo de chegada de água, puxando-o em
direcção a si.
Retire o eventual depósito de tártaro acumulado no
interior (com o auxílio de um objecto fino e pontiagudo tipo espeto fino ou agulha de tricotar).
Gerador de vapor (1 vez por mês)
Verta 1/2 copo de vinagre de álcool branco sobre o
gerador.
Deixe agir uns minutos, limpe e enxagúe com água.
Não utilizar esponjas ou pós abrasivos, nem detergentes de remoção de tártaro para máquinas de café.
Limpeza da Goteira
Desmonte a goteira, puxando-a para cima, limpe-a e
coloque-a novamente no lugar, encaixando-a nos três
encaixes previstos para o efeito.
A limpeza do forno não deve ser efectuada
com dispositivos de limpeza a vapor.
Como limpar o seu forno?
99636901_ML_A.qxd 18/04/05 09:50 Page 42
Page 43

43
O que fazer em caso de anomalias ?
O QUE DEVE
FAZER?
CAUSAS
POSSÍVEIS
O visor não se
acende
A lâmpada deixou de
funcionar.
Fuga de água ou de
vapor a nível da porta
durante a cozedura.
Defeito de alimentação do forno.
Placa electrónica fora
de serviço.
- Verificar a alimentação (fusível da sua instalação).
- Contactar o Serviço
Pós-Venda.
- Substituir a lâmpada.
- Ligar o forno.
- Substituir o fusível
da instalação.
A lâmpada está fundida.
O forno não está
ligado.
O fusível da sua
instalação está queimado.
A porta está mal
fechada.
A junta da porta está
defeituosa.
- Contactar o Serviço
Pós-Venda.
SE CONSTATAR
QUE...
Em qualquer dos casos, se a sua intervenção não for suficiente,
contacte imediatamente o Serviço Pós-Venda.
Como substituir a lâmpada?
- Rode o difusor luminoso para a esquerda, dando um quarto de volta.
- Desaperte a lâmpada no mesmo sentido.
Características da lâmpada:
- 15 W - 220-240 V
- 300°C - casquilho E 14
- Substitua a lâmpada e monte novamente o difusor luminoso,
certificando-se do posicionamento correcto das juntas.
- Volte a ligar o forno.
A lâmpada situa-se na parte traseira direita da cavidade do forno.
Desligue o seu forno da
alimentação eléctrica antes
de qualquer intervenção na lâmpada de modo a evitar qualquer
choque eléctrico.
PT
99636901_ML_A.qxd 18/04/05 09:50 Page 43
Page 44

44
Sommaire
Edito p. 45
La cuisson vapeur
Généralités p. 46
Comment se présente votre four ? p. 47
Accessoires p. 48
Comment installer votre four ?
Raccordement électrique p. 49
Encastrement p. 50
Comment faire une cuisson immédiate ? p. 51- 52
Verrouillage afficheur p. 53
Gestion de l’eau p. 53
Tableau de cuisson p. 54-55
Comment entretenir votre four ? p. 56
Comment changer l’ampoule ? p. 57
Que faire en cas d’anomalies ? p. 57
99636901_ML_A.qxd 18/04/05 09:50 Page 44
Page 45

45
Edito
Chère Cliente, Cher Client,
Vous venez d'acquérir un nouveau four FAGOR et nous vous en remercions.
Nos équipes de recherche ont conçu pour vous une nouvelle génération d'appareils pour vous permettre d'exercer pleinement vos talents culinaires et vous
régaler chaque jour.
Avec des lignes pures et une esthétique moderne, votre nouveau four FAGOR
s'intègre harmonieusement dans votre cuisine et allie parfaitement facilité d'utilisation et performances de cuisson.
Vous trouverez également dans la gamme des produits FAGOR, un vaste choix
de cuisinières, tables de cuisson, hottes aspirantes, lave-vaisselle, fours microondes et réfrigérateurs intégrables, que vous pourrez coordonner à votre nouveau four FAGOR.
Spécialiste de tout l'univers de la cuisson, FAGOR contribue ainsi à la réussite
culinaire, au plaisir partagé, à la convivialité en vous apportant des produits toujours plus performants, simples d'utilisation, respectueux de l'environnement,
esthétiques et fiables.
La Marque FAGOR.
FR
99636901_ML_A.qxd 18/04/05 09:50 Page 45
Page 46

46
La cuisson vapeur
Généralités
La cuisson vapeur est tout bénéfice si l’on respecte le mode d’emploi. Saine et naturelle, la
cuisine vapeur conserve leur bon goût aux aliments. Une sauce raffinée ou aux herbes aromatiques ajoute le petit plus qui fait la différence.
Elle ne transmet aucune odeur. Inutile d’aromatiser l’eau de cuisson avec des herbes ou des
épices, en revanche, on peut parfumer un poisson en le déposant sur un lit d’algues ou une
volaille sur un bouquet de romarin ou d’estragon.
Elle cuit simultanément viande, poisson et légumes.
Elle réchauffe en douceur pâtes, riz et purée sans risque d’attacher et sans dessèchement.
Elle facilite la cuisson des crèmes, flans, gâteaux de riz... recouverts de papier aluminium,
l’eau de condensation ne les détrempe pas.
Inutile de saler avant, pas même l’eau de cuisson.
Pour donner meilleure mine à une viande, faîtes la dorer rapidement de tous les côtés, au
beurre chaud à la poële.
Comparée à la cuisson à l’eau, la vapeur ne présente que des avantages:
Elle est rapide: la cuisson démarre immédiatement alors que le temps de cuisson des ali-
ments dans un récipient d’eau n’est décompté qu’à partir de la reprise de l’ébullition.
Elle est diététique: les vitamines (celles dites hydrosolubles) et les sels minéraux sont bien
préservés puisqu’ils se dissolvent à peine dans l’eau condensée qui nappe les aliments.
De plus, aucune matière grasse n’est utilisée pour conduire la cuisson.
La vapeur respecte le goût des aliments. Elle n’ajoute pas de parfum, ni goût de grillé ou de
poêlé et n’en ôte pas non plus puisqu’il n’y a pas de dilution dans l’eau.
Revers de la médaille: inutile de cuire de cette façon un poisson qui ne serait pas frais, ou
un légume oublié au réfrigérateur depuis une semaine: résultat catastrophique!
La vapeur ne communique pas les goûts ni les odeurs; n’hésitez donc pas à gagner à la fois
du temps et de l’argent en faisant cuire côte à côte mais sans se toucher, un poisson et un
dessert par exemple.
La vapeur convient aussi pour blanchir, réchauffer ou encore maintenir au chaud, en particulier les sauces.
Faîtes d’abord revenir à la poêle, avec très peu de matière grasse, les viandes genre volaille,
veau, porc, pour qu’elles prennent un aspect doré appétissant. Achever ensuite leur cuisson
à la vapeur.
Détaillés en morceaux, les aliments cuisent plus vite et de façon plus homogène que s’ils sont
entiers.
99636901_ML_A.qxd 18/04/05 09:50 Page 46
Page 47

47
Comment se présente votre four?
Bandeau de
commande
Réservoir
Afficheur
Générateur
de vapeur
1. Touche Arrêt
2. Touche Démarrage
3. Symbole cuisson vapeur
4. Sigle durée de cuisson
5. Touches +ou - réglage du temps
6. Verrouillage clavier
7. Indicateur de température
8. Indicateur de problème sur circuit d’eau
1
2
3
5
8
Tube d’arrivée
d’eau
4
6
7
Détail du bandeau de commande
Goulotte
FR
99636901_ML_A.qxd 18/04/05 09:50 Page 47
Page 48

48
Réservoir permettant l’alimentation en eau de votre
four de façon indépendante.
Sa contenance est d’environ 1 litre (niveau maxi.)
Plat de cuisson perforé évitant le contact entre les aliments et l’eau de condensation.
Plat permettant de récupérer l’eau de condensation.
Grille support amovible en inox:
à enfourner obligatoirement.
Accessoires
La casserolerie peut être nettoyée au lavevaisselle.
Réservoir amovible
Casserolerie
L’utilisation d’une eau faiblement calcaire facilitera l’entretien de votre four.
L’utilisation d’une eau déminéralisée est
interdite (pas alimentaire).
99636901_ML_A.qxd 18/04/05 09:51 Page 48
Page 49

49
Raccordement
électrique
Pour un branchement fixe, veillez à placer dans
la conduite d’alimentation, un moyen de déconnexion conforme aux règles d’installation. Sinon
l’appareil doit être placé de telle façon que la
fiche de prise de courant soit accessible lorsque
celui-ci est encastré.
Utilisez impérativement une prise de courant
comportant une borne de mise à la terre et raccordée conformément aux normes de sécurité
en vigueur.
Votre installation doit être équipée d’une protection
thermique de 10 Ampères.
Ne faites pas fonctionner le four si le cordon d’alimentation ou sa fiche sont abîmés. Dans ce cas, ils doivent
être remplacés par le fabricant, son S.A.V. ou des personnes de qualification similaire pour éviter tout danger.
Tension de fonctionnement ................................................ 220-240 V ~ 50 Hz
Puissance totale du four .................................................................... 1,77 kW
Consommation d’énergie
-de montée et maintien à 100°C pendant 1 heure ............................. 0,71 kWh
Dimensions utiles du four
Largeur ........................................................................................... 38,5 cm
Hauteur ........................................................................................... 18,2 cm
Profondeur ...................................................................................... 33,5 cm
Volume utile ................................................................................ 23,5 litres
Comment installer votre four?
FR
99636901_ML_A.qxd 18/04/05 09:51 Page 49
Page 50

50
Encastrement
1. Placez l’appareil dans la niche.
L’appareil doit être horizontal. Contrôlez
cette position.
2. Pour plus de stabilité, fixez le four
dans le meuble par 2 vis dans les trous
prévus à cet effet sur les montants latéraux.
3. Effectuez le raccordement électrique.
Veillez à ce que la fiche soit
accessible après installation.
99636901_ML_A.qxd 18/04/05 09:51 Page 50
380
50
560
550
378
405
544
20
386,5
595
Page 51

51
Cuisson
à la vapeur
Comment faire une cuisson immédiate ?
Cuisson vapeur à 100°C.
Appuyez sur la touche
“démarrage”. Un temps de
25 minutes vous est proposé.
Réglez la durée souhaitée
(mini. 5 min et maxi. 60
min) en appuyant sur + ou -
Vadidez avec la
touche “démar-
rage”.
Remplissez IMPERATIVEMENT le réservoir d'eau jusqu'au niveau maxi
avant la cuisson. Remettez le réservoir dans son logement en l'engageant
A FOND jusqu'à ce que vous ressentiez le PASSAGE D'UN CRAN.
Le symbole s’anime. Lorsque la température est atteinte, 100°C devient fixe et
un bip retentit.
Principe de
fonctionnement
L’eau contenue dans le réservoir arrive dans la cavité par un
tuyau. Cette eau est transformée en vapeur au contact d’une
surface chaude placée dans la partie inférieure de la cavité:
il s’agit du générateur de vapeur.
Il n’est pas nécessaire de rajouter de l’eau dans le plat de cuisson. Pour garantir UNE VRAIE CUISSON VAPEUR, votre four
est proposé avec une casserolerie spécialement étudiée pour
une parfaite cuisson.
1
2
3
4
Afin de ne pas altérer les résultats de cuisson, n’ouvrez pas la porte de
l’appareil pendant la cuisson.
Lors de la cuisson, l’appareil devient chaud. De la vapeur chaude s’échappe lorsque vous ouvrez la porte de l’appareil. Eloignez les enfants.
FR
99636901_ML_A.qxd 18/04/05 09:51 Page 51
Page 52

52
Modification du
temps de cuisson
En fin de cuisson
0m00s s’affiche. Suppression de l’animation. Emission
de bips discontinus durant 3 minutes.
Pour stopper les bips, appuyer sur la touche Arrêt ou
ouvrez la porte.
Arrêt en cours de
cuisson
En cours de cuisson, vous pouvez modifier le temps de
cuisson par les touches + ou -
A tout moment,vous pouvez stopper la cuisson en
appuyant sur la touche Arrêt (appui long d’environ 1
seconde).
Si la génération de vapeur ne s’est pas encore déclenchée (environ 1 minute), le four s’arrête immédiatement et le temps disparait.
Si la génération de vapeur est déjà commencée, le
temps passe à 3 minutes et un décompte s’effectue, la
vapeur s’évacue avant l’ouverture.
Videz IMPERATIVEMENT le réservoir.
Afin de garantir une bonne fiabilité du four, le ventilateur continue de
fonctionner un certain temps après la fin de cuisson.
99636901_ML_A.qxd 18/04/05 09:51 Page 52
Page 53

Pour déverrouiller,
appuyez sur la touche
“Arrêt” pendant quelques
secondes, un bip retentit
et la cadenas disparaît.
Appuyez sur la touche “Arrêt” pendant
quelques secondes.
53
Un verrouillage de l’afficheur est possible. Celui-ci ne
peut être activé que hors cuisson en mode heure ou en
mode cuisson différée
Verrouillage
afficheur
Un bip retentit et un cade-
nas apparaît sur l’écran. A
partir de ce moment, aucune
touche n’est active.
1
2
3
En cas de problème lié au circuit d’eau en cours de cuisson,
l’indicateur “absence d’eau” apparaît et un bip retentit.
Ce défaut est lié en particulier à:
- un réservoir vide.
- un réservoir mal emboîté.
Après avoir vérifier ces deux points, la cuisson redémarre automatiquement après fermeture de la porte.
Gestion de l’eau
FR
99636901_ML_A.qxd 18/04/05 09:51 Page 53
Page 54

54
Artichauts (Petits)
TEMPS
Quelle que soit la quantité
Asperges
Brocolis
Carottes
Céleri-rave
Citrouille
Champignons
Courgettes
Crosnes
Epinards
Endives
Fenouil
Haricots verts
Navets
Petits pois frais
Pommes de terre
40 à 45 min .
35 à 40 min.
18 min.
20 à 22 min.
25 à 30 min.
15 à 20 min.
15 min.
10 à 15 min.
20 min.
20 min.
35 min
30 min.
22 min.
30 à 35 min.
15 à 20 min.
20 à 25 min.
25 min.
40 à 45 min.
posés à l’envers dans le plat
pour les pointes, réduire le temps
en petits bouquets
en fines rondelles
en fines tranches
en cubes
en rondelles
trognon ôté et coupées en 2
dans la longueur
coupés en 2
en cubes
Poireaux
25 min.
coupés en 2
coupées en rondelles
entières
• Ces temps sont
fonction de la
nature, de la
grosseur et de la
fraîcheur des
légumes. Suivez
les indications
figurant dans la
colonne
«prépa-
rations»
.
• Le temps de
cuisson reste le
même quelle
que soit la quantité à cuire.
Exemple :
1 ou 4 artichauts
même temps de
cuisson .
• Pour contrôler
le degré de cuisson piquez dans
la partie la plus
épaisse du légume; s’il est cuit,
il n’y aura pas de
résistance.
(frais) remuer en cours de cuisson
(surgelés) ” ”
/
Choux
30 à 35 min.
22 min.
30 à 35 min.
Bruxelles
Fleurs en petits bouquets
Vert émincés
en fines lamelles
LEGUMES
PREPARATIONS
REMARQUES
Coquilles St Jacques
TEMPS
Moules/Bigorneaux
Crabes/Tourteaux
Homards
Langoustines
10 à 12 min.
20 à 25 min.
25 min.
30 à 35 min.
12 à 15 min.
avec aromates
avec aromates
/
selon le poids
/
• Disposez les
coquillages sur la
grille du plat en
verre,ajoutez herbes aromatiques.
• Déposez les
crustacés sur un
lit d’algues.
COQUILLAGES
CRUSTACES
PREPARATIONS
REMARQUES
Pommes/poires/
pêches
TEMPS
Compote
Crèmes
10 à 15 min.
25 min.
10 min.
entières, épluchées
fruits en lamelles
en ramequins
• Temps selon
maturité.
FRUITS-CREMES
PREPARATIONS
REMARQUES
Tableau de cuisson
99636901_ML_A.qxd 18/04/05 09:51 Page 54
Page 55

55
Brochet
TEMPS
Cabillaud/Colin
Dorade
Haddock
Hareng
Lieu (noir & jaune)
Lotte
Maquereau
Merlan/Morue
Raie
25 à 30 min.
13 à 15 min.
20 à 25 min.
15 min.
20 min.
15 à 20 min.
15 min.
20 min.
15 min.
25 à 30 min.
entier (1kg)
darnes (180 g)*
entière (1kg)
filets
entier (200g)
darnes (180 g)
entier (250g)
• *Darnes: tranches de poissons
rondes de 2 à 3 cm
d’épaisseur
(180/200g) par
personne.
• Exigez des produits très frais.
• Posez des poissons entiers dans
le plat tel quel ou
sur des feuilles de
laurier, de fenouil
ou autre herbe
aromatique.
• Dès la fin de la
cuisson, ôtez la
peau qui se décollera très facilement.
selon épaisseur
filets
POISSONS
PREPARATIONS
REMARQUES
Rougets
Rougets
Saumonette
Saumon
Soles
Thon
Truite
entière (1kg)
15 min.
10 min.
20 min.
15 à 20 min.
10 à 12 min.
20 à 25 min.
20 à 25 min.
entier (200g)
filets
gros tronçons (6 à 10cm de long)
darnes (180/200 g)
darnes (180/200 g)
entière (200g)
13 à 15 min.
filets
Boeuf
TEMPS
Porc
(filets mignon)
Volaille
(blancs,filets)
(Paupiettes)
Saucisses
15 à 30 min.
25 min.
20 à 25 min.
25 min.
20 min.
Rôti
800 g.:
55 à 60 min.
Cuisses poulet: 35 à 40 min.
Rôti dindonneau: 50 à 60 min.
Morteau 400 g
• Puis dorez au
gril dans un
autre plat.
VIANDES /
OEUFS
PREPARATIONS
REMARQUES
Boudins
10 à 15 min.
Déposez directement dans un plat, recouvrez d’eau ou de lait. En effet la vapeur ne suffit
pas pour saturer ces aliments qui gonflent. Posez une feuille d’aluminium sur le plat pour
éviter les retombées des gouttelettes d’eau.
TEMPS
• Egrenez à la
fourchette en
fin de cuisson.
RIZ, PÂTES
SEMOULE
PREPARATIONS
REMARQUES
Riz au lait
30 min.
100g de riz lavé-20cl de lait-2 c. à
soupe de sucre
Semoule
20 min.
200g (1/4 litre d’eau)
7 min.
5 à 6 min.
8 min.
Coque
: posé directement sur la grille.
Mol
let: posé directement sur la grille.
A
u plat: cassé dans un plat individuel posé sur la grille
et recouvert d’un film alimentaire.
Oeufs
à partir d’oeufs
très frais conservés à température
ambiante.
10 à 12 min.
Dur
/ Cocotte: voir recettes détaillées.
FR
99636901_ML_A.qxd 18/04/05 09:51 Page 55
Page 56

56
Entretien
Cavité (après chaque cuisson)
Essuyez la cavité avec un chiffon sec après refroidissement du
générateur de vapeur ou bien laissez sécher la cavité en maintenant la porte entreouverte.
Tuyau d’arrivée d’eau (1 fois par mois)
Retirez le tuyau d’arrivée d’eau en le tirant vers vous.
Enlevez le dépôt de tartre pouvant éventuellement s’être
déposé à l’intérieur (à l’aide d’un objet fin et pointu type fine
brochette ou aiguille à tricoter).
Générateur de vapeur (1 fois par mois)
Versez 1/2 verre de vinaigre d’alcool blanc sur le générateur.
Laissez agir quelques minutes, nettoyez et rincez à l’eau.
Ne pas utiliser d’éponge ou poudres abrasives, de détartrant à
cafetière.
Nettoyage de la
Goulotte
Démontez cette goulotte en la tirant vers le haut,
essuyez-la et remettez-la en place grâce aux trois encoches prévues à cet effet.
Le nettoyage du four ne doit pas être réalisé
avec un nettoyeur vapeur.
Comment entretenir votre four ?
99636901_ML_A.qxd 18/04/05 09:51 Page 56
Page 57

57
Que faire en cas d’anomalies ?
QUE FAUT-IL
FAIRE ?
LES CAUSES
POSSIBLES
Votre afficheur ne
s’allume pas
L'ampoule ne fonctionne plus.
Fuite d'eau ou de vapeur au niveau de la
porte pendant la cuisson.
Défaut d'alimentation
du four.
Carte électronique
hors service.
- Vérifier l'alimentation (fusible de votre
installation).
- Faire appel au Service Après-Vente.
- Changer l'ampoule.
- Brancher le four.
- Changer le fusible de
l'installation.
L'ampoule est hors
service.
Le four n'est pas
branché.
Le fusible de votre
installation est hors
service.
La porte est mal fermée.
Le joint de porte est
défectueux.
- Faire appel au Service Après-Vente.
VOUS CONSTATEZ
QUE...
Dans tous les cas, si votre intervention n’est pas suffisante,
contacter sans attendre le Service Après-Vente.
Comment changer l’ampoule ?
- Tournez le hublot vers la gauche d'un quart de tour.
- Dévissez l'ampoule dans le même sens.
Caractéristiques de l'ampoule :
- 15 W - 220-240 V
- 300°C - culot E 14
- Changez l'ampoule puis remonter le hublot en
veillant au bon positionnement des joints.
- Reconnectez votre four.
L'ampoule se situe à l'arrière
droit de la cavité du four.
Déconnectez votre four
de l'alimentation électrique avant toute intervention
sur l'ampoule afin déviter tout
choc électrique.
FR
99636901_ML_A.qxd 18/04/05 09:51 Page 57
Page 58

58
Inhalt
Vorwort S. 59
Das Kochen mit Dampf
Allgemeines S. 6 0
Wie sieht der Dampfgarer aus? S. 61
Zubehör S. 62
Installation des Dampfgarers
Stromanschluss S. 63
Einbau S. 64
Das sofortige Kochen S. 65-66
Sperrung des Anzeigers S. 67
Wasser-Management S. 67
Gartabelle S. 68-69
Die Pflege des Dampfgarers S. 70
Austausch der Glühbirne S. 71
Abhilfe bei Störungen S. 71
99636901_ML_A.qxd 18/04/05 09:51 Page 58
Page 59

59
DE
Vorwort
Liebe Kundin, lieber Kunde,
Sie haben soeben einen neuen Dampfgarer von FAGOR erworben, und wir
bedanken uns dafür.
Unsere Forschungsteams haben für Sie eine neue Generation von Geräten entwickelt, mit denen Sie Ihren kulinarischen Talenten freien Lauf lassen können
und jeden Tag mit Freude am Kochen schmackhafte Gerichte zubereiten werden.
Mit seinen klaren Linien und einer modernen Ästhetik integriert sich Ihr neuer
Dampfgarer von FAGOR harmonisch in Ihre Küche und verbindet auf perfekte
Weise einfache Benutzung und hohe Garleistung.
Die Produktreihe von FAGOR enthält auch eine breite Auswahl an einbaufähigen
Küchenherden, Kochfeldern, Dunstabzugshauben, Geschirrspülern,
Mikrowellenherden und Kühlschränken, die gut zu Ihrem neuen Dampfgarer
von FAGOR passen.
Als Spezialist der Welt des Kochens trägt FAGOR mit leistungsfähigen, einfach
zu benutzenden, umweltfreundlichen, ästhetischen und zuverlässigen Geräten zu
Ihrem kulinarischen Erfolg und Freude und Spaß beim gemeinsamen Kochen
und Genießen bei.
Die Marke FAGOR.
99636901_ML_A.qxd 18/04/05 09:51 Page 59
Page 60

60
Das Kochen mit Dampf
Allgemeines
Wenn Sie ein paar Grundregeln einhalten, ist das Garen mit Dampf ganz einfach.
Dampfgaren ist gesund und natürlich und erhält den natürlichen Geschmack der
Lebensmittel. Eine raffinierte Soße oder aromatische Kräuter steuern das kleine Plus bei,
das den großen kulinarischen Unterschied ausmacht.
Beim Dampfgaren wird kein Geruch übertragen. Dem Kochwasser brauchen keine Kräuter
oder Gewürze zugesetzt zu werden, um den Geschmack zu verbessern. Dagegen erhält
Fisch ein angenehmes Aroma, wenn er auf einem Algenbett gegart wird, oder Geflügel,
wenn es auf ein paar Zweigchen Rosmarin oder Estragon gelegt wird.
Mit dem Dampfgarer können Sie Fleisch, Fisch und Gemüse gleichzeitig zubereiten.
Nudeln, Reis und Püree lassen sich schnell und ohne jede Gefahr des Anbrennens oder
Austrocknens aufwärmen.
Die Zubereitung von Cremespeisen, Pudding, Reiskuchen usw. wird zum Kinderspiel. Die
Form wird einfach mit Aluminiumfolie abgedeckt, damit das Kondenswasser die Speise nicht
aufweicht.
Die Zutaten oder das Kochwasser brauchen vorher nicht gesalzen zu werden.
Damit Fleisch eine goldgelbe Farbe erhält, können Sie es vorher in der Bratpfanne mit etwas
Butter von allen Seiten kurz anbraten.
Im Vergleich zum Kochen im Wasser bietet das Dampfgaren nur Vorteile:
Die Garzeit ist kürzer: Der Garvorgang beginnt sofort, während die Garzeit beim Kochen in
einem Topf Wasser erst beginnt, wenn das Wasser wieder kocht.
Dampfgaren ist gesünder: Die (wasserlöslichen) Vitamine und Mineralsalze bleiben erhalten,
da sie sich im Kondenswasser, das sich auf den Lebensmitteln niederschlägt, kaum lösen.
Außerdem muss beim Dampfgaren kein Fett zugegeben werden.
Beim Dampfgaren wird der ganze Geschmack der Lebensmittel erhalten. Es wird kein ande-
res Aroma oder ein Grill- oder Bratgeschmack hinzugefügt und der Eigengeschmack des
Lebensmittels wird nicht verfälscht, da keine Lösung in Wasser stattfindet.
Aber versuchen Sie nicht, auf diese Weise einen Fisch zuzubereiten, der nicht frisch ist, oder
Gemüse, das schon seit einer Woche im Kühlschrank schlummert: Das Ergebnis wäre katastrophal!
Dampf gibt Geschmack oder Gerüche nicht weiter. Deshalb können Sie zum Beispiel auch
einen Fisch und einen Nachtisch gleichzeitig garen, wenn die beiden sich nicht berühren. So
sparen Sie viel Geld und Zeit!
Mit Dampf können Sie auch blanchieren, erwärmen oder warm halten, insbesondere Soßen.
Geflügel, Kalbfleisch oder Schweinefleisch sollten vor dem Dampfgaren mit ganz wenig Fett
in der Pfanne angebraten werden, damit sie eine appetitliche goldbraune Farbe annehmen.
Dann werden Sie im Dampf durchgegart.
In kleinere Stücke geschnittene Lebensmittel garen schneller und gleichmäßiger als große
Stücke oder ganzes Geflügel.
99636901_ML_A.qxd 18/04/05 09:51 Page 60
Page 61

61
DE
Wie sieht der Dampfgarer aus?
Bedienleiste
Tank
Anzeiger
Dampfgenerator
1. Aus-Taste
2. Starttaste
3. Symbol für Dampfkochen
4. Anzeige Gardauer
5. Tasten + oder - Zeiteinstellung
6. Sperrung der Tastatur
7. Temperaturanzeiger
8. Anzeiger für Störungen im Wasserkreislauf
1
2
3
5
8
Wasserzuführung
6
7
Details der Bedienleiste
Wasserablaufrinne
4
99636901_ML_A.qxd 18/04/05 09:51 Page 61
Page 62

62
Mit dem Tank wird der Dampfgarer unabhängig mit
Wasser versorgt.
Er hat ungefähr 1 Liter Inhalt (maximaler Füllstand)
Perforierte Pfanne, die den Kontakt der Lebensmittel
mit dem Kondenswasser verhindert.
In dieser Pfanne wird das Kondenswasser gesammelt.
Herausnehmbares Gitter aus Edelstahl:
muss unbedingt in den Dampfgarer eingeschoben werden.
Zubehör
Die Kochgeschirre sind spülmaschinenfest.
Herausnehmbarer Tank
Kochgeschirre
Die Pflege des Dampfgarers wird bei Verwendung
von gering kalkhaltigem Wasser vereinfacht.
Die Verwendung von demineralisiertem Wasser ist
untersagt (nicht lebensmittelgerecht).
99636901_ML_A.qxd 18/04/05 09:51 Page 62
Page 63

63
DE
Stromanschluss
Bei einem Festanschluss ist darauf zu achten, in
der Versorgungsleitung eine Abschaltmöglichkeit
vorzusehen, die den Installationsregeln
entspricht. Andernfalls muss das Gerät so plaziert
werden, dass der Stecker auch nach seinem
Einbau zugänglich ist.
Unbedingt eine Steckdose mit einer Erdung
benutzen, die nach den gültigen Sicherheitsnormen angeschlossen ist.
Die Anlage muss mit einem Wärmeschutz von
10 A ausgerüstet sein.
Den Garer nicht betreiben, wenn das Stromkabel
oder sein Stecker beschädigt sind. Sie müssen in
diesem Fall vom Hersteller, seinem Kundendienst
oder gleich qualifizierten Personen ausgetauscht
werden, um jegliche Gefahr zu vermeiden.
Betriebsspannung.................................................... 220 - 240 V ~ 50-60 Hz
Gesamtleistung des Dampfgarers .................................................... 1,77 kW
Energieverbrauch
- bei Anstieg und Haltung auf 100° in einer Stunde ....................... 0,71 kWh
Nutzabmessungen des Dampfgarers
Breite .......................................................................................... 38,5 cm
Höhe ........................................................................................... 18,2 cm
Tiefe ............................................................................................ 33,5 cm
Nutzvolumen ............................................................................ 23,5 Liter
Installation des Dampfgarers
99636901_ML_A.qxd 18/04/05 09:51 Page 63
Page 64

64
Einbau
1. Das Gerät in die Nische stellen.
Das Gerät muss waagrecht stehen. Diese
Position kontrollieren.
2. Zwecks besserer Stabilität den
Dampfgarer im Möbel mit 2 Schrauben
befestigen, die hierfür in den
Seitenpfosten vorgesehen sind.
3. Den Stromanschluss herstellen.
Darauf achten, dass der Stecker
nach der Installation zugänglich ist.
99636901_ML_A.qxd 18/04/05 09:51 Page 64
380
50
560
550
378
405
544
20
386,5
595
Page 65

65
DE
Das Kochen
mit Dampf
Das sofortige Kochen
Kochen mit Dampf bei 100°C.
Die Taste "Start" drücken.
Es wird eine Zeitdauer von
25 Minuten vorgeschlagen.
Mit der Taste
"Start" bestäti-
gen.
Den Wassertank vor dem Kochen UNBEDINGT bis zur maximalen Füllhöhe
auffüllen. Den Tank in seine Aufnahme einsetzen, indem er GANZ eingeschoben wird, bis ein HEBEL zu spüren ist.
Das Symbol wird animiert. Wenn die Temperatur erreicht ist, leuchtet 100°C
ständig, und es wird ein Piepton abgegeben.
Funktionsprinzip
Das Wasser gelangt vom Tank durch ein Röhrchen in den
Herdraum. Dieses Wasser wird bei Kontakt mit einer
heissen Fläche im unteren Teil des Herdraums in Dampf
umgewandelt: Dies ist der Dampfgenerator.
Es braucht kein Wasser in die Kochpfanne gegeben zu
werden. Zur Garantie DES ECHTEN DAMPFKOCHENS
wird der Garer mit speziell für den perfekten Garvorgang
konzipiertem Kochgeschirr angeboten.
3
Zur Vermeidung dessen, die Kochergebnisse zu beeinträchtigen, die Tür des
Geräts nicht während des Kochvorgangs öffnen.
Das Gerät wird beim Kochvorgang heiss. Der heisse Dampf wird freigesetzt,
wenn die Gerätetür geöffnet wird. Kinder entfernt halten.
4
Die gewünschte Zeitdauer
einstellen (Mind. 5 Min. und
max. 60 Min.) beim Drücken auf
+ oder -
21
99636901_ML_A.qxd 18/04/05 09:51 Page 65
Page 66

66
Änderung
der Gardauer
Nach dem
Garvorgang
0m00s wird angezeigt. Löschen der Animation.
3 Minuten lang Abgabe von diskontinuierlichen
Pieptönen.
Zur Abschaltung der Pieptöne die Taste Ays drücken
oder die Tür öffnen.
Abschaltung
bei laufendem
Garvorgang
Während des Garvorgangs kann die Gardauer mit den
Tasten + oder - geändert werden.
Der Garvorgang kann jederzeit mit Drücken der Aus
Taste unterbrochen werden (ca. 1 Sekunde lang drücken).
Wenn die Dampfentwicklung noch nicht begonnen hat,
(ca. 1 Minute), schaltet der Garer sofort ab, und die
Gardauer verschwindet.
Wenn die Dampfentwicklung schon begonnen hat, geht
die Gardauer auf 3 Minuten und wird rückwärts gezählt,
der Dampf wird vor dem Öffnen der Tür abgeführt.
Den Tank UNBEDINGT ausleeren.
Zur Garantie der guten Zuverlässigkeit des Dampfgarers läuft der Ventilator
noch einige Zeit nach dem Garende weiter.
99636901_ML_A.qxd 18/04/05 09:51 Page 66
Page 67

67
DE
Das Anzeigefeld kann durch Verriegeln gesperrt werden.
Es kann dann nur außerhalb eines Garvorgangs im
Uhrzeitmodus oder im zeitverzögerten Kochmodus aktiviert werden.
Sperrung
des Anzeigers
Einige Sekunden lang
die Taste "Aus" drüc-
ken.
Ein Piepton wird abgegeben,
und ein Schloss erscheint im
Bildschirm. Ab diesem Moment ist
keine Taste aktiv.
Für die Freigabe einige
Sekunden lang die
Taste "Aus" drücken, ein
Piepton wird abgegeben,
und das Schloss verschwindet.
1 2 3
Bei Problemen mit dem Wasserumlauf während des
Garvorgangs erscheint der Anzeiger "Kein Wasser", und
ein Piepton wird abgegeben.
Dieser Fehler steht insbesondere im Zusammenhang
mit:
- einem leeren Tank.
- einem schlecht eingesetzten Tank.
Nach Prüfung dieser beiden Punkte startet der
Garvorgang automatisch nach dem Schliessen der Tür.
WasserManagement
99636901_ML_A.qxd 18/04/05 09:51 Page 67
Page 68

68
Artischocken (kleine)
Spargel
Brokkoli
Karotten
Knollensellerei
Kürbis
Pilze
Kohl
Zucchini
Knollenziest
Spinat
Chicoree
Fenchel
Grüne Bohnen
Weisse Rüben
Frische Erbsen
Lauch
Kartoffeln
Jakobsmuscheln
Muscheln/Strand-
schnecken
Krebse/
Taschenkrebse
Hummer
Langustinen
Äpfel/Birnen/
Pfirsische
Kompotte
Cremes
40 bis 45 Min.
35 bis 40 Min.
18 Min.
20 bis 22 Min.
25 bis 30 Min.
15 bis 20 Min.
15 Min.
30 bis 35 Min.
22 Min.
30 bis 35 Min.
10 bis 15 Min.
20 Min.
20 Min.
35 min
30 Min.
22 Min.
30 bis 35 Min.
15 bis 20 Min.
20 bis 25 Min.
25 Min.
25 Min.
40 bis 45 Min.
10 bis 12 Min.
20 bis 25 Min.
25 Min.
30 bis 35 Min.
12 bis 15 Min.
10 bis 15 Min.
25 Min.
10 Min.
werden umgedreht in die Pfanne gelegt
für die Spitzen die Garzeit verringern
in kleinen Buketts
in feinen Scheiben
in feinen Scheiben
in Würfeln
in feinen Lamellen
Rosenkohl
Blumenkohl in kleinen Buketts
Wirsing feingeschnitten
in Scheiben
(frisch) während des
(Tiefkühl) Garvorgangs umrühren
Kern entfernt und längs geschnitten
durchgeschnitten
in Würfeln
/
durchgeschnitten
in Scheiben geschnitten
ganz
mit Aromastoffen
mit Aromastoffen
/
je nach Gewicht
/
ganz, geschält
Obst in Lamellen
in Schälchen
• Diese Garzeiten
hängen von der
Art, der Dicke und
der Frische der
Gemäuse ab. Die
Angaben in der
Spalte
"Zubereitungen"
befolgen.
• Die Garzeit
bleibt bei jeder
Menge die gleiche.
Beispiel:
1 oder
4 Artischocken,
gleiche Garzeit.
• Zur Kontrolle
der Garung in den
dicksten Teil des
Gemüses stechen;
Wenn es gar ist,
gibt es keinen
Widerstand.
• Die Muscheln auf
das Gitter der
Glaspfanne legen,
aromatische
Kräuter hinzufügen.
• Die Krustentiere
auf ein Algenbett
legen.
• Garzeit je Reife.
Gartabelle
MUSCHELN
GARZEIT ZUBEREITUNGEN BEMERKUNGEN
KRUSTENTIERE
GEMÜSE
GARZEIT
ZUBEREITUNGEN BEMERKUNGEN
Bei beliebiger Menge
OBST-CREMES GARZEIT ZUBEREITUNGEN BEMERKUNGEN
99636901_ML_A.qxd 18/04/05 09:51 Page 68
Page 69

69
DE
FLEISCH /
GARZEIT ZUBEREITUNGEN BEMERKUNGEN
EIER
• *Filets: Runde
Fischscheiben in 2
bis 3 cm Dicke
(180/200 g) pro
Person.
• Sehr frische
Produkte verlangen.
• Ganze Fische wie
sie sind in die
Pfanne oder auf
Lorberblätter,
Fenchel oder andere aromatische
Kräuter legen.
• Am Garende die
Haut abziehen, die
sich sehr leicht löst.
• Nach dem
Garvorgang mit
der Gabel lockern.
100 g gewaschenen Reis -
20 cl Milch - 2 Suppenlöffel Zucker
200 g (1/4 Liter Wasser)
Milchreis
Griess
• Dann im Grill in
einer anderen
Pfanne goldbraun
werden lassen.
Eier
ab sehr frischen
Eiern mit
Aufbewahrung bei
Raumtemperatur.
Hecht
Kabeljau/Dorsch
Goldbrasse
Schellfisch
Hering
Heller Seelachs
(Köhler & gelb)
Seeteufel
Makrele
Wittling/Kabeljau
Rochen
Barben
Barben
Junger Salm
Lachs
Seezungen
Thunfisch
Forelle ganz (1 kg)
25 bis 30 Min.
13 bis 15 Min.
20 bis 25 Min.
15 Min.
20 Min.
15 bis 20 Min.
15 Min.
20 Min.
15 Min.
25 bis 30 Min.
15 Min.
10 Min.
20 Min.
15 bis 20 Min.
10 bis 12 Min.
20 bis 25 Min.
20 bis 25 Min.
ganz (1 kg)
Filets (180 g)*
ganz (1 kg)
Filets
ganz (200 g)
Filets (180 g)
je nach Dicke
ganz (250 g)
Filets
ganz (200 g)
Filets
dicke Abschnitte (6 bis 10 cm Länge)
Filets (180/200 g)
Filets
Filets (180/200 g)
ganz (200 g) 13 bis 15 Min.
Rind
Schwein (Filets)
Geflügel (weisses,
Filets) (Rouladen)
Würstchen
Blutwurst
30 Min.
20 Min.
15 bis 30 Min.
25 Min.
20 bis 25 Min.
25 Min.
20 Min.
10 bis 15 Min.
7 Min.
5 bis 6 Min.
8 Min.
10 bis 12 Min.
Braten 800 g: 55 bis 60 Min.
Hähnchenschenkel: 35 bis 40 Min.
Kleiner Puterbraten: 50 bis 60 Min.
Mortadella 400 g
FISCH GARZEIT ZUBEREITUNGEN BEMERKUNGEN
REIS, TEIGWAREN
GARZEIT ZUBEREITUNGEN BEMERKUNGEN
GRIESS
Direkt in die Pfanne geben, mit Wasser oder Milch abdecken. Der Dampf reicht in der Tat
nicht aus, diese aufquellenden Produkte zu sättigen. Eine ALuminiumfolie auf die Pfanne
legen, um herabfallende Wassertröpfchen zu vermeiden.
Schale: werden direkt auf das Gitter gelegt.
Spiegelei:
In eine Einzelpfanne aufgeschlagen, auf das
Gitter gestellt und mit einer für Lebensmittel geeigneten Folie abgedeckt.
W
eiches Ei: wird direkt auf das Gitter gelegt.
Hartes Ei /I
m Töpfchen: siehe detaillierte Rezepte.
99636901_ML_A.qxd 18/04/05 09:51 Page 69
Page 70

70
Pflege
Herdraum (nach jedem Garvorgang)
Nach dem Abkühlen des Dampfgenerators den
Herdraum mit einem trockenen Tuch auswischen oder
ihn bei halboffener Tür trocknen lassen.
Wasserzuführung (1 mal pro Monat)
Das Röhrchen der Wasserzuführung nach vorne herausziehen.
Den Kesselstein entfernen, der sich eventuell innen
abgesetzt hat (mit einem dünnen und spitzen
Gegenstand von der Art Spiess oder Stricknadel).
Dampfgenerator (1 mal pro Monat)
1/2 Glas weissen Alkoholessig auf den Generator giessen.
Einige Minuten wirken lassen, dann reinigen und mit
Wasser abspülen. Keine Scheuerschwämme oder -pulver
oder Kalkenferner für Kaffeemaschinen benutzen.
Reinigung
der
Wasserablaufrinne
Diese Wasserablaufrinne nach oben ziehen und ausbauen, sie abwischen und wieder mit den drei hierfür
vorgesehenen Kerben einsetzen.
Die Reinigung des Dampfgarers darf nicht
mit einem Dampfreiniger durchgeführt
werden.
Die Pflege des Dampfherdes
99636901_ML_A.qxd 18/04/05 09:51 Page 70
Page 71

71
DE
Abhilfe bei Störungen
ABHILFE
DIE MÖGLICHEN
URSACHEN
Der Anzeiger leuchtet
nicht auf.
Die Glühbirne funktioniert nicht mehr
Wasser- oder Dampfleck an der Tür
während des Garens.
Fehler in der Stromversorgung des
Dampfgarers.
Elektronikkarte außer
Betrieb.
- Die Stromversorgung
überprüfen (Schmelzsicherung der Anlage).
- Den Kundendienst rufen.
- Die Glühbirne austauschen.
- Den Dampfgarer anschließen.
- Die Schmelzsicherung
der Anlage austauschen.
Die Glühbirne funktioniert nicht mehr.
Der Dampfgarer ist
nicht angeschlossen.
Die Schmelzsicherung
der Anlage ist außer
Betrieb.
Die Herdtür ist
schlecht geschlossen.
Die Türdichtung ist
fehlerhaft.
- Den Kundendienst rufen.
FESTSTELLUNG
Wenn die Einwirkung nicht ausreicht,
auf jeden Fall sofort den Kundendienst rufen.
Austausch der Glühbirne
- Mit dem kleinen Fenster eine Vierteldrehung nach links durch-
führen.
- Die Glühbirne im gleichen Sinn losschrauben.
Merkmale der Glühbirne:
- 15 W - 220-240 V
- 300°C - Sockel E 14
- Eine Glühbirne einsetzen, das kleine Fenster wieder montieren
und dabei auf den richtigen Sitz der Dichtungen achten.
- Den Dampfgarer wieder anschließen.
Die Glühbirne befindet sich hinten
rechts im Ofenraum.
Den Dampfgarer vor jedem
Eingriff an der Glühbirne von
der Stromversorgung trennen,
um jegliches Risiko eines Stromschlags auszuschließen.
99636901_ML_A.qxd 18/04/05 09:51 Page 71
Page 72

99636901 04/05
99636901_ML_A.qxd 18/04/05 09:51 Page 72
 Loading...