

Page 1
Le guide d’utilisation de votre four
de
R
éférences : HP-198*
Manual de utilización de los hornos
Gebruiksaanwijzing van uw oven
N
ávod k používání Vaší trouby
U
sing your oven
O
guia de utilização do seu forno
Bedienungsanleitung Ihres Backofens
FR
GB
DE
NL
CK
ES
PT
99628232_ML_A.qxd 22/05/03 14:14 Page 1
Page 2

Sommaire
Tout au long de la notice,
vous signale les consignes de sécurité,
vous signale les conseils et les astuces
Edito P.3
Comment se présente votre four ?
D
escriptif de l’appareil
P.4
A
ccessoires
P.5
Conseils de sécurité
P.6
Comment installer votre four ?
Raccordement électrique P.7-8
Comment changer l’ampoule ? P.8
Dimensions utiles pour encastrer votre four P.9
Comment utiliser votre four ?
Le détail de votre programmateur P.10
C
omment mettre à l’heure l’horloge du four ?
P.11
Comment faire une cuisson immédiate ? P.12
Comment programmer une cuisson ? P.12-14
Comment utiliser la minuterie ? P.15
Modes de cuisson du four P.16-17
Comment nettoyer la cavité de votre four ?
Qu’est-ce qu’une pyrolyse ? P.18
Dans quel cas faut-il effectuer une pyrolyse ? P.18
Comment faire une pyrolyse ? P.18-19
Que faire en cas d’anomalies de fonctionnement ?
P.20
2
99628232_ML_A.qxd 22/05/03 14:14 Page 2
Page 3
3
Edito
Chère Cliente, Cher Client,
Vous venez d'acquérir un four FAGOR et nous vous en remercions.
Nos équipes de recherche ont conçu pour vous une nouvelle génération
d'appareils pour cuisiner chaque jour avec plaisir.
Avec des lignes pures et une esthétique moderne, votre nouveau four
FAGOR s'intègre harmonieusement dans votre cuisine et allie parfaitement facilité d'utilisation et performances de cuisson.
Vous trouverez également dans la gamme des produits FAGOR, un vaste
choix de tables de cuisson, de hottes aspirantes, de lave-vaisselle et de
réfrigérateurs, que vous pourrez coordonner à votre nouveau four
FAGOR.
Bien entendu, dans un souci permanent de satisfaire au mieux vos exigences vis à vis de nos produits, notre service consommateurs est à
votre disposition et à votre écoute pour répondre à toutes vos questions
ou suggestions (coordonnées à la fin de ce livret).
A la pointe de l'innovation, FAGOR contribue ainsi à l'amélioration de la
qualité de la vie quotidienne en vous apportant des produits toujours plus
performants, simples d'utilisation, respectueux de l'environnement, esthétiques et fiables.
La Marque FAGOR
FR
99628232_ML_A.qxd 22/05/03 14:14 Page 3
Page 4
4
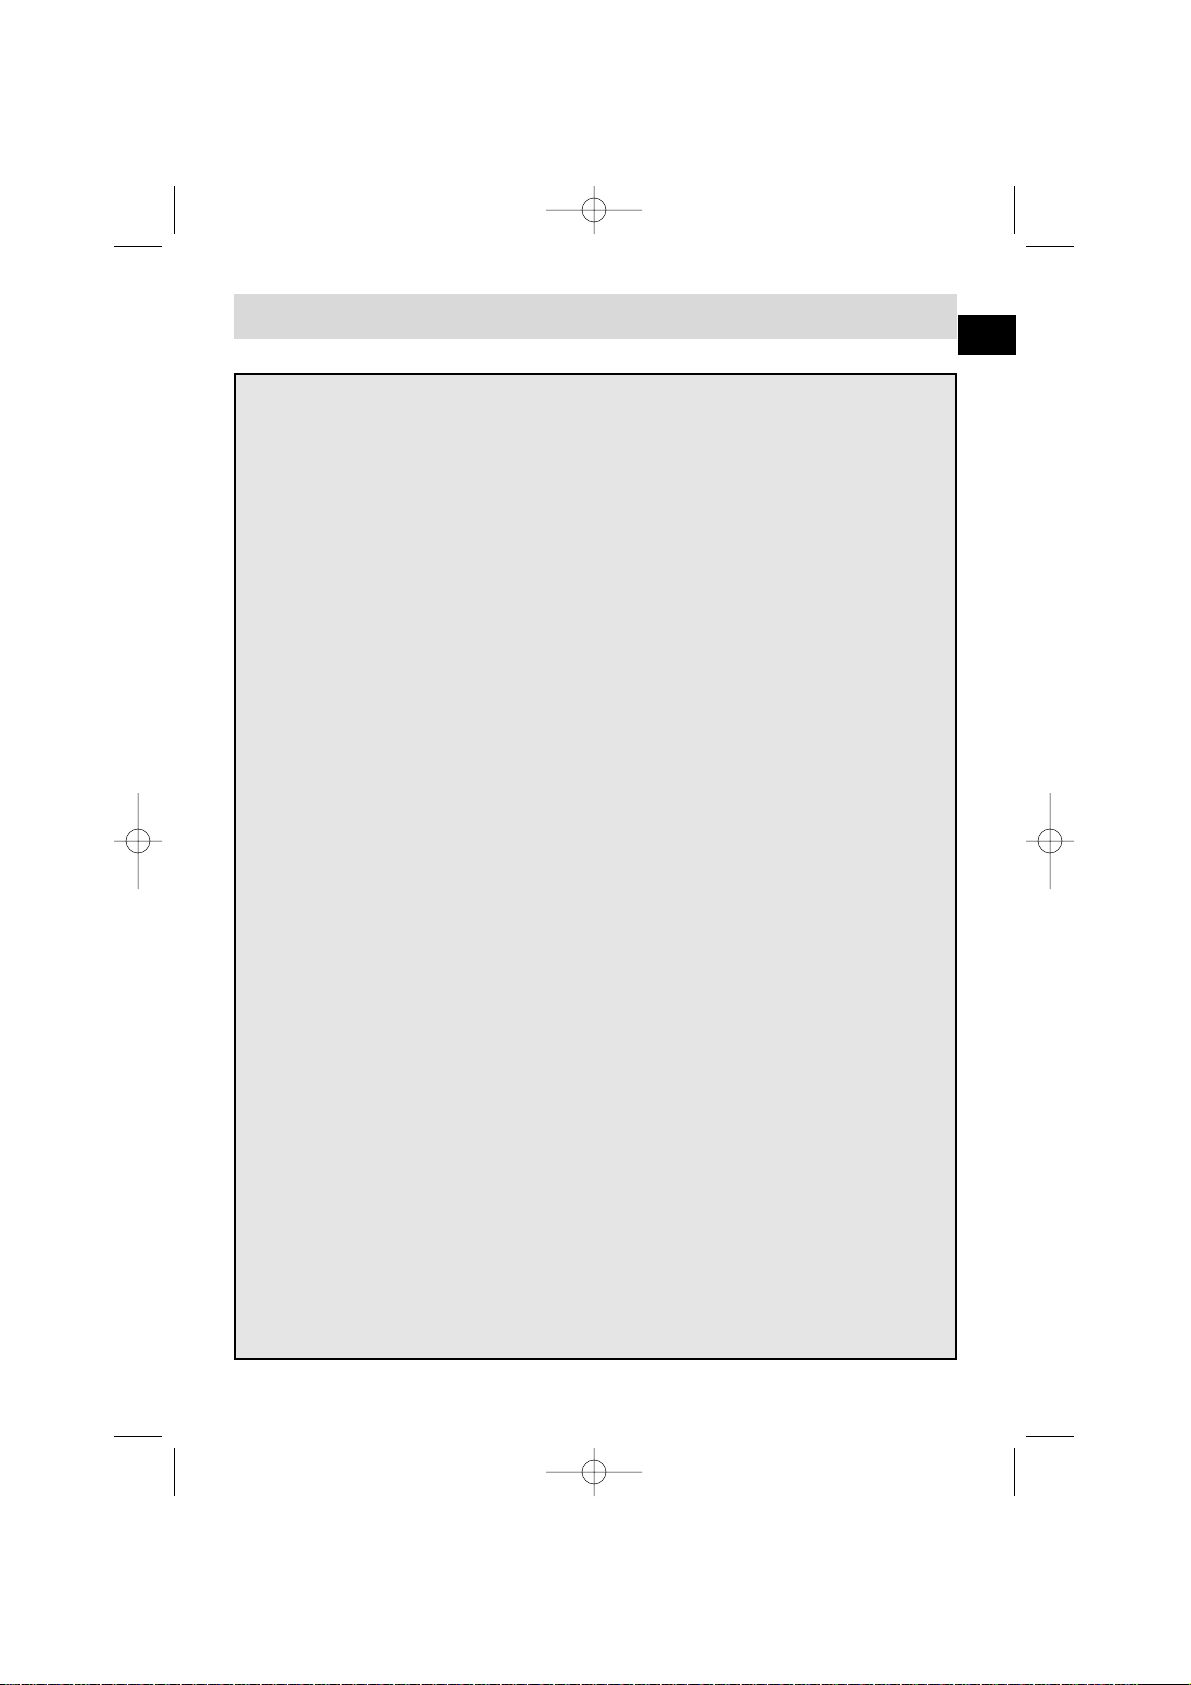
1
3
5
P
40
65
100
150
165
180
200
210
220
240
275
0
1
2
3
4
5
7
6
1
2
5
6
7
3
4
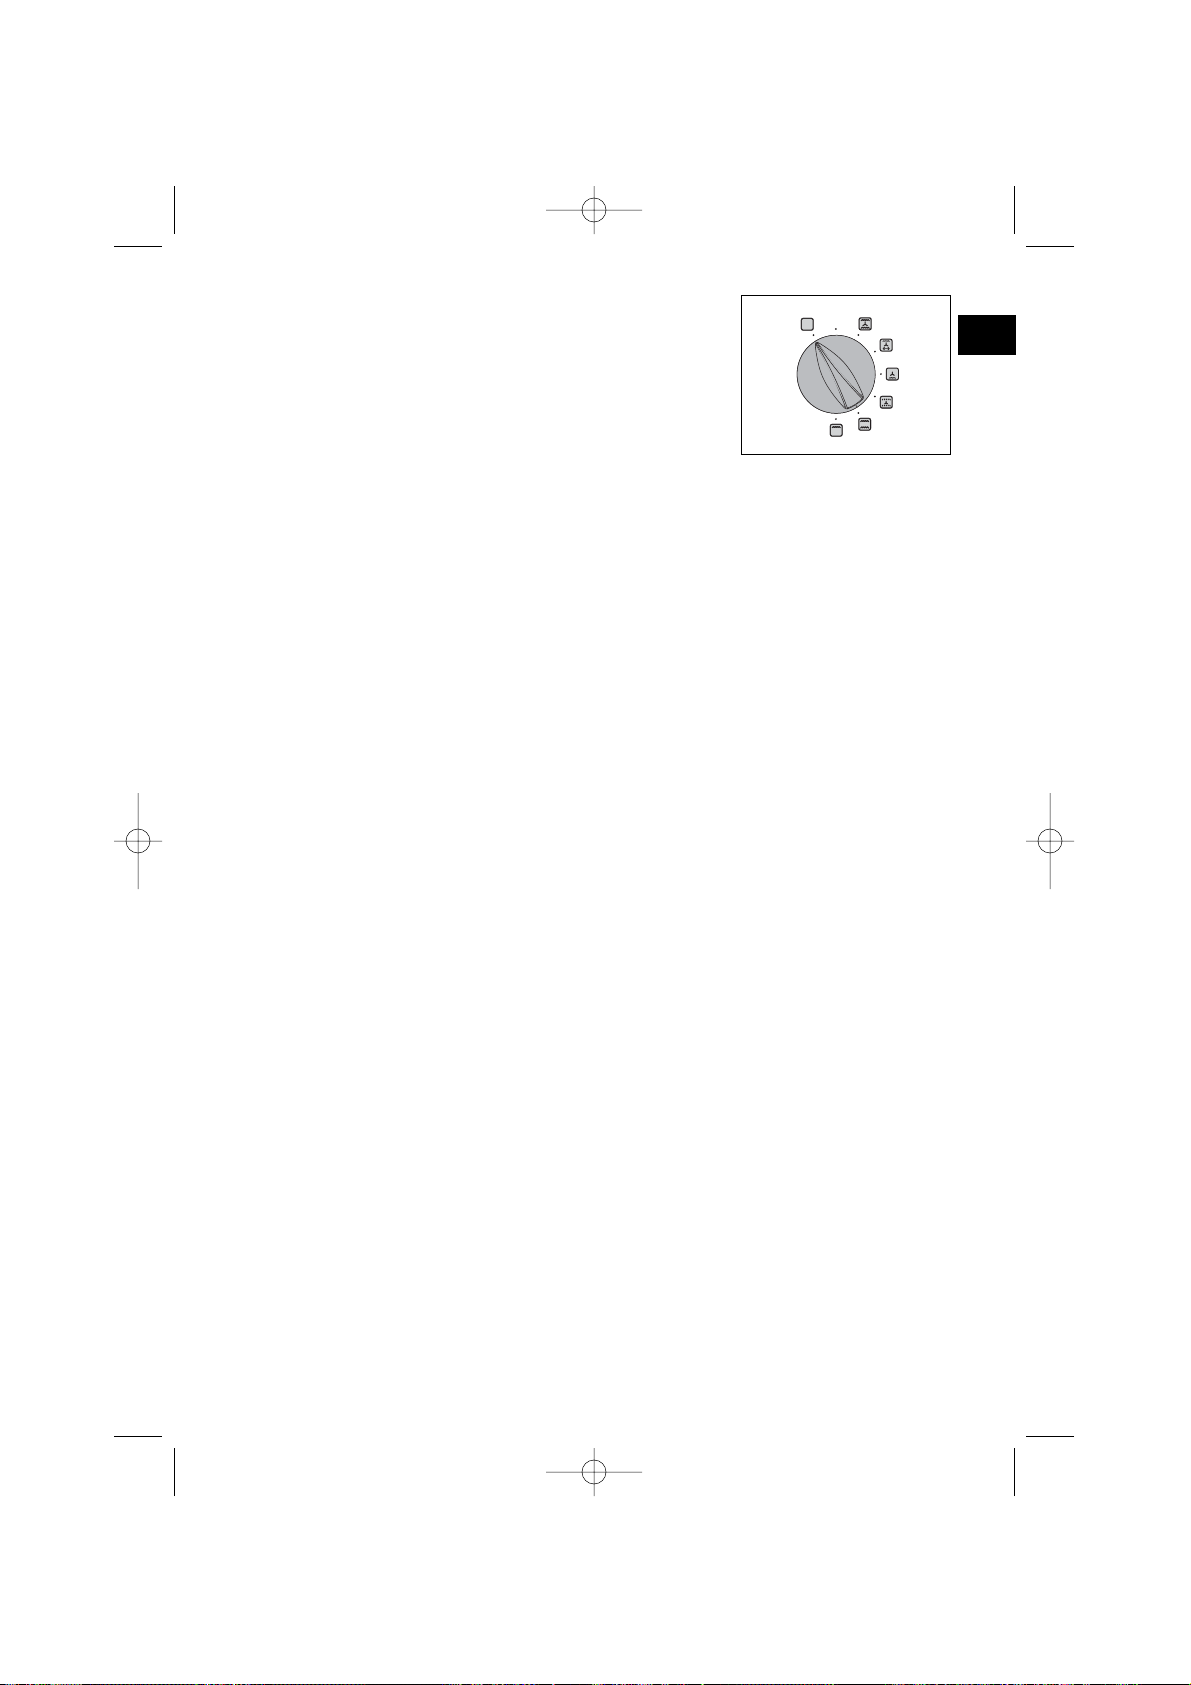
Sélecteur de température
Programmateur
Sélecteur de fonctions
Lampe
Indicateur de gradin
Trou pour tourne broche
Contact de détection
d’ouverture de porte
Comment se présente votre four ?
DESCRIPTIF APPAREIL
99628232_ML_A.qxd 22/05/03 14:14 Page 4
Page 5
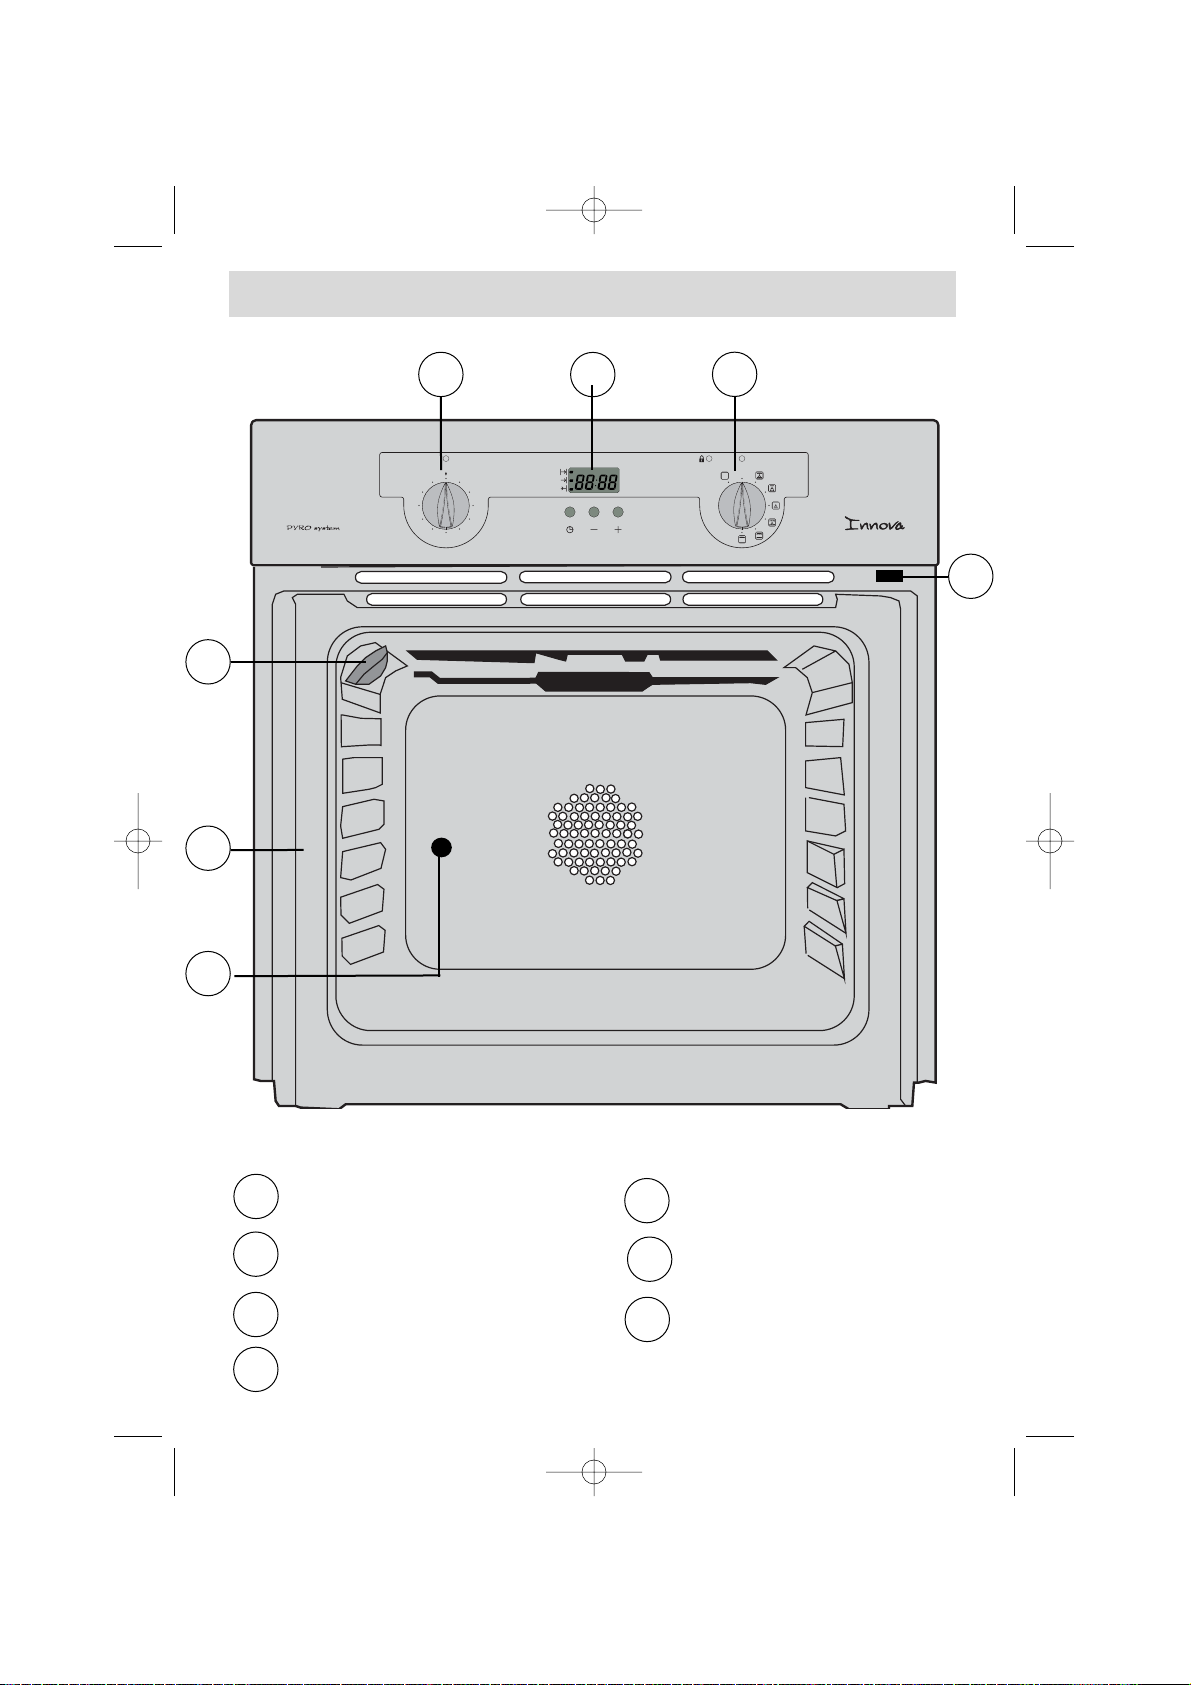
Plat creux
Il sert à recueillir le jus et les graisses de cuisson réalisées en gril fort ou gril pulsé.
Il peut être utilisé comme plat de cuisson en
appropriant la taille du morceau à cuire
(ex: une volaille avec les légumes autour, à
température modérée).
Ne jamais poser ce plat directement sur la sole, sauf en position GRIL.
5
Accessoires
Inséré dans les gradins sous la grille, il recueille les jus et les graisses des grillades. Il peut aussi être utilisé à demi rempli d'eau pour des cuissons au bain-marie.
Evitez de poser directement dans ce plat des rôtis ou des viandes car vous aurez
automatiquement d'importantes projections sur les parois du four.
Plat multi usages
(
plat à gâteaux ou lèchefrite)
Il sert de plat à gâteaux et dispose d'un
rebord incliné. Il s'utilise pour la cuisson de
pâtisseries telles que choux à la crème,
meringues, madeleines, pâtes feuilletées...
• enfilez une des fourchettes sur la broche ;
embrochez la pièce à rôtir ; enfilez la deuxième
fourchette ; centrez et serrez en vissant les deux fourchettes.
• placez la broche sur son berceau.
• poussez légèrement pour engager la pointe de la broche dans le carré d'entraînement situé au fond du four (6).
• retirez la poignée en la dévissant. Après la cuisson, revissez la poignée sur la
broche pour la retirer sans se brûler.
Tournebroche
Pour l'utiliser :
• disposez le plat multi-usages au gradin
N°1 pour recueillir les jus de cuisson ou sur
la sole si la pièce à rôtir est trop grosse.
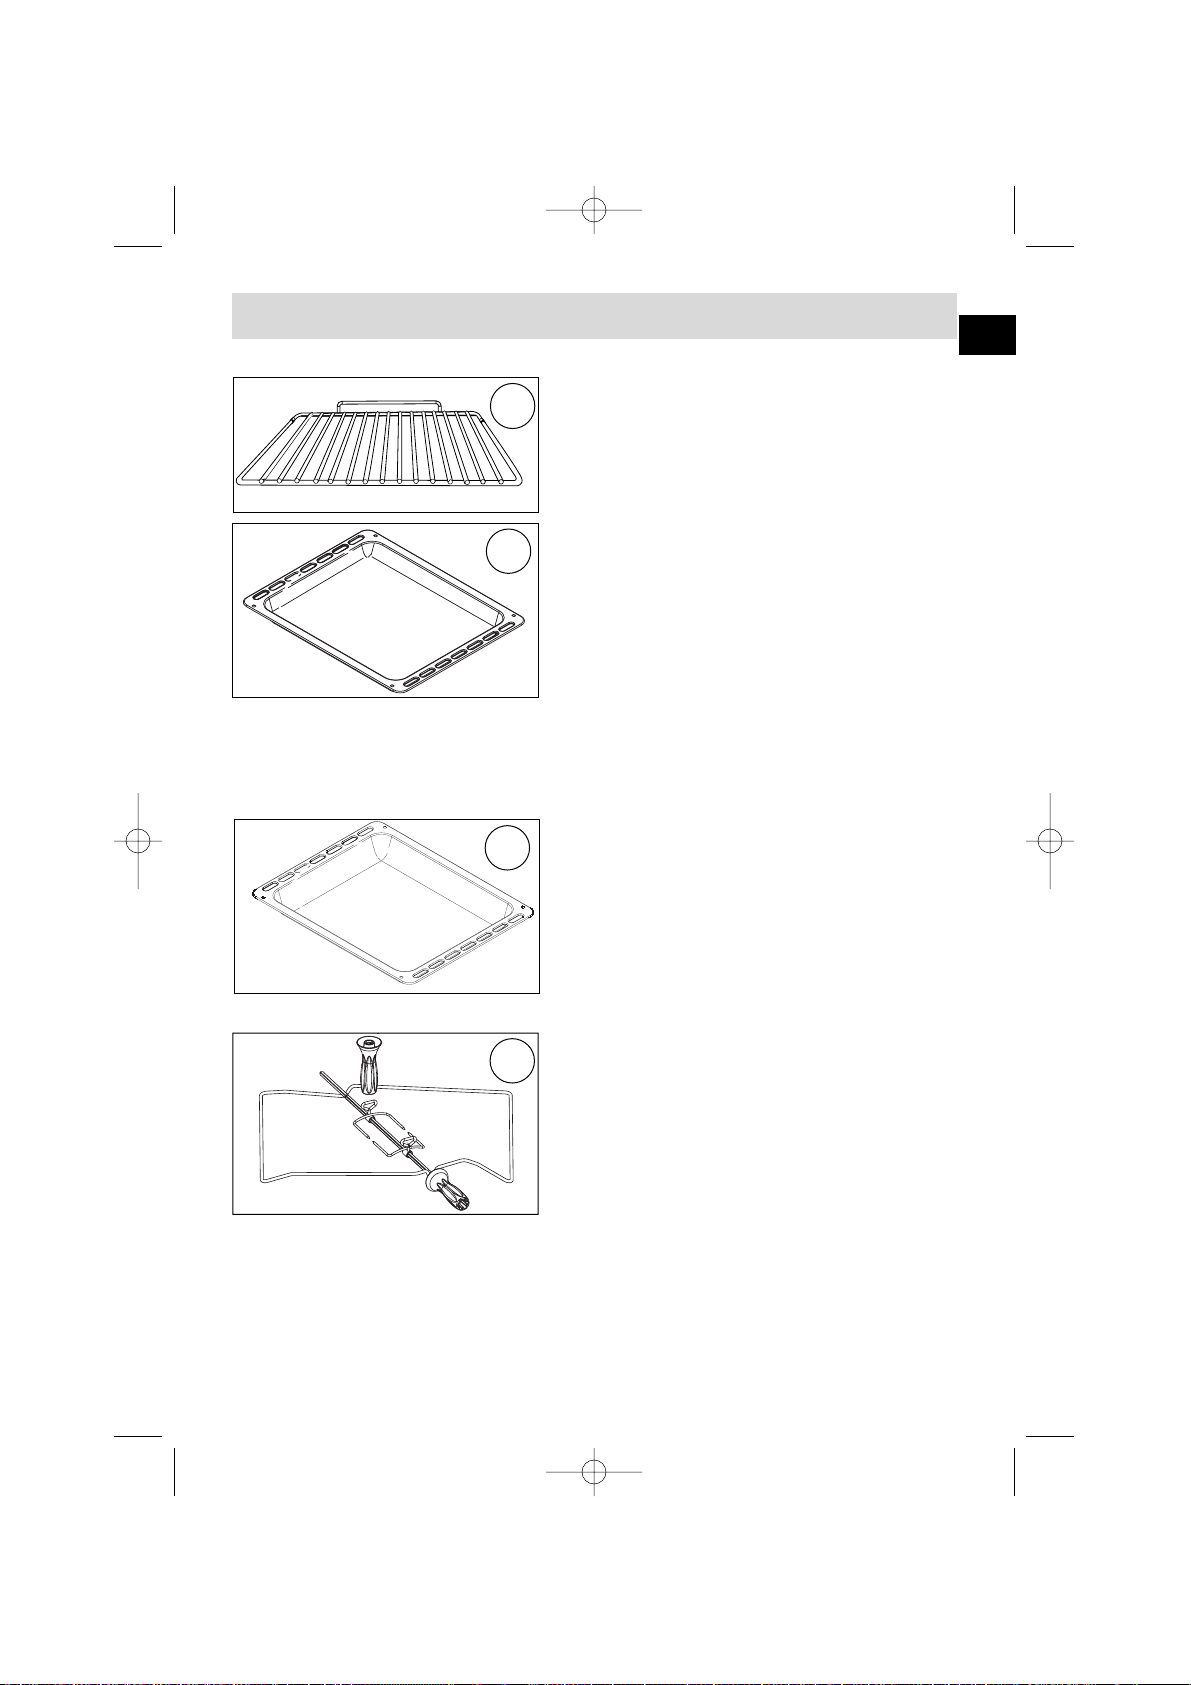
Grille sécurité anti basculement
La grille peut être utilisée pour supporter tous
les plats et moules contenant des aliments à
cuire ou à gratiner. Elle sera utilisée pour les
grillades (à poser directement dessus).
AR
AV
10
8
9
11
FR
99628232_ML_A.qxd 22/05/03 14:14 Page 5
Page 6
6
Conseils de sécurité
Merci de prendre connaissance de ces conseils avant d’installer et d’utiliser votre four. Ce four a été conçu pour être utlilisé par des particuliers
dans leur lieu d’habitation. Il est destiné exclusivement à la cuisson des denrées
alimentaires. Ce four ne contient aucun composant à base d’amiante.
PREMIERE UTILISATION :
Avant d’utiliser votre four pour la première fois, chauffer le à vide, porte fermée,
pendant 15 minutes environ sur la position maxi afin de “roder” l’appareil. La laine
minérale qui entoure la cavité du four peut dégager, au début, une odeur particulière due à sa composition. De même, vous constaterez peut-être un dégagement
de fumée. Tout ceci est normal.
UTILISATIONS SUIVANTES :
- Assurez vous que votre porte de four est bien fermée afin que le joint d’étanchéité remplisse correctement sa fonction.
- Ne laissez personne s’appuyer ou s’asseoir sur la porte du four ouverte.
- Lors de l’utilisation du gril porte entre-ouverte, les parties accessibles
ou les surfaces peuvent devenir chaudes. Eloignez les jeunes enfants.
- Lors de son utilisation, l’appareil devient chaud. Veillez à ne pas toucher les éléments chauffants situés à l’intérieur du four.
- Après une cuisson, ne prenez pas à main nue la casserolerie (grille, tournebroche, léchefrite, berceau de tournebroche...), utilisez une manique ou un tissu isolant.
- Ne garnissez pas votre four de feuilles en aluminium. Sinon, il en résulterait une
accumulation de chaleur qui influencerait désavantageusement le résultat de la
cuisson et du rôtissage et endommagerait l’émail.
- Avant de procéder au nettoyage pyrolyse de votre four, retirez tous les éléments
de casserolerie et enlevez les débordements importants.
- Ne pas utiliser de nettoyeur vapeur ou à haute pression.
- Pendant une pyrolyse, les surfaces accessibles deviennent plus chaudes qu’en
usage normal. Eloigner les jeunes enfants.
- Pour toute intervention de nettoyage dans la cavité du four, le four doit
être arrêté.
Remettez impérativement le sélecteur de fonction sur 0 pour
réutiliser votre four.
99628232_ML_A.qxd 22/05/03 14:14 Page 6
Page 7
7
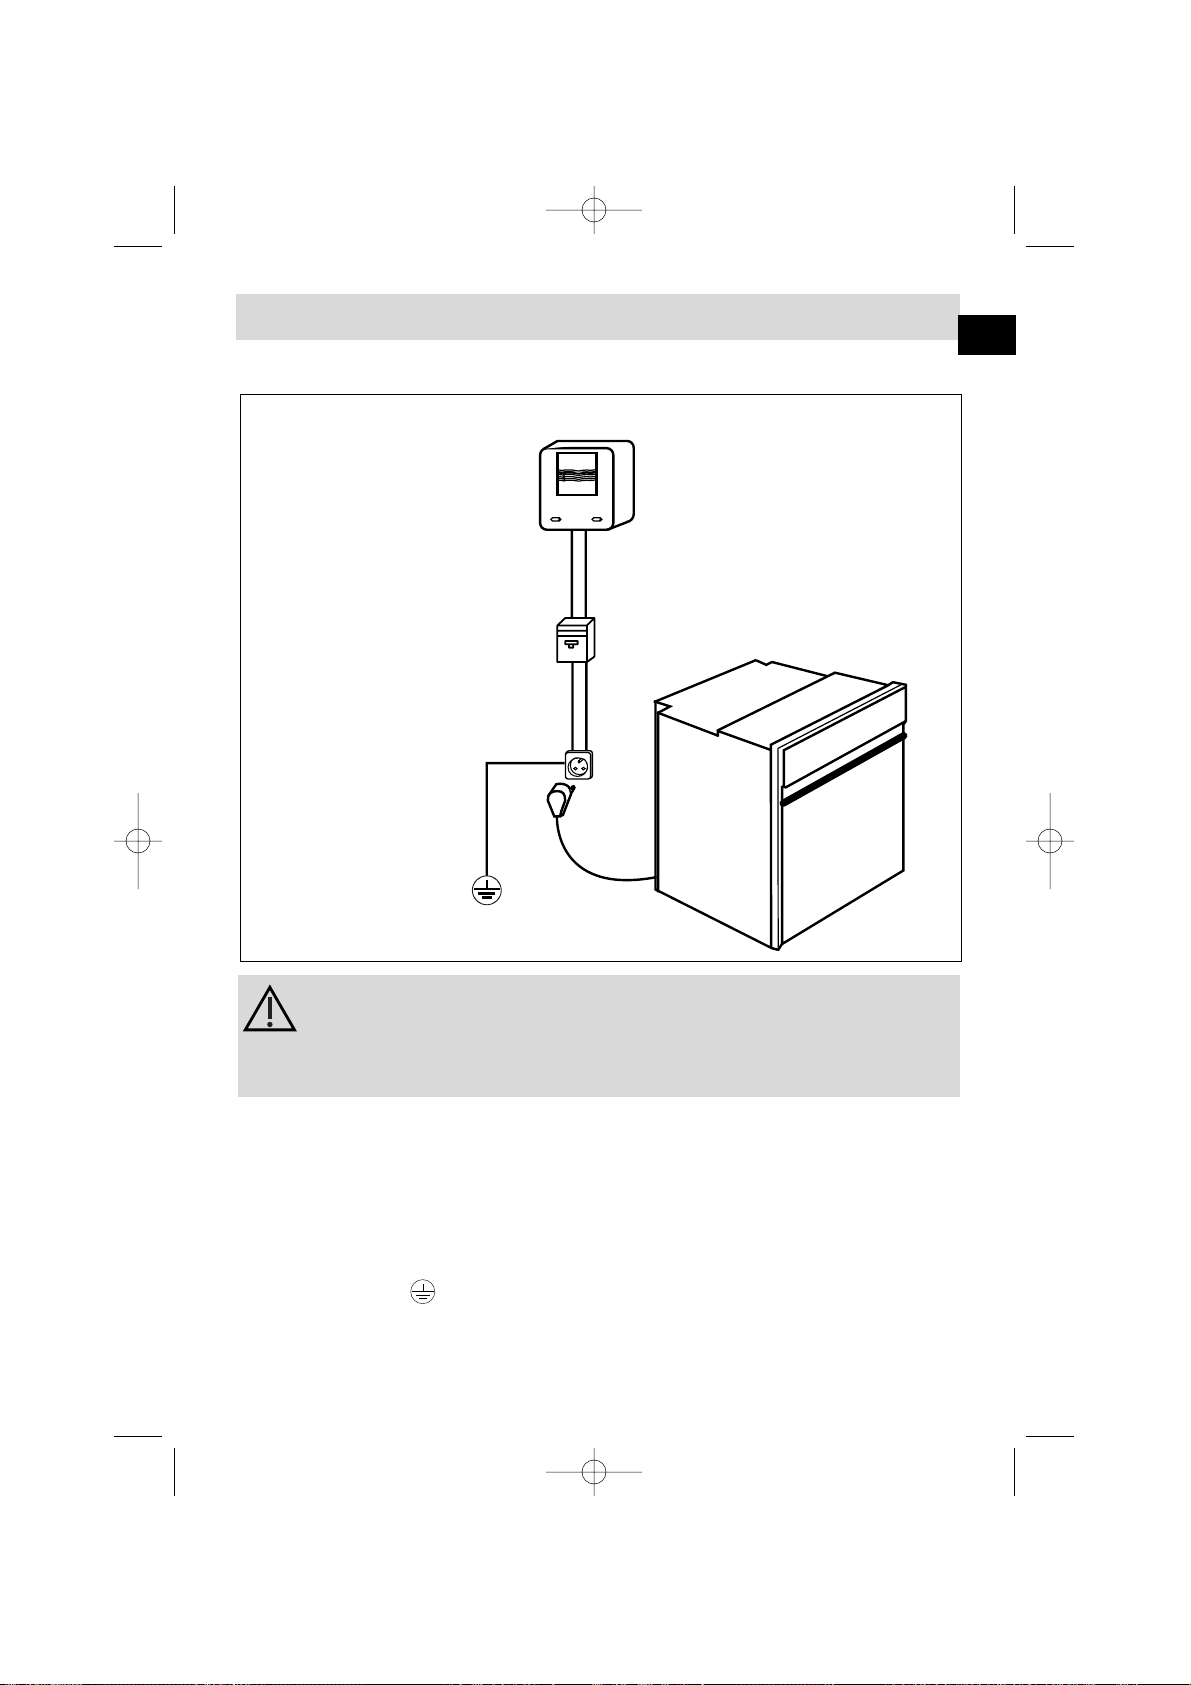
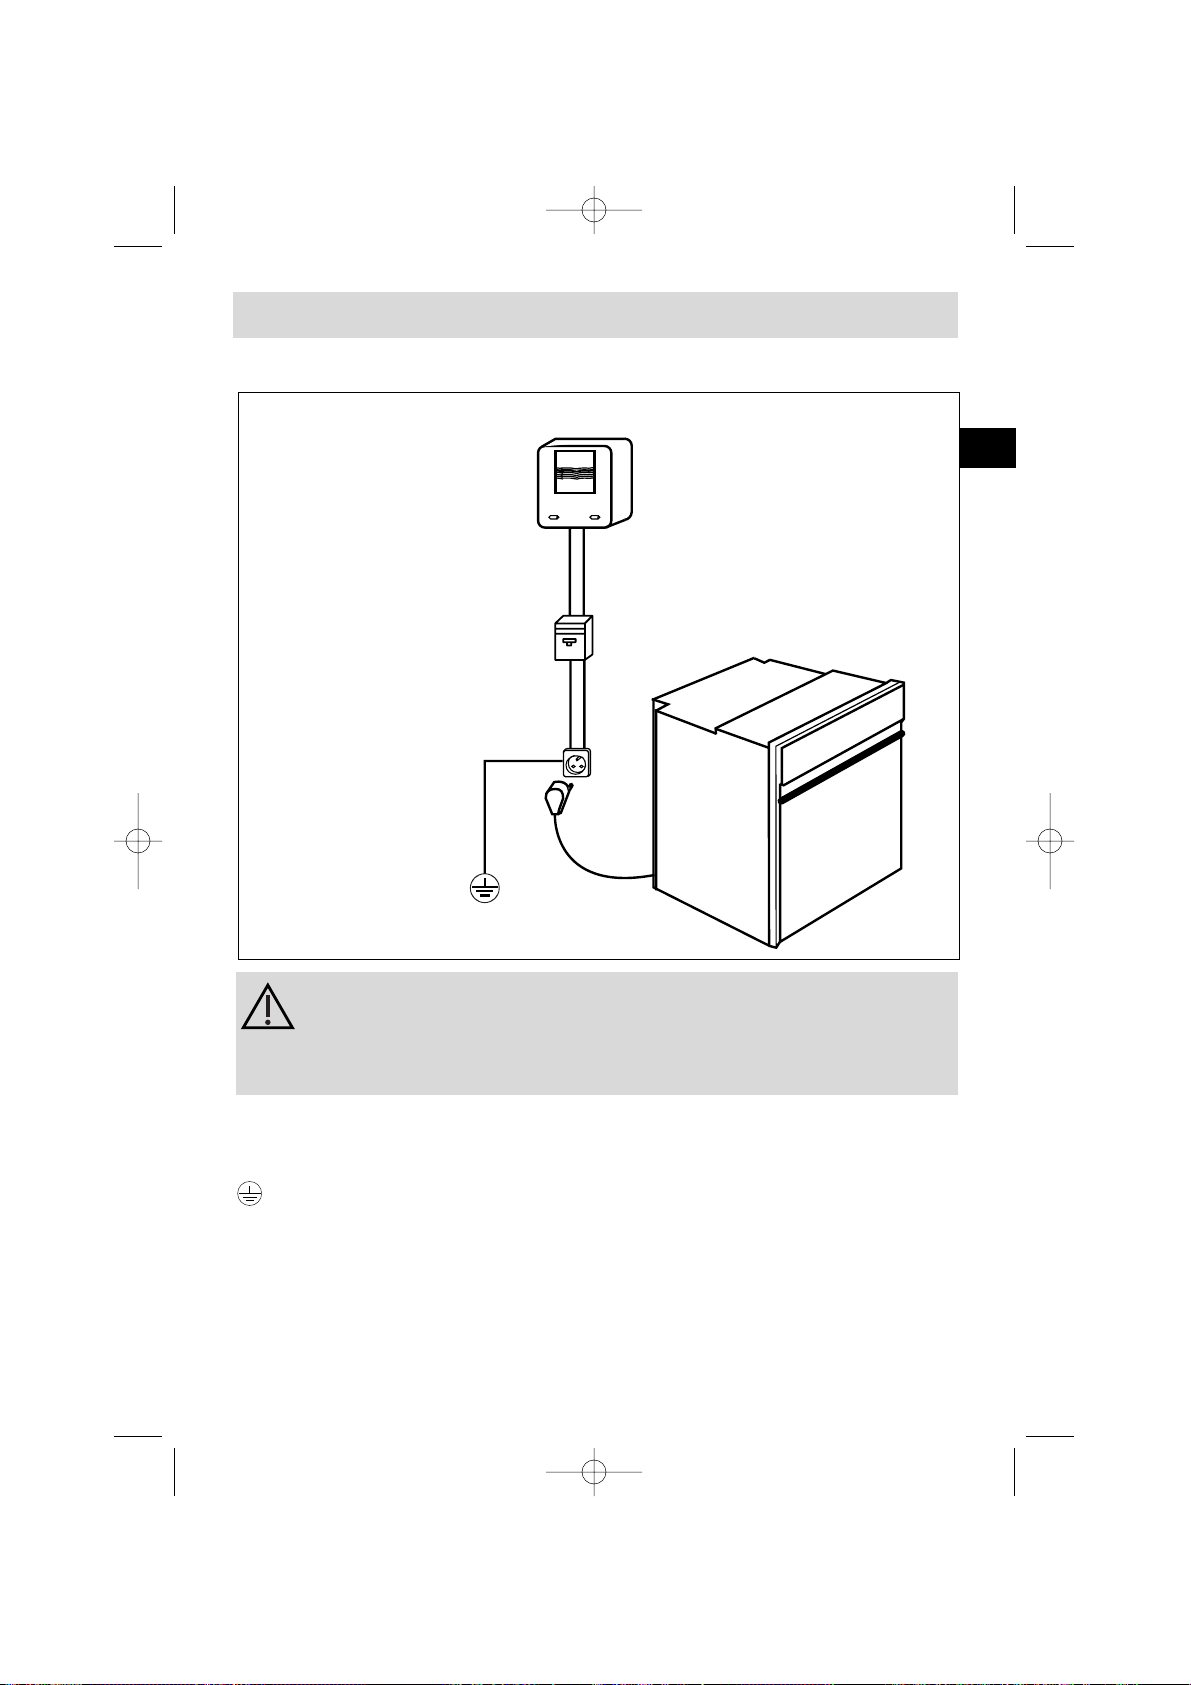
Comment installer votre four ?
Compteur 20A Mono
220-240 V ~ 50 Hz
Prise de courant
2 pôles + terre
norme CEI 60083
Ligne Mono 220-240 V ~
Raccordement électrique
Câble
d'alimentation
longueur 1,50 m
environ
Disjoncteur différentiel ou fusible 16A
Avant d'effectuer le branchement, s'assurer que les fils de votre
installation électrique sont d'une section suffisante pour alimen-
ter normalement l'appareil (section au minimum égale à celle du
câble d'alimentation).
Le fusible de votre installation doit être de 16 Ampères.
Le raccordement électrique est à réaliser avant la mise en place de l'appareil dans
le meuble.
• Le four doit être branché avec un câble d'alimentation (normalisé) à 3 conducteurs de 1,5 mm
2
(1 ph +1 N + terre) qui doivent être raccordés sur réseau
220-240 V ~ monophasé par l'intermédiaire d'une prise de courant 1 ph +1 N +
terre normalisée CEI 60083 ou d'un dispositif à coupure omnipolaire ayant une distance d'ouverture des contacts d'au moins 3 mm. Le fil de protection (vert-jaune)
est
relié à la borne de l'appareil et doit être relié à la terre de l'installation.
• Dans le cas d’un branchement avec prise de courant, celle-ci doit rester
accessible après l’installation de l’appareil.
• Le neutre du four (fil bleu) doit être raccordé au neutre du réseau.
FR
99628232_ML_A.qxd 22/05/03 14:14 Page 7
Page 8
• Le câble d’alimentation (H05 RR-F, H05 RN-F ou H05 VV-F) doit avoir une longueur
suffisante pour être raccordé au four à encastrer posé au sol devant le meuble.
Pour cela l’appareil doit être déconnecté du réseau :
• Ouvrez la trappe située en bas à droite du capot arrière en dévissant les 2 vis,
puis faîtes pivoter la trappe.
• Dénudez chaque fil du nouveau câble d’alimentation sur 12mm.
• Torsadez soigneusement les brins.
• Desserrez les vis du bornier et retirez le cordon d’alimentation à changer.
• Introduire le câble d’alimentation par le côté du capot dans le serre-câble situé à
droite du bornier.
• Raccordez les fils du câble conformément au(x) repère(s) écrit(s) sur le bornier.
• Tous les brins des fils d’alimentation doivent être emprisonnés sous les vis.
• Le fil de la phase sur la borne L.
• Le fil de terre couleur vert-jaune doit être relié à la borne .
• Le fil du neutre (bleu) sur la borne N.
• Vissez à fond les vis du bornier et vérifiez le branchement en tirant sur chaque fil.
• Fixez le câble au moyen du serre-câble situé à droite du bornier.
• Refermez la trappe à l’aide des 2 vis.
Changement du câble d’alimentation
Notre responsabilité ne saurait être engagée en cas d'accident consécutif à une mise à la terre inexistante, défectueuse ou incorrecte.
Comment installer votre four ?
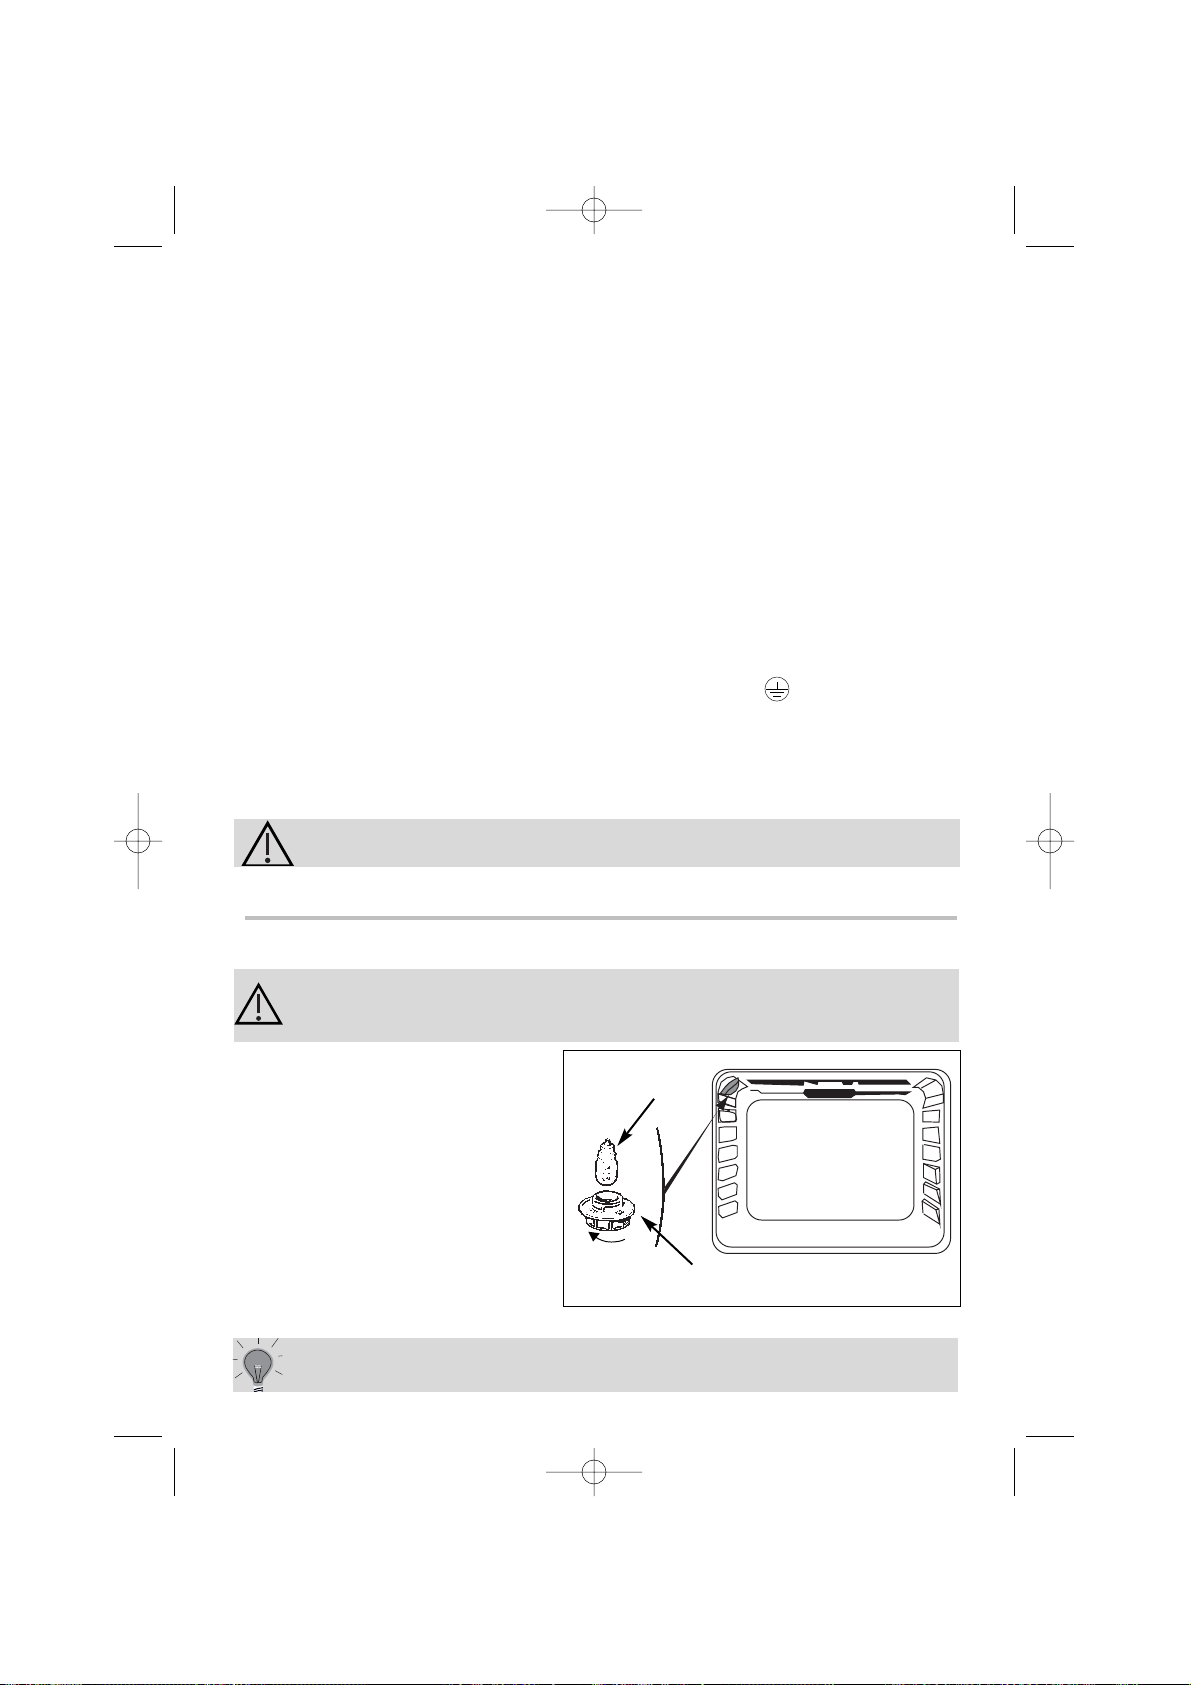
• L'ampoule se situe au plafond de la cavité de votre four.
a) Dévissez le hublot (voir ci-contre).
b) Dévissez l'ampoule dans le même
sens.
Caractéristiques de l'ampoule :
- 15 W
- 220-240 V
- 300°C
- culot E 14
c) Changer l'ampoule puis remonter
le hublot et rebrancher votre four
Ampoule
Dévissez
Hublot
Débrancher votre four avant toute intervention sur l'ampoule
pour eviter tout risque de choc électrique et laisser refroidir si
besoin l’appareil.
4. Comment changer l’ampoule ?
pour dévisser le hublot et la lampe, utiliser un gant de caout-
chouc qui facilitera le démontage.
8
99628232_ML_A.qxd 22/05/03 14:14 Page 8
Page 9
9
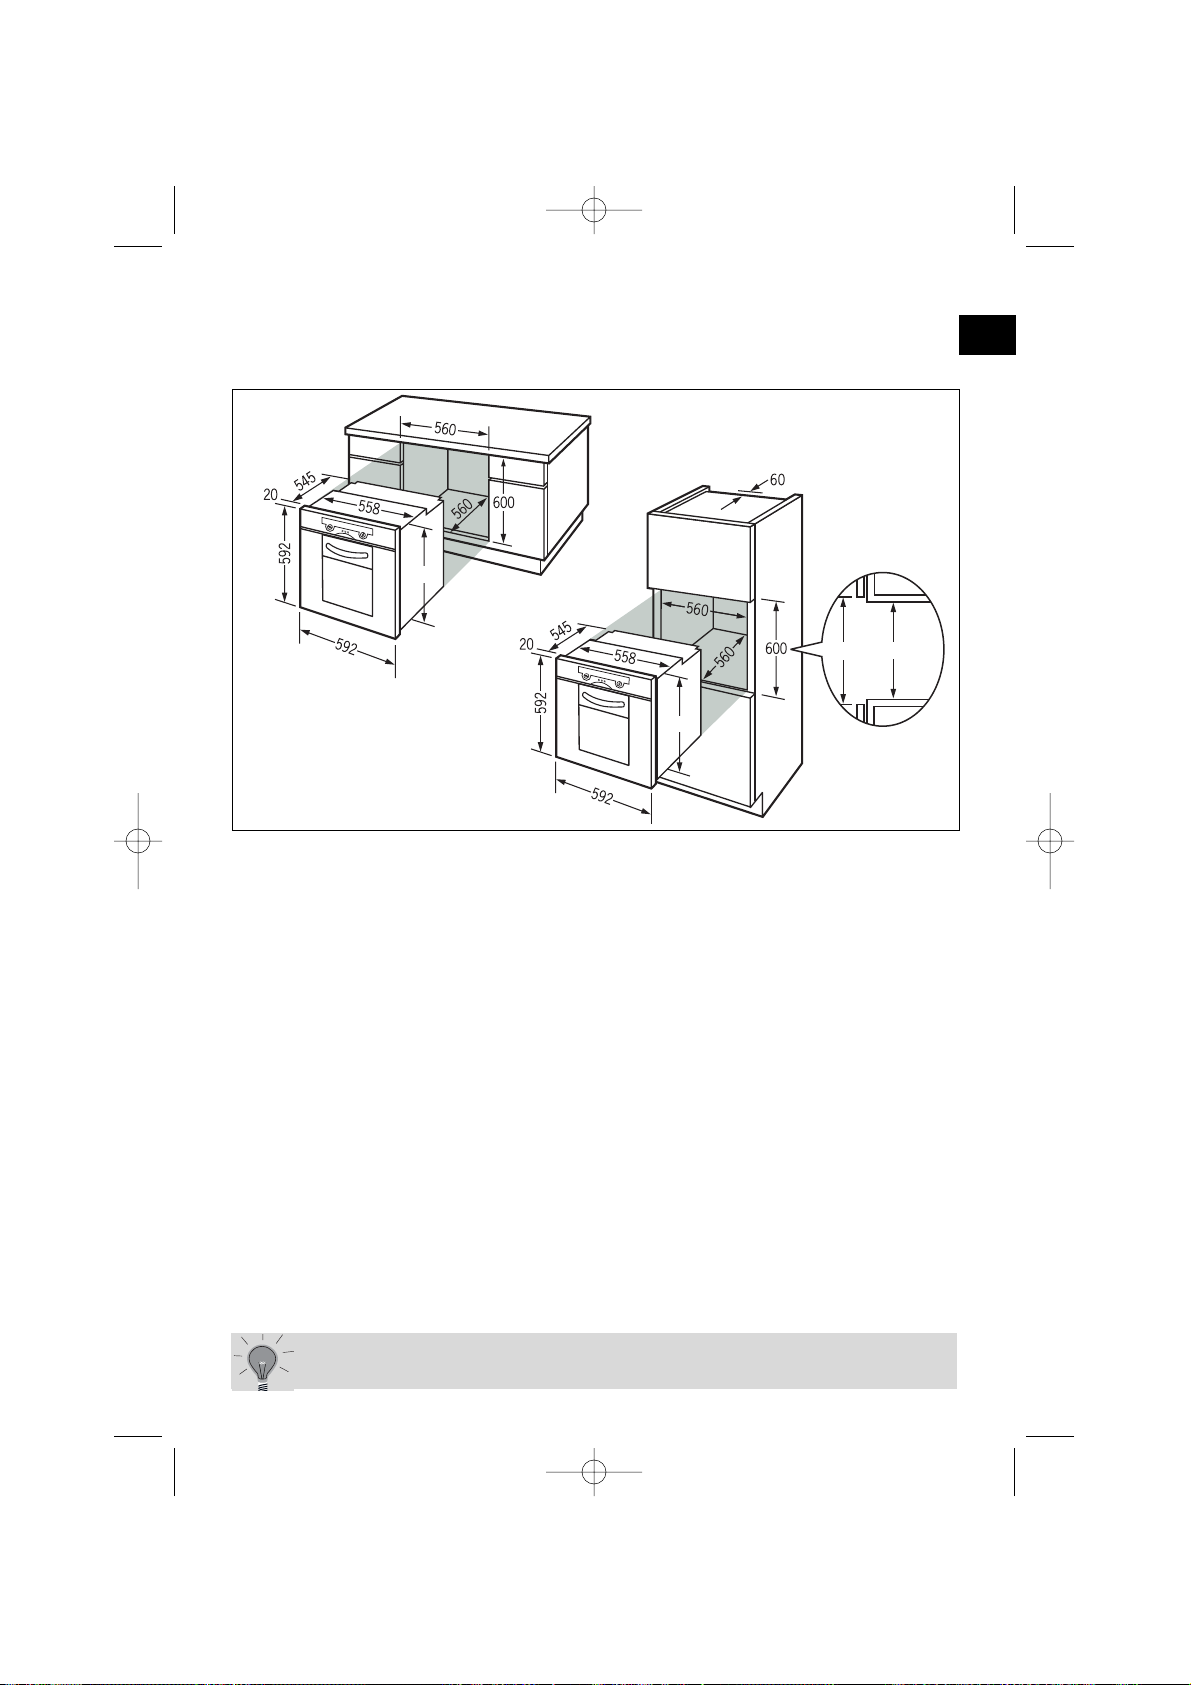
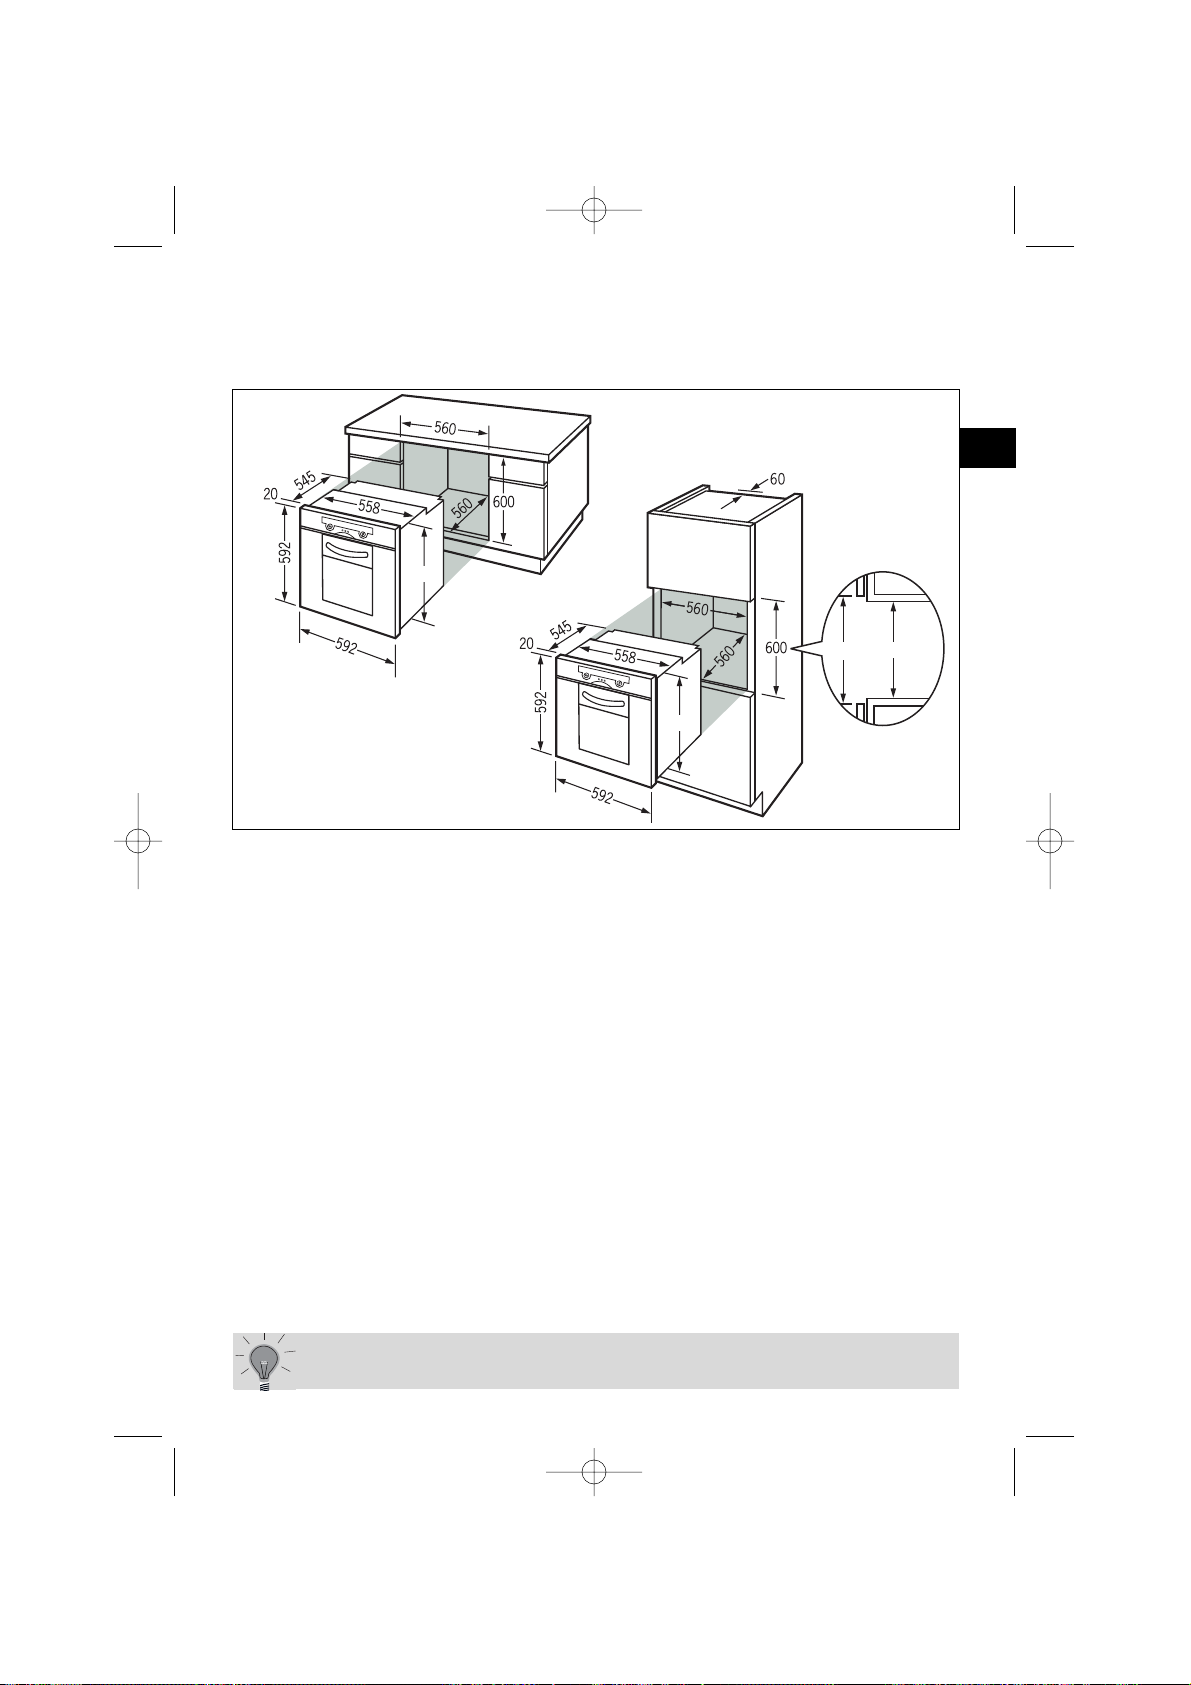
Comment installer votre four ?
Pour être assuré d’avoir une installation conforme, n’hésitez
pas à faire appel à un spécialiste électroménager.
Dimensions utiles pour encastrer votre four
Le four peut indifféremment être installé sous un plan de travail ou dans
un meuble en colonne (ouvert* ou fermé) ayant les dimensions d’encastrement adaptées (voir schéma ci-contre).
Votre four possède une circulation d’air optimisée qui permet d’obtenir des résultats
de cuisson et de nettoyage remarquables en respectant les éléments suivants :
• Centrez le four dans le meuble de façon à garantir une distance mini de 5 mm
avec le meuble voisin.
• La matière du meuble d’encastrement doit résister à la chaleur (ou être revêtu
d’une telle matière).
• Pour plus de stabilité, fixez le four dans le meuble par 2 vis au travers des trous
prévus à cet effet sur les montants latéraux (cf schéma).
Pour ce faire :
1) Retirez les cache vis en caoutchouc pour accéder aux trous de fixation.
2) Effectuez un trou de Ø 3 mm dans la paroi du meuble pour éviter l’éclatement du bois.
3) Fixez le four avec les 2 vis.
4) Remettez les cache vis en caoutchouc (ceux-ci servent également à amortir la
fermeture de la porte du four).
(*) si le meuble est ouvert, son ouverture doit être de 70 mm (maxi).
FR
577
577
585600
99628232_ML_A.qxd 22/05/03 14:14 Page 9
Page 10
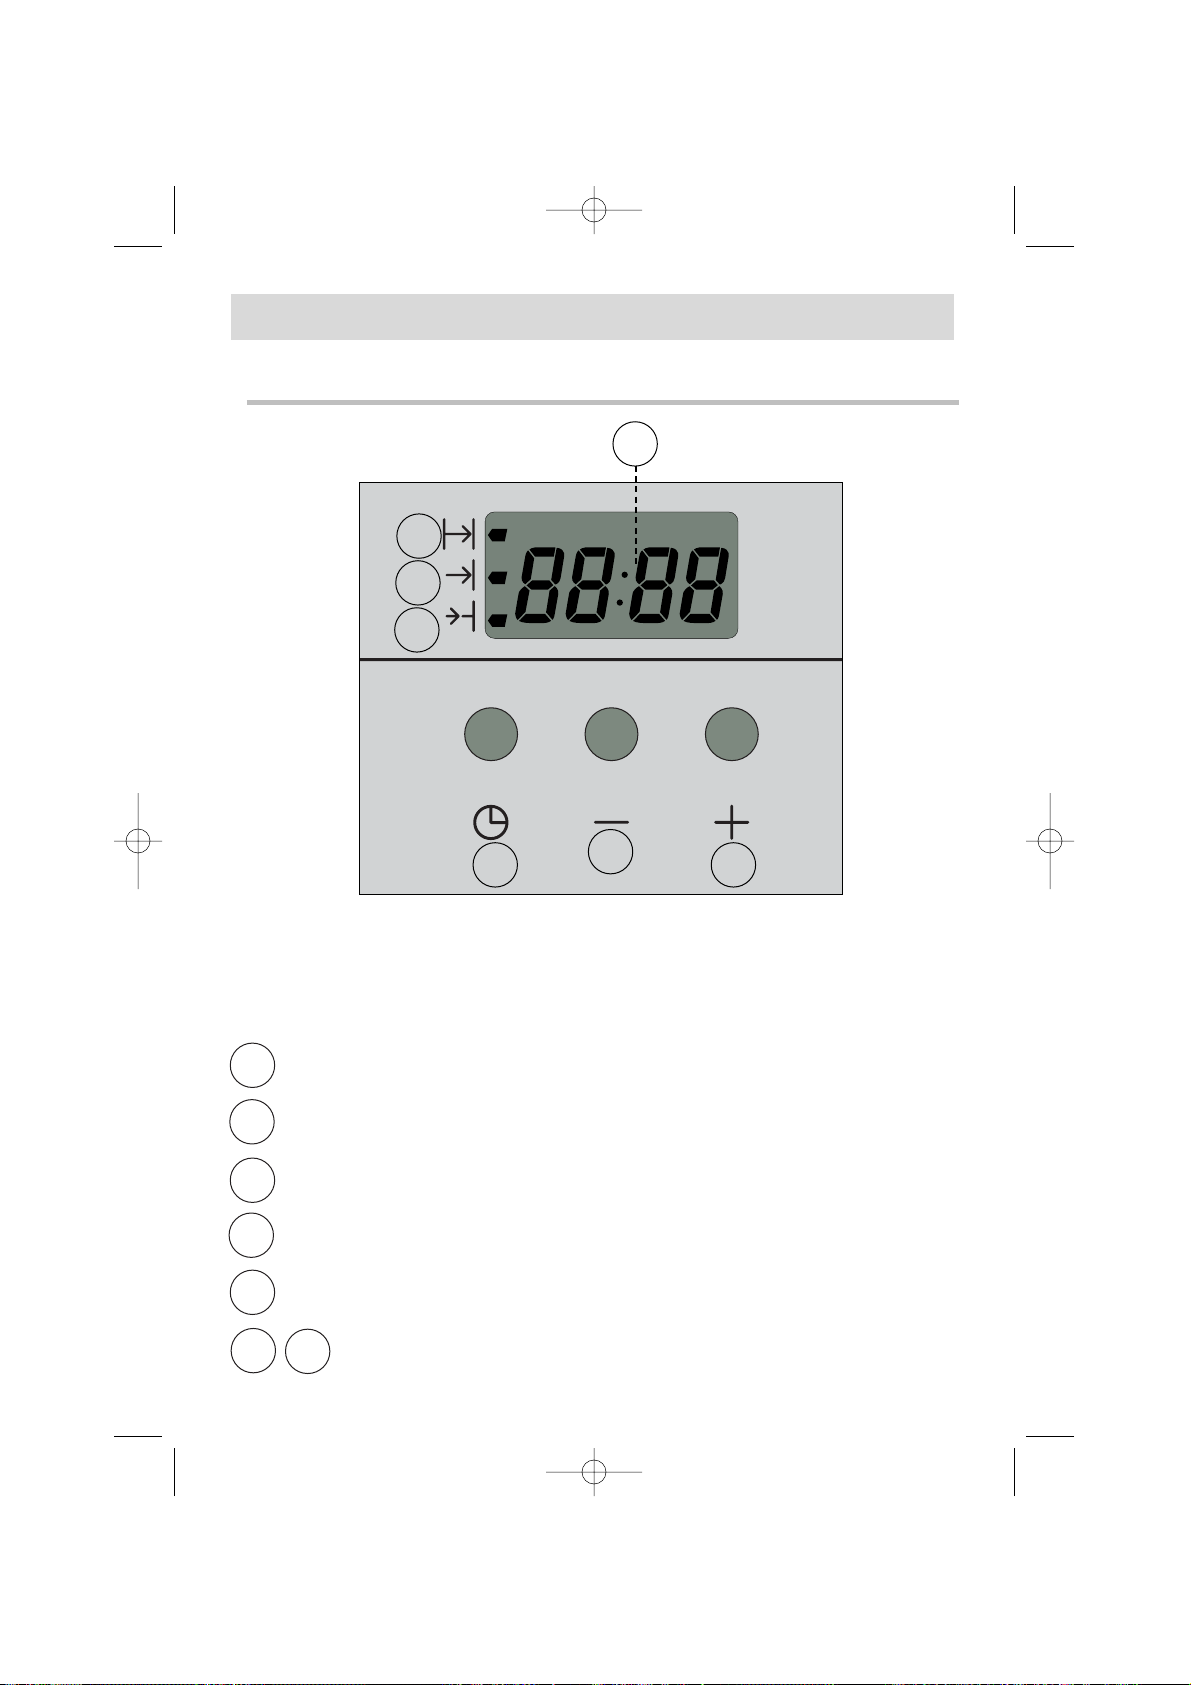
Affichage des temps et durées
Symbole de durée de cuisson
Symbole de fin de cuisson
Minuteur indépendant
Touche d’accès aux différents programmes de réglage du temps
Touches de réglages du temps
1
2
3
4
5
6
7
10
1. Le détail de votre programmateur
1
2
3
4
5
6
7
Comment utiliser votre four ?
DESCRIPTIF APPAREIL
99628232_ML_A.qxd 22/05/03 14:14 Page 10
Page 11
11
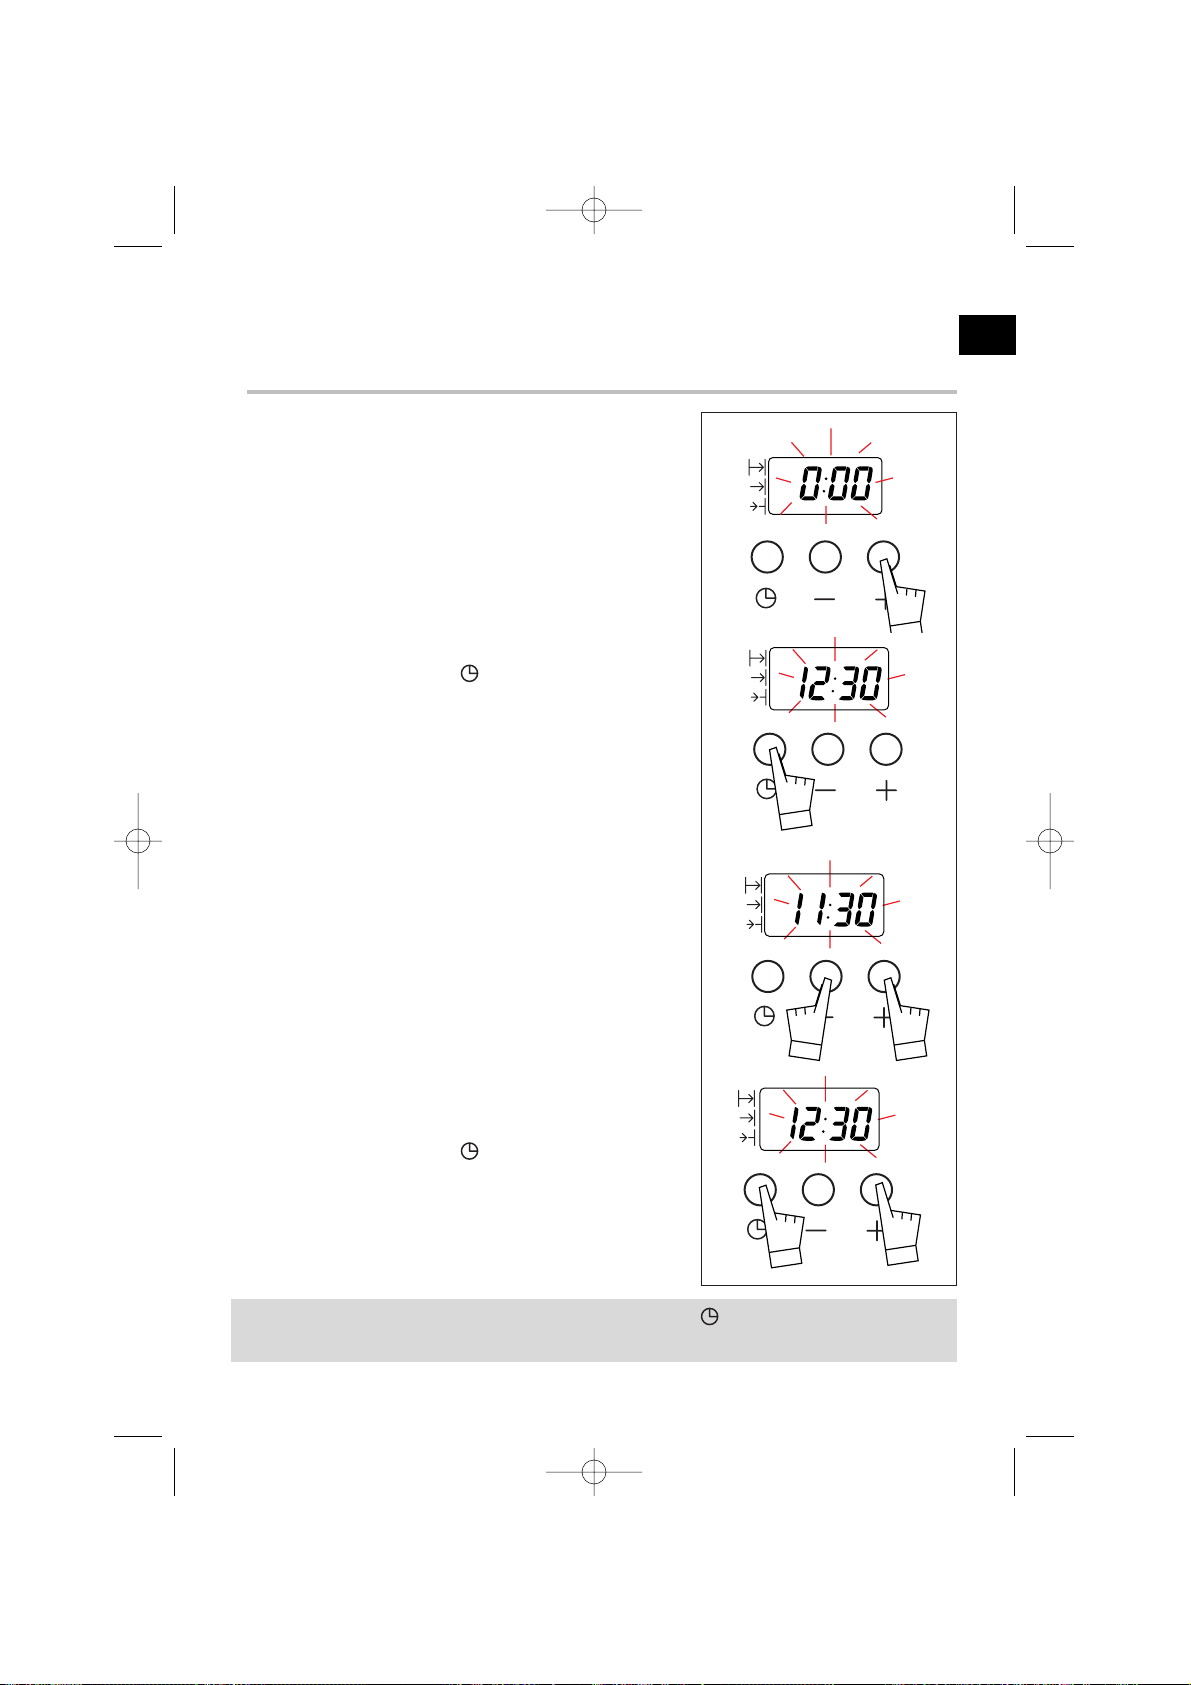
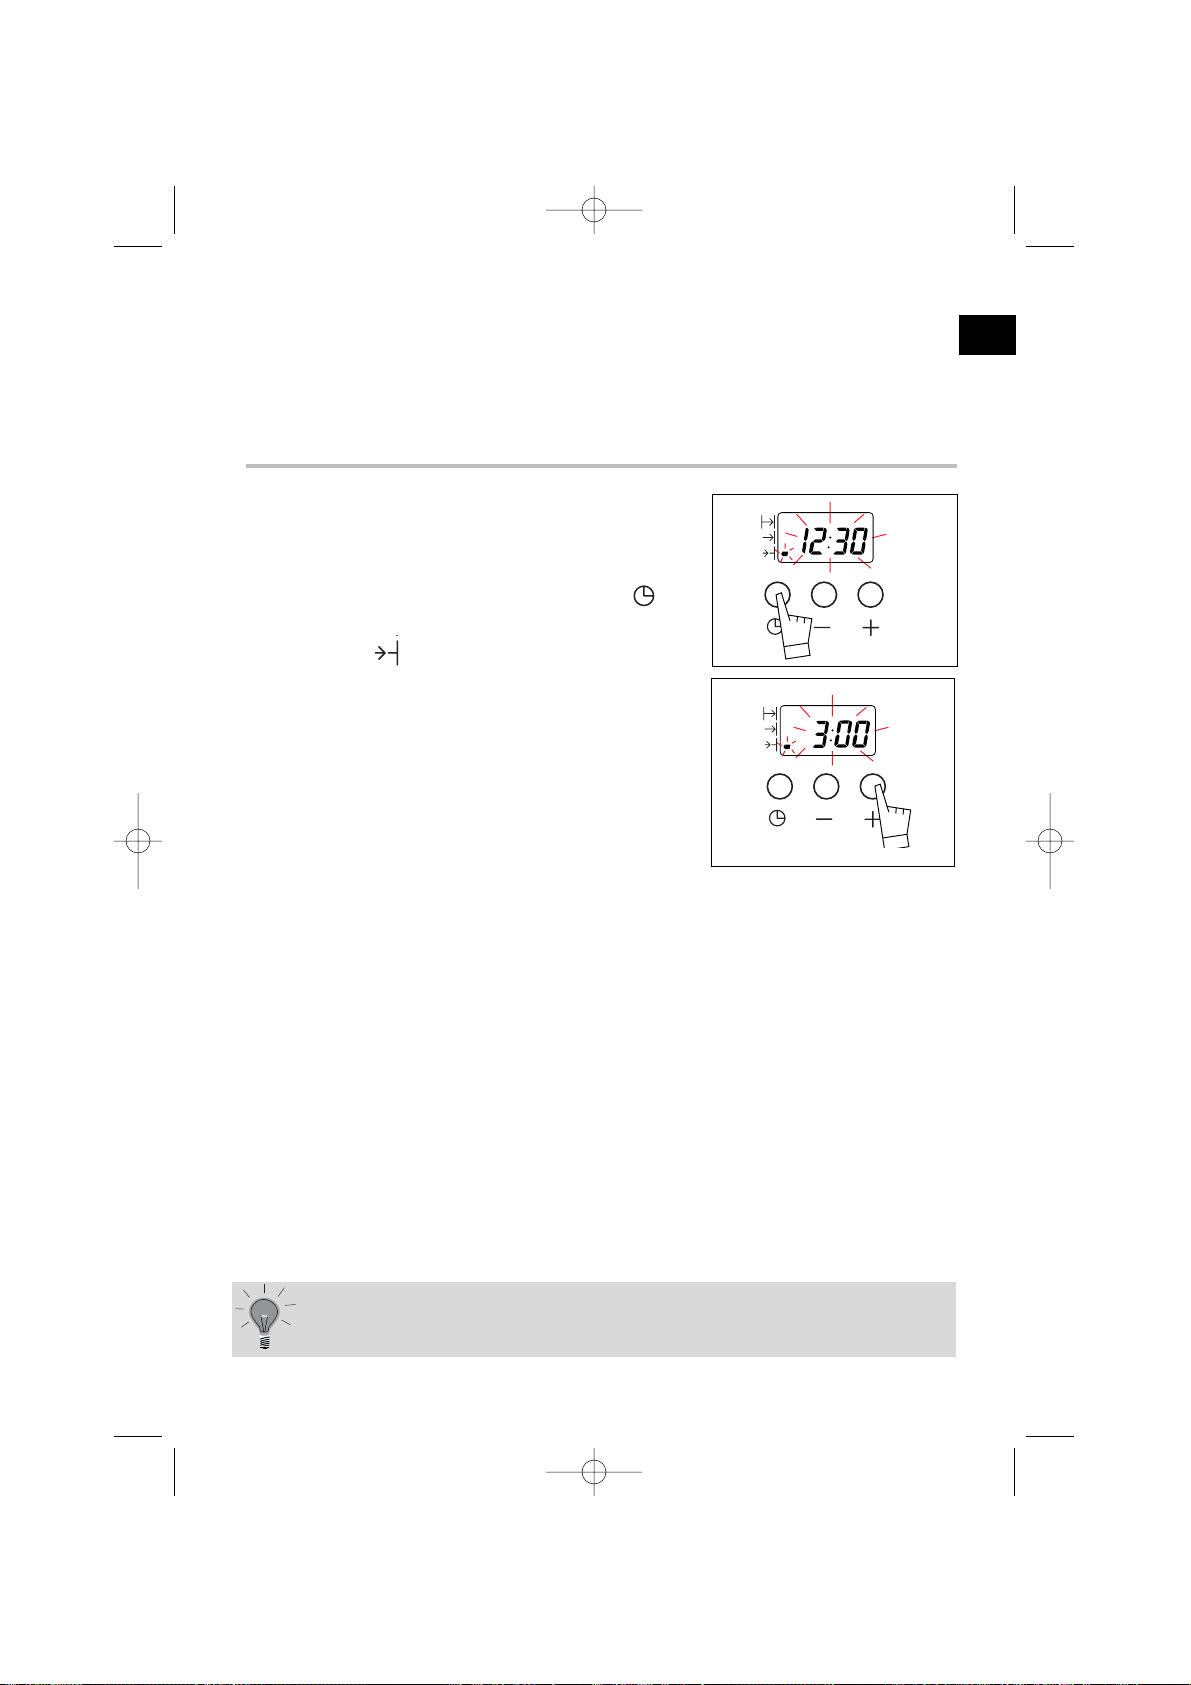
a) A la mise sous tension
• L’afficheur clignote.
• Réglez l’heure en appuyant sur les touches
+ ou - (le maintien du doigt sur la touche permet
d’obtenir un défilement rapide)
• Appuyez sur la touche pour valider.
Exemple:12h30.
b) Remise à l’heure de l’horloge
• Appuyez simultanément sur les touches + et pendant quelques secondes jusqu’à faire clignoter
l’affichage.
• Ajustez le réglage de l’heure avec les touches + ou -.
• Appuyez sur la touche pour valider.
2. C
omment mettre à l'heure l’horloge du four ?
S’il n’y a pas de validation par la touche , l’enregistrement
est automatique au bout de quelques secondes.
1
2
3
2
1
1
Comment utiliser votre four ?
FR
99628232_ML_A.qxd 22/05/03 14:14 Page 11
Page 12
12
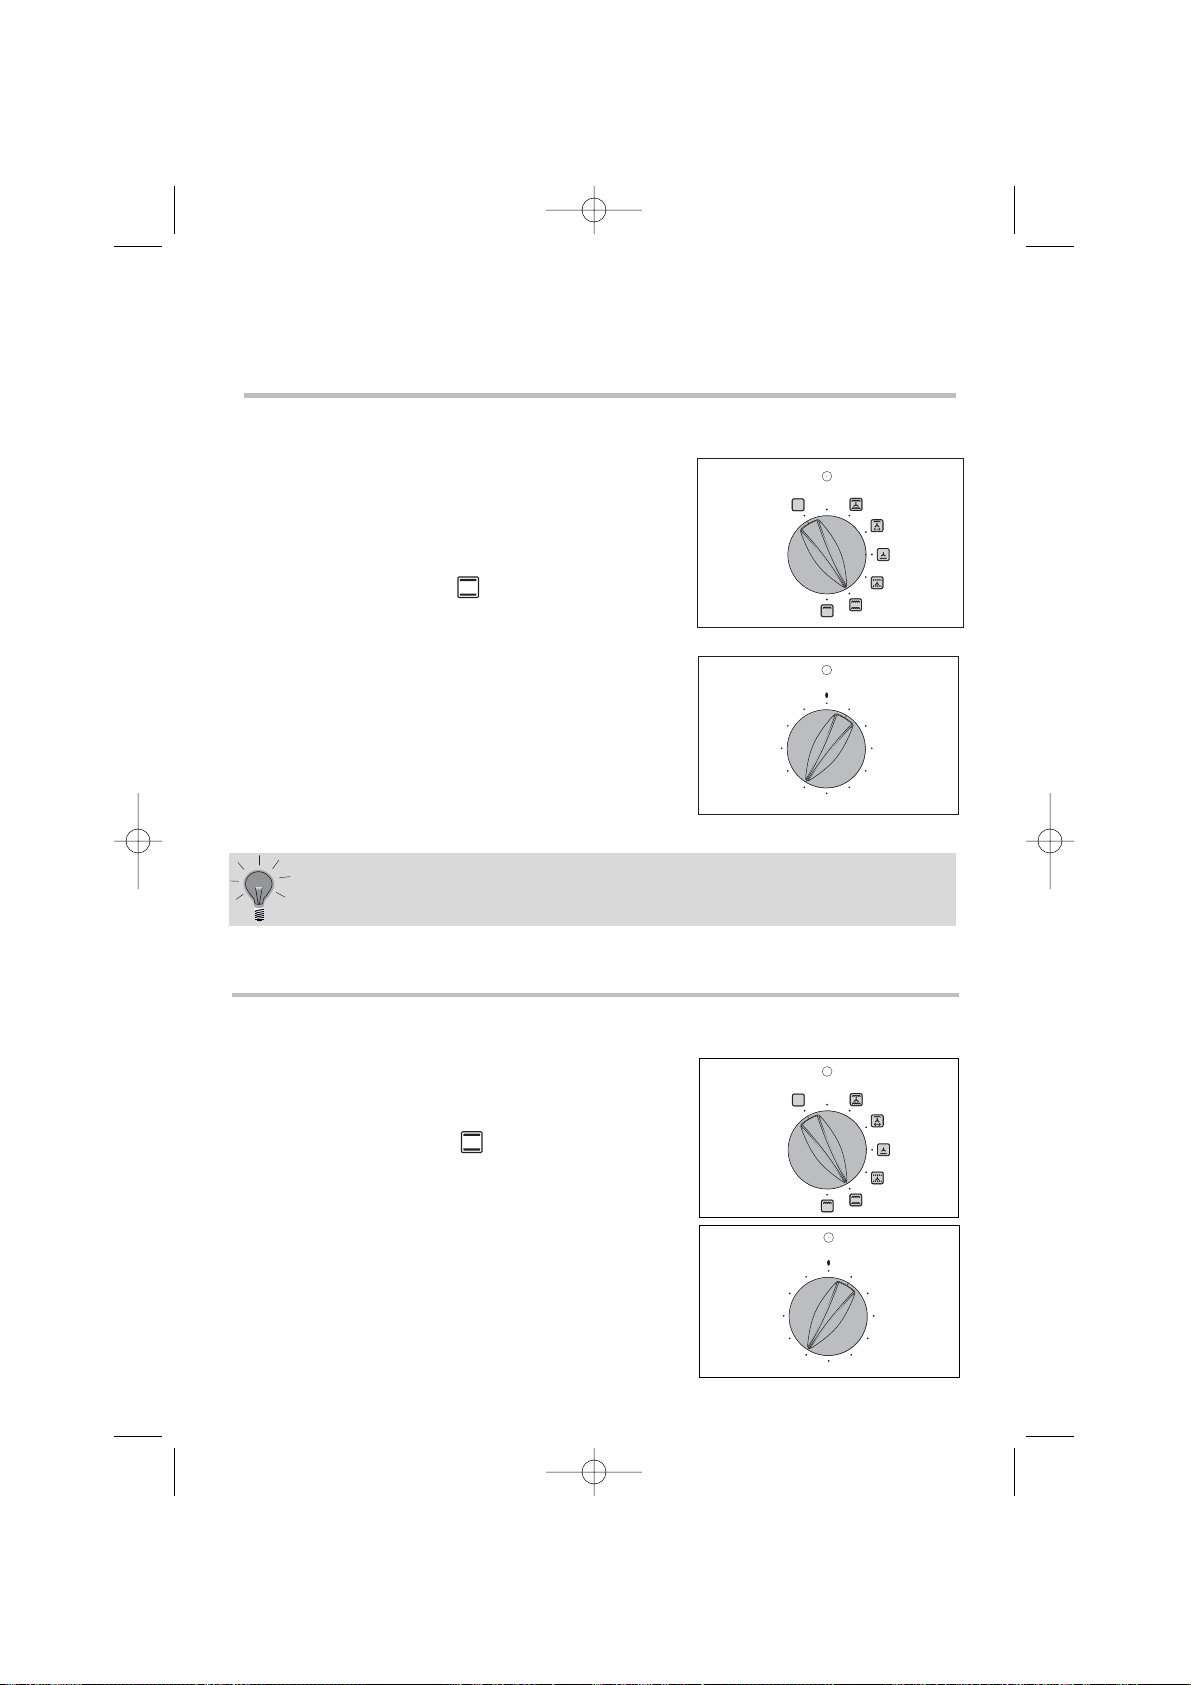
Comment utiliser votre four ?
Le programmateur ne doit afficher que
l'heure; celle-ci ne doit pas clignoter.
• Choisissez le mode de cuisson :
Tournez le sélecteur de fonctions sur la posi-
tion de votre choix.
Exemple : position " ".
• Choisissez la température de cuisson
Tournez le thermostat (sélecteur de
température) sur la température recommandée
par votre recette.
Exemple : repère de température 200°.
• Après ces actions, le four chauffe, le voyant de
thermostat s’allume.
3. Comment faire une cuisson immédiate ?
4. C
omment programmer une cuisson ?
a) Faire une cuisson avec une durée définie :
• Choisissez le mode de cuisson.
Tournez le sélecteur de fonctions sur la
position de votre choix
Exemple : position " ",
• Choisissez la température de cuisson.
Tournez le thermostat (sélecteur de
température) sur la température
recommandée par votre recette.
Exemple : repère de température 200°.
Après un cycle de cuisson, le ventilateur du four continue de
fonctionner pendant un certain temps, afin de garantir un bon
refroidissement des éléments.
99628232_ML_A.qxd 22/05/03 14:14 Page 12
0
P
220
210
240
200
275
40
65
100
150
165
180
0
P
220
210
240
200
275
180
40
65
100
150
165
Page 13
13
Comment utiliser votre four ?
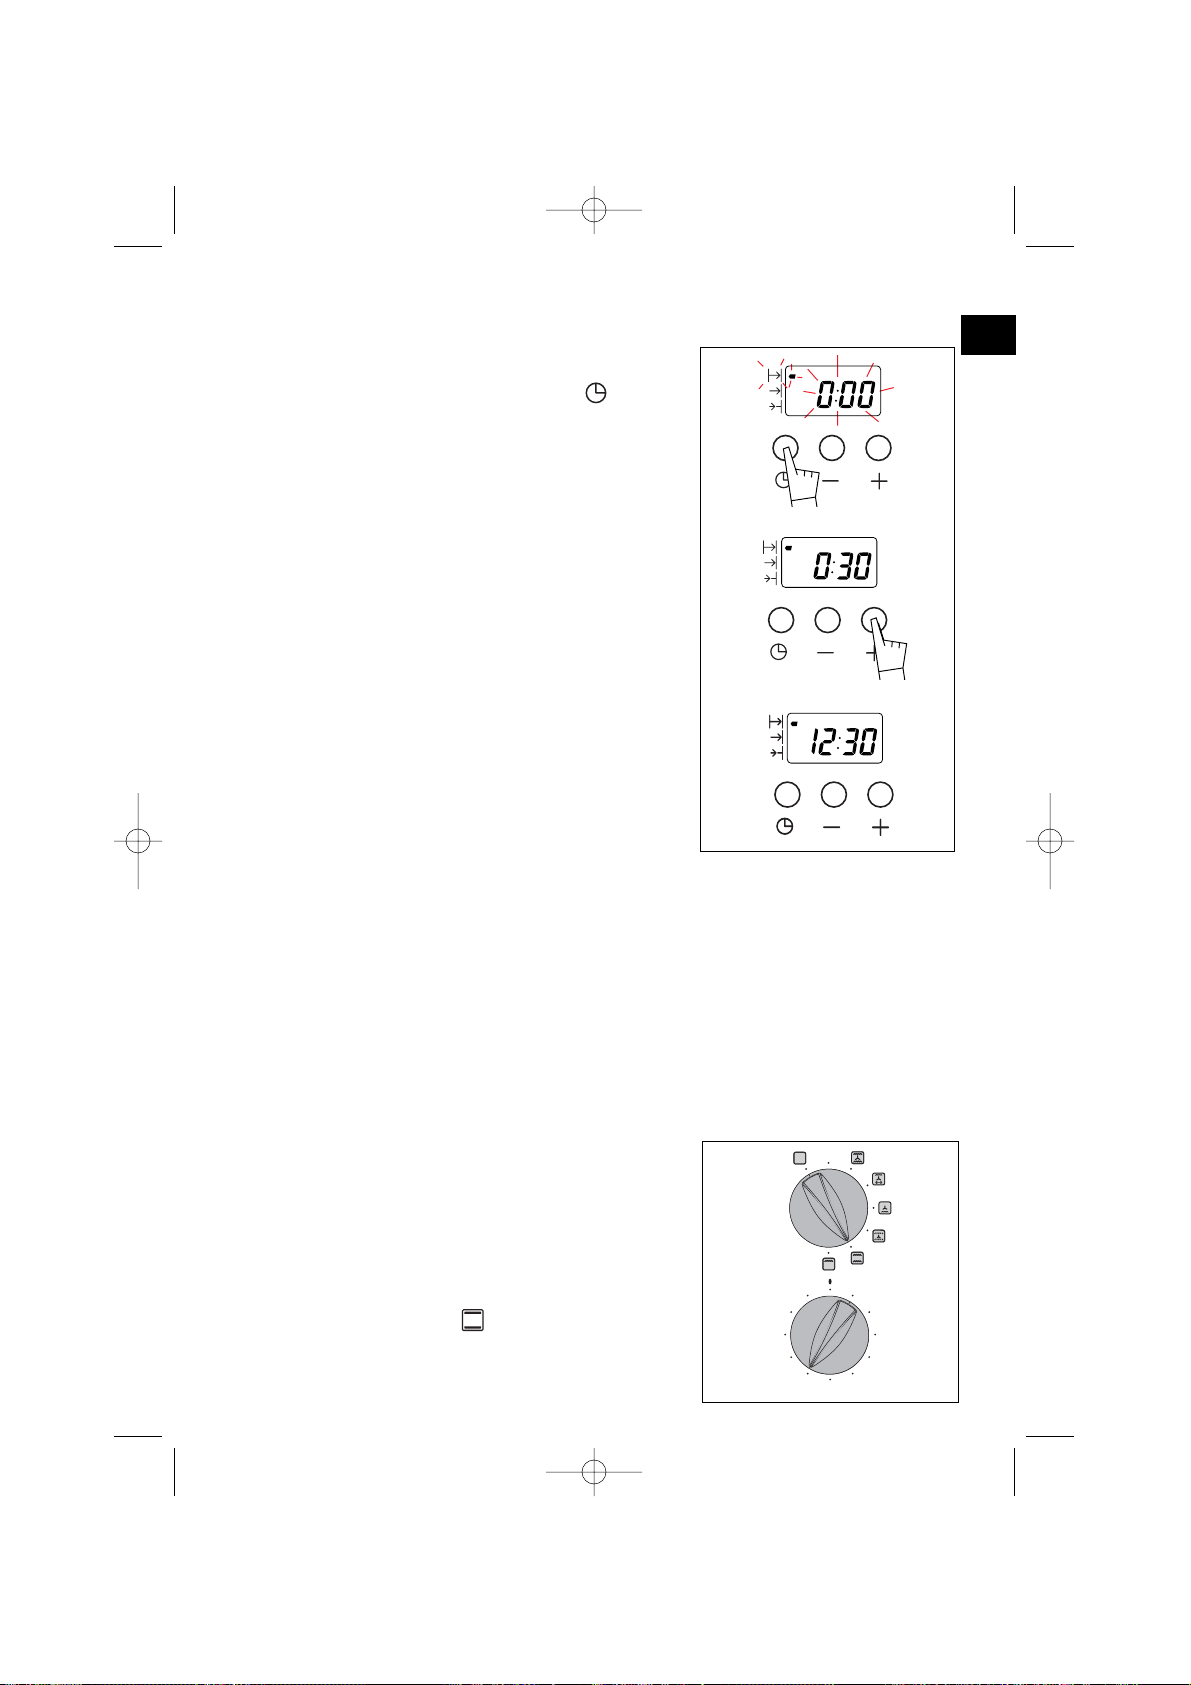
• Choisissez la durée de cuisson.
Appuyez une fois sur la touche .
La durée de cuisson (à 0H00) et le symbole
associé clignotent pour indiquer que le
réglage est alors possible. Il est possible de
régler la durée de cuisson.
Appuyez sur les touches + ou - pour
régler le temps souhaité.
Exemple : 30 minutes de cuisson.
Le décomptage de la durée se fait immédiatement après le relâchement des touches + ou -.
• Après ces actions, le four chauffe, le voyant de
thermostat s’allume.
Le symbole de durée de cuisson est fixe et
l’heure se réaffiche.
En fin de cuisson (fin du temps programmé),
- le four s’arrête,
- le symbole de durée de cuisson s’éteint,
- 0:00 s’affiche
- une série de bips sonores est émise durant
quelques minutes.
L’arrêt définitif des bips sonores se fait en appuyant sur n’importe quelle touche et l’affichage repasse à l’heure.
b) Faire une cuisson différée avec une durée définie :
(heure de fin choisie)
• Ajustez la température et réglez le mode
de cuisson.
Exemple : position " ",
repère de température 200°.
FR
99628232_ML_A.qxd 22/05/03 14:14 Page 13
P
0
220
210
240
200
275
180
40
65
100
150
165
Page 14

Il est possible
- de modifier à tout moment la durée de cuisson.
- de consulter à tout moment la durée restante de cuisson en
appuyant sur la touche « »
- d’annuler à tout moment la programmation en maintenant pen-
dant quelques secondes la touche « » jusqu’au bip.
Attention : à ce moment, votre four se remet à chauffer.
Pour arrêter la chauffe, remettez les sélecteurs de température
et de fonctions sur arrêt.
• Ajustez l'heure de fin de cuisson souhaitée en
appuyant sur les touches + ou -.
Exemple ci-contre : fin de cuisson souhaitée à 13h00.
L’enregistrement de la fin de cuisson se fait automatiquement au bout de quelques secondes.
Après ces actions, le départ de la chauffe du four est différé pour que la cuisson soit finie à l’heure programmée
(ex : 13h00).
Au démarrage de la cuisson, le symbole de fin de cuisson
s’éteint.
En fin de cuisson (fin du temps programmé),
- le four s’arrête,
- le symbole de durée de cuisson s’éteint,
- 0:00 s’affiche
- une série de bips sonores est émise durant quelques minutes.
L’arrêt définitif des bips sonores se fait en appuyant sur n’importe quelle touche
et l’affichage repasse à l’heure du jour.
14
• Appuyez une fois sur la touche .
La durée de cuisson à 0H00 et le symbole associé clignotent pour indiquer que le réglage est alors possible. Il est
possible de régler la durée de cuisson jusqu’à 23h59.
• Appuyez sur les touches + ou - pour régler le temps
souhaité.
Exemple : 25 min de cuisson
Au premier appui sur la touche +, le clignotement
s’arrête.
• Appuyez sur la touche jusqu’ à faire clignoter l’heure
de fin de cuisson et son symbole associé.
Son réglage est alors possible.
Comment utiliser votre four ?
99628232_ML_A.qxd 22/05/03 14:14 Page 14
Page 15
Votre four est équipé d'un minuteur
indépendant du fonctionnement du four
permettant de décompter un temps.
• Appuyez à plusieurs reprises sur la touche jusqu’à faire clignoter le symbole minuterie et l’affichage
correspondant .
5. Comment utiliser la minuterie ?
15
• Ajustez le temps choisi en appuyant sur les
touches + ou -. Le réglage se fait par tranches
de 30 secondes et le temps affiché est en
minute/seconde.
Le maintien de l’appui sur la touche permet d’obtenir
un défilement rapide.
Le décomptage débute quelques secondes après la fin du réglage et est visible
en permanence sur l’affichage.
En fin de décomptage du temps choisi, une série de bips est émise
(affichage 0:00).
L'arrêt des bips se fait en appuyant une fois sur la touche de votre choix.
Il est possible de modifier ou d’annuler à n’importe quel moment
la programmation de la minuterie.
Comment utiliser votre four ?
FR
99628232_ML_A.qxd 22/05/03 14:14 Page 15
Page 16
16
Traditionnel pulsé
La cuisson s’effectue par les éléments inférieur et supérieur et par
l’hélice de brassage d’air.
Gril pulsé + Tournebroche
La cuisson s’effectue, alternativement, par l’élément supérieur et par
l’hélice de brassage d’air.
Traditionnel
La cuisson s’effectue par les éléments inférieur et supérieur sans
brassage d’air.
Sole pulsée
La cuisson s’effectue par l’élément
inférieur associé à un léger dosage
du gril et à l’hélice de brassage d’air.
Gril
La cuisson s’effectue par l’élément
supérieur sans brassage d’air
.
Montée rapide
peuvent être e
Préchauffage in
Volailles et rôtis
les faces.
Le tourne broch
l’ouverture de l
Glissez la lèche
Nécessite un p
plat.
Effectuez un pr
minutes.
Glissez la léche
Cuisson par le
Placez la grille
Maintien au chaud
Dosage de l’élément supérieur et
inférieur associés au brassage d’air.
Maintien au cha
Symbole
Nom de la fonction Descrip
4. Modes de cuisson du four
*
* Séquences(s) utilisée(s) pour l’annonce écrite sur l’étiquette énergétique conformém
*
99628232_ML_A.qxd 22/05/03 14:14 Page 16
Page 17

nutile
aud.
17
Recommandé pour les viandes, pois-
sons, légumes, posés dans un plat en
terre de préference
Recommandé pour toutes les volailles
ou rôtis au tourne-broche.
Pour saisir et cuire à coeur gigot,
côtes de boeuf.
Pour garder leur fondant aux pavés
de poissons.
Recommandé pour les cuissons lentes
et délicates : gibiers moelleux...
Pour saisir rôtis de viande rouge
Pour mijoter en cocotte fermée plats
prealablement démarrés sur table de
cuisson (coq au vin, civet...)
Recommandé pour griller les côtelet-
tes, saucisses, tranches de pain,
gambas posées sur la grille.
Recommandé pour les plats humides
(quiches, tartes aux fruits juteux..
La pâte sera bien cuite dessous.
Recommandé pour les préparations
qui lèvent (cake, brioche, kouglof...) et
pour les soufflés qui ne seront pas bloqués par une croute dessus.
Recommandé pour faire lever les
pâtes à pain, à brioche, kouglof...en
ne dépassant pas 40°C (chauffe-assiettes, décongélation).
Recommandations
Modes de cuisson du four
FR
99628232_ML_A.qxd 22/05/03 14:14 Page 17
Page 18
18
1. Qu’est-ce une pyrolyse ?
3.
Comment faire une pyrolyse ?
CUISSONS PEU Biscuits, légumes, patisseries Cuissons sans éclaboussures
SALISSANTES quiches, soufflés une pyrolyse n’est pas justifiée
CUISSONS viandes, poissons, la pyrolyse peut se justifier
SALISSANTES (dans un plat) légumes farcis toutes les 3 cuissons
CUISSONS TRES grosses pièces de viandes la pyrolyse peut se faire après
SALISSANTES à la broche 1 cuisson de ce type si les
projections sont importantes
Votre four fume lors d’un préchauffage ou fume énormément lors d’une cuisson.
Votre four dégage une odeur à froid désagréable suite à différentes cuissons
(mouton, poisson, grillades...).
2. Dans quel cas faut il effectuer une pyrolyse ?
Il ne faut pas attendre que le four soit chargé de graisses pour
effectuer ce nettoyage.
-La pyrolyse est un cycle de chauffe de la cavité du four à très haute température qui permet d’éliminer toutes les salissures qui proviennent des éclaboussures
ou des débordements. Les fumées et odeurs dégagées sont détruites par le passage dans un catalyseur.
- La pyrolyse n’est toutefois pas nécessaire après chaque cuisson, mais seulement si le degré de salissure le justifie.
- Par mesure de sécurité, l’opération de nettoyage ne s’effectue qu’après blocage automatique de la porte. Dès que la température à l’intérieur du four dépasse les températures de cuisson, il est impossible de déverrouiller la porte même
en positionnant la manette «sélecteur de fonctions» sur 0.
Comment nettoyer la cavité de votre four ?
a) Retirez la casserolerie du four et enlevez les
débordements importants qui auraient pu
se produire
b) Vérifiez que le programmateur affiche
l’heure du jour et que celle-ci ne clignote pas.
99628232_ML_A.qxd 22/05/03 14:14 Page 18
Page 19
c) Positionnez la manette «sélecteur de
fonctions» sur la position «PYROLYSE».
La durée d’indisponibilité du four est de 2h30
(non modifiable).
Ce temps prend en compte la durée de refroidissement
jusqu’au déverrouillage de la porte.
• Au cours du cycle de pyrolyse, le voyant
de verrouillage s’allume pour vous indiquer que la porte est verrouillée.
• Le voyant de thermostat s’allume lorsque le four chauffe.
• La pyrolyse s’arrête automatiquement lorsque le voyant de verrouillage s’éteint, il
est alors possible d’ouvrir la porte.
d) Ramenez le sélecteur de fonctions sur la position 0.
e) Lorsque le four est froid, utilisez un chiffon humide pour enlever la cendre
blanche. Le four est propre et à nouveau utilisable pour effectuer une cuisson de
votre choix.
19
FR
99628232_ML_A.qxd 22/05/03 14:14 Page 19
P
0
Page 20

20
Que faire en cas d’anomalies de fonctionnement ?
Vous avez un doute sur le bon fonctionnement de votre four, ceci ne signifie
pas forcément qu'il y a une panne.
Dans tous les cas, vérifiez les point suivants :
Vous constatez que...
Les causes possibles Que faut-il faire ?
Le four ne chauffe pas.
• Le four n'est pas branché.
• Le fusible de votre installation est
hors service.
• La température sélectionnée est
trop basse.
• Le capteur est défectueux
• Le thermostat est défectueux.
• Le four a subi une surchauffe,
il
s’est mis en sécurité.
- Brancher le four.
- Changer le fusible de votre installation et vérifier sa valeur (16A).
- Augmenter la température sélectionnée.
- Faire appel au Service Après-Vente.
- Faire appel au Service Après-Vente.Faire appel au Service Après-Vente.
L’indicateur T°c clignote.
• Défaut de verrouillage de la porte.
• Capteur de température défectueux.
- Faire appel au Service Après-Vente.
- Faire appel au Service Après-Vente.
La lampe du four ne fonctionne
plus.
• La lampe est hors service.
• Le four n'est pas branché ou le
fusible est hors service.
- Changer la lampe.
- Brancher le four ou changer le fusible.
Le ventilateur de refroidissement continue de tourner à l’arrêt du four.
• La ventilation fonctionne pendant 1 heure maximum après la
cuisson, ou lorsque la température
de votre four est supérieure à
125°C.
• Si pas d’arrêt après 1 heure
- Ouvrir la porte du four pour accélérer le refroidissement du four.
- Faire appel au Service Après-Vente.
Le nettoyage par pyrolyse ne se
fait pas.
• La porte est mal fermée.
• Le système de verrouillage est
défectueux.
• Le capteur de T° est défectueux.
• Le contact de détection de
«porte fermée» est défectueux.
- Vérifier la fermeture de la porte.
- Faire appel au Service Après-Vente.
- Faire appel au Service Après-Vente.
- Faire appel au Service Après-Vente.
99628232_ML_A.qxd 22/05/03 14:14 Page 20
Page 21

21
99628232_ML_A.qxd 22/05/03 14:14 Page 21
Page 22

Sumario
A lo largo de todo el manual
indica las consignas de seguridad
indica consejos y trucos
Nota editorial P.23
Características del horno
D
escripción del horno
P.24
A
ccesorios
P.25
Consejos de seguridad
P.26
Instalación P.27
Conexión eléctrica P.27-28
Dimensiones necesarias para empotrar el horno P.29
Uso del horno
Detalles del programador P.30
C
ómo poner en hora el reloj del horno
P.31
Cómo hacer una cocción inmediata P.32
Cómo programar una cocción P.32-35
Cómo utilizar el minutero P.35
Qué hacer en caso de anomalías
en el funcionamiento P.36
Modos de cocción del horno P.38-39
Cómo limpiar el interior del horno
Qué es una pirólisis P.40
Cuándo debe efectuarse una pirólisis P.40
Cómo hacer una pirólisis P.40-41
Cómo cambiar la lámpara
P.41
22
99628232_ML_A.qxd 22/05/03 14:14 Page 22
Page 23
23
Nota editorial
Querida clienta, querido cliente:
Acaba usted de comprar un horno
FAGOR
y queremos agradecerle su
confianza.
Nuestros equipos de investigación han diseñado para usted una nueva
generación de aparatos para que cocinar cada día sea un placer.
Basado en la pureza de sus líneas y en una estética moderna, su nuevo
horno
FAGOR
se integra de forma armoniosa en su cocina,
ofreciéndole una perfecta unión entre facilidad de uso y prestaciones en
la cocción.
La gama de productos
Fagor
le ofrece asimismo una amplia elección
de encimeras de cocina, campanas extractoras, lavavajillas y frigoríficos
que podrá combinar con su nuevo horno
FAGOR
.
Por supuesto, nuestro deseo es poder responder permanentemente y de
la mejor forma a sus exigencias respecto a nuestros productos, y para
ello nuestro servicio de atención a los consumidores se encuentra a su
entera disposición para escuchar y para responder a todas sus preguntas
o sugerencias (encontrará los datos de contacto al final de este manual).
Siempre en la vanguardia innovadora,
Fagor
contribuye de esta forma a
mejorar su calidad de vida, ofreciéndole productos con más prestaciones,
fáciles de usar, que respetan el medio ambiente, estéticos y fiables.
La marca
FAGOR
ES
99628232_ML_A.qxd 22/05/03 14:14 Page 23
Page 24

24
1
3
5
P
40
65
100
150
165
180
200
210
220
240
275
0
1
2
3
4
5
7
6
1
2
5
6
7
3
4
Selector de temperatura
Programador
Selector de funciones
Lámpara
Indicador de altura del
soporte de la bandeja
Orificio para asador rotativo
Contacto de detección de
apertura de la puerta
Características del horno
DESCRIPCIÓN DEL HORNO
99628232_ML_A.qxd 22/05/03 14:14 Page 24
Page 25

25
Bandeja profunda
Accesorios
Si se coloca debajo de la rejilla, recoge la
grasa de los asados. También puede
utilizarse llenándola a medias de agua para
cocciones al baño María. Evite poner directamente en esta bandeja asados o carnes, ya
que se producirían automáticamente salpicaduras importantes en las paredes del horno.
Bandeja multiusos
(
bandeja para tartas o para recoger la grasa)
Sirve como bandeja para tartas y está
provista de un borde inclinado. Se utiliza
para repostería, como petisús, merengues,
magdalenas, hojaldres…
• Coloque el soporte del espadín en el escalón
nº 3.
• Inserte el alimento en el espadín y fíjelo por medio de las agujas correderas.
• Coloque el espadín sobre el soporte.
• Empuje ligeramente para encajar la punta del espadín en el orificio de arrastre
situado en el fondo del horno (6).
• Retire el mango desenroscando. Después de la cocción vuelva a enroscar el
mango, para poder retirar el espadín sin quemarse.
Asador rotativo
Para utilizarlo:
• Sitúe la bandeja multiusos en el escalón nº
1, para que recoja el jugo de la cocción, o
en la base del horno, si la pieza que va a
asar es demasiado grande.
Rejilla de seguridad antivuelco
La rejilla puede utilizarse para soportar todas las
bandejas y fuentes que contengan alimentos para
asar o para gratinar. Se utiliza también para
asados a la parrilla (que se colocarán
directamente sobre la rejilla).
8
9
11
10
ES
99628232_ML_A.qxd 22/05/03 14:14 Page 25
Page 26

Consejos de seguridad
Lea estos consejos antes de instalar y de utilizar su horno. Este horno
está diseñado para uso doméstico. Está destinado exclusivamente a la cocción
de productos alimentarios. Este horno no contiene ningún componente a base
de amianto.
USO POR PRIMERA VEZ:
Antes de utilizar su horno por primera vez, caliéntelo en vacío, con la puerta
cerrada, durante 15 minutos más o menos, en posición máxima para "rodar" el
aparato. La lana mineral que rodea el interior del horno puede emitir, al principio,
un olor particular debido a su composición. Es posible que también observe
emisión de humos. Ambas cosas son normales.
USOS POSTERIORES:
- Asegúrese de que la puerta del horno está bien cerrada, para que le cierre
hermético cumpla correctamente su función.
- No permita que nadie se apoye o se siente sobre la puerta del horno cuando esté
abierta.
- Las partes accesibles o las superficies pueden calentarse durante el
funcionamiento. Mantenga a los niños alejados del horno.
- Cuando está siendo utilizado, el aparato se calienta. Tenga cuidado de no tocar
los elementos que se calientan situados en el interior del horno.
- Después de haber utilizado una cocción, no coja los accesorios (rejilla, asador,
bandeja, soporte de asador) directamente con las manos, protéjase con un
guante o con un trapo aislante.
- No forre el horno con láminas de papel de aluminio, ya que se produciría una
acumulación de calor que tendría un efecto negativo en el resultado de la cocción
y asado y dañaría el esmalte.
- Antes de proceder a la limpieza de su horno mediante pirólisis, retire todos los
accesorios del mismo y elimine el exceso de grasa acumulada.
- No emplee limpiadores a vapor o de alta presión.
- Durante una pirólisis, las superficies accesibles se calientan más que durante el
uso normal del horno. Mantenga a los niños alejados del horno.
- Para realizar cualquier tipo de operación de limpieza en el interior del
horno, éste debe estar apagado.
26
99628232_ML_A.qxd 22/05/03 14:14 Page 26
Page 27
27
I
nstalación del horno
Contador 20 A Mono
220 - 240 V - 50 Hz
Toma de corriente
2 polos + tierra
norma CEI 83
Línea Mono 220 - 240 V ~
Conexión eléctrica
Cable de
alimentación de1,50
m de largo
aproximadamente
Disyuntor diferencial o fusible 16 A
Antes de efectuar la conexión, asegúrese de que los cables de su
instalación eléctrica tienen una sección suficiente para alimentar
normalmente el aparato (sección como mínimo igual a la del
cable de alimentación).
El fusible de la instalación debe ser de 16 amperios.
La conexión eléctrica debe realizarse antes de empotrar el aparato en el mueble.
• El horno debe estar conectado con un cable de alimentación (normalizado) a tres
conductores de 1,5 mm² (1 ph + 1 N + tierra) que deben estar conectados a la red
220 - 240 V - monofásica mediante una toma de corriente 1 ph + 1 N + tierra
normalizada CEI 83 o mediante un dispositivo de interrupción omnipolar que tenga
una apertura mínima entre contactos de al menos 3 mm. El cable de protección
(verde - amarillo) está unido al borne del aparato y debe estar conectado a la toma
de tierra de la instalación.
• En caso de que se conecte con una toma de corriente, ésta debe permanecer
accesible después de la instalación del aparato.
• El neutro del horno (cable azul) debe estar conectado al neutro de la red.
ES
99628232_ML_A.qxd 22/05/03 14:14 Page 27
Page 28

• El cable de alimentación (H05 RR-F, H05 RN-F o H05 W-F) debe ser lo
suficientemente largo como para conectarlo al horno que se va a empotrar cuando
éste está en el suelo delante del mueble.
• Para ello, con el aparato desconectado de la red:
• Abra la trampilla situada en la parte inferior derecha de la tapa trasera
destornillando los 2 tornillos, y a continuación haga girar la trampilla sobre su eje.
• Pele cada uno de los hilos del nuevo cable de alimentación a lo largo de 12 mm.
• Retuerza con cuidado las hebras.
• Afloje los tornillos del borne y retire el cable de alimentación que se va a cambiar.
• Introducir el cable de alimentación por el lateral de la tapa en el guardacables
situado a la derecha del borne.
• Conecte los hilos del cable según la(s) señal(es) indicadas en el borne.
• Todas las hebras de los hilos de alimentación deben estar aprisionadas bajo los
tornillos.
• El hilo de fase sobre el borne L.
• El hilo de tierra color verde-amarillo debe estar conectado al borne .
• El hilo neutro (azul) sobre el borne N.
• Fije los tornillos de los bornes a fondo y compruebe la conexión tirando de cada
uno de los hilos.
• Fije el cable con el guardacables situado a la derecha de los bornes.
• Cierre la tapa con los dos tornillos.
Cambio del cable de alimentación
No asumimos ningún tipo de responsabilidad en caso de accidente
debido a la falta de conexión de toma de tierra, o a una conexión
defectuosa o incorrecta.
28
99628232_ML_A.qxd 22/05/03 14:14 Page 28
Page 29
29
Cómo instalar fácilmente su horno
Para garantizar una installación adecuada, no dude en recurrir a
un especialista en electrodomésticos.
Dimensiones necesarias para empotrar el horno
El horno puede instalarse indistintamente bajo una encimera o en un
mueble en columna (abierto o cerrado) que tenga las dimensiones de
empotramiento adecuadas (véase el gráfico de la página anterior).
Su horno está provisto de una circulación de aire optimizada que permite obtener
excelentes resultados de cocción y de limpieza si se respetan las siguientes condiciones:
• Centre el horno en el mueble de manera que se garantice una distancia mínima
de 5 mm con respecto al mueble que haya al lado.
• El material del mueble en el que se empotra el horno debe ser resistente al calor
(o tener un revestimiento que lo haga resistente al calor).
• Para una mayor estabilidad, fije el horno en el mueble mediante dos tornillos a
través de los agujeros previstos para este fin situados sobre los montantes
laterales (véase esquema).
Para ello:
1) Retire las tapitas de goma para tener acceso a los agujeros de fijación.
2) Haga un agujero de Ø 3 mm en la pared del mueble para evitar que se astille
la madera.
3) Fije el horno con los dos tornillos
4) Vuelva a colocar las tapitas de goma (éstas sirven asimismo para amortiguar el
cierre de la puerta del horno).
ES
577
577
585600
99628232_ML_A.qxd 22/05/03 14:14 Page 29
Page 30
Indicación de tiempos y duraciones
Símbolo de duración de la cocción
Símbolo de fin de cocción
Minutero independiente
Mando de acceso a los diferentes programas de ajuste del tiempo
y
Mandos de regulación del tiempo
1
2
3
4
5
6
7
1. D
etalle del programador
1
2
3
4
5
6
7
Funcionamiento del horno
DESCRIPCIÓN DEL PROGRAMADOR
30
99628232_ML_A.qxd 22/05/03 14:15 Page 30
Page 31

31
a) Al instalar el horno, o tras
un corte de luz
• El visor parpadea.
• Regular la hora presionando los mandos + o - (si
se mantiene el mando presionado, los números
van pasando rápidamente).
• Presiones el mando para validar.
Ejemplo: 12h30.
b) Para volver a poner el reloj en hora
• Presione simultáneamente los mandos + y durante algunos segundos hasta que el visor
empiece a parpadear.
• Ajuste la hora con los mandos + o -.
• Presione el mando para validar.
2. Cómo poner en hora el reloj del horno
Si no se valida con el mando , al cabo de algunos segundos el
registro se hace de forma automática.
1
2
3
2
1
1
Funcionamiento del horno
ES
99628232_ML_A.qxd 22/05/03 14:15 Page 31
Page 32

Funcionamiento del horno
El programador sólo debe mostrar la hora: la hora
no debe parpadear.
• Seleccione el modo de cocción:
Gire el selector de funciones hasta la posición
elegida.
Ejemplo: posición " ".
• Seleccione la temperatura de la cocción
Gire el termostato (selector de temperatura)
hasta la temperatura recomendada para su
receta.
Ejemplo: selección de temperatura 200º.
• Una vez que se han realizado estas operaciones,
el horno se calienta y se enciende el indicador del
termostato.
(Recuerde que el horno estará funcionando sin
programador, siendo usted quien ponga fin al
cocinado).
3. Funcionamiento manual
4. Programación puesta en marcha en el momento
Usted quiere comenzar el cocinado, pero que pare automáticamente
transcurrido el tiempo deseado.
• Seleccione el modo de cocción.
Gire el selector de funciones hasta la
posición elegida.
Ejemplo: posición " ",
• Seleccione la temperatura de cocción.
Gire el termostato (selector de temperatura)
hasta la temperatura recomendada para su
receta.
Ejemplo: selección de temperatura 200º.
32
99628232_ML_A.qxd 22/05/03 14:15 Page 32
220
210
240
200
P
275
180
0
40
65
100
150
165
220
210
240
200
P
275
180
0
40
65
100
150
165
Page 33

33
Funcionamiento del horno
• Seleccione la duración de la cocción.
Presione una vez el mando
En la pantalla aparecerá 0:00 y la señal
luminosa del símbolo parpadean para
indicar que se puede ajustar la duración de la
cocción.
Presionar los mandos + o - para ajustar el tiempo
deseado.
Ejemplo: 30 minutos de cocción.
La cuenta atrás se inicia inmediatamente después de
dejar de presionar en los mandos + o -.
• Una vez realizadas estas acciones, el horno
se calienta y el visor del termostato se enciende.
El símbolo de duración de cocción permanece fijo y
vuelve a aparecer la hora.
Al finalizar la cocción (fin del tiempo programado).
- el horno se para,
- el símbolo de duración de cocción se apaga,
- aparece en el visor 0:00,
- el horno emite una serie de pitidos sonoros durante unos segundos.
Para parar los pitidos sonoros, es necesario presionar cualquiera de los mandos y
entonces vuelve a aparecer la hora en el visor.
Atención: en ese momento el horno vuelve a
calentarse.
Para detenerlo, vuelva a poner los
selectores de temperatura y de
funcionamiento en posición de parada.
En caso de no estar presente, el pitido a partir de 3 minutos, deja de sonar y el
horno sigue apagado.
Usted no quiere comenzar ahora el cocinado, es muy temprano, pero tiene que
salir de casa y quisiera que a la vuelta, el horno haya hecho su trabajo y
dejado de funcionar automáticamente.
5.
Programación puesta en marcha retardada
ES
99628232_ML_A.qxd 22/05/03 14:15 Page 33
Page 34

• Seleccione la temperatura y el modo de
cocción.
• Ejemplo: posición .
•
Selección de temperatura 200º.
- Presione una vez el mando
- En la pantalla aparecerá 0:00 y la señal luminosa
del símbolo parpadean para indicar que se
puede ajustar la duración de la cocción. Se puede
regular la duración hasta las 23h59
• Presione los mandos + o - para ajustar el
tiempo deseado.
Ejemplo: 25 minutos de cocción.
- Presione dos veces el mando
- En la pantalla aparecerá la hora y la señal
luminosa del símbolo parpadeando, y con los
botones + o - ponga la hora en que quiere
terminar el cocinado.
Ejemplo: las 12:45.
Al finalizar la cocción (fin del tiempo programado).
- el horno se para,
- el símbolo de duración de cocción se apaga,
- aparece en el visor 0:00,
- el horno emite una serie de pitidos sonoros
durante unos segundos. Para parar los
pitidos sonoros, es necesario presionar
cualquier de los mandos y entonces
vuelve a aparecer la hora en el visor.
Atención: en ese momento el horno vuelve a calentarse.
Para detenerlo, vuelva a poner los selectores de temperatura
y de funcionamiento en posición de parada.
En caso de no estar presente, el pitido a partir de 3 minutos, deja de sonar y el
horno sigue apagado.
Funcionamiento del horno
34
99628232_ML_A.qxd 22/05/03 14:15 Page 34
220
210
240
200
P
275
180
0
40
65
100
150
165
Page 35

35
Es posible modificar o anular en cualquier momento la
programación del minutero.
• Ajustar la hora de final de cocción deseada presionando los mandos + o Ejemplo: Fin de cocción deseada a las 13h00.
La hora de fin de cocción se graba automáticamente al cabo de unos segundos.
Una vez realizadas estas acciones, el inicio del calentamiento del horno se
difiere para que la cocción se termine a la hora programada (ej.: 13h00).
Cuando se inicia la cocción, el símbolo de fin de cocción se apaga.
Al finalizar la cocción (fin del tiempo programado).
- el horno se para,
- el símbolo de duración de cocción se apaga,
- aparece en el visor 0:00,
- el horno emite una serie de pitidos durante algunos minutos.
Para parar los pitidos es necesario presionar una vez sobre cualquiera de los
mandos, y entonces vuelve a aparecer la hora del día.
El horno está provisto de un minutero independiente del
funcionamiento del horno que permite descontar un tiempo.
- Presione tres veces el mando .
En la pantalla aparecerá 0:00 y la señal luminosa del
símbolo parpadeando.
• Ajuste el tiempo elegido presionando los mandos +
o -. El ajuste se hace por tramos de 30 segundos y el
tiempo aparece en minuto / segundo.
Manteniendo el mando presionado se puede hacer
avanzar los números rápidamente.
La cuenta atrás empieza unos segundos después de
finalizar el ajuste y aparece permanentemente en el visor.
Al final de la cuenta atrás del tiempo seleccionado, el
horno emite una serie de pitidos (indicación 0:00).
Para parar los pitidos es necesario presionar una vez
sobre cualquiera de los mandos.
6. Cómo utilizar el minutero
Funcionamiento del horno
Es posible:
- modificar en cualquier momento la duración de la cocción.
- consultar en cualquier momento el tiempo de cocción de queda, apoyando
sobre el mando « »
- anular en cualquier momento la programación, manteniendo presionado durante
unos segundos el mando « » hasta que suene un pitido.
Atención: en ese momento el horno vuelve a calentarse.
Para detenerlo, vuelva a poner los selectores de temperatura y funciones
en posición de parada.
ES
99628232_ML_A.qxd 22/05/03 14:15 Page 35
Page 36

Qué hacer en caso de anomalías en
el funcionamiento
Si le surge alguna duda respecto al buen funcionamiento de su horno,
no significa necesariamente que haya una avería.
En todo caso, compruebe los
siguientes puntos.
El horno no calienta.
- El horno no está enchufado
- El fusible de la instalación está fuera
de servicio.
- La temperatura seleccionada es
demasiado baja.
- El sensor está estropeado.
- El termostato está estropeado.
- El horno ha sufrido un
sobrecalentamiento. Ha accionado la
función de seguridad.
- Enchufe el horno
- Cambie el fusible de la instalación y
verifique su valor (16 A)
- Aumente la temperatura
seleccionada
- Recurra al Servicio Técnico.
- Recurra al Servicio Técnico.
- Recurra al Servicio Técnico.
El indicador parpadea.
- Fallo en el cierre de la puerta
- Sensor de temperatura estropeado.
- Recurra al Servicio Técnico.
- Recurra al Servicio Técnico.
La lámpara del horno no funciona.
- La bombilla se ha fundido.
- El horno no está enchufado o el
fusible se ha fundido.
- Cambiar la bombilla.
- Enchufar el horno o cambiar el
fusible.
El ventilador de enfriamiento
sigue funcionando cuando se
para el horno.
- La ventilación funciona durante 1
hora como máximo después de la
cocción o cuando la temperatura
del horno es superior a 125º C.
- Si no se para al cabo de 1 hora.
- Abrir la puerta del horno para
acelerar el enfriamiento.
- Recurra al Servicio Técnico.
La limpieza mediante pirólisis no
se efectúa.
- La puerta está mal cerrada.
- El sistema de cierre está
estropeado.
- El sensor de Tº está estropeado.
- El contacto de detección de
"puerta cerrada" está estropeado.
- Compruebe que la puerta está
cerrada.
- Recurra al Servicio Técnico.
- Recurra al Servicio Técnico.
- Recurra al Servicio Técnico.
36
99628232_ML_A.qxd 22/05/03 14:15 Page 36
Page 37

37
99628232_ML_A.qxd 22/05/03 14:15 Page 37
Page 38

38
Tradicional ventilado
La cocción la efectúan las
resistencias inferior y superior y la
turbina de movimiento del aire.
Gratinador nentilado+ Asador
La cocción la efectúa, alternativamente, la resistencia superior.y la
turbina de movimiento del aire
Resistencia inferior ventilada
La cocción la efectúa la resistencia
inferior, asociada con una ligera
dosis de gratinador y de la turbina
de movimiento del aire.
Cocción por ab
encima.
Situar la rejilla
Mantenimiento de calor
Mantenimiento
Símbolo
Nombre de la función Descri
*
*
Modos de cocción del horno
Tradicional
La cocción la efectúan las
resistencias inferior y superior sin
movimiento de aire.
Gratinador
La cocción la efectúa la resistencia
superior sin movimiento de aire.
Subida rápida
pueden meters
No es necesario
crujientes y jug
El asador sigue
puerta. Poner l
soporte inferior
Es necesario un
meter el plato
Es necesario un
Situar la bande
inferior.
* Secuencia(s) utilizada(s) para el anuncio escrito en la etiqueta energética de acuer
99628232_ML_A.qxd 22/05/03 14:15 Page 38
Page 39

39
Descripción de la función
M
odos de cocción del horno
de la temperatura.Algunos platos
gosos en todos los lados.
la bandeja recoge grasas en el
en el horno.
Recomendado para carnes, pescados, verduras, preferiblemente en fuente de barro.
Recomendado para todas las aves o
asados con rostidera. Para asar y cocinar hasta el centro piernas de cordero,
chuletas. Para mantener tiernos los pescados al horno.
Recomendado para todos los platos
húmedos (quiches, tartas de fruta). La
masa se hará bien por abajo.
Recomendado para recetas que deben
subir (cake, brioche, kouglof…) y para
los suflés que no formarán una costra
por encima.
Recomendado para que suba lasmasas de
pan, brioches, kouglof sin superar 40°C
(calientaplatos, descongelado)
Recomendado para cocciones lentas y delicadas: caza tierna… Para asados de carne
roja. Para cocer a fuego lento, con la olla
tapada, platos preparados fuera del horno
(pollo al vino, guiso de liebre…).
Recomendado para chuletas a la par-
rilla, salchichas, rebanadas de pan,
gambas a la parrilla.
ES
99628232_ML_A.qxd 22/05/03 14:15 Page 39
Page 40

40
1.
Qué es pirólisis
3. Cómo se hace una pirólisis
Cocciones que Galletas, verduras, pasteles Cocción sin salpicaduras
ensucian poco quiches, suflés No se justifica una pirólisis
Cocciones que Carnes, pescados (en La pirólisis puede justificarse
ensucian fuente) verduras rellenas cada 3 cocciones.
Cocciones que Piezas grandes de carnes La pirólisis puede hacerse
ensucian mucho ensartadas en la rostidera después de 1 cocción de este
tipo si hay muchas salpicaduras
Si su horno emite humo en el momento del precalentamiento o desprende mucho
humo durante la cocción. Si su horno desprende en frío un olor desagradable
después de determinadas cocciones (cordero, pescado, parrilladas…).
2. Cuándo debe efectuarse una pirólisis
No hay que esperar a que el horno esté lleno de grasa para
efectuar esta limpieza.
La pirólisis es un ciclo que calienta el interior del horno a muy alta temperatura
y que permite eliminar todos los residuos que proceden de salpicaduras o
desbordamientos. Los humos y los olores emitidos se destruyen mediante un
catalizador.
- No obstante, la pirólisis no es necesaria después de cada cocción, sino
únicamente cuando el grado de suciedad del horno lo justifica.
- Como medida de seguridad, la operación de limpieza sólo se efectúa tras un
bloqueo automático de la puerta. En cuanto la temperatura en el interior del
horno supera las temperaturas de cocción, es imposible abrir la puerta, incluso
situando el mando de "selección de funciones" en 0.
Cómo limpiar el interior del horno
a) Retire los accesorios del horno y elimine el
exceso de grasa que se haya podido producir.
b) Compruebe que el programador indica la hora
del día y que ésta no parpadea.
99628232_ML_A.qxd 22/05/03 14:15 Page 40
Page 41

c) Sitúe el mando de "selección de funciones" en la posición
"PIRÓLISIS" "p". El horno dejará de estar disponible durante
2h30 (no modificable).
Este tiempo incluye el tiempo de enfriamiento hasta que se
pueda abrir la puerta.
• Durante el ciclo de pirólisis, el visor de cierre se
enciende para indicar que la puerta está bloqueada.
• El visor de termostato se enciende cuando se calienta el horno.
• La pirólisis se detiene automáticamente cuando el visor de cierre se apaga,
entonces se puede abrir la puerta.
d) Vuelva a situar el mando de selección de funciones en posición 0.
e) Cuando el horno esté frío, utilice un trapo húmedo para eliminar la ceniza blanca.
El horno está limpio y puede utilizarse de nuevo para efectuar la cocción que desee.
41
• La lámpara se encuentra en la bóveda del interior del horno.
a) Desenrosque la tulipa (véase
esquema).
b) Desenrosque la bombilla en el
mismo sentido.
Características de la bombilla:
- 15 W
- 220-240 V
- 300°C
- Casquillo E 14
c) Cambiar la bombilla, volver a montar la tulipa y enchufar el horno.
Bombilla
Desenroscar
Tulip
Desenchufe el horno antes de realizar cualquier tipo de
intervención con la lámpara para evitar todo riesgo de descarga
eléctrica y, si es necesario, deje que el horno se enfríe.
4. Cómo cambiar la lámpara
Para desenroscar la tulipa y la bombilla, utilice un guante de
goma que facilitará la tarea de desmontaje.
ES
99628232_ML_A.qxd 22/05/03 14:15 Page 41
0
P
Page 42

Inhoud
In deze gebruikshandleiding
geeft symboll
veiligheidsaanwijzingen en symbool,
tips en praktische richtlijnen aan
Inleiding P.43
Indeling van uw oven P.44
Beschrijving van de oven
P.44
Oventoebehoren
P.45
Veiligheidsaanwijzingen
P.46
Installatie van uw oven
Elektrische aansluiting P.47-48
Vervanging van de ovenlamp P.48
Nuttige afmetingen voor de inbouw van uw oven P.49
Gebruik van uw oven
De programmaschakelaar P.50
I
nstellen van het uur van de oven
P.51
Onmiddellijk bakken P.52
Hoe programmeer ik een bakcyclus P.52-54
Gebruik van de schakelklok P.55
Bakwijzen van de oven P.56-57
Reiniging van de binnenzijde van de oven
Wat is een pyrolyse P.58
Wanneer is een pyrolysereiniging nodig P.58
Hoe voer ik een pyrolyse uit P.58-59
Problemen en oplossingen
P.59
42
99628232_ML_A.qxd 22/05/03 14:15 Page 42
Page 43

43
Inleiding
Geachte klant,
U heeft net een oven van FAGOR aangekocht. We willen u hier graag
voor bedanken.
Onze onderzoeksteams hebben voor u een nieuwe generatie van
apparaten ontworpen waarmee koken en bakken dag na dag een waar
plezier wordt.
Dank zij het moderne en verfijnde ontwerp zal uw nieuwe FAGOR-oven
harmonieus in uw keuken kunnen worden ingepast. Uw oven is een geslaagde combinatie van gebruiksvriendelijkheid, optimale bakprestaties en
esthetische schoonheid.
In het gamma van FAGOR-producten vindt u tevens een ruime keuze aan
kookplaten, afzuigkappen, vaatwasautomaten en koelkasten die allemaal
harmonieus met uw FAGOR-oven kunnen worden gecombineerd.
Uiteraard wensen wij onze klanten ook na de aankoop altijd tevreden te
houden. Onze servicedienst zal u altijd met uw vragen of suggesties
verderhelpen (zie achteraan deze handleiding).
FAGOR staat niet alleen voor technologische innovatie, maar verbetert
tevens de kwaliteit van uw dagelijkse leven. FAGOR biedt u immers
apparaten met een bijzonder mooie vormgeving die prestaties en
gebruiksgemak aan milieuvriendelijkheid en betrouwbaarheid koppelen.
FAGOR
NL
99628232_ML_A.qxd 22/05/03 14:15 Page 43
Page 44

44
1
3
5
P
40
65
100
150
165
180
200
210
220
240
275
0
1
2
3
4
5
7
6
1
2
5
6
7
3
4
Temperatuurknop
Programmaschakelaar
Keuzeknop
Lamp
Nummer inschuifsleuf
Opening voor draaispit
Detectiecontact voor
openen en sluiten van de
ovendeur
Indeling van uw oven
BESCHRIJVING VAN DE OVEN
99628232_ML_A.qxd 22/05/03 14:15 Page 44
Page 45

Diepe ovenschaal
Plaats deze ovenschaal onder het ovenrooster om
braadvet en braadsap op te vangen (in de stand
"sterke grill" of "grill + hetelucht").
U kan deze ovenschaal ook als bakplaat gebruiken. Let er wel op dat de grootte van het te bakken gerecht aangepast is (bv. gevogelte met een
groentenkrans bij een matige temperatuur).
Plaats de ovenschaal nooit op de ovenbodem, behalve in de stand GRILL.
Oventoebehoren
Plaats deze ovenschaal onder het ovenrooster om braadvet en braadsap op te
vangen. U kan deze braadslee ook voor de helft met water vullen om een
gerecht in bain-marie te bereiden. Leg nooit te roosteren of te braden vlees in
de braadslee. De braadslee zal dan sterk spatten op de ovenwanden.
Multifunctionele ovenschaal
(
patisserieplaat of braadslee)
Deze ovenschaal dient als bakplaat en heeft een
gebogen rand. Gebruik deze bakplaat voor de
bereiding van patisserie zoals soezen, meringue,
madeleinekoekjes, gebak van bladerdeeg...
• Schuif een eerste braadvork op het spit, plaats
vervolgens het te braden vlees tegen de vork op het spit en schuif tenslotte de
tweede braadvork op het spit. Schuif het vlees met de twee vorken tot in het midden
van het braadspit en draai de twee vorken vast.
• Plaats het braadspit op het draagkader.
•Druk de punt van het braadspit voorzichtig in de opening achteraan in de oven om het
spit vast te zetten (6).
• Verwijder het handvat door het los te schroeven. Na de bereiding kan u dit handvat
opnieuw op het spit vastschroeven zonder zich te verbranden.
Draaispit
Hoe gebruik ik het draaispit?
• Plaats de diepe ovenschaal in de eerste
inschuifsleuf vanaf de ovenbodem om
braadsappen op te vangen. Indien u een
zeer groot stuk vlees dient te bereiden, kan u
de diepe ovenschaal op de ovenbodem plaatsen.
Ovenrooster met kantelbeveiliging
Op dit rooster kan u alle soorten schotels en
bakvormen met het te bereiden of te
gratineren gerecht plaatsen. Dit rooster wordt
gebruikt voor grillgerechten (plaats het gerecht
op het rooster).
Achterzijde
Voorzijde
8
9
11
45
10
NL
99628232_ML_A.qxd 22/05/03 14:15 Page 45
Page 46

Veiligheidsaanwijzingen
Lees eerst aandachtig de volgende tips alvorens uw oven te installeren
en te gebruiken. Dit apparaat is bestemd voor huishoudelijk gebruik. Deze
oven is uitsluitend ontworpen voor het bakken van voedingsmiddelen. Deze oven
bevat geen enkel bestanddeel op basis van asbest.
EERSTE GEBRUIK :
Alvorens uw oven voor de eerste maal te gebruiken, laat u de lege oven eerst met
gesloten deur ongeveer 15 minuten in de maximumstand werken. Door de
specifieke samenstelling van de staalwolbekleding van de ovenruimte kan de oven
in het begin immers een bijzondere geur verspreiden. Bij deze proefverwarming
kan er mogelijk eveneens rookvorming optreden. Dit is normaal.
AANBEVELINGEN :
- Let erop dat de ovendeur altijd goed gesloten is. Enkel dan sluit de
afdichtingsvoeg de oven volledig af.
- Let erop dat niemand op een open ovendeur gaat leunen of zitten.
- Indien u de grill met de ovendeur op een kiertje gebruikt,
kunnen de ovenwanden en andere delen van de oven heet worden. Hou
kinderen op een afstand.
- Tijdens het gebruik van de oven wordt de oven warm. Raak uiteraard nooit de
verwarmingselementen binnen in de oven aan.
- Neem na een bakcyclus de oventoebehoren nooit met de blote hand vast
(rooster, draaispit, braadslee, draagkader voor het draaispit enz...). Gebruik altijd
een ovenwant of een hittebestendige doek.
- Plaats geen aluminiumfolie op de ovenwanden. Aluminiumfolie leidt tot
oververhitting van de oven wat tot een slecht bak- of braadresultaat en
beschadiging van het email kan leiden.
- Alvorens een pyrolysereiniging van de oven uit te voeren, verwijdert u alle
oventoebehoren uit de oven en verwijdert u tevens groffe (aangebakken)
etensresten.
- Gebruik geen hogedrukstoomreiniger.
- Tijdens een pyrolyse worden de wanden van de oven warmer dan tijdens een
gewone bakcyclus. Hou kinderen op een afstand!
- Zet de oven altijd af alvorens een reiniging aan de binnenzijde van de
oven uit te voeren.
Om de oven opnieuw te gebruiken, dient u de functieschakelaar
altijd opnieuw in de stand 0 te plaatsen.
46
99628232_ML_A.qxd 22/05/03 14:15 Page 46
Page 47

47
Installatie van uw oven
20A teller mono
220-240 V ~ 50 Hz
Stopcontact 2 polen
+ aarding
CEI-norm 60083
Monokabel 220-240 V ~
Elektrische aansluiting
Voedingskabel
lengte :
ongeveer 1,50 m
Differentieelschakelaar of zekering 16 A
Controleer vóór de elektrische aansluiting of de doorsnede van
de elektrische installatiedraden groot genoeg is voor de
elektrische voeding van het fornuis.
De zekering van uw installatie dient 16 Ampère te bedragen.
Voer de elektrische aansluiting uit alvorens de oven in het meubel in te bouwen.
• Voor de aansluiting van de oven gebruikt u een voedingskabel (genormaliseerd)
met 3 geleiders met een doorsnede van 1,5 mm2 (1 fasedraad + 1 nulleider + 1
aarding). Deze geleiders worden aangesloten op een elektriciteitsnet van 220-240
V ~ (monofasig) via een genormaliseerd stopcontact (1 fasedraad + 1 nulleider +
1 aarding) overeenkomstig de norm CEI 60083 of via een element met
omnipolaire schakelaar met een minimale afstand tussen de kontakten van 3 mm.
De beschermingsdraad (groen-geel) is verbonden met de aardingsklem van het
apparaat en moet worden verbonden met de aarding van de installatie.
• Indien u kiest voor een aansluiting op een stopcontact, dient u ervoor te zorgen
dat het stopcontact ook na de aansluiting gemakkelijk bereikbaar blijft.
• De nulleider van de oven (blauwe draad) dient met de nulleider van het
elektriciteitsnet te worden verbonden.
NL
99628232_ML_A.qxd 22/05/03 14:15 Page 47
Page 48

• De voedingskabel (H05 RR-F, H05 RN-F of H05 W-F) dient lang genoeg te zijn om te
kunnen worden aangesloten op de oven wanneer de oven met het oog op de
inbouw op de grond voor het keukenmeubel wordt geplaatst.
Werkwijze (koppel eerst de oven van het elektriciteitsnet af) :
• Open het toegangsplaatje rechts onderaan de achterwand. Draai hiervoor de 2 schroeven
los en draai het plaatje weg.
• Ontbloot elke draad van de nieuwe voedingskabel over een lengte van 12 mm.
• Tors de draadjes van elke draad voorzichtig ineen.
• Draai de schroeven van het klemmenbord los en verwijder de te vervangen
voedingskabel.
• Steek de voedingskabel langs de zijkant van de achterwand in de kabelklem rechts van het
klemmenbord.
• Verbind de draden van de voedingskabel overeenkomstig het (de) schema('s) op het
toegangsplaatje.
• Alle draadjes van elke draad van de voedingskabel dienen onder de schroeven vast te zitten.
• De fasedraad moet worden verbonden met de L-klem.
• De aardingsdraad (groen-geel) moet worden verbonden met de aardingskle .
• De nulleider (blauwe draad) moet worden verbonden met de N-klem.
• Draai de schroeven van het klemmenbord stevig vast en controleer de stevigheid van de
aansluiting door even aan elke draad te trekken.
• Leg de voedingskabel vast door middel van de kabelklem rechts van het
klemmenbord.
• Schroef het toegangsplaatje met de 2 schroeven opnieuw vast.
Vervanging van de voedingskabel
Onze aansprakelijkheid vervalt bij een ongeval ten gevolge van een
afwezige, defecte of foute aarding.
Installatie van uw oven
•
De ovenlamp bevindt zich bovenaan in de ovenruimte.
a) Schroef het vensterkapje los (zie
tekening).
b)Draai de lamp naar links los.
Kenmerken van de lampje :
- 15 W
- 220-240 V
- 300°C
- schroeffitting E 14
c) Plaats een nieuwe lamp en draai
het vensterkapje opnieuw dicht. Sluit de oven opnieuw aan.
lampje
Losschroeven
Vensterkapje
Trek altijd de stekker van uw oven uit alvorens de ovenlamp te
vervangen om elektrische schokken te vermijden. Laat indien
nodig de oven afkoelen.
4. Vervanging van de ovenlamp
Gebruik een rubberen handschoen voor het losschroeven van het
vensterkapje en de lamp (praktisch!).
48
99628232_ML_A.qxd 22/05/03 14:15 Page 48
Page 49

49
Installatie van uw oven
Voor een installatie overeenkomstig de wettelijke richtlijnen raden wij u
aan een beroep te doen op een erkend elektrotechnicus.
Nuttige afmetingen voor de inbouw van uw oven
De oven kan naar keuze onder een werkblad of een (open* of gesloten)
kolommeubel met de juiste afmetingen voor de inbouw van de oven
worden geïnstalleerd (zie schema).
Uw oven beschikt over een optimale luchtcirculatie die vlekkeloze bakresultaten en
een optimale reiniging garandeert. Voor een optimale luchtcirculatie dient u met de
volgende punten rekening te houden :
• Plaats de oven centraal in het meubel met een minimale afstand van 5 mm
tussen de zijwanden van de oven en de zijwanden van het inbouwmeubel.
• Het inbouwmeubel moet van hittebestendig materiaal gemaakt of ermee bekleed zijn.
• Voor meer stabiliteit schroeft u de oven met 2 schroeven in de in zijrand
voorziene schroefgaten in het meubel vast (zie schema).
Werkwijze :
1) Verwijder de rubberen schroefkapjes van de schroefgaten.
2) Maak een opening met een diameter van 3 mm in de wand van het meubel om te
vermijden dat het hout gaat barsten.
3) Bevestig de oven met de 2 schroeven.
4) Plaats de rubberen schroefkapjes opnieuw op de schroeven (de kapjes dempen
tevens het geluid bij het sluiten van de ovendeur).
(*) bij een open kolommeubel dient de opening (maximaal) 70 mm te bedragen.
NL
577
577
585600
99628232_ML_A.qxd 22/05/03 14:15 Page 49
Page 50

Tijdsgegevens en bakduur
Symbool bakduur
Symbool einde bakduur
Onafhankelijke schakelklok
Toets voor de activering van de verschillende programma's voor
het instellen van de tijdsgegevens
Toetsen voor tijdsinstellingen
1
2
3
4
5
6
7
50
1. De programmaschakelaar
1
2
3
4
5
6
7
Gebruik van uw oven
BESCHRIJVING VAN DE PROGRAMMASCHAKELAAR
99628232_ML_A.qxd 22/05/03 14:15 Page 50
Page 51

51
a) Tijdens het aansluiten van
de oven
• De display knippert.
• Stel het uur met de toetsen + en - in (hou de
toets ingedrukt indien u de cijfers sneller wil doen
vorderen).
• Druk op toets om het nieuwe uur te bevestigen.
Voorbeeld : 12h30.
b) Wijzigen van het ingestelde uur
• Druk gelijktijdig enkele sekonden lang op de
toetsen + en - tot de display begint te knipperen.
• Stel het uur met de toetsen + en - in.
• Druk op toets om het nieuwe uur te
bevestigen.
2. Instellen van het uur van de oven
Indien u het nieuwe uur niet met de toets bevestigt, zal de display
na enkele sekonden zelf het uur bevestigen.
1
2
3
2
1
1
Gebruik van uw oven
NL
99628232_ML_A.qxd 22/05/03 14:15 Page 51
Page 52

52
Gebruik van uw oven
De programmaschakelaar mag enkel het uur
vermelden en mag niet knipperen.
• Kies de bakwijze :
Plaats de keuzeknop in de gewenste stand.
Voorbeeld : stand " ".
• Kies de baktemperatuur
Draai de thermostaat (temperatuurknop) in
de voor uw gerecht aanbevolen temperatuur.
Voorbeeld : stand 200°.
• De oven begint nu te werken en het
thermostaatlampje gaat branden.
3. Onmiddellijk bakken
4. Hoe programmeer ik een bakcyclus
a) Bakken met een bepaalde bakduur :
• Kies de bakwijze :
Plaats de keuzeknop in de gewenste stand.
Voorbeeld : stand " ",
• Kies de baktemperatuur.
Draai de thermostaat (temperatuurknop) in de
voor uw gerecht aanbevolen temperatuur.
Voorbeeld : stand 200°.
Na een bakcyclus blijft de ventilator van de oven een tijdje
doorwerken om de verwarmingselementen af te koelen
(volgens mode).
99628232_ML_A.qxd 22/05/03 14:15 Page 52
0
P
220
210
240
200
275
40
65
100
150
165
180
0
P
220
210
240
200
275
180
40
65
100
150
165
Page 53

53
Gebruik van uw oven
• Kies de bakduur.
Druk éénmaal op de toets .
De bakduur (0u00) en het bakduursymbool
knipperen. U kan nu de bakduur instellen.
U kan de bakduur instellen.
U kan de bakduur met de toetsen + en instellen.
Voorbeeld : een bakduur van 30 minuten.
Meteen nadat u met de toetsen + of - de
bakduur heeft ingesteld en de toetsen loslaat,
begint het aftellen van de bakduur.
• De oven begint nu te werken en het thermostaat
lampje gaat branden.
De bakduursymbool brandt onafgebroken en op
de display verschijnt opnieuw het uur.
Na de bakcyclus (d.w.z. op het einde van de
geprogrammeerde bakduur) :
- stopt de oven,
- gaat het symbool van de bakduur op de display uit,
- staat de bakduur op 0:00 en
- hoort u enkele minuten lang een reeks bieptonen.
Druk op om het even welke toets om het biepsignaal
definitief te stoppen. Nu verschijnt opnieuw het uur op de
display.
b) Uitgesteld bakken met een bepaalde
bakduur :
(instelling van einduur)
• Stel de baktemperatuur in en kies de bakstand.
Voorbeeld : stand " ",
Voorbeeld : stand 200°.
NL
99628232_ML_A.qxd 22/05/03 14:15 Page 53
220
210
240
P
275
200
180
0
40
65
100
150
165
Page 54

U kan op elk moment :
- de bakduur wijzigen.
- de resterende bakduur met een druk op de toets « »
opvragen.
- de programmatie annuleren door op de toets « » te drukken
en enkele sekonden ingedrukt te houden tot u een bieptoon hoort.
Opgelet : op dit moment begint de oven opnieuw op te warmen.
Om de oven te stoppen, zet u de temperatuurknop en de
functiekeuzeknop in de stand 0.
• U kan nu het gewenste einduur van de bakcyclus met de
toetsen + en - instellen.
Voorbeeld : u wenst dat uw gerecht om 13u00 klaar is.
Na enkele sekonden registreert de oven automatisch uw
instelling.
De oven begint pas te werken op een moment dat het
door u ingestelde einduur (13u00) wordt bereikt.
Zodra de oven begint te werken, gaat het symbool van
het einduur op de display uit.
Na de bakcyclus (d.w.z. op het einde van de
geprogrammeerde bakduur) :
- stopt de oven,
- gaat het symbool van de bakduur op de display uit,
- staat de bakduur op 0:00 en
- hoort u enkele minuten lang een reeks bieptonen.
Druk op om het even welke toets om het biepsignaal definitief te stoppen. Nu
verschijnt opnieuw het uur op de display.
54
• Druk éénmaal op de toets .
De bakduur (0u00) en het bakduursymbool
knipperen. U kan nu de bakduur instellen (met een
maximale duur van 23u59).
• U kan de bakduur met de toetsen + en - instellen.
Voorbeeld : een bakduur van 25 minuten.
Zodra u op de toets + drukt, stopt de display met
knipperen.
• Druk op de toets om het einduur van de
bakcyclus en het symbool van het einduur te doen
knipperen.
U kan nu het einduur instellen.
Gebruik van uw oven
99628232_ML_A.qxd 22/05/03 14:16 Page 54
Page 55

Uw oven is voorzien van een schakelklok die
onafhankelijk van de oven werkt en waarop u
een bepaalde baktijd kan instellen.
• Druk enkele keren op de toets tot het symbool
van de schakelklok begint te knipperen en op de
display de baktijd verschijnt
.
5. Gebruik van de schakelkok
• U kan nu de gewenste baktijd in stappen van
30 sekonden met de toetsen "+" en "-" instellen. Op de
display staat de baktijd in minuten en sekonden
aangegeven.
Nadat u de baktijd heeft ingesteld, zal de tijd van de
schakelklok na enkele sekonden beginnen te lopen.
De tijd blijft ononderbroken op de display afleesbaar.
Na afloop van de ingestelde baktijd hoort u enkele bieptonen (de tijd op de display
is 0:00).
Druk éénmaal op om het even welke toets om de bieptonen te stoppen.
U kan op elk moment de programmatie van de schakelklok annuleren of wijzigen.
Gebruik van uw oven
NL
55
99628232_ML_A.qxd 22/05/03 14:16 Page 55
Page 56

Traditioneel hetelucht
Het bakken gebeurt met het
onderste en bovenste
verwarmingselement van de oven
en de luchtvermengingsschroef.
Grill hetelucht + Draaispit
Het bakken gebeurt afwisselend met
het bovenste
verwarmingselement van de oven en
de luchtvermengingsschroef.
T
raditioneel
Het bakken gebeurt met het onderste en het bovenste
verwarmingselement van de oven
zonder de
luchtvermengingsschroefr.
Hetelucht onderelement
Het bakken gebeurt met het
onderste verwarmingselement en
een lage grillstand in combinatie met
de luchtvermengingsschroef.
Grill
Het bakken gebeurt met het
bovenste verwarmingselement
zonder luchtvermengingsschroef.
Snelle stijging
Sommige gerec
oven worden g
Geen voorverw
Gevogelte en g
aan alle zijden.
Het draaispit bl
opent.
Plaats de braad
Verwarm de ov
Verwarm de ov
Schuif de braad
Het gerecht wo
lichte bovenve
Plaats het ove
inschuifsleuf.
Warmhouden
Het bakken gebeurt met het bovenste en onderste
verwarmingselement en de luchtvermengingsschroef.
Warmhouden.
Symbool
Functie Beschri
4. Bakwijzen van de oven HP198
*
* Gebruikte sekwenties voor de schriftelijke mededeling op het energie-etiket overeen
*
56
99628232_ML_A.qxd 22/05/03 14:16 Page 56
Page 57

57
Aanbevolen stand om wit vlees, vis en
groenten zacht te houden, bij voorkeur
in een aarden ovenschaal.
Aanbevolen stand voor het braden van
gevogelte en gebraad op het draaispit.
Om lamsbouten en grote stukken
rundsvlees te doorbakken.
Om vismoten te grillen en tegelijk
aan de binnenzijde zacht te houden.
Aanbevolen voor langzame en
delicate bereidingen :zachte
wildgerechten...
Braden van rood vlees.
Stoven van gerechten in een stoofpot
met deksel waarvan de bereiding op
een kookplaat is begonnen (coq au vin,
wildragout...).
Aanbevolen stand voor het grillen van
koteletten, worsten en gambas en
het roosteren van sneedjes brood
op het ovenrooster.
Aanbevolen voor vochtige bereidingen
(quiches, taarten met saphoudend fruit...).
Het deeg krijgt onderaan een goed
gebakken en krokante structuur.
Aanbevolen voor bereidingen met
gistdeeg (cake, brioche, kuglof...) en
soufflés die bovenaan geen hinderlijke
korst nodig hebben.
Aanbevolen stand voor het bakken van
brood, brioches, kouglof... zonder dat
de temperatuur boven de 40°C uitkomt
(opwarmen van borden, ontdooien).
Aanbevelingen
Bakwijzen van de oven
van de oventemperatuur.
ven 5 minuten voor.
NL
99628232_ML_A.qxd 22/05/03 14:16 Page 57
Page 58

58
1. Wat is een pyrolyse
3. Hoe voer ik een pyrolyse uit?
WEINIG BEVUILENDE Biscuits, groenten, patisserie Bakken zonder spatten
GERECHTEN quiches, soufflés. Geen pyrolyse nodig
NORMAAL BEVUILENDE Vlees, vis (in een ovenschotel) Voer eventueel om de
GERECHTEN gevulde groenten 3 bakcycli een pyrolyse uit
STERK BEVUILENDE Grote vleesstukken, Voer de pyrolyse meteen na
GERECHTEN gerechten op het braadspit de bakcyclus uit indien er
eend, kalkoen, lamsbout. teveel spatten op de ovenwan
den zitten.
Een pyrolysereiniging is ook nodig indien er bij het voorverwarmen rookvorming
optreedt of tijdens een bakcyclus overmatig veel rook wordt ontwikkeld.
Een pyrolysereiniging is ook nodig indien uw oven na de bereiding van verschillende
gerechten (schaap, vis, grillgerecht...) een onaangename geur verspreidt.
2. Wanneer is een pyrolysereiniging nodig
Wacht niet tot de oven als het ware onder het vet bedolven zit
alvorens een pyrolysereiniging uit te voeren.
- Bij een pyrolysereiniging wordt de binnenzijde van de oven bij zeer hoge
temperatuur gereinigd waardoor alle spat- of overkookresten worden verwijderd.
De bij de pyrolyse vrijkomende rook en geuren worden via een catalysator
vernietigd.
- U hoeft niet na elke bakcyclus een pyrolysereiniging uit te voeren, maar enkel
indien de oven te vuil is (wordt door de oven vermeld).
- Om veiligheidsredenen wordt de ovendeur vóór het begin van een pyrolysereiniging
geblokkeerd. Zodra de temperatuur in de oven boven de baktemperatuur uitstijgt,
kan u de ovendeur niet meer openen, ook niet door de keuzeknop in de stand 0
te zetten.
Reiniging van de binnenzijde van de oven
a) Verwijder alle oventoebehoren uit de oven.
Verwijder eventuele grove bakresten.
b) Op de programmaschakelaar staat normaal
het uur vermeld (mag niet knipperen).
99628232_ML_A.qxd 22/05/03 14:16 Page 58
Page 59

c) Plaats de keuzeknop in de stand «PYROLYSE».
De oven is 2u30 niet beschikbaar (niet
wijzigbaar).
De reinigingstijd omvat eveneens de afkoelingstijd tot de ontgrendeling van de ovendeur.
• Tijdens de pyrolysereiniging brandt het hangslot op de display
om aan te geven dat de ovendeur vergrendeld is.
• Tijdens de opwarming van de oven brandt het thermostaatsymbool op de display.
• Zodra het hangslot op de display uitgaat, stopt de pyrolyse automatisch. U kan nu
de ovendeur openen.
d) Zet de keuzeknop opnieuw in de stand 0.
e) Zodra de oven koud is, veegt u met een vochtige doek de witte assen op. De oven
is nu opnieuw proper en klaar voor een nieuwe bakcyclus!
59
Problemen en oplossingen
U twijfelt over de goede werking van uw oven. Dit betekent niet automatisch dat
er een defect is.
Controleer in elk geval eerst de volgende punten :
Probleem
Mogelijke oorzaken Oplossingen
De oven wordt niet warm.
• De oven is niet aangesloten.
• De zekering van de installatie is
defect.
• De baktemperatuur is te laag.
• De sensor is defect.
• De thermostaat is defect.
• Oververhitting van de oven. De
oven staat nu op veiligheid.
- Sluit de oven aan.
- Vervang de zekering van uw
installatie (16 A).
- Verhoog de baktemperatuur.
- Neem contact op met de
servicedienst.
- Neem contact op met de
servicedienst.
- Neem contact op met de
servicedienst.
De T°c-indicator knippert.
• De ovendeur is niet vergrendeld.
• Defecte temperatuursensor.
- Neem contact op met de
servicedienst.
- Neem contact op met de
servicedienst.
De ovenverlichting werkt niet meer.
• De lamp is defect.
• De oven is niet aangesloten of de
zekering is defect.
- Vervang de lamp.
- Sluit de oven aan of vervang de
zekering.
De ventilator blijft na het stoppen van de oven doorwerken.
• De ventilator blijft maximaal 1
uur na het stoppen van de oven
doorwerken (of zolang de
temperatuur van de oven meer
dan 125° bedraagt).
• Indien de oven na 1 uur niet stopt.
- Open de ovendeur om de oven
sneller te laten afkoelen.
- Neem contact op met de
servicedienst.
De pyrolysereiniging werkt niet.
• De ovendeur is niet goed gesloten.
• Het vergrendelingssysteem is
defect.
• Defecte temperatuursensor.
•Het sensorcontact "gesloten
ovendeur" is defect.
- Controleer of de ovendeur goed.
- Neem contact op met de
servicedienst.
- - Neem contact op met de
servicedienst.
- - - Neem contact op met de
servicedienst.
-
NL
99628232_ML_A.qxd 22/05/03 14:16 Page 59
0
P
Page 60

Obsah
V návodu k obsluze se
setkáte s následujícími
značkami :
signalizuje bezpečnostní předpisy
signalizuje rady a nápady
Úvod
Str.61
Jaký je všeobecný popis vaší trouby ? Str.62
P
opis přístroje
Str.62
D
oplňky
Str.63
Bezečnostní pokyny
Str.64
Jak instalovat vaši troubu ?
Elektrické připojení Str.65-66
Jak vyměnit žárovku ? Str.66
Výměna přívodního elektrického kabelu Str.67
Jak používat vaši troubu ?
Detail vašeho programátoru Str.68
J
ak nastavit na displeji vaší trouby hodiny ?
Str.69
Jak naprogramovat troubu, aby začala okamžitě péct ? Str.70
Jak naprogramovat pečení ? Str.70-72
Jak používat časový spínač s funkcí minutky ? Str.73
Různé způsoby pečení v troubě
Str.74-75
Jak vyčistit vnitřek vaší trouby ?
Co je to pyrolýza ? Str.76
Ve kterých případech je třeba provést čištění pyrolýzou ? Str.76
Jak při pyrolýze postupovat ? Str.76-77
Co dělat když ...?
Str.77
60
99628232_ML_A.qxd 22/05/03 14:16 Page 60
Page 61

61
Úvod
Drahá Zákaznice, Drahý Zákazníku,
Děkujeme vám, že jste si zakoupili troubu FAGOR.
Náš tým výzkumníků pro vás vytvořil novou generaci kuchyňských
přístrojů, ktreré vám zpříjemní každodenní vaření.
Díky čistým liniím a moderní estetice bude ladit vaše trouba FAGOR s
vaší kuchyní. Budete překvapeni jejím jednoduchým užíváním a
výkonností.
V sortimentu výrobků FAGOR naleznete široký výběr desek na vaření,
odpařovačů dýmu, myček nádobí a lednic, které budete moci sladit s vaší
novou troubou FAGOR.
Neustále se snažíme vyjít vstříc našim zákazníkům, a proto ani vy
neváhejte využít naší služby spotřebitelům, která je vám plně k dispozici.
Dostanete zde odpovědi na vaše dotazy a připomínky (kontakt naleznete
na konci této příručky).
Na samé špici technologie, FAGOR přispívá zlepšovat váš každodenní
život tím, že přivádí na trh stále výkonnější výrobky, zjednodušuje jejich
obsluhu, respektuje životní prostředí a přináší příjemný estetický vzhled a
technickou spolehlivost.
Výrobce Značky FAGOR
CK
99628232_ML_A.qxd 22/05/03 14:16 Page 61
Page 62

62
1
3
5
P
40
65
100
150
165
180
200
210
220
240
275
0
1
2
3
4
5
7
6
1
2
5
6
7
3
4
Volič teploty (termostat)
Programátor
Volič funkcí
Lampa
Ukazatel vodící lišty
Otvor pro otočný rožeň
Detekční kontakt otevírání
dveří
Jaký je všeobecný popis vaší trouby ?
POPIS PŘÍSTROJE
99628232_ML_A.qxd 22/05/03 14:16 Page 62
Page 63

Hluboký Plech
Slouží k zachycení šťávy a omastku z pečínek,
připravovaných na silném grilu nebo
pulzovaném grilu.
Může být používím jako plech na vaření,
uzpůsobíme-li velikost kusu masa (např:
drůbež se zeleninou, pečená při mírné teplotě).
Nikdy nepokládat tento plech přímo na dno trouby, pouze je-li nastaven GRIL.
63
Doplňky
Vloží-li se do zarážky pod mřížku, pomůže zachytit sťávu a omastek z
grilovaného masa. Můžeme ho také napustit do poloviny vodou pro vaření s vodní
lázní. Vyhýbejte se přímému položení pečínek a masa na plech, protože se
automaticky objeví stříkání omastku na stěny trouby.
Víceúčelový Plech
(plech na moučníky nebo plech na
odchytávání omastku)
Slouží jako plech na moučníky a je vybaven
zahnutým okrajem. Používá se při pečení
cukrovinek jako např. větrníčků s krémem,
sněhových pusinek, čajového pečiva,
listového těsta...
• nasuňte jednu z vidlic na rožeň, nasaďte na
rožeň maso, nasaďte druhou vidlici a zajistěte
maso pomocí těchto vidlic, dále pak maso stáhněte sešroubováním dvou vidlic.
• umístěte jeden konec rožně na podpěru.
• lehce zatlačte, aby se špička rožně uchytila v otvoru na zadní stěně trouby (6).
• vyšroubujte držadlo rožně. Po skončení grilování našroubujte držadlo a vyjměte
rožeň. Odejměte vidlice a sejměte jídlo z rožně.
Rotační gril
Pro jeho použití :
• zasuňte víceúčelový plech do vodící lišty
Č.1 pro zachycení šťávy z pečení nebo na
dno, je-li maso k pečení velké.
Bezpečnostní Mřížka upravená
proti vyklopení
Mřížka může být použita pod všechny plechy a
formy, obsahující potraviny určené k pečení
nebo gratinování. Může být použita na
grilování (pokládat přímo na ni).
zadní část
přední část
8
9
11
10
CK
99628232_ML_A.qxd 22/05/03 14:16 Page 63
Page 64

64
Bezečnostní pokyny
Děkujeme, že jste se seznámili z následujícími pokyny před instalací a
použitím trouby. Tato trouba je určena veřejnosti pro užití v domácnosti. Je
určena pouze na zpracovávání potravin. Tato trouba neobsahuje žádné
azbestové komponenty.
PRVNÍ POUŽITÍ :
Než použijete poprvé vaši troubu, zahřejte ji naprázdno se zavřenými dvířkami a
to asi po dobu 15 minut. Trouba musí být nastavena na maximum, aby se
"zaběhla". Konzervační prostředky, které se nacházejí v troubě, mohou ze
začátku uvolňovat nepříjemný zápach způsobený jejich složením. Je možné, že se
objeví i slabý dým. Tento jev je zcela normální.
DALŠÍ POUŽITÍ :
- Ujistěte se, že jsou dvířka od trouby dobře uzavřena, aby tak mohlo těsnění
správně plnit svou funkci.
- Zabraňte, aby se někdo opíral nebo si sedal na otevřená dvířka od trouby.
- Při použití grilu za mírně otevřených dvířek se mohou určité části nebo
plochy trouby zahřívat. Zamezte přístup k troubě dětem.
- Při používání se trouba zahřívá. Nedotýkejte se prosím horkých částí uvnitř
trouby.
- Po vaření neberte do holých rukou žádné předměty, které byly v troubě (mřížku,
podpěru rožně, plech na odchytávání omastku, ostatní části rožně...), používejte
chňapku nebo látku z izolačního materiálu.
- Neobkládejte vaši troubu aluminiovým alobalem. V troubě by se tak mohlo
akumulovat teplo, které by negativně ovlivnilo kvalitu pečení či vaření a
poškodilo glazuru.
- Než přistoupíte k čištění pyrolýzou, vyndejte všechny pomůcky na pečení a
odstraňte větší zbytky uchycených zbytků potravin.
- Nečistěte pomocí páry nebo vysokého tlaku.
- Během pyrolýzy se stávají přístupné části teplejší než při normálním užití.
Zamezte přístup k troubě dětem.
- Při jakémkoli čištění vnitřní části trouby musí být trouba vypnuta.
Neprodleně uveďte volič funkcí na 0, aby bylo možno troubu znovu
použít.
99628232_ML_A.qxd 22/05/03 14:16 Page 64
Page 65

65
Jak instalovat vaši troubu ?
Měřák 20A Mono
220-240 V ~ 50 Hz
Zásuvka
2 póly + země
Norma CEI 60083
Vedení Mono 220-240 V
Elektrické připojení
Přívodní
elektrický kabel
délka okolo
1,50 m
Diferenciální jistič nebo tavná pojistka 16A
Než provedete zapojení ujistěte se, že dráty vaší elektrické instalace
mají dostatečný průřez pro normální přívod energie (průřez se musí
rovnat nejméně průřezu přívodního elektrického drátu).
Pojistka u vaší instalace musí mít 16 ampérů.
Elektrické zapojení se provádí před zasunutím trouby do kuchyňské linky.
• Trouba musí být zapojena pomocí přívodního elektrického kabelu
(normalizovaného) se 3 vodiči o rozměru 1,5 mm2 (1 ph + 1 N + země), které musí
být napojeny na jednofázovou síť 220-240 V prostřednictvím zásuvky 1 ph + 1 N +
normalizované uzemění CEI 60083, nebo prostřednictvím odpojovacího
všepolárního zařízení, majícího vzdálenost při otevření kontaktů nejméně 3 mm.
Ochranný drát (zeleno-žlutý) je napojen na svorku
přístroje a musí být
uzemněn.
• V případě zapojení do zásuvky musí tato zásuvka zůstat přístupná i po
instalovaci přístroje.
• Nulový bod trouby (modrý drát) musí být připojen k nulovému bodu sítě.
CK
99628232_ML_A.qxd 22/05/03 14:16 Page 65
Page 66

• Přívodní elektrický kabel (H05 RR-F, H05 RN-F nebo H05 VV-F) musí být dostatečně dlouhý,
aby mohl být napojen na troubu nacházející se na podlaze, před zasazením do kuchyňské linky.
Pro tento úkon musí být přístroj odpojen od síťě :
• Otevřete poklop, nacházející se dole vpravo na zadním krytu odšroubováním
2 šroubů a poté nechte poklop otočit.
• Odstraňte izolaci každého drátu nového přívodního elektrického kabelu na délce 12 mm.
• Skruťte pečlivě jednotlivé prameny.
• Uvolněte závity lustrové svorky a vyjměte napájecí šňůru, kterou chcete vyměnit.
• Vsuňte napájecí šňůru ze strany krytu do kabelové svorky umístěné napravo od lustrové
svorky.
• Zapojte dráty kabelu v souladu se značkami vyznačenými na lustrové svorce.
• Všechny prameny kabelu musí být uschovány pod závity.
• Drát fáze vede do svorky L.
• Drát uzemění zeleno-žluté barvy musí být připojen na svorku .
• Drát nulový (modrá) ke svorce N.
• Co nejvíce utáhněte šrouby na lustrové svorce a zkontrolujte zapojení zatažením za každý
drát.
• Upevněte kabel pomocí kabelové svorky, nacházející se napravo od lustrové svorky.
• Uzavřete poklop pomocí 2 šroubů.
Výměna přívodního elektrického kabelu
Naše zodpovědnost nebude angažována v případě nehody způsobené
neuzeměním, dále pak vadným nebo nesprávným uzeměním.
Jak instalovat vaši troubu ?
• Žárovka se nachází na horní straně uvnitř vaší trouby.
a) Odšroubujte ochranné sklo
žárovky (viz. obrázek).
b) Odšroubujte žárovku stejným
směrem.
Technické údaje žárovky :
- 15 W
- 220-240 V
- 300°C
- patice E 14
c) Vyměňte žárovku, znovu namontujte ochranné sklo a zapojte troubu.
Žárovka
Odšroubujte
Ochranné sklo žárovky
Odpojte vaši troubu před jakoukoli opravou žárovky, abyste se vyhnuli
nebezpečí zranění elektrickým proudem a nezapomeňte nechat
troubu vychladit, je-li poptřeba.
4. Jak vyměnit žárovku ?
pro odšroubování ochranného skla a žárovky použijte kaučukovou
rukavici, která usnadní vymontování.
66
99628232_ML_A.qxd 22/05/03 14:16 Page 66
Page 67

67
Jak instalovat vaši troubu ?
Abyste se ujistili, že je vaše instalace vyhovující, neváhejte se obrátit
na odborníka.
Důležité rozměry pro vestavění vaší trouby
Trouba může být instalována pod deskou kuchyňské linky nebo v patrovém
nábytku (otevřený* nebo uzavřený), majícím vhodné rozměry pro vestavění
(viz.schéma).
Vaše trouba je opatřena optimálním prouděním vzduchu, které umožňuje
dosáhnout vynikajících výsledků při vaření a při čištění, jsou-li respektovány tyto
základní pokyny :
• Umístěte troubu do nábytku způsobem, aby byla zajištěna minimální vzdálenost
5 mm mezi stěnou nábytku a trouby.
• Materiál nábytku, do kterého je trouba vestavěna, musí odolávat teplu (nebo být
pokryt tepluvzdorným materiálem).
• Pro větší stabilitu upevněte troubu k nábytku pomocí 2 šroubů, které umístíte do
otvorů nacházejících se po stranách trouby (viz.schéma).
Postup :
1) Odstraňte kaučukové kryty závitů, čímž odkryjete přístup k fixačním otvorům.
2) Vyvrtejte otvor o průměru 3 mm ve stěně nábytku, abyste se vyvarovali prasknutí dřeva.
3) Upevněte troubu pomocí 2 šroubů.
4) Dejte zpět kaučukové kryty závitů (sloužící také ke tlumení zavírání dvířek
trouby).
(*) jestli je nábytek otevřen, jeho rozevření musí být 70 mm (maximálně).
CK
577
577
585600
99628232_ML_A.qxd 22/05/03 14:16 Page 67
Page 68

Zobrazení časů a dob
Symbol doby pečení
Symbol konce pečení
Nezávislý časový spínač (minutka)
Přístupové tlačítko k různým programům nastavování času
Tlačítka sloužící k nastavení teploty
1
2
3
4
5
6
7
68
1. D
etail vašeho programátoru
1
2
3
4
5
6
7
Jak používat vaši troubu ?
POPIS PŘÍSTROJE
99628232_ML_A.qxd 22/05/03 14:16 Page 68
Page 69

69
a) Při zapojení trouby do
elektrické sítě
• Na displeji bliká zobrazení 0:00.
• Mačkáním na tlačítka + nebo - nastavte čas
(přidržením prstu na tlačítku umožníte rychlejší
průběh hodin)
• Stisknutím tlačítka nastavení potvrdíte.
Příklad :12h30.
b) Nové nařízení hodin na displeji
• Stiskněte současně tlačítka + a - po dobu
několika sekund a to až do doby, kdy začne údaj na
displeji blikat.
• Seřiďte hodiny pomocí tlačítek + nebo -.
• Stisknutím tlačítka nastavení potvrdíte.
2. Jak nastavit na displeji vaší trouby hodiny ?
Jestliže neproběhne potvrzení pomocí tlačítka , zaregistrování
proběhne po několika sekundách automaticky.
1
2
3
2
1
1
Jak používat vaši troubu ?
CK
99628232_ML_A.qxd 22/05/03 14:16 Page 69
Page 70

70
Jak používat vaši troubu ?
Na programátoru smí být zobrazeny pouze hodiny,
které nesmí blikat.
• Zvolte vyhovující způsob pečení :
Nastavte otáčením volič funkcí do
požadované polohy.
Například : poloha " ".
• Zvolte teplotu pečení
Otočte termostat (volič teploty) na teplotu
doporučovanou pro přípravu vašeho receptu.
Například : ryska na teplotě 200°
• Po té se trouba začne zahřívat a světelná
kontrolka termostatu se rozsvítí.
3. J
ak naprogramovat troubu, aby začala okamžitě péct ?
4. Jak naprogramovat pečení ?
a) Přesně určená délka pečení :
• Zvolte vyhovující způsob pečení :
Nastavte otáčením volič funkcí do
požadované polohy.
Například : poloha " ",
• Zvolte teplotu pečení.
Otočte termostat (volič teploty) na teplotu
doporučovanou pro přípravu vašeho receptu.
Například : ryska na teplotě 200°.
Po jednom cyklu pečení je ventilátor trouby ještě po určitou dobu v
chodu, aby bylo zajištěno dobré ochlazení všech částí trouby (dle
modelu).
99628232_ML_A.qxd 22/05/03 14:16 Page 70
0
P
220
210
240
200
275
40
65
100
150
165
180
0
P
220
210
240
200
275
180
40
65
100
150
165
Page 71

71
Jak používat vaši troubu ?
• Zvolte dobu pečení.
Stiskněte jedenkrát tlačítko .
Délka pečení (na 0H00) a přidružený symbol
blikají, což udává, že nastavení může proběhnout.
Je možno nastavit dobu pečení.
Stiskněte tlačítka + nebo - pro nastavení
požadovaného času.
Například : 30 minut pečení.
Odpočítávání doby pečení nastává okamžitě po
uvolnění tlačítek + nebo -.
• Po té se trouba začne zahřívat a světelná
kontrolka termostatu se rozsvítí.
Symbol doby pečení je neměnný a čas se znovu
zobrazí.
Na konci pečení (konec naprogramovaného času) :
- trouba se zastaví,
- symbol doby pečení zhasne,
- rozsvítí se 0:00
- během několika minut jsou vydávány zvukové
signály (pípnutí).
Konečné zastavení zvukových signálů provedeme
zmáčknutím kteréhokoli tlačítka. Na displeji se opět objeví
denní hodina.
b) Naprogramovat posunutý začátek
pečení s přesně určenou délkou pečení :
(hodina konce pečení je zvolena)
• Nařiďte teplotu a nastavte způsob pečení.
Například : poloha " ",
ryska na teplotě 200°.
CK
99628232_ML_A.qxd 22/05/03 14:16 Page 71
220
210
240
P
275
200
180
0
40
65
100
150
165
Page 72

Je možno
- kdykoliv změnit dobu pečení.
- kdykoliv konzultovat dobu, která zbývá do konce pečení, a to
zmáčknutím tlačítka « »
- kdykoliv zrušit naprogramování tím, že na několik sekund stisknete
tlačítko « » a to až do pípnutí.
Pozor : v tomto okamžiku se začne trouba opět zahřívat.
Chcete-li zahřívání zastavit, je nutné nastavit volič funkcí a volič
teploty do polohy zastavení.
• Nastavte požadovanou hodinu konce pečení stisknutím
tlačítek + nebo -.
Příklad na vedlejším obrázku : požadovaný konec
pečení ve 13h00.
Zaregistrování konce pečení je provedeno po několika
sekundách automaticky.
Po provedení těchto úkonů je začátek pečení opožděn
tak, aby bylo pečení dokončeno v naprogramovanou
hodinu (např : 13h00).
Při spuštění pečení symbol konce pečení zhasne.
Na konci pečení (konec naprogramovaného času) :
- trouba se zastaví,
- symbol doby pečení zhasne,
- rozsvítí se 0:00
- během několika minut jsou vydávány zvukové signály (pípnutí).
Konečné zastavení zvukových signálů provedeme zmáčknutím kteréhokoli
tlačítka. Na displeji se opět objeví denní hodina.
72
• Stiskněte jedenkrát tlačítko .
Délka pečení na 0H00 a přidružený symbol blikají, což
udává, že nastavení může proběhnout. Je možno
nastavit dobu pečení až na 23h59.
• Stiskněte tlačítka + nebo - pro nastavení požadovaného
času.
Například : 25 minut pečení
Při prvním stisknutí tlačítka + se blikání zastaví.
• Stiskněte tlačítko až do doby, než začne blikat hodina
konce pečení a její přidružený symbol.
Nastavení je teď možné.
Jak používat vaši troubu ?
99628232_ML_A.qxd 22/05/03 14:16 Page 72
Page 73

Vaše trouba je vybavena časovým spínačem
(minutkou) nezávislým na fungování trouby
a umožňujícím odpočítávání času.
• Stiskněte několikrát tlačítko až do té doby, než
začne blikat symbol časového spínače (minutky) a
odpovídající zobrazení
.
5. Jak používat časový spínač s funkcí minutky ?
73
• Nařiďte zvolený čas pomocí tlačítek + nebo -.
Nařizování probíhá po 30ti sekundových úsecích a čas
je zobrazen v minutách/sekundách.
Přidržením prstu na tlačítku umožníte rychlejší
průběh hodin.
Odpočítávání času začne několik sekund po
ukončení nastavení a je stále viditelné na displeji.
Při dokončení odpočítávání zvoleného času je vydána série zvukových signálů,
pípnutí (zobrazení na displeji 0:00).
Zastavení zvukových signálů provedeme zmáčknutím kteréhokoli tlačítka.
Kdykoliv je možno změnit nebo zastavit naprogramování časového
spínače (minutky).
Jak používat vaši troubu ?
CK
99628232_ML_A.qxd 22/05/03 14:16 Page 73
Page 74

74
K
onvenční pečení s ventilátorem
Ohřev shora i ze spodu horkým
vzduchem rozháněným
ventilátorem.
Gril s ventilátorem + Otočná
rožeň
Ohřev a grilování shora horkým
vzduchem rozháněným
ventilátorem.
K
onvenční pečení shora i ze
spodu
Ohřev shora i ze spodu bez
rozhánění vzduchu ventilátorem.
Konvenční pečení jen ze
spodu
Ohřev ze spodu je spojen s jemným
grilováním a s rozháněním vzduchu
ventilátorem.
Gril
Ohřev shora bez rozhánění vzduchu
ventilátorem.
Rychlé stoupán
být vloženy do
Předehřívání tro
Drůbež a šťavn
všech stran
Rožeň se otáčí
Zasuňte plech
spodní vodící l
Nutné předehř
Nutné předehřá
Umístěte plech
Ohřev ze spod
Umístěte mřížk
Uchování teplého jídla
Dávkování ohřevu shora i ze spodu
spojené s rozháněním vzduchu
ventilátorem.
Uchování tepléh
Symbol
Název funkce
4. Různé způsoby pečení v troubě
*
* Užitá(é) sekvence vyznačená(é) na energetickém štítku podle normy EN 50304 a pod
*
99628232_ML_A.qxd 22/05/03 14:16 Page 74
Page 75

lišty.
Popis funkce
75
Doporučeno pro masa, ryby a zeleninu
vložených nejlépe do hliněného nádobí.
Doporučeno pro všechny druhy
drůbeže nebo pečínek připravovaných
na otočném rožni.
Pro prudké opečení nebo opečení do
růžova jehněčí kýty nebo hovězích žebírek.
Pro upečení rozplývajících se kousků
ryby.
Doporučeno pro pomalé a delikátní
pečení : měkká zvěřina...
Pro prudké opečení pečínek z červených
mas. Pro pomalé dovaření v uzavřeném
kastrolu na dušení. Týká se jídel
předběžně upravených na sporáku
(kohout na víně, ragú...)
Doporučeno pro grilování kotlet,
párků, plátků chleba, obřích krevet
položených na mřížce.
Doporučeno pro jídla s obsahem vody
(slaný koláč se šunkou a vejci, koláče se
šťavnatým ovocem...
Těsto bude ze spoda dobře propečeno.
Doporučeno pro těsta, u kterých se
pečením zvětší objem (biskupské chlebíčky,
briošky,bábovky...) a pro souflé, které
nebudou zastaveny horní kůrkou.
Doporučeno pro nakynutí těst na chléb,
briošky, bábovky... Teplota nesmí
přesáhnout hranici 40°C (ohřívání talířů,
rozmrazování).
Doporučení
Různé způsoby pečení v troubě
CK
99628232_ML_A.qxd 22/05/03 14:16 Page 75
Page 76

76
1. Co je to pyrolýza ?
3. Jak při pyrolýze postupovat ?
PEČENÍ MÁLO Sušenky, zelenina, moučníky Pečení bez stříkání, pyrolýza
ZNEČIŠŤUJÍCÍ slané koláče, suflé není potřebná
PEČENÍ masa, ryby, pyrolýza vhodná po
ZNEČIŠŤUJÍCÍ (na pekáči) plněná zelenina každých 3 použitích trouby
PEČENÍ VELMI velké kusy masa pyrolýza se může provést po
ZNEČIŠŤUJÍCÍ na rožni 1 pečení tohoto typu v
případě velkého znečištění
Vaše trouba dýmá během předehřívání nebo silně dýmá během pečení.
Vaše trouba vylučuje zastudena zápach po přípravě určítých pokrmů (skopové,
ryby, grilované maso...).
2. Ve kterých případech je třeba provést čištění pyrolýzou ?
Před provedením pyrolýzy nečekejte, až bude trouba velmi silně
znečistěna od omastku.
- Pyrolýza je cyklus, při kterém se vnitřek trouby zahřeje na velmi vysokou
teplotu, čímž je umožněno odstranění všech nečistot jako např. připečených
kousků nebo mastnoty. Vznikající dým a zápach jsou zničeny při průchodu
katalyzátorem.
- Pyrolýza není nutná po každém použití trouby, ale pouze v případě, že je
trouba více znečištěná.
- Pro vaši bezpečnost může toto čištění probíhat pouze v případě, jsou-li dvířka
trouby automaticky zablokována. V momentě, kdy přesáhne vnitřní teplota
trouby 250°C, není možné dvířka trouby otevřít a to ani v případě, že nastavíte
ovládací knoflík "volič funkcí" na 0.
Jak vyčistit vnitřek vaší trouby ?
a) Nejprve vyjměte z trouby všechno nádobí a
omyjte silně znečištěné plochy.
b) Ověřte, jestli je na programátororu zobrazena
hodina dne, a jestli tato hodnota nebliká.
99628232_ML_A.qxd 22/05/03 14:16 Page 76
Page 77

c) Nastavte ovládací knoflík "volič funkcí" na «PYROLYSE».
Troubu nebudete moci používat po dobu 2h30 (tato doba je
neměnitelná).
Do této doby je započítáno ochlazení trouby a celý proces končí
odblokováním dvířek.
• V době, kdy probíhá pyrolýza, je rozvícena
světelná kontrolka informující o uzamčení dvířek trouby.
• Světelná kontrolka termostatu je rozsvícena v době ohřevu trouby.
• Pyrolýza se automaticky zastaví po zhasnutí světelné kontrolky, signalizující
uzamčení trouby. Po té, co kontrolka zhasne, můžete troubu otevřít.
d) Nastavte volič funkcí na 0.
e) Po té, co se trouba ochladí, setřete pomocí mokrého hadříku bílý popílek. Trouba je
teď čistá a připravena k novému použití.
77
Co dělat když ...?
Pochybujete-li o dobrém fungování vaší trouby, , nemusí se bezpodmínečně jednat
o poruchu. V každém případě ověřte následující body :
Všimli jste si, že...
Možné příčiny Co je třeba udělat ?
Trouba se nevyhřívá.
• Trouba není zapojena.
• Tavná pojistka vaší instalace je
mimo provoz.
• Zvolená teplota je příliš nízká.
• Snímač je vadný.
• Termostat je vadný.
• Trouba se přehřála a byl nastaven
bezpečnostní stav.
- Zapojte troubu.
- Vyměňte pojistku a ověřte její
hodnotu (16 A).
- Zvyšte zvolenou teplotu.
- Obrátit se na servisní službu.
- Obrátit se na servisní službu.
- Obrátit se na servisní službu.
Ukazatel T°C bliká.
• Chyba v zablokování dvířek.
• Snímač teploty je vadný.
- Obrátit se na servisní službu.
- Obrátit se na servisní službu.
Lampa u trouby nefunguje.
• Lampa je mimo provoz.
• Trouba není zapojena nebo je
tavná pojistka mimo provoz.
- Vyměnit lampu.
- Zapojte troubu nebo vyměňte
pojistku.
Chladící ventilátor se točí i po
vypnutí trouby.
• Ventilace funguje maximálně 1
hodinu po ukončení pečení nebo v
případě, že teplota ve vaší troubě
překračuje 125°C.
• Ventilace se po hodině
nezastavila.
- Otevřít dvířka u vaší trouby, aby
se ochlazení urychlilo.
- Obrátit se na servisní službu.
Čištění pyrolýzou neprobíhá.
• Dvířka jsou špatně uzavřena.
• Systém blokování dvířek je
vadný.
• Snímač teploty T° je vadný.
• Kontakt detekce "uzavřená
dvířka" je vadný.
- Zkontolujte uzavření dvířek.
- Obrátit se na servisní službu.
- Obrátit se na servisní službu.
- Obrátit se na servisní službu.
CK
99628232_ML_A.qxd 22/05/03 14:16 Page 77
0
P
Page 78

Contents
Throughout this manual,
indicates safety recommendations,
indicates advice to help you make the
best use of your oven
Introduction P.79
Your oven P.80
H
ow it works
P.80
Accessories
P.81
Safety recommendations
P.82
How to install your oven
Electrical connections P.83-84
Changing bulb P.84
Dimensions for installation use P.85
How to use your oven
The oven programmer P.86
H
ow to set the clock
P.87
How to cook straightaway P.88
How to programme the cooking P.88-90
How to use the timer P.91
Cooking methods P.92-93
Cleaning the oven cavity
Pyrolysis explained P.94
When to clean by pyrolysis P.94
How to use the pyrolysis program P.94-95
Troubleshooting
P.95
78
99628232_ML_A.qxd 22/05/03 14:16 Page 78
Page 79

79
Introduction
Dear Customer,
Thank you for buying a FAGOR oven.
Our design staff have produced a new generation of kitchen equipment,
to make everyday cooking a pleasure.
You will find that the clean lines and modern look of your FAGOR oven
blends in perfectly with your kitchen décor. It is easy to use and
performs to a high standard.
FAGOR also makes a range of products that will enhance your kitchen
such as hobs, extractor hoods, built-in dishwashers and refrigerators.
There are models to complement your new FAGOR oven.
Of course, we make every effort to ensure that our products meet all
your requirements, and our Customer Relations department is at your
disposal, to answer all your questions and to listen to all your
suggestions (see back cover of manual).
FAGOR has always been a leader in the development of new products,
thus enhancing the quality of everyday life by providing increasingly
efficient products, that are easy to use, respect the environment, and are
attractive and reliable.
The FAGOR name.
GB
99628232_ML_A.qxd 22/05/03 14:16 Page 79
Page 80

80
1
3
5
P
40
65
100
150
165
180
200
210
220
240
275
0
1
2
3
4
5
7
6
1
2
5
6
7
3
4
Temperature control
Timer
Programme selector
Light
Rail positions
Hole for rotisserie
Door-open detector plate
Your oven
OVEN FEATURES
99628232_ML_A.qxd 22/05/03 14:16 Page 80
Page 81

Hollow dish
The tray can be used for collecting juices when
cooking with the grill element by itself or with
the oven set to pulsed grill (grill and fan). It is
particularly useful as a large roasting tray for
meat and vegetables.
Never cook with the GRILL tray sitting on the
bottom of the oven.
81
A
ccessories
Inserted under the shelf,this pan catches cooking juices and fat from grilled
food. It can also be used half filled with water as a double boiler. Joints should
not be cooked in this tray uncovered because fat could spit all over the oven
sides.
Multi-purpose baking tray
(
cake tray or dripping pan)
It can be used a cake dish and has a sloping edge. Can be used for cooking pastries
and cakes such as cream puffs, meringues,
madeleines and puff pastry.
• Slide one of the forks onto the spit; put the
piece of meat to be roasted onto the spit; slide
on the second fork; centre and tighten the two forks.
• Place the spit on its cradle.
• Push gently to locate the tip of the spit in the turning mechanism situated at the
back of the oven (6).
• Remove the handle by unscrewing it. After cooking, screw the handle back onto
the spit to take it out without burning yourself.
Rotisserie
To use it:
• Place the multi-purpose baking tray at
level no. 1 to collect the cooking juices or on
the bottom of the oven if the piece of meat
to be roasted is too big.
Anti-tip safety shelf
Food can either be placed on the shelf in a
dish or cake tin for cooking or browning, or
may be placed directly on the shelf itself.
BACK
FRONT
8
9
11
GB
10
99628232_ML_A.qxd 22/05/03 14:16 Page 81
Page 82

82
Safety recommendations
Please read these instructions before installing and using your oven.
The oven has been designed for domestic use only for cooking food. No asbestos
has been used in its construction.
USING FOR THE FIRST TIME:
Before you use your oven for the first time, leave it empty and, with the door
closed, turn it on to maximum temperature and let it heat up for 15 minutes. This
"runs the oven in". During this time there may be some smell from the mineral
wool that insulates the oven and there could be some smoke. This is perfectly
normal.
NORMAL USE:
- Always close the door properly. The oven is fitted with a seal designed to work
with a closed door.
- Never lean or let anyone sit on the oven door when it is open.
- When using the grill with the door partly open, the accessible parts or
surfaces can get hot. Always keep children at a safe distance.
- When the oven is on it will get hot. Take care not to touch the heating elements
inside the oven.
- Always protect your hands with oven gloves or something similar when removing
food, accessories or containers from the oven.
- Do not line your oven with kitchen foil. The metal will increase the heat
produced and could ruin the food and damage the enamel.
- Before carrying out the pyrolysis cleaning of your oven, remove all accessories
and utensils, and wipe away any major spillages.
- Never use a spray or a high-pressure washer to clean the oven.
- During the action of pyrolysis, accessible surfaces become much hotter than
during normal cooking. Keep children at a distance.
- Always check that the oven is off before you clean the inside.
Ensure that the function selector is returned to 0 to re-use your
oven.
99628232_ML_A.qxd 22/05/03 14:16 Page 82
Page 83

83
H
ow to install your oven
Electricity meter (mains)
(20A, single-phase
220-240 V alternating
current 50 Hz)
Socket
2 -pin with earth
220-240 V single phase
alternating current
supply
Electrical connections
Connecting
cable approx
1.50 m. long
Fused 16A or differential circuit breaker
Before connecting your oven, make sure you are using the correct size cable. The cross-section should be the same as the cable
connected to the oven.
Use a 16-amp fuse.
The electrical connections are made before the oven is installed in its housing.
• The oven must be connected using an approved 3-core cable (live, neutral and
earth) with 1.5 mm square conductors. This should be connected via a 3- pinsocket (live, neutral, and earth to the main supply which should be should be a 220240V, alternating single-phase current. If the oven is not connected using a plug
and socket, it must be connected to a multi-pole switch with a minimum gap of 3
mm between contacts. The earth wire (green and yellow) should be connected to the terminal marked with the earth symbol on the appliance and to the earth in the switch.
• Where the oven is connected using a separate plug and socket this must be accessible after
the oven has been installed.
• The neutral wire (blue) of the oven must be connected to the neutral in the main supply.
GB
99628232_ML_A.qxd 22/05/03 14:17 Page 83
Page 84

• The supply cable (H05 RR-F, H05 RN-F or H05 W-F) must be long enough to allow
the oven to rest on the floor in front of its housing.
With the oven sitting on the floor and disconnected:
• Open the trapdoor at the bottom right hand side at the back of the oven by
removing the 2 screws and swinging the door away.
• Remove the sheath from each wire in the new cable up to 12 mm.
• Twist the ends carefully together.
• Unscrew the terminal screws and remove the wires that need changing.
• Pass the new cable through the wire clamp to the right of the terminals.
• Connect the wires up in accordance with the markings on the terminals.
• Make sure all wires are trapped under the screws.
• The brown wire (live) going to terminal marked L.
• The green and yellow wire (earth) going to the one marked .
• The blue wire (neutral) going to the terminal marked N.
• Tighten the screws and check, by tugging on each wire, that they are firmly connected.
• Tighten the clamp to hold the cable.
• Close the trapdoor using the two screws.
Changing cables
We cannot accept any liability in the event of an accident
resulting from non-existent or faulty earthing.
How to install your oven
•
The light bulb is housed in the ceiling of your oven.
a) Unscrew the protective shade
(see diagram).
b) Unscrew the bulb in the same
direction.
A bulb is used:
- 15 W
- 220-240 V
- 300°C
- E 14 screw-fitting bulb
c) Change the bulb, replace the shade and switch your oven back on at the mains.
bulb fitting
unscrew
cover
Warning! Switch off the power at the main switch before
attempting to change the bulb. Leave the oven to cool if necessary.
4. Changing a bulb
It is easier to unscrew the shade and bulb if you wear a rubber
glove.
84
99628232_ML_A.qxd 22/05/03 14:17 Page 84
Page 85

85
How to install your oven
If you are unsure about fitting this oven yourself please use a
qualified electrician.
Dimensions for installation use
The oven may be housed either under a work surface or built into a
column that is open* or closed with a suitable opening.
Your oven works at its best and produces excellent results when cooking and
cleaning itself, if its air circulation is not compromised:
• The oven must be centred in the unit so that there is a minimum distance of
5 mm between it and the surrounding unit.
• The housing unit or its outer surface must be capable of withstanding heat.
• To ensure the oven rests firmly in the housing, screw it to the housing unit using
the holes on the side uprights provided (see diagram).
To do this:
1) Remove the rubber stoppers masking the fixing holes.
2) To prevent the housing unit splintering, drill two holes 3 mm in diameter in the
wall of the housing unit opposite the fixing holes.
3) Attach the oven using the two screws.
4) Conceal the hole using the rubber stoppers. (These also help to cushion the
closing of the oven door).
(*) If the housing unit is open at the back, the gap must not be more
than 70 mm.
GB
577
577
585600
99628232_ML_A.qxd 22/05/03 14:17 Page 85
Page 86

Time and duration display
Cooking time symbol
Cooking complete symbol
Independent timer
Button providing access to the various time setting programmes
Time adjustment buttons
1
2
3
4
5
6
7
86
1.
The oven programmer
1
2
3
4
5
6
7
H
ow to use your oven
OVEN FEATURES
99628232_ML_A.qxd 22/05/03 14:17 Page 86
Page 87

87
a) When the oven is first switched
on at the mains
• The display blinks.
• Press on the + and - buttons until the correct
time is shown (Keeping a finger on the button,
rather than tapping it, is quicker)
• Press button to confirm the time.
The example shows 12.30
b) Altering the clock
• Press on both + and - buttons together for a few
seconds until the display blinks.
• Adjust the time using the + and - buttons.
• Confirm the time by pressing .
2. How to set the clock
If you forget to confirm the time by pressing button , the oven will
do it automatically after a few seconds.
1
2
3
2
1
1
How to use your oven
GB
99628232_ML_A.qxd 22/05/03 14:17 Page 87
Page 88

88
How to use your oven
The timer display only shows the time of day.
It should not be blinking.
• Choose how you want to cook your food:
Turn the dial until it is indicating your choice.
The example chosen is " ".
• Choose the temperature you want to cook at:
Turn the dial (thermostat) to the temperature
recommended for the food you are cooking.
The example shows 200°.
• When you have done both these the oven heats
up and the temperature light glows.
3. How to cook straightaway
4.
How to programme the cooking
a) To delay cooking :
• Choose how you want to cook your food.
Turn the dial until it is indicating your choice
The example chosen is
"",
• Choose the temperature you want to cook at:
Turn the dial (thermostat) to the temperature
recommended for the food you are cooking.
The example here is 200°.
After cooking the fan continues to work for a while to ensure
the elements cool right down (Depending on model).
99628232_ML_A.qxd 22/05/03 14:17 Page 88
0
P
220
210
240
200
275
40
65
100
150
165
180
0
P
220
210
240
200
275
180
40
65
100
150
165
Page 89

89
How to use your oven
• Choose how long you want the food to cook.
Press once on the button.
The clock shows 0:00 and the cooking time
symbol blinks. You can now instruct the oven
how long to cook for. It is possible to select your
chosen cooking time.
Press the + and - buttons until your
chosen time is shown.
The example shows 30 minutes.
The count-down starts as soon as you stop
pressing the + and - buttons.
• The oven heats up and the temperature light
glows.
The cooking time symbol glows steadily and the
time of day is displayed again.
When the cooking time is over (the pre-programmed time
ends),
- The oven switches off,
- The cooking time symbol goes out,
- The display shows 0:00
- The oven gives a series of bleeps for several
minutes.
To stop the bleeper, press any button on the oven front. The
time is displayed again.
b) Delayed cooking with a pre-selected
cooking time:
(you decide when cooking will stop)
• Set the temperature and select the
cooking method.
The example shows " ",
and the temperature is 200°.
GB
99628232_ML_A.qxd 22/05/03 14:17 Page 89
220
210
240
P
275
200
180
0
40
65
100
150
165
Page 90

It is possible to :
- Change the cooking time at any moment.
- Consult the remaining cooking time at any moment by
pressing on the « » button.
- Cancel the programmed cooking cycle at any moment by
holding the « » button pressed in until you hear a beep.
Warning! At this point you must switch the temperature and
method controls off; otherwise the oven will start warming up
again.
• You can now enter the time you want the cooking
to finish using the + and - buttons.
The example shows cooking to stop
at 1 pm (13:00)
If you forget to enter a time straightaway, the oven
automatically assumes one.
The oven works out when to switch on so that the food
finishes cooking at the time selected (example : 13:00).
When the oven switches on, the end of cooking symbol
will go out and the cooking time symbol will come on.
At the chosen time for the cooking to stop
-
The oven switches off,
-
The cooking time symbol goes out,
-
The display shows 0:00
-
The oven gives a series of bleep for several minutes.
To stop the bleeping, press any of the buttons on the panel. The time of day will
then be displayed again.
90
•
Now press once on the button.
The clock shows 0:00 and the cooking time symbol
blinks. You can now instruct the oven how long to cook
for 23h59.
•
Press the + and - buttons to enter the length
of time the food is to cook for.
The example shown is 25 minutes
As soon as you press the + button the blinking stops.
• Now press the button until the timer display starts
blinking again.
At the same time, you will notice the end of cooking
symbol blinks too.
How to use your oven
99628232_ML_A.qxd 22/05/03 14:17 Page 90
Page 91

Your oven is fitted with a separate minute timer. It is
not connected to the oven's programmes. You can
use it just like a kitchen timer.
• Press several times on the button until the
timer indicator and the corresponding display start
flashing
.
5. Using the timer ?
91
• Set the chosen time by pressing the + or - buttons.
Adjustment is in 30-second increments and the time
displayed is in minutes/seconds.
Holding the button pressed in makes it possible to
rapidly scroll through the times.
The countdown begins several seconds after
adjustment has been carried out and is permanently visible on the display.
When the timer has finished counting down the chosen time, it issues a series
of beeps (displaying 0:00).
You can turn off the beeps by pressing once on the button of your choice.
It is possible to modify or cancel the programmed timer setting
at any time.
How to use your oven
GB
99628232_ML_A.qxd 22/05/03 14:17 Page 91
Page 92

92
P
ulsed conventional oven
Food is cooked by a top and bottom
element and the fan.
Pulsed grill + Rotisserie
Cooking is done alternately by the
top element and by the fan.
C
onventional oven
Food is cooked by a top and bottom
element. No fan.
Pulsed bottom oven
Food is cooked by the bottom element with gentle heat from the grill
and the pulsed-air fan.
Grill
Only the top element heats up. The
fan is not used
.
Oven rapidly reac
dishes can start o
No preheating
Poultry and roa
all sides.
The spit will co
is opened.
Position the dri
Pre-heating ne
temperature.
Warm up for 5
Slide the grill p
Cooking from b
Place the wire
Warming oven
Heating from top and bottom
elements with pulsed air.
Stays warm.
Symbol
Feature
4. Cooking methods
*
* Cooking methods referred to in the advertisement about energy labelling in accorda
*
99628232_ML_A.qxd 22/05/03 14:17 Page 92
Page 93

required
ast joints will be juicy and crisp on
Description
93
Recommended for meat, fish and
vegetables, preferably in earthenware
dishes.
Recommended for all poultry or roasts
cooked on the spit
To seal or thoroughly cook legs of
lamb and beef rib roasts.
To keep fish steaks nice and juicy
Recommended for food requiring
slow, careful cooking such as game and
braising joints. Ideal for sealing red
meat joints and simmering lidded
casseroles whose contents have been
partially cooked on the hob first.
Recommended for grilling cutlets,
sausages, slices of bread and
Mediterranean prawns placed on the
oven shelf.
Recommended for dishes with a lot of
liquid (quiches and fruit pies) as the
pastry base is cooked through.
Use also for food that rises (bread
and cakes) and uncovered soufflés.
Recommended for leaving breads to
rise (keeping temperature below 40ºC),
keeping dishes warm and thawing food.
Recommendations
Cooking methods
GB
99628232_ML_A.qxd 22/05/03 14:17 Page 93
Page 94

94
1.
Pyrolysis explained
3. How to use the pyro-clean program
FOOD WITH LITTLE Biscuits, vegetables, cakes You do not need to use
SPATTERING quiches, soufflés pyrolysis feature
FOOD THAT Meat, fish (in an open dish) Use the pyrolysis feature
SPATTERS stuffed vegetables after 3 oven uses
FOOD THAT Large pieces of If a lot of spitting occurs,
SPITS BADLY meat on the spit run the pyrolysis feature
afterwards.
If your oven smokes when the pre-heat feature is on or if there is a lot of
smoke during a cooking cycle run the pyrolysis cycle.
You can also use this feature if there is an unpleasant smell of cooking when the
oven is cold.
2. When to clean by pyrolysis
Do not wait until the oven is coated in dirt before cleaning it.
- Pyrolysis is a cleaning method during which the oven is heated to a high
temperature to remove debris and splatter caused by spitting and dripping food.
The smoke and smells that this produces are removed as the air passes through
a catalyst.
- It is not necessary to run the pyrolysis feature after every use of the oven,
simply when the oven is dirty.
- As a safety measure, once the temperature is higher than normal use the door
automatically locks. You cannot unlock it even by turning the pyrolysis feature
off.
Cleaning the oven cavity
a) Remove any accessories from the oven and
wipe off any excess grime.
b) Check that the programmer displays normal
time and that it is not flashing.
99628232_ML_A.qxd 22/05/03 14:17 Page 94
Page 95

c) urn the "function selector" knob to the
«PYROLYSE» position.
The length of time that the oven will be out of use is 2 hours 30
minutes. This cannot be
modified.
This length of time includes the required cooling time until the
door unlocks.
• During the pyrolysis cleaning cycle, the lock
symbol shown on the display lights up to show you that the door is locked.
• The thermostat indicator lights up when the oven is heating.
• The pyrolysis cleaning process turns off automatically when the lock symbol
disappears. It is then possible to open the door.
d) Return the function selector knob to the zero position.
e) When the oven has cooled down completely, use a damp cloth to wipe away the
white ash. The oven is clean and can be used once again to cook the dishes of your
choice.
95
T
roubleshooting
If you're not sure that your oven is working properly, it doesn't necessarily
mean that there's a problem.
In all cases, check the following points:
If you realize that..
Possible causes What should you do?
The oven isn't heating.
• The oven isn't connected to the
power supply.
• The fuse has blown.
• The temperature selected is too low.
• The sensor is faulty
• The thermostat is faulty.
• The oven has overheated. It has
been put out of use for safety
reasons.
- Connect to power supply.
- Change the fuse, checking that it is
16A.
- Increase the temperature selected.
- Contact the After-Sales Service.
- Contact the After-Sales Service.
- Contact the After-Sales Service.
The temperature light does not
go out.
• The door lock is faulty.
• The temperature sensor is faulty.
- Contact the After-Sales Service.
- Contact the After-Sales Service.
The light inside the oven isn't
working.
• The lamp is unusable.
• The oven isn't connected to the
power supply or the fuse has
blown.
- Change the bulb.
- Connect to power supply or
change fuse.
The cooling fan keeps working
after the oven is turned off.
• The fan can keep working for up
to an hour after the oven switches
off if is over 125ºC.
• If it has not stopped after 1 hour
- Open the door to help the oven
cool down more quickly.
- Contact the After-Sales Service.
Cleaning by pyrolysis has not
occurred.
• The door is not shut properly.
• The door-locking system is faulty.
• The temperature sensor is faulty.
• The plate that detects when the
door is shut is faulty.
- Check the door is properly closed.
- Contact the After-Sales Service.
- Contact the After-Sales Service.
- Contact the After-Sales Service.
GB
99628232_ML_A.qxd 22/05/03 14:17 Page 95
0
P
Page 96

Inhalt
In der
Gebrauchsanweisung
geben Ihnen die
Zeichen,
Sicherheitshinweise und,
Ratschläge und Tips.
Vorwort s.97
Präsentierung Ihres Backofens s.98
Beschreibung des Gerätes
s.98
Zubehör
s.99
Sicherheitshinweise
s.100
Backofeninstallation
Stromanschluss s.101-102
Wie wird eine lampe ausgewechselt s.102
Nützliche Maße für den Einbau Ihres Backofens s.103
Benutzung Ihres Backofens
Ihre Programmschaltuhr im Detail s.104
S
tellen der Uhr des Backofens
s.105
Starten eines sofortigen Garens s.106
Programmierung eines Garvorgangs s.106-108
Benutzung des Kurzzeitweckers s.109
Die Garfunktionen des Backofens s.110-111
Reinigung des Garraums Ihres Backofens
Was ist eine Pyrolyse s.112
Wann muss eine Pyrolyse durchgeführt werden s.112
Wie wird eine pyrolyse durchgeführt s.112-113
Was bei Betriebsanomalien tun
s.113
96
99628232_ML_A.qxd 22/05/03 14:17 Page 96
Page 97

97
Vorwort
Liebe Kundin, lieber Kunde,
Sie haben soeben einen Backofen von FAGOR erworben und wir
bedanken uns dafür.
Unsere Forschungsteams haben für Sie eine neue Gerätegeneration
entworfen, damit Kochen ein jeden Tag erneuertes Vergnügen bleibt.
Mit klaren Linien und einer modernen Ästhetik, integriert sich Ihr neuer
Backofen von FAGOR harmonisch in Ihre Küche und verbindet auf
perfekte Weise einfache Benutzung und Kochleistungen.
Die Produktreihe von FAGOR enthält auch eine breite Auswahl an
Kochplatten, Abzugshauben, Geschirrspülern und Kühlschränken, die Sie
passend zu Ihrem neuen Backofen von FAGOR erwerben können.
Darum bemüht, Ihre Ansprüche, was unsere Produkte betrifft, ständig
bestmöglich zufrieden zu stellen, steht unser Verbraucherservice gerne zu
Ihrer Verfügung und ist bereit, Ihren Vorschlägen anzuhören und all ihre
Fragen zu beantworten (Adresse am Ende dieser Broschüre).
An der Spitze der Innovation, trägt FAGOR zur Verbesserung der
Qualität Ihres täglichen Lebens bei, indem die Firma Ihnen immer l
eistungsstärkere, einfach zu benutzende, die Umwelt schonende,
ästhetische und zuverlässige Produkte anbietet.
Die Marke FAGOR
DE
99628232_ML_A.qxd 22/05/03 14:17 Page 97
Page 98

98
1
3
5
P
40
65
100
150
165
180
200
210
220
240
275
0
1
2
3
4
5
7
6
1
2
5
6
7
3
4
Temperaturwählschalter
Programmwähler
Funktionswählschalter
Lampe
Anzeige der Einschubebene
Loch für den Drehspieß
Erfassungskontakt der
Türöffnung
P
räsentierung Ihres Backofens
BESCHREIBUNG DES GERÄTES
99628232_ML_A.qxd 22/05/03 14:17 Page 98
Page 99

Tiefes Blech
Es dient zum Auffangen von Bratensaft und
Fett, wenn sie den starken Grill oder den
Umluftgrill verwenden.
Er kann zu Kochgefäß benutzt werden, wenn
Sie das zu garende Stück seiner Größe
anpassen (Bsp.: Geflügel mit Gemüse
umgeben, bei mäßiger Temperatur).
Dieses Blech nie direkt auf den Backofenboden
stellen, ausgenommen in der GRILLPOSITION.
99
Zubehör
Unter den Rost geschoben, fängt es den Saft und das Fett des gegrillten Fleisches auf. Halb
mit Wasser gefüllt, kann es auch zum Garen im Wasserbad verwendet werden.
Vermeiden Sie, Braten oder sonstiges Fleisch direkt auf dieses Blech zu legen, denn dies
hätte automatisch eine starke Verspritzung der Backofenwände zur Folge.
Multizweckblech
(Kuchenblech oder Fettpfanne)
Er dient als Kuchenblech und verfügt über
einen abgeschrägten Rand. Er wird für das
Backen von Gebäck wie Windbeutel,
Meringen, Madeleines, Blätterteiggebäck ...
• Eine Gabel auf den Spieß schieben, das zu
bratende Stück aufspießen und die zweite Gabel auf den Spieß schieben; das
Ganze zentrieren und die Gabeln festschrauben.
• Den Spieß auf seinen Träger legen.
• Die Spießspitze in das Loch an der Backofenrückwand stecken (6).
• Den Griff losschrauben und entfernen. Nach dem Bratvorgang den Griff wieder
an den Spieß schrauben, um denselben ohne Verbrennungsrisiko aus dem Ofen
entfernen zu können.
Bratspieß
Für seine Benutzung :
• Zum Auffangen des Bratensaftes, die
Mehrzweckfettpfanne in die Einschubebene
N° 1 schieben oder, wenn das Fleischstück
zu groß ist, diese auf den Boden des
Backofens stellen.
Kippsicherer Einschubrost
Der Einschubrost kann als Tragfläche für alle
zu garende oder backende Nahrungsmittel
enthaltende Behälter und Formen benutzt
werden. Sie ist für Grillstücke zu benutzen
(direkt darauf legen).
Hinten
Vorne.
8
9
11
DE
10
99628232_ML_A.qxd 22/05/03 14:17 Page 99
Page 100

100
Sicherheitshinweise
Bitte nehmen Sie diese Hinweise zur Kenntnis, bevor Sie Ihren
Backofen installieren und benutzen. Dieser Backofen wurde zur Benutzung
von Privatpersonen in ihrer Wohnung entworfen. Er ist ausschließlich zum Garen
von Nahrungsmitteln bestimmt und enthält keine Bestandteile auf Asbestbasis.
ERSTE BENUTZUNG:
Bevor Sie Ihren Backofen das erste Mal benutzen, müssen Sie ihn bei geschlossener
Tür etwa 15 Minuten bei stärkster Hitze aufheizen, damit das Gerät "eingefahren"
wird. Die Mineralwolle, welche den Garraum umgibt, kann am Anfang
einen eigenartigen, auf ihre Zusammensetzung zurückzuführenden Geruch
ausströmen. Ebenso werden Sie vielleicht das Ausströmen von Rauch feststellen.
Dies alles ist normal.
DIE NACHFOLGENDEN BENUTZUNGEN:
- Vergewissern Sie sich, dass die Backofentür gut geschlossen ist, damit die
Dichtung ihre Funktion korrekt erfüllen kann.
- Achten Sie darauf, dass niemand sich auf die geöffnete Backofentür stützt oder setzt.
- Bei Benutzung des Grills mit leicht geöffneter Tür, können die
erreichbaren Teile oder Flächen heiss werden. Kleine Kinder davon
fernhalten.
- Während seiner Benutzung wird das Gerät heiss. Darauf achten, die im Backofen
vorhandenen, heizenden Teile nicht zu berühren.
- Nach einem Garvorgang die Zubehörteile des Backofens (Grill, Bratspieß,
Fettpfanne, Spießträger ... ) nie ohne Handschutz herausnehmen. Benutzen Sie
einen Handschuh oder einen isolierendes Topflappen.
- Legen Sie Ihren Backofen nicht mit Alufolie aus, da sonst eine Hitzeanstauung
entsteht, die sich auf das Gar- oder Bratergebnis nachteilig auswirken und das
Email beschädigen würde.
- Bevor Sie Ihren Backofen anhand einer Pyrolyse reinigen, alle
Backofenzubehörteile sowie größere Überlaufreste entfernen.
- Keine Reiniger mit Dampf oder unter Hochdruck benutzen.
- Während einer Pyrolyse können die erreichbaren Flächen heisser werden als bei
einer normalen Benutzung. Kleine Kinder davon fernhalten.
- Alle Reinigungsvorgänge des Garraums müssen bei abgeschaltetem
Backofen durchgeführt werden.
Ihr Funktionswählschalter muss vor einer erneuten Benutzung
Ihres Backofens unbedingt auf 0 gestellt werden.
99628232_ML_A.qxd 22/05/03 14:17 Page 100
 Loading...