

Page 1

FEINGL.05/05 29/6/05 10:36 Página 1
Page 2

2.1.
OVENS
CONTENTS
GREETING
1. SAFETY ADVICE . . . . . . . . . . . . . . . . . . . . . . . . . . . . . . . . . . . . . . . . . . . . . .6
1.1. Installation . . . . . . . . . . . . . . . . . . . . . . . . . . . . . . . . . . . . . . . . . . . . . . . .6
1.2. Use and operation . . . . . . . . . . . . . . . . . . . . . . . . . . . . . . . . . . . . . . . . . .7
1.3. Child safety . . . . . . . . . . . . . . . . . . . . . . . . . . . . . . . . . . . . . . . . . . . . . . .8
1.4. Care and cleaning . . . . . . . . . . . . . . . . . . . . . . . . . . . . . . . . . . . . . . . . . .8
2. ASSEMBLY AND INSTALLATION . . . . . . . . . . . . . . . . . . . . . . . . . . . . . . . . .9
2.1. Unpacking . . . . . . . . . . . . . . . . . . . . . . . . . . . . . . . . . . . . . . . . . . . . . . . .9
2.2. Assembly and Connection to the mains power supply . . . . . . . . . . . . . . .9
3. YOUR NEW OVEN . . . . . . . . . . . . . . . . . . . . . . . . . . . . . . . . . . . . . . . . . . . .12
3.1. General Description . . . . . . . . . . . . . . . . . . . . . . . . . . . . . . . . . . . . . . . .12
a) Control panel . . . . . . . . . . . . . . . . . . . . . . . . . . . . . . . . . . . . . . . . . . .12
b) LCD display. . . . . . . . . . . . . . . . . . . . . . . . . . . . . . . . . . . . . . . . . . . .13
3.2. Before using the oven for the first time . . . . . . . . . . . . . . . . . . . . . . . . . .14
a) Set-up menu . . . . . . . . . . . . . . . . . . . . . . . . . . . . . . . . . . . . . . . . . . .14
b) Initial cleaning . . . . . . . . . . . . . . . . . . . . . . . . . . . . . . . . . . . . . . . . . .16
3.3. How to use your new oven . . . . . . . . . . . . . . . . . . . . . . . . . . . . . . . . . .16
a) How to turn the oven on and off . . . . . . . . . . . . . . . . . . . . . . . . . . . . .16
b) Step-by-step guide to cooking with the oven . . . . . . . . . . . . . . . . . . .16
c) How to select a cooking function . . . . . . . . . . . . . . . . . . . . . . . . . . . .17
d) Electronic temperature control and adjustment . . . . . . . . . . . . . . . . .19
3.4. Accessories . . . . . . . . . . . . . . . . . . . . . . . . . . . . . . . . . . . . . . . . . . . . . .20
3.5. AVANSSIS ventilation system . . . . . . . . . . . . . . . . . . . . . . . . . . . . . . . . .24
4. TIMER FUNCTIONS . . . . . . . . . . . . . . . . . . . . . . . . . . . . . . . . . . . . . . . . . . .25
4.1. Setting the timer . . . . . . . . . . . . . . . . . . . . . . . . . . . . . . . . . . . . . . . . . . .25
4.2. Cooking time . . . . . . . . . . . . . . . . . . . . . . . . . . . . . . . . . . . . . . . . . . . . .26
4.3. Auto-Stop cooking . . . . . . . . . . . . . . . . . . . . . . . . . . . . . . . . . . . . . . . . .27
4.4. Beeper . . . . . . . . . . . . . . . . . . . . . . . . . . . . . . . . . . . . . . . . . . . . . . . . . .28
4.5. Cancellation of timer functions . . . . . . . . . . . . . . . . . . . . . . . . . . . . . . . .29
FEINGL.05/05 29/6/05 10:36 Página 2
Page 3

2.1.
5. HOW TO PROGRAMME THE AUTOMATIC RECIPES IN A
“COOKBOOK”OVEN . . . . . . . . . . . . . . . . . . . . . . . . . . . . . . . . . . . . . . . . . .30
6. HOW TO PROGRAMME COOKING TIMES IN AN “AUTO-CHEF” OVEN . . .32
7. HOW TO MEMORIZE YOUR OWN RECIPES . . . . . . . . . . . . . . . . . . . . . . . .34
8. SAFETY FUNCTIONS . . . . . . . . . . . . . . . . . . . . . . . . . . . . . . . . . . . . . . . . .36
8.1. Automatic cut-off . . . . . . . . . . . . . . . . . . . . . . . . . . . . . . . . . . . . . . . . . .36
8.2. Child safety lock . . . . . . . . . . . . . . . . . . . . . . . . . . . . . . . . . . . . . . . . . . .36
9. CLEANING AND MAINTENANCE . . . . . . . . . . . . . . . . . . . . . . . . . . . . . . . .37
9.1. How to clean … . . . . . . . . . . . . . . . . . . . . . . . . . . . . . . . . . . . . . . . . . . .37
9.1.1. The outside of the oven . . . . . . . . . . . . . . . . . . . . . . . . . . . . . . . .37
9.1.2. The inside of the oven . . . . . . . . . . . . . . . . . . . . . . . . . . . . . . . . . .38
9.1.3. The Accessories . . . . . . . . . . . . . . . . . . . . . . . . . . . . . . . . . . . . . .40
9.1.4. The side grilles . . . . . . . . . . . . . . . . . . . . . . . . . . . . . . . . . . . . . . .40
9.1.5. The smoke filter . . . . . . . . . . . . . . . . . . . . . . . . . . . . . . . . . . . . . .41
9.1.6. The grease filter . . . . . . . . . . . . . . . . . . . . . . . . . . . . . . . . . . . . . .41
9.2. How to replace the interior light bulb . . . . . . . . . . . . . . . . . . . . . . . . . . .42
10. PRACTICAL ADVICE AND COOKING TABLE . . . . . . . . . . . . . . . . . . . . . . .43
11. LOCATING AND TROUBLESHOOTING PROBLEMS . . . . . . . . . . . . . . . . . .49
12. NET Comp@tible Oven: Connection to mains networks . . . . . . . . . . . . . .51
13. ENVIRONMENTAL NOTE . . . . . . . . . . . . . . . . . . . . . . . . . . . . . . . . . . . . . . .52
13.1. Protecting the environment . . . . . . . . . . . . . . . . . . . . . . . . . . . . . . . . . .52
13.2. Energy-saving tips . . . . . . . . . . . . . . . . . . . . . . . . . . . . . . . . . . . . . . . .53
FEINGL.05/05 29/6/05 10:36 Página 3
Page 4

FEINGL.05/05 29/6/05 10:36 Página 4
Page 5

Dear client,
You are now the proud owner of a FAGOR oven and we would like to thank you for
the confidence you have shown in us.
FAGOR provides you with a new generation of domestic appliances that contribute
to an improvement in your quality of life thanks to our range of innovative, easy-to use
and environmentally-friendly products.
The range of FAGOR products offers you a wide selection of cooking hobs, extractor
fans, microwave ovens, dishwashers, washing machines, and refrigerators that you
can combine with your new oven.
We aim to offer an on-going response to your demands regarding our products as
best we can. In addition, you will be able to contact us via the Internet on our web
page, www.fagor.com, where you will also be able to find updated information about
the latest innovations from the FAGOR brand. Don’t hesitate to ask us.
Before using your oven for the first time, we recommend you read the user manuals
carefully. You will find there the information you will need to make the most of your
new FAGOR oven. Please pay special attention to the safety advice and to the
comments on how to use and care for your oven correctly.
At the same time, we recommend you keep these manuals in a safe place as you
may find them useful for reference in the future for any question that might arise. If
you pass the appliance on to another person, please be sure to enclose the manuals.
Warm greetings and welcome to the family of FAGOR customers.
The FAGOR brand.
5
GREETING
FEINGL.05/05 29/6/05 10:36 Página 5
Page 6
Any manipulation of the oven or cooking hob for the purposes of installation,
maintenance, etc. must be carried out with the oven disconnected from the mains
electricity.
IMPORTANT
6
1. SAFETY ADVICE
INSTALLATION
1.1.
• Once all the packaging materials have been removed, check that the oven is not
damaged and that the power cable is in perfect condition. If you detect any
damage or minor problems caused in transit, call the Customer Service Centre,
and do not use the oven.
• Any work required for installing and repairing this oven must be done solely and
exclusively by an authorised fitter and following the manufacturer’s instructions.
The manufacturer declines any and all liability if the current standards are not
complied with.
• The identification plate on the lower front part of the oven provides the technical
details and identification number of the apparatus. This must be consulted
before proceeding with any electrical connections.
• It is dangerous to alter the characteristics or modify the product in any way.
• For electrical safety reasons, fitted ovens must be installed in appropriate units
and these must comply with the standards currently in force for this purpose.
FEINGL.05/05 29/6/05 10:36 Página 6
Page 7

7
• This oven has been designed solely for domestic use. Use it solely and
exclusively for cooking food, never for any other purpose.
• The oven must always be operated with the door closed, for all programmes,
including the grill.
• Open the oven door carefully, as hot steam may come out.
• Never pour water directly onto the inside of a hot oven, as this might damage the
enamel.
• Never pick up the bowls or pans used for cooking with your bare hands; always
use an insulating cloth or oven glove.
• Do not leave the oven to cool down with the door open. Even if the oven door is
only left a little ajar, the front panels of the adjacent units may be damaged over
time.
• Never store inflammable objects inside the oven.
• Never place food or dishes directly onto the floor of the oven. Always use a tray
or rack.
• Do not sit or lean on the oven door, it might lead to problems with the door
closure mechanism.
• If the oven breaks down for any reason, disconnect it and call Technical Service.
•Your oven is equipped with a fan that helps with vapour extraction and ensures
the furniture unit remains cool. The fan is always working when the oven is on.
Once the oven has been turned off, the fan continues to run for a time to reduce
the oven's external temperature. It is possible to feel the air emerging from
between the oven door and front panel.
USAGE AND OPERATION
1.2.
FEINGL.05/05 29/6/05 10:36 Página 7
Page 8
CARE AND CLEANING
8
CHILD SAFETY
• Always keep children at a safe distance and make sure they do not operate the
appliance without supervision.
• Never allow small children to play with the oven or turn the control knobs. The
programmer on your oven includes a child-safety lock, so be sure to use it.
• For reasons of safety and hygiene, always keep the oven clean. The
accumulation of dried grease or other remains of food may cause unpleasant
odours.
•To ensure a longer working life for your oven, it is recommended that a careful
general cleaning be carried out frequently.
• The oven must be turned off and sufficiently cooled down before any cleaning or
maintenance work is done, so that it can be touched without danger.
• The oven door must always be tightly closed. Keep the door seal clean at all
times.
• Never clean the oven with high-pressure cleaners or steam-cleaning machines.
• Do not use corrosive or abrasive cleaners. If a product of this type comes into
contact with the oven front, wash it off immediately with water.
•Avoid the use of hard sponges or scouring pads on the inside of the oven, as they
might damage the enamel. Follow the instructions provided in the part entitled
“Cleaning and Maintenance”.
1.3.
1.4.
FEINGL.05/05 29/6/05 10:36 Página 8
Page 9
9
UNPACKING
2.1.
ASSEMBLY AND CONNECTION TO MAINS ELECTRICITY
2.2.
1. Cut the plastic film covering the package.
2. Carefully remove all the oven’s protective elements: top cover, edge protection
and polystyrene base.
To protect the environment, please follow the advice given in the part entitled
“Environmental Note”.
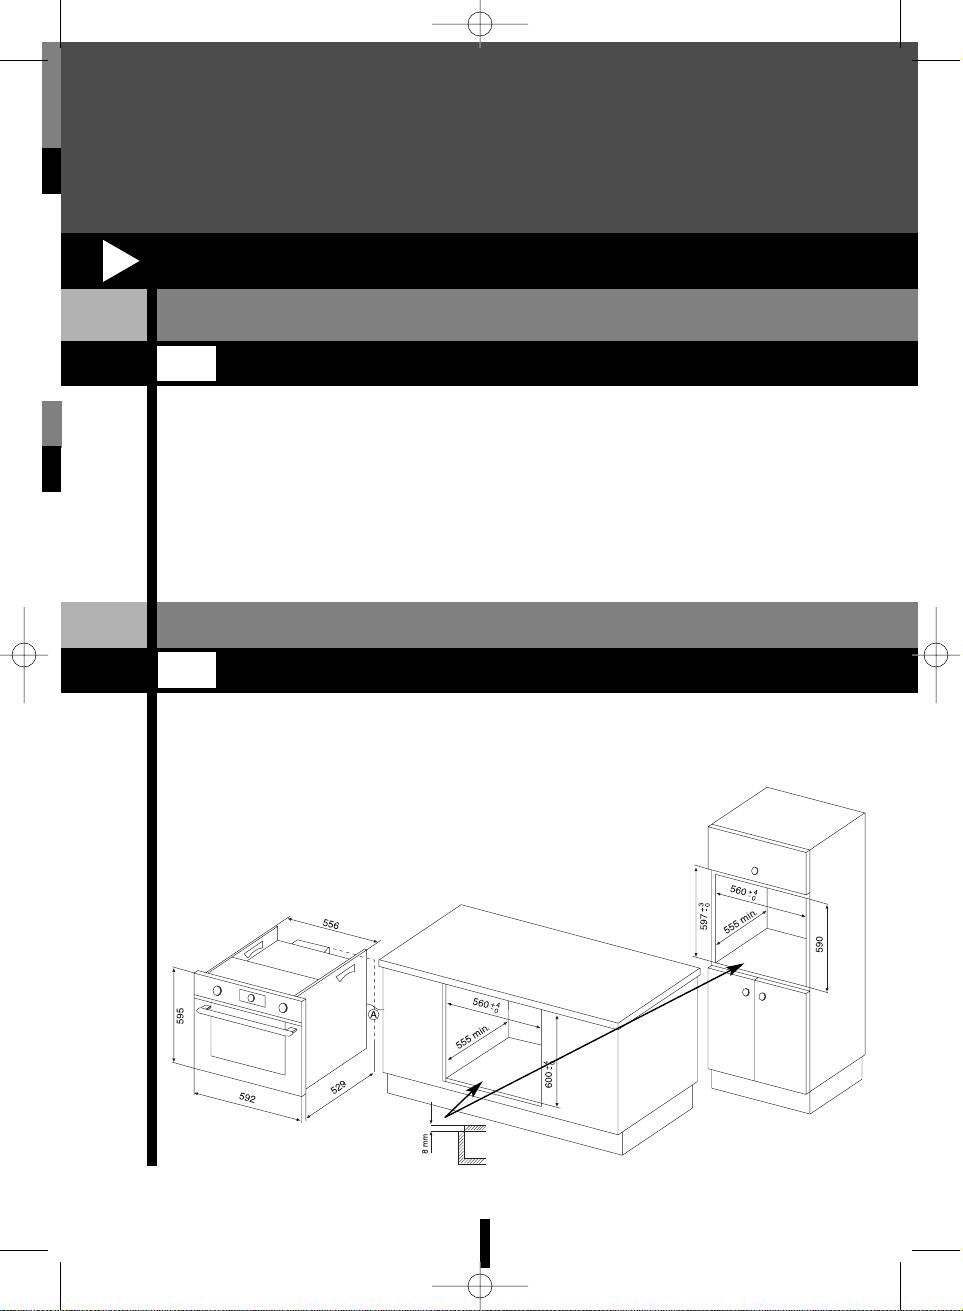
1. The measurements of the unit into which the
oven is to be mounted must coincide with those
indicated in the diagrams, depending on
whether the unit is wall-mounted or floor-based.
2. ASSEMBLY AND INSTALLATION
-Figure 1-
FEINGL.05/05 29/6/05 10:36 Página 9
Page 10

Connect the cable to a socket with a good earth connection. This is essential to
ensure the correct operation of the electronic elements.
3. After it is plugged in, place the oven in the space, taking special care not
to leave any surplus cable on top of the oven.
4. A switch for disconnecting the oven must be placed in the most accessible site
possible, with a minimum of 3 mm between the contacts.
10
2. At the back of the oven you will find cable “A” which is used to make the
electrical connection.
WARNING: Before plugging the appliance in, check the following:
• that the mains voltage corresponds to the voltage indicated on
the feature identification plate;
• that the electrical mains the oven is to be connected to is
powerful enough for the oven's maximum power load, indicated
on the feature identification plate.
FEINGL.05/05 29/6/05 10:36 Página 10
Page 11

5. Fasten the oven to the unit with the 2 screws you will find in the accessories bag.
6. Access the oven’s set-up menu.
11
-Figure 2-
FEINGL.05/05 29/6/05 10:36 Página 11
Page 12
12
3. YOUR NEW OVEN
GENERAL DESCRIPTION
3.1.
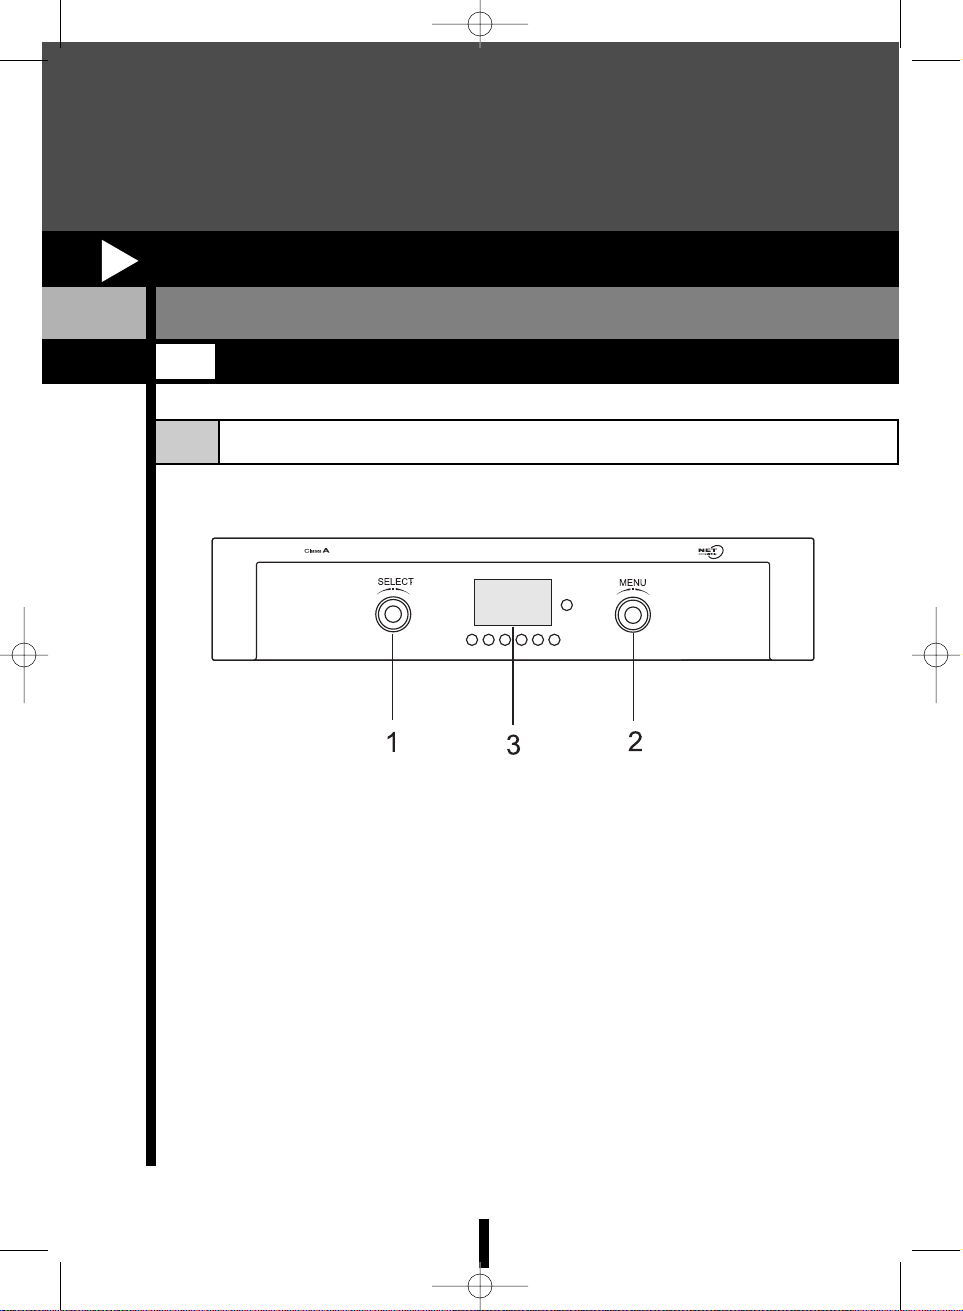
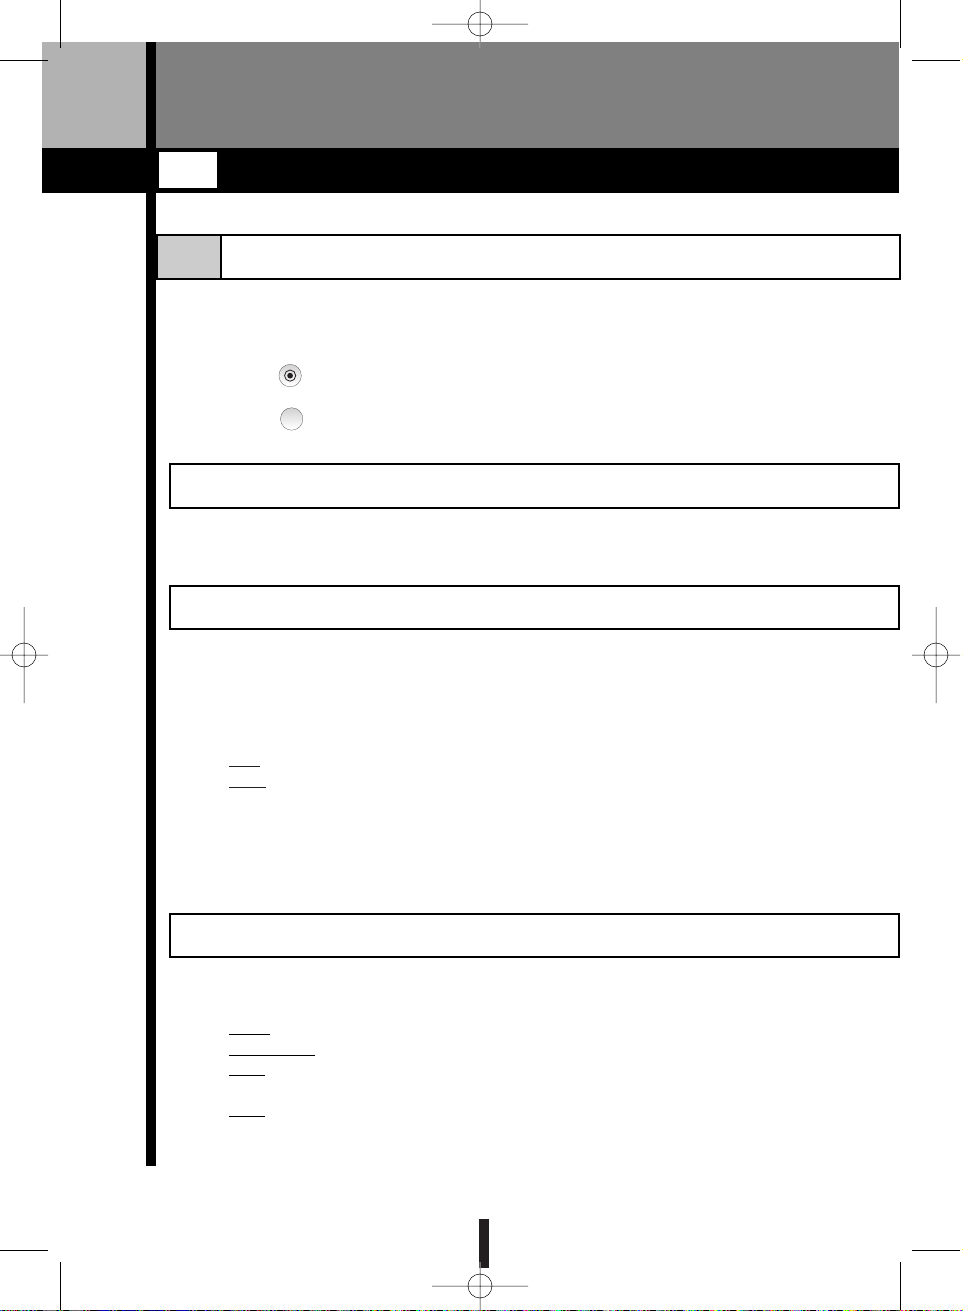
Your oven has 2 rotating controls that can be turned to the left or right.
1. SELECT Control.
2. MENU Control.
3. LCD display.
Control panel
a
FEINGL.05/05 29/6/05 10:36 Página 12
Page 13
13
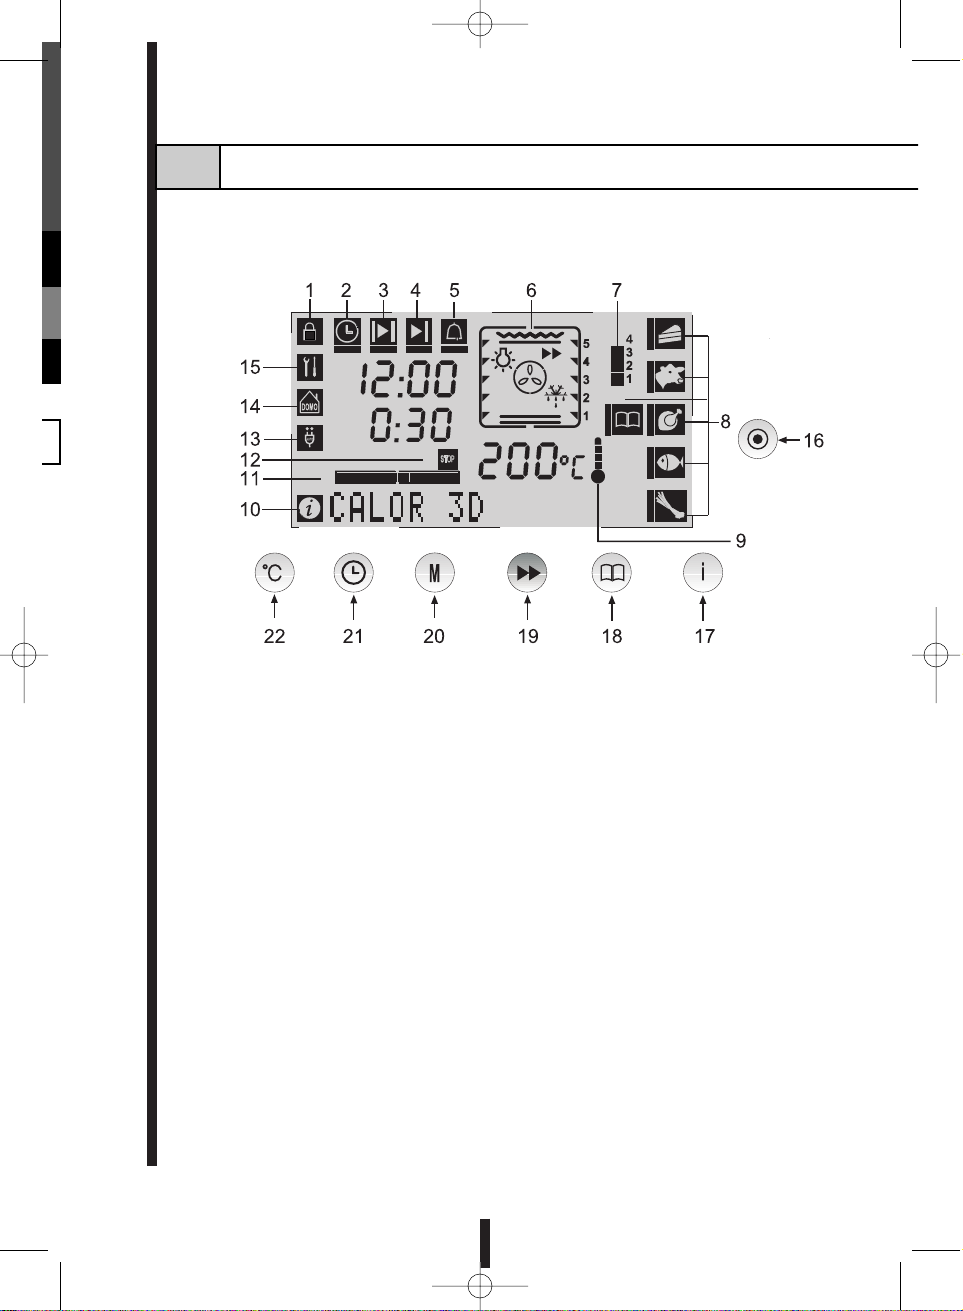
LCD display
b
1. Symbol indicating oven blocked
2. Time adjustment symbol
3. Cooking time symbol
4. End Cooking time symbol
5. Beeper symbol
6. Function representation symbol
7. Memories and cooking phases symbol
8. Recipes menu and food type symbol
9. Temperature scale symbol
10. Set-up symbol
11. Progress bar symbol
12. Oven stopped symbol
13. Automatic disconnection indicator symbol
14. NET Comp@tible oven symbol
15. Technical Service symbol
16. On/Off and stop button
17. Information and set-up menu button
18. Recipe selector button
19. "CELERIS" special function button
20. Memory button
21. Timer function button
22. Temperature button
FEINGL.05/05 29/6/05 10:36 Página 13
Page 14
You now have an electric oven with multiple possibilities for personalization. In order
to set up your oven to suit your preferences:
1. Keep the button pressed in until you hear a beep (for about 3 seconds) and
then the oven will be on.
2. Keep the button pressed until you hear a beep.
3. Then follow each of the steps indicated below:
1. Set the current date (dd-mm-yy) and time using the SELECT control and confirm
each setting by pressing in the control button.
2. Once you have set the time and date, choose of these two options and then press
the MENU control to confirm the setting made:
ON:
when the oven is off, the display will show the time and date.
OFF: when the oven is off, the display will not show the time and date.
NOTE:
• Once the time and date have been set for the first time, your oven includes a
system to allow it to remember these even after a power cut
Turn the MENU control round until it shows the desired language and then press it in
to confirm the selection made.
14
BEFORE USING THE OVEN FOR THE FIRST TIME
3.2.
SET-UP MENU
a
LANGUAGE
Choose one of these four options and confirm your selection by pressing the control:
KEY
: the oven will only beep when a button is pressed.
CONTROL:
the oven will only beep when the rotating controls are turned.
YES: the oven will beep whenever a button is pressed or one of the controls
is turned.
NO:
the oven will not beep at any time when buttons are pressed or controls
are turned.
SOUND
DATE AND TIME
i
FEINGL.05/05 29/6/05 10:36 Página 14
Page 15

15
Whenever the pre-set cooking programme has finished or the beeper has reached
the end of its countdown, the oven will beep continuously. You can choose how long
this beeping should last. Choose a duration from 0 to 60 seconds using the rotating
control and then confirm the setting made by pressing the control button in.
ALERT END
To avoid the possibility of you leaving the oven on and forgetting about it, you can set
the “Auto Shut-off" option so that it switches itself off. Turn the rotating control to select
the amount of time you would like the oven to wait (you can choose between 5 and 30
minutes) before switching itself off after you last operate a control. Once you have
selected the amount of time, confirm the selection by pressing the control in and the
on the display the symbol will be lit.
Confirming this last selection will take you out of the set-up menu.
AUTO SHUT-OFF
You can choose how and when to illuminate the interior of the oven. Choose one of
these three options using the rotating control and then confirm the setting made by
pressing the control button in:
YES:
whenever the oven is on, the interior light will remain lit.
NO: the oven light will remain off all the time.
AUTO: the oven itself will handle the lighting depending on whether it is in
interactive mode or not. If the light is off, press any button to turn it on.
LIGHTING
Certain recipes involve cooking at low temperatures, and so the oven’s interior light
remains off during cooking so as not to affect the temperature inside. For specific
recipes of this type, you can choose one or other of these options:
YES: the light will remain off during the cooking process.
NO: the light will remain on during the cooking process.
Once you have chosen one of these two options using the rotating control, confirm it
by pressing the control button in.
LIGHT AT LOW TEMPERATURES
FEINGL.05/05 29/6/05 10:36 Página 15
Page 16

16
Before using your new oven for the first time, heat it up when empty for about 30
minutes, with the door closed. Select the cooking function and adjust the
temperature to 250º C, having previously checked that all protective plastic sheeting
and labels have been removed.
At the beginning, the oven may give off a strange smell. You may also notice a little
smoke. All of this is normal. This is how any possible remains of grease inside the
oven left over from the manufacturing process are removed. Once the oven has
cooled down, clean it following the instructions given in the part entitled “Cleaning
and Maintenance”.
Before using any of the accessories included with your new oven for the first time,
clean them with water, a little soap and a cloth.
INITIAL CLEANING
b
HOW TO USE YOUR NEW OVEN
3.3.
•To turn on the oven, press the button and keep it pressed until you hear a
beep (approximately 3 seconds).
At that point, the display will light up and show the last selection made and the
symbol will be lit up to indicate that the oven is not warming up.
•To turn off the oven, press the button and keep it pressed until you hear a
beep (approximately 3 seconds).
HOW TO TURN YOUR OVEN ON AND OFF
a
Follow these steps to turn on your oven:
1. Turn on the oven by pressing the button.
2. Select a cooking function using the MENU control.
3. Set the desired temperature by using the button and the SELECT control,
then accept the setting made by pressing in either of the controls.
4. If you wish, you can set the cooking time by following the steps described in the
section entitled “Timer functions”.
5. Press either of the controls to operate the oven.
STEPS TO TAKE TO COOK WITH YOUR OVEN
b
FEINGL.05/05 29/6/05 10:36 Página 16
Page 17
17
Once the oven is on, the display will show one or other of the functions available. Turn
the MENU control and you will be able to display the different cooking functions
described below. Select the function you want to use and press in the MENU control.
At this point the oven will start operating.
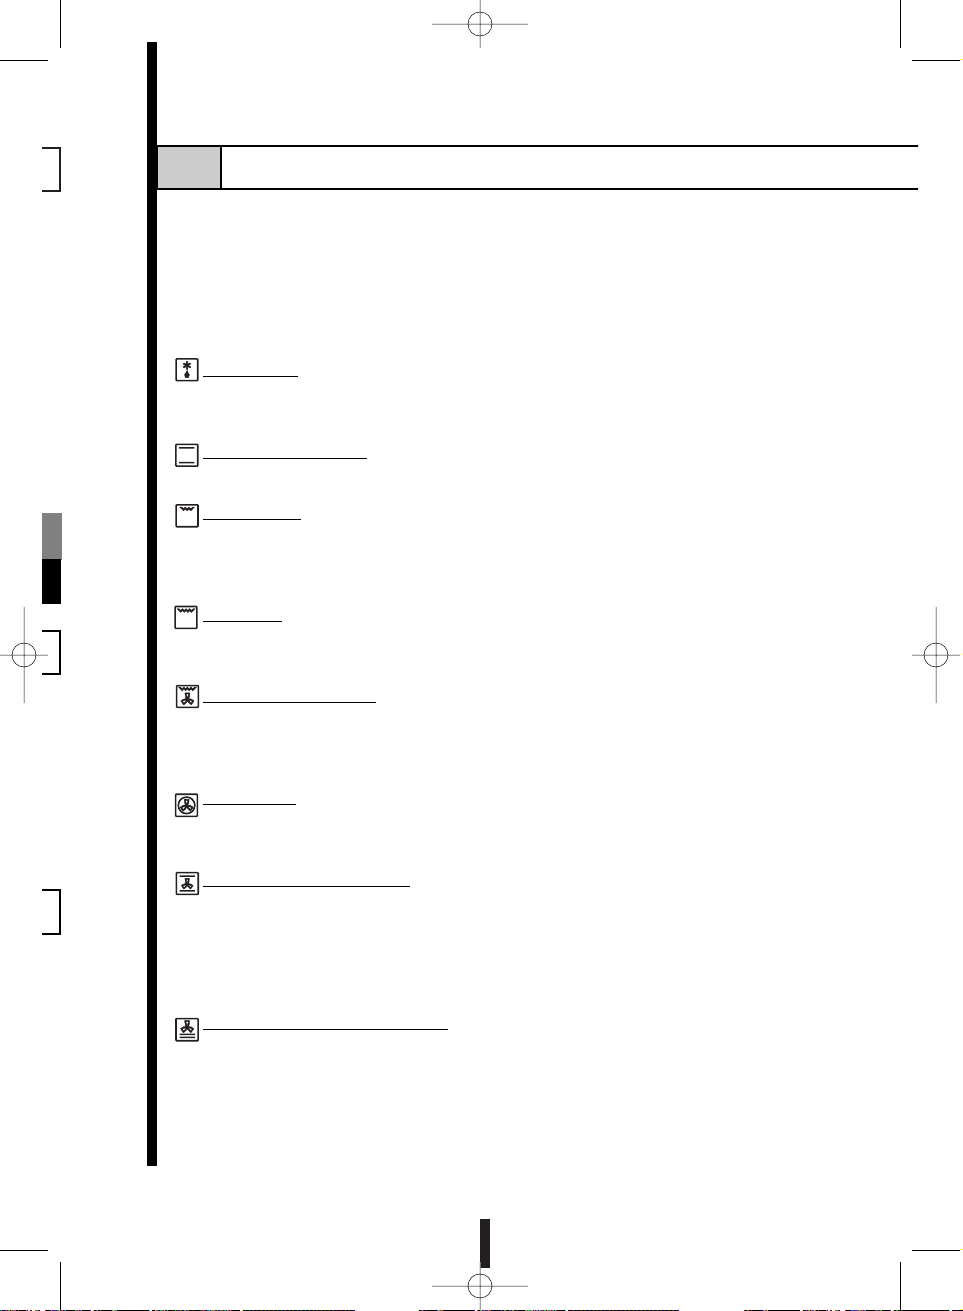
•Your oven offers the following cooking functions:
Defr
osting: The oven heats up all the elements at a very low temperature, so
that frozen food defrosts quickly and evenly. The defrost function can be used
with any type of frozen food: meat, fish or vegetables.
T
raditional Cooking: With this function, the heat comes from both above and
below, baking the food in the traditional way.
Gentle Grill:
Only the central part of the grill resistance is connected, allowing
you to save power when finishing off small gratinees or toasting or grilling smaller
portions of food. To ensure optimal results, place the items in the central part of
the tray or grille.
F
ast Grill: The action of the grill covers the entire surface of the tray or grille,
allowing you to toast large trays or several items of food at the same time. Very
appropriate for all types of toasting and gratinees.
Str
ong Grill with F
an:
The action of the grill covers the entire surface of the tray
or grille, allowing you to toast large trays or several items of food at the same
time. The fan ensures that the heat is uniformly distributed throughout the oven,
browning the food on all sides.
T
urbo Plus: The oven is heated by the circular element located at the rear.
The fan drives the hot air around the oven to distribute the heat more evenly.
Ideal for working with different trays at various heights.
T
raditional Heat with Fan: The heat comes from both the top and the bottom of
the oven and the fan distributes the temperature evenly. You can cook different
dishes on different levels at the same time without mixing smells or flavours.
In addition to these functions, your oven includes a series of special functions for
highly specific applications:
Intensive Bottom Heat (Pizza):
The strong heat coming from the lower part
of the oven and even temperature distribution due to the fan give pizzas a
particularly crisp base.
HOW TO SELECT A COOKING FUNCTION
c
FEINGL.05/05 29/6/05 10:36 Página 17
Page 18

18
ECO BAKING: Ideal for when the user is not in a hurry and it doesn’t matter if the
cooking takes longer. The oven automatically decides on the temperature and
time, for greater ease of use and cleaning, while saving energy.
W
arming: The oven uses a low heat to keep cooked food hot.
Delicate f
ood: This function is recommended for drying out foods such as
mushrooms or for making yoghurt thanks to the use of very low temperatures.
3D heat:
This function allows you to cook using several shelves at the same time,
as the fan uniformly distributes the heat inside the oven.
4-le
vel grill: This lets you choose between 4 different levels for the grill, thus
ensuring optimal cooking results. Electronic control allows cooking to continue for
longer than with a traditional grill. Suitable for browning fruit tarts or quiches and
for grilling fish and filleted meat.
• Apart from these cooking functions, you can also use the “CELERIS” warming
function:
The new “CELERIS” function has been developed to let you pre-heat the oven
quickly. Using this function, the appropriate temperature can be reached in
record time.
To enable the “CELERIS”function:
Press the button and the symbol will light up on the display. The Celeris
function will then be enabled so that every time you operate the oven, it will come into
play automatically until the required temperature is reached. Once the oven has
reached this temperature, it will beep to indicate that the food may now be put in the
oven; it will then automatically cook according to the function you selected.
To disable the “CELERIS”function:
Press the button and the symbol will be turned off.
NOTE:
• Remember that the food must not be placed inside the oven during the preheating process.
• Disable the “CELERIS” function when cooking dishes that do not require the
oven to be pre-heated.
FEINGL.05/05 29/6/05 10:36 Página 18
Page 19

19
The oven’s built-in electronic temperature control allows you to set the required
temperature and know the true temperature inside the oven. This function will allow
you to control the pre-set temperature with great precision, thus achieving better
results in your baking.
To set the temperature:
Once a cooking function has been selected, the display will show a temperature. If
you want to change the temperature, follow the steps described below:
1. Press the button and the temperature will start to flash on the display.
2. Set the desired temperature by turning the SELECT control.
3. Press the control button to accept the temperature set.
To know the true temperature inside the oven:
• The symbol indicates the temperature inside the oven relative to the temperature
selected. The lower circle on the scale will flash while the oven is warming up,
otherwise it will stay lit.
The 4 marks on the circle indicate the percentage of the pre-set temperature
reached; once the last segment is completed, the oven will have reached the preset temperature.
Example:
Temperature set: 100 ºC
Temperature reached inside the oven: 50ºC
Residual heat display:
Once cooking is over, the symbol will remain lit for as long as the oven remains
hot. Apart from safety reasons, this will enable you to take advantage of the
remaining heat.
•To know the temperature inside the oven more precisely while cooking, press in
the button and the screen will display the true temperature for a few
seconds.
ELECTRONIC TEMPERA TURE ADJUSTMENT
AND CONTROL:
d
M
i
FEINGL.05/05 29/6/05 10:36 Página 19
Page 20

20
ACCESSORI
3.4.
Baking T ray
Standard T ray
Deep T ray
FAGOR offers the optional feature of an “Extra Safety Door” for those models with the
“SD” symbol on the features plate. If you wish to acquire it, please contact your
distributor:
Reference: 991990324, EAN Code: 8412880140797
The oven has 5 different levels at which to place accessories, all clearly marked at
the side of the oven opening. Additional accessories may be obtained by requesting
them from our Official Technical Service.
Your oven comes from the factory with some of the accessories described below:
Aluminium tray, ideal for baking.
For all kinds of food.
If your oven has a "Deep Tray", place it under the grill to roast, gratiné and brown. The
juices will then fall into the tray and the oven will be kept clean.
The new deep tray is suitable for cooking dishes with
a large amount of sauce or liquid, ideal for liquid
puddings, frozen food and large roasts.
FEINGL.05/05 29/6/05 10:36 Página 20
Page 21

21
This grille can be used to hold any kind of dish containing food to be roasted
or grilled. It can also be used for grilling, by placing the food directly on top.
In this case, we recommend you place a tray under the grille to collect the
meat juices. This will keep the oven clean.
The grille has to be slid into place in the side rails with the catches facing
down, as indicated in the figure.
Grille with Non-Tip Safety Catch
The new grille with its non-tip safety catches can be
slid out of its housing about three quarters of the way
without tipping over. You will then be able to remove
food easily from inside the oven. In addition, it can be
used at any of the 5 levels available in the oven.
The new “Pull System” design ensures that food can
be handled safely and conveniently, and can be
placed at any of the 5 levels of the oven. The trays
can be pulled out of their housing about three
quarters of the way without tipping over or wobbling,
thus reducing the risk of burns. You will then be able
to remove food easily from inside the oven.
To insert the trays into the oven:
1. Insert the “Pull System” into the side rails until it
reaches the limits; you will have to raise it slightly
to pass it over the catches. .
Pull System
Catch
FEINGL.05/05 29/6/05 10:36 Página 21
Page 22

22
2. Next, insert any of the trays onto the upper part
of the “Pull System”, fitting it between the four
upper catches.
If you wish, the grille with its non-tip safety
feature may also be inserted on top of the
combination of the “Pull System” and tray, but
with the catches facing upwards.
3. Insert the whole set right inside the oven.
To pull the trays out of the oven:
Once cooking has been completed, slide the tray and grill set out until it reaches the
limit, once there you can do one of two things, as required:
a. Just take the tray out of the oven.
b. Take the whole set out of the oven. To do so, you will have to lift the “Pull
System” slightly to get past the catches that prevent it from tipping over.
Remember that the set of “Pull System” and tray or grille with non-tip safety
feature can be placed on any of the 5 levels.
Removable tray,Total Accessibility
With the new “Removable Total Access Tray”, food
handling is more convenient and easier thanks to the
carefully studied design allowing the trays to slide in
and out smoothly.
The trays can be taken completely out of their housing for total accessibility. In
addition, they remain totally stable so that you can work and handle them in total
safety, reducing the risk of burns, thus making it easier to take food out of the oven.
This new totally removable system can be placed on any of the bottom 4 levels of the
oven, giving even more cooking options.
FEINGL.05/05 29/6/05 10:36 Página 22
Page 23

23
To insert the trays into the oven:
1. Insert the “Removable Total Access Tray” into
the side rails until it reaches the limits; you will
have to raise it slightly to pass it over the
catches. Bear in mind that the round pegs go at
the rear.
2. Next, pull out the telescopic runners as far as they
will go.
3. Then fit any of the trays inside the 4 upper
catches on the telescopic runners.
If you wish, the grille with its non-tip safety feature
may also be inserted on top of the combination of
the “Removable Tray” and tray, but with the
catches facing upwards.
4. Insert the whole set right inside the oven.
To pull the trays out of the oven:
Once cooking has been completed, slide the arrangement out, once there you can
do one of two things, as required:
a. Just take the tray out of the oven.
b. Take the whole set out of the oven. To do so, you will have to lift the
“Removable Tray” slightly to get past the catches that prevent it from tipping
over.
Remember that the set of “Removable Tray” and tray or grille with non-tip
safety feature can be placed on any of the 4 lower levels.
FEINGL.05/05 29/6/05 10:36 Página 23
Page 24

AVANSSIS VENTILA TION SYSTEM
3.4.
24
The AVANSSIS ventilation system incorporated into your FAGOR oven will allow you
to achieve better cooking results with less power consumption.
Thanks to this new system, the oven itself takes care of regulating automatically the
optimal degree of humidity for each recipe, so as to obtain more homogeneous
cooking results every time.
The AVANSSIS system controls the vapours produced during cooking. In this way, the
oven's exterior temperature is always kept down to suitable levels throughout the
cooking process in order to protect the kitchen cabinets. As well as reducing the
power consumption, this also means greater safety and cleanliness.
FEINGL.05/05 29/6/05 10:36 Página 24
Page 25

To set the time:
1. When the oven is on, press the button.
2. Turn the MENU control until it displays the symbol corresponding to the
TIMER function. Press the control button to accept the selection.
3. Set the current time using the SELECT control and confirm each selection by
pressing in the control button.
Example: Current time 12:30.
NOTE:
• The time cannot be adjusted during the cooking process, so as not to
interfere with possible pre-set cooking programmes.
Once the time and date have been set, your oven includes a system that allows them
to be remembered even after a power cut
25
4. TIMER FUNCTIONS
SETTING THE CLOCK
4.1.
MENU
SELECT
M
i
FEINGL.05/05 29/6/05 10:36 Página 25
Page 26

With this function, the oven turns itself off automatically when the pre-set cooking time
has elapsed.
To set the cooking time:
1. Once a cooking function and a temperature have been set, press the button
and turn the MENU control until it displays the symbol corresponding to the
DURATION function. Press the control button to accept the selection.
2. Set the duration time using the SELECT control and press in the control to confirm
the setting made.
Example: I want the timer to operate the oven automatically for 45 minutes.
The symbol will remain lit and the display will count down how many minutes
are left before cooking will finish. The progress bar will gradually light
up as the pre-set time is completed.
Once the pre-set time has elapsed, the oven will turn itself off automatically and start
to beep while the symbol flashes. To switch off the beeper, press any button.
To cancel the cooking time:
1. Press the button and turn the MENU control until it displays the symbol
corresponding to the DURATION function. Press the control button to accept the
selection.
2. Turn the SELECT button until the time shown on the display is “0:00”.
Press the control button to accept the selection and the symbol will be turned
off. The cooking time function will have been cancelled.
26
COOKING TIME
4.2.
FEINGL.05/05 29/6/05 10:36 Página 26
SELECT
M
i
MENU
Page 27

27
AUTO-STOP COOKING
4.3.
With this function, you can set your oven to switch itself off automatically at a
particular time. The “auto-stop cooking” function is used simultaneously with the
“cooking duration” function so that the oven switches itself on and off automatically
after operating for the desired time.
To set the auto-stop cooking time:
1. Once the cooking duration or the desired recipe has been set, press the
button and turn the MENU control until it displays the symbol
corresponding to the AUTO-STOP function. Press the control button to accept
the selection.
Example: Current time 12:30, cooking time pre-set for 45 minutes.
2. Set the auto-stop time using the SELECT control and press in the control to
confirm the selection.
Example: I want the food to be ready at 14:30.
After a few seconds, the function will be activated and the oven will start working as
programmed.
Once the pre-set time has elapsed, the oven will turn itself off automatically and start
to beep while the symbol flashes. To switch off the beeper, press any button.
MENU
SELECT
M
i
SELECT
MENU
M
i
FEINGL.05/05 29/6/05 10:36 Página 27
Page 28

28
To cancel the auto-stop cooking time:
1. Press the button and turn the MENU control until it displays the symbol
corresponding to the AUTO-STOP function. Press the control button to accept
the selection.
2. Turn the SELECT control until the time shown on the display (hh:mm) is the lowest
possible allowed by the oven. Press the control button to accept the selection and
the symbol will be turned off.
The auto-stop cooking function will have been cancelled but the oven will start
operating in line with the pre-set cooking time.
WARNING: Remember that certain recipes for fish, shellfish, cakes and pastries
require the oven to be pre-heated. This type of recipe does not allow the cooking
end-time to be pre-set, as the food must not be placed in the oven before it has
warmed up.
The oven has a built-in countdown beeper function. You can use it for any oven
operation or for any other process.
To set the beeper:
1. Press the button and turn the MENU control until it displays the symbol
corresponding to the BEEPER function. Press the control button to accept the
selection.
2. Set the time you want the beeper to sound at using the SELECT control and press
in the control to confirm the selection.
Example: I want the beeper to sound in 45 minutes.
The symbol will remain lit.
BEEPER
4.4.
FEINGL.05/05 29/6/05 10:36 Página 28
SELECT
M
i
MENU
Page 29

29
Once the time set has elapsed, the oven will start to beep while the symbol
flashes. Press any button to turn off the beeper. The oven will stop beeping but the
symbol will continue to flash. Press any button to stop it flashing.
To cancel the beeper:
1. Press the button and turn the MENU control until it displays the symbol
corresponding to the BEEPER function. Press the control button to accept the
selection.
2. Turn the SELECT button until the time shown on the display is “0:00”. Press the
control button to accept the selection and the symbol will be turned off.
The beeper function will have been cancelled.
If you wish to cancel all the timer functions set, press the button for a few
seconds. The symbols corresponding to these functions will turn off to indicate that
they are no longer active.
CANCELLING TIMER FUNCTIONS
4.5.
FEINGL.05/05 29/6/05 10:36 Página 29
Page 30

30
5. HOW TO PROGRAMME THE AUTOMATIC
RECIPES IN A "COOKBOOK OVEN"
The COOKBOOK oven includes a series of automatic recipes that you can find in the
enclosed recipe book. These recipes automatically programme the cooking time and
temperature according to the weight of the main ingredient.
For each recipe, there is a range of possible weights. The fact that the oven may only
be programmed in steps of 100 g. must be taken into account when setting the
weight. For best results it is important that the weight set using the oven controls is
as close as possible to the true weight of the food to be cooked.
NOTE:
• If the weight of the food to be cooked is outside the specified range, you
should prepare the recipe manually, based on the values given for that recipe.
How to programme a pre-set recipe:
1. Turn on the oven.
2. Press the button. The display will show the symbol and the first pre-set
recipe will flash.
3. To select the recipe to be used, turn the MENU control button and the display will
show the automatic recipe numbers in order.
When you reach the chosen recipe, press the control button and that pre-set recipe
will be selected.
4. If the weight can be adjusted within a range for that recipe, the display will show
the standard weight defined for that pre-set recipe. If the weight of the food to be
cooked is the same as that shown on the screen, press the MENU control button
and the oven will accept that weight. If, however, the weight is not the same as
on the screen, use the same control button to change it. When the display shows
the closest value to the food’s true weight, press the MENU control button and the
system will accept that weight.
FEINGL.05/05 29/6/05 10:36 Página 30
Page 31

31
If the recipe does not require the weight to be set, go straight to the next step.
5. The display will show the text “SELECT DEGREE OF FINISHING”. Turn the MENU
control button and select the degree of finishing you desire, then press
the button to confirm the selection made.
Once the recipe has been selected and the weight set where necessary, the oven
will display the cooking time, temperature, cooking function, and the correct level
at which to put the oven tray or other accessory.
If you press the button, the display will show you the most appropriate
accessory for a few seconds.
If, after programming a pre-set recipe, you wish to set the cooking end-time,
follow the instructions in the part entitled “Auto-stop cooking”.
WARNING: Remember that certain recipes for fish, shellfish, cakes and pastries
require the oven to be pre-heated. The food should be placed in the oven when it
beeps to indicate that pre-heating has finished and the screen shows the symbol
completely lit up, i.e. when it has reached the required temperature. This type of
recipe therefore does not allow the cooking end-time to be set before it has heated
up so as to prevent you placing the food in the oven too early.
Remember that it is necessary to place the food into the oven immediately after the
pre-heating is completed in order to obtain optimal results. For recipes which require
the oven to be pre-heated, the oven will do this automatically.
NOTA:
• If none of the control buttons is touched for a few minutes when setting a pre-
set recipe, the selected pre-set recipe is over-ridden and the oven will return
to its previous state.
To cancel a pre-set recipe:
Press the button and the recipe will be interrupted (if you wish to continue
with it later, press the MENU control button again); if you really wish to cancel the
recipe, press the same control button again.
FEINGL.05/05 29/6/05 10:36 Página 31
i
Page 32

32
6. HOW TO PROGRAMME RECIPES BY TYPE OF
FOOD IN AN "AUTO-CHEF” OVEN
The “AUTO-CHEF” oven includes a menu where you will find different groups of food
types (poultry, fish, baking, …). This oven automatically programmes all the cooking
parameters depending on the type of food and it weight.
For some food types, there is a range of possible weights you can set. The fact that
the oven may only be programmed in steps of 100 g. must be taken into account
when setting the weight. For best results it is important that the weight set using the
oven controls is as close as possible to the true weight of the food to be cooked.
NOTE:
• If the weight of the food to be cooked is outside the specified range, you
should prepare the recipe manually, based on the values given for that type
of food.
How to set a recipe:
1. Turn on the oven.
2. Press the button and the display will show the “Food type” menu.
3. Turn the MENU control button to select the desired food type and confirm it by
pressing the control button in.
4. Turn the MENU control button to select the food you want to cook and confirm it
by pressing the control button in.
5. Make all necessary adjustments for the type of food you are going to prepare and
accept each of the selections.
FEINGL.05/05 29/6/05 10:36 Página 32
Page 33

33
6. If the weight can be adjusted within a range for that recipe, the display will
show the standard weight defined for it. If the weight of the food to be
cooked is the same as that shown on the screen, press the MENU control
button and the oven will accept that weight. If, however, the weight is not
the same as on the screen, use the same control button to change it. When
the display shows the closest value to the food’s true weight, press the
MENU control button and the system will accept that weight. If the recipe
does not require the weight to be set, go straight to the next step.
7. The display will show the text “SELECT DEGREE OF FINISHING”. Turn the MENU
control button to select the degree of finishing you desire, then press
the button to confirm the selection made.
Once the necessary adjustments have been made, the oven informs you how
long the cooking will take, the temperature, cooking function, and the correct
shelf level to use for the accessories.
If you press the button, the display will show you the most appropriate
accessory for a few seconds.
If, after programming a recipe, you wish to set the cooking auto-stop time, follow
the instructions in the part entitled “Auto-stop cooking”.
WARNING: Remember that certain recipes for fish, shellfish, cakes and pastries
require the oven to be pre-heated. The food should be placed in the oven when it
beeps to indicate that pre-heating has finished and the screen shows the symbol
completely lit up, i.e. when it has reached the required temperature. This type of
recipe therefore does not allow you to set an auto-stop time so as to prevent you
placing the food in the oven before it has heated up.
Remember that it is necessary to place the food into the oven immediately after the
oven beeps to show the pre-heating is completed in order to obtain optimal results.
For recipes which require the oven to be pre-heated, the oven will do this
automatically.
NOTE:
• If none of the control buttons is touched for a few minutes when setting a
recipe, the selected recipe is over-ridden and the oven will return to its
previous state.
To cancel a recipe:
1. Press the button and the recipe will be interrupted (if you wish to continue
with it later, press the MENU control button again); if you really wish to cancel the
recipe, press the same control button again.
FEINGL.05/05 29/6/05 10:36 Página 33
i
Page 34

7. HOW TO MEMORIZE YOUR RECIPES
If you are satisfied with the results of your cooking, you can store the settings selected
in the oven’s memory.
Thanks to this function, you can memorize your own recipes or adapt a pre-set one to
your preferences. There are 4 memories that let you store up to 3 different cooking
phases.
How to create a recipe of your own:
1. When the oven is on, press the button and the text line will indicate “SELECT
MEMORY”. Turn the MENU control button and select a memory that is free, then
press the control button to confirm the selection made.
2. At this point the display will flash the field corresponding to the first phase of the
recipe in the selected memory and the text “SELECT FUNCTION”.
3. Select the desired cooking function, the temperature and the duration (hh:mm) of
the first cooking phase, confirming each of the settings by pressing the control
button. You have now completed the memorization of the first phase of cooking.
4. Repeat the same procedure described in points 2 and 3 to memorize the other two
phases.
NOTE:
• If you wish to dispense with the other two phases, press the MENU control
button until you leave the “Memories Menu”.
How to memorize a recipe recently cooked:
Once you have finished baking or the recipe included in the oven, keep the button
pressed until the text line displays: “MEMORIZED”; the recipe will have been stored in the
first free memory.
If all 4 memories are occupied, the text line will display: “MEMORY FULL”, in which case
you will have to delete one or more of the memories and press the button again.
34
FEINGL.05/05 29/6/05 10:36 Página 34
M
M
M
Page 35

35
NOTE:
• When you use this operation, the oven will memorize the last 3 cooking
phases since it was turned on (any re-adjustment will be understood by the
oven as a new cooking phase). In order to prevent the memorization of
undesired phases, we recommend you turn off the oven and turn it on again
each time you start a new batch of cooking.
How to use a previously saved memory:
Once you have memorized a cooking process, you will be able to select it from one
of these three options by using the MENU control button and confirm the selections
made by pressing in the control button:
COOK:
To execute the memorized cooking process.
EDIT
: This option is used to display and/or edit the contents of a memory.
When you select this option, the display will show you the contents of each cooking
phase. If you only wish to display them, press the MENU control button several times
in order to go through each of the selections. If in addition you wish to edit any of
them, make any necessary adjustments and confirm these with the control button.
DELETE:
To eliminate a recipe.
FEINGL.05/05 29/6/05 10:36 Página 35
Page 36

36
8. SAFETY FUNCTIONS
AUTOMATIC CUT-OFF
8.1.
To set the locking mechanism:
Press in both the SELECT and the MENU control buttons simultaneously for a few
seconds until the symbol lights up. The oven will be locked.
The only thing you can do is switch the oven off, in which case it will be
unlocked automatically.
To release the oven locking mechanism:
Press in both control buttons simultaneously for a few seconds until the
symbol goes off.
If you have not pressed any control button for several hours with the oven on, then it
will turn itself off automatically for safety reasons.
When the oven is operating, you can lock it to prevent children from altering anything.
CHILD SAFETY LOCK
8.2.
M
i
MENU
SELECT
FEINGL.05/05 29/6/05 10:36 Página 36
Page 37

37
9. CLEANING AND MAINTENANCE
HOW T O CLEAN...
9.1.
The outside of the oven
9.1.1.
a. Oven with stainless-steel front:
Clean the outside of the oven preferably with warm water and a little washing-up
liquid. Rinse it very well. Dry it with a soft cloth immediately afterwards.
If any stains are difficult to remove, we recommend you use products specifically
designed for stainless steel. Test the product on a small area before applying it to the
entire surface. Follow the manufacturer's indications closely.
b. Oven with aluminium front:
Clean the outside of the oven with warm soapy water and a soft sponge. Rinse
it very well. Dry it with a soft cloth immediately afterwards.
Aggressive detergents, scouring pads and rough cloths should not be used.
c. Oven with glass front:
Use a mild window cleaner. Clean the surface with a soft window-cloth or a lintfree cloth with microscopic fibres without applying too much pressure.
FEINGL.05/05 29/6/05 10:36 Página 37
Page 38

38
The inside of the oven
9.1.2.
In order to ensure the continued attractive appearance of your oven in the long term, you
should clean the inside regularly, preferably every time you use it; this will avoid
generating fumes and unpleasant odours in subsequent uses.
To make it easier to clean the inside of the oven:
•To clean the glass cover protecting the oven
lamp:
Unscrew or pull out the lamp cover and clean it,
preferably with washing-up liquid.
Once it is clean, replace the lamp cover in its original position.
•Turn on the interior lamp. To turn on this light, just set the temperature
selector to “0” .
2. Completely raise
the pins in the
hinges
1. Open the door fully.
• It is easy to remove the oven door. Follow the steps described below very
carefully:
How to remove the door:
FEINGL.05/05 29/6/05 10:37 Página 38
Page 39

39
3. Close the oven door gently until you hear the catch engage; once you
reach the position of the catch, take hold of the door with both hands and
continue to push it closed while pulling upwards at the same time to lift
the hinges from their slots. The door will then be released.
How to install the door after cleaning:
1. Slide the hinges into their slots until
they hook into place, as indicated in
the figures.
2. Open the door fully, and push the
bolts down completely to their
original position. The door will then
be correctly installed.
• In some ovens it is possible to fold the grill down from the oven roof.
WARNING: The oven must be cold.
How to fold the grill down:
2. Press it in towards the
back of the oven.
1. Lift up the grill rod.
FEINGL.05/05 29/6/05 10:37 Página 39
Page 40

40
How to re-insert the grill after cleaning:
1. Press the grill’s rod towards the back of the oven and hook the grill back
into place in its support.
Accessories
9.1.3.
Soak the accessories immediately after use in a normal household detergent. In this
way, any scraps of food that may have adhered can be easily removed with a sponge
or a soft brush.
The side grilles
9.1.4.
The grilles can be removed for cleaning. To do so,
follow the steps described below:
How to remove the grilles:
1. Press the grille’s upper rod downwards to
unhook it from the support on the side panel.
2. Turn the grille as shown in the figure and pull
it outwards to extract it.
Wash the grilles in the dishwasher. To eliminate any stubborn dirt you may need to
use rougher cleaning sponges or brushes.
How to re-insert the grilles after cleaning:
Replace the grilles on the side walls by following the steps indicated above
but in reverse order.
FEINGL.05/05 29/6/05 10:37 Página 40
Page 41

41
If the oven has a smoke filter it can be removed by exerting a little pressure. It is
located in the upper part of the oven as shown in the figure.
The smoke filter
9.1.5.
Wash the smoke filter in the dishwasher; to remove very stubborn dirt soak it in very
hot water with an ordinary common household detergent. Leave it soaking for a few
minutes until the grease becomes soft. Any remaining grease stuck to it can then be
removed easily with a sponge or a soft brush.
After cleaning, replace it, using a little pressure to push it back in.
If your oven has a grease filter (in the bag with the tray), it can be placed in the
bottom of the oven, as shown in the diagrams.
The Grease filter
9.1.6.
Wash the grease filter in the dishwasher; to remove very stubborn dirt soak it in very
hot water with an ordinary household detergent. Leave it soaking for a few minutes
until the grease becomes soft. Any remaining grease stuck to it can then be removed
easily with a sponge or a soft brush.
After cleaning, replace it in the bottom of the oven.
FEINGL.05/05 29/6/05 10:37 Página 41
Page 42

42
2. Unscrew the lamp cover
by turning it to the left or,
in the case of a
rectangular lamp cover,
pull it out using a tool
and applying a little
pressure.
You can replace the oven’s interior light bulb if it stops working. You can obtain these
heat-resistant 25W replacement bulbs capable of withstanding 300ºC from the
Official Technical Service or from a specialised electrical store. Only use these lamps.
To r eplace the bulb do the following:
3. Unscrew the lamp by turning it to the left.
4. Replace the bulb with one of the same type.
5. Replace the lamp cover back into position, screwing it in or applying a little
pressure, depending on the type of lamp cover.
6. Re-connect the oven to the mains power supply.
1. Disconnect the oven from the mains power supply. If necessary, let the oven
cool down.
9.2.
HOW TO REPLACE THE BULB IN THE INTERIOR LIGHT
FEINGL.05/05 29/6/05 10:37 Página 42
Page 43

43
• Always use the cooking tables in this manual as a base for programming the
oven. To cook one of your own recipes, find a similar dish in the table as an aid
to choosing the most suitable function, temperature and cooking time.
• Cooking times indicated in the tables are approximate, and if the food is taken
straight from the fridge to the oven, a longer cooking time will be required. Times
also depend on taste, i.e. on how “well-done” you like your food.
• Large pieces will also require more time. The tables are worked out based on
amounts for about four people.
• Use the temperatures given in the tables. A higher temperature than that given
may generate excessive smoke and steam.
• If the food does not take up all the tray, place it in the centre.
• After cooking meat and poultry, let the roast stand for 5 to 10 minutes inside the
oven.
• Light coloured dishes are not suitable for baking or roasting, as they reflect the
heat.
•To ensure that poultry browns nicely, baste it well with fat.
•To check if a cake is done, stick a toothpick into the centre about 10 minutes
before cooking time is up. If it comes out clean, the cake is done.
• If the cake or pastry is more done underneath than on top, cook it on a higher
shelf next time. Choose a slightly higher cooking temperature and leave it in the
oven for longer. If on the other hand it is more done on top than underneath, place
it on a lower level in the oven. Choose a slightly lower cooking temperature and
leave it in the oven for longer.
10. PRACTICAL ADVICE AND COOKING TABLE
PRACTICAL ADVICE FOR BAKING AND ROASTING
a
FEINGL.05/05 29/6/05 10:37 Página 43
Page 44

44
PROBLEM
Cakes and pastries do not
rise enough
The roast or the baked
items are very pale
The roast or the baked
items are very dark
The roast or the baked
items are very dry
The roast or baked items
are too moist
POSSIBLE CAUSE
•Wrong function selected
•The oven has not been preheated enough
•Temperature too low
•Dish made of unsuitable
material
•Temperature too high
•The cooking time is very
long because the
temperature selected is
too low
•Too much liquid in the
dough
SOLUTION
• Check the function and
temperature selected
against the temperature
shown in the table
•Check the table for any preheating recommendations
•Check the temperature
selected against the
temperature shown in the
table
•Use only dark dishes
•Check the temperature
selected against the
temperature shown in the
table; reduce it slightly if
necessary
•Check the temperature
selected against the
temperature shown in the
table
•Check the temperature
selected against the
temperature shown in the
table; reduce it slightly if
necessary
•Prepare the dough with less
liquid.
FEINGL.05/05 29/6/05 10:37 Página 44
Page 45

45
COOKING T ABLES
b
Veal 210
o
50-60 min No
1,5 kg
Pork loin 220
o
50-60 min No
1,5 kg
Roast chicken 230
o
50-60 min No
1,25 kg
Roast rabbit 210
o
25-35 min No
1,2 kg
Roast lamb 220
o
40-50 min No
1 kg
Pork leg 180
o
85-95 min No
1,5 kg
Pork ribs 220
o
30-40 min No
1,5 kg
Turkey 170
o
40-50 min No
legs (2)
Turkey 190
o
115-125 min No
4 kg
Caramel 150
o
30-40 min No
custard
Sponge cake 180
o
25-35 min Yes
Pears baked 240
o
50-60 min No
in wine
Pastries 220
o
8-12 min No
FOOD
MEAT AND POULTRY
DESSERTS
TEMPERATURE TIME ACCESSORIES
PRE-POSITION
HEATINGFOOD
PRO-
GRAMME
FEINGL.05/05 29/6/05 10:37 Página 45
Page 46

46
Stuffed 220
o
12-16 min Yes
aubergines
Roast red 210
o
30-40 min No
peppers1,25 kg
Stuffed 220
o
15-19 min No
tomatoes (4)
Stuffed 200
o
25-35 min No
courgettes (2)
Roast 230
o
7-9 min Yes
hake 1,5 kg
Baked 240
o
4 min Yes
prawns 1 kg
Trout 250
o
9-11 min Yes
1 kg
Tuna 230
o
10-14 min No
fillets
Roast 220
o
13-17 min No
fish 1kg
Baked 250
o
8-10 min Yes
salmon (4)
Baked 220
o
7-9 min Yes
cod 1,5 kg
Pizza 220
o
18-22 min Yes
Bread 220
o
18-22 min No
Buns 210
o
15-19 min Yes
FOOD
STARTERS AND VEGETABLES
FISH AND SEAFOOD
TEMPERATURE TIME ACCESSORIES
POSITION
FOOD
PRE-
HEATING
VARIOUS
PRO-
GRAMME
FEINGL.05/05 29/6/05 10:37 Página 46
Page 47

47
Veal 190
o
50-60 min No
1,5 kg
Pork loin 200
o
50-60 min No
1,5 kg
Roast chicken 210
o
50-60 min No
1,25 kg
Roast rabbit 230
o
25-35 min No
1,2 kg
Roast lamb 200
o
40-55 min No
1 kg
Pork leg 150
o
85-95 min No
1,5 kg
Pork ribs 200
o
30-40 min No
1,5 kg
Turkey legs 150
o
40-50 min No
pavo (2)
Turkey 170
o
115-125 min No
4 kg
Caramel 150
o
30-40min No
custard
Sponge 180
o
15-25min No
cake
Pears baked 220
o
50-60min No
in wine
Pastries 200
o
8-12min No
For all kinds 75
o
No
of food
MEAT AND POULTRY
DESSERTS
THAWING
FOOD TEMPERATURE TIME ACCESSORIES
PRE-POSITION
HEATINGFOOD
PRO-
GRAMME
FEINGL.05/05 29/6/05 10:37 Página 47
Page 48

48
Roast 210
o
7-9 min Yes
hake 1,5 kg
Baked 220
o
4 min Yes
prawns 1 kg
Trout 240
o
9-11 min Yes
1 kg
Tuna 250
o
10-14 min No
fillets
Roast 200
o
13-17 min Yes
fish 1kg
Baked 240
o
8-10 min Yes
salmon (4)
Baked 210
o
7-9 min Yes
cod 1,5 kg
Pizza 200
o
18-22 min No
Bread 200
o
18-22 min No
Buns 220
o
13-17 min Yes
Stuffed 200
o
12-16 min Yes
aubergines
Roast red 190
o
30-40 min No
peppers1,25 kg
Stuffed 200
o
15-19 min No
tomatoes (4)
Stuffed 180
o
25-35 min No
courgettes (2)
STARTERS AND VEGETABLES
FISH AND SEAFOOD
VARIOUS
FOOD TEMPERATURE TIME
ACCESSORIES
PRE-POSITION
HEATINGFOOD
PRO-
GRAMME
FEINGL.05/05 29/6/05 10:37 Página 48
Page 49

49
11. LOCATING AND TROUBLESHOOTING
PROBLEMS
There may be small anomalies that do not necessarily mean a product has failed and
so do not require a Technical Service call-out.
These small anomalies are often easy to correct. To avoid calling out a Service
Engineer unnecessarily, check to see if the failure you have encountered is included
in the table below:
If your oven is still not working correctly after checking the points indicated in the
table, call the Technical Service department indicating the type of failure, the
appliance model, the product number and the serial number indicated on the
features identification plate. This plate is on the lower front face of the oven cavity.
Any repairs necessary must be carried out by Service Engineers from an Official
Technical Service. Any repairs effected improperly or incorrectly might give rise to
serious risks for users. To resolve a doubt, make a query, or lodge a complaint in
connection with the guarantee or report a failure of your oven, contact FAGOR on our
web site: www.fagor.com.
FEINGL.05/05 29/6/05 10:37 Página 49
Page 50

50
IF YOU NOTICE THAT …
The oven is NOT working. The
display is not showing any
information.
The oven is making a series
of beeps.
The oven is NOT working.
symbol is flashing.
The oven is NOT working.
symbol is flashing.
The oven is NOT working.
symbol is lit.
The oven DOES work, but the
symbol is flashing.
The oven light does NOT
work.
Smoke comes out when in
use.
The oven makes a noise after
it is switched off.
The glass on the inside of the
oven door is dripping wet.
The oven is NOT working and
the display is showing an F
followed by a number
POSSIBLE CAUSES
•No power supply.
•The oven is not plugged in
or turned on.
•Several
•The oven has been on for
several hours without any
control button being pressed.
•Power cut while the oven
was working.
•The programmed cooking
time has ended.
•Oven is locked
•The beeper countdown time
is up.
•The bulb has blown.
•The oven is not switched on
or your automatic cut-out
fuse switch has tripped.
•Oven has been set up not to
use the lamp at low
temperatures or never to use it.
•Oven temperature too high.
•Greasy oven.
•The oven fan is working
(even after the oven has
been switched off), to cool
down the oven and its
surroundings.
Some accessory (rail, tray,
etc.) is in contact with the
glass.
Operating fault.
ACTIONS
•Verificare lo stato della rete
elettrica.
•Collegare il forno.
•Leggere attentamente il
manuale d’uso
•Spegnere il forno premendo
il pulsante .
•Spegnere il forno premendo
il pulsante .
•Spegnere il forno premendo
il pulsante .
•Sbloccare il forno seguendo
le indicazioni del paragrafo
“Blocco di sicurezza per i
bambini”.
•Premere qualsiasi pulsante.
•Cambiare la lampadina.
•Collegare il forno o verificare
il differenziale.
•Riesaminare il Menu di
configurazione
•Ridurre la temperatura del
forno.
•Pulire il forno.
•È del tutto normale.
•Inserire l'accessorio più
all'interno per evitare il
contatto con il vetro.
•Rivolgersi al servizio tecnico
e comunicare il codice di
errore.
FEINGL.05/05 29/6/05 10:37 Página 50
Page 51

51
Your new NET Comp@tible oven is ready to be connected to the FAGOR Digital
Home network or any other compatible remote control network for households. It can
thus offer a series of advanced functions such as remote control by telephone,
remote diagnosis, etc.
NET Comp@tible ovens include a serial port to provide connectivity with a home
network over signal-carrying power lines.
To connect a NET Comp@tible oven to the home network, you need to purchase and
connect the Domotics Kit or optional communications module sold separately, and
there must be a FAGOR Maior-Domo® remote appliance management system in the
house. The connection of the appliance to the optional communications module
must be carried out solely and exclusively by FAGOR Technical Service personnel.
For further information and to find out when this additional feature will become
available, please contact us through our web site www.fagor.com.
Connection to Domotic networks is an offer that is only available in the Spanish
market.
12. NET COMP@TIBLE OVEN: CONNECTION
TO MAINS NETWORKS
FEINGL.05/05 29/6/05 10:37 Página 51
Page 52

52
13. ENVIRONMENTAL NOTE
PRO TECTING THE ENVIRONMENT
13.1.
FAGOR is always working to develop technologies and solutions aimed at reducing
energy consumption and conserving natural resources, thus effectively contributing
to a reduction in the damage suffered by the environment.
Disposing of the packaging from your new oven
Your new oven is covered by protective packaging during its transportation to your
home. All of the packaging materials used are environmentally-friendly and can be
recycled or re-used.
Please contribute actively to protecting the environment by using appropriate
methods for recycling and disposing of packaging materials. Your local council will
be pleased to inform you of the most efficient and up to date options available for
disposing of these materials.
FEINGL.05/05 29/6/05 10:37 Página 52
Page 53

53
ENERGY-SA VING TIPS
13.2.
•Pre-heat the oven only where this is indicated in the recipe or in the
cooking table for the dish you want to cook.
• It is better to use dark baking dishes, preferably black enamel, as these
materials absorb heat particularly well.
• If you wish to prepare several dishes, you should do so one after the other.
As the oven is already hot, the baking times for second and subsequent
items are shorter. You can also prepare two cakes simultaneously by
placing rectangular moulds side by side.
•Your oven includes the “Gentle Grill” function, use it when preparing
small amounts of grilled food, placing the food in the central part of the
tray or grille.
FEINGL.05/05 29/6/05 10:37 Página 53
Page 54

54
ENVIRONMENT AL TIPS
In order to protect the environment, deliver your used appliance to an official
collection centre or recyclable material recovery centre.
Before you dispose of your used appliance, make it unusable by cutting the
power cable.
FEINGL.05/05 29/6/05 10:37 Página 54
Page 55

55
FEINGL.05/05 29/6/05 10:37 Página 55
Page 56

06-05 C60T246A2
Printed on recycled paper
Fagor Electrodomésticos S.Coop
UK REPRESENTATIVE OFFICE
LEROY HOUSE
UNIT 3P, 436 ESSEX ROAD
LONDON N1 3QP
PHONE: 0207 354 0044
Fax:0207 354 0789
sales@fagorappliances.co.uk
FEINGL.05/05 29/6/05 10:37 Página 56
 Loading...