

Page 1

5H-720*
User Manual for Your Oven
Manual de utilización del horno
Guia de utilização do seu forno
Le guide d’utilisation de votre four
Bedienungsanleitung Ihres Backofens
PT
FR
DE
EN
ES
9963-5921 ML1 5H-720.qxd 14/04/05 14:57 Page 1
Page 2
2
T
able of Contents
Throughout the manual,
indicates safety recommendations,
indicates advice and tips
What does your oven look like?
Description of the appliance P.3
Accessories P.4
Safety recommendations P.5
How do you install your oven?
Electrical connection P.6-7
How do you change the bulb? P.7
Useful dimensions for installing your oven P.8
How does your oven work?
Close-up of your programmer P.9
How do you set the clock on the oven? P.10
How do you program for immediate cooking? P.11
How do you set a cooking programme? P.12-13
How do you use the timer? P.14
What do you do in case of operating
malfunctions?
P.15
Oven cooking modes P.16-17
How do you clean the cavity of your oven?
What is pyrolysis? P.18
In what situations should pyrolysis be used? P.18
How do you use the pyrolysis function? P.18-19
9963-5921 ML1 5H-720.qxd 14/04/05 14:57 Page 2
Page 3
1
3
5
3
EN
What does your oven look like?
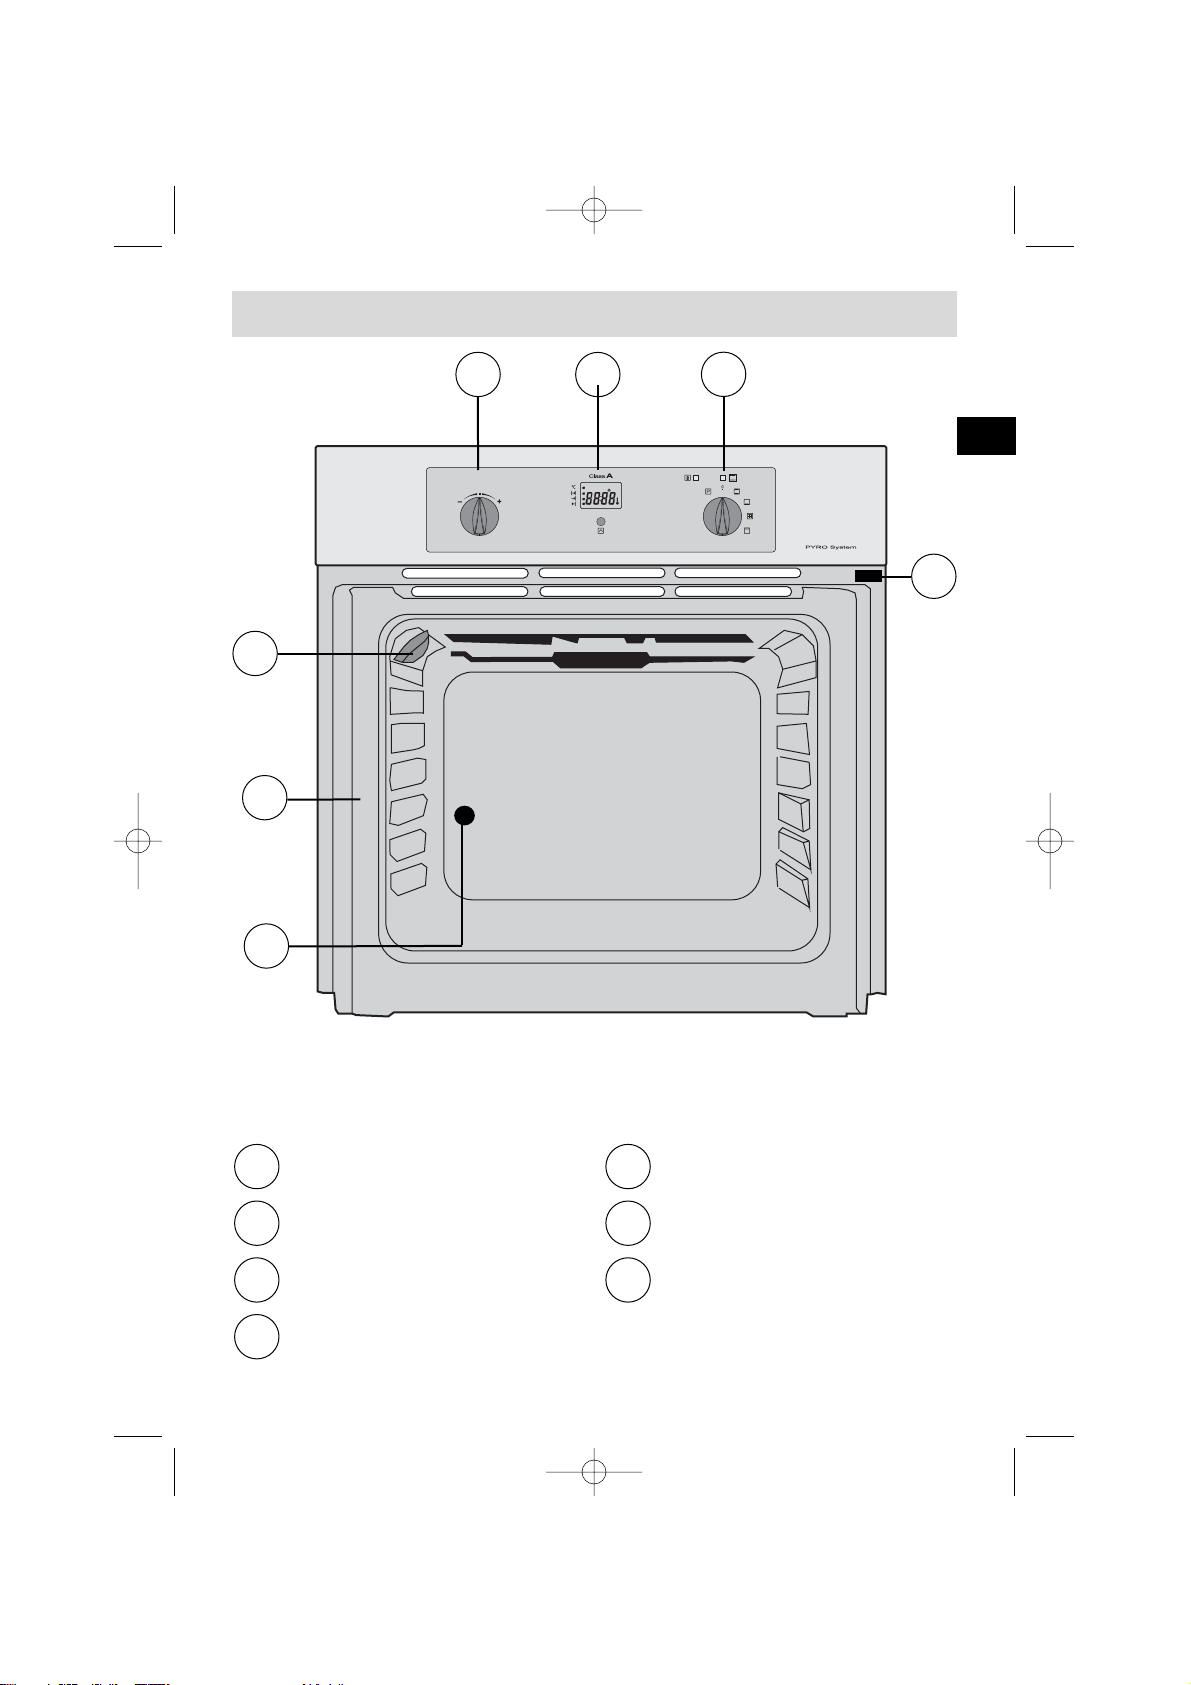
DESCRIPTION OF THE APPLIANCE
1
2
5
6
73
4
Temperature selector
Programmer
Function selector
Light
Shelf support indicator
Hole for turnspit
Contact for open door
detector
1
2
3
4
5
6
7
9963-5921 ML1 5H-720.qxd 14/04/05 14:57 Page 3
Page 4
4
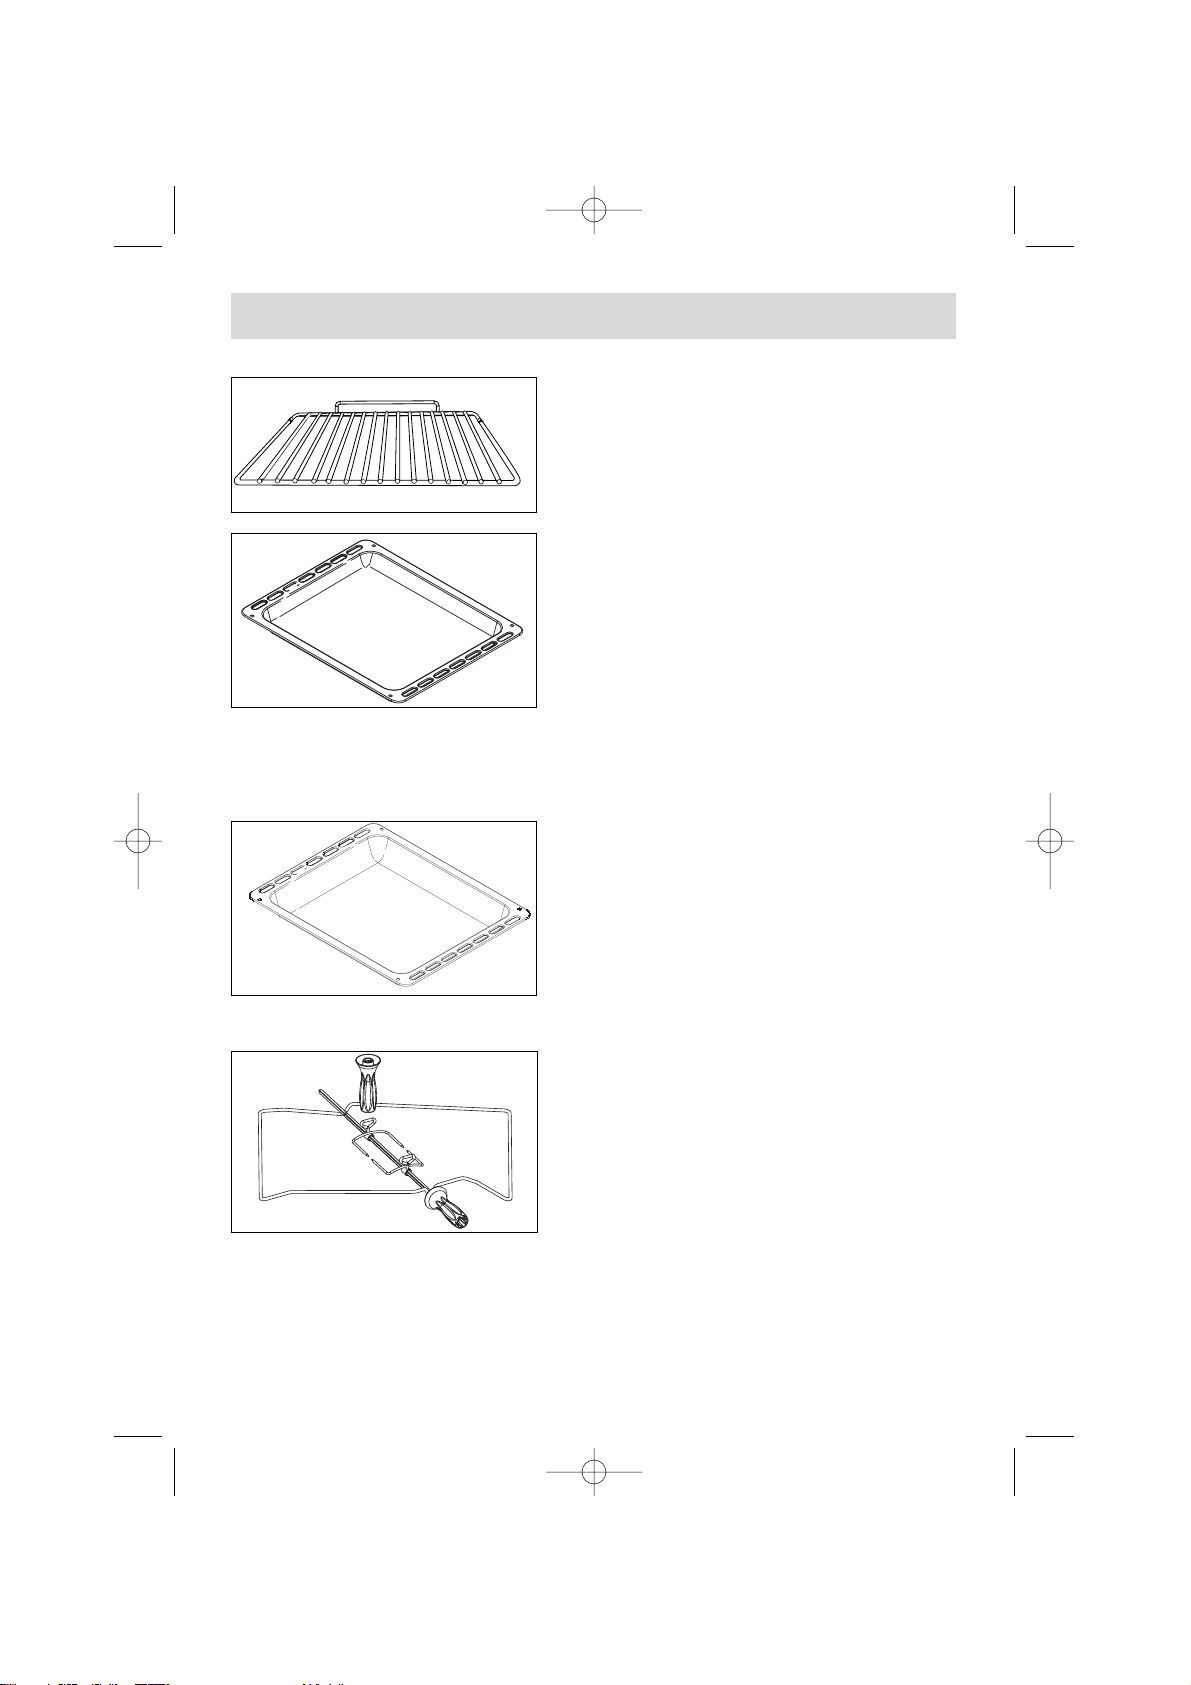
Accessories
Anti-tipping safety grid
The grid can be used to hold all dishes and
moulds containing foodstuffs to be cooked or
browned. It can be used for barbecues (to be
placed directly on the grid).
Multi-purpose dish
(cake dish or drip tray)
It serves as a cake dish and has a sloped
edge. It is used for cooking pastries such as
cream puffs, meringues, madeleines, puff
pastry, etc.
Inserted under the grid, it catches barbecue
juices and grease. It can also be used half-full
of water for double-boiler cooking methods. Avoid placing roasts or meats directly
in the dish because you are certain to have major splattering on the oven walls.
Hollow dish
It is used to collect juices and grease from
cooking with the high grill or the pulsed grill.
It can be used as a cooking dish when suitable
for the size of the item to be cooked (e.g.
whole poultry surrounded with vegetables, at
moderate temperature).
Never place this dish directly on the bottom
heating element, except in the GRILL position.
Turn spit
To use it:
• Place the hollow dish on the grid on shelf
support number 1 to catch the cooking juices
or on the bottom heating element if the piece
of meat being roasted is too big.
• Attach one of the forks onto the spit; pierce
the piece of meat being roasted; insert the
second fork; centre the meat and tighten the assembly by screwing in the two
forks.
• Place the spit in its support.
• Gently push to lodge the tip of the spit in the guide slot located at the back of
the oven (6).
• Remove the handle by unscrewing it. After cooking, screw the handle back into
the spit to remove it without burning yourself.
REAR
FRONT
9963-5921 ML1 5H-720.qxd 14/04/05 14:57 Page 4
Page 5

5
EN
Safety recommendations
Please become familiar with these recommendations before installing
and using your oven. This oven was designed for use by private persons in their
homes. It is intended solely for cooking foodstuffs. This oven does not contain any
asbestos-based components.
FIRST USE:
Before using your oven for the first time, heat it up while empty with the door
closed for approximately 15 minutes using the maximum setting in order to "cure"
the appliance. The rock wool that surrounds the oven cavity may initially release
a particular odour caused by its composition. Similarly, you may notice the release
of some smoke. All of this is normal.
SUBSEQUENT USE:
- Ensure that the door of your oven is completely closed so that the seal can
properly do its job.
- Do not let anyone lean against or sit on the oven door when it is open.
- When using the grill with the door semi-open, exposed parts and
surfaces may become hot. Keep small children away.
- When in use, the appliance becomes hot. Be careful not to touch the heating
elements located inside the oven.
- After cooking, do not use bare hands to touch the dishes or accessories (grid,
turnspit, drip tray, turnspit support, etc.); use a potholder or heat-resistant
material.
- Do not line your oven with sheets of aluminium. Otherwise, the result could be
an accumulation of heat that could have an undesirable effect on cooking and
roasting results and could damage the enamel.
- Before beginning a pyrolysis cleaning cycle in your oven, remove all parts of your
grids, trays and accessories and remove major spill residue.
- Do not use a steam cleaner or high-pressure cleaner.
- During pyrolysis, the exposed surfaces become hotter than during normal use.
Keep small children away.
- Before any cleaning is undertaken in the oven cavity, the oven must be
turned off.
The function selector absolutely must be returned to 0 in order
to use your oven again.
9963-5921 ML1 5H-720.qxd 14/04/05 14:57 Page 5
Page 6

6
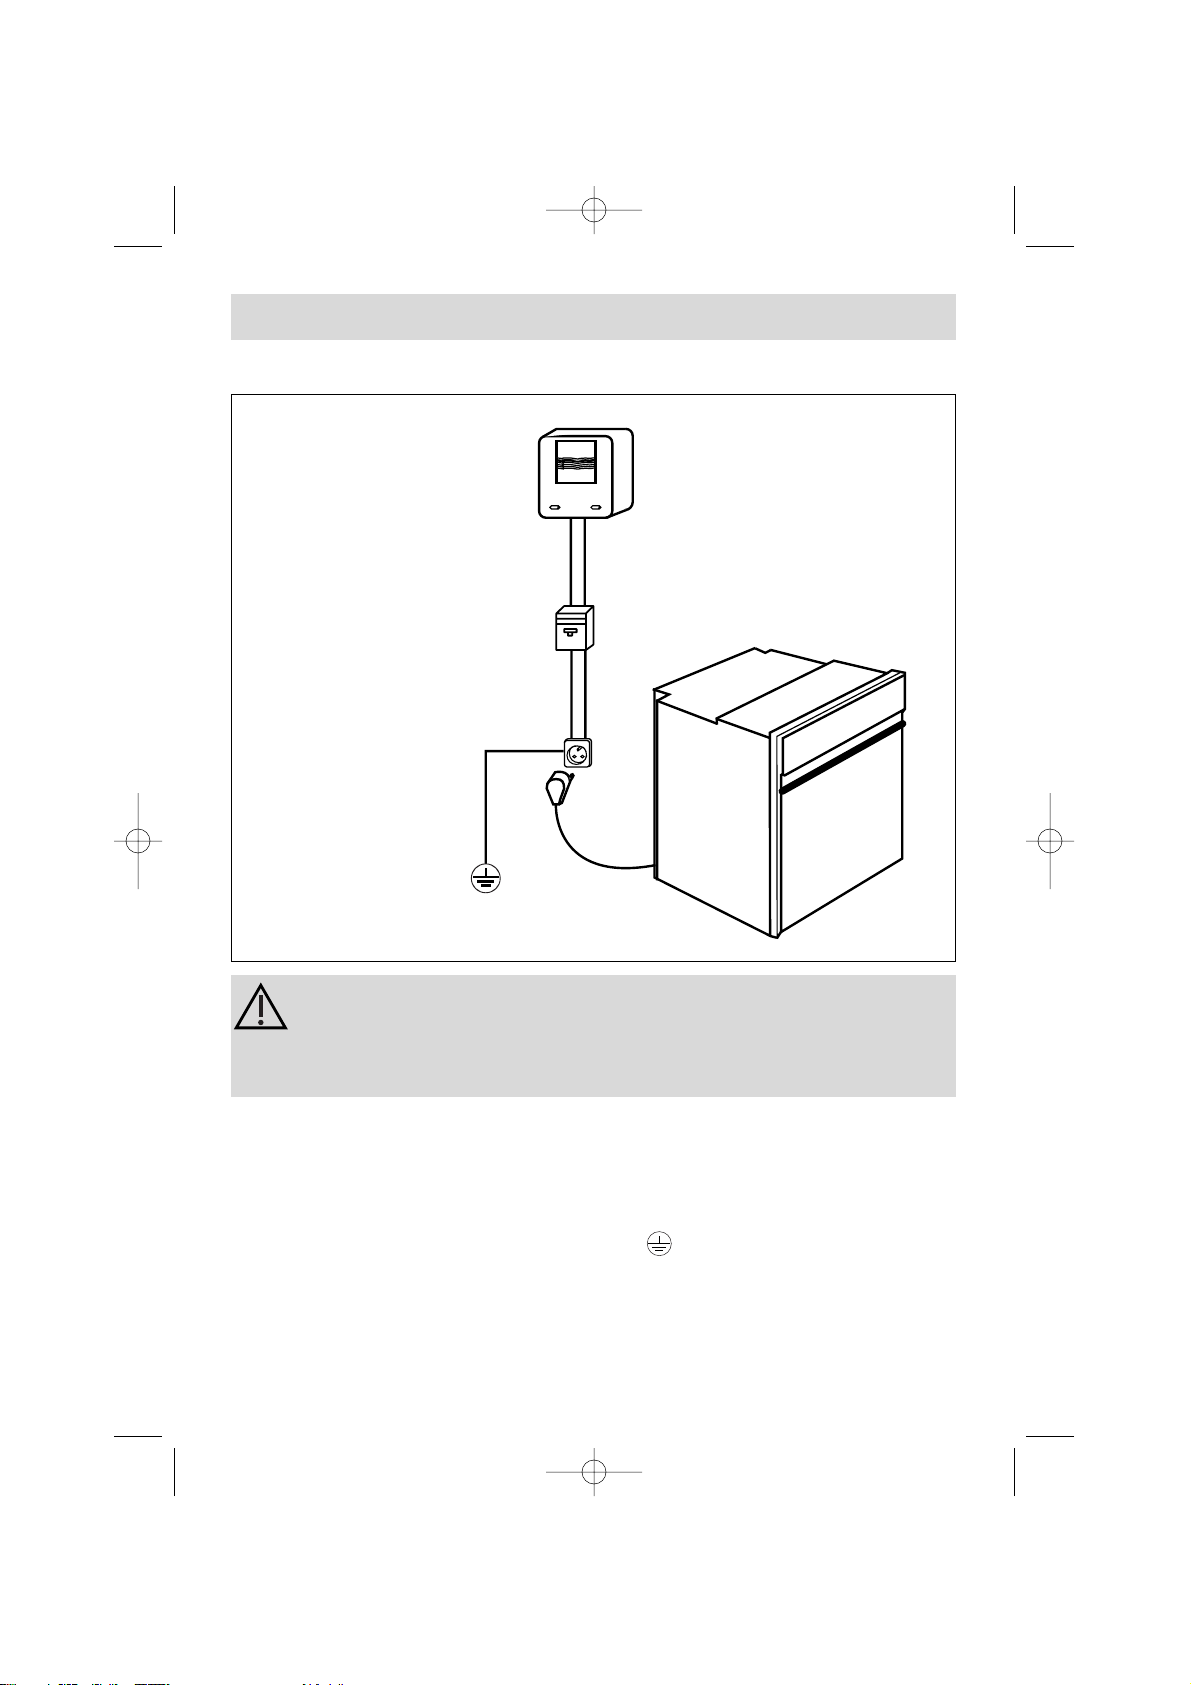
How do you install your oven?
Monophase 20A Meter
220-240 V ~ 50 Hz
Electrical outlet
2-prong receptacle
+ ground lead
CEI Standard 60083
Monophase line 220-240 V ~
Electrical connection
Power cable
length:
approximately 1.5 m
16A fuse or differential
circuit breaker
Before making the connection, ensure that the wires in your
electrical set-up have enough cross-sectional area to properly
supply electricity to the appliance (cross-sectional area must be
at least equal to that of the power cable).
The fuse in your set-up must be 16 amperes.
The electrical connection should be performed before the appliance is installed in the
cabinet.
• The oven must be connected with a power cable (standardised) with three 1.5 mm
2
conductors (1 ph +1 N + ground) that must be connected to a monophase
220-240 V network via a CEI 60083 standardised receptacle (1 ph + 1 N + ground
lead) or in accordance with installation rules. The safety wire (green-yellow) is
connected to the appliance's terminal and must be connected to the ground lead
of the electrical set-up.
• In the case of connections with an electric receptacle, it must remain accessible
after installation of the appliance.
• The oven's neutral conductor (blue wire) must be connected to the network's
neutral conductor.
9963-5921 ML1 5H-720.qxd 14/04/05 14:57 Page 6
Page 7
7
EN
• The power cable (H05 RR-F, H05 RN-F or H05 VV-F) must be of sufficient length to
be connected to the build-in oven while it sits on the floor in front of the cabinet.
To do this the appliance must be disconnected from the electrical network:
• Open the inspection flap located at the lower right of the back cover by unscrewing
the two screws, then pivot the inspection flap.
• Strip 12 mm along each wire of the new power cable.
• Carefully twist together the strands.
• Loosen the screws from the terminal board and remove the power cord to be
replaced.
• Introduce the power cable through the side of the cover in the cable clip located to
the right of the terminal board.
• Connect the power cord wires in accordance with the written markings on the terminal
board.
• All the strands of the electricity wires must be captured under the screws.
• The phase wire on the L terminal.
• The green-yellow coloured ground wire should be connected to the terminal.
• The neutral conductor (blue) on the N terminal.
• Screw down tightly the screws on the terminal board and check the connection by
pulling on each wire.
• Attach the cable with the cable clip located to the right of the terminal board.
• Close the inspection flap using the two screws.
Changing the power cable
We cannot be held liable for any accident resulting from an
inexistent, defective or incorrect ground lead.
How do you install your oven?
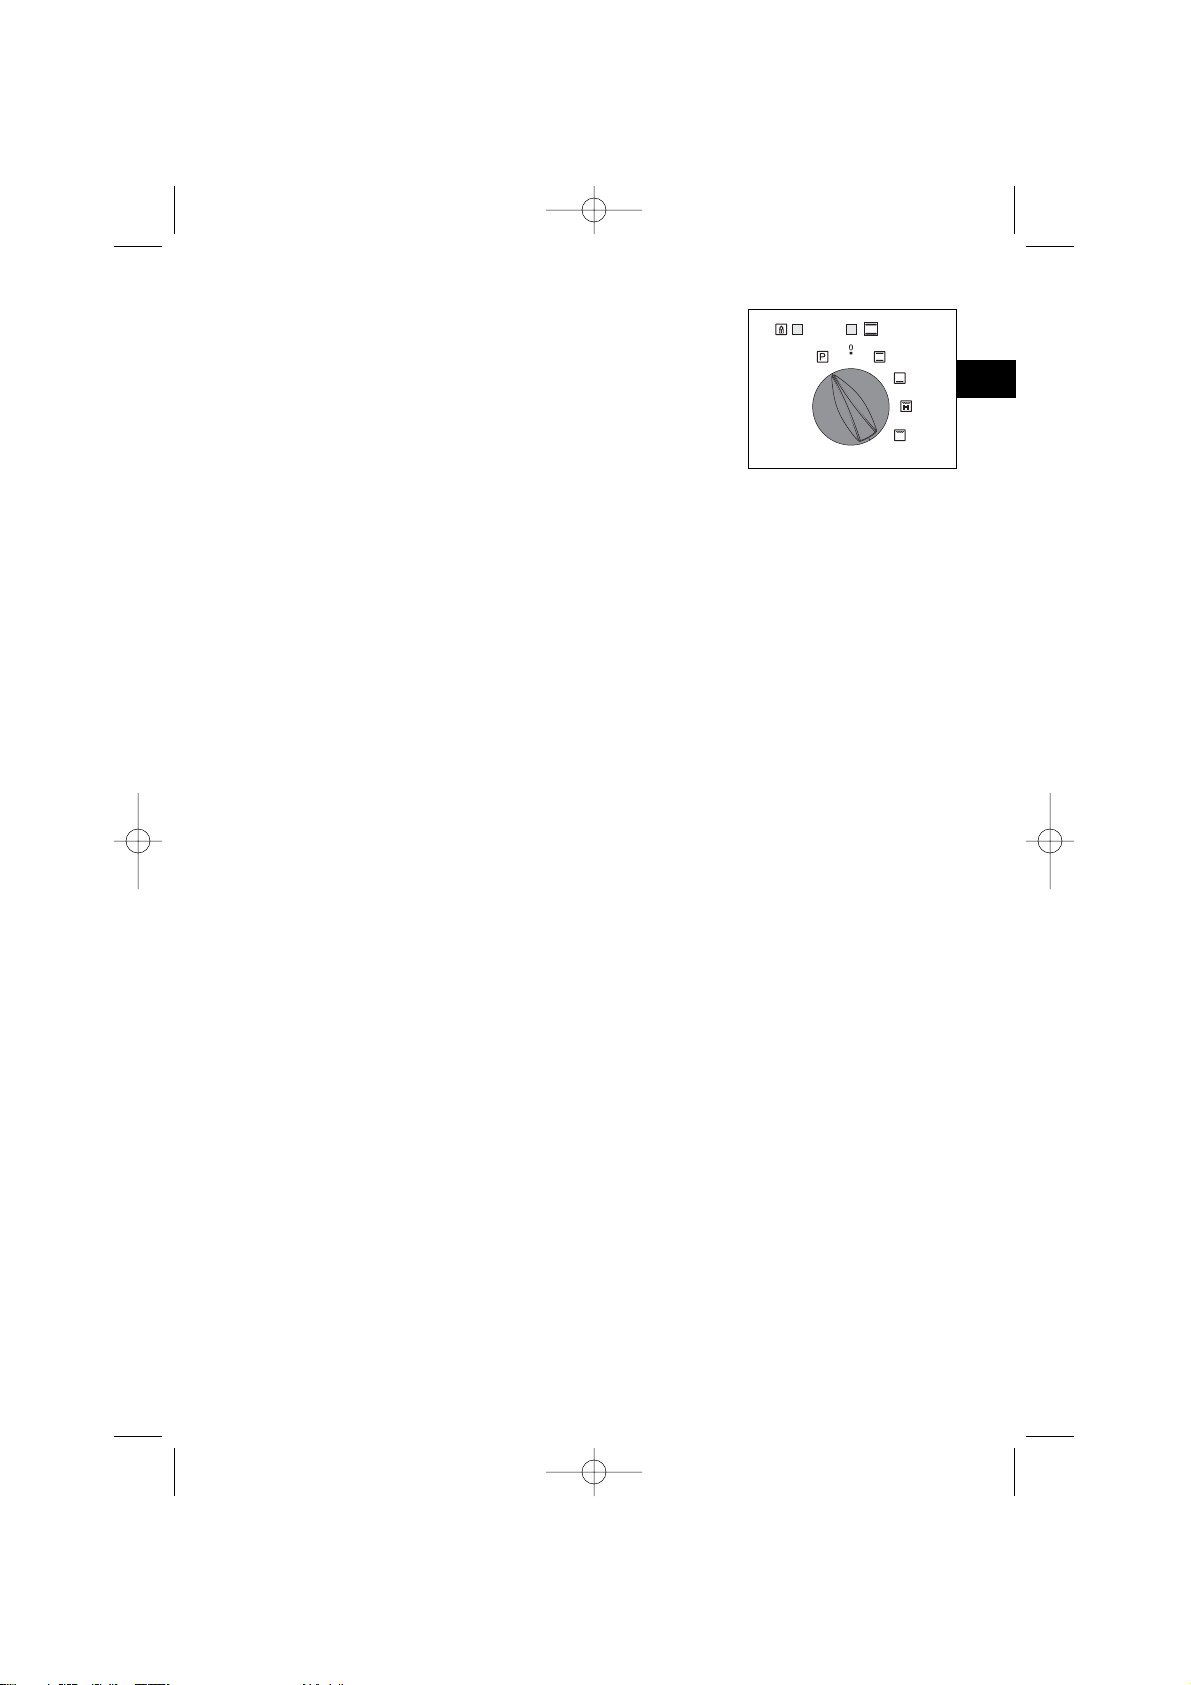
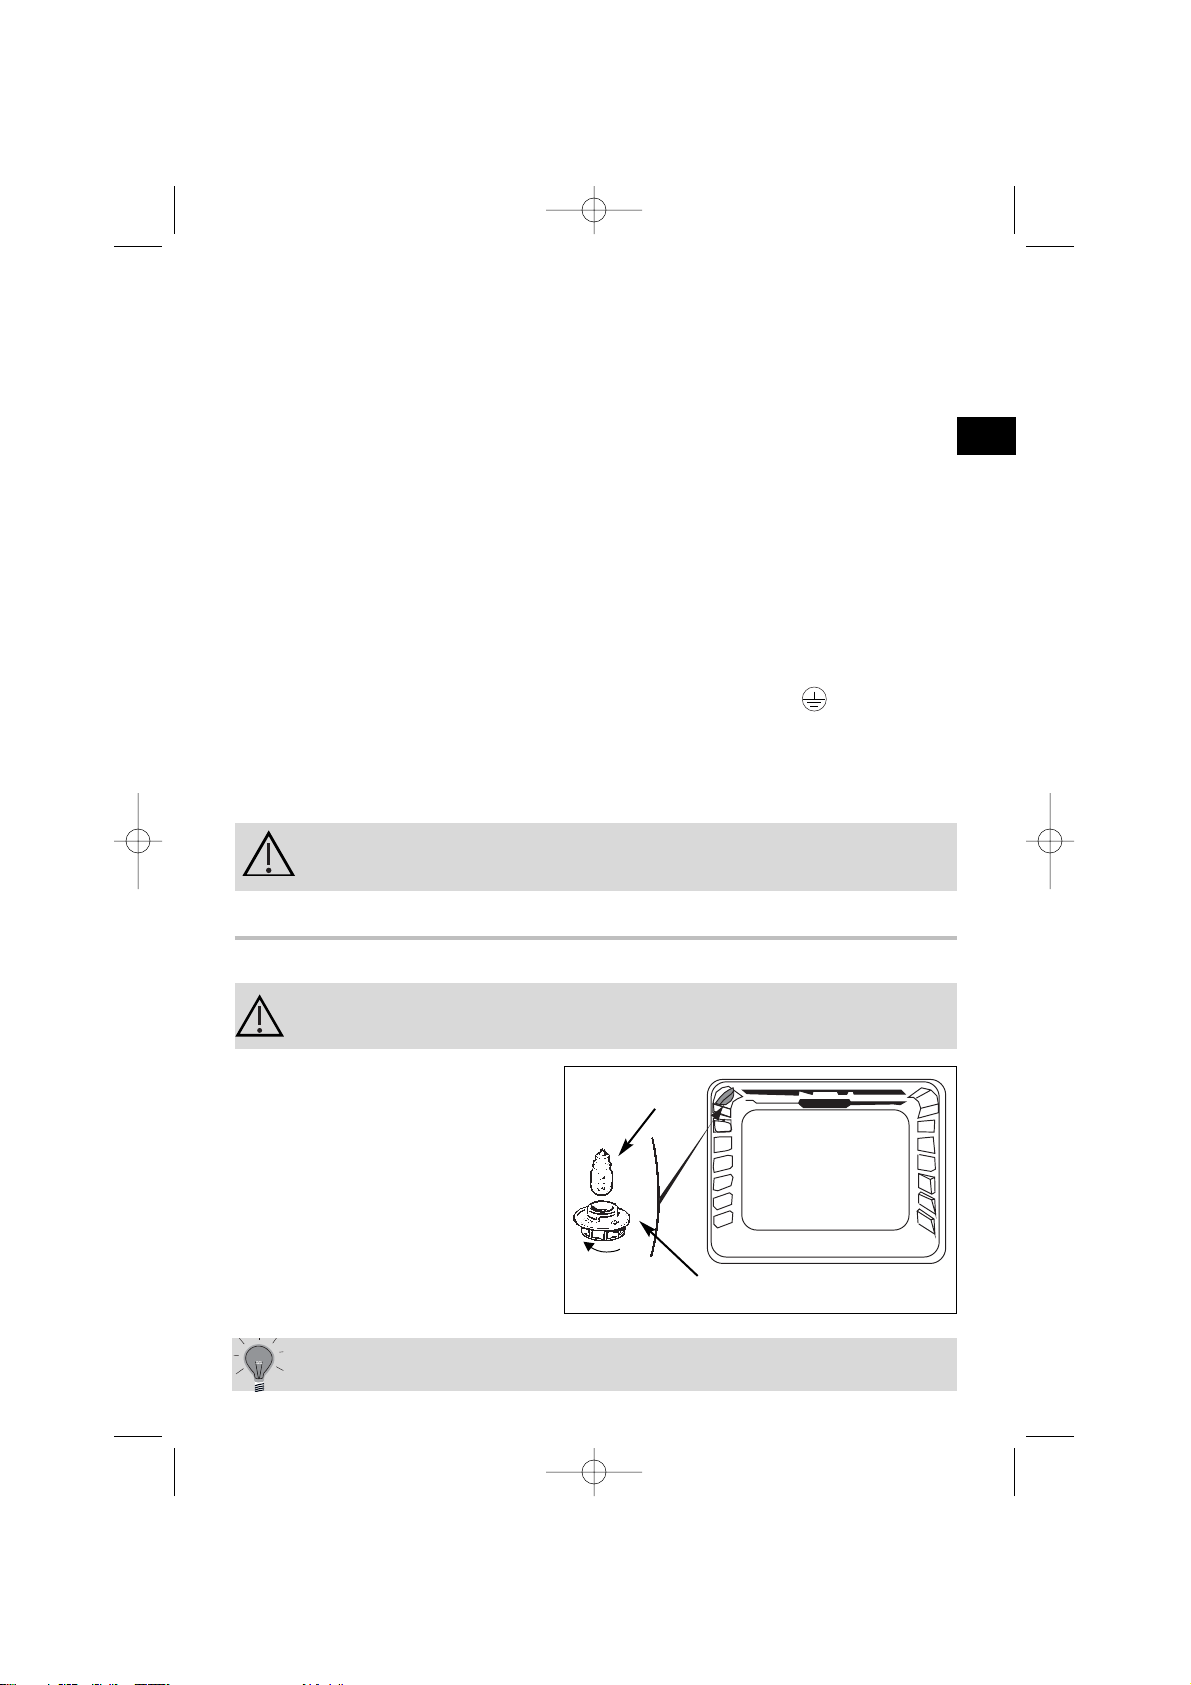
• The bulb is located on the ceiling of your oven's cavity.
a) Unscrew the view port (see
adjacent diagram).
b) Unscrew the light bulb in the
same direction.
Bulb specifications:
- 15 W
- 220-240 V
- 300°C
- E 14 cap
c) Replace the bulb then reposition
the view port and reconnect your oven.
Bulb
Unscrew
View port
Disconnect your oven before performing any task on the bulb to avoid
the risk of electric shock and, if necessary, let the appliance cool down.
H
ow do you change the bulb?
To unscrew the view port and the light, use a rubber glove, which
will make disassembly easier.
9963-5921 ML1 5H-720.qxd 14/04/05 14:57 Page 7
Page 8
8
How do you install your oven?
To be certain that you have properly installed your appliance, do
not hesitate to call on a household appliance specialist.
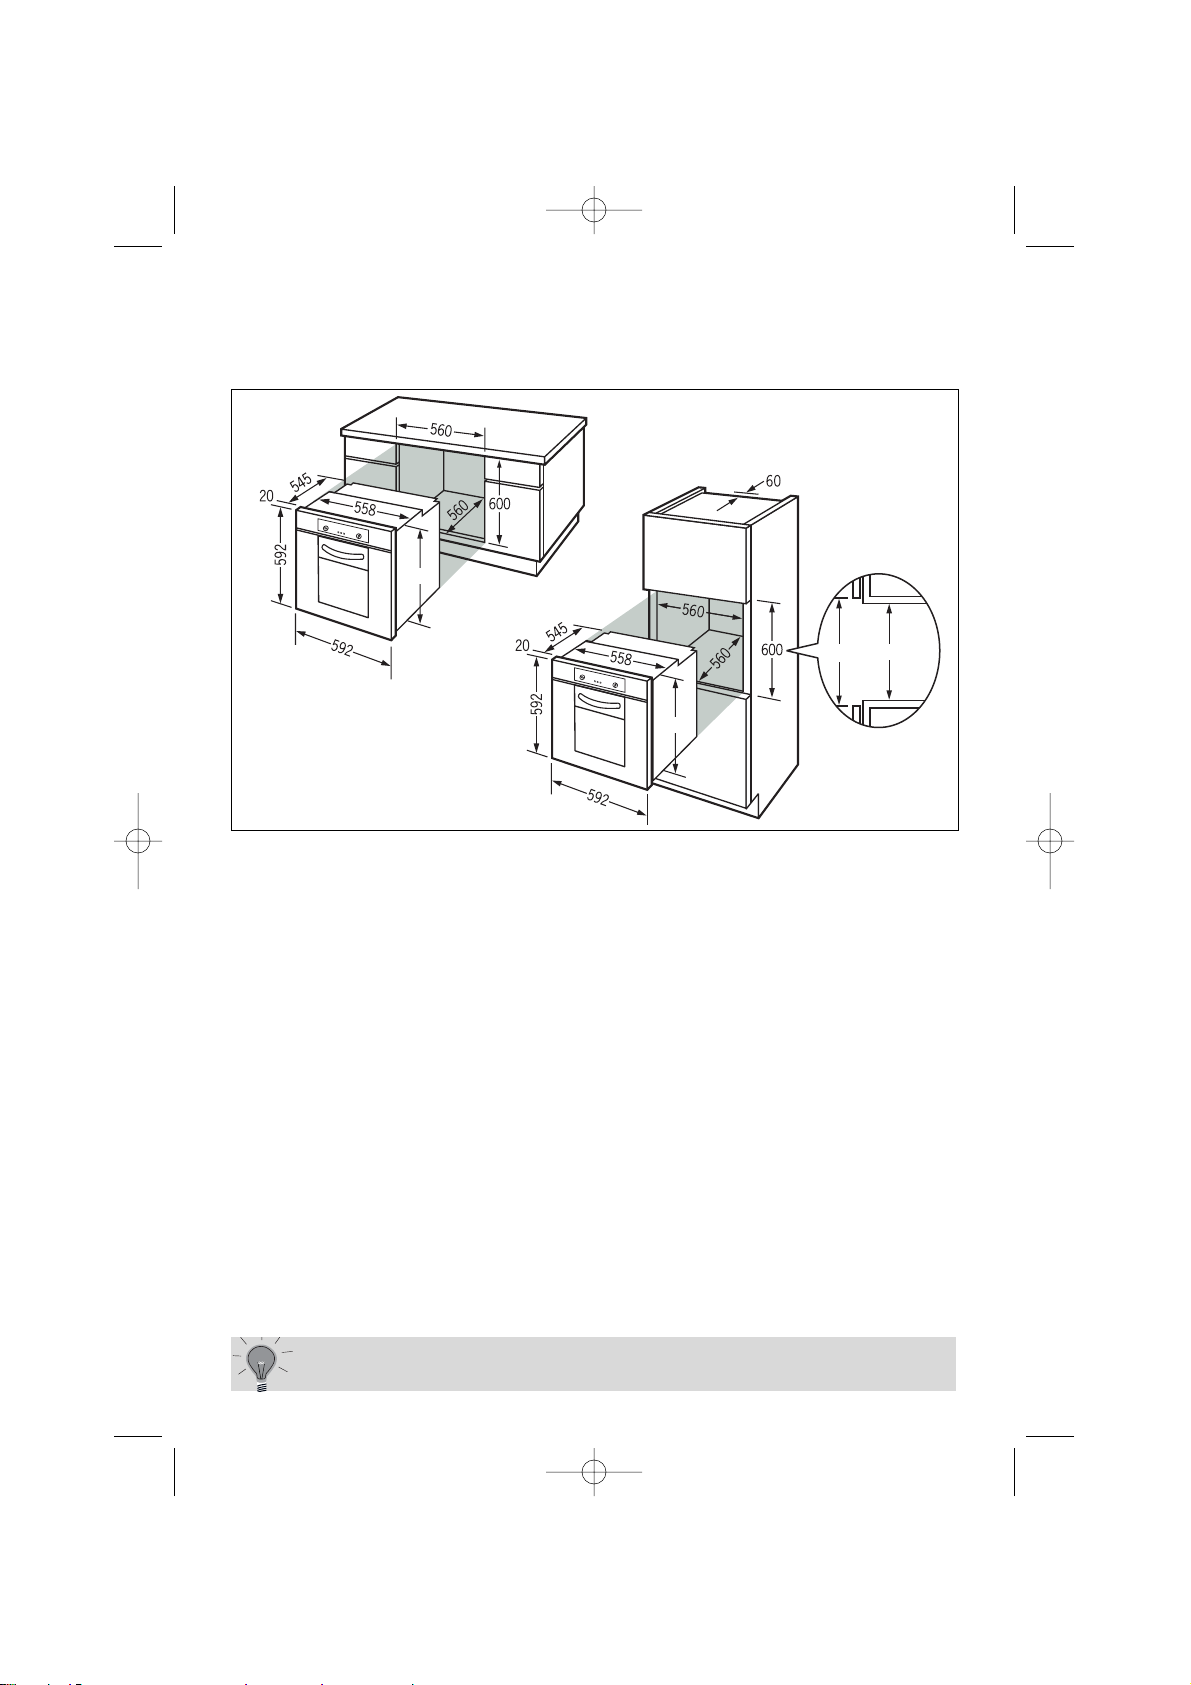
Useful dimensions for installing your oven
The oven can be installed under a work top or in a column of cabinetry
(open* or closed) having the appropriate dimensions for built-in
installation (see adjacent diagram).
Your oven has optimised air circulation that allows it to achieve remarkable
cooking and cleaning results if the following guidelines are respected:
• Centre the oven in the cabinet so as to guarantee a minimum distance of 5 mm
between the appliance and the neighbouring cabinet.
• The material of the built-in cabinetry must be heat resistant (or be covered with
such a material).
• For greater stability, attach the oven in the cabinet with two screws through the
holes provided for this purpose on either side of the front inner panel (see
diagram).
To do this:
1) Remove the rubber screw covers to access the mounting holes.
2) Drill a Ø 3 mm hole in the cabinet panel to avoid splitting the wood.
3) Attach the oven with the two screws.
4) Replace the rubber screw covers (they also serve to absorb the shock caused
by closing the oven door).
(*) If the cabinet is open, its opening must be 70 mm (maximum).
577
577
585600
9963-5921 ML1 5H-720.qxd 14/04/05 14:57 Page 8
Page 9

9
EN
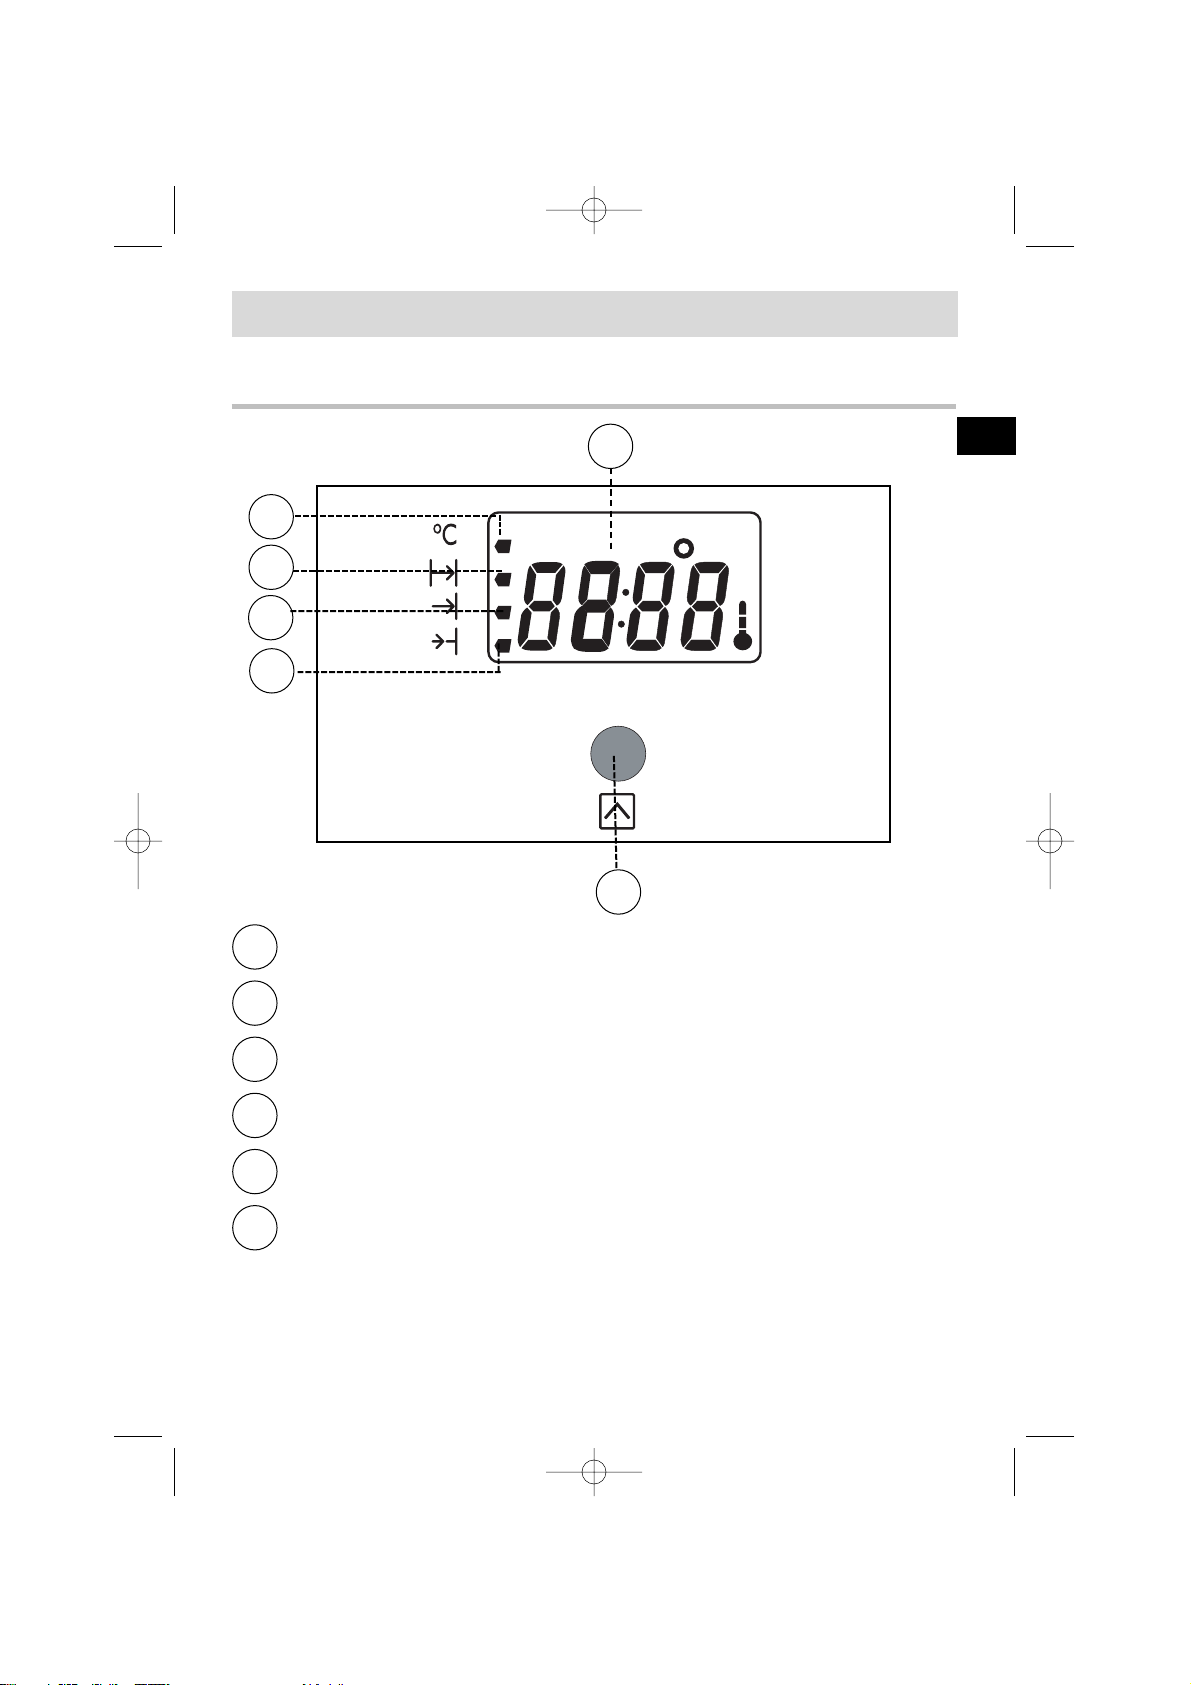
How does your oven work?
1. C
lose-up of your programmer
1
2
3
4
5
6
Display for temperatures, times, cooking duration and timer
Temperature display indicator
Cooking time display indicator
Cooking end time display indicator
Independent timer display indicator
Touch controls for accessing various programme settings
1
3
4
5
6
2
9963-5921 ML1 5H-720.qxd 14/04/05 14:57 Page 9
Page 10
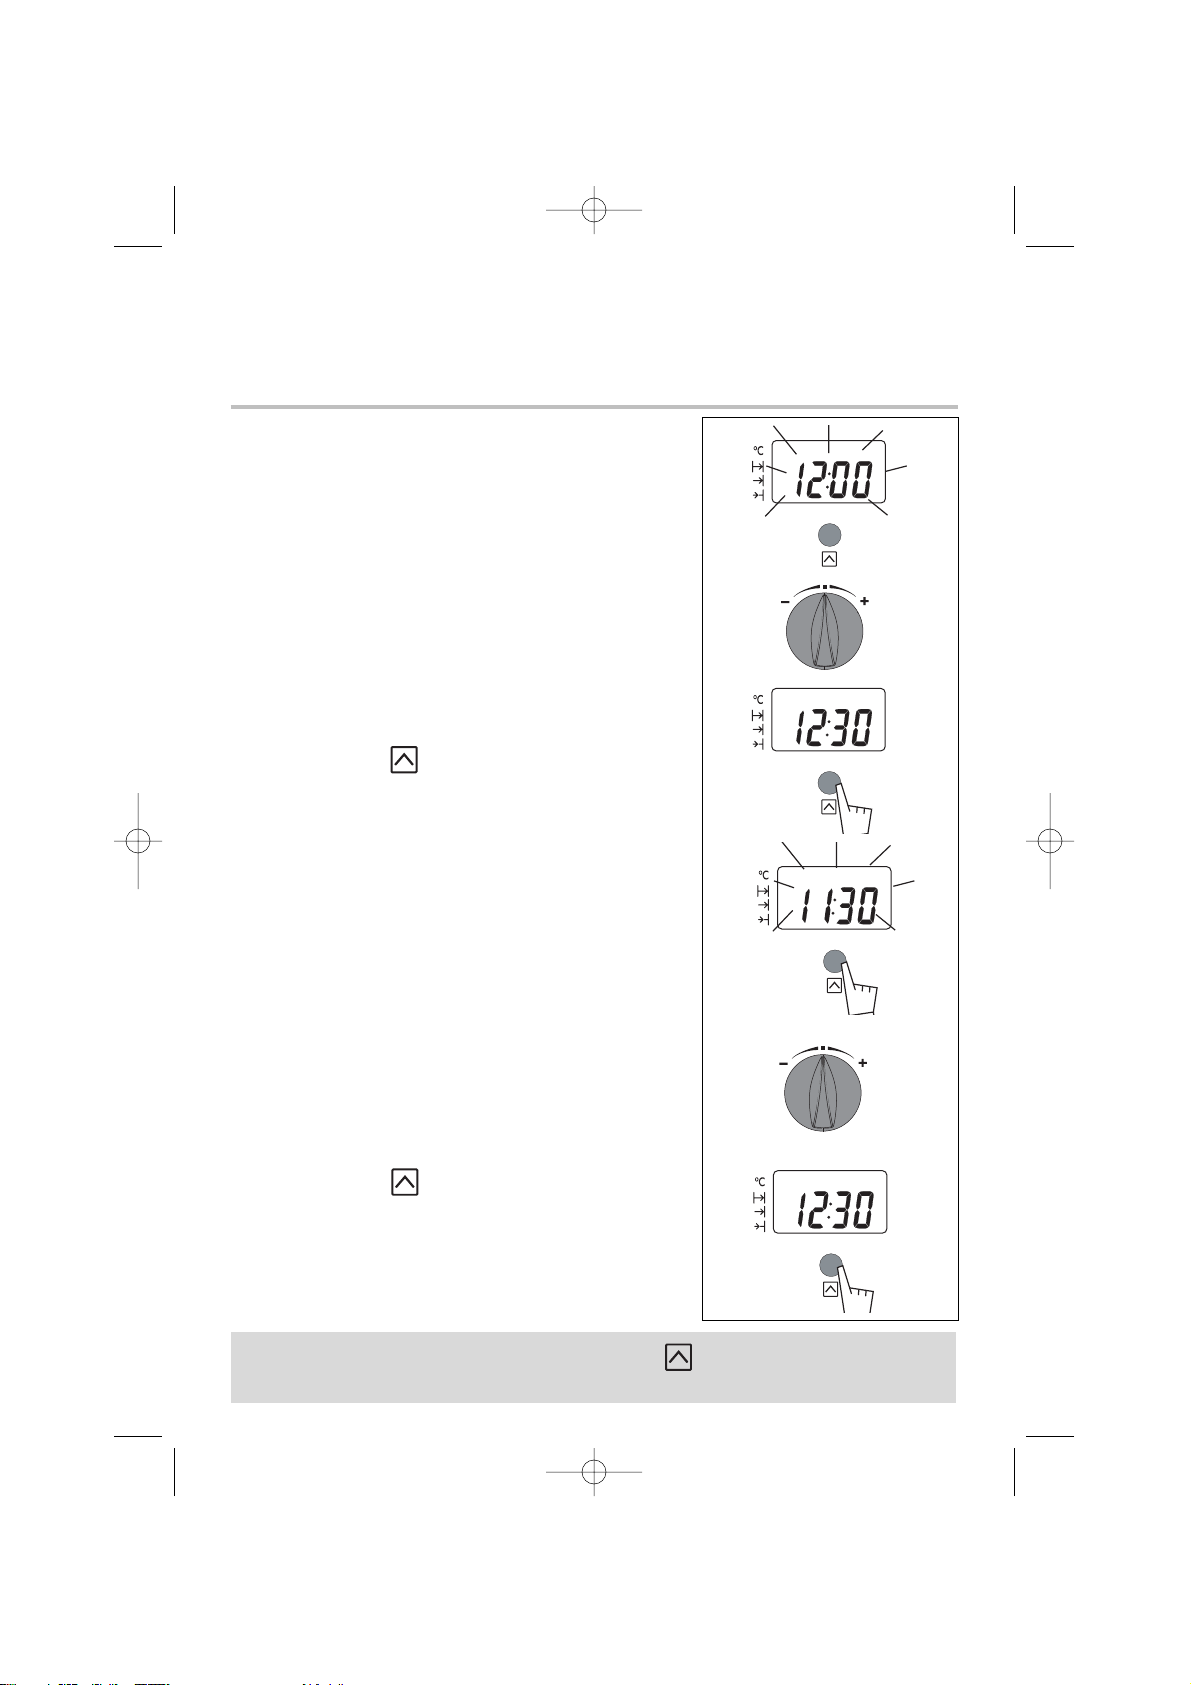
10
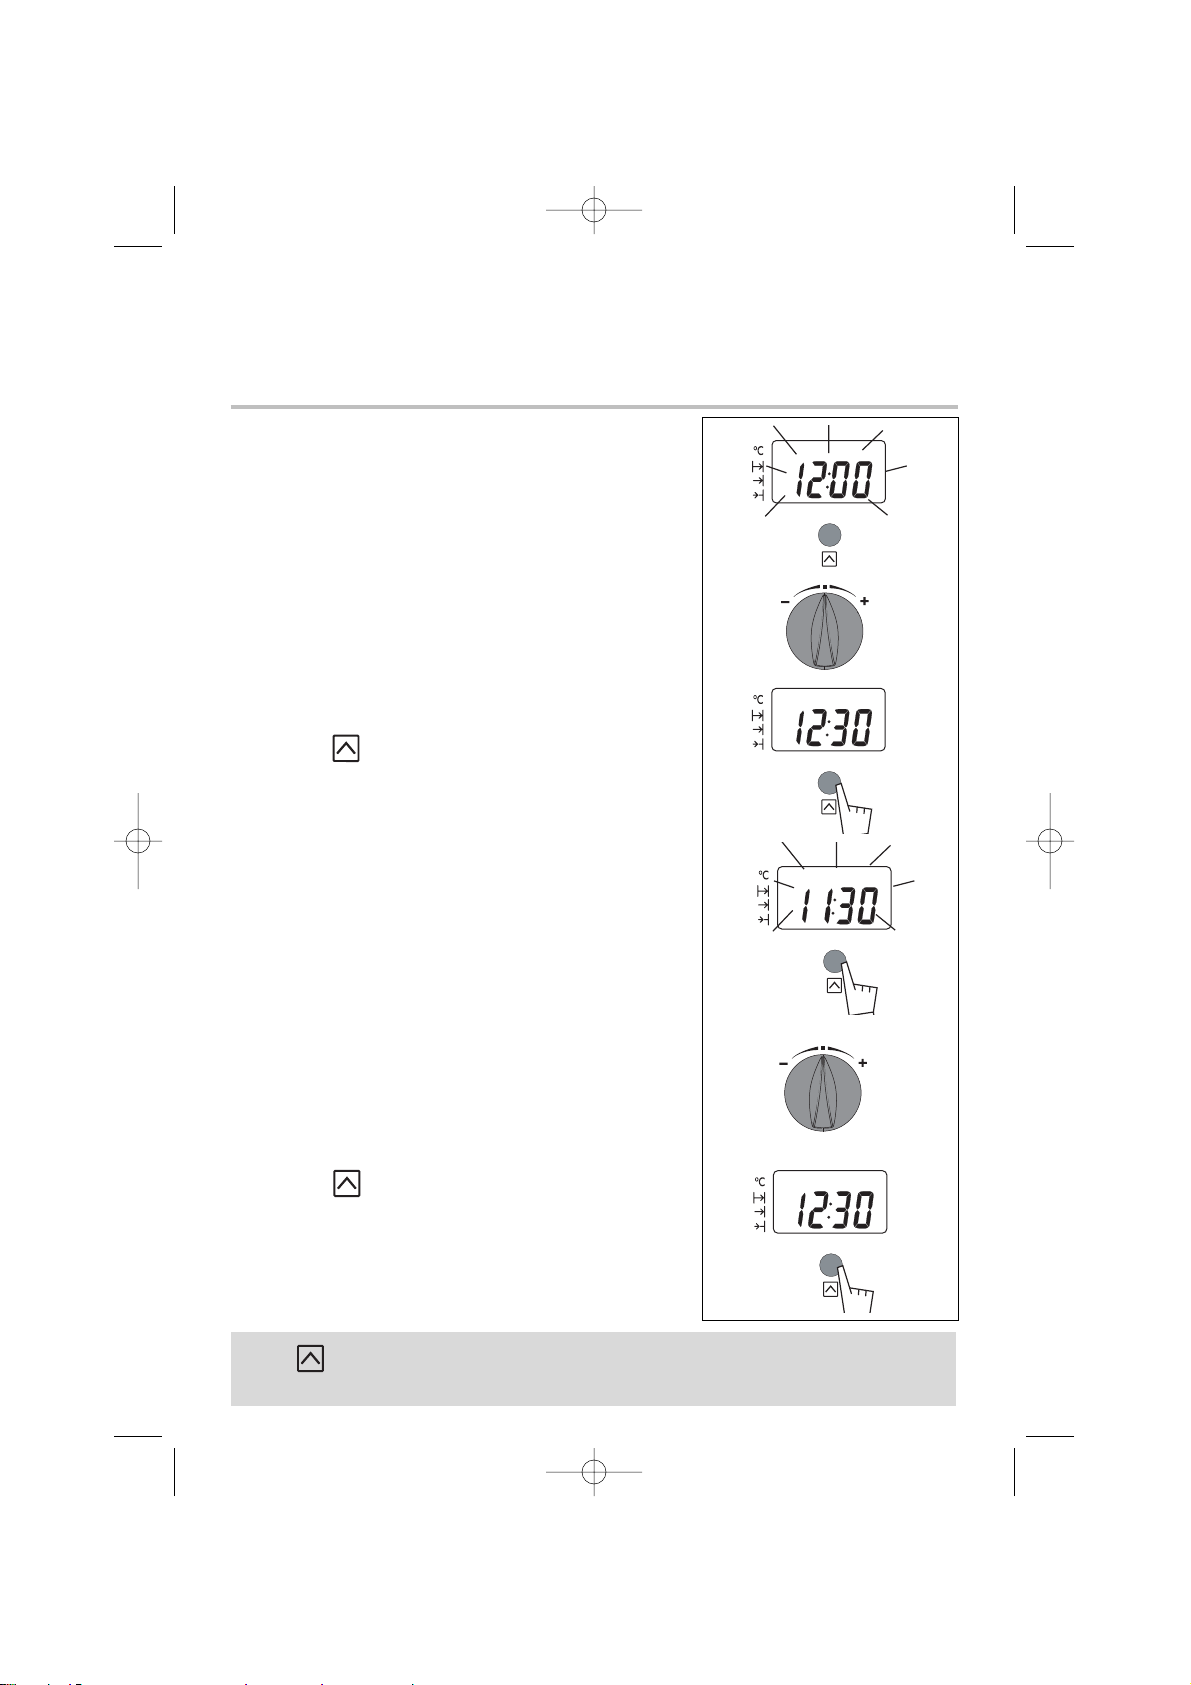
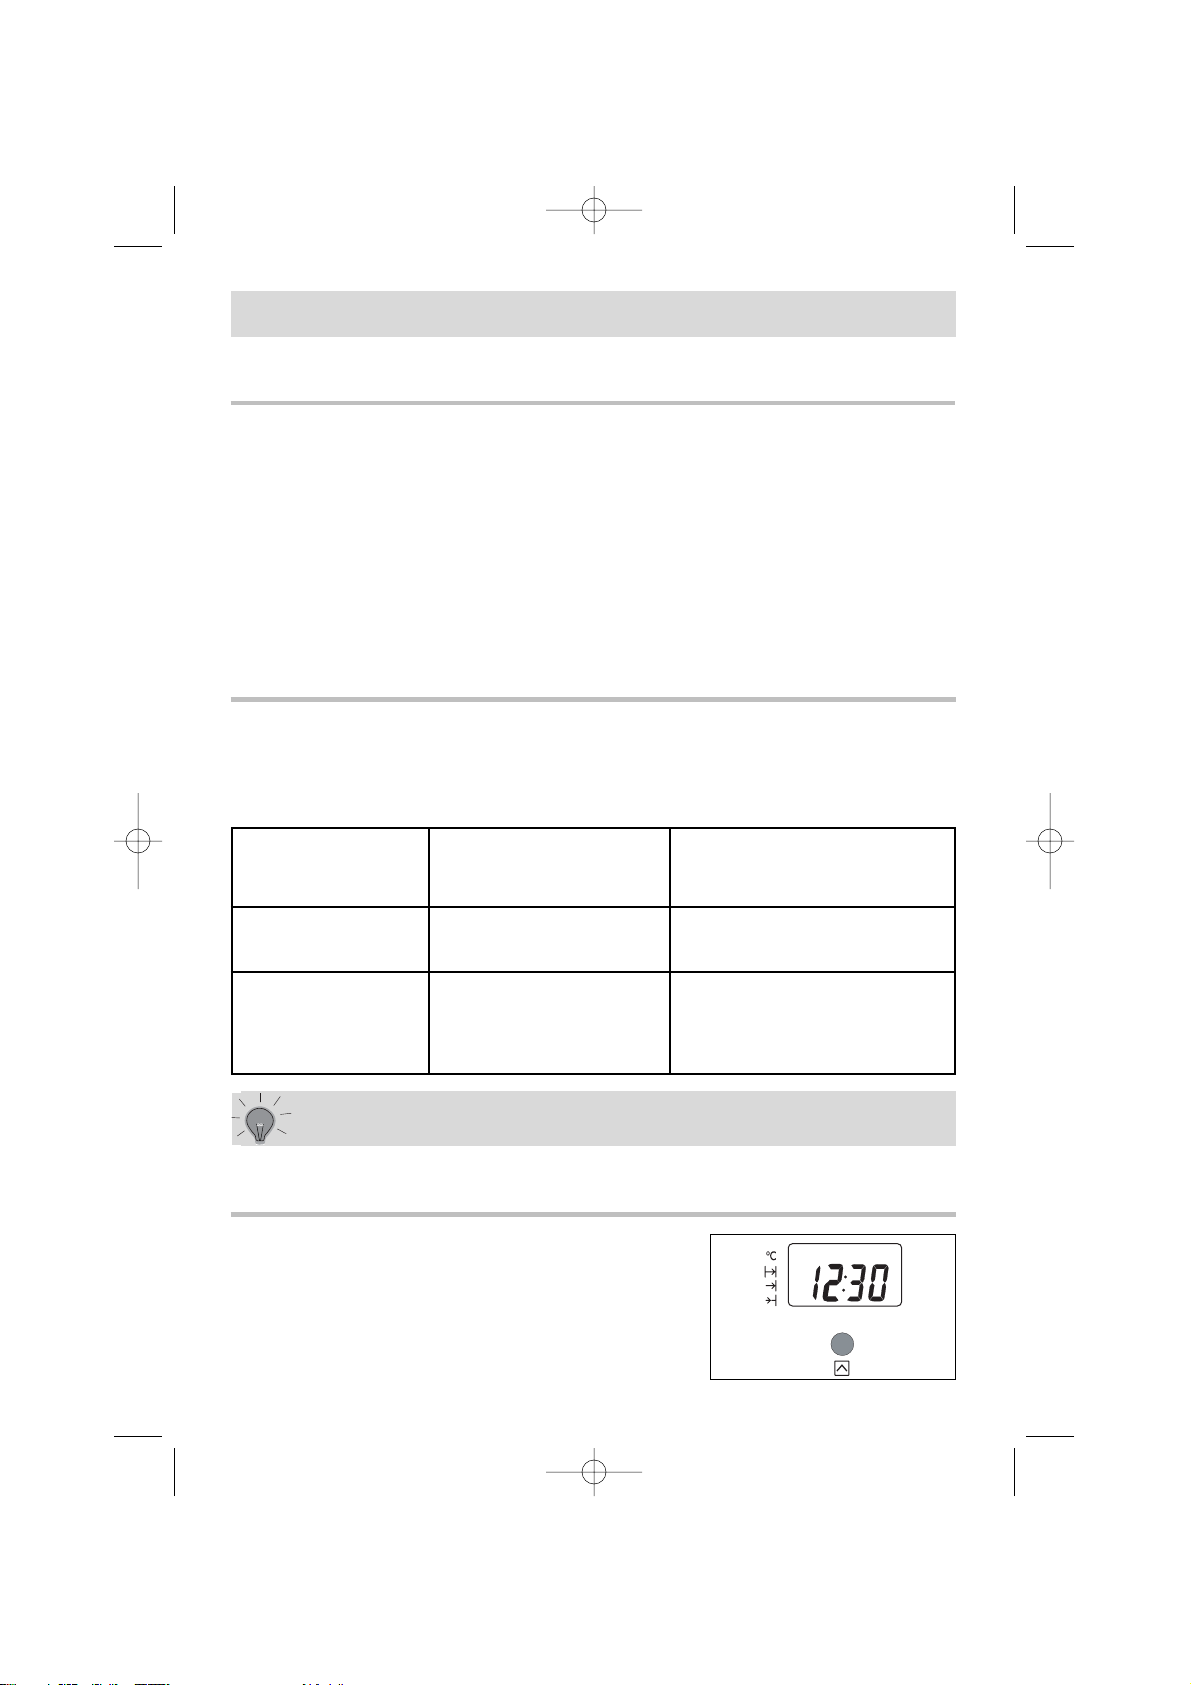
a) When supplied with electricity
• The displays flashes 12:00.
• Set the time using the + and - setting selector
(holding down the + or - allows you to obtain a rapid
advancement of the numbers)
• Press the touch control to enter.
Example: 12:30.
b) Resetting the clock time
• Continue to press until the time is displayed, then
release.
• Adjust the clock setting with the setting selector
(+ or -).
• Press the touch control to enter.
2.
How do you set the clock on the oven?
How does your oven work?
If the touch control is not pressed, the setting will be automatically
recorded after a few seconds.
9963-5921 ML1 5H-720.qxd 14/04/05 14:57 Page 10
Page 11
11
EN
How does your oven work?
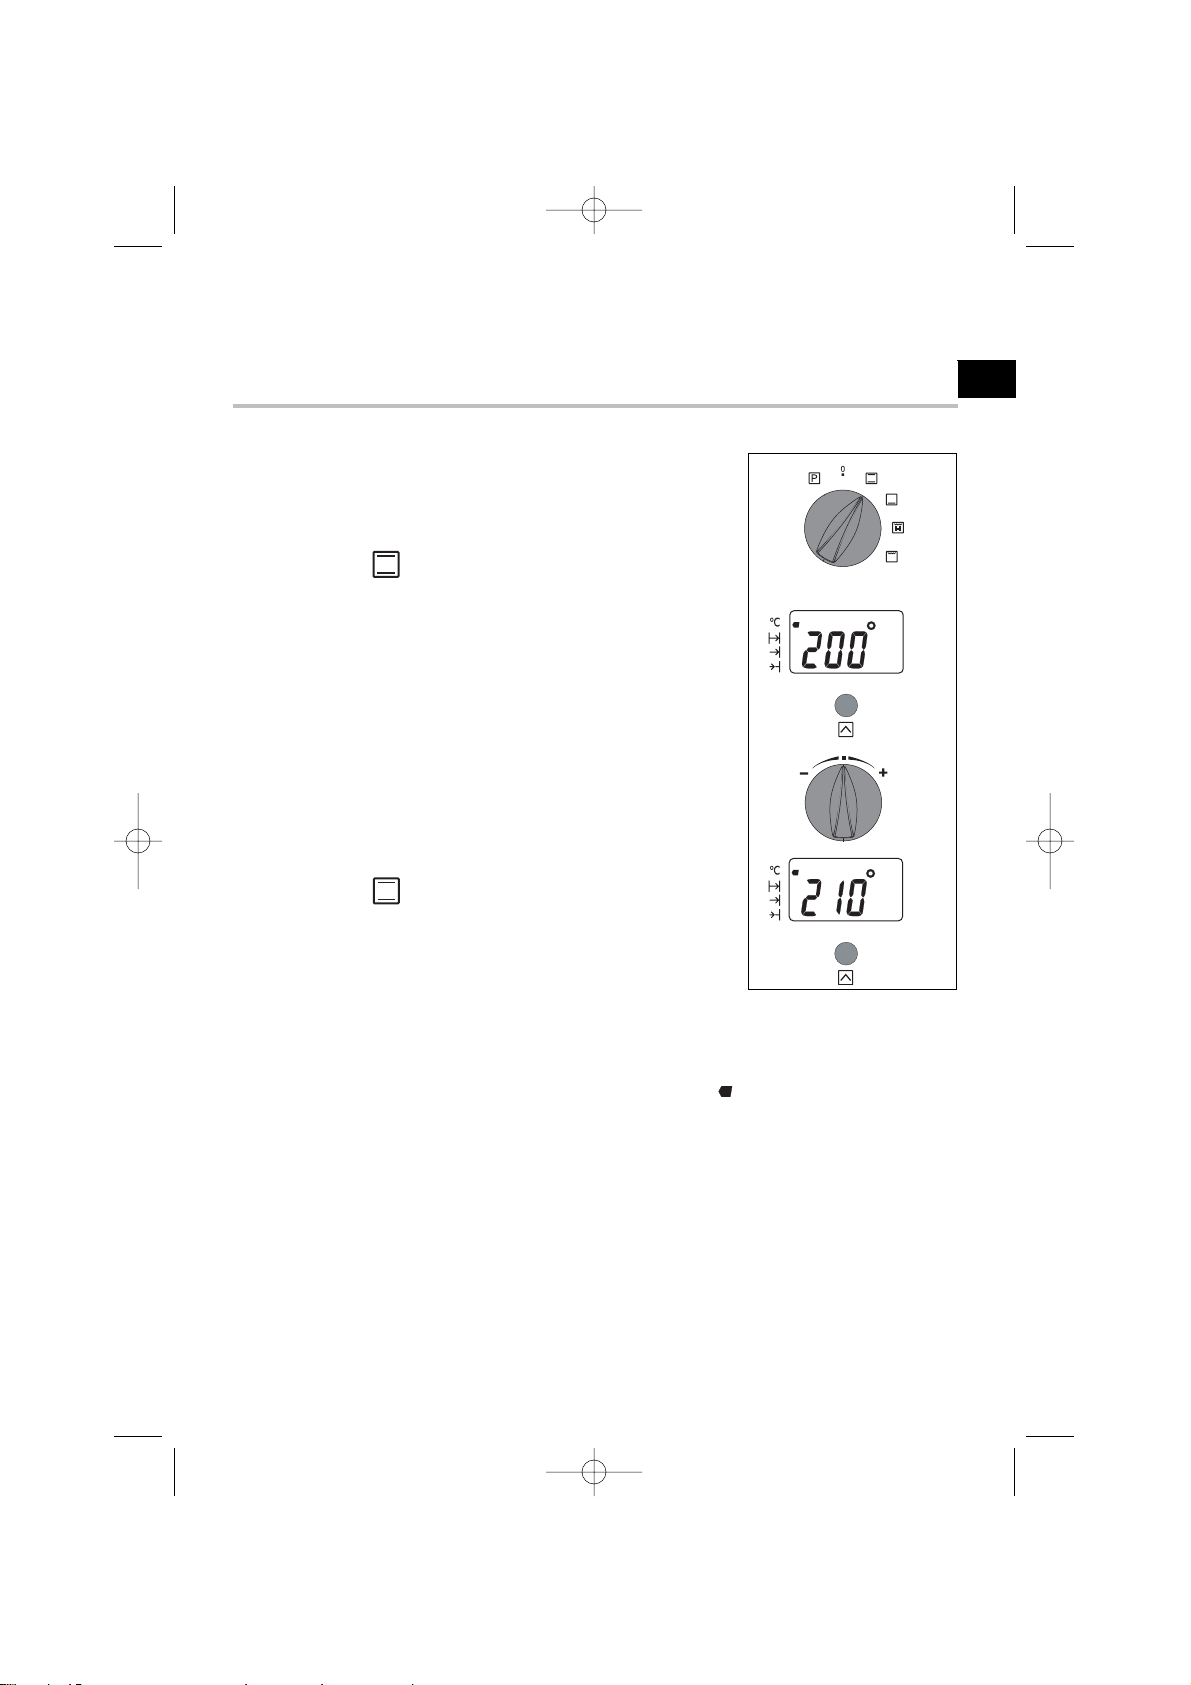
3. H
ow do you program for immediate cooking?
The analogue programmer should display only the time; it should not be flashing.
• Choose the cooking mode:
Turn the function selector to the position of your
choice.
Example: " " position -> The oven begins heating.
Your oven recommends the most commonly used
temperature.
Place your dish in the oven based on the
recommendations provided by the cook book.
It is, however, possible to adjust the temperature by
turning the selector toward + or -.
Example: " " set to 210°.
After these steps, the oven heats up and the display alternates between the
temperature in the oven and the selected temperature.
A series of beeps will be emitted when the oven reaches the selected temperature.
Once the temperature is reached, it remains fixed; the icon continues to flash.
After a cooking cycle, the circulating fan continues to function for a period
in order to cool the oven.
9963-5921 ML1 5H-720.qxd 14/04/05 14:57 Page 11
Page 12
12
How does your oven work?
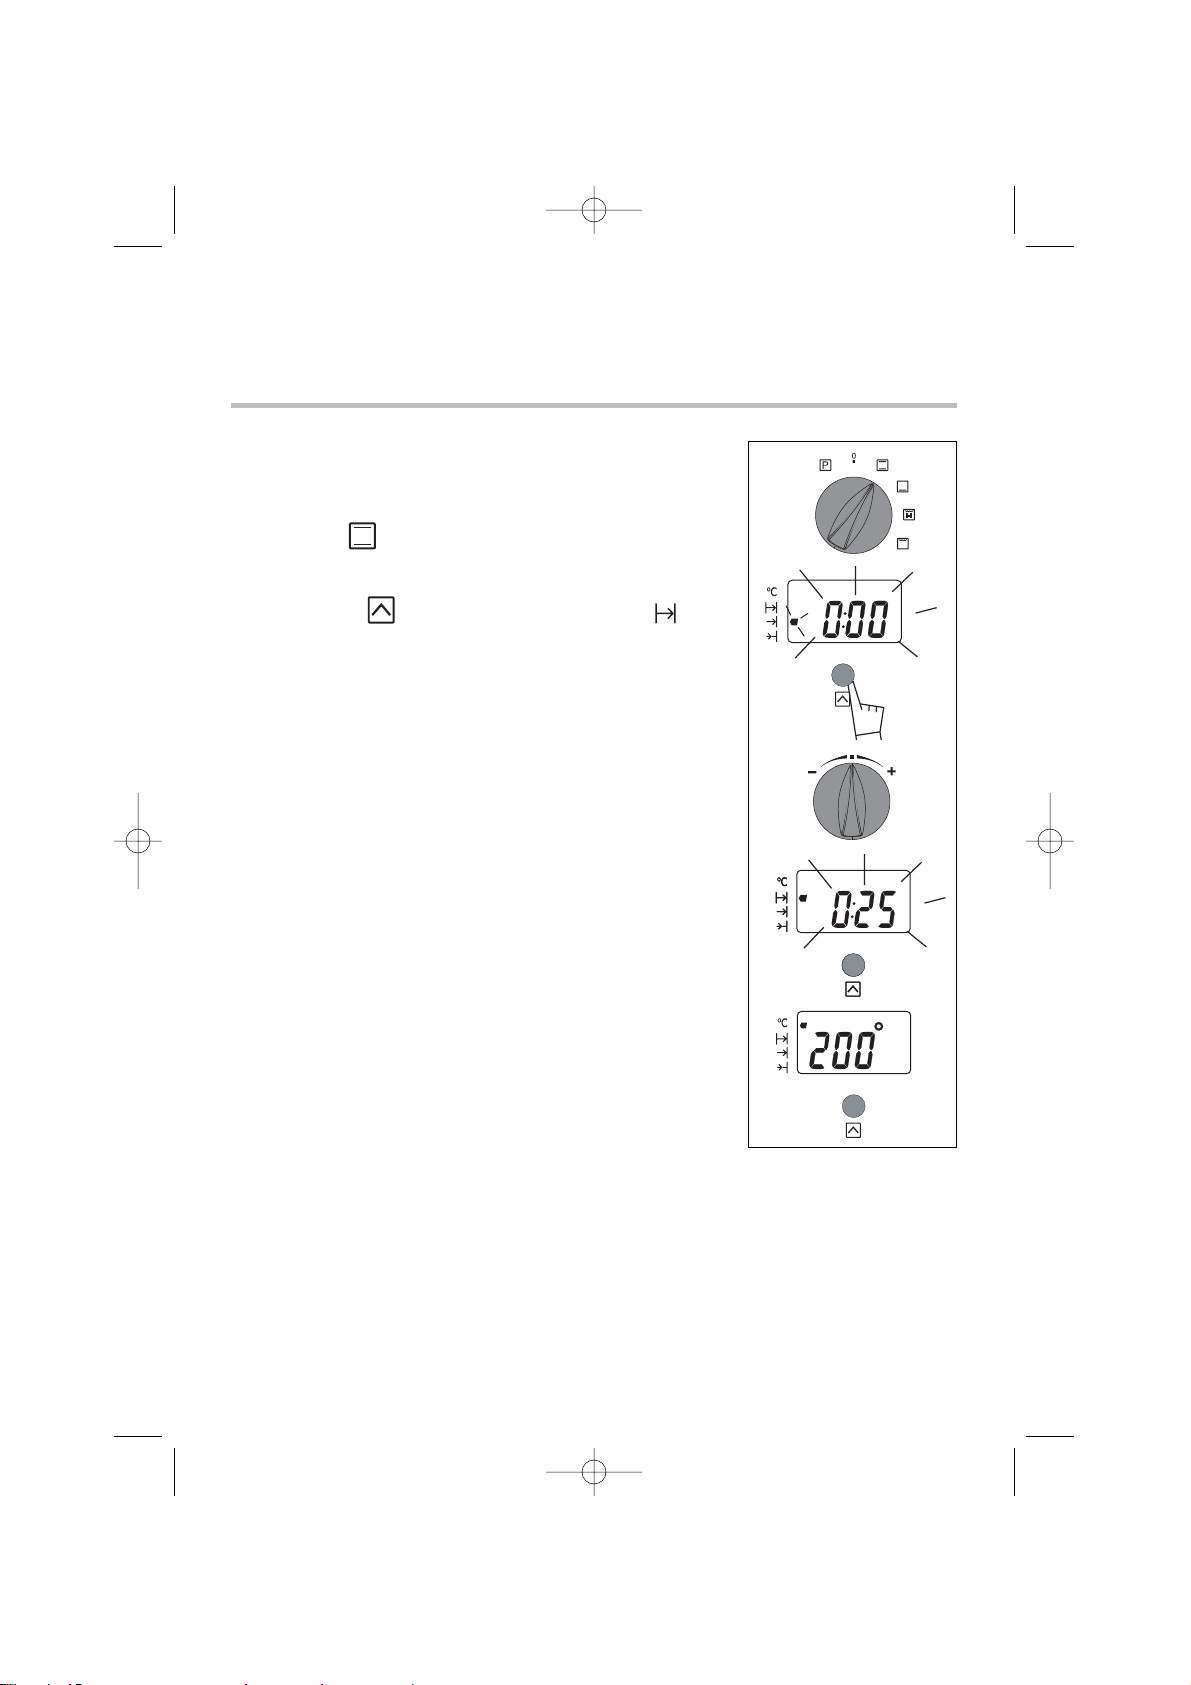
4. How do you set a cooking programme?
a) To begin immediately
1. Set the desired cooking mode and adjust the
temperature if necessary.
Example: " " position
Temperature 200°C.
2. Press the " " touch control until the " " icon
(cooking time) begins flashing.
The display flashes 0:00 to indicate that you can now
adjust the setting.
3. Move the setting selector toward + or - to choose the
desired temperature.
Example: 25 min cooking time.
The cooking time is automatically recorded after a few
seconds -> the display no longer flashes and again shows
the temperature.
The countdown of the length of time begins immediately
after it has been set.
After these three steps, the oven heats up:
A series of beeps will be emitted when the oven reaches the selected temperature.
At the end of cooking (end of programmed time),
- The oven stops,
- The cooking time indicator turns off,
- 0:00 is displayed
- A series of beeps is emitted for a few minutes.
The beeps are definitively deactivated by returning the function selector to 0.
9963-5921 ML1 5H-720.qxd 14/04/05 14:57 Page 12
Page 13
13
EN
How does your oven work?
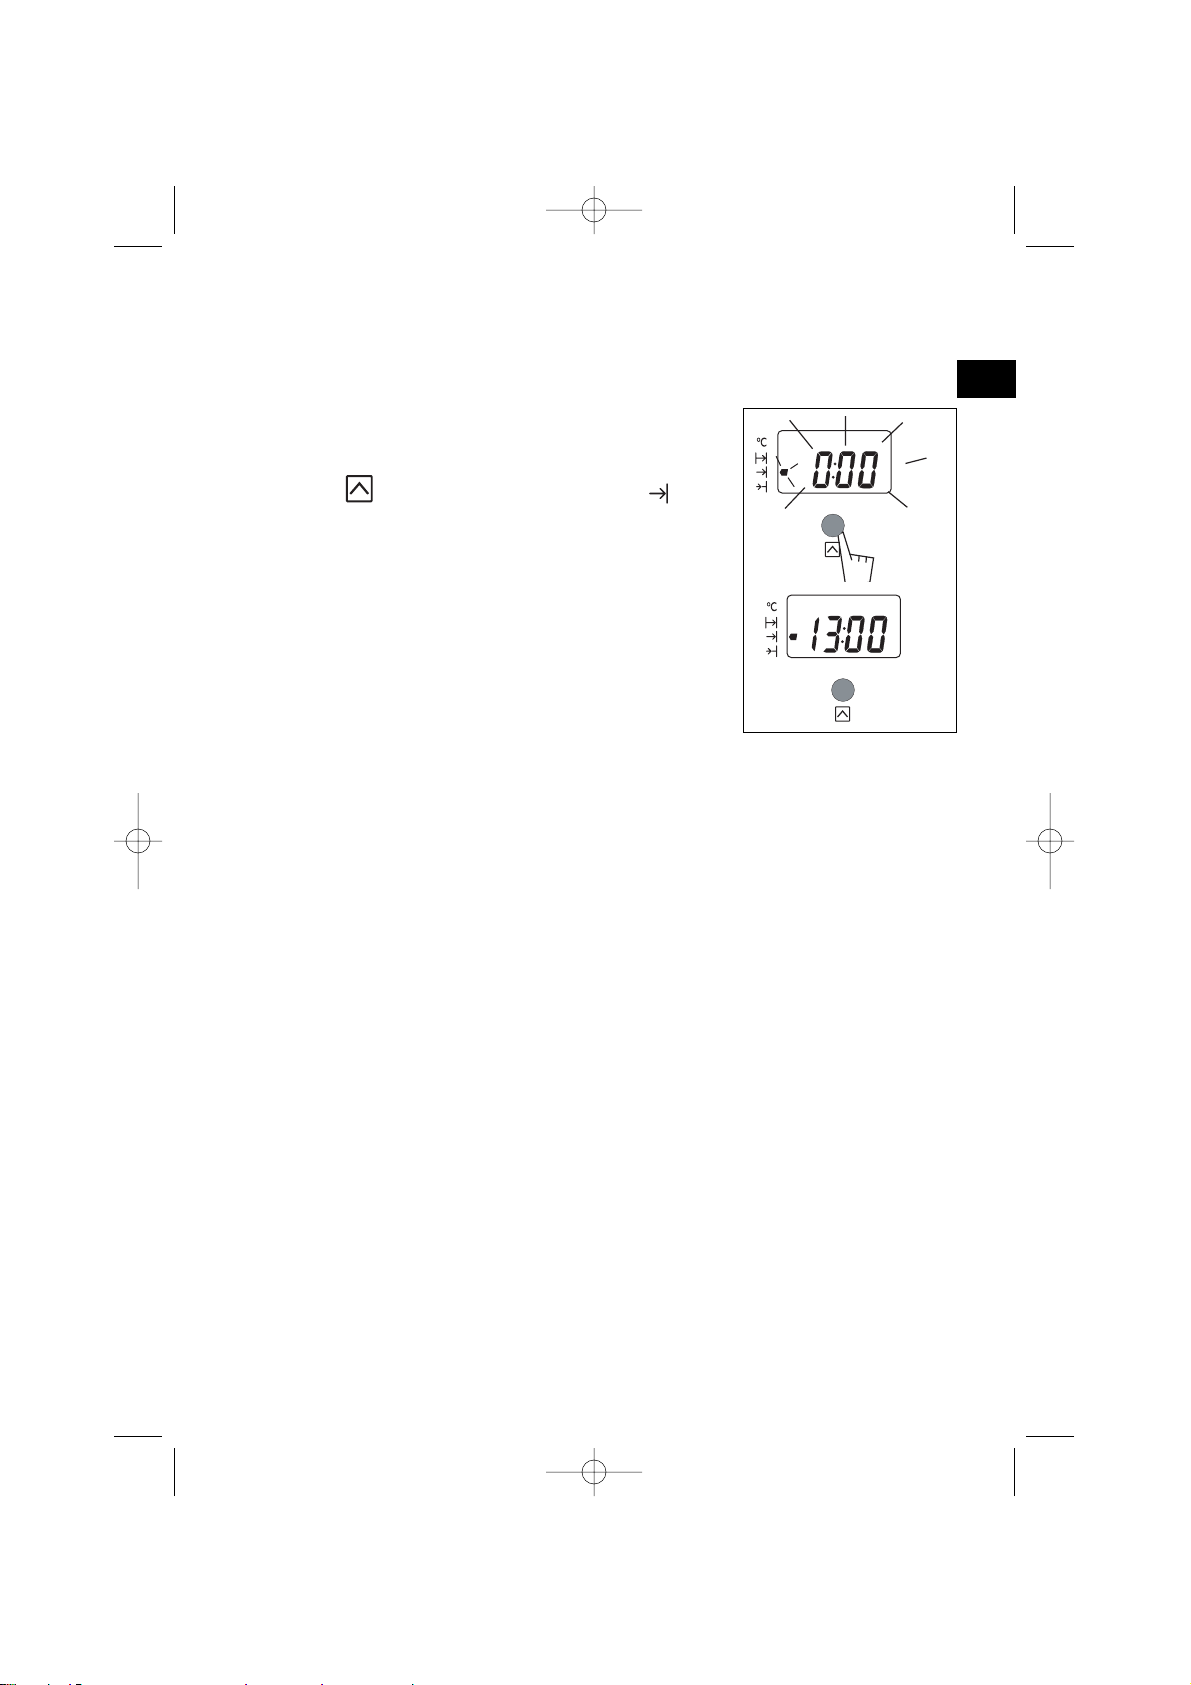
b) With delayed start (choose cooking end time)
Proceed as with programmed cooking.
After setting the cooking time,
Press the " " touch control until the " " icon
(cooking time) begins flashing.
The display flashes 0:00 to indicate that you can now
adjust the setting.
Turn the setting selector + or - to set the desired
cooking end time.
Example: End of cooking at 13:00.
After these steps, the oven heating is delayed so that
cooking ends at 13:00.
At the end of cooking (end of programmed time),
- The oven stops,
- The cooking time indicator turns off,
- 0:00 is displayed
- A series of beeps is emitted for a few minutes.
The beeps are definitively deactivated by returning the function selector to 0.
9963-5921 ML1 5H-720.qxd 14/04/05 14:57 Page 13
Page 14
14
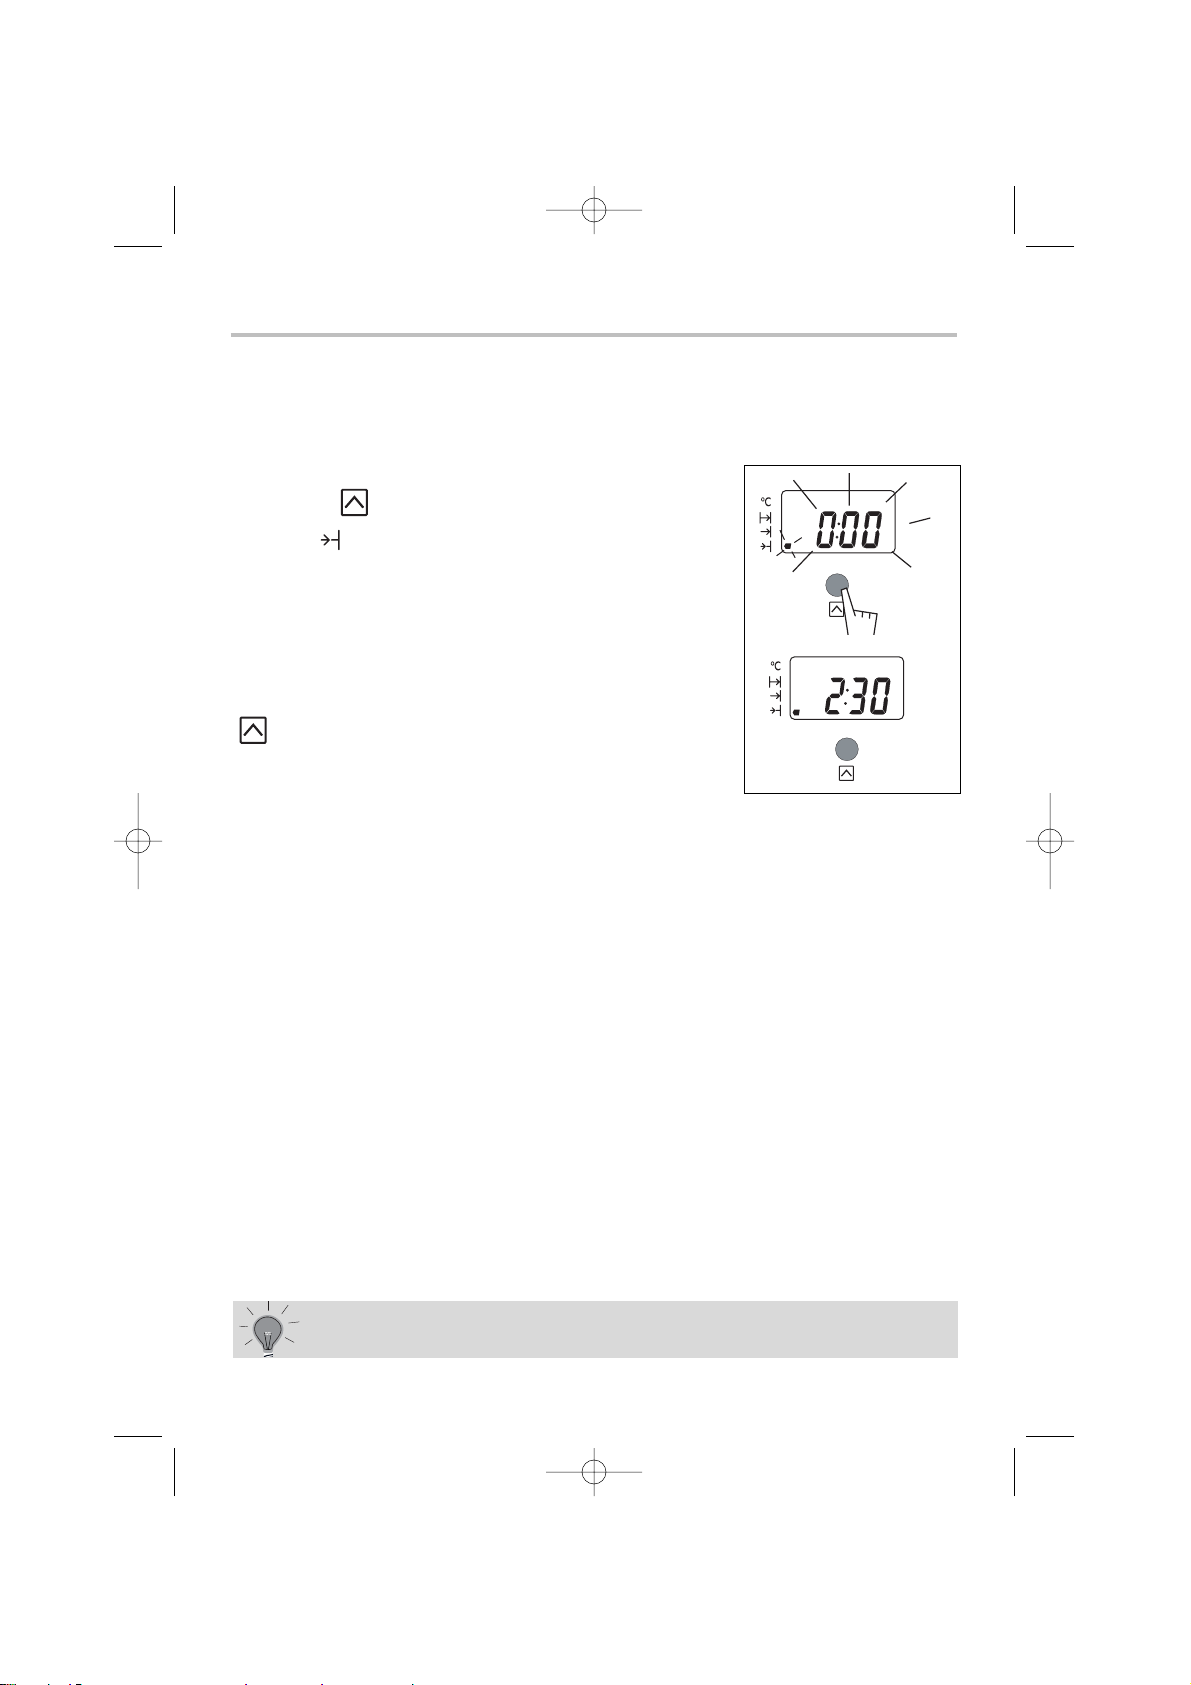
5. How do you use the timer?
Your oven is equipped with an electronic timer that is independent of the
oven functions, making it possible to measure times.
In this case, the timer display takes priority over the time of day and temperature
displays.
Press the " " touch control until the timer indicator
flashes " " -> the display is flashing.
Turn the setting button (+ and -) until you obtain the
desired length of time (max 60 minutes).
The display stops flashing after a few seconds or after the
touch control is pressed and the timer starts working,
counting down the time in seconds.
Once the time has expired, the timer emits a series of
beeps to notify you.
It is possible to change or cancel the timer programme at any
time.
9963-5921 ML1 5H-720.qxd 14/04/05 14:58 Page 14
Page 15
15
EN
What do you do in case of operating
malfunctions?
If you have a doubt about the functioning of your oven, this does not
necessarily mean that there is a malfunction.
In any event, check the following
items:
You observe that... Possible causes What should you do?
The oven is not heating.
• The oven is not connected.
• The fuse in your electrical set-up is
not working.
• The selected temperature is too
low.
• The sensor is defective.
• The oven has experienced
overheating and has engaged safety
steps.
- Connect the oven.
- Replace the fuse in your electrical
set-up and check its capacity (16A).
- Increase the selected temperature.
- Call the After-Sales Service
Department.
- Call the After-Sales Service
Department.
The temperature indicator is
flashing.
• Defective temperature sensor. - Call the After-Sales Service
Department.
The oven light is not working.
• The light is out of order.
• The oven is not connected or the
fuse is not working.
- Replace the light.
- Connect the oven or replace the
fuse.
The cooling fan continues to
operate after the oven stops.
• The fan should work for a
maximum of one hour after
cooking, or when the oven
temperature is greater than 125°C.
• If it does not stop after one hour.
- Open the oven door to accelerate
the cooling down of the oven.
- Call the After-Sales Service
Department.
The pyrolysis cleaning cycle
does not begin.
• The door is not properly closed.
• The locking system is defective.
• The temperature sensor is
defective.
• The contact for "closed door"
detection is defective.
- Verify that the door is locked.
- Call the After-Sales Service
Department.
- Call the After-Sales Service
Department.
- Call the After-Sales Service
Department.
9963-5921 ML1 5H-720.qxd 14/04/05 14:58 Page 15
Page 16
16
Traditional
Cooking controlled by the upper
and lower heating elements with
no fan.
Grill
Cooking controlled by the
upper element without the
fan.
Requires preheating before
placing the dish in the oven.
Preheat the oven for five
minutes.
Slide the drip tray onto the
bottom shelf support.
Symbol
Name of cooking mode Description of cooking
Oven cooking modes
*
* Programme(s) used to obtain the results indicated on the energy label in compliance wi
Bottom heating
Cooking is controlled by the
bottom element combined with a
slight dose of the grill.
Cooking heat from the bottom
with a small amount of heat
from the top.
Place the grid on the lower
shelf support.
Grill + Turn spit
Cooking controlled by the upper
element.
No need for preheating
Roasts and poultry that are crispy
and juicy all over.
The turnspit continues to work
until the door is opened.
Slide the drip tray onto the
bottom shelf support.
9963-5921 ML1 5H-720.qxd 14/04/05 14:58 Page 16
Page 17
17
EN
Recommended for slow, gentle cooking:
tender game meat, etc.
To seal roasts of red meat
To simmer in a covered stew pan dishes that
were begun on the hob (coq au vin, stew, etc.)
Recommended for grilling chops,
sausages, slices of bread or prawns
placed on the grid.
Recommendations
Oven cooking modes
Recomm. T°
Recommended for moist dishes (quiches,
juicy fruit tarts, etc.).
The crust will be thoroughly cooked on the
bottom.
Recommended for dishes that rise (cake,
brioche, kouglof, etc.) and for soufflés that will
not be stuck by a crust formed on the top.
Recommended for all poultry or roasts on
the turnspit.
For sealing and thoroughly cooking lamb
roasts, beef cuts.
For preserving tenderness in filets of fish.
Min. Recomm. Max.
35 200 275
Min. Recomm. Max.
180 275 275
Min. Recomm. Max.
35 165 275
Min. Recomm. Max.
180 225 275
9963-5921 ML1 5H-720.qxd 14/04/05 14:58 Page 17
Page 18
18
1. What is pyrolysis?
3. How do you use the pyrolysis function?
RELATIVELY Biscuits, vegetables, Splatter-free cooking
CLEAN COOKING pastry, quiches, Pyrolysis is not warranted
APPLICATIONS soufflés
DIRTY COOKING Meats, fish, (in a dish) Pyrolysis is warranted after
APPLICATIONS stuffed vegetables three cooking cycles
VERY DIRTY Large cuts of meat Pyrolysis can be performed
COOKING on the spit after one cooking application
APPLICATIONS of this kind if there is
a lot of splattering
If your oven emits smoke during preheating or releases large volumes of smoke
during cooking.
If your oven releases an unpleasant odour when cooled after various cooking
applications (lamb, fish, barbecue, etc.).
2. In what situations should pyrolysis be used?
You should not wait until the oven is coated in grease to initiate
a cleaning cycle.
- Pyrolysis is a cycle during which the oven cavity is heated to a very high
temperature in order to eliminate soiling from splattering and spills. The smoke
and odours released are destroyed as they move through catalyse
- Pyrolysis is not necessary after each cooking cycle, but simply when the dirtiness
warrants it.
- As a safety measure, the cleaning operation only begins after the door has
automatically locked. As soon as the internal temperature of the oven exceeds
cooking temperatures, it is impossible to unlock the door--even if the "function
selector" knob is turned to 0.
How do you clean the cavity of your oven?
a) Remove the grids, trays and wire shelf supports
from the oven and clean any major spill residue.
b) Ensure that the analogue programmer displays the
time of day and that it is not flashing.
9963-5921 ML1 5H-720.qxd 14/04/05 14:58 Page 18
Page 19
19
EN
c) Turn the "function selector" knob to the "PYRO"
position.
The oven will be unavailable for cooking for 2:30 (cannot
be modified).
This time includes the cooling time until the door can be
unlocked.
• During the pyrolysis cycle, the lock warning light is
displayed to indicate that the door is locked; the pyrolysis
indicator is displayed and alternates with a display of the time remaining.
• Pyrolysis automatically stops when the lock warning light turns off and it is then
possible to open the door.
d) Return the function selector to the 0 position 0.
e) When the oven is cool, use a damp cloth to remove the white ashes. The oven
is clean and once again ready for the cooking application of your choice.
9963-5921 ML1 5H-720.qxd 14/04/05 14:58 Page 19
Page 20
20
Í
ndice
A lo largo del manual, le indica las consignas de seguridad,
le señala los consejos y trucos
¿Cómo se presenta el horno?
Descripción del aparato P.21
Accesorios P.22
Consejos de seguridad P.23
¿Cómo instalar el horno?
Conexión eléctrica P.24-25
¿Cómo cambiar la bombilla? P.25
Dimensiones útiles para empotrar el horno P.26
¿Cómo utilizar el horno?
Detalle del programador P.27
¿Cómo poner en hora el reloj del horno? P.28
¿Cómo programar una cocción inmediata? P.29
¿Cómo programar una cocción? P.30-31
¿Cómo utilizar el minutero? P.32
¿Qué hacer en caso de producirse
anomalías en el funcionamiento?
P.33
Modos de cocción del horno P.34-35
¿Cómo limpiar el interior del horno?
¿Qué es una pirólisis? P.36
¿Cuándo se debe realizar una pirólisis? P.36
¿Cómo hacer una pirólisis? P.36-37
9963-5921 ML1 5H-720.qxd 14/04/05 14:58 Page 20
Page 21
1
3
5
21
ES
¿Cómo se presenta el horno?
DESCRIPCIÓN DEL APARATO
1
2
5
6
73
4
Selector de temperatura
Programador
Selector de funciones
Lámpara
Indicador de altura del
soporte de la bandeja
Orificio para asador rotativo
Contacto de detección de
apertura de la puerta
1
2
3
4
5
6
7
9963-5921 ML1 5H-720.qxd 14/04/05 14:58 Page 21
Page 22
22
Accesorios
Parrilla de seguridad antivuelco
La parrilla se puede utilizar como soporte para
bandejas y fuentes con alimentos para asar o
gratinar. Se utiliza también para asados a la
parrilla (que se colocarán directamente
encima).
Bandeja multiusos
(bandeja para tartas o para recoger la grasa)
Sirve como bandeja para tartas y tiene un
borde inclinado. Se utiliza para las reposterías,
como petisús, merengues, magdalenas,
hojaldres...
Si se coloca debajo de la parrilla, recoge la
grasa de los asados. También se puede utilizar, llenándola a medias de agua, para
cocer al baño maría. Evite poner directamente en la bandeja los asados o la carne,
ya que se producirían automáticamente salpicaduras importantes en las paredes
del horno.
Bandeja profunda
Sirve para recoger el jugo y la grasa de los
platos hechos con gratinado fuerte o con
gratinado pulsado.
Se puede utilizar como bandeja adecuando el
tamaño de la pieza a cocinar (ej.: un ave con
verduras alrededor, a temperatura moderada).
No coloque nunca esta bandeja directamente
sobre la resistencia inferior, salvo en la posición GRATINADO.
Asador rotativo
Para utilizarlo:
• coloque la bandeja multiusos en el escalón
nº 1, para que recoja el jugo de la cocción, o
en el suelo del horno si la pieza que va a asar
es demasiado grande.
• coloque uno de los tenedores en el espadín;
inserte el alimento que va a asar; coloque el
segundo tenedor; céntrelo y ajústelo enroscando los dos tenedores.
• coloque el espadín sobre el soporte.
• empuje ligeramente para encajar la punta del espadín en el orificio de arrastre
situado en el fondo del horno (6).
• retire el mango desenroscándolo. Después de la cocción, vuelva a enroscar el
mango para poder retirar el espadín sin quemarse.
TRAS
DEL
9963-5921 ML1 5H-720.qxd 14/04/05 14:58 Page 22
Page 23
23
ES
Consejos de seguridad
Lea estos consejos antes de instalar y utilizar el horno. Este horno ha sido
diseñado para darle un uso doméstico. Está destinado exclusivamente a la cocción
de productos alimenticios. Este horno no contiene ningún componente a base de
amianto.
USO POR PRIMERA VEZ:
Antes de utilizar el horno, caliéntelo en vacío, con la puerta cerrada, durante unos
15 minutos, en posición máxima para "rodar" el aparato. La lana mineral que
rodea el interior del horno puede desprender, al comienzo, un olor particular
debido a su composición. Asimismo, es posible que observe también una emisión
de humo. Ambas cosas son normales.
USOS POSTERIORES:
- Asegúrese de que la puerta del horno está bien cerrada, para que el cierre
hermético cumpla correctamente su función.
- No permita que nadie se apoye o se siente sobre la puerta del horno cuando
esté abierta.
- Las partes accesibles o las superficies pueden calentarse cuando se
utiliza el gratinador con la puerta entreabierta. Mantenga alejados a los
niños.
- El aparato se calienta cuando está siendo utilizado. No toque los elementos
calefactores del interior del horno.
- Después de haber efectuado una cocción, no coja los accesorios (parrilla, asador
rotativo, bandeja, soporte de asador...), utilice un guante o un trapo aislante.
- No forre el horno con láminas de papel de aluminio, ya que se produciría una
acumulación de calor que tendría un efecto negativo en el resultado de la cocción
y del asado, dañando también el esmalte.
- Antes de limpiar el horno con la pirólisis, retire todos los accesorios del mismo y
elimine el exceso de grasa acumulada.
- No utilice limpiadores a vapor o de alta presión.
- Durante una pirólisis, las superficies accesibles se calientan más que durante el
uso normal del horno. Mantenga alejados a los niños.
- Para realizar cualquier tipo de operación de limpieza en el interior del
horno, éste debe estar apagado.
Es obligatorio poner de nuevo el selector de función en 0 para
volver a utilizar el horno.
9963-5921 ML1 5H-720.qxd 14/04/05 14:58 Page 23
Page 24
24
¿Cómo instalar el horno?
Contador 20A Mono
220-240 V ~ 50 Hz
Toma de corriente
2 polos + tierra
norma CEI 60083
Línea Mono 220-240 V ~
Conexión eléctrica
Cable de
alimentación
de aproximadamente
1,50 m de largo
Disyuntor diferencial
o fusible 16A
Antes de efectuar la conexión, asegúrese de que los cables de su
instalación eléctrica tienen una sección suficiente para alimentar
normalmente el aparato (sección como mínimo igual a la del cable
de alimentación).
El fusible de la instalación debe ser de 16 Amperios.
La conexión eléctrica se debe efectuar antes de colocar el aparato en el mueble.
• El horno debe estar conectado con un cable de alimentación (normalizado) con
3 conductores de 1,5 mm
2
(1 F +1 N + tierra) que deben ir conectados a la red 220-
240 V ~ monofásica por medio de una toma de corriente 1 F +1 N + tierra
normalizada CEI 60083 o de acuerdo con las normas de instalación. El cable de
protección (verde-amarillo) está unido al borne del aparato y debe ir conectado
a la toma de tierra de la instalación.
• En caso de que se conecte con una toma de corriente, ésta debe permanecer
accesible una vez instalado el aparato.
• El neutro del horno (cable azul) debe estar conectado al neutro de la red.
9963-5921 ML1 5H-720.qxd 14/04/05 14:58 Page 24
Page 25
25
ES
• El cable de alimentación (H05 RR-F, H05 RN-F o H05 VV-F) debe ser lo
suficientemente largo como para conectarlo al horno que vamos a empotrar cuando
lo colocamos en el suelo delante del mueble.
Para ello, con el aparato desconectado de la red:
• Abra la tapa situada en la parte inferior derecha de la tapa trasera desatornillando
los 2 tornillos, y a continuación haga girar la tapa sobre su eje.
• Pele 12 mm de cada uno de los hilos del nuevo cable de alimentación.
• Retuerza con cuidado las hebras.
• Afloje los tornillos del borne y retire el cable de alimentación que va a cambiar.
• Introduzca el cable de alimentación por el lateral de la tapa en el guardacables
situado a la derecha del borne.
• Conecte los hilos del cable según la(s) señal(es) indicada(s) en el borne.
• Todas las hebras de los hilos de alimentación deben estar aprisionadas bajo los
tornillos.
• El hilo de la fase en el borne L.
• El hilo de tierra color verde-amarillo debe ir conectado al borne .
• El hilo del neutro (azul) en el borne N.
• Atornille a fondo los tornillos de los bornes y compruebe la conexión estirando de
cada uno de los hilos.
• Fije el cable con el guardacables situado a la derecha de los bornes.
• Vuelva a cerrar la tapa con los 2 tornillos.
Cambio del cable de alimentación
No asumimos ningún tipo de responsabilidad en caso de accidente
debido a una falta de conexión de toma de tierra o a una conexión
defectuosa o incorrecta.
¿Cómo instalar el horno?
• La bombilla se encuentra en el techo del interior del horno.
a) Desenrosque la tullipa (ver
esquema).
b) Desenrosque la bombilla en el
mismo sentido.
Caracteristicas de la bombilla:
- 15 W
- 220-240 V
- 300°C
- casquillo E 14
c) Cambiar la bombilla, volver a
colocar la tulipa y enchufar el horno
Bombilla
Desenroscar
Tulipa
Desconecte el horno antes de manipular la bombilla para evitar
todo riesgo de descarga eléctrica y, si es necesario, deje que se
enfríe el aparato.
¿Cómo cambiar la bombilla?
para desenroscar la tulipa, utilizar un guante de goma que
facilitará la tarea de desmontaje.
9963-5921 ML1 5H-720.qxd 14/04/05 14:58 Page 25
Page 26

26
¿Cómo instalar el horno?
Para garantizar una instalación adecuada, no dude en recurrir a
un especialista en electrodomésticos.
Dimensiones útiles para empotrar el horno
El horno puede instalarse indistintamente bajo una encimera o en un
mueble en columna (abierto* o cerrado) que tenga las dimensiones de
empotramiento adecuadas (ver esquema).
El horno está provisto de una circulación de aire optimizada que permite obtener
excelentes resultados de cocción y de limpieza si se respetan las siguientes
condiciones:
• Centre el horno en el mueble de manera que se garantice una distancia mínima de
5 mm con el mueble que haya al lado.
• El material del mueble en el que se empotra el horno debe ser resistente al calor
(o estar recubierto con un material resistente al calor).
• Para una mayor estabilidad, fije el horno en el mueble con 2 tornillos utilizando los
orificios previstos para ello en los laterales (ver esquema).
Para ello:
1) Retire las tapas de goma para poder acceder a los orificios de fijación.
2) Haga un agujero de Ø 3 mm en la pared del mueble para evitar que se astille la
madera.
3) Fije el horno con los 2 tornillos.
4) Vuelva a colocar las tapas de goma (éstas también sirven para amortiguar el cierre
de la puerta del horno).
(*) si el mueble está abierto, la apertura debe ser de 70 mm (como
máximo).
577
577
585600
9963-5921 ML1 5H-720.qxd 14/04/05 14:58 Page 26
Page 27
27
ES
¿Cómo utilizar el horno?
1. D
etalle del programador
1
2
3
4
5
6
Indicación de las temperaturas, tiempos, duraciones y minutero
Símbolo de la temperatura
Símbolo de duración de la cocción
Símbolo de final de cocción
Símbolo de minutero independiente
Mando de acceso a los diferentes programas de regulación
1
3
4
5
6
2
9963-5921 ML1 5H-720.qxd 14/04/05 14:58 Page 27
Page 28
28
a) Al conectar el horno
• La pantalla parpadea a las 12:00.
• Ajuste la hora con ayuda del selector de regulación
+ o - (si mantiene presionado + o -, los números
pasarán rápidamente)
• Pulse el mando para validar.
Ejemplo: 12:00.
b) Volver a poner en hora el reloj
• Mantener pulsado hasta que aparezca la hora y
soltar después.
• Ajuste la hora con el selector regulación (+ o -).
• Pulse el mando para validar.
2. ¿
Cómo poner en hora el reloj del horno?
¿Cómo utilizar el horno?
Si no se valida con el mando , se grabará
automáticamente al cabo de unos segundos.
9963-5921 ML1 5H-720.qxd 14/04/05 14:58 Page 28
Page 29

29
ES
¿Cómo utilizar el horno?
3. ¿C
ómo programar una cocción inmediata?
El programador sólo debe mostrar la hora; no debe parpadear.
• Seleccione el modo de cocción:
Gire el selector de funciones hasta la posición elegida.
Ejemplo: posición " " -> el horno se pone en
marcha.
El horno le propone la temperatura que se utiliza
habitualmente.
Coloque la bandeja en el horno siguiendo las
recomendaciones indicadas en el manual de cocción.
Si lo desea, puede ajustar la temperatura girando el
selector de ajuste hacia + o -.
Ejemplo " " ajustada a 210°.
Una vez realizadas estas operaciones, el horno se calienta y la pantalla alterna la
indicación de la temperatura en el horno y la temperatura elegida.
Unos pitidos avisarán de que el horno ha alcanzado la temperatura elegida.
Una vez que se ha conseguida la temperatura, ésta se mantiene fija y el símbolo
continua parpadeando.
Después de realizar un ciclo de cocción, la turbina de ventilación continúa
funcionando durante un cierto tiempo para que se enfríe el horno.
9963-5921 ML1 5H-720.qxd 14/04/05 14:58 Page 29
Page 30

30
¿Cómo utilizar el horno?
4. ¿Cómo programar una cocción?
a) Con puesta en marcha inmediata
1. Regule el modo de cocción que desea y si es necesario
ajuste la temperatura.
Ejemplo: posición “ ”
temperatura 200°C.
2. Pulse el mando “ ” hasta que el indicador de
duración de la cocción “ ” parpadee.
La pantalla parpadea en 0:00 para indicar que se puede
comenzar la regulación.
3. Gire el selector de regulación hacia + o - para regular
el tiempo que desea.
Ejemplo: 25 min de cocción.
La grabación del tiempo de cocción es automática al cabo
de unos segundos, -> la pantalla ya no parpadea y
regresa al modo temperatura.
La cuenta atrás se inicia inmediatamente después de la
regulación.
Una vez efectuadas estas 3 operaciones, el horno
comienza a calentar:
Unos pitidos avisarán de que el horno ha alcanzado la temperatura elegida.
Al finalizar la cocción (fin del tiempo programado),
- el horno se para,
- el símbolo de duración de cocción se apaga,
- aparece en el visor 0:00
- el horno emite unos pitidos durante unos minutos.
Para parar definitivamente los pitidos hay que volver a colocar el selector de
funciones en 0.
9963-5921 ML1 5H-720.qxd 14/04/05 14:58 Page 30
Page 31

31
ES
¿Cómo utilizar el horno?
b) Con puesta en marcha retardada (hora de fin de cocción elegida)
Proceda como para una cocción programada.
Una vez regulada la duración de la cocción,
Presione el mando“ ”hasta que parpadee el indicador
de fin de cocción “ ”.
La pantalla parpadea para indicar que se puede
comenzar la regulación.
Gire el selector de regulación hacia + o - para regular
la hora a la que desea que finalice.
Ejemplo: Fin de cocción a las 13:00.
Una vez efectuadas estas operaciones, la puesta en
marcha queda retardada para que la cocción termine a las
13:00.
Al finalizar la cocción (fin del tiempo programado),
- el horno se para,
- el símbolo de duración de cocción se apaga,
- aparece en el visor 0:00
- el horno emite unos pitidos durante unos minutos.
Para parar definitivamente los pitidos hay que volver a colocar el selector de
funciones en 0.
9963-5921 ML1 5H-720.qxd 14/04/05 14:58 Page 31
Page 32

32
5. ¿Cómo utilizar el minutero?
El horno está provisto de un minutero electrónico, independiente al
funcionamiento del horno, que permite hacer una cuenta atrás.
Cuando se está utilizando, la pantalla del minutero tiene prioridad sobre la
pantalla de la hora del día y la de la temperatura.
Presione el mando“ ”hasta que parpadee el indicador
del minutero -> la pantalla parpadea.
Gire el selector de regulación (+ o -) hasta conseguir el
tiempo deseado (máximo 60 minutos).
Al cabo de unos segundos o si se pulsa el mando ,
la pantalla deja de parpadear y el minutero se pone en
marcha, comenzando la cuenta atrás por segundos.
Una vez finalizado el tiempo, el minutero emite una serie
de pitidos para avisarle.
Se puede modificar o anular en cualquier momento la
programación del minutero.
9963-5921 ML1 5H-720.qxd 14/04/05 14:58 Page 32
Page 33

33
ES
¿Qué hacer en caso de producirse
anomalías en el funcionamiento?
Si le surge alguna duda respecto al buen funcionamiento de su horno, no
significa necesariamente que haya una avería.
En todo caso, compruebe los
siguientes puntos:
Se da cuenta de
que...
Las causas posibles
son...
¿Qué hay que hacer?
El horno no calienta.
• El horno no está enchufado.
• El fusible de la instalación está
fuera de servicio.
• La temperatura seleccionada es
demasiado baja.
• El sensor está estropeado
• El horno ha sufrido un
sobrecalentamiento, se ha activado
la función de seguridad.
- Enchufar el horno.
- Cambiar el fusible de la instalación
y comprobar su valor (16A).
- Amentar la temperatura
seleccionada.
- Recurrir al Servicio Técnico.
- Recurrir al Servicio Técnico.
El indicador de la T°c parpadea.
• Sensor de temperatura estropeado.
- Recurrir al Servicio Técnico.
La lámpara del horno no funciona.
• La bombilla se ha fundido.
• El horno no está enchufado o el
fusible se ha fundido.
- Cambiar la bombilla.
- Enchufar el horno o cambiar el
fusible.
El ventilador de enfriamiento
continúa funcionando cuando
se para el horno.
• La ventilación funciona como
máximo durante 1 hora después de
finalizar la cocción, o cuando la
temperatura del horno es superior
a 125°C.
• Si no se para al cabo de 1 hora
- Abrir la puerta del horno para
acelerar el enfriamiento del horno.
- Recurrir al Servicio Técnico.
La limpieza mediante pirólisis no
se efectúa.
• La puerta está mal cerrada.
• El sistema de bloqueo está
estropeado.
• El sensor de T° está estropeado.
• El contacto de detección de
"puerta cerrada" está estropeado.
- Comprobar el cierre de la puerta.
- Recurrir al Servicio Técnico.
- Recurrir al Servicio Técnico.
- Recurrir al Servicio Técnico.
9963-5921 ML1 5H-720.qxd 14/04/05 14:58 Page 33
Page 34

34
Tradicional
La cocción se efectúa con la
resistencia inferior y la superior,
sin movimiento de aire.
Gratinador
La cocción se efectúa con la
resistencia superior, sin
movimiento de aire.
Necesita un
precalentamiento antes de
introducir la bandeja en el
horno.
Efectúe un precalentamiento
de 5 minutos.
Coloque la bandeja para
recoger la grasa en la posición
más baja.
Símbolo
Nombre de la función Descripción de la func
Modos de cocción del horno
*
* Secuencia(s) utilizada(s) para la indicación escrita en la etiqueta energética de ac
Resistencia inferior
La cocción se efectúa con la
resistencia inferior, unida a una
pequeña dosis de gratinador.
Cocción por debajo y un
poco por encima.
Coloque la parrilla en la
posición más baja.
Gratinador + Asador rotativo
La cocción se efectúa con la
resistencia superior.
No hace falta precalentamiento
Aves y asados jugosos y
crujientes por todos los lados.
El asador rotativo continua
funcionando hasta que se abre
la puerta.
Coloque la bandeja para
recoger la grasa en la posición
más baja.
9963-5921 ML1 5H-720.qxd 14/04/05 14:58 Page 34
Page 35

35
ES
Recomendado para las cocciones lentas y
delicadas: carnes de caza tiernas...
Para hacer a fuego vivo los asados de carne roja
Para cocinar a fuego lento, con la olla tapada,
los platos comenzados en la placa de cocción
(gallo al vino, guiso de liebre...)
Recomendado para asar chuletillas,
salchichas, rebanadas de pan,
langostinos a la parrilla.
Recomendaciones
Modos de cocción del horno
Preco T°
Recomendado para los platos húmedos
(quiches, tartas de frutas jugosas...).
La masa quedará bien hecha por debajo.
Recomendado para las recetas que deben
levantarse (cake, brioche, kouglof...) y
para los suflés, que no quedarán
bloqueados por la costra formada encima.
Recomendado para todas las aves o
asados hechos con el asador rotativo.
Para que hacer hasta el centro las piernas
de cordero y las chuletas de buey.
Para los bloques de pescado queden
jugosos y tiernos.
míni recom máxi
35 200 275
míni recom máxi
180 275 275
míni recom máxi
35 165 275
míni recom máxi
180 225 275
9963-5921 ML1 5H-720.qxd 14/04/05 14:58 Page 35
Page 36

36
1. ¿Qué es una pirólisis?
3. ¿Cómo hacer una pirólisis?
COCCIONES QUE Galletas, verduras, Cocciones que no salpican
ENSUCIAN POCO pasteles, quiches, suflés No se justifica una pirólisis
COCCIONES QUE Carnes, pescados, Se puede justificar
ENSUCIAN (en bandeja) una pirólisis cada
MEDIANAMENTE verduras rellenas 3 cocciones
COCCIONES QUE Piezas grandes de carne Se puede hacer una pirólisis
ENSUCIAN MUCHO ensartadas en el asador después de 1 cocción de este
tipo se han producido
muchas salpicaduras
El horno emite humo en el precalentamiento o desprende mucho homo cuando
cocina.
El horno desprende un olor desagradable en frío debido a las distintas cocciones
(cordero, pescado, asados...).
2. ¿Cuándo se debe realizar una pirólisis?
No hay que esperar a que el horno esté lleno de grasa para
realizar esta limpieza.
- La pirólisis es un ciclo que calienta el interior del horno a muy alta temperatura, lo
que permite eliminar todos los residuos debidos a salpicaduras o desbordamientos.
Los humos y olores emitidos se destruyen al pasar por un catalizador.
- No es necesario efectuar una pirólisis cada vez que se cocine, sino únicamente
cuando el grado de suciedad del horno lo justifique.
- Por medida de seguridad, la operación de limpieza se pone en marcha sólo cuando
la puerta se haya bloqueado automáticamente. En cuanto la temperatura en el
interior del horno supera las temperaturas de cocción, se hace imposible desbloquear
la puerta, incluso colocando el mando de "selección de funciones" en 0.
¿Cómo limpiar el interior del horno?
a) Retire todos los accesorios del horno y elimine el
exceso de grasa que se haya podido producir
b) Compruebe que el programador indica la hora del
día y que no parpadea.
9963-5921 ML1 5H-720.qxd 14/04/05 14:58 Page 36
Page 37

37
ES
c) Gire el mando "selección de funciones" hasta la
posición "PIRÓLISIS".
El horno dejará de estar disponible durante dos horas y
media (no modificable).
Este tiempo incluye el tiempo de enfriamiento hasta que
se pueda abrir la puerta.
• Durante el ciclo de pirólisis, el piloto de bloqueo se
enciende para indicarle que la puerta está bloqueada, y el
indicador de pirólisis y el tiempo que falta se alternan en la pantalla.
• La pirólisis se detiene automáticamente cuando el piloto de bloqueo se apaga, se
puede entonces abrir la puerta.
d) Vuelva a colocar el selector de funciones en la posición 0.
e) Cuando el horno esté frío, utilice un trapo húmedo para eliminar la ceniza blanca.
El horno queda limpio y se puede utilizar de nuevo para realizar la cocción que
desee.
9963-5921 ML1 5H-720.qxd 14/04/05 14:58 Page 37
Page 38

38
Índice
Ao longo do guia,
assinala-lhe as instruções de segurança,
assinala-lhe os conselhos e as dicas.
Como se apresenta o seu forno?
Descrição do aparelho P.39
Acessórios P.40
Conselhos de segurança P.41
Como instalar o seu forno?
Ligação eléctrica P.42-43
Como mudar a lâmpada? P.43
Dimensões úteis para encastrar o forno P.44
Como utilizar o seu forno?
Pormenores do programador P.45
Como acertar a hora do relógio do forno? P.46
Como efectuar uma cozedura imediata? P.47
Como programar uma cozedura? P.48-49
Como utilizar o temporizador? P.50
Que fazer em caso de anomalias
de funcionamento?
P.51
Modos de cozedura do forno P.52-53
Como limpar a cavidade do forno?
O que é a pirólise? P.54
Em que casos é necessário efectuar uma pirólise? P.54
Como realizar uma pirólise? P.54-55
9963-5921 ML1 5H-720.qxd 14/04/05 14:58 Page 38
Page 39

1
3
5
39
PT
Como se apresenta o seu forno?
DESCRIÇÃO DO APARELHO
1
2
5
6
73
4
Selector de temperatura
Programador
Selector de funções
Lâmpada
Indicador dos suportes laterais
para tabuleiros e grelhas
Orifício para espeto rotativo
Contacto de detecção da
abertura da porta
1
2
3
4
5
6
7
9963-5921 ML1 5H-720.qxd 14/04/05 14:58 Page 39
Page 40

40
Acessórios
Grelha de segurança antibasculante
A grelha pode ser utilizada para colocar os
pratos e formas com alimentos a cozer ou
gratinar, ou então para fazer grelhados,
colocando-os directamente sobre a grelha.
Placa multiusos
(placa de pastelaria ou pingadeira)
Serve de placa de pastelaria e tem um rebordo
inclinado. Utiliza-se para a cozedura de bolos,
tais como profiteroles, suspiros, madalenas,
queques, massas folhadas, etc.
Colocada nos suportes laterais por baixo da
grelha, serve para recolher os molhos e
gorduras dos grelhados. Enchendo-a até metade, também pode ser utilizada para
cozer em banho-maria. Evite colocar carnes ou lombos assados directamente nesta
placa, pois haverá automaticamente importantes projecções nas paredes do forno.
Placa côncava
Serve para recolher o molho e as gorduras
obtidas com o grill forte ou o grill ventilado.
Pode ser utilizada como prato de cozedura,
adaptando o tamanho do alimento a cozer
(ex.: uma ave com legumes em volta, a
temperatura moderada).
Nunca colocar esta placa directamente sobre a
base, excepto na posição GRILL.
Espeto rotativo
Para a sua utilização:
• colocar a placa multiusos no suporte lateral
n.º 1 de modo a recolher o molho de cozedura,
ou então na base do forno, caso a peça para
assar seja demasiado grande.
• enfiar uma das forquilhas no espeto; colocar
no espeto o alimento que se deseja assar;
enfiar a outra forquilha; centrar e apertar, enroscando as duas forquilhas.
• colocar o espeto no seu suporte.
• empurrar ligeiramente de modo a enfiar a ponta do espeto no quadrado de
accionamento situado no fundo do forno (6).
• retirar o cabo, desenroscando-o. Após a cozedura, enroscar novamente o cabo no
espeto de modo a retirá-lo sem se queimar.
TRÁS
FRENTE
9963-5921 ML1 5H-720.qxd 14/04/05 14:58 Page 40
Page 41

41
PT
Conselhos de segurança
Agradecemos que tome conhecimento destes conselhos antes de
instalar e utilizar o seu forno. Este forno foi concebido para uma utilização por
particulares na sua habitação e destina-se exclusivamente à cozedura de géneros
alimentícios. Este forno não contém qualquer componente à base de amianto.
PRIMEIRA UTILIZAÇÃO:
Antes de o utilizar pela primeira vez, aqueça o forno vazio, com a porta fechada
e na potência máxima durante cerca de 15 minutos, de modo a "rodar" o
aparelho. No início, a lã mineral que reveste a cavidade do forno pode libertar um
odor característico devido à sua composição. Do mesmo modo, é possível que
constate uma produção de fumo. Tais fenómenos são normais.
UTILIZAÇÕES SEGUINTES:
- Assegure-se de que a porta do forno está bem fechada, de modo a que a junta
de estanquidade desempenhe correctamente a sua função.
- Não deixe ninguém apoiar-se ou sentar-se sobre a porta do forno aberta.
- Quando o grill é utilizado com a porta entreaberta, as zonas acessíveis
ou as superfícies podem ficar quentes. Mantenha as crianças afastadas.
- Durante a utilização, o aparelho aquece. Tome precauções de maneira a não
tocar nos elementos de aquecimento situados na cavidade do forno.
- Após a cozedura, não segure nenhum acessório do forno (grelha, espeto
rotativo, pingadeira, suporte do espeto rotativo, etc.) com as mãos desprotegidas.
Utilize pegas ou luvas, ou um tecido isolante.
- Não revista o interior do forno com folhas de alumínio. Caso contrário, haverá
uma acumulação de calor que deturparia o resultado da cozedura e da assadura,
e que danificaria o esmalte.
- Antes de proceder à limpeza pirolítica do forno, retire todos os acessórios do
forno e elimine a sujidade mais significativa.
- Não utilizar aparelhos de limpeza a vapor ou de alta pressão.
- Durante a pirólise, as superfícies acessíveis aquecem mais do que durante uma
utilização normal. Mantenha as crianças afastadas.
- Para qualquer intervenção de limpeza na sua cavidade, o forno deve
estar apagado.
Para voltar a utilizar o forno, deve colocar obrigatoriamente o
selector de função na posição 0.
9963-5921 ML1 5H-720.qxd 14/04/05 14:58 Page 41
Page 42

42
Como instalar o seu forno?
Contador 20A monofásico
220-240 V ~ 50 Hz
Tomada de corrente
eléctrica
2 pólos + terra
norma CEI 60083
Linha monofásica 220-240 V ~
Ligação eléctrica
Cabo de
alimentação
com cerca de 1,50 m
de comprimento
Disjuntor diferencial
ou fusível de 16A
Antes de efectuar a ligação, assegure-se de que o
dimensionamento da secção dos fios da sua instalação eléctrica é
suficientemente grande para alimentar normalmente o aparelho
(a secção deve ser, no mínimo, igual à do cabo eléctrico).
O fusível da sua instalação deve ser de 16 Amperes.
A ligação eléctrica deve ser efectuada antes de o aparelho ser instalado no móvel.
• O forno deve ser ligado com um cabo eléctrico (normalizado) de 3 condutores de
1,5 mm2(1 fase +1 neutro + terra), devendo estes ser ligados à rede monofásica
de 220-240 V ~ através de uma tomada eléctrica (1 fase + 1 neutro + terra)
normalizada CEI 60083 ou em conformidade com os regulamentos de instalação.
O fio de protecção (verde-amarelo) é ligado ao terminal do aparelho e deve
ser ligado à terra da instalação.
• No caso de uma ligação com tomada de corrente eléctrica, esta deverá ficar
acessível após a instalação do aparelho.
• O fio neutro do forno (azul) deverá ser ligado ao neutro da rede eléctrica.
9963-5921 ML1 5H-720.qxd 14/04/05 14:58 Page 42
Page 43

43
PT
• O cabo eléctrico (H05 RR-F, H05 RN-F ou H05 VV-F) deverá ser suficientemente
comprido para ser ligado ao forno a encastrar, quando colocado no chão em frente do
móvel.
Para esta operação, o forno deve estar desligado da rede eléctrica:
• Abra a placa situada na parte inferior direita da chapa traseira, desapertando os 2
parafusos e depois gire a placa.
• Descarnar 12 mm em cada fio do novo cabo eléctrico.
• Torça cuidadosamente os filamentos.
• Desaperte os parafusos do bloco terminal e retire o fio eléctrico a substituir.
• Introduza, pelo lado da chapa, o cabo eléctrico no serra-cabos situado à direita do
bloco terminal.
• Ligue os fios do cabo de acordo com as indicações inscritas no bloco terminal.
• Os filamentos dos fios eléctricos devem ficar todos presos sob os parafusos.
• O fio da fase no terminal L.
• O fio de terra verde-amarelo deve ser ligado ao terminal .
• O fio do neutro (azul) no terminal N.
• Aparafuse totalmente os parafusos do bloco terminal e verifique a ligação, puxando
por cada fio.
• Fixe o cabo por intermédio do serra-cabos situado à direita do bloco terminal.
• Feche a placa e aperte-a com os 2 parafusos.
Substituição do cabo eléctrico
Declinamos qualquer responsabilidade em caso de acidente
resultante de uma ligação à terra inexistente, defeituosa ou
incorrecta.
Como instalar o seu forno?
• A lâmpada está situada no tecto da cavidade do forno.
a) Desenrosque a tampa de vidro
(ver figura ao lado).
b) Desenrosque a lâmpada no
mesmo sentido.
Características da lâmpada:
- 15 W
- 220-240 V
- 300°C
- casquilho E 14
c) Mude a lâmpada, torne a instalar
a tampa de vidro e ligue novamente o forno.
Lâmpada
Desenrosque
Tampa de vidro
Desligar o forno antes de efectuar qualquer tipo de intervenção sobre
a lâmpada e, se necessário, deixar arrefecer o aparelho.
C
omo mudar a lâmpada?
Para desmontar com mais facilidade a tampa de vidro e a janela,
utilize uma luva de borracha.
9963-5921 ML1 5H-720.qxd 14/04/05 14:58 Page 43
Page 44

44
Como instalar o seu forno?
Para ter a certeza de obter uma instalação conforme, não hesite
em recorrer aos serviços de um técnico especializado em
electrodomésticos.
Dimensões úteis para encastrar o forno
O forno pode ser instalado quer por baixo de uma bancada de trabalho,
quer num armário em coluna (aberto* ou fechado) com dimensões de
encastre adaptadas (ver esquema acima).
O seu forno possui uma circulação de ar optimizada que permite obter excelentes
resultados de cozedura e de limpeza, desde que sejam respeitados os seguintes
aspectos:
• Centre o forno no armário de maneira a garantir uma distância mínima de 5 mm
em relação ao armário contíguo.
• O material de fabrico do armário de encastre deve ser resistente ao calor (ou deve
ser revestido com materiais deste tipo).
• Para uma maior estabilidade, fixe o forno ao armário com 2 parafusos, inserindo-
-os nos orifícios previstos para este efeito nos montantes laterais (ver esquema).
Para tal:
1) Retire as tampas de borracha dos parafusos para aceder aos orifícios de fixação.
2) Faça um orifício com 3 mm de diâmetro na parede do armário para evitar estalar
a madeira.
3) Fixe o forno com os 2 parafusos.
4) Coloque de novo as tampas de borracha dos parafusos, que servem igualmente
para amortecer o fecho da porta do forno.
(*) se se tratar de um armário aberto, a sua abertura deve ter 70 mm (no
máximo).
577
577
585600
9963-5921 ML1 5H-720.qxd 14/04/05 14:58 Page 44
Page 45

45
PT
Como utilizar o seu forno?
1. P
ormenores do programador
1
2
3
4
5
6
Visualização das temperaturas, tempos, durações e temporizador
Indicador de visualização da temperatura
Indicador de visualização da duração de cozedura
Indicador de visualização do fim da cozedura
Indicador de visualização do temporizador independente
Tecla de acesso aos diferentes programas de regulação
1
3
4
5
6
2
9963-5921 ML1 5H-720.qxd 14/04/05 14:58 Page 45
Page 46

46
a) Aquando da ligação eléctrica
• O visor acende-se por intermitência nas 12h.
• Acerte a hora com o auxílio do selector de
regulação + ou - (para obter um desfile rápido,
premir continuamente as teclas + ou -).
• Premir a tecla para validar.
Exemplo: 12h30.
b) Acertar a hora do relógio
• Manter a tecla premida até a hora aparecer, e
depois, soltar.
• Acerte a hora com o selector de regulação (+ ou -).
• Premir a tecla para validar.
2.
Como acertar a hora do relógio do forno?
Como utilizar o seu forno?
Se não validar com a tecla , o valor é registado
automaticamente após alguns segundos.
9963-5921 ML1 5H-720.qxd 14/04/05 14:58 Page 46
Page 47

47
PT
Como utilizar o seu forno?
3. C
omo efectuar uma cozedura imediata?
O programador deve apenas indicar a hora, sem que esta apareça a piscar.
• Escolha o modo de cozedura:
Rode o selector de funções para a posição pretendida.
Exemplo: posição " " -> o forno começa a funcionar.
O forno propõe-lhe a temperatura utilizada com maior
frequência.
Coloque o seu prato no forno de acordo com as
recomendações constantes no guia de cozedura.
É, no entanto, possível ajustar a temperatura accionando o
selector de regulação para + ou -.
Exemplo " " temperatura regulada para 210°.
Após estas operações, o forno começa a aquecer e o valor visualizado alterna entre
a temperatura no forno e a temperatura escolhida.
A emissão de um sinal sonoro indica que o forno atingiu a temperatura seleccionada.
Depois de atingida, a temperatura é estabilizada e o símbolo continua a piscar.
Após o ciclo de cozedura, a turbina de ventilação continua a funcionar
durante algum tempo para arrefecer o forno.
9963-5921 ML1 5H-720.qxd 14/04/05 14:59 Page 47
Page 48

48
Como utilizar o seu forno?
4. Como programar uma cozedura?
a) Com arranque imediato
1. Ajuste o modo de cozedura pretendido e regule,
eventualmente, a temperatura.
Exemplo: posição " "
temperatura de 200°C.
2. Prima a tecla " " até o indicador de duração de
cozedura " " começar a piscar.
O valor 0h00 começa a piscar para indicar que a
regulação é então possível.
3. Accione o selector de regulação + ou - para ajustar o
tempo pretendido.
Exemplo: 25 min. de cozedura.
O tempo de cozedura é registado automaticamente após
alguns segundos, ->o visor deixa de piscar e volta ao
modo temperatura.
A contagem decrescente da duração começa logo após a
regulação.
Após estas 3 operações, o forno começa a aquecer:
A emissão de um sinal sonoro indica que o forno atingiu a temperatura
seleccionada.
No final da cozedura (fim do tempo programado),
- o forno pára,
- o indicador de duração de cozedura apaga-se,
- o valor 0:00 aparece indicado
- é imitido um sinal sonoro durante alguns minutos.
Para parar a emissão do sinal sonoro, colocar o selector de funções na posição 0.
9963-5921 ML1 5H-720.qxd 14/04/05 14:59 Page 48
Page 49

49
PT
Como utilizar o seu forno?
b) Com arranque diferido (hora de fim escolhida)
Proceda como para uma cozedura programada.
Depois de ter regulado o tempo de cozedura,
prima a tecla " " até o indicador de fim de cozedura
" " começar a piscar.
O visor começa a piscar para indicar que a regulação é
então possível.
Rode o selector de regulação + ou - para ajustar a
hora pretendida para o fim da cozedura.
Exemplo: Fim da cozedura às 13h.
Após estas operações, o início do aquecimento é
diferido de modo a que a cozedura termine às 13h.
No final da cozedura (fim do tempo programado),
- o forno pára,
- o indicador de duração de cozedura apaga-se,
- o valor 0:00 aparece indicado
- é imitido um sinal sonoro durante alguns minutos.
Para parar a emissão do sinal sonoro, colocar o selector de funções na posição 0.
9963-5921 ML1 5H-720.qxd 14/04/05 14:59 Page 49
Page 50

50
5. Como utilizar o temporizador?
Este forno está equipado com um temporizador electrónico capaz de
efectuar a contagem decrescente do tempo, sendo o seu funcionamento
independente do forno.
Neste caso, o valor visualizado no temporizador prevalece
sobre a indicação da hora actual e da temperatura.
Prima a tecla " " até o indicador do temporizador
"
"
piscar
-> o visor começa a piscar.
Rode o selector de regulação (+ ou -) até obter a
duração pretendida (60 minutos no máximo).
O visor deixa de piscar passados alguns segundos ou então
ao premir a tecla e o temporizador começa a
funcionar, fazendo uma contagem decrescente em
segundos.
Esgotado o tempo, o temporizador emite um sinal sonoro de aviso.
É possível alterar ou cancelar a qualquer momento a
programação do temporizador.
9963-5921 ML1 5H-720.qxd 14/04/05 14:59 Page 50
Page 51

51
PT
Que fazer em caso de anomalias de
funcionamento?
Se tem dúvidas quanto ao devido funcionamento do seu forno, isso não
significa necessariamente que haja uma avaria.
De qualquer forma, verifique os
seguintes pontos:
Problema constatado... Causas possíveis O que se deve fazer?
O forno não aquece.
• O forno não está ligado.
• O fusível da sua instalação está
fundido.
• A temperatura seleccionada é
demasiado baixa.
• O sensor está defeituoso
• O forno sofreu um
sobreaquecimento e colocou-se em
posição de segurança.
- Ligar o forno.
- Mudar o fusível da sua instalação
e verificar o seu valor (16A).
- Aumentar a temperatura
seleccionada.
- Contactar o Serviço Pós-Venda.
- Contactar o Serviço Pós-Venda.
O indicador de T °c acende por
intermitência.
• Sensor de temperatura defeituoso. - Contactar o Serviço Pós-Venda.
A lâmpada do forno não
funciona.
• A lâmpada está fundida.
• O forno não está ligado ou o
fusível está fundido.
- Mudar a lâmpada.
- Ligar o forno ou mudar o fusível.
O ventilador de arrefecimento
continua a girar depois do
forno apagado.
• A ventilação funciona durante
1 hora (no máximo) após a cozedura
ou sempre que a temperatura do
forno seja superior a 125°C.
• Se não apagado ao fim de 1 hora.
- Abrir a porta do forno para acelerar
o arrefecimento do forno.
- Contactar o Serviço Pós-Venda.
A limpeza pirolítica não se
realiza.
• A porta está mal fechada.
• O sistema de bloqueio está
defeituoso.
• O sensor de temperatura está
defeituoso.
• O contacto de detecção de "porta
fechada" está defeituoso.
- Verificar o fecho da porta.
- Contactar o Serviço Pós-Venda.
- Contactar o Serviço Pós-Venda.
- Contactar o Serviço Pós-Venda.
9963-5921 ML1 5H-720.qxd 14/04/05 14:59 Page 51
Page 52

52
Tradicional
A cozedura é efectuada através
dos elementos inferior e superior
sem ventilação de ar.
Grill
A cozedura é efectuada
através do elemento superior
sem ventilação de ar.
Necessita de um préaquecimento antes de
colocar o prato no forno.
Efectue um pré-aquecimento
de 5 minutos.
Introduza a pingadeira nos
suportes laterais inferiores.
Símbolo
Nome da função Descrição da funçã
Modos de cozedura do forno
*
* Sequência(s) utilizada(s) para o anúncio escrito na etiqueta energética, em conform
Base
A cozedura é efectuada através do
elemento inferior, associado a uma
leve dosagem do grill.
Cozedura pela parte
inferior com uma leve
dosagem por cima.
Coloque a grelha nos
suportes laterais inferiores.
Grill + Espeto rotativo
A cozedura é efectuada através
do elemento superior.
Pré-aquecimento inútil
Aves e assados suculentos e
estaladiços em todos os lados.
O espeto rotativo continua a
funcionar até à abertura da
porta.
Coloque a pingadeira no
suporte lateral inferior.
9963-5921 ML1 5H-720.qxd 14/04/05 14:59 Page 52
Page 53

53
PT
Recomendado para cozeduras lentas e
delicadas: carne de caça tenra...
Para dourar a alta temperatura assados de carne
vermelha.
Para apurar em recipientes fechados os
cozinhados iniciados previamente na placa de
cozinha ("coq au vin", guisados, etc.)
Recomendado para grelhar costeletas,
salsichas, fatias de pão, gambas
colocadas na grelha.
Recomendações
Modos de cozedura do forno
Temp.
preconizadas
Recomendado para cozinhados húmidos
(quiches, tartes de fruta sumarenta, etc.).
A massa ficará bem cozida por baixo.
Recomendado para massas que levedam
(bolo inglês, brioche, kouglof...) e para soufflés
que não ficarão bloqueados com uma crosta
por cima.
Recomendado para todas as aves ou carnes
assadas no espeto rotativo.
Para dourar a alta temperatura ou cozer na
perfeição pernas de borrego, costeletas de
vaca.
Para obter postas de peixe tenras.
mín. precon. máx.
35 200 275
mín. precon. máx.
180 275 275
ão
mín. precon. máx.
35 165 275
mín. precon. máx.
180 225 275
9963-5921 ML1 5H-720.qxd 14/04/05 14:59 Page 53
Page 54

54
1. O que é a pirólise?
3. Como realizar uma pirólise?
COZEDURAS Bolachas, legumes, Cozeduras sem salpicos:
QUE PROVOCAM bolos, quiches, não há necessidade
POUCA SUJIDADE soufflés de efectuar uma pirólise
COZEDURAS QUE carne, peixe A pirólise justifica-se depois
PROVOCAM (numa assadeira), de efectuadas 3 cozeduras
SUJIDADE legumes recheados
COZEDURAS Peças de carne grande A pirólise pode ser efectuada
QUE PROVOCAM assadas no espeto após 1 cozedura deste tipo,
GRANDE SUJIDADE caso haja muitas projecções
Quando o forno produz fumo durante o pré-aquecimento ou essa produção é
muito intensa durante a cozedura, ou quando o forno, mesmo frio, liberta odores
desagradáveis após diversas cozeduras (borrego, peixe, grelhados, etc.).
2.
Em que casos é necessário efectuar uma pirólise?
Não deixar que o forno acumule demasiadamente a sujidade para
efectuar a limpeza pirolítica.
- A pirólise é um ciclo de aquecimento da cavidade do forno a uma temperatura
bastante alta e que permite eliminar toda a sujidade resultante de salpicos ou de
derrames. O fumo e os odores libertados são eliminados pela passagem através de
um catalisador.
- Não é, porém, necessário efectuar uma pirólise após cada cozedura, mas apenas
se o grau de sujidade o justificar.
- Por razões de segurança, a operação de limpeza só é efectuada após o bloqueio
automático da porta. Assim que a temperatura no interior do forno ultrapassa as
temperaturas de cozedura, é impossível abrir a porta, mesmo se se posicionar o
botão "selector de funções" na posição 0.
Como limpar a cavidade do forno?
a) Retire os acessórios do forno e limpe os depósitos
de sujidade importantes que existam.
b) Verifique se o programador indica a hora actual e
se esta não está a piscar.
9963-5921 ML1 5H-720.qxd 14/04/05 14:59 Page 54
Page 55

55
PT
c) Posicione o botão "selector de funções" na posição
"PIRÓLISE".
O forno fica então indisponível durante 2h30 (não
alterável).
Este tempo tem em conta o período de arrefecimento até
ao desbloqueio da porta.
• Durante o ciclo de pirólise, o indicador luminoso de
bloqueio acende-se para indicar que a porta está
bloqueada, o indicador de pirólise acende-se e a hora restante é visualizada de
modo alternado.
• A pirólise pára automaticamente quando o sinal de bloqueio se apaga, sendo
então possível abrir a porta.
d) Coloque novamente o selector de funções na posição 0.
e) Quando o forno estiver frio, remova a cinza branca com um pano húmido. O
forno está novamente limpo e pode voltar a ser utilizado para novas cozeduras.
9963-5921 ML1 5H-720.qxd 14/04/05 14:59 Page 55
Page 56

56
S
ommaire
Tout au long de la notice,
vous signale les consignes de sécurité,
vous signale les conseils et les astuces
Comment se présente votre four ?
Descriptif de l’appareil P.57
Accessoires P.58
Conseils de sécurité P.59
Comment installer votre four ?
Raccordement électrique P.60-61
Comment changer l’ampoule ? P.61
Dimensions utiles pour encastrer votre four P.62
Comment utiliser votre four ?
Le détail de votre programmateur P.63
Comment mettre à l’heure l’horloge du four ? P.64
Comment faire une cuisson immédiate ? P.65
Comment programmer une cuisson ? P.66-67
Comment utiliser la minuterie ? P.68
Que faire en cas d’anomalies de fonctionnement ?
P.69
Modes de cuisson du four P.70-71
Comment nettoyer la cavité de votre four ?
Qu’est-ce qu’une pyrolyse ? P.72
Dans quel cas faut-il effectuer une pyrolyse ? P.72
Comment faire une pyrolyse ? P.72-73
9963-5921 ML1 5H-720.qxd 14/04/05 14:59 Page 56
Page 57

1
3
5
57
FR
Comment se présente votre four ?
DESCRIPTIF DE L’APPAREIL
1
2
5
6
73
4
Sélecteur de température
Programmateur
Sélecteur de fonctions
Lampe
Indicateur de gradin
Trou pour tourne broche
Contact de détection
d'ouverture de porte
1
2
3
4
5
6
7
9963-5921 ML1 5H-720.qxd 14/04/05 14:59 Page 57
Page 58

58
Accessoires
Grille sécurité anti basculement
La grille peut être utilisée pour supporter tous
les plats et moules contenant des aliments à
cuire ou à gratiner. Elle sera utilisée pour les
grillades (à poser directement dessus).
Plat multi usages
(plat à gâteaux ou lèchefrite)
Il sert de plat à gâteaux et dispose d'un
rebord incliné. Il s'utilise pour la cuisson de
pâtisseries telles que choux à la crème,
meringues, madeleines, pâtes feuilletées...
Inséré dans les gradins sous la grille, il
recueille les jus et les graisses des grillades. Il peut aussi être utilisé à demi rempli
d'eau pour des cuissons au bain-marie.
Evitez de poser directement dans ce plat des rôtis ou des viandes car vous aurez
automatiquement d'importantes projections sur les parois du four.
Plat creux
Il sert à recueillir le jus et les graisses de
cuisson réalisées en gril fort ou gril pulsé.
Il peut être utilisé comme plat de cuisson en
appropriant la taille du morceau à cuire
(ex: une volaille avec les légumes autour, à
température modérée).
Ne jamais poser ce plat directement sur la sole, sauf en position GRIL.
Tournebroche
Pour l'utiliser :
• disposez le plat multi-usages au gradin N°1
pour recueillir les jus de cuisson ou sur la
sole si la pièce à rôtir est trop grosse.
• enfilez une des fourchettes sur la broche ;
embrochez la pièce à rôtir ; enfilez la
deuxième fourchette ; centrez et serrez en vissant les deux fourchettes.
• placez la broche sur son berceau.
• poussez légèrement pour engager la pointe de la broche dans le carré
d'entraînement situé au fond du four (6).
• retirez la poignée en la dévissant. Après la cuisson, revissez la poignée sur la
broche pour la retirer sans se brûler.
AR
AV
9963-5921 ML1 5H-720.qxd 14/04/05 14:59 Page 58
Page 59

59
FR
Conseils de sécurité
Merci de prendre connaissance de ces conseils avant d’installer et
d’utiliser votre four. Ce four a été conçu pour être utlilisé par des particuliers
dans leur lieu d’habitation. Il est destiné exclusivement à la cuisson des denrées
alimentaires. Ce four ne contient aucun composant à base d’amiante.
PREMIERE UTILISATION :
Avant d’utiliser votre four pour la première fois, chauffer le à vide, porte fermée,
pendant 15 minutes environ sur la position maxi afin de “roder” l’appareil. La laine
minérale qui entoure la cavité du four peut dégager, au début, une odeur
particulière due à sa composition. De même, vous constaterez peut-être un
dégagement de fumée. Tout ceci est normal.
UTILISATIONS SUIVANTES :
- Assurez vous que votre porte de four est bien fermée afin que le joint
d’étanchéité remplisse correctement sa fonction.
- Ne laissez personne s’appuyer ou s’asseoir sur la porte du four ouverte.
- Lors de l’utilisation du gril porte entre-ouverte, les parties accessibles
ou les surfaces peuvent devenir chaudes. Eloignez les jeunes enfants.
- Lors de son utilisation, l’appareil devient chaud. Veillez à ne pas toucher les
éléments chauffants situés à l’intérieur du four.
- Après une cuisson, ne prenez pas à main nue la casserolerie (grille,
tournebroche, léchefrite, berceau de tournebroche...), utilisez une manique ou un
tissu isolant.
- Ne garnissez pas votre four de feuilles en aluminium. Sinon, il en résulterait une
accumulation de chaleur qui influencerait désavantageusement le résultat de la
cuisson et du rôtissage et endommagerait l’émail.
- Avant de procéder au nettoyage pyrolyse de votre four, retirez tous les éléments
de casserolerie et enlevez les débordements importants.
- Ne pas utiliser de nettoyeur vapeur ou à haute pression.
- Pendant une pyrolyse, les surfaces accessibles deviennent plus chaudes qu’en
usage normal. Eloigner les jeunes enfants.
- Pour toute intervention de nettoyage dans la cavité du four, le four
doit être arrêté.
Remettez impérativement le sélecteur de fonction sur 0 pour
réutiliser votre four.
9963-5921 ML1 5H-720.qxd 14/04/05 14:59 Page 59
Page 60

60
Comment installer votre four ?
Compteur 20A Mono
220-240 V ~ 50 Hz
Prise de courant
2 pôles + terre
norme CEI 60083
Ligne Mono 220-240 V ~
Raccordement électrique
Câble
d'alimentation
longueur 1,50 m
environ
Disjoncteur différentiel
ou fusible 16A
Avant d'effectuer le branchement, s'assurer que les fils de votre
installation électrique sont d'une section suffisante pour
alimenter normalement l'appareil (section au minimum égale à
celle du câble d'alimentation).
Le fusible de votre installation doit être de 16 Ampères.
Le raccordement électrique est à réaliser avant la mise en place de l'appareil dans
le meuble.
• Le four doit être branché avec un câble d'alimentation (normalisé) à
3 conducteurs de 1,5 mm
2
(1 ph +1 N + terre) qui doivent être raccordés sur
réseau 220-240 V ~ monophasé par l'intermédiaire d'une prise de courant 1 ph +1
N + terre normalisée CEI 60083 ou conforme aux règles d’installation. Le fil de
protection (vert-jaune) est relié à la borne de l'appareil et doit être relié à la
terre de l'installation.
• Dans le cas d’un branchement avec prise de courant, celle-ci doit rester
accessible après l’installation de l’appareil.
• Le neutre du four (fil bleu) doit être raccordé au neutre du réseau.
9963-5921 ML1 5H-720.qxd 14/04/05 14:59 Page 60
Page 61

61
FR
• Le câble d’alimentation (H05 RR-F, H05 RN-F ou H05 VV-F) doit avoir une longueur
suffisante pour être raccordé au four à encastrer posé au sol devant le meuble.
Pour cela l’appareil doit être déconnecté du réseau :
• Ouvrez la trappe située en bas à droite du capot arrière en dévissant les 2 vis, puis
faîtes pivoter la trappe.
• Dénudez chaque fil du nouveau câble d’alimentation sur 12mm.
• Torsadez soigneusement les brins.
• Desserrez les vis du bornier et retirez le cordon d’alimentation à changer.
• Introduire le câble d’alimentation par le côté du capot dans le serre-câble situé à
droite du bornier.
• Raccordez les fils du câble conformément au(x) repère(s) écrit(s) sur le bornier.
• Tous les brins des fils d’alimentation doivent être emprisonnés sous les vis.
• Le fil de la phase sur la borne L.
• Le fil de terre couleur vert-jaune doit être relié à la borne .
• Le fil du neutre (bleu) sur la borne N.
• Vissez à fond les vis du bornier et vérifiez le branchement en tirant sur chaque fil.
• Fixez le câble au moyen du serre-câble situé à droite du bornier.
• Refermez la trappe à l’aide des 2 vis.
Changement du câble d’alimentation
Notre responsabilité ne saurait être engagée en cas d'accident
consécutif à une mise à la terre inexistante, défectueuse ou
incorrecte.
Comment installer votre four ?
• L'ampoule se situe au plafond de la cavité de votre four.
a) Dévissez le hublot (voir ci-contre).
b) Dévissez l'ampoule dans le même
sens.
Caractéristiques de l'ampoule :
- 15 W
- 220-240 V
- 300°C
- culot E 14
c) Changer l'ampoule puis remonter
le hublot et rebrancher votre four
Ampoule
Dévissez
Hublot
Débrancher votre four avant toute intervention sur l'ampoule
pour eviter tout risque de choc électrique et laisser refroidir si
besoin l’appareil.
Comment changer l’ampoule ?
pour dévisser le hublot et la lampe, utiliser un gant de
caoutchouc qui facilitera le démontage.
9963-5921 ML1 5H-720.qxd 14/04/05 14:59 Page 61
Page 62

62
Comment installer votre four ?
Pour être assuré d’avoir une installation conforme, n’hésitez pas
à faire appel à un spécialiste électroménager.
Dimensions utiles pour encastrer votre four
Le four peut indifféremment être installé sous un plan de travail ou dans
un meuble en colonne (ouvert* ou fermé) ayant les dimensions
d’encastrement adaptées (voir schéma ci-contre).
Votre four possède une circulation d’air optimisée qui permet d’obtenir des résultats
de cuisson et de nettoyage remarquables en respectant les éléments suivants :
• Centrez le four dans le meuble de façon à garantir une distance mini de 5 mm avec
le meuble voisin.
• La matière du meuble d’encastrement doit résister à la chaleur (ou être revêtu
d’une telle matière).
• Pour plus de stabilité, fixez le four dans le meuble par 2 vis au travers des trous
prévus à cet effet sur les montants latéraux (cf schéma).
Pour ce faire :
1) Retirez les cache vis en caoutchouc pour accéder aux trous de fixation.
2) Effectuez un trou de Ø 3 mm dans la paroi du meuble pour éviter l’éclatement
du bois.
3) Fixez le four avec les 2 vis.
4) Remettez les cache vis en caoutchouc (ceux-ci servent également à amortir la
fermeture de la porte du four).
(*) si le meuble est ouvert, son ouverture doit être de 70 mm (maxi).
577
577
585600
9963-5921 ML1 5H-720.qxd 14/04/05 14:59 Page 62
Page 63

63
FR
Comment utiliser votre four ?
1. L
e détail de votre programmateur
1
2
3
4
5
6
Affichage des températures, temps, durées et minuteur
Indicateur d'affichage de la température
Indicateur d'affichage de la durée de cuisson
Indicateur d'affichage de la fin de cuisson
Indicateur d'affichage du minuteur indépendant
Touche d'accès aux différents programmes de réglage
1
3
4
5
6
2
9963-5921 ML1 5H-720.qxd 14/04/05 14:59 Page 63
Page 64

64
a) A la mise sous tension
• L’afficheur clignote à 12h.
• Réglez l’heure à l’aide du sélecteur de réglage
+ ou - (le maintien sur + ou - permet d’obtenir un
défilement rapide)
• Appuyez sur la touche pour valider.
Exemple:12h30.
b) Remise à l’heure de l’horloge
• Maintenir appuyé jusqu'à l'apparition de l'heure,
puis relâcher.
• Ajustez le réglage de l’heure avec le sélecteur de
réglage ( + ou -).
• Appuyez sur la touche pour valider.
2.
Comment mettre à l'heure l’horloge du four ?
Comment utiliser votre four ?
S’il n’y a pas de validation par la touche , l’enregistrement
est automatique au bout de quelques secondes.
9963-5921 ML1 5H-720.qxd 14/04/05 14:59 Page 64
Page 65

65
FR
Comment utiliser votre four ?
3. C
omment faire une cuisson immédiate ?
Le programmateur ne doit afficher que l'heure; celle-ci ne doit pas clignoter.
• Choisissez le mode de cuisson :
Tournez le sélecteur de fonctions sur la position de
votre choix.
Exemple : position " "-> le four se met en marche.
Votre four vous propose la température la plus
couramment utilisée.
Placez votre plat dans le four selon les
recommandations fournies par le guide de cuisson.
Il vous est cependant possible d’ajuster la température
en actionnant le sélecteur de réglage vers + ou -.
Exemple " " ajustée à 210°.
Après ces actions, le four chauffe et l’affichage alterne entre la température
dans le four et la température choisie.
Une série de bips sonores retentit lorsque le four atteint la température choisie.
Une fois atteinte, la température reste fixe. Le symbole continue de clignoter.
Après un cycle de cuisson, la turbine de ventilation continue de
fonctionner pendant un certain temps, afin de refroidir le four.
9963-5921 ML1 5H-720.qxd 14/04/05 14:59 Page 65
Page 66

66
Comment utiliser votre four ?
4. Comment programmer une cuisson ?
a) Avec départ immédiat
1. Réglez le mode de cuisson choisi et éventuellement
ajuster la température.
Exemple : position “ ”
température 200°C.
2. Appuyez sur la touche “ ” jusqu’à faire clignoter
l’indicateur de durée de cuisson “ ”.
L’affichage clignote à 0h00 pour indiquer que le réglage
est alors possible.
3. Actionnez le sélecteur de réglage + ou - pour régler
le temps souhaité.
Exemple : 25 min de cuisson.
L’enregistrement du temps de cuisson est automatique
au bout de quelques secondes, ->l’afficheur ne clignote
plus et revient en mode température.
Le décomptage de la durée se fait immédiatement après
le réglage.
Après ces 3 actions, le four chauffe :
Une série de bips sonores retentit lorsque le four atteint la température choisie.
En fin de cuisson (fin du temps programmé),
- le four s’arrête,
- l’indicateur de durée de cuisson s’éteint,
- 0:00 s’affiche
- une série de bips sonores est émise durant quelques minutes.
L’arrêt définitif des bips sonores se fait en ramenant le sélecteur de fonctions
sur 0.
9963-5921 ML1 5H-720.qxd 14/04/05 14:59 Page 66
Page 67

67
FR
Comment utiliser votre four ?
b) Avec départ différé (heure de fin choisie)
Procédez comme une cuisson programmée.
Après le réglage de la durée de cuisson,
Appuyez sur la touche “ ” jusqu’à faire clignoter
l’indicateur de fin de cuisson “ ”.
L’affichage clignote pour indiquer que le réglage est alors
possible.
Tournez sur le sélecteur de réglage + ou - pour
régler l’heure de fin souhaitée.
Exemple : Fin de cuisson à 13h.
Après ces actions, le départ de la chauffe est différé
pour que la cuisson soit finie à 13h.
En fin de cuisson (fin du temps programmé),
- le four s’arrête,
- l’indicateur de durée de cuisson s’éteint,
- 0:00 s’affiche
- une série de bips sonores est émise durant quelques minutes.
L’arrêt définitif des bips sonores se fait en ramenant le sélecteur de fonctions sur 0.
9963-5921 ML1 5H-720.qxd 14/04/05 14:59 Page 67
Page 68

68
5. Comment utiliser la minuterie ?
Votre four est équipé d’un minuteur électronique indépendant du
fonctionnement du four permettant de décompter un temps.
Dans ce cas, l’affichage du minuteur est prioritaire sur l’affichage de l’heure du
jour et de la température.
Appuyez sur la touche “ ” jusqu’à faire clignoter
l’indicateur du minuteur -> l’afficheur clignote.
Tournez le sélecteur de réglage ( + ou - ) jusqu’à obtenir
la durée voulue (maxi 60 minutes)
L’afficheur s’arrête de clignoter au bout de quelques
secondes ou apès un appui sur la touche et le
minuteur se met en marche et décompte le temps de
secondes en secondes.
Une fois la durée écoulée, la minuterie émet une série de bips sonores pour vous
avertir.
Il est possible de modifier ou d’annuler à n’importe quel moment
la programmation de la minuterie.
9963-5921 ML1 5H-720.qxd 14/04/05 14:59 Page 68
Page 69

69
FR
Que faire en cas d’anomalies de fonctionnement ?
Vous avez un doute sur le bon fonctionnement de votre four, ceci ne signifie pas
forcément qu'il y a une panne.
Dans tous les cas, vérifiez les point suivants :
Vous constatez que... Les causes possibles Que faut-il faire ?
Le four ne chauffe pas.
• Le four n'est pas branché.
• Le fusible de votre installation est
hors service.
• La température sélectionnée est
trop basse.
• Le capteur est défectueux.
• Le four a subi une surchauffe, il
s’est mis en sécurité.
- Brancher le four.
- Changer le fusible de votre
installation et vérifier sa valeur (16A).
- Augmenter la température
sélectionnée.
- Faire appel au Service Après-Vente.
- Faire appel au Service Après-Vente.
L’indicateur T°c clignote.
• Capteur de température
défectueux.
- Faire appel au Service Après-Vente.
La lampe du four ne fonctionne
plus.
• La lampe est hors service.
• Le four n'est pas branché ou le
fusible est hors service.
- Changer la lampe.
- Brancher le four ou changer le
fusible.
Le ventilateur de
refroidissement continue de
tourner à l’arrêt du four.
• La ventilation fonctionne pendant
1 heure maximum après la cuisson,
ou lorsque la température de votre
four est supérieure à 125°C.
• Si pas d’arrêt après 1 heure
- Ouvrir la porte du four pour accélérer
le refroidissement du four.
- Faire appel au Service Après-Vente.
Le nettoyage par pyrolyse ne se
fait pas.
• La porte est mal fermée.
• Le système de verrouillage est
défectueux.
• Le capteur de T° est défectueux.
• Le contact de détection de «porte
fermée» est défectueux.
- Vérifier la fermeture de la porte.
- Faire appel au Service Après-Vente.
- Faire appel au Service Après-Vente.
- Faire appel au Service Après-Vente.
9963-5921 ML1 5H-720.qxd 14/04/05 14:59 Page 69
Page 70

70
Traditionnel
La cuisson s’effectue par
les éléments inférieur et
supérieur sans brassage
d’air.
Gril
La cuisson s’effectue par
l’élément supérieur sans
brassage d’air
.
Nécessite un préchauffage avant
d’enfourner le plat.
Effectuez un préchauffage de
5 minutes.
Glissez la léche frite sur le
gardin du bas.
Symbole
Nom de la fonction Description de la fonction
Modes de cuisson du four
*
* Séquences(s) utilisée(s) pour l’annonce écrite sur l’étiquette énergétique conformém
Sole
La cuisson s’effectue par
l’élément inférieur associé à
un léger dosage du gril.
Cuisson par le dessous avec léger
dosage dessus.
Placez la grille sur le gradin bas.
Gril + Tournebroche
La cuisson s’effectue par
l’élément supérieur.
Préchauffage inutile
Volailles et rôtis juteux et
croustillants sur toutes les faces.
Le tourne broche continue de
fonctionner jusqu’à l’ouverture de
la porte.
Glissez la lèche frite au gradin du
bas.
9963-5921 ML1 5H-720.qxd 14/04/05 14:59 Page 70
Page 71

71
FR
Recommandé pour les cuissons lentes
et délicates : gibiers moelleux…
Pour saisir rôtis de viande rouge
Pour mijoter en cocotte fermée plats
prealablement démarrés sur table de
cuisson (coq au vin, civet…)
Recommandé pour griller les
côtelettes, saucisses, tranches de
pain, gambas posées sur la grille.
Recommandations
Modes de cuisson du four
Préco T°
mini
180
préco
275
maxi
275
mini35préco
200
maxi
275
Recommandé pour les plats humides
(quiches, tartes aux fruits juteux…).
La pâte sera bien cuite dessous.
Recommandé pour les préparations qui
lèvent (cake, brioche, kouglof…) et pour les
soufflés qui ne seront pas bloqués par une
croute dessus.
Recommandé pour toutes les volailles
ou rôtis au tourne-broche.
Pour saisir et cuire à coeur gigot, côtes
de boeuf.
Pour garder leur fondant aux pavés de
poissons.
mini35préco
165
maxi
275
mini
180
préco
225
maxi
275
9963-5921 ML1 5H-720.qxd 14/04/05 14:59 Page 71
Page 72

72
1. Qu’est-ce une pyrolyse ?
3. Comment faire une pyrolyse ?
CUISSONS PEU Biscuits, légumes, patisseries Cuissons sans éclaboussures
SALISSANTES quiches, soufflés une pyrolyse n’est pas justifiée
CUISSONS viandes, poissons, la pyrolyse peut se justifier
SALISSANTES (dans un plat) légumes farcis toutes les 3 cuissons
CUISSONS TRES grosses pièces de viandes la pyrolyse peut se faire après
SALISSANTES à la broche 1 cuisson de ce type si les
projections sont importantes
Votre four fume lors d’un préchauffage ou fume énormément lors d’une cuisson.
Votre four dégage une odeur à froid désagréable suite à différentes cuissons
(mouton, poisson, grillades...).
2. Dans quel cas faut il effectuer une pyrolyse ?
Il ne faut pas attendre que le four soit chargé de graisses pour
effectuer ce nettoyage.
-La pyrolyse est un cycle de chauffe de la cavité du four à très haute
température qui permet d’éliminer toutes les salissures qui proviennent des
éclaboussures ou des débordements. Les fumées et odeurs dégagées sont
détruites par le passage dans un catalyseur.
- La pyrolyse n’est toutefois pas nécessaire après chaque cuisson, mais
seulement si le degré de salissure le justifie.
- Par mesure de sécurité, l’opération de nettoyage ne s’effectue qu’après
blocage automatique de la porte. Dès que la température à l’intérieur du four
dépasse les températures de cuisson, il est impossible de déverrouiller la porte
même en positionnant la manette «sélecteur de fonctions» sur 0.
Comment nettoyer la cavité de votre four ?
a) Retirez la casserolerie du four et enlevez les
débordements importants qui auraient pu se
produire
b) Vérifiez que le programmateur affiche l’heure du
jour et que celle-ci ne clignote pas.
9963-5921 ML1 5H-720.qxd 14/04/05 14:59 Page 72
Page 73

73
FR
c) Positionnez la manette «sélecteur de
fonctions» sur la position «PYROLYSE».
La durée d’indisponibilité du four est de 2h30
(non modifiable).
Ce temps prend en compte la durée de refroidissement
jusqu’au déverrouillage de la porte.
• Au cours du cycle de pyrolyse, le voyant de verrouillage
s'allume pour vous indiquer que la porte est verrouillée,
l'indicateur pyro s'allume et l'heure restante s'alterne.
• La pyrolyse s’arrête automatiquement lorsque le voyant de verrouillage s’éteint,
il est alors possible d’ouvrir la porte.
d) Ramenez le sélecteur de fonctions sur la position 0.
e) Lorsque le four est froid, utilisez un chiffon humide pour enlever la cendre
blanche. Le four est propre et à nouveau utilisable pour effectuer une cuisson de
votre choix.
9963-5921 ML1 5H-720.qxd 14/04/05 14:59 Page 73
Page 74

74
I
nhalt
In der gesamten Gebrauchsanweisung
geben Ihnen die Zeichen
Sicherheitshinweise und
Ratschläge und Tipps
Präsentierung Ihres Backofens
Beschreibung des Gerätes S.75
Zubehör S.76
Sicherheitshinweise S.77
Backofeninstallation
Stromanschluss S.78-79
Auswechseln der Glühbirne S.79
Nützliche Maße für den Einbau Ihres Backofens S.80
Benutzung Ihres Backofens
Ihre Programmschaltuhr im Detail S.81
Stellen der Uhr des Backofens S.82
Starten eines sofortigen Garvorgangs S.83
Programmierung eines Garvorgangs S.84-85
Benutzung des Kurzzeitweckers S.86
Verhalten bei Betriebsstörungen
S.87
Die Garfunktionen des Backofens S.88-89
Reinigung des Garraums Ihres Backofens
Was ist eine Pyrolyse? S.90
Wann muss seine Pyrolyse durchgeführt werden? S.90
Wie wird eine Pyrolyse durchgeführt? S.90-91
9963-5921 ML1 5H-720.qxd 14/04/05 14:59 Page 74
Page 75

1
3
5
75
Präsentierung Ihres Backofens
BESCHREIBUNG DES GERÄTES
1
2
5
6
73
4
Temperaturwahlschalter
Programmwähler
Funktionswahlschalter
Lampe
Anzeige der Einschubebene
Loch für den Drehspieß
Erfassungskontakt der
Türöffnung
1
2
3
4
5
6
DE
7
9963-5921 ML1 5H-720.qxd 14/04/05 14:59 Page 75
Page 76

76
Zubehör
Kippsicherer Einschubrost
Der Einschubrost kann als Tragfläche für alle
zu garende oder backende Nahrungsmittel
enthaltenden Behälter und Formen benutzt
werden. Er ist auch für Grillstücke zu benutzen
(direkt darauf legen).
Mehrzweckblech
(Kuchenblech oder Fettpfanne)
Dient als Kuchenblech und verfügt über einen
abgeschrägten Rand. Es wird für das Backen
von Gebäck wie Windbeutel, Baiser,
Madeleines, Blätterteiggebäck, usw. verwendet.
Unter den Rost geschoben, fängt es den Saft
und das Fett von gegrilltem Fleisch auf. Halb mit Wasser gefüllt, kann es auch zum
Garen im Wasserbad verwendet werden. Vermeiden Sie es, Braten oder sonstiges
Fleisch direkt auf dieses Blech zu legen, denn dies hätte automatisch eine starke
Verspritzung der Backofenwände zur Folge.
Tiefes Blech
Dient zum Auffangen von Bratensaft und Fett,
wenn Sie den starken Grill oder den Umluftgrill
verwenden. Es kann als Gargefäß benutzt
werden, wenn Sie das zu garende Stück seiner
Größe anpassen (z.B.: Geflügel mit Gemüse
umgeben, bei mäßiger Temperatur).
Dieses Blech nie direkt auf den Backofenboden
stellen, ausgenommen in der GRILLPOSITION.
Bratspieß
Für seine Benutzung:
• Zum Auffangen des Bratensaftes die
Mehrzweckfettpfanne in die Einschubebene
Nr. 1 schieben oder, wenn das Fleischstück zu
groß ist, diese auf den Boden des Backofens
stellen.
• Eine der Gabeln auf den Spieß schieben; das
zu bratende Stück aufspießen; die zweite Gabel auf den Spieß schieben; das Ganze
zentrieren und die Gabeln festschrauben.
• Den Spieß auf seinen Träger legen.
• Die Spitze des Spießes vorsichtig in das Loch an der Backofenrückwand stecken (6).
• Den Griff losschrauben und entfernen. Nach dem Bratvorgang den Griff wieder an
den Spieß schrauben, um denselben ohne Verbrennungsrisiko aus dem Ofen
entfernen zu können.
HINTEN
VORNE
9963-5921 ML1 5H-720.qxd 14/04/05 14:59 Page 76
Page 77

77
DE
Sicherheitshinweise
Bitte nehmen Sie diese Hinweise zur Kenntnis, bevor Sie den Backofen
installieren und benutzen. Dieser Backofen wurde zur Benutzung von
Privatpersonen in ihrer Wohnung entworfen. Er ist ausschließlich zum Garen von
Nahrungsmitteln bestimmt und enthält keine Bestandteile auf Asbestbasis.
ERSTE BENUTZUNG:
Bevor Sie Ihren Backofen zum ersten Mal benutzen, müssen Sie ihn bei
geschlossener Tür etwa 15 Minuten bei stärkster Hitze aufheizen, damit das Gerät
„eingefahren" wird. Die Mineralwolle, die den Garraum umgibt, kann am Anfang
einen eigenartigen, auf ihre Zusammensetzung zurückzuführenden Geruch
ausströmen. Ebenso werden Sie vielleicht das Ausströmen von Rauch feststellen.
Dies alles ist normal.
DIE NACHFOLGENDEN BENUTZUNGEN:
- Vergewissern Sie sich, dass die Backofentür gut geschlossen ist, damit die
Dichtung ihre Funktion korrekt erfüllen kann.
- Achten Sie darauf, dass sich niemand auf die geöffnete Backofentür stützt oder
setzt.
- Bei Benutzung des Grills mit leicht geöffneter Tür können die
erreichbaren Teile oder Flächen heiß werden. Kleine Kinder hiervon
fernhalten.
- Das Gerät wird während seiner Benutzung heiß. Darauf achten, die im Backofen
vorhandenen, heizenden Teile nicht zu berühren.
- Nach einem Garvorgang die Zubehörteile des Backofens (Rost, Bratspieß,
Fettpfanne, Spießträger, usw.) nie ohne Handschutz herausnehmen. Verwenden Sie
einen Handschuh oder einen isolierenden Topflappen.
- Legen Sie Ihren Backofen nicht mit Alufolie aus, da sonst eine Hitzeanstauung
entsteht, die sich auf das Gar- oder Bratergebnis nachteilig auswirken und das Email
beschädigen würde.
- Bevor Sie Ihren Backofen anhand einer Pyrolyse reinigen, alle
Backofenzubehörteile, sowie größere Überlaufreste entfernen.
- Keine Dampf- oder Hochdruckreiniger verwenden.
- Während einer Pyrolyse können die erreichbaren Flächen heißer werden als bei
einer normalen Benutzung. Kleine Kinder fernhalten.
- Alle Reinigungsvorgänge des Garraums müssen bei abgeschaltetem
Backofen durchgeführt werden.
Ihr Funktionswahlschalter muss vor einer erneuten Benutzung
des Backofens unbedingt auf 0 gestellt werden.
9963-5921 ML1 5H-720.qxd 14/04/05 14:59 Page 77
Page 78

78
Backofeninstallation
Zähler 20 A Mono
220-240 V ~ 50 Hz
Steckdose
2-polig + Erdung
Norm CEI 60083
Mono-Leitung 220-240 V ~
Stromanschluss
Stromzufüh-
rungskabel
von rund 1,50 m
Länge
Differentieller Überlastschalter
oder Sicherung 16A
Vergewissern Sie sich vor dem Anschluss, dass die Kabel Ihrer
elektrischen Installation einen für die normale Versorgung Ihres
Geräts ausreichenden Querschnitt aufweisen (Der Querschnitt
muss mindestens dem des Stromzuführungskabels entsprechen).
Ihr Gerät muss mit einer Sicherung von 16 Ampere ausgestattet sein.
Der elektrische Anschluss muss vor der Montage des Geräts im Möbel erfolgen.
• Der Backofen muss anhand eines (normalisierten) Stromzuführungskabels mit drei
Leitern à 1,5 mm2(1 Ph +1 N + Erde) angeschlossen sein. Diese drei Leiter müssen
an ein einphasiges Netz von 220-240 V ~ anhand einer normalisierten CEI 60083
Steckdose 1 Ph+1N + Erdung oder in Übereinstimmung mit den Installierungsstandards angeschlossen werden. Der Schutzleiter (grün-gelb) ist an die Erdungs-
klemme des Gerätes anzuschließen und muss mit der Erdung der Installation
verbunden werden.
• Im Falle eines Anschlusses anhand einer Steckdose, muss diese nach der
Installation des Gerätes erreichbar bleiben.
• Der Neutralleiter des Backofens (blaues Kabel) muss mit dem Neutralleiter des
Stromnetzes verbunden sein.
9963-5921 ML1 5H-720.qxd 14/04/05 14:59 Page 78
Page 79

79
DE
• Das Stromzuführungskabel (H05 RR-F, H05 RN-F oder H05 VV-F) muss so lang sein,
dass der einzubauende Backofen vor dem Möbel auf dem Boden stehend
angeschlossen werden kann.
Das Gerät darf bei diesem Vorgang nicht an das Stromnetz angeschlossen sein:
• Die an der hinteren Abdeckplatte unten rechts befindliche Klappe öffnen, indem sie
die zwei Schrauben lösen und die Klappe dann aufklappen.
• Alle Leiter des neuen Stromzuführungskabels über 12 mm abmanteln.
• Die Fasern sorgfältig verdrillen.
• Die Schrauben der Klemmleiste lösen und das auszutauschende Kabel herausziehen.
• Das Stromzuführungskabel seitlich durch die Abdeckklappe in die rechts neben der
Klemmleiste befindliche Kabelklemme führen.
• Die Leitungen der/den Markierung(en) entsprechend an die Klemmleiste anschließen.
• Alle Fasern der Zuführungsleiter müssen unter den Schrauben fest sitzen.
• Phasenleiter unter der Klemme L.
• Der gelb-grüne Erdleiter muss an die Klemme angeschlossen sein.
• Der Neutralleiter (blau) an die Klemme N.
• Die Schrauben der Klemmleiste fest anziehen und ihren Sitz durch Ziehen an jedem
Leiter überprüfen.
• Das Kabel anhand der rechts von der Klemmleiste befindlichen Kabelklemme
befestigen.
• Die Klappe mittels der 2 Schrauben wieder schließen.
Austausch des Stromzuführungskabels
Wir können für Unfälle, die auf eine nicht vorhandene, beschädigte
oder unkorrekte Erdung zurückzuführen sind, nicht haftbar
gemacht werden.
Backofeninstallation
• Die Lampe befindet sich an der Decke des Innenraums des Backofens.
a) Die Abdeckung abschrauben
(siehe nebenan).
b) Die Glühlampe in die gleiche
Richtung herausdrehen.
Daten der Lampe:
- 15 W
- 220-240 V
- 300°C
- Sockel E 14
c) Die Glühlampe auswechseln, die
runde Abdeckung wieder anmontieren und den Ofen erneut anschließen.
Glühlampe
Losschrauben
Runde Abdeckung
Vor jedem Eingriff an der Glühlampe den Ofen abschalten, um
Spannungsstöße zu vermeiden und ggf. den Ofen abkühlen zu lassen.
A
uswechseln der Glühbirne
Für ein leichteres Herausdrehen der Glasabdeckung und der
Lampe sollte ein Gummihandschuh verwendet werden.
9963-5921 ML1 5H-720.qxd 14/04/05 14:59 Page 79
Page 80

80
Backofeninstallation
Um sicher zu gehen, dass Ihre Installation konform ist, sollten Sie
einen Installateur für Haushaltsgeräte mit der Montage beauftragen.
Nützliche Maße für den Einbau Ihres Backofens
Der Backofen kann gleichermaßen unter einer Arbeitsplatte wie unter
einem (offenen* oder geschlossenen) Hochschrank mit den geeigneten
Abmessungen (siehe Schema) untergebracht werden.
Ihr Backofen ist mit einer optimierten Luftumwälzung ausgestattet, die es ermöglicht,
unter Beachtung der nachstehenden Hinweise bemerkenswerte Gar- und
Reinigungsergebnisse zu erzielen:
• Den Backofen im Möbel so zentrieren, dass ein Mindestabstand von 5 mm zum
nebenstehenden Schrank gewährleistet ist.
• Das Material des Einbaumöbels muss hitzebeständig sein (oder mit einem
hitzebeständigen Material beschichtet sein ).
• Um dem Backofen mehr Standfestigkeit zu verleihen, wird er anhand von
2 Schrauben durch die dafür vorgesehenen Bohrungen in den seitlichen Schutzleisten
befestigt (siehe Schema).
Hierzu folgendermaßen vorgehen:
1) Die Schraubenabdeckungen aus Kautschuk entfernen, um die Befestigungsbohrungen freizulegen.
2) In die Möbelwand ein Loch von 3 mm Durchmesser bohren, um das Bersten des
Holzes zu verhindern.
3) Den Backofen anhand der 2 Schrauben befestigen.
4) Die Schraubenabdeckungen aus Kautschuk wieder einsetzen (sie dienen auch als
Dämpfer beim Schließen der Backofentür).
(*) Wenn der Hochschrank offen ist, darf seine Öffnung höchstens 70 mm
betragen.
577
577
585600
9963-5921 ML1 5H-720.qxd 14/04/05 15:00 Page 80
Page 81

81
DE
Benutzung Ihres Backofens
1. I
hre Programmschaltuhr im Detail
1
2
3
4
5
6
Anzeige von Temperatur, Zeit, Garzeit und Zeituhr
Symbol der Temperaturanzeige
Symbol der Garzeitanzeige
Symbol der Anzeige des Garzeitendes
Symbol der unabhängigen Zeituhr
Zugriffstaste zu den verschiedenen Einstellprogrammen
1
3
4
5
6
2
9963-5921 ML1 5H-720.qxd 14/04/05 15:00 Page 81
Page 82

82
a) Bei der Inbetriebnahme
• Die Anzeige blinkt bei 12.00 Uhr.
• Stellen Sie die Uhr mit den Einstelltasten + oder -
ein (bei gedrückter Taste kann man die Ziffern
abrollen lassen)
• Betätigen Sie die Taste , um die Uhrzeit zu
bestätigen.
Beispiel: 12:30.
b) Neueinstellung der Uhrzeit
• So lange gedrückt halten, bis die Uhrzeit aufscheint,
dann loslassen.
• Die Uhrzeit mit dem Wahlschalter (+ oder -)
einstellen.
• Betätigen Sie die Taste , um die Uhrzeit zu
bestätigen.
2.
Stellen der Uhr des Backofens
Benutzung Ihres Backofens
Wenn keine Bestätigung mit der Taste erfolgt, wird die neue
Uhrzeit automatisch nach einigen Sekunden gespeichert.
9963-5921 ML1 5H-720.qxd 14/04/05 15:00 Page 82
Page 83

83
DE
Benutzung Ihres Backofens
3. S
tarten eines sofortigen Garvorgangs
Das Programmschaltfeld darf nur die Uhrzeit anzeigen; diese darf nicht blinken.
• Wählen Sie die Zubereitungsart:
Den Funktionswahlschalter auf die Position Ihrer Wahl
stellen.
Beispiel: Position " " -> das Gerät wird eingeschaltet.
Das Gerät schlägt Ihnen die am häufigsten verwendete
Temperatur vor.
Stellen Sie das Gericht in den Garraum und beachten
Sie dabei die Koch- oder Backanweisungen.
Sie können die Temperatur jedoch auch mit dem
Wahlschalter + oder - individuell einstellen.
Beispiel " " auf 210° eingestellt.
Danach heizt der Backofen auf, wobei abwechselnd die tatsächliche und die
eingestellte Temperatur angezeigt wird.
Wenn die vorprogrammierte Temperatur erreicht wird, ertönt ein akustisches Signal
(Pieptöne).
Danach wird die Temperatur durchgehend angezeigt. Das Symbol blinkt weiter.
Nach Abschluss eines Garvorgangs bleibt das Kühlgebläse noch einige
Zeit in Betrieb, um den Ofen abzukühlen.
9963-5921 ML1 5H-720.qxd 14/04/05 15:00 Page 83
Page 84

84
Benutzung Ihres Backofens
4. Programmierung eines Garvorgangs
a) Mit sofortigem Start
1. Das gewünschte Garprogramm und eventuell die
Temperatur einstellen.
Beispiel: Position " "
Temperatur 200°C.
2. Taste " " drücken, bis das Symbol für die Garzeit-
anzeige
""
blinkt.
Die Anzeige 0:00 blinkt, um anzuzeigen, dass die Garzeit
eingestellt werden kann.
3. Die gewünschte Garzeit mit dem Wahlschalter + oder
- einstellen.
Beispiel: 25 Minuten Garzeit.
Die Garzeit wird nach einigen Sekunden automatisch
abgespeichert -> die Anzeige blinkt nicht mehr und wird
auf die Temperaturanzeige umgeschaltet.
Die Garzeit wird sofort nach dem Einstellen auf Null
zurückgezählt.
Nach diesen 3 Arbeitsschritten beginnt das
Heizen:
Wenn die vorprogrammierte Temperatur erreicht wird, ertönt ein akustisches
Signal (Pieptöne).
Nach Ablauf der eingestellten Garzeit,
- schaltet der Ofen ab,
- erlischt die Garzeitanzeige,
- wird 0:00 angezeigt
- ertönt mehrere Minuten lang ein akustisches Signal (Pieptöne).
Das akustische Signal wird endgültig abgeschaltet, indem der
Funktionswahlschalter auf 0 gestellt wird.
9963-5921 ML1 5H-720.qxd 14/04/05 15:00 Page 84
Page 85

85
DE
Benutzung Ihres Backofens
b) Mit späterem Start (Wahl des Endzeitpunkts des Garens)
Wie bei einem Garen mit sofortigem Start vorgehen.
Nach dem Einstellen der Garzeit,
Die Taste " " drücken, bis das Symbol für den
Endzeit-
punkt der Garzeit " " blinkt.
Die Anzeige blinkt, um anzuzeigen, dass die Einstellung
jetzt möglich ist.
Den gewünschten Endzeitpunkt mit dem Wahlschalter
+ oder - einstellen.
Beispiel: Endzeitpunkt des Garens: 13 Uhr.
Nach diesen Arbeitsschritten beginnt der Ofen später
zu heizen, damit die Garzeit um 13 Uhr beendet ist.
Nach Ablauf der eingestellten Garzeit,
- schaltet der Ofen ab,
- erlischt die Garzeitanzeige,
- wird 0:00 angezeigt
- ertönt mehrere Minuten lang ein akustisches Signal (Pieptöne).
Das akustische Signal wird endgültig abgeschaltet, indem der
Funktionswahlschalter auf 0 gestellt wird.
9963-5921 ML1 5H-720.qxd 14/04/05 15:00 Page 85
Page 86

86
5. Benutzung des Kurzzeitweckers
Ihr Backofen ist mit einer von der Funktionsweise des Ofens unabhängigen
Schaltuhr ausgestattet, mit der das Rückwärtszählen einer Zeitdauer
möglich ist.
In diesem Fall hat die Anzeige der Zeituhr Vorrang vor
der Anzeige der Uhrzeit und der Temperatur.
Taste " " drücken, bis das Symbol der Zeituhr blinkt
-> die Anzeige blinkt.
Die gewünschte Zeit (höchstens 60 Minuten) mit dem
Wahlschalter (+ oder -) einstellen
Die Anzeige hört nach einigen Sekunden oder nach Druck
der Taste auf zu blinken und die Zeituhr beginnt, im
Sekundenrhythmus bis 0 zurückzuzählen.
Wenn die Zeituhr bis Null zurückgezählt hat, ertönt ein
akustisches Signal (Pieptöne).
Sie können die Programmierung des Kurzzeitweckers jederzeit
ändern oder annullieren.
9963-5921 ML1 5H-720.qxd 14/04/05 15:00 Page 86
Page 87

87
DE
Verhalten bei Betriebsstörungen
Sie sind sich nicht sicher, ob Ihr Backofen korrekt funktioniert. Das heißt
nicht unbedingt, dass eine Störung vorliegt.
Überprüfen Sie dennoch in allen
Fällen die folgenden Punkte:
Sie stellen fest, dass... Mögliche Ursachen Was ist zu tun?
Der Backofen nicht heizt.
• Der Ofen ist nicht angeschlossen.
• Die Sicherung ist ausgefallen.
• Die gewählte Temperatur ist zu
niedrig.
• Der Fühler ist defekt
• Der Backofen wurde überhitzt und
hat auf Sicherheitsbetrieb
umgeschaltet.
- Schließen Sie den Backofen an
- Wechseln Sie die Sicherung aus und
prüfen Sie die Stromstärke (16A).
- Stellen Sie eine höhere Temperatur
ein.
- Wenden Sie sich an den
Kundendienst.
- Wenden Sie sich an den
Kundendienst.
Der Temperaturanzeiger T°c
blinkt.
• Die Temperatursonde ist defekt. - Wenden Sie sich an den
Kundendienst.
Die Lampe des Backofens nicht
brennt.
• Die Lampe ist durchgebrannt.
• Der Backofen ist nicht
angeschlossen oder die Sicherung
ist ausgefallen.
- Glühlampe auswechseln.
- Schließen Sie den Backofen an oder
wechseln Sie die Sicherung aus.
Das Kühlgebläse nach dem
Abschalten des Backofens
weiterläuft.
• Das Kühlgebläse funktioniert nach
dem Garvorgang während
höchstens einer Stunde, bzw. bis
zum Erreichen einer Temperatur
von 125°C.
• Falls kein Stopp nach einer
Stunde.
- Öffnen Sie die Ofentür, um das
Abkühlen des Backofens zu
beschleunigen.
- Wenden Sie sich an den
Kundendienst.
Die Pyrolysereinigung nicht
funktioniert.
• Die Tür ist nicht richtig
verschlossen.
• Das Verriegelungssystem ist
defekt.
• Die Temperatursonde ist defekt.
• Der Erfassungskontakt für den
Türverschluss ist defekt.
- Überprüfen Sie den Türverschluss.
- Wenden Sie sich an den
Kundendienst.
- Wenden Sie sich an den
Kundendienst.
- Wenden Sie sich an den
Kundendienst.
9963-5921 ML1 5H-720.qxd 14/04/05 15:00 Page 87
Page 88

88
Traditionell
Das Garen erfolgt anhand der
oberen und unteren Heizelemente
ohne Luftumwälzschraube.
Grill
Das Garen erfolgt anhand des
oberen Heizelements ohne
Luftumwälzung.
Backofen vorheizen, bevor
die Speise in den Ofen
gestellt wird.
5 Minuten vorheizen.
Fettpfanne in die untere
Einschubebene schieben.
Symbol
Funktionsbezeichnung Funktionsbeschreibun
Die Garfunktionen des Backofens
*
* Gemäß der europäischen Norm EN 50304 und der europäischen Richtlinie 2002/40/
Boden
Das Garen erfolgt anhand des
unteren Heizelements verbunden
mit einer leichten Einstellung des
Grills.
Garen von unten mit einer
geringen Dosierung von oben.
Den Rost in die untere
Einschubebene schieben.
Grill + Bratspieß
Das Garen erfolgt anhand des
oberen Heizelements.
Vorheizen nicht erforderlich
Saftige, rundum knusprige
Braten und Geflügel.
Der Bratspieß dreht sich bis zum
Öffnen der Tür weiter.
Die Fettpfanne in die untere
Einschubebene stellen.
9963-5921 ML1 5H-720.qxd 14/04/05 15:00 Page 88
Page 89

89
DE
Empfohlen für langsame und delikate
Garvorgänge: saftiges Wild...
Zum Anbraten von Braten aus rotem Fleisch.
Zum Schmoren in geschlossener Kasserolle
von Gerichten, die bereits auf der Kochplatte
angebraten wurden (Coq au Vin, in Wein
geschmortes Wild, usw.).
Empfohlen zum Grillen von auf den Rost
gelegten Koteletts, Würsten,
Brotscheiben und Riesengarnelen.
Empfehlungen
Die Garfunktionen des Backofens
Empf. T°
Empfohlen für feuchtes Gebäck (Quiche,
saftige Obstkuchen...).
Der Boden wird unten gut gebacken.
Empfohlen für aufgehende Zubereitungen
(Kastenkuchen, Napfkuchen, Kugelhopf...) und
Soufflees, die somit nicht durch die Ausbildung
einer Kruste am Aufgehen gehindert werden.
Empfohlen für am Spieß gebratene
Geflügel oder Braten jeder Art.
Zum Anbraten und Garen von
Lammkeulen, Rinderkoteletts.
Damit Fischfilets schön zart und saftig
bleiben.
mini empf. maxi
35 200 275
mini empf. maxi
180 275 275
mini empf. maxi
35 165 275
mini empf. maxi
180 225 275
9963-5921 ML1 5H-720.qxd 14/04/05 15:00 Page 89
Page 90

90
1. Was ist eine Pyrolyse?
3.
Wie wird eine Pyrolyse durchgeführt?
ZUBEREITUNGEN, Kekse, Gemüse, Nicht spritzende Garvorgänge
DIE WENIG SCHMUTZ Gebäck, Quiche, Es muss keine Pyrolyse
ERZEUGEN Soufflees, usw. durchgeführt werden
ZUBEREITUNGEN, Fleisch, Fisch, Eine Pyrolyse kann nach
DIE VIEL SCHMUTZ (in einem Bräter), drei Kochvorgängen
ERZEUGEN gefülltes Gemüse durchgeführt werden
ZUBEREITUNGEN, Große Fleischstücke Eine Pyrolyse kann nach einem
DIE SEHR VIEL am Spieß Garvorgang durchgeführt
SCHMUTZ ERZEUGEN werden, wenn viel Fett
verspritzt wurde
Wenn Ihr Backofen beim Vorheizen oder beim Garvorgang stark qualmt.
Wenn Ihr Backofen aufgrund unterschiedlicher Garvorgänge (Hammel, Fisch,
Grillfleisch...) einen unangenehmen Geruch ausströmt.
2.
Wann muss seine Pyrolyse durchgeführt werden?
Nicht warten, bis der Backofen stark verfettet ist, um eine
Reinigung vorzunehmen.
- Die Pyrolyse entspricht einem Heizzyklus des Backofengarraums bei besonders
hohen Temperaturen, während dessen alle, aufgrund von Spritzern oder
überlaufenden Speisen entstandenen Verschmutzungen eliminiert werden können.
Rauch und Gerüche werden beim Durchgang durch einen Katalysator zerstört.
- Eine Pyrolyse ist jedoch nicht nach jedem Garvorgang erforderlich, sondern nur
dann, wenn der Verschmutzungsgrad des Ofens sie rechtfertigt.
- Aus Sicherheitsgründen erfolgt der Reinigungsvorgang erst nach dem automatischen
Verriegeln der Backofentür. Sobald die Temperatur im Backofen die üblichen
Gartemperaturen übersteigt, kann die Tür nicht mehr entriegelt werden, selbst wenn
man den Funktionswahlschalter auf 0 stellt.
Reinigung des Garraums Ihres Backofens
a) Entfernen Sie das Zubehör aus dem Backofen, sowie
den gröbsten Schmutz, der beispielsweise durch
Überkochen entstanden ist
b) Überprüfen Sie, ob die Uhrzeit in der Programmierleiste angezeigt wird und vergewissern Sie sich, dass
diese nicht blinkt.
9963-5921 ML1 5H-720.qxd 14/04/05 15:00 Page 90
Page 91

91
DE
c) Den Funktionswahlschalter auf die Position „PYROLYSE"
stellen.
Der Backofen kann 2h30 Stunden nicht benutzt werden
(nicht änderbar).
Diese Dauer berücksichtigt die für das Abkühlen bis zur
Entriegelung der Tür erforderliche Zeit.
• Während des Pyrolysezyklus leuchtet das
Verschlusssymbol. Dies bedeutet, dass die Backofentür
verriegelt ist. Das PYRO-Symbol leuchtet auf und die verbleibende Zeit wird in
regelmäßigen Abständen angezeigt
• Die Pyrolyse schaltet sich automatisch ab, wenn das Verschlusssymbol erloschen
ist. Jetzt kann die Tür geöffnet werden.
d) Den Funktionsauswahlschalter erneut auf 0 stellen.
e) Wenn der Backofen abgekühlt ist, die weiße Asche mit einem Tuch entfernen.
Nun ist der Backofen wieder sauber und kann erneut für einen beliebigen
Garvorgang benutzt werden.
9963-5921 ML1 5H-720.qxd 14/04/05 15:00 Page 91
Page 92

92
99635921 03/05
9963-5921 ML1 5H-720.qxd 14/04/05 15:00 Page 92
 Loading...