


Page 1

USERS MANUAL
oven
Page 2

INTRODUCTION P.3
YOUR LOWER OVEN
How it works P.4
Accessories P.5
SAFETY RECOMMENDATIONS P.6
HOW TO INSTALL YOUR OVEN
Electrical connections P.8-9
Dimensions for installation use P.10
UPPER OVEN
How to cook straightaway P.11
Upper Cooking mode P.12
Changing a Light Bulb P.13
HOW TO USE YOUR LOWER OVEN
The oven programmer P.14
How to set the clock P.15
Immediate cooking P.16
How to programme the cooking P.17-18
How to use the timer P.19
Changing a Light Bulb P.20
Cooking mode P.21-22
HOW DO YOU CLEAN THE CAVITY OF YOUR OVEN?
What is pyrolysis? P.23
In what situations should pyrolysis be used? P.23
How do you use the pyrolysis function? P.23-24
TROUBLESOOTING P.25
2
TABLE OF CONTENTS
Page 3

3
Dear Customer,
You have just acquired a
FFAAGGOORR oovveenn
and we would like to thank you.
Our research teams have created this new generation of appliances for you
so that cooking is a pleasure every day.
With pure lines and modern aesthetics, your new
FFAAGGOORR oovveenn
will blend har-
moniously into your kitchen and will perfectly combine cooking performance
and ease of use.
In the FAGOR product line, you will also find a wide range of hobs, ventilation
hoods, dishwashers and referigerators that you can coordinate with your new
FFAAGGOORR oovveenn
.
Of course, in an ongoing effort to best satisfy your demands with regard to
our products, our after-sales service department is at your disposal and ready
to listen in order to respond to all of your questions and suggestions (contact
information at the end of this booklet).
At the cutting edge of innovation, FAGOR helps to improve the quality of
everyday life by bringing you products that are ever more effective, easy to
use, environmentally friendly, attractive and reliable.
The FAGOR Brand
INTRODUCTION
Page 4
4
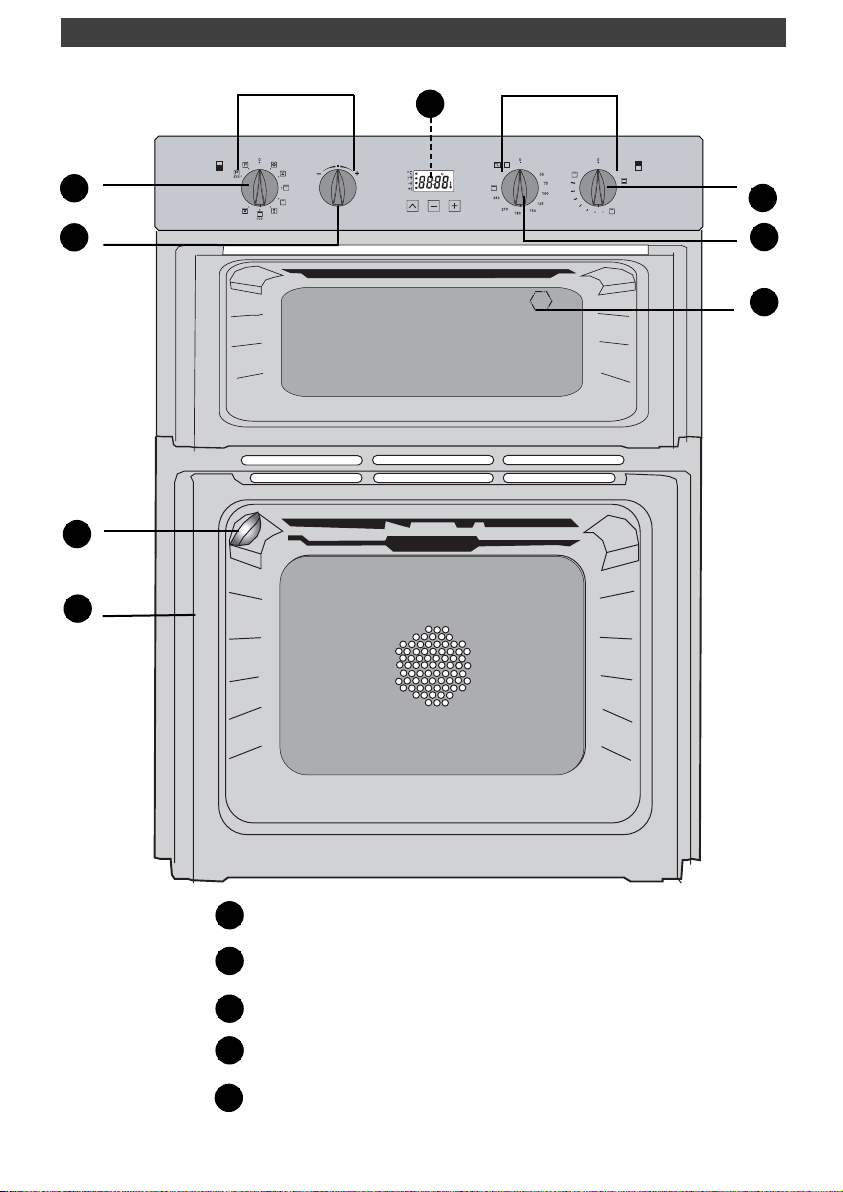
YOUR OVEN
Lower oven
Upper oven
Feature selector
Temperature control
Programmable clock(Lower)
Light
Rail positions
A
B
C
D
E
A
B
D
E
A
B
D
C
5
3
1
Page 5
5
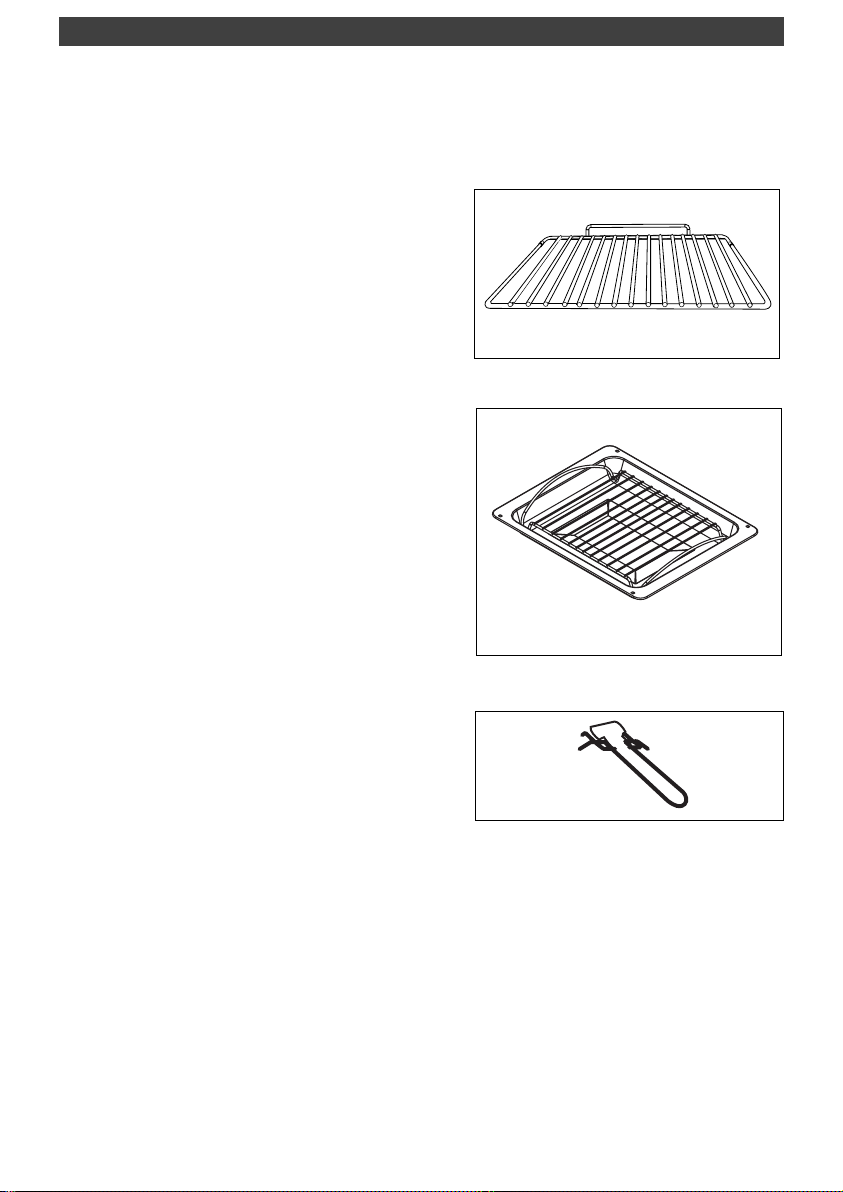
ACCESSORIES
••
Handle for grill tray
••
Anti-tip safety shelf
Food can either be placed on the shelf in a
dish or cake tin for cooking or browning.
••
Sloped 45 mm dish equipped with
a special grid for grilling
It serves to collect juices and fat from cooking
meat or fish placed directly on the grid during
a grill or pulsed grill sequence.
Never place this dish on the floor of the oven
(it may damage the enamel) unless it is in the
grill position (the bottom heating element
does not turn on when the oven is set for
grilling).
Page 6

6
SAFETY RECOMMENDATIONS
SAFETY INSTRUCTIONS
— This oven was designed for use by private
individuals in their homes. It is intended solely for cooking foodstuffs. This oven does not
contain any asbestos-based components.
— Please make sure children do not play with
the appliance.
— When you receive the appliance, unpack it
or have it unpacked immediately. Give it an
overall inspection. Make note of any concerns
or reservations on the delivery slip and make
sure to keep a copy of this form.
— Your appliance is intended for standard
household use. Do not use it for commercial
or industrial purposes or for any other purpose than that for which it was designed.
— Do not modify or attempt to modify any of
the characteristics of this appliance. This
would be dangerous to your safety.
— WARNING: accessible parts may be hot
when in use. It is advisable to keep small children away from the apppliance.
— Never pull your appliance by the door handle.
— Before using your oven for the first time,
heat it while empty for approximately 15 minutes. Make sure that the room is sufficiently
ventilated. You may notice a particular odour,
or a small release of smoke. All of this is normal.
— WARNING: accessible parts may become
hot when the grill is used. It is advisable to
keep children away from the apppliance.
— When in use, the appliance becomes hot.
Be careful not to touch the heating elements
located inside the oven.
— When placing dishes inside or removing
them from the oven, do not place your hands
close to the upper heating elements and use
heat-protective kitchen gloves.
— During pyrolysis, the exposed surfaces
become hotter than during normal use. It is
advisable to keep small children away from
the oven.
— Before beginning a pyrolysis cleaning cycle
in your oven, remove all parts of your grids,
trays and accessories and remove major spill
residue. During pyrolysis, exposed surfaces
become hotter than during normal use. It is
advisable to keep small children away from
the oven.
— At the end of cooking, do not pick up oven
or grill items (grid, rotisserie,...) with your bare
hands.
— Never place aluminium foil directly in contact with the floor of the oven (see the chapter on oven description), as accumulated heat
may cause deterioration of the enamel.
— Do not place heavy weights on the oven
door when open, and make sure that children
cannot climb or sit on it.
— The oven must be turned off when cleaning
inside the oven.
— This appliance is not intended to be used by
persons (including children) with reduced
physical, sensory or mental abilities, or persons lacking experience or awareness, unless
using it with the help of a person reponsible for
their safety, or under supervision and with prior
instruction in its use.
— In addition to the accessories supplied with
your oven, only use dishes capable of withstanding high temperatures (follow the manufacturer’s instructions).
— After using your oven, make sure that all the
controls are in their stop position.
— Do not use your oven as a larder or to store
any items after use.
••
Important
Keep this user guide with your appliance. If the appliance is ever sold or transferred to another person, ensure that the
new owner receives the user guide. Please
become familiar with these recommendations before installing and using your oven.
They were written for your safety and the
safety of others.
Page 7

SAFETY RECOMMENDATIONS
CARING FOR THE ENVIRONMENT
••
— This appliance’s packing materials are recyclable. Recycle them and play a role in protecting the environment by depositing them in
local authority containers provided for this
purpose.
— Your appliance also contains many recyclable materials. It is therefore marked with this
logo to indicate that used appliances must
not be mixed with other waste.
Recycling of the appliances organised by your manufacturer will thus
be undertaken in optimum conditions, in accordance with European
directive 2002/96/CE relating to
electrical and electronic equipment
waste. Contact your local council or your
retailer to find out the drop-off points for used
appliances that are nearest to your home.
— We thank you for your help in protecting the
environment.
Warning
Installation should only be performed by qualified installers and technicians.
This appliance complies with the following European directives:
- Low Voltage Directive 2006/95/CE for affixing the CE mark.
- Electromagnetic Compatibility Directive 89/336/CEE modified by directive 93/68/CEE for
attaching the CE mark.
- CE regulation 1935/2004 concerning materials and objects intended for contact with food
substances.
— Never use steam or high-pressure devices to
clean the oven (electrical safety requirement).
— For your safety, your oven is equipped with
an AUTOMATIC STOP, if you forget to turn off
your oven by mistake. After 23 hours and
30 minutes of continuous use, the AS
(Automatic Stop) feature will be activated and
your oven will turn itself off. AS or Auto Stop
will be displayed instead of the time and a
series of successive beeps will be emitted for
a short time.
7
Page 8

Warning
We cannot be held responsible for any accident resulting from inexistent, defective
or incorrect earthing.
If the electrical installation in your residence requires any changes in order to hook up your
appliance, contact a professional electrician.
If the oven malfunctions in any way, unplug the appliance or remove the fuse corresponding
to the sector where the oven is hooked up.
You must enable the appliance to be disconnected from the supply network after installation.
Disconnection can be enabled by ensuring that there is an accessible power plug or by incorporating a switch into the fixed wiring in compliance with the installation rules.
The oven is sold without a cable.
8
The electrical connections are made before the oven is installed in its housing.
• Before connecting your oven, make sure you are using
the correct size cable. The cross-section should be the
same as the cable connected to the oven. The fuse for your
installation must conform to the table shown opposite.
• Where the oven is connected using a separate plug and
socket this must be accessible after the oven has been installed.
• Where the appliance is not connected to the mains electricity supply by a plug, an omnipolar cutout
device (with a contacts gap of at least 3 mm) must be fitted
on the supply side of the connection to meet
requirements.
• The oven must be connected using a standard power
cable for which the number of conductors is
dependent upon the type of connection required and in
conformity with the table shown below.
EE
LECTRICAL CONNECTIONS
min.
network voltage connection diameter fuse
of cable
➀ 230V- 50Hz 1 L + N 4 mm² 32 A
➁ 400V 2N-50Hz 2 L + N 1,5 mm² 16 A
230V 2-2N-50Hz 2 L + N 1,5 mm² 16 A
3
HOW TO INSTALL YOUR OVEN
➀
➁
③
T
N
T
T
N
N
Ph 2
5
4
5
4
2
3
3
1
2
1
5
2
3
4
1
Page 9

HOW TO INSTALL YOUR OVEN
••
——
The power cable (H05 RR-F, H05 RN-F or H05 VV-F) must be of sufficient length to be connected to the build-in oven while it sits on the floor in front of the cabinet.
To do this the appliance must be disconnected from the electrical network:
——
Open the inspection flap located at the lower right of the back cover by unscrewing the two
screws, then pivot the inspection flap.
——
Strip 12 mm along each wire of the new power cable.
——
Carefully twist the strands together.
——
Loosen the screws from the terminal board and remove the power cord to be replaced.
——
Insert the power cable through the side of the cover into the cable clip located to the right of
the terminal board.
——
All the strands of the electrical wires must be secured tightly under the screws.
— The phase wire on the L terminal.
— The green-yellow coloured earth wire should be connected to the terminal .
——
The neutral wire (blue) on the N terminal.
----
Connect the wires according to the table on page 7.
——
Screw down tightly the screws on the terminal board and check the connection by pulling on each
wire.
——
Attach the cable with the cable clip located to the right of the terminal board.
——
Close the inspection flap using the two screws.
1stCONNECTION OR CHANGE OF THE POWER CABLE
9
Page 10

Tip
To be certain that you have prop-
erly installed your appliance, do
not hesitate to call on a household appliance specialist.
10
HOW TO INSTALL YOUR OVEN
BUILD-IN
To do this:
1) Remove the rubber screw covers to access
the mounting holes.
2) Drill a hole in the cabinet panel to avoid splitting the wood.
3) Attach the oven with the 2 screws.
4) Replace the rubber screw covers (they also
absorb the shock caused by closing the oven
door).
(*) if the cabinet is open, its opening must be
70 mm (maximum).
••
CHOICE OF LOCATION
The above diagrams show the dimensions of a
cabinet that will be able to hold your oven.
The oven can be installed in a cabinet column
(open* or closed) that has the appropriate dimensions for built-in installation (see diagram
opposite).
Your oven has optimised air circulation that allows it to achieve remarkable cooking and
cleaning results if the following guidelines are
followed:
• Centre the oven in the cabinet so as to guarantee a minimum distance of 5 mm between the
appliance and the cabinet beside it.
• The material or coating of the cabinet must
be heat-resistant.
• For greater stability, attach the oven in the
cabinet with two screws through the holes
provided for this purpose on either side of the
front inner panel (fig.1).
••
fig.1
5
888
870
875
595
545
875
20
875 mini
5
50
50
20
Page 11

The timer display only shows the time of day. It should not
be blinking.
• Choose the cooking method:
Turn the dial until it is indicating your choice.
Example: position " ".
• Choose the cooking temperature
Turn the dial to the temperature recommended for
the food you are cooking.
Example: 210 temperature mark.
When you have done both these the oven heats up and
the temperature light glows.
1. How to cook straightaway
The walls of the upper oven are covered with normal enamel, the oven is best used :
- With a thermostat setting of 50 to 250 for dishes which cause little or no spitting or soi-
ling, such as small and large cakes, etc.
- For grilling dishes that don't make any grease splashes (toasted sandwiches, etc.).
- For browning dishes (pasta, caramel creams, etc.).
11
HOW TO USE YOUR UPPER OVEN
Page 12

HOW TO USE YOUR UPPER OVEN
HUPPER OVEN COOKING MODES
••
CCOONNVVEENNTTIIOONNAALL OOVVEENN
•
The food is cooked by top and bottom elements.
•
Preheating is sometimes necessary to reach the required temperature.
•
Recommended to keep white meat, fish and vegetables juicy and succulent.
AADDJJUUSSTTAABBLLEE GGRRIILLLL
•
Cooking is carried out by the upper element.
•
The double grill covers the full srface of the oven shelf. The single grill is equally effi-
cient but covers a smaller area.
•
Recommended for grilling cutlets, sausages, slices of bread and Mediterranean
prawns placed on the oven shelf.
BOTTOM HEATING
•
Cooking controlled by the lower element.
•
Place the grid on the lowest shelf support.
•
Recommended for wet dishes (quiches, wet fruit tarts, etc).
PRE HEATING
•
Pre heat the oven before cooking.
•
Once the temperature reached don’t forget to select the desired cooking mode.
Page 13

13
HOW TO USE YOUR UPPER OVEN
bulb fitting
unscrew
cover
The lamp is accessible:
IInnssiiddee tthhee oovveenn..
The bulb is located on the ceiling of your
oven’s cavity.
- Unscrew the the protective shade (see dia-
gram).
- Unscrew the bulb in the same direction.
A bulb is used:
- 15 W
- 220-240 V
- 300°C
- E 14 screw-fitting bulb
- Change the bulb, replace the shade and
switch your oven back on at the mains.
Warning
Make sure the appliance is disconnected from the power before replacing the lamp
in order to avoid the risk of electric shock. Change the lamp only when the appliance has
cooled down.
HOW TO CHANGE A BULB
••
Tip
To unscrew the shade and light, use a rubber glove, which will make disassembly
easier.
Page 14

A
C
B
F
D
E
14
1. CLOSE-UP OF YOUR PROGRAMMER
HOW TO USE YOUR LOWER OVEN
A
B
Display for temperatures, times, cooking duration and timer.
Temperature display indicator.
Cooking time display indicator.
Cooking end time display indicator.
Independent timer display indicator.
Touch controls for accessing various programmer settings.
Buttons for adjusting the time
C
D
E
F
G
G
Page 15

15
a) WWhen supplied with electricity
• The displays flashes 12:00.
• Set the time using the ++and --setting selector (holding down
the ++or --allows you to obtain a rapid advancement of the
numbers)
• Press the touch control to enter.
Example: 12:30.
b) RResetting the clock time
• Continue to press until the time is displayed, then release.
• Adjust the clock setting with the setting (+ or -).
• Press the touch control to enter.
2. HOW DO YOU SET THE CLOCK ON THE OVEN?
IIff tthhee ttoouucchh ccoonnttrrooll iiss nnoott pprreesssseedd,, tthhee sseettttiinngg wwiillll bbee aauuttoommaattiiccaallllyy rreeccoorrddeedd aafftteerr aa ffeeww
sseeccoonnddss.
.
HOW TO USE YOUR LOWER OVEN
Page 16

16
3. HOW DO YOU PROGRAM FOR IMMEDIATE COOKING?
The analogue programmer should display only the time; it should not be flashing.
• Choose the cooking mode:
Turn the function selector to the position of your choice.
Example: " " position -> The oven begins heating.
Your oven recommends the most commonly used temperature.
PPllaaccee yyoouurr ddiisshh iinn tthhee oovveenn
based on the recommendations provided
by the cook book.
It is, however, possible to adjust the temperature by turning the selector toward ++or --.
Example: " " set to 210°.
After these steps, the oven heats up and the display alternates between the temperature in the oven and the selected temperature.
A series of beeps will be emitted when the oven reaches the selected temperature.
Once the temperature is reached, it remains fixed; the temperature
icon continues to flash.
HOW TO USE YOUR LOWER OVEN
Warning
All types of cooking are done with the door closed.
Warning
After a cooking cycle, the cooling fan continues to operate for a period of time in
order to guarantee optimal oven reliability.
Page 17

17
4. HOW DO YOU SET A COOKING PROGRAMME?
aa) TT
o begin immediately
11..
Set the desired cooking mode and adjust the temperature if
necessary.
Example: " " position
Temperature 200°C.
22..
Press the " " touch control until the " " icon (cooking time)
begins flashing.
The display flashes 0:00 to indicate that you can now adjust the setting.
33..
Move the setting selector toward ++or --to choose the desired tem-
perature.
Example: 25 min cooking time, 210°C.
The cooking time is automatically recorded after a few seconds ->
the display no longer flashes and again shows the temperature.
The countdown of the length of time begins immediately after it has
been set.
AAfftteerr tthheessee tthhrreeee sstteeppss,, tthhee oovveenn hheeaattss uupp::
A series of beeps will be emitted when the oven reaches the selected temperature.
At the end of cooking (end of programmed time),
- The oven stops,
- The cooking time indicator turns off,
- 0:00 is displayed
- A series of beeps is emitted for a few minutes.
The beeps are definitively deactivated by returning the function
selector to 0.
HOW TO USE YOUR LOWER OVEN
Page 18

18
bb) WW
ith delayed start (choose cooking end time)
PPrroocceeeedd aass wwiitthh pprrooggrraammmmeedd ccooookkiinngg..
After setting the cooking time,
Press the " " touch control until the " " icon (cooking time)
begins flashing.
The display flashes 0:00 to indicate that you can now adjust the setting.
Turn the setting selector ++or --to set the desired cooking end time.
Example: End of cooking at 13:00.
AAfftteerr tthheessee sstteeppss,,
the oven heating is delayed so that cooking ends
at 13:00.
At the end of cooking (end of programmed time),
- The oven stops,
- The cooking time indicator turns off,
- 0:00 is displayed
- A series of beeps is emitted for a few minutes.
The beeps are definitively deactivated by returning the function selector to 0.
HOW TO USE YOUR LOWER OVEN
Page 19

19
5. HOW DO YOU USE THE TIMER?
YYoouurr oovveenn iiss eeqquuiippppeedd wwiitthh aann eelleeccttrroonniicc ttiimmeerr tthhaatt iiss iinnddeeppeennddeenntt ooff tthhee oovveenn ffuunnccttiioonnss,, mmaakkiinngg
iitt
ppoossssiibbllee ttoo mmeeaassuurree ttiimmeess..
In this case, the timer display takes priority over the time of day and
temperature displays.
Press the " " touch control until the timer indicator
flashes " " -
> the display is flashing.
Turn the setting button (++and --) until you obtain the desired length of
time (max 60 minutes).
The display stops flashing after a few seconds or after the
touch control is pressed and the timer starts working, counting down
the time in seconds.
Once the time has expired, the timer emits a series of beeps to notify you.
HOW DO YOU USE THE TIMER
Warning
It is possible to change or cancel the timer at any time.
Page 20

20
• The bulb is located on the ceiling of your oven's cavity.
a) Unscrew the view port (see adjacent diagram).
b) Unscrew the light bulb in the same
direction.
Bulb specifications:
- 15 W
- 220-240 V
- 300°C
- E 14 cap
c) Replace the bulb then reposition the
view port and reconnect your oven.
Bulb
Unscrew
View port
DDiissccoonnnneecctt yyoouurr oovveenn bbeeffoorree ppeerrffoorrmmiinngg aannyy ttaasskk oonn tthhee bbuullbb ttoo aavvooiidd tthhee rriisskk ooff eelleeccttrriicc sshhoocckk aanndd,, iiff nneecceessssaarryy,, lleett tthhee
aapppplliiaannccee ccooooll ddoowwnn..
HOW DO YOU CHANGE THE BULB?
Tip
To unscrew the view port and the light, use a rubber glove, which will make disas-
sembly easier.
Warning
Make sure the appliance is disconnected from the power before replacing the lamp
in order to avoid the risk of electric shock. Change the lamp only when the appliance has
cooled down.
Page 21

21
** PPrrooggrraammmmee((ss)) uusseedd ttoo oobbttaaiinn tthhee rreessuullttss iinnddiiccaatteedd oonn tthhee eenneerrggyy llaabbeell iinn ccoommpplliiaannccee wwiitthh EEuurrooppeeaann ssttaannddaarrdd EENN 5500330044 aanndd