


CS Návod k Použití
EN Instructions Manual
ES Manual de Instrucciones DE Bedienungsanleitung FR Manuel d'Instruction HU Használati Utasítás
NL Handleiding
PT Manual de Instruções
RU
SK Návod na Použitie

EN |
ENGLISH |
3-12 |
FR |
FRANÇAIS |
13-22 |
DE |
DEUTSCH |
23-32 |
RU |
РУССКИЙ |
33-42 |
NL |
NEDERLANDS |
43-52 |
PT |
PORTUGUÊS |
53-62 |
ES |
ESPAÑOL |
63-72 |
HU |
MAGYAR |
73-82 |
CS |
ČESKY |
83-92 |
SK |
SLOVENSKY |
93-102 |

ENGLISH |
3 |
Dear Customer,
Thank you for choosing our product.
Please read these instructions carefully before connecting and using the appliance.
Knowledge of the operating principles will help guarantee correct and safe use of the appliance. This instruction booklet contains the technical characteristics of the washing machine and is full of useful information regarding its operation, all designed to help you get the best out of your appliance. If the appliance is sold or handed over for use by others, remember to give the new user the instruction booklet.
MODEL: ................................................................................................. |
DATE OF PURCHASE: ............... |
/............... |
/............................. |
|
SERIAL NUMBER: ........................................................................................................................................................................................... |
|
|
|
|
|
CONTENTS |
|
|
|
NOTES AND ADVICE FOR THE USER |
|
|
4-5 |
|
DESCRIPTION OF THE APPLIANCE |
|
|
5 |
|
INSTALLING THE WASHING MACHINE |
|
|
6-8 |
|
• Unpacking the washing machine and removing the locking devices |
|
6 |
||
• Levelling the washing machine |
|
|
6 |
|
• Connecting to the mains water supply |
|
|
7 |
|
• Connecting to the mains electricity supply |
|
8 |
||
USING THE WASHING MACHINE |
|
|
8-10 |
|
• Recommendations prior to use |
|
|
8 |
|
• |
Use of detergents |
|
|
9 |
• How to remove some stains |
|
|
10 |
|
• International clothing care symbols |
|
|
10 |
|
MAINTENANCE |
|
|
11-12 |
|
• Cleaning the washing machine |
|
|
11 |
|
• |
Cleaning the filter |
|
|
11 |
• |
Resolving problems |
|
|
12 |
This appliance is marked as complying with European Directive 2012/19/EU,Waste Electrical and Electronic Equipment (WEEE). Make sure that the product is disposed of in a correct manner. The user is obliged to contribute towards preventing negative consequences for health and the environment.
The symbol affixed to the product or accompanying documents signifies that the product must not be treated as normal domestic refuse, but must be delivered to an authorised collection centre to enable the electric and electronic equipment to be recycled.When disposing of the appliance, comply with local waste disposal regulations. For further information on the treatment, recovery and recycling of this product, refer to the appropriate offices, local domestic waste collection service or the retailer from where the appliance was purchased.
EN
SM2977
4 |
NOTES AND ADVICE FOR THE USER |
Before connecting the appliance read these instructions carefully. Repairing the failure arising from inappropriate connections or use of the appliance is not covered by the guarantee.
THE MANUFACTURERWILL NOT BE HELD RESPONSIBLE FOR ANY INCIDENTS RESULTING FROM NON-COMPLIANCE WITH SAFETY STANDARDS OR THE REQUIREMENTS OF THIS INSTRUCTION BOOK.
▼This appliance can be used by children aged from 8 years and above and person with reduced physical, sensory or mental capabilities or lack of experience and knowledge if they have been given supervision or instruction concerning use of the appliance in a safe way and understand the hazard involved. Children shall not play with the appliance. Cleaning and user maintenance shall not be made by children without supervision.
▼Children of less than 3 years should be kept away unless continuously supervised.
▼The appliance must be properly connected to the system with new hoses provided. Used hoses must never be reused.
▼The operating pressure of water (minimum and maximum) must be between 0.5bar (0.05MPa) and 10 bar (1 MPa).
▼If the supply cord is damaged, it must be replaced by the manufacturer, its service agent or similar qualified person in order to avoid a hazard.
▼Ventilation opening in the base must not be obstructed by a carpet.
▼Observe the maximum volume of dry load as indicated in the section “Program Table”.
▼Before using the washing machine, remove all the packing and locking devices used for the transport (locking screws). If this is not done, serious damage may be caused to both the appliance and your home.
▼This appliance has been designed for use as a domestic washing machine. Any other use is considered as improper and therefore dangerous.
▼Any modifications or attempts to interfere with the washing machine can be dangerous for the user and may damage the appliance itself.
▼Considering the substantial weight of the washing machine, specific safety standards must be observed during handling.
▼When the appliance is in operation, avoid any contact with the water being discharged through the drain hose, as it may be very hot. Do not touch the door glass either, as this will tend to heat up during washing.
▼Use the washing machine for machine-washa- ble items only. In the case of any doubts, refer to the manufacturer’s instructions on the label attached to the item to wash (see “Clothing care symbols”)
▼Before placing the washing in the washing machine, make sure that all pockets are empty. Hard or pointed objects such as coins, pins, nails, screws or stones can cause serious damage to the appliance.
▼Never wash items that have been soiled with substances containing petrol.In the case where stains have been removed using vaporising products, wait until these substances have fully evaporated from the surface of the material before loading into the washing machine.
▼The use and quantities of detergent, softener and bleach must comply with the instructions reported on the packaging.
▼Do not use detergents designed for hand washing, in that the excessive suds produced could damage the internal components.
▼After washing mats, blankets or any other longfibre materials, remove the filter and clean it if necessary.
▼It is advisable to leave the door open at the end of the wash cycle.
▼Do not attempt to repair any appliance faults alone, in that repairs carried out by a non-pro- fessional may cause serious damage and will invalidate any rights to repairs under guarantee.
▼Repairs to the appliance can only be carried out by personnel authorised by the customer service centres. All repairs must make use of original spare parts only.
▼Never insert or remove the plug from the mains socket with wet hands.
▼The washing machine must be connected to a mains socket fitted with an efficient earth complying with current safety standards.
▼Do not use extension leads or multiple plug adapters to connect the washing machine to
EN
SM2977
NOTES AND ADVICE FOR THE USER |
5 |
the mains electricity supply.
▼Do not expose the appliance to atmospheric agents.
▼The washing machine can only be opened once the led or display indicates that the cycle has finished.On some models, this is signalled by a flashing start button.
▼When servicing or cleaning the washing machine, remember to disconnect it from the
mains electricity supply.
▼Do not pull the power supply cable to unplug the washing machine from the mains supply. Pull the plug only.
▼It is advisable to unplug the washing machine from the mains electricity supply and close-off the water supply after each wash.
FOR WASHER/DRIER VERSIONS:
▼Never dry unwashed items.
▼Do not dry items that have been washed or had stains removed using chemical products.
▼Never dry items that have been soiled with substances such as cooking oil, petroleum, acetone, alcohol, petrol, kerosene, stain removers, turpentine, wax. Remove these substances in a hot wash using an abundant quantity of detergent prior to loading the items in the drier.
▼Do not dry items such as foam rubber, latex, raincoats, waterproof fabrics, rubber mats, preformed items, clothes or cushions with foam rubber padding, as
these may melt and damage other items in the washing or even the appliance itself.
▼Fabric softeners, or similar products, should be used as specified by the fabric softener instructions.
▼Children of less than 3 years should be kept away unless continuously supervised.
▼That the appliance must not be installed behind a lockable door, a sliding door or a door with a hinge on the opposite side to that of the appliance, in such a way that a full opening of the appliance door is restricted.
WARNING!!!THEFINALPARTOFADRYINGCYCLEISTHECOOLINGDOWN PHASE. CONSEQUENTLY, NEVER SWITCH OFFTHE DRIER BEFORETHE CYCLE HAS BEEN COMPLETED. OTHERWISE, THE WASHING MUST BE
TAKEN OUT QUICKLY AND HUNG OUTTO ALLOWTHE HEATTO DISSIPATE.
DESCRIPTION OF THE APPLIANCE
▼The washing machine has been constructed in steel panels which have been treated and painted to guarantees that its aesthetic qualities remain unaltered over time.
▼The motor and all moving parts have been designed and manufactured to guarantee the minimum possible noise levels
▼The large easily-accessible stainless steel drum will ensure a better quality wash and help to prolong the life of your washing
▼The easy to use control panel will satisfy all washing and drying needs (see control panel and programme table).
▼The wide door makes loading and unloading the washing much easier.
▼The very high stability of the appliance is the result of constant research by our technicians into the equilibrium of masses in movement.
G D F
E
A


A - Door |
E - Drum |
|
B - Filter |
F - Control panel |
B |
C - Adjustable feet |
G - Detergent drawer C |
1 |
D - Top cover |
|
|
EN
SM2977

6 |
INSTALLING THE WASHING MACHINE |
(according to the model) |
Installation must be carried out by qualified personnel in line with the instructions supplied by the manufacturer. Incorrect installation may result in damage and injury.
The appliance can be installed anywhere providing that the ambient temperature is not less than 3°C and that the wires or pipes on the rear of the machine are not squashed.
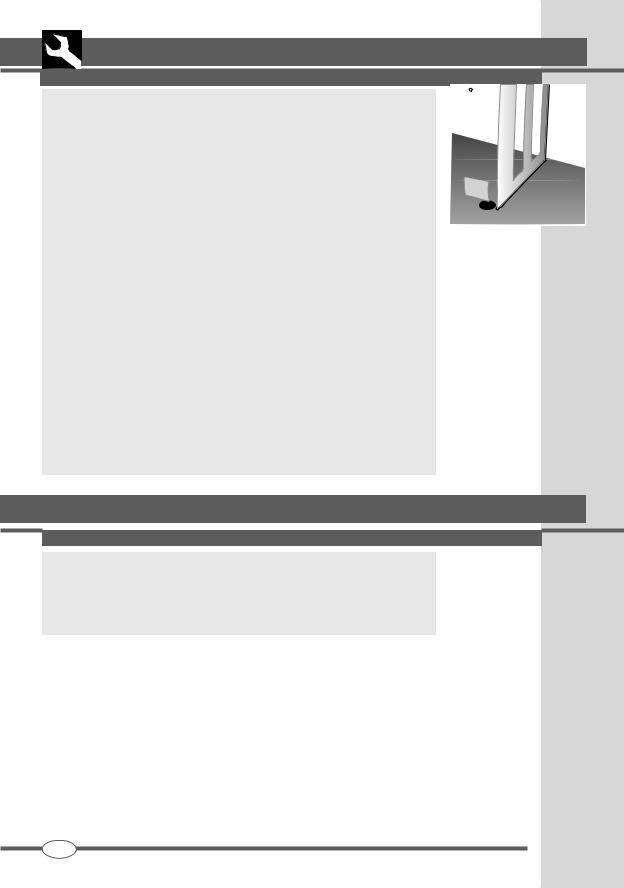
WARNING!! The washer/drier version must not be installed behind a locked door, a sliding door or with a hinged door on the opposite wall to the washer/drier itself.
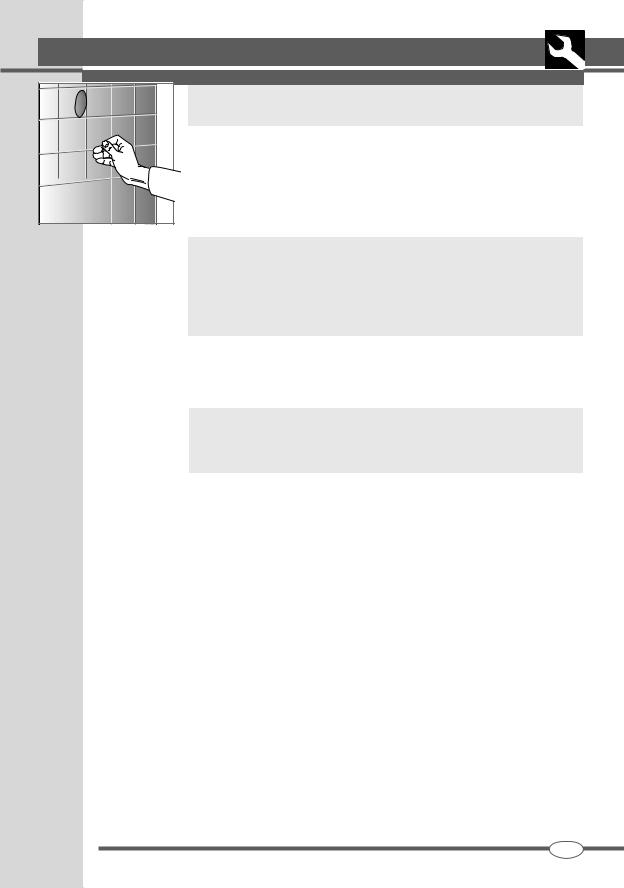
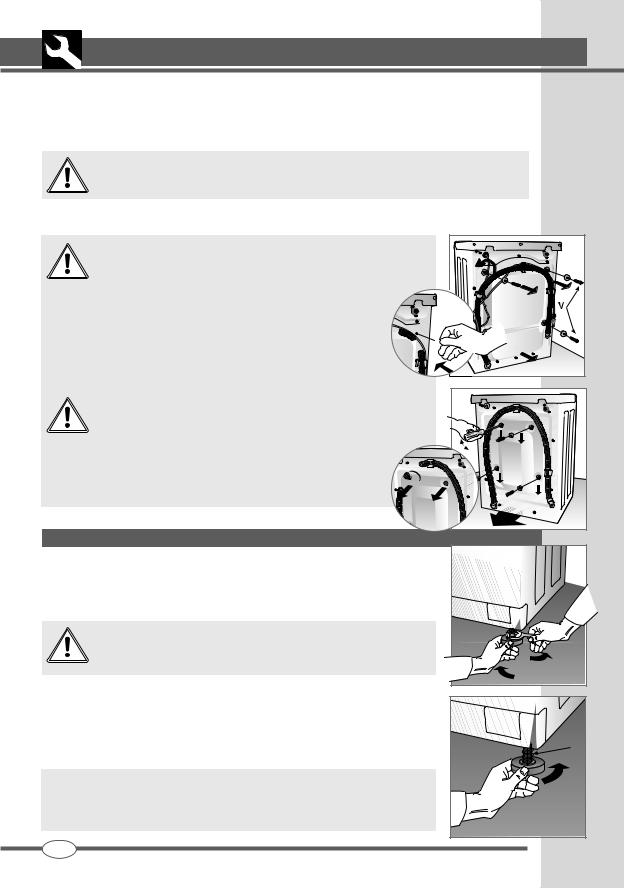
For transport reasons, the washing machine’s oscillating group is locked in place by 4 spacers and screws. Before using the machine, remove the spacers and locking screws. Keep the screws and spacers for future use.
Close off the holes using the plugs supplied. The plugs can be found in the bag containing the documents.
3


2
For transport reasons, the washing machine’s oscillating group 

 is locked in place by 4 spacers and screws. Before using the


 machine, remove the locking screws with a suitable tool.

Insert a screwdriver in the holes and lever out the 4 plastic spacers as shown in the figure.
5 |
4 |
|
LEVELLING THE WASHING MACHINE
After having selected the most suitable location for the appliance, make sure it is level by regulating the adjustable feet (Fig. 6).
Pay particular attention to the positioning and levelling of the washing machine and make sure that the lock nuts are tight.
If the appliance is not levelled correctly, it will be unstable and |
|
noisy and may cause damage. |
6 |
If the washing machine is installed on a carpeted floor, leave sufficient space between the appliance and the floor to guarantee the free circulation of air.
It is not advisable to install the appliance in rooms where the temperature could fall below 0°C.
In the under-worktop versions, screw in the feet until the spring is fully |
|
compressed, thus allowing the appliance to be installed under the worktop |
|
(Fig. 6B). |
6B |
|
|
EN |
SM2977 |
|

INSTALLING THE WASHING MACHINE |
7 |
CONNECTING THE WATER SUPPLY |
|
The mains water pressure must be between 0.05 and 1.00 Mpa |
|
(0.5 - 10 bar.) |
|
▼ Before connecting the washing machine, open the valve and allow a certain quantity of water to flow out in order to clean the pipes of any sand or rust. This operation is particularly important in the case where the washing machine has been left standing for a long time or when connecting to a new water supply system.
7▼ The fill hose must be connected to the mains supply using a ¾” threaded connection.
8 |
9
10
N.B. On electronic washing machines fitted with a dual solenoid valve (hot and cold water), connect the red hose to the hot water supply valve and the other hose to the cold water supply valve.
If a hot water supply is not available, both hoses must be connected to the cold supply using the fitting supplied (see fig. 8)
▼ Connect the fill hose (fig. 9).
N.B. Washing machines and condensation type washer/driers must be connected to the mains water supply using the new hoses provided with the appliance.The old hoses must not be re-used.
▼During the wash, the water supply valve must be fully open.
▼The drain hose must be positioned at a height of between 60 cm and 90 cm (fig. 10).
▼If the water is drained directly into the drainage system, the free end of the drain hose must be inserted in a pipe of internal diameter not les than 40 mm.
▼The drain hose connection to the drainage system must not be hermetically sealed, as this would cause a build up of air in the siphon and allow water to leak out.
▼If the wash water is drained into a washbasin, sink or other similar system, the free end of the hose must be reinforced at the bend using the bracket supplied with the washing machine. Place the hose over the edge of the washbasin and anchor the bracket in such as manner that prevents the hose from falling (fig. 11).The washbasin outlet must be clean and must allow the water to flow freely.
11
EN
SM2977

8 |
INSTALLING THE WASHING MACHINE |
|
|
CONNECTING TO THE MAINS ELECTRICITY SUPPLY |
|
|
Make sure that the voltage indicated on the identification plate |
|
|
attached to the inside of the filter door corresponds to that of the |
|
|
mains supply (fig. 12). |
|
|
All cut-outs, electric wiring and mains sockets must have a rating such that |
|
|
enables them to support the maximum load indicated on the identification plate. |
|
|
Once the appliance has been installed, it must be connected to the mains supply |
|
|
through a single-pole switch. |
12 |
|
The mains supply to which the appliance is connected must be fitted with an |
|
|
|
|
|
earthing system. If this is not the case, the manufacturer will not be held liable |
|
|
for any incidents that may occur (fig. 13). |
|
|
If the mains socket to which the appliance is connected is faulty or unsuitable, |
|
|
it must be replaced by a qualified electrician. |
|
|
The washing machine must not be connected to the mains supply using indirect |
|
|
methods such as extension leads or multiple adapters. |
|
|
During maintenance work, the washing machine must be disconnected from |
|
|
the mains electricity supply. |
|
|
Do not insert or remove the plug from the mains socket with wet hands. |
13 |
|
If the power supply cable is damaged in any way, contact the appropriate spe- |
|
|
cialised service centre. |
|
The plug used to connect the machine to the power supply must never be fixed behind the machine, but must be in a position easily accessible in an emergency.
USING THE WASHING MACHINE |
||
RECOMMENDATIONS PRIOR TO USE |
|
|
Warning: Before carrying out the first wash, allow the washing |
Open |
|
machine to effect a short wash cycle without any washing. |
||
Closed |
||
This will allow the operation of the washing machine to be checked |
||
|
||
and will clean the drum. |
|
|
Before each wash make sure that: |
|
|
▼ the water connections are correct, the drain hose is properly positioned (see |
14 |
|
connecting to the water supply) and that the water supply valve is open. |
|
|
▼ with dry hands, insert the plug in the mains socket. |
|
|
▼ sort the wash into types of fabric (refer to clothing care symbols). |
|
|
▼ check that there are no objects left in any of the pockets of the items to wash, |
|
|
as these may damage the washing, the appliance or the filter. |
|
|
|
15 |
|
EN |
SM2977 |
|
|
||

|
USING THE WASHING MACHINE |
9 |
|
USE OF DETERGENTS |
|
2 |
The washing machine is fitted with a three-compartment detergent drawer |
|
|
|
compartment for pre-wash or soak soap powder (1) compartment for normal wash soap powder (2)
|
|
softener compartment (3) |
3 |
1 |
|
16 |
|
Use a low-suds detergent and softener (if required) recommended for automatic |
|
washing machines. Follow the dosage instructions written on the packet. |
|
|
|
N.B. Too much detergent can produce excessive suds and may |
|
|
result in a poor wash. |
NO |
|
Too little detergent will produce an unsatisfactory wash. |
|
|
N.B.When adding detergent to the dispenser, remember to avoid |
|
YES |
any spillage into the softener compartment, in that this would |
|
create a soapy rinse and stain the fabrics white. Vice versa, if |
|
17 |
|
softener is added to the detergent compartment, the quality of |
|
the wash will be compromised. |
|
|
|
N.B. When using a liquid detergent (recommended for pro- |
|
|
grammes without pre-wash) proceed as follows: remove the baffle |
|
|
from its housing at the front of compartment 2 and insert it in the |
|
|
guides near the centre of the same compartment. |
18
19
20 |
▼ close the detergent drawer before starting the wash. |
|
Warning! Do not attempt to remove the detergent drawer while the washing machine is in operation, as this will cause water to flow out.
EN
SM2977
10 |
USING THE WASHING MACHINE |
HOW TO REMOVE SOME STAINS
Stains exist that cannot be removed by machine washing alone. Before trying to remove any type of stain by hand, first try the removal procedure on a small area of hidden fabric. Start from the edge of the stain and working inwards, this will prevent a dark ring from forming around the site of the stain. A few methods to adopt for removing stains are reported below.
▼Wax: Scrape the wax using a rounded point in order not to damage the fabric. Then, with the fabric placed between two pieces of absorbent paper, run a hot iron over the stain.
▼Ball point pens and felt-tip pens: clean using
a soft cloth soaked in ethyl alcohol.Take care not to spread the stain.
▼Damp and mould: if the fabric supports the use of bleach, carry out a wash cycle adding bleach. Otherwise, soak the soiled part in hydrogen peroxide (10 volumes) and leave for 10 to 15 minutes.
▼Light scorch marks left by ironing: follow the
instructions for mould and damp.
▼Rust: use products specially designed for rust stains, following the manufacturer’s instructions written on the packet.
▼Chewing gum: rub ice over the fabric, scrape away as much chewing gum as possible and then rub with a piece of cotton soaked in acetone.
▼Paint: do not allow the paint to dry. Rub the area with the solvent recommended by the paint manufacturer (e.g. water, turps, trichloroethylene), soap and then rinse.
▼Lipstick: stains on cotton or wool can be eliminated using a cloth soaked in ether. Stains on silk require the use of trichloroethylene.
▼Nail varnish: place a sheet of absorbent paper on the stained material, then dampen the back of the fabric with acetone, frequently changing the absorbent paper placed over the stain. Continue in this manner until the stain has disappeared.
▼Tar or dirt: spread a little fresh butter over the stain, allow to stand and then wash with oil of turpentine.
▼Grass: delicately soap the stain, use diluted bleach. Good results can be obtained on woollen fabrics using 90% alcohol.
▼Blood: put into soak in cold water with added salt, then wash with washing soap.
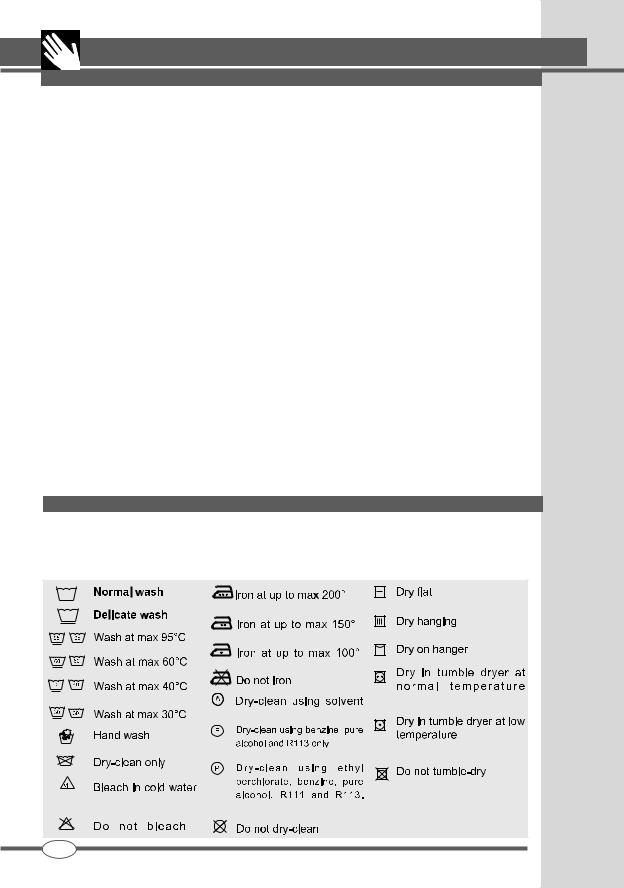
INTERNATIONAL CLOTHING CARE SYMBOLS
Before placing the clothes in the washing machine and selecting the wash programme, examine the symbols on the manufacturer’s label. The table reported below will provide a useful guide to reading the symbols.
EN
SM2977
|
MAINTENANCE |
11 |
|
CLEANING THE WASHING MACHINE |
|
|
The washing machine has been specifically designed to reduce maintenance to a |
|
|
minimum. Nevertheless, it is important that it is cleaned regularly. |
|
|
Before cleaning, make sure that the appliance has been disconnected from the power |
|
|
supply and that the water supply valve has been closed. |
|
|
The external structure and the parts of the washing machine in plastic must be |
|
|
cleaned with a soft damp cloth only. |
|
21 |
WARNING!! Never use chemicals, abrasive products, alcohol, soap, petrol |
|
or other solvents to clean the appliance as these may cause |
|
|
|
damage. (fig. 21) |
|
|
After washing, leave the door open for a short time to allow rubber parts to dry. |
|
|
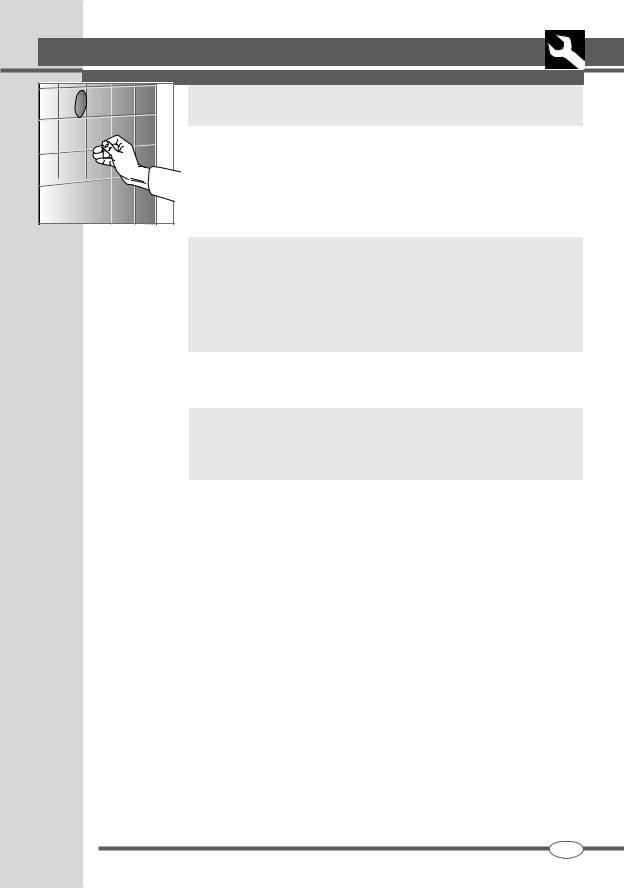
Periodically wash out the detergent compartments. To do this, remove the detergent |
|
|
compartment and rinse it under running water (fig. 22). Then replace it. |
|
22 |
|
|
|
REMOVING THE DETERGENT DRAWER |
|
23 |
▼ open the detergent drawer; |
|
|
▼ press on the word “PUSH” with the right hand and pull out the drawer with the |
|
|
left hand (fig. 23). |
|
|
CLEANING THE FILTER |
|
24 |
WARNING!! Before starting the operations described below, make sure |
|
|
|
|
|
that the washing machine is empty. Do not remove the filter |
|
|
while the washing machine is running, or when full of water. |
|
|
Place a cloth or tray under the filter to collect any water that may still be inside Open |
|
|
the filter door, unscrew the filter and remove it by turning it in an anticlockwise direc- |
|
|
tion (fig. 24-25). |
|
|
The filter must be cleaned periodically. |
|
25 |
Rinse the filter under running water to eliminate any residues. Replace the filter by |
|
screwing it in clockwise, making sure it closes and seals properly. |
|
|
|
|
|
SM2977 |
EN |
|
|
|

12 |
MAINTENANCE |
RESOLVING PROBLEMS
If the appliance is not working properly, check through the following troubleshooting guide before calling for technical assistance. In some models malfunctions are indicated by an error code displayed at the end of the cycle.
Code: E:00 Carry out all the checks listed in paragraphs marked with * E:01 Carry out all the checks listed in paragraphs marked with ** E:02 Technical malfunction “Call Customer Service”
E:03 Technical malfunction “Call Customer Service”
The washing machine does not work (warning lights are off) (Display off)
•Make sure that:
1)The mains power supply is working
2)The plug is inserted correctly in the socket
3)The On/Off button has been pressed, or if not present, check that the programming knob is positioned on a programme.
The washing machine does not work (warning lights are off) (Display lit)*
•Make sure that:
1)The programme has been selected
2)The door is closed properly
3)The “Start” button has been pressed (electronic models only)
4)Refer to the information provided for “The washing machine does not fill with water”
The washing machine does not fill with water*
•Check that:
1)There is water in the water supply system
2)The water fill pipe is connected to the washing machine
3)The mains water supply valve is open
4)The filter is not blocked If it is, clean the filter after first unplugging the appliance from the power supply
The washing machine continuously fills and drains the water**
•Check that:
1)The drain hose has been installed at the correct height (60-90 cm)
2)The end of the drain hose is not under water
The washing machine does not drain or spin**
•Check that:
1)The drain hose is properly connected
2)The drain hose is not kinked
3)The drain filter is not blocked
4)The no-spin function has not been selected
5)The Stop with water function has not been selected.
The washing machine vibrates and is noisy
•Make sure that:
1)All the locking elements used for transporta-
tion have been removed.
2)The washing machine is perfectly level
3)Bulky items such as sheets, tablecloths etc. are not all bundled in one part of the drum
The door will not open
•Make sure that:
1)The wash cycle has finished.
2)The Stop with water function has not been selected (automatic on some models).
The washing has not been spun properly
•Make sure that:
1)The washing is evenly distributed in the drum
2)The correct spin speed has been selected
The washing machine stops during a wash
•Make sure that:
1)The mains power supply is working
There is still a lot of detergent in the compartment
•Make sure that:
1)The mains water supply valve is open
2)The filter between the valve and the supply hose is clean
The washing is not clean at the end of the wash cycle
•Make sure that:
1)The drum has not been overloaded
2)The correct amount of detergent has been used
3)The correct programme has been selected
The washing has shrunk or faded
•Make sure that:
1)The correct washing programme has been selected
2)The correct washing temperature has been selected
The washing machine does not dry (washerdryer models only)
•Make sure that:
1)The mains water supply valve is open
2)The drain filter is clean
3)The washing machine is switched on (indicator light or display lit)
4)The drying program has been selected
5)The drying time has been set
If, after all these checks have been carried out, the appliance still does not work, inform the nearest customer service centre. When contacting the service centre, inform them of the appliance model, serial number and type of fault.The data relating the appliance can be found on the rating plate affixed to the inside of the filter door.This information will help the service centre operator in procuring the necessary spare parts, thus guaranteeing a speedy and efficient repair.
EN
SM2977
FRANÇAIS |
13 |
Cher client,
Nous vous remercions d’avoir choisi l’un de nos produits.
Nous vous invitons à lire attentivement les instructions d’utilisation avant de brancher et de mettre en service la machine.
La connaissance des principes de fonctionnement vous permettra d’utiliser l’appareil correctement et en toute sécurité. Ces instructions comportent un grand nombre d’indications utiles au bon fonctionnement de votre machine à laver ainsi que des détails techniques la concernant qui vous aideront à optimiser son utilisation. En cas de vente ou de cession de l’appareil, la notice d’emploi doit impérativement être remise au nouvel utilisateur. l’emploi.
|
|
.................................................................................................MODÈLE : |
...............DATE D’ACHAT : |
.............../ |
............................./ |
|
|
|
|
|
NUMÉRO DE FABRICATION : ............................................................................................................................................................ |
|
|
|
|
|
|
|
|
|
|
|
|
|
|
|
|
|
|
|
|
|
|
|
|
|
|
|
|
|
|
|
|
|
|
|
|
SOMMAIRE |
|
|
|
|
|
|
|
|
|
|
|
|
|
|
|
|
|
|
|
|
|
|
|
|
|
NOTES ET CONSEILS POUR L’UTILISATEUR |
|
|
14-15 |
|
||
|
|
DESCRIPTION DE LA MACHINE |
|
|
15 |
|
||
|
|
INSTALLATION DE LA MACHINE |
|
|
16-18 |
|
||
|
|
• Suppression de l’emballage et déblocage de la machine |
|
16 |
|
|||
|
|
• Mise à niveau de la machine à laver |
|
|
16 |
|
||
|
|
• |
Raccordements à l’eau |
|
|
17 |
|
|
|
|
• |
Branchement électrique |
|
|
18 |
|
|
|
|
UTILISATION DE LA MACHINE |
|
|
18-20 |
|
||
|
|
• |
Avertissements avant utilisation |
|
|
18 |
|
|
|
|
• |
Utilisation des détergents |
|
|
19 |
|
|
|
|
• Comment éliminer certains types de taches |
|
|
20 |
|
||
|
|
• Symboles internationaux pour le traitement des vêtements |
|
20 |
|
|||
|
|
ENTRETIEN |
|
|
21-22 |
|
||
|
|
• Nettoyage de la machine à laver |
|
|
21 |
|
||
|
|
• |
Nettoyage du filtre |
|
|
21 |
|
|
|
|
• |
Résolution des problèmes |
|
|
22 |
|
|
Cet appareil porte le symbole du recyclage conformément à la directive européenne 2012/19/EU relative aux déchets d’équipements électriques et électroniques (DEEE). En procédant correctement à la mise au rebut de cet appareil, l’utilisateur contribue à éviter toute conséquence néfaste pour l’environnement et la santé de l’homme.
Le symbole |
présent sur l’appareil ou sur la documentation qui l’accompagne indique |
que ce produit ne peut en aucun cas être traité comme déchet ménager. Il doit par conséquent être remis à un centre de collecte des déchets chargé du recyclage des équipements électriques et électroniques. Il faut donc s’en défaire selon les normes locales relatives au traitement des déchets. Pour toute autre information relative au traitement, à la récupération et au recyclage de ce produit, contacter le service local concerné, le service de collecte des déchets ménagers ou le magasin où le produit a été acheté.
FR
SM2977
14  NOTES ET CONSEILS POUR L’UTILISATEUR
Avant de raccorder l’appareil, lire attentivement les instructions. Les réparations dues à des connexions inappropriées ou à une utilisation incorrecte de l’appareil ne sont pas couvertes par la garantie.
LE FABRICANT DÉCLINE TOUTE RESPONSABILITÉ EN CAS D’ACCIDENTS PROVOQUÉS PAR LE NON-RESPECT DES NORMES DE SÉCURITÉ ET DES INSTRUCTIONS D’UTILISATION.
▼Ne Cet appareil peut être utilisé par des enfants âgés de 8 ans et plus et par personne avec des capacités ou le manque d’expérience et de connaissances physiques, sensorielles ou mentales réduites si elles sont sans surveillance ou instruction concernant l’utilisation de l’appareil en toute sécurité et de comprendre le danger impliqués.Les enfants ne doivent pas jouer avec l’appareil. Nettoyage et entretien utilisateur ne doit pas être fait par des enfants sans surveillance.
▼Les enfants de moins de trois ans doivent être tenus à l’écart, sauf se ils sont surveillés en permanence.
▼L’appareil doit être correctement raccordé au système avec de nouveaux tuyaux fournis.Tuyaux usés ne doivent pas être réutilisés.
▼La pression de fonctionnement de l’eau (minimum et maximum) doit être comprise entre 0,5 bar (0,05 MPa) et 10 bar (1 MPa).
▼Si le cordon d’alimentation est endommagé, il doit être remplacé par le fabricant, son agent de service ou une personne qualifiée afin d’éviter tout risque.
▼Ventilation ouverture de la base ne doit pas être obstruée par un tapis.
▼Respecter le volume maximal de charge sèche comme indiqué dans la section “Tableau des programmes”.
▼Avant la mise en service de la machine, retirer tout
l’emballage et le blocage utilisé pour le transport (vis de sécurité). Dans le cas contraire, votre machine et votre pièce d’habitation pourraient être sérieusement endommagées.
▼Cet appareil est une machine à laver le linge destinée à un usage domestique ; tout autre emploi doit être considéré comme impropre et, par conséquent, dangereux.
▼Toute modification ou tentative d’altération de l’appareil peut être dangereuse pour l’utilisateur et risque d’endommager la machine.
▼Étant donné le poids important de la machine, respecter des normes particulières de sécurité,
pendant tout déplacement de celle-ci.
▼Pendant le fonctionnement de l’appareil, éviter le contact avec l’eau sortant du tuyau d’évacuation, la température de celle-ci pourrait être élevée ; de plus, éviter le contact avec le verre du hublot car il a tendance à se réchauffer pendant le lavage.
▼Laver exclusivement des tissus destinés au lavage en machine. En cas de doutes, il est possible de contrôler les indications du fabricant reportées sur les étiquettes des vêtements (voir «Symboles pour le traitement des vêtements»).
▼Avant d’introduire les vêtements dans la machine, contrôler que toutes les poches soient parfaitement vides. Les objets durs et pointus, comme par exemple, les pièces de monnaie, épingles, clous, vis ou cailloux sont susceptibles de provoquer de graves dommages.
▼Ne pas laver à la machine les vêtements tachés de substances contenant de l’essence. En cas d’utilisation de produits vaporisés pour éliminer les taches, attendre l’évaporation totale desdites substances de la surface des tissus avant d’introduire les vêtements dans la machine à laver le linge.
▼Respecter les instructions reprises sur l’emballage en ce qui concerne l’utilisation et les quantités de détergents, adoucissants et blanchissants.
▼Ne pas utiliser de détergents destinés au lavage à la main, car on risque d’occasionner une mousse trop abondante et d’endommager les parties internes de la machine.
▼Après avoir terminé le lavage de tapis, couvertures ou de tout autre tissu à fibres longues, ne pas oublier de contrôler le filtre et de le nettoyer, si nécessaire.
▼Il est conseillé de laisser le hublot ouvert après la fin du cycle de lavage.
▼Ne jamais effectuer de réparations soi-même ou par des personnes non professionnelles car elles pourraient endommager gravement l’appareil et entraîner l’annulation de la garantie.
▼Les réparations de l’appareil doivent être confiées exclusivement au personnel des centres de service après-vente. Pour les réparations, seules les pièces détachées d’origine doivent être utilisées.
▼Ne pas brancher ou débrancher la fiche de la prise électrique avec les mains mouillées.
▼La machine à laver le linge doit être branchée à une prise de courant équipée d’une fiche terre conforme aux exigences de sécurité.
FR
SM2977

NOTES ET CONSEILS POUR L’UTILISATEUR  15
15
▼Ne pas utiliser de rallonges ou de prises multiples pour le raccordement électrique de la machine.
▼Ne pas exposer l’appareil aux agents atmosphériques.
▼L’ouverture de la machine est possible uniquement lorsque le voyant ou l’afficheur indique la fin du cycle. Pour certains modèles, cette situation est signalée par le clignotement de la touche départ.
▼Lors de la révision ou du nettoyage de l’appareil, ne pas oublier de le débrancher de la prise de courant.
▼Le débranchement de la machine à laver le linge s’effectue directement de la prise de courant ; ne tirer en aucun cas sur le câble électrique pour débrancher l’appareil.
▼Après chaque lavage, il est conseillé de débrancher l’appareil et de fermer le robinet d’arrivée d’eau.
POUR LES MACHINES À LAVER SÉCHANTES :
▼Ne pas sécher de vêtements non lavés.
▼Ne pas sécher de linge ayant été lavé ou détaché avec des produits chimiques.
▼Ne pas sécher de linge taché d’huile de cuisine, pétrole, acétone, essence, kérosène, détachant, térébenthine et cire. Éliminer ces substances avec un lavage à l’eau chaude en utilisant une grande dose de détergent avant de charger le linge dans le séchoir.
▼Ne pas sécher d’objets en caoutchoucmousse et latex, ne pas sécher d’imperméables, de tissus imperméabilisés, de matelas en caoutchouc, d’objets moulés, de vêtements ou coussins rembourrés
de caoutchouc-mousse car toutes ces matières pourraient fondre et endommager le reste du linge ou l’appareil.
▼Assouplissants, ou produits similaires, doivent être utilisés comme spécifié par les instructions d’assouplissant.
▼Les enfants de moins de 3 ans doivent être tenus à l’écart à moins supervisés en permanence.
▼Que l’appareil ne doit pas être installé derrière une porte verrouillable, une porte coulissante ou une porte avec une charnière sur le côté opposé à celui de l’appareil, de telle manière que l’ouverture totale de la porte de l’appareil est limité.
ATTENTION !!! LE CYCLE DE SÉCHAGE SETERMINE PAR LA PHASE DE REFROIDISSEMENT, NE JAMAIS ARRÊTER LE SÈCHE-LINGE AVANT LA FIN DU CYCLE, À MOINS QUETOUT LE LINGE NE SOIT RETIRÉ ET
PENDU RAPIDEMENT POUR DISSIPER LA CHALEUR.
DESCRIPTION DE LA MACHINE
▼La structure a été réalisée en panneaux de tôle traités et vernis de façon à ce que ses qualités esthétiques puissent rester inaltérées au cours du temps.
▼Le moteur et toutes les pièces en mouvement ont été conçus et réalisés de façon à ce que la machine soit extrêmement silencieuse.
▼Le tambour en acier inoxydable est ample et facilement accessible, afin de garantir une meilleure qualité du lavage et une plus longue durée de vie du linge.
▼Le tableau des commandes permet d’utiliser aisément tous les types de lavage et de séchage souhaités (voir tableau des commandes et tableau de sélection des programmes).
▼Le hublot très ample facilite les opérations
de chargement et de déchargement du linge.
▼Une recherche constante en termes d’équilibre des masses en mouvement de la part des techniciens permet une très grande stabilité de l’appareil .
G D F
E
A


A - Hublot |
E - |
Tambour |
|
|
B - Filtre |
F - |
Tableau des commandes |
B |
|
C - Pieds réglables |
G - |
Tiroir détergent |
C |
1 |
D - Couvercle supérieur |
|
|
|
|
|
|
|
|
|
FR
SM2977

16 |
INSTALLATION DE LA MACHINE |
(EN FONCTION DU MODÈLE) |
L’installation doit être effectuée par un technicien qualifié, conformément aux instructions fournies par le constructeur, une installation incorrecte pouvant causer des dommages aux personnes et aux choses.
Il est possible d’installer la machine en tout lieu, à condition que la température ambiante ne soit pas inférieure à 3°C et que les câbles ou tuyaux qui se trouvent à l’arrière de la machine ne soient pas écrasés.
ATTENTION!!! : La version machine à laver séchante ne doit pas être installée derrière une porte fermant à clé, une porte coulissante ou une porte avec charnière du côté opposé au côté de la machine à laver séchante.
Pour des raisons de transport, le groupe oscillant de la machine est bloqué par 4 entretoises avec vis. Avant de mettre la machine en fonction, retirer les entretoises et les vis de blocage, récupérer les vis et les entretoises pour tout déplacement éventuel de
la machine.
Boucher les trous au moyen des bouchons spéciaux fournis à cet effet que vous trouverez à l’intérieur du sachet contenant  documents.
3


2
Pour des raisons de transport, le groupe oscillant de la machine
est bloqué par 4 entretoises avec vis. Avant de mettre la machine en fonction, retirer les entretoises et les vis de blocage, récupérer les vis et les entretoises pour tout déplacement éventuel de la machine.
Boucher les trous au moyen des bouchons spéciaux fournis à 


 cet effet que vous trouverez à l’intérieur du sachet contenant les


 documents.


5 |
4 |
|
MISE A NIVEAU DE LA MACHINE A LAVER
Après avoir choisi l’emplacement adéquat, mettre correctement la machine à niveau grâce aux pieds réglables (fig. 6).
Faire particulièrement attention au choix de la position, à la mise à niveau de la machine à laver et à la sécurité des contre-écrous.
Une mise à niveau incorrecte de la machine la rendra instable, |
|
générera du bruit pendant son fonctionnement et provoquera |
|
des dommages. |
6 |
|
En cas de positionnement de la machine sur un sol recouvert de moquette, s’assurer que l’air circule librement entre la machine à laver et le sol.
Il est déconseillé d’installer la machine dans des locaux où la température pourrait descendre au-dessous de 0 °C.
Dans les versions sous plan, visser les pieds jusqu’à ce que le ressort |
|
complètement comprimé permette l’installation de la machine sous le plan |
|
de travail (fig. 6B). |
6B |
|
|
FR |
SM2977 |
|
INSTALLATION DE LA MACHINE |
17 |
RACCORDEMENTS À L’EAU |
|

 7
7
8 |
9
10
La pression du réseau hydraulique doit être comprise entre 0,05 et 1,00 MPa (0,5 - 10 bars.)
▼Avant d’effectuer la connexion, ouvrir le robinet, et faire couler une certaine quantité d’eau pour éliminer toute trace d’impuretés dans les tuyaux, telles que sable et rouille (cette opération est extrêmement importante si la machine à laver le linge est restée inutilisée pendant une longue période ou si elle est raccordée à une nouvelle conduite d’eau).
▼Le tuyau d’arrivée d’eau doit être connecté à la vanne d’alimentation en eau froide avec embout fileté de 3/4».
N.B. Dans les machines à laver le linge électroniques équipées de double électrovanne (eau chaude et froide), connecter le tuyau rouge au robinet de l’eau chaude et l’autre tuyau au robinet de l’eau froide. En cas d’impossibilité d’utilisation d’un robinet d’eau
chaude, les deux tuyaux devront être connectés à celui de l’eau froide, grâce au raccord prévu à cet effet, fourni avec la machine (voir fig. 8)
▼ Visser le tuyau d’alimentation sur la machine à laver le linge (fig. 9).
N.B.La machine à laver le linge et la machine à laver séchante de type à condensation destinées à être branchées sur le réseau hydraulique doivent être connectées au moyen du kit de tuyaux
neufs fourni avec la machine ; ne pas ré-utiliser les anciens tuyaux.
▼Pendant le lavage, la vanne d’alimentation de l’eau doit être totalement ouverte.
▼Le tuyau de vidange de l’eau doit être à une hauteur comprise entre 60 cm et 90 cm (fig. 10).
▼En cas de vidange directe de l’eau dans une conduite d’évacuation, l’extrémité libre du tuyau de la machine devra être insérée dans une conduite ayant un diamètre interne supérieur à 40 mm.
▼Il est important de ne pas connecter hermétiquement le tuyau de la machine à la conduite d’évacuation, pour éviter de remplir le siphon d’air et, par conséquent, de provoquer la sortie de l’eau.
▼En cas d’évacuation de l’eau dans un lavabo ou dans une autre zone d’évacuation, l’extrémité libre du tuyau doit être préalablement renforcée, au niveau du point de pliage, avec un crochet approprié, fourni avec la machine. Ensuite, placer le tuyau sur le bord du lavabo et fixer le crochet de façon à ce que le tuyau ne tombe pas (fig. 11). L’écoulement du lavabo doit être propre, afin que l’eau puisse être évacuée librement.
11
FR
SM2977
18 |
INSTALLATION DE LA MACHINE |
|
BRANCHEMENT ÉLECTRIQUE |
S’assurer que la tension électrique, indiquée dans les données |
|
|
techniques de la plaquette placée sur le côté interne du volet filtre, |
|
|
corresponde à celle du réseau électrique (fig. 12) |
|
|
Le disjoncteur différentiel, les câbles électriques et la prise de courant doivent |
|
|
être en mesure de supporter la charge maximale indiquée sur la plaquette. |
|
|
Après l’installation, l’accès à l’alimentation du secteur doit être garanti par un |
|
|
interrupteur omnipolaire. |
12 |
|
La machine doit être branchée à une prise de courant équipée d’une fiche terre. |
||
|
||
Dans le cas contraire, le fabricant décline toute responsabilité quant aux éventuels |
|
|
accidents (fig. 13). |
|
|
En cas de non fonctionnement de la prise dans laquelle la fiche est insérée, |
|
|
ou de présence d’une prise non appropriée, veuillez la faire remplacer par un |
|
|
électricien qualifié. |
|
|
Ne jamais brancher la machine à laver le linge au réseau par le biais d’éléments |
|
|
indirects tels que rallonges et prises multiples. |
|
|
Pendant l’entretien, déconnecter la fiche de la machine à laver de la source de |
|
|
courant. |
13 |
|
Ne pas brancher ou débrancher la fiche de la source de courant avec les mains |
||
|
||
mouillées. |
|
En cas d’endommagement du câble d’alimentation, contacter le centre de service aprèsvente technique spécialisé.
La prise de courant ne doit pas être placée derrière la machine à laver mais dans un endroit facilement accessible en cas d’urgence.
 UTILISATION DE LA MACHINE À LAVER LE LINGE
UTILISATION DES DÉTERGENTS
Attention : Avant le premier lavage du linge, il est souhaitable |
Ouvert |
d’effectuer un cycle de lavage rapide, sans linge. |
Fermé |
Cette opération permet de vérifier le bon fonctionnement de la |
|
machine à laver le linge et de nettoyer le tambour. |
|
Lors de chaque lavage, veuillez : |
|
▼ les connexions hydrauliques soient correctes, le tuyau d’évacuation soit posi- |
14 |
tionné correctement (voir connexion hydraulique) et que le robinet soit ouvert. |
|
▼ avec les mains parfaitement sèches, introduire la fiche dans la prise de courant. |
|
▼ partager le linge en fonction du type de tissu (voir étiquetage des pièces |
|
d’habillement). |
|
▼ veiller à ce que dans les poches des vêtements il n’y ait aucun objet susceptible |
|
d’endommager le linge, la machine ou le filtre. |
|
|
15 |
FR |
SM2977 |
|
UTILISATION DE LA MACHINE À LAVER LE LINGE  19
19
|
|
UTILISATION DES DÉTERGENTS |
2 |
|
La machine à laver le linge est équipée d’un tiroir à produits à trois compartiments. |
|
|
|
|
|
compartiment destiné au détergent en poudre pour le prélavage ou pour le trempage (1) ; |
|
|
compartiment destiné au détergent en poudre pour le lavage normal (2) ; |
|
|
compartiment destiné à l’adoucissant (3) |
3 |
1 |
Utiliser un détergent peu moussant et un adoucissant (si nécessaire) destiné aux |
16 |
|
machines à laver automatiques. Pour les dosages, suivre les indications reportées |
|
sur l’emballage. |
|
|
|
N.B. Des quantités trop élevées de détergent peuvent générer |
|
|
une mousse trop abondante et occasionner de mauvais résultats |
NON |
|
de lavage. Des quantités trop faibles peuvent donner lieu à des |
|
|
résultats de lavage insatisfaisants. |
|
|
N.B. Ne pas introduire de détergent dans le compartiment prévu |
|
|
pour l’adoucissant lors du remplissage du tiroir à produits ; en |
|
OUI |
effet, dans ce cas le rinçage se ferait avec de la mousse et les |
|
tissus seraient tachés de blanc. Dans le sens inverse, en cas |
|
|
|
|
17 |
|
d’introduction d’adoucissant dans le compartiment du détergent, l’efficacité |
|
de ce dernier serait réduite. |
|
|
|
N.B. En cas d’utilisation de détergent liquide (recommandé pour |
|
|
les programmes sans prélavage), suivre les indications suivantes : |
|
|
extraire la cloison qui se trouve dans le tiroir devant le comparti- |
|
|
ment 2 et l’insérer dans les guides spéciales vers le centre de ce |
|
|
même compartiment. |
18
19
▼ fermer le tiroir à produits avant de commencer le lavage.
20
Attention ! Ne pas ouvrir le tiroir à produits pendant le fonctionnement de la machine au risque de faire sortir de l’eau.
FR
SM2977

20 |
UTILISATION DE LA MACHINE À LAVER LE LINGE |
|
COMMENT ÉLIMINER CERTAINES TACHES |
Il existe des taches qui ne peuvent pas être éliminées des vêtements avec un simple lavage en machine. Avant de laver à la main tout type de taches, effectuer un essai sur une partie peu visible du vêtement, en allant de la partie externe de la tache vers le milieu de celle-ci, afin d’éviter la formation d’auréoles. Voici indiqués ci-après différents moyens d’éliminer les taches.
▼Cire : Gratter la cire avec une lame non tranchante, de façon à ne pas endommager le tissu, puis repasser le tissu en interposant une feuille de papier absorbant entre le fer à repasser et le vêtement taché.
▼Stylo à bille et feutres : tamponner à l’aide d’un chiffon doux imbibé d’alcool éthylique. Veiller à ne pas élargir la tache.
▼Humidité et moisissure : si le tissu supporte bien l’utilisation de l’eau de Javel, effectuer le cycle de lavage en ajoutant l’eau de Javel. Dans le cas contraire, il faut mouiller la partie sale avec de l’eau oxygénée à 10 volumes puis laisser agir pendant 10 ou 15 minutes.
▼Brûlures légères de fer à repasser : suivre les instructions indiquées pour la moisissure et l’humidité.
▼Rouille : utiliser des produits antirouille en suivant attentivement les indications reportées par le fabricant sur l’emballage.
▼Chewing-gum : traiter le tissu avec des glaçons, frotter le plus possible, puis passer un chiffon en coton imbibé d’acétone.
▼Vernis : ne jamais laisser sécher le vernis.
Traiter la zone sale avec le solvant indiqué sur l’emballage du vernis (par exemple :eau, essence de térébenthine, trichloréthylène, etc.), savonner puis rincer.
▼Rouge à lèvres :les taches sur le coton ou sur la laine peuvent être éliminées en tamponnant le tissu avec un chiffon imbibé d’éther. Pour la soie en revanche, utiliser du trichloréthylène.
▼Vernis à ongles :poser le côté taché du vêtement sur une feuille de papier absorbant puis humecter le revers du tissu avec de l’acétone, en prenant soin de changer fréquemment la feuille de papier absorbant qui se trouve sous la tache. Répéter cette opération jusqu’à ce que la tache soit totalement éliminée.
▼Cambouis ou goudron : étaler sur la tache un peu de beurre frais, laisser reposer puis laver avec de l’essence de térébenthine.
▼Herbe : savonner délicatement, traiter avec un produit à base d’eau de Javel diluée. Pour les tissus en laine, l’alcool à 90% peut également donner de bons résultats.
▼Sang : mettre le tissu à tremper dans l’eau froide avec du sel, puis laver avec du savon pour lessive.
SYMBOLES INTERNATIONAUX POUR LE TRAITEMENT DES VÊTEMENTS
Avant de mettre les vêtements dans la machine à laver et de sélectionner le programme correspondant, il est conseillé d’examiner les symboles reportés sur les étiquettes du fabricant. Le tableau ci-après peut se révéler utile pour la lecture des symboles.
FR
SM2977
|
ENTRETIEN |
21 |
|
|
NETTOYAGE DE LA MACHINE À LAVER LE LINGE |
|
|
|
La machine à laver a été conçue afin de réduire au minimum l’entretien. Il est toutefois |
|
|
|
important de ne pas oublier de la nettoyer régulièrement. |
|
|
|
Avant le nettoyage, s’assurer que l’appareil n’est plus branché au réseau électrique et |
|
|
|
que l’alimentation de l’eau est fermée. |
|
|
|
La structure externe et les parties en plastique de la machine doivent être nettoyées |
|
|
|
uniquement au moyen d’un chiffon doux humide. |
|
|
21 |
ATTENTION!! |
Pour le nettoyage de la machine, ne jamais utiliser |
|
|
de substances chimiques, produits abrasifs, alcool, |
|
|
|
|
savon, essence ou tout autre type de solvant, au risque |
|
|
|
d’endommager la machine. (fig.21) |
|
|
Après avoir terminé le lavage, laisser le hublot ouvert pendant un long moment, afin |
|
|
|
que les parties en caoutchouc puissent sécher. |
|
|
|
Laver périodiquement les compartiments des détergents. Dans ce but, sortir le tiroir |
|
|
|
à produits et rincer ce dernier sous l’eau courante (fig.22). Puis le remettre en place. |
|
|
22 |
|
|
|
|
COMMENT SORTIR LE TIROIR À PRODUITS |
|
|
23 |
▼ ouvrir le tiroir à produits ; |
|
|
|
▼ appuyer avec la main droite sur l’inscription «PUSH» et, avec l’autre main, |
|
|
|
enlever le tiroir en le tirant vers soi. (fig. 23) |
|
|
|
|
NETTOYAGE DU FILTRE |
|
24 |
ATTENTION!! |
Avant de commencer les opérations décrites ci-des- |
|
|
|
||
|
|
sous, s’assurer que la machine est vide. Ne pas retirer |
|
|
|
le filtre pendant le fonctionnement de la machine ou |
|
|
|
lorsque cette dernière est pleine d’eau. |
|
|
Mettre un chiffon sous le filtre ou bien un récipient plat pour recueillir l’eau qui est |
|
|
|
restée à l’intérieur. Ouvrir le volet du filtre, dévisser et retirer ce dernier en le tournant |
|
|
|
vers la gauche (fig.24/25). |
|
|
25 |
Le filtre doit être nettoyé périodiquement. |
|
|
Rincer le filtre à l’eau courante et éliminer toute trace de résidus. Revisser le filtre |
|
||
|
vers la droite, en s’assurant qu’il est fermé hermétiquement. |
|
|
SM2977 |
|
FR |
|
|
|
|
|

22 |
ENTRETIEN |
RÉSOLUTION DES PROBLÈMES
En cas de non fonctionnement de la machine, il est conseillé de vérifier la liste des causes suivante avant de contacter le service après-vente agréé. Pour certains modèles, les anomalies sont mises en évidence par un code en fin de cycle.
Code : E:00 Effectuer les contrôles indiqués dans le paragraphe marqué * E:00 Effectuer les contrôles indiqués dans le paragraphe marqué ** E:02 Anomalie technique « Contacter le Service Après-Vente » E:03 Anomalie technique « Contacter le Service Après-Vente »
La machine à laver le linge ne fonctionne pas (les voyants de contrôle ne sont pas allumés) (Afficheur éteint)
•Vérifier les points suivants:
1)Le réseau électrique est alimenté
2)Laficheestinséréecorrectementdanslaprisedecourant
3)la touche Marche/Arrêt est enfoncée ou, si
elle n’est pas prévue, le sélecteur des pro-
grammes est positionné sur un programme.
La machine à laver le linge ne fonctionne pas (les voyantsdecontrôlesontallumés)(Afficheurallumé)*
•Vérifier les points suivants :
1)Un programme a été sélectionné
2)Le hublot est fermé correctement
3)La touche «Départ» a été appuyée (uniquement pour les modèles électroniques)
4)Vérifier les indications suivantes «La machine ne charge pas l’eau»
La machine ne charge pas l’eau*
•Contrôler que :
1)Il y a de l’eau dans les conduites.
2)Le tuyau de vidange est branché à la machine à laver le linge
3)Le robinet d’alimentation de l’eau est ouvert
4)Le filtre n’est pas obstrué.Si nécessaire, effec-
tuer le nettoyage de celui-ci, en débranchant
l’appareil du réseau électrique.
La machine à laver le linge charge et décharge de l’eau continuellement**:
•Contrôler que :
1)Le tuyau de vidange se trouve à la bonne hauteur (60-90 cm.)
2)L’extrémité du tuyau de vidange n’est pas immergée dans l’eau
La machine à laver le linge n’effectue ni la vidange de l’eau ni l’essorage**:
•Contrôler que :
1)Le tuyau de vidange est branché correctement
2)Le tuyau de vidange n’est pas plié
3)Le filtre de vidange n’est pas obstrué
4)La fonction de suppression de l’essorage n’a pas été sélectionnée
5)La fonction « arrêt cuve pleine » n’a pas été sélectionnée.
La machine vibre et fait du bruit
• Vérifier les points suivants :
1)Toutes les protections pour le transport ont été retirées.
2)Lamachineàlaverlelingeestparfaitementdeniveau
3)Le linge volumineux tel que les draps, les nappes, etc. n’est pas concentré dans une seule partie du tambour
Le hublot ne s’ouvre pas
•Vérifier les points suivants :
1)Le cycle de lavage est terminé.
2)Lafonction« arrêtcuvepleine »n’apasétésélectionnée (automatique pour certains modèles).
L’essorage du linge est insuffisant
•Vérifier les points suivants :
1)Le linge a été réparti de façon uniforme dans le tambour
2)Une vitesse d’essorage correcte a été choisie
Lamachineàlaverlelingesebloquependantlelavage
•Vérifier les points suivants :
1)Le courant n’est pas coupé
Une quantité excessive de détergent reste dans le compartiment
•Vérifier les points suivants :
1)Le robinet d’alimentation de l’eau est ouvert
2)Le filtre qui se trouve entre le robinet et le tuyau d’alimentation est propre
Après le lavage, le linge n’est pas propre
•Vérifier les points suivants :
1)Le tambour n’a pas été chargé excessivement
2)Une quantité correcte de détergent a été utilisée
3)Un programme de lavage approprié a été choisi.
Le linge a rétréci ou bien a déteint
Vérifier les points suivants :
1)Un programme de lavage correct a été choisi
2)Une température de lavage correcte a été sélectionnée
La machine à laver le linge n’effectue pas le séchage (uniquement pour les modèles de machines à laver séchantes)
•Vérifier les points suivants :
1)Le robinet d’alimentation de l’eau est ouvert
2)Le filtre de vidange est propre
3)La machine à laver est en marche (voyant de contrôle ou afficheur allumé)
4)Le programme de séchage est sélectionné
5)Le temps de séchage a été programmé
Si, après vérification des points ci-dessus, l’appareil ne fonctionne toujours pas correctement, signaler le défaut au centre de service après-vente agréé le plus proche.
Merci de bien vouloir communiquer le modèle, le numéro de fabrication et le type de panne. Les données relatives à l’appareil sont reportées dans le tableau d’information qui se trouve sur le volet du filtre.
Ces informations permettent à l’opérateur du service après-vente de se procurer les pièces de rechange nécessaires et garantissent donc une exécution rapide et efficace de la réparation.
FR
SM2977
DEUTSCH |
23 |
Verehrter Kunde,
Wir gratulieren Ihnen zur Wahl unserer Waschmaschine.
Bitte lesen Sie diese Gebrauchsanweisung genau durch, bevor Sie die Maschine anschließen und gebrauchen.
Die gute Kenntnis der Funktionsprinzipien wird Ihnen die korrekte und sichere Nutzung des Geräts ermöglichen. Die Gebrauchsanweisung enthält neben den technischen Merkmalen der Waschmaschine viele nützliche Tipps, die Ihnen helfen werden, das Gerät optimal zu gebrauchen. Falls Sie die Maschine weiterverkaufen, denken Sie daran, dem neuen Besitzer auch diese Gebrauchsanweisung mitzugeben.
MODELL: .......................................................................................... |
DATUM DES ERWERBS: |
.............../............... |
/............................. |
|
SERIENNUMMER: ........................................................................................................................................................................................... |
|
|
|
|
|
INHALT |
|
|
|
HINWEISE UND RATSCHLÄGE FÜR DEN BENUTZER |
|
24-25 |
||
BESCHREIBUNG DER MASCHINE |
|
|
25 |
|
INSTALLATION DER MASCHINE |
|
|
26-28 |
|
• Auspacken und Entfernen der Transportsicherungen |
|
26 |
||
• |
Geradestellen der Maschine |
|
|
26 |
• |
Wasseranschluss |
|
|
27 |
• Anschluss an das Stromnetz |
|
|
28 |
|
GEBRAUCH DER WASCHMASCHINE |
|
|
28-30 |
|
• |
Vor dem Gebrauch |
|
|
28 |
• |
Verwendung der Waschmittel |
|
|
29 |
• |
Fleckenentfernung |
|
|
30 |
• |
Internationale Pflegekennzeichen |
|
|
30 |
WARTUNG |
|
|
31-32 |
|
• |
Reinigung der Waschmaschine |
|
|
31 |
• |
Reinigen des Flusensiebs |
|
|
31 |
• |
Problemlösungen |
|
|
32 |
Dieses Gerät entspricht den Europäischen Richtlinien 2012/19/EU, Waste Electrical and Electronic Equipment (WEEE). Die vorschriftsmäßige Entsorgung des ausrangierten Geräts stellt einen wertvollen Beitrag zum Schutz der Umwelt und der Gesundheit dar.
Das Symbol  am Gerät oder in den Begleitpapieren weist darauf hin, dass dieses Produkt nicht als Hausmüll behandelt werden darf, sondern als Sondermüll einer Sammelstelle für elektrische und elektronische Altgeräte zu übergeben ist. Gemäß den lokalenVorschriften zur Abfallbeseitigung entsorgen. Für weitere Informationen zu Behandlung, Abbau und Recycling dieses Geräts die zuständige Behörde, das Abfallbeseitigungsunternehmen oder den Händler, bei dem das Gerät erworben wurde, kontaktieren.
DE
SM2977

24  HINWEISE UND RATSCHLÄGE FÜR DEN BENUTZER
Vor dem Anschließen des Gerätes aufmerksam die Anleitung durchlesen. Reparationen wegen unpassenden Anschlüssen oder unsachgemäßem Gebrauch des Gerätes sind nicht durch die Garantie gedeckt.
DER HERSTELLER HAFTET NICHT FÜR EVENTUELLE SCHÄDEN, WELCHE INFOLGE DER NICHTBEACHTUNG DER SICHERHEITSVORSCHRIFTEN UND DER GEBRAUCHSANWEISUNG ENTSTEHEN KÖNNEN
▼Dieses Gerät kann von Kindern ab 8 Jahren und Menschen mit eingeschränkten physischen, sensorischen oder geistigen Fähigkeiten oder mangels Erfahrung und Wissen im Alter verwendet werden, wenn eine angemessene Aufsicht oder ausführliche Anleitung zur Benutzung des Geräts in einer sicheren Weise angegeben und verstehen die Gefahren beteiligt. Kinder dürfen nicht mit dem Gerät spielen. Reinigung und Wartung durch den Benutzer werden nicht von Kindern ohne Aufsicht durchgeführt werden.
▼Kinder im Alter von drei Jahren sollten ferngehalten werden, es sei denn, sie werden ständig überwacht.
▼Das Gerät muss ordnungsgemäß an das System mit neuen Schläuchen versehen angeschlossen werden.Gebrauchte Schläuche dürfen nicht wiederverwendet werden.
▼Der Betriebsdruck des Wassers (Minimum und Maximum) zwischen 0,5 bar (0,05 MPa) und 10 bar (1 MPa) ist.
▼Wenn das Netzkabel beschädigt ist, muss es durch den Hersteller, seinen Kundendienst oder einer ähnlich qualifizierten Person, um eine Gefahr zu vermeiden ersetzt werden.
▼Lüftungsöffnung in der Basis darf nicht durch einen Teppich behindert werden.
▼Beachten Sie die maximale Lautstärke des trockenen Last, wie in dem Abschnitt “Programmtabelle” angezeigt.
▼Vor dem Einschalten der Waschmaschine das gesamte Verpackungsmaterial und die Transportsicherungen (Sicherheitsschrauben) entfernen. Andernfalls kann sowohl die Maschine, als auch der Aufstellungsraum Ihrer Wohnung schwer beschädigt werden.
▼Das Gerät dient zum Waschen von Wäsche im Haushalt. Jede andere Verwendung ist unsachgemäß und folglich gefährlich.
▼Jede Veränderung oder sonstige Manipulierung des Geräts kann den Benutzer gefährden und Schäden an der Maschine verursachen.
▼Das Gerät hat ein beträchtliches Gewicht und folg-
lich sind für das Befördern desselben besondere Sicherheitsmaßnahmen zu treffen.
▼Während des Betriebs der Waschmaschine den Kontakt mit dem aus dem Ablaufschlauch austretenden Wasser vermeiden, da dieses sehr heiß sein kann. Auch die Glasscheibe des Einfüllfensters kann sich während des Betriebs erhitzen und sollte daher nicht berührt werden.
▼Waschen Sie nur für Maschinenwäsche geeignete Stoffe. Im Zweifelsfall die Herstellerhinweise am Etikett der Wäschestücke beachten (siehe „Pflegekennzeichen“).
▼Vor dem Einlegen von Kleidungsstücken in die Waschmaschine alle Taschen leeren. Harte oder spitze Gegenstände, wie beispielsweise Münzen, Nadeln, Nägel, Schrauben oder Steine können schwere Schäden verursachen.
▼In der Maschine dürfen keine Kleidungsstücke mit benzinhaltigenVerschmutzungen gewaschen werden.Falls Flecken mit verdampfenden Mitteln entfernt wurden, müssen diese vor dem Einfüllen in die Waschmaschine vollkommen verdampft sein.
▼Gebrauch von und Menge an Waschmittel, Weichspüler und Bleiche müssen den auf der Verpackung angegebenen Anweisungen entsprechen.
▼Keine Waschmittel für Handwäsche verwenden, da deren starke Schaumentwicklung die Innenteile des Waschautomaten beschädigen könnte.
▼Nach dem Waschen von Läufern, Decken oder anderen langfaserigen Geweben das Flusensieb herausnehmen und gegebenenfalls reinigen.
▼Wir empfehlen das Einfüllfenster nach dem Waschen geöffnet zu lassen.
▼Bei Betriebsstörungen auf keinen Fall versuchen, das Gerät selbst zu reparieren, weil dies schwerwiegende Schäden verursachen könnte und außerdem den Gewährleistungsanspruch verfallen lässt.
▼Das Gerät darf ausschließlich von autorisiertem Personal der Kundendienstzentren repariert werden. Für Reparaturen dürfen nur OriginalErsatzteile verwendet werden.
▼Den Gerätestecker auf keinen Fall mit nassen Händen einoder ausstecken.
▼Die Waschmaschine muss an eine vorschriftsmäßig geerdete Steckdose angeschlossen werden.
▼Die Verwendung von Verlängerungskabeln oder Mehrfachsteckern zum Anschließen der Maschine ist verboten.
▼Das Gerät darf nicht den Witterungseinflüssen
DE
SM2977
HINWEISE UND RATSCHLÄGE FÜR DEN BENUTZER  25
25
ausgesetzt werden.
▼Die Waschmaschine kann erst geöffnet werden, wenn die Kontrolllampe oder das Display das Zyklusende anzeigt. Bei einigen Modellen wird das Zyklusende durch das Blinken der StartTaste angezeigt.
▼Vor irgendwelchen Arbeiten am Gerät oder
dessen Reinigung das Gerät unbedingt spannungslos machen.
▼Beim Ausstecken des Kabels aus der Steckdose nicht am Kabel selbst, sondern am Stecker ziehen.
▼Nach dem Waschen empfiehlt es sich, den Stecker auszustecken und den Wasserhahn zu schließen.
FÜR WASCHTROCKNER:
▼Nicht gewaschene Kleidungsstücke nicht trocknen.
▼Keine mit chemischen Mitteln gewaschene oder behandelte Kleidungsstücke trocknen.
▼Auf keinen Fall Wäschestücke trocknen, die mit Speiseöl, Erdöl, Azeton, Alkohol, Benzin, Kerosin, Fleckenmittel, Terpentin oder Wachs verschmutzt sind. Derlei Wäschestücke müssen heiß und mit reichlich Waschmittel gewaschen werden, bevor sie in den Trockner eingefüllt werden.
▼Auf keinen Fall Kleidungsstücke mit Schaumgummi, Latex, impermeable und wasserdichte Gewebe, Gummimatten, bedruckte Stoffe, Kleidungsstücke oder
Kissen mit Schaumgummipolsterung im Trockner trocknen, weil derlei Materialien schmelzen und andereWäschestücke oder das Gerät selbst beschädigen könnten.
▼Weichspüler, oder ähnlichen Produkten, verwendet, wie durch die Weichspüler Anweisungen angegeben werden.
▼Kinder von weniger als 3 Jahren sollten ferngehalten werden, es sei denn kontinuierlich überwacht.
▼Dass das Gerät nicht hinter einer verschließbaren Tür, einer Schiebetür oder einer Tür mit einem Scharnier auf der gegenüberliegenden Seite zu derjenigen des Gerätes in einer solchen Weise, dass ein vollständiges Öffnen der Gerätetür beschränkt installiert werden.
ACHTUNG !!! DER LETZTE TEIL DES TROCKENGANGS IST DIE ABKÜHLUNG. DENTROCKNER NIEMALS ANHALTEN, BEVOR DAS ENDE DES GANGS ERREICHT WURDE, ES SEI DENN DIE WÄSCHE WIRD
SOFORT ENTNOMMEN UND AUFGEHÄNGT, UM DIEWÄRME ZUVERTEILEN.
BESCHREIBUNG DER MASCHINE
▼Das Gehäuse besteht aus Blechplatten, die so behandelt und lackiert sind, dass ihre ästhetischen Merkmale über lange Zeit unverändert erhalten bleiben.
▼Der Motor und alle Bewegungsteile wurden so konzipiert und realisiert, dass maximale Laufruhe garantiert werden kann.
▼Die praktische, geräumige Trommel aus Edelstahl schont die Wäsche und garantiert hohe Waschqualität.
▼Am Bedienfeld befinden sich alle Bedienelemente zur einfachen Anwahl aller gewünschten Waschund Trockenprogramme (siehe Bedienfeld und Programmtabelle).
▼Das große Einfüllfenster erleichtert das Einlegen und Entnehmen der Wäsche.
▼Die außerordentliche Stabilität der Maschine ist das Ergebnis ständiger Forschungen hinsichtlich der Gewichtsverteilung von sich bewegenden Massen.
G D F
E
A


A - Einfüllfenster |
E - |
Trommel |
|
|
B - Flusensieb |
F - |
Bedienfeld |
B |
|
C - |
Verstellbare Füße |
G - |
Waschmittel-Einspülkammer |
1 |
D - |
Arbeitsplatte |
|
C |
|
DE
SM2977
26 |
INSTALLATION DER MASCHINE |
(MODELLABHÄNGIG) |
Der Trockner muss von Fachpersonal und gemäß den Anweisungen des Herstellers installiert werden, da eine fehlerhafte Installation Personen– und Sachschäden verursachen kann.
Das Gerät kann überall dort aufgestellt werden, wo die Raumtemperatur 3°C nicht unterschreitet. Achten Sie darauf, dass Kabel und Schläuche an der Geräterückseite nicht gequetscht werden.
ACHTUNG! Waschtrockner dürfen nicht hinter verschließbaren Türen, Schiebetüren oder Türen mit Scharnier an der dem Waschtrockner entgegengesetzten Seite aufgestellt werden.
Für den Transport wird die Schwinggruppe des Geräts mit 4 Transportsicherungen mit Schrauben fixiert. Vor Inbetriebnahme der Waschmaschine die Transportsicherungen und Schrauben entfernen und für eventuelle zukünftige Umzüge aufbewahren.
Die Löcher mit den entsprechenden Stöpseln verschließen, die Sie im Plastikbeutel mit der Dokumentation finden. 

3


2
Für den Transport wird die Schwinggruppe des Gerätes mit 4 Transportsicherungen und Schrauben fixiert. Vor Inbetriebnahme der Waschmaschine die Transportsicherungen und Schrauben mit Hilfe eines Schraubenschlüssels entfernen.
Einen Schraubenzieher an den Löchern ansetzen und die 4 Trans-

 portsicherungen aus Plastik entfernen, wie in der Abbildung
 gezeigt.

5
GERADESTELLEN DER MASCHINE:
Nachdem die Maschine an einem geeigneten Ort aufgestellt wurde, muss sie mit Hilfe der verstellbaren Füße (Abb. 6) perfekt gerade ausgerichtet werden.
Den Standort sorgfältig auswählen und besonders auf die Nivellierung der Waschmaschine und die Sicherung der Konterschrauben achten.
Wenn die Maschine nicht perfekt gerade ausgerichtet ist, wird ihre Stabilität beeinträchtigt, bei Betrieb entsteht ein lautes Geräusch und sie kann Schaden erleiden.
4
6
Wenn die Waschmaschine auf Teppichboden aufgestellt wird, muss auf einen ausreichenden Bodenabstand geachtet werden, damit die korrekte Luftzirkulation gewährleistet wird.
Vom Aufstellen der Maschine in frostgefährdeten Räumen wird abgeraten.
Bei Versionen für den Einbau unter einer Arbeitsplatte die Füße so weit |
|
einschrauben, bis die ganz zusammengedrückte Feder die Installation unter |
|
der Arbeitsplatte ermöglicht (Abb. 6B). |
6B |
|
|
DE |
SM2977 |
|
INSTALLATION DER MASCHINE |
27 |
WASSERANSCHLUSS |
|
 7
7
8 |
9
10
Der Druck der Wasserleitung soll 0,05 bis 1,00 MPa (0,5 - 10 bar) betragen.
▼Vor dem Anschließen den Hahn öffnen und eine gewisse Menge Wasser fließen lassen, damit die Rohre durchgespült und von etwaigen Verunreinigungen, wie Sand, Rost, usw. befreit werden (dies ist besonders wichtig, wenn die Maschine lange Zeit nicht gebraucht wurde, oder wenn sie an eine neue Wasserleitung angeschlossen wird).
▼Der Wasserzulaufschlauch muss an einen Kaltwasserhahn mit 3/4“ Gewinde angeschlossen werden.
NB: Bei elektronischen Waschmaschinen mit doppeltem Magnetventil (Warmund Kaltwasser) wird der rote Schlauch an den Warmwasserhahn und der andere Schlauch an den Kaltwasserhahn angeschlossen. Ist kein Warmwasserhahn verfügbar, müssen beide
Schläuche mit Hilfe des entsprechenden mitgelieferten Anschlussstückes an den Kaltwasserhahn angeschlossen werden (siehe Abb. 8)
▼Den Wasserzulaufschlauch an die Waschmaschine anschließen (Abb. 9).
NB: Für den Anschluss an das Wassernetz von KondensationsWaschmaschinen und -Waschtrocknern sind die neuen, mit der jeweiligen Maschine mitgelieferten Schlauchsätze zu benutzen. Auf keinen Fall alte Schläuche wieder verwenden.
▼Während des Waschgangs muss der Wasserhahn vollkommen geöffnet sein.
▼Der Wasserablaufschlauch muss auf einer Höhe von 60 cm bis 90 cm vom Boden angebracht werden (Abb. 10).
▼Wenn das Wasser direkt in die Abwasserleitung abfließt, wird das freie Ende des Wasserablaufschlauchs in diese Leitung gesteckt, deren Innendurchmesser mindestens 40 mm betragen muss.
▼Der Ablaufschlauch darf auf keinen Fall luftdicht angeschlossen werden, damit keine Luft in den Siphon dringt und folglich Wasser ausläuft.
▼Soll das Wasser in ein Waschbecken oder einen anderen Ablauf geleitet werden, muss die Kurve am freien Ende des Wasserablaufschlauchs mit dem mitgelieferten Bügel gesichert werden. Dann den Schlauch am Waschbeckenrand einhängen und den Bügel fixieren, damit der Schlauch nicht abrutschen kann (Abb. 11). Darauf achten, dass der Abfluss des Waschbeckens sauber ist, damit das Wasser frei abließen kann.
11
DE
SM2977
28 |
INSTALLATION DER MASCHINE |
|
ELEKTROANSCHLUSS |
Überprüfen Sie, ob die am Typenschild an der Innenseite der Fil- |
|
|
terklappe angegebene Spannung mit demWert Ihres Stromnetzes |
|
|
übereinstimmt (Abb. 12). |
|
|
Schutzschalter, Stromkabel und Netzsteckdose müssen so ausgelegt sein, dass |
|
|
sie die am Typenschild angegebene Höchstlast aushalten können. |
|
|
Nach erfolgter Installation soll das Gerät über einen allpoligen Schalter an die |
|
|
Netzversorgung angeschlossen werden können. |
12 |
|
Die für den Anschluss der Maschine bestimmte Steckdose muss vorschriftsmä- |
||
|
||
ßig geerdet sein. Im gegenteiligen Fall haftet der Hersteller nicht für eventuelle |
|
|
Unfälle (Abb. 13). |
|
|
Falls die betreffende Steckdose defekt oder ungeeignet ist, muss sie von einem |
|
|
Elektriker ausgewechselt werden. |
|
|
Der Anschluss der Maschine mittels Verlängerungskabeln oder Mehrfachsteck- |
|
|
dosen ist verboten. |
|
|
Während der Wartung der Maschine muss der Stecker ausgesteckt sein. |
13 |
|
Den Gerätestecker auf keinen Fall mit nassen Händen einoder ausstecken. |
||
|
Falls das Kabel beschädigt sein sollte, ist der Kundendienst hinzuziehen.
Der Stecker für den Anschluss an das Stromnetz soll sich nicht hinter dem
Gerät, sondern an einer in Notfällen problemlos erreichbaren Stelle befinden.
GEBRAUCH DER WASCHMASCHINE |
||
VOR DEM GEBRAUCH |
|
|
Achtung: Bevor erstmals mit der Maschine gewaschen wird, |
Geöffnet |
|
|
||
einen kurzen Waschgang ohne Wäsche durchführen. |
Geschlossen |
|
Dadurch wird die einwandfreie Funktion der Waschmaschine erprobt und |
|
|
die Trommel gespült. |
|
|
Vor jedem Waschgang: |
14 |
|
▼ Kontrollieren, ob die Wasseranschlüsse in Ordnung sind, der Ablaufschlauch |
||
|
||
korrekt angebracht (siehe Wasseranschluss) und der Hahn geöffnet ist (Abb. |
|
|
14). |
|
|
▼ Mit trockenen Händen den Stecker in die Steckdose stecken. |
|
|
▼ die Wäsche nach Gewebeart sortieren (siehe Pflegekennzeichen). |
|
|
▼ Sicherstellen, dass sich keine Fremdkörper in den Taschen der Kleidungsstü- |
|
|
cke befinden, welche die Wäsche, die Maschine oder den Filter beschädigen |
|
|
könnten. |
|
|
|
15 |
|
DE |
SM2977 |
|
|
||

GEBRAUCH DER WASCHMASCHINE |
29 |
VERWENDUNG DER WASCHMITTEL |
|
2
3 1
16
NEIN
JA
17
18
19
20
Die Waschmaschine ist mit einer Waschmittelschublade mit drei Einspülkammern ausgestattet.
Waschpulver-Einspülkammer für Vorwäsche oder Einweichen (1)
Waschpulver-Einspülkammer für Hauptwäsche (2)
Einspülkammer für Weichspüler (3).
Verwenden Sie ein Waschmittel mit gebremster Schaumentwicklung und Weichspüler (wo erforderlich) für Waschautomaten.Die jeweiligen Mengen sind auf den Packungen der Waschmittel angegeben.
NB: Geben Sie nicht zuvielWaschmittel in die Kammer, weil sonst viel Schaum entsteht und dasWaschergebnis beeinträchtigt wird.
Zu wenigWaschmittel kann ebenfalls dasWaschergebnis beeinträchtigen.
NB: Beim Einfüllen des Waschmittels darauf achten, dass dieses nicht in die Kammer fürWeichspüler gelangt, da sonst mit Schaum gespült wird und weiße Flecken auf der Wäsche zurückbleiben können. Sollte hingegenWeichspüler in dieWaschmittel-Einspül-
kammer gelangen, könnte die Waschkraft beeinträchtigt werden.
NB: Werden Flüssigwaschmittel verwendet (empfehlenswert für Programme ohneVorwäsche), wie folgt vorgehen: dieTrennwand aus ihrem Sitz an der Schublade gegenüber der Kammer 2 nehmen und an den speziellen Führungen in der Mitte derselben
Kammer einsetzen.
▼Vor dem Einschalten der Maschine die Waschmittelschublade schließen.
Achtung! Die Waschmittelschublade nie herausziehen, während die Maschine in Betrieb ist, weil sonst Wasser austreten könnte.
DE
SM2977
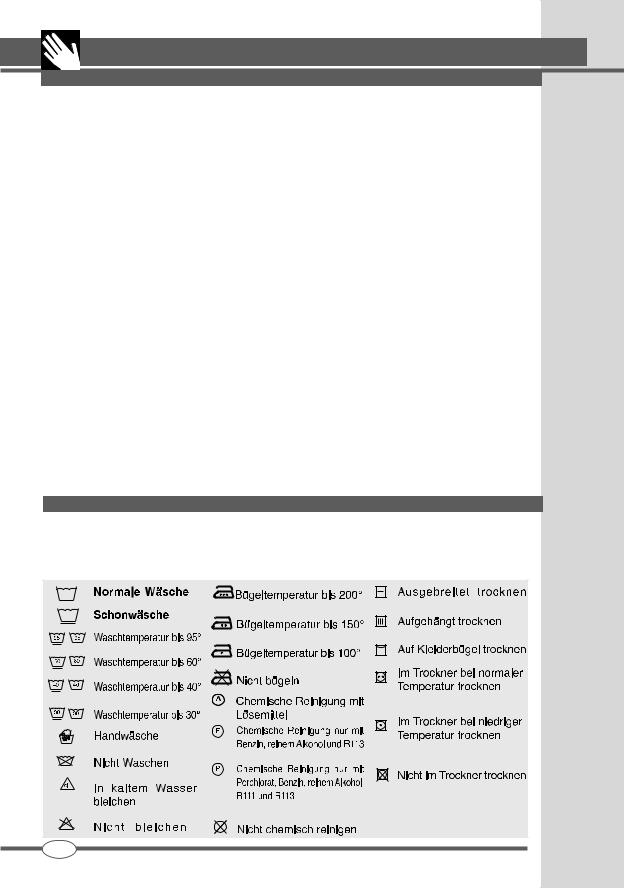
30 |
GEBRAUCH DER WASCHMASCHINE |
FLECKENENTFERNUNG
Bestimmte Flecken können allein durch Waschen in der Waschmaschine nicht beseitigt werden. Bevor irgendwelche Flecken behandelt werden, muss an einer unsichtbaren Stelle ausprobiert werden, ob das Gewebe farbecht ist. Flecken immer vom Rand ausgehend zur Mitte hin bearbeiten, damit keine Ränder entstehen. Nachstehend geben wir einige Tipps zur Entfernung von Flecken.
▼Wachs: Das Wachs vorsichtig mit einem Messer mit abgerundeter Spitze abschaben und den Stoff anschließend zwischen zwei saugfähige Bögen Papier legen und mit dem heißen Bügeleisen das restliche Wachs entfernen.
▼Kugelschreiber und filzstift: mit einem wei-
chen, mit Äthylalkohol getränkten Lappen behandeln. Darauf achten, dass der Flecken nicht größer wird.
▼Stockflecken und schimmel: Sofern das Ge-
webe bleichmittelfest ist, einen Waschzyklus mit Bleichmittel durchführen Andernfalls die Schmutzstellen mit 10%igem Wasserstoffperoxid anfeuchten und 10 bis 15 Minuten einwirken lassen.
▼Leichte bügeleisenverbrennungen: wie für
Stockflecken und Schimmel beschrieben vorgehen.
▼Rost: Einen Rostfleckenentferner nach Gebrauchsanweisung benutzen.
▼Kaugummi: Das Gewebe energisch mit Eiswürfeln abreiben und danach mit einem mit
Azeton angefeuchteten Lappen nachbehandeln.
▼Lack: Lack nicht eintrocknen lassen. Lackflecken unverzüglich mit dem auf der Packung angegebenen Lösemittel (z.B. Wasser, Terpentin, Trichloräthylen) behandeln, mit Seifenwasser auswaschen und spülen.
▼Lippenstift:Flecken auf Baumwolle oder Wolle mit Äther behandeln. Für Seide hingegen Trichloräthylen verwenden.
▼Nagellack: die befleckte Seite auf saugfähiges Papier legen und die andere Seite mit Azeton anfeuchten. Das Papier öfter erneuern. Auf diese Weise weiterbehandeln, bis der Fleck vollständig entfernt ist.
▼schlamm oder teer: den Fleck mit etwas frischer Butter einreiben, einwirken lassen und danach mit Terpentinöl waschen.
▼Gras: Vorsichtig einseifen und mit verdünntem Bleichmittel behandeln. Bei Wolle hat sich 90%iger Alkohol bewährt.
▼Blut: in kaltem Salzwasser einweichen und anschließend mit Waschseife waschen.
INTERNATIONALE PFLEGEKENNZEICHEN
Um für jedes Wäschestück das richtige Programm wählen zu können, sollten Sie sich die Kennzeichen auf dem Herstelleretikett ansehen.Die folgende Tabelle soll Ihnen beim Lesen der Symbole behilflich sein.
DE
SM2977
 Loading...