

Page 1
GSS 100 • Setup Guide
RS-232FunctionPin
1
2
3
4
5
6 - 9
—
Tx
Rx
—
Gnd
—
Not used
Transmit data
Receive data
Not used
Signal ground
Not used
The Extron GSS 100 is a portable graphic still store with 16 MB of memory that can hold up to
6 XGA (1024 x 768) bitmap images (BMP) or 32 or more XGA JPEG images.
The GSS outputs stored images in an RGB video format. The GSS provides a pass-through RGB
video input, in addition to the stored images, and allows you to switch the output between the
RGB pass-through input and one of the stored images.
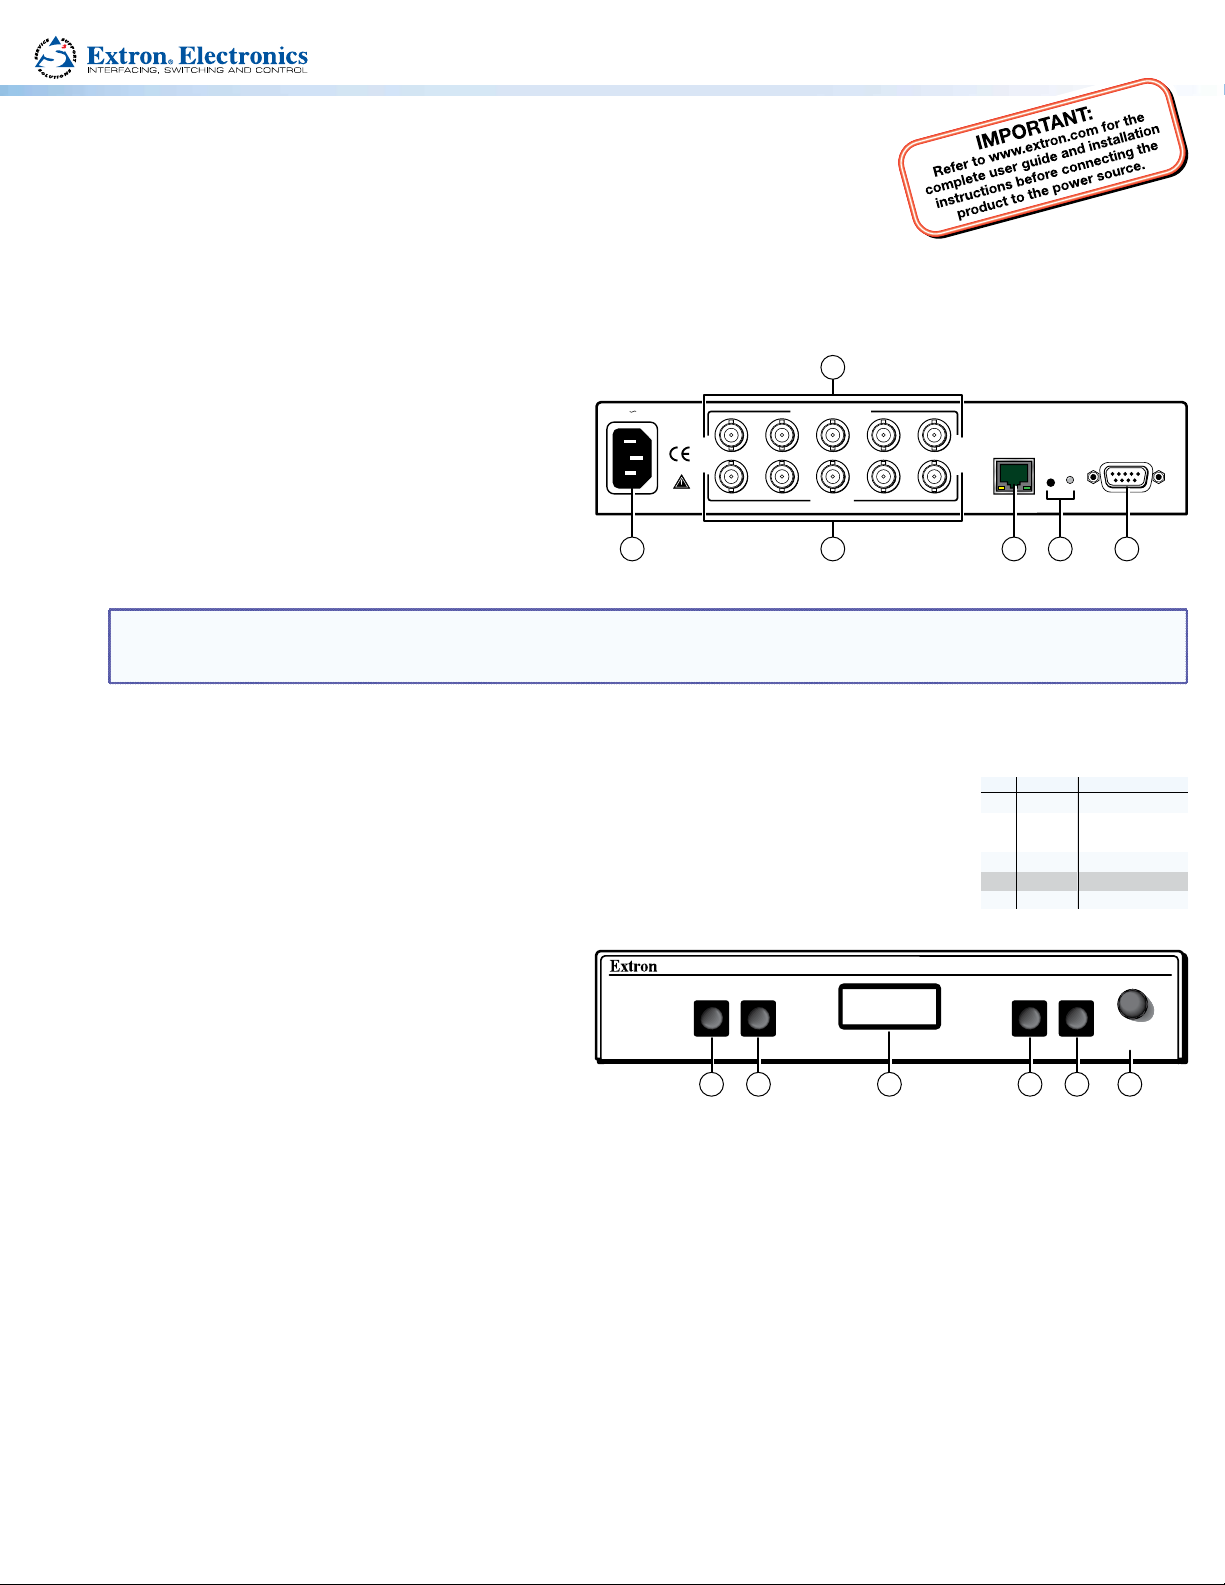
Connections
a AC power connector — Plug a standard IEC power cord
into this connector to connect the GSS to a 100 VAC to
240 VAC, 50 or 60 Hz power source.
b RGB Pass-thru connectors — Connect a high resolution
video input or computer input to these female, BNC
100-240V .3A MAX
50/60 Hz
R
R
2
RGB PASS-THRU
G
G
OUTPUT
B
H/HV
LAN
B
H/HVVV
RESET
connectors.
c Output connectors — Connect an RGB video display or
1 4 5
3 6
other device to these female BNC connectors.
NOTE: The still image output format (RGBHV or RGBS) must be configured using the front panel controls or a Simple
Instruction Set (SIS™) command. The output format applies only to the output of still images stored in the GSS; the
RGB Pass-through video is output exactly as it is input.
d LAN port — Connect the GSS to a PC or to an Ethernet LAN, via this RJ-45 connector. You can use the HTML pages embedded in
the GSS to upload still images from the PC to the GSS and to control the GSS. You can also use a PC to control the GSS with SIS
commands. The default address is 192.168.254.254.
e RS-232 port — Connect a computer or control system to this 9-pin D connector to allow remote
control using the SIS commands.
f Reset button — See the GSS 100 User Guide for greater detail.
RS-232
Controls and Indicators
a Image button — Press this button to activate the
menu on the LCD display (c) that allows you to select
between the RGB pass-through input and one of the
stored images.
b Take button — Press this button to activate either the
RGB pass-through input or one of the stored images.
c LCD display — 8-column by 2-line screen
d Menu button — Press the Menu button to enter and move through the main menu system in the GSS.
e Next button — Press the Next button to step through the submenus in the GSS menu system.
f Adjust/Select knob — Rotate the Adjust/Select knob to change a setting when it is used in conjunction with the Image and Take
buttons or the Menu and Next buttons.
IMAGE
TAKE
1 2 43 65
MENU
NEXT
GSS 100
ADJUST/
SELECT
Page 2
GSS 100 • Setup Guide
Operation
Graphic File Considerations
z The only valid file formats for stored images are *.bmp and *.jpg.
z Valid file names are up to 240 alphanumeric characters with no spaces.
z Progressive *.jpg images are not supported.
z Bitmap (*.bmp) images must be formatted as 24-bit RGB.
z The GSS 100 does not scale images. An 800 x 600 BMP file does not fill a 1024 x 768 output. Thus, images should be mastered at
the output resolution of the GSS.
z 1080i and 1080p files need to be mastered at a resolution of 1440 x 1080 instead of 1920 x 1080.
Conguring the Output
1. On the front panel, with the LCD displaying the default display cycle, press the
Menu button twice to display the Output Configuration menu.
2. Press the Next button to display the Resolution submenu.
3. Rotate the Adjust/Select knob to select the output resolution of the stored images.
4. Press the Next button to display the Sync submenu.
5. Rotate the Adjust/Select knob to select between RGBHV and RGBS.
6. Press the Next button to select the Polarity submenu.
7. Rotate the Adjust/Select knob to select among the sync polarities.
8. Press the Next button to select the RGB Delay submenu.
9. Rotate the Adjust/Select knob to set how long the GSS mutes the RGB output
before displaying the RGB pass-through input.
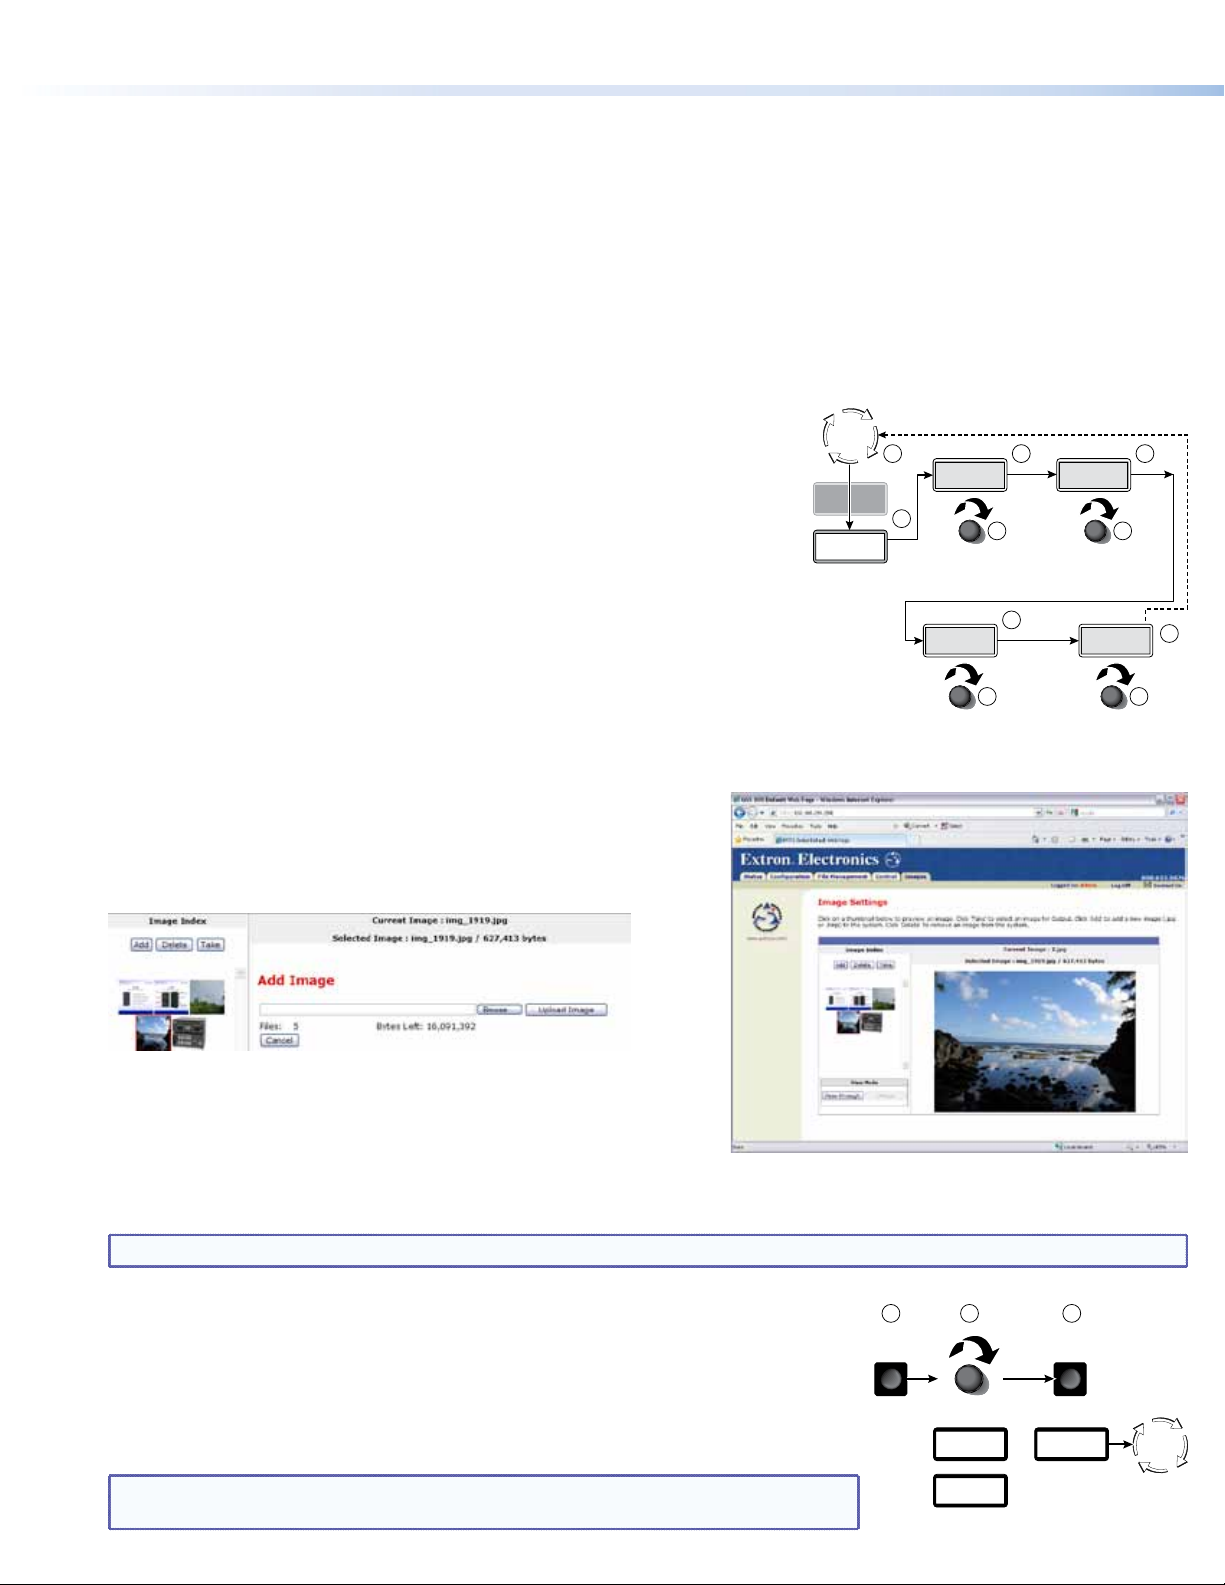
Uploading (Adding) an Image
1. Connect the GSS to a PC or to a network and open the embedded web
pages. See the GSS 100 User Guide for more detail.
2. Click the Images tab to access the Image Settings page.
3. Click the Add button. The Add Image field appears.
Default
Cycle
Menu x2
Switch
Effect
Output
Config
1
Next
1024 x
768 @60
2
Resolution
640 x 480
through 1080p
H Pol V
Neg Neg
Sync polarity
• H-/V- • H+/V-
• H-/V+ • H+/V+
4 6
Next
3 5
8
Next
Sync
RGBHV
Output sync format
• RGBHV • RGBS
RGB Dly
0.0 Sec
RGB Delay
0.0 to 5.0 seconds in
0.1 second increments
Next
10 sec.
10
97
4. Click the Browse button. The Choose File window appears.
5. Browse through your system and select the desired image file.
6. Click the Open button. The complete file location and name appear in
the Add Image field.
7. Click the Upload Image button. After several seconds, a thumbnail of the uploaded image appears in the Image Index portion
of the page and the image is available for display.
NOTE: Do NOT navigate away from the page until the thumbnail appears.
Selecting an Image to Display
1. On the front panel, press the Image button.
2. Rotate the Adjust/Select knob to select either PassThru or one of the previously loaded
images by file name.
3. Press the Take button. The LCD shows Loading Image and then returns to the default
display cycle once the image is loaded.
TIP: As an alternative, you can select an image using the embedded web pages of
2
the GSS 100. On the Images tab, click a thumbnail and click the Take button.
IMAGE
ADJUST/
SELECT
Select
PassThru
or
Select
Filename
321
TAKE
Loading
Image
Default
Cycle
Page 3

Deleting a Stored Image
1. Connect the GSS to a PC or to a network and open the embedded web pages. See the GSS 100 User Guide for greater detail.
2. Click the Images tab to access the Image Settings page.
3. Select (click) the thumbnail of the image to be deleted.
4. Click the Delete button. A confirmation message appears.
5. Click the Ok button.
Starting a Slide Show and Auto-switch Mode
1. On the front panel, with the LCD displaying the default display cycle, press the
Menu button three times to display the Slide Show menu.
2. Press the Next button to display the Duration submenu.
3. Rotate the Adjust/Select knob to set how long each slide is displayed in a slide
show from 0 to 300 seconds.
NOTE: The actual time that an image is displayed may vary, based on the
decoding time of the next image in the slide show.
4. Press the Next button to display the Pass-Thru submenu.
5. If desired, rotate the Adjust/Select knob to toggle between Disabled and Enabled.
6. Press the Next button to return to the Slide Show menu.
7. Press the Menu button to display the Advanced menu.
8. Press the Next button to display the Auto-Switch mode submenu.
9. Rotate the Adjust/Select knob to select among the Auto switch modes:
z Off (auto-switch mode off and slide show off) — Deactivates the automatic sync detection and the slide show.
z Off/show (auto-switch off and slide show on) — Leaves the automatic sync detection off and manually initiates the slide
show. If the pass-through input was displayed when this selection is made, the GSS displays the first image alphabetically by
file name.
z On/still (auto-switch on and slide show off) — Activates the automatic sync detection and auto-switches to a stored image.
If sync is lost, the GSS switches to the last displayed image that was output and displays that image until sync is restored or
you select another image to display.
z On/show (auto-Switch on and slide show on) — Activates the automatic sync detection and auto-switches to the slide show.
If sync is lost, the GSS switches to the last-displayed image and begins to cycle through the available images.
Default
Cycle
Menu x3
Switch
Effect
Output
Config
Slide
Show
Menu
Advanced
Menu
2
Next
Next
7
8
Next
1
Duration
030 Secs
3 5
Duration
0 to 300 seconds in
1 second increments
Auto Sw
Off
4
Next
PassThru
Disabled
Pass-Thru Input
• Disabled
• Enabled
10
10 sec.
Auto Switch
• Off • Off/show
9
• On/still • On/show
Next
6
Setting the Switch Effect and Dissolve Duration
1. On the front panel, with the LCD displaying the default display cycle, press the
Menu button to display the Switch Effect menu.
2. Press the Next button to display the Effect submenu.
3. Rotate the Adjust/Select knob to select either Cut (immediate switch) or Dissolve
Default
Cycle
Menu
Switch
Effect
1
Next
Cut
Next
4
Duration
0.0 Secs
2
Effect
(the image dissolves from old to new).
3 5
NOTE: If you selected Dissolve in step 3, you are finished. Allow the 10-second
timeout to elapse.
Transition effect
• Cut • Dissolve
Dissolve duration
0.0 to 5.0 seconds in
0.1 second increments.
4. Press the Next button to display the Duration submenu.
5. Rotate the Adjust/Select knob to the duration of the dissolve effect.
6. Allow the 10-second timeout to elapse.
Front Panel Security Lockout (Executive Mode)
The front panel security lockout (lock mode 1) limits the operation of the GSS from the front panel to the Image and Take buttons
only. Press and hold the Image button and the Next button simultaneously for approximately 2 seconds to toggle the lock on and
off.
NOTE: Lock mode 2, available using SIS commands only, completely locks the front panel, including the Menu and Next buttons
(see the “Selected SIS Commands“ section).
6
10 sec.
3
Page 4

GSS 100 • Setup Guide
Selected SIS Commands
The table below shows a partial list of SIS commands the you can use for operation and configuration of the GSS. For a complete
listing, see the GSS 100 User Guide. Run the following commands from a PC connected to the RS-232 port (item e on page 1).
Command
Recall an image to buffer
ASCII Command
(Host to Unit)
EX!RF}
Response
(Unit to Host)
X!]
•
Cim
NOTE: It will take several seconds between the issuance of the recall command (
Take
Switch effect
Dissolve duration
Display source
Slide show interval
Pass-through configuration
Auto-switch and slide show mode
Stored image output rate
Stored image output sync format
Stored image output sync polarity
RGB delay
Video mute and unmute
Front panel locks and unlock
%
X@
9*
# Eff
X#
# Dur
10*
X$
! Chn
X%
# Sli
2*
X^
# Pas
1*
X&
# Aut
4*
X**X^
= RteX**
X1)
# Syn
6*
X1!
# Pol
7*
X1@
# Dly
8*
X1#
B Vmt
X1$
X Exe
]
Tke
X@] X@
X#]
X$] X$
X%]
X^] X^
X&]
X(]
X1)]
X1!]
X1@]
X1#] X1#
X1$] X1$
(executive mode)
Additional description
Select image X! (file name with extension [*.bmp or *.jpg]) to display.
EX!RF}
) and the receipt of the Cim response.
Swap the displayed and buffered images using the selected effect
(cut or dissolve).
: 0 = cut 1= dissolve.
Set the duration of the dissolve effect to X#, in 0.1-second increments.
: 0 = last store image 1= pass-thru
Set the display time for each image to X% seconds.
: 0 = pass-thru 1= no pass-thru
Set auto-switch and slide show mode. X& definitions:
X&
: 0 = off 2 = on/still
1 = off/show 3 = on/show
Set the output resolution for the stored image to X* at X( Hz.
See below for X* and X( definitions.
Set the output sync format of the stored image to
X1)
: 0 = RGBHV 1 = RGBS
Set the output sync polarity of the stored image to
X1!
: 0 =
H– / V– 2 = H+ / V–
X1)
X1!
1 = H– / V+ 3 = H+ / V+
Mute the RGB output for
X1@
(in 0.1-second increments) before
displaying the RGB pass-through input.
: 0 = unmute 1= mute
: 0 = unlock 2 = complete lock
1 = partial lock
.
.
X*
= Resolution 0 = 640 x 480 5 = 1024 x 1024 10 = 1365 x 768 15 = 720p
1 = 600 x 600 6 = 1280 x 768 11 = 1365 x 1024 16 = 1080i
2 = 852 x 480 7 = 1280 x 1024 12 = 1400 x 1050 17 = 1080p
3 = 1024 x 768 8 = 1360 x 765 13 = 480p 18 = 1280 x 800
4 = 1024 x 852 9 = 1365 x 768 14 = 576p 19 = 1440 x 900
X(
= Refresh rate 0 = 50 Hz 3 = 96 Hz
1 = 60 Hz 4 = 100 Hz
2 = 72 Hz 5 = 120 Hz
Extron USA - West
Headquarters
+800.633.9876
Inside USA/Canada
Only
+1.714.491.1500
+1.714.491.1517 FAX
4
Extron USA - East
+800.633.9876
Inside USA/Canada
Only
+1.919.863.1794
+1.919.863.1797 FAX
Extron Europe
+800.3987.6673
Inside Europe Only
+31.33.453.4040
+31.33.453.4050 FAX
© 2011 Extron Electronics. All rights reserved. www.extron.com
Extron Asia
+800.7339.8766
Inside Asia Only
+65.6383.4400
+65.6383.4664 FAX
Extron Japan
+81.3.3511.7655
+81.3.3511.7656 FAX
Extron China
+400.883.1568
Inside China Only
+86.21.3760.1568
+86.21.3760.1566 FAX
Extron Middle East
+971.4.2991800
+971.4.2991880 FAX
68-974-50
Rev A
04 11
 Loading...