

Page 1
OWNER’S MANUAL
MANUAL DEL USUARIO
MANUEL D’UTILISATION
MODELS | MODELOS | MODÈLES
SV800 – SV800C
10.8 Volts / 10,8 Voltios / 10,8 Volts
COPYRIGHT© EURO-PRO OPERATING LLC 2009
EURO-PRO Operating LLC
Boston, MA, 02465
Tel.: 1 (800) 798-7398
www.sharkvac.com
Page 2

IMPORTANT SAFEGUARDS
READ ALL INSTRUCTIONS BEFORE USING YOUR VACUUM.
When using an electrical appliance, basic safety precautions should always be
observed, including the following:
WARNING: To reduce the risk of fire, electrical shock, or injury:
1. Do not charge this unit outdoors.
2. Do not use outdoors or on wet surfaces.
3. Do not allow to be used as a toy.
Close attention is necessary when used
by or near children.
4. Use only as described in this manual.
5 Use only manufacturer’s recommended
attachments.
6. Do not use charger if power cord has
been damaged. Do not use cordless
hand vacuum or charger if it has been
dropped, damaged, left outdoors, or
dropped in water. Return it to EURO-
PRO Operating LLC for examination,
repair or adjustment.
7. Do not abuse the charger cord. Never
carry the charger or base by the cord or
yank to disconnect from an outlet;
instead grasp the plug and pull to
disconnect.
8. Keep charger cord away from heated
surfaces.
9. This product includes rechargeable
nickel cadmium batteries. Batteries
must be recycled or disposed of
properly. Do not incinerate batteries
or expose to high temperatures, as
they may explode.
10. Do not handle plug or appliance with
wet hands.
11. Do not put any object into openings.
Do not use with any opening blocked;
keep free of dust, lint, hair and anything
that may reduce air flow.
12. Keep hair, loose clothing, fingers, and all
parts of body away from openings and
moving parts.
13. Do not pick up anything that is burning
or smoking, such as cigarettes,
matches, or hot ashes.
14. Do not attempt to change accessories
while unit is running.
15. Use extra care when cleaning on stairs.
16. Do not use to pick up flammable or
combustible liquids such as gasoline or
use in areas where they may be present.
17. Look on your hand vacuum and follow
all label and marking instructions.
18. Do not use charger with an extension
cord. Plug charger directly into an
electrical outlet. Use charger only in a
standard (120V., 60Hz) electrical outlet.
19. Do not use the hand vacuum clean er
without dust cup filter in place.
20. Store the cordless vacuum indoors. Put
the cordless vacuum away after use to
prevent accidents.
21. Leaks from battery cells can occur under
extreme conditions. If the liquid, which
is 20-35% solution of potassium hydroxide,
gets on the skin – wash immediately with
soap and water or neutralize with a mild
acid such as lemon juice or vinegar. If the
liquid gets into the eyes, flush them
immediately with clean water for a
minimum of 10 minutes and seek medical
attention.
22. Use only on dry, indoor surfaces.
23. Do not use for any purpose other than
described in this user’s guide.
24. Do not attempt to use the charger with any
other product nor attempt to charge this
product with another charger. Use only
the charger model YL-35-120200D
supplied with this appliance.
25. The battery must be removed from the
appliance before it is discarded.
26. The battery is to be recycled or disposed
of safely.
27. The appliance must be disconnected from
the supply when removing the battery.
28. Turn off all controls before unplugging.
29. Remove the battery from the vacuum
before servicing the appliance.
30. Always turn the vacuum off before
connecting or disconnecting the motorized
floor brush.
GETTING TO KNOW YOUR CORDLESS STICK VAC
1. Ergonomic Handle
2. Telescopic Tube
3. On/Off Switch
4. Filter
5. Dust Cup
6. Dust Cup Release
7. Motorized Floor Brush
8. Telescopic Tube
Locking Latch
*Illustrations may differ from actu a l produ ct
9. Telescopic Tube Release
10. Battery Release
11. Rechargeable Battery
12. Crevice Tool
13. Floor Brush / Crevice Tool
Release
14. Battery Charger Base
15. Charging Adapter
(Model YL-35-120200D)
16. Charging Light
SAVE THESE INSTRUCTIONS
For Household Use Only
1
Rev. 03/09B
NOTE: Your cordless stick vacuum is shipped with the battery
uncharged. Charging of the unit for 24 hours pr ior to first
use is required.
2
Page 3

OPERATING INSTRUCTIONS
OPERATING INSTRUCTIONS
Charging the Battery
NOTE: The battery is packaged
separately from the charging base but it
is not charged. Before using the
vacuum, charge the battery for 24 hours.
NOTE: The charging base can be
mounted on a table top or a wall near an
electrical outlet.
1. When mounting on a wall, make sure
that the intended wall area for the
charging base to be drilled is free
from any hidden electrical wires,
water pipes and gas lines.
2. Select an appropriate place close to a
wall power outlet (120V., 60 Hz).
3. Do not place near direct sunlight,
near a heat source or outdoors.
4. Select an appropriate drill type for the
material to be drilled.
5. Carefully measure and mark the
location of all bracket holes and then
drill holes and screw the charging
base onto the wall. (Screws not
included.)
6. The charge adapter plug is keyed and
will fit into the charging base only one
way. Align the channel on the
adaptor plug with the tab on the
bottom of the charging base. (Fig. 1)
7. Plug the charging adapter into the
closest electrical wall outlet.
8. Place the charging base onto the wall.
Be careful not to pinch the charging
adaptor wire between the wall and the
charging base.
9. Insert the battery into the charging
base to charge. The charging light on
the charging base will light up.
Charger base
Battery
Charging light
Charging
adapter
Fig. 1
Assembling the Stick Vac
1. Remove all the parts of the stick vac
from the box.
2. Hold the motorized brush and push it
in the base of the stick vac completely.
(Fig. 2)
3. Hold the telescopic tube and push it in
to the top of the handle of the stick
vac. (Fig. 3)
4. Once the telescopic tube is inserted,
you can adjust the height of the handle
by moving the locking latch past 90
degrees to the open position. Holding
the handle, extend the tube to the
height that is right for you and then
close the latch to the locked position.
(Fig. 3)
Fig. 3Fig. 2
NOTE: The battery must be charged for
24 hours prior to first use. Ensure that the
On/Off switch is in the “Off” position
before inserting the battery.
5. Hold the battery and insert the bottom
part first into the opening found at the
back of the unit. Then rotate in place
making sure that it clicks into place.
(Fig. 4)
Fig. 4
6. Turn the unit “On” to begin
vacuuming.
7. Place your foot lightly on the top of
the motorized brush and rotate the
handle back toward you to release the
unit from the locked upright position.
3
On/Off Switch
The On/Off switch has three different
positions. (Fig. 5)
1. Push on the "I" side to turn the
vacuum to “LOW” speed.
2. Push on the “II" side to turn the
vacuum to “HIGH” speed.
3. Push on the “O” (middle) to turn the
vacuum to the “Off” position.
= ON (Low speed)
= OFF
= ON (High speed)
Fig. 5
Converting Stick Vac to Hand Vac
1. Press the telescopic release button to
remove the telescopic tube. (Fig. 6)
2. Press the floor brush release button
and remove the motorized floor
brush. (Fig. 6)
Lift
Telescopic
tube release
Release
button
Pull
3. Insert the crevice tool into the bottom
of the vacuum making sure that it
snaps into place. (Fig. 7) To remove
the crevice tool, press the motorized
brush/crevice tool release button.
Fig. 6
Fig. 7
Emptying the Dust Cup
IMPORTANT: Always turn the vacuum
off before removing the dust cup.
1. To remove the dust cup, press the
dust cup release that is on the
bottom of the dust cup. (Fig. 8)
Dust cup
release
Fig. 8
2. Hold the dust cup
cover and twist it
to the left to remove
it from the dust
cup. (Fig. 9)
3. Hold it over a
garbage can and
empty the dust.
(Fig. 10)
IMPORTANT: Empty
the dust cup after every
use. Never use the
vacuum without the
dust cup and filter
in place.
4. To reattach the dust
cup cover, align the
indicators that are
the cover and the
dust cup and turn to
the right to lock in
place. Make sure
that the “▼”
symbol on the top
cover is aligned with
the “▲”symbol
on the dust cup
to lock into
place. (Fig. 11)
4
Fig. 10
Fig. 11
Fig. 9
Page 4
OPERATING INSTRUCTIONS
OPERATING INSTRUCTIONS
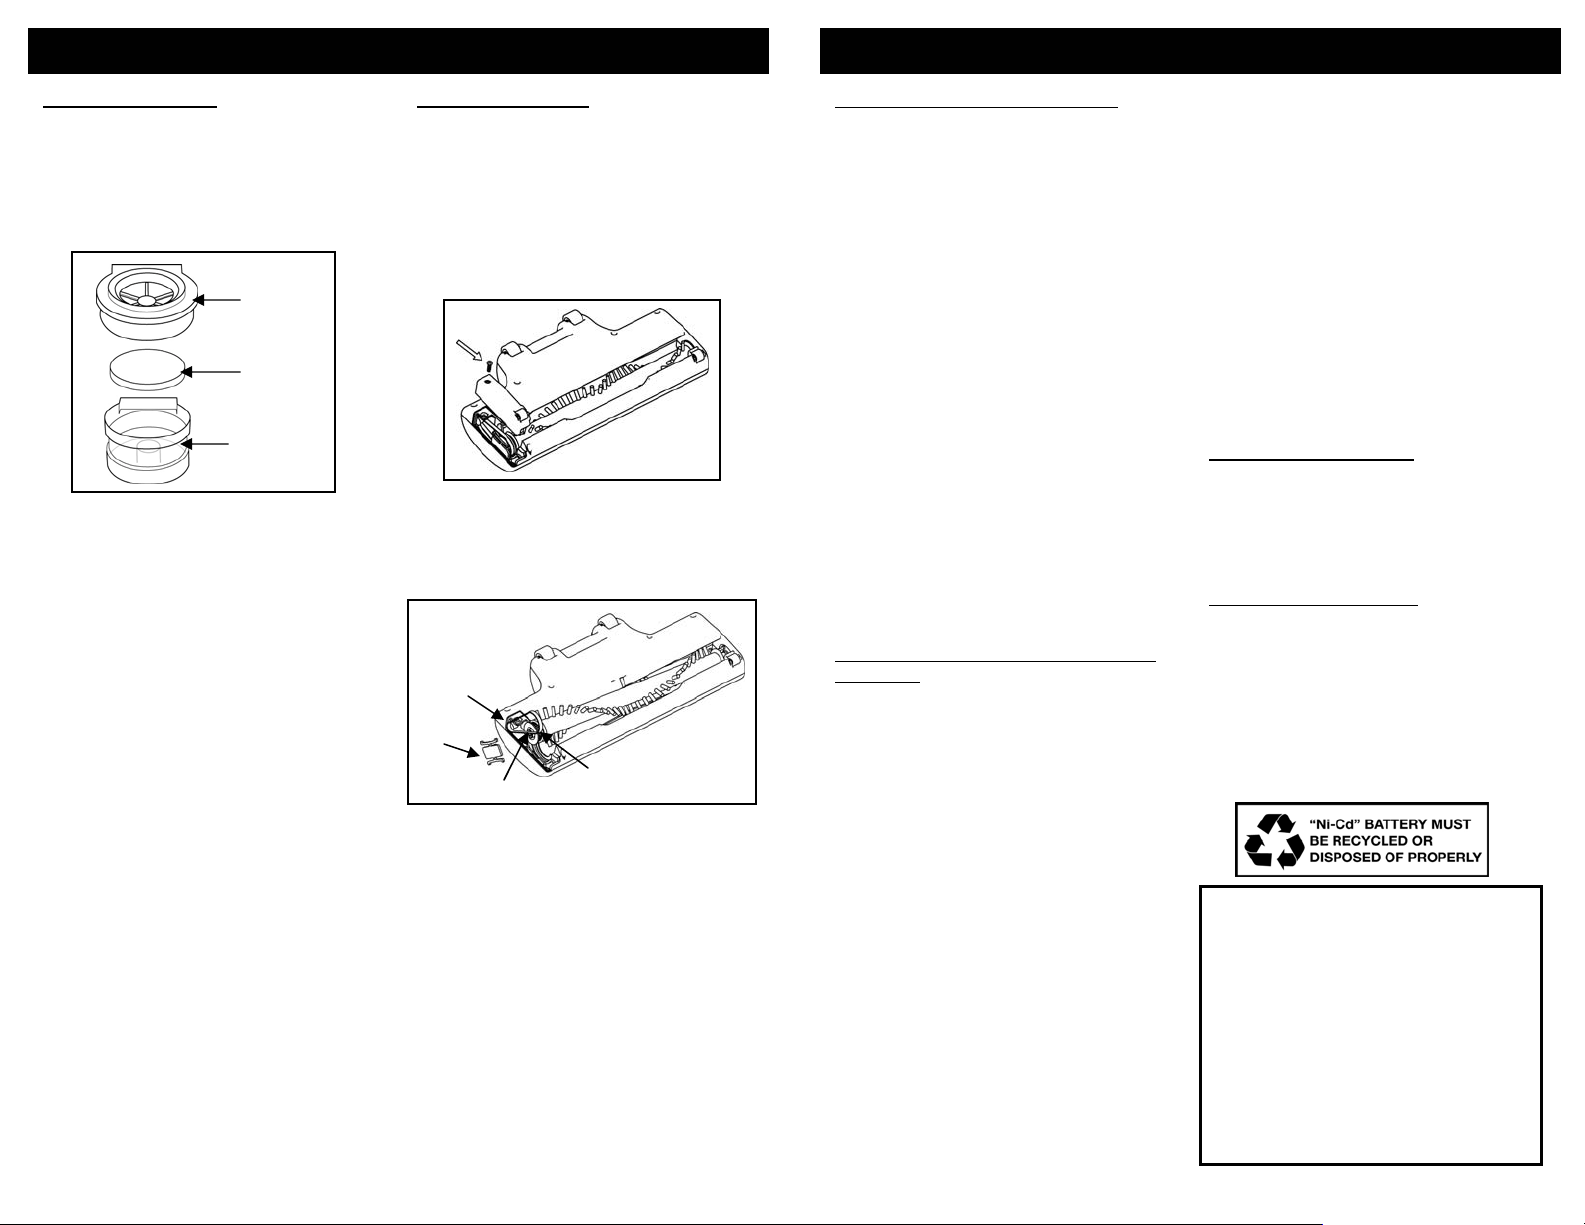
Cleaning the Filter
It is recommended that the filter be
cleaned every full discharge of the
battery. To remove the foam filter:
1. Remove the dust cup from the
vacuum.
2. Pull out the filter fame with the foam
filter from the top. (Fig. 12)
Filter
frame
Foam
filter
Filter
compartment
Fig. 12
3. Remove the foam filter and wash in
lukewarm water and let it air dry
completely before replacing it into the
vacuum. Never use a hair dryer or
any other hot forced air to dry the
foam filter.
4. When the foam filter is completely
dry, reinsert it into the filter frame and
replace it into the filter compartment.
NOTE: The foam filter must be replaced
every three months to maintain best
performance of the vacuum.
Changing the Belt
Occasionally the motorized brush drive
belt will require changing, the frequency
will depend upon the amount of use your
stick vac sees. To change the belt:
1. Remove the motorized brush from
the vacuum.
2. Turn the motorized brush upside
down and using a screw driver,
remove the screw at the rear of the
access cover. (Fig. 13)
Fig. 13
3. Put the screw to the side and lift the
access cover to remove it. (Fig. 13)
4. Lift the end of the brush bar and
remove the end cap. (Fig. 14)
5. Remove any pieces of the belt.
Drive
shaft
End
cap
Belt
Brush
roll
6. Slide one end of the new belt around
the drive shaft and the other around
the brush roll. (Fig. 14)
7. Place the end cap on the end of the
brush roll
8. Align the end cap with the slot in the
motorized brush head and slide it
down carefully.
9. Snap the access cover in place and
replace the screw.
Fig. 14
Cleaning the Motorized Brush
CAUTION: Remove the battery pack
to avoid the unit turning on
accidentally.
Periodically remove the motorized
brush from the stick vac to remove any
build up of lint, hair or fiber on the
rotating brush.
1. Remove the battery from the
battery pack compartment.
2. Place the vacuum on a flat surface
upside down.
3. Carefully slide a pair of scissors
under any trapped threads, pet hair,
or carpet fibers.
4. Cut along the threads, hair or fibers
and then remove these from
around the bristle brush.
NOTE: If your motorized brush
becomes jammed, your stick vac will
cease to operate. If this occurs, turn
the unit “Off” and allow the unit to cool
down for 2 minutes. Ensure that there
are not any threads or fibers around
brush. Then turn the power “On” and
unit should now operate normally. Call
customer service at 1 (800) 798-7398 if
the vacuum needs any other servicing.
To Maximize the Life of your NiCd
Batteries
NOTE: If the product has never been
used or has been stored for an extended
period of time without use – it will take
several complete charge and discharge
cycles to realize the full operational time
of your product.
1. Charge the battery for 24 hours
before initial use. Failure to do so
will reduce the product’s battery life
significantly.
2. Only recharge when the battery is
fully discharged (or as close to fully
discharged as possible).
3. Do not store in areas of high
temperature or humidity.
4. Fully discharge, then completely
re-charge the unit at least once a
month.
5. After three (3) months of storage,
the product should be fully
discharged and then recharged to
maximize battery power.
6. Use only the charging base and
charging adapter supplied with the
product. If other chargers are used,
the batteries can fail causing damage
to the battery, product or personal
property.
7. The charging indicator light on the
charging base will light up when the
battery is inserted to be charged. If
the charging indicator does not light,
check to make sure that the battery
was inserted properly. If it still does
not light up, then check the fuse or
the breaker.
8. NiCd batteries have a long useful life
but at some time they will need to be
replaced. To purchase replacement
batteries visit www.sharkvac.com.
Replacing the Battery
WARNING: NEVER use ordinary
batteries for replacement, as these may
leak and damage your vacuum cleaner.
Use only battery pack XBT800 provided
by EURO-PRO Operating LLC for
replacement.
Battery Pack Dispo sal
This stick vac is equipped with NiCd
batteries and you need to dispose of
them properly. When the battery pack is
no longer good for use, it must be
removed from the stick vac for disposal.
The battery pack must be recycled or
disposed of in accordance with local
regulations. Please consult your
Yellow Pages or local recycling
center for more information.
CAUTION
Use only with the battery pack
•
supplied with the unit.
• Never attempt to throw the battery
pack or unit into a fire or incinerate it.
• DO NOT attempt to remove or
damage the battery casing.
• Battery must be recycled or disposed
of properly at the end of it's service
life.
• DO NOT place batteries on metal
surfaces.
• DO NOT touch metal parts of the
batteries together as the batteries will
overheat.
5
6
Page 5

OPERATING INSTRUCTIONS
TROUBLESHOOTING GUIDE
PROBLEM POSSIBLE REASON POSSIBLE SOLUTION
1. Batteries discharged.
STICK VACUUM
WILL NOT OPERATE
MOTORIZED BRUSH
WILL NOT WORK
STICK VACUUM
WILL NOT PICK-UP
OR SUCTION
POWER IS WEAK
DUST ESCAPING
FROM STICK
VACUUM
BATTERY WILL NOT
HOLD CHARGE
2. Dead battery (battery
won't hold charge).
3. Contacts between the
battery and the
charging base are dirty.
4. No power in electrical
outlet supplying
transformer.
1. The agitator is blocked
with debris or string.
2. The belt is broken.
1. Dust cup container is
full.
2. Dust cup filter needs
cleaning or
replacement.
3. Battery needs
recharging.
1. Dust cup container is
full.
2. Dust cup filter is not
installed correctly.
3. Puncture/hole in dust
cup filter.
1. Battery has reached the
end of its service life.
1. Charge unit.
2. Replace battery.
3. Wipe and clean dirt from
contacts.
4. Check fuse or breaker.
Replace fuse/reset breaker
1. Remove debris from
agitator. If there is string
or thread wrapped cut
gently with scissors.
2. Replace the belt.
1. Empty dust cup container
2. Remove dust cup filter and
check for object(s) in air
duct and remove. Clean or
replace dust cup filter.
3. Charge battery.
1. Empty dust cup container.
2. Review dust cup filter
installation instructions.
3. Replace dust cup filter.
1. Call customer service at
1 (800) 798-7398 or visit
www.sharkvac.com to
order new battery.
Models
SV800
SV800C
ONE (1) YEAR LIMITED WARRANTY
EURO-PRO Operating LLC warrants this product to be free from defects in material and
workmanship for a period of one (1) year from the date of the original purchase, when utilized for
normal household use, subject to the following conditions, exclusions and exceptions.
If your appliance fails to operate properly while in use under normal household conditions within
the warranty period, return the complete appliance and accessories, freight prepaid. For
Customer Service support, call 1 (800) 798-7398 or visit our website at www.sharkvac.com.
If the appliance is found by EURO-PRO Operating LLC to be defective in material or
workmanship, EURO-PRO Operating LLC will repair or replace it free of charge. Proof of
purchase date and $ 11.95 to cover the cost of return shipping and handling must be included. *
Non-durable parts including, without limitation, filters, brushes and electrical parts which normally
require replacement are specifically excluded from warranty.
The liability of EURO-PRO Operating LLC is limited solely to the cost of the repair or
replacement of the unit at our option. This warranty does not cover normal wear of parts and does
not apply to any unit that has been tampered with or used for commercial purposes. This limited
warranty does not cover damage caused by misuse, abuse, negligent handling or damage due to
faulty packaging or mishandling in transit. This warranty does not cover damage or defects
caused by or resulting from damages from shipping or repairs, service or alterations to the
product or any of its parts, which have been performed by a repair person not authorized by
EURO-PRO Operating LLC.
This warranty is extended to the original purchaser of the unit and excludes all other legal and/or
conventional warranties. The responsibility of EURO-PRO Operating LLC if any, is limited to the
specific obligations expressly assumed by it under the terms of the limited warranty. In no event
is EURO-PRO Operating LLC liable for incidental or consequential damages of any nature
whatsoever. Some states do not permit the exclusion or limitation of incidental or consequential
damages, so the above may not apply to you.
This warranty gives you specific legal rights, and you may also have other rights which vary from
state to state or province to province.
*Important: Carefully pack item to avoid dam age in shipping. Be sure to include proof of
purchase date and to attach tag to item before packing with your name, complete address
and phone number with a note giving purchase information, model number and what you
believe is the problem with item. We recommend you insure the package (as damage in
shipping is not covered by your warranty). Mark the outside of your package “ATTENTION
CUSTOMER SERVICE”. We are constantly striving to impro ve our products, therefore the
specifications contain ed herein are subject to change w i thout noti c e.
REPLACEMENT PARTS FOR MODELS SV800 – SV800C
Replacement dust cup filter SKU# XF800 or XF800C
Replacement battery pack SKU# XBT800
Replacement belt SKU# X800BLT
To order replacement batteries, filters or belts or for technical support:
Call: 1 (800) 798-7398
Monday to Friday 8:30 A.M. - 5:00 P.M. Eastern Standard Time
or
visit our website: www.sharkvac.com
Please Note: The filter is washable. It should, however, be replaced every
three (3) months to ensure peak performance of your vacuum.
Important: Make sure that filter has completely air dried before
re-installing back in the hand vacuum.
7
-----------------------------------------------------------------------------------------
OWNERSHIP REGISTRATION CARD
Please fill out and mail the product registration card within ten (10) days of purchase. The registration will enable
us to contact you in the unlikely event of a product safety notification. By returning this card you acknowledge to
have read and understood the instructions for use, and warnings set forth in the accompanying instructions.
RETURN TO: EURO-PRO Operating LLC, 4400 Bois Franc, St. Laurent, Quebec, H4S 1A7
Models SV800 – SV800C
_____________________________________________________________________
Appliance model
_____________________________________________________________________
Date purchased Name of store
_____________________________________________________________________
Owner’s name
_____________________________________________________________________
Address City Prov. Postal code
Printed in China
FOR CANADIAN CONSUMERS ONLY
8
Page 6

MEDIDAS IMPORTANTES DE SEGURIDAD
LEA TODAS LAS INSTRUCCIONES ANTES DE USAR SU ASPIRADORA.
Al usar aparatos eléctricos, siempre debe seguir precauciones básicas de seguridad,
incluyendo las siguientes:
ADVERTENCIA: Para reducir el riesgo de incendio, descarga eléctrica o daños
personales:
1. No recargue esta unidad en el exterior.
2. No la utilice en el exterior o en superficies
húmedas.
3. No permita que sea utilizada como un
juguete. Debe tener mucho cuidado al ser
utilizada por o cerca de niños.
4. Utilícela solamente como se indica en este
manual.
5 Use únicamente los accesorios
recomendados por el fabricante.
6. No use el cargador si el cable de
alimentación está dañado. No utilice la
aspiradora inalámbrica o el cargador si se
han caído, dañado, dejado en el exterior o
tirado al agua. Retórnela a EURO-PRO
Operating LLC para que sea examinada,
reparada o ajustada.
7. No maltrate el cable del cargador. Nunca
levante el cargador o la base por el cable, o
tire del cable para desconectarlo del
tomacorriente; agárrelo por el enchufe y tire
para desconectarlo.
8. Mantenga el cargador alejado de superficies
calientes.
9. Este producto incluye baterías recargables
de níquel cadmio. Las baterías deben
descartarse o reciclarse de forma apropiada.
No arroje las baterías al fuego o las
exponga a altas temperaturas, pueden
explotar.
10. No toque el enchufe o el artefacto con las
manos húmedas.
11. No introduzca ningún objeto en las ranuras.
No la use con ninguna abertura tapada;
manténgalas libres de polvo, pelusa, pelos y
cualquier otra cosa que pudiera reducir el
flujo de aire.
12. Mantenga el cabello, la ropa suelta, los
dedos y toda parte del cuerpo alejados de
las aberturas y de las partes móviles.
13. No recoja nada que se esté quemando o
echando humo, como cigarrillos, fósforos, o
cenizas calientes.
14. No intente cambiar ningún accesorio
mientras la unidad está funcionando.
15. Tenga especial cuidado al limpiar
escaleras.
16. No la use para recoger líquidos inflamables
o combustibles como gasolina ni la use en
áreas donde puedan estar presentes.
17. Trabe su aspiradora de mano y siga todas
las instrucciones de las etiquetas.
18. No utilice el cargador con un cable de
extensión. Enchufe el cargador
directamente en un tomacorriente. Use el
cargador únicamente en un tomacorriente
común (120V, 60Hz).
19. NO use la aspiradora de mano sin tener
el filtro en su lugar.
20. Guarde la aspiradora inalámbrica dentro de
su casa. Guarde la aspiradora inalámbrica
luego de cada uso para evitar accidentes.
21. Bajo condiciones extremas, las baterías
pueden presentar pérdidas. Si el líquido,
que es una solución de 20-35% hidróxido
de potasio, entra en contacto con la piel,
lávese inmediatamente con agua y jabón o
neutralícelo con un ácido suave como jugo
de limón o vinagre. Si el líquido le entra en
los ojos, enjuáguelos inmediatamente con
agua limpia durante 10 minutos como
mínimo y vea un doctor.
22. Úsela solamente en superficies secas, en
interiores.
23. No la utilice con ningún propósito que no
esté descrito en este manual del usuario.
24. No intente usar el cargador con ningún otro
producto ni intente recargar este producto
con otro cargador. Use únicamente el
cargador modelo YL-35-120200D
suministrado con este artefa ct o.
25. Debe quitar la batería del artefacto antes
de desecharlo.
26. Deberá reciclar o desechar la batería de
forma segura.
27. Este artefacto debe desenchufarse del
tomacorriente antes de quitarle la batería.
28. Apague todos los controles antes de
desenchufarla.
29. Antes de revisar su aspiradora saque la
batería.
30. Siempre apagar su aspiradora antes de
conectar o desconectar su cepillo
motorizado.
CONSERVE ESTAS INSTRUCCIONES
Para Uso Doméstico Solamente
9 Rev. 03/09B
COMPONENTES DE SU ASPIRADORA VERTICAL
INALÁMBRICA
1. Mango ergonómico
2. Tubo telescópico
3. Llave de encendido
4. Filtro
5. Recipiente para la tierra
6. Traba del recipiente de la tierra
7. Cepillo eléctrico para pisos
8. Traba del tubo telescópico
9. Botón para destrabar el tubo
telescópico
* El dibujo puede no ser igual al producto real
NOTA: Su aspiradora vertical inalámbrica viene con la batería
descargada. Necesita cargar la unidad por 24 horas
antes de usarla por primera vez.
10. Botón para destrabar la
batería
11. Batería recargable
12. Cabezal esquinero
13. Liberación del cepillo
eléctrico/cabezal esquinero
14. Base para cargar la batería
15. Adaptador
(Modelo YL-35-120200D)
16. Luz de carga
10
Page 7

INSTRUCCIONES DE USO
INSTRUCCIONES DE USO
Carga de la Batería
NOTA: La batería viene embalada
separadamente de la base de carga pero
no está cargada. Cargue la batería
durante 24 horas antes de usar la
aspiradora.
NOTA: La base de carga se puede
montar sobre una mesa o en la pared,
cerca de un tomacorriente.
1. Asegúrese de que la pared a perforar
para el montaje de la base de carga
no tenga ningún cable eléctrico, caño
de agua o de gas dentro de ella.
2. Elija un lugar apropiado cerca de un
tomacorriente (120V, 60 Hz).
3. No la coloque cerca de la luz directa
del sol, de una fuente de calor o en el
exterior.
4. Seleccione un taladro adecuado para
el tipo de material a perforar.
5. Mida y marque cuidadosamente la
ubicación de todos los agujeros de
montaje y luego haga las
perforaciones y atornille la base de
carga a la pared. (Tornillos no
incluidos)
6. El enchufe del adaptador está
polarizado y entra en la base de
carga de una sola forma. Alinee la
ranura del enchufe del adaptador con
la pestaña de la parte inferior de la
base de carga. (Fig. 1)
7. Enchufe el adaptador en el
tomacorriente más cercano.
8. Coloque la base de carga en la
pared. Tenga cuidado de no pellizcar
el cable del adaptador entre la pared
y la base de carga.
9. Coloque la batería dentro de la base
de carga para cargarla. Se
encenderá la luz de carga en la base.
Base de carga
Batería
Luz de carga
Adaptador
Fig. 1
Armado de la aspiradora vertical
1. Saque todas las partes de la
aspiradora vertical de la caja.
2. Sostenga el cepillo eléctrico y
presiónelo completamente dentro de la
base de la aspiradora vertical. (Fig. 2)
3. Sostenga el tubo telescópico y
presiónelo sobre el mango de la
aspiradora vertical. (Fig. 3)
4. Una vez que el tubo telescópico esté
insertado, puede ajustar la altura del
mango moviendo la traba 90 grados
hacia la posición de abierta. Extienda
el tubo hasta la altura deseada que
sea correcta para usted mientras
sostiene el mango y luego gire la
traba hasta la posici
ón de trabada.
(Fig. 3)
NOTA: Se debe cargar la batería
Fig. 3Fig. 2
durante 24 horas antes de utilizarla por
primera vez. Verifique que la llave de
encendido esté en la posición “Off”
(apagado) antes de insertar la batería.
5. Sostenga la batería e inserte primero
la parte de abajo dentro de la
abertura de la parte posterior de la
unidad. Luego rótela en su lugar
verificando que haga clic y se trabe.
(Fig. 4)
6. Encienda la unidad para empezar a
aspirar.
7. Coloque suavemente su pie sobre el
cepillo eléctrico y rote el mango hacia
atrás (hacia usted) para destrabar la
unidad de su posición vertical.
11
Fig. 4
Llave de encendido
El botón de encendido tiene tres
posiciones. (Fig. 5)
1. Presione el lado “I” para encender la
aspiradora a baja velocidad.
2. Presione el lado “II” para encender la
aspiradora a alta velocidad.
3. Presione el lado “O” (el medio) para
apagar la aspiradora.
= Baja velocidad
= APAGAD O
= Alta velocidad
Fig. 5
Conversión de aspiradora v e rti cal
a aspiradora de mano
1. Presione el botón de liberación del
tubo telescópico para sacarlo.
(Fig. 6)
2. Presione el botón de liberación del
cepillo eléctrico para sacarlo. (Fig. 6)
Suba
Botón para
destrabar el
tubo
Botón de
liberación
Fig. 6
Tire
3. Inserte el cabezal esquinero en la
parte inferior de la
aspiradora verificando
que se trabe en su
lugar. (Fig. 7) Para
remover el cabezal
esquinero, presione
el botón de liberación
del cepillo eléctrico /
cabezal esquinero.
Fig. 7
Vaciado del recipiente de la tierra
IMPORTANTE: Apague siempre la
aspiradora antes de remover el recipiente
de la tierra.
1. Para quitar el recipiente de la tierra,
presione el botón para destrabarlo que
está en la parte de abajo del mismo.
(Fig. 8)
Traba del
recipiente
de la tierra
Fig. 8
2. Sostenga la tapa del
recipiente de la
tierra y gírela hacia
la izquierda para
sacarla del
recipiente de la
tierra. (Fig. 9)
3. Sosténgalo sobre un
cesto de basura y
sáquele toda la
tierra. (Fig. 10)
IMPORTANTE: Vacíe
el recipiente de la tierra
luego de cada uso.
Nunca use la
aspiradora sin el
recipiente para la
tierra y el filtro de
limpieza colocados.
4. Para volver a
colocar la tapa del
recipiente de la
tierra, alinee los
indicadores de la
tapa y del recipiente
y gíre hacia la
derecha para
trabarla en su lugar.
Verifique que las
flechas estén
alineadas del
recipiente de polvo
y la tapa. (Fig. 11)
12
Fig. 10
Fig. 11
Fig. 9
Page 8

INSTRUCCIONES DE USO
INSTRUCCIONES DE USO
Limpieza del Filtro
Le recomendamos limpiar el filtro cada
vez que la batería se descargue por
completo. Para sacar el filtro de esponja:
1. Quite el recipiente de la tierra de la
aspiradora.
2. Extraiga la junta con la unidad de
filtrado por la parte de arriba. (Fig. 12)
Filtre
marco
Filtro de
esponja
Filtre
compartimiento
Fig. 12
3. Saque el filtro de esponja y lávelo con
agua tibia y déjelo secar
completamente al aire antes de volver
a colocarlo dentro de la aspiradora.
Nunca use un secador de pelo o
cualquier otro tipo de aire caliente
para secar el filtro de esponja.
4. Una vez que el filtro esté seco, vuelva
a colocarlo en la unidad de filtrado y
colóquela dentro de la tapa del
recipiente de polvo.
NOTA: El filtro de esponja debe
reemplazarse cada tres meses para
mantener el mejor rendimiento de la
aspiradora.
Reemplazo de la correa
De vez en cuando, la correa del cepillo
giratorio puede necesitar ser
reemplazada, la frecuencia dependerá
del uso que se le dé a su aspiradora
vertical. Para cambiar la correa:
1. Quite el cepillo eléctrico de la
aspiradora.
2. Dé vuelta el cepillo eléctrico y saque
el tornillo que está en la parte de
atrás de la tapa de acceso con un
destornillador. (Fig. 13)
Fig. 13
3. Deje el tornillo a un lado y levante la
tapa de acceso para sacarla.
(Fig. 13)
4. Levante el extremo de la barra del
cepillo y saque el extremo. (Fig. 14)
5. Saque todos los trozos de correa.
Eje
impulsor
Extremo
Cepillo
Correa
6. Deslice un extremo de la correa
nueva alrededor del eje impulsor y el
otro extremo alrededor del cepillo
eléctrico. (Fig. 14)
7. Coloque el extremo en el cepillo
eléctrico.
8. Alinee el extremo con la ranura en el
cabezal del cepillo y deslícelo hacia
abajo con cuidado.
9. Vuelva a colocar la tapa de acceso
en su lugar y ajústela con el tornillo.
13
eléctrico
Fig. 14
Limpieza del cepillo eléctrico
CUIDADO: Saque la batería para
evitar que la unidad se encienda
accidentalmente.
De vez en cuando saque el cepillo
eléctrico de la aspiradora vertical para
remover la acumulación de pelusa,
cabellos o fibras en el cepillo giratorio.
1. Saque la batería de su
compartimiento.
2. Coloque la aspiradora boca abajo
sobre una superficie plana.
3. Deslice con cuidado una tijera por
debajo de cualquier hilo, cabello o
fibra que haya quedado atrapado.
4. Corte los hilos, cabellos o fibras y
sáquelas de alrededor del cepillo.
NOTA: Si el cepillo eléctrico se traba,
su aspiradora vertical se apagará
automáticamente. Si pasa esto,
apague la unidad y deje que se enfríe
durante 2 minutos. Verifique que no
haya ningún hilo o fibras alrededor del
cepillo. Luego encienda la unidad,
ahora debería funcionar normalmente.
Si su aspiradora necesita cualquier
otra revisión llamar la línea de atención
al cliente al 1 (866) 826-6941.
Para maximizar la vida útil de sus
baterías de NiCd
NOTA: Si nunca ha usado el producto,
o estuvo guardado por mucho tiempo sin
usarse, requerirá varios ciclos completos
de carga y descarga para obtener el
tiempo total de funcionamiento de su
producto.
1. Cargue la batería durante 24 horas
antes de utilizarla por primera vez. El
no hacer esto reducirá
considerablemente la vida útil de las
baterías.
2. Cárguela únicamente cuando la
batería esté completamente
descargada (o lo más cerca posible a
completamente descargada).
3. No las guarde en áreas de alta
temperatura o humedad.
4. Descargue completamente la unidad
y vuelva a recargarla por los menos
una vez al mes.
5. Luego de guardarlo por tres (3)
meses, deberá descargar
completamente el producto y luego
recargarlo para maximizar el poder de
las baterías.
6. Use únicamente la base de carga y el
adaptador que viene con este
producto. Si utiliza otros cargadores,
las baterías pueden llegar a fallar
causando daños a las baterías, el
producto o la propiedad privada.
7. La luz indicadora de carga de la base
de carga se encenderá al insertar la
batería para cargar. Si la luz
indicadora de carga no se enciende,
verifique que la batería esté insertada
correctamente. Si aún no se
enciende, verifique el fusible o la llave
térmica.
8. Las baterías de NiCd tienen una larga
vida útil pero deberá reemplazarlas
en cierto momento. Para comprar
baterías de reemplazo, visite
www.sharkvac.com.
Reemplazo de la batería
ADVERTENCIA: NUNCA reemplace las
baterías por pilas comunes ya que
pueden perder y dañar la aspiradora.
Use únicamente las baterías XBT800
proporcionadas por EURO-PRO
Operating LLC como repuesto.
Desechado de las baterías
Esta aspiradora vertical está equipada
con una batería de Ni-Cd y necesita
desecharla correctamente. Cuando la
batería no sirve más, debe sacarla de la
aspiradora vertical para desecharla. La
batería debe ser reciclada o
desechada de acuerdo con las normas
locales. Consulte sus Páginas
Amarillas o centro de reciclado local
por mayor información.
LA BATERÍA DE "Ni-Cd"
DEBE DESCARTARSE O
RECICLARSE EN FORMA
APROPIADA.
CUIDADO
• Use únicamente la batería
suministrada con la unidad.
• Nunca arroje la batería o la unidad al
fuego.
• NO intente remover o dañar la
cubierta de la batería.
• La batería debe ser reciclada o
desechada apropiadamente al final
de su vida útil.
• NO apoye las baterías sobre
superficies metálicas.
• NO permita que los terminales de las
baterías se toquen entre si ya que
podrían recalentar.
14
Page 9

INSTRUCCIONES DE USO
GUÍA DE SOLUCIÓN DE PROBLEMAS
POSIBLE SOLUCIÓNPOSIBLE CAUSAPROBLEMA
1. Recargue la unidad.
2. Reemplace las pilas.
3. Limpie la suciedad de los
contactos.
4. Verifique el fusible o la llave
general. Reemplace el
fusible/encienda la llave general
1. Saque los residuos del cepillo. Si
hay un hilo enrollado, córtelo
cuidadosamente con una tijera.
2. Reemplace la correa.
1. Vacíe el recipiente para la tierra.
2. Quite el filtro y verifique que no
haya nada tapando el conducto del
aire. Limpie o reemplace el filtro.
3. Cargue la batería.
1. Vacíe el recipiente para la tierra.
2. Repase las instrucciones del filtro.
3. Reemplace el filtro.
1. Llame al servicio al cliente al 1
(866) 826-6941 o visite
www.sharkvac.com para ordenar
una batería nueva.
ASPIRADORA
VERTICAL NO
FUNCIONA
CEPILLO ELÉCTRICO
NO FUNCIONA
NO LEVANTA LA
TIERRA O LA SUCCIÓN
ES MUY DÉBIL.
SALE TIERRA DE LA
ASPIRADORA
VERTICAL
LA BATERÍA NO
MANTIENE LA CARGA
1. Batería descargada.
2. Batería no funciona (no se
recarga).
3. Los contactos entre la batería y la
base de carga están sucios.
4. El tomacorriente donde enchufa el
cargador no funciona.
1. El cepillo está trabado con
residuos o hilos.
2. La correa está rota.
1. Recipiente para la tierra está lleno.
2. Hay que limpiar o reemplazar el
filtro.
3. La batería necesita una recarga.
1. Recipiente para la tierra está lleno.
2. El recipiente de la tierra no está
instalado correctamente.
3. Hay un agujero en el filtro o está
roto.
1. La batería ha alcanzado el final de
su vida útil.
PARTES DE REPUESTO PARA EL MODELOS SV800-SV800C
Filtro de repuesto SKU# XF800 o XF800C
Batería de repuesto SKU# XBT800
Correa de repuesto SKU# X800BLT
Para ordenar baterías, filtros o correas de repuesto o para soporte técnico:
de Lunes a Viernes de 8:30 AM hasta 5:00 PM EST
visite nuestro sitio de Internet: www.sharkvac.com
Observaciones: El filtro es lavable. Sin embargo, debe ser reemplazado cada
tres (3) meses para asegurar el óptimo rendimiento de su
aspiradora.
Importante: Asegúrese de que el filtro esté completamente seco al aire
antes de volverlo a instalar en la aspiradora de mano.
Llame al: 1 (866) 826-6941
o
15
Modelos
SV800
SV800C
GARANTÍA LIMITADA DE UN (1) AÑO
EURO-PRO Operating LLC garantiza este producto contra defectos de materiales y mano de
obra por un término de un (1) año a partir de la fecha de compra original, siempre que sea
utilizado para uso doméstico normal, sujeto a las siguientes condiciones, exclusiones y
excepciones.
Si su artefacto no funciona correctamente al utilizarlo bajo condiciones domésticas normales
dentro del período de garantía, devuelva el artefacto completo y los accesorios, pagando el
envío. Por servicio al cliente, llame al 1 (866) 826-6941 o visite nuestro sitio Web
www.sharkvac.com
Si EURO-PRO Operating LLC determina que el artefacto presenta un defecto de materiales o
mano de obra, lo reparará o remplazará sin cargo. El envío debe incluir un comprobante de la
fecha de compra y $11,95 para cubrir los gastos de envío. *Los insumos tales como, sin
limitación, filtros, cepillos y partes eléctricas que normalmente necesitan ser reemplazados son
explícitamente excluidos de la garantía.
La responsabilidad de EURO-PRO Operating LLC se limita únicamente al costo de reparación o
reemplazo de la unidad, a nuestro criterio. Esta garantía no cubre el desgaste normal de las
partes y no cubre ninguna unidad que haya sido alterada o utilizada con fines comerciales. Esta
garantía limitada no cubre daños ocasionados por uso inadecuado, abuso, negligencia o daños
causados por embalaje inapropiado o maltrato durante el transporte. Esta garantía no cubre
daños o defectos causados o resultantes durante el transporte para su reparación o alteraciones
del producto o cualquiera de sus partes, realizadas por una persona no autorizada por EURO-
PRO Operating LLC.
Esta garantía es válida para el comprador original del producto y excluye cualquier otra garantía
legal y/o convencional. La responsabilidad de EURO-PRO Operating LLC , de existir, se limita a
las obligaciones específicas asumidas expresamente bajo los términos de esta garantía limitada.
Bajo ninguna circunstancia EURO-PRO Operating LLC será responsable por daños incidentales
o indirectos de ninguna clase. Algunos estados no permiten la exclusión o limitación de daños
consiguientes o incidentales, por lo tanto lo anterior puede no ser válido para usted.
Esta garantía le otorga derechos legales específicos, y usted puede también tener otros
derechos los que varían de estado a estado o de provincia a provincia.
*Importante: Embale el producto cuidadosament e para evitar daños durante el transporte.
Asegúrese de incluir un comprobante de la fecha de compra y de colocarle una etiqueta al
producto con su nombre, dirección completa y número de teléfono, una nota
proporcionando información de la compra, número de modelo y una descripción del
problema. Le recomendamos asegurar el paquete (puesto que la garantía no cubre daños
de envío). Escriba en el exterior del paquete “ATTENTION CUSTOMER SERVICE”.
Nosotros nos esforzamos constantemente en mejorar nuestros productos, por lo tanto las
especificaciones aquí indicadas pueden cambiar sin previo aviso.
-------------------------------------------------------------------------------
TARJETA DE REGISTRO DEL CLIENTE
Complete y envíe la tarjeta de registro del producto dentro de los diez (10) días posteriores a la compra. El
registro nos permitirá contactarnos con usted en caso de existir alguna notificación de seguridad con respecto
al producto. Retornando esta tarjeta usted reconoce haber leído y entendido las instrucciones de uso y
advertencias incluidas en estas instrucciones.
ENVIAR A: EURO-PRO Operating LLC, 4400 Bois Franc, St. Laurent, Quebec, H4S 1A7
Modelos SV800 – SV800C
_____________________________________________________________________
Modelo del artefacto
_____________________________________________________________________
Fecha de compra Nombre del Negocio
_____________________________________________________________________
Nombre del dueño
_____________________________________________________________________
Dirección Ciudad Provincia Código Postal
Impreso en China
SÓLO PARA CONSUMIDORES CANADIENSES
16
Page 10

IMPORTANTES MESURES DE SÉCURITÉ
LISEZ ATTENTIVEMENT TOUTES LES INSTRUCTIONS AVANT D’UTILISER VOTRE
ASPIRATEUR.
Lorsque vous utilisez un appareil électrique, des précautions concernant la sécurité doivent
toujours être observées, incluant celles qui suivent:
AVERTISSEMENT : Afin de réduire les risques d'incendie, de décharges électriques ou
de blessures:
1. Ne pas charger cet appareil à l’extérieur.
2. Ne pas utiliser à l’extérieur ou sur des
surfaces mouillées.
3. Ne pas laisser l'appareil être utilisé comme un
jouet. Une attention particulière doit être
portée lorsqu’utilisé près ou par des enfants.
4. Utiliser seulement comme décrit dans ce
manuel.
5 Utilisez seulement les accessoires
recommandés par le fabricant.
6. Ne pas utiliser le chargeur si le cordon
d'alimentation a été endommagé. Ne pas
utiliser l’aspirateur portatif ou le chargeur s’ils
sont tombés, ont été endommagés, laissés à
l’extérieur ou s’ils sont tombés dans de l’eau.
Retournez-les à EURO-PRO Operating LLC
afin de les faire examiner, réparer ou ajuster.
7. Ne pas malmener le cordon du chargeur. Ne
pas transporter le chargeur ou la base par le
cordon ou ne pas tirer sur le cordon pour le
débrancher; empoignez plutôt la fiche et tirezla pour la débrancher.
8. Gardez le cordon du chargeur loin des
surfaces chauffées.
9. Ce produit comprend des piles rechargeables
nickel-cadmium. Se débarrasser
convenablement des piles ou les recycler. Ne
pas brûler les piles ou les exposer à des
températures élevées, car elles peuvent
exploser.
10. Ne pas manipuler la prise ou l’appareil avec
des mains mouillées.
11. Ne pas placer d’objets dans les ouvertures.
Ne pas utiliser si une ouverture est bloquée;
empêcher que ne s’accumulent de la
poussière, des peluches, des cheveux ou
tout ce qui peut limiter la circulation d’air.
12. Éloignez les cheveux, les vêtements, les
doigts et toute partie du corps des ouvertures
et des pièces amovibles.
13. Ne pas se servir de l’appareil pour ramasser
quelque chose qui brûle ou qui fume comme
des cigarettes, des allumettes ou de la cendre
encore chaude.
14. Ne pas essayer de remplacer des accessoires
alors que l’appareil fonctionne.
15. Faites très attention lorsque vous nettoyez
des escaliers.
16. Ne pas se servir de l’appareil pour ramasser
des liquides inflammables ou combustibles
tels que l’essence, et ne pas l’utiliser dans
des endroits où ces produits peuvent être
présents.
17. Vérifiez sur votre aspirateur portatif et
suivez tous les symboles et étiquettes
d’instructions.
18. Ne pas utiliser le chargeur avec une
rallonge. Brancher le chargeur directement
sur une prise électrique. Utiliser le
chargeur uniquement avec une prise
électrique standard (120V, 60Hz).
19. Ne pas utiliser l’aspirateur portatif s an s
que le filtre du bac de poussière soit en
place.
20. Ranger l'aspirateur sans fil à l'intérieur.
Rangez l’aspirateur portatif après chaque
utilisation pour éviter les accidents.
21. Des fuites des éléments de la batterie
peuvent se produire sous des conditions
extrêmes. Si le liquide, qui est une solution
composée de 20 à 35% d’hydroxyde de
potassium, entre en contact avec la peau,
nettoyez immédiatement avec du savon et
de l’eau ou neutraliser avec un acide doux
tel que le jus de citron ou le vinaigre. Si le
liquide entre en contact avec les yeux,
asperger immédiatement avec de l’eau
claire pendant au moins 10 minutes et
consulter un médecin.
22. Utiliser seulement sur des surfaces sèches
à l’intérieur.
23. Ne pas l'utiliser à des fins autres que celles
décrites dans le guide d’utilisateur.
24. Ne pas essayer d’utiliser le chargeur avec
un autre produit ou essayer de charger ce
produit avec un autre chargeur. Utiliser
seulement le modèle de chargeur YL-35120200D qui est fourni avec cet appareil.
25. La pile doit être enlevée de l’appareil avant
de le mettre au rebut.
26. La pile doit être recyclée ou jetée de façon
sécuritaire.
27. L’appareil doit être débranché lorsqu’on
enlève la pile.
28. Mettre hors fonction tous les contrôles
avant le débranchement.
29. Retirer la pile de l'appareil avant tout
entretien.
30. Toujours s'assurer que l'aspirateur est en
position "arrêt" avant d'assembler ou de
retirer la brosse motorisée.
CONSERVER CES INSTRUCTIONS
Pour un usage domestique seulement
APPRENEZ À CONNAITRE VOTRE ASPIRATEUR VERTICAL
SANS FIL
1. Poignée ergonomique
2. Tube Télescopique
3. Interrupteur Marche/Arrêt
4. Filtre
5. Réservoir à poussière
6. Bouton de dégagement du bac à
poussière
7. Brosse à planchers motorisée
8. Loquet de verrouillage du tube
télescopique
9. Dégagement du tube télescopique
*Les illustrations peuvent différer du produit exact
REMARQUE : Votre aspirateur vertical san s fil e st liv ré avec des
piles non chargées. Il est indispensable de charger
l’appareil pendant 24 heures avant la première
utilisation.
10. Déclenchement de la pile
11. Pile rechargeable
12. Suceur plat
13. Bouton de déclenchement
du suceur plat/brosse à
planchers
14. Chargeur de pile
15. Adaptateur de charge
(Modèle YL-35-120200D)
16. Indicateur de chargement
17
Rev. 03/09B
18
Page 11

MODE D’EMPLOI
MODE D’EMPLOI
Chargement de la pile
NOTE: La batterie est emballée séparément
de la base, mais n’est pas chargée.
d’utiliser l'aspirateur, chargez la pile pendant
24 heures.
Avant
REMARQUE: Le chargeur peut être
installé sur le dessus d’une table ou sur un
mur près d’une prise de courant.
1. Lorsque vous l’installez sur un mur,
assurez-vous que l’endroit que vous avez
prévu pour installer le chargeur est
exempt de fil électrique, de conduit d’eau
ou de canalisation de gaz caché.
2. Sélectionnez un endroit approprié près
d’une prise de courant murale (120 V,
60 Hz).
3. Ne pas laisser directement sous les
rayons du soleil ou près d’une source
de chaleur ainsi qu’à l’extérieur.
4. Sélectionnez le bon type de foret pour le
matériel à percer.
5. Mesurez et marquez soigneusement
l’endroit pour tous les trous de fixation
et percez par la suite les trous et vissez
le chargeur sur le mur. (Vis non fournies.)
6. La fiche de l’adaptateur du chargeur est
faite de telle façon à ce qu’il ne puisse
entrer que d’un seul côté dans le
chargeur. Alignez le sillon sur la fiche
de l'adaptateur avec la patte sur le fond
de la base de chargement. (Fig. 1)
7. Brancher l’adaptateur de charge dans
la prise de courant murale le plus près.
8. Placez le chargeur sur le mur. Soyez
prudent pour ne pas pincer le fil de
l’adaptateur de chargement entre le
mur et le chargeur.
9. Insérez la pile dans le chargeur pour la
charger. L’indicateur de chargement va
s’allumer sur le chargeur.
Chargeur
Pile
Indicateur de chargement
Adaptateur
de charge
Fig. 1
Assemblage de l’aspirateur vertical
1. Enlevez tous les pièces qui sont
livrées avec l’aspirateur vertical de la
boîte.
2. Tenez la brosse motorisée et poussezla complètement dans la base de
l’aspirateur vertical. (Fig. 2)
19
3. Tenez le tube télescopique et
poussez-le dans le haut de la poignée
de l’aspirateur vertical. (Fig. 3)
4. Une fois que le tube télescopique est
inséré, vous pouvez régler la hauteur
de la poignée en déplaçant le loquet
de verrouillage au-delà de 90 degrés à
la position ouverte. Maintenez la
poignée, allongez le tube à la hauteur
qui vous convient et fermez ensuite le
loquet à la position verrouillée. (Fig. 3)
Fig. 3Fig. 2
REMARQUE: La pile doit être chargée
pendant 24 heures avant la première
utilisation. S'assurer que l'interrupteur de
Marche/Arrêt est à la position « Arrêt »
avant d’insérer la pile.
5. Tenez la pile et insérez la partie
inférieure en premier dans l’ouverture
qui se trouve à l’arrière de l’appareil.
Ensuite, tournez-la en place en vous
assurant que vous entendez le clic une
fois en place. (Fig. 4)
Fig. 4
6. Mettez l’appareil en « Marche » pour
commencer à passer l’aspirateur.
7. Mettez votre pied doucement sur le
dessus de la brosse motorisé et
tournez la poignée vers vous pour
dégager l’appareil de la position
verrouillée verticale.
Interrupteur marche/arrêt
L’interrupteur de courant Marche/Arrêt
possède trois positions différentes. (Fig. 5)
1. Poussez sur le côté « I » pour activer
l’aspirateur en basse vitesse.
2. Poussez sur le côté « II » pour activer
l’aspirateur en haute vitesse.
3. Poussez sur le « O» (milieu) pour mettre
l’aspirateur à la position « Arrêt ».
= Marche (basse
vitesse)
= ARRÊT
= Marche
(haute vitesse)
Fig. 5
Transformer l’aspirateur vertical
en aspirateur portatif
1. Appuyez sur le bouton de
déclenchement télescopique pour
enlever le tube télescopique. (Fig. 6)
2. Appuyez sur le bouton de
déclenchement de la brosse à placer
et enlever la brosse à plancher
motorisé. (Fig. 6)
Soulever
3. Insérez le suceur plat
dans le bas de
l’aspirateur en vous
assurant qu'il est
enclenché à sa place.
(Fig. 7) Pour enlever
le suceur plat, appuyez
sur le bouton de
déclenchement de
brosse motorisé/
suceur plat.
Relâchement
du tube
télescopique
Bouton de
déclenchement
Tirez
Fig. 6
Fig. 7
Videz le bac à poussière
IMPORTANT: Toujours mettre hors
fonction l'aspirateur avant d’enlever le bac
à poussière.
1. Pour enlever le réservoir à poussière,
appuyez sur le bouton de dégagement
du réservoir à poussière et enlevez le
réservoir de l’aspirateur. (Fig. 8)
Bouton de
dégagement
du bac à
poussière
Fig. 8
2. Tenez le couvercle
du bac à poussière
et tournez-le vers
la droite pour
l'enlever de sur
le bac à poussière.
(Fig. 9)
3. Maintenez-le audessus d’une
poubelle et videz la
poussière.
(Fig. 10)
IMPORTANT: Videz
toujours le bac à
poussière après
chaque utilisation. Ne
jamais utiliser
l’aspirateur sans que
le bac à poussière
ou le filtre soient en
place.
4. Pour mettre en
place à nouveau le
couvercle du bac à
poussière, alignez
les indicateurs qui
sont sur le
couvercle et le bac
à poussière et tournez vers la droite
pour le verrouiller en place. Assurezvous que le symbole «▼» de
« verrouillage » sur le dessus du
couvercle est aligné avec le symbole
« ▲» sur le bac à poussière pour le
verrouiller en place. (Fig. 11)
20
Fig. 10
Fig. 11
Fig. 9
Page 12

MODE D’EMPLOI
MODE D’EMPLOI
Nettoyer le filtre
Il est recommandé que le filtre soit nettoyé
toutes les fois que la pile est complètement
déchargée. Pour enlever le filtre en
mousse :
1. Enlevez le bac à poussière de votre
aspirateur.
2. Retirez l'assemblage du filtre vers le
haut. (Fig. 12)
Châssis
de filtre
Filtre de
mousse
Compartiment
de filtre
Fig. 12
3. Enlevez le filtre de mousse et lavez-le
dans de l’eau tiède et laissez-le
sécher complètement avant de le
replacer dans l’aspirateur. Ne jamais
utiliser un séchoir à cheveux ou tout
autre air forcé chaud pour sécher le
filtre de mousse.
4. Lorsque le filtre de mousse est sec,
réinsérez-le dans le châssis du filtre
et replacez-le dans le compartiment
de filtre.
REMARQUE: Le filtre de mousse doit
être remplacé tous les trois mois pour
conserver la performance optimale de
l'aspirateur.
Changement de la courroie
Occasionnellement, la courroie de la
brosse motorisée aura besoin d’être
changée, la fréquence dépendra de
l’usage que vous faites de votre
aspirateur vertical. Pour changer la
courroie :
1. Enlevez la brosse motorisée de votre
aspirateur.
2. Tournez la brosse motorisée à
l’envers et en utilisant un tournevis,
enlevez la vis à l’arrière du couvercle
d’accès. (Fig. 13)
Fig. 13
3. Mettez la vis de côté et soulevez le
couvercle d’accès pour l’enlever.
(Fig. 13)
4. Soulevez le bout de la barre de la
brosse et enlevez le bouchon.
(Fig. 14)
5. Enlevez tous les pièces de la courroie.
Arbre
d’entraînement
Bouchon
Courroie
6. Glissez un côté de la nouvelle
courroie autour de l’arbre
d’entraînement et l’autre autour du
rouleau de la brosse. (Fig. 14)
7. Placez le bouchon sur le bout du
rouleau de la brosse.
8. Alignez le bouchon avec la rainure
dans la tête de la brosse motorisée
et glissez-le doucement vers le bas.
9. Remettez le couvercle d’accès en
place et remettez la vis.
21
Rouleau de
la brosse
Fig. 14
Nettoyage de la brosse motorisée
ATTENTION: Enlevez le bloc pile afin
d’éviter de mettre en marche l’appareil de
manière accidentelle.
Enlevez périodiquement la brosse
motorisée de sur l’aspirateur vertical afin
d’enlever les peluches, les cheveux ou les
fibres qui se sont accumulées sur la brosse
en rotation.
1. Retirez le bloc d’alimentation du
chargeur.
2. Mettez l’aspirateur sur une surface
plane à l’envers.
3. Glissez soigneusement une paire de
ciseaux sous les fils, les poils d'animaux
ou les fibres de tapis coincé.
4. Coupez le long des fils, cheveux ou
fibres et enlevez-les par la suite d’autour
du poil de la brosse.
REMARQUE: Si votre brosse motorisée
est coincée, votre aspirateur vertical va
cesser de fonctionner. Si cela se produit,
mettez l’appareil en « Arrêt » et laissez
l’appareil refroidir pendant 2 minutes.
Assurez-vous qu'il n'y a aucun fil ou fibre
autour de la brosse. Ensuite, remettez
l’appareil en « Marche » et l’appareil devrait
maintenant fonctionner normalement.
Appelez notre service à la clientèle au
1 (866) 826-6941, si votre aspirateur
nécessite un entretien plus avancé.
Afin de maximiser la durée de vie de
vos piles au nickel-cadmium
REMARQUE: Si le produit n’a jamais été
utilisé ou a été entreposé pendant une
longue période de temps sans être utilisé –
il faudra plusieurs cycles de charge et de
décharge complets pour garantir la durée
opérationnelle complète de votre produit.
1. Chargez la pile pendant 24 heures
avant la première utilisation. Ne pas
le faire réduira la durée de vie des
piles du produit de façon significative.
2. Recharger uniquement lorsque la pile
est complètement déchargée (ou
pratiquement déchargée).
3. Ne pas entreposer dans des zones à
température ou humidité élevées.
4. Déchargez complètement et rechargez
complètement l’appareil au moins une
fois par mois.
5. Après trois (3) mois d’entreposage, le
produit doit être complètement
déchargé puis rechargé afin de
maximiser la puissance de la pile.
6. Utilisez seulement le chargeur et
l’adaptateur du chargeur fourni avec le
produit. Si d’autres chargeurs sont
utilisés, les piles peuvent présenter des
défaillances, endommageant la pile, le
produit ou des biens personnels.
7. L’indicateur de charge sur le chargeur
va s’allumer lorsque la pile est insérée
pour être chargée. Si l'indicateur de
charge ne s’allume pas, assurez-vous
que la pile a été insérée correctement.
S'il ne s'allume toujours pas, vérifiez le
fusible ou le disjoncteur.
8. Les piles au NiCd ont une longue durée
de vie, mais devront éventuellement
être remplacées. Pour acheter des
piles de remplacement, visiter
www.sharvac.com.
Remplacement de la pile
AVERTISSEMENT: NE JAMAIS utiliser
de piles ordinaires pour le remplacement,
car ils peuvent couler et endommager votre
aspirateur. Utiliser seulement le bloc pile
XBT800 fourni par EURO-PRO Operating
LLC pour le remplacement.
Mise au rebut du bloc pile
Cette balayeuse verticale est équipée de
piles Ni-Cd et il est important que vous les
jetiez convenablement. Lorsque le bloc
pile n’est plus en condition d’utilisation, il
doit être enlevé de l'aspirateur vertical pour
être mis au rebut. Le bloc pile doit être
recyclé ou jeté conformément aux
réglementations locales. Veuillez
consulter les Pages Jaunes ou un
centre de recyclage local pour plus
d’information.
LES PILES « Ni-Cd »
DOIVENT ÊTRE RECYCLÉES
OU ÉLIMINÉES
CONVENABLEMENT
ATTENTION
• Utiliser seulement avec le bloc pile
fourni avec l'appareil.
• Ne jamais essayer de jeter le bloc pile
ou l’appareil dans un feu ou le brûler.
• NE PAS essayer de retirer ou
d’endommager le boîtier de la pile.
• La pile doit être recyclée ou jetée
adéquatement à la fin de sa durée
utile.
• NE PAS placer les piles sur des
surfaces métalliques.
• NE PAS faire entrer en contact les
parties métalliques des piles, car les
piles pourraient surchauffer.
22
Page 13

MODE D’EMPLOI
GUIDE DE DÉPANNAGE
SOLUTION POSSIBLECAUSE POSSIBLEPROBLÈME
LA BALAYEUSE
VERTICALE NE
FONCTIONNE
PAS
LA BROSSE
MOTORISÉE NE
FONCTIONNE
PAS
L’ASPIRATEUR
VERTICALE
N’ASPIRE PAS
OU LA
PUISSANCE
D’ASPIRATION
EST FAIBLE
DE LA
POUSSIÈRE
S’ÉCHAPPE DE
L'ASPIRATEUR
VERITCAL
LA PILE NE
TIENDRA PAS
SA CHARGE
1. Les piles sont déchargées.
2. Les piles sont mortes (les piles
ne tiennent plus la charge).
3. Les contacts entre la pile et le
chargeur sont sales.
4. Il n’y a pas de courant dans la
prise électrique qui alimente
l’adaptateur de charge.
1. L’agitateur est bloqué par des
débris ou des fibres.
2. La courroie est brisée.
1. Le réservoir du bac à poussière
est plein.
2. Le filtre du bac à poussière doit
être nettoyé ou remplacé.
3. La pile a besoin d’être rechargé.
1. Le réservoir du bac à poussière
est plein.
2. Le filtre du bac à poussière n’est
pas installé correctement.
3. Le filtre du bac à poussière est
troué.
1. La pile a atteint la fin de sa
durée de vie utile.
1. Charger l’unité.
2. Remplacer la pile.
3. Essuyer et nettoyer la saleté des
contacts.
4. Vérifier les fusibles ou le
disjoncteur. Remplacer les
fusibles ou relancer le
disjoncteur
1. Enlever les débris de l’agitateur.
S’il y a des fibres ou des fils
entourés, coupez-les doucement
avec des ciseaux.
2. Remplacer la courroie.
1. Vider le réservoir du bac à
poussière.
2. Retirer le filtre du bac à
poussière et vérifier s’il y a des
objets dans le conduit d’air et les
enlever. Nettoyer ou remplacer
le filtre du bac à poussière.
3. Charger la pile.
1. Vider le réservoir du bac à
poussière.
2. Examiner les instructions au
sujet de l’installation du filtre du
bac à poussière.
3. Remplacer le filtre du bac à
poussière.
1. Communiquer avec le service à
la clientèle au: 1 (866) 826-
6941 ou visiter le
www.sharkvac.com pour
commander une nouvelle pile.
PIÈCES DE REMPLACEMENTS POUR LES MODÈLES
SV800 – SV800C
Filtre à poussière de remplacement SKU# XF800 ou XF800C
Bloc pile de remplacement SKU# XBT800
Courroie de remplacement SKU# X800BLT
Pour commander des piles, des filtres ou des courroies de remplacement ou
Du lundi au vendredi de 8 h 30 à 17 h 00 heure de l’est.
Ou visitez notre site Web: www.sharkvac.com
Veuillez noter : Le filtre est lavable. Il devrait toutefois être remplacé tous les (3)
trois mois pour assurer une performance maximale de votre
aspirateur.
Important: S’assurer que le filtre soit complètement sec avant de
réinstaller dans l’aspirateur.
pour l'assistance technique:
Appelez au: 1 (866) 826-6941
23
Modèles
SV800
SV800C
GARANTIE LIMITÉE D'UN (1) AN
EURO-PRO Operating LLC garantit ce produit contre les défauts de pièces et de main-d’œuvre
pour une période d'un (1) an à compter de la date d'achat originale lorsqu'il est utilisé dans le
cadre d’un usage domestique normal, conforme aux conditions, aux exclusions et aux exceptions
suivantes.
Si votre appareil cesse de fonctionner correctement dans des conditions normales d'usage
domestique en dedans de la période de garantie, retournez l'appareil au complet incluant les
accessoires, avec les frais de transport payés d'avance à Pour le support à la clientèle, appelez
le 1(866) 826-6941 ou visitez notre site web au www.sharkvac.com.
Si EURO-PRO Operating LLC constate que l'appareil est défectueux au niveau du matériel ou
de la main-d’œuvre, EURO-PRO Operating LLC le réparera ou le remplacera sans frais. Un
justificatif de la date d’achat et 11,95 $ pour couvrir les frais de transport pour le retour et la
manipulation doivent être inclus. * Les accessoires consommables incluant, sans limitation, les
filtres à poussière et les brosses qui nécessitent un remplacement normal sont spécifiquement
exclus de la garantie.
La responsabilité de EURO-PRO Operating LLC se limite entièrement au coût de réparation ou
de remplacement de l’unité selon son choix. Cette garantie ne couvre pas l’usure normale des
parties et ne s’applique pas à un appareil qui a été altéré ou utilisé dans un but commercial. La
garantie limitée ne couvre pas les dommages causés par un mauvais usage, de l’abus, de la
négligence lors de la manutention ou des dommages dus à un mauvais emballage ou à une
mauvaise manipulation lors du transport. Cette garantie ne couvre pas les dommages ou défauts
causés ou résultants de dommages dus au transport ou à la réparation, à l'entretien ou à toute
altération de ce produit ou de chacune de ses pièces, qui aurait été effectués par une personne
non autorisée par EURO-PRO Operating LLC.
Cette garantie s’adresse à l’acheteur d’origine de l’appareil et exclue toute autre garantie légale
et/ou conventionnelle. La responsabilité de EURO-PRO Operating LLC s’il y en a une, se limite
aux obligations spécifiques exprimées sous cette garantie limitée. En aucun cas EURO-PRO
Operating LLC ne peut être tenu responsable pour des dommages indirects ou consécutifs de
toute nature confondue. Certaines provinces n’autorisent pas l’exclusion ou limitation de
dommages circonstanciels ou conséquents, auquel cas cette disposition ne s’appliquerait pas.
Cette garantie vous donne des droits légaux spécifiques, et il se peut que vous ayez d’autres
droits qui peuvent varier d’un état à l’autre ou d’une province à l’autre.
*Important: Emballez soigneusement l’appareil pour éviter tout dommage lors du
transport. Assurez-vous d'inclure une preuve de date d'achat et d'attacher une étiquette au
produit avec votre nom, votre adresse complète et votre numéro de téléphone avec une
note au sujet de l'achat, du num éro de modèle et ce que vous croyez être le problè me du
produit. Nous recommandons d’assurer le paquet, car la garantie ne couvre pas les
dommages causés par le transport. Marquez à l'extérieur de votre paquet « À
L’ATTENTION DU SERVICE À LA CLIENTÈLE ». Nous essayons constamment d’améliorer
nos produits, donc les clauses contenues dans ce document peuvent changer sans
préavis.
-----------------------------------------------------------------------------------------
CARTE D’ENREGISTREMENT DU PROPRIÉTAIRE
S.V.P., remplir et mailler cette carte d’enregistrement dans les 10 jours suivants la date d’achat.
L’enregistrement nous permettra de vous contacter dans le cas fort improbable d’un rappel ou d’un avis de
sécurité. En retournant cette carte vous reconnaissez avoir lu et compris le mode d'emploi, et les
avertissements présentés dans les instructions s'y rattachant.
RETOURNER À : EURO-PRO Operating LLC, 4400 Bois Franc, St. Laurent, Québec, H4S 1A7
Modèles SV800 – SV800C
_____________________________________________________________________
Modèle de l’appareil
_____________________________________________________________________
Date d’achat Nom du magasin
_____________________________________________________________________
Nom du propriétaire
_____________________________________________________________________
Adresse Ville Prov. Code Postal
Imprimé en Chine
POUR LES CONSOMMATEURS CANADIENS SEULEMENT
24
 Loading...