

Page 1

SOUND 140 CONCERTO
FM/AM Radio with RDS and Dock for iPod
OWNER’S MANUAL
®
Page 2

Page 3
SOUND 140 OWNER’S MANUAL
SOUND 140 OWNER’S MANUAL
®
DO YOU NEED HELP?
If you need help, please contact us, Monday-Friday, 8:30 a.m.-4:00
p.m., North America Pacic Time. 1-800-872-2228 from the U.S;
1-800-637-1648 from Canada; 650-903-3866, worldwide; FAX:
650-903-3867; web site, www.etoncorp.com; Etón Corporation, 1015
Corporation Way, Palo Alto, CA 94303, USA
WARNING
• Do not expose this appliance to rain or moisture.
• Do not submerge or expose for extended period to water.
• Protect from high humidity and rain.
• Only operate within specied temperature range (0 °C to 40 °C).
• Unplug immediately if liquid has been spilled or object have fallen into the apparatus.
• Clean only with a dry cloth. Do not use detergents or chemical solvents as this
might damage the nish.
• Unplug and disconnect external antennas during lightning storms.
• Do not remove cover [or back].
• Refer servicing to qualied service personnel.
ENVIRONMENT
DISPOSAL
According to the European Directive 2002/96/EC
all electrical and electronic products must be collected separately by a local collection system.
Please act according to your local rules and do not dispose of your
old products with your normal household waste.
3
Page 4

SOUND 140 OWNER’S MANUAL
Congratulations on your purchase of the new Eton Sound 140. Uniquely designed to work with your iPod, this Eton stereo audio system with
built-in universal dock provides advanced audio and radio performance
that brings out the best in your music. Remember to keep this manual
for future reference.
Enhance Your Enjoyment of the Music Stored on Your iPod®
with the Eton Stereo Audio System
• Enhance the richness of your iPod sound with Eton technology
• Powerful built-in speakers allow you to hear music with depth and
clarity
• Digital clock display with dual alarm
• Fall asleep or wake up to your iPod, AM/FM radio or buzzer
• Charges your iPod
• Integrated universal dock for your iPod
• Auxiliary line input for other generations of the iPod and other audio
devices
• AM/FM radio with PLL digital tuning technology
• External loop antenna provides better AM reception
• External wire antenna provides better FM reception
• Liquid crystal display with blue backlight
• Remote control included
WHAT’S INCLUDED?
Eton Sound 140, Remote Control, 3 universal well inserts, AC Power
supply, AM loop antenna, FM wire antenna, owner’s manual.
4
Page 5

SOUND 140 OWNER’S MANUAL
SOUND 140 OWNER’S MANUAL
SYSTEM SETUP
POWER SOURCE
Place the ES 140 on a sturdy surface. Plug the power supply into the
rear of the ES 140. Plug the AC power cord into the power supply
and then into a standard wall outlet.
INSERTING THE CORRECT IPOD DOCKING INSERT
The ES 140 is intelligently designed to easily accommodate all iPods
using the Apple 30-pin connector. To congure the ES 140 for your
specic iPod size, simply place the appropriate dock insert into the
dock area. Use the insert that came with your iPod or choose one
of the three inserts provided. Now you are ready to dock your iPod.
While your iPod is docked, its battery is charging (until it is fully
charged).
ANTENNA FOR AM AND FM
Connect the supplied external AM and FM antennas by sliding the
plug over the “F” connectors on the back of the radio. To avoid damage, when removing the antennas, never pull it by the cord. Always
grasp the antenna’s connector rmly and pull it straight out.
BACKUP BATTERY
On the rear of the radio is a backup battery compartment that holds
2 AA alkaline batteries for backup of time in case of power failure.
Use only new alkaline or lithium batteries of exactly the same brand
and type. The batteries are not included.
5
Page 6

SOUND 140 OWNER’S MANUAL
REMOTE CONTROL BATTERY
The remote control battery has been previously installed and is ready
for operation. When the remote control stops functioning, you must
replace the battery with a new one. To do so, locate the battery compartment on the bottom of the remote and follow the steps below:
1. Squeeze the small notch while pulling the ‘battery door latch ’ out
towards you. This will allow the battery holder to release and pop
out.
2. Insert a CR2025, 3V lithium battery. Make certain to follow the
correct polarity, following the directions of the corresponding
symbols (+/-).
3. Secure the battery and push the battery holder back into the
remote control until fully inserted.
LOCATION OF CONTROLS ON THE MAIN UNIT
Front Panel:
A) Knob (Multi-Function)
B) Sleep
C) Source
D) Play/Pause
E) Set
F) Tune +
G) Tune –
H) IR sensor
I) Light sensor
6
Page 7
SOUND 140 OWNER’S MANUAL
SOUND 140 OWNER’S MANUAL
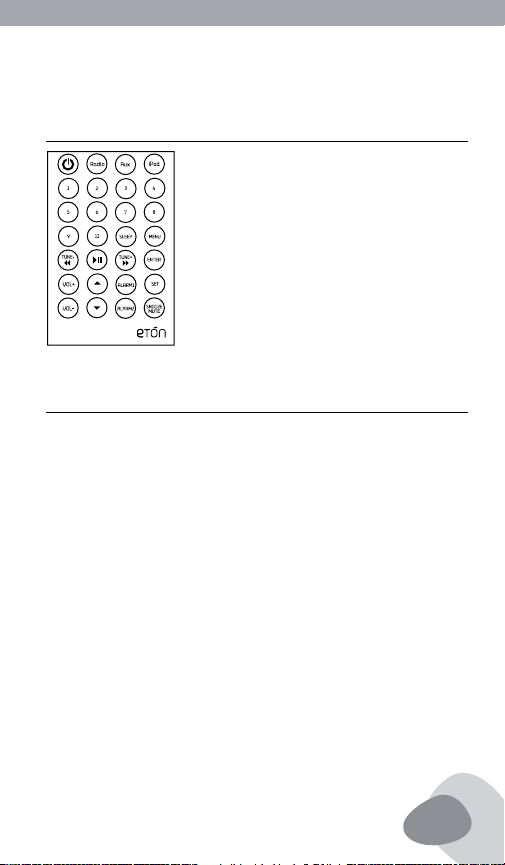
REMOTE CONTROL
CONTROLS
Power
Turns ES 140 on/off or switches off alarm when alarm is sounding.
Source
Input source selection Radio / Aux / iPod, (Radio change AM or FM
mode)
Radio preset channel
Preset radio channel 1 – 10 (AM/FM)
Radio Tune-/+
Tune Radio channel
iPod - Menu
Go back to the previous menu for iPod user only. (Common iPod :
Menu key feature)
7
Page 8

SOUND 140 OWNER’S MANUAL
CONTROLS continued
iPod - (up)
Skips to the next track when iPod is playing, or scans currently playing track toward the end by pressing and holding. In the radio mode,
it tunes the radio stations by pressing and holding.
iPod - (down)
Skips to the previous track when iPod is playing, or scans currently
playing track toward the beginning by pressing and holding. In the
radio mode, it tunes the radio stations by pressing and holding.
iPod -
Selects iPod and plays a track. In the play mode, it is used to pause
the playback.
Vol +/-
Volume adjustment.
Alarm 1 / 2
Set Alarm times.
Snooze/Mute
Activates snooze mode when the alarm sounds. Mutes the sound.
Sleep
The sleep timer enables play for a specied amount of time (15-90
minutes) and then shuts off
Enter
Choose a menu item; Play a song; Skip to any point is a song. (Common iPod Center button key feature)
8
Page 9

SOUND 140 OWNER’S MANUAL
SOUND 140 OWNER’S MANUAL
CONTROLS continued
Set
Setting Clock/Alarm/Sleep/Display
(Up)
Select Up for iPod user only. (Common iPod : Clock wheel key feature)
(Down)
Select Down for iPod user only. (Common iPod : Clock inverse wheel
key feature)
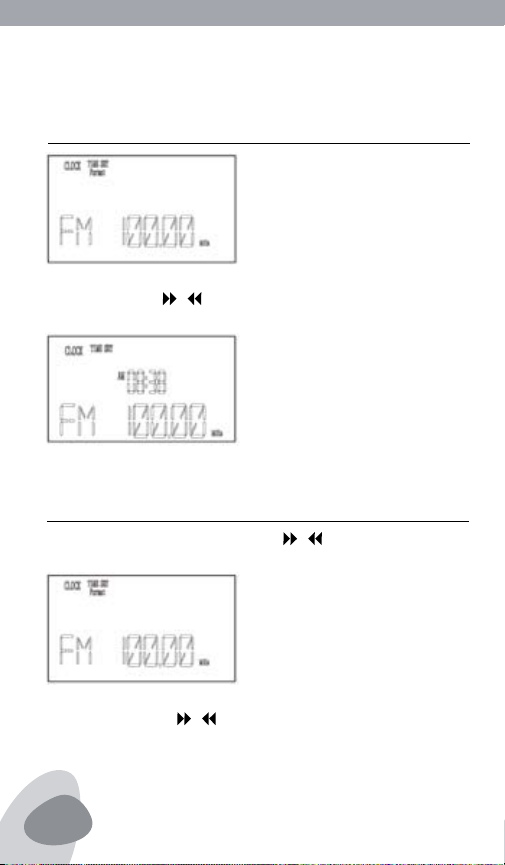
SETTING THE CLOCK
Set the following options using the Clock Set feature: Time, Format
Clock Display.
Press the SET button to enter the settings menu. The setting menu
reads CLOCK, ALARM, SLEEP and DISPLAY in the LCD. Use the TUNE
+/-( / ) buttons to select CLOCK and press the ENTER.
Use the TUNE +/-( / ) button to select ‘Time SET’ then press
ENTER.
9
Page 10
SOUND 140 OWNER’S MANUAL
SETTING THE CLOCK continued
Use the TUNE +/-( / ) buttons to adjust the minutes and press
ENTER, then to adjust the hour and press ENTER.
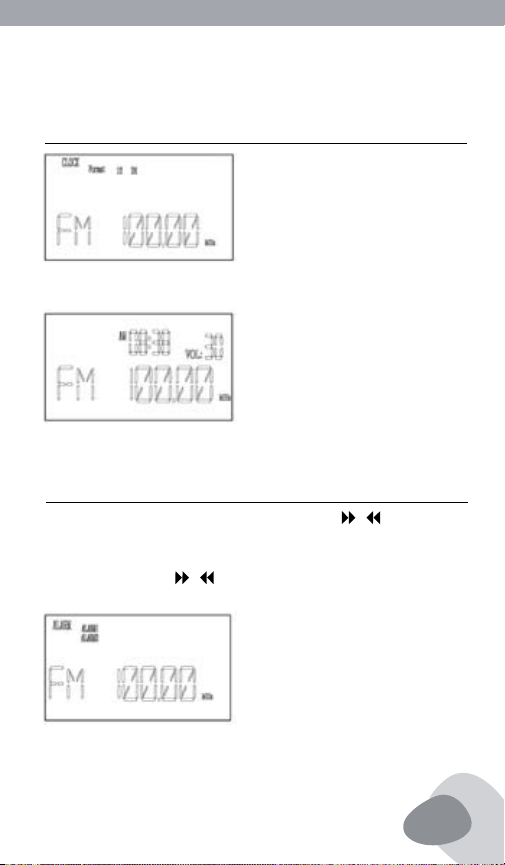
SETTING THE CLOCK FORMAT
1. In CLOCK setting, use the TUNE +/-( / ) buttons to select
”Format” then press the ”ENTER” knob to conrm.
2. Use the TUNE +/-( / ) buttons to select 24-hour or 12-hour
format, then press the ENTER knob to store the selection.
10
Page 11
SOUND 140 OWNER’S MANUAL
SOUND 140 OWNER’S MANUAL
SETTING THE CLOCK FORMAT continued
3. When you choose the 12-hour format, showing AM/PM on display:
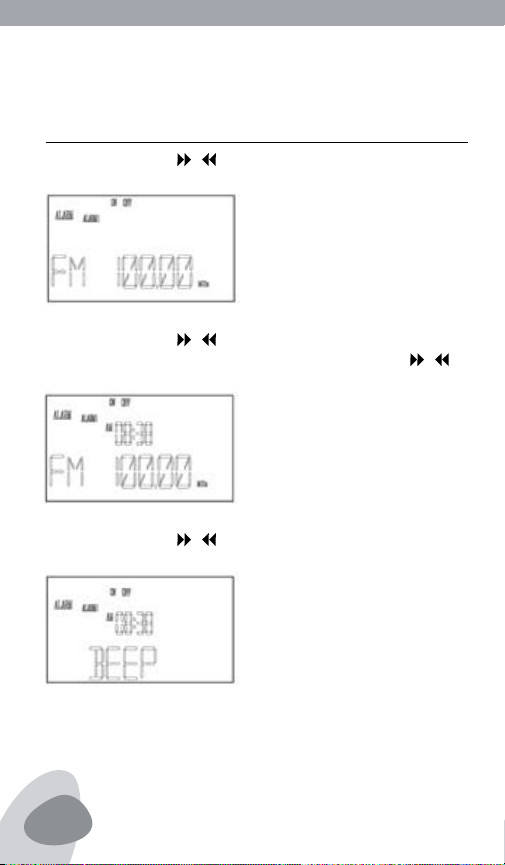
SETTING THE ALARM
1. Press the SET button, then use the TUNE +/-( / ) buttons to
select ALARM and press ENTER.
2. Use the TUNE +/-( / ) buttons to select ALARM 1 or ALARM2
and press ENTER to conrm.
11
Page 12
SOUND 140 OWNER’S MANUAL
SETTING THE ALARM continued
3. Use the TUNE +/-( / ) buttons to select ALARM ON or OFF
and then press ENTER.
4. Use the TUNE +/-( / ) buttons to set the correct minutes
then press ENTER. The hour will ash. Use the TUNE +/-( / )
buttons to set the hour, then press ENTER.
5. Use the TUNE +/-( / ) to select the ALARM activation mode
(BEEP/FM/AM/AUX/IPOD), then press ENTER.
12
Page 13
SOUND 140 OWNER’S MANUAL
SOUND 140 OWNER’S MANUAL
SETTING THE ALARM continued
6. After you complete the setting, the display shows ALARM 1 or
ALARM 2.
NOTE:
The next time you want to set the ALARM time, it will show your
last time. After setting the ALARM you can use the remote and press
the ALARM1 or ALARM2 buttons to turn it ON or OFF. ON or OFF
appears in the display.
USING THE SNOOZE FEATURE
Once the alarm activates, pressing the radio’s or the remote’s
SNOOZE button allows cancellation of the alarm for 7 minutes;
then the alarm resumes. This can be done 5 times, then the alarm is
cancelled.
13
Page 14

SOUND 140 OWNER’S MANUAL
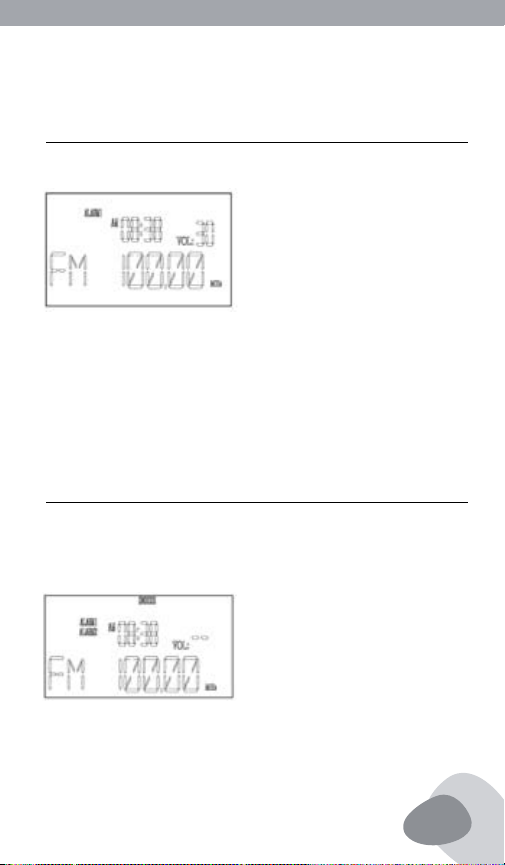
THE SLEEP TIMER
The sleep timer enables play for a specied amount of time (1-99
minutes) and then shuts off. When the SLEEP function is enabled,
the main display shows the sleep symbol. The timer setting can be
roughly (00-15-30-45-60-75-90min) or trimming (00~90min).
SETTING THE SLEEP TIMER
1. Press the SET button, use the TUNE +/-( / ) to select SLEEP,
then press ENTER.
2. Use the TUNE +/-( / ) buttons to set the SLEEP time, adjust-
ing the minutes from 00~90(1min/Step), then press ENTER.
After setting, the display shows SLEEP.
14
Page 15
SOUND 140 OWNER’S MANUAL
SOUND 140 OWNER’S MANUAL
ROUGHLY SETTING THE SLEEP TIMER
1. Press the SLEEP button, use the TUNE +/-( / ) to select 00-
15-30-45-60-75-90 min, then press ENTER.
2. After setting the display shows SLEEP.
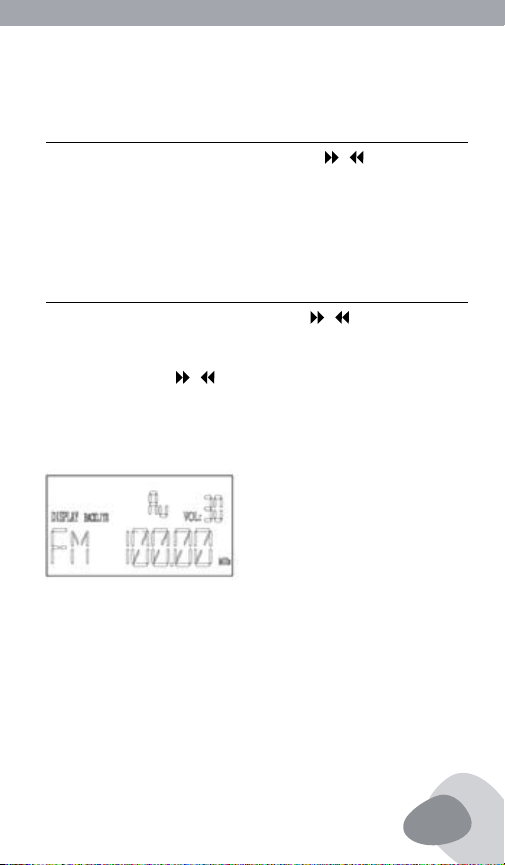
SETTING THE DISPLAY
1. Press the SET button, use the TUNE +/-( / ) buttons to select
DISPLAY, then press ENTER.
2. Use the TUNE +/-( / ) buttons to adjust the display’s backlight
brightness (AU-01-02-03-04-05), then press ENTER.
NOTE: When you set the display’s backlight brightness as ”Au” mode,
the brightness will automatically change with the environment.
15
Page 16

SOUND 140 OWNER’S MANUAL
OPERATIONAL INSTRUCTIONS
IMPORTANT:
1. Occasionally les on the iPod can become corrupted. This may
cause erratic behavior with your Eton product. Apple Computer
recommends that you visit their website www.apple.com to obtain
instructions on resetting or restoring your iPod to factory settings.
2. It is imperative that you use the correct dock adapter for your
iPod and that the dock adapter ts appropriately into the built-in
universal dock. Ignoring these rules can cause severe damage to
your iPod. Please refer to the section ‘Installing the Dock Adapter’
to properly install the dock adapter before operating the ES 140
with your iPod.
SETTING THE DISPLAY
1. Press the SOURCE buttons to select the mode as IPOD or use the
remote’s IPOD button to switch.
2. To listen to music, make sure that your iPod is inserted into the
built-in universal dock correctly. It will then automatically turn ON
and music will begin to play.
NOTE: If the sound seems inaudible, the ES 140 may not be detecting that your iPod is in the play mode. If this happens, press the
16
Page 17
SOUND 140 OWNER’S MANUAL
SOUND 140 OWNER’S MANUAL
SETTING THE DISPLAY continued
PLAY/PAUSE button on the ES 140 or the button on the Remote
Control twice for music play to begin.
3. To play music when your iPod is already in the dock and in the
standby mode, press the PLAY/PAUSE button on the ES 140 or
the button on the Remote Control. When it’s playing press the
ENTER button to go forward, use the (Up) (Down) buttons
to select and use the MENU button to go back.
4. To pause music, press the PLAY/PAUSE button during the play
mode. To resume playback, press it again.
5. To adjust the volume, either Use the KNOB wheel on the ES 140,
or use the VOL+ and VOL- buttons on the remote control.
6. To go to the Next or Previous track, use the or button on
the remote control. To search the current track using high speed
forward or rewind, press and hold the or buttons while track
is playing.
7. To power the unit off, Press and hold the radio’s KNOB button or
remote’s Power on/off. If your iPod is left in the built-in universal
dock, it will continue to charge.
8. This unit may not operate while in the pause mode. Press the
PLAY/PAUSE button on the ES 140 or on your iPod to initiate the
play mode.
17
Page 18

SOUND 140 OWNER’S MANUAL
CHARGING YOUR IPOD
Your iPod will always be CHARGING until reaching the FULL
CHARGE mode while it is in the built-in universal dock. This unit
cannot charge iPods with 9-pin connectors. Only iPods with 30 pin
connectors can be charged.
TRANSFERRING VIDEO FROM THE IPOD-VIDEO
TO TELEVISION
The Video-out feature is only made for 5th generation iPod and iPod
Photo. Other generations of iPod are not suitable for this feature.
Insert your iPod into the dock. Plug one end of the yellow AV cord
into the RCA JACK(VIDEO OUT) on the rear of the unit and the other
end into the television’s yellow Video input. Switch to the Video
mode on your television. Turn the TV Out option to ON by choosing
Videos option video settings from your iPod. Choose your favorite
video and choose play on your iPod.
SENDING THE AUDIO OUT
You can record the audio from the Eton Sound 140 or send the audio
to another amplier via the Line-out jack on the back of the radio.
This is a mono output jack, 3.5mm.
18
Page 19
SOUND 140 OWNER’S MANUAL
SOUND 140 OWNER’S MANUAL
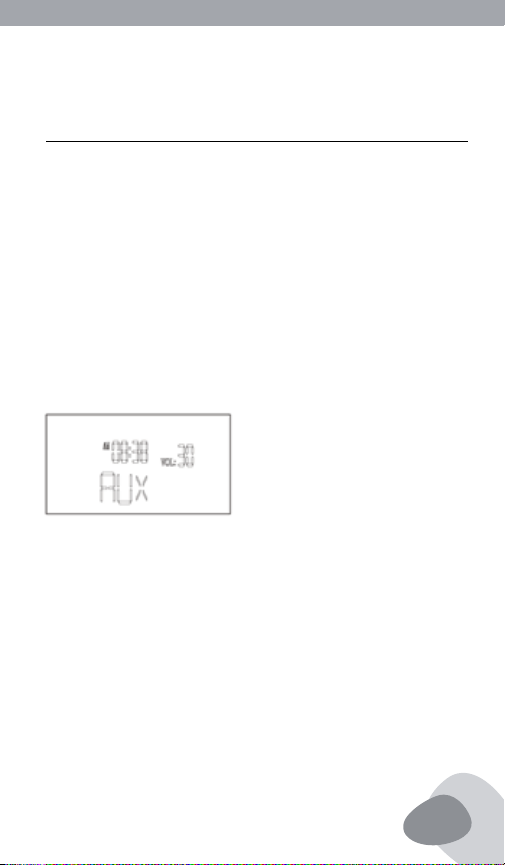
LISTENING TO OTHER AUDIO DEVICES
Using the 3.5mm, stereo line-in jack, labeled AUX-in on the back of
the ES 140, you can listen to rst and second generations of iPod or
any other audio player such as MP3 player or CD player that is not an
iPod. Please ensure that before using the AUX-in jack there is no iPod
in the built-in universal dock.
1. Insert the plug of the audio cable (not included) into the 3.5mm
stereo phone jack on your audio device, and then insert the other
end of the cable into the 3.5mm stereo phone jack (Aux-in),
located on the rear of ES 140.
2. To get into the AUX mode press the radio’s SOURCE button,
change to AUX mode or remote’s AUX button.
3. At this point it is safe to turn ON your device and enjoy the music.
4. To adjust the volume use the KNOB wheel or remote’s VOL+/- .You
may also need to adjust the audio device volume.
5. To power OFF the unit, press and hold the radio’s KNOB button or
remote’s Power button.
19
Page 20
SOUND 140 OWNER’S MANUAL
LISTENING TO YOUR FAVORITE RADIO STATIONS
For the best FM radio clarity plug in and fully extend the wire antenna into the socket located on the rear of the ES 140. It is important
not to alter, obstruct or attach other antennas to this wire antenna.
To achieve the best AM reception, plug in the AM loop antenna to
the socket on the rear of the ES 140.
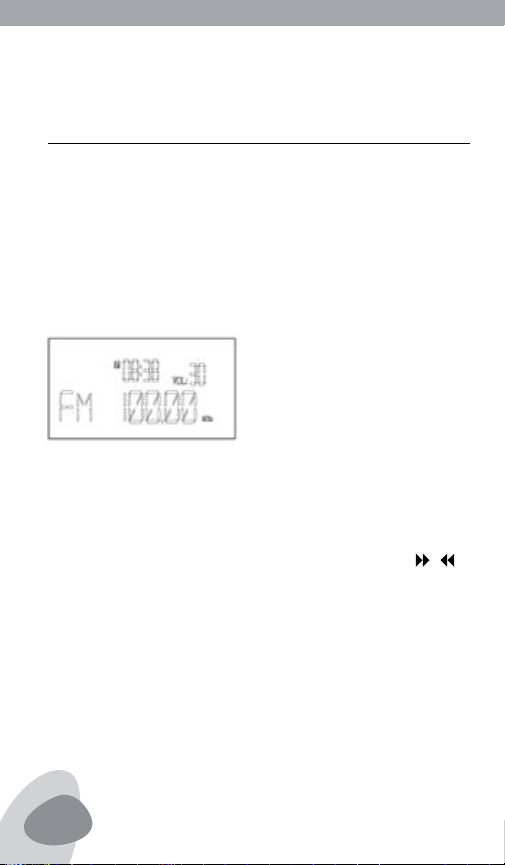
1. To select AM or FM press the radio’s SOURCE button or the
remote’s RADIO button. The radio frequency will appear in the
lower right corner of the display.
2. To tune in a desired station, use a short press of the radio’s Knob
button. Use a long press to enter the seek mode and the radio will
automatically stop on the next available strong station.
3. Press the radio’s TUNER +/- button or remote’s TUNE +/-( / )
to go frequency by frequency.
4. To adjust the volume use the radio’s KNOB wheel or remote’s
VOL+/- control.
5. To power OFF the unit press and hold the radio’s KNOB button or
remote’s Power button.
20
Page 21
SOUND 140 OWNER’S MANUAL
SOUND 140 OWNER’S MANUAL
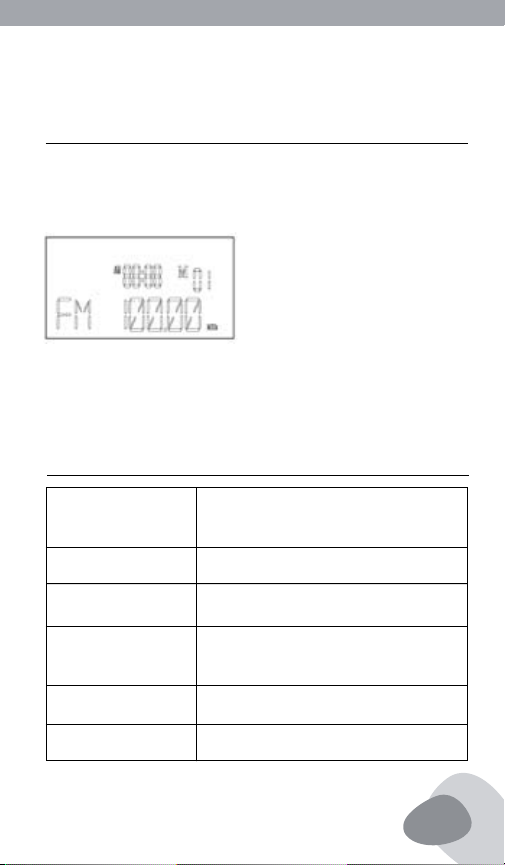
RADIO STATION MEMORY SETTING
1. There are 20 memories, 10 each for AM and FM.
2. Press one of the remote’s numeric buttons for three seconds; the
memory number will ash in the LCD to store.
3. To listen to a station that you’ve stored, press the appropriate
numeric button reecting the memory it’s stored in.
TECHNICAL DATA
Power supply
Audio output power
Temp. Range
Frequency coverage
Size
Weight
Input: 100 – 240 VAC / 50 – 60 HZ;
Output: 17VDC/2.3ADC(DC 3.5Ø jack)
30Watt
0 to 40 degrees Centigrade
AM: 520KHz~1710KHZ
FM: 87.5MHZ~108.0MHZ
34.0 x 14.5 x 17.4 (Unit: cm)
3.1 Kg
21
Page 22

SOUND 140 OWNER’S MANUAL
WARRANTY REGISTRATION
To ensure full warranty coverage or product updates, registration of
your product should be completed as soon as possible after purchase
or receipt. You may use one of the following options to register your
product:
1. By visiting our website at http://www.etoncorp.com.
2. Mail in enclosed warranty card.
3. Mail your warranty card or information to following address;
include your name, full mailing address, phone number, email address, model purchased, date purchased, retail vendor name:
Etón Corporation
1015 Corporation Way
Palo Alto, CA 94303 USA
LIMITED WARRANTY
Retain the warranty information from your warranty card with your
proof of purchase or the Limited Warranty information can also be
viewed at www.etoncorp.com.
SERVICE FOR YOUR PRODUCT
To obtain service for your product, we recommend rst contacting
an Etón service representative at 1-800-872-2228 US, 1-800637-1648 Canada, (650) 903-3866, customersvc@etoncorp.com
or your respective country distributor in Europe (see enclosed list)
for problem determination and trouble-shooting. If further service
22
Page 23

SOUND 140 OWNER’S MANUAL
SOUND 140 OWNER’S MANUAL
SERVICE FOR YOUR PRODUCT continued
is required, the technical staff will instruct how to proceed based
on whether the radio is still under warranty or needs non-warranty
service.
WARRANTY – If your product is still in warranty and the Etón service representative determines warranty service is needed, a return
authorization will be issued and instructions will be given. DO NOT
ship your radio back without obtaining the return authorization.
NON-WARRANTY – If your product is no longer under warranty and
requires service, the Etón service representative will refer you to the
nearest repair facility that will best handle the repair.
For service outside North America, please refer to the distributor
information included at time of purchase/receipt.
FCC NOTE
The manufacturer is not responsible for any radio or tv interference
caused by unauthorized modications to this equipment. Such modications could void the user’s authority to operate the equipment.
iPod is a trademark of Apple Inc., registered in the U.S. and other countries. “Made for iPod” means that an electronic accessory has been designed to
connect specically to iPod and has been certied by the developer to meet Apple performance standards.
Apple is not responsible for the operation of this device or its compliance with safety and regulatory standards.
23
Page 24

Page 25

SOUND 140 MANUAL D’OPÉRATION
®
VOUS AVEZ BESOIN D’AIDE ?
®
Si vous avez besoin d’aide, n’hésitez pas à nous contacter, du lundi
au vendredi, de 8h30 à 16h00, heure du Pacique nord-américain. 1800-872-2228 pour les États-Unis ; 1-800-637-1648 pour le Canada
; 650-903-3866 pour le monde entier ; fax : 650-903-3867 ; site
Internet www.etoncorp.com ; Etón Corporation , 1015 Corporation Way,
Palo Alto, CA 94303, USA
AVERTISSEMENT
• Ne pas exposer cet appareil à de la pluie ou de la moisissure.
• Ne pas submerger dans ou exposer pour de longues périodes à de l’eau.
• Protéger de la haute humidité et de la pluie.
• Utiliser seulement dans la gamme de température spéciée (0 °C à 40 °C).
• Débrancher immédiatement si du liquide a été déversé ou si un objet est tombé dans
l’appareil.
• Nettoyer seulement avec un chiffon sec. Ne pas utiliser de déter gents ou de solvants
chimiques sous crainte d’endommager la nition.
• Débrancher et déconnecter les antennes externes durant les orages.
• Ne pas enlever le couvercle [ou l’arrière].
• Référer le service à du personnel qualié.
ENVIRONNEMENT
ÉLIMINATION
Tous les produits éléctriques et éléctroniques
doivent être collectés séparément par un
système de collecte local, d’après la European
Directive (directive européenne) 2002/96/EC.
Prière d’agir selon vos lois locales et de ne pas disposer de vos vieux
produits avec vos déchets domestiques normaux.
25
Page 26

SOUND 140 MANUAL D’OPÉRATION
Félicitations pour l’acquisition du nouveau modèle Eton Sound 140.
Spécialement conçu pour fonctionner avec votre iPod, ce système audio
stéréo d’Eton avec station d’accueil universelle intégrée offre une performance audio et radio avancée qui offre le meilleur de votre musique.
Conservez ce manuel pour pouvoir le consulter ultérieurement.
Écoutez les titres de musique enregistrés sur votre iPod® avec
le système audio stéréo d’Eton
• Découvrez la richesse du son de votre iPod grâce à la technologie Eton
• Les puissants haut-parleurs intégrés vous permettent d’écouter de la
musique avec un son intense et cristallin
• Horloge numérique avec alarme double
• Endormez-vous ou réveillez-vous avec votre iPod, la radio ondes
moyennes/ ondes ultracourtes (AM/FM) ou la sonnerie
• Recharge votre iPod
• Station d’accueil universelle intégrée pour votre iPod
• Entrée de ligne auxiliaire pour les autres générations d’iPod et les
autres appareils audio
• Radio ondes moyennes/ ondes ultracourtes (AM/FM) avec technologie
de syntonisation numérique PLL
• L’antenne boucle externe garantit une meilleure réception des ondes
moyennes (AM)
• L’antenne l externe garantit une meilleure réception des ondes
ultracourtes (FM)
• Écran à cristaux liquides avec rétroéclairage bleu
• Télécommande incluse
26
Page 27

SOUND 140 MANUAL D’OPÉRATION
FOURNI AVEC LE POSTE DE RADIO
Eton Sound 140, télécommande, 3 inserts Well universels, bloc
d’alimentation électrique AC, antenne boucle pour ondes moyennes
(AM), antenne l pour ondes ultracourtes (FM), manuel d’utilisation.
INSTALLATION DU SYSTEME
ALIMENTATION ELECTRIQUE
Placez le poste ES 140 sur une surface stable. Branchez le bloc
d’alimentation électrique à l’arrière du poste ES 140. Branchez le
cordon d’alimentation AC au bloc d’alimentation électrique, puis dans
une prise standard.
INSERER LA CONNEXION CORRECTE DE L’IPOD
Le poste ES 140 est spécialement conçu pour s’adapter facilement
à tous les iPods utilisant le connecteur Apple à 30 broches. Pour
congurer le poste ES 140 en fonction de la taille spécique de votre
iPod, introduisez la connexion appropriée dans la zone prévue pour
la station d’accueil. Utilisez la connexion adaptée à votre iPod ou
choisissez l’une des trois connexions fournies. Vous pouvez maintenant positionner votre iPod sur la station. Lorsque votre iPod se trouve
sur la station d’accueil, sa batterie se recharge (jusqu’à ce qu’elle soit
entièrement rechargée).
27
Page 28

SOUND 140 MANUAL D’OPÉRATION
ANTENNE POUR ONDES MOYENNES (AM) ET
ONDES ULTRACOURTES (FM)
Connectez les antennes externes fournies pour ondes moyennes
(AM) et pour ondes ultracourtes (FM) en faisant glisser la che sur
les connecteurs “F” à l’arrière de la radio. An d’éviter tout endommagement lorsque vous retirez les antennes, ne les tirez jamais par
le cordon. Saisissez toujours fermement le connecteur de l’antenne
et retirez-le.
BATTERIE DE SAUVEGARDE
À l’arrière du poste de radio se trouve un compartiment prévu pour la
batterie de sauvegarde qui peut contenir 2 piles alcalines AA en vue
de sauvegarder l’heure en cas de coupure de courant. Utilisez uniquement des piles alcalines ou des piles en lithium de la même marque et
du même type. Les piles AA ne sont pas fournies.
BATTERIE DE LA TELECOMMANDE
La batterie de la télécommande a déjà été installée et est opérationnelle. Lorsque la télécommande ne fonctionne plus, vous devez
remplacer la pile par une nouvelle. Pour la remplacer, repérez le
compartiment prévu pour la batterie en bas de la télécommande et
procédez de la manière suivante :
1. Pressez la petite encoche en tirant le ‘rabat du compartiment à pile’
vers vous. Ceci permet de dégager et de faire sortir le support de
la pile.
2. Insérez une pile lithium CR2025 de 3V. Assurez-vous de respecter
28
Page 29

SOUND 140 MANUAL D’OPÉRATION
BATTERIE DE LA TELECOMMANDE continué
la polarité en suivant les directions des symboles correspondants
(+/-).
3. Fixez la pile et remettez le support de la batterie en place en la
poussant dans la télécommande jusqu’à ce qu’elle soit entièrement insérée.
EMPLACEMENT DES BOUTONS DE COMMANDE
SUR L’UNITÉ PRINCIPALE
Panneau frontal :
A) Bouton (multifonction)
B) Endormissement
C) Source
D) Lecture/Pause
E) Programmation
F) Syntonisation +
G) Syntonisation H) Capteur IR
I) Capteur lumière
29
Page 30

SOUND 140 MANUAL D’OPÉRATION
TÉLÉCOMMANDE
COMMANDES
Marche
Met en marche/ Éteint le poste ES 140 ou désactive l’alarme
lorsqu’elle retentit.
Source
Sélection de la source d’entrée radio / aux / iPod (pour la radio, mode
ondes moyennes (AM) ou ondes ultracourtes (FM)
Canaux de présélection radio
Canaux de présélection radio 1 – 10 (ondes moyennes AM/ ondes
ultracourtes FM)
Syntonisation radio -/+
Canal de syntonisation radio
Menu iPod
Retourner au menu précédent, uniquement pour l’utilisateur d’iPod.
30
Page 31

SOUND 140 MANUAL D’OPÉRATION
COMMANDES continué
(iPod courant : fonction-clé du menu)
iPod - (plus)
Permet de passer à la piste suivante pendant que l’iPod fonctionne
; appuyez sur la touche et maintenez-la enfoncée pour aller jusqu’à
la n de la piste en cours . En mode radio, appuyez sur la touche et
maintenez-la enfoncée pour syntoniser les stations de radio.
iPod - (moins)
Permet de passer à la piste précédente pendant que l’iPod fonctionne ; appuyez sur la touche et maintenez-la enfoncée pour revenir
au début de la piste. In the radio mode, it tunes the radio stations by
pressing and holding.
iPod -
Sélectionne iPod et lit une piste. En mode lecture, elle sert à stopper
provisoirement la lecture de la piste.
Vol +/-
Réglage du volume.
Alarme 1 / 2
Programmation des heures de l’alarme.
Répétition/ Pas de son
Active le mode de répétition lorsque l’alarme retentit. Coupe le son.
Endormissement
Avec la minuterie d’endormissement, la radio fonctionne pendant un
laps de temps déni (15-90 minutes) et s’éteint ensuite.
31
Page 32

SOUND 140 MANUAL D’OPÉRATION
COMMANDES continué
Enter
Choisir le thème d’un menu ; lire une chanson ; passer à une chanson
quelconque (iPod courant : fonction-clé bouton central)
Programmation
Programmer heure/ alarme/ endormissement/ écran
(Plus)
Sélectionne plus pour les utilisateurs d’iPod uniquement. (iPod courant : fonction-clé roue d’horloge)
(moins)
Sélectionne moins pour les utilisateurs d’iPod uniquement. (iPod
courant : fonction-clé roue d’horloge dans le sens inverse)
32
Page 33

SOUND 140 MANUAL D’OPÉRATION
PROGRAMMER L’HEURE
Programmez les options suivantes en utilisant la fonction de réglage
de l’heure : heure, afchage de l’heure.
Appuyez sur le bouton SET pour entrer dans le menu de réglage. Le
menu de réglage lit CLOCK, ALARM, SLEEP et DISPLAY sur l’écran.
Servez-vous des boutons TUNE +/-( / ) pour sélectionner CLOCK
et appuyez sur ENTER.
Servez-vous des boutons TUNE +/-( / ) pour sélectionner ‘Time
SET’ et appuyez sur ENTER.
Servez-vous des boutons TUNE +/-( / ) pour régler les minutes
et appuyez sur ENTER, puis réglez l’heure et appuyez sur ENTER.
33
Page 34

SOUND 140 MANUAL D’OPÉRATION
RÉGLAGE DE L’AFFICHAGE DE L’HEURE
1. En mode CLOCK, servez-vous des boutons TUNE +/-( / ) pour
sélectionner ”Format”, puis appuyez sur le bouton « ENTER » pour
conrmer.
2. Servez-vous des boutons TUNE +/-( / ) pour sélectionner
l’afchage 24 heures ou 12 heures, puis appuyez sur le bouton
ENTER pour enregistrer votre sélection.
3. Si vous optez pour l’afchage 12 heures, AM/ PM apparaît sur
l’écran.
34
Page 35

SOUND 140 MANUAL D’OPÉRATION
PROGRAMMER L’ALARME
1. Appuyez sur le bouton SET, puis servez-vous des boutons TUNE
+/-( / ) pour sélectionner ALARM et appuyez sur ENTER.
2. Servez-vous des boutons TUNE +/-( / ) pour sélectionner
ALARM 1 ou ALARM2 et appuyez sur ENTER pour conrmer.
3. Servez-vous des boutons TUNE +/-( / ) pour sélectionner ON
ou OFF et appuyez sur ENTER.
4. Servez-vous des boutons TUNE +/-( / ) pour programmer
les minutes correctes, puis appuyez sur ENTER. L’heure clignote.
Servez-vous des boutons TUNE +/-( / ) pour programmer
l’heure, puis appuyez sur ENTER.
35
Page 36

SOUND 140 MANUAL D’OPÉRATION
PROGRAMMER L’ALARME continué
5. Servez-vous des boutons TUNE +/-( / ) pour sélectionner
le mode d’activation de l’ALARME (BEEP/FM/AM/AUX/IPOD), puis
appuyez sur ENTER.
6. Une fois le réglage effectué, ALARM 1 ou ALARM 2 s’afchent sur
l’écran.
NOTE :
La prochaine fois que vous programmerez l’heure de l’ALARME, la
dernière heure programmée s’afchera. Après avoir réglé l’ALARME,
vous pouvez utiliser la télécommande et appuyer sur les touches
ALARM1 ou ALARM2 pour l’activer (ON) ou la désactiver (OFF). ON ou
OFF apparaît sur l’écran.
36
Page 37

SOUND 140 MANUAL D’OPÉRATION
UTILISER LA FONCTION RÉPÉTITION (SNOOZE)
Une fois l’alarme activée, appuyez sur le bouton SNOOZE de la radio
ou de la télécommande pour entraîner l’annulation de l’alarme pendant 7 minutes ; ensuite, l’alarme retentit de nouveau. Ce processus
peut être effectué 5 fois avant que l’alarme ne soit annulée.
LA MINUTERIE D’ENDORMISSEMENT
Avec la minuterie d’endormissement, la radio fonctionne pendant
un laps de temps déni (1-99 minutes) et s’éteint ensuite. Lorsque
la fonction d’endormissement (SLEEP est activée), le symbole
d’endormissement apparaît sur l’écran principal. Le réglage de la
minuterie peut être approximatif (00-15-30-45-60-75-90 min) ou
continu (00~90 min).
37
Page 38

SOUND 140 MANUAL D’OPÉRATION
RÉGLAGE DE LA MINUTERIE D’ENDORMISSEMENT
1. Appuyez sur le bouton SET, puis servez-vous des boutons TUNE
+/- to pour sélectionner SLEEP et appuyez sur ENTER.
2. Servez-vous des boutons TUNE +/-( / ) pour sélectionner la
minuterie SLEEP, réglez les minutes de 00~90 (1min/étape), puis
appuyez sur ENTER
Une fois le réglage effectué, SLEEP apparaît sur l’écran.
RÉGLAGE APPROXIMATIF DE LA MINUTERIE
D’ENDORMISSEMENT
1. Appuyez sur le bouton SLEEP , puis servez-vous des boutons TUNE
+/-( / ) pour sélectionner 00-15-30-45-60-75-90 min et
appuyez sur ENTER.
2. Une fois le réglage effectué, SLEEP apparaît sur l’écran.
38
Page 39

SOUND 140 MANUAL D’OPÉRATION
RÉGLAGE DE L’ÉCRAN
1. Appuyez sur le bouton SET, puis servez-vous des boutons TUNE
+/-( / ) pour sélectionner DISPLAY et appuyez sur ENTER.
2. Servez-vous des boutons TUNE +/-( / ) pour régler la luminosité du rétroéclairage de l’écran (AU-01-02-03-04-05), puis
appuyez sur ENTER.
NOTE : Si vous réglez la luminosité du rétroéclairage de l’écran
en mode ”Au”, la luminosité s’adaptera automatiquement à
l’environnement.
39
Page 40

SOUND 140 MANUAL D’OPÉRATION
INSTRUCTIONS RELATIVES AU FONCTIONNEMENT
IMPORTANT :
1. Les chiers enregistrés sur votre iPod peuvent parfois être
défectueux. Ceci peut entraîner une incompatibilité avec votre
produit Eton. Apple Computer vous conseille de consulter son site
Internet www.apple.com an d’obtenir des instructions visant à
régler ou à restaurer de nouveau votre iPod avec les réglages par
défaut.
2. Il est impératif que vous utilisiez l’adaptateur correct pour votre
iPod et que celui-ci soit parfaitement adapté à la station d’accueil
universelle intégrée. Le non-respect de ces règles pourrait
gravement endommager votre iPod. Référez-vous au paragraphe
‘Installation de l’adaptateur de la station d’accueil’ pour installer
l’adaptateur de la station d’accueil avant d’utiliser le poste ES 140
avec votre iPod.
ÉCOUTER VOS CHANSONS PRÉFÉRÉES
SUR VOTRE IPOD
1. Appuyez sur les boutons SOURCE pour sélectionner le mode IPOD
ou utilisez la touche IPOD de la télécommande.
2. Pour écouter de la musique, assurez-vous que votre iPod est cor-
rectement inséré dans la station d’accueil universelle intégrée. Si
40
Page 41

SOUND 140 MANUAL D’OPÉRATION
ÉCOUTER VOS CHANSONS PRÉFÉRÉES
SUR VOTRE IPOD continué
oui, il s’activera automatiquement et commencera la lecture des
titres.
NOTE : Si le son semble inaudible, il est possible que le poste ES 140
ne détecte pas que votre iPod est en mode lecture. Dans ce cas, appuyez deux fois sur le bouton PLAY/PAUSE du poste ES 140 ou sur la
touche de la télécommande pour commencer la lecture du titre.
3. Pour lire un titre de musique lorsque votre iPod se trouve déjà dans
la station d’accueil et en mode veille, appuyez sur le bouton PLAY/
PAUSE du poste ES 140 ou sur la touche de la télécommande.
Pendant la lecture, appuyez sur le bouton ENTER pour avancer,
servez-vous des boutons (plus) (moins) pour sélectionner
les titres et utilisez le bouton MENU pour retourner.
4. Pour arrêter provisoirement la lecture, appuyez sur le bouton
PLAY/PAUSE en mode lecture. Appuyez de nouveau sur le bouton
pour reprendre la lecture.
5. Pour régler le volume, utilisez soit le bouton du poste ES 140, ou
servez-vous des touches VOL+ et VOL- de la télécommande.
6. Pour passer à la piste suivante ou précédente, utilisez la touche
ou de la télécommande. Pour rechercher la piste actuelle en
utilisant l’avance ou le retour rapide, appuyez sur les boutons ou
et maintenez-les enfoncés pendant la lecture de la piste.
7. Pour arrêter le poste de radio, appuyez sur le bouton de la radio ou
la touche ON/OFF de la télécommande et maintenez-les enfoncés.
41
Page 42

SOUND 140 MANUAL D’OPÉRATION
ÉCOUTER VOS CHANSONS PRÉFÉRÉES
SUR VOTRE IPOD continué
Si vous laissez votre iPod dans la station d’accueil universelle
intégrée, il continuera à se recharger.
8. Ce poste de radio ne peut pas fonctionner s’il est en mode pause.
Appuyez sur le bouton PLAY/PAUSE du poste ES 140 ou de votre
iPod pour activer le mode lecture.
RECHARGER VOTRE IPOD
Votre iPod se RECHARGERA toujours jusqu’à ce qu’il soit ENTIÈREMENT RECHARGÉ tant qu’il se trouve dans la station d’accueil
universelle intégrée. Cette unité ne peut pas recharger d’iPods dotés
de connecteurs à 9 broches. Elle ne peut recharger que les iPods
dotés de connecteurs à 30 broches.
TRANSFÉRER DES VIDÉOS DE LA VIDÉO IPOD À
LA TÉLÉVISION
La fonction vidéo-out est faite uniquement pour la 5ème génération
d’iPods et d’iPods Photo. Les autres générations d’iPods ne sont pas
compatibles avec cette fonction.
Insérez votre iPod dans la station d’accueil. Branchez une extrémité
du cordon AV jaune dans le RCA JACK (VIDEO OUT) à l’arrière de
l’unité et l’autre extrémité dans l’entrée vidéo jaune de la télévision.
Activez le mode vidéo sur votre télévision. Activez l’option de sortie
42
Page 43

SOUND 140 MANUAL D’OPÉRATION
TRANSFÉRER DES VIDÉOS DE LA VIDÉO IPOD À
LA TÉLÉVISION continué
TV Out en sélectionnant l’option vidéos réglage vidéo à partir de
votre iPod. Sélectionnez votre vidéo préférée et choisissez lecture
sur votre iPod.
ENVOYER L’AUDIO
Vous pouvez enregistrer l’audio à partir du poste Eton Sound 140 ou
envoyer l’audio vers un autre amplicateur par le biais du line-out jack
situé à l’arrière de la radio. This is a mono output jack, 3.5mm.
ÉCOUTER D’AUTRES APPAREILS AUDIO
En utilisant le raccord jack line-in stéréo de 3,5 mm, dénommé AUX-in
à l’arrière du poste ES 140, vous pouvez écouter les premières et les
secondes générations d’iPods ou un autre lecteur audio qui n’est pas
un iPod, par exemple un lecteur MP3 ou un lecteur CD. Avant d’utiliser
le jack AUX-in, assurez-vous qu’il n’y a pas d’iPod dans la station
d’accueil universelle intégrée.
1. Introduisez l’extrémité du câble audio (non fourni) dans le jack
phone stéréo de 3,5 mm de votre appareil audio, puis introduisez
l’autre extrémité du câble dans le jack phone stéréo de 3,5 mm
(aux-in), situé à l’arrière du poste ES 140.
2. Pour activer le mode AUX, appuyez sur le bouton SOURCE de la
radio ou sur la touche AUX de la télécommande.
43
Page 44

SOUND 140 MANUAL D’OPÉRATION
ÉCOUTER D’AUTRES APPAREILS AUDIO continué
3. À partir de ce moment, vous pouvez activer votre appareil et
écouter la musique.
4. Pour régler le volume, utilisez le bouton rotatif de la radio ou les
touches VOL+/- de la télécommande.Il se peut également que vous
deviez régler le volume de votre appareil audio.
5. Pour arrêter le poste de radio, appuyez sur le bouton de la radio ou
la touche ON/OFF de la télécommande et maintenez-les enfoncés.
ÉCOUTER VOS STATIONS DE RADIO PRÉFÉRÉES
Pour obtenir la meilleure clarté des stations ultracourtes (FM),
branchez et dépliez entièrement l’antenne l dans la prise située à
l’arrière du poste ES 140. Il est important de ne pas abîmer, obstruer
ni attacher d’autres antennes à cette antenne l. An d’obtenir la
meilleure réception des stations ondes moyennes (AM), branchez
l’antenne boucle pour ondes moyennes dans la prise située à l’arrière
du poste ES 140.
1. Pour sélectionner les ondes moyennes (AM) ou les ondes ultracourtes (FM), appuyez sur le bouton SOURCE de la radio ou de la télé-
44
Page 45

SOUND 140 MANUAL D’OPÉRATION
ÉCOUTER VOS STATIONS DE RADIO PRÉFÉRÉES
continué
commande. La fréquence de la radio apparaît dans le coin inférieur
droit de l’écran.
2. Pour syntoniser une station souhaitée, appuyez brièvement sur
le bouton rotatif de la radio. Appuyez longuement pour passer
en mode de recherche ; la radio s’arrêtera automatiquement à la
prochaine station disponible.
3. Appuyez sur le SYNTONISEUR +/- de la radio ou sur les touches
TUNE +/-( / ) de la télécommande pour passer de fréquence
en fréquence.
4. Pour régler le volume, utilisez le bouton rotatif de la radio ou la
touche VOL+/- de la télécommande.
5. Pour arrêter le poste de radio, appuyez sur le bouton de la radio ou
la touche ON/OFF de la télécommande et maintenez-les enfoncés.
45
Page 46

SOUND 140 MANUAL D’OPÉRATION
PRÉSÉLECTIONS MÉMORISÉES DES STATIONS DE
RADIO
1. Il existe en tout 20 mémoires, 10 pour AM et 10 pour FM.
2. Appuyez pendant trois secondes sur l’une des touches numériques
de la télécommande ; le numéro de mémoire clignote à l’écran
avant d’être enregistré.
3. Pour écouter une station que vous avez mémorisée, appuyez sur la
touche numérique appropriée indiquant la mémoire dans laquelle
elle est enregistrée.
DONNÉES TECHNIQUES
Alimentation
électrique
Puissance de sortie
audio
Gamme de
température
46
Entrée : 100 – 240 VAC, 50 / 60 Hz ;
sortie : 17 VDC /2,3 ADC(jackDC 3,5 Ø )
30 watts
0 à 40 degrés Celsius
Page 47

SOUND 140 MANUAL D’OPÉRATION
DONNÉES TECHNIQUES continué
Gamme de
fréquences
Dimensions
Poids
Ondes moyennes (AM) : 520
KHz~1710 KHZ
Ondes ultracourtes (FM) : 87.5
MHZ~108.0 MHZ
34,0 x 14,5 x 17,4 (unité : cm)
3,1 kg
ENREGISTREMENT DE LA GARANTIE
Il est conseillé d’effectuer l’enregistrement de votre produit dès que
possible après l’achat ou la réception an d’assurer une couverture
de garantie complète ou les mises à jour du produit. Vous pouvez
enregistrer votre produit de trois manières différentes :
1. En consultant notre site web http://www.etoncorp.com.
2. En renvoyant la carte de garantie ci-jointe par courrier.
3. En renvoyant votre carte ou votre information d’enregistrement
à l’adresse suivante ; inscrivez votre nom, votre adresse postale
complète, votre numéro de téléphone, votre adresse e-mail, le nom
du modèle acheté, la date d’achat, le nom du revendeur :
Etón Corporation
1015 Corporation Way
Palo Alto, CA 94303 USA
47
Page 48

SOUND 140 MANUAL D’OPÉRATION
GARANTIE LIMITÉE
Conservez l’information de garantie de votre carte de garantie avec
votre preuve d’achat ou consultez l’information de garantie limitée sur
www.etoncorp.com.
SERVICE DE GARANTIE POUR VOTRE PRODUIT
Pour bénécier d’un service de garantie pour votre produit, nous vous
conseillons de contacter en premier lieu un représentant du service de
garantie Etón au 1-800-872-2228 pour les États-Unis, 1-800-6371648 pour le Canada ou (650) 903-3866, customersvc@etoncorp.
com ou le revendeur dans votre pays en Europe (voir liste ci-jointe) qui
constatera le problème et vous dépannera. Si une intervention supplémentaire s’avère nécessaire, le personnel technique vous informera
de la marche à suivre. Elle diffère si votre radio est toujours sous
garantie ou si elle est soumise à une réparation hors garantie.
GARANTIE – Une autorisation de retour sera émise et des instructions seront données si votre produit est toujours sous garantie et
que le représentant du service de garantie Etón justie la nécessité
d’une réparation sous garantie. NE renvoyez PAS votre radio tant que
vous n’avez pas encore reçu le numéro d’autorisation de retour.
HORS GARANTIE – Si votre produit n’est plus sous garantie et doit
être réparé, notre représentant du service de garantie Etón vous
conseillera l’atelier de réparation le plus proche qui sera en mesure de
réparer votre produit.
48
Page 49

SOUND 140 MANUAL D’OPÉRATION
SERVICE DE GARANTIE POUR VOTRE PRODUIT
continué
Pour le service de réparation hors Amérique du Nord, consultez
l’information fournie par le revendeur au moment de l’achat/de la
réception.
NOTE FCC
Le fabricant ne peut être en aucun cas tenu responsable des interférences radio ou télé causées par des modications non autorisées effectuées sur cet appareil. De telles modications peuvent
entraîner l’annulation du droit de l’utilisateur à manipuler l’appareil.
iPod is a trademark of Apple Inc., registered in the U.S. and other countries. “Made for iPod” means that an electronic accessory has been designed to
connect specically to iPod and has been certied by the developer to meet Apple performance standards.
Apple is not responsible for the operation of this device or its compliance with safety and regulatory standards.
49
Page 50

Page 51

GUÍA DE FUNCIONADMIENTO DE SOUND 140
®
¿NECESITA AYUDA?
En caso de necesitar ayuda, solicitamos contactarnos de lunes a viernes
desde las 8.30 hasta las 16.00 hrs., hora del Pacíco de Norteamérica. 1800-872-2228 en los EE.UU.; 1-800-637-1648 en Canadá; 650-9033866 a nivel mundial; FAX: 650-903-3867; sitio Web, www.etoncorp.
com; Etón Corporation, 1015 Corporation Way, Palo Alto, CA 94303,
EE.UU.
ADVERTENCIA
• No exponga este dispositivo a lluvia o humedad.
• No exponga o sumerja este aparato al agua durante un periodo largo.
• Proteja el aparato de gran humedad y lluvia.
• Utilice la unidad solamente dentro de un rango de temperatura especicado (0 °C a 40 °C).
• Desenchufe la unidad inmediatamente si han caído objetos o líquido dentro de la radio.
• Limpie la unidad solamente con un paño seco. No utilice detergentes o disolventes que
puedan dañar la cubierta del dispositivo.
• Desenchufe y desconecte las antenas externas (no incluidas) durante tormentas con
relámpagos.
• No quite la cubierta [o la parte posterior].
• Si este producto muestra algún problema, póngase en contacto con personal cualicado
de servicio.
MEDIO AMBIENTE
ÉLIMINATION
Tous les produits éléctriques et éléctroniques doivent être collectés séparément par un système de
collecte local, d’après la European Directive (directive
européenne) 2002/96/EC.
Prière d’agir selon vos lois locales et de ne pas disposer de vos
vieux produits avec vos déchets domestiques normaux.
51
Page 52

GUÍA DE FUNCIONADMIENTO DE SOUND 140
¡Felicitaciones para su compra del nuevo Eton Sound 140! Diseñado
especialmente para trabajar con su iPod, este sistema de audio estéreo
de Etón con acoplador universal integrado proporciona un rendimiento
avanzado de audio y radio para darle lo mejor de su música. No olvide
conservar este manual para consultas posteriores.
Mejore el placer de la música almacenada en su iPod® con el
sistema audio estéreo de Etón
• Mejore la riqueza del sonido de su iPod con la tecnología Etón
• Altoparlantes potentes integrados permiten escuchar la música con
profundidad y claridad.
• Pantalla de reloj digital con alarma dual
• Duérmese o despierte con su iPod, radio AM/FM o zumbador
• Carga su iPod
• Estación de docking universal integrada para su iPod
• Entrada de línea auxiliar para otras generaciones de iPod y otros
dispositivos audio
• Radio AM/FM con tecnología de sintonización digital PLL
• Antena de cuadro exterior mejora la recepción AM
• Antena de cable exterior mejora la recepción FM
• Pantalla de cristal líquido con luz de fondo azul
• Control remoto incluido
VOLUMEN DE SUMINISTRO
Etón Sound 140, control remoto, 3 insertos universales, alimentación
de corriente AC, antena de cuadro AM, antena de cable FM, manual
de usuario.
52
Page 53

GUÍA DE FUNCIONADMIENTO DE SOUND 140
CONFIGURACIÓN DEL SISTEMA
FUENTE DE ALIMENTACIÓN DE ENERGÍA
Coloque el ES 140 sobre una supercie sólida. Enchufe la alimentación de corriente en la parte trasera del ES 140. Coloque el cable de
alimentación de corriente y enchúfelo en la tomacorriente estándar.
INSERCIÓN DEL INSERTO CORRECTO DE ESTACIÓN DE DOCKING DEL IPOD
El ES 140 ha sido diseñado inteligentemente para facilitar el uso de
todos los modelos de iPod mediante un conector Apple de 30 clavijas.
Para congurar el ES 140 en función del tamaño especíco de su
iPod, coloque simplemente el inserto apropiado de acoplamiento en
la posición de docking. Utilice el inserto que viene conjuntamente
con su iPod o bien seleccione uno de los tres insertos suministrados.
Ahora puede colocar su iPod en la estación de docking. Durante la
conexión de su iPod en la estación de docking, se procede con la
carga de su batería (hasta que esté completamente cargada).
ANTENA PARA AM Y FM
Conecte las antenas externas AM y FM suministradas mediante
colocación del enchufe en los conectores “F” en la parte posterior de
la radio. Para evitar cualquier daño, no se debe tirar del cable al retirar
las antenas. Sujete siempre rmemente el conector de la antena para
desconectarla así correctamente.
53
Page 54

GUÍA DE FUNCIONADMIENTO DE SOUND 140
RESPALDO DE BATERÍA
En la parte posterior de la radio se encuentra un compartimento
de batería de respaldo que contiene 2 baterías alcalinas AA para el
respaldo de la hora en caso de una interrupción de la alimentación
de corriente. Utilice solamente baterías nuevas de alcalino o litio, de
la misma marco y del mismo tipo. Las baterías no forman parte del
volumen de suministro.
BATERÍA DEL CONTROL REMOTO
La batería del control remoto ha sido previamente instalada y está
lista para el uso. Cuando el control remoto deja de funcionar, debe
procederse con el reemplazo de la batería por una nueva. Para hacer
esto, debe colocarse el compartimento de batería en la parte inferior
del control para seguir luego los siguientes pasos:
1. Apriete la pequeña muesca mientras tire el‘pestillo de la puerta
de batería ’ hacia usted. De esta manera se suelta el soporte de
batería y se asoma.
2. Inserte una batería de litio CR2025 de 3V. Asegúrese de colocar
las baterías con la polaridad correcta, siguiente las indiciones de los
símbolos correspondientes (+/-).
3. Coloque la batería y empuje el soporte de batería nuevamente en
su lugar hasta insertarse completamente en el control remoto.
54
Page 55

GUÍA DE FUNCIONADMIENTO DE SOUND 140
UBICACIÓN DE LOS CONTROLES EN LA UNIDAD
PRINCIPAL
Panel frontal:
A) Botón (multifuncional)
B) Función Sleep
C) Fuente
D) Reproducir/Pausa
E) Conguración
F) Sintonizar +
G) Sintonizar H) Sensor IR
I) Sensor de luz
CONTROL REMOTO
55
Page 56

GUÍA DE FUNCIONADMIENTO DE SOUND 140
CONTROLES
Potencia
Activa/desactiva el ES 140 o desactiva la alarma cuando ésta se ha
activado.
Fuente
Selección de fuente de entrada de radio / Aux / iPod, (cambio de radio
con modo AM o FM)
Canal de preajuste de radio
Preajuste de canal de radio 1 – 10 (AM/FM)
Sintonizar radio +
Sintonizar canal de radio
Menú de iPod
Volver al menú anterior, sólo para usuarios de iPod. (iPod común:
Función de tecla de menú)
iPod - (arriba)
Salta al siguiente track al reproducir el iPod, o bien escanea hasta el
nal el track que se reproduce actualmente, mediante pulsación y
mantener pulsado el botón. En el modo de radio, sintoniza las estaciones de radio mediante pulsación y manteniendo pulsado el botón.
iPod - (abajo)
Salta al track anterior al reproducir el iPod, o bien escanea hasta el
comienzo el track que se reproduce actualmente, mediante pulsación
y mantener pulsado el botón. En el modo de radio, sintoniza las estaciones de radio mediante pulsación y manteniendo pulsado el botón.
56
Page 57

GUÍA DE FUNCIONADMIENTO DE SOUND 140
CONTROLES continuado
iPod -
Selecciona el iPod y reproduce un track. En el modo de reproducción,
se usa para interrumpir la reproducción.
Vol +/-
Ajuste de volumen.
Alarma 1 / 2
Ajusta el tiempo de alarma.
Snooze/Mudo
Activa el modo de snooze cuando suena la alarma. Deja el sonido en
mudo.
Sleep
El temporizador de sleep habilita la reproducción durante un período
determinado de tiempo (15 a 90 minutos) para desactivar luego el
equipo.
Intro
Selecciona un ítem de menú; Reproduce una canción; Salta hasta
cualquier punto dentro de la canció. (función de tecla central del iPod
común)
Ajuste
Ajuste de reloj/alarma/función sleep/pantalla
(Arriba)
Seleccionar Arriba, sólo para iPod. (iPod común: Función de tecla de
rueda de reloj)
57
Page 58

GUÍA DE FUNCIONADMIENTO DE SOUND 140
CONTROLES continuado
(Abajo)
Seleccionar Abajo, sólo para iPod. (iPod común: Función de tecla de
rueda inversa de reloj)
AJUSTE DEL RELOJ
Ajuste las siguientes opciones mediante el uso de la función de
ajuste de reloj: Tiempo, formato de indicación de reloj.
Pulse el botón SET para ingresar al menú de ajuste. El menú de ajuste
lee CLOCK, ALARM, SLEEP y DISPLAY en la pantalla LCD. Utilice los
botones TUNE +/-( / ) para seleccionar CLOCK y pulse luego
ENTER.
Utilice el botón TUNE +/-( / ) para seleccionar ‘Time SET’ y pulse
luego ENTER.
58
Page 59

GUÍA DE FUNCIONADMIENTO DE SOUND 140
AJUSTE DEL RELOJ continuado
Utilice los botones TUNE +/-( / ) para ajustar los minutos y pulse
luego ENTER. A continuación debe ajustarse la hora y terminarse
pulsando ENTER.
AJUSTE DEL FORMATO DE RELOJ
1. En el ajuste CLOCK, utilice los botones TUNE +/-( / ) para
seleccionar ”Format” y pulse luego ”ENTER” para conrmar.
2. Utilice los botones TUNE +/-( / ) para seleccionar el formato
de 24 horas o de 12 horas y pulse luego ENTER para almacenar la
selección.
59
Page 60

GUÍA DE FUNCIONADMIENTO DE SOUND 140
AJUSTE DEL FORMATO DE RELOJ continuado
3. Al seleccionar el formato de 12 horas, se indica también AM/PM en
la pantalla.
AJUSTE DEL ALARMA
1. Pulse el botón SET y utilice luego los botones TUNE +/-( / )
para seleccionar ALARM y pulse luego ENTER.
2. Utilice los botones TUNE +/-( / ) para seleccionar ALARM 1 o
ALARM 2 y pulse luego ENTER para conrmar.
3. Utilice los botones TUNE +/-( / ) para activar o desactivar la
alarma con ALARM ON u OFF y pulse luego ENTER.
60
Page 61

GUÍA DE FUNCIONADMIENTO DE SOUND 140
AJUSTE DEL ALARMA continuado
4. Utilice los botones TUNE +/-( / ) para ajustar los minutos
correctos y pulse luego ENTER. La hora se indica parpadeando.
Utilice los botones TUNE +/-( / ) para ajustar la hora y pulse
luego ENTER.
5. Utilice los botones TUNE +/-( / ) para seleccionar el modo
de activación de alarma (BEEP/FM/AM/AUX/IPOD) y pulse luego
ENTER.
61
Page 62

GUÍA DE FUNCIONADMIENTO DE SOUND 140
AJUSTE DEL ALARMA continuado
6. Después de haber terminado el ajuste, la pantalla indica ALARM 1
o ALARM 2.
NOTA:
La siguiente vez que desea ajustar el tiempo de alarma, se indicará el
tiempo ajustado en la ocasión anterior. Después del ajuste de ALARM,
usted puede usar el control remoto y pulsar el botón ALARM1 o
ALARM2 para activarla o bien desactivarla (ON u OFF). Se indica ON u
OFF en la pantalla.
USO DE LA FUNCIÓN SNOOZE
Después de haber activado la alarma, pulse el botón SNOOZE en la radio o en el control remoto para cancelar la alarma durante 7 minutos.
Luego se activa nuevamente la alarma. Esto puede repetirse 5 veces,
luego se cancela la alarma completamente.
62
Page 63

GUÍA DE FUNCIONADMIENTO DE SOUND 140
EL TEMPORIZADOR SLEEP
El temporizador de sleep habilita la reproducción durante un período
determinado de tiempo (1 a 99 minutos) para desactivar luego el
equipo. Cuando está habilitada la función SLEEP, la pantalla principal
indica el símbolo correspondiente. El ajuste del temporizador puede
ser aproximativo (00-15-30-45-60-75-90 minutos) o bien ) o bien
con indicación precisa (00~90min).
AJUSTE DEL TEMPORIZADOR SLEEP
1. Pulse el botón SET y utilice luego los botones TUNE +/-( / )
para seleccionar SLEEP y pulse luego ENTER.
2. Utilice los botones TUNE +/-( / ) para ajustar el tiempo SLEEP
y ajuste luego los minutos desde 00 a 90 (pasos de 1 minuto).
Pulse luego ENTER para conrmar.
Después del ajuste, la pantalla indica SLEEP.
63
Page 64

GUÍA DE FUNCIONADMIENTO DE SOUND 140
AJUSTE DEL TEMPORIZADOR SLEEP
1. Pulse el botón SLEEP y utilice luego los botones TUNE +/-( /
) para seleccionar 00-15-30-45-60-75-90 minutos y pulse
luego ENTER.
2. Después del ajuste, la pantalla indica SLEEP.
AJUSTE DE PANTALLA
1. Pulse el botón SET y utilice luego los botones TUNE +/-( / )
para seleccionar DISPLAY y pulse luego ENTER.
2. Utilice los botones TUNE +/-( / ) para ajustar el nivel de lumi-
nosidad de la luz de fonodo de la pantalla (AU-01-02-03-04-05) y
pulse luego ENTER.
NOTA: En caso de ajustar el nivel de luminosidad de la luz de fondo
de la pantalla en el modo ”Au”, la luminosidad se adapta automática-
mente a las condiciones de entorno.
64
Page 65

GUÍA DE FUNCIONADMIENTO DE SOUND 140
INSTRUCCIONES OPERACIONALES
IMPORTANTE:
1. Ocasionalmente, los archivos en el iPod pueden estar dañados.
Esto puede causar un comportamiento erróneo de su producto
Etón. Apple Computer recomienda visitar su página web www.
apple.com para obtener mayor información sobre el reajuste o la
recuperación de los ajustes originales de su iPod.
2. Resulta imperativo que use el adaptador correcto de docking para
su iPod y que el adaptador de docking se conecte correctamente
en el docking universal integrado. En caso de omitir estas reglas
surge el riesgo de graves daños en su iPod. Reérase a la sección
‘Installación del adaptador de docking’ para instalar correctamente
el adaptador de docking antes de operar el ES 140 con su iPod.
ESCUCHAR SUS CANCIONES FAVORITAS CON
EL IPOD
1. Pulse el botón SOURCE para seleccionar el modo IPOD o use el
botón IPOD en el control remoto para conmutar.
2. Para escuchar música, debe asegurarse que su iPod esté insertado
correctamente en el docking universal integrado. Luego se activa
automáticamente y empezará a reproducir la música.
65
Page 66

GUÍA DE FUNCIONADMIENTO DE SOUND 140
ESCUCHAR SUS CANCIONES FAVORITAS CON
EL IPOD continuado
NOTA: En caso que el sonido parezca inaudible, puede ser que el ES
140 no detecte que su iPod está en el modo de reproducción. En caso
de ocurrir esto, pulse dos veces el botón PLAY/PAUSE en el ES 140 o
el botón en el control remoto para empezar a tocar la música.
3. Para reproducir música cuando su iPod ya se encuentra conectado
y está en el modo standby, pulse el botón PLAY/PAUSE en el ES
140 o bien el botón en el control remoto. Cuando está reproduciendo, pulse el botón ENTER para avanzar y utilice los botones
(arriba) o (abajo) para seleccionar. El botón MENU sirve para
volver atrás.
4. Para interrumpir la reproducción de la música, pulse el botón
PLAY/PAUSE durante el modo de reproducción. Para continuar con
la reproducción, debe pulsarse este botón nuevamente.
5. Para ajustar el volumen, use la tecla de rueda en el ES 140 o bien
los botones VOL+ y VOL- en el control remoto.
6. Para saltar al siguiente track o al track anterior, utilice el botón o
en el control remoto. Para buscar el track actual con el avance o
el retroceso en alta velocidad, pulse y mantenga pulsado el botón
o durante la reproducción del track.
7. Para desactivar el equipo, pulse y mantenga pulsada la tecla de
rueda o bien el botón ON/OFF de potencia en el control remoto. En
caso que su iPod permanezca conectado en el docking universal
integrado, seguirá cargándose la batería.
66
Page 67

GUÍA DE FUNCIONADMIENTO DE SOUND 140
ESCUCHAR SUS CANCIONES FAVORITAS CON
EL IPOD continuado
8. Esta unidad no opera en el modo de pausa. Pulse el botón PLAY/
PAUSE en el ES 140 o en su iPod para iniciar el modo de reproduc-
ción.
CARGA DE SU IPOD
Su iPod será continuamente CARGADO hasta alcanzar la CARGA
COMPLETA, mientras está conectado en el docking universal
integrado. Esta unidad no puede cargar iPods con conectores de 9
clavijas. Se pueden cargar exclusivamente iPods con conectores de
30 clavijas.
TRANSFERERENCIA DE VIDEO DE IPOD-VIDEO A
TELEVISIÓN
La función Video-out puede usarse solamente para la quinta generación del iPod y iPod Photo. Otras generaciones del iPod no soportan
esta función.
Inserte su iPod en el docking. Enchufe un extremo del cable amarillo
AV en el RCA JACK(VIDEO OUT) ubicado en la parte posterior y el otro
extremo en la entrada de video amarilla de la televisión. Conmute su
televisor al modo de video. Active la opción TV Out mediante selección de la opción de video ajustes de video en su iPod. Seleccione
su video favorito y active luego la reproducción en su iPod.
67
Page 68

GUÍA DE FUNCIONADMIENTO DE SOUND 140
ENVÍO DE AUDIO OUT
Usted puede grabar el audio del Eton Sound 140 o enviar el audio a
otro amplicar vía la salida de línea ubicada en la parte posterior de la
radio. Esta es una salida mono de 3,5 mm.
ESCUCHAR OTROS DISPOSITIVOS DE AUDIO
Mediante uso de un enchufe de entrada estéreo de 3,5 mm, rotulada
con AUX-in en la parte posterior del ES 140, usted puede escuchar la
primera y segunda generación del iPod o cualquier otro reproductor
de audio como los reproductores de MP3 o los reproductores de CD.
Antes del uso del enchufe de entrada AUX se ha de asegurar que no
haya ningún iPod conectado con el docking universal.
1. Inserte el enchufe del cable de audio (no incluido) en el enchufe
estéreo de 3,5 mm de su dispositivo de audio e inserte luego el
otro extremo del cable en el enchufe estéreo de 3,5 mm (Aux-in)
que se encuentra en la parte posterior del ES 140.
2. Para conmutar al modo AUX debe pulsarse el botón SOURCE de
la radio, para cambiar luego al modo AUX en la radio o del control
remoto.
68
Page 69

GUÍA DE FUNCIONADMIENTO DE SOUND 140
ESCUCHAR OTROS DISPOSITIVOS DE AUDIO
continuado
3. Ahora se puedde activar en forma segura su equipo para disfrutar
de la música.
4. Para ajustar el volumen, use la tecla de rueda o el botón VOL+/- en
el control remoto. Usted puede ajustar también el volumen en el
dispositivo.
5. Para desactivar el equipo, pulse y mantenga pulsada la tecla de
rueda o bien el botón de potencia en el control remoto.
ESCUCHAR SUS ESTACIONES FAVORITAS
DE RADIO
Para alcanzar la mayor claridad en la sintonización FM, debe enchufarse y extenderse completamente la antena de cable en el enchufe
ubicado en la parte posterior del ES 140. Resulta importante no
alterar la antena ni colocar antenas de otro tipo. Para alcanzar la
mejor calidad en la sintonización AM, enchufe la antena de cuadro AM
en el enchufe ubicado en la parte posterior del ES 140.
1. Para seleccionar AM o FM, pulse el botón SOURCE en la radio o
el botón RADIO en el control remoto. La frecuencia de la radia se
indica en la esquina derecha inferior de la pantalla.
2. Para sintonizar una estación especíca, pulse brevemente la tecla
de rueda de la radio. Pulse esta tecla largamente para ingresar al
modo de búsqueda. La radio se detiene luego automáticamente en
la siguiente estación con señal fuerte.
69
Page 70

GUÍA DE FUNCIONADMIENTO DE SOUND 140
ESCUCHAR SUS ESTACIONES FAVORITAS
DE RADIO continuado
3. Pulse el botón TUNER +/- en la radio o TUNE +/-( / ) en el
control remoto para conmutar de frecuencia a frecuencia.
4. Para ajustar el volumen, use la tecla de rueda de la radio o el botón
VOL+/- en el control remoto.
5. Para desactivar el equipo, pulse y mantenga pulsada la tecla de
rueda o bien el botón de potencia en el control remoto.
AJUSTE DE MEMORIA DE ESTACIONES DE RADIO
1. Están disponibles 20 memorias, 10 respectivamente para AM y FM.
2. Pulse uno de los botones numéricos en el control remoto durante 3
segundos. El número de memoria se indica luego parpadeando en
el LCD para su almacenamiento.
3. Para escuchar una estación que se ha almacenado previamente,
pulse el botón numérico correspondiete bajo el cual se ha almace-
nado en la memoria.
70
Page 71

DATOS TÉCNICOS
GUÍA DE FUNCIONADMIENTO DE SOUND 140
Alimentación de cor-
riente
Potencia de salida de
audio
Rango de temperatura
Cobertura de
frecuencia
Dimensiones
Peso
Entrada: 100 – 240 VAC / 50 – 60 HZ;
Salida: 17VDC/2.3ADC(Enchufe DC de
3,5 Ø)
30 W
0 a 40 grados C
AM: 520KHz~1710KHZ
FM: 87,5MHZ~108,0MHZ
34,0 x 14,5 x 17,4 (unidad de medida:
cm)
3,1 kg
REGISTRO DE GARANTÍA
Para asegurar la cobertura completa de la garantía o adquirir actualizaciones del producto, debe registrar su producto tan pronto posible
después de la compra o recibo del producto. Usted puede utilizar una
de las siguientes opciones para registrar su producto:
1. Ya sea visitando nuestro sitio Web en http://www.etoncorp.com.
2. Enviando por correo la tarjeta de garantía suministrada.
3. Envíe por correo su tarjeta de garantía suministrada o información
a la dirección siguiente; escriba su nombre, dirección postal
71
Page 72

GUÍA DE FUNCIONADMIENTO DE SOUND 140
REGISTRO DE GARANTÍA continuado
completa, número de teléfono, dirección de e-mail, modelo comprado, fecha de compra, nombre del distribuidor del producto donde
ha adquirido el producto:
Etón Corporation
1015 Corporation Way
Palo Alto, CA 94303 EE.UU.
GARANTÍA LIMITADA
Conserve la información de garantía de su tarjeta de garantía con su
comprobante de compra. La información de Garantía Limitada puede
ser también leída en www.etoncorp.com.
SERVICIO PARA SU PRODUCTO
Para solicitar algún servicio para su producto, le recomendamos
contactar primero al representante de servicio de Etón llamando al
número de teléfono 1-800-872-2228 para los EE.UU., o al número de
teléfono 1-800-637-1648 para Canadá ó (650) 903-3866, customersvc@etoncorp.com o bien su distribuidor respectivo del país dentro
de Europa (véase la lista adjunta) para la localización y resolución del
problema. Si requiere un servicio adicional, el equipo técnico lo instruirá de como proceder considerando si la radio aún posee garantía o si
necesita servicio técnico para un producto que ya no posee garantía.
GARANTÍA – Si su producto aún posee garantía y el representante
de servicio de Etón determina que el servicio de garantía sea necesa-
72
Page 73

GUÍA DE FUNCIONADMIENTO DE SOUND 140
SERVICIO PARA SU PRODUCTO continuado
rio, se le enviará una autorización de retorno e instrucciones de envío
a una unidad de servicio de reparación autorizada de la garantía. NO
ENVÍE su radio de regreso sin haber recibido el número de autorización de retorno.
SIN GARANTÍA – Si su producto ya no posee garantía y requiere
servicio de nuestro equipo técnico, el representante de servicio de
Etón le indicará la unidad de reparación más cercana de su localidad
que pueda ofrecer el mejor servicio de reparación.
Para servicio fuera de América del Norte, por favor, consulte la información del distribuidor incluido en la fecha de la compra o del recibo.
NOTA FCC
El fabricante no asume la responsabilidad para cualquier tipo de interferencia de radio o TV causada por modicaciones no autorizadas en
este equipo. Estas modicaciones podrían anular la autorización del
usuario para operar el equipo.
iPod is a trademark of Apple Inc., registered in the U.S. and other countries. “Made for iPod” means that an electronic accessory has been designed to
connect specically to iPod and has been certied by the developer to meet Apple performance standards.
Apple is not responsible for the operation of this device or its compliance with safety and regulatory standards.
73
Page 74

Etón Corporation
Corporate Headquarters
1015 Corporation Way
Palo Alto, California 94303 USA
tel +1 650-903-3866
tel +1 800-872-2228
fax +1 650-903-3867
Etón Canada
1 Yonge Street, Suite 1801
Toronto, Ontario M5E 1W7 Canada
tel + 1 416-214-6885
Designed by Etón California and assembled in China. I © Copyright 2008 Etón Corporation. All rights reserved.
v.03-03-08
 Loading...