

Eton SOUND 101 Owner's Manual

SOUND 101
Table Radio with Dock for iPod/Sirius-Ready/AM/FM
OWNER’S MANUAL

SOUND 101 OWNER’S MANUAL
Need Help? Contact Us.
Etón Corporation, 1015 Corporation Way, Palo Alto, CA 94303, USA.
1-800-872-2228 (U.S.); 1-800-637-1648 (Canada); 650-903-3866
(worldwide); M-F, 8:30-4:00, Pacic Standard Time; www.etoncorp.com.
WARNING
• Do not expose this appliance to rain or moisture.
• Do not submerge or expose for extended period to water.
• Protect from high humidity and rain.
• Only operate within specied temperature range (0 °C to 40 °C).
• Unplug immediately if liquid has been spilled or object have fallen into the
apparatus.
• Clean only with a dry cloth. Do not use detergents or chemical solvents as this
might damage the nish.
• Unplug and disconnect external antennas during lightning storms.
• Do not remove cover [or back].
• Refer servicing to qualied service personnel.
ENVIRONMENT
DISPOSAL
According to the European Directive 2002/96/EC all
electrical and electronic products must be collected
separately by a local collection system.
Please act according to your local rules and do not dispose of your
old products with your normal household waste.
1

SOUND 101 OWNER’S MANUAL
WHAT YOUR RADIO INCLUDES
Owner’s manual, remote control, iPod dock, FM wire antenna, AM loop
antenna and AC adapter.
PREPARING YOUR REMOTE FOR USE
Grip the plastic piece on the bottom of the remote unit and pull it
out. If the battery drains replace it with a CR/DL2025.
INSTALLING THE ANTENNAS
Plug in the FM and AM antennas to their sockets on the back of the
radio. The white and black wires of the AM antenna should be connected to the white and black terminal blocks respectively.
INSTALLING THE BACKUP BATTERIES
The backup battery holder is on the back of the radio. While it’s
not necessary to install these for the radio to operate, the four AA
backup batteries backup the time and memories under a power outage. Use four AA alkaline batteries and place them into the battery
compartment on the back of the radio. Install the batteries with the
negative (at) section contacting the battery compartment terminal
that sticks out.
PERFORMANCE OF RESET
In case of electrical malfunction or to reset to factory default settings, perform a reset. To perform a reset, turn on the unit. Press
SETUP. Select <<Factory Default>> using the CHAN buttons
and press ENTER. Select <<Yes>> and press ENTER. The screen says
Are You Sure? Select <<Yes>> and press ENTER. The screen says
‘RESTORING …..’ The reset is performed.
2
SOUND 101 OWNER’S MANUAL
POWERING THE RADIO
Plug the Power Adapter into a mains (AC) outlet, then into the 15
VDC socket on the back of the radio.
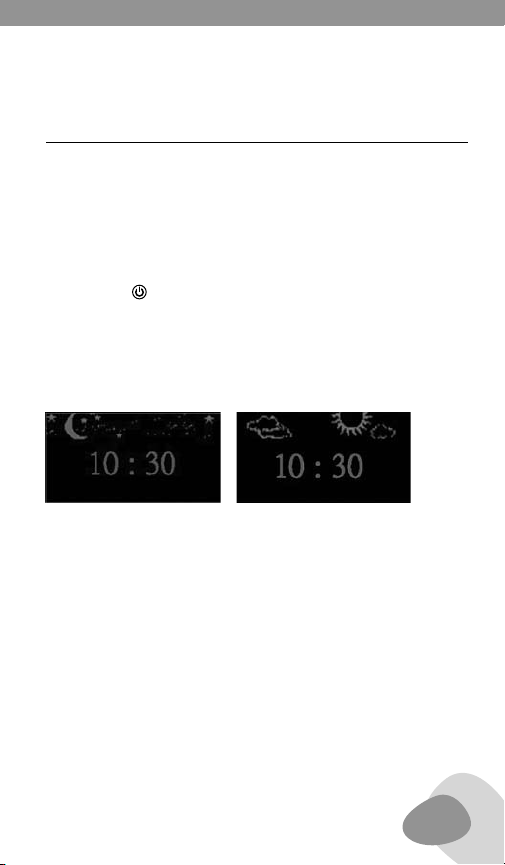
The POWER key switches the radio from standby to working mode.
When it is rst plugged in, it will be in the standby mode. In standby
mode, only the clock display is activated and the radio is off. To turn
the radio on, use a quick, short press of the radio’s or the remote’s
power button . To place it back into standby mode, use a quick,
short press of the power button.
In standby mode, from 06:00 am ~ 5:59 pm, you see the sun and
clouds at the top of screen; from 06:00 pm ~ 5:59 am you see the
moon and stars at the top of the screen. See below.
In Standby mode, you can illuminate the display for a few seconds by
pressing the SETUP, BAND, MUTE or MODE button.
3
SOUND 101 OWNER’S MANUAL
VOLUME CONTROL
The volume is controlled with the volume knob or the VOL buttons
on the remote. Turning the volume knob clockwise increases the
volume; counterclockwise decreases volume. Pressing the remote’s
VOL increases the volume; pressing the VOL button decreases
the volume. After adjusting the volume, the volume bar number and
icon will appear at lower left side of the screen for about 2 seconds,
and then will disappear.
MUTE BUTTON
Use a quick, short press of the remote’s MUTE button or the radio’s
SNOOZE button to mute the audio. When the mute function is active,
the mute icon will appear at the lower left side of the screen.
USING HEADPHONES/EARPHONES
Before placing Earphone/Headphone in/on you ears, turn the volume
all the way down. Use Headphone/Earphone with a 3.5 mm (1/8 inch)
stereo plug. Plug them into the earphone socket on the back of the
radio.
4

SOUND 101 OWNER’S MANUAL
SUBSCRIBING TO SIRIUS SATELLITE RADIO AND
PURCHASING THE SIRIUS ANTENNA
Go to www.sirius.com and click onto <<Accessories>> to purchase
a Sirius antenna. Click onto CHOOSE SIRIUS to subscribe. Click onto
INSTALL-ACTIVATE to activate. Or call Sirius at 1-866-595-9705.
See the section titled Working With Setup to obtain your Sirius ID.
Click onto <<What’s On Sirius>> to see the programming content.
ATTACHING THE SIRIUS TUNER MODULE TO THE
BACK OF THE RADIO
This is an optional procedure and need not be done. It is available for
your convenience. Connect it to the back of the radio by inserting
the module’s two sockets into their brackets on the back of the radio.
Push down, click and lock without too much pressure.
SELECTING SIRIUS, FM, AM, IPOD OR AUX-IN
After turning on the radio, look at the display and use sequential
presses of the MODE button to make your selection, then press
ENTER.
5

SOUND 101 OWNER’S MANUAL
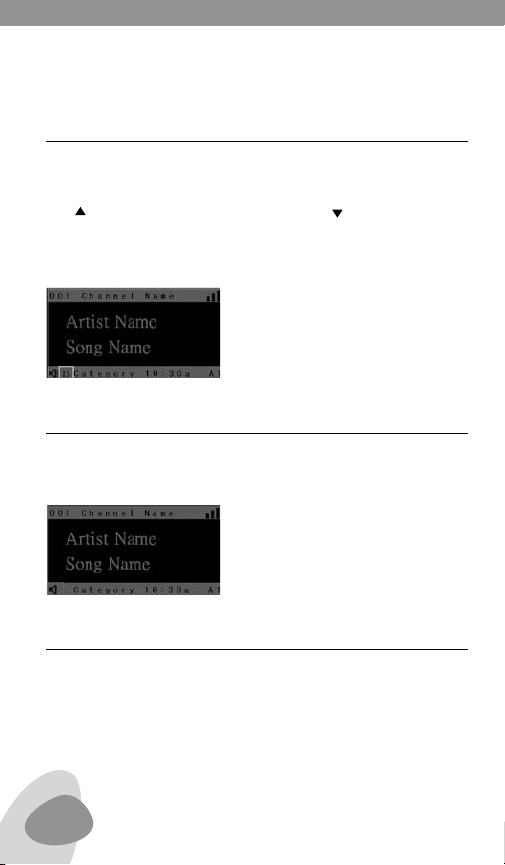
SIRIUS, FM AND AM MANUAL TUNING
Use quick, short presses of the CHAN / buttons to tune up or
down channel/frequency. The frequency that you are tuned to appears in the middle of the display.
In Sirius mode, pressing CHAN / will tune the next available channel or previous channel.
The CAT Button Shows Sirius Mode Categories
The CAT +/- button selects the available channels classied by
category, shown at the top of the screen. It will show the list for the
current category and won’t change until the next press. Press CAT +
to go to the next category and CAT - to go to the previous category.
Use CHAN / and ENTER to highlight and go to specic channels
within a category. It won’t exit the category display until you choose
a channel by pressing ENTER or pressing the other function keys like
the MENU key, etc.
FM AND AM AUTO TUNING
With auto-tuning the radio automatically stops at the next station
with good signal strength. Perform about a 1 second press of the
CHAN / buttons. The frequency that you are tuned to appears in
the middle of the display.
6

SOUND 101 OWNER’S MANUAL
USING DIRECT FREQUENCY ENTRY
Pressing the DIR key enters direct frequency entry tuning mode
in which buttons 0 ~ 9 are used to directly enter a channel or
frequency.
Sirius mode:
After entering the channel number, it will jump to the selected channel if you press the “DIR” or “ENTER” key or after 7 seconds.
It will jump to channel 0 if you don’t enter any channel number after
entering direct frequency entry mode.
Do not enter channels over 223.
If the Sirius channel that you select is not available, the prompt
window will show for 2 seconds and then will go back to the last
channel. See below.
7

SOUND 101 OWNER’S MANUAL
USING DIRECT FREQUENCY ENTRY continued
FM mode:
Enter the frequency; the last digit entered must be ‘0’; then press
ENTER. If you don’t press any key within 7 sec, it will go back to the
previous window.
AM mode:
Enter the frequency in 3 or 4 digits; then press ENTER. If you don’t
press any key within7 sec, it will go back to the previous window.
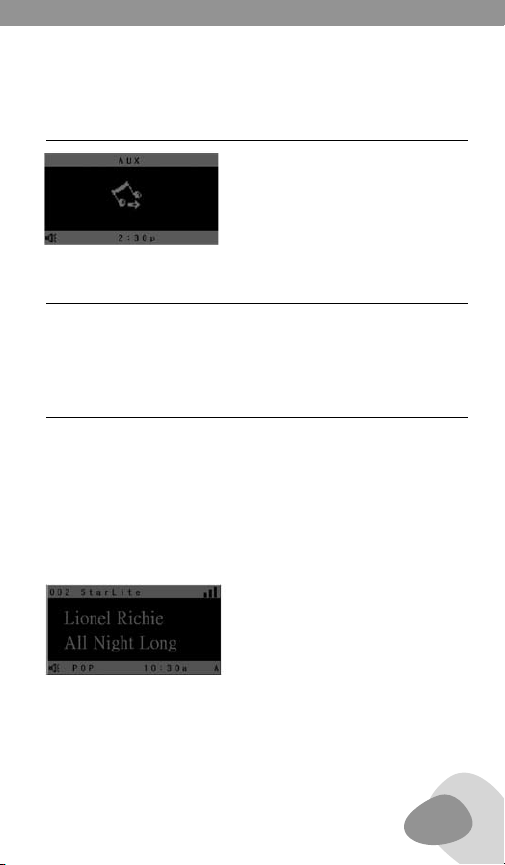
USING AUX-IN
The AUX-IN socket is on the back of the radio. Use this feature to
play other devices that have a line-out feature or earphone output
to play their audio through your radio’s speaker. It accommodates a
3.5 mm (1/8th inch) stereo plug. To use it, select the symbol shown
below under MODE.
8
SOUND 101 OWNER’S MANUAL
USING AUX-IN continued
USING THE LINE OUT SOCKET
The Line-Out socket is on the back of the radio. This provides input
to another device’s line-in socket. It accommodates a 3.5 mm (1/8th
inch) stereo plug.
WORKING WITH MEMORY PRESETS
The BAND button selects the memory presets. There are 4 bands,
A-D. Each band has 5 memory presets. When the presets are empty
a band shows as A, B, C, D; if it contains a memory it shows as A1,
A2, A3, A4, A5, etc. as well as B, C and D in the lower right corner of
the display. Buttons 1-5 are used to store and recall frequencies. You
may store 20 Sirius channels, 20 FM stations and 20 AM stations.
The band number will show in the lower right corner of the display, as
shown below.
9

SOUND 101 OWNER’S MANUAL
WORKING WITH MEMORY PRESETS continued
In normal working mode, the beep will alert after saving presets
and the preset number will change on the lower right corner of the
display. See below.
STORING A STATION/CHANNEL
1. Tune to the Sirius, FM or AM station that you wish to store.
2. Use the BAND button to select A, B, C, or D.
3. Press and hold button 1, 2, 3, 4 or 5 to store the station into
memory.
In the normal working mode, a beep will alert after saving presets
and the preset number will change on the lower right corner of the
screen.
ACCESSING A STORED STATION/CHANNEL
1. Use the BAND button to select A, B, C or D.
2. Use a quick, short press of button 1, 2, 3, 4 or 5 to recall the
station.
10
SOUND 101 OWNER’S MANUAL
ACCESSING A STORED STATION/CHANNEL
continued
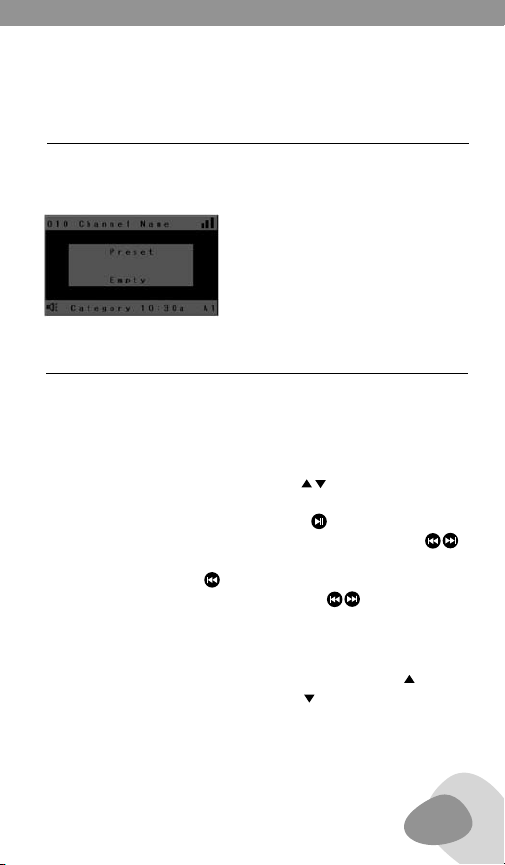
If the preset you would like to recall does not exist, then a prompt
window will appear for 2 seconds and go back to previous status. See
below.
WORKING WITH THE iPOD
Be sure to rst remove the protective cover from the iPod’s docking
cradle before plugging the iPod into it.
The iPod’s control section is on the bottom of the remote. Select
iPod with the MODE button and press ENTER. Use the MENU button
to scroll through the iPod’s menu. Use the buttons to scroll
up/down the menu. Use the ENTER button to select the item and to
play the song that you’ve selected. Use the button to play/pause
the song that’s been selected. Use quick, short presses on the
buttons to advance to the next song or skip back to the beginning
of the playing song. Press twice to go back to the beginning of
the last song. Use continuous pressure on the buttons to skip
forward/reverse through the song that’s been selected.
PLAYLIST button: For iPod mode usage; operates the iPod playlist
menu. Go to the previous playlist play mode when pressing ; go to
the next playlist play mode when pressing .
You need to set up at least 2 playlists in the iPod before you can
switch between <<Playlist A>> and <<Playlist B>>. Press the
11

SOUND 101 OWNER’S MANUAL
WORKING WITH THE iPOD continued
PLAYLIST button at play mode to switch between them. If you
have just one Playlist in the iPod, the currently playing song will
simply start over.
For example, if Playlist A and B are in the iPod with Song ‘a’ and ‘b’
in Playlist A and song ‘a’ and ‘b’ in Playlist B and you are listening to
Song ‘a’ from Playlist B, you will start playing Song from Playlist A
when pressing PLAYLIST on the remote.
CHAPTER button: For iPod mode usage, operates the e-book. Enter
to previous menu play mode when pressing ; enter to next menu
play mode when pressing .
SHUFFLE button: Press to play your songs in a random order.
Note: The multi color LED indicators on the iPod docking station will
be red for charging and blue for playing.
WORKING WITH SETUP
Pressing the SETUP button takes you to setup mode. Pressing CHAN
12

SOUND 101 OWNER’S MANUAL
WORKING WITH SETUP continued
enables selecting the parameter. Pressing the ENTER button
takes you to a lower layer or conrms an entry. Pressing the CHAN
buttons enables setting of the parameter. Pressing the SETUP
button reverts back to an upper layer. See setup menu options below.
Sirius ID
Shows the ESN assigned by Sirius during subscription.
Antenna Aiming
This enables you to see the signal strength of a Satellite or Terrestrial signal. The strength will vary depending on where you place
your antenna. You can use this feature to establish the best signal
location for your antenna.
13

SOUND 101 OWNER’S MANUAL
WORKING WITH SETUP continued
Setting the Clock
If you have subscribed to and activated Sirius, the clock will set itself,
but you will still have to manually select the time zone and turn
daylight savings on or off.
If Sirius is available the clock will set itself by synchronizing automatically. This clock uses the 12-hour format.
With or without Sirius, set the time zone and daylight savings as
shown below:
1. While looking at the display press SETUP.
2. Select <<Clock Setting>> with the CHAN buttons and press
ENTER.
3. Press ENTER again to select <<Time Zone>>, then select your
time zone with the CHAN buttons and press ENTER.
4. Select <<Daylight Savings Time>> with the CHAN buttons
and press ENTER.
5. Select <<YES>> or <<NO>> with the CHAN buttons and
press ENTER.
If Sirius is not available, set the clock using the following procedure:
1. While looking at the display press SETUP.
2. Press the CHAN buttons and select <<Clock Settings>>.
3. Press the CHAN buttons select <<Time Setting>> and press
ENTER.
4. While the hour ashes press the CHAN buttons to select the
correct hour, being sure to select AM or PM correctly; press ENTER.
5. While the minutes ash press the CHAN
correct minutes.
6. Press ENTER.
buttons to select the
14

SOUND 101 OWNER’S MANUAL
WORKING WITH SETUP continued
Contrast Setting
Contrast can be set from –5 to +5.
Audio Setting
This allows setting of the Bass and Treble from –5 to +5.
15

SOUND 101 OWNER’S MANUAL
WORKING WITH SETUP continued
Factory Default
Returns to factory default settings if YES is selected.
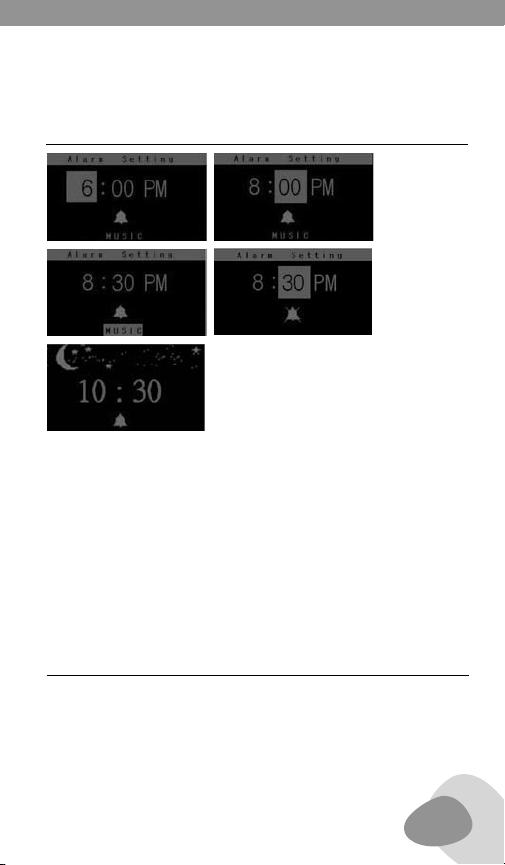
SETTING THE ALARM TIME
After you set the alarm time and before turning the radio off, be sure
to set it in the correct mode with the MODE button, so that you wake
up hearing what you want to hear. Also turn the alarm on by selecting BUZZ or MUSIC, as described below.
To set the alarm:
1. Look at the display, press and hold ALARM for 2 seconds.
2. Press the CHAN
ENTER.
3. Press the CHAN
ENTER.
4. Press the CHAN
or off, press ENTER.
buttons to set the alarm hour, then press
buttons to set the alarm minutes, then pres
buttons to set the alarm mode, BUZZ, MUSIC
16
SOUND 101 OWNER’S MANUAL
SETTING THE ALARM TIME continued
When the alarm activates the screen will be switched to alarm
source, while the backlight ashes until you press the POWER or
ALARM key to close the alarm and revert back to standby mode or
press the SNOOZE key to enter the snooze mode.
When the alarm activates with the Buzz source, the screen won’t
change, but the backlight ashes and beeps until you press the
POWER or ALARM key to close the alarm or press the SNOOZE key to
enter the snooze mode.
TURNING THE ALARM ON OR OFF QUICKLY
The alarm can be turned ON or OFF using the following technique:
1. Press the ALARM button for 2 seconds.
2. Immediately press ALARM again to select ON or OFF
3. Press ENTER to verify your selection.
17

SOUND 101 OWNER’S MANUAL
TURNING THE ALARM ON OR OFF QUICKLY
continued
USING THE SNOOZE FEATURE
The SNOOZE key can set the snooze time or activate snooze mode
when the alarm is active.
To set the snooze time, press and hold SNOOZE key for 2 seconds
and it will enter snooze setting mode. The snooze time can be set
for 5, 10 and 15 minutes by pressing the CHAN
selecting ENTER.
A quick, short press of the SNOOZE key actives the snooze mode
when the alarm is active. When snooze mode is active a pop-up window prompts you. This window won’t disappear until you press the
POWER key to revert back to standby mode or the alarm occurs again.
buttons and
18
SOUND 101 OWNER’S MANUAL
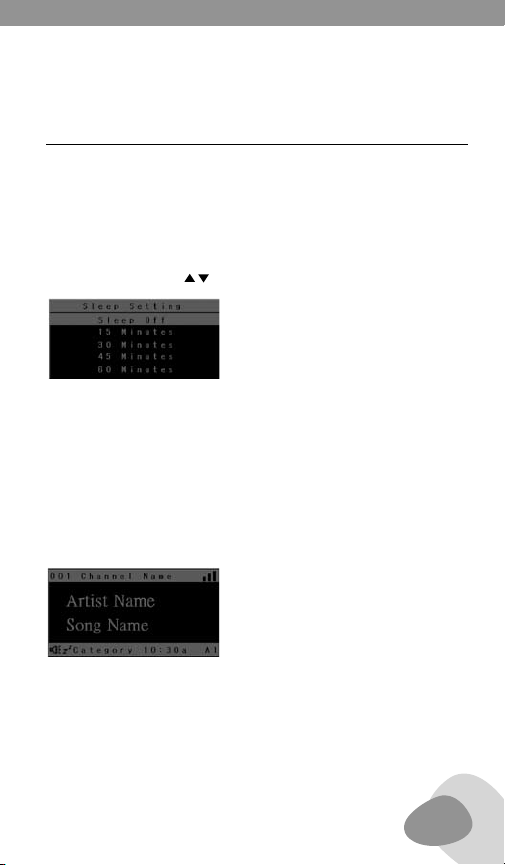
SETTING THE SLEEP TIMER
The sleep timer allows you to play the radio for a specied period of
time, after which it turns off.
To set the number of minutes for the sleep timer:
Press and hold the SLEEP button for 2 seconds and it will enter the
sleep setting mode. It can be set for OFF, 15, 30, 45 and 60 minutes
by pressing the CHAN
To turn the sleep timer ON or OFF:
Press SLEEP. Its state of ON or OFF shows in the display. To change
its state, press SLEEP again to set the sleep mode to ON or OFF,
then press ENTER.
When sleep mode is active, you see the sleep icon at the lower left
corner of the screen. If sleep times out, the receiver enters standby
mode.
buttons and then pressing ENTER.
19

SOUND 101 OWNER’S MANUAL
SPECIFICATIONS
• FM Frequency range: 87.5–108 MHz.
• AM Frequency range: 530-1710 kHz.
• Speaker output power: 3W.
• Speaker frequency response: 80 Hz – 20 kHz.
• Power supply input: 120 VAC, 60Hz.
• Power supply output: 15 VDC, 1.5A.
Specications and design are subject to possible modications
without notice due to improvement.
WARRANTY REGISTRATION
To ensure full warranty coverage or product updates, registration of
your product should be completed as soon as possible after purchase
or receipt. You may use one of the following options to register your
product:
1. By visiting our website at http://www.etoncorp.com.
2. Mail in enclosed warranty card.
3. Mail your registration card or information to following address;
include your name, full mailing address, phone number, email address, model purchased, date purchased, retail vendor name:
Etón Corporation
1015 Corporation Way
Palo Alto, CA 94303 USA
LIMITED WARRANTY
Retain the warranty information from your warranty card with your
proof of purchase or the Limited Warranty information can also be
viewed at www.etoncorp.com.
20
 Loading...