

Page 1

ETC® Setup Guide
Unison® Paradigm® Virtual Touchscreen
Overview
The Unison Paradigm Virtual Touchscreen (VTS) is a stand-alone client application that allows all of the
functionality of a Paradigm Touchscreen from any PC or Mac connected by Ethernet to the Paradigm
Central Control Server (P-CCS) network. Virtual Touchscreen functionality is only possible for systems
that utilize a Paradigm Central Control Server.
Paradigm Virtual Touchscreen configurations are created in ControlDesigner and assigned functionality
in LightDesigner.
Installation
Requirements
To install the Paradigm Virtual Touchscreen client application, you must have the following:
• Paradigm Server Project System with Central Control Server
• Computer running Windows
®
XP, Windows 7/8, or Intel based Macintosh running iOS 10.7 or
later, with web browser and connected to the same Ethernet network as the P-CCS.
Install the VTS Application
VTS for Mac
The Macintosh version of Virtual Touchscreen client application can be downloaded from the ETC
website at www.etcconnect.com. The VTS application for Mac is a “paradigm_vts_....._installer.dmg”
file type.
Step 1: Double click the paradigm installer file downloaded from the ETC website to begin the
installation. The MacVtsInstaller.pkg icon displays.
Step 2: Double click the MacVtsInstaller.pkg icon to launch the Paradigm VTS installer.
Step 3: Click [Continue], the Paradigm VTS software license agreement displays.
Step 4: Read the license, then click [Agree] to continue the installer.
Step 5: Select the destination folder for the application. ETC recommends installing the Paradigm
VTS application in its default location. Click [Install] to complete the installation.
Step 6: The installation is complete and the software installed, click the [Close] button to close
the dialog.
VTS for PC
The PC version of Virtual Touchscreen client application can be either downloaded from the ETC
website at www.etcconnect.com or downloaded from the built-in web interface of the connected
Paradigm Central Control Server (P-CCS).
Install VTS PC Client from P-CCS
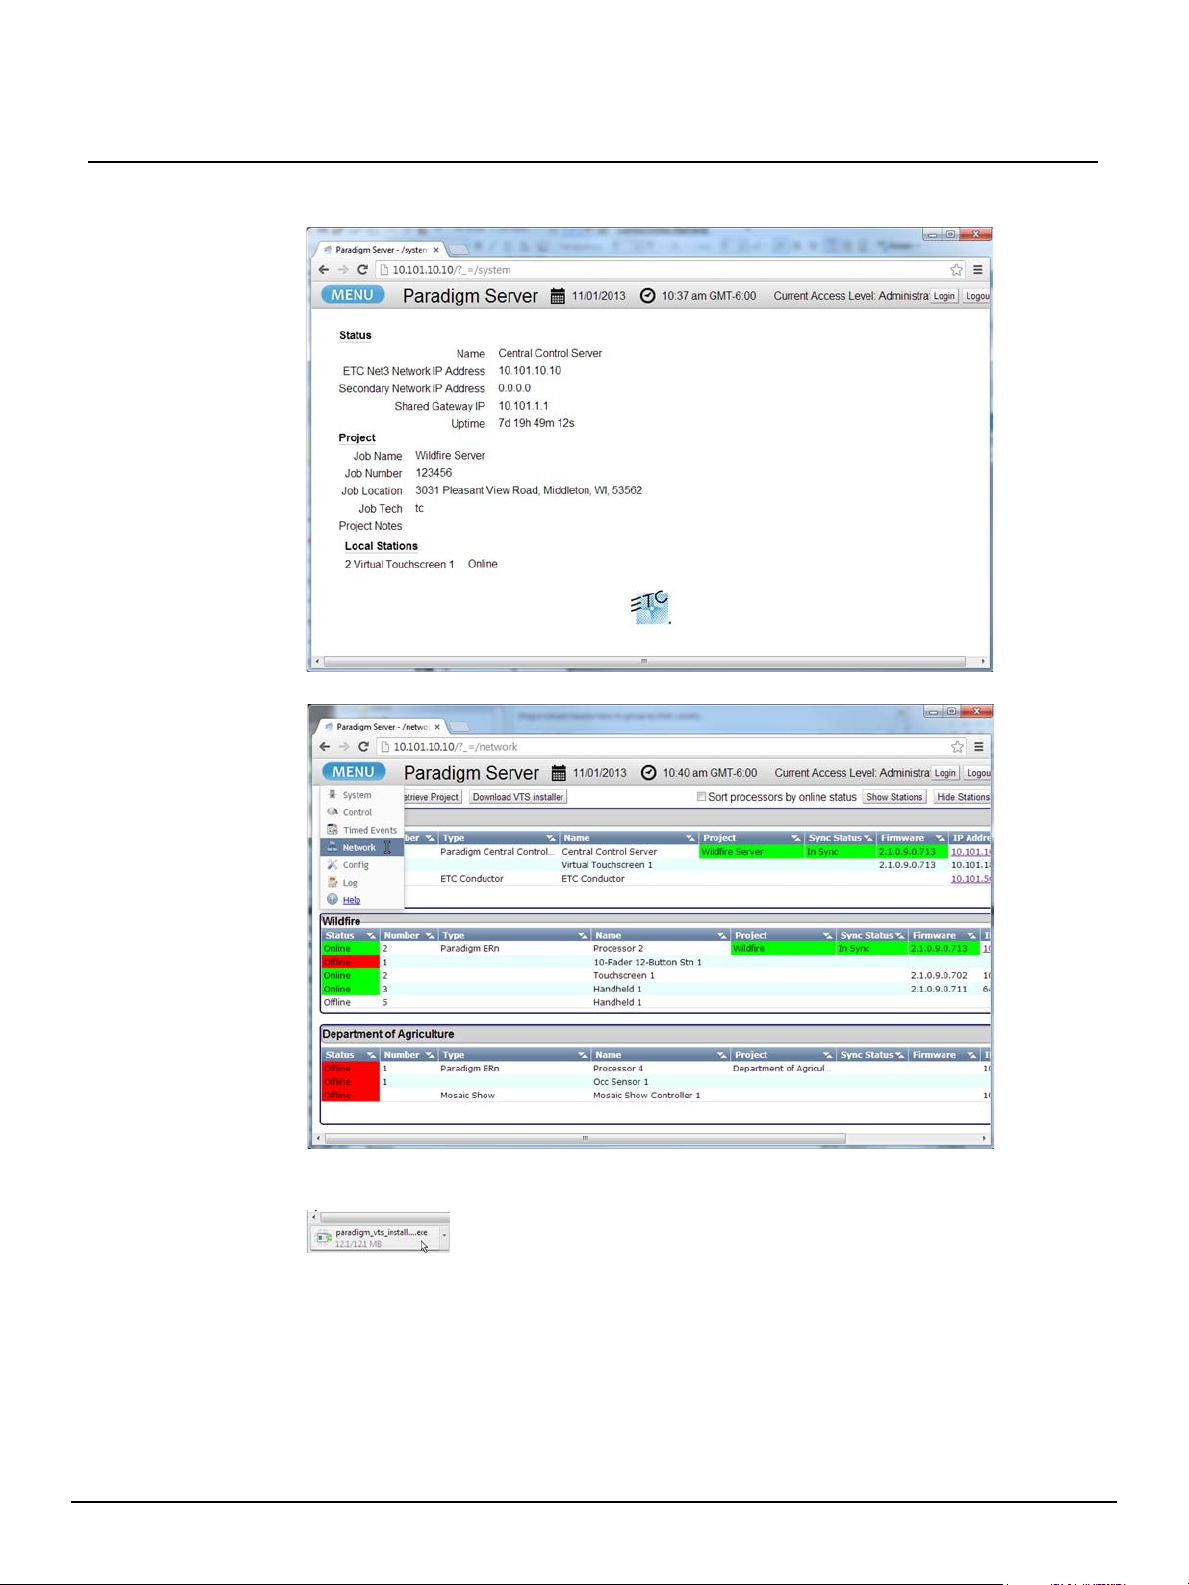
Step 1: To view the P-CCS web interface, make certain the computer is connected and
configured to the same network as the P-CCS.
Step 2: Launch the computers web browser (Internet Explorer 7 or newer, Safari, etc.).
Step 3: Enter the product IP address of the P-CCS in the address line of the browser. The P-CCS
is provided with a default IP address (10.101.10.10) from the factory. If your installation
Corporate Headquarters
London, UK
Rome, IT
Holzkirchen, DE
Hong Kong Rm 1801, 18/F, Tower 1 Phase 1, Enterprise Square, 9 Sheung Yuet Road, Kowloon Bay, Kowloon, Hong Kong Tel +852 2799 1220 Fax +852 2799 9325
Service:
Web:
7184M2140
Paradigm Virtual Touchscreen Setup Guide Page 1 of 8 Electronic Theatre Controls, Inc.
Unit 26-28, Victoria Industrial Estate, Victoria Road, London W3 6UU, UK Tel +44 (0)20 8896 1000 Fax +44 (0)20 8896 2000
Via Pieve Torina, 48, 00156 Rome, Italy Tel +39 (06) 32 111 683 Fax +44 (0) 20 8752 8486
(Americas) service@etcconnect.com
www.etcconnect.com
Rev B Released 2013-11
3031 Pleasant View Road, P.O. Box 620979, Middleton, Wisconsin 53562-0979 USA Tel +608 831 4116 Fax +608 836 1736
Ohmstrasse 3, 83607 Holzkirchen, Germany Tel +49 (80 24) 47 00-0 Fax +49 (80 24) 47 00-3 00
Copyright © 2013 ETC. All Rights Reserved. Product information and specifications subject to change.
(UK) service@etceurope.com (DE) techserv-hoki@etcconnect.com
ETC intends this document to be provided in its entirety.
(Asia) service@etcasia.com
Page 2
ETC Setup Guide
has changed the P-CCS address from its default, enter the correct IP address. The web
user interface displays the “System” screen of the connected Paradigm Server.
Paradigm Virtual Touchscreen
Step 4: Click “Menu” and select “Network”. The web interface navigates to the “Network” screen.
Step 5: Click the “Download VTS installer” button located on the top of the web interface. The
“paradigm_vts_install....exe” dialog displays.
Step 6: Select the installer file to begin the installation. The “Virtual Touchscreen Bundle Setup
Wizard” displays.
Paradigm Virtual Touchscreen Setup Guide Page 2 of 8 Electronic Theatre Controls, Inc.
Page 3
ETC Setup Guide
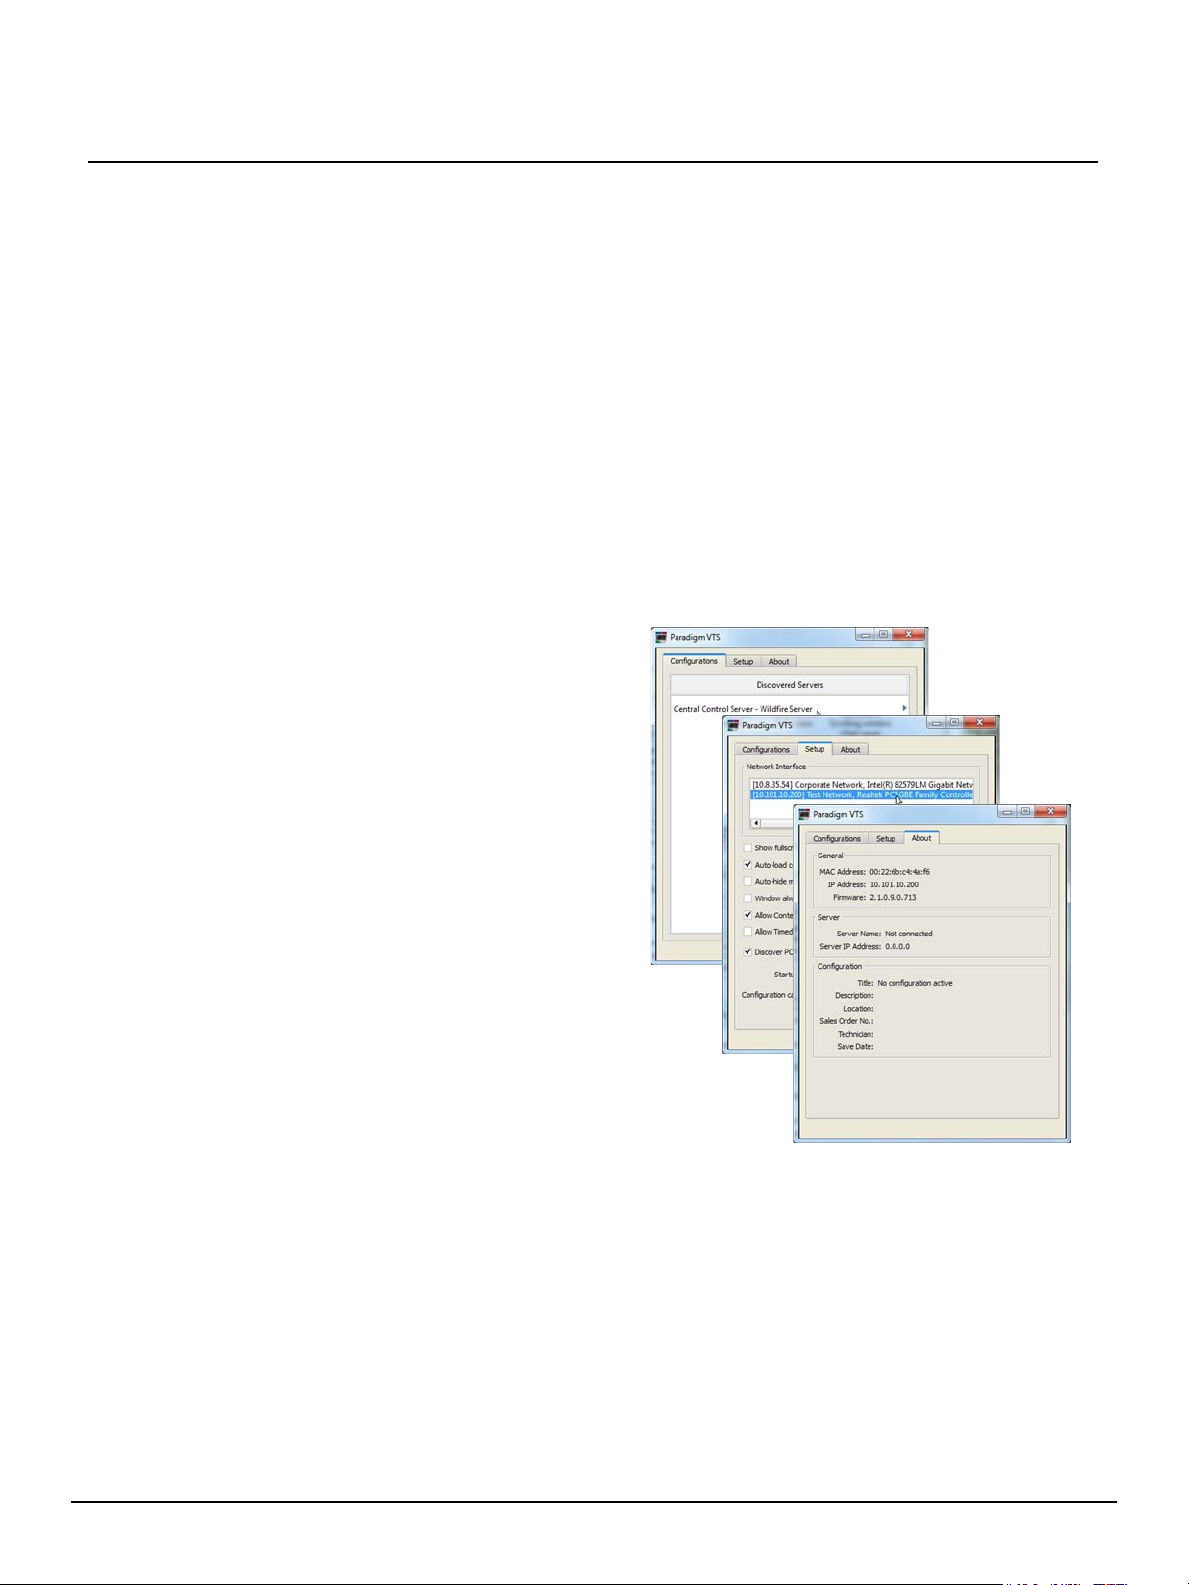
The VTS client application includes three tabs.
• “Configurations” tab - provides access to the
VTS configurations found on the discovered
and connected P-CCS.
• “Setup” tab - provides access to select the
Network Interface as well as set properties of
the VTS client application.
• “About” tab - displays read only information
about the host computer, P-CCS and the
selected configuration (if the configuration has
been selected).
How the VTS application displays initially is
dependent on if your host computer has more than
one network interface available to it. Reference
"Selecting the Lighting Network Interface" on page 4.
When the host computer has only one network
interface, meaning it is connected directly to the
lighting network, skip to "Connecting to the Central
Control Server" on page 4.
Step 7: This wizard will guide you through the installation of the Paradigm Virtual Touchscreen
Bundle.
• Click [Next].
• Click [I Agree].
• Select the components to install from the available list, then click [Next].
• Select whether the VTS software is to be installed for “All Users” of the computer or
the “Current User” only. Click [Next] to continue. ETC recommends installing this
application for “All Users”.
• Click [Install]. The Paradigm Virtual Touchscreen application will install in the
default Paradigm folder. This is recommended.
• Click [Finish].
Launch the VTS Application
Double-click the Paradigm Virtual Touchscreen icon on the desktop (if the desktop icon component was
installed), or browse to and click the Paradigm Virtual Touchscreen application found in the “Start” menu
on a PC or in the Applications folder of a Mac. The “Paradigm VTS” application opens.
Overview
Paradigm Virtual Touchscreen
Paradigm Virtual Touchscreen Setup Guide Page 3 of 8 Electronic Theatre Controls, Inc.
Page 4

ETC Setup Guide
Selecting the Lighting Network Interface
When multiple network interfaces are available to the host computer, the VTS application requires a
one time selection of the lighting network before the VTS can connect to the Paradigm Central Control
Processor.
Step 1: In the VTS application, select the “Setup” tab, then select the lighting network from the
available network interfaces in the list. The lighting network is typically a 10.101 network.
When changing a network selection, a message dialog displays confirming that you must
restart the VTS application before the new network interface selection takes effect.
Paradigm Virtual Touchscreen
Step 2: Ensure the “Discover PCCS” checkbox is selected.
Step 3: Click [Ok] to close the message dialog, then click the red “X” on the top right corner to
close the VTS application. When the application is restarted, the new network selection
is the default.
Connecting to the Central Control Server
The Paradigm Central Control Server (P-CCS) discovered on the network displays in the
“Configurations” tab. Click the server from the list to display a list of configured and available Virtual
Touchscreen configurations available that can be loaded to the Paradigm VTS application.
Note:
Select the Virtual Touchscreen from the list, then click [Connect] to connect. The touchscreen
configuration and theme will be sourced from the P-CCS then display on the touchscreen or computer
display.
Paradigm Virtual Touchscreen Setup Guide Page 4 of 8 Electronic Theatre Controls, Inc.
The Virtual Touchscreens displayed in the list have been pre-configured using
ControlDesigner (including assigning the theme and layout) and added to the
Paradigm configuration in LightDesigner. Reference the LightDesigner online help for
assistance in adding a Virtual Touchscreen to the configuration.
Page 5

ETC Setup Guide
• using a touchscreen - touch and
hold any area to display the
context menu.
• using a computer, right-click
anywhere on the display to view
the context menu.
The “Setup” tab provides access to select the Network Interface as well as
set properties of the VTS client application.
• Click the “Show fullscreen” checkbox to display the Virtual
Touchscreen covering the entire screen real-estate. Alternatively,
you could select “Toggle Fullscreen” from the context menu when
you have right-clicked on the display, or press F11 for a PC or
(Command) + F11 for a Mac. Fullscreen is recommended for
touchscreen applications.
• Click the “Auto-load config (recommended) button to have the VTS
automatically load the selected startup configuration when the VTS
is launched. See “Startup config:” below. This is selected by default.
• Click the “Auto-hide mouse pointer in fullscreen” checkbox to hide a
connected mouse pointer while the client is in full screen mode. This
setting is recommended for touchscreen applications.
Using the Virtual Touchscreen Application
How to use the Virtual Touchscreen depends on the device it is displayed on. If using a Touchscreen,
you can use your finger to touch a button control (activate a preset), slide a virtual fader (change a
channel intensity), or navigate between pages in the configuration. Each function is accomplished just
as you would when using a Paradigm Touchscreen.
When using a standard computer display, use a connected mouse to click buttons, slide faders, etc.
With the Virtual Touchscreen configuration displayed, through context menus you can do the following:
Paradigm Virtual Touchscreen
• Show Setup, or press (Control) + O for PC or (Command) + O for Mac, opens the Paradigm VTS
client application window. See “Show Setup” on page 5.
• Toggle Fullscreen, or press (F11) for PC or (Command) + F11 for Mac, changes the way the Virtual
Touchscreen is displayed on the display or touchscreen, filling the entire available space.
• Always stay on top - sets the Virtual Touchscreen behavior when other applications are run on the
host computer. When selected, the Virtual Touchscreen will always float on top of all other
application windows.
• Disconnect - disconnects the Virtual Touchscreen by closing the configuration but maintains the
Paradigm VTS client application open for selection of another configuration, if any.
• Quit - closes the Paradigm VTS client application.
Show Setup
Right-click on the displayed Virtual Touchscreen and select “Show Setup” from the context menu.
Alternatively, click (Control) + O for PC or (Command) + O for Mac. The Paradigm VTS client
application window displays. Select the “Setup” tab.
• Click the “Window always stays on top” checkbox to allow the Virtual Touchscreen to float on top
Paradigm Virtual Touchscreen Setup Guide Page 5 of 8 Electronic Theatre Controls, Inc.
Page 6

ETC Setup Guide
Each time the Paradigm VTS client application is launched, the
“Startup config:” indicated in this dialog will automatically load. To clear
the startup configuration setting click the [Clear Startup Config]
button.
To clear the configuration from the application cache, click the [Clear
Configuration Cache] button.
From this dialog, you can add a new event and delete or edit
existing events in the list.
Adding a new event and editing an existing event are very
similar in process.
of all other displayed applications. Alternatively, you could select “Always stay on top” from the
context menu when you have right-clicked on the display.
• Click the “Allow Context menu” checkbox to allow touch and hold selection of the context menu
in the configuration. This is selected by default.
• Click the “Allow Timed Event Edit from menu” button to allow configuration and viewing of timed
events in the configuration. This feature is passcode protected. Enter the setup passcode in the
provided dialog. VTS passcodes are set in ControlDesigner software for the configuration.
Reference ControlDesigner online help system for instructions to set the VTS setup passcode.
After enabling this setting, “Show Timed Events” displays for selection in the context menu. See
"Show Timed Events" on page 6.
• Click the “Discover PCCS” checkbox to allow the VTS application to automatically discover the
connected Paradigm Central Control Server on the network. Alternatively, you may specify the
P-CCS IP Address in the provided “Server IP Address” section.
Paradigm Virtual Touchscreen
Show Timed Events
Note:
Right-click on the Virtual Touchscreen display and select “Show Timed Events” from the context menu.
Alternatively, click (Control) + T for PC or (Command) + T for a Mac. The “Timed Events” dialog displays
including a list of all configured system timed events.
To view and configure Timed Events from the VTS, you must first enable the “Allow
Timed Event Edit from menu” selection in the Setup tab.
Paradigm Virtual Touchscreen Setup Guide Page 6 of 8 Electronic Theatre Controls, Inc.
Page 7

ETC Setup Guide
Add New Event
Step 1: Click the [Add] button, the “Timed Events” wizard displays.
Step 2: Specify a name for the new event.
Step 3: Specify the “Start” time.
•If Time is selected, additional selection for to specify the time is required.
•If Sunrise or Sunset are selected, additional selection for an “Offset” is required. An
offset is specified as an additive or a negative day, hour and/or minutes setting from
the astronomical time.
•If Event Offset is selected, additional selection of an event and the offset time is
required.An offset is specified as an additive or a negative hours and/or minutes
setting from the event time.
Step 4: Specify the “End” time. The options for the “End” time are similar to the “Start” time, except
Duration is now an option. When Duration is the selected “End” time, you will also be
required to specify the hours and minutes the new event should run from its “Start” time.
Step 5: If an override was previously created in LightDesigner for application to the new event,
select the override from the “Override” drop down. For more information on overrides,
reference the Paradigm LightDesigner online help system.
Step 6: If the new event should be allowed to play, even on protected days, click the “Allow on
Protected Days” checkbox.
Step 7: Click “Sync at boot” to ensure the Timed Event information is synchronized with the
Paradigm server.
Paradigm Virtual Touchscreen
Paradigm Virtual Touchscreen Setup Guide Page 7 of 8 Electronic Theatre Controls, Inc.
Page 8

ETC Setup Guide
Step 9: Select the recurrence type from the “Type” drop
down. Additional settings are provided
depending on the types selected, be sure to
complete all options for the selection. For
example, if “Weekly” is selected, the following
options display:
Step 11: Select the event action from the “Action” drop
down. Additional settings are provided
depending on the selected action. Be sure to
complete all options for the selection. For
example, if “Space Flick Warn for Preset” is the
action selected, the following options display:
Step 8: When the new event should recur, click the “Recurrence” tab.
Step 10: Select the “Start” tab in the dialog to set the event actions.
Paradigm Virtual Touchscreen
Step 12: Click [Ok] to close the wizard. The new event displays in the Timed Events list.
Edit Existing Event
Editing an existing event is very similar to adding a new event. Click the existing event from the Timed
Events list, then click [Edit]. The Timed Events wizard displays for selection including all of the pre-set
event data. Edit the event settings, then click [Ok] to close the wizard and return to the Timed Events
dialog.
Delete Existing Event
To delete an existing timed event, click the event in the Timed Events list, then click [Delete]. A dialog
displays requesting confirmation of whether you really want to delete the event. Click [Yes] to delete the
Timed Event and return to the Timed Events dialog.
Exit Timed Events Dialog
Click the [Exit] button on the bottom right of the display to exit the Timed Events dialog.
Paradigm Virtual Touchscreen Setup Guide Page 8 of 8 Electronic Theatre Controls, Inc.
 Loading...