

Page 1

Unison Mosaic MediaManager
User Manual
v1.0.3
Copyright © 2010-2012 Electronic Theatre Controls, Inc..
All rights reserved.
Production information and specifications subject to change.
Part Number: 7180M1242-1.0.3 Rev A.
Released 2012-08.
v1.0.3 02-08-2012 Custom
Page 2

Unison Mosaic MediaManagerUser Manual
ETC permits the reproduction of materials in this manual only for non-commercial purposes. All other rights are
reserved by ETC.
- 2 -
Page 3

Contents
Contents
Contents 3
Welcome 5
Introduction 5
Platforms 5
Help Overview 5
Help Help 5
Support 5
What's New in v1.0.3 6
Overview 7
User Interface 8
Main toolbar 8
Media Slot Browser 8
Designer Project Control 8
Media Preset Library 9
Media Slot Timeline Editor 9
Keyboard shortcuts 10
Notes for Macintosh users 10
Project Files 11
Creating a new project 11
Opening a project 11
Saving a project 11
Media Slots & Pixel Matrices 12
Importing Media Slots & Pixel Matrices 12
Filtering Media Slots 12
Removing Media Slots & Pixel Matrices 12
Media Presets 13
2D Matrix Presets 13
Creating a 2D Matrix Preset 13
Renaming a 2D Matrix Preset 14
Editing a 2D Matrix Preset 14
Deleting a 2D Matrix Preset 14
Video Presets 14
Creating a Video Preset 14
Renaming a Video Preset 14
Changing a Video Preset 14
Deleting a Video Preset 14
Image Presets 14
Creating an Image Preset 14
Renaming an Image Preset 15
Changing an Image Preset 15
Deleting an Image Preset 15
Custom Presets 15
Creating a Custom Preset 15
Renaming a Custom Preset 16
Editing a Custom Preset 16
Deleting a Custom Preset 17
Programming 18
Adding a Media Preset to a Media Slot 18
Reordering Media Presets on a Media Slot Timeline 18
- 3 -
Page 4

Unison Mosaic MediaManagerUser Manual
Editing the Length of a Media Preset 18
Editing the Transition of a Media Preset 18
Transition Properties 18
Simulation 20
Selecting a Pixel Matrix 20
Adjusting the Simulation View 20
Simulation Playback 20
Export 21
Uploading Slots 22
Pharos Installation Manager 22
FTP Transfer 22
Preferences 23
Simulation 23
Background Colour 23
Background Lines 23
Frequently asked questions 24
Is the free software a cut-down demo version? 24
Does the MediaManager software support the Apple Macintosh? 24
What are the PC minimum requirements for MediaManager? 24
What are the minimum Macintosh requirements for MediaManager? 24
Are project files compatible across versions and platforms? 24
Can I have multiple versions of MediaManager on my computer? 24
What are the Unison Mosaic MediaManager file extensions? 24
How do I add media slots to my Unison Mosaic MediaManager project? 25
What if I make changes to my Designer project? 25
Troubleshooting 26
I've exported my MediaManager project but there are no files in the folders for each Controller? 26
I have checked the FAQ and troubleshooting but I'm still stuck? 26
Media Slot Anatomy 27
Typical Slot Usage 27
Alternate Slot Usage 27
Looping and Cropping 28
Media longer than the slot: 28
Media does not fill the entire slot: 28
Software limits & capacities 30
- 4 -
Page 5

Welcome
Welcome
Introduction
Welcome and thank you for using version v1.0.3 of the Unison Mosaic MediaManager software. This is the first
public release of this software.
Platforms
Unison Mosaic MediaManager is designed to run on a PC running Microsoft Windows 7, Vista or XP (SP2+) or
an Apple Mac running OS X (10.5.x or later - Intel only). As the application is of a highly graphical nature a large
monitor is recommended (800x600 minimum) .
Help Overview
The Help is split into four major sections: Quick Start, Reference, Troubleshooting, and Appendices.
Those of you experimenting with the software for the first time should work through the Quick Start guide to familiarise yourself with the basics of the software. The Reference section then gives detailed descriptions of every
aspect of the software. The Troubleshooting section provides help to resolve any problems while the Appendices
provide additional useful resources.
Help Help
This is the PDF version of the online Help and it is available in various formats for printing. The online version,
which has the advantage of being fully searchable, can be opened from within MediaManager by clicking the help
button on the main toolbar.
Support
As with all successful control products, support is crucial and the team at ETC will do everything possible to
ensure that your project is a success. Please do not hesitate to contact us with your questions, bug reports and
suggestions at:
T: (800) 688-4116
E: service@etcconnect.com
Please also visit our website to keep up to date with the latest product news and software releases: www.etcco-
nnect.com.
- 5 -
Page 6

Unison Mosaic MediaManagerUser Manual
What's New in v1.0.3
l Multithreading support for exporting media
l New web help
- 6 -
Page 7

Overview
Overview
Unison Mosaic MediaManager is a tool to program media sequences onto media slots that have been imported
from one or more Unison Mosaic Designer projects. Media slots are programmed onto pixel matrices in Unison
Mosaic Designer to act as placeholders for media that will be generated after the Designer project has been
uploaded to Unison Mosaic Controllers. By uploading media sequences created by Unison Mosaic MediaManager to Unison Mosaic Controllers, you can change the media content of timelines without needing to open or
modify the Designer project file.
The media slots from multiple Unison Mosaic Designer projects can be imported into one Unison Mosaic MediaManager project, which allows the media for large, multi-project installations to be managed simultaneously.
Unison Mosaic RemoteManager can be used to quickly and easily upload the media exported from MediaManager to the correct Unison Mosaic Controllers, either across a local network or across the Internet.
- 7 -
Page 8
Unison Mosaic MediaManagerUser Manual
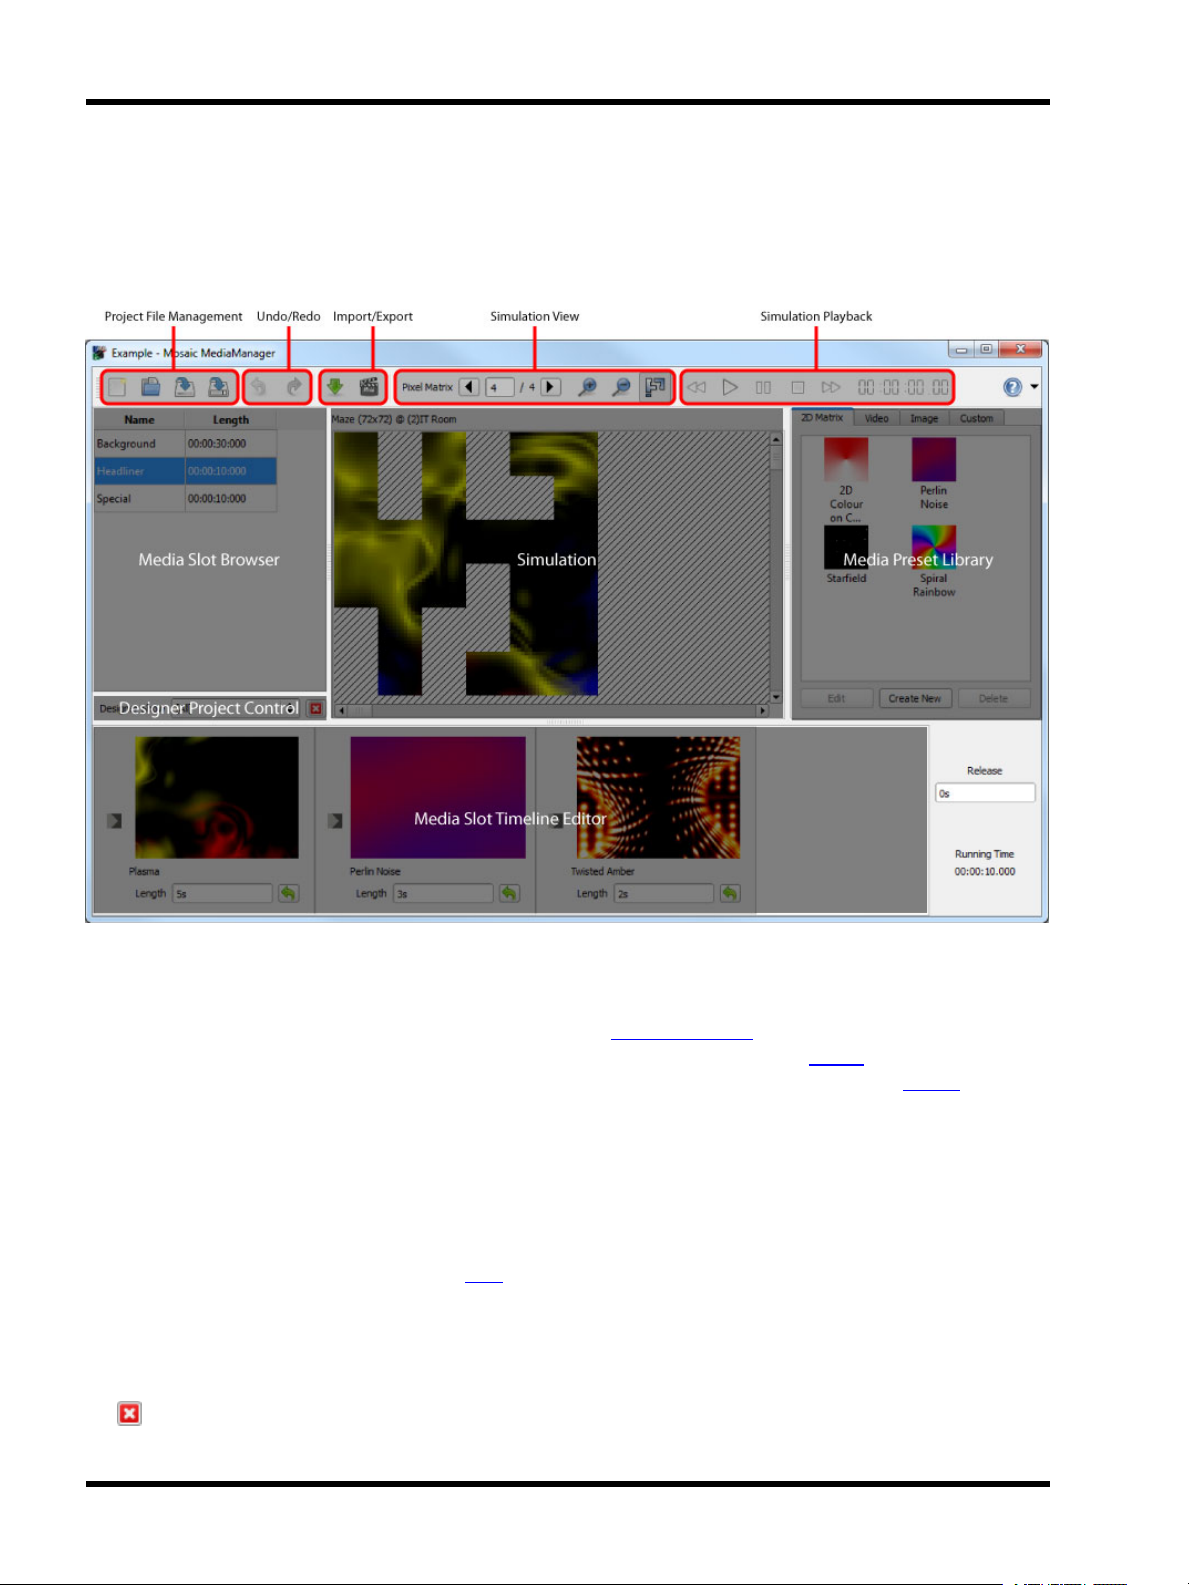
User Interface
The software has been designed to present a consistent graphical user interface and so it is worth familiarising
yourself with the layout of the main window before proceeding further:
Main toolbar
The buttons on the left of the main toolbar provide overall control of your MediaManager project. Create new
projects, open existing projects and save your work using the file management buttons. Use the Undo/Redo but-
tons to step backwards and forwards through operations that affect your project. The Import button allows you to
add media slots to your project, as exported from a Unison Mosaic Designer project file, and the Export button
generates the files needed for each Controller to be able to play back your media slot programming.
Media Slot Browser
Any media slots that have been imported into your MediaManager project are listed here. Media slots from different Designer projects with the same name will only be listed once. The length of each media slot, as configured when the media slot was created in Designer, is also listed. To begin editing the programming for a media
slot, click it in this browser to select it. Click here to find out more about managing media slots.
Designer Project Control
The drop-down list can be used to filter the media slots displayed in the media slot browser by Designer project.
All the media slots imported from a Designer project can be removed from the MediaManager project by clicking
the button.
- 8 -
Page 9

User Interface
Media Preset Library
Create new lighting presets from the built-in matrix effects, or import your own video and images. You can also
create custom presets using Lua scripts. Click here to find out more about media presets.
Media Slot Timeline Editor
The programming for the currently selected media slot is displayed here. Elements can be reordered by drag &
drop. Transitions can be edited by clicking the button. Media presets are added to the timeline by dragging
them from the media preset library. The total length of the programming is displayed to the right of the media slot
timeline editor.
- 9 -
Page 10

Unison Mosaic MediaManagerUser Manual
Keyboard shortcuts
For ease and speed of use various keyboard keys map to application commands:
● F1 Launch the online help.
● Ctrl + N New project.
● Ctrl + O Open project.
● Ctrl + S Save project.
● Ctrl + Z Undo the last operation.
● Ctrl + Shift + Z
Redo the last operation to be undone.
● Ctrl + Y
Notes for Macintosh users
Unison Mosaic MediaManager makes a good deal of use of the two button mouse with right-click being used to
invoke context-sensitive menus. As the majority of Mac users have only a single button mouse they must hold
Ctrl while clicking to get this functionality. Furthermore Macs have an Command key that serves as the alternative to the Windows Ctrl key. Shift and Alt work as described for Windows.
- 10 -
Page 11

Project Files
Project Files
Unison Mosaic MediaManager projects are saved with the file extension ".mdm".
Creating a new project
Click or press Ctrl+N. You will be prompted to choose a location to save your new project and then a blank
project will be created with no media slots or media presets.
Opening a project
Click or press Ctrl+O. You will be prompted to choose an existing .mdm file to load. As the project loads,
MediaManager checks if all the media files referenced in the project exist. If not, you will be prompted to locate
these files.
Saving a project
Click or press Ctrl+S.
To save to a different file or to export your project complete with all your media files, click and choose either
Save As or Export Project. You will be prompted to choose a new location to save to. After Save As, subsequent
saves will go to the new file.
- 11 -
Page 12

Unison Mosaic MediaManagerUser Manual
Media Slots & Pixel Matrices
Importing Media Slots & Pixel Matrices
Unison Mosaic Designer exports media slots to files with extension ".mdx". These files contain information about
the media slots and the pixel matrices onto which they're programmed. To generate a .mdx file in Designer, go to
File > Export for Media Manager.
Click . You will be prompted to choose a .mdx file to import from.
Imported media slots will appear in the media slot browser on the left of the application window. Their name and
length is shown.
If you make changes to your Designer project, simply go to File > Export for Media Manager in Designer again
and import the .mdx file into your existing MediaManager project. You media slots will be updated with the new
details.
Filtering Media Slots
The media slots in the media slot browser can be filtered by the Designer project(s) in which they're used.
Select a Designer project from the drop-down list underneath the media slot browser. Only the media slots used
by the selected Designer project will be shown in the media slot browser.
Removing Media Slots & Pixel Matrices
Media slots and pixel matrices cannot be removed individually, but all the media slots and pixel matrices imported
from a Designer project can be removed together.
Select a Designer project from the drop-down list underneath the media slot browser, then click . All the pixel
matrices imported from the Designer project will be removed, along with any media slots that aren't referenced by
any other imported Designer project(s).
- 12 -
Page 13

Media Presets
Media Presets
Media presets are the building blocks of media slot programming. You can create media presets from built-in
matrix effects, existing video and image files, or code your own using Lua scripts.
2D Matrix Presets
Creating a 2D Matrix Preset
Select the 2D Matrix tab on the right of the application window. Click Create New. The 2D Matrix preset editing
dialog will appear.
- 13 -
Page 14

Unison Mosaic MediaManagerUser Manual
Click OK when you've finished setting up your 2D matrix preset. The new 2D matrix preset will appear in the 2D
matrix preset library as a thumbnail image and the name of the effect.
Renaming a 2D Matrix Preset
Double-click a 2D matrix preset in the library and type a new name.
Editing a 2D Matrix Preset
To modify an existing 2D matrix preset, select the 2D matrix preset in the library and click Edit or right-click the
2D matrix preset and select Edit. The 2D matrix editing dialog will appear. Click OK when you've finished editing,
or Cancel to discard your changes.
Any media slots that use this 2D matrix preset will now use the new settings.
Deleting a 2D Matrix Preset
Select the 2D matrix prest in the library and click Delete or right-click the 2D matrix preset and select Delete.
Video Presets
Creating a Video Preset
Select the Video tab on the right of the application window. Click Create New . You will be prompted to choose
an existing video file. The new video preset will appear in the video preset library as a thumbnail image and its file
name.
Renaming a Video Preset
Double-click a video preset in the library and type a new name.
Changing a Video Preset
To change the source file of an existing video preset, select the video preset in the library and click Locate or
right-click the video preset and select Locate. You will be prompted to select an existing video file.
Any media slots that use this video preset will now use the new video source file.
Deleting a Video Preset
Select the video preset in the library and click Delete or right-click the video preset and select Delete.
Image Presets
Creating an Image Preset
Select the Image tab on the right of the application window. Click Create New . You will be prompted to choose
an existing image file. The new image preset will appear in the image preset library as a thumbnail image and its
file name.
- 14 -
Page 15

Media Presets
Renaming an Image Preset
Double-click an image preset in the library and type a new name.
Changing an Image Preset
To change the source file of an existing image preset, select the image preset in the library and click Locate or
right-click the image preset and select Locate. You will be prompted to select an existing image file.
Any media slots that use this image preset will now use the new image source file.
Deleting an Image Preset
Select the image preset in the library and click Delete or right-click the image preset and select Delete.
Custom Presets
Creating a Custom Preset
Select the Custom tab on the right of the application window. Click Create New. The custom preset editing
dialog will appear.
- 15 -
Page 16

Unison Mosaic MediaManagerUser Manual
For help with writing custom presets for Pharos in Lua, please read the Custom Preset Programming Guide
appendix in the Unison Mosaic Designer help.
Click OK when you've finished writing and configuring your custom preset. The new custom preset will appear in
the custom preset library as a thumbnail image.
Renaming a Custom Preset
Double-click a custom preset in the library and type a new name.
Editing a Custom Preset
To modify an existing custom preset, select the custom preset in the library and click Edit or right-click the 2D
matrix preset and select Edit. The custom preset editing dialog will appear. Click OK when you've finished editing, or Cancel to discard your changes.
Any media slots that use this custom preset will now use the new settings.
- 16 -
Page 17

Media Presets
Deleting a Custom Preset
Select the custom prest in the library and click Delete or right-click the custom preset and select Delete.
- 17 -
Page 18

Unison Mosaic MediaManagerUser Manual
Programming
Media presets can be programmed onto the selected media slot. Transitions can be set up between media presets.
If the total length of programming on a media slot is less than the length of the media slot then the content will
loop when played back by Controllers. If the total length of programming on a media slot is greater than the
length of the media slot then some cropping will occur.
Adding a Media Preset to a Media Slot
l Select the media slot to program from the media slot browser on the left of the application window.
l Click and drag a media preset from the media preset library and drop it onto the media slot timeline at the
bottom of the application window.
Reordering Media Presets on a Media Slot Timeline
Click and drag a media preset on the timeline of a media slot to change its position in the timeline.
Editing the Length of a Media Preset
Enter the new length into the length editor of the media preset on the media slot timeline. If the length is longer
than the length of the media preset source then the media preset will loop.
Click next to the length editor of the media preset on the media slot timeline to reset the length to the default
value.
Editing the Transition of a Media Preset
Click within the media preset on the media slot timeline. The transition editor dialog will appear.
Transition Properties
l Time: the duration of the transition. This cannot be more than the length of the media preset.
l Type: how the media presets should blend into each other.
- 18 -
Page 19

l Spread: how many pixels should be involved in the transition at once.
l Angle: the start angle for the transition (in degrees).
Programming
- 19 -
Page 20

Unison Mosaic MediaManagerUser Manual
Simulation
The programming on each media slot can be simulated for each of the pixel matrices on which the media slot was
used in Pharos Designer.
Selecting a Pixel Matrix
The current pixel matrix number is displayed on the application toolbar, along with the total number of pixel
matrices on which the selected media slot is used. Use the arrow buttons to change the current pixel matrix.
Adjusting the Simulation View
l
Zoom In: click
l
Zoom Out: click
l Pan: click and drag to pan the simulation view, or use the scroll bars.
l
Show Used Pixels: click to enable this feature. Click again to disable.
l Background Colour: this can be changed in the Preferences dialog.
Simulation Playback
Use the simulation playback buttons on the application toolbar.
l
Play:
l
Pause:
l
Stop:
l
Seek Forwards:
l
Seek Backwards:
The current point in time for the simulation is shown on the application toolbar.
- 20 -
Page 21

Export
Export
Unison Mosaic MediaManager exports media slot programming in a format suitable for transferring to Unison
Mosaic Controllers. Click . You will be prompted for a folder to save the generated files.
A successful export will place a folder in the location you have chosen for each Designer project in your MediaManager project. Each folder will be named the same as the Designer project followed by the unique Designer
project ID number surrounded by {} brackets. These folders will contain additional folders, one per Controller in
the Designer project - it is inside each Controller’s folder that the Media Slot information is stored, ready to be
uploaded.
MediaManager will only generate media for Controllers that were patched in the associated Designer project. In
addition, one or more media slots must be programmed onto timelines. You can make changes to your
Designer project at any time and then update this information in MediaManager by importing a new .mdx file
(exported from Designer) into your existing MediaManager project.
- 21 -
Page 22

Unison Mosaic MediaManagerUser Manual
Uploading Slots
After you have exported your MediaManager slot programming, you now must move these files to each Controller
so that your timelines can use the new slot programming. There are two ways to do this:
Pharos Installation Manager
Provided your Controllers are connected to a network and accessible from your computer, the Unison Mosaic
RemoteManager application, free to download from our website, can easily transfer both your Designer project
file and media slot information to each Controller. Please refer to the Installation Manager help for how to setup
and start using this application.
FTP Transfer
Provided your Controllers are connected to a network and accessible from your computer, any FTP application
can connect to a Controller and allow you to move the media slot files for each Controller to the Controller’s memory card.
- 22 -
Page 23

Preferences
Preferences
Click the down arrow next to the Help button on the main toolbar then click to open the Preferences dialog.
Simulation
Set preferences for how media slot programming is simulated.
Background Colour
Set the background colour of the simulation view. If you have media that's predominantly white then it may be
helpful to change the background colour from the default.
Background Lines
Choose whether diagonal lines are displayed on the simulation view as a contrast aid and what their colour is.
- 23 -
Page 24

Unison Mosaic MediaManagerUser Manual
Frequently asked questions
Is the free software a cut-down demo version?
No. The free MediaManager software is the full software package. Downloads and updates can be found on our
website.
Does the MediaManager software support the Apple Macintosh?
Yes, from v1.0 we have full support for Intel Macs running Apple OS X 10.5 and later. Project files will be compatible, regardless of the operating system on which they are created.
What are the PC minimum requirements for MediaManager?
l Microsoft Windows XP (SP2+ 32bit only), Vista (32/64bit) & 7 (32/64bit)
l Intel processor at 1 GHz or above
l 256MB RAM
l 100MB free hard disk space
l 800x600 minimum screen resolution (higher is better)
What are the minimum Macintosh requirements for MediaManager?
l Apple Mac OS X 10.5.x or later (32bit only)
l Intel processor at 1 GHz or above
l 256MB RAM
l 100MB free hard disk space
l 800x600 minimum screen resolution (higher is better)
Are project files compatible across versions and platforms?
Any project file saved in an earlier version of MediaManager can be loaded by a later version. Project files are
compatible between the PC and Mac versions of the software. However, projects saved in a later version of
MediaManager may not be backwards compatible with an earlier version as we reserve the right to make structural changes to improve the product.
Can I have multiple versions of MediaManager on my computer?
Yes, as long as you install the software to a different location each time. However, this could lead to confusion
and a reinstall takes just seconds, so we would recommend keeping the installers on hand and only having one
version installed at a time.
See system limits and capacities.
What are the Unison Mosaic MediaManager file extensions?
*.mdm Unison Mosaic MediaManager project file.
*.mdx Generated by Unison Mosaic Designer from the File menu, it contains information about the
media slots, the pixel matrices and the patch for importing into MediaManager.
- 24 -
Page 25

Frequently asked questions
How do I add media slots to my Unison Mosaic MediaManager project?
Media slots are added to a Unison Mosaic MediaManager project when you import a .mdx file that was generated
by Unison Mosaic Designer. Media slots in MediaManager represent media slots in a Designer project.
What if I make changes to my Designer project?
If you make any changes to your Designer project after you've already created programming for your media slots
in MediaManager then you can simply import the changes into your existingMediaManager project. In Designer,
go to File > Export for Media Manager to generate the .mdx file again, then click the Import button in MediaManager and select this file. The media slots will be updated.
The only changes to a Designer project that will affect MediaManager are changes to the patch, pixel matrices,
media slots and the programming of media slots on timelines. If you make any other changes you do not need to
update your MediaManager project.
- 25 -
Page 26

Unison Mosaic MediaManagerUser Manual
Troubleshooting
The following section lists common problems and their solutions.
I've exported my MediaManager project but there are no files in the folders
for each Controller?
The fixtures in the pixel matrices in your Designer project must be patched before MediaManager can know which
files to generate for which Controller. Open your Designer project, complete the patch and then go to File > Export
for media manager to generate the .mdx file again. Return to MediaManager and import this .mdx file into your
existing MediaManager project. Your media slots will be updated with the new patch information and you can
click the Export button to generate files for your Controllers.
I have checked the FAQ and troubleshooting but I'm still stuck?
Contact support, please be prepared to send in your project files.
- 26 -
Page 27

Media Slot Anatomy
Media Slot Anatomy
The media slots that you create in Unison Mosaic Designer have three user-modifiable time elements: the slot
Length, Fade in time and Release time. Adjusting these parameters will affect the output of media slots. Some
applications may require fixed fade times for all slot content while others may want to have these times flexible
and set via MediaManager. Each scenario is discussed below:
Typical Slot Usage
When a media slot is created in Designer you select an overall Length. When the same media slot is added to a
timeline you can add Fade in and Release timing as with any preset. Close attention should be paid to these time
settings as you begin to add media to your slots in MediaManager.
Below is a graphical example of a 10 second media slot that has been given a 2 second fade in and a 2 second
release time. Notice that the release time occurs after the slot duration has been reached - you should always
place enough media on a slot to cover the duration & release time.
For example, you could add a 6 second video followed by a 6 second 2D Matrix preset. The two clips total 12 seconds, equalling the duration plus the release time of the slot. When this slot is played on an MSC the media will
start immediately but full brightness won’t be achieved until the 2 second fade completes. When the duration of
10 seconds has been reached the slot’s 2 second release will begin and complete at the 12 second mark.
Note: the transition between the effects is set in Dynamic Media Manager and will output as simulated.
Note: Filling a slot completely provides the best playback results when media slots interact with other timeline
elements.
Alternate Slot Usage
Another approach is to allow MediaManager to govern all fade and release timing. When adding a media slot to a
timeline, set both fade and release times to 0 seconds. This allows you to customize the fades when placing
media on the slots within MediaManager. The example below offers similar playback as the example above,
except the fade in and release times are set in MediaManager. During playback, fade and release timings happen
within the confines of the slot’s duration. The only drawback to this approach is that the transition to another timeline element will snap through black, rather than crossfading.
- 27 -
Page 28

Unison Mosaic MediaManagerUser Manual
Note: Using fade times on both the slot and the DMM media is not recommended and can create some
unexpected transitions.
Looping and Cropping
Because media slots have a fixed duration, the question arises about how a slot will function if you place too
much media on it or not enough. Study the examples below to be sure you get what you expect when adding
media onto your slots.
Media longer than the slot:
In fig.1 when 10 seconds is reached the video immediately stops playback or takes the slot’s release time if set
above 0. The last 2 seconds of the 14 second video is never seen.
Media does not fill the entire slot:
In fig. 2, a 3.5 second video clip is placed on a 10 second slot with a 2 second fade in and release. During playback the media slot will attempt to fill itself with content and therefore loop the 3.5 second clip until the total duration of the slot is reached.
- 28 -
Page 29

Media Slot Anatomy
This example, fig.3 is very similar to fig. 2 above except the slot does not contain a fade or release time. Instead
the 4 second media clip contains the fade and release times as set within MediaManager. During playback, the
looping nature of the short clip is as above except the fade and release are executed on every loop. The slot
bumps the clip out abruptly when the slot’s duration is reached.
- 29 -
Page 30

Unison Mosaic MediaManagerUser Manual
Software limits & capacities
Unison Mosaic MediaManager imposes the following project limits which cannot be exceeded:
Media slots 1024
Pixel matrices 2560
Media presets 256
Designer projects 10 The number of different .mdx files that can be imported
- 30 -
 Loading...