

Page 1
ETC® Installation Guide
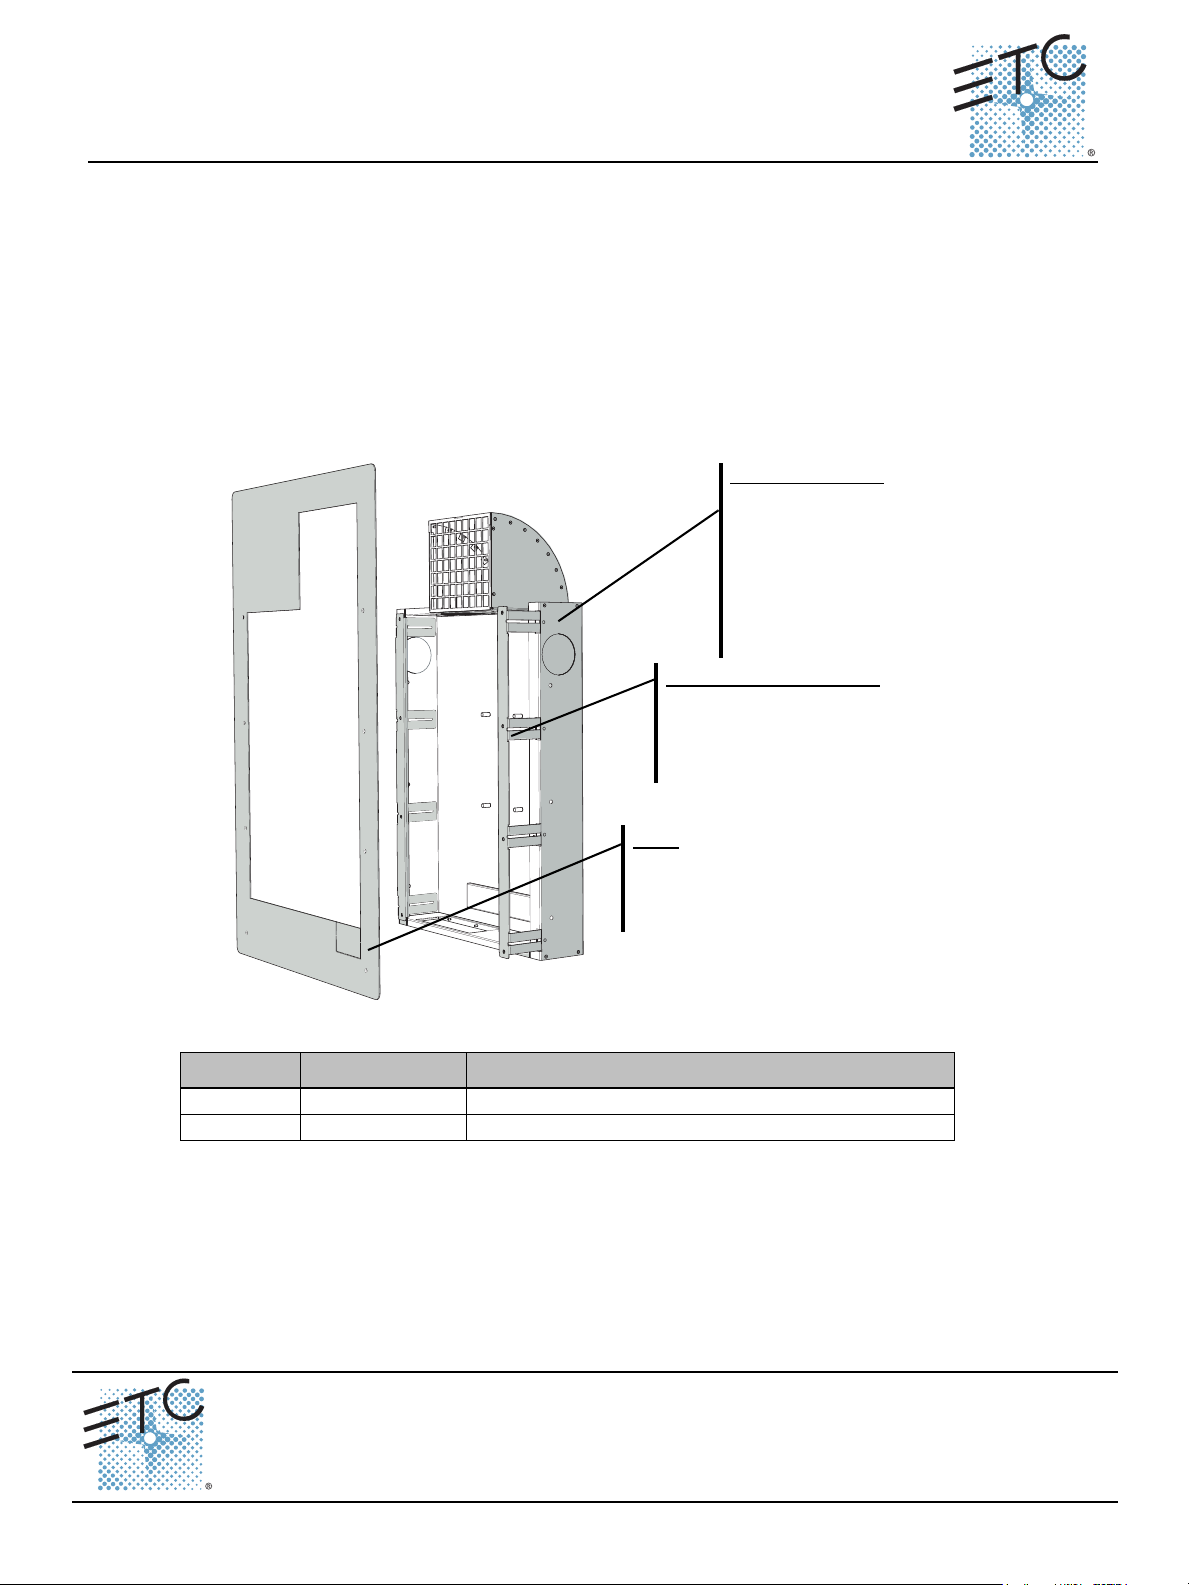
Rough-in enclosure
The enclosure installs into the cavity of a wall and
secures directly to 2”x4” or 2”x6” construction.
The installation depth of the rough-in determines
how much the DRd rack will extend from the
finished surface.
Openings are provided on the rough-in enclosure,
matching the top and bottom acceptable wire
access for the DRd enclosure, allowing for
convenient conduit access and wire routing.
Extension rails (removable)
Extension rails are provided to extend the enclosure (up
to additional 2.5 inches) flush to the finished wall surface
(as required) for cover attachment. These rails can be
easily removed when they are not required.
Cover
The cover is provided to fit securely to the rough-in
enclosure or extension rails as needed. When the DRd rack
enclosure is installed with a Unison Battery Pack (UBPO), a
knockout is provided in the cover for removal as needed.
Unison® DRd Semi-Recessed Installation Kit
Using this Guide
This document is intended to guide you through the installation of the DRd Semi-Recessed installation
kit. Reference the Unison DRd Rack Enclosure Installation Manual for instructions that are specific to
the installation of the DRd rack including conduit entry, wire specification and termination, installing rack
options, checking the rack installation, sealing air leaks, etc.
Return to this guide to finish up the installation including setting the fan speed switch on the dimming
engine, re-attaching the DRd rack door, and attaching the cover.
Overview
The Unison DRd Semi-Recessed installation kit provides the ability to partially recess a Unison DRd
rack enclosure into a wall.
Two kits are available:
Model Part Number Description
DRd6-RIK 7183K1003 DRd 6 Semi-Recessed Installation kit
DRd12-RIK 7183K1002 DRd 12 Semi-Recessed Installation kit
Each kit ships with the following:
• rough-in enclosure with extension rails attached (rails are removable as needed)
• cover
• hardware including:
• 4 each 5/16 nuts and washers to attach the DRd rack
• 8 each 10-32 screws to attach the cover
• this installation guide
Corporate Headquarters
London, UK
Rome, IT
Holzkirchen, DE
Hong Kong Rm 1801, 18/F, Tower 1 Phase 1, Enterprise Square, 9 Sheung Yuet Road, Kowloon Bay, Kowloon, Hong Kong Tel +852 2799 1220 Fax +852 2799 9325
Service:
Web:
7183M2120
Unit 26-28, Victoria Industrial Estate, Victoria Road, London W3 6UU, UK Tel +44 (0)20 8896 1000 Fax +44 (0)20 8896 2000
Via Pieve Torina, 48, 00156 Rome, Italy Tel +39 (06) 32 111 683 Fax +44 (0) 20 8752 8486
(Americas) service@etcconnect.com
www.etcconnect.com
Rev A Released 2012-02 ETC intends this document to be provided in its entirety.
DRd Semi-Recessed Installation Kit Installation Guide Page 1 of 8 Electronic Theatre Controls, Inc.
3031 Pleasant View Road, P.O. Box 620979, Middleton, Wisconsin 53562-0979 USA Tel +608 831 4116 Fax +608 836 1736
Ohmstrasse 3, 83607 Holzkirchen, Germany Tel +49 (80 24) 47 00-0 Fax +49 (80 24) 47 00-3 00
Copyright © 2012 ETC. All Rights Reserved. Product information and specifications subject to change.
(UK) service@etceurope.com (DE) techserv-hoki@etcconnect.com
(Asia) service@etcasia.com
Page 2
ETC Installation Guide
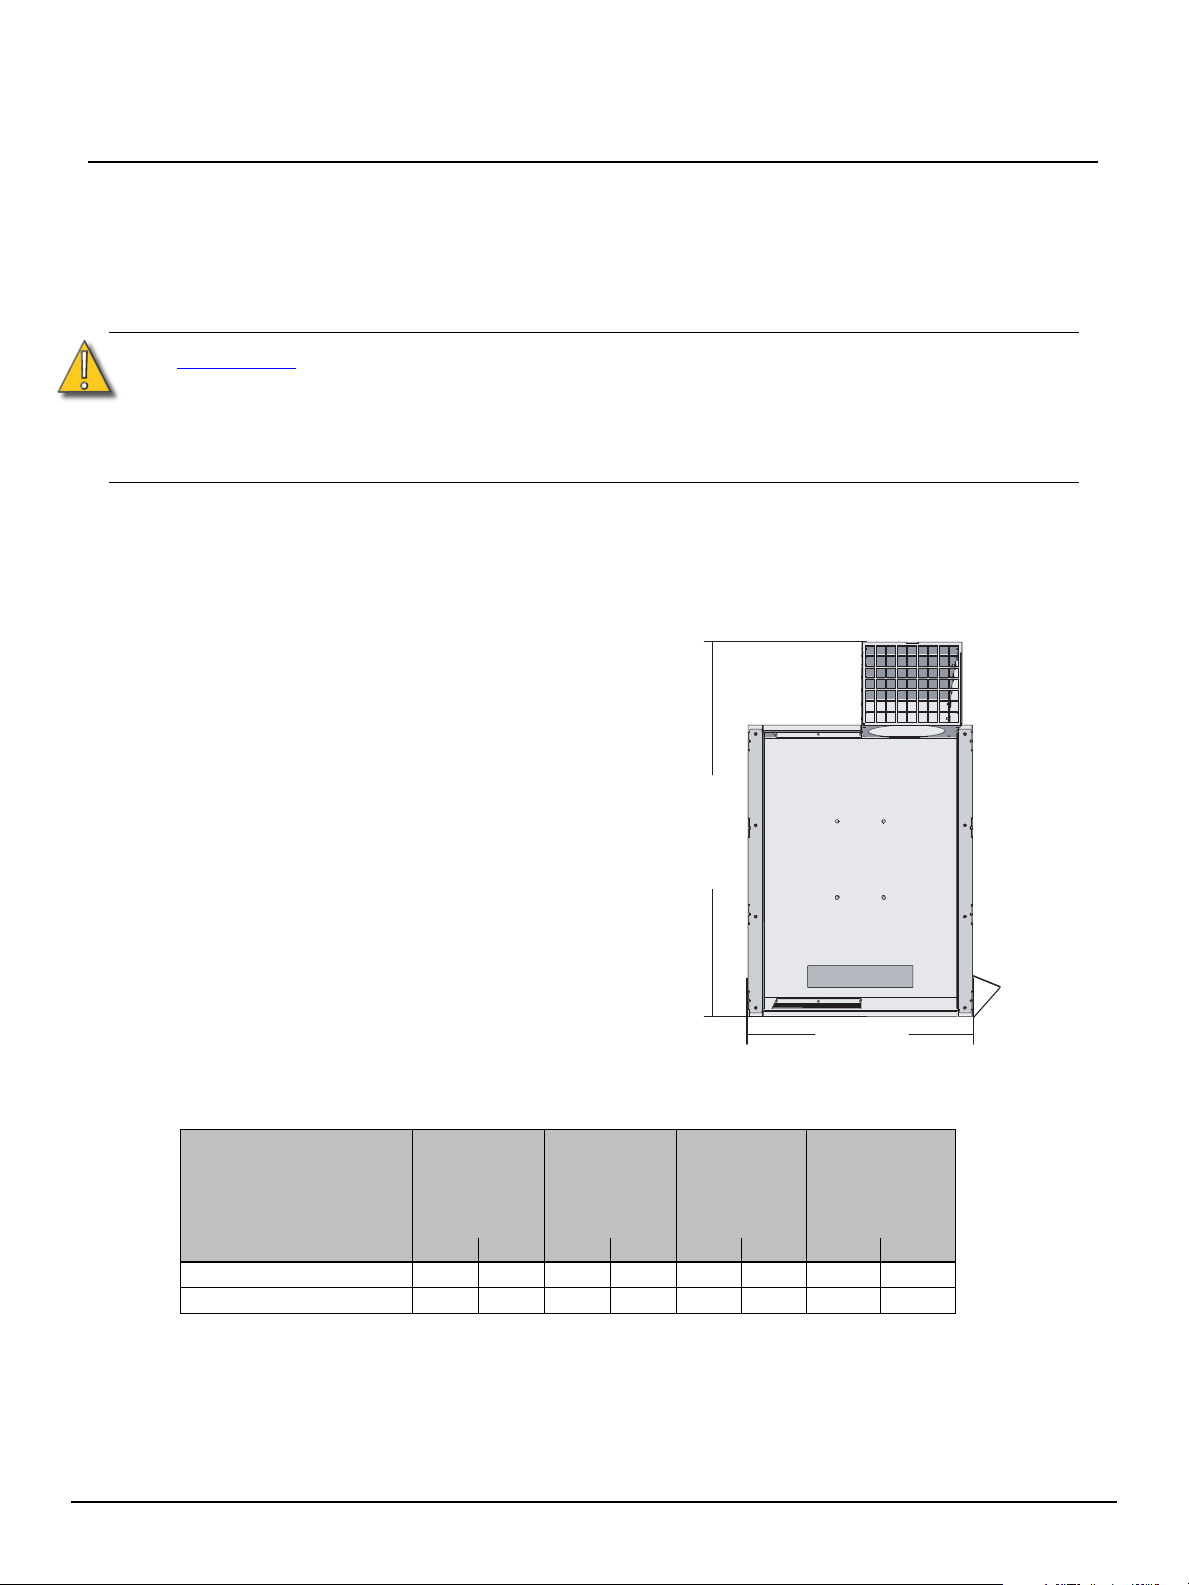
The dimensions in the table below are provided for the
rough-in only and do not include the cover or DRd rack
measurements for depth.
It is recommended that you install the rough-in at least
36” (915mm) off the floor surface to ensure clear view
of the user interface.
The wall framing and blocking must be strong enough
to hold the semi-recessed kit and DRd rack fully
populated with modules, conduit and wire
(approximately 140 lbs / 63.5kg).
The weights noted below are specific to the rough-in
only and do not include conduit, hardware, cable, rack
and module weights.
For accurate, application-specific, DRd rack enclosure
and module weights, reference the Unison DRd Rack
Enclosure Installation Manual.
DRd Semi-Recessed Installation Kit
Prepare for Installation
Where to Install the Rough-in
The DRd Semi-Recessed installation kit is designed to allow installation of a DRd rack into a wall cavity,
between 2”x4” or 2”x6” framed wall studs. The installation depth of the rough-in enclosure determines
how much the DRd rack enclosure will extend from the finished surface.
CAUTION:
Unison DRd rack enclosures require at least 17” (432mm) of front clearance and 6”
(152mm) of clearance to the left of the DRd rack door hinge from walls or other
equipment to allow for installation and removal of modules after installation.
If you do not allow this clearance, energization, operation and maintenance of your
DRd rack enclosure will be significantly difficult.
DRd Rack Enclosure Specification and Installation
Reference the DRd Rack Enclosure Installation Manual for rack installation details, including all
mechanical, electrical and control wire requirements.
Rough-in Dimensions
DRd6 kit
32.25”
(819mm)
DRd12 kit
41.5”
(1,054mm)
Both kits are
4” (102mm)
Both kits are
20” (559mm)
Kit Type
DRd6 Semi-Recessed kit 32.25 819 20 448 4 102 15 6.8
DRd12 Semi-Recessed kit 41.5 1,054 20 448 4 102 19 9
Height Width Depth
inches mm inches mm inches mm lbs kgs
Semi-
recessed kit
Product
Weight
DRd Semi-Recessed Installation Kit Installation Guide Page 2 of 8 Electronic Theatre Controls, Inc.
Page 3
ETC Installation Guide
DRd6 kit
36”
(906mm)
DRd12 kit
45”
(1,143mm)
Both kits are
22” (559mm)
Both kits are
10” (250mm)
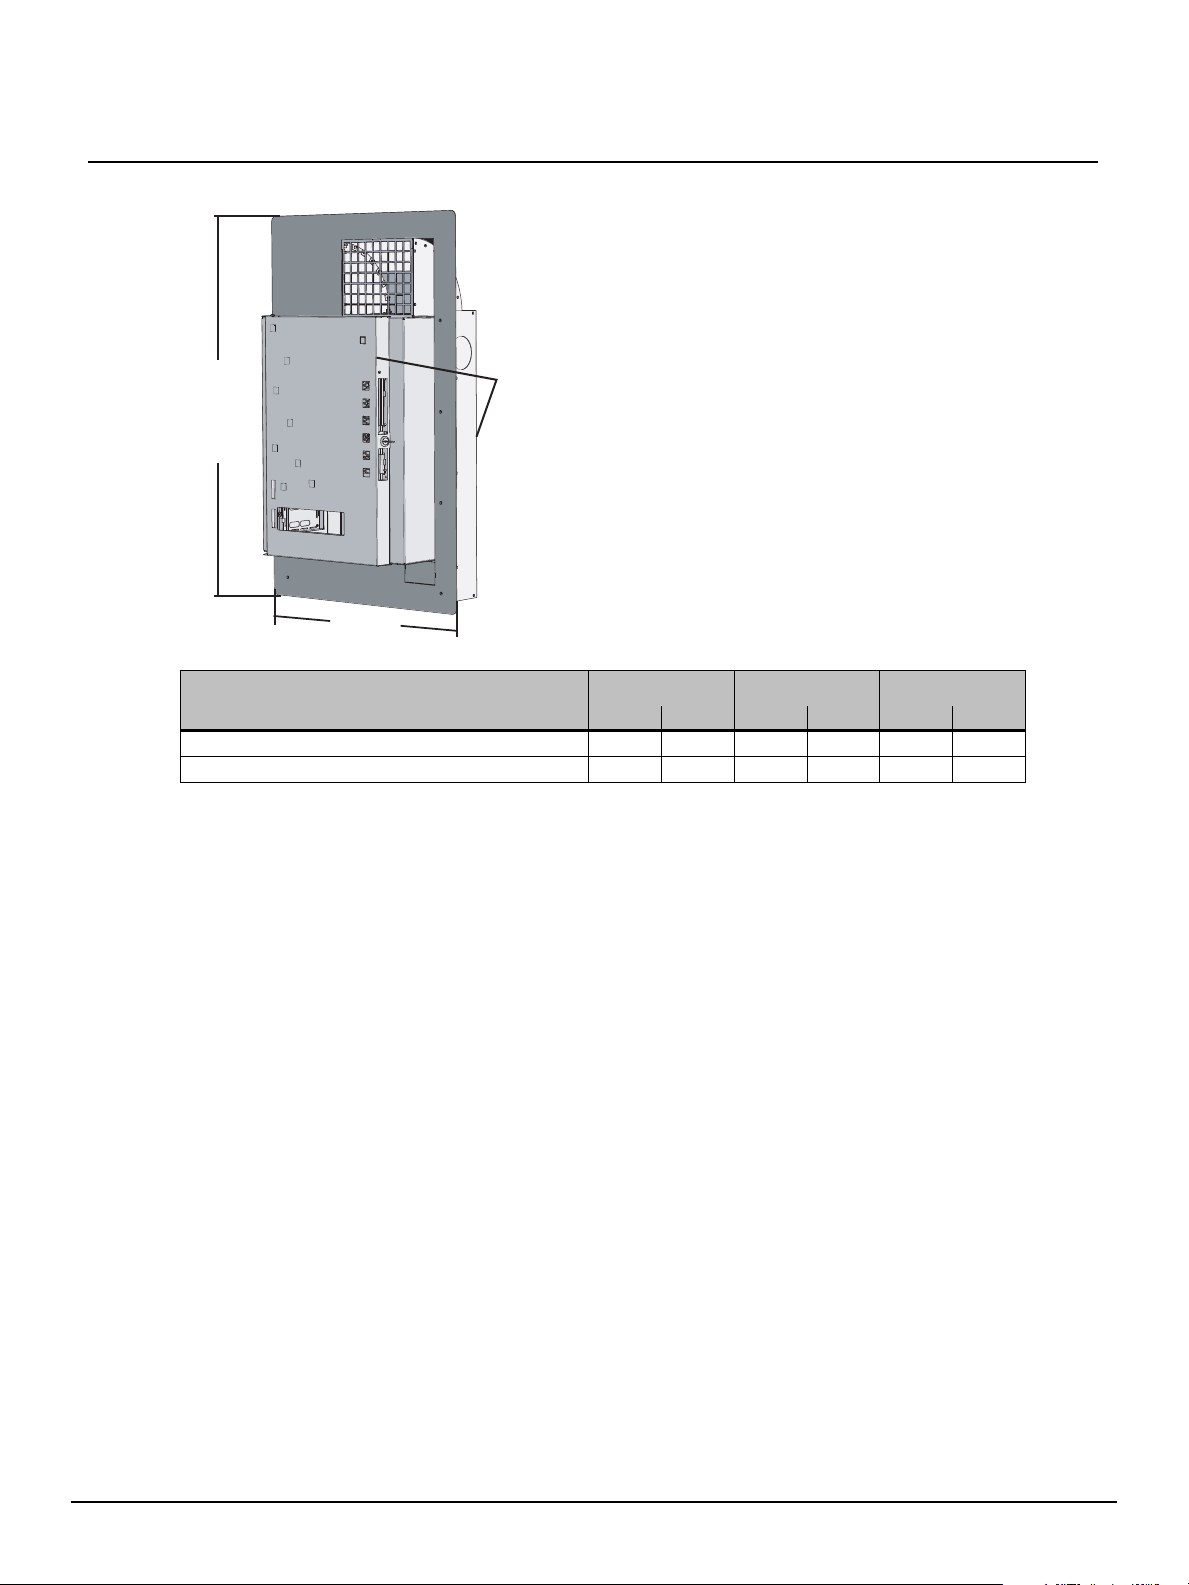
The dimensions in the table below are provided as
an estimation of the final installation including a
DRd rack enclosure and cover.
DRd Semi-Recessed Installation Kit
Finished Installation Dimensions
Kit / Rack Type
DRd6 Semi-Recessed kit with DRd6 installed 36 906 22 559 10 250
DRd12 Semi-Recessed kit with DRd12 installed 45 1,143 22 559 10 250
Height Width Depth
inches mm inches mm inches mm
Required Tools and Hardware
The items listed below are required (not provided) to install the Semi-Recessed installation kit.
• 6 each 1/4” mounting hardware (lag bolts preferred) for securing the recessed enclosure to
framing
• adjustable wrench to secure the DRd rack into the enclosure
• #10 nut driver or socket for extension rail adjustment or removal
• #2 Philips head screwdriver to secure the front cover during final installation
DRd Semi-Recessed Installation Kit Installation Guide Page 3 of 8 Electronic Theatre Controls, Inc.
Page 4

ETC Installation Guide
Step 4:
secure
each side
DRd Semi-Recessed Installation Kit
Installation
Mounting the Rough-in
The wall frame and blocking must be strong enough to hold the Semi-Recessed installation kit and the
DRd rack enclosure fully populated with modules, conduit and wire.
Store the cover in a safe location for installation during final installation.
Step 1: Determine where your rack will be installed. It is
recommended that you install the rack at least
36” (915mm) off the floor surface to ensure clear
view of the user interface.
Step 2: Prepare and construct framing / blocking to the
rough opening dimensions specified in Rough-in
Dimensions on page 2.
WARNING:
Step 3: Align the enclosure between the framed studs,
Step 4: Locate the three screw holes provided on each
Step 5: Adjust or Remove the extension rails depending on the type of construction framing used
Once installed, this product may be in contact
with a wall surface in the room behind it.
This could subject a person to electrical
shock as well as damage the DRd if objects
could be installed, nailed to, or screwed
into the opposite wall surface.
If this risk exists, install a suitable barrier
between the recessed enclosure and the
opposite wall surface.
ensuring it is level (flush is not required) to the
surface.
side of the enclosure and secure the rough-in
enclosure to the wall studs using 1/4” hardware
(lag bolts recommended but not provided).
for this installation.
• For installations utilizing 2”x4” construction, the extension rails are not required and
should be removed. Remove the 10-32 nuts (four per side) that secure the rails to
the enclosure.
• For installations utilizing 2”x6” construction, adjust the extension rails to be flush
with the drywall or finished surface. Loosen the 10-32 nuts that secure the rails and
adjust the rail to the required depth, then re-tighten the 10-32 nuts.
DRd Semi-Recessed Installation Kit Installation Guide Page 4 of 8 Electronic Theatre Controls, Inc.
Page 5

ETC Installation Guide
a: Loosen the two captured screws that secure the access panel.
b: Gently pull the panel straight down until the top of the access panel is
clear of the rack.
c: Tilt the supply access panel away from the rack.
d: Disconnect the three cables that are attached to the unit.
• For the cable bundle on the left side, squeeze the tabs on either
side of the connector and gently pull the cable until it is free.
• For the ribbon cable connected on the right rear side, release the
tabs on either side of the connector by sliding them opposite the
connector then gently pull the cable free.
• For the two wire cable on the right side, gently pull the connector
straight out.
DRd Semi-Recessed Installation Kit
Plan Conduit Entry and Wire Routing
This section is specific to preparation of the DRd rack for installation into the recessed enclosure.
Openings are provided on the top and bottom of the recessed enclosure, providing conduit access to
the DRd enclosure.
Note:
Step 1: Plan conduit and wire routing to the DRd rack enclosure. Reference the Unison DRd Rack
Step 2: Mark the desired conduit access (top, bottom) on the DRd rack. Be sure to read and
Step 3: Remove the power supply/dimming engine access panel to allow for better access in the
It may be helpful to temporarily install the DRd rack into the recessed enclosure and
mark the opening. This allows for certain placement of conduit entry.
Components on the bottom of the DRd rack prohibit conduit entry in certain locations.
A label denoting acceptable conduit access on the bottom panel of the DRd rack
defines the acceptable conduit access.
Enclosure Installation Manual “Wire Routing and Specification” section to plan wire
routing.
comply with the label inside the DRd rack which details the recommended access
locations for conduit entry into the bottom of the rack.
top of the DRd rack enclosure while roughing-in conduit and cable.
Step 4: Punch holes into the planned conduit entry location of the DRd rack and install conduit
fittings or insert lining materials in the conduit opening.
Step 5: Be sure there are minimal air gaps. Reference the Unison DRd Rack Enclosure
Installation Manual, “Sealing Rack Air Leaks” for instruction.
CAUTION:
DRd Semi-Recessed Installation Kit Installation Guide Page 5 of 8 Electronic Theatre Controls, Inc.
Wire openings must have fittings, bushings, grommets or fiche paper lining material to
protect the wire and cable insulation from damage by sharp metal edges, and to
prevent air leaks.
Page 6

ETC Installation Guide
Step 1: Remove the DRd rack enclosure
door before installing the DRd into
the recessed enclosure.
• Open the rack door and
separate the ground cable
between the rack and the door
by pulling the faston tab free.
• Remove the screw securing
the bottom of the rack.
• Remove the screw securing
the top of the rack and the
door should be free.
Step 2: Store the rack door and hardware
in a safe location until final
installation.
Step 3: Insert the DRd rack into the recessed enclosure.
a: Angle the DRd rack top side first into the recessed
enclosure first, clearing the fan grill and any conduit
fittings (if any).
b: Then rest the bottom edge of the DRd on the small
ledge that is provided on the back pane of the
enclosure. The keyholes on the rear panel of the
DRd should align to the threaded studs on the
recessed enclosure.
DRd Semi-Recessed Installation Kit
Install DRd Rack Enclosure
Step 4: Secure the DRd rack into place using four 5/16” nuts and washers provided. Tighten the
hardware securely.
Complete DRd Rack Installation
Refer to the Unison DRd Rack Enclosure Installation Manual, to complete the DRd rack installation.
DRd Semi-Recessed Installation Kit Installation Guide Page 6 of 8 Electronic Theatre Controls, Inc.
Page 7

ETC Installation Guide
Set the fan speed switch to the aft position, away
from the 2-pin wire harness connector.
This switch must be set prior to power up as it
determines what the fan speed will be when run in
a recessed rack mode.
DRd Semi-Recessed Installation Kit
Final Installation
Power Supply / Dimming Engine Access Panel
The power supply/dimming engine was removed from the DRd rack prior to installing conduit and
termination wires. Before reinstalling this access panel you must change the fan speed switch setting.
Set Fan Speed Switch
Re-install the Power Supply / Dimming Engine Access Panel
Step 1: Replace the dimming engine.
a: Align the panel perpendicular to the enclosure.
b: Align the guide pins into the top of the guide slots on the DRd.
c: Slide the panel down the guided slots.
Step 2: Reconnect the three cables to the panel:
a: For the cable bundle on the left side, push the cable into the connector. The black wire
will be closest to you and the blue will be farthest away. The first and sixth pins are flat
on one side to prevent the cable from being connected the wrong way.
b: For the ribbon cable on the right rear side, gently push the cable into the connector. The
tabs on the sides of the connector will close when the cable is properly connected. The
ribbon cable has a small tab to prevent it from being connected the wrong way. The tab
will be toward the rear of the enclosure.
c: For the two-wire cable on the right side, gently push the connector straight down. The
black wire will be toward the right side of the rack, and the red will be toward the left.
Step 3: Rotate / tilt the dimming engine toward the rack enclosure.
Step 4: Gently push the dimming engine up.
Step 5: Tighten the two captured screws to secure the panel to the rack.
DRd Semi-Recessed Installation Kit Installation Guide Page 7 of 8 Electronic Theatre Controls, Inc.
Page 8

ETC Installation Guide
Use whichever sequence you prefer to
re-attach the DRd rack door to the enclosure,
ensuring the top screw and bottom screw, as
well as the ground spade are re-installed.
The following sequence has proven to be
successful.
Step 1: Align the door to the enclosure
in the closed position. The top
and bottom hinge brackets
should be aligned over the
screw holes.
Attach the cover using the eight 10-32 screws provided.
DRd Semi-Recessed Installation Kit
Install DRd Rack Door
Note:
Step 2: Install the top and bottom screws.
Step 3: Re-attach ground spade to its receptacle on the rack door.
The DRd enclosure and rack door are provided with magnets that help maintain the
door in a closed position during unlocked operation. DO NOT rely on this magnet to
hold the door when it is unassisted and unattached.
Install Semi-Recessed Finished Cover
The finished cover for this installation kit simply installs over the DRd rack, securing with screws directly
to the rough-in enclosure or the extension rails, if they are used.
Note:
Before attaching the cover, notice that its is provided with a removable panel located
on the lower right hand corner. Remove this panel (similar to a knockout) ONLY if the
DRd rack is installed with a Unison Battery Pack (UBPO).
DRd Semi-Recessed Installation Kit Installation Guide Page 8 of 8 Electronic Theatre Controls, Inc.
 Loading...