

Page 1
ETC Setup Guide
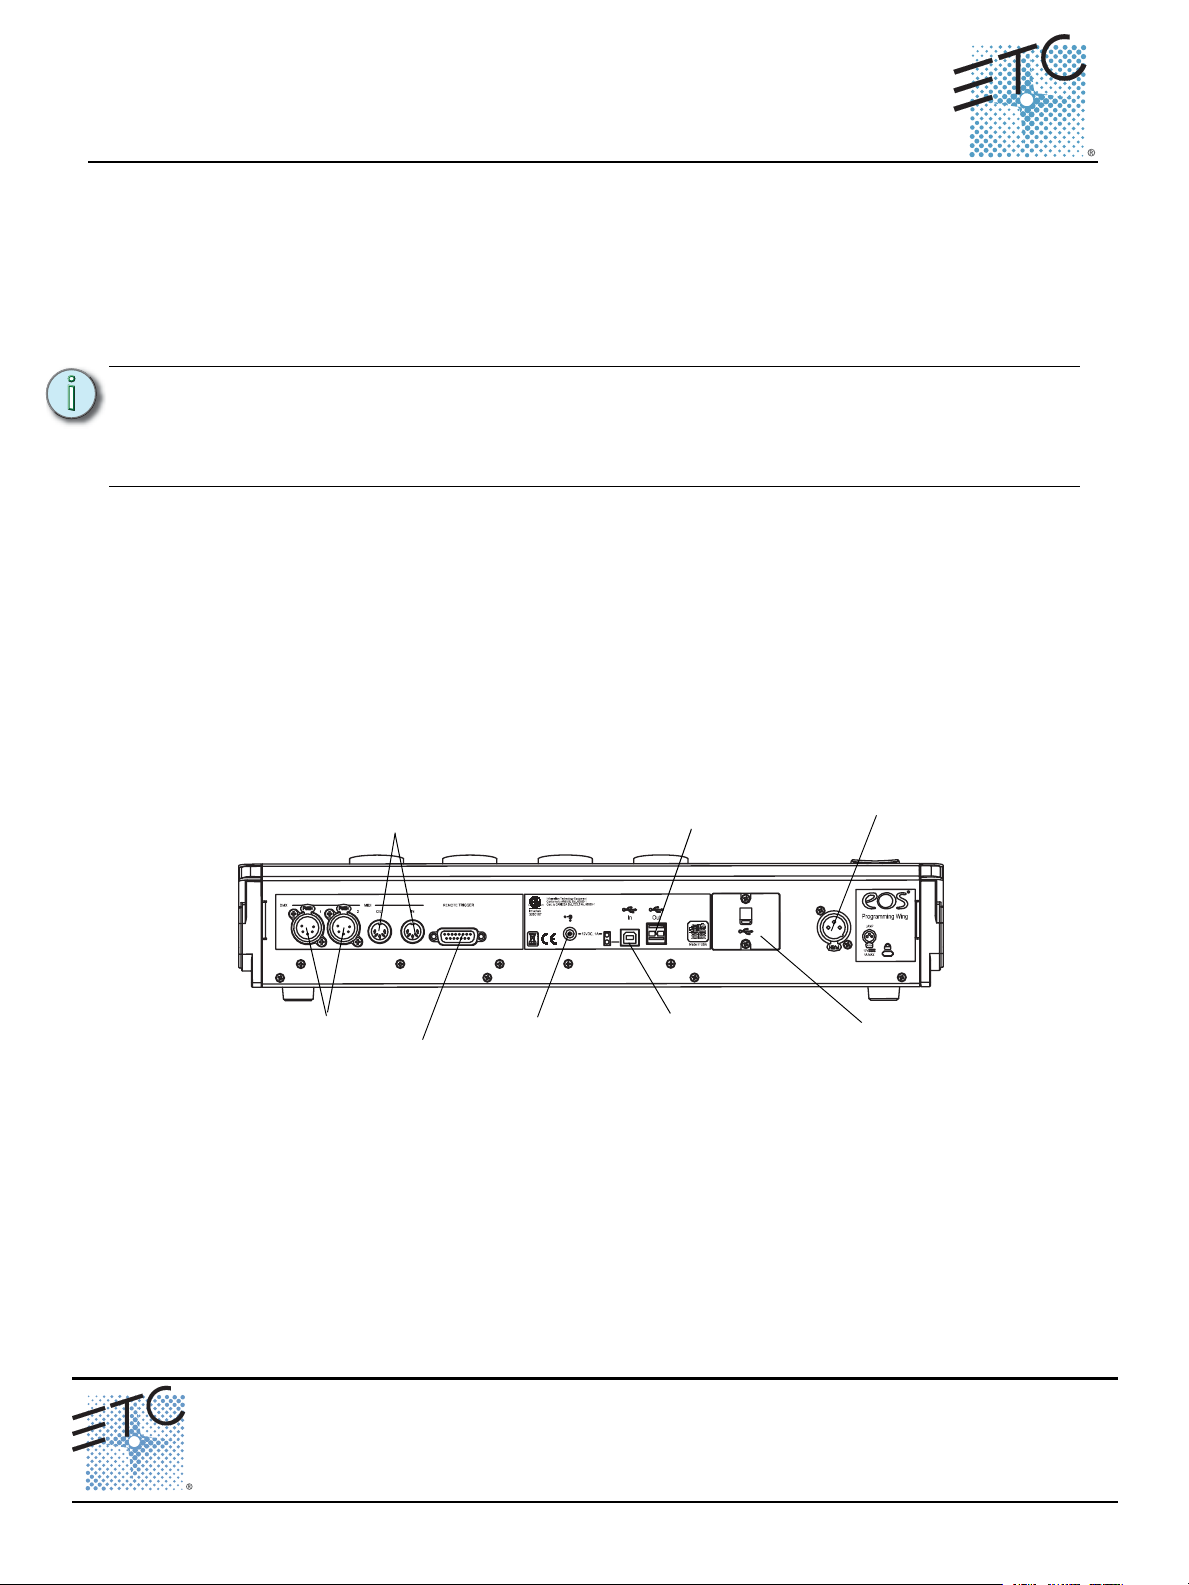
DMX x2
Remote
Trigger
Midi In
& Out
Desk Lamp
Power
Input
USB Type B
Connector
(For connecting
to a host device)
USB Type A
Connector
ETCnomad
Dongle
Keeper
Console Accessory Wings
Eos® Programming Wing
For information about the Cobalt Programming Wing, see page 3, and for the Cobalt Motor Fader Wing,
see page 5.
This section outlines the setup of your Eos Programming Wing. For additional information, please refer to
the Eos Ti, Eos, and Gio Operations Manual, which can be downloaded from our website at
www.etcconnect.com.
Note:
The Eos Programming Wing requires Windows 7 / 8.1 or higher or Mac OS X Yosemite
(10.10) or higher. The programming wing will not work with Windows XP.
The Eos Programming Wing is only compatible with the Windows 7 Eos Family consoles
listed below.
The Eos Programming Wing can be used with ETCnomad, ETCnomad Puck, RVI, Ion RPU, RPU3 and RVI3.
The Eos Programming Wing ships with the following:
• Power supply
• IEC power cord
• This setup guide
• Dust cover
•USB cord
Hardware Setup
Rear Panel
Step 1: Attach the power supply to the power input.
Step 2: Connect the programming wing to a computer, ETCnomad Puck, or RVI/RPU3 via the USB
Type B Connector. You will need to use a Type A to Type B USB cable (provided).
Step 3: Connect any additional cables or accessories that are needed.
Corporate Headquarters Middleton, WI, USA Tel +608 831 4116 Service: (Americas)
London, UK Tel +44 (0)20 8896 1000 Service: (UK)
Rome, IT Tel +39 (06) 32 111 683 Service: (UK)
Holzkirchen, DE Tel +49 (80 24) 47 00-0 Service: (DE)
Hong Kong Tel +852 2799 1220 Service: (Asia)
Web: www.etcconnect.com © 2015 ETC. All Rights Reserved. Product information and specifications subject to change.
4240M2200
Console Accessory Wings Page 1 of 6 Electronic Theatre Controls, Inc.
Rev B Released 2015-11 ETC intends this document to be provided in its entirety.
service@etceurope.com
service@etceurope.com
techserv-hoki@etcconnect.com
service@etcasia.com
service@etcconnect.com
Page 2
ETC Setup Guide
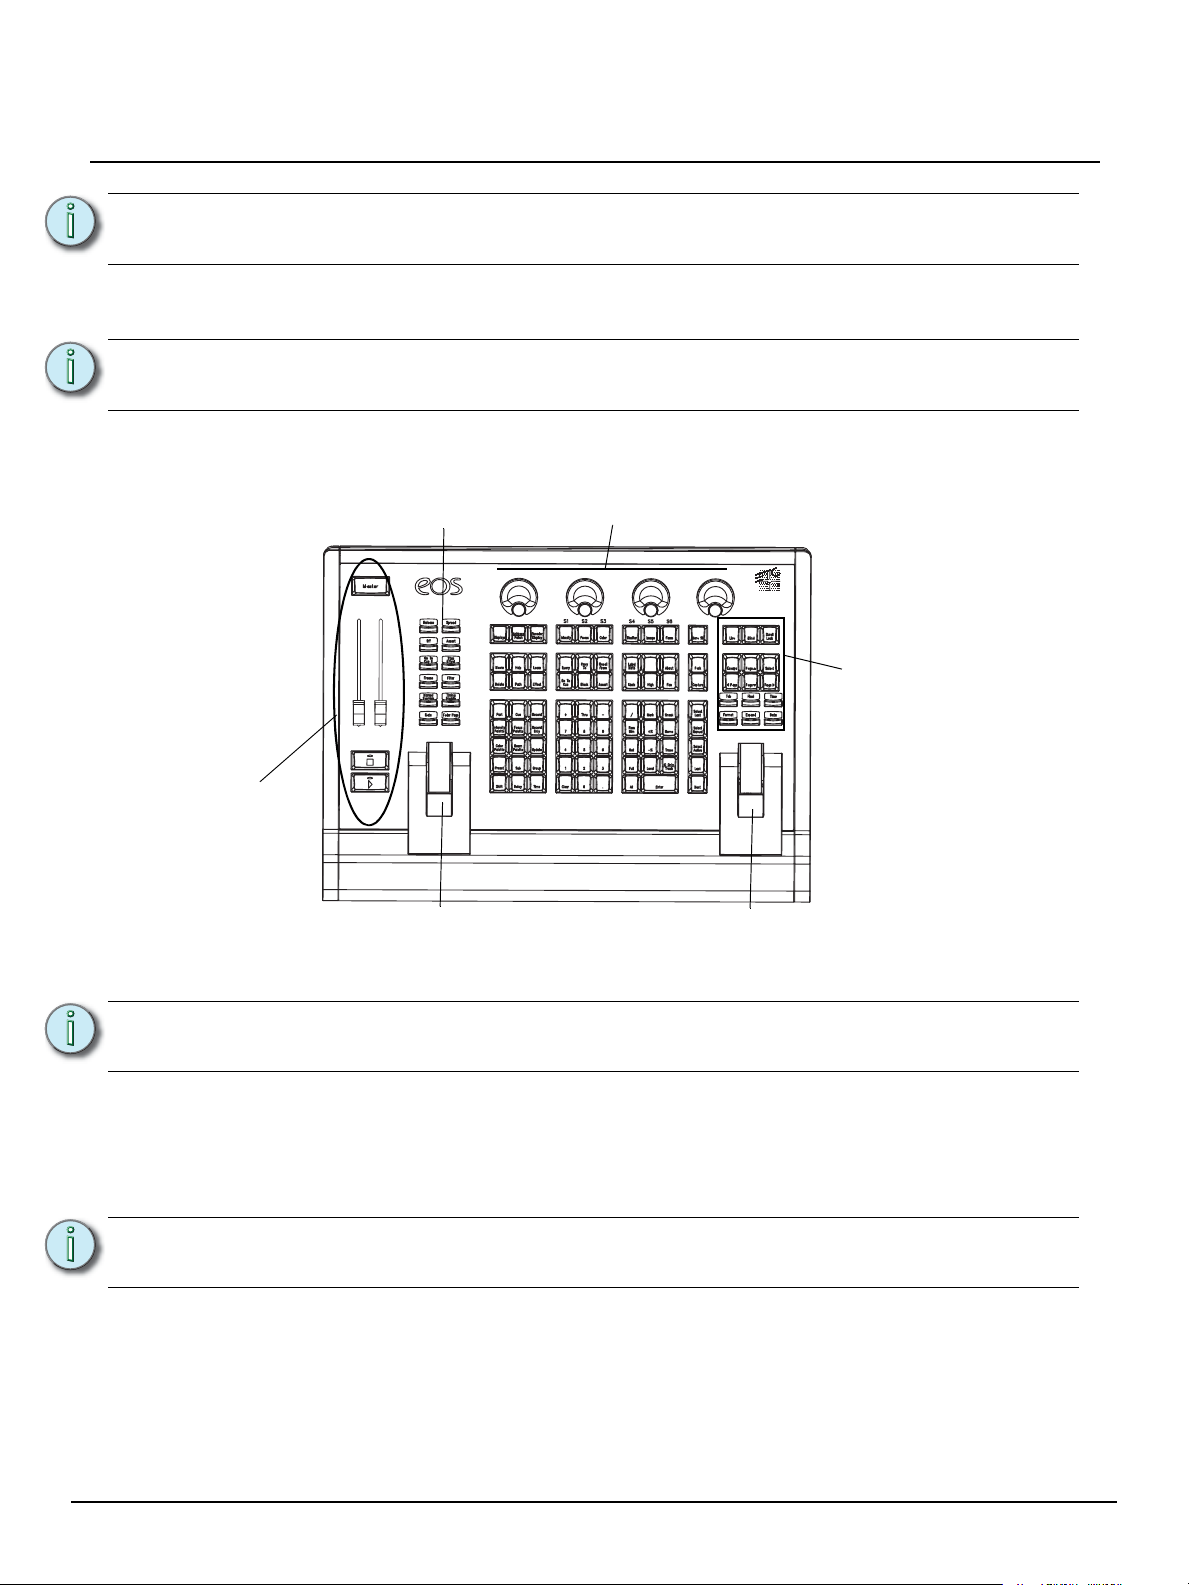
Encoders
Navigation Keys
Level
Wheel
Control Keypad
Rate
Wheel
Fader
Control
Buttons
Playback
Controls
Console Accessory Wings
Note:
When first connected to a PC or Mac that has ETCnomad software installed, drivers will automatically
install. After that installation, the Programming Wing will be ready to use.
Note:
To power on the wing, power input and a USB connection to an RVI, Ion RPU, RVI3,
RPU3, ETCnomad Puck, or a device running ETCnomad are required.
It is recommended that the programming wing be connected before launching the
ETCnomad software, or starting up a RPU or RVI.
Front Panel
Note:
Settings
In the ECU>Settings>Local I/O, settings are available for the Eos Programming Wing. From this screen,
you can configure the port address, enable Doubled, and set the port speed. Multiple devices will appear
in separate boxes and can be identified by their serial numbers.
Note:
Also available on this screen are the Show Control settings for configuring the remote trigger and MIDI
ports. Please see the Eos Family Show Control Setup Guide for more information.
Console Accessory Wings Page 2 of 6 Electronic Theatre Controls, Inc.
For information about controlling the brightness of the keyboard and a desk lamp, please
see the Setup chapter of the Eos Ti, Eos, and Gio Operations Manual.
With a Programming Wing connected, you will need to go into the main Eos application
first before the Programming Wing will display in the ECU.
Page 3

ETC Setup Guide
DMX/RDM x2
Remote
Trigger
Midi In
& Out
Desk Lamp
Power
Input
USB Type A
Connector
USB Type B
Connector
(For connecting
to a host device)
ETCnomad
Dongle
Keeper
Console Accessory Wings
Cobalt® Programming Wing
This section outlines the setup and configuration of your Cobalt Programming Wing. For additional
information, please refer to the Cobalt User Manual that shipped with your console or you may download
it from our website at www.etcconnect.com.
Note:
The Cobalt Programming Wing can be used with ETCnomad, ETCnomad Puck, RVI, and RVI3. Cobalt
Programming Wing ships with the following:
• Power supply
• IEC power cord
• This setup guide
• Dust cover
•USB cord
The Cobalt Programming Wing is compatible with devices running Windows 7 / 8.1 or
higher or Mac OS X Yosemite (10.10) or higher as listed below. The programming wing
will not work with any Congo family or Cobalt family console (already containing a
programming panel) or with the Congo or Cobalt Light Server, or with any device running
Windows XP.
Hardware Setup
Rear Panel
Step 1: Attach the power supply to the power input.
Step 2: Connect the programming wing to a computer, ETCnomad Puck, RVI, or RVI3 via the USB
Type B Connector. You will need to use a Type A to Type B USB cable (provided).
Step 3: Connect any additional cables or accessories that are needed.
Note:
When first connected to a PC or Mac that has ETCnomad software installed, drivers will automatically
install. After that installation, the Programming Wing will be ready to use.
Console Accessory Wings Page 3 of 6 Electronic Theatre Controls, Inc.
To power on the wing, power input and a USB connection to an RVI, RVI3, ETCnomad
Puck, or a device running ETCnomad are required.
Page 4

ETC Setup Guide
Main
Playback
Output
Control
Encoders
Level
Wheel
Master
Playbacks
Control Keypad
Console Accessory Wings
Note:
Front Panel
It is recommended that the programming wing be connected before launching the
ETCnomad software, or starting up an RVI.
Note:
Settings
In Browser>General Settings>DMX Settings, settings are available for the Cobalt Programming Wing.
You can configure the port address and set the port speed.
Available in Browser>General Settings>Play Settings, in the MIDI tab are the Show Control settings for
configuring the MIDI ports.
For information about controlling the brightness of the keyboard and a desk lamp, please
see the Console Settings section of the Cobalt User Manual.
Console Accessory Wings Page 4 of 6 Electronic Theatre Controls, Inc.
Page 5

ETC Setup Guide
Power
Input
USB Type A
Connector
USB Type B
Connector
(For connecting to a
host device)
Console Accessory Wings
Cobalt Motor Fader Wing
This section outlines the setup and configuration of your Cobalt Motor Fader Wing. For additional
information, please refer to the Cobalt User Manual that shipped with your console or you may download
it from our website at www.etcconnect.com.
Note:
Note:
The Cobalt Motor Fader Wing can be used with ETCnomad, ETCnomad Puck, Cobalt Light Server, RVI, and
RVI3. Cobalt Motor Fader Wing ships with the following:
• Power supply
• IEC power cord
• This setup guide
• Dust cover
•USB cord
The Cobalt Motor Fader Wing is compatible with devices running Windows 7 / 8.1 or
higher or Mac OS X Yosemite (10.10) or higher as listed below. The motor fader wing
will not work with any device running Windows XP.
Only a single Cobalt Motor Fader Wing is supported at this time.
Hardware Setup
Rear Panel
Step 1: Attach the power supply to the power input.
Step 2: Connect the motor fader wing to a computer, ETCnomad Puck, Cobalt Light Server, RVI, or
RVI3 via the USB Type B Connector. You will need to use a Type A to Type B USB cable
(provided).
Step 3: Connect any additional cables or accessories that are needed.
Note:
When first connected to a PC or Mac, that has ETCnomad software installed, drivers will automatically
install. After that installation, the Programming Wing will be ready to use.
Console Accessory Wings Page 5 of 6 Electronic Theatre Controls, Inc.
To power on the wing, power input and a USB connection to an RVI, RVI3, Cobalt Light
Server, ETCnomad Puck, or a device running ETCnomad are required.
Page 6

ETC Setup Guide
Cobalt 20 Motor Fader Wing Cobalt 10 Motor Fader Wing
Console Accessory Wings
Note:
Front Panel
It is recommended that the wing be connected before launching the ETCnomad
software, or starting up an RVI.
Note:
For information about controlling the brightness of the wing, please see the Console
Settings section of the Cobalt User Manual.
Console Accessory Wings Page 6 of 6 Electronic Theatre Controls, Inc.
 Loading...