

Page 1
ETC® Supplement
Workspaces
Display
Controls
Menu Button
Tabs
A Frame
Eos Family v2.2 Supplement to Operations Manual
The following information is new for version 2.2.0. This document is supplemental to and should be
used in conjunction with information in the Eos Titanium, Eos, and Gio v2.0 Operations Manual, Ion
v2.0 Operations Manual, and the Element v2.1.0 User Manual..
CAUTION:
If you choose to update fixture definitions in your existing show files after
upgrading to version 2.2, it is recommended that you verify that your show plays
back as expected. Changes have been made to the fixture library to make fixtures
in future shows easier to control, however, these changes will impact existing
shows after you manually update fixture definitions. For more information, see
Changes to Fixtures on page 16
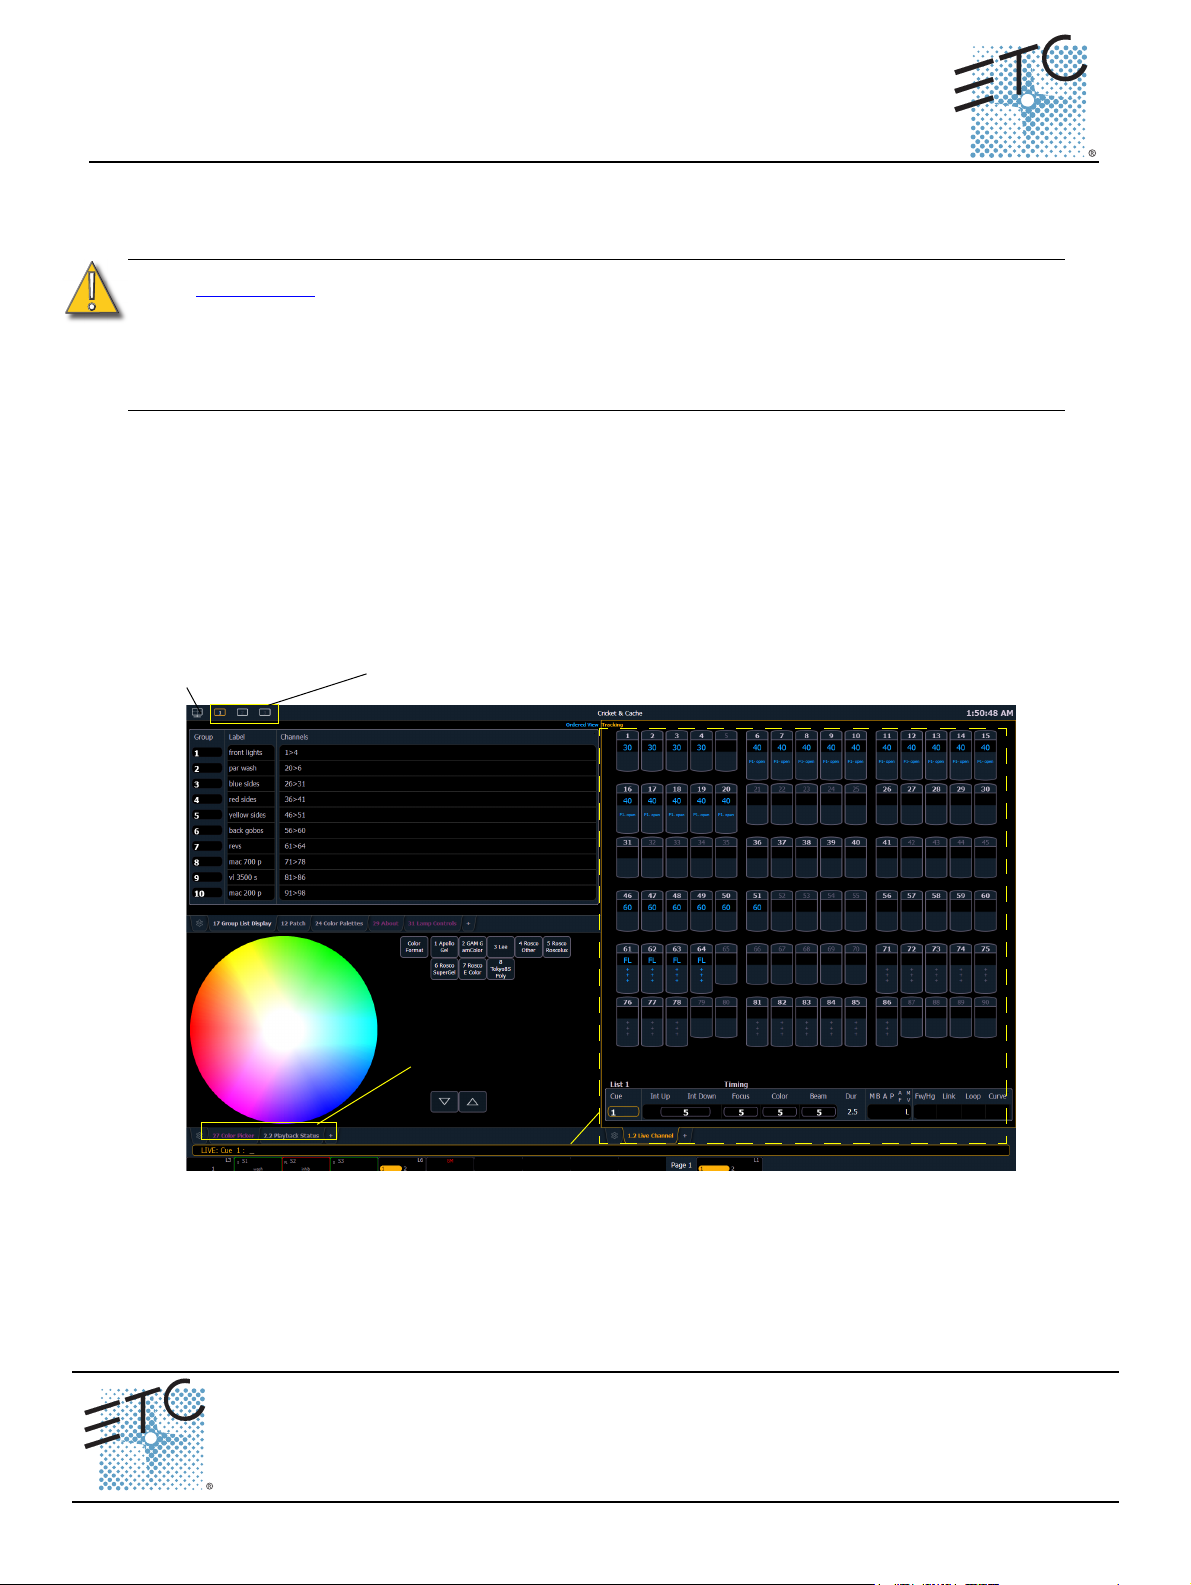
Display Management Tools
One of the most significant improvements to the Eos family in this software release are the
enhanced display management tools. The software provides improved capabilities for opening and
navigating displays and control tools.
Increasing the depth of individual displays, this software introduces the ability to have one of three
different workspaces active on individual monitors, as well as to have up to four areas (called
frames) in use in any workspace. Each frame can hold multiple tabs.
Eos Family Operations Manual Supplement Page 1 Electronic Theatre Controls, Inc.
Monitors
Any physical monitor or touchscreen device connected to your console. The integral touchscreens
on Eos Ti are examples of monitors as are external monitors used with any of the Eos Family
consoles.
Corporate Headquarters
London, UK
Rome, IT
Holzkirchen, DE
Hong Kong Rm 1801, 18/F, Tower 1 Phase 1, Enterprise Square, 9 Sheung Yuet Road, Kowloon Bay, Kowloon, Hong Kong Tel +852 2799 1220 Fax +852 2799 9325
Service:
Web:
4250M1211-2.2.0
Unit 26-28, Victoria Industrial Estate, Victoria Road, London W3 6UU, UK Tel +44 (0)20 8896 1000 Fax +44 (0)20 8896 2000
Via Pieve Torina, 48, 00156 Rome, Italy Tel +39 (06) 32 111 683 Fax +44 (0) 20 8752 8486
(Americas) service@etcconnect.com
www.etcconnect.com
3031 Pleasant View Road, P.O. Box 620979, Middleton, Wisconsin 53562-0979 USA Tel +608 831 4116 Fax +608 836 1736
Ohmstrasse 3, 83607 Holzkirchen, Germany Tel +49 (80 24) 47 00-0 Fax +49 (80 24) 47 00-3 00
Rev B Released 2014-06 ETC intends this document to be provided in its entirety.
QSF 4.1.9.1
(UK) service@etceurope.com (DE) techserv-hoki@etcconnect.com
Copyright © 2014 ETC. All Rights Reserved. Product information and specifications subject to change.
(Asia) service@etcasia.com
Page 2
ETC Supplement
Workspaces
Further expanding your monitor capabilities, workspaces have been added to offer independent
display control on all of your connected monitors. Every monitor can have up to three workspaces,
identified by the workspace icons in the upper left corner of any monitor (including any integrated
touchscreens with your console).
Eos Family v2.2.0
You can use [Tab] + [Page
increment or decrement the current workspace and will then force all of the other workspaces to
match the current workspace’s number (1, 2, or 3). This is so you can quickly step through the
workspaces.
] and [Tab] + [Page ] to cycle through the workspaces. This will
Workspaces 1, 2, and 3
These three monitor icons are used to switch between each monitor’s available workspaces. Each
can be set up to include any of the desired layout, displays, and controls options offered on the
Home Screen (page 4) or the Display Controls Screen (page 6).
Frames
Each workspace can have up to four frames in its layout. The number of frames in a workspace
layout is determined by choosing from the Layout Options (page 4) offered in the Home Screen
(page 4) or the Monitor Options Screen (page 6).
Tabs
Any frame can have multiple tabs open. Tabs are now broken down into two categories: Control
and Display. Control tabs (see page 6 for a list of tabs) are the virtual control options that were
formerly available in the browser, such as the color picker and the virtual keyboard. Display tabs
(see page 5 for a list of tabs) are the various displays available on the console, such as the
playback status display and the park display.
You can open or close tabs using the Display Icons (page 5), Control Icons (page 6), or all of the
methods used in previous versions of software. Pressing [Shift] + [Tab] once will clear all tabs on
the selected monitor but tabs in locked frames will remain. Pressing [Shift] + [Tab] twice will clear
all tabs on all monitors but tabs in locked frames will remain. Pressing [Shift] + [Tab] a third time
will clear all tabs on all monitors including those in locked frames.
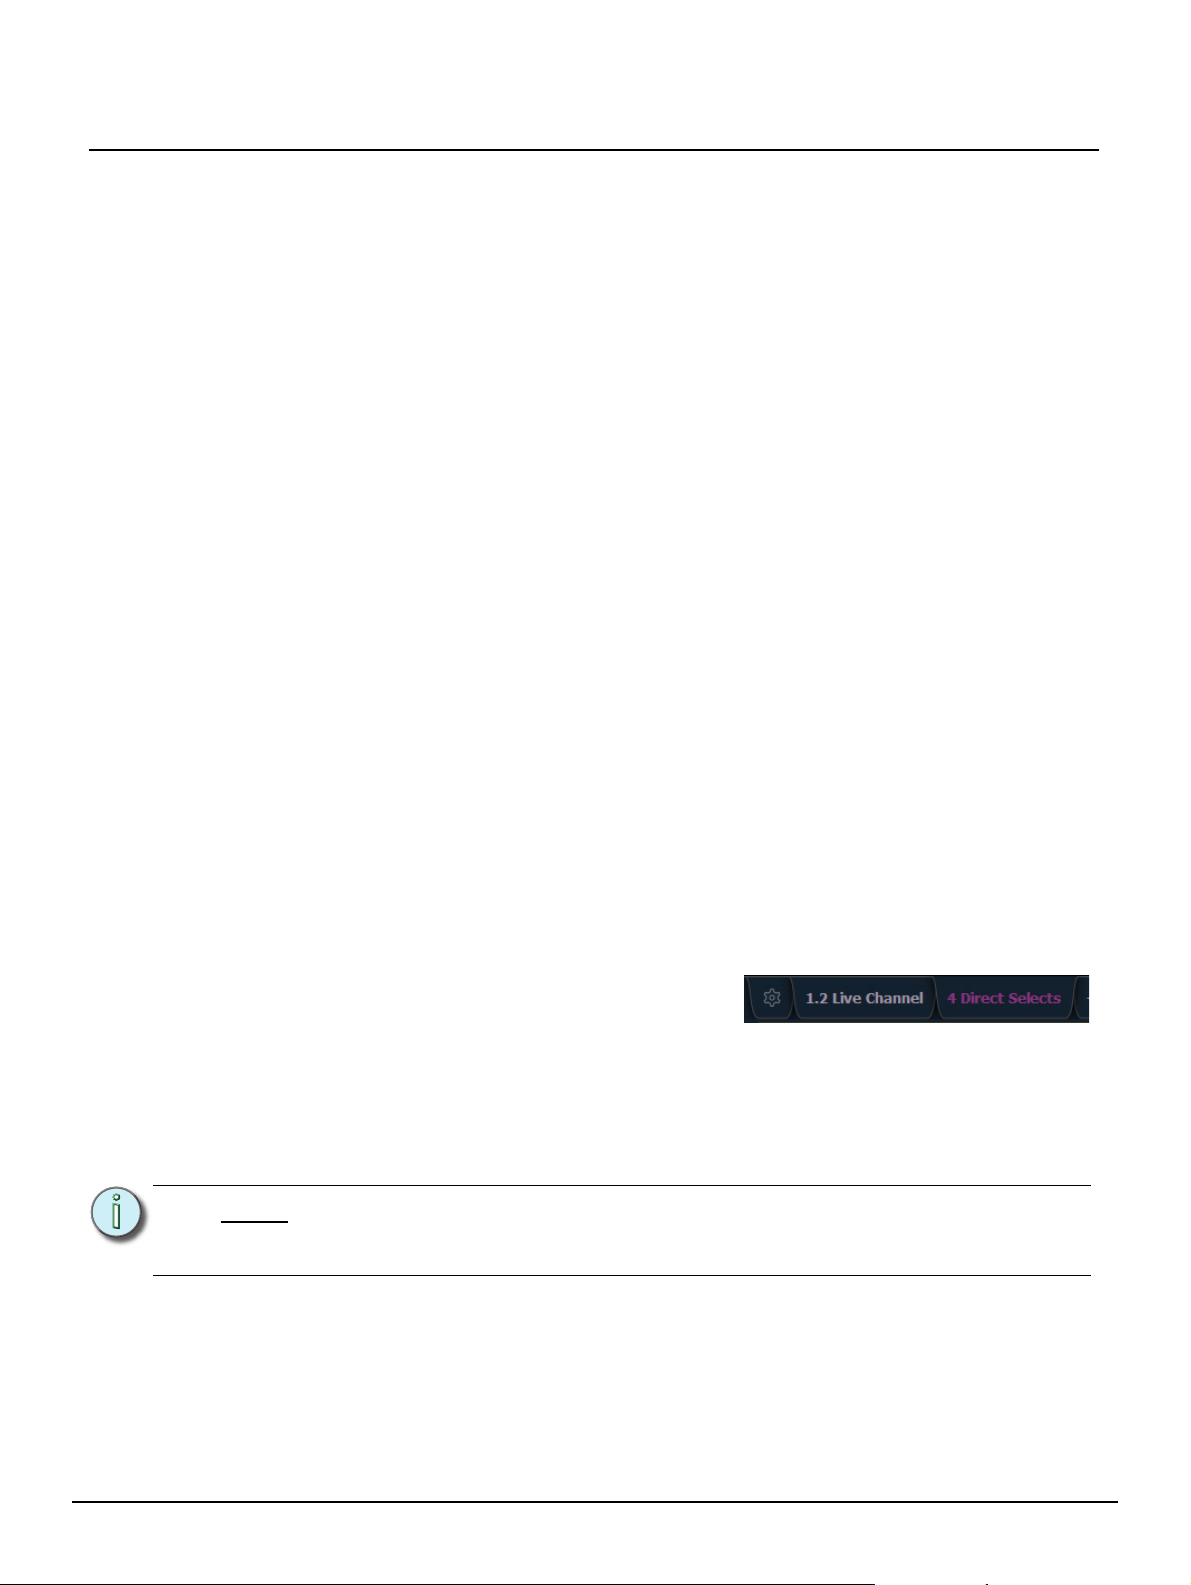
White text in the tab indicates a Display Tab, and magenta
text indicates a Control Tab.
All Display and Control Tabs have fixed tab numbering
under which they open (for example, “Live” opens under Tab 1, “Patch” under Tab 12, and “Color
Picker” under Tab 27). These numbers are identified on the Home Screen in each icon and in the
following table. For multiple instances of the same display, the tab number will be followed with a
decimal number. Additional tabs will start their numbering with n.2. When you press [Tab], active
focus will move numerically through all open tabs on active workspaces.
Note:
Eos Family Operations Manual Supplement Page 2 Electronic Theatre Controls, Inc.
Using just the [Tab] key to cycle through tabs will skip over any Control Tabs in
locked frames. Pressing [Tab] [n] will select the tab regardless of if it is in a locked
frame or not.
Page 3
ETC Supplement
Eos Family v2.2.0
This table lists the tab number for each of the Control and Display tabs.
1 Channels 11 Show Control List 21 Curve List 31 Lamp Controls
2 Playback Status Display 12 Patch 22 Intensity Palettes 99 Diagnostics
3 Magic Sheet Display 13 Effect List 23 Focus Palettes
4 Direct Selects 14 Magic Sheet List 24 Color Palettes
5 ML Controls 15 Submaster List 25 Beam Palettes
6 Effect Status 16 Cue List Index 26 Preset List
7 Virtual Keyboard 17 Group List 27 Color Picker
8 Effect Channels 18 Macro List 28 Virtual Faders
9 Pixel Map List 19 Snapshot List 29 About
10 Pixel Map Preview 20 Park 30 Command History
Focus Rules for Control and Display Tabs
Single clicking on a Controls Tab will bring it to the front of the frame but will not move focus to that
tab unless the tab’s frame already has focus. Double clicking on a Controls Tab will bring it to the
front and grab focus. Single clicking on a Display Tab will bring it to the front and grab focus.
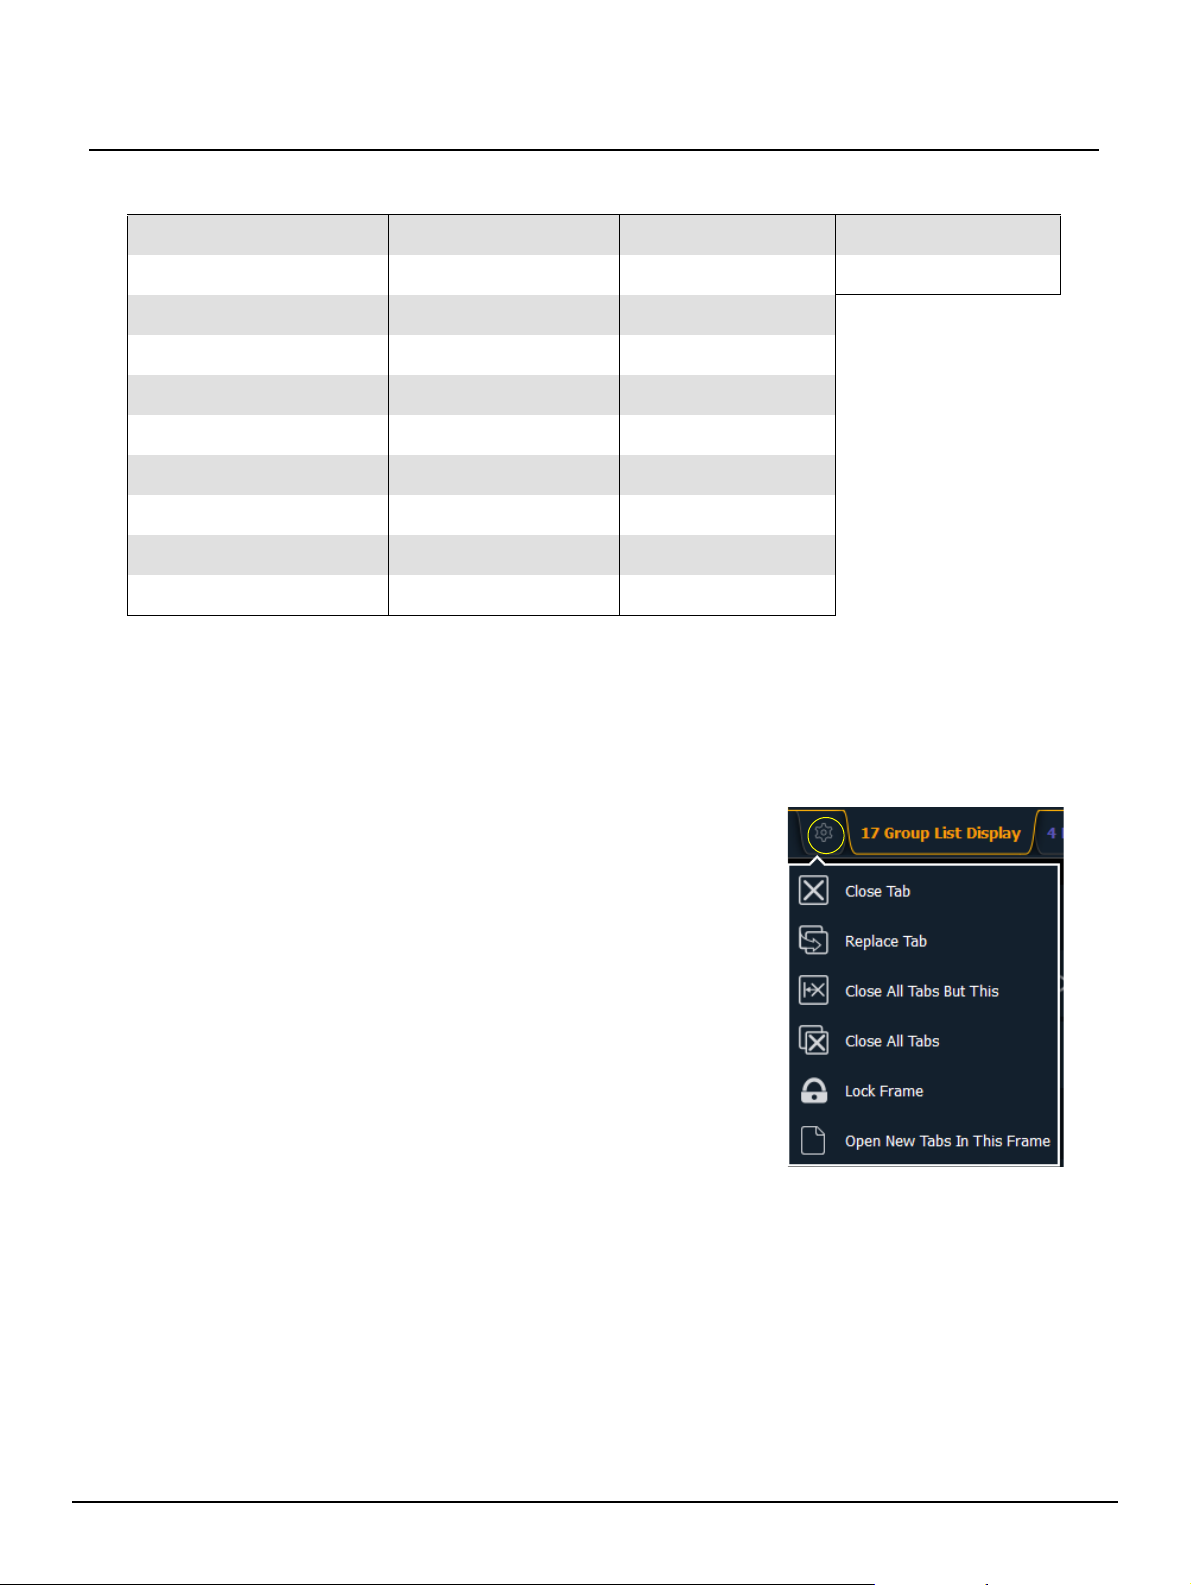
Tab Tools
Every frame has a tab tools menu in the lower left corner of the
frame. Selecting this menu icon will open the tab tools menu,
which provides options for opening and closing tabs in that
frame. You can left click with a mouse or double tap a tab in focus
to also see this menu. Most options are self-explanatory with the
following exceptions:
• “Replace Tab” allows you to close the current tab and
choose from the Home Screen which display to replace it
with. Pressing escape will return you to the previously
selected tab.
• “Lock Frame” prevents any additional tabs from being
opened in the selected frame.
• “Open New Tabs In This Frame” specifies that any new
tabs opened will automatically open in the specified frame.
Only one frame can have this option selected at a time.
Eos Family Operations Manual Supplement Page 3 Electronic Theatre Controls, Inc.
Page 4
ETC Supplement
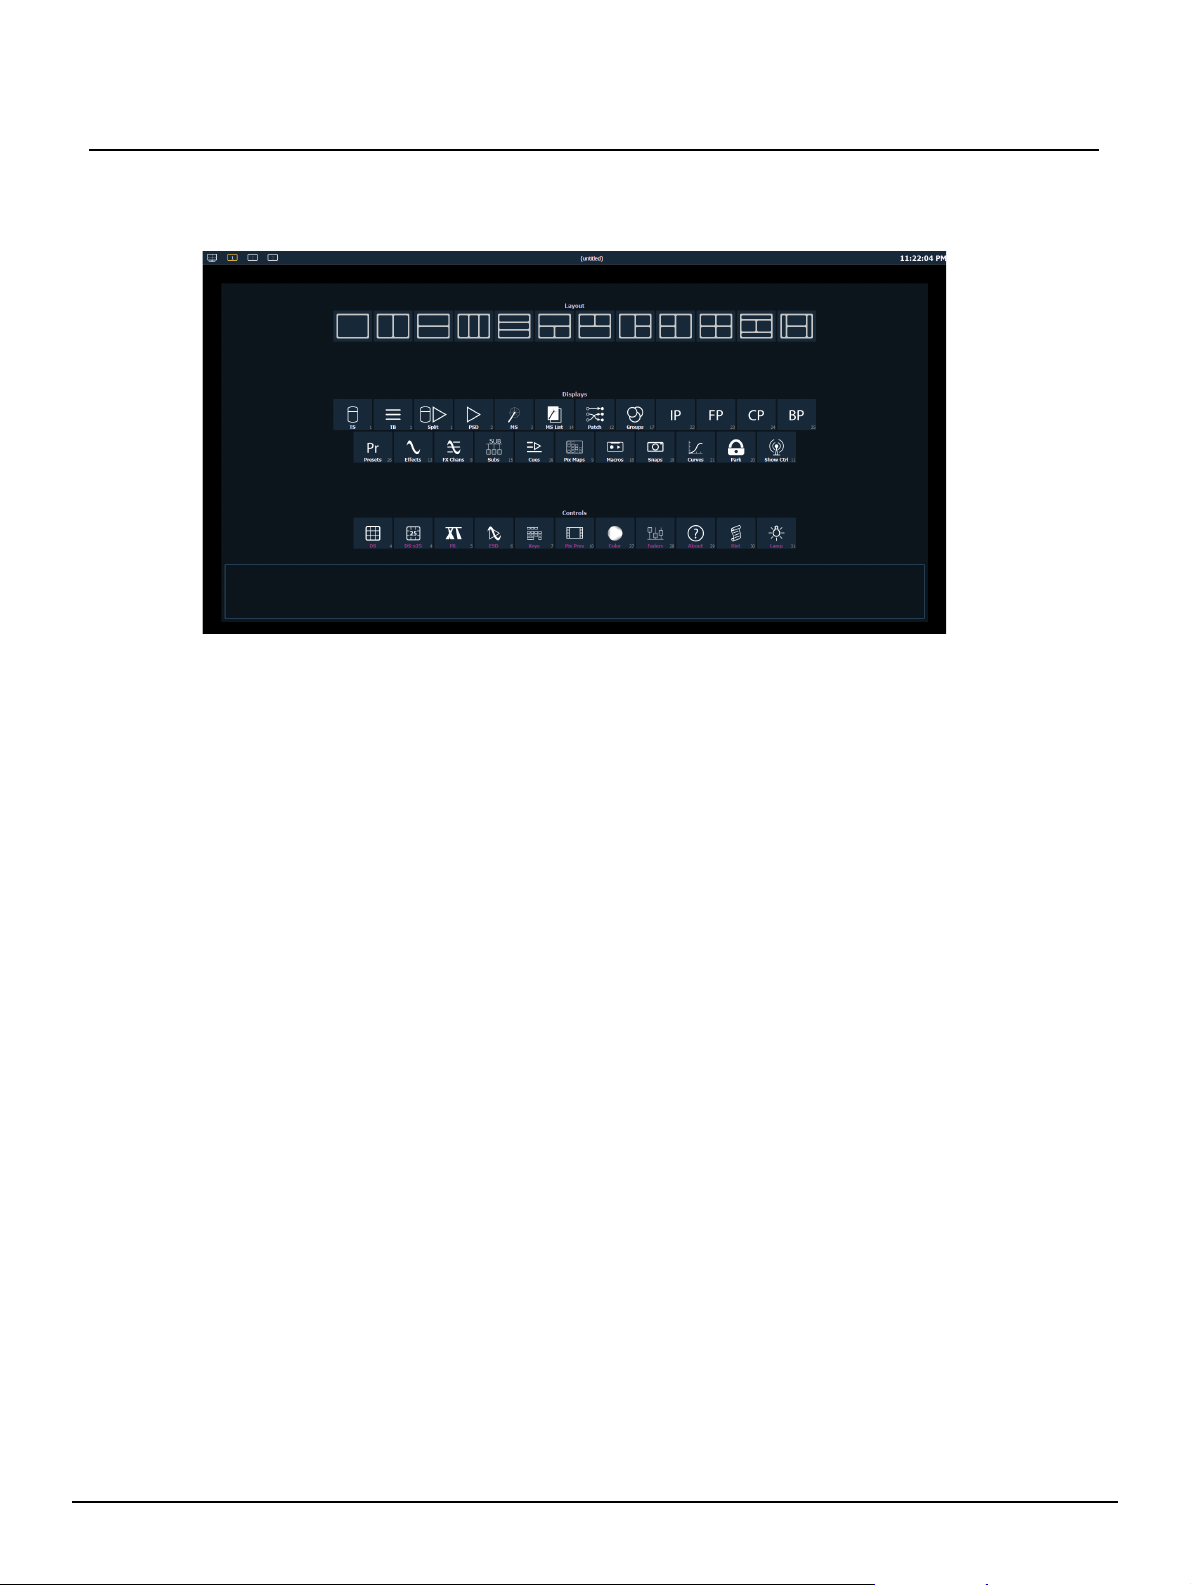
Snapshots Area
Layout Options
Display Icons
Control Icons
Home Screen
Upon start up or creation of a new show file, any connected monitor that is not already displaying
the Live or Playback Status Displays will show the Display Management Home Screen.
This screen consists of four general areas, each offering different display-related options.
Eos Family v2.2.0
Layout Options
These tools offer you greater flexibility in the number of tabs you can view in any given workspace.A
workspace can have up to four frames. Selecting a layout icon will assign the frame layout identified
in the icon. Once a layout is assigned, you can select which displays and controls will be in which
frames.
Eos Family Operations Manual Supplement Page 4 Electronic Theatre Controls, Inc.
Page 5
ETC Supplement
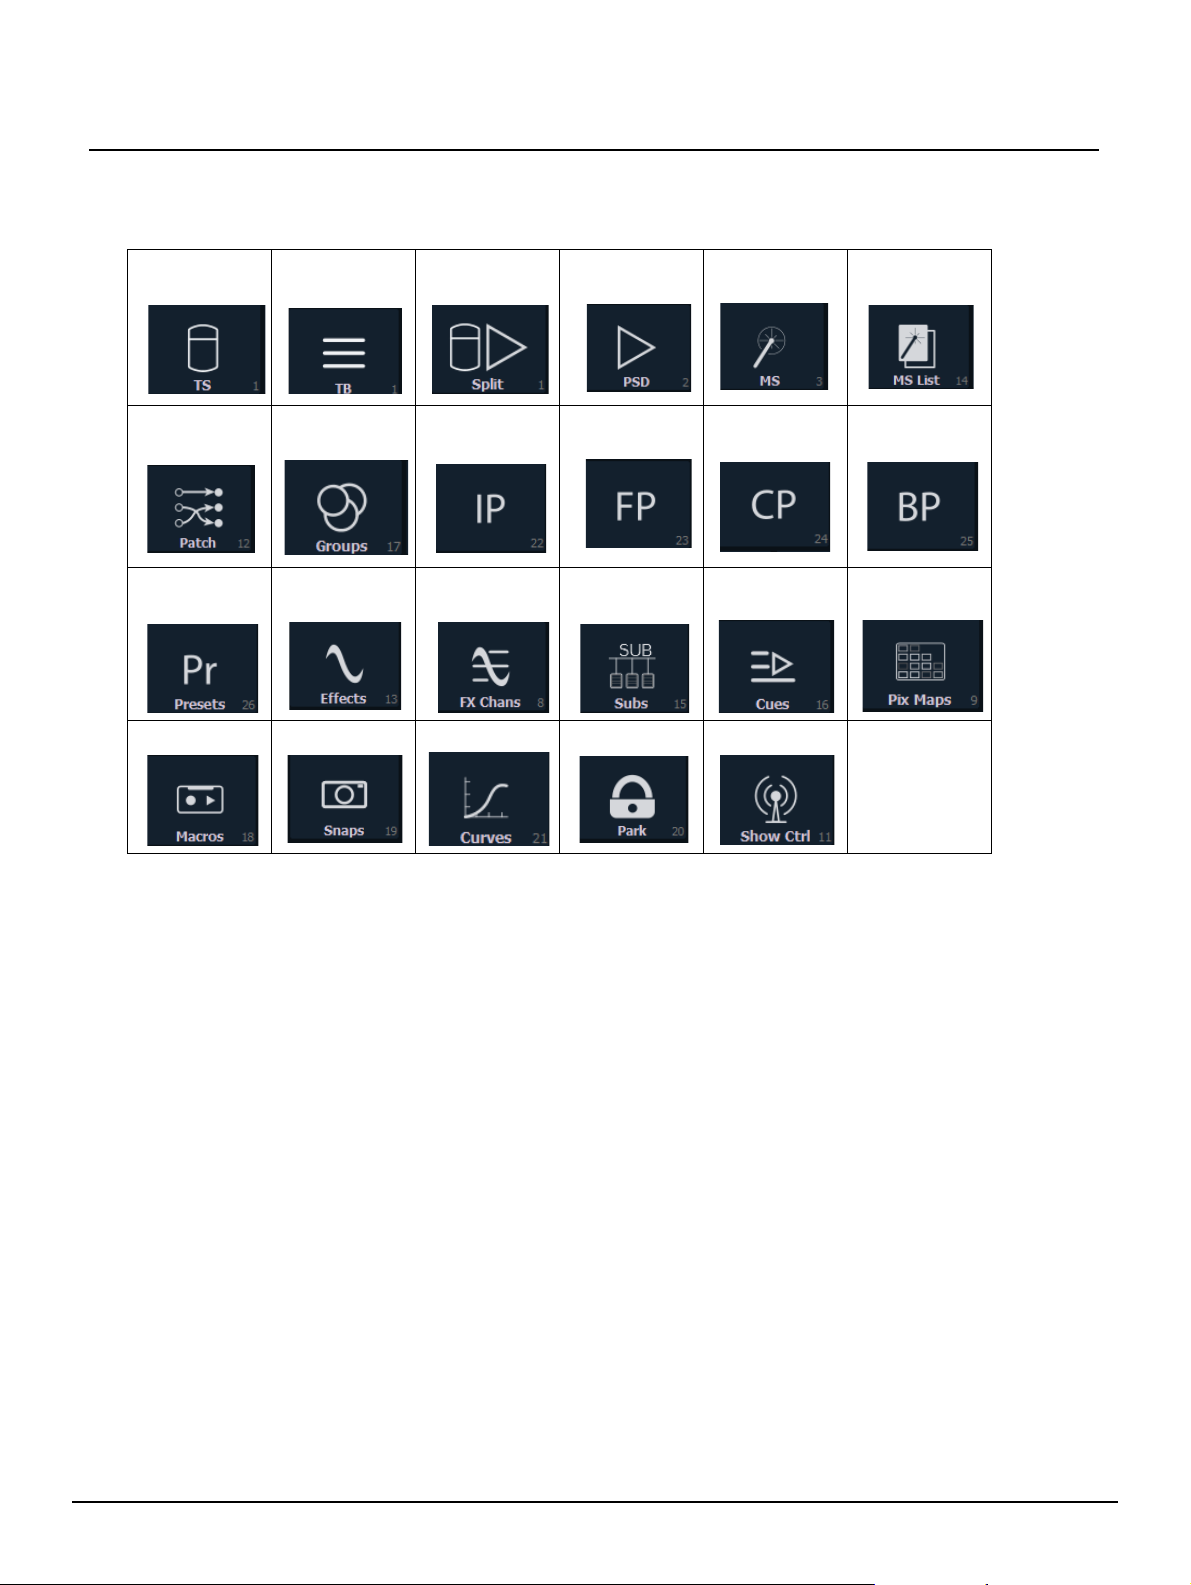
Display Icons
The following displays can be selected, and they will open in a new tab in the selected frame:
Eos Family v2.2.0
Channel
(Tombstones)
Patch Groups Intensity
Presets Effects Effect
Macros Snapshots Curves Park Show Control
Channel
(Table)
Split Channel Playback
Status Display
Focus Palettes Color Palettes Beam Palettes
Palettes
Submasters Cue List Pixel Maps
Channels
Magic Sheet
Display
Magic Sheet
List
The following displays can have multiple instances open:
• Channel (Tombstone)
• Channel (Table)
• Split Channel
• Playback Status Display
• Magic Sheet Display
• Effect Channels
•Park
For multiple instances of the same display, the tab number will be followed with a decimal number.
Additional tabs will start their numbering with n.2. If you have only one instance, there will be no
decimal number.
Eos Family Operations Manual Supplement Page 5 Electronic Theatre Controls, Inc.
Page 6
ETC Supplement
Display
Controls
Menu
Button
New Snapshot
Button
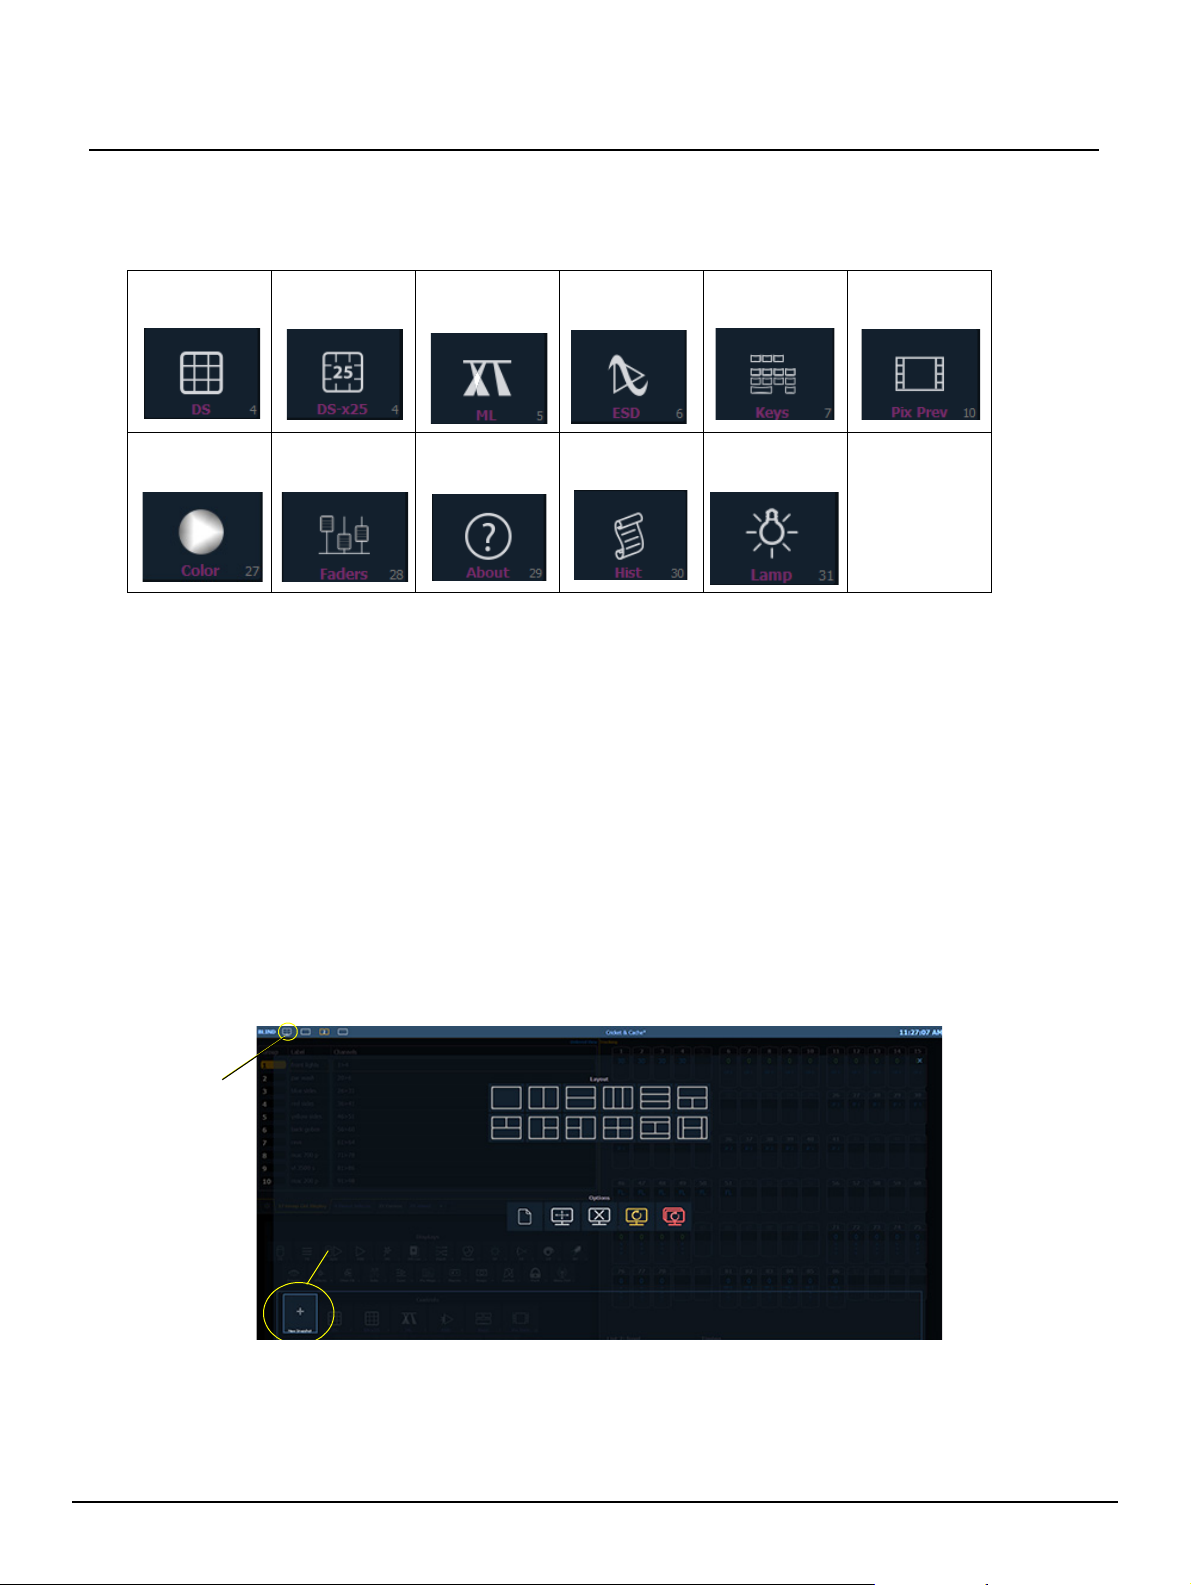
Control Icons
The virtual controls that were located in the browser are now part of the home screen. You can
select from the following list of virtual controls, and they will open in a new tab in the selected frame:
Eos Family v2.2.0
Direct Selects
Classic
Color Picker Fader Module About Command
Direct Selects
x25
ML Controls Effect Status Virtual
Keyboard
Lamp Controls
History
Pixel Map
Preview
Snapshots
The snapshots displayed here are single monitor-only snapshots recorded for the visible
workspace. These snapshots can be recalled from any selected monitor from the Home Screen or
the Display Controls menu screen. You can recall a monitor-only snapshot from the command line
by using the syntax [Snapshot] [n] [Enter]. When recalled from the command line, the selected
snapshot will only affect the monitor from which it was originally recorded.
To record a monitor-only snapshot, press the {New Snapshot} button on the Display Controls
menu screen. [Delete] [Snapshot] [n] [Enter] [Enter] will delete a monitor-only snapshot.
All snapshots can be viewed on the snapshot list display, which can be opened by pressing
[Snapshot] [Snapshot] or from the home screen.
Display Controls Screen
Selecting the display controls icon will grant you access to the Layout Options previously
described. Choose the layout icon for the arrangement and number of frames you want to use on
the monitor.
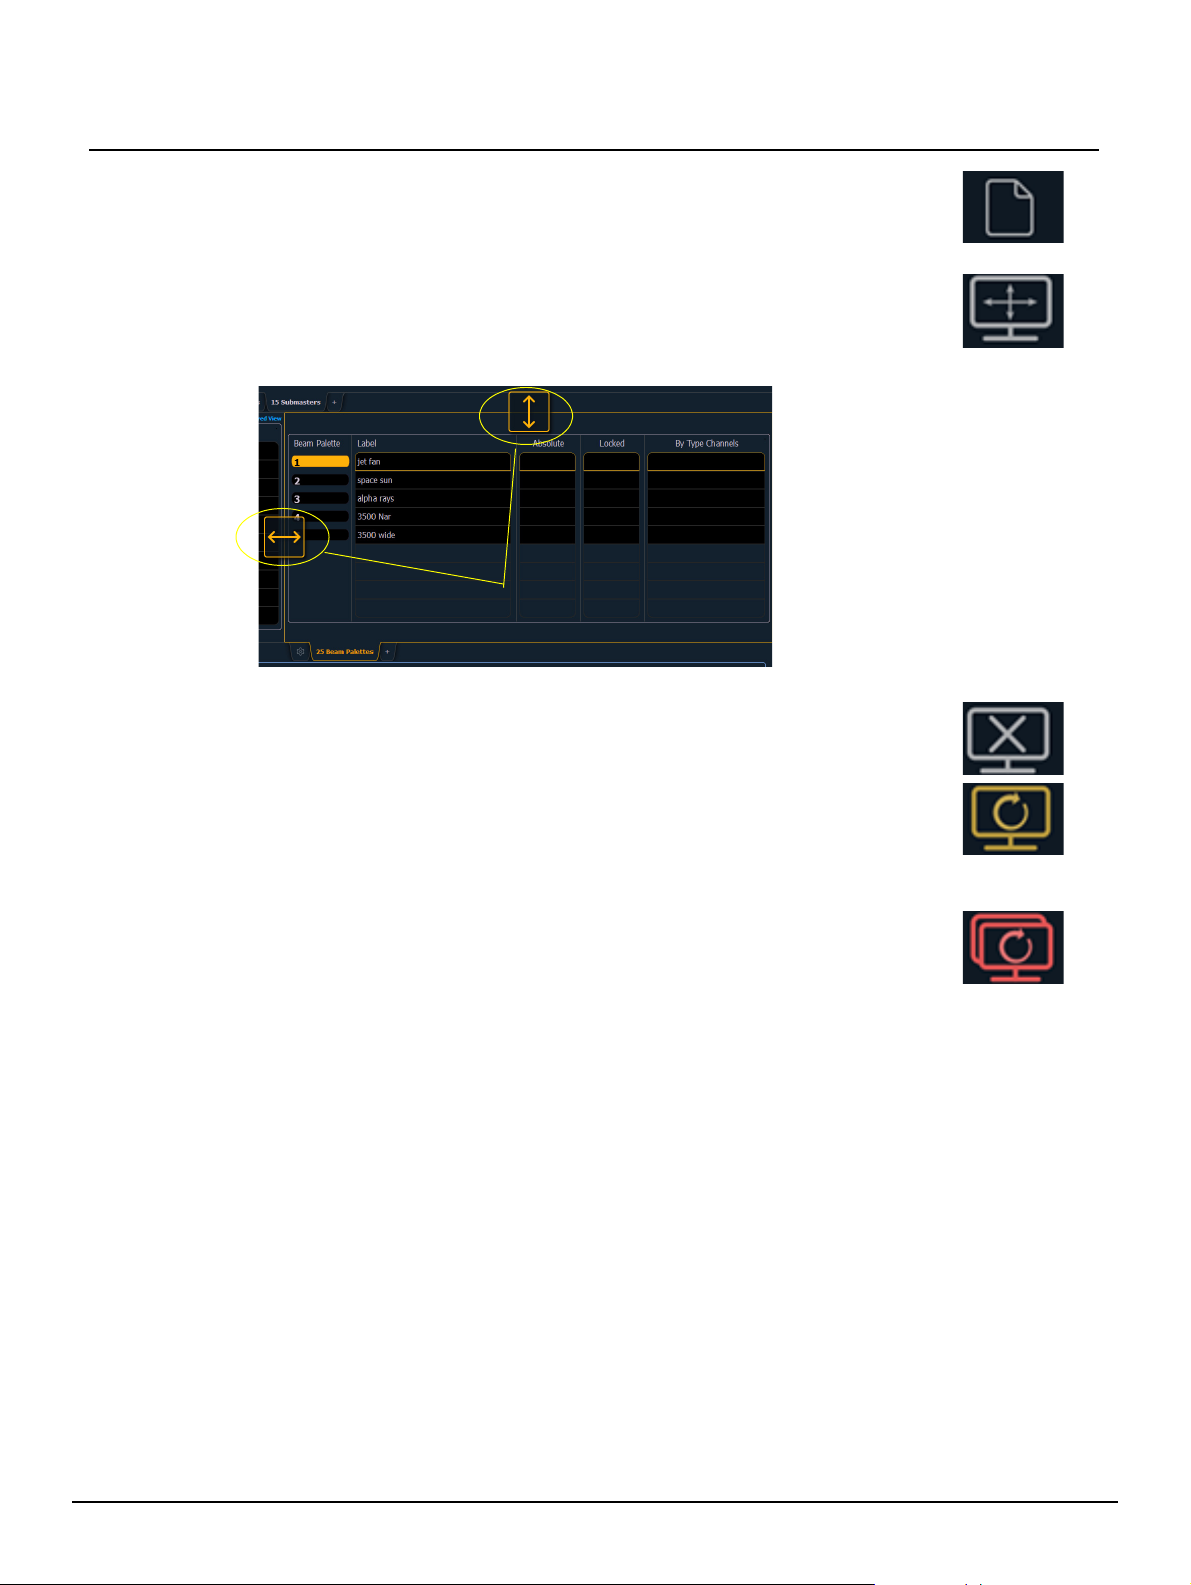
This screen also offers options for opening and closing tabs as well as resizing and resetting the
monitor(s). The icons are:
Eos Family Operations Manual Supplement Page 6 Electronic Theatre Controls, Inc.
Page 7
ETC Supplement
Resize Tool Icons
Open New Tabs On This Monitor
Select this icon to redirect to the Home Screen where you can open new tabs using
the Display and Controls icons.
Resize Frames In This Workspace
Select this icon to resize frames in any of the workspaces on the monitor. After
selecting, resizing tools will appear between frames of the workspace and you can
select and drag the resize tool icons to adjust sizing as needed.
Eos Family v2.2.0
Close All Tabs In This Workspace
Select this icon to close all of the tabs in the active workspace on this monitor only.
Reset This Display
This icon will close all of the tabs and frames and will reset the layout for the active
workspace to a single frame displaying the Home Screen, from which you can select
new tabs to open.
Reset All Displays
This icon will close all of the tabs and frames on all monitors, reset all layouts to a
single frame, and return their workspaces to the Home Screen, from which you can
select new tabs to open.
Eos Family Operations Manual Supplement Page 7 Electronic Theatre Controls, Inc.
Page 8
ETC Supplement
Row
Headers
Column Headers
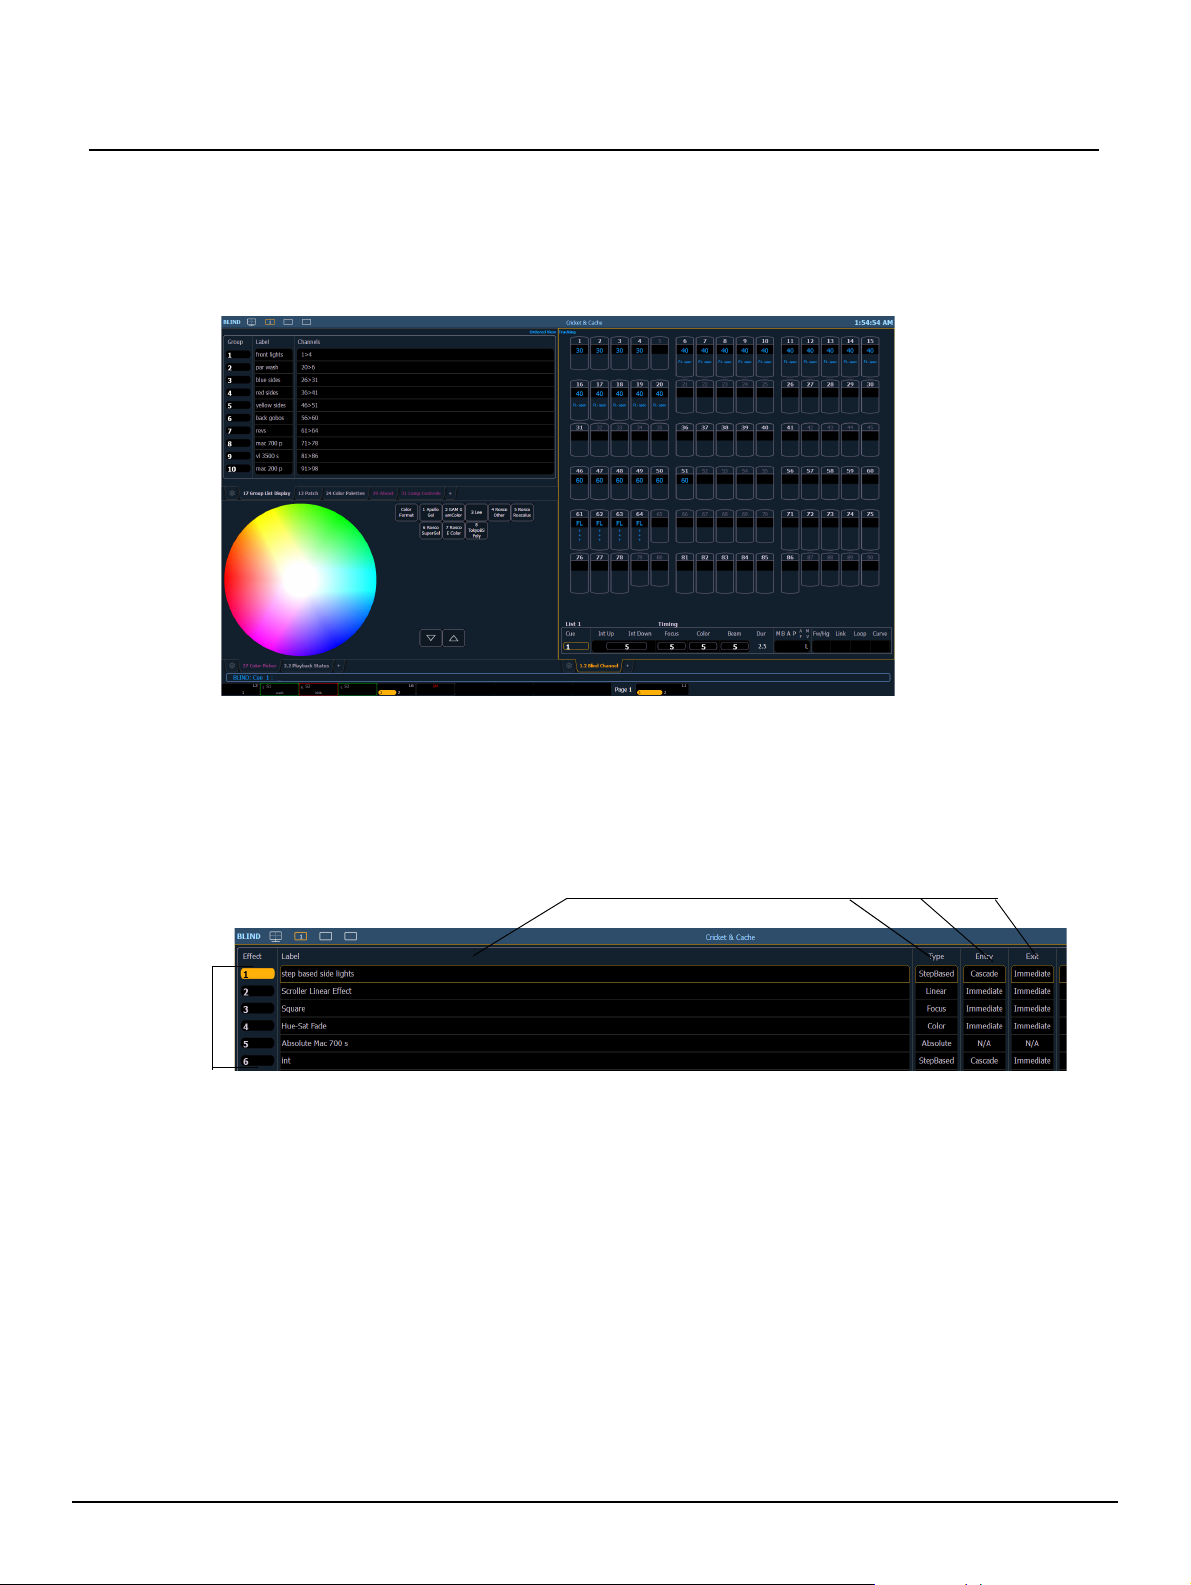
Changes to Displays
Blind Indicators
The blind indicators have changed with version 2.2. Now while in blind, the background color of the
displays will be blue, the title bar will be bright blue, and the word “Blind” will display in the top left
corner of each monitor. You can click on “Blind” to go back to live.
Eos Family v2.2.0
Clickable Support to Displays
Several displays are more interactive now with click supported cells. Clicking on a row header will
select and place it on the command line. You can click on multiple row headers to select a range of
items. Double-clicking a row header will select that row and deselect any other rows. Clicking on a
column header will place that action on the command line. You can click on multiple column actions
that can be combined, such as cue times, to place those on the command line.
The following displays have added clickable support:
• Show Control List
• Cue List
• Playback Status Display
• Palette Lists
•Sub List
•Preset List
•Effect List
•Group List
• Snapshot List
•Curve List
• Partition List
• Pixel Map List
• Magic Sheet List
• Park Address List
Eos Family Operations Manual Supplement Page 8 Electronic Theatre Controls, Inc.
Page 9
ETC Supplement
• Patch Display
• Spreadsheet Display
•Macro List
Displaying Fader Pages with Content
When using [Fader Page] or [Shift]+ [Fader Page], the displayed page will jump to the next page
with content, and then to the next incremental page before skipping to the next page with content.
For example, pages 1-3 and page 11 have content. If on page 2 you press [Fader Page], you will
see pages 3 then 4 then 11 then 12 displayed. After page 12, you will jump back to page 1.
When on page 11, as you press [Shift]+ [Fader Page] you will see page 10 then page 3.
Playback Fader/Page Displayed in Cue List Index
Previously only the playback fader’s ID displayed in the cue list index. Now the page and fader
number display after the playback ID.
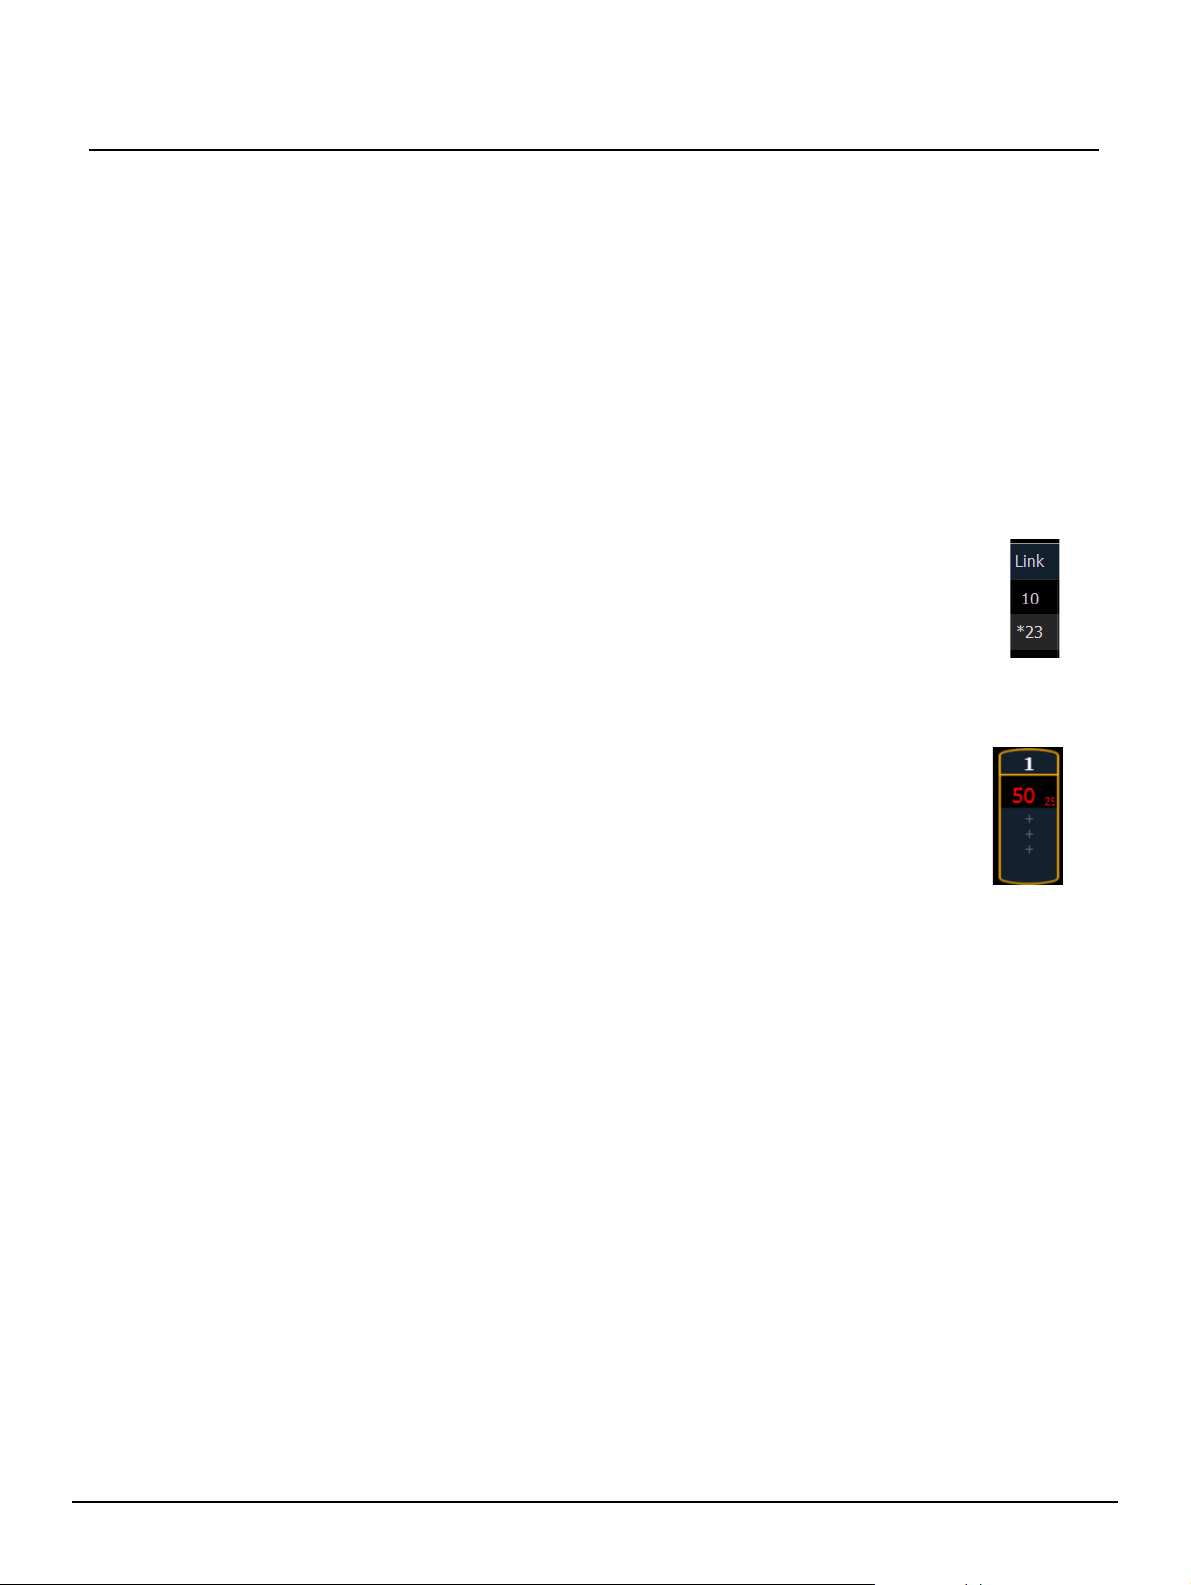
Links to Non-existent Cues
When a cue is linked to a non-existent cue, a “*” will display next to the cue number in the
link column of the playback status display and the cue list index.
Beam Subcategories Rearranged
The order of beam parameters has changed from (Shutters, Image, Form) to (Form,
Image, Shutters). This change impacts the live/blind displays, ML controls, the fixture editor
parameter list, and the parameter tiles in the CIA. This change does not affect the physical keycaps.
Eos Family v2.2.0
Virtual Media Server Crossfade
The Virtual Media Server crossfade parameter level will display in subscript beside the
intensity.
Element Playback Status Display
Scrolling with a mouse is now enabled for the Playback Status Display on Element. This
behavior was already available on the other Eos Family consoles.
Changes to Direct Selects
There are now two different direct select modes: direct selects classic and direct selects x25.
Direct Selects Classic
In classic mode, you have two options, fit to screen and classic layout, that were first made
available in version 2.1. You can change between fit to screen and classic layout by toggling the
{Classic/Fit} button.
A couple of new options have been added for version 2.2:
•A {1x/2x} button allows you to toggle the direct selects to show one bank of 5 rows or two
banks of 5 rows.
•A {Record} button has been added that posts Record to the command line.
Eos Family Operations Manual Supplement Page 9 Electronic Theatre Controls, Inc.
Page 10

ETC Supplement
Page Access
Buttons
Direct Selects x25
The Direct Selects x 25 mode displays only a single category of direct selects at a time.
By using the {+25} and {-25} buttons, you can change the number of available buttons in
increments of 25. You can select a page of direct selects by using the page access buttons or by
using the page up and down buttons. The {Select} and {Flexi} buttons work the same as in
previous software versions.
Eos Family v2.2.0
Changes to About
The number of patched channels and number of cues have been added to the default [About]
display. The number of cues is a count across all cue lists. Multipart cues are only counted once.To
see this display, press [About] when the command line is clear.
About Palette/Preset
A {Usage} button has been added to the About Palettes and About Presets displays.
{Usage} displays the following information about palettes and presets:
• Number of cues that move
• List of channels that use the palette/preset in a cue
• List of channels stored in the palette/preset that are not used in a cue
• List of cues in which the palette/preset have a move instruction
• List of effects that use the palette/preset
About Macro
An [About] Macro display has been added. This display shows a list of cues that will execute a
selected macro. To view this display, you must be in the Macro Editor Display. While in that display,
press [About] and then select the macro by using a mouse or touchscreen.
About Cuelist
The following information will be displayed when a cue list is selected:
• Cue List Attributes
Eos Family Operations Manual Supplement Page 10 Electronic Theatre Controls, Inc.
Page 11

ETC Supplement
• Active Cue
• The number of cues in the list (Multipart cues are only counted once)
• First cue in the list
• Last cue in the list
• Partition
• Playback number and physical fader location of the cue list
• Channels currently controlled in live by the cue list
• Channels with any intensities above 0 in the cue list
• Channels with Parameters stored in the cue list but no intensities
Changes to User Interface
Changes to Snapshots
The following changes have been made to the snapshot screen ([Snapshot] [Snapshot]):
•The {Faders} button is no longer selected by default.
•A {Visible Workspaces} button has been added to snapshot only the visible workspaces.
•An {All Workspaces} button has been added to quickly include all workspaces, including
those not visible at the time of recording.
• Direct selects is no longer a separate option.
See Snapshots on page 6 for information on single monitor snapshots.
Eos Family v2.2.0
Snapshots Added to Element
Snapshot functionality has been added to the Element console with the addition of a {Snapshot}
softkey.You can now store all of the monitor configurations for your Element console. All displays
are automatically included in all snapshots.
Changes to Setup
Default Preheat Time
An option for default preheat time has been added to Setup>ShowSettings.
If this option is disabled, the cue’s up intensity time will be used when
preheating. The default setting is “Disabled”.
Changes to Channel Distribution
When {Offset} is pressed, a new channel distribution display will open.
The following options are available as extensions of {Offset}. Previously only {Reverse},
{Random}, {Odd}, {Even}, and {Reorder} were available. Options can be used together. These
extensions can be used to create subgroups. For more information on subgroups, please see the
Eos Family v2.0.1 Operations Manual Supplement.
Eos Family Operations Manual Supplement Page 11 Electronic Theatre Controls, Inc.
Page 12

ETC Supplement
Direction
• {Reverse} creates a group with the channels in the reverse order that they were selected in.
• {Mirror In} creates subgroups of channels that mirror inward.
• [1] [Thru] [8] {Mirror In} [Enter] would create 4 subgroups in this order: (1,8) (2,7)
(3,6) (4,5).
Ch 1 Ch 2 Ch 3 Ch 4 Ch 5 Ch 6 Ch 7 Ch 8
X X
X X
X X
X X
• {Mirror Out} creates subgroups of channels that mirror outward.
• [1] [Thru] [8] {Mirror Out} [Enter] would create 4 subgroups in this order: (4,5) (3,6)
(2,7) (1,8).
Ch 1 Ch 2 Ch 3 Ch 4 Ch 5 Ch 6 Ch 7 Ch 8
X X
X X
X X
X X
Eos Family v2.2.0
• {Random} creates a random order to the channels.
Grouping
• {Chan Per Group} creates a specified cluster of channels.
• [1] [Thru] [1][2]{Chan Per Group} [3] [Enter] would create these 4 subgroups of 3
channels each: (1,2,3) (4,5,6) (7,8,9) (10,11,12).
• {InterLeave} creates a number of distributed sets of channels, that are not clustered together.
• [1] [Thru] [1][2]{Chan Per Group} [4] {InterLeave} [Enter] would create these 4
subgroups: (1,4,7,10) (2,5,8,11) (3,6,9,12).
• [1] [Thru] [5] [+] [1][1] [Thru] [1][5] [+] [2][1] [Thru] [2][5] {Chan Per Group} [3]
{InterLeave} [Enter] would create these 5 subgroups: (1,11,21) (2,12,22) (3,13,23)
(4,14,24) (5,15,25).
• {Num Groups} creates a specified number of subgroups.
• [1] [Thru] [1][2]{Num Groups} [3] [Enter] would create these 3 subgroups: (1,2,3,4)
(5,6,7,8) (9,10,11,12).
Spacing
• {Jump} is used to skip over a specified number of channels.
• [1] [Thru] [1][2]{Chan Per Group} [3] {Jump} [1] [Enter] would create these 3
subgroups of 3 channels each: (1,2,3) (5,6,7) (9,10,11). Channels 4, 8, and 12 will be
jumped over and will not be in the subgroups.
• {Odd} selects only the odd numbered channels.
• {Even} selects only the even numbered channels.
• {Reorder} is used to reorder the channels of a group into numeric order.
{Offset} Button Added to Some Displays
Submaster, palette, and preset blind views now all include an {Offset} button. Step-based effects
have an {Offset} button now as well.
Eos Family Operations Manual Supplement Page 12 Electronic Theatre Controls, Inc.
Page 13

ETC Supplement
Changes to Effects
Effect Channel Display
The ability to override certain effect properties per channel at the cue level has been added.
The effect channel display has been added for this. To open this display, press [Shift] + [Effect] or
select the effect channel icon from the display management home screen, see Display Icons on
page 5.
Eos Family v2.2.0
The following properties can be overridden:
•Rate
• BPM
• Size (Relative Effects Only)
• H Form (Focus Effects Only)
• V Form (Focus Effects Only)
• Axis (Focus Effects Only)
Note:
[2][6]<Effect><1>{Rate}[6][Enter] - to change the rate for just channel 26. With the effect running,
the console will default to the running effect number. You may need to select the effect first ([Effect]
[n] [Enter]). This will open the effect status display, and you will have access to the effect softkeys.
In the effect status display, an “+” will display by any effect property that has a channel level
override.
You can then store these channel overrides in a cue by using [Record] or [Update].
To add a channel level override, first you will need to be in the Effect Channel
display with the effect running. The effect status display also needs to be open.To
learn how to apply an effect, please see the Apply an Existing Effect section of the
Creating and Using Effects chapter of your console’s manual.
Eos Family Operations Manual Supplement Page 13 Electronic Theatre Controls, Inc.
Page 14

ETC Supplement
BPM as a Cue Level Override
BPM can be applied to an effect or individual channels as only a cue level override in live and blind.
As a cue level override, the effect step/action times will not be affected.
Eos Family v2.2.0
Note:
With an effect recorded into a cue and playing back in live, [Effect] [1] {BPM} [3][0] [Enter] will
change the BPM of the effect running. This change will happen immediately but the step or action
times will not change. You can see the BPM value, which will be in red, in the Effect Status display.
When the cue is updated or recorded with the new BPM, an “*” will appear next to the effect number
in the Ext Links column of the PSD and the cue list. The BPM value in the effect status display will
now be displayed in blue.
[1] [Effect] [1] {BPM} [3][0] [Enter] will only change the BPM for channel 1. A “+” will display in the
BPM column of the effect status display, and the BPM will display in red in the effect channel
display.
Once the cue is updated or recorded, the BPM will display in blue in the effect channel display. The
“+” will still be displayed in the effect status display, and an “*” will appear next to the effect number
in the Ext Links column of the PSD and the cue list.
The effect editor cannot be open when applying a cue level override. The effect
status display does need to be open though. You can open the effect status
display from the home screen or by pressing [Effect] while in live.
BPM Impacts All Times of a Step-based Effect
Applying BPM to a Step based effect will now override all timing in the effect. Previously BPM only
impacted the step times. Now the Step, In, Dwell, and Decay times are all affected.
Step/Action Selection
If an effect step/action is on the command line or indicated in the blue text to the left of the
command line, entering a number on the command line will default to selecting a step/action for the
previous selected effect.
If no step/action is displayed, the command line will default to effect number.
Effect List Navigation
Using the [Next]/ [Last] keys will now only move between effects in the effect list display. To
navigate the effect editor, you will need to use the page arrow keys.
Confirming Effects changes
When using [Page ] to create a new effect step/action in the Effects Editor display, you will first
be asked to confirm the new step/action number before continuing. This is to prevent new step/
action from being created by mistake. To bypass this confirmation, you can hold down [Shift] while
using [Page
] or enter the step/action number manually.
Changes to the ECU
Client Mode Consoles
Consoles in client or backup mode now by default will not output on their local DMX ports. This
option is found at ECU>Settings>Local I/O. Click on {Output Local DMX in Client mode} to
enable the ability to output.
24 Hour Format Clock Added
In the ECU>Settings>General, an option has been added to display the clock in the 24 hour
format.
Eos Family Operations Manual Supplement Page 14 Electronic Theatre Controls, Inc.
Page 15

ETC Supplement
Magic Sheets now indicate Live or Blind on their tab.
Changes to Magic Sheets
Display Behavior
In the Background Settings tab of the magic sheet editing tools, there is
a new option for display behavior. This option was added to go along
with the new focus rules for display and control tabs. See Focus Rules
for Control and Display Tabs on page 3 for more information.
The following display behaviors are now available:
• Normal Display - The display will behave the same as a Display Tab.
• Channel Display - This mode uses the following rules:
• When focus is drawn to the playback status display, a magic sheet channel display
will be brought to the front.
•Using [Shift] + [Live] cycles through the magic sheet channel displays.
•Pressing [Live] or bringing a Live tab into focus will restore your last focused magic
sheet channel display.
• Magic sheet channel displays in the locked frame will not be skipped when using
the [Tab] key to cycle through tabs.
• Control - The display will behave the same as a Controls Tab.
Changes to Background Settings
You can now select live and blind backgrounds for magic sheets. These backgrounds can either
use a solid color, gradient of two colors, or an image. One of these backgrounds will be used when
editing a magic sheet. Select the {Use While Editing} button to use either the live or blind
background.
Eos Family v2.2.0
Live and Blind Indicators
Clock
A clock has been added to the MS Object Library. You can now
add a clock to any magic sheet. By using the MS Object
properties, you can edit the color, font, and size of the clock.
Eos Family Operations Manual Supplement Page 15 Electronic Theatre Controls, Inc.
Page 16

ETC Supplement
Enabled
Disabled
Changes to Fixtures
Changes have been made to the fixture library in version 2.2 to make fixtures easier to control.
These changes affect the fixture definitions.
These changes include:
• More mode parameters for complex fixtures
• More calibrated ranges
• For example, DMX ranges are calibrated in real units (25 to 50 Hz or 5 to 20 RPM)
instead of their absolute DMX values.
• Changes to the index type parameters
• For example, some index parameters that used to be 0-360 degrees are now -180-180
degrees.
Pixel Mapping Installer Update
Eos Family v2.2 includes an enhancement for operating file system support for Nomad systems
running on a PC or Macintosh. This changes the default location for storing show files and media to
the main “User” documents location of the system; [Windows Drive]:\Users\<<Your User
Name>>\My Documents\ETC\Eos for Windows 7 & 8, ~/Documents/ETC/Eos on Mac platforms.
An update to the Eos Family Pixel Mapping Installer is available (v1.0.1). You may obtain this
release of software by downloading it from the Downloads section of the ETC website,
www.etcconnect.com
Mapping Installer v1.0.1. This is not required for upgrades to Eos Family v2.2, but it is
recommended.
. First time Nomad installs of Eos Family v2.2 should use Eos Family Pixel
Eos Family v2.2.0
Note:
Note:
For consoles updating from v1.9.2 or earlier, it is recommended that you install
pixel map installer v1.0.1
Please be sure to check your media archive location in
ECU>Settings>General>Media Archive Path to ensure proper configuration.
Restoring defaults will use the updated locations configured by Eos v2.2 and the
v1.0.1 pixel map installer.
ECU Change for Nomad
For Nomad, a new option has been added to the ECU to allow Fullscreen Offline Editor mode.
Instead of separate windows, the displays will be fullscreen.
With this mode disabled, you can choose up to six windows to display. Fullscreen Offline Editor
mode is enabled by default.
Eos Family Operations Manual Supplement Page 16 Electronic Theatre Controls, Inc.
Page 17

ETC Supplement
Hard Power Switch
Fan
USB Ports
Ethernet Ports 1 & 2
Audio Reserved
for Future
Implementation
Remote
Trigger
MIDI Ports
In & Out
IEC Receptacle
USB
Ports
USB Ports
Display
Port
DVI-I
Port
DVI-D
Port
eSATA
Port
DMX Ports
1 & 2
Phone
Remote
IEC Receptacle
Hard Power Switch
Fan
USB Ports
USB
Ports
USB Ports
Ethernet Ports 1 & 2
Display
Port
DVI-I
Port
DVI-D
Port
eSATA
Port
Audio Reserved
for Future
Implementation
DMX Ports
1 & 2
Phone
Remote
Remote
Trigger
MIDI Ports
In & Out
Hardware Changes
Element and Ion are now shipping with Windows 7 and a revised motherboard/SSHD.
Element
Eos Family v2.2.0
Ion
Physical
Port
Display Port
DVI-I Port
DVI-D Port
Ion & Element support up to 2 monitors using
Signal
Type
the following combinations:
Display Port
Yes
No
No No
Yes
with Adapter
DVI VGA
Yes
Yes
Yes
with Adapter
Yes
with Active
Adapter
Eos Family Operations Manual Supplement Page 17 Electronic Theatre Controls, Inc.
Multitouch monitors need to be Windows 7 or 8 Compatible.
Page 18

ETC® Supplement
Classic Format
Fit to Screen
Eos Family v2.1.0 Supplement to Operations Manual
The following information is new for version 2.1.0. This document is supplemental to information in
the Eos Titanium, Eos, and Gio v2.0 Operations Manual, and Ion v2.0 Operations Manual, and
should be used in conjunction with it. For Element users, the Element User Manual has been
updated for version 2.1.0.
Eos Ti
Eos Ti consoles cannot automatically update the software on other devices running software
versions prior to 2.1.0. Once those units are updated to version 2.1.0, Eos Ti consoles will be able
to auto update all system devices via the update setting in the ECU.
System Overview Change
Channel Counts
The maximum number of allowed channels that can be defined in patch has increased from 10,000
to 16,000, (can be any number from 1 to 99,999). This change impacts Eos Ti, Eos, Gio, and Ion.
System Basics Changes
Direct Selects
There are two options for opening the direct select modules, which are Fit to Screen and Classic
Layout. Fit to Screen is designed for wide format displays. For standard size monitors, use the
Classic Layout. The following example shows both options on a wide format display:
[Shift] + Direct Select
Selecting record targets from direct selects will terminate the command line. To post a control to the
command line without terminating it, hold down [Shift] while pressing the direct select. This allows
multiple commands to be selected and executed at once, and an optional sneak time to be entered.
Modifying a Terminated Channel Selection
It is possible to add or remove channels from a previously terminated command line. You will need
to first press [+] or [-] and then you can add to or remove from your current channel selection.This
includes selecting channels from the direct selects, summary view, and Magic Sheets.
Corporate Headquarters
London, UK
Rome, IT
Holzkirchen, DE
Hong Kong Rm 1801, 18/F, Tower 1 Phase 1, Enterprise Square, 9 Sheung Yuet Road, Kowloon Bay, Kowloon, Hong Kong Tel +852 2799 1220 Fax +852 2799 9325
Service:
Web:
4250M1211-2.1.0
Eos Family Operations Manual Supplement Page 1 Electronic Theatre Controls, Inc.
Unit 26-28, Victoria Industrial Estate, Victoria Road, London W3 6UU, UK Tel +44 (0)20 8896 1000 Fax +44 (0)20 8896 2000
Via Pieve Torina, 48, 00156 Rome, Italy Tel +39 (06) 32 111 683 Fax +44 (0) 20 8752 8486
(Americas) service@etcconnect.com
www.etcconnect.com
3031 Pleasant View Road, P.O. Box 620979, Middleton, Wisconsin 53562-0979 USA Tel +608 831 4116 Fax +608 836 1736
Ohmstrasse 3, 83607 Holzkirchen, Germany Tel +49 (80 24) 47 00-0 Fax +49 (80 24) 47 00-3 00
Rev A Released 2013-12 ETC intends this document to be provided in its entirety.
QSF 4.1.9.1
(UK) service@etceurope.com (DE) techserv-hoki@etcconnect.com
Copyright © 2013 ETC. All Rights Reserved. Product information and specifications subject to change.
(Asia) service@etcasia.com
Page 19

ETC Supplement
Grandmaster/Blackout
If a grandmaster is set to a value other than 100%, a grandmaster button
with the set value will be shown at the top of each display. If blackout is
currently on, a blackout button will be shown at the top of the displays.
Clicking on either button will open a new display which will allow you to
turn off blackout and set the grandmaster to a different level.
Managing Show Files Change
Show File Advisory
If the loaded show file exceeds the console’s output capacity, an advisory will display in the CIA.
You will need to dismiss the advisory by pressing {Ok} before continuing. To see the capacity of the
console, press [About].
Eos Family v2.1.0
Setup Changes
High Contrast Display
By default, High Contrast Display is now enabled in Setup>Desk>Displays.
100 Channel Display
Additional options have been added to 100 Channel Display in Setup, Setup>Desk>Displays, to
help accommodate different display dimensions.
You can select to have this option disabled, display the channels in 4 rows of 25 (4x25), or 5 rows
of 20 (5x20), depending on the dimensions of your displays. The default for this setting is
“Disabled.”
Encoder Acceleration on Eos and Ion
Encoder Acceleration has been removed from Eos and Ion, which matches the behavior of the Eos
Ti and Gio encoders.
In Setup>Desk>Face Panel>Encoders, there are two options available: {Degrees Per
Revolution}, which is for the pan & tilt encoders, and {Percent Per Revolution}, which is for the
other encoders. When a pan or tilt encoder is moved one revolution, the parameter will change by
as many degrees as defined in Setup. The default is 30. When any other encoder is moved one
revolution, the parameter will change by the set percentage of its entire range. The default is 35.
The settings for {Encoder Degrees Per Revolution} and {Encoder Percent Per Revolution} are
stored with the show file. Starting a new file will reset the two settings to their default values.
Note:
On Eos, toggling an encoder no longer works to place it into fine mode.On both
Eos and Ion, hold down [Shift] while moving the encoder for fine control.
Releasing the [Shift] key will restore the encoder to its default mode
Eos Family Operations Manual Supplement Page 2 Electronic Theatre Controls, Inc.
Page 20

ETC Supplement
Removing Virtual Hue and Saturation Parameters
In Setup>Show>Show Settings, an option, {Create Virtual HSB}, has been added, which allows
you to disable creation of virtual hue and saturation parameters. This option is “Enabled” by default.
When Virtual HSB controls are disabled, the hue and saturation columns will not display in Table
view. You will not be able to record just the Hue or Saturation values into a cue, submaster, preset,
or palette, and you cannot apply an effect to Hue and Saturation. You will still be able to control Hue
and Saturation from the encoders, ML Controls, Color Picker, and the command line.
Fan Change
Using Subgroups with Fan
Subgroups can be used with the Fan feature. Channels in the same subgroup will act as a single
channel when fanned.
For Example:
Group 1 is made up of channels 120 thru 130. Channels 120 thru 123 are one subgroup,
channels 124 thru 126 are not in any subgroup, and channels 125 thru 130 are another
subgroup.
• [Group] [1] [Fan] [Enter]
Eos Family v2.1.0
Selects group 1 and puts it into fan mode. Rolling up the level wheel creates the following
result. Channels 120 thru 123 share an intensity, channels 124 thru 126 each have different
intensities, and channels 127 thru 130 share an intensity.
Submaster and Patch Changes
GM Exempt and Intensity Master
For channels that have been set to GM Exempt in Patch, Intensity Master control will not impact the
intensity of those channels.
[Query] {Unpatched}
To quickly delete channels without addresses in the Patch display, you can use the command
[Query] {Unpatched} [Delete]. This will post to the command line all channels without addresses.
By pressing [Enter][Enter] you will delete them.
Ion users will need to press [Shift] + [Select Last] to access the {Query} softkey in Patch.
[About] Changes
In the default About display, a new field has been added called Parameters. This field references
the number of parameters that have been defined in patch. This includes parameters that have
been patched to output addresses and those that have not. The field below Parameters,
Addresses, only calculates the number of addresses that have been used in patch (which counts
toward available outputs). The Parameters field is useful as even unpatched, but defined,
parameters must be displayed and calculated in the fade engine. If you are running a large show,
it is helpful to delete defined, but unpatched channels. This is where the [Query] {Unpatched}
command is helpful.
Eos Family Operations Manual Supplement Page 3 Electronic Theatre Controls, Inc.
Page 21

ETC Supplement
For Example:
About Cue
In the About Cue display, three new columns that show channel moves have been added. Those
columns are intensity moves, live NPs moves, and dark NPs moves.
Effects Changes
Preprogrammed Rainbow Effects
Two new preprogrammed effects have been added to the effect list. Effect 917 is a Rainbow RGB
effect, and effect 918 is a Rainbow CMY effect. These effects are for a rainbow on native color
parameters that will fade hue from 0 to 360 with saturation at full, when the parameters are at their
default levels. 0 is the default for CMY, and Full is the default for RGB.
Eos Family v2.1.0
Focus Effects
When adjusting the form of a focus effect, you can hold down [Shift] while using the horizontal
encoder to change the vertical form.
Beats Per Minute/ Tap Rate
For step-based and absolute effects, you can set a beats per minute (BPM). For step-based effects,
BPM affects the step times and for absolute effects, this affects the time/dwell. Note that BPM
impacts the effect directly. It is not currently available as a cue level override.
There are two different ways for assigning BPM to effects:
Directly setting BPM
If you know the BPM, you can assign that directly to the effect by using the {BPM} softkey, which is
available when in the effect editor display.
• [Effect] [1] {BPM} [1][9][0] [Enter] - sets the BPM of effect 1 to 190. The step times will be
adjusted for step-based effects, or the time/dwell will be adjusted for absolute effects.
The BPM will display on the right side of the effect editor beside the effect number/label. Editing the
cycle time, the step time for a step-based effect, or the time/dwell for an absolute effect will remove
the BPM.
Learning BPM
If you don't know the desired BPM, you can learn the BPM.
From Live, with the effect running:
• [Effect] [1] [Learn] [Time] - posts Effect 1 Learn Time Sample BPM to the command line, and
opens the effect editor display.
Eos Family Operations Manual Supplement Page 4 Electronic Theatre Controls, Inc.
Page 22

ETC Supplement
At 50%
At 100%
Outline Color Icon
While in this mode, press [Enter] to establish the BPM. The console will use an average of the last
four times you press [Enter] in this mode to calculate the BPM. Pressing [Learn] again will stop this
mode.
In this mode, every time the BPM changes, a live running effect will be modified accordingly without
stopping.
Learning Discrete Step Time
In learning discrete step time mode, every time you press [Enter], the time since the last press of
[Enter] is used to set the next step's step time for a step-based effect, or the next step's fade/dwell
time of an absolute effect.
• [Effect] [1] [Learn] [Time] [Time] - posts Effect 1 Learn Time Discrete Steps to the command
line, and opens the effect editor display.
Pressing [Learn] again will stop this mode.
Instead of pressing [Enter], you can press [At] while in this mode to add new steps to the end of the
effect. Pressing [Enter] will send you back to the first step in the effect.
Magic Sheet Changes
Eos Family v2.1.0
Address as Target Type
Address is now an available target for magic sheet objects.
Address Added to List of Fields
Address has been added to the list of fields that can be displayed around an object.
Address Object Color
An address object, with its outline color set to Link to Channel
Color, will have a white outline if the address is patched, or a dark
outline if the address is unpatched.
If the address object's outline color is set to Link to Channel
Intensity, the brightness of the outline color will be tied to the DMX
level of the address. The higher that the DMX value is the brighter
the outline color will be.
To set the outline color to Link to Channel Color or Intensity, select
the outline color icon in the color section of MS Object Properties.
Then select either Link to Channel Color or Link to Channel Intensity.
Eos Family Operations Manual Supplement Page 5 Electronic Theatre Controls, Inc.
Page 23

ETC Supplement
Fixture Symbols
Additional fixture symbols can be imported. The symbol must be saved as a .svg image file, and
needs to be tagged properly. These tags can be linked to the channel’s color, intensity or both.
The outline section needs to be tagged as etc_symbol_outline0, etc_symbol_outline, and/or
etc_symbol_outline2. The base section needs to be tagged as etc_symbol_base0,
etc_symbol_base, and/or etc_symbol_base2. Tags can be layered, and they will render in the order
listed below:
• etc_symbol_base0 - uses fill color intensity link (not color)
• etc_symbol_base - uses fill color and intensity link
• etc_symbol_base2 - uses fill color intensity link (not color)
• etc_symbol_outline0 - uses outline intensity link (not color)
• etc_symbol_outline - uses outline color and intensity link
• etc_symbol_outline2 - uses outline intensity link (not color)
Tags that only link to intensity will cause the base or outline to dim based on the channel’s intensity.
The edits to the tags in the .svg file can be made in any text editor program, such as Notepad, or in
a .SVG editor program, such as Inkscape.
ECU Changes
Eos Family v2.1.0
Enable Sensor/ FDX3000 Feedback
Clicking in the enable box will allow your console to receive feedback over the network from a
CEM+, a CEM3, or FDX3000. This option is “Enabled” by default.
Enable FDX2000 Feedback
Clicking in the enable box will allow your console to receive FDX2000 dimmer feedback over the
network.
Client Software Change
Using Offline or Client with Mac Laptops
When using a Mac laptop or wireless
keyboard with the Mac functions
mapped to the F1-F12 keys, Eos
offline/client functions are not
executable. The Mac functions must
first be disabled before Eos offline/
client functions will work:
Step 1: Open System
Preferences on your
computer.
Step 2: Open the Keyboard
section.
Step 3: Enable Use all F1, F2,
etc. keys as standard
function keys by
clicking in the box.
Eos Family Operations Manual Supplement Page 6 Electronic Theatre Controls, Inc.
Page 24

ETC® Supplement
Eos Family v2.0.1 Supplement to Operations Manual
The following information is new for version 2.0.1. This document is supplemental to information in
the Eos Titanium, Eos, and Gio v2.0 Operations Manual, Ion v2.0 Operations Manual, and Element
v2.0 User Manual, and should be used in conjunction with it.
Display Changes
Changes in this section impact the System Basics chapter and the Facepanel Shortcuts appendix.
Latching Data and Time
[Data] Key
Pressing and holding [Data] allows you to view the values behind any referenced or marked data.
[Data] exposes the next lower reference level. So if you view a palette reference and press [Data],
the absolute data will be displayed instead. If you are viewing a preset, absolute or palette data will
be displayed, depending on what is contained in the preset.
On Eos Ti, Eos, Gio, and Ion, you can lock this mode by pressing [Shift] + [Data]. When in display
reference values mode, “Data Latched” will display in the upper left of the live display and the
[Data] key will be lit in green on Eos Ti and Gio. To exit this mode, press [Shift] +[Data] again.
[Time] Key
Pressing and holding the [Time] (the one by [Data] on Eos Ti, Eos, and Gio) allows you to view
discrete timing data behind any channel parameter. [Time] exposes channel or parameter specific
timing for any channels in the current cue. The first value is the delay time. If “--” is displayed, there
is no delay. The value to the right of the / is the transition time.
On Eos Ti, Eos, and Gio, you can lock this mode by pressing [Shift] + [Time]. When in display time
mode, “Timing Latched” will display in the upper left of the live display and the [Time] key will be lit
in green on Eos Ti and Gio. To exit this mode, press [Shift] +[Time] again.
On Ion, you can lock this mode by pressing [Shift] + [Time] [Time]. To exit this mode, press [Shift]
+[Time].
Category Time in PSD
When the {PSD Time Countdown} setup option (Setup> Desk> Displays) is enabled, each
category time will individually turn gold when that timing has completed.
Manual Control Changes
Changes in this section impact the Basic Manual Control or the Advanced Manual Control chapter.
Rem Dim /
Rem Dim levels can either be an absolute value, such as Full or 50%, or a proportional value, which
would set the levels to a percentage value of their current levels. To use a proportional value, press
[/] before entering the percentage value.
For Example:
Assume that channels 1 through 10 are selected and set to an intensity level of 60. Select channel
1 and dim the remaining channels.
Corporate Headquarters
London, UK
Rome, IT
Holzkirchen, DE
Hong Kong Rm 1801, 18/F, Tower 1 Phase 1, Enterprise Square, 9 Sheung Yuet Road, Kowloon Bay, Kowloon, Hong Kong Tel +852 2799 1220 Fax +852 2799 9325
Service:
Web:
4250M1211-2.0.1
Eos Family v2.0.1 Operations Manual Supplement Page 1 Electronic Theatre Controls, Inc.
Unit 26-28, Victoria Industrial Estate, Victoria Road, London W3 6UU, UK Tel +44 (0)20 8896 1000 Fax +44 (0)20 8896 2000
Via Pieve Torina, 48, 00156 Rome, Italy Tel +39 (06) 32 111 683 Fax +44 (0) 20 8752 8486
(Americas) service@etcconnect.com
www.etcconnect.com
3031 Pleasant View Road, P.O. Box 620979, Middleton, Wisconsin 53562-0979 USA Tel +608 831 4116 Fax +608 836 1736
Ohmstrasse 3, 83607 Holzkirchen, Germany Tel +49 (80 24) 47 00-0 Fax +49 (80 24) 47 00-3 00
Rev A Released 2013-06 ETC intends this document to be provided in its entirety.
QSF 4.1.9.1
(UK) service@etceurope.com (DE) techserv-hoki@etcconnect.com
Copyright © 2013 ETC. All Rights Reserved. Product information and specifications subject to change.
(Asia) service@etcasia.com
Page 25

ETC Supplement
• [1] [Rem Dim] [/] [5][0] [Enter]
Channels 2 through 10 will be dimmed to 30.
Highlight Rem Dim
To temporarily override the {Highlight Rem Dim} option in Setup, you can use either of the
following syntax examples:
• [channel list] [Highlight] [Rem Dim] [#] [Enter]
• [channel list] [Highlight] [Rem Dim] [/] [#] [Enter]
[-] [Select Manual] / [Select Active]
[-] [Select Manual] or [-] [Select Active] can be used to modify channel selections. Using [-]
[Select Manual] will select all of the channels in the list except those that have manual data. Using
[-] [Select Active] will select all of the channels in the list except those that are active.
• [1] [Thru] [2] [0] [-] [Select Manual] [Enter] - selects channels 1 through 20 except any
channels that currently have manual data.
[1] [Thru] [2] [0] [-] [Select Active] [Enter] - selects channels 1 through 20 except any channels
that are currently active.
[Undo] [Undo] [Enter]
Pressing [Undo] [Undo] will scroll to the most recent undo-able command in the command history
display. To undo the command, press [Enter].
Eos Family v2.0.1
Capture Latch
Previously Capture Latch would be enabled for all users when it was enabled by one user. Now
Capture Latch works on a user by user basis. For more information on using Capture Latch, see the
Using [Capture] section of the Advanced Manual Control chapter.
Recording and Playback Changes
Changes in this section impact the Cue Playback, Storing and Using Submasters, or Using
Partitioned Control chapters.
Loading a Cue with Temporary Time
A cue can be loaded with a temporary time.
• [Cue] [3] [Time] [6] [Load] - loads cue 3 with the
manual time of 6.
Note:
Submasters
The number of submasters has increased to 999. The number of fader pages available is still 30,
which means that there is a still a limit of 300 submasters being used with physical faders at a time.
Partitions on Cue Lists
A partition may be assigned to a cue list. If a partition has already been applied to a cue list, any
channels not in the cue list's partition will not be included in cues when they stored or replayed.
For multipart cues, the temporary time will be applied to the entire cue, not just the
part on the command line.
For cues with discrete timing, its parameters will use the temporary time instead
of the assigned discrete timing.
Any data for a cue list that already existed before a partition is applied, will be maintained, including
data for channels not included in the partition. If data existed before the partition was assigned, in
Eos Family v2.0.1 Operations Manual Supplement Page 2 Electronic Theatre Controls, Inc.
Page 26

ETC Supplement
Channels that were
initially saved in the
cue list but are not in
the currently
assigned partition
Default Update Setup Options
blind, channels that are not in the partition will display without a channel graphic, any levels will be
in gray, and a small superscript N will display with it.
Assigned partitions will display in the external links column in the cue list index.
To assign a partition to a cue list:
• [Cue] [n] [/] {Partition} [n] [Enter]
To remove a partition from a cue list:
• [Cue] [n] [/] {Partition} [Enter]
Working with a Single Cue List Changes
Changes in this section applies to the Working with a Single Cue List chapter.
Eos Family v2.0.1
Auto-block Cleanup
Cues that have auto-blocks will display a underscored b in the PSD. {Autoblock Clean} is used to
remove all auto-blocks from a single cue, cue range or entire cue list. {Autoblock Clean} is a
softkey that will be posted when a cue list and/or cue number are on the command line in the Cue
List Index, Live, and Blind. A range of cues or a cue list can be specified with this command.
For Example:
• [Cue] [1] [/] {Autoblock Clean} [Enter] - clears all auto-blocks from cue list 1. Only blocks
displayed with the white underscore are removed. If the [Block] key was previously used, this
command will not unblock it.
• [Cue][1] [/] [1][0] [Thru] [1][0][0] {Autoblock Clean} [Enter] - clears the auto-blocks just
from cues 10 through 100 of cuelist 1.
Default Update Modes
The default Update modes have changed. Eos defaults to Make Absolute for the {Update Mode},
with {Break Nested} and {Update Last Ref} enabled.
Eos Family v2.0.1 Operations Manual Supplement Page 3 Electronic Theatre Controls, Inc.
Page 27

ETC Supplement
Timing Disable
This change affects the Setup and Cue Playback chapters.
You can assign a separate time value for [Timing Disable] in Setup> Desk> Manual Control>
Default Times> Timing Disable. When a fader has been set to timing disable mode, cues will use
the time set in Setup. The default time is 0.
[Shift] + [Go] and [Shift] + [Back]
[Shift] + [Go] and [Shift] + [Back] can be used to cut to the next cue in the same way as [Timing
Disable] + [Go] and [Timing Disable] + [Back].
Show File
An indicator has been added to show when a show file has been
modified but not saved. An asterisk (*) will display beside the show file
name.
Mirror Mode
This change affects the Mirror Mode section of the Multi-console and Synchronized Backup
chapter.
A device that is currently in mirror mode can select which user number it is mirroring by using the
alphanumeric keyboard shortcut M + # (# being the user number). M + ESCAPE can be used to
leave mirror mode.
Eos Family v2.0.1
Note:
If a device is not currently in mirror mode, pressing M on an alphanumeric
keyboard will post Mark to the command line.
Collapsing PSD Columns
This change affects the Playback Status Display section of the System Basics chapter.
To collapse a column in the Playback Status Display, press [Escape] while clicking on the column
you want to collapse. Press [Shift] + [Select] to bring back all of the collapsed columns.
Magic Sheets on Direct Selects
Magic Sheets can now be accessed from the direct selects. Clicking on a magic sheet direct select
will open the Magic Sheet tab and display the selected magic sheet. Pressing a different magic
sheet direct select will change the displayed sheet.
Using Park Changes
Changes in this section impact the Using Park chapter.
Recall From Park
You can use [Recall From] [Park] to set a channel or parameter to the same level as the current
park value.
For Example:
Let’s assume that channels 1 through 5 are parked at 55. To recall that level to channels in live or
blind, use the following syntax:
• [1] [Thru] [1][5] [Recall From] [Park] [Enter]
Channels 1 through 5 will be set to 55 and channels 6 through 15 will be unaffected.
Note:
Eos Family v2.0.1 Operations Manual Supplement Page 4 Electronic Theatre Controls, Inc.
This does not release the Park buffer.
Page 28

ETC Supplement
Subgroups
[Thru][Thru] in Park
When parking a range of addresses in Park, using [Thru] will only park the intensities. If you want
to park all of the addresses and parameters within the selected range, you will need to use [Thru]
[Thru].
Patch Changes
Changes in this section impact the Patch chapter.
{Swap} in Patch
Additional options have been added to {Swap} in Patch.
• {Swap} - swaps only the patched address
• {Swap} {Plus Show} - swaps all show and patch data
• {Swap} {Only Show} - swaps only the show data and not patch data
• {Swap} {Plus Patch} - swaps addresses and patch data but not show data
Fixture Editor Parameters
The fixture editor parameters list is now displayed in alphabetical order.
[Thru] [Thru]
This change applies to the Multipart Cues chapter.
Eos Family v2.0.1
[Thru] [Thru] can be used in blind to create multiple cue parts in a range. For example, [Cue] [1]
[Part] [1] [Thru] [Thru] [4] [Enter] will create parts 1 through 4. If you were to use just [Thru]
instead of [Thru] [Thru] in that example you would create parts 1 and 4.
Subgroups
This change applies to the Using Groups chapter.
You can create subsets of channels within a group by using [Shift] + [/]. [Shift] + [/] will create
parentheses. These subsets of channels or subgroups are treated as a single channel in the
following ways:
• When applying absolute or relative effects from live, the subgroups are treated as a single
• When setting a range of step's channels on a step based effect, the subgroup will not be
• When the group is selected and next/last is pressed, each subgroup is traversed.
• When a group has subgroups, {Reverse}, {Reorder}, and {Random} in the group editor will
Subgroups can be created either in the group list or live.
channel by the effect.
spread out amongst multiple steps.
affect the subgroups instead of the channels in each subgroup. {Reorder} will order the
groups based on the first channel in each group.
To create a subgroup in live:
• [Shift] + [/] [1] [Thru] [4] [Shift] + [/] [Record] [Group] [2] [Enter]
To create a subgroup in the group list index:
• [Group] [2] [Enter] [Shift] + [/] [1] [Thru] [4] [Shift] + [/] [Enter]
Note:
Eos Family v2.0.1 Operations Manual Supplement Page 5 Electronic Theatre Controls, Inc.
Fan is not currently supported with Subgroups.
Page 29

ETC Supplement
Managing Show Files Changes
Changes in this section impact the Managing Show Files chapter.
Importing Custom Gobo Images
Custom gobo images can be imported by going to Browser> Import> Gobo Images and selecting
an image file or folder. If a folder is selected, all image files within the folder will be imported. All
standard image files are supported with the exception of .svg files.
Imported gobo images can be deleted by going into Browser> Import> Gobo Images> Imported
Gobos, selecting the image, and pressing [Delete] [Enter].
Imported Media and Partial Show Open/Merge
A new tile, {Media} has been added to the Partial Show Opening and Merge displays. Media is
imported gobo and magic sheet images.
Eos Family v2.0.1
Note:
Media will be included by default when you select Patch, Fixtures, or Magic
Sheets.
Virtual Media Server
Changes in this section impact the Virtual Media Server chapter.
Number of Pixel Maps
The number of pixel maps per show file is now 40. Previously it was limited to 10 maps.
{Flash}
The {Flash} softkey is available in the Pixel Map Editor display. {Flash} works the same as it does
in Live. See the section on Flash in the Basic Manual Control chapter for more information.
Patch by Channel
An option for setting the starting channel has been added to the Edit display for mapping channelbased pixels.
• When either {Starting Channel} or {Starting Address} is selected, both fields will be
cleared.
• Address-based pixels can not overlap with channel-based pixels. This includes the entire
DMX fixture footprint.
• If using {Starting Channel}, any overlapping channel-based pixels will be removed and any
overlapping address-based fixtures will be unpatched.
•If using {Starting Address}, any overlapping address-based pixels will be removed and any
overlapping channel-based fixtures will be unpatched.
• When the [Data] key is latched, the address for channel-based pixels will display.
• When [Format] is pressed, the address will toggle between port/offset and address number.
Eos Family v2.0.1 Operations Manual Supplement Page 6 Electronic Theatre Controls, Inc.
Page 30

ETC Supplement
Copies Start Color to End Color
Copies End Color to Start Color
Swaps Start Color and End Color
Park and Address Check
You can use Park and Address Check for Virtual Media Server outputs.
Color Picker
A second color picker has been added for virtual effect layers. The second color picker will be
labeled as End Color and will control RGB2.
Copying Color
You can copy or swap a color between the two color pickers using the buttons located between the
two color pickers.
Eos Family v2.0.1
FDX Dimmer Feedback
ECU Settings
Changes in this section impact the ECU appendix.
FDX Feedback
Clicking in the enable box will allow Eos to receive FDX dimmer feedback over the network.
Broadcast Type
• Directed Broadcast - Broadcast packets are directed to a subnet based on the IP address and
subnet mask of the sender.
• Limited Broadcast - The limited broadcast address is 255.255.255.255. It is limited because
routers will never forward datagrams with that destination address. This means that
datagrams with the limited broadcast address are confined to the particular network segment
on which they originate.
About System
Changes in this section impact the About chapter.
Clicking on a FDX rack in the {About System} list will open the About Rack display, which shows
the following information about the rack:
• Rack number
• Rack Type
• Phase A,B,C Voltages
• Frequency
• System Number
• IP Address
• Software Version
Device List
For information about FDX Dimmer feedback, see the Device List section in the Patch chapter.
Eos Family v2.0.1 Operations Manual Supplement Page 7 Electronic Theatre Controls, Inc.
 Loading...