

Page 1

emphasis™
Lighting Control System
Console User Manual
v1.4.0
Copyright © Electronic Theatre Controls, Inc.
All Rights reserved.
Product information and specifications subject to change.
Part Number:
4200M1211-1.4.0
Released: May 2003
Rev A
Page 2

ETC®, Emphasis™, Expression®, Insight™, Imagine™, Focus™, Express™, Unison®,
Obsession
®
II, ETCNet2™, EDMX™, Sensor®, and WYSILink™ are either registered trademarks
or trademarks of Electronic Theatre Controls, Inc. in the United States and other countries.
The name WYSIWYG
Microsoft
®
and Windows® are registered trademarks of Microsoft Corporation in the United
™
is a trademark of CAST Lighting Limited.
States and other countries.
®
Dell
is a registered trademark of Dell Computer Corporation.
Autodesk
®
and AutoCAD® are registered trademarks of Autodesk, Inc., in the United States and
other countries.
Page 3

Table of Contents
Introduction . . . . . . . . . . . . . . . . . . . . . .1
Using this Manual . . . . . . . . . . . . . . . . . . . . . . . . . . . . . . . . .2
Help from ETC Technical Services . . . . . . . . . . . . . . . . . . . .3
Americas . . . . . . . . . . . . . . . . . . . . . . . . . . . . . . . . . . . .3
Europe . . . . . . . . . . . . . . . . . . . . . . . . . . . . . . . . . . . . . .3
Asia . . . . . . . . . . . . . . . . . . . . . . . . . . . . . . . . . . . . . . . .3
Chapter 1
System Overview . . . . . . . . . . . . . . . . .5
Emphasis Options . . . . . . . . . . . . . . . . . . . . . . . . . . . . . . . . .6
Server Types . . . . . . . . . . . . . . . . . . . . . . . . . . . . . . . . .6
Channel Counts . . . . . . . . . . . . . . . . . . . . . . . . . . . . . . .6
Facepanels . . . . . . . . . . . . . . . . . . . . . . . . . . . . . . . . . .6
System Components . . . . . . . . . . . . . . . . . . . . . . . . . . . . . . .7
Emphasis Server . . . . . . . . . . . . . . . . . . . . . . . . . . . . . .7
Emphasis Facepanel . . . . . . . . . . . . . . . . . . . . . . . . . . .7
Emphasis Visualization . . . . . . . . . . . . . . . . . . . . . . . . .8
Emphasis Console . . . . . . . . . . . . . . . . . . . . . . . . . . . . .8
Installation Guidelines . . . . . . . . . . . . . . . . . . . . . . . . . . . . . .9
Hooking Up the Hardware . . . . . . . . . . . . . . . . . . . . . . .9
Connecting a Printer . . . . . . . . . . . . . . . . . . . . . . . . . .10
Software Installation . . . . . . . . . . . . . . . . . . . . . . . . . .11
Registration . . . . . . . . . . . . . . . . . . . . . . . . . . . . . . . . .13
Upgrades . . . . . . . . . . . . . . . . . . . . . . . . . . . . . . . . . . .15
System Procedures . . . . . . . . . . . . . . . . . . . . . . . . . . . . . . .16
Power-up Procedure . . . . . . . . . . . . . . . . . . . . . . . . . .16
Login as a Different User . . . . . . . . . . . . . . . . . . . . . . .17
Shut-down Procedure . . . . . . . . . . . . . . . . . . . . . . . . .17
Troubleshooting. . . . . . . . . . . . . . . . . . . . . . . . . . . . . . . . . .18
How do I find the software version? . . . . . . . . . . . . . . .19
Chapter 2
Table of Contents i
Emphasis Console User Interface . . .21
Emphasis Facepanel Options . . . . . . . . . . . . . . . . . . . . . . .22
Express Two-Scene . . . . . . . . . . . . . . . . . . . . . . . . . . .22
Express ECS . . . . . . . . . . . . . . . . . . . . . . . . . . . . . . . .22
Expression ECS . . . . . . . . . . . . . . . . . . . . . . . . . . . . . .22
Insight ECS . . . . . . . . . . . . . . . . . . . . . . . . . . . . . . . . .22
Setting the Facepanel Type on the Server . . . . . . . . .22
Accessories . . . . . . . . . . . . . . . . . . . . . . . . . . . . . . . . .24
Console Displays. . . . . . . . . . . . . . . . . . . . . . . . . . . . . . . . .27
Display Features . . . . . . . . . . . . . . . . . . . . . . . . . . . . .27
Stage, Blind and Fader . . . . . . . . . . . . . . . . . . . . . . . .28
Spreadsheet . . . . . . . . . . . . . . . . . . . . . . . . . . . . . . . .31
Tracksheet . . . . . . . . . . . . . . . . . . . . . . . . . . . . . . . . . .31
Patch . . . . . . . . . . . . . . . . . . . . . . . . . . . . . . . . . . . . . .32
Page 4

Park . . . . . . . . . . . . . . . . . . . . . . . . . . . . . . . . . . . . . . . 32
Playback . . . . . . . . . . . . . . . . . . . . . . . . . . . . . . . . . . .33
Expression LED displays . . . . . . . . . . . . . . . . . . . . . . .33
Hard keys vs. Softkeys by Facepanel Type . . . . . . . . . . . . 34
Softkeys . . . . . . . . . . . . . . . . . . . . . . . . . . . . . . . . . . . . 36
Channel Concepts in the Emphasis Control System. . . . . .43
HTP vs. LTP . . . . . . . . . . . . . . . . . . . . . . . . . . . . . . . . 43
Independent Channels . . . . . . . . . . . . . . . . . . . . . . . .43
Preset vs. Tracking . . . . . . . . . . . . . . . . . . . . . . . . . . .44
Chapter 3
System Settings . . . . . . . . . . . . . . . . .45
The Setup Menu . . . . . . . . . . . . . . . . . . . . . . . . . . . . . . . . .46
System Settings . . . . . . . . . . . . . . . . . . . . . . . . . . . . . . 46
Options Settings . . . . . . . . . . . . . . . . . . . . . . . . . . . . . 51
Clock Functions . . . . . . . . . . . . . . . . . . . . . . . . . . . . . .51
Clear Functions . . . . . . . . . . . . . . . . . . . . . . . . . . . . . .53
Print Functions . . . . . . . . . . . . . . . . . . . . . . . . . . . . . . . 54
Macro List . . . . . . . . . . . . . . . . . . . . . . . . . . . . . . . . . .54
Time Code Events and Real Time Programs . . . . . . .54
Channel Attributes . . . . . . . . . . . . . . . . . . . . . . . . . . . . 54
Profiles . . . . . . . . . . . . . . . . . . . . . . . . . . . . . . . . . . . . .55
Moving Light Functions . . . . . . . . . . . . . . . . . . . . . . . . 56
Patch . . . . . . . . . . . . . . . . . . . . . . . . . . . . . . . . . . . . . . . . . . 61
Interactivity with Emphasis Visualization . . . . . . . . . . . 61
EDMX . . . . . . . . . . . . . . . . . . . . . . . . . . . . . . . . . . . . .62
Modifying dimmer output . . . . . . . . . . . . . . . . . . . . . . .63
Label Dimmers . . . . . . . . . . . . . . . . . . . . . . . . . . . . . .66
Patching to a Strand Lighting CD80 Dimmer Rack . . .66
Using the About Command . . . . . . . . . . . . . . . . . . . . . . . . . 67
About Dimmer . . . . . . . . . . . . . . . . . . . . . . . . . . . . . . . 67
About Channel . . . . . . . . . . . . . . . . . . . . . . . . . . . . . . .67
About Show . . . . . . . . . . . . . . . . . . . . . . . . . . . . . . . . . 68
Chapter 4
ii Emphasis Console v1.4.0 User Manual
Live Editing . . . . . . . . . . . . . . . . . . . . .69
Displays. . . . . . . . . . . . . . . . . . . . . . . . . . . . . . . . . . . . . . . .70
Stage Display . . . . . . . . . . . . . . . . . . . . . . . . . . . . . . .70
Fader Display . . . . . . . . . . . . . . . . . . . . . . . . . . . . . . .71
Manual Control . . . . . . . . . . . . . . . . . . . . . . . . . . . . . . . . . . 72
Select Channels, Dimmers and Fixtures . . . . . . . . . . .72
Set Levels . . . . . . . . . . . . . . . . . . . . . . . . . . . . . . . . . . 75
Captured channels and [Release] . . . . . . . . . . . . . . .77
Dimmer and Channel Check . . . . . . . . . . . . . . . . . . . .78
Solo . . . . . . . . . . . . . . . . . . . . . . . . . . . . . . . . . . . . . . .79
Moving Light Control . . . . . . . . . . . . . . . . . . . . . . . . . . 80
Sneak . . . . . . . . . . . . . . . . . . . . . . . . . . . . . . . . . . . . .83
Channel Faders (Express Two-Scene/Insight only) . . 84
Groups . . . . . . . . . . . . . . . . . . . . . . . . . . . . . . . . . . . . . 84
Park . . . . . . . . . . . . . . . . . . . . . . . . . . . . . . . . . . . . . . . 85
Page 5

Cues . . . . . . . . . . . . . . . . . . . . . . . . . . . . . . . . . . . . . . . . . . 88
Cue Types . . . . . . . . . . . . . . . . . . . . . . . . . . . . . . . . . . 88
Record Cues . . . . . . . . . . . . . . . . . . . . . . . . . . . . . . . . 89
Link Functions . . . . . . . . . . . . . . . . . . . . . . . . . . . . . . .89
Tracking . . . . . . . . . . . . . . . . . . . . . . . . . . . . . . . . . . . . 90
Stage Effects . . . . . . . . . . . . . . . . . . . . . . . . . . . . . . . . 92
Using Cues as Groups . . . . . . . . . . . . . . . . . . . . . . . .93
Submasters . . . . . . . . . . . . . . . . . . . . . . . . . . . . . . . . . . . . .94
Submaster Types . . . . . . . . . . . . . . . . . . . . . . . . . . . .94
Record Submasters . . . . . . . . . . . . . . . . . . . . . . . . . . .95
Using [Load Sub] . . . . . . . . . . . . . . . . . . . . . . . . . . . .96
Using Submasters as Groups . . . . . . . . . . . . . . . . . . .97
Time Functions . . . . . . . . . . . . . . . . . . . . . . . . . . . . . . . . . .98
Cues . . . . . . . . . . . . . . . . . . . . . . . . . . . . . . . . . . . . . . 98
Submasters . . . . . . . . . . . . . . . . . . . . . . . . . . . . . . . .100
Special Functions . . . . . . . . . . . . . . . . . . . . . . . . . . . . . . . 101
Except . . . . . . . . . . . . . . . . . . . . . . . . . . . . . . . . . . . .101
Solo . . . . . . . . . . . . . . . . . . . . . . . . . . . . . . . . . . . . . .101
Update . . . . . . . . . . . . . . . . . . . . . . . . . . . . . . . . . . . .102
Delete . . . . . . . . . . . . . . . . . . . . . . . . . . . . . . . . . . . . 102
Label . . . . . . . . . . . . . . . . . . . . . . . . . . . . . . . . . . . . . 103
Chapter 5
Blind Editing . . . . . . . . . . . . . . . . . . .105
Displays. . . . . . . . . . . . . . . . . . . . . . . . . . . . . . . . . . . . . . .106
Blind . . . . . . . . . . . . . . . . . . . . . . . . . . . . . . . . . . . . . .106
List Displays . . . . . . . . . . . . . . . . . . . . . . . . . . . . . . .107
Spreadsheets . . . . . . . . . . . . . . . . . . . . . . . . . . . . . .108
Tracksheet . . . . . . . . . . . . . . . . . . . . . . . . . . . . . . . . .109
Cues . . . . . . . . . . . . . . . . . . . . . . . . . . . . . . . . . . . . . . . . . 110
Cue List . . . . . . . . . . . . . . . . . . . . . . . . . . . . . . . . . . .111
Spreadsheet . . . . . . . . . . . . . . . . . . . . . . . . . . . . . . .113
Tracksheet . . . . . . . . . . . . . . . . . . . . . . . . . . . . . . . . .116
Subroutines . . . . . . . . . . . . . . . . . . . . . . . . . . . . . . . . . . . .117
Subroutines in Cues . . . . . . . . . . . . . . . . . . . . . . . . .117
Subroutines on Submasters (Subs-on-Subs) . . . . . . 120
Effects . . . . . . . . . . . . . . . . . . . . . . . . . . . . . . . . . . . . . . . .123
Blind Effects . . . . . . . . . . . . . . . . . . . . . . . . . . . . . . . . 123
Submasters . . . . . . . . . . . . . . . . . . . . . . . . . . . . . . . . . . . .128
Submaster List . . . . . . . . . . . . . . . . . . . . . . . . . . . . . . 128
Submaster Spreadsheet . . . . . . . . . . . . . . . . . . . . . .130
Supermasters . . . . . . . . . . . . . . . . . . . . . . . . . . . . . .132
Groups . . . . . . . . . . . . . . . . . . . . . . . . . . . . . . . . . . . . . . . 133
Group List . . . . . . . . . . . . . . . . . . . . . . . . . . . . . . . . .134
Group Spreadsheet . . . . . . . . . . . . . . . . . . . . . . . . . .135
Focus Points . . . . . . . . . . . . . . . . . . . . . . . . . . . . . . . . . . .137
Focus Point List . . . . . . . . . . . . . . . . . . . . . . . . . . . . . 138
Focus Point Spreadsheet . . . . . . . . . . . . . . . . . . . . .139
Table of Contents iii
Page 6

Chapter 6
Playback . . . . . . . . . . . . . . . . . . . . . .143
A/B and C/D Fader Pairs. . . . . . . . . . . . . . . . . . . . . . . . . . 144
Fader Controls . . . . . . . . . . . . . . . . . . . . . . . . . . . . . .144
Playback Cue List . . . . . . . . . . . . . . . . . . . . . . . . . . .145
Fader Status display . . . . . . . . . . . . . . . . . . . . . . . . .146
Cue Playback . . . . . . . . . . . . . . . . . . . . . . . . . . . . . .147
Quickstep . . . . . . . . . . . . . . . . . . . . . . . . . . . . . . . . . .150
Multi-part Cues . . . . . . . . . . . . . . . . . . . . . . . . . . . . . 150
Effect Cues . . . . . . . . . . . . . . . . . . . . . . . . . . . . . . . .150
Subroutine Cues . . . . . . . . . . . . . . . . . . . . . . . . . . . .150
Submasters . . . . . . . . . . . . . . . . . . . . . . . . . . . . . . . . . . . .152
Submaster Pages . . . . . . . . . . . . . . . . . . . . . . . . . . . 152
Effects . . . . . . . . . . . . . . . . . . . . . . . . . . . . . . . . . . . .152
Subroutines on Submasters (Subs-on-Subs) . . . . . . 152
Submaster Rate . . . . . . . . . . . . . . . . . . . . . . . . . . . . . 153
Supermasters . . . . . . . . . . . . . . . . . . . . . . . . . . . . . .153
Chapter 7
Chapter 8
Chapter 9
Macros . . . . . . . . . . . . . . . . . . . . . . .155
Create Macros. . . . . . . . . . . . . . . . . . . . . . . . . . . . . . . . . .156
Learn Macro . . . . . . . . . . . . . . . . . . . . . . . . . . . . . . .156
Display Macros . . . . . . . . . . . . . . . . . . . . . . . . . . . . .156
Macro Editing . . . . . . . . . . . . . . . . . . . . . . . . . . . . . . . 158
Special Macro Functions . . . . . . . . . . . . . . . . . . . . . .161
Playback Macros . . . . . . . . . . . . . . . . . . . . . . . . . . . . . . . . 162
Remote Macros . . . . . . . . . . . . . . . . . . . . . . . . . . . . .162
Startup Macro . . . . . . . . . . . . . . . . . . . . . . . . . . . . . .162
Sample Macros . . . . . . . . . . . . . . . . . . . . . . . . . . . . . . . . . 163
Real Time Programs. . . . . . . . . . . . .165
Real Time Programs . . . . . . . . . . . . . . . . . . . . . . . . . . . . . 166
Setting the time and location . . . . . . . . . . . . . . . . . . .166
Create and Edit Real Time Programs . . . . . . . . . . . .168
Enable Real Time Programs . . . . . . . . . . . . . . . . . . . 171
Time and Location. . . . . . . . . . . . . . . . . . . . . . . . . . . . . . .172
Control Interfaces . . . . . . . . . . . . . . .175
ETCNet2 . . . . . . . . . . . . . . . . . . . . . . . . . . . . . . . . . . . . . . 176
EDMX Basics (ETCNet2 v4.0.0 and above) . . . . . . .176
DMX Output . . . . . . . . . . . . . . . . . . . . . . . . . . . . . . . .178
DMX Input . . . . . . . . . . . . . . . . . . . . . . . . . . . . . . . . .179
Remote Macros . . . . . . . . . . . . . . . . . . . . . . . . . . . . .179
Remote Trigger . . . . . . . . . . . . . . . . . . . . . . . . . . . . . 180
Facepanel Configuration . . . . . . . . . . . . . . . . . . . . . . . . . . 182
Show Control Overview. . . . . . . . . . . . . . . . . . . . . . . . . . .183
iv Emphasis Console v1.4.0 User Manual
Page 7

MIDI Basics . . . . . . . . . . . . . . . . . . . . . . . . . . . . . . . . . . . .184
ETC MIDI Message Formats . . . . . . . . . . . . . . . . . . . 185
MIDI Message definitions . . . . . . . . . . . . . . . . . . . . .186
MIDI Show Control . . . . . . . . . . . . . . . . . . . . . . . . . . . . . .188
MIDI Show Control (MSC) Commands . . . . . . . . . . .188
MSC Frame Packet . . . . . . . . . . . . . . . . . . . . . . . . . . 189
SMPTE . . . . . . . . . . . . . . . . . . . . . . . . . . . . . . . . . . . . . . . 192
Time Code Program . . . . . . . . . . . . . . . . . . . . . . . . . . . . .193
Time Code Events Display . . . . . . . . . . . . . . . . . . . .193
Run a Time Code Program . . . . . . . . . . . . . . . . . . . .197
Emphasis Serial Button Protocol. . . . . . . . . . . . . . . . . . . . 200
Commands . . . . . . . . . . . . . . . . . . . . . . . . . . . . . . . .200
Arguments . . . . . . . . . . . . . . . . . . . . . . . . . . . . . . . . . 200
Command Examples . . . . . . . . . . . . . . . . . . . . . . . . .201
Input Stream Echoing . . . . . . . . . . . . . . . . . . . . . . . . 201
Things to Keep in Mind... . . . . . . . . . . . . . . . . . . . . . .202
The Keyword Table . . . . . . . . . . . . . . . . . . . . . . . . . .202
Appendix A
Appendix B
System Defaults . . . . . . . . . . . . . . . .207
Emphasis Visualization and Console Defaults . . . . . . . . .208
Facepanel Type . . . . . . . . . . . . . . . . . . . . . . . . . . . . .208
Diagnostics . . . . . . . . . . . . . . . . . . . . . . . . . . . . . . . .208
IO . . . . . . . . . . . . . . . . . . . . . . . . . . . . . . . . . . . . . . . . 208
ASCII Options . . . . . . . . . . . . . . . . . . . . . . . . . . . . . .209
Emphasis Visualization Defaults . . . . . . . . . . . . . . . . . . . . 210
File Options Tab . . . . . . . . . . . . . . . . . . . . . . . . . . . .210
Emphasis Console Defaults . . . . . . . . . . . . . . . . . . . . . . . 211
Language . . . . . . . . . . . . . . . . . . . . . . . . . . . . . . . . . . 211
System ID . . . . . . . . . . . . . . . . . . . . . . . . . . . . . . . . .211
Expression Facepanel Defaults . . . . . . . . . . . . . . . . . . . . 212
Express Facepanel Defaults . . . . . . . . . . . . . . . . . . . . . . . 214
Maintenance and Troubleshooting . .215
Return the Facepanel to v3.1 Operation . . . . . . . . . . . . . .216
Export your Show File to “.shw” Format . . . . . . . . . .216
Create a v3.1 Console Software Disk . . . . . . . . . . . .217
Install v3.1 Console Software . . . . . . . . . . . . . . . . . . 218
Open the Facepanel . . . . . . . . . . . . . . . . . . . . . . . . . . . . . 219
Spare parts kit . . . . . . . . . . . . . . . . . . . . . . . . . . . . . .219
Replacing fuses. . . . . . . . . . . . . . . . . . . . . . . . . . . . . . . . .220
Connecting desk lights (Express facepanels only) . . . . . . 221
Expression and Insight DIP switches . . . . . . . . . . . . . . . . 222
Internal DIP Switches . . . . . . . . . . . . . . . . . . . . . . . . 222
VGA monitor connections . . . . . . . . . . . . . . . . . . . . . . . . .223
Connecting DMX cable to facepanel . . . . . . . . . . . . . . . . .224
Table of Contents v
Page 8

Using an optional pointing device . . . . . . . . . . . . . . . . . . .225
Installation . . . . . . . . . . . . . . . . . . . . . . . . . . . . . . . . .225
Device check . . . . . . . . . . . . . . . . . . . . . . . . . . . . . . . 225
Connecting an alphanumeric keyboard. . . . . . . . . . . . . . .226
Installing Remote Focus Unit . . . . . . . . . . . . . . . . . . . . . .227
Connecting MIDI . . . . . . . . . . . . . . . . . . . . . . . . . . . . . . . .228
MIDI Out/Thru jumper setting . . . . . . . . . . . . . . . . . .228
Connecting SMPTE (Expression and Insight only) . . . . . .230
SMPTE facepanel connector . . . . . . . . . . . . . . . . . . . 230
Using Remote Macros. . . . . . . . . . . . . . . . . . . . . . . . . . . .231
Wiring Remote Macros . . . . . . . . . . . . . . . . . . . . . . . 232
Expression/Insight facepanels . . . . . . . . . . . . . . . . . .232
Appendix C
Appendix D
Lighting Playback Controllers . . . . . .235
Expression/Insight LPC Installation and Configuration . . .236
Installation Guidelines . . . . . . . . . . . . . . . . . . . . . . . .236
Configuration Guidelines . . . . . . . . . . . . . . . . . . . . . .236
Expression/Insight LPC User Interface . . . . . . . . . . . . . . . 237
The Cue Playback Display . . . . . . . . . . . . . . . . . . . .237
The Macro Playback Display . . . . . . . . . . . . . . . . . . . 237
The Edit Display . . . . . . . . . . . . . . . . . . . . . . . . . . . .237
Express LPC Installation and Configuration . . . . . . . . . . .238
Rack-mount Installation . . . . . . . . . . . . . . . . . . . . . . . 238
Surface-mount Installation . . . . . . . . . . . . . . . . . . . . .239
Install Cables . . . . . . . . . . . . . . . . . . . . . . . . . . . . . . .240
Configuration Guidelines . . . . . . . . . . . . . . . . . . . . . .240
Express LPC User Interface . . . . . . . . . . . . . . . . . . . . . . . 241
Specifications . . . . . . . . . . . . . . . . . .243
Emphasis Control System Specifications . . . . . . . . . . . . .244
Express Facepanel Specifications . . . . . . . . . . . . . . . . . .250
Expression Facepanel Specifications . . . . . . . . . . . . . . . .254
Insight Facepanel Specifications. . . . . . . . . . . . . . . . . . . . 259
Appendix E
vi Emphasis Console v1.4.0 User Manual
Foldout Diagrams . . . . . . . . . . . . . . .265
Emphasis Control System Riser Diagrams . . . . . . . . . . . 267
Emphasis Facepanel Rear Panel Connections. . . . . . . . 268
Insight Facepanel Overview . . . . . . . . . . . . . . . . . . . . . . 269
Expression Facepanel Overview. . . . . . . . . . . . . . . . . . . 270
Express 125/250/ECS Facepanel Overview . . . . . . . . . . 271
Express 24/48 Facepanel Overview . . . . . . . . . . . . . . . . 272
Express 48/96 & 72/144 Facepanel Overview . . . . . . . . 273
Page 9

Emphasis LPC Facepanel Overview. . . . . . . . . . . . . . . . 274
Command Keypad Overview. . . . . . . . . . . . . . . . . . . . . . 275
Express Facepanel Two-Scene Operation . . . . . . . . . . . 276
Overview . . . . . . . . . . . . . . . . . . . . . . . . . . . . . . . . . .276
Setup Two-scene Operation . . . . . . . . . . . . . . . . . . .276
Playback Looks using the AB Fader Pair . . . . . . . . .276
Playback Looks with Timing . . . . . . . . . . . . . . . . . . .276
Table of Contents vii
Page 10

This page intentionally blank.
viii Emphasis Console v1.4.0 User Manual
Page 11

Introduction
This manual covers the basic installation and operation of the Emphasis Control System.
Specifically, this volume contains the operational instructions for Emphasis Console, the
facepanel interface to your Emphasis Control System. For information on using Emphasis
Visualization, please see the Emphasis Visualization User Manual.
The introduction contains the following sections:
• Using this Manual. . . . . . . . . . . . . . . . . . . . . . . . . . . . . . . . . . . 2
• Help from ETC Technical Services . . . . . . . . . . . . . . . . . . . . . 3
If you are reading these manuals cover-to-cover, please begin with
the Emphasis Visualization User Manual.
The Emphasis Visualization User Manual contains a Quick Start
chapter that contains a tutorial for new users, and some basic
information for users familiar with WYSIWYG and/or Expressionstyle consoles.
Introduction 1
Page 12
Using this Manual
This manual is intended for use in conjunction with the Emphasis Visualization User
Manual.
This manual assumes that you have a basic familiarity with the Microsoft Windows
operating system, opening and closing files, closing and resizing windows, using Windows
Explorer, and performing basic disk operations.
In order to be specific about where features and commands are found, the following naming
and text conventions will be used:
• Emphasis™ Server (hardware): the computer used to run the Emphasis applications.
This is also referred to simply as the “Server”.
• Emphasis Facepanel (hardware): the control console hardware. This is also referred
to simply as the “Facepanel”.
• Emphasis Visualization (software): the application that resides solely on the Server
and provides WYSIWYG
• Emphasis Console (software): the application that drives the Facepanel. The Console
displays resemble the traditional Facepanel displays, and can be viewed on either the
Server or Facepanel monitors. This application usually remains hidden, as the displays
can be accessed through the Facepanel and Visualization.
• Menus and commands found on the Server are indicated in bold text. For example: In
the File menu, click Open.
™
-based functionality.
®
• Server keyboard buttons are indicated in all CAPS. For example, TAB or CTRL.
• Facepanel buttons and softkeys are indicated in bold [brackets]. For example, [Stage]
or [Enter]. Optional keys are indicated in <angle brackets>, for example, <Dim> or
<Channel>. A note about <S7 - More Softkeys>: this command is always indicated as
optional, and is only indicated once in an instruction regardless of how many pages of
softkeys exist. This is because there is no way to predict what softkey page you are on
at any given time. Press <S7 - More Softkeys> until you find the required command.
• References to other parts of the manual are indicated in italics. When viewing this
manual electronically, click on the reference to jump to that section of the manual.
Note:
CAUTION:
Notes are helpful hints and information that is supplemental to the main text.
A Caution statement indicates situations where there may be undefined or
unwanted consequences of an action, potential for data loss or an equipment
problem.
WARNING: A Warning statement indicates situations where damage may occur, people may
be harmed, or there are serious or dangerous consequences of an action.
Please email comments about this manual to: TechComm@etcconnect.com
2 Emphasis Console v1.4.0 User Manual
Page 13

Help from ETC Technical Services
If you are having difficulties, your most convenient resources are the references given in
this manual and the Help system. To search more widely, try the ETC website at
www.etcconnect.com
Services directly at one of the offices identified below. Emergency service is available from
all ETC offices outside of normal business hours.
When calling for help, please have the following information handy:
• Console model and serial number (located on back panel)
• Emphasis Server serial number (located inside the door on the front of the Server case)
• Software version (see How do I find the software version?, page 19)
• Dimmer manufacturer and installation type
• Moving light information (manufacturer, mode, data cable type)
• Other components in your system (Unison
Americas
ETC International
Technical Services Department
3030 Laura Lane
Middleton, WI 53562
+1-800-775-4382
+1-608 831-4116
. If none of these resources is sufficient, contact ETC Technical
®
, other consoles, etc.)
service@etcconnect.com
Europe
ETC Europe Ltd.
Technical Services Department
5 Victoria Industrial Estate
Victoria Road,
London W3 6UU England
+44 (0)20 8896 1000
service@etceurope.com
Asia
ETC Asia, Ltd.
Technical Services Department
Room 605-606
Tower III, Enterprise Square
9 Sheung Yuet Road
Kowloon Bay, Kowloon, Hong Kong
+852 2799 1220
service@etcasia.com
Introduction 3
Page 14

This page intentionally blank.
4 Emphasis Console v1.4.0 User Manual
Page 15

Chapter 1
System Overview
Emphasis integrates the functionality of WYSIWYG with the Expression-style control
consoles to give you a powerful, but user-friendly, control system offering both a graphical,
point-and-click environment and a tactile button-and-wheel interface. Emphasis ensures
consistency and accuracy with total integration of data across all modes. Data input in any
mode is applied through the paperwork, on the light plot, in the console patch, on reports,
and on screen, in every view.
This chapter contains the following sections:
• Emphasis Options . . . . . . . . . . . . . . . . . . . . . . . . . . . . . . . . . . 6
• System Components . . . . . . . . . . . . . . . . . . . . . . . . . . . . . . . . 7
• Installation Guidelines . . . . . . . . . . . . . . . . . . . . . . . . . . . . . . . 9
• System Procedures . . . . . . . . . . . . . . . . . . . . . . . . . . . . . . . . 16
• Troubleshooting . . . . . . . . . . . . . . . . . . . . . . . . . . . . . . . . . . . 18
1 System Overview 5
Page 16

Emphasis Options
Emphasis systems are created by choosing the server type, maximum channel count and
Facepanel type. Emphasis is offered as an upgrade to an existing Express or Expressionstyle console (see below for compatible Facepanel types), or as a complete package.
Server Types
• 3D - Includes full console feature set and full visualization functionality: paperwork and
presentation tools, data tasks, 3D CAD drafting, complete visualization and rendering.
WYSIWYG Design stand-alone software is included. The 3D Server will support up to
two monitors.
• 2D - Includes full console feature set and limited visualization functionality: paperwork
and presentation tools, data tasks, and 2D CAD drafting. WYSIWYG Report standalone software is included. The 2D Server will support one monitor.
Channel Counts
• 500 channels
• 1000 channels
• 2500 channels
• 5000 channels
Channel counts refer to the maximum number of control channels you can have in a show.
All channel options have 32,767 EDMX™ addresses available.
Facepanels
• Expression with Emphasis (Expression ECS), Expression 3, Expression 2x,
Imagine™ 3
• Insight™ with Emphasis (Insight ECS), Insight 3, Insight 2x, Focus™
• Express (all varieties)
6 Emphasis Console v1.4.0 User Manual
Page 17
System Components
Emphasis Server
The Emphasis server is a Dell® computer optimized by ETC for the best performance of the
Emphasis Visualization and Emphasis Console applications. The Server is provided preconfigured and should not require any software installations for its initial use. This section
contains information on specific differences between your Server and a regular PC.
The Server contains all of the software required for Emphasis to run, a hard drive for show
data storage, a CD-RW drive for show data storage, and a 3.5” floppy drive for Facepanel
Software Disk creation.
There is a special hardware key called a “dongle” inside your Server, coded for the software
features you have purchased. If this is removed, Emphasis will not run. This dongle is not
usable on other computers and cannot be used with WYSIWYG stand-alone applications.
Note:
There are two USB ports located behind the door on the front of your Server. The
Emphasis dongle is connected internally to the rear port of this pair, so it may not be used
for other USB devices. The front port is available for your use.
A keyboard and mouse are included with your Server. The keyboard may have a number
of buttons designed for use with common internet tasks. These buttons have been
disabled, as the Server should not be connected to the internet at any time.
When you power up your Server, it will automatically launch the Emphasis applications.
The first time you do this, the Registration dialog box will appear (see Registration, page
13).
Emphasis Servers can be configured for 2D or 3D operation. The following table illustrates
the differences between the standard 2D and 3D Servers:
Feature 2D Server 3D Server
Monitors 1 Up to 2
CAD Views Wireframe only Wireframe, Isometric and Shaded
Emphasis Views Wireframe only Wireframe, Isometric and Shaded
Rendering No Yes
Emphasis Facepanel
The Emphasis Facepanel can be any of the following consoles:
• Expression with Emphasis, Expression 3, Expression 2x, Imagine™ 3
• Insight™ with Emphasis, Insight 3, Insight 2x, Focus™
• Express (all varieties)
When used in an Emphasis system, the Facepanel becomes an input device on the
network, rather than a stand-alone device. You are limited to some of the constraints of the
individual Facepanel types, such as submaster quantities, channel-fader availability and
monitor counts; however, you gain cue-, channel- and dimmer-counts when connected to
an Emphasis Server.
When a Facepanel has been upgraded to Emphasis operation, it will no longer operate as
a stand-alone console. The Facepanel essentially becomes a keyboard with some DMX
Node functionality. As such, the Facepanel cannot operate without the Emphasis Server
online. In case of an emergency, you can export your Emphasis show file as a v3.1 show,
reload the v3.1 software to your Facepanel and run it as a stand-alone console. The
1 System Overview 7
Page 18

procedure for exporting your show to v3.1 format is described in the Emphasis Visualization
User Manual. The procedure for returning your Facepanel to v3.1 operation is described in
Return the Facepanel to v3.1 Operation, page 216.
Emphasis Visualization
Emphasis Visualization is the software application that provides the graphic interface to the
Emphasis Control System. It is based on the powerful WYSIWYG suite of software
applications. This is where you patch your show, create your plot and prepare your
paperwork. You can also select and control fixtures, pre-cue your show and preview
recorded cues using the visualization features.
While Emphasis Visualization is based on WYSIWYG, there are some significant changes
that allow for interaction with the Emphasis Console. See the Emphasis Visualization User
Manual for more information on these new features.
Emphasis Console
Emphasis Console is the software application that drives the Facepanel. This application
usually remains hidden. You can access the settings and controls either from the
Facepanel or from the virtual Facepanel in Emphasis Visualization.
8 Emphasis Console v1.4.0 User Manual
Page 19
Installation Guidelines
Hooking Up the Hardware
Emphasis systems can range from a simple Server and Facepanel combination to fully
integrated network systems. Regardless of the size of your system, there are some basic
connections that are common to all systems.
Note:
Note:
Note:
See Expression and Insight DIP switches, page 222 for the correct network settings.
Incorrect settings will not allow your Facepanel and Server to communicate.
Emphasis uses UTP (Unshielded Twisted Pair) cable and a hub or switch for
communication between the Facepanel and Server. A hub or switch is required for network
connections between Facepanels, Servers and other network devices such as ETCNet2™
Nodes and Unison Architectural Controls. In all cases, networking equipment and cables
must meet or exceed the Cat 5 standard.
To connect your system devices:
Step 1: Place your Facepanel and Server on a stable, flat surface. The Server may be
placed flat (horizontally) on the table or on its edge (vertically). The Server’s CD
tray is designed to work in either orientation.
Step 2: Connect the Facepanel Twisted Pair jack to the Server using UTP cable through
a hub or switch.
Step 3: Connect DMX cables to the Facepanel DMX outputs.
You may also connect DMX cables to Nodes, if available.
Step 4: Connect RFU cable to the Facepanel RFU connector.
You may also connect your RFU cable to a Node, if available.
Step 5: If you have ETCLink in your system, the cable must be connected to an
ETCLink-enabled DMX Node. The ETCLink connector on your Facepanel is not
supported in Emphasis.
Step 6: Connect any MIDI or SMPTE cables to the appropriate connectors on the
Facepanel.
Step 7: Connect the Dell keyboard and mouse that came with the Server to the
appropriate connectors on the Server. These connections are colour coded. You
may also have a second keyboard connected to the Facepanel, if desired, for
labeling items on the console, such as cues, groups and submasters. The
second keyboard is not required, but may be added for convenience.
Step 8: Connect your monitors. There will be at least one monitor on the Server and one
on the Facepanel.
• Servers configured for 2D operation will only support one monitor.
• Servers configured for 3D operation are supplied with a dual-video card.
Monitors are connected to this card using a Y-cable, provided with your
Server.
• Expression and Insight consoles support two monitors. Express consoles
support one monitor only.
1 System Overview 9
Page 20
Step 9: Connect power cables to Server, Facepanel, and hubs or switches.
CAUTION:
If you plug in the server it may boot - it may not wait for you to press the power
button. If the keyboard and/or mouse are not plugged in when your power up, they
will not be recognized by the Server. You will have to force the Server to power
down, plug them in, and restart.
Connecting a Printer
Connecting a printer to your Emphasis Server follows the same setup rules as any
Windows computer. If your printer requires a software installation, you will need to logon as
the System Manager. If you have problems connecting a printer to your Emphasis Control
System, please contact ETC Technical Services (see Help from ETC Technical Services,
page 3).
Install a printer from the System Manager login:
Step 1: Login as the System Manager (see Login as a Different User, page 17).
Step 2: Right-click on Start menu on task bar and click Explore. Alternatively, you can
press á+E to launch Windows Explorer at any time.
Step 3: Click to expand My Computer in the file tree.
Step 4: Click Control Panel.
Step 5: Double-click Printers and Faxes.
Step 6: Double-click Add Printers.
Step 7: Uncheck Automatically detect and install my Plug and Play printer. If this is left
checked, you will be asked for a password that you do not have.
Step 8: Continue through the wizard to setup your printer.
CAUTION:
Modification to hardware or software components or settings may affect the
stability of the Emphasis Control System. Consult ETC Technical Services before
making any changes. Non-authorized changes resulting in instability may require
reloading the operating system, which will restore defaults, remove any changes,
and may result in a loss of existing show files.
10 Emphasis Console v1.4.0 User Manual
Page 21
Software Installation
Your Emphasis Server will arrive with all software fully installed. If you have purchased a
complete Emphasis Control System, including an Emphasis Server and a Facepanel, the
Facepanel Software should also be loaded and ready to use.
If you have purchased Emphasis as an upgrade to an existing Express or Expression-style
console, you will need to upgrade the software in your console.
Installing Facepanel Software
If you have purchased Emphasis as an upgrade to an existing console, or if you install a
new version of software on your Emphasis Server, you will also need to update the software
version in your Facepanel. If Facepanel Software disks are not provided or are lost, you can
create your own Facepanel Software disk. The Facepanel Software Disk must be a 3.5” HD
floppy disk.
You may also create v3.1 software disks for Express and Expression-style consoles. This
provides a way to return a Facepanel to v3.1 operation as a backup. It is recommended to
keep separate disks for v3.1 and Emphasis Facepanel software on hand.
To create and install a Facepanel Software Disk:
Step 1: Exit Emphasis.
Step 2: Insert a 3.5” HD floppy disk into the floppy drive on the Emphasis Server.
Step 3: Login as System Manager (See Login as a Different User, page 17).
CAUTION:
Step 4: Click OK to clear the warning screen.
Step 5: Open the Facepanel Software folder located on the desktop.
Step 6: Double-click the appropriate Facepanel Software file.
Step 7: Click Unzip to extract the software onto the floppy disk.
Step 8: Click OK when completed.
Step 9: Close the WinZip window and the Facepanel Software window.
Step 10: In the Windows Start menu, click Log Off. Click the Log Off button in the dialog
Step 11: Click Emphasis to login as the Emphasis User.
Step 12: Eject the floppy disk from the Emphasis Server. Insert the floppy disk into the disk
Step 13: Power up the Facepanel. The software will load automatically.
Step 14: When completed, eject the floppy disk from the disk drive and restart the
Step 15: Press [
Modification to hardware or software components or settings may affect the
stability of the Emphasis Control System. Consult ETC Technical Services before
making any changes. Non-authorized changes resulting in instability may require
loading the operating system, which will restore defaults, remove any changes, and
may result in a loss of existing show files.
• EmphExpression.exe - for Expression and Insight facepanels used with an
Emphasis Control System.
• EmphExpress.exe - for Express facepanels used with the Emphasis Control
System.
that opens. This will return you to the Emphasis Login screen.
drive on the Facepanel.
Facepanel.
u] or [v] to select the Emphasis Server (processor) to connect to. You will
need to arrow-down to select the processor, even if only one processor is listed.
1 System Overview 11
Page 22

Step 16: Press [Enter]. The Facepanel will boot and the Stage displays will open on the
attached monitors.
Installing Software on the Emphasis Server
If you are reinstalling a new version of software, you will be provided specific instructions
for installation with the release notes for that version. When installing Emphasis software,
you are given the opportunity to install only Emphasis program files (located on the C drive)
or to install a full disk image for both the C and D drives.
CAUTION:
It is highly recommended to backup all show files before loading new software. To backup
existing show files see the Emphasis Visualization User Manual.
To install new software:
Step 1: Power up the Emphasis Server.
Step 2: When the Dell screen appears, press F12.
Step 3: Insert Emphasis Software CD #1 into the CD drive on the Emphasis Server.
Step 4: Press “4” to select Boot from IDE CD ROM and press ENTER.
Step 5: A warning screen appears allowing you to choose to continue or abort:
Step 6: The installation type screen appears. Choose the type of installation you want to
Installing a full disk image for the C and D drives will delete show files stored on the
Emphasis Server.
• If you want to continue with the installation process, press any key.
• If you want to abort the installation process, Press CTRL+C. When
prompted to “Terminate batch job (Y/N)?”, press “Y”. The DOS prompt will
appear. You may restart the Emphasis Server (press CTRL+ALT+DELETE)
at this point for normal operation.
perform:
• Install Emphasis Program files only (press “E”). This option restores the disk
image of the C drive only, show files are retained.
• Install full disk image (press “A”). This option restores the disk image of the
C and D drives, show files are deleted.
CAUTION:
Step 7: After you press “E” or “A”, the disk image begins to load from the Emphasis
Step 8: When completed, you will be prompted to remove the final CD from the drive and
Step 9: After a new version of software has been installed on your Emphasis Server, you
12 Emphasis Console v1.4.0 User Manual
Installing a full disk image for the C and D drives will delete show files stored on the
Emphasis Server.
Software Disk #1. You will be prompted to load subsequent disks by the disk
utility. Eject the first disk and load the next disk and press ENTER.
restart the Emphasis Server. You can restart the Emphasis Server by pressing
the power button twice, or by pressing CTRL+ALT+DELETE.
will need to install Facepanel Software. See Installing Facepanel Software, page
11, for that procedure.
Page 23
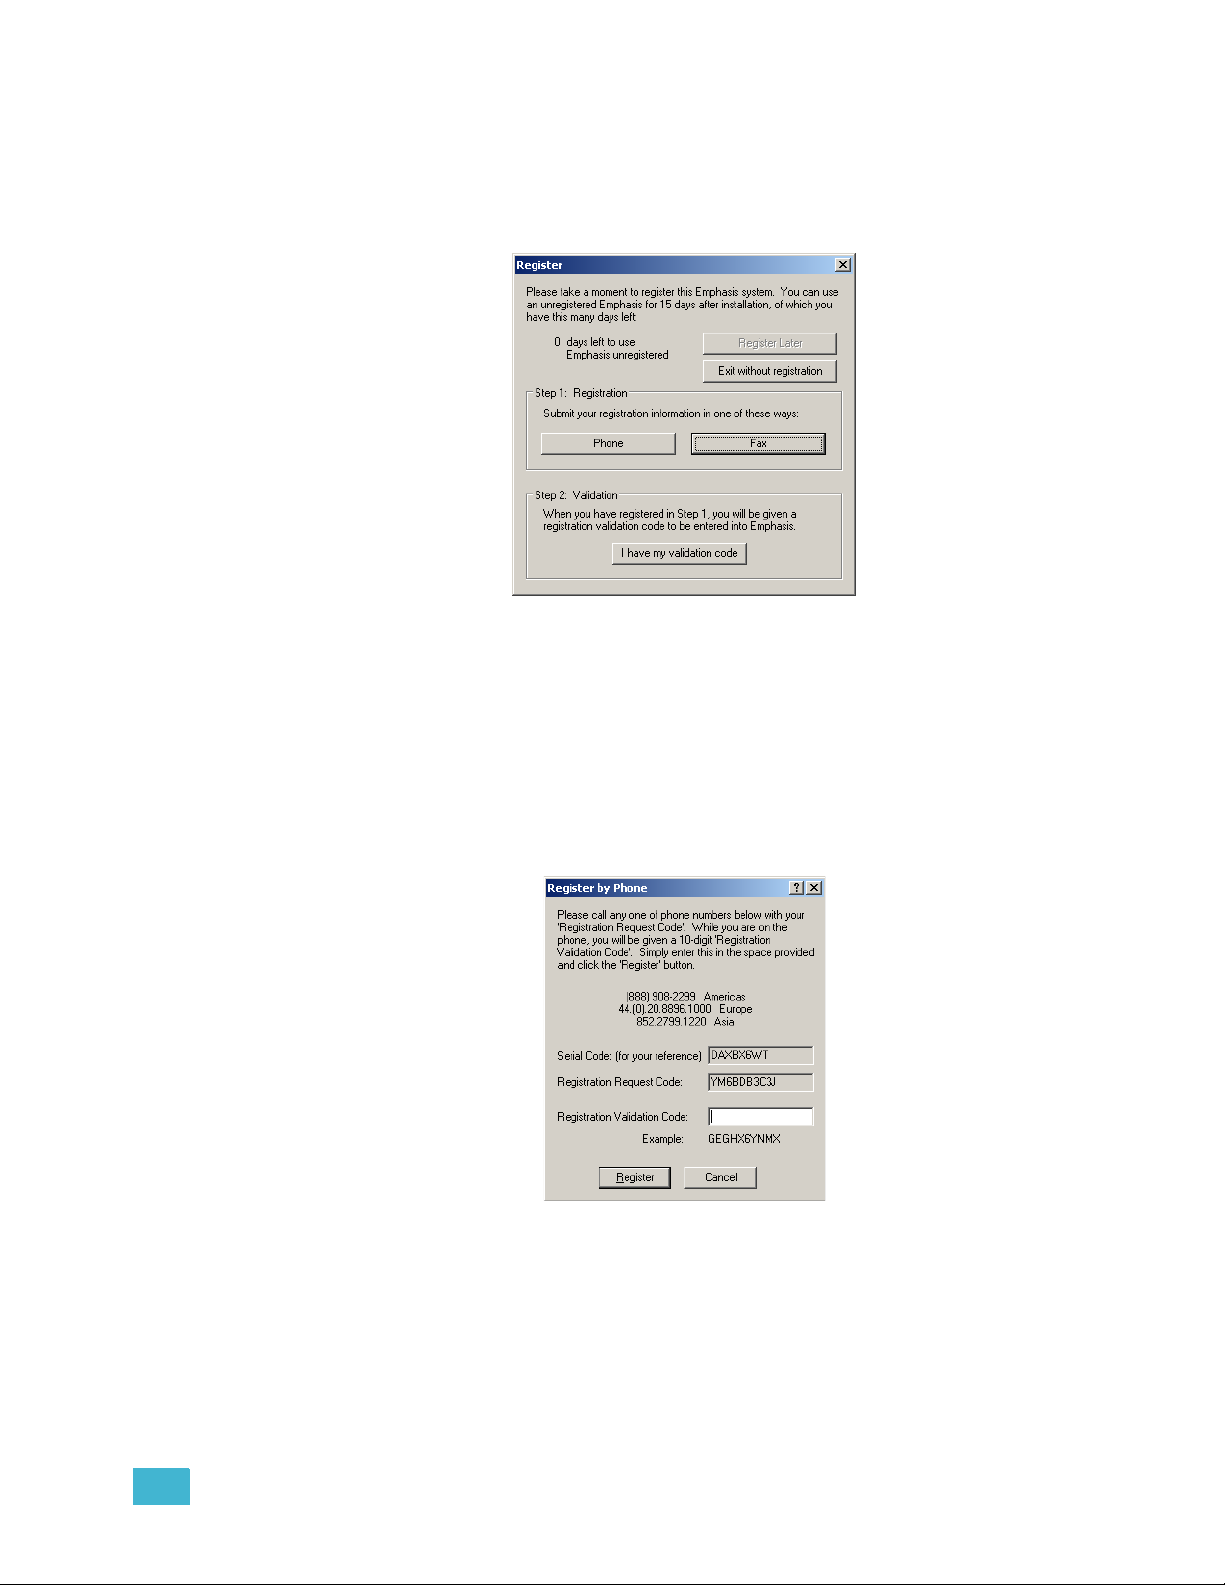
Registration
When you first start your Emphasis Control System, you will be prompted to register the
system. Registration will enable ETC to track your system for support purposes, and will
enroll your system in the software subscription included with your Emphasis Control
System, providing you with software upgrades for the duration of the subscription.
You have 15 days to use the system prior to registering; however, it is recommended that
you register your system as soon as possible. After 15 days have passed, you will not be
able to use Emphasis Visualization until you enter the registration code. You may register
your Emphasis Control System by phone, fax or email.
To register by phone:
Step 1: Power up the Emphasis Server. If the system is unregistered, the Registration
dialog should open. You can also open the Registration dialog using the Help
menu Registration command.
Step 2: In the Register dialog, click the Phone button.
Step 3: Call ETC at one of the given phone numbers and speak to a Customer Service
Representative. You will need to provide them with the Registration Request
Code and your contact details. They will provide you with a Registration
Validation Code to enter in the dialog.
Step 4: Enter the Registration Validation Code in the dialog. Make sure to use all
uppercase letters when you enter the code.
Step 5: Click Register.
1 System Overview 13
Page 24
To register by fax:
Step 1: Fill out the registration form included with your Emphasis Server. Fax it to the
appropriate fax number based on your location. You will be sent a Registration
Validation Code within a full business day.
Step 2: If you cannot find the form, you can print a new copy from the Emphasis Server.
Ensure you have a printer connected to your Emphasis Server. See Connecting
a Printer, page 10, for more information.
Step 3: Power up the Emphasis Server. If the system is unregistered, the Registration
dialog should open. You can also open the Registration dialog using the Help
menu Registration command.
Step 4: In the Register dialog, click the Fax button.
Step 5: Print the form, fill in all the information and fax it to the appropriate number
indicated on the form. You will be sent a Registration Validation Code within a full
business day.
Note:
Alternatively, you can email your registration (all the information required on the fax form)
to registeremphasis@etcconnect.com.
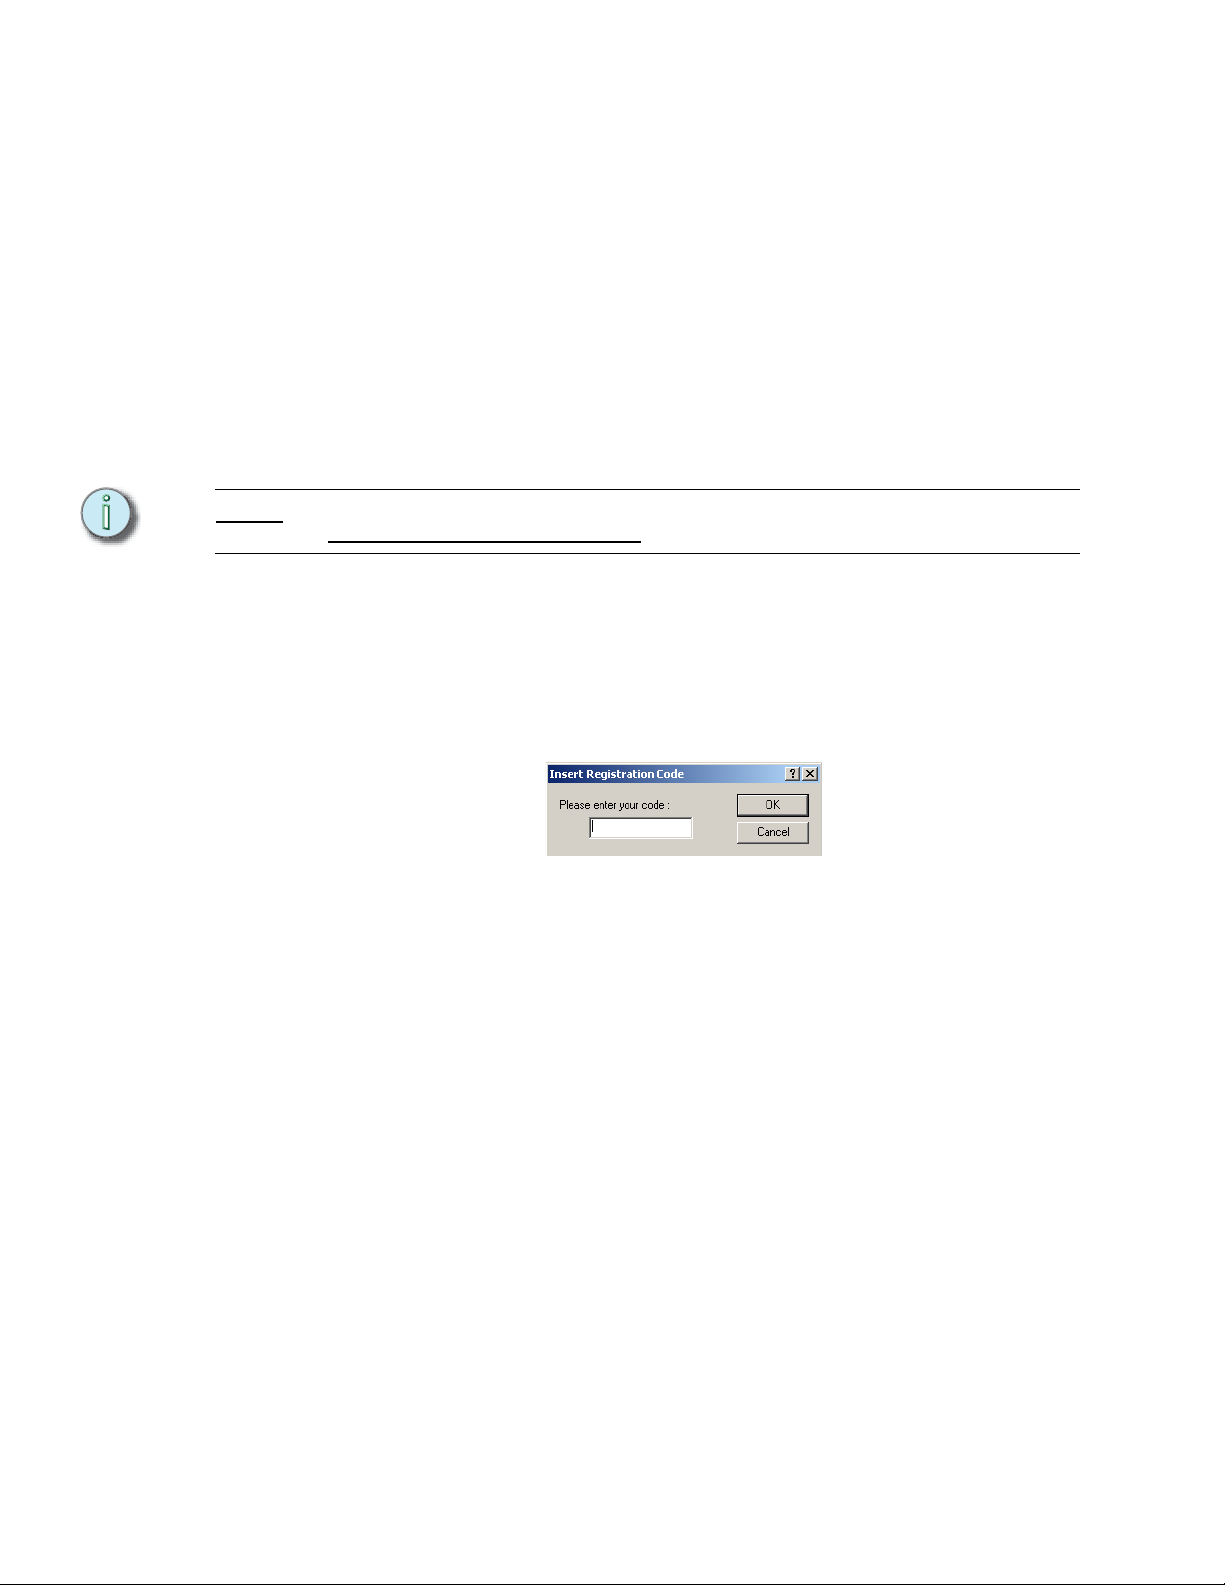
Step 6: When you receive your Registration Validation Code, take it to your Emphasis
Control System. Power up the Emphasis Server. If the system is unregistered,
the Registration dialog should open. You can also open the Registration dialog
using the Help menu Registration command.
Step 7: In the Register dialog, click the “I have my validation code” button. Enter the
Registration Validation Code in the dialog. Make sure to use all capital letters
when you enter the code.
Step 8: Click OK.
14 Emphasis Console v1.4.0 User Manual
Page 25

Upgrades
To upgrade your Emphasis Control System, contact the ETC dealer who provided your
Emphasis Control System to purchase the upgrade. When purchased, you will receive an
Upgrade Code that will unlock the new features you have purchased.
You can upgrade from a lower channel count to a higher channel count, and/or from 2D to
3D operation. You can also purchase an activation code for the Wireless Remote Focus
Unit (WRFU) and/or WYSILink™. If you want to upgrade from a single monitor system to a
dual monitor system to expand your desktop area, you may need to send the Emphasis
Server back to ETC for that hardware upgrade. This hardware upgrade does not affect any
functional abilities of the Emphasis Control System, only the available monitor space.
Emphasis 3D will operate the same on single and dual monitor systems.
To upgrade your Emphasis Control System:
Step 1: Contact your ETC dealer to purchase your Upgrade Code. When you have your
Step 2: Power up your Emphasis Server.
Step 3: In the Help menu, click Upgrade.
Step 4: Enter your Upgrade Code in the dialog box. Make sure to use all uppercase
Step 5: Verify that the code you have entered is correct.
Step 6: Click the Upgrade button.
Step 7: Close and restart Emphasis. Your upgrade will take effect on the restart.
Upgrade Code, continue to Step 2.
letters when you enter the code.
1 System Overview 15
Page 26
System Procedures
Power-up Procedure
For best performance, power-up your system in the following order:
Step 1: Turn on the hub(s) and/or switch(es).
Step 2: Turn on the Server and monitor(s). Wait for the Emphasis application to start up
completely before proceeding to the next step.
Note:
Note:
In a network with multiple Emphasis Control Systems online, allow one Emphasis Server
to fully startup before starting the other Emphasis Servers. This will ensure that your
network configures correctly.
Step 3: Turn on the Facepanel(s) and monitor(s).
Step 4: Turn on any ETCNet2 Nodes.
Step 5: Turn on accessories such as Remote Focus Units.
When you power-up your Emphasis Control System, the system will default to opening
the last valid show file. If the show file is no longer available in the Shows directory,
Emphasis will open a new show called “Untitled”. You may setup the system to open a
new show on startup if you wish. See Create a Default Show in the Emphasis
Visualization User Manual for more information.
Fader Priority
In an Emphasis system, you have multiple active faders to control the output of the control
system. These include the submasters and cue fader pairs on the Facepanel, as well as
the virtual submasters and cue fader pairs in the Emphasis Console application (visible
from the Emphasis mode in Emphasis Visualization).
Fader levels are accepted only from one source within a system. Each source has a priority.
The source with the highest priority (lowest number) that is currently connected will be the
accepted fader source. All fader movements on other devices are ignored. A device with a
fader priority of zero (0) is disabled. More than one device can have a fader priority of zero
(0). All other devices must have a unique priority setting.
The virtual faders in the hidden Emphasis Console application will always have the lowest
priority. The virtual faders on Emphasis Visualization will have the next higher priority. All
physical Facepanels will have even higher priority or be disabled.
When a Facepanel connects to a Server for the first time, it is assigned the highest (lowest
number) priority not already assigned to something else. The assignments are stored when
you exit Emphasis, so that the assignment will be remembered the next time you startup
your system. To set priorities the first time in a multiple Facepanel system, turn on each
Facepanel in order from highest priority (lowest number) to lowest priority. If you need to
change the set priority order in a multiple Facepanel system, please contact ETC Technical
Services.
Note:
16 Emphasis Console v1.4.0 User Manual
When a Facepanel is attached to the Emphasis Server, only the Facepanel faders can
control channels. Virtual faders in Emphasis Visualization will “move” to mimic the current
levels of the physical faders, but they cannot be used to control channels directly.
Page 27

Login as a Different User
There are a number of different user accounts contained in the Emphasis system. When
the system is turned on, it will open using the Emphasis User settings. To gain access to
the other user accounts, exit Emphasis.
Note:
When you load new system software onto your Emphasis Server, you will see an
advisory indicating that the library indices are being rebuilt the first time each user type
logs in. This is normal behavior.
• Emphasis User: This user account is not password protected, and is the default user
when Emphasis launches on startup. When this user type is selected, access is limited
mainly to Emphasis. Other applications and computer components are hidden. When
this user account is selected, critical program files may not be deleted (this does not
include show files) and no other software may be installed.
• NCE User: This user account is primarily for adjusting settings in the Network
Configuration Editor (NCE) application. There is no password protection for this user
type. When this user account is selected, critical program files may not be deleted (this
does not include show files) and no other software may be installed.
• System Manager: The System Manager has access to set the password for this user
account, as well as partial Administrative rights, installation of software, system
maintenance, Facepanel code, and all Emphasis and NCE user privileges.
• Technical Services: This user type is reserved for ETC Technical Services and is
password protected.
To change the System Manager password:
Step 1: Exit Emphasis and login as the System Manager.
Step 2: In the Windows Start menu, click All Programs, then click User Accounts. The
User Accounts dialog will open.
Step 3: Under “Pick a task...”, click “Create a password”.
Step 4: Follow the directions in the dialog to create a password and a password hint for
the System Manager account. When complete, click the Create Password button
at the bottom of the dialog box.
Shut-down Procedure
To shut-down your Emphasis Control System:
Step 1: In the Emphasis Visualization File menu, click Save to save your show file.
Step 2: In the File menu, click Exit. You may also click the Exit button at the top-right
corner of the Emphasis Visualization window.
Step 3: In the lower-left corner of the Login screen, click Shutdown Emphasis Server.
The “Turn off computer” dialog opens.
Step 4: Click Turn Off to shut the Server down completely. Alternatively, click Stand By
to place the Server in stand by mode or click Restart to cause the Server to reboot. Click Cancel to return to the Login screen without shutting down the
Server.
Step 5: Turn off any peripheral equipment, such as Nodes and Remote Focus Units.
Step 6: Turn off the Facepanel at the power switch located on the rear panel.
1 System Overview 17
Page 28

Troubleshooting
The Emphasis Facepanel type defaults to the Expression 3 console. This affects the video
output of your Facepanel and the virtual facepanel in Emphasis Visualization. If you have
an Insight or Express console as your Emphasis Facepanel, or if you swap Facepanels
from an Expression-style to an Insight or Express, you will need to change the default
settings to reflect this in the Emphasis Visualization, Emphasis mode Setup menu. See
Setting the Facepanel Type on the Server, page 22 for more information.
Note:
If you have a show open and only the Emphasis mode is available, you are operating in
Show Mode. See the Emphasis Visualization User Manual: Load Show for information on
leaving Show Mode.
The Emphasis Server is provided fully configured from the factory. It should not be treated
as a regular desktop computer. The following modifications to the factory setup are known
to cause problems of varying severity:
• Screen savers. Do not enable screen savers on the Emphasis server. They can cause
unexpected behavior in your system.
• Power settings are set to never turn off the monitor(s) or the hard disk. The system is
also set to never go into standby mode on its own. The “Sleep” button on the keyboard
is also disabled. Do not put your Emphasis Server into standby or sleep mode while
running Emphasis software.
• Microsoft Windows XP appearance. Windows XP appearance settings are graphics
heavy and will impact the performance speed of your system. The appearance settings
are set to minimize the impact of the operating system on performance.
• View contents while dragging windows. This setting is also graphics-heavy and will
impair the performance speed of your system.
• Wallpaper on the desktop. Wallpapers are graphics heavy and will impact the
performance speed of your system. The wallpaper is set to “None” as a default.
• Additional software applications (games, internet browsers, word processors, etc.). It is
not advisable to load additional applications onto your Emphasis Server. Conflicts may
occur between applications that could severely impact your system’s performance. The
Emphasis Server should not be connected to the Internet.
• On a 3D Server with dual monitors, you may experience problems with shaded views,
especially on the second monitor. If your shaded views appear to refresh incorrectly
(especially after shaded view windows have been overlapped), you may want to
change the OpenGL options to “Safe Rendering”.
To change the OpenGL settings:
Step 1: In the Emphasis Visualization Options menu, click Application Options.
Step 2: Click the OpenGL tab.
Step 3: Click the button for the following settings:
• Fast Rendering: This is the ideal setting.
• Fast Rendering for Primary Display Only: (Default) This sets the primary
monitor to Fast Rendering and the second monitor to Safe Rendering and
will solve the incorrect refresh problem on the second monitor.
• Safe Rendering: This sets both monitors to “Safe Rendering”.
18 Emphasis Console v1.4.0 User Manual
Page 29
If you have problems using your Emphasis Control System, please refer to your manuals
for additional information.
If you do not find the answer in a manual, please call your local dealer or ETC Technical
Services (see Help from ETC Technical Services, page 3. Please have the following
information available before you call:
• Console model and serial number (located on back panel)
• Emphasis Server serial number (located inside the door on the front of the Server case)
• Software version (see below)
• Dimmer manufacturer and installation type
• Moving light information (manufacturer, mode, data cable type)
• Other components in your system (Unison, other consoles, etc.)
How do I find the software version?
Emphasis is actually a suite of software, all with different version numbers. In general, all
you need to provide to Technical Services is the suite version number.
To find the Emphasis Control System suite version number:
Step 1: In the Emphasis Visualization Help menu, click About Emphasis. The About...
dialog box will open.
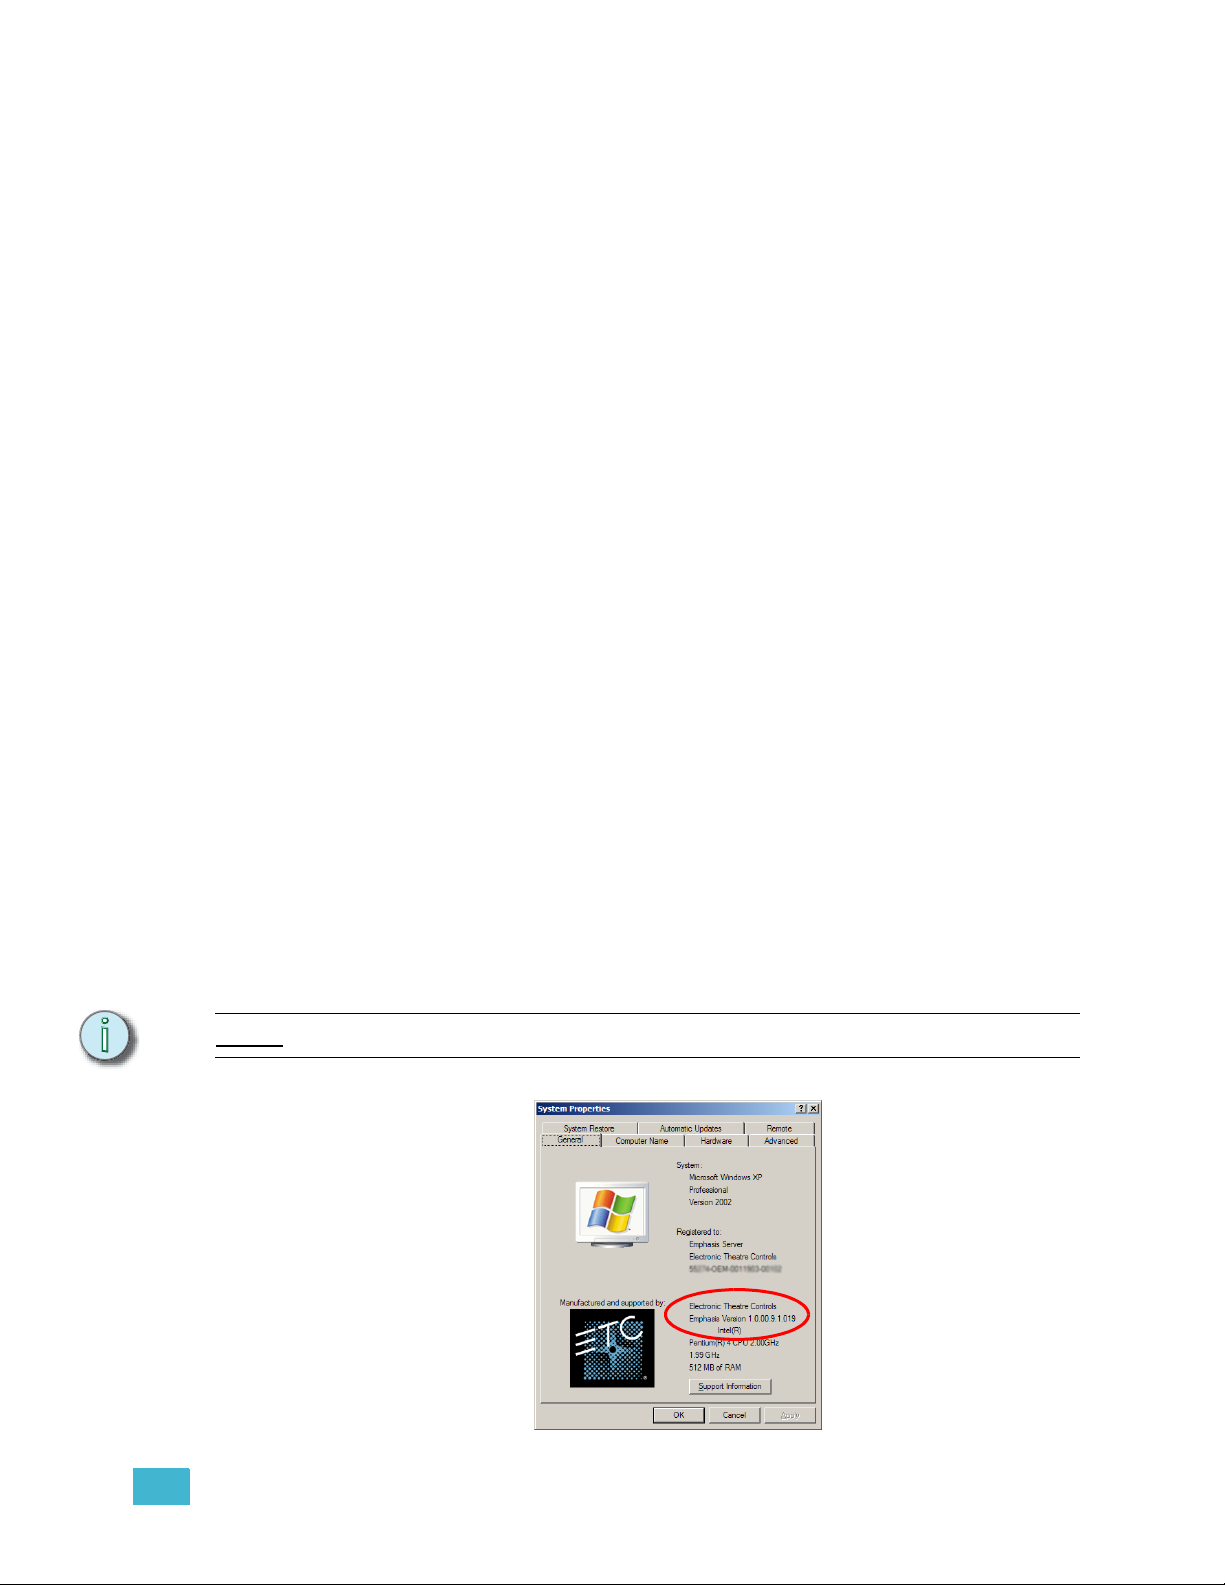
Step 2: Find the Emphasis Visualization Version number at the top of the dialog box. The
suite version number is indicated in parentheses at the end of the full version
number.
Note:
To find the suite version number outside Emphasis Visualization:
Step 1: Minimize Emphasis Visualization and right-click on Start menu on task bar and
click Explore. Alternatively, you can press
any time.
Step 2: Right-click My Computer and click Properties.
Step 3: Click the General tab. You will find the Windows version information as well as
the Emphasis system version. The Support Info button also displays the version
number, as well as the phone numbers for ETC Americas, ETC Europe and ETC
Asia.
You can also use the shortcut á+PAUSE/BREAK to view the System Properties.
á+E to launch Windows Explorer at
1 System Overview 19
Page 30

If you are asked to provide specific component version numbers, it is recommended that
you use the first method to find all the version numbers at the same time. If that is not
possible, use one of the other methods to find the specific information you are looking for.
To find the complete list of version numbers on the Server:
Step 1: Minimize Emphasis Visualization and right-click on Start menu on task bar and
click Explore. Alternatively, you can press
any time.
Step 2: Navigate to this location: C:\Program Files\ETC
Step 3: Double-click the Emphasis Component Report. This report contains version
information for all the installed Emphasis components.
á+E to launch Windows Explorer at
Note:
Note that this will not update version information if you have upgraded individual
components rather than the whole disk image.
To find the Emphasis Visualization version number:
In the Help menu, click About Emphasis.
To find the Emphasis Console version number:
Step 1: Minimize Emphasis Visualization and maximize Emphasis Console.
Step 2: In the Help menu, click About.
To find the Facepanel version number:
Restart the Facepanel and watch CRT1. The Facepanel version number appears on the
bottom of the screen just after the boot screen and before the ETC logo.
20 Emphasis Console v1.4.0 User Manual
Page 31

Chapter 2
Emphasis Console User Interface
This chapter covers the variations in the available Emphasis Facepanels: Express,
Expression and Insight. It also covers the available accessories that can be used within
your Emphasis Control System, including the Remote Focus Unit (RFU) and Wireless
Remote Focus Unit (WRFU). This chapter also describes the different softkey setups of the
various Facepanels, and the basic channel concepts behind the Emphasis Control System.
This chapter contains the following sections:
• Emphasis Facepanel Options . . . . . . . . . . . . . . . . . . . . . . . . 22
• Console Displays . . . . . . . . . . . . . . . . . . . . . . . . . . . . . . . . . . 27
• Hard keys vs. Softkeys by Facepanel Type . . . . . . . . . . . . . 34
• Channel Concepts in the Emphasis Control System . . . . . 43
2 Emphasis Console User Interface 21
Page 32

Emphasis Facepanel Options
The Emphasis Control System is compatible with a number of Express and Expressionstyle facepanels. The Emphasis Facepanel is used as an input device for channel
selection, recording and playback, as well as an output device for DMX data.
Express Two-Scene
This facepanel type includes the Express 24/48, the Express 48/96 and the Express 72/
144. For more information on the features of this facepanel type, see foldouts F:Express
24/48 Facepanel Overview, page 272, and G:Express 48/96 & 72/144 Facepanel
Overview, page 273. The Emphasis Visualization virtual console does not include two-
scene operation, only submasters, for this facepanel type.
Express ECS
This facepanel type includes the Express 125, the Express 250 and the Express ECS. For
more information on the features of this facepanel type, see foldout E:Express 125/250/
ECS Facepanel Overview, page 271. The Emphasis Visualization virtual console emulates
all facepanel controls for this facepanel type.
Expression ECS
This facepanel type includes the Concept 2x, Expression 2x, Imagine 3, Expression 3 and
Expression ECS. For more information on the features of this facepanel type, see foldout
D:Expression Facepanel Overview, page 270. The Emphasis Visualization virtual console
emulates all facepanel controls for this facepanel type, except encoders.
Insight ECS
This facepanel type includes the Insight 2x, Focus, Insight 3 and Insight ECS. For more
information on the features of this facepanel type, see foldout C:Insight Facepanel
Overview, page 269. The Emphasis Visualization virtual console emulates all facepanel
controls for this facepanel type, except encoders.
Setting the Facepanel Type on the Server
You will need to tell your Emphasis Server what kind of Facepanel you are using. The
Server defaults to Expression 3. This setting determines the Emphasis Console displays
that are available.
Set the Facepanel type in Emphasis Visualization:
Step 1: Turn on your Emphasis Control System. Allow it to finish its startup before
proceeding to the next step.
Step 2: Click the Emphasis mode button at the top of the Emphasis Visualization screen.
Step 3: In the Setup menu, click Facepanel Type. The Facepanel Type dialog box
opens.
22 Emphasis Console v1.4.0 User Manual
Page 33

Step 4: Click the name of your Facepanel type to set it as current.
Step 5: Exit Emphasis. This will return you to the login screen.
Step 6: Click the Emphasis user button at the top of the list. This will restart Emphasis
with the new Facepanel type.
2 Emphasis Console User Interface 23
Page 34

Accessories
remote focus unit
Go
Hold
A/B
Back
A/B
M
1
Clear
Tr
ack
.
E
nter
Blind
0
1
2
+
3
4
5
7
8
6
9
R
el
Ch
an
Along with your Emphasis Facepanel, you may have additional accessories in your system.
Remote Focus Unit (RFU)
A Remote Focus Unit (RFU) is used to select channels, set levels, record and playback
cues and playback macros. An RFU can be connected to the back of your Facepanel, or to
a Video Node, or to dedicated RFU connectors that may be distributed throughout your
venue.
Install the RFU:
Step 1: Verify that RFU power switch is turned off. (Unit is off when switch is in the
position toward the top edge of the RFU.)
Step 2: Insert the RFU cable into the connector on the back of the facepanel labeled
RFU. RFUs may also be connected to ETCNet2 Nodes.
Step 3: Turn RFU on.
Step 4: After the RFU completes booting, use the keypad to perform functions as you
would on the Facepanel. Use the [S*] to access softkeys and the [M*] key to
access macros.
24 Emphasis Console v1.4.0 User Manual
Page 35

Wireless Remote Focus Unit (WRFU)
A Wireless Remote Focus Unit (WRFU) is a combination of the WRFU software application
running on a Pocket PC compatible handheld. The WRFU gives you increased functionality
over the standard RFU, and has the advantage of being a wireless device you can carry
with you anywhere in your venue. WRFU units access the ETCNet2 network through
Access Points placed throughout your venue. See the WRFU v4.0.0 Installation Manual for
more information on the installation and setup of your WRFU.
Connect the WRFU to your system:
Step 1: Turn on your Emphasis Control System. Allow it to finish its startup before
proceeding to the next step.
Step 2: Turn on your WRFU.
Step 3: Login to your WRFU using your user name and password, if required.
Step 4: Find your system ID on the Processor Select screen. Tap to select it and tap OK.
If you have setup your WRFU to auto-connect to your system, this page will not
display if your system is online.
Note:
If your processor is displayed in low-lighted text, your system is not WRFU-enabled. You
will not be able to connect your WRFU to this system. To purchase the WRFU upgrade,
please contact your ETC Dealer. Once purchased, you will be provided an upgrade code.
See Upgrades, page 15 for information on entering your upgrade code.
2 Emphasis Console User Interface 25
Page 36

Optional Pointing Device (Mouse/Trackball)
o
u
se
If you have a serial mouse, trackball or other pointing device, you can connect it to your
Expression/Insight facepanel and use it to control moving light fixtures. This pointing device
is not used within Emphasis Visualization, only for direct control of moving light attributes,
(typically pan and tilt). The optional pointing device connects to the “mouse” connector on
the rear panel, and is linked to encoders TX and TY in the Encoder Setup display (see
Encoder Setup, page 59).
Moving Light Module (MLM) for Expression/Insight 2x Facepanels
Expression/Insight 2x facepanels do not have encoders built in. You may have a Moving
Light Module (MLM) for use with your facepanel. If so, the MLM operates the same as the
encoders do. You can attach a serial mouse or trackball directly to the MLM to control pan
and tilt on moving light fixtures.
Note:
Install a Moving Light Module (MLM) on an Expression/Insight 2x facepanel:
Step 1: Turn off facepanel power.
Step 2: Connect the MLM to the facepanel port labeled Digitizer/Serial. See foldout
B:Emphasis Facepanel Rear Panel Connections, page 268.
The Designer’s Worksheet digitizer is not compatible with the Emphasis Control System.
Step 3: Connect an optional pointing device to the MLM, if desired.
Step 4: Plug the power cord of the MLM into a wall outlet or power strip.
Step 5: Turn on facepanel power.
26 Emphasis Console v1.4.0 User Manual
Page 37

Console Displays
Emphasis Facepanels provide a number of displays that allow you to view your show data
and system settings. These displays are described in this section. Their functionality will be
described in detail within the chapters of this manual.
Display Features
In general, the displays are divided between Command and Playback displays. On the
Express facepanels, all displays appear on a single monitor. On Expression/Insight
facepanels, CRT#1 is the Command display and CRT#2 is the Playback display. You can
swap displays from CRT#1 to CRT#2 and back again using the [Swap] key. You can also
have channel displays (Stage, Blind and Fader) span both monitors by pressing the
[Expand] key.
Colors in Displays
The Stage, Blind, Fader, Tracksheet and Spreadsheet displays all use color to indicate the
selection state and move information about channel levels.
Channel Numbers/Channel Patch
• Gray . . . . . . . . . . . . . Unselected channel.
• Yellow. . . . . . . . . . . . Selected channel. Controlled by the level (Y) wheel or trackpad.
• White . . . . . . . . . . . . Channel in selected group, but not selected by Only function.
Channel Numbers/Fixture in Channel Patch
• Gray bar . . . . . . . . . . Surrounds all channels in a single patched fixture.
• Light gray. . . . . . . . . High (coarse) channels for 16-bit parameters.
• Dark gray . . . . . . . . . Low (fine) channels for 16-bit parameters.
• Yellow. . . . . . . . . . . . Selected channels of selected fixtures.
Channel Levels
• White on Red . . . . . . Selected channel’s level as it is being raised or lowered.
• Yellow. . . . . . . . . . . . In Stage, this level is generated by a submaster.
• White . . . . . . . . . . . . In Stage and Fader, this level is generated by an Effect. In Blind,
Spreadsheet and Tracksheet, this level is recorded in a
submaster, group, focus point or an allfade cue.
• Red . . . . . . . . . . . . . . In Stage and Fader, this level belongs to a captured channel. In
Blind and Tracksheet, unrecorded levels appear in red.
• Green . . . . . . . . . . . . Channel level has moved from its recorded level in the previous
cue. In Blind, Spreadsheet and Tracksheet, the recorded level is
lower than in the prior cue.
• Blue . . . . . . . . . . . . . In Blind, Spreadsheet and Tracksheet, the recorded level is
higher than in the prior cue.
• Purple . . . . . . . . . . . . Channel level is the same as in the prior cue.
• Gray . . . . . . . . . . . . . In Blind, this level is recorded into a multi-part cue (see Multi-
Part cues, page 110), but is not recorded into the currently
displayed cue part.
2 Emphasis Console User Interface 27
Page 38

Stage, Blind and Fader
The Stage display shows you the current levels of all active channels.The Blind display
looks almost exactly the same as Stage, but is used to view and edit cues, groups,
submasters, subroutines and effects without affecting the look on stage.
Display Name Indicates the current
display and time.
Channel Area - Displays
the channels in your show
in gray, the levels of those
channels in various colors,
and any focus point
reference below the level.
Indication of
reference to a Focus
Point.
Attribute Bar - Displays
current settings for the
selected cue, group or
submaster.
Expression/ Insight facepanels
Express facepanels
Keypad Corner:
Indicates how Emphasis
will interpret the next
numerical entry. If you
enter a range, only the
last number in the value
will be displayed.
Prompt Area - Shows a
prompt related to the
next or just -completed
action.
Playback displays see Playback, page 33.
Softkeys - Additional
Emphasis Console
functions available by
pressing [S1] - [S8].
28 Emphasis Console v1.4.0 User Manual
Page 39

The Fader display is accessed by a hard key on Expression and Insight facepanels, and by
a softkey on Express facepanels. The Fader display selectively displays the contribution to
the stage output of the A/B and/or C/D fader pairs, individual submasters or background
channels (see LTP, page 43). Changes made in the Fader display are made live and will
affect the stage output. Unlike the Stage display, the Fader display is not affected by the
Grandmaster fader, or by inhibitive submasters (see Submaster Types, page 94).
Changing display pages
If you are using more channels than can be displayed on a single display, you can use
softkeys [S4-Previous Page] and [S5-Next Page] to view more channels. You can also
use the arrow keys to change pages: left-arrow [
arrow [
arrow [
Note:
u] displays the previous page, down-arrow [v] displays the next page and right-
t] jumps to the last page of channels.
On Express facepanels, you may need to press [S7 - More Softkeys] to find [S4 -
Previous Page] and [S5 - Previous Page].
Expression/Insight display shown.
s] jumps to the first page of channels, up-
2 Emphasis Console User Interface 29
Page 40

Flexichannel
When you enable Flexichannel, only channels used somewhere in your show will appear
on the Emphasis Console Stage, Blind and Fader displays. By reducing the number of
channels you have to display, you can reduce the amount of paging from screen-to-screen
you need to do to view your data. This, of course, assumes that you are using fewer than
the maximum number of channels in your system, or that your patch places channels all
over the place with numerous gaps between them. If you are using all the available
channels, Flexichannel will only change your display from horizontal to vertical channels.
Expression/Insight display shown.
Which channels are displayed is determined by the following guidelines:
• Flexichannel displays channels with set levels, whether those levels are recorded or
not.
• Flexichannel does not display channels whose channel attributes (see Channel
Attributes, page 54) have been changed unless levels are also set.
• Flexichannel displays all channels patched to fixtures.
• Flexichannel displays links to focus points just as you would see in other channel
displays.
• Channels not displayed in Flexichannel displays are shown in gray in Spreadsheet,
Tracksheet and Patch.
Enable or disable Flexichannel:
Step 1: On your Emphasis Facepanel or from the virtual facepanel in Emphasis
Visualization, press [Setup] [1] [Enter] to display the Systems Settings menu.
Step 2: Press [9] [Enter] to access the Flexichannel option.
Step 3: Press [1] [Enter] to enable Flexichannel, or press [0] [Enter] to disable
Flexichannel.
Step 4: Press [Stage] to return to the Stage display.
Working with Flexichannel active will change how you select channels. For information on
channel selection, please see Channel selection in Flexichannel, page 74.
30 Emphasis Console v1.4.0 User Manual
Page 41

Updating the Flexichannel Displays
If the channel usage changes, such as when you shutdown and restart Emphasis, you load
a new show or channels that once fulfilled the guidelines above no longer do, you will need
to update Flexichannel. Press [Setup] [1] [S1-Purge Flexi] to update Flexichannel.
Spreadsheet
Spreadsheets are available through softkeys in the Blind display. You can use
spreadsheets to view and edit channel data across a number of cues, groups, submasters
and focus points.
Tracksheet
The Tracksheet displays all the cue information for a single channel. You can see each
recorded level for a single channel across the entire cue list, viewing how many cues the
channel is recorded into, where the channel moves up or down, as well as where the
channel tracks through consecutive cues at the same level. You can also make edits to a
cue or a range of cues for that channel.
2 Emphasis Console User Interface 31
Page 42

Patch
The Patch display is used to apply profiles and proportional levels to patched dimmers (see
Patch, page 61). You can also use the Patch display to patch dimmers to channels,
however it is highly recommended that you use Emphasis Visualization to patch your
channels. You must use Emphasis Visualization to create a moving light patch in
Emphasis.
Park
The Park display is accessed by a hard key on Expression and Insight facepanels, and by
a softkey on Express facepanels. The Park display is used to view and edit parked channels
and parked dimmers. A parked channel or dimmer stays at the parked level until it is
unparked. For more information on parking channels and dimmers, see Park, page 85.
32 Emphasis Console v1.4.0 User Manual
Page 43

Playback
elRate
p
ecor
d
C/
Ne
Cu
e
/
The Playback display (Expression/Insight only) contains three separate areas containing
the Cue List, Submaster List and the Fader Status windows.
Note:
On Express facepanels, the cue list and fader status windows are integrated into the
Stage, Blind and Fader displays.
Expression LED displays
Expression facepanels have a series of LED displays across the top. These displays
provide supplemental information regarding your faders, cues, submasters, groups and
levels.
A/B Display - shows
the number of the
current cue in the A/B
fader pair.
Channel/Group Display - shows
the last selected channel or
group.
Next Cue Display shows the number of the
next cue in the playback
cue list.
A
Rate/X Display - shows the level of
the high (coarse) channel in 16-bit
pairs. When the X wheel is used as a
Rate wheel, this display is not used.
C/D Display - shows
the number of the
current cue in the C/D
fader pair.
xt
R
Channel/Grou
Level/Y Display - shows the level of the low
(fine) channel in 16-bit pairs. When the Y
wheel is used as a Level wheel, this display
shows the level of the selected channel. If
more than one channel is selected, this
display shows the level of the highest
selected channel number.
Record Display - shows
the currently selected
item. This can be a cue,
group or submaster.
Lev
2 Emphasis Console User Interface 33
Page 44

Hard keys vs. Softkeys by Facepanel Type
This section provides a comprehensive listing of hard keys and softkeys by facepanel type.
Some hard keys on Expression and Insight facepanels are not available or are softkeys on
Express facepanels. These are indicated as references to the softkey page(s) on which
they occur (see Softkeys, page 36). Use this list if you are unsure where to find a function
of the facepanel.
Please use foldout I:Command Keypad Overview, page 275 as a guide to the locations of
the hard keys.
Facepanel Keys
Function Expression/Insight Express
Stage Display Keys Display Keys
Blind Display Keys Display Keys
Fader Display Keys Stage 3
Tracksheet Display Keys Not Available
Patch Display Keys Display Keys
Park Display Keys Stage 3
Setup Display Keys Display Keys
Expand Display Keys Not Available
Facepanel Keys
Function Expression/Insight Express
M1 Macro Keys Macro Keys
M2 Macro Keys Macro Keys
M3 Macro Keys Macro Keys
M4 Macro Keys Not Available
M5 Macro Keys Not Available
M* Macro Keys Macro Keys
Macro Wait Macro Keys Macro Editing Softkey
Enter Macro Macro Keys Cluster A
Facepanel Keys
Function Expression/Insight Express
Swap Cluster A Not Available
About Cluster A Cluster A
Learn Cluster A Cluster A
Help Cluster A Cluster A
s
u
v
t
Navigation Keys Navigation Keys
Navigation Keys Navigation Keys
Navigation Keys Navigation Keys
Navigation Keys Navigation Keys
34 Emphasis Console v1.4.0 User Manual
Page 45

Facepanel Keys
Function Expression/Insight Express
S1 Softkeys Softkeys
S2 Softkeys Softkeys
S3 Softkeys Softkeys
S4 Softkeys Softkeys
S5 Softkeys Softkeys
S6 Softkeys Softkeys
S7 Softkeys Softkeys
S8 Softkeys Softkeys
Facepanel Keys
Function Expression/Insight Express
Page Cluster B Cluster B
Type Cluster B Cluster B
Cue Cluster B Cluster B
Load Sub Cluster B Stage 3
Stage, Blind Cue, Blind Cue Part 2, Blind
Only Cluster B
Sub Cluster B Cluster B
Link Cluster B Cluster B
Part Cluster B
Group Cluster B Cluster B
Follow Cluster B
Label Cluster B Not Available
Time Cluster B Cluster B
Wait Cluster B Cluster B
Track Cluster B Cluster B
Record Cluster B Cluster B
Group, Blind Focus Point, Blind Submaster,
Fader
Stage 3, Blind Cue 2, Cue List, Blind Cue Part
2, Fader 3
Stage, Blind Cue 2, Cue List, Blind Cue Effect 3
(BCE3), Fader
Facepanel Keys
Function Expression/Insight Express
Channel Cluster C Cluster C
Dim Cluster C Cluster C
Thru Cluster C Cluster C
At Cluster C Cluster C
And Cluster C Cluster C
Full Cluster C Cluster C
Except Cluster C Cluster C
Level Cluster C Cluster C
Release Cluster C Cluster C
Focus Point Cluster C Cluster C
2 Emphasis Console User Interface 35
Page 46

More Softkeys
Fixture
(Stage 2)
More Softkeys
Fixture
(Stage 2)
Flash
More Softkeys
(Stage 3)
Flash
More Softkeys
(Stage 3)
Step
More Softkeys
Park
Go To Subr
More Softkeys
Fixture
(Blind Cue 2)
More Softkeys
Fixture
(Blind Cue 2)
More Softkeys
(Blind Cue)
More Softkeys
Track Sheet
(Blind Cue 3)
More Softkeys
(Blind Cue)
Step
(Stage)
More Softkeys
(Stage 4)
More Softkeys
(Stage)
Step
Go To Subr
Step
unassigned softkey.
In the softkey list below, jumps to other softkey pages are indicated in parentheses. Expression/Insight softkeys are indicated first. If
an Express softkey set is different, it is listed in the shaded row beneath the Expression version. Empty cells in the table indicate an
Softkeys
Softkeys
Backgrnd
DisplayS1S2S3S4S5S6S7S8
Previous Page Next Page Sneak
Overrides
Backgrnd
Fadeout Subr Update
Stage
Only Follow Sneak
Overrides
Enable
Fadeout Subr Update
Sub List Solo Rate Delete
Quickstep
Enable
Stage 2
Sub List Solo Previous Page Next Page Delete
Quickstep
Stage 3
Part Load Sub Fader Rate Park
Label
Stage 4
Previous Page Next Page Delete Cue
Spread Sheet
(Cue Spread
Sheet)
Cue List (Cue
List)
Select Cue
Only Rate Delete Cue
Spread Sheet
(Cue Spread
Sheet)
Cue List (Cue
List)
Select Cue
Blind Cue
Solo Rate Block
Part Follow Solo Previous Page Next Page Block
Blind Cue 2
Label
Blind Cue 3
36 Emphasis Console v1.4.0 User Manual
Page 47

More Softkeys
Tracking
Fixture
More Softkeys
Part 2)
(Blind Cue
(Blind Cue
Part)
More Softkeys
Track Sheet
(Blind Cue
Part)
Return (Blind
(Blind Group)
Group)
Return (Blind
Group
Fixture
More Softkeys
(Blind Group
2)
More Softkeys
Return (Blind
Return (Blind
Cue)
Return (Blind
Cue)
Track Sheet
More Softkeys
(Blind Cue
List)
Cue)
Enable/
Disable
Softkeys (Continued)
Rate Previous Page Next Page Delete Cue
Label
Part Follow Rate Previous Page Next Page Delete Cue
DisplayS1S2S3S4S5S6S7S8
Blind Cue List
Cue List
2
Block Create Cue Replace Level Previous Page Next Page Delete Cue
Cue Spread
Sheet
Previous Page Next Page Delete Cue
Spread Sheet
(Cue Spread
Sheet)
Cue List (Cue
List)
Select Cue
Blind Cue
Part
Solo Rate Block
Blind Cue
Part 2
Part Label Solo Only Rate Block
Previous Page Next Page Delete Group Fixture
Spread Sheet
(Group Spread
Sheet)
Group List
(Group List)
Select Group
Blind Group
Previous Page Next Page Delete Group
Spread Sheet
(Group Spread
Sheet)
Group List
(Group List)
Select Group
Label Only
Blind Group 2
Previous Page Next Page Delete Group
Label Previous Page Next Page Delete Group
Group List
2 Emphasis Console User Interface 37
Page 48

More Softkeys
Fixture
(Blind Focus
Point 2)
More Softkeys
(Blind Focus
Point)
Return (Blind
Group)
Return (Blind
Return (Blind
Focus Point)
Focus Point)
Return (Blind
Focus Point)
More Softkeys
Fixture
(Blind Sub 2)
More Softkeys
Fixture
(Blind Sub 2)
More Softkeys
(Blind
Submaster)
More Softkeys
(Blind
Submaster)
Previous Page Next Page Delete Focus Fixture
Softkeys (Continued)
Spread
Sheet (Focus
Spread Sheet)
Spread
Focus List
(Focus List)
Focus List
Select Group Create Group Replace Level Previous Page Next Page Delete Group
DisplayS1S2S3S4S5S6S7S8
Group Spread
Sheet
Select Focus
Blind Focus
Point
Previous Page Next Page Delete Focus
Sheet (Focus
Spread Sheet)
(Focus List)
Select Focus
Label Only
Blind Focus
Point 2
Previous Page Next Page Delete Focus
Label Previous Page Next Page Delete Focus
Focus List
Focus Spread
Select Focus Create Focus Replace Level Previous Page Next Page Delete Focus
Sheet
Previous Page Next Page Delete Sub
Spread Sheet
(Sub Spread
Sheet)
Sub List (Sub
List)
Select Sub
Blind
Only Rate Delete Sub
Spread Sheet
(Sub Spread
Sheet)
Sub List (Sub
List)
Select Sub
Submaster
Bump Status Solo Rate
Bump Status Label Solo Previous Page Next Page
Blind Sub 2
38 Emphasis Console v1.4.0 User Manual
Page 49

Attribute
Return (Blind
Return (Blind
Return (Blind
Submaster)
Submaster)
Submaster)
Add Channels
More Softkeys
(BCE2)
(Attributes)
More Softkeys
More Softkeys
(BCE3)
Rate
Track Sheet
(BCE)
More Softkeys
(BCE)
More Softkeys
Attribute
Add Channels
(BSE2)
(Attributes)
More Softkeys
More Softkeys
(BSE3)
Track Sheet
(BSE)
More Softkeys
(BSE)
Style
More Softkeys
(BCS2)
Softkeys (Continued)
Select Sub Replace Level Previous Page Next Page Delete Sub
Bump Status Label Rate Previous Page Next Page Delete Sub
Bump Status Rate Previous Page Next Page Delete Sub
DisplayS1S2S3S4S5S6S7S8
Sub Spread
Submaster
List
Sheet
Previous Page Next Page Delete Cue
Spread Sheet
(Cue Spread
Sheet)
Cue List (Cue
List)
Step
Blind Cue
Effect (BCE)
BCE2 Step Step Time In/Dwell/Out Low/High Insert Step Delete Step
Previous Page Next Page Delete Sub
Spread Sheet
(Sub Spread
Sheet)
Alternate Reverse Bounce Build Random Random Rate Return (BCE)
Follow Label Rate
Positive/
Negative
BCE3
Attributes
Sub List (Sub
List)
Step
Blind Sub
Effect (BSE)
BSE2 Step Step Time In/Dwell/Out Low/High Insert Step Delete Step
Bump Status Rate
Bump Status Label Rate
BSE3
Previous Page Next Page Delete Cue
Spread Sheet
(Cue Spread
Sheet)
Cue List (Cue
List)
Step
Blind Cue
Subroutine
(BCS)
2 Emphasis Console User Interface 39
Page 50

Up/Down/
More Softkeys
Follow
Up/Down/
(BCS)
More Softkeys
Follow
Tracksheet
(BCS3)
More Softkeys
Fixture
(BCS)
More Softkeys
More Softkeys
(Fader 2)
Step
Return (Stage)
More Softkeys
(Fader 2)
Fixture
Step
(Fader)
More Softkeys
(Fader)
More Softkeys
(Fader)
Rate Park
Fixture Patch
(Fixture Patch)
Fixture Patch
(Fixture Patch)
Softkeys (Continued)
Label
Step Select Cue Rate Type/Level Insert Step Delete Step
Step Select Cue Rate Type/Level Insert Step Delete Step
DisplayS1S2S3S4S5S6S7S8
BCS2
BCS3
Previous Page Next Page Select Fader
Only Follow Select Fader
Backgrnd
Overrides
Backgrnd
Overrides
Update
Update
Fadeout
Subroutine
Fadeout
Subroutine
Fader
Solo Rate Delete
Enable
Fader 2
Go To Subr
Load Sub Solo Previous Page Next Page Delete
Quickstep
Step
Fader 3 Part
Previous Page Next Page Unpatch
Show/Hide
Profile
Tracksheet Block Solo Previous Page Next Page
Labels
Patch
Previous Page Next Page Unpatch
Show/Hide
Labels
Label Profile
Previous Page Next Page
Previous Page Next Page Return (Stage)
Park
Save Showfile
Show Name Save Showfile
Setup
40 Emphasis Console v1.4.0 User Manual
Page 51

Reset Loop
Return (Setup)
Return (Setup)
Return (Setup)
More Softkeys
More Softkeys
More Softkeys
More Softkeys
(STC3)
(STC2)
(SRTP2)
(STC)
More Softkeys
Return (Setup)
(SRTP2)
Sort
More Softkeys
(SRTP)
Delete
Program
Reset Profile
More Softkeys
(Setup Profiles
2)
More Softkeys
(Setup
Profiles)
Return (Setup)
Sort
Softkeys (Continued)
Manual Mode Pause Mode Step Learn Mode
Clock Enable/
Disable
Purge Flexi Return (Setup)
Disable MIDI Return (Setup)
Stop Printer Pause Printer Return (Setup)
Internal Clock
Time Astro Clock Days/Date Macro Label
Select
Program
Time Astro Clock Days/Date Macro
Select
Program
Label
Independent Flip 16 Bit Previous Page Next Page LTP Return (Setup)
Select Profile Percent Clear All Clear to End Fill Between Copy to Profile Reset Profile Return (Setup)
DisplayS1S2S3S4S5S6S7S8
Setup Real
Time
Programs
Setup System
Settings
Setup
Options
Setup Clock
Functions
Setup Clear
Functions
Setup Print
Functions
Setup Macro TBD
Setup Time
Code (STC)
STC2 Select Event Code Time Cue Rate Bump Macro
STC3 Insert Event Copy Event Move Event Previous Page Next Page Delete Event
(SRTP)
SRTP2 Insert Program Copy Program Move Program Previous Page Next Page
Setup
Channel
Attributes
Setup Profiles
Setup Profiles
2
2 Emphasis Console User Interface 41
Page 52

Return (SMLF)
Return (SMLF
Return (Setup)
Delete
Personality
or Patch)
Reset Defaults Return (SMLF)
Autoload
Encoders
Previous Page Next Page
Softkeys (Continued)
View
Personality
DisplayS1S2S3S4S5S6S7S8
Setup Moving
Light
Functions
(SMLF)
SMLF
Personality
Functions
SMLF Fixture
Select Fixture Label Encoder Setup Previous Page Next Page Swap Focus Flip
Patch
Category Label Previous Page Next Page Reset Defaults Return (SMLF)
Select
Attribute
SMLF
Attribute
Setup
SMLF
Page Attribute
Select
Encoder
Encoder
Setup
42 Emphasis Console v1.4.0 User Manual
Page 53

Channel Concepts in the Emphasis Control System
The Emphasis Control System controls channels using both Highest-Takes-Precedence
(HTP) and Latest-Takes-Precedence (LTP) conventions, and stores information for
channels using both Preset and Tracking conventions. These conventions are described
here so that you can understand the expected behavior of your control channels and cue
playback.
HTP vs. LTP
Emphasis uses two basic channel types – Highest-Takes-Precedence (HTP) channels and
Latest-Takes-Precedence (LTP) channels. In all cases, channels that are parked or
manually controlled by the keypad or through the tools in Emphasis Visualization become
captured and take precedence over any playback controls. See Manual Control, page 72
for more information on selected and captured channels.
HTP
In playback situations, HTP channels will output the level that is highest based on all
channel inputs, like cues and submasters. HTP channels are also referred to as “pile-on”,
because as control inputs are added (you may bring up cues and multiple submasters that
all have a channel recorded at various levels, for example), the system calculates which
input has the highest level for that channel and outputs that level. As control inputs are
taken down (you pull some of those submasters down to zero), the console will adjust the
channel level, if required, to highest remaining level, and so on. Channels that control
dimmers are typically HTP channels.
In cues, HTP channels will always follow the timing of the current cue. It does not matter if
the channel levels are the same from cue to cue. If the fade timing is different from cue to
cue, and you play the next cue before the previous cue completes, the fade time for HTP
channels that are moving will change to the current cue’s fade time.
LTP
LTP channels obey the latest cue command to set their level. They are not affected by
submasters, unless the submaster contains a subroutine (see Subroutines on Submasters
(Subs-on-Subs), page 152). LTP channels can also fade in the background. What this
means is that an LTP channel will always listen to the most recently played cue if it is
moving in that cue. If the channel has the same level in a series of cues, and the first cue
of the series is not allowed to complete before you play back subsequent cues, the channel
will complete its fade in the background in the fade time of the first cue.
Channels levels fading in the background are displayed in purple, and cannot be cleared
from the A/B or C/D faders, since they aren’t really in those faders anymore. You can view
cues running in the background using the Fader display. See Background fades, page 149
for more information on channels in the background.
Independent Channels
Both HTP and LTP channels can also be independent. Independent channels are not
affected by the Grandmaster fader, the Blackout key, and Flash and Solo functions.
Independent channels also have protection from the release command, requiring repeated
key presses to return them to zero or recorded levels. Most frequently, color scrollers and
control parameters on moving light fixtures other than intensity are set as independent
channels. This keeps their moving parts from speeding to full or zero unintentionally when
the Grandmaster, Blackout, Flash and Solo are used.
2 Emphasis Console User Interface 43
Page 54

Preset vs. Tracking
Preset and Tracking are terms used when thinking about how your cue data is stored,
edited, and what affect it has on playback.
Preset
Typically, each cue you store will take a complete picture of the output of the system and
store it as the cue you designate. There are ways to modify how much of the stage picture
you store (see Record Cues, page 89 for more information). This philosophy is called
preset. In a preset system, each cue stores data for every channel, regardless of whether
that channel’s level is moving. Each cue is a complete picture of the intended stage look,
and each cue is played back in its entirety.
When you edit channels in cues, you need to keep in mind that you are typically editing only
one cue at a time. If you want to change a channel (or channels) level in a series of
consecutive cues, you can either edit each cue one at a time, edit using the Spreadsheet
display (see Spreadsheet, page 113) or Tracksheet display (see Tracksheet, page 116), or
use a Track Record to accomplish this task.
Tracking
In the Emphasis Control System, tracking refers to channels that are recorded at the same
level from cue to cue – those channels appear to track from one cue to the next. Track
editing is a very powerful tool and requires that you understand some basic terms. A track
edit can make very significant changes throughout your show, so use it carefully.
A Track record will change the current cue, and subsequent cues for channels that remain
at the same level until the cue that contains a move instruction for those channels. As an
extreme example, if you Track Record a channel into cue #1 that has not been used
anywhere in your show, that channel will be recorded into your entire cue list at that level,
because it is not told to move in any of those cues. If you make changes to a number of
channels in a cue and then Track Record, each channel will stop the track at it’s own next
move instruction. See Track Record, page 91 for more information.
Back Track is used to track record backwards from the current cue. Track Record will only
record levels into subsequent cues. Use Back Track to record levels into previous cues. As
with Track, the levels will be recorded until they encounter a move instruction or an Allfade
cue. See Back Track, page 91 for more information.
Fill Track is used to track in both directions from the current cue. Use Fill Track to record
forward and backward in the cue list at the same time. As with Track, the levels will be
recorded until they encounter a move instruction or an Allfade cue. See Fill Track, page 92
for more information.
An Allfade cue will stop a Track Record at a certain cue number by forcing all channels to
“move”, even if their level tracks through to subsequent cues. Channels at zero will be given
a move instruction to “be at zero”, and all other channels will be given a move instruction to
“be at your level”. This will appear to a Track Record as a brick wall, and will stop channels
from tracking forward beyond this cue. See Allfade, page 88
A Blocked Channel creates a move instruction on a channel basis, rather than a cue basis
as Allfade does. The Block setting remains with the channel as cues are copied or updated,
but are lost if the cue is re-recorded. It is possible to Backtrack over a Blocked channel’s
level, but it is not possible to Track Record over it. Blocked channel’s levels will track
forward normally. See Blocked Channels, page 111 for more information.
for more information.
44 Emphasis Console v1.4.0 User Manual
Page 55

Chapter 3
System Settings
This chapter covers the basic settings you can adjust to customize your Emphasis Control
System working environment. It also covers patch functions and the About command.
This chapter contains the following sections:
• The Setup Menu . . . . . . . . . . . . . . . . . . . . . . . . . . . . . . . . . . . 46
• Patch . . . . . . . . . . . . . . . . . . . . . . . . . . . . . . . . . . . . . . . . . . . . 61
• Using the About Command . . . . . . . . . . . . . . . . . . . . . . . . . . 67
3 System Settings 45
Page 56

The Setup Menu
The Setup menu provides a number of settings you can adjust to customize your working
environment. These include things like the number of dimmers and channels you have in
your system, how some facepanel controls work, default timing information, among others.
This section describes all the settings available in the Setup menu.
System Settings
The System Settings menu allows you to customize your working environment.
46 Emphasis Console v1.4.0 User Manual
Page 57

Number of Dimmers
The Number of Dimmers setting adjusts the number of EDMX addresses you can patch to.
In the Emphasis Control System, all patching is made to EDMX addresses (called dimmers
within the patch at the facepanel), which are converted to standard DMX at the output
connector (see DMX Output, page 178). All Emphasis Control Systems can access all
32,767 EDMX addresses if required. However, this is usually more addresses than are
required for a typical show.
Your system will default to a setting of twice the number of dimmers as there are channels,
unless you are running a 5,000 channel system, where the dimmer count will default to the
maximum of 32,767.
CAUTION:
Change the number of dimmers:
Step 1: On your Emphasis Facepanel or from the virtual facepanel in Emphasis
Step 2: Press [1] [Enter] to choose Number of Dimmers.
Step 3: Using the numeric keypad on the Facepanel or the virtual facepanel, type in the
If after a show is patched you reduce the number of dimmers below the number
you have patched, those dimmers will become unpatched. Restoring the number
of dimmers will not automatically restore dimmers lost in the patch. It is
recommended that changes to the number of dimmers be made before you patch,
in order to avoid inadvertently unpatching dimmers.
Number of Channels
The Number of Channels setting adjusts the number of control channels you have
available. You may find that you do not need the maximum number of channels in your
system for a particular show. By setting the number of channels to a reduced number, you
reduce the number of pages of channels you might have to page through in channel and
patch displays.
If you do choose to reduce the number of channels in your system, keep in mind that
moving light fixtures and other DMX controlled devices often require more than one control
channel to operate. Make sure that you include enough channels to control these devices.
Visualization, press [Setup] [1] [Enter] to display the Systems Settings menu.
desired number of dimmers and press [Enter].
Change the number of channels:
Step 1: On your Emphasis Facepanel or from the virtual facepanel in Emphasis
Visualization, press [Setup] [1] [Enter] to display the Systems Settings menu.
Step 2: Press [2] [Enter] to choose Number of Channels.
Step 3: Using the numeric keypad on the Facepanel or the virtual facepanel, type in the
desired number of channels and press [Enter].
3 System Settings 47
Page 58

Default Fade Time
Emphasis assumes a five-second default for cue upfade and downfade times. You can
change this default time to whatever you like. Each cue you record after you change this
default will have the new time recorded. Changing this setting will not affect cues recorded
prior to the change. See Cues, page 98 for more information.
Use the following guidelines when entering time values in Emphasis:
• Times can range from 0.1 seconds to 99:59 minutes. Zero timing is also available.
• Use a decimal point for times less than one second: 0.1-0.9 second.
• Two-digit entries are calculated in seconds: 42=42 seconds, 90=1 minute 30 seconds.
• Three- and four-digit entries are calculated in minutes and seconds: 330=3 minutes 30
seconds, 1075=11 minutes 15 seconds.
Change the default fade times:
Step 1: On your Emphasis Facepanel or from the virtual facepanel in Emphasis
Visualization, press [Setup] [1] [Enter] to display the Systems Settings menu.
Step 2: Press [3] [Enter] to choose Default Fade Time.
Step 3: Using the numeric keypad on the Facepanel or the virtual facepanel, type in the
desired default upfade time and press [Enter].
Step 4: Using the numeric keypad on the Facepanel or the virtual facepanel, type in the
desired default downfade time and press [Enter].
Default Level
The [Level] key can be assigned any level between zero and full (100%). The default
setting is full. Use this menu item to change it to whatever level you would like. See Set
Levels, page 75 for more information.
Change the default level:
Step 1: On your Emphasis Facepanel or from the virtual facepanel in Emphasis
Visualization, press [Setup] [1] [Enter] to display the Systems Settings menu.
Step 2: Press [4] [Enter] to choose Default Level.
Step 3: Using the numeric keypad on the Facepanel or the virtual facepanel, type in the
desired level. This entry self-terminates at a two-digit entry (you don’t have to
press [Enter]), so use the [Full] key to enter 100%.
Default Fader Clear Time
The A/B and C/D fader pairs have a [Clear] key. To remove a cue from the stage output,
clear the fader pair containing that cue. Channels in that cue will be released to the next
highest control input (fader pair or submaster) or will fade out completely. See Fader
Controls, page 144 for more information.
The default fader clear time is zero seconds, causing cleared channels to drop to zero
immediately. If you would prefer that clearing a fader takes a longer time to achieve a
blackout, change the default fader clear time. The fader clear time can be set to anything
from zero to 99:59 minutes, following the guidelines in Default Fade Time, page 48.
Change the default fader clear time:
Step 1: On your Emphasis Facepanel or from the virtual facepanel in Emphasis
Visualization, press [Setup] [1] [Enter] to display the Systems Settings menu.
Step 2: Press [5] [Enter] to choose Default Fader Clear Time.
Step 3: Using the numeric keypad on the Facepanel or the virtual facepanel, type in the
desired default fader clear time and press [Enter].
48 Emphasis Console v1.4.0 User Manual
Page 59

Default Sneak Time
The sneak function allows you to fade channel levels over a specified time period, rather
than setting the new level immediately or manually setting the level with the level wheel or
trackpad. See Sneak, page 83 for more information.
The default sneak time is five seconds. The default sneak time can be set to anything from
zero to 99:59 minutes, following the guidelines in Default Fade Time, page 48.
Change the default sneak time:
Step 1: On your Emphasis Facepanel or from the virtual facepanel in Emphasis
Visualization, press [Setup] [1] [Enter] to display the Systems Settings menu.
Step 2: Press [6] [Enter] to choose Default Sneak Time.
Step 3: Using the numeric keypad on the Facepanel or the virtual facepanel, type in the
desired default sneak time and press [Enter].
Number of Effect Step Channels
In Emphasis you can place up to 1,000 channels (the default value for this setting) in each
step within an effect (see Blind Effects, page 123). If you do not plan to use this capacity,
you can reduce the number of channels allowed in each step. Reducing this number may
improve the memory usage and speed of your system.
Change the number of effect step channels:
Step 1: On your Emphasis Facepanel or from the virtual facepanel in Emphasis
Visualization, press [Setup] [1] [Enter] to display the Systems Settings menu.
Step 2: Press [7] [Enter] to choose Number of Effect Step Channels.
Step 3: Using the numeric keypad on the Facepanel or the virtual facepanel, type in the
desired maximum number of effect step channels and press [Enter].
Blackout Key
You can disable the facepanel’s [Blackout] key. This prevents accidental blackouts of the
entire system’s output.
Disable (or enable) the Blackout key:
Step 1: On your Emphasis Facepanel or from the virtual facepanel in Emphasis
Visualization, press [Setup] [1] [Enter] to display the Systems Settings menu.
Step 2: Press [8] [Enter] to choose Blackout Key.
Step 3: Press [0] [Enter] to disable the Blackout key, or [1] [Enter] to enable the
Blackout Key.
Flexichannel
The Flexichannel display mode is described in Flexichannel, page 30. Use this setting to
enable and disable Flexichannel mode.
Disable (or enable) Flexichannel:
Step 1: On your Emphasis Facepanel or from the virtual facepanel in Emphasis
Visualization, press [Setup] [1] [Enter] to display the Systems Settings menu.
Step 2: Press [9] [Enter] to choose Flexichannel.
Step 3: Press [0] [Enter] to disable Flexichannel, or [1] [Enter] to enable Flexichannel.
3 System Settings 49
Page 60

Master Type
The Grandmaster fader can be set to one of three options:
• Disabled . . . . . . . . . . Master fader has no effect.
• Grandmaster . . . . . . The default setting, the master fader controls all levels on stage
except parked and independent channels.
• Sub Grandmaster . . Master fader controls all levels on stage generated by
submasters.
Set the Master type:
Step 1: On your Emphasis Facepanel or from the virtual facepanel in Emphasis
Visualization, press [Setup] [1] [Enter] to display the Systems Settings menu.
Step 2: Press [1][0] [Enter] to choose Master Type.
Step 3: Press [0] [Enter] to disable the Grandmaster, or [1] [Enter] for Grandmaster, or
[2] [Enter] for Sub Grandmaster.
Set Channels/Submasters 1-to-1
You can set any or all pages of submasters to automatically record a one-to-one
relationship with your channels. This means you can automatically record channel 1 to
submaster 1, channel 2 to submaster 2, and so on. Each channel records at full, allowing
you to emulate channel faders on consoles without that ability.
Set channels/submasters 1-to-1:
Step 1: On your Emphasis Facepanel or from the virtual facepanel in Emphasis
Visualization, press [Setup] [1] [Enter] to display the Systems Settings menu.
Step 2: Press [1][1] [Enter] to choose Set Channels/Submasters 1-to-1.
Step 3: Press [0] [Enter] to set all submaster pages 1-to-1 (for 240 channels on Express
and Expression, 1080 channels for Insight), or [x] [Enter], where [x] is the page
you want to set 1-to-1.
Bump Keys
You can enable or disable the bump keys (also known as bump buttons) for the channel/
submaster faders. You might want to do this if you or your operator has a tendency to
accidentally lean on or press the bump keys, causing channels or submasters to flash to
full output unexpectedly. Bump keys are enabled by default.
Disable (or enable) the bump keys:
Step 1: On your Emphasis Facepanel or from the virtual facepanel in Emphasis
Visualization, press [Setup] [1] [Enter] to display the Systems Settings menu.
Step 2: Press [1] [Enter] to access the System Settings menu.
Step 3: Press [1][2] [Enter] to choose Bump Keys.
Step 4: Press [0] [Enter] to disable the bump keys, or [1] [Enter] to enable the bump
keys.
Record Lockout
Once your show is programmed, you may want to prevent an operator from making
changes to your recorded cues or submasters. You can disable the [Record], [Track] and
[Update] functions by enabling the record lockout. The record lockout is disabled by
default.
50 Emphasis Console v1.4.0 User Manual
Page 61

Enable (or disable) the record lockout:
Step 1: On your Emphasis Facepanel or from the virtual facepanel in Emphasis
Visualization, press [Setup] [1] [Enter] to display the Systems Settings menu.
Step 2: Press [1] [Enter] to access the System Settings menu.
Step 3: Press [1][3] [Enter] to choose Record Lockout.
Step 4: Press [1] [Enter] to enable the record lockout, or [0] [Enter] to disable the record
lockout.
Note:
Record Lockout only disables Emphasis Console record functions. You can still make
changes to the show file in Emphasis Visualization.
Options Settings
The Options settings are used when you are using your Emphasis Control System with
MIDI, time code or real time programs. See Show Control Overview, page 183, and Real
Time Programs, page 166 for information on these settings.
Clock Functions
Emphasis has an astronomical time clock that can be used along with real time programs
(see Real Time Programs, page 166) to run lighting cues at specific times of day, or at an
offset from sunrise or sunset. For information on setting the clock functions, see Setting the
time and location, page 166.
If you need to set the time and date for your entire system, you will need to change the clock
settings on your Emphasis Server.
Set the time and date on the Emphasis Server:
Step 1: Turn on your Emphasis Control System. Allow it to finish its startup before
proceeding to the next step.
Step 2: Exit Emphasis Visualization. When complete, the login screen will be displayed.
Step 3: Login as the System Manager.
Step 4: Right-click the clock at the right end of the Windows task bar and click Adjust
Time/Date.
3 System Settings 51
Page 62

52 Emphasis Console v1.4.0 User Manual
Page 63

Step 5: Set the date, time and time zone and click OK.
Step 6: Click the Start menu in the Windows task bar and click Log Off. In the
confirmation dialog, click Log Off.
Step 7: Login as the Emphasis user.
Clear Functions
You can use the Clear functions to remove portions of your show data from your show file.
Note:
• Clear Show - erases all show information except patch and configuration settings.
• Clear Cues - erases all recorded cue data.
• Clear Submasters - erases all recorded submaster data.
• Clear Groups - erases all recorded groups.
• Clear Focus Points - erases all recorded focus points.
• Clear Macros - erases all recorded macros.
• Clear Time Code Events - erases all recorded time code events.
• Clear Real Time Programs - erases all real time programs.
• Clear Channel Attributes - resets all channel attributes to defaults.
• Reset Profiles - returns all dimmer profiles to their default curves. Profiles 1-9 return
to their default curve, profiles 10-32 reset to a linear curve.
• Set Patch 1-to-1 - sets the patch 1-to-1 with one dimmer per channel. Dimmers above
the set channel count are unpatched.
If you accidentally clear data, DO NOT SAVE YOUR SHOW. You can reload the show
and restore data current to your most recent save. It is always a good idea to save your
show often during programming.
3 System Settings 53
Page 64

Print Functions
The print functions menu offers a number of reports that can be printed on a printer
connected to your Emphasis Server (the local printer port on the Facepanel is not
supported). The following reports can be printed from this menu:
• Print Stage Display
• Print Cues - this report will print cues in Flexichannel format to save paper)
• Print Submasters
• Print Groups
• Print Focus Points
• Print Macros
• Print Time Code Events
• Print Real Time Programs
• Print Channel Attributes
• Print Profiles
• Print Patch (formatted like the Emphasis Console display)
• Print Cue List
• Print Submaster List
• Print Group List
• Print Focus Point List
• Print Moving Lights
• Print Tracksheet
Macro List
This menu is used in the creation and editing of macros. Please see Macros, page 155 for
the use of this menu.
Time Code Events and Real Time Programs
The Time Code Events menu is described in Time Code Program, page 193, and the Real
Time Programs menu is described in Real Time Programs, page 165.
Channel Attributes
The Channel Attributes display is used to set the following channel attributes:
• Independent - Independent channels are described in Independent Channels, page
43. A “y” in this column indicates that the channel is independent. Use [S1 -
Independent] to edit this setting for selected channels.
• Flip - A flipped channel outputs DMX full when the channel level is set to zero, and
DMX zero when the channel level is set to full. A “y” in this column indicates the channel
is flipped. Use [S2 - Flip] to edit this setting for selected channels.
• 16 Bit - A typical control channel is an 8-Bit channel. Moving lights often use two control
channels to operate a single parameter, like pan or tilt, in order to increase the control
resolution of that parameter. This is accomplished by pairing two consecutive channels
to operate using 16 Bits (the lower channel number is the high, or coarse movement,
54 Emphasis Console v1.4.0 User Manual
Page 65

channel, while the higher channel number is the low, or fine movement, channel).
Channels set to 16-Bit are indicated by “Hi” and “Lo”. Use [S3 - 16 Bit] to edit this
setting for selected channels.
• LTP - LTP is described in LTP, page 43, and is indicated by a “y” in this column. Use
[S6 - LTP] to edit this setting for selected channels.
• Label - You can assign labels to channels, if you wish. Use [Label] and the
alphanumeric keyboard to edit this setting for selected channels. When complete,
press [Enter].
Note:
Label can be found on <S7 - More Softkeys> [S2 - Label] on Express facepanels.
Edit channel attributes:
Step 1: On your Emphasis Facepanel or from the virtual facepanel in Emphasis
Visualization, press [Setup] [9] [Enter] to access the Channel Attributes display.
Step 2: Select a channel by typing the channel number on the numeric keypad or by
scrolling through the channel list using the arrow keys. Select channel ranges
using the numeric keypad and the [And], [Thru], and [Except] keys.
Step 3: Press the softkey that corresponds to the attribute you want to change, or use
the right- and left-arrow ([
Step 4: Following the prompt above the softkeys, press [1] to enable or [0] to disable the
attribute you’ve chosen.
t] and [s]) keys to scroll to the attribute’s column.
Profiles
The Profiles menu is described in Dimmer Profiles, page 63.
3 System Settings 55
Page 66

Moving Light Functions
Adding moving lights to your show is as easy as inserting and patching them in Emphasis
Visualization. Once they exist in your show file, you can make adjustments to their control
at the Facepanel using the Setup menu for Moving Light Functions.
Personality Setup
You can view personalities in your show in this display. You cannot edit or add personalities
here. To add personalities, insert fixtures into your show through Emphasis Visualization.
As you insert fixtures, their personalities are added to this list.
Select a personality number and press [S3- View Personality] to display the names of the
parameters for encoder assignments, as well as 16-Bit channels, independent channels,
LTP channels and settings for the home position. The home position is the placement of
the fixture after it has calibrated and it is ready to be used in the show.
56 Emphasis Console v1.4.0 User Manual
Page 67

Fixture Patch
The Fixture Patch display allows you to view your moving light patch information, and set
fixtures to swapped focus (pan encoder controls tilt, tilt encoder controls pan) or flipped
focus (you can flip pan, tilt, or both). Swap and Flip cannot be set from Emphasis
Visualization, and fixtures cannot be patched from Emphasis Console, so insert and patch
your fixtures first, then adjust the swap and flip settings here. See how to insert and patch
fixtures in the Emphasis Visualization User Manual.
Set a fixture to swapped focus:
Step 1: On your Emphasis Facepanel or from the virtual facepanel in Emphasis
Visualization, press [Setup] [1][1] [Enter] to access the Moving Light Functions
menu.
Step 2: Press [2] [Enter] to display the Fixture Patch.
Step 3: Press [S1 - Select Fixture] [x] [S6 - Swap Focus], where [x] is the fixture
number.
Step 4: Press [1] [Enter] to enable swap, or [0] [Enter] to disable a swap.
Set a fixture to flipped focus:
Step 1: On your Emphasis Facepanel or from the virtual facepanel in Emphasis
Visualization, press [Setup] [1][1] [Enter] to access the Moving Light Functions
menu.
Step 2: Press [2] [Enter] to display the Fixture Patch.
Step 3: Press [S1 - Select Fixture] [x] [S7 - Flip], where [x] is the fixture number.
Step 4: Press [1] [Enter] to enable flipped pan, or [0] [Enter] to disable a flipped pan.
Step 5: Press [1] [Enter] to enable flipped tilt, or [0] [Enter] to disable a flipped tilt.
Attribute Setup
A fixture personality may have up to 64 attributes. Most of the attributes have a name that
describes the function to which they are assigned, such as “Pan”, “Tilt”, “Gobo” or “Strobe”.
Attributes are assigned to a category that describes their general function. You can edit
these assignments if you wish, including attributes in one or more categories. These
categories allow you to select similar attributes across fixtures without having to select each
individual channel within the fixtures. Categories are selected using the [Only] command.
3 System Settings 57
Page 68

• Position . . . . . . . . . . Attributes that control the direction of the beam; Pan and Tilt.
• Image . . . . . . . . . . . . Attributes that affect the shape of the beam; Gobo, FX, etc.
• Color. . . . . . . . . . . . . Attributes that color the beam: Cyan, Magenta, Yellow, Color,
etc.
• Beam . . . . . . . . . . . . Attributes that affect the quality of the beam; Intensity, Strobe,
Zoom, Iris, Focus, etc.
• Other. . . . . . . . . . . . . Typically used for speed and control channels.
Note:
Change attribute category assignments:
Step 1: On your Emphasis Facepanel or from the virtual facepanel in Emphasis
Visualization, press [Setup] [1][1] [Enter] to access the Moving Light Functions
menu.
Step 2: Press [3] [Enter] to display the Attribute Setup.
Step 3: Press [S1 - Select Attribute] [x] [S2 - Category], where [x] is the attribute
number.
Step 4: Press the following to toggle the category assignment:
• [1] for Position.
• [2] for Image.
• [3] for Color.
• [4] for Beam.
• [5] for Other.
Step 5: When you have completed your adjustments, press [Enter].
To return all attributes to their default settings, press [S7-Reset Defaults] [Enter].
58 Emphasis Console v1.4.0 User Manual
Page 69

Attribute names and default categories
Attribute/Category Attribute/Category Attribute/Category Attribute/Category
1: Int(ensity) Beam 17: CTB Color 33: IntFun Beam 49: FxSpd1 Image
2: Pan Position 18: Gobo1 Image 34: FocSpd Position 50: FxSpd2 Image
3: Tilt Position 19: Gobo2 Image 35: FocFun Position 51: FxFun1 Image
4: Strobe Beam 20: Gobo3 Image 36: CSpd1 Color 52: FxFun2 Image
5: Zoom Beam 21: GRot1 Image 37: CSpd2 Color 53: Macro1 Other
6: Focus Beam 22: GRot2 Image 38: CFun1 Color 54: Macro2 Other
7: Iris Beam 23: GRot3 Image 39: CFun2 Color 55: Fram1A Beam
8: Frost Beam 24: FX1 Image 40: CFun3 Color 56: Fram1B Beam
9: Lens Beam 25: FX2 Image 41: CFun4 Color 57: Fram2A Beam
10: Cyan Color 26: FX3 Image 42: GSpd1 Image 58: Fram2B Beam
11: Magenta Color 27: FxRot1 Image 43: GSpd2 Image 59: Fram3A Beam
12: Yellow Color 28: FxRot2 Image 44: GSpd3 Image 60: Fram3B Beam
13: Clr1 Color 29: FxRot3 Image 45: GFun1 Image 61: Fram4A Beam
14: Clr2 Color 30: MSpd Other 46: GFun2 Image 62: Fram4B Beam
15: Clr3 Color 31: MFun Other 47: GFun3 Image 63: FramRot Image
16: CTO Color 32: IntSpd Beam 48: GFun4 Image 64: Spin Image
Encoder Setup
Emphasis allows you to control moving light attributes through the Fixture Box. This display
has six pages and shows up to nine attributes per page. Each attribute is assigned to an
encoder, which is a physical device on Expression/Insight 3 and ECS facepanels.
Expression 2x style facepanels can use an MLM (see Moving Light Module (MLM) for
Expression/Insight 2x Facepanels, page 26) to control moving lights. Express facepanels
and Expression/Insight 2x facepanels without an MLM access the attributes using the arrow
keys and the trackpad or level wheel. You can also assign attributes to an external pointing
device, such as a trackball, using the TX and TY encoders.
Encoders are assigned to 44 of the 64 available attributes by default. It is possible,
depending on the fixtures you have patched in Emphasis Visualization, for attributes to end
up spread across multiple pages of encoders. You can change the placement of the
attributes within the Fixture Box by modifying the Encoder Setup.
3 System Settings 59
Page 70

Change encoder assignments by attribute:
Step 1: On your Emphasis Facepanel or from the virtual facepanel in Emphasis
Visualization, press [Setup] [1][1] [Enter] to access the Moving Light Functions
menu.
Step 2: Press [4] [Enter] to display the Encoder Setup.
Step 3: Press [S1 - Select Encoder] [x] [S2-Page] [y] [S3 - Attribute], where [x] is the
encoder number and [y] is the page number.
Step 4: Press [+] and [-] to scroll through the available attributes until you find the one
you want to assign. You can also enter the attribute number directly.
Step 5: Press [Enter] to assign the attribute to the selected encoder.
Step 6: Repeat steps 3 through 5 to assign more attributes to encoders. You can use the
arrow keys to move from encoder to encoder and from page to page.
Note:
Note:
Each attribute may appear on multiple pages, but an attribute may only appear once on
any given encoder page.
Change attribute assignments automatically:
Step 1: On your Emphasis Facepanel or from the virtual facepanel in Emphasis
Visualization, press [Setup] [1][1] [Enter] to access the Moving Light Functions
menu.
Step 2: Press [4] [Enter] to display the Encoder Setup.
Step 3: Press [S6 - Autoload Encoders].
Step 4: Press [Enter] to confirm, or [Clear] to cancel the command. Pressing [Enter] will
place only the attributes for patched fixtures on the encoders, and will start
assignments at encoder #1 on page #1, filling encoders as necessary to
accommodate all the patched attributes.
Autoload Encoders is also available on [S3 - Autoload Encoders] in the Fixture Patch
Display.
Reset encoder assignment defaults:
Step 1: On your Emphasis Facepanel or from the virtual facepanel in Emphasis
Visualization, press [Setup] [1][1] [Enter] to access the Moving Light Functions
menu.
Step 2: Press [4] [Enter] to display the Encoder Setup.
Step 1: Press [S7 - Reset Defaults].
Step 2: Press [Enter] to confirm, or [Clear] to cancel the command. Pressing [Enter] will
restore the default encoder assignments.
60 Emphasis Console v1.4.0 User Manual
Page 71

Patch
To control dimmers and other DMX controlled devices using your Emphasis Control
System, you will need to create a patch. Emphasis uses control channels to record data in
cues and submasters. Control channels must have dimmers assigned to them, so that the
dimmers (or other DMX controlled devices) know which channel to listen to for level
information. This assignment is called the patch.
Interactivity with Emphasis Visualization
While it is possible to create a patch for conventional dimmers in Emphasis Console, it is
better to create your patch in Emphasis Visualization. Emphasis Console only allows you
to patch conventional dimmers to channels, not moving light fixtures that use personalities.
Also, as you patch in Emphasis Console, Emphasis Visualization is entering data into the
show file for “Spare Circuits”, as it has no idea what kind of fixture you are patching, or
where it is hung in your plot. If you are not using the data management or visualization tools
for a show, feel free to patch directly in Emphasis Console.
Patch dimmers (spare circuits) in Emphasis Console:
Step 1: On your Emphasis Facepanel or from the virtual facepanel in Emphasis
Visualization, press [Patch] to access the Patch display.
Step 2: Press <Dim> [x] [Enter], where [x] is the dimmer number, to select the dimmer.
You can use [And], [Thru] and [Except] to select ranges of dimmers.
Step 3: Press <Channel> [y] [Enter], where [y] is the channel number. You cannot
patch selected dimmers to more than one channel, nor can you patch selected
dimmers across ranges of channels.
Step 4: Repeat steps 2 and 3 for additional dimmers.
Note:
Unpatch dimmers in Emphasis Console:
Step 1: On your Emphasis Facepanel or from the virtual facepanel in Emphasis
Visualization, press [Patch] to access the Patch display.
Step 2: Press <Dim> [x] [Enter], where [x] is the dimmer number, to select the dimmer.
You can use [And], [Thru] and [Except] to select ranges of dimmers.
Step 3: Press [S6 - Unpatch].
You cannot unpatch dimmers assigned to moving light fixtures using [S6 - Unpatch]. You
must unpatch the fixture in Emphasis Visualization.
3 System Settings 61
Page 72

EDMX
512
1
512
2
512
3
3
5
513
514
s
Though the Patch display indicates that you are patching dimmers to channels, what you
are actually doing is patching an EDMX address to your control channel. EDMX is ETC’s
proprietary protocol for transmitting DMX information over an Ethernet network. The suite
of ETC network protocols is called ETCNet2 and is the communication method used by the
Emphasis Server and the Facepanel. ETCNet2 is also used in systems that contain Video
Nodes and DMX Nodes. The Video Node allows you to see the Facepanel display(s) and
attach a Remote Focus Unit, an optional keyboard and Remote Macro controller at a
location away from your Facepanel. The DMX Node can be configured for up to four DMX
outputs or inputs, and allows you to have DMX outputs and inputs away from your
Facepanel.
There are 32,767 addresses available in EDMX, which corresponds to 64 universes of
DMX. DMX is the industry-standard protocol for controlling dimmers from a lighting control
console. Each universe of DMX contains 512 addresses. Each Emphasis Control System
can be custom-configured to the needs of the venue, so to explain how patching to EDMX
addresses gets you industry-standard DMX at an output in a simple system, please see the
diagram below.
Control Channels
2
1
Patch
EDMX Addresse
4
5
3
1025 1026
997 998
999
32,767
1000
Console
Configuration/NCE
DMX Output Port #
DMX Output Port #
DMX Output Port #
Using Emphasis with Dimmer Doubling™
Dimmer Doubling is a feature of ETC Sensor dimming that enables you to use a single
dimmer and a special two-fer to control two Source Four fixtures separately, In Emphasis,
there is no convention for patching dimmers as 1A and 1B to indicate which side of the
Dimmer Doubler you are using, as was the case in previous control consoles. To patch
doubled circuits, you will need to patch the EDMX address corresponding to DMX 1-256 for
the A-side of the doublers and EDMX addresses corresponding to DMX 257-512 for the Bside of the doublers.
If you have any questions about patching Dimmer Doubling within an Emphasis Control
System, please call ETC Technical Services (see Help from ETC Technical Services, page
3).
Note:
62 Emphasis Console v1.4.0 User Manual
Dimmer Doubling is available only for ETC dimming systems operating at a nominal 115
volts, 60Hz. It is not available for systems operating at other voltages or frequencies.
Page 73

Modifying dimmer output
Normally, when you fade a control channel, patched dimmers will output the same level.
For example, if you set a channel to 50%, the patched dimmers will output at 50%. You can
modify this by applying a proportional level to individual dimmers, or by assigning a dimmer
profile. If desired, you can apply a proportion and a profile to any dimmer. You can select
channels and set them to levels while you are viewing the patch. This way you can see the
affect of applied proportions and profiles.
Note:
Do not apply proportions or profiles to 16 Bit channels. This will yield unexpected results.
Proportional Patching
A proportion applied to a dimmer caps the output to the assigned level. For example, if you
set a proportion of 80 to a dimmer, that dimmer will only output 80% when its patched
channel is set to full (100%). Because this is a proportional setting, when the channel is set
to 50, the dimmer will output 40% (half of 80).
Proportional patching can be used when you need to match dimmers with different wattage
lamps in them, or if you want to keep a dimmer or dimmers from ever reaching its full output.
Set a proportional dimmer output level:
Step 1: On your Emphasis Facepanel or from the virtual facepanel in Emphasis
Visualization, press [Patch] to access the Patch display.
Step 2: Press <Dim> [x], where [x] is the dimmer number, to select the dimmer. You can
use [And], [Thru] and [Except] to select ranges of dimmers.
Step 3: Press [At] [y], where [y] is the two-digit proportional level. Enter a zero before
single-digit levels (i.e., 08). Use [Full] to remove a proportional level from a
dimmer.
Dimmer Profiles
You can assign a profile to a dimmer in the Emphasis Console Patch display. A profile
governs the output level of DMX in relation to the channel level. Profiles are often used to
match dimmers with different dimming curves, compensating for any mismatches in
dimmer output by adjusting the DMX level. Profiles can also be used to preheat lamps
(warming the filaments can extend lamp life or speed the time to full output on lamps that
are bumped to full).
3 System Settings 63
Page 74

You can assign any dimmer patched to an 8-bit channel a proportional patch level and a
profile. In that case, the proportional level is calculated first, then the profile is applied to
determine the DMX output for that dimmer.
There are 33 available profiles. Profile 0 is the default profile (linear) and is not editable.
The remaining 32 profiles are editable, with profiles 1-9 given default non-linear curves, and
10-32 left at linear for editing. You can view and edit profiles in the Profile display in the
Setup menu.
View available profiles:
Step 1: On your Emphasis Facepanel or from the virtual facepanel in Emphasis
Visualization, press [Setup] [1][0] [Enter] to access the Profiles display.
Step 2: Press <S1-Select Profile> [x] [Enter], where [x] corresponds to the profile you
want to view.
• 0 - Linear (Default - not editable) • 6 - Full at 1%
• 1 - IES Square Law • 7 - Preheat at 5%
• 2 - Slow Bottom • 8 - Preheat at 10%
• 3 - Fast Bottom • 9 - Hot Patch
• 4 - Slow Top • 10-32 - Linear
• 5 - Fast Top
Assign a profile to a dimmer:
Step 1: On your Emphasis Facepanel or from the virtual facepanel in Emphasis
Visualization, press [Patch] to view the Patch display.
Step 2: Press <Dim> [x], where [x] is the dimmer number, to select the dimmer. You can
use [And], [Thru] and [Except] to select ranges of dimmers.
Step 3: Press [S2 - Profile] [y] [Enter], where [y] is the profile number you want to
assign.
Edit a dimmer profile:
Step 1: On your Emphasis Facepanel or from the virtual facepanel in Emphasis
Visualization, press [Setup] [1][0] [Enter] to access the Profiles display.
Step 2: Press <S1-Select Profile> [x] [Enter], where [x] corresponds to the profile you
want to edit.
64 Emphasis Console v1.4.0 User Manual
Page 75

Note:
You can copy another profile to the desired destination and edit from that if you wish.
Select the profile you want to copy, then press [S6 - Copy to Profile] [x] [Enter], where
[x] is the destination profile’s number.
Step 3: Use the following methods to edit the profile:
• Press [S2 - Percent] [x] [At] [y] [Enter] where [x] is the percentage of fade
completion and [y] is the desired output percentage. You can also use the
up/down arrows to set the level and the left/right arrows to select
percentages.
• Press [S2 - Percent] [x] [S4 - Clear to End] to set all percentages above the
selected one to undefined output.
• Press [S5 - Fill Between] [Enter] to have Emphasis calculate output levels
for undefined completion percentages. Emphasis will calculate an even
transition between set output levels for any undefined levels within the
profile. You must have some set levels within the profile before you press
[S5] for this to have any effect.
• Press [S7 - Reset Profile] to return the profile to its default settings.
• You can label your profile (up to 16 characters). The name will appear in the
upper-left corner of the profile display and on the profile printed report. Press
[Label] or <S7 - More Softkeys> [S2 - Label], type in the label on the
alphanumeric keyboard, and press [Enter].
Step 4: Repeat step 4 until all adjustments have been made.
3 System Settings 65
Page 76

Label Dimmers
You have the option to label dimmers using the [Label] key. On any facepanel you can
show or hide labels using [S6 - Show/Hide Labels] in the Patch display.
Note:
Label can be found on <S7 - More Softkeys> [S2 - Label] on Express facepanels.
Label dimmers:
Step 1: On your Emphasis Facepanel or from the virtual facepanel in Emphasis
Visualization, press [Patch] to access the Patch display.
Step 2: Press <Dim> [x], where [x] is the dimmer number, to select the dimmer.
Step 3: Press [Label] and type the label name. Labels can be five characters long. When
done, press [Enter].
Step 4: Press [S3 - Show/Hide Labels] to toggle label display.
Patching to a Strand Lighting CD80 Dimmer Rack
Strand CD80 dimmer racks have 48 dimmer slots. Each dimmer slot holds either two 2.4kW
dimmers or one 6kW or 12kW dimmer. Refer to the illustrations below to determine the
address for the dimmer slots. When patching 6kW and 12kW dimmer, patch the slot’s odd
number to the desired channel number. Patch the slot’s even number to channel zero
(essentially unpatching the dimmer).
103
101
99
97
98
109
110
100
111
112
102
113
114
104
115
116
13
14
1
4
2
15
16
17
18
8
6
19
20
10
21
22
12
23
24
11
9
7
5
3
105
106
117
118
107
108
119
120
25
26
37
38
49
50
61
62
73
74
85
86
27
28
39
40
51
52
63
64
75
76
87
88
29
30
41
42
53
54
65
66
77
78
89
90
31
32
43
44
55
56
67
68
79
80
91
92
33
34
45
46
57
58
69
70
81
82
93
94
35
36
47
48
59
60
71
72
83
84
95
96
121
122
133
134
145
146
157
158
169
170
181
182
123
124
135
136
147
178
159
160
171
172
183
184
125
126
137
138
149
150
161
162
173
174
185
186
127
128
139
140
151
152
163
164
175
176
187
188
129
130
141
142
153
154
165
166
177
178
189
190
131
132
143
144
155
156
167
168
179
180
191
192
66 Emphasis Console v1.4.0 User Manual
Page 77

Using the About Command
The [About] command is a powerful tool for viewing information about dimmers, channels
and your Emphasis Console show.
About Dimmer
Use About Dimmer to view patch data and source data about a specific dimmer. Press
[About] [Dim] [x], where [x] is the dimmer number you want to view, to open the About
Dimmer display.
About Channel
Use About Channel to view patch and usage data about a specific channel. Press [About]
[Channel] [x], where [x] is the channel number you want to view, to open the About
Channel display.
3 System Settings 67
Page 78

About Show
Use About Show to view statistics of recorded items in your show. Press [About] [Enter]
to open the About Show display.
68 Emphasis Console v1.4.0 User Manual
Page 79

Chapter 4
Live Editing
This chapter contains information about selecting and controlling channels and fixtures for
use in a live environment, where changes happen on screen and on stage. This chapter
also covers parking channels and dimmers, recording cues and submasters, and timing
concepts.
This chapter contains the following sections:
• Displays . . . . . . . . . . . . . . . . . . . . . . . . . . . . . . . . . . . . . . . . . . 70
• Manual Control . . . . . . . . . . . . . . . . . . . . . . . . . . . . . . . . . . . . 72
• Cues. . . . . . . . . . . . . . . . . . . . . . . . . . . . . . . . . . . . . . . . . . . . . 88
• Submasters . . . . . . . . . . . . . . . . . . . . . . . . . . . . . . . . . . . . . . . 94
• Time Functions . . . . . . . . . . . . . . . . . . . . . . . . . . . . . . . . . . . . 98
• Special Functions. . . . . . . . . . . . . . . . . . . . . . . . . . . . . . . . . 101
4 Live Editing 69
Page 80

Displays
To control channels live, you need to be in either the Stage or Fader display in Emphasis
Console. These displays show you the channel levels of the current Emphasis Control
System output.
Stage Display
The Stage display shows you the total output of the Emphasis Control System, with channel
levels generated by manual control, cues in the A/B and C/D fader pairs, submasters and
channels in the background.
Express
Stage display
Expression/Insight
Stage display
70 Emphasis Console v1.4.0 User Manual
Page 81

Fader Display
The Fader display gives you the opportunity to view channel data contributing to the output
of the Emphasis Control System by submaster, by fader or by viewing the background. This
is extremely helpful when you have multiple playback controls active at the same time and
you want to make an edit.
Expression/Insight display shown.
4 Live Editing 71
Page 82

Manual Control
Once you have created your patch (see Patch, page 61), the next step is setting your
channels and fixtures to levels so that you can store cues and submasters. Manual control
is interactive with Emphasis Visualization, so you can choose to work with the mouse,
selecting lights by clicking them, or you may choose to use the keypad interface of
Emphasis Console.
Select Channels, Dimmers and Fixtures
Channels are the means by which Emphasis stores cue data. Everything you want to store
in a cue or submaster needs to be patched to a channel. Moving lights use multiple
channels to control all their parameters.
Emphasis uses fixture personalities to organize the channels required for a moving light.
When you want to use moving lights in your show, patch them using the personalities
available in the libraries in Emphasis Visualization (See the Emphasis Visualization User
Manual for how to patch).
You can also access dimmers directly for troubleshooting purposes, or to park them at a
level (see Park, page 85).
Selected channels are under your immediate control. There are a number of ways to select
channels and fixtures: directly by number, by selecting a group containing the desired
channels (see Groups, page 84), and/or by selecting a Concept (see Concepts, page 73).
Dimmers must be selected using the [Dim] key.
Direct Selection
The most direct way to select a channel or fixture is to simply type its number on the
Facepanel’s numeric keypad. You can select single channels, or multiple channels using
the [And] key, or ranges of channels using the [Thru] key, and you can remove channels
from a selection using the [Except] key. The same is true of fixture selections. In most
cases, the channel key’s LED is lit, making the [Channel] key press optional.
Select channels:
• Press <Channel> [x] to select a single channel.
• Press <Channel> [x] [And] [z] to select non-consecutive channels.
• Press <Channel> [x] [Thru] [z] to select a range of channels.
• Press <Channel> [a] [Thru] [g] [Except] [c] to select a range of channels, except
channel [c].
• You can use [Except] multiple times to remove multiple channels from the selection:
<Channel> [1] [Thru] [1][0] [Except] [5] [Except] [7], selects channels 1-4, 6 and 8-
10.
• Press <Channel> [Enter] to select all channels with levels above zero.
• In Emphasis Visualization, you can click on a fixture symbol to select its channel. See
the Emphasis Visualization User Manual for more information on selecting fixtures
using the mouse.
72 Emphasis Console v1.4.0 User Manual
Page 83

Select dimmers:
• Press <Dim> [x] to select a single dimmer for dimmer check, or in Patch or Park
displays.
• Press <Dim> [x] [And] [z] to select non-consecutive dimmers in Patch or Park.
• Press <Dim> [x] [Thru] [z] to select a range of dimmers in Patch or Park displays.
• Press <Dim> [a] [Thru] [g] [Except] [c] to select a range of dimmers, except dimmer
[c] in channel patch or park.
• You can use [Except] multiple times to remove multiple dimmers from the selection:
<Dim> [1] [Thru] [1][0] [Except] [5] [Except] [7], selects dimmers 1-4, 6 and 8-10 in
Patch or Park displays.
Select fixtures:
• Press [S8 - Fixture] [x] to select a fixture number. Use [And], [Thru] and [Except] to
select multiple fixtures.
• In Emphasis Visualization, you can click on a fixture symbol to select its channels. See
the Emphasis Visualization User Manual for more information on selecting fixtures
using the mouse.
Concepts
In Emphasis Visualization, you can create groups of fixtures (conventional or moving light
fixtures). These are called concepts and are found in the Shortcut bar. Use concepts to
select groups of channels and fixtures, then set levels either with the mouse or with the
Emphasis Console features described in the next section. See the Emphasis Visualization
User Manual for more information on creating concepts and setting levels within
Visualization.
4 Live Editing 73
Page 84

Channel selection in Flexichannel
In Flexichannel mode (see Flexichannel, page 30), channel selection using the [Thru] key
changes slightly. In Flexichannel, only channels used in the show are visible on screen.
When you use the [Thru] key in Flexichannel, only visible channels will be selected. To
select all channels in the range, regardless of their visibility, press [Thru] twice: <Channel>
[x] [Thru] [Thru] [z].
Channels selected with:
<Channel> [7][0]
[Thru] [1][0][1]
Channels selected with:
<Channel> [7][0]
[Thru] [Thru] [1][0][1]
74 Emphasis Console v1.4.0 User Manual
Page 85

Set Levels
Once channels or fixtures are selected, you will want to set a level. Levels indicate the
intensity level for conventional channels, or the attribute setting for fixtures. Emphasis
Console displays channel levels as a two-digit percentage from 00 to FL (100%).
Note:
You can view the raw data for 16 Bit channels (pan and tilt) in the fixture box (see Moving
Light Control, page 80), otherwise the percentage equivalent is displayed in the channel
area of the Emphasis Console displays.
Channel levels can be set directly, or by reference to a focus point (see Focus Points, page
81). Direct levels are stored into focus points, and can be recorded into groups (see
Groups, page 84), cues and submasters.
Direct Levels
The simplest way to set a channel level is to do it directly using the [At], [Full] and [Level]
keys, or the level wheel/trackpad. This is most frequently used for setting levels for
channels that control intensity (dimmers).
When you use fixtures, you can set levels directly by channel, or by using the encoders, or
the arrow keys and trackpad.
If you are selecting fixtures using the mouse in Emphasis Visualization, you can set levels
using the right-click menu or the Design tools. See the Emphasis Visualization User Manual
for more information on selecting fixtures and setting levels within Visualization.
Set levels using [At]:
Step 1: Select channels using the procedure described in Select Channels, Dimmers
Step 2: Press [At] [x], where [x] is the two-digit percentage. You can repeat pressing [At]
and Fixtures, page 72.
[x] until you have achieved the output you like without re-selecting the channels
each time, unless you record those levels or otherwise deselect the channels.
Note:
<Channel> [1] [At] [5] [Enter] sets channel 1 to a level of 50%. Using this syntax, you
can skip the zero in levels like 10, 20, 30 and so on. If you want to set a level lower than
10, you must enter the leading zero - [At] [0][5] to set 5%.
Set levels using [Full] or [Level]:
Step 1: Select channels using the procedure described in Select Channels, Dimmers
and Fixtures, page 72.
Step 2: Press [Full] to set the channel(s) to 100%, or press [Level] to set the channel(s)
to the output level set in Default Level, page 48.
Set levels using the level wheel (Expression/Insight only):
Step 1: Select channels using the procedure described in Select Channels, Dimmers
and Fixtures, page 72.
Step 2: Roll the level wheel away from you to raise the level, or toward you to lower the
level.
4 Live Editing 75
Page 86

Set levels using the trackpad (Express only)
Step 1: Select channels using the procedure described in Select Channels, Dimmers
and Fixtures, page 72.
Step 2: Slide your finger from bottom to top of the trackpad to raise the level, or from top
to bottom to lower the level. You can change the resolution of the trackpad by
pressing the coarse and fine pads to the left of the main trackpad. The coarse
pad has a rougher texture than the fine pad. When you set the resolution to
coarse, levels change faster when you slide your finger up and down. Use the
fine setting to move levels only a few points at a time.
Y - Axis
Coarse pad
(Tilt)
X - Axis (Pan)
Fine pad
76 Emphasis Console v1.4.0 User Manual
Page 87

Captured channels and [Release]
When you set channels to levels and then move on to select other channels, the channels
you have just set are displayed in red and become captured. Captured channels have been
set to levels using manual control, and they may have been recorded into a cue, group,
focus point or submaster. Captured channels remain at their set level until you release
them.
Captured channels in red
Channels with certain attribute settings (see Channel Attributes, page 54) respond to the
[Release] command differently.
• Selected dependent channels are released with the first press of [Release]. Selected
independent channels are released with the second press of [Release].
• Unselected (captured) dependent channels are released with the first press of
[Release] if there are no selected channels. Unselected (captured) independent
channels are released with the second press of [Release].
Captured
channel
indicator
Selected
channels on the
wheel/trackpad
• If you had dependent and independent channels captured, and some of those channels
selected, it’s possible for you to have to press [Release] up to four times to release all
captured channels.
• First press releases selected dependent channels.
• Second press releases selected independent channels.
• Third press releases unselected (captured) dependent channels.
• Fourth press releases unselected (captured) independent channels.
4 Live Editing 77
Page 88

Dimmer and Channel Check
Often before a rehearsal or performance, you will want to check that all your lights are
working. Emphasis offers a feature called Dimmer Check that allows you to step
sequentially through your dimmers (EDMX addresses), setting the current dimmer to the
level of your choice. If you want to do this on a channel level, rather than on the EDMX level,
you have a number of choices, described below.
Use Dimmer Check:
Step 1: Press [Dim] [x], where [x] is the first dimmer you want to check.
Step 2: Press [At] [y] [Enter], where [y] is the level you want the dimmers to go to. The
dimmer will unpatch itself temporarily and output the level you set.
Step 3: Press [+] to move to the next dimmer, or [-] to move to the previous dimmer. As
you press [+] or [-], each dimmer will temporarily unpatch itself and output the
level you set in step 2.
Step 4: When you are done checking dimmers, press any key other than [+] or [-] to
release the last dimmer.
Note:
Note:
Only one dimmer can be checked at a time using the Dimmer Check feature. Dimmer
check tests all dimmers, regardless of patch.
Channel check using the keypad:
Step 1: Press <Channel> [x] [Full], where [x] is the first channel you want to check.
Step 2: Press [At] [0][0] [+] [Full] to set the first channel to zero output and the next
channel to full.
Step 3: Repeat step 2 until all channels have been checked.
Step 4: Press [Release] to release the captured channels. You may need to press
[Release] multiple times, depending on your channel attribute settings.
This type of channel check is typically used for channels patched to dimmers, not for
moving lights. You can create a macro to automate this process. See Sample Macros,
page 163.
Channel check using the [S8 - Flash] softkey:
Step 1: Press <Channel> [x], where [x] is the first channel you want to check.
Step 2: Press <S7 - More Softkeys> and press and hold [S8 - Flash]. The channel will
jump to full output.
Step 3: While pressing [S8 - Flash], press [+] to move to the next channel, or [-] to move
to the previous channel. As you press [+] or [-], each channel will temporarily
jump to full output.
Step 4: Release [S8 - Flash] to return the last channel to its stage level.
Note:
78 Emphasis Console v1.4.0 User Manual
Independent channels will not respond to this kind of channel check.
Page 89

Solo
The solo function can be used to suppress the levels of unselected channels. This is helpful
if you want to temporarily change the stage look to just a few channels, or record a cue,
group or submaster containing only a few of the channels in the current stage look.
Set levels using [S3 - Solo]:
Step 1: Select channels using the procedure described in Select Channels, Dimmers
and Fixtures, page 72.
Step 2: Set levels using the procedure described in Set Levels, page 75.
Step 3: Press <S7 - More Softkeys> [S3 - Solo]. In Stage and Fader, all unselected
dependent channels will be temporarily set to zero level. In Blind, all unselected
channels will be set to zero level.
Step 4: In Stage, press [S3 - Solo] again to restore levels for unselected channels. In
Blind, press [Release] to restore recorded levels.
Note:
In Blind, pressing [S3 - Solo] again clears all levels, regardless of channel selection.
4 Live Editing 79
Page 90

Moving Light Control
Moving lights require multiple control channels to control all their attributes. Collectively,
these channels are called a fixture. Fixtures are patched in Emphasis Visualization using
personalities that automatically match up their control channels to attributes and categories
in Emphasis Console. There are tools for controlling fixtures directly from Emphasis
Visualization. See the Emphasis Visualization User Manual for more information on
selecting fixtures and setting levels within Visualization.
There are also features for controlling fixtures directly from the Facepanel. Expression and
Insight facepanels have encoders for easily controlling the attributes of fixtures. See
Moving Light Functions, page 56 for information on setting up fixture attributes and
encoders.
Note:
Fixture
channels
Fixture Box
You can access fixture attributes using the trackpad and arrow keys on Express
facepanels. On Expression/Insight 2x facepanels without the MLM, use the arrow keys
and the level wheel.
When you have fixtures patched in your show, they will appear in the console displays as
channels surrounded by a gray bar. As you select fixtures, their available attributes and
encoder assignments are displayed in the fixture box. You can set levels for channels within
a fixture by direct selection as well.
Encoder assignment Current page
Control fixtures using the encoders (Expression/Insight 3 or 2x with MLM):
Step 1: Press [S8 - Fixture] [x], where [x] is the fixture number you want to select. Use
[And], [Thru] and [Except] to select multiple fixtures. The fixture box will be
displayed.
Step 2: Press [Focus Point] [Enter] to prepare the fixture for control.
Step 3: Press the page keys to move from one encoder page to the next.
Step 4: Spin the encoder corresponding to the attribute you want to change. Attributes
assigned to TX and TY are controlled by a serial trackball or other pointing device
connected to the Facepanel or MLM.
Step 5: Repeat steps 2 and 3 until you have completed all the changes you want to
make.
80 Emphasis Console v1.4.0 User Manual
Fixture attribute
16 Bit data
Page 91

Control fixtures with the arrow keys (Express & Expression/Insight 2x without MLM):
Step 1: Press [S8 - Fixture] [x], where [x] is the fixture number you want to select. Use
[And], [Thru] and [Except] to select multiple fixtures. The fixture box will be
displayed.
Step 2: Press [Focus Point] [Enter] to prepare the fixture for control.
Step 3: Press up- and down-arrow keys ([
the next.
Step 4: Press left- and right-arrow keys ([
change.
Step 5: Use the trackpad or level wheel to adjust the attribute level.
Step 6: Repeat steps 2 through 4 until you have completed all the changes you want to
make.
u] or [v]) to move from one encoder page to
s] or [t]) to move to the attribute you want to
Focus Points
Focus points are special groups that can be used to set levels in cues and submasters by
reference. When you set channels and fixtures to a focus point, they will take their levels
from those recorded in the focus point. If you make changes to a focus point, any channels
in a cue or submaster with a reference to that focus point will play back with the new levels.
This is very useful for pan and tilt of moving lights. If you are touring a show, or if the final
placement of furniture on your set is not determined, you can create a focus point for each
of your focus positions. When you write your cues with reference to these focus points, and
the furniture placement gets changed, you can simply refocus your lights and update the
focus points with new pan and tilt values, and all your cues will play back using that new
focus information.
Note:
Focus points can be associated with focus positions in Emphasis Visualization. See the
Emphasis Visualization User Manual for more information on linking a focus position to a
focus point.
Focus points can store data for any channel in your show, not just fixtures or pan and tilt
data.
Record a focus point:
Step 1: Select channels using the procedure described in Select Channels, Dimmers
and Fixtures, page 72.
Step 2: Set levels using the procedure described in Set Levels, page 75, or by using the
encoders, or by direct control through Emphasis Visualization.
Step 3: Press [Record] [Focus Point] [x] [Enter], where [x] is the number of the focus
point.
Recall a focus point for selected channels:
Step 1: Select channels using the procedure described in Select Channels, Dimmers
and Fixtures, page 72.
Step 2: Press [Focus Point] [x], where [x] is the focus point number. Channels will be
captured at the level recorded in the focus point, and the number [x] will be
indicated below the level.
Use focus points as selection groups:
Step 1: Press [Focus Point] [x], where [x] is the number of the focus point you want to
use to select channels.
4 Live Editing 81
Page 92

Step 2: Press:
• [At] [y], where [y] is a proportional level, or use the level wheel/trackpad.
When you do this, you are using the focus point like it is a group. No
reference to recorded levels is created or maintained. Direct levels are
recorded in any subsequent record command.
• [Focus Point] [y] [Enter], where [y] is the focus point you want to reference
to. This could be the same as the focus point you used in step 1, if you
wanted to look at the entire focus point on stage, for example. Or, you can
use the focus point in step 1 as a selection tool, and the focus point here as
a level setting tool.
Palettes
If you want to create a quick color select, you can use palettes. Palettes are stored in
Emphasis Visualization as a shortcut in the Emphasis mode. They are not referenced by
cues and submasters, but do provide a quick way to recall colors. See the Emphasis
Visualization User Manual for more information on palettes.
Only and Solo
The [Only] and [S3 - Solo] functions can be used with fixtures to limit selections and record
commands to the attribute categories. This is useful if you only want to set the color
channels of a fixture to a focus point, or if you only want to record position channels to a
focus point, for example. You can also use [S3 - Solo] to step through your fixtures,
adjusting them individually, then return to the whole stage look.
Note:
Note:
Only is found on [S4 - Only] in Stage, Blind and Fader on Express facepanels.
Select and adjust fixtures using [S3 - Solo]:
Step 1: Press [S8 - Fixture] [x] <S7 - More Softkeys> [S3 - Solo], to select fixture [x]
and force all other intensities temporarily to zero.
Step 2: Adjust fixture [x].
Step 3: Press [+] to select the next fixture, or [-] to select the previous fixture.
Step 4: Repeat steps 2 and 3 until you have completed making your adjustments.
Step 5: Press [S3 - Solo] to return to the full stage look.
Select fixture attributes using [Only]:
Step 1: Press [S8 - Fixture] [x], where [x] is the fixture number you want to select. Use
[And], [Thru] and [Except] to select multiple fixtures. The fixture box will be
displayed.
Step 2: Press [Only] [S1 - Position] to select the position channels of the fixture. You
can substitute [S2 - Image], [S3 - Color], [S4 - Beam] or [S5 - Other] to select
channels assigned to those categories. If you press [Only] [S6 - Attribute] [y],
where [y] is an attribute number, you can limit your selection to one attribute.
See Attribute Setup, page 57 for information on attributes and their categories.
Step 3: Press [Focus Point] [z], where [z] is the focus point number. Channels will be
captured at the level recorded in the focus point, and the number [z] will be
indicated below the level. You can also set direct levels using the encoders or the
[At] key.
82 Emphasis Console v1.4.0 User Manual
Page 93

Sneak
You can use [Only] and [S3 - Solo] to limit the channels you record into a focus point. This
is helpful if you want to create focus points for one attribute category, like position, without
having to clear out all other channels.
Record a focus point using [Only] and [S3 - Solo]:
Step 1: Press [S8 - Fixture] [x], where [x] is the fixture number you want to select. Use
[And], [Thru] and [Except] to select multiple fixtures. The fixture box will be
displayed.
Step 2: Press [Only] [S1 - Position] to select the position channels of the fixture. You
can substitute [S2 - Image], [S3 - Color], [S4 - Beam] or [S5 - Other] to select
channels assigned to those categories. If you press [Only] [S6 - Attribute] [y],
where [y] is an attribute number, you can limit your selection to one attribute.
Step 3: Set levels using the procedure described in Moving Light Control, page 80.
Step 4: Press [Record] [Focus Point] [y] [S3 - Solo] to record focus point [y] with levels
for the selected attribute(s) only.
With the sneak function, you can manually set direct levels over time. When you use the
[At], [Full], [Level] and [Release] keys, the new level takes affect immediately. When you
use the level wheel or trackpad, you may not fade to the new level evenly. If you need to
change channel levels, and you want the change to be smooth or go unnoticed (like in a
performance situation), you can use the sneak function to have channels assume new
levels (or restore to recorded levels) over a given period of time. You can use the default
sneak time, set in Default Sneak Time, page 49, or you can set the sneak time yourself.
Note:
Note:
You cannot sneak to a focus point, only to direct levels.
Set channel level using [S6 - Sneak]:
Step 1: Press <Stage>. The sneak softkey is only available in the Stage display.
Step 2: Press [S6 - Sneak]. This activates the sneak mode.
Step 3: Select the channels you want to sneak using the procedure described in Select
Channels, Dimmers and Fixtures, page 72. You do not need to press [Channel].
Step 4: Choose one of the following options:
• Press [Enter] to sneak the channels out, or to recorded levels, in the default
Sneak time.
• Press [Time] [y] [Enter] to sneak the channels out, or to recorded levels, in
the time [y].
• Press [At] [x] [Enter], to sneak to level [x] in the default Sneak time.
• Press [At] [x] [Time] [y] [Enter] to sneak to level [x] in the time [y].
To sneak all captured channels out or to their recorded levels in the default sneak time,
press [S6 - Sneak] [Enter].
4 Live Editing 83
Page 94

Channel Faders (Express Two-Scene/Insight only)
On Express Two-Scene facepanels and on Insight facepanels you have the option of
setting channel levels using the channel faders. Express Two-Scene facepanels have
dedicated channel faders, and Insight facepanels share channel and submaster faders.
Channel levels set with the channel faders are not captured, but will remain active under
HTP operation until the channel fader is moved back to the zero position.
To operate an Express Two-Scene console using channel faders, please see Express
Facepanel Two-Scene Operation, page 276 .
Use channel faders on Insight facepanels:
Step 1: The facepanel defaults to Submaster faders (the [Sub Mode] LED is lit). Press
[Sub Mode] to turn off the LED and switch to channel mode.
Step 2: Slide the faders to the levels you require.
Groups
If you find yourself selecting the same groupings of channels over and over, or you always
want to set levels for certain channels proportionally relative to each other, you can record
those channels with levels to a group. A group is a simple way to select multiple channels
with minimal key presses. You can also use recorded cues and submasters as groups, see
Using Cues as Groups, page 93 and Using Submasters as Groups, page 97 for more
information.
Record a group:
Step 1: Select channels using the procedure described in Select Channels, Dimmers
and Fixtures, page 72.
Step 2: Set levels using the procedure described in Set Levels, page 75. Only channels
with levels are recorded into groups.
Step 3: Press [Record] [Group] [x] [Enter], where [x] is the group number.
Recall a group:
• Press [Group] [x] [Full], where [x] is the group number, to recall the group as it was
recorded.
• Press [Group] [x] [At] [y], where [x] is the group number and [y] is a level, to recall the
group at a proportional level. For example, you recorded the channels in group 1 at full.
When you recall [Group] [1] [At] [7][5], all the channels in group 1 will be set to 75%.
If the channels were recorded into group 1 at 80%, that same syntax would set the
group 1 channels to 60% (75% of 80).
Recall groups using [Only]:
Step 1: Press [Group] [x] to select the first group. You can use [And] and [Thru] to
select multiple groups.
Step 2: Press [Only] [Group] [y] to select only the channels that are common to groups
[x] and [y].
84 Emphasis Console v1.4.0 User Manual
Page 95

Park
Parked channels and dimmers are set to a level that they will maintain regardless of manual
control, cue or submaster playback. Parked levels are not recorded into cues, groups or
submasters and are independent of most other instructions, with the following exception:
• [Blackout] affects parked dependent channels. Independent channels are not affected
by [Blackout].
Channels and dimmers that are unparked will return to whatever control input has the
highest level, or they will return to zero output.
Note:
Since you can park channels and dimmers separately, it is possible to park a channel and
its patched dimmer at different levels. In this case, the parked dimmer level will take
precedence. When the dimmer is unparked, the channel’s parked level will take
precedence.
Park Dimmers
When you park dimmers, they will stay at their parked level and ignore any instructions they
get from the channel they are patched to. So, you can park a dimmer to a specific level (to
maintain worklight, or for troubleshooting purposes, for example) and still be setting
channel levels and recording cues.
Park dimmers at direct levels:
Step 1: In the Stage display, press <S7 - More Softkeys> [S6 - Park]. In the Park
display, you do not need to press a softkey before selecting dimmers.
Step 2: Select dimmers using the procedure described in Select Channels, Dimmers and
Fixtures, page 72.
Step 3: If selected dimmers are not already at the levels you require, press [At] [x],
where [x] is the level you desire. If they are at the levels you require, skip this
step.
Step 4: Press [Enter] to park the dimmers. In the Park display, dimmers will display the
level they are parked to.
4 Live Editing 85
Page 96

Park Channels
You can park channels at direct levels, or with reference to a focus point. Channels parked
at a focus point will update their parked level if the corresponding focus point is changed.
See Focus Points, page 81 for more information.
Park channels at direct levels:
Step 1: In the Stage display, press <S7 - More Softkeys> [S6 - Park]. In the Park
display, you do not need to press a softkey before selecting channels.
Step 2: Select channels using the procedure described in Select Channels, Dimmers
and Fixtures, page 72.
Step 3: If selected channels are not already at the levels you require, press [At] [x],
where [x] is the level you desire. If they are at the levels you require, skip this
step.
Step 4: Press [Enter] to park the channels. In the Park display, channels will display the
level they are parked to.
Park channels at focus points:
Step 1: In the Stage display, press <S7 - More Softkeys> [S6 - Park]. In the Park
display, you do not need to press a softkey before selecting channels.
Step 2: Select channels using the procedure described in Select Channels, Dimmers
and Fixtures, page 72.
Step 3: Press [Focus Point] [x], where [x] is the number of the focus point.
Step 4: Press [Enter] to park the channels. In the Park display, channels will display the
level they are parked to and the focus point number they are referencing.
Park Groups, Focus Points, Cues and Submasters
You can park channels at levels based upon recorded groups, focus points, cues and
submasters. When you park based upon recorded levels, you have the option of parking at
the recorded levels, or at a proportional level.
Park channels relative to recorded levels:
Step 1: In the Stage display, press <S7 - More Softkeys> [S6 - Park]. In the Park
display, you do not need to press a softkey before selecting channels.
Step 2: Press [Group] [x], where [x] is the group number. [Group] can be replaced with
[Cue], [Sub] or [Focus Point] as needed.
Step 3: Press [Full] to park at recorded levels, or press [At] [y], where [y] is the
proportional level. For example, channel 1 is recorded into group 1 at full (100%).
You park [Group] [1] [At] [5][0]. Channel 1 will park at 50%.
86 Emphasis Console v1.4.0 User Manual
Page 97

Park Fixtures
If you need to park a moving light, you can park whole fixtures one at a time or in ranges.
You can park them with direct levels or with reference to a focus point. You can only park
fixtures from the Stage display, and when you park a fixture, all associated channels are
parked whether you select them to set levels or not.
Park fixtures:
Step 1: Press [Stage].
Step 2: Select fixtures using the procedure described in Select Channels, Dimmers and
Fixtures, page 72.
Step 3: Set levels for the fixture(s) as described in Moving Light Control, page 80.
Step 4: Press <S7 - More Softkeys> [S6 - Park] [Enter]. The selected fixture(s)
channels will be parked at their direct level, or at the level generated by a
referenced focus point, or at zero if they were without a set level when parked.
Unpark
When you unpark channels and dimmers, they are released to the highest control input
level or are sent to zero output.
Unpark channels:
Step 1: In the Stage display, press <S7 - More Softkeys> [S6 - Park]. In the Park
display, you do not need to press a softkey before selecting channels.
Step 2: Select channels using the procedure described in Select Channels, Dimmers
and Fixtures, page 72. You can also select channels to unpark by [Group],
[Cue], [Sub] and [Focus Point].
Step 3: Press [Release] to unpark the channel(s).
Note:
Note:
To unpark all channels from Stage, press [S6 - Park] [Release] [Enter]. To unpark all
channels in the Park display, press [Release] [Enter].
Unpark dimmers:
Step 1: In the Stage display, press <S7 - More Softkeys> [S6 - Park]. In the Park
display, you do not need to press a softkey before selecting dimmers.
Step 2: Select dimmers using the procedure described in Select Channels, Dimmers and
Fixtures, page 72.
Step 3: Press [Release] to unpark the dimmer(s).
To unpark all dimmers from Stage, press [S6 - Park] [Dim] [Release] [Enter]. To unpark
all dimmers in the Park display, press [Dim] [Release] [Enter].
4 Live Editing 87
Page 98

Cues
Cue Types
Crossfade
Allfade
Cues are one of the fundamental playback methods in your Emphasis Control System. A
cue is a recorded stage look that exists within a structure known as a cue list. Cues can be
played back individually or in sequential order in the A/B and C/D fader pairs (see A/B and
C/D Fader Pairs, page 144). Cues contain fade times, and can contain wait and follow
instructions (see Time Functions, page 98), links to other cues, macros or submasters (see
Link Functions, page 89), and can be labeled (see Label, page 103).
Emphasis has a 9,999 cue capacity. You can number cues from 0.1 - 999.9. Cues can be
used as groups (see Using Cues as Groups, page 93), and are the basic unit for
subroutines (see Subroutines, page 117).
In general, when you play back cues, you are simply fading one stage look into another.
There are five cue types that can affect how cues play back, or how cues are edited.
In a crossfade cue, channels that are moving to a higher level will fade in the upfade time,
and channels that are moving to a lower level will fade in the downfade time. Channels may
be tracked through crossfade cues.
Allfade cues force all unused channels to move to zero, and create move instructions for all
tracking channels in the cue. This cue type will stop a track record from changing levels in
subsequent cues (see Tracking, page 90). This is a useful cue type to use at the end of
scenes or acts. An allfade cue also clears the other fader pair when played back.
Block
A block cue forces all LTP channels to fade to completion in background cue timing and
then runs in a physical fader like any other cue. Use block cues to end effects running in
the background, without having to use the [S3 - Background Overrides] command.
Effect
Instead of simply fading from one stage look to another, an effect cue runs a dynamic series
of steps at a given rate. Each step contains channels or groups at levels. An example of a
simple effect is a chase, where lights turn on and off in sequence. Complex effects can be
made as well, to emulate lightning or fire or reflections off water, for example. Effects can
also be used with moving lights. See Stage Effects, page 92 for information on creating
effect cues.
Subroutine
Subroutine cues are like effects, but instead of using channels and groups as the base
element, subroutines use cues. In a sense, a subroutine is a cue list of its own, that can run
as an automated loop, or can wait for a manual go for each step. Subroutines are very
useful for creating complex moving light effects. Subroutine cues are slightly different than
Subroutines-on-Submasters, described in Subroutines on Submasters (Subs-on-Subs),
page 152.
88 Emphasis Console v1.4.0 User Manual
Page 99

Record Cues
Emphasis provides two basic recording functions – [Record] and [Track]. The [Record]
function saves all channels at their Stage levels in the cue, group or submaster you specify.
When you use [Record] for cues, only the cue you specify is affected. [Track], on the other
hand, can make changes across a series of cues (see Tracking, page 90).
Record cues:
Step 1: Select channels using the procedure described in Select Channels, Dimmers
Step 2: Set levels using the procedure described in Set Levels, page 75 and Moving
Step 3: Press [Record] <Cue> [x] [Enter], where [x] is the target cue number. If the
and Fixtures, page 72.
Light Control, page 80.
target cue number has already been recorded, a “Cue Recorded” message will
blink on the stage display. If you choose to record to a used number, the new look
will overwrite the old look.
Note:
Remember that the [Record] function will store all Stage levels in the cue, group or
submaster you specify. Make sure that you have cleared all unwanted channels before
recording your cues. Stray channel levels may come from captured channels, active
submasters, cues in the fader pairs, or channels in the background. If you need to leave
a channel or dimmer at a level, but you do not want to record it at that level in your cues,
use the Except or Solo commands (see Special Functions, page 101) or the Park
command (see Park, page 85).
Link Functions
There are times when you want cues to play back out of numerical order, or you may want
other things to happen in your Emphasis Control System when a cue is played back. You
can use the [Link] function to change the order of the cue list, without having to re-record
all your cues, and to link cues to submaster bumps and macros. You can enter links in
Stage, Blind, Fader and Cue List displays.
When you link a cue to another cue you change the playback order of your cue list. For
example, you have a cue list of five cues numbered 1-5 and you link cue 1 to cue 5. When
you play back cue 1, cue 5 becomes the next cue, skipping over cues 2-4. By linking cues
in both directions, you can create link loops. In a link loop, pressing [Go] will keep you within
the loop.
Link a cue to another cue:
Step 1: Press [Cue] [x], where [x] is the first cue to play back.
Step 2: Press [Link] <Cue> [y] [Enter], where [y] is the cue to jump to in the cue list.
Link to macros
You can link a cue to a macro. A macro is a recorded series of commands (see Macros,
page 155). The macro will fire as soon as you press [Go], unless you have entered a
[Follow] time in the cue (see Follow, page 99).
Link a cue to a macro:
Step 1: Press [Cue] [x], where [x] is the cue you are linking the macro to.
Step 2: Press [Link] [Enter Macro] [y] [Enter], where [y] is the macro number.
4 Live Editing 89
Page 100

Link to submasters
You can also link a cue to a submaster (see Submasters, page 94). Submaster links have
two components - sub-bump on and sub-bump off. This allows you to fire a submaster
automatically when you press [Go]. Use sub-bump on to fade in the submaster, and sub-
bump off to fade out the submaster. The submaster will fire as soon as you press [Go],
unless you have entered a [Follow] time in the cue.
Link a cue to a submaster:
Step 1: Press [Cue] [x], where [x] is the cue you are linking the submaster to.
Step 2: Press:
• [Link] [Sub] [+] [y] [Enter], where [y] is the submaster number, to link to a
sub-bump on.
• [Link] [Sub] [-] [y] [Enter], where [y] is the submaster number, to link to a
sub-bump off.
• You can press the actual submaster bump button instead of entering the
number - [Link] [Sub] [+] [Sub-Bump y] [Enter]. You still need to indicate
[+] or [-] to indicate whether you want the submaster to turn on or off.
Clear a link
You can only have one item linked to a single cue at a time. If you have a cue linked to
another cue, and then link a macro to that same cue, the cue link will be replaced with the
macro link. You can also clear a link completely. Clearing a link does not clear any
associated [Follow] time (see Follow, page 99).
Clear a link:
Step 1: Press [Cue] [x], where [x] is the cue number containing the link.
Step 2: Press [Link] [Clear]. This removes the link.
Tracking
Tracking is an editing method that enables you to change channel levels through
consecutive cues. You can track forward, track backward, or both directions at once.
Tracking is a powerful tool that should be used with care, as it can make sweeping changes
in your show with only a few key presses.
When you have channel levels that stay the same through a series of consecutive cues,
those levels are said to track through those cues (shaded cells in the table below show
tracking channels). Track recording will change the whole series of cues in one record
action. A track record stops changing cues when the tracked channel’s level moves to a
different level, the channel is blocked (see Blocked Channels, page 111), or a block or
allfade cue is encountered (see Cue Types, page 88).
Channels 1 2 3 4 5
Cue 1 00 25 00 FL 30
Cue 2
Cue 3
Cue 4
Cue 5 00
FL 25 60 FL 25
FL 25 50 FL 50
FL 25 50 FL 30
25 50 00 65
Note:
90 Emphasis Console v1.4.0 User Manual
If you use [Track] and have blackout cues in your show, make them allfade cues. This
will keep channels from unintentionally tracking through your blackouts.
 Loading...