

Esotec Palermo LED User manual
Operating manual
GB
solar battery station 6 V/ 3,2 Ah
Customer support:
If you have problems or questions regarding this product, simply contact us!
Monday to Friday 8 am to 12 noon and 1 pm to 4 pm.
By phone: +49 9605-92206-0
By e-mail for ordering spare parts: ersatzteil@esotec.de
By e-mail for questions about the product: technik@esotec.de
Manufacturer item-No: 101818
These instructions relate ONLY to this product and contain important information for using the product for the first time. Please keep these instructions
for later reference and should always accompany the product in the event of
transference to a new user.
1. Introduction
Dear Costumer, thank you for purchasing the solar pump kit.
With this solar pump kit you purchased a product manufactured according to the
current state of technology.
To maintain this state and guarantee a safe operation, you as the user will have to
follow this operating manual!
This product fulfils all requirements of the valid European and national regulations. The conformity was proved. The relevant declarations and documentation are deposited with the manufacturer.
4. Assembly/installation and start of operation
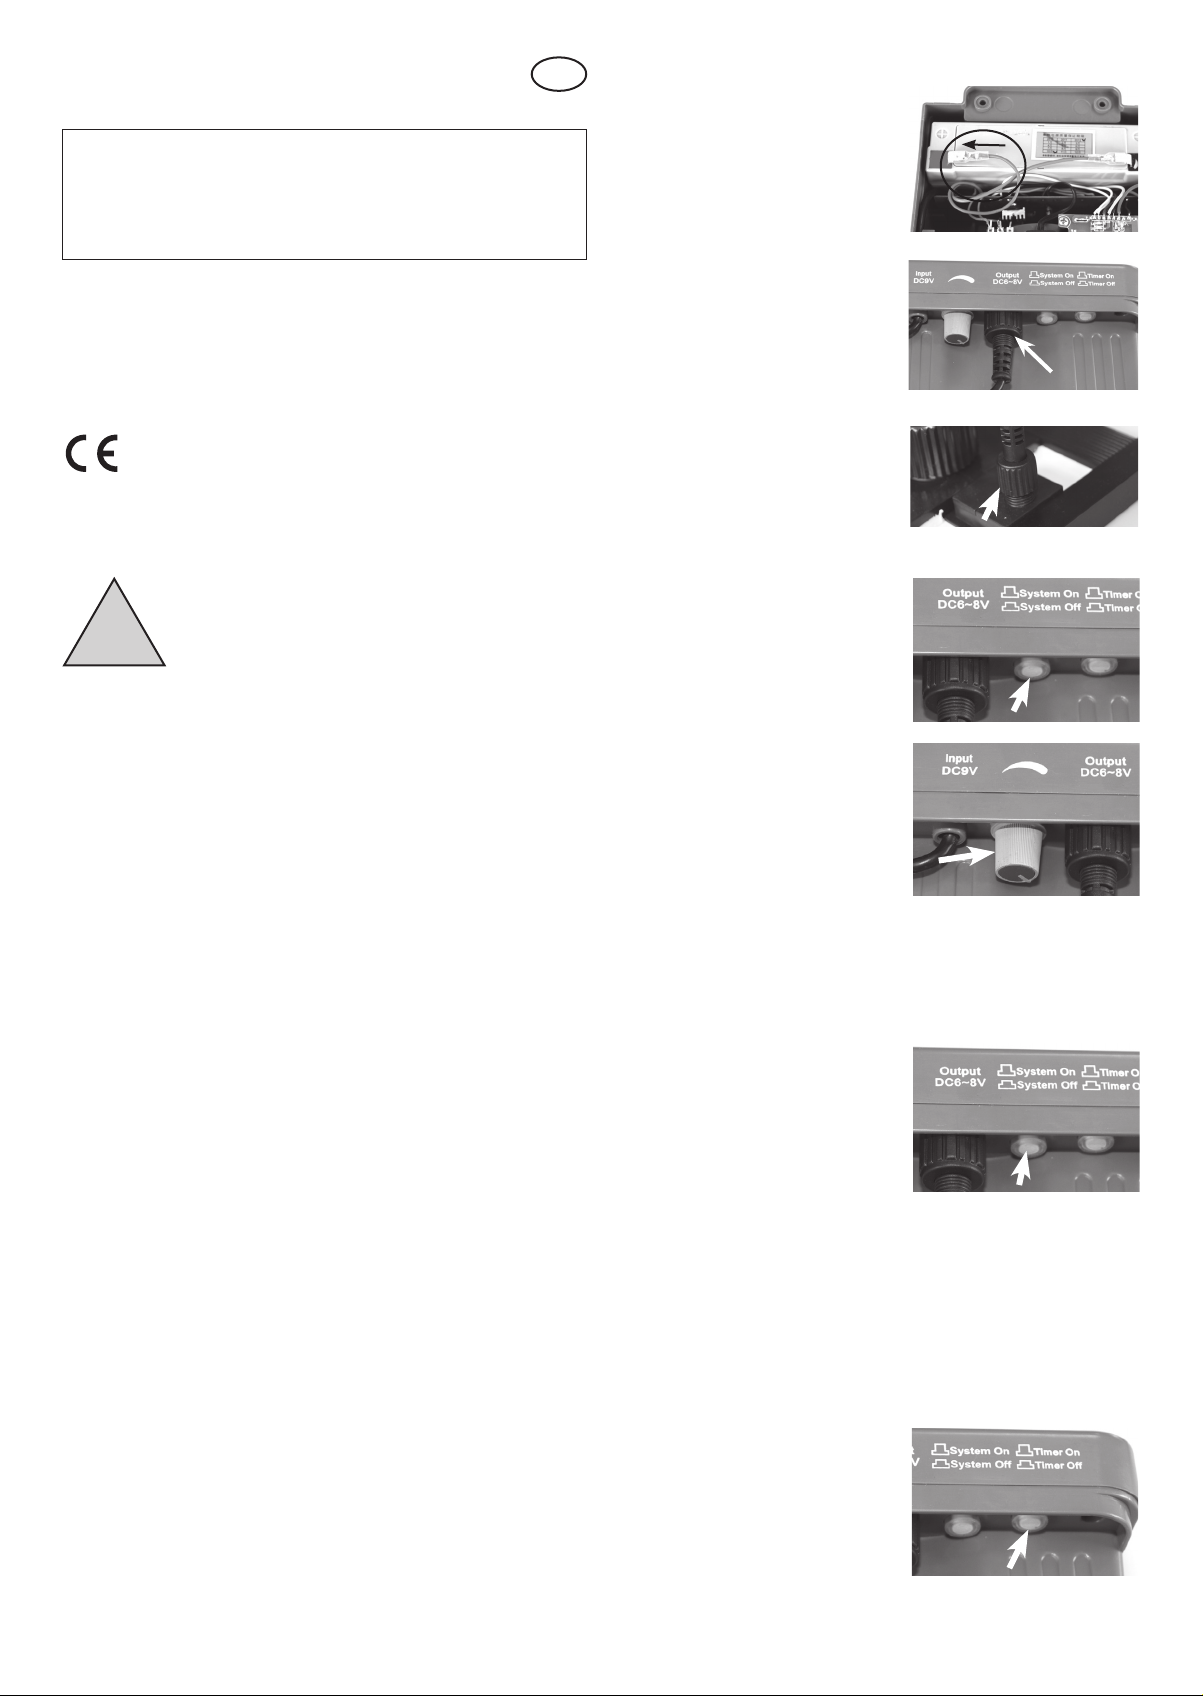
1. Loosen the screws on the underside of the
housing and remove the cover from the
battery box.
2. Place the electrical connector on the
brown cable onto the positive terminal of
the rechargeable battery.
3. Completely unroll the cable at the pump.
4. Insert the plug on the pump cable in the
built-in socket “OUTPUT DC 6-8 V” a the
accumulator station. Screw the cap nut
tight.
Please make sure that the switch is in OFF
position.
5. Completely unroll the cable at the accumulator station.
6. Insert the cable with the socket into the plug
of the solar module. Screw the cap nut tight.
2. Safety Instructions
- In case of damages caused by not following
this operating manual, the warranty rights
will expire! We exclude liability for any
consequential damages!
- We exclude liability for property or
!
- In these cases any guarantee rights will expire.
Due to safety and admission reasons (CE) it is not allowed to arbitrarily reconstruct
and/or change the solar pump kit.
Therefore, please keep to the operating manual.
The accident prevention rules of the association of the industrial trade cooperative
association for electric plants and working material are to be considered in industrial
environments
personal damages caused by inappropriate
handling or not following the safety instructions.
3. Intended Use
- The accumulator station may be used in the esotec pump systems Palermo LED.
- The accumulator station is installed between pump and solar module.
- The pump may be switched-on or –off via a switch.
- The built-in accumulator is protected against deep discharge or overload.
- Two LEDs inform the user about the state of charge of the accumulator.
- The system is plug-in-ready and set within minutes.
Note: The accumulator station must not be set up in the blazing sun or in water.
3.1 Mode of operation:
The accumulator station is interconnected between the solar module and the pond
pump.
With optimal solar radiation, the solar module generates more electric energy than
required by the pond pump. The excess energy is then stored in the accumulator and
will be available to the pond pump when it is shady or dark outside.
The pump is switched-on and the green LED „Stystem“ is illuminated if the accumulator voltage is within its operative range. The pump is switched-off and the red LED
„System“ is illuminated if the accumulator is discharged.
The electronics protects the accumulator against deep discharge or overload.
The charge of the accumulator has always priority.
3.2 Operational Behavior:
In the morning, the discharged battery is charged via the solar module. A charging
timer is started as soon as the battery reaches the voltage of 6.2 V and the battery is
charged fully for another 120 minutes. The LED „System“ ashes every 10 seconds
for 2 times red/green. The output is switched on after this time.
In the evening and with decreasing solar radiation, the pump is increasingly supplied with energy by the accumulator. The system will run until the accumulator
has reached its deep discharge threshold (approx. 5,7 V). The pump and the LED
illumination are switched-off automatically and the red LED „System“ is illuminated.
Then, the accumulator is again charged via the solar module the following morning.
This process may take several hours depending in the solar radiation.
The output voltage of the accumulator station may be adjusted via the controller on
the front side. In times with little sunshine, the controller should be adjusted to the
lowest setting.
7. Put the pump into the pond. Please pay attention to the operating manual of the
pump. It contains important notes regarding the start of operation and maintenance.
8. Put the switch „System“ into the position
„ON“. The battery is discharged if the LED
„System“ is illuminated red. Here, please
pay attention to item (3.2). The output is
switched on and the pump is working if the
LED „System“ is illuminated green.
9. The operating voltage of the pump may be
adjusted to 6 V and 8 V. This is done by
means of a controller. Thus, the power of
the pump is adjustable.
Note: Full power should only be chosen
in high summer. The increased power
consumption leads to a reduction of the
maximum operating time of the accumulator.
Note: The plugs and sockets are protected against inverse polarity. Do not apply
force when inserting the plugs. The glass of the solar module is fragile.
Note: The accumulator station must not be set up in the blazing sun.
5. Operating mode of the accumulator station
5.1 Settings via System switch:
1. Position ON : If the built-in accumulator has
the correspondingly high voltage, the pump
starts to run (LED „System“ is illuminated
green) and the accumulator is charged if
excess energy is available. In case the capacity of the solar module should now be reduced
due to clouds, the pump will be supplied with
energy via the accumulator. In the evening,
the pump will still run for some time until the
control deactivates the accumulator (LED is
red illuminated).
2. Position 0 (OFF) : The pump is switched-off . The accumulator is charged via the
solar module and the electric energy is stored. The LED is not illuminated.
Note: In case you would like to achieve a particularly long operating time in the
evening, then set the switch to its “OFF” position during the day and to its “ON”
position in the evening.
Note: In high summer and in case of a high solar radiation, we recommend leaving
the switch in its „ON“ position. Thus, you will achieve the maximum possible runtime
of the pump.
5.2 Timer operation:
Via the pressure switch “Timer On”, “Timer
Off” it is possible to operate the battery station
by means of the timer function. The function is
active when the switch is pressed. The green
LED „Timer“ is illuminated while the output is
switched on and it is ashing during the waiting
period. The pump is working for approx. 10
minutes every hour.
Note: This function shall particularly be used
in case of weak solar radiation or for a longer
overshoot time at darkness.
6. Exchange of the accumulator
We recommend to exchange the accumulator approx. every 2 years. A new identical
in construction accumulator is available from the manufacturer or dealer.
Proceed as follows if you want to exchange the accumulator:
1. Set the switch „System“ into the position „OFF“ and unplug the module and the
water pump from the accumulator station.
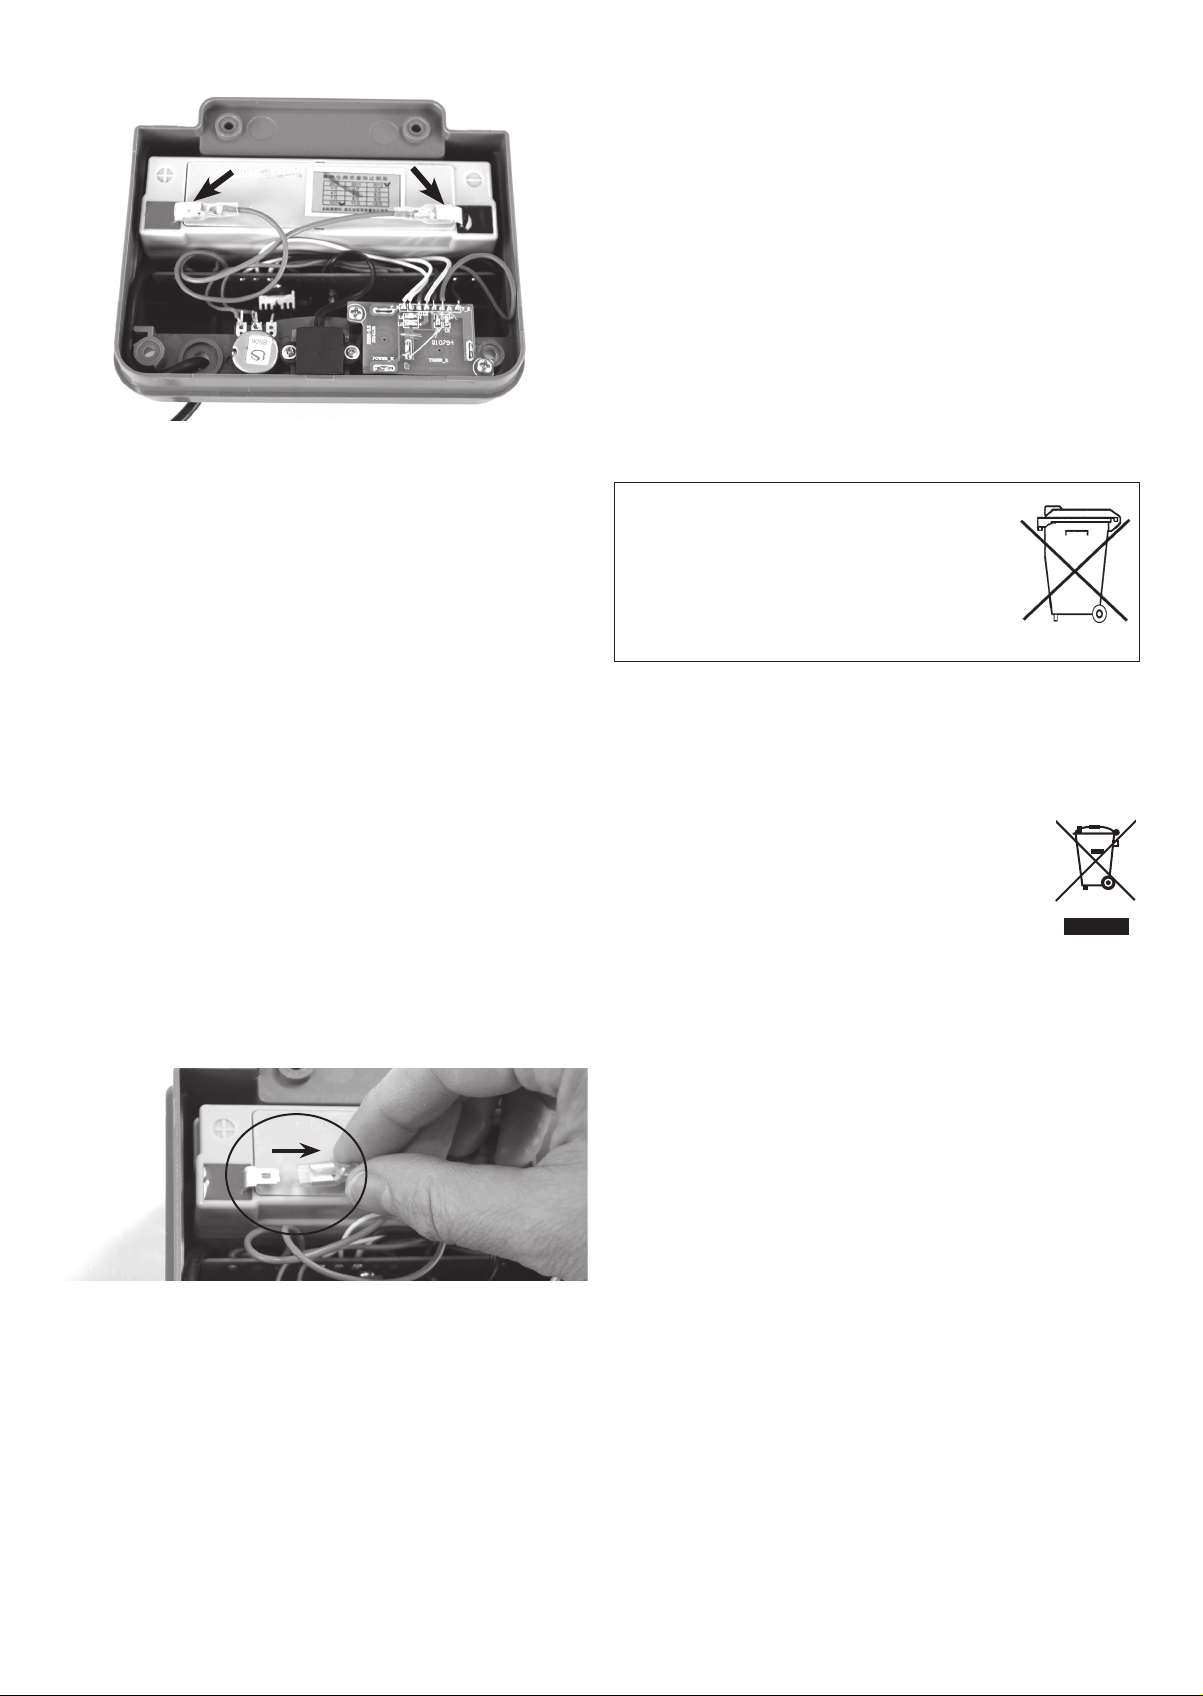
2. Turn the accumulator station upside down and loosen the screws on the bottom
frame of the accumulator box, turn it back and carefully remove the cover.
3. Unplug both cables from the accumulator (see picture above). Please memorize
the color of the cables for the positive pole (brown) and negative pole (blue).
4. Remove the accumulator from the housing and insert the new identical in construction accumulator.
5. Reattach the cable lugs on the poles of the accumulator with correct polarity.
Cable color for the positive pole (brown) and negative pole (blue).
6. Close the housing in reverse order.
Note: Please only use an identical in construction accumulator with identical voltage
and capacity.
Note: The old accumulator has to be disposed of in an environmentally sound way.
For this purpose, please contact you local authorities, public collection points or your
dealer.
7. Storing throughout the winter
Completely charge the rechargeable battery in the battery box. Use a sunny day to
do this and disconnect the battery box.
After charging disconnect the cable from one terminal of the rechargeable battery.
To do this open the housing as described in Section 6. The battery box should only
be stored throughout the winter in a fully charged condition and in a frost free room.
The LED is not illuminated green. In spite of solar radiation when switching-off
and on again of the switch „System“ On/Off , the pump starts to work and the
green LED is illuminated.
1. The accumulator has not yet reached its restart threshold. The electronics is reset
after the deactivation and activation of the system and the system starts to work
without waiting for the restart threshold. This is a normal process and does not
indicate any defect.
9. Technical data:
- Accumulator: Pb 6 V/ 3,2 Ah
- Overload protection: approx. 6,7 V
- Deep discharge protection: approx. 5,7 V
- Voltage threshold for restart: approx. 6,2 V
- Output voltage: 6 - 8 V DC (adjustable)
- Max. power at the output: 3 W
- Max. connectable module
capacity (input): 5 Wp
- Protection class: IP 44
- Protection: III
WARNING of trip hazard! Lay the connection cable so that it does not constitute a
trip hazard!
Battery take-back
- Batteries must not be discarded into domestic waste.
- The consumer is legally required to return batteries after
use, e.g. to public collecting centers or to battery distributors.
- Contaminant-containing batteries are labeled with the sign
“crossed-out trashcan“ and one of the chemical symbols.
Used batteries should be disposed environmentally friendly
and should not be discarded into domestic waste. Your
dealer is legally required to take back old batteries.
Manufacturer:
esotec GmbH - Gewerbegebiet Weberschlag 9 - D-92729 Weiherhammer
Tel.-Nr: +49 9605-92206-0 Fax.-Nr: +49 9605-92206-10
Internet: www.esotec.de e-mail: info@esotec.de
Pb
Disposal:
Dear Customer,
Please help us to avoid any litter. Should you decide that you wish
to part company with this article, please bear in mind that many of
its components are made from valuable raw materials and can be
recycled.
Do not therefore dispose of the article in your domestic rubbish
bins, but instead please take it to your recycling point for electrical
equipment.
Many thanks for your cooperation.
Spare parts:
- Extender cable for pump or solar module: Item No.: 101740
- Battery 6 V/ 3,2 Ah: Item-No: 901036
8. Troubleshooting
The LED „System“ is not illuminated green in spite of solar radiation.
1. The accumulator has not yet been charged sufficiently and the restart threshold is
not reached. The charging process may take several hours in case of insufficient
solar radiation.
2. Accumulator is exhausted! The accumulator should be exchanged approx. every
2 years. Please see item 7 of this instruction.
Copyright, esotec GmbH
 Loading...