

Page 1
Page 2
SF-710/510/310 User's Guide
Introduction
Introduction
Thank you very much for purchasing this GPS Sports Monitor "WristableGPS".
To use the device correctly, make sure you read the User's Guide along with the supplied Quick Guide.
Keep the supplied Quick Guide handy to help you resolve any problems.
The illustrations and screens shown in the Quick Guide/User's Guide are for the SF-710.
By using a built-in GPS sensor and stride sensor, this device can measure running distance, pace, elapsed time, altitude,
and calories burnt. You can also upload recorded data to a dedicated Web site allowing you to look back over previous
workouts. You can plan more effectively for a more enjoyable running experience.
Descriptions in the User's Guide
Important:
c
Note:
Menu Name
A/B/C/D
U
Trademarks
EPSON and EXCEED YOUR VISION are registered trademarks of the Seiko Epson Corporation.
Microsoft and Windows are registered trademarks of the Microsoft Corporation in the United States of America and
other countries.
The Bluetooth
marks by the Seiko Epson Corporation is under license.
Other product names are the trademarks or registered trademarks of their respective companies.
Caution:
❏ Unapproved copying of part or all of this guide is strictly forbidden.
word mark and logos are the registered trademarks owned by Bluetooth SIG, Inc. and any use of such
®
Indicates things you must or must not do. Ignoring these instructions or
mishandling this device could cause malfunction or operational problems
to the device.
Indicates additional explanations and related information.
Indicates menu items displayed on the screen of the device.
Indicates the device buttons.
Indicates related pages. Click the link in blue text to display the related
page.
❏ The content of this guide is subject to change without prior notice.
❏ Although every effort has been made to ensure the accuracy of this guide, contact us if you have any questions or
notice any errors in descriptions in the content of this guide.
❏ Despite the preceding clause, we cannot accept any responsibility for mishandling due to errors in this guide.
❏ We cannot accept any responsibility for malfunctions and so on that occur due to ignoring the content of this
guide, the device being handled inappropriately, repairs or modifications performed by a third party that is not
our company or appointed by our company.
2
Page 3
SF-710/510/310 User's Guide
Features
Chronograph function
Allows you to measure running data such as distance and time.
You can measure split and lap times, as well as using the GPS signal to measure distance
and pace.
U “Measuring Time, Distance, and Speed (Chronograph Function)” on page 37
Split Time: Elapsed time from the start
Lap time: Time taken for each lap
You can use the history screen to check recorded measurement data.
U “Checking Measurement Data” on page 62
Introduction
Interval function
Goal function (timed race)
Allows you to perform interval training.
Interval training:
Training method in which you repeat sets of light and hard exercise to increase your
athletic ability. An exercise menu is created using combinations of hard (sprint) and
light (rest) exercise. An alarm sounds when it is time to change between sprinting and
resting.
U “Setting a Time and Distance for Hard and Light Workouts(Interval Function)” on
page 42
Allows you to set a time as your goal and measure the time taken until that goal is
reached.
You can exercise while checking the elapsed time. You can also calculate the estimated
distance until the goal is reached.
U “Measure until the time or distance set in advance is reached (Goal function)” on
page 50
You can use the history screen to check recorded measurement data.
U “Checking Measurement Data” on page 62
3
Page 4

SF-710/510/310 User's Guide
Goal function (distance race)
Allows you to set a distance as your goal and measure the time taken until that goal is
reached.
You can exercise while checking the distance. You can also calculate the estimated time
until the goal is reached.
U “Measure until the time or distance set in advance is reached (Goal function)” on
page 50
You can use the history screen to check recorded measurement data.
U “Checking Measurement Data” on page 62
Mes. Settings
Allows you to change the measurement settings.
❏ Automatically records laps when a time or distance set in advance has been
Introduction
reached (AT Lap function)
U “Recording Laps Automatically (AT Lap Function)” on page 55
❏ Automatically stops measuring when you stop running, and resumes when you
continue running (AT Pause function)
U “Automatically Start/Stop Measuring (AT Pause Function)” on page 57
❏ Sets and measures the target time for one kilometer (Target Pace function)
U “Setting a Pace and Measuring (Target Pace Function)” on page 59
❏ Monitors heart rate with the HR Monitor (Heart rate function)
U “Measuring Heart Rate” on page 70
❏ You can change the items and layout of the measurement screen display (Screen
settings function)
U “Screen” on page 95
❏ Tap to display a set function (Tap function)
U “Tap” on page 21
4
Page 5

SF-710/510/310 User's Guide
Settings
Allows you to change the settings for the device.
❏ Communicates with external devices (Communication function)
❏ Inverts the screen's display (Invert function)
❏ Adjusts the screen's contrast (Adjust contrast function)
❏ Turns on the light automatically when the screen changes (Auto Light function)
❏ Sets an alarm (Alarm function)
❏ Turns off operation tones (Operation Tones function)
Introduction
U “Comm. Settings” on page 92
U “Sys. Settings” on page 93
U “Sys. Settings” on page 93
U “Sys. Settings” on page 93
U “Sys. Settings” on page 93
Other features
U “Sys. Settings” on page 93
❏ Resets configuration information in the device's memory (Initialize function)
U “Sys. Settings” on page 93
❏ Supports the Quasi-Zenith Satellite System (QZSS).
U “Supports the Quasi-Zenith Satellite System” on page 31
❏ You can measure pitch and stride using the built-in stride sensor (SF-710/SF-510
only).
U “Educating Your Stride Sensor” on page 32
❏ You can skip GPS positioning if it is taking too long.
U “Skipping GPS positioning” on page 29
❏ You can manage recorded data using the dedicated Web application "NeoRun".
U “Data Management Using the Web Application (NeoRun)” on page 74
5
Page 6

SF-710/510/310 User's Guide
Contents
Contents
Introduction
Features................................. 3
Using this Device Safely
Symbols in this Manual...................... 8
Notes on Usage............................ 9
About the Device and Accessories............ 9
About the Cradle....................... 10
Optional HR Monitor.................... 11
Notes on Storage.......................... 11
Notes on Electromagnetic Waves.............. 11
Preparing and Basic Operations
Checking the Items Provided................. 14
Basic Operations.......................... 15
Changing screens....................... 15
Function of each button.................. 17
Tap................................. 21
Charging............................... 22
Before Use............................ 22
Charging............................. 23
Initial Settings............................ 25
About the Battery....................... 27
Specifying a GPS (GPS Positioning)............ 28
Measuring Function for the Device.......... 28
GPS Positioning........................ 29
Making Precise Measurements.............. 31
Supports the Quasi-Zenith Satellite System..... 31
Educating Your Stride Sensor................ 32
About the Stride Sensor................... 32
Educating the Stride Sensor................ 32
Measurable items......................... 33
Measure
Measuring Time, Distance, and Speed
(Chronograph Function).................... 37
What is the chronograph function?.......... 37
Measuring............................ 38
Screen Display......................... 40
Setting a Time and Distance for Hard and Light
Workouts(Interval Function)................. 42
What is the Interval Function?.............. 42
Setting Interval Conditions and Measuring. . . . . 43
Loading Interval Conditions that have Already
been Set.............................. 47
Screen Display......................... 49
Measure until the time or distance set in advance
is reached (Goal function)................... 50
What is the goal function?................. 50
Measuring by Setting the Time or Distance. . . . 51
Screen Display......................... 54
Recording Laps Automatically (AT Lap
Function)............................... 55
Automatically Start/Stop Measuring (AT Pause
Function)............................... 57
Setting a Pace and Measuring (Target Pace
Function)............................... 59
Checking Measurement Data (History
Function)
Checking Measurement Data................. 62
Measurement Data that can be Checked in
History............................... 62
Measuring Heart Rate (HR Monitor)
Preparing to Measure Heart Rate.............. 65
Preparing the HR Monitor................. 65
Wearing the HR Monitor................. 65
Registering the HR Monitor to the Device. . . . . 66
Enabling the HR Monitor................. 68
Measuring Heart Rate...................... 70
Checking the Communication Status with the
HR Monitor........................... 70
Displaying the Measured Heart Rate Screen. . . . 70
Replacing the Battery for the HR Monitor. . . . . . . 72
Data Management Using the Web
Application (NeoRun)
What is the Web Application (NeoRun)?. . . . . . . . 75
Installing the NR Uploader.................. 77
Creating an Account (When Using for the First
Time).................................. 78
Uploading Measurement Data................ 80
Checking Uploaded Measurement Data......... 82
Settings
Making Settings.......................... 86
6
Page 7

SF-710/510/310 User's Guide
Contents
Mes. Settings............................. 87
Changing the Mes. Settings................ 87
Mes. Settings Table...................... 89
Settings................................. 91
Changing the Settings.................... 91
Settings Table.......................... 92
Screen................................. 95
Screen Settings......................... 95
Screen Pattern Table..................... 96
Measurement Display Items Table........... 98
Changing the Measurement Screen......... 101
Changing the Lap...................... 106
Setting Examples....................... 108
Maintenance
Performing Maintenance................... 110
Performing After Care................... 110
About the strap........................ 110
HR Monitor Maintenance................ 110
Replacing the Battery...................... 111
About the Device's Built-in Rechargeable
Battery.............................. 111
About the HR Monitor Battery............. 111
Updating the Firmware.................... 112
Checking the Firmware Version............ 112
Updating the Firmware.................. 112
Troubleshooting
Caution:............................... 114
Problem Solving......................... 115
Resetting the System...................... 118
Contacting us About this Product............ 119
After Service............................ 120
Appendix
Understanding the Icons................... 122
Product Specifications..................... 123
Device Specifications.................... 123
Cradle specifications.................... 124
Option Specifications................... 124
Glossary............................... 125
Index
7
Page 8
SF-710/510/310 User's Guide
Using this Device Safely
Using this Device Safely
To use this device safely, make sure you read the user's guides before use (the supplied Quick Guide and this User's
Guide).
If you do not follow the content of the user's guides, a malfunction or accident could occur.
❏ Keep the user's guides (supplied Quick Guide and this User's Guide) handy to help you resolve any problems.
This device is for use in Japan only.
❏
❏ This is not a medical device. Use for exercising only.
Symbols in this Manual
This User's Guide uses the following symbols to prevent injury to the user or to others, or damage to property when
using this device, as well as preventing dangerous usage. Make sure you understand these symbols before reading the
guide.
Warning:
!
Ignoring these instructions and mishandling this device could cause serious injury or death.
Caution:
!
Ignoring these instructions and mishandling this device could cause injury or damage to property.
This symbol indicates operations (instructions and actions) you must perform.
This symbol indicates forbidden actions.
8
Page 9
SF-710/510/310 User's Guide
Using this Device Safely
Notes on Usage
About the Device and Accessories
Exercise according to your own physical condition. It is dangerous to exercise suddenly or
excessively. If you feel nauseous or if your physical condition alters while exercising, stop
exercising and contact a doctor.
Do not keep your eyes on the device while exercising; otherwise you could fall or cause a traffic
accident. Pay close attention to your surroundings while using the device.
Do not use while scuba diving.
Warning
This device is made using precision parts and electronic components. Do not use or store in the
following locations; otherwise an electric shock, fire, problem, or malfunction could occur.
❏ Locations subject to large changes in temperature and humidity
❏ Near volatile substances
❏ Sooty or dusty places
❏ Near a fire
❏ Locations close to powerful magnetic devices (near speakers and so on)
Do not disassemble or perform repairs yourself; otherwi se an e lectr ic sho ck or a n accident could
occur.
Do not leave this device in reach of children.
Caution
If you suffer from any allergies or rashes when wearing the device, stop using it immediately and
contact a medical specialist such as a dermatologist.
The device is water resistant at 5 barometric pressures. Although you can use the device for
swimming and so on, do not perform button operations in water or when it is wet. This may effect
the quality of the waterproofing.
Do not directly apply high pressure water from a faucet. Water pressure from a faucet is high and
could affect the quality of the waterproofing.
Do not use in the bath or in a sauna. Steam and materials in soap or hot springs could affect the
quality of the waterproofing or cause rust.
9
Page 10
SF-710/510/310 User's Guide
About the Cradle
Do not use a damaged cradle; otherwise a problem or fire could occur. If it is damaged, contact a
repair center.
Do not use them if you notice any abnormalities such as smoke, strange odors, or noises;
otherwise a fire could occur.
If any abnormalities occur, disconnect the cable from the cradle immediately, and contact a repair
center.
Do not use if any foreign substances or liquids such as water get inside the device; otherwise an
electric shock or fire could occur. Disconnect the cable from the cradle immediately, and contact
a repair center.
Using this Device Safely
Warning
Do not use the cable for the cradle if any foreign substances such as dust are stuck to the
connector; otherwise a fire could occur.
Do not use the cradle to charge any other devices. Only use the cradle provided to charge the
device; otherwise a problem, electric shock, or fire could occur.
10
Page 11
SF-710/510/310 User's Guide
Optional HR Monitor
If the HR monitor battery is accidentally swallowed, contact your doctor immediately.
Be careful not to injure yourself when replacing the HR monitor battery.
When disposing of the HR monitor battery, follow your local laws and regulations.
When replacing the HR monitor battery, only use the type of battery specified. Also, make sure the
direction of the positive and negative terminals is correct.
Do not place the battery or the HR monitor with a battery installed into a fire.
Using this Device Safely
Warning
Notes on Storage
Caution
Do not place in a location subject to magnetic fields or electromagnetic waves, such as on top of a
television. Otherwise, data may be corrupted or lost.
Do not leave the device unattended in locations where it could come into contact with chemicals,
or in locations where chemical substances are emitted. If gasoline, nail varnish, or any spray-on
liquid such as cosmetics, as well as cleaning liquid, toilet detergent, adhesives, and so on, comes
into contact with the device or the strap, they could cause discoloring or damage.
Notes on Electromagnetic Waves
This device is equipped with Bluetooth® Smart technology. When operating supported HR monitors or smartphones,
this function wirelessly sends and receives heart rate measurement data to the device.
This device has been classified as a low electronic data communication system based on Radio Law. Therefore, this
device does not require a radio station license. The following acts may be punishable by law.
❏ Disassembling or remodeling the device
❏ Removing the verification or certification number for the device
VCCI Class B Information Technology Device
This device is a class B information technology device. This device is designed for home
use, but interference could occur when using in close proximity to radios or television
antennas.
11
Page 12
SF-710/510/310 User's Guide
Using this Device Safely
Certification information
Japan
Frequency
This device uses the frequency bands 2.402 to 2.480 GHz. Other wireless devices may
use the same frequency. Note the following points to avoid wireless interference with
other wireless devices.
Precautions when performing wireless communication
This device operates on the 2.4 GHz band.
This device operates in the same frequency bandwidth as industrial, scientific, and medical devices such as microwave
ovens and mobile object identification (RF-ID) systems (licensed premises radio stations, amateur, and unlicensed
specified low-power radio stations (hereafter "other radio stations")) used in factory production lines.
1. Before using this device, make sure there are no "other radio stations" being used in the vicinity.
2. If this device causes RF interference between the device and "other radio stations", promptly move to a different
location, stop using the device, and contact your local dealer to ask for advice on preventing interference (for example
setting up partitions).
3. In addition, when harmful radio wave interference occurs between the device and "other radio stations", and refer to
"Contacting us about this product" to contact our information center.
U “Contacting us About this Product” on page 119
Warning
If you notice any abnormalities on your skin and so on, stop using the device immediately and
contact a specialist.
In areas in which usage is restricted, such as on airplanes and in hospitals, follow the rules and
regulations provided (such as in-flight announcements).
Do not use the device if you have a surgically implanted medical device such as a cardiac
pacemaker.
Do not bring the device into an operating room, intensive care unit, and so on, and do not use the
device near medical equipment. Radio waves from the device may interfere with electronic
medical equipment causing the equipment to malfunction and cause an accident.
12
Page 13

SF-710/510/310 User's Guide
Preparing and Basic Operations
Preparing and Basic Operations
You need to make the following preparations before use.
U “Checking the Items Provided” on page 14
U “Basic Operations” on page 15
U “Charging” on page 22
U “Initial Settings” on page 25
Once preparations are complete, check the method and important points when performing GPS satellite positioning.
U “Specifying a GPS (GPS Positioning)” on page 28
U “Educating Your Stride Sensor” on page 32
U “Measurable items” on page 33
13
Page 14
SF-710/510/310 User's Guide
Preparing and Basic Operations
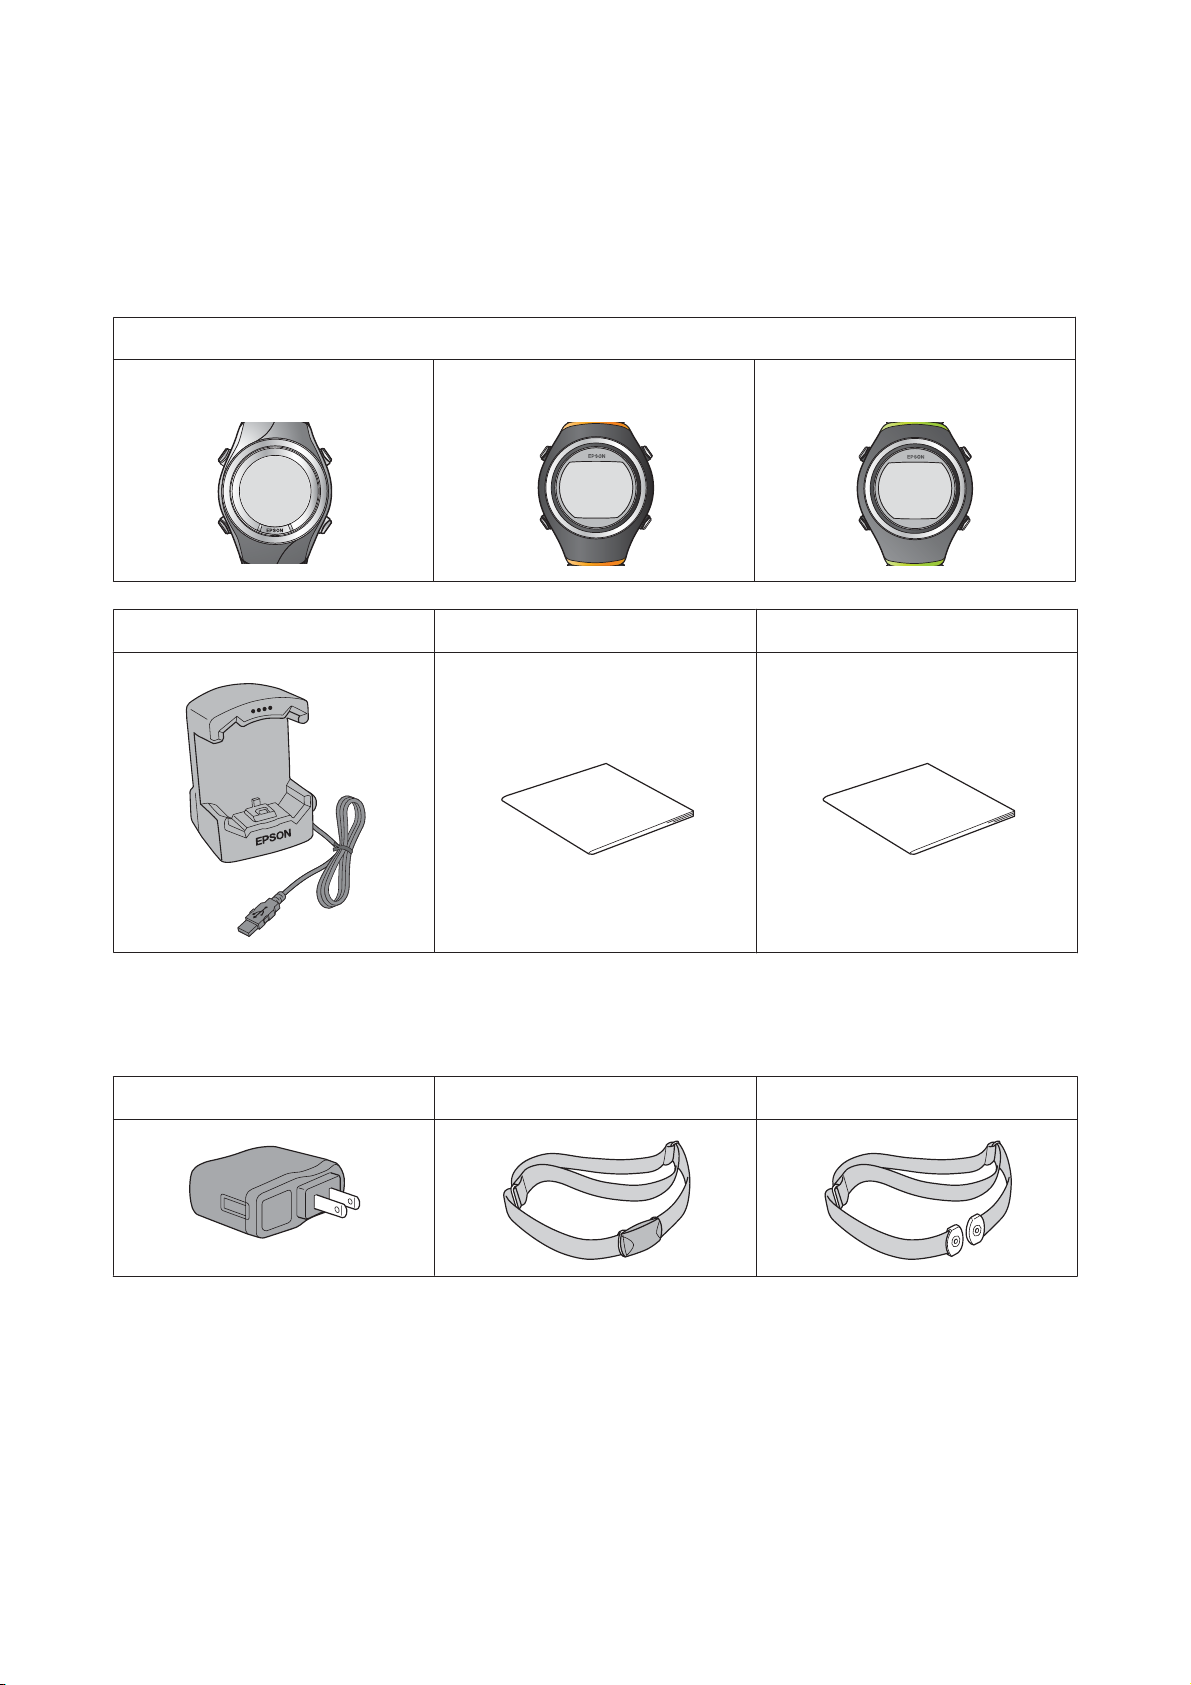
Checking the Items Provided
Make sure you check that all of the following items have been supplied with this product. If there is anything missing,
contact your local dealer.
Main unit (One of the models that you purchased.)
SF-710 SF-510 SF-310
Cradle Quick Guide Warranty
Options
You can purchase the following optional extras. Contact your local dealer for more information.
AC Adapter (Model No.: SFAC01) HR Monitor (Model No.: SFHRM01) HR Belt (Model No.: SSHRST01)
14
Page 15
SF-710/510/310 User's Guide
Preparing and Basic Operations
Basic Operations
Changing screens
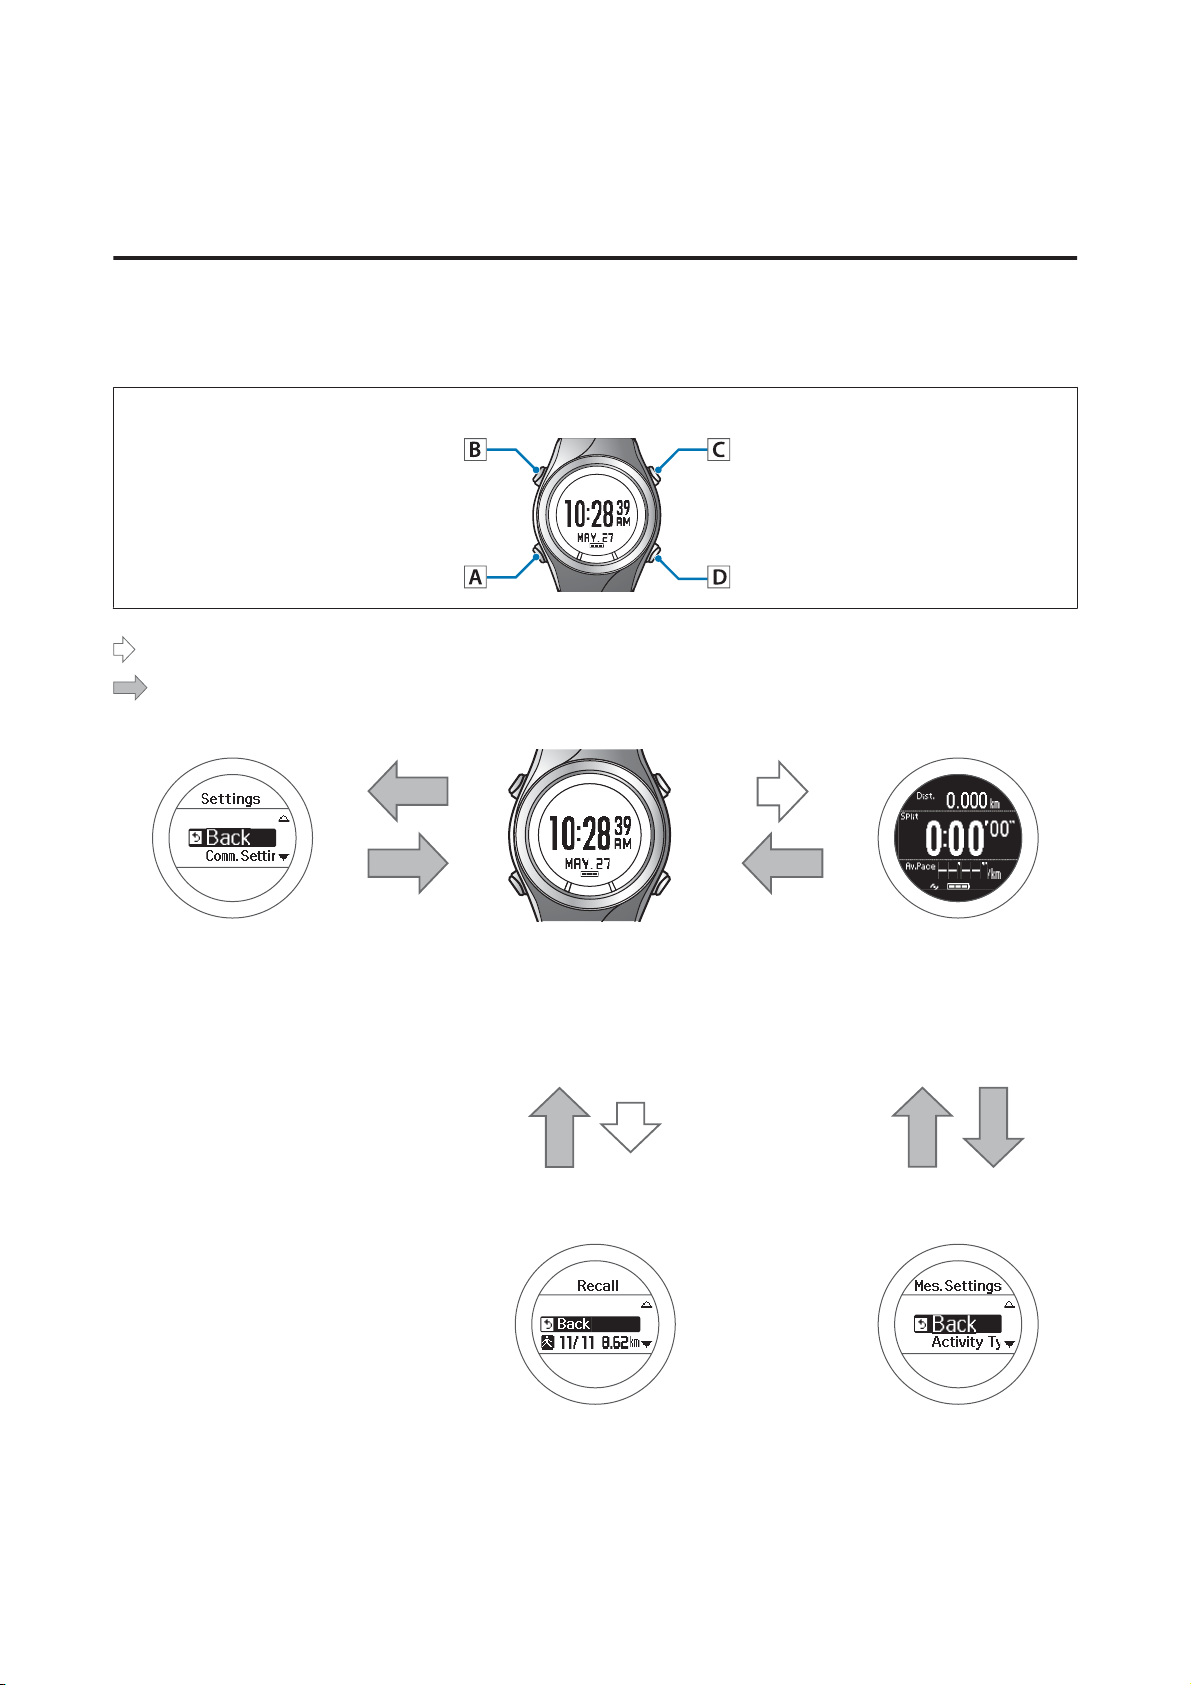
This device is comprised of a Time screen, Measurement screen, Settings screen (Settings menu and Mes. Settings
menu), and History screen, and you can perform operations with the following buttons.
Operation buttons
: Short press
: Long press (two seconds or more)
Settings menu
B
A
U “Setting screen
(Settings menu/Mes.
Settings menu)” on
page 19
See the following pages for information
on making settings for each screen.
Time screen
Measurement screen
C
A/C
U “Time screen” on
page 17
U “Measurement screen”
on page 18
D
A
History screen Mes. Settings menu
A
B
U “Making Settings” on page 86
U “History screen” on
page 20
15
U “Setting screen
(Settings menu/Mes.
Settings menu)” on
page 19
Page 16
SF-710/510/310 User's Guide
Preparing and Basic Operations
Note:
❏ When you leave the device for a while, it enters sleep status and the time display turns off. This is not a malfunction as
the display is restored the next time you move the device. You can also turn off the sleep function.
U “Sys. Settings” on page 93
❏ The time screen is displayed if no operations are made for a specified length of time. The time varies depending on the
screen displayed.
Sys. Settings/User Settings/History Screen: 3 mins.
Measurement Screen (while not measuring): 60 mins.
❏ When three minutes have passed without any operations being performed on the Mes. Settings menu screen, the
measurement screen is displayed.
16
Page 17
SF-710/510/310 User's Guide
Preparing and Basic Operations
Function of each button
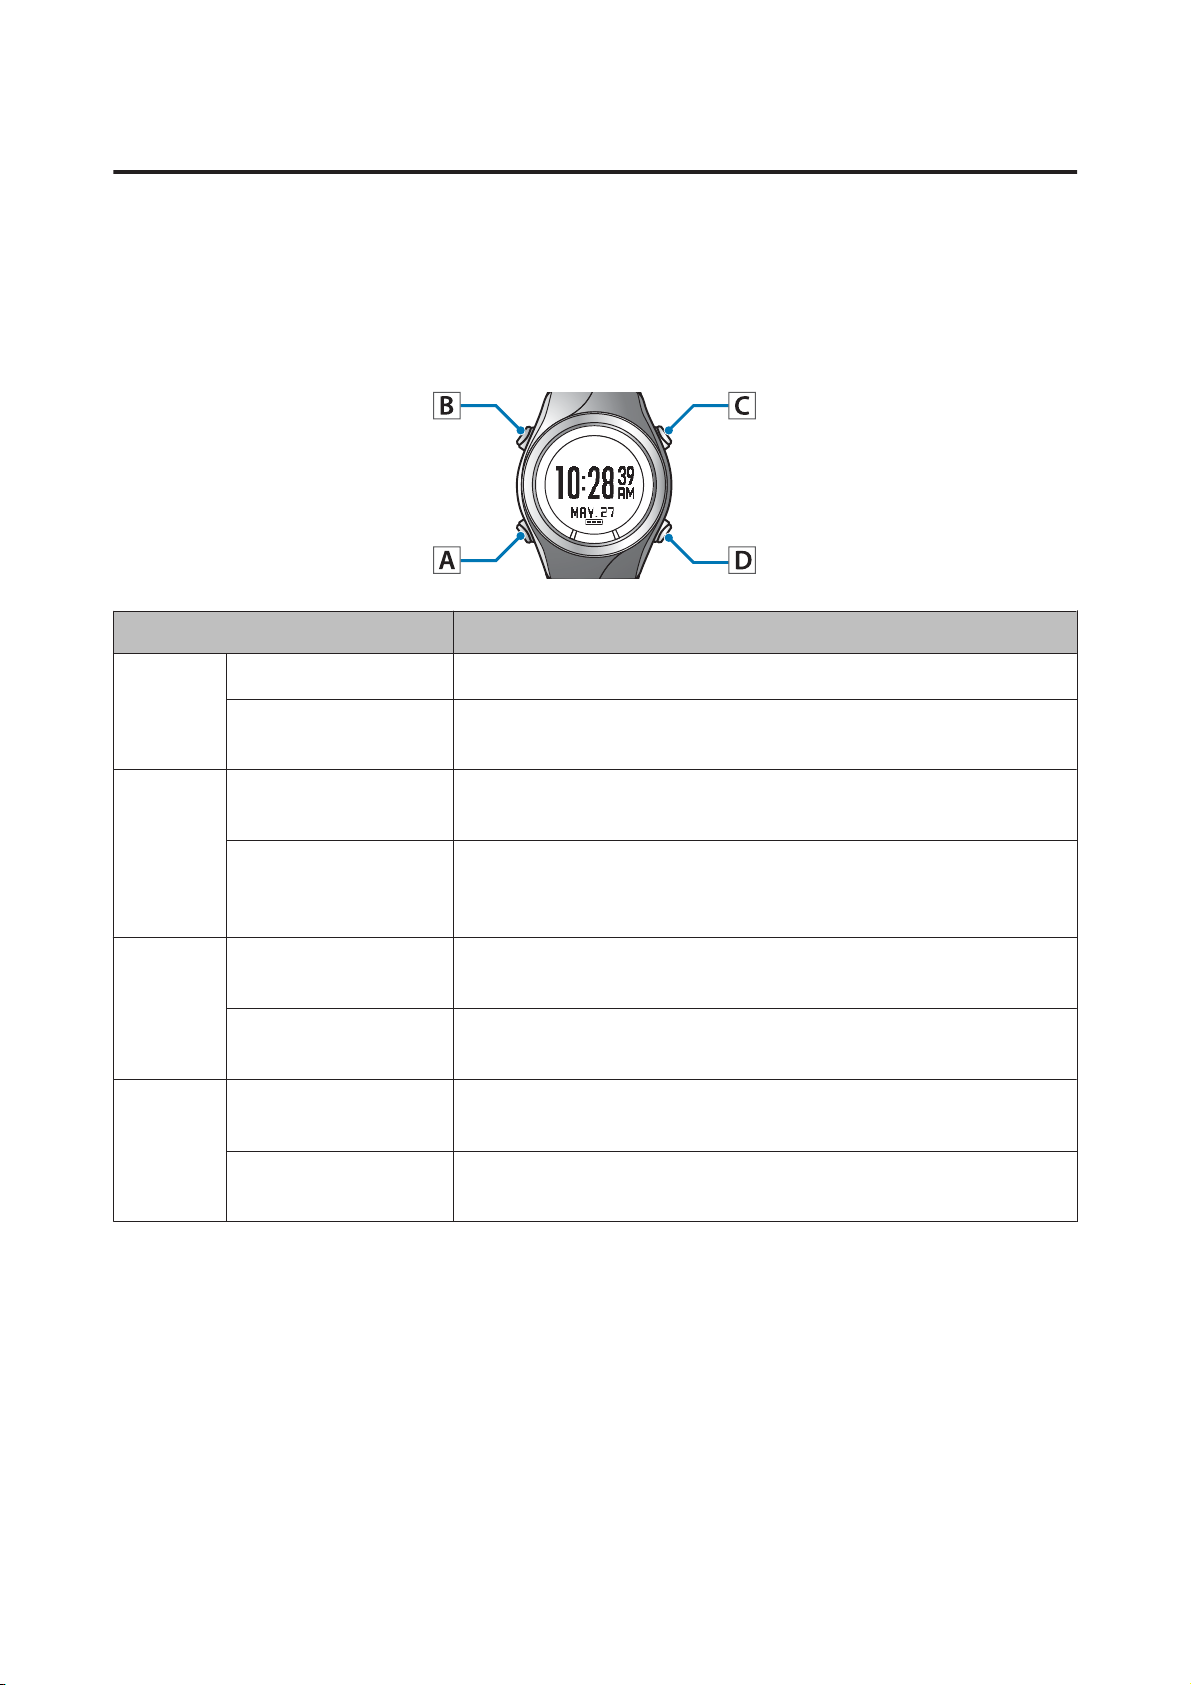
The function for each button changes depending on which screen is displayed.
Time screen
Operation buttons
Button Operation Explanation
Short press -
A
B
C
D
Long press (two
seconds or more)
Short press Turns the light on or off. The light turns on for approximately 10
Long press (two
seconds or more)
Short press Performs GPS positioning, and displays the measurement screen.
Long press (two
seconds or more)
Short press Displays a record of the measurement history (history screen).
Long press (two
seconds or more)
Turns the power on or off.
seconds.
Displays the Settings menu.
U “Setting screen (Settings menu/Mes. Settings menu)” on
page 19
U “Measurement screen” on page 18
Changes to indoor mode (GPS off) (SF-710/SF-510 only).
U “Indoor mode (SF-710/SF-510 only)” on page 30
U “History screen” on page 20
Performs Bluetooth
measurement data.
communication. Use this when uploading
®
17
Page 18
SF-710/510/310 User's Guide
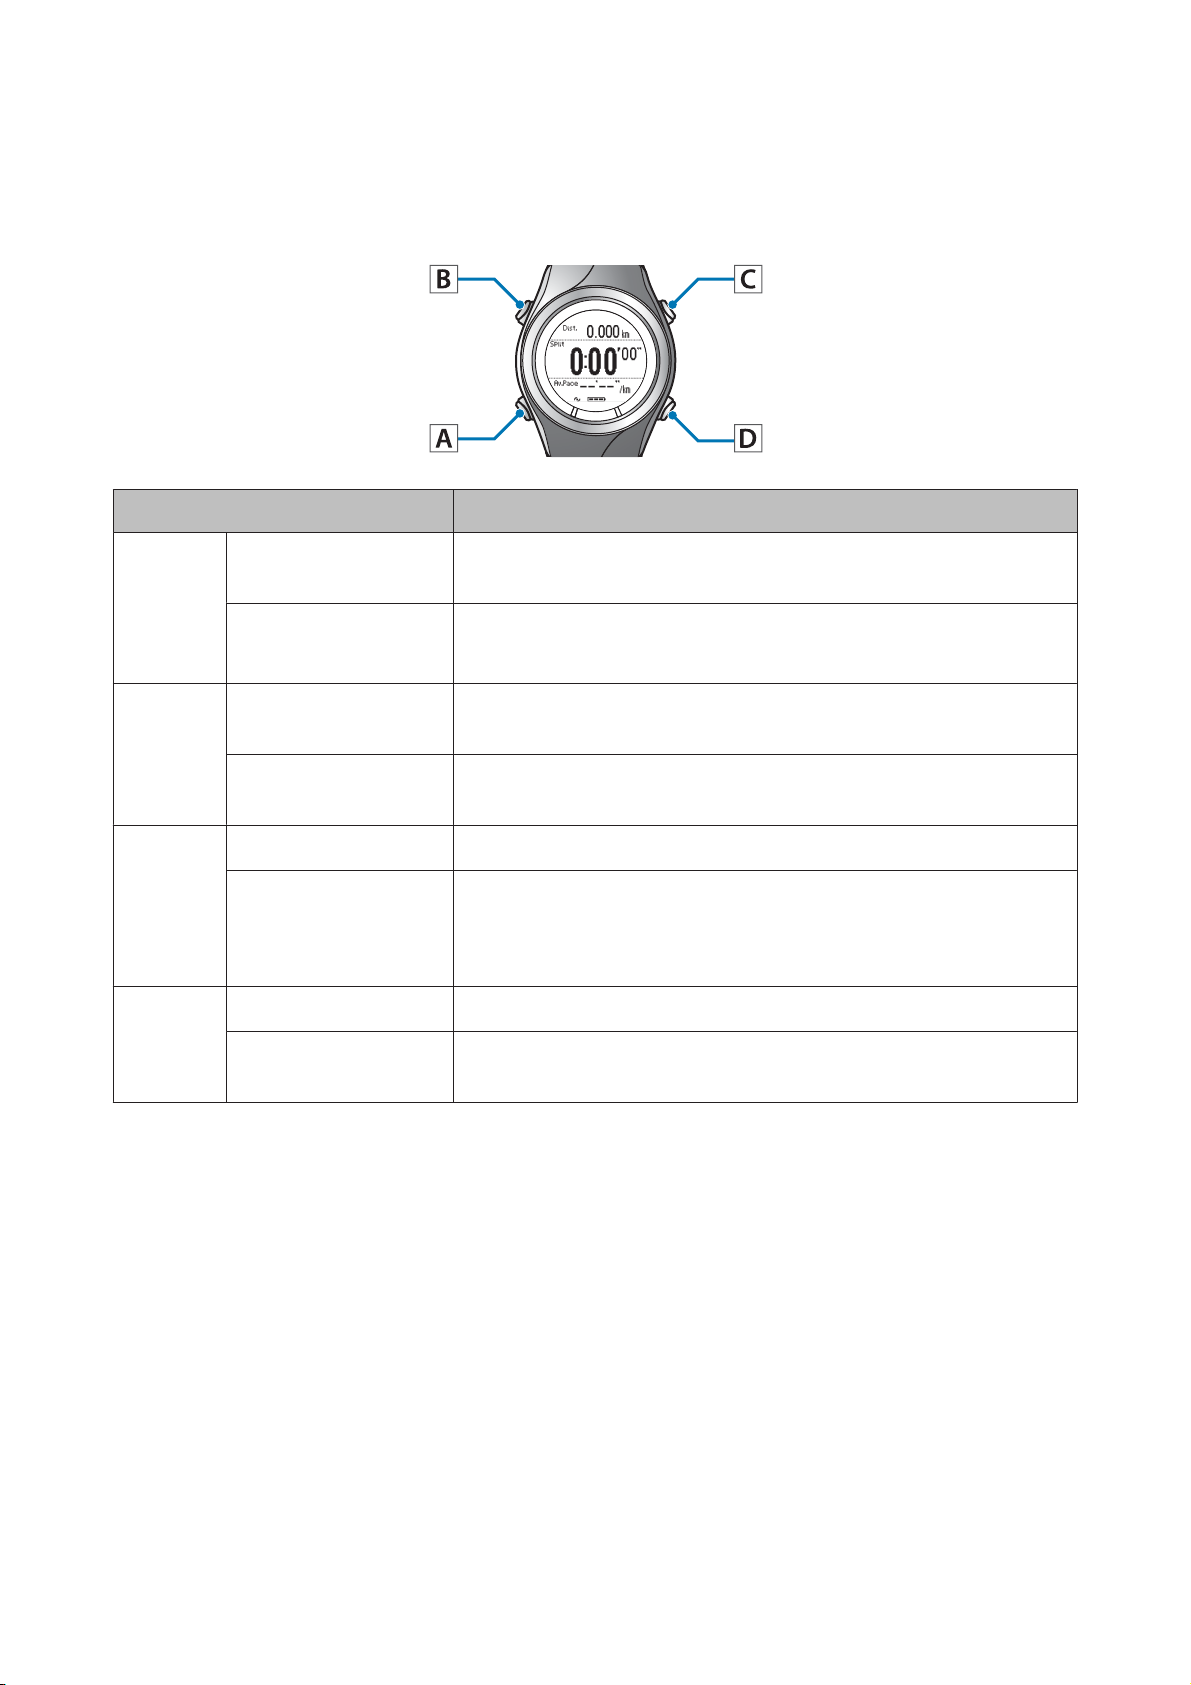
Measurement screen
Operation buttons
Button Operation Explanation
Short press You can display up to four measurement screens and switch the
A
Long press (two
seconds or more)
Preparing and Basic Operations
screens using this button.
Displays the time screen.
Not available while measuring.
Short press Turns the light on or off. The light turns on for approximately 10
seconds.
B
Long press (two
seconds or more)
Short press Starts, stops, or resumes measuring.
C
D
* When you reset the display, it returns to the status before measuring started allowing you to start the next
measurement. Data that has been measured up to that point is stored in the device's memory.
Long press (two
seconds or more)
Short press Records laps while measuring.
Long press (two
seconds or more)
Displays the Mes. Settings menu.
Not available while measuring.
Displays the time screen.
Displays the time screen if you use reset* while measuring is stopped.
Not available while measuring.
Resets* while measuring is stopped.
Not available while resetting measurements.
18
Page 19
SF-710/510/310 User's Guide
Preparing and Basic Operations
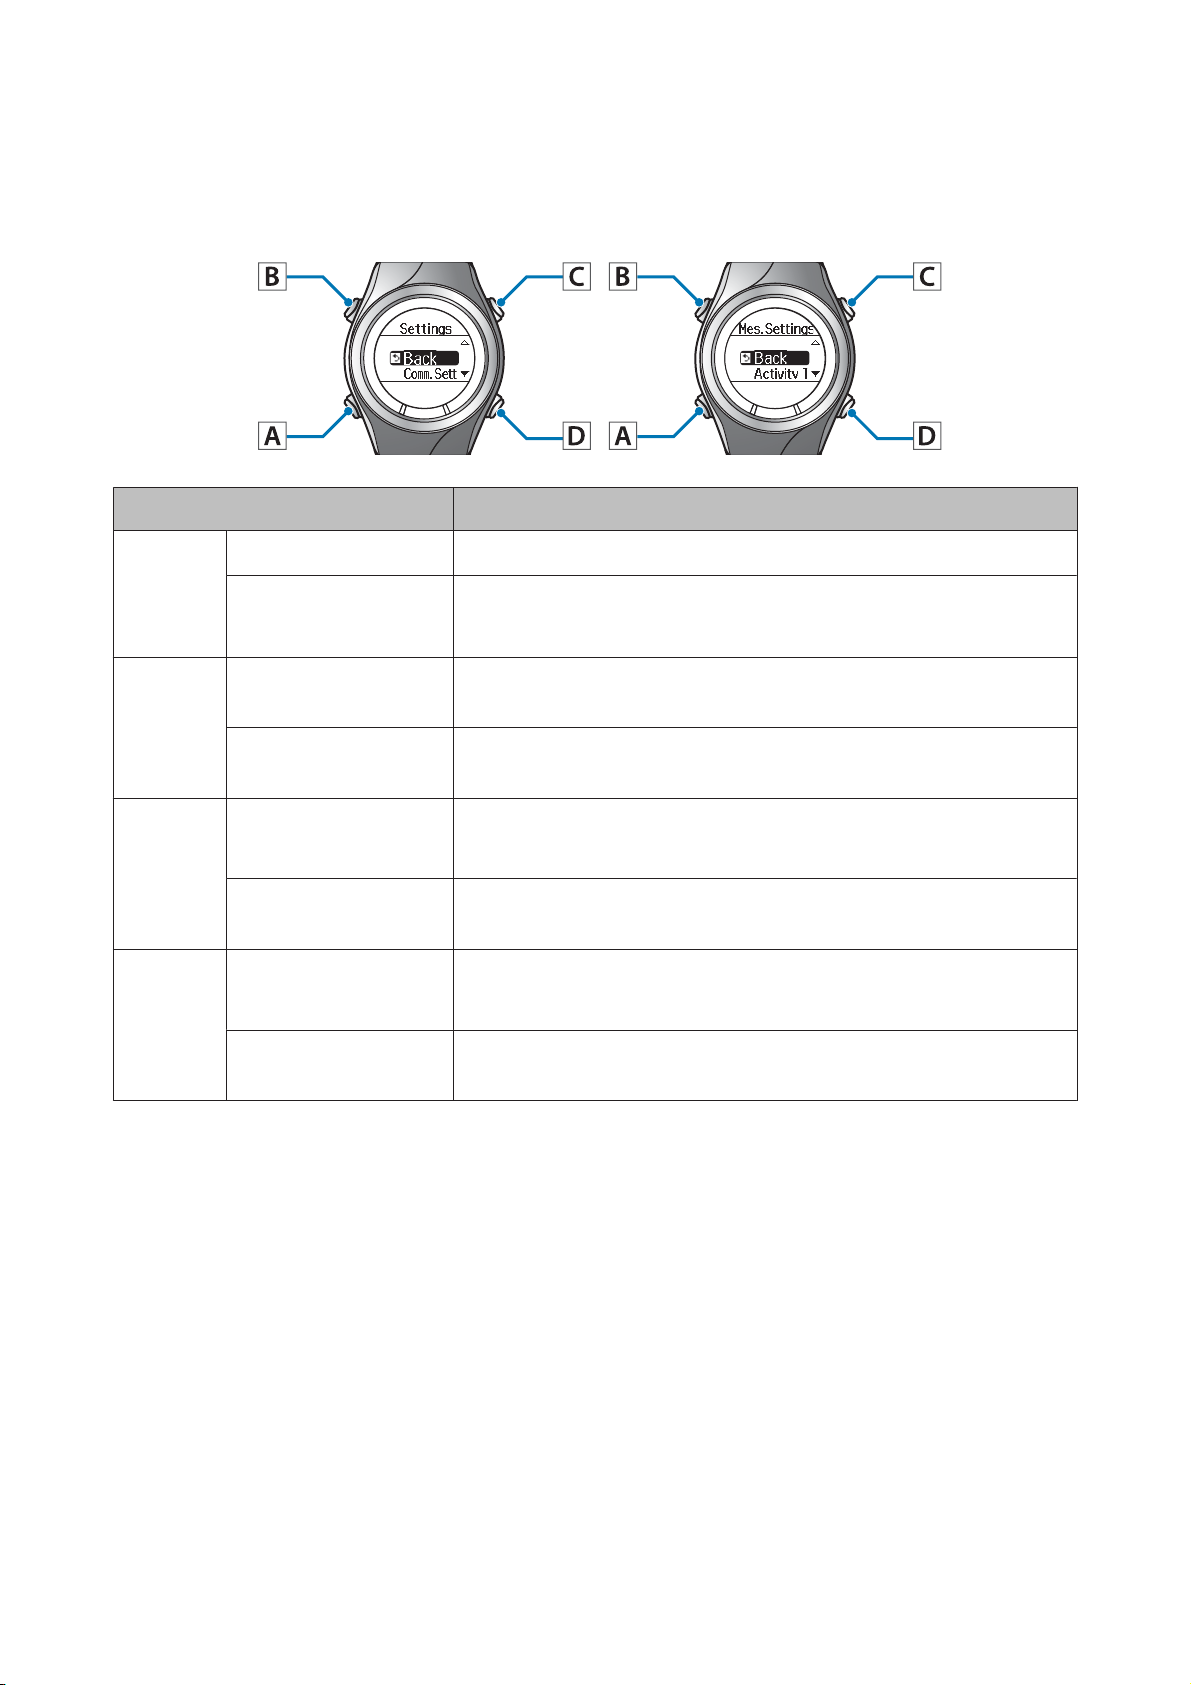
Setting screen (Settings menu/Mes. Settings menu)
Operation buttons
Button Operation Explanation
Short press Confirm a selection.
A
B
C
D
Long press (two
seconds or more)
Short press Turns the light on or off. The light turns on for approximately 10
Long press (two
seconds or more)
Short press
Long press (two
seconds or more)
Short press
Long press (two
seconds or more)
From the Settings menu, the time screen is displayed.
From the Mes. Settings menu, the measurement screen is displayed.
seconds.
-
Selects the upper item.
Increases the value.
Selects the upper item.
Speeds through the values.
Selects the lower item.
Decreases the value.
Selects the lower item.
Speeds through the values.
19
Page 20
SF-710/510/310 User's Guide
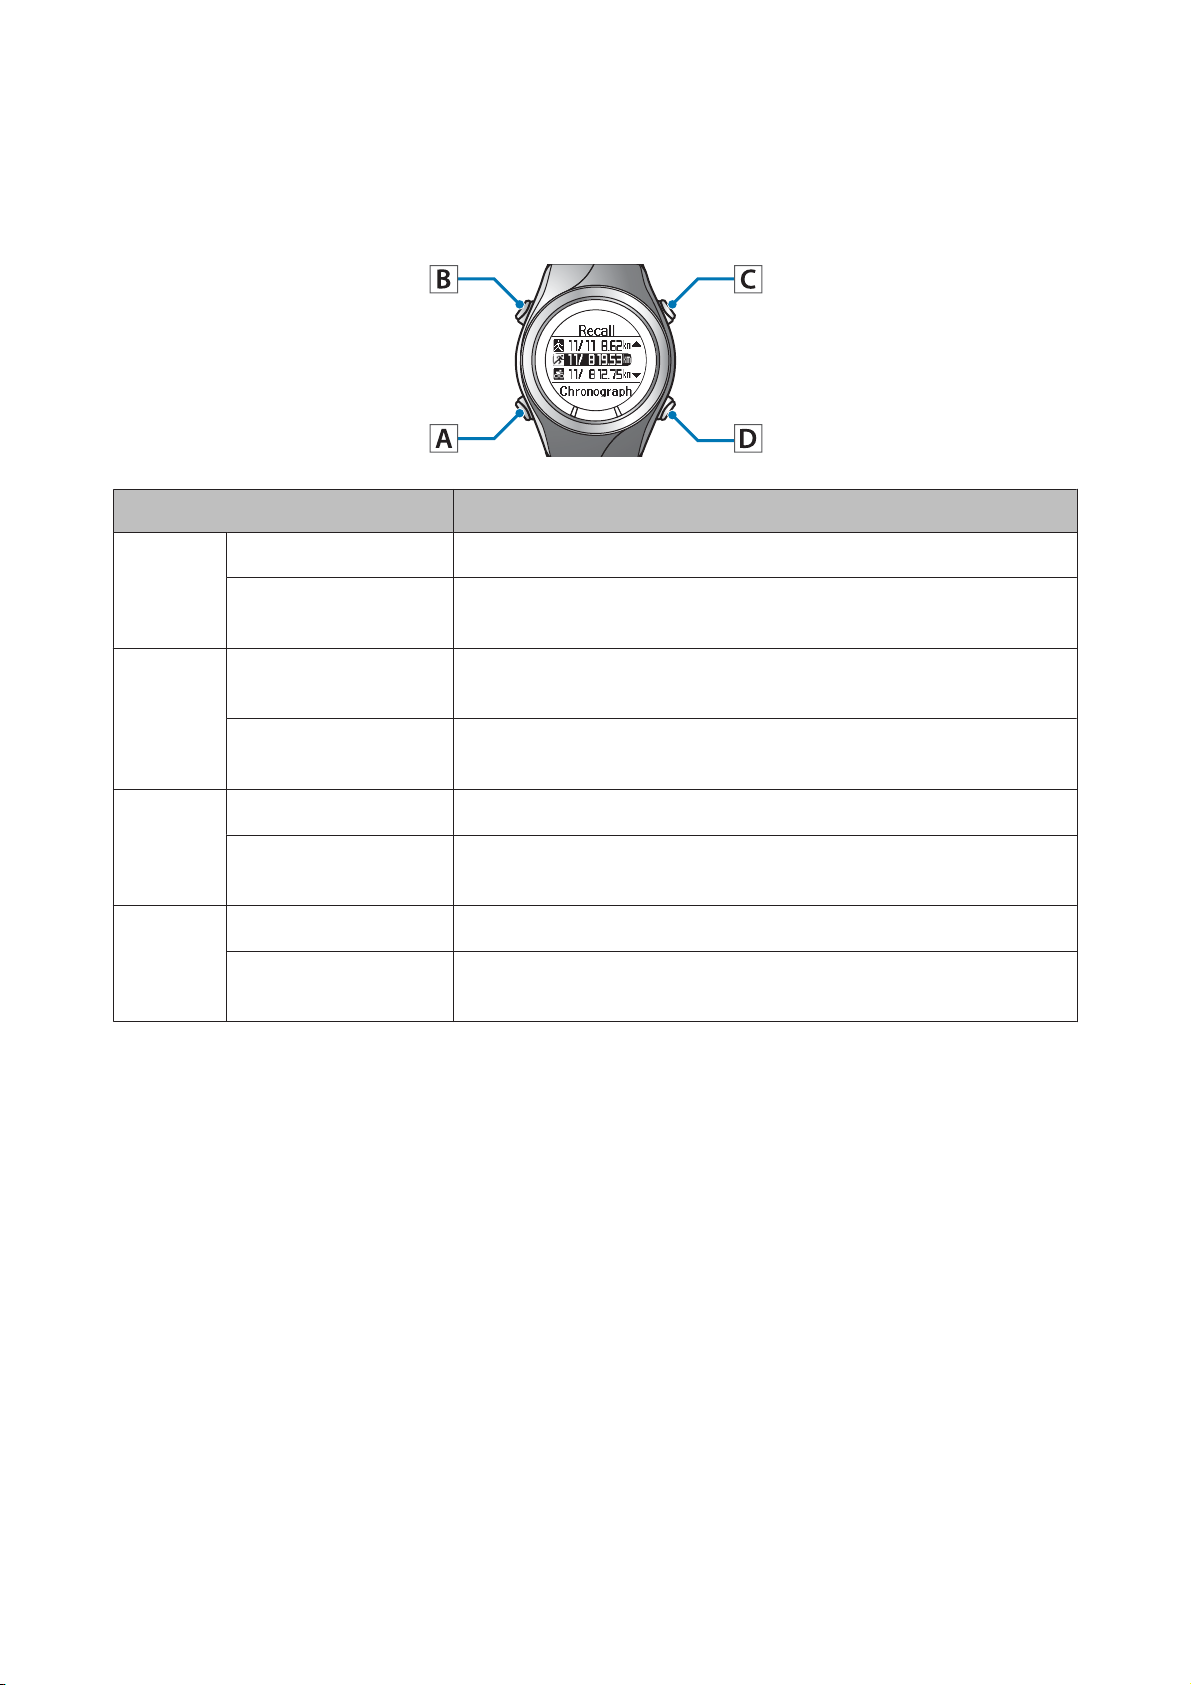
History screen
Operation buttons
Button Operation Explanation
Short press Confirm a selection.
Preparing and Basic Operations
A
B
C
D
Long press (two
seconds or more)
Short press Turns the light on or off. The light turns on for approximately 10
Long press (two
seconds or more)
Short press Selects the upper item.
Long press (two
seconds or more)
Short press Selects the lower item.
Long press (two
seconds or more)
Displays the time screen.
seconds.
-
Selects the upper item.
Selects the lower item.
20
Page 21
SF-710/510/310 User's Guide
Preparing and Basic Operations
Tap
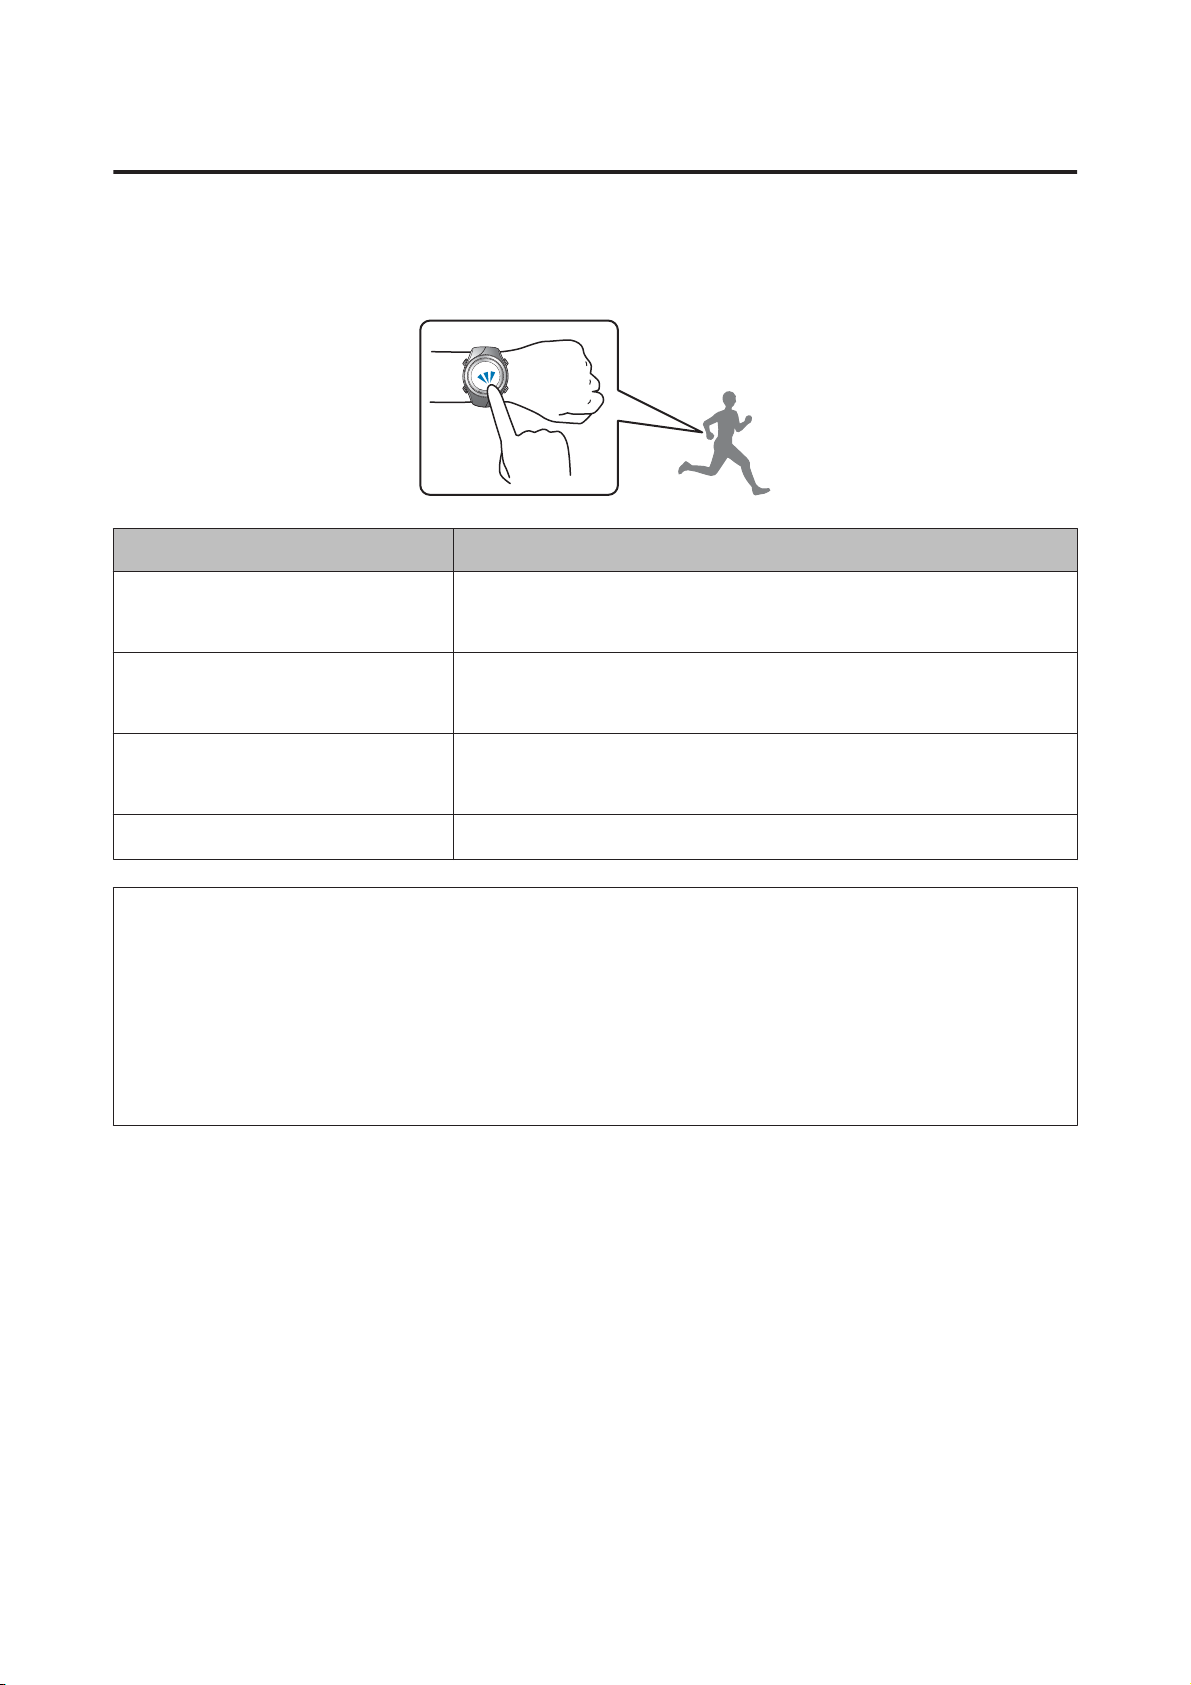
You can perform one of the following operations by tapping the screen once while measuring.
Tapping is only supported while measuring in SF-710/SF-510.
Function Explanation
Lap Records the lap.
The same operation as pressing D while measuring.
Light Turns on the light. The light turns on for approximately 10 seconds.
The same operation as pressing B.
Screen Chg. Changes between the four measurement screens.
The same operation as pressing A.
OFF (default) Turns off tap operations.
Note:
❏ When you want to change functions operated by tapping, set Tap from the Mes. Settings menu.
U “Mes. Settings” on page 87
❏ The operation may not be recognized if you tap the screen rapidly in succession. Leave a gap of approximately one
second between taps.
❏ When bike mode is selected, the tap function may operate automatically depending on the condition of the road surface.
If this occurs, we recommend setting OFF.
21
Page 22
SF-710/510/310 User's Guide
Preparing and Basic Operations
Charging
Before Use
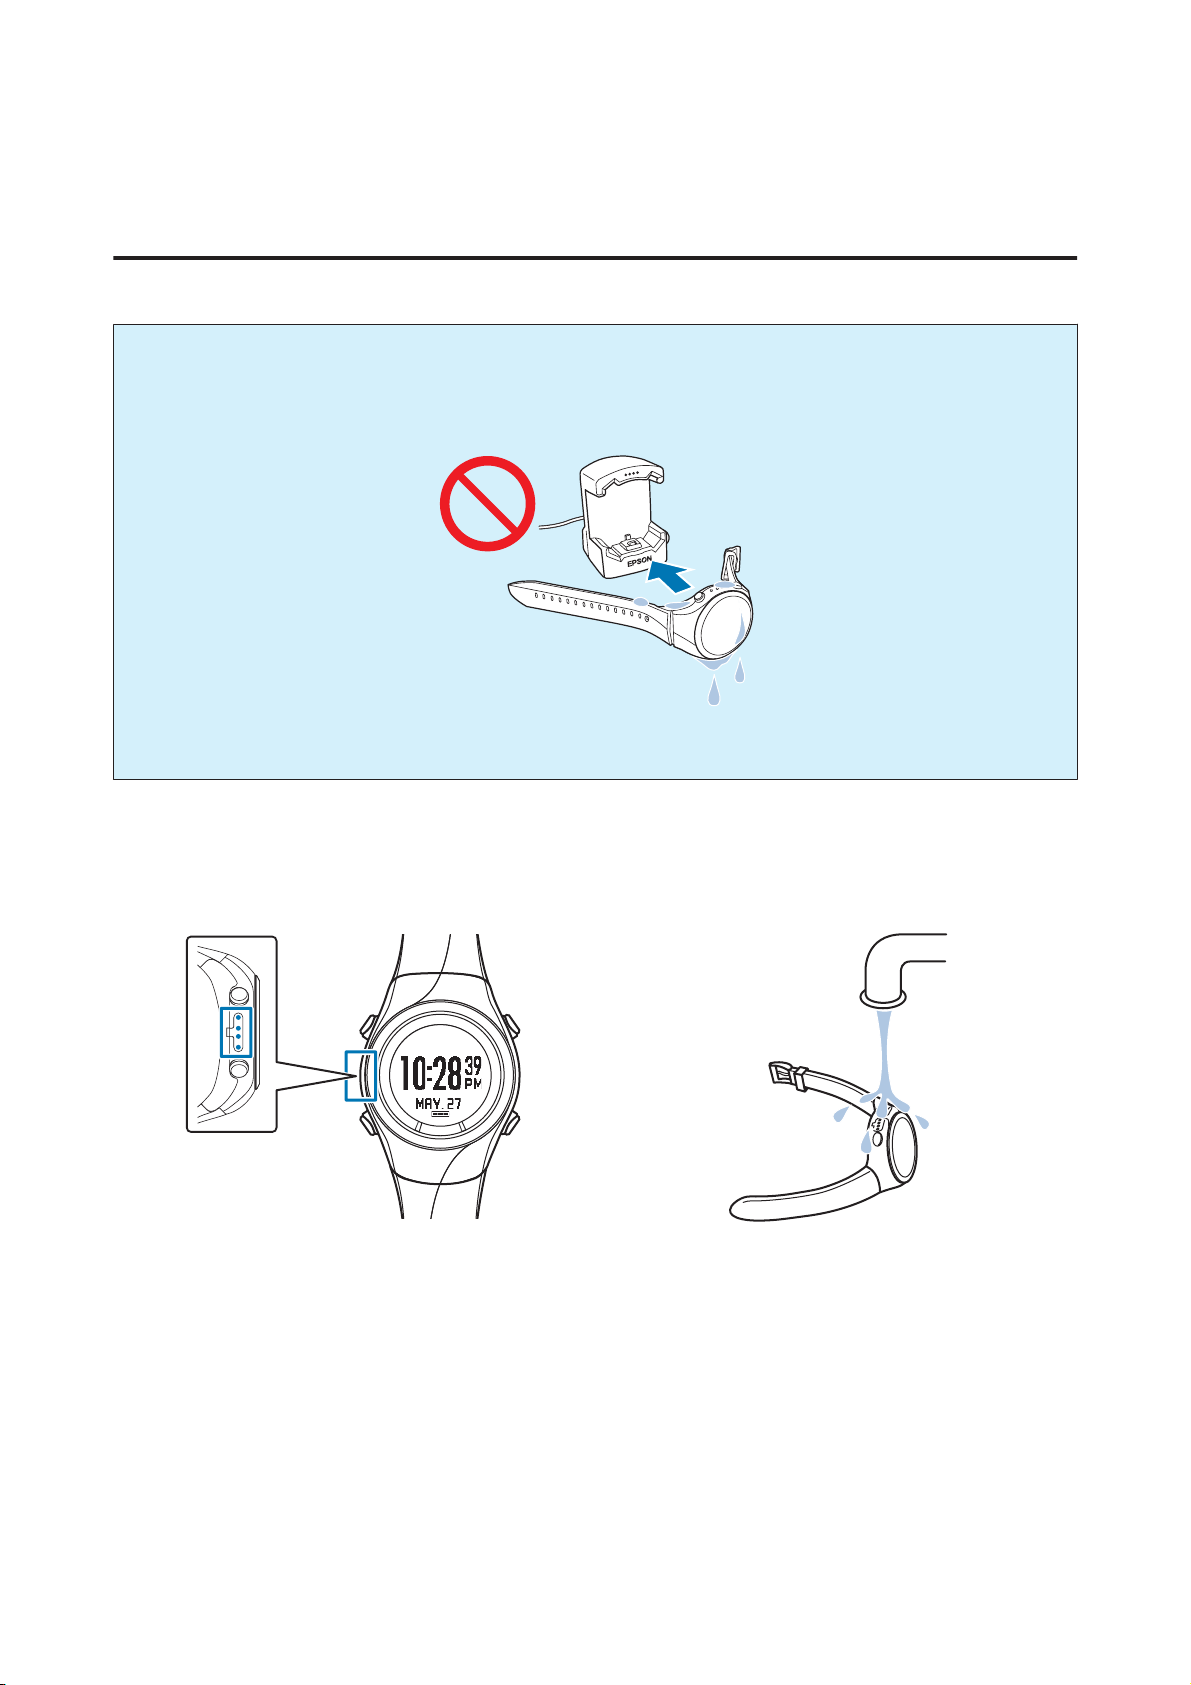
Important:
c
❏ Do not place the device in the cradle if it is wet from water or sweat.
Otherwise the contact points on the cradle and the device could corrode, malfunction, or cause a
communication failure.
❏ Do not perform button operations when it is wet; otherwise, a malfunction could occur.
If the device is wet from water or sweat, use a little running water to wash the contact points, wipe away most of the
water with a towel and so on, and then let it dry naturally before placing it in the cradle.
Contact points Use low pressure water to wash the device.
See the following for more details about daily maintenance.
U “Performing Maintenance” on page 110
22
Page 23
SF-710/510/310 User's Guide
Preparing and Basic Operations
Charging
Important:
c
❏ Charge this device when using it for the first time.
❏ Charge in an environment where the surrounding temperature is 5 to 35°C. In any other environment the
following charge error screen is displayed, and charging stops. When it returns to a suitable temperature,
charging resumes.
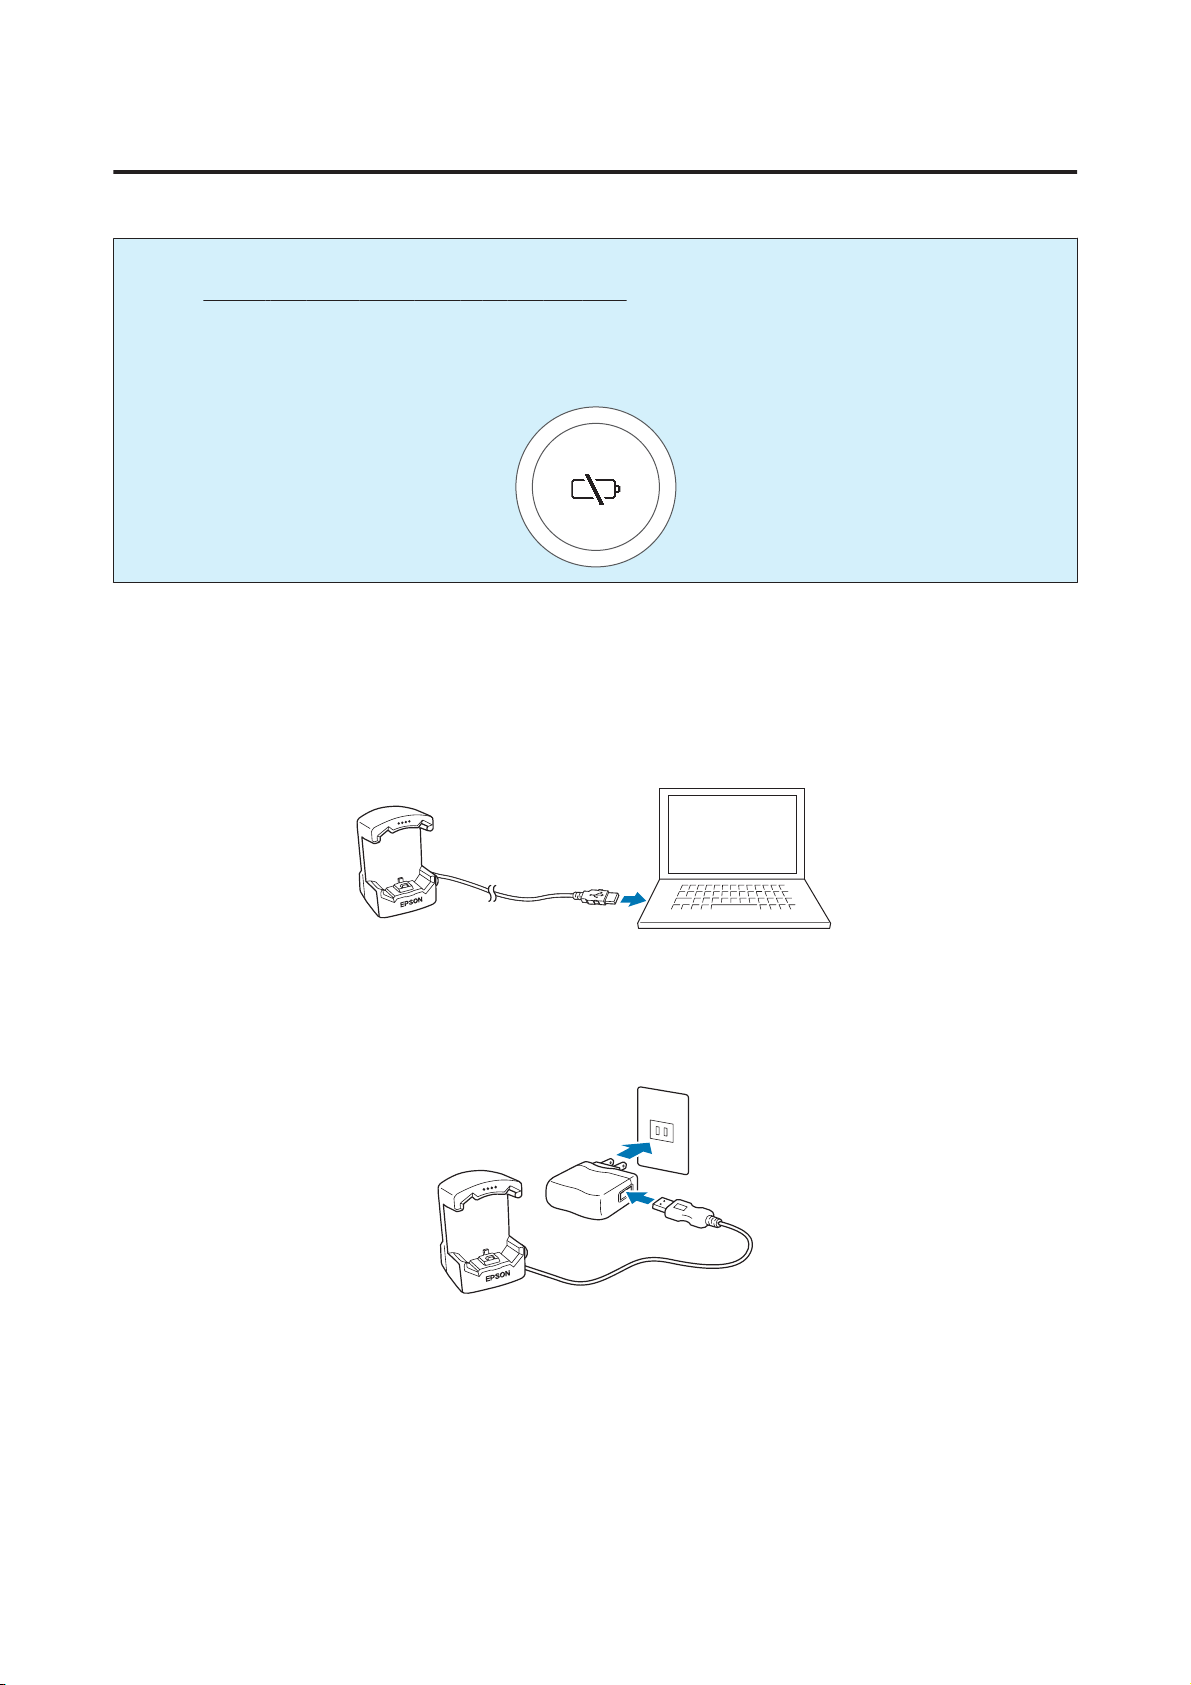
Connect the cradle using one of the following methods.
A
o Using a computer
Connect the cradle's USB plug to the computer's USB port.
This is not guaranteed to work with all computers. Do not use a USB hub. Instead, connect the cradle directly to
the computer.
o Using the AC adapter
Connect the cradle's USB plug to the AC adapter's USB port.
We recommend using the optional AC adapter (Model No.: SFAC01). If you do not use a supported AC
adapter, you may not be able to charge or it may not operate correctly.
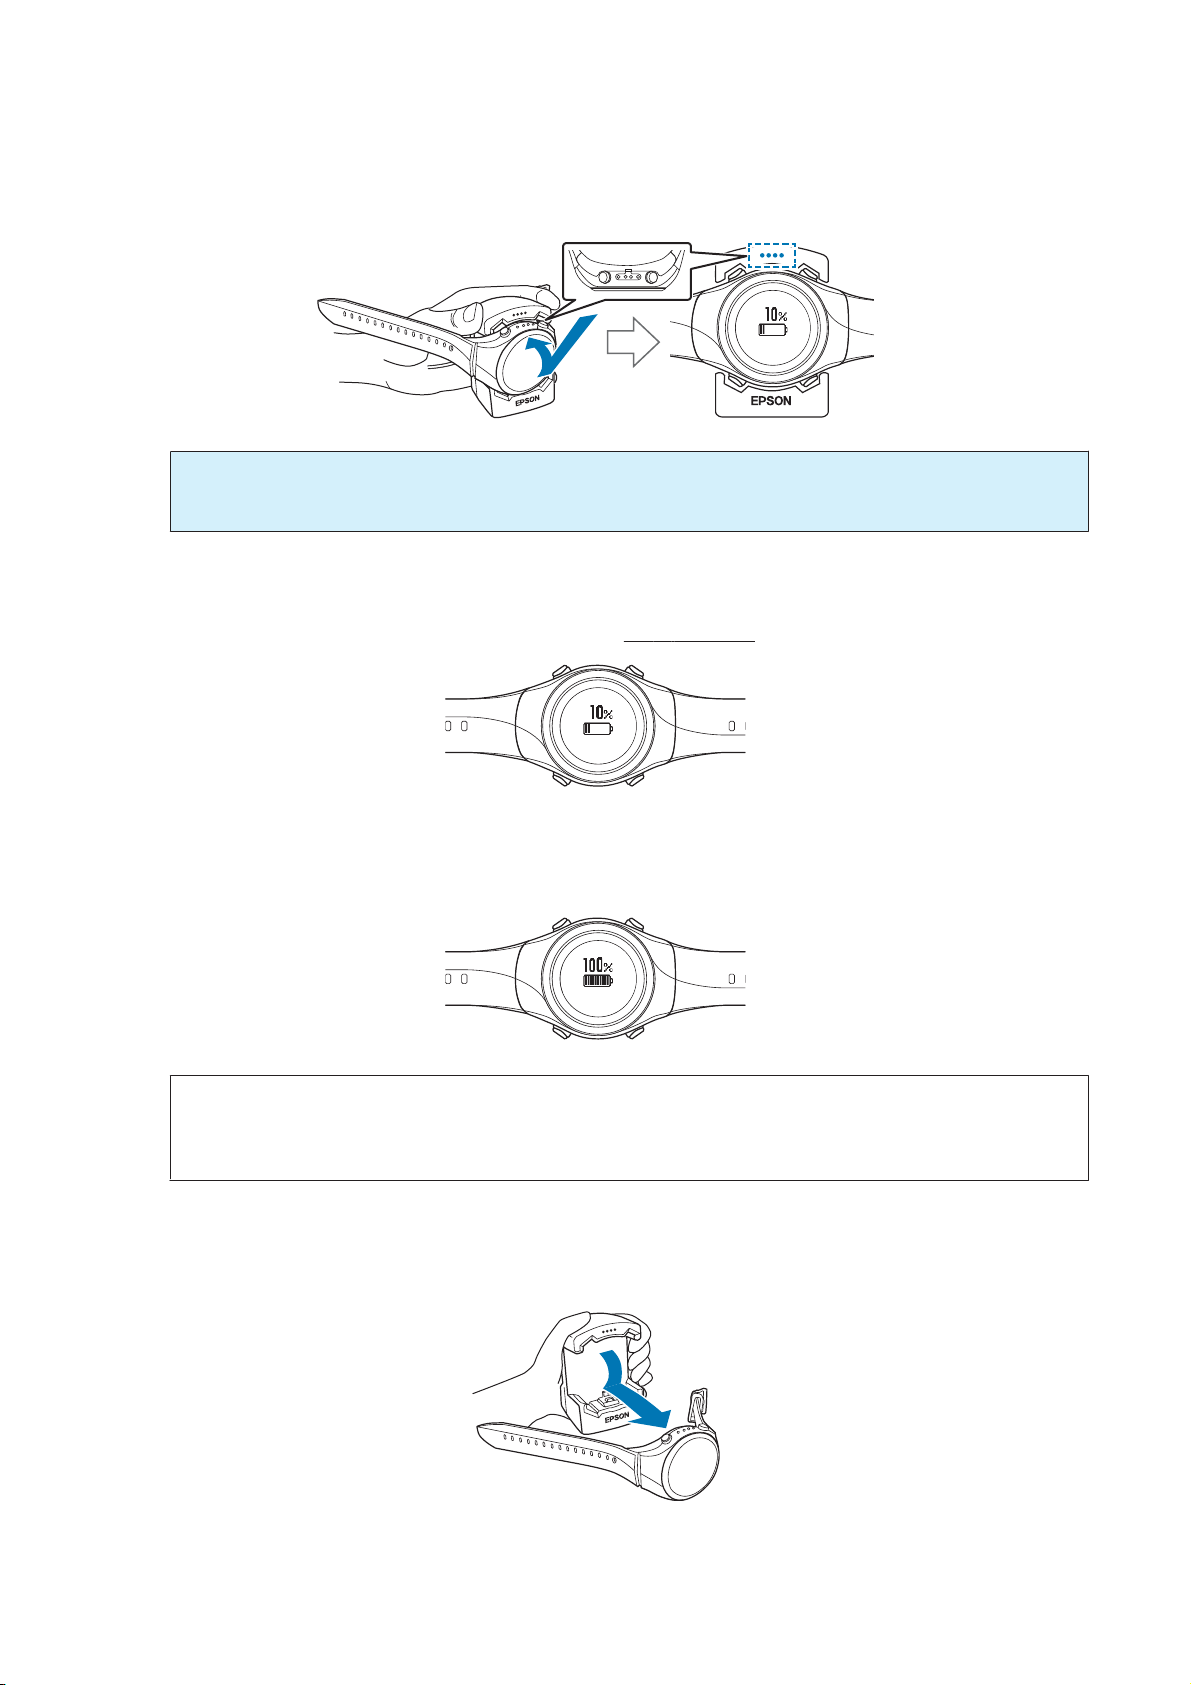
Place the device into the cradle.
B
Check that the contact points on the device are pointing up and match the contact marks on the cradle.
23
Page 24
SF-710/510/310 User's Guide
Preparing and Basic Operations
After placing the device into the bottom of the cradle, push carefully on the top of the device until it is fixed in
place.
Important:
c
Make sure the device is placed in the correct direction; otherwise, the cradle could be damaged.
When the device is placed in the correct direction, the alarm sounds, the following screen is displayed, and
charging starts.
Although the average time necessary for a full charge is
Check that charging is complete.
C
When the following charging icon is displayed, charging is complete.
Note:
When the battery icon displays 100%, an over-charge prevention function is activated. The device will not be damaged
even if you continue to charge the battery.
2.5 to 3.5 hours, this varies depending on the situation.
When charging is complete, remove the device from the cradle.
D
Hold the cradle and press the device down into the lower part of the cradle for a smooth release.
24
Page 25
SF-710/510/310 User's Guide
Preparing and Basic Operations
Initial Settings
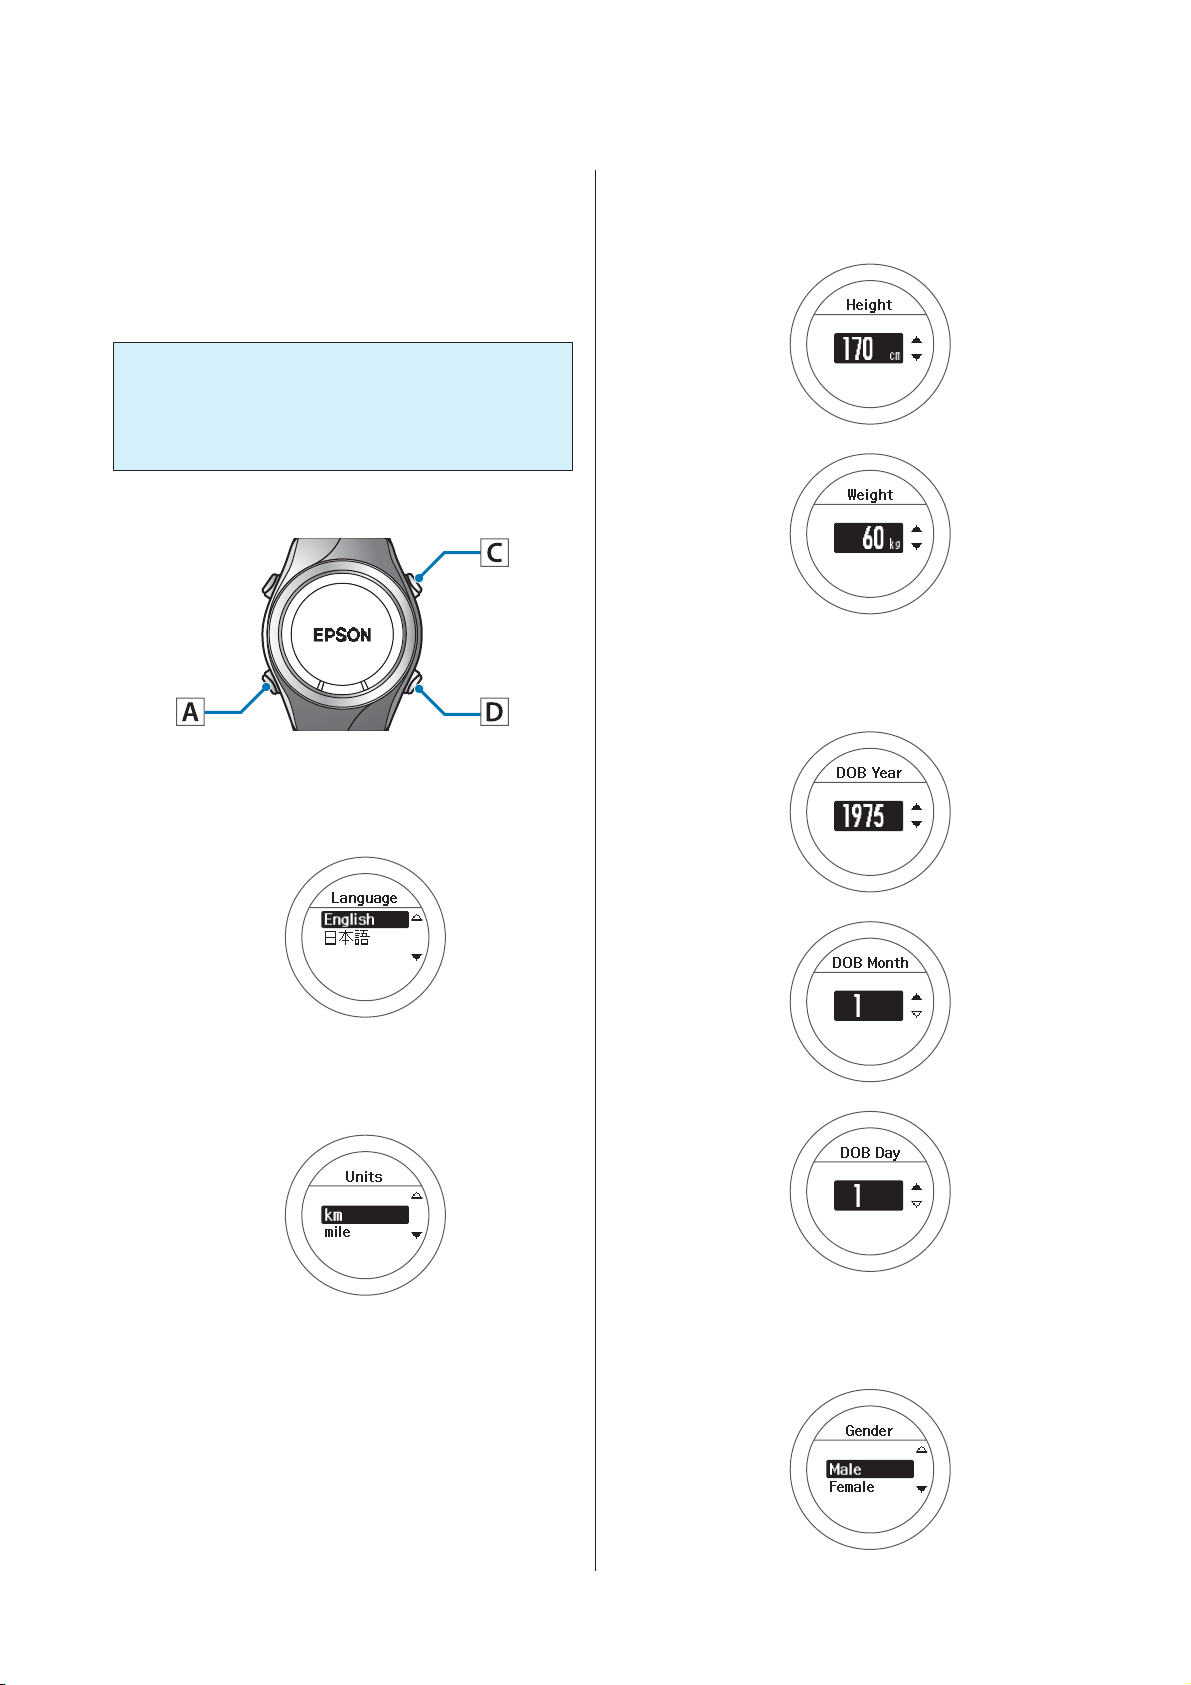
After charging the device for the first time and removing
it from the cradle, follow the on-screen instructions to
initialize the settings.
Important:
c
Set the time by receiving a GPS signal. Signals
from the GPS cannot be received while indoors.
Make sure this is performed outside.
Operation buttons
Set your Height and Weight.
C
Use C/D to select, and then press A.
Set your DOB.
D
Use C/D to select, and then press A.
Set the language.
A
Use C/D to select, and then press A.
Set the Units.
B
Use C/D to select, and then press A.
Set your Gender.
E
25
Use C/D to select, and then press A.
Page 26
SF-710/510/310 User's Guide
Preparing and Basic Operations
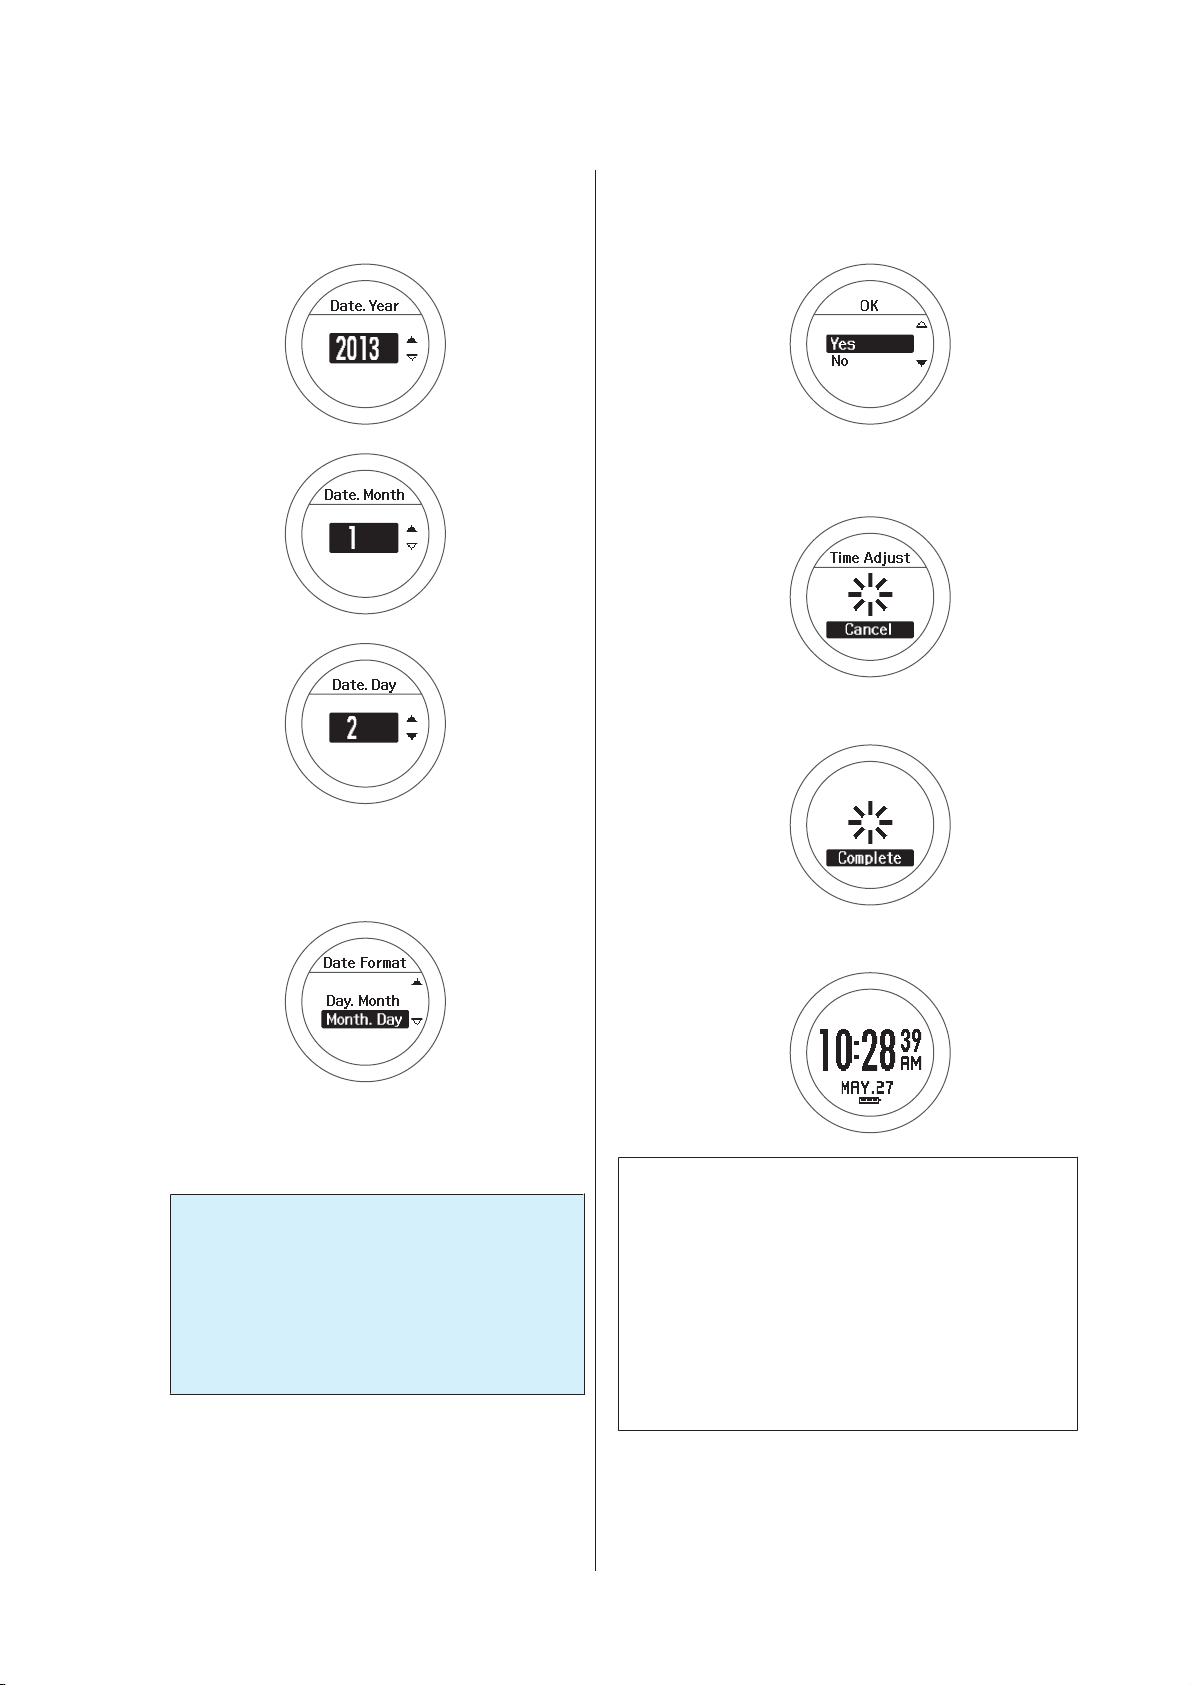
Set today's date.
F
Use C/D to select, and then press A.
Complete the settings.
I
Use C/D to select Yes, and then press A.
A signal is received from the GPS and time is
automatically synchronized.
When Complete is displayed, press A.
Set the Date Format.
G
Use C/D to select, and then press A.
Go to a location outside with no
H
obstructions overhead.
Important:
c
Take the following steps to receive a signal
from the GPS and synchronize time
automatically. Since the signal from the
GPS cannot be received indoors, go outside
to a location without any obstructions
overhead.
The time screen is displayed.
Note:
❏ When you leave the device for a while, it enters sleep
status and the time display turns off. This is not a
malfunction as the display is restored the next time
you move the device.
❏ If time synchronization fails, the signal from the GPS
may not be being received properly. Perform Time
Adjust from Sys. Settings.
U “Sys. Settings” on page 93
26
Page 27
SF-710/510/310 User's Guide
Preparing and Basic Operations
About the Battery
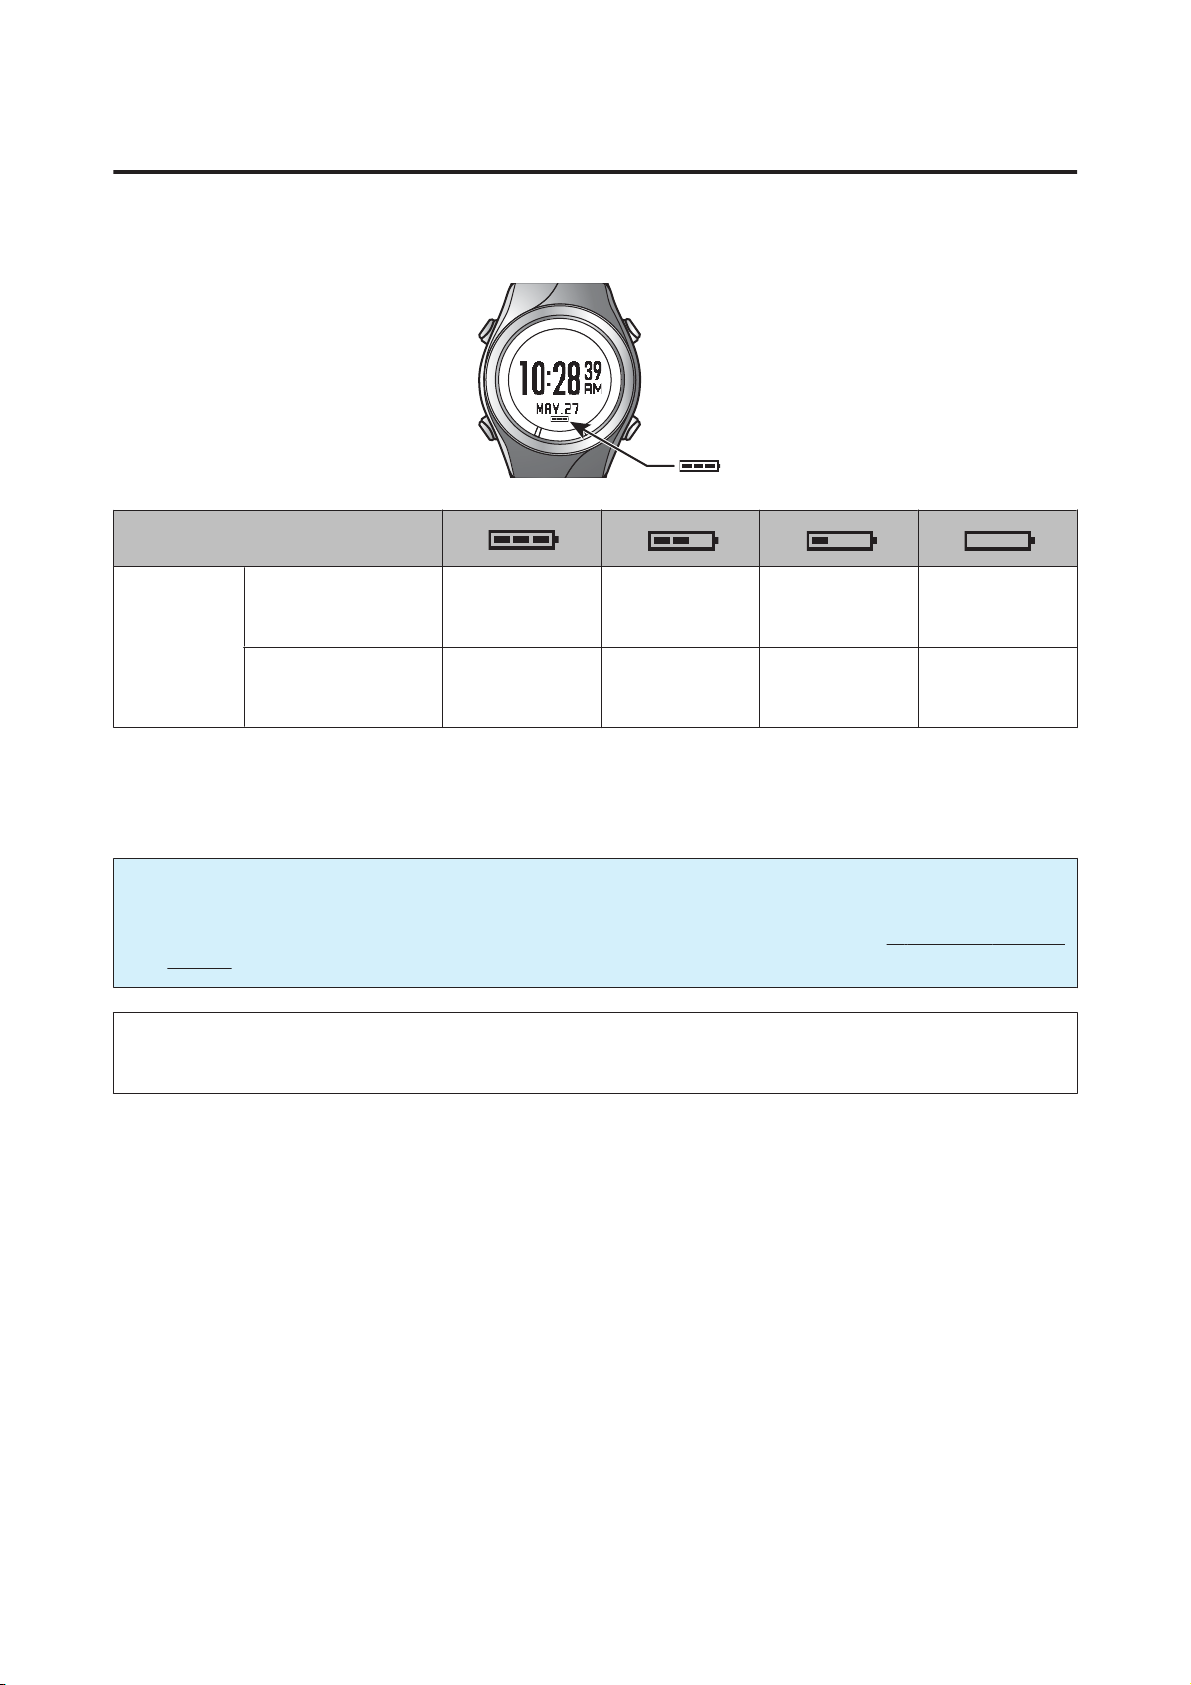
You can check how much charge remains from the battery icon below the time display.
Battery icon
GPS On
Hours
remaining*
* Standard hours during which you can use the Chronograph function while receiving a GPS signal.
Usage hours vary depending on the conditions (HR Monitor On, frequency the light turns on, and so on).
Important:
c
Nothing is displayed when the battery is running out. If the device is left for a long time with a low battery, the
performance of the rechargeable battery will deteriorate. Make sure you charge the device
months even when it is not being used.
Note:
Even if the battery runs out, measurement data is stored in the main memory.
HR Monitor Off
GPS On
HR Monitor On
30 to 21 hours 21 to 12 hours 12 to 3 hours 3 to 0 hours
26 to 18 hours 18 to 10 hours 10 to 2 hours 2 to 0 hours
at least once every six
27
Page 28
SF-710/510/310 User's Guide
Preparing and Basic Operations
Specifying a GPS (GPS Positioning)
Measuring Function for the Device
This device receives a signal from the GPS, and measures distance and pace. To make sure measurements are
performed accurately, try to use the device under the following conditions which allow for easy reception of GPS
signals.
❏ Outside with no obstructions overhead
❏ Wear the device with the screen facing up
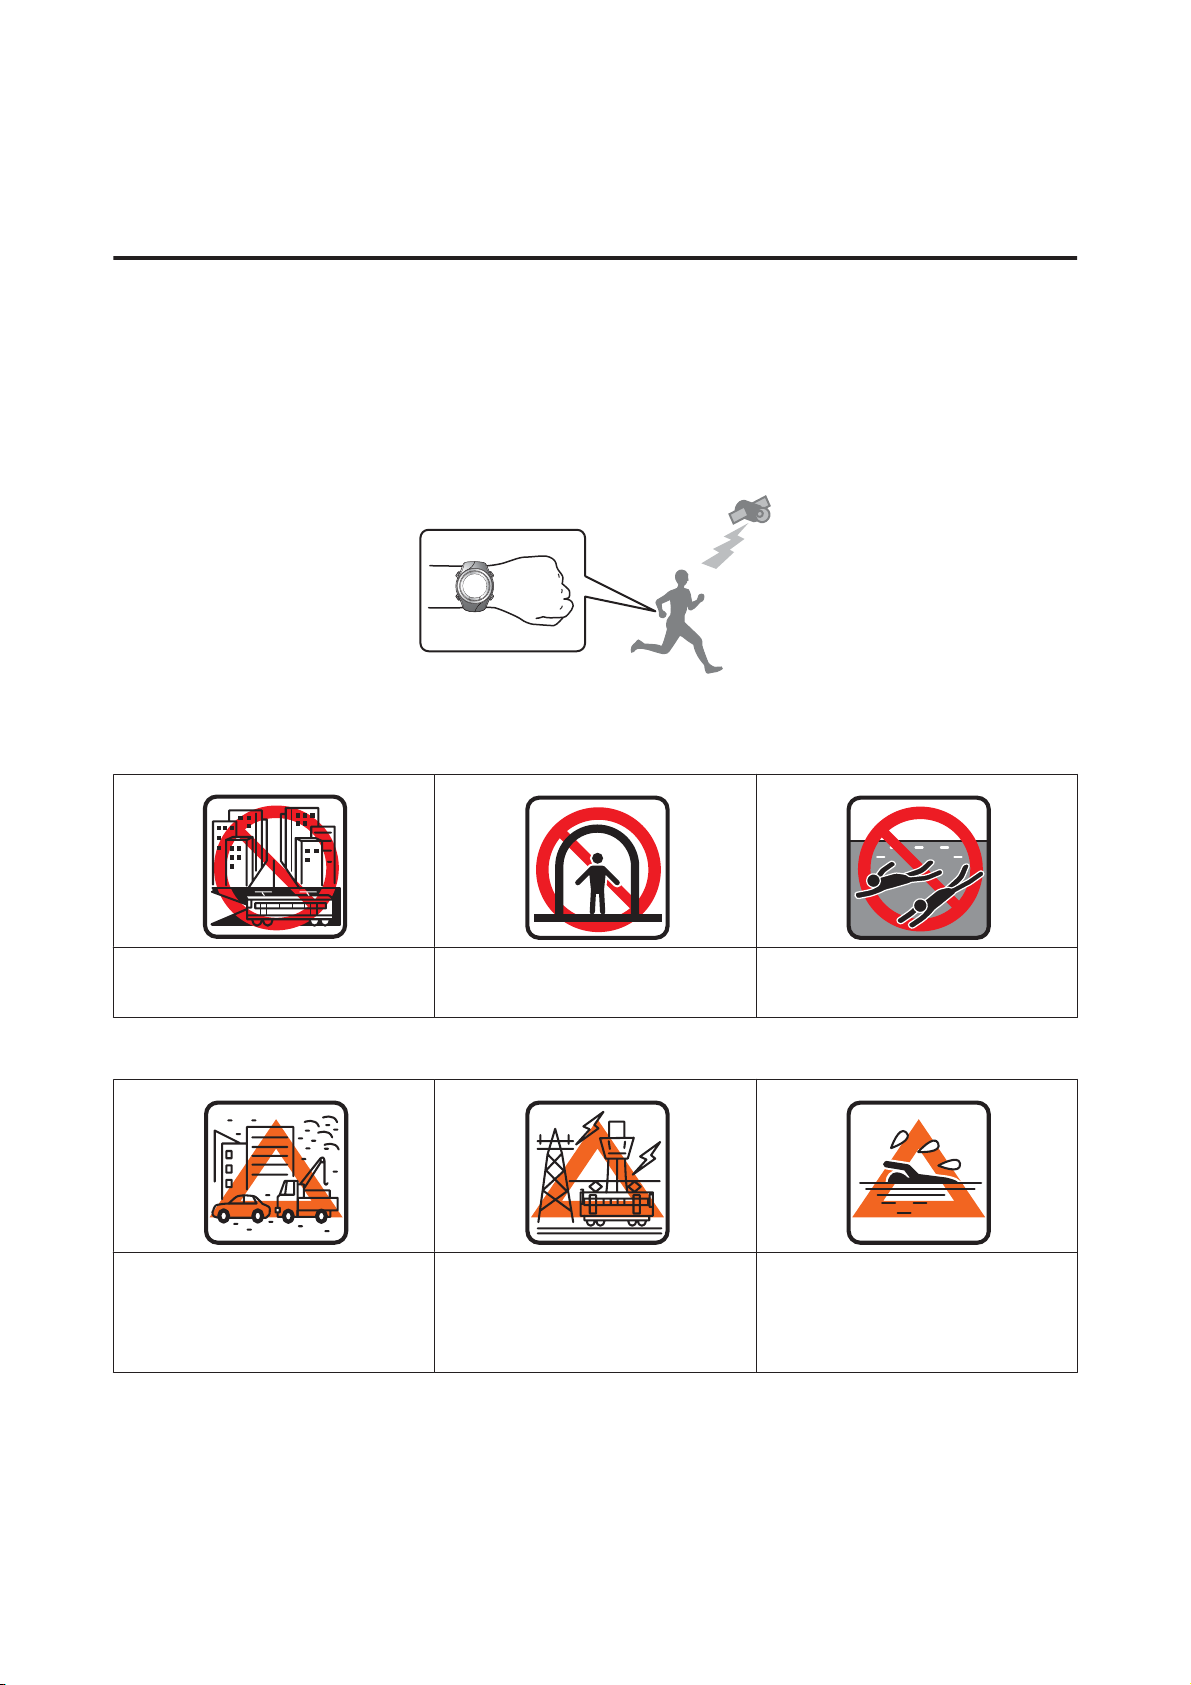
You cannot receive a signal from the GPS when indoors and in the following environments.
Locations where you cannot receive signals
Inside rooms or buildings, or
underground
Locations that are difficult to receive signals
Locations with electronic
interference, such as
constructions sites and heavy
traffic
In tunnels Under water
Near high-voltage wires or
television towers, overhead
electric wires for trains, and roads
with skyscrapers
On water
28
Page 29
SF-710/510/310 User's Guide
Preparing and Basic Operations
GPS Positioning
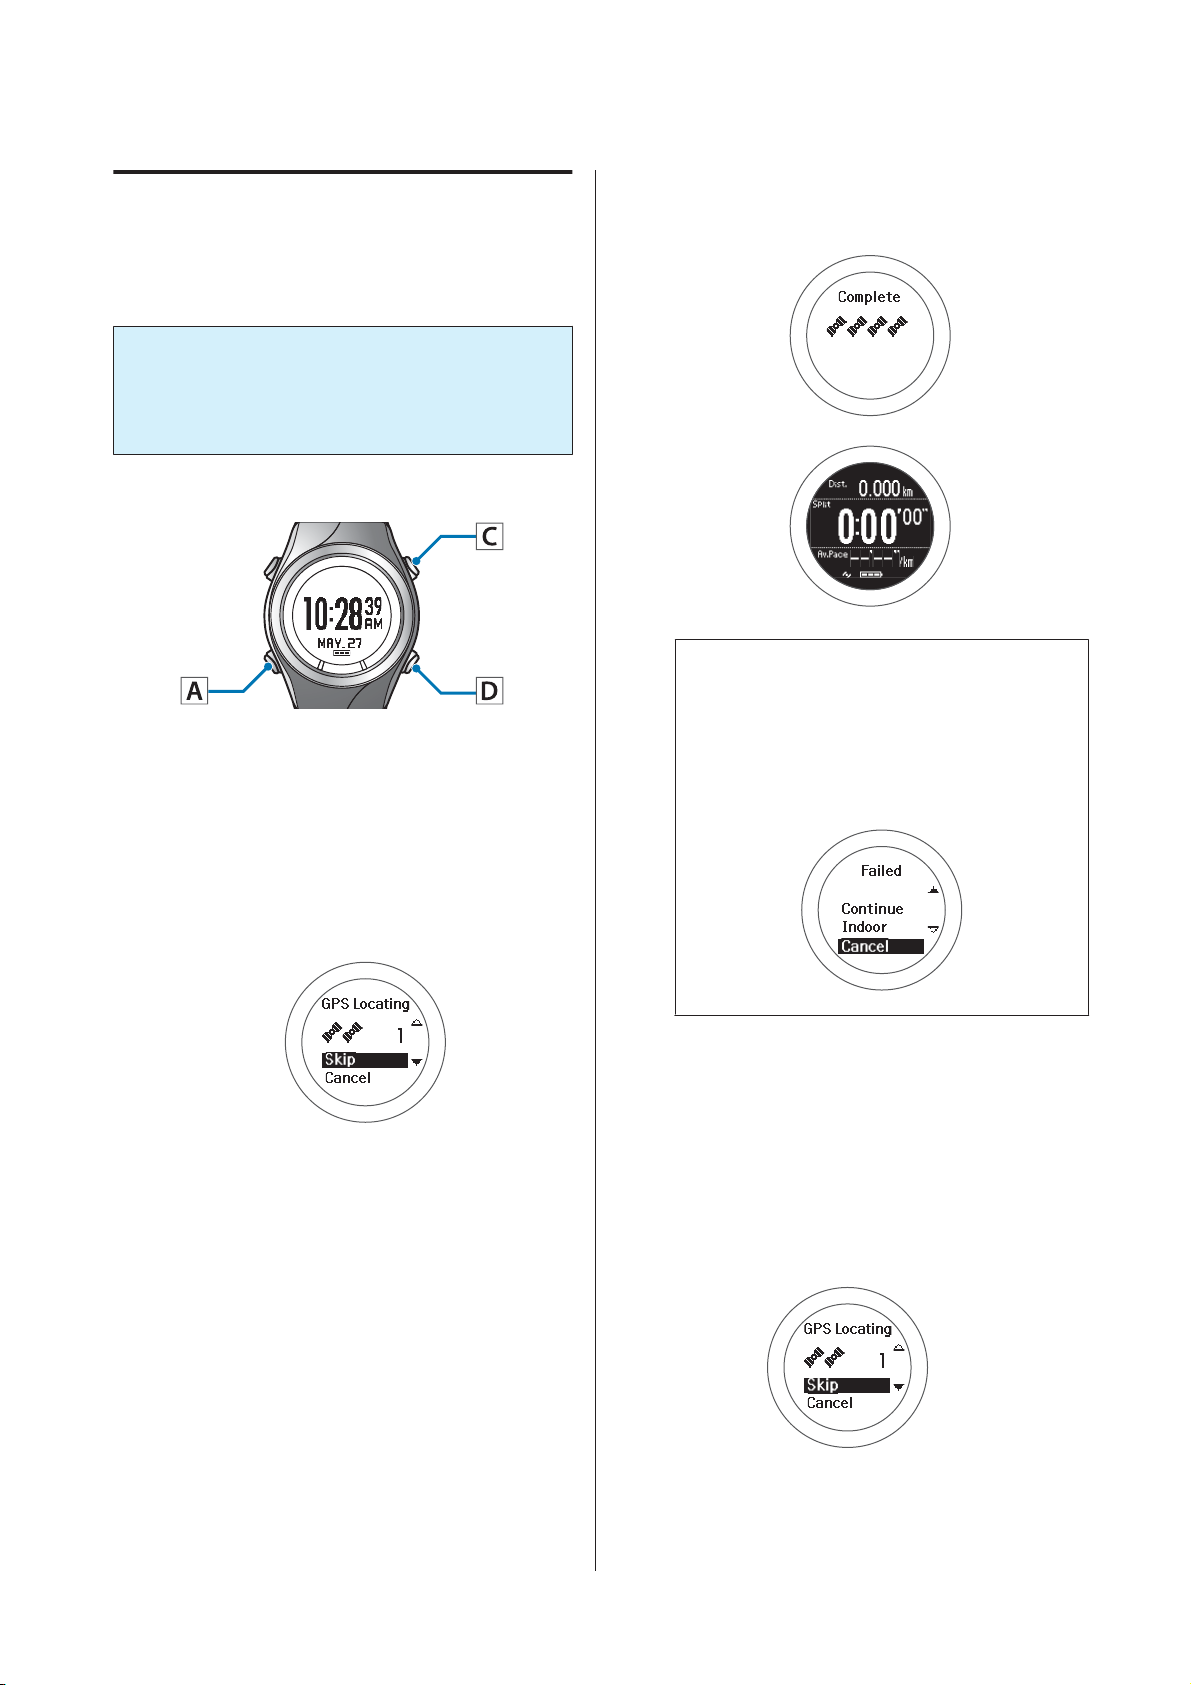
When you change to the measurement screen, the
device receives a signal from various satellites, and
identifies a GPS to use for measurement.
Important:
c
While identifying a GPS, make sure you are
outside with no obstructions overhead, and try to
keep the device as still as possible.
Operation buttons
Go to a location outside with no
A
obstructions overhead.
When GPS positioning is complete, the
positioning complete screen flashes, and then the
measurement screen is displayed.
Note:
It usually takes less than two minutes to complete
GPS positioning.
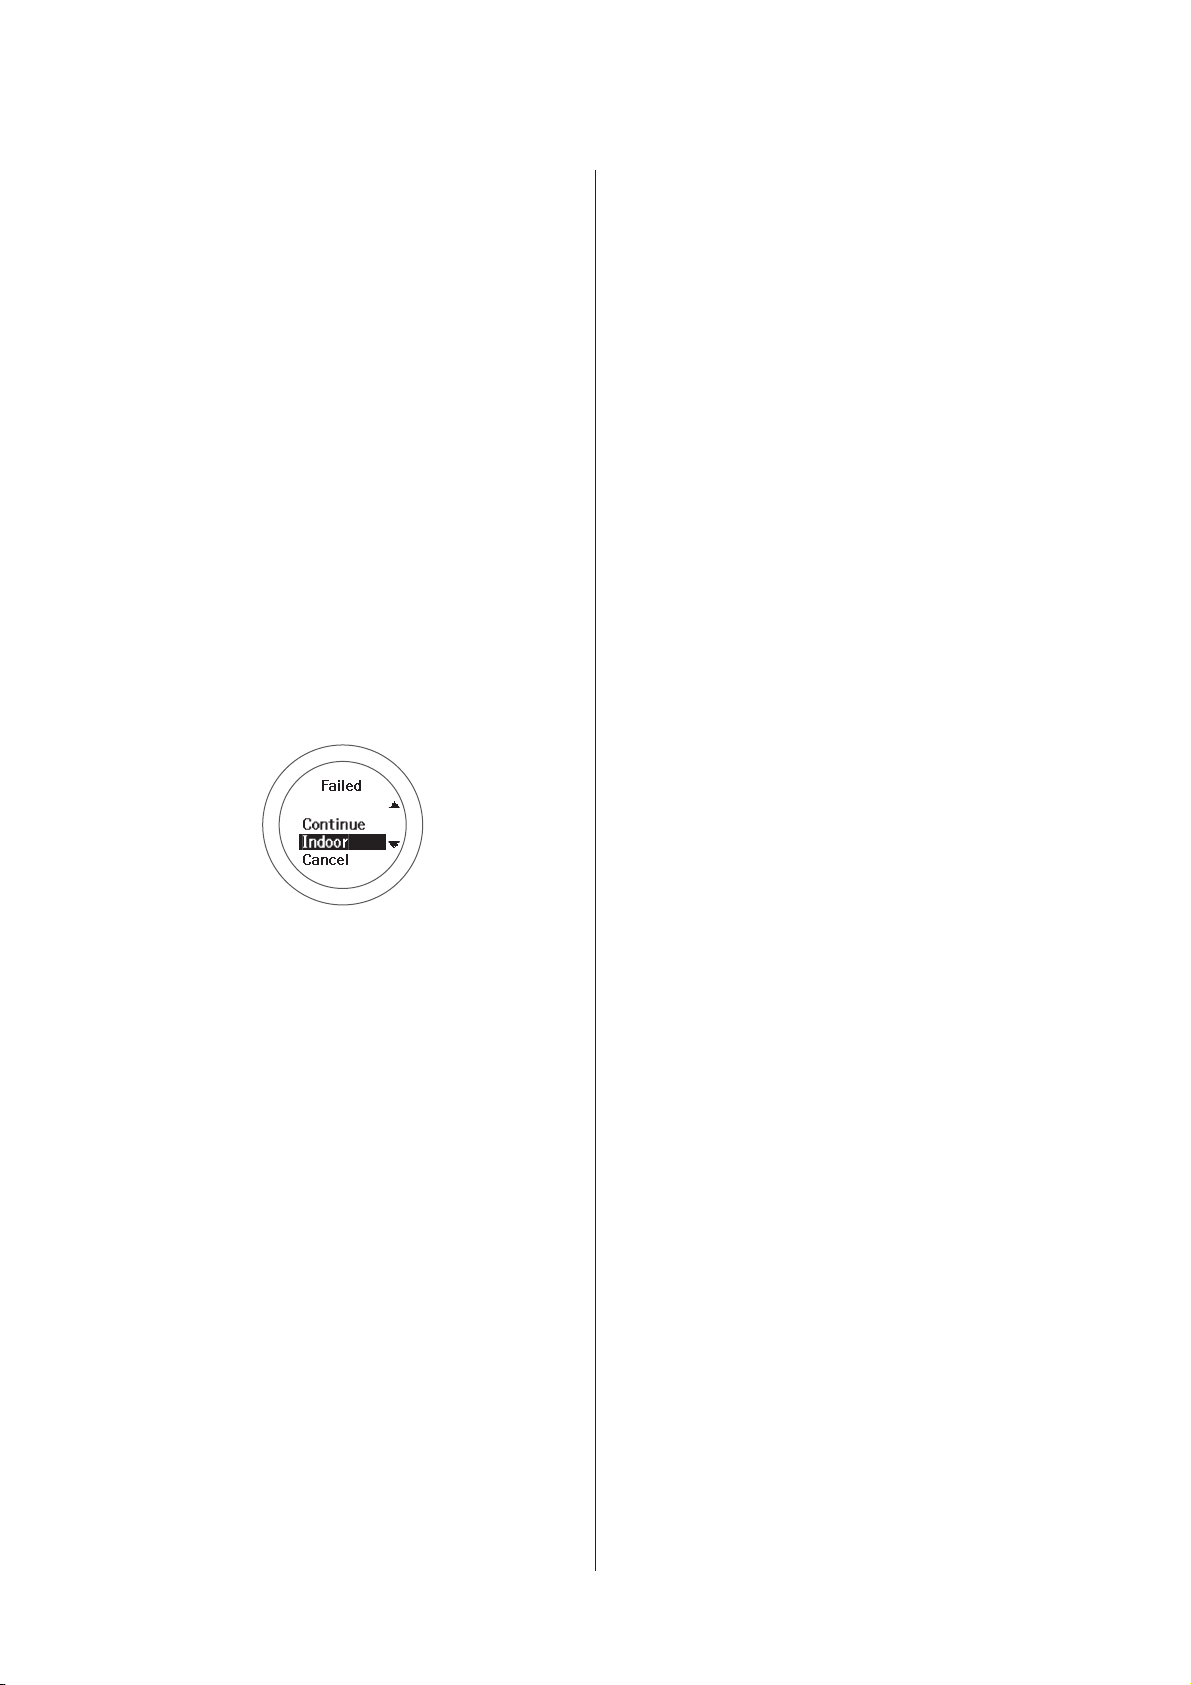
If it takes more than two minutes or Failed is
displayed, we recommend selecting Cancel,
moving to a different location, and trying again.
Perform GPS positioning.
B
Press C.
GPD positioning starts.
When the measurement screen is displayed, you can
start measuring.
U “Measure” on page 36
Skipping GPS positioning
If you want to start measuring immediately, or if GPS
positioning is taking too long, select Skip during GPS
positioning and start measuring.
29
Page 30
SF-710/510/310 User's Guide
Preparing and Basic Operations
GPS positioning continues while measuring, and when
positioning is complete the device starts recording
positional information. The route before GPS
positioning is complete is not recorded.
Indoor mode (SF-710/SF-510 only)
This function allows you to measure without
performing GPS positioning. Use this when GPS
positioning cannot be performed because you are
indoors and so on.
The route and so on is not recorded in indoor mode.
Also, measurement items are limited in indoor mode.
U “Measurable items” on page 33
Use either of the following methods to enter indoor
mode.
❏ Hold down C on the time screen
❏ If GPS positioning fails, select Indoor on the screen
displayed
30
Page 31
SF-710/510/310 User's Guide
Preparing and Basic Operations
Making Precise Measurements
In the following situations, complete GPS positioning, display the measurement screen, and then wait outside for at
least 15 minutes with no obstructions overhead. This allows you to make precise measurements.
❏ When you use the device for the first time after purchase
❏ When the device has not been used for several months
You do not need to make these preparations from the second time.
Note:
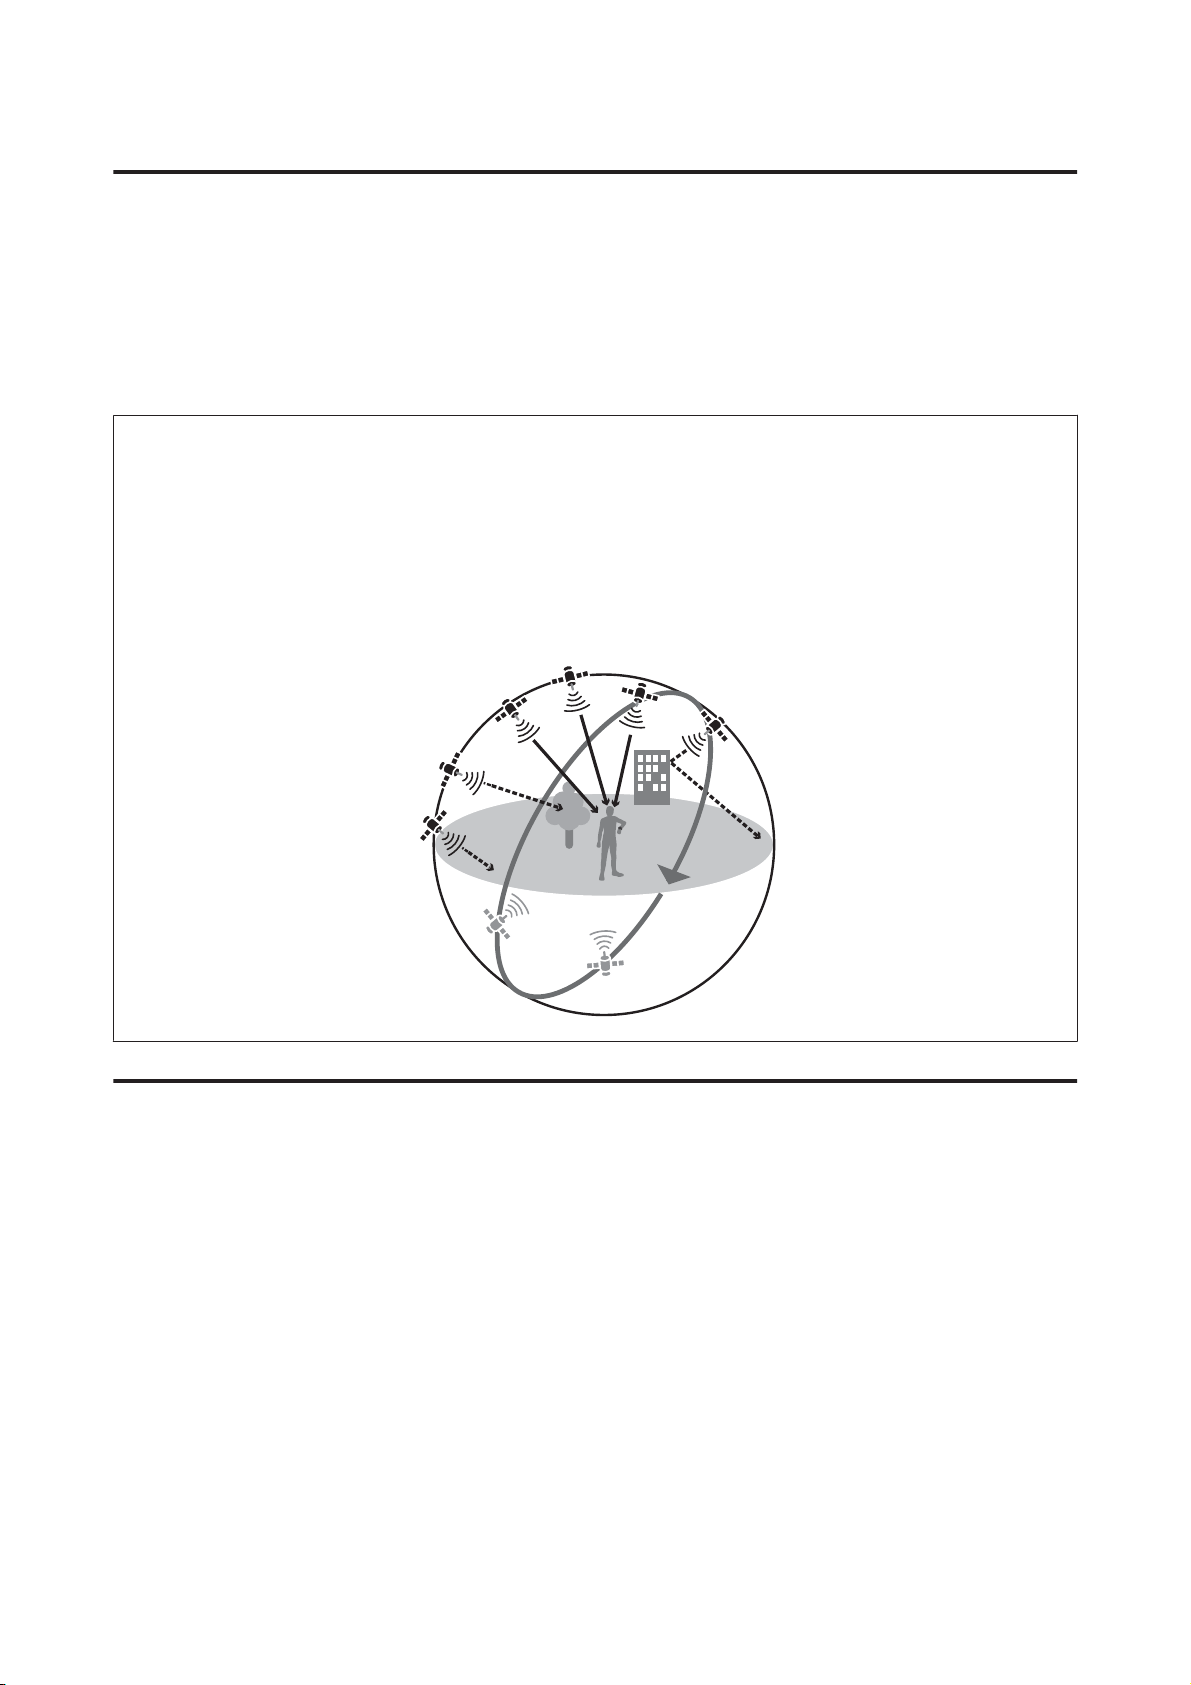
The basic configuration of the GPS system is 24 satellites orbiting the Earth at an altitude of 20,000 km, with at least four
satellites traveling in six different orbits. The GPS receiver acquires data from four satellites and calculates the latitude,
longitude, altitude, and time. Measuring can start once positioning has been performed and this information has been
received. Since you can receive more detailed GPS navigation data (satellite orbital information) after 15 minutes from this
point, you can make more precise measurements.
However, errors may occur in distance measurements, even after waiting 15 minutes or more, due to atmospheric conditions
and the usage environment.
Supports the Quasi-Zenith Satellite System
This device supports the Quasi-Zenith Satellite System (QZSS). The Quasi-Zenith Satellite System is a system of
satellites that passes directly over Japan and sends positioning signals that are very similar to current GPS signals. This
allows signals to be sent to wider areas of Japan that were previously trouble spots, such as mountainous regions, or
areas with a high density of skyscrapers such as the center of Tokyo.
31
Page 32
SF-710/510/310 User's Guide
Preparing and Basic Operations
Educating Your Stride Sensor
About the Stride Sensor
This device contains a stride sensor that uses a stride algorithm to learn your pace from your actual speed and your
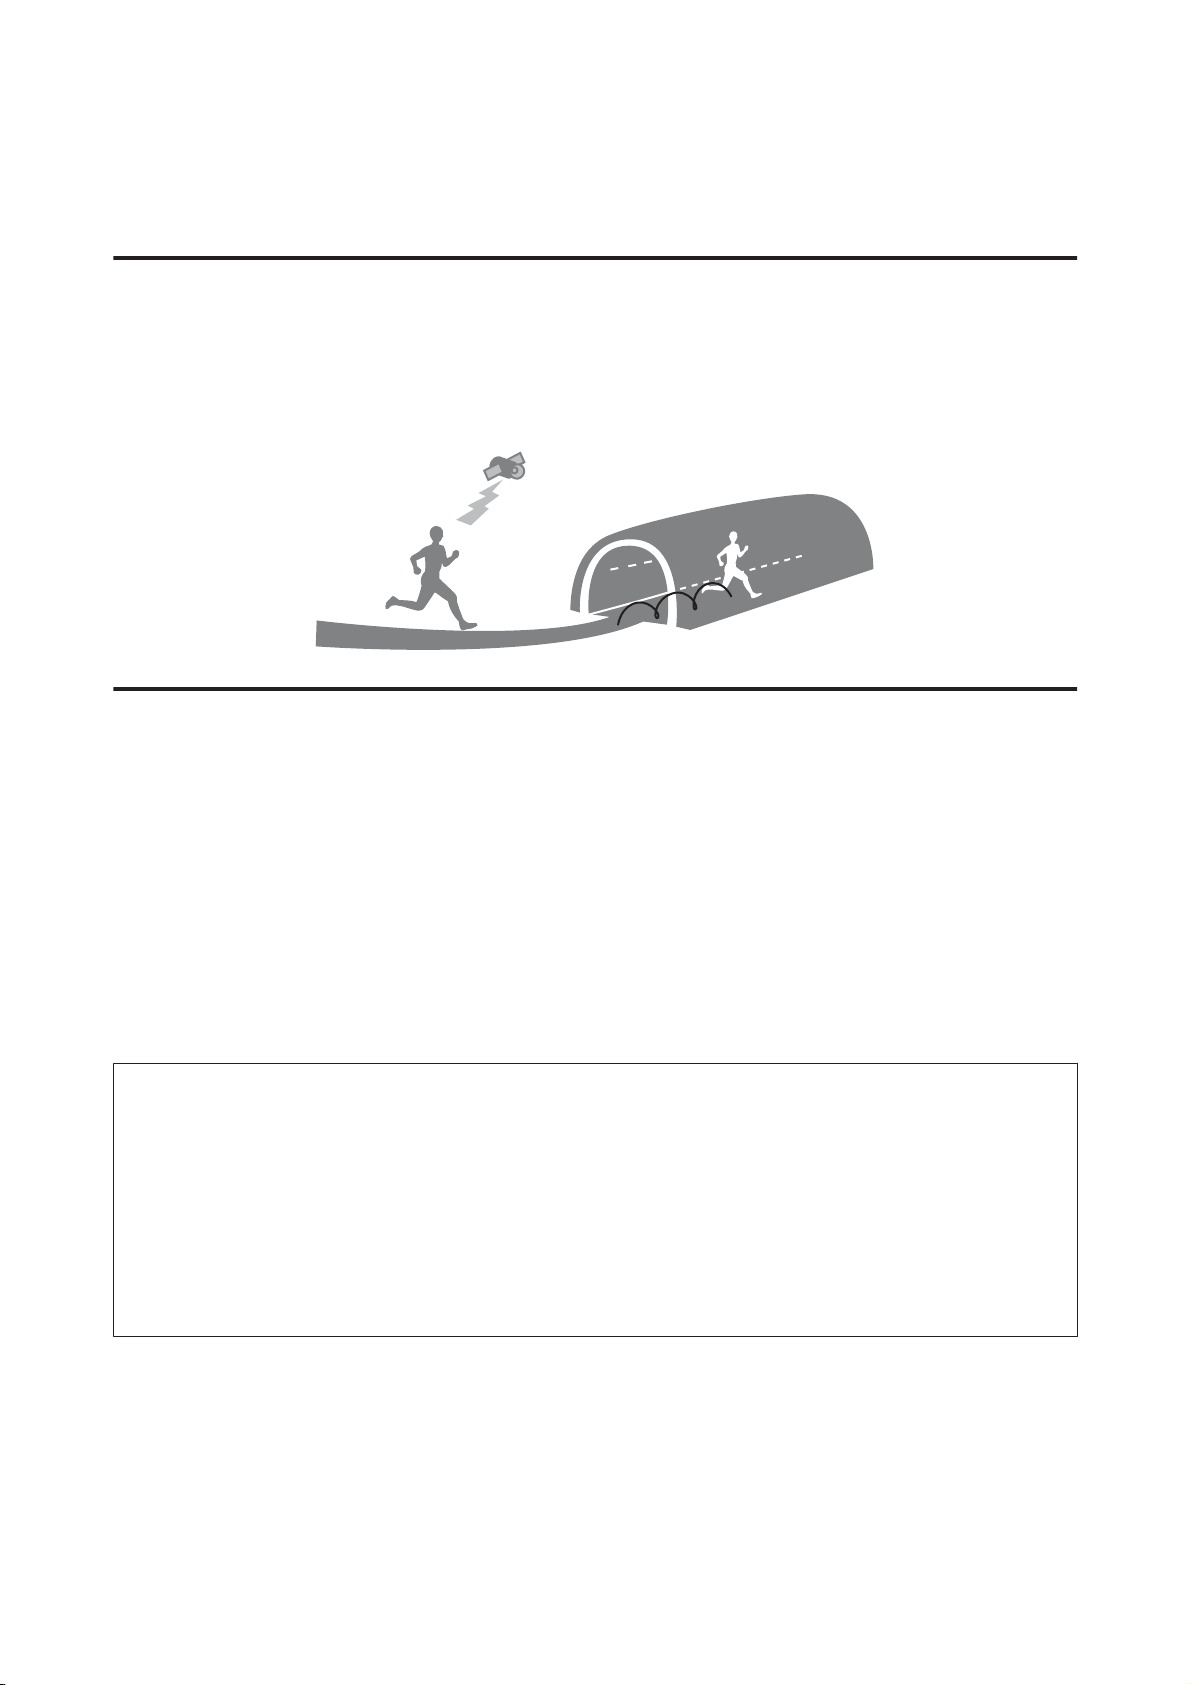
body's vibration frequency. This allows the device to calculate distance and laps with high precision, as well as measure
your pitch and stride even in locations that cannot receive signals from GPS satellites such as in a tunnel, and so on
(SF-710/SF-510 only).
Educating the Stride Sensor
When using the device for the first time, run under the following conditions so that the stride sensor can learn your
stride.
Location/Time
Run or walk in the following locations that allow GPS positioning.
❏ When outside with no obstructions overhead: Approximately 10 mins.
❏ When surrounded by tall buildings: approximately 30 mins.
Measure
Measure using the chronograph function.
U “Measuring Time, Distance, and Speed (Chronograph Function)” on page 37
Note:
❏ You do not need to make these preparations from the second time. However, note that information on your stride is
initialized if the device is initialized. If this occurs, you need to educate the stride sensor again.
❏ When you mainly use the device for walking, from the Mes. Settings menu, set Activity Type to Walk.
U “Mes. Settings” on page 87
❏ The device's stride sensor is used for running and walking. This does not support bike mode. In bike mode, "-" is
displayed for the stride and pitch on the measurement display.
❏ Large measurement errors may occur if your stride differs significantly from this learning session.
32
Page 33
SF-710/510/310 User's Guide
Preparing and Basic Operations
Measurable items
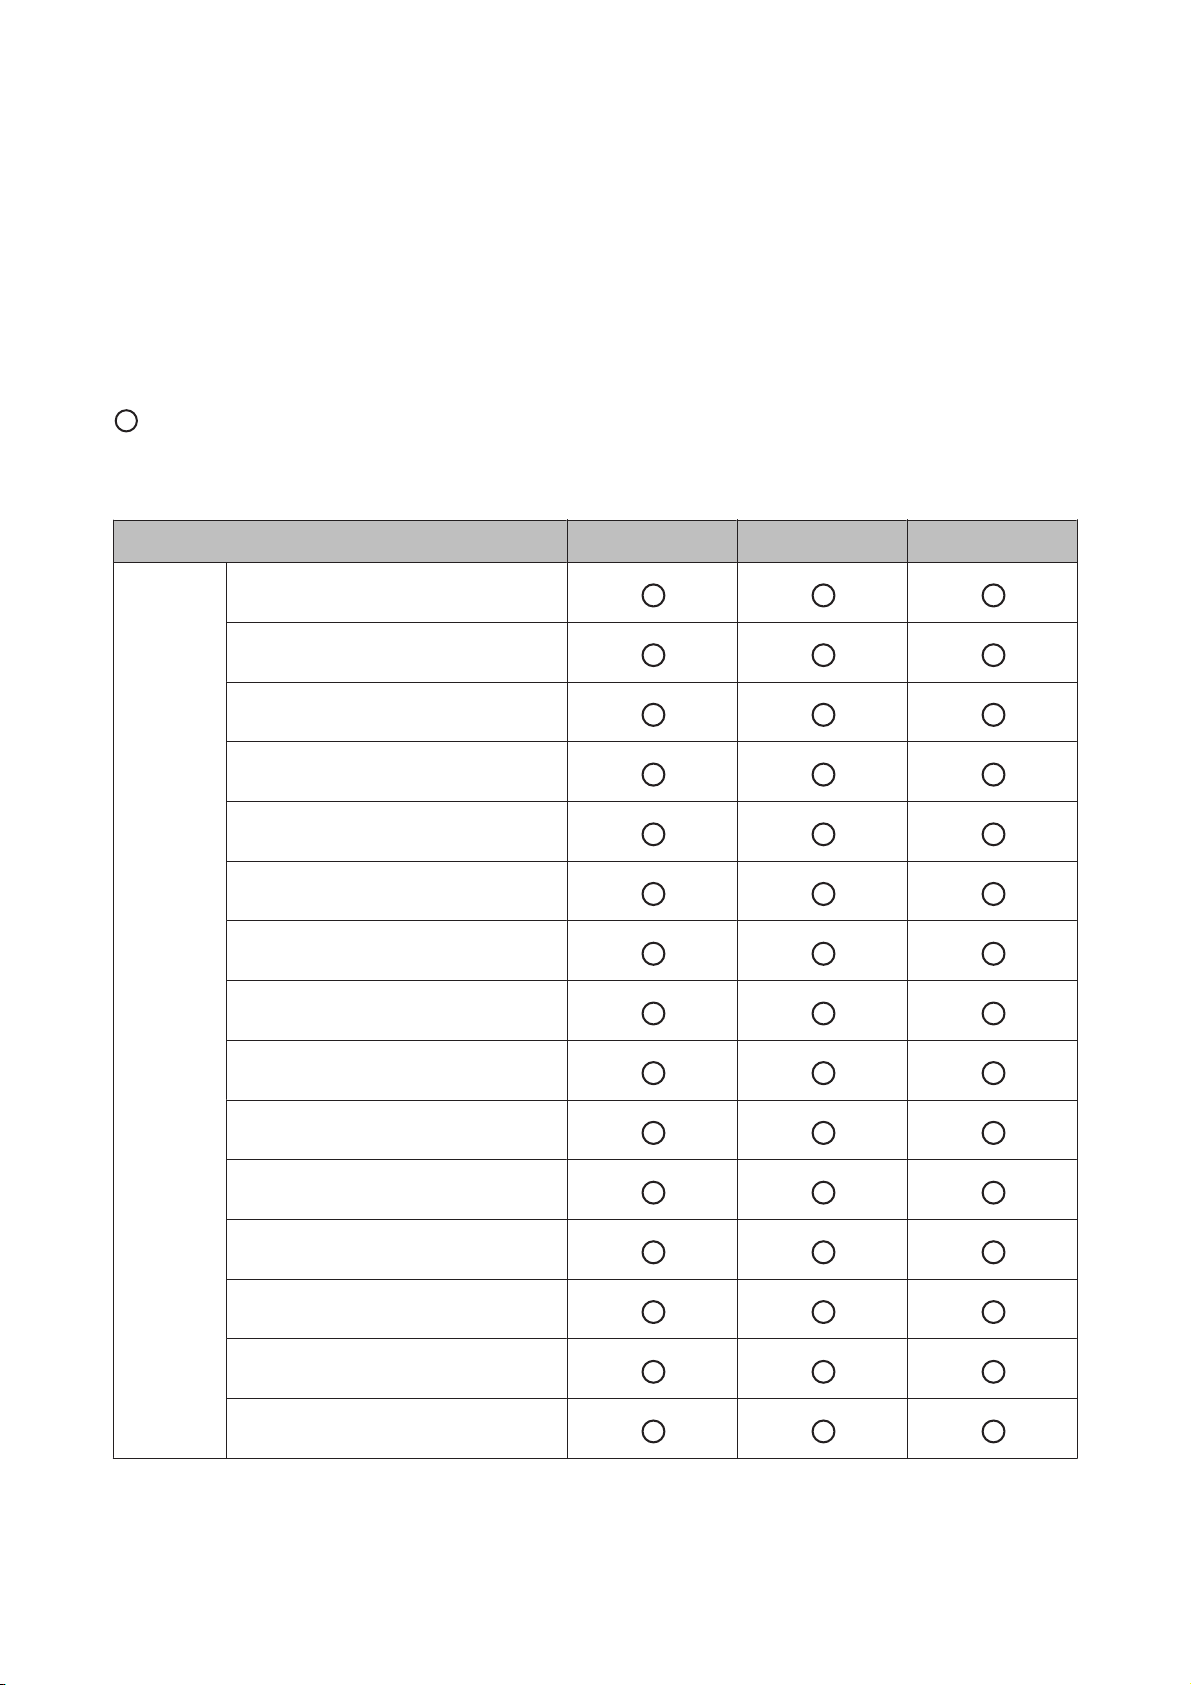
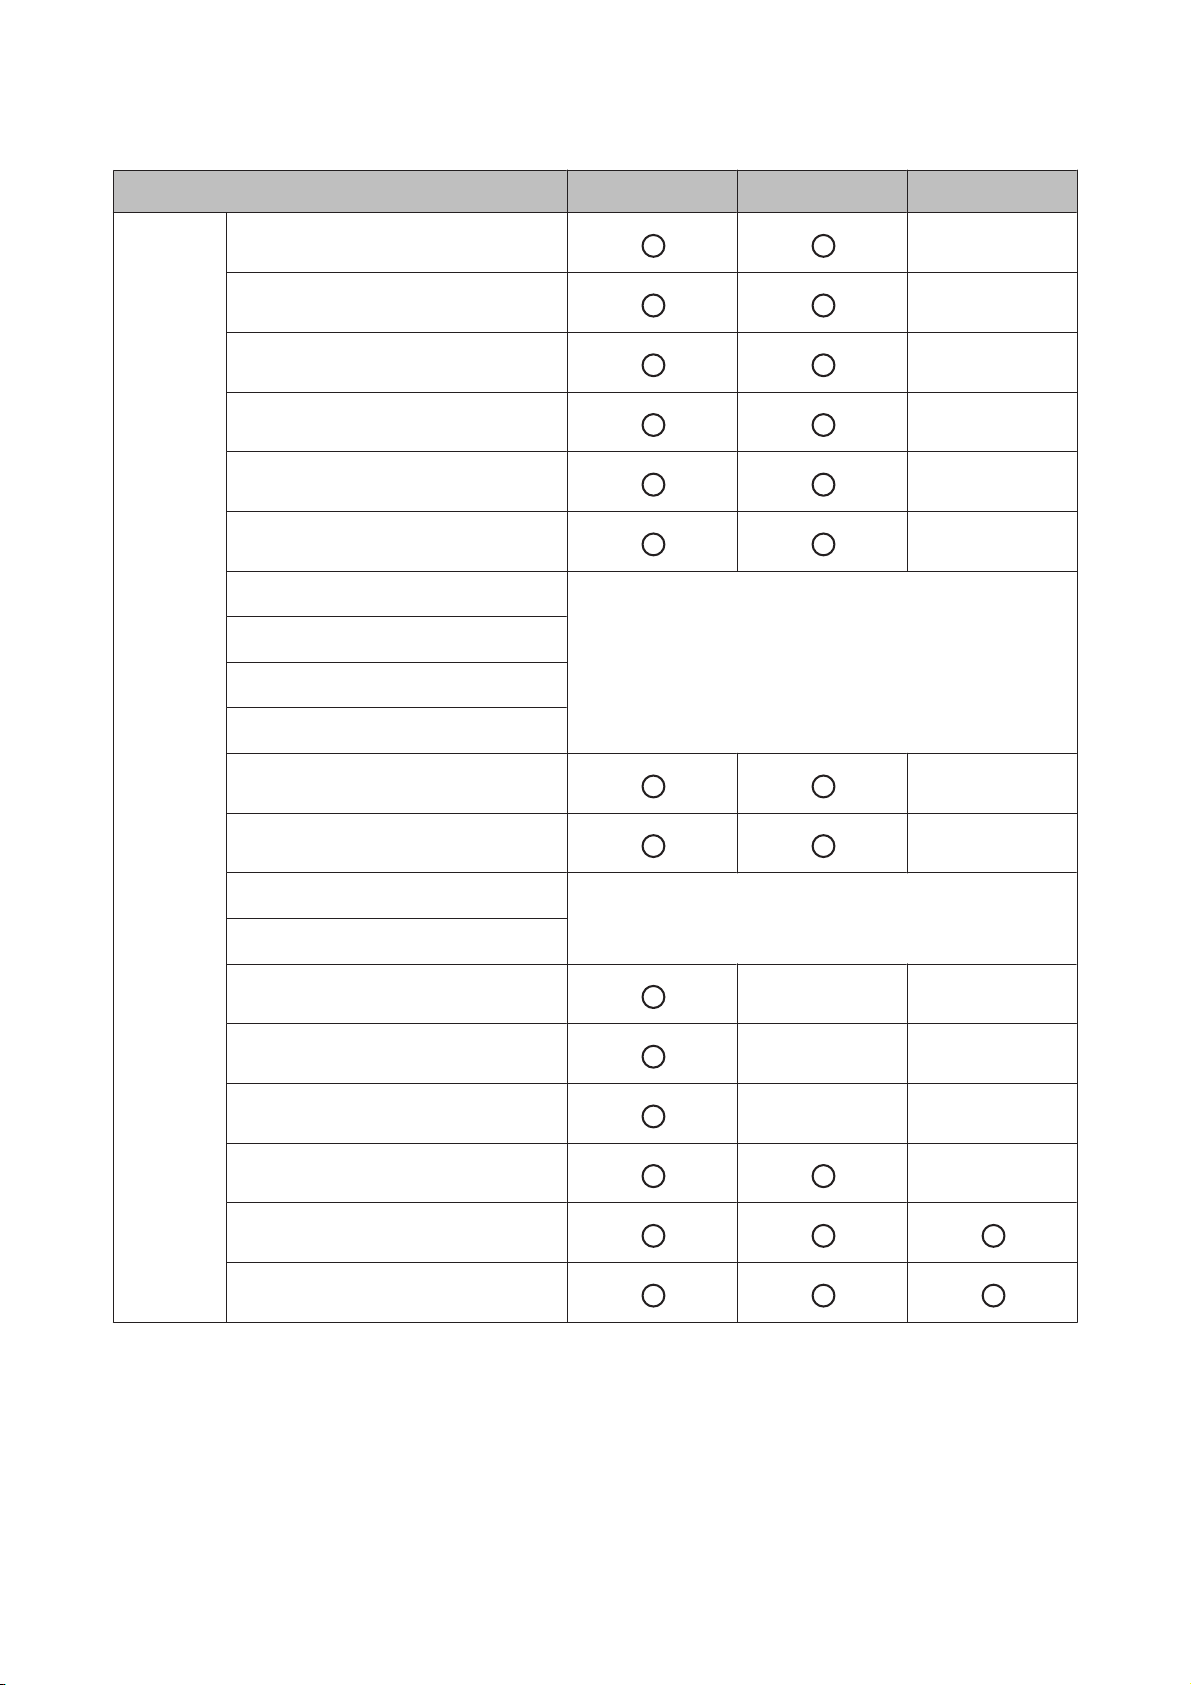
Items that can be measured by each measurement function for chronograph, interval, and goal change according to
the settings for the GPS signal (GPS on/off) and the HR monitor.
When GPS is off for indoor mode (SF-710/SF510 only), the route is not recorded.
: Measuring possible
- : Cannot measure
* : Cannot measure during indoor modeU “Indoor mode (SF-710/SF-510 only)” on page 30
SF-710 SF-510 SF-310
Measure
ment
item
(display
name)
Distance (Dist.)
Lap Distance (LapDist.)
Pace (Pace)
Average Pace (Av.Pace)
Lap Pace (LapSpd)
Speed (Speed)
Average Speed (Av.Spd)
Lap Speed (LapSpeed)
Split Time (Split)
Lap Time (Lap)
Time (Time)
Calories Burnt (Calories)
Altitude (Alt.)*
Guide Time (Guide)
Guide Distance (GuideDist.)
33
Page 34
SF-710/510/310 User's Guide
Preparing and Basic Operations
SF-710 SF-510 SF-310
Measure
ment
items
(display
name)
Stride (Stride)
Average Stride (Av.Stride)
Lap Stride (LapStride)
Pitch (Pitch)
Average Pitch (Av.Pitch)
Lap Pitch (LapPitch)
HR (HR)
Average HR (Av.HR)
Maximum HR (Max.HR)
Lap HR (LapHR)
Steps (Steps)
-
-
-
-
-
-
See the following table for items that can be measured
by the HR monitor settings
-
Lap Steps (LapStp)
HR Zone Time (SpentHR)
Time to HR Zone (TimeHR)
Total Ascent (Tot.Asc.)*
Total Descent (Tot.Des.)*
Grade (Grade)*
Latitude/Longitude (LAT/LONG)*
Estimated Time (Est.)
Estimated Distance (Est.Dist.)
-
See the following table for items that can be measured
by the HR monitor settings
--
--
--
-
34
Page 35
SF-710/510/310 User's Guide
Preparing and Basic Operations
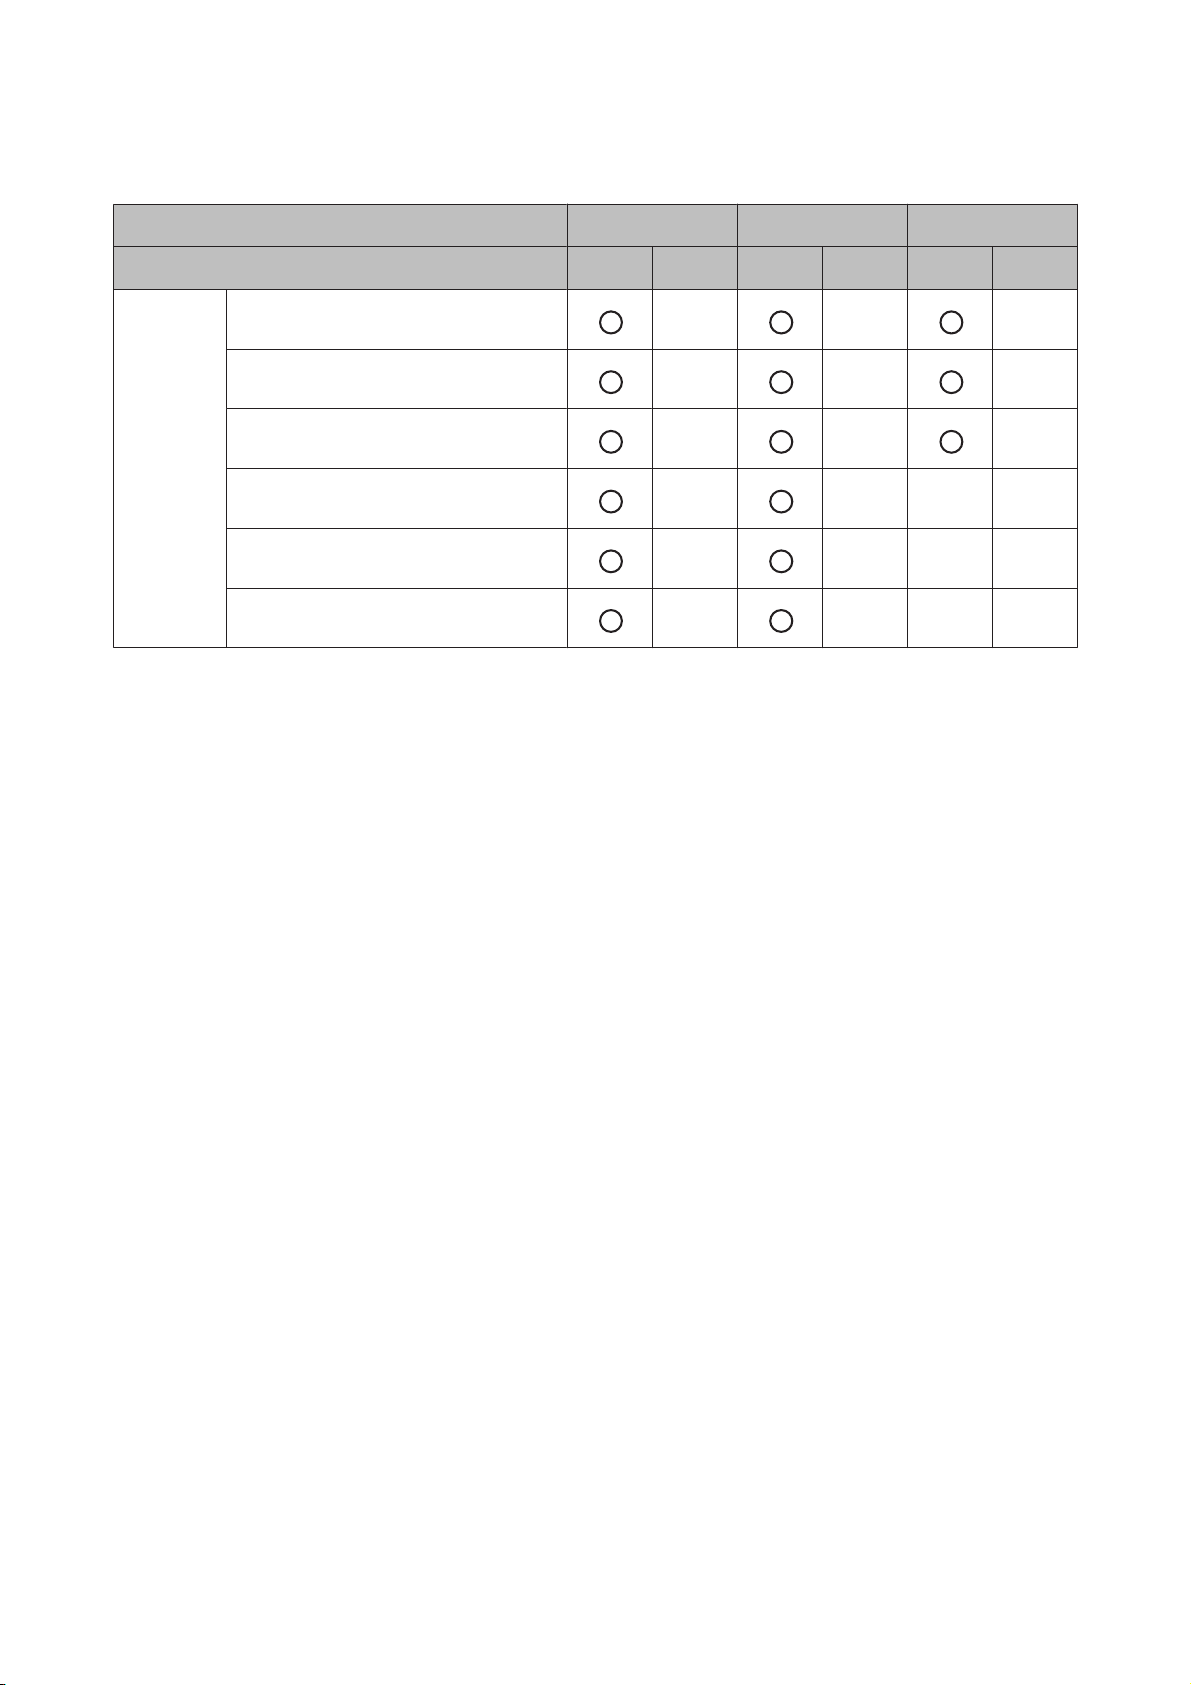
See the following table for items that can be measured by the HR monitor settings
SF-710 SF-510 SF-310
HR monitor status On Off On Off On Off
Measure
HR (HR)
ment
items
Lap HR (LapHR)
(display
name)
Average HR (Av.HR)
Maximum HR (Max.HR)
HR Zone Time (Spent.HR)
Time to HR Zone (Time.HR)
The HR monitor can be purchased as an optional item.
- - -
- - -
- - -
- ---
- ---
- ---
35
Page 36

SF-710/510/310 User's Guide
Measure
Measure
Using the positional information and time for the GPS signal, the time, distance, and speed are measured
automatically.
Also, training is supported for a variety of functions, such as the interval function.
U “Measuring Time, Distance, and Speed (Chronograph Function)” on page 37
U “Setting a Time and Distance for Hard and Light Workouts(Interval Function)” on page 42
U “Measure until the time or distance set in advance is reached (Goal function)” on page 50
U “Recording Laps Automatically (AT Lap Function)” on page 55
U “Automatically Start/Stop Measuring (AT Pause Function)” on page 57
U “Setting a Pace and Measuring (Target Pace Function)” on page 59
36
Page 37
SF-710/510/310 User's Guide
Measure
Measuring Time, Distance, and Speed (Chronograph Function)
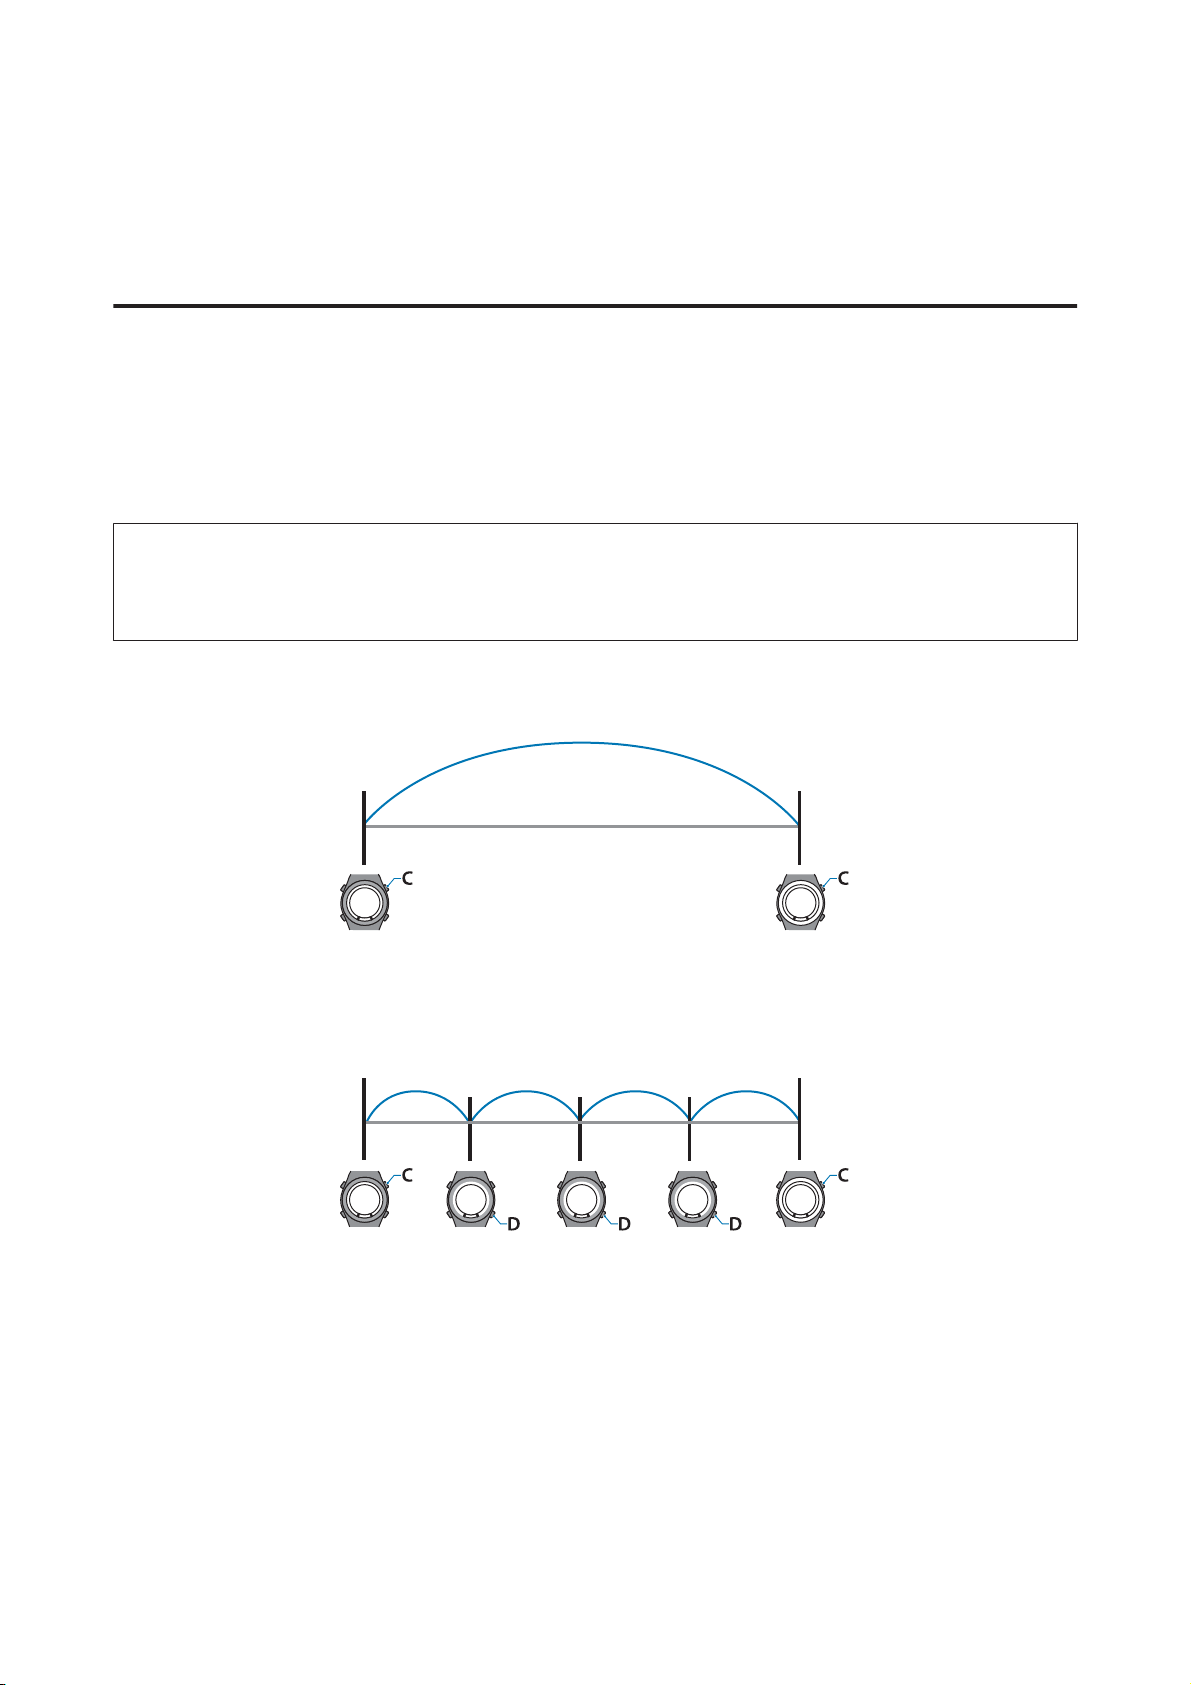
What is the chronograph function?
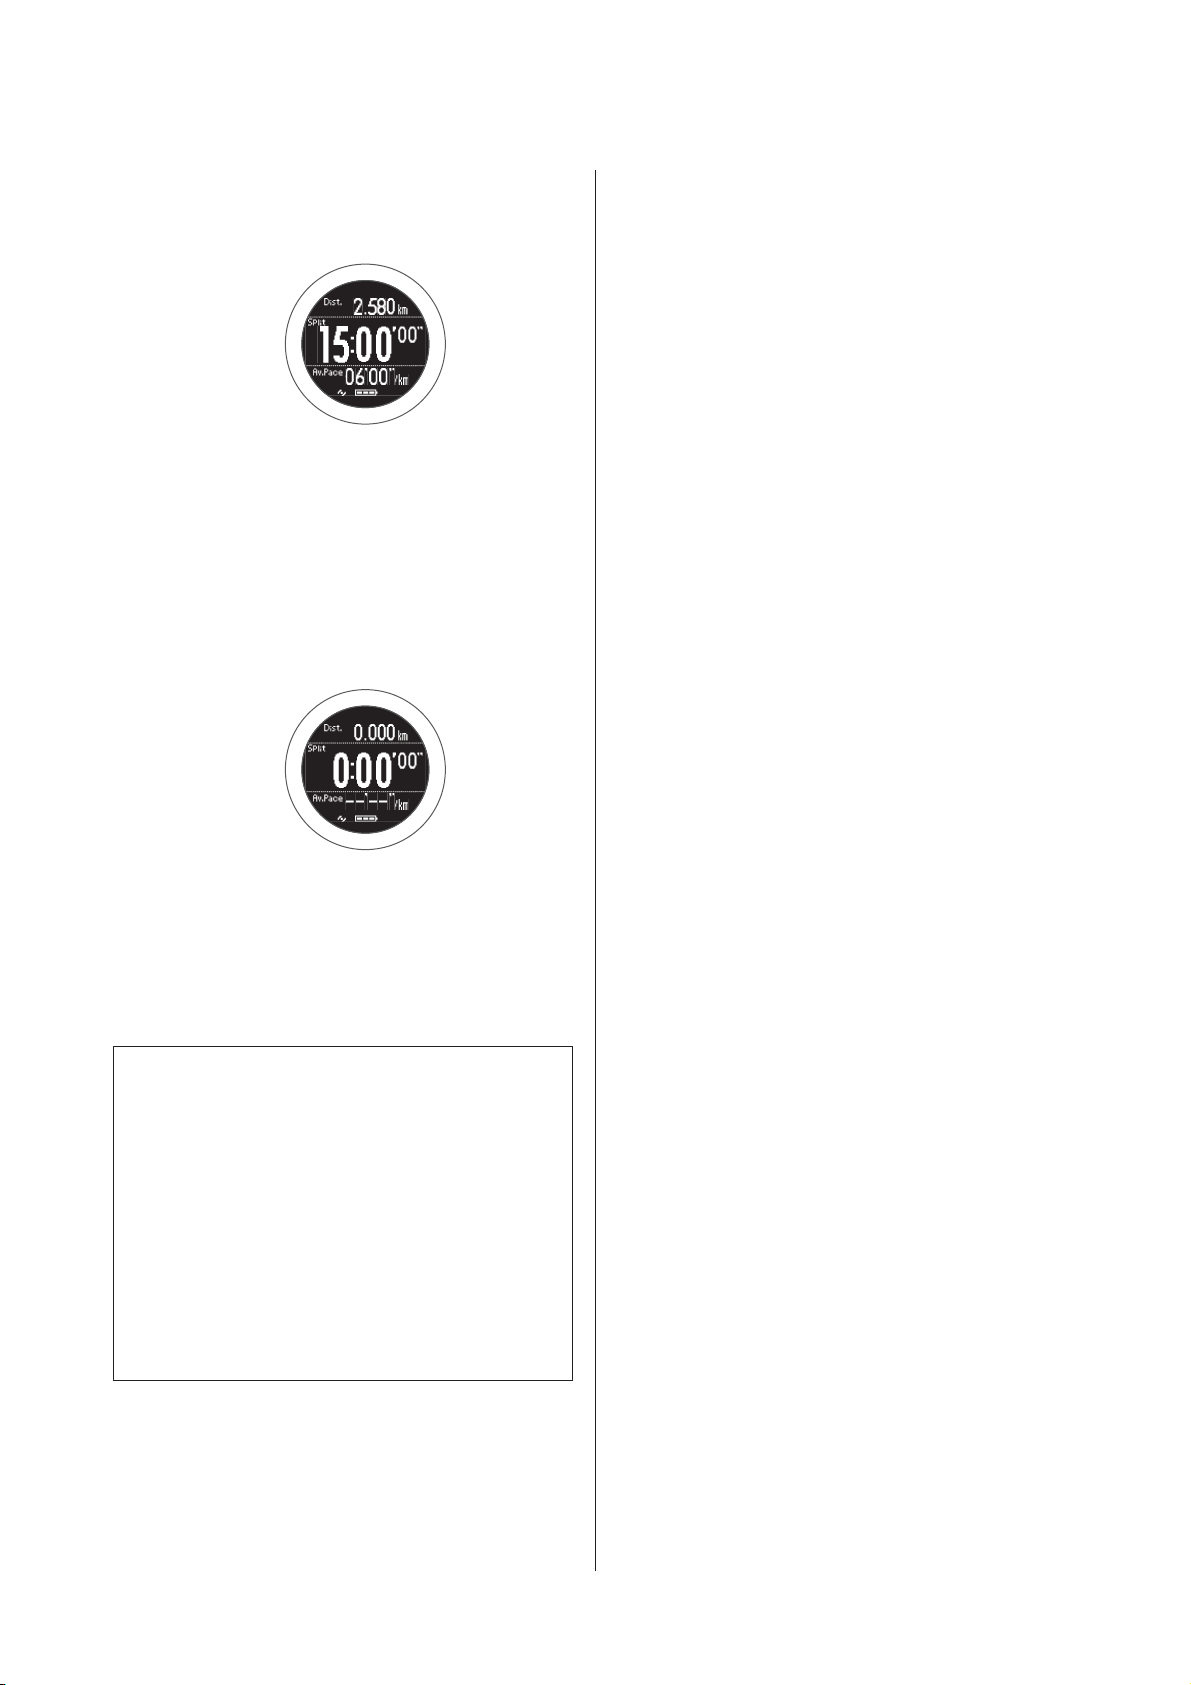
This function allows you to measure split times and lap times simultaneously. Also, since this d ev ic e is eq ui pp ed w it h a
GPS function, you can automatically measure distance, speed, and route using the positional information and time
from the GPS signal.
This is useful for a variety of activities such as running or walking, and can be used for competition or standard
exercise.
Note:
Set the Activity Type (Run, Walk, or Bike) before you start measuring.
U “Mes. Settings” on page 87
Split Time
Measures the elapsed time from the start.
Press C to start measuring, and press C again to stop measuring.
Lap Time
Records the elapsed time for each lap.
To record a lap, press D while measuring.
Also, when using the AT Lap function, laps are recorded automatically when a time or distance set in advance has been
reached.
U “Recording Laps Automatically (AT Lap Function)” on page 55
37
Page 38
SF-710/510/310 User's Guide
Measure
Measuring
Important:
c
❏ When performing GPS positioning, make
sure the screen is facing up and you are
outside with no obstructions overhead.
U “Specifying a GPS (GPS Positioning)” on
page 28
❏ It usually takes less than two minutes to
complete GPS positioning.
If it takes more than two minutes or Failed is
displayed, we recommend selecting Cancel,
moving to a different location, and trying
again.
Operation buttons
Note:
❏ You can skip GPS positioning if you want to
start measuring immediately or if it is taking
too long.
U “Skipping GPS positioning” on page 29
❏ Use indoor mode when GPS positioning
cannot be performed because you are inside
and so on.
U “Indoor mode (SF-710/SF-510 only)” on
page 30
❏ Screens are explained using the default
screens. You can invert the screen's display.
U “Sys. Settings” on page 93
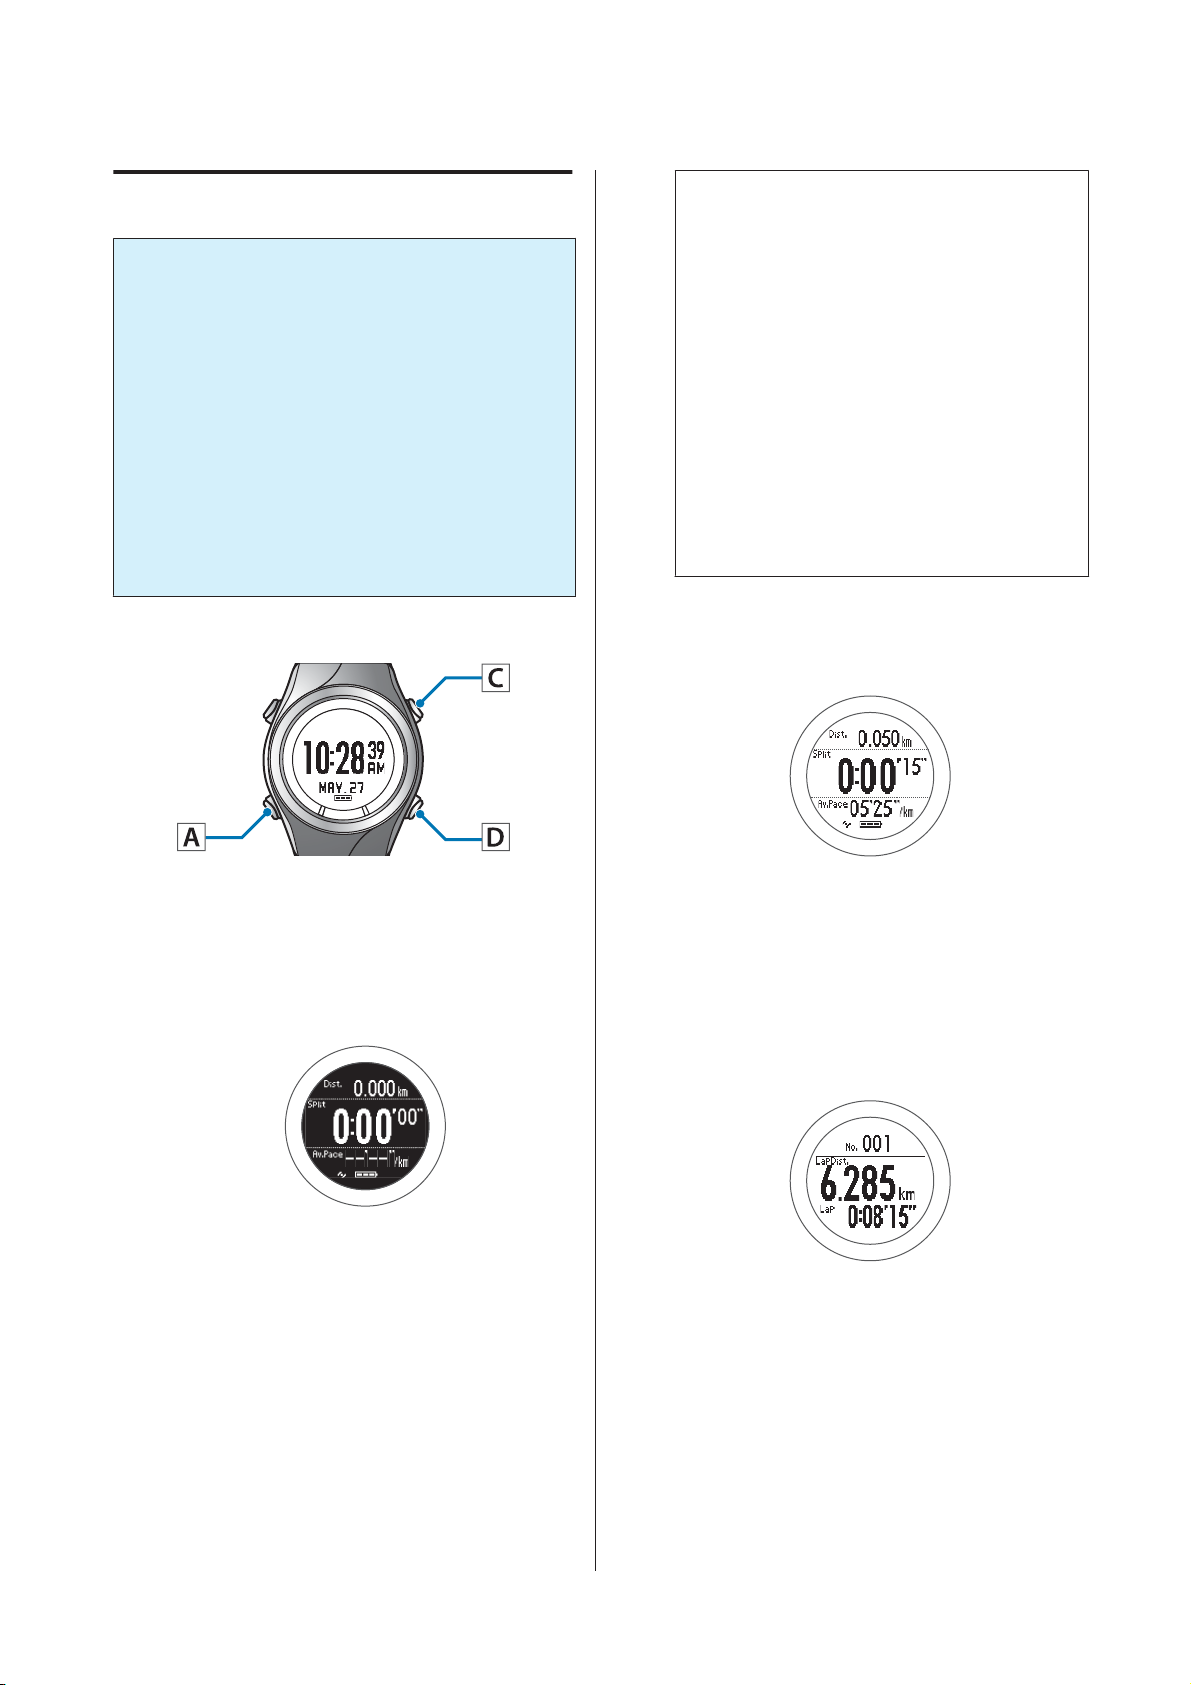
Start measuring.
B
Press C.
Display the measurement screen.
A
Press C on the time screen.
GPS positioning starts, and the measurement
screen is displayed once positioning is complete.
Record the lap.
C
Press D while measuring.
The Lap Hold Screen* is displayed for 10
seconds, and then the measurement screen is
displayed.
U “Lap Hold Screen” on page 41
* The screen display differs depending on the
settings.
U “Screen Pattern Table” on page 96
38
Page 39
SF-710/510/310 User's Guide
Stop measuring.
D
Press C while measuring.
Press C to start measuring again.
Reset the measurement results.
E
Hold down D while measuring is stopped.
When you reset the display, it returns to the
status before measuring started allowing you to
start the next measurement.
Measure
Data measured up to that point is stored in the
device's memory, and you can check it by
pressing D on the time screen.
U “Checking Measurement Data” on
page 62
Note:
To stop measuring and return to the time screen
❏ After resetting the measurement results in step 5,
hold down A.
❏ While the screen in step 4 is displayed while
measurement is stopped, hold down C. The
measurement results are reset and the time screen is
displayed.
❏ If no operations are made for 60 minutes on a screen
other than the measuring screen, the time screen is
displayed.
39
Page 40
SF-710/510/310 User's Guide
Measure
Screen Display
Measurement screen
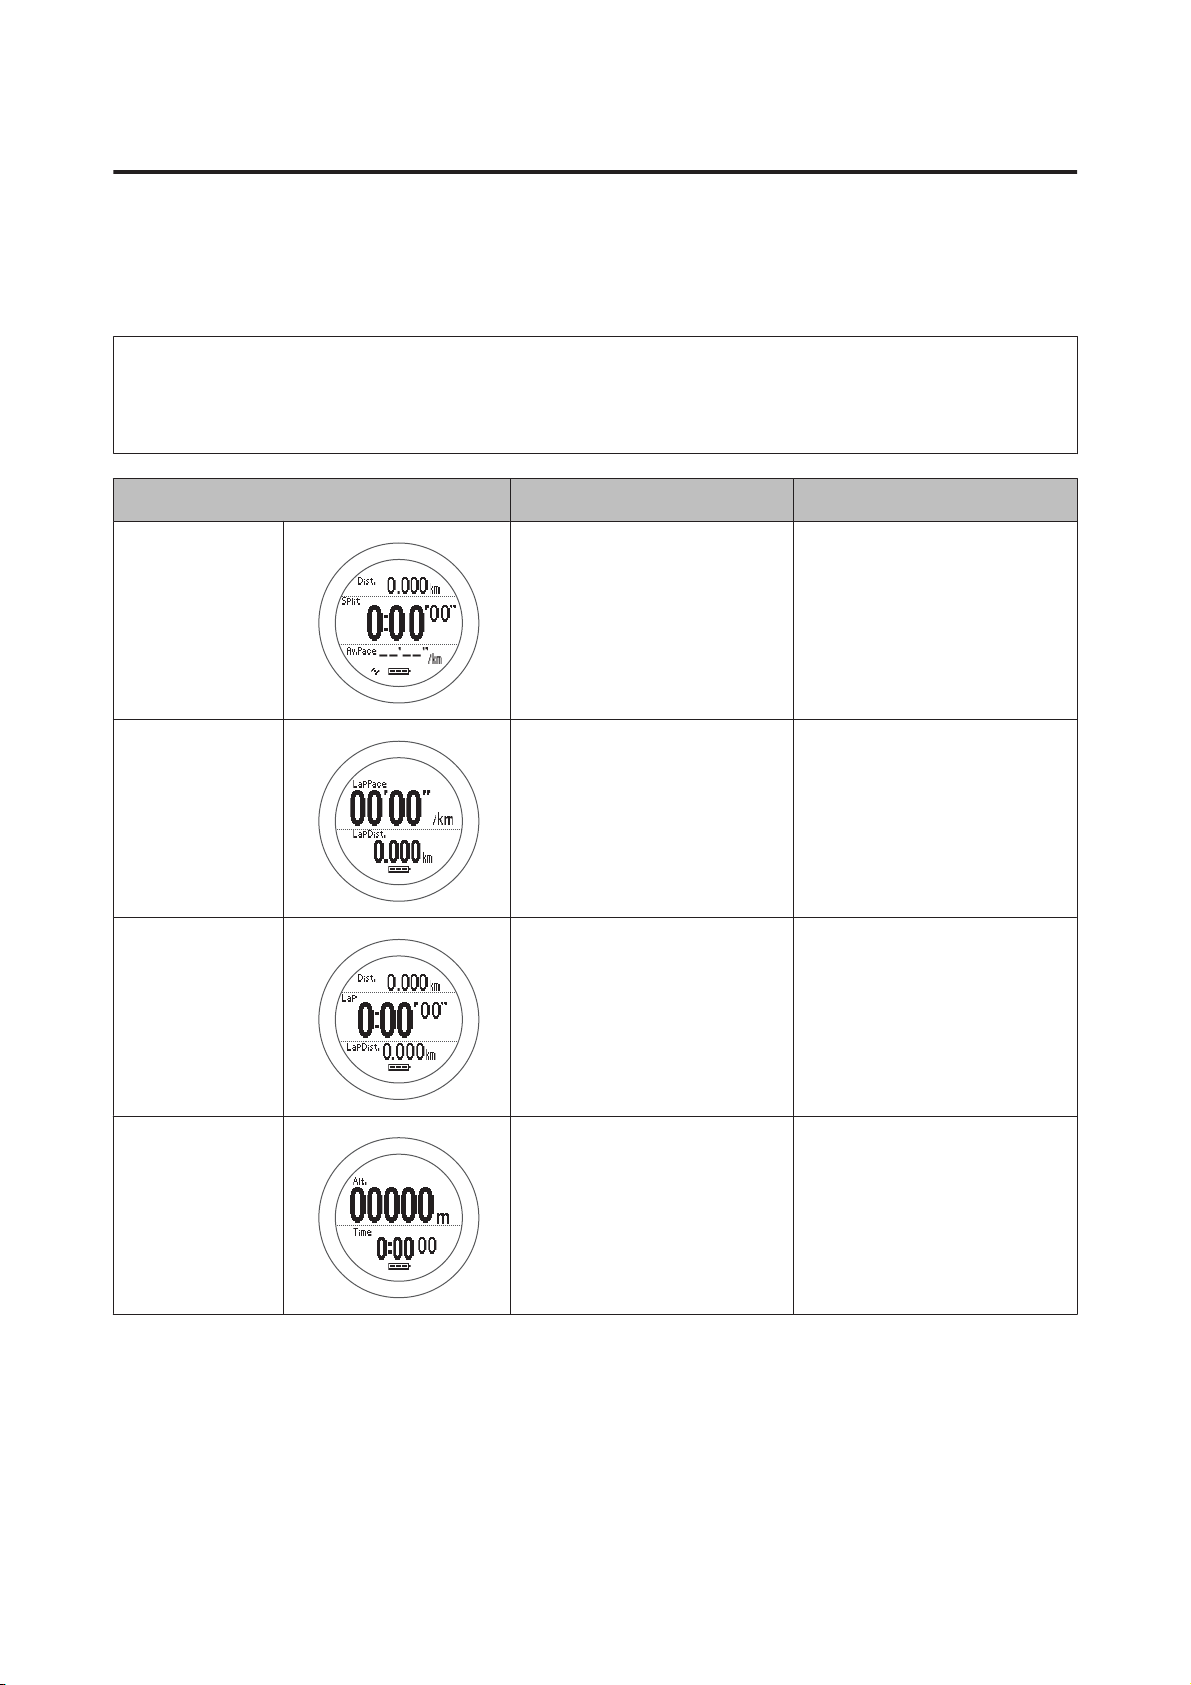
There are four measurement screens available. Press A to change the screen.
Note:
You can change the screen pattern and the measurement items displayed for each screen.
U “Screen” on page 95
Screen Screen Pattern (Default) Measurement Item (Default)
Screen1 3 Lines Distance (Dist.)
Split Time (Split)
Average Pace (Av.Pace)
Screen2
Screen3
Screen4
2 Lines Lap Pace (LapPace)
Lap Distance (LapDist.)
3 Lines Distance (Dist.)
Lap Time (Lap)
Lap Distance (LapDist.)
2 Lines Altitude (Alt.)
Time (Time)
40
Page 41
SF-710/510/310 User's Guide
Measure
Lap Hold Screen
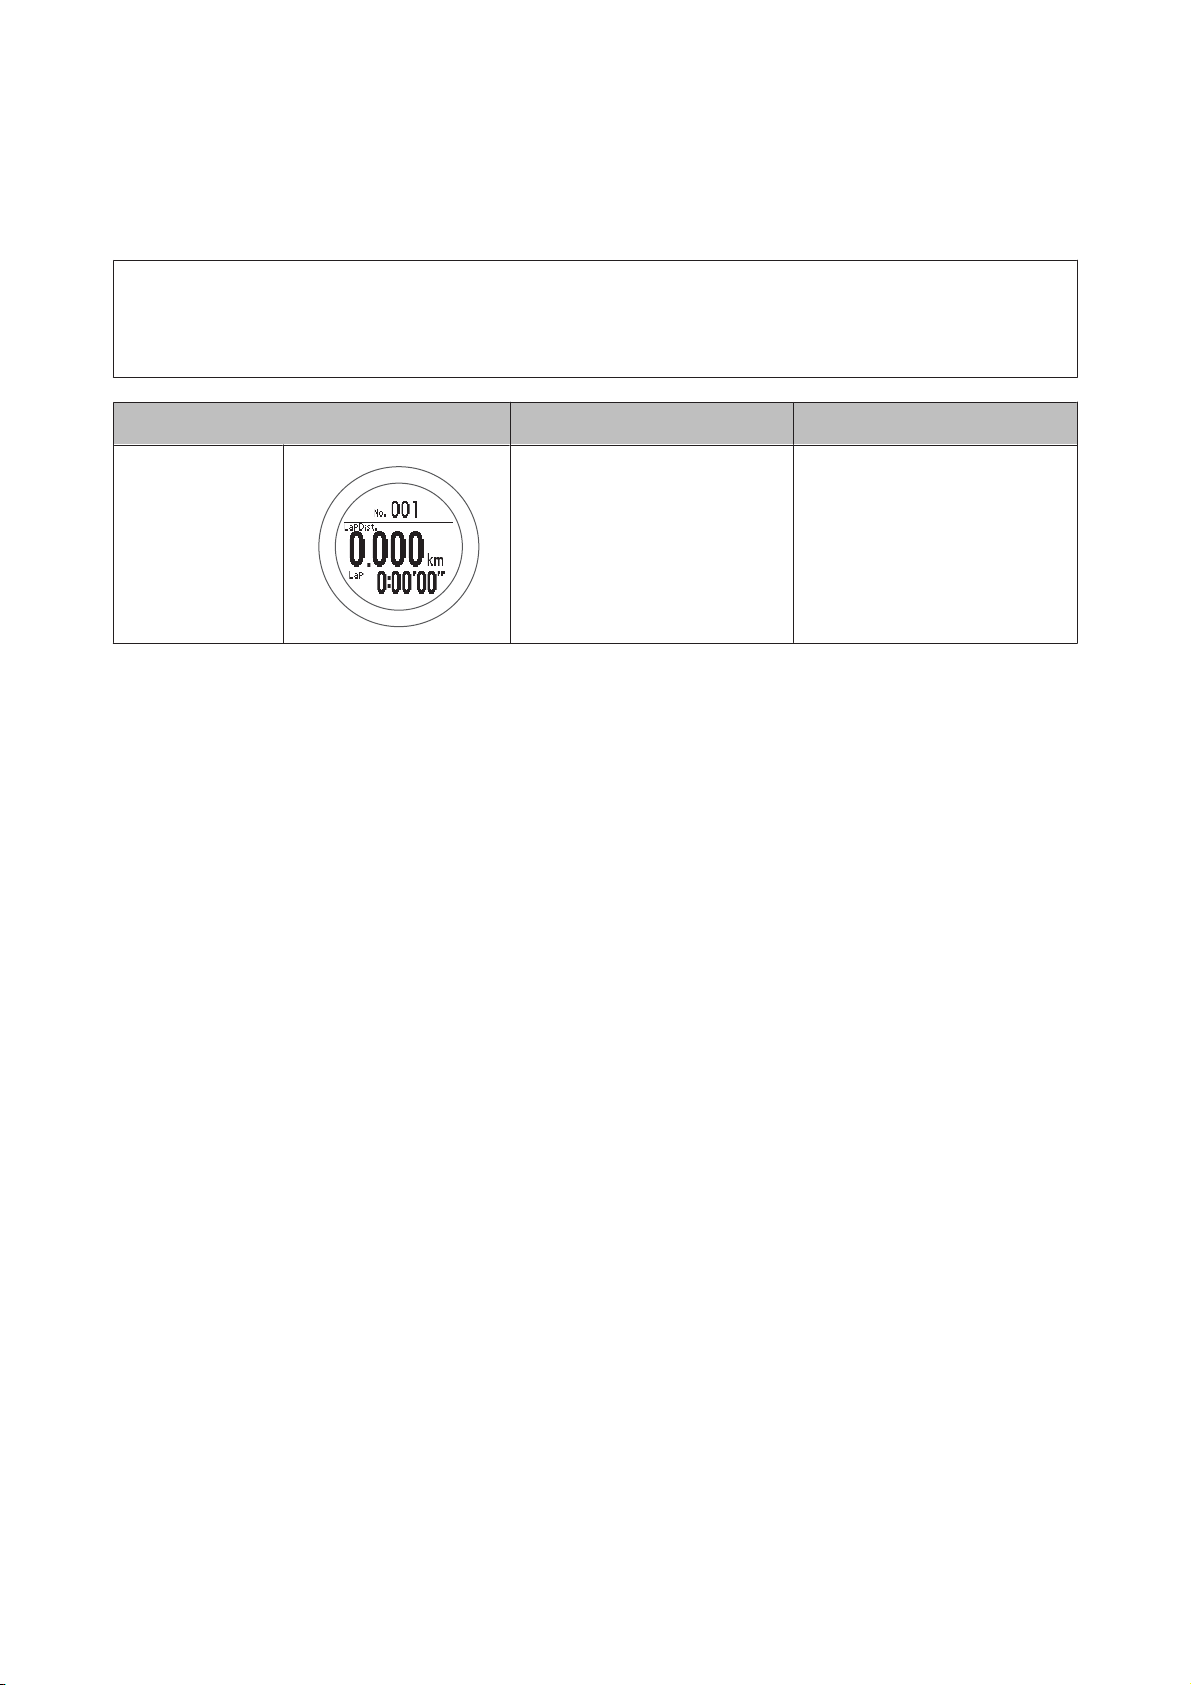
The Lap Hold Screen is displayed for 10 seconds when a lap is recorded.
Note:
You can change the screen pattern and the measurement items displayed.
U “Screen” on page 95
Screen Screen Pattern (Default) Measurement Item (Default)
Lap Hold Screen 2 Lines Lap Distance (LapDist.)
Lap Time (Lap)
41
Page 42
SF-710/510/310 User's Guide
Measure
Setting a Time and Distance for Hard and Light Workouts (Interval Function)
What is the Interval Function?
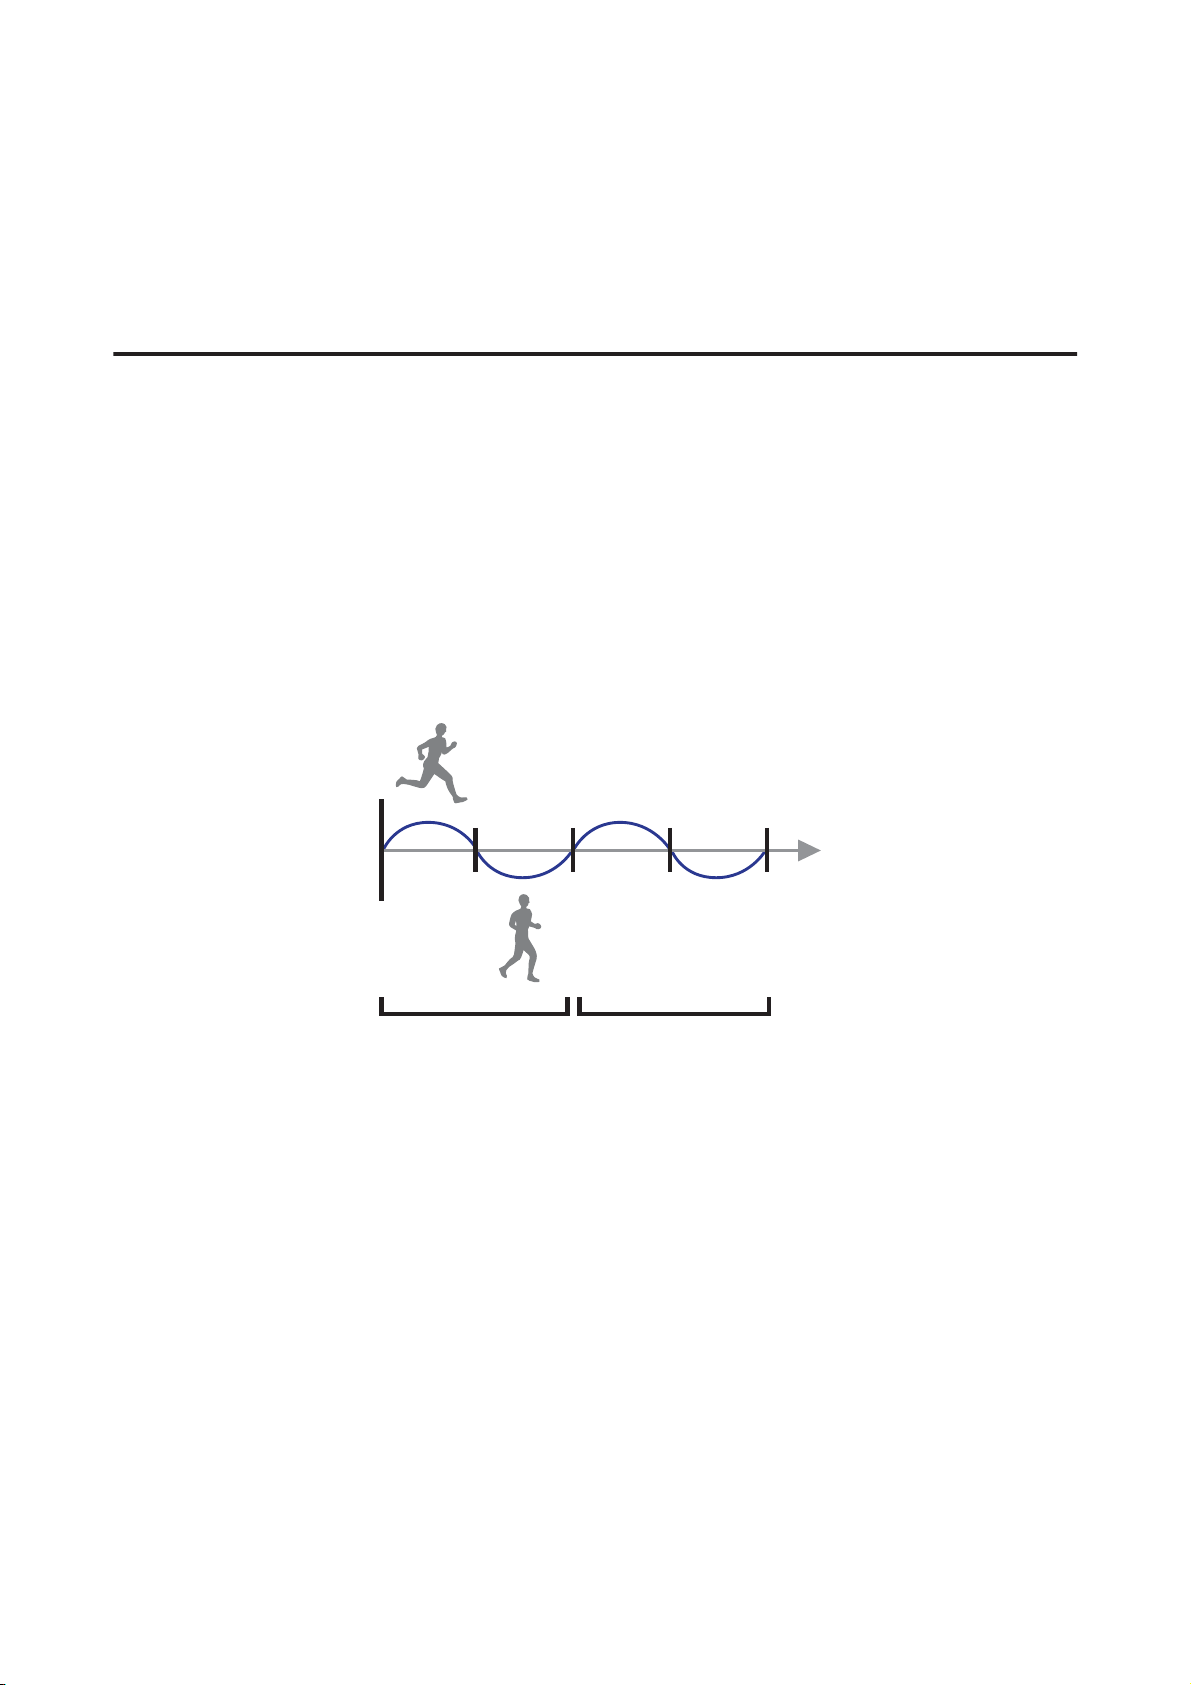
This function allows you to perform sets of hard (sprint) and light (rest) exercise.
You can set the time and distance, and create an exercise menu.
An alarm notifies you to change between sprint and rest times.
Sprint: Hard exercise
Rest: Light exercise
Repeat No.: Number of times to repeat one set of sprinting and resting
Sprint
Rest
Repeat No. 1 2
42
Page 43
SF-710/510/310 User's Guide
Measure
Setting Interval Conditions and Measuring
Important:
c
❏ When performing GPS positioning, make
sure the screen is facing up and you are
outside with no obstructions overhead.
U “Specifying a GPS (GPS Positioning)” on
page 28
❏ It usually takes less than two minutes to
complete GPS positioning.
If it takes more than two minutes or Failed is
displayed, we recommend selecting Cancel,
moving to a different location, and trying
again.
Operation buttons
Note:
❏ You can skip GPS positioning if you want to
start measuring immediately or if it is taking
too long.
U “Skipping GPS positioning” on page 29
❏ Use indoor mode when GPS positioning
cannot be performed because you are inside
and so on.
U “Indoor mode (SF-710/SF-510 only)” on
page 30
Displays the Mes. Settings menu.
B
Hold down B on the measurement screen.
Setting interval conditions
Display the measurement screen.
A
Press C on the time screen.
GPS positioning starts, and the measurement
screen is displayed once positioning is complete.
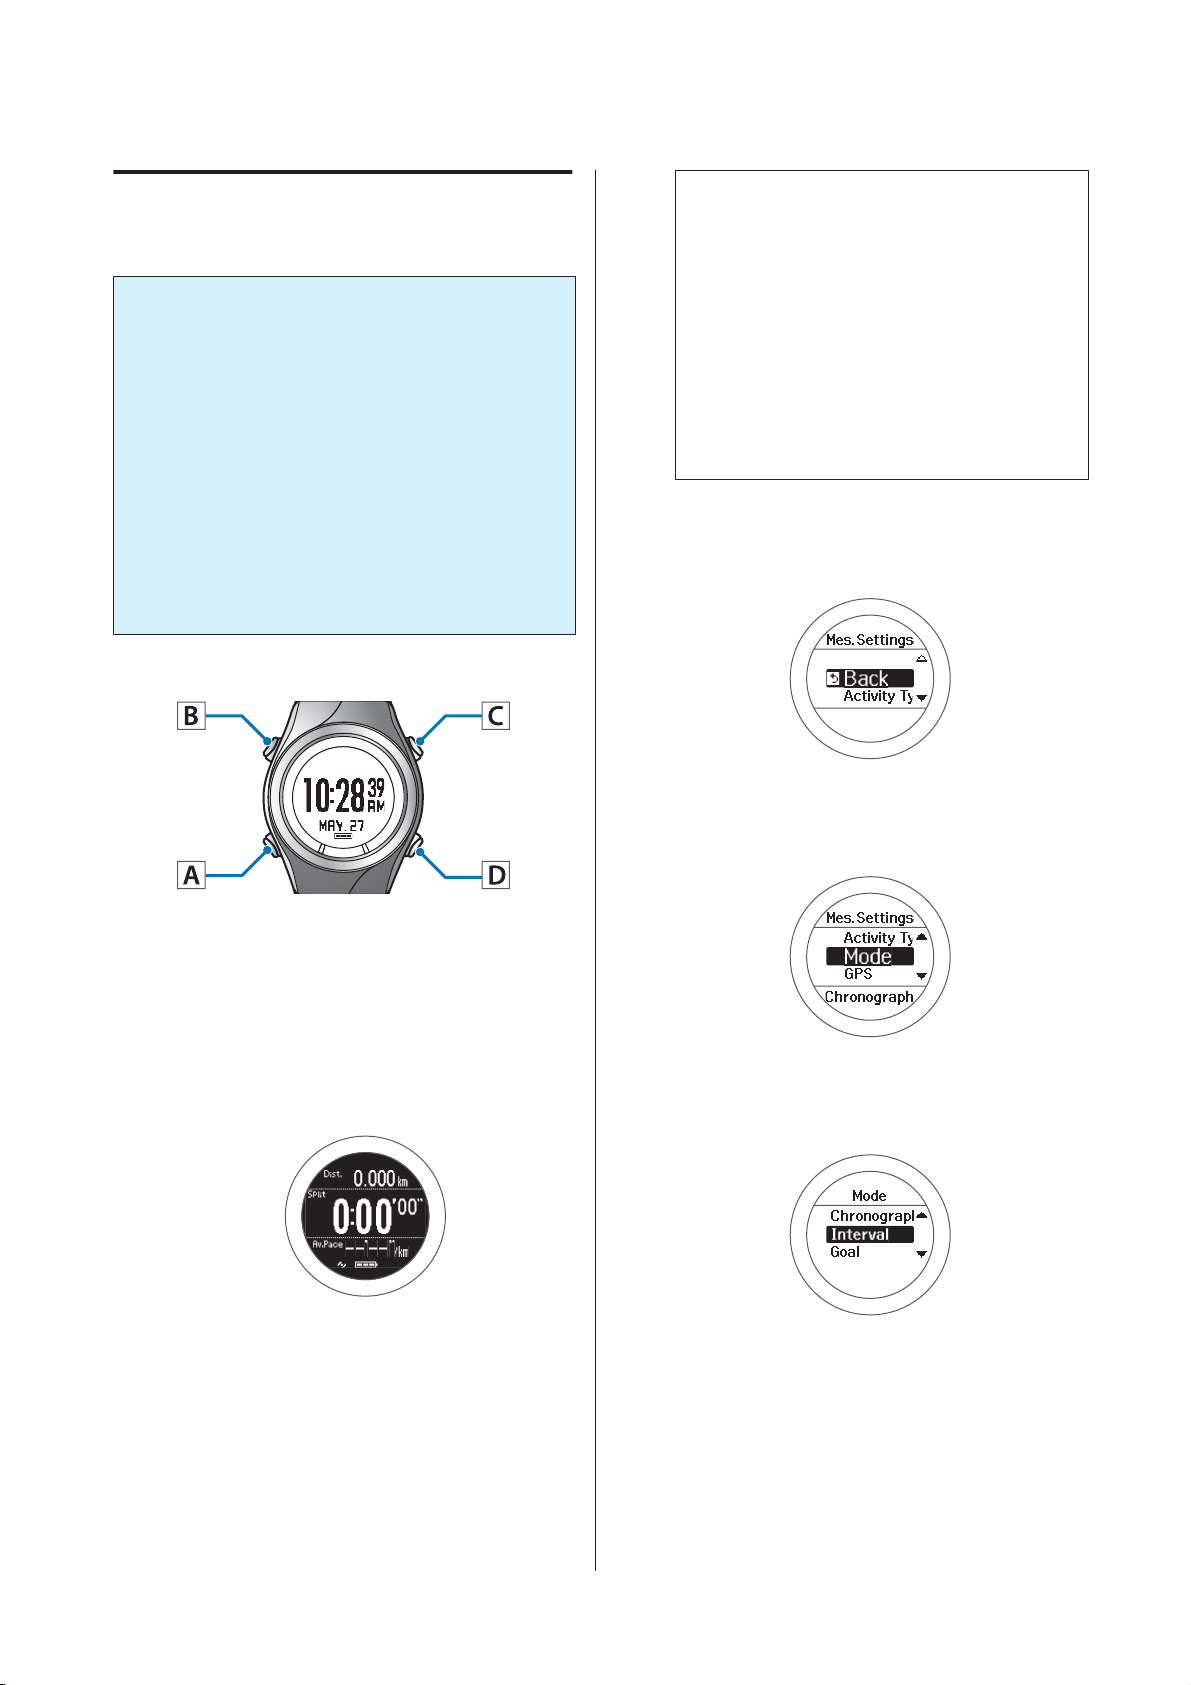
Select Mode.
C
Use C/D to select, and then press A.
Select Interval.
D
Use C/D to select, and then press A.
43
Page 44
SF-710/510/310 User's Guide
Measure
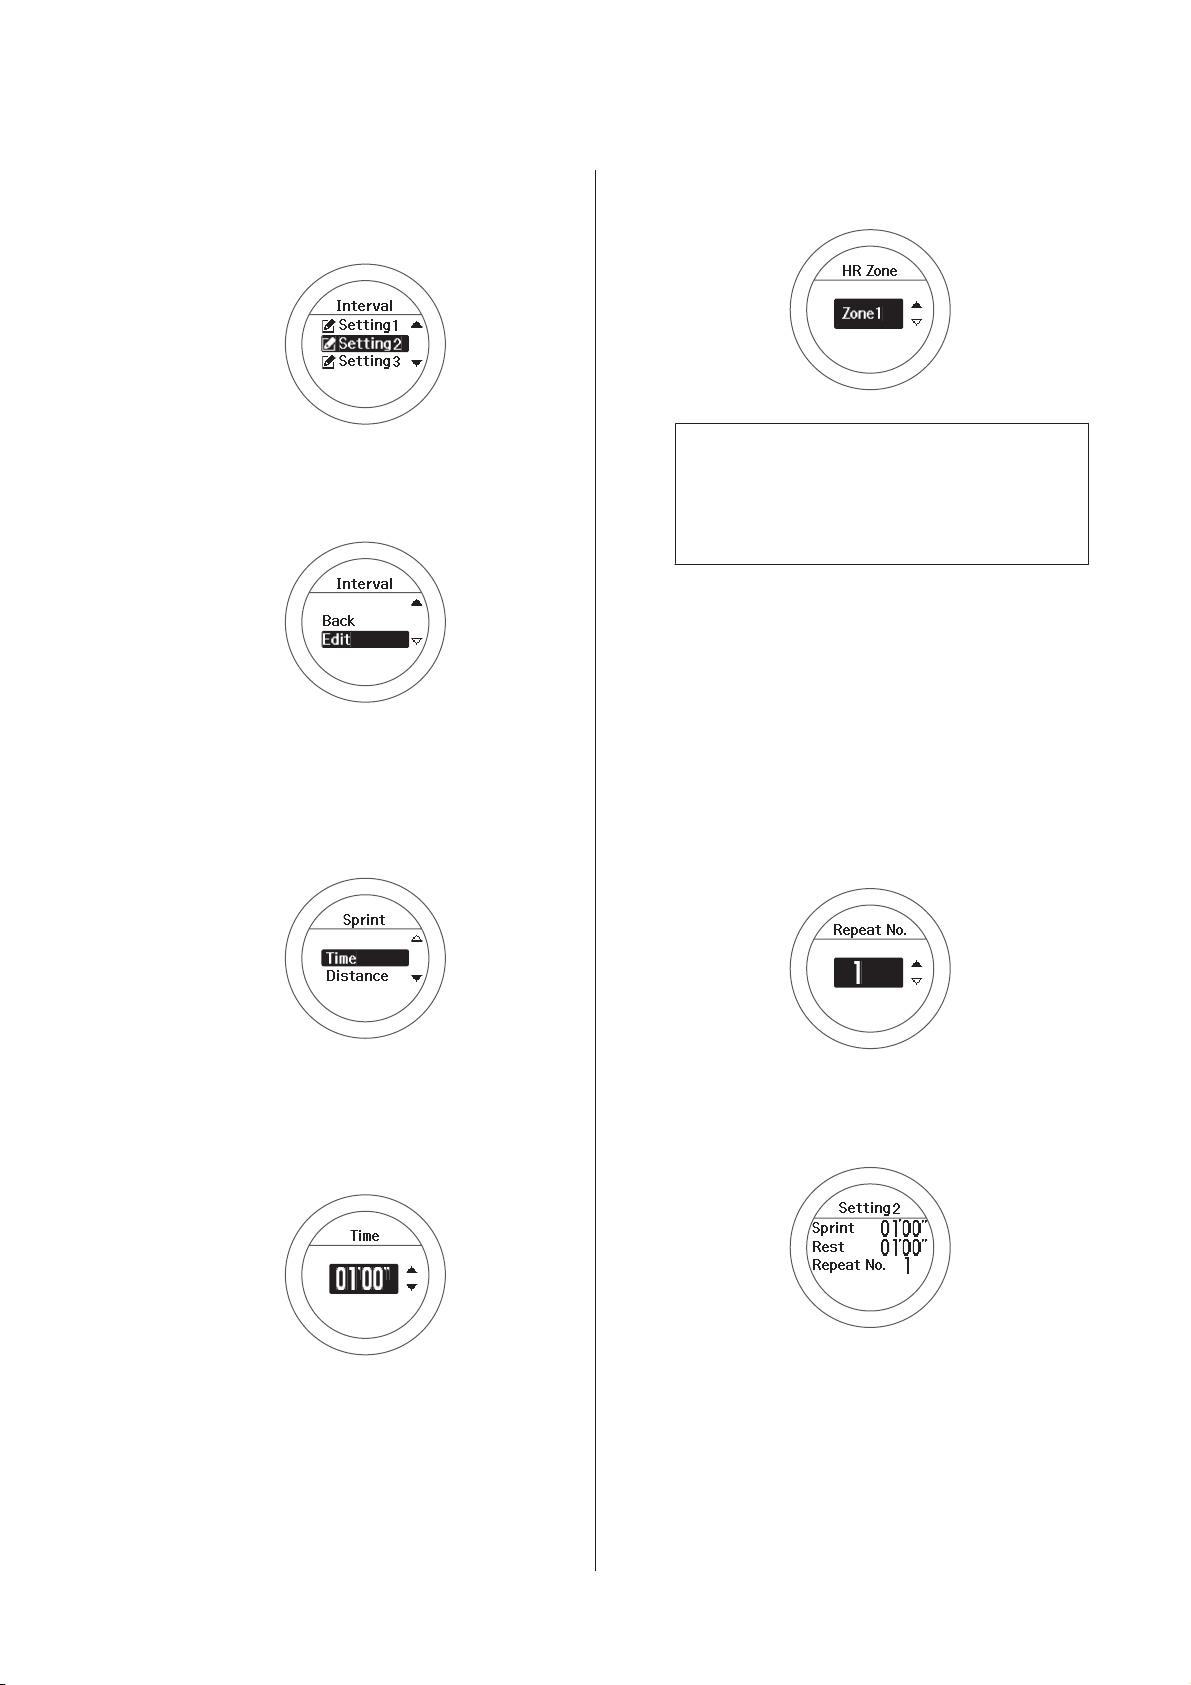
Select settings 1, 2, or 3.
E
Use C/D to select, and then press A.
Select Edit.
F
Use C/D to select, and then press A.
Select whether to set distance or time
G
as the length of the sprint (hard
exercise).
Use C/D to select, and then press A.
An alarm sounds if you are outside the set heart
rate zone.
Note:
You can check or change the value set for the heart
rate in each heart rate zone in User Settings.
U “User Settings” on page 92
Set the rest (light exercise).
J
Follow steps 7 to 9.
Set the Repeat No. (number of times
K
to repeat one set of sprinting and
resting).
Use C/D to set, and then press A.
Hold down C/D to speed through the numbers.
Set the time or distance.
H
Use C/D to set, and then press A.
Hold down C/D to speed through the numbers.
Set the heart rate zone you want to
I
maintain while sprinting.
Use C/D to select, and then press A.
Check the set content.
L
After checking, press A.
44
Page 45
SF-710/510/310 User's Guide
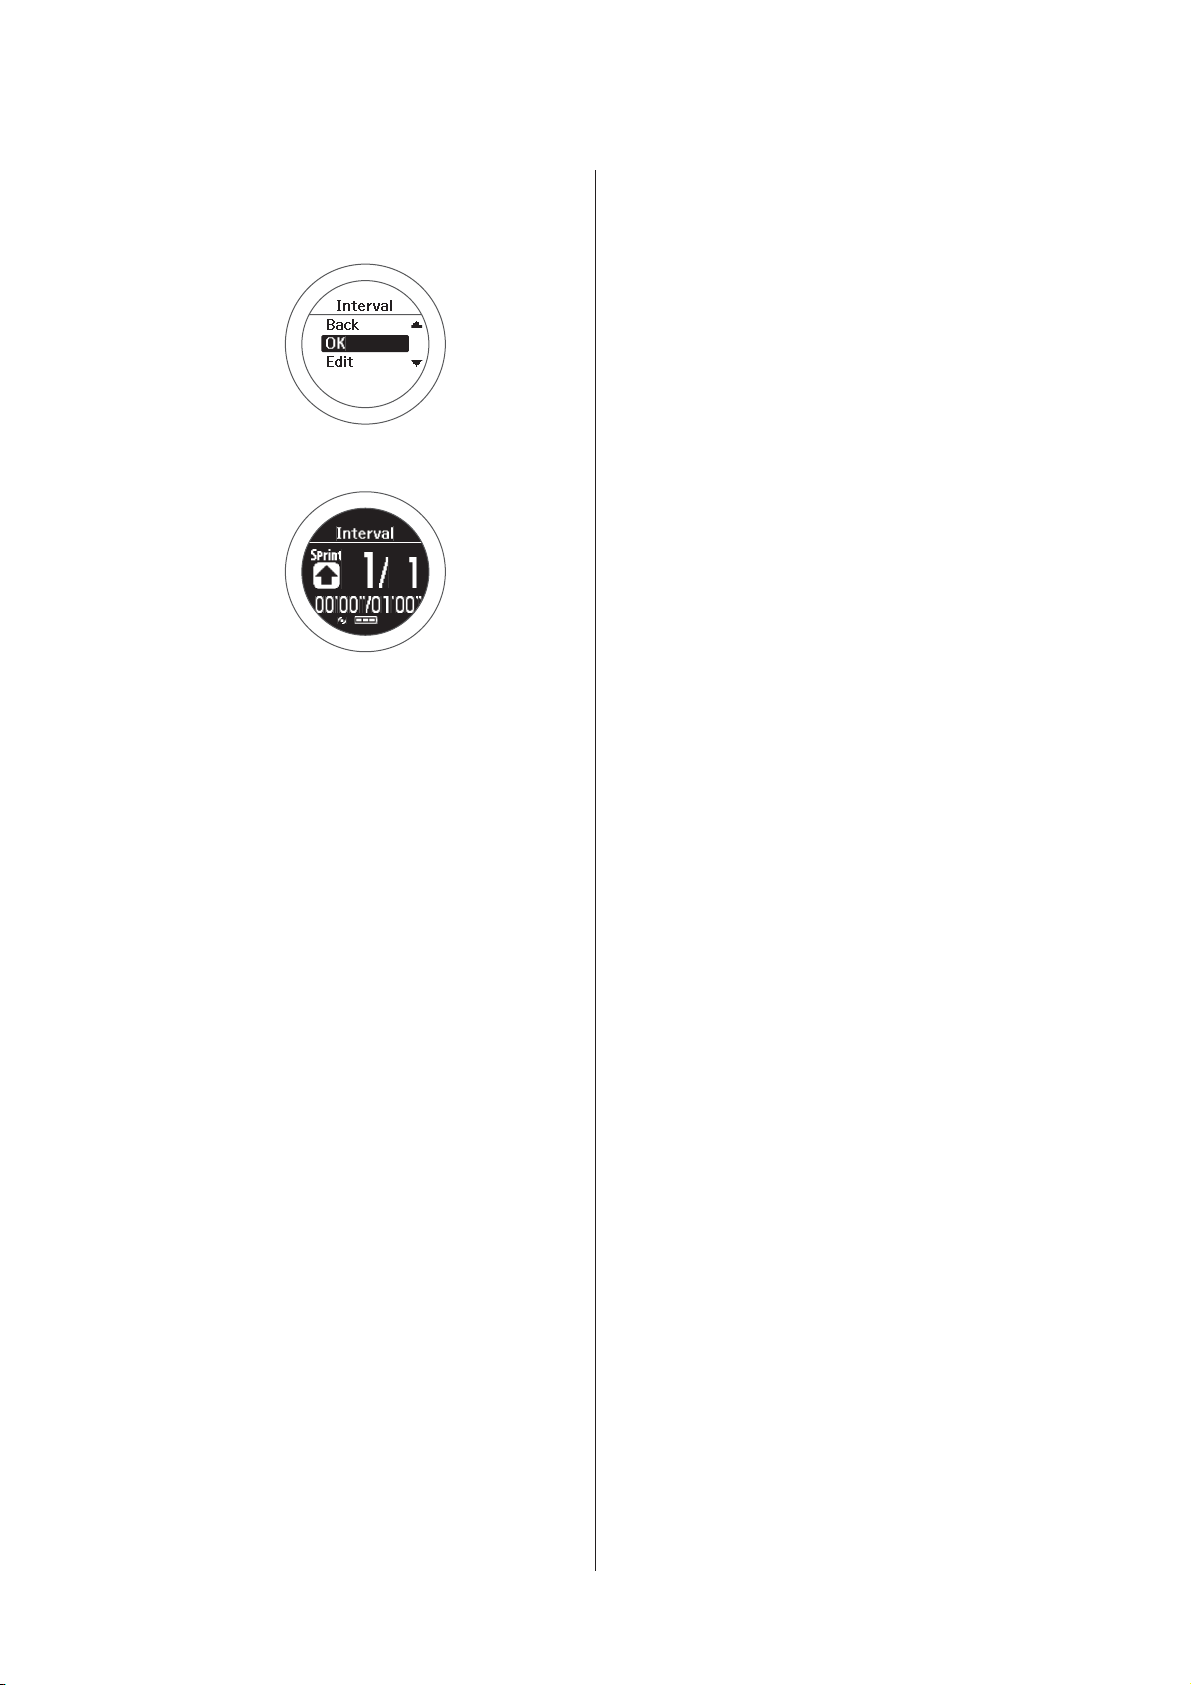
Select OK.
M
Use C/D to select, and then press A.
The interval measurement screen is displayed.
Measure
45
Page 46
SF-710/510/310 User's Guide
Measure
Measuring
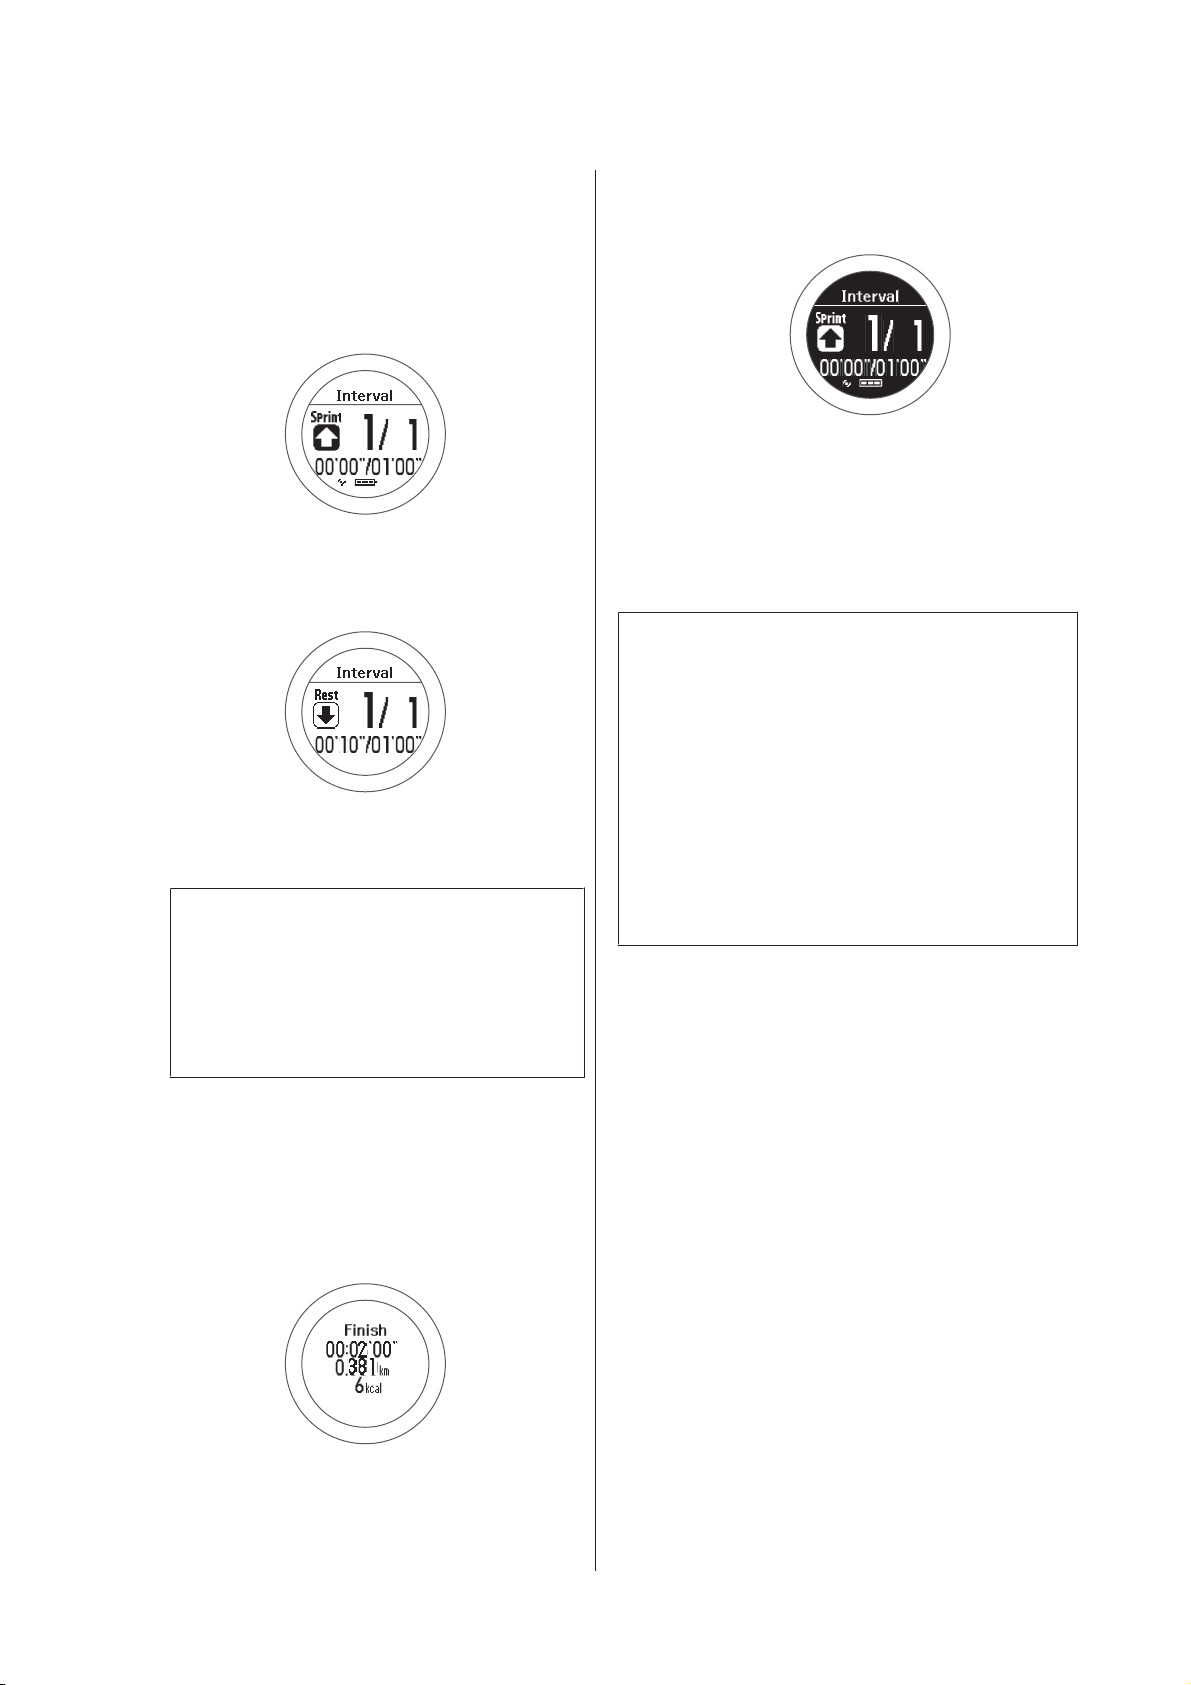
Start measuring.
A
Press C.
Sprint measuring starts.
When the sprint time (or sprint distance) has
passed, an alarm sounds and rest measuring
starts automatically.
When the repeat number is set to two or more,
the sprint and rest set is repeated.
Note:
❏ If you press D while measuring, you can
change from sprint to rest, and then back to
sprint again.
When you reset the display, it returns to the
status before measuring started allowing you to
start the next measurement.
Data measured up to that point is stored in the
device's memory, and you can check it by
pressing D on the time screen.
U “Checking Measurement Data” on
page 62
Note:
To stop measuring and return to the time screen
❏ After resetting the measurement results in step 3,
hold down A.
❏ While the screen in step 2 is displayed while
measurement is stopped, hold down C. The
measurement results are reset and the time screen is
displayed.
❏ If no operations are made for 60 minutes on a screen
other than the measuring screen, the time screen is
displayed.
❏ To stop while exercising, press C. Press C to
resume measuring.
Finish measuring.
B
Measuring finishes automatically after repeating
the specified sprint and rest sets.
When you finish, the time, distance, and calories
burnt are displayed.
Reset the measurement results.
C
Hold down D while measuring is stopped.
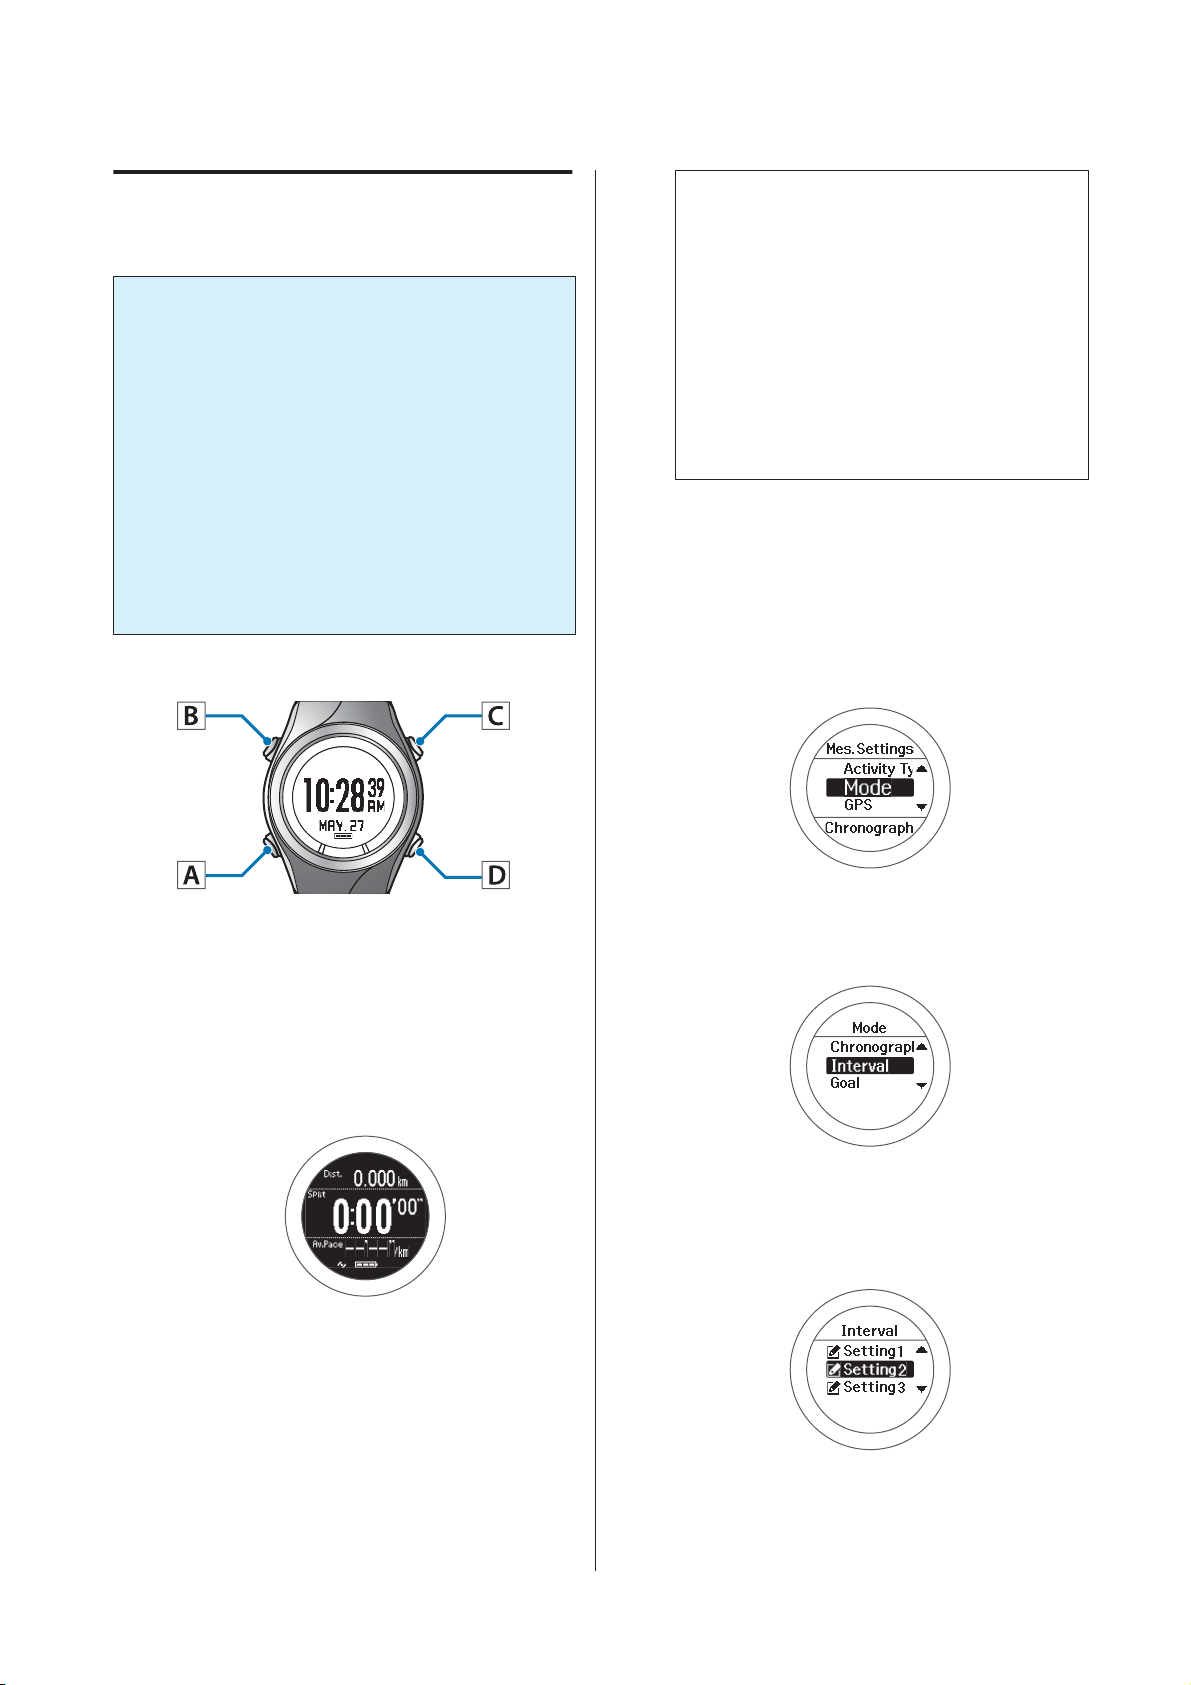
46
Page 47
SF-710/510/310 User's Guide
Measure
Loading Interval Conditions that have Already been Set
Important:
c
❏ When performing GPS positioning, make
sure the screen is facing up and you are
outside with no obstructions overhead.
U “Specifying a GPS (GPS Positioning)” on
page 28
❏ It usually takes less than two minutes to
complete GPS positioning.
If it takes more than two minutes or Failed is
displayed, we recommend selecting Cancel,
moving to a different location, and trying
again.
Operation buttons
Note:
❏ You can skip GPS positioning if you want to
start measuring immediately or if it is taking
too long.
U “Skipping GPS positioning” on page 29
❏ Use indoor mode when GPS positioning
cannot be performed because you are indoors
and so on.
U “Indoor mode (SF-710/SF-510 only)” on
page 30
Displays the Mes. Settings menu.
B
Hold down B on the measurement screen.
Select Mode.
C
Use C/D to select, and then press A.
Loading interval conditions
Display the measurement screen.
A
Press C on the time screen.
GPS positioning starts, and the measurement
screen is displayed once positioning is complete.
Select Interval.
D
Use C/D to select, and then press A.
Select settings 1, 2, or 3.
E
Use C/D to select the registered setting, and then
press A.
47
Page 48
SF-710/510/310 User's Guide
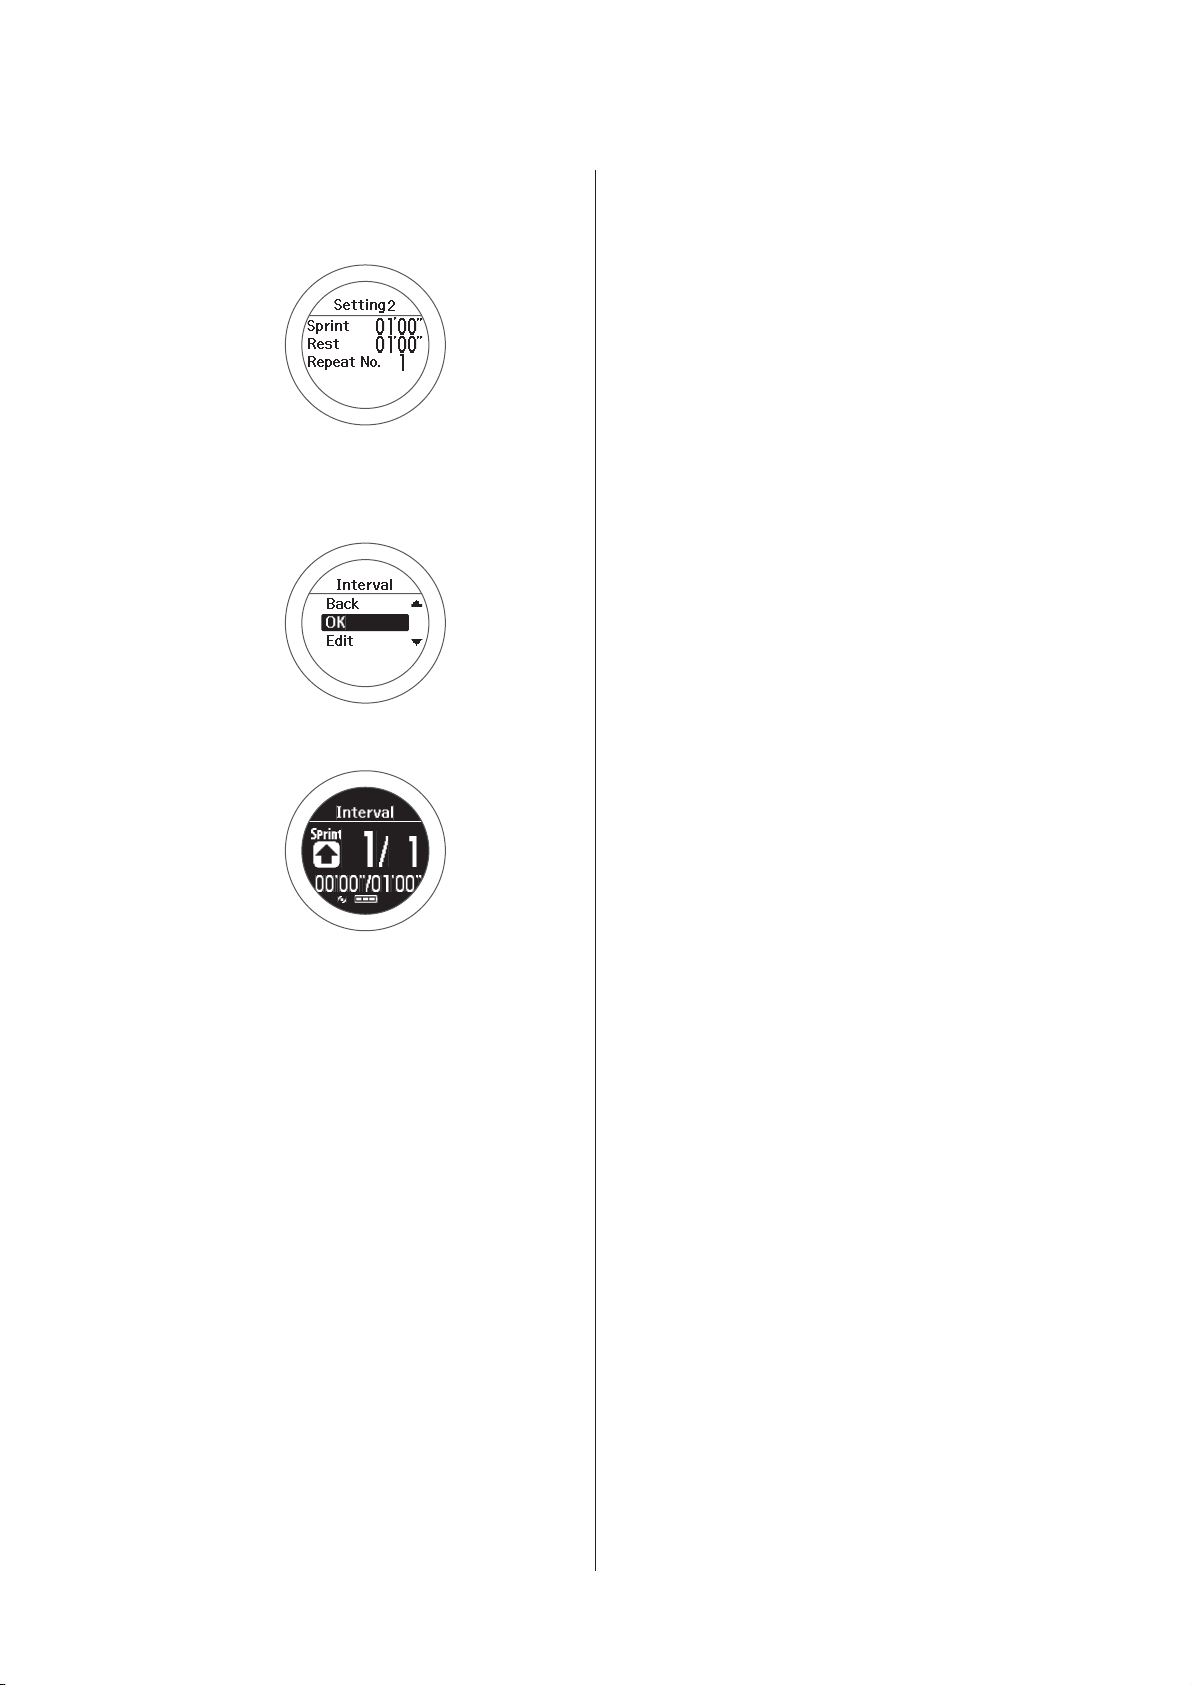
Check the set content.
F
Press A.
Select OK.
G
Use C/D to select, and then press A.
Measure
The interval measurement screen is displayed.
Measuring
See the following page for information on measuring.
U “Measuring” on page 46
48
Page 49
SF-710/510/310 User's Guide
Measure
Screen Display
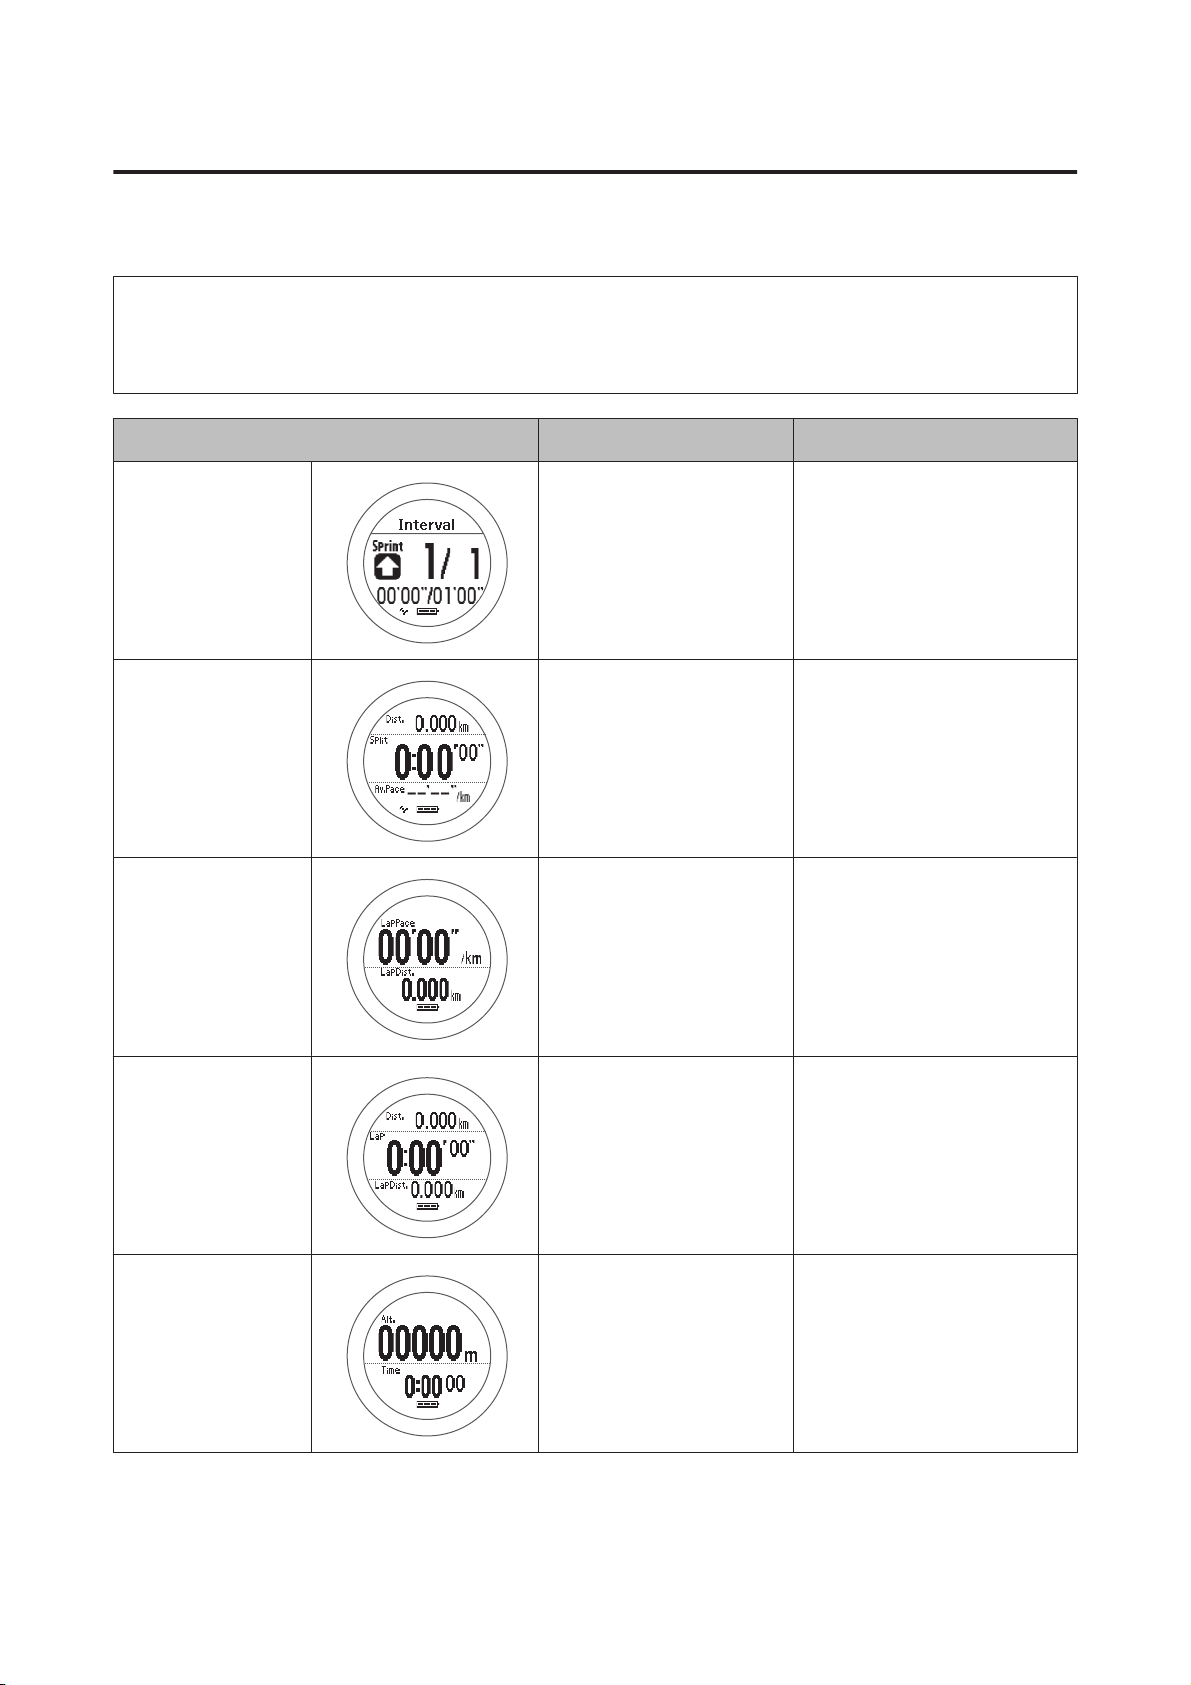
There are five measurement screens available. Press A to change the screen.
Note:
You can change the screen pattern and the measurement items displayed for screens one to four.
U “Screen” on page 95
Screen Screen Pattern (Default) Measurement Item (Default)
Fixed interval
screen
Screen1
Screen2
Interval Time or distance for Sprint/
Rest
3 Lines Distance (Dist.)
Split Time (Split)
Average Pace (Av.Pace)
2 Lines Lap Pace (LapPace)
Lap Distance (LapDist.)
Screen3
Screen4
3 Lines Distance (Dist.)
Lap Time (Lap)
Lap Distance (LapDist.)
2 Lines Altitude (Alt.)
Time (Time)
49
Page 50
SF-710/510/310 User's Guide
Measure
Measure until the time or distance set in advance is reached (Goal function)
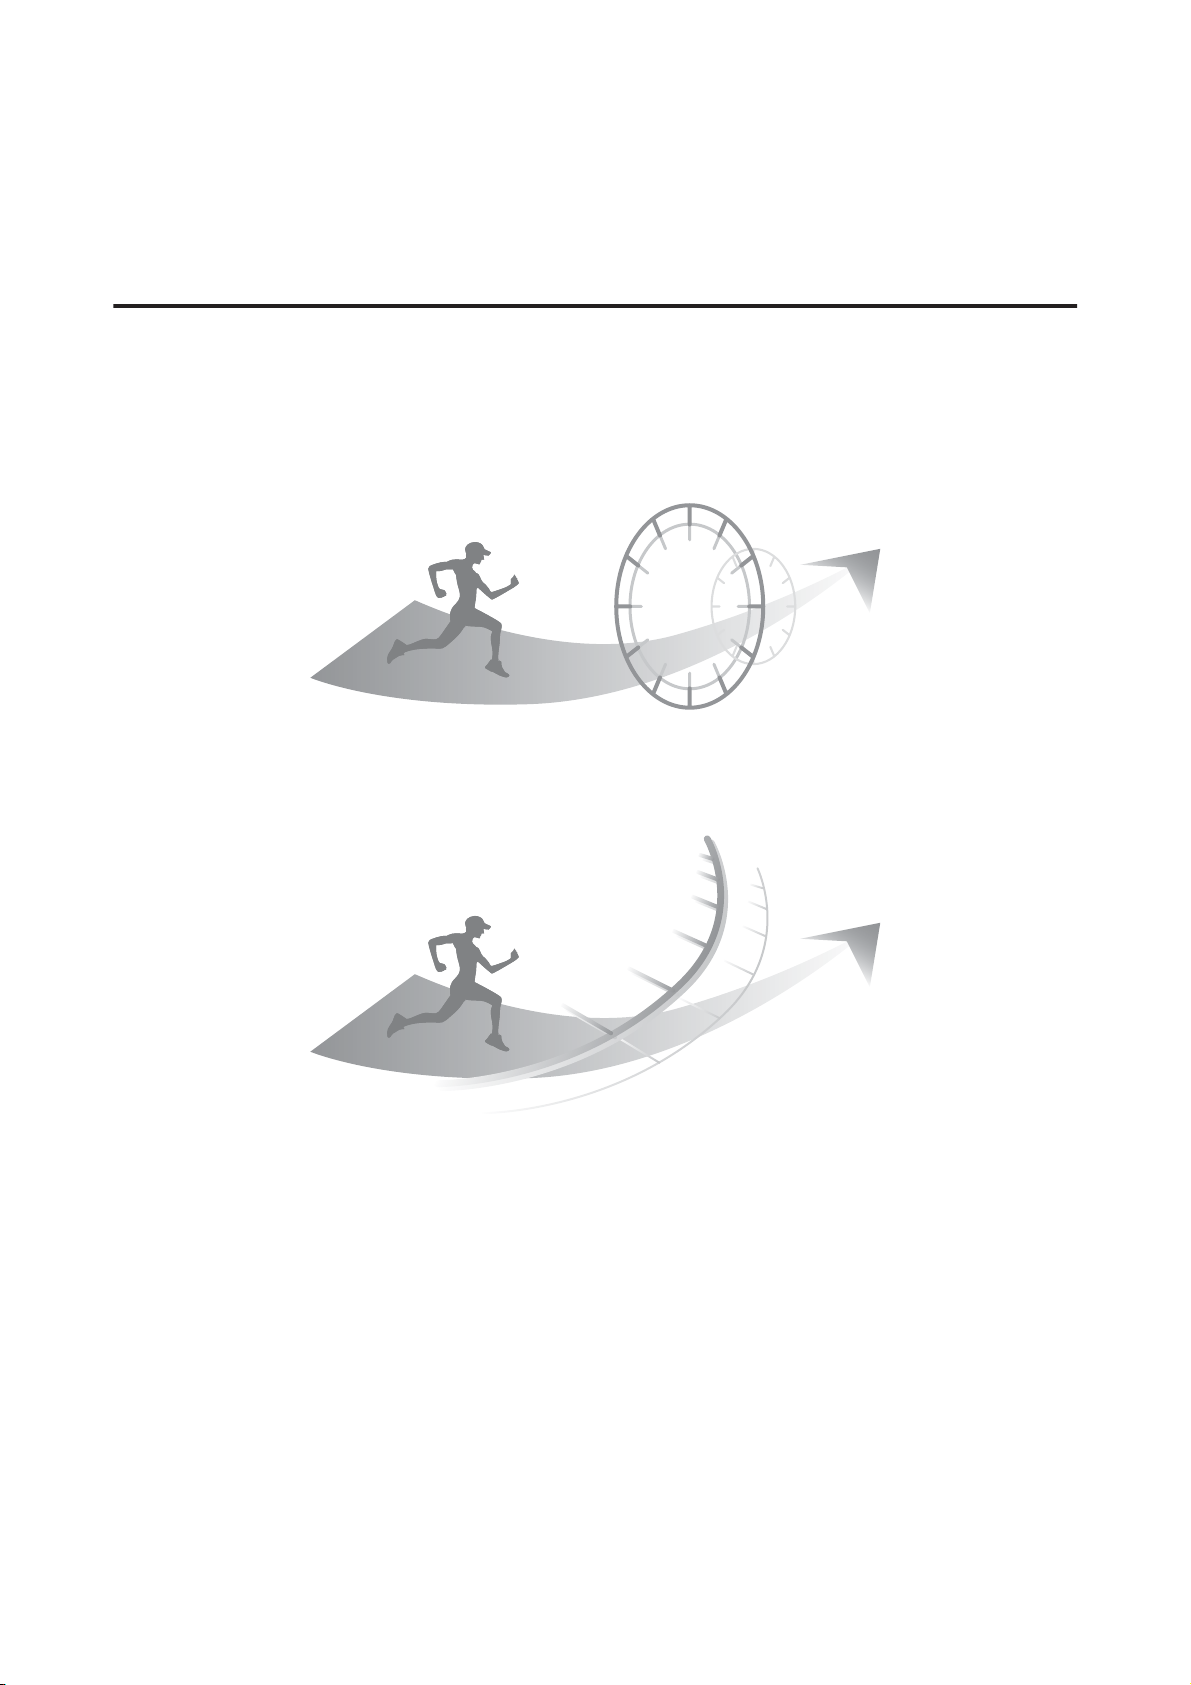
What is the goal function?
This function allows you to measure until the time or distance set in advance is reached.
Time race
Allows you to set a time as your goal and measure the time taken until that goal is reached. You can exercise while
checking the elapsed time. You can also calculate the estimated distance until the goal is reached.
Distance race
Allows you to set a distance as your goal and measure the time taken until that goal is reached. You can exercise while
checking the distance. You can also calculate the estimated time.
50
Page 51
SF-710/510/310 User's Guide
Measure
Measuring by Setting the Time or Distance
Important:
c
❏ When performing GPS positioning, make
sure the screen is facing up and you are
outside with no obstructions overhead.
U “Specifying a GPS (GPS Positioning)” on
page 28
❏ It usually takes less than two minutes to
complete GPS positioning.
If it takes more than two minutes or Failed is
displayed, we recommend selecting Cancel,
moving to a different location, and trying
again.
Operation buttons
Note:
❏ You can skip GPS positioning if you want to
start measuring immediately or if it is taking
too long.
U “Skipping GPS positioning” on page 29
❏ Use indoor mode when GPS positioning
cannot be performed because you are indoors
and so on.
U “Indoor mode (SF-710/SF-510 only)” on
page 30
Displays the Mes. Settings menu.
B
Hold down B on the measurement screen.
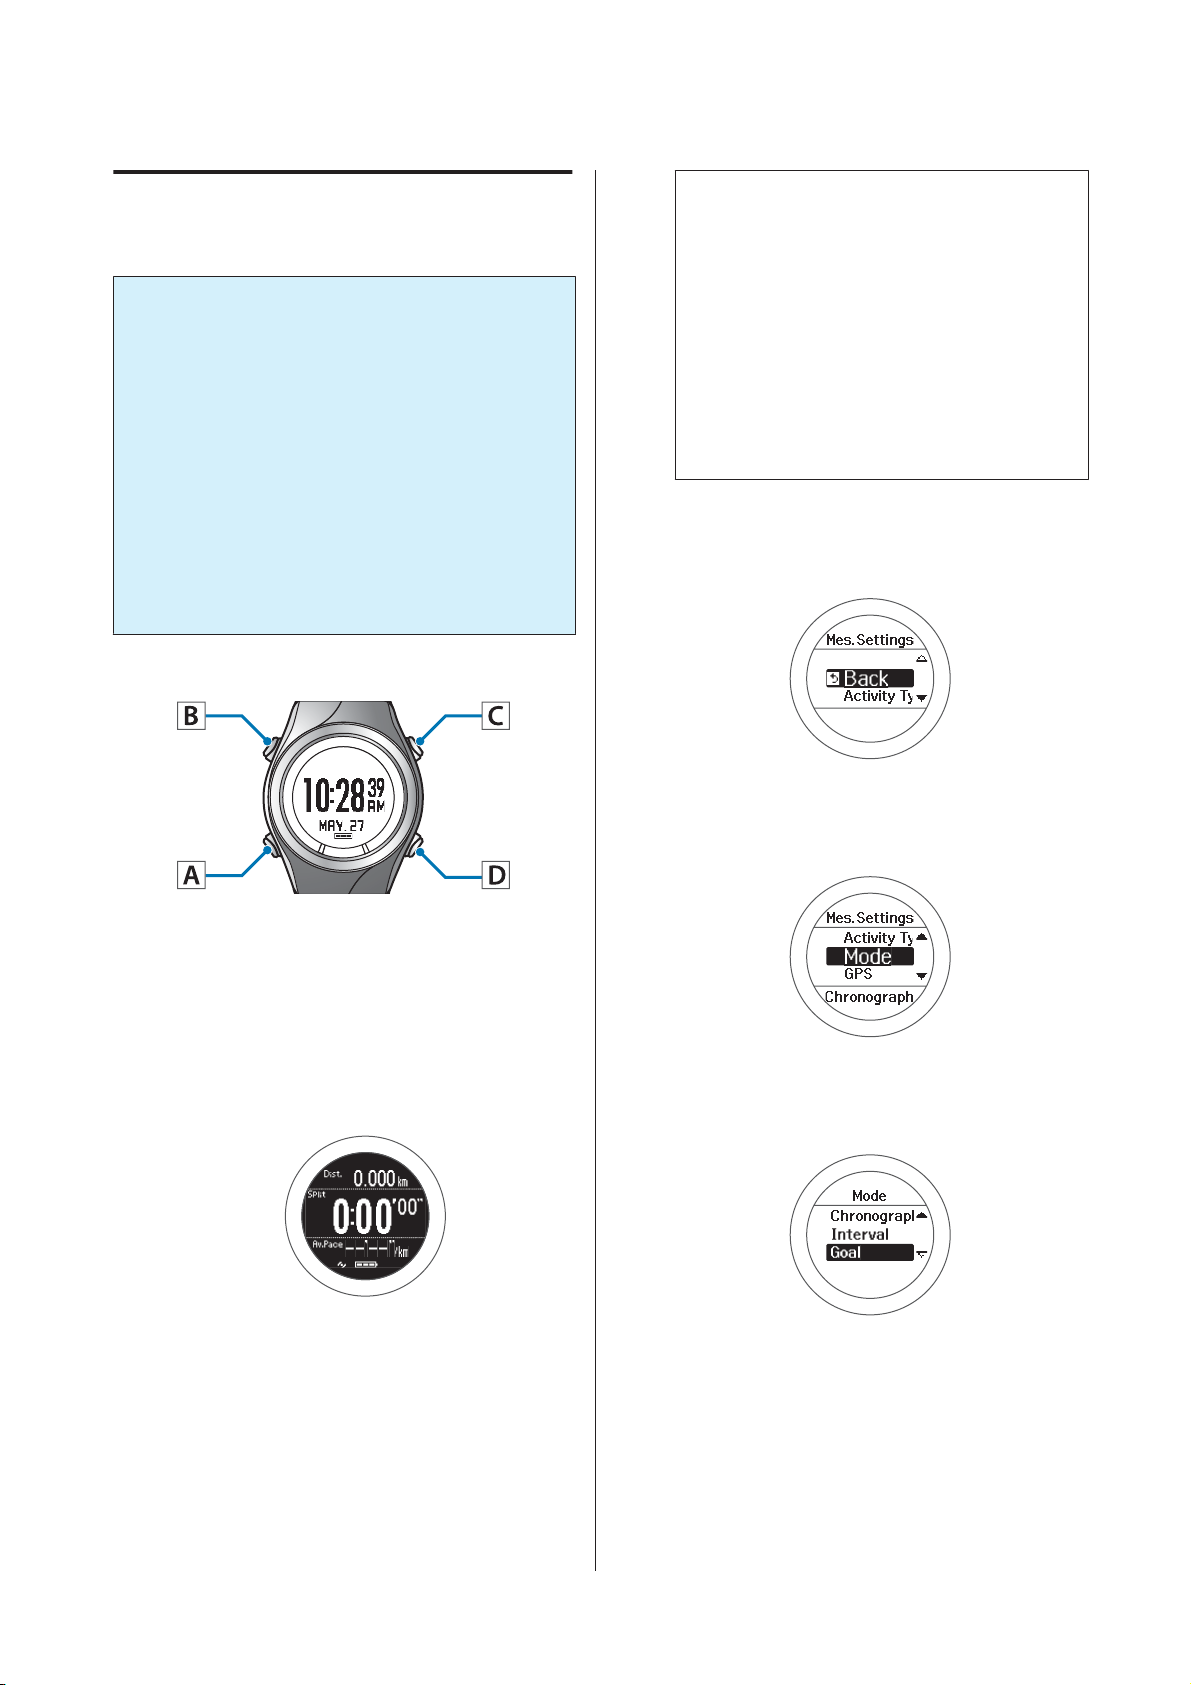
Set the time or distance.
Display the measurement screen.
A
Press C on the time screen.
GPS positioning starts, and the measurement
screen is displayed once positioning is complete.
Select Mode.
C
Use C/D to select, and then press A.
Select Goal.
D
Use C/D to select, and then press A.
51
Page 52
SF-710/510/310 User's Guide
Measure
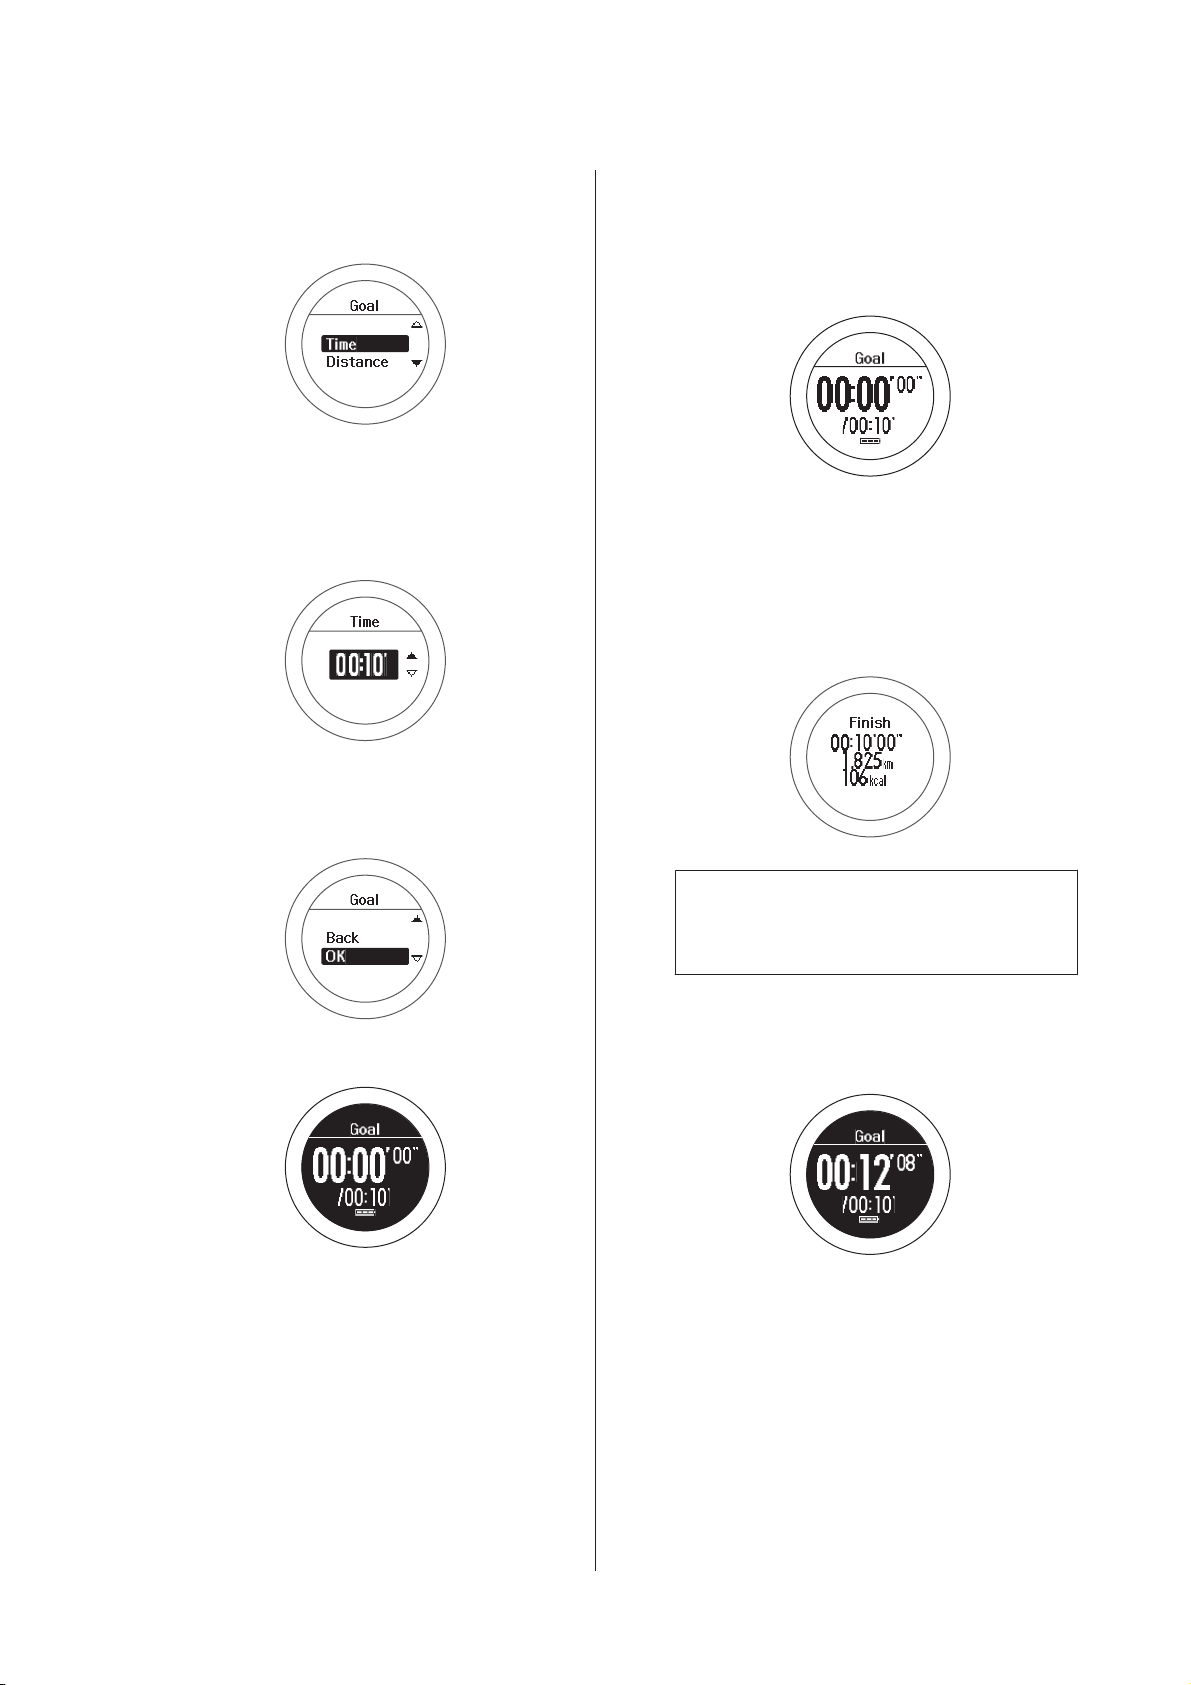
Select whether to set time or distance.
E
Use C/D to select, and then press A.
Set the time or distance.
F
Use C/D to set, and then press A.
Hold down C/D to speed through the numbers.
Measuring
Start measuring.
A
Press C.
When the set time or distance is
B
reached, the "Finish" screen is
displayed.
The time, distance, and calories burnt are
displayed.
Select OK.
G
Use C/D to select, and then press A.
The goal measurement screen is displayed.
Note:
An alarm notifies you when you reach 50% and
90% of the set time or distance.
Stop measuring.
C
Press C while measuring.
Reset the measurement results.
D
Hold down D while measuring is stopped.
52
Page 53

SF-710/510/310 User's Guide
When you reset the display, it returns to the
status before measuring started allowing you to
start the next measurement.
Data measured up to that point is stored in the
device's memory, and you can check it by
pressing D on the time screen.
U “Checking Measurement Data” on
page 62
Measure
Note:
To stop measuring and return to the time screen
❏ After resetting the measurement results in step 4,
hold down A.
❏ While the screen in step 3 is displayed while
measurement is stopped, hold down C. The
measurement results are reset and the time screen is
displayed.
❏ If no operations are made for 60 minutes on a screen
other than the measuring screen, the time screen is
displayed.
53
Page 54
SF-710/510/310 User's Guide
Measure
Screen Display
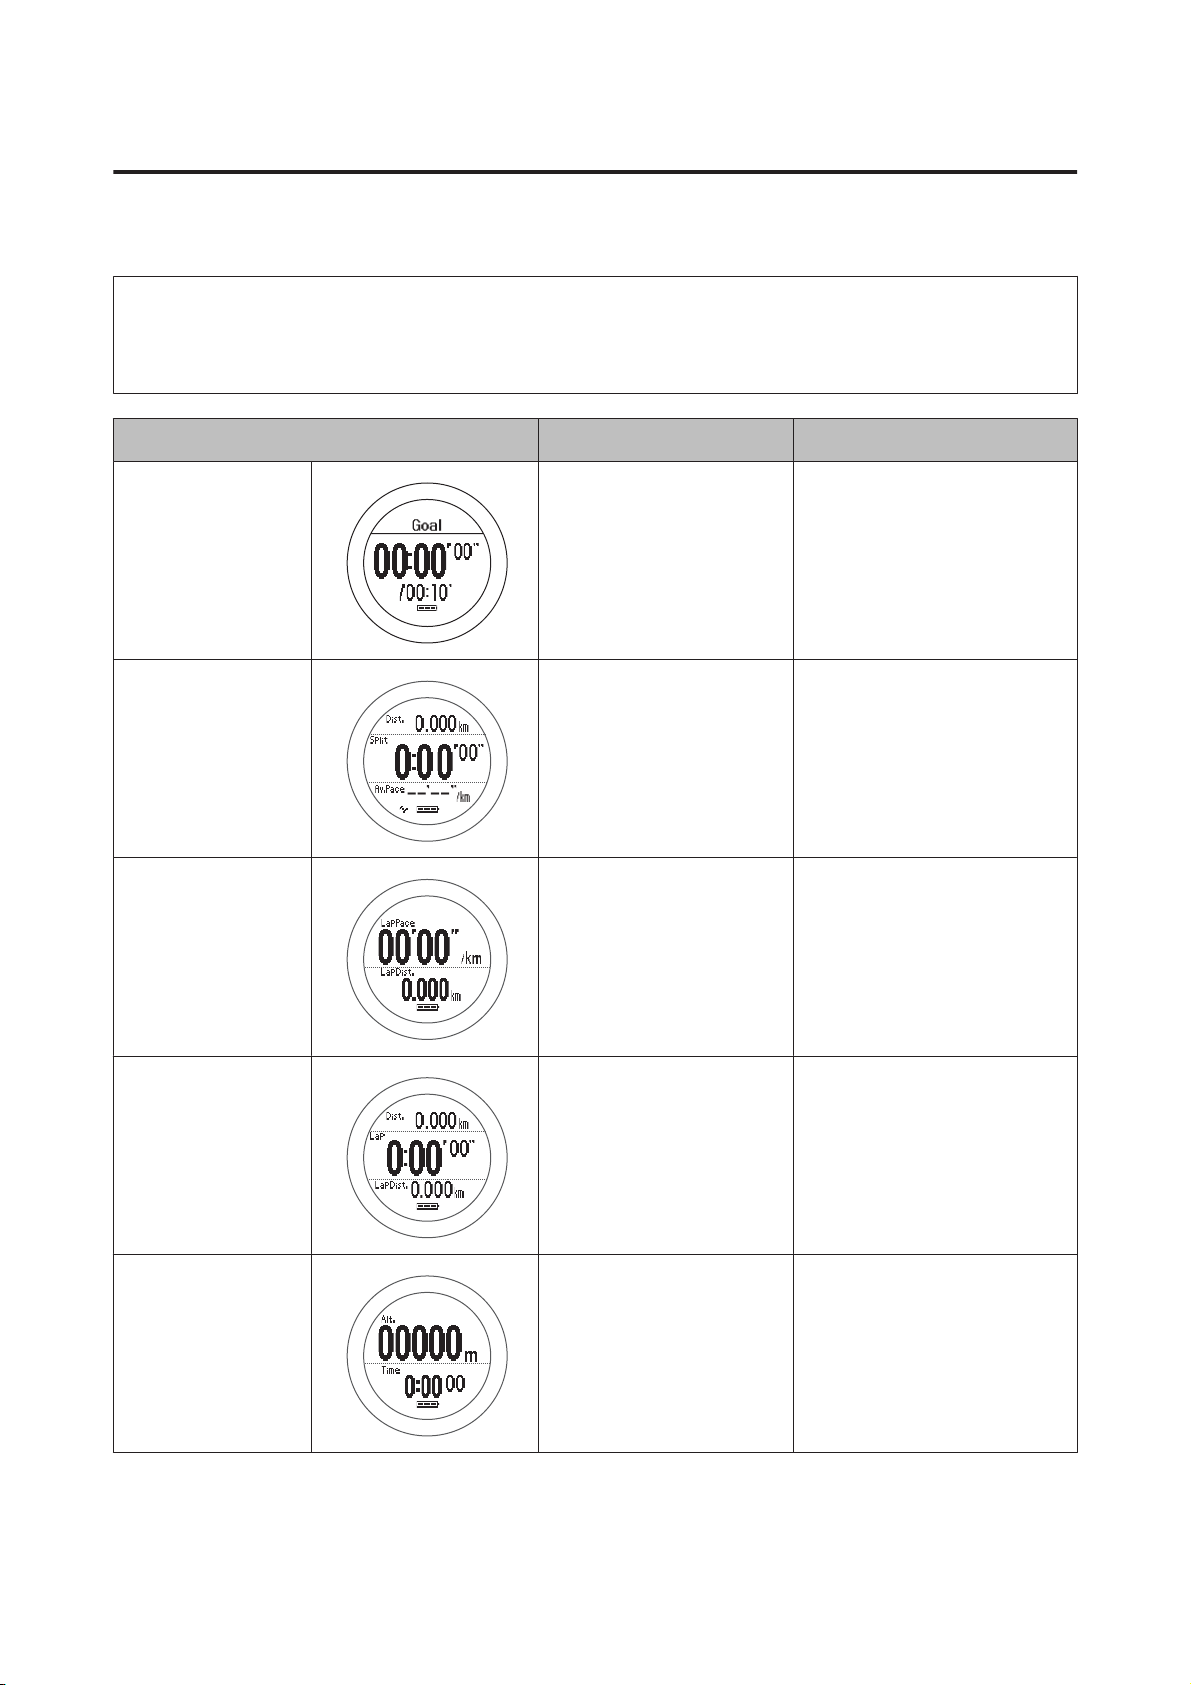
There are five measurement screens available. Press A to change the screen.
Note:
You can change the screen pattern and the measurement items displayed for screens one to four.
U “Screen” on page 95
Screen Screen Pattern (Default) Measurement Item (Default)
Fixed goal screen Goal Time or distance for Goal
Screen1
Screen2
Screen3
3 Lines Distance (Dist.)
Split Time (Split)
Average Pace (Av.Pace)
2 Lines Lap Pace (LapPace)
Lap Distance (LapDist.)
3 Lines Distance (Dist.)
Lap Time (Lap)
Lap Distance (LapDist.)
Screen4
2 Lines Altitude (Alt.)
Time (Time)
54
Page 55
SF-710/510/310 User's Guide
Measure
Recording Laps Automatically (AT Lap Function)
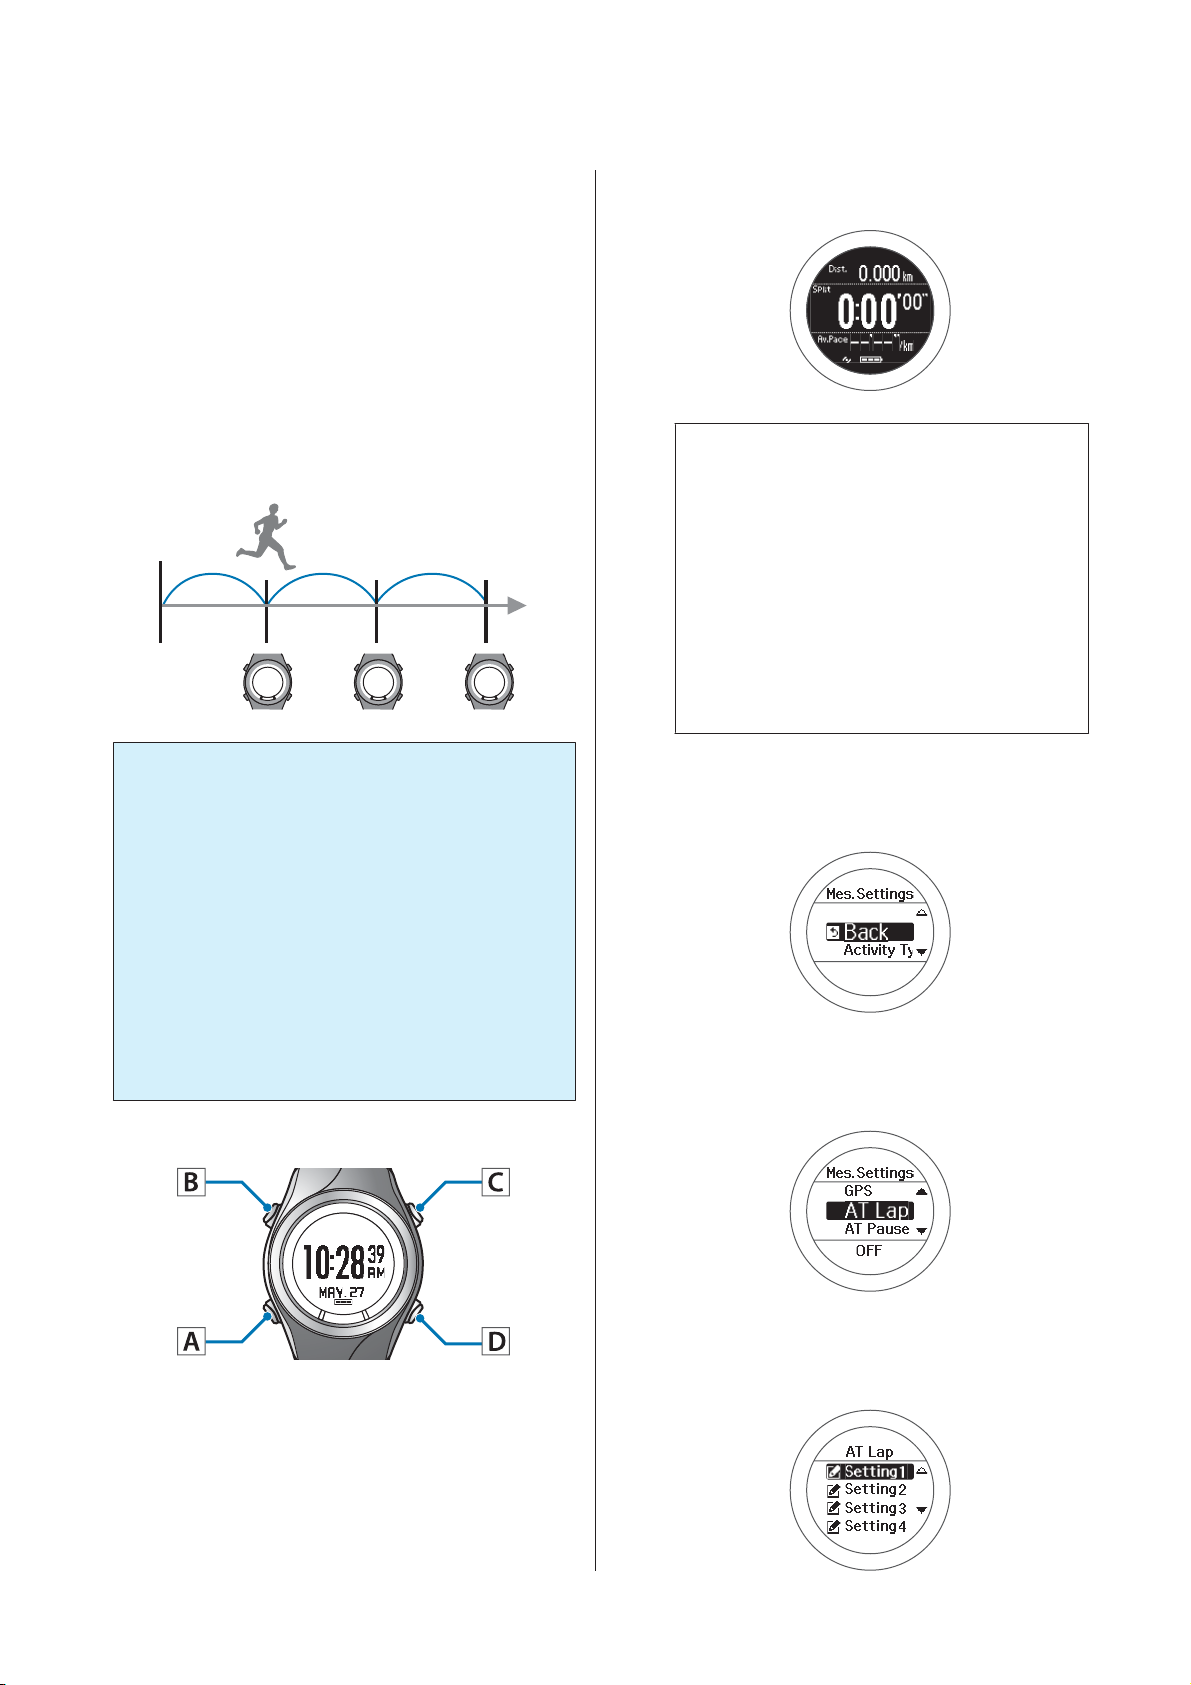
When a time or distance set in advance is reached, laps
are recorded automatically.
Set the lap time or distance. You can set five times or
distances. However, only one setting can be used while
measuring.
GPS positioning starts, and the measurement
screen is displayed once positioning is complete.
Note:
❏ You can skip GPS positioning if you want to
start measuring immediately or if it is taking
too long.
U “Skipping GPS positioning” on page 29
❏ Use indoor mode when GPS positioning
cannot be performed because you are indoors
and so on.
U “Indoor mode (SF-710/SF-510 only)” on
page 30
Important:
c
❏ When performing GPS positioning, make
sure the screen is facing up and you are
outside with no obstructions overhead.
U “Specifying a GPS (GPS Positioning)” on
page 28
❏ It usually takes less than two minutes to
complete GPS positioning.
If it takes more than two minutes or Failed is
displayed, we recommend selecting Cancel,
moving to a different location, and trying
again.
Operation buttons
Displays the Mes. Settings menu.
B
Hold down B on the measurement screen.
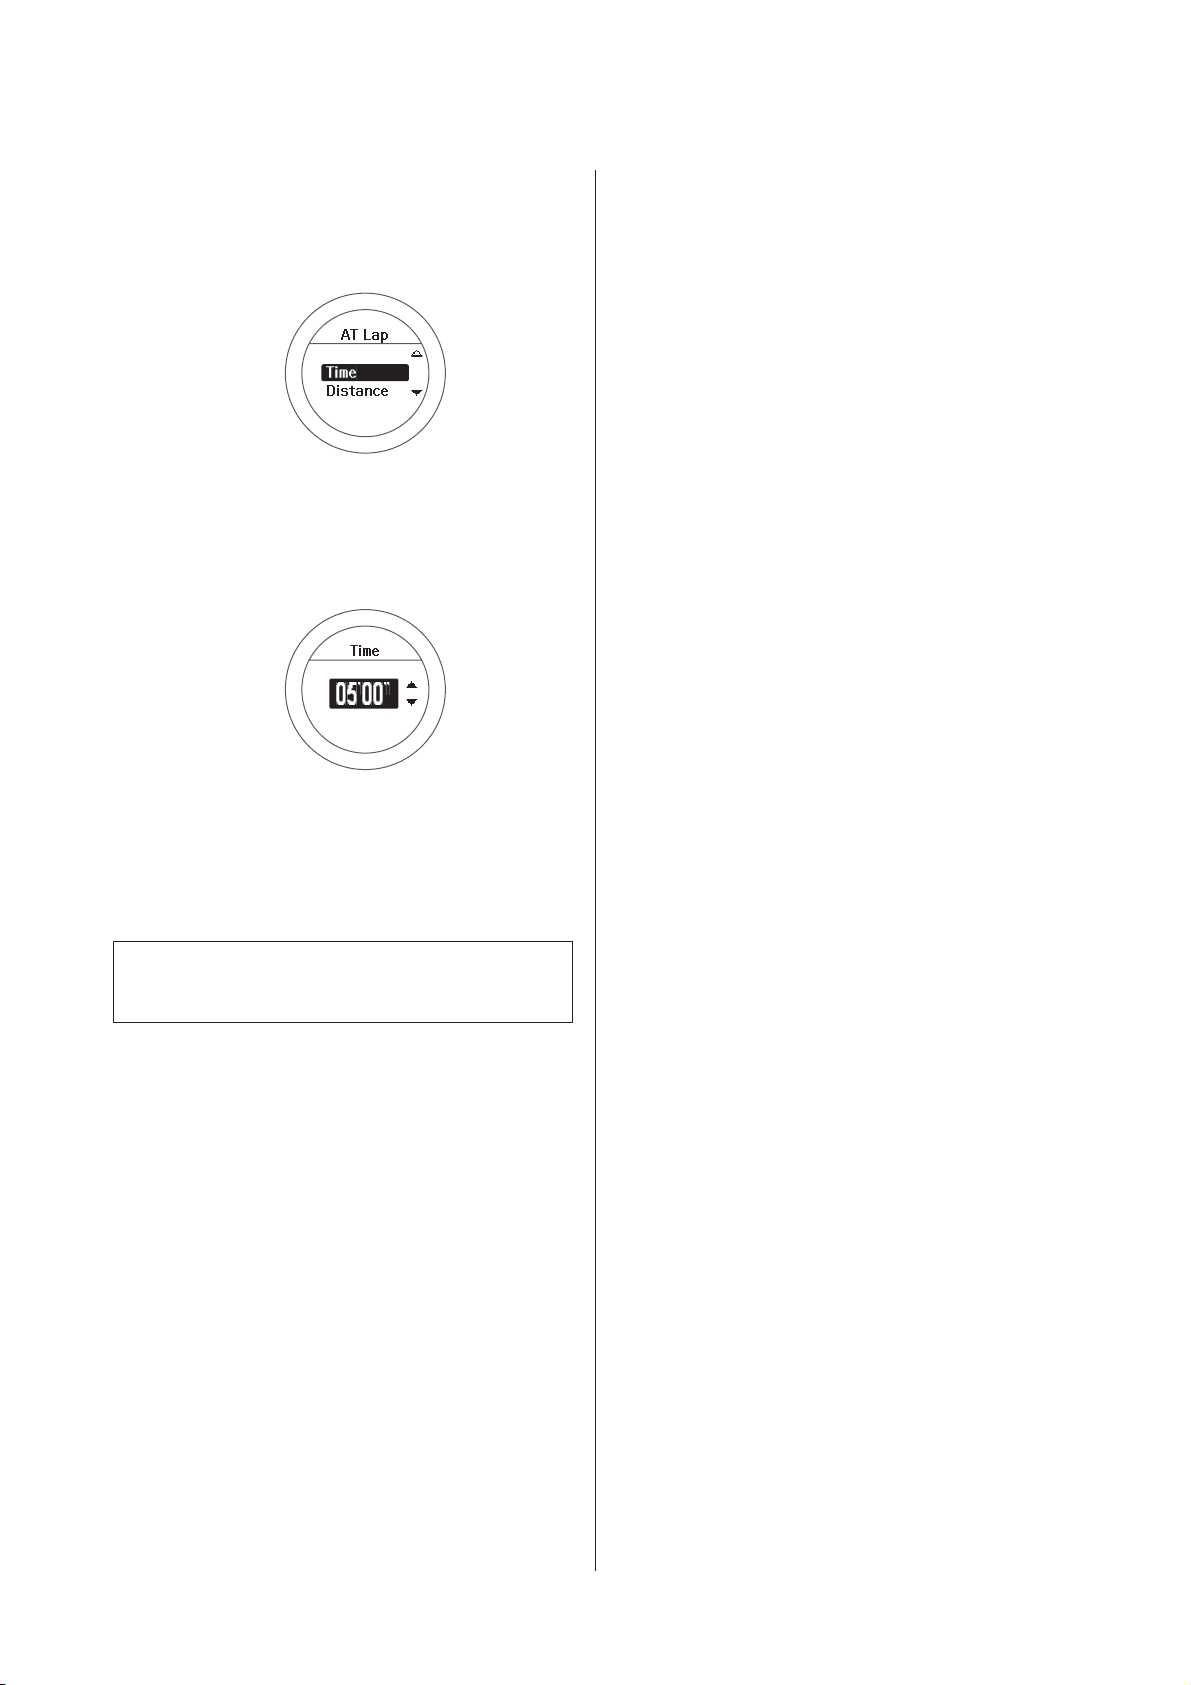
Select AT Lap.
C
Use C/D to select, and then press A.
Select one of the settings from 1 to 5.
D
Display the measurement screen.
A
Press C on the time screen.
Use C/D to select, and then press A.
55
Page 56
SF-710/510/310 User's Guide
Select whether to set distance or time
E
as the length of the lap.
Use C/D to select, and then press A.
Set the time or distance.
F
Use C/D to set, and then press A.
Hold down C/D to speed through the numbers.
Measure
Complete the settings.
G
Hold down A.
The measurement screen is displayed.
Note:
To turn off this function, select OFF in step 4.
56
Page 57
SF-710/510/310 User's Guide
Measure
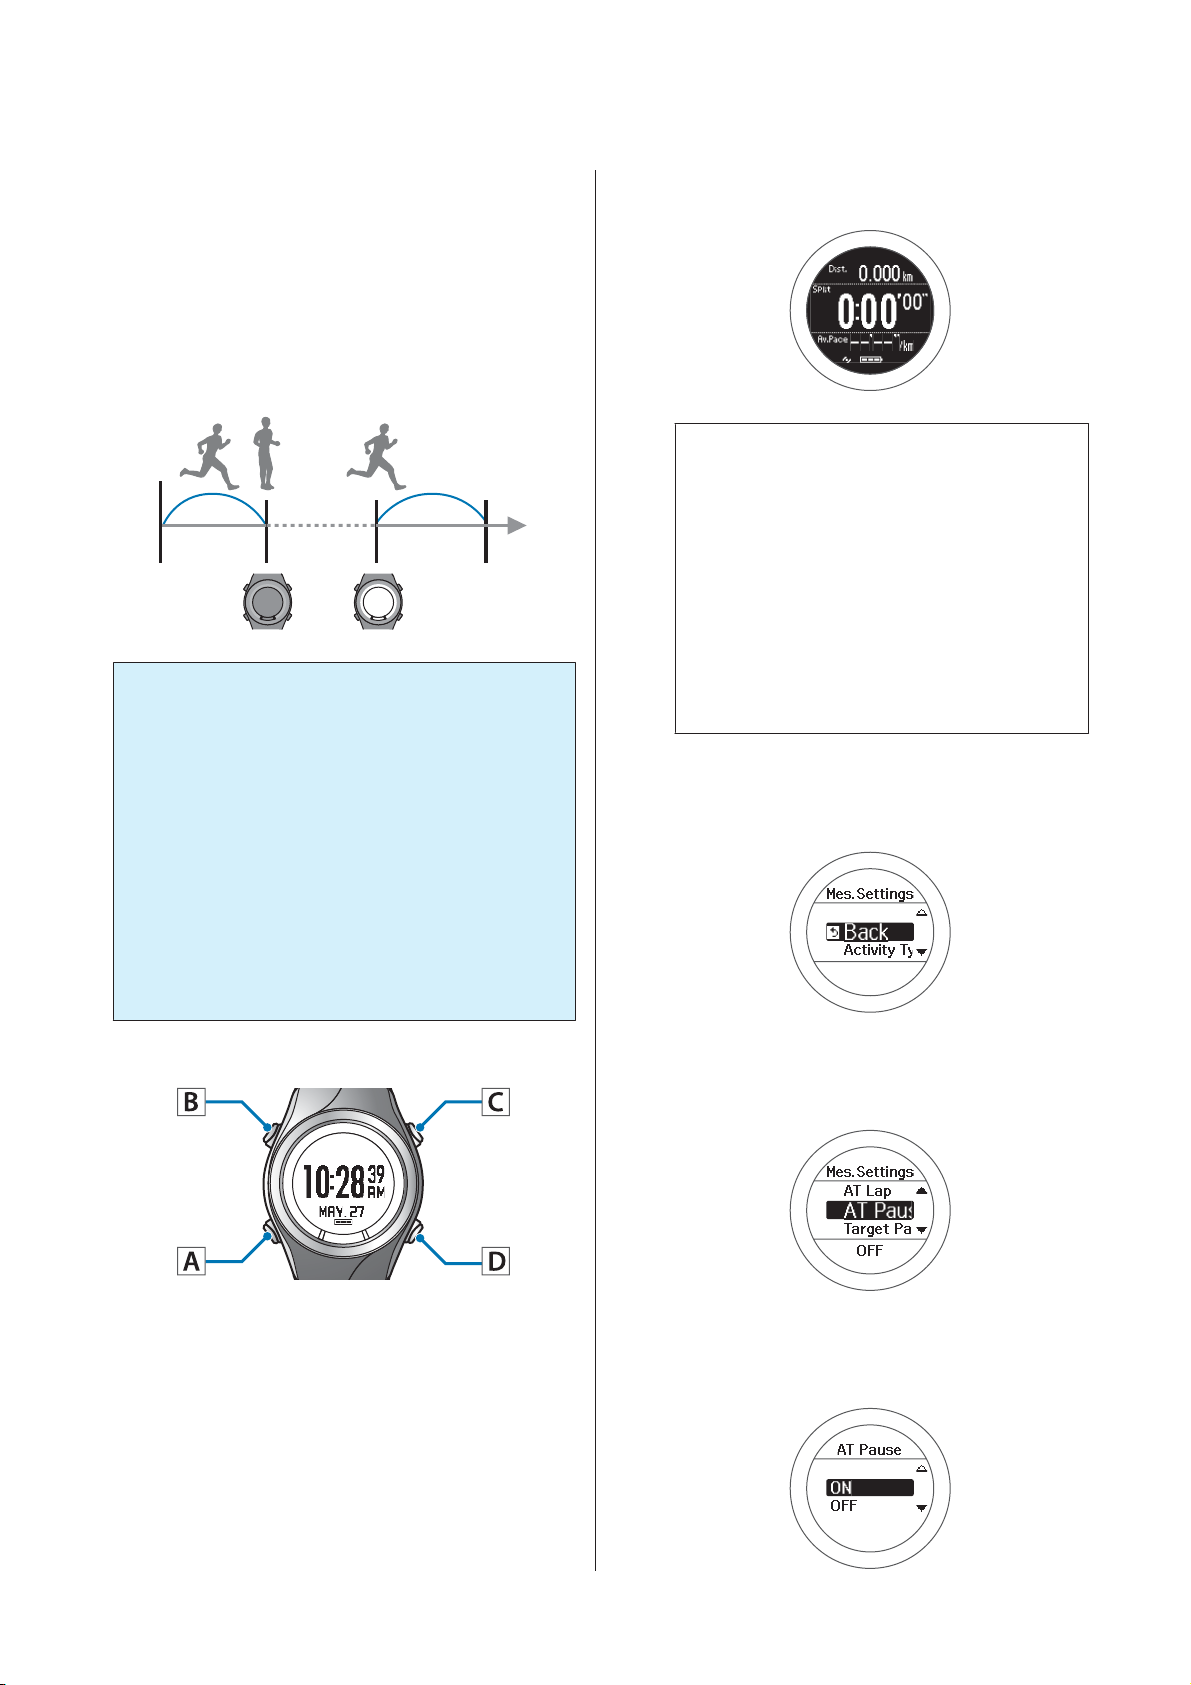
Automatically Start/Stop Measuring (AT Pause Function)
Measuring stops automatically when you stop running,
and resumes when you continue running.
Important:
c
❏ When performing GPS positioning, make
sure the screen is facing up and you are
outside with no obstructions overhead.
U “Specifying a GPS (GPS Positioning)” on
page 28
❏ It usually takes less than two minutes to
complete GPS positioning.
GPS positioning starts, and the measurement
screen is displayed once positioning is complete.
Note:
❏ You can skip GPS positioning if you want to
start measuring immediately or if it is taking
too long.
U “Skipping GPS positioning” on page 29
❏ Use indoor mode when GPS positioning
cannot be performed because you are indoors
and so on.
U “Indoor mode (SF-710/SF-510 only)” on
page 30
Displays the Mes. Settings menu.
B
Hold down B on the measurement screen.
If it takes more than two minutes or Failed is
displayed, we recommend selecting Cancel,
moving to a different location, and trying
again.
Operation buttons
Display the measurement screen.
A
Press C on the time screen.
Select AT Pause.
C
Use C/D to select, and then press A.
Select ON.
D
Use C/D to select, and then press A.
57
Page 58

SF-710/510/310 User's Guide
Complete the settings.
E
Hold down A.
The measurement screen is displayed.
Note:
To turn off this function, select OFF in step 4.
Measure
58
Page 59
SF-710/510/310 User's Guide
Measure
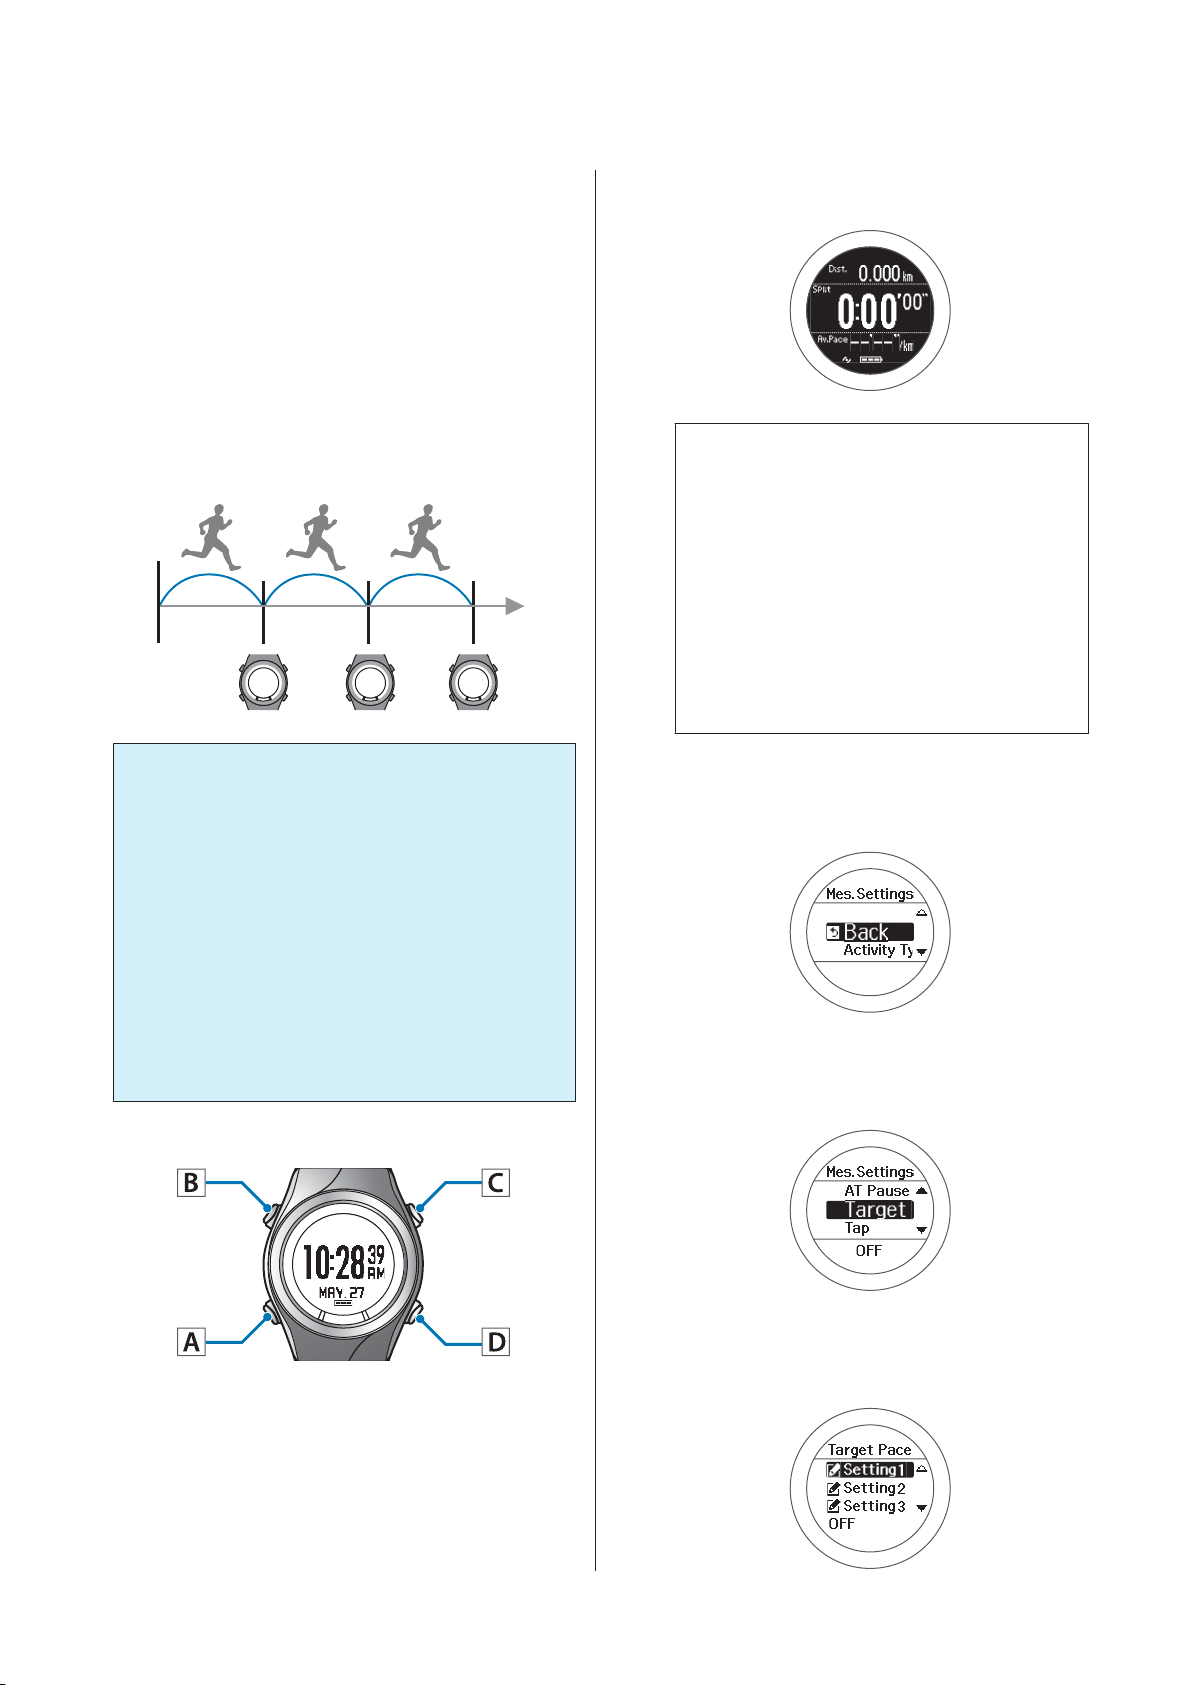
Setting a Pace and Measuring (Target Pace Function)
You can use this function to sound an alarm if you fall
be hind the pace s et as the targe t pace during m easuring.
Set your target time for one kilometer (target pace) and
the range at which the alarm sounds when you fall
behind that target pace.
♪
♪
♪
GPS positioning starts, and the measurement
screen is displayed once positioning is complete.
Note:
❏ You can skip GPS positioning if you want to
start measuring immediately or if it is taking
too long.
U “Skipping GPS positioning” on page 29
❏ Use indoor mode when GPS positioning
cannot be performed because you are indoors
and so on.
U “Indoor mode (SF-710/SF-510 only)” on
page 30
Important:
c
❏ When performing GPS positioning, make
sure the screen is facing up and you are
outside with no obstructions overhead.
U “Specifying a GPS (GPS Positioning)” on
page 28
❏ It usually takes less than two minutes to
complete GPS positioning.
If it takes more than two minutes or Failed is
displayed, we recommend selecting Cancel,
moving to a different location, and trying
again.
Operation buttons
Displays the Mes. Settings menu.
B
Hold down B on the measurement screen.
Select Target Pace.
C
Use C/D to select, and then press A.
Select settings 1, 2, or 3.
D
Display the measurement screen.
A
Press C on the time screen.
Use C/D to select, and then press A.
59
Page 60
SF-710/510/310 User's Guide
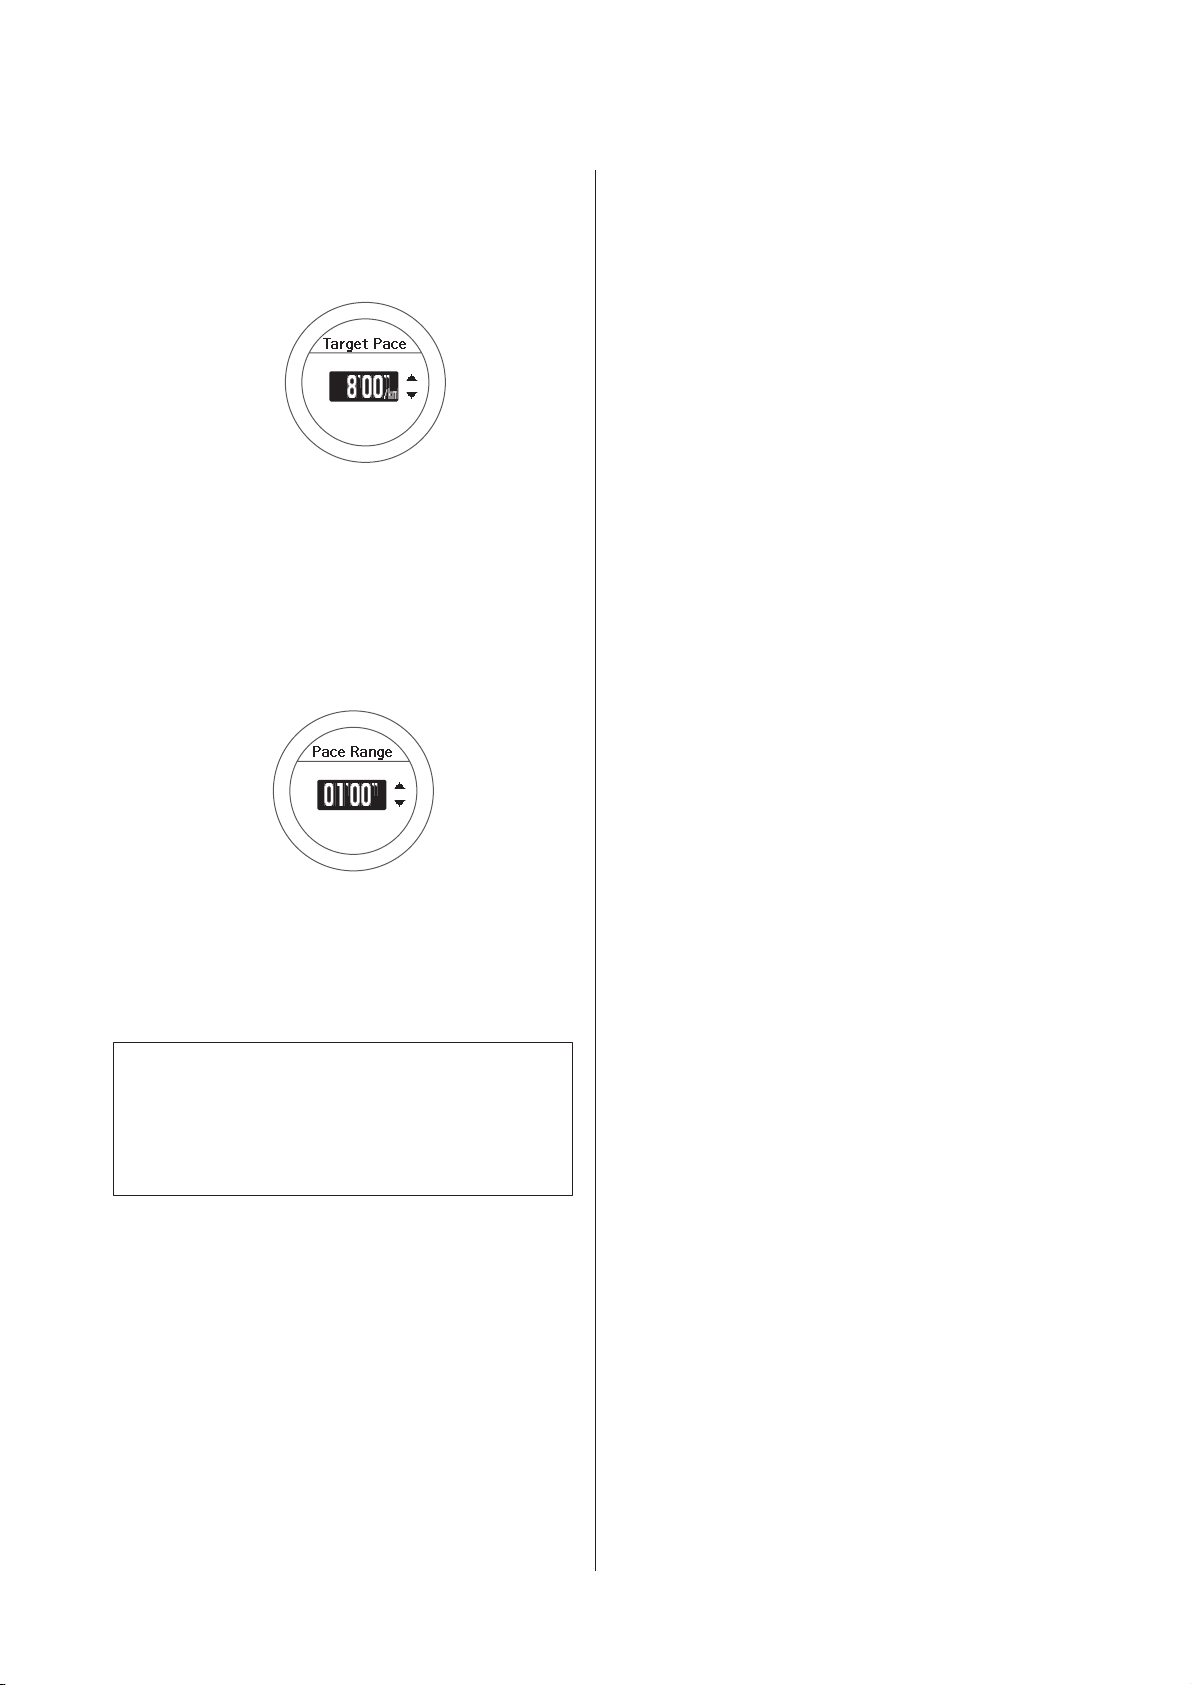
Set the target time for one kilometer.
E
Use C/D to set, and then press A.
Hold down C/D to speed through the numbers.
Set the range for maintaining your
F
target pace.
Use C/D to set, and then press A.
Measure
Hold down C/D to speed through the numbers.
An alarm sounds if you are outside the set pace
range.
This completes the settings.
G
Hold down A.
The measurement screen is displayed.
Note:
If you want to turn off the alarm that notifies you when
you are falling behind the set pace range, select OFF in
step 6.OFF is the bottom line for the Pace Range (under
0'05").
60
Page 61

SF-710/510/310 User's Guide
Checking Measurement Data (History Function)
Checking Measurement Data (History
Function)
You can check measured data on the history screen.
U “Checking Measurement Data” on page 62
U “Measurement Data that can be Checked in History” on page 62
61
Page 62
SF-710/510/310 User's Guide
Checking Measurement Data (History Function)
Checking Measurement Data
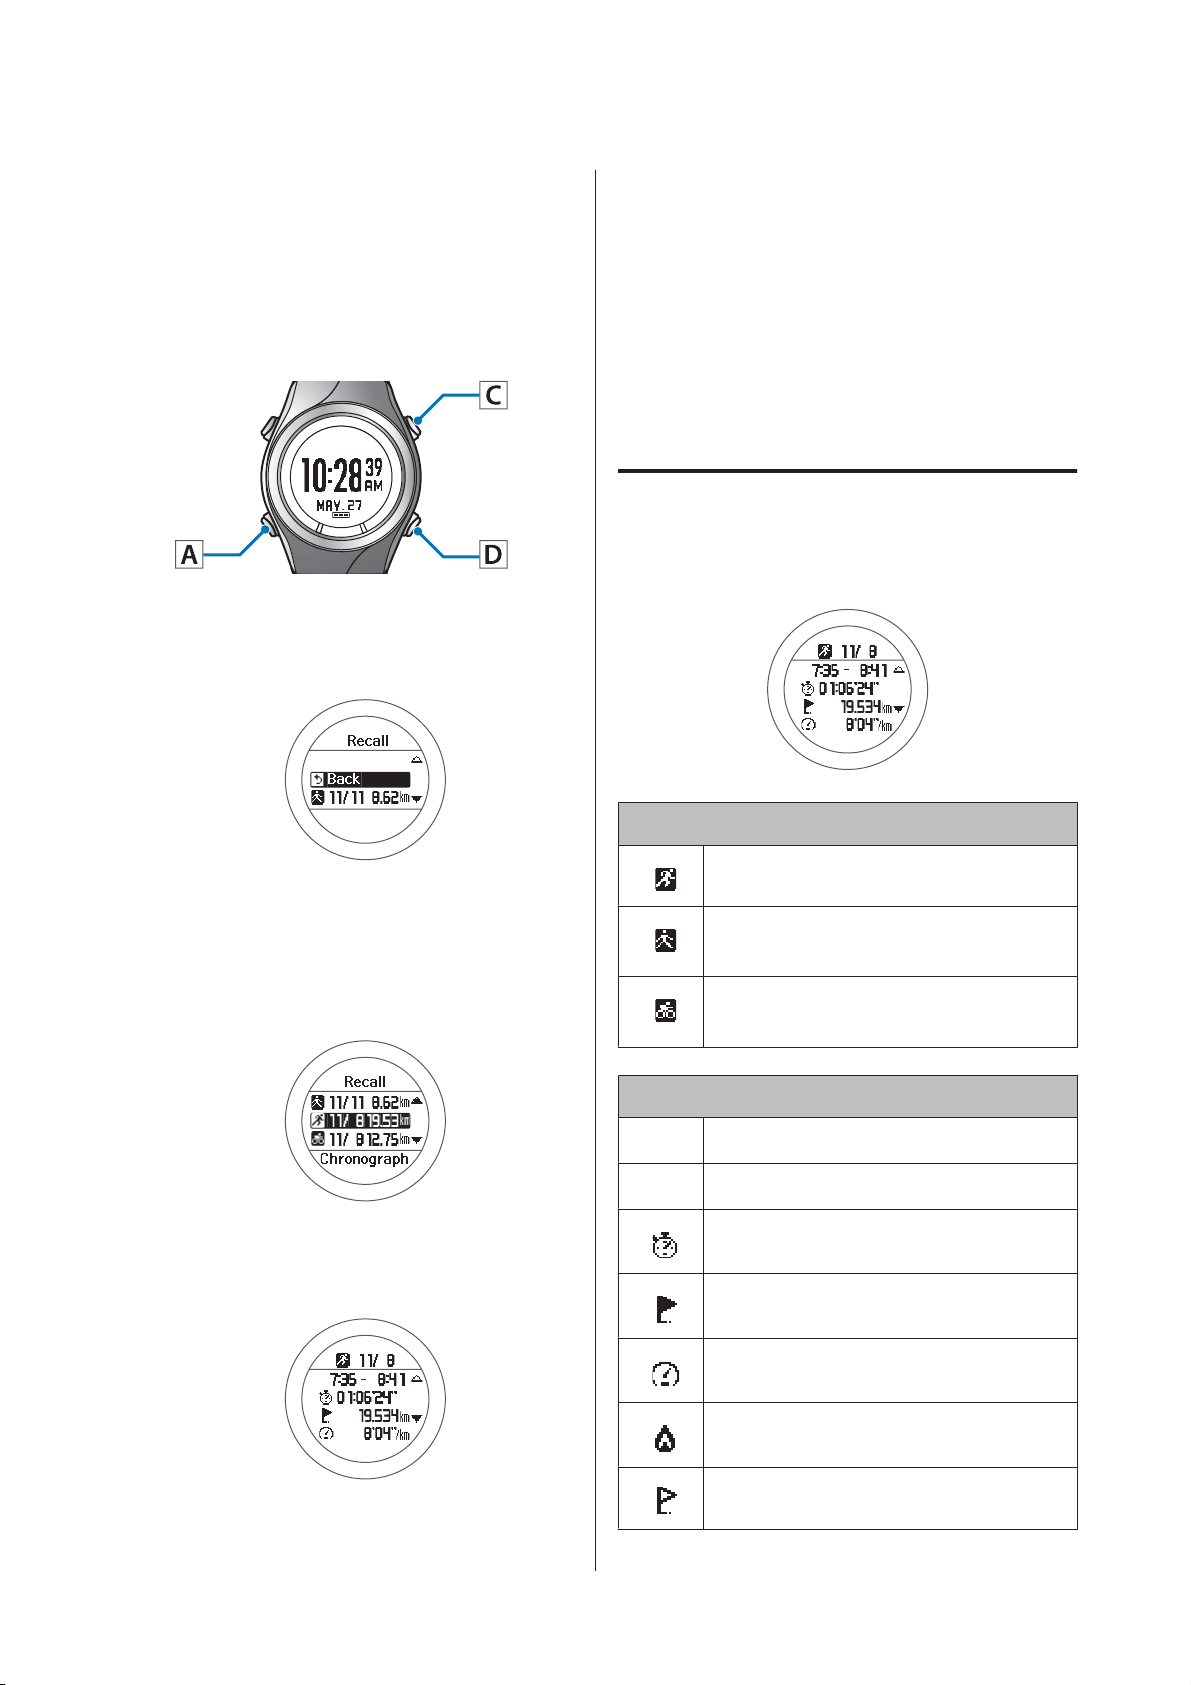
You can check measured data on the history screen.
Operation buttons
Display the history list screen.
A
Press D on the time screen.
After checking, display the history list
D
screen.
Press A.
Finish checking the history.
E
Hold down A.
Displays the time screen.
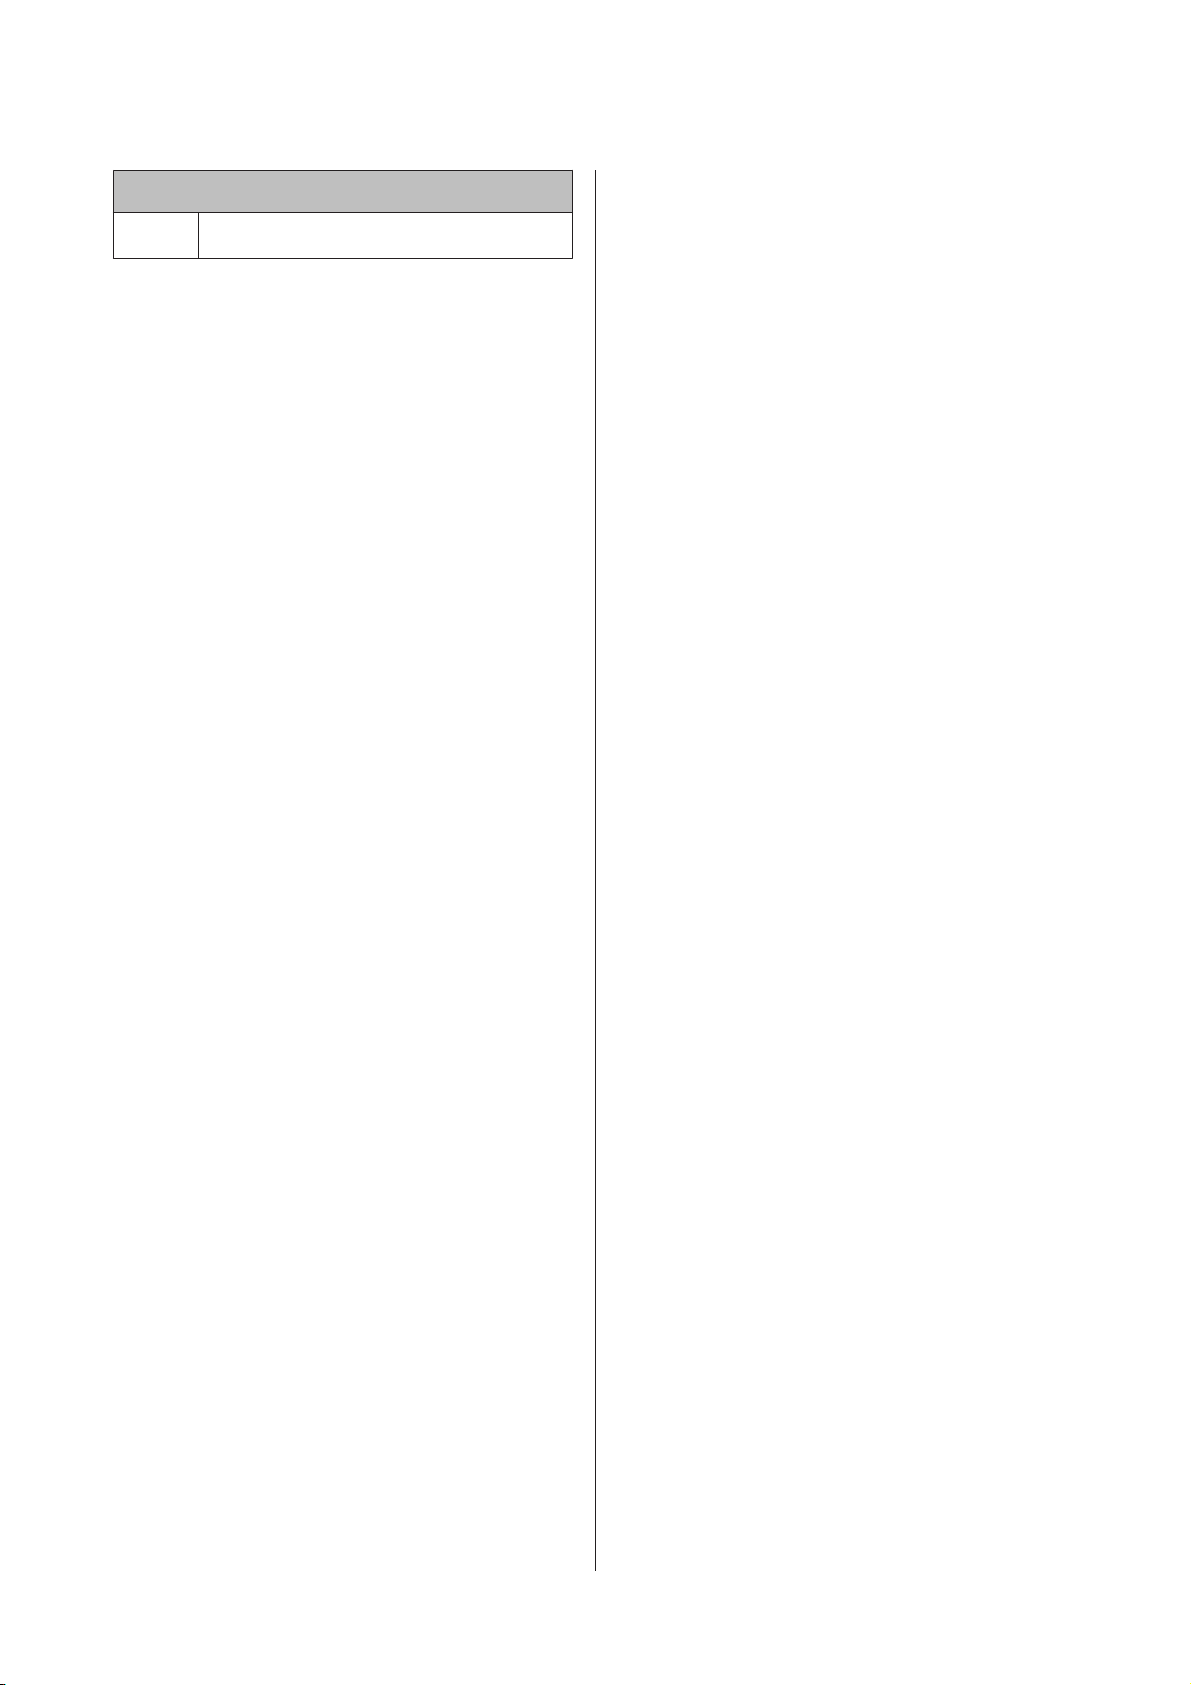
Measurement Data that can be Checked in History
The following measurement data can be checked.
Select the data you want to check.
B
The history list screen displays item icons, the
date measured, and the distance.
Use C/D to select, and then press A.
Check the measurement data.
C
Use C/D to scroll the screen.
Icon
Run mode (measuring while running)
Walking mode (measuring while
walking)
Bike mode (measuring while riding a
bike)
Measurement Item
-Date measured
- Start Time/End Time
Split time
Distance
Average pace
62
Calories Burnt
Lap number
Page 63
SF-710/510/310 User's Guide
Checking Measurement Data (History Function)
Measurement Item
-Lap pace
To clear the history, you need to initialize the device.
When initializing, all setting information for User
Settings, Sys. Settings, and Mes. Settings is also
initialized along with the history information.
U “Sys. Settings” on page 93
63
Page 64

SF-710/510/310 User's Guide
Measuring Heart Rate (HR Monitor)
Measuring Heart Rate (HR Monitor)
You can measure your heart rate by using the optional HR monitor.
U “Preparing to Measure Heart Rate” on page 65
U “Measuring Heart Rate” on page 70
U “Replacing the Battery for the HR Monitor” on page 72
64
Page 65
SF-710/510/310 User's Guide
Measuring Heart Rate (HR Monitor)
Preparing to Measure Heart Rate
Preparing the HR Monitor
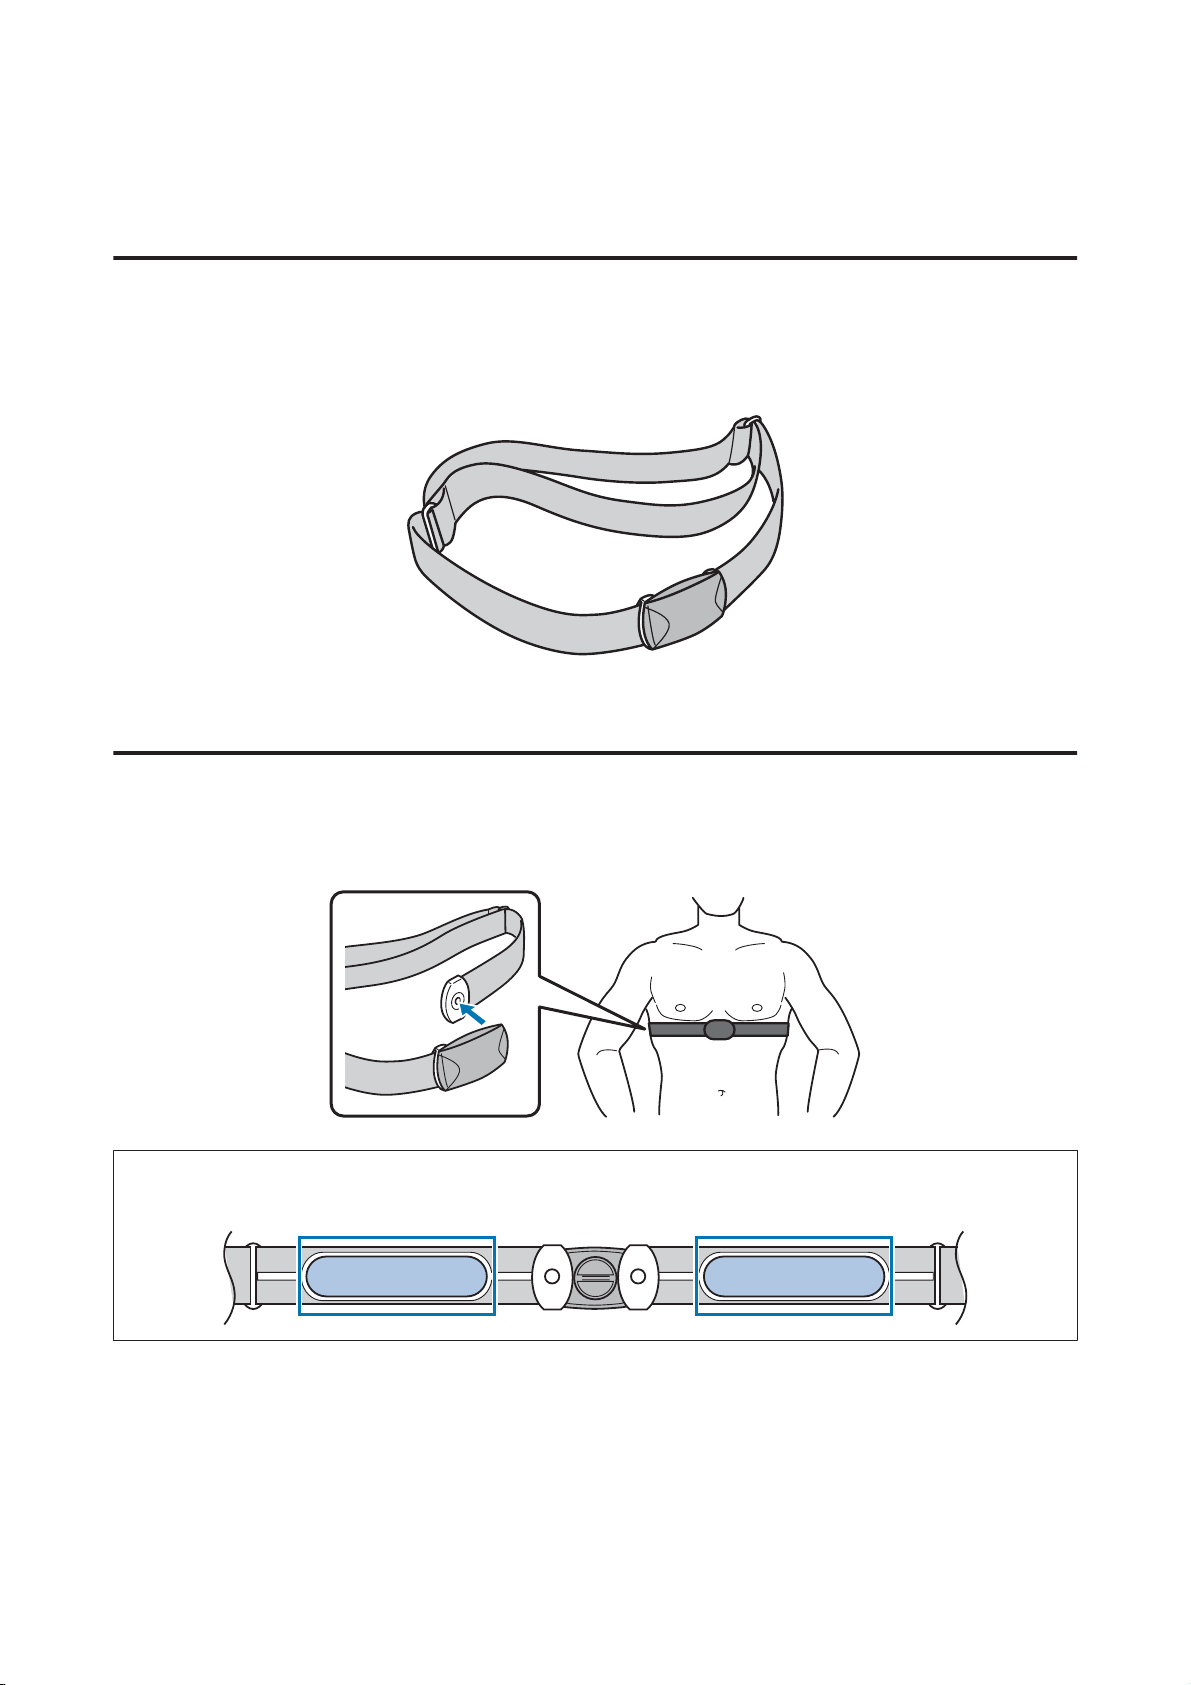
The HR monitor can be purchased as an optional item. Contact your local dealer to purchase an HR monitor.
HR Monitor (Model No.: SFHRM01)
The HR monitor communicates with the device using Bluetooth® Smart technology.
Wearing the HR Monitor
Wear the HR belt so that the electrode section of the HR belt is pressed against your chest. Make sure it is attached
correctly to avoid missing out on any data.
Note:
You can perform stable measurements when the electrode sections of the HR belt are a little wet.
65
Page 66
SF-710/510/310 User's Guide
Measuring Heart Rate (HR Monitor)
Registering the HR Monitor to the Device
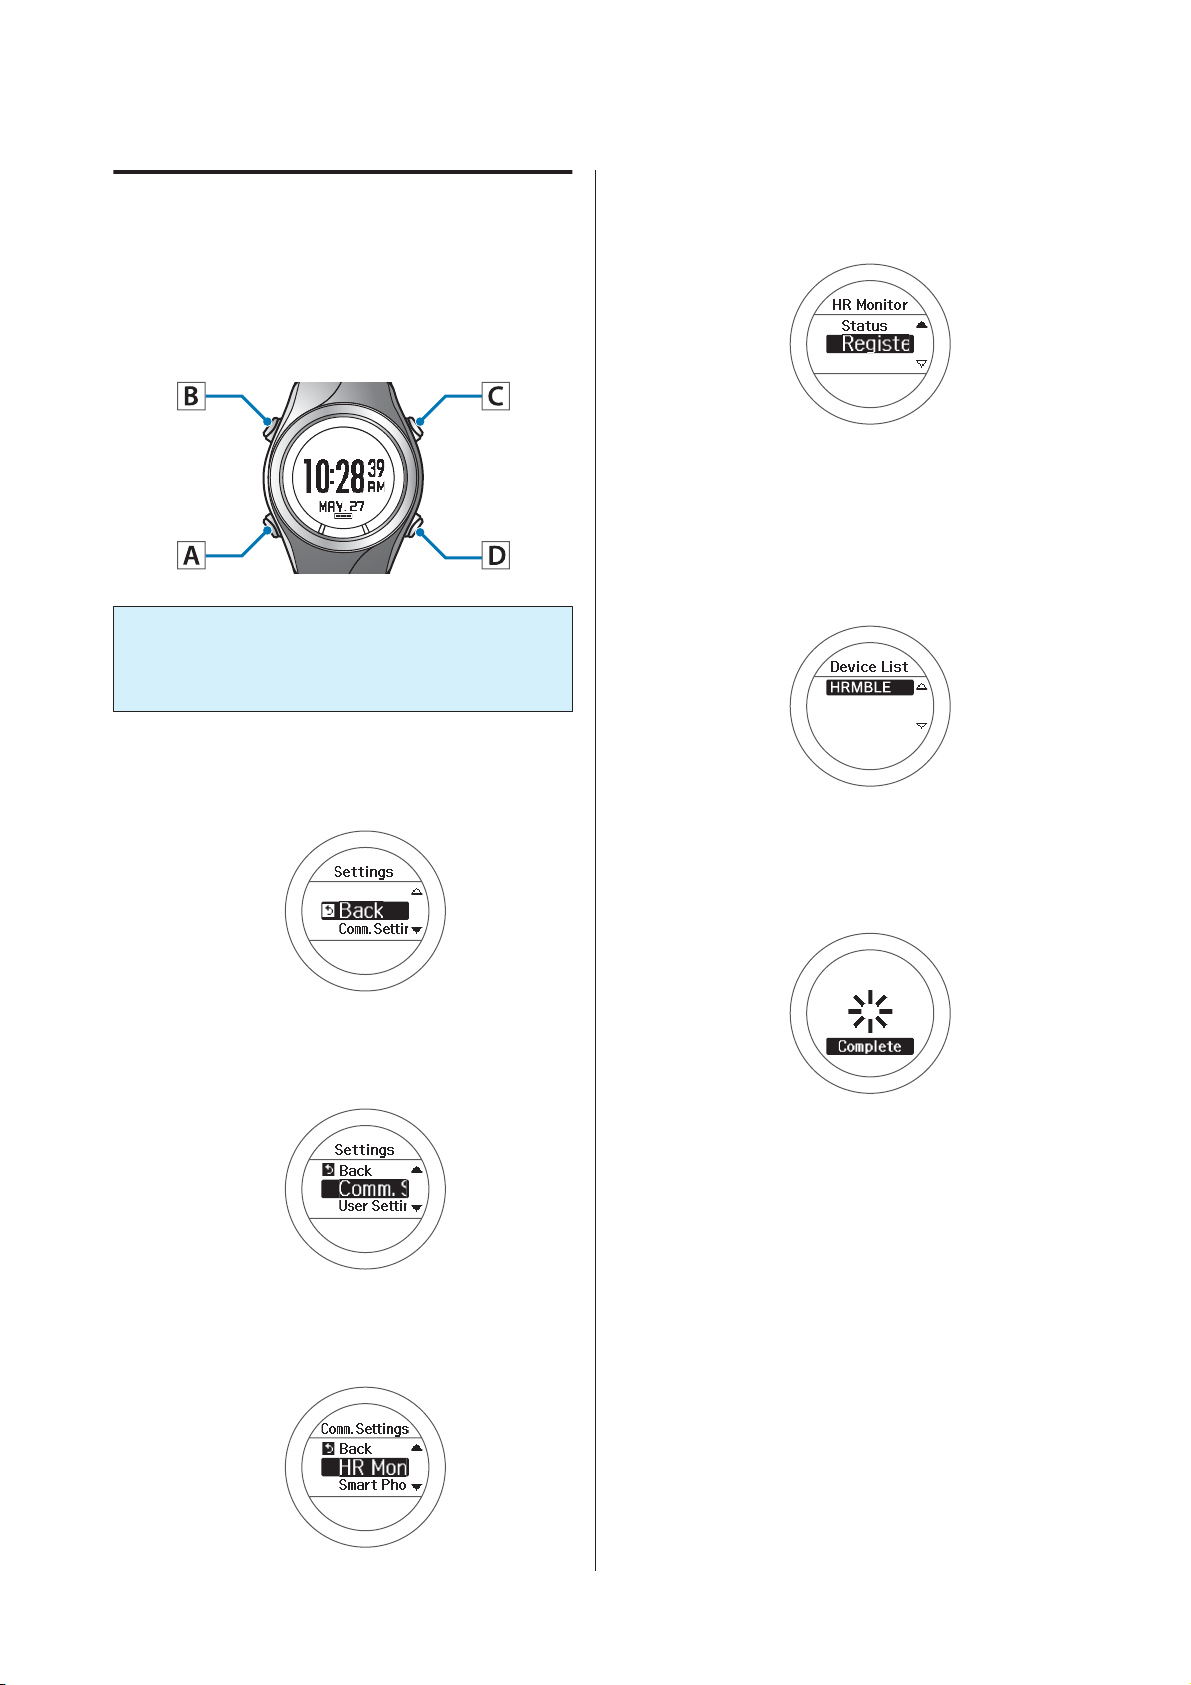
When using the HR monitor for the first time, wear the
HR monitor when you register it to the device.
Operation buttons
Important:
c
Check that there are no other HR monitors in the
surrounding area before registering.
Displays the Settings menu.
A
Select Register.
D
Use C/D to select, and then press A.
The device starts searching for the HR monitor
and displays the search results.
Select the registered HR monitor.
E
Use C/D to select, and then press A.
Hold down B on the time screen.
Select Comm. Settings.
B
Use C/D to select, and then press A.
Select HR Monitor.
C
Use C/D to select, and then press A.
Complete the communication
F
settings.
Press A.
Complete the settings.
G
Hold down A.
Displays the time screen.
66
Page 67
SF-710/510/310 User's Guide
Measuring Heart Rate (HR Monitor)
Note:
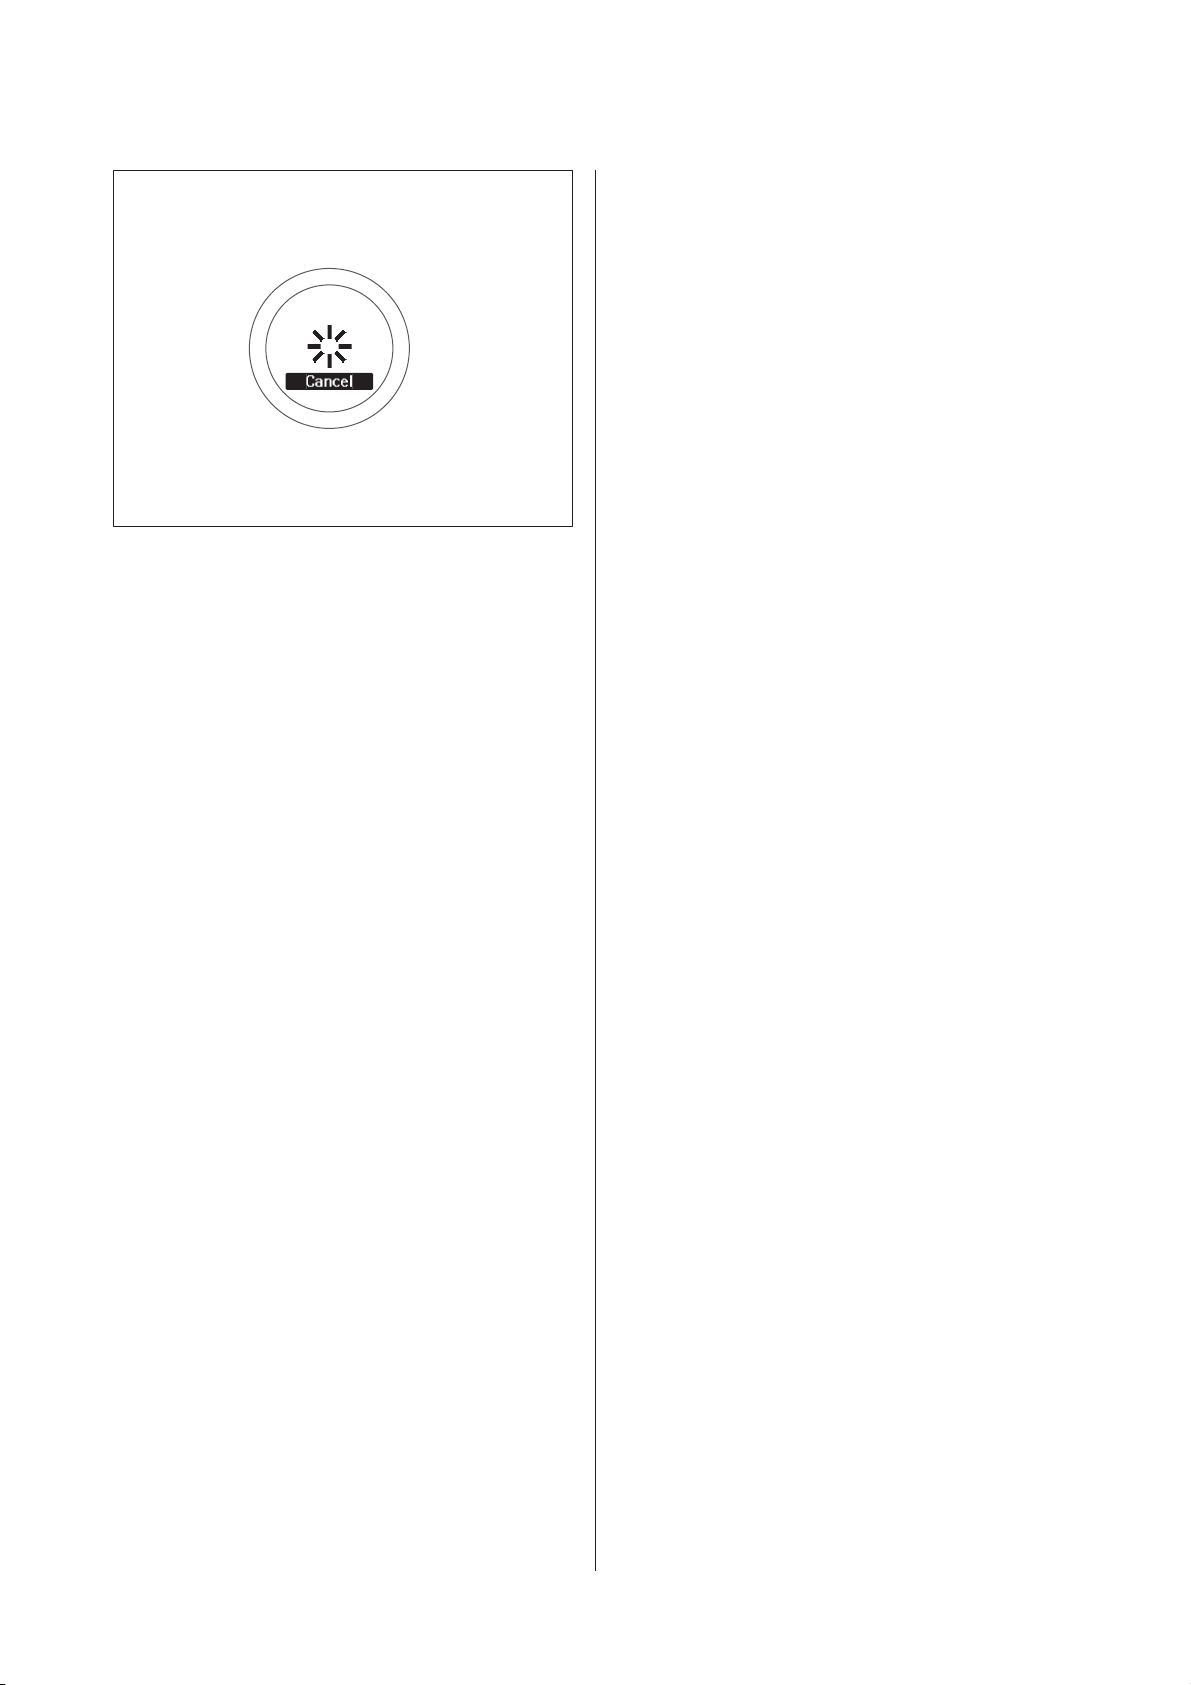
If the following screen is displayed and communication
cannot be established, reset the HR monitor.
U “Replacing the Battery for the HR Monitor” on
page 72
67
Page 68
SF-710/510/310 User's Guide
Measuring Heart Rate (HR Monitor)
Enabling the HR Monitor
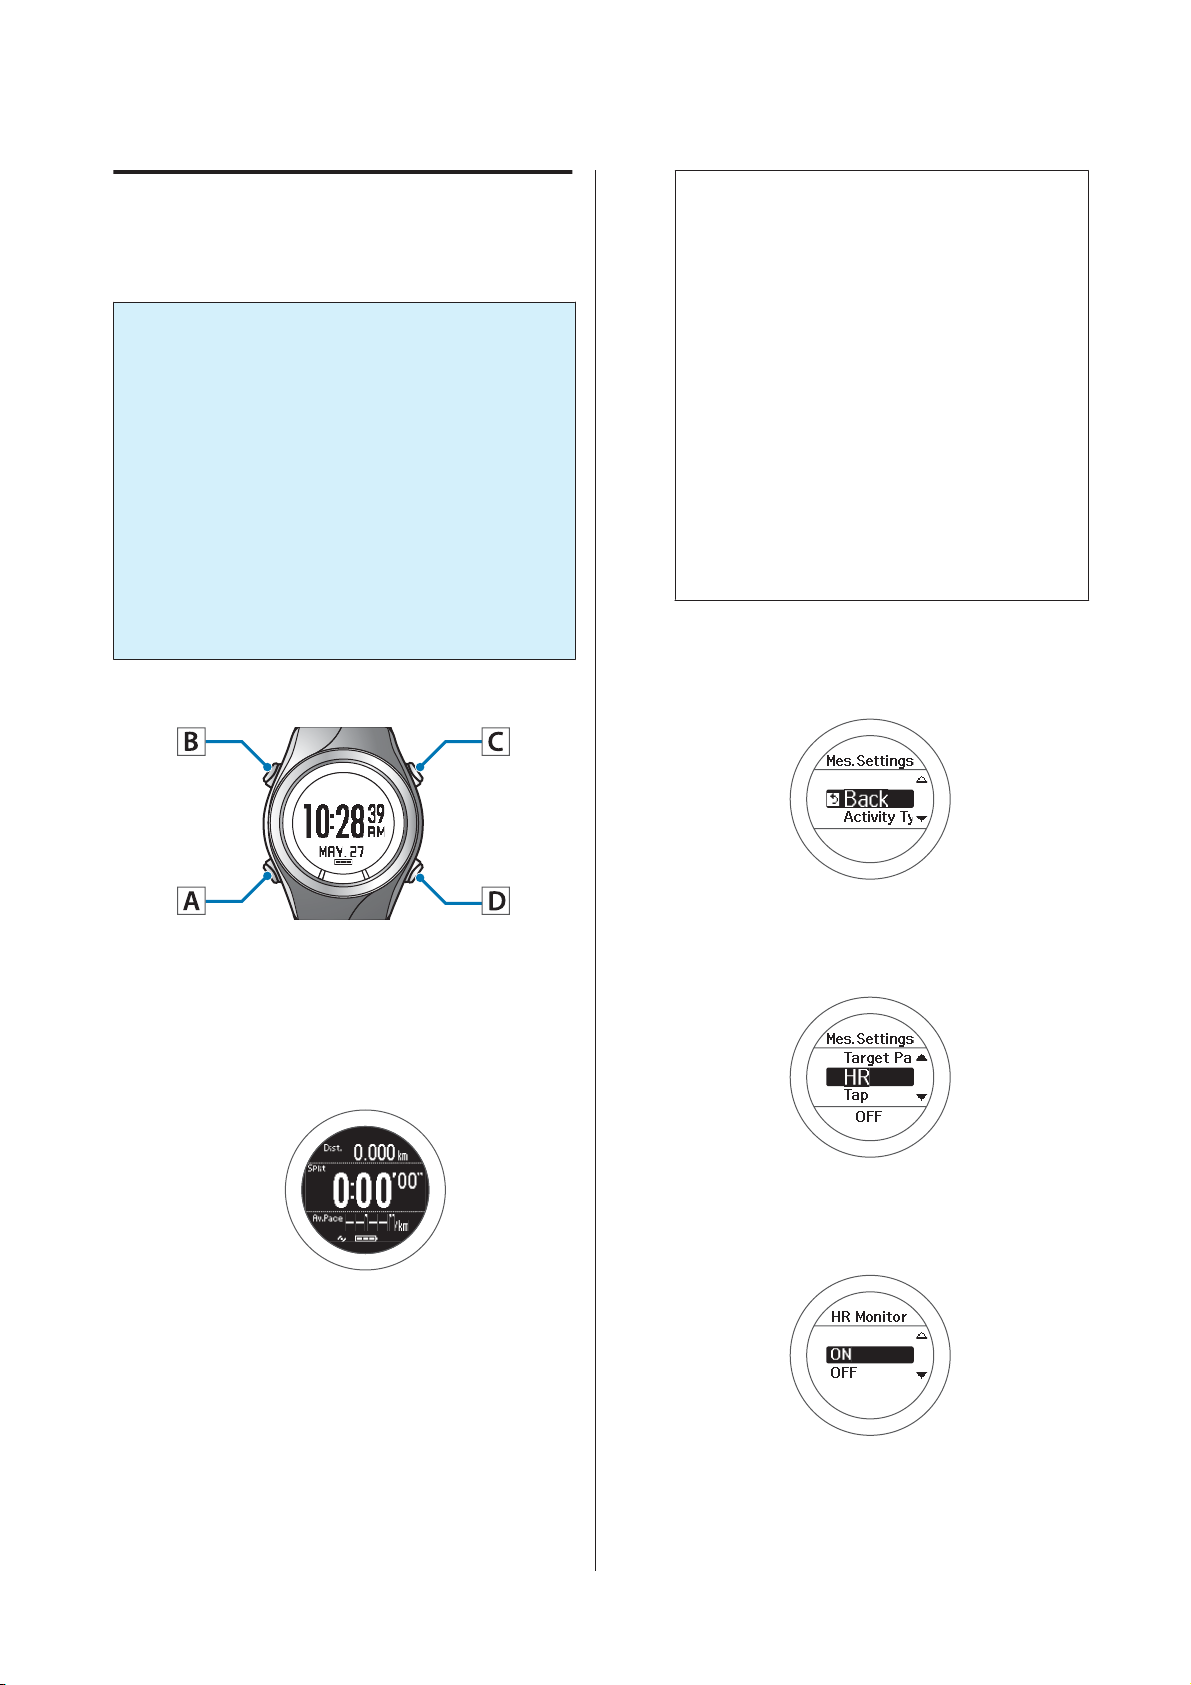
When using the HR monitor, set HR to ON from the
Mes. Settings menu.
Important:
c
❏ When performing GPS positioning, make
sure the screen is facing up and you are
outside with no obstructions overhead.
U “Specifying a GPS (GPS Positioning)” on
page 28
❏ It usually takes less than two minutes to
complete GPS positioning.
If it takes more than two minutes or Failed is
displayed, we recommend selecting Cancel,
moving to a different location, and trying
again.
Operation buttons
Note:
❏ You can skip GPS positioning if you want to
start measuring immediately or if it is taking
too long.
U “Skipping GPS positioning” on page 29
❏ Use indoor mode when GPS positioning
cannot be performed because you are indoors
and so on.
U “Indoor mode (SF-710/SF-510 only)” on
page 30
❏ Screens are explained using the default
screens. You can invert the screen's
monochrome display.
U “Sys. Settings” on page 93
Displays the Mes. Settings menu.
B
Hold down B on the measurement screen.
Display the measurement screen.
A
Press C on the time screen.
GPS positioning starts, and the measurement
screen is displayed once positioning is complete.
Select HR.
C
Use C/D to select, and then press A.
Select ON.
D
Use C/D to select, and then press A.
68
Page 69
SF-710/510/310 User's Guide
Measuring Heart Rate (HR Monitor)
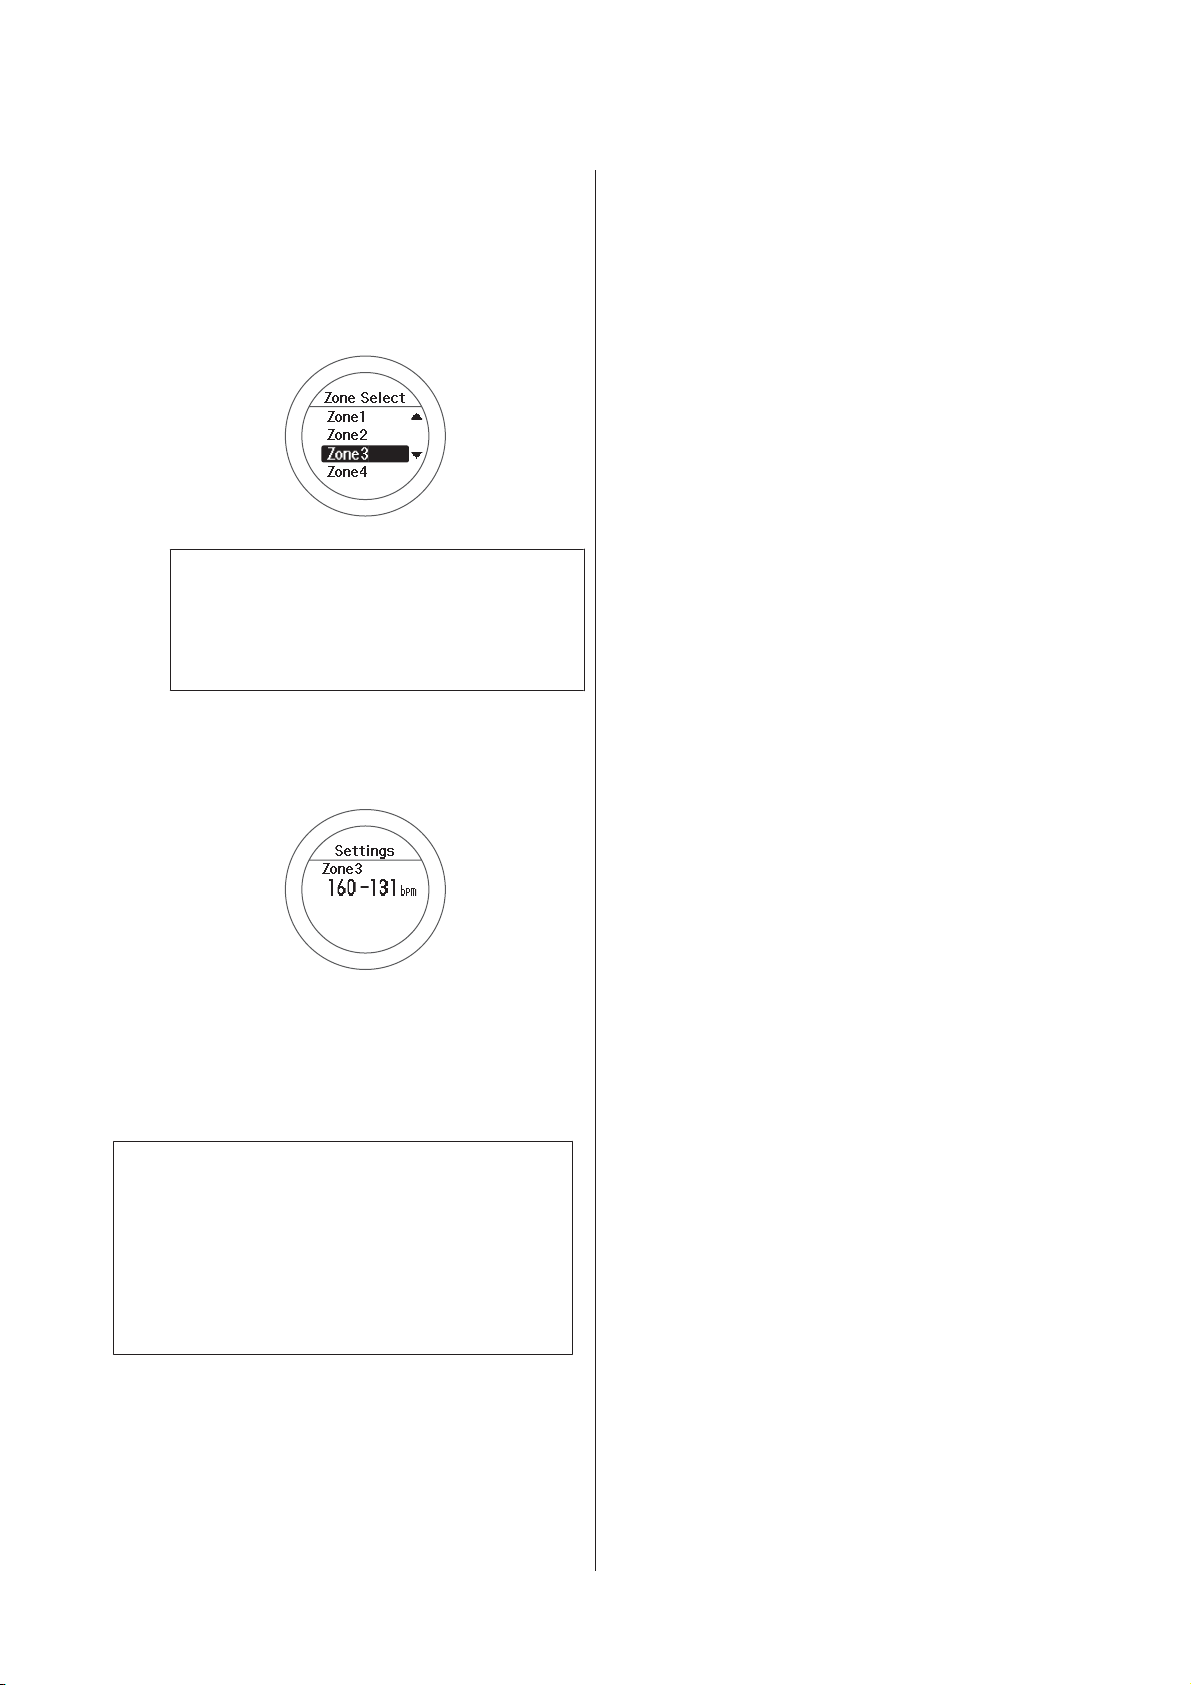
Set the heart rate zone you want to
E
maintain while exercising.
Use C/D to select, and then press A.
An alarm sounds if you are outside the set heart
rate zone.
Note:
You can check or change the value set for the heart
rate in each heart rate zone in User Settings.
U “User Settings” on page 92
Check the set content.
F
Press A.
Complete the settings.
G
Hold down A.
The measurement screen is displayed.
Note:
❏ When HR is set to ON, the battery life for the device
is reduced. When you are not using the HR monitor,
set HR to OFF.
❏ If you want to turn off the alarm that notifies you
when you are outside the set heart rate zone, select
OFF in step 5.
69
Page 70
SF-710/510/310 User's Guide
Measuring Heart Rate (HR Monitor)
Measuring Heart Rate
When HR is set to ON from the Mes. Settings menu, you can use the HR monitor to measure heart rate in the
chronograph, interval, and goal functions. See the following pages for information on each function.
U “Measuring Time, Distance, and Speed (Chronograph Function)” on page 37
U “Setting a Time and Distance for Hard and Light Workouts(Interval Function)” on page 42
U “Measure until the time or distance set in advance is reached (Goal function)” on page 50
Checking the Communication Status with the HR Monitor
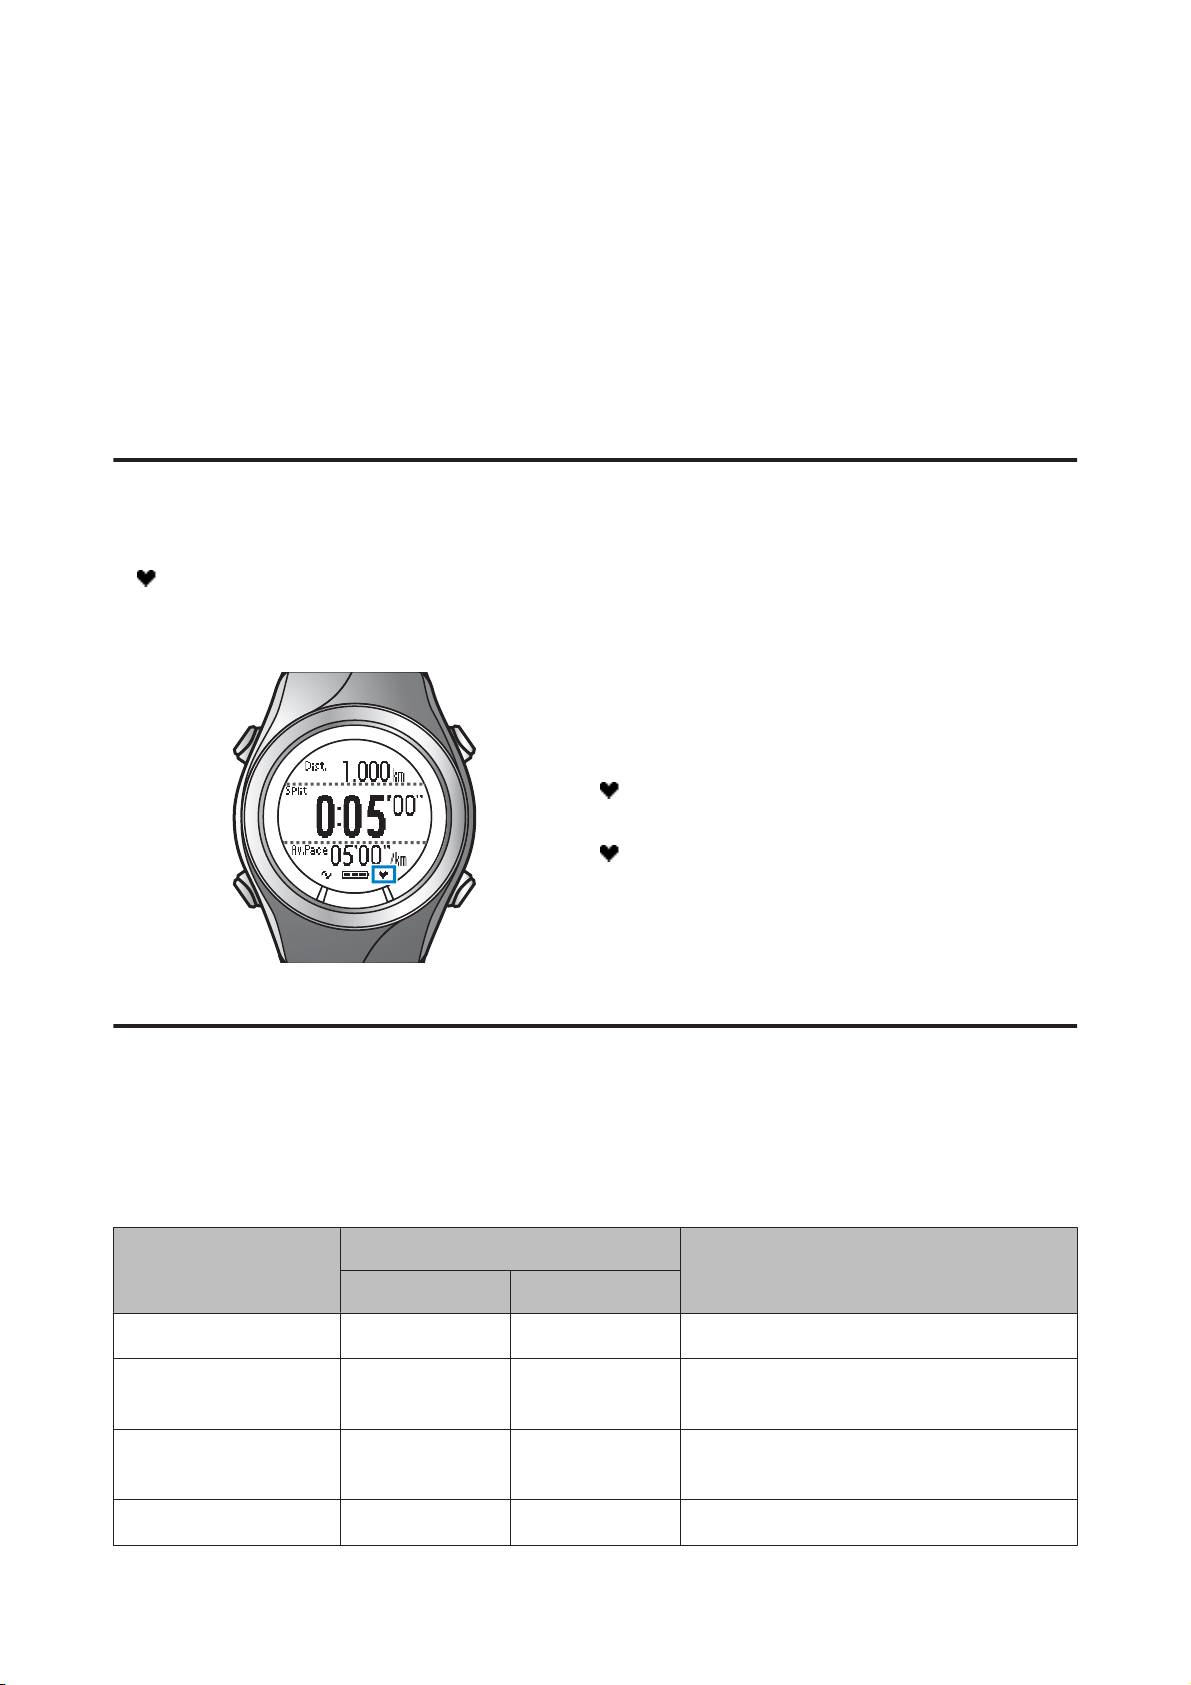
You can check the communication status of the HR monitor from the icon on the measurement screen.
is flashing, check that you are wearing the HR monitor correctly.
If
Measurement screen: Chronograph
On: Communicating with the HR monitor.
Flashing: Cannot communicate with the HR monitor.
Displaying the Measured Heart Rate Screen
The heart rate measurement item is not displayed by default. Change the screen settings to display the heart rate
item.
U “Screen” on page 95
List of measurement items displayed (items related to heart rate)
Display name
Display item
1 Line 2 Lines/3 Lines
HR HR HR Current heart rate
Average HR Avg.HR Av.HR Average heart rate from the start of
measurements
Maximum HR* Max.HR Max.HR Maximum heart rate from the start of
measurements
Lap HR LapHR LapHR Average heart rate for each lap
Explanation
70
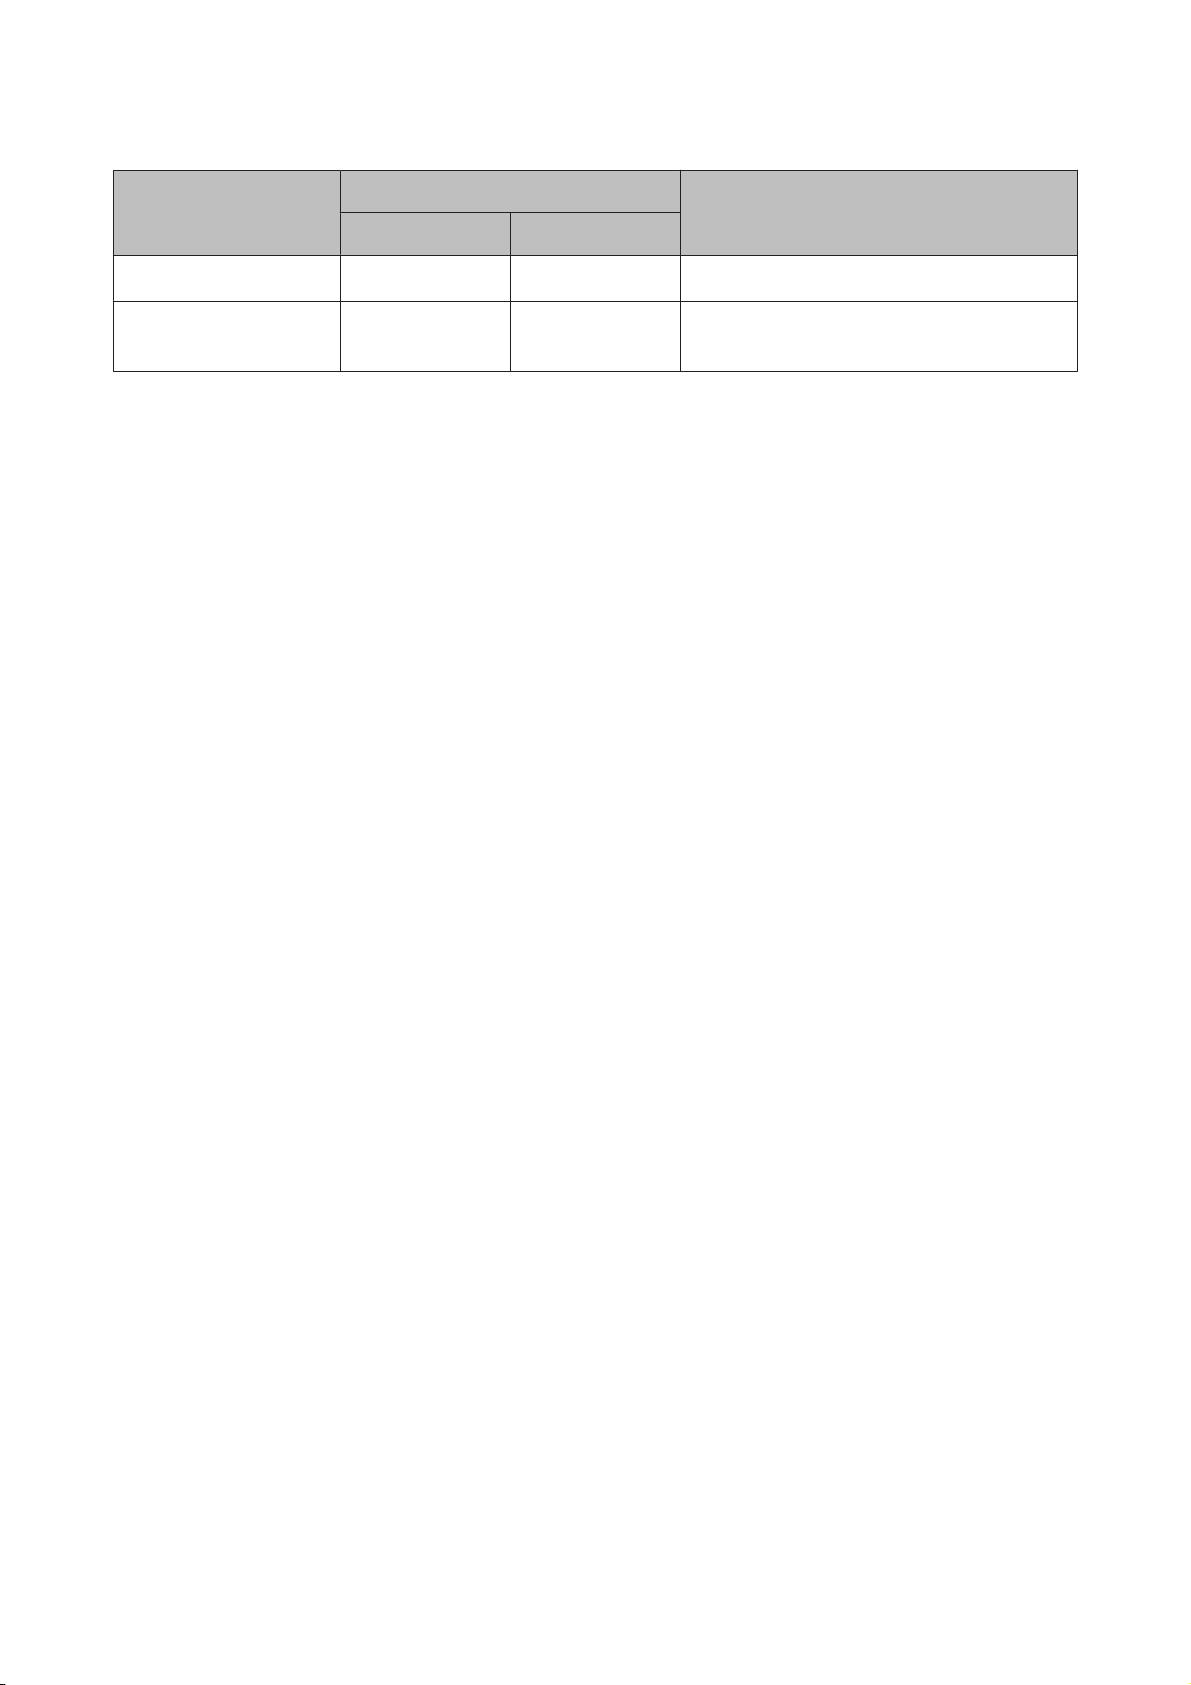
Page 71
SF-710/510/310 User's Guide
Measuring Heart Rate (HR Monitor)
Display name
Display item
1 Line 2 Lines/3 Lines
Explanation
HR Zone Time* Spent.HR Spent.HR Time within heart rate zone for each lap
Time to HR Zone* Time.HR Time.HR Time until entering heart rate zone for each
lap
* Only displayed for the SF-710/SF-510.
71
Page 72
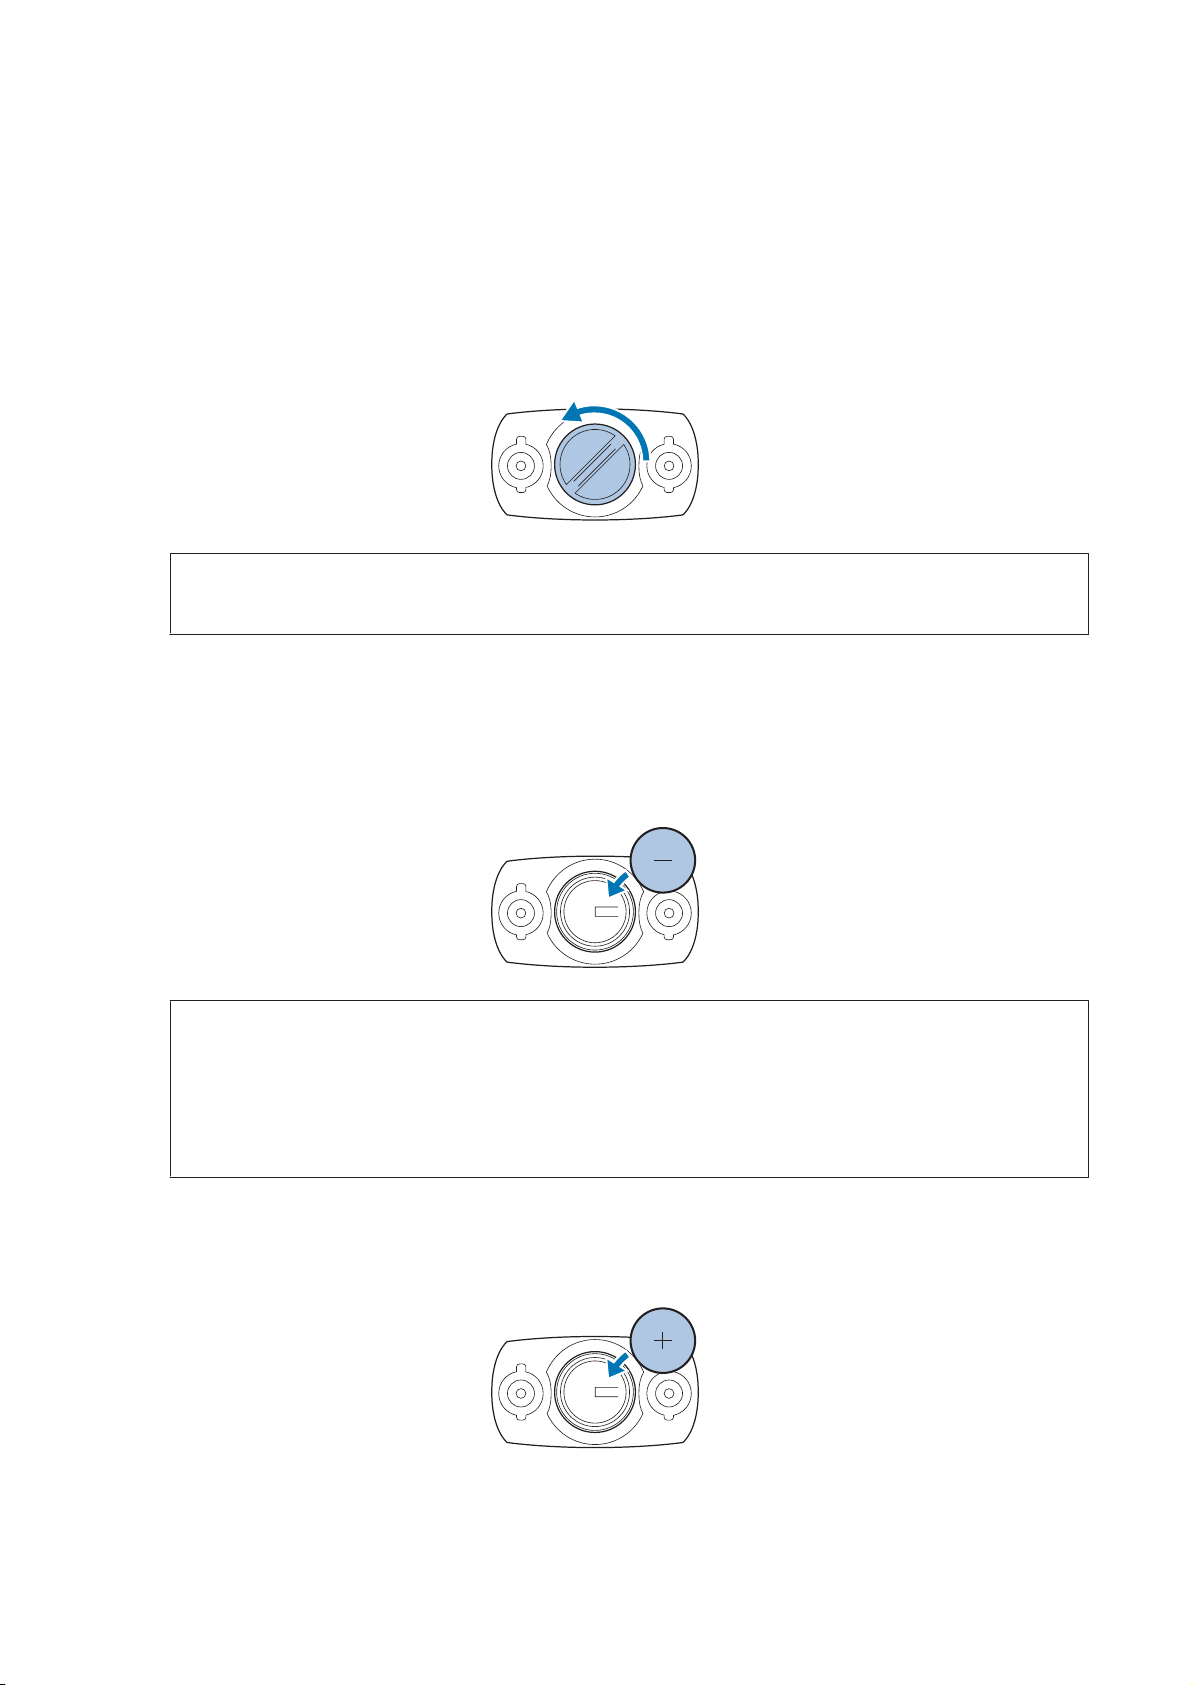
SF-710/510/310 User's Guide
Measuring Heart Rate (HR Monitor)
Replacing the Battery for the HR Monitor
If you cannot measure your heart rate, the HR monitor battery may have run out. Replace the battery.
The HR monitor uses a lithium battery (CR2032).
Use something flat, such as a coin, to remove the battery cover.
A
Note:
You can avoid damaging the cover by wrapping the coin in a thin handkerchief and so on.
Remove the battery, and reset the HR monitor.
B
First, remove the battery.
Turn the battery over so that the negative side is facing up and put it back in, and then wait for at least three
seconds.
Note:
Resetting the HR monitor:
Any remaining charge in the HR sensor circuitry is dispersed by removing the battery, reinserting it with the negative
side facing up, and waiting for at least three seconds.
If the HR monitor temporarily freezes, you can reset it by using this method.
Insert a new battery.
C
Make sure the + side is facing up.
72
Page 73
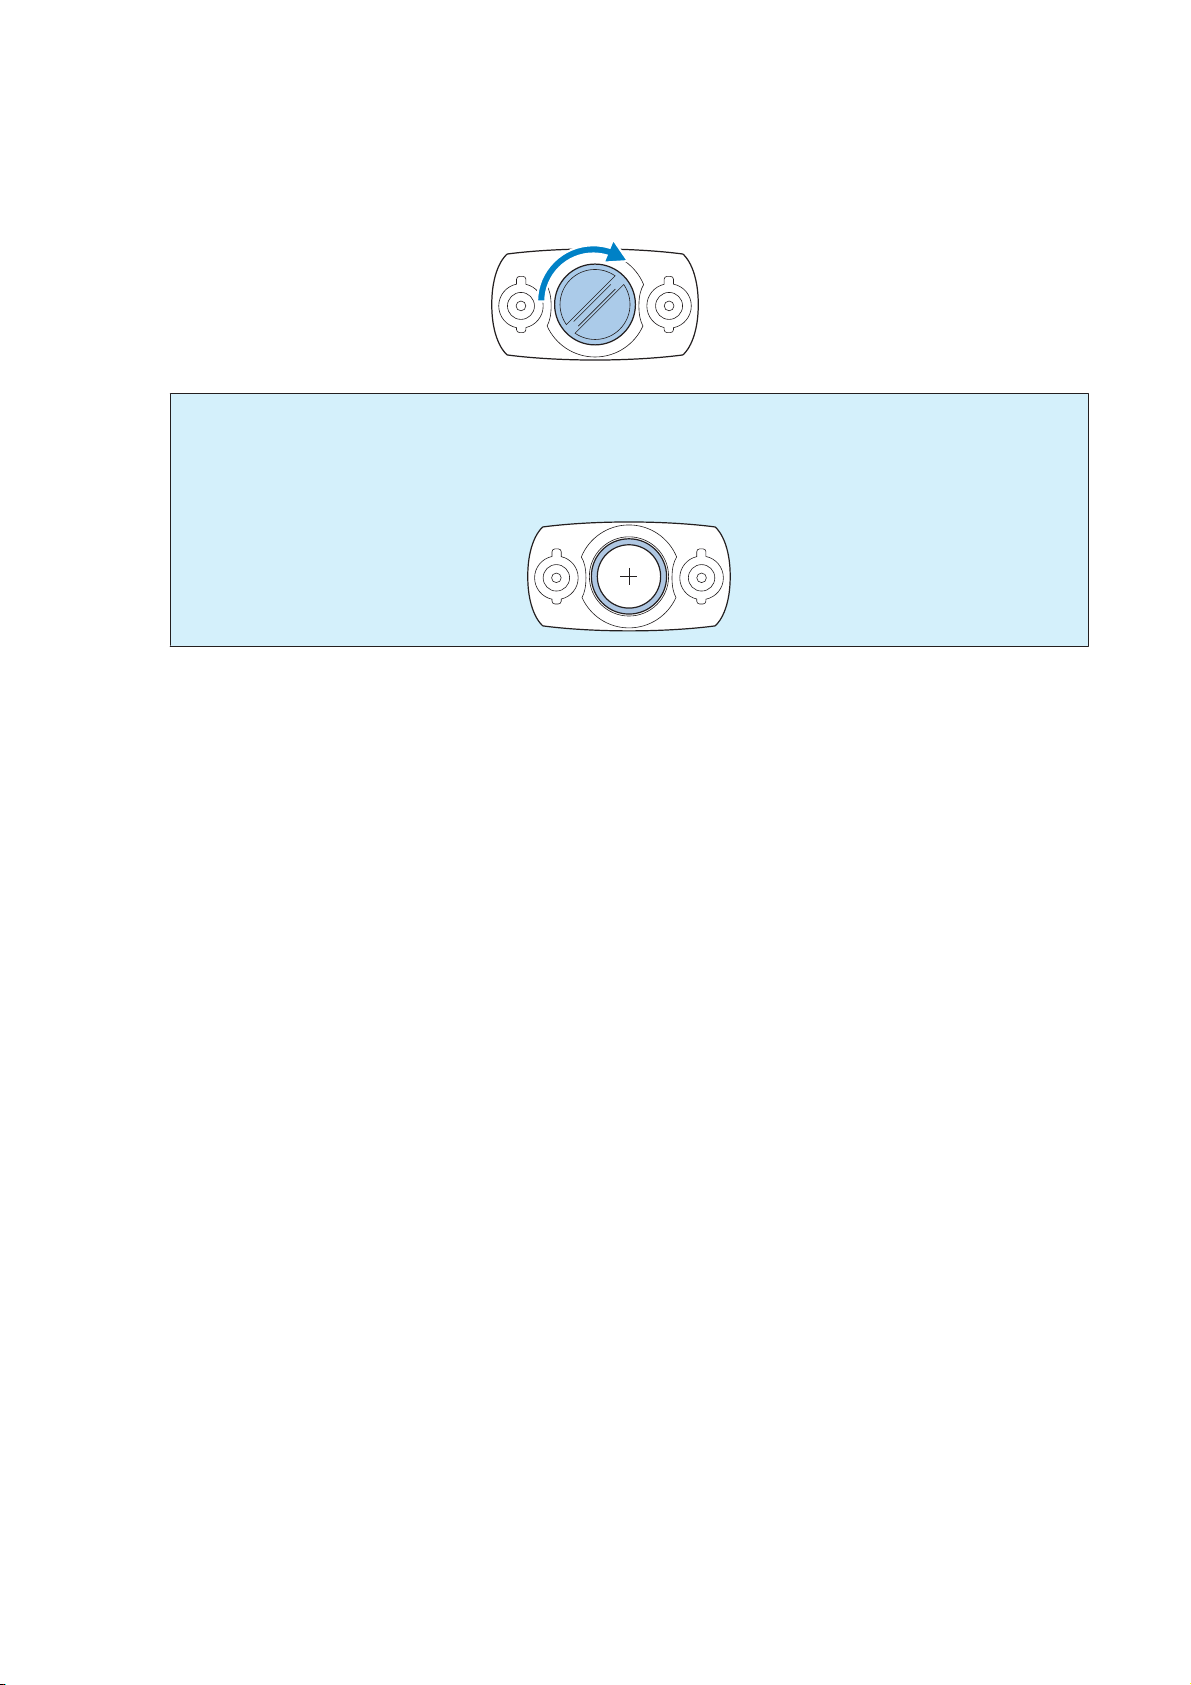
SF-710/510/310 User's Guide
Replace the battery cover.
D
Important:
c
If the internal seal (the blue part in the following diagram) has come out, put it back in its original position,
and then close the cover. If the seal gets caught or broken when closing the cover, sweat or water could enter
into the device causing a malfunction.
Measuring Heart Rate (HR Monitor)
73
Page 74
SF-710/510/310 User's Guide
Data Management Using the Web Application (NeoRun)
Data Management Using the Web Application
(NeoRun)
This device allows you to manage measured data using a dedicated Web application (NeoRun).
The Web application (NeoRun) allows you to manage, review, and use your running route, distance, speed, heart rate,
calories burnt, and so on.
Note:
You need to make an account the first time you use NeoRun.
U “Creating an Account (When Using for the First Time)” on page 78
If you already have an account with NeoRun, you can continue using it with this device.
U “What is the Web Application (NeoRun)?” on page 75
U “Installing the NR Uploader” on page 77
U “Creating an Account (When Using for the First Time)” on page 78
U “Checking Uploaded Measurement Data” on page 82
74
Page 75
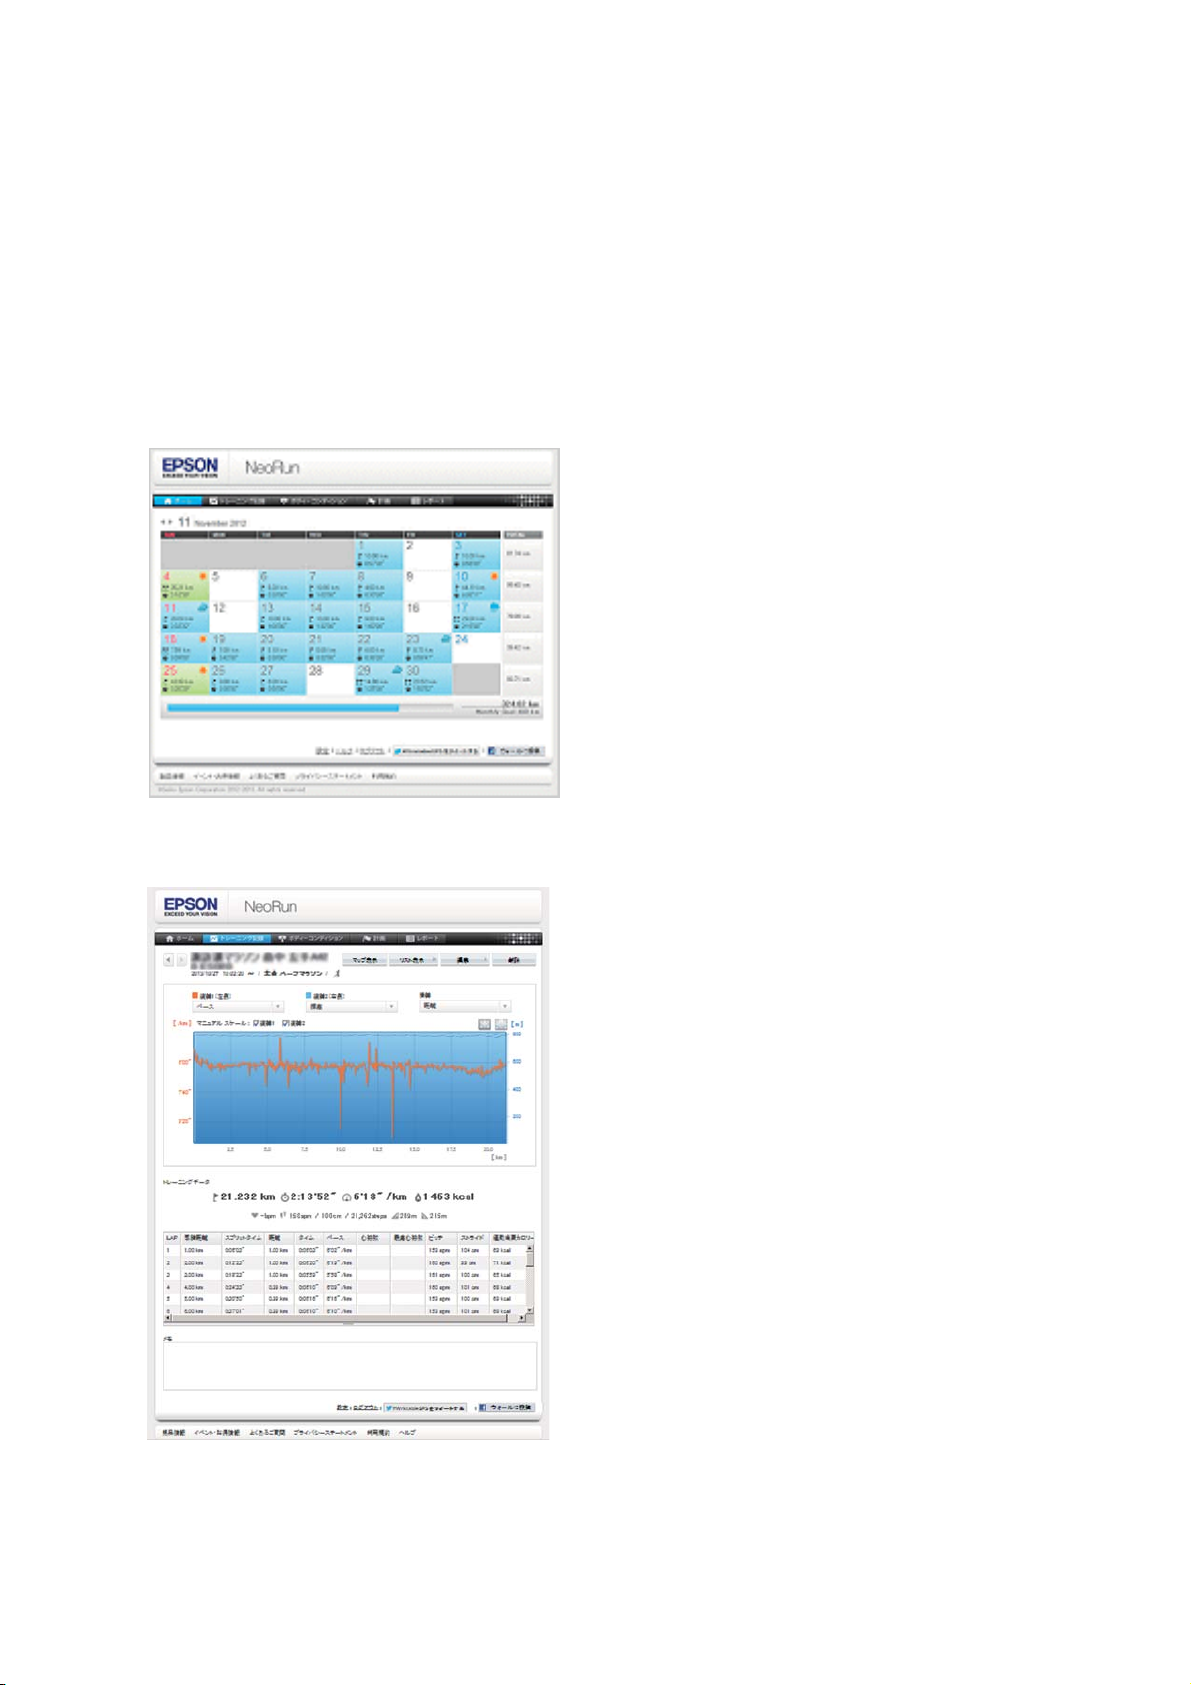
SF-710/510/310 User's Guide
Data Management Using the Web Application (NeoRun)
What is the Web Application (NeoRun)?
The Web application (NeoRun) sends measurement data through your computer allowing you to manage your
running route, distance, speed, heart rate, calories burnt, and so on.
You can also use this for data analysis as the sent data can be displayed in various formats, such as a map display for the
route, a graph showing speed/distance, and a total display (for months/entire periods).
By exporting in GPX format, you can also use the measurement data on other applications.
Home screen
Manage records in calendar format. Allows you to easily
review past runs.
Training record screen
Displays the pace/speed, altitude, heart rate, and so on as
a graph. Allows you to analyze training from different
angles.
75
Page 76
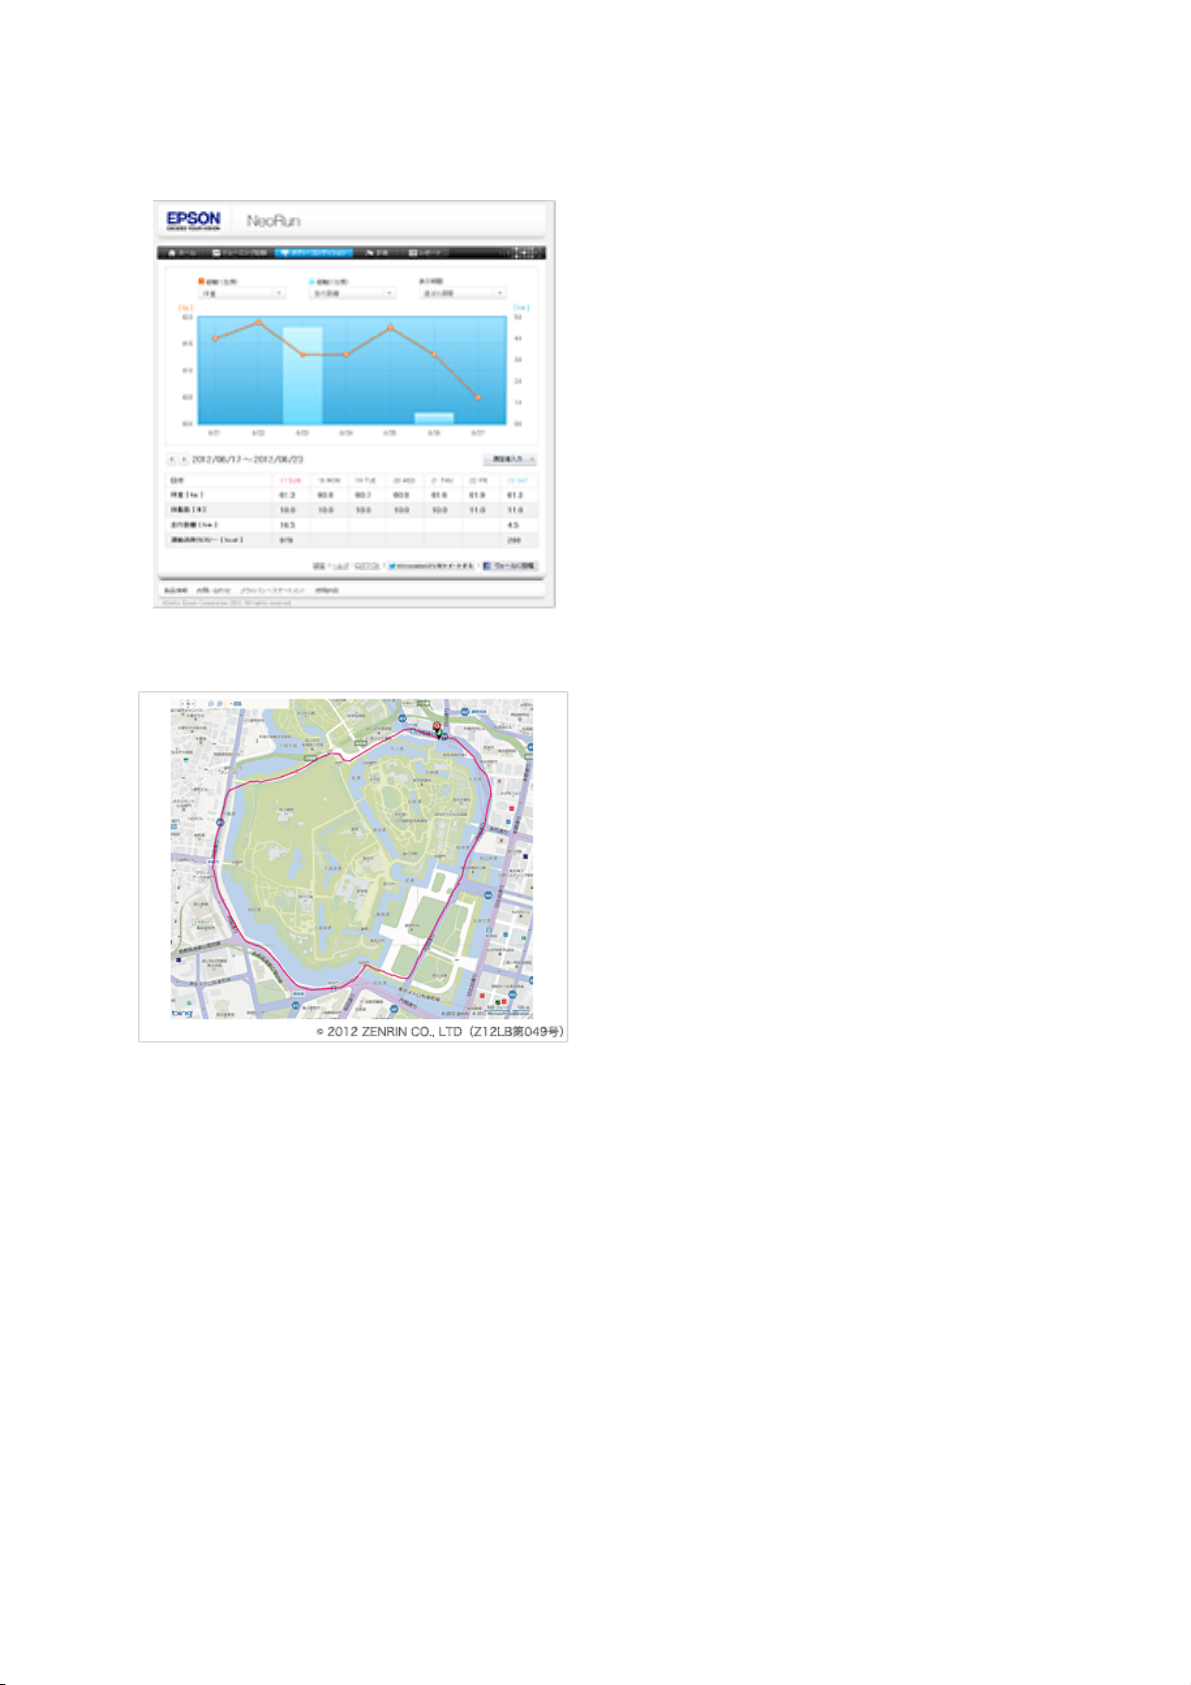
SF-710/510/310 User's Guide
Data Management Using the Web Application (NeoRun)
Body condition screen
Displays changes in weight, body fat, calories burnt
through exercise as a graph. Allows you to record,
manage, and check your physical condition.
Training map screen
By using the built-in GPS function, you can review
running routes you have left on the map, as well as look
back on courses in competitions or when you were on a
trip.
76
Page 77
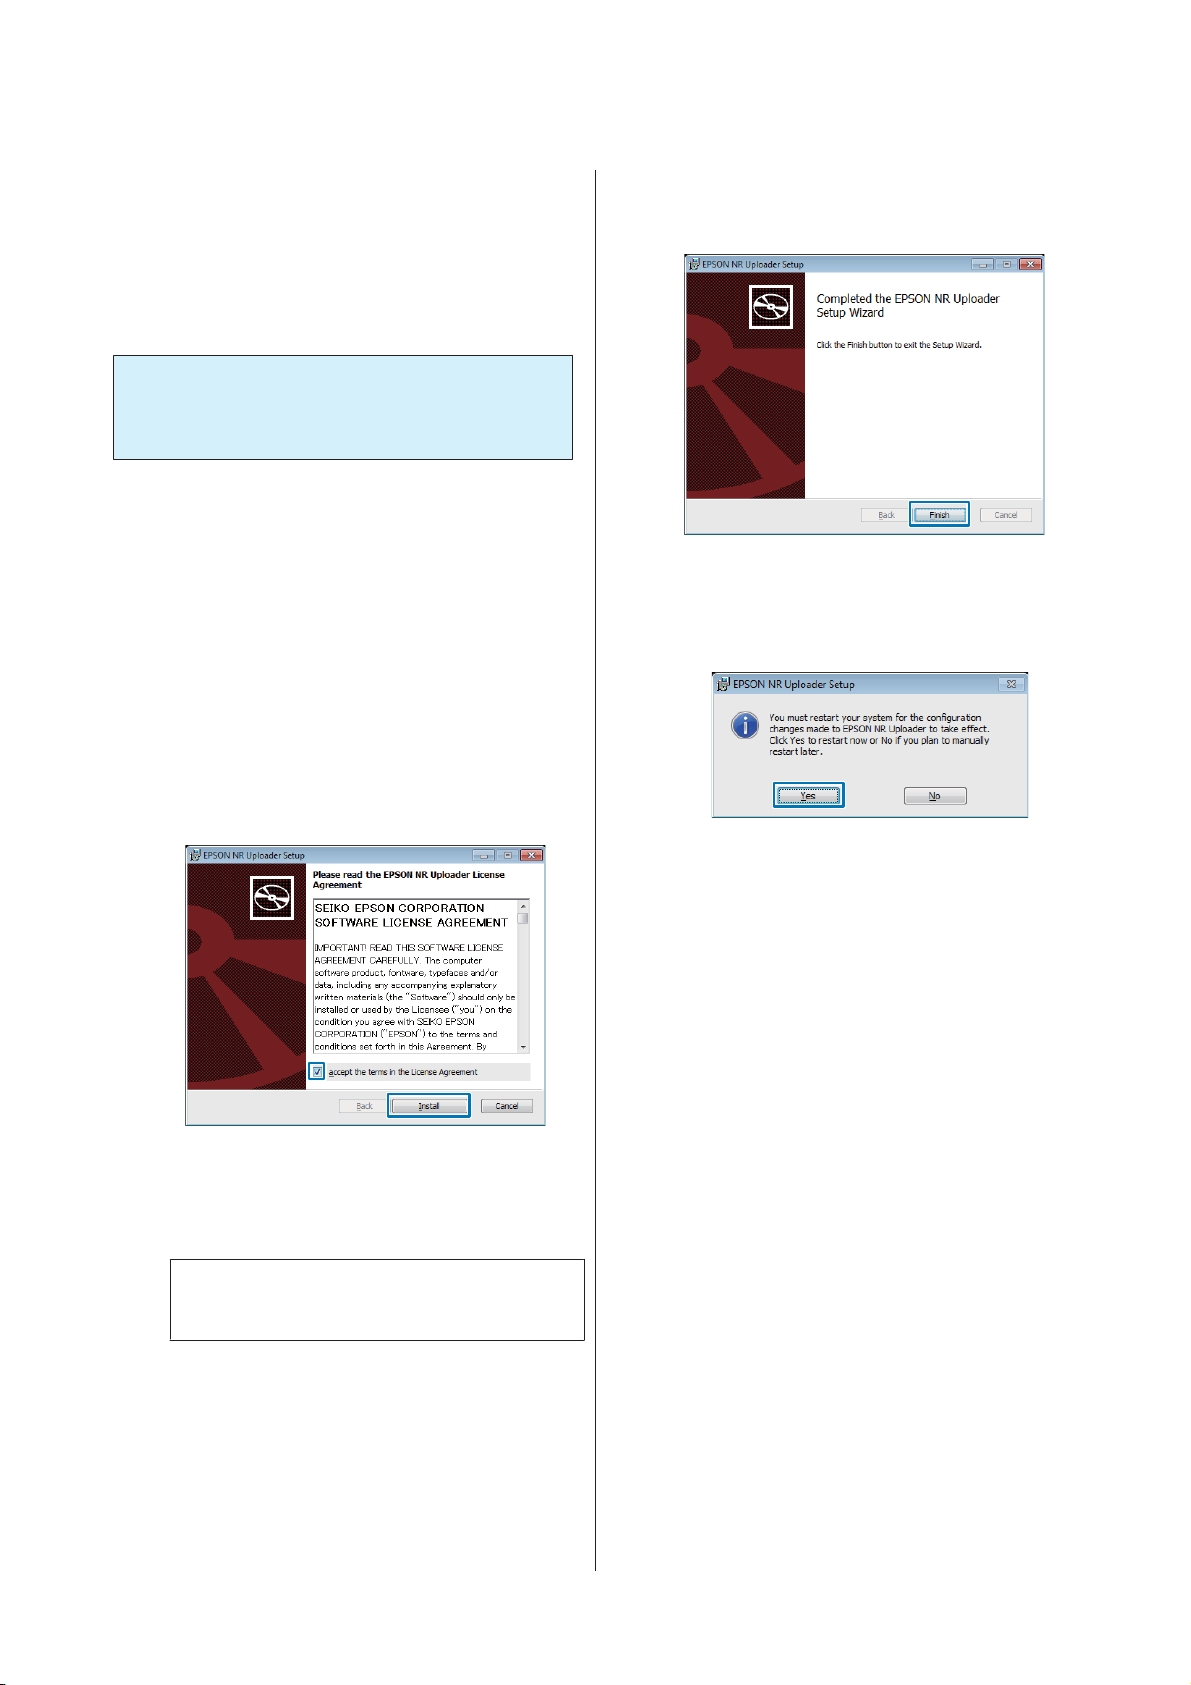
SF-710/510/310 User's Guide
Data Management Using the Web Application (NeoRun)
Installing the NR Uploader
You need NR Uploader to upload measurement data to
the Web application (NeoRun).
Follow the steps below to install NR Uploader.
Important:
c
Use NR Uploader Ver. 2.0 or later. You can use
Ver. 2.0 with the SS series.
Access the following Web site and
A
download NR Uploader.
http://www.epson.jp/download/
Run the downloaded file.
B
The Setup screen is displayed.
Select I accept the terms in the
C
License Agreement, and then click
Install.
When the completion screen is
D
displayed, click Finish.
When a screen is displayed asking you
E
to reboot your computer, click Yes to
reboot.
Installation starts.
Follow the on-screen instructions until the
installation complete screen is displayed.
A security message may be displayed, but you can
continue with the installation.
Installation is complete.
77
Page 78
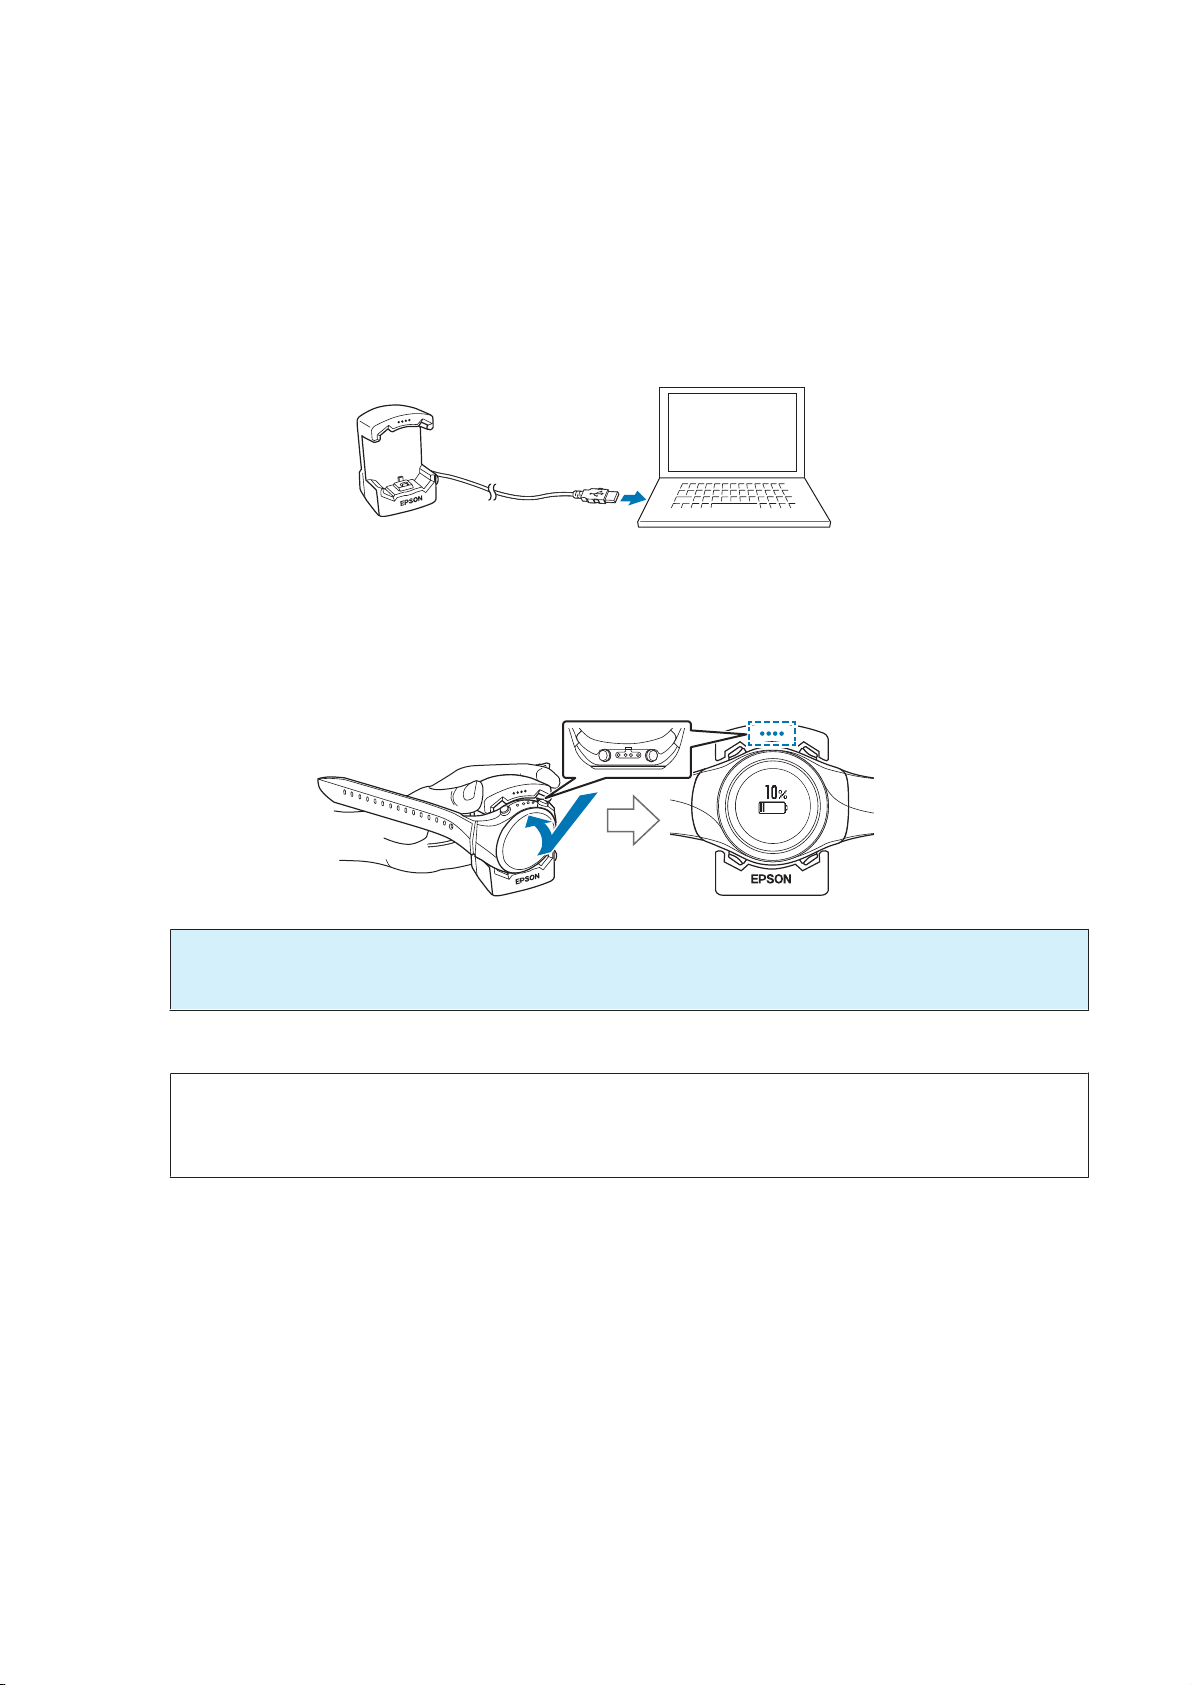
SF-710/510/310 User's Guide
Data Management Using the Web Application (NeoRun)
Creating an Account (When Using for the First Time)
You need to create an account with the Web application (NeoRun) when using it for the first time.
Connect the cradle to the computer on which NR Uploader is installed with a USB
A
cable.
Place the device into the cradle.
B
Check that the contact points on the device are pointing up and match the contact marks on the cradle.
After placing the device into the bottom of the cradle, push carefully on the top of the device until it is fixed in
place.
Important:
c
Make sure the device is placed in the correct direction; otherwise, the cradle could be damaged.
NR Uploader starts.
Note:
If NR Uploader does not start, disconnect the cable from the cradle, wait a few seconds, and then reconnect. Do not
remove the device from the cradle.
78
Page 79
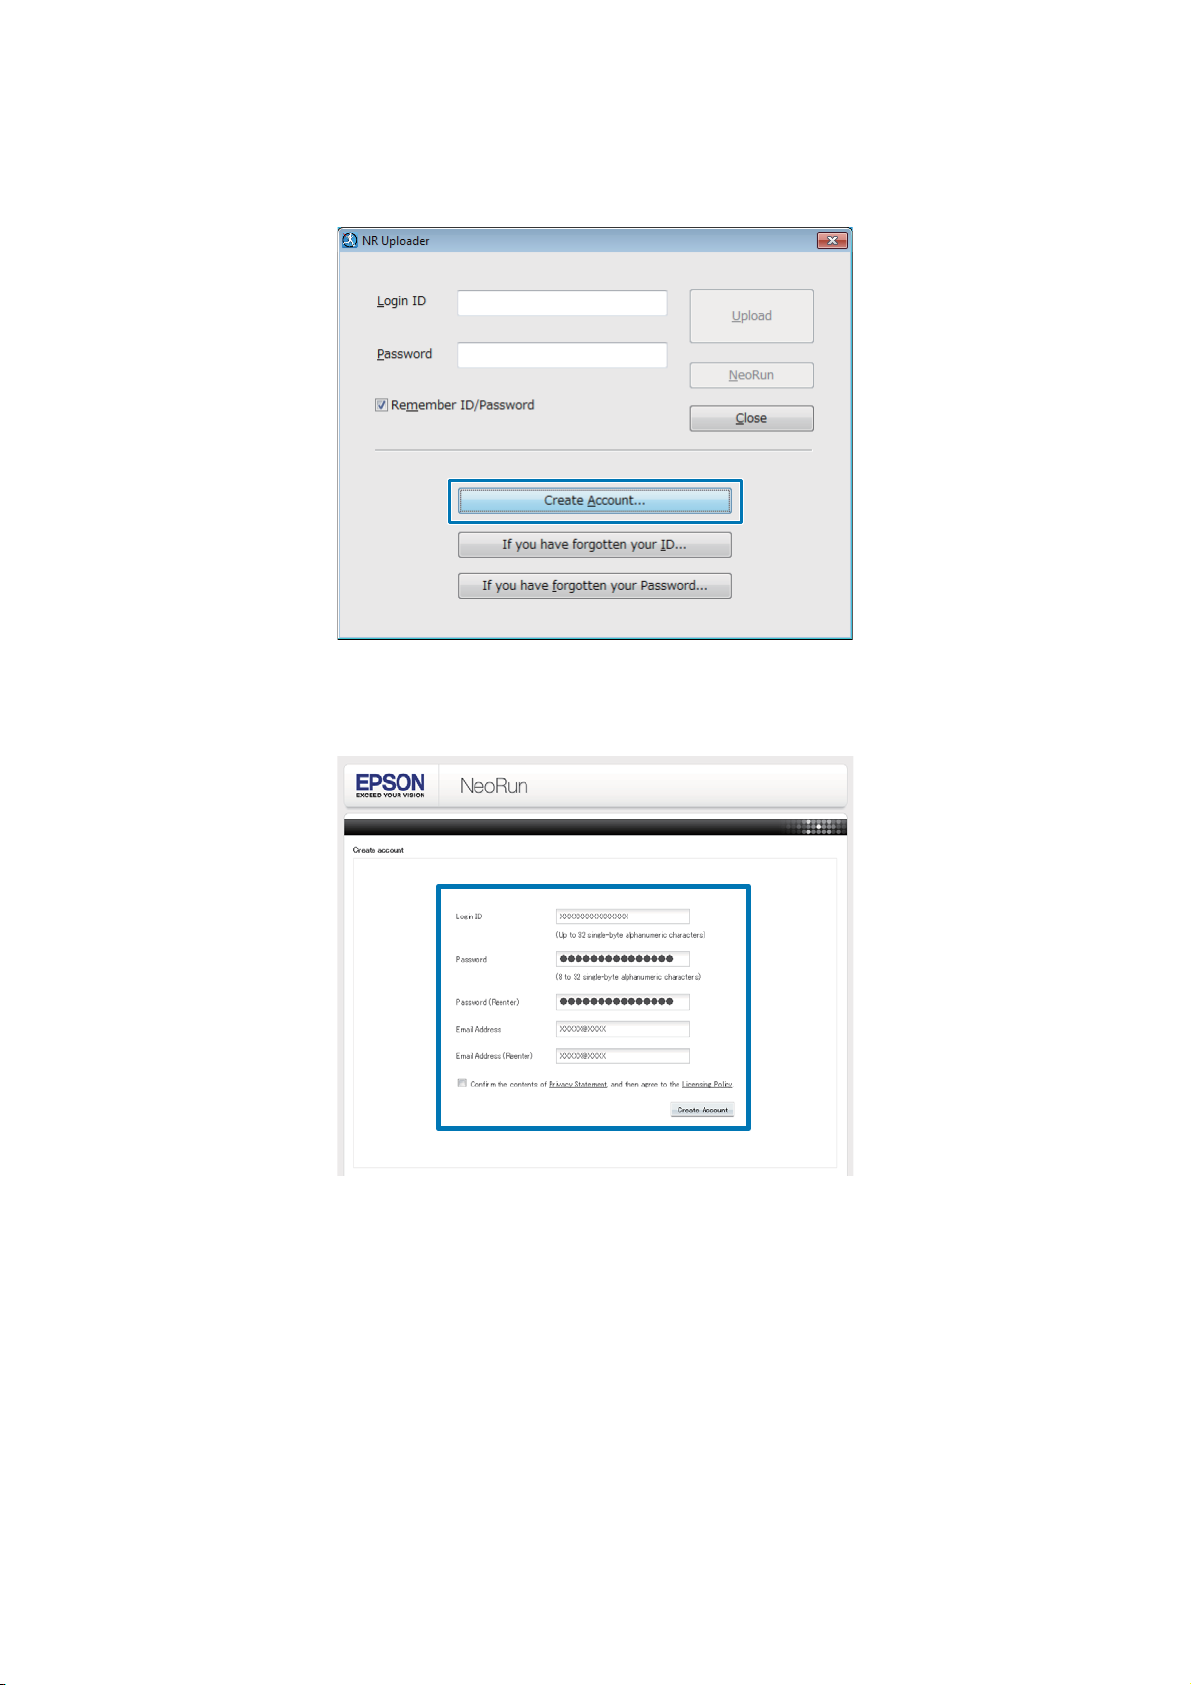
SF-710/510/310 User's Guide
Data Management Using the Web Application (NeoRun)
Click Create Account.
C
Create an account.
D
Enter information for the Login ID, Password, and Email Address, and then click Create Account.
To upload measurement data, go to step 3 in the following section.
U “Uploading Measurement Data” on page 80
79
Page 80
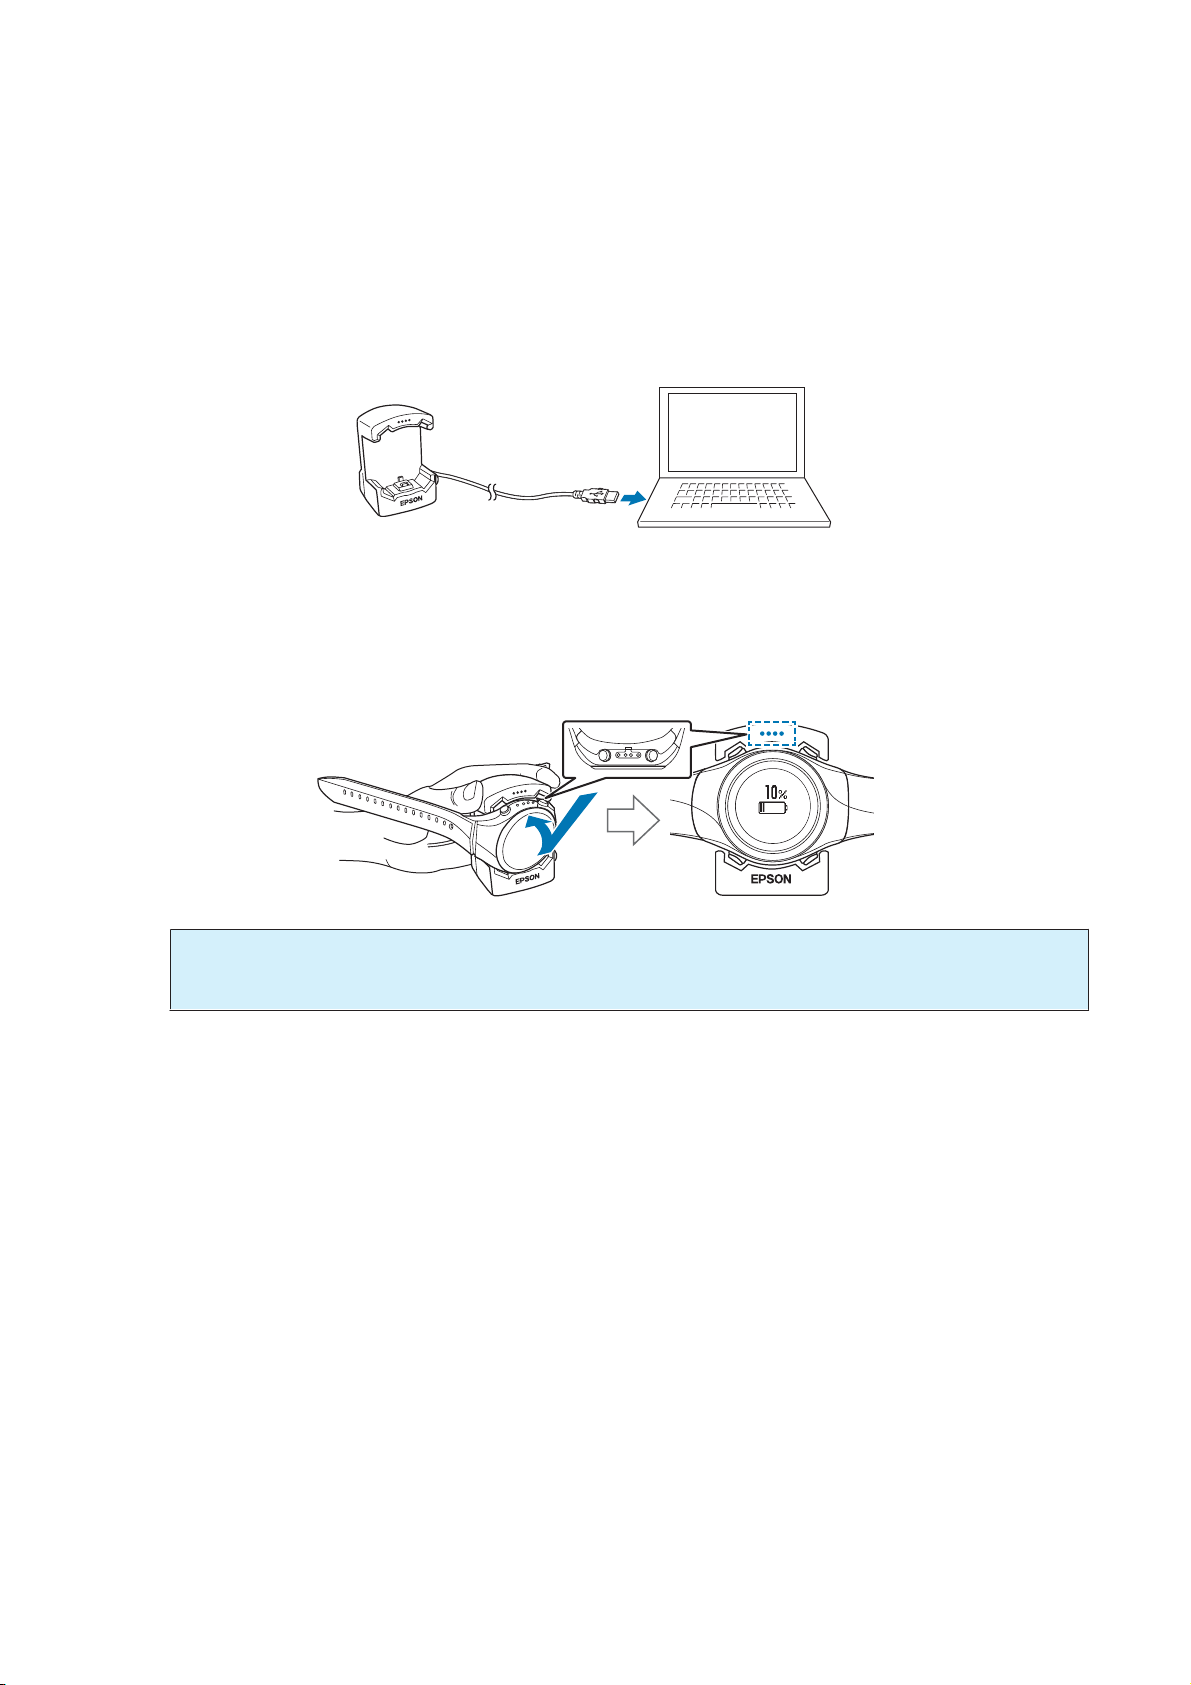
SF-710/510/310 User's Guide
Data Management Using the Web Application (NeoRun)
Uploading Measurement Data
You can upload measurement data to the Web application (NeoRun).
Connect the cradle to the computer on which NR Uploader is installed with a USB
A
cable.
Place the device into the cradle.
B
Check that the contact points on the device are pointing up and match the contact marks on the cradle.
After placing the device into the bottom of the cradle, push carefully on the top of the device until it is fixed in
place.
Important:
c
Make sure the device is placed in the correct direction; otherwise, the cradle could be damaged.
NR Uploader starts.
80
Page 81
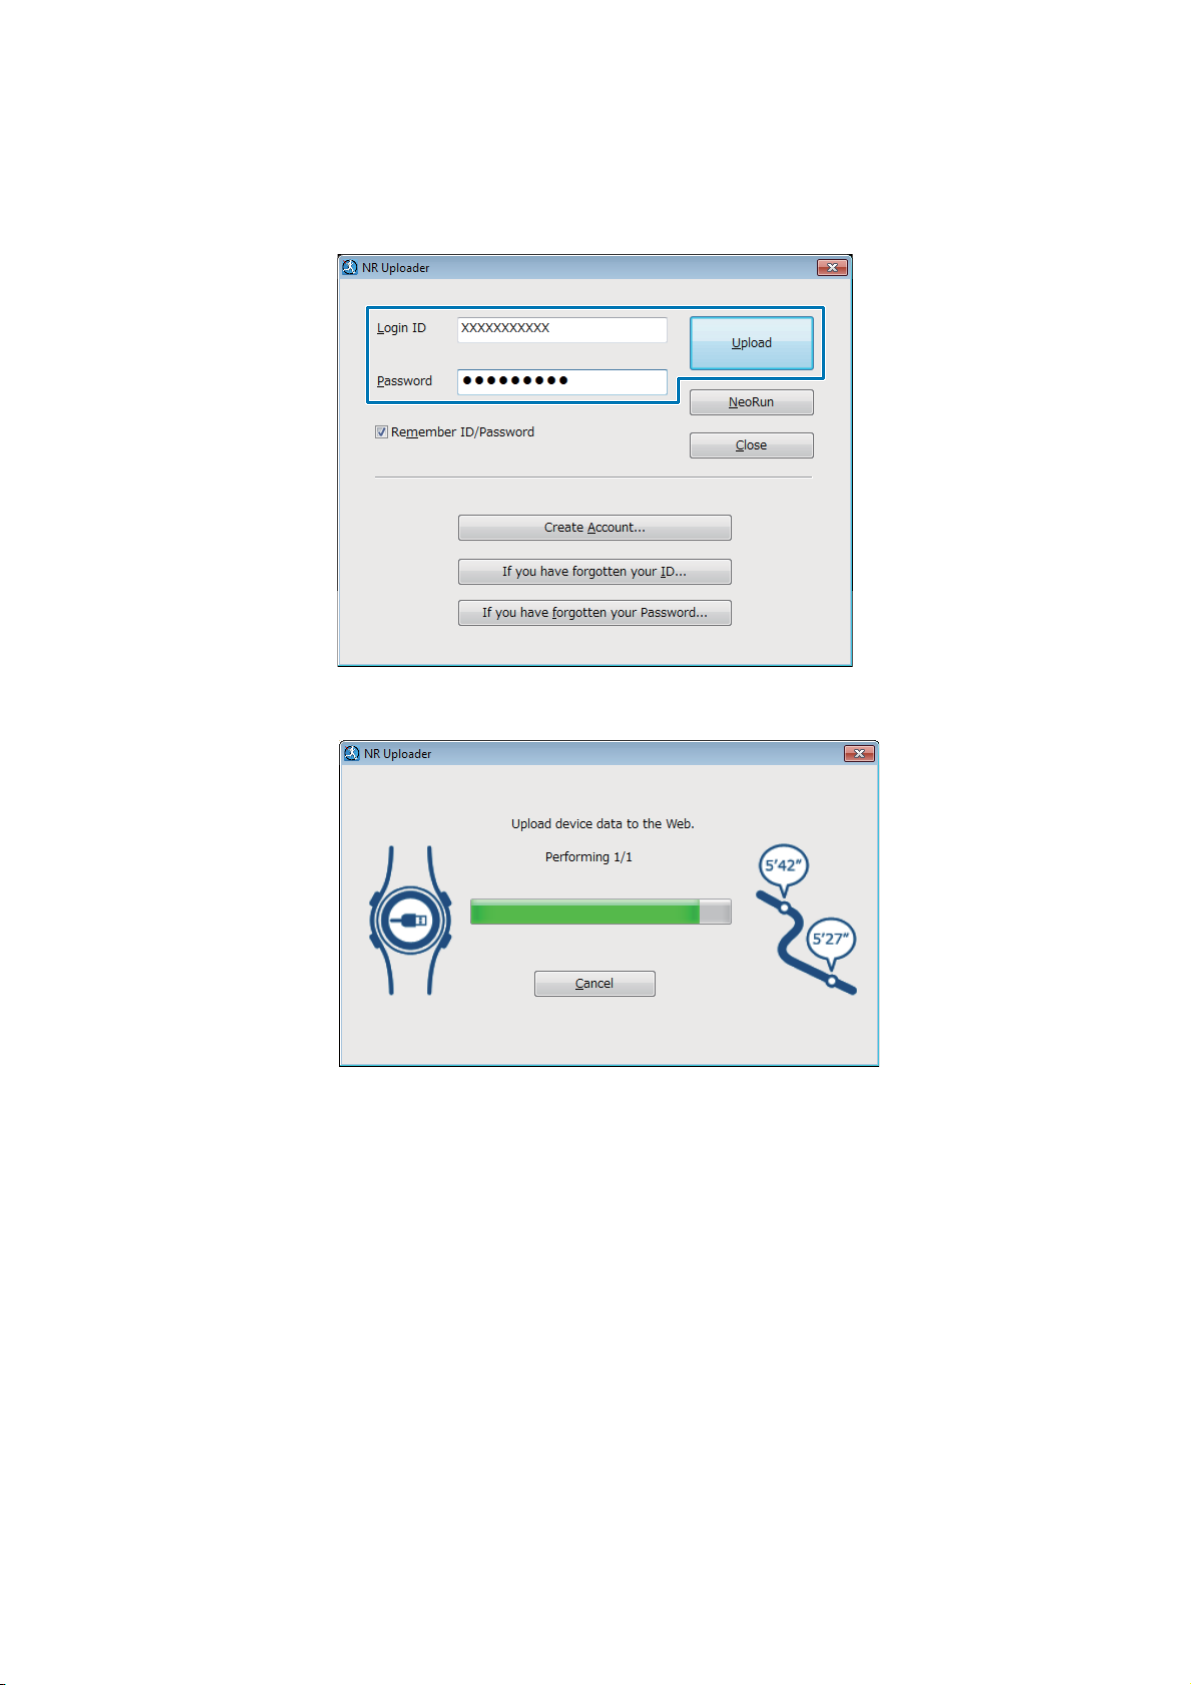
SF-710/510/310 User's Guide
Data Management Using the Web Application (NeoRun)
Enter your Login ID and Password on the NR Uploader screen, and then click
C
Upload.
Data is uploaded to the Web application (NeoRun).
When the upload is complete, the Web application (NeoRun) starts and the Home screen is displayed.
81
Page 82
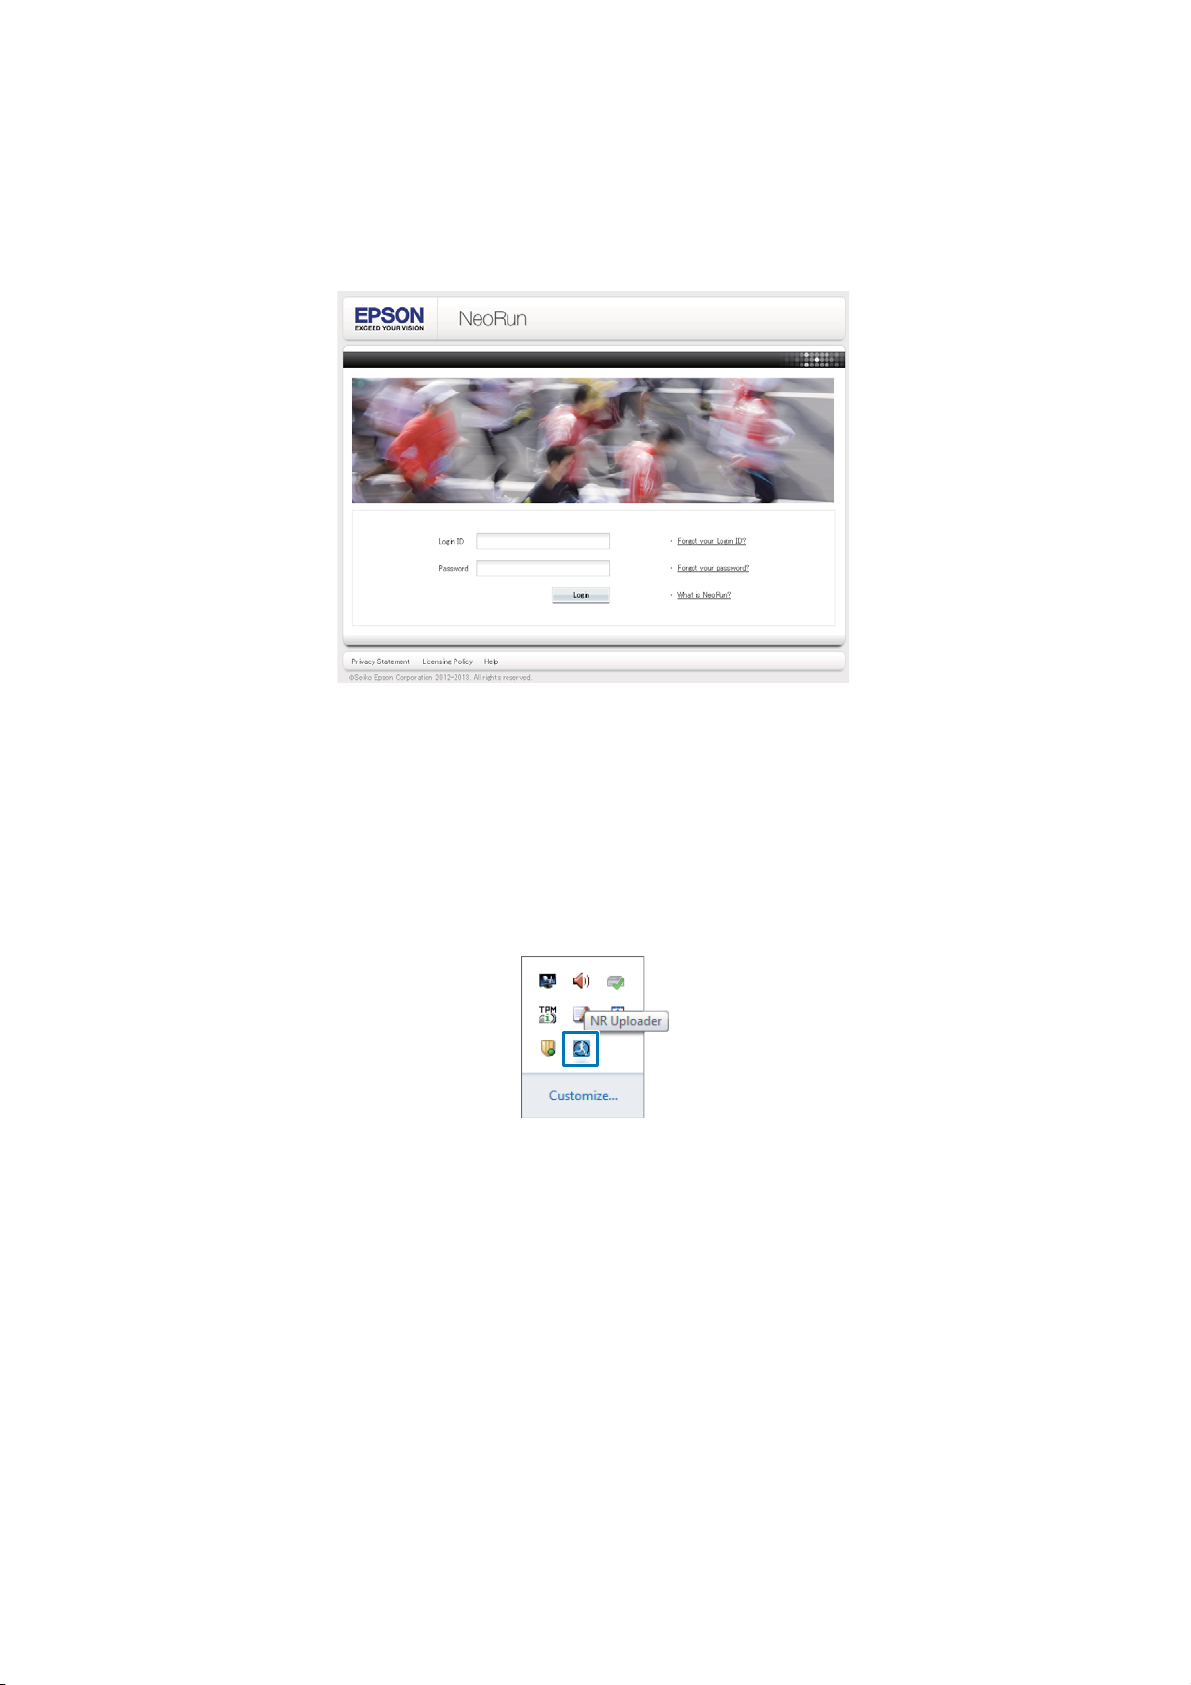
SF-710/510/310 User's Guide
Data Management Using the Web Application (NeoRun)
Checking Uploaded Measurement Data
Access the Web application (NeoRun) to check uploaded measurement data.
Start NeoRun.
A
Use one of the following methods to start NeoRun.
o Access the following Web site.
https://go-wellness.epson.com/neo-run/
o Start from the NR Uploader icon on your computer.
Right-click the NR Uploader icon from the Windows desktop taskbar, and then select NeoRun.
82
Page 83
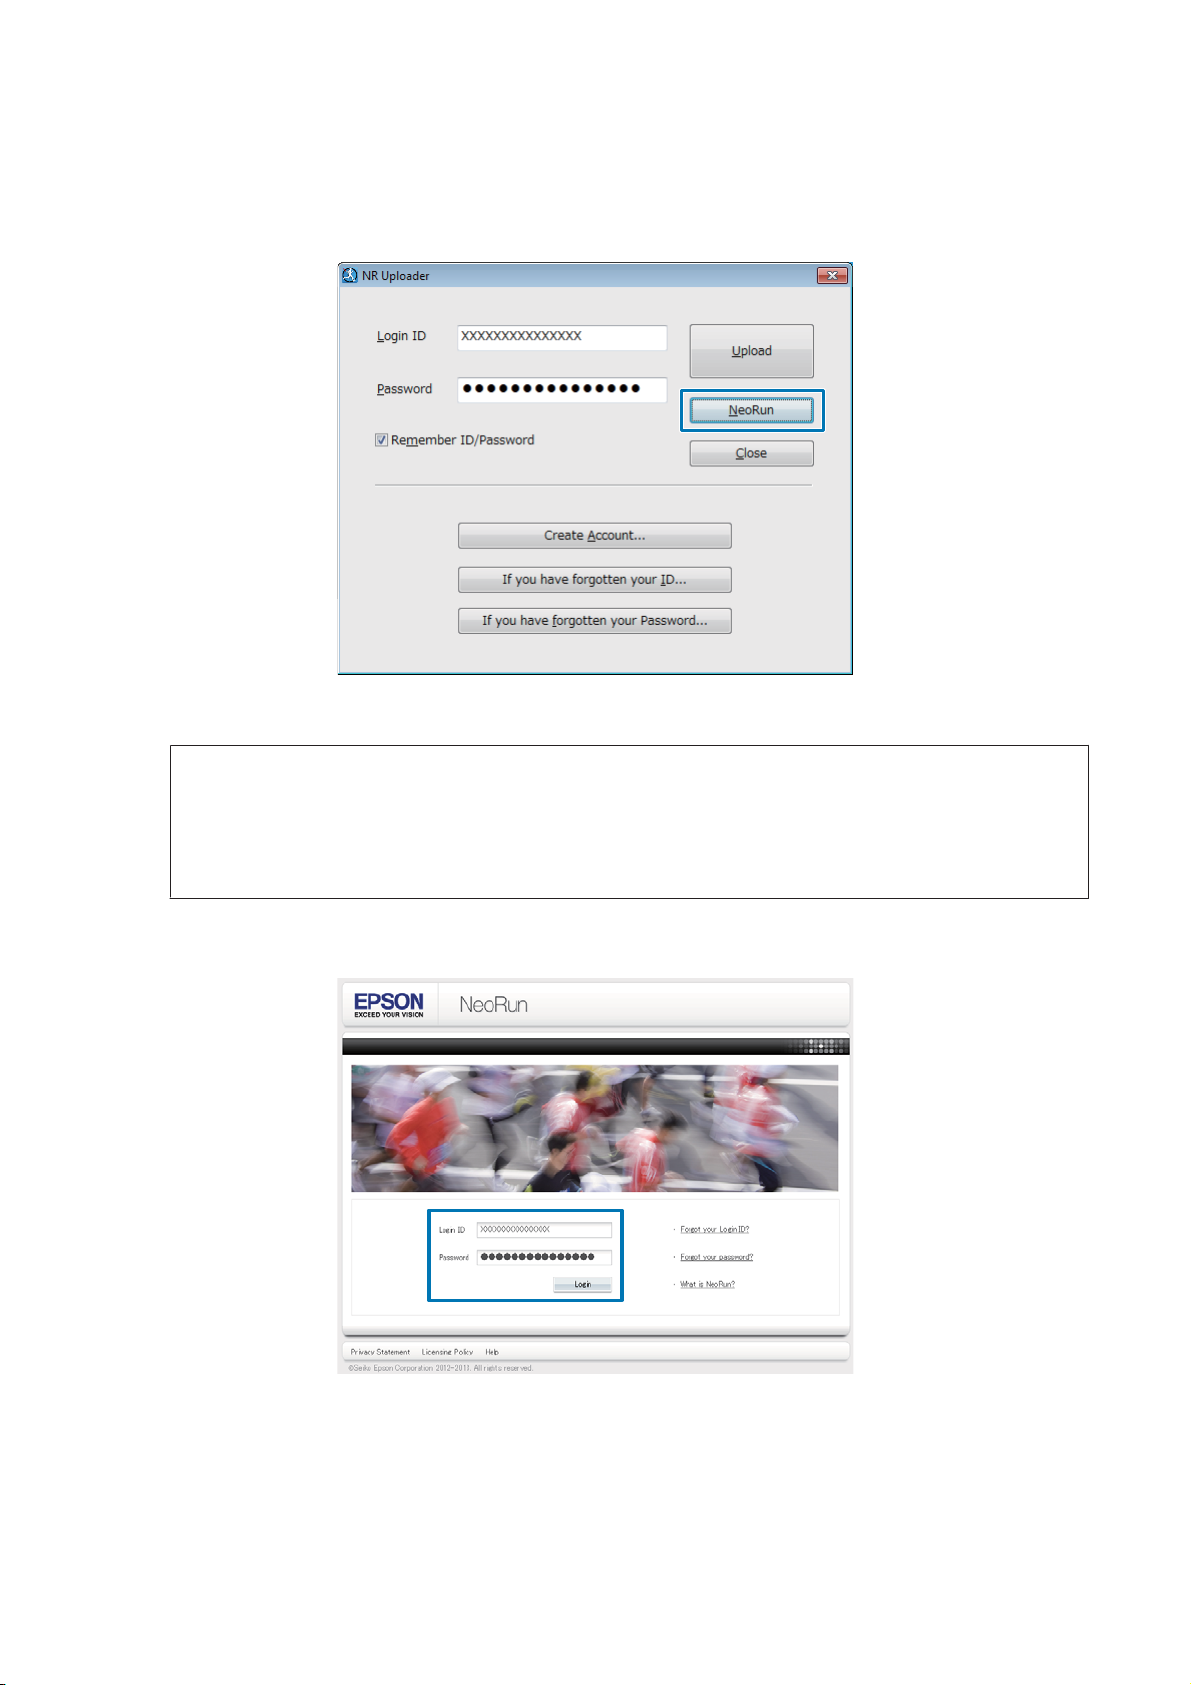
SF-710/510/310 User's Guide
Data Management Using the Web Application (NeoRun)
o Click NeoRun on the NR Uploader screen.
The NR Uploader screen is displayed when you place the device in the cradle connected to the computer.
The Web application (NeoRun) starts and the Home screen is displayed. Go to step 3.
Note:
The NeoRun button is not available in the following circumstances.
❏ When the login ID and password have not been saved or entered.
❏ When the device has been removed from the cradle.
Enter the Login ID and Password, and then click Login.
B
83
Page 84
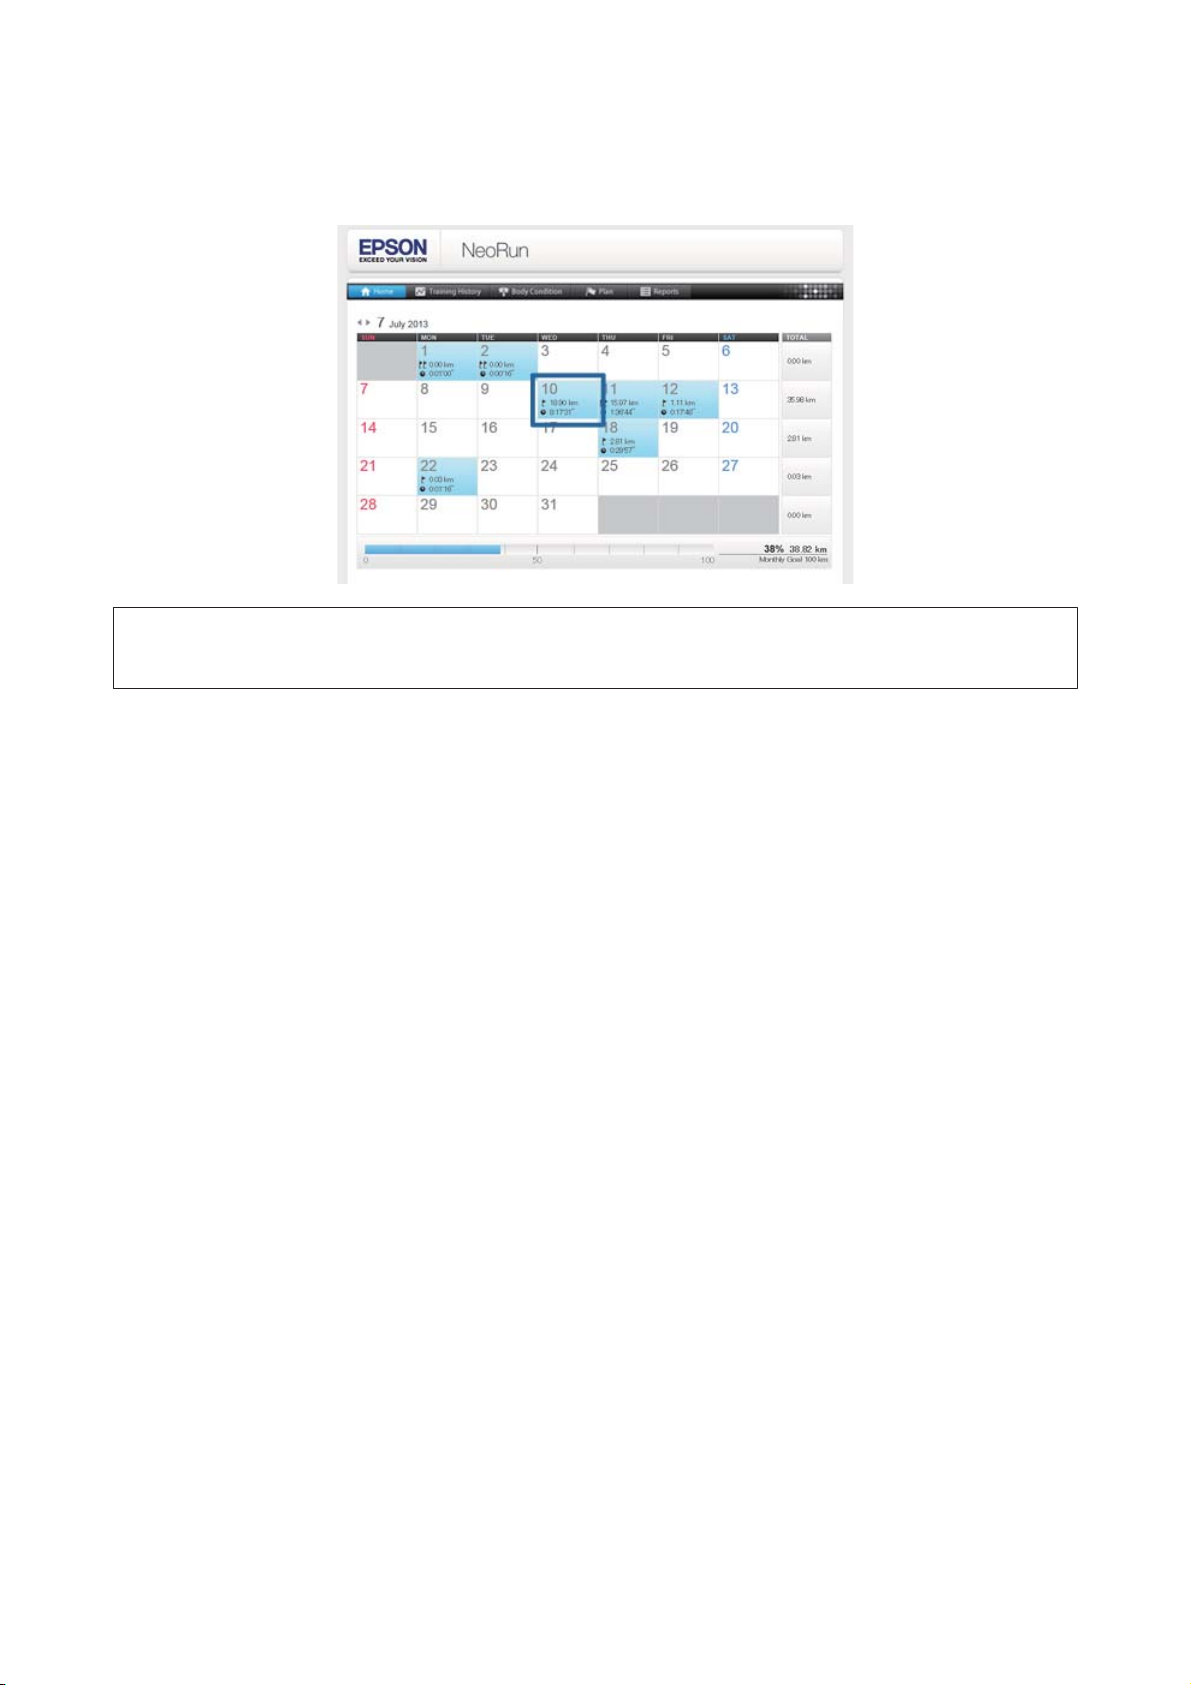
SF-710/510/310 User's Guide
Data Management Using the Web Application (NeoRun)
Click the data you want to check from the uploaded data.
C
Note:
For information on using the Web application (NeoRun), see the NeoRun Help.
84
Page 85

SF-710/510/310 User's Guide
Settings
Settings
You can change a variety of settings for measurement or device. Make settings to suit your purpose.
U “Making Settings” on page 86
U “Mes. Settings” on page 87
U “Settings” on page 91
U “Screen” on page 95
85
Page 86
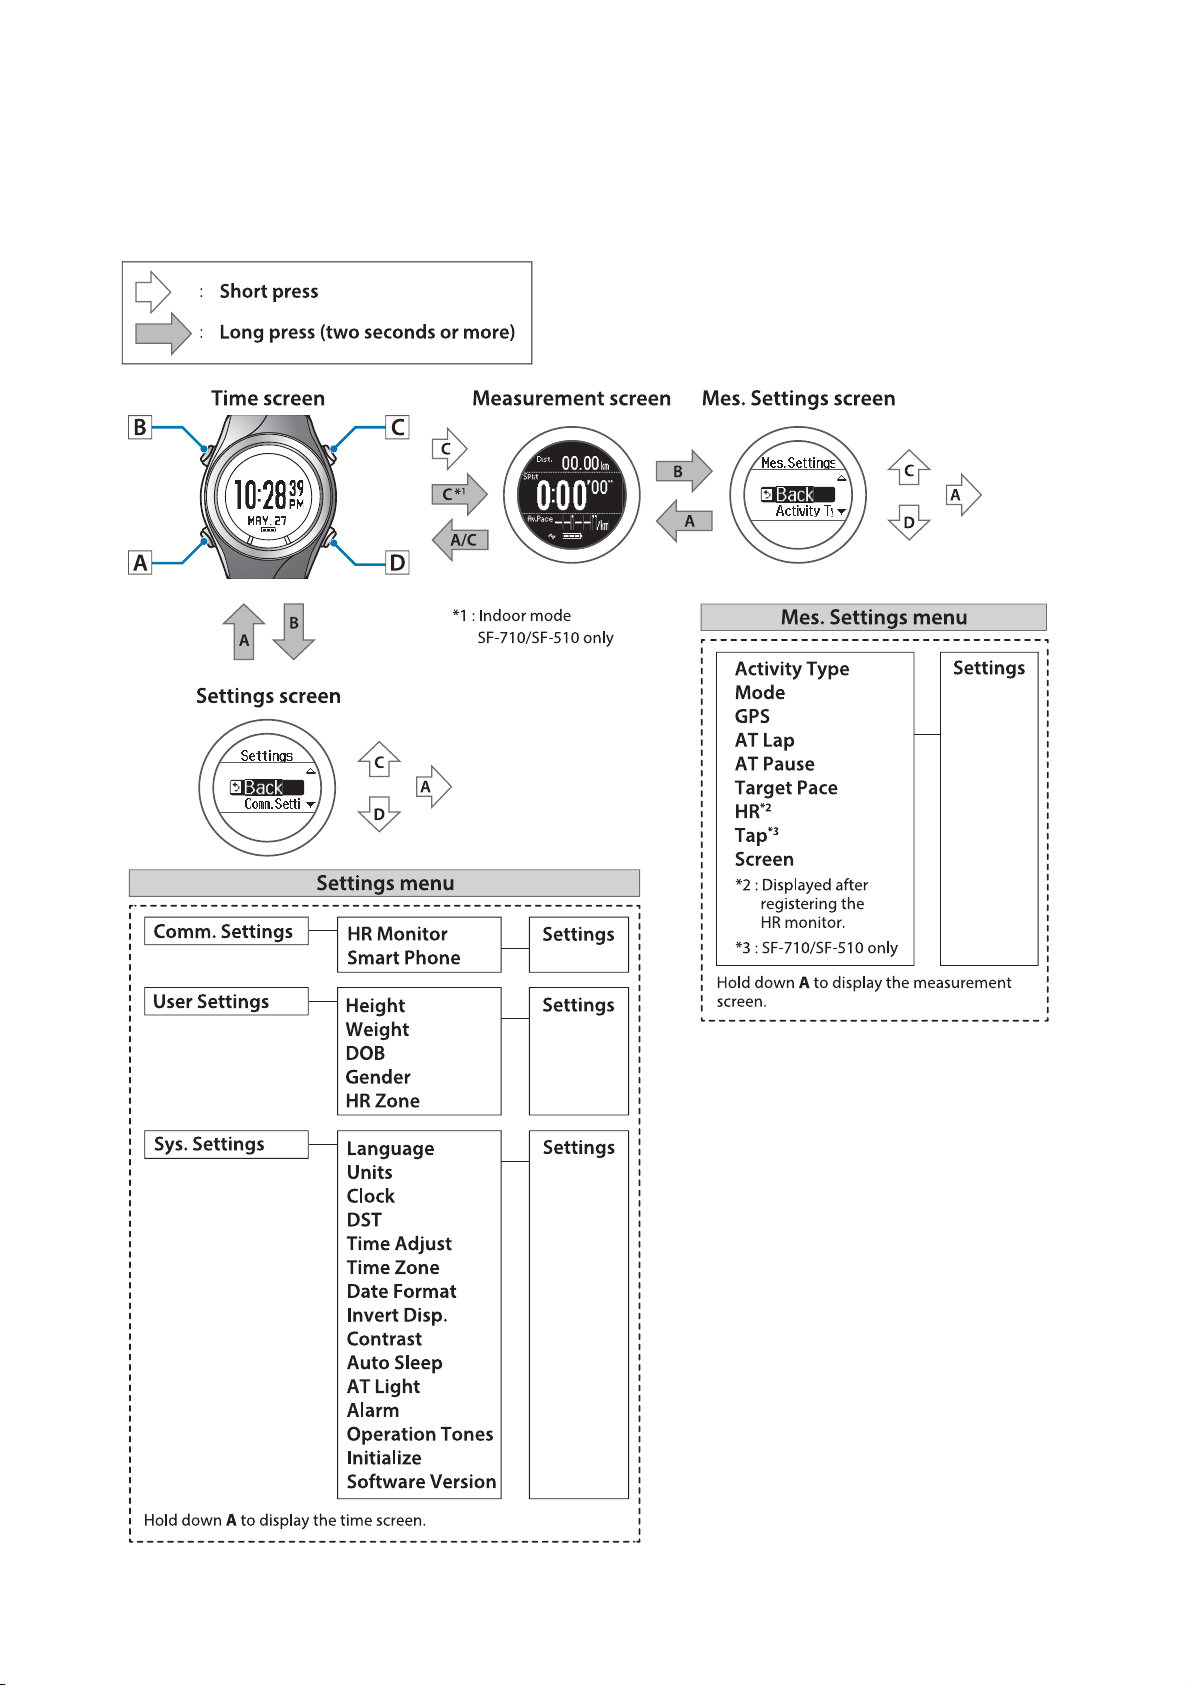
SF-710/510/310 User's Guide
Making Settings
Settings
86
Page 87
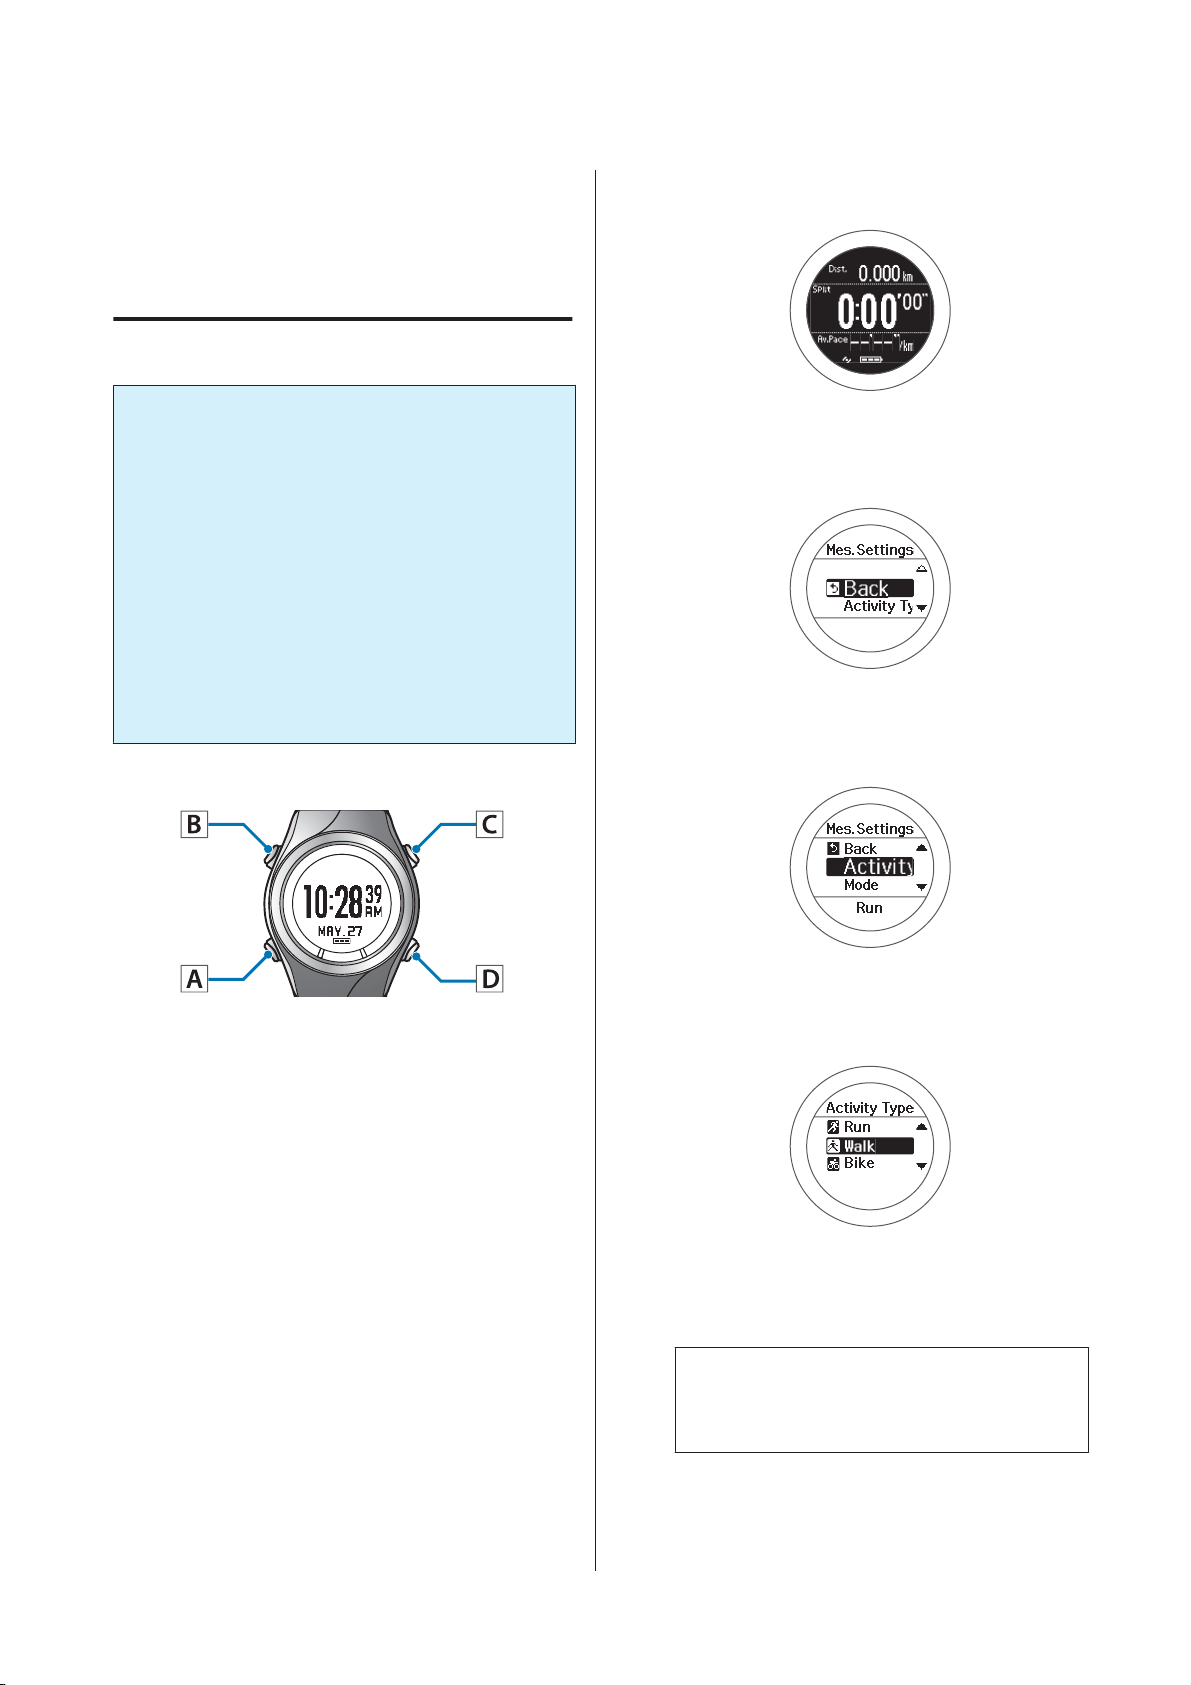
SF-710/510/310 User's Guide
Settings
Mes. Settings
Allows you to change the measurement settings.
Changing the Mes. Settings
Important:
c
❏ When performing GPS positioning, make
sure the screen is facing up and you are
outside with no obstructions overhead.
U “Specifying a GPS (GPS Positioning)” on
page 28
❏ It usually takes less than two minutes to
complete GPS positioning.
If it takes more than two minutes or Failed is
displayed, we recommend selecting Cancel,
moving to a different location, and trying
again.
U “Indoor mode (SF-710/SF-510 only)”
on page 30
Display the Mes. Settings menu.
B
Hold down B on the measurement screen.
Select a setting item.
C
Operation buttons
Display the measurement screen.
A
Use one of the following methods to display.
❏ When performing GPS positioning:
Press C on the time screen.
❏ When skipping GPS positioning:
Press C on the time screen, and then select
Skip on the GPS positioning screen.
U “Skipping GPS positioning” on
page 29
❏ When not performing GPS positioning
(Indoor mode: SF-710/SF-510 only):
Hold down C on the time screen.
Use C/D to select, and then press A.
Select a setting value.
D
Use C/D to select, and then press A.
Depending on the setting item, you may need to
make further settings. Follow the on-screen
instructions.
Note:
When setting a number, hold down C/D to speed
through the numbers.
87
Complete the settings.
E
Hold down A.
Page 88

SF-710/510/310 User's Guide
The measurement screen is displayed.
Note:
On the screen displayed after resetting measurements, if
you hold down A, the time screen is displayed.
Settings
88
Page 89
SF-710/510/310 User's Guide
Settings
Mes. Settings Table
Setting items Value Explanation
Activity Type Run (default) Set when running or jogging.
Walk Set when walking (exercising at a slow pace).
Bike Set when performing exercises that do not require you to
swing your arms, such as riding a bike. We recommend
set ti ng Bi ke mod e w he n i n ve hi cle s su ch as car s o r t rain s.
Mode Chronograph (default) Set the mode to suit the measurements you want to
make.
Interval
Goal
Chronograph mode allows you to measure split times
and lap times (section measurement) simultaneously.
U “Measuring Time, Distance, and Speed
(Chronograph Function)” on page 37
Interval mode allows you to switch the sets of hard
(sprint) or light (rest) exercises, and repeat using the
specific distance or time set in advance.
U “Setting a Time and Distance for Hard and Light
Workouts(Interval Function)” on page 42
Goal mode measures until the time or distance set in
advance is reached.
U “Measure until the time or distance set in advance is
reached (Goal function)” on page 50
GPS - Displays the number of GPS satellites being accessed.
AT Lap Setting1 When a time or distance set in advance is reached, this
function records laps automatically.
Setting2
Setting3
Setting4
Setting5
OFF (default)
Set the lap time or distance.
You can set five times or distances.
U “Recording Laps Automatically (AT Lap Function)”
on page 55
AT Pause ON This function automatically stops measuring when you
stop running, and resumes when you continue running.
OFF (default)
Target Pace Setting1 Set the target time and pace range for one kilometer. An
Setting2
Setting3
OFF (default)
U “Automatically Start/Stop Measuring (AT Pause
Function)” on page 57
alarm sounds if you are outside the set pace range.
You can set three target paces.
U “Setting a Pace and Measuring (Target Pace
Function)” on page 59
89
Page 90
SF-710/510/310 User's Guide
Settings
Setting items Value Explanation
HR*1 ON You can measure your heart rate by wearing the HR
monitor (optional).
OFF (default)
U “Measuring Heart Rate” on page 70
Tap*2
(Only for the
measurement screen)
Lap You can perform one of the operations set here by
tapping the screen once while measuring.
Light
Screen Chg.
When Bike is selected as the Activity Type, the tap
function may operate automatically depending on the
condition of the road surface. If this occurs, we
OFF (default)
recommend setting OFF.
U “Tap” on page 21
Screen Screen1 You can display up to four measurement screens You can
change the screen pattern and the measurement items
Screen2
Screen3
displayed for each screen.
You can also change the Lap Hold Screen, but this is not
displayed for the interval function.
Screen4
U “Screen” on page 95
Lap Hold Screen
*1 Displayed after registering the HR monitor.
*2 Only displayed for the SF-710/SF-510.
90
Page 91
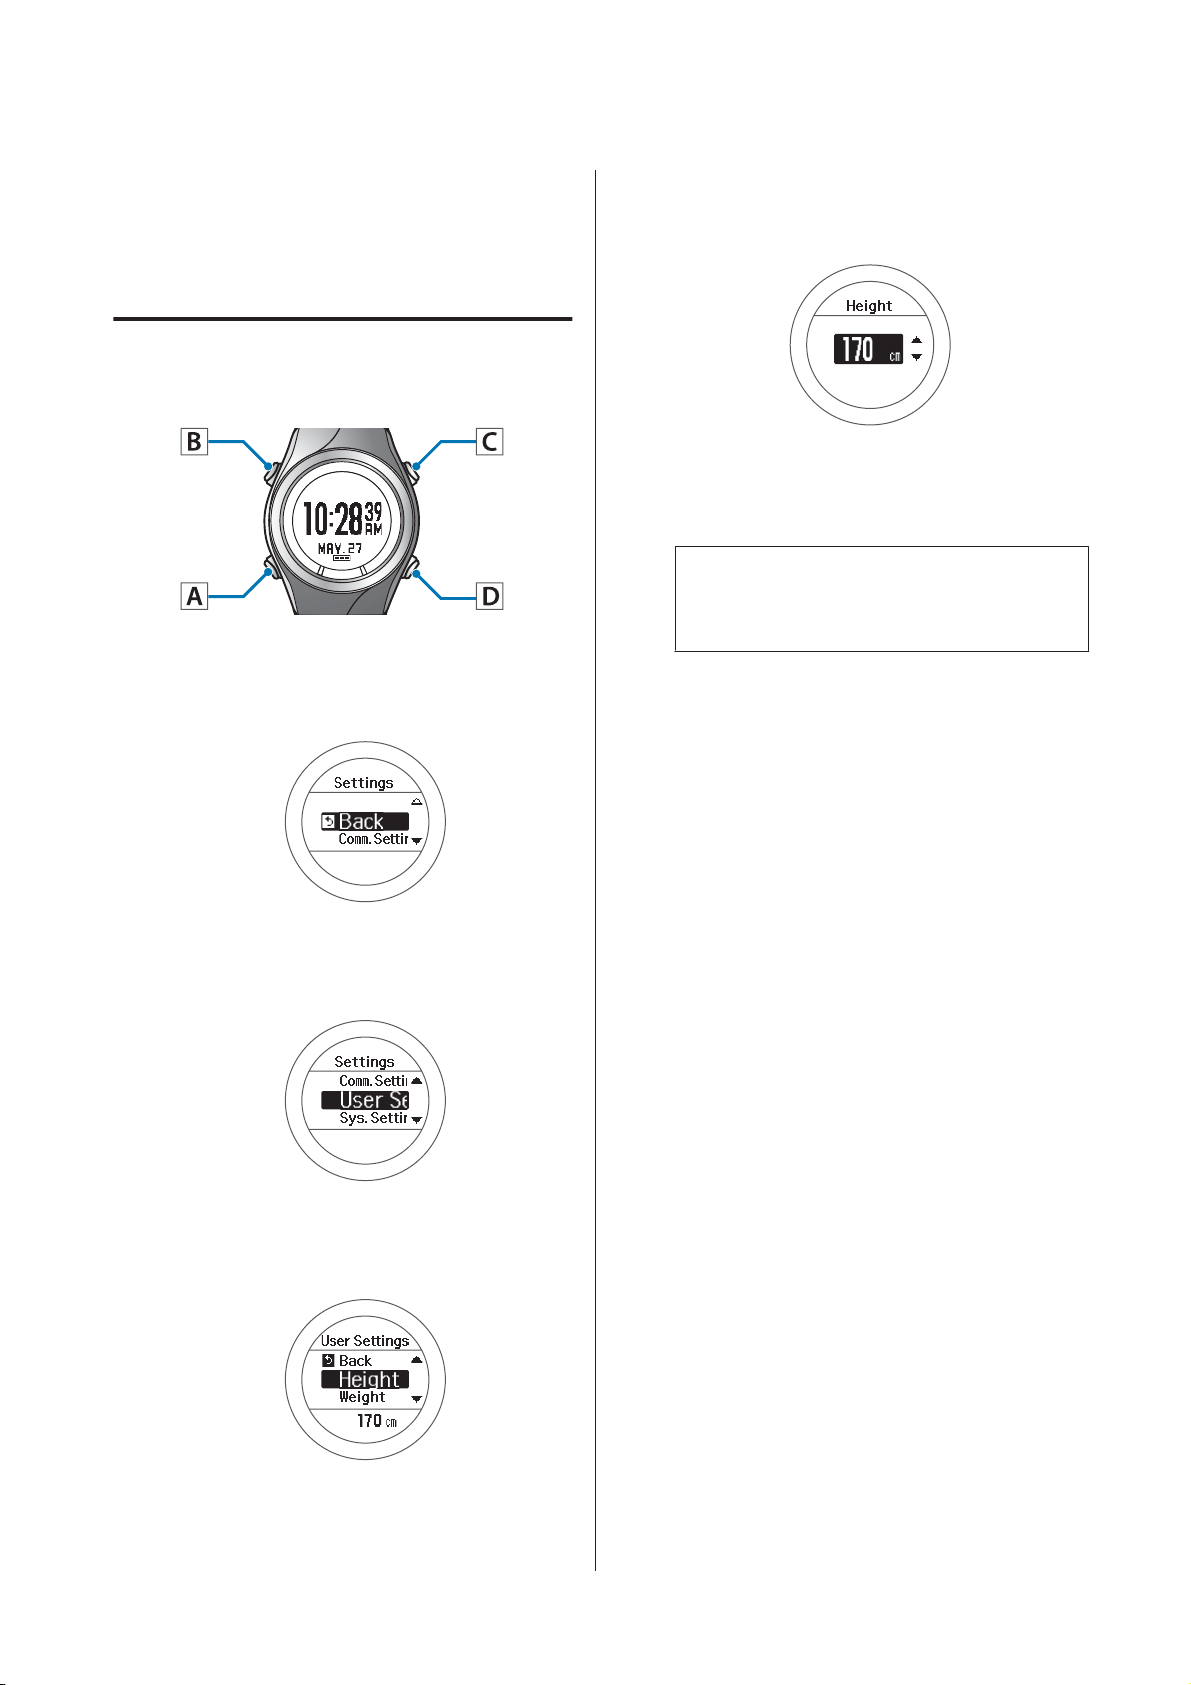
SF-710/510/310 User's Guide
Settings
Settings
Allows you to change the settings for the device.
Changing the Settings
Operation buttons
Displays the Settings menu.
A
Hold down B on the time screen.
Select a setting value.
D
Use C/D to select, and then press A.
Depending on the setting item, you may need to
make further settings. Follow the on-screen
instructions.
Note:
When setting a number, hold down C/D to speed
through the numbers.
This completes the settings.
E
Hold down A.
Select a setting item.
B
Use C/D to select, and then press A.
Select a setting item.
C
Use C/D to select, and then press A.
Displays the time screen.
91
Page 92
SF-710/510/310 User's Guide
Settings
Settings Table
Comm. Settings
Set to connect the HR monitor or smartphone to this device and communicate.
Setting items Value Explanation
HR Monitor Status Register the HR monitor to this device.
Register
Smart Phone Communicate Register a smartphone to this device.
Forget Device
U “Registering the HR Monitor to the Device” on
page 66
See the "Smartphone User's Guide" for more details.
User Settings
Set the user information.
The Height, Weight, DOB, and Gender information is used to calculate the calories burnt.
The value in parenthesis () is the default setting.
Setting items Value Explanation
Height (170 cm) Set the height.
Weight (60 kg) Set the weight.
DOB Year (1975) Set your date of birth.
DOB Month (1)
DOB Day (1)
Gender Male (default) Set your gender.
Female
HR Zone Zone1
(100 to 30 bpm)
Zone2
(130 to 101 bpm)
Zone3
(160 to 131 bpm)
Zone4
(190 to 161 bpm)
Zone5
(240 to 191 bpm)
Set the maximum and minimum heart rate.
You can set five zones to suit the exercise intensity.
92
Page 93
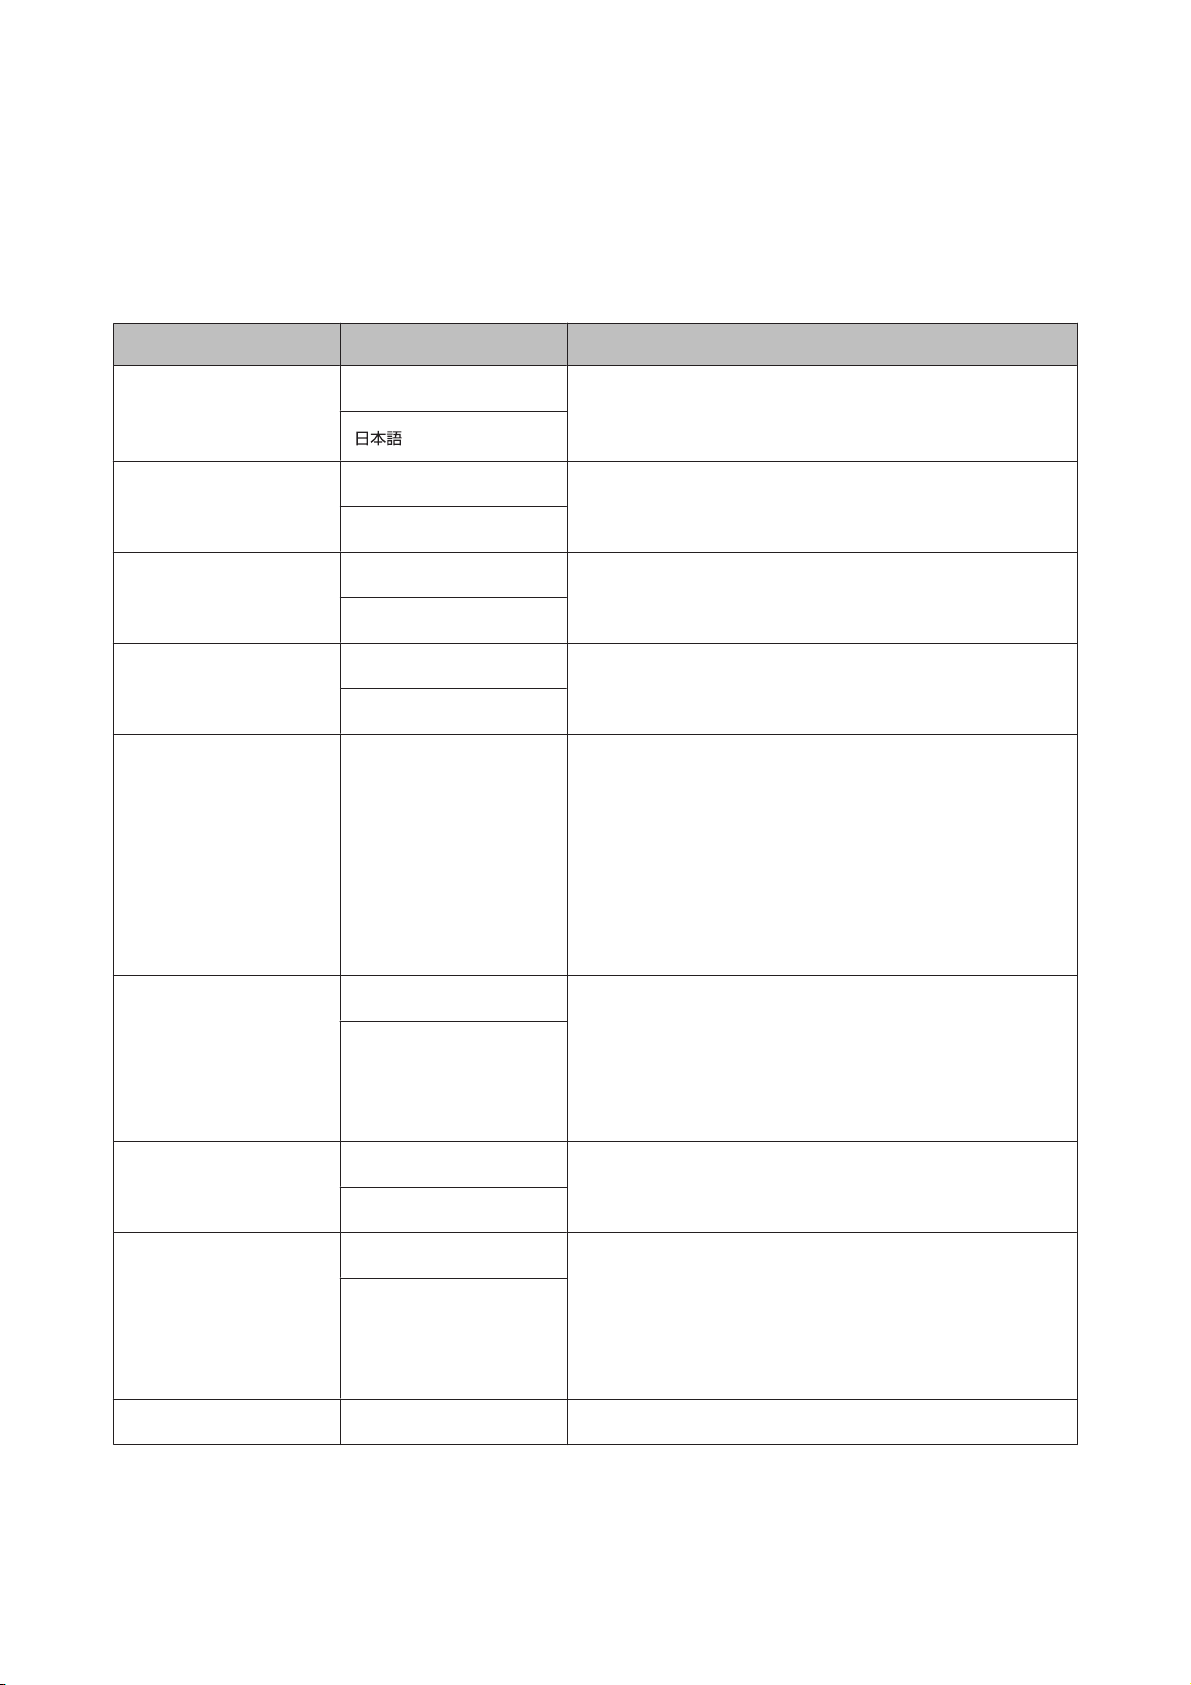
SF-710/510/310 User's Guide
Settings
Sys. Settings
Make settings for the device's system.
The value in parenthesis () is the default setting.
Setting items Value Explanation
Language English (default) Set the display language.
Units km (default) Set the display units for distance.
mile
Clock 12 Hour (default) Set the format for the display time.
24 Hour
DST ON Set summer time.
OFF (default)
Time Adjust - The device receives a signal from the GPS and
automatically sets the time.
Signals from the GPS cannot be received while indoors.
Make sure the screen is facing up and you are outside
with no obstructions overhead.
If GPS positioning has not completed after two minutes,
we recommend selecting Cancel, moving to a different
location, and trying again.
Time Zone Auto (default) Sets the time zone for your location.
Manual
Date Format Day. Month Set the display format for the date.
When Auto is selected, perform Time Adjust to set the
time zone automatically.
When Manual is selected, you can set the time zone
within a range of -12:00 to +14:00.
Month. Day (default)
Invert Disp. ON Set the display format for the screen.
OFF (default)
Contrast (4) Set the contrast for the screen.
When ON is selected, white text is displayed over a black
background.
When OFF is selected, black text is displayed over a whit e
background.
93
Page 94
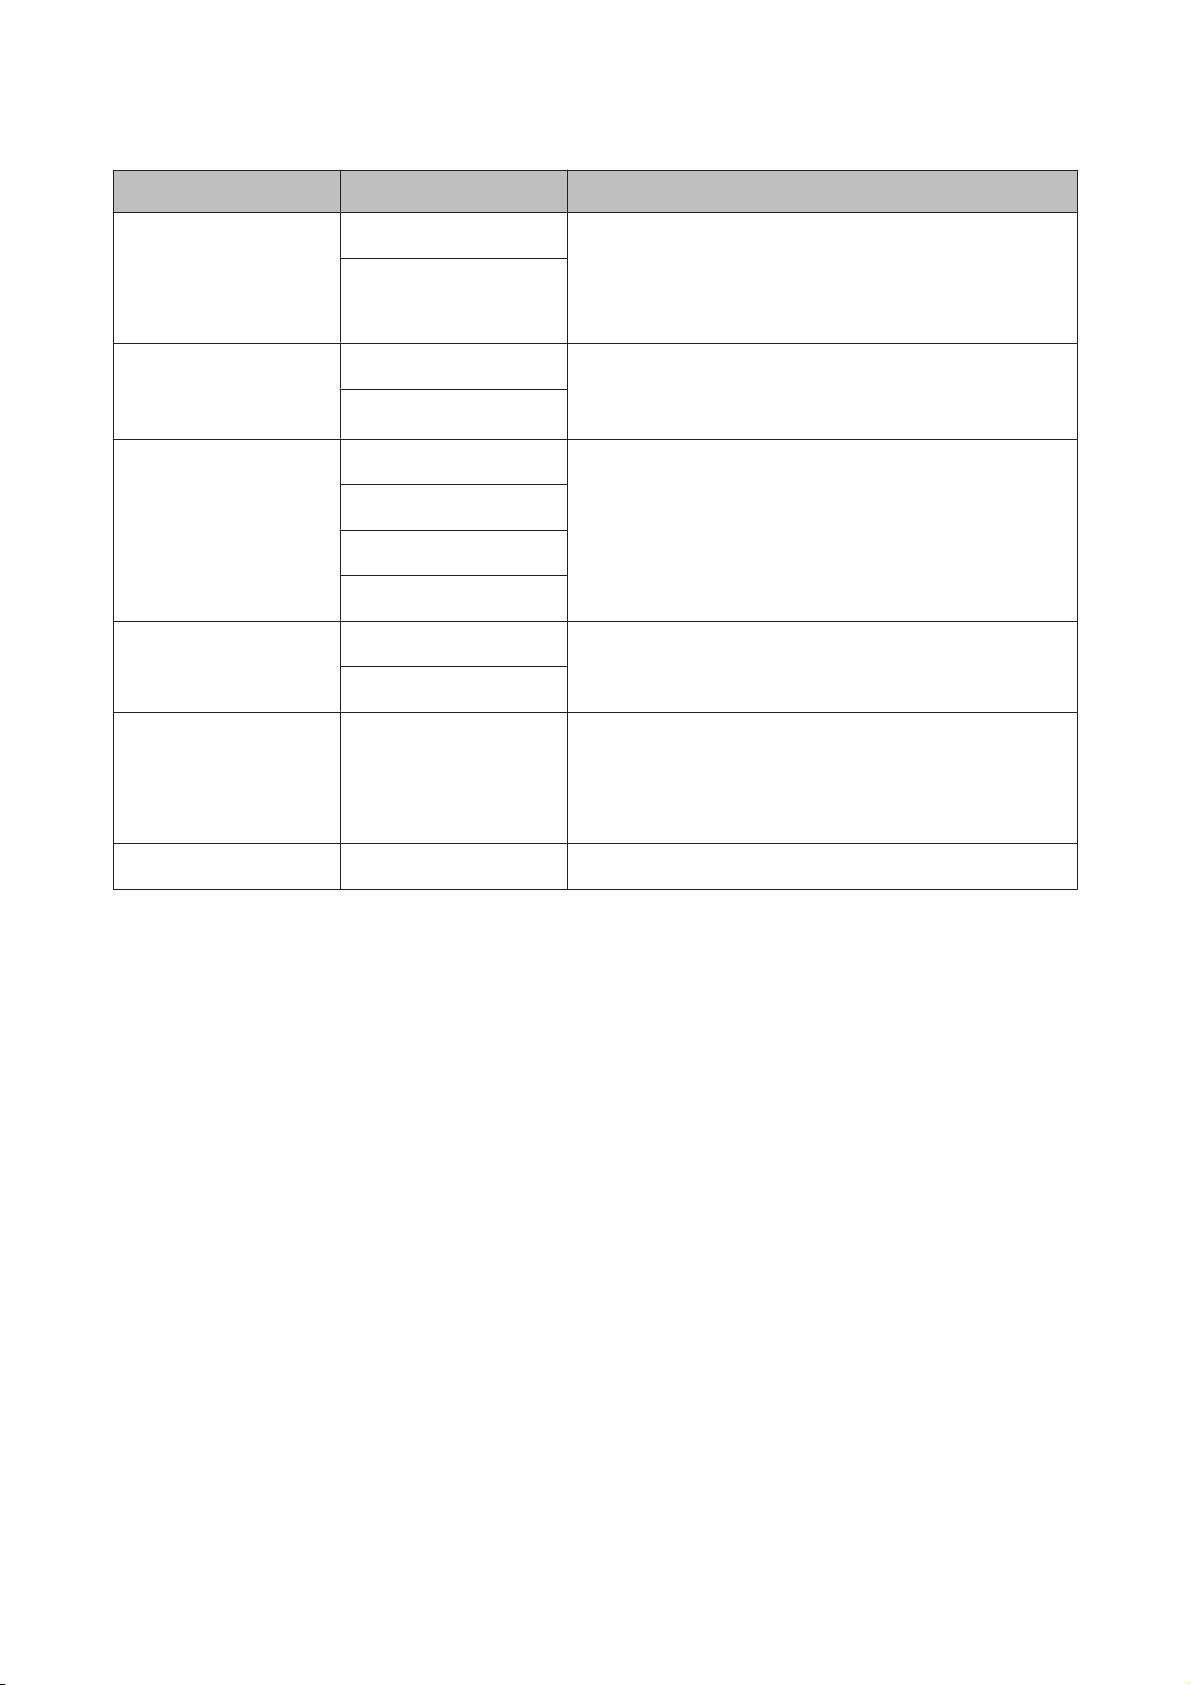
SF-710/510/310 User's Guide
Settings
Setting items Value Explanation
Auto Sleep ON (default) When you leave the device for a while, this function
automatically puts the device into sleep status.
OFF
Entering sleep status reduces the amount of power
consumption.
AT Light ON When the screen changes, this function automatically
turns on the light. When a specified time has passed, the
OFF (default)
light automatically turns off.
Alarm Tones (default) Set the alarm type and time (1 to 10 minutes).
Vib.*
Tones & Vib.*
OFF
Operation Tones ON (default) Turn on or off the operation tones.
OFF
Initialize -
Initializes all setting information (Comm. Settings, User
Settings, Sys. Settings and Mes. Settings) and stride
sensor information in the device's memory.
Measurement history data is also deleted.
Software Version - Displays the firmware version information.
* Only displayed for the SF-710.
94
Page 95
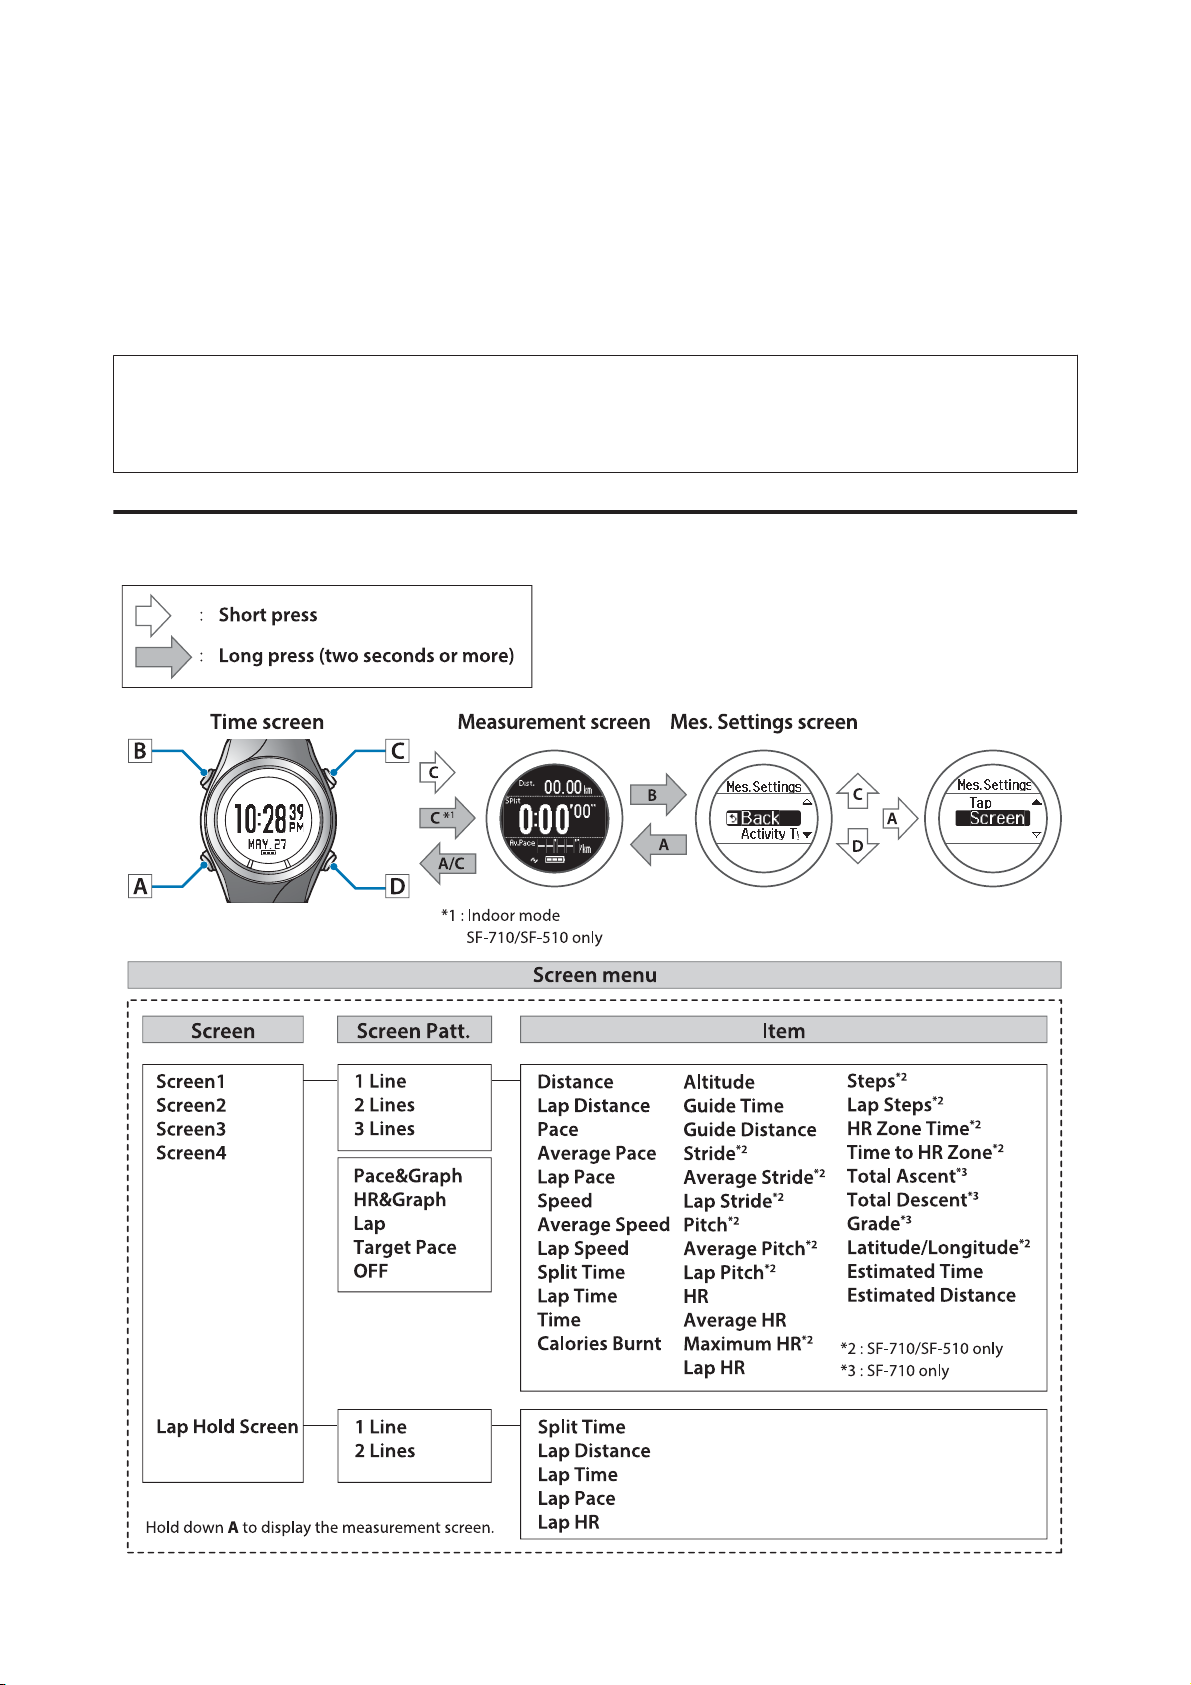
SF-710/510/310 User's Guide
Settings
Screen
You can display up to four measurement screens. You can change the screen pattern (by displaying one line to three
lines of data) and the measurement items displayed for each screen.
You can also change the display for the lap hold screen.
Note:
See the following pages for the default screen settings.
U “Screen Display” on page 40
Screen Settings
95
Page 96
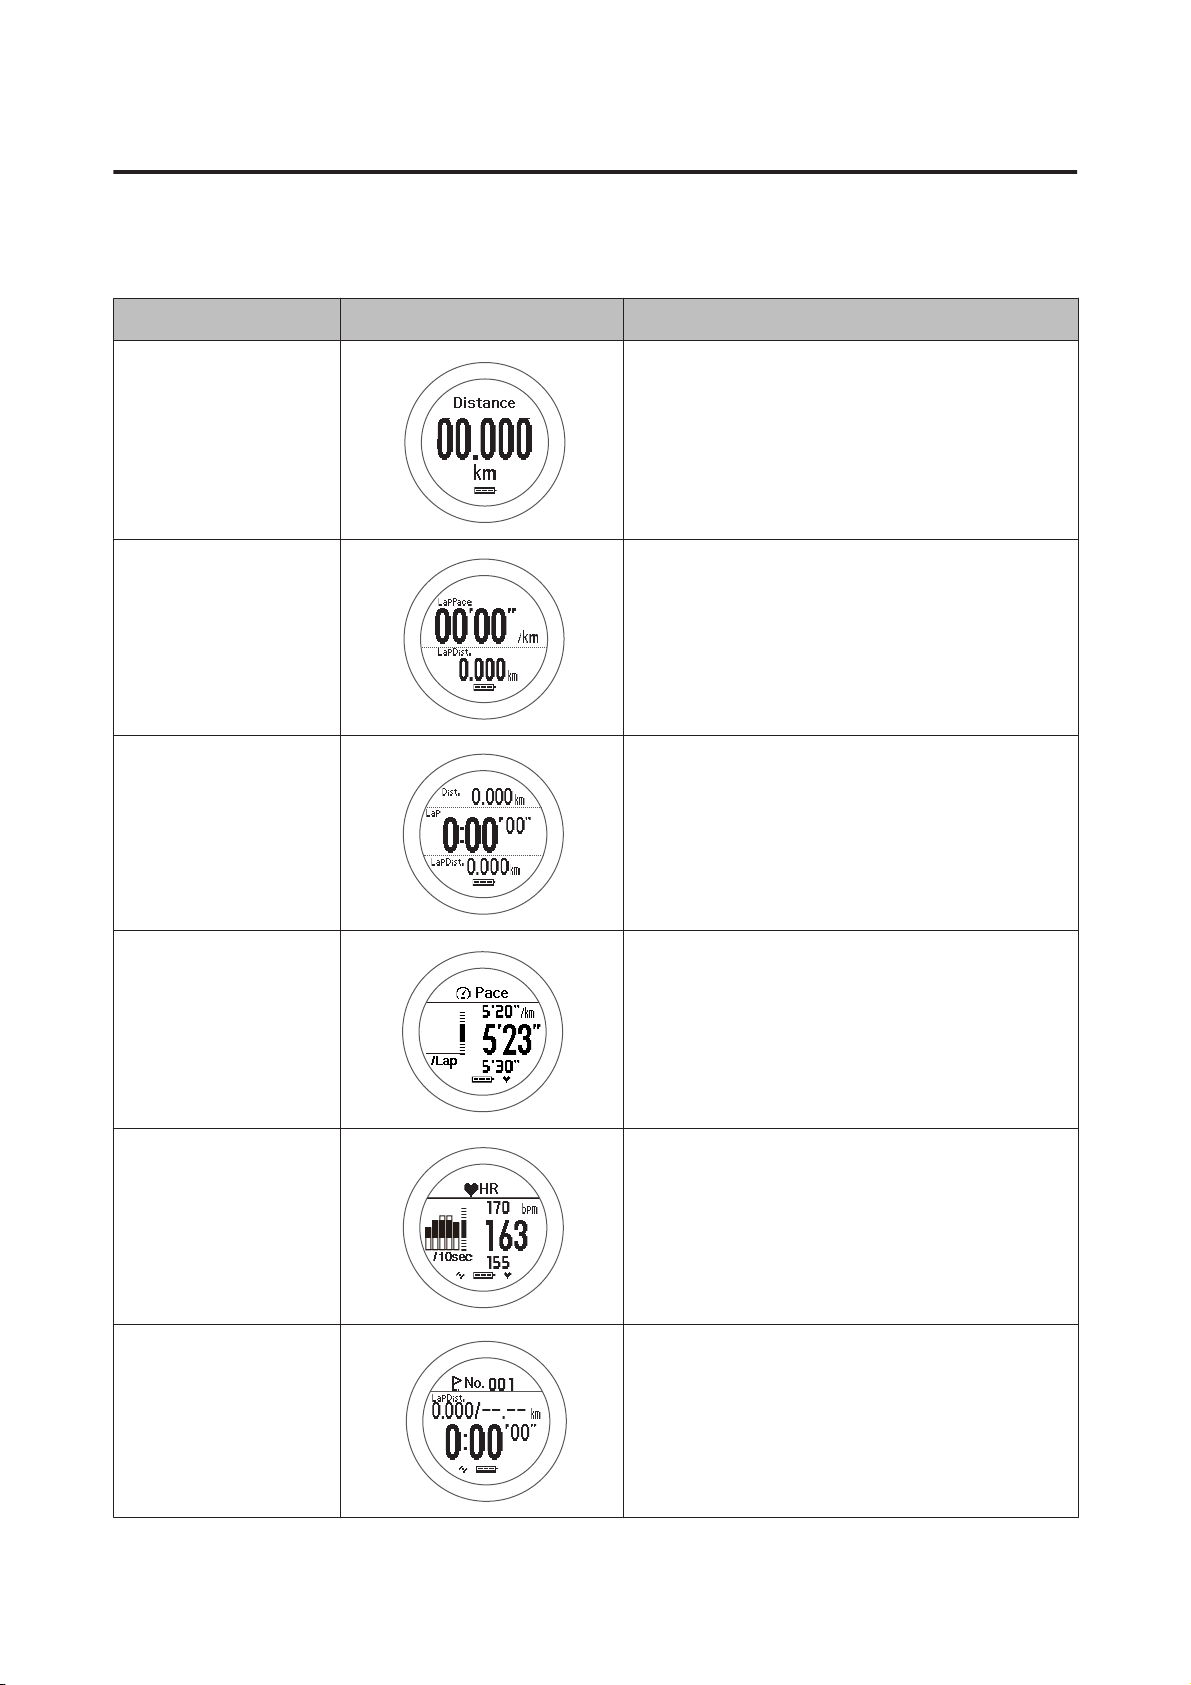
SF-710/510/310 User's Guide
Settings
Screen Pattern Table
Measurement screen
Screen Pattern Screen Explanation
1 Line Displays one measurement item on the screen.
2 Lines
3 Lines
Pace&Graph
Displays two measurement items on the screen by
dividing the screen into two sections.
Displays three measurement items on the screen
by dividing the screen into three sections.
When a pace alarm is set, this shows whether or
not you have achieved the pace. When the pace
alarm is off, only the current pace is displayed.
HR&Graph
Lap
When the HR alarm is set, this shows whether or
not you are within the limits of the set heart rate
zone. When the HR alarm is off, only the current
heart rate is displayed.
Displays information on the lap acquired from the
lap function.
96
Page 97
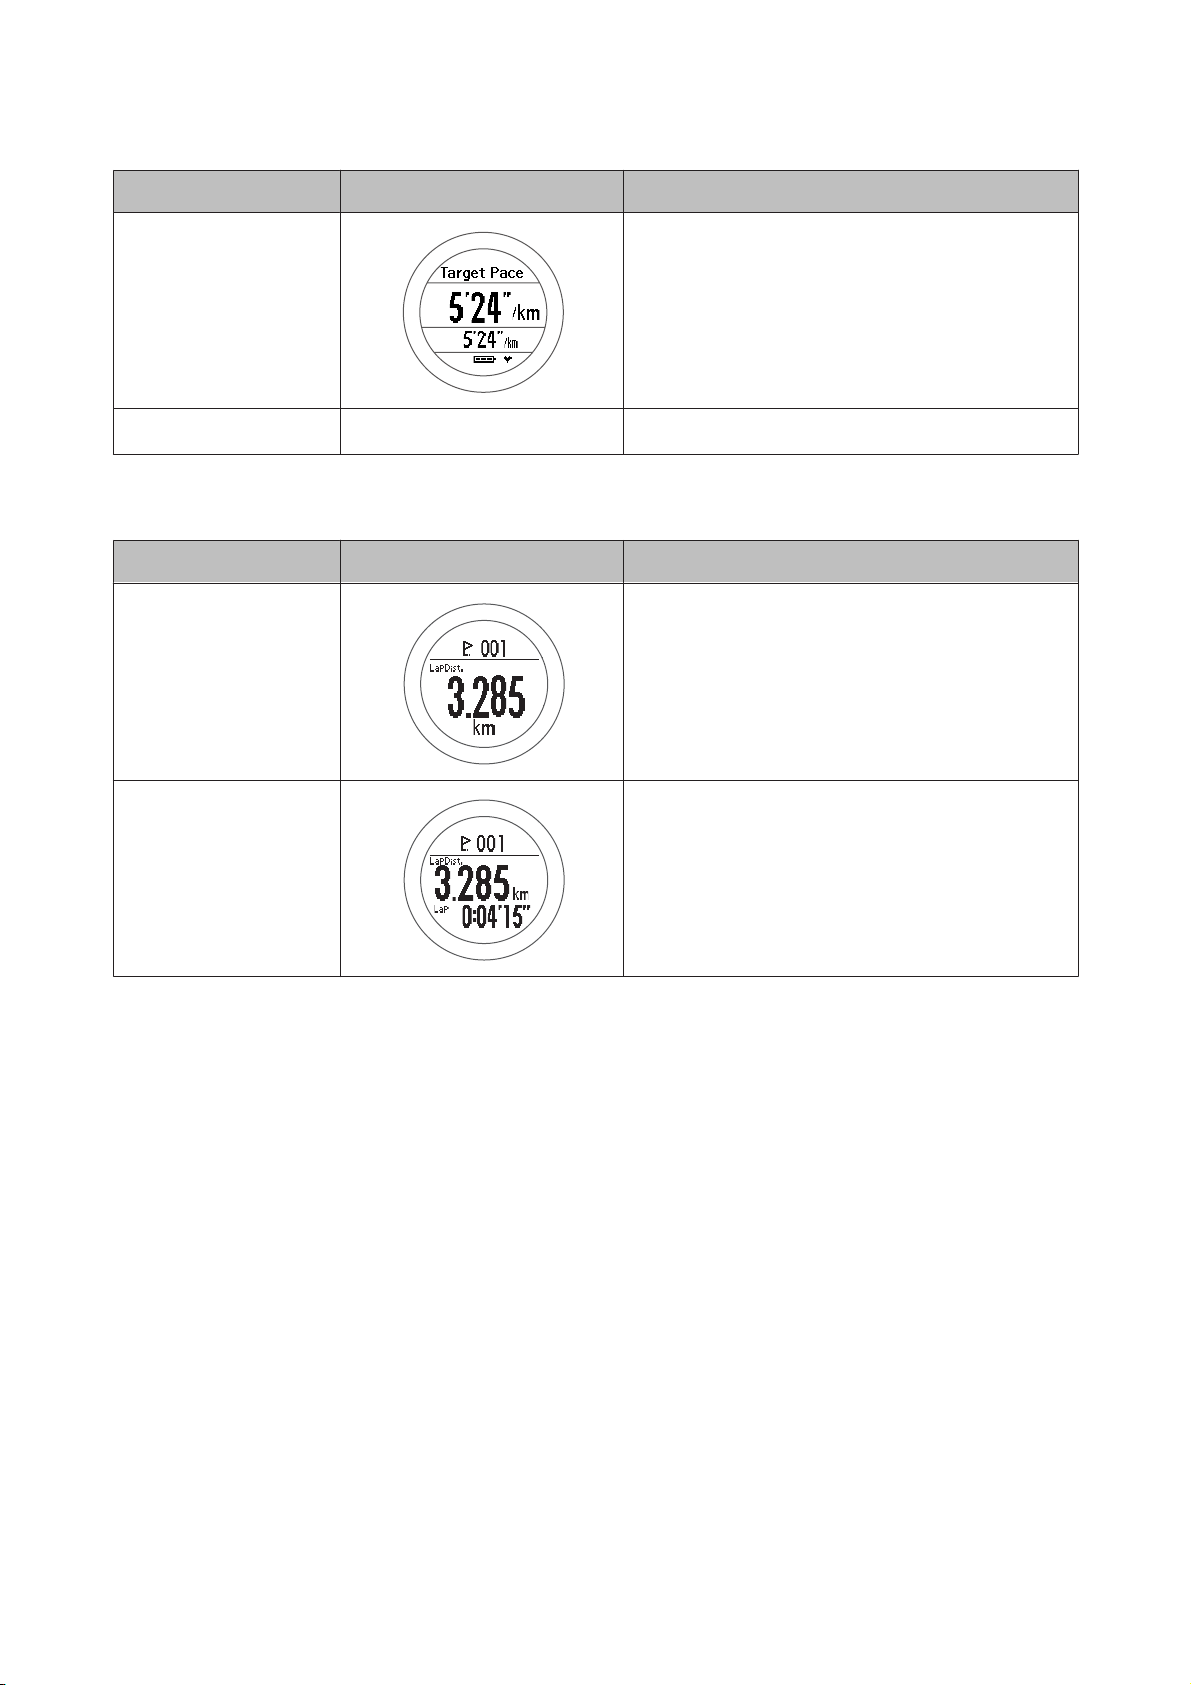
SF-710/510/310 User's Guide
Settings
Screen Pattern Screen Explanation
Target Pace Displays the current pace at the top and the target
pace at the bottom.
OFF - The measurement screen is not displayed.
Lap Hold Screen
Screen Pattern Screen Explanation
1 Line Displays one measurement item on the screen.
2 Lines
Displays two measurement items on the screen by
dividing the screen into two sections.
97
Page 98
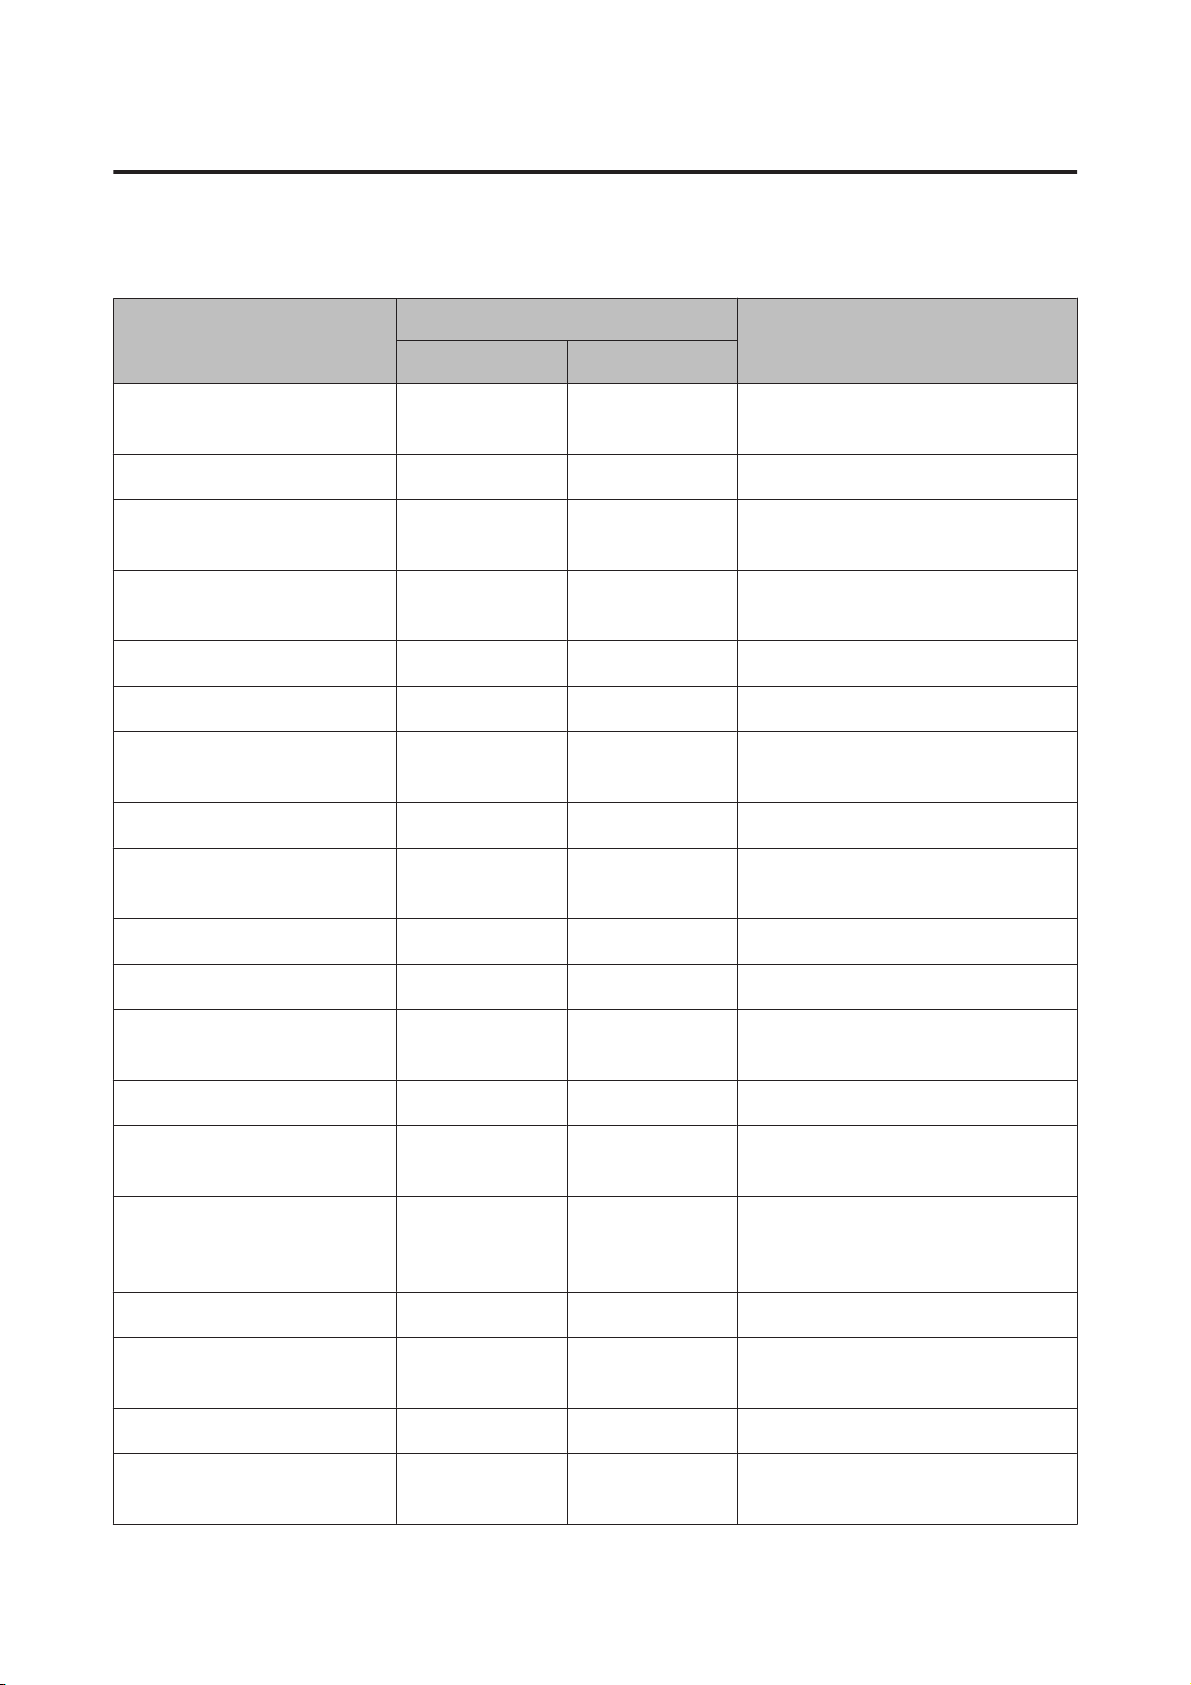
SF-710/510/310 User's Guide
Settings
Measurement Display Items Table
Measurement screen
Display name
Display item
1 Line 2 Lines/3 Lines
Distance Distance Dist. Total distance from the start of
measurements
Lap Distance LapDistance LapDist. Distance for each lap
Pace Pace Pace Current pace (time taken for one
kilometer)
Average Pace Avg.Pace Av.Pace Average pace from the start of
measurements
Explanation
Lap Pace LapPace LapPace Average pace for each lap
Speed Speed Speed Current speed
Average Speed Avg.Speed Av.Spd Average speed from the start of
measurements
Lap Speed LapSpeed LapSpd Average speed for each lap
Split Time SplitTime Split Total time from the start of
measurements
Lap Time LapTime Lap Time for each lap
Time Time Time Current time
Calories Burnt Calories Calories Current calories burnt through
exercise
Altitude*1 Altitude Alt. Current altitude
Guide Time*2 GuideTime Guide Progress time towards target pace
(reaching target or falling behind)
Guide Distance*2 GuideDist. GuideDist. Progress distance towards target
pace (reaching target or falling
behind)
Stride*3 Stride Stride Current Stride
Average Stride*3 Avg.Stride Av.Stride Average stride from the start of
measurements
Lap Stride*3 LapStride LapStride Average stride for each lap
Pitch*3 Pitch Pitch Current Pitch (number of strides in
one minute)
98
Page 99
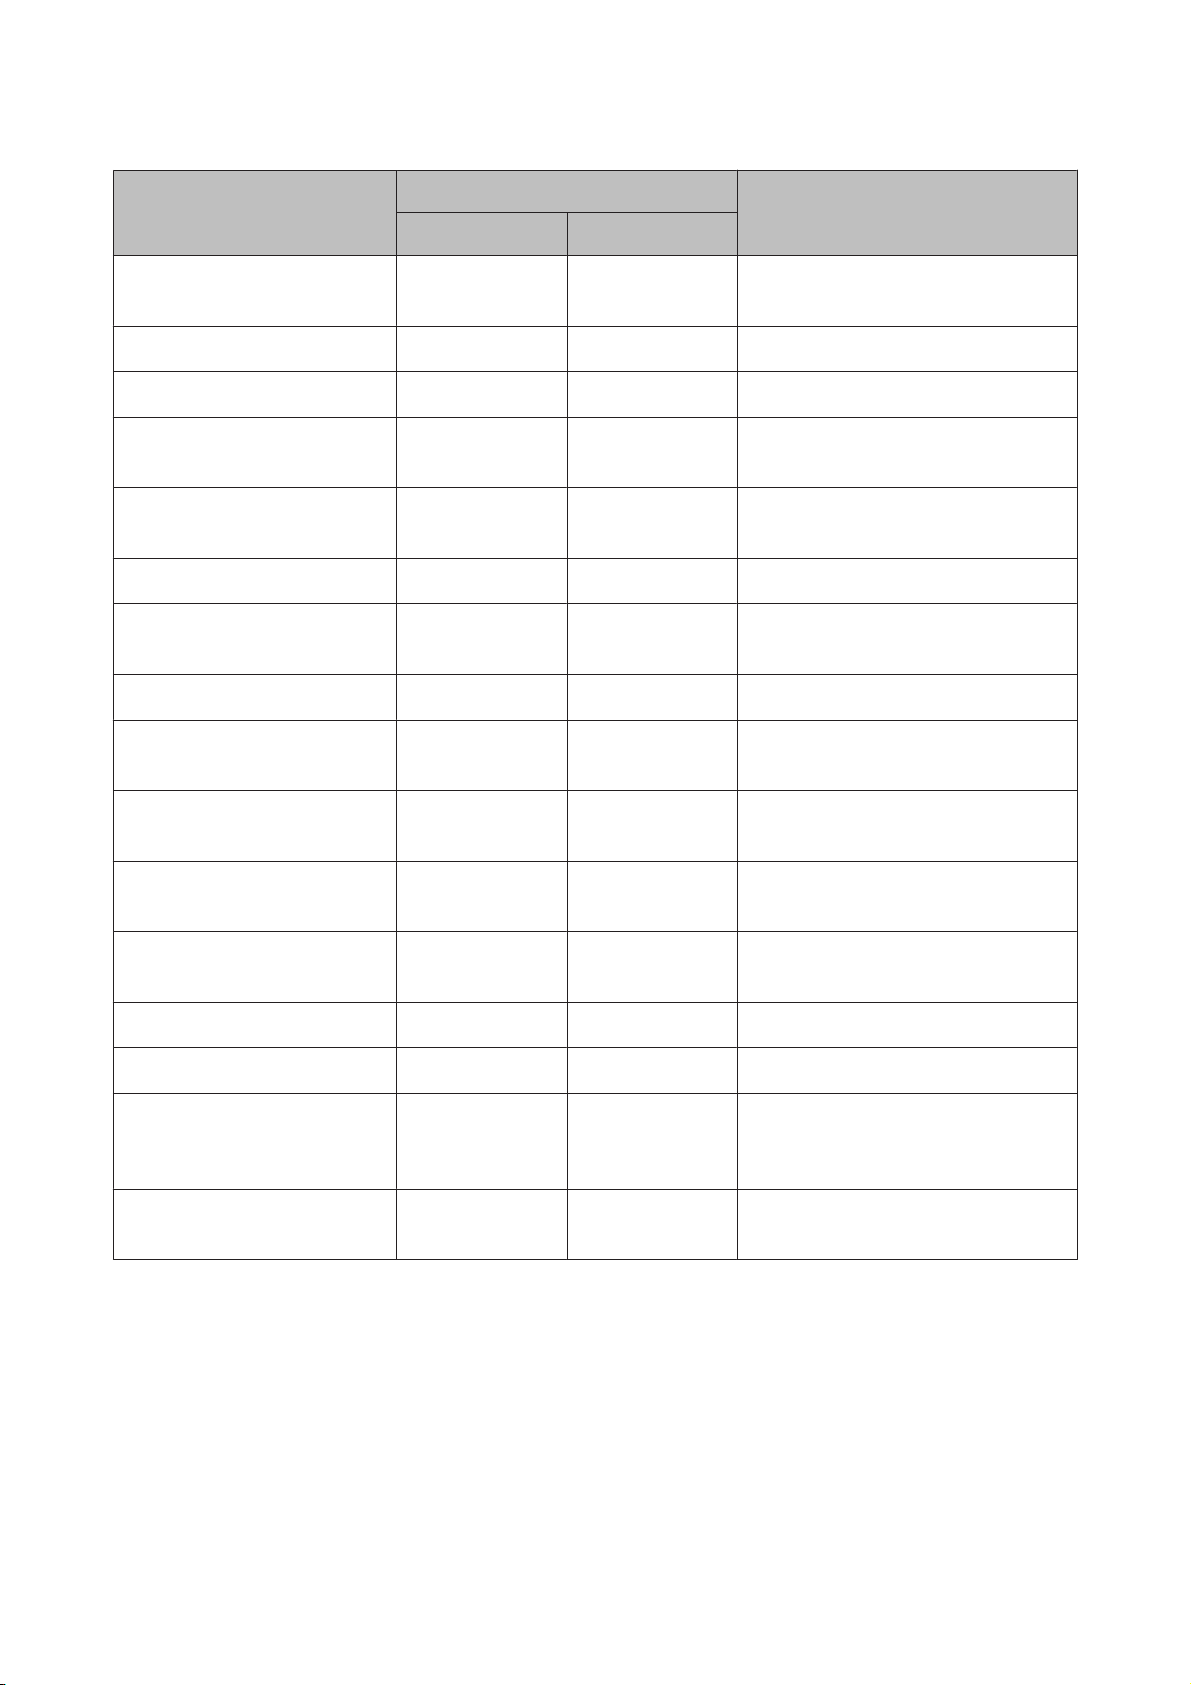
SF-710/510/310 User's Guide
Settings
Display name
Display item
1 Line 2 Lines/3 Lines
Explanation
Average Pitch*3 Avg.Pitch Av.Pitch Average pitch from the start of
measurements
Lap Pitch*3 LapPitch LapPitch Average pitch for each lap
HR HR HR Current heart rate
Average HR Avg.HR Av.HR Average heart rate from the start of
measurements
Maximum HR*3 Max.HR Max.HR Maximum heart rate from the st art of
measurements
Lap HR LapHR LapHR Average heart rate for each lap
Steps*3 Steps Steps Number of steps from the start of
measurements
Lap Steps*3 LapSteps LapStp Number of steps for each lap
HR Zone Time*3*4 Spent.HR Spent.HR Time within heart rate zone for each
lap
Time to HR Zone*3*5 Time.HR Time.HR Time until entering heart rate zone
for each lap
Total Ascent*1*6 TotalAscent Tot.Asc. Total ascent from the start of
measurements
Total Descent*1*6 TotalDescent Tot.Des. Total descent from the start of
measurements
Grade*1*6 Grade Grade Current Grade
Latitude/Longitude*3 LAT/LONG LAT/LONG Current Latitude/Longitude
Estimated Time*7 Est.Time Est. Estimated time of arrival at the
target distance set in the goal
function
Estimated Distance*7 Est.Dist. Est.Dist. Estimated distance reached at the
target time set in the goal function
*1
Altitude, Total Ascent, Total Descent, and Grade are calculated using the GPS signal. There functions may
contain larger errors when compared to the accuracy of position and distance depending on the GPS
environment.
*2
Set the Target Pace in the Mes. Settings menu.
U “Setting a Pace and Measuring (Target Pace Function)” on page 59
*3 Only displayed for the SF-710/SF-510.
99
Page 100
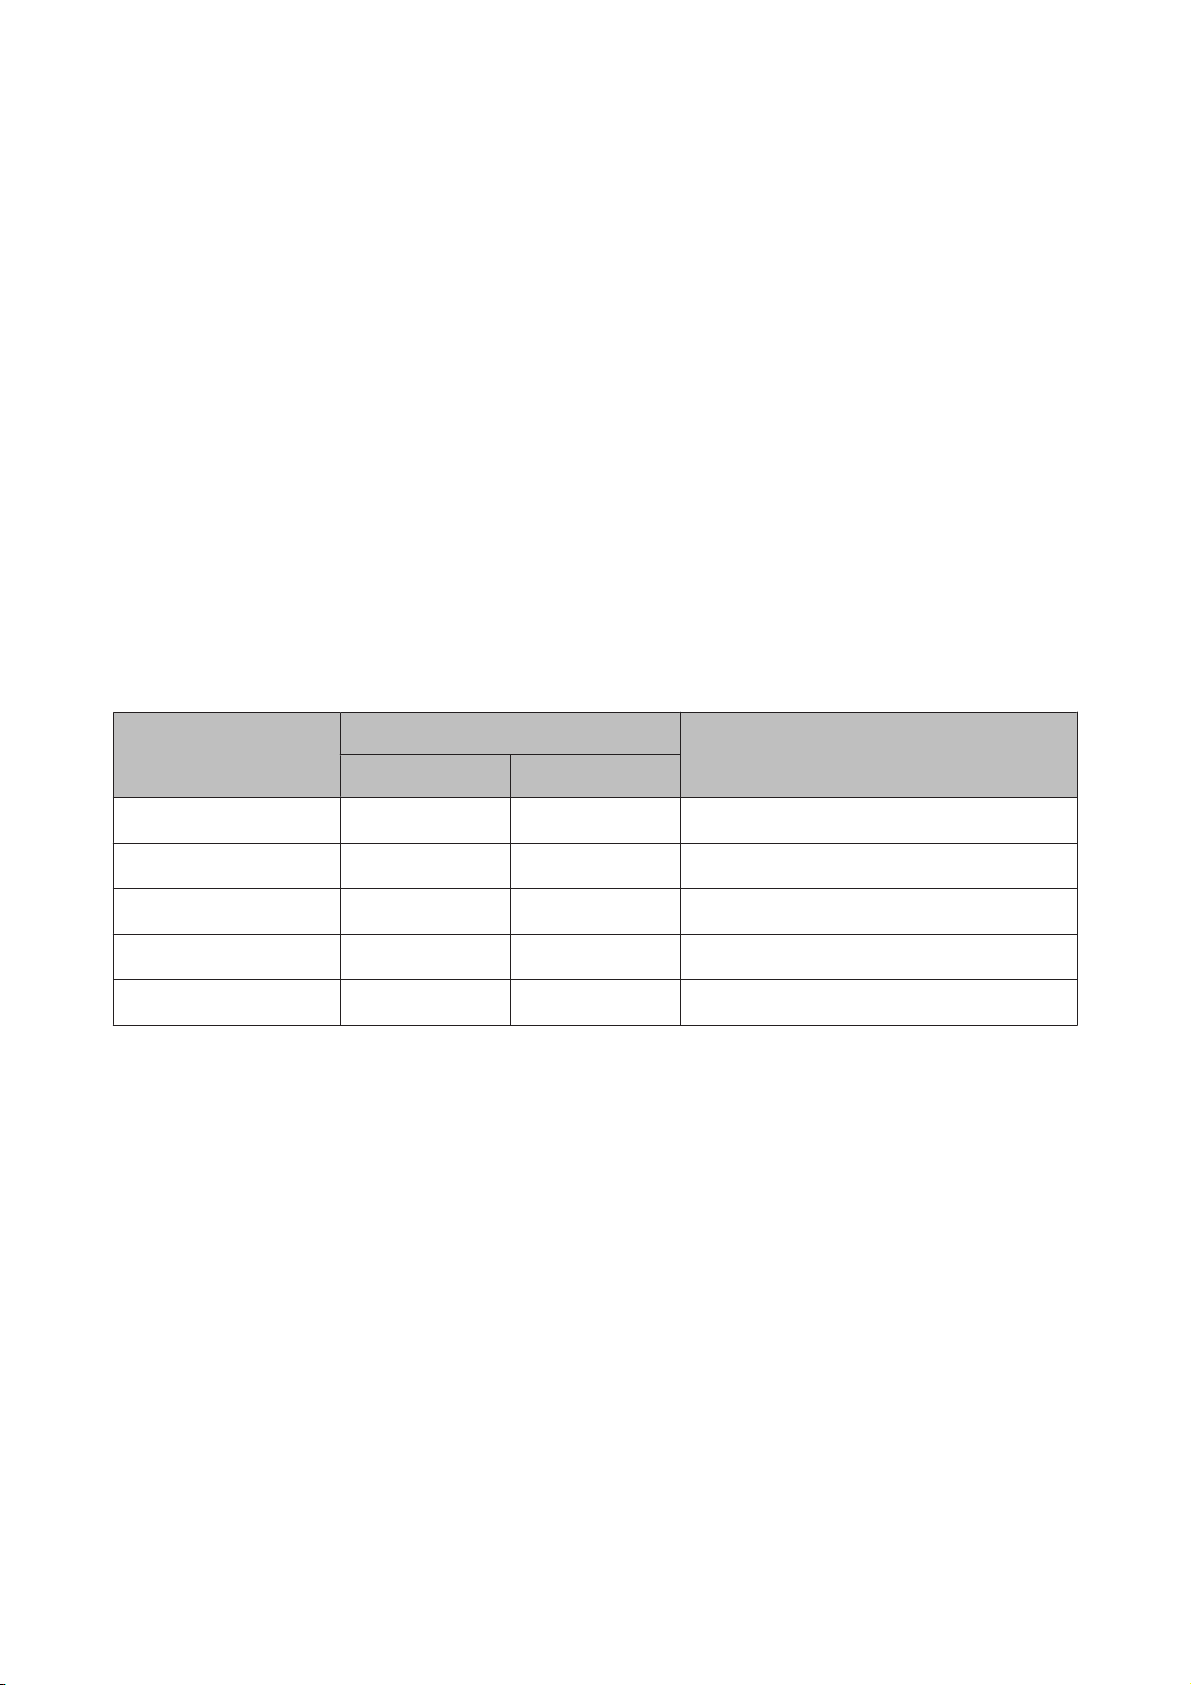
SF-710/510/310 User's Guide
Settings
*4
Make the following settings in the Mes. Settings menu.
❏ When Mode is set to Chronograph/Goal
HR > HR Monitor: ON > Zone Select: Zone1 to Zone5
❏ When Mode is set to Interval
Mode: Interval > HR Zone: Zone1 to Zone5
HR > HR Monitor: ON
*5
Make the following settings in the Mes. Settings menu.
Mode: Interval > HR Zone: Zone1 to Zone5
HR > HR Monitor: ON
*6 Only displayed for the SF-710.
*7
Use when Mode is set to Goal from the Mes. Settings menu.
Lap Hold Screen
Display name
Display item
1 Line 2 Lines/3 Lines
Split Time Split Split Total time from the start of measurements
Lap Distance LapDist. LapDist. Distance for each lap
Lap Time Lap Lap Time for each lap
Lap Pace LapPace LapPace Average pace for each lap
Lap HR LapHR LapHR Average heart rate for each lap
Explanation
100
 Loading...