

Page 1

WF-110
Quick Guide
Getting Started . . . . . . . . . . . . . . . . . . . . . . . . . . . . . . . . . . . . . . . . . . . . . . . . 2
Connecting to a Computer . . . . . . . . . . . . . . . . . . . . . . . . . . . . . . . . . . . . . . . 6
Loading Paper. . . . . . . . . . . . . . . . . . . . . . . . . . . . . . . . . . . . . . . . . . . . . . . . . 7
Using the Control Panel . . . . . . . . . . . . . . . . . . . . . . . . . . . . . . . . . . . . . . . . . 8
Mobile and Voice-activated Printing . . . . . . . . . . . . . . . . . . . . . . . . . . . . . . . . 9
Charging the Battery. . . . . . . . . . . . . . . . . . . . . . . . . . . . . . . . . . . . . . . . . . . . 9
Replacing Ink Cartridges and the Maintenance Box. . . . . . . . . . . . . . . . . . . 10
Travel and Handling Tips. . . . . . . . . . . . . . . . . . . . . . . . . . . . . . . . . . . . . . . . 10
Solving Problems . . . . . . . . . . . . . . . . . . . . . . . . . . . . . . . . . . . . . . . . . . . . . 11
Where to Get Help . . . . . . . . . . . . . . . . . . . . . . . . . . . . . . . . . . . . . . . . . . . . 12
Notices . . . . . . . . . . . . . . . . . . . . . . . . . . . . . . . . . . . . . . . . . . . . . . . . . . . . . 13
Guide rapide
Renseignements de départ . . . . . . . . . . . . . . . . . . . . . . . . . . . . . . . . . . . . . 18
Connexion à un ordinateur . . . . . . . . . . . . . . . . . . . . . . . . . . . . . . . . . . . . . . 23
Chargement du papier . . . . . . . . . . . . . . . . . . . . . . . . . . . . . . . . . . . . . . . . . 24
Utilisation du panneau de commande . . . . . . . . . . . . . . . . . . . . . . . . . . . . . 25
Impression mobile et à commande vocale . . . . . . . . . . . . . . . . . . . . . . . . . . 26
Chargement de la pile. . . . . . . . . . . . . . . . . . . . . . . . . . . . . . . . . . . . . . . . . . 26
Remplacement des cartouches d’encre et de la boîte de maintenance . . . 27
Conseils pour le déplacement et la manipulation de l’imprimante . . . . . . . . 28
Résolution de problèmes . . . . . . . . . . . . . . . . . . . . . . . . . . . . . . . . . . . . . . . 28
Comment obtenir de l’aide . . . . . . . . . . . . . . . . . . . . . . . . . . . . . . . . . . . . . . 30
Avis. . . . . . . . . . . . . . . . . . . . . . . . . . . . . . . . . . . . . . . . . . . . . . . . . . . . . . . . 31
Page 2

Getting Started
English
Printer
Ink cartridges
Micro USB cable
Power cord
and adapter
Replacement
maintenance box
Software CD
IMPORTANT: Before using this product, make sure you read these instructions and the
safety instructions in the online User’s Guide.
Note: This printer is designed for use with Epson
or ink. For important ink information, visit www.epson.com/epsonink (U.S.) or
www.epson.ca/epsonink (Canada) or see your printer box.
Your WF-110 wireless mobile printer includes these special features:
■ Lightweight but rugged design for professional-quality documents and photos
■ A built-in battery that you can charge from the USB port
■ An optional external battery (part number C12C934941) for extended printing time
■ Easy printing from a variety of mobile devices, including smartphones and tablets
Follow the instructions in this section to unpack the printer, charge the battery, install ink,
and install software.
Unpacking
®
cartridges only, not third-party cartridges
Remove any tape or packing materials, but do not open ink cartridge packages until you
are ready to install the ink. Cartridges are vacuum packed to maintain reliability.
2 Getting Started
Page 3
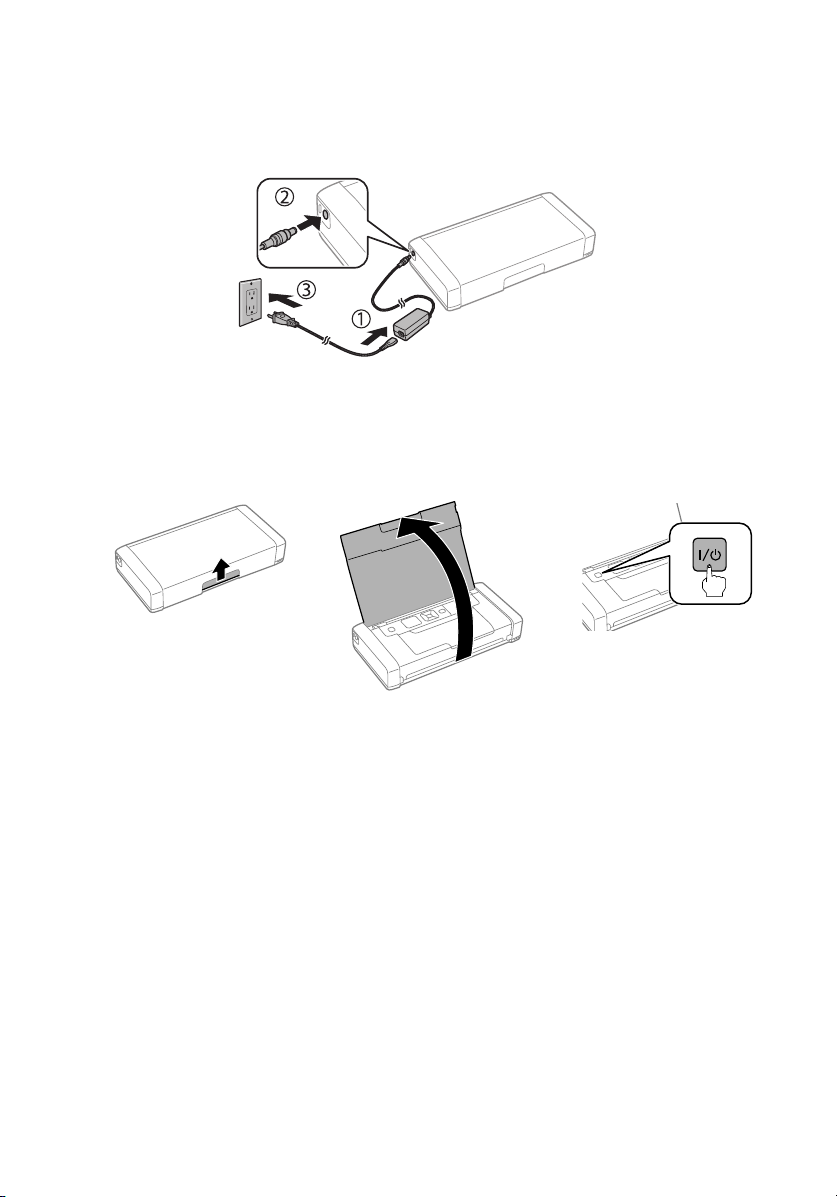
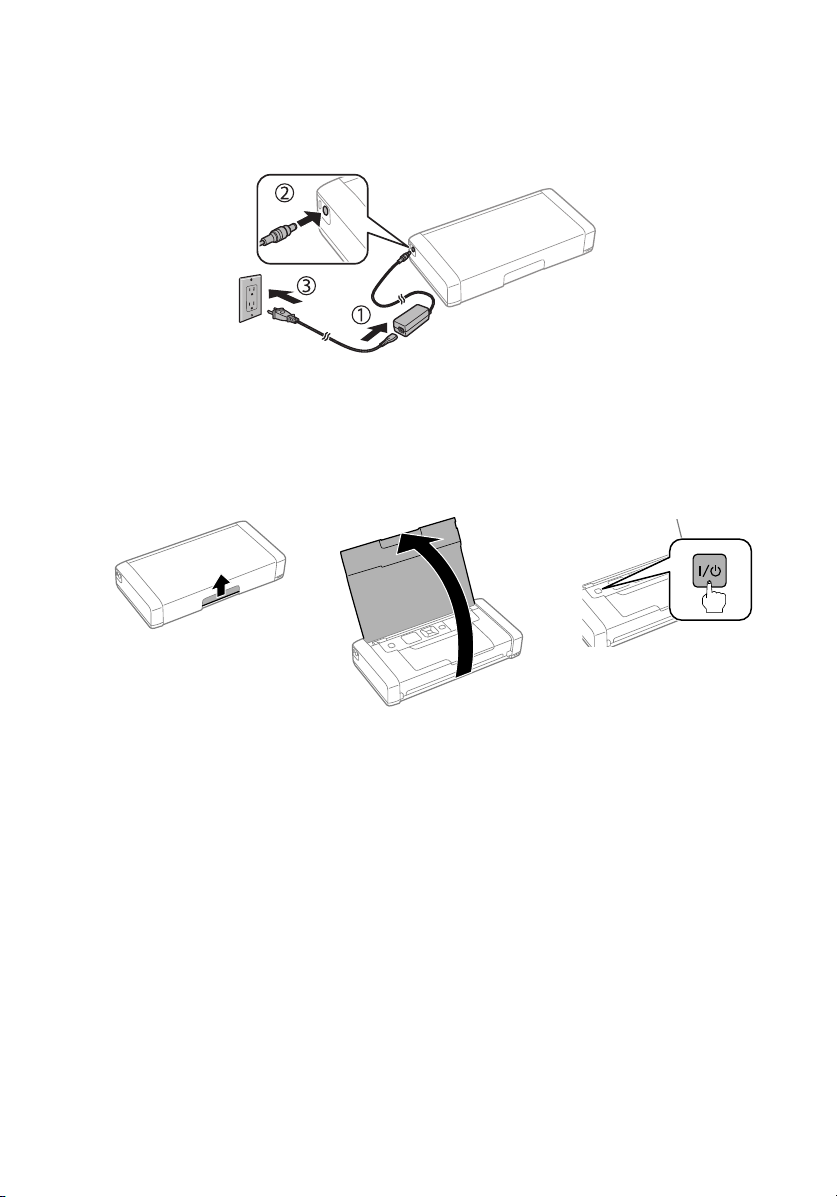
Turning on and Configuring
1. Connect the power cord and adapter, but do not connect the printer to your
computer yet.
Note: Plugging in the printer charges the battery. You can print a few pages after
charging for 5 minutes; the battery is fully charged after about 2.5 hours. You can also
charge the battery using the micro USB cable, as described on page 10.
2. Open the cover and turn on the printer.
3. Select your language on the LCD screen, then press
Note:
■ You can change this setting later using the product’s control panel. For more
information, see the online User’s Guide.
■ If an error message appears, turn off the product and check that no protective material
has been left inside the product.
OK.
Getting Started 3
Page 4
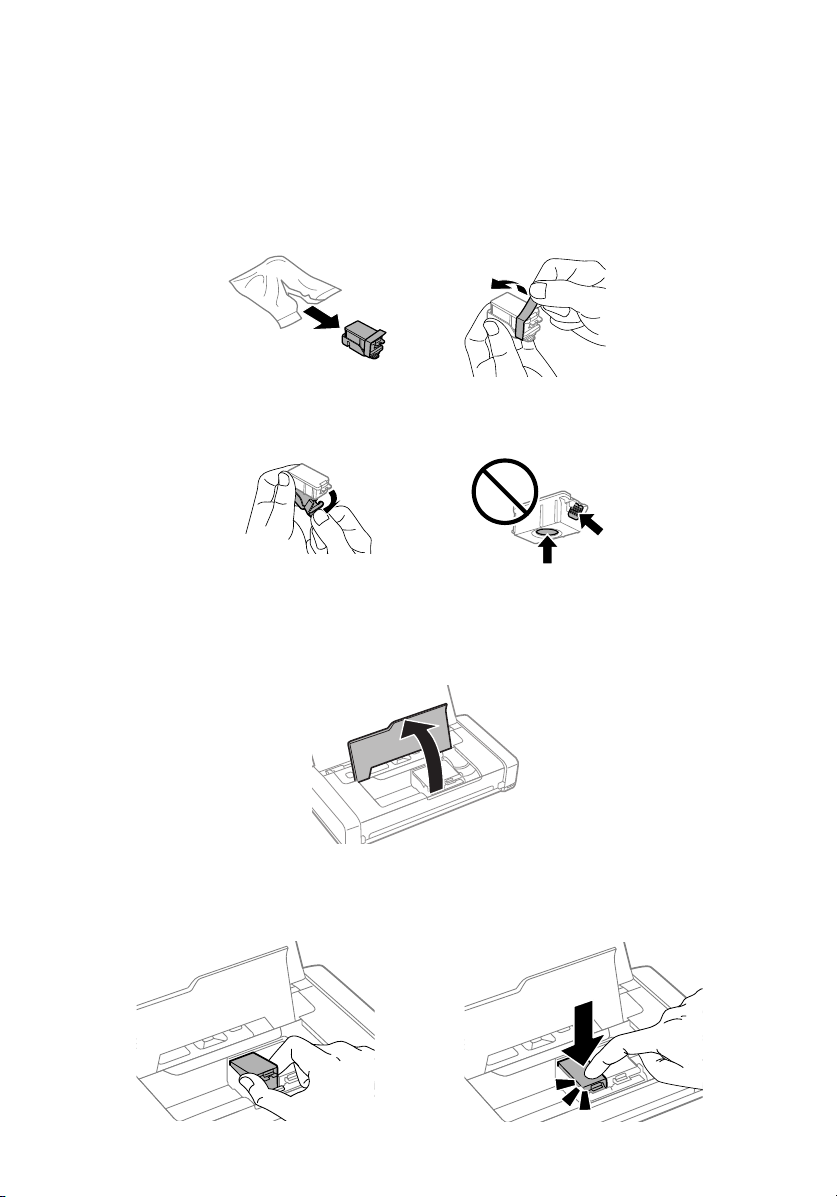
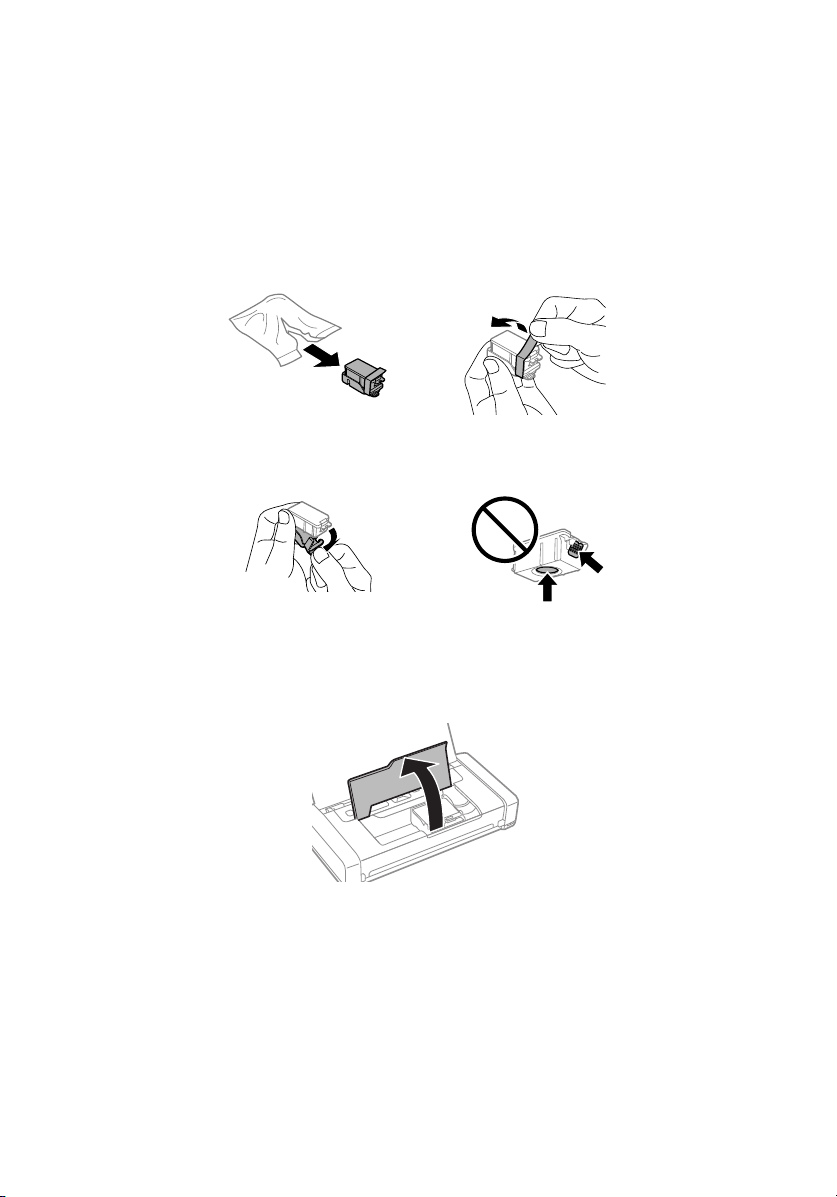
Installing Ink
Caution: Keep the ink cartridges out of the reach of children and do not drink the ink.
Note: The included initial cartridges are designed for reliable printer setup and cannot be
used as replacement cartridges or resold. After setup, the remaining ink is available for
printing.
1. Unpack the ink cartridges and remove the yellow tape.
2. Remove the caps, but be careful not to touch the areas shown below.
Note: Save the caps so you can recap ink cartridges before storing or disposing of
them.
3. Open the inner cover.
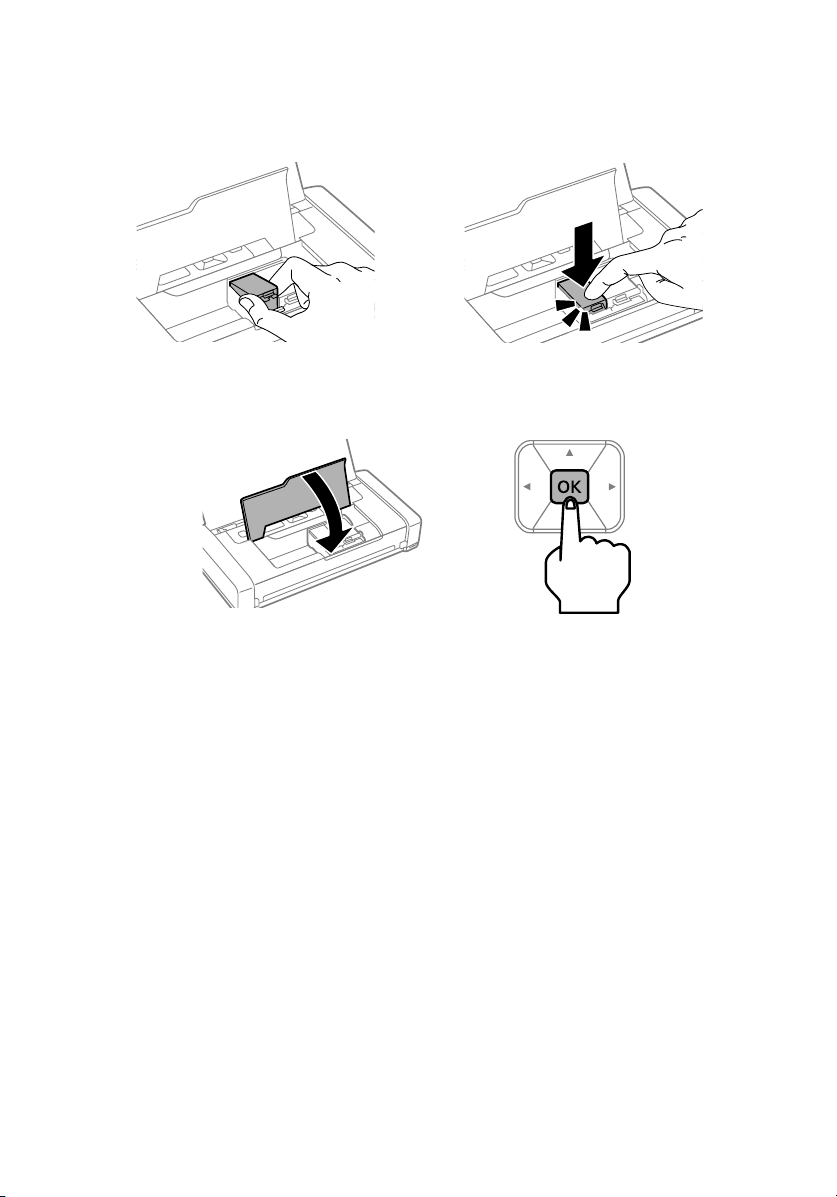
4. Insert the cartridges at a slight angle as shown, then press into place. Make sure the
black cartridge is on the left and the color cartridge is on the right.
4 Getting Started
Page 5

5. Close the inner cover and press
OK to begin charging the ink. Ink charging takes
about 4 minutes.
Caution: Don’t turn off the printer or raise the inner cover while the printer is charging
or you’ll waste ink.
6. When you see a completion message on the printer’s LCD screen, ink charging is
complete. Press
Note: As part of setup, your product’s serial number will be sent to a secure Epson server so
that you can be eligible to participate in programs we may offer from time to time, including
the Epson ink replenishment program. You will have a separate opportunity to consent to
participating in such programs.
OK to return to the home screen.
Installing Software
Note:
■ If you are using a Mac or your computer does not have a CD/DVD drive, an Internet
connection is required to obtain the product software.
■ To print from a Chromebook™, go to www.epson.com/support/gcp (U.S.) or
www.epson.ca/support/gcp (Canada) for instructions.
■ From a Windows
printer. See page 6 for instructions. To print from a mobile device, see page 9.
Firmware Update Notice: Epson periodically provides firmware updates to address issues
of security, performance, minor bug fixes and ensure your printer functions as designed.
Your printer was designed to work only with genuine Epson ink cartridges, therefore some
updates may affect the functionality of third-party ink.
1. Make sure the printer is not connected to your computer.
Windows: If you see a Found New Hardware screen, click
micro USB cable.
2. Insert the printer CD (Windows only) or download and run your printer’s software
package. For the latest software, visit:
www.epson.com/support/wf110 (U.S.) or www.epson.ca/support/wf110 (Canada)
3. Follow the instructions on the computer screen to run the setup program.
®
computer, you can also print using the basic driver built into the
Cancel and disconnect the
Getting Started 5
Page 6
4. When you see the Select Your Connection screen, select one of the following and
follow the on-screen instructions:
■ Wireless connection
In most cases, the software installer automatically attempts to set up your wireless
connection. If setup is unsuccessful, you may need to enter your network name
(SSID) and password.
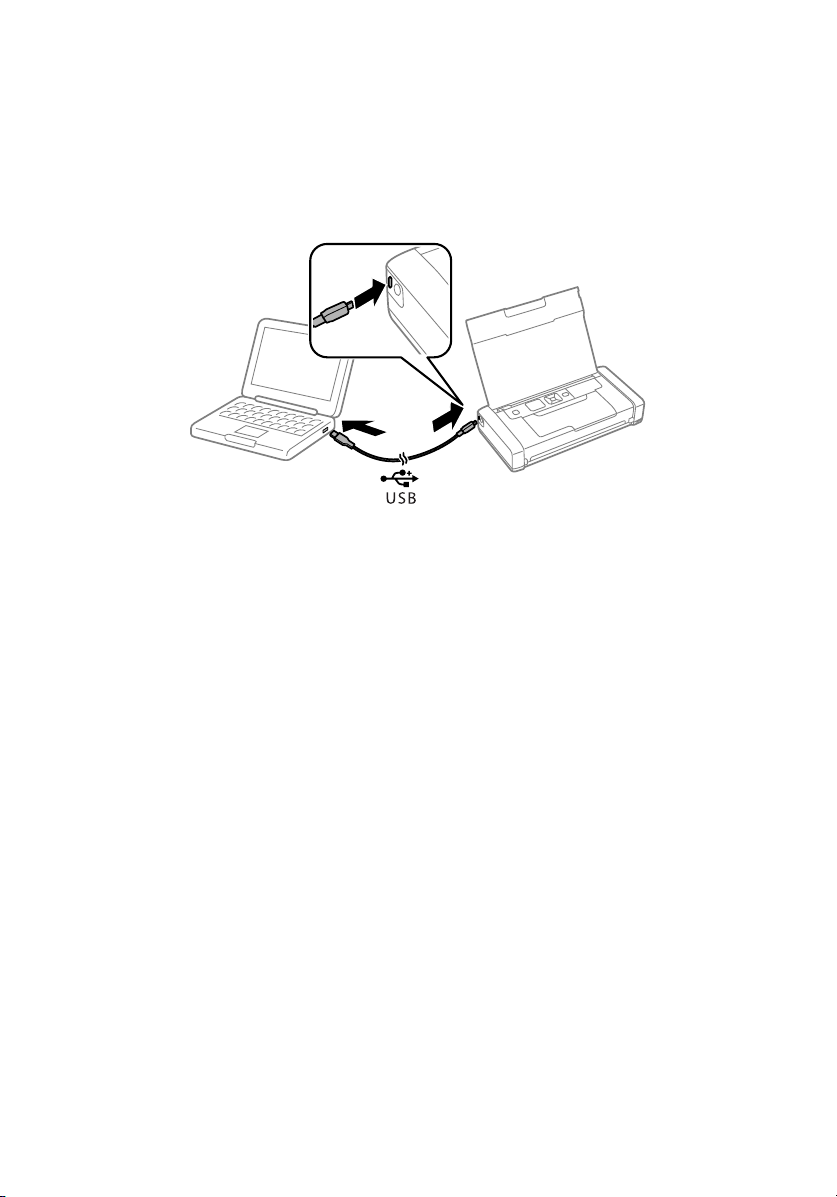
■ Direct USB connection
Use the micro USB cable that came with the printer.
Note: You can also print wirelessly using Wi-Fi Direct®, as described on page 7.
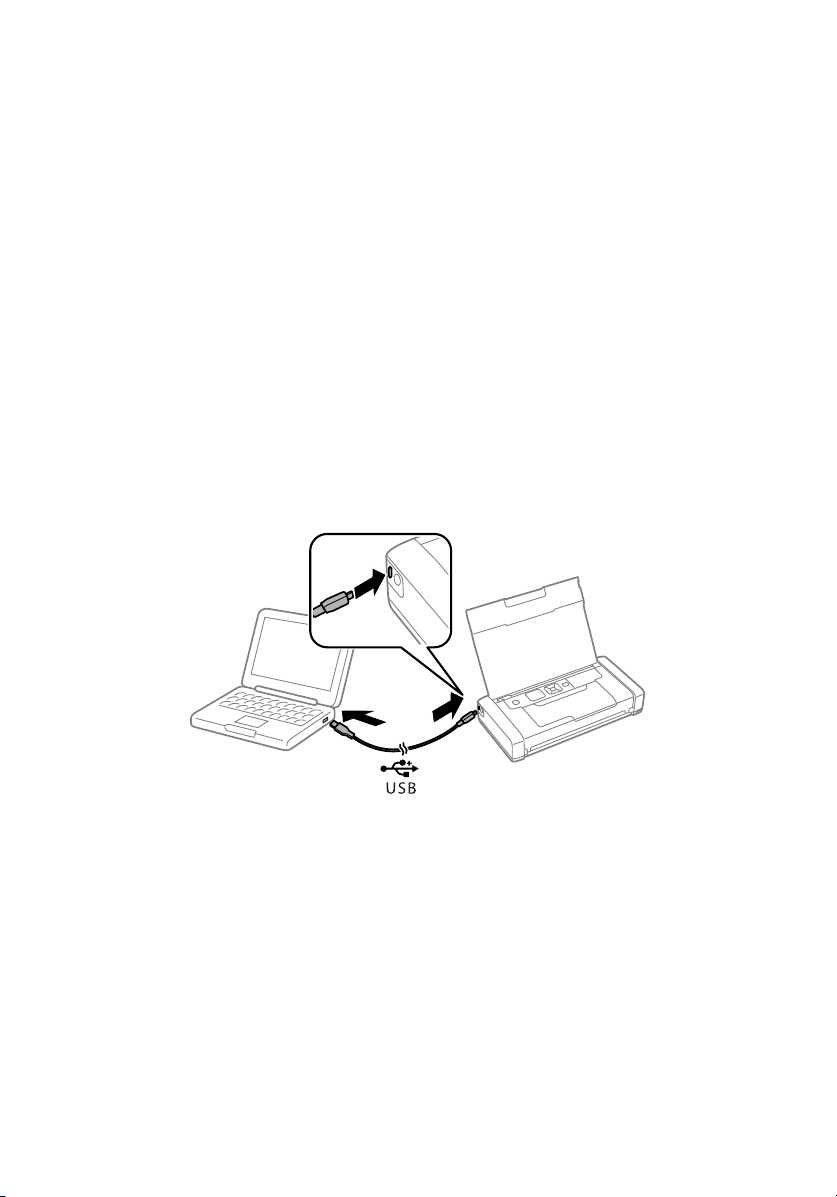
Connecting to a Computer
Your printer provides several ways to connect, both at home and on the road:
■ Connect to your computer using the micro USB cable and the WF-110 software
installed on the computer, as described on page 5.
■ Connect to a Windows computer using the micro USB cable and the built-in basic
driver.
1. Disconnect the printer from your computer.
2. On the printer’s control panel, select
OK.
Menu > WF-110 Basic Driver. Then press
3. Connect the printer to your computer using the micro USB cable, as shown
above, then press
4. Open
SETUP.
Computer or My Computer on your system, then double-click EPSON >
OK on the printer’s control panel.
5. Follow the on-screen instructions to install the driver.
6 Connecting to a Computer
Page 7
■ Connect wirelessly to your computer.
If you installed the software as described on page 5 and selected wireless connection,
you can print using your home or office Wi-Fi network.
If you are away from your home or office network you can use Wi-Fi Direct, which
lets you connect up to 8 devices.
1. On the printer’s control panel, select
Wi-Fi Setup > Wi-Fi Direct.
2. Follow the on-screen instructions until the SSID and password are displayed.
3. On your computer or other device, select the SSID and enter the password.
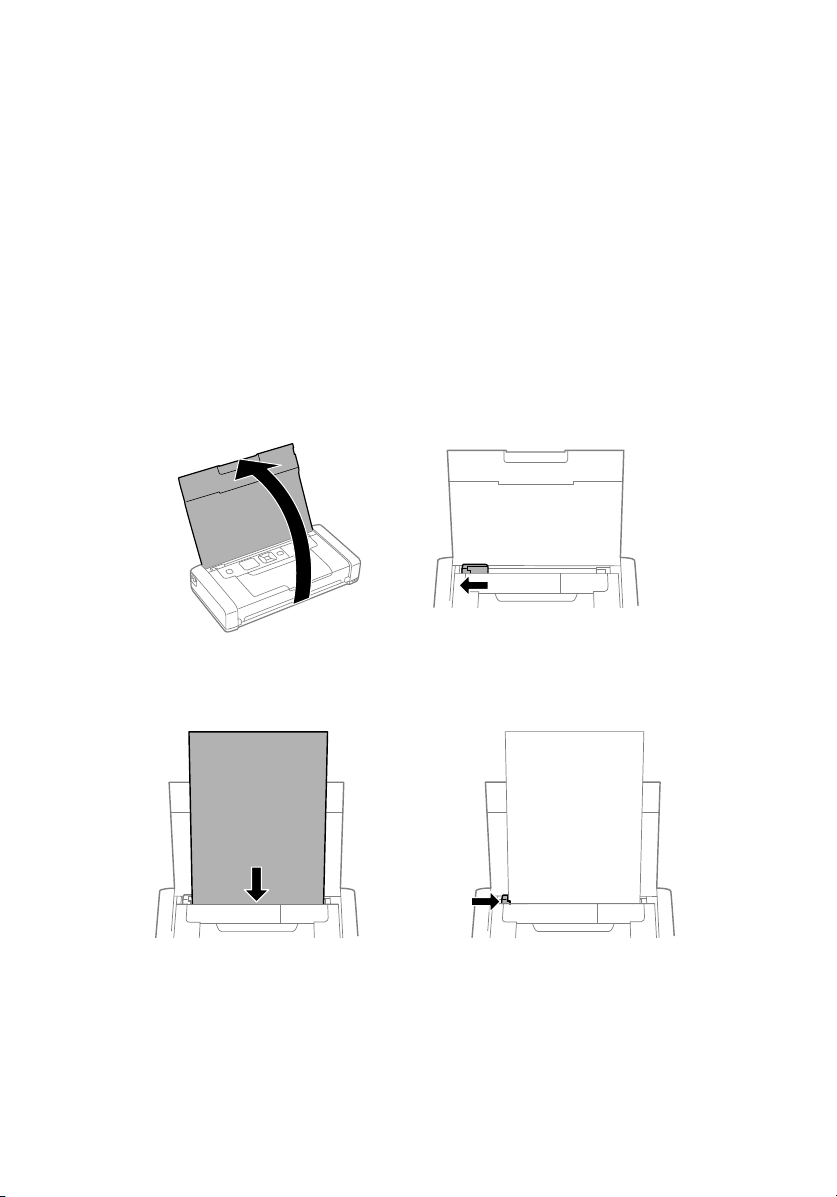
Loading Paper
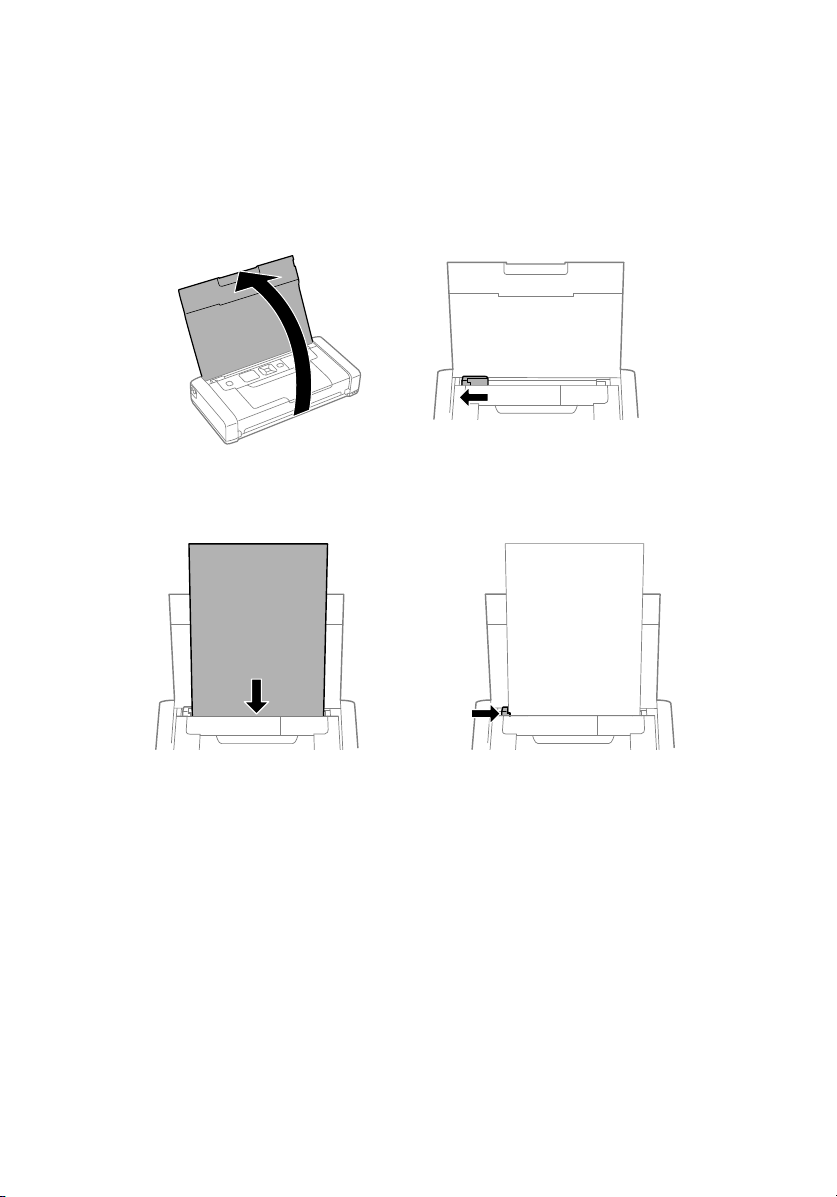
1. Open the cover and slide the edge guide to the left.
2. Load up to 20 sheets of plain paper behind the tabs, then slide the edge guide against
the paper if necessary.
Note: You can load up to five sheets of Epson photo paper, one sheet of Epson
Premium Presentation Paper Matte, or one sheet of legal-size paper. For instructions on
loading special paper or envelopes, see the online User’s Guide.
3. Confirm the paper setting on the printer’s control panel.
4. Make sure there is room in front of the printer for your printed pages, so they don’t
fall on the floor.
Loading Paper 7
Page 8
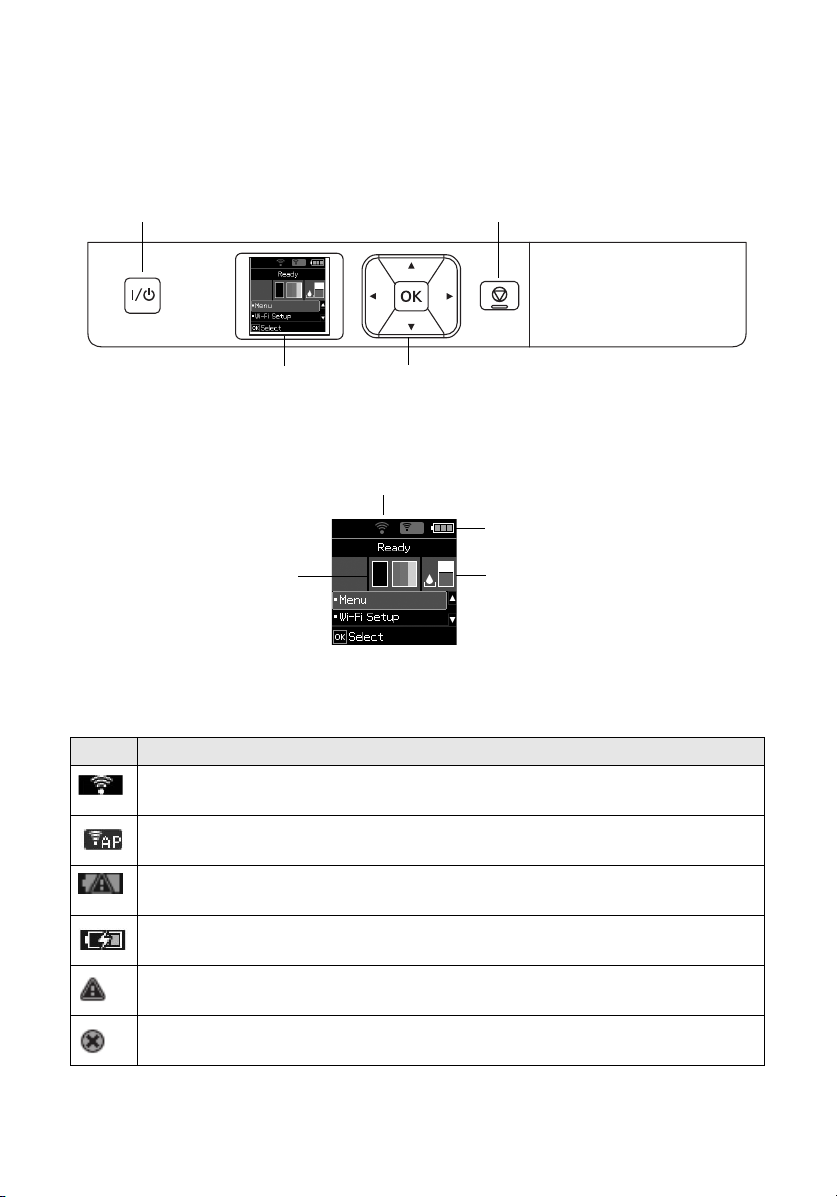
Using the Control Panel
Turn on and off
Cancel operation or return
to previous screen
Select menu
items
LCD screen
Battery status
Network status
Ink
levels
Maintenance
box level
To save energy, the screen goes dark after several minutes of inactivity. Press any button to
turn it back on. To adjust the sleep timer, select
The LCD screen shows the printer status:
Menu > Printer Setup > Sleep Timer.
Note: The initial maintenance box is partly filled after ink charging.
You may see the following icons on the screen:
Icon Meaning
The printer is connected to a Wi-Fi (wireless) network.
The printer is connected with Wi-Fi Direct (Simple AP) mode.
There is a battery problem. Go to
The battery is charging.
8 Using the Control Panel
The ink cartridge is low or maintenance box is nearly full.
The ink cartridge is expended.
Menu > Battery.
Page 9
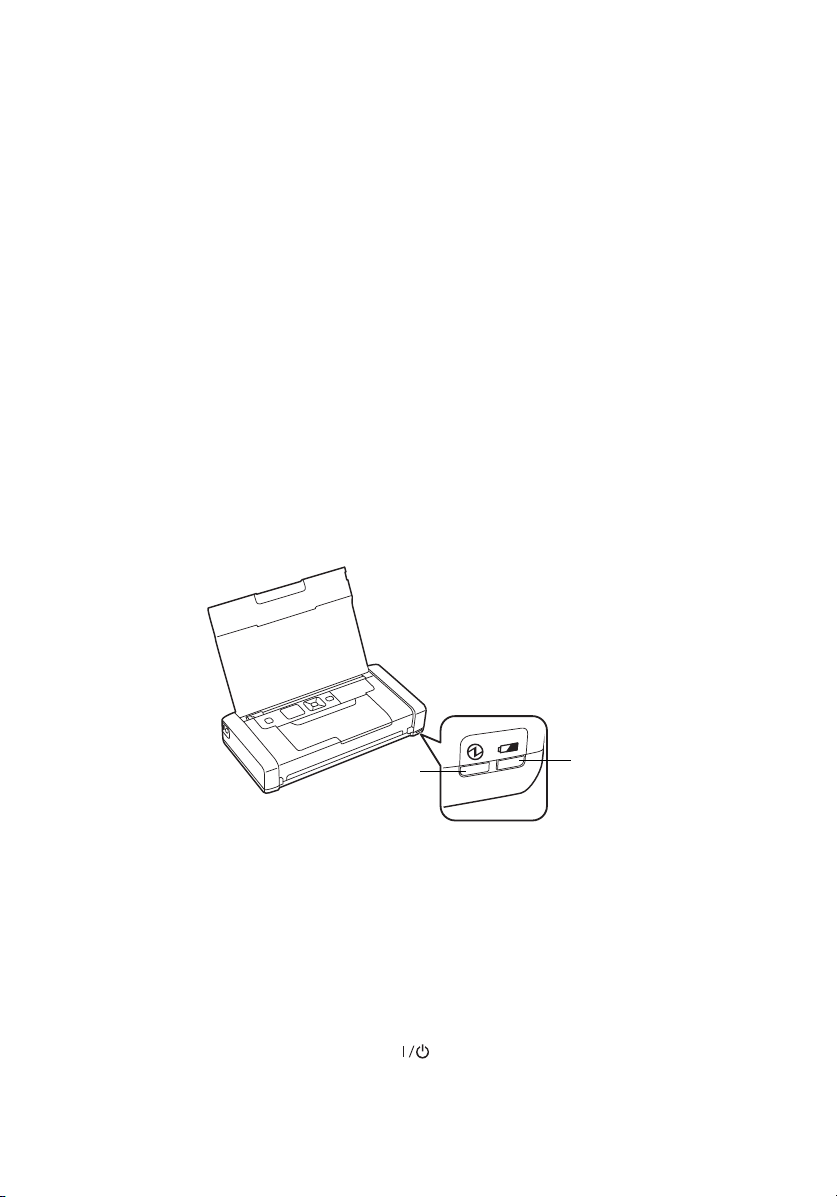
Mobile and Voice-activated Printing
Battery
light
Power
light
■ Print directly from your iOS device. Simply connect your printer and device to the
same network and tap the action icon to select the print option.
■ Print directly from your Android
™
(v4.4 or later) device*. Simply connect your
printer and device to the same network and tap the menu icon to select the print
option.
■ Print from wherever you are, next to your printer or remotely, with Epson Connect
and Google Cloud Print
™
. Learn more at www.epson.com/connect (U.S.) or
www.epson.ca/connect (Canada).
■ Use voice-activated assistants to print a variety of creative and everyday items from
your Epson product. Simply add your product to an Epson Connect account, then
link the account to a voice-activated assistant. See www.epson.com/voice (U.S.) or
www.epson.ca/voice (Canada) for more information.
* May require the Epson Print Enabler or Mopria Print Service app from Google Play
™
Charging the Battery
™
.
Note: An optional external battery (part number C12C934941) is also available for extended
printing time.
Plug in the printer to charge the battery, as described on page 3.
■ The battery light is orange when the battery is charging and turns off when the
battery is fully charged. The light flashes if a battery problem occurs.
■ The power light is blue when the printer is turned on and flashes when the printer is
operating. To save power when it is running on the battery, the printer turns off after
several minutes of inactivity. Press the button to turn it back on. To adjust the
power off timer, select
Menu > Printer Setup > Power Off Timer.
Mobile and Voice-activated Printing 9
Page 10

■
You can also charge the battery using the micro USB cable.
Connect the printer to your computer using the micro USB cable, as shown on
page 6. Wake the computer if it is in sleep or hibernate mode. Charging starts when
the printer is turned off or goes into sleep mode. You can use any USB power source,
including some automobiles. If battery charging does not start, select
Battery > Battery Settings on the printer’s control panel, enable USB Power
Supply via PC
■ A fully charged battery can print approximately 50 color or 100 black and white
pages. Printing is slower when running on the battery.
■ When you finish using the printer, make sure you press the button to turn it off.
, then try again.
Menu >
Replacing Ink Cartridges and the
Maintenance Box
Ensure brilliant results with Epson specialty papers, engineered specifically for Epson
printers. Find specialty Epson papers and Epson Genuine Ink at www.epson.com (U.S.
sales) or www.epson.ca (Canadian sales) and at Epson authorized resellers. Call
800-GO-EPSON (800-463-7766).
Use these part numbers when you order or purchase new ink cartridges or maintenance
boxes:
■ Black ink cartridge: 215
■ Tri-Color ink cartridge: 215
■ Maintenance box: T2950
Note: If you remove a low or expended ink cartridge, you cannot re-install and use the
cartridge.
Travel and Handling Tips
■ When you travel by plane, Epson recommends handling the printer as a carry-on.
■ Make sure you take extra ink cartridges and a spare maintenance box.
■ Avoid strong impacts, which may damage the printer.
■ Leave the ink cartridges and maintenance box installed.
■ Do not leave the printer in direct sunlight, near heat sources, or inside cars or other
hot locations.
■ If print quality declines, you may need to clean or align the print head. For
instructions, see your online User’s Guide.
10 Replacing Ink Cartridges and the Maintenance Box
Page 11

Solving Problems
If you have a network problem with your printer, check the messages on the LCD screen
to diagnose the cause of most problems.
You can also check the basic troubleshooting suggestions below. For more in-depth
troubleshooting, see your online User’s Gu ide or access FAQs at
www.epson.com/support/wf110 (U.S.) or www.epson.ca/support/wf110 (Canada).
Network Problems
■ Make sure you select the right network name (SSID). If your wireless router doesn’t
broadcast its network name (SSID), manually enter your wireless network name.
■ Try restarting the router (turn it off and then on), then try to connect to it again.
■ Verify that the network settings are correct and check the signal strength. If it is poor,
try moving the printer closer to your router or access point.
■ If your network has security enabled, make sure you enter your network password
(WEP key or WPA passphrase) correctly. Be sure to enter your password in the correct
case.
■ Print a network status sheet from the printer’s control panel. Select Menu > Network
Settings
■ Remove and reinstall your product software.
Power and Printing Problems
■ If the power doesn’t turn on or off, hold down the button for a few seconds.
■ If the LCD screen is dark, the printer may be in sleep mode. Press any button to wake
it up.
■ If the printer turns off automatically, press the button to turn it back on. If the
battery is low, connect the AC adapter and plug in the printer. Or charge it using the
micro USB cable, as described on page 9. If the battery is completely discharged,
charge it for at least 30 minutes before attempting to turn the product back on.
■ If print quality is poor, make sure you select the correct paper type before printing.
■ If you notice light or dark bands across your printouts or they are too faint, run a
nozzle check to see if the print head needs cleaning. Select
Nozzle Check
> Print Status Sheet.
Menu > Maintenance >
, then follow the instructions on the screen.
Paper Feeding Problems
■ If paper doesn’t feed correctly, make sure the printer is on a flat surface and you have
not loaded too many sheets.
■ Always load paper short edge first.
Solving Problems 11
Page 12

■
If paper has jammed, follow any instructions on the LCD screen.
1. Remove any jammed paper from the rear feeder:
2. If paper is jammed inside, open the inner cover and remove the paper, including
any torn pieces.
Where to Get Help
User’s Guide
Windows: Click the icon on your desktop or Apps screen to access the online
Mac: Click the icon in Applications/Epson Software/Guide to access the online User’s
Guide.
If you don’t have a User’s Guide icon, go to the Epson website as described below.
Videos
Visit www.epson.com/support/wf110videos (U.S.) or
www.epson.ca/support/wf110videos (Canada) to view support videos.
12 Where to Get Help
User’s Guide.
Page 13

Technical Support
Visit www.epson.com/support/wf110 (U.S.) or www.epson.ca/support/wf110 (Canada)
to download drivers, view manuals, get FAQs, or contact Epson.
Call (562) 276-7202 (U.S.) or (905) 709-2567 (Canada) 6
Monday through Friday, and 7
AM – 4 PM, Pacific Time, Saturday. Days and hours of
AM – 8 PM, Pacific Time,
support are subject to change without notice. Toll or long distance charges may apply.
Recycling
Epson offers a recycling program for end of life hardware and ink cartridges. Please go to
www.epson.com/recycle (U.S.) or www.epson.ca/recycle (Canada) for information on
how to return your products for proper disposal.
Notices
Declaration of Conformity
According to 47CFR, Part 2 and 15 for: Class B Personal Computers and Peripherals; and/or CPU
Boards and Power Supplies used with Class B Personal Computers:
We: Ep s o n A m e r i c a , Inc.
Located at: 3840 Kilroy Airport Way, MS 3-13, Long Beach, CA 90806
Telephone: (562) 981-3840
Declare under sole responsibility that the product identified herein, complies with 47CFR Part 2 and
15 of the FCC rules as a Class B digital device. Each product marketed is identical to the
representative unit tested and found to be compliant with the standards. Records maintained
continue to reflect the equipment being produced can be expected to be within the variation
accepted, due to quantity production and testing on a statistical basis as required by 47CFR §2.906.
Operation is subject to the following two conditions: (1) this device may not cause harmful
interference, and (2) this device must accept any interference received, including interference that
may cause undesired operation.
Trade Name: Epson
Type of Product: Printer
Model: B582A
Marketing name: WF-110
Notices 13
Page 14

Epson America, Inc. Limited Warranty
1. What Is Covered: Epson America, Inc. (“Epson”) warrants to the original retail purchaser that the
Epson printer covered by this limited warranty statement, if purchased and operated only in the
United States, Canada, or Puerto Rico, will be free from defects in workmanship and materials for
a period of one (1) year or 15,000 printed sheets whichever happens first. For warranty service,
you must provide proof of the date of original purchase.
2. What Epson Will Do To Correct Problems: Should your Epson printer prove defective during
the warranty period, please call the Epson Connection
(905) 709-2567 (Canada) for warranty repair instructions and return authorization. An Epson
service technician will provide telephone diagnostic service to determine whether the printer
requires service. If service is needed, Epson will, at its option, exchange or repair the printer
without charge for parts or labor. If Epson authorizes an exchange for the defective unit, Epson
will ship a replacement printer to you, freight prepaid, so long as you use an address in the United
States, Canada, or Puerto Rico. You are responsible for securely packaging the defective unit and
returning it to Epson within five (5) working days of receipt of the replacement. Epson requires a
debit or a credit card number to secure the cost of the replacement printer in the event that you
fail to return the defective one. If Epson authorizes repair instead of exchange, Epson will direct
you to send your printer to Epson or its authorized service center, where the printer will be
repaired and sent back to you. You are responsible for packing the printer and for all costs to and
from the Epson authorized service center. When warranty service involves the exchange of the
printer or a part, the item replaced becomes Epson property. The replacement printer or part may
be new or refurbished to the Epson standard of quality, and, at Epson’s option, may be another
model of like kind and quality. Exchange products and parts assume the remaining warranty
period of your original product covered by this limited warranty.
3. What This Warranty Does Not Cover:
A. This warranty covers only normal use in the United States, Canada, or Puerto Rico.
B. Excessive, continuous, or commercial use is not considered normal use; damage, maintenance
or service from such use will not be covered under this warranty.
C. This warranty is not transferable.
D. This warranty does not cover any color change or fading of prints or reimbursement of
materials or services required for reprinting.
E. This warranty does not cover damage to the Epson product caused by parts or supplies not
distributed by Epson.
F. This warranty does not cover ink bottles, ink cartridges, ink supply units, or ink packs.
G. This warranty does not cover damage to the unit caused by incorrectly loading ink into the
product or loading the incorrect color/black ink or ink type into the product.
H. This warranty does not cover damage to the unit or other property by incorrect handling of
the ink bottles, ink cartridges, ink supply units, or ink packs.
I. This warranty does not cover third party parts, components, or peripheral devices added to the
Epson product after its shipment from Epson, e.g., dealer or user-added boards or
components.
J. Epson is not responsible for warranty service should the Epson label or logo or the rating label
or serial number be removed or should the product fail to be properly maintained or fail to
function properly as a result of misuse, abuse, improper installation, neglect, improper
shipping, damage caused by disasters such as fire, flood, and lightning, improper electrical
current, software problems, interaction with non-Epson products, or service other than by an
Epson Authorized Servicer
K. If a claimed defect cannot be identified or reproduced, you will be held responsible for the
costs incurred.
SM
at (562) 276-7202 (U.S.) or
14 Notices
Page 15

4. DISCLAIMER OF OTHER WARRANTIES: THE WARRANTY AND REMEDY
PROVIDED ABOVE ARE EXCLUSIVE AND IN LIEU OF ALL OTHER EXPRESS OR
IMPLIED WARRANTIES INCLUDING, BUT NOT LIMITED TO, THE IMPLIED
WARRANTIES OF MERCHANTABILITY, NONINFRINGEMENT OR FITNESS FOR A
PARTICULAR PURPOSE. SOME LAWS DO NOT ALLOW THE EXCLUSION OF
IMPLIED WARRANTIES. IF THESE LAWS APPLY, THEN ALL EXPRESS AND IMPLIED
WARRANTIES ARE LIMITED TO THE WARRANTY PERIOD IDENTIFIED ABOVE.
UNLESS STATED HEREIN, ANY STATEMENTS OR REPRESENTATIONS MADE BY
ANY OTHER PERSON OR FIRM ARE VOID.
5. EXCLUSION OF DAMAGES; EPSON’S MAXIMUM LIABILITY: IN NO EVENT SHALL
EPSON OR ITS AFFILIATES BE LIABLE FOR ANY SPECIAL, INCIDENTAL, OR
CONSEQUENTIAL DAMAGES OR ANY LOST PROFITS RESULTING FROM THE USE
OR INABILITY TO USE THE EPSON PRODUCT, WHETHER RESULTING FROM
BREACH OF WARRANTY OR ANY OTHER LEGAL THEORY. IN NO EVENT SHALL
EPSON OR ITS AFFILIATES BE LIABLE FOR DAMAGES OF ANY KIND IN EXCESS OF
THE ORIGINAL RETAIL PURCHASE PRICE OF THE PRODUCT.
6. Disputes, Arbitration, Governing Laws:
A. Any controversy or claim arising out of or relating to Epson products or services or this
agreement, shall be resolved by arbitration, rather than in court, in Los Angeles County,
California. If you or Epson commences arbitration, the arbitration shall be governed by the
rules of JAMS that are in effect when the arbitration is filed, excluding any rules that permit
arbitration on a class or representative basis, available at http://www.jamsadr.com or by calling
(800) 352-5267, and under the rules set forth in this agreement. Disputes shall be resolved by
a single neutral arbitrator, and both parties shall have a reasonable opportunity to participate
in the selection of the arbitrator. The arbitrator is bound by the terms of this agreement.
B. Pre-Arbitration Steps and Notice. Before submitting a claim for arbitration, you agree to try,
for sixty (60) days, to resolve any dispute informally by contacting us at
customer.inquires@ea.epson.com. Please include your name, address and contact information,
the facts giving rise to the dispute, and the relief requested. You agree to act in good faith to
resolve the dispute, but if you and Epson do not reach a resolution within the sixty (60) days,
you may commence an arbitration.
C. Opt-out. You may elect to opt out (exclude yourself) from the final, binding, individual
arbitration procedure and waiver of class and representative proceedings specified in this
agreement by sending a written letter to Epson America, Inc., ATTN: Legal Department,
3840 Kilroy Airport Way, Long Beach, CA 90806, within thirty (30) days of your purchase of
the Epson products and/or services that specifies (i) your name, (ii) your mailing address, and
(iii) your request to be excluded from the final, binding individual arbitration procedure and
waiver of class and representative proceedings specified in this Section 6. In the event that you
opt out consistent with the procedure set forth above, all other terms shall continue to apply,
including the requirement to provide notice prior to litigation.
D. Judgment on the arbitration award may be entered in any court having jurisdiction. There is
no judge or jury in arbitration and your grounds for appeal are limited, however, the arbitrator
is empowered to grant relief and award you the same damages as a court could, including
declaratory or injunctive relief.
E. Notwithstanding the foregoing, you may bring an individual action in a small claims court of
your state or municipality if the action is within that court's jurisdiction and is pending only
in that court.
F. Any action must be brought within three (3) months of the expiration of the warranty.
G. You and Epson each agree that any dispute resolution proceedings will be conducted only on
an individual basis and not in a class, consolidated or representative action. If for any reason
a claim proceeds in court rather than in arbitration we each waive any right to a jury trial.
We also both agree that you or Epson may bring suit in court to enjoin infringement or
other misuse of intellectual property rights.
Notices 15
Page 16

H. If any provision in this Section 6 is found to be unenforceable, that provision shall be severed
with the remainder of this agreement remaining in full force and effect. The foregoing shall
not apply to the prohibition against class, consolidated or representative actions in Section 6G
above. This means that if Section 6G is found to be unenforceable, then all of Section 6,
except for this paragraph H, shall be null and void.
7. Other Provisions:
A. Other Rights You May Have: This warranty gives you specific legal rights, and you may also
have other rights which vary from jurisdiction to jurisdiction. Some jurisdictions do not allow
limitations on how long an implied warranty lasts, or allow the exclusion or limitation of
incidental or consequential damages, so the above limitations or exclusions may not apply to
you.
B. Warranties in Canada: In Canada, warranties include both warranties and conditions.
C. Except for Section 6, which is governed by the Federal Arbitration Act, in the event of a
dispute in which the provisions of Section 6 are inapplicable, severed from the remainder of
this agreement, or you opt out pursuant to Section 6C, you and Epson both consent to the
jurisdiction of your state of residence.
To find the Epson Authorized Reseller nearest you, please visit: www.epson.com in the U.S. or
www.epson.ca in Canada.
To find the Epson Customer Care Center nearest you, please visit
www.epson.com/servicecenterlocator in the U.S. or www.epson.ca/servicecenterlocator in Canada.
You can also write to: Epson America, Inc., P.O. Box 93012, Long Beach, CA 90809-3012.
Copyright Notice
All rights reserved. No part of this publication may be reproduced, stored in a retrieval system, or
transmitted in any form or by any means, electronic, mechanical, photocopying, recording, or
otherwise, without the prior written permission of Seiko Epson Corporation. The information
contained herein is designed only for use with this Epson product. Epson is not responsible for any
use of this information as applied to other equipment.
Neither Seiko Epson Corporation nor its affiliates shall be liable to the purchaser of this product or
third parties for damages, losses, costs, or expenses incurred by purchaser or third parties as a result
of: accident, misuse, or abuse of this product or unauthorized modifications, repairs, or alterations to
this product, or (excluding the U.S.) failure to strictly comply with Seiko Epson Corporation’s
operating and maintenance instructions.
Seiko Epson Corporation shall not be liable for any damages or problems arising from the use of any
options or any consumable products other than those designated as Original Epson Products or
Epson Approved Products by Seiko Epson Corporation.
Responsible Use of Copyrighted Materials
Epson encourages each user to be responsible and respectful of the copyright laws when using any
Epson product. While some countries’ laws permit limited copying or reuse of copyrighted material
in certain circumstances, those circumstances may not be as broad as some people assume. Contact
your legal advisor for any questions regarding copyright law.
16 Notices
Page 17

Trademarks
EPSON is a registered trademark, EPSON Exceed Your Vision is a registered logomark, and Epson
Connect is a trademark of Seiko Epson Corporation.
Epson Connection is a service mark of Epson America, Inc.
Windows is a registered trademark of Microsoft Corporation in the United States and/or other
countries.
Mac is a trademark of Apple Inc., registered in the U.S. and other countries.
Wi-Fi Direct
Android, Google Cloud Print, Chromebook, and Google Play are trademarks of Google LLC.
General Notice: Other product names used herein are for identification purposes only and may be
trademarks of their respective owners. Epson disclaims any and all rights in those marks.
This information is subject to change without notice.
®
is a registered trademark of Wi-Fi Alliance®.
Notices 17
Page 18

Renseignements de départ
Français
Imprimante
Cartouches
d’encre
Câble micro-USBCordon
d’alimentation
et adaptateur
Boîte de maintenance
de rechange
CD des
logiciels
IMPORTANT : Avant d’utiliser ce produit, assurez-vous de lire ces instructions et les
instructions de sécurité dans le Guide de l’utilisateur en ligne.
Remarque : Cette imprimante a été conçue pour être utilisée seulement avec les
cartouches d’encre Epson
Pour obtenir de l’information importante concernant l’encre, visitez le site
www.epson.ca/epsonink ou consultez la boîte de l’imprimante.
Votre imprimante mobile sans fil WF-110 comporte les caractéristiques spéciales suivantes :
■ Légère, mais de conception robuste, elle permet d’imprimer des documents et des
photos de qualité professionnelle.
■ Elle dispose d’une pile intégrée rechargeable par un port USB.
■ Elle est munie d’une pile externe optionnelle (numéro de pièce C12C934941) pour
une durée d’impression prolongée.
■ Elle permet d’imprimer facilement à partir de divers appareils mobiles, y compris des
téléphones intelligents et des tablettes.
Suivez les instructions indiquées dans cette section pour déballer l’imprimante, charger la
pile, installer les cartouches d’encre et installer le logiciel.
Déballage
®
, et non avec des cartouches ou de l’encre d’un tiers.
Retirez tous les rubans et les matériaux d’emballage, mais ouvrez les emballages des
cartouches d’encre seulement lorsque vous êtes prêt à installer ces dernières. Les cartouches
sont emballées sous vide pour maintenir leur fiabilité.
18 Renseignements de départ
Page 19
Mise sous tension et configuration
1. Branchez le cordon d’alimentation et l’adaptateur, mais ne branchez pas l’imprimante
à votre ordinateur tout de suite.
Remarque : Le branchement de l’imprimante permet le chargement de la pile. Vous
pouvez imprimer quelques pages après avoir chargé la pile durant 5 minutes; la pile est
complètement chargée après 2,5 heures. Vous pouvez aussi charger la pile au moyen du
câble micro-USB tel que décrit à la page 27.
2. Ouvrez le capot et allumez l’imprimante.
3. Choisissez votre langue à l’écran ACL, puis appuyez sur
Remarque :
■ Vous pourrez modifier ces paramètres plus tard en utilisant le panneau de commande
du produit. Pour obtenir plus d’informations, consultez le Guide de l’utilisateur en ligne.
■ Si un message d’erreur s’affiche, éteignez l’imprimante et vérifiez qu’aucun matériel de
protection n’a été laissé à l’intérieur du produit.
OK.
Renseignements de départ 19
Page 20
Chargement des cartouches d’encre
Mise en garde : Gardez les cartouches d’encre hors de la portée des enfants et n’ingérez
pas l’encre.
Remarque : Les cartouches d’encre initiales fournies sont conçues pour assurer la fiabilité
de la configuration de l’imprimante et ne peuvent être utilisées comme cartouches d’encre
de remplacement ni revendues. Après la configuration, l’encre restante peut être utilisée
pour l’impression.
1. Déballez les cartouches d’encre et retirez le ruban jaune.
2. Retirez les bouchons, mais évitez de toucher aux parties illustrées ci-dessous.
Remarque : Conservez les bouchons afin de pouvoir couvrir les cartouches d’encre
avant de les stocker ou lorsque vous souhaitez en disposer.
3. Ouvrez le capot interne.
20 Renseignements de départ
Page 21
4. Insérez les cartouches en les inclinant légèrement tel qu’illustré et appuyez dessus pour
les mettre en place. Assurez-vous que la cartouche d’encre noire est placée à gauche et
que la cartouche de couleur est placée à droite.
5. Fermez le capot interne et appuyez sur
OK pour lancer le chargement de l’encre. Le
processus prend environ 4 minutes.
Mise en garde : N’éteignez pas l’imprimante et n’ouvrez pas le capot interne pendant
le chargement, sinon vous gaspillerez de l’encre.
6. Lorsque vous voyez un message d’achèvement à l’écran ACL du produit, le
chargement est terminé. Appuyez sur
Remarque : Dans le cadre du processus de configuration, le numéro de série de votre
imprimante sera envoyé vers un serveur Epson sécurisé afin de vous rendre admissible aux
programmes que nous pourrions offrir de temps à autre, incluant le programme de
réapprovisionnement en encre Epson. Vous aurez la possibilité de donner votre
consentement individuel pour chacun de ces programmes.
OK pour revenir à l’écran d’accueil.
Renseignements de départ 21
Page 22

Installation des logiciels
Remarque :
■ Si vous utilisez un Mac ou si votre ordinateur ne possède pas de lecteur CD/DVD, une
connexion Internet est requise pour obtenir les logiciels de votre produit.
■ Pour imprimer depuis un Chromebook
pour les instructions.
■ Si vous avez un ordinateur Windows
au moyen du pilote de base intégré à l’imprimante. Consultez les instructions à la
page 23. Pour imprimer à partir d’un appareil mobile, consultez la page 26.
Avis concernant la mise à jour du micrologiciel : Epson fournit périodiquement des mises
à jour de micrologiciel afin de résoudre des problèmes de sécurité ou de performance ainsi
que des bogues mineurs et pour s’assurer que votre imprimante fonctionne tel que prévu.
Votre imprimante a été conçue pour être utilisée seulement avec des cartouches d’encre de
marque Epson authentique. Certaines mises à jour pourraient affecter le fonctionnement de
l’encre d’un tiers.
1. Assurez-vous que l’imprimante n’est pas branchée à votre ordinateur.
Windows : Si l’écran Nouveau matériel détecté s’affiche, cliquez sur
débranchez le câble micro-USB.
2. Insérez le CD fourni avec l’imprimante (Windows seulement) ou téléchargez et
exécutez l’ensemble des logiciels de votre imprimante. Pour obtenir les plus récents
logiciels, visitez :
www.epson.ca/support/wf110
3. Suivez les instructions à l’écran de l’ordinateur pour exécuter le programme de
configuration.
4. Lorsque l’écran Sélectionnez votre connexion s’affiche, sélectionnez l’une des
connexions suivantes et suivez les instructions qui s’affichent à l’écran :
■ Connexion sans fil
Dans la plupart des cas, le programme d’installation des logiciels essaie
automatiquement de configurer votre connexion sans fil. Si la configuration
échoue, il est possible que vous deviez saisir le nom de réseau (SSID) et le mot de
passe.
■ Connexion USB directe
MC
, visitez le site www.epson.ca/support/gcp
®
, vous pouvez également lancer des impressions
Annuler et
Utilisez le câble micro-USB fourni avec l’imprimante.
Remarque : Vous pouvez aussi lancer une impression au moyen d’une connexion sans
fil avec le mode Wi-Fi Direct
22 Renseignements de départ
®
, tel que décrit à la page 23.
Page 23
Connexion à un ordinateur
Votre imprimante offre plusieurs options de connexion, à la maison et lors de vos
déplacements :
■ Connectez le produit à votre ordinateur au moyen du câble micro-USB et du logiciel
WF-110 installé sur l’ordinateur, tel que décrit à la page 22.
■ Branchez l’imprimante à votre ordinateur Windows au moyen du câble micro-USB et
du pilote de base intégré.
1. Débranchez l’imprimante de votre ordinateur.
2. Sur le panneau de commande de l’imprimante, sélectionnez
WF-110.
Puis, appuyez sur OK.
3. Branchez l’imprimante à votre ordinateur au moyen du câble micro-USB, tel
qu’illustré ci-dessus, puis appuyez sur
OK sur le panneau de commande de
l’imprimante.
4. Ouvrez
>
Ordinateur ou Ce PC sur votre système, puis double-cliquez sur EPSON
SETUP.
5. Suivez les instructions à l’écran pour installer le pilote.
■ Établissez une connexion sans fil avec votre ordinateur.
Si vous avez installé le logiciel tel que décrit à la page 22 et que vous avez choisi une
connexion sans fil, vous pouvez lancer une impression à partir de votre réseau Wi-Fi
de maison ou de bureau.
Si votre réseau de maison ou de bureau n’est pas accessible à l’endroit où vous vous
trouvez, vous pouvez utiliser Wi-Fi Direct, qui permet de connecter jusqu’à 8 appareils.
1. Sur le panneau de commande de l’imprimante, sélectionnez
Wi-Fi > Config Wi-Fi Direct.
2. Suivez les instructions à l’écran jusqu’à ce que le nom du réseau (SSID) et le mot
de passe soient affichés.
Menu > Pilote base
Configuration
Connexion à un ordinateur 23
Page 24
3. Sur votre ordinateur ou votre appareil, sélectionnez le SSID et entrez le mot de
passe.
Chargement du papier
1. Ouvrez le capot et faites glisser le guide-papier vers la gauche.
2. Chargez jusqu’à 20 feuilles de papier ordinaire derrière les languettes, puis faites glisser
le guide-papier contre le papier, si nécessaire.
Remarque : Vous pouvez charger jusqu’à cinq feuilles de papier photo Epson, une
feuille de Papier pour présentation haute qualité Epson ou une feuille de format légal.
Pour des instructions sur le chargement de papier spécial ou d’enveloppes, consultez le
Guide de l’utilisateur en ligne.
3. Confirmez le type de papier sur le panneau de commande de l’imprimante.
4. Assurez-vous qu’il y a assez de place devant l’imprimante pour vos feuilles imprimées
afin qu’elles ne tombent pas par terre.
24 Chargement du papier
Page 25

Utilisation du panneau de commande
Éteindre ou allumer
l’imprimante
Annuler l’opération ou retourner
à l’écran précédent
Sélectionner des
options du menu
Écran ACL
État de la pile
État du réseau
Niveaux
d’encre
Niveau de la boîte
de maintenance
Afin de réduire la consommation d’énergie, l’écran s’assombrit après plusieurs minutes
d’inactivité. Appuyez sur n’importe quel bouton pour le rallumer. Pour ajuster la minuterie
de veille, sélectionnez
L’écran ACL affiche l’état de l’imprimante :
Menu > Configuration impri. > Minuterie veille.
Remarque : La boîte de maintenance initiale est partiellement remplie après le chargement
de l’encre.
Il est possible que les icônes suivantes s’affichent à l’écran :
Icône Signification
L’imprimante est connectée à un réseau Wi-Fi (sans fil).
L’imprimante est connectée via le mode Wi-Fi Direct (Simple AP).
Il existe un problème lié à la pile. Sélectionnez
La pile se recharge.
Le niveau de la cartouche d’encre est bas, ou la boîte de maintenance est presque
pleine.
La cartouche d’encre est épuisée.
Menu > Batterie.
Utilisation du panneau de commande 25
Page 26

Impression mobile et à commande vocale
Témoin de
la pile
Témoin
d’alimentation
■ Imprimez directement depuis un appareil iOS. Vous n’avez qu’à connecter votre
imprimante et l’appareil au même réseau et à appuyer sur l’icône d’action pour
sélectionner l’option d’impression.
■ Imprimez directement depuis un appareil Android
ultérieure)*. Connectez simplement votre imprimante et l’appareil au même réseau et
appuyez sur l’icône de menu pour sélectionner l’option d’impression.
■ Imprimez à distance ou lorsque vous vous trouvez près de votre imprimante avec
Epson Connect
MC
et Google Cloud PrintMC. Pour en apprendre davantage, visitez le
site www.epson.ca/connect.
■ Utilisez les assistants à commande vocale pour imprimer une variété de contenus
créatifs et courants depuis votre produit Epson. Vous n’avez qu’à ajouter votre produit
à un compte Epson Connect, puis à relier le compte à un assistant à commande
vocale. Consultez le site www.epson.ca/voice pour plus d’informations.
MC
(v4.4 ou une version
* Pourrait nécessiter l’application Epson Print Enabler ou Mopria Print Service,
disponibles sur Google Play
MC
.
Chargement de la pile
Remarque : Une pile externe optionnelle (numéro de pièce C12C934941) est aussi
disponible pour une durée d’impression prolongée.
Branchez l’imprimante pour charger la pile, tel que décrit à la page 19.
■ Le témoin de la pile devient orange quand elle se recharge et il s’éteint quand elle est
complètement chargée. La lumière clignote si un problème lié à la pile survient.
26 Impression mobile et à commande vocale
Page 27

■ Le témoin d’alimentation devient bleu quand l’imprimante est mise sous tension et il
clignote quand elle est en fonction. Pour économiser de l’énergie quand la pile est
utilisée, l’imprimante s’éteint après plusieurs minutes d’inactivité. Appuyez sur le
bouton pour la remettre sous tension. Pour ajuster la minuterie de mise hors
tension, sélectionnez
■ Vous pouvez également charger la pile au moyen du câble micro-USB.
Menu > Configuration impri. > Minuterie d’extinction.
Branchez l’imprimante à votre ordinateur au moyen du câble micro-USB, tel
qu’illustré à la page 23. Activez l’ordinateur s’il est en mode veille ou en mode veille
prolongée. Le chargement débute quand l’imprimante est mise hors tension ou quand
elle se met en mode veille. Vous pouvez utiliser n’importe quelle source d’alimentation
USB, y compris certaines automobiles. Si le chargement de la pile ne démarre pas,
sélectionnez
l’imprimante, activez
■ Quand la pile est complètement chargée, l’imprimante peut imprimer environ
Menu > Batterie > Param. batterie sur le panneau de commande de
Alimentation USB par PC, puis essayez de nouveau.
50 pages en couleur ou 100 pages en noir et blanc. L’impression est plus lente quand
l’alimentation provient de la pile.
■ Quand vous avez terminé d’utiliser l’imprimante, appuyez sur le bouton pour la
mettre hors tension.
Remplacement des cartouches d’encre et de
la boîte de maintenance
Pour garantir d’excellents résultats, utilisez les papiers pour usages spéciaux Epson, conçus
spécialement pour les imprimantes Epson. Vous pouvez acheter les papiers pour usages
spéciaux et l’encre de marque Epson authentique à l’adresse www.epson.ca et auprès d’un
détaillant Epson autorisé. Composez le 1 800 807-7766.
Utilisez les numéros de pièce suivants quand vous commandez ou achetez de nouvelles
cartouches d’encre ou boîtes de maintenance :
■ Cartouche d’encre noire : 215
■ Cartouche d’encre tricolore : 215
■ Boîte de maintenance : T2950
Remarque : Si vous retirez une cartouche d’encre épuisée ou presque épuisée, vous ne
pouvez pas réinstaller et réutiliser la cartouche.
Remplacement des cartouches d’encre et de la boîte de maintenance 27
Page 28

Conseils pour le déplacement et la
manipulation de l’imprimante
■ Epson recommande de transporter l’imprimante en tant que bagage de cabine quand
vous voyagez par avion.
■ Assurez-vous d’apporter des cartouches d’encre additionnelles et une boîte de
maintenance de rechange.
■ Évitez les chocs violents, car ils risquent d’endommager l’imprimante.
■ Laissez les cartouches d’encre et la boîte de maintenance installées.
■ Ne laissez pas l’imprimante exposée à la lumière directe du soleil ni près d’une source
de chaleur, à l’intérieur d’une voiture ou dans un autre endroit chaud.
■ Si la qualité d’impression diminue, il est peut-être nécessaire de nettoyer ou d’aligner
la tête d’impression. Pour les instructions, consultez le Guide de l’utilisateur en ligne.
Résolution de problèmes
En cas de problème de réseau avec votre imprimante, vérifiez les messages à l’écran ACL
pour déterminer la cause de la plupart des problèmes qui peuvent survenir.
Vous pouvez aussi consulter les suggestions de dépannage de base ci-dessous. Pour obtenir
des informations de dépannage plus détaillées, consultez le Guide de l’utilisateur en ligne
ou la FAQ à l’adresse www.epson.ca/support/wf110.
Problèmes de réseau
■ Assurez-vous d’avoir sélectionné le bon nom de réseau (SSID). Si votre routeur sans fil
ne diffuse pas le nom du réseau (SSID), entrez manuellement le nom de votre réseau
sans fil.
■ Redémarrez votre routeur (éteignez-le et rallumez-le), puis essayez de vous reconnecter
au routeur.
■ Assurez-vous que les paramètres réseau sont corrects et vérifiez la puissance du signal.
S’il est faible, déplacez l’imprimante pour la rapprocher du routeur ou du point
d’accès.
■ Si la sécurité de votre réseau est activée, assurez-vous d’avoir bien saisi le mot de passe
du réseau (clé WEP ou phrase passe WPA). Le mot de passe doit être saisi selon la
casse appropriée.
■ Imprimez une feuille d’état du réseau à partir du panneau de commande de
l’imprimante. Sélectionnez
■ Désinstallez et réinstallez les logiciels de votre produit.
28 Conseils pour le déplacement et la manipulation de l’imprimante
Menu > Paramètres réseau > Imprimer feuille d’état.
Page 29

Problèmes d’alimentation et d’impression
■ S’il est impossible de mettre l’imprimante sous tension ou hors tension, enfoncez le
bouton durant quelques secondes.
■ Si l’écran ACL est noir, l’imprimante est peut-être en mode veille. Appuyez sur
n’importe quel bouton pour quitter le mode veille.
■ Si l’imprimante s’éteint automatiquement, appuyez sur le bouton pour la
remettre sous tension. Si le niveau de la pile est bas, branchez le bloc d’alimentation
externe. Vous pouvez aussi charger la pile au moyen du câble micro-USB, tel que
décrit à la page 26. Si la pile est complètement déchargée, chargez-la pendant au
moins 30 minutes avant d’essayer de mettre le produit sous tension de nouveau.
■ Si la qualité d’impression est médiocre, assurez-vous de choisir le bon type de papier
avant d’imprimer.
■ Si vous constatez des bandes claires ou foncées sur vos imprimés ou si ces derniers sont
trop pâles, faites une vérification des buses pour voir si la tête d’impression a besoin
d’être nettoyée. Sélectionnez
Menu > Maintenance > Vérif. buses et suivez ensuite
les instructions à l’écran.
Problèmes d’alimentation de papier
■ En cas de problème concernant l’alimentation de papier, assurez-vous que
l’imprimante est posée à plat et que vous n’avez pas chargé trop de feuilles.
■ Chargez toujours le papier petit côté en premier.
■ Si le papier est coincé, suivez les instructions affichées à l’écran ACL.
1. Retirez tout papier coincé dans la fente d’alimentation arrière.
Résolution de problèmes 29
Page 30

2. Si du papier est coincé à l’intérieur de l’imprimante, ouvrez le capot interne et
retirez le papier. Assurez-vous qu’il ne reste pas de bouts de papier déchirés.
Comment obtenir de l’aide
Guide de l’utilisateur
Windows : Cliquez sur l’icône sur le bureau ou sur l’écran Applications afin d’accéder au
Guide de l’utilisateur en ligne.
Mac : Cliquez sur l’icône dans le dossier Applications/Epson Software/Guide afin
d’accéder au Guide de l’utilisateur en ligne.
Si vous n’avez pas d’icône pour le Guide de l’utilisateur, visitez le site Web d’Epson, tel que
décrit ci-dessous.
Vidéos
Visitez le site www.epson.ca/support/wf110videos pour visionner des vidéos de soutien.
Soutien technique
Visitez le site www.epson.ca/support/wf110 pour télécharger des pilotes, consulter des
manuels et la FAQ ou communiquer avec Epson par courriel.
Composez le (905) 709-2567 entre 6 h et 20 h, heure du Pacifique, du lundi au vendredi,
et entre 7 h et 16 h, heure du Pacifique, le samedi. Les heures et les jours de soutien sont
modifiables sans préavis. Des frais d’interurbain peuvent s’appliquer.
Recyclage
Epson offre un programme de recyclage pour le matériel et les cartouches d’encre en fin de
vie utile. Veuillez consulter le site www.epson.ca/recycle pour obtenir de l’information
concernant le retour de vos produits pour une élimination appropriée.
30 Comment obtenir de l’aide
Page 31

Avis
Déclaration de conformité
Selon la norme 47CFR, parties 2 et 15, régissant les ordinateurs personnels et périphériques de classe
B, et/ou les unités centrales et les dispositifs d’alimentation électrique utilisés avec les ordinateurs
personnels de classe B :
Nous : Epson America, Inc.
Situés à : 3840 Kilroy Airport Way, MS 3-13, Long Beach, CA 90806, USA
Téléphone : 562 981-3840
déclarons, sous notre seule et unique responsabilité, que le produit identifié dans les présentes est
conforme à la norme 47CFR, parties 2 et 15, des règles FCC régissant les dispositifs numériques de
classe B. Chaque produit commercialisé est identique à l’appareil représentatif testé et jugé conforme
aux normes. Les registres maintenus continuent d’indiquer que l’équipement produit devrait se situer
dans les limites de variation acceptables, du fait de la production en quantité et des essais statistiques
réalisés, conformément au règlement 47CFR, alinéa 2.906. L’utilisation de l’appareil doit s’effectuer
selon deux conditions : (1) cet appareil ne doit pas provoquer d’interférences néfastes, et 2) cet
appareil doit tolérer les interférences reçues, y compris celles qui risquent de provoquer un
fonctionnement indésirable.
Nom commercial : Epson
Type de produit : Imprimante
Modèle : B582A
Nom de commercialisation : WF-110
Garantie limitée d’Epson America, Inc.
1. Éléments couverts par la garantie : Epson America, Inc. (« Epson ») garantit à l’acheteur initial de
l’imprimante Epson couverte par la présente garantie limitée que si l’imprimante est achetée
neuve et utilisée seulement au Canada, aux États-Unis ou à Porto Rico, elle sera exempte de
défauts de fabrication et de vices de matériau pendant une durée d’un (1) an ou pour 15 000
feuilles imprimées, selon la première éventualité. Pour demander une intervention au titre de la
garantie, vous devez fournir la preuve de la date d’achat d’origine.
2. Ce que fera Epson pour remédier aux problèmes : Si votre imprimante Epson est défectueuse
durant la période où elle est couverte par la garantie, veuillez appeler Epson Connection
(905) 709-2567 (Canada) ou (562) 276-7202 (États-Unis) pour obtenir des instructions de
réparation ou une autorisation de retour. Un technicien Epson réalisera un diagnostic
téléphonique pour déterminer si l’imprimante a besoin d’être réparée. Si l’imprimante a besoin
d’être réparée, Epson peut, selon son choix, la remplacer ou la réparer, sans frais de pièces ni de
main-d’œuvre. Si Epson autorise le remplacement de l’appareil défectueux, Epson vous enverra
une imprimante de remplacement, en port payé si vous avez une adresse au Canada, aux ÉtatsUnis ou à Porto Rico. Il vous incombe d’emballer correctement l’appareil défectueux et de le
retourner à Epson dans un délai de cinq (5) jours ouvrables après avoir reçu l’unité de
remplacement. Epson vous demandera un numéro de carte de crédit ou de débit pour couvrir le
coût du produit de remplacement au cas où vous ne retourneriez pas le produit défectueux. Si
Epson autorise la réparation du produit au lieu d’un échange, Epson vous demandera de lui
envoyer le produit directement ou à son centre de service autorisé, qui réparera le produit et vous
le renverra. Vous avez la responsabilité d’emballer le produit et devez défrayer les coûts
d’expédition vers et depuis le centre de service autorisé Epson. Lorsqu’une intervention au titre de
la garantie nécessite l’échange du produit ou d’une pièce, l’élément remplacé devient propriété
d’Epson. Le produit ou la pièce de remplacement pourra être neuf ou remis à neuf selon les
MS
au
Avis 31
Page 32

normes de qualité d’Epson et, au choix d’Epson, pourra être un autre modèle de même type et
qualité. Les produits et pièces de remplacement sont couverts pour la période de garantie restante
du produit d’origine couvert par la présente garantie limitée.
3. Éléments non couverts par la garantie :
A. Cette garantie ne s’applique qu’au Canada, aux États-Unis et à Puerto Rico dans le contexte
d’une utilisation normale.
B. L’utilisation excessive, continue ou commerciale de ce produit n’est pas considérée comme une
utilisation normale; tout dommage, entretien ou besoin de réparations découlant d’une telle
utilisation n’est pas couvert par la présente garantie.
C. La présente garantie n’est pas transférable.
D. La présente garantie ne couvre pas la décoloration, le jaunissement des tirages ni le
remboursement des matériaux ou services nécessaires pour les travaux de réimpression.
E. La présente garantie ne s’applique pas aux dommages subis par le produit Epson du fait de
l’utilisation de pièces ou fournitures qui ne sont pas distribuées par Epson.
F. La présente garantie ne couvre pas ni les bouteilles d’encre, les cartouches d’encre, ni les unités
d’alimentation en encre, ni les sacs d’encre.
G. La présente garantie ne couvre pas les dommages causés à l’unité s’ils sont provoqués par un
remplissage incorrect de l’encre ou l’utilisation d’encre de la mauvaise couleur ou du mauvais
type.
H. La présente garantie ne couvre pas les dommages causés à l’unité ou à une propriété par une
manipulation incorrecte des bouteilles d’encre, des cartouches d’encre, des unités
d’alimentation en encre ou des sacs d’encre.
I. La présente garantie ne couvre pas les pièces, composantes ou appareils périphériques de tiers
ajoutés au produit Epson après son envoi par Epson, par exemple, les cartes ou composantes
ajoutées par le revendeur ou l’utilisateur.
J. Epson ne sera pas tenue d’effectuer d’interventions au titre de la garantie lorsque l’étiquette ou
le logo Epson, le numéro de série ou la plaque signalétique ont été enlevés du produit; si le
produit n’est pas correctement entretenu ou ne fonctionne pas correctement du fait d’une
utilisation inadéquate ou abusive, d’une installation incorrecte, d’une négligence, d’avaries lors
du transport, de dommages causés par des désastres tels un incendie, une inondation ou la
foudre, d’une surtension électrique, de problèmes de logiciel, d’une interaction avec des
produits d’une autre marque qu’Epson ou d’une intervention effectuée par un tiers autre qu’un
réparateur Epson agréé.
K. Si une anomalie signalée ne peut être décelée ni reproduite, les frais engagés seront à votre
charge.
4. STIPULATION D’EXONÉRATION D’AUTRES GARANTIES : CE QUI PRÉCÈDE
CONSTITUE LA SEULE GARANTIE ET LE SEUL RECOURS, ET EXCLUT TOUTE
AUTRE GARANTIE, EXPRESSE OU IMPLICITE, Y COMPRIS, MAIS SANS S’Y
LIMITER, TOUTE GARANTIE IMPLICITE DE QUALITÉ MARCHANDE, D’ABSENCE
DE CONTREFAÇON OU D’APTITUDE À UNE FIN PARTICULIÈRE. CERTAINES LOIS
NE PERMETTENT PAS L’EXCLUSION DE GARANTIES IMPLICITES. LE CAS
ÉCHÉANT, L’EFFET DE TOUTES LES GARANTIES EXPRESSES ET IMPLICITES SE
LIMITE À LA PÉRIODE DE GARANTIE MENTIONNÉE PRÉCÉDEMMENT. SAUF
DISPOSITIONS CONTRAIRES, TOUTE DÉCLARATION OU GARANTIE FAITES PAR
UNE AUTRE PERSONNE OU SOCIÉTÉ EST NULLE.
5. EXCLUSION DES DOMMAGES; RESPONSABILITÉ MAXIMALE D’EPSON : NI
EPSON NI LES MEMBRES DE SON GROUPE NE POURRONT ÊTRE TENUS
RESPONSABLES EN CAS DE DOMMAGES SPÉCIAUX, ACCIDENTELS OU
INDIRECTS ET EN CAS DE PERTES DE PROFIT DÉCOULANT DE L’UTILISATION
OU DE L’IMPOSSIBILITÉ D’UTILISATION DU PRODUIT EPSON, QUE CE SOIT À LA
SUITE DU NON-RESPECT DE LA GARANTIE OU D’UNE AUTRE THÉORIE
32 Avis
Page 33

JURIDIQUE. EN AUCUN CAS EPSON OU LES MEMBRES DE SON GROUPE NE
PEUVENT ÊTRE TENUS RESPONSABLES DES DOMMAGES DE QUELQUE TYPE
QUE CE SOIT QUI EXCÈDENT LE PRIX D’ACHAT AU DÉTAIL ORIGINAL DU
PRODUIT.
6. Différends, arbitrage, lois applicables :
A. Les controverses ou réclamations reliées aux produits et services d’Epson ou à la présente
entente doivent être résolues par arbitrage en Californie, dans le comté de Los Angeles, plutôt
que par un tribunal. Si vous ou Epson entamez le processus d’arbitrage, il sera régi par les
règlements de JAMS en vigueur au moment où la demande d’arbitrage est déposée et par les
règles énoncées dans la présente entente, tout règlement permettant les recours collectifs ou les
mesures représentatives étant exclu. On peut prendre connaissance des règlements de JAMS à
l’adresse http://www.jamsadr.com ou en composant le 1 800 352-5267. Les différends doivent
être résolus par un seul arbitre neutre, et les deux parties doivent avoir une possibilité
raisonnable de participer à la sélection de l’arbitre. L’arbitre est lié par les modalités de la
présente entente.
B. Préparation à l’arbitrage et envoi d’un avis. Avant de soumettre une demande d’arbitrage, vous
acceptez de vous efforcer de résoudre tout différend de façon informelle pendant soixante
(60) jours en communiquant avec nous à l’adresse customer.inquires@ea.epson.com. Veuillez
inclure votre nom, votre adresse et vos coordonnées, les faits à l’origine du différend et la
réparation demandée. Vous vous engagez à agir de bonne foi pour tenter de résoudre le
différend. Toutefois, si vous et Epson ne parvenez pas à un accord pour régler le différend dans
les soixante (60) jours, vous pouvez entamer la procédure d’arbitrage.
C. Retrait. Vous pouvez choisir de vous retirer (vous exclure) de la procédure d’arbitrage
individuelle, exécutoire et finale, et de la renonciation aux procédures de recours collectif et
aux mesures représentatives mentionnées dans la présente entente en adressant une lettre à
l’adresse d’Epson America, Inc., à l’attention du : Legal Department, 3840 Kilroy Airport
Way, Long Beach, CA 90806, dans les trente (30) jours suivant votre achat de produits ou
services Epson, dans laquelle figurent (i) votre nom, (ii) votre adresse postale, et (iii) votre
demande d’être exclu de la procédure d’arbitrage finale, exécutoire et individuelle et de la
renonciation aux procédures de recours collectif et aux mesures représentatives figurant au
présent article 6. Dans le cas où vous choisiriez de vous retirer de la procédure décrite ci-dessus,
toutes les autres conditions continuent de s’appliquer, incluant l’obligation de nous envoyer un
avis avant d’entamer toute procédure contentieuse.
D. La décision rendue lors de l’arbitrage pourra faire l’objet d’un jugement par tout tribunal
compétent. Il n’y a ni juge ni jury lors d’un arbitrage et vos motifs d’appel sont limités, mais
l’arbitre est habilité à accorder des réparations et peut vous accorder les mêmes dommagesintérêts qu’un tribunal pourrait le faire, y compris un jugement de constatation ou une mesure
injonctive.
E. Nonobstant ce qui précède, vous pouvez intenter une action individuelle à la Cour des petites
créances de votre province ou municipalité si l’action relève de la compétence de ce tribunal et
qu’elle est en instance uniquement dans cette cour.
F. Toutes les actions doivent être intentées dans les trois (3) mois à compter de la date
d’expiration de la garantie.
G. Vous et Epson convenez que les procédures de règlement des différends ne pourront être
entamées qu’à titre individuel et non dans le cadre d’un recours collectif, d’une action de
groupe ou de mesures représentatives. Si, pour quelque raison que ce soit, une réclamation
est soumise à un tribunal plutôt que dans le cadre d’une procédure d’arbitrage, les deux
parties aux présentes renoncent à leur droit d’obtenir un procès devant jury. Vous et Epson
convenez en outre qu’une poursuite judiciaire peut être initiée par l’une ou l’autre des parties
pour contrer une violation ou une utilisation abusive des droits de propriété intellectuelle.
H. Si l’une ou l’autre des dispositions du présent article 6 est déclarée inexécutoire, cette
disposition sera retirée et le reste de la présente entente restera en vigueur. Ce qui précède ne
s’applique pas à l’interdiction d’entamer un recours collectif, une action de groupe ou des
mesures représentatives tel que décrit dans l’article 6G ci-dessus. Cela signifie que si le
Avis 33
Page 34

paragraphe G de l’article 6 est jugé inexécutoire, l’article 6 au complet, excepté le présent
paragraphe H, devient alors nul et non avenu.
7. Autres dispositions :
A. Autres droits que vous pourriez avoir : La présente garantie vous confère des droits précis, et
vous pourriez avoir d’autres droits selon le territoire de compétence. Certains pays n’autorisent
pas les limitations quant à la durée d’une garantie implicite ni les exclusions ou limitations des
dommages exemplaires ou indirects; les limitations ou exclusions indiquées précédemment
pourraient ainsi ne pas être applicables.
B. Garanties au Canada : Au Canada, les garanties englobent les garanties et les conditions.
C. À l’exception de ce qui est prévu aux dispositions de l’article 6, qui sont régies par la Federal
Arbitration Act, dans l’éventualité d’un différend au cours duquel les dispositions de l’article 6
seraient inapplicables et disjointes du reste de la présente entente, ou si vous choisissez de vous
exclure en vertu du paragraphe C de l’article 6, vous et Epson reconnaissez la compétence des
tribunaux de votre province/territoire de résidence.
Pour trouver le revendeur Epson autorisé le plus près de chez vous, visitez le site www.epson.ca
(www.epson.com si vous habitez aux États-Unis).
Pour trouver le centre de service agréé Epson le plus près de chez vous, visitez le site
www.epson.ca/servicecenterlocator (ou www.epson.com/servicecenterlocator si vous habitez
aux É.-U.).
Ou encore, écrivez-nous à l’adresse : Epson America, Inc., P.O. Box 93012, Long Beach, CA
90809-301, USA.
Avis sur les droits d’auteur
Tous droits réservés. Il est interdit de reproduire, de conserver dans un système central ou de
transmettre le contenu de cette publication sous quelque forme et par quelque moyen que ce soit —
reproduction électronique ou mécanique, photocopie, enregistrement ou autre — sans la permission
écrite préalable de Seiko Epson Corporation. Les renseignements contenus dans le présent guide
concernent uniquement ce produit Epson. Epson ne peut être tenue responsable de l’utilisation de
ces renseignements pour faire fonctionner d’autres équipements.
Ni Seiko Epson Corporation ni ses filiales ne sauraient être tenues responsables vis-à-vis de l’acheteur
de ce produit, ou de tiers, des dommages, pertes, frais ou dépenses découlant : d’un accident, d’une
utilisation incorrecte ou abusive, de modifications non autorisées, de réparations ou (à l’exception
des États-Unis) du non-respect des directives d’utilisation ou d’entretien de Seiko Epson
Corporation.
Seiko Epson Corporation décline toute responsabilité en cas de dommages ou de problèmes
découlant de l’utilisation d’options ou de produits consommables autres que les produits désignés
comme produits Epson d’origine ou comme produits approuvés pour Epson par Seiko Epson
Corporation.
Utilisation responsable du matériel protégé par les lois sur les
droits d’auteur
Epson encourage les utilisateurs de ses produits à faire preuve de responsabilité et à respecter les lois
sur les droits d’auteur. Dans certains pays, la loi permet une reproduction ou une réutilisation limitée
de matériel protégé dans certaines circonstances, mais ces dernières sont parfois moins étendues que
le croient certaines personnes. Pour toute question relative aux droits d’auteur, communiquez avec
votre conseiller juridique.
34 Avis
Page 35

Marques de commerce
EPSON est une marque déposée, EPSON Exceed Your Vision est un logotype déposé et Epson
Connect est une marque de commerce de Seiko Epson Corporation.
Epson Connection est une marque de service d’Epson America, Inc.
Windows est une marque enregistrée de Microsoft Corporation aux États-Unis et dans d’autres pays.
Mac est une marque de commerce d’Apple Inc., enregistrée aux États-Unis et dans d’autres pays.
Wi-Fi Direct
Android, Google Cloud Print, Chromebook et Google Play sont des marques de commerce de
Google LLC.
Avis général : Les autres noms de produit figurant dans le présent document ne sont cités qu’à des
fins d’identification et peuvent être des marques de commerce de leurs propriétaires respectifs. Epson
renonce à tous les droits associés à ces marques.
L’information contenue dans ce document peut être modifiée sans préavis.
®
est une marque déposée de Wi-Fi Alliance®.
Avis 35
Page 36

© 2019 Epson America, Inc., 5/19
CPD-57577R1
Printed in XXXXXX
Pays d’impression : XXXXXX
 Loading...