

Epson V11H164020 - PowerLite Home 10+ WVGA LCD Projector, PowerLite Home 10 Owner's Manual
EPSON PowerLite Home 10 Projector
7/03 EPSON PowerLite Home 10 Projector - 1
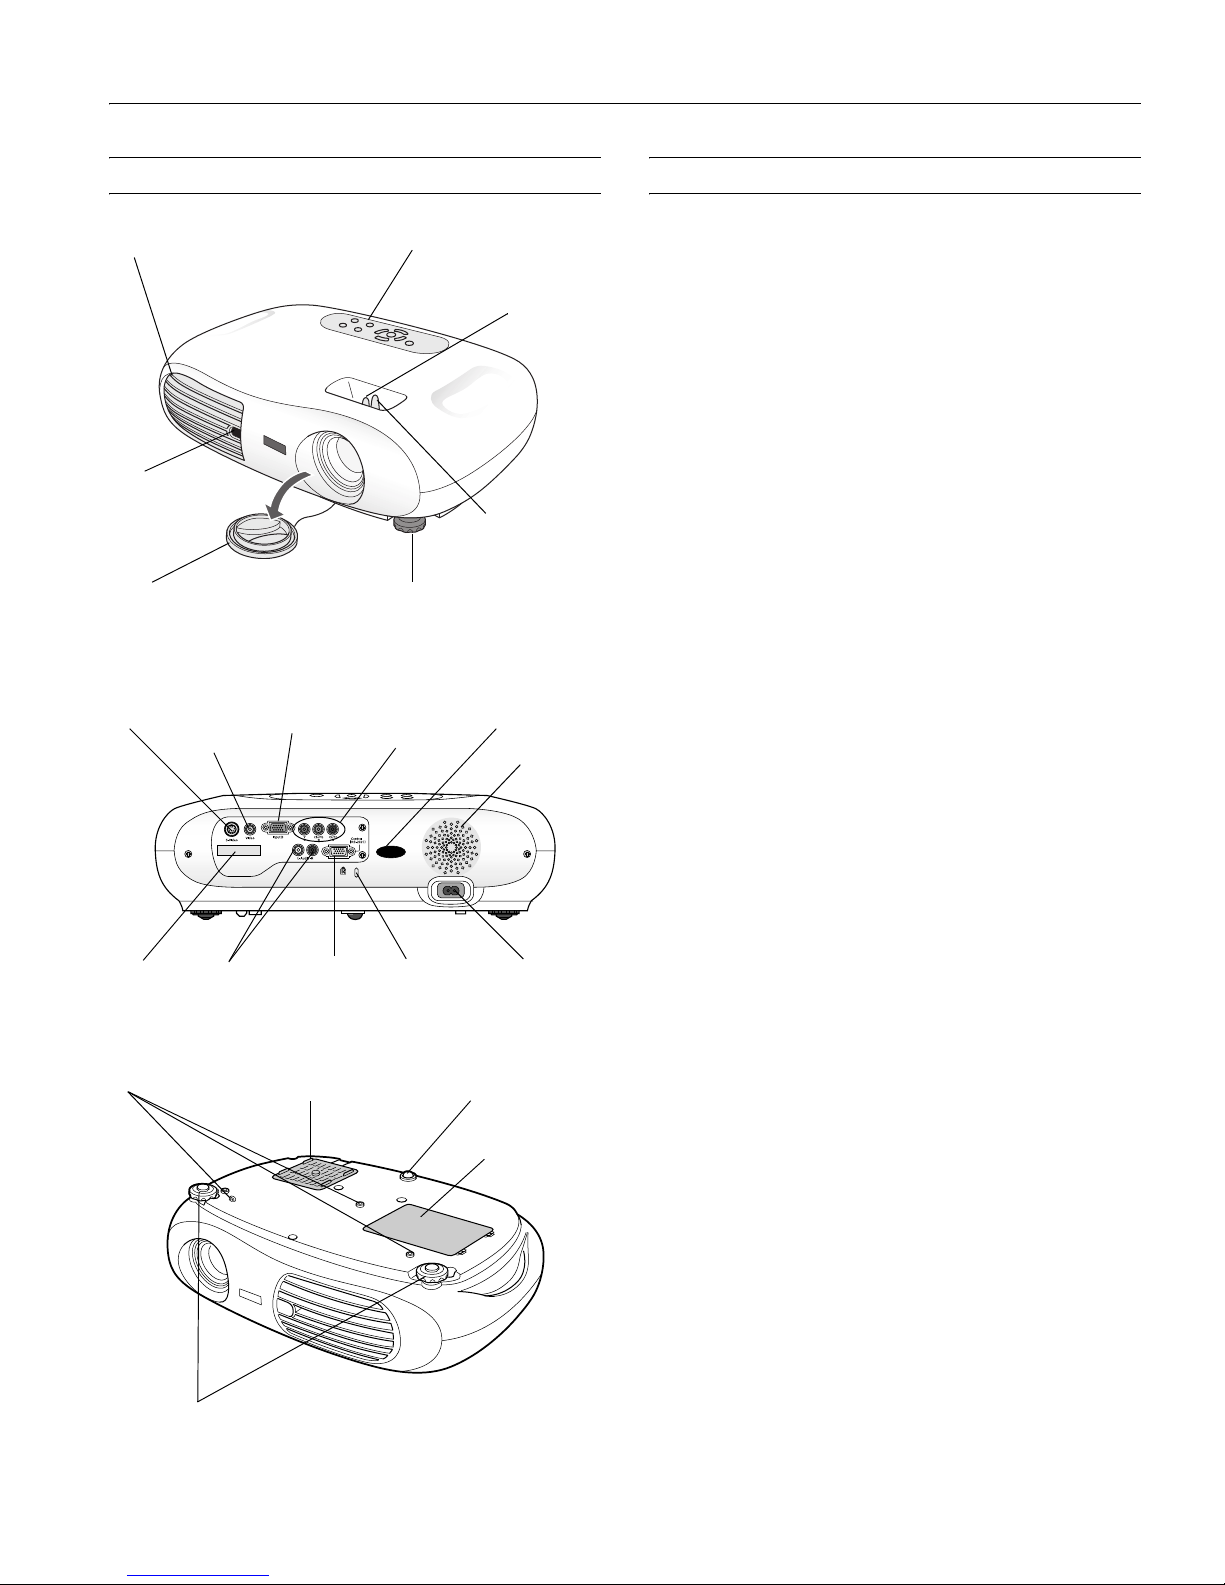
Projector Parts Projector Specifications
General
Type of display Poly-silicon Thin Film Transistor (TFT)
active matrix with Micro Lens Array
Size of LCD panels Diagonal: 0.55 inches (14 mm)
Lens F=1.7 to 2.1 mm, f=13.9 to 21.4 mm
Focus adjustment Manual
Zoom ratio Digital 1.1 to 1.54, lens at maximum size
Resolution 854 × 480 pixels (480p native resolution)
Color
reproduction 24 bit, 16.7 million colors
Brightness 1000 ANSI lumens (Dynamic color
mode)
Contrast ratio 700:1 (Theatre Black color mode)
Image size 30 to 300 inches (0.76 to 7.6 m)
Projection distance Tele: 3.7 to 38 ft (1.1 to 11.6 m)
Wide: 2.4 to 25 ft (0.7 to 7.6 m)
Projection methods Front, rear, upside-down (shelf or ceiling
mount)
Sound output 1W monaural
Optical aspect ratio 16.9
Keystone correction
angle
± 15° vertical
Keystone correction
ratio 9.6:1
Noise level 29 dB (Theatre Black color mode)
32 dB (all other color modes)
Supported video
interface standards HDTV, NTSC, NTSC4.43, PAL,
M-PAL, N-PAL, PAL60, SECAM
Projection Lamp
Type UHE (Ultra High Efficiency)
Power consumption 132W
Lamp life About 3000 hours (Theatre Black
color mode)
About 2000 hours (other color modes)
Part number V13H010L2H
Remote Control
Range 20 feet (6 meters)
Battery Lithium (CR2025)
Control panel
Infrared
receiver
Ventilation slots
Lens Adjustable foot
Focus lever
Zoom lever
Remote
control
holder
Audio ports RS-232 port Security lock
Power
inlet
S-video
port
Video port
(composite
video)
Input B
(computer)
Input A
(component
video)
Infrared
receiver
Speaker
Lamp cover
Air filter intake vent
Ceiling mount holders
Rubber foot
Adjustable feet
EPSON PowerLite Home 10 Projector
2 - EPSON PowerLite Home 10 Projector 7/03
Dimensions
Height 4.5 inches (114 mm)
Width 15.8 inches (402 mm)
Depth 11.6 inches (294 mm)
Weight approximately 7.9 lb (3.6 kg)
Electrical
Rated frequency 50/60 Hz
Power supply 100 to 120 V model: 100 to 120 VAC,
2.3 A
200 to 240 V model: 200 to 240 VAC,
1.0 A
Power consumption Operating: 200 W at 100 VAC
Standby: 5 W at 100 VAC
Environmental
Temperature
(non-condensing) Operating: 41 to 95° F (5 to 35° C),
Storage: 14 to 140° F (–10 to 60° C)
Humidity Operating: 20 to 80% RH,
non-condensing
Storage: 10 to 90% RH, non-condensing
Safety
United States FCC Part 15B Class B
UL1950 Rev. 3
Canada ICES-003 Class B
CSA C22.2 No. 950-95 (cUL)
CE Marking Directive 89/336/EEC
EN 55022, 1998 Class B
EN 55024, 1998
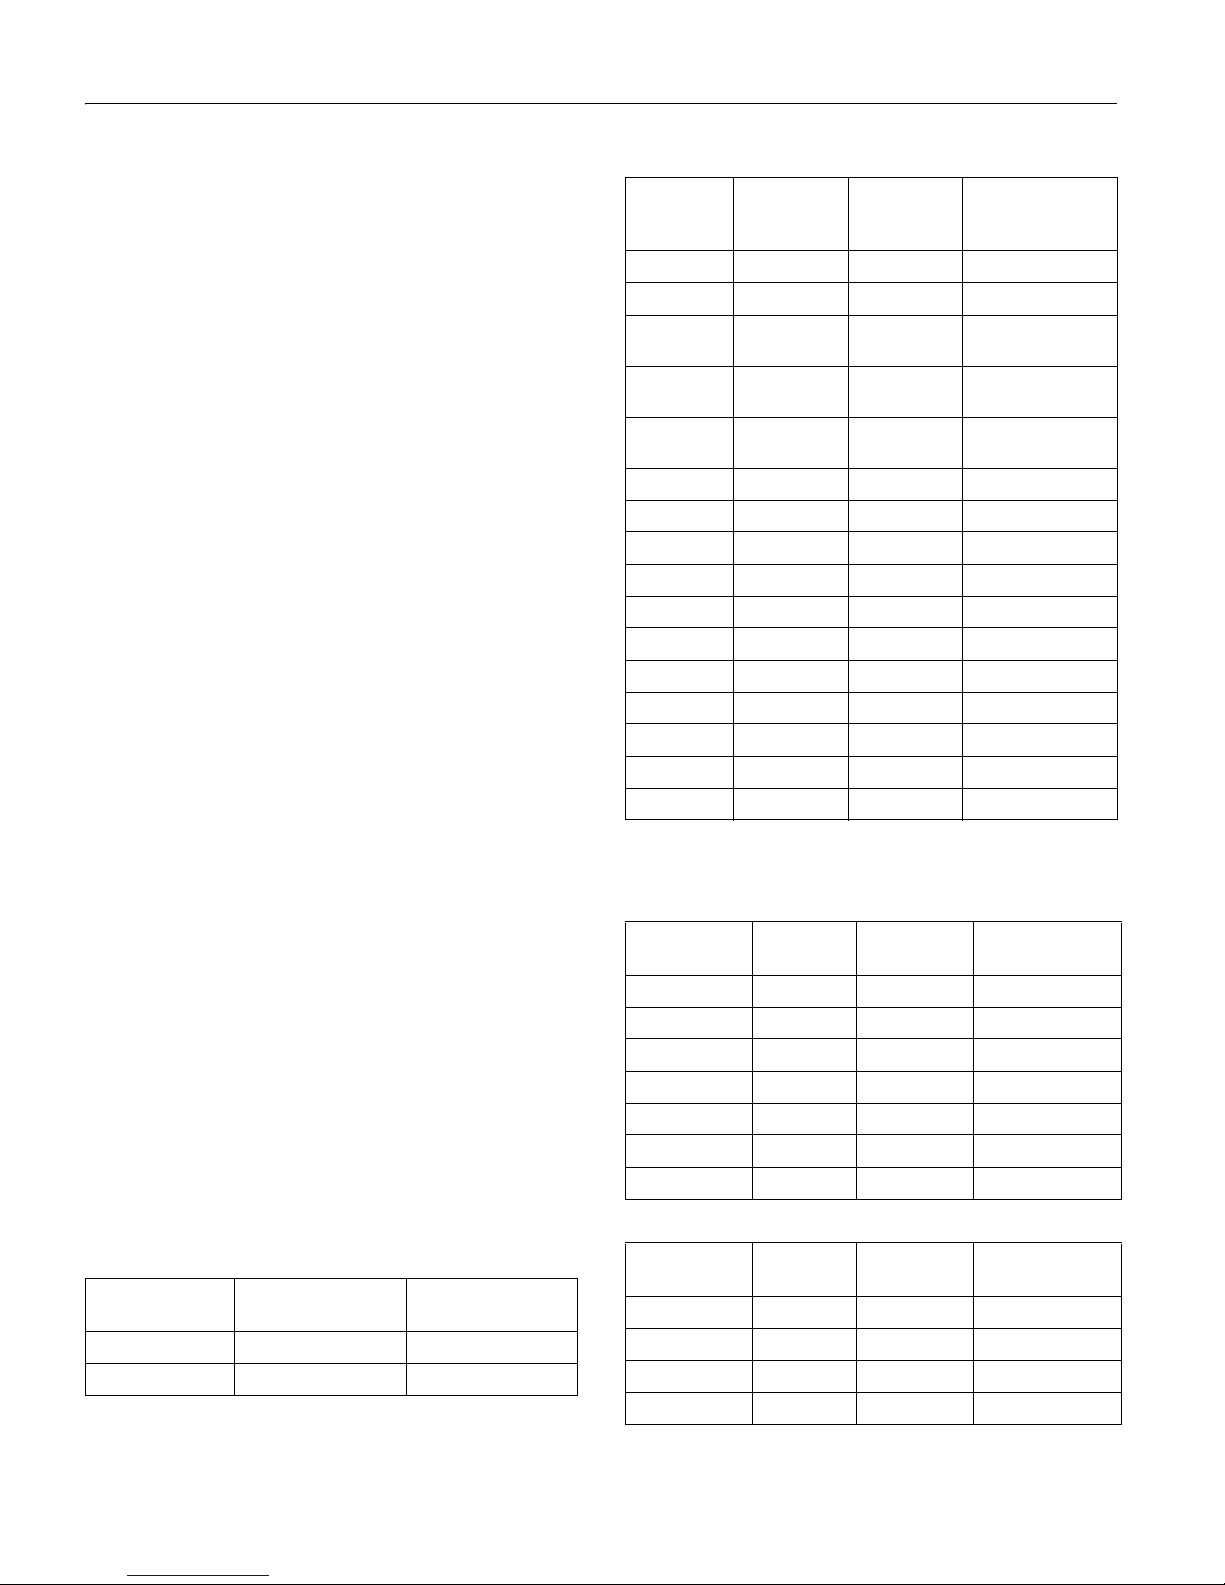
Compatible Video Formats
The projector supports the video formats listed in the following
tables. To project computer images, the computer’s video card
must be set at a refresh rate that’s compatible with the projector.
See your computer documentation for details.
Note: It may be possible to project signals which are not listed in
these tables. However, not all functions may be supported.
Composite Video/S-Video
* Includes NTSC 4:43, N-PAL, M-PAL, and PAL-60
Computer
* Connection is not possible if the equipment does not have a VGA
output port.
Component Video
SCART (4 RCA/ RGB Video)
Signal Resolutions
Normal Aspect
Mode
TV (NTSC)* 640 × 480 4:3: 640 × 480
TV (PAL, SECAM)* 768 × 576 4:3: 640 × 480
Signal
Refresh
Rate
(Hz) Resolution
Normal Aspect
Mode
VGA 60 640 × 480 4:3: 640 × 480
VGAEGA 70 640 × 350 854 × 468
VESA 72 / 75 / 85,
iMac*
640 × 480 4:3: 800 × 600
SVGA 56 / 60 / 72 /
75 / 85, iMac*
800 × 600 4:3: 640 × 480
XGA 43i / 60 / 70 /
75 / 85, iMac*
1024 × 768 4:3: 640 × 480
MAC13” 67 640 × 480 4:3: 640 × 480
MAC16” 75 832 × 624 4:3: 640 × 480
MAC19” 75 1024 × 768 4:3: 640 × 480
MAC19-60” 59 1024 × 768 4:3: 640 × 480
MAC21” 75 1152 × 870 4:3: 636 × 480
SDTV (480i) 60 640 × 480 4:3: 640 × 480
SDTV (480p) 60 640 × 480 4:3: 640 × 480
SDTV (575i) 50 768 × 576 4:3: 640 × 480
SDTV (575p) 50 768 × 576 4:3: 640 × 480
HDTV (720p) 60 1280 × 720 16:9: 854 × 480
HDTV (1080i) 50/ 60 1920 × 1080 16:9: 854 × 480
Signal
Refresh
Rate (Hz) Resolution
Normal
Aspect Mode
HDTV (720p) 60 1280 × 720 16:9: 854 × 480
HDTV (1080i) 60 1920 × 1080 16:9: 854 × 480
HDTV (1080i) 50 1920 × 1080 16:9: 854 × 480
SDTV (480i) 60 640 × 480 4:3: 640 × 480
SDTV (480p) 60 640 × 480 4:3: 640 × 480
SDTV (575p) 50 768 × 576 4:3: 640 × 480
SDTV (575i) 50 768 × 576 4:3: 640 × 480
Signal
Refresh
Rate (Hz) Resolution
Normal
Aspect Mode
SDTV (480i) 60 640 × 480 4:3: 640 × 480
SDTV (480p) 60 640 × 480 4:3: 640 × 480
SDTV (575i) 50 768 × 576 4:3: 640 × 480
SDTV (575p) 50 768 × 576 4:3: 640 × 480
EPSON PowerLite Home 10 Projector
7/03 EPSON PowerLite Home 10 Projector - 3
Positioning the Projector
Follow these guidelines to get the best results when projecting:
❏ Place the projector on a sturdy, level surface, between
2.5 and 38 feet from the screen.
❏ Make sure there is plenty of space for ventilation around and
under the projector.
❏ Make sure the projector is within 10 feet of a grounded
electrical outlet or extension cord and within 5 feet of the
image source.
❏ Face the projector squarely toward the screen.
The projector supports 5 viewing setups, as shown below. If it is
installed in a rear or overhead position, you need to select the
correct
Projection option from the Setting menu after you turn
it on. If you mount the projector on the ceiling, professional
installation is recommended.
If the projector is tilted in the front or the back, you may need
to adjust the image shape. See page 5.
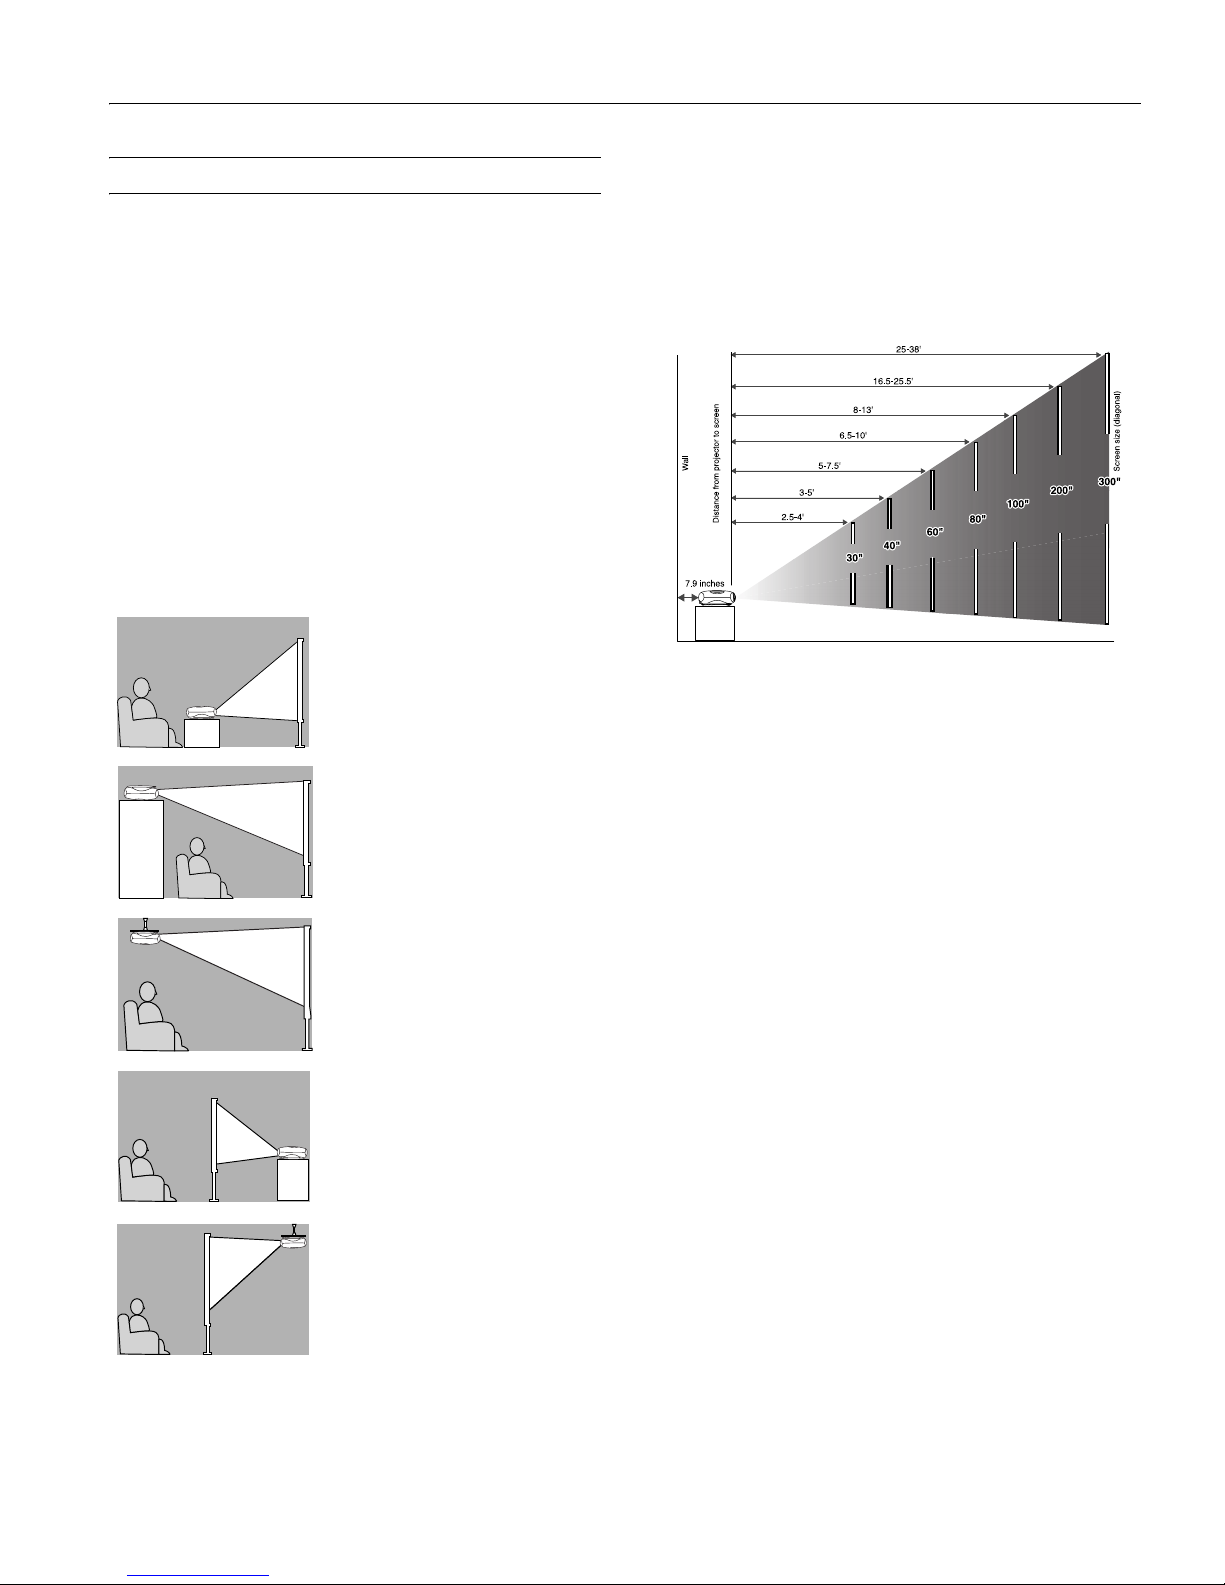
Image Size and Projection Distance
The distance between the projector and the screen determines
the size of the projected image, as shown below. Because other
adjustments—such as those made with the
Aspect button—
also affect the size of the image, the numbers shown in the
illustration should be considered as general guidelines, not exact
measurements.
Use the formulas given below either to find out how large your
image will be when you know the distance from the projector to
the screen, or to find out how far from the screen to place the
projector when you want an image of a certain size. Since the
size of the image can be changed by rotating the zoom ring,
formulas are given for both the minimum and maximum sizes.
To determine the diagonal size of an image when you know the
projection distance:
Minimum diagonal size = (0.39421 × projection distance) +
1.2116
Maximum diagonal size = (0.25690 × projection distance) +
0.69164
To determine the projection distance when you know the
diagonal size of the screen image:
Projection distance = (minimum diagonal screen size ×
2.5367) - 3.0735
Projection distance = (maximum diagonal screen size ×
3.8925) - 2.6922
Table
Convenient for temporary front
projection. Choose
Front from
the menu.
Ceiling
Professional installation
recommended. Choose
Front/Ceiling from the menu.
(You can purchase ceiling mounting
equipment from EPSON; see page
12.)
Rear
For permanent installation behind a
translucent screen. Choose
Rear
from the menu.
Rear/Ceiling
Professional installation behind a
translucent screen recommended.
Choose
Rear/Ceiling from the menu.
(You can purchase special ceiling
mounting equipment from EPSON;
see page 12.)
Shelf
Attach the three rubber feet that
came with the projector to the
top of the projector, then turn the
projector upside-down. Choose
Front/Ceiling from the menu.

EPSON PowerLite Home 10 Projector
4 - EPSON PowerLite Home 10 Projector 7/03
Turning the Projector On and Off
Once you’ve connected the projector to your computer or other
equipment, follow these instructions to turn it on and display
an image:
1. Make sure the power is turned off for the projector and any
sources connected to it.
2. Remove the lens cover.
3. Connect one end of the power cord to the projector and plug
the other end into a grounded electrical outlet.
The P
Power light on the projector turns orange, indicating
that the projector is receiving power, but is not yet turned
on.
Note: The projector will not respond to any buttons on the
control panel or remote control while the power light is
flashing orange.
4. If you are connecting to video equipment, turn it on now. (If
you are connecting to a computer, don’t turn it on yet.)
5. Press the P
Power button on the remote control or the top
of the projector to turn on the projector.
You hear a beep, the P
Power light flashes green as the
projector warms up, and the projection lamp comes on in
about 45 seconds.
6. If you are using a computer, turn it on now.
The projector automatically detects the video source and begins
projecting.
If you don’t see a picture, make sure the P power light on the
projector is green and not flashing, and the lens cover is off.
Also, make sure your cable is connected to both the projector
and your video equipment, and the video equipment is on. If
you still don’t see a picture, see the suggestions in the
Troubleshooting section on page 6.
Turning Off the Projector
When you’re ready to shut down the projector, follow these
steps:
1. Turn off your video equipment first. (If you’re connecting to
a computer, leave the computer on.)
2. Press the P
Power button on the projector or remote
control.
3. When you see the confirmation message, press the P
Power
button again to turn the projector off. (If you don’t want to
turn it off, press any other button or ignore the message. It
disappears in about 7 seconds.)
The lamp is turned off and the P
Power light flashes orange
as the projector cools down. When the projector has cooled,
the P
Power light stays orange and the exhaust fan shuts
off.
Note: If you want to turn the projector on again, wait until
the orange light stops flashing. Then press the P
Power
button.
4. Unplug the power cord from the electrical outlet.
Caution: Never disconnect the power cord while the
P power light is green or flashing orange. You may damage
the projector.
5. Replace the lens cover and retract the projector’s adjustable
feet.
6. Store the remote control in its holder on the back of the
projector. (Part of the remote control will stick out when it’s
fully inserted.)
Adjusting the Image
1. To raise the picture, turn the projector’s front feet.
Orange
 Loading...