

Page 1

USN 52R / USN 52L
Technical Reference and Operating Manual
Ident No. 28 642
Page 2

Krautkramer USN 52R/USN 52L Issue 05, 02/00 0-1
Index
1. Introduction ....................................... 1-1
1.1 Safety information ................................... 1-2
Storage batteries ....................................... 1-2
Defects/errors and exceptional stresses .... 1-2
Software .................................................... 1-3
1.2 Important notes........................................ 1-3
Preconditions for testing with ultrasonic
flaw detectors ............................................ 1-3
Operator training ........................................ 1-4
Technical test requirements ....................... 1-4
Limits of testing ......................................... 1-5
Wall thickness measurements
with ultrasonics .......................................... 1-5
Effect of the material of the test object ...... 1-5
Effect of temperature variations ................. 1-6
Measurement of remaining wall thickness .. 1-6
Flaw boundary scanning method ................ 1-6
Echo display comparison method .............. 1-7
1.3 USN 52R/USN 52L .................................... 1-8
Special features of the two versions: ......... 1-8
1.4 Remarks on this manual......................... 1-10
Before starting for the first time ................ 1-10
Getting to know the adjustment functions .1-10
Service ..................................................... 1-10
Specifications and basic settings..............1-10
Layout of this manual ...............................1-11
2. Standard package
and accessories ................................ 2-1
2.1 Standard package .................................... 2-3
2.2 Required accessories .............................. 2-4
2.3 Recommended accessories .................... 2-4
2.4 Recommended outside products ............ 2-5
3. Setting into operation ....................... 3-1
3.1 Positioning the USN 52R/USN 52L .......... 3-2
3.2 Power supply ........................................... 3-2
Battery operation ....................................... 3-3
Inserting the batteries ................................ 3-3
Using the battery charger ........................... 3-4
Page 3

0-2 Issue 05, 02/00 Krautkramer USN 52R/USN 52L
Index
3.3 Probe connection..................................... 3-5
3.4 Starting the USN 52 R .............................. 3-5
Switching on .............................................. 3-5
Reset ......................................................... 3-6
3.5 Screen saver ............................................. 3-6
4. Basics of operation ........................... 4-1
4.1 USN 52R and USN 52L ............................. 4-2
4.2 Display ...................................................... 4-4
A-scan display ........................................... 4-4
Functions on the display ............................ 4-5
Indications beneath the A-scan .................. 4-6
4.2 Keypad ...................................................... 4-8
Function keys ............................................ 4-8
Special keys .............................................. 4-8
Special keys of the USN 52L for
setting the display...................................... 4-9
4.3 Operational concept ...............................4-10
Changing the operating levels ...................4-10
Selection of function groups and functions 4-10
Setting the function ................................... 4-10
Accelerated adjustment ............................4-10
Selection of measured value for enlarged
display ......................................................4-11
4.4 Function keys ..........................................4-11
4.5 Keys for special functions ......................4-12
Only USN 52L ...........................................4-12
4.6 Important basic settings .........................4-13
Set language .............................................4-13
Setting the measurement units ................. 4-13
5. Operation ........................................... 5-1
5.1 Function overview
(first operating level) ................................ 5-2
5.2 Adjustment of the USN 52R/USN 52L ...... 5-3
GAIN Gain adjustment........................... 5-3
Selection of basic data .............................. 5-4
Setting the receiver .................................... 5-6
Setting the pulser....................................... 5-8
Gate adjustment .......................................5-10
Calibration functions .................................5-12
Page 4

Krautkramer USN 52R/USN 52L Issue 05, 02/00 0-3
Index
Storing data ..............................................5-14
Clearing the instrument setting..................5-15
Clearing all data ........................................ 5-16
Displaying stored A-Scans (preview) .........5-16
5.3 USN 52R/USN 52L calibration ................ 5-17
Calibration of display range .......................5-17
Calibration with a straight-beam probe .......5-18
Calibration with angle-beam probes ........... 5-20
Calibration with a dual (T/R) probe ............5-21
Automatic calibration ................................5-22
Preparing the instrument for
digital measurement ..................................5-23
Calibrating the sensitivity ..........................5-24
5.4 DAC/TCG ..................................................5-25
Function group TCG ..................................5-26
5.5 Recording a Distance-Amplitude
Curve .......................................................5-28
5.6 Echo evaluation with DAC/TCG .............. 5-31
DAC mode ................................................ 5-32
TCG mode ................................................ 5-33
5.7 Measuring thickness ...............................5-34
5.8 Storing measured values - Data Logger 5-35
Determining the number of FILES ............. 5-35
Selecting a FILE .......................................5-36
Clearing FILES ......................................... 5-37
Storing measured values .......................... 5-37
Viewing stored readings ............................ 5-38
Clearing the measured values ................... 5-38
5.9 Configuring the USN 52R/USN 52L ........ 5-39
5.10Data set names ........................................5-50
5.11Setting the RS232 interface .................... 5-57
5.12Setting the flaw location calculation......5-59
Displaying the measured values ...............5-61
Automatic calibration ................................ 5-62
5.13Setting the measurement methods ........ 5-62
5.14Locking set values .................................. 5-64
5.15Function check ........................................5-64
Page 5

0-4 Issue 05, 02/00 Krautkramer USN 52R/USN 52L
Index
6. Documentation .................................. 6-1
6.1 Printing instrument settings and
display contents ....................................... 6-2
Preparing the printer................................... 6-2
6.2 Documentation with the PC program
UltraDOC ................................................... 6-5
7. Servicing and maintenance .............. 7-1
7.1 Cleaning the USN 52R/USN 52L .............. 7-2
7.2 Maintenance of NiCd cells ....................... 7-2
Charging NiCd cells ................................... 7-2
Handling NiCd cells .................................... 7-3
Handling AlMn batteries ............................. 7-3
8. Interfaces, Peripherals 8 .................. 8-1
8.1 Interfaces .................................................. 8-2
Serial interface RS 232 .............................. 8-2
Layout of 7 pin Lemo socket (RS 232) ....... 8-3
Layout of 4 pin Lemo socket (charger
socket, switching output) ........................... 8-4
8.2 Connection of a peripheral ...................... 8-5
8.3 Transferring the display contents ........... 8-6
8.4 Printing Data Logger report .................... 8-6
Data Logger report format .......................... 8-7
8.5 Transferring measurement values........... 8-9
Transferring measurements values in
the Data Logger to a PC ............................ 8-9
Printing display contents and instrument
settings.....................................................8-10
Transfer formats ........................................8-10
8.6 USN 52R/USN 52L remote operation ......8-12
8.7 Configuring the MEMO function ............ 8-17
Defining data header ................................. 8-17
8.8 Analog outputs........................................8-20
Analog voltage for the echo amplitude
(echo in the monitor gate) ......................... 8-21
Analog voltage for the sound path of
an echo.....................................................8-21
TTL switching output.................................8-22
Page 6

Krautkramer USN 52R/USN 52L Issue 05, 02/00 0-5
Index
9. Specifications .................................... 9-1
10.Appendix.......................................... 10-1
10.1 Function directory ..................................10-2
10.2 EC Certificate of Conformity...................10-7
10.3 Service addresses...................................10-8
11.Changes........................................... 11-1
12.Index ................................................. 12-1
Page 7

0-6 Issue 05, 02/00 Krautkramer USN 52R/USN 52L
Page 8

Krautkramer USN 52R/USN 52L Issue 05, 02/00 1-1
Introduction 1
Page 9

1-2 Issue 05, 02/00 Krautkramer USN 52R/USN 52L
1.1 Safety information
USN 52R and USN 52L have been designed and tested
according to DIN EN 61 010 Part 1, March 1994, Safety
requirements for electrical measuring, control and lab
equipment, and was technically in perfectly safe and
faultless condition when leaving the manufacturing
works.
In order to maintain this condition and to ensure a safe
operation, you should urgently read the following safety
information before putting the instrument into operation.
A Attention:
USN 52R and USN 52L are instruments for materials
testing. Any use for medical applications or other
purposes is not allowed!
The instruments may only be used in industrial environments!
Storage batteries
USN 52R/USN 52L can be operated with storage batteries. Please only use the power supply/battery charger
unit UN 655 for storage battery charge.
Defects/errors and exceptional stresses
If you have reason to believe that a safe operation of
your instrument is no longer possible, you have to disconnect the instrument and secure it against unintentional reconnection. Remove the batteries if necessary.
• A safe operation is e.g. no longer possible
• if the instrument shows visible damages,
• if the instrument no longer operates perfectly,
• after prolonged storage under adverse conditions
(e.g. exceptional temperatures and/or especially high
air humidity, or corrosive environmental conditions),
• after being subjected to heavy stresses during
transportation.
Introduction
Safety information
Page 10

Krautkramer USN 52R/USN 52L Issue 05, 02/00 1-3
Software
Based on the present state of the art software can
never be completely error-free.
That is why software-controlled instruments should be
checked before use to see if the necessary functions
operate perfectly in the provided combination.
Therefore, please check the functions of the instrument
according to the information given in Chapter 5.
Should you have any questions with regard to the application of your USN 52R/USN 52L, please contact your
local “Krautkrämer” or “Krautkramer-Branson” agent.
1.2 Important notes
Please read the following notes before using your
USN 52R/USN 52L. It is important that you understand
and observe this information to avoid making any mistakes in operating the instrument. These could lead to
false test results which can finally result in injury to
persons or damage to property.
Preconditions for testing with ultrasonic flaw
detectors
This Operating Manual contains all the necessary information on how to operate the USN 52R/USN 52L. There
are, however, a number of factors which affect the test
results obtained. In the following, please find a detailed
description of the three most important conditions for
reliable testing with ultrasonic flaw detection equipment:
• a properly trained operator,
• knowledge of the specialized test requirements and
limits of testing
• selection of the appropriate test equipment.
Important notes
Introduction
Page 11

1-4 Issue 05, 02/00 Krautkramer USN 52R/USN 52L
Operator training
The operator of an ultrasonic flaw detector must be
adequately trained in the field of ultrasonic test methods. This includes, among other things, sufficient
knowledge of:
– sound propagation theory,
– the effects of the velocity of sound in the material,
– what happens to the sound wave at the interface
between two different materials under test,
– the propagation of the sound beam,
– the effect of the sound attenuation in the object
under test,
– the effect of the surface condition of the object under
test.
Lack of knowledge here can lead to false test results
with unforeseeable consequences.
Information concerning existing possibilities for the
qualification of ultrasonic operators as well as the question of achieving these qualifications can be obtained
from the corresponding NDT societies in your country
(DGZfP in Germany, ASNT in the USA etc.), or also
from Krautkramer-Branson.
Technical test requirements
Every ultrasonic test is subject to specific technical
test requirements. The most important of these are:
• definition of the scope of the test;
• selection of the appropriate technical test method;
• taking into account the properties of the material;
• laying down the test limits for “recording and evaluation purposes“.
It is the task of those with overall responsibility for testing to ensure that the test operator is fully informed
about these requirements. The best basis for such information is experience with identical test objects. It is
also essential that the relevant test specifications be
clearly and completely understood by the test operator.
Krautkrämer GmbH & Co regularly hold specialized
training courses for qualified persons in the field of ultrasonic testing.
Scheduled dates of such courses will be given on request.
Introduction
Important notes
Page 12

Krautkramer USN 52R/USN 52L Issue 05, 02/00 1-5
Limits of testing
Ultrasonic tests can only provide information about
those parts of the test object which the sound beam
from the probe used has actually passed through.
Extreme caution is advised in making any conclusions
from the tested areas of the test object as to the condition of those parts of the test object which have not
actually been tested.
Such conclusions are usually only possible where a
large amount of previous data is available and proven
methods of statistical evaluation are used.
Boundary surfaces within the test object can completely reflect the sound beam so that flaws or reflection points lying deeper remain undetected. Care must
therefore be taken to ensure that the sound beam does
in fact penetrate all those parts of the test object which
are to be tested.
Wall thickness measurements with ultrasonics
All wall thickness measurements with ultrasonics are
based on a time-of-flight measurement. Accurate measurement results require a constant sound velocity
within the material. In test objects of steel, even with
varying alloying constituents, this condition is usually
fulfilled: the variation of the sound velocity within the
material is so slight that it is only of importance for
high-precision measurements. In other materials, however, e.g. nonferrous metals and plastics, the sound
velocity can vary substantially within the material and
cause inaccurate measurement results.
Effect of the material of the test object
If the test object is not of a single, homogeneous material, then the sound may propagate at different velocities in different parts of the object. In this case, the test
range adjustment should be chosen for the average of
the different velocities in the different parts of the object. This is done by using a calibration block in which
the velocity of sound is the same as the average within
the test object.
If substantial variations in the velocity of sound within
the objects are anticipated, then the instrument should
be readjusted at frequent short intervals to the actual
sound velocity values present. If this is not done, false
results may be obtained for the wall thickness.
Important notes
Introduction
Page 13

1-6 Issue 05, 02/00 Krautkramer USN 52R/USN 52L
Effect of temperature variations
The velocity of sound within the test object also varies
as a function of the temperature of the material. This
can cause appreciable errors if the instrument has been
calibrated on a cold calibration block and is then used
on a warm or hot test object. Such errors can be
avoided either by warming the calibration block to the
same temperature before calibrating, or by using a correction factor obtained from tables.
Measurement of remaining wall thickness
The measurement of the remaining wall thickness on
plant components such as pipes, tanks and reaction
vessels of all types which have been corroded or
eroded from the inside requires a suitable test instrument and special care in handling the probe.
The test operator must be told the nominal wall thicknesses and the likely amount of the loss due to erosion
or corrosion.
Assessing flaws using ultrasonics
In present-day test practice there are basically two
methods of assessing flaws.
If the diameter of the sound beam is smaller than the
extent of the flaw, then the beam can be used to scan
the boundaries of the flaw and thus determine its area.
If, however, the diameter of the sound beam is greater
than the size of the flaw, the maximum echo response
from the flaw must be compared with the maximum
echo response from an artificial flaw at the same depth
provided for comparison purposes.
Flaw boundary scanning method
The smaller the diameter of the sound beam from the
probe, the more accurately the determined flaw area
corresponds to the actual flaw area when scanning the
flaw boundaries with the sound beam from a probe.
If, however, the sound beam is relatively broad, the
determined flaw area can substantially differ from the
actual flaw area. Care should therefore be taken to select a probe which will give a sufficiently narrow beam
at the position of the flaw.
Introduction
Important notes
Page 14

Krautkramer USN 52R/USN 52L Issue 05, 02/00 1-7
Echo display comparison method
The echo from a small natural flaw is usually smaller
than the echo from an artificial comparison flaw (e.g.
circular disc reflector) of the same size. This is due, for
instance, to the roughness of the surface of a natural
flaw, or to the fact that the beam does not impinge on it
at right angles.
If this fact is not taken into account when assessing
natural flaws, there is a danger of underestimating their
magnitude.
In the case of very jagged or fissured flaws (e.g. shrink
holes in castings) it may be that so much scattering of
the sound occurs at the surface of the flaw that no flaw
echo is produced. In such cases, a different assessment method should be chosen, e.g. backwall echo
attenuation method.
When testing large components, the distance sensitiveness of the flaw echoes plays an important role. Care
should be taken here to choose artificial comparison
flaws whose distance sensitivity laws come as close
as possible to those of the natural flaws being assessed.
Ultrasound is subject to attenuation as it passes
through any material. This attenuation is very small in,
for instance, fine grained steel, and also in many small
components made of other materials.
If, however, the sound travels a large distance into the
medium, then even at low attenuation coefficients a
large cumulative attenuation can result. There is then a
danger that echoes from natural flaws appear too small.
For this reason, the effects of sound attenuation on the
evaluation results must always be estimated and, if
necessary, taken into account.
If the test object has a rough surface, part of the incident sound energy will be scattered at its surface and
is lost to the test instrument. The larger this initial scattering, the smaller the echoes appear, and the more
incorrect also the results of the evaluation.
It is therefore important to make an allowance for the
surface roughness of the test object and apply a correction to the observed height of the echoes (transfer
correction).
Important notes
Introduction
Page 15

1-8 Issue 05, 02/00 Krautkramer USN 52R/USN 52L
1.3 USN 52R/USN 52L
USN 52R/USN 52L are lightweight, compact ultrasonic
flaw detectors which is especially well suited for
• locating and evaluating material flaws,
• measuring wall thicknesses.
• documenting all test results and readings.
USN 52R:
• high-resolution EL display, 146 mm x 67 mm
(5.75“ x 2.65“), 552 x 256 pixels
USN 52L:
• transflective LCD screen, 114 mm x 75 mm
(4.5“ x 3.0“), 480 x 320 pixels
Special features of the two versions:
• lightness in weight (2.7 kg including batteries) and
small in size,
• an easy-to-clean keypad,
Introduction
USN 52R/USN 52L
USN 52R
USN 52L
Page 16

Krautkramer USN 52R/USN 52L Issue 05, 02/00 1-9
• 2-stage adjustment of pulse repetition rate in order to
avoid phantom echoes,
• indication of amplitude and sound path for flaw
testing and thickness measurement,
• DAC for convenient display evaluation according to
the reference block method (e.g. ASME code, etc.),
• analog outputs for external control purposes: proportional voltage for amplitude and sound path of the
echo in the monitor gate,
• A-scan storage, peak freeze and zoom function,
• preview of all stored A-Scans,
• locking function to avoid unintentional alteration of
set values,
• magnified display of measured values for easy
reading even from longer distances,
• rapid switching between programmable sound
velocities, e.g. for longitudinal and transverse waves
in steel.
• 60 Hz A-scan refresh rate,
• mains power or battery operation (max. 5 hours of
operation),
• on-board Data Logger for storage of up to 2,500
thickness readings in a maximum of 99 freely
configurable files,
• RS232 interface for data transfer, A-scan displays
and reports, or for remote control of the USN 52 R,
• storage of 140 (USN 52R) / 100 (USN 52L) control
data sets enabling quick calibration and reproducibility of the test,
• alphanumeric entry of data set names and display of
a directory of all data sets,
• frequency ranges from 0.25 - 11 MHz wide band
• echo representation: RF signal, full-wave, positive
and negative half-wave,
• optimized probe matching by means of 4 adjustable
damping values between 50 and 1000 ohms,
• automatic calibration of the sound velocity and probe
delay according to data from 2 calibration echoes
(with plausibility check),
USN 52R/USN 52L
Introduction
Page 17

1-10 Issue 05, 02/00 Krautkramer USN 52R/USN 52L
1.4 Remarks on this manual
H Note:
This manual applies to the two USN 52 versions
USN 52R and USN 52L. The examples shown refer to
the USN 52R; however, since function groups and functions of the two instruments are basically the same, the
examples also apply to the USN 52L. Only the display
size and type are different. For more details on the differences between the two versions, please refer to
pages 1-8 and 4-2 to 4-3.
Before starting for the first time
Before operating your USN 52 R for the first time, read
Chapters 1 and 3 in this manual. There you will find a
description of the necessary preparations for starting.
In addition to this, you will be informed about the most
important adjustment possibilities available on the front
panel of the instrument.
By doing this, you will avoid interferences or failures
and you will be in a position to use the instruments’s
function range to the full.
Getting to know the adjustment functions
Chapters 4 and 5 describe the most important adjustment functions using the corresponding menus. In
Chapter 10 you will find a list and a brief description of
all functions together with adjustment criteria.
Service
Chapter 10 also contains a list of After-Sales Service
Centers which can be contacted in case of defects.
Specifications and basic settings
The USN 52 R specifications are contained in
Chapter 9.
There is a basic setting for each adjustment function,
this can be seen in the function tables in Chapter 8:
default values are shown in bold-face type.
Introduction
Remarks on this manual
Page 18

Krautkramer USN 52R/USN 52L Issue 05, 02/00 1-11
Layout of this manual
In order to simplify use of this manual, the operating
steps are always presented in the same way. This enables you to find information quickly.
Descriptions of functions
Chapter 5 shows the functions that you require for various operating procedures in the same way as they are
displayed by the USN 52 R, e.g.:
a-START
Operating steps
The operating steps are presented in the same way as
in the following example:
With U mark the second function group in the righthand table.
With NO set the function PARITY to ON.
Keys
– JC / NO / U mean:
Press the right or left key.
– J / N / T mean:
Only press the left key.
– C / O / V mean:
Only press the right key.
H Note:
Under Note you will find, for example, references to
other chapters or special recommendations.
A Attention:
The Attention symbol warns you about wrong operation
when the correctness of the results is endangered.
Remarks on this manual
Introduction
Page 19

1-12 Issue 05, 02/00 Krautkramer USN 52R/USN 52L
Page 20

Krautkramer USN 52R/USN 52L Issue 05, 02/00 2-1
Standard package and accessories 2
Page 21

2-2 Issue 05, 02/00 Krautkramer USN 52R/USN 52L
This chapter gives information about all parts and
options supplied for the USN 52R/USN 52L.
Among others, it describes:
• Accessories in the Standard Package
• Accessories required for operation of the instrument
• Recommended accessories
• Outside products configured for operation with the
USN 52R/USN 52L which have been successfully
proven and were tested in connection with the
instruments at our company.
Standard package and accessories
Page 22

Krautkramer USN 52R/USN 52L Issue 05, 02/00 2-3
2.1 Standard package
Product type Description Order no.
USN 52R Portable ultrasonic flaw detector
with high-resolution EL display,
with probe connector LEMO 00 34 900
with probe connector BNC 34 901
USN 52R DGS Portable ultrasonic flaw detector
with high-resolution EL display, including DGS function
with probe connector LEMO 00 34 911
with probe connector BNC 35 022
USN 52L Portable ultrasonic flaw detector
with transflective LCD screen
with probe connector LEMO 00 35 062
USN 52L DGS Portable ultrasonic flaw detector
with transflective LCD screen, including DGS function 35 063
including:
Operating manual (English) or 28 641
Operating manual (German) 28 642
Standard package Standard package and accessories
Page 23

2-4 Issue 05, 02/00 Krautkramer USN 52R/USN 52L
2.2 Required accessories
Product type Description Order no.
UN 655 Power supply/battery charger unit 34 941
NCA 2-6 Set of six NiCd batteries 25 812
2.3 Recommended accessories
UN 777 Case with light shield and strap 34 094
UN 762 Light shield 34 093
UN 685 Charging frame for NiCd batteries 33 763
UNRCH External charging adapter cable (connects UN 655
with UN 685) 18 840
UNCO Remote copy switch 05 301
TGDL/PC Cable for transfer of data 13 647
to the PC. LEMO 00 7-pin to DB 25S.
Incl. adaptor DB 25P to DB 9S for AT
Standard package and accessories Standard package
Page 24

Krautkramer USN 52R/USN 52L Issue 05, 02/00 2-5
Product type Description Order no.
GCH1 Adaptor DB 25P (gender changer) to connect 13 648
the USN 52/PC cable to a printer
with serial interface (EPSON)
GCH3 Adapter (gender changer) to connect the 34 797
USN 52/PC cable to a Seiko printer (DPU 414)
UNAN Connecting cable for analog output (one end open) 17 337
UN 100 W UltraDOC for USN 50/52 33 827
2.4 Recommended outside products
Printer EPSON LX-300 17 995
Printer Seiko DPU 414 17 993
Recommended outside products Standard package and accessories
Page 25

2-6 Issue 05, 02/00 Krautkramer USN 52R/USN 52L
Page 26

Krautkramer USN 52R/USN 52L Issue 05, 02/00 3-1
Setting into operation 3
Page 27

3-2 Issue 05, 02/00 Krautkramer USN 52R/USN 52L
It is imperative that you observe the instructions given
in this chapter before setting the instrument into operation.
Here you will be informed about the necessary preparations before startig the instrument for the first time in
order to avoid any damages or wrong measurement
results.
3.1 Positioning the USN 52R/
USN 52L
Refer to Chapter 9 concerning the permitted ambient
conditions, such as temperature and humidity. Position
the instrument on a smooth surface so that the display
can be easily read.
If the instrument is taken from a cold area into a warm
area, you should wait until it has adjusted to the temperature before switching on (avoids condensation).
3.2 Power supply
There must be sufficient power in order to guarantee
operation.
The instrument can be operated with batteries or on
mains power via a special instrument charger.
Setting into operation
Positioning the USN 52R/USN 52L
Page 28
Krautkramer USN 52R/USN 52L Issue 05, 02/00 3-3
Battery operation
For battery operation, you will either require 6 NiCd or
alkaline batteries (D-cells). The current battery voltage
is indicated on the display by a symbol:
H Note:
The batteries should be exchanged as soon as possible
when the charge indication is at about 25%. The instrument automatically switches off when reliable operation
can no longer be ensured. We recommend that a spare
set of fully charged batteries be available when using
the instrument for longer periods outside.
When the batteries are exchanged, all settings will remain stored and are instantly available when switching
on again.
H Note:
Used or defective batteries are special refuse and shall
be disposed of according to legal regulations.
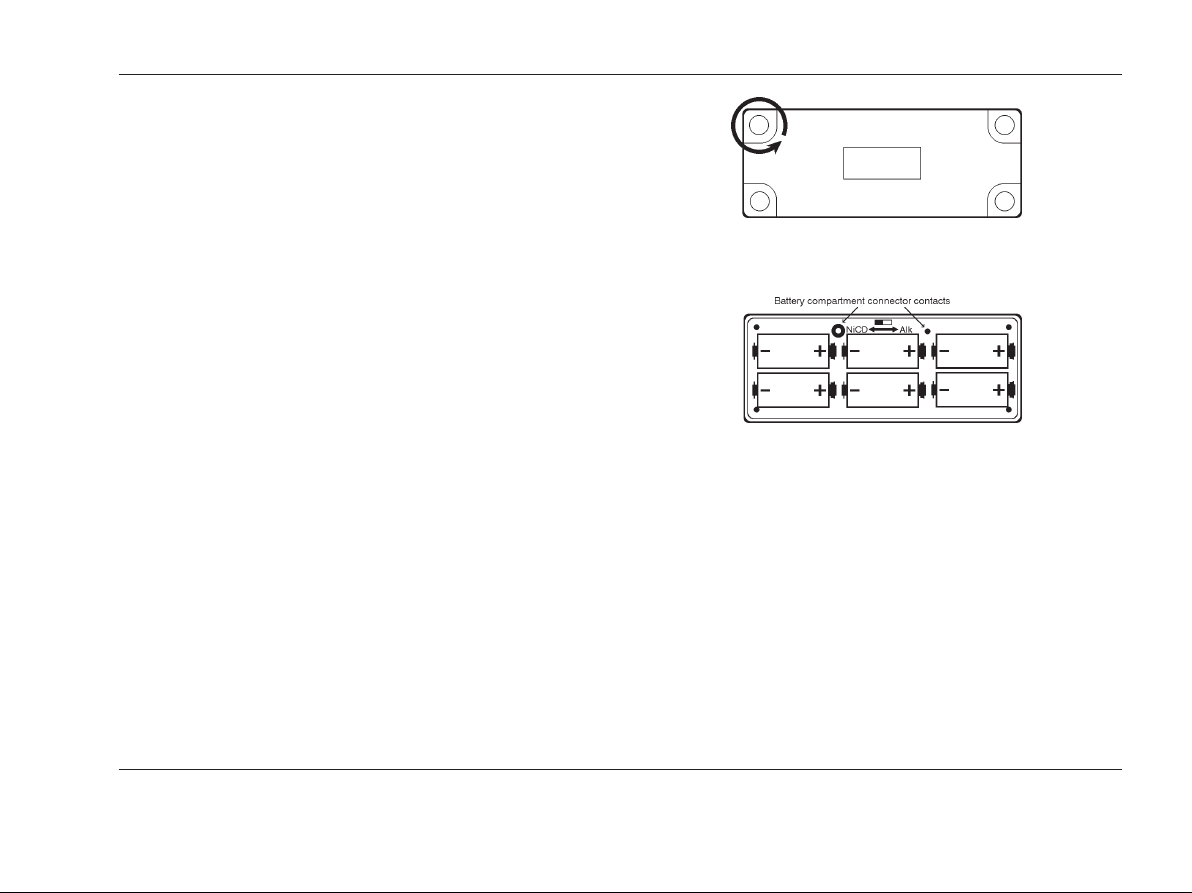
Inserting the batteries
To insert new batteries, you must first loosen the four
screws at the bottom of the instrument (see following
figure) and then remove the battery compartment lid.
Each battery in the battery pack is secured with a
separate holder.
AAttention:
When inserting the batteries, make sure that the polarities are correct and that the switch in the battery compartment is set to the type of battery being used!
Nickel Cadmium (NiCd): left
Alkaline (Alk): right
This ensures that only rechargeable batteries are
charged.
Positioning the USN 52 R
Setting into operation
Page 29
3-4 Issue 05, 02/00 Krautkramer USN 52R/USN 52L
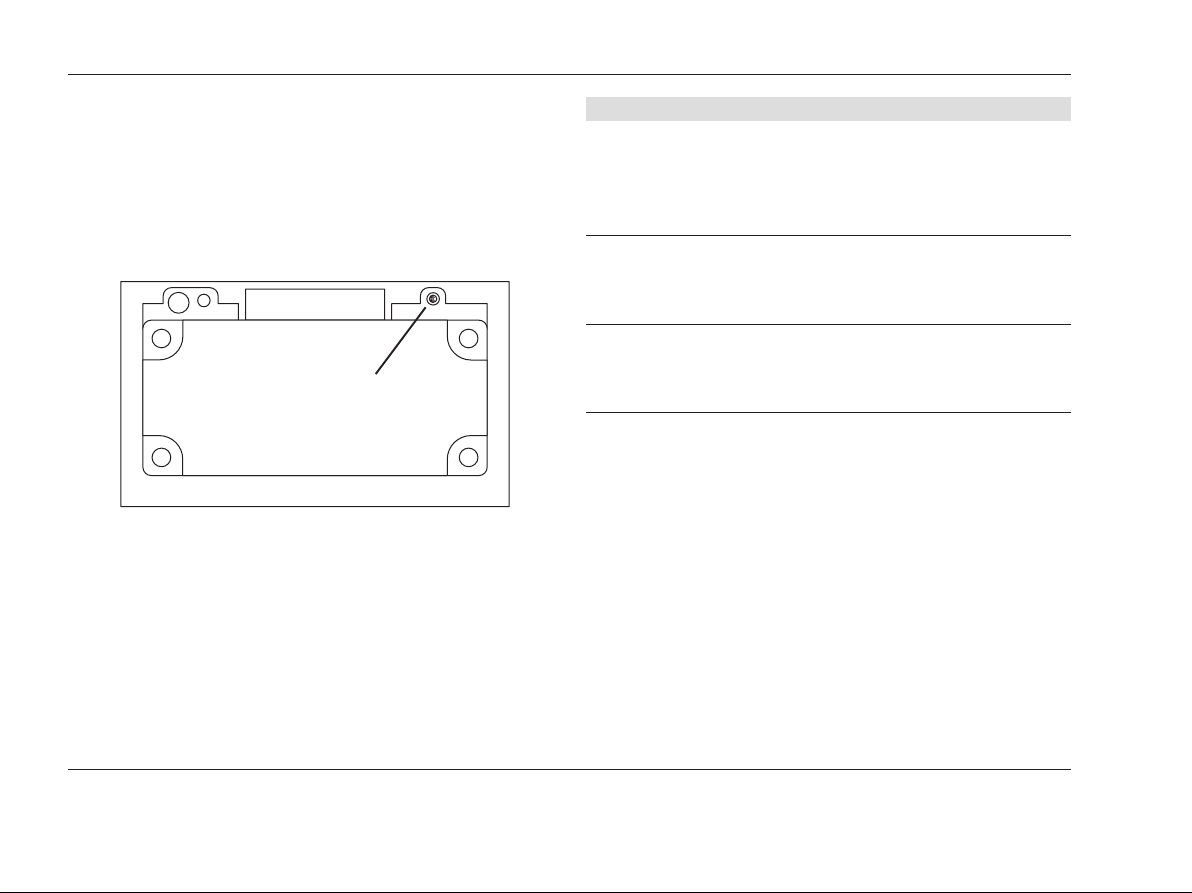
Using the battery charger
The power supply/charger unit for USN 52R/USN 52L
automatically adjusts itself fo the existing supply voltage in the range from 80 to 250 V.
The connection for the combined power supply/charger
unit is at the rear of the instrument (see following figure).
LED Status
LED off - instrument is switched off
- no NiCd batteries in the
insturment
- instrument is set to AlMn
LED on - instrument is switched on
- NiCd batteries are being
charged
LED flashes - instrument is switched off
- NiCd batteries are fully
charged (trickle charge)
A Attention:
If you have inserted AlMn cells and the switch is set to
NiCd, the internal charge of the cells will be isolated. In
this case, the AlMn cells will become quickly hot and
the pressure in the cells will cause a leakage of electrolyte after a short period of time. This strongly caustic
fluid can damage the instrument!
Only use the batteries that we recommend. There is a
danger of explosion if the charger and the batteries are
incorrectly used.
Setting into operation
Positioning the USN 52R/USN 52L
Connection supply/battery charger
When using the power supply/charger unit you are able
to simultaneously charge NiCd cells in the USN 52 R
and operate the instrument. The power supply/charger
unit requires 4 to 7 hours in order to fully charge the
NiCd cells.
The green LED indicates that the power supply/charger
unit is connected to mains.
The yellow LED of the power supply/charger unit indicates the operational status:
Page 30

Krautkramer USN 52R/USN 52L Issue 05, 02/00 3-5
3.3 Probe connection
The probe connections are on the lower right of the
front panel.
Connect straight-beam probes to the red socket (Receive - right). With T/R probes, connect the pulser cable
to the green socket (left) and the receiver cable to the
red socket (right).
– Set the pulser power as follows:
– Switch the USN 52 R on with K.
– Select the function group RCVR by pressing C.
– Using N or O, set the damping resistor in function
DAMPING There are 4 settings available: 50, 75, 150
and 1000 ohms.
3.4 Starting the USN 52 R
Switching on
This is the normal way of switching on the USN 52 R.
– Press the switch-on key K in the operator’s control
panel.
After a short time, the start display appears with information about the applied software version and about
the instrument configuration.
The settings for all function values and default settings
are the same as before switching off.
Probe connection
Setting into operation
Page 31

3-6 Issue 05, 02/00 Krautkramer USN 52R/USN 52L
Reset
If you are not able to operate the functions after a warm
start, you must carry out a cold start:
– Press A and K together.
– Keep A pressed until the A-scan appears.
A Attention:
The instrument has now the factory-preset default setting. The dialog language is English.
Refer to Chapter 4 for changing the default settings
according to your own requirements.
3.5 Screen saver
USN 52R/USN 52L are equipped with a screen saver in
order to extend the life of the display screen and the
operating time of the batteries. If your instrument is on,
and you have not pressed a key, and no positive gate
violation has occurred for 30 minutes the text/graphics
portion of the display will be erased and only a live Ascan trace will be displayed. If a frozen image is being
displayed when the unit goes into screen saver mode,
the frozen image will be lost. To exit the screen saver
mode, you must press a key or have a positive gate
violation. The keypress to exit screen saver mode will
not change any instrument settings. When screen saver
mode is exited, the screen will return to the display
which was present before.
Setting into operation
Screen saver
Page 32

Krautkramer USN 52R/USN 52L Issue 05, 02/00 4-1
Basics of operation 4
Page 33

4-2 Issue 05, 02/00 Krautkramer USN 52R/USN 52L
4.1 USN 52R and USN 52L
The present operating manual applies to both instrument versions. Operating concept, operating levels,
function groups and functions of the two instruments
are basically the same.
The only difference is the type and size of the display
screen or its setting.
Basics of operation
USN 52R and USN 52L
USN 52R
USN 52R: The screen brightness of the EL display is
set in the function INTENSITY (Please refer to page
5-45).
USN 52L: The LCD screen is set using special keys
(please refer to page 4-3).
Page 34

Krautkramer USN 52R/USN 52L Issue 05, 02/00 4-3
USN 52R and USN 52L Basics of operation
The USN 52L is provided with the following special
keys for the LCD screen:
l
switches the display backlight directly on
and off.
u
varies the brightness / the contrast of the
LCD screen.
USN 52L
Page 35

4-4 Issue 05, 02/00 Krautkramer USN 52R/USN 52L
4.2 Display
A-scan display
The digital display shows the A-scan either
• in the normal mode
with measured-value overlay - the value highlighted
in the measurement line is overlaid on the display.
Basics of operation Display
• in the enlarged mode
display mode with overlaid measured value.
– Press L for switching over.
Page 36

Krautkramer USN 52R/USN 52L Issue 05, 02/00 4-5
Functions on the display
Selected function groups are shown on the display:
• In the first operating level one selected function
group is displayed in addition to the A-scan.
• In the second operating level there are 3 groups
compiled into one function table (refer to fold-out
page).
– Press X for switching between the two operating
levels.
Display Basics of operation
Page 37

4-6 Issue 05, 02/00 Krautkramer USN 52R/USN 52L
Indications beneath the A-scan
Measurement line
The current measurement results are displayed here.
The contents of this line depend on the settings of the
functions MEASURE, TOF, AMPLITUDE, FILE MODE,
ANGLE and X-VALUE.
Basics of operation
Display
Status line
Symbols appear here which indicate certain settings,
e.g. battery charge status (please refer to fold-out
page).
Page 38

Krautkramer USN 52R/USN 52L Issue 05, 02/00 4-7
Menu line
The function groups in the first operating level are displayed here. The selected group is inverted.
Display
Basics of operation
Page 39

4-8 Issue 05, 02/00 Krautkramer USN 52R/USN 52L
4.2 Keypad
Function keys
– Below: for function group selection and for switching
over between operating levels.
– To the right: for changing instrument settings and
values.
Basics of operation Keypad
Special keys
– for special instrument functions
Page 40

Krautkramer USN 52R/USN 52L Issue 05, 02/00 4-9
Special keys of the USN 52L for setting the
display
For switching the backlight on and off, and for setting
the contrast/brightness.
Keypad Basics of operation
Page 41

4-10 Issue 05, 02/00 Krautkramer USN 52R/USN 52L
4.3 Operational concept
The functions are divided into two operating levels.
– In the first operating level you will find the most
frequently used functions divided into seven function
groups. You can toggle between the function groups
as you like.
– The second operating level contains seven groups of
functions which do not influence the A-scan. That is
why the A-scan is removed here and the whole
screen used for display of the function tables
between which you are able to switch back and forth
as you like.
Changing the operating levels
Press X in order to toggle between the first and the
second operating level.
Selection of function groups and functions
– With J or C you can select a function group.
– With T or V you can change between the function
tables in the second operating level.
Setting the function
To the right of each function you will find a pair of keys
M. With N you will decrease the displayed value and
with O you will increase it.
Accelerated adjustment
You are able to accelerate the adjustment of all functions having a certain adjustment range in order to
quickly bridge large differences between the values.
Press N or O and keep it pressed. The accelerated
adjustment is completed as soon as the key is released.
Example: Adjustment of sound velocity
– Select the function group BASIC.
– In MTL VEL press N or O in order to change the
sound velocity.
Basics of operation Operational concept
Page 42

Krautkramer USN 52R/USN 52L Issue 05, 02/00 4-11
Selection of measured value for enlarged
display
Using U in the measurement line select the value
which is to be enlarged on the display.
With U you also can toggle between graticule scaling
in scale divisions (Div.) and display of the RANGE/
DELAY in the measurement line. For this, either the
function GATE LOGIC or MEASURE must be set to
OFF (both functions: lower operating level).
4.4 Function keys
With the function keys you select functions and change
the indicated settings:
Ke y Function
K Switches the USN 52 R on and off
F Returns to the first operating level and to
the BASIC function group
U Selects measured values or function tables
I Selects function group.
M Changes active setting
X Change of operating level
Operational concept Basics of operation
Page 43

4-12 Issue 05, 02/00 Krautkramer USN 52R/USN 52L
4.5 Keys for special functions
Important functions and special functions can be selected via special keys on the right-hand side of the
operating field:
Ke y Function
D dB-Step – Changes step size for the gain
setting
B dB-REF – Stores reference echo
E Display freeze – Freezes display
A Copy – Transmits data to the RS232
interface
L Zoom – Expands the echo display over the
whole screen
H Magnify – Expands the gate over the whole
display width
G Lock on/off – Locks function values
Basics of operation Keys for special functions
Only USN 52L
The USN 52L is provided with two additional special
keys on the left-hand side of the display. They are used
for setting the LCD screen.
Ke y Function
l Backlight - Switches the display backlight
on and off.
u
Contrast - varies the brightness / contrast
of the LCD screen.
Page 44

Krautkramer USN 52R/USN 52L Issue 05, 02/00 4-13
4.6 Important basic settings
Set language
In the LANGUAGE function in the second operating
level you can select the language in which the names
of the functions are to be displayed.
The following languages are available:
• German • Swedish
• English • Danish
• Italian • Norwegian
• French • Finnish
• Spanish • Dutch
• Portuguese • Russian
Operation:
– Change to the second level with X.
– Select the left-hand function table with T V.
– Highlight the left function group with C.
Important basic settings Basics of operation
– Set the required language in the LANGUAGE
function with N or O.
– You will return to the first operating level with X
or F.
Setting the measurement units
In the function MEAS. UNITS in the second operating
level you can determine the measurement units in
which you wish to operate the instrument (mm or
inches).
Operation:
– Change to the second operating level with X.
– Select the left-hand function table with T V.
– Highlight the left function group with C.
– Using N or O in MEAS. UNITS set the required
units.
– You will return to the first operating level with X
or F.
Page 45

4-14 Issue 05, 02/00 Krautkramer USN 52R/USN 52L
Page 46

Krautkramer USN 52R/USN 52L Issue 05, 02/00 5-1
Operation 5
Page 47

5-2 Issue 05, 02/00 Krautkramer USN 52R/USN 52L
5.1 Function overview
(first operating level)
In the first operating level you will find all functions
required for basic adjustment of the USN 52R/USN 52L.
They are compiled into function groups allocated to
certain operation tasks.
In order to change between the function groups, press
J or C.
Function group Contents
BASIC Here you can enter the basic settings
for the measurement
RCVR Here you can set the functions of the
receiver.
PULS In this group you will find the functions
for DUAL/SINGLE changeover
GATE Contains all functions for adjusting the
positions of both gates.
S-CAL Contains all functions for the calibration
of the digital sound path measurement.
MEM Contains functions for storing your data
into the memory.
TCG You can use these functions to operate
the DAC/TCG.
Operation
Function overview
Page 48

Krautkramer USN 52R/USN 52L Issue 05, 02/00 5-3
5.2 Adjustment of the USN 52R/
USN 52L
GAIN Gain adjustment
With this function the echoes of the reflectors to be
detected are amplified so that they appear on the display at the required height.
In order that you are able to change the gain at any
time, you will find this function in all function groups of
the first operating level.
Operation:
– Change the setting of GAIN with M.
D
-Setting the dB STEP
You set the gain with a certain step size which you can
select with D. There are five steps available:
• 6.5 to 24 dB
(variable via dB STEP in the second operating level,
refer to Chapter 5.6)
• 6.0 dB
• 2.0 dB
• 1.0 dB
• 0.5 dB
• 0.1 dB
Operation:
• Press D in order to change between the five steps.
The set step is displayed as a value in the GAIN
function.
Adjustment of the USN 52 R
Operation
Page 49

5-4 Issue 05, 02/00 Krautkramer USN 52R/USN 52L
Selection of basic data
In this function you set the different values which serve
as a measurement basis and for the display indication.
– With JC go to the BASIC function group.
RANGE Calibration range
In this function you set the display range for the A-Scan.
In doing this, you can select between two settings:
• coarse: in steps
-5 mm
- 10 mm
- 25 mm
- 50 mm
- 100 mm
- 125 mm
- 200 mm
- 250 mm
- 500 mm
- 1000 mm
- 5000 mm
• fine: continuous from 5.0 mm bis 5000 mm. The
function name appears in small letters (“Range”).
Operation:
– Press N or O in order to change between the steps
or to continuously select the required value.
– Coarse/Fine change-over: Simultaneously press N
and O in RANGE.
Operation Adjustment of the USN 52R/USN 52L
Page 50

Krautkramer USN 52R/USN 52L Issue 05, 02/00 5-5
H Note:
The setting is limited by the set sound velocity.
The measurement units for all settings – mm or inches
– can be selected in the second operating level.
MTL VEL Setting the sound velocity
In this function you enter the test object’s sound velocity as a reference value. You have two possibilities:
Coarse: switch between the two preset values, e.g.
3353 m/s or 5918 m/s.
Fine: set a value between 1000 m/s and 9999 m/s. The
name of the function appears in small letters (mtl vel)
H Note:
You can select the two values for the coarse setting in
the second operating level.
Operation:
– Press M to change the displayed value. The set
value is displayed in the MTL VEL function.
– Coarse/Fine change-over: Simultaneously press N
and O in MTL VEL.
DELAY Setting the delay
In this function the timing of the sweep start is adjusted.
Operation:
– Set a value between -20 µs and 999 µs (range
dependent) in steps of 0.008 µs with M.
– Reset delay to 0.000 µs: simultaneously press N
and O in DELAY.
H Note:
In order to take the probe delay into account, you must
calibrate the probe zero point with ZERO in the function
group S-CAL.
Adjustment of the USN 52R/USN 52L Operation
Page 51

5-6 Issue 05, 02/00 Krautkramer USN 52R/USN 52L
Setting the receiver
All functions for adjustment of the receiver can be
found in the function group RCVR.
– With JC go to the function group RCVR.
FREQ. Frequency
With this function you can set the operating frequency.
You can choose between four settings:
• 0.4 - 10 MHz = broadband amplifier
• 2 - 8 MHz = 4MHz according to DIN 25 450
• 3 - 10 MHz = high frequency range
• 0.3 - 4 MHz = low frequency range
Operation:
– Select the required setting in FREQ. using M.
Operation Adjustment of the USN 52R/USN 52L
Page 52

Krautkramer USN 52R/USN 52L Issue 05, 02/00 5-7
DAMPING Electrical damping of the probe
You can use the function DAMPING to connect various
resistors in parallel to the probe in order to achieve an
optimum matching of the probe’s electrical impedance
to the instrument.
– Select a low value with broadband probes, or if you
wish to improve the near resolution.
– Select a high value if you are using narrow-band
probes, or if you need a high sound intensity.
Operation:
Set the required value in DAMPING using M.
RECTIF. Setting the rectification mode
In the RECTIF. function you select the rectification
mode of the echo pulses according to the application.
You have the following possibilities:
• FULL (full-wave): All half-waves above the base line
are displayed
•RF (radio-frequency display): All signals are
displayed in their original form.
H Note:
The RF display mode is only adjustable if the function
INTENSITY (display brightness) is set to LOW and the
range does not exceed 196 mm (with 5920 mm).
• NEG HALF (negative half-wave): Only negative halfwaves are displayed.
• POS HALF (positive half-wave): Only positive halfwaves are displayed.
Operation:
– Select the required setting in RECTIF. with M.
Adjustment of the USN 52R/USN 52L Operation
Page 53

5-8 Issue 05, 02/00 Krautkramer USN 52R/USN 52L
Setting the pulser
In the function group PULS you can change the operating mode and the pulse repetition rate of the pulser as
well as operate the reject function.
– Use JC to go to the function group PULS.
PULSER Changeover of initial pulse
You can use this function to change between the singleelement or dual (T/R) mode for the instrument operation:
• SINGLE: single-element operation mode; the probe
connector sockets are connected in parallel.
• DUAL: dual (T/R) operation mode; the initial pulse is
available at the green socket - the red socket is
connected to the amplifier input.
Select this setting if you are using a dual (T/R) probe
or the through-transmission mode.
Operation:
– Select the required setting in PULSER using M.
H Note:
The corresponding symbol will be displayed in the status line:
Single Dual
Operation Adjustment of the USN 52R/USN 52L
Page 54

Krautkramer USN 52R/USN 52L Issue 05, 02/00 5-9
REJECT Suppression of spurious echoes
With the REJECT function you are able to suppress
unwanted signals, e.g. material noise.
The setting, given in percent, indicates the height that
echoes have to reach in order to be displayed in the
first place.
Operation:
In REJECT set the required percentage value with M.
A Attention:
Be careful with this function because flaw echoes can
also be suppressed.
REP-RATE Repetition rate
The number of the ultrasonic signals emitted per second is varied using this function. This enables selective
suppression of spurious or interference echoes and
especially phantom echoes which may occur when
testing larger test objects. The function enables two
settings:
•HIGH: Maximum pulse repetition rate
(113 to 905 Hz, depending on the range setting);
default setting.
•LOW: Reduced pulse repetition rate
(56 to 452 Hz, depending on the range setting);
for testing larger test objects or in case any
statistical noise signals occur.
Operation:
In REP-RATE set the required percentage value with
M.
Adjustment of the USN 52R/USN 52L Operation
Page 55

5-10 Issue 05, 02/00 Krautkramer USN 52R/USN 52L
Gate adjustment
All functions for adjustment of Gates a and b are contained in the function group GATE.
– With JC go to function group GATE.
USN 52R/USN 52L make the two gates a and b available. Gate b is only required for the measurement or
calibration of multi-echo sequences and enables the
measurement of the distance between two echoes. The
flaw Gate b is dependent of Gate a and is correspondingly adjusted:
• b-START: at 10% to 90% of a-WIDTH (after a-
START)
• b-THRESH: 10% to 90% screen height
A Attention:
When both gates are superimposed on each other, the
wrong values can be indicated with a wrongly selected
Gate b.
Both gates evaluate only within the visible area of the
display. If there are gates or parts of gates outside this
area, an evaluation will not be made.
The gates have two tasks:
• They monitor the area of the test object in which a
flaw is expected. When an echo exceeds or falls
below the gate, a warning signal can be activated.
• They select the echoes for the digital time-of-flight or
amplitude measurement.
Operation Adjustment of the USN 52R/USN 52L
Page 56

Krautkramer USN 52R/USN 52L Issue 05, 02/00 5-11
Operation:
The MULTECHO setting of the function MEASURE
(lower operating level) is a prerequisite for operation.
• Simultaneously press N and O in a-WIDTH or
a-THRESH in order to switch to the settings for
Gate b.
a-THRESH Determination of threshold
With this function you determine the threshold for the
selected gate. You can set a range from 10% to 90%
screen height in 1% steps.
Operation:
– Set the required threshold value in a-THRESH with
M.
The selected gate is displayed as a line.
If there is a violation of the set threshold (signals exceeding or falling below it), an alarm is activated.
The exact gate position is defined by two further
parameters:
• Gate start (a-START)
• Gate width (a-WIDTH)
a-START Start of the gate
In the function a-START you determine the start of
Gate a within a range from 0 to 5000 mm (continuous).
a-WIDTH Width of the gate
In the function a-WIDTH you determine the width within
a range from 1 to 5000 mm (continuous).
Operation:
– Set the gate position in a-START and a-WIDTH
with the assigned M keys.
Adjustment of the USN 52R/USN 52L Operation
Page 57

5-12 Issue 05, 02/00 Krautkramer USN 52R/USN 52L
Calibration functions
USN 52R/USN 52L are accurately calibrated using the
functions of the function group S-CAL.
– With I go the function group S-CAL.
H Note:
Read Chapter 5.3 first in order to exactly set the sound
velocity and the probe delay.
H Note:
Refer also to the AUTO CAL function in Chapter 5.3.
The function group S-CAL correspondingly changes
when this function is used.
a-START Gate start
The active value for the gate start, which you have
entered into the function group GATE, is displayed in
a-START. If necessary, you can make a subsequent
change to this value here.
H Note:
In order to obtain the correct setting, you must have
selected the display range, according to the test task,
in the function group BASIC beforehand.
Operation Adjustment of the USN 52R/USN 52L
Page 58

Krautkramer USN 52R/USN 52L Issue 05, 02/00 5-13
MTL VEL Sound velocity
In MTL VEL you set the value for the sound velocity in
the material under test. You can change between preset
fixed values or continuously adjust the value.
Operation:
– Set the sound velocity in MTL VEL with M, e.g.
5920 m/s (longitudinal wave velocity in steel).
H Note:
The default value for the sound velocity can be
changed in the second operating level (functions VE-
LOCITY # 1 and VELOCITY # 2) if you frequently operate with other materials (refer to Chapter 5.6).
Adjustment of the freely selected value:
– Simultaneously press NO in MTL VEL.
– Change the setting with M.
With free adjustment of the value, the function name
appears in small letters (mtl vel). In this way you are
able to recognize which mode of adjustment you have
selected.
A Attention:
Always make sure that the sound velocity in MTL VEL
is set correctly! The instrument calculates all interval
and distance indications using the values which have
been set here.
ZERO Probe delay
Each probe has a delay block (protective layer, delay
wedge with angle-beam probes) between the element
and the coupling surface. The initial pulse must be
transmitted through this delay block before the sound
can enter the test object. The ZERO function allows
you to take into account the loss of time caused by the
delay block in order to achieve the correct measurement of all sound paths in the test object.
Operation:
Set the value for the probe delay in ZERO using M.
H Note:
If the value for ZERO is not known, read Chapter 5.3
beforehand in order to determine this value.
Adjustment of the USN 52 R Operation
Page 59

5-14 Issue 05, 02/00 Krautkramer USN 52R/USN 52L
Storing data
This group contains functions for storage and recall of
your data.
– With I go the function group MEM.
Data set names and MEMO mode in chapter 5.10 on
this.
RECALL Loading of a stored setting
With this function you can load the instrument settings
(data set) which you have previously stored. If a data
set contains a stored setting, this will be indicated by
the symbol ■ in the RECALL function.
A Attention:
The active settings will be overwritten, therefore store
beforehand in order to save them.
Operation:
– With M switch to ON so that the settings can be
loaded. When the sequence is finished, the display
automatically changes to OFF.
– Acknowledge system safety prompt with F.
H Note:
To be able to find everything better, you can store a
name (max. 8 alphanumeric characters) with every data
set. If the MEMO function is activated, you have additional possibilities of data set description (free formulation of texts or filling-in of predetermined header fields)
to improve the documentation. Please read the sections
Operation Adjustment of the USN 52R/USN 52L
Page 60

Krautkramer USN 52R/USN 52L Issue 05, 02/00 5-15
SET# Selection of data set
You are able to select the required data set number with
this function. If necessary, an allocated data set name
will be displayed at the same time.
Additionally, you can give each data set a name with
which it is stored. Refer to Chapter 5.10
Entering and
displaying data set names
.
Operation:
– Select a number between 1 and 140 (USN 52R) / 1
and 100 (USN 52L) with M.
STORE Storing the instrument settings
With this function you store the active instrument settings and the active A-scan under the number indicated
in SET#.
If the data set is already allocated (symbol ■) you cannot overwrite it. You must firstly clear the old data set.
Operation:
– Switch to ON with M to store the setting. When the
process is completed, the display automatically
changes to OFF.
– Acknowledge system safety prompt with F.
– If required, enter the required additional information
in the displayed MEMO menu (please see chapter
5.10).
Clearing the instrument setting
An instrument setting which is stored can be overwritten after you have disabled the write protection.
You can reallocate the data set.
Operation:
– Simultaneously press N and O in the RECALL
function.
– Acknowledge system safety prompt with F.
Write protection is disabled. The symbol ■ is deleted.
The data set can now be reallocated.
Adjustment of the USN 52R/USN 52L Operation
Page 61

5-16 Issue 05, 02/00 Krautkramer USN 52R/USN 52L
Clearing all data
You can clear all data sets (data logger and active instrument settings).
Operation:
– Switch off the instrument.
– Keep keys F , E and K simultaneously for
approximately 10 seconds.
All data sets are now cleared.
Displaying stored A-Scans (preview)
In the function group MEM you have the possibility to
display all A-Scans belonging to the stored data sets
without having to load them simultaneously. In this way,
you obtain a quick overlook of your stored data.
Operation:
– Simultaneously press N and O in the function
SET#.
The selected data set’s A-Scan is displayed. At the
same time, the function GAIN is changed in DATA SET
PREVIEW as recognition of this preview function.
If additional information was stored for this data set by
means of the MEMO function, the first 46 characters of
this additional information are displayed in the menu bar
(please refer to chapter 5.10).
– You can scroll through all stored data sets
using M. The corresponding A-Scans are
displayed.
– If you require to load a displayed data set, set the
RECALL function to ON using M and acknowledge
system safety prompt with F. The preview function
will then be switched off.
– If you do not wish to load a data set: exit the preview
function by pressing N and O simultaneously in
SET#.
Operation Adjustment of the USN 52R/USN 52L
Page 62

Krautkramer USN 52R/USN 52L Issue 05, 02/00 5-17
5.3 USN 52R/USN 52L calibration
Calibration of display range
Before you operate the instrument, you must calibrate
it. Depending on the material and the dimensions of the
test object, the sound velocity and the calibration range
have to be set and the probe delay taken into consideration. In addition, the test sensitivity has to be adjusted
according to the specified requirements.
A Attention:
In order to reliably operate the instrument, adequate
training in ultrasonics is required.
Calibration guarantees that
– the total thickness of the test object is displayed,
– the distance to the flaw or to the backwall of the test
object can be determined using the horizontal
position of the echo, or it can be digitally displayed,
– all flaws are displayed which must be detected
according to test specifications,
– the size of the flaw can be determined by
comparison with a known reflector.
H Note:
For all calibration procedures, use a calibration block
which is made of the same material and has the same
temperature as your test object.
The following examples show three main methods of
ultrasonic testing:
• Testing with a straight-beam probe,
• Vertical testing with a dual (T/R) probe,
• Angle beaming with an angle-beam probe (transverse
waves).
With all calibrations you must
– set the pulser and receiver according to the test task
and
– decide whether you are going to use the FLANK or
PEAK mode for your measurements (MEASURE
function int the lower operating level) before
calibrating.
USN 52R/USN 52L calibration Operation
Page 63

5-18 Issue 05, 02/00 Krautkramer USN 52R/USN 52L
Recommendation:
As long as the echoes to be evaluated indicate a distinct maximum amplitude, select the PEAK mode of
measurement.
Basic adjustment:
Before calibrating the instrument, you must carry out
the following basic adjustment:
Group Function Setting
BASIC DELAY 0.000 ms
RANGE adjust
Calibration with a straight-beam probe
Known sound velocity, no delay block
– Set sound velocity MTL VEL
– Position Gate a over one of the echoes
– Adjust ZERO so that the correct “S=...”-value is
indicated in the measurement line.
Example:
Carry out the calibration on a flat calibration block V1
(thickness: 25 mm) for a calibration range of 100 mm.
– Set RANGE to 100 mm
– Set known sound velocity MTL VEL (5920 m/s)
– Position the gate over the first calibration echo out of
25 mm
– Adjust ZERO so that “S=25.0" is displayed in the
measurement line
The display range is now calibrated for the described
task.
Sound velocity unknown, no delay block
– Set MEASURE to MULTECHO
– Set the gates so that the first echo is evaluated in
Gate a and the second echo in Gate b.
Attention: Be careful of node errors when adjusting
the threshold!
– Adjust the sound velocity MTL VEL until the
displayed reading (sound path between the two
backwall echoes) corresponds to the actual
thickness of the test object. If necessary, you have
to readjust the gate parameters.
– Set MEASURE to 0 TO 1st
Operation USN 52R/USN 52L calibration
Page 64

Krautkramer USN 52R/USN 52L Issue 05, 02/00 5-19
– Increase ZERO until the correct sound path value for
the echo is displayed.
Example:
– Carry out calibration on a 25 mm thick test piece for
a calibration range of 100 mm.
– Set RANGE to 100 mm
– Set ZERO to 0.000 s
– If possible, when in MTL VEL, set an approximate
value for the sound velocity
– Set MEASURE to MULTECHO
– Adjust the gates so that the first echo is evaluated in
Gate a and the second in Gate b.
Attention: Be careful of node errors when setting the
threshold!
– Adjust the sound velocity MTL VEL until the
displayed reading (sound path between the two
backwall echoes) corresponds to the actual
thickness of the test object. If necessary, you have
to readjust the gate parameters.
– Set MEASURE to 0 TO 1st
– Increase ZERO until the correct sound path for the
echo in the gate is displayed.
Straight-beam probe with delay
Calibration with straight-beam probes, which have a
greater delay path, mainly corresponds to the above
calibration for straight-beam probes which only have the
protection layer as a delay path.
Unlike the above procedure, you have to start by making the following adjustments:
– Set DELAY and ZERO to 0
– Preadjust ZERO so that the first interface echo is at
the zero point of the scale.
– Adjust RANGE so that, with a known sound
velocity, the first interface echo and at least the first
backwall echo appear, and, with an unknown sound
velocity, at least two backwall echoes appear before
the second interface echo.
– From this point, proceed the same as for both
previous cases.
USN 52R/USN 52L calibration Operation
Page 65

5-20 Issue 05, 02/00 Krautkramer USN 52R/USN 52L
Calibration with angle-beam probes
Known sound velocity
In this case, it is sufficient when there is an echo from
a known reflector with a known distance, e.g. the arc of
the calibration block V1, V2.
– Enter known sound velocity MTL VEL
– Set Gate a to the first echo
– Set ZERO so that the correct value is displayed in
the measurement line “S=...”.
Example:
Calibration of the 100 mm range for steel (trans) using
calibration block V2
– Enter sound velocity MTL VEL (3255 m/s)
– Set RANGE to 100 mm.
– Set DELAY and ZERO to 0.
– Couple the probe and peak the first echo from the
25 mm radius of V2.
– Set Gate a to the first arc echo.
– Adjust ZERO so that “S=25" is displayed in the
measurement line.
The display range is now calibrated. For the measurement you can now enter the values for ANGLE, X-
VALUE and THICKNESS.
Unknown sound velocity
In this case you will require a calibration block made of
the test material. A semicylinder is suitable for this
purpose.
Couple the probe to the plane of section of the
semicylinder with the radius R, and peak the first echo
from the semicircle. An echo sequence occurs with the
sound paths R, 3R, 5R, etc.
You apply these echoes for calibration the same as the
backwall echoes described above which come from a
plane-parallel calibration piece with vertical beaming.
Operation USN 52R/USN 52L calibration
Page 66

Krautkramer USN 52R/USN 52L Issue 05, 02/00 5-21
Example:
Calibration on a semicylinder having a radius of
R=50 mm at a test range of 200 mm.
– Set RANGE to 200 mm.
– Set DELAY and ZERO to 0.
– Set MEASURE to MULTECHO.
– Couple the probe and peak the echoes.
– Adjust the gate so that the first arc echo (® 50 mm
sound path) in Gate a and the second arc echo
(® 150 mm sound path) in Gate b are evaluated.
– Set the sound velocity MTL VEL so that
“S=100" is displayed in the measurement line
– Set MEASURE to 0 TO 1st
– Set Gate a to an echo
– Set ZERO so that “S=50" is displayed in the
measurement line
The calibration has now been completed.
Calibration with a dual (T/R) probe
Above all, dual (T/R) probes are mainly used for thickness measurement. When applying these probes observe the following characteristics:
The FLANK mode
Most dual (T/R) probes have a roof angle (an element
which is at an angle to the surface of the test object).
Due to this, mode conversions occur with sound entry
and at the reflection on the backwall which can cause
rugged, wide echoes. This is the reason why you should
always select FLANK in TOF.
In order to obtain steep increasing flanks, which enable
a higher measurement accuracy, you can use the Reject function if necessary. In this regard, refer to the
information on the DAMPING function.
V-path error
With dual (T/R) probes, there is a V-shaped sound path
from the pulser to the receiver element via the reflection from the backwall. This “V-path” influences the
measurement accuracy. Therefore, you should select
two thicknesses which include the expected thickness
range. The V-path error can be largely compensated in
this way.
USN 52 R calibration Operation
Page 67

5-22 Issue 05, 02/00 Krautkramer USN 52R/USN 52L
Higher sound velocity
Due to the V-path error, a higher sound velocity than
the test material is required when calibrating, especially
with smaller thicknesses. This is typical of dual (T/R)
probes and acts as compensation of the V-path error.
Owing to the described effect there is a drop in the
echo amplitude with smaller thicknesses which should
be carefully observed with values < 2 mm.
A calibration block having different thicknesses must be
used for calibration. The thicknesses are to be selected
so that they include the expected measurement value.
– Set PULSER in the function group PULS to DUAL.
– Set RANGE according to the test task and the probe
being used..
– Set TOF to FLANK.
– Couple the probe to the thinner part of the calibration
block and peak the echo.
– Set the flank as steeply as possible by adjusting the gain.
– Set Gate a on the first echo.
– Set ZERO in the function group S-CAL so that the
measurement line display the correct value at
“S=...”.
– Couple the probe to the thicker part of the calibration
block and peak the echo.
– Set the flank as steeply as possible by adjusting the
gain.
– Set Gate a on the first echo.
– Set the sound velocity “C” so that the correct value is
displayed in the measurement line at “S=...”.
Automatic calibration
The instrument has an automatic calibration capability
via the function AUTO CAL. Two calibration echoes
must be entered. The instrument then carries out a plausibility check and automatically sets the parameter.
– Set the function AUTO CAL in the second operation
level (right function table) to ON.
– Return to the first operation level with X and select
function group S-CAL with I.
The function group S-CAL changes in preparation for
the automatic calibration and now contains the CAL
function (calibration) as well as the function S-REF
(sound path for the reference echo).
Operation USN 52R/USN 52L calibration
Page 68

Krautkramer USN 52R/USN 52L Issue 05, 02/00 5-23
Operation:
– In the function CAL press N and O simultaneously.
The function is now enabled.
– REC 0 is displayed, indicating that no calibration
echo has been recordet yet.
– Set the gate onto the first calibration echo and enter
the sound path in S-REF using M.
– Save the first calibration echo using M in the CAL
function. On the display: REC 1.
– Set the gate onto the second calibration echo and
enter the sound path in S-REF using M.
– Save the second calibration echo using M in thte
CAL function. On the display: REC 2.
– Press O on CAL again to terminate the 2-step
calibration procedure.
Automatic calibration is carried out after the instrument
has calculated the entered parameters and made a
plausibility check.
H Note:
To verify a correct instrument calibration, always check
the setting using the echo of a known distance, other
than those used for calibration.
Preparing the instrument for
digital measurement
USN 52R/USN 52L must be calibrated to the material to
be tested in order to give the correct measurement
readings.
H Note:
For all calibration procedures, use a calibration block
with a known thickness, made of the same material and
having the same temperature as your test object.
Preconditions:
To start with, calibrate the A-scan display as described
in the preceding section. Carry out the following basic
settings:
GATE LOGIC:
POSITIVE, NEGATIVE or MEASURE
MEASURE: 0 TO 1st – for measurement to the first
echo in the gate. By this, the thickness or the flaw position can be measured.
USN 52R/USN 52L calibration Operation
Page 69

5-24 Issue 05, 02/00 Krautkramer USN 52R/USN 52L
MEASURE: MULTECHO – for measurement between
the first echoes in the gate sections. Above all, this
setting is suitable for thickness measurement in the
multiecho sequences.
TOF: According to the application.
Calibrating the sensitivity – B
B is of great help for sensitivity calibration. With B you
store a reference echo as a basis for your measurement and amplitude evaluation. Gain differences in dB
between the amplitudes of any echoes and the stored
echo are directly displayed in the measurement line as
”H=”.
Operation:
– Couple the probe and peak the reference echo,
– Adjust the gain so that the echo reaches the required
height.
– Position Gate a on the reference echo. This must be
the highest echo in the gate,
– Press B. The reference echo is now stored. The
value is reset by pressing again.
Operation USN 52R/USN 52L calibration
Recall of dB difference:
– Set AMPLITUDE to dB THRESHOLD.
– Position the gate onto the required echo.
The dB difference is now displayed in the measurement
line. It indicates the dB amount by which the flaw echo
falls below or exceeds the reference echo.
Page 70

Krautkramer USN 52R/USN 52L Issue 05, 02/00 5-25
5.4 DAC/TCG
The DAC/TCG function enables you to:
• record a Distance-Amplitude Curve and to store it as
an essential part of the current data set.
• display the Distance-Amplitude Curve (DAC) of the
reference echoes.
• activate the Time-Corrected Gain (TCG) which
increases the gain as a function of distance so that
all reference echoes attain the same height. The
amplitude evaluation of echo indications is now
carried out in relation to the first reference echo.
• activate the TCG as above, however, with
simultaneous representation of the DAC/TCG
function.
Due to the angle of beam spread of the sound beam
and the sound attenuation in the material, the echo
height of equally sized reflectors depends on their distance to the probe.
The DAC/TCG in the USN 52R/USN 52L can correct
these influences.
In this regard, the gain is varied as a function of the
time of flight in such a way that the echoes appear
equally high on the display irrespective of their distance.
This means that the echo amplitude now only depends
on the reflection characteristic of the flaw.
If you use a calibration block provided with artificial
flaws corresponding to the natural flaws of your test
object for recording the DAC, you can use this echo
amplitude for the evaluation of the reflector without
having to make any other corrections. The calibration
block should be made of the same material as the test
object.
Each artificial flaw is scanned, the echo is peaked and
then recorded.
The DAC brings the echo sequence to 80% screen
height. During this, the instrument sets the gain to the
gain value of the highest echo.
The maximum dynamic range is 40 dB;
the maximum slope of the curve is 6 dB/µs;
the maximum number of curve points is 9.
DAC/TCG Operation
Page 71

5-26 Issue 05, 02/00 Krautkramer USN 52R/USN 52L
Function group TCG
With these functions you can operate all DAC/TCG
modes.
Use C to go to the function group TCG:
DAC/TCG mode
With this function you can determine the DAC/TCG
mode:
OFF: No DAC/TCG is active.
DAC: The already stored Distance-Amplitude Curve is
displayed on the screen.
TCG: The TCG is calculated on the basis of the curve
so that all reference echoes reach the same screen
height: TCG (=Time-Corrected Gain).
Echoes from the test object are now evaluated in relation to a reference echo.
H Note:
• With active TCG the symbol T is displayed in the
status line.
• In the TCG setting, the lowest function DAC ECHO
changes to CURVE.
You can additionally have the progress of the gain
increase displayed by a curve at this point if you
wish: CURVE = ON.
Operation DAC/TCG
Page 72

Krautkramer USN 52R/USN 52L Issue 05, 02/00 5-27
• The two settings DAC and TCG can only be switched
on if a curve was recorded beforehand, or if a data
set containing a curve was recalled.
REC: Use this setting to prepare the instrument for the
recording of a DAC curve. A curve that possibly already
exists is deleted.
a-START: With this, you can determine the starting
point of the gate (please also refer to function group
GATE). This function is repeated here because it is
required for recording a curve and for the echo evaluation.
DAC ECHO: The DAC ECHO function shows the number of curve points (reference echoes) and is used in
the recording mode (REC) for recording the next reference echo.
Operation:
Before starting to record a reference curve, you have to
carry out a correct instrument calibration first. This especially applies to the functions: RANGE, MTL VEL,
FREQ., RECTIF. and DAMPING due to the fact that a
variation of these functions is no longer possible with
an active DAC or TCG.
DAC/TCG Operation
Page 73

5-28 Issue 05, 02/00 Krautkramer USN 52R/USN 52L
5.5 Recording a DistanceAmplitude Curve
A Attention:
Recording of a new curve will delete a curve that possibly already exists. If necessary, make sure that the old
curve is stored in a free data set before you start recording a new curve!
Use C to go to the function group DAC.
– Press the JC keys simultaneously to switch the
DAC/TCG function to the record mode: DAC/TCG =
REC.
– The DAC ECHO function is at 0 as no echo has been
recorded yet.
– Couple the probe to the reference block and peak the
first reference echo. Bring the echo with Gain to
about 80% screen height.
– Move the gate onto the corresponding echo with
a-START. The gate threshold must be adjusted so
that the echo exceeds it.
– Switch on DAC ECHO now:
All reference echo data (sound path, amplitude and
gain setting) are stored in the instrument, and the
DAC ECHO function shows the number 1.
– Peak the next reference cho.
– Position the gate onto the echo and readjust the gain
if required until the echo exceeds the threshold.
– Switch on the DAC ECHO:
The data of the second echo are stored DAC ECHO = 2.
You will now already recognize that there is a curve
between the amplitude of the first echo and the gaincorrected amplitude of the second echo.
Operation Recording a Distance-Amplitude Curve
Page 74

Krautkramer USN 52R/USN 52L Issue 05, 02/00 5-29
– Continue to proceed in this way until all available
reference echoes are recorded.
– Switch on the curve now by setting the DAC/TCG
function to DAC:
The record mode is automatically switched off, the
curve is displayed, and all echo indications can be
evaluated relative to this curve.
H Note:
The DAC/TCG function is now marked with “*“ indicating
that the current setting contains a DAC curve.
The marking DAC/TCG* also appears when the function
is switched off.
– If you require an evaluation in the TCG mode, switch
the DAC/TCG function over to TCG.
All reference echoes will now be at approx. 80%
screen height. At the same time, you can now have
a graphic display of the gain increase with the
CURVE function.
– All echoes will from now on be evaluated in relation
to the reference height (dBR); this is the height of the
first reference echo.
– To be on the safe side, store this setting in a free
data set.
Recording a Distance-Amplitude Curve Operation
Page 75

5-30 Issue 05, 02/00 Krautkramer USN 52R/USN 52L
H Note:
If the DAC/TCG is active, the symbol T is additionally
displayed in the status line:
Operation Recording a Distance-Amplitude Curve
Page 76

Krautkramer USN 52R/USN 52L Issue 05, 02/00 5-31
5.6 Echo evaluation with
DAC/TCG
To be able to evaluate a flaw indication by means of the
DAC/TCG, certain requirements have to be met:
• The Distance-Amplitude Curve must already be
recorded.
• It
only
applies to the same probe that was used for
recording the curve. Not even another probe of the
same type must be used!
• The curve and the DAC/TCG
only
apply to the
material that corresponds with the material of the
reference block.
• All functions affecting the echo amplitude must be
set as they were during recording of the curve. This
especially applies to the following functions:
DAMPING, FREQ.,RECTIF., MTL VEL, PULSER
and REJECT.
• TOF is set to PEAK.
• AMPLITUDE is set to dB THRESHOLD.
• Choose the echo amplitude (as dB difference to the
curve) using the T V -keys for an enlarged
representation in the A-scan.
Echo evaluation with DAC/TCG Operation
Page 77

5-32 Issue 05, 02/00 Krautkramer USN 52R/USN 52L
DAC mode
– Peak the echo of an assumed flaw and shift the gate
so that the echo data are evaluated.
– You can read the sound path in the measurement line
and, in addition with angle-beam probes, the
(reduced) projection distance and the flaw depth.
You can immediately see from the A-scan whether or
not the echo has to be recorded.
The recording threshold violations in dB can also be
easily determined:
– Adjust the gate threshold exactly to the point of
intersection of the curve with the assumed flaw
indication.
The enlarged reading in the A-scan indicates the
amount of dB by which the flaw echo exceeds the
curve, i.e. the amount by which the echo indication
exceeds the reference echo.
Operation Echo evaluation with DAC/TCG
Page 78

Krautkramer USN 52R/USN 52L Issue 05, 02/00 5-33
TCG mode
A Attention:
An echo amplitude evaluation as measurement of the
difference to the reference echo is only possible if the
reference height (height of the first reference echo)
stored during the reference echo recording still applies.
If another echo is stored as reference echo with [dBRef] after recording of the curve, the original reference
echo is lost.
If this is the case, then you need for a flaw evaluation
again the reference block with which the Distance-Amplitude Curve was recorded.
After switching-on of the TCG mode, all echoes from
the reference flaws reach the height of the first reference echo. In addition, you can position the gate over
the entire evaluation range so that each echo is directly
measured.
– Peak the echo from an assumed flaw. If necessary,
increase the gain until the echo exceeds the gate
threshold.
– You can read the sound path in the measurement line
and, in addition with angle-beam probes, the
(reduced) projection distance and the flaw depth.
The enlarged reading in the A-scan (dBR) indicates
the amount in dB by which the flaw echo exceeds or
falls below the reference echo.
The result of an amplitude evaluation is not affected by
a gain variation, i.e. the indicated gain difference dBR is
always the difference between the flaw echo and the
reference echo.
Echo evaluation with DAC/TCG Operation
Page 79

5-34 Issue 05, 02/00 Krautkramer USN 52R/USN 52L
5.7 Measuring thickness
USN 52R/USN 52L enable you to measure thickness
and distance in a simple way. The measured value is
directly displayed. One of the following two methods of
measurement is used, depending on the application:
• Measurement to the first echo – e.g. corrosion
measurement with a dual (T/R) probe
• Measurement of the multi-echo sequence with a
single- element probe on a test object which has a
good surface on both sides
Preparations
– Select probe
– Set MEASURE (refer to previous section)
– Select TOF (refer to Page 5-9)
– Calibrate A-scan display
– Calibrate the USN 52 R for the selected probe and
the measurement mode (refer to previous section)
Measuring the thickness
– Clean the surface of the test object from dirt and any
loose particles
– Apply couplant to the surface of the test object
– Using slight and even pressure, couple the probe
– Observe A-scan display and S=...”-value until the
measured value display is stable
– Maximize the echo amplitude
– Read measured value
H Note:
If you are operating with MULTECHO in MEASURE,
observe Gate b in order to evaluate the correct echo.
You can store the displayed measurement values in the
Data Logger or transfer them into another instrument
via the RS232 interface.
Operation Measuring thickness
Page 80

Krautkramer USN 52R/USN 52L Issue 05, 02/00 5-35
5.8 Storing measured values Data Logger
The Data Logger helps you to store and manage your
measurement results. These are saved even when the
batteries are removed. The stored measured values can
be:
• displayed
• deliberately deleted
• transferred to a peripheral
• output via a PC or printer
A number of measurements are compiled into one
“FILE”. To file measured values in the Data Logger you
must
• determine the required number of FILES
• select a FILE
Determining the number of FILES
You determine the total number of FILES (max. 99) –
the instrument automatically determines the number of
measurement locations according to the following formula:
Number of measurement locations = 2500 : Number
of FILES
The first measured value of each FILE is automatically
allocated the number 1. However, you can also select
another measurement location. All the following measured values are consecutively filed until all measurement locations are full or until you select another FILE
or measurement location.
H Note:
You can only determine the number of FILES when the
Data Logger is empty.
Storing measured values - Data Logger Operation
Page 81

5-36 Issue 05, 02/00 Krautkramer USN 52R/USN 52L
Operation:
– Change to the second operating level and select the
function group for the Data Logger.
– Set the required number of FILES in FILE NUMBER:
SET #01 = 1 FILE, SET #02 = 2 FILES, etc.
– Simultaneously press M when the required number
is displayed. The memory is correspondingly set up.
You can store the measurement results. The Data Logger has the following presettings:
FILE MODE: THICKNESS
MEASURE: 0 TO 1st
GATE LOGIC: POSITIVE
COPY MODE: DATA LOGGER
Selecting a FILE
If the instrument was switched off or if the Data Logger
was selected, then the FILE number last selected is
automatically active. In order to select another number:
Operation:
– Change to the second operating level and select the
function group of the Data Logger.
– Set the required number in FILE NUMBER.
The active status of each FILE number is displayed:
EMPTY:
File is empty.
ACTIVE:
File contains at least one reading.
FULL:
All measurement locations in this FILE are allocated.
ALL CLEAR:
You must first enter the number of FILES.
Operation Storing measured values - Data Logger
Page 82

Krautkramer USN 52R/USN 52L Issue 05, 02/00 5-37
Clearing FILES
All cleared data are irrevocably lost. Therefore, transfer
the data to a PC or printer beforehand if necessary.
Operation:
– Change to the second operating level and select the
function group for the Data Logger.
– Select the data set in FILE NUMBER which you
wish to delete. Select ALL CLEAR to completely
delete the Data Logger.
A Attention:
All deleted data are irretrievably lost!
– Simultaneously press M in FILE NUMBER and
keep it pressed for about 3 seconds.
When the FILE status “EMPTY” or “ALL CLEAR” is
displayed, the selected FILE or the complete contents
of the Data Logger are cleared.
Storing measured values
A measured value is only stored if it is not equal to 0
and if the active measurement location is empty. To
start with, set the following values:
FILE NUMBER: EMPTY or ACTIVE
FILE MODE: THICKNESS
COPY MODE: DATA LOGGER
MEASURE: 0 TO 1st or MULTECHO
The thickness value is displayed in the A-scan mode at
the top right-hand side. The measurement line shows:
• LOC: the memory slot number of the selected FILE.
The next measured value will be stored here.
• VAL: the value which is stored on the displayed
measurement location.
Operation:
Press A to store the measured value.
H Note:
You should transfer data to a PC in order to save them
permanently. You can order the software which is required for data transfer from Krautkrämer (refer to Chapter 2).
Storing measured values - Data Logger Operation
Page 83

5-38 Issue 05, 02/00 Krautkramer USN 52R/USN 52L
Viewing stored readings
You can select each measurement location and have
the values displayed which are stored there. The following appear as measurement location status:
EMPTY:
no measurement stored
x.xx mm:
the stored values in the active units of measure
ERROR:
erroneous measured value. Storing must be repeated.
Operating in the A-scan mode:
Measurement location number (LOC) and value (VAL)
are displayed in the measurement line.
– With T or V select the required measurement
location. The value stored there appears at VAL.
Operation from the second operating level:
– Select the function group containing the Data Logger.
– Using N or O select the required measurement
location when in LOCATION. The value stored there
is displayed in VALUE.
Clearing the measured values
You can clear the displayed reading and, if necessary,
store a new value at this measurement location.
Operation in the A-scan mode:
– Select the value to be cleared as described above.
– Simultaneously press U and keep the keys
pressed for about 3 seconds.
When VAL : EMPTY appears, then the measured value
is deleted.
– If necessary, press A in order to store a new value
at this measurement location.
Operation from the second operating level:
– Select the value to be deleted, as described above.
– When in VALUE, simultaneously press M and keep
the keys pressed for about 3 seconds.
When VALUE: EMPTY appears, the measured value is
deleted.
– Press Ain the A-scan mode to store a new value at
this measurement location.
Operation Storing measured values - Data Logger
Page 84

Krautkramer USN 52R/USN 52L Issue 05, 02/00 5-39
5.9 Configuring the USN 52R/
USN 52L
In the second operating level you will find all functions
which do not have a direct influence on the A-scan.
They are compiled into two function tables.
– Press X to change from the first to the second
operating level and back again.
The currently active table of the lower operating level
appears.
– Press T or V to change between function tables of
the second operating level.
Configuring the USN 52R/USN 52L Operation
Page 85

5-40 Issue 05, 02/00 Krautkramer USN 52R/USN 52L
Left Table
Left function group
GRATICULE Display graticule on/off
AMPLITUDE Amplitude reading
FREEZE MODE Storage mode
INTENSITY, Display brightness (only USN 52R)
Center function group
VELOCITY # 1 Sound velocity for coarse mode
VELOCITY # 2 Sound velocity for coarse mode
dB STEP Step range for D
GATE LOGIC Evaluation logic and on/off
Right function group
FILE NUMBER All functions are used for adjustment of
LOCATION the Data Logger in order to store and
VALUE recall the measured values.
FILE MODE
Operation Configuring the USN 52R/USN 52L
Page 86

Krautkramer USN 52R/USN 52L Issue 05, 02/00 5-41
Center Table
Left function group
A-SCAN Hollow or solid echo signal display
LANGUAGE Display language
DATA SET DIREC Directory of all data sets
DATA SET NAME Entry of data set names
Center function group
BAUD RATE All functions are for adjustment of the
LENGTH RS232 interface and for the copy
PARITY mode, e.g. for transfer to the
COPY MODE Data Logger
Right function group
ANGLE All functions are
THICKNESS used for calculation
X-VALUE of the
O-DIAM flaw position.
Configuring the USN 52R/USN 52L Operation
Page 87

5-42 Issue 05, 02/00 Krautkramer USN 52R/USN 52L
Right Table
Left function group
AUTO CAL Display graticule on/off
GATE LOGIC Amplitude reading
MEASURE Storage mode
TOF Display brightness
Center function group
AMPL.EVAL. Switching between DAC/TGC and DGS
MEMO MEMO function on/off
MEAS.UNITS Selection of units
Operation Configuring the USN 52R/USN 52L
Page 88

Krautkramer USN 52R/USN 52L Issue 05, 02/00 5-43
GRATICULE Display graticule
In this function you either switch the display graticule
on or off. In doing this, you are able to directly read off
the echo positions and heights.
Operation:
– Highlight the left function group in the left function
table with JC.
– Enable or disable GRATICULE with M. The
currently active setting is displayed.
AMPLITUDE Amplitude display
In this function you determine how the amplitude of the
highest echo is to be displayed in the gate. This appears in the measurement line as an “H = ...”-value.
You have the following possibilities:
• % Screen HT: A percentage of the screen height
• dB THRESHOLD: (dB REF not active) expressed as
a dB difference relative to the gate threshold
• dB THRESHOLD: (dB REF active) expressed as a
dB difference relative to the stored reference echo
amplitude
Operation:
– Highlight the left function group in the left function
table with I.
– With M select the required setting.
Configuring the USN 52R/USN 52L Operation
Page 89

5-44 Issue 05, 02/00 Krautkramer USN 52R/USN 52L
FREEZE MODE Storage mode
In this function you determine which display contents
you wish to store:
• FREEZE ALL: the complete A-scan presentation is
stored.
• FREEZE PEAK: the highest echo amplitude is
stored.
Operation:
– Highlight the left function group in the left function
table with I.
– With M select the required setting.
INTENSITY Display brightness
(only USN 52R)
You are able to adjust your USN 52 R to different ambient light conditions. To do this, you can switch between
two brightness positions:
•HIGH
•LOW
Operation:
– Highlight the left function group in the left function
table with I.
– With M select the required setting.
H Note:
Please consider a higher power consumption with
INTENSITY = HIGH which reduces the battery life.
Operation Configuring the USN 52R/USN 52L
Page 90

Krautkramer USN 52R/USN 52L Issue 05, 02/00 5-45
VELOCITY #1 Preselecting fixed values for
VELOCITY #2 sound velocity
When calibrating the display range, you can select between two fixed sound velocity values in the coarse
mode.
In this function you determine which values are available for selection.
• You can set the sound velocity between 1000 m/s
and 9999 m/s (continuously adjustable).
Operation:
– Highlight the center function group in the left function
table with I.
– With M set the required values in VELOCITY #1
and VELOCITY #2.
H Note:
The preset default values here are as follows:
• 5918 m/s for longitudinal sound velocity
• 3353 m/s for transverse sound velocity
dB STEP Sets step range
You can set the gain with five different step ranges. In
this function you enter your own value for the adjustable step.
• You are able to enter a step range between 6.5 dB
und 24.0 dB in steps of 0.5 dB.
Operation:
– Highlight the center function group in the left function
table with I.
– With M set the required step range.
Configuring the USN 52R/USN 52L Operation
Page 91

5-46 Issue 05, 02/00 Krautkramer USN 52R/USN 52L
GATE LOGIC Setting the gate logic
In this function you can activate the gate and select
the criteria for triggering the gate alarm. The following
settings are available:
• OFF: The gate is disabled. The gate bar is not
displayed.
• POSITIVE: The gate is enabled. When the signal
exceeds the threshold that was preset in a-THRESH,
the two LEDs will flash alternately.
• NEGATIVE: The gate is enabled. When the signal
falls below the threshold that was preset in a-
THRESH, the two LEDs will flash alternately.
• MEASURE: The gate is enabled. However, there is
no alarm with threshold violation.
H Note:
You can select either POSITIVE, NEGATIVE or MEASURE for digital thickness measurements.
A Attention:
Both gates only evaluate within the visible part of the
display range. If there are gates or parts of gates outside the visible part of the display range, then a gate
evaluation will not be made there.
Operation:
– Highlight the center function group in the left function
table with I.
– With M select the required gate setting.
Operation Configuring the USN 52R/USN 52L
Page 92

Krautkramer USN 52R/USN 52L Issue 05, 02/00 5-47
FILE NUMBER Selecting a file
In this function you enter the number of FILES for the
Data Logger. You can also select specific measured
values here. The indicated functions are:
• ALL CLEAR: No files have been configured
• FILE NUMBER # 1-99: Enter number of files
• ALL FILES: When there are configured files
• EMPTY: (before file number) No reading stored
• ACTIVE: (before file number) Reading stored
• FULL: (before file number) No measurement
locations free
Operation:
– Hightlight the right function group in the left function
table with I.
– With M select the required setting.
H Note:
More detailed information about operation of the Data
Logger can be found in Chapter 5.5.
LOCATION Selecting the measurement
location
Set the measurement location at which the next measured value is to be stored.
Operation:
– Highlight the right function group in the left function
table with I.
– With M select the number of the required
measurement location.
– If you wish to return to LOCATION 1, press N and
O simultaneously.
Configuring the USN 52R/USN 52L Operation
Page 93

5-48 Issue 05, 02/00 Krautkramer USN 52R/USN 52L
VALUE Displaying the measured value
The measured value at the selected location is displayed:
• EMTPY: No reading stored
• xx.x mm: The stored reading
Clearing the measured value:
– Highlight the right function group in the left function
table with I.
– If necessary, press M for about 3 seconds in order
to clear the displayed reading.
FILE MODE Enabling the Data Logger
In FILE MODE you can enable or disable the Data Log-
ger:
• OFF: Data Logger is disabled.
• THICKNESS: Data Logger is enabled.
H Note:
You can only enable the Data Logger when DATA LOGGER is selected in COPY MODE (right function table).
Operation:
– Highlight the right function group in the left function
table with I.
– With M alternately enable and disable the Data
Logger.
Operation Configuring the USN 52R/USN 52L
Page 94

Krautkramer USN 52R/USN 52L Issue 05, 02/00 5-49
LANGUAGE Setting the display language
In LANGUAGE you can select the dialog language for
interactive communication with the instrument. The
following languages are available:
• German • Swedish
• English • Danish
• French • Norwegian
• Italian • Finnish
• Spanish • Dutch
• Portuguese • Russian
Operation:
– Highlight the left function group in the center function
table with I.
– Select the required language with M.
MEAS. UNITS Setting the measurement
units
In this function you enter the measurement units in
which the instrument is to operate. You can select between METRIC or INCH.
Operation:
– Highlight the left function group in the center function
table with I.
– Select the required measurement unit with M.
H Note:
If the measurement units are changed at a later time,
the values are automatically converted. However, in
order to work with “rounded off” values, you should set
the measurement units at the beginning of the test.
Configuring the USN 52 R Operation
Page 95

5-50 Issue 05, 02/00 Krautkramer USN 52R/USN 52L
5.10 Data set names
Data set names
You can give the instrument settings (data sets) alphanumeric names which are also stored. In doing this you
are able to identify your data.
The data set number remains the clear identification
(e.g. with the application of data transfer software).
The names can consist of up to a maximum of 8 characters.
MEMO function
The MEMO function of the instrument gives further
possibilities for a better documentation of test results
(data sets). You can either type and store a text (max.
80 alphanumeric characters) for each data set, or you
can fill in data in predefined fields which are likewise
stored together with the data set. Unlike the text that
can be freely edited, a data header is structured and
consists of individual fields which are automatically or
manually filled in with additional information. You can
determine the structure of the header (number of fields,
field lenghts and field names) by means of remote con-
trol commands. You can define so-called active fields
which are automatically filled in with data (e.g. sound
path or amplitude) from the currently active A-scan.
When the MEMO function is switched on, the menu for
the entry of additional data (texts or header data) appears each time a data set is stored. This menu is always also accessible via the second operating level.
To use the MEMO function, you have to:
– switch the MEMO function on,
– define a header by means of remote control
commands if necessary.
H Note:
You will find the remote control commands in
chapter 8.7.
Operation Data set names
Page 96

Krautkramer USN 52R/USN 52L Issue 05, 02/00 5-51
DATA SET NAME Entry of a data set name
This function is used for entering the data set name.
Operation:
– Highlight the left function group in the center function
table using JC.
– Select the required data set number with M.
– Simultaneously press N and O allocated to the
function DATA SET NAME.
You will see the following display:
In the two lower lines you will see letters, numbers and
characters which you can use for the data set name.
To enter the required text, start by selecting the entry
position in each case, and then select the character
which should be inserted at this position.
The entry position and character are always marked by
a flashing cursor. You can enter all required characters
in any chosen order.
– Press the keys T or V in order to change the entry
position.
– Press the keys N or O next to the corresponding
character string in order to select a character. The
flashing cursor changes the string automatically. The
highlighted character is immediately inserted at the
entry position.
– Finally, press the key X to store the entries.
The data set name is now stored together with the data
set number and also appears in the function group
MEM in the first operating level.
The cursor flashes at the entry position of the inverted
field of the menu.
Data set names Operation
Page 97

5-52 Issue 05, 02/00 Krautkramer USN 52R/USN 52L
You can overwrite characters that have already been
entered simply by marking the corresponding position
and selecting another character.
DATA SET DIREC Data set directory
In this function you obtain a quick overlook over all
stored data sets with their names and numbers.
Operation:
– Mark the right function group in the center function
table with I.
– Switch on the function DATA SET DIREC with M.
A total of 12 data sets are displayed.
– A further group of 12 data sets is displayed using the
U keys; V selects the following group, T the
previous group.
You can select one of the displayed data sets in the
directory:
– Mark the column with I.
– Press the corresponding M keys.
The directory function is exited; the selected data set is
now entered into the left-hand function group in the
function DATA SET NAME.
Using the function group MEM in the first operating
Operation Data set names
Page 98

Krautkramer USN 52R/USN 52L Issue 05, 02/00 5-53
level and the function RECALL you are able to load this
data set as usual. The directory function can be exited
at any time by pressing X or F.
MEMO Storing additional information
You can store additional information on every data set,
either as freely formulated text (max. 80 alphanumeric
characters) or by filling in predefined fields of the data
header.
If the MEMO function is activated, the menu for entering additional information (texts or header data) appears
each time a data set is stored. This menu is always
also accessible via the second operating level.
Operation:
– Select a data set as described in the previous
section.
– Highlight the center function group in the right-hand
function table with I.
– Press N and O simultaneously for the function
MEMO. You will see the menu for the entry of additional information allocated to the selected data set.
Data set names Operation
Page 99

5-54 Issue 05, 02/00 Krautkramer USN 52R/USN 52L
If USN 52R/USN 52L are set to the entry of freely formulated texts, you will see the following display:
Entering texts
In the two lower lines you will see letters, numbers and
characters that you can use for the texts. To enter the
required text, start by selecting the entry position in
each case, and then select the character that should be
inserted at this position. The entry position and character are each marked by a flashing cursor. You can enter
all required characters in any chosen order.
H Note:
You only need the TAB character for the entry in a data
header.
– Press the keys T or V to change the entry position.
– Press the keys N or O next to the corresponding
character string in order to select a character. The
flashing cursor changes the string automatically. The
highlighted character is immediately inserted at the
entry position.
– Finally, press the key X to store all entries.
If a data header was defined for the entry of additional
information, you will see e.g. this display:
The cursor flashes at the entry position.
Operation Data set names
Page 100

Krautkramer USN 52R/USN 52L Issue 05, 02/00 5-55
The additional information is now stored together with
the data set number. If the MEMO function was used
for the selected data set, you will see the first 46 characters of the entered additional information instead of
the menu bar in the PREVIEW mode (the first operating
level).
Filling in a data header
In the two lower lines you will see letters, numbers and
characters that you can use for the texts.
Above it, you will see four other lines: two lines containing the labelings of the selectable fields, each of the
lines below them are used for text entries. Depending
on the data header configuration, some fields are already automatically filled in with data from the currently
active A-scan. You cannot select these fields.
To enter the required text, start by selecting a field and
then the entry position in each case, and continue by
selecting the character to be inserted at that position.
The entry position and character are always marked by
a flashing cursor. You can enter all required characters
in any chosen order.
Operation:
– Press the keys N or O next to the corresponding
character string in order to select a character. The
flashing cursor changes the string automatically. The
highlighted character is immediately inserted at the
entry position.
– Press the keys T or V to change the entry
position within a field.
Data set names Operation
 Loading...