

Epson H6000IIP - TM Two-color Thermal Line, C31C489111 - TM J7000P B/W Inkjet Printer, U01II - UB Print Server, OPOS ADK User Manual
Page 1

EPSON OPOS ADK MANUAL
User's Manual
(Installer/ SetupPOS/ TMUSB)
Version 2.65 Jul. 2009
Page 2

Version 2.65 Jul. 2009
ii
User's Manual
Installer, SetupPOS, TMUSB
Notes
(1) Reproduction of any part of this documentation by any means is prohibited.
(2) The contents of this documentation are subject to change without notice.
(3) Comments and notification of any mistakes in this documentation are gratefully
accepted.
(4) This software cannot be used with other equipment that the specified.
(5) EPSON will not be responsible for any consequences resulting from the use of any
information in this documentation.
Trademarks
Microsoft®, Windows®, Windows Vista™, Visual Basic® and Visual C++® are trademarks
or registered trademarks of Microsoft Corporation in the United States and/or other
countries.
EPSON® and ESC/POS® are registered trademarks of SEIKO EPSON CORPORATION.
Other product and company names used herein are for identification purposes only and
may be trademarks or registered trademarks of their respective companies.
Copyright © 2000-2009 SEIKO EPSON CORPORATION
Page 3

Version 2.65 Jul. 2009
iii
User's Manual
Installer, SetupPOS, TMUSB
Contents
SECTION 1. INTRODUCTION ............................................................................................1
SECTION 2. DEVELOPME
NT OUTLINE............................................................................2
2.1. Features....................................................................................................................2
2.2. Operating
Envi
ronment .............................................................................................2
2.3. Necessary System Components.............................................................................11
SECTION 3. INSTALLATION............................................................................................13
3.1. Features of the Insta
ller...........................................................................................13
3.2. Explanation of Installe
r Disks..................................................................................14
3.3. Installation
...............................................................................................................14
3.3.1. First Installation
................................................................................................14
3.3.2. Overwriting Installation
.....................................................................................22
3.4. Files to be installed .................................................................................................40
3.5. Types of Installation................................................................................................41
3.6. CO Registration.......................................................................................................41
3.6.1. The method for updating the CCO....................................................................42
3.7. INI Files...................................................................................................................42
3.8. System Setup Files.................................................................................................42
3.9. Installation Using the Registry File
..........................................................................42
3.10. Add-in Functions (Serv
ice Pack)...........................................................................44
3.11. Silent In
stallation...................................................................................................47
3.12. Messages for Installation.......................................................................................50
3.12.1. Messages at the Ti
me of Startup....................................................................50
3.12.2. Messages during In
stallation..........................................................................51
3.12.3. Message during Driver Installation after EPSON OPOS ADK Instal
lation......53
3.12.4. Messages When the Silent Mode is specifie
d ................................................53
3.12.5. Messages Related to Registry File.................................................................54
3.12.6. Messages during Coexisting Installation
.........................................................54
3.12.7. Add-in Installation Messages
..........................................................................55
3.13. Precautions for Inst
allation....................................................................................55
SECTION 4. UNINSTALLATION ......................................................................................58
4.1. Uninstallation Procedures .......................................................................................58
4.2. Types of Uninstallation
............................................................................................59
4.3. Silent Uninstallation.................................................................................................59
Page 4

Version 2.65 Jul. 2009
iv
User's Manual
Installer, SetupPOS, TMUSB
4.4. Messages for Uninstallation....................................................................................62
4.5. Precautions for Uninstallation..................................................................................63
SECTION 5. SETUPPOS UTILITY.................................................................................... 64
5.1. Starting and Exiting.................................................................................................64
5.1.1. Starting
SetupPOS ...........................................................................................64
5.1.2. Exiting SetupPOS.............................................................................................64
5.2. About the Basic Operations (MAIN WINDOW)
........................................................65
5.2.1. Menu.................................................................................................................65
5.2.2. Tool Ba
r............................................................................................................97
5.2.3. Left Pane
..........................................................................................................97
5.2.4. Right Pane........................................................................................................98
5.2.5. Pop-up Menus ................................................................................................101
5.2.6. Drag-and-drop ................................................................................................106
5.3. Using Wizards.......................................................................................................107
5.3.1. Using
the Add New Device wizard
..................................................................107
5.3.2. Using the USB Auto
Setup Wizard ..................................................................121
5.4. About the Warning Dialog Box
..............................................................................122
5.4.1. The Contradictory Warning of a Setup of Registry .........................................122
5.5. Messag
es..............................................................................................................127
5.5.1. Messages Explanations
..................................................................................127
5.6. Using th
e Keyboard Hook Control Utility
...............................................................132
5.6.1. Functions........................................................................................................132
5.6.2. Activati
on........................................................................................................132
5.6.3. Device Dependency
........................................................................................133
5.7. Using Devi
ces.......................................................................................................134
5.7.1. Setting up a Device.........................................................................................134
5.7.2. Removing a Device
.........................................................................................136
5.8. Glossary
................................................................................................................136
SECTION 6. EPSON TM USB DRIVER..........................................................................139
6.1. Installation
.............................................................................................................139
6.1.1. Windows 2000................................................................................................139
6.1.2. Windows XP...................................................................................................139
6.1.3. Windows Vista................................................................................................140
6.1.4. Precautions.....................................................................................................140
6.2. Updating an old vers
ion of the USB device driver.................................................141
6.2.1. Windows
2000................................................................................................141
6.3. Naming Devi
ces....................................................................................................141
6.3.1. Device Names in the Registry ........................................................................141
Page 5

Version 2.65 Jul. 2009
v
User's Manual
Installer, SetupPOS, TMUSB
6.4. Port Names on OPOS...........................................................................................142
SECTION 7. WARNINGS................................................................................................144
7.1. Precauti
ons for Connecting with USB I/F
..............................................................144
Page 6

Version 2.65 Jul. 2009
1
User's Manual
Installer, SetupPOS, TMUSB
Section 1. Introduction
This manual contains an outline of the EPSON OPOS ADK program, and provides
installation and setup instructions for the OPOS Setup program.
EPSON OPOS ADK contains software with API functions that can be used easily through
ActiveX controls supported by Visual Basic on a computer running Windows 2000,
Windows XP or Windows Vista platforms. Application developers using the Windows 2000,
Windows XP or Windows Vista operating systems, without any concern for attached
peripherals type or protocol, can develop real-time, multitasking, GUI-based, POS
applications with lots of functionality.
Section 2, Development Outline, describes the requirements and uses of EPSON OPOS
ADK, and lists what is included in the package.
Section 3, Installation, contains directions on how to install the program.
Section 4, Uninstallation, contains directions on how to uninstall the program.
Section 5, SetupPOS Utility, shows you how to use the program to record information
about OPOS devices in the system registry.
Section 6, Epson TM USB Driver, provides details on how to install the USB driver and the
device names.
Section 7, Warnings, describes the matters that demand attention.
The “UPOS 1.11”, created by the OPOS committee, describes API functions in detail. The
Application Development Guide describes application development. Please refer to these
manuals for information on these subjects.
Page 7

Version 2.65 Jul. 2009
2
User's Manual
Installer, SetupPOS, TMUSB
Section 2. Development Outline
This section describes development outline for the EPSON OPOS ADK.
2.1. Features
EPSON OPOS ADK offers standardized API functions th
at interface with
peripherals used in POS systems through ActiveX controls that can be run in
Visual Basic, operating on the Windows 2000, Windows XP or Windows Vista
platforms. Through these standardized API functions, you can develop powerful,
open POS systems easily.
2.2. Operating Environment
The EPSON
OPOS ADK
operates under the following environment.
• Computer Hardware
IBM PC/AT or compatible
* Please follow the specifications recommended by your OS for system
requirements (CPU, RAM, etc.).
• Operating Systems
Windows 2000
Windows XP
Windows Vista
Windows Embedded for Point Of Service
Windows Embedded POSReady 2009
* For the details of each operation system version, refer to the release note
included in the Installation disks.
* Internet Explorer: Version 5.0 or higher (Recommend)
* There are unsupported devices in Windows Vista environment.
For details of contents, please refer to "Accessible Devices" of next page.
• Accessible Serial Ports
COM1, COM2, COM3, COM4 (extended port functions allow use of
COM5 though COM10)
Page 8

Version 2.65 Jul. 2009
3
User's Manual
Installer, SetupPOS, TMUSB
• Accessible Parallel Ports
LPT1, LPT2, LPT3 (operation is unverified in LPT3)
• Accessible USB ports
USB equipment must be connected to the IBM PC/AT compatible
machines that are equipped with USB connectors or use USB expansion
cards (however, the operating system must be the English version of
Windows 2000, Windows XP or Windows Vista when USB is used.)
If the USB device cannot be identified when an IBM PC/AT compatible
machine equipped with a USB connector is in use (especially for
machines put on the market prior to the English version of Windows 98
being available), contact the manufacturer.
• Accessible Network
Ethernet and IEEE802.11b support applies to TCP/IP compliant
networks. The setup of a compliant network should be handled by a
qualified network administrator.
• Supported Languages
Microsoft Visual Basic Version 5.0 or higher
Microsoft Visual C++ Version 5.0 or higher
• Accessible Devices
Line Displays:
EPSON DM-D210
EPSON DM-D110U (USB)
EPSON DM-D210U (USB)
EPSON DM-D500
EPSON DM-D500U (USB)
EPSON DM-D120
*1
(For ARCX(IM-700))
*1
The operation is not supported in Windows Vi sta environment.
MICR:
EPSON TM-H5000II with MICR
EPSON TM-H5000IIP with MICR
EPSON TM-H5000IIU with MICR (USB)
EPSON TM-H5000IIE with MICR (Ethernet)
Page 9

Version 2.65 Jul. 2009
4
User's Manual
Installer, SetupPOS, TMUSB
EPSON TM-U675 with MICR
EPSON TM-U675P with MICR
EPSON TM-U675U with MICR (USB)
EPSON TM-U675E with MICR (Ethernet)
EPSON TM-U950 with MICR
EPSON TM-H6000II with MICR
EPSON TM-H6000IIP with MICR
EPSON TM-H6000IIU with MICR (USB)
EPSON TM-H6000IIE with MICR (Ethernet)
EPSON TM-J7000/J7100 with MICR
EPSON TM-J7000P/J7100P with MICR
EPSON TM-J7000U/J7100U with MICR (USB)
EPSON TM-J7000E/J7100E with MICR (Ethernet)
EPSON TM-H5200 with MICR
EPSON TM-H5200P with MICR
EPSON TM-H5200U with MICR (USB)
EPSON TM-H5200E with MICR (Ethernet)
EPSON TM-H6000III with MICR
EPSON TM-H6000IIIP with MICR
EPSON TM-H6000IIIU with MICR (USB)
EPSON TM-H6000IIIE with MICR (Ethernet)
POS Printers:
EPSON RP-U420
EPSON RP-U420P
EPSON TM-295
EPSON TM-295P
EPSON TM-H5000II
EPSON TM-H5000IIP
EPSON TM-H5000IIU (USB)
EPSON TM-H5000IIE (Ethernet)
EPSON TM-H5000IIM
EPSON TM-H5000IIPM
EPSON TM-H5000IIMU (USB)
EPSON TM-H5000IIME (Ethernet)
EPSON TM-L60II
Page 10

Version 2.65 Jul. 2009
5
User's Manual
Installer, SetupPOS, TMUSB
EPSON TM-L60IIP
EPSON TM-T90
EPSON TM-T90P
EPSON TM-T90U (USB)
EPSON TM-T90E (Ethernet)
EPSON TM-U230
EPSON TM-U230P
EPSON TM-U230U (USB)
EPSON TM-U230E (Ethernet)
EPSON TM-U325
EPSON TM-U325P
EPSON TM-U325U (USB)
EPSON TM-U325E (Ethernet)
EPSON TM-U375
EPSON TM-U375P
EPSON TM-U590
EPSON TM-U590P
EPSON TM-U590U (USB)
EPSON TM-U590E (Ethernet)
EPSON TM-U590M
EPSON TM-U590PM
EPSON TM-U590MU (USB)
EPSON TM-U590ME (Ethernet)
EPSON TM-U675
EPSON TM-U675P
EPSON TM-U675U (USB)
EPSON TM-U675E (Ethernet)
EPSON TM-U675M
EPSON TM-U675PM
EPSON TM-U675MU (USB)
EPSON TM-U675ME (Ethernet)
EPSON TM-U950
EPSON TM-U950P
EPSON TM-U230M
EPSON TM-U230PM
EPSON TM-U230MU (USB)
EPSON TM-U230ME (Ethernet)
Page 11

Version 2.65 Jul. 2009
6
User's Manual
Installer, SetupPOS, TMUSB
EPSON TM-J2000/J2100
EPSON TM-J2000P/J2100P
EPSON TM-J2000U/J2100U (USB)
EPSON TM-J2000E/J2100E (Ethernet)
EPSON TM-L90
EPSON TM-L90P
EPSON TM-L90U (USB)
EPSON TM-L90E (Ethernet)
EPSON TM-U210DM
EPSON TM-U210DPM
EPSON TM-U210DMU (USB)
EPSON TM-U210DME (Ethernet)
EPSON TM-H6000II
EPSON TM-H6000IIP
EPSON TM-H6000IIU (USB)
EPSON TM-H6000IIE (Ethernet)
EPSON TM-H6000IIM
EPSON TM-H6000IIPM
EPSON TM-H6000IIMU (USB)
EPSON TM-H6000IIME (Ethernet)
EPSON TM-T88III
EPSON TM-T88IIIP
EPSON TM-T88IIIU (USB)
EPSON TM-T88IIIE (Ethernet)
EPSON TM-T88IIIM
EPSON TM-T88IIIPM
EPSON TM-T88IIIMU (USB)
EPSON TM-T88IIIME (Ethernet)
EPSON TM-L90M
EPSON TM-L90PM
EPSON TM-L90MU (USB)
EPSON TM-L90ME (Ethernet)
EPSON TM-T90M
EPSON TM-T90PM
EPSON TM-T90MU (USB)
EPSON TM-T90ME (Ethernet)
EPSON TM-J2000M/J2100M
Page 12

Version 2.65 Jul. 2009
7
User's Manual
Installer, SetupPOS, TMUSB
EPSON TM-J2000PM/J2100PM
EPSON TM-J2000MU/J2100MU (USB)
EPSON TM-J2000ME/J2100ME (Ethernet)
EPSON TM-J7000/J7100
EPSON TM-J7000P/J7100P
EPSON TM-J7000U/J7100U (USB)
EPSON TM-J7000E/J7100E (Ethernet)
EPSON TM-J7500/J7600
EPSON TM-J7500P/J7600P
EPSON TM-J7500U/J7600U (USB)
EPSON TM-J7500E/J7600E (Ethernet)
EPSON TM-U220A
EPSON TM-U220AP
EPSON TM-U220AU (USB)
EPSON TM-U220AE (Ethernet)
EPSON TM-U220B
EPSON TM-U220BP
EPSON TM-U220BU (USB)
EPSON TM-U220BE (Ethernet)
EPSON TM-U220D
EPSON TM-U220DP
EPSON TM-U220DU (USB)
EPSON TM-U220DE (Ethernet)
EPSON TM-U220AM
EPSON TM-U220APM
EPSON TM-U220AMU (USB)
EPSON TM-U220AME (Ethernet)
EPSON TM-U220BM
EPSON TM-U220BPM
EPSON TM-U220BMU (USB)
EPSON TM-U220BME (Ethernet)
EPSON TM-U220DM
EPSON TM-U220DPM
EPSON TM-U220DMU (USB)
EPSON TM-U220DME (Ethernet)
EPSON TM-P60
EPSON TM-P60W (IEEE802.11b)
Page 13

Version 2.65 Jul. 2009
8
User's Manual
Installer, SetupPOS, TMUSB
EPSON TM-H5200
EPSON TM-H5200P
EPSON TM-H5200U (USB)
EPSON TM-H5200E (Ethernet)
EPSON TM-U220AM_BM
EPSON TM-U220APM_BM
EPSON TM-U220AM_BMU (USB)
EPSON TM-U220AM_BME (Ethernet)
EPSON TM-U220BM_BM
EPSON TM-U220BPM_BM
EPSON TM-U220BM_BMU (USB)
EPSON TM-U220BM_BME (Ethernet)
EPSON TM-U220DM_BM
EPSON TM-U220DPM_BM
EPSON TM-U220DM_BMU (USB)
EPSON TM-U220DM_BME (Ethernet)
EPSON TM-T88IIIX
*1
(For ARCX(IM-700))
EPSON TM-T88IIIXM
*1
(For ARCX(IM-700))
EPSON TM-H6000III
EPSON TM-H6000IIIP
EPSON TM-H6000IIIU (USB)
EPSON TM-H6000IIIE (Ethernet)
EPSON TM-H6000IIIM
EPSON TM-H6000IIIPM
EPSON TM-H6000IIIMU (USB)
EPSON TM-H6000IIIME (Ethernet)
EPSON TM-P60PEELER
EPSON TM-P60PEELERW (IEEE802.11b)
EPSON TM-U120M
EPSON TM-U120PM
EPSON TM-T88IV
EPSON TM-T88IVP
EPSON TM-T88IVU (USB)
EPSON TM-T88IVE (Ethernet)
EPSON TM-T88IVM
EPSON TM-T88IVPM
EPSON TM-T88IVMU (USB)
Page 14

Version 2.65 Jul. 2009
9
User's Manual
Installer, SetupPOS, TMUSB
EPSON TM-T88IVME (Ethernet)
EPSON TM-T70
EPSON TM-T70P
EPSON TM-T70U (USB)
EPSON TM-T70E (Ethernet)
EPSON TM-295M
EPSON TM-295PM
EPSON TM-U950M (EPROM)
EPSON TM-U950PM (EPROM)
EPSON TM-U950M (FlashROM)
EPSON TM-U950PM (FlashROM)
EPSON TM-T88IVReStick
EPSON TM-T88IVReStickP
EPSON TM-T88IVReStickU (USB)
EPSON TM-T88IVReStickE (Ethernet)
*1
The operation is not supported in Windows Vi sta environment.
Cash Drawer:
Standard Cash Drawer for TM series (Serial, Parallel, USB, Ethernet)
Multi_A Cash Drawer (2 Drawer) (Serial, Parallel, USB, Ethernet)
Multi_B Cash Drawer (2 Drawer) (Serial, Parallel, USB, Ethernet)
Hard Totals:
*1
EPSON IM-700 CompactFlash (For ARCX (IM-700))
EPSON SR-610 CompactFlash (For URBANII (SR-610))
*1
The operation is not supported in Windows Vi sta environment.
MSR:
*1
EPSON DM-MS123 (For URBANII (SR-610))
EPSON DM-M820 (For MR (IM-800))
EPSON DM-MX112/DM-MX123 (For ARCX (IM-700))
*1
The operation is not supported in Windows Vi sta environment.
Keylock:
*1
EPSON DM-KX060 (For ARCX (IM-700), URBANII (SR-610))
*1
The operation is not supported in Windows Vi sta environment.
Page 15

Version 2.65 Jul. 2009
10
User's Manual
Installer, SetupPOS, TMUSB
CheckScanner:
EPSON TM-H6000II with Scanner
EPSON TM-H6000IIP with Scanner
EPSON TM-H6000IIU with Scanner (USB)
EPSON TM-H6000IIE with Scanner (Ethernet)
EPSON TM-H6000III with Scanner
EPSON TM-H6000IIIP with Scanner
EPSON TM-H6000IIIU with Scanner (USB)
EPSON TM-H6000IIIE with Scanner (Ethernet)
ElectronicJournal:
EPSON TM-H6000III
EPSON TM-H6000IIIP
EPSON TM-H6000IIIU (USB)
EPSON TM-H6000IIIE (Ethernet)
EPSON TM-H6000IIIM
EPSON TM-H6000IIIPM
EPSON TM-H6000IIIMU (USB)
EPSON TM-H6000IIIME (Ethernet)
EPSON TM-T88IV
EPSON TM-T88IVP
EPSON TM-T88IVU (USB)
EPSON TM-T88IVE (Ethernet)
EPSON TM-T88IVM
EPSON TM-T88IVPM
EPSON TM-T88IVMU (USB)
EPSON TM-T88IVME (Ethernet)
Page 16

Version 2.65 Jul. 2009
11
User's Manual
Installer, SetupPOS, TMUSB
2.3. Necessary System Components
In order to develop an application using OPOS API, the following hardware and
software are necessary.
• Computer Body Parts
IBM PC/AT Interchange Machine
* Please follow the specifications recommended by your OS for system
requirements (CPU, RAM, etc.).
• Operating System
Windows 2000
Windows XP
WIndows Vista
Windows Embedded for Point Of Service
Windows Embedded POSReady 2009
• Floppy Disk Drive
One or more floppy disc drives
• Hard Disk, Memory
At least 10M bytes hard disk capacity is needed except for
recommended blank capacity of using OS (Windows 2000, Windows XP,
WIndows Vista).
• Disks
Please confirm that your package contains all the following items.
Install Disks:
EPSON OPOS ADK Installation Disk x
These disks include software, manuals and sample programs
Sample Programs:
EPSON OPOS ADK Install Disk contains practical sample
program guides using common API for each device. The method
for use is described on the sample program guide. Please copy
onto the hard disk as necessary.
Manuals:
On-line manuals are included on EPSON OPOS ADK Disk.
USER’S GUIDE
Information on EPSON OPOS ADK installation and setup.
APPLICATION DEVELOPMENT GUIDE
Page 17

Version 2.65 Jul. 2009
12
User's Manual
Installer, SetupPOS, TMUSB
Programming examples and explanations of factors governing
of peripherals. The Application Development Guide is divided
into common subjects and device subjects. The common
subjects portion contains general information about OPOS and
device classes. The device subjects’ portion contains
information about specific devices. Please refer to common
subjects and device subjects for the device being used.
SAMPLE PROGRAM GUIDE
Contains outlines, detailed explanations, and notes on the
sample program included on the EPSON OPOS ADK.
Page 18

Version 2.65 Jul. 2009
13
User's Manual
Installer, SetupPOS, TMUSB
Section 3. Installation
Running the EPSON OPOS ADK Installer program can perform all the processing required
for installation of the EPSON OPOS ADK. To ensure optimal use of the OPOS, various
functions are offered during installation. Please read this manual for details.
When installing or reinstalling, first ensure that all running application programs are closed;
both those use the OPOS files as well as any other applications.
After installing of EPSON OPOS ADK, it is necessary to confirm the setup, such as port
and device settings. For details, please refer to "Section 5. SetupPOS Utility" of this
manual.
The EPSON OPOS ADK install program is explained in the following.
3.1. Features of the Installer
This Installer is
created using InstallShield 12.
The Installer
performs the following operations:
• Specifies the destination directory for installation
• Specifies the destination folder for installation
• Specifies the initial settings for OPOS
• Specifies REG files
• Installation type
y Full installation ("Common CO" or "EPSON CO")
y Custom installation
(1) Selection of device class units, Selection of CO
(2) Selection of the old and new CO (Selection of the CO install)
• Installation of the manual and the Sample Program
• Installation of the driver of EPSON TM USB
• Installation of the driver of parallel
• Uninstallation type
y Full uninstallation (all)
y Custom uninstallation
(3) Selection of the SO
• Add-in (Service Pack, File update)
• Silent mode installation/uninstallation
Page 19

Version 2.65 Jul. 2009
14
User's Manual
Installer, SetupPOS, TMUSB
3.2. Explanation of Installer Disks
There is only a CD-ROM install disk. The installation from the FD is not supported.
Install according to the following procedure.
3.3. Installation
The procedu
re of install is as follows:
When Windo
ws 2000, Windows XP or Windows Vista is used, installation can be
done only by authorized users of the PC installation. Please request the
authorized users for help.
Installation of the EPSON TM USB Driver (EPSON USB controller for TM printer
series) is required when the USB POSPrinter, LineDisplay, MICR, CheckScanner,
CashDrawer and ElectronicJournal are to be used. Without the installation in
advance, the devices used with USB port cannot be registered normally. Also,
use the Windows 2000, Windows XP or Windows Vista when EPSON OPOS
USB devices are to be used.
For details of EPSON TM USB Driver, please refer to the "Section 6 EPSON TM
USB Drive"of this manual.
3.3.1.
First Installation
Without the installation of EPSON OPOS ADK in
advance, install according to the
following procedure.
<Installation Procedure>
(1) Run the SETUP.EXE program on disk 1.
If Setup is executed while other program is running, its operation is not
guaranteed. It is suggested to close all programs before executing Setup.
Startup of the Setup program may take some time.
Page 20
Version 2.65 Jul. 2009
15
User's Manual
Installer, SetupPOS, TMUSB
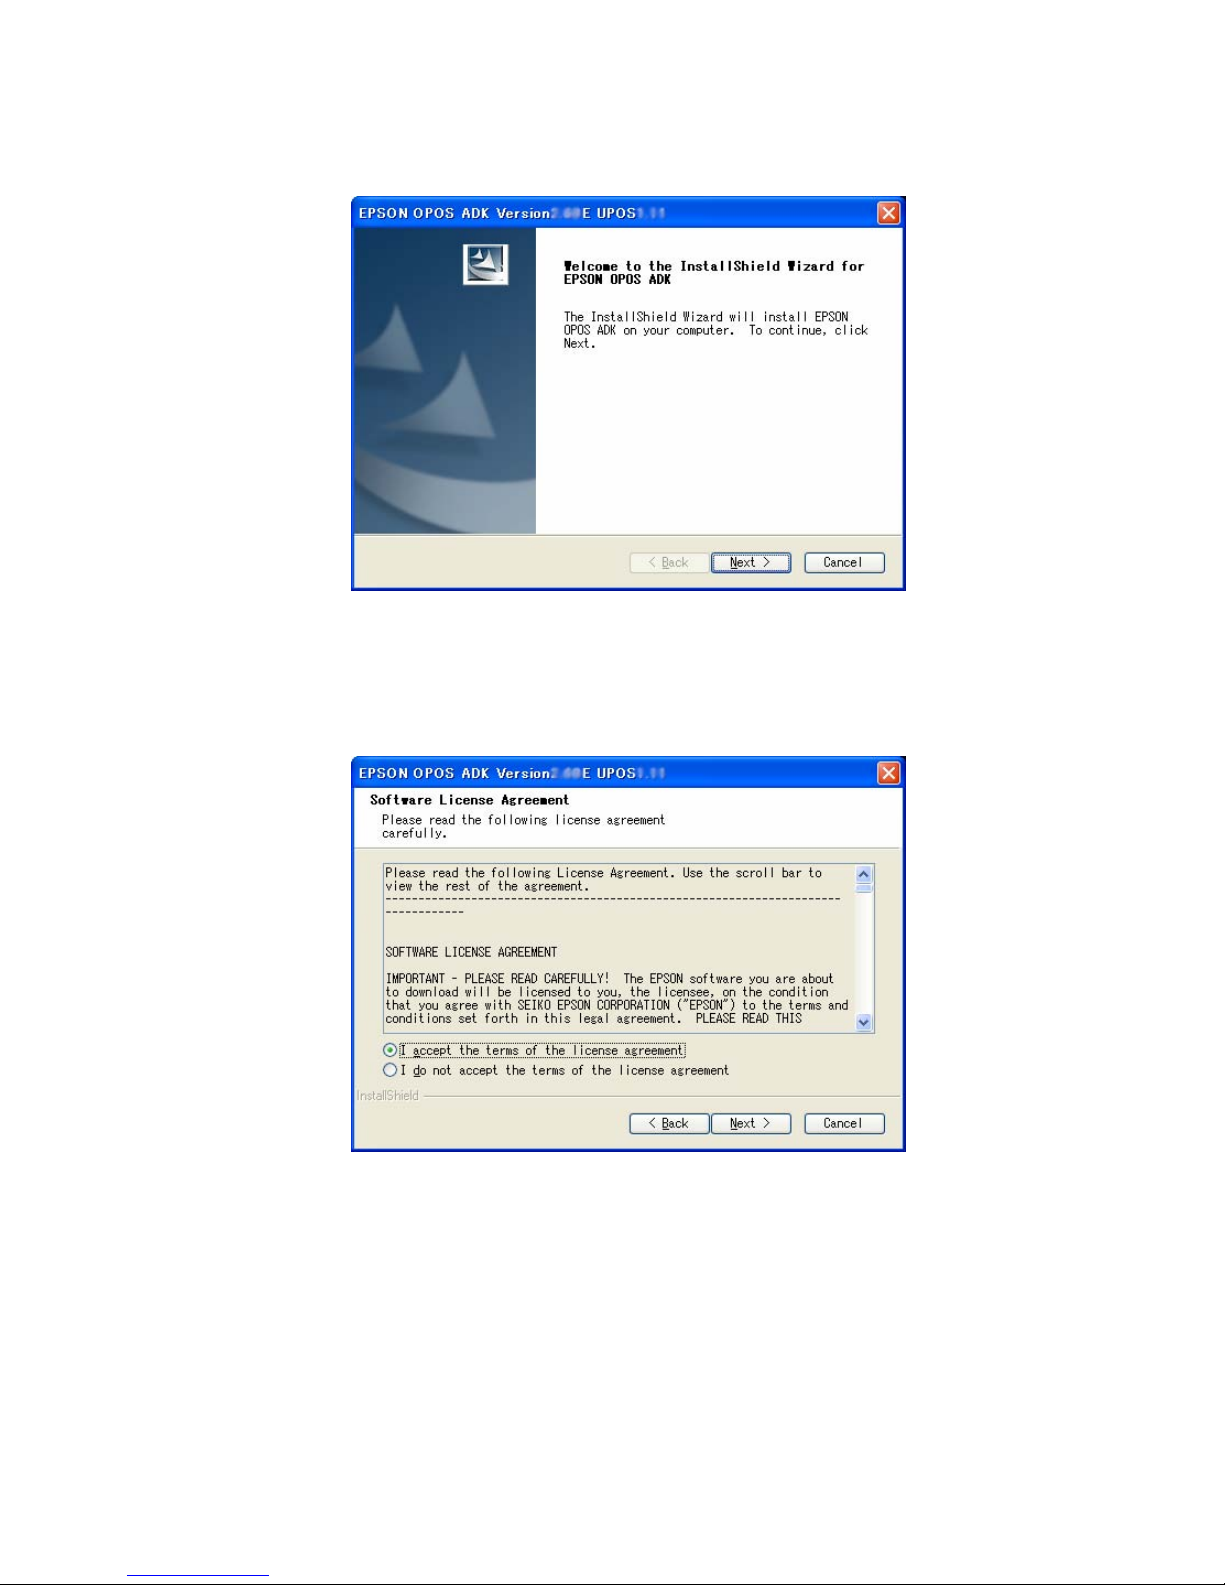
(2) The “Welcome” dialog is displayed.
Read the contents and then select the [Next] button if agreed with the
contents.
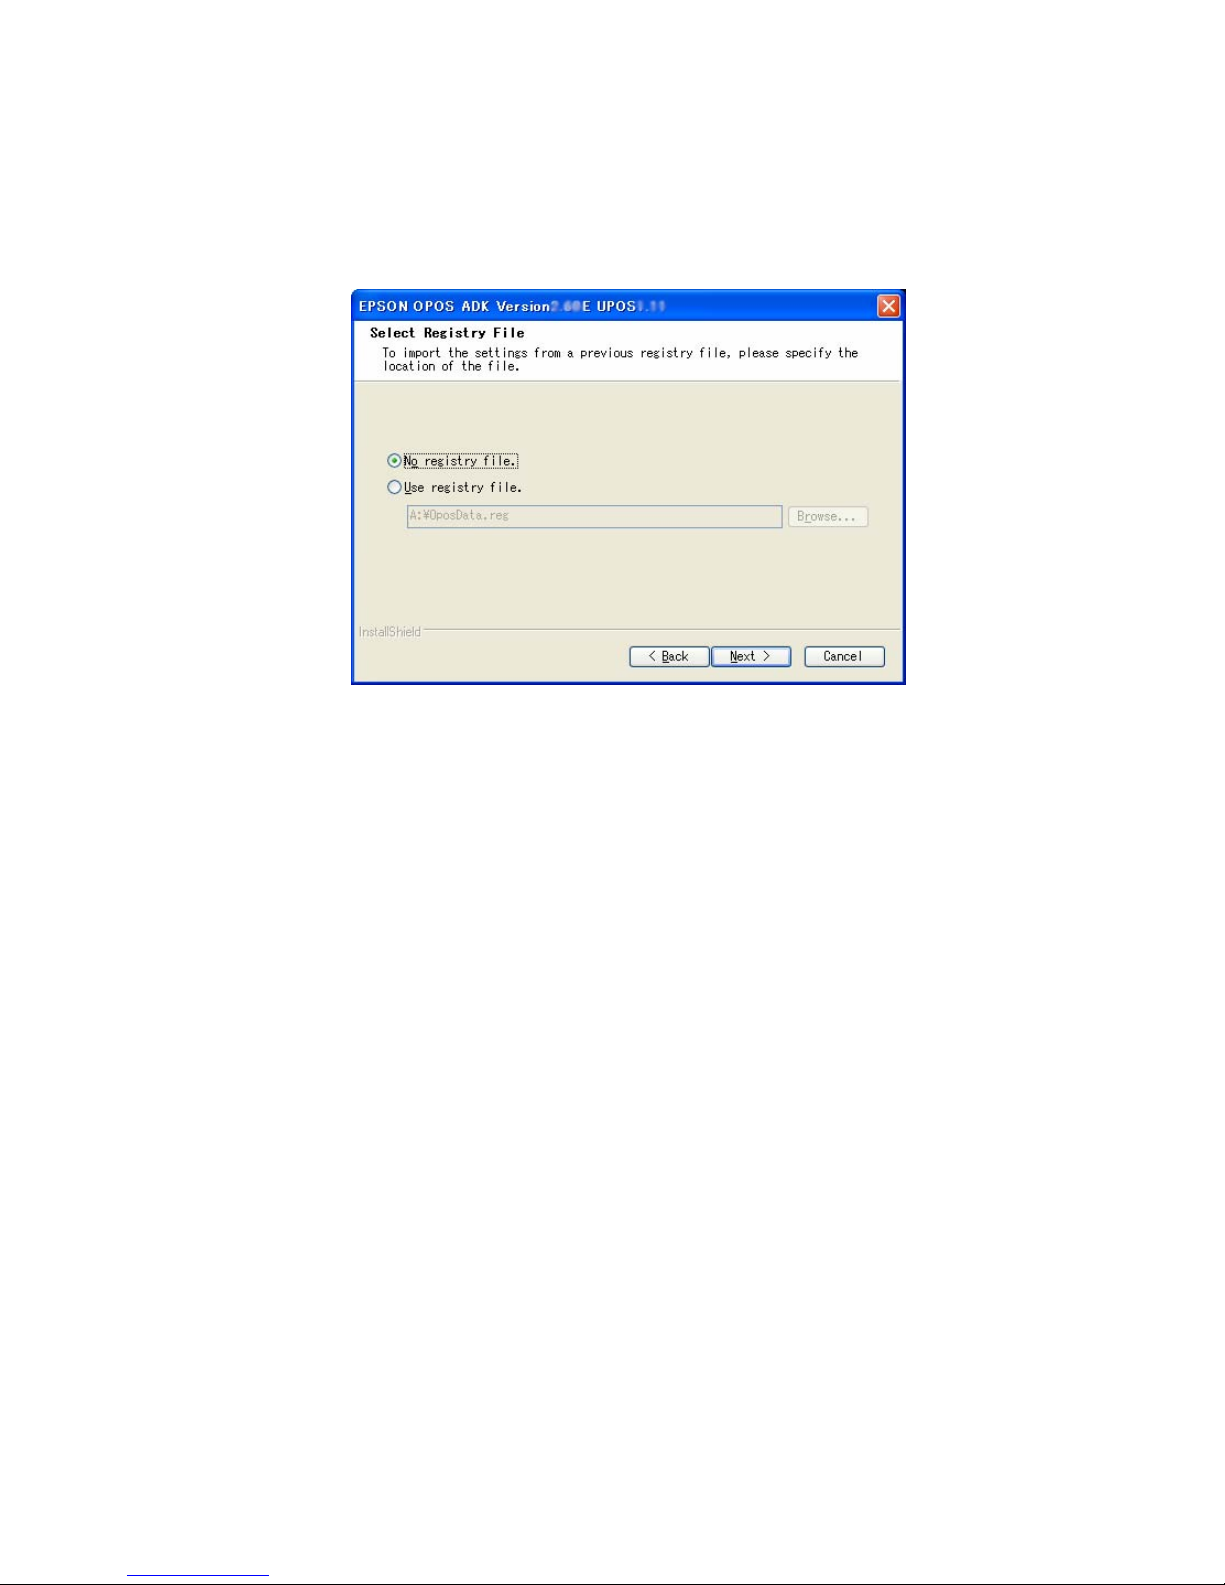
(3) The “Software License Agreement” dialog box is displayed.
To install the EPSON OPOS ADK, the user must agree to the contents of
the displayed agreement. Read the contents. Select “I accept the terms of
the license agreement” if agreed with the Software License Agreement.
After the selection, the [Next] button becomes effective. Select the [Next]
button. If the Software License Agreement is not acceptable, select “I do
not accept the terms of the license agreement”. Then, select the [Cancel]
Page 21
Version 2.65 Jul. 2009
16
User's Manual
Installer, SetupPOS, TMUSB
button. Exits installation. Select the [Back] button for returning to the
previous dialog box.
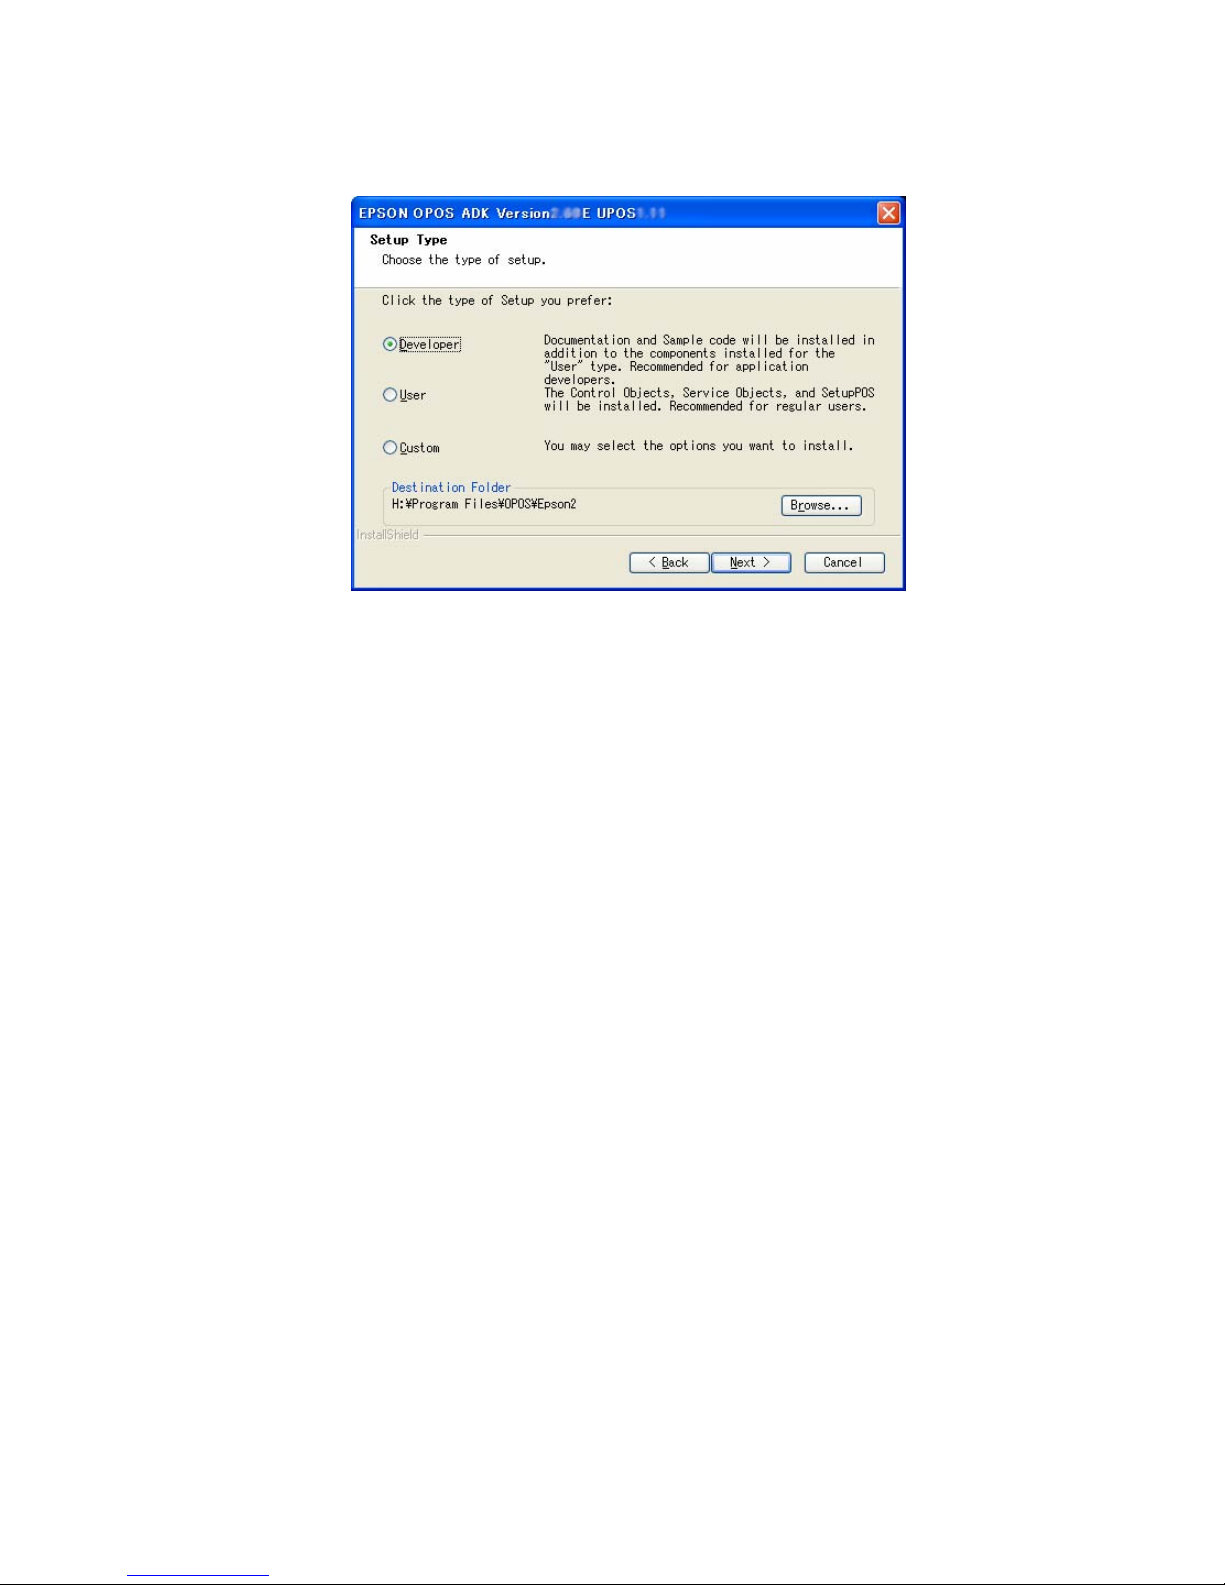
(4) The “Select Registry File” dialog box is displayed.
Select “No Registry File” not to use the REG file. Then, select the [Next]
button. Select “Use Registry File” to use the REG file. Enter the full path
REG file name after the text box is enabled. Then, select the [Next] button.
Press the [Browse...] button to specify the folder name that includes the
REG file. The REG file is a file for restoring information related to EPSON
OPOS ADK. Use the SetupPOS utility to create this file. If an improper
Registry File is selected, an error message will be displayed and it will not
be possible to move to the next dialog box. Follow the directions of the
error message and confirm that the Registry File is correct.When the
Registry File is set correctly, subsequent information can be referred from
the Registry File.
Select the [Back] button for return to the previous dialog box.
Select the [Cancel] button for quitting.
Page 22
Version 2.65 Jul. 2009
17
User's Manual
Installer, SetupPOS, TMUSB
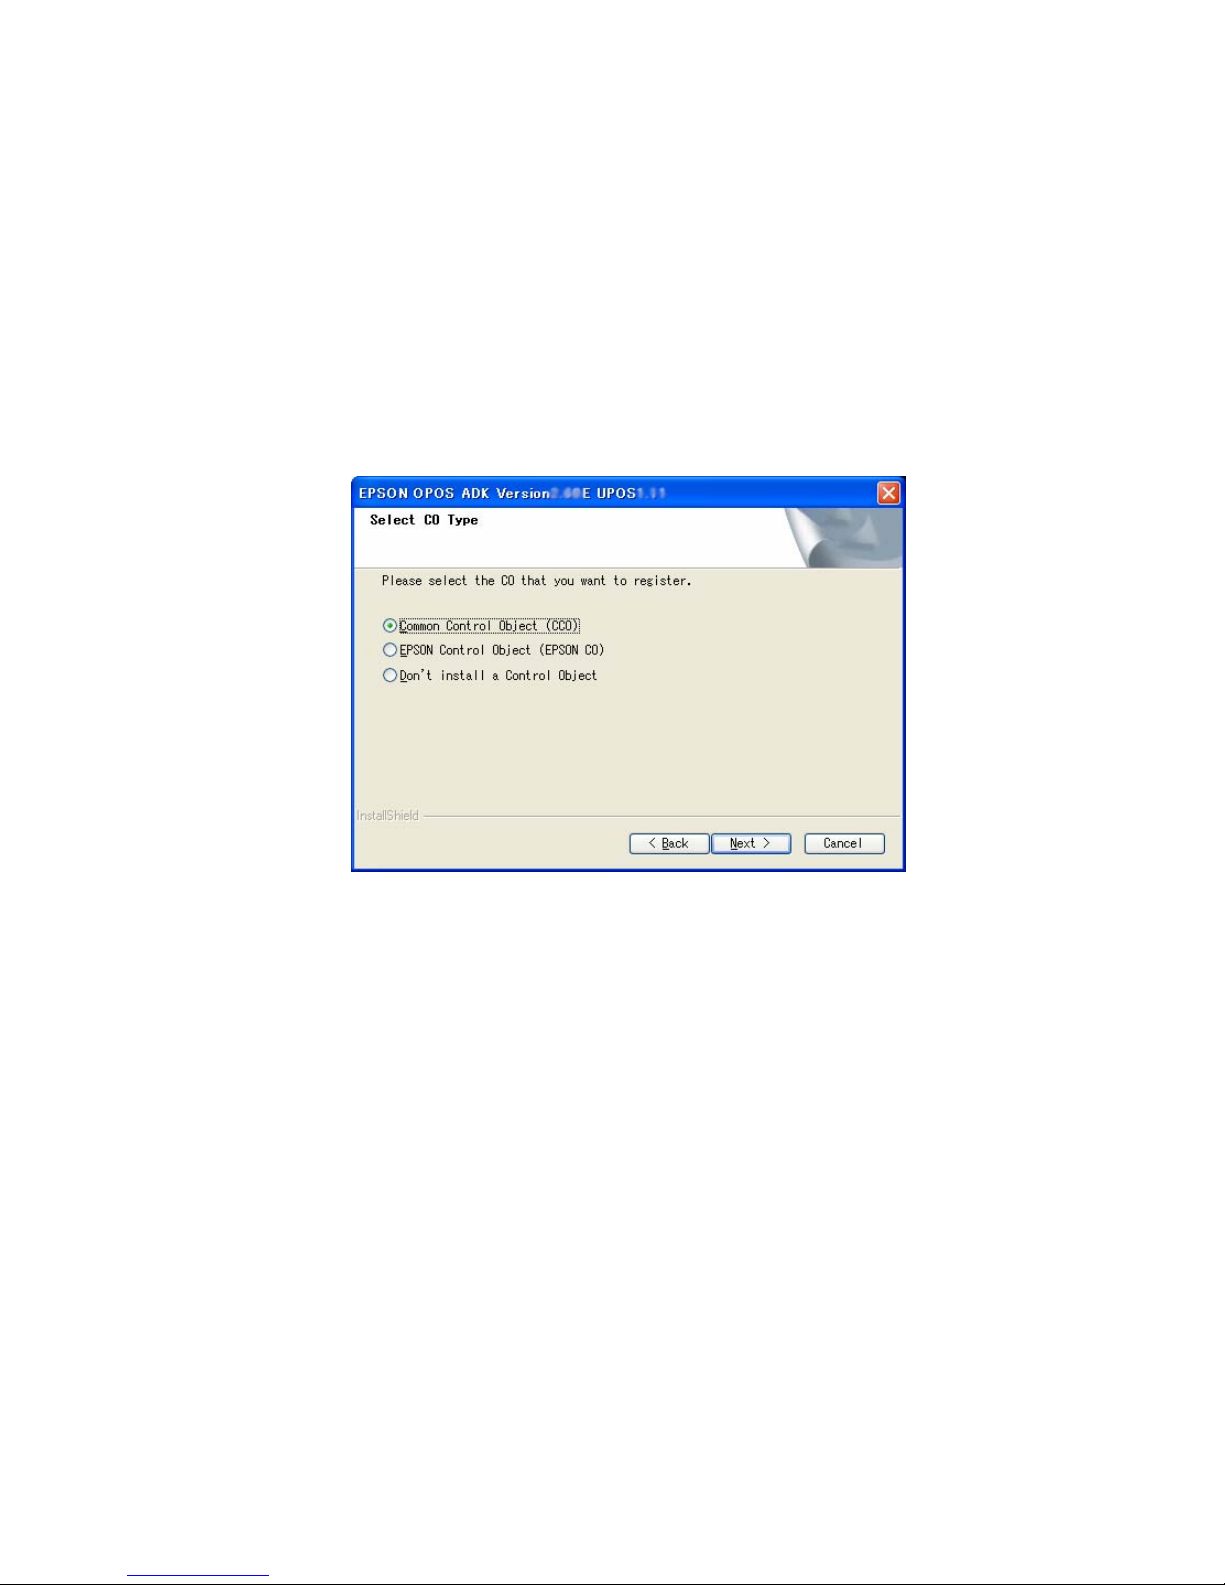
(5) The “Setup Type” dialog box is displayed.
Select a setup type to be installed. Selectable types are “Developer”,
“User” and “Custom”.
The details of type are as follows:
Developer
Components:
Full installation of programs
Manual
SampleProgram
CO:
<Windows 2000/XP> CCO
<Windows Vista> CCO
User
Components:
Full installation of programs
CO:
<Windows 2000/XP> CCO
<Windows Vista> CCO
Custom
Select components to be installed.
Page 23
Version 2.65 Jul. 2009
18
User's Manual
Installer, SetupPOS, TMUSB
(6) After selecting a type, press the [Next] button.
When the "Developer" or the "Users" have been selected, the “Start
Copying Files” dialog box is displayed. Confirm the contents and select the
[Next] button.
When the "Custom” has been selected, the “Select CO Type” dialog box is
displayed.
Select the [Back] button for return to the previous dialog box.
Select the [Cancel] button for quitting.
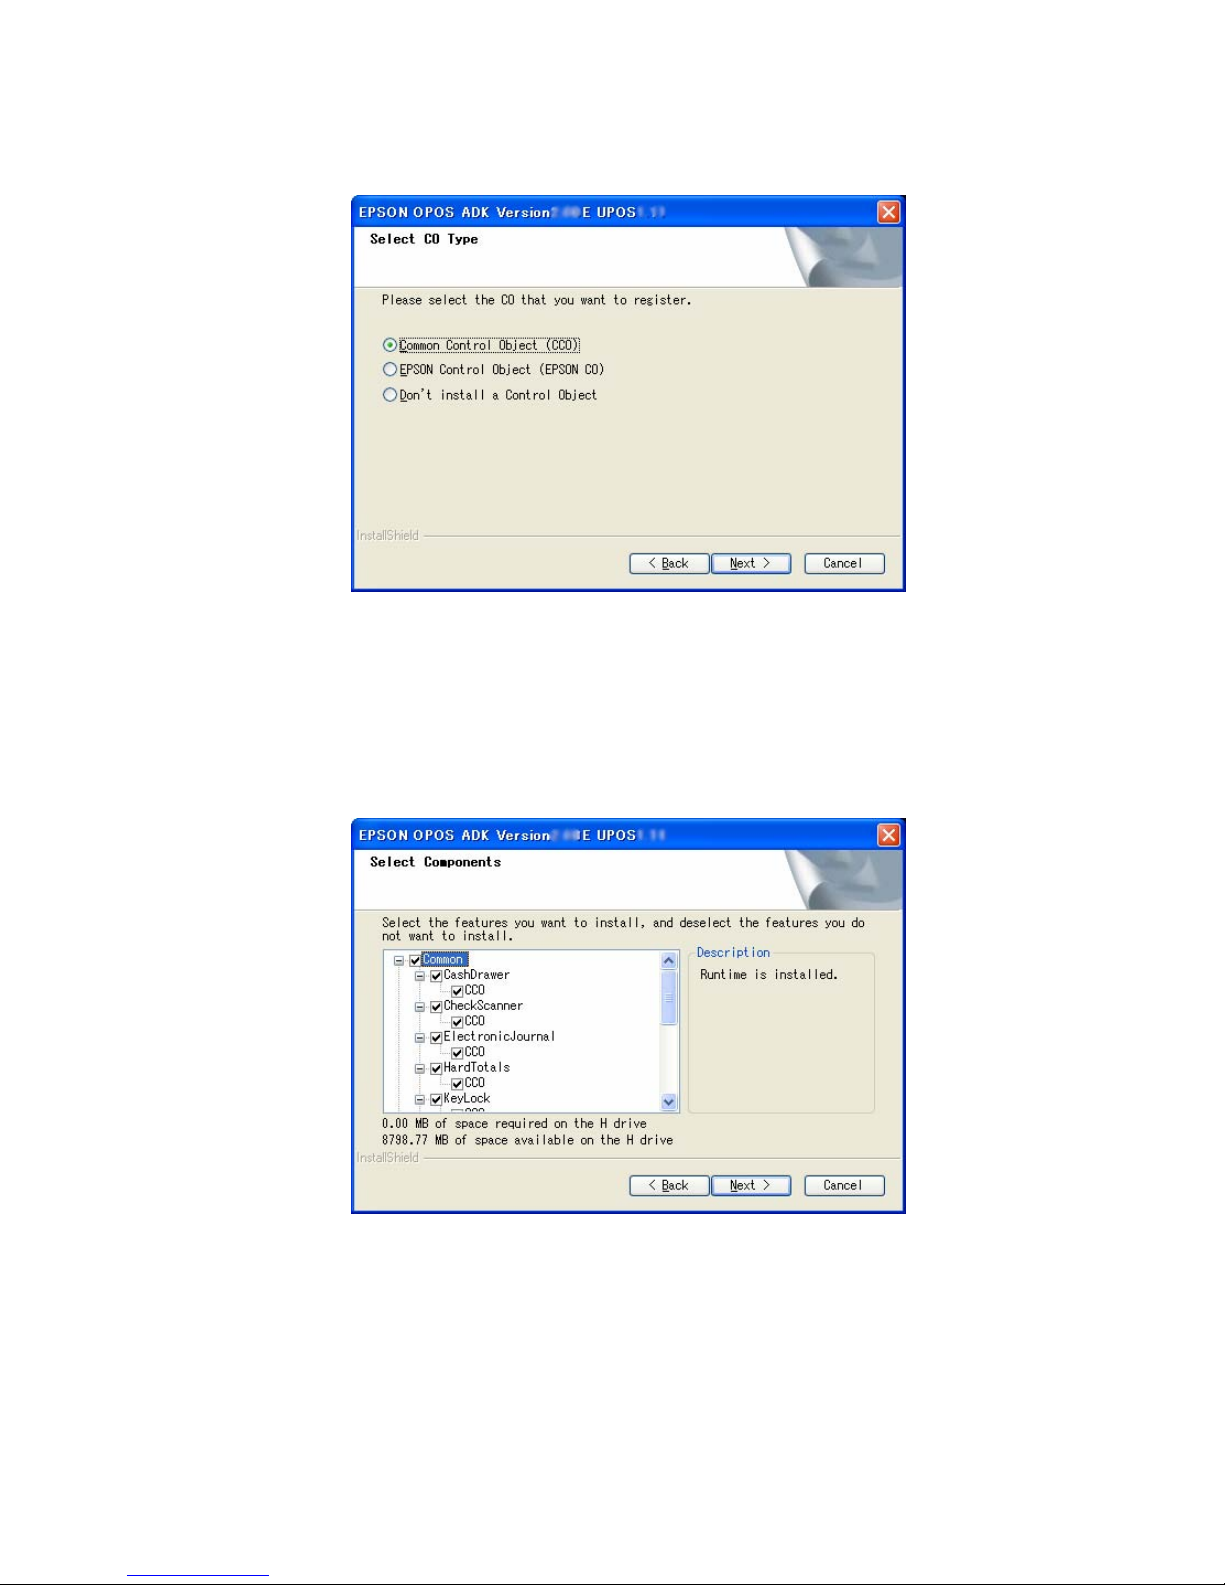
(7) The “Select CO Type” dialog box is displayed.
Select the CO that has a priority for registration. The CO registered here
will be valid for all devices.
When the type is decided, select the [Next] button.
Select the [Back] button to return to the previous dialog box.
Select the [Cancel] button for quitting.
Page 24
Version 2.65 Jul. 2009
19
User's Manual
Installer, SetupPOS, TMUSB
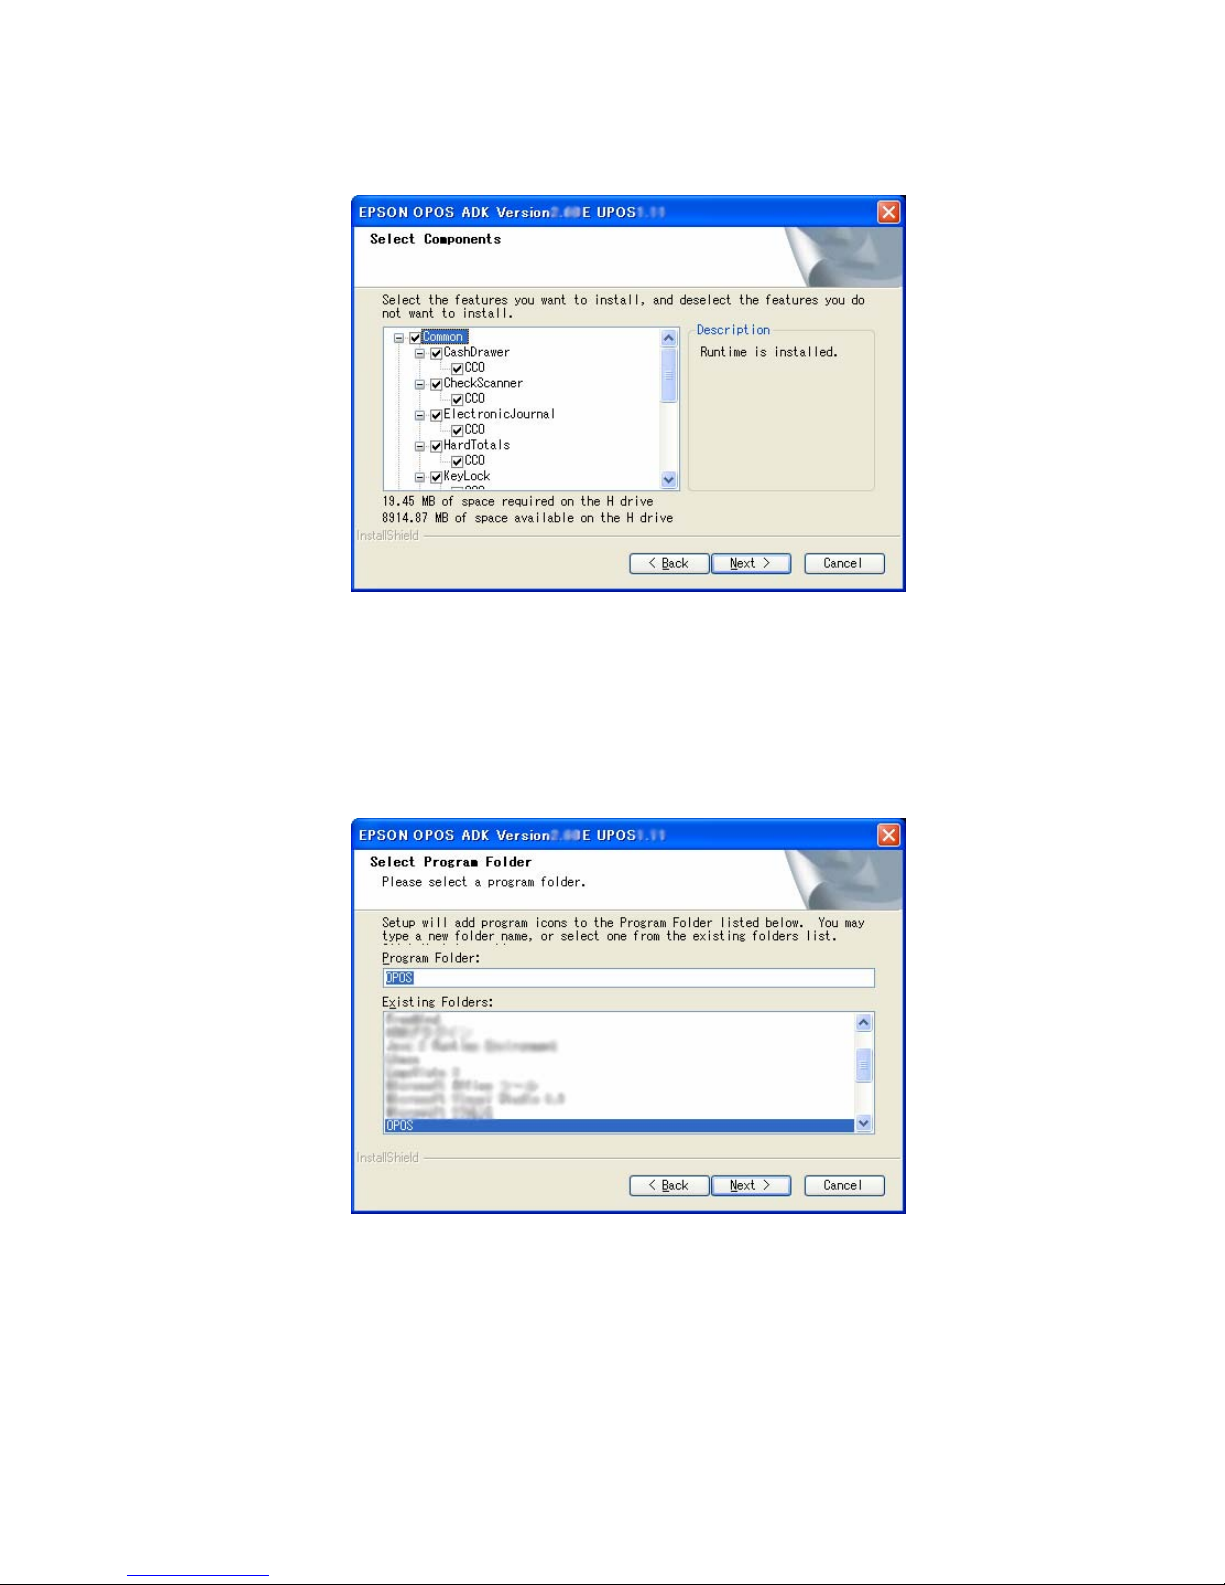
(8) The “Select Components” dialog box is displayed.
Select the necessary components.
To go to the next dialog box, select the [Next] button.
Select the [Back] button for return to the previous dialog box.
Select the [Cancel] button for quitting.
(9) The “Select Program Folder” dialog box is displayed.
The previously decided folder name is displayed in “Program Folder”. If the
Registry File is specified, this information is referred from the Registry File.
Normally, default values should be used. The folder name can be changed,
or an existing folder can be selected, but if an existing folder is used,
Page 25
Version 2.65 Jul. 2009
20
User's Manual
Installer, SetupPOS, TMUSB
please select it only after obtaining an understanding of the folder’s
attributes. If the OS being used is Windows 2000, Windows XP or
Windows Vista, the folder must have COMMON attributes.
To go to the next dialog box, select the [Next] button.
Select the [Back] button for return to the previous dialog box.
If the [Back] button is selected, the set folder name will be canceled.
Select the [Cancel] button for quitting.
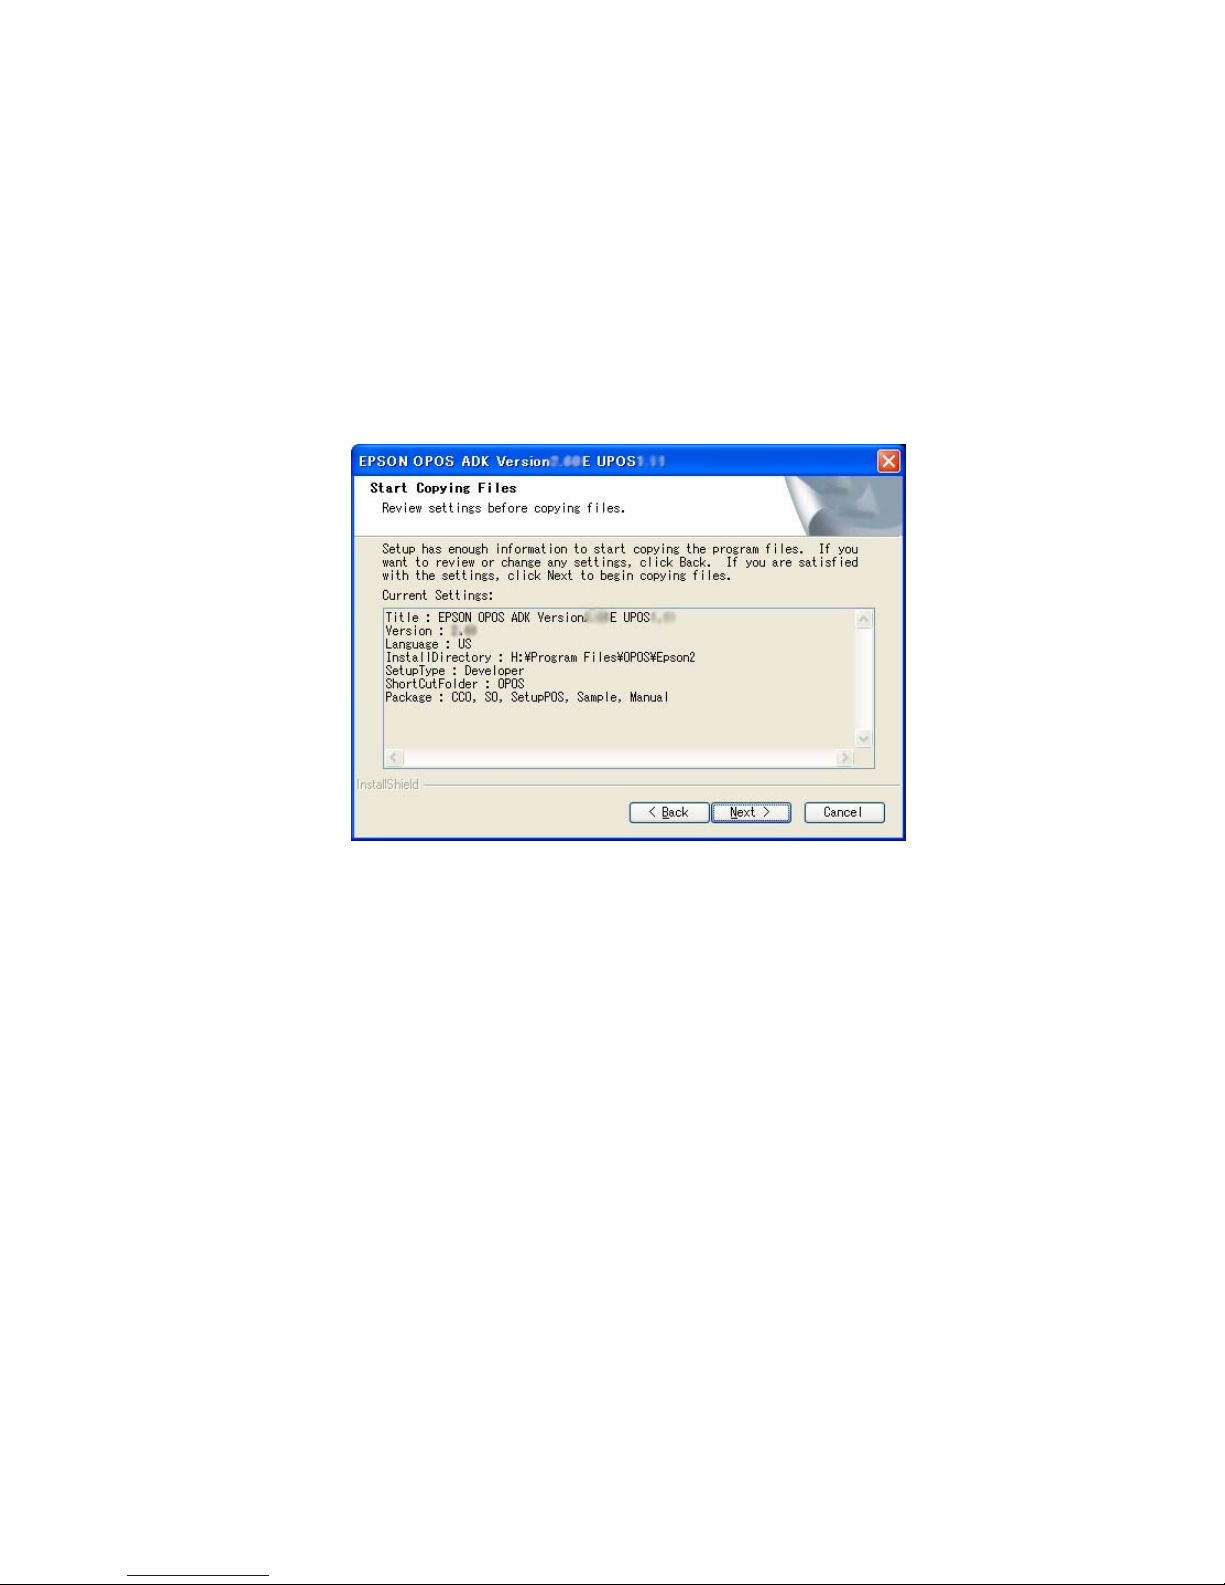
(10) The “Start Copying Files” dialog box is displayed.
This dialog box shows the information that has already been set. Confirm
the contents and select the [Next] button.
Select the [Back] button for return to the previous dialog box.
Select the [Cancel] button for quitting.
Page 26
Version 2.65 Jul. 2009
21
User's Manual
Installer, SetupPOS, TMUSB
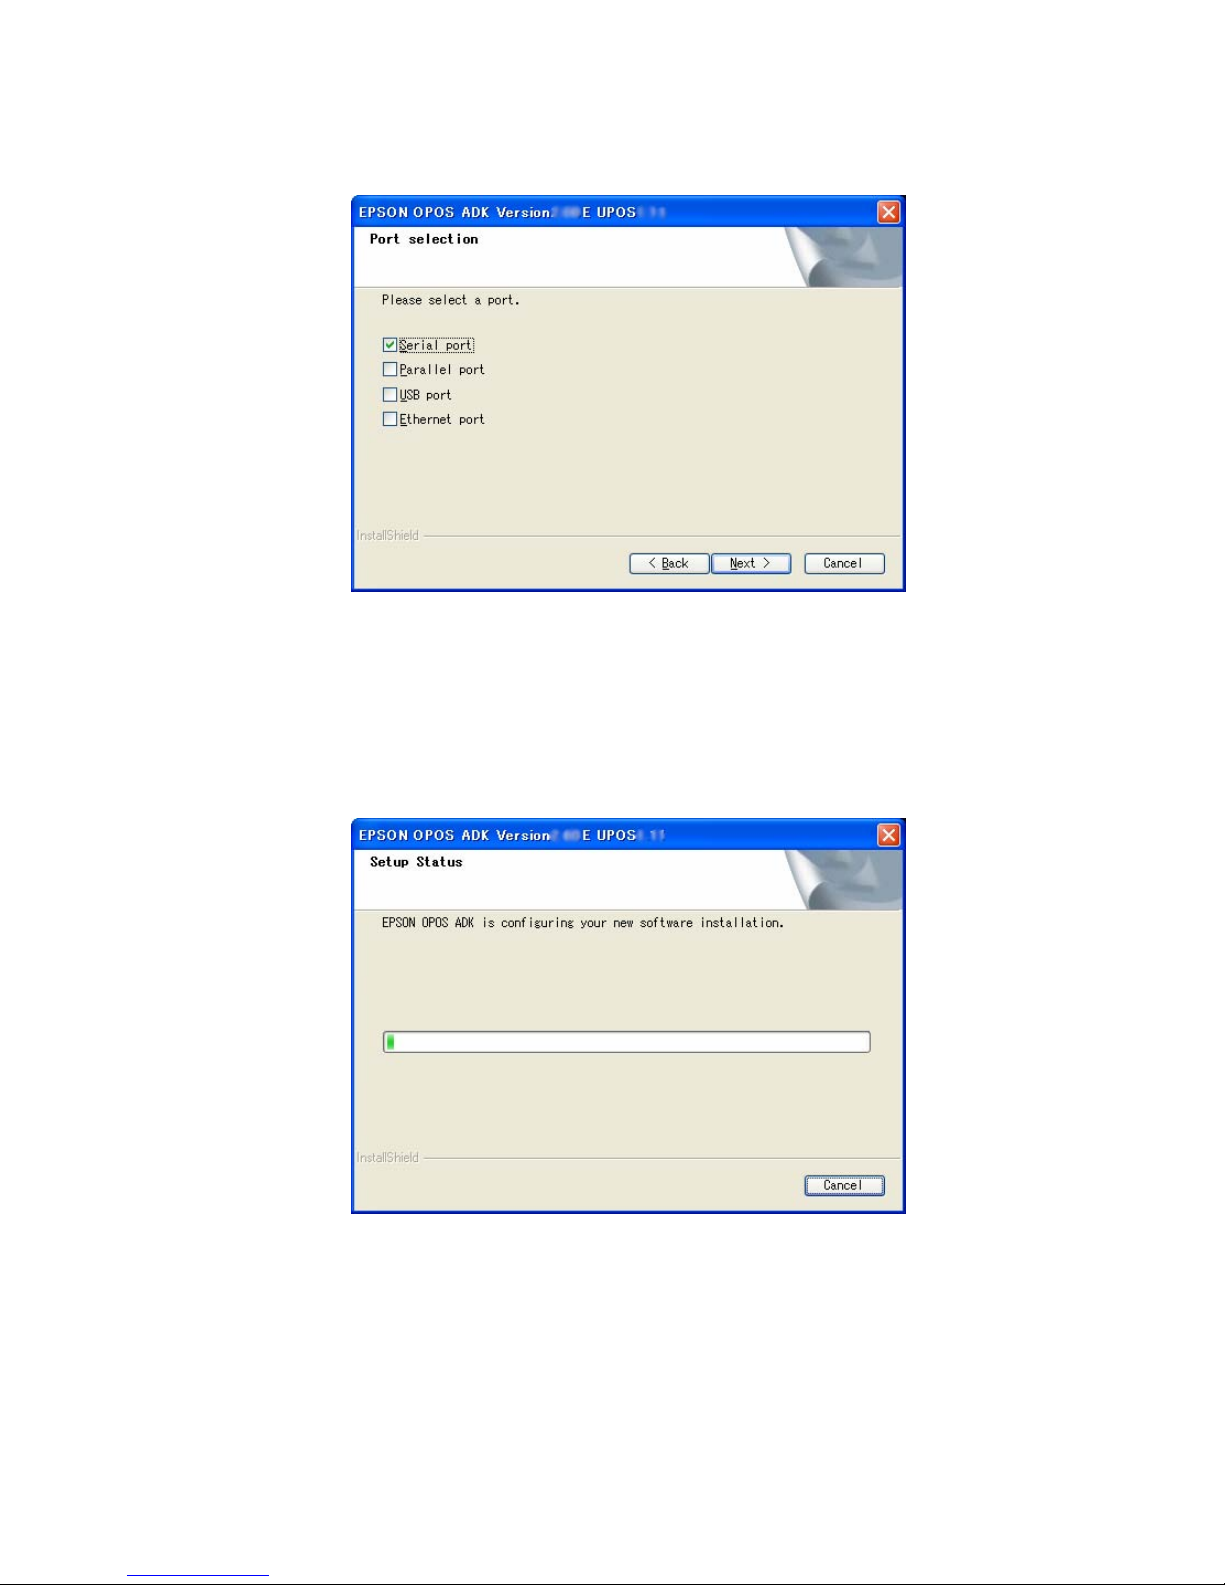
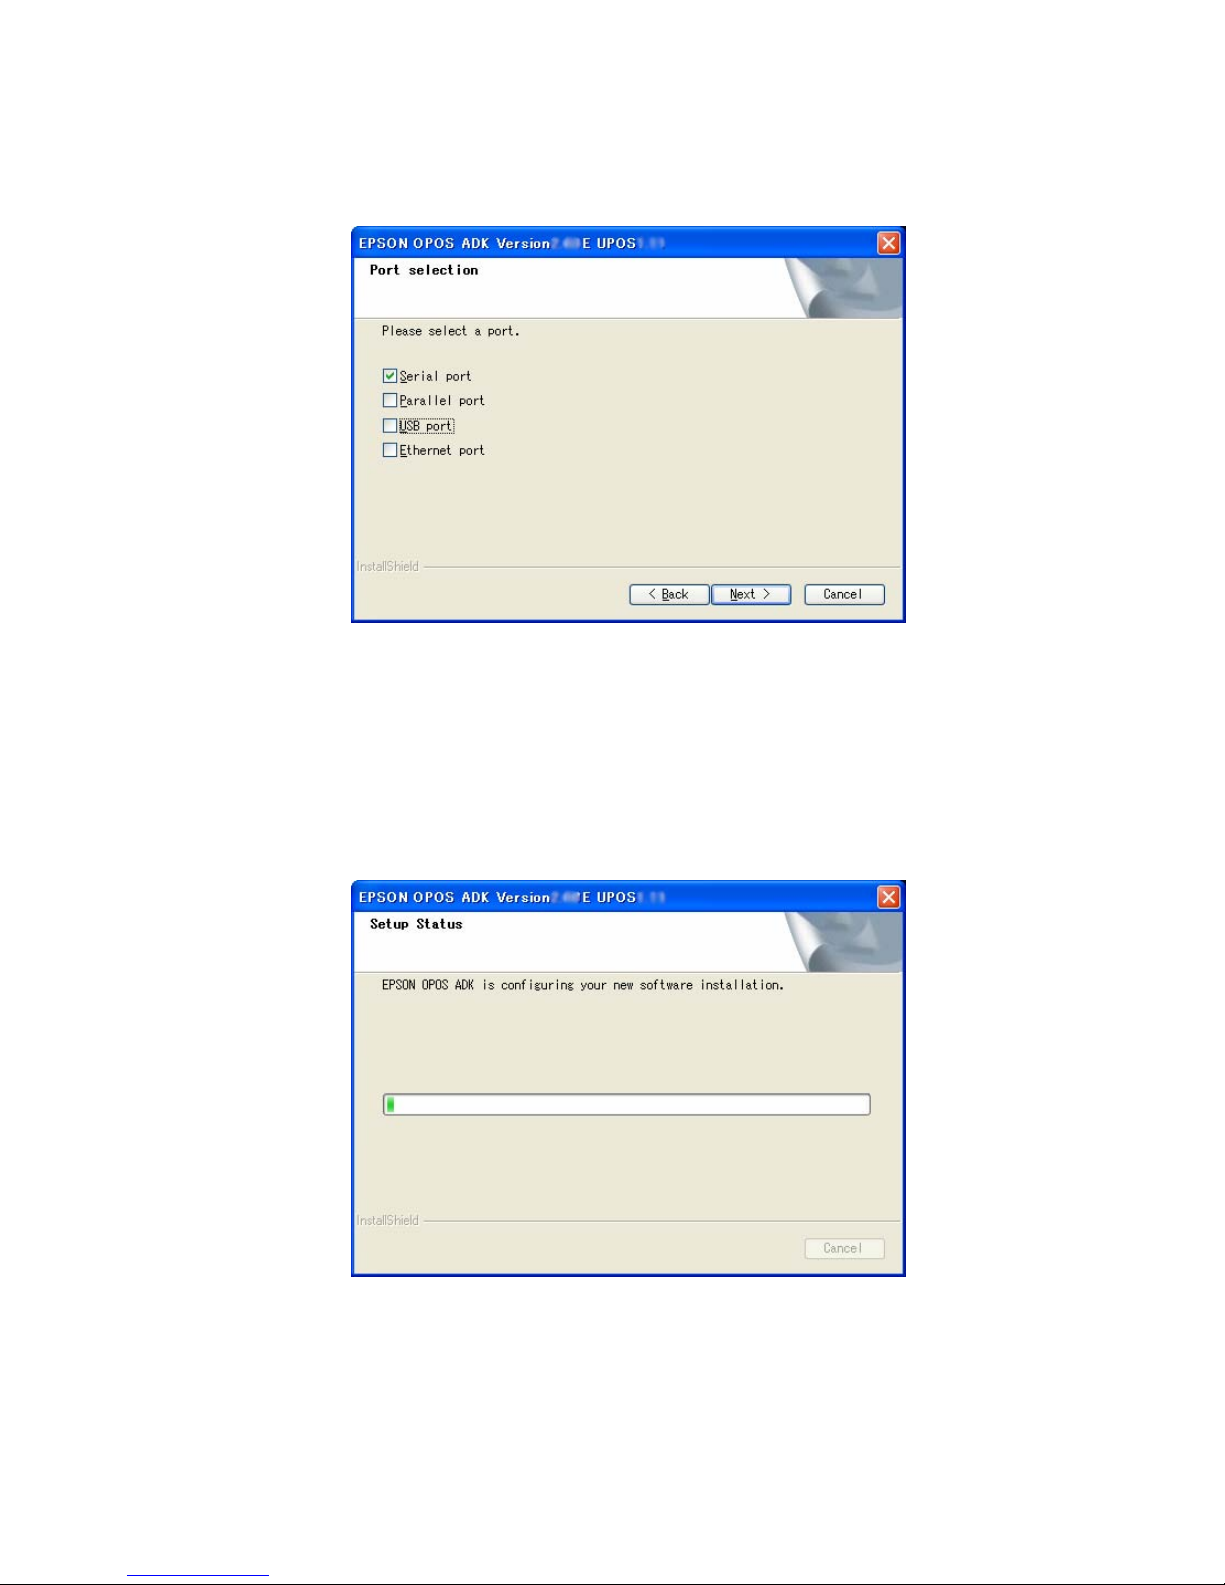
(11) The “Port selection” dialog box is displayed.
Select the port.
When the Parallel port was selected, the Lilac parallel driver is installed.
When the USB port was selected, the TMUSB driver is installed.
Select the [Cancel] button for quitting.
(12) The “Setup Status” dialog box is displayed.
The progress is shown on the status bar.
The [Cancel] button works at this point, but do not press the [Cancel]
button unless there is a particular reason.
Operation after pressing the [Cancel] button is not guaranteed. If pressed,
Page 27

Version 2.65 Jul. 2009
22
User's Manual
Installer, SetupPOS, TMUSB
be sure to perform a reinstallation.
At this point, all the information necessary for the version upgrade shall be
updated. It may take a few minutes for all the operations to be completed.
(13) When all the operations are completed, the “Setup Complete” dialog box is
displayed. Select in the check box whether or not to display the release
note on the installed EPSON OPOS ADK. It is strongly recommended to
read the notes.
(14) If system files are renewed because of the installation, rebooting of system
may be requested. In this case, please specify whether rebooting right
away or later, and execute the rebooting. If later rebooting is specified,
make sure to reboot after the completion of the installation. The operation
under the un-rebooted environment is not guaranteed at all.
(15) Installation is completed. The SetupPOS utility starts up. Confirm the
settings in accordance with the setup described in “Section 5. SetupPOS
Utility” of this manual. When system rebooting is executed, SetupPOS
utility does not start automatically. Please start SetupPOS utility from start
menu.
3.3.2.
Overwriting Installation
With the inst
allation of EPSON OPOS ADK in advance, install according to the
following procedure.
3.3.2.1. Overwriting Version 2.60 by Version 2.60
When performing an overwrite installation, user information, specified installation
destination, and specified program folder in the previous installation will remain
effective. This information cannot be changed. If a version of EPSON OPOS ADK
has been already installed, when you try to install the same version, Add-in
Installation starts. In this case, only the installed devices and files are overwritten.
This overwriting is not able to overwrite in Windows Vista environment.
<Installation Procedure>
(1) Run the SETUP.EXE program on disk 1.
Before running SETUP.EXE, close the other programs already running.
Otherwise, installation may fail. It takes some time for Setup to start. Wait
a while.
Page 28
Version 2.65 Jul. 2009
23
User's Manual
Installer, SetupPOS, TMUSB
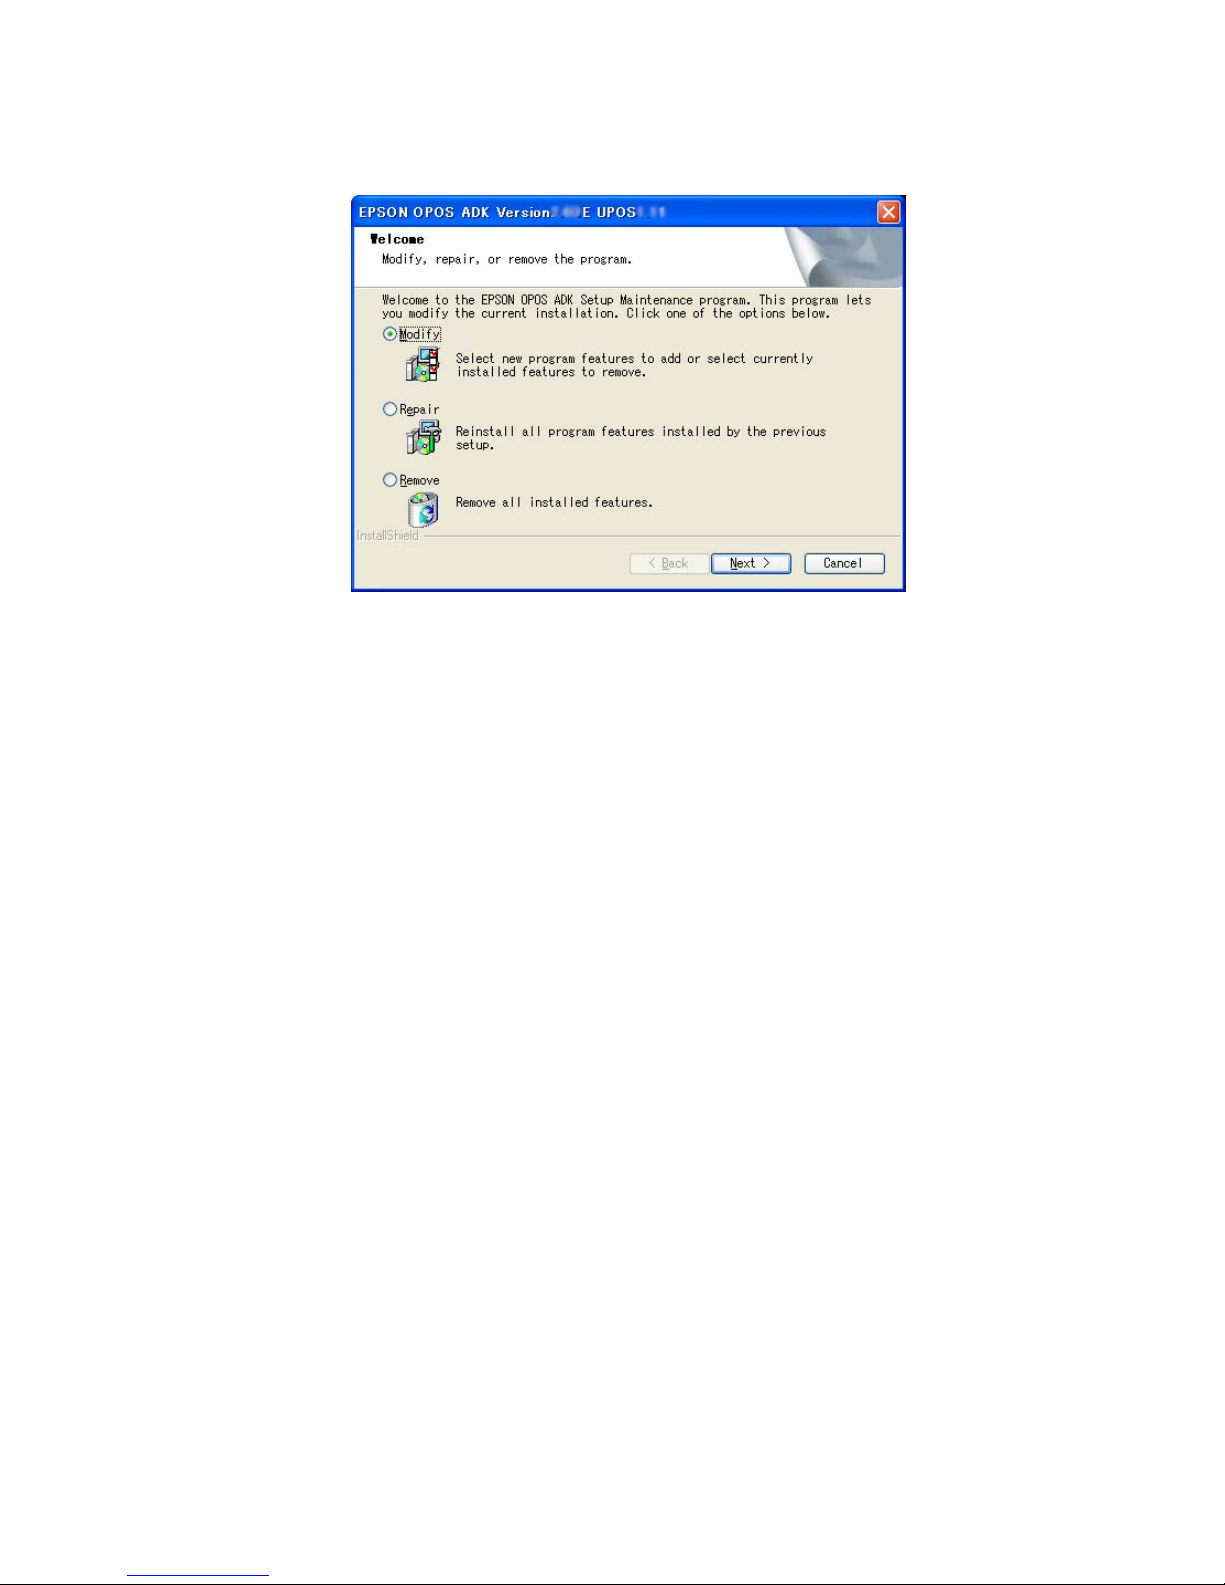
(2) The “Welcome” dialog box is displayed.
Select the arbitrary option and then select the [Next] button. After this
procedure is different depending on the select option. When the "Modify”
has been selected, the “Select CO Type” dialog box is displayed.
When the "Repair” has been selected, the “Setup Status” dialog box is
displayed. When the "Remove” has been selected, the confirmation
message to removing is displayed.
When the "Yes” has been selected, the uninstaller gets started.
When the "No” has been selected, this dialog is displayed again.
Select the [Cancel] button for quitting.
Page 29
Version 2.65 Jul. 2009
24
User's Manual
Installer, SetupPOS, TMUSB
(3) The “Select CO Type” dialog box is displayed.
Select the CO that has a priority for registration.
When the type is decided, select the [Next] button.
Select the [Back] button to return to the previous dialog box.
Select the [Cancel] button for quitting.
(4) The “Select Components” dialog box is displayed.
After reviewing the components to add and remove, select the [Next]
button.
Select the [Back] button to return to the previous dialog box.
Select the [Cancel] button for quitting.
Page 30
Version 2.65 Jul. 2009
25
User's Manual
Installer, SetupPOS, TMUSB
(5) The “Port selection” dialog box is displayed.
Select the method of connection used by device, select the [Next] button.
When the Parallel port is selected, the Lilac parallel driver is installed.
When the USB port is selected, the TMUSB driver is installed.
Select the [Back] button to return to the previous dialog box.
Select the [Cancel] button for quitting.
(6) The “Setup Status” dialog box is displayed.
The progress is shown on the status bar.
At this point, all the information necessary for the version upgrade shall be
Page 31

Version 2.65 Jul. 2009
26
User's Manual
Installer, SetupPOS, TMUSB
updated. It may take a few minutes for all the operations to be completed.
(7) When all the operations are completed, the “Setup Complete” dialog box is
displayed.
Select the [Finish] button.
(8) If system files are renewed because of the installation, rebooting of system
may be requested. In this case, please specify whether rebooting right
away or later, and execute the rebooting.
If later rebooting is specified, make sure to reboot after the completion of
the installation. The operation under the un-rebooted environment is not
guaranteed at all.
(9) Installation is completed. The SetupPOS utility starts up. Confirm the
settings in accordance with the setup described in “Section 5. SetupPOS
Utility” of this manual. When system rebooting is executed, SetupPOS
utility does not start automatically. Please start SetupPOS utility from start
menu.
Page 32

Version 2.65 Jul. 2009
27
User's Manual
Installer, SetupPOS, TMUSB
3.3.2.2. Overwriting Version 2.xx prior to Version 2.60 by Version 2.60
When performing an overwrite installation, user information, specified installation
destination, and specified program folder in the previous installation will remain
effective. This information cannot be changed.
If Version 2.xx prior to Version 2.60 of EPSON OPOS ADK already has been
installed, when you try to install the new version, Add-in Installation starts. In this
case, only the installed devices and files are overwritten.
This overwriting is not able to overwrite in Windows Vista environment.
<Installation Procedure>
(1) Run the SETUP.EXE program on disk 1.
Before running SETUP.EXE, close the other programs already running.
Otherwise, installation may fail. It takes some time for Setup to start. Wait
a while.
Compares the module already installed with the module contained in the
package. If there is a possibility that problem occurs, the “Question” dialog
box is displayed and a summary is notified.
(2) The “Welcome” dialog box is displayed.
Read the contents and then select the [Next] button if agreed with the
contents.
Select the [Cancel] button for quitting.
Page 33

Version 2.65 Jul. 2009
28
User's Manual
Installer, SetupPOS, TMUSB
(3) The “Information” dialog box is displayed.
This dialog box displays information on the settings of the already installed
EPSON OPOS ADK. Confirm the contents of the list and select the [Next]
button if the contents are satisfactory.
Select the [Back] button to return to the previous dialog box.
Select the [Cancel] button for quitting.
(4) The “Software License Agreement” dialog box is displayed.
To install the EPSON OPOS ADK, the user must agree to the contents of
the displayed agreement. Read the contents. In addition, select “I accept
the terms in the License” if agreed with the Software License Agreement.
Page 34

Version 2.65 Jul. 2009
29
User's Manual
Installer, SetupPOS, TMUSB
After the selection, the [Next] button becomes effective. Select the [Next]
button. If the Software License Agreement is not acceptable, select “I do
not accept the terms in the License Agreement”. Then, select the [Cancel]
button. Exits installation.
Select the [Back] button for returning to the previous dialog box.
(5) The “Select Registry File” dialog box is displayed.
Select “No Registry File” not to use the REG file. Then, select the [Next]
button. Select “Use Registry File” to use the REG file. Enter the full path
REG file name after the text box is enabled. Then, select the [Next] button.
Press the [Browse] button to specify the folder name that includes the REG
file. The REG file is a file for restoring information related to EPSON OPOS
ADK. Use the SetupPOS utility to create this file. If an improper Registry
File is selected, an error message will be displayed and it will not be
possible to move to the next dialog box. Follow the directions of the error
message and confirm that the Registry File is correct.When the Registry
File is set correctly, subsequent information can be referred from the
Registry File.
Select the [Back] button to return to the previous dialog box.
Select the [Cancel] button for quitting.
Page 35

Version 2.65 Jul. 2009
30
User's Manual
Installer, SetupPOS, TMUSB
(6) The “Start Copying Files” dialog box is displayed.
This dialog box shows the information that has already been set. Confirm
the contents and select the [Next] button.
Select the [Back] button to return to the previous dialog box.
Select the [Cancel] button for quitting.
(7) The “Port selection” dialog box is displayed.
Select the method of connection used by device, select the [Next] button.
When the Parallel port is selected, the Lilac parallel driver is installed.
When the USB port is selected, the TMUSB driver is installed.
Select the [Back] button to return to the previous dialog box.
Page 36

Version 2.65 Jul. 2009
31
User's Manual
Installer, SetupPOS, TMUSB
Select the [Cancel] button for quitting.
(8) The “Setup Status” dialog box is displayed.
The progress is shown on the status bar.
The [Cancel] button works at this point, but do not press the [Cancel]
button unless there is a particular reason.
Operation after pressing the [Cancel] button is not guaranteed. If pressed,
be sure to perform a reinstallation.
At this point, all the information necessary for the version upgrade shall be
updated. It may take a few minutes for all the operations to be completed.
Page 37

Version 2.65 Jul. 2009
32
User's Manual
Installer, SetupPOS, TMUSB
(9) When all the operations are completed, the “InstallShield Wizard
Complete” dialog box is displayed.
Select in the check box whether or not to display the release note on the
installed EPSON OPOS ADK. It is strongly recommended to read the
notes.
(10) If system files are renewed because of the installation, rebooting of system
may be requested. In this case, please specify whether rebooting right
away or later, and execute the rebooting.
If later rebooting is specified, make sure to reboot after the completion of
the installation. The operation under the un-rebooted environment is not
guaranteed at all.
(11) Installation is completed. The SetupPOS utility starts up. Confirm the
settings in accordance with the setup described in “Section 5. SetupPOS
Utility” of this manual.
When system rebooting is executed, SetupPOS utility does not start
automatically. Please start SetupPOS utility from start menu.
Page 38

Version 2.65 Jul. 2009
33
User's Manual
Installer, SetupPOS, TMUSB
3.3.2.3. Overwriting Version 1.xx by Version 2.60
EPSON OPOS ADK Version 1.xx can be overwritten only by Version 2.xx. The
Version 2.xx overwrites all the components of the Version 1.xx.
When performing an overwrite installation, user information, specified installation
destination, and specified program folder in the previous installation will remain
effective. This information cannot be changed.
This overwriting is not able to overwrite in Windows Vista environment.
<Installation Procedure>
(1) Run the SETUP.EXE program on disk 1.
Before running SETUP.EXE, close the other programs already running.
Otherwise, installation may fail. It takes some time for Setup to start. Wait
a while.
(2) The “Welcome” dialog box is displayed.
Read the contents and then select the [Next] button if agreed with the
contents. Select the [Cancel] button for quitting.
Page 39

Version 2.65 Jul. 2009
34
User's Manual
Installer, SetupPOS, TMUSB
(3) The “Information” dialog box is displayed.
This dialog box displays information on the settings of the already installed
EPSON OPOS ADK. Confirm the contents of the list and select the [Next]
button if the contents are satisfactory.
Select the [Back] button to return to the previous dialog box.
Select the [Cancel] button for quitting.
From (4) to (11) steps are the same as those described in “3.3.1 First
Installation”. Please refer to "3.3.1 First Installation" of this manual.
(12) The “Question” dialog box is displayed.
Select the [Yes] button for updating to the information of the OPOS ADK
version that coexisted.
Select the [No] button for not updating to the information of the OPOS ADK
version that coexisted
Page 40

Version 2.65 Jul. 2009
35
User's Manual
Installer, SetupPOS, TMUSB
(13) When all the operations are completed, the “InstallShield Wizard
Complete” dialog box is displayed.
Select in the check box whether or not to display the release note on the
installed EPSON OPOS ADK. It is strongly recommended to read the
notes.
(14) If system files are renewed because of the installation, rebooting of system
may be requested. In this case, please specify whether rebooting right
away or later, and execute the rebooting.
If later rebooting is specified, make sure to reboot after the completion of
the installation. The operation under the un-rebooted environment is not
guaranteed at all.
(15) Installation is completed. The SetupPOS utility starts up. Confirm the
settings in accordance with the setup described in “Section 5. SetupPOS
Utility” of this manual.
When system rebooting is executed, SetupPOS utility does not start
automatically. Please start SetupPOS utility from start menu.
Page 41

Version 2.65 Jul. 2009
36
User's Manual
Installer, SetupPOS, TMUSB
3.3.2.4. Version1.xx and Version2.60 Coexisting Installation
Coexistence implies that the devices of Version 1.xx and the devices of Version
2.60 operate simultaneously. The above versions are able to coexist, but it is
recommended to use Version 2.60 alone since there are some restrictions as
follows:
This overwriting is not able to overwrite in Windows Vista environment.
<Restrictions on coexistence>
Hydra settings devices on the same port cannot coexist and be shared between
versions.
(Example) Version 1.xx : Printer, Display, Drawer are hydra settings.
Version 2.60 : When printer alone is intended installed.
In this case, the whole settings cannot be succeeded as they are unless Printer,
Display and Drawer are also installed in Version 2.60.
Only the printer information is succeeded, and the device settings for Display and
Drawer are deleted.
It is not possible for devices with shared keyboard interface to coexist and be
shared by different versions.
(Example) Version 1.xx : MSR, Keylock.
Version 2.60 : When Keylock alone is intended installed.
In this case, the whole settings cannot be succeeded as they are unless both
Keylock and MSR are also installed in Version 2.60. Only the Keylock information
is succeeded, and the device settings for MSR are deleted from both versions.
The restrictions apply to the following devices.
COM hydra : Printer, Display, Drawer, MICR, CheckScanner
Keyboard hydra : MSR, Keylock
<Installation Procedure>
From (1) to (4) steps are the same as those described in “3.3.1 First
Installation”. Please refer to "
3.3.1 First Installation
" of this manual.
Page 42

Version 2.65 Jul. 2009
37
User's Manual
Installer, SetupPOS, TMUSB
(5) The “Setup Type” dialog box is displayed.
Select the [Custom] button, and then select the [Next] button.
Select the [Back] button to return to the previous dialog box.
Select the [Cancel] button for quitting.
(6) The “Select CO Type” dialog box is displayed.
Select the CO that has a priority for registration. The CO registered here
will be valid for all devices.
When the type is decided, select the [Next] button.
Select the [Back] button to return to the previous dialog box.
Page 43

Version 2.65 Jul. 2009
38
User's Manual
Installer, SetupPOS, TMUSB
Select the [Cancel] button for quitting.
(7) The “Select Components” dialog box is displayed.
Select the necessary components.
Select the [Next] button to go to the next dialog box.
Select the [Back] button to return to the previous dialog box.
Select the [Cancel] button for quitting.
(8) The “Start Copying Files” dialog box is displayed.
This dialog box shows the information that has already been set. Confirm
the contents and select the [Next] button.
Select the [Back] button to return to the previous dialog box.
Select the [Cancel] button for quitting.
(9) Copying of files, registration of DLL and OCX, and setting the registry
begins.
During the copying, the confirmation message “Inherit the previous version
information?“ is displayed. When overwriting, be sure to select yes. This
ensures that the device information set in Version 1.xx can be used by
Version 2.xx. It may take a few minutes for all the operations to be
completed. When the [No] button is selected, information on Version 1.xx
remains as it is.
At this point, all the information necessary for the version upgrade shall be
updated.
It may take a few minutes for all the operations to be completed.
Page 44

Version 2.65 Jul. 2009
39
User's Manual
Installer, SetupPOS, TMUSB
The [Cancel] button works at this point, but do not press the [Cancel]
button unless there is a particular reason. Operation after pressing the
[Cancel] button is not guaranteed. If pressed, be sure to perform a
reinstallation.
(10) When all the operations are completed, the “Setup Complete” dialog box is
displayed.
Select in the check box whether or not to display the release note on the
installed EPSON OPOS ADK. It is strongly recommended to read the
notes.
When the installation of the parallel driver is successfully done, system
files are renewed and a message to query rebooting method is indicated.
Please specify whether rebooting right away or later, and execute the
rebooting. If later rebooting is specified, make sure to reboot after the
completion of the installation. The operation under the un-rebooted
environment is not guaranteed at all.
(11) Installation is completed. The SetupPOS utility starts up. Confirm the
settings in accordance with the setup described in “Section 5. SetupPOS
Utility” of this manual.
When system rebooting is executed, SetupPOS utility does not start
automatically. Please start SetupPOS utility from start menu.
3.3.2.5. Others
When both Version 1.xx and Version 2.xx prior to Version 2.60 are already
installed and in addition, Version 2.xx is upgraded to Version 2.xx, the method
described in Section 3. “
3.3.2.2. Overwriting Version 2.xx prio
r
to Version 2.60 by
Version 2.60” of this manual applies.
Page 45

Version 2.65 Jul. 2009
40
User's Manual
Installer, SetupPOS, TMUSB
3.4. Files to be installed
The following files are installed when the installation is normally completed.
• Program files:
These files are installed in the directory where the EPSON OPOS ADK is
installed. Software files such as CO, SO, utilities, and device information files
are included in this directory. To install these files, select “Program Files” in the
“Select Install Module” dialog box at installation.
• Include files:
These files are installed in the Include folder under the folder where the
EPSON OPOS ADK is installed. Files necessary for the OPOS such as C++
header file, VB header file, and TLB file for CO are included in this directory. To
install these files, select “Program Files” in the “Select Install Module” dialog
box at installation.
• Sample:
These files are installed in the Sample folder under the folder where the
EPSON OPOS ADK is installed. Sample programs for VC++ and VB are
included in this directory. To install these files, select “Sample” in the “Select
Install Module” dialog box at installation.
• Manuals:
These files are installed in the Manual folder under the folder where the
EPSON OPOS ADK is installed. To install these files, select “Manuals” in the
“Select Install Module” dialog box at installation.
• EPSON TM USB Driver Files:
These files are installed in the Tmusb folder under the folder where the EPSON
OPOS ADK is installed. The Installer of EPSON TM USB Driver and related
files are included in this directory. Folders are made for each OS and files are
copied. These files are inevitably installed.
• Parallel Driver Files:
These files are installed in the Lilac folder under the folder where the EPSON
OPOS ADK is installed. The installer of parallel driver and related files are
included in this directory. Folders are made for each OS and files are copied.
These files are inevitably installed.
Page 46

Version 2.65 Jul. 2009
41
User's Manual
Installer, SetupPOS, TMUSB
3.5. Types of Installation
There are two types of installation: full and custom.
Select the type in the “Install Type” dialog box.
• Full installation
Full installation installs all the supported devices. For supported devices, read
the release note included in the Installer disks.
• Custom installation
Custom installation installs selected devices from the supported devices.
Selectable units are device classes. If selecting custom installation in the
“Install Type” dialog box, the “Select Components” dialog box appears. The
displayed list shows the devices that can be installed. Check only the devices
that you want to install.
3.6. CO Registration
Both CCO and EPSON CO can be
installed and registered in EPSON OPOS
ADK. In addition, you can also choose to register neither of the two, and thus it
becomes possible to use the COs of a previous version or from another company.
When using multiple COs in this way, please note the following precautions.
Please note the following points when when the multiple CO are used.
(When application is created with VB)
(1) Pasting control on form by adding VB component
In this case, character strings applicable to the CO type library is displayed
in the ”Component dialog” box.
As this character strings is an individual string, it is possible to select the
CO to be actually used. If multiple COs are registered, select the CO that
you want to use from the list of components.
(2) Creating CO by specifying Program ID using Create Object
In this case, specifies the program ID of the CO.
The program ID is character strings determined by the OPOS
specifications.
Ex: the CO of a POSPrinter is “OPOS.POSPrinter”.
If multiple COs of the same device class have been registered, the latest
one is created.
If this method is used, it is also necessary to pay attention to the order of
the registrations of COs.
Page 47

Version 2.65 Jul. 2009
42
User's Manual
Installer, SetupPOS, TMUSB
(3) Creating CO using WithEvent
In this case, it is not possible to create “as Object”; it is necessary to create
it “as Class Name”.
The CO Class Name may be the same or different.
Before declaring a variable using WithEvent, components are selected
using method (1), and the components selected in the ”Component” dialog
box can be used.
3.6.1. The method for updating the CCO
The CCO that is bundled with EPSON OPOS ADK Version 2.60 is the latest
version at rel
ease time.
Please use the following procedure to update to a later
version.
<Installation Procedure>
(1) Download the CCO installer from the following web site.
http://www.monroecs.com/
(2) Installs by the downloaded CCO installer.
<Warnings>
y If you install EPSON OPOS after updating the CCO, the CCO will
become the older version.
Follow the above steps, then update the CCO again.
y If you uninstall EPSON OPOS, the updated CCO will also be uninstalled.
Follow the above steps, then update the CCO again.
3.7. INI Files
The INSTALL.INI file con
t
ains information copied to the directory that is specified
by the installation program. Also, SETUP.INI is a file referred by SETUP.EXE.
Make sure these file are always in the same directory as the SETUP.EXE file.
Please do not edit these files. If modified, the operation is not guaranteed.
3.8. System Setup Files
There is no
need for
the user to edit any system files (AUTOEXEC.BAT,
CONFIG.SYS, SYSTEM.INI).
3.9. Installation Using the Registry File
The registry file is used when a user
wants to restore an envir
onment created on
one PC to another PC. When the various settings are made with the SetupPOS
utility, this information is retained in the registry. With the SetupPOS utility, only
Page 48

Version 2.65 Jul. 2009
43
User's Manual
Installer, SetupPOS, TMUSB
the information necessary for the registry is stored in a file. By specifying this file
with the Installer, it is possible to restore the same environment.
To use this function, follow the procedure described below.
In this section, the originally created environment is called the “main PC”, and the
environment that you want to reconstruct is called “target PC”.
<Procedure>
(1) Install the EPSON OPOS ADK in the main PC, and set the necessary
information and the various devices using the SetupPOS utility.
Use the SetupPOS utility to save the registry. At this point, pay attention to
the following and create the files.
• Specify “Register All”.
(2) Perform installation on the target PC.
At this point, the following two methods are available. Select the method
that suits the environment.
• Installation using the normal installation method.
• Installation using the Silent Installation method.
For the normal installation method, take the procedures described in “
3.3
Installation”. For installation using the Silent Installation method, see
Section 3. “3.11. Silent Installation
”.
When installing on the target PC, specify the registry file saved in
procedure (1).
<Restrictions>
• The Registry File must be created using the SetupPOS utility.
• It is a prerequisite that the Registry File contains the same version
information as the version to be installed, or the same information as the
installed environment.
• When a registry file is specified using the installer User Interface, install
components are not determined automatically. Desired components
should be selected using the installer User Interface.
• With the installation using the Registry File, the old version’s information
is not succeeded.
Page 49

Version 2.65 Jul. 2009
44
User's Manual
Installer, SetupPOS, TMUSB
3.10. Add-in Functions (Service Pack)
The add-in function is a function installing the package containing update
requirement only. A service pack is created based on the version exist. (This
existed version is called the base version, in this section.) A service pack may be
made available when devices are added or some kind of update becomes
necessary after the release of the base version. For the latest service pack,
please consult the manufacturer.
When you install the service pack, the registry information before the service pack
has been installed is saved as a file in the destination folder for installation (file
name: "OposReg.reg"). Use this registry file for Silent Installation of the base
version to the target PC.
This function is also used when you overwrite an old version (Version 2.xx) of
EPSON OPOS ADK with a new version. In this case, the installed devices or the
files only are all updated.
<Procedure>
(1) Run the SETUP.EXE file on the service pack disk.
If Setup is executed with other programs’ running, its operation is not
guaranteed. It is suggested to close all programs before executing Setup.
Startup of the Setup program may take some time.
(2) Displayed message before the installation.
Before the installation, a message about the installed devices or files
appears.
For service pack:
If a device included in the service pack is not installed, a warning message
appears. This is because devices cannot be added after installing the
service pack. (Refer to <Restrictions> below for details.)
To overwrite Version 2.xx with a new version:
If the devices and files included in the new version are not installed, a
prompt message appears. All devices or files not listed in the message will
be overwritten. To install other files, run the installation again after the
update.
Select [Next] to continue. Select [Cancel] to cancel the installation.
(3) The “Welcome” dialog box is displayed.
Read the contents and then select the [Next] button if you agree with the
contents.
Page 50

Version 2.65 Jul. 2009
45
User's Manual
Installer, SetupPOS, TMUSB
(4) The “Software License Agreement” dialog box is displayed.
To install the EPSON OPOS ADK, you must agree to the contents of the
displayed agreement. Read the contents and select “I accept the terms in
the License” if agreed with the Software License Agreement. After the
selection, the [Next] button becomes effective. Then, select the [Next]
button. If the Software License Agreement is not acceptable, select “I do
not accept the terms in the License Agreement”. Then, select the [Cancel]
button. Select the [Back] button to return to the previous dialog box.
(5) The “Information List” dialog box is displayed.
Information of the installed EPSON OPOS ADK is displayed. Confirm the
contents, and then select the [Next] button if the contents are acceptable.
(6) The “Select Registry File” dialog box is displayed.
Select “Not Use Registry File” when the REG file is not used. Then select
the [Next] button. Select “Use Registry File” to use the REG file. Enter the
full path REG file name after the text box is enabled. The default value is
“A:\OPOSDATA.reg”. Then, select the [Next] button. Press the [Browse]
button to specify the folder name that includes the REG file.
The REG file is a file for restoring information related to EPSON OPOS
ADK. Use the SetupPOS utility to create this file.
If an improper Registry File is selected, an error message will be displayed
and it will not be possible to go to the next dialog box. Follow the directions
of the error message and confirm that the Registry File is correct. When
the Registry File is set correctly, subsequent information can be referred
from the Registry File. When installing by overwriting, the Registry File
information will have priority over the installation information of the
previous installation.
Select the [Back] button to return to the previous dialog box.
(7) The "Select Installation Module" dialog box is displayed.
Select a module to be installed. Selectable modules are "Program Files",
"Samples", and "Manuals".
Installed modules cannot be selected.
After selecting a module, press the [Next] button. Press the [Back] button
to go back to the previous dialog box.
(8) The “Start Copying Files ” dialog box is displayed.
The dialog box shows the information, which has already been set.
Page 51

Version 2.65 Jul. 2009
46
User's Manual
Installer, SetupPOS, TMUSB
Confirm the contents and select the [Next] button.
Select the [Back] button to return to the previous dialog box.
(9) Copying of files, registration of DLL and OCX, and setting the registry
begins.
The [Cancel] button works at this point, but do not press the [Cancel]
button unless there is a particular reason. Operation after pressing the
[Cancel] button is not guaranteed. If pressed, be sure to perform a
reinstallation.
At this point, all the information necessary for the version upgrade shall be
updated.
It may take a few minutes for all the operations to be completed.
(10) When all the operations are completed, the “Setup Complete” dialog box is
displayed. Select in the check box whether or not to display the release
note on the installed EPSON OPOS ADK. It is strongly recommended to
read the notes.
When the installation of the parallel driver is successfully done, system
files are renewed and a message to query rebooting method is indicated.
Please specify whether rebooting right away or later, and execute the
rebooting. If later rebooting is specified, make sure to reboot after the
completion of the installation. The operation under the un-rebooted
environment is not guaranteed at all.
(11) Installation is completed. The SetupPOS utility starts up. Confirm the
settings in accordance with the setup described in “Section 5. SetupPOS
Utility” of this manual.
When system rebooting is executed, SetupPOS utility does not start
automatically. Please start SetupPOS utility from start menu.
<Restrictions>
• Be sure to install the base version before installing the service pack.
• As long as the service pack version number is higher than already
installed service packs it can be installed without installing intermediate
service packs. For instance, it is possible to add-in Service Pack Version
3 directly to the base version. It is not necessary to first add-in Service
Pack Version 1 or 2.
• It is not possible to install a service pack older version than the one
Page 52

Version 2.65 Jul. 2009
47
User's Manual
Installer, SetupPOS, TMUSB
currently installed.
For instances; after Service Pack Version 3 has been installed, it is not
possible to install Service Pack Version 1 or 2.
• The base version cannot be overwritten after installing the service pack.
Also, the service pack alone cannot be uninstalled. In other words, after
the service pack is installed, later installations of additional devices are
not possible. Be sure to reinstall or overwrite the base version and the
desired devices before installing the service pack.
3.11. Silent Installation
Installation can be
perfo
rmed without using the user interface. This is called
“Silent Installation”. This function uses the Registry File explained in the previous
section. For details, please refer to the "3.9 Installation Using the Registry
File
" of
this manual. This function is mainly used for installation on the target PC. Please
use another installation function using normal user interface on the main PC. For
description of target PC and main PC, please refer to the "3.9 Installation Using
the Registry File" of this manual. When executing a Silent Installation, the registry
information from the main PC is succeeded. OPOS ADK Manuals and the
Sample Programs cannot be installed when using the Silent Installation function.
To use this function, take the following procedures.
<Procedure>
Install the EPSON OPOS ADK on the main PC, and set the necessary
information and the various devices using the SetupPOS utility. Then, save the
registry using the SetupPOS utility.
(1) Make a recording file.
Make a file for recording the operation of install. To install the EPSON
OPOS ADK, perform the following commands.
(Example) ”Full Path\Setup.exe” /r
When the installation finished, the install operation is recorded to the
"Setup.iss" file that is made in the Windows folder.
(2) Use the "Export Registry" in SetupPOS utility to save the registry
information. Select the [All] button
(3) Using the (1) recording file and the (2) recording file for Silent Install.
Copy the (1) recording file to the same folder as the "Setup.exe".
(Example)
Page 53

Version 2.65 Jul. 2009
48
User's Manual
Installer, SetupPOS, TMUSB
”Full Path\Setup.exe” /s /a“a:\OposData.reg”
To specify the path of the recording file, use the "/f1" option.
(Example)
”Full Path\Setup.exe” /s /f1”c:\Temp\setup.iss” /a“a:\OposData.reg”
The functions are added to Silent Installation by adding the following
parameters to command lines.
The following parameters can be used at the same time. If you wish to use
them at once, input the parameter you want to use after the parameter added
to the command line.
Parameters do not distinguish capital and small letters. It is not necessary
specifying only with small letters as the following examples show.
<Making a recording file>
Adding Parameter: “ /r”
Example: ”Full Path\Setup.exe” /r
<Indicating the Silent Installation>
Adding Parameter: “ /s”
Example: ”Full Path\Setup.exe” /s /a“Full Path\OposData.reg”
<Specify the substitute recording file name and the path name>
Adding Parameter: “ /f1”
Example: ”Full Path\Setup.exe” /s /f1"C:\Temp\Setup.iss" /a“Full Path\
OposData.reg”
<Specify the substitute log file name and the path name>
Adding Parameter: “ /f2”
Example: ”Full Path\Setup.exe” /s /f2"C:\Temp\Setup.iss" /a“Full Path\
OposData.reg”
<Indicating that adds the registry >
Adding Parameter: “ /a”
Example: ”Full Path\Setup.exe” /s /a“Full Path\OposData.reg”
<Rebooting after the Silent Installation>
Adding Parameter: “ /n”
Example: ”Full Path\Setup.exe” /s /a“Full Path\OposData.reg” /n
Page 54

Version 2.65 Jul. 2009
49
User's Manual
Installer, SetupPOS, TMUSB
• The result is stored in the log file.
The log file is created with the name “Silence.log” in the target directory. All
errors can be referred here. However, before the completion of the installation,
the file is created in the root where Windows is (e.g. “C:\”) since the target
directory is not decided until the completion of the installation. Please ensure
no errors exist in the log file after the Silent Installation.
<How to view Silence.log>
[SilenceMode Log]
Silence Mode Start : Silence mode starts
[SilenceMode Log End] : Silence mode ends
ERROR : Error message
WARNING : Warning message
INFORMATION : Information
MESSAGE : Message
Messages are logged in the same way as the messages listed in Section 3.
“3.12. Messages for Installation
” of this manual.
Once the Silence.log file is created, results are added to this file. For the
latest result, please see the line, which indicates the start of the latest
Silent Installation.
<Restrictions>
• The registry file is necessary for the Silent Installation.
• The registry file saved by the base version can be used only for the
Silent Installation of the base version. It cannot be used to install the
service pack.
• When installing a service pack with Silent Installation function, registry
files have to be made under the condition that the service pack is being
installed in advance. When the environment in which the service pack
has been installed is imported to the target PC with the Silent Installation,
first, execute the Silent Installation with the base version and the registry
file for the base version (created automatically in the destination folder
for installation during the service pack installation), then execute the
Silent Installation with the service pack and the registry file for the
service pack.
EX: Procedures for service pack Silent Installation
2. First Silent Installation of the OPOS Version 2.xx by using the following
Example:
Page 55

Version 2.65 Jul. 2009
50
User's Manual
Installer, SetupPOS, TMUSB
”Full Path\Setup.exe” /s /a”Full Path\OposReg.reg”
3. Next, Silent Installation of the service pack by using the following
Example:
”Full Path\Setup.exe” /s /a”Full Path\OposData.reg”
Notes: The registry files such as "OposReg.reg" or "OposData.reg" are the
example, which are already saved.
• When the environment (Main PC) for creating the registry files to be
used is installing EPSON TM USB Driver or parallel driver with this
installer, the driver being installed is installed with Silent Installation
regardless of parameter’s presence. If you wish not to install those
drivers to the target PC, please make a registry file with a PC that is not
installing respective driver.
• When a parallel driver is installed with Silent Installation, the system
rebooting is not executed upon success of installation. For installing the
parallel driver with Silent Installation, adding reboot parameter or
rebooting after installation is required.
3.12.
Messages for Installation
The prog
ra
m shows a user message when necessary after the execution or
setting of an item selected in a dialog box. Follow the instructions in them.
Conditions in which messages appear and the messages themselves are listed
below.
3.12.1. Messages at the Time of Startup
Condition Error
Message
A user without administrator authority is
attempting to perform installation.
(Windows 2000/ Windows XP/ Windows
Vista)
The user does not have Administrator
authority.
The “Install.ini” file is not found.
There is no "Install.ini” file in the current
directory. This installation is closing.
The “Relnote.txt” file is not found.
There is no "Relnote.txt” file in the current
directory. This installation is closing.
The contents of the “Install.ini” file are
illegal and the contents are changed.
The setting files for installation are not found
or the contents have been changed.
The registry information is corrupted. Registry information couldn’t be read.
Attempting to install a previous version
over a new version.
Newer OPOS has been already installed.
Page 56

Version 2.65 Jul. 2009
51
User's Manual
Installer, SetupPOS, TMUSB
Attempting to install a special version by
overwriting but the special version does
not allow overwriting installation.
This version can't be installed in.
Attempting to install a special version by
coexistence but the special version does
not allow coexisting installation.
This version can't be installed in.
Attempting to install a version that allows
overwriting in the condition where a
special version that does not allow
overwriting installation is already
installed.
It can't be installed. It won't replace the OPOS
of this version.
Attempting to install a version that allows
coexistence in the condition where a
special version that does not allow
coexisting installation is already installed.
It can't be installed. It won't replace the OPOS
of this version.
Attempting to install by
overwriting/coexistence when the version
allows neither overwriting nor coexisting
installation.
The OPOS in the registry files can’t replace
the current version, and they can’t coexist
either.
A version in different language is already
installed.
The language of OPOS of this installation is
different from the language of OPOS being
installed. It can’t be installed.
The Comctl32.DLL system file is
outdated, corrupted, or does not exist.
For EPSON OPOS ADK to run properly, the
update of Comctl32.DLL is required.
The latest DLL update ca be found and
downloaded from the Microsoft web site.
(Or can be found with the provided disk with
OPOS.)
Installer can be resumed following running the
DLL update, 50Comupd.exe.
3.12.2. Messages during Installation
Condition Error Message
There is not enough free space in the
directory in which EPSON OPOS ADK to
be installed.
The necessary free capacity can't be secured
to install OPOS.
Another application is using a file to be
installed with EPSON OPOS ADK.
A required file may be in use. Close all
applications, and install again from the
beginning.
Not a single component has been
checked for custom installation.
A component isn’t being checked.
The registry information contains illegal
data.
An illegal result has been returned on the
registry information.
When there was a failure to load an
installer internal DLL.
The specified file cannot be found. Please
prepare a valid disk and restart installation.
When the selected CO type is different
from the installed CO type.
The selected control objects type is not
compatible with the one already installed.
If you continue and install with this control
objects type, the existing objects will be
automatically removed and invalidated.
The registry recordation of uninstall
information is failed.
Failed to record uninstall information.
The uninstaller may not work correctly.
Page 57

Version 2.65 Jul. 2009
52
User's Manual
Installer, SetupPOS, TMUSB
When the information for registered
devices that is not supported by the
current version is contained in the
specified registry file.
Information for registered devices that is not
supported by the current version is contained
in the specified registry file.
Since the use of this file as it is could lead to
unexpected results, it is necessary to delete
this device information.
Do you wish to delete this device information?
Click "Yes" to continue the install and delete
this device information.
Page 58

Version 2.65 Jul. 2009
53
User's Manual
Installer, SetupPOS, TMUSB
3.12.3. Message during Driver Installation after EPSON OPOS ADK Installation
Condition Error Message
There is no driver supporting the OS
currently used.
The OS currently used is not supported.
The Installation transaction of the parallel
driver is failed.
Failed to the installation transaction of the
Parallel driver.
An error is returned during the installation
of the parallel driver.
The Installer of the Parallel driver returned an
error.
An unexpected error is returned during
the installation of the parallel driver.
An unexpected error is detected.
The update transaction of the parallel
driver is success.
To use the Parallel interface, the PC must be
restarted.
To restart now, remove the disk and click
"Yes".
To restart later, click "No".
3.12.4. Messages When the Silent Mode is specified
Condition Error Message
An illegal value is specified for the Silent
Installation command line.
The form of the command line parameter is
illegal. Define it as follows.
setup /a“RegData.reg”
An inexistent registry file is specified in
the command line.
Registry File specified in the command line
parameter cannot be found.
The Silent mode’s log file cannot be
created.
Failed to make the silence log files.
The Silent Installer log file cannot be
opened.
Failed to open the Silent Installer log file.
A unsupported registry file is specified in
the parameter.
Registry file specified in the command line is
illegal.
Page 59

Version 2.65 Jul. 2009
54
User's Manual
Installer, SetupPOS, TMUSB
3.12.5. Messages Related to Registry File
Condition Error Message
The registry file, which is not being
installed, is specified for registry import
or the parameter specification at starting
up.
The version recorded by registry file doesn’t
correspond to the version of this installation.
The coexistence registry file of a version
that is not installed is specified at the
time of coexistence installation
The version of the coexistence in the registry
file and the version that is now being installed
are different.
A registry file that contains coexistence
information is specified at the time of sole
installation
The coexistence version in the registry file
hasn’t been installed in the target computer.
A registry file created with a different
language version is specified at the time
the parameter is specified during registry
file selection or startup
The language of OPOS recorded by registry
file doesn’t correspond to the language of this
installation.
A registry file created with a version that
is not supported is specified.
The specified registry file contains information
on the unsupported version by this
installation. This file cannot be used.
An internal processing of the registry file
isn’t performed smoothly due to some
reasons.
Failed to make copies of the specified registry
file. The selection of registry file is invalid.
A registry file that was made by different
version OS is specified when registry file
import or the parameter is specified at
startup.
The language of OPOS recorded by registry
file doesn’t correspond to the language of this
installation.
3.12.6. Messages during Coexisting Installation
Condition Error Message
Coexisting with a current version, a
registry file containing only information
on Version 2.xx is specified when registry
file is selected or the parameter is
specified at startup.
This registry file has information only on this
version.When coexistence is installed, it can’t
be used.
Coexisting installation with a version that
does not support coexistence is
executed.
A version of OPOS that cannot work with this
version has been already installed. After
uninstalling the currently installed OPOS,
please install the new version.
Overwriting Ver1.9x by Ver2.xx.
Do you want to update the shared OPOS
information?
Page 60

Version 2.65 Jul. 2009
55
User's Manual
Installer, SetupPOS, TMUSB
3.12.7. Add-in Installation Messages
Condition Error Message
Installation of an add-in service pack
whose language is different from that of
the base version is executed.
The language of OPOS of this installation is
different from the language of OPOS being
installed. It can’t be installed.
Installation of an add-in service pack
over a wrong base version is executed.
The installed version is not supported.
Installing the base version in the
condition where the add-in service pack
has been installed.
The service pack has been already installed
in the OPOS.
Installing a service pack alone without its
base version is being installed.
The OPOS base version for this service pack
has not been installed.
Devices and files included in the add-in
service pack have not been installed in
the base version.
The following devices and files cannot be
installed after the installation of
service pack x.
----
----
It is recommended to have them installed
before installing service pack x in case they
are needed in the future.
Proceed with installation?
The devices and files included in the full
package are not installed yet
The following devices and files included in
Version 2.xx are not installed.
----
----
Only installed files are updated.
To install other files, run the installation again.
Proceed with installation?
3.13. Precautions for Installation
• Overwriting installation is
not possible when an EPSON OPOS ADK of different
version or language (US version, Japanese version) has already been installed.
• It is not possible to read registry information files stored in an EPSON OPOS
ADK of different version (including the service pack) or language (US version,
Japanese version).
• Be sure to install the devices stated in the REG file information that is specified
in the registry file import (that is, the devices that had already been installed or
registered when the Setup POS utility stores to the REG file). If these do not
match, operation cannot be guaranteed.
REG file information : POSPrinter, LineDisplay, MSR
Installed device : MSR
If such a setting is made as shown above, a conflict is generated, as it is only
the settings of the POSPrinter and LineDisplay that will become valid whereas
Page 61

Version 2.65 Jul. 2009
56
User's Manual
Installer, SetupPOS, TMUSB
the actual files do not exist.
• If the installation fails for some reason, or it is canceled during the execution,
be sure to perform a reinstallation. In the condition where installation has failed
or been canceled, the settings, etc. may not be completely removed even if
uninstallation is performed. EPSON OPOS ADK may malfunction due to the
failure of the first installation even after the reinstallation. It is recommended to
uninstall EPSON OPS ADK and install it again.
• When using USB POSPrinter, MICR, LineDisplay, CheckScanner, CashDrawer
and ElectronicJournal, install the Epson TM USB Driver (Epson USB controller
for TM printer series) in advance. It is not possible to install the USB OPOS
information unless the Epson TM USB driver is installed. Users of the EPSON
TM USB Driver should refer to "Section 6. EPSON TM USB Driver" of this
manual.
• When Version 1.xx and Version 2.xx are installed coexisting, the operation of
Version 2.xx will not be normal if the uninstaller of Version 1.xx is used. Be sure
to uninstall Version 2.xx first, or use the uninstaller of Version 2.xx to uninstall
Version 1.xx.
• If Version 2.xx is uninstalled under th e coexisting environment of Version 1.xx
and Version 2.xx, the subsequent behavior of Version 1 is not guaranteed. In
such a case reinstall Version 1.xx and make the prescribed settings.
• You can install and uninstall CCO using the SetupPOS utility; subsequently,
however, the CCO registration information and the Installer cannot be
synchronized.
When CCO is registered by the SetupPOS utility while CCO is not installed by
the Installer, or when CCO is released by the SetupPOS utility while CCO is
installed by the Installer, the Installer message may not be appropriate.
• When overwriting Version 1.xx by Version 2.xx, the settings of the trace
function on Version 1.xx may not be succeeded. They are as follows.
CashDrawer: “Open Status Phase” (Device Specific Settings)
POSPrinter: “Reverse feed removal” (Device Specific Settings)
All devices: When the Trace file name is setting to default value by the
OPOS API Trace Setting.
Set the trace function again before using it after the information was succeeded.
When overwriting Version 1.xx by Version 2.xx in the above cases, please
redefine the setting by the SetupPOS Utility after installing.
If both Version 1.xx and Version 2.xx exist at the same time and "Trace All" is
selected for each version, only trace of either one of the versions can be taken.
• When the reboot setting after the Silent Installation is being specified, the
system reboots automatically after the installation. The data being edited
Page 62

Version 2.65 Jul. 2009
57
User's Manual
Installer, SetupPOS, TMUSB
should be saved or terminated before the installation.
• When installation of parallel driver with this installer is succeeded, please make
sure to reboot the system. The rebooting enables the use of recommended
parallel driver.
Please note that if the system is not rebooted, the operation is not guaranteed
at all.
• Upon completion of the installation, a Tmusb folder that stores the installer of
EPSON TM USB Driver and a Lilac folder that stores the installer of
recommended parallel driver are created at the target folder.
Even if these drivers are not installed with this installer, they can be installed by
execution of their installers later on.
Page 63

Version 2.65 Jul. 2009
58
User's Manual
Installer, SetupPOS, TMUSB
Section 4. Uninstallation
The provided Uninstaller must be used to uninstall an installed EPSON OPOS
ADK program. The following methods are available for uninstallation.
• Choose the "Add/Remove Programs" (in Windows 2000/XP) or the "Uninstall a
program" (in Windows Vista) in the Control Panel, and then select the "EPSON
OPOS ADK Version 2.xx".
In both cases, the EPSON OPOS ADK uninstaller is executed.
When uninstalling, first make sure that all running applications are closed; both
those used by OPOS as well as any other applications.
However, when using Windows 2000, Windows XP and Windows Vista, only
privileged users can use install programs. Please consult a user who has
privilege for the machine.
4.1. Uninstallation Procedures
Perform unin
s
tallation using either of the methods prescribed.
(1) The “Information...” dialog box is displayed.
This dialog box displays the version(s) compatible with the Uninstaller.
Confirm that the version to uninstall using the Uninstaller is listed. To
continue, select Yes. To cancel the operation here, select No.
(2) The “ADK Selection” dialog box is displayed.
All the currently installed EPSON OPOS ADK versions are displayed.
Select the version to uninstall. Multiple versions cannot be selected. If you
check the Complete uninstall of selected OPOS ADK check box, full
uninstallation is performed. If the check mark is removed, it is possible to
select the device(s) to be removed. When the selection has been made,
select the [Next] button. If checked, go to step (4).
To return to the previous dialog box, select the [Back] button.
Page 64

Version 2.65 Jul. 2009
59
User's Manual
Installer, SetupPOS, TMUSB
(3) The “Selection of Devices to Delete” dialog box appears.
The “Selectable devices” window shows the currently installed devices.
Select a device to be deleted, and then press the [Remove] button. The
device is moved to the “Devices to delete” window. To return to the
“Selectable devices” window, press the [Add] button. Move devices from
the “Selectable devices” window to “Devices to delete” the window. To
move all the devices shown in the “Selectable devices” window to the
“Devices to delete” window, press the [All] button. All the devices are
moved. When the selection is done, select the [Next] button.
To return to the previous dialog box, select the [Back] button.
(4) The “Confirm Deletion” dialog box appears.
Information related to the Uninstallation is displayed. Confirm the contents.
Uninstallation starts when the [Start] button is selected. To return to the
previous dialog box without starting deleting, select the [Back] button if you
do not want to start deleting.
• The Uninstallation process starts. A progress bar indicates the status of
the Uninstallation.
• A message indicating completion is displayed on the progress bar when
the Uninstallation is completed.
4.2.
Types of Uninstallation
There a
r
e two types of Uninstallation: full and custom. The types of the
Uninstallation can be selected by “Completely remove the selected ADK
configuration” check box in the “Select ADK Version” dialog box.
• Full uninstall
Deletes all the devices registered in the selected version.
• Custom uninstall
Select the devices to be uninstalled from all the devices registered in the
selected the devices using the “Selection of Devices to Delete” dialog box.
The device can be specified by device classes.
4.3. Silent Uninstallation
It is possible to perform uninstallatio
n
without using the user interface. This is
called Silent Uninstallation. When Silent Uninstallation is used, only full
Page 65

Version 2.65 Jul. 2009
60
User's Manual
Installer, SetupPOS, TMUSB
uninstallation is performed. Specify in the command line as follows:
The way to specify depends on the installing version.
y Silent Uninstallation of Version 1.xx
Example: “FullPath\Uninstaller.exe” /s”Version”
y Silent Uninstallation of from Version 2.00 to 2.50 (including service pack
version)
Example: “FullPath\Uninstaller.exe” /s
When only /s is specified as the parameter, the currently installed program is
uninstalled. This parameter can only be used when only one version is currently
installed. If multiple versions are installed, an error message is displayed. When
multiple versions are installed, specify as follows.
y Silent Uninstallation of Version 2.60
<Procedure>
(1) Make a recording file.
Make a file for recording the operation of uninstall. To uninstall the
EPSON OPOS ADK, perform the following commands.
(Example) ”Full Path\Setup.exe” /r
When the uninstallation finished, the uninstall operation is recorded
to the "Setup.iss" file that is made in the Windows folder.
(2) Using the (1) recording file file for Silent Uninstall. Copy the (1)
recording file to the same folder as the "Setup.exe".
(Example) ”Full Path\Setup.exe” /s
To specify the path of the recording file, use the "/f1" option.
(Example) ”Full Path\Setup.exe” /s /f1”c:\Temp\Setup.iss
The functions are added to Silent Installation by adding the following parameters
to command lines.
The following parameters can be used at the same time. If you wish to use them
at once, input the parameter you want to use after the parameter added to the
command line.
Parameters do not distinguish capital and small letters. It is not necessary
specifying only with small letters as the following examples show.
<Indicating the Silent Uninstallation>
Adding Parameter: /s
Page 66

Version 2.65 Jul. 2009
61
User's Manual
Installer, SetupPOS, TMUSB
Example: “FullPath\Uninstaller.exe” /s
<When the Silent Uninstallation finished, not to display the dialog box>
Adding Parameter: /m
Example: “FullPath\Uninstaller.exe” /s /z”/m”
To specify the "/m" option, use the "/z" option.
<Not to delete the file that is made and used by ElectronicJournal>
Adding Parameter: /e
Example: “FullPath\Uninstaller.exe” /s /z”/e”
To specify the "/e" option, use the "/z" option.
< When the Silent Uninstallation finished, not to display the dialog box, and
not to delete the file that is made and used by ElectronicJournal>
Adding Parameter: /m, /e
Example: “FullPath\Uninstaller.exe” /s /z”/m /e”
To specify the “/m” option and the “/e” option, use the "/z" option.
Page 67

Version 2.65 Jul. 2009
62
User's Manual
Installer, SetupPOS, TMUSB
4.4. Messages for Uninstallation
The Uninstaller program shows user messages when necessary after the
execution of dialog boxes or making of settings. Follow the instructions in them.
Conditions in which messages appear and the messages themselves are listed
below.
Condition Error Message
A user who does not have Administrator
authority is attempting to perform
Uninstallation.
Administrator Access Required. Execute this
program from an account with administrative
access.
The Uninstaller is started while OPOS is
not installed.
OPOS is not installed.
The Uninstaller of a version in a different
language was executed.
The target language of OPOS is not installed.
The Uninstaller does not have the
required information.
Internal Error Occurred. Premature program
termination required. Some component may
not have been deleted. Please manually
delete remaining components.
The registry contains illegal information. Unable to open registry. Program terminating.
The required information was not found
in the registry.
Unable to get required information from
registry. Program terminating.
Other files have been copied to the install
directory.
Unable to remove directory. Remove directory
manually.
An illegal value has been entered on the
command line.
Invalid Parameter. Required format is:
Uninstaller /s“X.xx”
The version that is not installed is
specified as the command line
parameter.
Version not installed or invalid command
parameter.
The file to be uninstalled is being used by
another application.
Xxx is being used by other application. To
delete this file, exit the application using the
file and push the [Retry] button. To leave this
file, push the [Cancel] button.
Only the /S parameter is specified on the
command line when multiple versions of
OPOS are installed.
There is more than one installed version of
OPOS. Use the command line option
Uninstaller /s“X.xx” to uninstall a specific
version or execute the user interface version.
Page 68

Version 2.65 Jul. 2009
63
User's Manual
Installer, SetupPOS, TMUSB
4.5. Precautions for Uninstallation
• Uninstallation is not possible when an EPSON OPOS ADK of different version
or language (US version, Japanese version) is installed.
• The Uninstallation is executed on the condition that OPOS-related files are not
in use. If OPOS-related files are in use, a message that files cannot be deleted
is displayed. When this message is displayed, close the application that is
using the OPOS-related files. Then try again to continue the Uninstallation
process. If the Uninstallation is not retried, files alone will remain in the
directory.
• Close Explorer for executing Uninstaller.
• This Uninstaller does not uninstall the EPSON TM USB Driver and the
recommended parallel driver that are provided by the installer. However, the
system operation is not affected by those drivers.
• If the parameter "/m" is specified for the Silent Installer, it operates in Silent
mode. For this reason, after the Silent Uninstaller is finished, do not execute
the installer.
Page 69

Version 2.65 Jul. 2009
64
User's Manual
Installer, SetupPOS, TMUSB
Section 5. SetupPOS Utility
SetupPOS is a setup utility for registering, modifying, or deleting devices and port
environments of EPSON OPOS ADK to the system registry.
On Windows 2000, Windows XP or Windows Vista, depending on the permissions of the
user, the user may only be able to view the settings but does not have the ability to register
or modify the settings without a few exceptions.
5.1. Starting and Exiting
5.1.1. Starting SetupPOS
At the end of the installation, continue and use this utility.
Or, after installation, click the [Start] b
utton, point to Programs, and then select
[OPOS]. Finally, select [SetupPOS Ver2.00] to start the utility.
5.1.2. Exiting SetupPOS
Use one of the following three method
s to exit
the program.
1. In the SetupPOS main window, select Exit from the File menu.
2. Click the [Close] button in the upper right corner of the window.
3. Click the
mark in the upper left corner of the window. From the shortcut
menu, select Close.
Page 70

Version 2.65 Jul. 2009
65
User's Manual
Installer, SetupPOS, TMUSB
5.2. About the Basic Operations (MAIN WINDOW)
When SetupPOS runs, its main window appears as shown below. In this window,
it is possible to add or delete devices, and make the settings by the explorer-like
operations. This window consists of a menu bar, tool bars, and device settings
panes.
The following sections describe the various components of the SetupPOS main
window.
5.2.1. Menu
1. File
Use the File
menu to display prop
erties and exit SetupPOS.
i. Property
Use this menu command to display properties of the item selected in the
left or right pane. The properties can only be viewed but not modified.
Page 71

Version 2.65 Jul. 2009
66
User's Manual
Installer, SetupPOS, TMUSB
Depending on the item selected, the properties that can be displayed are
as follows:
Device class/device class name
This gives information about EPSON OPOS ADK, CO, or version of
SetupPOS.
Device name key
This gives information about the device's detail, communication
settings
*1
, trace settings, message handling, sleep time settings and
DeviceStatistics settings.
*1
It becomes key hook driver in case of the MSR and Keylock.
Port connection
This gives information about the range of port.
Serial port (COM) or parallel port (LPT)
This gives information about the range of port.
USB/KeyBoard/Memory/Network/Wireless/(None)
No property is displayed.
ii. Exit
This menu command exits SetupPOS.
2. Edit
This menu contains commands for setting and editing devices.
i. Cut
This menu command prepares a selected device for moving, and is valid
only when “Port Connection View” is selected. Use this command, for
example, when moving a device to another port. Usually, this command
is used with the Paste command. Cutting and pasting the other device,
or drag-and-drop of the other device cancel the Cut command to the
device which has been prepared for moving (or cut). After cutting the
device, using the Paste command appropriately moves a port.
Example: Moving device from COM1 to COM2, from USB2 to USB1, or
from LTP2 to "None".
This operation becomes disabled if at “Port Connection View” the device
name key is not selected.
Page 72

Version 2.65 Jul. 2009
67
User's Manual
Installer, SetupPOS, TMUSB
To cut a device
Select the device name key and select Cut from the Edit menu, in tool
bar, or from a pop-up menu, which is brought up by right-click.
On Windows 2000, Windows XP and Windows Vista, the user must
have the administrative permissions in order to use this function.
ii. Copy
This menu command copies character strings. Note that a device cannot
be copied.
To copy character strings
Select the character strings, then select Copy from the Edit menu.
iii. Paste
This menu command pastes character strings that has been copied
earlier, or moves a device that has been cut earlier to a valid port.
Note that pasting a device (which has been cut earlier) backs to its
original port or to another type of port (for example from COM1 to LPT3)
is not allowed. Also, this command does not work if nothing has been cut
or copied earlier. This command is valid only when “Port Connection
View” is selected.
To paste a device that has been cut earlier
After copying the device, the [Paste] icon becomes enabled as well.
Select a valid port, and then select Paste from the Edit menu. On
Windows 2000, Windows XP and Windows Vista, the user must have
the administrative permissions in order to use this function.
iv. Select All
Use this menu command to select all items displayed in the right pane.
v. Invert Selection
Use this menu command to invert the sate of the selection of all items
displayed in the right pane.
vi. Add New Device
Page 73

Version 2.65 Jul. 2009
68
User's Manual
Installer, SetupPOS, TMUSB
Use this menu command to display the Add New Device wizard and add
a new device to the device class. The device class displayed here refers
to devices prepared by the install program. For details, see the Section 5.
"5.3.1. Using the Add New Devic
e wiz
ard" of this manual. On Windows
2000, Windows XP and Windows Vista, the user must have the
administrative permissions in order to use this function.
vii. Add New LDN
Use this menu command to display the “Add New LDN” dialog box and
add a logical device name to a device.
A logical device name that has already been used by the same device
class cannot be specified. When re-specifying a logical device name that
has been used and then deleted the corresponded device, a
confirmation message appears that is whether to replace the old logical
device name with the new one. On Windows 2000, Windows XP and
Windows Vista, the user must have the administrative permissions in
order to use this function.
<About the dialog box for adding logical device name>
"Choose DeviceClass." combo box:
Select a device class for adding the logical device name. If the device
class has already been selected in the window, then it appears in the
combo box by default; otherwise the device classes appear in standard
way or by name. Also, only device classes which the control objects
(CO) supporting the device is installed are listed in the combo box.
"Choose DeviceNameKey" combo box:
Select a device name key for adding the logical device name. If the
device name key has already been selected in the window, then it
Page 74

Version 2.65 Jul. 2009
69
User's Manual
Installer, SetupPOS, TMUSB
appears in the combo box by default; otherwise the device names
appear by ascending order. If no device exists for the device class, then
the combo box becomes empty.
"Input a logical device name. (maximum 16 characters)" edit field
Enter a logical device name to be added. The name can be up to 16
characters, but it cannot contain the "\” character. If the logical device
name is invalid or is already registered, then the Continue or the [OK]
button becomes disabled.
[Continue] button
Use this button to set up the logical device name and then continue to
add more logical device names.
[OK] button
Use this button to set up the logical device name.
[Cancel] button
Use this button to cancel the setting and close the dialog box.
[Help] button
Use this button to display the help on the dialog box by clicking this
button.
Adding a logical device name
In the window, select a device name key for adding the logical device.
From the Edit menu, select "Add New LDN" and then enter the logical
device name. Another method is to select a device name key for adding
the logical device and right-click it. From the pop-up menu, select "Add
New LDN" and then enter the logical device name.
viii. Delete
Use this menu command to delete a device selected in the current
window. Before deleting, a confirmation message box appears; when
clicking the [Yes] button, the device is deleted.
When deleting a master device of Hydra connection, a confirmation
message box appears that is whether to delete the slave devices as well.
It is possible to select to delete the master device only or all including
the slave devices.
Delete of ElectronicJournal device
If an Electronic Journal device is deleted, a data file confirmation
Page 75

Version 2.65 Jul. 2009
70
User's Manual
Installer, SetupPOS, TMUSB
message is displayed. If "Yes" is selected, the Electronic Journal data
files are deleted. If "No" is selected and the data files are not deleted, if
is possible that the files will not be able to be deleted using EPSON
OPOS ADK.
If no device name key or logical device name is selected, then this
operation becomes disabled. On Windows 2000, Windows XP and
Windows Vista, the user must have the administrative permissions in
order to use this function.
To delete a device, use one of the following methods:
1) In the main window, select a device name key or the LDN to be
deleted. From the Edit menu, select Delete.
Or, in the main window, select a device name key or the LDN to be
deleted. Right-click to bring up a pop-up menu and select Delete.
2) In the main window, select a device or the LDN to be deleted, and
then press the Delete key.
3) In the main window, select a device or the LDN to be deleted, and
then click the [Delete] icon in the tool bar.
ix. Rename LDN
This menu command renames the logical device currently selected in
the window. The name can be up to 16 characters, but it cannot contain
the "\" character. Also, the same logical device name cannot be used
again in the same device class.
A confirmation message box appears before the name change takes
effect. If no logical device name is selected, then this operation becomes
disabled. On Windows 2000, Windows XP and Windows Vista, the user
must have the administrative permissions in order to use this function.
To rename a logical device:
While in the main window, select a device name. From the Edit menu,
select “Rename LDN”. The name is ready for editing now. Change the
device's name and then press the Enter key. When a confirmation
message appears, click the [Yes] button and the logical device name is
changed.
Page 76

Version 2.65 Jul. 2009
71
User's Manual
Installer, SetupPOS, TMUSB
x. Communication Settings
Use this menu command to display the “Communication Settings” dialog
box and change the communication settings of the selected device. This
command works only on the following devices: COM, LPT, USB,
Ethernet, IEEE802.11b, or devices using the keyboard interface (such
as Printer, LineDisplay, CashDrawer, MSR, Keylock, MICR,
CheckScanner, ElectronicJournal).
Communication Settings of slave devices with Hydra connection cannot
be modified. Also, Communication Settings of device with Hydra
connection can only be performed from the master device. When the
master device is changed, settings of all of its slave devices are
changed as well.
On Windows 2000, Windows XP and Windows Vista, the user must
have the administrative permissions in order to use this function.
Page 77

Version 2.65 Jul. 2009
72
User's Manual
Installer, SetupPOS, TMUSB
<Communication Settings dialog box>
Page 78

Version 2.65 Jul. 2009
73
User's Manual
Installer, SetupPOS, TMUSB
Port settings
"Port number" combo box
Use this combo box to display the port name of the selected device, as
follows:
For serial port : ”COM Port settings” combo box
For parallel port : ”LPT Port settings” combo box
For USB port : “USB port settings” combo box
For network : “Network Setting” edit box
For wireless : “Network Setting” edit box
Use this combo box to select a serial, parallel, or USB port number. For
network and wireless, set the IP address and the host name. The
network settings set the input value by pushing the [Update] button.
When selecting "None", the registry's port information "(Port)" is deleted.
The setting ranges for serial, parallel port number can modify in the “Port
Range Setting” dialog box. For USB port, the ports, which can be
connected by the USB driver when the “Communication Settings” dialog
box appears, become the selectable range. If the device, which has
been set is on the port to be set, depending on the capability of the
device and the selected device, a message not to set the device to the
port appears. In this case, the port setting is invalid.
[Auto Setting] button
This command becomes disabled if a non-USB port is selected. When
clicking this button, the “USB Auto Setting" wizard is displayed and it is
possible to retrieve a USB port number automatically. For details, refer
to the Section 5. “5.3.2. Using the USB Auto Setting wizard
” of this
manual.
[Update] button
Use this button to update the IP address or host name. The [update]
button works only when the IP address or host name entered into the
edit field is different from the existing one. If a device already exists at
the IP address or host name entered into the edit field, then depending
on the device or the capability of the selected device, a message
appears to indicate that the IP address or host name cannot be used.
When continuing and adding the device, the IP address or host name of
that device becomes invalid.
Page 79

Version 2.65 Jul. 2009
74
User's Manual
Installer, SetupPOS, TMUSB
"Port is being used by" combo box
This combo box contains a list of devices already set up for the port
number selected.
Detailed settings of the port
The settings from "BaudRate" to "Handshake" apply to the serial port.
Change these settings to match the printer's settings. If the detailed
settings of a master device in Hydra connection are changed, then the
settings of its slave devices are also changed automatically. Also, as
mentioned above, the detailed settings of the slave devices cannot be
changed directly.
"BaudRate" combo box
Use this combo box to display or set the communication speed of the
serial port. The values that can be used depend on the device
information file (INF file). For information on the communication speed,
refer to the hardware manual of the device.
If the selected port is parallel, USB, network, wireless port, or "None",
then this setting cannot be set or changed. For a slave device in Hydra
connection, the speed is displayed but cannot be modified.
"BitLength" combo box
Use this combo box to display or set the data bit length of the serial port.
The values that can be used depend on the device information file (INF
file). For information on data bit length of the device, refer to the
hardware manual of the device.
If the selected port is parallel, USB, network, wireless port, or "None",
then this setting cannot be set or changed. For a slave device in Hydra
connection, the value is displayed but cannot be modified.
"Parity" combo box
Use this combo box to display or set the parity bit length of the serial
port. The values that can be used depend on the device information file
(INF file). For information on parity bit of the device, refer to the
hardware manual of the device.
If the selected port is parallel, USB, network, wireless port, or "None",
then this setting cannot be set or changed. For a slave device in Hydra
connection, the value is displayed but cannot be modified.
Page 80

Version 2.65 Jul. 2009
75
User's Manual
Installer, SetupPOS, TMUSB
"StopBit" combo box
Use this combo box to display or set the stop bit of the serial port. The
values that can be used depend on the device information file (INF file).
For information on stop bit of the device, refer to the hardware manual of
the device.
If the selected port is parallel, USB, network, wireless port, or "None",
then this setting cannot be set or changed. For a slave device in Hydra
connection, the value is displayed but cannot be modified.
"Handshake" combo box
Use this combo box to display or set the handshake of the serial port.
The values that can be used depend on the device information file (INF
file). For information on handshake of the device, refer to the hardware
manual of the device.
If the selected port is parallel, USB, network, wireless port, or "None",
then this setting cannot be set or changed. For a slave device in Hydra
connection, the value is displayed but cannot be modified.
"InputBuf" edit field
This edit field supports only Version 1.xx devices.
Use this edit field to display or set the input buffer size of the serial port.
The range of acceptable values is 32 to 8192.
If the selected port is parallel, USB, network, wireless port, or "None",
then this setting cannot be set or changed. For a slave device in Hydra
connection, the information is displayed but cannot be modified. Also,
the default value has been optimized to allow for normal operation.
"OutputBuf" edit field
Use this edit field to display or set the size of the output buffer size of the
serial, parallel, network, or wireless port. The range of acceptable values
is usually 32 to 1024. For some devices, the range is modified by
settings of the device information file (INF).
If the selected port is USB or "None", then this setting cannot be set or
changed. For a slave device in Hydra connection, the value is displayed
but cannot be modified. In addition, the default value has been optimized
to allow for normal operation.
"Output Interval Time" edit field
Use this edit field for set the retry time to use when output fails. For
details of output interval time, please refer to the "
5.8 Glossary
" of this
Page 81

Version 2.65 Jul. 2009
76
User's Manual
Installer, SetupPOS, TMUSB
manual. The range of acceptable values is 0 to 9999. This setting is
valid for COM, LPT, USB, network, and wireless port.
If the selected port is "None", then this setting cannot be set or changed.
For a slave device in Hydra connection, the value is displayed but
cannot be modified. Also, the default value has been optimized to allow
for normal operation.
"Input SleepTime" edit field
This edit field supports only Version 1.xx devices.
Use this edit field to display or set the sleep time at the location where
API is processed, during input from the port. The range of acceptable
values is 0 to 99.
If the selected port is USB or "None", then this setting cannot be set or
changed. For a slave device in Hydra connection, the value is displayed
but cannot be modified. Also, the default value has been optimized to
allow for normal operation.
"Master device of the following device(Master device to:)” edit field
If the selected device is a master device connected to Hydra, then the
slave device is displayed; if the device is slave, then the master device is
displayed.
[ CheckHealth Interactive] button
Use this button to execute the CheckHealth method using Level =
OPOS_CH_INTERACTIVE for the device. If the port setting is "None",
then this button is disabled. For details, refer to the manual of the
device.
[Device Specific Settings] button
Use this button to display the ”Device Specific Settings” dialog box and
change the device specific settings for the selected device. If the
selected device does not support device specific settings, then this
button is disabled. For details, refer to the manual of the device.
[OK] button
Use this button to close the dialog box and save the device's
communication settings to the registry.
[Cancel] button
Use this button to cancel the changes and close the dialog box. Any
changes in the settings will not be saved to the registry.
Page 82

Version 2.65 Jul. 2009
77
User's Manual
Installer, SetupPOS, TMUSB
[Help] button
Use this button to display the help on the dialog box by clicking this
button.
Use this screen to set the details of Keyboard Hook Control.
"Start hooking keyboard input for this device" check button
If the [Yes] button is selected, then the EPSON Keyboard Hook Control
utility (hereafter referred to as "Hook Control") is placed in the Windows
Startup group and when the system runs, monitoring of keyboard input
to this device also starts.
If the [No] button is selected, the hook control utility is not always loaded
or placed in the Windows Startup group.
In this case, however, it is possible to use this device in the OPOS
application.
If an input event occurs at this device then the OPOS control is not
opened yet, then unanticipated keyboard input may result.
To avoid this problem, it is necessary to register the hook control utility
as the target of this device.
If no keyboard-monitoring driver is used, then these buttons become
disabled.
Note that when version 1.xx and version 2.xx are installed
simultaneously, it is impossible to use MSR and Keylock devices of
Page 83

Version 2.65 Jul. 2009
78
User's Manual
Installer, SetupPOS, TMUSB
these versions at a time. Use the combination of MSR and Keylock of
either version (only version 1.xx or only version 2.xx). MSR and Keylock
use the keyboard interface and keyboard monitoring driver
(EPSONHKO). However, this driver differs form version 1.xx and version
2.xx, so it is impossible to use MSR and Keylock devices of both
versions at a time.
"Start hooking keyboard input for this device" list box
This list box displays the list of devices which are monitored by the Hook
Control.
If the setting of the "Start hooking keyboard input for this device" check
buttons is changed, the setting is valid.
"Show Keylock position adjustment dialog box at system start up"
check buttons
This setting is available only when selecting the Keylock.
If the [Yes] button is selected, when the system runs, a dialog box
appears and prompts for change of the position.
Then follow the instructions and modify the position so that the key
position can be correctly adjusted. Usually, select the [Yes] button.
If the [No] button is selected, then the dialog box will not appear.
However, when starting the system, the Keylock position must at least
be modified once. To know the initial state of the Keylock correctly,
select the [Yes] button.
[CheckHealth Interactive] button
Use this button to call the CheckHealth method for the selected device
using Level = OPOS_CH_INTERTACTIVE.
For details, see the manual of each device.
[Device Specific Settings] button
Use this button to display the ”Device specific Setting” dialog box and
change the device specific settings for the selected device.
If the selected device does not support device specific settings, then this
button becomes disabled. For details, see the manual of each device.
[OK] button
Use this button to close the dialog box and save the setting information
to the registry.
Page 84

Version 2.65 Jul. 2009
79
User's Manual
Installer, SetupPOS, TMUSB
[Cancel] button
Use this button to cancel the settings and close the dialog box.
The modifying setting does not be set to the registry.
[Help] button
Use this button to display the help on the dialog box by clicking this
button.
3. View
Use this menu to control display of the main window.
i. Tool Bar
Use this menu command to hide or display the tool bar.
If the command comes with a check mark : the tool bar is displayed.
If the command comes with no check mark : the tool bar is hidden.
Once changed, the setting remains effective even when restarting the
system. As the default, the tool bar is displayed.
What is the tool bar?
The tool bar appears below the menu bar of the main window and
contains a list of frequently used menu commands. Clicking a button
easily run a menu command associated with the button.
ii. Status Bar
Use this menu command to hide or display the status bar.
If the command comes with a check mark: the status bar is displayed.
If the command comes with no check mark: the status bar is hidden.
Once changed, the setting remains effective even when restarting the
system. As the default, the status bar is displayed.
What is the status bar?
The status bar displays various information of the main window. For
example, when a menu bar item is displayed, its description appears on
the status bar.
iii. Large Icon
Use this menu command to display items in the right pane in large icons.
It is possible to display information using one of the following menu
commands: [Large Icon], [Small Icon], [List], or [Details]. When selecting
Page 85

Version 2.65 Jul. 2009
80
User's Manual
Installer, SetupPOS, TMUSB
[Large Icon], a check mark appears together with the command. Once
selected, the setting remains effective even when restarting the system.
iv. Small Icon
Use this menu command to display items in the right pane in small icons.
It is possible to display information using one of the following menu
commands: [Large Icon], [Small Icon], [List], or [Details]. When selecting
[Small Icon], a check mark appears together with the command. Once
selected, the setting remains effective even when restarting the system.
v. List
Use this menu command to display items in the right pane as a list. It is
possible to display information using one of the following menu
commands: [Large Icon], [Small Icon], [List], or [Details]. When selecting
[List], a check mark appears together with the command. Once selected,
the setting remains effective even when restarting the system. As the
default, items in the right pane are displayed as a list.
vi. Details
Use this menu command to display items in the right pane as a detailed
list. It is possible to display information using one of the following menu
commands: [Large Icon], [Small Icon], [List], or [Details]. When selecting
[Details], a check mark appears together with the command. Once
selected, the setting remains effective even when restarting the system.
In the Details view, "Device Description" and "Connection condition" are
displayed. For "Connection condition", it can be Stand alone, Hydra,
master, or slave. Once set, the setting remains effective even when
restarting the system.
vii. Device Class View
This view displays devices in the left pane for each device class. "Device
Class View" and "Port Connection View" form a group. When selecting
"Device Class View", a check mark appears together with the command.
Once set, the setting remains effective even when restarting the system.
As the default, "Device Class View" is selected.
Page 86

Version 2.65 Jul. 2009
81
User's Manual
Installer, SetupPOS, TMUSB
viii. Port Connection View
This view displays devices in the left pane for each port. "Device Class
View" and "Port Connection View" form a group. When selecting "Port
Connection View", a check mark appears together with the command.
Once set, the setting remains effective even when restarting the system.
ix. Device Class Ordering
Use this menu command to change the sort order of the device classes
in "Device Class View", either "by Standard" or "by Name". If "by
Standard" is selected, then device classes supported by EPSON have
the priority in the display. If "by Name" is selected, then device classes
are sorted alphabetically. Once set, the setting remains effective even
when restarting the system.
What is "by Standard"?
With this view, device classes are displayed in the following order.
1. POSPrinter
2. LineDisplay
3. CashDrawer
4. ElectronicJournal
5. MICR
6. CheckScanner
7. MSR
8. Keylock
9. Scanner
10. HardTotals
11. CashChanger
12. CoinDispenser
13. POSKeyboad
14. Scale
15. SignatureCapture
16. ToneIndicator
17. BumpBar
18. FiscalPrinter
19. PINPad
20. RemoteOrderDisplay
Page 87

Version 2.65 Jul. 2009
82
User's Manual
Installer, SetupPOS, TMUSB
What is "by Name"?
With this view, device classes are displayed in the alphabetical order.
x. All View
Use this menu command to expand the view of the left pane. After
selecting “All View”, all device information is not always displayed, but
right after “All View” is selected. Using this menu command enables to
check the details of the device currently set.
4. Tools
Use this menu to display items for supplementary tools of devices.
i. CheckHealth Interactive
This menu command calls the CheckHealth method using Level =
OPOS_CH_INTERACTIVE for the device (key of the device name)
currently selected in the window. If the call succeeds, the result is
displayed in CheckHealthText. If error occurs during the call, then an
error API is called, and ResultCode and ResultCodeExtended are
displayed.
This menu command becomes disabled if no device name key is
selected in the window.
What is "CheckHealth Interactive (OPOS_CH_INTERACTIVE)"?
CheckHealth Interactive executes an interactive test with device. The
supported service object usually provides a dialog box to display the test
options as well as test results.
ii. Device Specific Settings
Use this menu command to perform device specific settings for the
device currently selected in the window. If no device name key is
selected in the window, then this operation becomes disabled. Also, if
the selected device does not support device specific settings, then this
operation becomes disabled.
On Windows 2000, Windows XP and Windows Vista, the user must
have the administrative permissions in order to use this function.
iii. Validate
Page 88

Version 2.65 Jul. 2009
83
User's Manual
Installer, SetupPOS, TMUSB
Use this menu command to validate the registry settings. When a check
mark appears on the menu command, the validation is carried out.
When the validation is valid, after device settings are changed, the
OPOS registry settings is checked if they are correctly set. If conflict
exists in the registry settings, a “Warning” dialog box appears to indicate
the conflict. We recommend turning on this function (that is, command
with the check mark).
If automatic validation is not required, turn off the command (check mark
cleared). However, in this case the user must take the responsibility to
make sure the OPOS registry settings are correctly adjusted. After
turning off the function, if the function is turned on again, registry
validation starts from that moment. Once set, the setting remains
effective even when restarting the system. For details on this function,
see the description of ”Warning” dialog boxes.
iv. Export Registry
Use this menu command to display the “Export Registry” dialog box and
export the current OPOS registry settings to a registry data file. The
saved file can then be used to recover, copy, or install the OPOS
environment.
In the “Save As” dialog box, specify a file name to export the registry. If
the file already exists, then a message box appears to confirm to
overwrite the existing file. Select the [Yes] button to overwrite, or the
[No] button to append. If the existing file is overwritten, then all existing
registry data is deleted; if the existing file is appended, then the new
settings are appended to the end of the file. It is possible to specify the
extent of the export from the following options: Register All, Selecting
Object, and Hydra.
<Export registry dialog box>
[All] button
Use this button to export all OPOS registry settings to a registry data file.
All settings below the ADK configuration key of the registry are always
saved.
[Selecting] button
Use this button to export only the OPOS registry settings for the item
Page 89

Version 2.65 Jul. 2009
84
User's Manual
Installer, SetupPOS, TMUSB
currently selected in the window, to a registry data file. If multiple items
are selected, then multiple registry settings are exported. This button
becomes disabled if no item with registry settings is selected in the
window.
[Hydra] button
This button becomes enabled if the device currently selected in the
window is a Hydra device, and then the Hydra-related settings of the
device are exported. This button becomes disabled if the device
currently selected in the window is not a Hydra device.
[Cancel] button
Use this button to cancel the changes and close the dialog box. Any
changes in the settings will not be saved to the registry.
[Help] button
Use this button to display the help on the dialog box by clicking this
button.
5. Option
This menu contains commands for maintenance.
i. Confirm the Hydra Settings closely
When a check mark appears, this menu command is turned on and a
stringent check will be carried out to confirm the validity of the registry in
version 1.xx. If the command is turned off, then only the minimum check
will be carried out. With this command, it is possible to add devices of
the same device class to the same port, or create multiple Hydra
configurations.
On Windows 2000, Windows XP and Windows Vista, the user must
have the administrative permissions in order to use this function.
ii. Port range setting
Use this menu command to display the ”Port Range Settings” dialog box
and set the maximum numbers of the serial or parallel ports according to
the hardware configuration. Usually, as long as the port configuration is
not changed, it is not necessary to use this dialog box. The default range
depends on the PC, but the acceptable range are as follows:
COM port : 10
Page 90

Version 2.65 Jul. 2009
85
User's Manual
Installer, SetupPOS, TMUSB
LPT port : 3
On Windows 2000, Windows XP and Windows Vista, the user must
have the administrative permissions in order to use this function.
<Port range dialog box>
"Maximum COM ports" edit field with spin buttons
Set the largest number of serial (COM) ports that can be used. The range
that can be chosen is 1 to 10. However, it is impossible to select a number
which is smaller than the maximum number of COM ports currently in use.
"System default" button
Use this button to set the suitable value for the current system as the
largest number of serial ports (COM). Before using this function, use the
control panel of the OS to make sure the system has been configured
correctly.
"Maximum LPT ports" edit field
Set the largest number of parallel (LPT) ports that can be used. The
range that can be chosen is 1 to 3. However, it is impossible to select a
number which is smaller than the maximum number of LPT ports
currently in use.
"System default" button
Use this button to set the suitable value for the current system as the
largest number of serial ports (LPT). Before using this function, use the
control panel of the OS to make sure the system has been configured
correctly.
[OK] button
Close the dialog box and set the port range to the registry.
[Cancel] button
Use this button to cancel the setting and close the dialog box.
[Help] button
Use this button to display the help on the dialog box by clicking this
button.
iii. OPOS API Trace Setting
Use this menu command to display the “OPOS API trace settings” dialog
box and set the trace settings of OPOS ADK. Note that for version 1.xx,
the trace function can be used only if an EPSON OPOS ADK supporting
Page 91

Version 2.65 Jul. 2009
86
User's Manual
Installer, SetupPOS, TMUSB
trace is installed.
The trace (log) function provides support for application development.
Usually this function is used only for debugging OPOS applications; it is
not used for other purposes.
On Windows 2000, Windows XP and Windows Vista, the user must
have the administrative permissions in order to use this function.
When EPSON CO is used, the log of all devices can be taken. When
CCO is used, only the log of POSPrinter, LineDisplay, CashDrawer,
MICR, CheckScanner and ElectronicJournal can be taken.
<OPOS API Trace setting dialog box>
"DeviceName" combo box
Use this combo box to select a device name for enabling the OPOS API
trace function.
The device is the target to use when "Private Trace" is selected.
If a device name is currently selected in the window, the device appears as
the default name in the combo box.
If the currently selected device's settings have been changed, changing
the settings of another device displays a message box to confirm to save
the settings. Select the [Yes] button to save the settings to the registry.
Even if the [Cancel] button is selected to close the dialog box, the settings
are not abandoned.
"Tracing mode" radio buttons
Select a tracing mode from the following options:
"No Trace" : Disable the OPOS API trace function.
This option is selected as the default.
"Global Trace" : Trace all OPOS devices (EPSON devices only).
"Private Trace" : Trace only the specified valid device.
Usually, select "No Trace".
When the OPOS API trace is turned on, all OPOS API calls (all property
access and all method calls) are traced, with the trace result recorded in
the trace log file. Note that the "Global Trace" option takes priority over
the "Private Trace" option, but when the "Private Trace" option is used,
the "Global Trace" settings are deleted. For example, if "Global Trace"
has been set to the POS printer and the user uses the line display to set
trace to "Private Trace", the POS printer will be excluded from the target
Page 92

Version 2.65 Jul. 2009
87
User's Manual
Installer, SetupPOS, TMUSB
of trace.
To avoid this problem, use the "Private Trace" option for the device to
trace.
When CCO is registered, the device that can be traced is limited. Even
when [Global Trace] is selected, only the device that can be traced is
traced.
.
"Use specific trace log file" check box
Select this check box when using a specific trace log file.
When selected, it is possible to change the trace log file name. When
cleared, the trace log file name is automatically set.
If the name of log file is set the same name as the other log file (even
error log file of POSPrinter), log information of the following device don't
be recorded. To avoid this problem, please don't use the same name as
the other log file.
If a special trace log file is specified, please be careful of the access
privileges for both the specified file, and for the save location.
If there is an insufficient access privilege for the specified location, the
trace log file will not be created.
" Notify when trace log file becomes full. " check box
In order to receive notification when the trace log file has exceeded the
maximum size limit, check this checkbox. The ability to change the trace
log file name depends on whether this checkbox is checked.
[OK] button
Close the dialog box and save the current settings.
[Cancel] button
Use this button to cancel the setting and close the dialog box.
[Help] button
Use this button to display the help on the dialog box by clicking this
button.
iv. Message Handling
Page 93

Version 2.65 Jul. 2009
88
User's Manual
Installer, SetupPOS, TMUSB
Use this menu command to display the “Message handling” dialog box
and set up message handling for the registered devices.
On Windows 2000, Windows XP and Windows Vista, the user must
have the administrative permissions in order to use this function.
What is message handling?
Some application needs to extract a message while a method requiring
much time is being processed. In this case, use this command. If
"Message is processed during synchronous" is selected, then OPOS
methods or properties are not executed while an OPOS method
requiring much time is being processed.
(For example, during synchronization, if the Close method is executed,
this may result in fatal errors such as causing the PC to hang.)
<Message handling dialog box>
"Message is not processed during synchronous" radio button
Use this radio button to disable message handling.
"Message is processed during synchronous" radio button
Use this radio button to enable message handling.
When this button is selected, a warning message box appears;
when choosing the [Yes] button, the "Message is processed during
synchronous" radio button is then selected and message handling will be
performed.
[OK] button
Close the dialog box and save the current settings.
[Cancel] button
Use this button to cancel the setting and close the dialog box.
[Help] button
Use this button to display the help on the dialog box by clicking this
button.
v. Setting Sleep Time
Use this menu command to display the “Setting Sleep Time” dialog box
and set the Sleep time of Win32 API.
In the programs for waiting for input from device inside the driver or long
processing programs, to keep the CPU time use exclusively, EPSON
OPOS ADK calls Sleep (a WIN32 API) and specifies the time to pass
control to other programs.
Page 94

Version 2.65 Jul. 2009
89
User's Manual
Installer, SetupPOS, TMUSB
By using this dialog box, it is possible to set the length of the Sleep time
for processing long programs.
By modifying the sleep time, it is possible to change the ratio of the CPU
time used by a particular device. For the sleep time of input-waiting
programs, refer to the port details of the device to learn to how to
change it. Because the settings have been optimized, usually it is not
necessary to modify them.
On Windows 2000, Windows XP and Windows Vista, the user must
have the administrative permissions in order to use this function.
<Setting Sleep Time dialog box>
"DeviceName" combo box
Use this combo box to select a device for setting the sleep time.
If a device name is currently selected in the window, the device appears
as the default name in the combo box.
To change the sleep time of the other device, select the device name
from the list.
If the currently selected device's settings have been changed, changing
the settings of another device display a message box to confirm to save
the settings.
If the [Yes] button is selected, then the even if the [Cancel] button is
selected to close the dialog box, the settings are not abandoned.
"Setting Individual Device" check box
To set the sleep time for each device, select this check box.
Usually, this check box is selected so that the sleep time value applies
only to the device selected in the "DeviceName" combo box.
If this check box is cleared, then the sleep time value applies to all
devices and the value set to each device becomes ignored.
However, the individual sleep time values are stored in the OPOS
registry even if the check mark is cleared, when selecting the check box
again, the individual sleep time values will be used again.
"Setting Value (msec)" edit field
Use the edit field to specify the sleep time for the Sleep API. The
acceptable range is 0 to 999.
[OK] button
Close the dialog box and save the sleep time to the registry.
[Cancel] button
Page 95

Version 2.65 Jul. 2009
90
User's Manual
Installer, SetupPOS, TMUSB
Use this button to cancel the setting and close the dialog box.
[Help] button
Use this button to display the help on the dialog box by clicking this
button.
vi. DeviceStatistics Settings
The "DeviceStatistics Settings" dialog box is displayed.
The device statistics information file is the file that SO uses to provide
the DeviceStatistics functions.
<DeviceStatistics Settings dialog box>
"DeviceStatistics information files preservation folder." edit box
Shows the path to a folder where DeviceStatistics information is to be
saved.
[OK] button
Close the dialog box.
[Help] button
Use this button to display the help on the dialog box by clicking this
button.
vii. Version Compatibility
Use this menu command to display the ”Version compatibility” dialog box
and ensure version compatibility in terms of the differing specifications
among versions of OPOS ADK.
On Windows 2000, Windows XP and Windows Vista, the user must
have the administrative permissions in order to use this function.
<Version compatibility dialog box>
"Common" radio button
Use the radio buttons to specify the sending conditions of DataEvent
when AutoDisable = TRUE.
This button is available only when using EPSON OPOS ADK version
1.xx.
For "Open, Claim&Enable" (default):
Immediately after SO receives the data notified as DataEvent,
DeviceEnabled is set to FALSE.
Page 96

Version 2.65 Jul. 2009
91
User's Manual
Installer, SetupPOS, TMUSB
At this moment, DataEvent is not sent. Afterwards, when DeviceEnabled
is set to TRUE, DataEvent is sent.
(AutoDisable UPOS specifications)
For "Open, Claim":
Immediately after SO receives the data notified as DataEvent,
DeviceEnabled is set to FALSE.
At this moment, DataEvent is sent (EPSON specific specifications).
Usually, select "Open, Claim&Enable" (recommended).
To upgrade OPOS ADK from version 1.5x or earlier and enable the
existing applications to run in the new version without any modification,
use "Open, Claim”.
The specifications for operations are different in pre-Ver2.60 and
Ver2.60. Select which specification. These are settable only for the
EPSON OPOS ADK of the starting from Ver2.60.
(3) When the specification starting from OPOS Ver2.60:
The specifications for the initialization, devices with hydra
connection, and Error Event are operated in compliance with
UPOS1.11. (UPOS Specification)
(4) When the specifications prior to OPOS Ver2.60:
The specifications for the initialization, devices with hydra
connection, and Error Event are operated in compliance with the
specifications Pre-Ver2.60. (EPSON Specification)
The default setting is different by the condition.
Condition Default setting
Without the installation of EPSON OPOS ADK in
advance
Ver2.60
specification
When the prior to Version 2.60 of EPSON OPOS
ADK already has been installed
Pre-Ver2.60
specification
The target categories are as follows:
<Initialization processing>
POSPrinter
LineDisplay
CashDrawer
(ElectronicJournal)
Page 97

Version 2.65 Jul. 2009
92
User's Manual
Installer, SetupPOS, TMUSB
<Switch-over of Hydra error code>
LineDisplay
CashDrawer
<Error Event processing>
Scanner
MSR
"POS Printer [Prior to Ver2.0]" check box
This check box is available only when using EPSON OPOS ADK version
1.xx.
Use this check box to specify the operation of BeginInsersion/
EndInsertion of slip.
If the check box is selected (default):
BeginInsertion only waits for insertion of Slip, and the printer has not yet
entered into the slip selection state. When EndInsertion selects slip after
the slip insertion is confirmed. The printer goes into the slip selection
state and slip printing becomes possible.
If the check box is cleared:
BeginInsertion/EndInsertion of OPOS ADK version 1.5x or earlier works.
Usually, select this check box (recommended).
To upgrade OPOS ADK from version 1.5x or earlier and enable the
existing applications to run in the new version without any modification,
clear this check box.
"MSR" check box
Use this check box to specify the operation of the data set by
TrackXData.
If the check box is selected (default):
Header and footer are not added to the data of the TrackXData
properties.
If the check box is cleared:
Operation follows the old specifications. Header and footer are added to
the data of the TrackXData properties.
Usually, select this check box (recommended).
To upgrade OPOS ADK from version 1.5x or earlier and enable the
existing applications to run in the new version without any modification,
clear this check box. For version 2.xx, because the equivalent properties
Page 98

Version 2.65 Jul. 2009
93
User's Manual
Installer, SetupPOS, TMUSB
are added with UPOS 1.5, this setting cannot be changed; this is
possible only when version 1.xx of EPSON OPOS ADK is used.
Specify a track for storing the JIS-II data.
Set track 3 to the JIS-II data.
If the check box is cleared (default): Store JIS-II data to track 4.
If the check box is selected: Store JIS-II data to track 3.
Usually, do not select this check box.
It is possible to operate OPOS ADK in the same way as version 1.xx.
[OK] button
Close the dialog box and save the version compatibility settings to the
registry.
[Cancel] button
Use this button to cancel the setting and close the dialog box.
[Help] button
Use this button to display the help on the dialog box by clicking this
button.
viii. Change of component
Use this menu command to start the installer to register or delete
EPSON OPOS ADK/CCO.
Change EPSON OPOS ADK:
Start the installer (SetupPOS.exe).
After the installer starts, SetupPOS ends.
Change CCO:
Start the CCO Installer/Uninstaller.
Even if the Installer/Uninstaller starts, SetupPOS does not end.
On Windows 2000, Windows XP and Windows Vista, the user must
have the administrative permissions in order to use this function.
<Change of component dialog box>
To change EPSON OPOS ADK:
" The path of the install file " edit field
The path of the install file of EPSON OPOS ADK appears in the edit
field.
The default path displayed:
If only version 1.xx is installed: (installed folder)\Setup.exe
Page 99

Version 2.65 Jul. 2009
94
User's Manual
Installer, SetupPOS, TMUSB
If version 2.xx is installed: A:\ Setup.exe
[Browse] button
Use this button to open the file open common dialog box and select
the install file. After selecting the install file, the path of the file appears
in the " The path of the install file " edit field.
[OK] button
Use this button to start the install of the file specified in the " The path
of the install file " edit field. If the install file does not exist, a message
appears and the dialog box closes.
[Cancel] button
Use this button to cancel the setting and close the dialog box.
[Help] button
Use this button to display the help on the dialog box by clicking this
button.
To register or delete CCO:
"CCO registration" radio button
To register CCO, select this radio button.
"CCO deletion" radio button
To delete CCO, select this radio button.
This button is disabled if CCO is not installed.
"The path of the install file " edit field
The path to where EPSON OPOS ADK is installed, as well as the
installer file appears in the edit field.
The path displayed:
If the "CCO registration" radio button is selected: (EPSON OPOS
ADK's installed folder)\OposCCOs.exe
If the "CCO deletion" radio button is selected: the path to where CCO
is installed, as well as the Uninstaller file.
Note that EPSON does not provide CCO installer.
Obtain it separately. CCO is available from the website of Microsoft.
[Browse] button
Use this button to open the file open common dialog box and select
the Install or Uninstall file of CCO. After selecting the file, the
information appears in the " The path of the install file " edit field.
[OK] button
Use this button to start the Installer or Uninstaller of the file specified
Page 100

Version 2.65 Jul. 2009
95
User's Manual
Installer, SetupPOS, TMUSB
in the " The path of the install file " edit field.
Even if the Installer/Uninstaller starts, SetupPOS does not end.
If the install file does not exist, a message appears and the dialog box
closes.
[Cancel] button
Use this button to cancel the setting and close the dialog box.
[Help] button
Use this button to display the help on the dialog box by clicking this
button.
6. Help
This menu contains commands on help.
i. Help Topics
Use this menu command to search help by topic and keyword.
ii. About EPSON SetupPOS
Use this menu command to display the version information dialog box
and view the EPSON OPOS ADK, control object information (CO) as
well as the version information of SetupPOS.
<About EPSON SetupPOS dialog box>
* EPSON OPOS ADK Version Information
"EPSON OPOS ADK Version" edit field
The version of EPSON OPOS ADK appears in the edit field.
If a Service Pack is installed, then "SPxx" appears after the version
information.
"UPOS Release" edit field
The version of UPOS supporting this version of EPSON OPOS ADK
appears in the edit field.
"Custom" edit field
Usually nothing is displayed in this field.
If this is a version for a customer, then the customer name appears here.
* Control Object Information
If multiple CO exists, then the version information of the CO found first is
displayed.
"Device Class" combo box
 Loading...