

Page 1

User’s Guide
Printed on recycled paper with at least 10% post-consumer content.
Page 2

Printing with the StylusRIP Software
Drag and Drop Printing
Drag and drop allows you to print one or more files at a
convenient time. You can close your applications, so your
Macintosh can print as quickly as possible with the maximum
system resources. You don’t even have to have the StylusRIP
application open before you start. Follow these steps:
1. Create a PostScript document as usual and set your Page
Setup options.
2. Select
3. In the Print dialog box, set the
4. Select a level 2 binary PostScript file type (not an EPS file).
5. Select the other options you want to use, and click
6. If necessary, choose the folder where you want to save the
7. After your file is created, simply drag it to the StylusRIP
Print from the File menu.
Destination to File.
OK.
When you return to the StylusRIP print dialog box, click
Save.
print file.
alias. StylusRIP opens (if it’s not already open) and begins
processing your file or files. You can continue to drag and
drop multiple files, and they will be processed in order.
2-12
Page 3
Printing with the StylusRIP Software
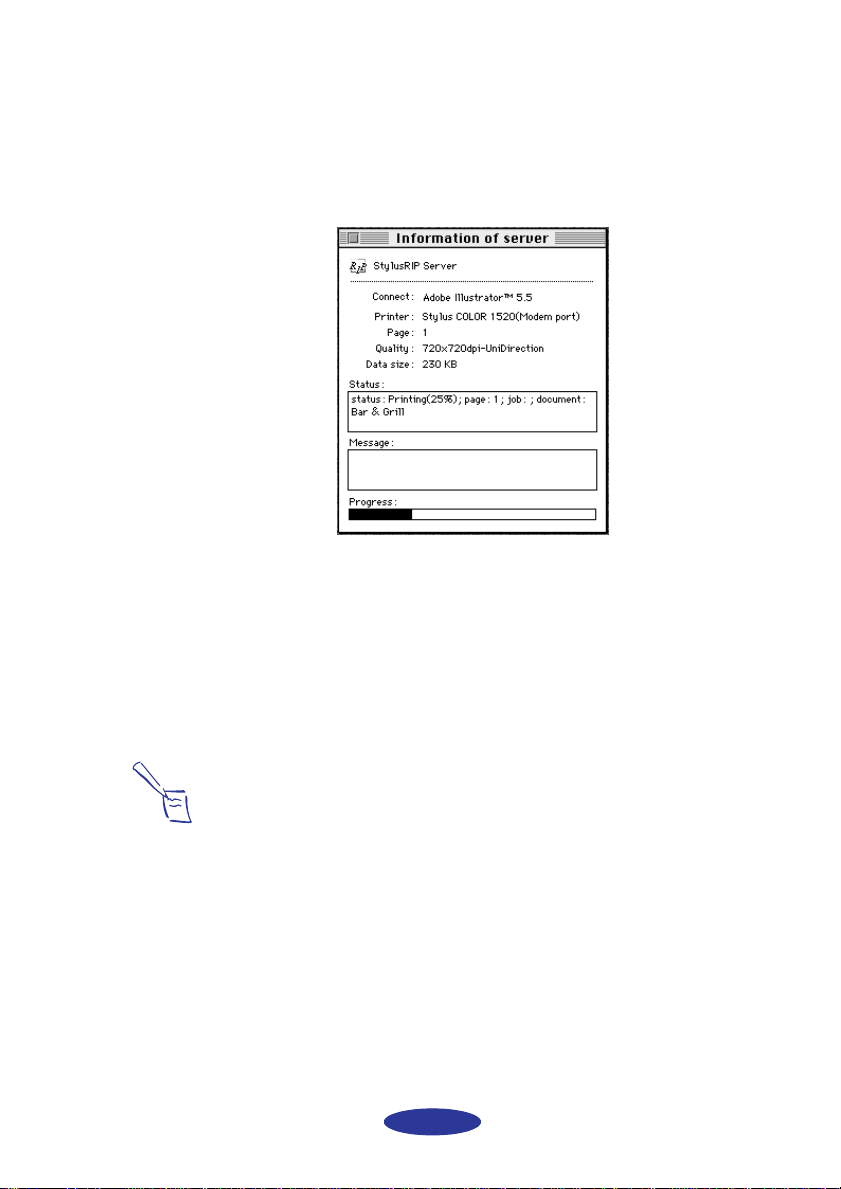
Managing Print Jobs
While your job is printing, you see a window like the following:
If you don’t see this window, select
PostScript menu.
You can use the Information window to track the progress of
your print job. If a problem occurs during printing, you’ll see it
displayed in the Message area.
Note:
To cancel a print job, press the Command and
Show window from the
period keys.
Using the StylusRIP Monitor
If you’re running StylusRIP on a network, you can use the
StylusRIP Monitor to manage your print jobs. You must have
Raster Spool Mode turned on in order to use the StylusRIP
Monitor.
2-13
Page 4

Printing with the StylusRIP Software
To turn on Raster Spool Mode, choose
File menu of the StylusRIP Server software. Check
Spool Mode
and click OK. You must exit and restart the
Preferences from the
Raster
StylusRIP Server software for this mode to take effect.
The Monitor starts automatically when you send a print job. In
the Monitor window you can see a list of spooled print jobs and
the status of the job that’s currently printing.
If you don’t see the StylusRIP Monitor, select
Show window
from the menu.
To cancel a print job that is already spooled and is waiting to be
printed, select the job and click
Job Cancel.
2-14
Page 5

Troubleshooting
3
This chapter describes solutions to some problems you may
have with the StylusRIP software. Many problems can be solved
by making sure the printer is turned on and properly connected
to the print server or network before you start the StylusRIP
software, so check these conditions whenever you encounter a
problem.
Here are some detailed solutions to specific problems or error
messages you may receive.
Printed images are clipped at the edges
Possible cause Solution
You are printing a
document with
margins larger than
the printable area of
your printer.
You selected the
wrong printer name
in the Chooser.
Check your printer
the maximum printable area on your printer and
format your document so it fits within that area.
Also check that your printer software settings are
correct for the document.
Follow the instructions under “Starting the
StylusRIP Server Software” on page 2-4 and make
sure you select the correct printer icon, AppleTalk
zone, and printer name. Then try printing again.
User’s Guide
for information on
3-1
Page 6

Troubleshooting
The printer is producing many pages containing garbled
characters
Possible cause Solution
The printer is not
receiving and
processing
PostScript codes.
One or more colors are missing in your printout or it prints in
black ink only
Possible cause Solution
You didn’t specify
color data in your
application software
or select color ink in
your printer software.
Your color print head
needs cleaning or the
ink cartridge is
empty.
If you’re printing on a network using Raster Spool
Mode, click Cancel Job in the StylusRIP Monitor to
stop printing. If this doesn’t work, turn off the
printer to avoid wasting paper. Then halt the
StylusRIP application by holding down the Option
and Command keys and then pressing Esc. Restart
your Macintosh to establish communication with
the printer.
Make sure that you correctly performed all the
steps in Chapters 1 and 2.
Check your application software documentation for
instructions on creating a color document. Also
make sure color ink is selected in your printer
software; see your printer
instructions.
See your printer
cleaning the color print head or on reading your
printer’s control panel lights to see if you need to
replace the color ink cartridge.
User’s Guide
User’s Guide
for instructions on
for
3-2
Page 7

You see a memory or VM error message
Possible cause Solution
Virtual memory is not
turned on.
Not enough memory
is allocated to the
StylusRIP software.
Your system needs
more memory.
Select Control Panels from the Apple menu, then
select Memory Control Panel. Click the On button
in the Virtual Memory panel.
Quit StylusRIP and select the StylusRIP icon on
your desktop. Select Get Info from the File menu.
Then increase the amount of available memory in
the Preferred size box to at least 16MB, making
sure to leave some memory available for your
system software and other applications.
If neither of the solutions above prevent memory
error messages, you need to install additional
memory on your Macintosh.
You see Font not found or Find font error messages
Possible cause Solution
You’re allowing Font
Substitution in your
application.
You’re not using
PostScript fonts.
You have moved or
renamed the
StylusRIP software
folder.
Your StylusRIP
Preferences and tmp
folders are corrupted.
Your Font
Management utility
has a font conflict.
Turn off Font Substitution in your application’s Page
Setup dialog box.
You must have PostScript compatible fonts (not
just screen fonts) loaded on your system and
selected in your application to be able to print with
StylusRIP.
Follow the steps in Chapter 1 to reinstall the
StylusRIP software on your system. Then, don’t
move any of the installed files or folders.
If none of the solutions above prevent font error
messages, delete the tmp folder and the StylusRIP
Preference folder in the StylusRIP folder. StylusRIP
will create a new preference file automatically
when you restart the program.
If you use a Font Management utility, check it to
make sure all the fonts are available for your
application as necessary.
Troubleshooting
3-3
Page 8

Troubleshooting
You see a Printer cannot be opened or Printer not found error
message
Possible cause Solution
The printer is not
turned on.
The printer is not
completely
connected to the
StylusRIP
standalone or server
Macintosh.
You’re using an
optional LocalTalk or
EtherTalk interface
card and named the
printer incorrectly.
Turn on the printer and try printing again.
Make sure the printer connection is secure at both
ends of the cable. Also make sure the cable is not
defective and it meets the specifications for your
printer. See your printer
information.
Check the instructions in Chapter 1 to make sure
you named the printer correctly.
User’s Guide
for more
3-4
Page 9

Index
A
Accessories, 7
AppleTalk, 1-3, 1-8, 2-4 to 2-5
C
Cancelling print jobs, 2-14
Client installation, 1-6 to 1-7
Clipped images, 3-1
Color matching, 1-9 to 1-10
ColorSync, 2, 1-9 to 1-10
Customer Care Centers, 7
D
Download service, 8
Drag and drop printing, 2-12
E
EPSON
Accessories, 7
Customer Care Centers, 7
Download service, 8
Electronic Support Services, 7 to 8
FaxAdvice, 8
help, 7 to 8
World Wide Web site, 8
Error messages, 3-3 to 3-4
F
FaxAdvice, 8
H
Help, where to get, 7 to 8
I
ICC profiles, 2, 1-9 to 1-10
Installing
in printer, 1-7 to 1-9
on client, 1-6 to 1-7
on server, 1-2 to 1-5
on standalone, 1-2 to 1-5
J
Job Priority setting, 2-3
L
LocalTalk, 4
M
Manual, how to use, 6
Media/Resolution setting, 2-11
Missing colors, 3-2
Monitor, StylusRIP, 2-13 to 2-14
I-1
Page 10

Index
N
Network configuration, 4 to 6
Network name setting, 2-3
O
Online support, 7 to 8
Options, print, 2-10 to 2-11
P
PANTONE, 2, 1-9 to 1-10
Paper option, 2-11
PostScript
definition, 1
sticker, 1-9
PostScript Printer Descriptions
(PPDs), selecting, 2-6
Preferences, 2-2 to 2-4
Print jobs
cancelling, 2-14
managing, 2-13 to 2-14
setting up, 2-8 to 2-9
Print options, 2-10 to 2-11
Print server, 4 to 5, 1-2 to 1-5
Printer profile, 2-10
Printer, checking, 1-2
Printing
cancelling, 2-14
drag and drop, 2-12
from application, 2-8 to 2-11
options, 2-10 to 2-11
Printout problems, 3-1 to 3-2
S
Serial connection, 1-8, 2-2
Server software
automatically starting, 2-7 to 2-8
manually starting, 2-4 to 2-7
setting up, 2-1 to 2-4
Service, 7to8
Setting up StylusRIP server,
2-1 to 2-4
Standalone
configuration, 4
installing software, 1-4 to 1-5
preparing for installation,
1-3 to 1-4
setting up, 2-1 to 2-4
starting software, 2-4 to 2-8
StylusRIP features, 2
StylusRIP Monitor, 2-13 to 2-14
Support, EPSON, 7 to 8
System requirements, 3
T
Timeout setting, 2-3
Troubleshooting, 3-1 to 3-4
U
Updater, 1-7 to 1-9
W
World Wide Web, 8
R
Raster Spool Mode, 2-3 to 2-4, 2-14
Remote only, 1-3
I-2
 Loading...