

Page 1
Network Installation Guide
Epson Stylus® NX510 Series
Page 2

Before You Begin
Make sure you installed ink cartridges and loaded paper as described on the
Start Here sheet. Then follow the instructions in this guide to set up the printer for
use on a network.
Tip:
For a video tutorial and other information about setting up a wireless network, go to:
epson.com/support/wireless.
Do one of the following:
■
If you’re installing the printer for the first time, see “Choose Your Connection
Type” on page 3.
■
If you’re setting up an additional computer to use the printer on the network,
follow the steps in “Install Software” on page 23.
2
Before You Begin
Page 3
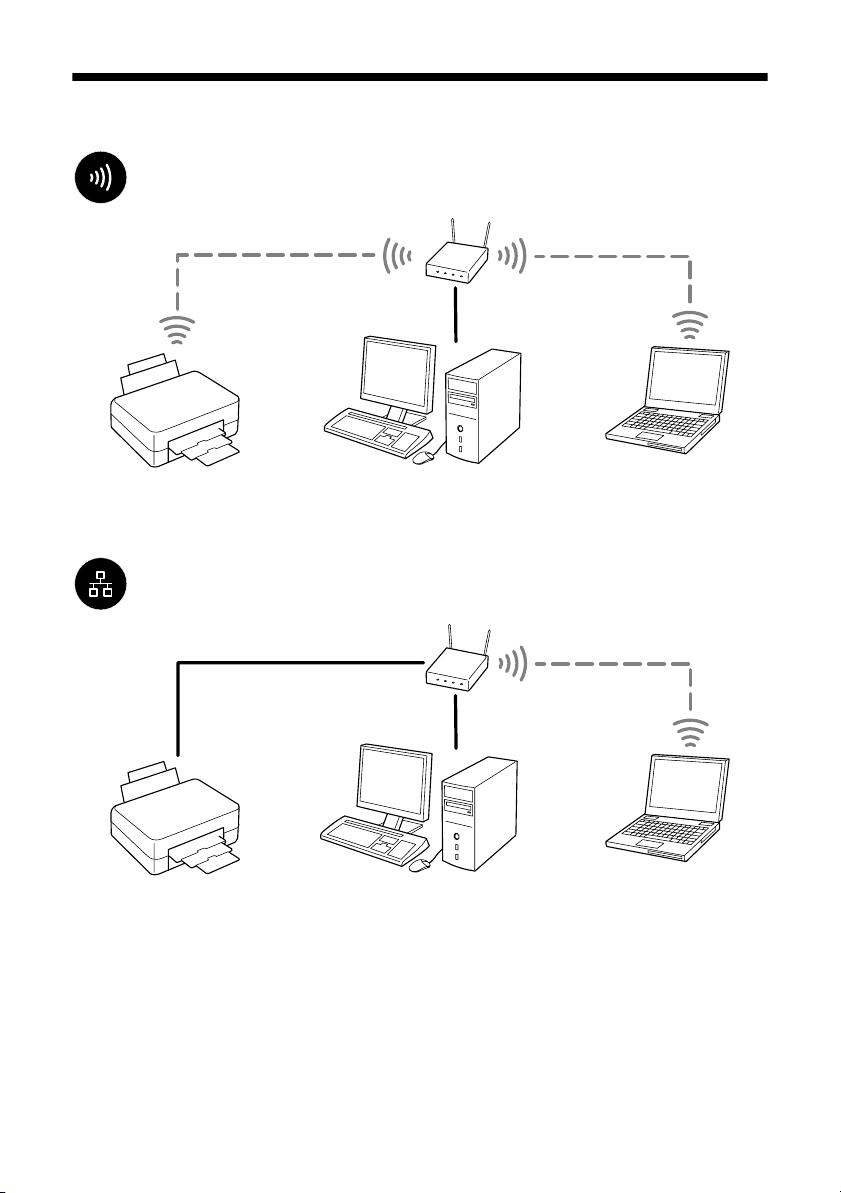
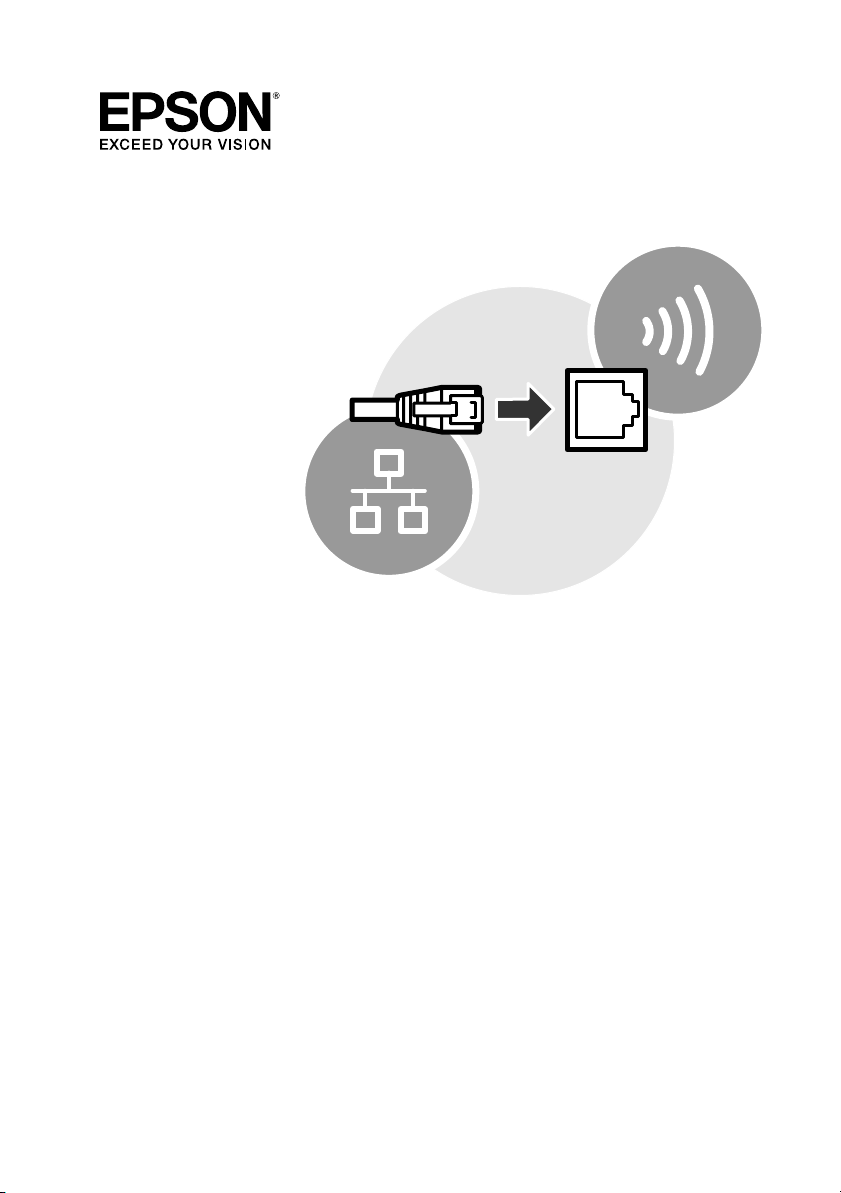
Choose Your Connection Type
Wireless
Note:
If you want to print wirelessly but do not have an access point or router, see “Create an
Ad-Hoc Wireless Connection” on page 16.
Wired
To connect the printer wirelessly, see page 4.
To connect the printer using an Ethernet cable, see page 22.
Choose Your Connection Type
3
Page 4
Wireless Network Installation
To add the printer to your wireless network, you need to know the name (SSID)
of your wireless network. If it has security enabled, you also need to know the
WEP key or WPA passphrase. Write down your network and security information
in the space provided below:
■
Network name (SSID): _________________________________________
■
WEP key or WPA passphrase: ____________________________________
Note:
If your WPA passphrase contains upper- or lowercase letters, be sure to note it
correctly.
If you don’t know your wireless network name (SSID), WEP key, or WPA passphrase,
contact the person who set up your wireless network before you begin.
Connect Wirelessly Using the Setup Wizard
Follow the steps below to connect to your wireless network.
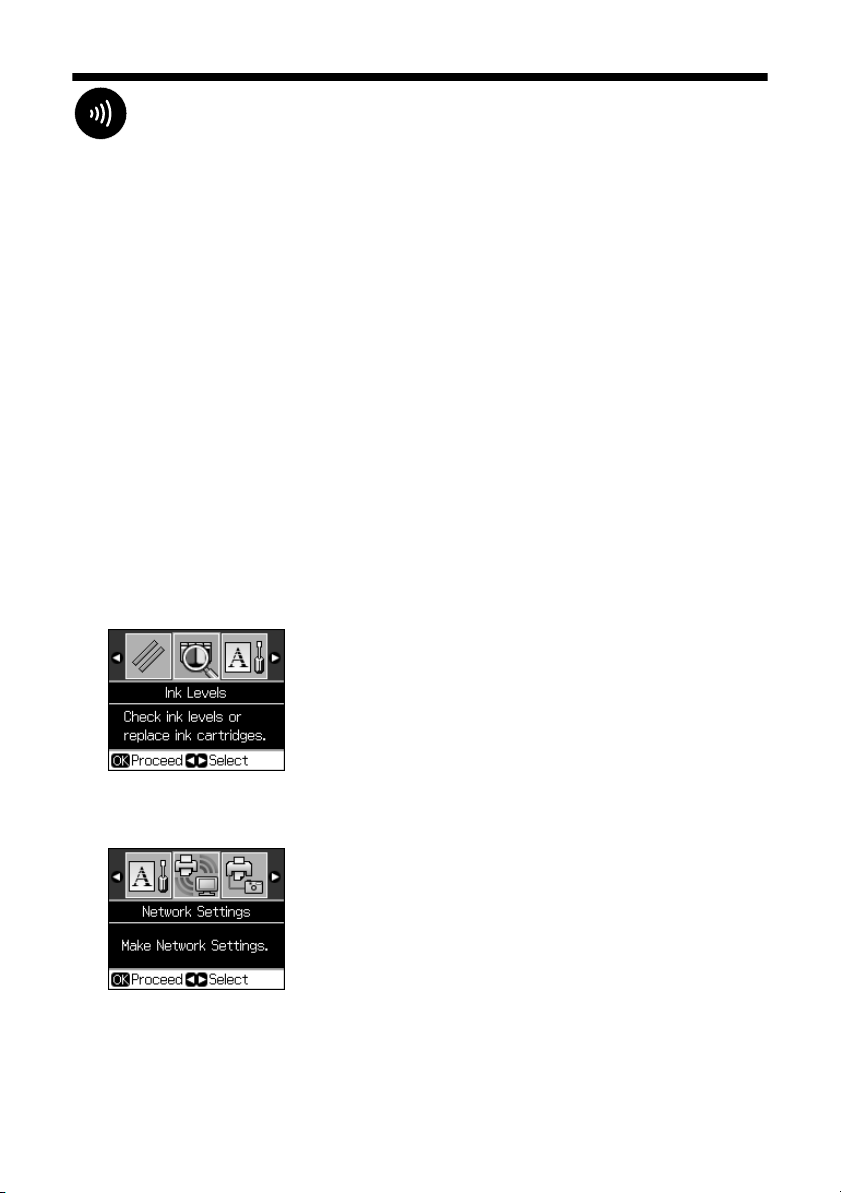
1. Press the
F
Setup
button on the printer’s control panel.
2. Press l or r to select
4
Wireless Network Installation
Network Settings
, then press OK.
Page 5
3. Press
OK
to select
Wireless LAN Setup
.
4. Press
OK
to select
Setup Wizard
.
5. Press u or d to select the name of your wireless network, then press
If your network name isn’t listed, try the following:
■
Make sure that your wireless router or access point is turned on and
y
Back
working correctly. Press the
OK
screen, press
■
If you still can’t find the network name in the list, your router or access
to select
Setup Wizard
point is not broadcasting its network name. Press the
button to return to the previous
, then repeat step 5.
y
Back
button, then
see “Connect Wirelessly Using Advanced Setup” on page 8.
OK
.
6. Do one of the following:
■
If your wireless network doesn’t have security enabled, continue
with step 9.
■
If your wireless network has security enabled, continue with step 7.
Wireless Network Installation
5
Page 6

7. Use the arrow buttons on the printer’s control panel to enter your WEP key or
x
Menu
WPA passphrase. Press the
button to switch between uppercase,
lowercase, or numeric/special characters.
Indicates current selection. Press the x Menu
button to switch between uppercase, lowercase,
or numeric/special characters.
From the printer’s control panel:
Press u or d to select a character.
Press l or r to move the cursor.
Press – to delete a character.
Press OK when done.
Important:
WPA passphrases and WEP keys in ASCII format are case-sensitive. Be sure to
enter upper- or lowercase letters as necessary.
Press x
■
numeric/special (
■
Press u or d until you see the character you want.
■
Press l or r to move the cursor.
■
Press – to delete a character.
Menu
to switch between uppercase (
123
) characters.
ABC
), lowercase (
8. When you’re done entering your WEP key or WPA passphrase, press
6
Wireless Network Installation
abc
OK
), or
.
Page 7
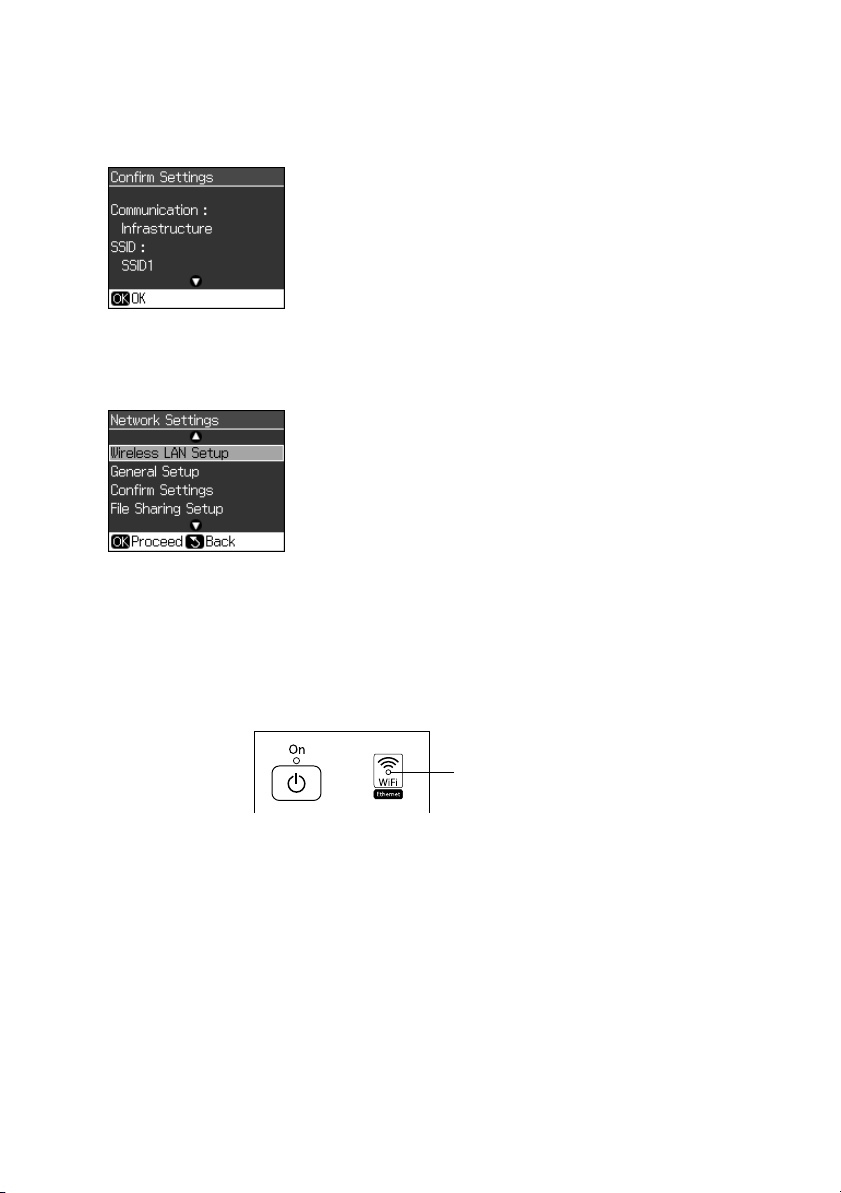
9. When you see a screen like this one, verify that the settings are correct. If you
need to change a setting, press
y
Back
until you see the setting you need to
change.
10. Once you have verified that your network settings are correct, press
OK
to save
the settings and return to the Network Settings menu.
r
Copy
11. Press the
button to exit the Network Settings Menu.
12. Wait for the printer to connect to your wireless network (this can take up to
90 seconds).
Once it’s connected, you see a green
WiFi
light on the printer’s control panel.
WiFi light
13. Continue with “Install Software” on page 23.
Note:
If the printer doesn’t connect to your wireless network after 90 seconds, the WEP key
or WPA passphrase may have been entered incorrectly. See “Connect Wirelessly Using
the Setup Wizard” on page 4 to select your network settings again.
If the printer still doesn’t connect to your wireless network, see “The printer cannot
find or connect to the wireless router or access point” on page 31.
Wireless Network Installation
7
Page 8
Connect Wirelessly Using Advanced Setup
Use this setup method if your access point or router isn’t broadcasting its network
name (SSID).
1. Press the
F
Setup
button on the printer’s control panel.
2. Press l or r to select
OK
3. Press
to select
Wireless LAN Setup
Network Settings
, then press OK.
.
4. Press u or d to select
8
Wireless Network Installation
Advanced Setup
, then press OK.
Page 9
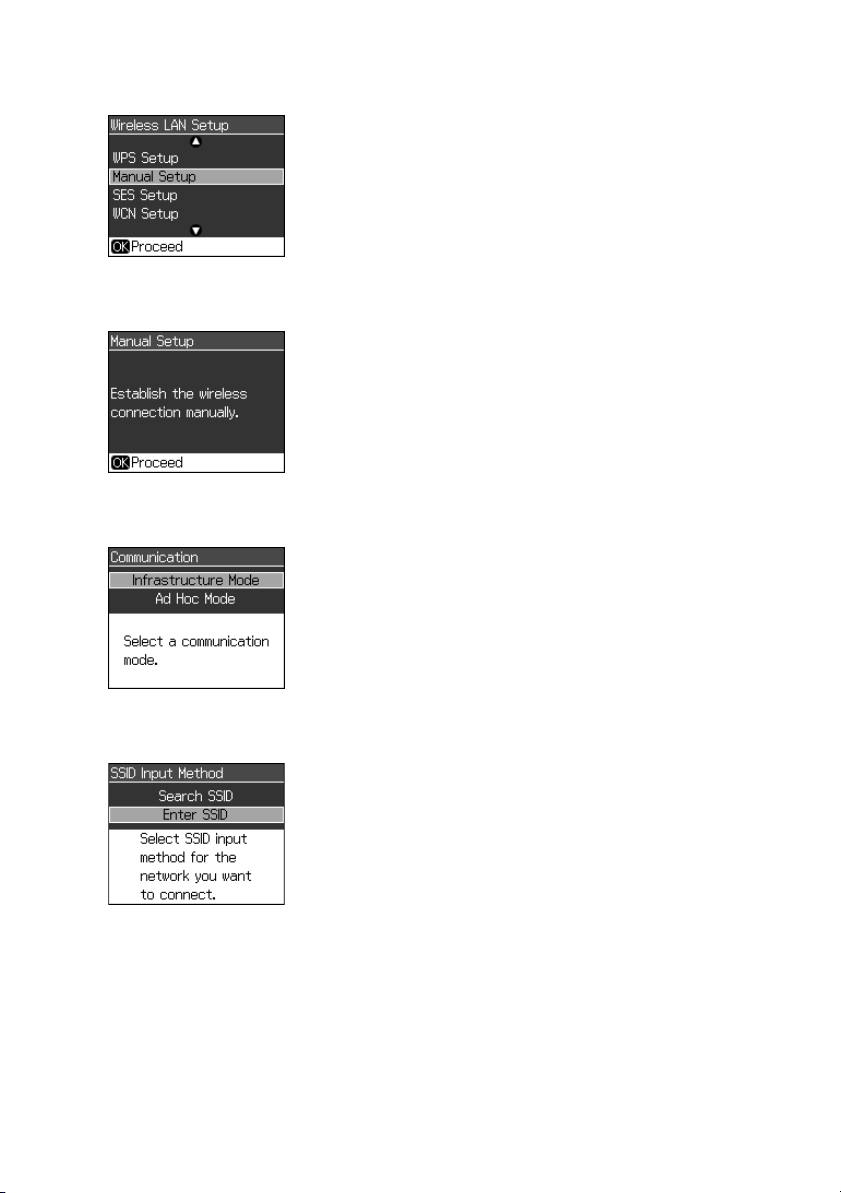
5. Press u or d to select
Manual Setup
6. When you see this screen, press
, then press OK.
OK
.
7. Press u or d to select
8. Press u or d to select
Infrastructure Mode
Enter SSID
, then press OK.
, then press OK.
Wireless Network Installation
9
Page 10
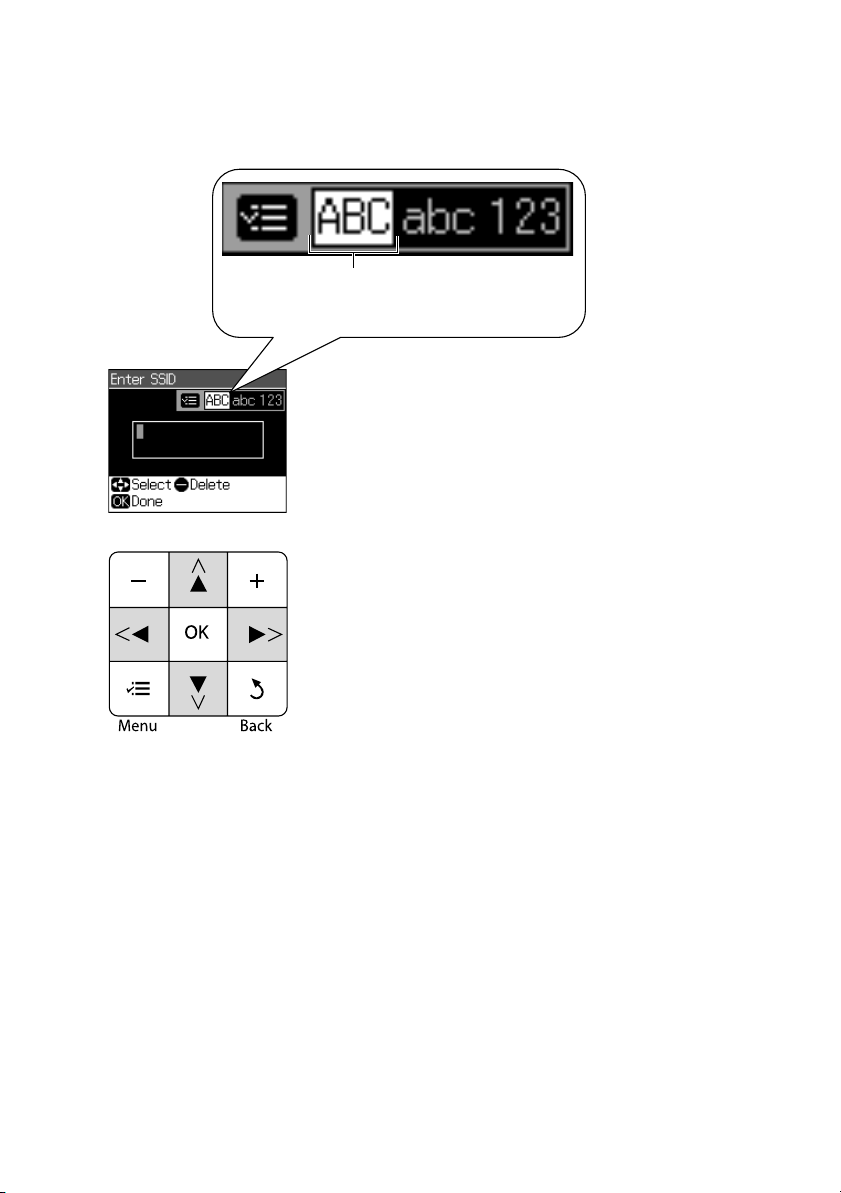
9. Use the arrow buttons on the printer’s control panel to enter your wireless
x
Menu
network name (SSID). Press the
button to switch between
uppercase, lowercase, or numeric/special characters.
Indicates current selection. Press the x Menu
button to switch between uppercase, lowercase,
or numeric/special characters.
From the printer’s control panel:
Press u or d to select a character.
Press l or r to move the cursor.
Press – to delete a character.
Press OK when done.
Important:
Network names are case-sensitive. Be sure to enter upper- or lowercase letters as
necessary.
Press x
■
numeric/special (
■
Press u or d until you see the character you want.
■
Press l or r to move the cursor.
■
Press – to delete a character.
Menu
to switch between uppercase (
123
) characters.
ABC
10. When you’re done entering your wireless network name, press
10
Wireless Network Installation
), lowercase (
OK
.
abc
), or
Page 11

11. Press u or d to select the security mode that your wireless network is using,
then press
Note:
If your wireless network doesn’t have security enabled, select None, then
press OK.
OK
.
12. Do one of the following:
■
If your wireless network uses WPA as the security mode, continue with
“Select WPA Security Settings” on page 12.
■
If your wireless network uses WEP as the security mode, continue with
“Select WEP Security Settings” on page 13.
■
If your wireless network doesn’t have security enabled, continue with
“Confirm Your Network Settings” on page 14.
Wireless Network Installation
11
Page 12

Select WPA Security Settings
1. Use the arrow buttons on the printer’s control panel to enter your WPA
passphrase. Press the
or numeric/special characters.
x
Menu
button to switch between uppercase, lowercase,
Indicates current selection. Press the x Menu
button to switch between uppercase, lowercase,
or numeric/special characters.
From the printer’s control panel:
Press u or d to select a character.
Press l or r to move the cursor.
Press – to delete a character.
Press OK when done.
Important:
WPA passphrases are case-sensitive. Be sure to enter upper- or lowercase letters
as necessary.
■
Press x
numeric/special (
■
Press u or d until you see the character you want.
■
Press l or r to move the cursor.
■
Press – to delete a character.
Menu
to switch between uppercase (
123
) characters.
2. When you’re done entering the WPA passphrase, press
3. Continue with “Confirm Your Network Settings” on page 14.
12
Wireless Network Installation
ABC
), lowercase (
OK
abc
), or
.
Page 13

Select WEP Security Settings
1. Press u or d to select
Hexadecimal
Note:
If the WEP key is 5 or 13 characters, it’s ASCII. If the WEP key is 10 or 26
characters, it’s hexadecimal.
if your WEP key is in hexadecimal format.
Alphanumeric
if your WEP key is ASCII, or select
2. Use the arrow buttons on the printer’s control panel to enter your WEP key.
x
Menu
Press the
button to switch between uppercase, lowercase, or numeric
characters.
Indicates current selection. Press the x Menu
button to switch between uppercase, lowercase,
or numeric characters.
From the printer’s control panel:
Press u or d to select a character.
Press l or r to move the cursor.
Press – to delete a character.
Press OK when done.
Important:
WEP keys in ASCII format are case-sensitive. Be sure to enter upper- or lowercase
letters as necessary.
Wireless Network Installation
13
Page 14

■
Press x
numeric (
■
Press u or d until you see the character you want.
■
Press l or r to move the cursor.
■
Press – to delete a character.
Menu
to switch between uppercase (
123
) characters.
ABC
), lowercase (
abc
), or
3. When you’re done entering the WEP key, press
OK
.
4. Continue with the next section.
Confirm Your Network Settings
1. When you see a screen like this one, verify that the settings are correct. If you
y
Back
need to change a setting, press
change.
2. Once you have verified that your network settings are correct, press
the settings and return to the Network Settings menu.
until you see the setting you need to
OK
to save
r
3. Press the
14
Wireless Network Installation
Copy
button to exit the Setup menu.
Page 15

4. Wait for the printer to connect to your wireless network (this can take up to
90 seconds).
Once it’s connected, you see a green
WiFi
light on the printer’s control panel.
WiFi light
5. Continue with “Install Software” on page 23.
Note:
If the printer doesn’t connect to your wireless network after 90 seconds, the SSID,
WEP key, or WPA passphrase may have been entered incorrectly. See “Connect
Wirelessly Using Advanced Setup” on page 8 to select your network settings again.
If the printer still doesn’t connect to your wireless network, see “The printer cannot
find or connect to the wireless router or access point” on page 31.
Wireless Network Installation
15
Page 16

Create an Ad-Hoc Wireless Connection
Use this setup method if you want to print wirelessly but do not have an access
point or router.
Important:
For Windows® users: If your computer is connected to a network with an Ethernet
cable, you need to disconnect it before installing software. When setup is complete,
reconnect your computer’s Ethernet cable.
®
For Macintosh
cable, you cannot set up your printer this way. See “Connect Wirelessly Using the
Setup Wizard” on page 4 or “Wired (Ethernet) Installation” on page 22 to set up your
printer.
users: If your computer is connected to a network with an Ethernet
1. Press the F
Setup
button on the printer’s control panel.
2. Press l or r to select
3. Press
OK
to select
Wireless LAN Setup
Network Settings
, then press OK.
.
16
Wireless Network Installation
Page 17

4. Press u or d to select
Advanced Setup
, then press OK.
5. Press u or d to select
Manual Setup
6. When you see this screen, press
7. Press u or d to select
Ad Hoc Mode
, then press OK.
OK
.
, then press OK.
8. Press u or d to select
Enter SSID
, then press OK.
Wireless Network Installation
17
Page 18

9. Use the arrow buttons on the printer’s control panel to create a unique
x
Menu
network name (SSID) to identify your printer. Press the
button to
switch between uppercase, lowercase, or numeric/special characters.
Indicates current selection. Press the x Menu
button to switch between uppercase, lowercase,
or numeric/special characters.
From the printer’s control panel:
Press u or d to select a character.
Press l or r to move the cursor.
Press – to delete a character.
Press OK when done.
Important:
Network names are case-sensitive. Be sure to enter upper- or lowercase letters as
necessary.
■
Press x
Menu
numeric/special (
■
Press u or d until you see the character you want.
■
Press l or r to move the cursor.
■
Press – to delete a character.
18
Wireless Network Installation
to switch between uppercase (
123
) characters.
ABC
), lowercase (
abc
), or
Page 19

10. Press
OK
to select the default channel for your Ad Hoc network.
11. Continue with the next section.
Choose Security Settings
1. Press u or d to select the security mode you want to use for the Ad Hoc
wireless network, then press
Note:
If you don’t want to enable security for your Ad Hoc network, select None, then
press OK.
OK
.
2. Do one of the following:
■
If you selected
None
as the security mode, continue with “Confirm Your
Settings and Connect to the Network” on page 21.
■
If you selected WEP as the security mode, continue with step 3.
3. Create a WEP key for the Ad Hoc network. The WEP key can be in
alphanumeric (ASCII) format (recommended) or hexadecimal format.
Note:
An alphanumeric WEP key must be 5 or 13 characters. A hexadecimal WEP key
must be 10 or 25 characters.
4. Press u or d to select
Hexadecimal
if your WEP key is in hexadecimal format.
Alphanumeric
if your WEP key is ASCII, or select
Wireless Network Installation
19
Page 20

5. Use the arrow buttons on the printer’s control panel to enter your WEP key.
x
Menu
Press the
button to switch between uppercase, lowercase, or numeric
characters.
Indicates current selection. Press the x Menu
button to switch between uppercase, lowercase,
or numeric characters.
From the printer’s control panel:
Press u or d to select a character.
Press l or r to move the cursor.
Press – to delete a character.
Press OK when done.
Important:
WEP keys in ASCII format are case-sensitive. Be sure to enter upper- or lowercase
letters as necessary.
Press x
■
numeric (
■
Press u or d until you see the character you want.
■
Press l or r to move the cursor.
■
Press – to delete a character.
Menu
to switch between uppercase (
123
) characters.
6. When you’re done entering the WEP key, press
7. Continue with the next section.
20
Wireless Network Installation
OK
ABC
.
), lowercase (
abc
), or
Page 21

Confirm Your Settings and Connect to the Network
1. When you see a screen like this one, verify that the settings are correct. If you
need to change a setting, press
change.
y
Back
until you see the setting you need to
2. Once you have verified that your network settings are correct, press
OK
to save
the settings and return to the Network Settings menu.
r
Copy
3. Press the
button to exit the Setup menu.
4. On your computer, connect to the wireless network name you created on
page 18 (see your computer or wireless adapter’s documentation for details).
5. Continue with “Install Software” on page 23.
Wireless Network Installation
21
Page 22

Wired (Ethernet) Installation
1. Connect an Ethernet network cable to the
LAN (10/100)
port on your printer.
2. Connect the other end to any available LAN port on your router, access point,
or hub.
Note:
If you’re switching from a wireless to a wired network connection, you need to
disable the wireless adapter using the printer’s control panel. Press the F Setup
button on the printer’s control panel, select Network Settings > Wireless LAN
Setup > Advanced Setup > Disable Wireless LAN. Select Yes, then press OK.
3. Continue with the next section to install software.
22
Wired (Ethernet) Installation
Page 23

Install Software
Follow the steps in this section for each computer you want to use with your
printer over the network.
1. Insert the printer software CD.
2. Windows Vista
When you see the User Account Control screen, click
Windows
step 3.
Mac OS
3. Click
®
Install
®
: If you see the AutoPlay window, click
®
XP: When you see the Software Installation screen, continue with
Run SETUP.EXE
Continue
.
X: Double-click the icon.
.
.
4. When you see this screen, select
click
Next
.
Install driver for network connection
Install Software
and
23
Page 24

5. When you see this screen, click
Next
to start network setup.
6. Make sure that your printer is turned on and connected to your network.
Next
7. When you see the Firewall Warning screen, click
.
Note:
If you see a firewall alert message, click Unblock or Allow to let EpsonNet Setup
continue. Do not select Ask Me Later, Keep Blocking, or Block.
24
Install Software
Page 25

8. Wait while EpsonNet Setup configures your printer for the network.
9. Do one of the following:
■
If you see the Installation Complete screen, continue with “Finish the
Installation” on page 28.
Install Software
25
Page 26

■
If no available printers are found on your network, see “EpsonNet Setup
was unable to find my printer on the network” on page 32.
■
If EpsonNet Setup finds more than one printer on your network, select
the printer you want to configure, then click
Next
. When you see the
Installation Complete screen, continue with “Finish the Installation” on
page 28.
26
Install Software
Page 27

■
If you are installing the printer in Ad Hoc mode and you see this screen,
make sure that your computer’s wireless adapter is set to acquire an IP
address automatically. Then select
Automatically using DHCP (Recommended)
Acquire the IP Address
and click
Next
you see the Installation Complete screen, continue with “Finish the
Installation” on page 28.
. When
Install Software
27
Page 28

Finish the Installation
Follow the steps for your operating system:
■
“Windows” below
■
“Macintosh” on page 29
Windows
1. Print a test page, then click
2. Follow the prompts on the screen to install bonus software and finish the
installation.
3. When installation is complete, restart your computer.
You’re ready to scan and print. See your printed documentation and on-screen
Epson Information Center for details.
Finish
.
28
Finish the Installation
Page 29

Macintosh
1. Click
Save
to install an application that allows you to access the printer’s
memory card slots over the network.
2. Select where you would like install the application, then click
Save
.
3. Click
Finish
.
Finish the Installation
29
Page 30

4. When you see this screen, click
Add Printer
.
5. Follow the steps on the right side of the screen to add your EPSON TCPIP
printer.
Note:
It may take up to 90 seconds for your computer to find the EPSON TCPIP printer
on the network.
6. Follow the prompts on the screen to print a test page, install bonus software,
and finish the installation.
7. When installation is complete, restart your computer.
You’re ready to scan and print. See your printed documentation and on-screen
Epson Information Center for details.
30
Finish the Installation
Page 31

Troubleshooting
If you have problems setting up or using your product on a network, check these
sections for help:
■
“Setup Problems” below
■
“Printing Problems” on page 33
■
“Scanning Problems” on page 34
This section also explains how to print a Network Status Sheet (see page 34).
Setup Problems
The printer cannot find or connect to the wireless router or access point
■
Try connecting to the wireless router or access point with your computer or
another device to confirm that it is working correctly.
■
Make sure that the printer is within range of your router or access point.
■
Avoid placing the printer near a microwave oven, 2.4 GHz cordless phone, or
large metal object such as a filing cabinet.
■
Make sure there aren’t any access restrictions (such as MAC address filtering)
set on the wireless router or access point. If access restrictions are set, register
the printer’s MAC address on the router or access point. Print a Network
Status Sheet (see page 34) to obtain the MAC address. Then see your router or
access point’s documentation for instructions.
■
If your wireless router or access point doesn’t broadcast its network name
(SSID), see “Connect Wirelessly Using Advanced Setup” on page 8 for
instructions on connecting to your wireless network. If your wireless router or
access point has wireless security enabled, you will also need to know what
kind of security it is using.
■
If the printer doesn’t connect to your wireless network, the WEP key or WPA
passphrase may have been entered incorrectly. See “Wireless Network
Installation” on page 4 to select your network settings again.
■
The printer is compatible with 802.11b and 802.11g. If your router or access
point supports 802.11n (Wireless N), makes sure that it is set to compatibility
mode to allow 802.11b and 802.11g devices to connect to it.
Troubleshooting
31
Page 32

EpsonNet Setup was unable to find my printer on the network
1. If you see a screen like this one, do one of the following:
■
If you connected the printer wirelessly, verify that the printer is turned on
and the green WiFi light on the printer’s control panel is on. Select
setup using the printer’s control panel
■
If you connected the printer to your network with an Ethernet network
, then click
Next
.
cable, verify that the printer is turned on and connected to your network.
Select
Wired Network (Ethernet) setup
, then click
Next
.
Wi-Fi
■
If you created an Ad-Hoc wireless connection, do one of the following:
■
■
■
If you’re switching from a wireless to a wired network connection, you
need to disable the wireless adapter using the printer’s control panel. Press
the
Settings
Wireless LAN
2. Continue clicking
printer. Then continue with step 9 on page 25.
32
Troubleshooting
For Windows users:
If your computer is connected to a network
with an Ethernet cable, disconnect it. When setup is complete,
reconnect your computer’s Ethernet cable.
For Macintosh users:
If your computer is connected to a network
with an Ethernet cable, you cannot set up your printer this way. See
page 4 or page 22 to set up your printer.
F
Setup
button on the printer’s control panel, select
>
Wireless LAN Setup
. Select
Next
Yes
, then press OK.
until EpsonNet Setup begins to search for your
>
Advanced Setup
Network
>
Disable
Page 33

Software installation failed
Make sure that the printer is connected to your network (see page 4 for wireless or
page 22 for Ethernet). Then remove and reinsert the CD to reinstall the printer
software.
Cannot communicate on a wired LAN
If you’re switching from a wireless to a wired network connection, you need to
F
Setup
disable the wireless adapter using the printer’s control panel. Press the
button on the printer’s control panel, select
Setup
>
Advanced Setup
Yes
, then press OK.
The printer does not appear in the Add Printer window (Mac OS X)
>
Manual Setup
Network Settings
>
Disable Wireless LAN
>
Wireless LAN
. Select
Make sure the printer driver was installed correctly and that your computer’s
TCP/IP settings are configured correctly.
Printing Problems
Cannot print over the network
■
For wireless connections, print a Network Status Sheet (see page 34). If the
Link Status is Disconnected, make sure the wireless router or access point is
turned on and the settings are correct for your wireless network.
■
For wired connections, print a Network Status Sheet (see page 34) and make
sure the settings are correct for your network.
If the Network Status is Disconnected, try the following:
■
Make sure the Ethernet cable is securely connected to both the printer
and your router, access point, switch, or hub.
■
Try connecting to another port on your router, access point, switch, or
hub.
■
Try connecting the printer to another router, access point, switch or hub.
■
Try connecting the printer to your router, access point, switch, or hub
with another Ethernet cable.
■
When using TCP/IP, make sure the printer’s IP address is set correctly for your
network. If your network does not assign IP addresses using DHCP, you need
to set the IP address manually.
Troubleshooting
33
Page 34

Printing is slow or the print is cut off
For wireless connections, print a Network Status Sheet (see below) and check the
Signal Strength. If it’s poor, try moving the printer closer to your wireless router or
access point. Avoid placing the printer next to a microwave oven, 2.4 GHz
cordless phone, or large metal objects such as a filing cabinet.
A dial-up connection dialog box appears when printing with EpsonNet
Print
If you use a dial-up connection for Internet access, you will see this message every
time you print. Try connecting to the Internet using a LAN connection or set your
dial-up connection to dial manually (Never dial a connection).
Scanning Problems
Cannot find the scanner or start Epson Scan
■
If network communication was interrupted while starting Epson Scan, exit
Epson Scan, and restart it after a few seconds. If Epson Scan cannot restart,
turn the printer off and back on, and then try restarting Epson Scan. Check
the
Timeout Setting
Scan Help.
■
If you have a firewall or Internet security software installed, the search feature
in
EPSON Scan Settings
Network Status Sheet (see below), click
Enter address
in
EPSON Scan Settings
may not work correctly. In this case, print a
EPSON Scan Settings > Add >
, and enter the IP address manually.
. For details, see the Epson
■
If you are scanning a large document at high resolution, a communication
error may occur. If the scan did not complete, lower the resolution.
Print a Network Status Sheet
1. If necessary, press the F
the Setup menu.
2. Select
3. Select
Network Settings
Confirm Settings
4. Press the x
34
Troubleshooting
Start
Setup
button on the printer’s control panel to enter
.
.
button to print a network status sheet.
Page 35

Copyright Notice
All rights reserved. No part of this publication may be reproduced, stored in a retrieval system, or
transmitted in any form or by any means, electronic, mechanical, photocopying, recording, or
otherwise, without the prior written permission of Seiko Epson Corporation. The information
contained herein is designed only for use with this Epson product. Epson is not responsible for any
use of this information as applied to other equipment.
Neither Seiko Epson Corporation nor its affiliates shall be liable to the purchaser of this product or
third parties for damages, losses, costs, or expenses incurred by purchaser or third parties as a result
of: accident, misuse, or abuse of this product or unauthorized modifications, repairs, or alterations to
this product, or (excluding the U.S.) failure to strictly comply with Seiko Epson Corporation’s
operating and maintenance instructions.
Seiko Epson Corporation shall not be liable for any damages or problems arising from the use of any
options or any consumable products other than those designated as Original Epson Products or
Epson Approved Products by Seiko Epson Corporation.
Software License Agreements
In addition to software program rights owned by Seiko Epson Corporation, this product also
includes open-source software. See the “Software Notices” section in the online Epson Information
Center for a list of open-source software and software license terms applied to this printer.
Trademarks
Epson is a registered trademark and Epson Exceed Your Vision is a registered logomark of Seiko
Epson Corporation.
Epson Stylus is a registered trademark of Epson America, Inc.
General Notice: Other product names used herein are for identification purposes only and may be
trademarks of their respective owners. Epson disclaims any and all rights in those marks.
This information is subject to change without notice.
© 2009 Epson America, Inc. 3/09
Copyright Notice
35
Page 36

CPD-27300R1
Printed in XXXXXX
 Loading...