

Page 1

®
EPSON Stylus C84WN
Setup and
Installation
Page 2

Copyright Notice
All rights reserved. No part of this publication may be reproduced, stored in a retrieval system, or
transmitted in any form or by any means, electronic, mechanical, photocopying, recording, or
otherwise, without the prior written permission of SEIKO EPSON CORPORATION. The
information contained herein is designed only for use with this EPSON product. EPSON is not
responsible for any use of this information as applied to other equipment.
Neither SEIKO EPSON CORPORATION nor its affiliates shall be liable to the purchaser of this
product or third parties for damages, losses, costs, or expenses incurred by purchaser or third parties
as a result of: accident, misuse, or abuse of this product or unauthorized modifications, repairs, or
alterations to this product, or (excluding the U.S.) failure to strictly comply with SEIKO EPSON
CORPORATION’s operating and maintenance instructions.
SEIKO EPSON CORPORATION shall not be liable for any damages or problems arising from the
use of any options or any consumable products other than those designated as Original EPSON
Products or EPSON Approved Products by SEIKO EPSON CORPORATION.
Responsible Use of Copyrighted Materials
Digital cameras, scanners, and ink jet printers, like conventional photocopiers and cameras, can be
misused by improper copying or printing of copyrighted material. While some countries’ laws
permit limited copying of copyrighted material in certain circumstances, those circumstances may
not be as broad as some people assume. EPSON encourages each user to be responsible and
respectful of the copyright laws when using digital cameras, scanners, and ink jet printers.
Trademarks
EPSON and EPSON Stylus are registered trademarks of SEIKO EPSON CORPORATION.
EPSON Connection, EPSON Store, and SoundAdvice are service marks, DuraBrite is a registered
trademark, and EPSON Software is a trademark of Epson America, Inc.
General Notice: Other product names used herein are for identification purposes only and may be
trademarks of their respective owners. EPSON disclaims any and all rights in those marks.
© 2004 Epson America, Inc.
1/04
2
Page 3

Contents
Introduction . . . . . . . . . . . . . . . . . . . . . . . . . . . . . . . . . . . . . . . . . . . 5
Wireless Printing . . . . . . . . . . . . . . . . . . . . . . . . . . . . . . . . . . . . . . . . . . 5
Windows System Requirements . . . . . . . . . . . . . . . . . . . . . . . . . . . . . . . . 7
Macintosh System Requirements . . . . . . . . . . . . . . . . . . . . . . . . . . . . . . . 8
Where to Get Information . . . . . . . . . . . . . . . . . . . . . . . . . . . . . . . . . . . . 9
Setting Up the Printer and Print Server . . . . . . . . . . . . . . . . . 11
Unpacking . . . . . . . . . . . . . . . . . . . . . . . . . . . . . . . . . . . . . . . . . . . . . 12
Installing the Ink Cartridges . . . . . . . . . . . . . . . . . . . . . . . . . . . . . . . . . 13
Loading Paper . . . . . . . . . . . . . . . . . . . . . . . . . . . . . . . . . . . . . . . . . . . 15
Running a Printer Check . . . . . . . . . . . . . . . . . . . . . . . . . . . . . . . . . . . . 16
Connecting the Print Server . . . . . . . . . . . . . . . . . . . . . . . . . . . . . . . . . . 16
Installing and Configuring the Software for Windows . . . . 19
Before You Begin . . . . . . . . . . . . . . . . . . . . . . . . . . . . . . . . . . . . . . . . . 19
Installing the C84WN Software . . . . . . . . . . . . . . . . . . . . . . . . . . . . . . . 20
Installing the Software . . . . . . . . . . . . . . . . . . . . . . . . . . . . . . . . . . . 21
Configuring the Print Server . . . . . . . . . . . . . . . . . . . . . . . . . . . . . . 24
Setting Up a Network Port . . . . . . . . . . . . . . . . . . . . . . . . . . . . . . . . . . 28
Setting Up a Port on Windows XP/2000 . . . . . . . . . . . . . . . . . . . . . . 28
Setting Up a Port on Windows Me/98 . . . . . . . . . . . . . . . . . . . . . . . 30
Setting Up a Port on Windows NT . . . . . . . . . . . . . . . . . . . . . . . . . . 32
Setting Up Additional Computers . . . . . . . . . . . . . . . . . . . . . . . . . . . . . 33
Installing and Configuring the Software for Macintosh . . . 35
Before You Begin . . . . . . . . . . . . . . . . . . . . . . . . . . . . . . . . . . . . . . . . . 36
Installing the C84WN Software . . . . . . . . . . . . . . . . . . . . . . . . . . . . . . . 37
Installing the Software . . . . . . . . . . . . . . . . . . . . . . . . . . . . . . . . . . . 38
Configuring the Print Server . . . . . . . . . . . . . . . . . . . . . . . . . . . . . . 40
Contents 3
Page 4

Setting Up Your Macintosh to Print . . . . . . . . . . . . . . . . . . . . . . . . . . . . 42
Setting Up Printing on Macintosh OS X . . . . . . . . . . . . . . . . . . . . . . 43
Setting Up Printing on Macintosh OS 8.6 to 9.x . . . . . . . . . . . . . . . . 44
Setting Up Additional Macintosh Computers . . . . . . . . . . . . . . . . . . . . . . 44
Solving Wireless Printing Problems. . . . . . . . . . . . . . . . . . . . . 45
Problems and Solutions . . . . . . . . . . . . . . . . . . . . . . . . . . . . . . . . . . . . . 46
Uninstalling the Software . . . . . . . . . . . . . . . . . . . . . . . . . . . . . . . . . . . 51
Windows . . . . . . . . . . . . . . . . . . . . . . . . . . . . . . . . . . . . . . . . . . . . 51
Macintosh OS X 10.1 to 10.3 . . . . . . . . . . . . . . . . . . . . . . . . . . . . . 52
Macintosh OS 8.6 to 9.x . . . . . . . . . . . . . . . . . . . . . . . . . . . . . . . . . 52
Where To Get Help . . . . . . . . . . . . . . . . . . . . . . . . . . . . . . . . . . . . . . . 53
Appendix A:
Configuration Settings . . . . . . . . . . . . . . . . . . . . . . . . . . . . . . . . 55
Appendix B:
Specifications and Notices . . . . . . . . . . . . . . . . . . . . . . . . . . . . . 61
Epson America, Inc. Limited Warranty . . . . . . . . . . . . . . . . . . . . . . . . . . 62
FCC Compliance Statement . . . . . . . . . . . . . . . . . . . . . . . . . . . . . . . . . 64
Index . . . . . . . . . . . . . . . . . . . . . . . . . . . . . . . . . . . . . . . . . . . . . . . . 65
4 Contents
Page 5
Introduction
Your EPSON Stylus® C84WN printer combines all the features of EPSON’s
exclusive ink jet technology—extremely fast print speeds, ultra-sharp text, vibrant
colors, and long-lasting DuraBrite
■ You can print from any computer on your existing network, if the network
includes a wireless access point or AirPort
■ Even without an existing wireless network, you can print from any computer
equipped with a wireless card or adapter, from distances up to 120 feet.
The EpsonNet 802.11b Wireless Print Server included with the printer is
compatible with most wireless cards, adapters and access points that comply with
the WiFi
™
(Wireless Fidelity) standard. This book provides all the instructions
you’ll need for setting up the printer, installing the software, and configuring your
system for wireless printing.
®
ink—with a wireless print server.
®
base station.
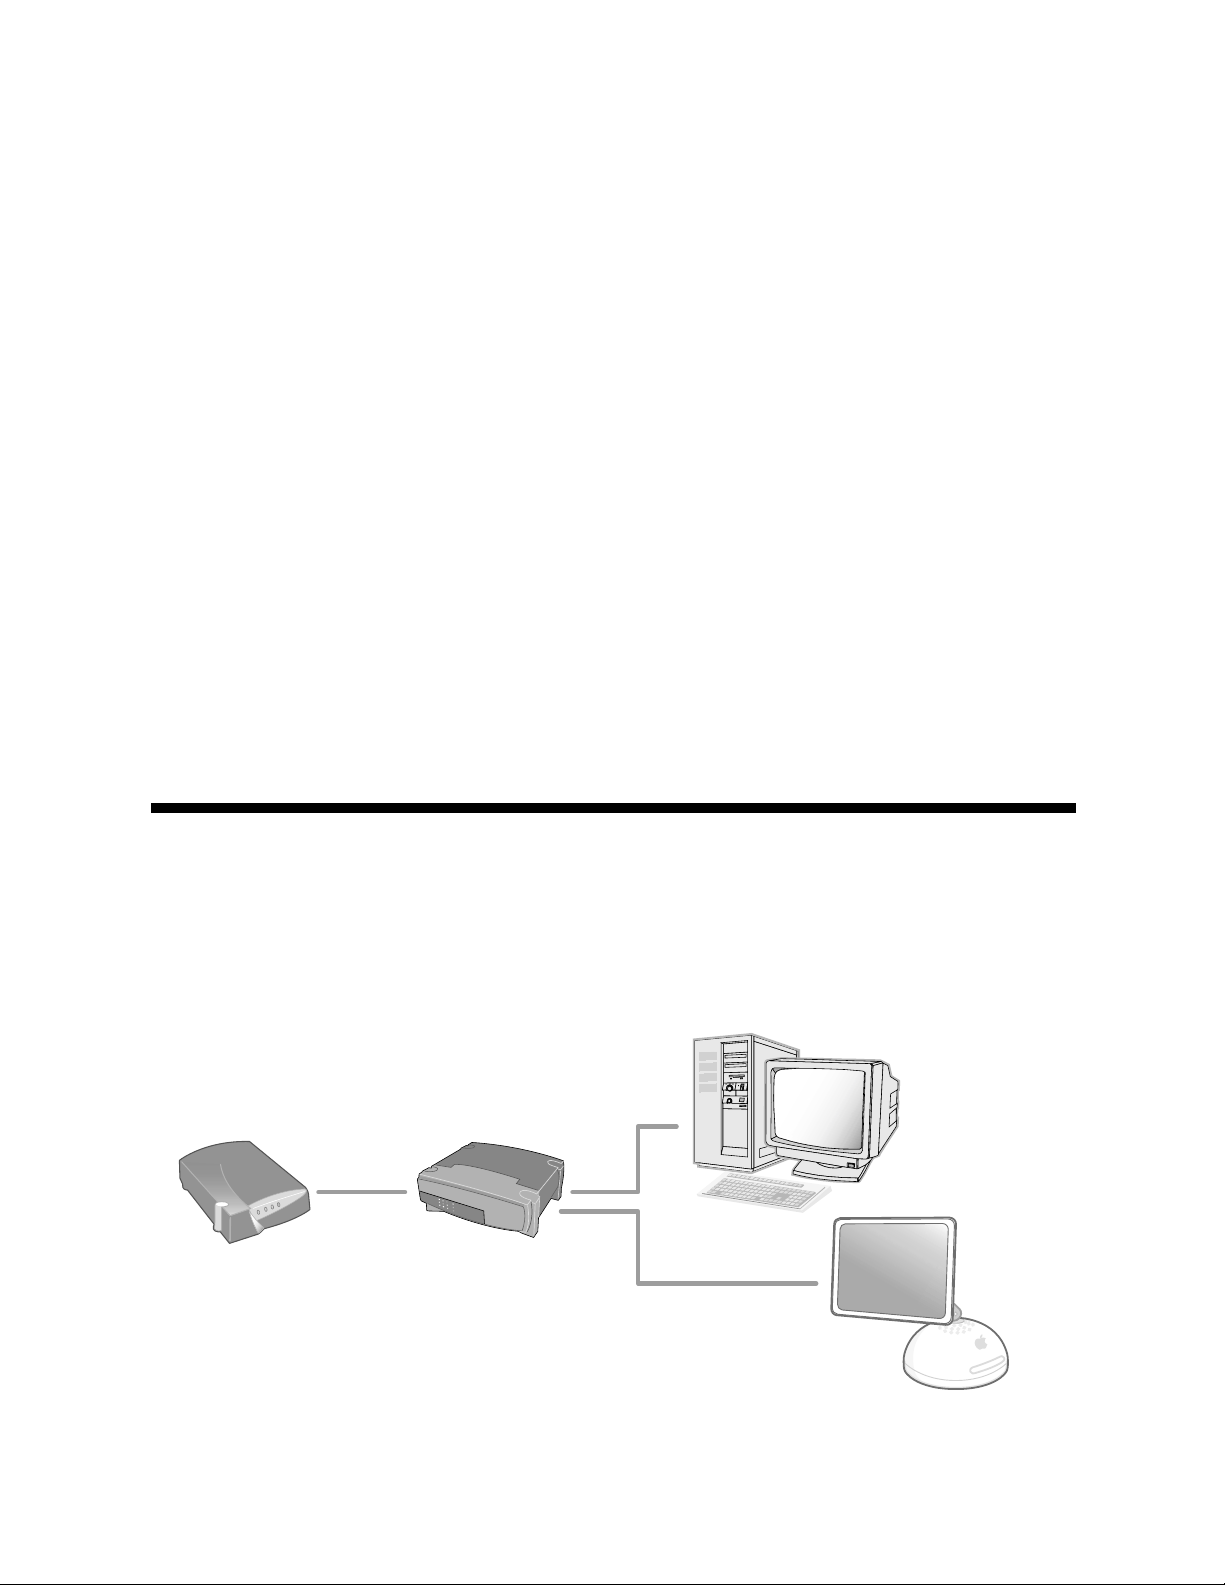
Wireless Printing
The EPSON® Stylus C84WN is designed for use in a small office, home, or
school network. On a wired network like the one illustrated below, the computers
and other equipment share information through a series of cables.
Computers
RouterCable/DSL modem
Introduction 5
Page 6

With a wireless network, you share information between computers and printers
using radio waves, similar to the technology used in cordless phones. You can place
the EPSON Stylus C84WN in a convenient location and print to it without
having to connect it to your computer or network.
If you have an access point/base station, both wired and wireless-equipped
computers can print to the printer. An access point might also allow computers to
share other resources, such as Internet access.
The illustration below shows a wireless network that uses an access point.
Printer Wireless
print server
Cable/ DSL modem
Access point or
AirPort base station
Wireless
laptop
Computers on
LAN (Local
Area Network)
If you don’t have an access point, you can still print to the EPSON Stylus C84WN
from any desktop computer or laptop that has a wireless card or adapter. In the
illustration below, both wireless-equipped computers communicate directly with
the print server.
Wireless
computers
Wireless print server
Printer
6 Introduction
Page 7

Before you can set up your EPSON Stylus C84WN, you need to decide how you
will use it: either with an access point (in infrastructure mode), or without an access
point (in ad hoc mode, also called ad hoc 802.11b, computer-to-computer, and
peer-to-peer).
Windows System Requirements
For wireless printing with the EPSON Stylus C84WN, make sure each computer
meets the following requirements:
■ A Microsoft
®
Windows® compatible PC or laptop with a Pentium®-
equivalent processor, 333 MHz or faster recommended
■ Windows 98, Windows Me, Windows NT
®
4.0, Windows 2000, or
Windows XP
■ 64MB of RAM (128MB recommended)
■ 100MB of free hard disk space (200MB or more recommended)
■ VGA or better display adapter and monitor (SVGA for Windows XP)
■ CD-ROM or DVD drive for installing the printer software
In addition, each computer needs to be connected to an existing wired network
with a wireless access point, or needs to have a wireless card or adapter.
■ You can use an access point alone or in combination with a hub or router.
Note:
For a list of supported access points, visit EPSON’s support site at:
http://support.epson.com. Click Troubleshooting & FAQs in the column on the
left, then click Printers > Epson Stylus C84WN > Frequently Asked Questions >
Wireless Networking Questions.
Wireless cards can be installed in a PCMCIA slot on a laptop or a PCI slot in
■
a desktop computer. Wireless adapters can be connected through a USB port.
If you want to print without an access point, make sure your card or adapter
works in ad hoc mode.
Note:
For a list of supported cards, visit EPSON’s support site at:
http://support.epson.com. Click Troubleshooting & FAQs in the column on the
left, then click Printers > Epson Stylus C84WN > Frequently Asked Questions >
Wireless Networking Questions.
Windows System Requirements 7
Page 8

Macintosh System Requirements
For wireless printing with the EPSON Stylus C84WN, make sure each
Macintosh
®
meets the following requirements:
■ An Apple
®
iBook,® iMac,® PowerBook® G3 or G4, Power Mac® G4 Cube, or
Power Mac G3 or G4
■ Mac
®
OS 8.6 through 9.x; OS X 10.1 through 10.3 (Mac OS 9.1 or later
recommended)
■ For Mac OS 8.6 through 9.x: 32MB of available RAM (64MB
recommended); for Mac OS X: 128MB RAM (256MB recommended)
■ 100MB of free hard disk space (200MB recommended)
■ VGA display or better
■ CD-ROM or DVD drive for installing the printer software
Note:
If you are using AirPort, EPSON recommends that you use the print server with an
access point or AirPort base station. With AirPort, your print server works more
reliably in infrastructure mode.
Make sure the access point supports AppleTalk.® For a list of supported access
■
points, see EPSON’s web site at: http://support.epson.com.
■ For computers not connected to a wired network, you need an AirPort
card or Macintosh-compatible wireless adapter. Make sure your card or
adapter works in ad hoc mode if you want to print without an access point.
Note:
For a list of supported cards, visit EPSON’s support site at:
http://support.epson.com. Click Troubleshooting &
left, then click Printers > Epson Stylus C84WN > Frequently Asked Questions >
Wireless Networking Questions.
If you are using an AirPort card or the AirPort base station, use AirPort
■
FAQs in the column on the
software version 2.04 or later.
8 Introduction
Page 9

Where to Get Information
Use this booklet to set up and configure your EPSON Stylus C84WN for wireless
network printing. Please follow these guidelines:
Warnings must be followed carefully to avoid bodily injury.
Cautions must be observed to avoid damage to your equipment.
Notes contain important information about your printer.
Tips provide helpful hints to make printing easier.
For additional information, check the following:
■ Start Here
Fast-track instructions for setting up your printer and configuring your
network for wireless printing in infrastructure mode.
■ Printer Basics
Tells you how to print all types of documents and photos, maintain the
printer, and solve basic problems.
■ Your on-screen EPSON Printer Information Center
Gives you quick, on-screen access to information about your printer.
It includes EPSON Print Show animated tutorials on loading special
paper, replacing ink cartridges, and other tasks. It also includes your
on-screen User Guide for additional information about your printer.
See Printer Basics for instructions on viewing the Print Show animations
and User Guide.
■ On-screen software help
If you need assistance as you use the printer software, click the Help button.
■ http://support.epson.com
You can receive technical advice through e-mail and access troubleshooting
information, software updates, and new print server firmware. Information
about configuring the print server for NetWare
®
environments and other
network protocols is also available.
If you still need help after checking these sources, you can speak to a technical
support representative or take advantage of EPSON’s automated support services
as described on page 53.
Where to Get Information 9
Page 10

10 Introduction
Page 11

Setting Up the Printer and Print Server
This chapter describes how to unpack and set up your printer and print server, and
make sure that both are working properly.
You can locate the printer and print server anywhere in your home or office.
However, keep in mind that walls and ceilings will weaken the signal between
your print server, computer(s), and access point (if you have one), and that the
print server must be within 120 feet of your other equipment.
Make sure you choose a location away from high temperatures, direct sunlight,
humidity, and dust. Do not place the print server on a metal surface or near
other devices that might cause interference, such as cordless phones operating at
2.4 GHz, microwave ovens, or Bluetooth
™
devices.
Follow the instructions in these sections:
■ Unpacking the printer
■ Installing the ink cartridges
■ Loading paper
■ Running a printer check
■ Connecting the print server
Setting Up the Printer and Print Server 11
Page 12

Unpacking
Follow these steps to unpack the printer, remove the packaging material, and
attach the paper support:
1. Take everything out of the box. Make sure you have all the items shown here:
Ink
cartridges
Print server
power supply
Printer
Basics
Start Here
poster
Printer software
CD-ROM
Paper
support
Print server
base
Print
server
Parallel
cable
Power cord
Printer
2. Remove all the tape and packing material from the printer, as shown. Be sure
to check inside and all around the printer for tape and other packing
materials.
Don’t touch this cable Carefully remove this piece
Caution:
Make sure you follow all the safety instructions listed in the Printer Basics book.
12 Setting Up the Printer and Print Server
Page 13

3. Slide the paper support
into the slot on the back
of the printer.
The paper support
should fit securely.
Installing the Ink Cartridges
Follow these steps to plug in the printer, turn it on, and install the ink cartridges:
1. Connect the printer’s power cord to the printer, then plug it into a standard
electrical outlet.
2. Lower the printer’s output tray, pull out the extension, and open the cover.
3. Shake the package of ink cartridges four or five times. Then remove the
cartridges from the package. Don’t shake them after removing the packaging.
Caution:
Don’t remove the cartridge labels, or ink may leak. Don’t touch the green circuit
boards on the cartridges.
Warning:
Keep ink cartridges out of the reach of children. If ink gets on your skin, wash the
area thoroughly with soap and water. If ink gets in your eyes, flush them
immediately with water.
Installing the Ink Cartridges 13
Page 14
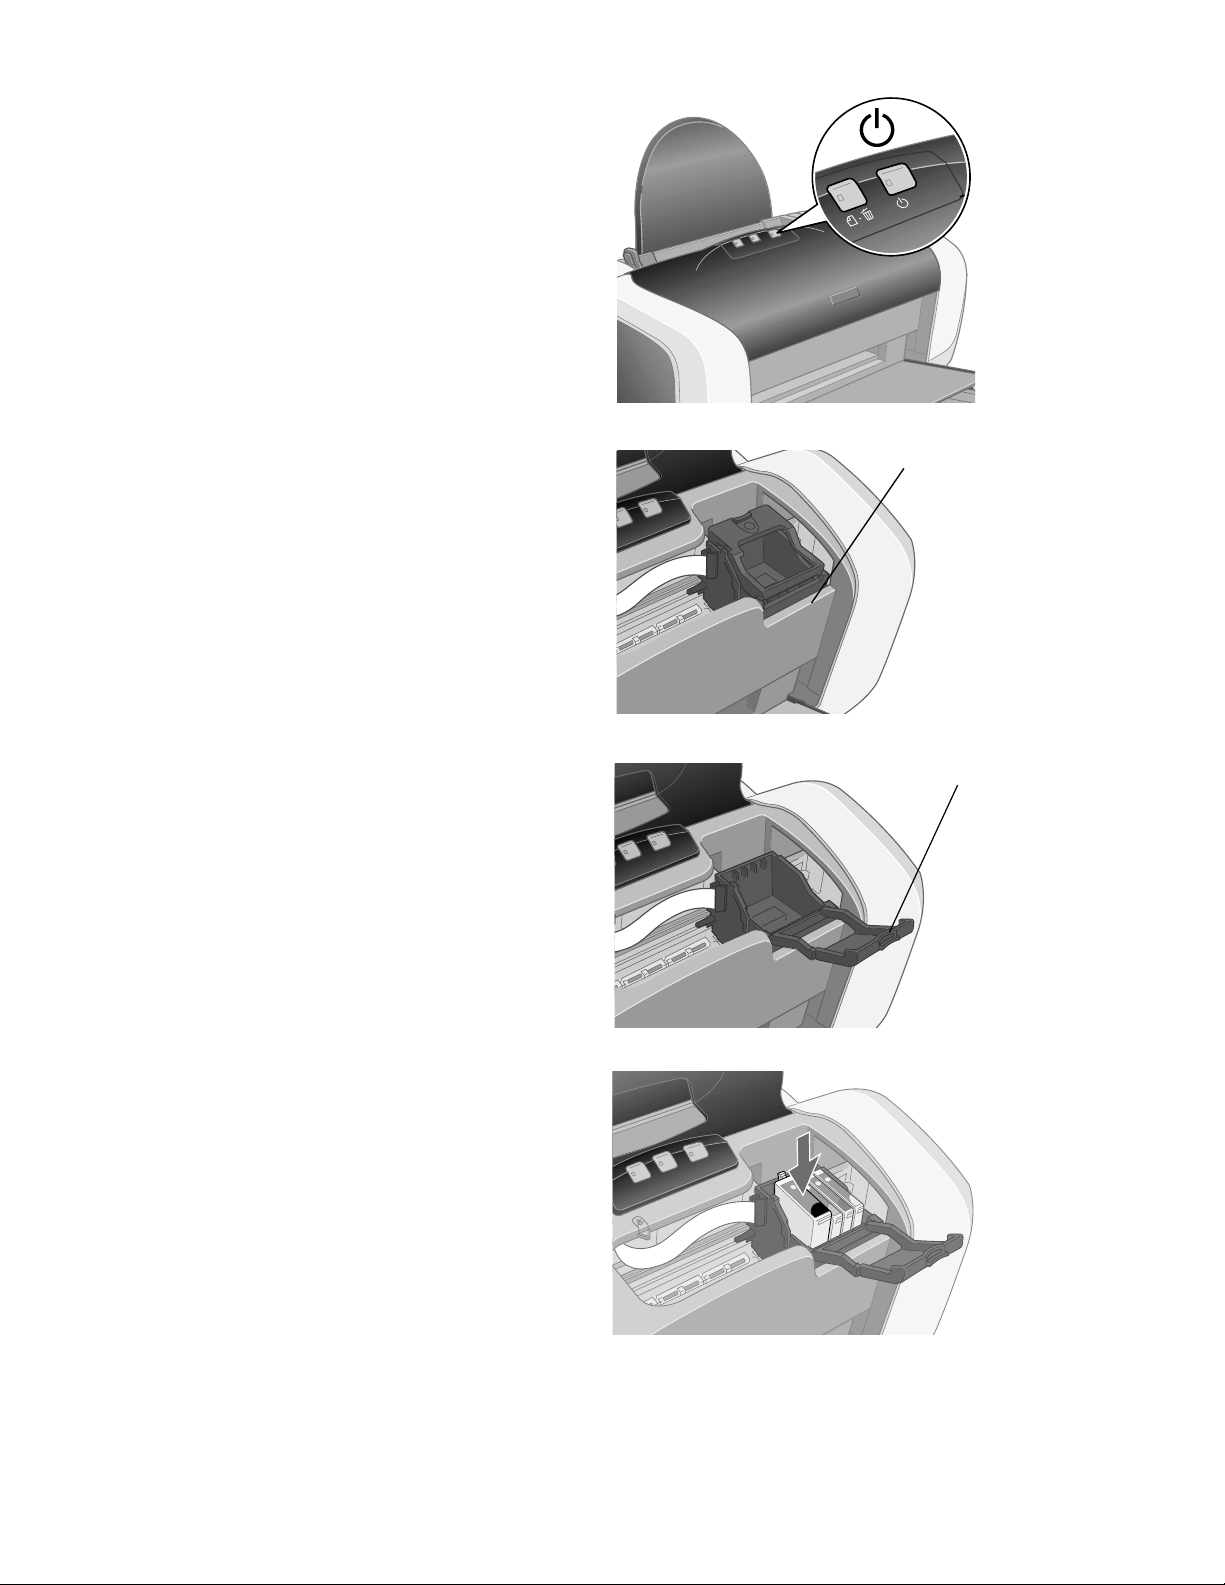
4. Press the P power button until the
green power light comes on.
Caution:
Always use the P power button to
turn the printer on and off. Never use
an external switch, such as a power
strip switch or wall switch.
5. Wait for the cartridge holder to
move to the ink replacement
position.
6. Open the cartridge cover.
7. Lower each ink cartridge into its
Ink replacement
position
Cartridge
cover
holder. (The holders are colorcoded.)
Note:
Install all four ink cartridges, and
leave them installed for all types of
printing, or the printer won’t work.
8. Gently push each cartridge down
until it clicks into place.
Tip:
Press the “bull’s-eye” on the cartridge label to make sure the cartridge is all the
way down.
14 Setting Up the Printer and Print Server
Page 15

9. Close the cartridge cover.
10. Press the printer’s H ink button and close the printer cover.
Ink charging takes about 90 seconds. You see the green P power light flash
and hear the printer working. Don’t turn off the printer during this process or
you’ll waste ink.
Caution:
Never turn off the printer when the green P power light is flashing, unless the
printer hasn’t moved or made any noise for more than 5 minutes.
Loading Paper
1. Fan a few sheets of paper and place them against the right edge guide. Don’t
push the paper in.
2. Pull out the output tray extension.
3. Slide the left edge guide against the paper, but not too tightly.
When loading paper, follow these guidelines:
■ Don’t load paper above the arrow inside the left edge guide.
■ Always load paper short edge first, even when you’rprocdge guide.■ Always load paper short edge first, even when you’rprocdge guide.■ Always load paper short edge first, even when you’rprocdge guide.■ Always load paper short edge first, even when you’rprocdge guide.■ Always load paper short edge first, even when you’rprocdge guide.■ Always load paper short edge first, even when you’rprocdge guide.■ Always load paper short edge first, even when you’rprocdge guide.■ Always load paper short edge first, even when you’rprocdge guide.■ Always load paper short edge first, even when you’rprocdge guide.■ Always load paper short edge first, even when you’rprocdge guide.■ Always load paper short edge first, even when you’rprocdge guide.■ Always load paper short edge first, even when you’rprocdge guide.■ Always load paper short edge first, even when you’rprocdge guide.■ Always load paper short edge first, even when you’rprocdge guide.■ Always load paper short edge first, even when you’rprocdge guide.■ Always load paper short edge first, even when you’rprocdge guide.■ Always load paper short edge first, even when you’rprocdge guide.■ Always load paper short edge first, even when you’rprocdge guide.■ Always load paper short edge first, even when you’rprocdge guide.■ Always load paper short edge first, even when you’rprocdge guide.■ Always load paper short edge first, even when you’rprocdge guide.■ Always load paper short edge first, even when you’rprocdge guide.■ Always load paper short edge first, even when you’rprocdge guide.■ Always load paper short edge first, even when you’rprocdge guide.■ Always load paper short edge first, even when you’rprocdge guide.■ Always load paper short edge first, even when you’rprocdge guide.■ Always load paper short edge first, even when you’rprocdge guide.■ Always load paper short edge first, even when you’rprocdge guide.■ Always load paper short edge first, even when you’rprocdge guide.■ Always load paper short edge first, even when you’rprocdge guide.■ Always load paper short edge first, even when you’rprocdge guide.■ Always load paper short edge first, even when you’rprocdge guide.■ Always load paper short edge first, even when you’rprocdge guide.■ Always load paper short edge first, even when you’rprocdge guide.■ Always load paper short edge first, even when you’rprocdge guide.■ Always load paper short edge first, even when you’rprocdge guide.■ Always load paper short edge first, even when you’rprocdge guide.■ Always load paper short edge first, even when you’rprocdge guide.■ Always load paper short edge first, even when you’rprocdge guide.■ Always load paper short edge first, even when you’rprocdge guide.■ Always load paper short edge first, even when you’rprocdge guide.■ Always load paper short edge first, even when you’rprocdge guide.■ Always load paper short edge first, even when you’rprocdge guide.■ Always load paper short edge first, even when you’rprocdge guide.■ Always load paper short edge first, even when you’rprocdge guide.■ Always load paper short edge first, even when you’rprocdge guide.■ Always load paper short edge first, even when you’rprocdge guide.■ Always load paper short edge first, even when you’rprocdge guide.■ Always load paper short edge first, even when you’rprocdge guide.■ Always load paper short edge first, even when you’rprocdge guide.■ Always load paper short edge first, even when you’rprocdge guide.■ Always load paper short edge first, even when you’rprocdge guide.■ Always load paper short edge first, even when you’rprocdge guide.■ Always load paper short edge first, even when you’rprocdge guide.■ Always load paper short edge first, even when you’rprocdge guide.■ Always load paper short edge first, even when you’rprocdge guide.■ Always load paper short edge first, even when you’rprocdge guide.■ Always load paper short edge first, even when you’rprocdge guide.■ Always load paper short edge first, even when you’rprocdge guide.■ Always load paper short edge first, even when you’rprocdge guide.■ Always load paper short edge first, even when you’rprocdge guide.■ Always load paper short edge first, even when you’rprocdge guide.■ Always load paper short edge first, even when you’rprocdge guide.■ Always load paper short edge first, even when you’rprocdge guide.■ Always load paper short edge first, even when you’rprocdge guide.■ Always load paper short edge first, even when you’rprocdge guide.■ Always load paper short edge first, even when you’rprocdge guide.■ Always load paper short edge first, even when you’rprocdge guide.■ Always load paper short edge first, even when you’rprocdge guide.■ Always load paper short edge first, even when you’rprocdge guide.■ Always load paper short edge first, even when you’rprocdge guide.■ Always load paper short edge first, even when you’rprocdge guide.■ Always load paper short edge first, even when you’rprocdge guide.■ Always load paper short edge first, even when you’rprocdge guide.■ Always load paper short edge first, even when you’rprocdge guide.■ Always load paper short edge first, even when you’rprocdge guide.■ Always load paper short edge first, even when you’rprocdge guide.■ Always load paper short edge first, even when you’rprocdge guide.■ Always load paper short edge first, even when you’rprocdge guide.■ Always load paper short edge first, even when you’rprocdge guide.■ Always load paper short edge first, even when you’rprocdge guide.■ Always load paper short edge first, even when you’rprocdge guide.■ Always load paper short edge first, even when you’rprocdge guide.■ Always load paper short edge first, even when you’rprocdge guide.■ Always load paper short edge first, even when you’rprocdge guide.■ Always load paper short edge first, even when you’rprocdge guide.■ Always load paper short edge first, even when you’rprocdge guide.■ Always load paper short edge first, even when you’rprocdge guide.■ Always load paper short edge first, even when you’rprocdge guide.■ Always load paper short edge first, even when you’rprocdge guide.■ Always load paper short edge first, even when you’rprocdge guide.■ Always load paper short edge first, even when you’rprocdge guide.■ Always load paper short edge first, even when you’rprocdge guide.■ Always load paper short edge first, even when you’rprocdge guide.■ Always load paper short edge first, even when you’rprocdge guide.■ Always load paper short edge first, even when you’rprocdge guide.■ Always load paper short edge first, even when you’rprocdge guide.■ Always load paper short edge first, even when you’rprocdge guide.■ Always load paper short edge first, even when you’rprocdge guide.■ Always load paper short edge first, even when you’rprocdge guide.■ Always load paper short edge first, even when you’rprocdge guide.■ Always load paper short edge first, even when you’rprocdge guide.■ Always load paper short edge first, even when you’rprocdge guide.■ Always load paper short edge first, even when you’rprocdge guide.■ Always load paper short edge first, even when you’rprocdge guide.■ Always load paper short edge first, even when you’rprocdge guide.■ Always load paper short edge first, even when you’rprocdge guide.■ Always load paper short edge first, even when you’rprocdge guide.■ Always load paper short edge first, even when you’rprocdge guide.■ Always load paper short edge first, even when you’rprocdge guide.■ Always load paper short edge first, even when you’rprocdge guide.■ Always load paper short edge first, even when you’rprocdge guide.■ Always load paper short edge first, even when you’rprocdge guide.■ Always load paper short edge first, even when you’rprocdge guide.■ Always load paper short edge first, even when you’rprocdge guide.■ Always load paper short edge first, even when you’rprocdge guide.■ Always load paper short edge first, even when you’rprocdge guide.■ Always load paper short edge first, even when you’rprocdge guide.■ Always load paper short edge first, even when you’rprocdge guide.■ Always load paper short edge first, even when you’rprocdge guide.■ Always load paper short edge first, even when you’rprocdge guide.■ Always load paper short edge first, even when you’rprocdge guide.■ Always load paper short edge first, even when you’rprocdge guide.■ Always load paper short edge first, even when you’rprocdge guide.■ Always load paper short edge first, even when you’rprocdge guide.■ Always load paper short edge first, even when you
Loading Paper 15
 Loading...