

Page 1
EPSON PRODUCT SUPPORT BULLETIN
Date:
PSB #:
Reference:
Product(s):
Subject:
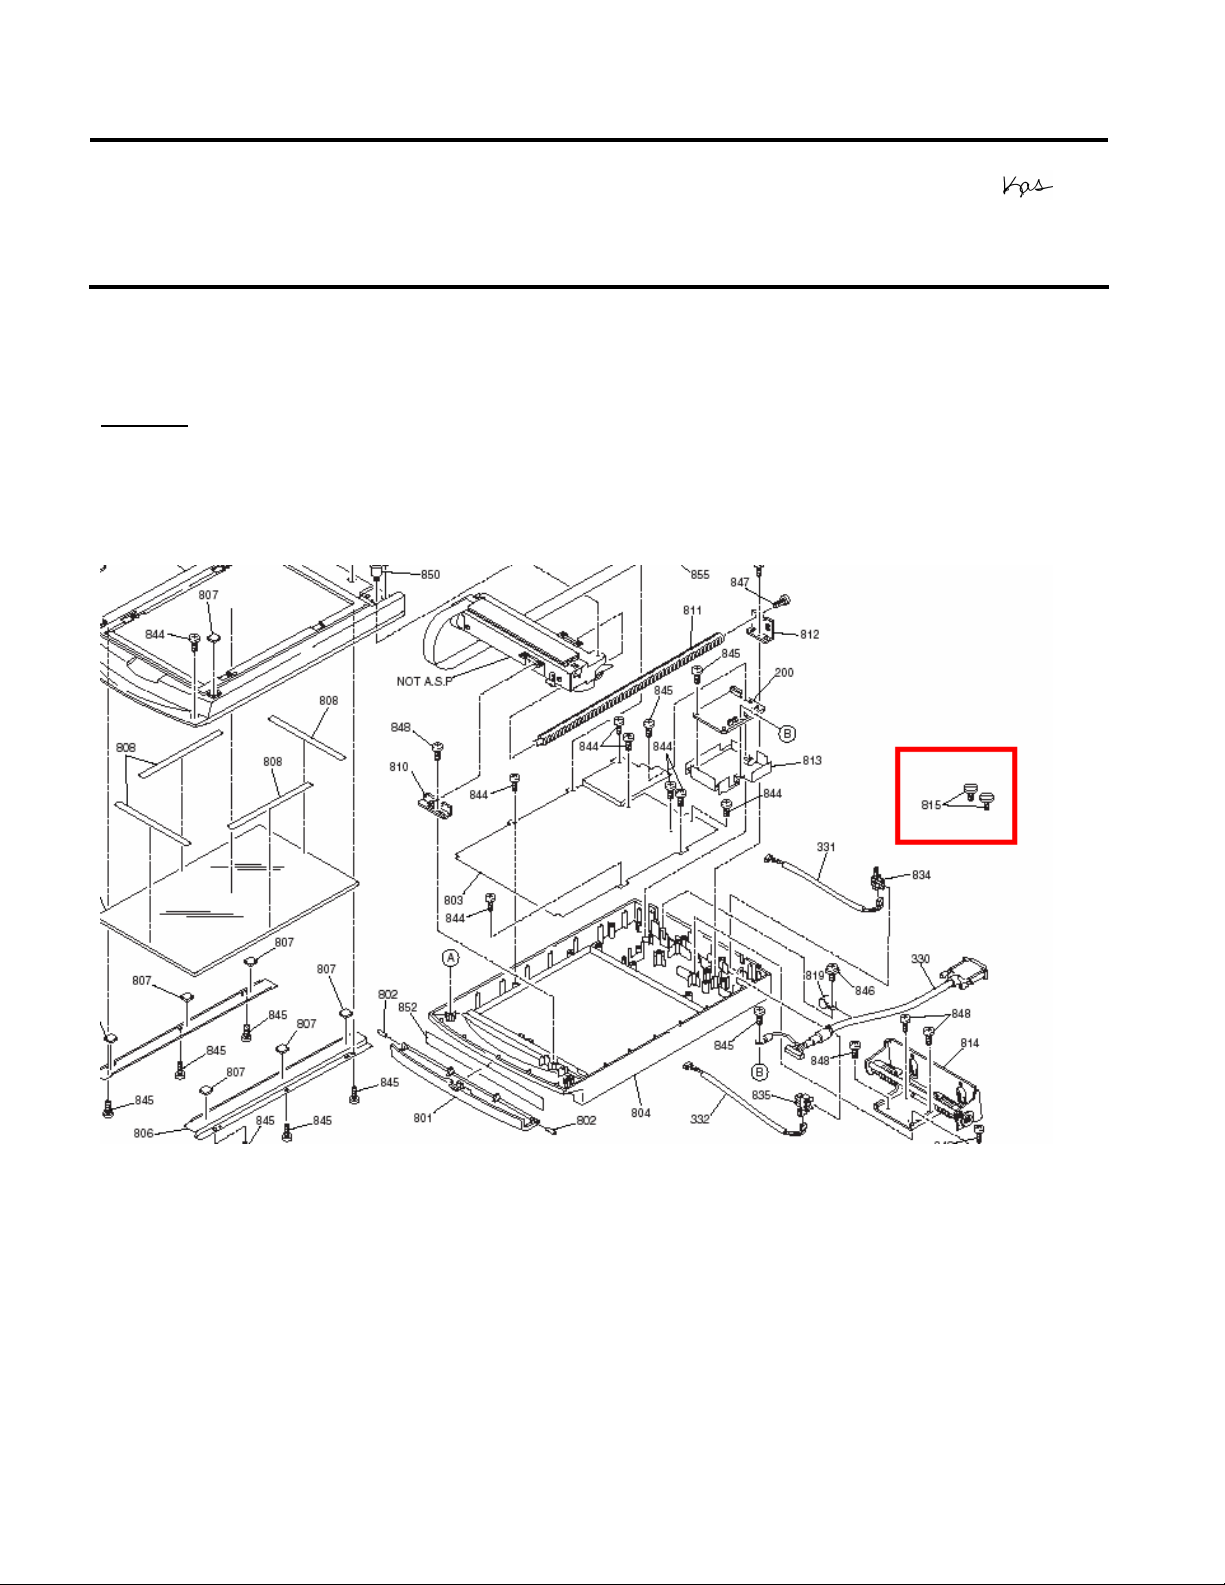
This bulletin was created to inform you of the part numbers used for the thumbscrews (mounting
screws) that secure the transparency units to the scanner.
Reason:
Epson Customers may need to replace these thumbscrews because they are missing or
misplaced. Epson Dealers and Customer Care Centers may call Technical Support for assistance
in locating the reference or part number for the thumbscrews. The location of the thumbscrews on
the Product diagram is on the right hand side, and is often overlooked (See red box below)
04/07/2003
PSB.2003.04.004
N/A
EPSON Scanner Options
Part numbers for transparency adapter mounting screws (thumbscrews)
Originator:
Authorization:
Total Pages:
TC
1
The correct part and reference numbers for the Expression 1600/1680 Transparency Unit
(B813182) lock-down thumbscrews are respectively: 1012588 and 815. The Parts Price List (PPL)
description is S. THUMB SCREW M4X10 F/NI, Quantity = 2.
Note: The part number is subject to change but the reference number will remain the same.
These screws are used on the following scanners and options: ES-600C/800C/1000C/1200C
options (ADF & TPU), and the Expression 636/800/1600/1680 options (ADF & TPU). The part and
reference number for Expression 1600/1680 Transparency Unit (B813182) can be used to order
replacement thumbscrews for all models and options listed above.
Page 1 of 1
Page 2

EPSON AMERICA, INC.
Product Support Bulletin
Subject: OS/2 Warp 3.0 and Epson TWAIN
Date: 1/26/95
Page(s): 1 of 4
This bulletin describes the necessary steps to implement the Epson TWAIN driver
in a Windows 3.1 session under OS/2 Warp 3.0. This procedure will cover both
current versions of Epson TWAIN (1.03 and lower as well as 2.02 and higher) using
bidirectional parallel and SCSI interfaces.
PSB No: P-0103A
Originator: CEB
NOTE:
TWAIN v1.03 and lower will not work with the Epson ES-1200C scanner. You must
use TWAIN 2.02 or higher. If you are using the ES-1200C with a program that has
Epson scanner support, you may need install the EPSN.SYS device driver for that
Windows session. To do this, follow steps 6 through 16 below. You will need to
obtain EPSNSY.EXE from the Epson BBS. This file has the EPSN.SYS driver
included in it. Simply copy the driver to the root directory of your boot drive.
Bidirectional Parallel Interface
Epson TWAIN v2.xx
There is no special procedure required to setup this version of the driver to run in a
Windows session under OS/2 Warp 3.0. Simply launch Windows and install the
driver.
Epson TWAIN
Follow the steps below to enable Epson TWAIN
1.
From the OS/2 desktop, double click on the OS/2 SYSTEM folder
2.
Double click on the COMMAND PROMPTS folder
3.
Double click on the Win-OS/2 icon.
4.
Once Windows is loaded, follow the TWAIN installation procedure. When the
installation program asks if you wish to make changes to the CONFIG.SYS or
the CONFIG.ADD, select CONFIG.ADD.
5.
Once the installation has completed, exit Windows.
6.
If the COMMAND PROMPTS folder is not open, follow steps 1 and 2.
7.
Move the mouse to the WIN-OS/2 FULL SCREEN icon. Click on the right
mouse button.
~1.0~
~1.0~:
Page 3

PSB No: P-0103A
Page: 2 of 4
8.
Select SETTINGS from the pop-up menu.
Once the SETTINGS notebook has opened, click on SESSION.
9.
10.
Click on the WIN-OS2 SETTINGS.
11.
Click on OTHER DOS SETTINGS.
12.
Click on OK.
13.
Highlight DOS-DEVICE.
14.
In the window to the right, add the EPSN.SYS driver. X represents the
appropriate parallel port.
X = 0 (Parallel port address 3BCh)
X = 1 (Parallel port address 378h)
X = 2 (Parallel port address 278h); This is the default setting Epson TWAIN
uses.
The device line would be entered in the following manner. Substitute 0, 1 or 2
based on your configuration.
C:\EPSN.SYS x /i79
15.
Click on SAVE.
16.
Close the SETTINGS notebook.
The next time a Win-OS/:! session is started, you will see the EPSON device driver
load. If you do not, repeat the above steps. If you have migrated a Windows
application to the OS/2 desktop, apply the above steps to that icon instead of the
Win-OS/2 icon. To verify that the configuration is correct, configure the DOS FULL
SCREEN icon using the same methods outlined in steps 6 through 16. Once you
have completed those steps, start a DOS FULL SCREEN session and run the
SCANTEST utility from the \WlNDOWS\TWAIN directory. If SCANTEST runs
successfully, chances are that the Windows session will run properly.
SCSI Interface
In order for either of the Epson TWAIN drivers to function in a Windows session
under OS/2, you must install support for your ASPI compliant SCSI card under
OS/2 first. For installation instructions, refer to your OS/2 manual.
Once you have installed support for your ASPI compliant card under OS/2, you
need to manually check the CONFIG.SYS file for four key files. You should have
the following lines in the OS/2 CONFIG.SYS. If these lines do not exist, add them.
The AHAxxxx.ADD should have been inserted when you installed the SCSI support
for OS/2.
Page 4

PSB No: P-0103A
Page: 3 of 4
BASEDEV=OS2ASPI.DMD
BASEDEV=OS2SCSLDMD
BASEDEV=AHAxxxx.ADD /V
DEVlCE=C:\OS2\MDOS\SPlSYS
NOTE:
This document assumes that you are using an Adaptec card. The AHA1510 and
AHA1540C were tested when creating this document.
Once you have verified that the above lines are in the CONFIG.SYS, shut down
OS/2 and reboot.
NOTE:
If the SCSI card does not find any devices on the SCSI chain, the AHAxxxx.ADD
driver will not load thus causing VASPI.SYS not to load. If this occurs, double
check your card’s configuration and the SCSI cabling.
Epson TWAIN
Follow the steps below to enable Epson TWAIN
1.
From the OS/2 desktop, double click on the OS/2 SYSTEM folder
2.
Double click on the COMMAND PROMPTS folder
3.
Double click on the Win-OS/2 icon.
4.
Once Windows is loaded, follow the TWAIN installation procedure. When the
installation program asks if you wish to make changes to the CONFIG.SYS or
the CONFlG.ADD, select CONFIG.ADD.
5.
Once the installation has completed, exit Windows.
6.
If the COMMAND PROMPTS folder is not open, follow steps 1 and 2.
7.
Move the mouse to the WIN-OS/:! FULL SCREEN icon. Click on the right
mouse button.
8.
Select SETTINGS from the pop-up menu.
9.
Once the SETTINGS notebook has opened, click on SESSION.
10.
Click on the WIN-OS2 SETTINGS.
11.
Click on OTHER DOS SETTINGS.
12.
Click on OK.
13.
Highlight DOS-DEVICE.
14.
In the window to the right, add the EPSN.SYS driver. X represents the
appropriate SCSI ID of the scanner.
~1.0~
~1.0~:
The device line would be entered in the following manner.
C:\EPSN.SYS 3 /Sx /i79
Page 5

PSB No: P-0103A
Page: 4 of 4
15. Click on SAVE.
16. Close the SETTINGS notebook.
The next time a Win-OS/2 session is started, you will see the EPSON device driver
load. If you do not, repeat the above steps. If you have migrated a Windows
application to the OS/2 desktop, apply the above steps to that icon instead of the
Win-OS/2 icon. To verify that the configuration is correct, configure the DOS FULL
SCREEN icon using the same methods outlined in steps 6 through 16. Once you
have completed those steps, start a DOS FULL SCREEN session and run the
SCANTEST utility from the \WlNDOWS\TWAIN directory. If SCANTEST runs
successfully, chances are that the Windows session will run properly.
Epson TWAIN v2.xx
There is no special procedure required to setup this version of the driver to run in a
Windows session under OS/2 Warp. Simply launch Windows and install the driver.
Follow the procedures outlined in the user’s manual.
properly, verify that the device drivers mentioned earlier in this section are being
executed.
If the driver does not install
Page 6

EPSON AMERICA, INC.
Product Support Bulletin
Subject: Image Editing Terms
EPSON
Date: 6/5/91
Page(s): 1 of 3
The following terms’ are used to describe image editing and grayscale in
connection with scanners, monitors and printers.
Additive
Primary Colors:
Aliasing:
Antialiasing :
Brightness:
Continuous
Tone:
The colors produced by mixing colored light. The primary
additive colors are red, green and blue. The absence of color
produces black (0%); maximum intensity produces white (100%).
This principle is used in color monitors (RGB). By using 24 bits
per pixel it is possible to represent more than 16 million colors.
The jagged diagonal lines that appear in low resolution mode.
Usually noticeable on characters like
The removal of the aliasing or step-like diagonal lines.
The balance of light and dark shades.
The transition from light to dark or dark to light in a smooth
uninterrupted progression. Laser and dot matrix printers do not
support continuous tones.
PSB No: P-0078
Originator: RS
‘A”
and
VV’!
Contrast:
Cropping:
Dithering:
DPI:
‘Some terms taken from PC Publishing, Jan. 1990.
The range between the darkest and lightest shades of an image.
As contrast increases, the number of gray shades between black
and white decreases.
An operation that allows portions of an image to be selected.
Usually pertains to scanning technology.
A method of shading that uses black dots of varying density to
represent darker areas. This technology is used in devices that
only support black and white outputs.
Abbreviation for dot per inch. The standard measurement of
resolution for all output devices. DPI describes the number of
pixels in an image.
Page 7

PSB No: P-0078
Page: 2 of 3
Gamma
Function:
Grayscale:
The function that defines the light intensity ratio between the
original image and the output data. The ES-300C scanner allows
the function to be altered so that when the image is reproduced
on a different type of output device, the tones in the reproduced
images will be closer to the original image.
A term used to describe the output of devices that support more
than just black and white. Grayscales support up to 258 shades
of gray. The table below details the number of data bits required
to show the number of possible gray levels.
Number of
Bits
Possible Gray Levels
1
2
3
4 16
5
6
2
(black and white)
4
8
32
64
grays
grays
grays
grays
grays
Halftone:
7
8 256 grays
The output in 1 or 2 bit data format that simulates grayscale by
128
grays
creating a pattern of small dots that vary in size and density.
Halftones are used in newspapers to display photographs. The
Epson ES-300C supports 3 types of halftoning.
Highlight:
Line Art:
The brightest value in a continuous tone or halftone image.
Images consisting of only black and white pixels. Text is a good
example of line art.
tine Screen: Also known as screen ruling, it is the distance between the
centers of halftone dots. For example, a newspaper uses a
typical line screen - sixty five halftone dots per inch at a forty five
degree angle for photographs.
Matrix:
The square grid that forms the halftone dots. As the matrix size
increases, more possible variations on dot size and shape are
available.
Page 8

PSB No: P-0078
Page: 3 of 3
Midtones:
Pixel:
Posterize:
Screen Angle:
Smoothing:
Spot Function:
The values in a continuous tone or halftone image correspond to
the medium values in the range. Generally the values is between
30% to 70%.
A relative unit of measuring resolution. Pixel size is relative, due
to the output device. For example, a monitor pixel may be
different in size compared to a scanner pixel. Pixels can be
measured absolutely when fixed to another standard, like pixels
per inch.
To limit the number of shades in an image to create a highly
contrasted effect.
The angle at which halftone dots are lined up. As mentioned
earlier, newspapers commonly use a screen angle of forty five
degrees.
An operation that softens the edges between adjacent tones.
A procedural body in the Postscript language that defines the
shape of the halftone spot.
Subtractive
Primary Colors:
Threshold:
Colors that are produced by mixing inks or paints. The three
subtractive colors are cyan, magenta, and yellow. This process
reduces the amount of light that the human eye receives. The
absence of color is white (0%), while full intensity is black (100%).
This model is used in printing.
The selected gray level above which gray shades are converted
to white and below which gray shades are converted to black.
This is used to produce higher contrast or posterize images.
 Loading...