

Page 1

Alignment Guide
Guía de alineación
Guia de alinhamento
Epson® SureColor® S-Series
Page 2

2 |
Contents
Parallel Adjustment ........................................................................................................................... 3
Adjusting the Take-in Reel .........................................................................................................4
Adjusting the Take-up Reel ...................................................................................................... 13
Using the Paper Tape .....................................................................................................................20
Contenido
Ajuste paralelo ................................................................................................................................ 22
Ajuste del rodillo de alimentación ............................................................................................ 23
Ajuste del rodillo de recogida .................................................................................................... 32
Uso de la cinta de papel .................................................................................................................. 39
Conteúdo
Ajuste paralelo ................................................................................................................................ 41
Ajuste do rolo ........................................................................................................................... 42
Ajuste da bobina de alimentação ..............................................................................................51
Uso da fita de papel ........................................................................................................................ 58
Page 3
Parallel Adjustment | 3
Your printer includes several new parts that are designed to improve performance and media feeding
accuracy.
• A kit containing a new alignment tool and new adjustment guides
• Paper tape (non-adhesive) for attaching media to the auto take-up reel
This booklet tells you how to perform parallel adjustment using the new parts, and how to use the paper
tape.
Parallel Adjustment
The parallel adjustment procedure ensures that media is fed straight into the printer and onto the auto
take-up reel. This procedure replaces “Adjusting the Media System” in the Setup Guide included with your
printer.
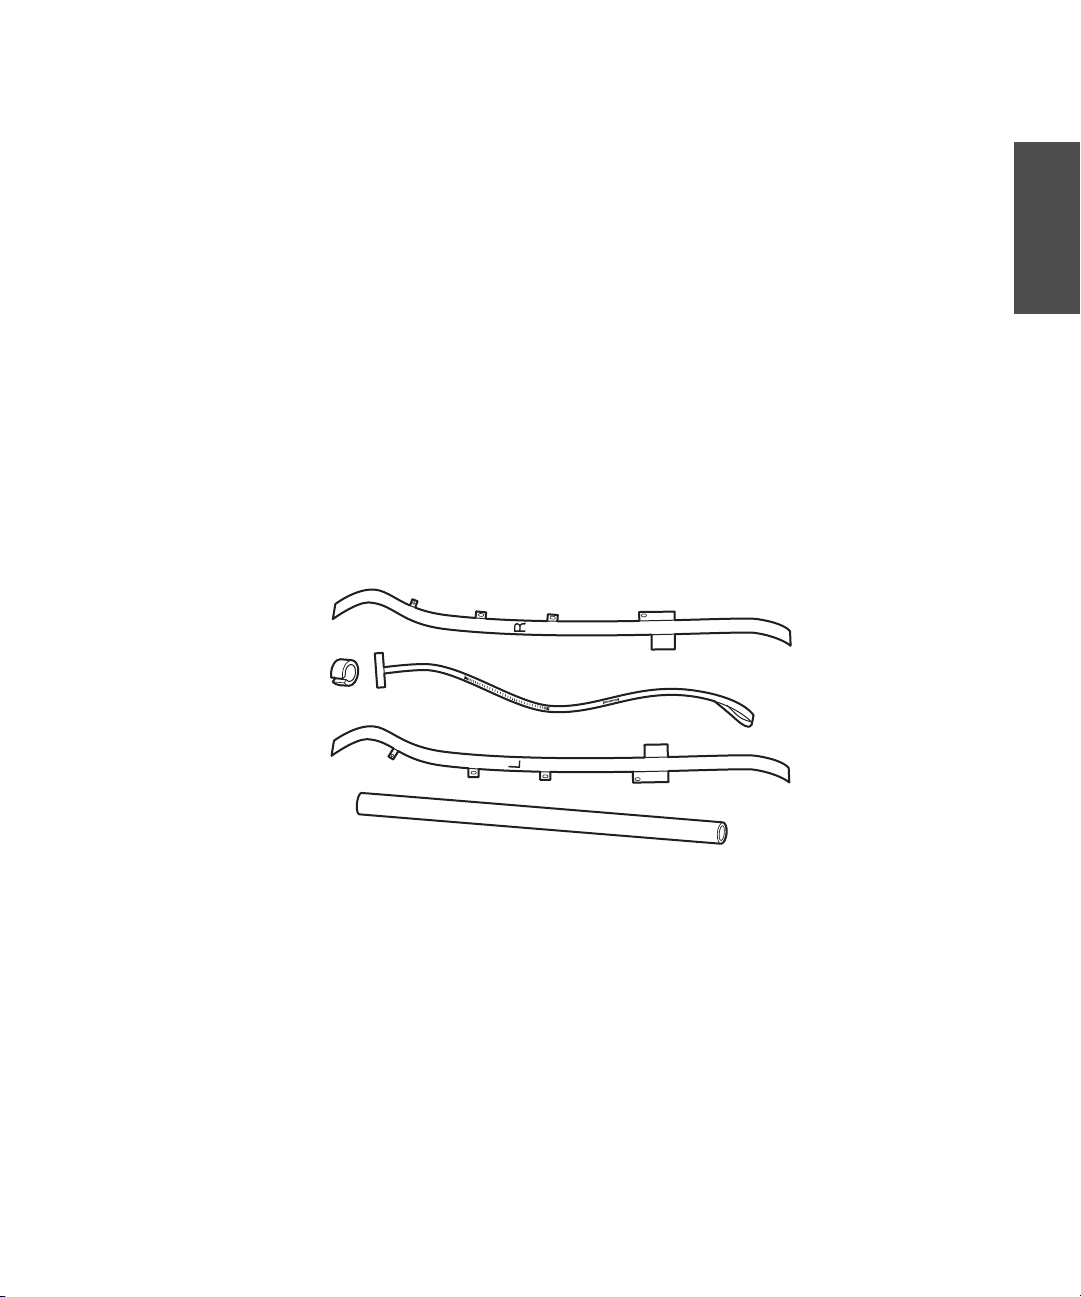
The parts shown below are used in parallel adjustment:
English
Right adjustment guide
Counterweight
Alignment tool
Left adjustment guide
Roll core
Before you begin the parallel adjustment procedure, make sure the printer is leveled and on a level surface.
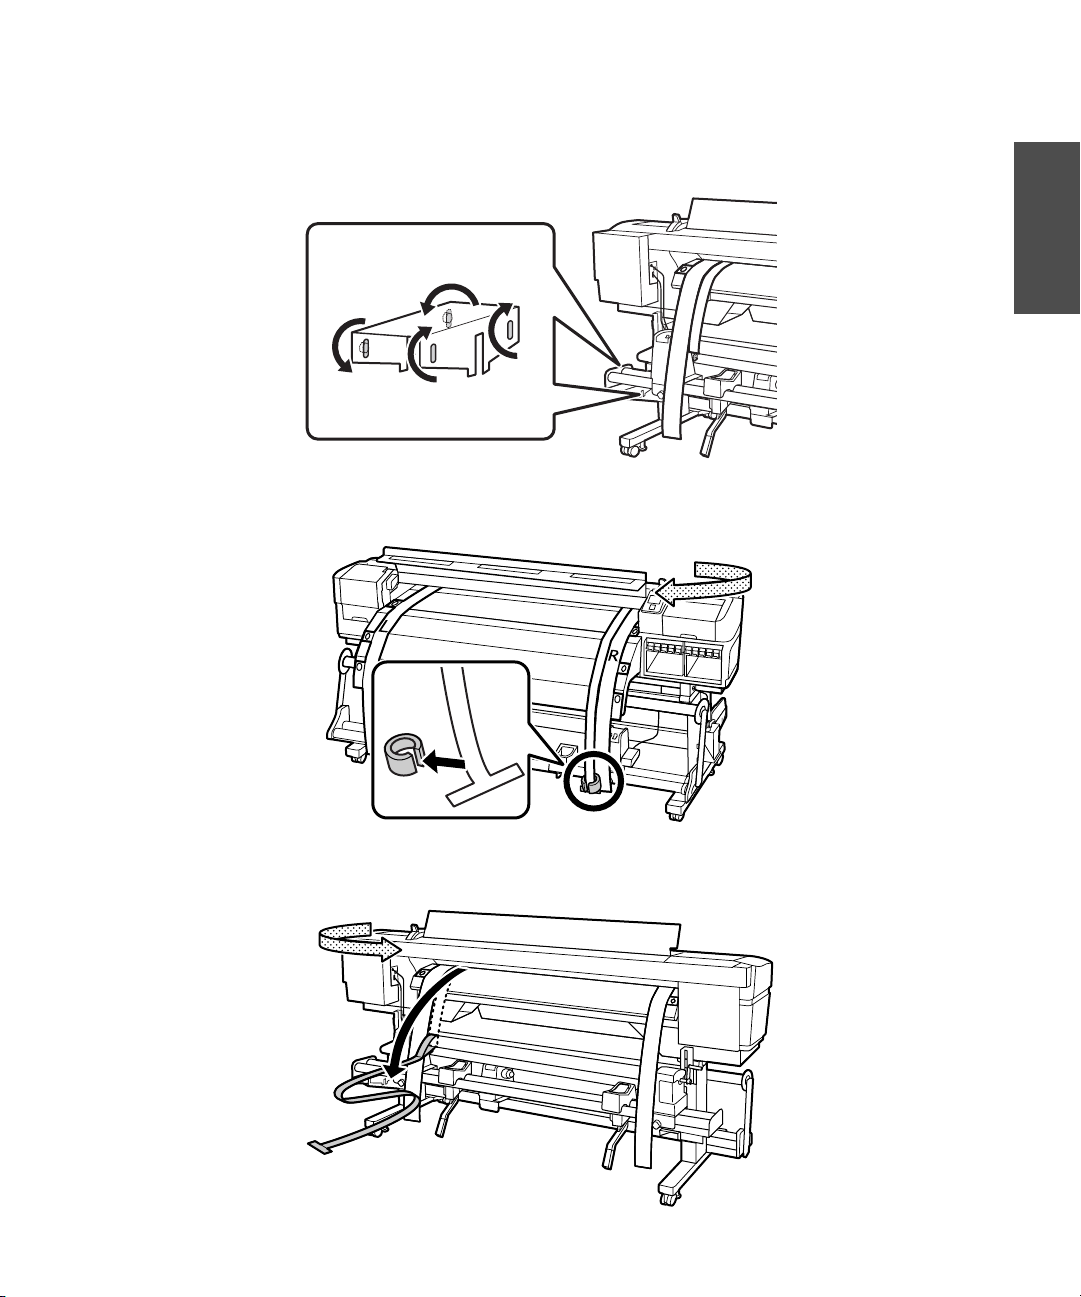
Carefully unroll the adjustment guides.
Page 4
4 | Adjusting the Take-in Reel
Adjusting the Take-in Reel
After the printer is set up, the media feeding system should be adjusted. Two people are required for
parallel adjustment, one in front of the printer, and one in back.
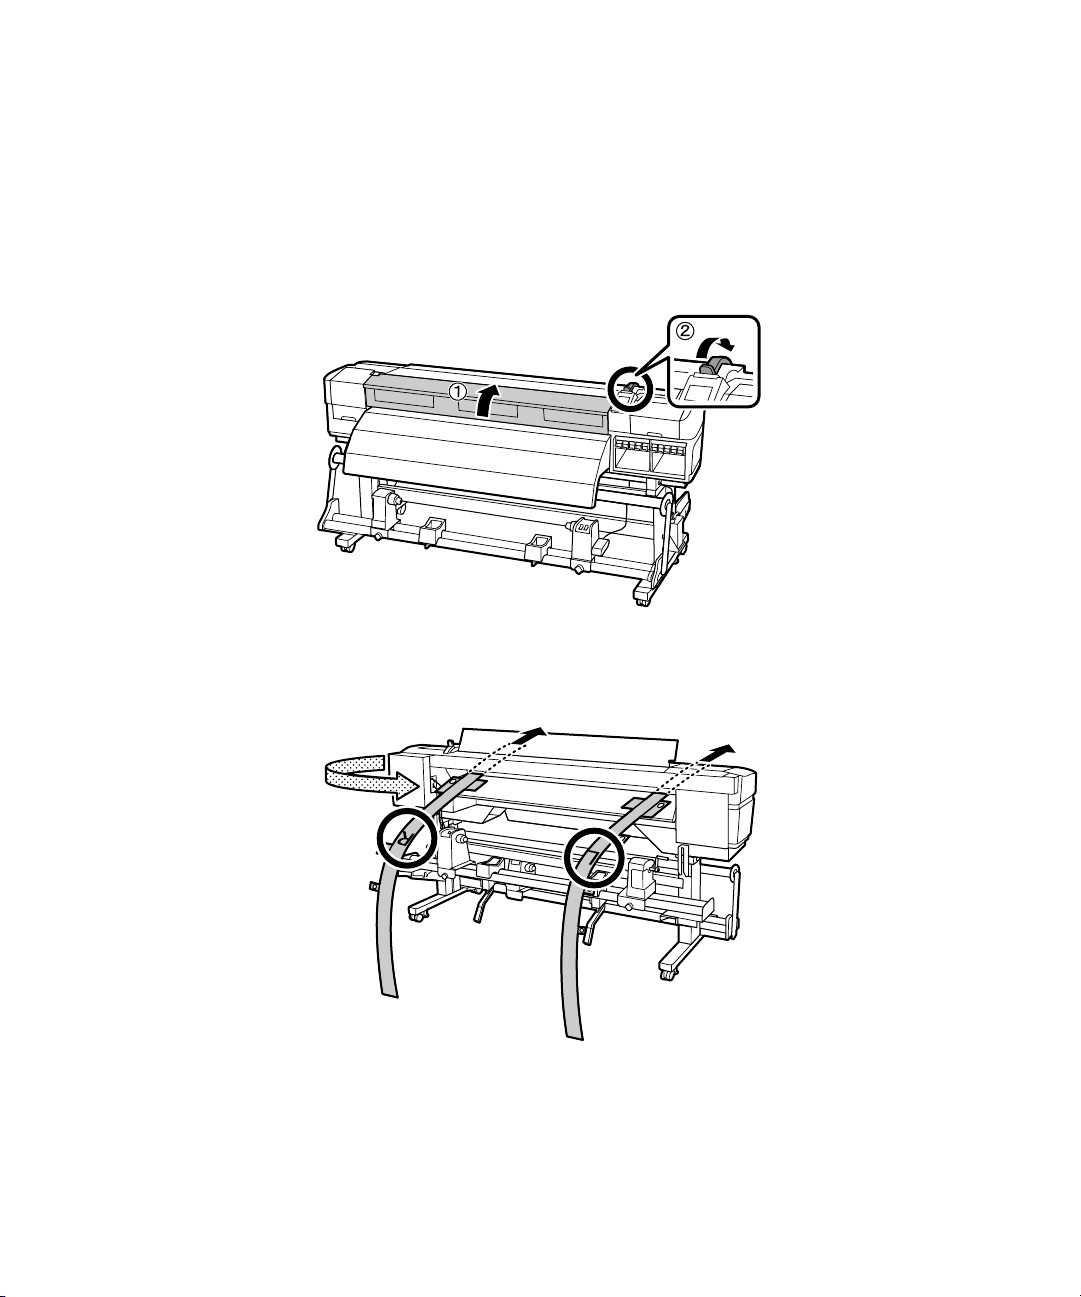
1. Open the front cover and push back the media loading lever.
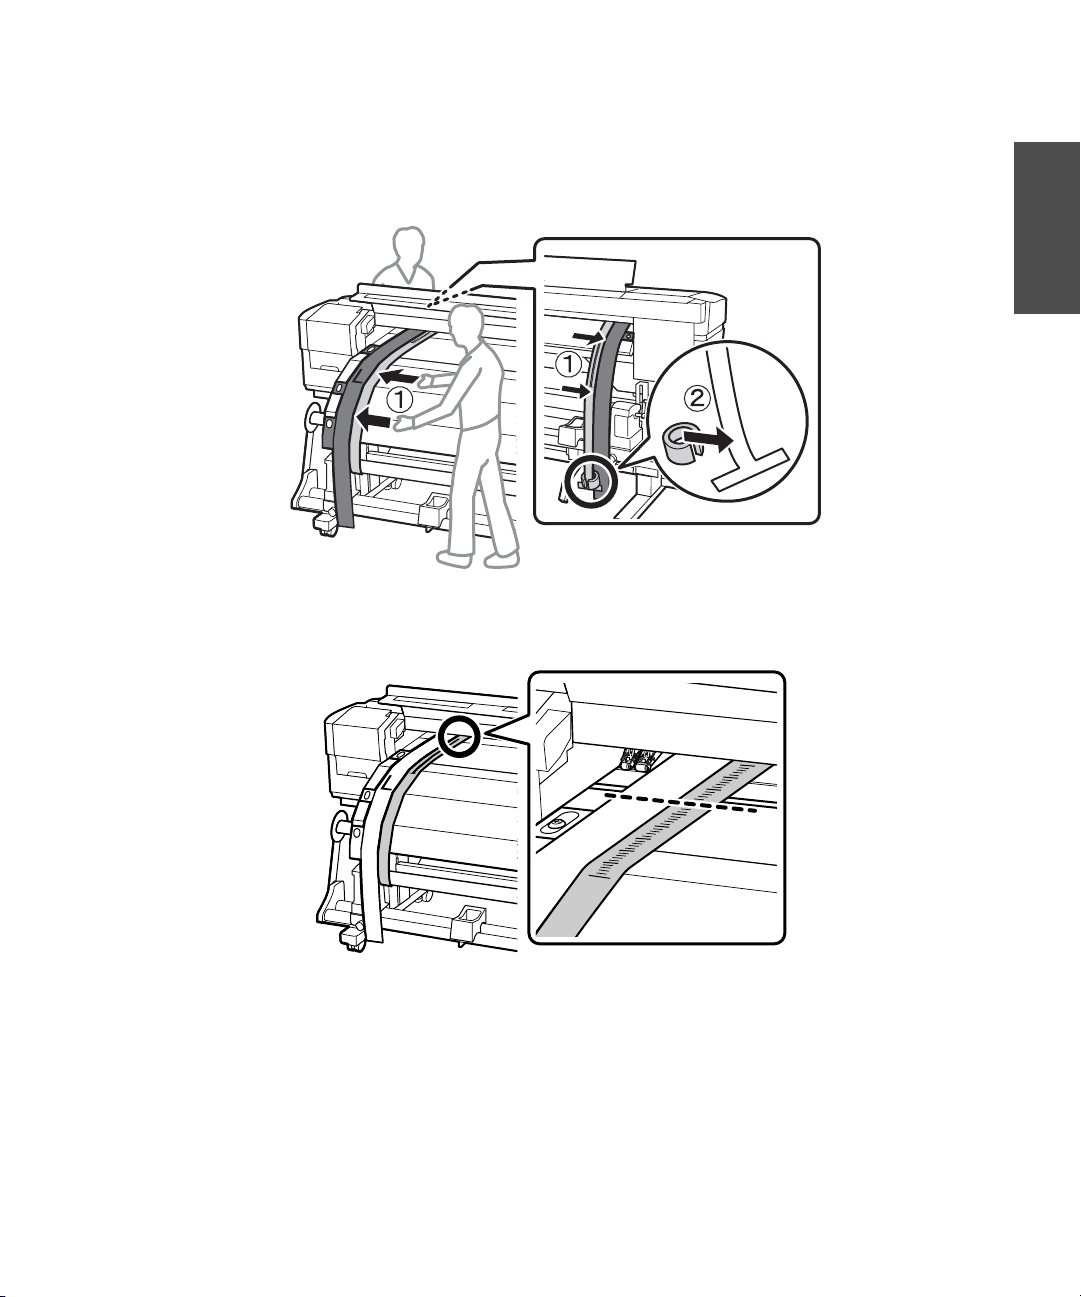
2. From the back of the printer, feed the left and right adjustment guides through the paper path as
shown:
Page 5
Adjusting the Take-in Reel | 5
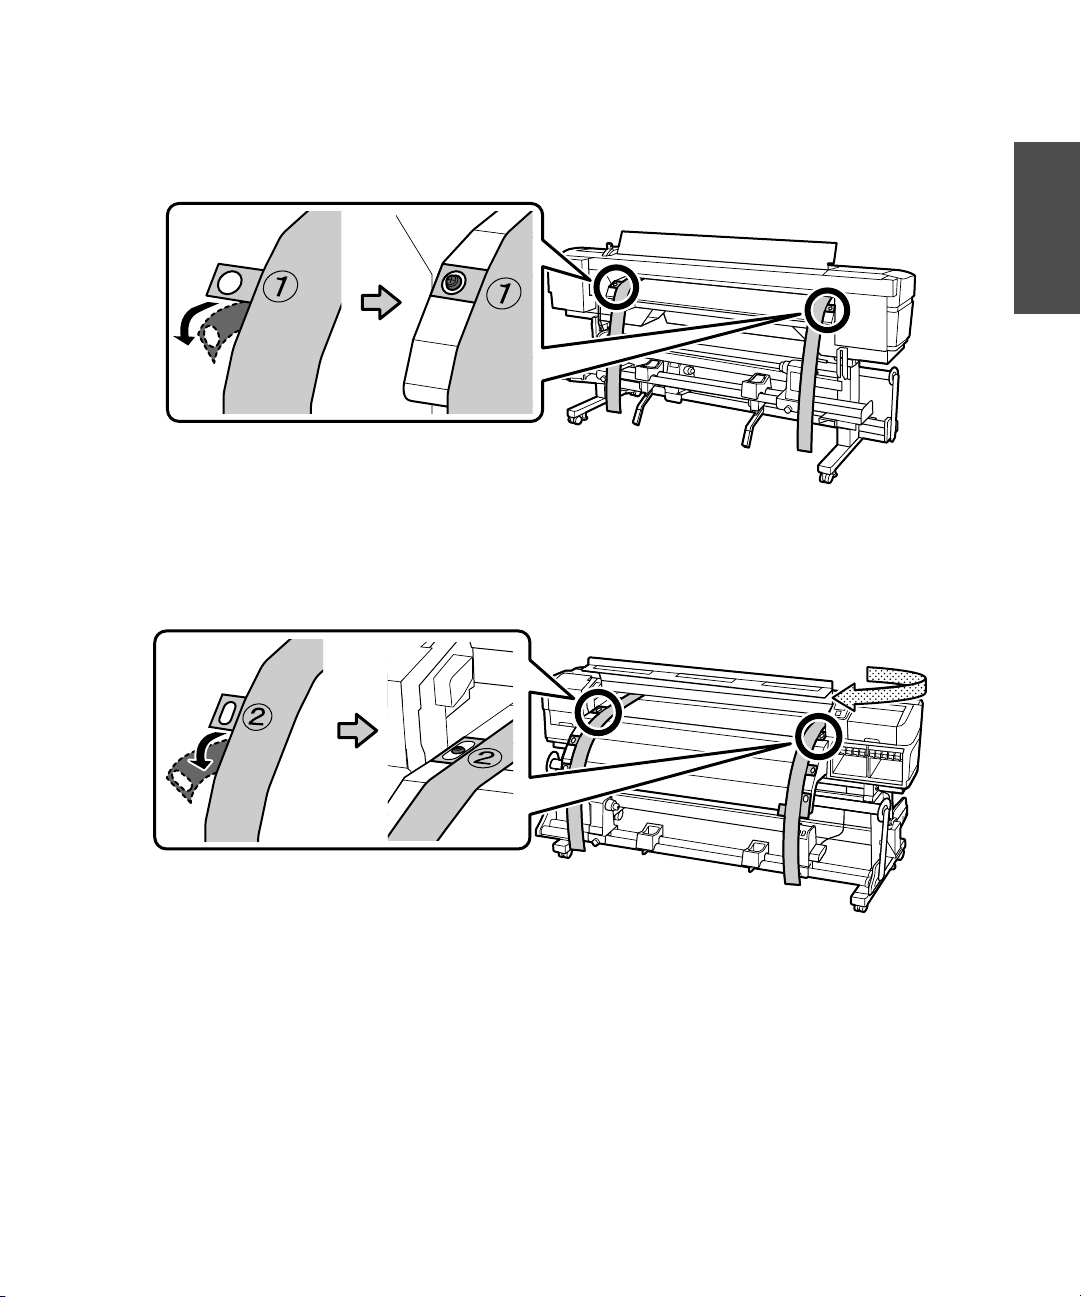
3. Place the tabs over the screws at the back of the printer and remove the backing to secure the tabs.
Note: The adhesive does not damage the heating unit.
4.
Place the tabs over the screws at the front of the printer and attach them as shown:
English
Page 6
6 | Adjusting the Take-in Reel
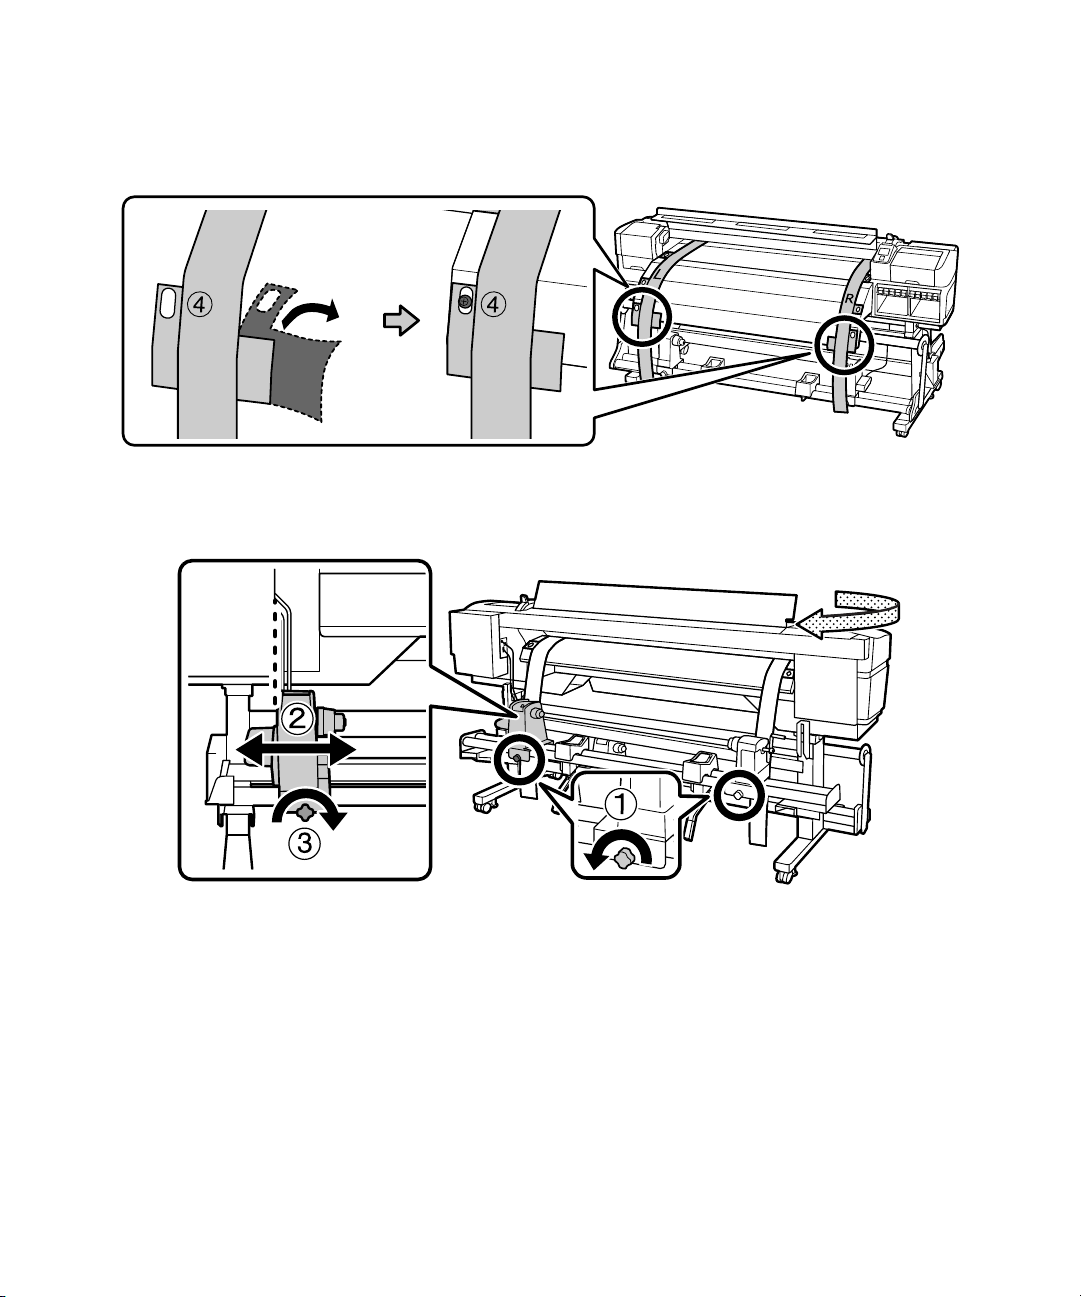
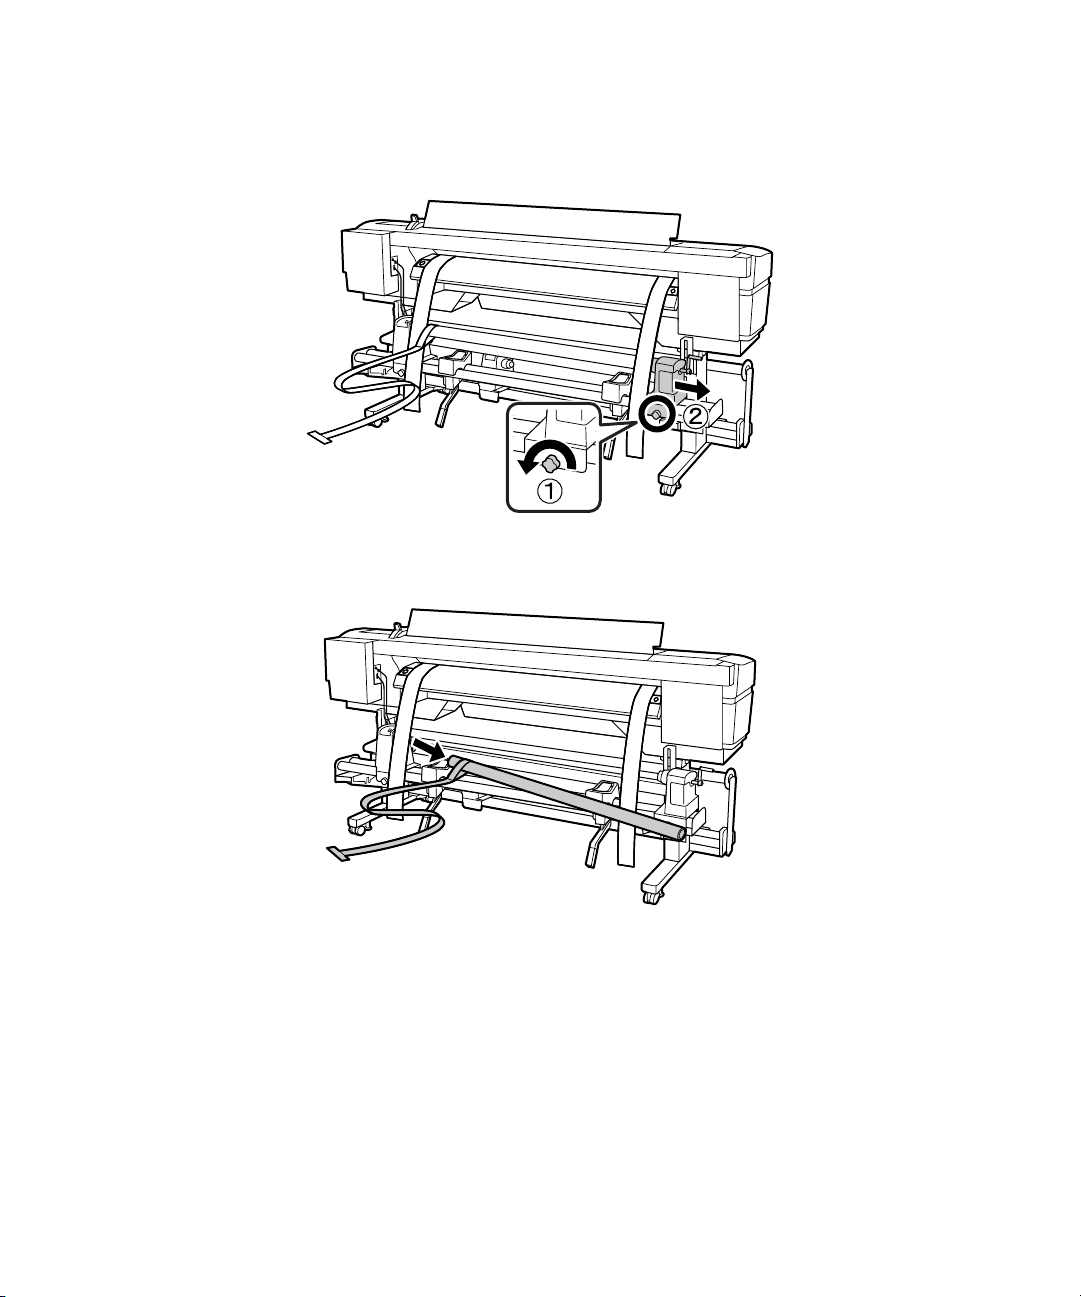
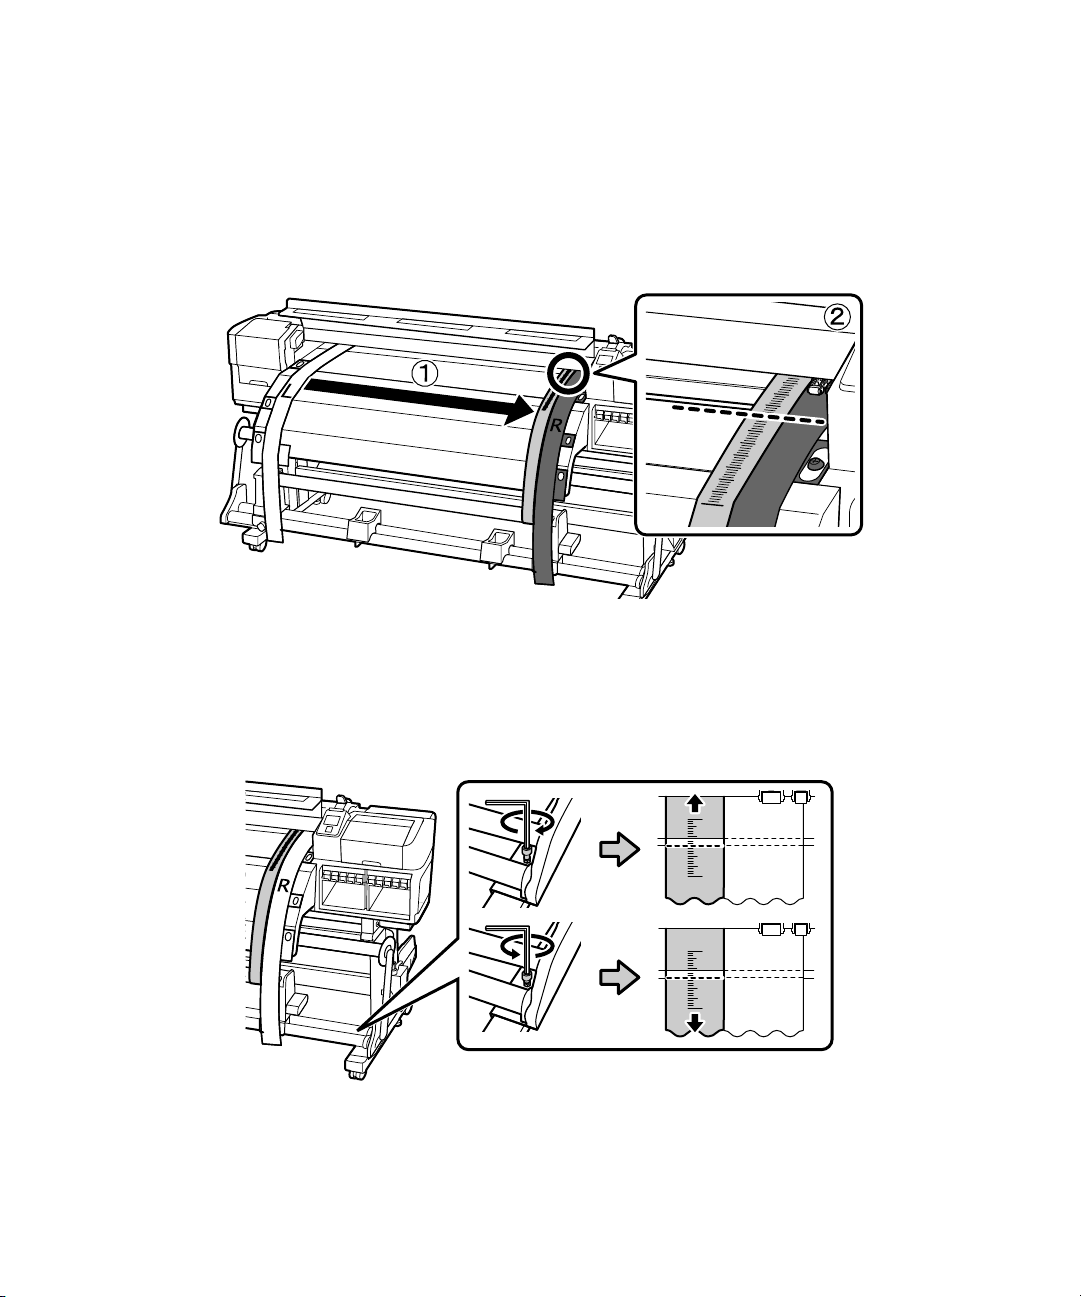
5. Place tab 4 over the screws at the bottom of the after heater and attach it as shown.
6. At the back of the printer, align the left side of the roll holder with the left side of the printer as shown.
Then tighten the roll holder fixing screw to secure it in place.
Page 7
Adjusting the Take-in Reel | 7
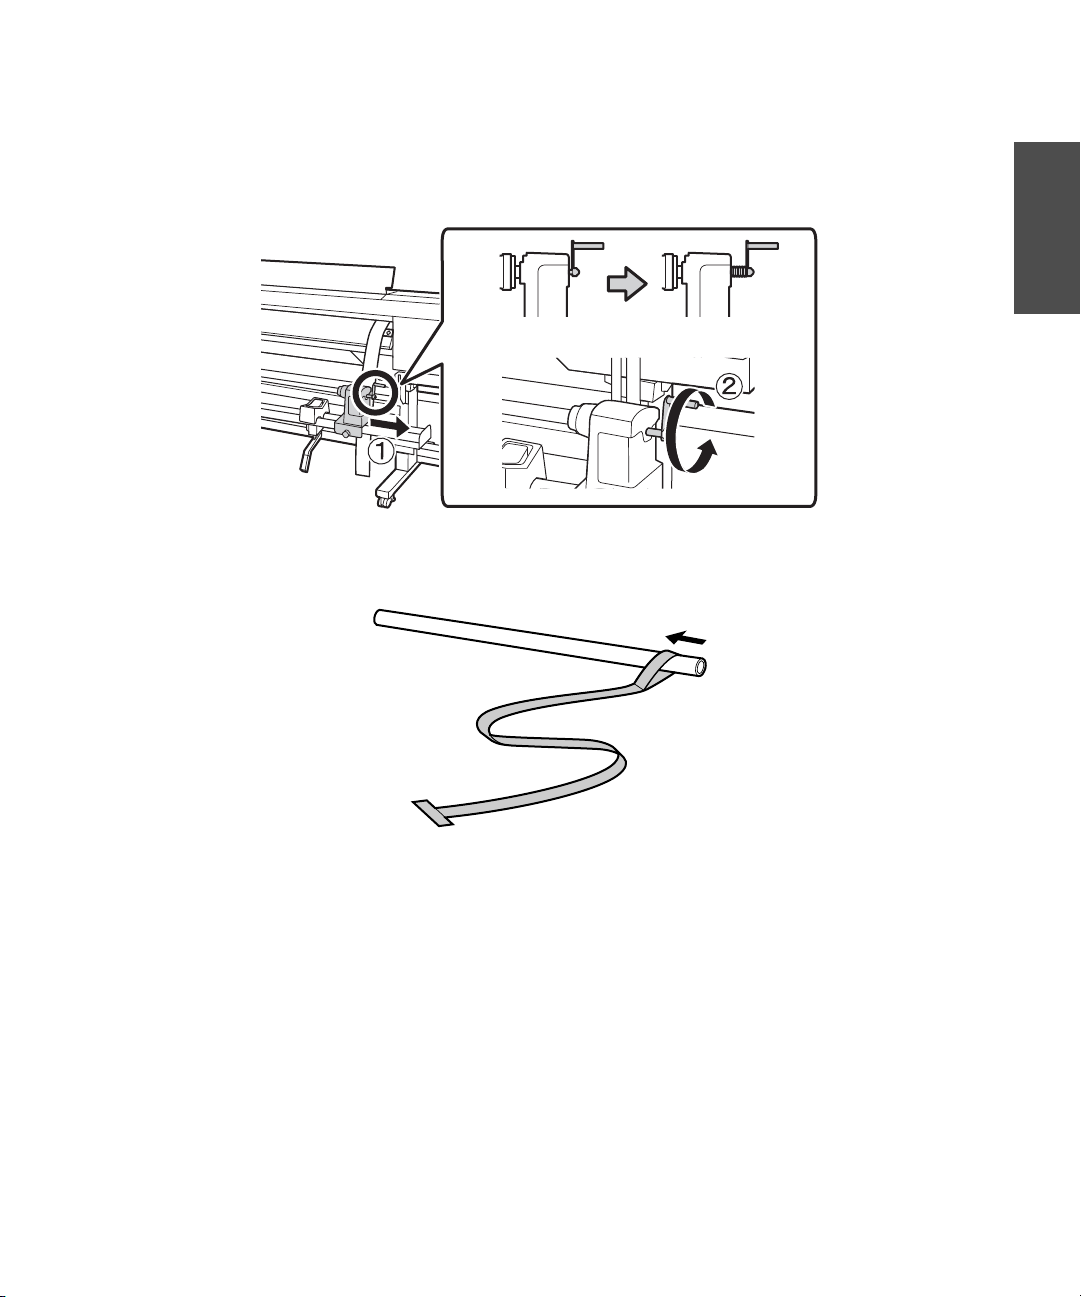
7. If the roll holder handle shaft is pushed in, rotate the handle towards you (counterclockwise) until it
no longer turns.
8. Slide the included 64-inch roll core into the loop at the end of the alignment tool:
English
Page 8
8 | Adjusting the Take-in Reel
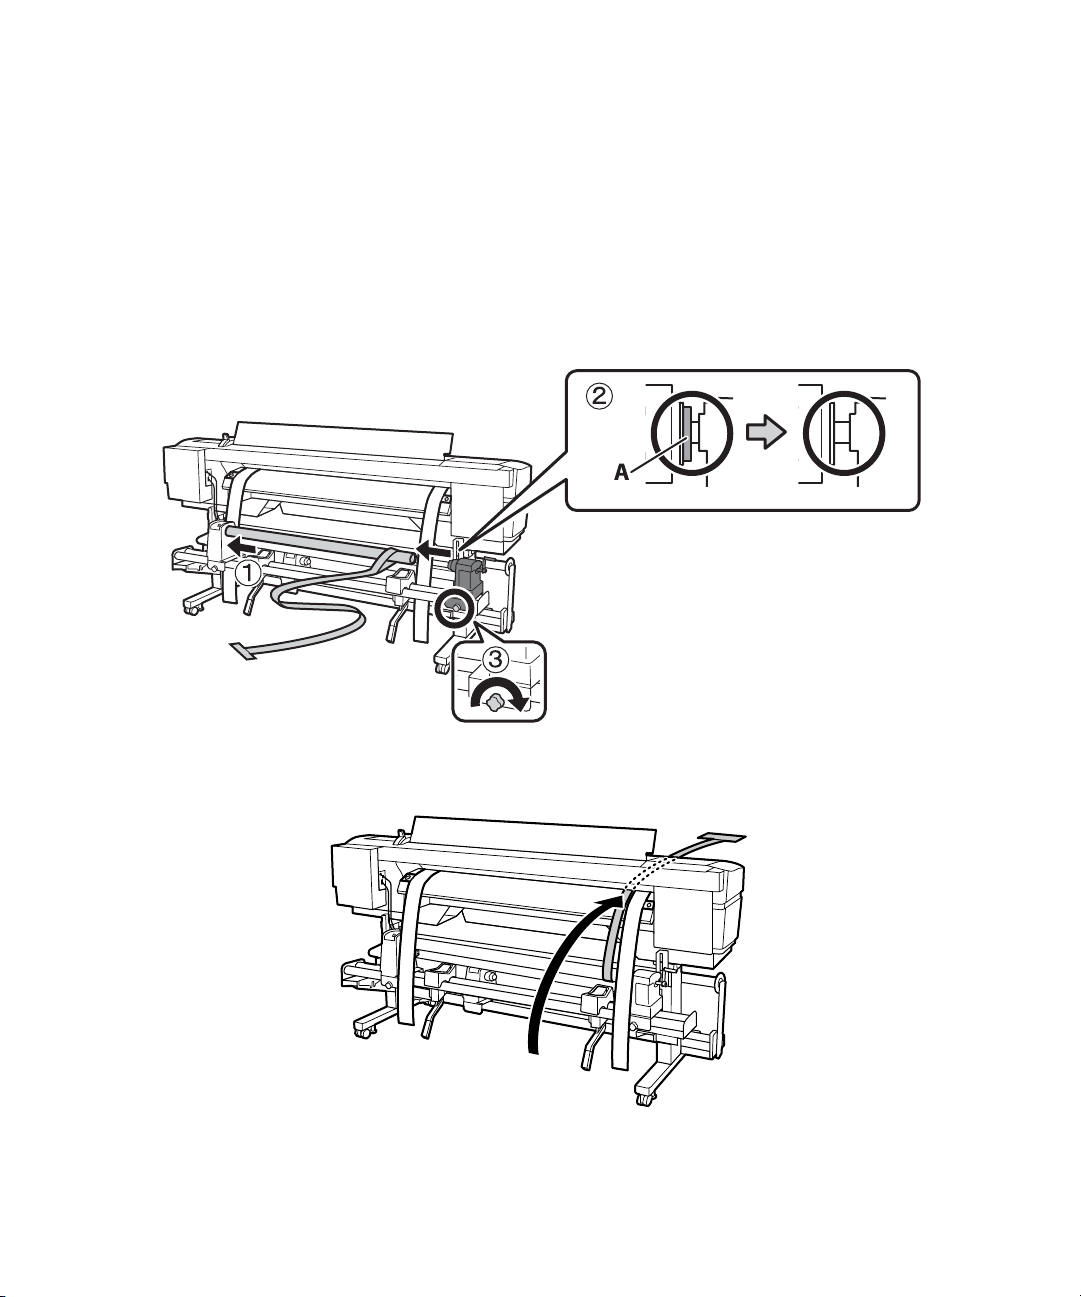
9. Load the roll core with the alignment tool onto the roll holder:
• Place the core on the left roll holder and press it in until part A is hidden.
• Move the right roll holder over to hold the roll core in place, then turn the roll holder screw on
the right to lock it into place.
• If you are installing the optional heavy roll media system, rotate the handle until part A (the light
gray part) is hidden as shown below:
10. Slide the alignment tool to the right side of the roll core and feed it into the printer.
Page 9
Adjusting the Take-in Reel | 9
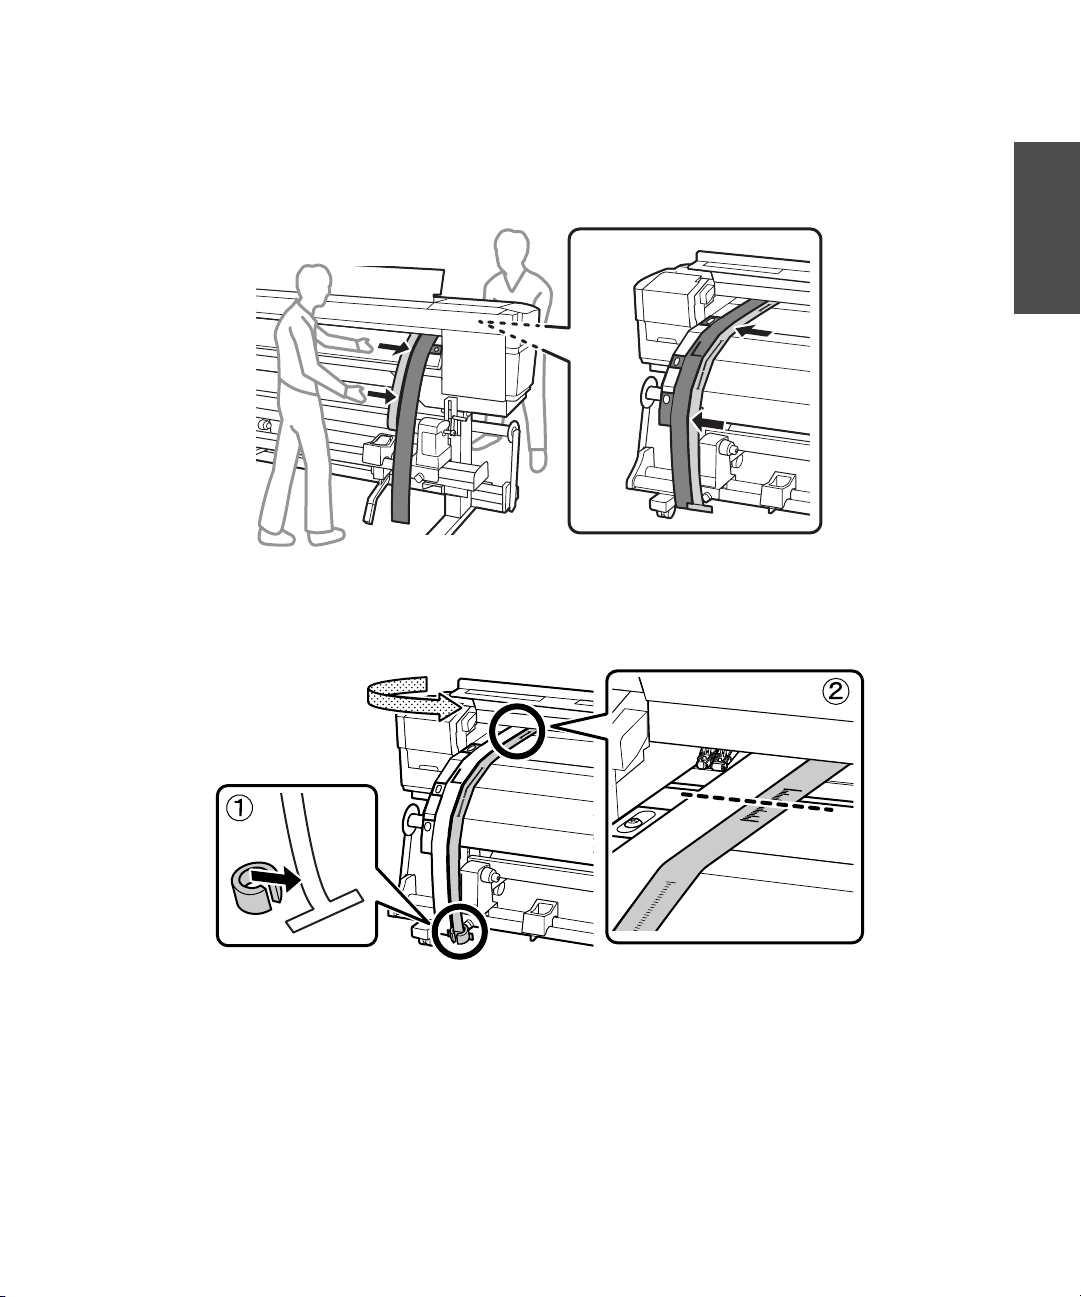
11. Place the alignment tool next to the left adjustment guide and line them up at the front and back of
the printer.
12. Attach the counterweight to the alignment tool to keep it stretched taut. Note the location where it
crosses the front of the white line on the platen.
English
Page 10
10 | Adjusting the Take-in Reel
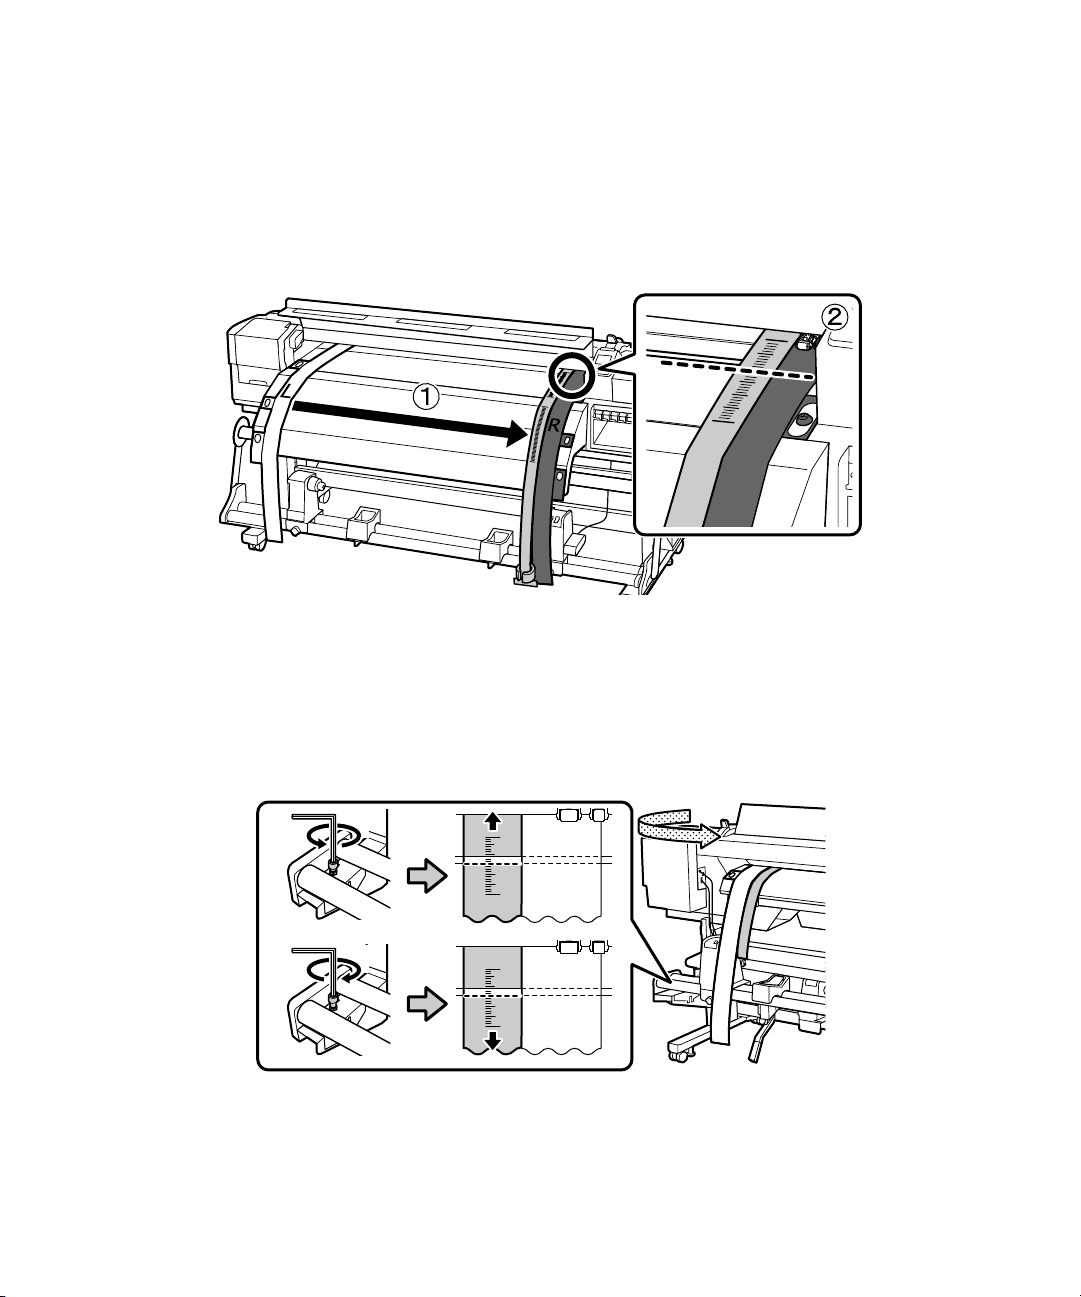
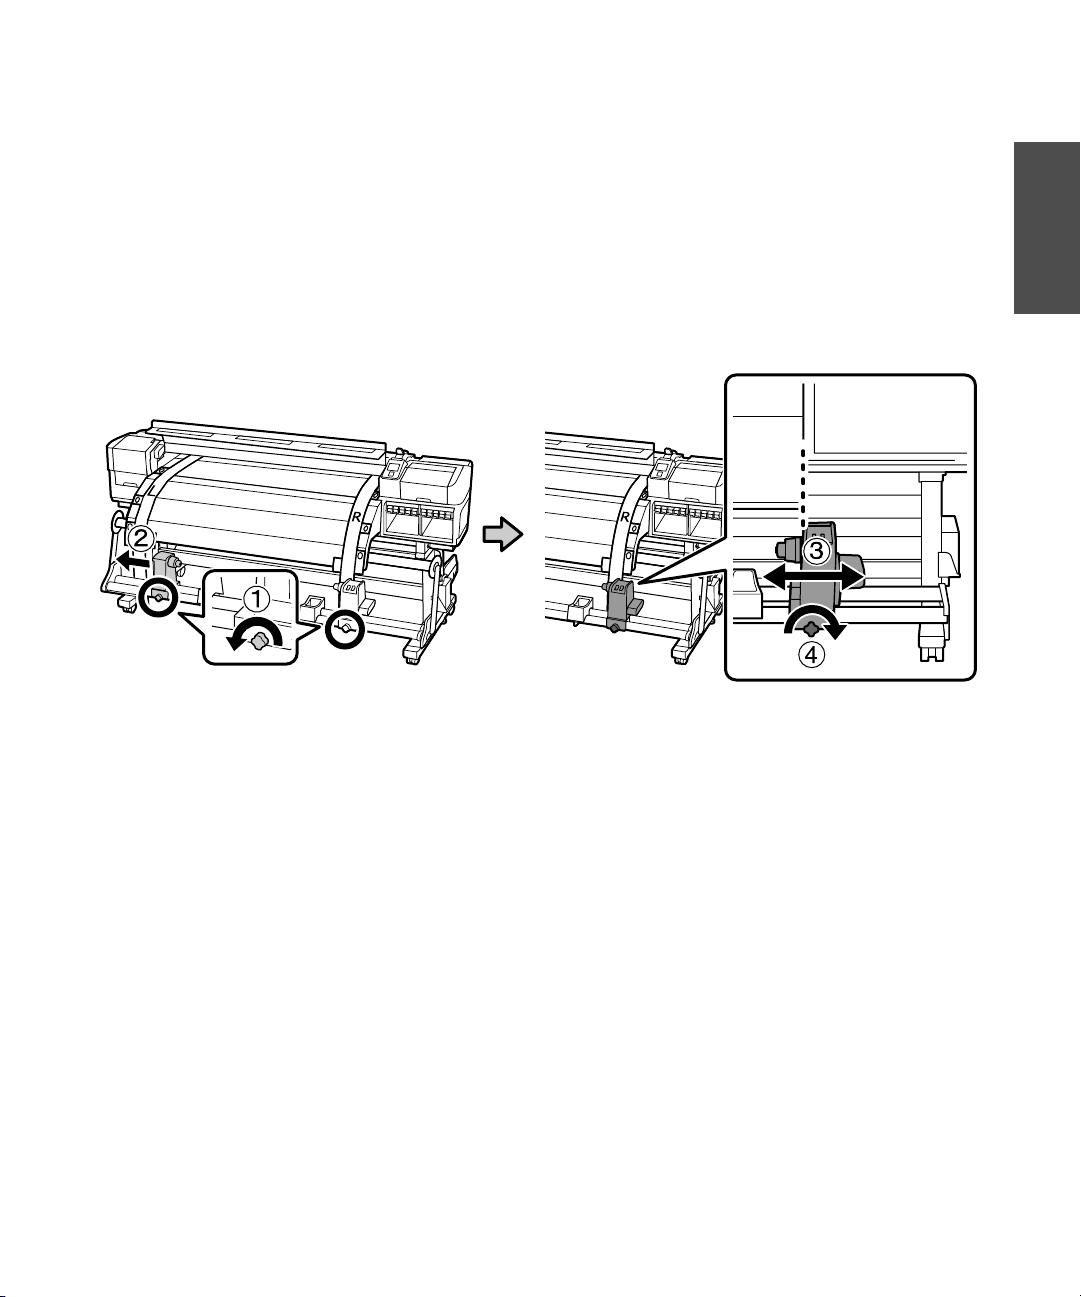
13. Lift up the alignment tool and slide it to the other side of the printer, next to the right adjustment
guide. Line up the alignment tool and the adjustment guide at the front and back of the printer.
Note the location where the alignment tool crosses the front of the white line on the platen. If the
location is different from the left side, go to step 14. If they are the same, go to step 15.
14. Make sure all four of the mounting screws are loose. To make adjustments, have a person at the back
of the printer turn the silver adjustment screw. Turn the screw counterclockwise to move the line
back, and turn it clockwise to move the line forward. The line will move approximately 1 mm with
each turn of the screw. Continue to turn the silver adjustment screw until the measurements are the
same.
Page 11
Adjusting the Take-in Reel | 11
15. Fully tighten all four of the mounting screws on the left bracket to secure it in place.
16. At the front of the printer, remove the counterweight from the alignment tool.
English
17. From the back of the printer, remove the alignment tool.
Page 12
12 | Adjusting the Take-in Reel
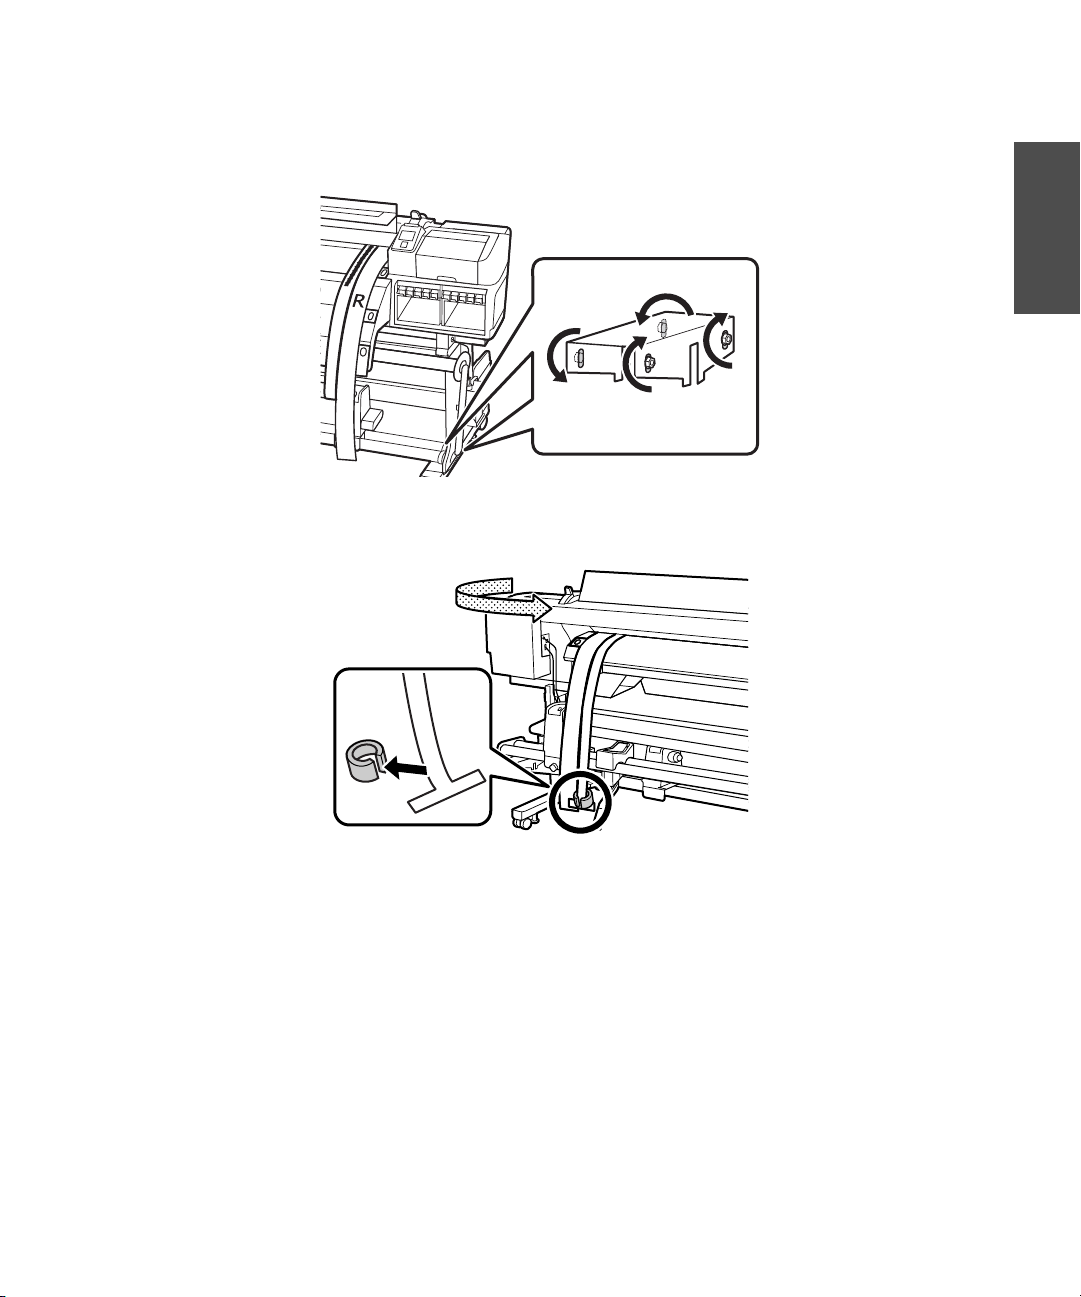
18. Loosen the roll holder fixing screw and move the right roll holder.
19. Remove the roll core and the alignment tool.
Page 13
Adjusting the Take-up Reel | 13
Adjusting the Take-up Reel
Once you have adjusted the take-in reel unit, you need to perform a similar procedure on the take-up reel
unit. Two people are required for parallel adjustment, one in front of the printer and one in back.
1. Loosen the roll holder fixing screws and move the left roll holder all the way to the left. Align the
inside edge of the right roll holder with the outside edge of the after heater, then tighten the right roll
holder fixing screw.
English
Page 14
14 | Adjusting the Take-up Reel
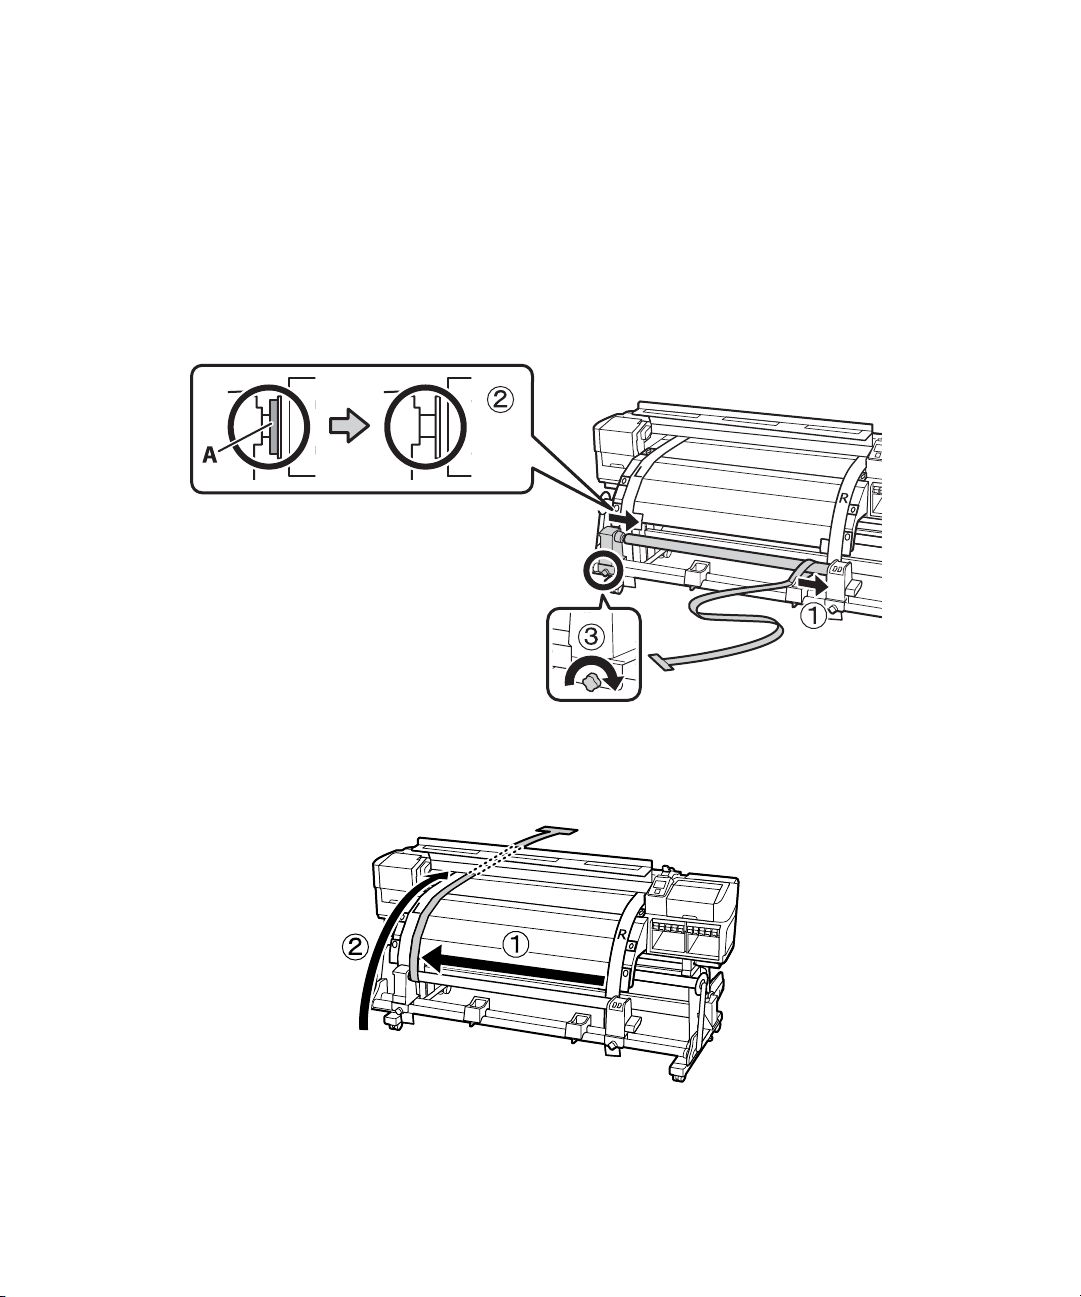
2. Load the roll core with the alignment tool onto the roll holder:
• Place the core on the right roll holder and press it in until part A is hidden.
• Move the left roll holder over to hold the roll core in place, then turn the roll holder screw on the
left to lock it into place.
• If you are installing the optional heavy roll media system, rotate the handle until part A (the light
gray part) is hidden after completing step 3.
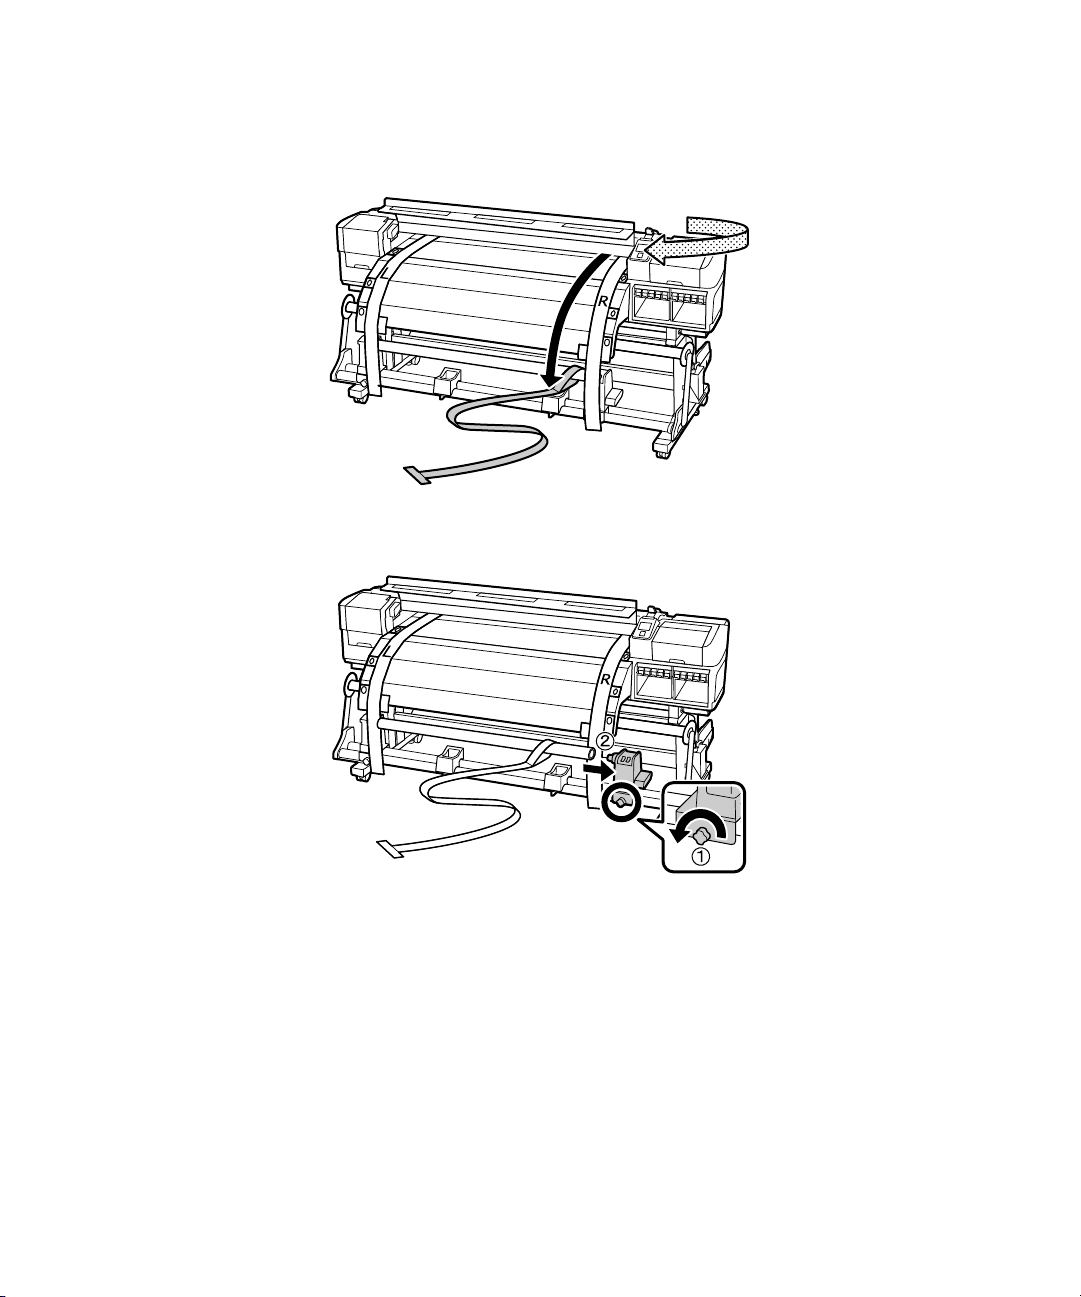
3. From the front of the printer, move the alignment tool to the left side and feed it through the paper
path as shown:
Page 15
Adjusting the Take-up Reel | 15
4. Place the alignment tool next to the left adjustment guide and line them up at the front and back of
the printer. Then attach the counterweight to the alignment tool.
5. Note the location where the alignment tool crosses the front of the white line on the platen.
English
Page 16
16 | Adjusting the Take-up Reel
6. Lift up the alignment tool and slide it to the other side of the printer, next to the right adjustment
guide. Line up the alignment tool and the adjustment guide at the front and back of the printer.
Note the location where the alignment tool crosses the front of the white line on the platen. If the
location is different from the left side, go to step 7. If they are the same, go to step 8.
7. Make sure all four of the mounting screws are loose. To make adjustments, turn the adjustment screw
counterclockwise to move the line back, and turn it clockwise to move the line forward. The line will
move approximately 1 mm with each turn of the screw. Continue to turn the silver adjustment screw
until the measurements are the same.
Page 17
Adjusting the Take-up Reel | 17
8. Fully tighten all four of the screws on the right bracket to secure it in place.
9. At the back of the printer, remove the counterweight from the alignment tool.
English
Page 18
18 | Adjusting the Take-up Reel
10. At the front of the printer, remove the alignment tool.
11. Loosen the roll holder fixing screw and move the right roll holder.
Page 19

Adjusting the Take-up Reel | 19
12. Remove the roll core and the alignment tool.
13. Remove the alignment tool from the roll core, then remove the adjustment guides from the printer.
English
Roll up the alignment tool and adjustment guides and store them so that they don’t become creased. Save
the roll core for future use.
Page 20

20 | Using the Paper Tape
Using the Paper Tape
Use the paper tape to attach media to the auto take-up reel core. This allows the media to “self-center,”
preventing skew and head strike issues. You can use the paper tape included with the printer or any paper
tape that resists tearing and stretching.
Note: Epson recommends using a roll core that is wider than the media you are printing on. This may help keep
the edges of the media on the core as it is rolled up.
1.
After media is loaded in the printer, do the following:
• Grasp the center of the media edge and pull it straight down.
• Pull the media down until the leading edge reaches the upper label on the after heater.
2. Cut off about 24 inches (60 cm) of paper tape and attach it to the media using adhesive tape.
3. Trim the corners of the media, leaving a straight section at the center about 4 to 8 inches (10 to 20
cm) wide.
4-8 in. (10-20 cm)
Page 21

Using the Paper Tape | 21
4. Feed the media by pressing the button, until the leading edge of the paper tape reaches the roll core
on the auto take-up reel.
5. Attach the paper tape to the roll core using adhesive tape. If you want to take up media with the
printed side facing in, attach the paper tape to the back of the roll core.
6. Set the Auto switch on the auto take-up reel according to the way you want to wind the paper:
• Printed side out:
English
• Printed side in:
7. Gently lower the tension bar. Make sure the paper tape does not come off.
EPSON and SureColor are registered trademarks, and EPSON Exceed Your Vision is a registered logomark of Seiko Epson
Corporation.
General Notice: Other product names used herein are for identification purposes only and may be trademarks of their respective
owners. Epson disclaims any and all rights in those marks.
This information is subject to change without notice.
Page 22

22 | Ajuste paralelo
Su impresora incluye varias piezas nuevas que están diseñadas para mejorar el rendimiento y la precisión de
la alimentación del material:
• Un kit que contiene una nueva herramienta de alineación y nuevas guías de ajuste
• Cinta de papel (no adhesiva) para sujetar el material al rodillo de recogida
Este folleto le indica cómo realizar el ajuste paralelo con las nuevas piezas y cómo usar la cinta de papel.
Ajuste paralelo
El procedimiento de ajuste paralelo asegura que el material se alimente en forma recta dentro de la
impresora y sobre el rodillo de recogida. Este procedimiento reemplaza los pasos descritos en la sección
“Ajuste del sistema de materiales” de la Guía de instalación incluida con la impresora.
A continuación se muestran las piezas que se usan en el ajuste paralelo:
Guía de ajuste derecha
Contrapeso
Herramienta de alineación
Guía de ajuste izquierda
Portarrollos
Antes de empezar el procedimiento de ajuste paralelo, asegúrese de que la impresora esté nivelada y sobre
una superficie plana. Desenrolle cuidadosamente las guías de ajuste.
Page 23

Ajuste del rodillo de alimentación | 23
Ajuste del rodillo de alimentación
Después de que configure la impresora, debe ajustar el sistema de alimentación del material. Se requieren
dos personas para realizar el ajuste paralelo, una enfrente y otra detrás de la impresora.
1. Abra la tapa frontal y empuje hacia atrás la palanca de carga del papel.
Español
2. Desde la parte posterior de la impresora, introduzca las guías de alineación izquierda y derecha a través
del recorrido del papel, tal como se muestra a continuación:
Page 24

24 | Ajuste del rodillo de alimentación
3. Coloque las lengüetas sobre los tornillos de la parte posterior de la impresora y retire el papel protector
para fijar las lengüetas.
Nota: El adhesivo no daña la unidad de calentamiento.
Coloque las lengüetas sobre los tornillos de la parte delantera de la impresora y fíjelas como se muestra
4.
a continuación:
Page 25

Ajuste del rodillo de alimentación | 25
5. Coloque la lengüeta 4 sobre los tornillos en la parte inferior del post-calentador y fíjela como se
muestra a continuación:
6. En la parte posterior de la impresora, alinee el lado izquierdo del tope del rollo con el lado izquierdo de
la impresora, tal como se muestra a continuación. Luego, apriete el seguro del tope del rollo para fijarlo
en su lugar.
Español
Page 26

26 | Ajuste del rodillo de alimentación
7. Si empujó hasta el fondo el eje de la manivela del tope del rollo, debe girar la manivela hacia usted
(hacia la izquierda) hasta que no gire más. El eje de la manivela no debe estar colocado hasta el fondo.
8. Deslice el portarrollos de 64 pulg. (163 cm) incluido con la impresora en el acoplamiento del extremo
de la herramienta de alineación:
Page 27

Ajuste del rodillo de alimentación | 27
9. Cargue el portarrollos con la herramienta de alineación en el tope del rollo:
• Coloque el extremo del portarrollos en el tope izquierdo del rollo y empújelo hasta que la pieza A
quede oculta.
• Desplace el tope derecho del rollo para que el portarrollos quede fijo y luego gire el seguro del tope
del rollo hacia la derecha para bloquearlo en su lugar.
• Si va a instalar el sistema opcional para rollos de material pesado, gire la manivela hasta que la
A (la pieza de color gris claro) quede oculta, tal como se muestra a continuación:
pieza
Español
10. Deslice la herramienta de alineación hacia el lado derecho del portarrollos e introdúzcala en
la impresora.
Page 28

28 | Ajuste del rodillo de alimentación
11. Coloque la herramienta de alineación junto a la guía de ajuste izquierda y alinéelas en la parte frontal y
posterior de la impresora.
12. Fije el contrapeso a la herramienta de alineación para mantenerla tensa. Fíjese en dónde cruza la parte
frontal de la línea blanca de la platina.
Page 29

Ajuste del rodillo de alimentación | 29
13. Levante la herramienta de alineación y deslícela hacia el otro lado de la impresora, junto a la guía de
ajuste derecha. Alinee la herramienta de alineación y la guía de ajuste en la parte frontal y posterior de
la impresora.
Fíjese en la ubicación donde la herramienta de alineación cruza la parte frontal de la línea blanca de la
platina. Si la ubicación es distinta de la del lado izquierdo, vaya al paso 14. Si es la misma, vaya al
paso 15.
Español
14. Asegúrese de que los cuatro tornillos de montaje estén sueltos. Para realizar ajustes, pídale a la persona
en la parte posterior de la impresora que gire el tornillo de ajuste plateado. Gire el tornillo hacia la
izquierda para mover la línea hacia atrás y gírelo hacia la derecha para mover la línea hacia adelante.
La línea se moverá aproximadamente 1 mm con cada giro del tornillo. Siga girando el tornillo de
ajuste plateado hasta que las medidas sean las mismas.
Page 30

30 | Ajuste del rodillo de alimentación
15. Apriete completamente los cuatro tornillos de montaje del soporte izquierdo para fijarlo en su lugar.
16. En la parte frontal de la impresora, retire el contrapeso de la herramienta de alineación.
17. Retire la herramienta de alineación desde la parte posterior de la impresora.
Page 31

Ajuste del rodillo de alimentación | 31
18. Afloje el seguro del tope del rollo y mueva el tope del rollo derecho.
19. Retire el portarrollos y la herramienta de alineación.
Español
Page 32

32 | Ajuste del rodillo de recogida
Ajuste del rodillo de recogida
Una vez que haya ajustado la unidad del rodillo de alimentación, necesita realizar un procedimiento similar
en la unidad del rodillo de recogida. Se requieren dos personas para el ajuste paralelo, una que se ubique al
frente de la impresora y la otra en la parte posterior.
1. Afloje los seguros de los topes del rollo y mueva el tope del rollo izquierdo completamente hacia la
izquierda. Alinee el borde interior del tope derecho del rollo con el borde exterior del post-calentador,
luego, apriete el seguro del tope del rollo derecho.
Page 33

Ajuste del rodillo de recogida | 33
2. Cargue el portarrollos con la herramienta de alineación en el tope del rollo:
• Coloque el extremo del portarrollos en el tope derecho del rollo y empújelo hasta que la pieza A
quede oculta.
• Desplace el tope izquierdo del rollo para que el portarrollos quede fijo y luego gire el seguro del
tope del rollo hacia la izquierda para bloquearlo en su lugar.
• Si va a instalar el sistema opcional para rollos de material pesado, gire la manivela hasta que la
A (la pieza de color gris claro) quede oculta después de haber completado el paso 3.
pieza
Español
3. Desde la parte delantera de la impresora, mueva la herramienta de alineación al lado izquierdo e
introdúzcala en el recorrido del papel, tal como se muestra a continuación:
Page 34

34 | Ajuste del rodillo de recogida
4. Coloque la herramienta de alineación junto a la guía de ajuste izquierda y alinéelas en la parte frontal y
posterior de la impresora. Luego, fije el contrapeso a la herramienta de alineación.
5. Fíjese en dónde la herramienta de alineación cruza la parte frontal de la línea blanca de la platina.
Page 35

Ajuste del rodillo de recogida | 35
6. Levante la herramienta de alineación y deslícela hacia el otro lado de la impresora, junto a la guía de
ajuste derecha. Alinee la herramienta de alineación y la guía de ajuste en la parte frontal y posterior de
la impresora.
Fíjese en la ubicación donde la herramienta de alineación cruza la parte frontal de la línea blanca de la
platina. Si la ubicación es distinta de la del lado izquierdo, vaya al paso 7. Si es la misma, vaya al
paso 8.
Español
7. Asegúrese de que los cuatro tornillos de montaje estén sueltos. Para realizar el ajuste, gire el tornillo de
ajuste hacia la izquierda para mover la línea hacia atrás y gírelo hacia la derecha para mover la línea
hacia adelante. La línea se moverá aproximadamente 1 mm con cada giro del tornillo. Siga girando el
tornillo de ajuste plateado hasta que las medidas sean las mismas.
Page 36

36 | Ajuste del rodillo de recogida
8. Apriete completamente los cuatro tornillos del soporte derecho para fijarlo en su lugar.
9. En la parte posterior de la impresora, retire el contrapeso de la herramienta de alineación.
Page 37

Ajuste del rodillo de recogida | 37
10. Retire la herramienta de alineación desde la parte frontal de la impresora.
11. Afloje el seguro del tope del rollo y mueva el tope del rollo derecho.
Español
Page 38

38 | Ajuste del rodillo de recogida
12. Retire el portarrollos y la herramienta de alineación.
13. Retire la herramienta de alineación del portarrollos, luego retire las guías de ajuste de la impresora.
Enrolle la herramienta de alineación y las guías de ajuste y guárdelas de modo que no se plieguen. Guarde
el portarrollos para usarlo en el futuro.
Page 39

Uso de la cinta de papel | 39
Uso de la cinta de papel
Use la cinta de papel para fijar el material al eje del rodillo de recogida. Esto permite que el material se
“centre automáticamente” para prevenir problemas de torceduras y de golpe de cabezal. Puede usar la cinta
de papel incluida con la impresora o cualquier otra cinta de papel que resista el deterioro y el estiramiento.
Nota: Epson recomienda usar un portarrollos que sea más ancho que el material en el que va a imprimir.
Esto puede ayudar a proteger los bordes del material a medida que se enrolla en el portarrollos.
1.
Después de que cargue el material en la impresora, haga lo siguiente:
• Sujete el centro del borde del material y tírelo hacia abajo.
• Tire el material hacia abajo hasta que el borde delantero alcance la etiqueta superior del
post-calentador.
2. Corte aproximadamente 24 pulg. (60 cm) de cinta de papel y fíjela al material con cinta adhesiva.
3. Recorte las esquinas del material, dejando una sección recta en el centro de aproximadamente
4a8pulg. (10a20 cm) deancho.
Español
4 - 8 pulg (10 - 20 cm)
Page 40

40 | Uso de la cinta de papel
4. Presione el botón para alimentar el material, hasta que el borde delantero de la cinta de papel
alcance el portarrollos del rodillo de recogida automática.
5. Fije la cinta de papel al portarrollos con cinta adhesiva. Si desea enrollar el material con la cara impresa
hacia adentro, pegue la cinta de papel a la parte posterior del portarrollos.
6. Configure el interruptor Auto del rodillo de recogida automática según cómo desee enrollar el papel:
• Cara impresa hacia fuera:
• Cara impresa hacia dentro:
7. Baje la barra tensora con cuidado. Asegúrese de que la cinta de papel no se despegue.
EPSON y SureColor son marcas registradas y EPSON Exceed Your Vision es un logotipo registrado de Seiko Epson Corporation.
Aviso general: El resto de los productos que se mencionan en esta publicación aparecen únicamente con fines de identificación y
pueden ser marcas comerciales de sus respectivos propietarios. Epson renuncia a cualquier derecho sobre dichas marcas.
La información contenida en la presente está sujeta a cambios sin previo aviso.
Page 41

Ajuste paralelo | 41
Sua impressora possui diversas novas peças que são projetadas para melhorar desempenho e precisão
de alimentação de papel:
• Um kit contendo uma nova ferramenta de alinhamento e novas guias de ajuste.
• Fita de papel (não-adesiva) para prender mídia ao rolo de coleta automática.
Este panfleto mostra como realizar ajuste paralelo usando as novas peças e como usar a fita de papel.
Ajuste paralelo
O procedimento de ajuste paralelo garante que o papel seja alimentada direto para dentro da impressora
e ao rolo de coleta. Este procedimento substitui a informação presentada na seção “Ajuste de sistema de
alimentação de papel” no Guia de instalação incluído com sua impressora.
As peças mostradas abaixo são usados em ajuste paralelo:
Guia direita de ajuste
Contrapeso
Ferramenta de
alinhamento
Guia esquerda de
ajuste
Núcleo do rolo
Antes de começar o procedimento de ajuste paralelo, a impressora deve estar nivelada em uma superfície
plana. Desenrole cuidadosamente as guias de ajuste.
Português
Page 42

42 | Ajuste do rolo
Ajuste do rolo
Após configuração da impressora, o sistema de alimentação de papel deve ser ajustado. São necessárias duas
pessoas para ajuste paralelo, uma na frente da impressora e uma atrás.
1. Abra a tampa frontal e empurre a alavanca de carregamento de papel.
2. De trás da impressora, passe as guias direita e esquerda de ajuste pelo caminho de papel
como mostrado:
Page 43

Ajuste do rolo | 43
3. Coloque as guias sobre os parafusos atrás da impressora e remova a proteção para prender as guias.
Observação: O adesivo não danifica a unidade de aquecimento.
4.
Coloque as guias sobre os parafusos na frente da impressora e prenda como mostrado:
Português
Page 44

44 | Ajuste do rolo
5. Coloque a guia 4 sobre os parafusos na parte de baixo do pós-aquecedor e prenda como mostrado.
6. Atrás da impressora, alinhe o lado esquerdo do suporte de rolo com o lado esquerdo da impressora
como mostrado. Depois aperte o parafuso de fixação de suporte de rolo para prendê-lo no lugar.
Page 45

Ajuste do rolo | 45
7. Se o haste da manivela do suporte de rolo estiver para dentro, deve girar a manivela na sua direção
(anti-horário) até não girar mais. O haste da manivela não deve estar para dentro.
8. Coloque o núcleo do rolo de 64 polegadas (1,63 m) na alça no fim da ferramenta de alinhamento:
Português
Page 46

46 | Ajuste do rolo
9. Coloque o núcleo do rolo com a ferramenta de alinhamento no suporte de rolo:
• Coloque o extremo do núcleo no suporte esquerdo de rolo e empurre até a parte A
estar escondida.
• Mova o suporte direito de rolo para prender o núcleo do rolo no lugar, depois gire o parafuso
de suporte de rolo na direita para travar no lugar.
• Se estiver instalando o sistema de papel de rolo pesado opcional, gire a manivela até a parte A
(a peça cinza clara) estar escondida como mostrado a seguir:
10. Deslize a ferramenta de alinhamento para o lado direito do centro do rolo e coloque para dentro
da impressora.
Page 47

Ajuste do rolo | 47
11. Coloque a ferramenta de alinhamento próxima à guia esquerda de ajuste a alinhe-as na frente e atrás
da impressora.
12. Prenda o contrapeso à ferramenta de alinhamento para mantê-la tensionada. Repare onde ela cruza
a frente da linha branca na parte frontal da impressora.
Português
Page 48

48 | Ajuste do rolo
13. Levante a ferramenta de alinhamento e deslize para o outro lado da impressora, próxima à guia direita
de ajuste. Alinhe a ferramenta de alinhamento e a guia de ajuste na frente e atrás da impressora.
Repare no local onde a ferramenta de alinhamento cruza a frente da linha branca na parte frontal
da impressora. Se o local for diferente do lado esquerdo, vá para o passo 14. Se for o mesmo, vá para
o passo 15.
14. Todos os 4 parafusos de montagem devem estar soltos. Para fazer ajustes, mande a pessoa atrás da
impressora girar os parafusos de ajuste prata. Gire o parafuso no sentido anti-horário para mover
a linha para trás e gire-o no sentido horário para mover a linha para frente. A linha se moverá
aproximadamente 1 mm a cada volta do parafuso. Continue girando o parafuso de ajuste prata
até que as medidas sejam as mesmas.
Page 49

Ajuste do rolo | 49
15. Aperte completamente os 4 parafusos de montagem no suporte esquerdo para prendê-lo no lugar.
16. Na frente da impressora, remova o contrapeso da ferramenta de alinhamento.
17. De trás da impressora, remova a ferramenta de alinhamento.
Português
Page 50

50 | Ajuste do rolo
18. Solte o parafuso de fixação do suporte de rolo e mova o suporte de rolo direito.
19. Remova o centro de rolo e a ferramenta de ajuste.
Page 51

Ajuste da bobina de alimentação | 51
Ajuste da bobina de alimentação
Depois de ajustar a unidade do rolo de alimentação, você precisa realizar um procedimento parecido
na unidade de bobina de alimentação. São necessárias duas pessoas para ajuste paralelo, uma na frente
da impressora e uma atrás.
1. Solte os parafusos de fixação de suporte de rolo e mova o suporte de rolo esquerdo todo para
a esquerda. Alinhe a margem interna do suporte direito de rolo com a margem externa do
pós-aquecedor, depois aperte o parafuso de fixação de suporte direito de rolo.
Português
Page 52

52 | Ajuste da bobina de alimentação
2. Coloque o núcleo de rolo com a ferramenta de ajuste no suporte de rolo:
• Coloque o extremo do núcleo no suporte direito de rolo e empurre até a parte A estar escondida.
• Mova o suporte esquerdo de rolo para segurar o núcleo de rolo no lugar, depois gire o parafuso
de suporte de rolo na esquerda para travá-lo no lugar.
• Se estiver instalando o sistema de papel de rolo pesado opcional, gire a manivela até a parte A
(a peça cinza clara) estar escondida após completar o passo 3.
3. Da frente da impressora, mova a ferramenta de alinhamento para o lado esquerdo e passe pelo
caminho de papel como mostrado:
Page 53

Ajuste da bobina de alimentação | 53
4. Coloque a ferramenta de alinhamento próxima à guia esquerda de ajuste a alinhe-as na frente e atrás
da impressora. Depois prenda o contrapeso à ferramenta de alinhamento.
5. Repare no local onde a ferramenta de alinhamento cruza a frente da linha branca na parte frontal
da impressora.
Português
Page 54

54 | Ajuste da bobina de alimentação
6. Levante a ferramenta de alinhamento e deslize para o outro lado da impressora, próxima à guia direita
de ajuste. Alinhe a ferramenta de alinhamento e a guia de ajuste na frente e atrás da impressora.
Repare no local onde a ferramenta de alinhamento cruza a frente da linha branca na parte frontal
da impressora. Se o local for diferente do lado esquerdo, vá para o passo 7. Se for o mesmo, vá para
opasso 8.
7. Todos os 4 parafusos de montagem devem estar soltos. Para fazer ajustes, gire o parafuso de ajuste no
sentido anti-horário para mover a linha para trás e gire-o no sentido horário para mover a linha para
frente. A linha se moverá aproximadamente 1 mm a cada volta do parafuso. Continue girando o
parafuso de ajuste prata até que as medidas sejam as mesmas.
Page 55

Ajuste da bobina de alimentação | 55
8. Aperte completamente os 4 parafusos no suporte direito para prendê-lo no lugar.
9. Atrás da impressora, remova o contrapeso da ferramenta de alinhamento.
Português
Page 56

56 | Ajuste da bobina de alimentação
10. Na frente da impressora, remova a ferramenta de alinhamento.
11. Solte o parafuso de fixação do suporte de rolo e mova o suporte de rolo direito.
Page 57

Ajuste da bobina de alimentação | 57
12. Remova o núcleo do rolo e a ferramenta de alinhamento.
13. Remova a ferramenta de alinhamento do núcleo do rolo, depois remova as guias de ajuste da
impressora.
Português
Enrole a ferramenta de alinhamento e as guias de ajuste e guarde-as para que não fiquem rachadas. Guarde
o centro de rolo para usar no futuro.
Page 58

58 | Uso da fita de papel
Uso da fita de papel
Use a fita de papel para prender mídia ao centro do rolo de coleta. Isso permite que o papel se
“auto-centralize”, evitando problemas de distorção e impacto do cabeçote. Você pode usar a fita de papel
incluída com a impressora ou qualquer fita de papel resistente a rasgamento e alongamento.
Note: A Epson recomenda usar um núcleo do rolo que seja mais largo do que o papel no qual va imprimir. Isso
pode ajudar a manter as bordas do papel no centro ao papel em que é enrolada.
1.
Depois que de papel está carregada na impressora, faça o seguinte:
• Pegue no centro da margem de papel e puxe reto para baixo.
• Puxe de papel para baixo até a margem frontal chegar à etiqueta superior no pós-aquecedor.
2. Corte cerca de 60 cm da fita de papel e prenda na mídia usando fita adesiva.
3. Recorte os cantos de papel, deixando uma parte reta no centro com cerca de 10 a 20 cm de largura.
10-20 cm
Page 59

Uso da fita de papel | 59
4. Passe mídia pressionando , até que a margem frontal da fita de papel chegar ao núcleo do rolo
no rolo de coleta.
5. Prenda a fita de papel ao centro de rolo usando fita adesiva. Se quiser coletar papel com a face
de impressão para dentro, prenda a fita de papel à parte de trás do centro de rolo.
6. Ajuste o interruptor Auto no rolo de coleta automática de acordo com a forma como deseja enrolar
opapel:
Português
• Face de impressão para fora:
• Face de impressão para dentro:
7. Abaixe a barra de tensão com cuidado. A fita de papel não pode sair.
EPSON e SureColor são marcas registradas, e EPSON Exceed Your Vision é uma logomarca registrada de Seiko Epson
Corporation.
Aviso geral: Outros nomes de produtos são usados aqui apenas com propósito de identificação e podem ser marcas comerciais de
seus respectivos donos. A Epson nega todo e qualquer direito sobre tais marcas.
Esta informação está sujeita a mudança sem aviso.
© 2014 Epson America, Inc., 4/14
Page 60

Printed in U.S.A.
Impreso en EE.UU.
Impresso nos EUA CPD-40967
 Loading...