

Page 1
Introduction
Thank you for purchasing the Epson R-D1s. Please follow the
instructions in this guide to set up and start using your camera.
Warnings must be followed carefully to avoid bodily injury.
w
Cautions must be observed to avoid damage to your equipment.
c
Notes contain important information and useful tips on the operation of your
product.
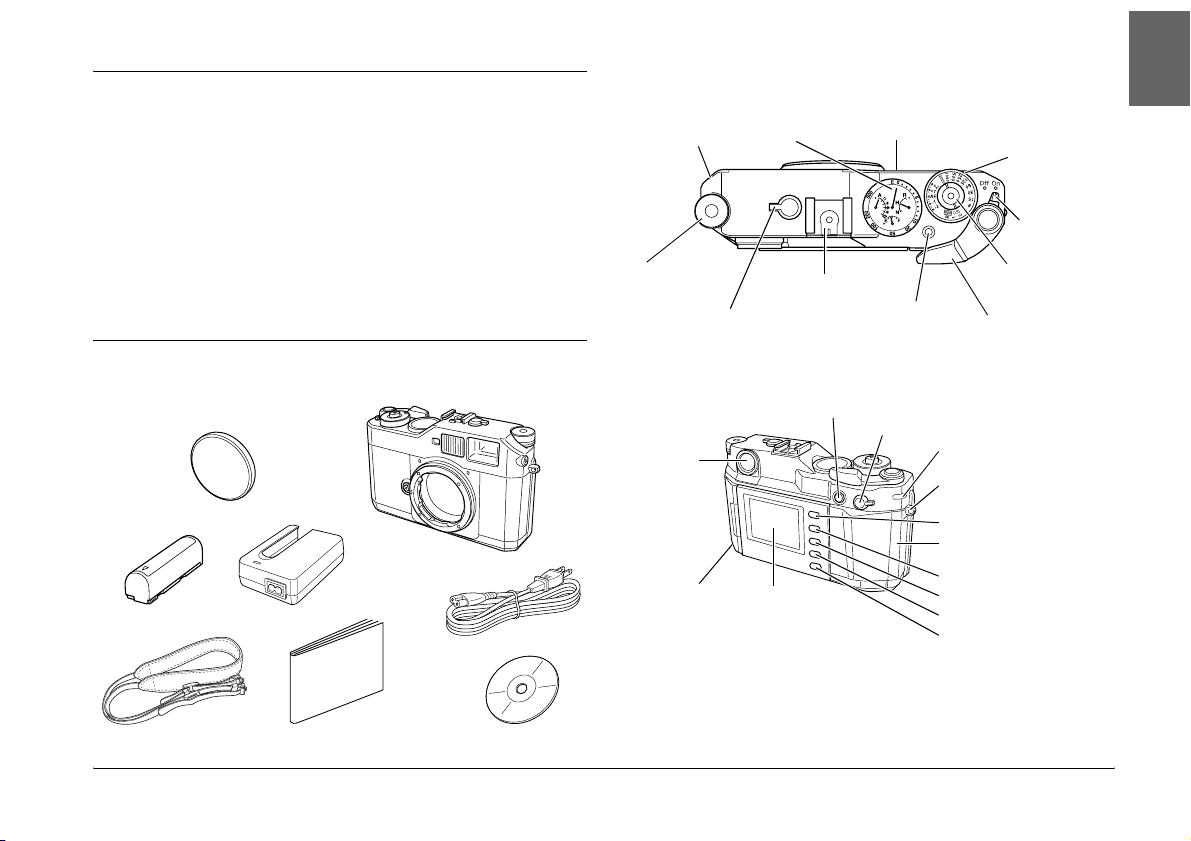
Components
Top View
X-sync contact
Jog dial
(page 4)
Frame selector lever
(page 3)
Back View
Viewfinder
(page 6)
Battery cover
(page 3)
Status gauge
(page 4)
Accessory shoe
AE-lock button Image quality/WB lever
LCD monitor
(page 4)
Lens release button
(page 3)
Dial-lock release
button (page 6)
(page 5)
Memory card access
light (page 2)
Strap eyelet (page 2)
LCD button (page 4)
Memory card slot
cover (page 2)
MENU button (page 4)
ENTER button (page 7)
CANCEL button
USER button (page 9)
Shutter charge lever
(page 6)
Shutter
speed/ISO
sensitivity dial
(page 5)
Power switch
(page 4)
Shutter release
button
(page 7)
English
1
Page 2
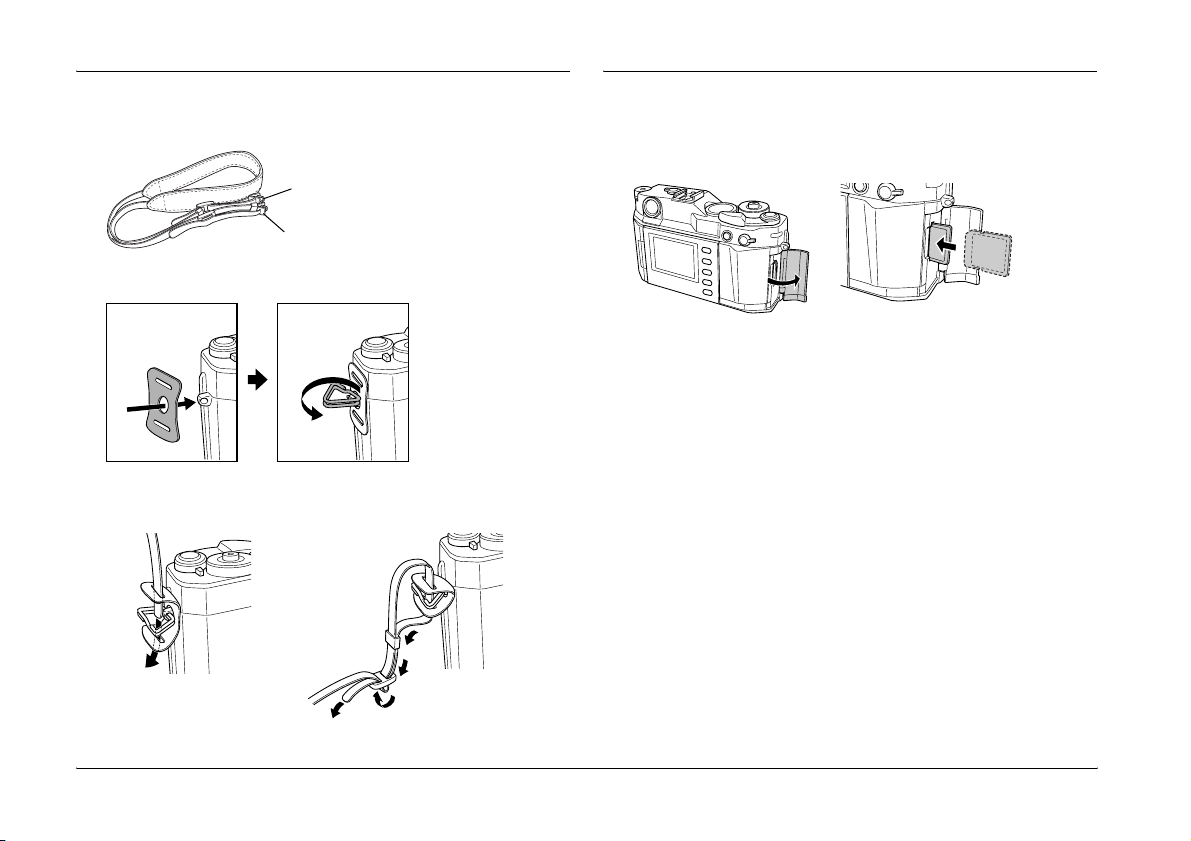
Attach the Strap to the Camera
Insert a Memory Card
1. Remove the protective pads and metal rings from the strap.
Metal ring
Protective pad
2. Attach the protective pad and metal ring to the strap eyelet.
3. Lace the strap through the pad and the ring, then secure it with the
plastic fasteners. Do the same on the other side of the camera.
Open the mem ory card slot cover. Insert the memory card until it clicks,
with the labeled side facing the back of the camera. Close the cover.
To remove the me mory card later, push in the card to releas e it and then
pull it out.
Caution:
Never remove the memory card while the memory card access light is
c
on. This may cause data in the card to be lost or damaged, or make the
memory card unusable.
Note:
If the memory card has been already formatted with a computer or another
digital camera, you may not be able to save images on the card. If this happens,
reformat the card using this camera. For instructions, see the User’s Guide
on the CD-ROM that came with your camera.
2
Page 3

Charge and Install the Battery
Be sure to charge the battery before installing it in the camera. It takes
about 3.5 hours to fully charge a new or empty battery.
Open the battery cover and insert the battery as far as it goes. Close the
cover until it clicks.
The battery is fully charged when the red light on the charger turns off.
Attach the Lens
You can attach either M-mount or L-mount lenses to the camera. For
an L-mount lens, you will need a third-party adapter ring.
Caution:
❏ Do not use lenses that protrude more than 20.5 mm from the back
c
of the mount base.
❏ If using a collapsible lens, do not press the lens barrel into the
camera body.
Align the dot on the lens body with the red dot on the lens release
button. Insert and rotate the lens clockwise until it clicks.
Select the Focal Length
Move the frame selector lever to select the focal length for the lens: 50
mm, 28 mm, or 35 mm. The bright-line frame for the selected focal
length is displayed in the viewfinder.
English
3
Page 4
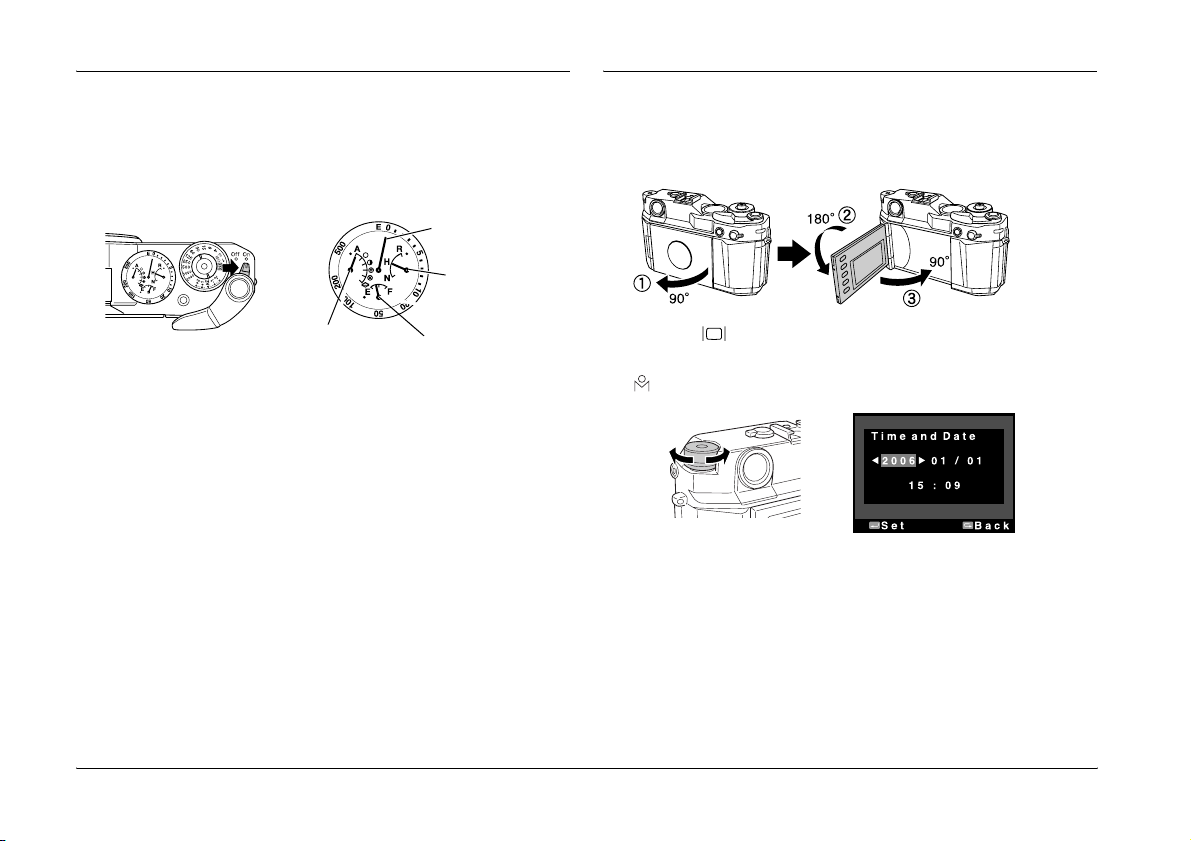
Turn on the Camera
Set Time and Date
To turn on the camera, move the power switch to the On position. The
status gauge displays the current settings: white balance, remaining
battery power, image quality, and the number of shots remaining (on
the perimeter).
Remaining shots
Image quality
White balance
Caution:
Never turn off the camera while the memory card access light is on. This
c
may cause data in the card to be lost or damaged, or render the memory
card unusable.
Battery power
Follow these steps to set the time and date:
1. Pull open the LCD monitor, flip it over, and close it.
2. Press the (LCD) button.
3. Rotate the jog dial to change the date as necessary, then press the
(MENU) button to display the next item.
4
Page 5
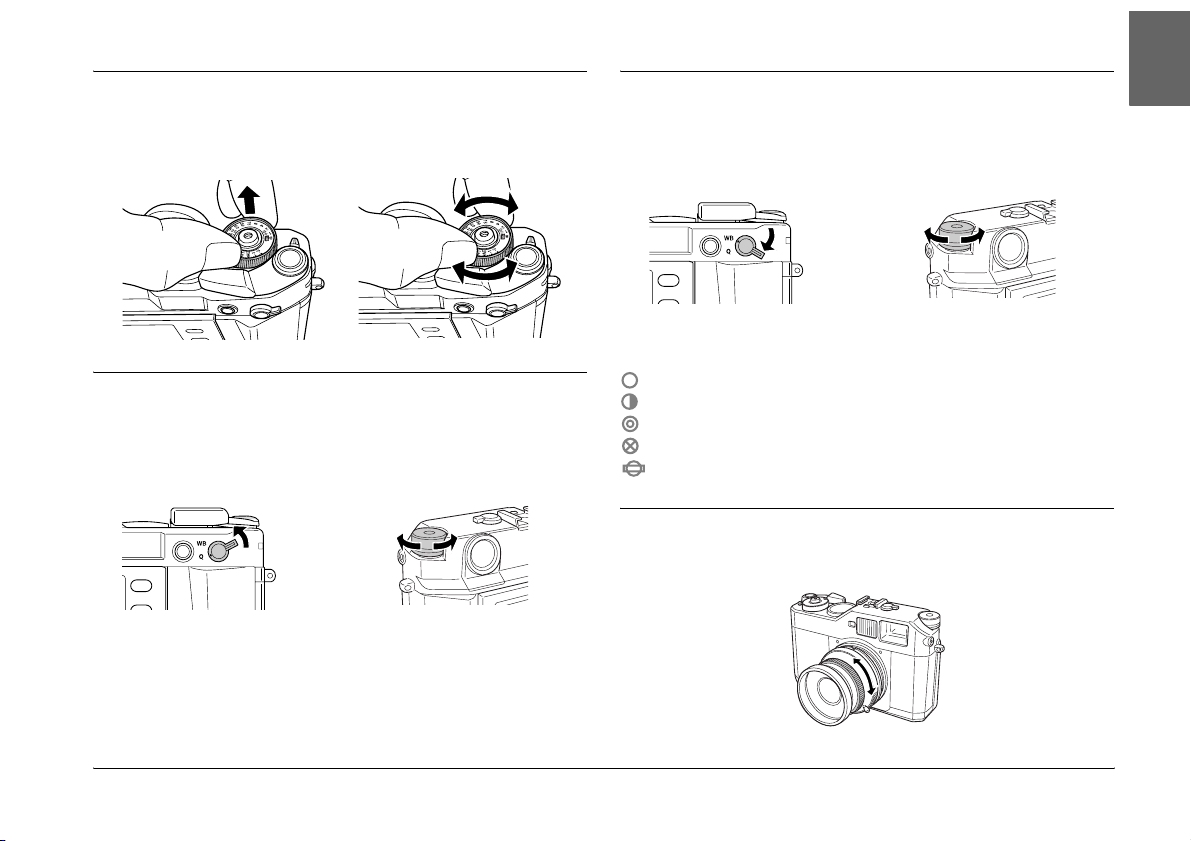
Set ISO Sensitivity
Set White Balance
English
Pull up and rotate the outer ring of the shutter speed dial to select the
ISO sensitivity: 200, 400, 800, or 1600.
Set Image Quality
Pull up and hold the image quality/WB lever at the Q position, and
rotate the jog dial to select the desired image quality setting on the
status gauge.
Select from the following:
R: RAW/RAW+JPEG (10/13 MB)
H: JPEG (High resolution: 3 MB)
N: JPEG (Normal resolution: 1.5 MB)
Pull down and hold the image quality/WB lever at the WB position,
and rotate the jog dial to select the white balance setting on the status
gauge.
Select from the following:
AAuto
Sunny
Shade
Cloudy
Incandescent
Fluorescent
Set Aperture
Rotate the lens aperture ring to the desired value.
5
Page 6

Set Shutter Speed
Taking a Picture
Rotate the shutter speed dial to the desired value. Select AE for
automatic exposure, or a desi red shutter speed from 1 to 1/2000 second,
or B (Bulb).
To change the setting, rotate the shutter speed dial while pressing the
dial-lock release button.
Cock the shutter before taking each picture.
Look through the viewfinder and point to the subject. Rotate the focus
ring on the lens until the double-image converges in the center of the
bright-line frame.
6
Page 7

Press the shutter release button halfway to display the shutter speed in
the viewfinder. If you set the shutter speed for manual exposure, the
metered value flashes for your reference. For automatic exposure (i.e.,
AE on the shutter speed dial), the camera uses the displayed shutter
speed.
When you are ready, gently press the shutter release button all the way
down to take a picture.
View Pictures
Press the (LCD) button to view the saved picture. If you have taken
more than one picture, rotate the jog dial to scroll through them.
Delete Pictures
To delete a picture, rotate the jog dial to display the picture you want
to delete. Press (MENU), then (ENTER) twice. Rotate the jog dial
to select OK, then press (ENTER) to delete the picture. Press the
shutter release button to return to the shooting mode.
Customizing the Settings
1. Press (LCD), then (MENU) to display the Main menu on the
LCD monitor.
2. Select (Settings) using the jog dial, then press the (ENTER)
button to display the Settings menu.
English
7
Page 8

3. Select the desired setting using the jog dial, then press the
(ENTER) button. The selected setting is displayed.
If you select (Basic Setup), select the desired setting using the
jog dial and press the (ENTER) button again.
4. Change the value or select the item using the jog dial, then press
the (ENTER) button.
Setting Items
You can change the following camera settings through the Settings
menu.
Settings Menu
Setting Description
(Color Setting) Selects whether to save images in Color or
(Basic Setup) Displays the Basic Setup menu. See “Basic Setup
(Format SD Card) Formats the memory card. You can select
Monochrome. For Monochrome, you can
select the Monochrome Filter by pressing the
(MENU) button.
Menu” on the next page.
Quick Format or Full Format.
Setting Description
(Initialize Settings) Resets the current settings (except date and
time) to their default settings as shown below.
Setting Default Value
Color Color
Film Standard
Date YYYY/MM/DD
Power Save Timer 5min
Sequential Numbering On
LCD Brightness 5/8
Language English
USER Button Delete
(Long Exp Noise
Reduction)
(Color Space) Selects the color space from sRGB or Adobe
(RAW Setting) Sets the image format recorded when shooting
Reduces noise that appears on an image taken
with a long exposure. The shooting time may
become longer depending on shooting
conditions.
RGB. Adobe RGB is a wider color space than
sRGB and encompasses the colors that can be
printed with CMYK inks. Select Adobe RGB if you
have a printer that supports it.
in RAW mode. You can select RAW format only,
or both RAW and JPEG (high resolution) format
in a single file. RAW+JPEG provides the
convenience of viewing the JPEG image on
most computers while retaining the RAW data
for postprocessing, at an increase in image size
and memory card access time.
8
Page 9

Setting Description
(Film Setting) Allows you to quickly switch film profiles to best
suit the shooting subject or environment. For
each film profile (Film1, Film2, or Film3), you can
assign Edge Enhance, Saturation, Tint, Contrast,
and NR (Noise Reduction). By default, Film1 is
preset for portrait, Film2 for landscape, and
Film3 for night pictures. Use Standard if no
particular profile is required.
Basic Setup Menu
Setting Description
Time and Date Sets the current date and time
Date Format Selects date display format from the following:
Power Save Timer Selects the length of time before the camera
Sequential Numbering Specifies whether to save images with a
(year, month, day, hours and minutes).
YYYY/MM/DD (default setting),
MM/DD/YYYY,
DD/MM/YYYY
enters the power save mode, in which the LCD
monitor is turned off automatically to reduce
power consumption.
The available settings are 3min, 5min (default
setting), 10min, or 20min.
Press any button to exit the power save mode.
sequential number (as part of the file name).
On (default): sequential numbers continue
even if the memory card is replaced.
Off: sequential numbers end and a new
sequence of numbers starts when the memory
card is replaced.
Setting Description
LCD Brightness Changes brightness of the LCD monitor.
Language Selects the language for messages and menus
Calibrate Needles Displays the Needle Calibration menu to adjust
Dead Pixel Correction Corrects non-functional pixels so they are less
Quick View Displays the image on the LCD monitor (i.e.,
Assign USER Button You can assign one of the following functions
Also shows the firmware version.
displayed on the LCD monitor from the
following: Japanese, English, French, German,
Italian, Spanish, Dutch, T (Traditional)-Chinese
the status gauge needles.
conspicuous on the LCD monitor. Repeat this
procedure every few months as necessary. For
the pixels that cannot be corrected with this
setting, try the Long Exp Noise Reduction
feature.
Note:
B e s u r e to a t t ac h t h e l e n s ca p b e fo r e e xe c u t in g
this function.
Make sure the battery has enough power left
when using this feature.
enters the playback mode) automatically
when you release the shutter.You can select
the time period during which each image is
displayed on the LCD monitor, from 3 sec or 10
sec.
to the (USER) button: Delete, Lock,
Magnify, Print, and Film. By default, Delete is
assigned to this button.
English
9
Page 10

Learning More About the Camera
For more information about the camera, see the Epson R-D1s User’s
Guide PDF on the CD-ROM that came with your camera.
Note:
Adobe Reader must be installed on your computer for you to be able to read
the User's Guide. For more information, consult the Adobe Systems
Incorporated web site.
Safety Instructions
Read all of these instructions before using this product, and keep this
guide handy for later reference. Follow all warnings and instructions
marked on this product and the options.
When using the camera
❏ Follow all warnings and instructions marked on this product.
❏ Do not expose the camera to severe impact; doing so may cause
malfunctions especially while the camera is operating.
❏ Do not insert objects into any of the camera’s openings.
❏ Do not touch the components inside this product unless instructed
to do so in the user documentation. Never force this product’s
components into place. Although this product is designed to be
sturdy, rough handling can damage it.
❏ Protect the camera from rapid temperature change.
❏ Never spill liquid onto this product.
❏ If this product emits unusual noises, odors, or smoke, cancel the
current operation and turn it off immediately. Remove the battery
from the product. Contact Customer Support.
❏ To prevent fire or electric shock, do not cover this product with a
blanket or other covering that may give off a static electric shock.
❏ To prevent fire or electric shock, do not expose this product or its
options to rain or moisture.
❏ To prevent fire or explosion, do not use this product where
flammable or volatile gas is stored.
❏ Do not use this product outdoors during a thunderstorm.
❏ Do not use this product after moving it between extreme
temperatures, which may cause condensation to form on electronic
parts.
❏ To prevent possible injury, do not take flash pictures in close
proximity to anyone’s eyes.
❏ Do not insert your finger into the camera or EM mount.
❏ If the liquid crystal solution contained in the LCD monitor leaks
out and gets on your hands, wash them thoroughly with soap and
water. If it gets into your eyes, flush them immediately with water.
❏ If you use this product in places where the use of electronic devices
is limited, such as in airplanes or hospitals, follow all instructions
in those places.
When using the strap
❏ Do not swing the camera about. This can damage the camera or
other objects, or cause injury.
❏ Do not pull or tighten the strap too much when wearing it; this can
cause serious injury.
❏ Keep the strap away from children.
10
Page 11

When using the battery
Follow these precautions when using the battery: mishandling it may
cause injury.
❏ If battery acid gets into your eyes or on your skin, immediately
rinse the affected area thoroughly with water and seek medical
treatment. If a battery is swallowed, seek medical treatment
immediately.
❏ Use only an Epson lithium-ion battery for this camera according to
the directions in the user documentation.
❏ Do not use the battery that comes with this product for other
devices.
❏ To protect against short-circuiting, do not remove the outside
sleeves of the battery.
❏ Do not handle the battery with wet hands or use it near water.
❏ Do not expose the battery to water or high humidity.
❏ Do not drop, puncture, disassemble, mutilate, or short-circuit the
battery.
❏ Do not expose the battery to heat, fire, or water.
❏ Do not use batteries that are leaking or damaged in any way.
❏ Do not charge the battery on battery chargers other than the one
provided with this product.
❏ Do not charge the battery near open flame or in very hot locations.
❏ Keep the battery away from heat sources.
❏ Prevent the battery from coming into contact with metal objects
that could short-circuit it, such as coins or keys.
❏ Do not solder wires or terminals directly to the battery.
❏ Do not touch battery terminals.
❏ Keep the battery away from open flame.
❏ If overheating, discoloration, distortion, a strange smell or any
other abnormal situations occur, remove the battery from this
product and do not use it.
❏ Keep batteries out of the reach of children.
❏ If charging has not finished after the regular charging time, stop
charging.
❏ Do not place the battery into a high-pressured container or a
microwave oven.
❏ Do not insert the battery into electrical outlets or other power
sources such as cigarette lighters.
❏ Charge the battery before using it. The battery is not fully charged
when you purchase it.
When storing the battery
❏ When not using this product for a long period, remove the battery
and store it separately.
❏ Do not store the battery where temperature or humidity is very
high.
❏ Store the battery out of children’s reach.
❏ Discharge the battery completely before storing it for a long time.
❏ When not using the battery for a long time, charge the battery and
then discharge it completely about once a year during storage.
When disposing of the battery
Before disposing of the battery, make sure you discharge it completely.
Warning:
❏ Be sure to completely cover both ends of the battery with tape to
w
prevent combustion or explosion when disposing of it.
❏ Do not dispose of the battery as ordinary refuse. Instead, dispose
of it in a collection or recycle box in accordance with local laws.
English
11
Page 12

For the Netherlands users:
Do not dispose of the battery with ordinary refuse. Instead, dispose of
it as small chemical waste in accordance with local laws, and the
following Dutch Government Gazette 45, KCA Marking:
Bij dit produkt zijn batterijen geleverd. Wanneer deze
leeg zijn, moet u ze niet weggooien maar inleveren als
KCA.
For German users:
Do not dispose of the battery with ordinary refuse. Instead, dispose of
it in a recycle box in accordance with local laws.
For North America and Canada Users:
This mark indicates that the battery will be recycled by
RBRC. When you dispose of the battery, contact RBRC.
When using the battery charger
IMPORTANT SAFETY INSTRUCTIONS
Warning:
Read all relevant safety and operating instructions before using this
w
product, as misuse could result in personal injury from fire, explosion,
leakage, overheating, or electric shock.
These safety and operating instructions should be kept for future
reference.
❏ Use only the Epson battery charger provided to charge the Epson
lithium-ion battery Model EU-85. Never attempt to charge other
types of batteries in this charger as they may explode, leak,
overheat, or cause personal injury.
❏ Do not charge primary (non-rechargeable) batteries.
❏ Do not handle the battery charger with wet hands or use it near
water.
❏ Do not expose the battery charger to water or high humidity.
❏ Use only the type of power source indicated on the battery
charger’s label, and always supply power directly fr om a standard,
domestic power outlet with a power cord that meets the relevant
local safety standards.
❏ Place the battery charger near an electrical outlet where the power
cord can be easily unplugged.
❏ The battery charger is designed for use and provided with this
product. Do not attempt to use it with other electronic devices
unless specified.
❏ The battery charger included is designed for use with this product.
Use of any other battery charger could result in fire, electrical shock,
or injury.
❏ Use only a power source that meets the power requirements
indicated on the label attached to the product. If you are not sure
of the power supply specifications in your area, contact your local
power company or contact Customer Support.
❏ Make sure the total amperage of all devices plugged into the power
outlet does not exceed the power outlet’s ampere rating.
❏ If you plan to u se this product in Germ any, the building installat ion
must be protected by a 16 amp circuit breaker to provide adequate
short-circuit protection and over-current protection for this
product.
❏ Do not use a damaged or frayed battery charger.
12
Page 13

❏ If you use an extension cord with this product, make sure the total
amperage of all devices plugged into the extension cord does not
exceed the cord’s ampere rating.
❏ Never disassemble, modify, or attempt to repair the battery charger
by yourself except as specifically explained in this guide.
❏ Do not use power outlets controlled by wall switches or automatic
timers.
❏ Do not use power outlets on the same circuit as large motors or
other appliances that may cause voltage fluctuations.
❏ Avoid using outlets on the same circuit as photocopiers or air
conditioning systems that regularly switch on and off.
❏ Position this product’s power cord so that it will not be stepped on
or run over.
❏ Do not place any objects on the power cord or the battery charger.
❏ Keep the power cord straight at the ends and at the points where
it enters the transformer.
❏ The power cord should be placed to avoid abrasions, cuts, fraying,
crimping, kinking, and other damage.
❏ If you cannot insert the plug into the power outlet, contact an
electrician.
For US and Canadian users:
Use the power cord provided or a 6 to 10 foot UL-approved type SPT-2
or heavier type, 2 X 18 AWG cord with a 125 V 10 A plug and 125 V 7
A connector.
When using a memory card
❏ Only memory cards designed for the product’s specifications can
be used.
❏ The methods for using memory cards vary according to card type.
Be sure to refer to the documentation included with your memory
card for details.
❏ Do not remove the memory card while the power switch is on.
English
When using the LCD
❏ The LCD monitor on this product may contain a few small bright
or dark spots. These are normal and do not mean that your LCD
monitor is damaged in any way.
❏ If the LCD monitor on this product is damaged, consult your
dealer.
❏ If the liquid crystal solution contained in the LCD monitor on this
product leaks out and gets onto your hands, wash them thoroughly
with soap and water. If it gets into your eyes, flush them
immediately with water. If discomfort or vision problems remain
after a thorough flushing, see a doctor immediately.
❏ Only use a soft, dry cloth to clean the display. Do not use liquid or
chemical cleaners.
When storing, maintaining, or transporting the camera
❏ Do not store this product outdoors.
❏ Do not store this product near water.
❏ Do not store this product in a location subject to high temperature
or humidity.
❏ Do not store this product in a location subject to rapid changes in
temperature or humidity.
❏ Do not store this product in a location subject to direct sunlight or
strong light sources.
13
Page 14

For United Kingdom, Hong Kong, and Singapore users
Replace fuses only with fuses of the correct size and rating.
FCC Compliance Statement for United States Users
For United Kingdom users
Safety information
Warning:
Refer to the rating plate for voltage and check that the appliance voltage
w
corresponds to the supply voltage.
Important:
The wires in the mains lead fitted to this appliance are coloured in accordance
to the following code:
Blue - Neutral
Brown - Live
If you have to fit a plug:
As the colours of the mains lead of this appliance may not match coloured
markings used to identify the terminals in a plug, please proceed as follows:
The blue wire must be connected to the terminal in the plug marked with the
letter N.
The brown wire must be connected to the terminal in the plug marked with the
letter L.
If damage occurs to the plug, replace the cord set or consult a qualified
electrician.
This equipment has been tested and found to comply with the limits
for a Class B digital device, pursuant to Part 15 of the FCC Rules. These
limits are designed to provide reasonable protection against harmful
interference in a residential installation. This equipment generates,
uses, and can radiate radio frequency energy and, if not installed and
used in accordance with the instructions, may cause harmful
interference to radio or television reception. However, there is no
guarantee that interference will not occur in a particular installation. If
this equipment does cause interference to radio and television
reception, which can be determined by turning the equipment off and
on, the user is encouraged to try to correct the interference by one or
more of the following measures.
❏ Reorient of relocate the receiving antenna
❏ Increase the separation between the equipment and receiver
❏ Connect the equipment to an outlet on a circuit different from that
to which the receiver is connected
❏ Consult your dealer or an experienced radio/TV technician for
help
14
Page 15

WARNING
The connection of a non-shielded equipment interface cable to this
equipment will invalidate the FCC Certification of this device and may
cause interference levels which exceed the limits established by the FCC
for this equipment. It is the responsibility of the user to obtain and use
a shielded equipment interface cable with this device. If this equipment
has more than one interface connector, do not leave cables connected
to unused interfaces.
Changes or modific ations not expressly approved by the man ufacturer
could void the user’s authority to operate the equipment.
For Canadian users
This Class B digital apparatus complies with Canadian ICES-003.
Cet appareil numéri que de la classe B est conforme à la nor me NMB-003
du Canada.
DECLARATION of CONFORMITY
According to 47CFR, Part 2 and 15 for Class B Personal Computers and
Peripherals; and/or CPU Boards and Power Supplies used with Class
B Personal Computers:
We:
Located at:
EPSON AMERICA, INC.
MS 3-13
3840 Kilroy Airport Way
Long Beach, CA 90806
Telephone: (562) 290-5254
Declare under sole responsibility that the product identified herein,
complies with 47CFR Part 2 and 15 of the FCC rules as a Class B digital
device. Each product marketed, is identical to the representative unit
tested and found to be compliant with the standards. Records
maintained continue to reflect the equipment being produced can be
expected to be within the variation accepted, due to quantity
production and testing on a st atistical basis as required by 47CFR §2.909
Operation is s ubject to the following t wo conditions: (1) this device may
not cause harmful interference, and (2) this device must accept any
interference received, including interference that may cause undesired
operation.
Trade Name:
Type of Product:
Model:
EPSON
Digital Still Camera
G911A
English
15
Page 16

Copyright
Copyright © 2006 Seiko Epson Corporation. All rights reserved.
No part of this publication may be reproduced, stored in a retrieval
system, or transmitted in any form or by any means, electronic,
mechanical, photocopying, recording, or otherwise, without the prior
written permission of Seiko Epson Corporation. The information
contained herein is designed only for use with this Epson product.
Epson is not responsible for any use of this information as applied to
other products.
Trademarks
EPSON is a registered trademark of Seiko Epson Corporation.
Adobe and Adobe Reader are registered trademarks of Adobe System
Incorporated.
SD is a trademark.
General Notice: Other product names used herein are for identification
purposes only and may be trademarks of their respective owners.
Epson disclaims any and all rights in those marks.
16
 Loading...