

Page 1

PS-500 Series
User’s Manual
Page 2

! Important
Indicates things you must or must not do. Ignoring these instructions or
mishandling this device could cause malfunction or operational problems to
the device.
Note:
Indicates additional explanations and related information.
Indicate related pages. Click the link in blue text to display the related page.
Introduction
Thank you very much for purchasing a PS-500.
To use the device correctly, make sure you read the User’s manual along with the supplied Quick Start Guide.
Keep the supplied Quick Start Guide handy to help you resolve any problems.
Description in the User’s Manual
Trademarks
EPSON and EXCEED YOUR VISION are registered trademarks of the Seiko Epson Corporation.
Microsoft and Windows are registered trademarks of the Microsoft Corporation in the United States of America
and other countries.
The Bluetooth® word mark and logos are the registered trademarks owned by Bluetooth SIG, Inc. and any use of
such marks by Seiko Epson Corporation is under license.
Other product names are the trademarks or registered trademarks of their respective companies.
Caution:
- Unapproved copying of part or all of this manual is strictly forbidden.
- The content of this manual is subject to change without prior notice.
- Although every effort has been made to ensure the accuracy of this manual, contact us if you have any
questions or notice any errors in descriptions in the content of this manual.
- Despite the preceding clause, we cannot accept any responsibility of mishandling due to errors in this manual.
- We cannot accept any responsibility for malfunctions and so on that occur due to ignoring the content of this
manual, the device being handled inappropriately, repairs or modifications performed by a third party that is not
our company of appointed by our company.
Introduction 2
Page 3

System Requirement
Note:
PS-500 has Bluetooth® Smart to transfer data to PULSENSE View.
Uploaded data can be seen via PULSENSE View for Web (URL: go-wellness.epson.com).
To upload your data from PS-500
Use the PULSENSE View for iOS, Android on your smart device.
Your data will be transferred via Bluetooth® Smart.
Use the PULSENSE View Web application on your PC by using the
USB cradle.
See the data
Log into PULSENSE View for iOS, Android on your smart device.
Log into the PULSENSE View web application.
Note:
To charge the PS-500 a USB port is required. You can use the USB port of a PC or an AC adapter. We
recommend using the specified AC adapter. (SFAC03 for UK and Ireland. SFAC02 Europe excluding UK
and Ireland.)
A smart device such as a smart phone or tablet with Bluetooth® Smart capability is needed to upload product
recorded data.
Please check the below link for the latest compatibility.
www.epson.eu/pulsense
Introduction 3
Page 4

Contents
Introduction 2
Description in the User’s Manual .................................................................................. 2
Trademarks................................................................................................................... 2
Caution: ........................................................................................................................ 2
System Requirement .................................................................................................... 3
Contents 4
Using this Device Safely 6
Symbols in this Manual ................................................................................................. 6
Notes on Using the Product and Components ............................................................. 7
Notes on using the cradle ............................................................................................. 8
Regulatory and Safety Notices ..................................................................................... 8
Set up and Basic Operation 10
Things You Can Do With The Product ....................................................................... 11
Measuring items ................................................................................................ 11
The heart rate zone display .............................................................................. 11
What’s in the box ........................................................................................................ 12
Options .............................................................................................................. 12
Operating buttons and functions................................................................................. 13
Icons .................................................................................................................. 14
Getting Started ........................................................................................................... 15
To record your data ........................................................................................... 15
How to cancel the battery protection mode ...................................................... 15
Wearing the PS-500 .......................................................................................... 17
Initial Configuration ..................................................................................................... 18
Smart device user ............................................................................................. 18
PC User............................................................................................................. 20
How to use 21
Display Screen In Heart Rate Measurement Mode .......................................... 27
Display Screen (Without measuring heart rate) ................................................ 28
Back light .................................................................................................................... 29
Menu Navigation ......................................................................................................... 30
Navigate in the menu ........................................................................................ 30
Check your heart rate range in the fat burning zone ........................................ 32
Bluetooth® settings ............................................................................................ 33
LED Settings ..................................................................................................... 35
Vibration settings .............................................................................................. 36
Power Off .......................................................................................................... 36
Firmware ........................................................................................................... 37
Language setting ........................................................................................................ 37
Other Functions 38
Notification Settings .................................................................................................... 39
Contents 4
Page 5

Wake-up Alarm ........................................................................................................... 40
Fitting adjustment ....................................................................................................... 41
Maintenance 43
Looking after your device ........................................................................................... 44
About the wristband .......................................................................................... 44
Replacing the Battery ................................................................................................. 45
Updating the Firmware ............................................................................................... 46
Appendix 47
Product Specification .................................................................................................. 48
Device Specifications ........................................................................................ 48
Cradle Specification .......................................................................................... 48
Options specifications ....................................................................................... 48
Troubleshooting 49
Caution ....................................................................................................................... 50
Problem Solving ......................................................................................................... 51
System Reset ............................................................................................................. 52
Contacting us .............................................................................................................. 53
Contents 5
Page 6

Warning:
This symbol indicates information that, if ignored, could possibly result in serious personal injury.
Caution:
This symbol indicates information that, if ignored, could possibly result in personal injury or damage the
product.
This symbol indicates an action that should be done.
This symbol indicates an action that must not be done.
Using this Device Safely
Make sure you read the manuals (Quick Start Guide and User’s manual) first to use this product safely.
The product may malfunction, or an accident may occur if it is handled incorrectly.
- Keep the manuals handy to help you resolve any problems.
- When taking this product out of the country of purchase, check the laws and regulations in the destination
country before you travel.
- This product is not a medical device. Use this product as an indicator during physical exercise.
Symbols in this Manual
The following symbols are used in this manual to indicate possible dangerous operations or handling. Make sure
you understand these warnings before using the product.
Using this Device Safely 6
Page 7

Warning
Exercise according to your physical capabilities.
Stop exercising and consult your doctor if you feel unwell during exercise.
This product is a highly accurate sensor and able to measure your pulse rate;
However, this is not a medical device.
If you have any concerns, consult your doctor before using this product.
Do not keep your eyes on the device while exercising; otherwise you could fall or cause a traffic
accident. Pay attention to your surroundings while using the device.
Do not use or store this product in the following environments.
It may cause an electric shock or fire, or the product may malfunction or be damaged.
- Locations with very high or low temperatures or humidity
- Near volatile substances
- Sooty or dusty places
- Near a fire
- Near a strong magnetic field (for example, near a loudspeaker)
Do not disassemble this product, and do not attempt to repair this product by yourself. It may
cause an electric shock or accident.
Do not leave this product within reach of young children.
Caution
To avoid the possibility of skin irritation or discomfort from wearing the PS-500, you must keep
the skin under the band clean and dry at all times. Do not allow water, sweat, dead skin, or dirt
to build up under the band. Do not wear the product too tight. If you feel any discomfort, loosen
the wristband or stop usage.
Avoid water, sweat or dirt build up between your skin and the product. Clean as directed in
“Looking after your device” on page 44.
During sleep your wrist may swell, loosen the band by one setting if it becomes tight.
Do not pour water directly from the tap onto this product. The power of the tap water stream
may be strong enough to compromise the product’s waterproof feature
Notes on Using the Product and Components
Using this Device Safely 7
Page 8

Caution
Do not wear this product in a bath or sauna. The steam and soap may compromise the
waterproof feature or cause corrosion.
Note:
Please note that even if not used, the PS-500 should be charged at least once within a 6 month period.
Failing to do so might affect the performance of the rechargeable battery.
Warning
Do not use the cradle or AC adapter if they are in any way damaged, faulty or contaminated by
foreign material such as dust, water or dirt. Do not use any adapter other than the specified
adapter for charging
Notes on using the cradle
Regulatory and Safety Notices
Data communication between the smartphone and product is made by Bluetooth Low Energy which operates in
the 2.4GHz band.
Hereby, SEIKO EPSON, declares that this PS-500 is in compliance with the essential requirements and other
relevant provisions of Directive 1999/5/EC.
This equipment may be operated in the UK and Ireland, Germany and France.
SEIKO EPSON CORPORATION,
3-3-5 Owa, Suwa-shi, Nagano-Ken, 392-8502, Japan
Using this Device Safely 8
Page 9

Warning
In areas in which usage is restricted, such as on airplanes and in hospitals, follow the rules and
regulations provided(such as in-flight announcements)
Do not use the device if you have a surgically implanted medical device such as cardiac
pacemaker.
Do not bring the device into an operating room, intensive care unit, and so on, and do not use
the device near medical equipment. Radio waves from the device may interfere with electronic
medical equipment causing the equipment to malfunction and cause an accident.
This device is equipped with Bluetooth® Smart technology. When operating supported HR
monitors or smart phones, this function wirelessly sends and receives heart rate measurement
data to the device.
This device has been certified as a wireless device based on the Radio Law.
Therefore, the following acts may be punishable by law.
- Disassembling or remodeling the device
- Removing the verification or certification number for the device
Using this Device Safely 9
Page 10

Set up and Basic Operation
You need to make the following preparations before use.
“Things You Can Do with the Product” on page 11
“What’s in the box” on page 12
“Operating buttons and functions” on page 13
“Getting Started” on page 15
“Initial Configuration” on page 18
Set up and Basic Operation 10
Page 11

Items
Contents
Heart rate
The PS-500 reads and records your heart rate from the changes in light
reflected through the blood vessels in your wrist.
Calories
PULSENSE calculates the actual burned calories based upon the body motion
and the heart rate information, which is related very closely to the calories
burned, enabling more detailed calorie calculation. When heart rate
measurement is disabled, the PS-500 will calculate calories based on body
motion only.
Steps
Records the number of steps and calculates the distance using the
accelerometer to measure your body movement. This function enables you to
consciously track your general activity, so you can make small changes to
become more active.
Distance
The distance is calculated approximately from the step count and your height.
Note:
Irregular arm movements may effect the reading on the steps and distance counters.
% of max. heart rate
Heart rate zone
0 – 40%
Below
40 – 70%
Fat Burning
70 – 80%
Aerobic
80 – 90%
Anaerobic
90 -100%
Maximum
Note:
- Your initial heart rate zones are calculated by your profile data.
- When using the PS-500 overnight the heart rate zones will be adjusted according to your basal heart
rate (minimum heart rate).
Things You Can Do With The Product
Measuring items
The heart rate zone display
PULSENSE monitors your heart rate across 5 zones, as detailed below. This is displayed on LEDs on the device,
you can also set a vibration alert. See 'How to Use' section for details.
Set up and Basic Operation 11
Page 12

PS-500
Cradle
Quick Start Guide
Information sheet
AC Adapter
(SFAC03 for UK and Ireland.)
AC Adapter
(SFAC02 for Europe excluding UK and
Ireland.)
What’s in the box
Contact your reseller if there are any missing or damaged components.
Options
You can purchase the following optional extras. Contact your local reseller for more information.
Set up and Basic Operation 12
Page 13
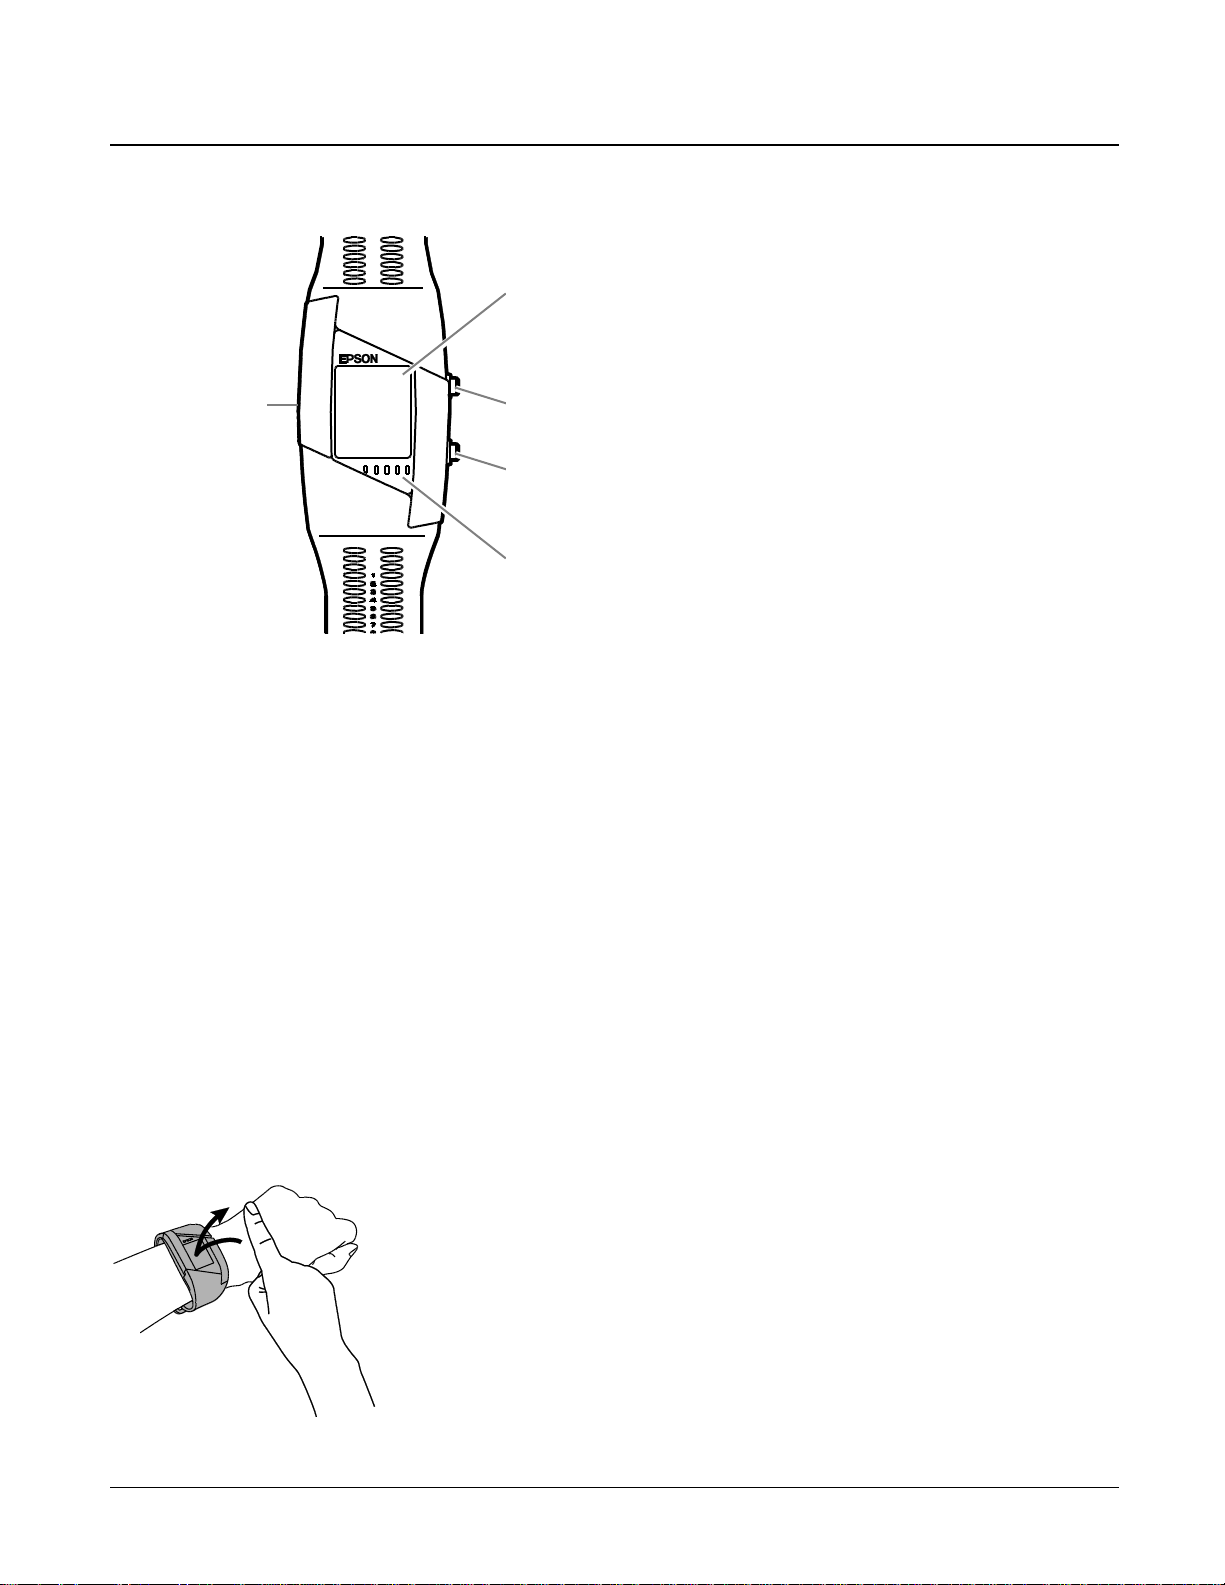
Battery icon, Bluetooth icon, Vibration icon
A Button
B Button
LEDs
Contact Point
Operating buttons and functions
[A] Button
Start / Stop heart rate measurement.
[B] Button
Check recorded data. Hold down [B] to return to the previous screen.
Contact Point
Check that the contact points on the device are pointing up and match the contact marks on the cradle.
LEDs(Blue & Orange)
The LEDs on the PS-500 light up or flash to indicate the current heart rate zone.
If you set your target in PULSENSE View, you can check your progress while the measure is displayed on the
screen. You can cycle through the measurement by pressing the [B] Button.
「
TAP」Operation
Tap the screen once to turn the backlight on.
Tap the screen twice to get into the main menu.
Set up and Basic Operation 13
Page 14

Battery Icon
Remaining Time
36 to 20hours
20 to 12hours
12 to 3hours
3 to 0hours
! Important
Remaining time may vary depending on usage.
Bluetooth® Icon
displayed as shown
below.
Status
OFF
Bluetooth® OFF
Flash
Not connected to smart device
ON
Connected to smart device
Icons
Battery Icon
Bluetooth® Icon
This product communicates with the smart device via Bluetooth® Smart technology. While the product is
connected to the smart device, the Bluetooth® icon will be displayed as shown below.
Vibration Icon
When vibration is set to ON, the below icon will be displayed on the time screen, you change the
vibration settings to a specific heart rate zone in PULSENSE View.
Set up and Basic Operation 14
Page 15

! Important
To record your data it is necessary to register your device with the PULSENSE View PC or smart device
application.
! Important
- You need to charge the product when using it for the first time.
- The product automatically turns on when being charged.
- Make sure that charging is complete.
Getting Started
To record your data
How to cancel the battery protection mode
1 Attach the PS-500 to the cradle.
1 Hold the top and bottom of the cradle to open it as shown below.
2 Make sure that the terminal on the PS-500 is facing up, and then attach the cradle.
Set up and Basic Operation 15
Page 16

Note:
Some PC USB ports may not support the charging function.
Note:
- An orange LED will be shown while charging and the LED will change to blue when the PS-500 is fully
charged
- Charging takes approximately 1.5 to 2.5 hours to complete; however, the duration may vary.
! Important
- Please note that even if not used, the PS-500 should be charged at least once within a 6 month period.
Failing to do so might effect the performance of the rechargeable battery.
- The battery is not replaceable
2 Charging the product.
2-1 Using a PC
Insert the cradle's into the USB port of your PC.
Please note that if you are connecting the cradle via a USB hub it may not charge.
In this case please connect directly to the USB port of the PC.
2-2 Using an AC adapter
Connect the cradle with the AC adapter, and then insert the AC adapter into the power socket.
We recommend using the specified AC adapter (SFAC03 for UK and Ireland. SFAC02 for Europe excluding
UK and Ireland.)
Set up and Basic Operation 16
Page 17

Wearing the PS-500
Note:
Do not wear the product too tight. If you feel any discomfort, loosen the wristband. During sleep your wrist
may swell, loosen the band by one setting if it becomes tight.
Bone
When wearing the product, make sure it does not touch the bone on your wrist.
Wear the product closely around your wrist. Tighten the wrist band if your pulse is not measured correctly while
exercising.
Set up and Basic Operation 17
Page 18

! Important
You need to perform initial configuration before using PS-500 for the first time. Create a PULSENSE View
account and connect the device.
Note:
Set Bluetooth® on your smart device to ON.
Ensure your smart device is connected to the Internet.
Initial Configuration
Smart device user
1. Search your smart device's app store for the dedicated application Epson PULSENSE View
(free), and then install it.
Check that "Internet communication" and "Bluetooth®" are enabled in your smart device. Check the operating
instructions for your smart device for the configuration method.
2. Start Epson PULSENSE View.
Make sure that the product is within one meter from the smart device and battery is fully charged.
PULSENSE View Icon
Set up and Basic Operation 18
Page 19

3. You need to set up a PULSENSE View account and follow the on-screen instructions.
Once you have created your account and completed your profile, follow the on-screen instructions to pair
your PS-500 with your smart device.
You can see “Complete” on your PS-500 when pairing was successful.
Set up and Basic Operation 19
Page 20

You need to set up a PULSENSE View account and follow the
on-screen instructions.
PC User
1 Download “PS Uploader” from below address.
www.epson.eu/pulsense
2 Execute the downloaded file and run the installation.
3 After installing, “PS Uploader” will open automatically. You can see “PS Uploader” icon in the
taskbar.
“PS Uploader” icon
4 Insert the cradle's USB cable into the USB port of your PC.
5 Go to the “create account screen” and follow the on-screen instructions.
Set up and Basic Operation 20
Page 21

How to use
This product measures heart rate and activity 24 hours a day, tracking your steps, distance, calories, sleep
quality and heart rate across five zones helping you to make better lifestyle choices.
“Heart rate measurement” on page 22
“Menu Navigation” on page 30
“Language setting” on page 37
How to use 21
Page 22

Heart rate measurement
Operation buttons
1 Attach the product to your wrist and press the [A] Button
Heart rate detection will start and a progress bar will be displayed.
- If the PS-500 cannot detect the heart rate within one minute the device will vibrate and an error message will
be displayed. If the device does not detect your heart rate within three minutes, the product will vibrate for
longer and an error message will be displayed. The PS-500 will then stop the heart detection.
- Press the [A] Button to start the heart rate detection again.
How to use 22
Page 23

PS-500’s Screen
State
Support
It is likely that the device is not
fitted correctly onto your wrist.
Wear the product closely around
your wrist. Tighten the wrist band
if your pulse is not measured
correctly.
It is likely that the device is not
fitted correctly onto your wrist or
the temperature on the surface of
your skin is too low.
Wear the product closely around
your wrist. Tighten the wrist band
if your pulse is not measured
correctly and warm your wrist and
fingertips if they seem cold.
Note:
Try the below to facilitate heart rate detection.
- Try to keep your body and arms still.
- Position the arm below your heart. Do not cross your arms.
If the heart rate can’t be detected
The following vibration (if enabled) and display is shown when heart rate can’t be detected.
2 Once detection is complete, your heart rate will be displayed on the screen as shown below.
How to use 23
Page 24

LED
% of max.
heart rate
LED settings
TAP
FLASH
ON
OFF
■□□□□
Under 40%
Blinking
OFF (If you tap, the LED will blink)
-
■□□□□
40~49%
Blinking
ON
-
■■□□□
50~59%
↑ ↑ ↑
-
■■■□□
60~69%
↑ ↑ ↑
-
■■■■□
70~79%
↑ ↑ ↑
-
■■■■■
80~89%
↑ ↑ ↑
-
■■■■■
Above 90%
Blinking (Faster)
-
LED
Heart rate zones
You can check your heart rate zone using the product LEDs. Settings can be made via PULSENSE View to
determine when the LEDs will illuminate. See below table for the available settings.
How to use 24
Page 25

Note:
- Your initial heart rate zones are calculated by your profile data. When using the PS-500 overnight the
heart rate zones will be adjusted according to your basal heart rate (minimum heart rate).
- You can check your real time heart rate (updated every four seconds) in the PULSENSE View app.
Swipe the tab located in the middle at the top of the screen to the bottom in order to display the realtime meter.
How your heart rate measurement is being used
The PS-500 continuously monitors your heart rate and uses this recording in addition to your body
movement to calculate the individual activities in PULSENSE View. We therefore recommend having the
heart rate detection enabled all the time, not only during exercise.
For more information, go to the Help section within the PULSENSE View app.
How to use 25
Page 26
Note:
If the [A] Button was pressed accidentally it will return back to the time screen after 10 seconds. You can
also hold the [B] Button to return to the previous screen.
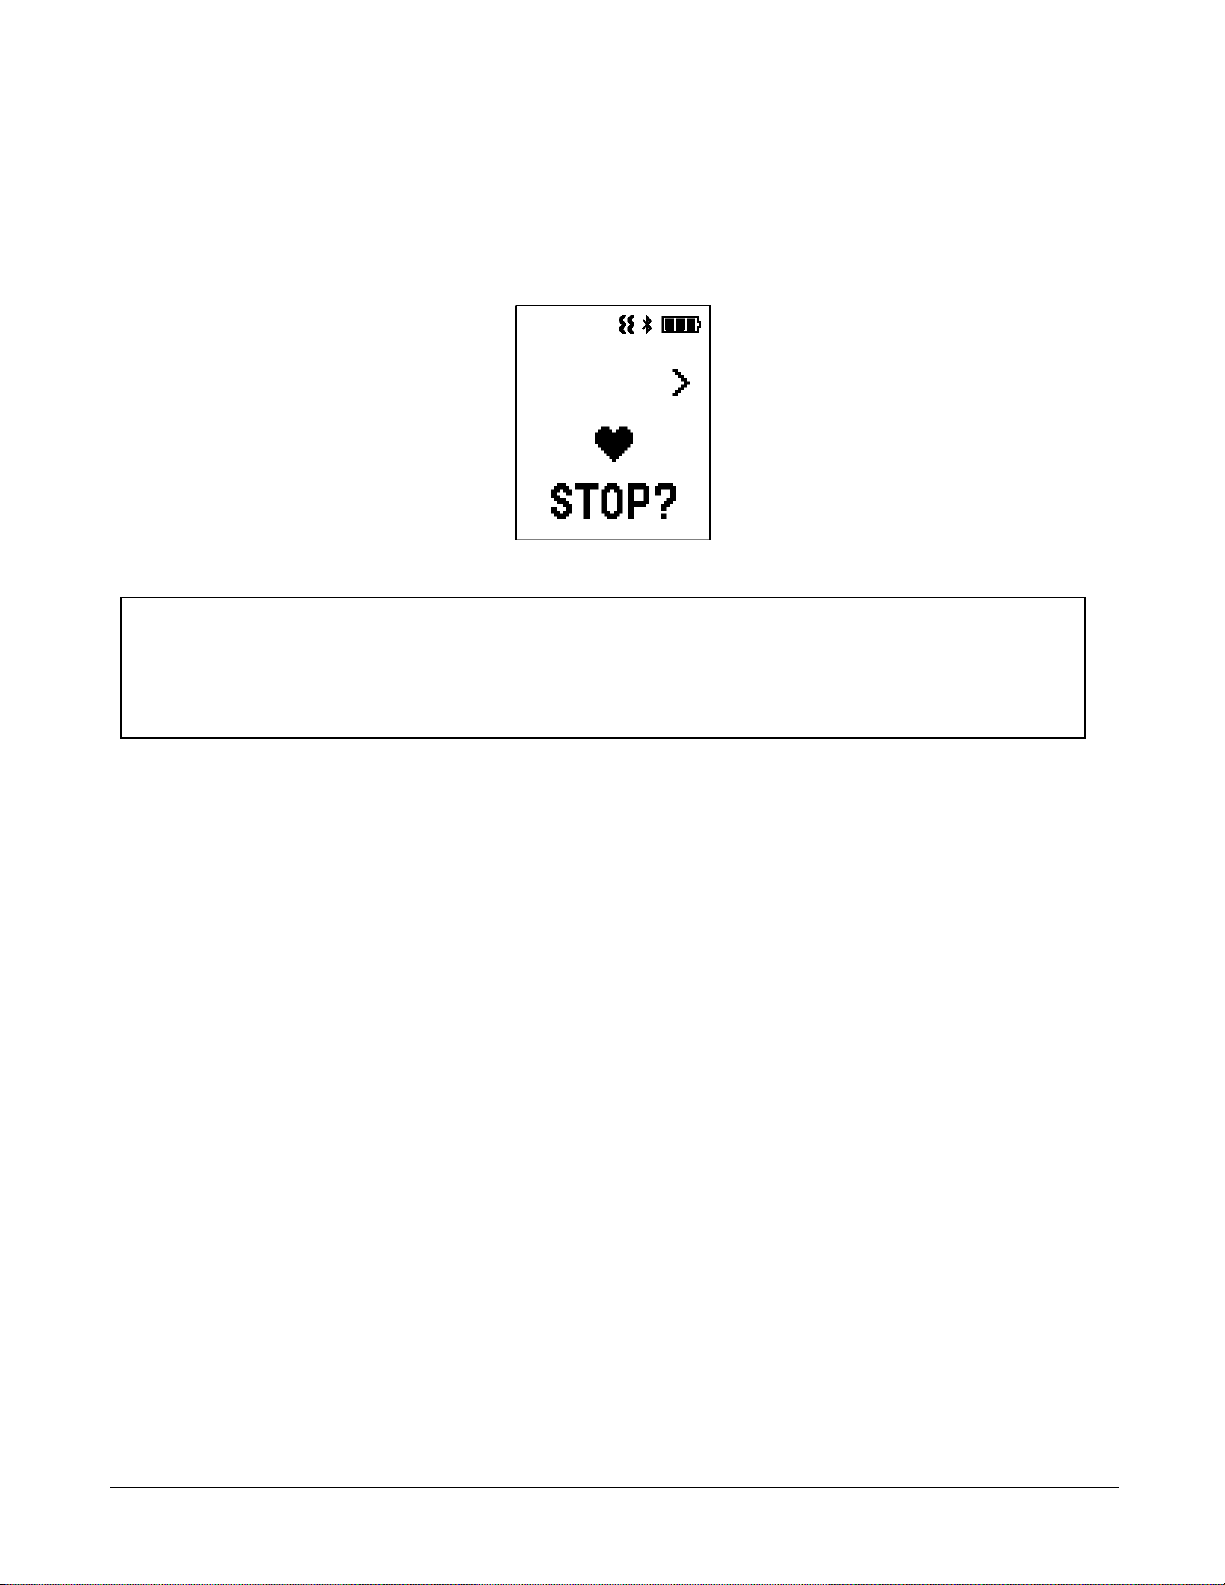
How to stop and resume heart rate measurement
1 Manual Operation.
1 To stop measuring your heart rate, press the [A] button.
2 Confirm to stop heart rate measurement by pressing the [A] Button.
2 Automatically stop heart rate measurement
If you remove the PS-500 and no movement is detected the device will automatically enter the sleep mode.
How to use 26
Page 27

Display Screen In Heart Rate Measurement Mode
How long in fat burning zone.
Calories burned.
Privacy screen (Displays time and
date without showing heart rate value
Steps
Heart rate, time and date
Distance calculated by steps
Heart rate and zone indicator
While in the heart rate measurement mode, you can check your real-time heart rate data and statistics on the
screens below. Press the [B] Button to change the display.
How to use 27
Page 28

Calories burned
Time and date
Steps
Distance calculated by steps
Display Screen (Without measuring heart rate)
When heart rate measurement is disabled, you can check your statistics on the screens below. Press the [B]
Button to change the display.
How to use 28
Page 29

Back light
Tap the screen of the PS-500 once to turn the backlight on.
How to use 29
Page 30

Menu Navigation
Tap the screen of the PS-500 twice to enter the menu.
Navigate in the menu
Once in the menu, press the [B] Button to navigate between the sub-menus. Press the [A] Button to enter a submenu. If you want to return to the time screen hold [B] button.
How to use 30
Page 31

Zone Menu
Bluetooth® Menu
Systems Menu
page on 32
page on 33
Back to “Zone
Menu”
LED
page on 35
Vibrate
page on 36
Version
Power OFF
Back to “LED”
page on 37
page on 36
How to use 31
Page 32

Go back to the previous screen.
Check your heart rate range in the fat burning zone
You can check in which heart rate range you have to be to enter the fat burning zone in the [Zone] menu. Press
the [A] Button once in the [Zone] screen.
How to use 32
Page 33

Note:
Make sure that the product is within one meter from the smart device.
Your smart device will need to be connected to the Internet to complete pairing.
Bluetooth® settings
Pairing
Enter the Bluetooth® menu to pair with a smart device or PULSENSE View.
Un-pair
By this operation, pairing information will be deleted from the PS-500.
1 Delete pairing information from PS-500
Enter the Bluetooth® menu and press the [A] Button.
2 Delete pairing information from 「PULSENSE View」
1 Open the 「PULSENSE View」
2 Go to the settings and pairing menu.
3 Delete PS-500.
3 Delete pairing information from your smart device
Go to the Bluetooth
How to use 33
®
menu of your smart device and delete the PS-500.
Page 34

Check
What
1 Attach the PS-500 to the cradle to cancel the battery protection mode.
2
Enable Bluetooth® communication on your smart device.
3 To check smart device compatibility follow this link www.epson.eu/pulsense
4 Ensure your smart device is connected to the Internet.
5
Remove any other PULSENSE product that could interfere with the Bluetooth®
communication.
Check
What
1 Has the PS-500 already been un-paired?
If not, tap the screen twice to enter the menu and press the [B] Button to enter the
Bluetooth® menu. Confirm your selection by pressing the [A] Button
2 Has the PS-500 already been deleted from PULSENSE View?
Delete the PS-500 from the pairing menu in PULSENE View
3 Has the PS-500 already been deleted in the Bluetooth® settings of your smart device?
Delete the PS-500 from the Bluetooth® menu in smart device
4
Has Bluetooth® communication been enabled on your smart device?
5 To check smart device compatibility follow this link www.epson.eu/pulsense
6 Ensure your smart device is connected to the Internet.
7
Remove any other PULSENSE product that could interfere with the Bluetooth®
communication.
Pairing issues
<When using the product for the first time>
<When pairing is lost or the PS-500 has been paired with another smart device>
How to use 34
Page 35

Press the [B] Button and select from [TAP]、
[FLASH]、[ON]、[OFF] and press the[A] Button.
LED Settings
About the LED pattern, see “Heart rate zones” page on24
How to use 35
Page 36

Note:
Even if not used, the product should be charged at least once within a 6 month period. Failing to do so
might affect the performance of the rechargeable battery.
Press the [B] Button to select [ON] or [OFF], press [A] to
set.
Turn off PS-500.
Back to the previous screen.
Vibration settings
Power Off
(Hold down [B] )
To turn the PS-500 on again.
・ Press [A] or [B]
・ Attach the product to the charging cradle.
How to use 36
Page 37

Firmware
Language setting
The following languages are supported: Japanese, English, French, German, and Traditional Chinese.
Go to 'Regional Settings' in PULSENSE View to select your language.
Press the [A] or [B] Button to write the settings to your device.
How to use 37
Page 38

Other Functions
“Notification Settings” on page 39
“Wake-up Alarm” on page 40
“ Fitting adjustment” on page 41
Other Functions 38
Page 39

Note:
The PS-500 must be connected via Bluetooth® to your smart device. Some additional settings might be
required in the Notifications Settings of your smart device. See your smart device manual for details.
Some Android devices may not support this function..
Notification Settings
The PS-500 can alert you of E-Mails, calls or schedule notifications received on your smart device.
The notification settings must be set in PULSENSE View. See Help section in the PULSENSE View for details.
Other Functions 39
Page 40

Wake-up Alarm
You can set a sleep-phase alarm to wake you at a light sleep phase, making it easier to wake up.
You need to set the alarm time and a window time during which PULSENSE can wake you up. For example if
you set 7am as your alarm time and 30 minutes as your window, PULSENSE will vibrate to wake you in a light
sleep phase between 6:30 and 7:00.
Other Functions 40
Page 41

Note:
Try to keep your arm as still as possible. If you move too much, the screen will turn back to step 2.
Fitting adjustment
The PS-500 has a tool to correctly adjust the strap for optimal heart rate reading.
1 Wear the product loose, hold the [B] Button and remember the wrist band hole number.
2 Position your wrist, so that the black ball is in the centre of the target.
3 Heart rate measurement start automatically and the screen below is shown.
Other Functions 41
Page 42

Next
4 Once the first bar is finished and 'Next' is displayed, tighten the wrist bar by one setting and
repeat step 2 and 3.
5 Once the test is complete, reposition the wrist band to the highest setting for best results.
Other Functions 42
Page 43

Maintenance
“Looking after your device”on page 44
“Replacing the Battery” on page 45
“Updating the Firmware” on page 46
Maintenance 43
Page 44

! Important:
- Avoid water, sweat or dirt build up between your skin and the product as it could lead to skin irritations.
Looking after your device
Clean the PS-500 regularly. Wipe the product with a slightly moist soft cloth and then dry, or use a soft brush.
About the wristband
The wristband is made of silicon which could lose its elasticity and colour over time.
Maintenance 44
Page 45

Replacing the Battery
You cannot replace the built-in rechargeable battery .
Maintenance 45
Page 46

! Important
When updating the firmware, the history may be deleted and settings may be initialised. For more details
on updating by smart device, see the following website.
www.epson.eu/pulsense
Before updating the firmware, we recommend uploading your measurement data to PULSENSE View via
the app or PS Uploader.
Updating the Firmware
You may be able to solve problems that occur by updating the firmware.
We recommend using the latest version.
Maintenance 46
Page 47

Appendix
“Product Specification” on page 48
Appendix 47
Page 48

Contents
Specification
Model
PS-500
Size (LxWxH)
45mm x 35mm x 14mm(Excluding sensor unit)
1.77in x 1.38in x 0.55in(Excluding sensor unit)
Weight
Approx. 44g
Wrist Size
140-190mm (5.51in-7.48in)
Battery
Rechargeable Lithium Ion 75mAh
Battery Life (Heart rate ON)
Approx. 36hours (depending on usage)
Recharge Time
Approx. 3.5hours (from empty to full)
Water Resistance
3bar
Connectivity
Bluetooth® Smart & USB
Operating Temperature
-5℃~+40℃
Storage Temperature
-20℃~+60℃
Contents
Specification
Operating Temperature
-5℃~35℃
Function
Recharge, update PS-500 data through PC.
Contents
Specifications
Model
SFAC02 for Europe excluding UK and Ireland.
SFAC03 for UK and Ireland.
Input
AC 100-240V 50/60Hz
Output
DC 5V / 1.0A
Product Specification
Device Specifications
Cradle Specification
Options specifications
You can purchase the following optional extras.
AC adapter
Appendix 48
Page 49

Troubleshooting
This section explains how to solve problems that occur during use.
“Caution” on page 50
“Problem Solving” on page 51
“Resetting the System” on page 52
“Contacting us” on page 53
Troubleshooting 49
Page 50

Caution
- Clean the PS-500 regularly. Wipe the product with a slightly moist soft cloth and then dry, or use a soft brush.
- Do not use the cradle or AC adapter if they are in any way damaged, faulty or contaminated by foreign material
such as dust, water or dirt. Do not use any adapter other than the specified adapter for charging.
- If charging becomes unstable, clean the contact points on the device and cradle with a damp cotton swab.
- If device operations becomes unstable or if data transfer is not possible, perform a system reset by connecting
the product to the cradle.
- Exercise according to your physical capabilities. Stop exercising and consult your doctor if you feel unwell
during exercise
- During sleep and in other situations your wrist may swell, loosen the band by one setting if it becomes tight.
- We recommend to connect the PS-500 to your smart device or PC once a day.
Troubleshooting 50
Page 51

Problem
Solution
Basic Action
Nothing on the display.
After buying the product, the PS-500 is in
battery protection mode. Set product to the
cradle and connect to a USB port to charge the
device and terminate the battery protection
mode.
“Getting Started” on page 15
The product is not responding
according to the performed
operation
Check the battery level and charge the device if
necessary.
Charging
The device does not charge
when set to the cradle.
Charging stops frequently.
Charge in an environment where the
surrounding temperature is 5 to 35℃
Some PCs may not support the product.
If you are connecting the charging cradle via a
USB hub it may not charge. In this case please
connect directly to the USB port of the PC.
Clean the contact points of the product and
charging cradle.
“Looking after your device” on page 43
The product and charging cradle
heat up while charging.
The product or cradle might be faulty.
Immediately stop using the product and cradle,
and contact our service center.
A charging error is being
displayed.
Charge in a location with an operating
temperature of 5 to 35 ℃.
Water Resistance
Can I use the product while
swimming or diving?
The product is water resistant to 3bar. The
product is not designed for swimming or diving.
The inside of the glass where
the sensor is located is cloudy.
Temporary clouding will not affect the product.
Use it as is. If the clouding does not clear up
after some time, water may have entered the
product.
Data Transfer
Data transfer is not possible
even though the product is
connected to a smart device.
Refer to the Bluetooth® section in this manual
to resolve pairing issues.
Problem Solving
Check each item.
Troubleshooting 51
Page 52

System Reset
If device operations become unstable, perform a system reset by connecting the product to the cradle.
Charging resets the system, and returns the product to normal operation.
If this suggestion does not solve your problem, check “Problem Solving” on page 51.
Troubleshooting 52
Page 53

Contacting us
Go to www.epson.eu/pulsense for service contact details.
EPSON EUROPE B.V.
Address: Atlas Arena, Azië building, Hoogoorddreef 5, 1101 BA Amsterdam Zuidoost,
The Netherlands
Troubleshooting 53
Page 54

412830801
Troubleshooting 54
 Loading...